

Page 1
Page 2

CONTENTS
INTRODUCTION ......................................................................................................... 3
GETTING TO KNOW THE CarDAQ-Plus 2® ............................................................... 3
- LED Status Lights ........................................................................................................... 3
INSTALLATION & DEVICE ACTIVATION ................................................................... 4
J2534 Toolbox 3 .......................................................................................................... 7
DREWTECH - Tech2Win DRIVER .............................................................................. 9
- Troubleshooting ............................................................................................................... 9
PRODUCT SPECIFICATIONS .................................................................................. 10
- Protocols Supported .......................................................................................................10
- Operating Systems Supported ........................................................................................10
- Product Specifications/Tolerances..................................................................................10
IMPORTANT NOTES ................................................................................................ 12
LIMITED WARRANTY ............................................................................................... 12
FCC STATEMENT ..................................................................................................... 13
COPYRIGHT INFORMATION .................................................................................... 13
- Copyright .......................................................................................................................12
- Notices ..........................................................................................................................12
- Acknowledgements .......................................................................................................12
DREWTECH SUPPORT ............................................................................................ 14
2
Page 3

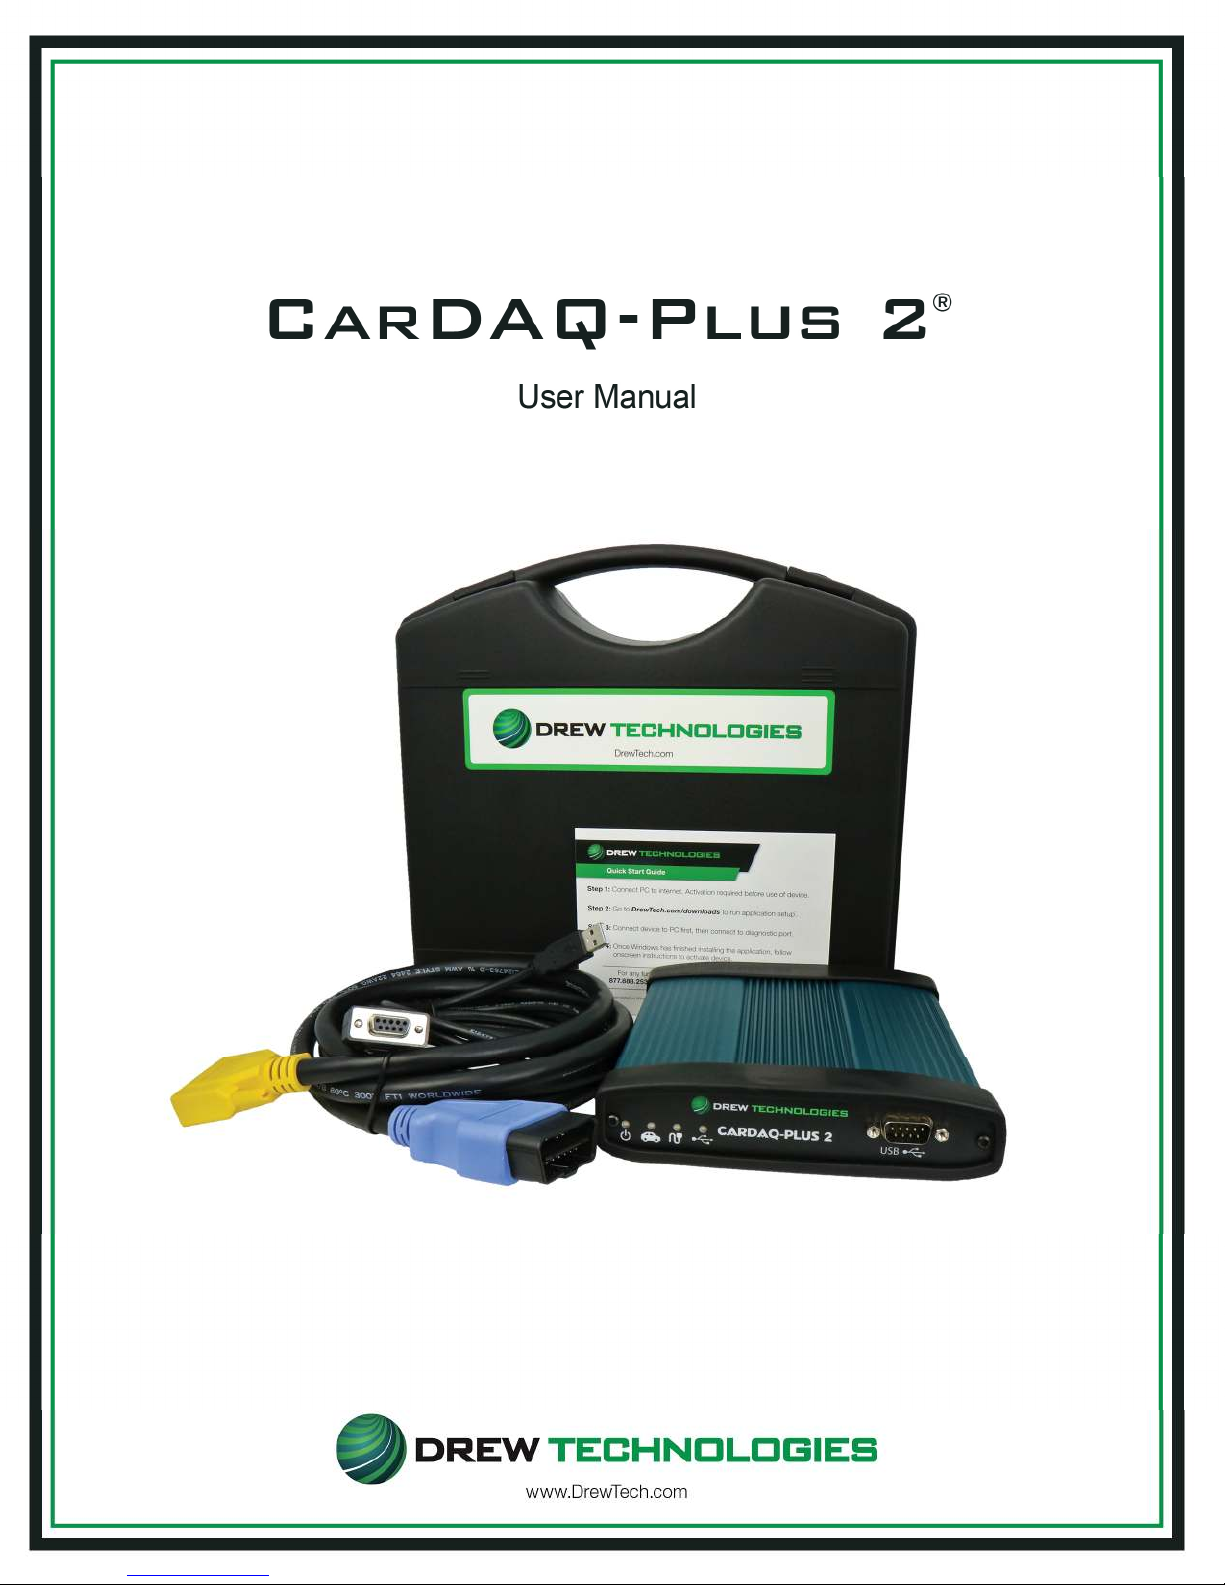
USB Cable Port
Power
Protocol
Vehicle Cable
USB Cable
Connection
INTRODUCTION
Thank you for choosingDrew Technologies! CarDAQ-Plus 2®will allow you to re-flash/program
modern vehicle controllers specified by the OEM as well as perform dealer level diagnostics
with select OEM applications. More information for each OEM can also be found in the J2534
Toolbox 3®application. This user manual covers the initial setup, features,and common
questions regarding the CarDAQ-Plus 2® device and is available at DrewTech.com.
GETTING TO KNOW THE CarDAQ-Plus 2®
Auxiliary Programming
Voltage Connection
LED Status lights:
Power
Protocol
Connection
Vehicle Cable
USB Cable
Vehicle Cable
Blinking Red Solid Red Blinking Green Solid Green
Firmware error-Call
DrewTech Support
- -
-
-
-
Cable not connected
or cable error
Install issue - Call
DrewTech Support
Device startup in
progress
Connected &
communicating with
vehicle
-
- Connected to PC
Device is functioning
Connected to vehicle
Cable OK/vehicle power
(communication)
3
Page 4
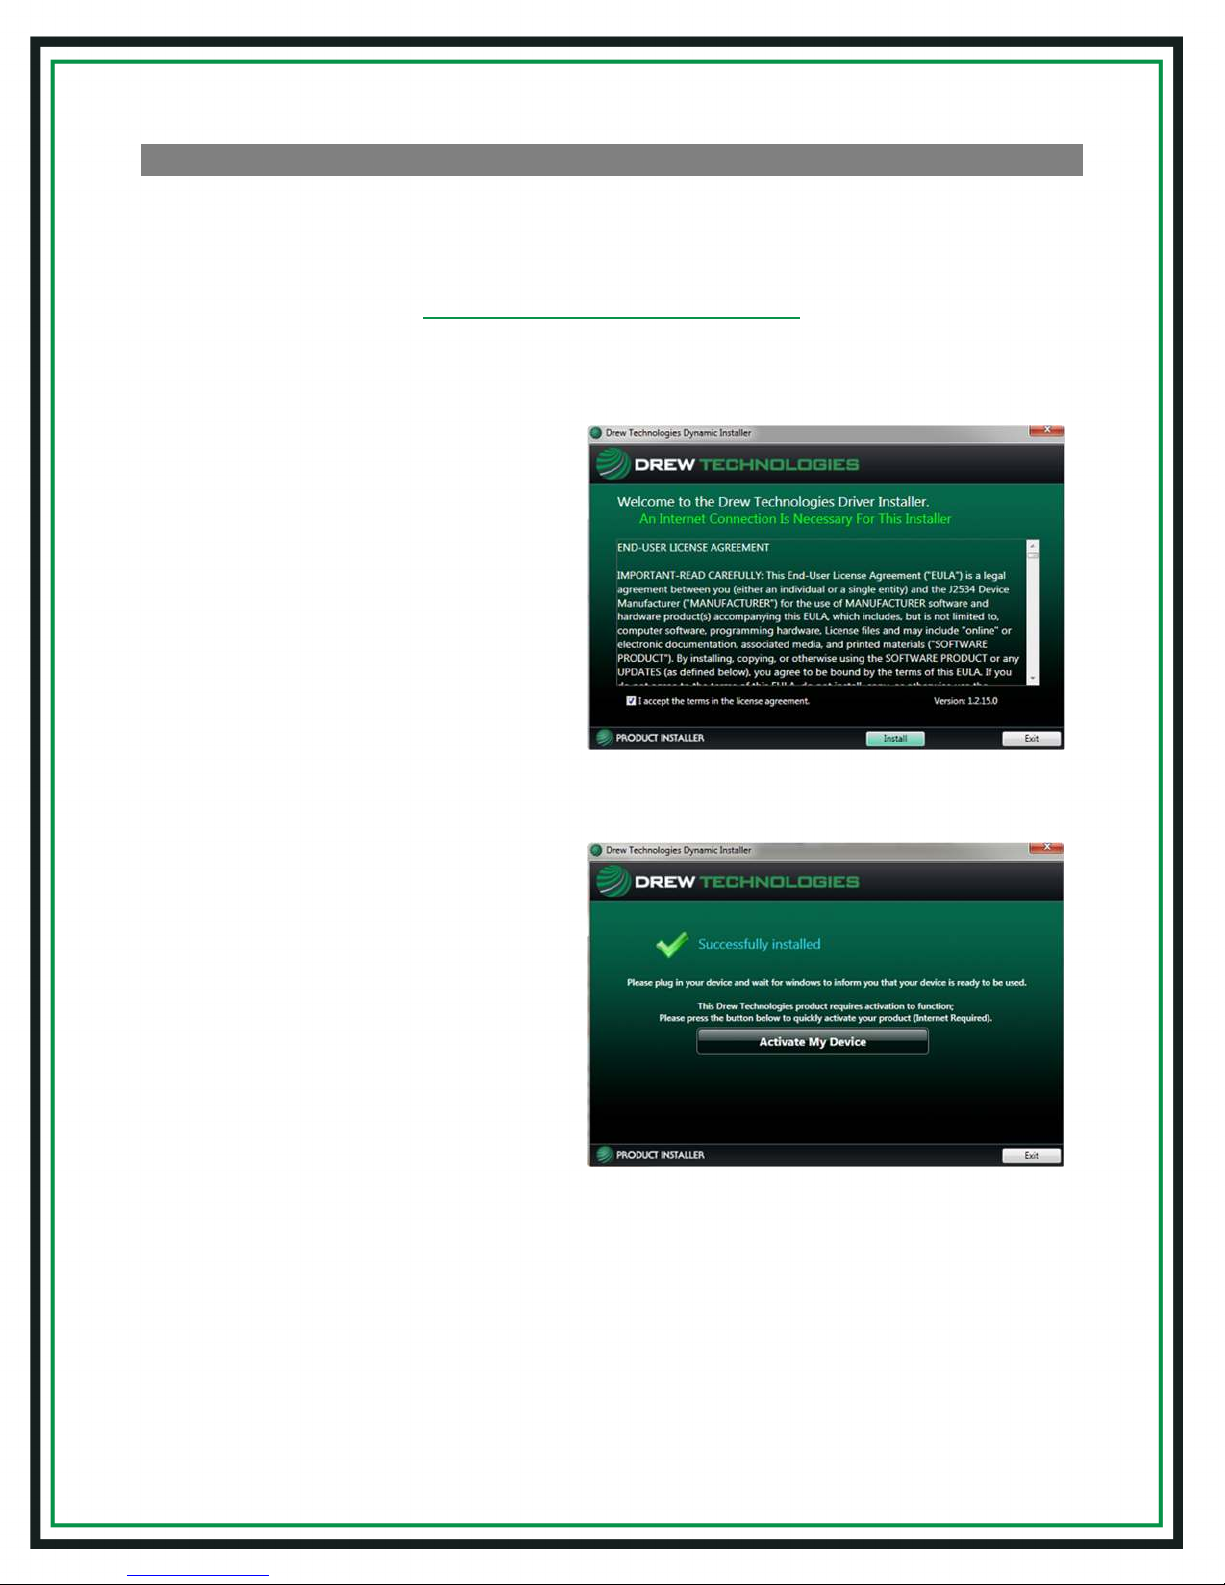
INSTALLATION & DEVICE ACTIVATION
1. Click this link to go to the DrewTech downloads page:
DrewTech.com/downloads
2. Locate and click on the "CarDAQ-PLUS 2®Set-up" link
3. Run the installation once the
software has downloaded to your
PC. Upon encountering this screen,
read the end-user license
agreement, and check the box next
to “I accept...”then click "Install"
4. Once the setup application has
finished, connect the USB cable to
your CarDAQ-Plus 2®device and to
the PC. Look for the message
window in the lower, right-hand
corner of the screen that indicates
that the drivers are being installed
and listen for the familiar Windows
driver installation chime. Upon
successful driver installation,
click“Activate My Device”
4
Page 5

5. The Device Activator application
will refresh. Click "Activate My
Device!"
6. Select the device you want to
activate and click "Continue"
7. Fill in all applicable information and
click "Continue"
5
Page 6

8. Select your type of business and level
of programmingexperience, then select
the OEMs you are planning to support.
Click "Continue"
9. (a) For final check of the interface, unplug
the USB cable for the CarDAQ-Plus 2®device
from your PC, and click "Ok"
(b) Then plug the USB cable for the
CarDAQ-Plus 2®device back into your PC,
and click "Ok"
10. Once product activation is performed
successfully, you can also install the
software on other PCs without having
to perform the activation procedure
again. Click “Close Application”
6
Page 7

J2534 Toolbox 3
The J2534 Toolbox 3 application isautomatically installed on the PC when the pass-thru driver is
installed and will place an icon on the desktop. The purpose of J2534 Toolbox 3 is to provide
current, relative information and assistance to the user. The information is provided viavarious
walk-through documents, OEM documentation, web-links, quick-links, videos, basic diagnostic
functions, connection verification, and more. J2534 Toolbox 3 should be referred to regularly as
information is updated continually.
1. Locate and double-click the "J2534 Toolbox" icon
on the Desktop
2. Select your interface from the dropdown menu
and click "Auto Login"
3. General tab: contains important news, current
OEM concerns, training broadcast invitations,
and current information you should review
4. Sales tab: connects you to the
DrewTech website
7
Page 8

5. Diagnostics tab: contains relative links, some
diagnostic functions, information and videos
about flashing, and OEMs that currently provide
diagnostics via J2534
6. Flashing tab: contains the information
pertaining to OEM J2534 flashing including
links, information, walkthroughs, and some
helper functions
7. Support tab:contains functions to check driver
installation, vehicle communication, updating
the device, create debug logs, contacting
Support,and other resources
8. Training tab:contains general information,
regarding installation and using OEM J2534
application videos with Drew Technologies
products
8
Page 9

DREWTECH - Tech2Win DRIVER
DrewTech’s Tech2Win driver allows the use of the CarDAQ-Plus 2®device as the interface using
the Tech2Win application. If communication concerns are encountered, first check the
DrewTech Tech2Win driver status and configuration:
1. Go to: Start>All Programs>Drew Technologies, Inc>Tech2WinDriver and open the
"DrewTech Tech2Win Driver Configuration" application
2. Confirm that the driver is installed, which is indicated by a green check mark. Note: If
there is a red X, click"Install"
Troubleshooting:
• If the "Install" does not work, click on "Exit", then right-click on the Start menu short cut
and choose “Run as Administrator.” Reopen the "DrewTech Tech2Win Driver
Configuration" application and click "Install"
• Channel Dropping: Depending on which vehicle systems are being diagnosed, selecting
"Drop Single..." or "Drop CAN..." options may need to be changed to communicate
properly. CAN on 6 & 14 is not affected by this
9
Page 10

Blue Tooth Setup
If you have ordered a Bluetooth equipped CarDAQ Plus 2®, you will have an antenna and
Bluetooth USB dongle included. Drew Technologies supports Bluetooth Diagnostics, but will
not provide support for module programming done via Bluetooth. To setup your CarDAQ Plus
2® to communicate with your PC, you will need to perform several steps listed below:
1. Thread the antenna onto the gold stud labeled “Wireless” on the back faceplate of the
CarDAQ Plus 2® between the “Aux” and “Vehicle Cable” ports.
2. Insert the USB Bluetooth Dongle into a known good USB port on your PC and allow
Windows to install the drivers for it.
3. Plug the vehicle cable into your CarDAQ Plus 2 and a vehicle.
4. The Power LED and Car LED will be lit up Solid green. The Wireless LED is will be
flashing a different shade of green.
5. For Windows 10, skip to step 10. Windows 7, Once the driver installation reports
complete, Right click the BlueTooth icon in your system tray in the lower right corner.
6. Click Add a device.
7. Click “CarDAQ-Plus2-######” where the ##### corresponds to the serial number on the
bottom of the case.
8. Click next.
9. Enter “2534” if prompted for the PIN code.
10. Windows 10. Once the driver installation reports complete, Right click the BlueTooth
icon in your system tray in the lower right corner.
11. Click Add a Bluetooth Device.
12. Wait until you see “CarDAQ-Plus2-######” where ##### corresponds to the serial
number on the bottom of the case.
13. Click Pair.
14. Enter “2534” if prompted for a PIN code.
PRODUCT SPECIFICATIONS
Protocols Supported:
• CAN Bus (capable of ISO 15765, GMLAN, J1939, and ISO14229)
• 2nd CAN (Dual or Single Wire)
• Ford SCP (J1850PWM)
• GM Class2 (J1850VPW)
• KWP2000 (ISO9141/14230)
• Chrysler SCI (J2610)
•
Compliant to SAE J2534 (Feb 2002) and SAE J2534-1(Dec 2004)
• Compliant to ISO 22900-1 MVCI physical layer
• Programming voltage on J1962 pin 6, 9, 11, 12, 13, 14, or Aux
• Ground pin 9
10
Page 11

Operating Systems Supported:
• Windows 7® 32-bit and 64-bit Versions
• Windows 8® 32-bit and 64-bit Versions
• Windows 8.1® 32-bit and 64-bit Versions
• Windows 10® 32-bit and 64-bit Versions
Physical Specifications/Tolerances:
Name Value
Dimensions (approximate)
InputVoltageRange
Supply Current 220mA @ 7VDC
Operating Temperature
Storage Temperature
6.5” x 6” x 1.5”
7VDC to 27VDC
175mA @12VDC
0°C to +60°C ambient
-20°C to +85°C ambient
PC Communications Type
USB version 1.1 or higher
11
Page 12

IMPORTANT NOTES
CarDAQ-Plus 2® has been carefully designed and tested to comply with OBDII protocols.
However, some vehicle models are not in full compliance with these protocols for various
reasons. In addition, the computer control systems or sensors on any given vehicle may be
malfunctioning or out of specification.
While DrewTech’s testing and the experiences of thousands of CarDAQ-Plus 2® users have
shown the unit to be safe and reliable, there is an inherent risk in using any product that may
potentially affect the operation or drive-ability of your vehicle.If you are concerned about the
operation of your vehicle at any time while using CarDAQ-Plus 2®:
• Pull off the roadway immediately or as soon as it is safe to do so.
• Disconnect the CarDAQ-Plus 2®device from the OBDII port.
• Consult a licensed mechanic or automobile service center.
Permission is granted to copy any or all portions of this manual, provided that such copies are
for use with Drew Technologies, Inc. products and that “© 2017 Drew Technologies, Inc.”,
(herein referred to as “DrewTech”), remains on all copies. The accompanying software,
provided for use with the DrewTech product, is also copyrighted. Permission is granted to copy
this software for back-up purposes only.
LIMITED WARRANTY
Products are warranted to be free from defects in materials or workmanship for one year from
the date of purchase*. Within this period, Drew Technologies will, at its sole option, repair or
replace any components that fail in normal use. Such repairs or replacement will be made at no
charge to the customer for parts or labor, provided that the customer shall be responsible for
any transportation cost. This warranty does not apply to: (i) cosmetic damage, such as
scratches, nicks and dents; (ii) damage caused by accident, abuse, misuse, water, flood, fire, or
other acts of nature or external causes; (iii) damage caused by service performed by anyone
who is not an authorized service provider of Drew Technologies; or (iv) damage to a product
that has been connected to power and/or data cables that are not supplied by Drew
Technologies.
Drew Technologies retains the exclusive right to repair or replace (with a new or newly
overhauled replacement product) the device or offer a full refund of the purchase price at its
sole discretion. SUCH REMEDY SHALL BE YOUR SOLE AND EXCLUSIVE REMEDY FOR
ANY BREACH OF WARRANTY.
To obtain warranty service, contact Drew Technologies’ Support for shipping instructions and a
RMA number. Securely pack the device and the completed RMA form, which is required for
warranty repairs. Write the RMA number clearly on the outside of the package. Send the device,
with freight charges prepaid, to Drew Technologies.
* Detachable cables for all products have a 90-day warranty.IMclean and IMclean
Bluetoothhave a 3-year warranty. DrewLinQ has a 2-year warranty.
12
Page 13

FCC STATEMENT
The wireless module has been tested and found to comply with the FCC part 15 and ICRSS-
210 rules. These limits are designed to provide reasonable protection against harmful
interference in approved installations. This equipment generates, uses, and can radiate radio
frequency energy. If not installed and used in accordance with the instructions, this device may
cause harmful interference to radio communications. However, there is no guarantee that
interference may not occur in a particular installation. This device complies with part 15 of the
FCC rules. Operation is subject to the following two conditions: (1) this device may not cause
harmful interference, and (2) this device must accept any interference received, including
interference that may cause undesired operation. Modifications or changes to this equipment
not expressly approved by the party responsible for compliance may render void the user’s
authority to operate this equipment.
• Modular Approval, FCC and IC
• FCC ID: X3ZBTMOD3
• IC: 8828A-MOD3
In accordance with FCC part 15, the SPT2632C1A.AT2 is listed above as a modular transmitter device.
COPYRIGHT INFORMATION
Copyright:
• All material herein is Copyrighted ©1996 - 2017 Drew Technologies, Inc.
• CarDAQ-Plus 2 software, hardware, and firmware are also copyrighted
• Users are given permission to copy any part of this manual provided that the copy is
used with the DrewLinQ product and the "Copyright © 2017 Drew Technologies, Inc ."
statement remain on all copies
• "DrewTech" is synonymous with "Drew Technologies, Inc." and is used in this manual
• The “Drew Technologies” logo is a registered trademark of Drew Technologies, Inc.
Notices:
• The information contained in this document is subject to change without prior notice.
DrewTech shall not be held liable for technical/editorial errors, or omissions herein
• Warranties for DrewTech products and services are set forth in the express written
warranty statements accompanying the product. Nothing herein should be construed as
constituting any additional warranty
• DrewTech assumes no responsibility for any damage resulting from the use, misuse, or
negligent use of the hardware or any software application used with CarDAQ-Plus 2
Acknowledgements:
• Microsoft™ and the various versions of Windows™ are U.S. registered trademarks of
Microsoft Corporation
• Most OEM software applications are registered trademarks of their respective
corporations and also carry copyright notices
13
Page 14

DREWTECH SUPPORT
For any technical support, please contact Drew Technologies Support by emailat
support@drewtech.com or call toll-free:877.888.2534, option 3.
Support hours are 8:30am - 5:30pm EST Monday - Friday, excluding holidays.
Drew Technologies, Inc.
3915 Research Park Drive, Suite A10
Ann Arbor, MI 48108
Document revision: January 2017, BDT86
14
 Loading...