


CARDAQ-PLUS
Quick Start Guide
CarDAQ-Plus has been carefully designed and tested to comply with OBDII protocols, which are used on most 1996 and newer cars and light trucks sold in the USA. However, some vehicle models are not in full compliance with these protocols for various reasons. In addition, the computer control systems or sensors on any given vehicle may be malfunctioning or out of specification.
Note: Vehicles manufactured for use outside of the USA may not comply with OBDII protocols, even though an SAE J1962 connector is located in the vehicle. Connection to vehicles manufactured for use outside of the USA is AT YOUR OWN RISK. Drew Technologies will not be held responsible for ANY direct, indirect or consequential damage that arises as a result of connecting to such a vehicle.
Before installing CarDAQ-Plus, we recommend visiting this website for service information: www.nastf.org.
While Drew Technologies testing and the experience of thousands of CarDAQPlus users have shown the interface to be safe and reliable, there is an inherent risk in using any product that may potentially affect the operation or drive-ability of your vehicle. Drew Technologies will not be held responsible for ANY direct, indirect or consequential damage that arises as a result of using CarDAQ-Plus on a vehicle.
If you are concerned about the operation of your vehicle at any time while using CarDAQ-Plus:
•If you are driving, pull off the roadway immediately or as soon as it is safe to do so.
•Disconnect CarDAQ-Plus from the OBDII port.
•Consult a licensed mechanic or automobile service center.
Report any issues or concerns to our Technical Support Dept. at support@drewtech.com. We are open Monday through Friday, 9:00 a.m. to 5:30 p.m. Eastern Time. We maintain an active database of the feedback we receive, and your comments can help us continuously improve the product.
2
Contents |
|
Contents............................................................................................................. |
3 |
Introduction ....................................................................................................... |
4 |
Getting to Know CarDAQ-Plus ........................................................................ |
4 |
Powering CarDAQ-Plus................................................................................... |
4 |
Setting up the CarDAQ-Plus ............................................................................ |
4 |
Installing the CarDAQ-Plus Software to your PC ............................................ |
4 |
The Capabilities of J2534 and CarDAQ-Plus.................................................. |
6 |
Reprogramming with J2534 ............................................................................ |
6 |
J2534 ToolBox................................................................................................. |
6 |
Updating the CarDAQ-Plus Drivers on your PC.............................................. |
7 |
Updating the Firmware inside your CarDAQ-Plus........................................... |
8 |
Diagnostics with J2534.................................................................................... |
9 |
Specifications.................................................................................................. |
10 |
Connectors and Status Indicators ................................................................. |
11 |
Vehicle Connector ......................................................................................... |
12 |
Ethernet Lights .............................................................................................. |
12 |
A/D Inputs Connector .................................................................................... |
12 |
Troubleshooting and Support ....................................................................... |
13 |
If all else fails................................................................................................. |
14 |
Other Drew Tech Products............................................................................. |
16 |
3
Introduction
Thank you for choosing CarDAQ-Plus! You now have the most complete J2534 Pass-Thru device available for technicians today. The CarDAQPlus will allow you to re-flash modern vehicle controllers to stock as well as perform dealer level diagnostics on select manufacturer’s vehicles.
This Quick Start Guide covers the initial setup, features, and common questions. This manual is always available at www.drewtech.com. Information for individual manufacturers can be found in the J2534 Toolbox application.
Getting to Know CarDAQ-Plus
Your package includes: the CarDAQ-Plus interface, a crossover Ethernet cable, a USB cable, an OBD-II cable, and a installation CD that includes PC drivers and the J2534 Toolbox.
Powering CarDAQ-Plus
The CarDAQ-Plus receives power from a vehicle OBDII port. When CarDAQ-Plus is powered-on, the lights will cycle through a self-test procedure. The CarDAQPlus does not receive power from your PC’s Ethernet or USB ports. Do not connect the CarDAQ-Plus to your PC until you have installed the software below.
Setting up the CarDAQ-Plus
Do not connect the CarDAQ-Plus to your PC until you have installed the software below.
Installing the CarDAQ-Plus Software to your PC
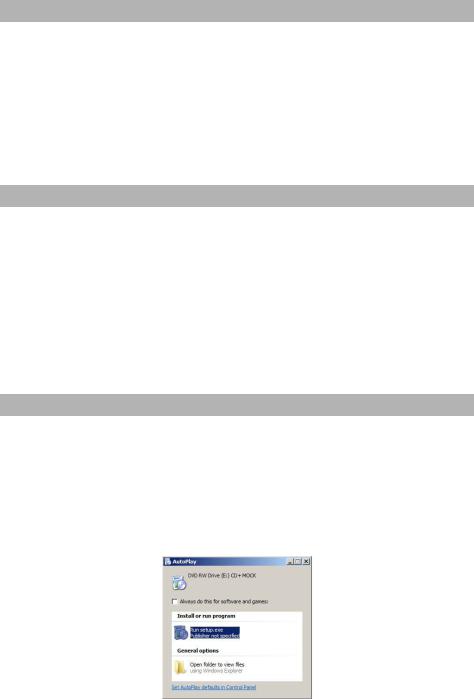
1.Insert the CD that came with your CarDAQ-Plus into the CD/DVD slot of your PC. Make sure your CarDAQ-Plus is not connected to the PC at this point. The Autoplay options will appear:
2. Click on [Run setup.exe] to begin the installation.
4

3.The CarDAQ-Plus drivers and the J2534 ToolBox will now begin installation. Follow the Setup Wizard instructions.
4.When the installation is finished, power up your CarDAQ-Plus from a vehicle with the OBDII cable, and then connect the USB cable from CarDAQ-Plus to your PC. The drivers will automatically be found and installed on Windows Vista and 7 computers.
For Windows XP, a few more steps are required:
a.The “Found New Hardware Wizard” will pop up when you connect your CarDAQ-Plus.
b.Make sure “No, not this time” is selected and click [Next]. This screen appears:
c.Select “Install the software automatically (Recommended)” and click [Next]. After the progress bar finishes, click [Finish]. Windows XP users are finished installing at this point and can run the software they will be using with the CarDAQ-Plus.
5
 Loading...