

Page 1
CarDAQ-M
J2534-1&2 Module
Quick Start Guide
Page 2

CarDAQ-M has been carefully designed and tested to comply with OBDII
protocols, which are used on most 1996 and newer cars and light trucks sold in
the USA. However, some vehicle models are not in full compliance with these
protocols for various reasons. In addition, the computer control systems or
sensors on any given vehicle may be malfunctioning or out of specification.
Note:
Vehicles manufactured for use outside of the USA may not comply with
OBDII protocols, even though an SAE J1962 connector is located in the vehicle.
Connection to vehicles manufactured for use outside of the USA is AT YOUR
OWN RISK. Drew Technologies will not be held responsible for ANY direct,
indirect or consequential damage that arises as a result of connecting to su ch a
vehicle.
Before installing CarDAQ-M, we recommend visiting this website for service
information: www.nastf.org
While Drew Technologies testing and the experience of thousands of CarDAQ-M
users have shown the interface to be safe and reliable, there is an inherent risk in
using any product that may potentially affect the operation or drive-ability of your
vehicle. Drew Technologies will not be held responsible for ANY direct, indirect or
consequential damage that arises as a result of using CarDAQ-M on a vehicle.
If you are concerned about the operation of your vehicle at any time while using
CarDAQ-M:
If you are driving, pull off the roadway immediately or as soon as it is
safe to do so.
Disconnect CarDAQ-M from the OBDII port.
Consult a licensed mechanic or automobile service center.
Report any issues or concerns to our Technical Support Dept. at
support@drewtech.com. We are open Monday through Friday, 9:00 a.m. to 5:30
p.m. Eastern Time. We maintain an active database of the feedback we receive,
and your comments can help us continuously improve the product.
.
2
Page 3

Contents
CONTENTS.....................................................................................................................3
1. INTRODUCTION......................................................................................................4
COPYRIGHTS & TRADEMARKS..............................................................................4
2. GETTING TO KNOW CARDAQ-M.....................................................................4
CARDAQ-M EXPANSION MODULES .................................................................... 4
3. SETTING UP THE CARDAQ-M...........................................................................5
INSTALLING THE CARDAQ-M SOFTWARE TO YOUR PC........................................5
ADDING AN EXPANSION MODULE TO CARDAQ-M................................................6
4. THE CAPABILITIES OF J2534 AND CARDAQ-M........................................7
REPROGRAMMING WITH J2534...........................................................................7
J2534 TOOLBOX™......................................................................................................7
REGISTERING/CREATING AN ACCOUNT ...............................................................7
J2534 TOOLBOX RESOURCES................................................................................9
UPDATING THE CARDAQ-M DRIVERS ON YOUR PC................................10
5. SPECIFICATIONS..................................................................................................11
J2534-1&2 MODULES......................................................................................11
SUPPORTED PROTOCOLS.................................................................................11
SPECIFICATIONS ..............................................................................................11
CONNECTORS AND STATUS INDICATORS ...........................................................12
6. TROUBLESHOOTING AND SUPPORT...........................................................12
IF ALL ELSE FAILS.............................................................................................13
LIMITED WARRANTY.........................................................................................13
OTHER DREW TECH PRODUCTS........................................................................16
3
Page 4
1. Introduction
Thank you for choosing CarDAQ-M! You now have the most complete and upgradeable
J2534 Pass-Thru device available for technicians today. The CarDAQ-M will al low you to reflash modern vehicle controllers to stock as well as perform dealer level diagnostics on
select manufacturer’s vehicles.
This Quick Start Guide covers the initial setup, features, and common questions. This
manual is always available at www.drewtech.com
can be found in the J2534 Toolbox application.
. Information for individual manu facturers
Copyrights & Trademarks
Copyright 1999-2014 Drew Technologies, Inc., All Rights Reserved. Mongoose Pro, CarDAQ,
DashDAQ, ScanDAQ, CarDAQ2534, and J2534 ToolBox are registered trademarks of Drew
Technologies, Inc. All other trademarks and brand names are the property of their
respective owners.
2. Getting to Know CarDAQ-M
Your package includes: the CarDAQ-M interface, a USB cable, an OBD-II
cable, and a installation CD that includes PC drivers and the J2534
Toolbox.
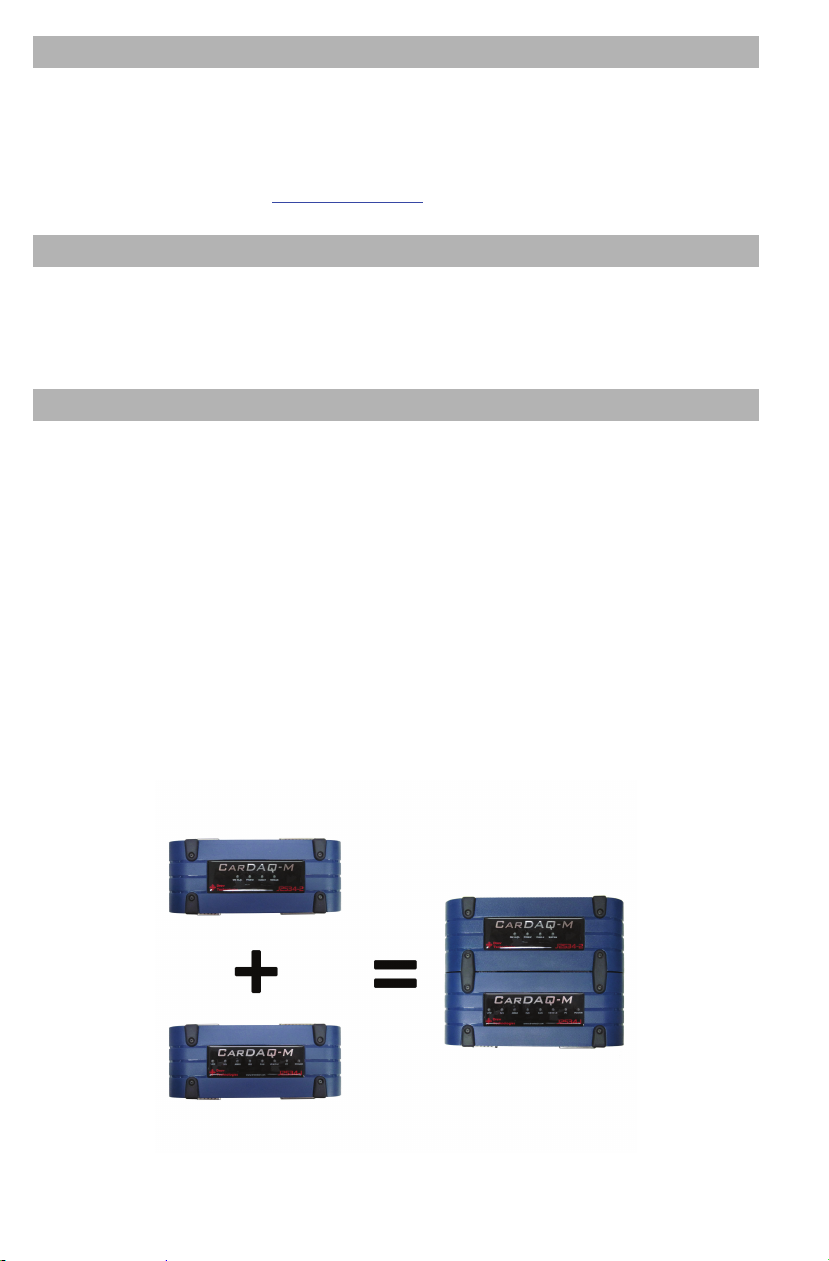
CarDAQ-M Expansion Modules
The CarDAQ-M was designed to be the last J2534 tool you will ever need.
As OBDII standards change and vehicle manufacturers make vehicle
computer systems ever more complex, the CarDAQ-M will have
expansion modules available to stay up to date. By connecting these
modules end-to-end, the CarDAQ-M can be updated to support new
vehicle technologies that currently do not exist. Simply purchase an
expansion module, connect it to the CarDAQ-M and now you have the
most current J2534 tool.
4
Page 5
Setting up the CarDAQ-M
Do not connect the CarDAQ-M to your PC until you
have installed the software below.
Installing the CarDAQ-M Software to your PC
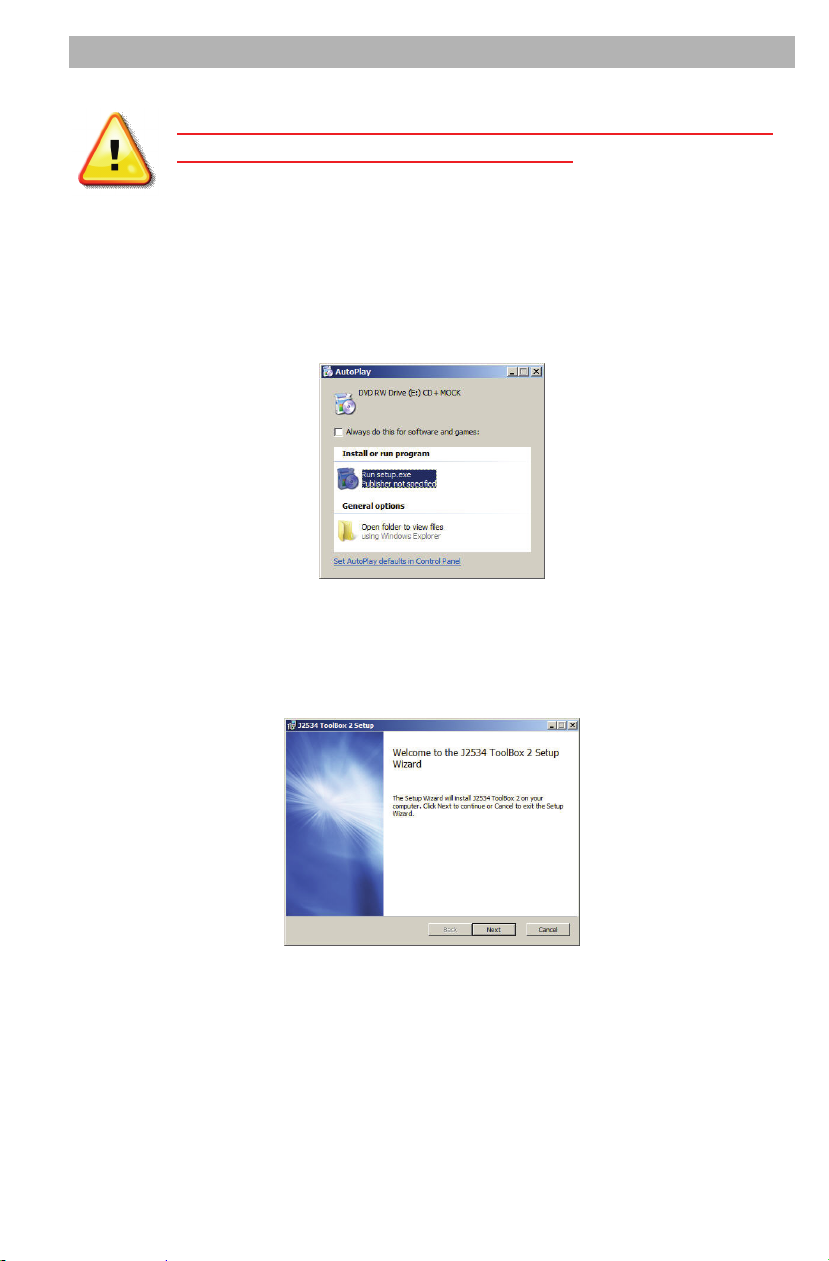
1. Insert the CD that came with your CarDAQ-M into the CD/DVD slot of
your PC. Make sure your CarDAQ-M is not connected to the PC at this
point. The Autoplay options will appear:
2. Click on [Run setup.exe] to begin the installation.
3. The J2534 ToolBox, Tech2Win Driver and the CarDAQ-M drivers
will now begin installation. Follow the Setup Wizard instructions.
4. When the installation is finished, power up your CarDAQ-M from a
vehicle with the OBDII cable.
5. Connect the USB cable from CarDAQ-M to your PC. The drivers
will automatically be found and installed on Windows Vista and 7
computers.
For Windows XP, a few more steps are required:
5
Page 6

a. The “Found New Hardware Wizard” will pop up when you
connect your CarDAQ-M.
b. Make sure “No, not this time” is selected and click [Next].
This screen appears:
c. Select “Install the software automatically (Recommended)”
and click [Next]. After the progress bar finishes, click
[Finish]. Windows XP users are finished installing at this
point and can run the software they will be using with the
CarDAQ-M.
Adding an Expansion Module to CarDAQ-M
Note: Unplug all cables from CarDAQ-M before
connecting or disconnecting modules.
To add an expansion to CarDAQ-M:
1. Remove the half tabs on the side of the CarDAQ-M with a 1/16”
Allen style wrench. This is the side with the “Vehicle” and
“Expansion-C” connectors. Save the screws you remove.
2. Connect the expansion module so that the text on the labels read
the same direction. Make sure the USB port on the J2534-1
module is accessible.
6
Page 7

3. Fasten the two modules together with the four full tabs and
additional screws that came with the new expansion module.
The Capabilities of J2534 and CarDAQ-M
The CarDAQ-M is the most complete J2534 pass-thru device available
today. The capabilities of CarDAQ-M are largely determined by software
the vehicle manufacturers provide. More information on specific
manufacturers can be found in the J2534 Toolbox.
Reprogramming with J2534
J2534 and federal law mandate that automakers allow shop technicians
the ability to re-flash emissions-related vehicle electronic control units,
typically engine and transmission controllers. Some automakers allow for
more modules, and some have enabled factory diagnostics. Use the J2534
Toolbox for more information on the capability provided from each
manufacturer.
J2534 ToolBox™
The J2534 ToolBox is a program created by Drew Technologies to help
distribute current information to technicians working with J2534. The
J2534 ToolBox has up-to-date information on manufacturer
reprogramming issues, links to manufacturer sites, and much more. The
J2534 Toolbox is installed from the disk that came with your CarDAQ M.
The J2534 Toolbox can also be downloaded from
www.drewtech.com/downloads
.
Registering/Creating an Account
To begin using the J2534 Toolbox click on the J2534 Toolbox icon on you
desktop.
When toolbox starts up you will need login in to use all of the features
provided. If you do not have an account, click on the
button. The J2534 Toolbox requires an account to access all of the
features that make it useful to you as an information source.
7
Page 8

As you work through the registration process fill out all information
completely and correctly.
Step 1
(Personal Information) of the registration will require you to fill out
information regarding your J2534 Toolbox account.
Step 2
(Business Information) will require some information about your
business.
Step 3
(Device Registration) will require you to register the CarDAQ M you
are using. Please have the CarDAQ M connected to the PC at this point.
8
Page 9

Step 4
Your CarDAQ M has now been registered.
All features of the J2534 Toolbox will now be available to you. Remember
to save yo ur login informa tion so that yo u can login quickl y. If you lose
your login information you will need to click on “Forgot Password?
login screen.
(Registration Confirmation) confirms your J2534 Toolbox account.
” at the
J2534 Toolbox Resources
Once you have logged in to the account you registered for you will have
access to all of the benefits the J2534 Toolbox has to offer. Make sure to
spend some time clicking through all the tabs at the top to familiarize
yourself. These tabs include:
General
date information with news and current issues in the J2534 service world.
– This tab will be shown every time you log in. This tab has up to
Flashing
started with a re-flash. Reference the information here before you get
started when you need to do a re-flash.
Diagnostics
get started with diagnostics through J2534. The manufacturers listed
here will provide diagnostics with your J2534 Pass-Thru device.
Support
your Pass-Thru device is working correctly. This section also has the
software to update the drivers and firmware for your Pass-Thru device.
Sales
that can be purchased for vehicle service.
Recalls
Forums
discussions on using J2534 devices. There are topics dedicated to
manufacturers and the use of the J2534 Toolbox itself.
– This tab has all the information you will need before you get
- This tab has all the information you will need before you
– This tab houses all of the tools you will need to make sure
– The sales tab will give you information about our other products
– This tab has recalls available for all vehicles 1996 and newer.
– The J2534 Toolbox has dedicated forums available for having
9
Page 10

Updating the CarDAQ-M Drivers on your PC
Unplug CarDAQ-M’s cable from your PC before
completing the steps below.
To update the CarDAQ-M drivers on your PC:
1. Open your web browser and go to the downloads page at
www.drewtech.com
2. Determine if your computer is running a 32 or 64 bit version of
Microsoft Window. Right click on [Computer] in the Start menu
and click on [Properties] to find this information.
3. Download the “Drivers Only” installer for your 32 or 64 bit version
of Windows.
4. Once the download has finished, run the file. It will be named
“J2534 CarDAQ-M.msi” for the 32 bit version and “J2534 CarDAQM_x64.msi” for the 64 bit version.
5. Follow the Setup Wizard’s instructions to complete the install
10
Page 11

Specifications
J2534-1&2 Modules
Supported Protocols
CAN Bus (capable of ISO 15765, GMLAN, J1939, and ISO14229)
2nd CAN (Dual or Single Wire)
Ford SCP (J1850PWM)
GM Class2 (J1850VPW)
KWP2000 (ISO9141/14230)
Chrysler SCI (J2610)
o Compliant to SAE J2534 (Feb 2002) and SAE J2534-1 (Dec 2004)
o Compliant to ISO 22900-1 MVCI physical layer
o Programming voltage on J1962 pin 6, 9, 11, 12, 13, 14 or Aux
o Ground pin 9
Specifications
Name Value
Input Voltage Range 7VDC to 26VDC
Supply Current 140mA @ 7VDC
100mA @12VDC
Operating
Temperature
Storage Temperature -20C to +85C ambient
Size
+0C to +60C ambient
1.25”H x 7.5”D x 3.25”W
11
Page 12

Connectors and Status Indicators
PC Connection Panel
Ports and their functions:
Expansion A and B:
For a direct to PC USB connection.
USB:
External programming voltage supply. For use on some vehicles that
AUX:
have special programming needs.
External power option which maybe needed for future expansion
PWR:
modules.
Future PC connection options.
Expansion Panel
This side of CarDAQ-M allows future modules to be connected for more
capability. An expansion module is connected to the CarDAQ-M with
both the Vehicle and Expansion C ports, then secured by with metal tabs
and screws between the modules.
Vehicle:
Expansion C:
OBDII cable is connected here.
Connection for future expansion modules.
6. Troubleshooting and Support
Some questions and answers to common questions with the CarDAQ-M:
Q: I have connected my CarDAQ-M to my computer with the USB
cable, but nothing happens.
A: Make sure the drivers are installed on your computer using Install
Check in the J2534 Toolbox. If you have not run the driver installer from
the CarDAQ-M CD, disconnect the CarDAQ-M from the computer and
install the drivers.
12
Page 13

Q: I have installed the drivers and connected my CarDAQ-M but
nothing seems to be working.
A: Connect CarDAQ-M to your computer and to a vehicle. Turn the
vehicle key to the “On” position. Open the J2534 Toolbox and go to the
support tab. Use the Vehicle Check application to see if a protocol is
found. If a error occurs instantly, re-install the drivers.
Q: How do I re-install the drivers on the PC?
Find the CD that came with your CarDAQ-M or download the installer
from the website. Run the installer. Click on the “Remove” button to
uninstall. Run the installer again to install the drivers on your PC.
Q: I am having problems re-flashing a vehicle.
A: Gather the following pieces of information: computer operating
system, CarDAQ-M driver and firmware versions, vehicle information, and
error messages from the manufacturer’s program. Contact the vehicle
manufacturer’s technical support with this information. If the vehicle
manufacturer’s technical assistance cannot get you going, contact Drew
Technologies for assistance.
If all else fails...
Please contact Drew Technologies for technical support at
support@drewtech.com. If technical support finds it necessary for the
unit to be returned for repair, you will be asked for your contact
information and then provided with a Return Merchandise Authorization
number (RMA#). Drew Technologies will use the RMA to track the unit
through the repair process. Please write this number on the outside of
your shipping box so it can be routed to the correct department. If the
necessary repair is not covered by Drew Technologies' warranty, you will
be contacted for payment arrangements.
Limited Warranty
Drew Technologies, Inc. guarantees that every CarDAQ M is free from physic al defects in
material and workmanship under normal use for one year from the date of purchase.
IN NO EVENT SHALL DREW TECHNOLOGIES, INC.'S LIABILITY EXCEED THE PRICE PAID FOR
THE PRODUCT. DREW TECHNOLOGIES SHALL BE EXEMPT FROM ALL OTHER CLAIMS WHETHER
BASED UPON DIRECT, INDIRECT, SPECIAL, INCIDENTAL, OR CONSEQUENTIAL DAMAGES
RESULTING FROM THE USE OF THE PRODUCT, ITS ACCOMPANYING SOFTWARE, OR ITS
DOCUMENTATION. Drew Technologies, Inc. makes no warranty or representation,
expressed, implied, or statutory, with respect to its products or the contents or use of this
documentation and all accompanying software, and specifically disclaims its quality,
performance, merchantability, or fitness for any particular purpose. Drew Technologies,
Inc. reserves the right to revise or update its products, software, or documentation without
obligation to notify any individual or entity. Please direct all inquiries to:
Drew Technologies, Inc.
3915 Research Park Dr
Suite A10
Ann Arbor, MI
13
Page 14

Notes:
14
Page 15

Notes:
15
Page 16

Other Drew Tech Products
Drew Technologies has several products available for data acquisition,
diagnostics, development, testing, and reprogramming for modern
vehicles. Visit www.drewtech.com
for more information
CarDAQ-Plus
and USB connectivity to a computer, a built-in operating
system for running internal programs, protocol support
for all modern vehicles, and six analog inputs.
Mongoose Pro
cost, high-performance PassThru (SAE J2534) vehicle
interfaces. Connect any laptop with USB 2.0 directly to
the OBD-II (SAE J1962) connector with full-speed
performance.
IMclean
in California and other states.
IMready™ - Low cost emissions tester. Plug into a
vehicle and get a simple green, yellow, red indication for
pass/wait/fail. Runs the whole emission test
™ - Fully SAE J2534 compliant. Ethernet
™ - Drew Technologies’ family of low-
™ - OBD2 emissions test tool. Certified for use
16
 Loading...