

Page 1
Operating/Safety Instructions
Model 780 Cordless Rotary Tool
HONESTLY NOW … Have you read this OWNER’S MANUAL?
DM 2610913513 6/01 6/8/01 8:44 PM Page 1
Safety
•
• Assembly
Operation
•
Accessory Information
•
Warranty
•
• Registration Form
• Service Parts
1-800-437-3635
http://www.dremel.com
P.O. Box 1468
Racine, Wisconsin
Parlez-vous français?
Voir page 21
¿Habla español?
Vea página 41
©
S-B Power Tool Co.
2001
All Rights Reserved
2 610 925 471 10/04 Printed in Mexico
Page 2

Page 2
General Safety Rules for All Battery Operated Tools
Read and understand all instructions. Failure to follow all instructions listed below, may result
in electric shock, fire and/or serious personal injury.
SAVE THESE INSTRUCTIONS
!
WARNING
Work Area
Keep your work area clean and well lit. Cluttered
benches and dark areas invite accidents.
Do not operate power tools in explosive atmospheres, such as in the presence of flammable liquids, gases, or dust. Power tools create sparks
which may ignite the dust or fumes.
Keep bystanders, children, and visitors away while
operating a power tool. Distractions can cause you
to lose control.
Electrical Safety
Do not abuse the cord. Never use the cord to carry
the tool. Keep cord away from heat, oil, sharp
edges, or moving parts. Replace damaged cords
immediately. Damaged cords may create a fire.
A battery operated tool with integral batteries or a
separate battery pack must be recharged only with
the specified charger for the battery. A charger that
may be suitable for one type of battery may create a
risk of fire when used with another battery.
Use battery operated tool only with specifically designated battery pack. Use of any other batteries may
create a risk of fire.
Personal Safety
Stay alert, watch what you are doing, and use common sense when operating a power tool. Do not use
tool while tired or under the influence of drugs,
alcohol, or medication. A moment of inattention
while operating power tools may result in serious personal injury.
Dress properly. Do not wear loose clothing or jewelry. Contain long hair. Keep your hair, clothing,
and gloves away from moving parts. Loose clothes,
jewelry, or long hair can be caught in moving parts.
Avoid accidental starting. Be sure switch is in the
locked or off position before inserting battery pack.
Carrying tools with your finger on the switch or
inserting the battery pack into a tool with the switch
on invites accidents.
Remove adjusting keys or wrenches before turning
the tool on. A wrench or a key that is left attached to
a rotating part of the tool may result in personal
injury.
Do not overreach. Keep proper footing and balance
at all times. Proper footing and balance enable better
control of the tool in unexpected situations.
Use safety equipment. Always wear eye protection.
Dust mask, non-skid safety shoes, hard hat, or hear-
ing protection must be used for appropriate conditions.
Tool Use and Care
Use clamps or other practical way to secure and
support the workpiece to a stable platform. Holding
the work by hand or against your body is unstable and
may lead to loss of control.
Do not force tool. Use the correct tool for your application. The correct tool will do the job better and
safer at the rate for which it is designed.
Do not use tool if switch does not turn it on or off. A
tool that cannot be controlled with the switch is dangerous and must be repaired.
Disconnect battery pack from tool or place the
switch in the locked or off position before making
any adjustments, changing accessories, or storing
the tool. Such preventive safety measures reduce the
risk of starting the tool accidentally.
Store idle tools out of reach of children and other
untrained persons. Tools are dangerous in the hands
of untrained users.
When battery pack is not in use, keep it away from
other metal objects like: paper clips, coins, keys,
nails, screws, or other small metal objects that can
make a connection from one terminal to another.
Shorting the battery terminals together may cause
sparks, burns, or a fire.
Maintain tools with care. Keep cutting tools sharp
and clean. Properly maintained tools with sharp cut-
ting edge are less likely to bind and are easier to control.
Check for misalignment or binding of moving parts,
breakage of parts, and any other condition that may
affect the tool's operation. If damaged, have the
tool serviced before using. Many accidents are
caused by poorly maintained tools.
Use only accessories that are recommended by the
manufacturer for your model. Accessories that may
be suitable for one tool may create a risk of injury
when used on another tool.
Service
Tool service must be performed only by qualified
repair personnel. Service or maintenance performed
by unqualified personnel may result in a risk of injury.
When servicing a tool, use only identical replacement parts. Follow instructions in the Maintenance
section of this manual. Use of unauthorized parts or
failure to follow Maintenance Instructions may create
a risk of shock or injury.
DM 2610913513 6/01 6/8/01 8:44 PM Page 2
Page 3

Page 3
Safety Rules for Cordless Rotary Tools
Accessories must be rated for at least the speed
recommended on the tool warning label. Wheels
and other accessories running over rated speed can
fly apart and cause injury.
Hold tool by insulated gripping surfaces when performing an operation where the cutting tool may
contact hidden wiring or its own cord. Contact with
a "live" wire will make exposed metal parts of the tool
"live" and shock the operator. If cutting into existing
walls or other blind areas where electrical wiring may
exist is unavoidable, disconnect all fuses or circuit
breakers feeding this worksite.
Do not operate the flexible shaft with a sharp bend.
Over bending the shaft can generate excessive heat
on the jacket or hand piece. The recommended minimum is 6" radius.
Disconnect battery pack from tool or place the
switch in the locked or off position before making
any assembly, adjustments or changing accessories. Such preventive safety measures reduce the
risk of starting the tool accidentally.
Be aware of the switch location, when placing the
tool down or when picking the tool up. You may acci-
dentally activate the switch.
Always hold the hand piece firmly in your hands
during the start-up. The reaction torque of the motor,
as it accelerates to full speed, can cause the shaft to
twist.
Always wear safety goggles and dust mask. Use
only in well ventilated area. Using personal safety
devices and working in safe environment reduces risk
of injury.
After changing the bits or making any adjustments,
make sure the collet nut and any other adjustment
devices are securely tightened. Loose adjustment
device can unexpectedly shift, causing loss of control,
loose rotating components will be violently thrown.
Do not reach in the area of the spinning bit. The
proximity of the spinning bit to your hand may not
always be obvious.
Allow brushes to run at operating speed for at least
one minute before using wheel. During this time no
one is to stand in front or in line with the brush.
Loose bristles or wires will be discharged during the
run-in time.
Wire and bristle brushes must never be operated at
speeds greater than 15,000/min. Direct the discharge of the spinning wire brush away from you.
Small particles and tiny wire fragments may be discharged at high velocity during the “cleaning” action
with these brushes and may become imbedded in
your skin. Bristles or wires will be discharged from
the brush at high speeds.
Wear protective gloves and face shield with wire or
bristle brushes. Apply wire or bristle brushes lightly to the work as only the tips of the wire/bristles do
the work. “Heavy” pressure on bristles will cause the
wire or bristle to become overstressed, resulting in a
wiping action and will cause the bristles/wire to be
discharged.
Carefully handle both the tool and individual grinding wheels to avoid chipping or cracking. Install a
new wheel if tool is dropped while grinding. Do not
use a wheel that may be damaged. Fragments from
a wheel that bursts during operation will fly away at
great velocity possibly striking you or bystanders.
Never use dull or damaged bits. Sharp bits must be
handled with care. Damaged bits can snap during
use. Dull bits require more force to push the tool,
possibly causing the bit to break.
Use clamps to support workpiece whenever practical. Never hold a small workpiece in one hand and
the tool in the other hand while in use. Allow for
sufficient space, at least 6", between your hand and
the spinning bit. Round material such as dowel rods,
pipes or tubing have a tendency to roll while being
cut, and may cause the bit to “bite” or jump toward
you. Clamping a small workpiece allows you to use
both hands to control the tool.
Inspect your workpiece before cutting. When cutting
irregularly shaped workpieces, plan your work so it
will not slip and pinch the bit and be torn from your
hand. For example, if carving wood, make sure there
are no nails or foreign objects in the workpiece. Nails
or foreign objects can cause the bit to jump.
Never start the tool when the bit is engaged in the
material. The bit cutting edge may grab the material
causing loss of control of the cutter.
Avoid bouncing and snagging the wheel, especially
when working corners, sharp edges etc. This can
cause loss of control and kick-back.
The direction of feed with the bit into the material
when carving, routing or cutting is very important.
Always feed the bit into the material in the same
direction as the cutting edge is exiting from the
material (which is the same direction as the chips
are thrown). Feeding the tool in the wrong direction,
causes the cutting edge of the bit to climb out of the
work and pull the tool in the direction of this feed.
If the workpiece or bit becomes jammed or bogged
down, turn the tool “OFF” by the switch. Wait for
all moving parts to stop and unplug the tool, then
work to free the jammed material. If the switch to
DM 2610913513 6/01 6/8/01 8:44 PM Page 3
Page 4

Page 4
the tool is left “ON” the tool could restart unexpectedly causing serious personal injury.
Do not leave a running tool unattended, turn power
off. Only when tool comes to a complete stop it is
safe to put it down.
Do not grind or sand near flammable materials.
Sparks from the wheel could ignite these materials.
Do not touch the bit or collet after use. After use the
bit and collet are too hot to be touched by bare hands.
Regularly clean the tool's air vents by compressed
air. Excessive accumulation of powdered metal inside
the motor housing may cause electrical failures.
Do not allow familiarity gained from frequent use of
your rotary tool to become commonplace. Always
remember that a careless fraction of a second is sufficient to inflict severe injury.
Do not alter or misuse tool. Any alteration or modification is a misuse and may result in serious personal
injury.
This product is not intended for use as a dental drill,
in human or veterinary medical applications.
Serious personal injury may result.
When using the steel saws, cutoff wheels, high
speed cutters or tungsten carbide cutters, always
have the work securely clamped. Never attempt to
hold the work with one hand while using any of
these accessories. The reason is that these wheels
will grab if they become slightly canted in the groove,
and can kickback causing loss of control resulting in
serious injury. Your second hand should be used to
steady and guide the hand holding the tool. When a
cutoff wheel grabs, the wheel itself usually breaks.
When the steel saw, high speed cutters or tungsten
carbide cutter grab, it may jump from the groove and
you could lose control of the tool.
Some dust created by power
sanding, sawing, grinding,
drilling, and other construction activities contains
chemicals known to cause cancer, birth defects or
other reproductive harm. Some examples of these
chemicals are:
• Lead from lead-based paints,
• Crystalline silica from bricks and cement and other
masonry products, and
• Arsenic and chromium from chemically treated
lumber.
Your risk from these exposures varies, depending on
how often you do this type of work. To reduce your
exposure to these chemicals: work in a well ventilated
area, and work with approved safety equipment, such
as those dust masks that are specially designed to filter out microscopic particles.
!
WARNING
DM 2610913513 6/01 6/8/01 8:44 PM Page 4
Page 5

Page 5
Before using battery charger, read all instructions and
cautionary markings on (1) battery charger, (2) battery pack, and (3) product using battery.
Use only the charger which accompanied your
product or direct replacement as listed in the
catalog or this manual. Do not substitute any other
charger. Use only Dremel battery charger No. 786 with
your product.
Do not disassemble charger or operate the charger if
it has received a sharp blow, been dropped or otherwise damaged in any way. Replace damaged cord or
plugs immediately. Incorrect reassembly or damage
may result in electric shock or fire.
Do not recharge battery in damp or wet environment.
Do not expose charger to rain or snow. If battery case
is cracked or otherwise damaged, do not insert into
charger. Battery short or fire may result.
Charge only Dremel No. 785 rechargeable batteries
with the above listed chargers. Other types of batter-
ies may burst causing personal injury and damage.
Charge battery pack in temperatures above +40
degrees F (4 degrees C) and below +105 degrees F
(41 degrees C). Store tool and battery pack in loca-
tions where temperatures will not exceed 120
degrees F (49 degrees C). This is important to prevent
serious damage to the battery cells.
Battery leakage may occur under extreme usage or
temperature conditions. Avoid contact with skin and
eyes. The battery liquid is caustic and could cause
chemical burns to tissues. If liquid comes in contact
with skin, wash quickly with soap and water, then with
lemon juice or vinegar. If the liquid contacts your eyes,
flush them with water for a minimum of 10 minutes and
seek medical attention.
Place charger on flat non-flammable surfaces and
away from flammable materials when re-charging
battery pack. The charger and battery pack heat dur-
ing charging. Carpeting and other heat insulating surfaces block proper air circulation which may cause
overheating of the charger and battery pack. If smoke
or melting of the case are observed unplug the charger immediately and do not use the battery pack or
charger.
Use of an attachment not recommended or sold by
Dremel may result in a risk of fire, electric shock or
injury to persons.
Battery/Charger
When batteries are not in tool or
charger, keep them away from
metal objects. For example, to protect terminals from
shorting DO NOT place batteries in a tool box or pocket
with nails, screws, keys, etc. Fire or injury may result.
DO NOT PUT BATTERIES INTO FIRE OR EXPOSE TO
HIGH HEAT. They may explode.
Battery Care
Do not attempt to disassemble the
battery or remove any component
projecting from the battery terminals. Fire or injury
may result. Prior to disposal, protect exposed terminals
with heavy insulating tape to prevent shorting.
Nickel-Cadmium Batteries
If equipped with a nickel-cadmium battery, the battery
must be collected, recycled or disposed of in an
environmentally sound manner.
“The EPA certified RBRC Battery
Recycling Seal on the nickel-cadmium (Ni-Cd) battery indicates S-B
Power Tool Company is voluntarily
participating in an industry program to collect and recycle these
batteries at the end of their useful life, when taken out
of service in the United States or Canada. The RBRC
program provides a convenient alterative to placing
used Ni-Cd batteries into the trash or the municipal
waste stream, which may be illegal in your area.
Please call 1-800-8-BATTERY for information on Ni-Cd
battery recycling and disposal bans/restrictions in
your area, or return your batteries to a
Skil/Bosch/Dremel Service Center for recycling. S-B
Power Tool Company’s involvement in this program is
part of our commitment to preserving our environment and conserving our natural resources.”
Nickel-Metal Hydride Batteries
If equipped with a nickel-metal hydride battery, the battery can be disposed of in a municipal solid waste
stream.
Battery Disposal
!
WARNING
!
WARNING
DM 2610913513 6/01 6/8/01 8:44 PM Page 5
Page 6
Page 6
IMPORTANT: Some of the following symbols may be used on your tool. Please study them and learn their
meaning. Proper interpretation of these symbols will allow you to operate the tool better and safer.
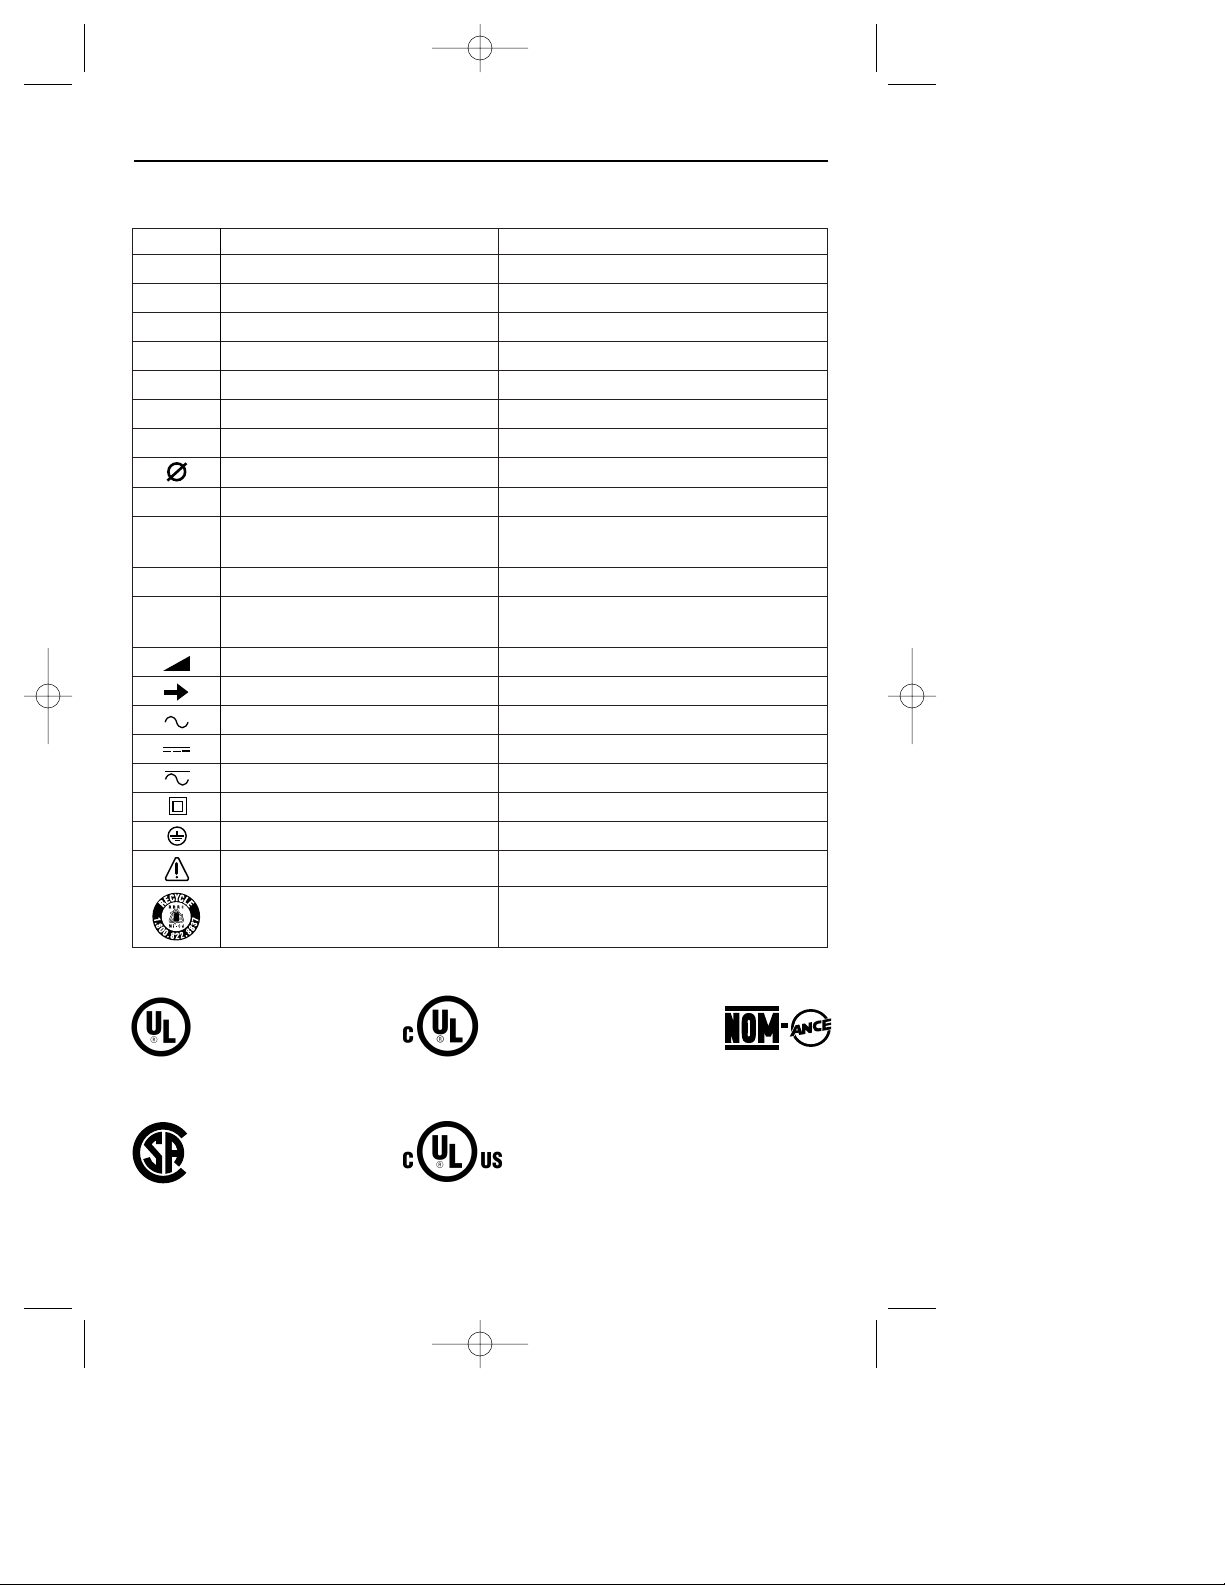
Symbol Name Designation/Explanation
V Volts Voltage (potential)
A Amperes Current
Hz Hertz Frequency (cycles per second)
W Watt Power
kg Kilograms Weight
min Minutes Time
s Seconds Time
Diameter Size of drill bits, grinding wheels, etc.
n
0
No load speed Rotational speed, at no load
.../min Revolutions or reciprocation per minute Revolutions, strokes, surface speed,
orbits etc. per minute
0 Off position Zero speed, zero torque...
1, 2, 3, ... Selector settings Speed, torque or position settings.
I, II, III, Higher number means greater speed
Infinitely variable selector with off Speed is increasing from 0 setting
Arrow Action in the direction of arrow
Alternating current Type or a characteristic of current
Direct current Type or a characteristic of current
Alternating or direct current Type or a characteristic of current
Class II construction Designates Double Insulated Construction tools.
Earthing terminal Grounding terminal
Warning symbol Alerts user to warning messages
Ni-Cad RBRC seal Designates Ni-Cad battery recycling program
Symbols
0
This symbol designates
that this tool is listed by
Underwriters Laboratories.
This symbol designates
that this tool is listed by
the Canadian Standards
Association.
This symbol designates that
this tool is listed to Canadian
Standards by Underwriters
Laboratories.
This symbol
designates
that
this tool
complies
to NOM
Mexican
Standards.
This symbol designates that
this tool is listed by
Underwriters Laboratories,
and listed to Canadian
Standards by Underwriters
Laboratories.
DM 2610913513 6/01 6/8/01 8:44 PM Page 6
Page 7
Rotary Tool
Model number 780
Voltage rating 9.6 V
No load speed no5,000-25,000/min
Collet Capacities 1/32”, 1/16”, 3/32”, 1/8”
Charger
Model number 786
Voltage rating 120 V 60 Hz
Amperage rating 250 mA
Charge time 3 Hr.
Page 7
Functional Description & Specifications
Disconnect battery pack from tool or place the switch in the locked or off position before
making any assembly, adjustments or changing accessories. Such preventive safety mea-
sures reduce the risk of starting the tool accidentally.
!
WARNING
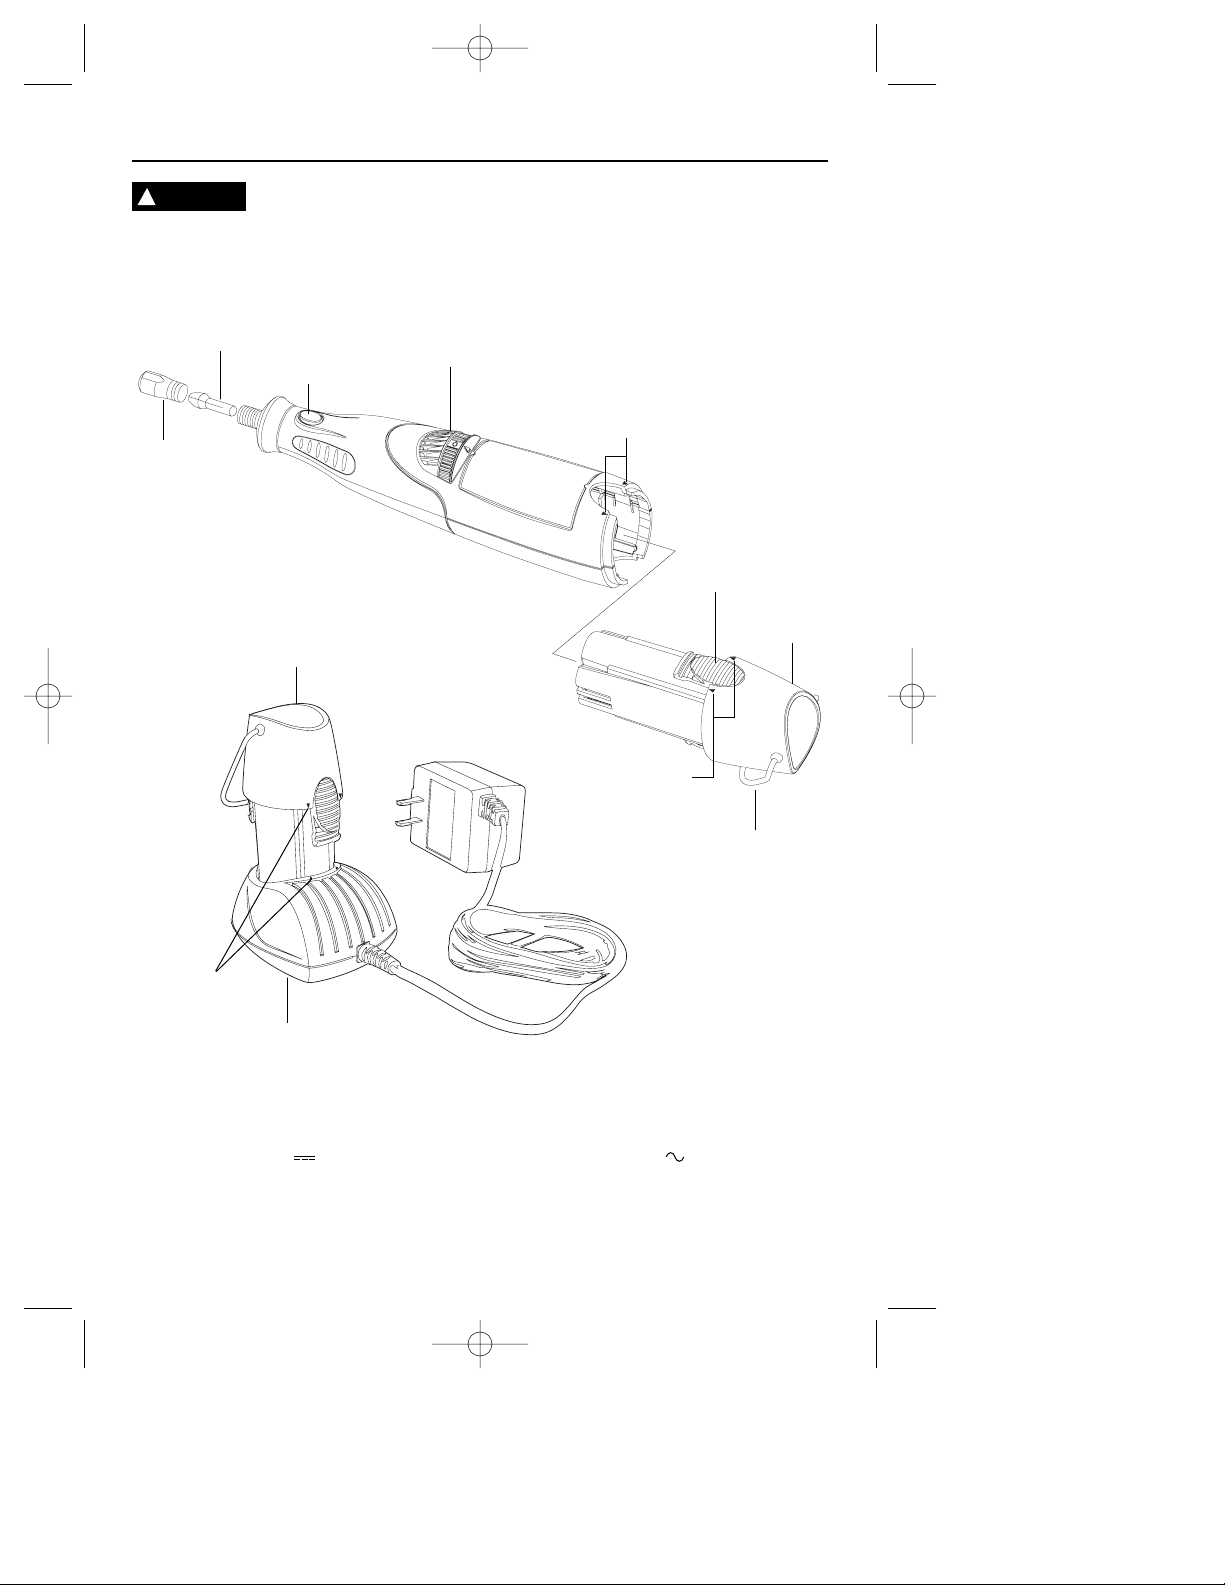
Cordless Rotary Tool
COLLET
NUT
SWITCH
BATTERY
PACK
SHAFT
LOCK
BUTTON
RELEASE
TAB
HANGER
CHARGER
ALIGNMENT
MARKS
ALIGNMENT
MARKS
ALIGNMENT
MARKS
COLLET
BATTERY
PACK
DM 2610913513 6/01 6/8/01 8:44 PM Page 7
Page 8
Page 8
Assembly
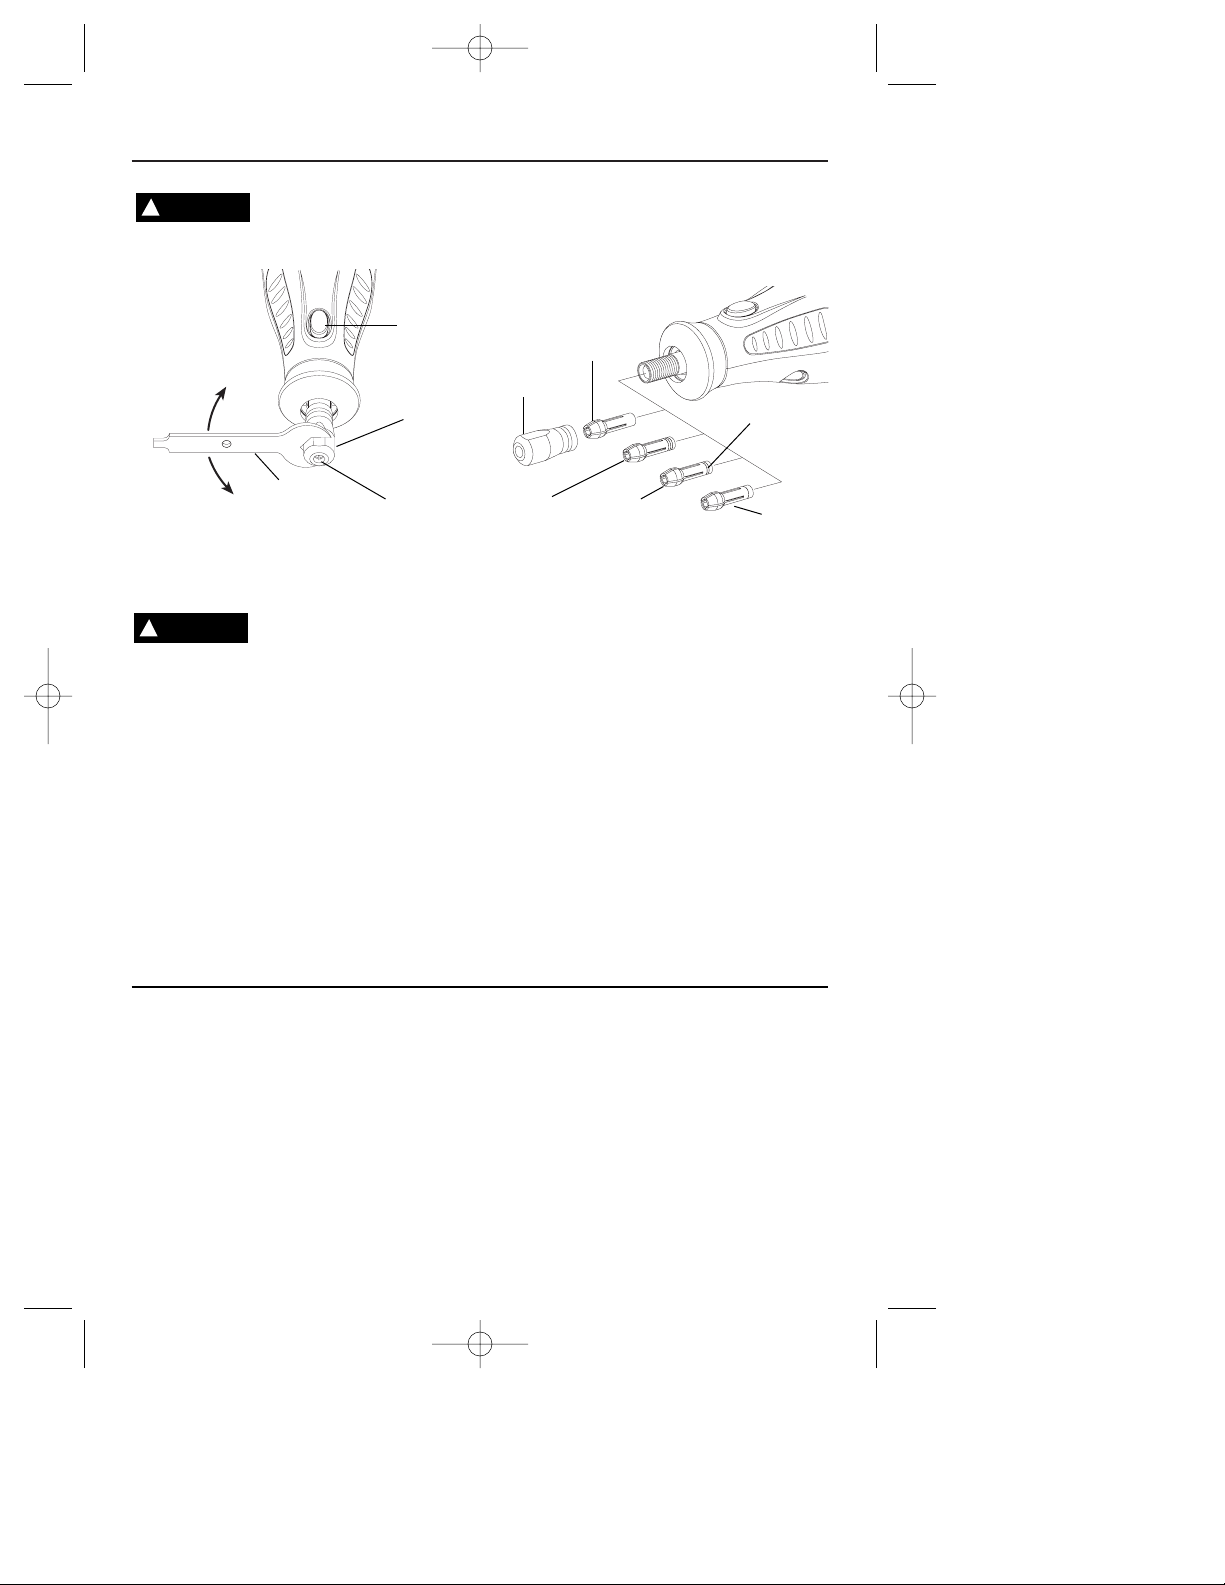
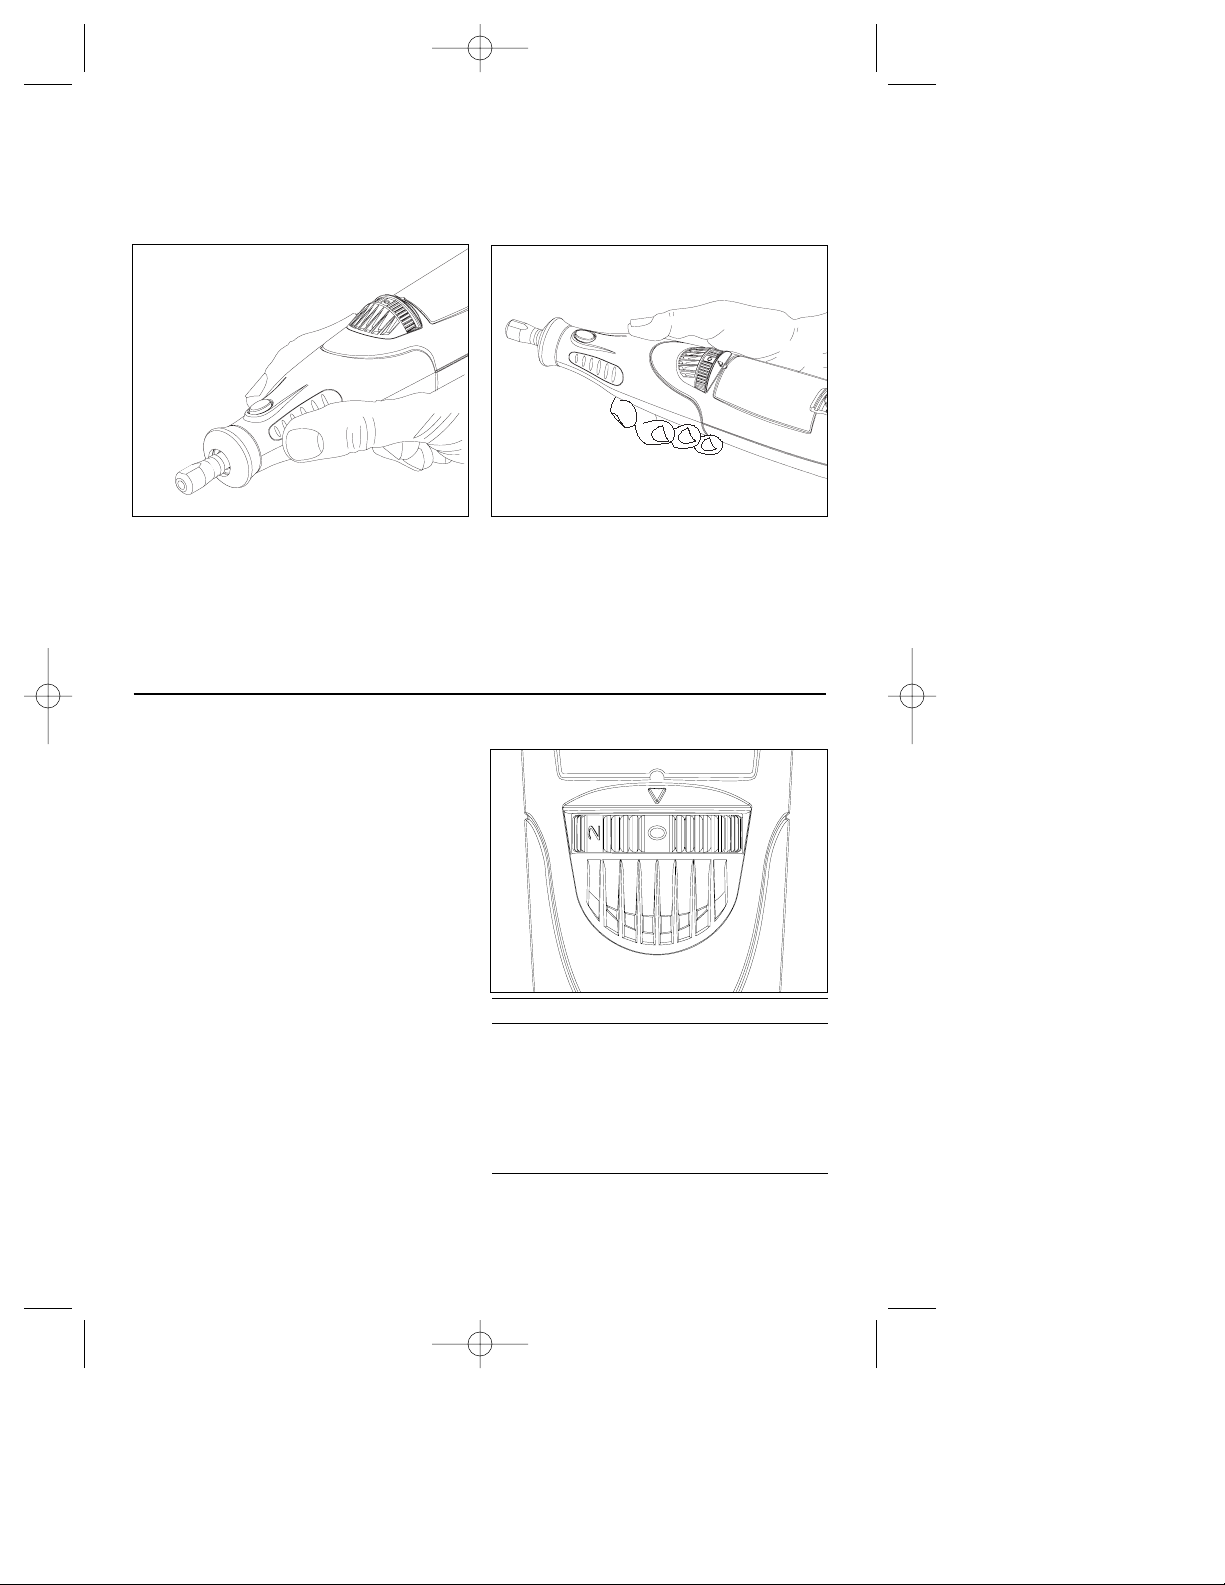
COLLET — To loosen, first press shaft lock button and
rotate the shaft by hand until the lock engages the shaft
preventing further rotation.
Do not engage lock while the
Rotary Tool is running.
With the shaft lock engaged use the collet wrench to
loosen the collet nut if necessary. Change accessories
by inserting the new one into the collet as far as possible to minimize runout and unbalance. With the shaft
lock engaged, finger tighten the collet nut until the
accessory shank is gripped by the collet. Avoid excessive tightening of the collet nut.
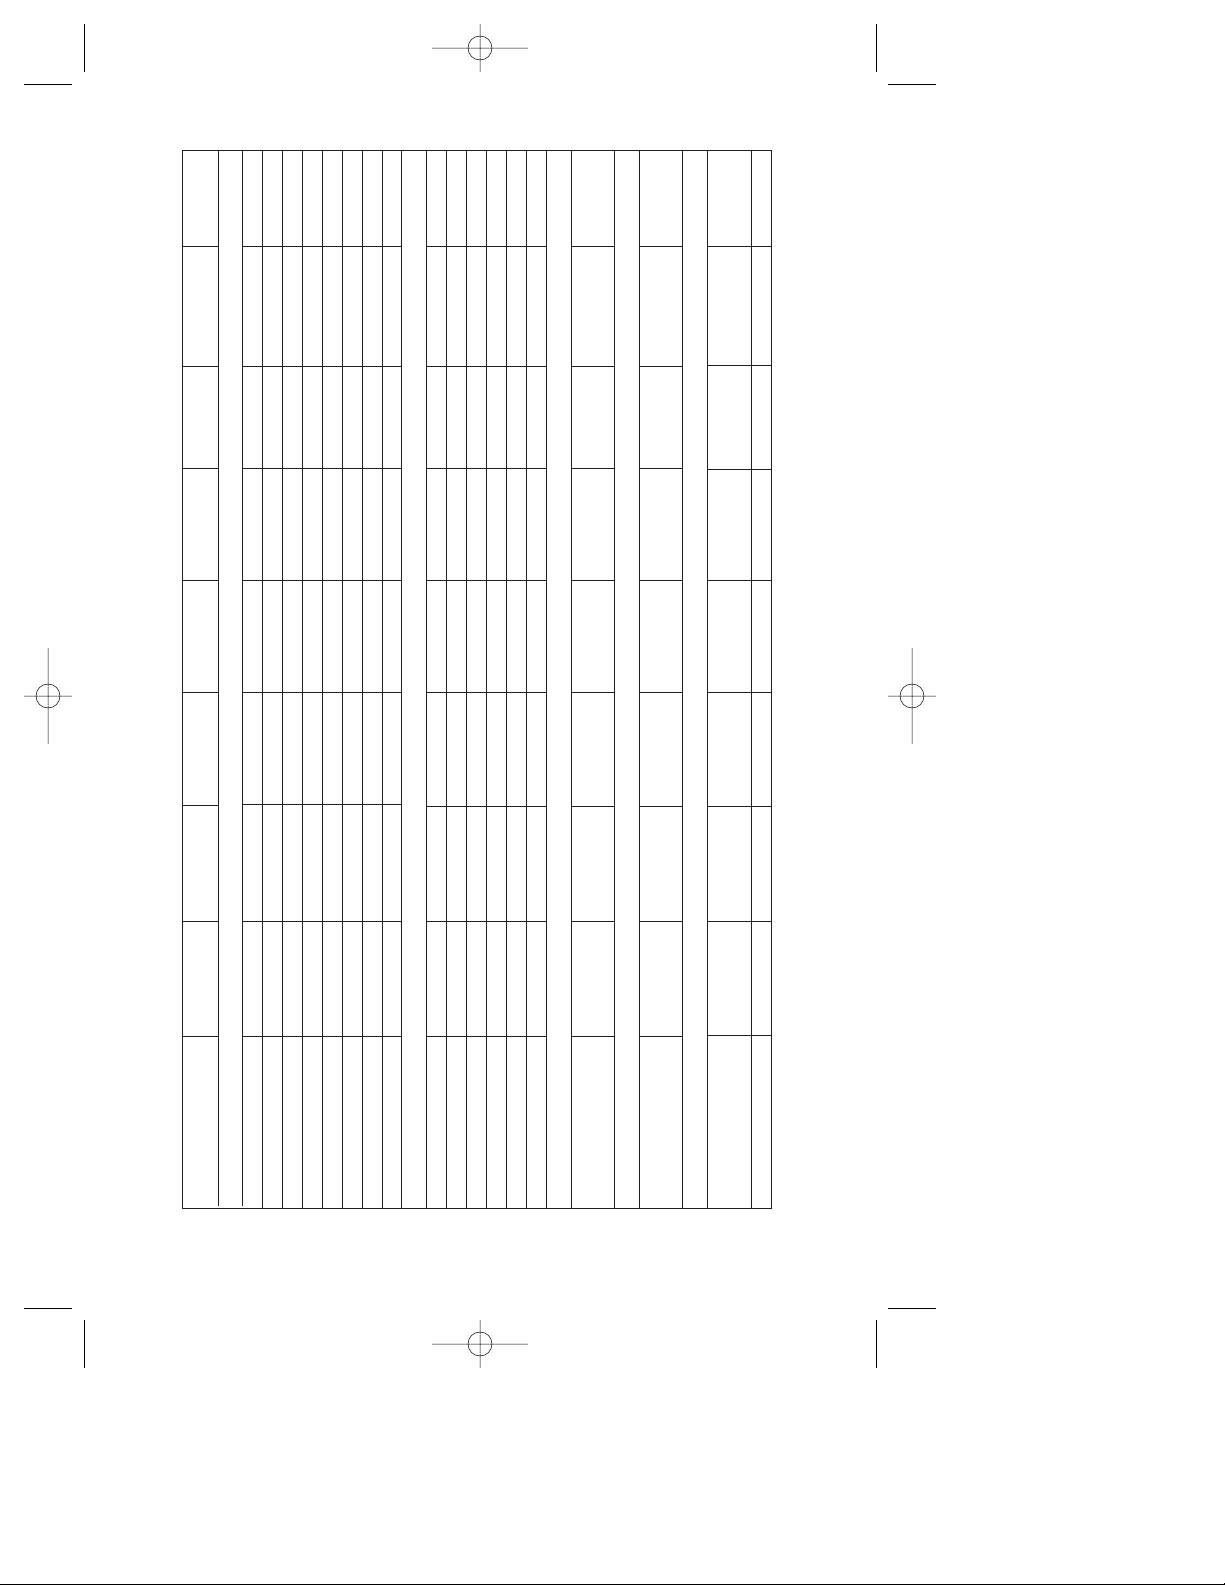
COLLETS — Four different size collets (see illustration), to accommodate different shank sizes, are
available for your Cordless Rotary Tool. To install a different collet, remove the collet nut and remove the old
collet. Insert the unslotted end of the collet in the hole
in the end of the tool shaft. Replace collet nut on the
shaft. Always use the collet which matches the shank
size of the accessory you plan to use. Never force a
larger diameter shank into a collet.
BALANCING ACCESSORIES — For precision work, it is
important that all accessories be in good balance
(much the same as the tires on your automobile). To
true up or balance an accessory, slightly loosen collet
nut and give the accessory or collet a 1/4 turn. Retighten collet nut and run the Tool. You should be able
to tell by the sound and feel if your accessory is running in balance. Continue adjusting in this fashion until
best balance is achieved. To maintain balance on abrasive wheel points, before each use, with the wheel point
secured in the collet, turn on the Cordless Rotary Tool
and run the 415 Dressing Stone lightly against the
revolving wheel point. This removes high spots and
trues up the wheel point for good balance.
ALWAYS BE SURE THE TOOL IS
IN THE “0” POSITION BEFORE
CHANGING ACCESSORIES, CHANGING COLLETS OR
SERVICING YOUR CORDLESS ROTARY TOOL.
SHAFT
LOCK
BUTTON
TO LOOSEN
TO TIGHTEN
COLLET
NUT
COLLET
COLLET
NUT
IDENTIFICATION
RINGS
480 1/8"
COLLET
481 3/32"
COLLET
482 1/16"
COLLET
483 1/32"
COLLET
Operation Instructions
Introduction
The Cordless Rotary Tool is a handful of high-speed
power. It serves as a carver, a grinder, polisher, sander,
cutter, power brush, drill and more.
Your Cordless Rotary Tool has a small, powerful electric
motor, is comfortable in the hand, and is made to accept
a large variety of accessories including abrasive wheels,
drill bits, wire brushes, polishers, engraving cutters,
router bits, and cutting wheels. Accessories come in a
variety of shapes and permit you to do a number of
different jobs. As you become familiar with the range of
accessories and their uses, you will learn just how
versatile your Cordless Rotary Tool is. You’ll see dozens
of uses you hadn’t thought of before now.
The real secret of the Cordless Rotary Tool is its speed.
To understand the advantages of its high speed, you
have to know that the standard portable electric drill
runs at speeds up to 2,800 revolutions per minute. The
typical electric drill is a low-speed, high torque tool; the
Cordless Rotary Tool is just the opposite — a highspeed, low torque tool. The chief difference to the user
is that in the high speed tools, the speed combined with
the accessory mounted in the collet does the work. You
!
WARNING
!
CAUTION
COLLET IDENTIFICATION CHART — Collet sizes can
be identified by the rings on the back end of collet.
1/32" Collet has one (1) ring.
1/16" Collet has two (2) rings.
3/32" Collet has three (3) rings.
1/8" Collet has no rings.
COLLET
WRENCH
DM 2610913513 6/01 6/8/01 8:44 PM Page 8
Page 9

Page 9
Important Charging Notes
1. The battery pack accepts only about 80% of its
maximum capacity with its first few charge cycles.
However, after the first few charge cycles, the battery
will charge to full capacity.
2. The charger was designed to fast charge the battery only when the battery temperature is between
40˚F (4˚C) and 105˚F (41˚C).
3. A substantial drop in operating time per charge
may mean that the battery pack is nearing the end of
its life and should be replaced.
4. If you anticipate long periods (i.e. a month or more)
of non-use of your tool, it is best to run your tool down
until it is fully discharged before storing your battery
pack. After a long period of storage, the capacity at first
recharge will be lower. Normal capacity will be restored
in two or three charge/discharge cycles. Remember to
unplug charger during storage period.
5. If battery does not charge properly:
a. Check for voltage at outlet by plugging in
some other electrical device.
b. Check to see if outlet is connected to a light
switch which turns power “off” when lights are turned
off.
c. Check battery pack terminals for dirt. Clean
with cotton swab and alcohol if necessary.
d. If you still do not get proper charging, take or
send tool, battery pack and charger to your Dremel
Service Center.
Note: Use of chargers or battery packs not sold by
Dremel may void the warranty.
Read the next sections carefully. They will help you use
your Cordless Rotary Tool correctly and help you select
the correct accessory for your job.
Charging the Tool
The Cordless Rotary Tool is not fully charged. The tool
is equipped with a removable battery pack. Be sure to
charge pack prior to initial use. For best results on first
charge, charge pack overnight.
To charge the battery pack
1. Put the switch in the “OFF” position.
2. Squeeze release tabs on both sides of battery pack,
and remove pack from back of tool as shown on page 7.
3. Align marks on battery pack with marks on charger,
insert battery pack into charger as shown.
4. Plug charger into the power source. The green L.E.D.
light indicates connection has been made and the
battery pack is charging. Under normal usage the battery pack requires 3 hours charging time to reach full
capacity.
5. When charging is completed, remove pack from
charger.
6. Align marks on battery pack with marks on the hous-
ing of tool as shown. Squeeze release tabs, insert battery pack into back of tool, and release pressure on tabs
so it locks in place.
don’t apply pressure to the tool, but simply hold and
guide it. In the low speed tools, you not only guide the
tool, but also apply pressure to it, as you do, for example,
when drilling a hole.
It is this high speed, along with its compact size and
wide variety of special accessories and attachments that
makes your Cordless Rotary Tool different from other
power tools. The speed enables it to do jobs low speed
tools cannot do, such as cutting hardened steel, engraving glass, etc.
Getting the most out of your Cordless Rotary Tool is a
matter of learning how to let this speed work for you.
Using the Cordless Rotary Tool
The first step in learning to use the Cordless Rotary Tool
is to get the “feel” of it. Hold it in your hand and feel its
weight and balance. Feel the taper of the housing. This
taper permits the tool to be grasped much like a pen or
pencil.
When you turn on the tool for the first time, hold it away
from your face. Accessories can be damaged during
handling, and can fly apart as they come up to speed.
This is not common, but it does happen.
Practice on scrap materials first to see how the Cordless
Rotary Tool cuts. Keep in mind that the work is done by
the speed of the tool and by the accessory in the collet.
You should not lean on or push the tool into the work.
Instead, lower the spinning accessory lightly to the
work and allow it to touch the point at which you want
cutting (or sanding or etching, etc.) to begin. Concentrate on guiding the tool over the work using very little pressure from your hand. Allow the accessory to do
the work.
Usually, it is best to make a series of passes with the
tool rather than attempt to do all the work in one pass.
To make a cut, for example, pass the tool back and forth
over the work, much as you would a small paint brush.
DM 2610913513 6/01 6/8/01 8:44 PM Page 9
Page 10
Page 10
For best control in close work, grip the Rotary Tool
like a pencil between your thumb and forefinger.
The “handgrip” method of holding the tool is used for
operations such as grinding a flat surface or using
cutoff wheels.
Operating Speeds For Accessories
Set the speed indicator to fit the job to achieve the
best job results when working with different
materials.
To select the right speed for each job, use a practice
piece of material. Vary speed to find the best speed
for the accessory you are using and the job to be
done.
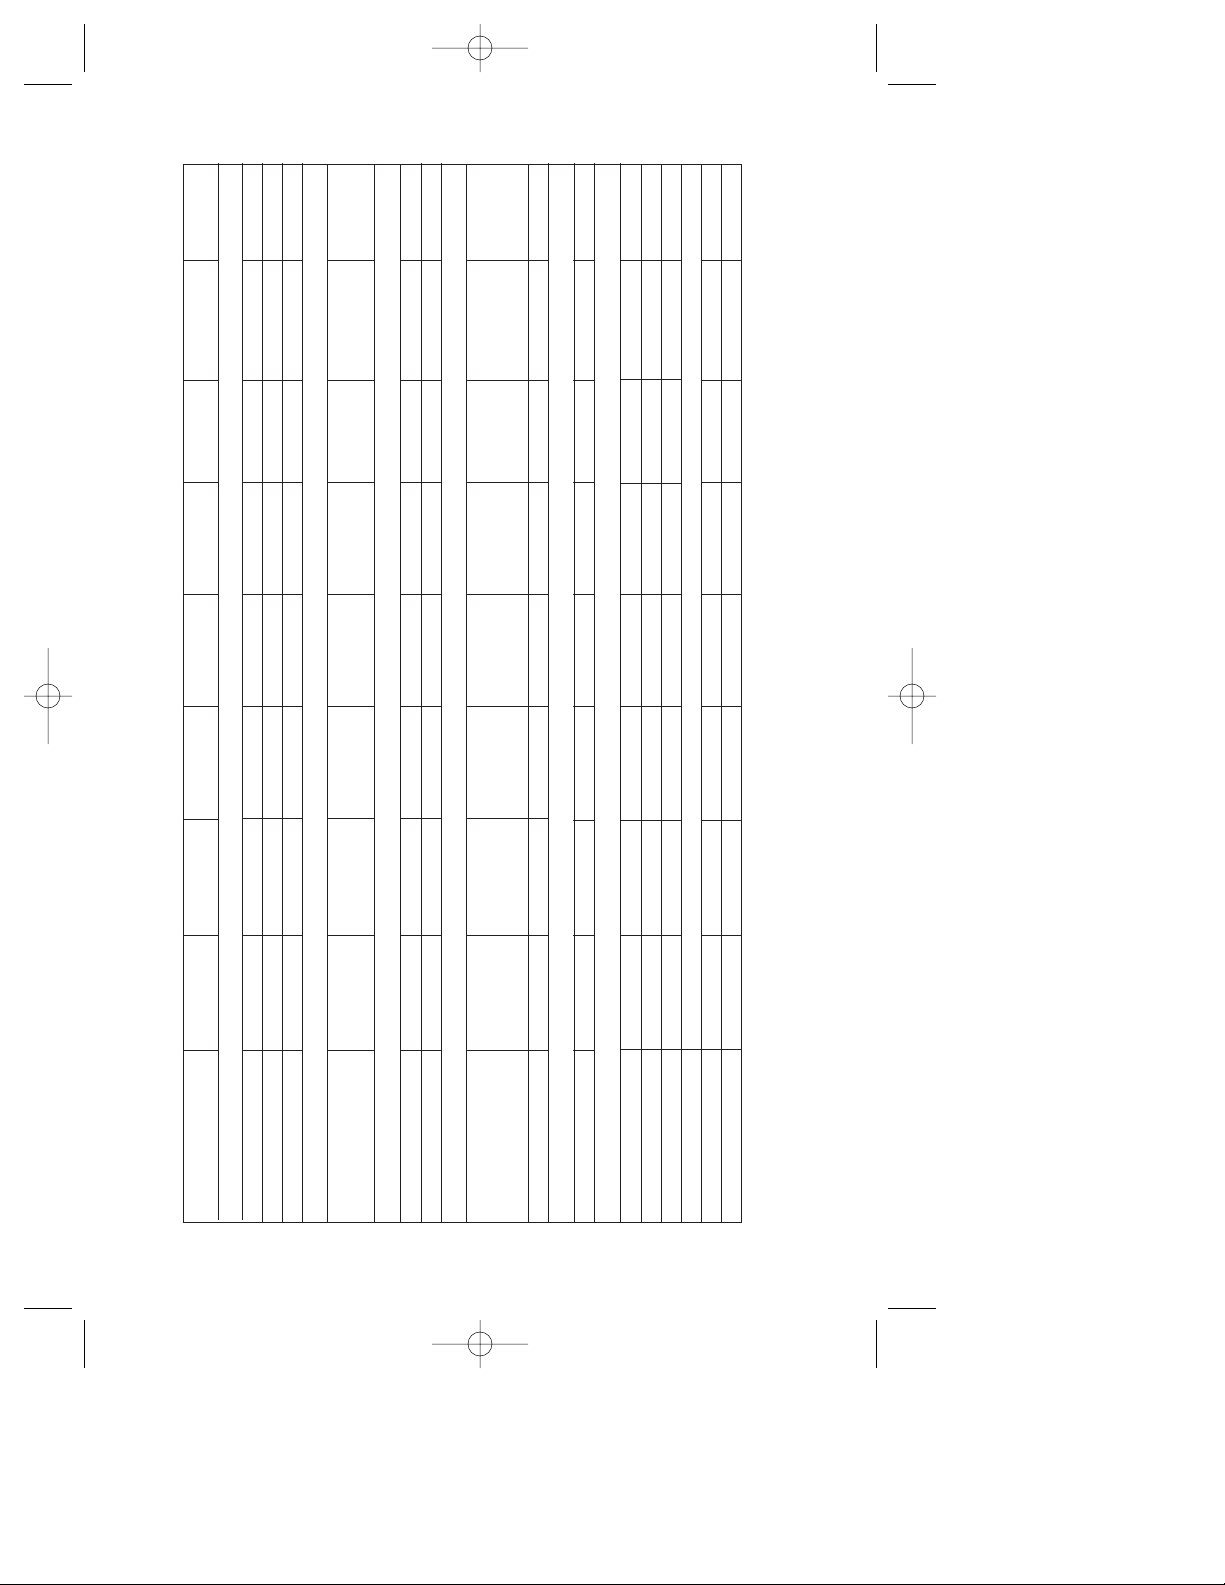
Your Cordless RotaryTool is equipped with a variable
speed control dial. To turn the tool ON, rotate dial to
desired number to select the operating speed needed
from 5,000 – 25,000 RPM. To turn tool OFF, rotate
dial to the “0” off position.
You can refer to the charts on page 13, 14, and 15 to
determine the proper speed, based on the material
being worked and the type of accessory being used.
These charts enable you to select both the correct
accessory and the optimum speed at a glance.
Needs for Slower Speeds
Certain materials, however, (some plastics, for example) require a relatively slow speed because at high
speed the friction of the tool generates heat and causes the plastic to melt.
Most work is done at high speed on your Cordless
Rotary Tool. Lower speeds are needed only for certain
tasks.
The speed of Model 780 is controlled by rotating this
dial to desired setting on dial.
Switch Setting Speed Range
0 OFF Position
2 1,000 – 15,000 RPM
4 6,000 – 10,000 RPM
* 6 11,000 – 15,000 RPM
8 16,000 – 20,000 RPM
10 21,000 – 25,000 RPM
*6 is the maximum speed setting for wire brushes.
Cut a little material on each pass until you reach the
desired depth. For most work, the deft, gentle touch is
best. With it, you have the best control, are less likely to
make errors, and will get the most efficient work out of
the accessory.
DM 2610913513 6/01 6/8/01 8:44 PM Page 10
Page 11

Página 11
To aid you in determining the optimum operational
speed for different materials and different accessories,
we have constructed a series of tables that appear on
page 13, 14 and 15. By referring to these tables, you
can discover the recommended speeds for each type of
accessory. Look these tables over and become familiar
with them.
Ultimately, the best way to determine the correct speed
for work on any material is to practice for a few minutes on a piece of scrap, even after referring to the
chart. You can quickly learn that a slower or faster
speed is more effective just by observing what happens
as you make a pass or two at different speeds. When
working with plastic, for example, start at a slow rate of
speed and increase the speed until you observe that the
plastic is melting at the point of contact. Then reduce
the speed slightly to get the optimum working speed.
Some rules of thumb in regard to speed:
1. Plastic and materials that melt at low temperatures
should be cut at low speeds.
2. Polishing, buffing and cleaning with a wire brush
must be done at speeds below 15,000 RPM to
prevent damage to the brush.
3. Wood should be cut at high speed.
4. Iron or steel should be cut at top speed if using
tungsten carbide accessory, but at slower speeds
if using high speed steel cutters. If a high speed
steel cutter starts to chatter — this normally
means it is running too slow.
5. Aluminum, copper alloys, lead alloys, zinc alloys
and tin may be cut at various speeds, depending
on the type of cutting being done. Use paraffin or
other suitable lubricant on the cutter to prevent
the cut material from adhering to the cutter teeth.
Increasing the pressure on the tool is not the answer
when it is not cutting as you think it should. Perhaps
you should be using a different cutter, and perhaps an
adjustment in speed would solve the problem. But
leaning on the tool seldom helps.
Operating Speeds for Accessories - (cont.)
Questions or Problems ? Call 1-800-437-3635
or check our website at www.Dremel.com
Using the Cordless Rotary Tool with Attachments
The Cordless Rotary Tool can be used with all Dremel attachments. If you currently own or plan to purchase a
212 Drill Press, 231 Shaper / Router Table, 330 Router Attachment, or a 2217 Tool Holder, please contact
Customer Service at 1-800-437-3635 to obtain a FREE adapter ring (part number 2610912344). This adapter
ring will allow you to use your new Cordless Rotary Tool with the attachments listed above.
DM 2610913513 6/01 6/8/01 8:44 PM Page 11
Page 12
Page 12
8-108-108-10
CATALOG
NUMBER
SOFT
WOOD
HARD
WOOD
LAMINATES
PLASTIC
STEEL
ALUMINUM,
BRASS, ETC.
SHELL/
STONE
CERAMIC
GLASS
SPEED SETTINGS
* Speed for light cuts, caution burning on deep grooves.
• Depending on cutting direction relative to grain.
HIGH SPEED CUTTERS
ENGRAVING CUTTERS
100, 121, 131
114, 124, 134, 144
190
118, 191, 192, 193, 194
116, 117, 125, 196
115
198
199
101010
10*
10*
10*
8-10
6-8
6-8
8-10*
6-8*
6-8*
8-10
8-10
8-10
8-10
8-10
8-10
6-8
6-8
4-6
6-8
6-8
4-6
10101010101010
10
10
6-8
10
10
6-8106-8
6-8
6-8
4-6
4-6
4-6
4-6
4-6
4-6
4-6
4-6
4-6
8-10
6-8
4-6
2-6
4-6
4-6
8-10
4-6
10
10
4-6
2-4
6-8
4-6
Use only Dremel Tested, High Performance Accessories.
105, 108
106, 109
107, 110
111
112
113
101010
10*
10*
10*
DIAMOND WHEEL POINTS
7103, 7105, 7117, 7120,
7122, 7123, 7134, 7144
8-10 8-10
9931, 9932, 9933, 9934,
9935, 9936
10 8 2-4
6-8
TUNGSTEN CARBIDE CUTTERS
STRUCTURED TOOTH TUNGSTEN CARBIDE CUTTERS
9901, 9902, 9903, 9904,
9905, 9906, 9912
10 8-10 2-4 10 6-8
9909, 9910, 9911
8-1010
8-10
10
DM 2610913513 6/01 6/8/01 8:44 PM Page 12
Page 13
Page 13
10
8
6-10
2-4
2-4
2-4
10
10
10
10
8
10
8
10
409, 420, 426, 540
542
545
560
561
562
10
10
6-10
83142, 83322, 83702,
84922, 85422, 85602,
85622
903, 911, 921, 932, 941,
945, 952, 953, 954, 971,
997, 8153, 8175, 8193,
8215
6-8
10
2-6
2-6 2-8
2-4 10 10
CUTTING ACCESSORIES
612, 640
615, 617, 618, 650, 652
654
10*
10*
10*
10 1010 10
10•
10•
10•
ABRASIVE POINTS
516, 517, 518
500
6
6
6
6
8
8
6
6
4
4
CATALOG
NUMBER
SOFT
WOOD
HARD
WOOD
LAMINATES
PLASTIC
STEEL
ALUMINUM,
BRASS, ETC.
SHELL/
STONE
CERAMIC
GLASS
SPEED SETTINGS
* Speed for light cuts, caution burning on deep grooves.
• Depending on cutting direction relative to grain.
HIGH SPEED ROUTER BITS (Use with cutting guide or shaper/router table)
Use only Dremel Tested, High Performance Accessories.
2-4
541
453, 454, 455
2-6 2-8
10 1010 10
10
2-4
SILICON CARBIDE GRINDING STONES
ALUMINUM OXIDE GRINDING STONES
CHAIN SAW SHARPENING STONES
For use on drywall. For best results, use at setting 10. (Use with cutting guide)
DM 2610913513 6/01 6/8/01 8:44 PM Page 13
Page 14
Page 14
461, 462, 463
414, 422, 429
425, 427
423
403, 404, 405
530, 531, 532
428, 442, 443
535, 536, 537
10
8-10
8-10
8-10
666
6
466
6
4
6
6
2-4
2
10
8-10
8-10
8-10
6
6
6
10
8-10
8-10
10
8-10
8-10
6
10
8-10
8-10
CATALOG
NUMBER
SOFT
WOOD
HARD
WOOD
LAMINATES
PLASTIC
STEEL
ALUMINUM,
BRASS, ETC.
SHELL/
STONE
CERAMIC
GLASS
SPEED SETTINGS
* Speed for light cuts, caution burning on deep grooves.
• Depending on cutting direction relative to grain.
POLISHING ACCESSORIES
430, 431, 438
439, 440, 444
407, 408, 432
411, 412, 413
502, 503, 504, 505 10 10 1082
2-10
2-10
2-10
8
2-10
2-10
2-10
2-10
2-10
2-10
2-10
2-10
2-10
8
2-6
2-6
2-6
2-4
101010
101010
2-4
SANDING BANDS AND DISCS
FLAPWHEELS
569, 570 For Use on Wall and Floor Grout (Use with grout removal cutting guide)
GROUT REMOVAL BITS
150 10 6
8
10 2-4
DRILL BIT
511 6 6 664
FINISHING ABRASIVE BUFFS
Use only Dremel Tested, High Performance Accessories.
DM 2610913513 6/01 6/8/01 8:44 PM Page 14
Page 15

Page 15
Service
NO USER SERVICEABLE PARTS
INSIDE. Preventive maintenance
performed by unauthorized personnel may result in
misplacing of internal wires and components which
could cause serious hazard. We recommend that all
tool service be performed by a Dremel Service Center.
SERVICEMEN: Disconnect tool and/or charger from
power source before servicing.
D.C. motors
The motor in your tool has been engineered for many
hours of dependable service. To maintain peak efficiency
of the motor, we recommend it be examined every six
months. Only a genuine Dremel replacement motor
specially designed for your tool should be used.
Cleaning
To avoid accidents, always dis-
connect the tool and/or charger
from the power supply before cleaning. The tool may
be cleaned most effectively with compressed dry air.
Always wear safety goggles when cleaning tools with
compressed air.
Ventilation openings and switch levers must be kept
clean and free of foreign matter. Do not attempt to clean
by inserting pointed objects through opening.
Certain cleaning agents and solvents damage plastic parts. Some
of these are: gasoline, carbon tetrachloride, chlorinated
cleaning solvents, ammonia and household detergents
that contain ammonia.
Extension Cords
If an extension cord is necessary,
a cord with adequate size conductors that is capable of carrying the current necessary
for your tool must be used. This will prevent excessive
voltage drop, loss of power or overheating. Grounded
tools must use 3-wire extension cords that have 3prong plugs and receptacles.
RECOMMENDED SIZES OF EXTENSION CORDS
120 VOLT ALTERNATING CURRENT TOOLS
NOTE: The smaller the gauge number, the heavier the
cord.
!
WARNING
!
WARNING
!
CAUTION
Maintenance
Tool’s
Ampere
Rating
Cord Size in A.W.G.
Wire Sizes in mm
2
3-6
6-8
8-10
10-12
12-16
18 16 16 14 .75 .75 1.5 2.5
18 16 14 12 .75 1.0 2.5 4.0
18 16 14 12 .75 1.0 2.5 4.0
16 16 14 12 1.0 2.5 4.0 —
14 12 — — — — — —
25 50 100 150 15 30 60 120
Cord Length in Feet Cord Length in Meters
!
WARNING
DM 2610913513 6/01 6/8/01 8:44 PM Page 15
Page 16
Page 16
Dremel Accessories
The number and variety of accessories for the Rotary
Tool are almost limitless. There is a category suited to
almost any job you might have to do — and a variety
of sizes and shapes within each category which enables you to get the perfect accessory for every need.
Refer to the DREMEL ACCESSORY ORDER FORM for
illustrations of the accessories available. These
accessories may be found at your local hardware,
hobby or home center dealers.
Collets
If you expect to use a variety of accessories, we recommend that in the beginning you purchase a complete set
of four collets. Store these so that you will have the
proper size of collet for any accessory or drill bit you
want to use. Currently, the 1/8", 3/32",1/32" and 1/16"
collets accommodate all of the available Dremel
accessories. 1/8" collets are included in most rotary
tool kits.
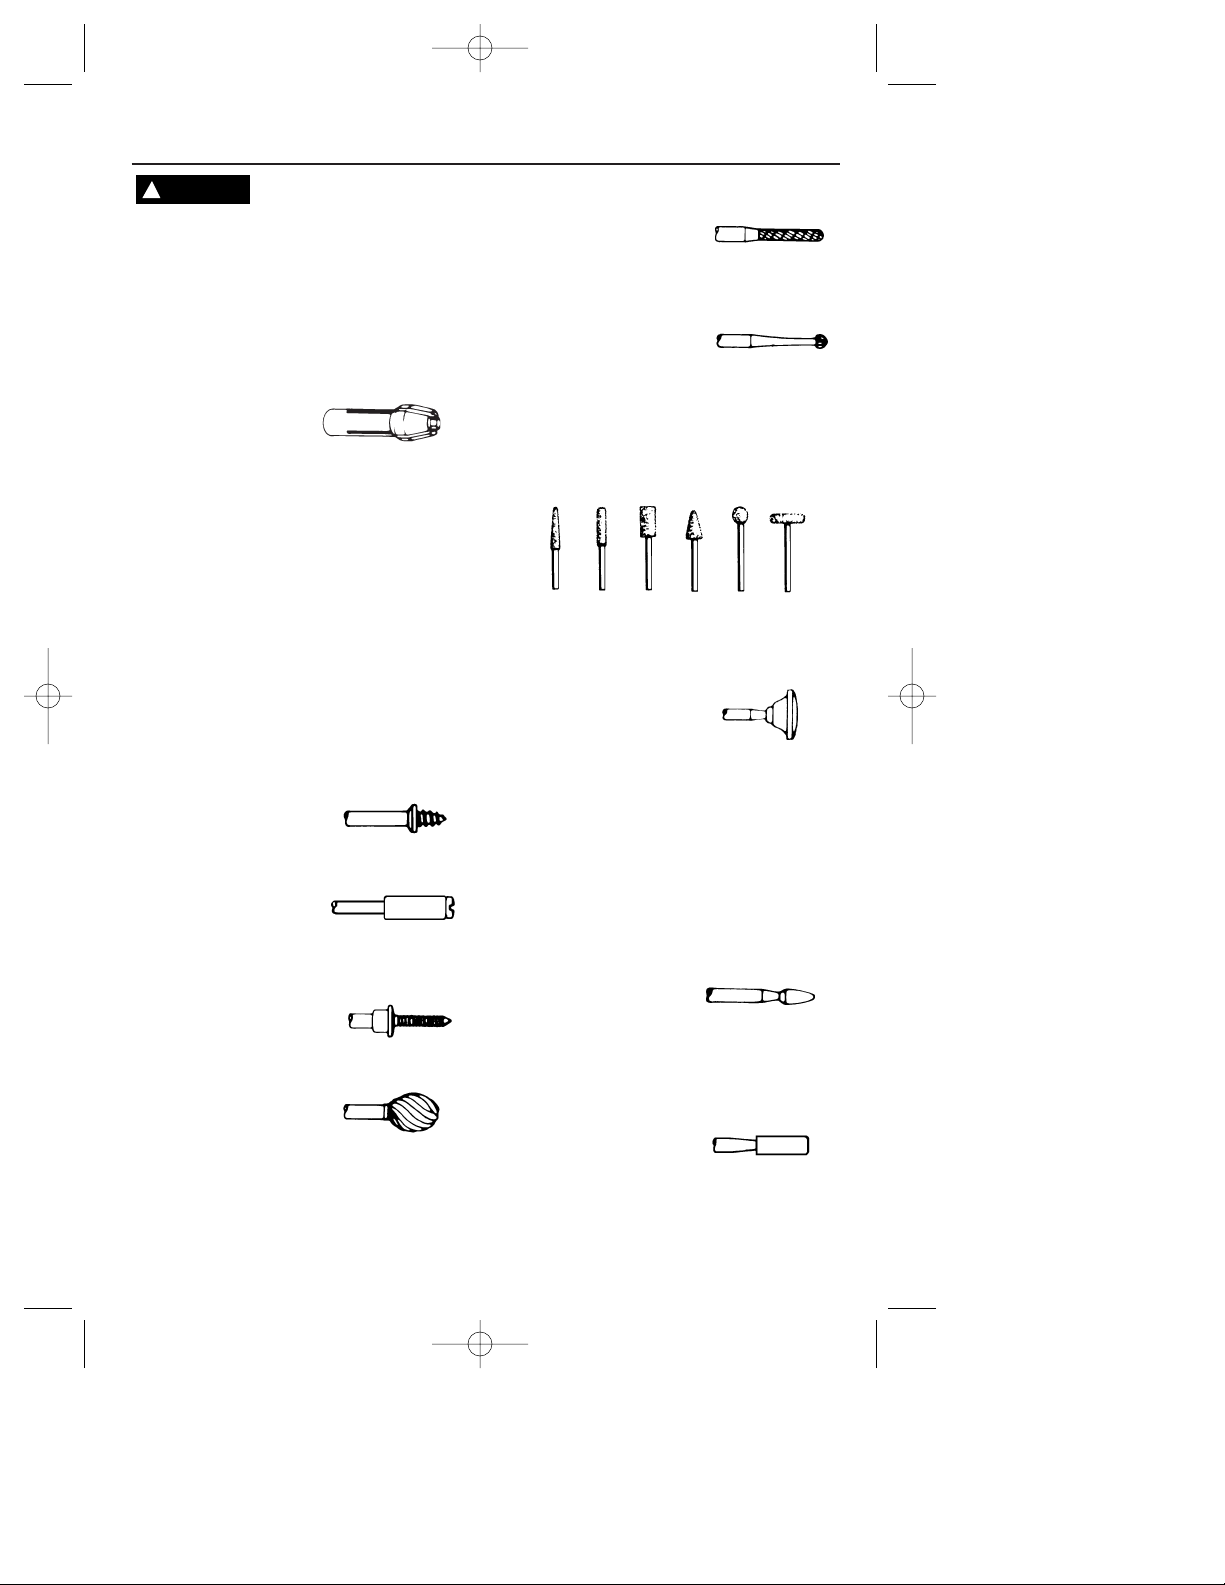
Mandrels
A mandrel is a shank with a threaded or screw head,
which are required when you use polishing accessories, cutting wheels, sanding discs, and polishing
points. The reason mandrels are used is that sanding
discs, cutting wheels and similar accessories must be
replaced frequently. The mandrel is a permanent
shank, allowing you to replace only the worn head
when necessary, thus saving the expense of replacing
the shaft each time.
Screw Mandrel No. 401
This is a screw mandrel used with the felt polishing tip
and felt polishing wheels. 1/8" shank.
Small Screw Mandrel No. 402
This is a mandrel with a small screw at its tip, and is
used with emery and fiberglass cutting wheels, sanding discs and polishing wheels. 1/8" shank.
Threaded Tip Mandrel No. 424
This is a mandrel with a threaded tip which threads into
the polishing point accessory No. 427. 1/8" shank.
High Speed Cutters
Available in many shapes, high speed cutters are used
in carving, cutting and slotting in wood, plastics and
soft metals such as aluminum, copper and brass. These
are the accessories to use for freehand routing or carving in wood or plastic, and for precision cutting. Made
of high quality steel. 1/8" shank.
Tungsten Carbide Cutters
These are tough, long-lived cutters for use on hardened steel, fired ceramics and other very hard materials. They can be used for engraving on tools and
garden equipment. 1/8" shanks.
Engraving Cutters
This group has a wide variety of sizes and shapes, and
are made for intricate work on ceramics (greenware),
wood carvings, jewelry and scrimshaw. They often are
used in making complicated printed circuit boards.
They should not be used on steel and other very hard
materials but are excellent on wood, plastic and soft
metals. 3/32" shank.
Structured Tooth Tungsten Carbide Cutters
Fast cutting, needle-sharp teeth for greater material
removal with minimum loading. Use on fiberglass,
wood, plastic, epoxy and rubber. 1/8" and 1/4" shank.
Aluminum Oxide Grinding Stones (red/brown)
Round, pointed, flat — you name the shape and there is
one available in this category. These are made of aluminum oxide and cover virtually every possible kind of
grinding application. Use them for sharpening lawn
mower blades, screwdriver tips, knives, scissors, chisels
and other cutting tools. Use to remove flash from metal
castings, deburring any metal after cutting, smoothing
welded joints, grinding off rivets and removing rust.
These grinding stones can be resharped with a dressing
stone. In machine shops, high speed drills and cutters
normally are ground with aluminum oxide wheels. 1/8"
shank.
Silicon Carbide Grinding Stones (blue/green)
Tougher than aluminum oxide points, these are made
especially for use on hard materials such as glass and
ceramics. Typical uses might be the removal of stilt
marks and excess glaze on ceramics and engraving on
glass. 1/8" shank.
Diamond Wheel Points
Excellent for fine detail work on wood, jade, ceramic,
glass and other hard material. Bits are covered with
diamond particles. 3/32" shanks.
Use only Dremel Tested, High Performance Accessories. Other accessories are not
designed for this tool and may lead to personal injury or property damage.
!
WARNING
DM 2610913513 6/01 6/8/01 8:45 PM Page 16
Page 17
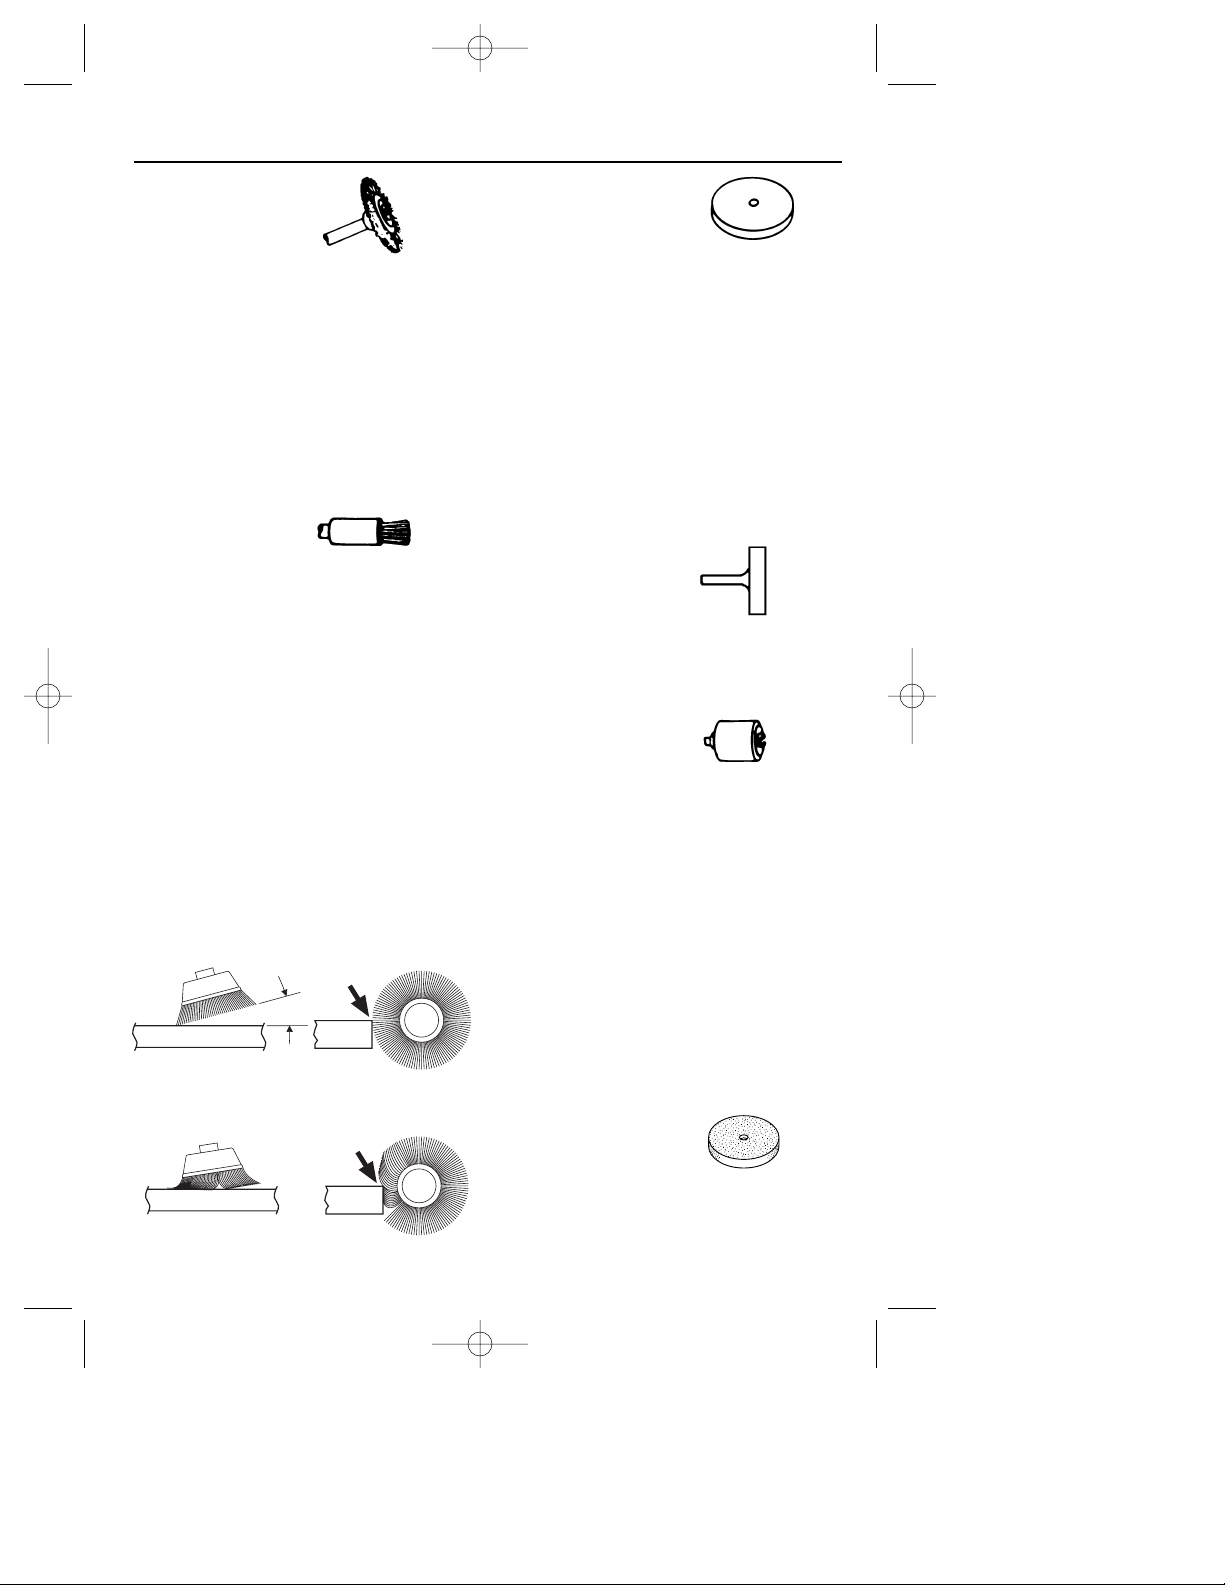
Wire Brushes
Three different shapes of wire brushes are available.
For best results wire brushes should be used at
speeds not greater than 15,000 RPM. Refer to
Operating Speeds section for proper tool speed
setting. The three shapes come in three different
materials: stainless steel, brass and carbon wire. The
stainless steel perform well on pewter, aluminum,
stainless steel, and other metals, without leaving "afterrust". Brass brushes are non sparking, and softer than
steel; making them good for use on soft metal like
gold, cooper and brass. The carbon wire brushes are
good for general purpose cleaning.
Bristle Brushes
These are excellent cleaning tools on silverware, jewelry and antiques. The three shapes make it possible to
get into tight corners and other difficult places. Bristle
brushes can be used with polishing compound for
faster cleaning or polishing.
Brushing Pressure
1. Remember, the tips of a wire brush do the work.
Operate the brush with the lightest pressure so only
the tips of the wire come in contact with the work.
2. If heavier pressures are used, the wires will be
overstressed, resulting in a wiping action; and if this
is continued, the life of the brush will be shortened
due to wire fatigue.
3. Apply the brush to the work in such a way that as
much of the brush face as possible is in full contact
with the work. Applying the side or edge of the brush
to the work will result in wire breakage and shortened
brush life.
Polishing Accessories
These include an impregnated polishing point and an
impregnated polishing wheel for bringing metal surfaces to smooth finish; a felt polishing tip and felt
polishing wheel, and cloth polishing wheel, all used for
polishing plastics, metals, jewelry and small parts. Also
included in this group is a polishing compound (No.
421) for use with the felt and cloth polishers.
Polishing points make a very smooth surface, but a
high luster is obtained using felt or cloth wheels and
polishing compound. For best results polishing
accessories should be used at speeds not greater
than 15,000 RPM.
No polishing compound is needed when using the
425 Polishing Wheel or 427 Polishing point.
Aluminum Oxide Abrasive Wheels
Use to remove paint, deburr metal, polish stainless
steel and other metals. Available in fine and medium
grits. 1/8" shank.
Sanding Accessories
Sanding discs in fine, medium and coarse grades are
made to fit mandrel No. 402. They can be used for
nearly any small sanding job you might have, from
model making to fine furniture finishing. In addition,
there is the drum sander, a tiny drum which fits into the
Rotary Tool and makes it possible to shape wood,
smooth fiberglass, sand inside curves and other difficult places, and other sanding jobs. You replace the
sanding bands on the drum as they become worn and
lose their grit. Bands come in fine and coarse grades.
Flapwheels grind and polish flat or contoured surfaces.
They are used most effectively as a finishing sander
after heavier surface sanding and material removal is
completed. Flapwheels come in fine and coarse
grades. Buffs are a great finishing accessory for cleaning and light sanding. They work effectively on metal,
glass, wood, aluminum and plastics. Coarse and medium buffs are sold together. 1/8" shank.
Grinding Wheel
Use for deburring, removing rust, and general purpose
grinding. Use with Mandrel #402.
Page 17
15°
CORRECT:
Wire tips doing the work.
INCORRECT:
Excessive pressure can cause wire breakage.
Dremel Accessories - (Cont.)
DM 2610913513 6/01 6/8/01 8:45 PM Page 17
Page 18
Page 18
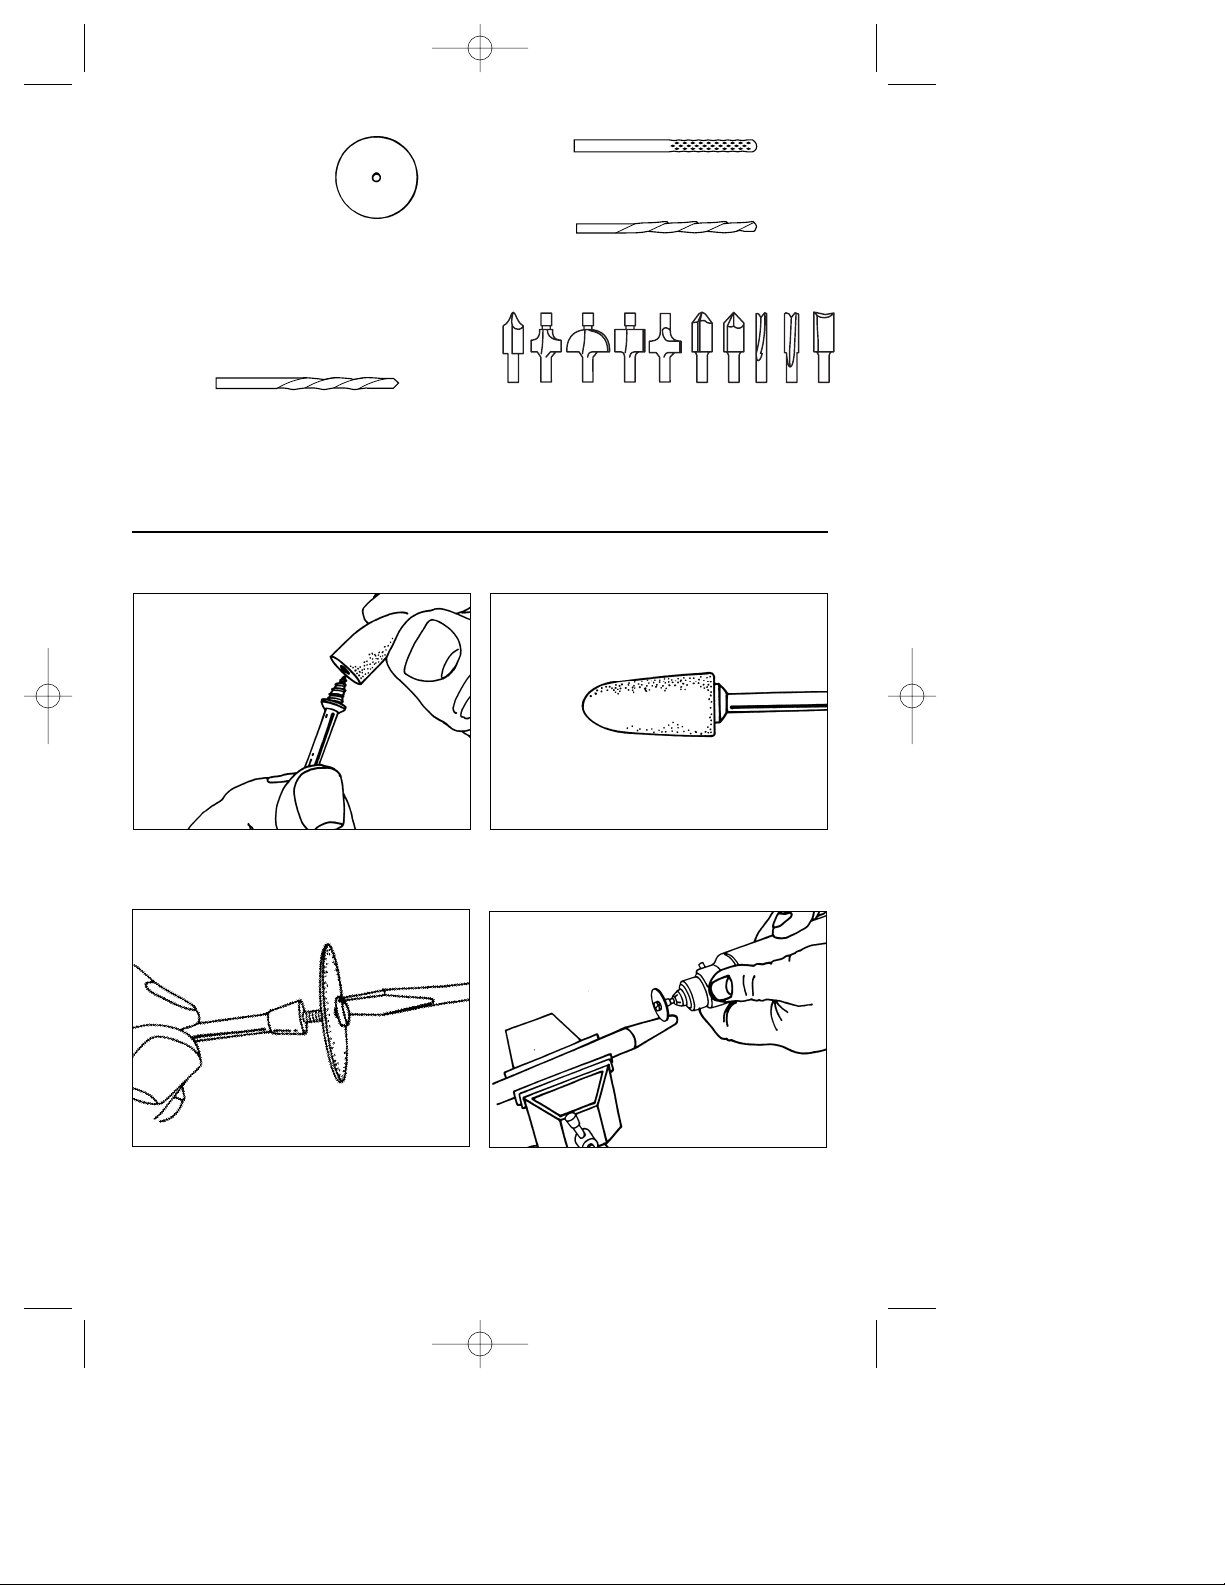
Cutting Wheels
These thin discs of emery or fiberglass are used for
slicing, cutting off and similar operations. Use them for
cutting off frozen bolt heads and nuts, or to reslot a
screw head which has become so damaged that the
screwdriver won’t work in it. Fine for cutting BX cable,
small rods, tubing, cable and cutting rectangular holes
in sheet metal.
Drywall Cutting Bit
Gives you fast, clean cuts in drywall.
Tile Cutting Bit
Cuts ceramic wall tile, cement board, and plaster.
Spiral Cutting Bit
Cuts through all types of wood and wood composites.
High Speed Router Bits
For routing, inlaying, and mortising in wood and other
soft materials. Use with Dremel No. 330 Router
attachment and No. 231 Shaper/Router table.
Mandrel No. 401 is used with the felt polishing tip and wheels. Thread the tip on to the screw carefully. The
felt tip must thread down straight on the screw Mandrel, and be turned all the way to the collar.
Mandrel No. 402 has a small screw at its tip, and is used with emery cutting wheels and sanding discs. Higher
speeds, usually maximum, are best for most work, including cutting steel. Which is shown here.
DM 2610913513 6/01 6/8/01 8:45 PM Page 18
Page 19
Page 19
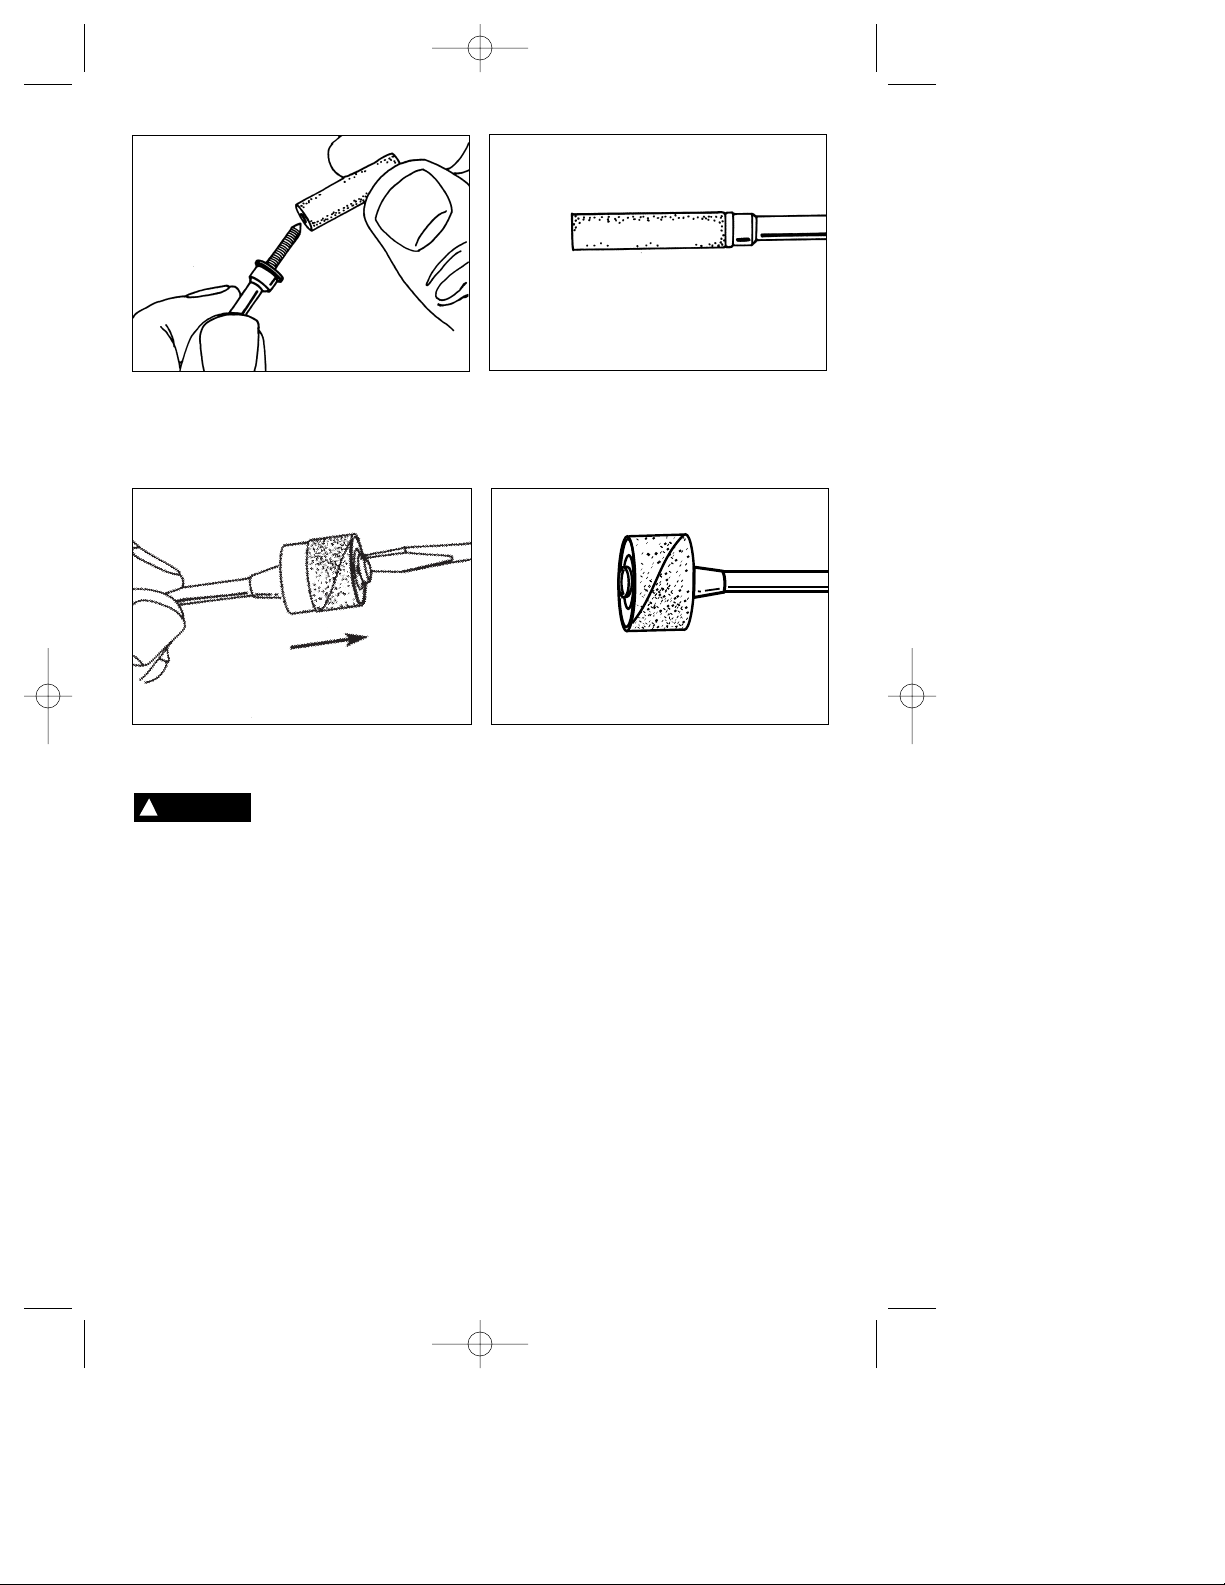
To replace a band on the Drum Sander, loosen the screw without removing it to contract the drum then slide
the old band off. Slide the new sanding band on and then expand the drum by tightening the screw once again.
Before each use, check to make certain that all components are assembled to accessory
shank and that the drum is sufficiently expanded to secure the band during use. If sand-
ing band is loose on the drum during operation it may “fly” off and strike you or bystanders.
WARNING
!
The machine-screw threading on Mandrel No. 424 threads into polishing point No. 427. This and other threaded mandrels must be screwed firmly down to the collar before being used.
DM 2610913513 6/01 6/8/01 8:45 PM Page 19
Page 20

Page 20
Your Dremel product is warranted against defective material or workmanship for a period of two years from date of
purchase. In the event of a failure of a product to conform to this written warranty, please take the following action:
1. DO NOT return your product to the place of purchase.
2. Carefully package the product by itself, with no other items, and return it, freight prepaid, along with:
A. A copy of your dated proof of purchase (please keep a copy for yourself).
B. A written statement about the nature of the problem.
C. Your name, address and phone number to:
UNITED STATES
Dremel Service Center Dremel Service Center
4915 Twenty-First Street OR 4631 E. Sunny Dunes
Racine, Wisconsin 53406 Palm Springs, CA 92264
CANADA OUTSIDE
Giles Tool Agency CONTINENTAL UNITED STATES
6520 Lawrence Av. East See your local distributor or write
Scarborough, Ont. to Dremel, 4915 Twenty-First St.
Canada M1C 4A7 Racine, Wisconsin 53406
1-888-285-3476
We recommend that the package be insured against loss or in transit damage for which we cannot be responsible.
This warranty applies only to the original registered purchaser. DAMAGE TO THE PRODUCT RESULTING FROM
TAMPERING, ACCIDENT, ABUSE, NEGLIGENCE, UNAUTHORIZED REPAIRS OR ALTERATIONS, UNAPPROVED
ATTACHMENTS OR OTHER CAUSES UNRELATED TO PROBLEMS WITH MATERIAL OR WORKMANSHIP ARE NOT
COVERED BY THIS WARRANTY.
No employee, agent, dealer or other person is authorized to give any warranties on behalf of Dremel. If Dremel
inspection shows that the problem was caused by problems with material or workmanship within the limitations of
the warranty, Dremel will repair or replace the product free of charge and return product prepaid. Repairs made necessary by normal wear or abuse, or repair for product outside the warranty period, if they can be made, will be
charged at regular factory prices.
DREMEL MAKES NO OTHER WARRANTY OF ANY KIND WHATEVER, EXPRESSED OR IMPLIED, AND ALL IMPLIED
WARRANTIES OF MERCHANTABILITY AND FITNESS FOR A PARTICULAR PURPOSE WHICH EXCEED THE ABOVE
MENTIONED OBLIGATION ARE HEREBY DISCLAIMED BY DREMEL AND EXCLUDED FROM THIS LIMITED WARRANTY.
This warranty gives you specific legal rights and you may also have other rights which vary from state to state. The
obligation of the warrantor is solely to repair or replace the product. The warrantor is not liable for any incidental or
consequential damages due to any such alleged defect. Some states do not allow the exclusion or limitation of incidental or consequential damages, so the above limitations or exclusion may not apply to you.
For prices and warranty fulfillment in the continental United States, contact your local Dremel distributor.
EXPORTADO POR: S.B. POWER TOOL COMPANY, CHICAGO, IL 60646, E.U.A.
IMPORTADO POR: ROBERT BOSCH S.A. DE C.V., CALLE ROBERT BOSCH NO. 405, ZONA
INDUSTRIAL TOLUCA, MÉXICO. C.P. 50070 TEL. (72) 792300
Dremel Limited Warranty
DM 2610913513 6/01 6/8/01 8:45 PM Page 20
Page 21

Page 21
Consignes de fonctionnement/sécurité
Outil rotatif sans cordon modèle 780
SOYEZ FRANC … Avez-vous luce MANUEL ?
• Sécurité
• Assemblage
• Fonctionnement
• Informations sur les accessoires
• Garantie
• Formulaire d'enregistrement
• Pièces de service
P.O. Box 1468
Racine, Wisconsin
1-800-437-3635
http://www.dremel.com
©
S-B Power Tool Co.
2001
All Rights Reserved
DM 2610913513 6/01 6/8/01 8:45 PM Page 21
Page 22

Page 22
Vous devez lire et comprendre toutes les instructions. Lenon-respect, même partiel, des instructions ci-après entraîne un risque de choc életrique, d'incendie et/ou
de blessures graves.
CONSERVEZ CES INSTRUCTIONS
AVERTISSEMENT
!
Consignes générales de sécurité pour tous les outils à pile
Aire de travail
Veillez à ce que l'aire de travail soit propre et bien
éclairée. Le désordre et le manque de lumière
favorisent les accidents.
N'utilisez pas d'outils électriques dans une atmosphère explosive, par exemple enprésence de liquides, de gaz ou de poussières inflammables. Les
outils électriques créent des étincelles qui pourraient
enflammer les poussières ou les vapeurs.
Tenez à distance les curieux, les enfants et les visiteurs pendant que vous travaillezavec un outil électrique. Ils pourraient vous distraire et vous faire faire
une fausse manoeuvre.
Sécurité électrique
N'abusez pas du cordon. Ne transportez jamais
l'outil par le cordon. Tenez le cordon à l'écart de la
chaleur, de l'huile, des arêtes vives ou des pièces
mobiles. Remplacez les cordons endommagés
immédiatement. Les cordons endommagés peuvent
provoquer un incendie.
Un outil à pile avec piles incorporées ou bloc-pile
distinct doit être rechargé uniquement avec le
chargeur indiqué pour la pile. Un chargeur qui peut
être adéquat pour un type de pile peut créer un risque
d'incendie lorsqu'il est utilisé avec une autre pile.
Utiliser un outil à pile uniquement avec le bloc-pile
désigné spécifiquement. L'emploi de toute autre pile
peut créer un risque d'incendie.
Sécurité des personnes
Restez alerte, concentrez-vous sur votre travail et
faites preuve de jugement. N'utilisez pas un outil
électrique si vous êtes fatigué ou sous l'influence de
drogues, d'alcool ou de médicaments. Un instant d'i-
nattention suffit pour entraîner des blessures graves.
Habillez-vous convenablement. Ne portez ni vêtements flottants ni bijoux. Confinez les cheveux longs.
N'approchez jamais les cheveux, les vêtements ou
les gants des pièces en mouvement. Des vêtements
flottants, des bijoux ou des cheveux longs risquent
d'être happés par des pièces en mouvement. Gardez les
poignées sèches, propres et exemptes d'huile et de
graisse.
Évitez la mise en marche accidentelle. Assurez-vous
que l'interrupteur est en position de blocage ou d'arrêt avant d'insérer le bloc-pile. Il est dangereux de
transporter l'outil avec le doigt sur l'interrupteur ou
d'insérer le bloc-pile dans un outil alors que l'interrupteur est en position de marche.
Enlevez les clés de réglage ou de serrage avant de
démarrer l'outil. Une clé laissée dans une pièce tour-
nante de l'outil peut provoquer des blessures.
Ne vous penchez pas trop en avant. Maintenez un bon
appui et restez en équilibre entout temps. Un bonne
stabilité vous permet de mieux réagir à une situation
inattendue.
Utilisez des accessoires de sécurité. Portez toujours
des lunettes ou une visière. Selon les conditions,
portez aussi un masque antipoussière, des bottes de
sécurité antidérapantes, un casque protecteur et/ou un
appareil antibruit.
Utilisation et entretien des outils
Immobilisez le matériau sur une surface stable au
moyen de brides ou de toute autre façon adéquate. Le
fait de tenir la pièce avec la main ou contre votre corps
offre une stabilité insuffisante et peut amener un dérapage de l'outil.
Ne forcez pas l'outil. Utilisez l'outil approprié à la
tâche. L'outil correct fonctionne mieux et de façon plus
sécuritaire. Respectez aussi la vitesse de travail qui lui
est propre.
N'utilisez pas l'outil si l'interrupteur ne le met pas
en marche ou à l'arrêt. Un outil qui ne peut être con-
trôlé par l'interrupteur est dangereux et doit être
réparé.
Débranchez le bloc-pile de l'outil ou mettez l'interrupteur en position de blocage ou d'arrêt avant d'effectuer tout réglage, de changer les accessoires ou
de remiser l'outil. Ces mesures de sécurité préven-
tives réduisent le risque d'une mise en marche accidentelle de l'outil.
Rangez les outils hors de la portée des enfants et
d'autres personnes inexpérimentées. Les outils sont
dangereux dans les mains d'utilisateurs novices.
Lorsque le bloc-pile n'est pas en usage, tenez-le à
l'écart d'autres objets métalliques tels que trombones, pièces de monnaie, clés, clous, vis ou autres
petits objets métalliques susceptibles d'établir une
connexion d'une borne à une autre. Le court-cir-
cuitage des bornes de batterie ensemble peut causer
des étincelles, des brûlures ou un incendie.
Prenez soin de bien entretenir les outils. Les outils de
coupe doivent être toujours bien affûtés et propres.
Des outils bien entretenus, dont les arêtes sont bien
tranchantes, sont moins susceptibles de coincer et plus
faciles à diriger.
Soyez attentif à tout désalignement ou coincement
des pièces en mouvement, à tout bris ou à toute autre
condition préjudiciable au bon fonctionnement de
l'outil. Si vous constatez qu'un outil est endommagé,
faites-le réparer avant de vous en servir. De nom-
breux accidents sont causés par des outils en mauvais
état.
DM 2610913513 6/01 6/8/01 8:45 PM Page 22
Page 23

Page 23
N'utilisez que des accessoires que le fabricant
recommande pour votre modèle d'outil. Certains
accessoires peuvent convenir à un outil, mais être dangereux avec un autre.
Réparation
La réparation des outils électriques doit être confiée à un réparateur qualifié. L'entretien ou la répa-
ration d'un outil électrique par un amateur peut avoir
des conséquences graves.
Pour la réparation d'un outil, n'employez que des
pièces de rechange d'origine. Suivez les directives
données à la section « Réparation » de ce manuel.
L'emploi de pièces non autorisées ou le non-respect
des instructions d'entretien peut créer un risque de
choc électrique ou de blessures.
Consignes de sécurité pour outil rotatif sans cordon
Les accessoires doivent être prévus pour au moins
la vitesse recommandée sur l'étiquette d'avertissement de l'outil. Les meules et les autres accessoires
utilisés à une vitesse supérieure à la vitesse nominale
peuvent se détacher et provoquer des blessures.
Tenez l'outil par les surfaces isolées de prise en
exécutant une opération lorsque l'outil de coupe
peut venir en contact avec des fils cachés ou son
propre cordon. Le contact avec un fil sous tension
rendra les parties métalliques exposées de l'outil sous
tension et causera des secousses électriques à
l'opérateur. Pour couper dans des murs existants ou
autres endroits aveugles pouvant dissimuler des fils
électriques, débranchez tous les fusibles ou les disjoncteurs alimentant ce lieu de travail.
Ne faites pas fonctionner l’arbre flexible avec une
courbe prononcée. Lors du pliage, l’arbre peut pro-
duire une chaleur excessive sur la gaine ou la partie
maniable. Le rayon minimum recommandé est de 6
po.
Débranchez le bloc-pile de l'outil ou placez l'interrupteur à la position de blocage ou d'arrêt avant d'effectuer tout assemblage ou réglage ou de changer
les accessoires. Ces mesures de sécurité préventives
réduisent le risque d'une mise en marche accidentelle
de l'outil.
Connaissez l'emplacement de l'interrupteur lorsque
vous déposez l'outil ou lorsque vous le reprenez.
Vous pouvez actionner l'interrupteur par mégarde.
Maintenez toujours fermement la partie maniable
dans vos mains pendant le démarrage. Lors de son
accélération pour atteindre le plein régime, le couple
à réaction du moteur peut entraîner une torsion de
l’arbre.
Portez toujours des lunettes de sécurité et un
masque anti-poussières. N'utilisez l'outil qu'à un
endroit bien aéré. L'utilisation de dispositifs de sécurité personnelle et le travail dans un environnement
sûr réduisent les risques de blessures.
Après avoir changé les lames ou effectué quelque
réglage que ce soit, assurez-vous que l'écrou de la
douille et tout autre dispositif de réglage sont bien
serrés. Un dispositif de réglage lâche peut bouger
soudainement et causer ainsi une perte de contrôle
avec projection violente des composants en rotation.
Ne placez pas la main à proximité de la mèche qui
tourne. Vous ne vous rendrez pas toujours compte de
cette proximité.
Laissez les brosses tourner à la vitesse de fonctionnement pendant au moins une minute avant d’utiliser la meule. Durant cette période, personne ne
doit se tenir devant la meule ou en ligne avec celleci. Pendant la période de rodage, les poils ou fils de
fer seront éjectés de la brosse.
Les brosses (à poils standards ou métalliques) ne
doivent jamais être utilisées au-dessus de 15 000
tr/min. Dirigez la décharge de la brosse métallique
en rotation en sens opposé à vous. Des petites particules et des petits fragments de fil peuvent être
déchargés à grande vitesse durant l'action de « nettoyage » de ces brosses et peuvent se loger dans
votre peau. À haute vitesse, les poils ou fils de fer mal
attachés seront éjectés.
Portez des gants protecteurs et un masque de
soudeur avec les brosses métalliques ou en soie de
porc. Appliquez légèrement les brosses
métalliques ou en soie de porc sur votre ouvrage,
puisque seules les extrémités du fil métallique/des
brosses font le travail. Une « lourde » pression sur
les brosses entraînera une surcharge du fil métallique
ou de la brosse, résultant en une action d’essuyage,
et entraînera une décharge des brosses/du fil
métallique.
Maniez soigneusement l'outil aussi bien que les
meules individuelles pour éviter les éclats ou les
fissurations. Posez une nouvelle meule si l'outil
tombe pendant la rectification. N'utilisez pas une
meule qui peut être endommagée. Les fragments
d'une meule qui éclate durant le fonctionnement
seront projetés à grande vitesse et pourraient frapper
des personnes présentes ou vous-même.
N'utilisez jamais de lames émoussées ou abîmées.
Les lames affilées doivent être maniées soigneusement. Les mèches abîmées peuvent se rompre
brusquement durant l'usage. Les lames émoussées
nécessitent plus de force pour pousser l'outil, causant
éventuellement un bris de la lame.
Utilisez des pinces pour supporter l'ouvrage autant
que possible. Ne tenez jamais un petit ouvrage
d'une main et l'outil de l'autre main pendant que
DM 2610913513 6/01 6/8/01 8:45 PM Page 23
Page 24

Page 24
celui-ci est en usage. Prévoyez un espace suffisant,
d'au moins 150 mm, entre votre main et la mèche
qui tourne. Les pièces rondes, telles que tiges cylin-
driques, tuyaux ou tubes, ont tendance à rouler pendant qu'on les coupe et, de ce fait, la mèche peut «
mordre » ou sauter vers vous. En fixant un petit
ouvrage, vous pourrez utiliser vos deux mains pour
contrôler l'outil.
Inspectez l'ouvrage avant de le couper. Avant de
couper un ouvrage de forme irrégulière, planifiez
votre travail de manière à ce que l'ouvrage ne
glisse pas et ne vienne pas pincer la mèche qui
sera arrachée de votre main. Ainsi, si vous taillez du
bois, assurez-vous de l'absence de clous ou de corps
étrangers dans l'ouvrage. Sous l'effet du contact avec
des clous ou corps étrangers, la mèche peut sauter.
Ne mettez jamais l'outil en marche alors que la
lame est enfoncée dans le matériau. Le tranchant de
la lame peut se coincer dans le matériau et vous faire
perdre le contrôle du couteau.
Évitez de faire rebondir et de heurter la meule,
surtout en travaillant des coins, des arêtes vives,
etc. Ceci peut causer une perte de contrôle et un
rebond.
Le sens d'avance de la mèche dans l'ouvrage
lorsque vous taillez, détourez ou coupez est très
important. Avancez toujours la mèche dans l'ouvrage dans le sens dans lequel le tranchant sort de
l'ouvrage (ce qui correspond au sens d'éjection des
copeaux). L'avance de l'outil dans le mauvais sens
fait sortir le tranchant de la mèche de l'ouvrage et tire
l'outil dans le sens de cette avance.
Si le matériau ou la mèche se grippe ou se bloque,
mettez l'outil hors tension « OFF » par l'interrupteur. Attendez que toutes les pièces mobiles s'immobilisent et débranchez l'outil, procédez ensuite à
débloquer l'ouvrage bloqué. Si l'interrupteur de
l'outil est laissé en position de marche « ON », l'outil
pourrait se remettre en marche par mégarde et causer
ainsi des blessures graves.
Ne laissez pas un outil en marche sans surveillance, mettez hors tension. L'outil peut être déposé
en toute sécurité uniquement lorsqu'il s'est arrêté
complètement.
Ne rectifiez et ne poncez pas à proximité de
matières inflammables. Les étincelles provenant de
la meule pourraient enflammer ces matières.
Ne touchez pas la mèche ou la douille après usage.
Après usage, la mèche et la douille sont trop chaudes
pour être touchées à mains nues.
Nettoyez régulièrement les prises d'air de l'outil à
l'aide d'air comprimé. Une accumulation excessive
de métal en poudre à l'intérieur du carter du moteur
peut causer des défaillances électriques.
Ne soyez pas dupé par la familiarité acquise par un
usage fréquent de votre outil rotatif. N'oubliez pas
qu'une fraction de seconde d'insouciance suffit à
infliger des blessures graves.
Ne modifiez pas l'outil et n'en faites pas un usage
erroné. Toute altération ou modification constitue un
usage erroné et peut provoquer des blessures graves.
Ce produit n’est pas destiné à être utilisé comme
fraise dentaire dans des applications médicales
humaines ou vétérinaires. Des blessures graves
peuvent s’ensuivre.
Lorsque vous utilisez les scies en acier, les disques
de découpage, les couteaux à grande vitesse ou les
couteaux au carbure de tungstène, assurez-vous
que la pièce est toujours bien assujettie. Ne tentez
jamais de tenir la pièce d’une seule main tout en
utilisant l’un de ces accessoires. La raison en est
que ces roues grippent lorsqu’elles sont le moindrement inclinées dans la rainure, et elles peuvent
alors rebondir, vous faisant ainsi perdre le contrôle et
causant des blessures graves. Votre autre main doit
servir à stabiliser et guider la main qui tient l’outil.
Lorsqu’un disque de découpage grippe, on peut
généralement s’attendre à ce qu’il se brise. Lorsque la
scie en acier, les couteaux à grande vitesse ou le
couteau au carbure de tungstène grippent, ils peuvent
sauter hors de la rainure et vous pouvez perdre le
contrôle de l’outil.
Les travaux à la machine
tel que ponçage, sciage,
meulage, perçage et autres travaux du bâtiment peuvent créer des poussières contenant des produits
chimiques qui sont des causes reconnues de cancer,
de malformation congénitale ou d’autres problèmes
reproductifs. Ces produits chimiques sont, par exemple :
• Le plomb provenant des peintures à base de plomb,
• Les cristaux de silices provenant des briques et du
ciment et d’autres produits de maçonnerie, et
• L’arsenic et le chrome provenant des bois traités
chimiquement.
Le niveau de risque dû à cette exposition varie avec la
fréquence de ces types de travaux. Pour réduire l’exposition à ces produits chimiques, il faut travailler dans un
lieu bien ventilé et porter un équipement de sécurité
approprié tel que certains masques à poussière conçus
spécialement pour filtrer les particules microscopiques.
AVERTISSEMENT
!
DM 2610913513 6/01 6/8/01 8:45 PM Page 24
Page 25

Page 25
Avant d'utiliser le chargeur de pile, lisez toutes les
consignes et tous les marquages d'avertissement sur
(1) le chargeur de pile, (2) le bloc-pile et (3) le produit utilisant la pile.
N'utilisez que le chargeur qui accompagnait votre
produit ou remplacement direct, comme indiqué dans
le catalogue ou ce manuel. Ne substituez aucun autre
chargeur. Utilisez uniquement le chargeur de pile
Dremel No. 786 avec votre produit.
Ne désassemblez pas le chargeur et ne l'utilisez pas
s'il a reçu un choc violent, s'il est tombé ou s'il a
été endommagé par ailleurs. Remplacez immédiatement les cordons ou les fiches abîmés. Un remontage
incorrect ou des dommages peuvent provoquer un
incendie ou des secousses électriques.
Ne rechargez pas la pile dans un environnement
mouillé ou humide. N'exposez pas le chargeur à la
pluie ou la neige. Si le boîtier de la pile est fissuré ou
endommagé par ailleurs, ne l'insérez pas dans le
chargeur.Il pourrait y avoir un incendie ou un court-cir-
cuit de pile.
Chargez uniquement les piles rechargeables Dremel
Nos. 785 l'aide des chargeurs susmentionnés. Les
autres types de piles peuvent éclater causant ainsi des
blessures et des dommages.
Chargez le bloc-pile à des températures de plus de 4
degrés C (+40°F) et de moins de 41 degrés C
(+105°F). Rangez l'outil et le bloc-pile à des endroits
dont la température ne dépasse pas 49 degrés C
(+120°F). Ceci est important pour prévenir des dom-
mages considérables aux éléments des piles.
Il peut y avoir une fuite de pile dans des conditions
extrêmes d'utilisation ou de température. Évitez tout
contact avec la peau et les yeux. Le liquide de pile est
caustique et pourrait causer des brûlures chimiques aux
tissus. Si le liquide vient en contact avec la peau, lavez
rapidement à l'eau savonneuse, puis au jus de citron ou
au vinaigre. Si le liquide vient en contact avec les yeux,
rincez-les à l'eau pendant au moins 10 minutes et sollicitez des soins médicaux.
Posez le chargeur sur une surface plate inflammable et à distance de matériaux inflammables
lorsqu’on recharge un bloc-piles. Le chargeur et le
bloc-piles s’échauffent pendant la charge. Le
coussinet de mousse souple et autres surfaces
isolantes empêchent la circulation normale de l’air, ce
qui peut provoquer une surchauffe du chargeur et du
bloc-piles. S’il y a dégagement de fumée ou si le boîtier fond, débranchez le chargeur immédiatement et
n’utilisez ni le chargeur, ni le bloc-piles.
L'utilisation d'un accessoire non recommandé ni
vendu par Dremel peut causer des risques d'incendie,
de chocs électriques ou de lésions corporelles.
Chargeur de pile
Entretien des piles
Lorsque les piles ne sont
pas dans l’outil ou le
chargeur, gardez-les à l’écart d’objets métalliques.
Ainsi, pour éviter un court-circuitage des bornes, NE
PLACEZ PAS les piles dans la boîte à outils ou dans la
poche avec des clous, des vis, des clés, etc. Ceci peut
provoquer un incendie ou des blessures.
NE METTEZ PAS LES PILES AU FEU ET NE LES
EXPOSEZ PAS À UNE CHALEUR ÉLEVÉE. Elles peuvent
exploser.
Mise au rebut des piles
Ne tentez pas de
désassembler le bloc-piles
ou d’enlever tout composant faisant saillie des
bornes de piles, ce qui peut provoquer un incendie ou
des blessures. Avant la mise au rebut, protégez les
bornes exposées à l’aide d’un ruban isolant épais pour
prévenir le court-circuitage.
Piles nickel-cadmium
Si le produit est équipé d'une pile nickel-cadmium, la
pile doit être ramassée, recyclée ou mise au rebut d'une
manière qui ne soit pas nocive pour l'environnement.
“Le sceau RBRC de recyclage des
piles, homologué par l’EPA (Agence
pour la protection de l’environnement des États-Unis), qui se
trouve sur les piles au nickel-cad-
mium (Ni-Cd) indique que S-B
Power Tool Company participe volontairement à un
programme industriel de ramassage et de recyclage
de ces piles au terme de leur vie utile, pourvu qu’elles
soient mises hors service aux États-Unis ou au
Canada. Le programme du RBRC offre une alternative
pratique à la mise des piles au Ni-Cd usées au rebut ou
au ramassage d’ordures municipal, ce qui pourrait être
interdit dans votre région.
Veuillez appeler le 1-800-8-BATTERY pour obtenir de
plus amples renseignements sur le recyclage des piles
au Ni-Cd et sur les restrictions ou interdictions de
mise au rebut qui s’appliquent à votre région ou renvoyez vos piles à un Centre de Service
Skil/Bosch/Dremel pour recyclage. La participation de
S-B Power Tool Company à ce programme s'insère
dans le contexte de notre engagement à préserver
notre environnement et à conserver nos ressources
naturelles.”
Piles nickel-hydrure de métal
Si le produit est équipé d'une pile nickel-hydrure de
métal, la pile peut être mise au rebut dans un flux de
déchets solides municipaux.
AVERTISSEMENT
!
AVERTISSEMENT
!
DM 2610913513 6/01 6/8/01 8:45 PM Page 25
Page 26

Page 26
Symboles
Important : Certains des symboles suivants peuvent être utilisés sur votre outil. Veuillez les étudier et appren-
dre leur signification. Une interprétation appropriée de ces symboles vous permettra d'utiliser l'outil de façon
plus efficace et plus sûre.
Symbole Nom Désignation/Explication
V Volts Tension (potentielle)
A Ampères Courant
Hz Hertz Fréquence (cycles par seconde)
W Watt Puissance
kg Kilogrammes Poids
min Minutes Temps
s Secondes Temps
Diamètre Taille des mèches de perceuse, meules, etc.
n
0
Vitesse à vide Vitesse de rotation, à vide
.../min Tours ou mouvement alternatif par Tours, coups, vitesse en surface, orbites,
minute etc., par minute,
0 Position d'arrêt Vitesse zéro, couple zéro ...
1, 2, 3, ... Réglages du sélecteur Réglages de vitesse, de couple ou de position.
l, ll, lll, ... Un nombre plus élevé signifie une vitesse plus grande.
Sélecteur variable à l'infini avec arrêt La vitesse augmente depuis le réglage 0
Flèche Action dans la direction de la flèche
Courant alternatif Type ou caractéristique du courant
Courant continu Type ou caractéristique du courant
Courant alternatif ou continu Type ou caractéristique du courant
Construction classe II isolation Désigne des outils construits avec double
Borne de terre borne de mise à la terre
Symbole d'avertissement Alerte l'utilisateur aux messages d'avertissement.
Sceau Ni-Cad RBRCmc Désigne le programme de recyclage des piles Ni-Cad.
0
Ce symbole signifie que cet
outil est approuvé par
Underwriters Laboratories.
Ce symbole signifie que cet
outil est approuvé par
l'Association canadienne de
normalisation.
Ce symbole signifie que cet outil
est approuvé conformément aux
normes canadiennes par
Underwriters Laboratories.
Ce symbole
signifie que
cet outil se
conforme aux
normes
mexicaines
NOM.
Ce symbole signifie que cet outil
est approuvé par Underwriters
Laboratories et qu’il a été
homologué selon les normes
canadiennes par Underwriters
Laboratories.
DM 2610913513 6/01 6/8/01 8:45 PM Page 26
Page 27

Page 27
Description fonctionnelle et spécifications
Débranchez le bloc-pile de l'outil ou placez l'interrupteur à la position de blocage ou
d'arrêt avant d'effectuer tout assemblage ou réglage ou de changer les accessoires.
Ces mesures de sécurité préventives réduisent le risque d'une mise en marche accidentelle de l'outil.
Outil rotatif sans cordon
Outil rotatif sans cordon
Numéro de modèler 780
Intensité nominale 9,6 V
Régime à vide no5 000-25 000/min
Collet Capacities 0,8 mm, 1,6 mm,
2,4 mm, 3,2 mm
Chargeur
Numéro de modèler 786
Intensité nominale 120 V 60 Hz
Amperaje nominal 250 mA
Temps de charge 3 hr
AVERTISSEMENT
!
ÉCROU DE
DOUILLE
INTERRUPTEUR
BLOC-PILE
BOUTON
DE BLOCAGE
DE L’ARBRE
PATTE DE
DÉTACHEMENT
BRIDE
DE SUSPENSION
CHARGEUR
MARQUES
D’ALIGNEMENT
MARQUES
D’ALIGNEMENT
MARQUES
D’ALIGNEMENT
DOUILLE
BLOC-PILE
DM 2610913513 6/01 6/8/01 8:45 PM Page 27
Page 28

Page 28
Consignes d’utilisation
ASSUREZ-VOUS TOUJOURS
QUE L’OUTIL EST À LA POSITION “0” AVANT DE CHANGER LES ACCESSOIRES
OU LES DOUILLES, OU DE FAIRE L’ENTRETIEN DE
VOTRE OUTIL ROTATIF SANS CORDON.
AVERTISSEMENT
!
DOUILLE — Pour desserrer, appuyez d’abord sur le
bouton de blocage de l’arbre et tournez l’arbre à la main
jusqu’à ce que le dispositif de blocage engage l’arbre,
empêchant ainsi toute rotation ultérieure.
N’appuyez pas sur le bouton de blocage de l’arbre
pendant que le Outil Rotatif est en marche.
L’arbre étant bloqué, utilisez la clé à douille pour desserrer l’écrou de douille, au besoin. Changez les accessoires en insérant le nouveau le plus loin possible dans
la douille de serrage, réduisant ainsi les possibilités
qu’il ne se libère ou ne se déséquilibre. L’arbre étant
bloqué, serrez à la main l’écrou de douille jusqu’à ce
que la tige de l’accessoire soit retenue solidement par
la douille. Évitez un serrage excessif de l’écrou.
DOUILLES — Quatre tailles différentes de douilles (reportez-vous à l’illustration), adaptées à des tailles différentes de tiges, sont offertes pour votre outil rotatif sans
cordon. Pour poser une autre douille, retirez l’écrou de
la douille ainsi que la douille à remplacer. Insérez l’extrémité non fendue de la douille dans l’ouverture à l’extrémité de l’arbre de l’outil. Replacez l’écrou sur l’arbre.
Utilisez toujours la douille de même grosseur que la
tige de l’accessoire que vous désirez utiliser. Ne
forcez jamais une tige trop grosse pour la douille.
ÉQUILIBRAGE DES ACCESSOIRES — Pour le travail de
précision, il est important que tous les accessoires
soient bien équilibrés (tout comme les pneus de votre
voiture). Pour rectifier ou équilibrer un accessoire,
desserrez légèrement l’écrou de la douille, et tournez
l’accessoire ou la douille d’un quart de tour. Resserrez
l’écrou de la douille et mettez l’outil rotatif sans cordon
en marche. Le son qui se fait entendre et le maniement
de l’outil devraient vous indiquer si l’accessoire est bien
équilibré. Continuez l’ajustement de cette façon jusqu’à
ce que vous obteniez le meilleur équilibre. Pour maintenir l’équilibre des pointes de meule abrasive, avant
chaque usage, alors que la pointe de roue est retenue
fermement dans la douille, mettez l’outil rotatif sans cordon en marche et tenez la pierre à rectifier 415 légèrement appuyée sur la pointe de la meule en rotation. Ceci
a pour effet d’éliminer les points élevés tout en rectifiant
la pointe de meule pour un meilleur équilibre.
Assemblage
TABLEAU D’IDENTIFICATION DES DOUILLES DE SERRAGE — Les tailles des douilles de serrage peuvent
être identifiées par les anneaux à l’extrémité arrière de
la douille.
La douille de 0,8 mm possède un (1) anneau.
La douille de 1,6 mm possède deux (2) anneaux.
La douille de 2,4 mm possède trois (3) anneaux.
La douille de 3,2 mm ne possède aucun anneau.
Introduction
L’outil rotatif sans cordon est un outil polyvalent à
grande vitesse. Il peut servir à découper, aiguiser, polir,
poncer, couper, brosser, percer et davantage.
Votre outil rotatif sans cordon possède un petit moteur
électrique puissant, il se manie confortablement, et il a
été conçu de manière à recevoir un vaste éventail
d’accessoires, y compris roues abrasives, forets, bross-
es métalliques, polissoirs, fraises à graver, fers de toupie
et disques de découpage. Les accessoires sont offerts
en différentes formes et ils vous permettent d’exécuter
différentes tâches. À mesure que vous vous familiariserez avec l’éventail d’accessoires et leurs usages, vous
constaterez la grande souplesse d’emploi de l’outil
rotatif sans cordon et découvrirez de nombreux usages
auxquels vous n’aviez pas pensé auparavant.
BOUTON
DE BLOCAGE
DE L’ARBRE
POUR DESSERRER
POUR SERRER
ÉCROU DE
DOUILLE
DOUILLE
CLÉ À
DOUILLE
ÉCROU
DE DOUILLE
ANNEAUX
D’IDENTIFICATION
DOUILLE 480
3,2 mm
DOUILLE 481
2,4 mm
DOUILLE 482
1,6 mm
DOUILLE 483
0,8 mm
DM 2610913513 6/01 6/8/01 8:45 PM Page 28
Page 29

Page 29
Le véritable secret de l’outil rotatif sans cordon tient à sa
vitesse. Pour comprendre les avantages de sa grande
vitesse, il vous faut savoir que la perceuse électrique
portative standard fonctionne à des vitesses allant
jusqu’à 2800 tours/minute. La perceuse électrique standard est un outil à basse vitesse mais à couple élevé ;
l’outil rotatif sans cordon est précisément l’inverse, un
outil à grande vitesse mais à couple réduit. La différence
principale du point de vue de l’utilisateur est que, sur les
outils à grande vitesse, la vitesse alliée au fait que l’accessoire est monté dans la douille de serrage fait le travail. Il ne vous est nullement nécessaire d’exercer une
pression sur l’outil ; il vous suffit de tenir et de guider
l’outil. Dans le cas des outils à basse vitesse, non seule-
ment devez-vous guider l’outil, vous devez également
exercer une pression sur celui-ci comme vous le faites,
par exemple, en perçant un trou.
C’est cette vitesse élevée, combinée avec sa taille compacte et une grande variété d’accessoires spécialisés qui
fait la différence entre votre outil rotatif sans cordon et
les autres outils électroportatifs. Cette caractéristique lui
permet d’effectuer des tâches que les outils à basse
vitesse ne peuvent pas accomplir comme par exemple le
sciage d’acier trempé, la gravure du verre, etc.
Pour tirer le maximum de votre outil rotatif sans cordon
il vous faut ap prendre comment mettre cette vitesse à
votre service.
Lisez attentivement les sections qui suivent. Elles vous
aideront à utiliser correctement votre outil rotatif sans
cordon et à sélectionner l’accessoire convenant à la
tâche.
Charge de l’outil
L’outil rotatif sans cordon n’est pas entièrement chargé.
L’outil est équipé d’un bloc-pile amovible. Assurez-vous
de charger le bloc-pile avant le premier usage. Pour de
meilleurs résultats lors de la première charge, chargez le
bloc-pile pendant toute la nuit.
Pour charger le bloc-piles
1. Mettez l’interrupteur en position arrêt « OFF ».
2. Appuyez sur les pattes de détachement situées de
chaque côté du bloc-pile et retirez le bloc de la partie
arrière de l’outil, comme illustré à la page 27.
3. Positionnez les marques d’alignement du bloc-pile en
face de celles du chargeur et enfoncez le bloc-pile dans
le chargeur comme illustré.
4. Branchez le chargeur sur une prise de courant. Le
témoin lumineux vert indique que le contact a été réalisé et que le bloc-pile est en cours de charge. Dans des
conditions normales d’utilisation, il faut trois heures
pour recharger complètement le bloc-pile.
5. Une fois la charge terminée, retirez le bloc-pile du
chargeur.
6. Positionnez les marques du bloc-pile en face de
celles du bâti de l’outil comme illustré. Appuyez sur les
pattes de détachement, enfoncez le bloc-pile dans la
partie arrière de l’outil et relâchez la pression sur les
pattes pour que le bloc-pile se verrouille en place.
Remarques importantes concernant la charge
1. Lors des premiers cycles de charge, le bloc-piles
neuf n’absorbe que 80 % de sa capacité maximale.
Par la suite, cependant, les piles se chargeront à
pleine capacité.
2. De même, le chargeur n’est destiné qu’à la charge
rapide des bloc-piles dont la température se situe
entre 4°C (40°F) et 41°C (105°F).
3. Une diminution marquée de la réserve énergétique
entre les charges peut signaler l’épuisement du blocpiles et le besoin d’un remplacement.
4. Si vous prévoyez de longues périodes (à savoir, un
mois ou plus) de non-utilisation de votre outil, il est
préférable d'utiliser votre outil jusqu'à ce que sa pile
soit entièrement déchargée avant de remiser votre
bloc-pile. Après une longue période de remisage, la
capacité sera réduite à la première recharge. La
capacité normale sera rétablie en deux ou trois cycles
de charge/décharge. N'oubliez pas de débrancher le
chargeur durant la période de remisage.
5. Si le bloc-piles ne se charge pas normale-ment :
a. Vérifiez la présence de courant à la prise en y
branchant un autre appareil électrique.
b. Vérifiez si la prise n’est pas raccordée con-
jointement à un interrupteur qui servirait à éteindre
les lumières.
c. Vérifiez la propreté des bornes du bloc-piles.
Nettoyez-les au besoin avec un bâtonnet imbibé d’alcool.
d. Si vous n’arrivez toujours pas à obtenir la charge
satisfaisante, confiez l’outil, le bloc-piles et le
chargeur à votre centre d’entretien Dremel habituel.
Remarque : L’usage de chargeurs ou de blocs-piles
autres que ceux vendus par Dremel peut annuler la
garantie.
Utilisation de l’outil rotatif sans cordon
Apprendre à utiliser l’outil rotatif sans cordon, c’est
d’abord en connaître le maniement. Tenez-le dans votre
main pour en sentir le poids et l’équilibre. Habituez-vous
à la forme conique de son boîtier qui permet d’empoigner l’outil rotatif sans cordon comme s’il s’agissait d’un
stylo ou d’un crayon.
Lorsque vous mettez l’outil en marche pour la première
fois, tenez-le éloigné de votre visage. Certains accessoires peuvent avoir été endommagés durant la manutention et peuvent alors se séparer en morceaux
lorsqu’ils atteignent une certaine vitesse. Ceci ne
survient pas fréquemment, mais il vaut mieux prévenir.
Pratiquez d’abord sur des matériaux de rebut pour voir
DM 2610913513 6/01 6/8/01 8:45 PM Page 29
Page 30

Page 30
Réglez l’indicateur de vitesse selon la tâche à
accomplir pour obtenir les meilleurs résultats en utilisant des matériaux différents.
Utilisez une pièce d’essai afin de sélectionner la
vitesse convenant à chaque tâche. Changez la vitesse
pour trouver celle convenant le mieux à l’accessoire
que vous utilisez et à la tâche à accomplir.
Votre outil rotatif sans cordon est muni d’une molette de
variation de vitesse. Pour mettre l’outil en marche, mettez la molette sur la graduation désirée correspondant à
la vitesse souhaitée entre 5 000 et 25 000 tr/min. Pour
arrêter l’outil, ramenez la molette à la position arrêt
« 0 ».
Vous pouvez consulter les tableaux des pages 33, 34,
et 35 pour déterminer la vitesse appropriée en fonction
des matériaux et du type de couteau ou autre accessoire utilisé. Ces tableaux vous permettent de sélectionner d’un coup d’œil tant l’accessoire correct que la
vitesse optimale.
Nécessité de vitesses plus lentes
Cependant, certains matériaux (certains plastiques, par
exemple) nécessitent une vitesse relativement lente
parce que la friction de l’outil à haute vitesse produit de
la chaleur et peut faire fondre le plastique.
La plupart des opérations se font à haute vitesse sur
votre outil rotatif sans cordon. Les vitesses plus lentes
sont nécessaires uniquement pour certaines tâches.
La vitesse du modèle 780 se règle en tournant cette
molette pour la positionner sur la graduation
désirée.
Réglage de l’interrupteur Plage de vitesses
0 Position ARRÊT
2 11,000 – 15,000 RPM
4 16,000 – 10,000 RPM
* 6 11,000 – 15,000 RPM
8 16,000 – 20,000 RPM
10 21,000 – 25,000 RPM
*6 est le réglage correspondant à la vitesse maximale
pour les brosses métalliques.
Vitesses de service et accessoires
Pour obtenir un meilleur contrôle dans le travail de
précision, tenez le Outil Rotatif comme un crayon,
entre le pouce et l’index.
Tenez l’outil dans la « paume de la main » pour le
meulage de surfaces planes ou lors de l’utilisation
de disques de découpage.
comment coupe l’outil rotatif sans cordon. N’oubliez pas
que le travail est accompli par la vitesse de l’outil et par
l’accessoire monté dans la douille de serrage. Vous ne
devez pas vous appuyer sur l’outil ni pousser celui-ci
dans le matériau.
Abaissez plutôt l’accessoire en rotation, légèrement vers
la pièce, en le laissant toucher l’endroit où vous voulez
commencer la coupe (ou le ponçage ou la gravure, etc.).
Axez vos efforts sur le guidage de l’outil sur la pièce, en
n’exerçant qu’une très faible pression de votre main.
Laissez l’accessoire faire le travail.
Il est habituellement préférable de passer l’outil plusieurs
fois plutôt que de tenter de faire tout le travail d’une seule
fois. Ainsi, pour pratiquer une coupe, passez l’outil
allant-venant sur la pièce, tout comme vous le feriez avec
un petit pinceau. Coupez un peu de matériau à chaque
passage jusqu’à ce que vous atteigniez la profondeur
désirée. L’approche douce et adroite est celle qui convient le mieux à la plupart des tâches. Vous exercez ainsi
un meilleur contrôle, êtes moins susceptible de commettre des erreurs, et obtenez le meilleur rendement de
l’accessoire.
DM 2610913513 6/01 6/8/01 8:45 PM Page 30
Page 31

Página 31
Pour vous aider à déterminer la vitesse de service optimale pour différents matériaux ou accessoires, nous
avons préparé une série de tableaux qui apparaissent
aux pages 33, 34 et 35. En consultant ces tableaux,
vous aurez tôt fait de découvrir les vitesses recommandées pour tous les genres d’accessoires. Examinez
bien ces tableaux pour vous familiariser avec le contenu
de chacun.
En dernière analyse, la meilleure façon de déterminer la
bonne vitesse de travail sur un matériau donné est de
procéder à des essais pendant quelques minutes sur
une pièce de rebut, même après avoir consulté le
tableau. Vous apprendrez vite qu’une vitesse plus lente
ou plus rapide est plus efficace, par une simple observation de ce qui se produit lorsque vous passez l’outil
une ou deux fois à des vitesses différentes. Ainsi,
lorsque vous travaillez avec une matière plastique, commencez à basse vitesse et augmentez cette vitesse
jusqu’à ce que vous constatiez que la matière plastique
fond au point de contact. Diminuez la vitesse progressivement afin d’obtenir la vitesse de travail optimale.
Certaines règles concernant la vitesse :
1. Les matières plastiques et les matières qui fondent
à basses températures doivent être coupées à basses vitesses.
2. Le polissage, l’émeulage et le nettoyage à l’aide
d’une brosse métallique doivent se faire à des
vitesses de moins de 15 000 tours/minute afin de
prévenir les dommages à la brosse.
3. Le bois doit être coupé à haute vitesse.
4. Le fer ou l’acier doit être coupé à une vitesse maximum si on utilise un accessoire au carbure de
tungstène, mais à des vitesses moindres si on utilise
des couteaux à acier rapide. Si un tel couteau commence à claquer, c’est généralement une indication
qu’il tourne trop lentement.
5. L’aluminium, les alliages de cuivre, les alliages de
plomb, les alliages de zinc, et l’étain peuvent être
coupés à n’importe quelle vitesse, selon le genre de
coupe que l’on effectue. Utilisez de la paraffine ou
tout autre lubrifiant convenable sur le couteau pour
éviter que le matériau coupé n’adhère aux dents du
couteau.
Il ne suffit pas d’accroître la pression sur l’outil lorsqu’il
ne coupe pas à votre satisfaction. Peut-être devriezvous utiliser un couteau différent ou peut-être un ajustement de la vitesse solutionnerait le problème.
Cependant, faire pression sur l’outil aide rarement.
Vitesses d’utilisation pour les accessoires - (suite)
Utilisation de l’outil rotatif sans fil avec des accessoires
L’outil rotatif sans fil peut être utilisé avec tous les accessoires Dremel. Si vous possédez déjà ou prévoyez
d’acheter un pied de perceuse No 212, une table de toupillage No 231, un accessoire de défonceuse No 330
ou un porte-outil No 2217, veuillez contacter le Service Clients au 1-800-437-3635 pour obtenir GRATUITEMENT
une bague d’adaptation (numéro de pièce 2610912344). Cette bague d’adaptation vous permettra d’utiliser
votre nouvel outil rotatif sans fil avec les accessoires mentionnés ci-dessus.
Questions ou problèmes ? Composez le 1-800-437-3635.
Ou visitez notre site web à www.Dremel.com
DM 2610913513 6/01 6/8/01 8:45 PM Page 31
Page 32

Page 32
8-108-108-10
NUMÉRO DE
CATALOGUE
BOIS
TENDRE
BOIS
DUR
STRATIFIÉS
MATIÈRES PLASTIQUES
ACIER
ALUMINIUM,
LAITON, ETC.
COQUILLE /
PIERRE
CÉRAMIQUE
VERRE
RÉGLAGES DE VITESSE
* Vitesse pour coupes légères, risque de brûlures sur rainures profondes.
• Selon le sens de coupe par rapport au grain du bois.
COUTEAUX À COUPE RAPIDE
COUTEAUX À GRAVER
100, 121, 131
114, 124, 134, 144
190
118, 191, 192, 193, 194
116, 117, 125, 196
115
198
199
101010
10*
10*
10*
8-10
6-8
6-8
8-10*
6-8*
6-8
8-10
8-10
8-10
8-10
8-10
8-10
6-8
6-8
4-6
6-8
6-8
4-6
10101010101010
10
10
6-8
10
10
6-8106-8
6-8
6-8
4-6
4-6
4-6
4-6
4-6
4-6
4-6
4-6
4-6
8-10
6-8
4-6
2-6
4-6
4-6
8-10
4-6
10
10
4-6
2-4
6-8
4-6
Utilisez uniquement les accessoires de haute performance mis à l'épreuve par Dremel.
105, 108
106, 109
107, 110
111
112
113
101010
10*
10*
10*
POINTES DE MEULE EN DIAMANT
7103, 7105, 7117, 7120,
7122, 7123, 7134, 7144
8-10 8-10
9931, 9932, 9933, 9934,
9935, 9936
10 8 2-4
6-8
COUTEAUX AU CARBURE DE TUNGSTÈNE
COUTEAUX AU CARBURE DE TUNGSTÈNE À DENT STRUCTURÉE
9901, 9902, 9903, 9904,
9905, 9906, 9912
10 8-10 2-4 10 6-8
9909, 9910, 9911
8-1010
8-10
10
DM 2610913513 6/01 6/8/01 8:45 PM Page 32
Page 33

Page 33
6-10
10
8
6-10
2-4
2-4
2-4
10
10
10
10
8
10
8
10
409, 420, 426, 540
542
545
560
561
562
6-10
10
10
6-10
83142, 83322, 83702,
84922, 85422, 85602,
85622
903, 911, 921, 932, 941,
945, 952, 953, 954, 971,
997, 8153, 8175, 8193,
8215
6-8
10
2-6
2-6 2-8
2-4 10 10
ACCESSOIRES DE COUPE
612, 640
615, 617, 618, 650, 652
654
10*
10*
10*
10 1010 10
10•
10•
10•
POINTES ABRASIVES
516,517,518
500
6
6
6
6
8
8
6
6
4
4
NUMÉRO DE
CATALOGUE
BOIS
TENDRE
BOIS
DUR
STRATIFIÉS
MATIÈRES PLASTIQUES
ACIER
ALUMINIUM,
LAITON, ETC.
COQUILLE /
PIERRE
CÉRAMIQUE
VERRE
RÉGLAGES DE VITESSE
* Vitesse pour coupes légères, risque de brûlures sur rainures profondes.
• Selon le sens de coupe par rapport au grain du bois.
MÈCHES DE TOUPILLAGE À HAUTE VITESSE (S’utilisent avec un guide de coupe ou une table de toupillage)
Utilisez uniquement les accessoires de haute performance mis à l'épreuve par Dremel.
2-4
541
453, 454, 455
2-6 2-8
10 1010 10
10
2-4
MEULES AU CARBURE DE SILICIUM
MEULES À L’OXYDE D’ALUMINIUM
PIERRES À AFFÛTER POUR TRONÇONNEUSE A CHAÎNE
Pour plaques de plâtre. Vous obtiendrez de meilleurs résultats sur la position 10. (Utilisez un guide de coupe)
DM 2610913513 6/01 6/8/01 8:45 PM Page 33
Page 34

Página 34
461, 462, 463
414, 422, 429
425, 427
423
403, 404, 405
530, 531, 532
428, 442, 443
535, 536, 537
10
8-10
8-10
8-10
666
6
466
6
4
6
6
2-4
2
10
8-10
8-10
8-10
6
6
6
10
8-10
8-10
10
8-10
8-10
6
10
8-10
8-10
NUMÉRO DE
CATALOGUE
BOIS
TENDRE
BOIS
DUR
STRATIFIÉS
MATIÈRES PLASTIQUES
ACIER
ALUMINIUM,
LAITON, ETC.
COQUILLE /
PIERRE
CÉRAMIQUE
VERRE
RÉGLAGES DE VITESSE
* Vitesse pour coupes légères, risque de brûlures sur rainures profondes.
• Selon le sens de coupe par rapport au grain du bois.
ACCESSOIRES DE POLISSAGE
430, 431, 438
439, 440, 444
407, 408, 432
411, 412, 413
502, 503, 504, 505 10 10 1082
2-10
2-10
2-10
8
2-10
2-10
2-10
2-10
2-10
2-10
2-10
2-10
2-10
8
2-6
2-6
2-6
2-4
101010
101010
2-4
RUBANS ET DISQUES DE PONÇAGE
DISQUES LAMELLAIRES
569, 570
À utiliser sur coulis pour murs et plancher (S’utilise avec le guide de décapage de joints)
FORETS POUR EXTRACTION DE COULIS
150 10 6
8
10 2-4
FORET
511 6 6 664
BUFFLES ABRASIFS DE FINITION
Utilisez uniquement les accessoires de haute performance mis à l'épreuve par Dremel.
DM 2610913513 6/01 6/8/01 8:45 PM Page 34
Page 35

Page 35
Entretien
IL N’EXISTE À L’INTÉRIEUR
AUCUNE PIÈCE SUSCEPTIBLE D’ÊTRE ENTRETENUE PAR L’UTILISATEUR.
L’entretien préventif exécuté par des personnes non
autorisés peut entraîner un positionnement erroné
des composants et des fils internes, ce qui peut
présenter de graves dangers. Nous recommandons
de confier toute intervention d’entretien sur l’outil à un
centre de service-usine Dremel. TECHNICIENS :
Débranchez l’outil et/ou le chargeur de la source de
courant avant d’entretenir.
Moteurs C.C.
Le moteur de votre outil a été conçu pour de
nombreuses heures d’utilisation fiable. Pour maintenir
l’efficacité maximale du moteur, nous recommandons
de l’examiner tous les six mois. Seul un moteur de
remplacement Dremel authentique, conçu spécialement
pour votre outil, doit être utilisé.
Nettoyage
Pour éviter les accidents,
débranchez toujours l’outil
et/ou le chargeur de la source de courant avant de
nettoyer. La façon la plus efficace de nettoyer l’outil est
à l’aide d’air sec comprimé. Portez toujours des
lunettes de sécurité en nettoyant les outils à l’air
comprimé.
Les prises d’air et les leviers de commutation doivent
être gardés propres et exempts de corps étrangers. Ne
tentez pas de nettoyer en insérant des objets pointus à
travers l’ouverture.
Certains solvants et agents
nettoyants abîment les
pièces en plastique. Citons notamment l’essence, le
tétrachlorure de carbone, les solvants chlorés de
nettoyage, l’ammoniaque et les détersifs ménagers
qui contiennent de l’ammoniaque.
Rallonges
Si un cordon de rallonge
s'avère nécessaire, vous
devez utiliser un cordon avec conducteurs de dimension adéquate pouvant porter le courant nécessaire à
votre outil. Ceci préviendra une chute excessive de
tension, une perte de courant ou une surchauffe. Les
outils mis à la terre doivent utiliser des cordons de
rallonge trifilaires pourvus de fiches à trois broches
ainsi que des prises à trois broches.
DIMENSIONS DE RALLONGES RECOMMANDÉES
OUTILS 120 VOLTS COURANT ALTERNATIF
REMARQUE : Plus le calibre est petit, plus le fil est gros.
AVERTISSEMENT
!
AVERTISSEMENT
!
AVERTISSEMENT
!
Intensité
nominale
de l’outil
Longueur en pieds
Longueur en mètres
3-6
6-8
8-10
10-12
12-16
18 16 16 14 .75 .75 1.5 2.5
18 16 14 12 .75 1.0 2.5 4.0
18 16 14 12 .75 1.0 2.5 4.0
16 16 14 12 1.0 2.5 4.0 —
14 12 — — — — — —
25 50 100 150 15 30 60 120
Calibre A.W.G.
Calibre en mm
2
Maintenance
MISE EN GARDE
!
DM 2610913513 6/01 6/8/01 8:45 PM Page 35
Page 36

Page 36
Reportez-vous à la section d’informations sur le bon
de commande d’accessoires DREMEL : vous y trouverez les illustrations des accessoires disponibles.
Vous pouvez vous procurer ces accessoires auprès
de votre quincaillerie locale ou au centre de bricolage ou d’articles ménagers le plus proche de chez
vous.
Douilles
Si vous vous attendez à utiliser différents accessoires,
nous vous recommandons d’acheter initialement un
jeu complet de quatre douilles. Rangez-les de manière
à avoir la douille de taille appropriée pour tout accessoire ou foret que vous désirez utiliser. Les douilles de
3,2 mm, 2,4 mm, 0,8 mm et 1,6 mm peuvent
actuellement recevoir tous les accessoires Dremel
offerts. Les douilles d’1/8 po sont comprises dans la
plupart des kits d’outils rotatifs.
Mandrins
Un mandrin est une tige à embout fileté ou à vis qui est
nécessaire pour l’utilisation d’accessoires de polissage, de disques de découpage, de disques de
ponçage ou de meules de polissage. Les mandrins
sont utilisés parce que les disques de ponçage, les disques de découpage et les accessoires similaires
doivent être remplacés souvent. Le mandrin est une
tige permanente, ce qui vous permet de ne remplacer
que la tête usée au besoin et d’économiser les frais de
remplacer l’arbre chaque fois.
Mandrin à vis No. 401
Il s’agit d’un mandrin à vis utilisé avec la pointe de
polissage en feutre et les disques de polissage en feutre. Tiges de 3,2 mm.
Mandrin à petite vis No. 402
Il s’agit d’un mandrin avec une petite vis à son
extrémité. Il s’utilise avec les disques de découpage en
émeri et en fibre de verre, les disques de ponçage et les
disques de polissage. Tiges de 3,2 mm.
Mandrin à extrémité filetée No. 424
Il s’agit d’un mandrin présentant une extrémité filetée
qui se visse dans la pointe de polissage, accessoire No.
427. Tiges de 3,2 mm.
Couteaux à grande vitesse
Offerts en un grand nombre de formes, les couteaux à
grande vitesse servent à ciseler, couper et mortaiser
dans le bois, les matières plastiques et les métaux
mous tels que l’aluminium, le cuivre et le laiton. Ce
sont les accessoires à utiliser pour le détourage à main
libre ou le ciselage dans le bois ou le plastique, ainsi
que pour le coupage de précision. Faits d’acier de
haute qualité. Tiges de 3,2 mm.
Couteaux au carbure de tungstène
Ces couteaux résistants et de longue durée sont destinés à être utilisés sur l’acier trempé, la céramique
cuite et autres matériaux très durs. On peut s’en servir
pour graver les outils et le matériel de jardinage. Tiges
de 3,2 mm.
Couteaux à graver
Ce groupe présente un vaste éventail de tailles et de
formes, et ces couteaux sont conçus pour le travail
délicat sur la céramique (à l’état vert), les sculptures en
bois, les bijoux et la gravure sur coquillages, os, etc.
On les utilise souvent dans le travail complexe de production des plaquettes à circuits imprimés. Ils ne
doivent pas être utilisés sur l’acier et autres matériaux
très durs, mais ils sont excellents sur le bois, les
matières plastiques et les métaux mous. Ils nécessitent
la tiges de 2,4 mm.
Couteaux au carbure de tungstène
(aux dents nervurées)
Les dents très affilées, à coupe rapide, enlèvent une
plus grande quantité de matériau tout en se chargeant
le moins possible. S’emploient sur la fibre de verre, le
bois, les matières plastiques, l’époxyde et le
caoutchouc. Tiges de 3,2 mm et 2,4 mm.
Meules en oxyde d’aluminium (rouge/brun)
Rondes, pointues, plates : elles sont offertes dans
toutes les formes. Ces meules sont faites d’oxyde d’aluminium et elles couvrent pratiquement chaque application de meulage. Vous pouvez les utiliser pour aiguiser les lames de tondeuse à gazon, les pointes de
tournevis, les couteaux, les ciseaux, les burins et
autres outils de coupe. Utilisez-les pour enlever les
bavures sur les pièces coulées en métal, ébarber tout
métal après la coupe, lisser les joints soudés, meuler
les rivets et enlever la rouille. Ces meules peuvent être
Utilisez uniquement les accessoires de haute performance mis à l'épreuve par
Dremel. Aucun des autres accessoires n’a été conçu pour cet outil. Leur usage
pourrait occasionner des blessures corporelles ou des dommages matériels.
AVERTISSEMENT
!
Accessoires Dremel
DM 2610913513 6/01 6/8/01 8:45 PM Page 36
Page 37

Page 37
réaiguisées avec une pierre d’ébarbage. Dans les ateliers d’usinage, les forets et les couteaux pour usage à
grande vitesse sont généralement meulés à l’aide de
disques en oxyde d’aluminium. Tiges de 3,2 mm.
Meules au carbure de silicium (bleu/vert)
Plus robustes que les pointes en oxyde d’aluminium,
ces meules sont conçues spécialement pour usage sur
les matériaux durs tels que le verre et la céramique. On
les utilise souvent pour enlever les marques et l’excès
de glaçure sur la céramique, ainsi que la gravure sur le
verre. Tiges de 3,2 mm.
Pointes de meule en diamant
Excellentes pour le travail de précision sur le bois, le
jade, la céramique, le verre et autres matériaux durs.
Les mèches sont recouvertes de particules de diamant.
Tiges de 2,4 mm.
Brosses métalliques
Trois formes différentes de brosses en fil métallique
sont offertes. Pour obtenir de meilleurs résultats, les
brosses en fil métallique doivent être utilisées à des
vitesses ne dépassant pas 15 000 tr/min. Référezvous au chapitre sur les vitesses d’utilisation pour
déterminer le réglage approprié de l’outil. Les trois
formes sont offertes en trois matériaux différents : acier
inoxydable, laiton et fil de carbone. L'acier inoxydable
est efficace sur l'étain, l'aluminium, l'acier inoxydable et
les autres métaux, sans laisser d'« après-rouille ». Les
brosses en laiton ne forment pas d'étincelles et sont
plus douces que l'acier, ce qui les rend adaptées pour
usage sur les métaux mous tels que l'or, le cuivre et le
laiton. Les brosses en fil de carbone sont bonnes pour
le nettoyage à usage général.
Brosses en soie de porc
Ces brosses conviennent parfaitement bien au nettoyage de l’argenterie, des bijoux et des objets d’antiquité.
Les trois formes permettent d’atteindre les angles
étroits et autres endroits difficiles d’accès. Les brosses
en soie de porc peuvent être utilisées avec la pâte à polir
pour accélérer le nettoyage ou le polissage.
Pression de brossage
1. Souvenez-vous : ce sont les pointes d’une brosse
métallique qui font le travail. N’appliquez qu’une
pression très légère sur la brosse de sorte que seules
les pointes des poils viennent en contact avec la
pièce.
2. Si vous appliquez une pression trop importante,
les poils seront surchargés, résultant en un balayage
de la pièce. Si ceci se prolonge, la durée de vie de la
brosse s’en trouvera écourtée à cause de la fatigue
des poils.
3. Appliquez la brosse sur la pièce de manière à ce
que la plus grande partie possible de sa tranche soit
en contact total avec la pièce. Appliquer le côté ou le
bord de la brosse sur la pièce résulterait en une cassure des poils et écourterait sa durée de vie.
Accessoires de polissage
Ceux-ci comprennent une pointe ainsi qu’un disque à
polir, tous deux imbibés, pour lisser les surfaces
métalliques ; une pointe et un disque en feutre ainsi
qu’un disque en tissu servant tous à polir les matières
plastiques, les métaux et les petites pièces de bijouterie.
Ce groupe comprend également une pâte à polir (No.
421) pour usage avec les disques à polir en feutre et en
tissu.
Les pointes de polissage produisent une surface très
lisse, mais la surface est plus éclatante lorsque l’on
utilise les disques en feutre ou en tissu et la pâte à polir.
Pour de meilleurs résultats, les accessoires de polissage doivent être utilisés à des vitesses non
supérieures à 15 000 tours/minute.
Aucun pâte à polir n’est nécessaire si on utilise le disque
à polir No. 425, la pointe à polir No. 427.
15°
CORRECT
Les pointes des poils font le travail.
INCORRECT
Pression excessive risquant de briser les poils.
Accessoires Dremel - (suite)
DM 2610913513 6/01 6/8/01 8:45 PM Page 37
Page 38

Page 38
Meules abrasives en oxyde d’aluminium
Servent à enlever la peinture, ébarber le métal et polir
l’acier inoxydable ainsi que les autres métaux. Offertes
en grains fin et moyen. Tiges de 3,2 mm.
Accessoires de ponçage
Les disques de ponçage, à grains fin, moyen et gros,
sont adaptés au mandrin No. 402. Ils peuvent être utilisés pour pratiquement toute petite tâche de ponçage à
exécuter, allant de la fabrication de maquettes à la finition de beaux meubles. Ces accessoires comprennent
également le tambour ponceur, petit tambour qui s’insère dans le Outil Rotatif et permet de façonner le bois,
de lisser la fibre de verre, de poncer l’intérieur des
courbes et autres endroits difficiles, et d’accomplir
d’autres tâches de ponçage. Vous remplacez les bandes
de ponçage sur le tambour à mesure qu’elles s’usent et
perdent leur grain. Les bandes sont offertes en grains
fin ou gros. Les disques lamellaires meulent et polissent
les surfaces plates ou à contours. Ils peuvent être utilisés le plus efficacement possible en tant que ponceuses de finition après avoir procédé à un ponçage de
surface et à une extraction de matériaux plus intensifs.
On peut trouver des disques lamellaires à grain fin et à
gros grain. Les buffles sont un excellent accessoire de
finition pour le nettoyage et le ponçage léger. Ils sont
d’un usage
efficace sur le métal, le verre, le bois, l’aluminium et le plastique. Les buffles à gros grain et à grain moyen
sont vendus ensemble. Tiges de 3,2 mm.
Meule
Utiliser pour ébavurer, enlever la rouille et la rectification
à usage général. Utiliser avec le mandrin No. 402.
Disques de découpage
Ces disques minces en fibre de verre ou émeri servent
à trancher, couper et autres opérations du genre.
Utilisez-les pour couper les têtes de boulon et écrous
gelés, ou pour refaire la fente d’une tête de vis qui est si
abîmée que le tournevis n’y a plus de prise. Très efficaces pour couper les câbles BX, les petites tiges, les
tubes et les câbles, ainsi que pour pratiquer des trous
rectangulaires dans la tôle.
Mèche pour coupe de murs secs
Vous donne des coupes rapides et nettes dans les murs
secs.
Mèche pour coupe de carrelage
Coupe le carrelage des murs en céramique, les plaques
de ciment et le plâtre.
Mèche pour coupe en spirale
Coupe à travers tous les types de bois et bois composites.
Fers de défonceuse en acier rapide
Pour le défonçage, la marqueterie et le mortaisage du
bois et autres matériaux mous. Utilisez-les avec l’accessoire de défonçage Dremel No 330 et la table de
toupillage Dremel No 231.
Le mandrin No. 401 s'emploie avec les meules et l'embout de polissage en feutre. Insérez l'embout sur la vis
soigneusement. L'embout en feutre doit descendre droit sur le mandrin de la vis, et il doit être tourné complètement jusqu'à la douille.
DM 2610913513 6/01 6/8/01 8:45 PM Page 38
Page 39

Page 39
Pour remplacer une bande sur la ponceuse à tambour, desserrez la vis sans la retirer pour contracter le tambour,
puis faites glisser la vieille bande à l'extérieur. Faites glisser la nouvelle bande de ponçage sur la ponceuse, puis donnez de l'expansion au tambour en serrant à nouveau la vis.
Avant chaque usage, vérifiez pour vous assurer que tous les composants sont assemblés sur la tige de l'accessoire et que le tambour est suffisamment étendu pour fixer
solidement la bande durant l'utilisation. Si la bande de ponçage est lâche sur le tambour durant le fonctionnement,
elle peut être projetée et vous frapper ou frapper les personnes présentes.
AVERTISSEMENT
!
Le mandrin No. 402 possède une petite vis à son extrémité, et cette vis est utilisée avec les patins de ponçage et
les meules de coupe à l'émeri. Les vitesses élevées, habituellement les vitesses maximales, sont celles qui
conviennent le mieux à la plupart des tâches, y compris la coupe de l'acier qui est illustrée ici.
Le filet de la vis à métaux sur le mandrin No. 424 se visse dans la pointe à polir No. 427. Ce mandrin et les
autres mandrins filetés doivent être vissés fermement sur la douille avant d'être utilisés.
DM 2610913513 6/01 6/8/01 8:46 PM Page 39
Page 40

Page 40
Votre Outil Rotatif Dremel est garanti contre les vices de matériaux ou d’exécution pendant un délai cinq ans depuis
la date d’achat. Dans l’hypothèse où le produit ne se conformerait pas à cette garantie écrite, veuillez procéder de
la façon suivante :
1. NE RAPPORTEZ PAS le produit à l’endroit où vous l’avez acheté.
2. Emballez avec soin le produit seul, sans aucun autre article, et renvoyez-le, port payé, accompagné :
A. d’une copie de votre preuve d’achat datée (veuillez en garder une copie pour vous-même)
B. d’une déclaration écrite concernant la nature du problème
C. d’une indication de vos nom, adresse et numéro de téléphone, à l’adresse suivante :
ÉTATS-UNIS
Dremel Service Center Dremel Service Center
4915 Twenty-First Street OU 4631 E. Sunny Dunes
Racine, Wisconsin 53406 Palm Springs, California 92264
1-800-437-3635 1-800-437-3635
CANADA À L’EXTÉRIEUR DU TERRITOIRE
Giles Tool Agency CONTINENTAL DES ÉTATS-UNIS
6520 Lawrence Av. East Consultez votre distributeur local ou écrivez à :
Scarborough, Ontario Dremel
Canada M1C 4A7 4915 Twenty-First St., Racine, Wisconsin 53406
1-888-285-3476
Nous vous recommandons d’assurer le paquet contre la perte ou les dommages en cours de route dont nous ne
pouvons assumer la responsabilité.
Cette garantie n’est offerte qu’à l’acheteur enregistré d’origine. LES DOMMAGES AU PRODUIT RÉSULTANT DE
MANIPULATIONS, ACCIDENT, USAGE ABUSIF, NÉGLIGENCE, RÉPARATIONS OU ALTÉRATIONS NON
AUTORISÉES, UTILISATION D’ACCESSOIRES NON APPROUVÉS OU AUTRES CAUSES NON LIÉES À LA
DÉFAILLANCE DES MATÉRIAUX OU DE L’EXÉCUTION NE SONT PAS COUVERTS PAR CETTE GARANTIE.
Aucun employé, mandataire, vendeur ou autre personne n’est autorisé à accorder des garanties au nom de Dremel.
Si l’inspection effectuée par Dremel révèle que le problème a été causé par une défaillance des matériaux ou de
l’exécution dans les limites de la garantie, Dremel réparera ou remplacera le produit gratuitement et renverra le produit port payé. Si elles peuvent être effectuées, les réparations rendues nécessaires par l’usure normale ou un usage
abusif, ou les réparations du produit une fois expirée la période de garantie, seront facturées aux tarifs réguliers de
l’usine.
DREMEL N’ACCORDE AUCUNE AUTRE GARANTIE DE QUELQUE NATURE QUE CE SOIT, EXPLICITE OU
IMPLICITE, ET TOUTES LES GARANTIES IMPLICITES DE COMMERCIALISATION ET D’APTITUDE À UN USAGE
PARTICULIER EN SUS DE L’OBLIGATION SUSVISÉE SONT DÉNIÉES PAR LES PRÉSENTES PAR DREMEL ET
EXCLUES DE CETTE GARANTIE LIMITÉE.
Cette garantie vous accorde certains droits précis, et vous pouvez également avoir d’autres droits qui varient d’un
endroit à un autre. L’obligation du garant se limite à réparer ou remplacer le produit. Le garant n’est responsable
d’aucun dommage accessoire ou indirect attribuable à cette supposée défaillance. Certaines juridictions ne permettent pas l’exclusion ou la limitation des dommages accessoires ou indirects ; il se peut donc que les limitations ou
l’exclusion qui précède ne s’appliquent pas à vous.
En ce qui concerne les prix et la façon de vous prévaloir de la garantie sur le territoire continental des États-Unis,
mettez-vous en contact avec votre distributeur Dremel local.
Garantie limitée de Dremel
DM 2610913513 6/01 6/8/01 8:46 PM Page 40
Page 41

Página 41
Instrucciones de funcionamiento y seguridad
Herramienta giratoria sin cordon modelo 780
SEA SINCERO … ¿Ha leído este MANUAL DEL USUARIO?
• Seguridad
• Ensamblaje
• Funcionamiento
• Información sobre accesorios
• Garantía
• Formulario de inscripción
• Piezas de repuesto
P.O. Box 1468
Racine, Wisconsin
1-800-437-3635
http://www.dremel.com
©
S-B Power Tool Co.
2001
All Rights Reserved
DM 2610913513 6/01 6/8/01 8:46 PM Page 41
Page 42

Página 42
Area de trabajo
Mantenga el área de trabajo limpia y bien iluminada.
Las mesas desordenadas y las áreas oscuras invitan a
que se produzcan accidentes.
No utilice herramientas mecánicas en atmósferas
explosivas, tales como las existentes en presencia de
líquidos, gases o polvos inflamables. Las herramien-
tas mecánicas generan chispas y éstas pueden dar
lugar a la ignición del polvo o los vapores.
Mantenga a las personas que se encuentren presentes, a los niños y a los visitantes alejados al utilizar una herramienta mecánica. Las distracciones
pueden hacer que usted pierda el control.
Seguridad eléctrica
No abuse del cordón. Nunca use el cordón para llevar la herramienta. Mantenga el cordón alejado del
calor, el aceite, los bordes afilados o las piezas
móviles. Cambie los cordones dañados inmediatamente. Los cordones dañados pueden causar un
incendio.
Una herramienta accionada por baterías que tenga
baterías integradas o un paquete de baterías separado se debe recargar solamente con el cargador
especificado para la batería. Un cargador que puede
ser adecuado para un tipo de batería puede crear un
peligro de incendio cuando se usa con otra batería.
Utilice la herramienta accionada por baterías solamente con el paquete de baterías designado específicamente. El uso de cualquier otra batería puede crear
un peligro de incendio.
Seguridad personal
Manténgase alerta, fíjese en lo que está haciendo y
use el sentido común cuando utilice una herramienta
mecánica. No use la herramienta cuando esté cansado o se encuentre bajo la influencia de drogas, alcohol o medicamentos. Un momento de distracción al
utilizar herramientas mecánicas puede dar lugar a
lesiones personales graves.
Vístase adecuadamente. No se ponga ropa holgada ni
joyas. Sujétese el pelo. Mantenga el pelo, la ropa y
los guantes alejados de las piezas móviles. La ropa
holgada, las joyas o el pelo largo pueden quedar atrapados en las piezas móviles. Mantenga los mangos
secos, limpios y libres de aceite y grasa.
Evite el arranque accidental. Asegúrese de que el
interruptor esté en la posición fijada o de apagado
antes de introducir el paquete de baterías. Llevar her-
ramientas con el dedo en el interruptor o introducir el
paquete de baterías en una herramienta con el interruptor en la posición de encendido invita a que se produzcan accidentes.
Quite las llaves de ajuste o de tuerca antes de encender la herramienta. Una llave de ajuste o de tuerca que
se deje puesta en una pieza giratoria de la herramienta
puede ocasionar lesiones personales.
No intente alcanzar demasiado lejos. Mantenga un
apoyo de los pies y un equilibrio adecuados en todo
momento. El apoyo de los pies y el equilibrio adecua-
dos permiten un mejor control de la herramienta en
situaciones inesperadas.
Utilice equipo de seguridad. Use siempre protección
de los ojos. Se debe utilizar una máscara antipolvo,
zapatos de seguridad antideslizantes, casco o protección de los oídos según lo requieran las condiciones.
Utilización y cuidado de las herramientas
Utilice abrazaderas u otro modo práctico de fijar y
soportar la pieza de trabajo a una plataforma estable.
La sujeción de la pieza de trabajo con la mano o contra
el cuerpo resulta inestable y puede ocasionar pérdida de
control.
No fuerce la herramienta. Use la herramienta correcta para la aplicación que desea. La herramienta cor-
recta hará el trabajo mejor y con más seguridad a la
capacidad nominal para la que está diseñada.
No utilice esta herramienta si el interruptor no la
enciende o apaga. Una herramienta que no se puede
controlar con el interruptor es peligrosa y se debe
reparar.
Desconecte el paquete de baterías de la herramienta
o ponga el interruptor en la posición fijada o de apagado antes de hacer cualquier ajuste, cambiar accesorios o guardar la herramienta. Dichas medidas pre-
ventivas de seguridad reducen el riesgo de arrancar la
herramienta accidentalmente.
Guarde las herramientas que no esté usando fuera
del alcance de los niños y otras personas no capacitadas. Las herramientas son peligrosas en las manos
de los usuarios no capacitados.
Cuando no se esté utilizando el paquete de baterías,
manténgalo alejado de otros objetos metálicos como:
sujetapapeles, monedas, llaves, clavos, tornillos u
otros objetos metálicos pequeños que pueden hacer
una conexión de un terminal con otro. El cortocircuito
de los terminales de las baterías puede causar chispas,
quemaduras o un incendio.
Mantenga las herramientas con cuidado. Conserve
las herramientas de corte afiladas y limpias. Las her-
ramientas mantenidas adecuadamente, con bordes de
corte afilados, tienen menos probabilidades de atascarse y son más fáciles de controlar.
Compruebe la desalineación o el atasco de las piezas
móviles, la ruptura de piezas y cualquier otra
situación que pueda afectar el funcionamiento de las
Lea y entienda todas las instrucciones. El incumplimiento de todas las instrucciones indi-
cadas a continuación puede dar lugar a sacudidas eléctricas, incendios y/o lesiones person-
ales graves.
CONSERVE ESTAS INSTRUCCIONES
ADVERTENCIA
!
Normas generales de seguridad para todas las herramientas accionadas por baterias
DM 2610913513 6/01 6/8/01 8:46 PM Page 42
Page 43

Página 43
herramientas. Si la herramienta está dañada, haga
que realicen un servicio de ajustes y reparaciones a
la herramienta antes de usarla. Muchos accidentes
son causados por herramientas mantenidas deficientemente.
Utilice únicamente accesorios que estén recomendados por el fabricante de su modelo. Los accesorios
que pueden ser adecuados para una herramienta
pueden volverse peligrosos cuando se utilizan en otra
herramienta.
Servicio
El servicio de ajustes y reparaciones de una
herramienta debe ser realizado únicamente por
personal de reparaciones competente. El servicio o
mantenimiento realizado por personal no competente
podría ocasionar un peligro de que se produzcan
lesiones.
Al realizar servicio de ajustes y reparaciones de
una herramienta, utilice únicamente piezas de
repuesto idénticas. Siga las instrucciones que
aparecen en la sección Mantenimiento de este
manual. El uso de piezas no autorizadas o el
incumplimiento de las instrucciones de
Mantenimiento puede ocasionar un peligro de que se
produzcan sacudidas eléctricas o lesiones.
Los accesorios deben tener capacidad nominal
para al menos la velocidad recomendada en la etiqueta de advertencia de la herramienta. Las muelas
y otros accesorios que funcionen a velocidades superiores a la velocidad nominal pueden saltar en pedazos y causar lesiones.
Sujete siempre la herramienta por las superficies
de agarre aisladas al realizar una operación en la
que la herramienta de corte pueda entrar en contacto con cables ocultos o con su propio cordón. El
contacto con un cable con corriente transmitirá corriente a las piezas metálicas al descubierto y hará que
el operador reciba sacudidas eléctricas. Si el corte en
paredes existentes u otras áreas ciegas donde puedan
existir cables eléctricos es inevitable, desconecte
todos los fusibles o cortacircuitos que alimentan el
lugar de trabajo.
No utilice el eje flexible en una posición en la que
el eje esté muy doblado. Doblar el eje excesivamente
puede generar calor excesivo en la envoltura o en la
pieza de mano. El mínimo recomendado es un radio
de 6 pulgadas.
Desconecte el paquete de baterías de la herramienta o ponga el interruptor en la posición fijada o de
apagado antes de hacer cualquier ensamblaje,
ajustes o cambiar accesorios. Dichas medidas pre-
ventivas de seguridad reducen el riesgo de arrancar la
herramienta accidentalmente.
Sepa la ubicación del interruptor. Al dejar la herramienta o al recogerla, usted podría activar el interruptor accidentalmente.
Sostenga siempre firmemente la pieza de mano en
las manos durante el arranque. El par de torsión de
reacción del motor, a medida que éste acelera hasta
alcanzar toda su velocidad, puede hacer que el eje se
tuerza.
Use siempre gafas de seguridad y máscara antipolvo. Use la herramienta únicamente en un área bien
ventilada. La utilización de dispositivos de seguridad
personal y el trabajar en un entorno seguro reducen el
riesgo de que se produzcan lesiones.
Después de cambiar las brocas o de hacer ajustes,
asegúrese de que la tuerca del portaherramienta y
otros dispositivos de ajuste estén apretados firmemente. Un dispositivo de ajuste flojo puede
desplazarse inesperadamente, causando pérdida de
control, y los componentes giratorios flojos saldrán
despedidos violentamente.
No ponga las manos en el área de la broca que gira.
Es posible que la proximidad de la mano a la broca
que gira no siempre sea obvia.
Deje que los cepillos estén en marcha a la velocidad de funcionamiento durante al menos un minuto
antes de utilizar la rueda. Durante este tiempo
nadie debe situarse delante del cepillo o en línea
con éste. Las cerdas o los alambres sueltos se
desprenderán durante el tiempo de rodaje.
Los cepillos de cerda nunca deben utilizarse a
velocidades superiores a 15,000 revoluciones/min.
Dirija la descarga de la escobilla de alambre que
gira de manera que se aleje de usted. Durante la
acción de "limpieza" con estas escobillas pueden
descargarse pequeñas partículas y diminutos fragmentos de alambre a alta velocidad que pueden
incrustarse en la piel. Las cerdas o los alambres se
desprenderán del cepillo a altas velocidades.
Use guantes protectores y careta protectora con los
cepillos de alambre o de cerdas. Aplique suavemente los cepillos de alambre o de cerdas a la
pieza de trabajo, ya que solamente las puntas de
los alambres o de las cerdas realizan el trabajo.
Una presión "grande" sobre los alambres o las cerdas
hará que estas partes resulten sometidas a una tensión excesiva, lo cual dará como resultado una acción
de barrido y hará que las cerdas o los alambres se
desprendan.
Maneje cuidadosamente la herramienta y las
ruedas de amolar individuales para evitar que se
mellen o se agrieten. Instale una muela nueva si la
herramienta se cae al amolar. No use una muela
que pueda estar dañada. Los fragmentos de una
muela que salta en pedazos durante el funcionamiento saldrán despedidos a gran velocidad y posiblemente le golpearán a usted o golpearán a las personas que estén presentes.
Normas de seguridad para herramienta giratoria sin cordon
DM 2610913513 6/01 6/8/01 8:46 PM Page 43
Page 44

Página 44
Nunca use brocas desafiladas o dañadas. Las brocas afiladas se deben manejar con cuidado. Las
brocas dañadas pueden romperse bruscamente
durante el uso. Las brocas desafiladas requieren más
fuerza para empujar la herramienta, con lo que es
posible que la broca se rompa.
Use abrazaderas para soportar la pieza de trabajo
siempre que resulte práctico. Nunca tenga una
pieza de trabajo pequeña en una mano y la herramienta en la otra mano mientas esté utilizando la
herramienta. Deje que haya suficiente espacio, al
menos 150 mm pulgadas, entre la mano y la broca
que gira. El material redondo, tal como las varillas
con espiga, las tuberías y los tubos, tiene tendencia a
rodar cuando se corta y puede hacer que la broca
"muerda" o salte hacia usted. El fijar con abrazaderas
una pieza de trabajo pequeña le permite usar ambas
manos para controlar la herramienta.
Inspeccione la pieza de trabajo antes de cortar. Al
cortar piezas de trabajo que tengan forma irregular,
planifique el trabajo para que la pieza de trabajo no
patine ni pellizque la broca y le sea arrancada de
las manos. Por ejemplo, si talla madera, asegúrese
de que no haya clavos ni objetos extraños en la pieza
de trabajo. Los clavos o los objetos extraños pueden
hacer que la broca salte.
Nunca arranque la herramienta cuando la broca
esté acoplada en el material. El borde de corte de la
broca puede engancharse en el material, causando
pérdida de control de la cortadora.
Evite que la muela rebote y se atasque, especialmente al trabajar en esquinas, bordes afilados,
etc. Esto puede causar pérdida de control y retroce-
so.
El sentido de avance con la broca en el interior del
material al tallar, fresar o cortar es muy importante. Haga avanzar siempre la broca hacia el interior del material en el mismo sentido en que el
borde de corte esté saliendo del material (que es el
mismo sentido en que las virutas salen despedidas). El hacer avanzar la herramienta en sentido
incorrecto hace que el borde de corte de la broca se
salga de la pieza de trabajo y tire de la herramienta en
el sentido de dicho avance.
Si la pieza de trabajo o la broca se atasca o se
engancha, apague la herramienta utilizando el
interruptor (posición "OFF"). Espere a que todas las
piezas móviles se detengan, desenchufe la herramienta y luego libere el material atascado. Si el
interruptor de la herramienta se deja encendido (posición "ON"), la herramienta podría volver a arrancar
inesperadamente, causando graves lesiones personales.
No deje desatendida una herramienta en marcha.
Apáguela. Solamente cuando la herramienta se
detenga por completo es seguro dejarla.
No amuele ni lije cerca de materiales inflamables.
Las chispas provenientes de la muela podrían inflamar estos materiales.
No toque la broca ni el portaherramienta después
de la utilización. Después de la utilización, la broca y
el portaherramienta están demasiado calientes para
tocarlos con las manos desnudas.
Limpie regularmente con aire comprimido las aberturas de ventilación de la herramienta. La acumu-
lación excesiva de metal en polvo dentro de la caja del
motor puede causar averías eléctricas.
No deje que el trabajar de manera confiada debido
a la familiarización adquirida con el uso frecuente
de la herramienta giratoria se convierta en algo
habitual. Recuerde siempre que un descuido de una
fracción de segundo es suficiente para causar
lesiones graves.
No altere ni utilice incorrectamente la herramienta.
Cualquier alteración o modificación constituye uso
incorrecto y puede tener como resultado graves
lesiones personales.
Este producto no está diseñado para utilizarse
como taladro dental en aplicaciones médicas en
seres humanos ni en veterinaria. Pueden producirse
lesiones personales graves.
Al utilizar sierras de acero, ruedas de recortar, cortadores de alta velocidad o cortadores de carburo
de tungsteno, tenga siempre la pieza de trabajo fija
con abrazaderas. Nunca intente sujetar la pieza de
trabajo con una mano cuando esté utilizando cualquiera de estos accesorios. La razón es que estas
ruedas se atascarán si se ladean ligeramente en la
ranura y pueden experimentar retroceso, causando
una pérdida de control que tendrá como resultado
lesiones graves. La otra mano se debe utilizar para
afianzar y guiar la mano que sujeta la herramienta.
Cuando una rueda de recortar se atasca, normalmente la propia rueda se rompe. Cuando la sierra de
acero, los cortadores de alta velocidad o el cortador
de carburo de tungsteno se atascan, es posible que
salten y se salgan de la ranura, con lo que usted
podría perder el control de la herramienta.
Cierto polvo generado por el
lijado, aserrado, amolado y
taladrado mecánicos, y por otras actividades de construcción, contiene agentes químicos que se sabe
que causan cáncer, defectos de nacimiento u otros
daños sobre la reproducción. Algunos ejemplos de
estos agentes químicos son:
• Plomo de pinturas a base de plomo,
• Sílice cristalina de ladrillos y cemento y otros produc-
tos de mampostería, y
• Arsénico y cromo de madera tratada químicamente.
Su riesgo por causa de estas exposiciones varía,
dependiendo de con cuánta frecuencia realice este tipo
de trabajo. Para reducir su exposición a estos agentes
químicos: trabaje en un área bien ventilada y trabaje con
equipo de seguridad aprobado, como por ejemplo máscaras antipolvo que estén diseñadas especialmente
para impedir mediante filtración el paso de partículas
microscópicas.
ADVERTENCIA
!
DM 2610913513 6/01 6/8/01 8:46 PM Page 44
Page 45

Página 45
Antes de utilizar el cargador de baterías, lea todas las
instrucciones e indicaciones de precaución que se
encuentran en (1) el cargador de baterías, (2) el
paquete de baterías y (3) el producto que utiliza
baterías.
Utilice solamente el cargador que acompañaba el
producto o un reemplazo directo según se indica en el
catálogo o en este manual. No sustituirlo por ningún
otro cargador. Utilice solamente los cargadores de
baterías Dremel No.786 con el producto.
No desarme el cargador ni lo haga funcionar si ha
recibido un golpe brusco, se ha caído o se ha dañado
de cualquier modo. Cambie el cordón o los enchufes
dañados inmediatamente. El reensamblaje incorrecto
o los daños pueden ocasionar sacudidas eléctricas o
incendio.
No recargue la batería en un entorno húmedo o mojado. No exponga el cargador a lluvia ni nieve. Si la
caja de baterías está agrietada o dañada de algún
otro modo, no la introduzca en el cargador. Se puede
producir un cortocircuito de las baterías o un incendio.
Cargue solamente las baterías recargables Dremel
Nos. 785 con los cargadores indicados anteriormente. Otros tipos de baterías pueden reventar
causando lesiones personales y daños.
Cargue el paquete de baterías a temperaturas superiores a +40 grados F (4 grados C) e inferiores a +105
grados F (41 grados C). Guarde la herramienta y el
paquete de baterías en lugares donde las temperaturas no superen 120 grados F (49 grados C). Esto es
importante para evitar daños graves a los elementos de
la batería.
Se puede producir un escape del líquido de las
baterías bajo condiciones extremas de uso o de temperatura. Evite el contacto con la piel y los ojos. El
líquido de la batería es cáustico y podría causar quemaduras químicas en los tejidos. Si el líquido entra en
contacto con la piel, lávela rápidamente con agua y
jabón y luego con jugo de limón o vinagre. Si el líquido
entra en contacto con los ojos, enjuáguelos con agua
durante un mínimo de 10 minutos y obtenga atención
médica.
Ponga el cargador sobre superficies planas ininflamables y alejado de materiales inflamables
cuando recargue el paquete de baterías. El car-
gador y el paquete de baterías se calientan durante el
proceso de carga. Las alfombras y otras superficies
termoaislantes bloquean la circulación adecuada de
aire, lo cual puede causar sobrecalentamiento del cargador y del paquete de baterías. Si observa humo o
que la carcasa se está derritiendo, desenchufe
inmediatamente el cargador y no utilice el paquete de
baterías ni el cargador.
El uso de un accesorio no recomendado ni vendido
por Dremel puede constituir un peligro de incendio,
sacudidas eléctricas o lesiones a las personas.
Batería/cargador
Cuidado de las baterías
Cuando las baterías no están
en la herramienta o en el car-
gador, manténgalas alejadas de objetos metálicos.
Por ejemplo, para evitar que las terminales hagan cortocircuito, NO ponga las baterías en una caja de her-
ramientas o en un bolsillo con clavos, tornillos, llaves,
etc. Se pueden producir un incendio o lesiones.
NO ARROJE LAS BATERIAS AL FUEGO NI LAS EXPONGA AL CALOR INTENSO. Pueden explotar.
Eliminación de las baterías
No intente desarmar la batería
ni quitar ninguno de los
componentes que sobresalen de las terminales de la
batería. Se pueden producir lesiones o un incendio.
Antes de tirarla, proteja las terminales que están al
descubierto con cinta adhesiva aislante gruesa para
prevenir cortocircuitos.
Baterias de niquel-cadmio
Si este producto está equipado con una batería de
níquel-cadmio, dicha batería debe recogerse, reciclarse
o eliminarse de manera segura para el medio ambiente.
“El sello de reciclaje de baterías
RBRC certificado por la EPA que se
encuentra en la batería de níquelcadmio (Ni-Cd) indica que S-B
Power Tool Company está partici-
pando voluntariamente en un programa de la industria para recoger y reciclar estas
baterías al final de su vida útil, cuando se retiran de
servicio en los Estados Unidos y Canadá. El programa
RBRC proporciona una alternativa conveniente a tirar
las baterías de Ni-Cd usadas a la basura o a la corriente municipal de aguas residuales, lo cual quizás sea
ilegal en su área.
Tenga la amabilidad de llamar al 1-800-8-BATTERY
para obtener información acerca de las prohibiciones/restricciones sobre el reciclaje y la eliminación
de baterías de Ni-Cd en su lugar o devuelva las
baterías a un Centro de servicio Skil/Bosch/Dremel
para reciclarlas. La participación de S-B Power Tool
Company en este programa es parte de nuestro compromiso hacia preservar nuestro medio ambiente y
conservar nuestros recursos naturales.”
Baterias de niquel-hidruro metalico
Si este producto está equipado con una batería de
níquel-hidruro metálico, dicha batería debe eliminarse
en un curso de agua municipal para residuos sólidos.
ADVERTENCIA
!
ADVERTENCIA
!
DM 2610913513 6/01 6/8/01 8:46 PM Page 45
Page 46

Página 46
Importante: Es posible que algunos de los símbolos siguientes se usen en su herramienta. Por favor, estúdielos y aprenda su significado. La interpretación adecuada de estos símbolos le permitirá utilizar la herramienta
mejor y con más seguridad.
Símbolo Nombre Designación/explicación
V Volt Tensión (potencial)
A Ampere Corriente
Hz Hertz Frecuencia (ciclos por segundo)
W Watt Potencia
kg Kilogramo Peso
min Minuto Tiempo
s Segundo Tiempo
Diámetro Tamaño de las brocas taladradoras, muelas, etc.,
n
0
Velocidad sin carga Velocidad rotacional sin carga
.../min Revoluciones o alternación por minuto Revoluciones, golpes, velocidad de
superficie, órbitas, etc., por minuto
0 Posición "off" (apagado) Velocidad cero, par motor cero...
1, 2, 3, ... Graduaciones del selector Graduaciones de velocidad, par motor o
I, II, III, posición. Un número más alto significa
mayor velocidadselector settings
Selector infinitamente variable con apagado La velocidad aumenta desde la graduación de 0
Flecha Acción en la dirección de la flecha
Corriente alterna Tipo o una característica de corriente
Corriente continua Tipo o una característica de corriente
Corriente alterna o continua Tipo o una característica de corriente
Construcción de clase II Designa las herramientas de construcción
con aislamiento doble.
Terminal de toma de tierra Terminal de conexión a tierra
Símbolo de advertencia Alerta al usuario sobre mensajes de advertencia
Sello RBRCTM de Ni-Cd Designa el programa de reciclaje de baterías de Ni-Cd
0
Símbolos
Este símbolo indica que esta
herramienta está catalogada
por Underwriters
Laboratories.
Este símbolo indica que esta
herramienta está catalogada
por la Canadian Standards
Association.
Este símbolo indica que
Underwriters Laboratories ha
catalogado esta herramienta
indicando que cumple las normas canadienses.
Este símbolo
indica que esta
herramienta
cumple con la
norma mexicana oficial
Este símbolo indica que esta
herramienta está catalogada por
Underwriters Laboratories y que
Underwriters Laboratories la ha
catalogado según las normas
canadienses.
DM 2610913513 6/01 6/8/01 8:46 PM Page 46
Page 47

Página 47
Descripión funcional y especificaciones
Desconecte el paquete de baterías de la herramienta o ponga el interruptor en la posición fijada o de apagado antes de hacer cualquier ensamblaje, ajustes o cambiar acce-
sorios. Dichas medidas preventivas de seguridad reducen el riesgo de arrancar la herramienta accidentalmente.
Herramienta giratoria sin cordon
ADVERTENCIA
!
Herramienta giratoria sin cordon
Número de modelo 780
Tensión nominal 9,6 V
Capacidad sin carga no5 000-25 000/min
Collet Capacities 0,8 mm, 1,6 mm,
2,4 mm , 3,2 mm
Cargador
Número de modelor 786
Tensión nomina 120 V 60 Hz
Amperaje nominal 200 mA
Tiempo de carga 3 h
TUERCA DEL
PORTAHERRAMIENTA
INTERRUPTOR
PAQUETE DE
BATERIAS
BOTON DE
FIJACION DEL EJE
LENGÜETA DE
LIBERACION
GANCHO
CARGADOR
MARCAS DE
ALINEACION
MARCAS DE
ALINEACION
MARCAS DE
ALINEACION
PORTAHERRAMIENTA
PAQUETE DE
BATERIAS
DM 2610913513 6/01 6/8/01 8:46 PM Page 47
Page 48

Página 48
PORTAHERRAMIENTA — Para aflojarlo, oprima
primero el botón de fijación del eje y gire el eje a mano
hasta que el cierre acople el eje, impidiendo así toda
rotación posterior.
No acople el cierre mientras la
Herramienta Giratoria está en
marcha.
Con el cierre del eje acoplado, utilice la llave de portaherramienta para aflojar la tuerca del portaherramienta
en caso de que sea necesario. Cambie accesorios introduciendo el nuevo accesorio en el portaherramienta
hasta donde se pueda para minimizar el descentramiento y el desequilibrio. Con el cierre del eje acoplado, apriete la tuerca del portaherramienta con los dedos
hasta que el portaherramienta agarre el cuerpo del accesorio. Evite apretar excesivamente la tuerca del portaherramienta.
PORTAHERRAMIENTAS — Hay portaherramientas de
cuatro tamaños distintos (vea la ilustración) disponibles
para la herramienta giratoria sin cordón con objeto de
acomodar diferentes tamaños de cuerpo. Para instalar
un portaherramienta distinto, saque la tuerca del portaherramienta y quite el portaherramienta viejo. Introduzca
el extremo no ranurado del portaherramienta en el
agujero que se encuentra al final del eje de la herramienta. Vuelva a colocar la tuerca del portaherramienta
en el eje. Utilice siempre el portaherramienta que
corresponda al tamaño del cuerpo del accesorio que
usted piensa utilizar. Nunca intente introducir a la
fuerza en un portaherramienta un cuerpo de diámetro
más grande que el que pueda aceptar dicho
portaherramienta.
EQUILIBRADO DE ACCESORIOS — Para realizar trabajo
de precisión es importante que todos los accesorios se
encuentren bien equilibrados (de manera muy parecida
a las gomas de su automóvil). Para nivelar o equilibrar
un accesorio, afloje ligeramente la tuerca del
portaherramienta y haga girar el accesorio o el
portaherramienta 1/4 de vuelta. Vuelva a apretar la
tuerca del portaherramienta y ponga en marcha la
herramienta giratoria sin cordón. El sonido y la
sensación del accesorio deberán permitirle saber si éste
está funcionando de manera equilibrada. Siga realizando
ajustes de esta manera hasta lograr el mejor equilibrio.
Para mantener equilibradas las fresas abrasivas, antes
de cada utilización, con la fresa fijada de manera segura
en el portaherramienta, encienda la herramienta giratoria
sin cordón y haga funcionar la piedra de reacondicionamiento 415 apoyándola ligeramente contra la
fresa que gira. Esto quita las partes que sobresalen y
nivela la fresa para que ésta quede bien equilibrada.
Ensamblaje
CUADRO DE IDENTIFICACION DE PORTAHERRAMIENTAS — Los tamaños de portaherramienta se
pueden identificar por medio de las anillas que se
encuentran en el extremo posterior del portaherramienta.
El portaherramienta de 0,8 mm tiene (1) anilla.
El portaherramienta de 1,6 mm tiene (2) anillas.
El portaherramienta de 2,4 mm tiene (3) anillas.
El portaherramienta de 3,2 mm no tiene anillas.
ASEGURESE SIEMPRE DE QUE
LA HERRAMIENTA ESTE EN LA
POSICION “0” ANTES DE CAMBIAR ACCESORIOS,
CAMBIAR PORTAHERRAMIENTAS O REALIZAR SERVICIO DE AJUSTES Y REPARACIONES DE LA HERRAMIENTA GIRATORIA SIN CORDON.
ADVERTENCIA
!
PRECAUCION
!
Instrucciones de funcionamiento
La herramienta giratoria sin cordón pone en la mano del
usuario potencia a alta velocidad. Sirve de talladora,
amoladora, pulidora, lijadora, cortadora, cepillo
mecánico, taladro y más.
La herramienta giratoria sin cordón tiene un pequeño y
potente motor eléctrico, se agarra cómodamente con la
mano y está hecha para aceptar una amplia variedad de
accesorios, incluyendo ruedas abrasivas, brocas taladradoras, cepillos de alambre, pulidores, cortadores
para grabar, brocas para fresar y ruedas de corte. Los
accesorios vienen en formas diversas y le permiten a
usted realizar varios trabajos diferentes. A medida que
se vaya familiarizando con la gama de accesorios y sus
usos, irá dándose cuenta de la gran versatilidad de la
herramienta giratoria sin cordón. Descubrirá docenas de
usos en los que no había pensado hasta ahora.
El verdadero secreto de la herramienta giratoria sin
cordón es su velocidad. Para entender las ventajas que
BOTON DE
FIJACION
DEL EJE
PARA AFLOJAR
PARA APRETAR
TUERCA DEL
PORTAHERRAMIENTA
PORTAHERRAMIENTA
LLAVE DE
PORTAHER-
RAMIENTA
TUERCA DEL
PORTAHERRAMIENTA
ANILLAS DE
IDENTIFICACION
PORTAHERRAMIENTA
481 DE 2,4 mm
PORTA-
HERRAMIENTA
480 DE 3,2 mm
PORTA-
HERRAMIENTA
482 DE
1,6 mm
PORTA-
HERRAMIENTA
483 DE
0,8 mm
DM 2610913513 6/01 6/8/01 8:46 PM Page 48
Page 49

Página 49
Utilización de la herramienta giratoria sin cordón
El primer paso para aprender a utilizar la herramienta
giratoria sin cordón consiste en acostumbrarse a la
herramienta. Téngala en la mano y experimente la
sensación que producen su peso y equilibrio. Toque la
parte cónica de la caja protectora. Esta parte cónica
permite agarrar la herramienta giratoria sin cordón de
manera muy parecida a como se agarra una pluma o un
lápiz.
Cuando encienda la herramienta por primera vez,
sosténgala alejada de la cara. Los accesorios pueden
Lea las siguientes secciones cuidadosamente. Le ayudarán a utilizar la herramienta giratoria sin cordón correctamente y a seleccionar el accesorio correcto para el
trabajo que usted desea realizar.
Carga de la herramienta
La herramienta giratoria sin cordón no está completamente cargada. La herramienta está equipada con un
paquete de baterías extraíble. Asegúrese de cargar el
paquete antes de la utilización inicial. Para obtener resultados óptimos en la primera carga, cargue el paquete
toda la noche.
Para cargar el paquete de baterías
1. Ponga el interruptor en la posición de apagado.
2. Oprima las lengüetas de liberación que se encuentran
a ambos lados del paquete de baterías y saque el paquete de la parte posterior de la herramienta tal como se
muestra en la página 47.
3. Alinee las marcas que están en el paquete de baterías
con las marcas que están en el cargador e introduzca el
paquete de baterías en el cargador de la manera que se
muestra en la ilustración.
4. Enchufe el cargador en la fuente de energía. La luz
verde de L.E.D. (diodo emisor de luz) indica que se ha
producido la conexión y que el paquete de baterías se
está cargando. Bajo uso normal, el paquete de baterías
requiere un tiempo de carga de 3 horas para alcanzar su
capacidad completa.
5. Cuando se haya completado la carga, retire el paquete del cargador.
6. Alinee las marcas del paquete de baterías con las
marcas de la caja protectora de la herramienta tal como
se muestra en la ilustración. Oprima las lengüetas de
liberación, introduzca el paquete de baterías en la parte
posterior de la herramienta y deje de ejercer presión
sobre las lengüetas para que el paquete quede fijo en su
sitio.
ofrece su alta velocidad, usted ha de saber que el taladro
eléctrico portátil estándar funciona a velocidades de
hasta 2,800 revoluciones por minuto. El taladro eléctrico
típico es una herramienta de baja velocidad y par motor
alto; la herramienta giratoria sin cordón es justo lo
contrario — una herramienta de alta velocidad y par
motor bajo. La diferencia principal para el usuario es que
en las herramientas de alta velocidad, la velocidad
combinada con el accesorio montado en el portaherramienta realiza el trabajo. Usted no tiene que ejercer
presión sobre la herramienta, sino simplemente sujetarla
y guiarla. En las herramientas de baja velocidad, usted
no sólo tiene que guiar la herramienta, sino que además
tiene que ejercer presión sobre ella, tal como lo hace, por
ejemplo, al taladrar un agujero.
Esta alta velocidad, junto con su tamaño compacto y
amplia gama de accesorios y aditamentos especiales, es
lo que hace que la herramienta giratoria sin cordón sea
distinta a otras herramientas mecánicas. La velocidad
permite que la herramienta haga trabajos que las
herramientas de baja velocidad no pueden hacer, tales
como cortar acero endurecido, grabar vidrio, etc.
El sacar el mayor provecho a la herramienta giratoria sin
cordón es cuestión de aprender cómo dejar que la velocidad haga el trabajo para usted.
Notas importantes para cargar
1. El paquete de baterías acepta únicamente alrededor del 80 por ciento de su capacidad máxima en los
primeros ciclos de carga. Sin embargo, después de
los primeros ciclos de carga, la batería se cargará
hasta su capacidad máxima.
2. El cargador fue diseñado para cargar la batería
rápidamente sólo cuando la temperatura de la batería
está entre 4°C (40°F) y 41°C (105°F).
3. Un descenso considerable en el tiempo de funcionamiento por carga puede significar que el paquete de baterías se está acercando al final de su vida y
que debe ser sustituido.
4. Si espera que haya largos períodos (es decir, un
mes o más) en los que no se use la herramienta, lo
mejor es hacerla funcionar hasta que esté completamente descargada antes de guardar el paquete de
baterías. Después de un largo período de almacenamiento, la capacidad después de la primera recarga
será más baja. La capacidad normal se restaurará en
dos o tres ciclos de carga/descarga. Recuerde desenchufar el cargador durante el período de almacenamiento.
5. Si la batería no carga adecuadamente:
a. Compruebe que hay tensión en el tomacorriente
enchufando algún otro dispositivo eléctrico.
b. Compruebe si el tomacorriente está conectado a
un interruptor de luz que corta el suministro de
energía cuando se apagan las luces.
c. Compruebe si hay suciedad en las terminales
del paquete de baterías. Límpielas con un pedazo de
algodón y alcohol si es necesario.
d. Si usted sigue sin obtener una carga adecuada,
lleve o envíe la herramienta, el paquete de baterías y
el cargador al Centro de servicio de fábrica Dremel.
Nota: La utilización de cargadores o paquetes de
baterías no vendidos por Dremel puede invalidar la
garantía.
DM 2610913513 6/01 6/8/01 8:46 PM Page 49
Page 50

Ajuste el indicador de velocidad de manera adecuada
para el trabajo que se va a realizar para lograr los mejores resultados al trabajar con materiales diferentes.
Con objeto de seleccionar la velocidad correcta para
cada trabajo, utilice una pieza de material de práctica. Varíe la velocidad a fin de encontrar la mejor
velocidad para el accesorio que usted está utilizando
y el trabajo que va a realizar.
La herramienta giratoria sin cordón está equipada con
un dial de control de velocidad variable. Para encender la
herramienta, gire el dial hasta el número deseado para
seleccionar la velocidad de funcionamiento necesaria,
desde 5,000 hasta 25,000 RPM. Para apagar la herramienta, gire el dial hasta la posición de apagado "0".
Puede consultar los cuadros de las páginas 53 y 54
para determinar la velocidad adecuada basándose en
el material en el que se está trabajando y el tipo de
cortador u otro accesorio que se está utilizando.
Estos cuadros le permiten seleccionar de un vistazo
tanto el accesorio correcto como la velocidad óptima.
Necesidades de velocidades más lentas
Sin embargo, ciertos materiales (algunos plásticos, por
ejemplo) requieren una velocidad relativamente lenta
porque a alta velocidad la fricción de la herramienta genera calor y hace que el plástico se funda.
La mayoría del trabajo se realiza a alta velocidad en la
herramienta giratoria sin cordón. Las velocidades más
bajas se necesitan únicamente para ciertas tareas.
La velocidad del modelo 780 se controla girando este
dial hasta la posición deseada en el dial.
Posición del interruptor Intervalo de velocidad
0 Posición de apagado
2 11,000 – 15,000 RPM
4 16,000 – 10,000 RPM
*6 11,000 – 15,000 RPM
8 16,000 – 20,000 RPM
10 21,000 – 25,000 RPM
*6 es la posición de máxima velocidad para cepillos de
alambre.
Página 50
Para tener mejor control al realizar trabajo fino,
agarre la Herramienta Giratoria como un lápiz entre
el dedo pulgar y el dedo índice.
El método de "agarre" para sujetar la herramienta se
utiliza para realizar operaciones como el amolado de
una superficie plana o la utilización de ruedas de
recortar.
Velocidades de funcionamiento y accesorios
resultar dañados durante el transporte o el manejo y
pueden salir despedidos al ganar velocidad. Esto no es
común, pero sí sucede.
Practique primero en materiales de desecho para ver
cómo corta la herramienta giratoria sin cordón. Tenga en
cuenta que el trabajo es realizado por la velocidad de la
herramienta y por el accesorio que se encuentra en el
portaherramienta. Usted no debe apoyarse sobre la
herramienta ni empujarla para que entre en la pieza de
trabajo.
En vez de hacer esto, haga descender lentamente hasta
la pieza de trabajo el accesorio mientras éste gira y deje
que toque el punto en el cual usted quiere que comience
el corte (o lijado o grabado, etc.). Concéntrese en guiar
la herramienta sobre la pieza de trabajo ejerciendo muy
poca presión con la mano. Deje que el accesorio realice
el trabajo.
Normalmente, es mejor realizar una serie de pasadas
con la herramienta en vez de intentar hacer todo el
trabajo en una sola pasada. Por ejemplo, para realizar un
corte, pase la herramienta hacia adelante y hacia atrás
sobre la pieza de trabajo de manera muy parecida a
como lo haría con una brocha pequeña. Corte un poco
de material en cada pasada hasta que llegue a la
profundidad deseada. Para la mayoría de los trabajos, es
mejor utilizar un toque hábil y suave. Con éste, usted
logra el mejor control, reduce las posibilidades de
cometer errores y logrará que el accesorio realice el
trabajo de la manera más eficaz posible.
DM 2610913513 6/01 6/8/01 8:46 PM Page 50
Page 51

Página 51
Para ayudarle a determinar la velocidad de funcionamiento óptima para diferentes materiales y distintos accesorios, hemos preparado una serie de tablas
que aparecen en las páginas 53, 54 y 55. Consultando
dichas tablas usted puede determinar las velocidades
recomendadas para cada tipo de accesorio. Eche un vistazo a estas tablas y familiarícese con ellas.
En última instancia, la mejor manera de determinar la
velocidad correcta para realizar trabajo en cualquier
material es practicar durante unos minutos utilizando
una pieza de desecho, incluso después de consultar el
cuadro. Usted puede descubrir rápidamente que una
velocidad más lenta o más rápida es mucho más eficaz
simplemente observando qué pasa cuando usted realiza
una o dos pasadas a diferentes velocidades. Por ejemplo, al trabajar con plástico comience utilizando un régimen bajo de velocidad y aumente la velocidad hasta que
observe que el plástico se está fundiendo en el punto de
contacto. Luego, reduzca la velocidad ligeramente para
obtener la velocidad de trabajo óptima.
Algunas reglas prácticas en cuanto a velocidad:
1. El plástico y los materiales que se funden a bajas
temperaturas deberán cortarse a velocidades bajas.
2. El pulido, el bruñido y la limpieza con un cepillo de
alambre deberán realizarse a velocidades inferiores
a 15,000 RPM para evitar que el cepillo sufra daños.
3. La madera debiera cortarse a alta velocidad.
4. El hierro o el acero se deberán cortar a máxima velocidad si se utiliza el accesorio de carburo de tungsteno, pero a velocidades más lentas si se utilizan
cortadores de acero de alta velocidad. Si un cortador
de acero de alta velocidad comienza a vibrar ruidosamente — normalmente esto significa que está
funcionando demasiado despacio.
5. El aluminio, las aleaciones de cobre, las aleaciones
de plomo, las aleaciones de cinc y el estaño se
podrán cortar a cualquier velocidad, según el tipo
de corte que se esté realizando. Aplique al cortador
parafina u otro lubricante adecuado para evitar que
el material cortado se adhiera a los dientes del cortador.
El aumentar la presión ejercida sobre la herramienta no
es la solución cuando ésta no corta como usted cree
que debería hacerlo. Tal vez usted debería utilizar un
cortador diferente y quizás un ajuste de la velocidad
solucionaría el problema. Pero el apoyarse sobre la herramienta raramente ayuda.
Utilización de la herramienta giratoria sin cordón con aditamentos
La herramienta giratoria sin cordón puede utilizarse con todos los aditamentos Dremel. Si en la actualidad usted
posee o piensa comprar un taladro de columna 212, una mesa de conformadora / fresadora 231, un aditamento
de fresadora 330 ó un portaherramienta 2217, sírvase ponerse en contacto con Servicio al Cliente llamando al
1-800-437-3635 para obtener un anillo adaptador GRATIS (número de pieza 2610912344). Este anillo adaptador
le permitirá utilizar su nueva herramienta giratoria sin cordón con los aditamentos mencionados anteriormente.
¿Preguntas o problemas? Llame al 1-800-437-3635
o consulte nuestro sitio Web en www.Dremel.com
Velocidades de funcionamiento para los accesorios - (cont.)
DM 2610913513 6/01 6/8/01 8:46 PM Page 51
Page 52

Página 52
8-108-108-10
NUMERO DE
CATALOGO
MADERA
BLANDA
MADERA
DURA
MATERIALES
LAMINADOS PLASTICO
ACERO
ALUMINIO,
LATON, ETC.
CAPARAZON/
PIEDRA
CERAMICA
VIDRIO
POSICIONES DE VELOCIDAD
*Velocidad para cortes ligeros; precaución de no quemar en ranuras profundas.
•Según la dirección de corte respecto a la veta.
CORTADORES DE ALTA VELOCIDAD
CORTADORES PARA GRABAR
100, 121, 131
114, 124, 134, 144
190
118, 191, 192, 193, 194
116, 117, 125, 196
115
198
199
101010
10*
10*
10*
8-10
6-8
6-8
8-10*
6-8*
6-8*
8-10
8-10
8-10
8-10
8-10
8-10
6-8
6-8
4-6
6-8
6-8
4-6
10101010101010
10
10
6-8
10
10
6-8106-8
6-8
6-8
4-6
4-6
4-6
4-6
4-6
4-6
4-6
4-6
4-6
8-10
6-8
4-6
2-6
4-6
4-6
8-10
4-6
10
10
4-6
2-4
6-8
4-6
Utilice únicamente accesorios de alto rendimiento comprobados por Dremel.
105, 108
106, 109
107, 110
111
112
113
101010
10*
10*
10*
FRESAS CON PUNTA DE DIAMANTE
7103, 7105, 7117, 7120,
7122, 7123, 7134, 7144
8-10 8-10
9931, 9932, 9933, 9934,
9935, 9936
10 8 2-4
6-8
CORTADORES DE CARBURO DE TUNGSTENO
CORTADORES DE CARBURO DE TUNGSTENO CON DIENTES ESTRUCTURADOS
9901, 9902, 9903, 9904,
9905, 9906, 9912
10 8-10 2-4 10 6-8
9909, 9910, 9911
8-1010
8-10
10
DM 2610913513 6/01 6/8/01 8:46 PM Page 52
Page 53

Página 53
6-10
8-1086-10
2-4
2-4
2-4
10
10
10
10
8
10
8
10
409, 420, 426, 540
542
545
560
561
562
6-10108-10
6-10
83142, 83322, 83702,
84922, 85422, 85602,
85622
903, 911, 921, 932, 941,
945, 952, 953, 954, 971,
997, 8153, 8175, 8193,
8215
6-8
10
2-6
2-6 2-8
2-4 10 10
ACCESORIOS DE CORTE
612, 640
615, 617, 618, 650, 652
654
10*
10*
10*
10 1010 10
8•
10•
8•
FRESAS ABRASIVAS
516, 517, 518
500
6
6
6
6
8
8
6
6
4
4
NUMERO DE
CATALOGO
MADERA
BLANDA
MADERA
DURA
MATERIALES
LAMINADOS PLASTICO
ACERO
ALUMINIO,
LATON, ETC.
CAPARAZON/
PIEDRA
CERAMICA
VIDRIO
POSICIONES DE VELOCIDAD
*Velocidad para cortes ligeros; precaución de no quemar en ranuras profundas.
•Según la dirección de corte respecto a la veta.
BROCAS DEL ALTA VELOCIDAD PARA FRESAR (Utilícelas con una guía de corte o una mesa de conformadora/fresadora)
Utilice únicamente accesorios de alto rendimiento comprobados por Dremel.
2-4
541
453, 454, 455
2-6 2-8
10 1010 10
10
2-4
PIEDRAS DE AMOLAR DE CARBURO DE SILICIO
PIEDRAS DE AMOLAR DE OXIDO DE ALUMINIO
PIEDRAS DE AFILAR PARA SIERRAS DE CADENA
Para uso en pared de tipo seco. Para obtener los mejores resultados, utilice el accesorio en la posición 10. (Utilícelo con una guía de corte)
DM 2610913513 6/01 6/8/01 8:46 PM Page 53
Page 54

Página 54
461, 462, 463
414, 422, 429
425, 427
423
403, 404, 405
530, 531, 532
428, 442, 443
535, 536, 537
10
8-10
8-10
8-10
666
6
466
6
4
6
6
2-4
2
10
8-10
8-10
8-10
6
6
6
10
8-10
8-10
10
8-10
8-10
6
10
8-10
8-10
NUMERO DE
CATALOGO
MADERA
BLANDA
MADERA
DURA
MATERIALES
LAMINADOS PLASTICO
ACERO
ALUMINIO,
LATON, ETC.
CAPARAZON/
PIEDRA
CERAMICA
VIDRIO
POSICIONES DE VELOCIDAD
*Velocidad para cortes ligeros; precaución de no quemar en ranuras profundas.
•Según la dirección de corte respecto a la veta.
ACCESORIOS PARA PULIR
430, 431, 438
439, 440, 444
407, 408, 432
411, 412, 413
502, 503, 504, 505 10 10 1082
2-10
2-10
2-10
8
2-10
2-10
2-10
2-10
2-10
2-10
2-10
2-10
2-10
8
2-6
2-6
2-6
2-4
101010
101010
2-4
CINTAS Y DISCOS DE LIJAR
RUEDAS DE ALETAS
569, 570
Para usar en lechada de paredes y pisos (Utilícelas con una guía de corte de remoción de lechada)
BROCAS PARA QUITAR LECHADA
150 10 6
8
10 2-4
BROCA TALADRADORA
511 6 6 664
DISCOS DE PULIR ABRASIVOS DE ACABADO
Utilice únicamente accesorios de alto rendimiento comprobados por Dremel.
DM 2610913513 6/01 6/8/01 8:46 PM Page 54
Page 55

Página 55
Servicio
NO HAY PIEZAS EN EL INTERI-
OR QUE PUEDAN SER AJUSTADAS O REPARADAS POR EL USUARIO. El mantenimiento preventivo realizado por personal no autorizado pude dar lugar a la colocación incorrecta de
cables y componentes internos que podría constituir
un peligro serio. Recomendamos que todo el servicio
de las herramientas sea realizado en un Centro de servicio de fábrica Dremel. TECNICOS DE REPARACIONES:
Desconecten la herramienta y/o el cargador de la fuente
de energía antes de realizar servicio de ajustes y reparaciones.
Motores “corriente directa”
El motor de la herramienta ha sido diseñado para
muchas horas de servicio fiable. Para mantener un
rendimiento óptimo del motor, recomendamos que éste
sea examinado cada seis meses. Sólo se debe usar un
motor de repuesto Dremel genuino diseñado especialmente para la herramienta.
Limpieza
Para evitar accidentes,
desconecte siempre la herramienta y/o el cargador de la fuente de energía
antes de la limpieza. La herramienta se puede limpiar
más eficazmente con aire comprimido seco. Use gafas
de seguridad siempre que limpie herramientas con
aire comprimido.
Las aberturas de ventilación y las palancas de interruptor deben mantenerse limpias y libres de materias
extrañas. No intente limpiar introduciendo objetos puntiagudos a través de las aberturas.
Ciertos agentes de limpieza y
disolventes dañan las piezas
de plástico. Algunos de estos son: gasolina,
tetracloruro de carbono, disolventes de limpieza
clorados, amoníaco y detergentes domésticos que
contienen amoníaco.
Cordones de extensión
Si es necesario un cordón de
extensión, se debe usar un
cordón con conductores de tamaño adecuado que sea
capaz de transportar la corriente necesaria para la
herramienta. Esto evitará caídas de tensión excesivas,
pérdida de potencia o recalentamiento. Las herramientas
conectadas a tierra deben usar cordones de extensión de
3 hilos que tengan enchufes de 3 terminales y receptáculos para 3 terminales.
TAMAÑOS RECOMENDADOS DE CORDONES DE
EXTENSIOHERRAMIENTAS DE 120 V CORRIENTE
ALTERNA
NOTA: Cuanto más pequeño es el número de calibre,
más grueso es el cordón.
ADVERTENCIA
!
ADVERTENCIA
!
PRECAUCION
!
ADVERTENCIA
!
Capacidad
nominal en
amperes de la
herramienta
Tamaño del cordón en A.W.G.
Tamaños del cable en mm
2
3-6
6-8
8-10
10-12
12-16
18 16 16 14 0,75 0,75 1,5 2,5
18 16 14 12 0,75 1,0 2,5 4,0
18 16 14 12 0,75 1,0 2,5 4,0
16 16 14 12 1,0 2,5 4,0 —
14 12 — — — — — —
25 50 100 150 15 30 60 120
Longitud del cordón en pies Longitud del cordón en metro
Mantenimiento
DM 2610913513 6/01 6/8/01 8:46 PM Page 55
Page 56

Página 56
Accesorios para la herramienta giratoria sin cordón
Utilice únicamente accesorios de alto rendimiento comprobados por Dremel. Otros acce-
sorios no están diseñados para esta herramienta y pueden causar lesiones personales o
daños materiales.
ADVERTENCIA
!
Consulte el FORMULARIO DE PEDIDO CON INFORMACION SOBRE ACCESORIOS DREMEL para ver ilustraciones de los accesorios disponibles. Estos accesorios se pueden encontrar en los distribuidores locales
de ferretería, hobbys o centros para el hogar.
Portaherramientas
Si usted piensa utilizar diversos accesorios, le recomendamos que inicialmente compre un juego completo de
cuatro portaherramientas. Guárdelos con objeto de
tener el tamaño adecuado de portaherramienta para
cualquier accesorio o broca taladradora que quiera usar.
En la actualidad los portaherramientas de 3,2 mm,
2,4 mm, 0,8 mm y 1,6 mm acomodan todos los accesorios Dremel disponibles. Los portaherramientas de
1/8 de pulgada se incluyen en la mayoría de juegos
de herramienta giratoria.
Vástagos
Un vástago es un cuerpo con una cabeza roscada o de
tornillo, y es necesario cuando se utilicen accesorios de
pulir, ruedas de corte, discos de lijar y puntas de pulir.
La razón por la cual se utilizan vástagos es que los discos de lijar, las ruedas de corte y accesorios similares
deben ser sustituidos frecuentemente. El vástago es
una espiga permanente que permite que usted cambie
únicamente la cabeza desgastada cuando sea necesario, por lo que se ahorra el costo de sustituir el eje
cada vez.
Vástago de tornillo No. 401
Este es un vástago de tornillo utilizado con la punta de
pulir de fieltro y las ruedas de pulir de fieltro. Espigas de
3,2 mm.
Vástago de tornillo pequeño No. 402
Este es un vástago con un tornillo pequeño en la punta
y se utiliza con ruedas de corte de esmeril, discos de
lijar y ruedas de pulir. Espigas de 3,2 mm.
Vástago de punta roscada No. 424
Este es un vástago con una punta roscada que se
enrosca en el accesorio de punta de pulir No. 427.
Espigas de 3,2 mm.
Cortadores de alta velocidad
Disponibles en muchas formas, los cortadores de alta
velocidad se utilizan para tallar, cortar y ranurar madera,
plásticos y metales blandos tales como aluminio, cobre
y latón. Estos son los accesorios que se han de utilizar
para realizar a pulso fresado o tallado de madera o plástico y para realizar cortes de precisión. Espigas de 3,2
mm.
Cortadores de carburo de tungsteno
Estos son cortadores duros y de larga duración para
utilización en acero templado, cerámica cocida en horno
y otros materiales muy duros. Se pueden utilizar para
grabar en herramientas y equipos de jardín. Espigas de
3,2 mm.
Cortadores para grabar
Este grupo de cortadores abarca una amplia gama de
tamaños y formas, y los cortadores están hechos para
realizar trabajo complicado en cerámica (del tipo no cocido en
horno), tallados en madera, joyas y tallados en marfil, caparazones de moluscos o barbas de ballena. Se utilizan
frecuentemente para hacer placas de circuitos impresos
complicados. No se deben utilizar en acero ni en otros
materiales muy duros, pero son excelentes en madera,
plástico y metales blandos. Necesitan un portaherramienta de 2,4 mm.
Cortadores de carburo de tungsteno
de dientes estructurados
Dientes de corte rápido y afilados como una aguja para
mayor remoción de material y mínima carga. Utilícelos
en fibra de vidrio, madera, plástico, epóxi y caucho.
Espigas de 3,2 mm y 2,4 mm.
Piedras de amolar de óxido de aluminio
(naranja/marrón)
Redondas, puntiagudas, planas — diga qué forma
quiere y habrá alguna disponible en esta categoría. Estas
piedras están hechas de óxido de aluminio y cubren
prácticamente todos los tipos posibles de aplicaciones
de amolado. Utilícelas para afilar hojas de cortadoras de
césped, puntas de destornillador, cuchillos, tijeras,
cinceles y otras herramientas de corte. Utilícelas para
quitar rebabas de piezas metálicas fundidas, desbarbar
cualquier metal después de cortarlo, alisar juntas soldadas, amolar remaches y quitar herrumbre. Estas
DM 2610913513 6/01 6/8/01 8:46 PM Page 56
Page 57

Página 57
piedras de amolar pueden reafilarse con una piedra de
reacondicionamiento. En los talleres de maquinaria, normalmente las brocas y los cortadores de alta velocidad
son amolados con muelas de óxido de aluminio. Espigas
de 3,2 mm.
Piedras de amolar de carburo de silicio (verde/gris)
Más duras que las puntas de óxido de aluminio, estas
piedras están hechas especialmente para la utilización en
materiales duros tales como vidrio y cerámica. Algunos
usos típicos podrían ser la remoción de marcas que
sobresalgan y el exceso de esmalte en cerámica, y el
grabar en vidrio. Espigas de 3,2 mm.
Fresas con punta de diamante
Excelentes para trabajos que involucran detalles finos
en madera, jade, cerámica, vidrio y otros materiales
duros. Las brocas están cubiertas con partículas de
diamante. Espigas de 2,4 mm.
Escobillas de alambre
Hay disponibles escobillas de alambre de tres formas
distintas. Para obtener resultados óptimos, las esco-
billas de alambre deben utilizarse a velocidades que
no sean superiores a 15,000 RPM. Consulte la sección
Velocidades de funcionamiento para informarse
sobre el ajuste adecuado de la velocidad de la
herramienta.Las tres formas de escobillas vienen en
tres materiales distintos: alambre de acero inoxidable,
de latón y de carbono. El acero inoxidable da buenos
resultados en peltre, aluminio, acero inoxidable y otros
metales, sin dejar "residuos de herrumbre". Las escobillas de latón no generan chispas y son más blandas
que las de acero, por lo que dan buenos resultados
cuando se usan en metales blandos como oro, cobre y
latón. Las escobillas de alambre de carbono dan
buenos resultados para limpieza de propósito general.
Cepillos de cerda
Estos cepillos constituyen excelentes herramientas para
la limpieza de objetos de plata, joyas y antigüedades.
Las tres formas hacen posible tener acceso a rincones
estrechos y otros lugares difíciles. Los cepillos de cerda
se pueden utilizar con compuesto para pulir con objeto
de lograr una limpieza o pulido más rápido.
Presión de cepillado
1. Recuerde que las puntas de un cepillo de alambre
hacen el trabajo. Utilice el cepillo con la presión más
ligera para que solamente las puntas del alambre
entren en contacto con la pieza de trabajo.
2. Si se utilizan presiones más grandes, se someterá
a los alambres a una tensión excesiva, lo cual dará
como resultado una acción de barrido, y si se continúa
haciendo esto, podrá acortarse la duración del cepillo
debido a la fatiga del alambre.
3. Aplique el cepillo a la pieza de trabajo de manera
que tanta cara del cepillo como sea posible esté en
contacto completo con la pieza de trabajo. La aplicación del lado o del borde del cepillo a la pieza de
trabajo causará la rotura del alambre y acortará la
duración del cepillo.
Accesorios para pulir
Entre estos accesorios se encuentran una punta de pulir
impregnada y una rueda de pulir impregnada para dar
un acabado liso a las superficies metálicas; una punta
de pulir de fieltro y una rueda de pulir de fieltro, y una
rueda de pulir de tela. Todos estos accesorios se utilizan
para pulir plásticos, metales y pequeñas piezas de joyería. También se encuentra en este grupo un compuesto
para pulir (No.421) para utilizar con los pulidores de
fieltro y de tela.
Las puntas de pulir dejan una superficie muy lisa, pero
se obtiene un brillo mayor utilizando ruedas de fieltro o
de tela y compuesto para pulir. Para obtener los
mejores resultados, los accesorios de pulir deben utilizarse a velocidades que no superen las 15,000
RPM.
No se necesita compuesto para pulir cuando se utiliza la
rueda de pulir 425 o la punta de pulir 427.
Ruedas abrasivas de óxido de aluminio
Se utilizan para quitar pintura, desbarbar metal y pulir
acero inoxidable y otros metales. Disponibles con grano
fino y mediano. Espigas de 3,2 mm.
15°
CORRECTO:
Las puntas de alambre hacen el trabajo.
INCORRECTO:
Una presión excesiva puede causar la rotura del alambre.
Accesorios para la Dremel - (cont.)
DM 2610913513 6/01 6/8/01 8:46 PM Page 57
Page 58

Página 58
Accesorios para lijar
Los discos de lijar de grado fino, mediano y grueso
están hechos para acoplarse en el vástago No. 402. Se
pueden utilizar para casi todos los trabajos pequeños de
lijado que usted tenga que realizar, desde la fabricación
de modelos hasta el acabado de muebles finos.
Además, está el lijador de tambor, un diminuto tambor
que encaja en la Herramienta Giratoria y que hace posible dar forma a madera, alisar fibra de vidrio, lijar en el
interior de curvas y otros lugares difíciles y realizar otros
trabajos de lijado. Cambie las bandas de lijar del tambor
a medida que se vayan desgastando y pierdan el grano.
Las bandas vienen en grados finos y gruesos. Las
ruedas de aletas amuelan y pulen superficies planas o
contorneadas. Se utilizan con la máxima eficacia como
lijadora de acabado después de completar un lijado más
pesado de la superficie y la remoción de material. Las
ruedas de aletas vienen en calidades fina y gruesa. Los
discos de pulir son un magnífico accesorio de acabado
para limpieza y lijado ligero. Funcionan eficazmente en
metal, vidrio, madera, aluminio y plásticos. Los discos
de pulir gruesos y medianos se venden juntos. Espigas
de 3,2 mm.
Muela
Se utiliza para desbarbar, quitar herrumbre y amolado
de propósito general. Utilícela con el vástago roscado
No. 402.
Ruedas de corte
Estos delgados discos de esmeril o de fibra de vidrio se
utilizan para rebanar, cortar y operaciones similares.
Utilícelos para cortar cabezas de perno y tuercas agar-
rotadas o para volver a ranurar una cabeza de tornillo
que esté tan dañada que no permita usar un destornillador. Buenas para cortar cable BX, varillas pequeñas,
tubería, cable, y para cortar agujeros rectangulares en
chapa metálica.
Broca para cortar pared de tipo seco
Permite hacer cortes rápidos y limpios en pared de tipo
seco.
Broca para cortar loseta
Corta loseta de cerámica para pared, tablero de
cemento y yeso.
Broca de corte en espiral
Corta a través de todos los tipos de madera y materiales compuestos de madera.
Brocas de fresadora de alta velocidad
Para fresar, incrustar y mortajar en madera y otros
materiales blandos. Utilícelas con el accesorio de fresadora No. 330 de Dremel y la mesa de perfiladora/fresadora No. 231 de Dremel.
El vástago No. 401 se utiliza con la punta de pulir de fieltro y las ruedas de pulir de fieltro. Enrosque la punta
en el tornillo cuidadosamente. La punta de fieltro debe enroscarse hacia abajo en línea recta sobre el vástago
del tornillo y se debe girar del todo hasta el collarín.
DM 2610913513 6/01 6/8/01 8:46 PM Page 58
Page 59

Página 59
Para cambiar una cinta de lijar en la lijadora de tambor, afloje el tornillo sin quitarlo para contraer el tambor y
luego deslice la cinta vieja hasta sacarla. Deslice la cinta de lijar nueva sobre el tambor hasta que esté colocada y luego expanda el tambor apretando el tornillo una vez más.
Antes de cada uso, asegúrese de que todos los componentes estén montados en el
cuerpo del accesorio y de que el tambor esté suficientemente expandido para man-
tener fija la cinta de lijar durante el uso. Si dicha cinta está floja en el tambor durante la operación, podrá
salir despedida y golpearles a usted o las personas que se encuentren presentes.
ADVERTENCIA
!
El roscado de tornillo para metales del vástago No. 424 se enrosca en el interior de la punta de pulir No. 427.
Este y otros vástagos roscados se deben enroscar firmemente hacia abajo hasta el collarín antes de utilizarse.
El vástago No. 402 tiene un tornillo pequeño en la punta y se utiliza con ruedas de corte de esmeril y discos de
lijar de esmeril. Las velocidades más altas, normalmente las máximas, son mejores para la mayoría de los trabajos, incluyendo el corte de acero, que se muestra aquí.
DM 2610913513 6/01 6/8/01 8:46 PM Page 59
Page 60

Página 60
Este producto Dremel está garantizado contra defectos de material o de fabricación durante un período de dos años
a partir de la fecha de compra. En caso de que un producto no se ajuste a esta garantía escrita, por favor, tome las
medidas siguientes:
1. NO devuelva el producto al lugar de compra.
2. Empaquete el producto cuidadosamente y solo, sin otros artículos, y envíelo con el porte pagado junto con:
A. Una copia de la prueba de compra fechada (por favor, conserve una copia para usted).
B. Una explicación por escrito de la naturaleza del problema.
C. Su nombre, dirección y número de teléfono a:
ESTADOS UNIDOS
Dremel Service Center Dremel Service Center
4915 Twenty-First Street O 4631 E. Sunny Dunes
Racine, Wisconsin 53406 Palm Springs, California 92264
CANADA FUERA DE LOS TERRITORIOS
Giles Tool Agency CONTINENTALES DE LOS EE.UU.
6520 Lawrence Av. East Vea al distribuidor local
Scarborough, Ont. o escriba a Dremel, 4915 Twenty-First St.
Canada M1C 4A7 Racine, Wisconsin 53406
1-888-285-3476
Recomendamos que el paquete sea asegurado contra pérdida o daños durante el transporte por los cuales no
podemos ser responsables.
Esta garantía tiene validez únicamente para el comprador original inscrito. LOS DAÑOS AL PRODUCTO
PRODUCIDOS POR MANIPULACION INCORRECTA, ACCIDENTE, ABUSO, NEGLIGENCIA, REPARACIONES O
ALTERACIONES NO AUTORIZADAS, ACCESORIOS NO APROBADOS U OTRAS CAUSAS NO RELACIONADAS CON
PROBLEMAS DEL MATERIAL O LA FABRICACION NO ESTAN CUBIERTOS POR ESTA GARANTIA.
Ningún empleado, agente, distribuidor, ni ninguna otra persona está autorizado a dar ninguna garantía en nombre
de Dremel. Si la inspección de Dremel demuestra que el problema fue causado por problemas con el material o la
fabricación dentro de los límites de la garantía, Dremel reparará o reemplazará el producto gratuitamente y devolverá
el producto con el porte pagado. Las reparaciones necesarias debido al desgaste normal o al abuso, o las
reparaciones de productos que se encuentren fuera del período de garantía, en caso de que se puedan realizar, se
cobrarán a precios de fábrica normales.
DREMEL NO DA NINGUNA OTRA GARANTIA DE NINGUN OTRO TIPO, EXPRESA O IMPLICITA, Y TODAS LAS
GARANTIAS IMPLICITAS DE COMERCIABILIDAD E IDONEIDAD PARA UN PROPOSITO ESPECIFICO QUE EXCEDEN
LA OBLIGACION MENCIONADA ANTERIORMENTE QUEDAN POR LA PRESENTE RECHAZADAS POR PARTE DE
DREMEL Y ESTAN EXCLUIDAS DE ESTA GARANTIA LIMITADA.
Esta garantía le confiere a usted derechos legales específicos y es posible que usted también tenga otros derechos
que varían de un estado a otro. La obligación del garante consiste únicamente en reparar o reemplazar el producto.
El garante no es responsable de ningún daño incidental o emergente debido a cualquiera de dichos defectos
alegados. Algunos estados no permiten la exclusión o limitación de los daños incidentales o emergentes, por lo que
es posible que las limitaciones o la exclusión anterior no sean aplicables en el caso de usted.
Para precios y cumplimiento de la garantía en los territorios continentales de los Estados Unidos, póngase en
contacto con el distribuidor local Dremel.
Garantía limitada Dremel
DM 2610913513 6/01 6/8/01 8:46 PM Page 60
Page 61

Página 61
MODEL 780
28
29
24
801
27
804
823
823
801
31
31
652
30
CODE PART
NO. NO. DESCRIPTION DESCRIPTION DESCRIPCION
24 2610912366 Lock Button
Bouton de verrouillage Boton de cierre
27 26150785AA Battery Pack Bloc-pile Paquete de baterias
28 2615297355 Collet Nut
Ecrou De Douille Tuerca del portaherramienta
29 2615110480 1/8" Collet (In Tool)
Douille 3,2 mm po (avec l'outil) Portaherramienta de 3,2 mm
(en la herramienta)
30 2610913684 Housing Cap Chapeau du bâti Tapa de la caja protectora
31 2914201664 Screw (2 Required)
Vis
(2 requis)
Tornillos
(2 requeridos)
652 2610913820 Charger Chargeur Cargador
801 2610913819 Housing Set
Bâti Juego de caja protectora
804 2610914072 Motor & Speed Control Assembly
Montage de moteur et l'interrupteur Ensamblaje del motor y interruptor
823 2610913818 Shaft Lock Assembly
Ensemble de blocage de l’arbre Ensamblaje del cierre del eje
DM 2610913513 6/01 6/8/01 8:46 PM Page 61
Page 62

Página 62
DM 2610913513 6/01 6/8/01 8:46 PM Page 62
Page 63

Página 63
DM 2610913513 6/01 6/8/01 8:46 PM Page 63
 Loading...