

Page 1
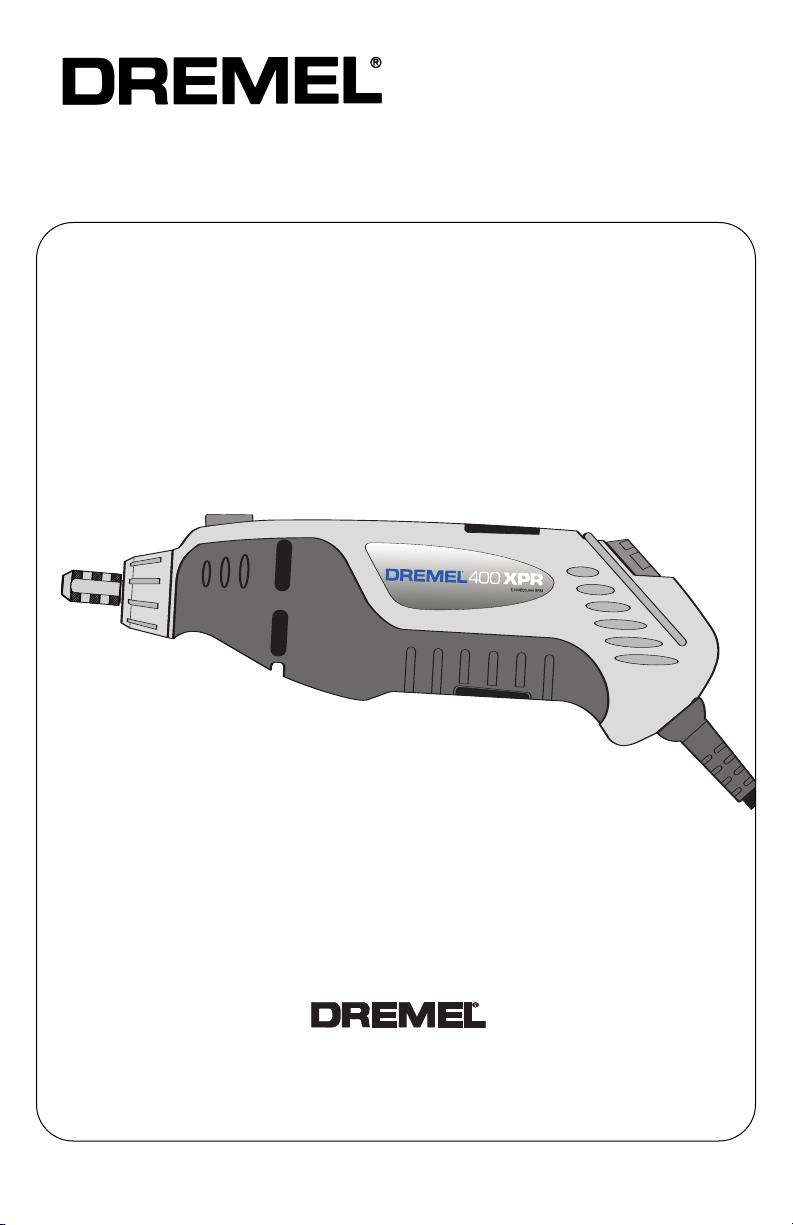
400 Series XPR
Instructional Safety
Manual
High Performance Rotary Tool
Dremel brand products are manufactured and sold by the
Dremel Division of Robert Bosch
Form No. 2610925455 10/04
1-800-437-3635
http://www.dremel.com
ool Corporation
T
Robert Bosch
ool Corporation © 2004
T
All Rights Reserved
Page 2

POWER TOOL SAFETY RULES
WARNING
!
Read and understand all instructions. Failure to follow all instructions list-
ed below, may result in electric shock, fire and/or serious personal injury.
SAVE THESE INSTRUCTIONS
WORK AREA
Keep your work area clean and well lit.
Cluttered benches and dark areas invite accidents.
Do not operate power tools in explosive
atmospheres, such as in the presence of
flammable liquids, gases, or dust.
tools create sparks which may ignite the dust
or fumes.
Keep bystanders, children, and visitors
away while operating a power tool.
Distractions can cause you to lose control.
Power
Electrical Safety
Double Insulated tools are equipped with
a polarized plug (one blade is wider than
the other.) This plug will fit in a polarized
outlet only one way. If the plug does not
fit fully in the outlet, reverse the plug. If it
still does not fit, contact a qualified electrician to install a polarized outlet. Do not
change the plug in any way.
Insulation eliminates the need for the three
wire grounded power cord and grounded
power supply system. Before plugging in the
tool, be certain the outlet voltage supplied is
within the voltage marked on the nameplate.
Do not use “AC only” rated tools with a DC
power supply.
Avoid body contact with grounded surfaces such as pipes, radiators, ranges
and refrigerators.
of electric shock if your body is grounded. If
operating the power tool in damp locations is
unavoidable, a Ground Fault Circuit
Interrupter must be used to supply the power
to your tool. Electrician’s rubber gloves and
footwear will further enhance your personal
safety.
Don't expose power tools to rain or wet
conditions.
increase the risk of electric shock.
Do not abuse the cord. Never use the cord
to carry the tools or pull the plug from an
outlet. Keep cord away from heat, oil,
sharp edges or moving parts.
damaged cords immediately
cords increase the risk of electric shock.
When operating a power tool outside, use
an outdoor extension cord marked "W-A"
or "W."
use and reduce the risk of electric shock.
These cords are rated for outdoor
There is an increased risk
Water entering a power tool will
Double
Replace
. Damaged
Personal Safety
Stay alert, watch what you are doing and
use common sense when operating a
power tool. Do not use tool while tired or
under the influence of drugs, alcohol, or
medication.
operating power tools may result in serious
personal injury.
Dress properly. Do not wear loose clothing or jewelry. Contain long hair. Keep
your hair, clothing, and gloves away from
moving parts.
long hair can be caught in moving parts.
Keep handles dry, clean and free from oil and
grease.
Avoid accidental starting. Be sure switch
is “OFF” before plugging in.
with your finger on the switch or plugging in
tools that have the switch “ON” invites accidents.
Remove adjusting keys or wrenches
before turning the tool ON.
key that is left attached to a rotating part of
the tool may result in personal injury.
Do not overreach. Keep proper footing
and balance at all times.
balance enables better control of the tool in
unexpected situations.
Use safety equipment. Always wear eye
protection.
shoes, hard hat, or hearing protection must
be used for appropriate conditions.
A moment of inattention while
Loose clothes, jewelry, or
Carrying tools
A wrench or a
Proper footing and
Dust mask, non-skid safety
Tool Use and Care
Use clamps or other practical way to
secure and support the workpiece to a
stable platform.
or against your body is unstable and may
lead to loss of control.
Do not force tool. Use the correct tool for
your application.
job better and safer at the rate for which it is
designed.
Do not use tool if switch does not turn it
ON or OFF.
trolled with the switch is dangerous and must
be repaired.
Disconnect the plug from the power
source before making any adjustments,
changing accessories, or storing the tool.
Such preventive safety measures reduce the
risk of starting the tool accidentally.
2
Holding the work by hand
The correct tool will do the
Any tool that cannot be con-
Page 3

Store idle tools out of reach of children
and other untrained persons.
dangerous in the hands of untrained users.
Maintain tools with care. Keep cutting
tools sharp and clean.
tained tools, with sharp cutting edges are
less likely to bind and are easier to control.
Any alteration or modification is a misuse
and may result in a dangerous condition.
Check for misalignment or binding of
moving parts, breakage of parts, and any
other condition that may affect the tools
operation. If damaged, have the tool
serviced before using.
are caused by poorly maintained tools.
Develop a periodic maintenance schedule
for your tool.
Use only accessories that are recommended by the manufacturer for your
model.
Accessories that may be suitable for
one tool, may become hazardous when
used on another tool.
Tools are
Properly main-
Many accidents
SAFETY RULES FOR ROTARY TOOL
Accessories must be rated for at least the
speed recommended on the tool warning
label.
Wheels and other accessories running over rated speed can fly apart and
cause injury.
Hold tool by insulated gripping surfaces
when performing an operation where the
cutting tool may contact hidden wiring or
its own cord.
make exposed metal parts of the tool "live"
and shock the operator. If cutting into existing
walls or other blind areas where electrical
wiring may exist is unavoidable, disconnect
all fuses or circuit breakers feeding this worksite.
Do not operate the flexible shaft with a
sharp bend.
generate excessive heat on the jacket or
hand piece. The recommended minimum is
6" radius.
Always disconnect the power cord from
the power source before making any
adjustments or attaching any accessories.
to start leading to serious personal injury.
Be aware of the switch location, when
placing the tool down or when picking the
tool up.
switch.
Always hold the hand piece firmly in your
hands during the start-up.
torque of the motor, as it accelerates to full
speed, can cause the shaft to twist.
Contact with a "live" wire will
Over bending the shaft can
You may unexpectedly cause the tool
You may accidentally activate the
The reaction
Service
Tool service must be performed only by
qualified repair personnel.
maintenance performed by unqualified personnel could result in a risk of injury. For
example: internal wires may be misplaced
or pinched, safety guard return springs may
be improperly mounted.
When servicing a tool, use only identical
replacement parts. Follow instructions in
the Maintenance section of this manual.
Use of unauthorized parts or failure to follow
Maintenance Instructions may create a risk
of electric shock or injury. Certain cleaning
agents such as gasoline, carbon tetrachloride, ammonia, etc. may damage plastic
parts.
Always wear safety goggles and dust
mask. Use only in well ventilated area.
Using personal safety devices and working in
safe environment reduces risk of injury.
After changing the bits or making any
adjustments, make sure the collet nut and
any other adjustment devices are securely tightened.
unexpectedly shift, causing loss of control,
loose rotating components will be violently
thrown.
Do not reach in the area of the spinning
bit.
The proximity of the spinning bit to your
hand may not always be obvious.
Allow brushes to run at operating speed
for at least one minute before using
wheel. During this time no one is to stand
in front or in line with the brush.
bristles or wires will be discharged during the
run-in time.
Wire and bristle brushes must never be
operated at speeds greater than
15,000/min. Direct the discharge of the
spinning wire brush away from you.
Small particles and tiny wire fragments may
be discharged at high velocity during the
“cleaning” action with these brushes and may
become imbedded in your skin. Bristles or
wires will be discharged from the brush at
high speeds.
Carefully handle both the tool and individual grinding wheels to avoid chipping or
cracking. Install a new wheel if tool is
Loose adjustment device can
Service or
Loose
3
Page 4

SAFETY RULES FOR ROTARY TOOL (CONTINUED)
dropped while grinding. Do not use a
wheel that may be damaged.
from a wheel that bursts during operation will
fly away at great velocity possibly striking you
or bystanders.
Never use dull or damaged bits. Sharp
bits must be handled with care.
bits can snap during use. Dull bits require
more force to push the tool, possibly causing
the bit to break.
Use clamps to support workpiece whenever practical. Never hold a small workpiece in one hand and the tool in the other
hand while in use. Allow for sufficient
space, at least 6", between your hand and
the spinning bit.
dowel rods, pipes or tubing have a tendency
to roll while being cut, and may cause the bit
to “bite” or jump toward you. Clamping a
small workpiece allows you to use both
hands to control the tool.
Inspect your workpiece before cutting.
When cutting irregularly shaped workpieces, plan your work so it will not slip
and pinch the bit and be torn from your
hand.
For example, if carving wood, make
sure there are no nails or foreign objects in
the workpiece. Nails or foreign objects can
cause the bit to jump.
Never start the tool when the bit is
engaged in the material.
edge may grab the material causing loss of
control of the cutter.
Avoid bouncing and snagging the wheel,
especially when working corners, sharp
edges etc.
and kick-back.
The direction of feed with the bit into the
material when carving, routing or cutting
is very important. Always feed the bit into
the material in the same direction as the
cutting edge is exiting from the material
(which is the same direction as the chips
are thrown).
direction, causes the cutting edge of the bit to
climb out of the work and pull the tool in the
direction of this feed.
If the workpiece or bit becomes jammed
or bogged down, turn the tool “OFF” by
the switch. Wait for all moving parts to
stop and unplug the tool, then work to
free the jammed material.
the tool is left “ON” the tool could restart
unexpectedly causing serious personal
injury.
Do not leave a running tool unattended,
turn power off.
Round material such as
This can cause loss of control
Feeding the tool in the wrong
Only when tool comes to a
Fragments
Damaged
The bit cutting
If the switch to
complete stop it is safe to put it down.
Do not grind or sand near flammable
materials.
ignite these materials.
Do not touch the bit or collet after use.
After use the bit and collet are too hot to be
touched by bare hands.
Regularly clean the tool's air vents with
compressed air.
powdered metal inside the motor housing
may cause electrical failures.
Do not allow familiarity gained from frequent use of your rotary tool to become
commonplace.
careless fraction of a second is sufficient to
inflict severe injury.
Do not alter or misuse tool. Any alteration
or modification is a misuse and may result in
serious personal injury.
This product is not intended for use as a
dental drill, in human or veterinary medical applications.
When using the steel saws, cutoff wheels,
high speed cutters or tungsten carbide
cutters, always have the work securely
clamped. Never attempt to hold the work
with one hand while using any of these
accessories.
wheels will grab if they become slightly canted in the groove, and can kickback causing
loss of control resulting in serious injury. Your
second hand should be used to steady and
guide the hand holding the tool. When a cutoff wheel grabs, the wheel itself usually
breaks. When the steel saw, high speed cutters or tungsten carbide cutter grab, it may
jump from the groove and you could lose
control of the tool.
!
construction activities, contains chemicals known to cause cancer, birth defects
or other reproductive harm. Some examples of these chemicals are:
• Lead from lead-based paints,
• Crystalline silica from bricks and cement
and other masonry products, and
• Arsenic and chromium from chemically
treated lumber.
our risk from these exposures varies,
Y
depending on how often you do this type of
work. To reduce your exposure to these
chemicals, work in a well ventilated area, and
work with approved safety equipment, such
as those dust masks that are specially
designed to filter out microscopic particles.
Sparks from the wheel could
Excessive accumulation of
Always remember that a
Serious injury may result.
The reason is that these
WARNING
Some dust created by
power drilling and other
4
Page 5
GETTING TO KNOW YOUR ROTARY TOOL
Unpacking & Checking Contents
WARNING
!
cal shock, always remove plug from wall
outlet when tool is not in use.
Separate all loose parts from packing materials and check each item with the contents
listed on the carton to make sure all items are
accounted for before discarding any packing
material.
IMPORTANT! If any parts are missing, or if
you require any assistance with these
instructions, please contact the Dremel™
Consumer Service at:
To avoid injury from unexpected starting or electri-
1-800-437-3635
or check our website at www.Dremel.com.
Description
The 400 Series XPR™ Rotary Tool incorporates both high-speed and performance to
Collet Nut
Collet
serve as a carver
, grinder, polisher, sander,
cutter, power brush, drill, and more.
The tool utilizes a small, but effective DC
motor. The large variety of available
Dremel™ accessories includes abrasive
wheels, drill bits, wire and nylon brushes,
engraving and carving cutters, router bits,
polishing points and more. The ability to add
different Dremel™ attachments adds to the
multi-faceted uses of the tool. The variety of
projects you can do with the tool is limitless.
The 400 Series XPR Rotary Tool is a highspeed tool and operates at speeds 5,000 to
35,000 RPM. (A typical electric drill operates
only up to 2500 RPM!). When used with
Dremel™ accessories and attachments, the
400 Series XPR rotary tool’s high speed performance allows you to work on even the
most demanding projects without having to
exert undue pressure on the tool. The tool
does the work for you.
Collet Wrench
Housing Cap
Ventilation Openings
Brush Cover
(one each side)
Shaft Lock Button
5
On/Off Switch
Hanger
Variable Speed Dial
Power Cord
Page 6
SPECIFICATIONS
General Specifications
Voltage Rating . . . . . . . . . .120 V, 50-60 Hz
Amperage Rating . . . . . . . . . . . . . . . . .2.0 A
No Load Speed . . . . . . . . . .No35,000/min
Collet Capacity . . . .1/32", 1/16", 3/32", 1/8"
Motor Specifications
This Rotary Tool utilizes a variable highspeed RPM motor. It is wired for operation on
110-120 volts, 50-60 Hz. alternating current.
Before connecting the motor cord to wall outlet, make certain the power switch is in the
OFF position and be sure the electric current
is of the same characteristics as stamped on
the Rotary Tool nameplate.
Connection To A Power Source
DANGER
!
prongs on the plug when installing or
removing the plug to or from the outlet.
DANGER
!
have it replaced immediately to avoid
shock or fire hazard.
To avoid electric shock,
do not touch the metal
If power cord is worn, cut
or damaged in any way,
Extension Cords
If an extension cord is necessary, a cord
with adequate size conductors that is
capable of carrying the current necessary
for your tool must be used.
vent excessive voltage drop, loss of power or
overheating.
RECOMMENDED SIZES
OF EXTENSION CORDS
120 VOLT ALTERNATING CURRENT TOOLS
NOTE: The smaller the gauge number, the
heavier the cord.
ool’
T
Ampere
Rating
2-6
6-8
8-10
10-12
12-16
Cord Size in A.W.G.
s
Cord Length in Feet Cord Length in Meters
25 50 100 150 15 30 60 120
18 16 16 14 .75 .75 1.5 2.5
18 16 14 12 .75 1.0 2.5 4.0
18 16 14 12 .75 1.0 2.5 4.0
16 16 14 12 1.0 2.5 4.0 —
14 12 — —————
This will pre-
Wire Sizes in mm
2
6
Page 7

SYMBOLS
0
IMPORTANT! Some of the following symbols may be used on your tool. Please study
them and learn their meaning. Proper interpretation of these symbols will allow you to
operate the tool better and safer.
Symbol Name Designation/Explanation
V Volts Voltage (potential)
A Amperes Current
Hz Hertz Frequency (cycles per second)
W Watt Power
kg Kilograms Weight
min Minutes Time
s Seconds Time
Diameter Size of drill bits, grinding wheels,etc.
n
0
.../min Revolutions or reciprocation Revolutions, strokes, surface speed,
0 Off position Zero speed, zero torque...
1, 2, 3, ... Selector settings Speed, torque or position settings.
I, II, III, Higher number means greater speed
No load speed Rotational speed, at no load
per minute orbits etc. per minute
Infinitely variable selector with off Speed is increasing from 0 setting
Arrow Action in the direction of arrow
Alternating current Type or a characteristic of current
Direct current Type or a characteristic of current
Alternating or direct current Type or a characteristic of current
Class II construction Designates Double Insulated
Construction tools.
Earthing terminal Grounding terminal
Warning symbol Alerts user to warning messages
Ni-Cad RBRC seal Designates Ni-Cad battery recycling
program
This symbol designates
that this tool is listed by
Underwriters Laboratories.
This symbol designates
that this tool is listed by
the Canadian Standards
Association, and is listed
to US Standards by CSA.
This symbol designates
that this tool is listed by
the Canadian Standards
This symbol designates
that this tool is listed to
Canadian Standards by
Underwriters
Laboratories.
This symbol designates that
this tool is listed by
Underwriters Laboratories,
and listed to Canadian
Standards by Underwriters
Laboratories.
This symbol
designates
that
this tool complies
to NOM
Mexican
Standards.
Association.
7
Page 8
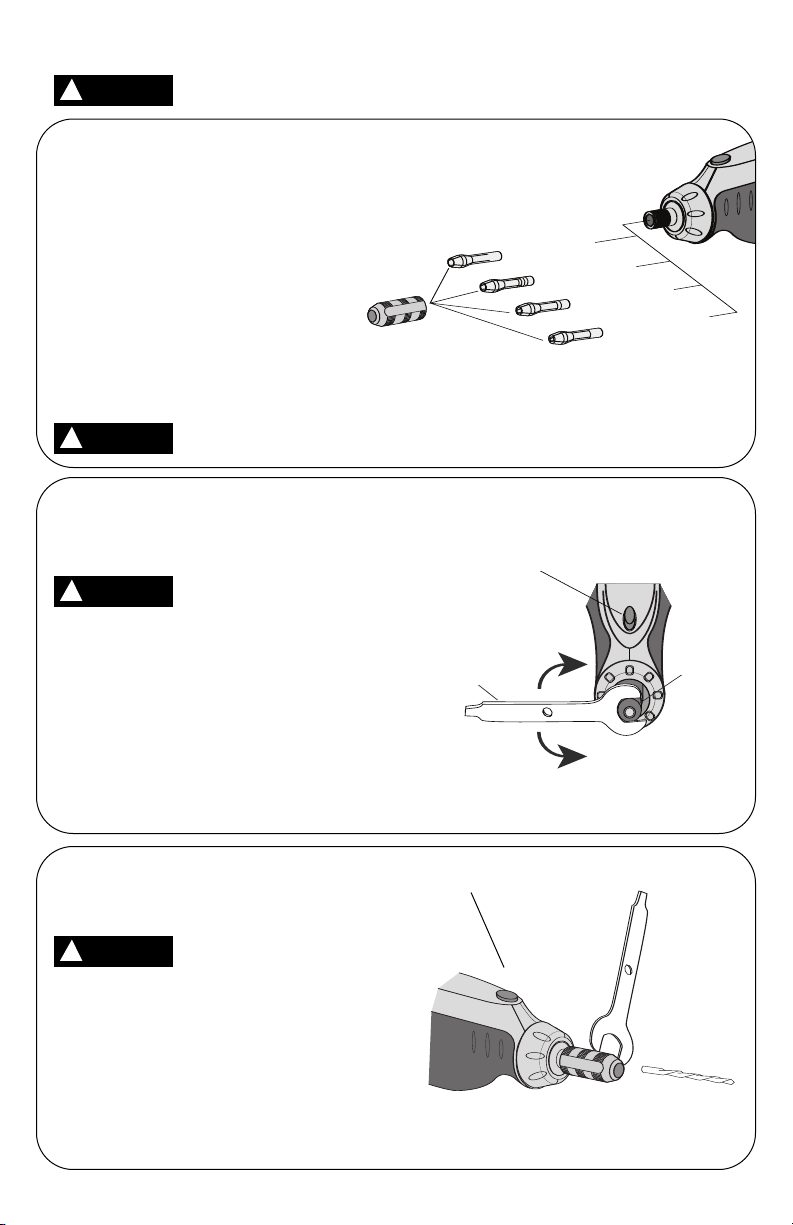
Shaft Lock Button
Collet Wrench
To
Tighten
To
Loosen
Collet Nut
1/8" Collet (480)
3/32" Collet (481)
1/16" Collet (482)
1/32" Collet (483)
Collet Nut
ASSEMBLY
WARNING
!
The Dremel™ accessories available for the
rotary tool come with various shank sizes.
Four size collets are available to accommodate
the different shank sizes. Collet sizes are identified by the rings on the back of the collet:
• 1/32" collet has 1 ring (No. 483)
• 1/16" collet has 2 rings (No. 482)
• 3/32" collet has 3 rings (No. 481)
• 1/8" collet has no rings (No. 480)
NOTE: Some rotary tool kits may not include all
four collet sizes. Collets are available separately.
Always unplug rotary tool before changing accessories, changing
collets, or servicing the tool.
Collets
1. Press the shaft lock button, hold down
tool is running.
2. With the shaft lock button engaged,
3. Remove the collet by pulling it free from
4. Install the appropriate size collet fully
1. Press the shaft lock button and rotate
tool is running.
2. With the shaft lock button engaged,
3. Insert the bit or accessory shank fully
4. With the shaft lock button engaged, fin-
CAUTION
!
Always use the collet which matches the shank size of the accessory you
plan to use. Do not force a larger diameter shank into a smaller collet.
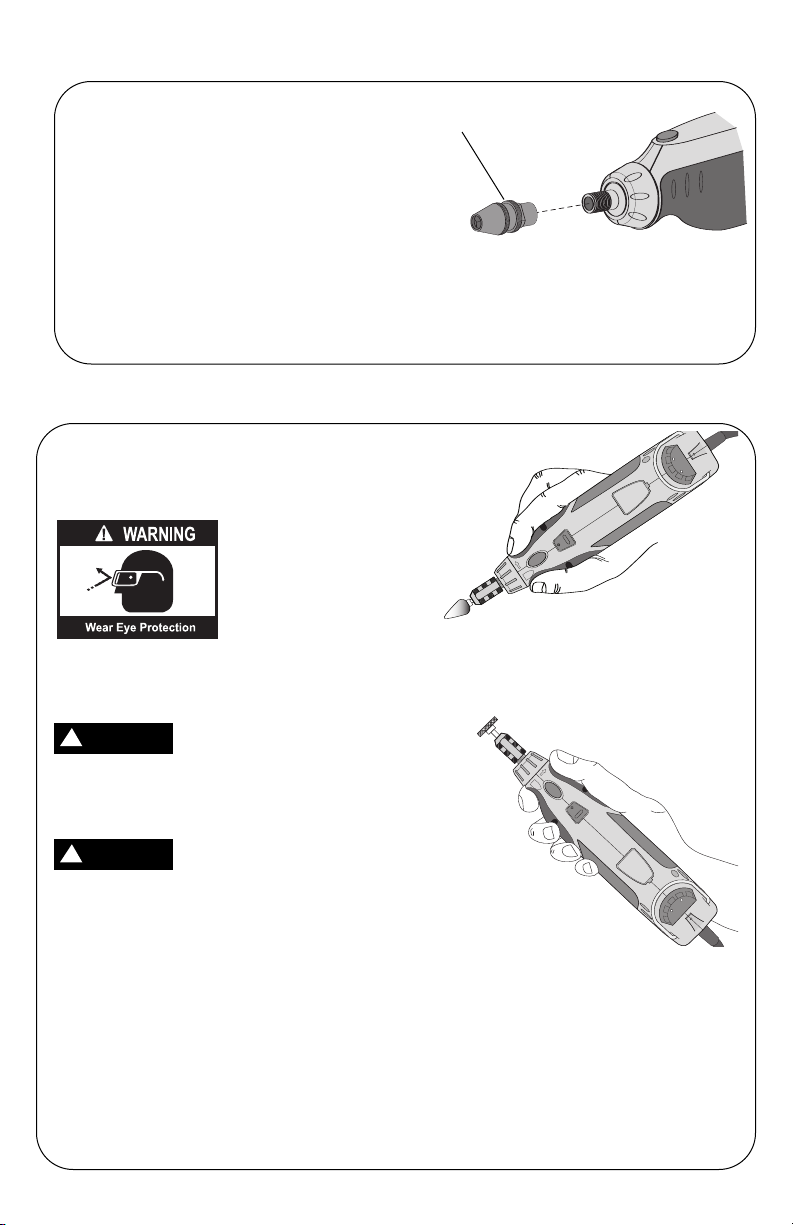
Changing Collets
and rotate the shaft by hand until it
engages the shaft.
WARNING
!
Do not engage the shaft
lock button while rotary
loosen and remove the collet nut. Use
the collet wrench if necessary.
the shaft.
into the shaft and reinstall the collet nut
finger tight. Do not fully tighten the nut
when there is no bit or accessory
installed.
Changing Accessories
the shaft by hand until it engages the
shaft lock.
WARNING
!
loosen (do not remove) the collet nut.
Use the collet wrench if necessary.
into the collet.
ger tighten the collet nut until the bit or
accessory shank is gripped by the collet.
Do not engage the shaft
lock button while rotary
Shaft Lock Button
NOTE: Be sure to read the instructions
supplied with your Dremel™ accessory for
further information on its use.
8
Page 9
ASSEMBLY (CONTINUED)
2
4
2
4
Keyless Chuck
The keyless chuck is used in place of the stan
dard collet and collet nut to easily and quickly
remove and install some accessories.
The keyless chuck holds various accessories
with shank sizes 1/32" to 1/8" and is intended
for light duty accessories such as drill bits,
sanding drums, polishing accessories, wire
and bristle brushes and cut-off wheels.
1. See steps 1—3, Changing Collets on
page 7 to install the keyless chuck.
2. Thread the keyless chuck onto the rotary
tool shank.
OPERATION
Learning To Use the Rotary Tool
Getting the most out of your rotary tool is a
matter of learning how to let the speed and
the feel of the tool in your hands work for you.
The first step in learning to use the rotary
tool is to get the “feel”
of it. Hold it in your
hand and feel its
weight and balance.
housing. This taper permits the tool to be
grasped much like a pen or pencil. The
unique comfort grip on the nose allows for
added comfort and control during use.
WARNING
!
Accessories can be damaged during
handling and can fly apart as they come
up to speed. This is not common, but it
does happen.
CAUTION
!
your hand. Blocking the air vents could
cause the motor to overheat.
IMPORTANT!
Practice on scrap material first
to see how the tool’s high-speed action performs. Keep in mind that your rotary tool will
perform best by allowing the speed, along
with the correct Dremel™ accessory and
attachment, do the work for you. Do not put
pressure on the tool during use, if possible.
Instead, lower the spinning accessory lightly
to the work surface and allow it to touch the
point at which you want to begin.
Concentrate on guiding the tool over the
work using very little pressure from your
hand. Allow the accessory to do the work.
Feel the taper of the
Always hold the tool
away from your face.
When holding tool, do not
cover the air vents with
-
Keyless Chuck
3. Use the supplied wrench to completely tighten the keyless chuck if you are
unable to apply sufficient tightening
pressure to hold the bit or accessory.
For best control in close work, grip the rotary
tool like a pencil between your thumb and
forefinger.
The “golf” grip method is used for more aggressive operations such as grinding or cutting.
Usually it is better to make a series of pass
es with the tool rather than to do the entire
job with one pass. A gentle touch gives the
best control and reduces the chance for
error.
9
-
Page 10

2
4
OPERATION (CONTINUED)
Operating Speeds
To achieve the best results when working
with different materials, set the variable
speed control to suit the job. To select the
right speed for the accessory in use, practice
with scrap material first.
NOTE: Speed is affected by voltage changes. A
reduced incoming voltage will slow the RPM of the
tool, especially at the lowest setting. If your tool
appears to be running slowly, increase the speed
setting accordingly. The tool may not start at the
lowest switch setting in areas where outlet voltage
is less than 120 volts. Simply move the speed setting to a higher position to begin operation.
The 400 Series XPR Rotary Tool switch settings are marked on the speed control dial.
Refer to the Speed Settings chart on pages
11 thru 13 to help determine the proper
speed for the material being worked on and
the accessory to use.
Most jobs can be accomplished using the
tool at the highest setting. However, certain
materials (some plastics and metals) can be
damaged by high-speed generated heat and
should be worked on at relatively slow
speeds.
Slow speed operation (15,000 RPM or less)
is usually best for polishing operations
employing the felt polishing accessories, delicate wood carving and fragile model parts.
All brushing applications require lower
speeds to avoid wire discharge from the
holder. Let the performance of the tool do the
work for you when using lower speed settings.
Higher speeds are better for drilling, carving,
cutting, routing, shaping, cutting dadoes or
rabbets in wood. Hardwoods, metals and
glass require high speed operation also.
The settings for approximate RPM’s are:
Switch Setting Speed Range RPM
2 5,000-8,000
4 9,000-11,000
6 12,000-17,000
8 18,000-24,000
10 25,000-35,000
Set the Speed Control to the desired setting.
Some guidelines regarding tool speed:
• There is no accessory for the Dremel
Rotary tool that will drill or cut glass.
• Plastic and other materials that melt at low
temperatures should be cut at low speeds.
• Polishing, buffing and cleaning with a wire
brush must be done at speeds not greater
than 15,000 RPM to prevent damage to the
brush and your material.
• Wood should be cut at high speed.
• Iron or steel should be cut at high speed.
• If a high speed steel cutter starts to vibrate,
it usually indicates that it is running too
slow.
• Aluminum, copper alloys, lead alloys, zinc
alloys and tin may be cut at various
speeds, depending on the type of cutting
being done. Use a paraffin (not water) or
other suitable lubricant on the cutter to prevent the cut material from adhering to the
cutter teeth.
NOTE: Increasing pressure on the tool is not
the answer when it is not performing properly. Try a different accessory or speed setting
to achieve the desired result. Please refer to
the following Speed Setting charts or simply
contact Dremel Consumer Service at:
1-800-437-3635
or at www.Dremel.com.
10
Page 11

SPEED SETTINGS
Use only Dremel™ tested, high performance accessories.
* Speed for light cuts; Caution - burning on deep grooves.
• Depending on cutting direction relative to grain.
High Speed Cutters
Catalog
Number
100, 121, 131
114, 124,
134, 144
190
118, 191, 192,
193, 194
116, 117,
125, 196
115
198
199
Catalog
Number
105, 108
106, 109
107, 110
111
112
113
Catalog
Number
7103, 7105,
7117, 7120,
7122, 7123,
7134, 7144
Soft Hard Laminates Steel Aluminum, Shell Ceramic Glass
Wood Wood Plastic Brass, etc. Stone
810 5 5 6 - - 86 4 5 6 - - -
810 4 7 8 - - 810 4 5 8 - - -
86 4 5 6 - - -
810 4 5 6 - - 88 4 5 6 - - 88 4 5 6 - - -
Engraving Cutters
Soft Hard Laminates Steel Aluminum, Shell Ceramic Glass
Wood Wood Plastic Brass, etc. Stone
810 6 4 6 - - 8 10 54 6--810 5 4 6 - - 8* 10* 6* 4 6 - - 8* 10* 5* 4 6 - - 8* 10* 5* 4 6 - - -
Diamond Wheel Points
Soft Hard Laminates Steel Aluminum, Shell Ceramic Glass
Wood Wood Plastic Brass, etc. Stone
10 8 - - - 10 10 10
Catalog
Number
9931, 9932,
9933, 9934,
9935, 9936
Catalog
Number
9901, 9902,
9903, 9904,
9905, 9906,
9909, 9910,
9911, 9912
Structured Tooth Tungsten Carbide Cutters
Soft Hard Laminates Steel Aluminum, Shell Ceramic Glass
Wood Wood Plastic Brass, etc. Stone
88 4 - 6 - - -
Tungsten Carbide Cutters
Soft Hard Laminates Steel Aluminum, Shell Ceramic Glass
Wood Wood Plastic Brass, etc. Stone
8
8
4 8-10 6 8 8-10 8-10
11
Page 12

SPEED SETTINGS (CONTINUED)
Use only Dremel™ tested, high performance accessories.
* Speed for light cuts; Caution - burning on deep grooves.
• Depending on cutting direction relative to grain.
High Speed Router Bits
Catalog
Number
612, 640
615, 617, 618,
650, 652
654
Catalog
Number
83142, 83322,
83702, 84922,
85422, 85602,
85622
Catalog
Number
516, 517, 518,
500
Catalog
Number
903, 911, 921,
932,941, 945,
952, 953, 954,
971, 997,
8153, 8175,
8193, 8215
541
Catalog
Number
453, 454, 455
Soft Hard Laminates Steel Aluminum, Shell Ceramic Glass
Wood Wood Plastic Brass, etc. Stone
10* 8• - - - - - 10* 8• - - - - - -
10* 8• - - - - - -
Silicon Carbide Grinding Stones
Soft Hard Laminates Steel Aluminum, Shell Ceramic Glass
Wood Wood Plastic Brass, etc. Stone
- - 6 10 4 6 10 10
Abrasive Points
Soft Hard Laminates Steel Aluminum, Shell Ceramic Glass
Wood Wood Plastic Brass, etc. Stone
4-6 4-6 - 8 6 - - 4-6 4-6 - 8 6 - - -
Aluminum Oxide Grinding Stones
Soft Hard Laminates Steel Aluminum, Shell Ceramic Glass
Wood Wood Plastic Brass, etc. Stone
10 10 - 8 4 6 10 -
10 10 - 8 4 610 -
Chain Saw Sharpening Stones
Soft Hard Laminates Steel Aluminum, Shell Ceramic Glass
Wood Wood Plastic Brass, etc. Stone
-- - 8 - ---
12
Page 13

SPEED SETTINGS (CONTINUED)
Use only Dremel™ tested, high performance accessories.
* Speed for light cuts; Caution - burning on deep grooves. • Depending on cutting direction relative to grain.
Cutting Accessories
Catalog
Number
409, 420, 426,
540
542
545
560
561
562
Catalog
Number
461, 462, 463
414, 422, 429
425, 427
423
403, 404, 405
530, 531, 532
428, 442, 443
535, 536, 537
Catalog
Number
430, 431, 438
439, 440, 444
407, 408, 432
411, 412, 413
Catalog
Number
502, 503, 504,
505
Catalog
Number
511
Catalog
Number
150
Catalog
Number
569, 570
Soft Hard Laminates Steel Aluminum, Shell Ceramic Glass
Wood Wood Plastic Brass, etc. Stone
- - 2-4 10 10 10 10 -
10 8-10 2-4 10 10 10 10 -
8-10 8 - - - - - -
For use on drywall. For best results, use at 35,000 rpm.
6-10 6-10 2-4 - 10 - - -
-- - - - -10-
Polishing Accessories
Soft Hard Laminates Steel Aluminum, Shell Ceramic Glass
Wood Wood Plastic Brass, etc. Stone
-- - 8 8 888
-- - 6 6 666
-- -8 8---
- - - 6-8 6-8 6-8 6-8 6-8
4 4 2-4 6 6 - - -
- 4-4---4 4 2 4 - --44 - 4 4 4 - -
Sanding Bands and Discs
Soft Hard Laminates Steel Aluminum, Shell Ceramic Glass
Wood Wood Plastic Brass, etc. Stone
2-10 2-10 2-6 10 10 2-10 2-10 2-10 2-10 2-6 10 10 2-10 2-10 2-10 2-10 2-6 10 10 2-10 2-10 -
8 8 2-4 - 2-4 - - -
Flapwheels
Soft Hard Laminates Steel Aluminum, Shell Ceramic Glass
Wood Wood Plastic Brass, etc. Stone
6-8 8 2 10 8-10 - - -
Finishing Abrasive Buffs
Soft Hard Laminates Steel Aluminum, Shell Ceramic Glass
Wood Wood Plastic Brass, etc. Stone
66 4 6 6 - - -
Drill Bit
Soft Hard Laminates Steel Aluminum, Shell Ceramic Glass
Wood Wood Plastic Brass, etc. Stone
10
8-10
2-4
-
6---
Grout Removal Bits
Ceramic Glass
Soft
Wood
Aluminum,
Laminates
Hard
Wood Plastic Brass, etc. Stone
For use on wall and floor grout. 6-8 -
Steel
Shell
13
Page 14
"V" Notch
MAINTENANCE
2
4
WARNING
!
Preventative maintenance
performed by unauthorized personnel may result in misplacing
of internal wires and components which
could cause serious hazard. We recommend that all tool service be performed
by a Dremel™ Service Facility.
WARNING
!
To avoid injury from unex-
pected starting or electrical shock, always remove plug from wall
outlet before performing service or cleaning.
Carbon Brushes
The brushes in your tool have been engineered for many hours of dependable service.
To prepare the brushes for use, run the tool
at full speed for 5 minutes under no load.
This will properly “seat” the brushes, and
extend the life of the tool.
To maintain peak efficiency of the motor,
examine the brushes for wear every 40-50
hours.
CAUTION
!
damage the motor.
Use only original Dremel™ replacement
brushes.’
Inspect the rotary tool brushes after 40-50
hours of use. If the rotary tool runs erratically, loses power, or makes unusual noises
check the brushes for wear and possible
replacement. Remember: brushes in the
rotary tool are similar to oil in a car; the more
you check/service, the better the performance.
Follow these steps to check/change the
rotary tool brushes.
1. With the power cord unplugged, place
the tool on a clean surface. Use the tool
wrench to pry up and release the clip on
the brush cover (Figure A).
2. Remove the brushes from the tool by
pulling the shunt and brass clip which
are attached to the brush (Figure B).
NOTE: Be sure to note how the brass clip
slides out of the slot next to the brush pock
et. Also, note how the detent on brass clip fits
into brush pocket slot, which secures the
brass clip into proper position.
3. Check each brush for wear
less than 3/8" long, or if contact end is
rough or pitted, replace the brush.
Using the tool with worn
brushes will permanently
. If brush is
A
Removing Brush Cover
B
Removing/Inspecting Brushes
C
-
Installing Brushes
14
Page 15

For questions or replacement brushes,
please call Dremel’s Consumer Service
or check our website at www.Dremel.com.
4. Install existing or new brushes so the
NOTE: The detent on the brass clip must fit
into the slot on the side of the brush pocket,
which secures the brass clip in the proper
position (Figure C).
5. Reinstall brush covers by angling the
6. Plug power cord into a wall outlet. Run
at
1-800-437-3635
curved surface of the brush end matches the curvature of the motor commutator (as seen through the brush opening).
non-clip end into the opening. Make certain brush spring is centered in the “V”
notch on the brush, then snap closed
the clip end of the brush cover.
the rotary tool at full speed for 5 minutes
under no load. This will properly seat the
brushes and extend the life of the tool.
Cleaning The Tool
Ventilation openings and switch levers must
be kept clean and free of foreign matter. Do
not attempt to clean by inserting pointed
objects through openings.
The tool may be
cleaned with compressed air. Always
wear safety goggles
when cleaning tool
with compressed air.
There is no need to lubricate the Dremel™
rotary tool.
CAUTION
!
plastic parts. Some of these are: gasoline,
carbon tetrachloride, chlorinated cleaning solvents, ammonia and household
detergents that contain ammonia.
Clean the “soft grip” areas of the tool using a
damp cloth. Tougher soiled areas may
require more than one wipe application to get
clean.
Certain cleaning agents
and solvents will damage
15
Page 16

ACCESSORIES
For availability of all accessories and attachments, refer your local hardware, hobby or home
center. Or contact Dremel Consumer Service at:
WARNING
!
damage.
Use only Dremel™, high-performance accessories. Other accessories are
not designed for this tool and may lead to personal injury or property
1-800-437-3635 or at www.Dremel.com.
Drywall Cutting Bit
When using a template (outlet box) behind
the drywall, cut in a counterclockwise direction.
High Speed Router Bits
For routing, inlaying and mortising in wood
and other soft materials. Use only with
Dremel™ Router Attachment #330 or
Shape/Router Table #231.
Mandrels
A mandrel is a shank with a threaded or
screw head used with polishing accessories,
cutting wheels, sanding discs and polishing
points. The mandrel is a permanent shank,
allowing for replacement of the worn head
when necessary.
Screw Mandrel
For use with the felt polishing
tip and felt polishing wheels.
1/8" shank
Tile Cutting Bit
For use wall tile, cement board and plaster.
Start the bit into the material at a 45° angle
and then slowly bring it to a 90° angle to
begin the cut.
Multipurpose Cutting Bit
For use in wood, plastics, drywall, fiberglass,
vinyl or aluminum siding, acoustical tile and
laminates.
Start the bit into the material at a 45° angle
and then slowly bring it to a 90° angle to
begin the cut.
Small Screw Mandrel
Mandrel has a small screw
at the tip and is used with
emery and fiberglass cutting
wheels, sanding discs and
polishing wheels.
1/8" shank
Threaded Tip Mandrel
Mandrel has a threaded tip
which threads into the polishing point accessory #427.
1/8" shank
Aluminum Oxide Grinding
Stones (red/brown)
These grinding stones
come round, pointed or flat
and are made of aluminum
oxide. Use them for every possible grinding
operation: sharpening lawn mower blades,
screwdriver tips, knives, scissors, chisels and
other cutting tools. Use to remove flash from
metal castings, deburring any kind of metal.
These grinding stones can be resharpened
with a dressing stone. In machine shops,
high speed drills and cutters are normally
ground with aluminum oxide wheels.
1/8" shank
Silicon Carbide Grinding
Stones (blue/green)
Tougher than aluminum oxide
points, these are made especially for use on
hard materials such as glass and ceramics.
1/8" shank
Diamond Wheel Points
Used for fine detail work on
wood, jade, ceramic, glass and
other hard material. Bits are
covered with diamond parti
cles.
16
3/32" shank
-
Page 17
ACCESSORIES (continued)
High Speed Cutters
High speed cutters are
used in carving, cutting
and slotting wood, plastics
and soft metals (such as aluminum, copper
and brass). Made of high quality steel.
1/8" shank
Structured Tooth Tungsten Carbide Cutters
1/8" shank
These cutters feature fast cutting needlesharp teeth for greater material removal with
minimum loading. Use on fiberglass, wood,
plastic, epoxy and rubber.
Wire Brushes
CAUTION
!
15,000 rpm. Refer to Speed Settings
(pages 10-12) for proper tool and setting.
Three different shapes
of wire brushes are
available in three different materials: stainless
steel, brass and carbon
wire. Stainless steel
brushes perform well on pewter, aluminum,
stainless steel and other metals, without
leaving rust. Brass brushes are non-sparking
and softer than steel, making them good for
use on soft metals like gold, copper and
brass. Carbon wire brushes are good for
general purpose cleaning.
Never use wire brushes at
speeds greater than
1/8" shank
Engraving Cutters
Engraving cutters come in a
wide variety of sizes and
shapes and are used for intricate work on
ceramics (greenware), wood carvings, jewelry and scrimshaw. They are often used in
making complicated printed circuit boards.
They should not be used on steel and very
hard materials, but are good for use on
wood, plastic and soft metals.
3/32" shank
Tungsten Carbide Cutters
Tungsten carbide cutters
are long-lived cutters for
use on hardened steel, fired
ceramics and other very hard materials. They
can be used for engraving on tools and garden equipment.
1/8" shank
Brushing Pressure
•. The tips of a wire brush do the work.
Operate the brush with the lightest pressure so only the tips of the wires come in
contact with the work surface.
•. If heavier pressure is used, the wires will
become overstressed, resulting in a wiping action. If this continues, the life of the
brush will be shortened by fatigue.
•. Apply the brush to the work surface so
the majority of the brush face makes full
contact. Applying the edge or side of the
brush to the work surface will result in
wire breakage and shortened brush life.
Bristle Brushes
Bristle brushes are
used for cleaning tools on
silverware, jewelry and antiques. The three
shapes make it possible to get into tight corners and other difficult spaces. They can be
used with polishing compound for faster
cleaning or polishing.
1/8" shank
Aluminum Oxide Abrasive
Wheels
Used to remove paint, deburr
metal, polish stainless steel
and other metals. Available in
medium grit.
1/8" shank
Grinding Wheel
Used for deburring, removing
rust, and general purpose grinding. Use with Mandrel #402.
17
Page 18
ACCESSORIES (continued)
Sanding Accessories
Sanding discs in fine,
medium and coarse
grades are made to fit
mandrel #402. They can be
used for nearly any small sanding job from
model making to fine furniture finishing.
In addition, the drum sander makes it possible to shape wood, smooth fiberglass, sand
inside curves and other difficult places. Drum
bands are replaceable and come in fine and
coarse grades.
1/8" shank
Flapwheels grind and polish flat or contoured
surfaces.
finishing sander, after heavier surface sanding and material removal is completed.
Flapwheels come in fine and coarse grades.
Buffs are a great finishing accessory for
cleaning and light sanding. They work effectively on metal, glass, wood, aluminum and
plastics. Buffs are available in medium and
coarse grades.
They are used most effectively as a
ATTACHMENTS
The following attachments are part of the Dremel Rotary Tool System; increasing the versatility
of your rotary tool.
XPR MultiSaw
The Dremel XPR MultiSaw turns your rotary tool into a multipurpose saw that will allow you to make straight and curved cuts in
a variety of materials. Scroll cutting patterns is now fast and easy.
Using standard jigsaw blades, you can cut soft & hard wood, plywood, metal, PVC, plastic, and much more!
Use with model 400 Series XPR only.
XPR Planer
Convert your corded rotary tool into a planer.
• The planer is designed for two types of planing: straight
planing and 45° planing, up to 2-1/8".
• In addition, the straight planing technique can be used for
limited shaping and carving.
• Ideal for fixing a warped or stuck door!
Use with model 400 Series XPR only.
Flex Light
The flex light uses Lithium Ion batteries (batteries included).
• LED lighting provides visibility in dimly lit
areas and increases light on detailed projects
• Easy to attach, no confusing wires or connections
• Attaches to Workstation 220 and Plunge
Router 335
Use with model 400 Series XPR only
.
18
Page 19
ATTACHMENTS (continued)
7 6 5 4 3
3 2
1
3/4
1/2
1/4
0
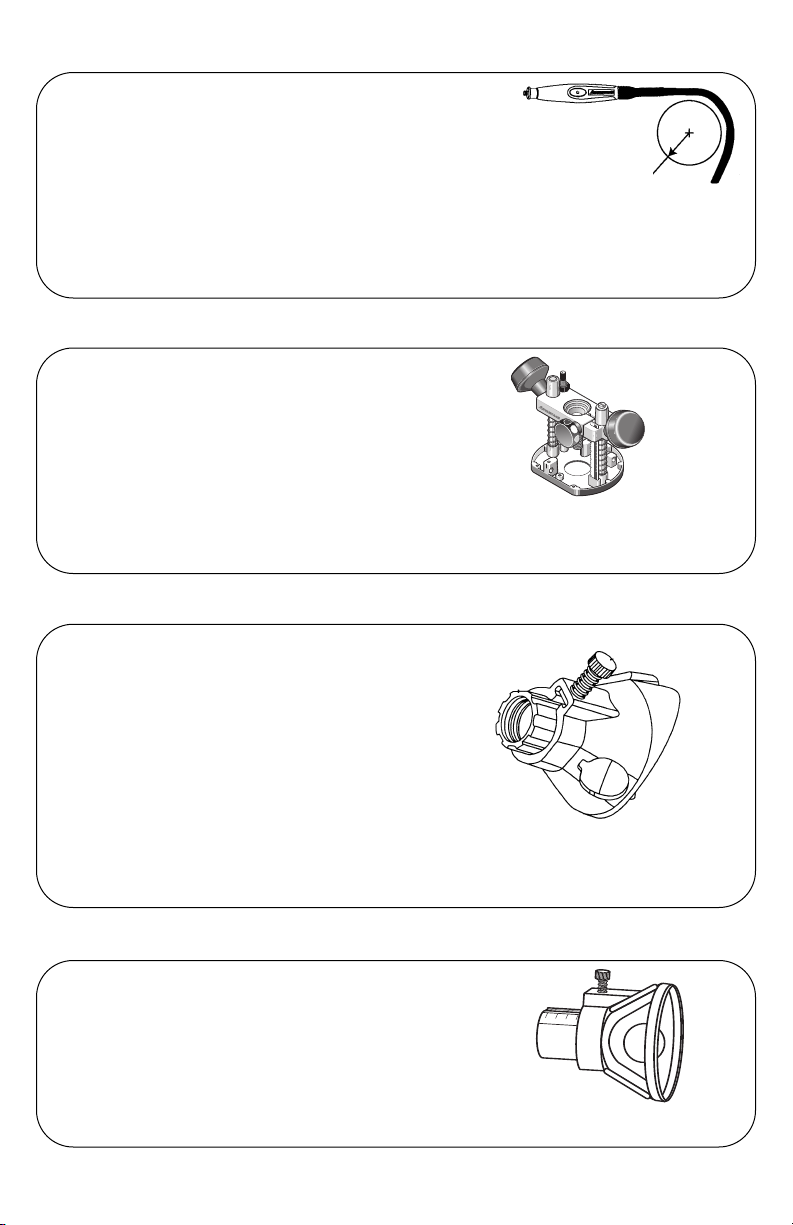
Flex Shaft
Ideal for hard-to-reach places and fine detail work.
• Quick connect attach system
• 36" long cable with new 5" bend radius provides more flexibility
• Comfort grip hand piece
• Integrated shaft lock button
• Holds up to 1/8" shank
Use with models: 275, 285, 395, 398, 780, 800, 400 Series XPR.
5" Radius
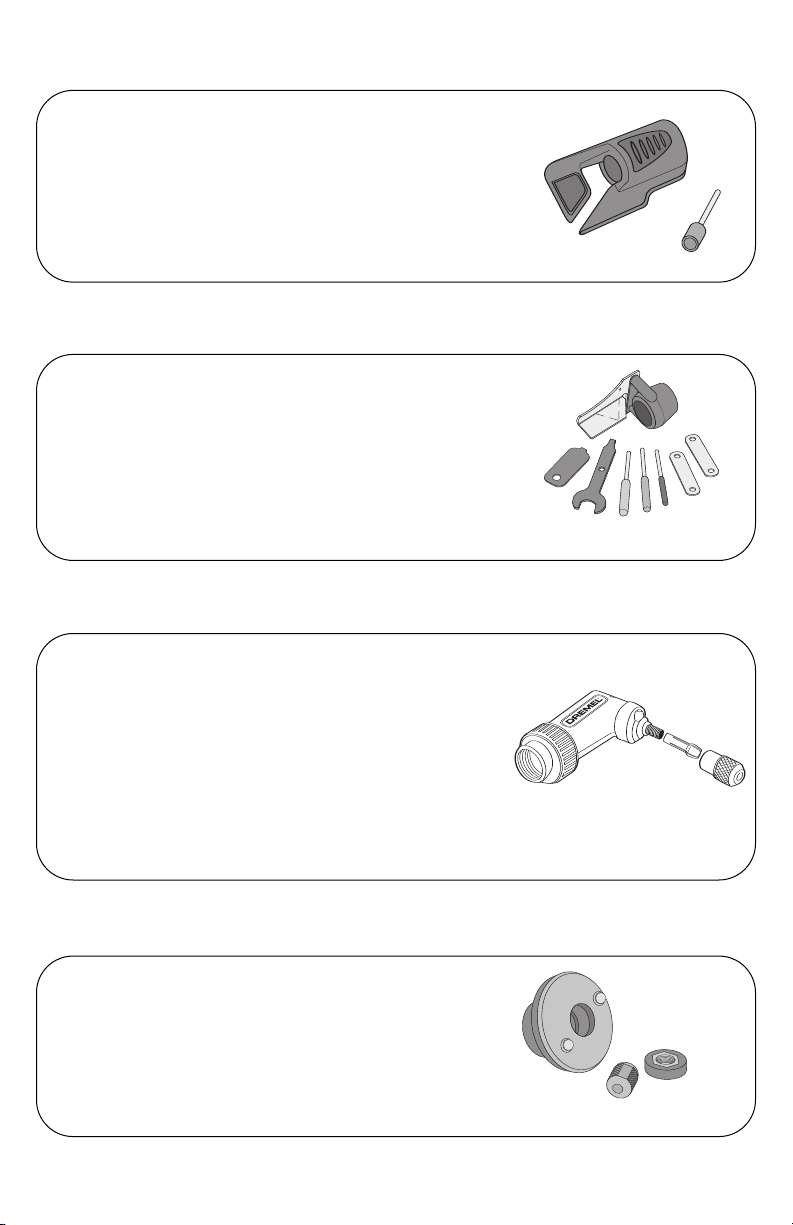
Converts you corded rotary tool into a plunge router.
• Clear base
• Two depth stop
• Includes edge guide and circle guide
• Rout circles, parallel to edge, signs, inlay work, and
lettering template adapters
Use with models: 275, 285, 395, 398, 800, 400 Series XPR.
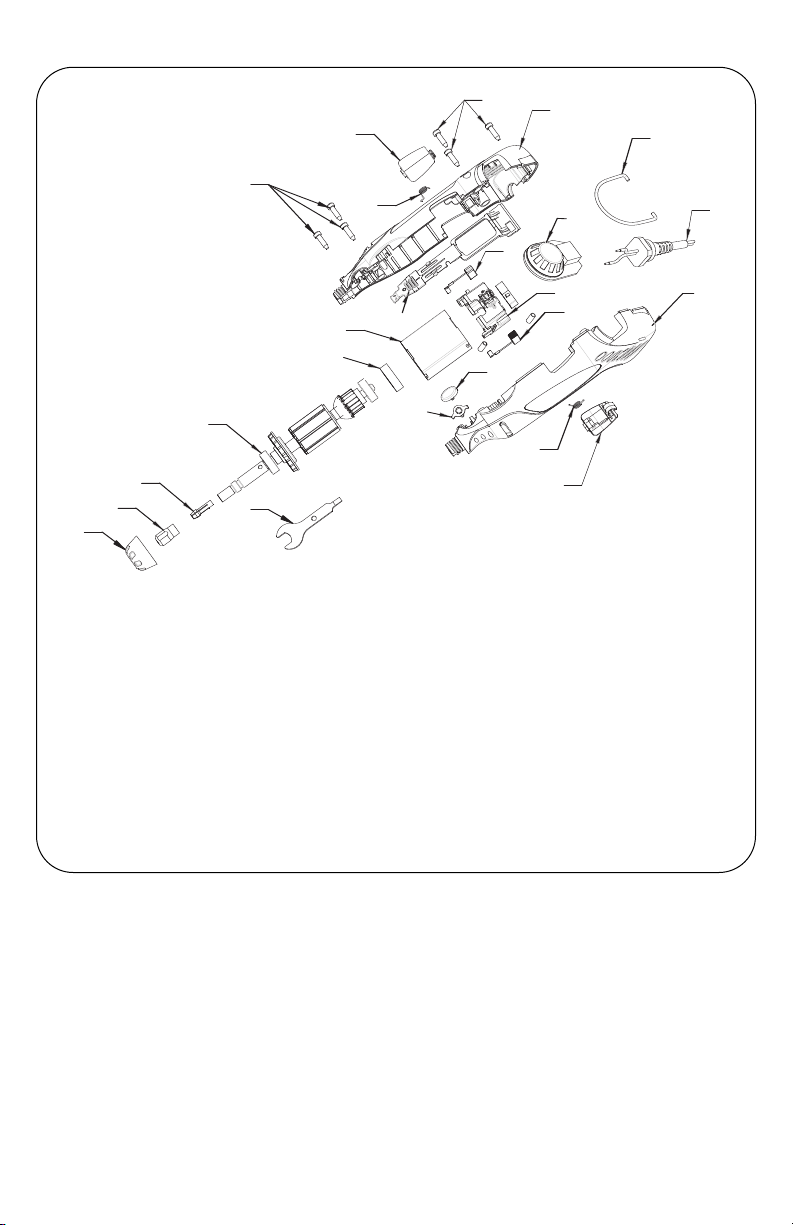
Grout Removal
Fast and easy way to regrout any room or replace a
broken tile!
• Multiple side depth adjustment
• 30° angle for control cutting
• Guides 180° apart to keep bit centered between
tiles
• Easy screw mounting
• Includes 1/16" grout removal bit
Use with models: 275, 285, 395, 398, 770, 780, 800, 400 Series XPR.
Plunge Router
Cutting Guide
Provides controlled cutting in a variety of materials
• Allows for sturdy controlled cuts with maximum visi
bility
• Easy depth adjustment. Set to the correct cutting
depth for the project material.
Use with models: 275, 285, 395, 398, 770, 780, 800, 400 Series XPR.
19
-
Page 20
ATTACHMENTS (continued)
30
o
30
o
GAGE
Lawn / Garden Sharpener
The fastest, easiest, safest way to sharpen your lawn mower
blade and other garden tools.
• Guide provides optimum sharpening angle
• Sharpens most rotary lawn mower blades
• Includes sharpening stone
Use with models: 275, 285, 395, 398, 770, 780, 800, 400 Series XPR.
Chain Saw Sharpener
• Easily sharpen the dullest of chains
• Contains: sharpening attachment, 3 sharpening stones,
gauge, 2 spacers, wrench, instruction manual
Use with models: 275, 285, 395, 398, 770, 780, 800, 400 Series XPR.
Right Angle
Enhances the versatility of the rotary tool by allowing you to
get into hard-to-reach places.
• Ball bearings and spiral gears provide smooth and cool
operation
• Coupling system allows you to orient the attachment on
your tool in 12 different directions
• Quick disconnect system easily attaches to your rotary tool
in place of the housing cap, no wrenches required
Use with models: 275, 285, 395, 398, 780, 800, 400 Series XPR.
Dremelite
• Provides visibility in dimly lit areas and increases light on
detailed projects
• Two extremely long lasting and durable LED lights
• Uses a magnet threaded onto the tool’s output shaft to provide a clever and simple power source—no wires!
Use with models: 275, 285, 395, 398, 770, 780, 800, 400 Series XPR.
20
Page 21

ATTACHMENTS (continued)
Flex Shaft Tool Holder
Conveniently suspends any Dremel rotary tool above your workbench.
• Perfect for use with the Flex-Shaft attachment
• Clamps to workbenches up to 1-3/4" thick, and adjusts in height
from 12" to 42"
• Store extra bits on base
Use with models: 275, 285, 395, 398, 400 Series XPR.
Tool Holder and Base
• Firmly holds rotary tools in any position
• Control workpiece (hands free) for better results
Use with models: 275, 285, 395, 398, 780, 400 Series XPR.
21
Page 22
1
1
2
5
3
10
10
16
17
18
19
20
25
25
22
24
23
25
25
30
28
27
24
4
SERVICE PARTS & DIAGRAM
Ref. Part No. Description
1 2610920980 Housing Set
2 2610920701 Field Assembly
3 2610920702 Armature and
Bearing Assembly
4 2615990962 Wrench
5 2615294041 Cord
10 2610920705 Brush Spring (Pair)
16 261920709 Brush Holder
Assembly
17 2610920972 Collet Lock & Spring
Ref. Part No. Description
18 2610922763 Collet Nut
19 2615110480 1/8" Collet (In Tool)
20 2610920710 Switch Assembly
22 2610914379 Rubber Bearing
Sleeve
23 2610920718 Hanger
24 2615294035 Screws (Individual)
25 2610921563 Brush Door (Pair)
27 2610920716 Glamour Cap
28 2640920711 Speed Control
30 2610920717 Housing Cap
22
Page 23

DREMEL™ LIMITED WARRANTY
Your Dremel™ product is warranted against defective material or workmanship for a period of five
years from date of purchase. In the event of a failure of a product to conform to this written warranty, please take the following action:
1. DO NOT return your product to the place of purchase.
2. Carefully package the product by itself, with no other items, and return it, freight prepaid,
along with:
A. A copy of your dated proof of purchase (please keep a copy for yourself).
B. A written statement about the nature of the problem.
C. Your name, address and phone number to:
UNITED STATES
Dremel Service Center Dremel Service Center
4631 E. Sunny Dune, Palm Springs, CA 92264
53406
We recommend that the package be insured against loss or in transit damage for which we cannot be responsible.
This warranty applies only to the original registered purchaser. DAMAGE TO THE PRODUCT
RESULTING FROM TAMPERING, ACCIDENT, ABUSE, NEGLIGENCE, UNAUTHORIZED
REPAIRS OR ALTERATIONS, UNAPPROVED ATTACHMENTS OR OTHER CAUSES UNRELATED TO PROBLEMS WITH MATERIAL OR WORKMANSHIP ARE NOT COVERED BY THIS
WARRANTY.
No employee, agent, dealer or other person is authorized to give any warranties on behalf of
Dremel. If Dremel inspection shows that the problem was caused by problems with material or
workmanship within the limitations of the warranty, Dremel will repair or replace the product free
of charge and return product prepaid. Repairs made necessary by normal wear or abuse, or
repair for product outside the warranty period, if they can be made, will be charged at regular factory prices.
DREMEL MAKES NO OTHER WARRANTY OF ANY KIND WHATEVER, EXPRESSED OR
IMPLIED, AND ALL IMPLIED WARRANTIES OF MERCHANTABILITY AND FITNESS FOR A PARTICULAR PURPOSE WHICH EXCEED THE ABOVE MENTIONED OBLIGATION ARE HEREBY
DISCLAIMED BY DREMEL AND EXCLUDED FROM THIS LIMITED WARRANTY.
This warranty gives you specific legal rights and you may also have other rights which vary from state
to state. The obligation of the warrantor is solely to repair or replace the product. The warrantor is
not liable for any incidental or consequential damages due to any such alleged defect. Some states
do not allow the exclusion or limitation of incidental or consequential damages, so the above limitations or exclusion may not apply to you.
For prices and warranty fulfillment in the continental United States, contact your local Dremel distributor.
4915 21st Street, Racine, WI 53406 OR
CANADA OUTSIDE
Giles Tool Agency CONTINENTAL UNITED STATES
6520 Lawrence Av. East See your local distributor or write to
Scarborough, Ont., Canada M1C 4A7 Dremel, 4915 21st Street, Racine, WI
23
Page 24

NOTE
24
Page 25

Série XPR
Manuel d'instructions
et de sécurité
Outil rotatif haute performance
1-800-437-3635
http://www.dremel.com
Les produits Dremel sont fabriqués et vendus par
ool Corporation
la division Dremel de la Robert Bosch
T
Robert Bosch
ool Corporation © 2004
T
ous droits réservés
T
Page 26

POWER TOOL SAFETY RULES
AVERTISSEMENT
!
Vous devez lire et comprendre toutes les instructions. Lenonrespect, même partiel, des instructions ci-après entraîne un
risque de choc életrique, d'incendie et/ou de blessures graves.
CONSERVEZ CES INSTRUCTIONS
Veillez à ce que l'aire de travail soit propre et bien éclairée.
Le désordre et le manque de lumière favorisent les accidents.
N'utilisez pas d'outils électriques dans une atmosphère
explosive, par exemple enprésence de liquides, de gaz ou
de poussières inflammables.
des étincelles qui pourraient enflammer les poussières ou les
vapeurs.
Tenez à distance les curieux, les enfants et les visiteurs
pendant que vous travaillezavec un outil électrique.
pourraient vous distraire et vous faire faire une fausse
manoeuvre.
Les outils électriques créent
Sécurité électrique
Aire de travail
Les outils à double isolation sont équipés d'une fiche
polarisée (une des lames est pluslarge que l'autre), qui ne
peut se brancher que d'une seule façon dans une prise
polarisée. Si la fiche n'entre pas parfaitement dans la prise,
inversez sa position ; si elle n'entre toujours pasbien,
demandez à un électricien qualifié d'installer une prise de
courant polarisée. Ne modifiez pas la fiche de l'outil.
double isolation élimine le besoin d'un cordon
d'alimentationà trois fils avec mise à la terre ainsi que d'une
prise de courant mise à la terre. Avant de brancher l'outil,
assurez-vous que la tension de la prise correspond, à celle
indiquée sur la plaque signalétique. N'utilisez pas d'outils
prévus pour courant alternatif seulement avec une source de
courant continu.
Évitez tout contact corporel avec des surfaces mises à la
terre (tuyauterie, radiateurs, cuisinières, réfrigérateurs,
etc.).
Le risque de choc électrique est plus grand si votre corps
est encontact avec la terre.Si l'utilisation de l'outil électrique
dans un endroit humide est inévitable, un disjoncteur de fuite à
la terre doit être utilisé pour alimenter votre outil. Des
chaussures et des gants en caoutchouc d'électricien
contribueront à accroître davantage votre sécurité personnelle.
N'exposez pas les outils électriques à la pluie ou à l'eau. La
présence d'eau dans un outil électrique augmente le risque de
choc électrique.
Ne maltraitez pas le cordon. Ne transportez pas l'outil par
son cordon et ne débranchez pas la fiche en tirant sur le
cordon. N'exposez pas le cordon à la chaleur, à des huiles,
à des arêtes vives ou à des pièces en mouvement.
Remplacez immédiatement un cordon endommagé.
cordon endommagé augmente le risque de choc électrique.
Lorsque vous utilisez un outil électrique à l'extérieur
employez un prolongateur pour l'extérieur marqué « W
ou « W ».
Ces cordons sont faits pour être utilisés à l'extérieur
et réduisent le risque de choc électrique. Reportez-vous aux «
Dimensions recommandées des cordons de rallonge » dans la
section Accessoires de ce manuel.
Sécurité des personnes
Restez alerte, concentrez-vous sur votre travail et faites
preuve de jugement. N'utilisez pas un outil électrique si
vous êtes fatigué ou sous l'influence de drogues, d'alcool
ou de médicaments.
Un instant d'inattention suf
fit pour
entraîner des blessures graves.
Habillez-vous convenablement. Ne portez ni vêtements
flottants ni bijoux. Confinez les cheveux longs.
N'approchez jamais les cheveux, les vêtements ou les
gants des pièces en mouvement.
des bijoux ou des cheveux longs risquent d'être happés par
des pièces en mouvement. Gardez les poignées sèches,
propres et exemptes d'huile et de graisse.
Méfiez-vous d'un démarrage accidentel. Avant de brancher
l'outil, assurez-vous que son interrupteur est sur ARRÈT.
Ils
Le fait de transporter un outil avec le doigt sur la détente ou de
brancher un outil dont l'interrupteur est en position MARCHE
peut mener tout droit à un accident.
Enlevez les clés de réglage ou de serrage avant de
démarrer l'outil.
l'outil peut provoquer des blessures.
Ne vous penchez pas trop en avant. Maintenez un bon
appui et restez en équilibre entout temps.
vous permet de mieux réagir à une situation inattendue.
Utilisez des accessoires de sécurité. Portez toujours des
La
lunettes ou une visière.
masque antipoussière, des bottes de sécurité antidérapantes,
un casque protecteur et/ou un appareil antibruit.
Une clé laissée dans une pièce tournante de
Utilisation et entretien des outils
Immobilisez le matériau sur une surface stable au moyen
de brides ou de toute autre façon adéquate.
la pièce avec la main ou contre votre corps offre une stabilité
insuffisante et peut amener un dérapage de l'outil.
Ne forcez pas l'outil. Utilisez l'outil approprié à la tâche.
L'outil correct fonctionne mieux et de façon plus sécuritaire.
Respectez aussi la vitesse de travail qui lui est propre.
N'utilisez pas un outil si son interrupteur est bloqué. Un
outil que vous ne pouvez pas commander par son interrupteur
est dangereux et doit être réparé.
Débranchez la fiche de l'outil avant d'effectuer un réglage,
de changer d'accessoire oude ranger l'outil.
mesures préventives de sécurité réduisent le risque de
démarrage accidentel de l'outil.
Rangez les outils hors de la portée des enfants et d'autres
personnes inexpérimentées.
les mains d'utilisateurs novices.
Prenez soin de bien entretenir les outils. Les outils de
Un
coupe doivent être toujours bien affûtés et propres.
outils bien entretenus, dont les arêtes sont bien tranchantes,
,
sont moins susceptibles de coincer et plus faciles à
»
-A
diriger.Toute altération ou modification constitue un usage
erroné et peut causer un danger.
Soyez attentif à tout désalignement ou coincement des
pièces en mouvement, à tout bris ou à toute autre
condition préjudiciable au bon fonctionnement de l'outil.
Si vous constatez qu'un outil est endommagé, faites-le
réparer avant de vous en servir.
causés par des outils en mauvais état. Élaborez un calendrier
d'entretien périodique de votre outil.
Des vêtements flottants,
Un bonne stabilité
Selon les conditions, portez aussi un
Le fait de tenir
De telles
Les outils sont dangereux dans
Des
De nombreux accidents sont
26
Page 27

N'utilisez que des accessoires que le fabricant
recommande pour votre modèle d'outil.
accessoires peuvent convenir à un outil, mais être dangereux
avec un autre.
Certains
Réparation
La réparation des outils électriques doit être confiée à un
réparateur qualifié.
électrique par un amateur peut avoir des conséquences
graves. Ainsi, des fils internes peuvent être mal placés ou
pincés, des ressorts de rappel de protecteur peuvent être
montés erronément.
L'entretien ou la réparation d'un outil
Consignes de sécurité pour outils rotatifs
Pour la réparation d'un outil, n'employez que des pièces
de rechange d'origine. Suivez les directives données à la
section « Réparation » de ce manuel.
autorisées ou le non-respect des instructions d'entretien peut
créer un risque de choc électrique ou de blessures. Certains
agents nettoyants tels qu'essence, tétrachlorure de carbone,
ammoniac, etc., peuvent abîmer les pièces en plastique.avant
l’entretien ; avant de changer les lames, les mèches, les
couteaux, etc.
L'emploi de pièces non
Les accessoires doivent être prévus pour au moins la
vitesse recommandée sur l'étiquette d'avertissement de
Les meules et les autres accessoires utilisés à une
l'outil.
vitesse supérieure à la vitesse nominale peuvent se détacher et provoquer des blessures.
Tenez l'outil par les surfaces isolées de prise en exécutant une opération lorsque l'outil de coupe peut venir en
contact avec des fils cachés ou son propre cordon.
contact avec un fil sous tension rendra les parties
métalliques exposées de l'outil sous tension et causera des
secousses électriques à l'opérateur. Pour couper dans des
murs existants ou autres endroits aveugles pouvant dissimuler des fils électriques, débranchez tous les fusibles ou
les disjoncteurs alimentant ce lieu de travail.
L’avertissement suivant s’applique aux outils à arbre
flexible et à leurs accessoires : ne faites pas fonctionner
l’arbre flexible avec une courbe prononcée.
pliage, l’arbre peut produire une chaleur excessive sur la
gaine ou la partie maniable. Le rayon minimum recommandé
est de 6 po.
Débranchez toujours le cordon de la prise de courant
avant d'effectuer quelque réglage que ce soit ou de
poser des accessoires.
par mégarde et causer des blessures graves.
Connaissez l'emplacement de l'interrupteur lorsque
vous déposez l'outil ou lorsque vous le reprenez.
pouvez actionner l'interrupteur par mégarde.
L’avertissement suivant s’applique aux outils à arbre
flexible et à leurs accessoires : maintenez toujours fermement la partie maniable dans vos mains pendant le
démarrage.
régime, le couple à réaction du moteur peut entraîner une
torsion de l’arbre.
Portez toujours des lunettes de sécurité et un masque
anti-poussières.
L'utilisation de dispositifs de sécurité personnelle et le travail
dans un environnement sûr réduisent les risques de
blessures.
Après avoir changé les lames ou effectué quelque
réglage que ce soit, assurez-vous que l'écrou de la
douille et tout autre dispositif de réglage sont bien serrés.
ment et causer ainsi une perte de contrôle avec projection
violente des composants en rotation.
Ne placez pas la main à proximité de la mèche qui
tourne.
proximité.
Lors de son accélération pour atteindre le plein
Un dispositif de réglage lâche peut bouger soudaine
Vous ne vous rendrez pas toujours compte de cette
L'outil pourrait se mettre en marche
N'utilisez l'outil qu'à un endroit bien aéré.
Lors du
Vous
Laissez les brosses tourner à la vitesse de fonctionnement pendant au moins une minute avant d’utiliser la
meule. Durant cette période, personne ne doit se tenir
devant la meule ou en ligne avec celle-ci.
ode de rodage, les poils ou fils de fer seront éjectés de la
brosse.
Les brosses (à poils standards ou métalliques) ne doivent
Le
jamais être utilisées au-dessus de 15 000 tr/min.
décharge de la brosse métallique en rotation en sens
opposé à vous.
ments de fil peuvent être déchargés à grande vitesse durant
l'action de « nettoyage » de ces brosses et peuvent se loger
dans votre peau. À haute vitesse, les poils ou fils de fer mal
attachés seront éjectés.
Portez des gants protecteurs et un masque de soudeur
avec les brosses métalliques ou en soie de porc.
Appliquez légèrement les brosses métalliques ou en
soie de porc sur votre ouvrage, puisque seules les
extrémités du fil métallique/des brosses font le travail.
Une « lourde » pression sur les brosses entraînera une surcharge du fil métallique ou de la brosse, résultant en une
action d’essuyage, et entraînera une décharge des brosses/du fil métallique.
Maniez soigneusement l'outil aussi bien que les meules
individuelles pour éviter les éclats ou les fissurations.
Posez une nouvelle meule si l'outil tombe pendant la
rectification. N'utilisez pas une meule qui peut être
endommagée.
le fonctionnement seront projetés à grande vitesse et pourraient frapper des personnes présentes ou vous-même.
N'utilisez jamais de lames émoussées ou abîmées. Les
lames affilées doivent être maniées soigneusement. Les
mèches abîmées peuvent se rompre brusquement durant
l'usage. Les lames émoussées nécessitent plus de force
pour pousser l'outil, causant éventuellement un bris de la
lame.
Utilisez des pinces pour supporter l'ouvrage autant que
possible. Ne tenez jamais un petit ouvrage d'une main et
l'outil de l'autre main pendant que celui-ci est en usage.
Prévoyez un espace suffisant, d'au moins 150 mm, entre
votre main et la mèche qui tourne.
telles que tiges cylindriques, tuyaux ou tubes, ont tendance
à rouler pendant qu'on les coupe et, de ce fait, la mèche peut
« mordre » ou sauter vers vous. En fixant un petit ouvrage,
vous pourrez utiliser vos deux mains pour contrôler l'outil.
Inspectez l'ouvrage avant de le couper. Avant de couper
un ouvrage de forme irrégulière, planifiez votre travail de
Des petites particules et des petits frag-
Les fragments d'une meule qui éclate durant
Pendant la péri-
Les pièces rondes,
Dirigez la
27
Page 28

Consignes de sécurité pour outils rotatifs
manière à ce que l'ouvrage ne glisse pas et ne vienne
pas pincer la mèche qui sera arrachée de votre main.
Ainsi, si vous taillez du bois, assurez-vous de l'absence de
clous ou de corps étrangers dans l'ouvrage. Sous l'effet du
contact avec des clous ou corps étrangers, la mèche peut
sauter.
Ne mettez jamais l'outil en marche alors que la lame est
enfoncée dans le matériau.
coincer dans le matériau et vous faire perdre le contrôle du
couteau.
Évitez de faire rebondir et de heurter la meule, surtout en
travaillant des coins, des arêtes vives, etc.
causer une perte de contrôle et un rebond.
Le sens d'avance de la mèche dans l'ouvrage lorsque
vous taillez, détourez ou coupez est très important.
Avancez toujours la mèche dans l'ouvrage dans le sens
dans lequel le tranchant sort de l'ouvrage (ce qui correspond au sens d'éjection des copeaux).
dans le mauvais sens fait sortir le tranchant de la mèche de
l'ouvrage et tire l'outil dans le sens de cette avance.
Si le matériau ou la mèche se grippe ou se bloque, mettez l'outil hors tension « OFF » par l'interrupteur.
Attendez que toutes les pièces mobiles s'immobilisent
et débranchez l'outil, procédez ensuite à débloquer l'ouvrage bloqué.
de marche « ON », l'outil pourrait se remettre en marche par
mégarde et causer ainsi des blessures graves.
Ne laissez pas un outil en marche sans surveillance,
mettez hors tension.
rité uniquement lorsqu'il s'est arrêté complètement.
Ne rectifiez et ne poncez pas à proximité de matières
inflammables.
raient enflammer ces matières.
Ne touchez pas la mèche ou la douille après usage.
Après usage, la mèche et la douille sont trop chaudes pour
être touchées à mains nues.
Nettoyez régulièrement les prises d'air de l'outil à l'aide
d'air comprimé.
poudre à l'intérieur du carter du moteur peut causer des
défaillances électriques.
Si l'interrupteur de l'outil est laissé en position
Les étincelles provenant de la meule pour-
Une accumulation excessive de métal en
Le tranchant de la lame peut se
Ceci peut
L'avance de l'outil
L'outil peut être déposé en toute sécu-
Ne soyez pas dupé par la familiarité acquise par un
usage fréquent de votre outil rotatif.
fraction de seconde d'insouciance suffit à infliger des
blessures graves.
Ne modifiez pas l'outil et n'en faites pas un usage
erroné.
Toute altération ou modification constitue un usage
erroné et peut provoquer des blessures graves.
Ce produit n’est pas destiné à être utilisé comme fraise
dentaire dans des applications médicales humaines ou
vétérinaires.
Lorsque vous utilisez les scies en acier, les disques de
découpage, les couteaux à grande vitesse ou les
couteaux au carbure de tungstène, assurez-vous que la
pièce est toujours bien assujettie. Ne tentez jamais de
tenir la pièce d’une seule main tout en utilisant l’un de
ces accessoires.
lorsqu’elles sont le moindrement inclinées dans la rainure, et
elles peuvent alors rebondir, vous faisant ainsi perdre le contrôle et causant des blessures graves. Votre autre main doit
servir à stabiliser et guider la main qui tient l’outil. Lorsqu’un
disque de découpage grippe, on peut généralement s’attendre à ce qu’il se brise. Lorsque la scie en acier, les couteaux
à grande vitesse ou le couteau au carbure de tungstène grippent, ils peuvent sauter hors de la rainure et vous pouvez
perdre le contrôle de l’outil.
!
travaux du bâtiment peuvent créer des poussières contenant des produits chimiques qui sont des causes reconnues de cancer, de malformation congénitale ou d’autres
problèmes reproductifs. Ces produits chimiques sont, par
exemple :
• Le plomb provenant des peintures à base de plomb,
• Les cristaux de silices provenant des briques et du ciment et
d’autres produits de maçonnerie, et
• L’arsenic et le chrome provenant des bois traités chimique-
ment
Le niveau de risque dû à cette exposition varie avec la
fréquence de ces types de travaux. Pour réduire l’exposition à
ces produits chimiques, il faut travailler dans un lieu bien ventilé et porter un équipement de sécurité approprié tel que certains masques à poussière conçus spécialement pour filtrer les
particules microscopiques.
Des blessures graves peuvent s’ensuivre.
La raison en est que ces roues grippent
AVERTISSEMENT
N'oubliez pas qu'une
Les travaux à la machine tel
que ponçage, sciage, meulage, perçage et autres
28
Page 29

FAMILIARISATION AVEC L'OUTIL ROTATIF
Déballage et contrôle du contenu
!
AVERTISSEMENT
causées par le démarrage intempestif de
l'outil ou une décharge électrique,
débranchez toujours l'outil de la prise
murale lorsqu'il n'est pas utilisé.
Séparez toutes les pièces non fixées des
matériaux d'emballage et pour chaque article, pointez sur la liste de colisage qui figure
sur le carton pour vous assurer que rien ne
manque avant de jeter les matériaux d'emballage.
IMPORTANT! S'il manque la moindre
pièce ou si vous comprenez mal ces
instructions, contactez le service clientèle Dremel™ au : 1-800-437-3635 ou visitez notre site Web www.Dremel.com.
Pour écarter tout
risque de blessures
1-800-437-3635
Description
L'outil rotatif SÉRIE XPR™ associe haut
régime et performance pour servir de
Écrou de la bague de serrage
Bague de serrage
machine à ciseler
, meuleuse, cône à polir,
ponceuse, fraise, brosse, perceuse et plus
encore.
L'outil utilise un moteur à courant continu,
petit mais efficace. La grande variété d'accessoires Dremel™ disponibles inclut des
meules abrasives, des forets, des brosses
métalliques et en nylon, des fraises à graver
et à ciseler, des arêtes tranchantes, des
pointes à polir et plus encore. L'ajout possible de différents accessoires Dremel™ augmente d'autant la polyvalence de l'outil. La
variété des projets réalisables avec l'outil est
infinie.
L'outil rotatif SÉRIE XPR est un outil à haut
régime qui fonctionne entre 5 000 et 35 000
tr/min. (Une perceuse électrique typique
fonctionne uniquement jusqu'à 2 500 tr/min !)
Associés aux accessoires Dremel™, le haut
régime et la performance de l'outil rotatif
série XPR vous permettent de travailler sur
les projets les plus contraignants, sans avoir
à appliquer la moindre pression sur l'outil.
L'outil se charge de faire le travail.
Capuchon du boîtier
Bouches d'aération
Couvercle de brosse
(un de chaque côté)
Dispositif de suspension
29
Clé (serrage de la bague)
Bouton de blocage de l'arbre
Interrupteur de marche/arrêt
Régulateur de régime
Cordon d'alimentation
Page 30

CARACTÉRISTIQUES TECHNIQUES
Caractéristiques générales
Tension nominale . . . . . . . .120 V, 50-60 Hz
Intensité nominale . . . . . . . . . . . . . . . .2.0 A
Régime à vide . . . . . . . . . . . .No35,000/min
Bagues de serrage
compatibles 1/32 po (0,7 mm), 1/16 po (1,6
mm), 3/32 po (2,4 mm), 1/8 po (3 mm)
Caractéristiques techniques du moteur
Cet outil rotatif utilise un moteur à haut
régime variable. Il a été conçu pour fonctionner sur du courant alternatif de 110-120 volts
et 50-60 Hz. Avant de brancher le cordon du
moteur sur la prise murale, assurez-vous que
l'interrupteur d'alimentation est sur position "
arrêt " et que les caractéristiques du courant
électrique correspondent exactement à
celles estampillées sur la plaque signalétique
de l'outil rotatif.
Branchement sur l'alimentation
DANGER
!
touchez pas les lames métalliques de la
fiche en installant ou retirant la fiche de la
prise.
DANGER
!
endommagé d'une quelconque manière,
faites-le remplacer immédiatement pour
éviter une électrocution ou un risque d'incendie.
Pour écarter tout risque
d'électrocution, ne
Si le cordon d'alimentation est usé, coupé ou
Rallonges
Si une rallonge est nécessaire, un cordon
doté de conducteurs de calibre adéquat
et capable de transporter le courant
nécessaire pour votre outil devra être utilisé. Ceci empêchera les chutes de tension excessives, les coupures d'alimentation et les surchauffes.
DIMENSIONS RECOMMANDÉES
POUR LES RALLONGES
OUTILS 120 VOL
REMARQUE: Plus le numéro de calibre est
petit, plus le cordon est lourd.
Calibre du cordon en
Intensité
nominale
de l'outil
2-6
6-8
8-10
10-12
12-16
A.W
Longueur du cordon en pieds
25 50 100 150 15 30 60 120
18 16 16 14 .75 .75 1.5 2.5
18 16 14 12 .75 1.0 2.5 4.0
18 16 14 12 .75 1.0 2.5 4.0
16 16 14 12 1.0 2.5 4.0 —
14 12 — — — — — —
TS C.A.
Calibre des conduc-
.G.
teurs en mm2
Longueur du cordon
en
mètres
30
Page 31

SYMBOLES
0
Important : Certains des symboles suivants peuvent être utilisés sur votre outil. Veuillez les étudier et apprendre leur signification. Une interprétation appropriée de ces symboles vous permettra d'utiliser l'outil de façon plus efficace et plus
sûre.
Symbol Name Designation/Explanation
Symbole Nom Désignation/Explication
V Volts Tension (potentielle)
A Ampères Courant
Hz Hertz Fréquence (cycles par seconde)
W Watt Puissance
kg Kilogrammes Poids
min Minutes Temps
s Secondes Temps
Diamètre Taille des mèches de perceuse, meules,
n
0
Vitesse à vide Vitesse de rotation, à vide
.../min Tours ou mouvement alternatif par Tours, coups, vitesse en surface, orbites,
minute etc., par minute,
0 Position d'arrêt Vitesse zéro, couple zéro ...
1, 2, 3, ... Réglages du sélecteur Réglages de vitesse, de couple ou de
l, ll, lll, ... position. Un nombre plus élevé signifie
Sélecteur variable à l'infini avec arrêt La vitesse augmente depuis le réglage 0
Flèche Action dans la direction de la flèche
Courant alternatif Type ou caractéristique du courant
Courant continu Type ou caractéristique du courant
Courant alternatif Type ou caractéristique du courant
ou continu
Construction classe II Désigne des outils construits avec double
isolation
Borne de terre borne de mise à la terre
Symbole d'avertissement Alerte l'utilisateur aux messages
Sceau Ni-Cad RBRCmc Désigne le programme de recyclage des piles
etc.
une vitesse plus grande.
d'avertissement.
Ce symbole signifie que cet outil
est approuvé par Underwriters
Laboratories.
Ce symbole indique que cet
outil est approuvé par
l'Association canadienne de
normalisation (ACNOR) et a
été classé parmi les normes
américaines par l'ACNOR.
Ce symbole signifie que cet
outil est approuvé par
l'Association canadienne de
normalisation.
Ce symbole signifie que
cet outil est approuvé conformément aux normes canadiennes par Underwriters
Laboratories.
Ce symbole signifie que cet outil
est approuvé par Underwriters
Laboratories et qu’il a été homologué selon les normes canadiennes par Underwriters
Laboratories.
31
Ce symbole signifie que
cet outil se conforme aux
normes mexi
-
caines NOM.
Page 32

Bouton de
blocage de l'arbre
Clé (serrage
de la bague)
Pour serrer
Pour desserrer
Écrou de la
bague de serrage
1/8" (480)
3/32" (481)
1/16" (482)
1/32"(483)
Écrou de la
bague de
serrage
ASSEMBLAGE
!
AVERTISSEMENT
Bagues de serrage
Les accessoires Dremel™ disponibles pour
l'outil rotatif sont proposés avec des tailles de
tiges différentes.
Quatre dimensions de bagues sont proposées pour accommoder les différents
diamètres de tiges. Les dimensions des
bagues sont indiquées par les anneaux à
l'arrière de la bague :
• La bague de 1/32 po (0,7 mm) a un
anneau (no 483)
• La bague de 1/16 po (1,6 mm) a deux
anneaux (no 482)
ATTENTION
!
de force une tige de plus grand diamètre dans une bague de serrage.
Changement de bague de serrage
1. Appuyez sur le bouton de blocage de
l'arbre et tournez l'arbre à la main
jusqu'à ce qu'il s'enclenche.
!
AVERTISSEMENT
de l'arbre pendant que l'outil rotatif fonctionne.
2. Une fois le bouton de blocage de l'arbre
enclenché, desserrez et retirez l'écrou
de la bague de serrage. Utilisez la clé de
serrage au besoin.
3. Retirez la bague de serrage en tirant
pour la dégager de l'arbre.
Débranchez toujours l'outil rotatif avant de changer des accessoires ou des bagues ou d'effectuer une maintenance sur l'outil..
• La bague de 3/32 po (0,7 mm) a trois
anneaux (no 481)
• La bague de 1/8 po (3 mm) n'a aucun
anneau (no 480)
REMARQUE : Il est possible que certains kits
d'outils rotatifs n'incluent pas les quatre tailles
de bague. Les bagues sont également proposées séparément.
Utilisez toujours la bague de serrage qui correspond au diamètre de tige
de l'accessoire que vous envisagez d'utiliser. N'essayez pas d'introduire
N'actionnez pas le
bouton de blocage
4. Installez la bague de serrage de la taille
appropriée à fond dans l'arbre et réinstallez l'écrou de la bague en le serrant
des doigts. Ne serrez pas l'écrou à fond
lorsqu'aucun foret ou accessoire n'est
installé.
Changement d'accessoires
1.Appuyez sur le bouton de blocage de l'arbre
et tournez l'arbre à la main jusqu'à ce qu'il
s'enclenche.
!
AVERTISSEMENT
bre pendant que l'outil rotatif fonctionne.
2. Une fois le bouton de blocage de l'arbre
enclenché, desserrez (sans retirer) l'écrou
de la bague de serrage. Utilisez la clé de
serrage au besoin.
3. Insérez la tige du foret ou de l'accessoire à
fond dans la bague de serrage.
4. Le bouton de blocage de l'arbre étant
enclenché, serrez des doigts l'écrou de la
bague jusqu'à ce que la tige du foret ou de
l'accessoire soit saisie par la bague.
N'actionnez pas le bouton de blocage de l'ar-
Bouton de blocage de l'arbre
REMARQUE : Veillez à lire les instructions fournies avec votre accessoire
Dremel™ pour toute information supplémentaire sur son mode d'emploi.
32
Page 33

ASSEMBLAGE (SUITE)
2
4
2
4
AVERTISSEMENT
Se protéger les yeux
Mandrin auto-serrant
Le mandrin auto-serrant est utilisé à la place
de la bague et de l'écrou de bague standard
pour retirer et installer facilement et rapidement certains accessoires.
Le mandrin auto-serrant est compatible avec
divers accessoires dont la tige mesure entre
1/32 et 1/8 po et est destiné aux accessoires
légers tels que les forets, les cylindres de contact, les accessoires de polissage, les brosses
métalliques et à soies en nylon et les meules
tronçonneuses.
1. Pour installer le mandrin auto-serrant,
reportez-vous aux étapes 1 à 3,
Changement de bague de serrage, page 7.
Mode d'emploi de l'outil rotatif
Pour tirer le maximum de votre outil rotatif,
vous devez apprendre à laisser l'outil faire le
travail à votre place.
La première étape
pour apprendre à
utiliser l'outil rotatif
consiste à apprendre
à " bien le sentir ".
Tenez-le dans la main
et pesez-le tout en
avec son point d'équilibre. Palpez la partie
conique du boîtier : elle vous permet de saisir
l'outil un peu comme un crayon ou un stylo.
La poignée confortable originale au bout
augmente le confort et la maniabilité.
!
AVERTISSEMENT
visage. Les accessoires peuvent être
endommagés en cours de manipulation
et envoyer des projectiles lorsqu'ils
atteignent leur régime d'exploitation.
Ceci est rare, mais pas impossible.
Lorsque vous tenez l'outil, ne couvrez
pas les bouches d'aération avec votre
main. L'obturation des bouches d'aéra-
ATTENTION
!
vous sur des chutes de matériau en premier
pour voir comment l'outil fonctionne à haut
régime. N'oubliez pas que votre outil rotatif
donnera les meilleurs résultats lorsque vous
permettrez à son régime, associé à l'accessoire Dremel™ correct, de faire le travail à
votre place. N'appuyez pas sur l'outil durant
vous familiarisant
Tenez toujours
l'outil à l'écart du
tion entraînera la surchauffe du moteur.
IMPORTANT!
Entraînez-
Mandrin auto-serrant
2. Serrez le mandrin auto-serrant sur la
3. Utilisez la clé fournie pour serrer à
UTILISATION
Pour une meilleure maîtrise pour les travaux de
précision, tenez l'outil rotatif comme un crayon,
entre le pouce et l'index.
La méthode " prise de golf " est réservée aux
opérations plus agressives telles que le meulage
ou la coupe.
l'utilisation, si possible
À la place, abaissez légèrement l'accessoire
rotatif jusqu'à la surface de travail et mettezla au contact du point où vous voulez commencer. Concentrez-vous sur le guidage de
l'outil sur l'ouvrage en n'appuyant que très
légèrement avec la main. Laissez l'acces
soire faire son travail.
Généralement, il est préférable d'ef
une série de passages avec l'outil plutôt que
d'effectuer l'ensemble du travail d'un seul
trait. Un léger contact donne la meilleure
maîtrise et réduit les risques d'erreur.
tige de l'outil rotatif.
fond le mandrin auto-serrant si vous
êtes incapable d'appliquer une pression de serrage suffisante pour fixer le
foret ou l'accessoire.
-
fectuer
33
Page 34

2
4
UTILISATION (SUITE)
Régimes d'exploitation
Pour obtenir les meilleurs résultats lorsque
vous travaillez sur différents matériaux,
adaptez le régulateur de régime au travail.
Pour sélectionner le régime adapté à l'accessoire utilisé, entraînez-vous dans un premier
temps sur une chute.
REMARQUE: Le régime est sensible aux fluctuation de tension. Une baisse de la tension
entrante ralentira l'outil, surtout au plus bas
régime. Si votre outil semble fonctionner lentement, augmentez le régime en conséquence
avec le régulateur. Dans les endroits où la tension
secteur est inférieure à 120 V, il est possible que
l'outil ne démarre pas au réglage le plus bas.
Déplacez simplement le régulateur à une position
supérieure pour faire démarrer l'outil.
Les réglages du régulateur de l'outil rotatif
SÉRIE XPR sont indiqués sur le cadran.
Pour déterminer le régime adapté au matériau travaillé et l'accessoire à utiliser, consultez
le tableau Sélection d'un régime, pages 11 à
13.
La plupart des travaux peuvent être accom-
plis en utilisant l'outil au réglage le plus haut.
Toutefois, certains matériaux (certains plastiques et métaux) peuvent être endommagés
sous l'effet de la chaleur dégagée à haut
régime et doivent être travaillés à des
régimes relativement bas.
Un fonctionnement à bas régime (15 000
tr/min ou moins) est généralement préférable
pour les opérations de polissage employant
des accessoires de polissage en feutre, le
ciselage délicat du bois et des pièces de
maquettes fragiles. Toutes les applications
de brossage exigent des régimes inférieurs
pour éviter la désolidarisation des soies
métalliques du support. À bas régime, laissez la performance de l'outil faire le travail à
votre place.
Les régimes plus élevés sont mieux adaptés
au perçage, au ciselage, à la coupe, au
toupillage, au profilage, à la taille de rainures
ou feuillures dans le bois. Les bois durs, les
métaux et le verre exigent également un
fonctionnement à haut régime.
Les réglages correspondent approximativement aux régimes suivants :
Utilisez le réglage adapté.
Réglage Régime (tr/min)
2 5,000 à 8,000
4 9,000 à 11,000
6 12,000 à 17,000
8 18,000 à 24,000
10 25,000 à 35,000
Quelques consignes relatives au régime de
l'outil :
• Il n'existe aucun accessoire pour l'outil
rotatif Dremel capable de percer ou de
couper le verre.
• Le plastique et d'autres matériaux dont le
point de fusion correspond à une basse température doivent être coupés à bas régime.
• Le polissage et le nettoyage avec une
brosse métallique doivent être effectués à un
régime inférieur ou égal 15 000 tr/min pour
éviter d'endommager la brosse et votre
matériau.
• Le bois doit être coupé à haut régime.
• Le fer ou l'acier doivent être coupés à
haut régime.
• Si une fraise acier à haut régime commence à vibrer, cela indique généralement
qu'elle tourne trop lentement.
• L'aluminium, les alliages de cuivre, les
alliages de plomb, les alliages de zinc et l'étain pourront être coupés à des régimes
divers, selon le type de coupe. Utilisez une
paraffine (pas de l'eau) ou un autre lubrifiant
adapté sur la fraise pour empêcher le matériau d'adhérer aux dents de la fraise.
REMARQUE: L'augmentation de pression
sur l'outil n'est pas la réponse lorsqu'il ne
fonctionne pas correctement. Essayez un
autre accessoire ou réglage pour obtenir le
résultat escompté. Veuillez vous reporter aux
tableaux de réglages suivants ou contacter
simplement le service clientèle Dremel au :
1-800-437-3635
www
or at
.Dremel.com.
34
Page 35

SÉLECTION D'UN RÉGIME
Utilisez uniquement des accessoires Dremel™ ultra-performants testés.
* Régime pour les coupes légères ; attention - brûlures sur les rainures profondes.
o Selon la direction de coupe par rapport au grain.
Fraises à haut régime
Numéro
de référence
100, 121, 131
114, 124,
134, 144
190
118, 191, 192,
193, 194
116, 117,
125, 196
115
198
199
Numéro
de référence
105, 108
106, 109
107, 110
111
112
113
Numéro
de référence
7103, 7105,
7117, 7120,
7122, 7123,
7134, 7144
Bois Bois Laminés Acier Aluminium, Pierre CéramiqueVerre
tendre dur Plastique laiton, etc. Stone
810 5 5 6 - - 86 4 5 6 - - -
810 4 7 8 - - 810 4 5 8 - - -
86 4 5 6 - - -
810 4 5 6 - - 88 4 5 6 - - 88 4 5 6 - - -
Fraises à graver
Bois Bois Laminés Acier Aluminium, Pierre CéramiqueVerre
tendre dur Plastique laiton, etc. Stone
810 6 4 6 - - 8 10 54 6--810 5 4 6 - - 8* 10* 6* 4 6 - - 8* 10* 5* 4 6 - - 8* 10* 5* 4 6 - - -
Meules diamants
Bois Bois Laminés Acier Aluminium, Pierre CéramiqueVerre
tendre dur Plastique laiton, etc. Stone
10 8 - - - 10 10 10
Numéro
de référence
9931, 9932,
9933, 9934,
9935, 9936
Numéro
de référence
9901, 9902,
9903, 9904,
9905, 9906,
9909, 9910,
9911, 9912
Fraises en carbure de tungstène à dents structurées
Bois Bois Laminés Acier Aluminium, Pierre CéramiqueVerre
tendre dur Plastique laiton, etc. Stone
88 4 - 6 - - -
Fraises en carbure de tungstène
Bois Bois Laminés Acier Aluminium, Pierre CéramiqueVerre
tendre dur Plastique laiton, etc. Stone
8
8
4 8-10 6 8 8-10 8-10
35
Page 36

SÉLECTION D'UN RÉGIME (SUITE)
Utilisez uniquement des accessoires Dremel™ ultra-performants testés.
* Régime pour les coupes légères ; attention - brûlures sur les rainures profondes.
o Selon la direction de coupe par rapport au grain.
Arêtes tranchantes à haut régime
Numéro
de référence
612, 640
615, 617, 618,
650, 652
654
Numéro
de référence
83142, 83322,
83702, 84922,
85422, 85602,
85622
Numéro
de référence
516, 517, 518,
500
Numéro
de référence
903, 911, 921,
932,941, 945,
952, 953, 954,
971, 997,
8153, 8175,
8193, 8215
541
Numéro
de référence
453, 454, 455
Bois Bois Laminés Acier Aluminium, Pierre CéramiqueVerre
tendre dur Plastique laiton, etc. Stone
10* 8• - - - - - 10* 8• - - - - - -
10* 8• - - - - - -
Meules en carbure de silicium
Bois Bois Laminés Acier Aluminium, Pierre CéramiqueVerre
tendre dur Plastique laiton, etc. Stone
- - 6 10 4 6 10 10
Pointes abrasives
Bois Bois Laminés Acier Aluminium, Pierre CéramiqueVerre
tendre dur Plastique laiton, etc. Stone
4-6 4-6 - 8 6 - - 4-6 4-6 - 8 6 - - -
Meules en oxyde d'aluminium
Bois Bois Laminés Acier Aluminium, Pierre CéramiqueVerre
tendre dur Plastique laiton, etc. Stone
10 10 - 8 4 6 10 -
10 10 - 8 4 610 -
Pierres à aiguiser des scies à chaîne
Bois Bois Laminés Acier Aluminium, Pierre CéramiqueVerre
tendre dur Plastique laiton, etc. Stone
-- - 8 - -- -
36
Page 37

Numéro
de référencer
409, 420, 426,
540
542
545
560
561
562
Numéro
de référence
461, 462, 463
414, 422, 429
425, 427
423
403, 404, 405
530, 531, 532
428, 442, 443
535, 536, 537
Numéro
de référencer
430, 431, 438
439, 440, 444
407, 408, 432
411, 412, 413
Numéro
de référence
502, 503, 504,
505
Numéro
de référence
511
Numéro
de référence
150
Numéro
de référence
569, 570
SÉLECTION D'UN RÉGIME (SUITE)
Accessoires de coupe
Bois Bois Laminés Acier Aluminium, Pierre CéramiqueVerre
tendre
8-10 8 - - - - - -
6-10 6-10 2-4 - 10 - - -
Bois Bois Laminés Acier Aluminium, Pierre CéramiqueVerre
tendre dur Plastique laiton, etc. Stone
Bois Bois Laminés Acier Aluminium, Pierre CéramiqueVerre
tendre dur Plastique laiton, etc. Stone
2-10 2-10 2-6 10 10 2-10 2-10 2-10 2-10 2-6 10 10 2-10 2-10 2-10 2-10 2-6 10 10 2-10 2-10 -
Bois Bois Laminés Acier Aluminium, Pierre CéramiqueVerre
tendre dur Plastique laiton, etc. Stone
Bois Bois Laminés Acier Aluminium, Pierre CéramiqueVerre
tendre dur Plastique laiton, etc. Stone
Bois Bois Laminés Acier Aluminium, Pierre CéramiqueVerre
tendre dur Plastique laiton, etc. Stone
Bois Bois Laminés Acier Aluminium, Pierre CéramiqueVerre
tendre
dur Plastique laiton, etc. Stone
- - 2-4 10 10 10 10 -
10 8-10 2-4 10 10 10 10 -
For use on drywall. For best results, use at 35,000 rpm.
-- - - - -10-
Accessoires de polissage
-- - 8 8 888
-- - 6 6 666
-- -8 8---
- - - 6-8 6-8 6-8 6-8 6-8
4 4 2-4 6 6 - - -
-4 - 4 - - - 44 2 4 - - - 4 4-444--
Bandes et disques à poncer
8 8 2-4 - 2-4 - - -
Meules à lamelles
6-8 8 2 10 8-10 - - -
Tampons abrasifs de finition
66 4 6 6 - - -
Foret
10 8-10 2-4 - 6 - - -
Foret de retrait de mortier
Plastique
dur
S'utilise sur le mortier de mur ou de sol.
laiton, etc.
Stone
6-8
-
37
Page 38

ENTRETIEN
2
4
l'encoche en V
!
AVERTISSEMENT
Un entretien préven-
tif réalisé par un personnel non autorisé risque de se solder
par le déplacement de fils et composants
internes, ce qui peut poser un grave danger. Nous vous recommandons de confier toute maintenance de l'outil à un centre
de maintenance Dremel™..
!
AVERTISSEMENT
Pour écarter tout
risque de blessures
causées par le démarrage intempestif de
l'outil ou une décharge électrique,
débranchez toujours l'outil de la prise
murale avant d'effectuer une maintenance ou un nettoyage.
Brosses en carbone
Les brosses situées à l'intérieure de l'outil ont
été conçues pour fournir de nombreuses
heures de service fiable.
Pour préparer les brosses à l'emploi, faites
tourner l'outil à plein régime et à vide pendant
5 minutes. Ceci permettra de caler correctement les brosses et de prolonger la durée de
vie de l'outil.
Pour maintenir l'efficacité maximale du
moteur, examinez l'usure des brosses toutes
les 40 à 50 heures.
ATTENTION
!
endommagera le moteur de manière permanente.
Utilisez uniquement des brosses de
rechange Dremel™ authentiques.
Inspectez les brosses de l'outil rotatif après
40 à 50 heures d'utilisation. S'il fonctionne de
manière irrégulière, subit des coupures de
courant ou fait des bruits étranges, vérifiez
l'usure des brosses et remplacez-les au
besoin. Rappel : Les brosses de l'outil rotatif
jouent un rôle similaire à l'huile d'un moteur
de voiture ; plus souvent vous les contrôlerez
et en changerez, meilleure sera la performance.
Procédez comme suit pour vérifier/remplacer
les brosses de l'outil rotatif.
1. Après avoir débranché le cordon d'alimentation, placez l'outil sur une surface
propre. Utilisez la clé de l'outil pour
soulever et dégager le clip sur le couvercle des brosses (Figure A).
2. Retirez les brosses de l'outil en tirant sur
le shunt et le clip en laiton qui sont
attachés à la brosse (Figure B).
L'utilisation de l'outil
avec des brosses usées
A
Retrait du couvercle de la brosse
B
Retrait/inspection des brosses
C
Installation des brosses
REMARQUE : Notez comment le clip en
laiton sort de la fente à côté du logement de
la brosse. Notez également comment la
détente du clip en laiton tient dans la fente du
logement de la brosse, qui fixe le clip en
laiton dans la bonne position.
3.Vérifiez l'usure de chaque brosse. S'il ne
reste plus que 9,5 mm sur la brosse ou
si l'extrémité de contact est rugueuse ou
piquée, remplacez la brosse.
4. Installez les brosses existantes ou
neuves de sorte que la surface incurvée de
l'extrémité de la brosse corresponde à la
courbure du commutateur du moteur
(comme observé à travers l'ouverture de la
brosse).
38
Page 39

AVERTISSEMENT
Se protéger les yeux
ENTRETIEN (SUITE)
Pour toute question ou obtenir des
brosses de rechange, appelez le service
clientèle de Dremel au 1-800-437-3635 ou
rendez-vous sur notre site Web
www.Dremel.com.
REMARQUE: La détente sur le clip en laiton
doit tenir dans la fente sur le côté du logement de la brosse, qui fixe le clip en laiton
dans la bonne position (Figure C).
5. Réinstallez les couvercles de brosse en
inclinant l'extrémité opposée du clip
dans l'ouverture, avant d'enclencher
l'extrémité clip du couvercle de la brosse
pour refermer. Assurez-vous que le
ressort de la brosse est centré dans l'encoche en V de la brosse.
6. Branchez le cordon d'alimentation sur
une prise murale. Faites tourner l'outil
rotatif à plein régime et à vide pendant 5
minutes. Ceci permettra de caler correctement les brosses et de prolonger la
durée de vie de l'outil.
Nettoyage de l'outil
Les bouches d'aération et les leviers de commutateur doivent être maintenus propres.
N'essayez pas de les nettoyer en insérant un
objet pointu dans les ouvertures.
L'outil pourra être nettoyé à l'air comprimé.
Portez toujours des
lunettes de sécurité
lorsque vous nettoyez
l'outil à l'air comprimé.
Il est inutile de lubrifier l'outil rotatif Dremel™.
ATTENTION
!
mageront les composants en plastique,
notamment : essence, tétrachlorure de
carbone, solvants de nettoyage chlorés,
ammoniaque et détergents ménagers
ammoniacaux.
Nettoyez les zones de préhension douces de
l'outil avec un chiffon doux. Les zones salies
plus robustes pourront exiger plusieurs nettoyages avec un chiffon..
Certains nettoyants et
solvants endom-
39
Page 40

ACCESSOIRES
Pour connaître tous les accessoires disponibles, rendez-vous dans la quincaillerie ou au centre
de bricolage le plus proche. Vous pouvez aussi contacter le service clientèle de Dremel au : 1800-437-3635 ou à www.Dremel.com.
!
AVERTISSEMENT
risquent d'engendrer des blessures et des dégâts matériels.
Utilisez uniquement des accessoires Dremel™ ultra-performants.
Les autres accessoires n'ont pas été conçus pour cet outil et
Foret de coupe de cloisons sèches
Lorsque vous utilisez un gabarit (boîte à prises) derrière la cloison, coupez dans le sens
inverse des aiguilles d'une montre.
Arêtes tranchantes à haut régime
Pour toupiller, incruster et mortaiser dans le
bois et d'autres matériaux tendres. Utilisez
uniquement un accessoire de toupillage
Dremel™ no 330 ou une table à toupie/de
profilage no 231.
Mandrins
Un mandrin est une tige à tête filetée qui est
utilisée avec les accessoires de polissage,
les fraises circulaires, disques à poncer et les
pointes de polissage. Le mandrin est une tige
inamovible qui permet le remplacement de la
tête usée au besoin.
Mandrin fileté
S'utilise avec les embouts et
les meules à polir en feutre.
Tige de 1/8
po (3 mm)
Foret de coupe de carrelage
S'utilise pour le carrelage mural, les panneaux de fibragglociment et le plâtre.
Introduisez le foret dans le matériau à 45°,
puis amenez-le lentement à 90° pour commencer la coupe.
Foret de coupe polyvalent
S'utilise pour le bois, les plastiques, les cloisons sèches, la fibre de verre, les parements
de vinyle ou d'aluminium, les carreaux
insonorisants et les laminés.
Introduisez le foret dans le matériau à 45°,
puis amenez-le lentement à 90° pour commencer la coupe.
Petit mandrin filetél
Le mandrin a une petite vis
à son extrémité et il s'utilise
avec les fraises circulaires en
émeri et fibre de verre, disques à poncer et meules à
polir.
Tige de 1/8
po (3 mm)
Mandrin à embout fileté
Le mandrin a une extrémité
filetée qui se visse dans l'accessoire de polissage no 427.
Tige de 1/8
po (3 mm)
Meules en oxyde d'aluminium (rouges/marron)
Ces meules sont proposées
comme modèles ronds,
pointus ou plats et sont en
oxyde d'aluminium. Utilisez-les pour toute
opération possible de meulage : affûtage de
lames de tondeuses à gazon, pointes de
tournevis, couteaux, ciseaux, burins et
autres outils de coupe. Utilisez ces meules
pour retirer les bavures des pièces de fonte,
ébarber tout type de métal. Ces meules peuvent être réaffûtées avec une
dégauchisseuse. Dans les ateliers d'usinage,
les perceuses et fraises à haut débit sont
normalement meulées avec des meules en
oxyde d'aluminium.
Tige de 1/8
po (3 mm)
Meules en carbure de silicium (bleues/vertes)
Plus robustes que les pointes
en oxyde d'aluminium, ces
meules sont surtout faites pour
les matériaux durs tels que le
verre et la céramique.
Meules diamants
S'utilisent pour le travail de
précision sur le bois, le jade, la
céramique, le verre et autres
matériaux durs. Les forets sont
recouverts de particules de
diamant.
40
Tige de 1/8
po (3 mm)
Tige de 3/32
po (2.3 mm)
Page 41

ACCESSOIRES (SUITE)
Fraises à haut régime
utilisées pour ciseler,
couper et fendre le bois,
les plastiques et les
métaux mous (comme l'aluminium, le cuivre
et le laiton). Fait d'acier de haute qualité.
Tige de 1/8
po (3 mm)
Fraises en carbure de tungstène à dents structurées
Tige de 1/8 po (3 mm)
Ces fraises ont des dents ultra-pointues qui
coupent vite pour un retrait plus rapide du
matériau et un minimum d'encrassage.
S'utilisent sur la fibre de verre, le bois, le
plastique, la résine époxyde et le
caoutchouc.
ATTENTION
!
N'utilisez jamais les brosses à plus de 15
000 tr/min. Reportez-vous au tableau de
sélection d'un régime
(pages 10-12) pour
les correspondances
outil-réglage.
Trois formes différentes de brosses
métalliques sont disponibles dans trois
matériaux différents : acier inoxydable, laiton
et carbone. Les brosses en acier inoxydable
donnent de bons résultats sur l'étain, l'aluminium, l'acier inoxydable et d'autres
métaux, sans laisser de rouille. Les brosses
en laiton ne produisent pas d'étincelles et
elles sont plus douces que l'acier, ce qui les
rend adaptées à une utilisation sur les
métaux mous comme l'or, le cuivre et le
laiton. Les brosses en carbone sont adaptées à un nettoyage général.
Brosses métalliques
Tige de 1/8
po (3 mm)
Fraises à graver
Les fraises à graver sont
proposées dans une
grande variété de tailles et
de formes et sont utilisées pour le travail
minutieux sur la céramique (pièces crues),
les sculptures sur bois, les bijoux et l'ivoire
sculpté et gravé. Elles sont souvent utilisées
pour la fabrication de cartes de circuits
imprimés compliquées. Elles ne doivent pas
être utilisées sur de l'acier et des matériaux
très durs, mais elles conviennent au bois, au
plastique et aux métaux mous.
Tige de 3/32
po (2.3 mm)
Fraises en carbure de
tungstène
Les fraises en carbure de
tungstène sont des fraises
durables qui s'utilisent sur l'acier trempé, la
céramique cuite et d'autres matériaux très
durs. Elles peuvent être utilisées pour graver
sur des outils et des outils de jardinage.
Tige de 1/8
po (3 mm)
Pression de brossage
•.Les extrémités d'une brosse métallique se
chargent de faire le travail. Utilisez la
brosse en appuyant au minimum dessus
de sorte que seule l'extrémité des fils
métalliques touche la surface de travail.
•.Si une plus forte pression est appliquée,
les fils métalliques courbés produiront
un balayage. Si la pression persiste, la
durée de vie de la brosse diminuera.
•.Appliquez la brosse sur la surface de l'ouvrage pour que l'essentiel de la face de
la brosse fasse contact. L'application du
bord ou du côté de la brosse sur la surface de l'ouvrage entraînera la casse
des fils et réduira la durée de vie de la
brosse.
Les pointes des poils font le travail.
CORRECT
Brosses à soies
Les brosses à soies
s'utilisent pour nettoyer l'argenterie, les
bijoux et les antiquités. Les trois formes permettent l'accès aux espaces restreints ou difficiles à travailler pour d'autres raisons. Ces
brosses peuvent être utilisées avec une pâte
à polir pour nettoyer ou faire briller plus rapidement.
Tige de 1/8
po (3 mm)
Pression excessive risquant de briser les poils.
INCORRECT
41
Page 42

ACCESSOIRES (SUITE)
Accessoires de ponçage
Les disques à poncer de
grain fin, moyen et gros
s'adaptent au mandrin no
402. Ils peuvent être utilisés pour quasiment tout petit travail de
ponçage, de la fabrication d'une maquette à
la finition de beaux meubles.
En outre, la ponceuse à cylindres permet de
profiler le bois, lisser la fibre de verre, poncer
l'intérieur de courbes et autres endroits difficiles. Les bandes de cylindre sont remplaçables et proposées en grain fin ou gros
Tige de 1/8 po
(3 mm)
Meules abrasives en oxyde
d'aluminium
S'utilise pour retirer la peinture,
ébarber le métal, polir l'acier
inoxydable et d'autres métaux.
Disponible en grain moyen.
Tige de 1/8
po (3 mm)
grain.
Les meules à lamelle meulent et polissent les
surfaces planes ou les courbes. Elles sont
des plus efficaces pour le ponçage de finition, après un ponçage de surface plus lourd
et le retrait de matériau. Les meules à
lamelle sont proposées en grain fin ou gros
grain.
Les buffles sont des accessoires de finition
parfaits pour un nettoyage ou un ponçage
léger. Ils s'utilisent sur le métal, le verre, l'aluminium et les plastiques. Les buffles sont
proposés en grain moyen et gros grain.
Meule
Utilisée pour ébarber, retirer la
rouille et les applications
générales de meulage. S'utilise avec le mandrin no 402.
OUTILS ANNEXES
Les outils annexes suivants font partie intégrante de l'outil rotatif Dremel et augmentent sa polyvalence.
XPR MultiSaw
La scie Dremel XPR MultiSaw transforme votre outil rotatif en une
scie polyvalente qui vous permettra de pratiquer des coupes
droites et incurvées dans une variété de matériaux. Les motifs de
coupe en C sont désormais rapides et faciles. Avec des lames de
scie sauteuse standard, vous pouvez couper bois mou et bois
dur, contreplaqué, métal, PVC, plastique et bien plus encore!
À utiliser avec le modèle XPR série 400 uniquement.
XPR Raboteuse
Convertissez votre outil rotatif à cordon en une raboteuse.
• La raboteuse est prévue pour deux types de rabotage : rabotage droit et rabotage à 45°, monter à 2-1/8 po (5.40 mm).
• En outre, la technique de rabotage droit peut être utilisée
pour des applications limitées de profilage et de ciselage
• Idéal pour réparer une porte déformée ou coincée!
À utiliser avec le modèle XPR série 400 uniquement.
Flex Light
La Flex Light utilise des piles ion-lithium (non
fournies).
• L'éclairage électroluminescent est un gage
de visibilité dans les endroits faiblement
éclairés et éclairage d'appoint sur les pro
jets de détail
• Fixation facile; pas de fils ou raccords
À utiliser avec le modèle XPR série 400 uniquement.
-
• Se fixe au porte de travail 220 et à la toupie
à piston 335.
42
Page 43

ATTACHEMENTS (SUITE)
7 6 5 4 3
3 2
1
3/4
1/2
1/4
0
Idéal pour les endroits difficilement accessibles et le travail
de détail.
• Système de fixation rapide
• Câble long de 91 cm avec nouveau rayon de courbure de
21.7 cm pour plus de flexibilité
• Pièce à main confortable à tenir
• Bouton de blocage d'arbre intégré
• Accepte une tige de 1/8 po (3 mm) max.
À utiliser avec les modèles : XPR série 275, 285, 395, 398, 780, 800 ou 400.
5" Radius
Convertit votre outil rotatif à cordon en une toupie à piston.
• Base transparente
• Deux butées de profondeur
• Inclut un guide de bord et un guide circulaire
• Toupillez des cercles, des parallèles au bord, des panneaux, des incrustations et des gabarits de lettre
À utiliser avec les modèles : XPR série 275, 285, 395, 398, 800 ou 400.
Retrait de mortier
Manière facile et rapide de réinjecter de mortier une pièce ou de
remplacer un carrelage cassé!
• Réglage de profondeur sur plusieurs côtés
• Angle de 30° pour une coupe maîtrisée
• Guides écartés de 180° pour maintenir le foret centré entre les
carreaux
• Fixation pratique par vissage
• Inclut un foret de retrait de mortier de 1/16 po (1,6 mm)
À utiliser avec les modèles : XPR série 275, 285, 395, 398 ou 400.
Toupie à piston
Guide de coupe
Coupe maîtrisée d'une variété de matériaux.
• Permet les coupes maîtrisées nettes avec une visibilité
maximale
• Réglage de profondeur facile. Réglez à la profondeur de
coupe correcte pour le matériau du projet.
À utiliser avec les modèles : XPR série 275, 285, 395, 398, 770, 780 ou 400.
43
Page 44

OUTILS ANNEXES ( SUITE)
30
o
30
o
GAGE
Affûteuse d'outils de jardin
La manière la plus rapide, facile et sûre d'affûter la lame de
votre tondeuse et autres outils de jardinage.
• Le guide produit un angle optimum d'affûtage
• Affûte la plupart des lames de tondeuse à lame horizontale
• Inclut une pierre d'affûtage
À utiliser avec les modèles : XPR série 275, 285, 395, 398, 770, 780, 800 ou 400.
Affûteuse de scie à chaîne
• Affûte facilement les chaînes émoussées
• Contenu : accessoire d'affûtage, 3 pierres à aiguiser, calibre,
2 entretoises, clé, manuel d'instructions
À utiliser avec les modèles : XPR série 275, 285, 395, 398, 770, 780, 800 ou 400.
Angle droit
Augmente la polyvalence de l'outil rotatif en vous permettant d'atteindre les endroits difficiles d'accès.
• Les roulements à billes et les engrenages hélicoïdaux se
traduisent par un fonctionnement sans à-coups et surchauffe
• Le système d'accouplement vous permet d'orienter l'accessoire
sur l'outil dans 12 directions différentes
• Le système de fixation rapide s'attache facilement à votre outil, à
la place du capuchon du boîtier ; clé inutile
À utiliser avec les modèles : XPR série 275, 285, 395, 398, 780, 800 ou 400.
Dremelite
• Gage de visibilité dans les endroits faiblement éclairés et
éclairage d'appoint sur les projets de détail
• Deux ampoules extrêmement durables
• Utilise un aimant vissé sur l'arbre de l'outil pour fournir une
alimentation astucieuse et simple
À utiliser avec les modèles : XPR série 275, 285, 395, 398, 770, 780, 800 ou 400.
44
Page 45
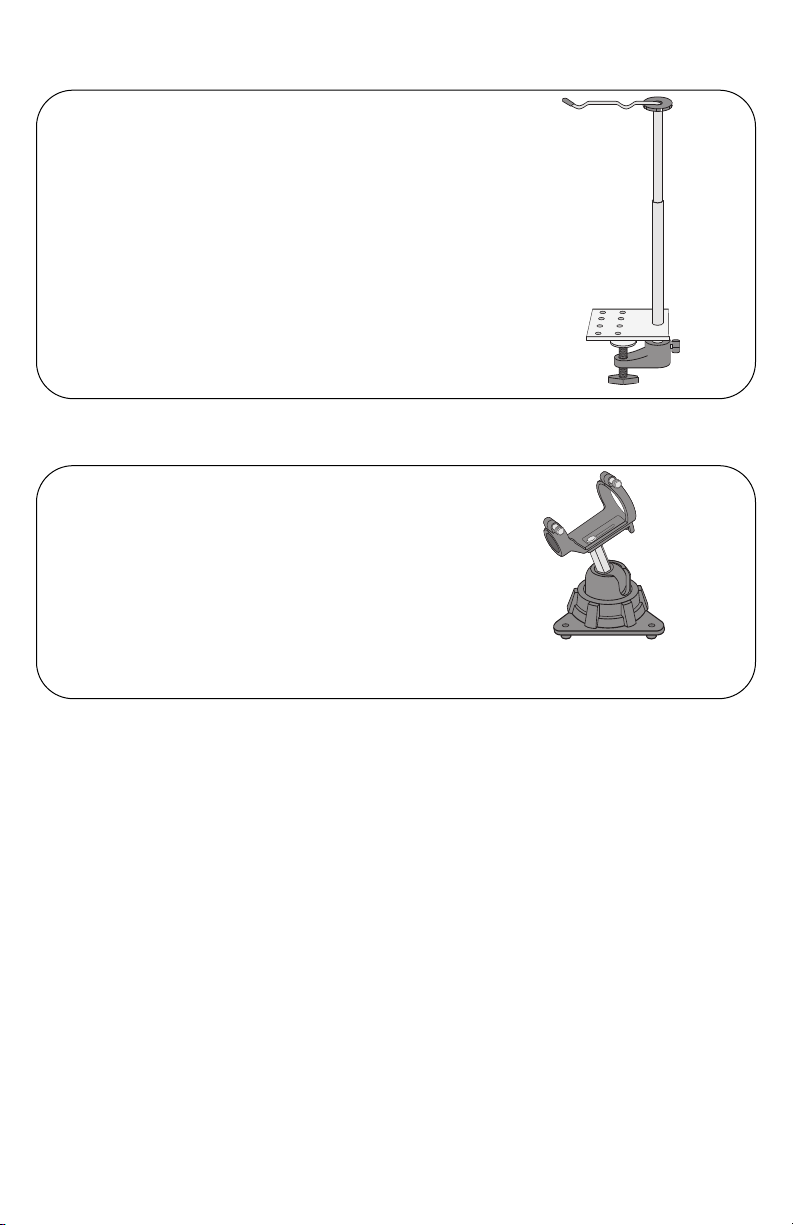
OUTILS ANNEXES ( SUITE)
Porte-outil Flex Shaft
Pratique, permet la suspension de n'importe quel outil rotatif
Dremel au-dessus de votre établi.
• Parfait pour une utilisation avec l'accessoire Flex Shaft
• Se pince sur les établis de 4,4 cm maximum d'épaisseur et
s'ajuste en hauteur entre 30,5 et 106 cm
• Rangez les forets supplémentaires sur la base
À utiliser avec les modèles : XPR série 275, 285, 395, 398, ou 400.
Porte-outil et base
• Tient fermement les outils rotatifs dans n'importe quelle
position
• Contrôle la pièce à travailler (mains libres) pour de meilleurs
résultats
À utiliser avec les modèles : XPR série 275, 285, 395, 398, 780, 800 ou 400.
45
Page 46

1
1
2
5
3
10
10
16
17
18
19
20
25
25
22
24
23
25
25
30
28
27
24
4
PIÈCES DÉTACHÉES ET DIAGRAMME
Légende No de réf. Description
1 2610920980 Mécanisme de blocage et
ressort de la bague de serrage
2 2610920701 Boîtier électrique
3 2610920702 Armature et palier
4 2615990962 Clé
5 2615294041 Cordon
10 2610920705 Ressort de brosse (paire)
16 2610920709 Porte-brosse
17 2610920972 Collet Lock & Spring
18 2610922763 Écrou de la bague de serrage
19 2615110480 Bague de serrage de 1/8 po (dans l'outil)
20 2610920710 Interrupteur
22 2610914379 En Caoutchouc Palier Chemise
23 2610920718 Dispositif de suspension
24 2615294035
25 2610921563 Porte de brosse (paire)
27 2610920716 Capuchon
28 2610920711 Commande de vitesse
30 2610920717 Capuchon du boîtier
Vis (individuelles)
46
Page 47

GARANTIE LIMITÉE DREMEL™
Votre produit Dremel est garanti contre les vices de matière et de main d'œuvre pour une période de deux
ans à partir de la date d'achat. Au cas ou un produit n'est pas conforme à cette garantie écrite, il convient
d'agir comme suit:
1. NE rapportez PAS votre produit là où vous l'avez acheté.
2. Emballez le produit seul avec soin, sans rien d'autre, et renvoyez-le en port payé accompagné des documents suivants:
A. Une copie de votre preuve d'achat datée (veuillez conserver une copie pour vous-même).
B. Une description écrite du problème.
C. Nom, adresse et numéro de téléphone à l'attention de :
ÉTATS-UNIS
Dremel Service Center
4915 21st Street OU 4631 E. Sunny Dune
Racine, WI 53406 Palm Springs, CA 92264
CANADA EN DEHORS DES ÉTATS
Giles Tool Agency AMÉRICAINS CONTINENTAUX
6520 Lawrence Av. East Contactez votre distributeur local ou écrivez à
Scarborough, Ont. toDremel, 4915 21st Street
Canada M1C 4A7 Racine, WI 53406
Nous vous recommandons d'assurer votre envoi contre la perte ou les dégâts de transport,
lesquels ne peuvent en aucun cas engager notre responsabilité.
Cette garantie ne s'applique qu'à l'acheteur inscrit d'origine. LES DÉGÂTS AU PRODUIT
RÉSULTANT DE MODIFICATIONS, D'ACCIDENT, D'UN MAUVAIS TRAITEMENT, D'UNE
NÉGLIGENCE, DE RÉPARATIONS NON AUTORISÉES, DE L'UTILISATION D'ACCESSOIRES
NON HOMOLOGUÉS OU D'AUTRES CAUSES NON LIÉES À DES VICES DE MATIÈRE OU DE
MAIN D'OEUVRE NE SONT PAS COUVERTS PAR CETTE GARANTIE.
Aucun employé, agent ou distributeur ni qui que ce soit d'autre n'est autorisé à donner aucune
garantie de la part de Dremel. Si l'inspection par Dremel démontre que le problème a été causé
par un vice de matière ou de main d'œuvre dans les limites de la garantie, Dremel réparera ou
remplacera le produit sans frais et le renverra en port payé. Les réparations nécessitées par
l'usure normale ou un mauvais traitement et les réparations du produit en dehors de la période de
garantie, si elles sont possibles, seront effectuées au coût usine normal.
DREMEL NE FAIT AUCUNE AUTRE GARANTIE D'AUCUNE SORTE, EXPLICITE OU IMPLICITE,
ET TOUTES LES GARANTIES IMPLICITES QUE LE PRODUIT EST COMMERCIALISABLE ET
QU'IL CONVIENT À UN USAGE PARTICULIER SAUF COMME EXPRESSÉMENT MENTIONNÉ CIDESSUS SONT EXPRESSÉMENT DÉCLINÉES ET EXCLUES DE CETTE GARANTIE LIMITÉE.
Cette garantie vous donne des droits spécifiques et il se peut que vous ayez d'autres recours légaux
qui varient d'état à état. Le devoir du garant se limite à la réparation ou au remplacement du produit.
Le garant ne saurait être tenu pour responsable des dommages directs ou indirects causés par le vice
supposé. Certains états n'admettent pas l'exclusion ou la limitation des dommages directs ou indi
rects. Les limitations ou exclusions mentionnées ci-dessus ne s'appliquent donc pas forcément à
vous.
Pour vous renseigner sur les prix ou l'exécution de la garantie dans les états américains continentaux,
contactez votre distributeur Dremel.
Dremel Service Center
-
47
Page 48

NOTE
48
Page 49

400 Series XPR
Manual de instrucciones
de seguridad
Herramienta rotatoria
de alto rendimiento
1-800-437-3635
http://www.dremel.com
Los productos de la marca Dremel son manufacturados y vendidos por la División
ool Corporation
Dremel de Robert Bosch
T
Robert Bosch
ool Corporation © 2004
T
Se reservan todos los derechos
Page 50

NORMAS DE SEGURIDAD PARA HERRAMIENTAS MECÁNICAS
ADVERTENCIA
!
Mantenga el área de trabajo limpia y bien iluminada.
Las mesas desordenadas y las áreas oscuras invitan a que
se produzcan accidentes.
No utilice herramientas mecánicas en atmósferas
explosivas, tales como las existentes en presencia de
líquidos, gases o polvos inflamables. Las herramientas
mecánicas generan chispas y éstas pueden dar lugar a la
ignición del polvo o los vapores.
Mantenga a las personas que se encuentren
presentes, a los niños y a los visitantes alejados al
utilizar una herramienta mecánica. Las distracciones
pueden hacer que usted pierda el control.
Las herramientas con aislamiento doble están
equipadas con un enchufe polarizado (un terminal es
más ancho que el otro). Este enchufe entrará en un
tomacorriente polarizado solamente de una manera. Si
el enchufe no entra por completo en el tomacorriente,
déle la vuelta. Si sigue sin entrar, póngase en contacto
con un electricista competente para instalar un
tomacorriente polarizado. No haga ningún tipo de
cambio en el enchufe. El aislamiento doble elimina la
necesidad del sistema de cordón de energía de tres hilos
conectado a tierra y la fuente de energía conectada a
tierra. Antes de enchufar la herramienta, asegúrese de que
la tensión del tomacorriente suministrada se encuentre
dentro del margen de la tensión especificada en la placa
del fabricante. No utilice herramientas con capacidad
nominal "AC solamente" ("AC only") con una fuente de
energía DC.
Evite el contacto del cuerpo con las superficies
conectadas a tierra tales como tuberías, radiadores,
estufas de cocina y refrigeradores. Hay mayor riesgo de
que se produzcan sacudidas eléctricas si su cuerpo está
conectado a tierra. Si la utilización de la herramienta
mecánica en lugares húmedos es inevitable, se debe usar
un interruptor de circuito para fallos a tierra para
suministrar la energía a la herramienta. Los guantes de
goma para electricista y el calzado antideslizante
aumentarán más la seguridad personal.
No exponga las herramientas mecánicas a la lluvia ni a
situaciones húmedas. La entrada de agua en una
herramienta mecánica aumentará el riesgo de que se
produzcan sacudidas eléctricas.
No abuse del cordón. Nunca use el cordón para llevar las
herramientas ni para sacar el enchufe de un tomacorriente.
Mantenga el cordón alejado del calor, el aceite, los bordes
afilados o las piezas móviles. Cambie los cordones
dañados inmediatamente. Los cordones dañados
aumentan el riesgo de que se produzcan sacudidas
eléctricas.
Al utilizar una herramienta mecánica a la intemperie,
utilice un cordón de extensión para intemperie
marcado "W-A" o "W".
nominal para uso a la intemperie y reducen el riesgo de
que se produzcan sacudidas eléctricas. Consulte
"Tamaños recomendados de los cordones de extensión"
en la sección Accesorios de este manual.
Lea y entienda todas las instrucciones. El incumplimiento de todas las instrucciones indicadas a continuación puede dar lugar a sacudidas eléctricas, incendios y/o lesiones personales
graves.
Area de trabajo
Seguridad eléctrica
Estos cordones tienen capacidad
CONSERVE ESTAS INSTRUCCIONES
Manténgase alerta, fíjese en lo que está haciendo y use
el sentido común cuando utilice una herramienta
mecánica. No use la herramienta cuando esté cansado
o se encuentre bajo la influencia de drogas, alcohol o
medicamentos.
herramientas mecánicas puede dar lugar a lesiones
personales graves.
Vístase adecuadamente. No se ponga ropa holgada ni
joyas. Sujétese el pelo. Mantenga el pelo, la ropa y los
guantes alejados de las piezas móviles. La ropa
holgada, las joyas o el pelo largo pueden quedar atrapados
en las piezas móviles. Mantenga los mangos secos,
limpios y libres de aceite y grasa.
Evite el arranque accidental. Asegúrese de que el
interruptor esté en la posición "OFF" (apagado) antes
de enchufar la herramienta. El llevar las herramientas
con el dedo en el interruptor o el enchufar herramientas
que tengan el interruptor en la posición "ON" (encendido)
invita a que se produzcan accidentes.
Quite las llaves de ajuste o de tuerca antes de
encender la herramienta. Una llave de ajuste o de tuerca
que se deje puesta en una pieza giratoria de la herramienta
puede ocasionar lesiones personales.
No intente alcanzar demasiado lejos. Mantenga un
apoyo de los pies y un equilibrio adecuados en todo
momento. El apoyo de los pies y el equilibrio adecuados
permiten un mejor control de la herramienta en situaciones
inesperadas.
Utilice equipo de seguridad. Use siempre protección
de los ojos. Se debe utilizar una máscara antipolvo,
zapatos de seguridad antideslizantes, casco o protección
de los oídos según lo requieran las condiciones.
Utilización y cuidado de las herramientas
Utilice abrazaderas u otro modo práctico de fijar y
soportar la pieza de trabajo a una plataforma estable.
La sujeción de la pieza de trabajo con la mano o contra el
cuerpo resulta inestable y puede ocasionar pérdida de
control.
No fuerce la herramienta. Use la herramienta correcta
para la aplicación que desea. La herramienta correcta
hará el trabajo mejor y con más seguridad a la capacidad
nominal para la que está diseñada.
No utilice la herramienta si el interruptor no la
enciende o apaga. Toda herramienta que no se pueda
controlar con el interruptor es peligrosa y debe ser
reparada.
Desconecte el enchufe de la fuente de energía antes de
hacer cualquier ajuste, cambiar accesorios o guardar
la herramienta. Estas medidas de seguridad preventivas
reducen el riesgo de arrancar la herramienta
accidentalmente.
Guarde las herramientas que no esté usando fuera del
alcance de los niños y otras personas no capacitadas.
Las herramientas son peligrosas en las manos de los
usuarios no capacitados.
Mantenga las herramientas con cuidado. Conserve las
herramientas de corte afiladas y limpias. Las
herramientas mantenidas adecuadamente, con bordes de
Seguridad personal
Un momento de distracción al utilizar
50
Page 51

corte afilados, tienen menos probabilidades de atascarse y
son más fáciles de controlar. Toda alteración o modificación
constituye un uso incorrecto y puede tener como resultado
una situación peligrosa.
Compruebe la desalineación o el atasco de las piezas
móviles, la ruptura de piezas y cualquier otra situación
que pueda afectar el funcionamiento de las
herramientas. Si la herramienta está dañada, haga que
realicen un servicio de ajustes y reparaciones a la
herramienta antes de usarla.
causados por herramientas mantenidas deficientemente.
Muchos accidentes son
Establezca un programa de mantenimiento periódico para
la herramienta.
Utilice únicamente accesorios que estén
recomendados por el fabricante de su modelo. Los
accesorios que pueden ser adecuados para una
herramienta pueden volverse peligrosos cuando se utilizan
en otra herramienta.
El servicio de ajustes y reparaciones de una
herramienta debe ser realizado únicamente por
personal de reparaciones competente. El servicio o
mantenimiento realizado por personal no competente
podría ocasionar un peligro de que se produzcan lesiones.
Por ejemplo: Los cables internos pueden colocarse mal o
pellizcarse, los resortes de retorno de los protectores de
seguridad pueden montarse inadecuadamente.
Al realizar servicio de ajustes y reparaciones de una
herramienta, utilice únicamente piezas de repuesto
idénticas. Siga las instrucciones que aparecen en la
sección Mantenimiento de este manual. El uso de
piezas no autorizadas o el incumplimiento de las
instrucciones de Mantenimiento puede ocasionar un
peligro de que se produzcan sacudidas eléctricas o
lesiones. Ciertos agentes de limpieza, tales como gasolina,
tetracloruro de carbono, amoníaco, etc., pueden dañar las
Servicio
piezas de plástico.
NORMAS DE SEGURIDAD PARA HERRAMIENTAS GIRATORIAS
Los accesorios deben tener capacidad nominal para al
menos la velocidad recomendada en la etiqueta de
advertencia de la herramienta.
rios que funcionen a velocidades superiores a la velocidad
nominal pueden saltar en pedazos y causar lesiones.
Sujete siempre la herramienta por las superficies de
agarre aisladas al realizar una operación en la que la
herramienta de corte pueda entrar en contacto con
cables ocultos o con su propio cordón. El contacto con
un cable con corriente transmitirá corriente a las piezas
metálicas al descubierto y hará que el operador reciba sacudidas eléctricas. Si el corte en paredes existentes u otras
áreas ciegas donde puedan existir cables eléctricos es
inevitable, desconecte todos los fusibles o cortacircuitos que
alimentan el lugar de trabajo.
La siguiente advertencia está destinada a las herramientas y los accesorios de eje flexible. No utilice el eje flexible en una posición en la que el eje esté muy doblado.
Doblar el eje excesivamente puede generar calor excesivo
en la envoltura o en la pieza de mano. El mínimo recomendado es un radio de 15,3 cm (6”).
Desconecte siempre el cordón de energía de la fuente de
energía antes de hacer cualquier ajuste o de colocar
cualquier accesorio.
usted haga que la herramienta arranque, dando lugar a
graves lesiones personales.
Sepa la ubicación del interruptor.Al dejar la herramienta o
al recogerla, usted podría activar el interruptor accidentalmente.
La advertencia siguiente está destinada a las herramientas y los accesorios de eje flexible. Sostenga siempre
firmemente la pieza de mano en las manos durante el
arranque.
El par de torsión de reacción del motor, a medida
que éste acelera hasta alcanzar toda su velocidad, puede
hacer que el eje se tuerza.
Use siempre gafas de seguridad y máscara antipolvo.
Use la herramienta únicamente en un área bien ventila-
La utilización de dispositivos de seguridad personal y el
da.
trabajar en un entorno seguro reducen el riesgo de que se
produzcan lesiones.
Después de cambiar las brocas o de hacer ajustes,
Las muelas y otros acceso-
Es posible que inesperadamente
asegúrese de que la tuerca del portaherramienta y otros
dispositivos de ajuste estén apretados firmemente.
dispositivo de ajuste flojo puede desplazarse inesperadamente, causando pérdida de control, y los componentes
giratorios flojos saldrán despedidos violentamente.
No ponga las manos en el área de la broca que gira. Es
posible que la proximidad de la mano a la broca que gira no
siempre sea obvia.
Deje que los cepillos estén en marcha a la velocidad de
funcionamiento durante al menos un minuto antes de
utilizar la rueda. Durante este tiempo nadie debe situarse delante del cepillo o en línea con éste.
los alambres sueltos se desprenderán durante el tiempo de
rodaje.
Los cepillos de cerda nunca deben utilizarse a velocidades superiores a 15 000/min. Dirija la descarga de la
escobilla de alambre que gira de manera que se aleje de
usted.
Durante la acción de "limpieza" con estas escobillas
pueden descargarse pequeñas partículas y diminutos fragmentos de alambre a alta velocidad que pueden incrustarse
en la piel. Las cerdas o los alambres se desprenderán del
cepillo a altas velocidades.
Use guantes protectores y careta protectora con los
cepillos de alambre o de cerdas. Aplique suavemente
los cepillos de alambre o de cerdas a la pieza de trabajo, ya que solamente las puntas de los alambres o de las
cerdas realizan el trabajo.
alambres o las cerdas hará que estas partes resulten
sometidas a una tensión excesiva, lo cual dará como resultado una acción de barrido y hará que las cerdas o los alambres se desprendan.
Maneje cuidadosamente la herramienta y las ruedas de
amolar individuales para evitar que se mellen o se agrieten. Instale una muela nueva si la herramienta se cae al
amolar. No use una muela que pueda estar dañada.
fragmentos de una muela que salta en pedazos durante el
funcionamiento saldrán despedidos a gran velocidad y posiblemente le golpearán a usted o golpearán a las personas
que estén presentes.
Nunca use brocas desafiladas o dañadas. Las brocas
afiladas se deben manejar con cuidado.
Una presión "grande" sobre los
Las cerdas o
Los
Las brocas
Un
51
Page 52

NORMAS DE SEGURIDAD PARA HERRAMIENTAS GIRATORIAS
dañadas pueden romperse bruscamente durante el uso. Las
brocas desafiladas requieren más fuerza para empujar la
herramienta, con lo que es posible que la broca se rompa.
Use abrazaderas para soportar la pieza de trabajo siempre que resulte práctico. Nunca tenga una pieza de tra
bajo pequeña en una mano y la herramienta en la otra
mano mientas esté utilizando la herramienta. Deje que
haya suficiente espacio, al menos 150 mm, entre la
mano y la broca que gira.
varillas con espiga, las tuberías y los tubos, tiene tendencia
a rodar cuando se corta y puede hacer que la broca "muerda" o salte hacia usted. El fijar con abrazaderas una pieza de
trabajo pequeña le permite usar ambas manos para controlar la herramienta.
Inspeccione la pieza de trabajo antes de cortar. Al cortar piezas de trabajo que tengan forma irregular, planifique el trabajo para que la pieza de trabajo no patine ni
pellizque la broca y le sea arrancada de las manos.
ejemplo, si talla madera, asegúrese de que no haya clavos
ni objetos extraños en la pieza de trabajo. Los clavos o los
objetos extraños pueden hacer que la broca salte.
Nunca arranque la herramienta cuando la broca esté
acoplada en el material.
puede engancharse en el material, causando pérdida de
control de la cortadora.
Evite que la muela rebote y se atasque, especialmente al
trabajar en esquinas, bordes afilados, etc.
causar pérdida de control y retroceso.
El sentido de avance con la broca en el interior del material al tallar, fresar o cortar es muy importante. Haga
avanzar siempre la broca hacia el interior del material en
el mismo sentido en que el borde de corte esté saliendo
del material (que es el mismo sentido en que las virutas
salen despedidas).
tido incorrecto hace que el borde de corte de la broca se
salga de la pieza de trabajo y tire de la herramienta en el
sentido de dicho avance.
Si la pieza de trabajo o la broca se atasca o se engancha,
apague la herramienta utilizando el interruptor (posición
"OFF"). Espere a que todas las piezas móviles se detengan, desenchufe la herramienta y luego libere el material atascado.
encendido (posición "ON"), la herramienta podría volver a
arrancar inesperadamente, causando graves lesiones personales.
No deje desatendida una herramienta en marcha.
Apáguela.
completo es seguro dejarla.
No amuele ni lije cerca de materiales inflamables. Las
chispas provenientes de la muela podrían inflamar estos
materiales.
No toque la broca ni el portaherramienta después de la
utilización.
ramienta están demasiado calientes para tocarlos con las
manos desnudas.
Limpie regularmente con aire comprimido las aberturas
de ventilación de la herramienta.
va de metal en polvo dentro de la caja del motor puede
causar averías eléctricas.
No deje que el trabajar de manera confiada debido a la
familiarización adquirida con el uso frecuente de la her
Si el interruptor de la herramienta se deja
Solamente cuando la herramienta se detenga por
Después de la utilización, la broca y el portaher-
El material redondo, tal como las
Por
El borde de corte de la broca
Esto puede
El hacer avanzar la herramienta en sen-
La acumulación excesi-
ramienta giratoria se convierta en algo habitual.
Recuerde siempre que un descuido de una fracción de
segundo es suficiente para causar lesiones graves.
No altere ni utilice incorrectamente la herramienta.
Cualquier alteración o modificación constituye uso incorrec
-
to y puede tener como resultado graves lesiones personales.
Este producto no está diseñado para utilizarse como tal
adro dental en aplicaciones médicas en seres humanos
ni en veterinaria.
graves.
Al utilizar sierras de acero, ruedas de recortar, cortadores de alta velocidad o cortadores de carburo de
tungsteno, tenga siempre la pieza de trabajo fija con
abrazaderas. Nunca intente sujetar la pieza de trabajo
con una mano cuando esté utilizando cualquiera de
estos accesorios.
carán si se ladean ligeramente en la ranura y pueden experimentar retroceso, causando una pérdida de control que tendrá como resultado lesiones graves. La otra mano se debe
utilizar para afianzar y guiar la mano que sujeta la herramienta. Cuando una rueda de recortar se atasca, normalmente la propia rueda se rompe. Cuando la sierra de acero,
los cortadores de alta velocidad o el cortador de carburo de
tungsteno se atascan, es posible que salten y se salgan de
la ranura, con lo que usted podría perder el control de la herramienta.
ADVERTENCIA
!
do mecánicos, y por otras actividades de construcción,
contiene agentes químicos que se sabe que causan
cáncer, defectos de nacimiento u otros daños sobre la
reproducción. Algunos ejemplos de estos agentes químicos son:
• Plomo de pinturas a base de plomo,
• Sílice cristalina de ladrillos y cemento y otros productos de
mampostería, y
• Arsénico y cromo de madera tratada químicamente.
Su riesgo por causa de estas exposiciones varía, dependiendo
de con cuánta frecuencia realice este tipo de trabajo. Para
reducir su exposición a estos agentes químicos: trabaje en un
área bien ventilada y trabaje con equipo de seguridad aprobado, como por ejemplo máscaras antipolvo que estén diseñadas
especialmente para impedir mediante filtración el paso de
partículas microscópicas.
-
Pueden producirse lesiones personales
La razón es que estas ruedas se atas-
Cierto polvo generado por el lijado, aserrado, amolado y taladra-
-
-
52
Page 53

FAMILIARÍCESE CON SU HERRAMIENTA ROTATORIA
Desempaque y revisión del contenido
ADVERTENCIA
!
perado de la herramienta o a descargas
eléctricas, siempre desenchufe la herramienta del tomacorriente de la pared
cuando no la está usando.
¡IMPORTANTE! Si le falta alguna pieza, o
si requiere asistencia con estas instrucciones, por favor comuníquese con el
Departamento de Servicio al
Consumidor de Dremel™ al teléfono:
1-800-437-3635 o visite nuestro sitio
Web en www.Dremel.com.
Separe todas las piezas sueltas de los materiales de empaque y verifique cada artículo
con la lista de piezas que se encuentra en la
caja, para asegurarse de que tenga todas las
piezas antes de desechar el material de
empaque.
A fin de evitar lesiones
debido al arranque ines-
Descripción
La herramienta rotatoria SERIES XPR™
combina alta velocidad y rendimiento para
servir como grabador, afiladora, pulidora,
Tuerca del collarín
Collarín
lijadora, cortador, cepillo de potencia, taladro
y más.
La herramienta utiliza un motor de CC
pequeño pero efectivo. La gran variedad de
accesorios Dremel™ disponibles incluye
muelas abrasivas, brocas para taladro, escobillas de alambre y de nilón, cortadores de
grabado y esculpido, brocas buriladoras,
puntas de pulido y más. La capacidad para
usar diferentes aditamentos Dremel™ añade
múltiples usos a la herramienta. La variedad
de proyectos que puede realizar con la herramienta es ilimitada.
La herramienta rotatoria SERIES XPR es
una herramienta de alta velocidad y opera a
velocidades de 5,000 a 35,000 RPM. (¡Un
taladro eléctrico típico opera sólo a 2500
RPM!). Cuando se usa con los accesorios y
aditamentos Dremel™, la alta velocidad y el
rendimiento de la herramienta rotatoria
Series XPR le permite trabajar hasta en los
proyectos más exigentes sin tener que
ejercer una presión indebida sobre la herramienta. La herramienta hace el trabajo por
usted.
Anillo tapa del casco
Aberturas de ventilación
Pulsador del seguro del eje
apa de la cavidad de la
T
escobilla (a cada lado)
53
Llave para la tuerca del collarín
Conmutador de encendido/apagado
Disco de velocidad variable
Colgador
Cable eléctrico
Page 54

ESPECIFICACIONES
Especificaciones generales
Voltaje nominal . . . . . . . . . .120 V, 50-60 Hz
Amperaje nominal . . . . . . . . . . . . . . . .2.0 A
Velocidad sin carga . . . . . . .No35,000/min
Capacidad del collarín 1/32" (0.7 mm),1/16"
(1.6 mm), 3/32" (2.4 mm), 1/8" (3 mm
Especificaciones del motor
Esta herramienta rotatoria utiliza un motor de
velocidad (RPM) variable. Está conectado
para operar con corriente alterna de 110-120
voltios, 50-60 Hz. Antes de conectar el cable
de alimentación en el tomacorriente de la
pared, asegúrese de que el conmutador de
alimentación esté en la posición OFF (APAGADO) y asegúrese de que la corriente eléctrica tenga las mismas características que
las estampadas en la placa nominal de la
herramienta rotatoria.
PELIGRO
!
una descarga eléctrica, no toque las patillas metálicas del enchufe cuando lo
conecte en, o lo desconecte del tomacorriente..
PELIGRO
!
dañado de cualquier forma, reemplácelo
inmediatamente para evitar descargas o
el riesgo de incendio.
Conexión a una fuente de
alimentación. Para evitar
Si el cable eléctrico está
desgastado, cortado o
Cables de extensión
Si es necesario usar un cable de extensión, se debe usar un cable con conductores del calibre adecuado que sea capaz
de conducir la corriente necesaria para
su herramienta. Esto evitará una caída
excesiva de voltaje, la pérdida de energía
o sobrecalentamiento.
CALIBRE RECOMENDADO P
LOS CABLES DE EXTENSIÓN
HERRAMIENTAS DE CORRIENTE
ALTERNADE 120 VOLTIOS
NOTA: Cuanto más pequeño sea el número
del calibre, más pesado será el cable.
Calibre del cable en
Amperaje
nominal
de la her
ramienta
2-6
6-8
8-10
10-12
12-16
-
A.W.G.
Lo ngitu d d el c ab le en pi es Longitud del cable en metros
25 50 100 150 15 30 60 120
18 16 16 14 .75 .75 1.5 2.5
18 16 14 12 .75 1.0 2.5 4.0
18 16 14 12 .75 1.0 2.5 4.0
16 16 14 12 1.0 2.5 4.0 —
14 12 — — — — — —
ARA
Calibre de los alambres
en mm2
54
Page 55

SÍMBOLOS
0
Importante: Es posible que algunos de los símbolos siguientes se usen en su herramienta. Por favor, estúdielos y
aprenda su significado. La interpretación adecuada de estos símbolos le permitirá utilizar la herramienta mejor y con
más seguridad.
Símbolo Nombre Designación/explicación
V Volt Tensión (potencial)
A Ampere Corriente
Hz Hertz Frecuencia (ciclos por segundo)
W Watt Potencia
kg Kilogramo Peso
min Minuto Tiempo
s Segundo Tiempo
Diámetro Tamaño de las brocas taladradoras,
muelas, etc.,
n
0
.../min Revoluciones o alternación por minuto Revoluciones, golpes, velocidad de
0 Posición "off" (apagado) Velocidad cero, par motor cero...
1, 2, 3, ... Graduaciones del selector Graduaciones de velocidad, par motor o
I, II, III, posición. Un número más alto significa
Velocidad sin carga Velocidad rotacional sin carga
superficie, órbitas, etc., por minuto
mayor velocidadselector settings
Selector infinitamente variable con La velocidad aumenta desde la
apagado graduación de 0
Flecha Acción en la dirección de la flecha
Corriente alterna Tipo o una característica de corriente
Corriente continua Tipo o una característica de corriente
Corriente alterna o continua Tipo o una característica de corriente
Construcción de clase II Designa las herramientas de construcción
con aislamiento doble.
Terminal de toma de tierra Terminal de conexión a tierra
Símbolo de advertencia Alerta al usuario sobre mensajes de
advertencia
Sello RBRCTM de Ni-Cd Designa el programa de reciclaje de baterías
de Ni-Cd
Este símbolo indica que esta herramienta está catalogada por
Underwriters Laboratories.
Este símbolo indica que esta her
ramienta está listada por la
Asociación Canadiense de
Normas (Canadian Standards
Association) y por la CSA respecto a normas de Estados Unidos.
Este símbolo indica que esta
herramienta está catalogada
por la Canadian Standards
Association.
Este símbolo indica que
Underwriters Laboratories ha
catalogado esta herramienta
indicando que cumple las normas canadienses.
Este símbolo indica que esta
herramienta está catalogada por
Underwriters Laboratories y que
Underwriters Laboratories la ha
catalogado según las normas
canadienses.
55
Este símbolo
indica que esta
herramienta
cumple con la
norma mexicana
oficial (NOM).
Page 56

Pulsador del seguro del eje
Llave para la
tuerca del collarín
Para apretarn
Para aflojar
Tue rca
del collarín
1/8" (480)
3/32" (481)
1/16" (482)
1/32" (483)
Tue rca
del collar
ín
MONTAJE
ADVERTENCIA
!
Los accesorios Dremel™ disponibles para la
herramienta rotatoria vienen con espigas de
diferentes tamaños.
Hay disponibles collarines de cuatro tamaños
para acomodarse a las espigas de diferente
tamaño. El tamaño de los collarines se identifica con los anillos que se encuentran en la parte
posterior del collarín:
• El collarín de 1/32" tiene 1 anillo (N.º 483)
• El collarín de 1/16" tiene 2 anillos (N.º 482)
• El collarín de 3/32" tiene 3 anillos (N.º 481)
• El collarín de 1/8" no tiene anillos (N.º 480)
PRECAUCIÓN
!
diámetro mayor en un collarín de tamaño menor.
1. Presione el pulsador del seguro del eje,
manténgalo presionado y gire el eje con
la mano hasta que se embrague.
ADVERTENCIA
!
mientras la herramienta rotatoria esté
funcionando.
2. Con el pulsador del seguro del eje
embragado, afloje y quite la tuerca del
collarín. Use la llave para la tuerca del
collarín si es necesario.
3. Quite el collarín separándolo del eje.
4. Instale el collarín del tamaño adecuado
Siempre desenchufe la herramienta rotatoria antes de cambiar accesorios, collarines o antes de dar servicio a la herramienta.
Collarines
Siempre use el collarín que coincida con el tamaño de la espiga del
accesorio que planea usar. No introduzca por la fuerza una espiga de
Cambio de collarines
No embrague el pulsador del seguro del eje
NOTA: Algunos juegos de herramientas
rotatorias pueden no incluir collarines de
todos los tamaños. Los collarines están
disponibles por separado.
completamente en el eje y vuelva a
instalar la tuerca del collarín apretándola con la mano. No apriete totalmente
la tuerca cuando la herramienta no
tenga instalada una broca o un accesorio.
Cambio de accesorios
1.Presione el pulsador del seguro del eje y
gire el eje con la mano hasta que se
embrague con el seguro del eje.
ADVERTENCIA
!
mientras la herramienta rotatoria esté
funcionando.
2. Con el pulsador del seguro del eje
embragado, afloje (pero no quite) la
tuerca del collarín. Use la llave para la
tuerca del collarín si es necesario.
3. Introduzca la broca o la espiga accesoria completamente en el collarín.
4. Con el pulsador del seguro del eje
embragado, apriete con los dedos la
No embrague el pulsador del seguro del eje
Pulsador del seguro del eje
tuerca del collarín hasta que la broca o
la espiga accesoria quede fija por el collarín.
Asegúrese de leer las instrucciones
A:
NOT
que se suministran con su accesorio
Dremel™ para obtener más información
sobre su uso.
56
Page 57

MONTAJE (CONTINUACIÓN)
2
4
2
4
ADVERTENCIA
Use Anteojos De Proteccion
Manguito portaherramientas sin llave
El manguito portaherramientas sin llave se
usa en lugar del collarín estándar y de la tuerca del collarín para quitar e instalar fácil y rápidamente algunos accesorios.
El manguito portaherramientas sin llave sujeta varios accesorios con espigas de tamaño
de 1/32" a 1/8" y está diseñado para accesorios de trabajo ligero tales como brocas para
taladro, tambores de lijado, accesorios de
pulido, escobillas de alambre y de cerdas y
ruedas cortadoras.
1. Vea los pasos del 1 al 3, Cambio de collarines en la página 7 para instalar el
manguito portaherramientas sin llave.
OPERACIÓN
Aprenda a usar la herramienta rotatoria
Para aprovechar al máximo su herramienta
rotatoria necesita aprender cómo hacer que
la velocidad y la sensación de la herramienta en sus manos trabajen por usted.
El primer paso
para aprender a
usar la herramienta rotatoria es
"sentir cómo se
siente". Sujete la
mano y sienta su peso y equilibrio. Sienta la
conicidad del casco. Esta conicidad permite
que la herramienta se pueda sujetar de manera similar a un bolígrafo o a un lápiz. El
exclusivo agarre cómodo de la nariz proporciona más comodidad y control durante su
uso.
ADVERTENCIA
!
cara. Los accesorios pueden resultar
dañados durante su manejo y pueden
salir disparados cuando se aceleran.
Esto no es común pero sucede.
PRECAUCIÓN
!
salidas de aire con la mano. El bloqueo de
las salidas de aire podría causar el calentamiento excesivo del motor.
¡IMPORTANTE!
Primero practique en retazos de material para ver la acción de alta
velocidad de la herramienta. Tenga en cuenta que su herramienta rotatoria funcionará
mejor cuando se permite que la velocidad,
junto con el accesorio y el aditamento
herramienta en su
Siempre sujete la herramienta lejos de su
Cuando sujete la herramienta no cubra las
Manguito portaherramientas sin llave
2. Enrosque el manguito portaherramientas sin llave en la espiga de la
herramienta rotatoria.
3. Cuando no pueda aplicar suficiente
presión de apriete para fijar la broca o
el accesorio, use la llave de tuercas
que se proporciona para apretar completamente el manguito portaherramientas sin llave.
Para obtener el mejor control en trabajos que
debe realizar muy cerca de la superficie, sujete la
herramienta rotatoria como si fuera un lápiz, entre
sus dedos pulgar e índice.
En operaciones más agresivas, tales como afilado o corte se usa el método de agarre tipo "golf".
Dremel™ correctos hagan el trabajo por
usted. Si es posible no aplique presión sobre
la herramienta durante su uso.
En lugar de ello, baje ligeramente el accesorio giratorio hasta la superficie de trabajo y
permita que toque el punto en el que desea
comenzar. Concéntrese en guiar la herramienta sobre el trabajo aplicando muy
poca presión con la mano. Permita que el
accesorio realice el trabajo.
Generalmente es mejor hacer una serie de
pases con la herramienta que hacer todo el
trabajo en un solo pase. Un toque suave
proporciona el mejor control y reduce las
probabilidades de error.
57
Page 58

2
4
OPERACIÓN (CONTINUACIÓN)
Velocidades de operación
Para lograr los mejores resultados cuando
trabaje con diferentes materiales, ajuste el
control de velocidad variable que se adapte
al trabajo. Para seleccionar la velocidad correcta para el accesorio que se está usando,
primero practique con retazos de material.
NOTA: La velocidad se ve afectada por los cambios de voltaje. Un menor voltaje de entrada
reducirá las RPM de la herramienta, especialmente en el ajuste más bajo. Si su herramienta
parece estar funcionando lentamente, aumente la
velocidad según lo necesite. En áreas con voltajes menores de 120 voltios es posible que la herramienta no funcione en el ajuste menor.
Simplemente coloque la herramienta en el ajuste
más alto para iniciar la operación.
Los ajustes del conmutador de la herramienta rotatoria SERIES XPR están marcados en
el disco de control de velocidad. Consulte la
tabla de Ajustes de velocidad que se
encuentra en las páginas de la 11 a la 13
para ayudar a determinar la velocidad adecuada para el material que se está trabajando y el accesorio que se debe usar.
La mayoría de las tareas se pueden realizar
usando la herramienta en el ajuste más alto.
Sin embargo, ciertos materiales (algunos
plásticos y metales) pueden resultar dañados por el calor que se genera a altas velocidades y se deben trabajar a velocidades relativamente lentas.
Generalmente la operación a baja velocidad
(15,000 RPM o menos) es mejor para operaciones de pulido que requieren el uso de
accesorios de pulido de fieltro, esculpido delicado de madera y piezas frágiles de modelos. Todas las aplicaciones de cepillado
requieren menores velocidades para evitar
que el alambre se desprenda del portaalambre. Cuando use los ajustes de velocidad
menores, deje que la herramienta haga el
trabajo por usted.
Las velocidades más altas son mejores para
taladrado, esculpido, corte, burilado, conformado, y corte de juntas a rebajo y juntas de
ranura en madera. La madera dura, los metales y el vidrio también requieren una
operación a alta velocidad.
Los ajustes para las RPM aproximadas son:
Ajuste del conmutador Intervalo de
velocidad (RPM)
stablezca el control
de velocidad
en el ajuste deseado.
Ajuste Intervalo de
del conmutador velocidad (RPM)
2 5,000-8,000
4 9,000-11,000
6 12,000-17,000
8 18,000-24,000
10 25,000-35,000
Algunos lineamientos referentes a la velocidad de la herramienta:
• La herramienta rotatoria Dremel no tiene
un accesorio para perforar o cortar vidrio.
• El plástico y otros materiales que se derriten a bajas temperaturas se deben cortar
a bajas velocidades.
• El pulido, bruñido y limpieza con escobillas
de alambre se debe hacer a velocidades
no mayores de 15,000 RPM a fin de evitar
el daño a la escobilla y a su material.
• La madera se debe cortar a alta velocidad.
• El hierro o el acero se debe cortar a alta
velocidad.
• La vibración de un cortador de acero de
alta velocidad generalmente indica que la
velocidad es demasiado lenta.
• El aluminio, las aleaciones de cobre, las
aleaciones de plomo, las aleaciones de
zinc y el estaño se pueden cortar a varias
velocidades, dependiendo del corte que se
esté haciendo. Aplique un compuesto a
base de parafina (no agua) u otro lubricante adecuado en la herramienta para
evitar que el material se adhiera en los
dientes de corte.
NOTA: Cuando la herramienta no esté rindiendo adecuadamente, el aumento de la presión sobre ella no es la respuesta. Pruebe un
accesorio o un ajuste de velocidad diferente
para lograr el resultado deseado. Por favor
consulte las siguientes tablas de velocidad o
simplemente comuníquese con el
Departamento de Servicio al Consumidor de
Dremel al:
1-800-437-3635
o visite www.Dremel.com.
58
Page 59

AJUSTES DE VELOCIDAD
Use sólo los accesorios Dremel™ comprobados, de alto rendimiento.
* Velocidad para cortes ligeros; precaución: quemado de ranuras profundas.
• Dependiendo de la dirección del corte en relación con el grano.
Cortadores de alta velocidad
Número de
catálogo
100, 121, 131
114, 124,
134, 144
190
118, 191, 192,
193, 194
116, 117,
125, 196
115
198
199
Número de
catálogo
105, 108
106, 109
107, 110
111
112
113
Número de
catálogo
7103, 7105,
7117, 7120,
7122, 7123,
7134, 7144
Madera Madera Laminados Acero Aluminio, LumaquelaCerámicaVidrio
Suave dura Plástico bronce, etc. Stone
810 5 5 6 - - 86 4 5 6 - - -
810 4 7 8 - - 810 4 5 8 - - -
86 4 5 6 - - -
810 4 5 6 - - 88 4 5 6 - - 88 4 5 6 - - -
Cortadores de grabado
Madera Madera Laminados Acero Aluminio, LumaquelaCerámicaVidrio
Suave dura Plástico bronce, etc. Stone
810 6 4 6 - - 8 10 54 6--810 5 4 6 - - 8* 10* 6* 4 6 - - 8* 10* 5* 4 6 - - 8* 10* 5* 4 6 - - -
Puntas de muelas abrasivas de diamante
Madera Madera Laminados Acero Aluminio, LumaquelaCerámicaVidrio
Suave dura Plástico bronce, etc. Stone
10 8 - - - 10 10 10
Número de
catálogo
9931, 9932,
9933, 9934,
9935, 9936
Número de
catálogo
9901, 9902,
9903, 9904,
9905, 9906,
9909, 9910,
9911, 9912
Cortadores de carburo de tungsteno de dientes estructurados
Madera Madera Laminados Acero Aluminio, LumaquelaCerámicaVidrio
Suave dura Plástico bronce, etc. Stone
88 4 - 6 - - -
Cortadores de carburo de tungsteno
Madera Madera Laminados Acero Aluminio, LumaquelaCerámicaVidrio
Suave dura Plástico bronce, etc. Stone
8
8
4 8-10 6 8 8-10 8-10
59
Page 60

AJUSTES DE VELOCIDAD (CONTINUACIÓN)
Use sólo los accesorios Dremel™ comprobados, de alto rendimiento.
* Velocidad para cortes ligeros; precaución: quemado de ranuras profundas.
• Dependiendo de la dirección del corte en relación con el grano.
Brocas buriladoras de alta velocidad
Número de
catálogo
612, 640
615, 617, 618,
650, 652
654
Número de
catálogo
83142, 83322,
83702, 84922,
85422, 85602,
85622
Número de
catálogo
516, 517, 518,
500
Número de
catálogo
903, 911, 921,
932,941, 945,
952, 953, 954,
971, 997,
8153, 8175,
8193, 8215
541
Número de
catálogo
453, 454, 455
Madera Madera Laminados Acero Aluminio, LumaquelaCerámicaVidrio
Suave dura Plástico bronce, etc. Stone
10* 8• - - - - - 10* 8• - - - - - -
10* 8• - - - - - -
Esmeriladoras de carburo de silicio
Madera Madera Laminados Acero Aluminio, LumaquelaCerámicaVidrio
Suave dura Plástico bronce, etc. Stone
- - 6 10 4 6 10 10
Puntas abrasivas
Madera Madera Laminados Acero Aluminio, LumaquelaCerámicaVidrio
Suave dura Plástico bronce, etc. Stone
4-6 4-6 - 8 6 - - 4-6 4-6 - 8 6 - - -
Esmeriladoras de óxido de aluminio
Madera Madera Laminados Acero Aluminio, LumaquelaCerámicaVidrio
Suave dura Plástico bronce, etc. Stone
10 10 - 8 4 6 10 -
10 10 - 8 4 610 -
Piedras para afilar sierras de cadena
Madera Madera Laminados Acero Aluminio, LumaquelaCerámicaVidrio
Suave dura Plástico bronce, etc. Stone
-- - 8 - -- -
60
Page 61

AJUSTES DE VELOCIDAD (CONTINUACIÓN)
Use sólo los accesorios Dremel™ comprobados, de alto rendimiento.
* Velocidad para cortes ligeros; precaución: quemado de ranuras profundas.
• Dependiendo de la dirección del corte en relación con el grano.
Accesorios de corte
Número de
catálogo
409, 420, 426,
540
542
545
560
561
562
Número de
catálogo
461, 462, 463
414, 422, 429
425, 427
423
403, 404, 405
530, 531, 532
428, 442, 443
535, 536, 537
Número de
catálogo
430, 431, 438
439, 440, 444
407, 408, 432
411, 412, 413
Número de
catálogo
502, 503, 504,
505
Número de
catálogo
511
Número de
catálogo
150
Número de
catálogo
569, 570
Madera Madera Laminados Acero Aluminio, LumaquelaCerámicaVidrio
Suave dura Plástico bronce, etc. Stone
- - 2-4 10 10 10 10 -
10 8-10 2-4 10 10 10 10 -
8-10 8 - - - - - -
For use on drywall. For best results, use at 35,000 rpm.
6-10 6-10 2-4 - 10 - - -
-- - - - -10-
Accesorios de pulido
Madera Madera Laminados Acero Aluminio, LumaquelaCerámicaVidrio
Suave dura Plástico bronce, etc. Stone
-- - 8 8 888
-- - 6 6 666
-- -8 8---
- - - 6-8 6-8 6-8 6-8 6-8
4 4 2-4 6 6 - - -
-4 - 4 - - - 44 2 4 - - - 44 - 4 4 4 - -
Bandas y discos de lijado
Madera Madera Laminados Acero Aluminio, LumaquelaCerámicaVidrio
Suave dura Plástico bronce, etc. Stone
2-10 2-10 2-6 10 10 2-10 2-10 2-10 2-10 2-6 10 10 2-10 2-10 2-10 2-10 2-6 10 10 2-10 2-10 -
8 8 2-4 - 2-4 - - -
Ruedas de aletas
Madera Madera Laminados Acero Aluminio, LumaquelaCerámicaVidrio
Suave dura Plástico bronce, etc. Stone
6-8 8 2 10 8-10 - - -
Pulidores abrasivos de acabado
Madera Madera Laminados Acero Aluminio, LumaquelaCerámicaVidrio
Suave dura Plástico bronce, etc. Stone
66 4 6 6 - - -
Brocas para taladro
Madera
Madera Laminados Acero Aluminio, LumaquelaCerámicaVidrio
Suave
dura Plástico bronce, etc. Stone
10 8-10 2-4 - 6 - - -
Brocas de extracción de lechada
Acero
dura
Laminados
Plástico bronce, etc. Stone
Madera
Madera
Suave
Para usarse con lechada de pared y de piso. 6-8 -
Aluminio,
Lumaquela
CerámicaVidrio
61
Page 62

la ranura en "V"
MANTENIMIENTO
2
4
ADVERTENCIA
!
El mantenimiento pre-
ventivo realizado por
personal no autorizado puede dar como
resultado la colocación inadecuada de
alambres y de los componentes internos,
y esto podría ocasionar un riesgo grave.
Recomendamos que todo el servicio de la
herramienta sea realizado en un Centro
de Servicio Dremel™.
ADVERTENCIA
!
A fin de evitar lesiones
debido al arranque inesperado de la herramienta o a descargas
eléctricas, siempre desenchufe la herramienta del tomacorriente de la pared
antes de proporcionarle servicio o
limpiarla.
Escobillas de carbón
Las escobillas de su herramienta se han diseñado para proporcionarle muchas horas de
servicio fiable.
Para preparar las escobillas haga funcionar
la herramienta a toda velocidad durante 5
minutos sin carga. Esto "asentará" apropiadamente las escobillas y prolongará la vida
útil de la herramienta.
Para mantener la eficiencia máxima del
motor, revise el desgaste de las escobillas
cada 40 a 50 horas.
PRECAUCIÓN
!
gastadas dañará permanentemente el
motor.
Use solamente escobillas de repuesto originales de Dremel™.
Revise las escobillas de la herramienta rotatoria después de 40 a 50 horas de uso. Si la
herramienta rotatoria funciona erráticamente, pierde potencia o produce ruidos
inusitados, revise el desgaste de las escobillas y la posible necesidad de reemplazarlas.
Recuerde: las escobillas de la herramienta
rotatoria son similares al aceite en un auto;
cuanto más las revise y les proporcione servicio, mejor será su rendimiento.
Siga estos pasos para revisar y cambiar las
escobillas de la herramienta rotatoria.
1. Con el cable eléctrico desconectado,
coloque la herramienta en una superfi
cie limpia. Use la llave de tuercas de la
herramienta para liberar el clip de la
tapa de la cavidad de la escobilla
(Figura A).
2. Saque las escobillas de la herramienta
halando el derivador y el clip de bronce
El uso de la herramienta con escobillas des-
A
Remoción de la tapa de la cavidad de la
escobilla
B
Remoción e inspección
de las escobillas
C
Instalación de las escobillas
que están conectados en la escobilla
(Figura B).
NOTA: Asegúrese de observar cómo el clip
de bronce sale de la ranura próxima a la
cavidad de la escobilla. También observe
cómo el retén del clip de bronce se ajusta en
la ranura de la cavidad de la escobilla, lo cual
asegura el clip de bronce en su posición adecuada.
-
3. Revise el desgaste de cada escobilla. Si
la longitud de la escobilla es menor de
3/8" (9.5 mm) o si el extremo de contacto está áspero o picado, reemplace la
escobilla.
4.Instale las escobillas existentes o las
62
Page 63

ADVERTENCIA
Use Anteojos De Proteccion
MANTENIMIENTO (CONTINUACIÓN)
Si tiene preguntas o desea reemplazar
las escobillas, llame al Departamento de
Servicio al Consumidor de Dremel al
teléfono at
o visite nuestro sitio Web en
nuevas de manera que la superficie
curva del extremo de la escobilla coincida con la curvatura del conmutador del
motor (como se ve a través de la abertura de la escobilla).
NOTA: El retén del clip de bronce debe caber
en la ranura que se encuentra al lado de la
cavidad de la escobilla, que asegura el clip
en su posición adecuada (Figura C).
5. Vuelva a instalar las tapas de las cavidades de las escobillas introduciendo
en ángulo el extremo de la tapa que no
tiene clip en la abertura y luego cerrando a presión el extremo de la tapa que
tiene el clip. Asegúrese de que el muelle
de la escobilla esté centrado
6. Enchufe el cable eléctrico en el tomacorriente de pared. Haga funcionar la
herramienta rotatoria a toda velocidad
durante 5 minutos sin carga. Esto asentará apropiadamente las escobillas y
prolongará la vida útil de la herramienta.
1-800-437-3635
www
.Dremel.com.
Limpieza de la herramienta
Las aberturas de ventilación y las palancas
del conmutador se deben mantener limpias y
libres de materiales extraños. No intente
limpiarlas introduciendo objetos puntiagudos
a través de las aberturas.
La herramienta se
puede limpiar con
aire comprimido.
Siempre use gafas
de seguridad
cuando limpie la
aire comprimido.
No hay necesidad de lubricar la herramienta
rotatoria Dremel™.
PRECAUCIÓN
!
ventes dañarán las partes de plástico. Por
ejemplo, gasolina, tetracloruro de carbono, agentes de limpieza clorados,
amoníaco y detergentes domésticos que
contienen amoníaco.
Limpie las áreas de "agarre suave" de la herramienta con un paño húmedo. Las áreas
difíciles de limpiar pueden requerir más de
una limpieza con el paño.
herramienta con
Ciertos agentes
limpiadores y sol-
63
Page 64

ACCESORIOS
Si desea conocer la disponibilidad de los accesorios y aditamentos, consulte a una ferretería,
centro de pasatiempos o centro de artículos para el hogar de su localidad. O comuníquese con
el Departamento de Servicio al Consumidor de Dremel al teléfono:
o visite www.Dremel.com.
ADVERTENCIA
!
Use sólo los accesorios Dremel™ de alto rendimiento. Otros accesorios no están
diseñados para esta herramienta y pueden ocasionar lesiones o daños materiales.
1-800-437-3635
Broca de corte de placas de yeso
Cuando use una plantilla (caja de tomacorriente) detrás de la placa de yeso, corte circularmente hacia la izquierda.
Brocas buriladoras de alta velocidad
Para burilado, incrustaciones y mortajas en
madera y en otros materiales suaves. Use
sólo el accesorio burilador N.º 330 o la mesa
conformadora/buriladora N.º 231 de
Dremel™.
Mandriles
Un mandril es una espiga con un cabezal
roscado o de tornillo que se usa con accesorios de pulido, moletas cortantes, discos de
lijado y puntas de pulido. El mandril es un eje
permanente, que permite el reemplazo del
cabezal desgastado cuando sea necesario.
Mandril de tornillo
Para usarse con puntas de
pulido de fieltro y discos pulidores de fieltro.
Espiga de
1/8"
Broca de corte de azulejo
Para usarse en azulejos de pared, tableros
de cemento y yeso.Introduzca la broca en el
material a un ángulo de 45º y luego lentamente colóquela en un ángulo de 90º para
comenzar el corte.
Broca de corte de múltiples usos
Para usarse en madera, plástico, placa de
yeso, fibra de vidrio, forrado de vinilo o aluminio, azulejo acústico y laminados.
Introduzca la broca en el material a un ángulo de 45º y luego lentamente colóquela en un
ángulo de 90º para comenzar el corte.
Mandril de tornillo pequeño
El mandril tiene un pequeño
tornillo en la punta y se usa
con esmeriles y moletas de
corte de fibra de vidrio, discos de
lijado y discos pulidores.
Espiga de 1/8"
Mandril de punta roscada
El mandril tiene una punta
roscada que se enrosca en la
punta de pulido, accesorio N.º
427.
Espiga de
1/8"
Esmeriladoras de óxido de
aluminio (rojas/cafés)
Estas esmeriladoras vienen
redondas, puntiagudas o
planas y están hechas de
óxido de aluminio. Úselas para todas las
operaciones de esmerilado: afilado de hojas
de podadoras de césped, puntas de
destornillador, cuchillos, tijeras, cinceles y
otras herramientas de corte. Úselas para
quitar aristas de los moldes metálicos, y para
eliminar las rebabas de cualquier clase de
material. Estas esmeriladoras pueden reafilarse con una piedra de reafilado. En talleres
de maquinado, los taladros y cortadores de
alta velocidad generalmente se esmerilan
con muelas de óxido de aluminio.
Espiga de
1/8"
Esmeriladoras de carburo
de silicio (azules/verdes)
Más resistentes que las puntas de óxido de aluminio, estas esmeriladoras están diseñadas especialmente para
usarse en materiales duros tales como vidrio
y cerámica.
Espiga de 1/8"
Puntas de muelas abrasivas
de diamante
Se usan para trabajo de
detalles finos en madera, jade,
cerámica, vidrio y otros materiales duros. Las brocas están
cubiertas con partículas de
diamante.
64
Espiga de
3/32"
Page 65

ACCESORIOS (CONTINUACIÓN)
Cortadores de alta velocidad
Los cortadores de alta velocidad se usan para esculpir,
cortar y ranurar madera, plásticos y metales suaves (como
aluminio, cobre y latón). Están hechos de
acero de alta calidad.
Espiga de 1/8"
Cortadores de carburo de tungsteno de
dientes estructurados
Espiga de 1/8"
Estos cortadores tienen dientes filosos como
agujas de corte rápido para mayor remoción
de material con carga mínima. Úselos en
fibra de vidrio, madera, plástico, epoxia y
caucho.
Escobillas de alambre
PRECAUCIÓN
!
dades mayores de 15,000 rpm. Consulte
los Ajustes de velocidad (páginas 10 a 12)
para ver la herramienta y el ajuste adecuados.
Hay disponibles escobillas de tres formas
diferentes y de tres
materiales diferentes:
acero inoxidable,
bronce y alambre de carbono. Las escobillas de acero inoxidable
rinden bien en peltre, aluminio, acero inoxidable y otros metales, sin dejar oxidación. Las
escobillas de bronce no producen chispas y
son más suaves que el acero, lo que las
hace ideales para usarse en metales suaves
como oro, cobre y bronce. Las escobillas de
alambre de carbono son buenas para
limpieza general.
Nunca use escobillas
de alambre a veloci-
Espiga de 1/8"
Escobillas de cerdas
Las escobillas de cerdas se usan para
limpiar artículos de
plata, joyería y antigüedades. Las tres formas permiten tener acceso a esquinas estrechas y otros espacios de acceso difícil. Se
pueden usar con compuestos pulidores para
limpiar o pulir rápidamente.
Espiga de 1/8"
Cortadores de grabado
Los cortadores de grabado vienen en una amplia
variedad de tamaños y formas y se usan para trabajo intrincado en
cerámica (greenware cerámico), tallado de
madera, joyería y grabado en marfil o hueso.
Frecuentemente se usan para hacer complicados tableros de circuitos impresos. No se
deben usar en acero ni en materiales muy
duros, pero son buenos para madera, plástico y metales suaves.
Espiga de 3/32"
Cortadores de carburo de tungsteno
Los cortadores de carburo
de tungsteno son cortadores de larga vida útil que
se usan en acero templado, cerámica cocida al horno
y otros materiales muy duros. Se pueden
usar para grabar herramientas y equipo de
jardín.
Espiga de 1/8"
Escobillas de presión
o.Las puntas de la escobilla de alambre
hacen el trabajo. Opere la escobilla con
la presión más ligera para que sólo las
puntas de los alambres entren en contacto con la superficie de trabajo.
o.Si se aplica más presión, los alambres se
pueden estresar en exceso y dar como
resultado una acción de barrido. Si esto
continua, la vida útil de la escobilla se
verá reducida por la fatiga del material.
o.Aplique la escobilla a la superficie de tra-
bajo de manera que la mayor área de la
cara de la escobilla establezca contacto
completo con la superficie. Si aplica el
borde o el lado de la escobilla en la
superficie de trabajo, el alambre se
romperá y se acortará la vida útil de la
escobilla.
Las puntas de alambre hacen el trabajo.
Una presión excesiva puede causar la
CORRECTO:
INCORRECT
rotura del alambre.
O:
65
Page 66

ACCESORIOS (CONTINUACIÓN)
Accesorios de lijado
Los discos de lijado de
grano fino, medio y grueso están diseñados para
ajustarse al mandril N.º
402. Se pueden usar para casi cualquier trabajo pequeño de lijado desde la fabricación
de modelos hasta el acabado de muebles.
Además, la lijadora de tambor hace posible
conformar madera, alisar fibra de vidrio, lijar
el interior de curvas y otros lugares difíciles.
Las bandas del tambor se pueden reemplazar y vienen en grano fino y grueso.
Espiga de 1/8"
Muelas abrasivas de óxido de
aluminio
Se usan para quitar pintura,
eliminar rebabas de metal,
pulir acero inoxidable y otros
metales. Están disponibles en grano medio..
Espiga de 1/8"
Las ruedas de aletas esmerilan y pulen
superficies planas y contorneadas. Se usan
más efectivamente como lijadoras de acabado, después de completar el lijado profundo
de la superficie y la remoción del material
producto del lijado. Las ruedas de aletas
vienen en granos fino y grueso.
Los pulidores son un excelente accesorio de
acabado para limpieza y lijado ligero.
Funcionan de manera eficaz en metal, vidrio,
madera, aluminio y plástico. Los pulidores
vienen disponibles en granos medio y grueso.
Muela abrasiva
Se usa para desbarbar, eliminar
oxidación y para esmerilado en
general. Úsese con el mandril N.º 402.
ADITAMENTOS
Los siguientes aditamentos forman parte del sistema de la herramienta rotatoria Dremel;
aumentan la versatilidad de su herramienta rotatoria.
XPR MultiSaw
El accesorio Dremel XPR MultiSaw convierte su herramienta rotatoria en una sierra de múltiples usos que le permitirá hacer cortes
rectos y curvos en una variedad de materiales. Los patrones de
corte espirales ahora se hacen rápida y fácilmente. Con las hojas
de la sierra alternativa vertical puede cortar madera, madera contrachapada, metal, PVC, plástico, ¡y mucho más!
Use solo con el modelo XPR Serie 400.
XPR Cepilladora
Convierte su herramienta rotatoria con cable eléctrico en una
cepilladora.
o La cepilladora está diseñada para dos tipos de cepillado: cepil-
lado recto y cepillado a 45º, incrementar a 2-1/8" (5.40 mm)
o Además, la técnica de cepillado recto se puede usar para
actividades limitadas de conformado y tallado.
• ¡Ideal para reparar puertas combadas o atrancadas!
Use solo con el modelo XPR Serie 400.
Lámpara flexible
La lámpara flexible usa baterías de yoduro
de litio (se incluyen las baterías).
• La iluminación por LED proporciona visibilidad en áreas con poca iluminación y
aumenta la luz en proyectos detallados.
• Fácil de conectar, sin alambres ni conexiones confusos.
• Se conecta a la estación de trabajo 220 y
al burilador de pistón 335.
Use solo con el modelo XPR Serie 400.
66
Page 67

ADITAMENTOS (CONTINUACIÓN)
7 6 5 4 3
3 2
1
3/4
1/2
1/4
0
Eje flexible
Ideal para lugares de difícil acceso y trabajo de detalles finos.
• Sistema de conexión rápida
• Cable de 36" de longitud con un nuevo radio curvo de 5" que
proporciona más flexibilidad
• Pieza de mano de agarre cómodo
• Pulsador integrado del seguro del eje
• Sujeta ejes de hasta 1/8"
Use con los modelos: XPR Series 275, 285, 395, 398, 780, 800, 400.
5" Radius
Convierte su herramienta rotatoria con cable eléctrico en un burilador
de pistón.
• Base transparente
• Tope de dos profundidades
• Incluye guía del borde y guía del círculo
• Para burilar círculos, paralelos al borde, avisos y trabajo de
incrustación y adaptadores de plantillas de letras
Use con los modelos: XPR Series 275, 285, 395, 398, 800, 400.
Remoción de lechada
¡Una manera rápida y fácil de volver a colocar lechada en cualquier habitación o reemplazar azulejos
rotos!
• Ajuste de profundidad de múltiples lados
• Ángulo de 30º para un corte controlado
• Guías con separación de 180º para mantener la
broca centrada entre los azulejos.
• Fácil montaje por atornillado
• Incluye piedra de afilar.
Burilador de pistón
Guía de corte
Permite el corte controlado en una variedad de materiales.
• Permite cortes de alto control con visibilidad máxima
• Ajuste fácil de la profundidad. Se ajusta a la profundidad de
corte correcta del material de trabajo.
Use con los modelos: XPR Series 275, 285, 395, 398, 770, 780, 800, 400.
67
Page 68

ADITAMENTOS (CONTINUACIÓN)
30
o
30
o
GAGE
Afiladora de equipo de césped y jardín
La manera más rápida, fácil y segura de afilar las hojas de su podadora de césped y de otras herramientas para el jardín.
• La guía proporciona un óptimo ángulo de afilado
• Afila las hojas de la mayoría de las podadoras rotatorias de césped
• Includes sharpening stone
Use con los modelos: XPR Series 275, 285, 395, 398, 780, 800, 400.
Afiladora de sierras de cadena
• Afila fácilmente las sierras de cadena más desafiladas.
• Contiene: aditamento de afilado, tres piedras de afilar, medidor, dos separadores, llave de tuercas, manual de instrucciones.
Use con los modelos: XPR Series 275, 285, 395, 398, 780, 800, 400.
Ángulo recto
Aumenta la versatilidad de la herramienta rotatoria permitiéndole
tener acceso a lugares difíciles.
• Los cojinetes de bola y los engranes de dentadura espiral permiten
una operación suave y fría.
• El sistema de acoplamiento le permite orientar el aditamento de su
herramienta en 12 direcciones diferentes.
• El sistema de desconexión rápida se conecta a su herramienta
rotatoria en lugar del anillo tapa del casco, sin necesidad de llaves
de tuercas.
Use with models: 275, 285, 395, 398, 780, 800, 400 Series XPR.
Dremelite
• Proporciona visibilidad en áreas con poca iluminación y aumenta la luz en proyectos detallados.
• Dos luces LED extremadamente duraderas.
• Utiliza un imán roscado en el eje de salida de la herramienta para
proporcionar una fuente de potencia ingeniosa y simple.
Use with models: 275, 285, 395, 398, 770, 780, 800, 400 Series XPR.
68
Page 69

ADITAMENTOS (CONTINUACIÓN)
Portaherramienta de eje flexible
Convenientemente suspende cualquier herramienta rotatoria
Dremel sobre su mesa de trabajo.
• Perfecto para usarse con el aditamento de eje flexible
• Se sujeta a mesas de trabajo de hasta 1 fl" de grueso, y se
ajusta a alturas de 12 a 42"
• Almacene brocas adicionales en la base
Use with models: 275, 285, 395, 398, 400 Series XPR.
Sujetador y base para la herramienta
• Sujeta firmemente las herramientas rotatorias en cualquier
posición
• Control de la pieza de trabajo (sin manos) para obtener
resultados óptimos
Use with models: 275, 285, 395, 398, 780, 400 Series XPR.
69
Page 70

1
1
2
5
3
10
10
16
17
18
19
20
25
25
22
24
23
25
25
28
27
24
4
PIEZAS DE SERVICIO Y DIAGRAMA
Ref. Pieza N.º Descripción
1 2610920980 Juego del casco
2 2610920701 Caja eléctrica
3 2610920702 Armadura y
conjunto de cojinetes
4 2615990962 Llave de tuercas
5 2615294041 Cable
10 2610920705 Resorte de
escobillas (Par)
16 2610920709 Conjunto del
Portaescobilla
17 2610920972 Seguro y resorte del
collarín
18 2610922763 Tuerca del collarínt
19 2615110480 Collarín de 1/8" (en
la herramienta)
Ref. Pieza N.º Descripción
20 2610920710 Conjunto del
conmutador
22 2610914379 Gomma Palier
Funda
23 2610920718 Colgador
24 2615294035 Tornillos
25 2610921563 Puerta de las esco
(individuales)
billas (Par)
27 2610920716 Tapa
28 2610920711 Control de velocidad
30 2610920717 Anillo tapa del
70
casco
Page 71

Garantía limitada de Dremel™
Su producto Dremel está garantizado contra material defectuoso o fabricación defectuosa durante un período de dos años a partir
de la fecha de compra. En el caso de que un producto no se ajuste a esta garantía escrita, por favor
1.
NO devuelva el producto al lugar de compra.
2. Empaque cuidadosamente el producto solo, sin otros artículos, y devuélvalo con el transporte prepagado, junto con:
A. Una copia de su comprobante de compra fechado (por favor, guarde una copia para usted).
B.
Una descripción por escrito de la naturaleza del problema.
C.
Su nombre, dirección y número de teléfono:
ESTADOS UNIDOS
Dremel Service Center
4915 21st Street O 4631 E. Sunny Dune
Racine, WI 53406 Palm Springs, CA 92264
CANADÁ
Giles Tool Agency LOS ESTADOS UNIDOS CONTINENTALES
6520 Lawrence Av. East Consulte a su distribuidor local o escriba a
Scarborough, Ont
Canada M1C 4A7 Racine, WI 53406
Recomendamos asegurar el paquete contra pérdida o daños durante el transporte de los cuales no podemos ser responsables.
Esta garantía se aplica sólo al comprador registrado original. LOS DAÑOS AL PRODUCTO QUE SE PRODUZCAN COMO CON-
SECUENCIA DE MANIPULACIÓN INDEBIDA, ACCIDENTE, ABUSO, NEGLIGENCIA, REPARACIONES O ALTERACIONES
NO
AUTORIZADAS, ADITAMENTOS NO APROBADOS U OTRAS CAUSAS QUE NO ESTÉN RELACIONADAS CON PROB-
LEMAS CON EL MATERIAL O LA FABRICACIÓN, NO ESTÁN CUBIERTOS POR ESTA GARANTÍA.
Ningún empleado, agente, distribuidor u otra persona está autorizado a dar garantías en nombre de Dremel. Si la inspección de
Dremel demuestra que el problema fue causado por problemas con el material o la fabricación dentro de las limitaciones de la
garantía, Dremel reparará o reemplazará el producto libre de cargos y lo enviará con el transporte prepagado. Las reparaciones
que sean necesarias por causa del desgaste normal o del abuso normal, o la reparación del producto fuera del período de garantía, si se pueden hacer, se cobrarán a los precios de fábrica regulares.
DREMEL NO DA NINGUNA OTRA GARANTÍA DE ABSOLUTAMENTE NINGÚN OTRO TIPO, NI EXPRESA NI IMPLÍCITA, Y
TODAS LAS GARANTÍAS IMPLÍCITAS DE COMERCIABILIDAD E IDONEIDAD PARA UN PROPÓSITO ESPECÍFICO QUE
EXCEDAN LA OBLIGACIÓN MENCIONADAANTERIORMENTE QUEDAN POR LA PRESENTE DESESTIMADAS POR DREMEL
Y EXCLUIDAS DE ESTA GARANTÍA LIMITADA.
Esta garantía le confiere a usted derechos legales específicos y es posible que usted tenga también otros derechos que varían de
un estado a otro. La obligación del garante es únicamente reparar o reemplazar el producto. El garante no es responsable de ningún
daño incidental o emergente debido a cualquiera de dichos supuestos defectos. Algunos estados no permiten la exclusión o la limitación de los daños incidentales o emergentes, así que es posible que las limitaciones o la exclusión anteriores no tengan aplicación
en el caso de usted.
Para obtener precios y para el cumplimiento de la garantía en los Estados Unidos continentales, póngase en contacto con su distribuidor local de Dremel.
Dremel Service Center
FUERA DE
Dremel, 4915 21st Street
, tome las medidas siguientes:
71
Page 72

NOTA
72
 Loading...