


 Loading...
Dreambox DM 500-S/C/T
Bedienungsanleitung
Digitaler Satellitenempfänger zum Empfang von freien und verschlüsselten DVB-Programmen.
Kommunikations-Schnittstelle
Smartcard Leser
Linux OS
User Manual
Digital satellite receiver for free and encrypted Digital Video Broadcasting (DVB).
Communication-Port
Smartcard Reader
Linux OS

U s e r M a n u a l D r e a m b o x D M 5 0 0
english
1.T a b l e o f c o n t e n t s
1. Table of contents.............................................................................................................................. |
- 2 - |
||
2. Views |
................................................................................................................................................ |
- 4 - |
|
3. Explanation front panel..................................................................................................................... |
- 5 - |
||
4. Explanation ......................................................................................................................rear panel |
- 5 - |
||
5. Safety ............................................................................................................................instructions |
- 7 - |
||
6. Shut down ........................................................................................................................................ |
- 8 - |
||
7. Additional ............................................................................................................safety instructions |
- 8 - |
||
8. Disposal .........................................................................................................................instructions |
- 9 - |
||
9. Packaging ........................................................................................................................contents |
- 10 - |
||
10. |
Installation .................................................................................................................................... |
- 10 - |
|
11. |
Remote .............................................................................................................................control |
- 11 - |
|
12. |
Important ...................................................................................................notes about operation |
- 12 - |
|
13. |
Remote ................................................................................................................control buttons |
- 13 - |
|
14. |
Turning ...............................................................................................your Dreambox on and off |
- 15 - |
|
15. |
Sleeptimer .................................................................................................................................... |
- 16 - |
|
16. |
Main ...........................................................................................................................OSD Menu |
- 16 - |
|
17. |
Infobar .......................................................................................................................................... |
- 18 - |
|
|
17.1 ...................................................................................................................... |
Infobar – EPG |
- 19 - |
|
17.2 ......................................................................................................... |
Infobar – Sub Services |
- 21 - |
|
17.3 .......................................................................................................... |
Infobar – Audio tracks |
- 22 - |
|
17.4 .................................................................................................................. |
Infobar – Plugins |
- 22 - |
18. |
Setting ..................................................................................................................OSD language |
- 23 - |
|
19. |
Setting ....................................................................................................................the time zone |
- 24 - |
|
|
19.1 ......................................................................................................... |
Manual time correction |
- 26 - |
20. |
Signal ....................................................................strength (Adjusting your antenna, DM 500-T) |
- 27 - |
|
|
20.1 ......................................................................................................... |
Disable 5V (DM 500 - T) |
- 28 - |
|
20.2 ............................................................................. |
Automatic transponder scan (DM 500 - T) |
- 29 - |
|
20.3 .................................................................................. |
Manual transponder scan (DM 500 - T) |
- 31 - |
21. |
Automatic .....................................................................................transponder scan (DM 500-C) |
- 32 - |
|
|
21.1 ................................................................................. |
Manual transponder scan (DM 500 - C) |
- 34 - |
22. |
Satfinder ...................................................................................(Adjusting your dish, DM 500-S) |
- 35 - |
|
23. |
Satellite ...................................................................................................................configuration |
- 36 - |
|
|
23.1 .................................................................................one single satellite – direct connection |
- 37 - |
|
|
23.2 ...................................................................................................... |
2 satellites via Toneburst |
- 38 - |
|
23.3 ................................................................................. |
2 satellites via 22kHz (Highband only) |
- 39 - |
|
23.4 .................................................................................................. |
2 satellites via DiSEqC A/B |
- 40 - |
|
23.5 .......................................................................................... |
4 satellites via DiSEqC OPT A/B |
- 41 - |
|
23.6 ........................................................................................ |
Many satellites via DiSEqC Rotor |
- 42 - |
24. |
Motor ..................................................................................................................................setup |
- 45 - |
|
25. |
Example ....................................................................table for the DiSEqC 1.2 Rotor (SG21000) |
- 46 - |
|
26. |
Automatic .....................................................................................transponder scan (DM 500-S) |
- 47 - |
|
27. |
Automatic ............................................................................................multisat scan (DM 500-S) |
- 50 - |
|
28. |
Manual ..........................................................................................transponder scan (DM 500-S) |
- 54 - |
|
29. |
Edit a .....................................................................................................transponder (DM 500-S) |
- 55 - |
|
30. |
Service ................................................................................organizing – Adding a new Bouquet |
- 58 - |
|
|
30.1 .............................................. |
Service organizing – Adding services to an existing Bouquet |
- 60 - |
|
30.2 ............................................................................... |
Service organizing – Editing a Bouquet |
- 62 - |
31. |
Parental ........................................................................................................lock and Setup lock |
- 64 - |
|
|
31.1 .................................................................................................. |
Activating the parental lock |
- 65 - |
|
31.2 .............................................................................................. |
Deactivating the parental lock |
- 67 - |
|
31.3 ....................................................................................................... |
Activating the setup lock |
- 68 - |
|
31.4 .................................................................................................. |
Deactivating the setup lock |
- 70 - |
32. |
Locking ..........................................................................................................................a service |
- 71 - |
|
33. |
Unlocking ......................................................................................................................a service |
- 72 - |
|
34. |
Audio/Video .....................................................................................................................settings |
- 73 - |
|
35. |
Keyboard ...................................................................................................................................... |
- 75 - |
|
2

U s e r M a n u a l D r e a m b o x D M 5 0 0 |
english |
36. |
OSD settings ................................................................................................................................ |
- 76 - |
||
|
36.1 |
Skin Setup........................................................................................................................... |
- 78 - |
|
|
36.2 |
Available Skins..................................................................................................................... |
- 79 - |
|
|
36.3 |
Setting the teletext (TuxText) position.................................................................................. |
- 80 - |
|
37. |
Teletext (TuxText) ........................................................................................................................ |
- 82 - |
||
38. |
Expert setup ................................................................................................................................. |
- 84 - |
||
|
38.1 |
Communications setup (Setting up LAN, NFS shares) ........................................................ |
- 86 - |
|
|
38.2 |
Ngrab – Streaming setup ..................................................................................................... |
- 89 - |
|
|
38.3 |
Manual software update....................................................................................................... |
- 90 - |
|
|
38.4 |
Remote control setup ........................................................................................................... |
- 91 - |
|
|
38.5 |
Reset to factory defaults....................................................................................................... |
- 92 - |
|
39. |
Timer ............................................................................................................................................ |
- 93 - |
||
40. |
Information – Streaminformation .................................................................................................. |
- 94 - |
||
41. |
Information – About ...................................................................................................................... |
- 95 - |
||
42. |
Technical data .............................................................................................................................. |
- 96 - |
||
43. |
Contact & support information ...................................................................................................... |
- 98 |
- |
|
44. |
Warranty card............................................................................................................................... |
- 99 |
- |
|
45. |
Copyright notes ......................................................................................................................... |
- 100 |
- |
|
46. |
GNU General Public License...................................................................................................... |
- 101 |
- |
|
Note: The Dreambox DM 500 carries the CE-sign and fulfills all requirements form the EU. Version: November 2005.
Software: Release 1.09
Subject to change without prior notification.
3
U s e r M a n u a l D r e a m b o x D M 5 0 0 |
english |
2.V i e w s
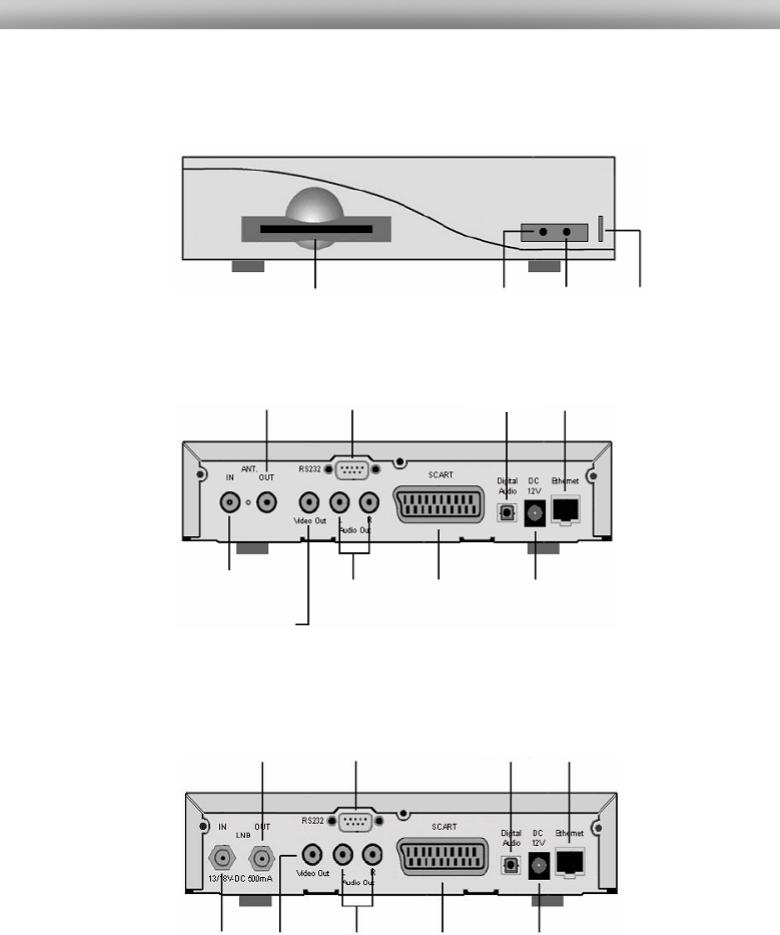
Front panel
Smartcard Reader |
Standby LED |
RC LED |
Standby |
|
|
|
On / off |
|
|
||
|
|
|
|
Rear panel DM 500-C/T
|
|
|
Audio |
|
|
|
|
output |
|
|
|
|
Network interface |
|
Antenna |
|
|
||
|
Serial |
(digital) |
||
output |
|
interface |
|
|
|
|
|
||
|
|
|
|
|
|
|
|
|
|
|
|
|
|
|
Antenna |
|
|
|
|
|
|
|
|
|
|
|
|
|
Power supply |
|||
|
|
|
TV Scart |
|
||||
|
Audio |
|
|
|||||
input |
|
|
|
|
||||
|
|
|
|
output |
|
|
connector |
|
|
|
|
|
|
|
|||
|
Video |
|
(analog) |
|
|
|
||
|
|
|
|
|
||||
|
output |
|
|
|
|
|
|
|
|
|
|
|
|
|
|
||
|
|
|
|
|
|
|
|
|
Rear panel DM 500-S
|
|
|
|
Audio |
|
|
|
|
|
output |
|
LNB |
|
Serial |
|
|
|
|
|
Network interface |
|||
|
|
(digital) |
|||
output |
|
interface |
|
||
|
|
|
|
||
|
|
|
|
|
|
|
|
|
|
|
|
|
|
|
|
|
|
LNB |
Video |
Audio |
TV Scart |
Power supply |
input |
output |
output |
|
connector |
|
|
(analog) |
|
|
|
|
|
|
4

U s e r M a n u a l D r e a m b o x D M 5 0 0
english
3. |
E x p l a n a t i o n f r o n t p a n e l |
3.1Smartcard Reader
Insert your Dreamcrypt Smartcard with the golden chip facing down and forward into the Smartcard reader. Dreamcrypt is a registered trademark of Dream-Multimedia.
3.2Standby LED
The Standby LED lights up red if the Dreambox is in standby mode. It lights up green if the Dreambox is powered on.
3.3Remote Control (RC) Led
The remote control LED lights up every time the Dreambox receives a signal from the remote control.
3.4Standby on/off
The Standby on/off button toggles between standby mode and powered on mode.
4. |
E x p l a n a t i o n r e a r p a n e l |
4.1Antenna input (DM 500-C/T)
Connect your antenna cable here.
4.2Antenna output (DM 500-C/T)
You can optionally connect your TV or VCR here.
4.3LNB input (DM 500-S)
Connect the coaxial cable from your LNB here.
4.4LNB output (DM 500-S)
You can connect an analogue/digital receiver here. Remember to shutdown your Dreambox completely in order for the receiver to work.
4.5Video output (FBAS)
You can optionally connect your Dreambox to a TV using a RCA/Chinch cable. (Composite)
4.6Audio output - analog (Cinch)
Connect your Dreambox with a RCA/Cinch cable to your HiFi-Amplifier (e.g. AUX In or Tape In ports).
5

U s e r M a n u a l D r e a m b o x D M 5 0 0 |
english |
4.7Serial interface (RS232C, Sub-D, 9-pin)
The Serial Port is used to update the operating system. Please connect a serial null modem cable here.
4.8TV Scart
Connect your TV or beamer to your Dreambox using a Scart cable.
4.9Audio output - digital (Toslink)
You can connect your Dreambox with an optical (Toslink) cable to your HiFi-Amplifier or DSP. The AC3 signal is also available at this port in case the selected channel transmits Dolby Digital signals.
4.10Power supply connector
Plug the power cable of the power supply that came with your Dreambox into power outlet. Connect your power supply to your Dreambox. You must not connect the power plug of the power supply to anything other than a socket that supplies 230V/50Hz.
4.11Network interface (Ethernet 10/100Mbit, RJ45)
The Communication Port is an Ethernet port. It is used to communicate with your Dreambox via HTTP, FTP, NFS, Telnet and Samba. This port is also used to update the operating system of your Dreambox. Please use a regular patch cable to connect your Dreambox to your LAN.
6

U s e r M a n u a l D r e a m b o x D M 5 0 0 |
english |
5.S a f e t y I n s t r u c t i o n s
Please read the safety instructions completely and carefully, before using the Dreambox. The Manufacturer takes no responsibility for incorrect handling of the Dreambox.
-Allow enough space around the Dreambox for sufficient ventilation.
-Do not cover the Dreambox’s ventilation openings with items such as newspapers, tablecloths, curtains etc.
-Do not expose the Dreambox to dripping or splashing liquids.
-Do not place open flame sources, such as lit candles, on the Dreambox.
-Do not place any containers with liquid, such as vases, on the Dreambox.
-Do not connect or modify cables while the Dreambox is connected to the power.
-Do not remove the cover. Risk of electric shock!
-Do not put any metal things into the slots or ventilation openings.
-Please note that the only way to isolate the Dreambox completely from the main power supply is to unplug the main power cable!
WARNING!
Modifications and changes to the Dreambox lead to loss of warranty. We recommend the installation of a hard disk by your local dealer.
Unskilled installation of a hard disk leads to loss of warranty.
7

U s e r M a n u a l D r e a m b o x D M 5 0 0 |
english |
6.S h u t D o w n
-In case your Dreambox is in use for a longer period of time disconnect the power plug from the power outlet.
-During thunder storm the unit should also be physically disconnected from the power outlet.
7. |
A d d i t i o n a l s a f e t y i n s t r u c t i o n s |
|
|
- (Dis-)Connecting to a LNB: |
|
|
|
Turn the Dreambox off before you connect or disconnect a cable coming from a LNB. |
|
- Connecting to a TV: |
|
|
|
Before connecting or disconnecting your Dreambox to a TV please turn it off. |
|
- In case you notice any damage to the power cord or power plug immediately disconnect |
|
|
|
the unit from the power outlet. |
|
- In case the unit was exposed to humidity immediately disconnect the unit from the power |
|
|
|
outlet. |
|
- In case you notice any serious damage to the outer shell of the unit immediately |
|
|
|
disconnect the unit from the power outlet. |
|
- Do not expose the Dreambox to direct sunlight, lightning or rain. |
|
|
- |
Grounding: |
|
|
The LNB cable must be grounded. |
|
|
The grounding system must match SABS 061. |
|
- |
Cleaning: |
|
|
Disconnect the mains power cord before cleaning the cover. Use a slightly damp cloth |
|
|
without cleaning agents |
- Connect the Dreambox only to suitable sockets. Do not allow overloads to occur.
8

U s e r M a n u a l D r e a m b o x D M 5 0 0 |
english |
8.D i s p o s a l i n s t r u c t i o n s
The packaging of the Dreambox only consists of reusable materials. Please recycle if possible.
This symbol on the product or on its packaging indicates that this product must not be disposed of with your other household waste. Instead, it is your responsibility to dispose of your waste equipment by handing it over to a designated collection point for the recycling of waste electrical and electronic equipment. The separate collection and recycling of your waste equipment at the time of disposal will help to conserve natural resources and ensure that it is recycled in a manner that protects human health and the environment.
For more information about where you can drop off your waste equipment for recycling, please contact your local city office, your household waste disposal service or the shop where you purchased the product.
Please note that empty batteries and electric waste is not to be put into the regular garbage.
9

U s e r M a n u a l D r e a m b o x D M 5 0 0 |
english |
9. P a c k a g i n g c o n t e n t s
Please check the completeness of the box.
Included in box:
-1 Dreambox DM 500
-1 Power supply
-1 Power cord
-1 Remote control
-2 Batteries (1,5V Micro / AAA / LR6)
-1 User manual (latest release via Internet http://www.dream-multimedia-tv.de )
10.I n s t a l l a t i o n
-Insert 2 AA (1,5V) batteries, taking care to observe the + and - markings indicated inside, into the remote control.
-Before using the Dreambox, please read the safety instructions.
-Connect the LNB or antenna with a coaxial cable to LNB or Antenna In at your Dreambox.
-Connect the Dreambox with a Scart cable to your television screen.
-Plug in the power cable into a 230V/50Hz power socket.
-If you are using a switchable power socket please shutdown your Dreambox into deep standby before switching off the power socket.
-If you switch on your Dreambox for the first time, you will see the setup wizard. The setup wizard will guide you through the first time installation. You will be asked for your TV standard, the regional settings and your language. Please choose and follow the instructions on the screen.
-Please note that the video format meets the factory setting CVBS (FBAS).
10

U s e r M a n u a l D r e a m b o x D M 5 0 0
11.R e m o t e C o n t r o l
MUTE-Button
Numeric Keypad
Arrow-left-Button
INFO-Button
OK-Button
Volume-down-Button
AUDIO-Button
Channel-down-Button
TEXT–Button
TV-Button
english
Standby-Button
Arrow-right-Button
Channel-up-Button
MENU-Button
Volume-up-Button
EXIT-Button
HELP-Button
RADIO-Button
Options-Buttons
11
U s e r M a n u a l D r e a m b o x D M 5 0 0 |
english |
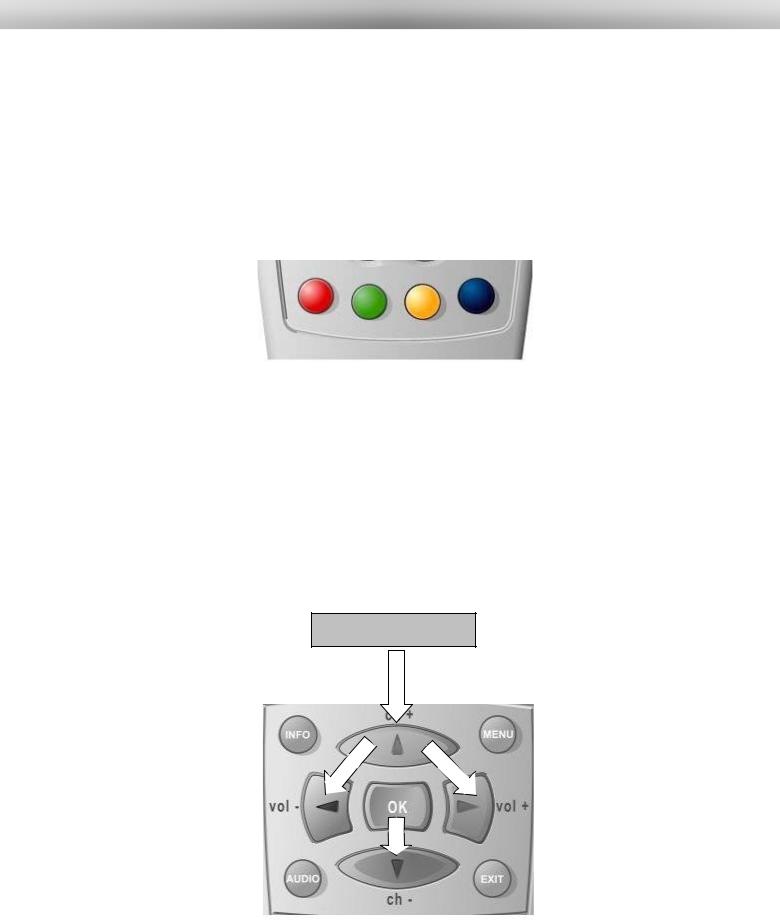
12.Important notes about operation
All functions of the Dreambox can be controlled via OSD-Menu (On-Screen-Display). This makes the handling of the Dreambox very easy for you. All options are indicated by four colored dots or beams (red, green, yellow, blue) in the OSD-Menu and can be started with the Option-Buttons on the Remote Control.
Depending on the chosen Menu, these options do change.
All Menus and Service lists are closed with the EXITButton.
During Menu and Channellist |
If you want to enter a |
navigation the following |
Menu press the |
buttons are used to navigate: |
OK-Button. |
Channel-up = up |
|
Channel-down = down |
|
Volume down = left |
|
Volume up = right |
|
Navigation-Buttons
12
U s e r M a n u a l D r e a m b o x D M 5 0 0 |
english |
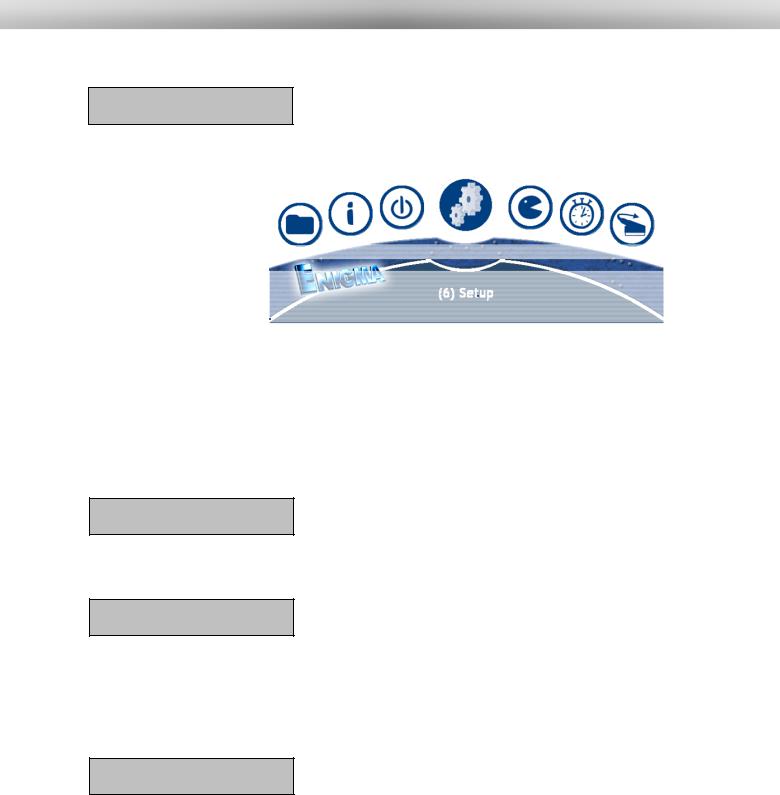
13.Remote Control Buttons
MENU-Button
If you are in TVor RADIO-Mode, pressing this button will bring up the OSD main menu. The OSD main menu has the following options:
-(1) TV Mode
-(2) Radio Mode
-(3) File Mode
-(4) Information
-(5) Shutdown
-(6) Setup
-(7) Games
-(8) Timer
You can switch to the needed option by pressing the Navigation-Buttons left or right. Also see: Important notes about operation.
The numbers in front of each option can be used to directly access the needed function by pressing the according number on the Numeric Keypad of your Remote control.
If you are in the service list, pressing the MENU-Button brings up the service menu. The shown options may vary depending on the service list you selected.
Standby-Button
The Standby-Button switches your Dreambox on and off.
Also see: Turning your Dreambox on / off.
Numeric Keypad
Enter a service number to directly access the option by using the Numeric Keypad. The service numbers are on the left side of the service list.
The Numeric Keypad can also be used to enter the page number in teletext mode, if you have pressed the TEXT-Button and activated the teletext decoder. The TV station has to submit teletext information; otherwise this feature cannot be used.
MUTE-Button
Pressing the MUTE-Button mutes the Volume. A crossed speaker symbol will appear on the TV screen. Pressing it again or pressing one of the Volume-up or down-Buttons brings back the audio.
13

U s e r M a n u a l D r e a m b o x D M 5 0 0
english
Arrow-left-Button Arrow-right-Button
These Buttons enable to jump back or forwards through the Playlist. The Playlist contains the last chosen services, which have been selected.
Once having opened the service list, you are able to jump at the Beginning or the End of the Servicelist or to the next Marker.
INFO-Button
If no OSD menu is visible on the screen and you are in TV or RADIO-Mode, pressing the INFO-Button will reveal the Infobar. Pressing it again while the Infobar still is visible will bring up the EPG information of the chosen station as long as it available.
OK-Button
By pressing the OK-Button you confirm a selection in the menu or service list navigation.
If no OSD menu is present on your screen, the service list is shown once you press the OKButton.
Channel-up-Button
Pressing the Channel-up-Button takes you to the next station in your selected service list. If the menu or service list is visible this button will move the cursor up.
Channel-up-Button
Pressing the Channel-down-Button takes you to the previous station in your selected service list. If the menu or service list is visible this button will move the cursor down.
Volume-up-Button
Pressing the Volume-up-Button will turn up the volume. If the menu or service list is visible this button will move the cursor to the right.
Volume-down-Button
Pressing the Volume-down-Button will lower the volume. If the menu or service list is visible this button will move the cursor to the left.
AUDIO-Button
By pressing the AUDIO-Button you can choose the different audio tracks offered by the station. Different audio tracks are indicated by the yellow dot in the Infobar.
EXIT-Button
You can leave all menus and service lists by pressing the EXIT-Button.
14
U s e r M a n u a l D r e a m b o x D M 5 0 0
english
TEXT-Button
The TEXT-Button activates the Teletext (TuxTxt). If you are in the stations list, pressing this button will directly take you to the FILE-Mode.
TV-Button
Pressing the TV-Button activates the TV-Mode.
RADIO-Button
Pressing the RADIO-Button activates the RADIO-Mode.
HELP-Button
Pressing the HELP-Button activates the Help menu.
Options-Buttons
All possible options are shown by the four colored dots/blocks (red, green, yellow, blue) and can be activated by the Options-Buttons.
Depending on the menu you currently are in the options will change and will be named differently.
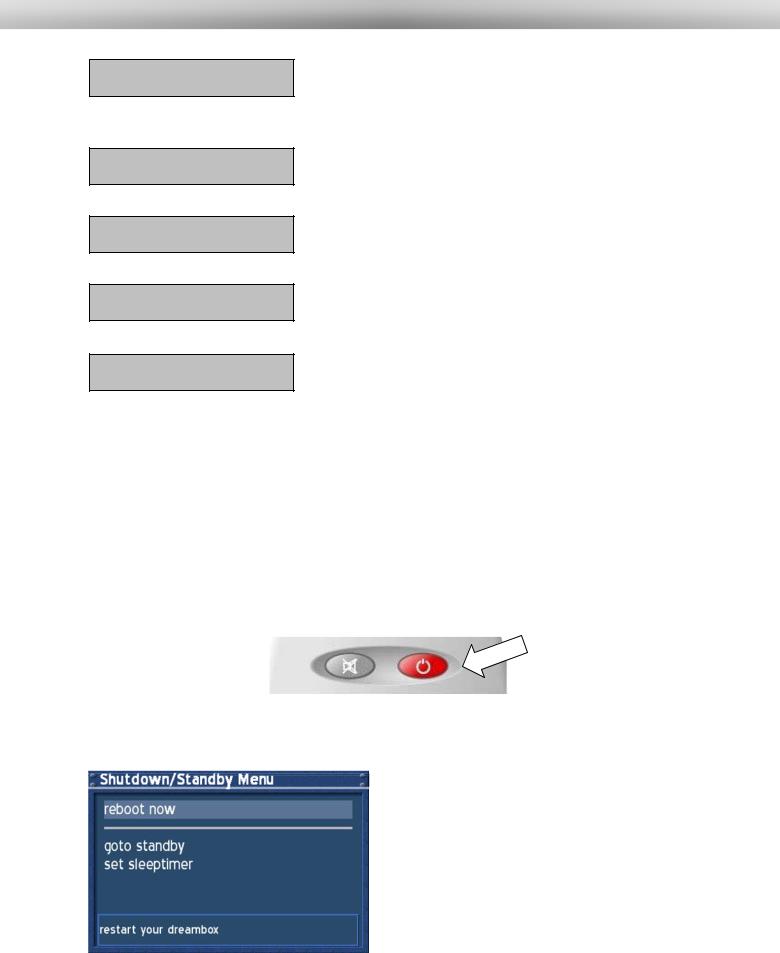
14.Turning your Dreambox on and off
Use the Standby-Button to turn your Dreambox on and off.
To put your Dreambox into Standby-Mode either press the Standby-Button on your remote control or on your Dreambox.
Holding down the Standby-Button on your remote control for three seconds will show the Shutdown / Standby menu.
This is the Shutdown / Standby menu. Navigate to the desired option and confirm by pressing the OK-Button.
Reboot now:
Your Dreambox will be rebooted.
Goto standby:
Your Dreambox goes into standby mode.
Set sleeptimer:
You can find an explanation in the section
Sleeptimer.
15
U s e r M a n u a l D r e a m b o x D M 5 0 0 |
english |
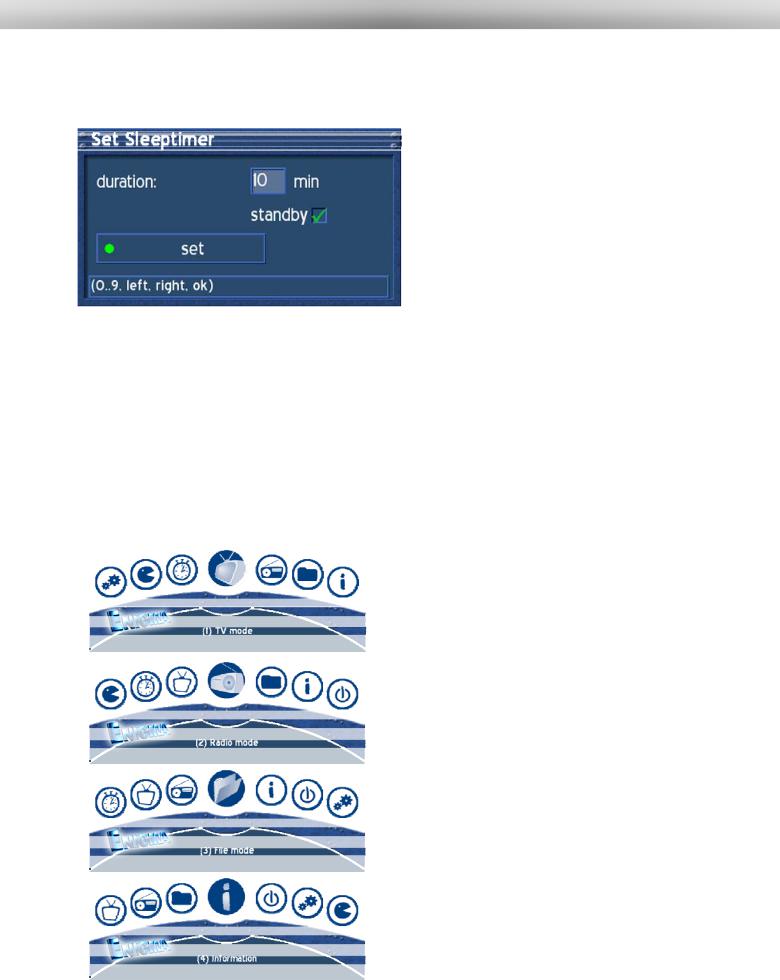
15.Sleeptimer
Press the Power-Button for at least 3 seconds, select "set sleeptimer" to access this menu.
This is he sleeptimer menu.
Define a maximum duration of 240 minutes. Define if the Dreambox should shutdown or should go into standby mode by setting a check into one of the checkboxes beside shutdown and standby using the OK-Button.
Either press the green Options-Button or the
OK-Button to accept the setting.
16.Main OSD menu
If no OSD menu is shown on your screen you can access the main OSD menu by pressing the Menu-Button on your remote control.
Through the main OSD menu you can access the submenus and functions of your Dreambox. Please use the Navigation-Buttons left and right or up and down, depending on you main OSD menu’s view, to access the desired functions and submenus. Use the OKButton to activate your selection.
As an alternative you can directly access the submenu or function by pressing the corresponding number in your remote control’s Numeric Keypad.
Selecting this symbol activates the TV mode.
Selecting this symbol activates the Radio mode.
Selecting this symbol activates the file mode.
Selecting this symbol takes you to the Info menu. The Info menu supplies you with additional information about the station, signal strength and software version of you Dreambox.
16

U s e r M a n u a l D r e a m b o x D M 5 0 0 |
english |
Selecting this symbol takes you to the shutdown menu. Selecting the option ‚Shutdown now’ will turn you Dreambox off. Pressing the Power-Button on your remote control will turn your Dreambox on again.
Selecting this symbol takes you to the setup menu. You can change all your Dreambox’s settings in the setup menu.
Selecting this symbol takes you to the games.
Selecting this symbol takes you to the Timer menu. All set timers can be viewed, changed and deleted here.
Through the menu options
(5)Setup ->
(3)System ->
(6)OSD Settings ->
You can choose to view the main OSD menu as a regular menu.
See section OSD Settings.
17
U s e r M a n u a l D r e a m b o x D M 5 0 0 |
english |
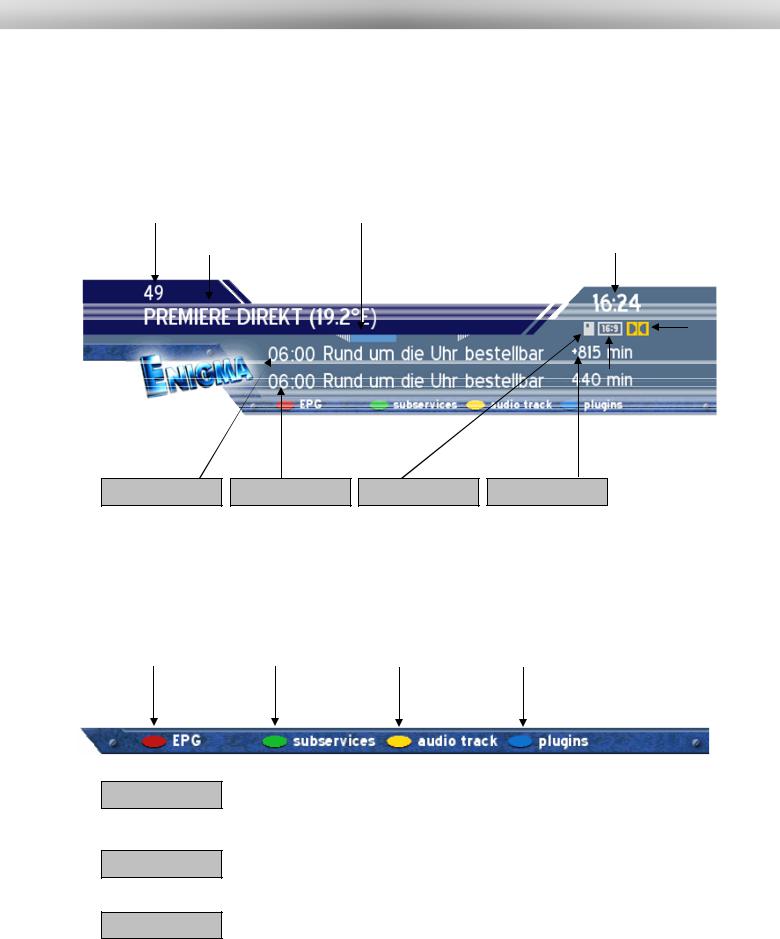
17.Infobar
The Infobar appears and disappears by pressing the OK-Button once, if no OSD menu is shown on your screen. The Infobar shows all necessary Information about the selected service.
Channel number |
|
Channel name |
|
Elapsed time |
|
Current time |
|
|
|
Dolby Digital |
|||||
|
|
|
|
|
|
|
|
|
|
|
|
|
|
|
|
|
|
|
|
|
|
|
|
|
|
|
|
|
|
|
|
|
|
|
|
|
|
|
|
|
|
|
|
|
|
|
|
|
|
|
|
|
|
|
|
|
|
|
|
|
|
|
|
|
|
|
|
|
|
|
|
|
|
|
|
|
|
|
|
|
|
|
|
|
|
|
|
|
|
|
|
|
|
|
|
Current show |
Next show |
Encrypted |
Remainig time |
Aspect ratio |
|
|
|
|
|
EPG avialable |
|
Sub services |
|
Audio tracks |
|
Teletext / Plugins |
|
|
|
|
|
|
|
Encrypted
Apect ratio
Dolby Digital
Is highlighted yellow as soon as a show is broadcasted encrypted.
Is highlighted yellow as soon as a show is broadcasted in 16:9 aspect ratio.
Is highlighted yellow as soon as a show is broadcasted in Dolby Digital.
18
U s e r M a n u a l D r e a m b o x D M 5 0 0 |
english |
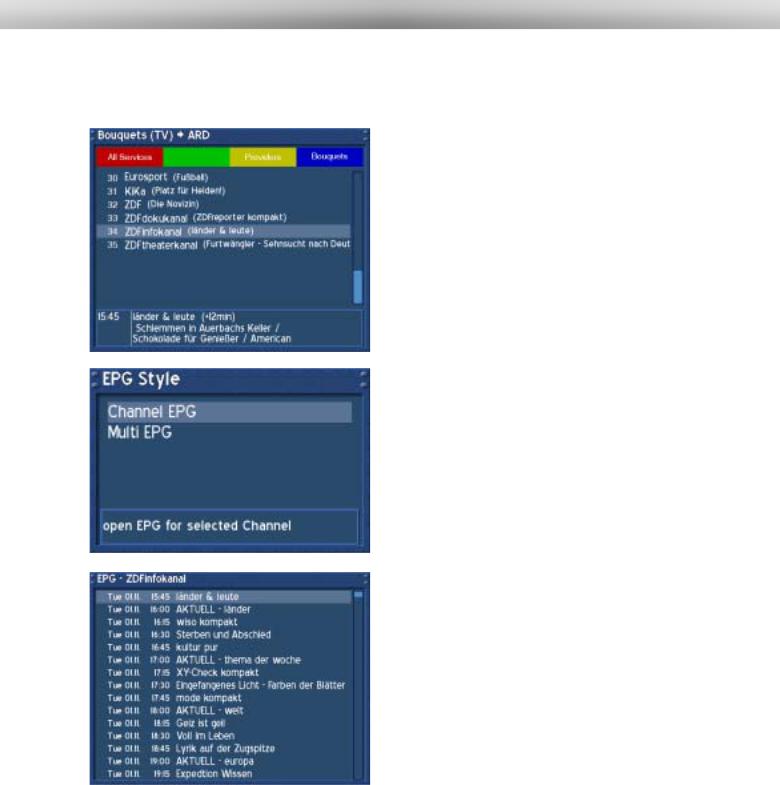
17.1Infobar - EPG (Electronic Program Guide)
The red dot in the Infobar appears if the selected station transmits EPG information.
If no OSD menu is visible on your screen and you are in TV mode press the TV-Button to access the service list.
Press the Info-Button to get to the selection of the
EPG style.
Or you can press the red Options-Button to directly access the EPG of the station without having to go through the service list.
Select „Channel EPG“ and press the OK-Button to activate it.
Use the Navigation-Buttons to navigate to the desired event and press the OK-Button to view additional information.
Pressing the EXIT-Button will quit the EPG.
The Options-Buttons are mapped differently in this view, press the Help-Button to see an explanation.
19
U s e r M a n u a l D r e a m b o x D M 5 0 0 |
english |
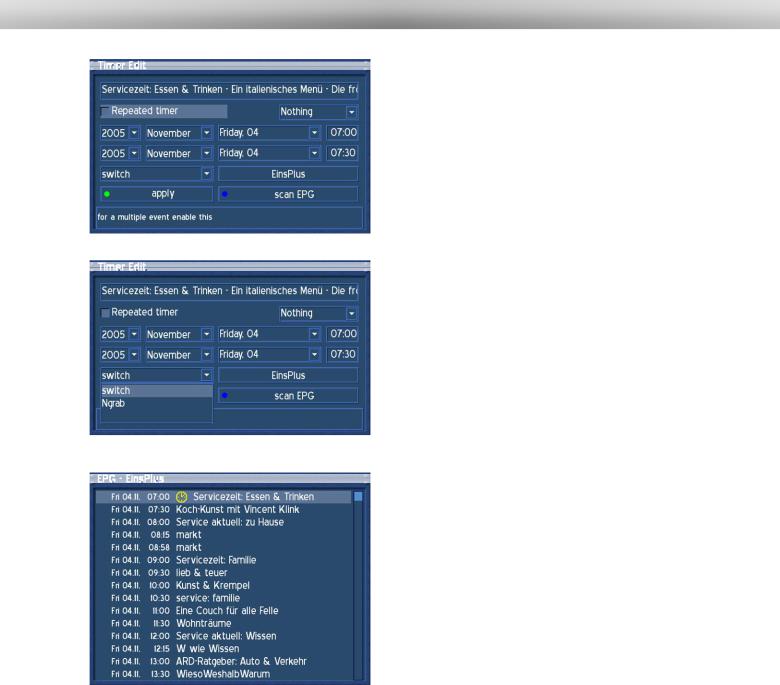
Pressing the green Options-Button will show the “Timer Edit” menu. Use the Navigation-Buttons to reach the desired option and use the OK-Button to open up the drop down menus.
Change the setting to fit your needs.
The drop down menu „Switch“ offers the same options that you can directly access from the EPG using the colored Options-Buttons.
„Switch“ will switch to the desired service. „NGrab“ will record via LAN.
Press the green Options-Button to save your settings.
After saving you timer event you will be taken back to the EPG.
The set timers will be symbolized with a red clock symbol for NGrab Timers and a yellow clock symbol for Switch Timers.
20
U s e r M a n u a l D r e a m b o x D M 5 0 0 |
english |
Press the numbers 1-6 to adjust the number of hours shown on the screen. The red line marks the current time.
If you selected Multi-EPG when you were asked for the EPG style you will see this view.
Use the Navigation-Buttons to navigate to the desired event. The current selection is highlighted gray. Pressing the Info-Button once will show additional information. Pressing the Info-Button again will return you to the Multi-EPG screen.
Pressing the OK-Button in Multi-EPG mode will directly switch to the selected service.
The Options-Buttons are mapped differently in this view, press the Help-Button to see an explanation.
Pressing the EXIT-Button will quit the EPG.
17.2Infobar – Sub services
The green dot in the Infobar appears if the selected station transmits sub services.
You can quit the Quickzap-Mode by either reentering this menu and pressing the green Options-Button again or by accessing the service list and selecting a new service by pressing the Navigation-Button up or down.
Pressing the green Options-Button in TV or Radio mode will reveal the sub services menu.
Use the Navigation-Buttons up and down to move to one of the sub services. Press the OK-Button to select.
If you chose the option “Enable quickzap” (green Options-Button), you will stay in the sub services and can jump between the sub services by pressing the Navigation-Buttons left and right.
The option „Add to Bouquet“ (yellow OptionsButton) will add the selected service to a newly created or already existing Bouquet of your choice. See section Managing Services.
21
U s e r M a n u a l D r e a m b o x D M 5 0 0 |
english |
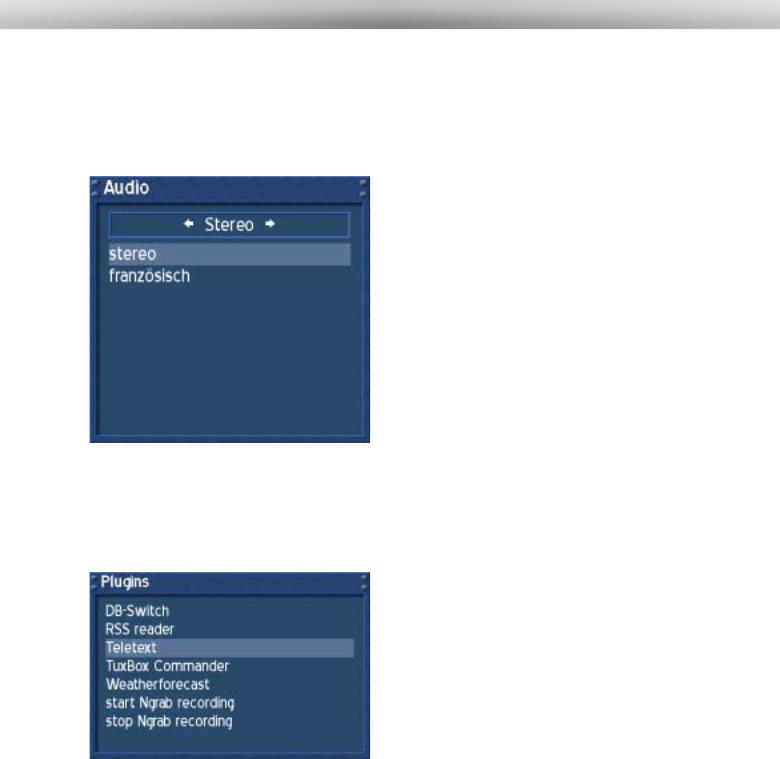
17.3Infobar – Audio tracks
The yellow dot in the Infobar appears if the selected station transmits multiple Audio tracks.
Pressing the yellow Options-Button in TV or Radio mode will reveal the audio menu of the service.
Use the Navigation-Buttons up and down to move to desired audio track. Press the OK-Button to select.
The contents of this menu will vary from service to service.
Move to the option “Stereo”. Use the NavigationButtons left or right to choose the different audio modes, Left-Mono, Stereo, Right-Mono. Press the
OK-Button to select.
.
17.4Infobar - Plugins
The blue dot in the info bar is always visible.
Pressing the blue Options-Button in TV or Radio mode will reveal the Plugins menu.
The option Teletext - Software Decoder“ will open the service’s teletext.
See section Teletext (TuxText).
The options „Start/Stop NGrab recording“ are still in development and therefore will not be explained in detail.
22
U s e r M a n u a l D r e a m b o x D M 5 0 0 |
english |
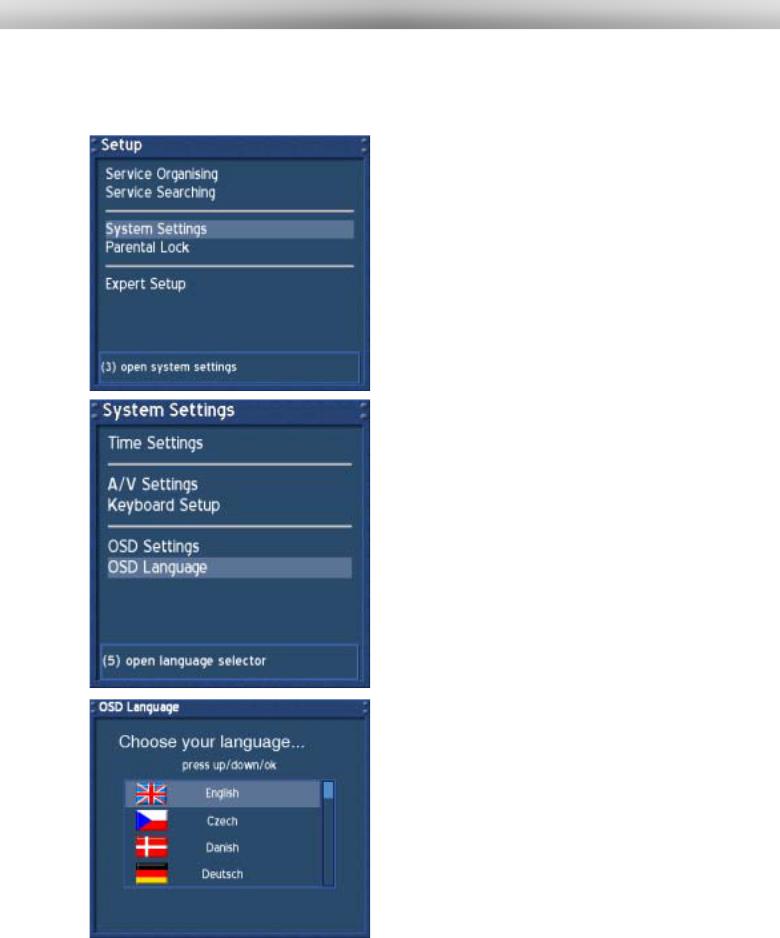
18.Setting OSD language
If no OSD menu is visible on your screen, press the Menu-Button to open the main OSD menu. Navigate to the option “Setup” and press the OK-Button to select.
Navigate to the option “System Settings” and press the OK-Button.
The “System Settings” menu will open up.
Navigate to the option “OSD Language” and press the OK-Button.
The “OSD Language” menu will open up.
Select your desired and language with the
Navigation-Buttons up and down. Press the OK-
Button to activate.
The Exit-Button will quit this menu.
.
23
U s e r M a n u a l D r e a m b o x D M 5 0 0 |
english |
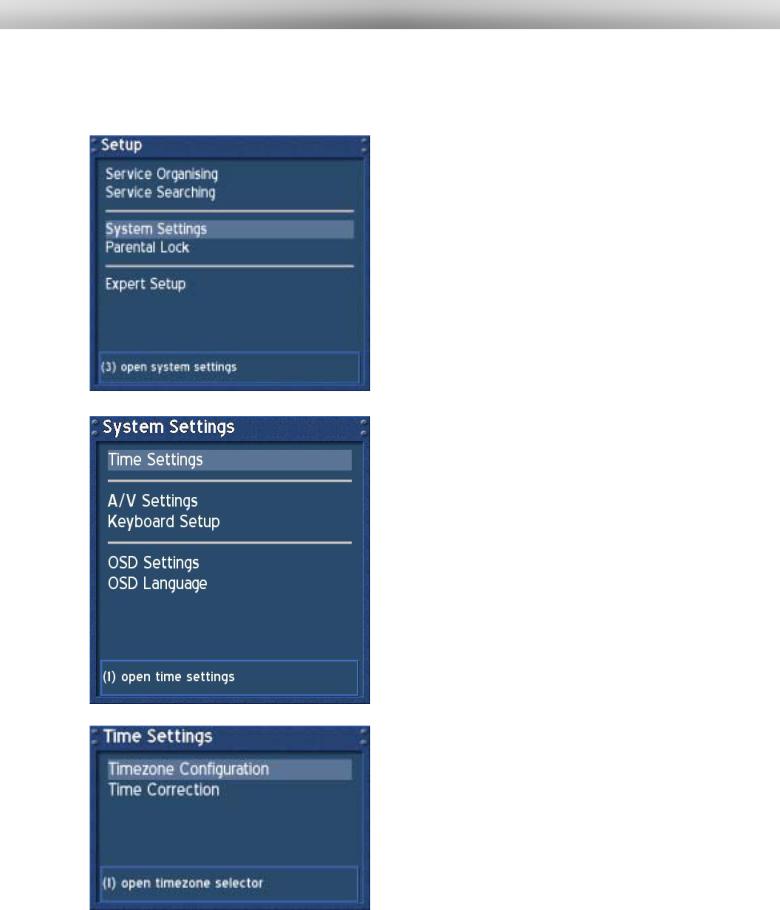
19.Setting the time zone
If no OSD menu is visible on your screen, press the Menu-Button to open the main OSD menu. Navigate to the option “Setup” and press the OK-Button to select.
Navigate to the option “System Settings” and press the OK-Button.
The “System Settings” menu will open up.
Navigate to the option “Time” and press the OK-
Button.
The “Time Settings” menu will open up.
You can either set your time zone or manually adjust the time of you Dreambox in this menu.
Navigate to the option “Time Zone Setup” and press the OK-Button.
24
U s e r M a n u a l D r e a m b o x D M 5 0 0 |
english |
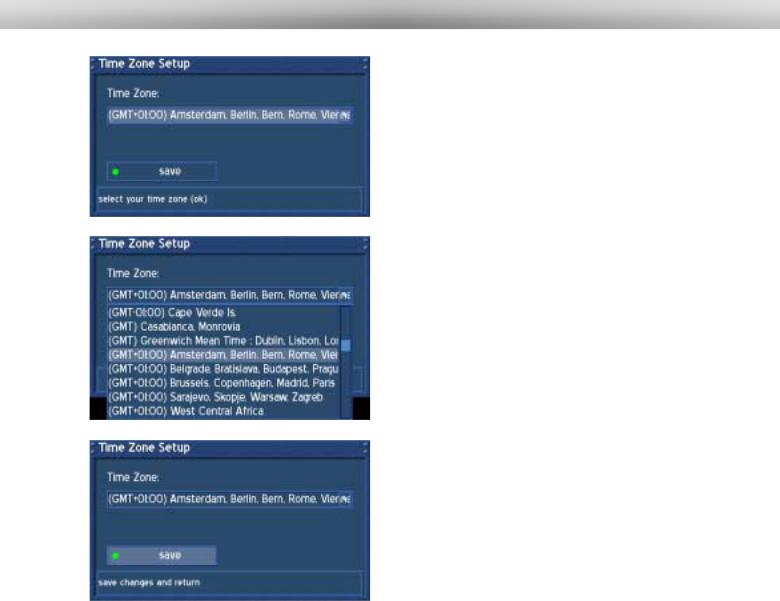
The “Time Zone Setup” menu will open up.
Press the OK-Button to get open the list of time zones.
.
Select your desired and time zone with the
Navigation-Buttons up and down. Press the OKButton to activate.
The time zone list will disappear and you current selection is shown as seen in the picture above.
Navigate to the option “save” and press the OKButton to save your settings. Optionally you can press the green Options-Button to save.
You are taken back to the “Time” menu.
25
U s e r M a n u a l D r e a m b o x D M 5 0 0 |
english |
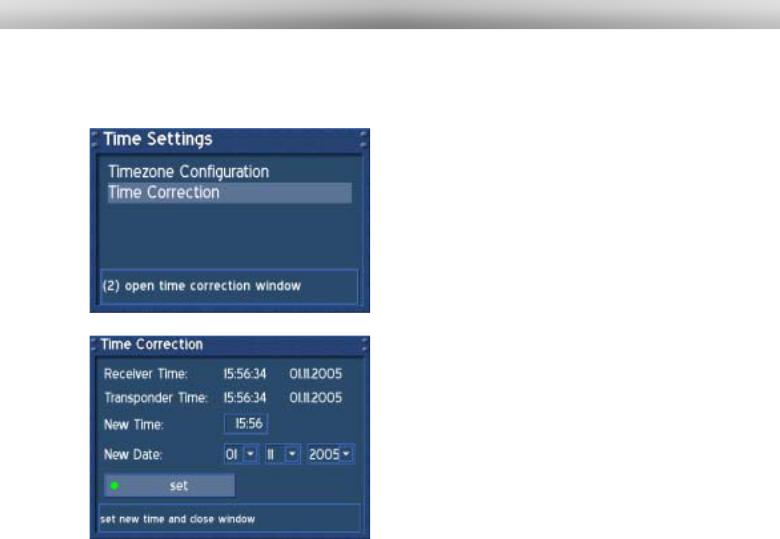
19.1Manual time correction
Please read the section Setting the time zone to learn how to get into this menu.
Navigate to the option “Time Correction” and press the OK-Button.
When entering this menu, please wait a second. The Dreambox tries to receive the current time. The Transponder Time and Date will be automatically updated. If this fails, enter the new time and date manually.
Navigate to the option “set” and press the OKButton to save your settings. Optionally you can press the green Options-Button to save.
You are taken back to the “Time Settings” menu.
Pressing the Exit-Button will leave this menu.
26
U s e r M a n u a l D r e a m b o x D M 5 0 0 |
english |
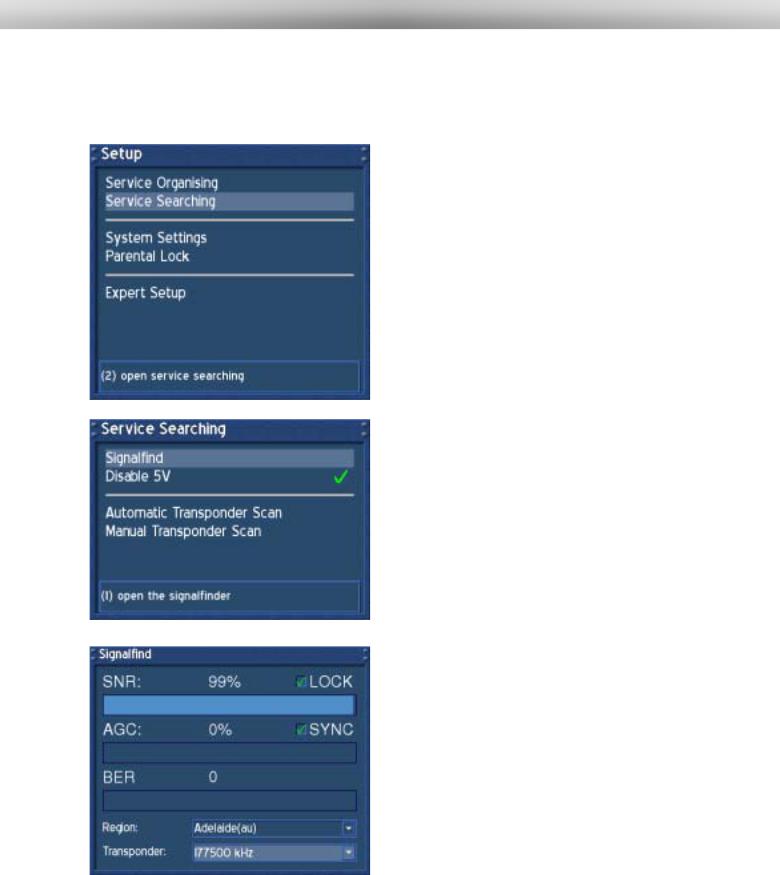
20.Signal strength (Adjusting your antenna, DM 500-T)
If no OSD menu is visible on your screen, press the Menu-Button to open the main OSD menu. Navigate to the option “Setup” and press the OK-Button to select.
Navigate to the option “Service Searching” and press the OK-Button.
Navigate to the option “Signalfind” and press the
OK-Button.
Press the OK-Button to select a transponder.
Choose the region where you live in from the drop down menu „Region“ and press the OK-Button.
Move your antenna around a bit and keep an eye on the SNR and SGC values. The higher they are the better the reception is.
Pressing the Exit-Button will leave this menu.
27
U s e r M a n u a l D r e a m b o x D M 5 0 0 |
english |
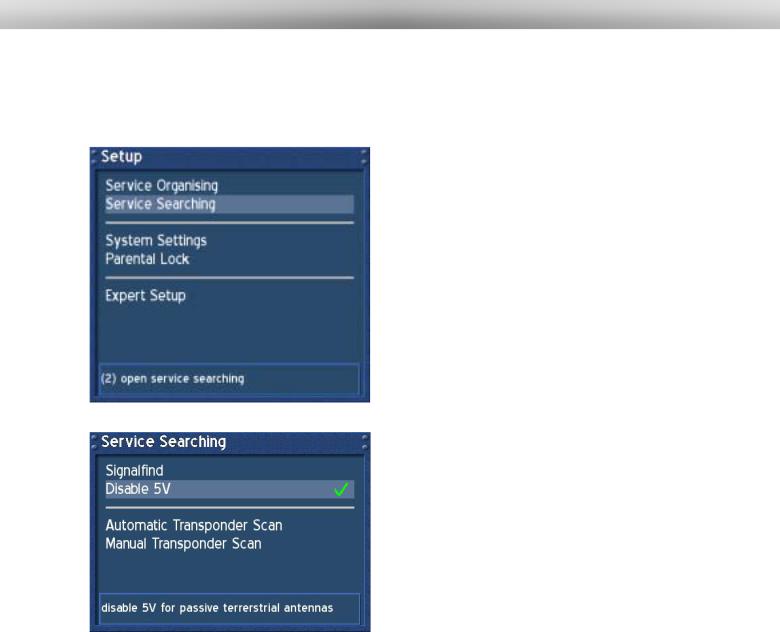
20.1Disable 5V (DM 500-T)
If no OSD menu is visible on your screen, press the Menu-Button to open the main OSD menu. Navigate to the option “Setup” and press the OK-Button to select.
Navigate to the option “Service Searching” and press the OK-Button.
Navigate to the option “Disable 5V”.
Press the OK-Button to set a check behind this option if you use a passive antenna.
If you connected an active antenna and want to use it without its power supply, press the OK-Button to remove the check behind this option.
28
U s e r M a n u a l D r e a m b o x D M 5 0 0 |
english |
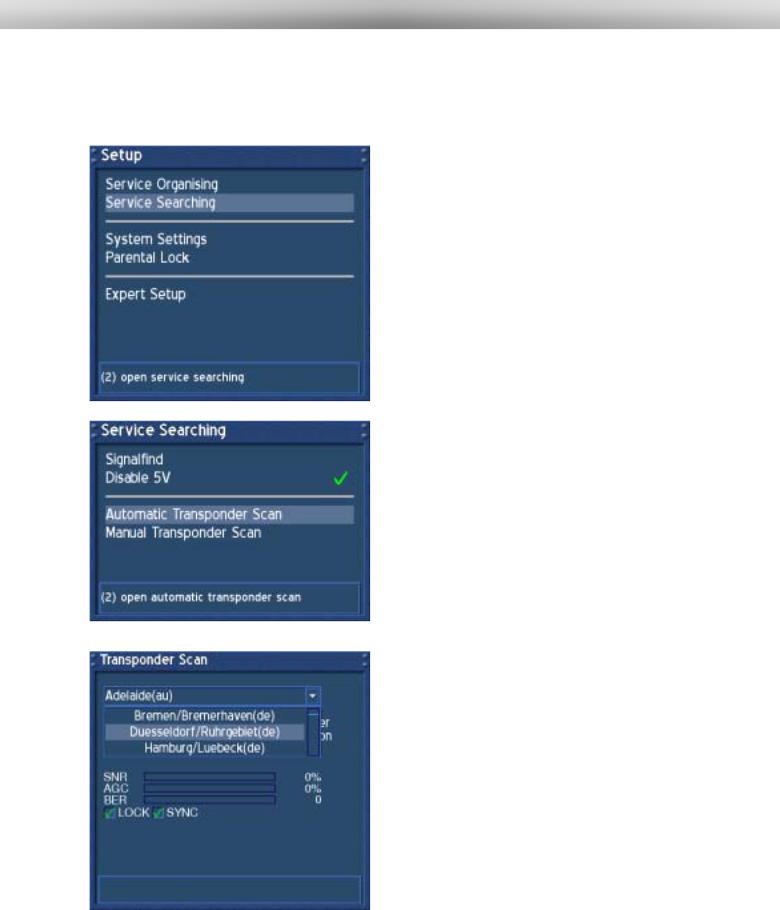
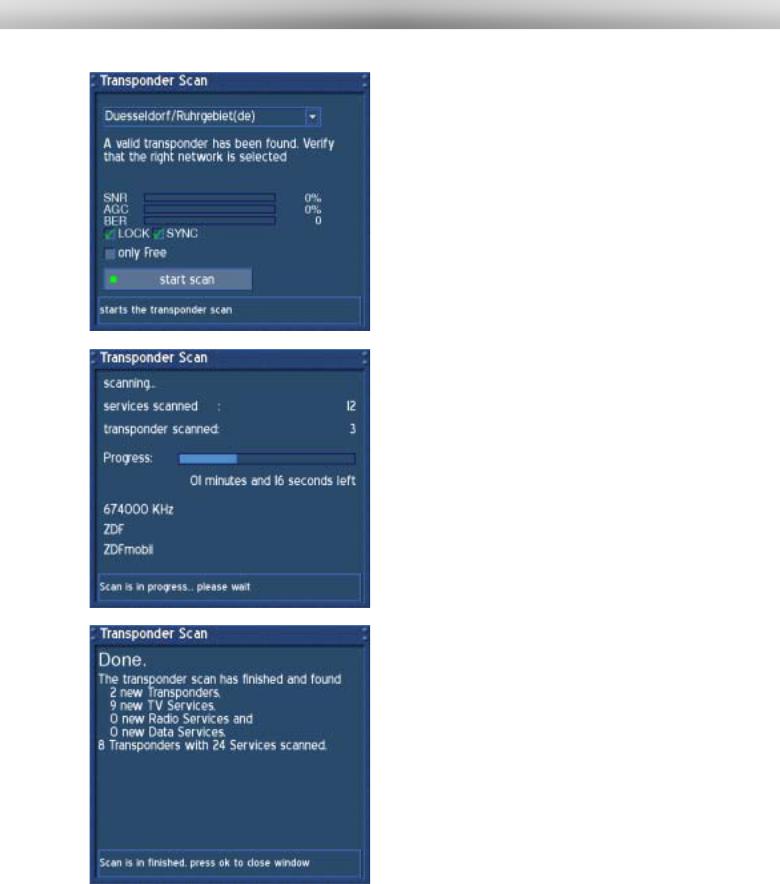
20.2Automatic transponder scan (DM 500-T)
If no OSD menu is visible on your screen, press the Menu-Button to open the main OSD menu. Navigate to the option “Setup” and press the OK-Button to select.
Navigate to the option “Service Searching” and press the OK-Button.
Navigate to the option “Automatic Transponder
Scan” and press the OK-Button.
Select the region you live in the drop down menu and press the OK-Button.
29
U s e r M a n u a l D r e a m b o x D M 5 0 0 |
english |
You now should see that a valid transponder has been found and the checkboxes in front of “LOCK” and “SYNC” should be checked.
SNR:
Signal to Noise Ratio
AGC:
Automatic Gain Control
BER:
Bit Error Rate (should be equals 0 if possible)
only Free:
If you check the checkbox in front of the “only Free” option, your Dreambox will search on for FTA (nonencrypted) services.
Press the green Options-Button to start searching.
After you started searching you will see the progress bar and the estimated remaining time.
Please wait until your Dreambox finished searching for services.
You can always abort the searching by pressing the Exit-Button several times.
Once your Dreambox is done searching you will see this menu on the right. A brief summary of the search is shown.
Press the OK-Button to close this menu.
30
Loading...