

Doyon FC-16-2, FC16 Installation Manual
ÉQUIPEMENT DOYON INC.
1255, rue Principale
Linière, Qc, Canada G0M 1J0
Tel.: 1 (418) 685-3431
Canada: 1 (800) 463-1636
US: 1 (800) 463-4273
FAX: 1 (418) 685-3948
Internet: http://www.doyon.qc.ca
e-mail: doyon@doyon.qc.ca
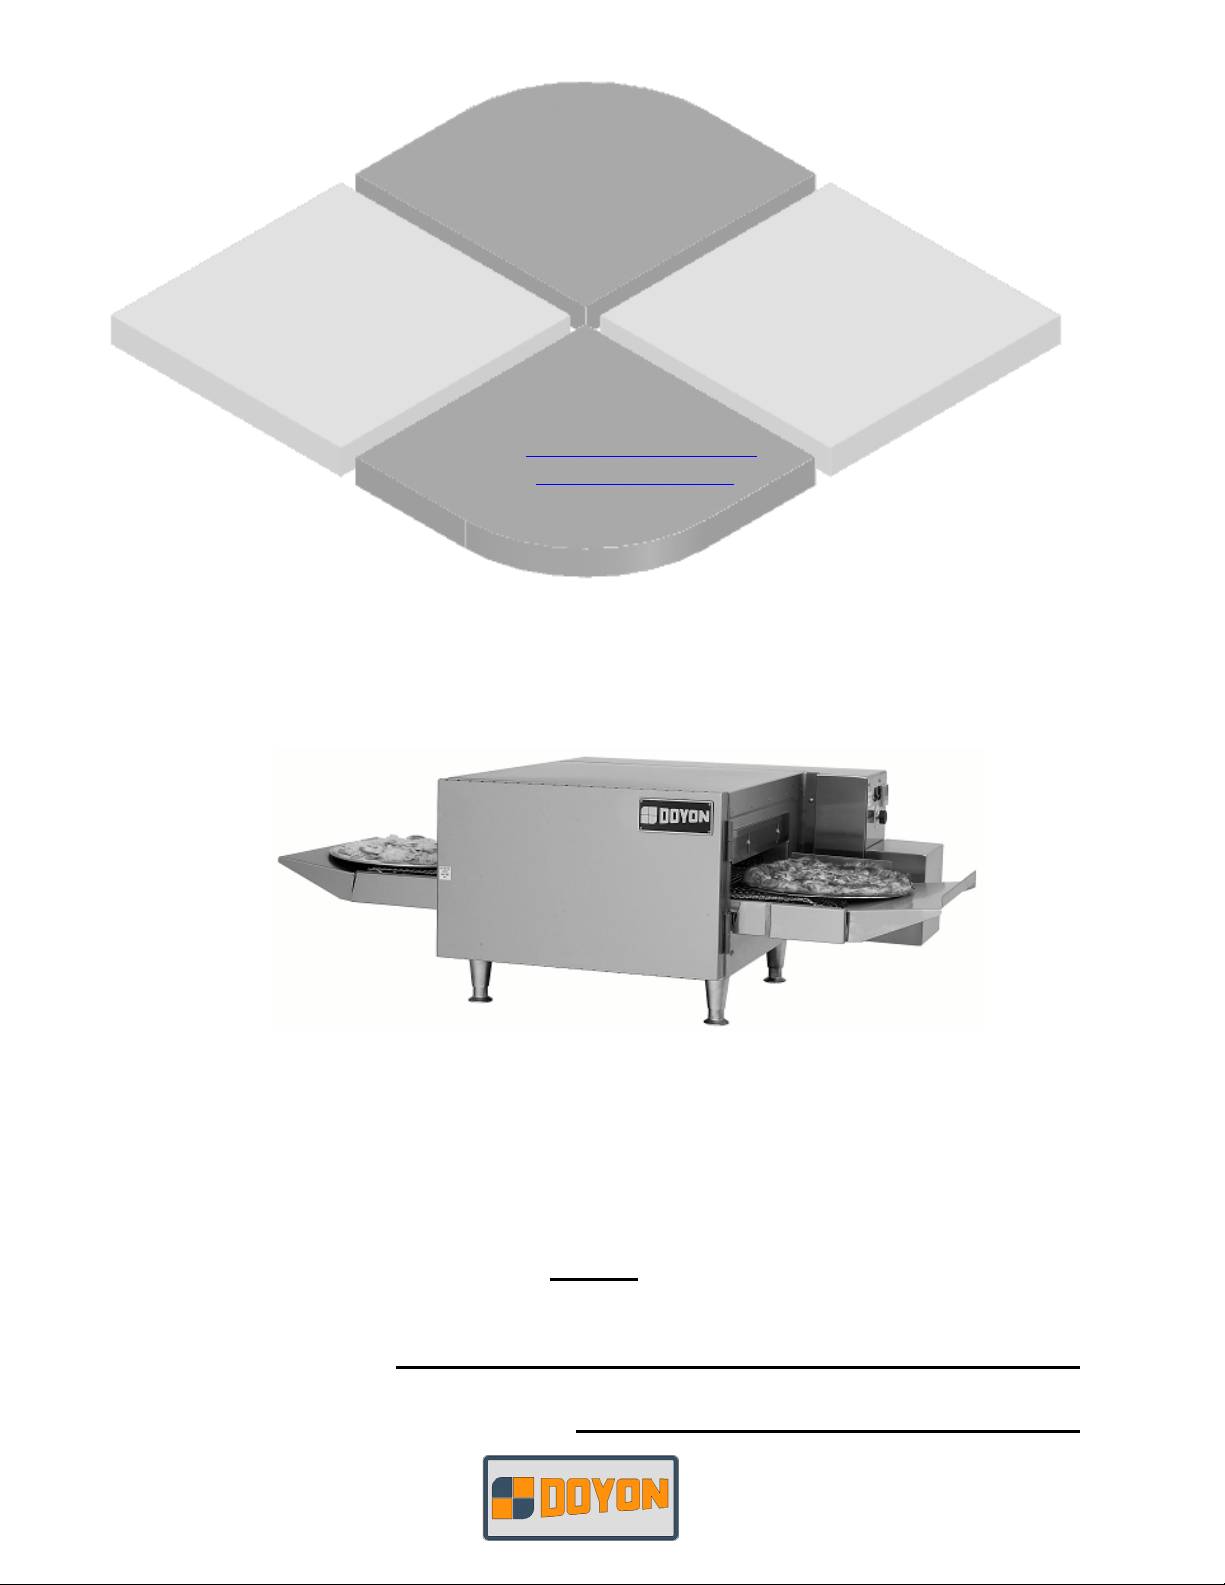
FC16
Product / Produit:
Serial number / Numéro de série:

IMPORTANT SAFETY INSTRUCTIONS
SAVE THESE INSTRUCTIONS
DANGER
TO REDUCE THE RISK OF FIRE OR ELECTRIC SHOCK
CAREFULLY FOLLOW THESE INSTRUCTIONS
TABLE OF CONTENTS
(table des matières :page suivante)
DESCRIPTION________________________________________________________________ A-1
Introduction________________________________________________________________ A-1
Construction _______________________________________________________________ A-1
Shipping __________________________________________________________________ A-1
Installation warnings_________________________________________________________ A-3
Distances to respect__________________________________________________________ A-3
Installation ________________________________________________________________ A-5
Operation/Instructions of the oven ______________________________________________ A-7
Cooking time and temperature recommendation ___________________________________ A-9
Remove the conveyor and clean the oven________________________________________ A-11
Remove the belt ___________________________________________________________ A-13
Troubleshooting ___________________________________________________________ A-19
Air adjustment – Top diffuser_________________________________________________ A-21
Air adjustment – Bottom diffuser ______________________________________________ A-22
COMPONENT PARTS __________________________________________________________B-1
FC16 - Side view ____________________________________________________________B-1
FC16 - Back view ____________________________________________________________B-3
CONTROL PANELS ____________________________________________________________C-1
1PH 208-240V 50HZ _________________________________________________________C-1
FC16 [LIVRET].DOC 09/09

IMPORTANT INSTRUCTIONS DE SÉCURITÉ
CONSERVEZ CE MANUEL D’INSTRUCTIONS
DANGER
AFIN DE RÉDUIRE LES RISQUES D'INCENDIE OU D'ÉLECTROCUTION
SUIVRE CES INSTRUCTIONS AVEC SOIN
TABLE DES MATIÈRES
DESCRIPTION _________________________________________________________________A-2
Introduction ________________________________________________________________A-2
Construction ________________________________________________________________A-2
Expédition __________________________________________________________________A-2
Avertissement lors de l'installation_______________________________________________A-4
Distances à respecter _________________________________________________________A-4
Installation _________________________________________________________________A-6
Opération/Instruction du four___________________________________________________A-8
Température et temps de cuisson recommandé ____________________________________A-10
Enlever le convoyeur et nettoyer le four__________________________________________A-12
Démontage de la chaîne ______________________________________________________A-16
Dépannage ________________________________________________________________A-20
Ajustement d’air – Diffuseur du haut ____________________________________________A-21
Ajustement d’air – Diffuseur du bas_____________________________________________A-22
PIÈCES COMPOSANTE _________________________________________________________B-1
FC16 - Vue de côté ___________________________________________________________B-1
FC16 - Vue arrière ___________________________________________________________B-3
PANNEAUX DE CONTRÔLE _____________________________________________________C-1
1PH 208-240V 50hz __________________________________________________________C-1
A-1
SECTION A:
DESCRIPTION
INTRODUCTION
The manufacturer suggests to read this manual carefully.
This equipment is manufactured with first quality material by experienced technicians. Proper
installation and maintenance will guarantee a reliable service for years to come.
A nameplate fixed to the front or right side of the oven specifies the model number, serial number,
voltage and amperage.
Drawings and replacement parts numbers are included in this manual. The electrical diagram is affixed
in the control panel at the back of the oven.
ATTENTION
DOYON is not responsible for damages to the property or the equipment caused
by personnel who is not certified by known organisations. The customer is
responsible for finding qualified technicians in electricity and plumbing for the
installation of the oven.
CONSTRUCTION
You just bought the most advanced oven in the world, "DOYON" technology at it’s best. This oven is
manufactured using the highest quality components and material.
The oven gives a perfect uniform baking with its unique Jet Air convection system. The DOYON oven
is designed with parts that are easy to find.
SHIPPING
For your safety, this equipment has been verified by qualified technicians and carefully crated before
shipment. The freight company assumes full responsibility concerning the delivery in good condition of
the equipment in accepting to transport it.
IMPORTANT
RECEPTION OF THE MERCHANDISE
Take care to verify that the received equipment is not damaged before signing the delivery receipt. If a
damage or a lost part is noticed, write it clearly on the receipt. If it is noticed after the carrier has left,
contact immediately the freight company in order that they do their inspection.
We do not assume the responsibility for damages or losses that may occur during transportation.
A-2
DESCRIPTION
INTRODUCTION
Le fabricant suggère de lire attentivement ce manuel et de suivre avec soin les instructions fournies.
Votre équipement est fabriqué avec des matériaux de première qualité par des techniciens
d'expérience. Une utilisation normale et un entretien adéquat de l'équipement vous assureront
plusieurs années de bon service.
Une plaque signalétique, située sur le coin avant droit ou le côté droit du four, mentionne le numéro
de modèle, le numéro de série, la tension et l'ampérage.
Les dessins et les numéros de pièces de rechange sont inclus dans ce manuel. Le plan électrique est
affiché dans la boîte de contrôle à l'arrière du four.
ATTENTION
Équipement Doyon Inc. ne peut être tenu responsable pour les dommages causés à
la propriété ou à l'équipement par du personnel non certifié par des organismes
accrédités. Le client a la responsabilité de retenir les services d'un technicien
spécialisé en électricité et d'un plombier qualifié pour l'installation du four.
CONSTRUCTION
Vous avez maintenant en votre possession le four le plus performant présentement disponible sur le
marché, un four utilisant la technologie "DOYON" à son meilleur. Ce four est fabriqué avec des
matériaux de première qualité.
Avec son système unique de convection «Jet Air», ce four vous permettra d'obtenir une cuisson
uniforme. Le four Doyon est fabriqué avec des matériaux et pièces composantes facilement disponibles
sur le marché.
EXPÉDITION
Pour votre protection, cet équipement a été vérifié et emballé avec précaution par des techniciens
qualifiés avant son expédition. La compagnie de transport assume la pleine responsabilité
concernant la livraison de cet équipement en bon état en acceptant de le transporter.
IMPORTANT
RÉCEPTION DE LA MARCHANDISE
Avant de signer le reçu de livraison, prenez soin de vérifier dès la réception si l'équipement n'est pas
endommagé. Si un dommage ou une perte est détecté, écrivez-le clairement sur le reçu de livraison
ou votre bon de transport et faites signer le livreur. Si le dommage est remarqué après le départ du
transporteur, contactez immédiatement la compagnie de transport afin de leur permettre de
constater les dommages causés.
Nous ne pouvons assumer la responsabilité pour les dommages ou les pertes qui pourraient survenir
pendant le transport.
A-3
INSTALLATION WARNINGS
POWER FAILURE WARNING
WHEN YOU HAVE A POWER FAILURE, SHUT OFF THE OVEN POWER SWITCH TO
PROTECT THE ELECTRONIC COMPONENTS WHEN THE POWER COMES BACK.
FOR YOUR SAFETY
DO NOT STORE OR USE GASOLINE OR OTHER FLAMMABLE VAPORS
AND LIQUIDS IN THE VICINITY OF THIS OR ANY APPLIANCE.
INSTALLATION AND SERVICE
WARNING
IMPROPER INSTALLATION, ADJUSTMENT, ALTERATION, SERVICE OR
MAINTENANCE CAN CAUSE PROPERTY DAMAGE, INJURY OR DEATH.
READ THE INSTALLATION, OPERATING AND MAINTENANCE INSTRUCTIONS
THOROUGHLY BEFORE INSTALLING OR SERVICING THIS EQUIPMENT.
Installation and service must be done by specialised technicians. Contact a certified electrician and
plumber for set up.
The oven must be connected to the utility and electrically grounded in conformity to the effective
local regulations. If these are not established, the oven must be connected according to the Canadian
Electrical Code (CSA-C22.1-XX) or National Electrical Code (NFPA 70-XX). Refer to last edition
year for XX. Installation must also allow proper access for service (24 inches each side and back).
The ovens must be installed with a proper ventilation according with the local building code.
DISTANCES TO RESPECT
A) Back and sides of the oven: 4 pouces.
B) Top of the oven: a clearance of 12 inches to the ceiling must exist to permit adequate
venting of the exhaust pipe and hot parts and to give proper access to a
technician. The draft hood must have a clearance of 2 inches minimum all
around.
C) Floor: on it's legs 4 inches minimum.
D) Sides of the oven: do not install other than easily removable equipment for service and
maintenance (not closer than 4 inches).
E) It is recommended to have a certain length of electric cable between oven and wall to help
gain access for service.
A-4
AVERTISSEMENT LORS DE L'INSTALLATION
PANNE ÉLECTRIQUE
LORS D'UNE PANNE ÉLECTRIQUE, FERMER L'INTERRUPTEUR DU FOUR POUR
PROTÉGER LES COMPOSANTES ÉLECTRONIQUES.
POUR VOTRE SÉCURITÉ
NE PAS EMMAGASINER OU UTILISER D'ESSENCE OU AUTRES VAPEURS
ET LIQUIDES INFLAMMABLES À PROXIMITÉ DE CET ÉQUIPEMENT
OU DE TOUT AUTRE APPAREIL.
INSTALLATION ET SERVICE
AVERTISSEMENT
UNE INSTALLATION, UN AJUSTEMENT, UNE ALTÉRATION, UN SERVICE OU UN
ENTRETIEN NON CONFORME AUX NORMES PEUT CAUSER DES DOMMAGES À LA
PROPRIÉTÉ, DES BLESSURES OU LA MORT. LIRE ATTENTIVEMENT LES DIRECTIVES
D'INSTALLATION, D'OPÉRATION ET D'ENTRETIEN AVANT DE FAIRE
L'INSTALLATION OU L'ENTRETIEN DE L'ÉQUIPEMENT.
L'installation et le service doivent être faits par un technicien spécialisé. Contactez un technicien
spécialisé en électricité.
Cet appareil doit être branché et mis à la terre (grounded) conformément aux règlements effectifs de
votre localité. Si aucune réglementation n'est établie, le four doit être branché conformément au Code
Canadien de l’électricité CSA 22.1-XX ou au Code National de l'Électricité NFPA 70-XX. Référez-vous
à l’année de la dernière édition pour XX. L'installation doit aussi permettre un accès suffisant pour
effectuer le service sur l'équipement (24 pouces sur toutes les faces).
Le four doit être installé sous une ventilation adéquate respectant les norme locales.
DISTANCES À RESPECTER
A) Arrière du four : 4 pouces.
B) Dessus du four : Il est obligatoire d'avoir au moins 12 pouces entre le dessus du four et le
plafond de manière à permettre une ventilation adéquate du tuyau
d’évacuation et des parties chauffantes tout en permettant l’accès à un
technicien.
C) Plancher : Une distance de 4 pouces minimum.
D) Les côtés du four : Installer uniquement des équipements légers et faciles à déplacer pour être
en mesure d'effectuer l'entretien de l'appareil (4 pouces minimum).
E) Il est recommandé d'installer une longueur supplémentaire de câble électrique entre le four et le
mur pour faciliter l'accès au technicien.

A-5
INSTALLATION
IN GENERAL
Take off the packaging material with care. Take off all the material used for packing and accessories.
If the equipment is delivered with casters, always lock the wheels after installation and use flexible
wire. It must also be installed with restraining device (chain comes with the oven) to guard against
transmission of strain to the gas supply and connectors.
1. To the electrician
Electrical supply installation must be in accordance with the electrical rating on the nameplate.
WARNING
The electrician must make sure that the supply cable does not come in contact
with the oven top which becomes hot.

A-6
INSTALLATION
EN GÉNÉRAL
Ouvrir avec soin l'emballage de votre équipement. Enlever tous les matériaux utilisés pour
l'envelopper ainsi que les accessoires.
Si l'appareil est muni de roulettes, veuillez toujours les bloquer après l'installation et utiliser un
cordon souple. De plus, des équipements de retenues (chaîne comprise avec le four) doivent être
installés pour empêcher le tuyau d'alimentation et les connecteurs de subir des tensions lorsque le
four est déplacé.
1. À l'électricien
L'installation de l'alimentation électrique des fours doit être conforme avec la source électrique
spécifiée sur la plaque signalétique de l’appareil.
AVERTISSEMENT
L'électricien doit s'assurer que le câble d'alimentation ne touche pas le dessus du
four à cause du degré élevé de chaleur dégagée par celui-ci.
A-7
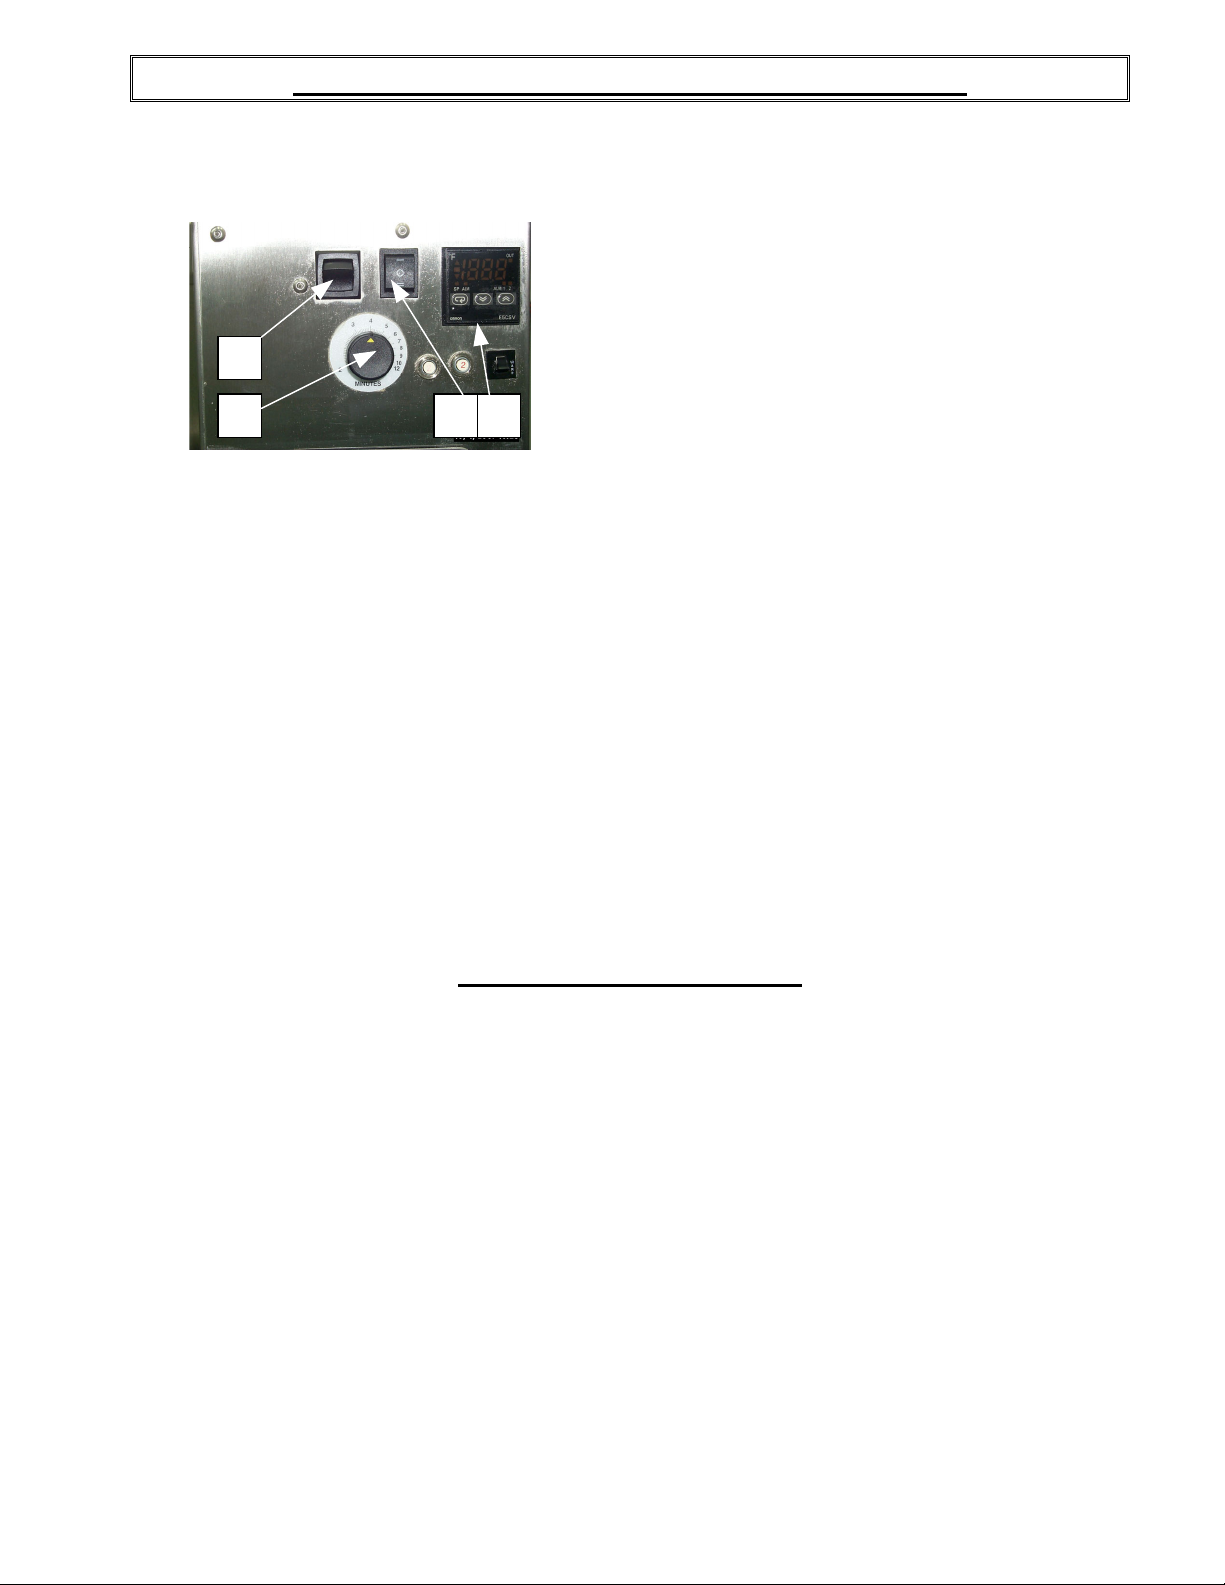
OPERATION/INSTRUCTIONS OF THE OVEN
1. Turn the main switch to the position "ON" [ I ].
2. Turn the conveyor switch to the position "ON" [ I - forward or II - reverse ].
1
4
3. Adjust the thermostat at the desired temperature (see THERMOSTAT INSTRUCTIONS below).
4. Adjust baking time according to your product. Use the knob on the speed control to set your baking
time.
(see suggestions in the tables next page.)
N.B. The thermostat display must be "ON". (If not, press the breaker on the
front)
5. Heat the unit until you reach the baking temperature.
When the desired temperature is reached, the red light ON goes out on the thermostat.
6. Place your products on the conveyor.
We recommend to use perforated pan or pizza screen.
7. To stop the oven, just turn the main switch to "OFF" [ O ] position. After the oven is off, the main
fan motor will run for 10 minutes to cool down the oven.
32
THERMOSTAT INSTRUCTIONS
To obtain a very good thermal stability, we use a digital temperature controller with thermocouple. The
Omron E5CSV thermostat controls the heat at the SP (set point).
The temperature of the oven is always shown on the display of the thermostat and an arrow indicates if
the temperature is over or below the SP. When the green light is lit, it indicates that the temperature is at
the SP ± 1 %.
To adjust the SP value, you just have to press the key on the left and use the up and down keys to set
temperature and alarm value. Press the left key to return to run mode.
 Loading...