

Page 1
Page 2
2
3
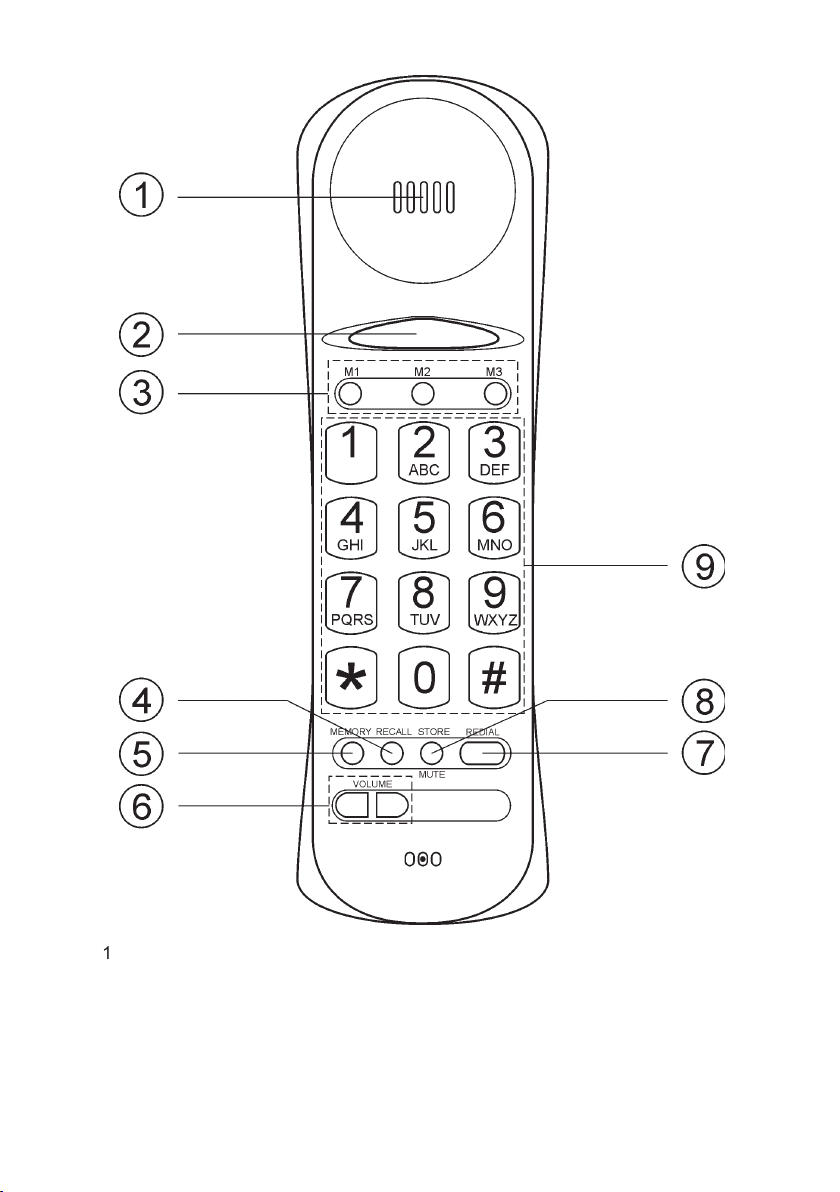
One Touch (Direct) Memories
4
5
6
7
8
Store/Mute button
9
Page 3

English
Operation
Connect the telephone line cord to a telephone network wall socket.
2.
Lift the handset and listen for the dial tone. Your telephone is now
operational.
Wall mounting
The telephone can be wall mounted using two screws positioned vertically at a
distance of 100 mm, the screws should t into the ‘keyholes’ on the back of the
telephone. Remove the hanger hook by pushing it upwards, then rotate it 180
degrees and replace it.
Press and release
to mute the handset microphone during a call. Press and
release
again to continue with your telephone conversation.
If the number dialled is engaged or you wish to dial the last number called lift the
handset and press and release
was from memory (i.e. M1, M2, M3 or 0-9).
Access to additional network services can be gained by using the
button,
and
keys. Contact your network operator for more information.
Press the
button followed by the extension number to when connected
to a PBX (TBR only).
Page 4

English
www.doro.com
Settings
The telephone has 3 one-touch and 10 two-touch memories. One-touch memories
are stored in M1, M2 & M3, two touch memories are stored using the telephone
keypad digits 0-9.
Lift the handset, press and release
STORE
(ignore anything you hear in the
earpiece).
2.
Select a memory location M1, M2 or M3 by pressing the corresponding button.
3.
Enter the telephone number to be stored (up to 21 digits).
Press and release
STORE
again.
Replace the handset. The number is now stored.
Lift the handset and wait for a dialling tone.
Select a memory location by pressing the corresponding memory button (M1,
M2 or M3). The stored number will now be dialled.
Lift the handset, press and release
STORE
(ignore anything you hear in the
earpiece).
2.
Press and release
3.
Select a memory location by pressing one of the keypad number buttons
Enter the telephone number to be stored (up to 21 digits).
Press and release
STORE
again.
6.
Replace the handset. The number is now stored.
Lift the handset and wait for a dialling tone.
2.
Press and release
3.
Select a memory location by pressing the relevant keypad number
Press and release
if you wish to insert a pause in a telephone number. The name or
Page 5

English
Settings
During a conversation press and release either
{
to increase or
to increase or
}
to decrease the
earpiece volume.
Lift the handset, press and release
STORE
(ignore anything you hear in the
earpiece).
Press and release
3.
Select a ringer and melody by pressing the number keys
0
9
(please refer to the
table below).
Press and release
STORE
volume
3
5
6 (factory setting)
8
9
0
Off *
Page 6

English
www.doro.com
Other
If you cannot resolve the fault using the fault nder section, technical support is
available on the
Premium Rate Number: 0906 302 0114
Calls cost
50 pence per minute
and is operational between 9AM - 5PM Monday-Friday excluding Bank Holidays.
Alternatively, E-mail on: tech@doro-uk.com
You can contact us in writing: Consumer Support Group, Doro UK Ltd.,
22 Walkers Road, North Moons Moat, Redditch, Worcestershire, B98 9HE,
Web site: www.doro-uk.com
This product is guaranteed for a period of 12 months from the date of purchase. Proof
of purchase is required for any service or support required during the guarantee period.
This guarantee shall not apply to a fault caused by an accident or a similar incident
or damage, liquid ingress, negligence, abnormal usage or any other circumstances on
the purchaser’s part. Furthermore, this guarantee shall not apply to a fault caused by
a thunderstorm or any other voltage uctuations. This guarantee does not in any way
affect your statutory rights. (As a matter of precaution, we recommend disconnecting
the telephone during a thunderstorm.)
Page 7

Page 8

Version 2.0
 Loading...