

Dometic StarLight Installation And Operating Manual

Oven with grill and hob
Installation and Operating Manual. . . 8
Backofen mit Grillkabinett und
Kochmulde
Montage- und
Bedienungsanleitung. . . . . . . . . . . . 22
Four avec compartiment gril et
plan de cuisson
Instructions de montage
et de service . . . . . . . . . . . . . . . . . . 37
Horno con gabinete con parrilla y
encimera
Instrucciones de montaje y de uso . 52
Forno con grill e piano cottura
Istruzioni di montaggio e d’uso . . . . 68
Oven met grillcabinet en kookplaat
Montagehandleiding en
gebruiksaanwijzing . . . . . . . . . . . . . 84
Bageovn med grillkabinet og
kogeområde
Monterings- og
betjeningsvejledning . . . . . . . . . . . . 99
Ugn med grillskåp och spishäll
Monterings- och bruksanvisning . . 113
Stekeovn med grillkabinett og
komfyrtopp
Monterings- og bruksanvisning . . . 127
Uuni grilli- ja keitinosalla
Asennus- ja käyttöohje . . . . . . . . . 141
EN
DE
FRESIT
NL
DA
SV
NO
FI
Духовка с грилем и варочной
панелью
Инструкция по монтажу и
эксплуатации . . . . . . . . . . . . . . . . 155
Piekarnik z rusztem grillowym
i płytą grzejną
Instrukcja montażu i obsługi . . . . . 170
Trouba s grilem a vařičem
Návod k montáži a obsluze. . . . . . 186
Rúra na pečenie s grilovacím
priestorom a varnou doskou
Návod na montáž a uvedenie do
prevádzky . . . . . . . . . . . . . . . . . . . 200
RU
PL
CS
SK
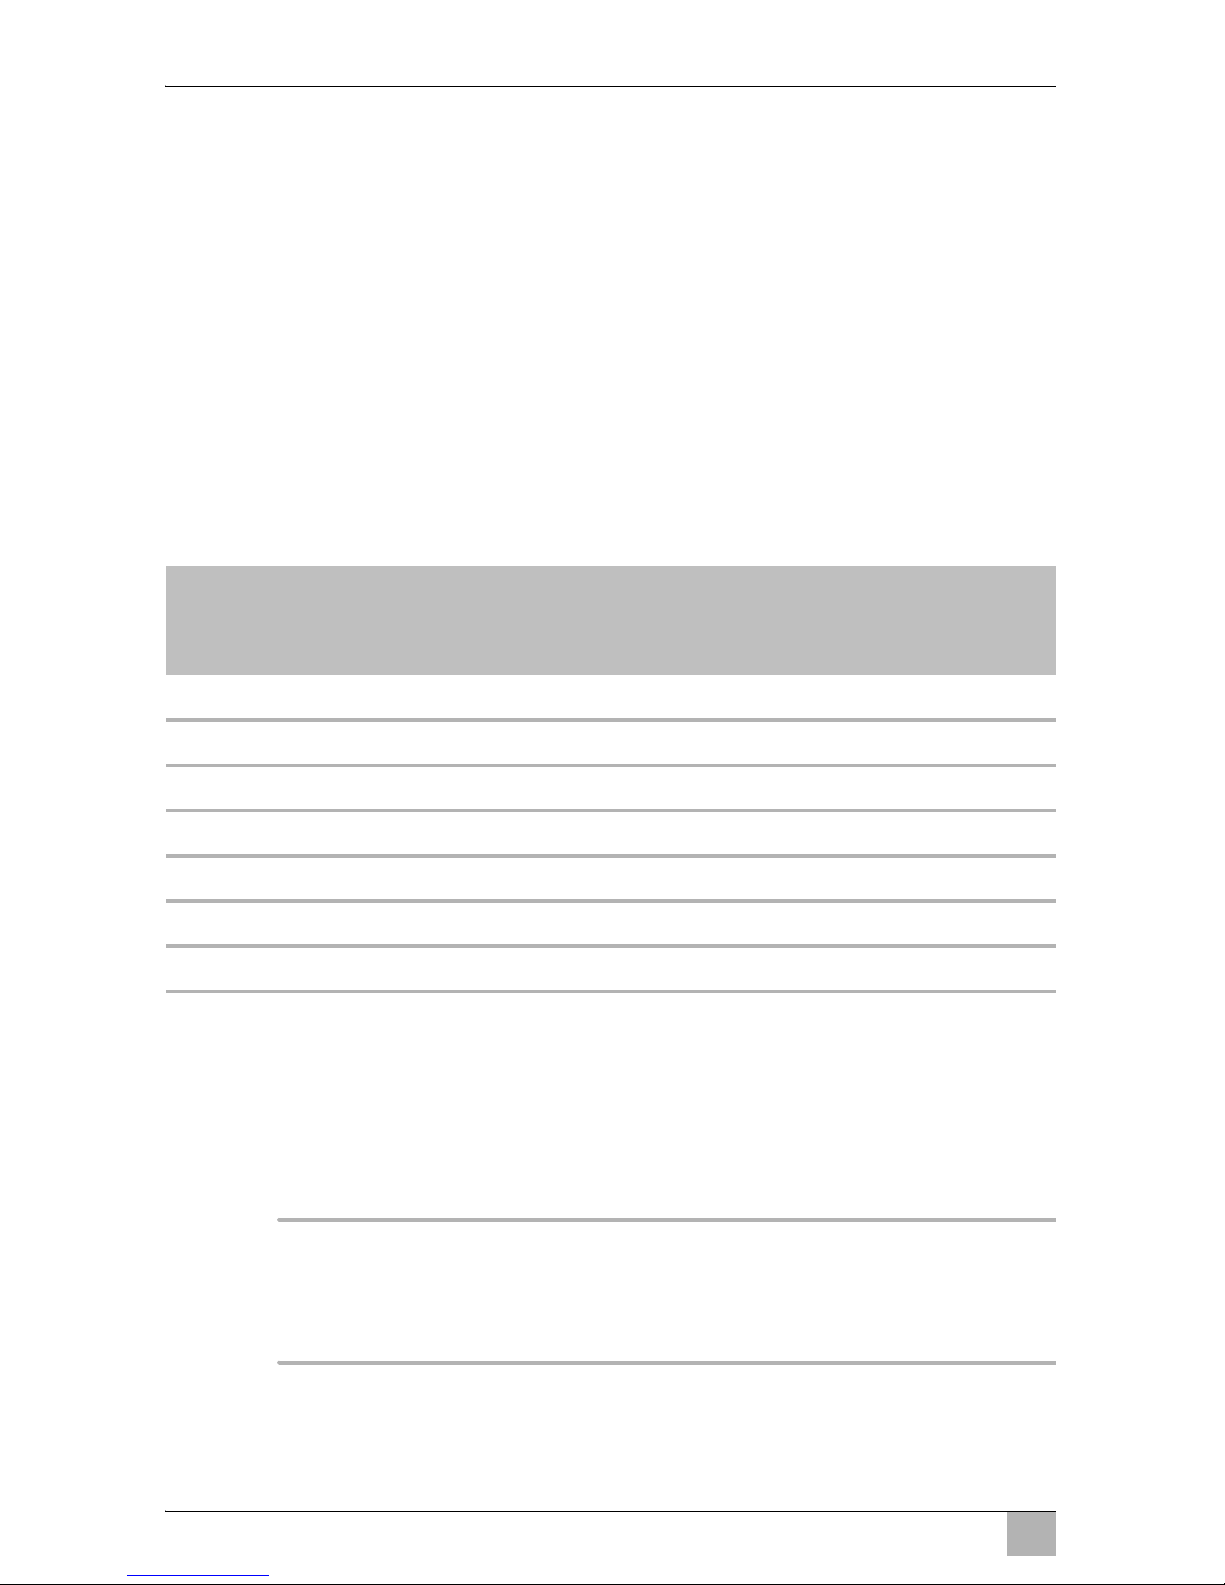
StarLight
Dometic StarLight
2
1
2
3
4
5
1
0
0
GRILL
12 3
4
5
6
4
5
6
7
2
Dometic StarLight
3
112,4
413,6
458,6
479
391,1
448,6
470,4
356,9
580,5
539,5
507,5
R565,1
391
441,3
397,5
106,4 227
450
3
544
465
473
R565,1
63
4
Dometic StarLight
4
200
500
5
134 mm
6
Dometic StarLight
5
7
1
2
8
Dometic StarLight
6
1
9
1
0
Dometic StarLight
7
1
2
a

EN
Explanation of symbols Dometic StarLight
8
Please read this manual carefully before starting up and store it in a
safe place. If you pass on the device to another person, hand over this
instruction manual along with it.
Contents
1 Explanation of symbols . . . . . . . . . . . . . . . . . . . . . . . . . . . . . . . . . . . 8
2 General safety instructions . . . . . . . . . . . . . . . . . . . . . . . . . . . . . . . . 9
3 Scope of delivery . . . . . . . . . . . . . . . . . . . . . . . . . . . . . . . . . . . . . . . 12
4 Accessories . . . . . . . . . . . . . . . . . . . . . . . . . . . . . . . . . . . . . . . . . . . 12
5 Intended use . . . . . . . . . . . . . . . . . . . . . . . . . . . . . . . . . . . . . . . . . . 12
6 Technical description . . . . . . . . . . . . . . . . . . . . . . . . . . . . . . . . . . . . 13
7 Installing the device . . . . . . . . . . . . . . . . . . . . . . . . . . . . . . . . . . . . . 14
8 Before initial use . . . . . . . . . . . . . . . . . . . . . . . . . . . . . . . . . . . . . . . 16
9 Using the device . . . . . . . . . . . . . . . . . . . . . . . . . . . . . . . . . . . . . . . 16
10 Troubleshooting . . . . . . . . . . . . . . . . . . . . . . . . . . . . . . . . . . . . . . . . 19
11 Maintaining the device . . . . . . . . . . . . . . . . . . . . . . . . . . . . . . . . . . . 19
12 Cleaning the device . . . . . . . . . . . . . . . . . . . . . . . . . . . . . . . . . . . . . 20
13 Warranty . . . . . . . . . . . . . . . . . . . . . . . . . . . . . . . . . . . . . . . . . . . . . 20
14 Disposal . . . . . . . . . . . . . . . . . . . . . . . . . . . . . . . . . . . . . . . . . . . . . . 20
15 Technical data . . . . . . . . . . . . . . . . . . . . . . . . . . . . . . . . . . . . . . . . . 21
1 Explanation of symbols
!
WARNING!
Safety instruction: Failure to observe this instruction can cause
fatal or serious injury.
!
CAUTION!
Safety instruction: Failure to observe this instruction can lead to
injury.

EN
Dometic StarLight General safety instructions
9
A
NOTICE!
Failure to observe this instruction can cause material damage and
impair the function of the product.
I
NOTE
Supplementary information for operating the product.
➤ Action: This symbol indicates that action is required on your part. The
required action is described step-by-step.
✓ This symbol describes the result of an action.
fig. 1 5, page 3: This refers to an element in an illustration. In this case,
item 5 in figure 1 on page 3.
2 General safety instructions
The manufacturer accepts no liability for damage in the following cases:
Faulty assembly or connection
Damage to the product resulting from mechanical influences and excess
voltage
Alterations to the product without express permission from the manu-
facturer
Use for purposes other than those described in the operating manual
2.1 General safety
!
WARNING!
Only use liquid gas (butane, propane) in the I
3B/P
, I3+, I3 catego-
ries. Do not use any other fuel sources.
Keep a suitable fire extinguisher in the immediate vicinity.
Ensure that the fire extinguisher is regularly checked by a specialist.
This device may only be connected to the gas supply by a spe-
cialist in accordance with the applicable guidelines and standards (in particular EN 1949).

EN
General safety instructions Dometic StarLight
10
This device is not connected to an exhaust extractor. It must be
installed and connected according to the applicable installation
conditions. Pay special attention to the ventilation requirements.
A
NOTICE!
Only use the device as intended.
2.2 Safety precautions when handling liquid gas
!
WARNING!
Keep combustible materials away from heating or cooking de-
vices and other light or heat sources.
Compare the pressure information on the type plate with the in-
formation on the pressure regulator.
Never store liquid gas cylinders in unventilated areas or below
ground level (cellar, funnel shaped holes in the ground).
Keep liquid gas cylinders away from direct sunlight. The temper-
ature may not exceed 50 °C.
2.3 Operating the device safely
!
WARNING!
If you smell gas:
– Close the valve on the gas cylinder and keep it closed until
the error is rectified.
– Never attempt to find a gas leak with a naked flame.
The device may only be used in rooms with adequate ventilation
according to the applicable regulations of the country.
Using the gas cooker leads to a build-up of heat and moisture in
the room it is used in. Ensure the room is well-ventilated by
keeping natural air vents open or providing a mechanical ventilation device (such as an extractor hood).
Using the device intensively and for prolonged periods could
make additional ventilation necessary, for example by opening
a window or a more efficient ventilation system, such as using
the mechanical ventilation device at a higher power level.

EN
Dometic StarLight General safety instructions
11
People (including children) whose physical, sensory or mental
capacities prevent them from using this device safely may not
be allowed to operate it without the supervision of a responsible
adult.
Children must be supervised to ensure that they do not play with
the device.
Never leave the device unattended when in use for prolonged
periods of time.
Use long matches or a suitable lighter. Check the gas outlets
when you ignite the burners. Do not ignite the burner if you cannot see it directly.
Remove your hand quickly as soon as the burner is lit.
Wear suitable clothing when using the device.
Do not wear loose hanging clothing which might catch fire.
Leave the device to cool down properly before you touch it with
bare hands.
Never change the nozzles, injector or burners.
Keep the area around the device free from fat, alcoholic sub-
stances, plastic and flammable materials (e.g. curtains, cloths
or kitchen materials).
Only use pots and pans with an even base and a diameter not
larger than the grids on the hob (approx. 200°mm). The pots
and pans should be large enough to cover the flame. If the flame
is not covered, items of clothing could catch fire.
Pots and pans of the correct size also improve the efficiency of
the hob.
Ensure that pots and pans are stable when cooking.
Never allow pot or pan handles to protrude over the edge of the
hob. Turn the handles inwards, making sure that they are not
positioned over other burners. This reduces the risk of spillage,
the ignition of flammable materials and serious scolding.
Proceed with caution when heating oil or fat, as they can ignite
under excessive heat.
Only use dry oven cloths to avoid steam build-up. Do not use
towels as these can catch fire.
Only operate the device when you or another person can attend
to it. Pots which boil over can cause smoke and fires.
Set the control knob to the neutral setting (0) before removing
the pot or pan.
EN
Scope of delivery Dometic StarLight
12
Do not use the device to heat the room.
Hot parts should not be allowed to come into contact with oil,
water or any other liquids.
3 Scope of delivery
4 Accessories
Available as accessories (not included in the scope of delivery):
5 Intended use
Dometic StarLight is intended for installing on board vehicles or boats.
The device may only be used for cooking, baking and grilling. It may not be
used for heating.
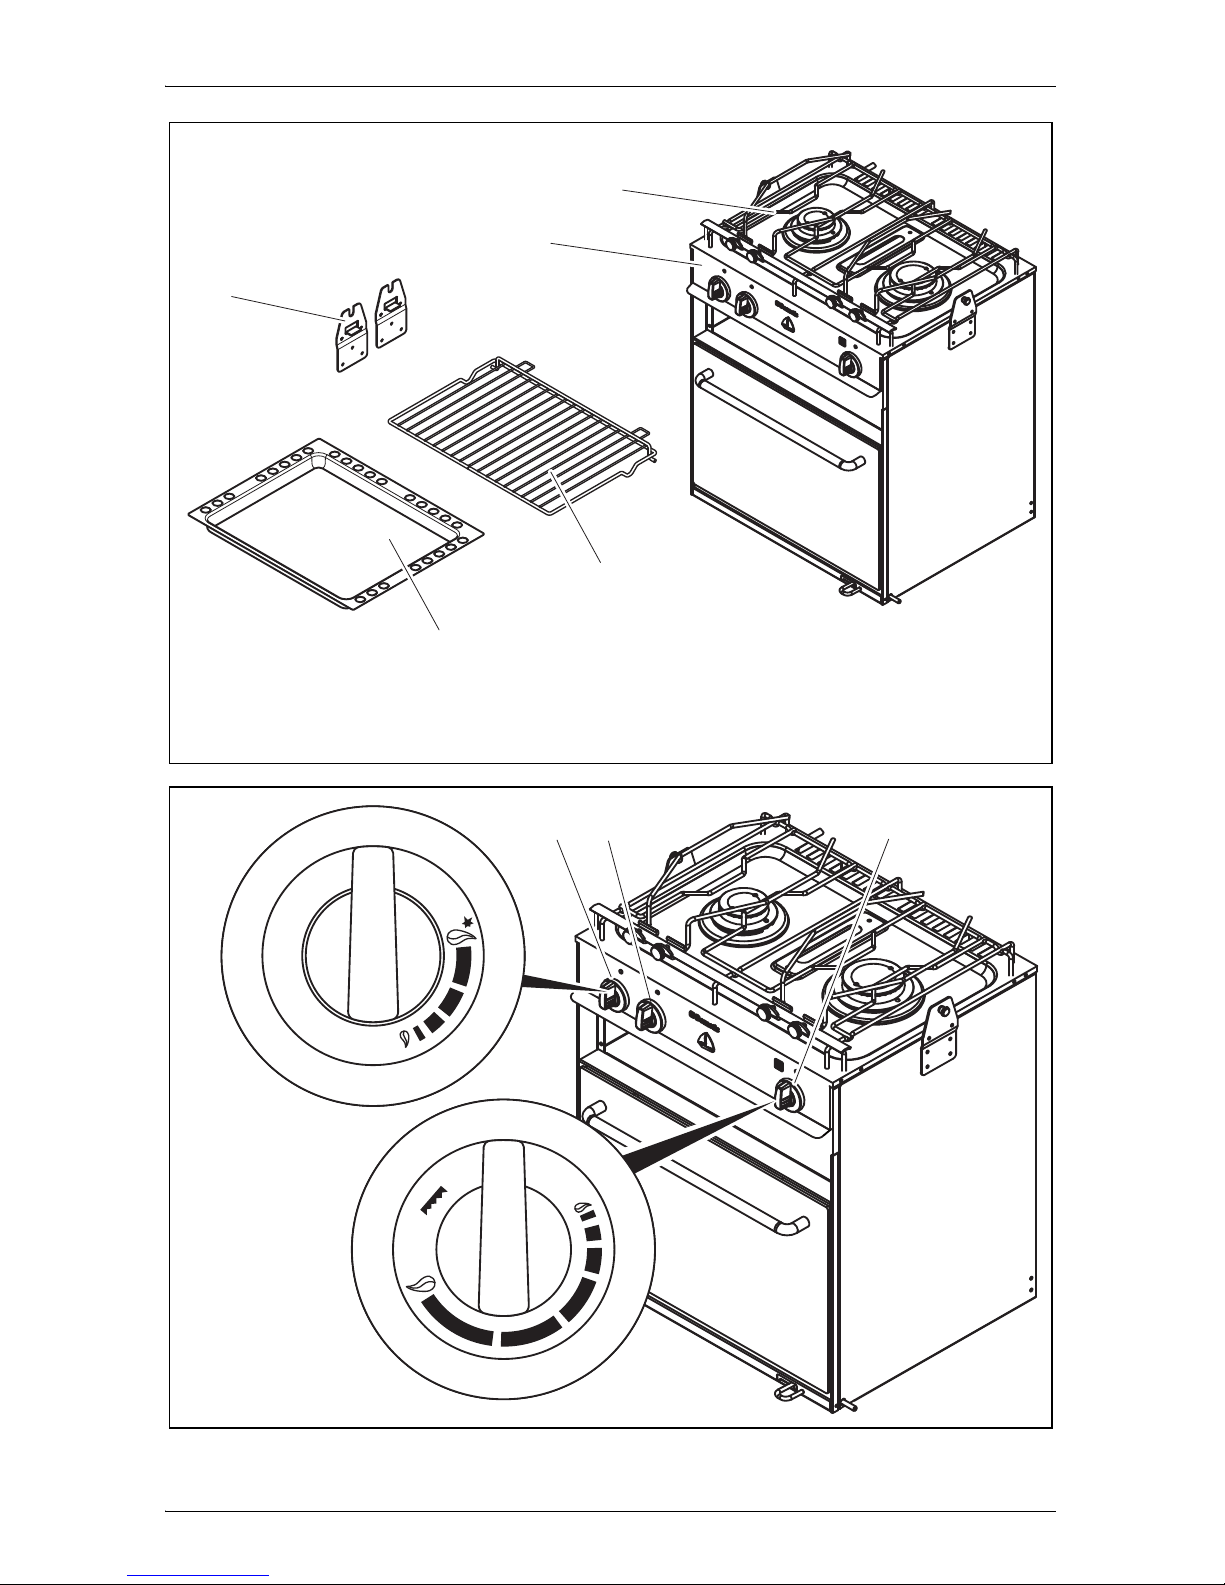
No. in
fig. 1,
page 2
Quantity Description
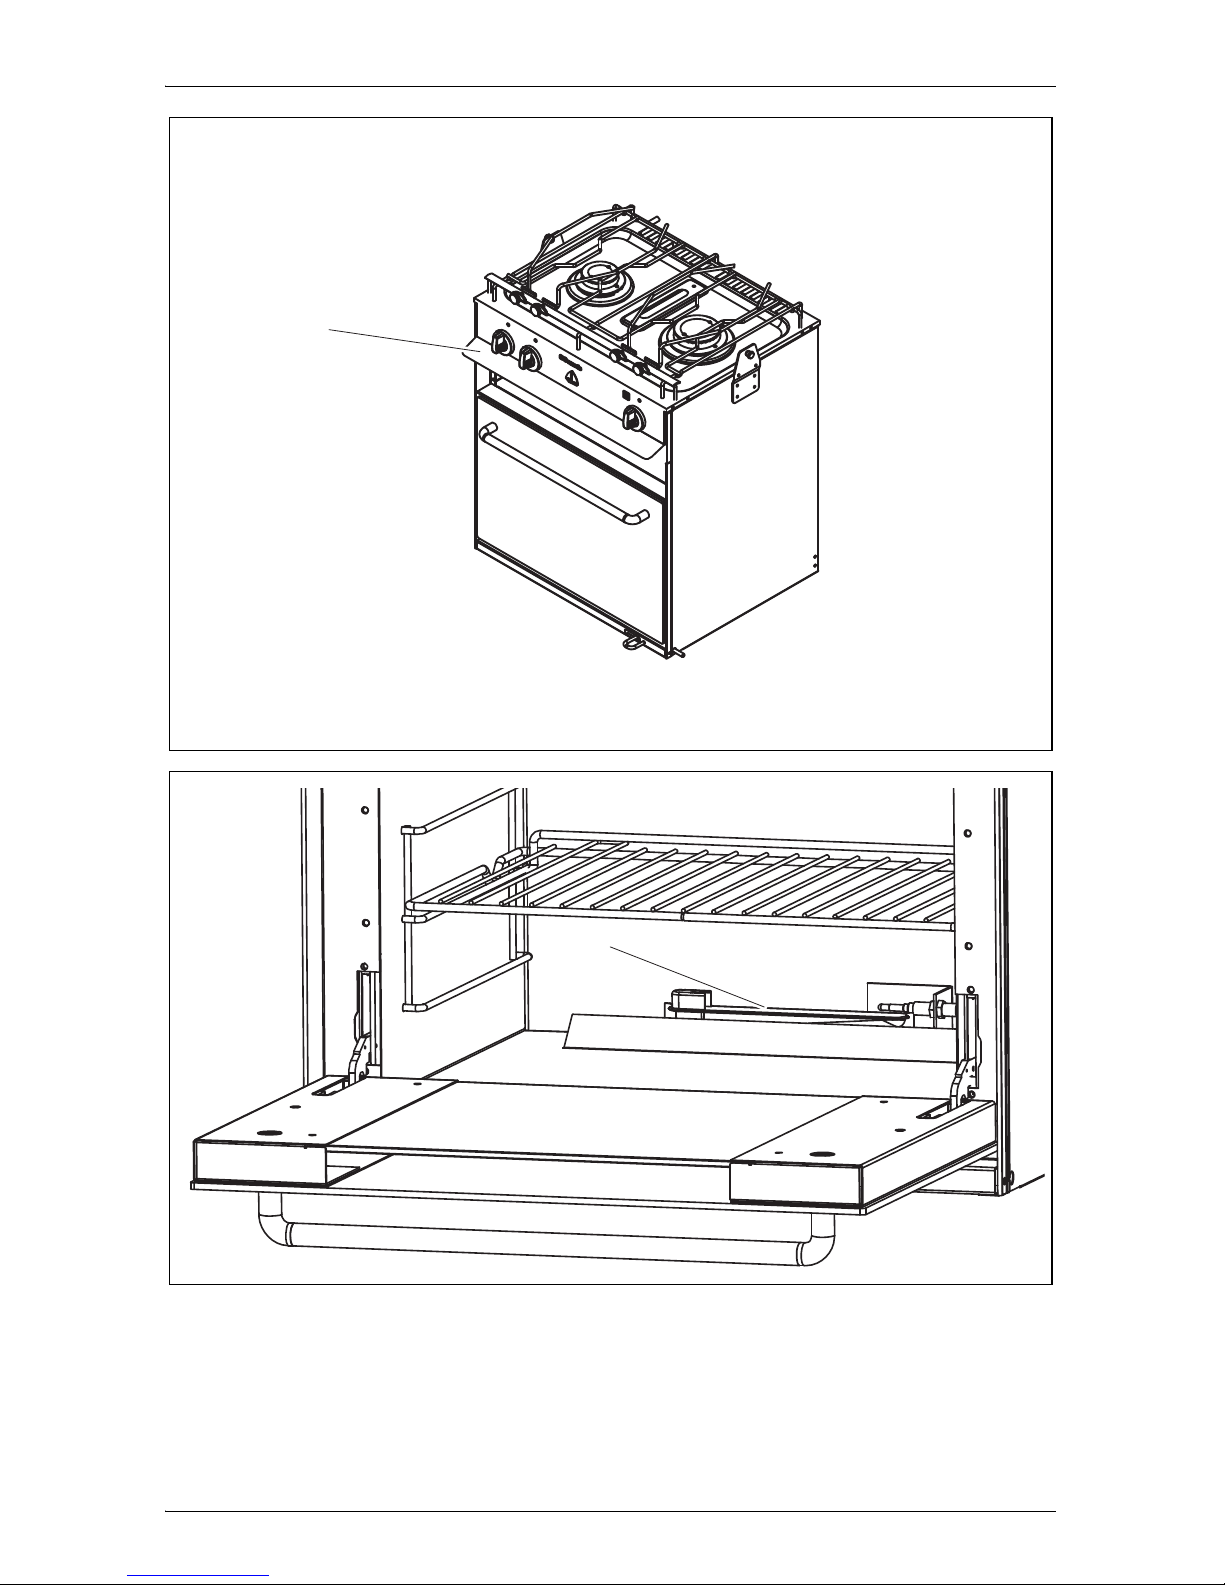
1 1 Oven with grill and hob
2 2 Pot holder
3 1 Gimbal
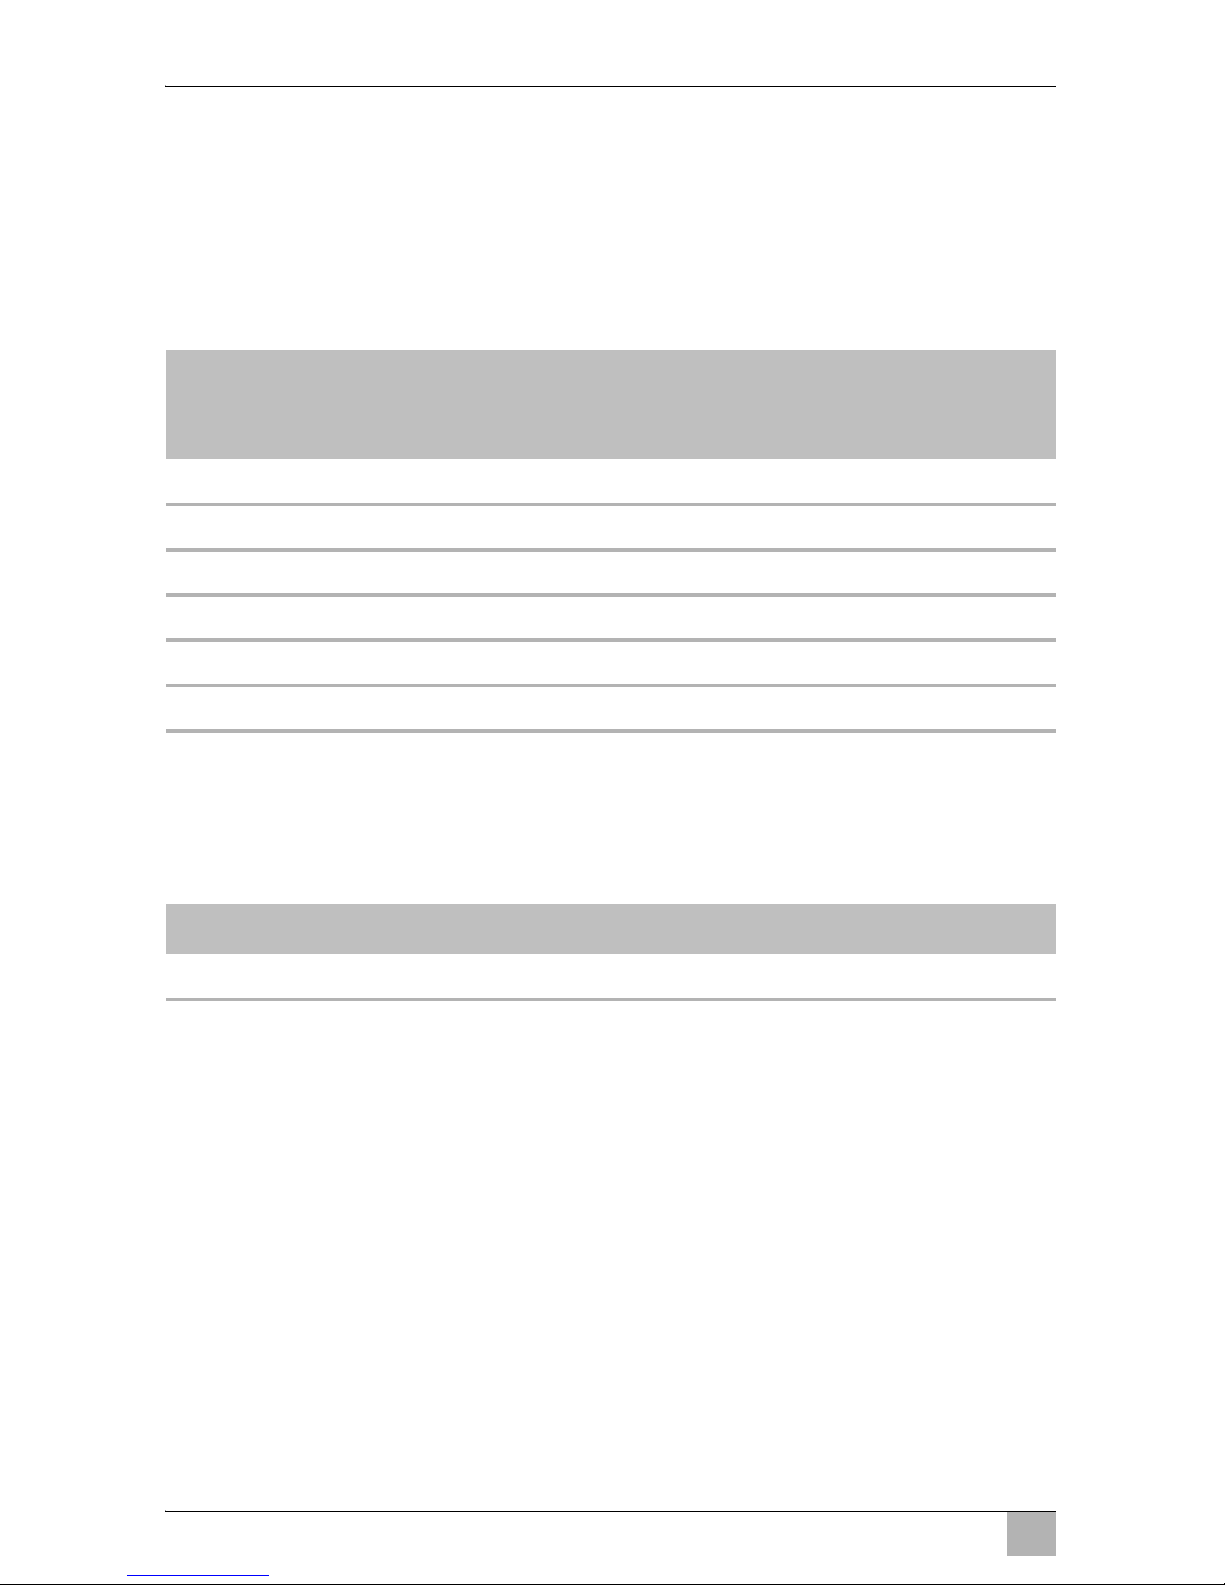
41Baking tray
51Rack
– 1 Instruction manual
Description Item number
Pan 9103303862
EN
Dometic StarLight Technical description
13
6 Technical description
Dometic StarLight (item no. 9103303820) is a gas-powered oven with a grill
and hob with 2 burners.
The device is made of stainless steel. The chromed pot grids and holders are
detachable.
The two cooking rings can be controlled separately from the grill and oven.
Liquid gas in the categories I
3B/P
, I3+, I3 (butane, propane) is used as fuel.
The grill and the oven cannot be used at the same time.
Control elements
6.1 Gas pressure
Refer to the type plate for the permissible gas pressure.
Only use pressure regulators that have been specified and approved in your
country.
!
WARNING! Beware of injury
The outlet pressure of the pressure regulator must always match
the connection pressure (gas pressure) of the device (see additional sheet).
No. in
fig. 2,
page 2
Description
1 Control knob for the left cooking ring
2 Control knob for the right cooking ring
3 Knob for the grill and oven
4 Neutral position
5 Large flame setting
6 Small flame setting
7 GRILL setting
EN
Installing the device Dometic StarLight
14
7 Installing the device
You can fit the device into an existing kitchen installation.
7.1 Selecting the installation location
When selecting the installation location, observe the following instructions:
Select a well-ventilated location for the device.
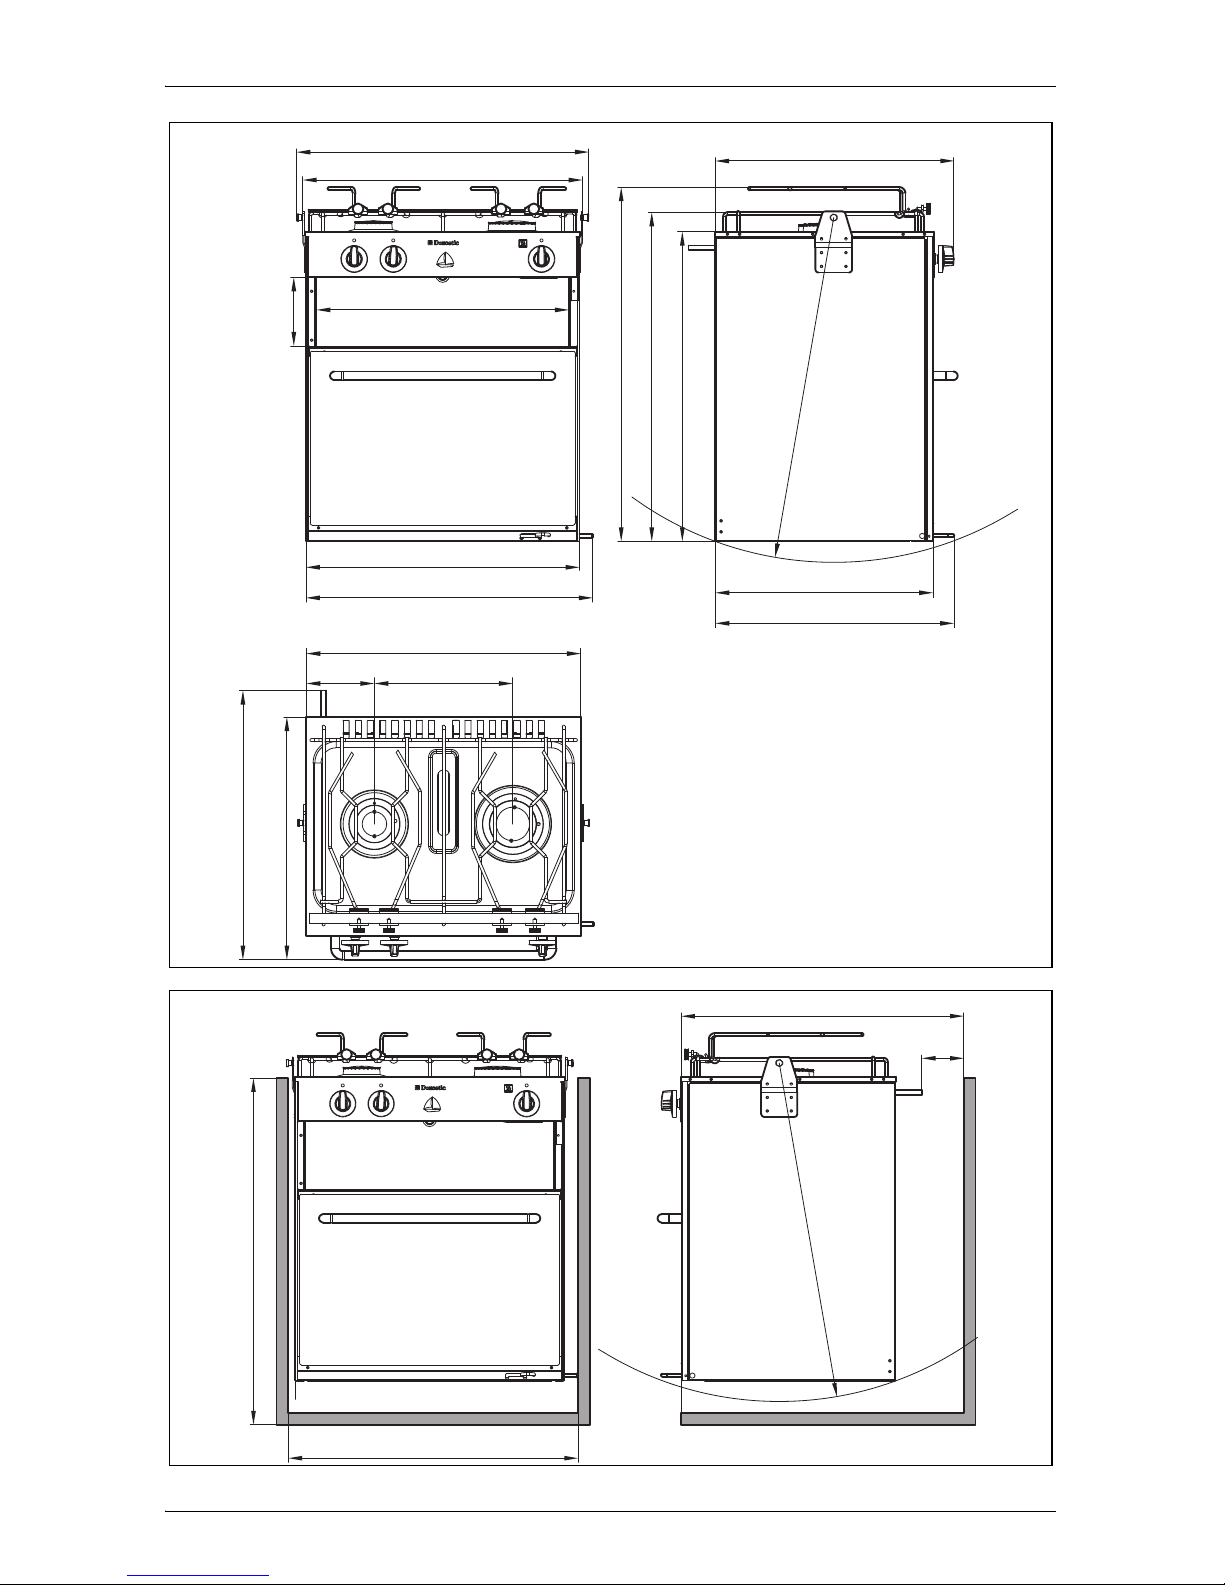
Check the dimensions of the device (fig. 4, page 3 and fig. 5, page 4).
Ensure the following minimum clearances
– 200°mm to the side walls
– 170°mm to the back wall
– 500°mm between the burner and horizontal surface above the hob
Ensure that there are no draughts in the installation location.
Do not operate the device in rooms that are potentially explosive.
If gimbals are being used, make sure that the cooker is able to vibrate.
Leave sufficient space for the vibration of the gimbal.
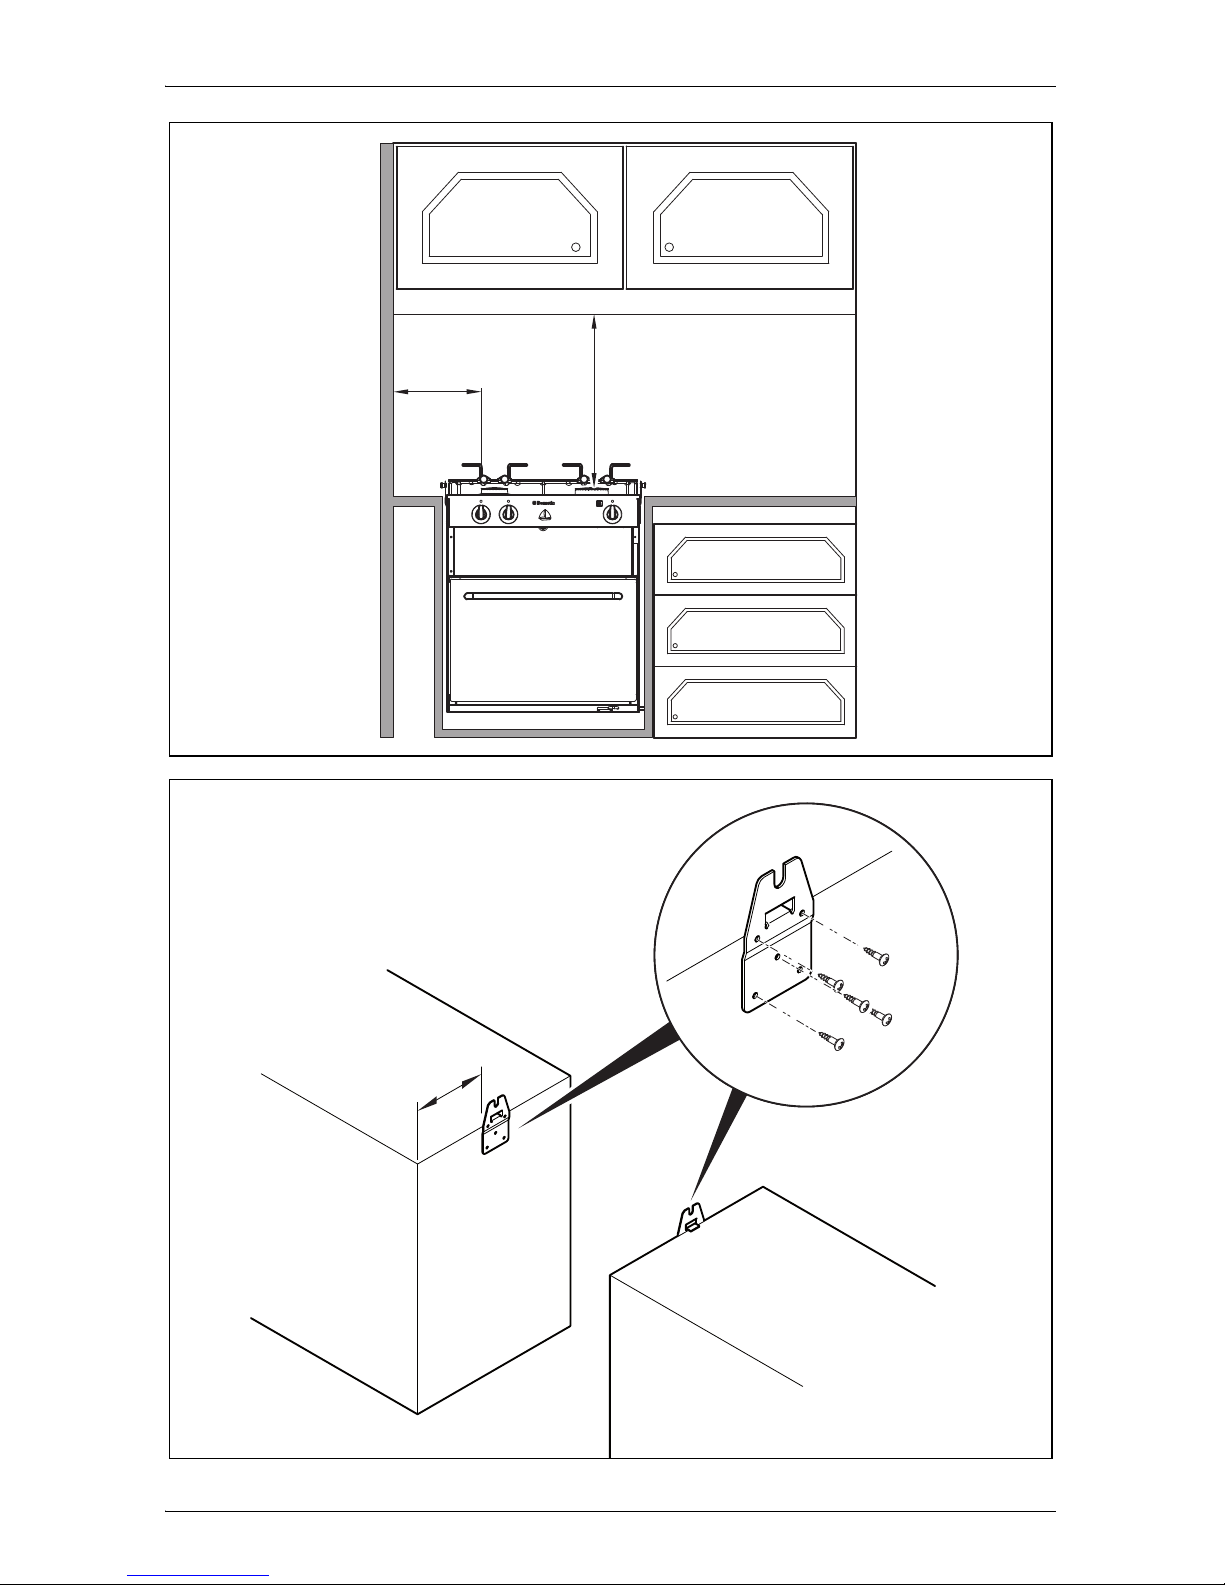
7.2 Installing the device
A
NOTICE! Beware of damage
Before drilling any holes, make sure that no electrical cables or other parts of the vehicle can be damaged by drilling, sawing and filing.
This is how to install the device (fig. 6, page 4 and fig. 7, page 5):
➤ Fasten the side plates using the screws provided leaving a space of
134 mm around the kitchen unit.
➤ Mount the device so that the bolts of the mounting plate hook into the side
plates (fig. 7 , page 5).

EN
Dometic StarLight Installing the device
15
7.3 Connecting the device to the gas supply
!
WARNING! Beware of injury
This device may only be connected to the gas supply by a spe-
cialist in accordance with the applicable guidelines and standards (in particular EN 1949).
Only use propane or butane gas cylinders with an approved
pressure reducing valve and a suitable head. Compare the
pressure information on the type plate with the pressure information on the propane or butane gas cylinder.
Observe the following instructions during connection:
Use gas pipes made from steel 8 x 1 mm (welded, seamless or stain-
less steel), which are flush-mounted with a cutting ring screw assembly.
Fasten the pipes on the side or rear wall of the surrounding furniture parts
so that no loads are exerted on the actuators.
The connection must only be able to be released using tools. Observe the
technical regulations on DVGW worksheets G607 and G608.
The entire pipe system must be free of stress.
During operation, there must be air vents with a cross-section of at least
150 cm
2
in the installation space. These vents can be closed, but must be
kept open when the device is in use.
Connect the device to the gas supply.
➤ Attach a sign above the device with the following text:
“WARNING!
When cooking, provide additional ventilation e.g. by opening windows
near the grill, hob or oven.
This device must not be used for heating the room.”
➤ Open the main shut-off valve.
!
WARNING! Beware of injury
Never check for leaks with a naked flame or near sources of ignition.
➤ Check all connections with leak spray.
There are no leaks if no bubbles form.
EN
Before initial use Dometic StarLight
16
8 Before initial use
➤ Clean the rack and the baking tray with a standard cleaning agent.
➤ Turn the oven on for 30 minutes while empty at the highest temperature.
9 Using the device
I
NOTE
While it is operating, you will be able to hear a slight noise
caused by the gas flowing out. This is completely harmless.
Smoke can occur when using it for the first time. This is caused
by deposits of machine oil burning and stops after approx.
10 minutes.
The stainless steel burners turn blue from the high temperature.
This does not affect the operation or the quality of the material.
9.1 Igniting the burners
!
WARNING! Beware of injury
Only use the device when you or another person can attend to it.
Ignite the burner as soon as you have turned on the gas supply.
Otherwise gas can accumulate in the burner area and could
cause an explosion.
The complete ignition process must be visible from above and
must not be hidden by pots placed on the hob.
➤ Open the main shut-off valve.
➤ Turn the control knob of the burner anti-clockwise from the neutral setting
(0) to the large flame setting.
➤ Press the control knob in and hold it in this position.
➤ Ignite the burner straight away with a match or suitable lighter. Remove
your hand quickly as soon as the burner is lit.
Once the burner is lit, you can release the knob after approx.
10 seconds.
➤ If the burner goes out after releasing the knob:
wait at least 60°seconds before you ignite it again.
EN
Dometic StarLight Using the device
17
➤ Set the flame so that it does not exceed the base of the pot.
➤ Turn the control knob to the required position: “Large flame” or “Small
flame”.
9.2 Igniting the grill
!
WARNING! Beware of injury
Only use the device when you or another person can attend to it.
Never use the grill without any food to grill.
Ignite the burner as soon as you have turned on the gas supply.
Otherwise gas can accumulate in the burner area and could
cause an explosion.
Keep an eye on the gas outlets while you are igniting the burner
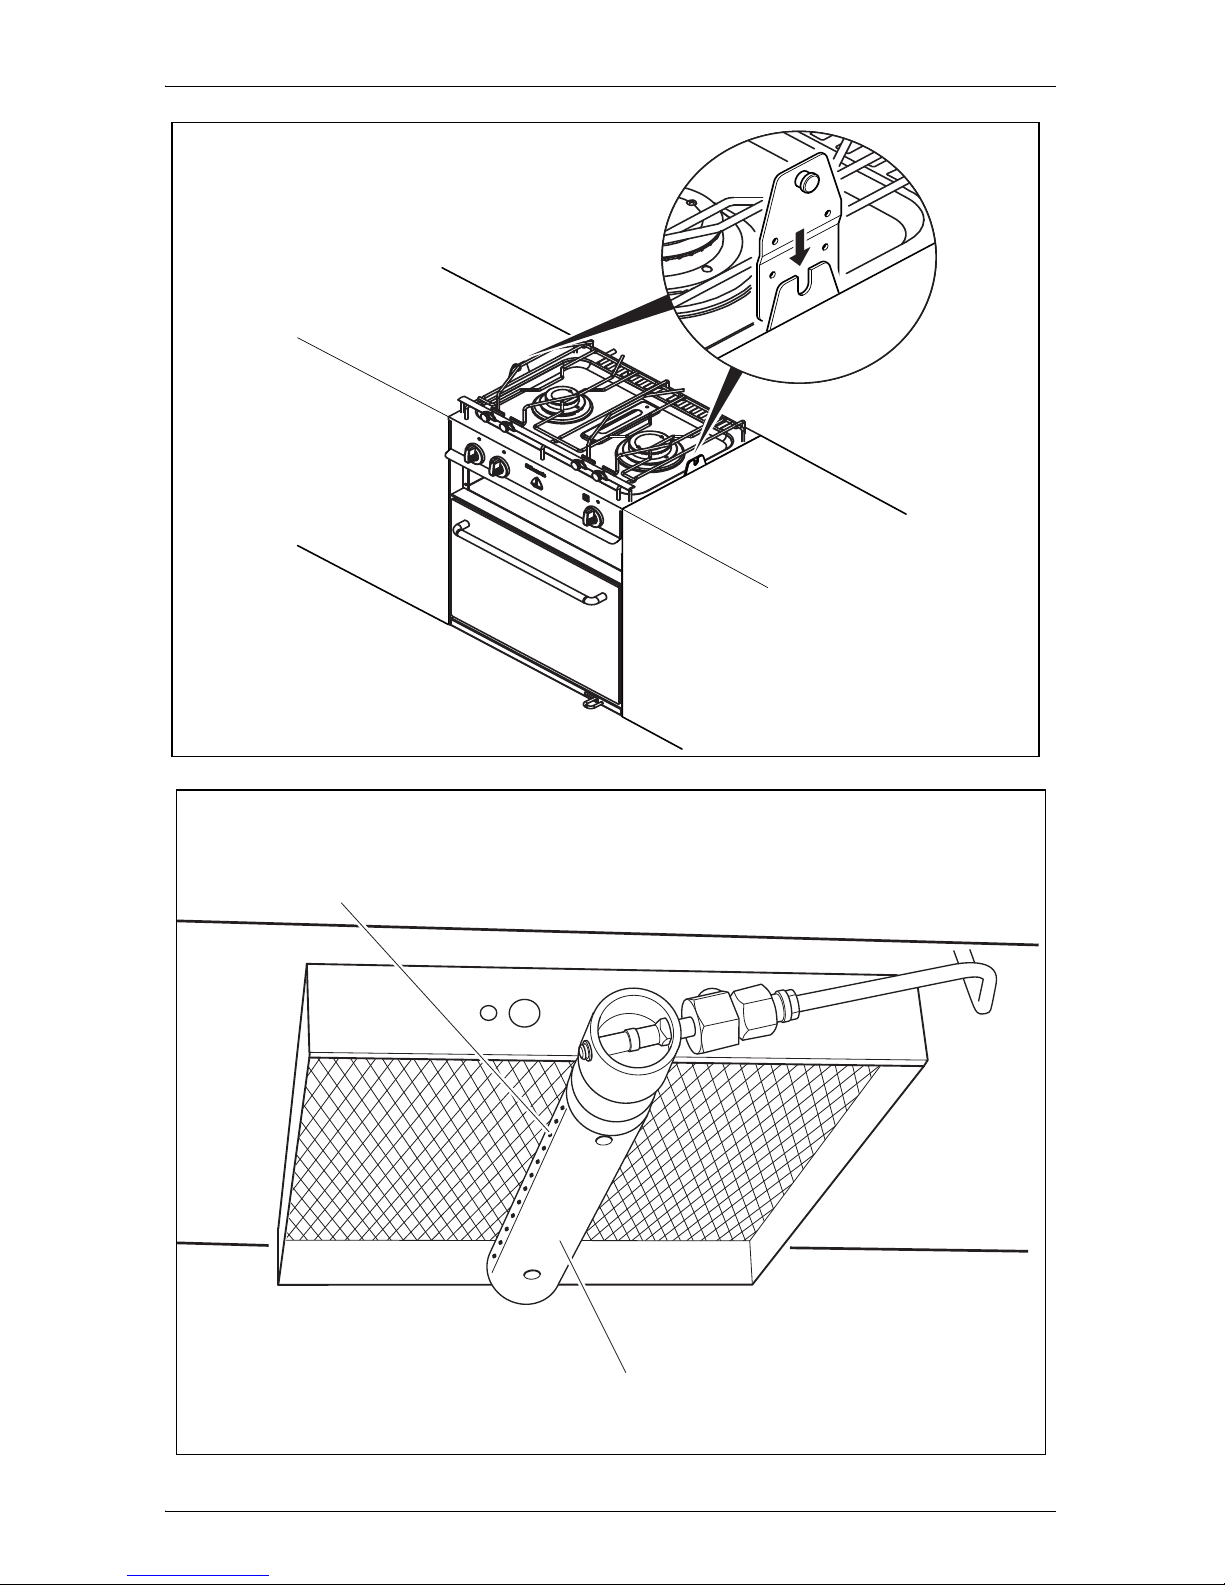
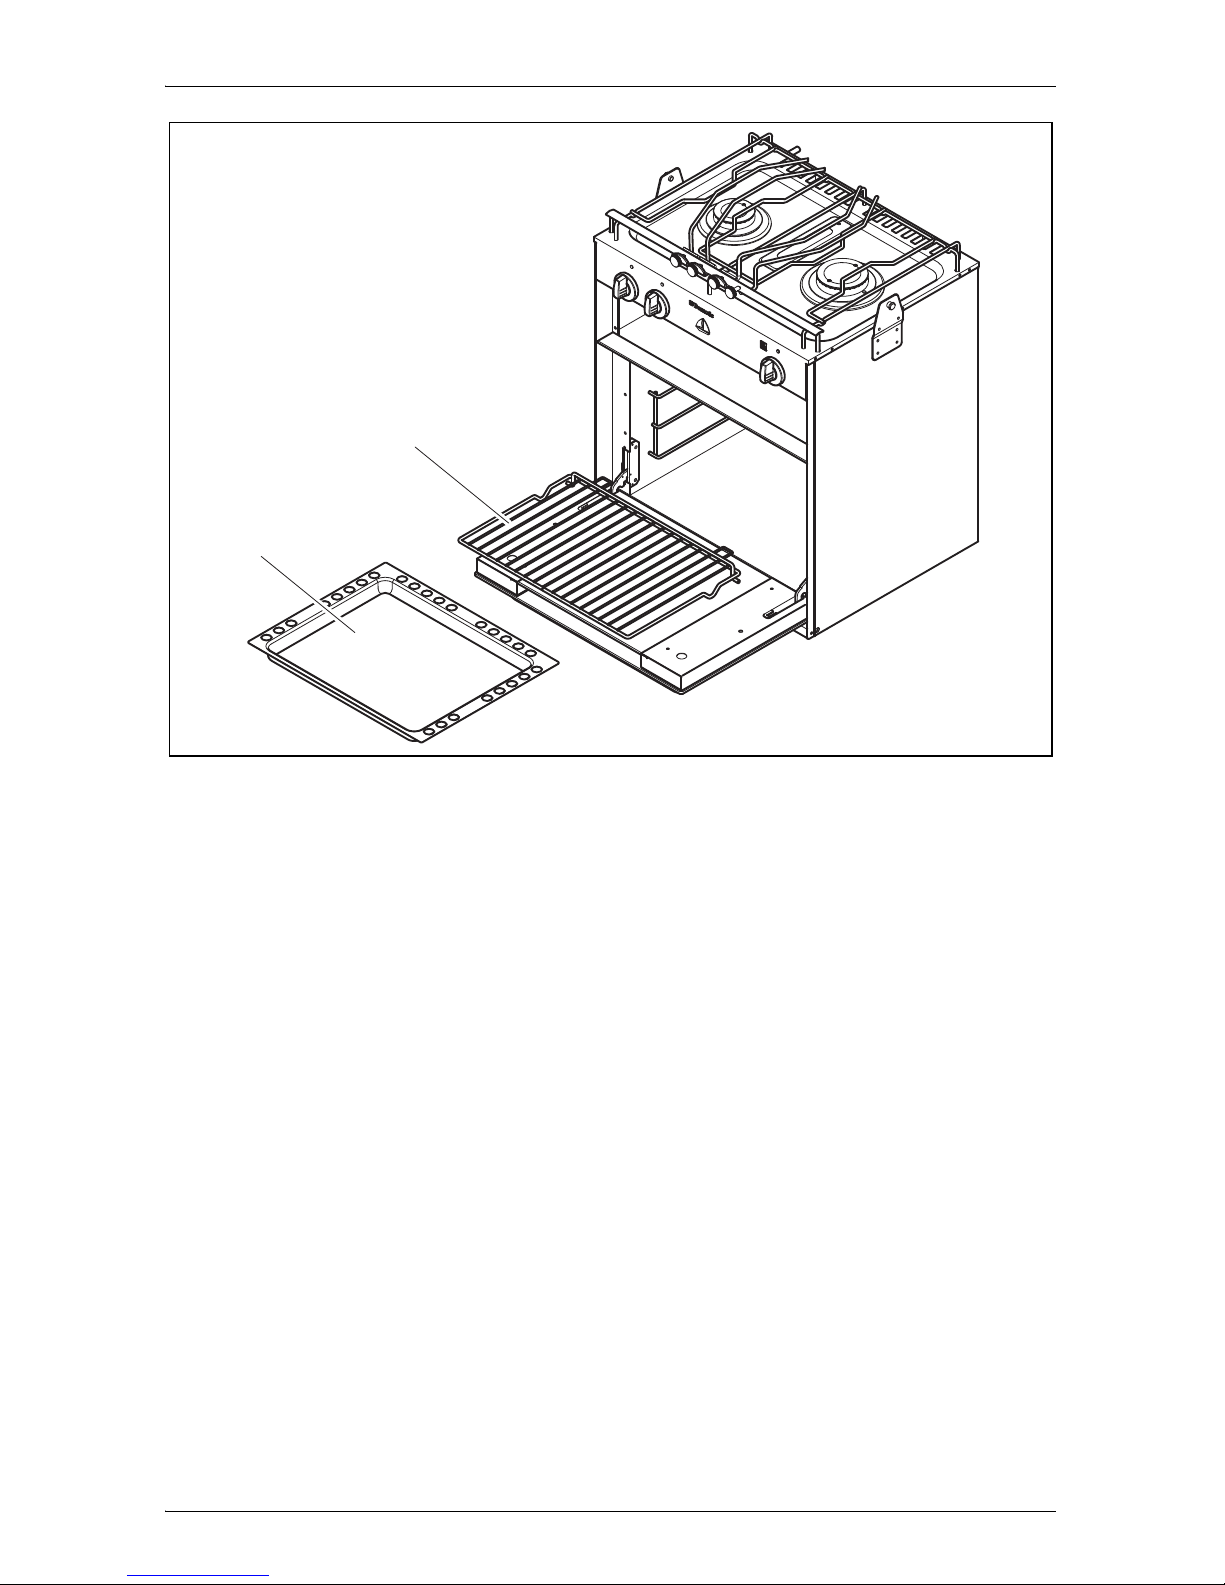
(fig. 8 1, page 5).
➤ Pull the heat guard out fully (fig. 9 1, page 6).
➤ Open the main shut-off valve.
➤ Turn the control knob (fig. 2 3, page 2) from the neutral setting (0) to the
GRILL setting.
➤ Press the control knob in and hold it in this position.
➤ Ignite the burner straight away at the gas outlet (fig. 8 1, page 5) using
a long match or a suitable lighter. Remove your hand quickly as soon as
the burner is lit.
Once the burner is lit, you can release the knob after approx.
10 seconds.
➤ If the burner goes out after releasing the knob:
wait at least 60°seconds before you ignite it again.
➤ After it is ignited, check that the flames are burning on both sides along
the whole length of the burner pipe (fig. 8 2, page 5).
I
NOTE
Place the pan (accessory) directly on top of the burner to gain the
most heat.
EN
Using the device Dometic StarLight
18
9.3 Igniting the oven
!
WARNING! Beware of injury
Use long matches or a long lighter to ignite the burner.
Remove your hand quickly as soon as the burner is lit.
I
NOTE
The oven can only be ignited if the oven door is completely open.
➤ Open the oven door completely.
➤ Open the main shut-off valve.
➤ Turn the control knob of the burner (fig. 2 3, page 2) anti-clockwise from
the neutral setting (0) to the large flame setting.
➤ Press the control knob in and hold it in this position.
➤ Ignite the burner straight away at the gas outlet (fig. 0 1, page 6) using
a long match or a suitable lighter. Remove your hand quickly as soon as
the burner is lit.
Once the burner is lit, you can release the knob after approx.
10 seconds.
➤ If the burner goes out after releasing the knob:
wait at least 60 seconds before you ignite it again.
➤ After it is ignited, check that the flames are burning on both sides along
the whole length of the burner pipe.
➤ Turn the control knob to the required position.
I
NOTE
If the oven has not cooled down from previous use, the burner may
go out straight after lighting it. In this case, blow into the burner
opening to get rid of the steam.
Ignite the oven again as previously described.

EN
Dometic StarLight Troubleshooting
19
9.4 Using the rack and baking tray
Note the following information when using the rack and baking tray:
You can select three heights for the rack and baking tray.
Always insert the rack (fig. a 1, page 7) and baking tray (fig. a 2,
page 7) into the oven as shown.
Always slide the rack into the guide rails.
9.5 Switching off the hob, grill or oven
➤ Turn the control knob to the neutral position.
✓ The burner goes out.
➤ If you are not planning to use the device for a long time, close the valve
on the gas cylinder.
10 Troubleshooting
Repairs to the gas supply parts on the device may only be carried out by a
qualified technician.
➤ Shut off the gas supply immediately if a fault occurs.
➤ Check again for any damage to the device.
➤ Replace the damaged parts.
➤ Only use the device again once all the faults have been rectified.
11 Maintaining the device
For safety reasons, the device must be inspected annually by a specialist for
correct functionality and necessary repairs.
➤ While checking the device every year, pay particular attention to the fol-
lowing:
–Gas leaks
– Burning and flame stability
– Fresh air supply
– Safety and regulating devices (burner taps)
➤ Check that the installation location conforms to local regulations.
EN
Cleaning the device Dometic StarLight
20
➤ Check the following components for dirt and clean, if necessary:
– Gas outlets on the burner
– Burner heads
– Thermal element
➤ Check the correct distance between the burner head and thermal element
(approx. 1–3 mm).
12 Cleaning the device
A
NOTICE!
Do not use any sharp or hard objects for cleaning since they may
damage the device.
Only use standard cleaning agents.
➤ Allow the device to cool down properly before cleaning it.
➤ Remove the grids from the hob.
➤ Clean the hob surface, the grill box and the oven. Pay special attention to
removing sticky fat and oil residue.
➤ Do not use a steam cleaner to clean the device under any circumstances.
13 Warranty
The statutory warranty period applies. If the product is defective, please
contact the manufacturer's branch in your country (see the back of the
instruction manual for the addresses) or your retailer.
For repair and guarantee processing, please include the following documents when you send in the device:
A copy of the receipt with purchasing date
A reason for the claim or description of the fault
14 Disposal
➤ If possible, dispose of the packaging material in the appropriate recycling
container.
EN
Dometic StarLight Technical data
21
15 Technical data
Dometic StarLight
Item no.: 9103303820
Gas consumption: Burner: 291 g/h
Grill: 100 g/h
Oven: 80 g/h
Device class: III
Gas category: I
3B/P
, I3+, I3 (butane/propane)
Number of cooking rings: 2
Nominal heat input: Burner: (2200°W + 1800°W
Grill: 1300 W
Oven: 1100 W
Dimensions: see fig. 3, page 3
Weight: 23 kg
Inspection/certification:
DE
Erklärung der Symbole Dometic StarLight
22
Bitte lesen Sie diese Anleitung vor der Inbetriebnahme sorgfältig durch
und bewahren Sie sie auf. Geben Sie sie im Fall einer Weitergabe des
Geräts an den Nutzer weiter.
Inhalt
1 Erklärung der Symbole . . . . . . . . . . . . . . . . . . . . . . . . . . . . . . . . . . 22
2 Allgemeine Sicherheitshinweise . . . . . . . . . . . . . . . . . . . . . . . . . . . 23
3 Lieferumfang . . . . . . . . . . . . . . . . . . . . . . . . . . . . . . . . . . . . . . . . . . 27
4 Zubehör . . . . . . . . . . . . . . . . . . . . . . . . . . . . . . . . . . . . . . . . . . . . . . 27
5 Bestimmungsgemäßer Gebrauch . . . . . . . . . . . . . . . . . . . . . . . . . . 27
6 Technische Beschreibung . . . . . . . . . . . . . . . . . . . . . . . . . . . . . . . . 28
7 Gerät einbauen . . . . . . . . . . . . . . . . . . . . . . . . . . . . . . . . . . . . . . . . 29
8 Vor dem ersten Gebrauch . . . . . . . . . . . . . . . . . . . . . . . . . . . . . . . . 31
9 Gerät benutzen . . . . . . . . . . . . . . . . . . . . . . . . . . . . . . . . . . . . . . . . 31
10 Störungsbeseitigung . . . . . . . . . . . . . . . . . . . . . . . . . . . . . . . . . . . . 34
11 Gerät warten . . . . . . . . . . . . . . . . . . . . . . . . . . . . . . . . . . . . . . . . . . 35
12 Gerät reinigen . . . . . . . . . . . . . . . . . . . . . . . . . . . . . . . . . . . . . . . . . 35
13 Gewährleistung . . . . . . . . . . . . . . . . . . . . . . . . . . . . . . . . . . . . . . . . 36
14 Entsorgung. . . . . . . . . . . . . . . . . . . . . . . . . . . . . . . . . . . . . . . . . . . . 36
15 Technische Daten . . . . . . . . . . . . . . . . . . . . . . . . . . . . . . . . . . . . . . 36
1 Erklärung der Symbole
!
WARNUNG!
Sicherheitshinweis: Nichtbeachtung kann zu Tod oder schwerer
Verletzung führen.
!
VORSICHT!
Sicherheitshinweis: Nichtbeachtung kann zu Verletzungen
führen.

DE
Dometic StarLight Allgemeine Sicherheitshinweise
23
A
ACHTUNG!
Nichtbeachtung kann zu Materialschäden führen und die Funktion
des Produktes beeinträchtigen.
I
HINWEIS
Ergänzende Informationen zur Bedienung des Produktes.
➤ Handlung: Dieses Symbol zeigt Ihnen, dass Sie etwas tun müssen. Die
erforderlichen Handlungen werden Schritt für Schritt beschrieben.
✓ Dieses Symbol beschreibt das Ergebnis einer Handlung.
Abb. 1 5, Seite 3: Diese Angabe weist Sie auf ein Element in einer Abbildung hin, in diesem Beispiel auf „Position 5 in Abbildung 1 auf Seite 3“.
2 Allgemeine Sicherheitshinweise
Der Hersteller übernimmt in folgenden Fällen keine Haftung für Schäden:
Montage- oder Anschlussfehler
Beschädigungen am Produkt durch mechanische Einflüsse und Über-
spannungen
Veränderungen am Produkt ohne ausdrückliche Genehmigung vom
Hersteller
Verwendung für andere als die in der Anleitung beschriebenen Zwecke
2.1 Grundlegende Sicherheit
!
WARNUNG!
Verwenden Sie ausschließlich Flüssiggas der Kategorien I
3B/P
,
I
3+
, I3 (Butan/Propan). Verwenden Sie keine anderen Brenn-
stoffe.
Bringen Sie einen geeigneten Feuerlöscher in Reichweite an.
Sorgen Sie dafür, dass der Feuerlöscher in regelmäßigen
Abständen von einem Fachmann überprüft wird.
Das Gerät darf nur von einer Fachkraft gemäß den geltenden
Vorschriften und Normen (insbesondere EN 1949) an die Gasversorgung angeschlossen werden.

DE
Allgemeine Sicherheitshinweise Dometic StarLight
24
Dieses Gerät wird nicht an eine Verbrennungsprodukt-
abführung angeschlossen. Es muss nach den geltenden
Installationsbedingungen aufgestellt und angeschlossen
werden. Besonders zu beachten sind die relevanten Anforderungen an die Belüftung.
A
ACHTUNG!
Benutzen Sie das Gerät nur zu seinem bestimmungsgemäßen
Gebrauch.
2.2 Sicherheit beim Umgang mit Flüssiggas
!
WARNUNG!
Halten Sie brennbare Stoffe von Heiz- und Kochgeräten sowie
anderen Licht- und Wärmequellen fern.
Vergleichen Sie die Druckangabe auf dem Typenschild mit der
Druckangabe auf dem Druckregler.
Bewahren Sie Flüssiggasflaschen niemals an unbelüfteten
Plätzen oder unterhalb Bodenniveau (Keller, trichterförmige
Erdmulden) auf.
Schützen Sie Flüssiggasflaschen vor direkter Sonnen-
einstrahlung. Die Temperatur darf 50 °C nicht überschreiten.
2.3 Sicherheit beim Betrieb des Geräts
!
WARNUNG!
Wenn Sie Gasgeruch wahrnehmen:
– Schließen Sie das Gasflaschenventil und lassen Sie es ge-
schlossen, bis der Fehler behoben wurde.
– Versuchen Sie niemals das Leck mit einer offenen Flamme
zu finden.
Das Gerät darf in Räumen nur dann betrieben werden, wenn für
eine ausreichende Belüftung entsprechend der geltenden Vorschriften des Landes gesorgt ist.

DE
Dometic StarLight Allgemeine Sicherheitshinweise
25
Die Benutzung des Gaskochgeräts führt zu einer Wärme- und
Feuchtigkeitsbildung im Aufstellraum. Achten Sie auf eine gute
Belüftung des Raums: Halten Sie die natürlichen Belüftungsöffnungen offen oder sehen Sie eine mechanische Lüftungseinrichtung (z. B. eine Dunstabzugshaube) vor.
Eine intensive und lang andauernd Benutzung des Geräts kann
eine zusätzliche Belüftung, z. B. Öffnen eines Fensters, oder
eine wirksamere Belüftung, z. B. Betrieb der vorhandenen
mechanischern Lüftungseinrichtung auf höherer Leistungsstufe, erforderlich machen.
Personen (einschließlich Kinder), die aufgrund ihrer physi-
schen, sensorischen oder geistigen Fähigkeiten oder ihrer Unerfahrenheit oder Unkenntnis nicht in der Lage sind, das Gerät
sicher zu benutzen, sollten dieses Gerät nicht ohne Aufsicht
oder Anweisung durch eine verantwortliche Person nutzen.
Kinder sollten beaufsichtigt werden, um sicherzustellen, dass
sie nicht mit dem Gerät spielen.
Lassen Sie das Gerät beim Betrieb niemals über längere Zeit
unbeaufsichtigt.
Benutzen Sie lange Zündhölzer oder einen entsprechenden
Anzünder. Schauen Sie beim Zündvorgang auf die
Gasaustrittsöffnungen. Zünden Sie den Brenner nicht ohne
direkten Sichtkontakt an.
Ziehen Sie schnell Ihre Hand zurück, sobald der Brenner gezündet hat.
Tragen Sie beim Benutzen des Geräts entsprechende
Kleidung.
Tragen Sie keine lose hängenden Kleidungsstücke, die Feuer
fangen könnten.
Lassen Sie das Gerät bis auf Umgebungstemperatur abkühlen,
bevor Sie es mit den bloßen Händen berühren.
Verändern Sie niemals Düse, Injektor oder Brenner.
Halten Sie den Bereich um das Gerät frei von Fett, alkoholi-
schen Substanzen, Plastikmaterial und brennbarem Stoff (z. B.
Vorhänge, Handtücher, Küchenmaterialien).

DE
Allgemeine Sicherheitshinweise Dometic StarLight
26
Benutzen Sie nur Töpfe und Pfannen mit ebenem Boden und
einem Durchmesser, der nicht größer ist als das auf dem
Kocher befindliche Topfrost (ca. 200 mm). Die Töpfe und
Pfannen sollten so groß sein, dass sie die Flammen abdecken.
Werden die Flammen nicht abgedeckt, können sich Kleidungsstücke entzünden.
Darüber hinaus verbessern Töpfe und Pfannen der richtigen
Größe die Wirtschaftlichkeit.
Achten Sie beim Kochen darauf, dass die Töpfe und Pfannen
sicher stehen.
Lassen Sie die Griffe von Töpfen oder Pfannen niemals über
den Kocher hinausragen. Drehen Sie die Griffe nach innen –
aber so, dass sie sich nicht über anderen Brennern befinden.
Damit wird die Gefahr des Verschüttens, der Entzündung von
brennbaren Stoffen und schwerer Verbrennungen verringert.
Gehen Sie vorsichtig vor, wenn Sie Fett oder Öl erhitzen. Fett
und Öl können sich bei zu großer Hitze entzünden.
Benutzen Sie nur trockene Topflappen, um die Dampfbildung
zu vermeiden. Benutzen Sie anstelle von Topflappen keine
Handtücher o. ä., da diese Feuer fangen könnten.
Betreiben Sie das Gerät niemals unbeaufsichtigt. Über-
kochende Töpfe können Rauch und Brände verursachen.
Stellen Sie den Regler in die Nullstellung (0), bevor Sie den
Topf herunternehmen.
Benutzen Sie das Gerät nicht zum Heizen des Raums.
Heiße Geräteteile sollten nicht mit Fett, Wasser oder anderen
Flüssigkeiten in Kontakt kommen.
DE
Dometic StarLight Lieferumfang
27
3Lieferumfang
4 Zubehör
Als Zubehör erhältlich (nicht im Lieferumfang enthalten):
5 Bestimmungsgemäßer Gebrauch
Dometic StarLight ist für den Einbau an Bord von Fahrzeugen oder Booten
bestimmt.
Das Gerät darf nur zum Kochen, Backen und Grillen verwendet werden. Es
darf insbesondere nicht zum Heizen verwendet werden.
Nr. in
Abb. 1,
Seite 2
Menge Bezeichnung
1 1 Backofen mit Grillkabinett und Kochmulde
2 2 Topfhalter
3 1 Kardanaufhängung
4 1 Backblech
51Rost
– 1 Bedienungsanleitung
Bezeichnung Artikelnummer
Pfanne 9103303862
DE
Technische Beschreibung Dometic StarLight
28
6 Technische Beschreibung
Dometic StarLight (Art.-Nr. 9103303820) ist ein gasbetriebener Backofen mit
Grillkabinett und 2-flammiger Kochmulde.
Das Gerät ist aus Edelstahlblech gefertigt. Die verchromten Topfaufsätze
und Topfhalter sind abnehmbar.
Die beiden Kochfelder sind unabhängig von Grill und Backofen regelbar. Als
Brennstoff wird Flüssiggas der Kategorien I
3B/P
, I3+, I3 (Butan/Propan)
verwendet.
Grill und Backofen können nicht gleichzeitig betrieben werden.
Bedienelemente
6.1 Gasdruck
Den zulässigen Gasdruck können Sie dem Typenschild entnehmen.
Benutzen Sie nur in Ihrem Land vorgeschriebene und zugelassene Druckregler.
!
WARNUNG! Verletzungsgefahr!
Der Ausgangsdruck des Druckreglers muss auf jedem Fall mit dem
Anschlussdruck (Gasdruck) des Geräts übereinstimmen (siehe
Zusatzblatt).
Nr. in
Abb. 2,
Seite 2
Bezeichnung
1 Regler für linkes Kochfeld
2 Regler für rechtes Kochfeld
3 Regler für den Grill und für den Backofen
4 Nullstellung
5 Stellung „Große Flamme“
6 Stellung „Kleine Flamme“
7 Stellung „GRILL“

DE
Dometic StarLight Gerät einbauen
29
7 Gerät einbauen
Sie können das Gerät in die vorhandene Kücheninstallation integrieren.
7.1 Einbauort auswählen
Beachten Sie bei der Wahl des Einbauorts folgende Hinweise:
Wählen Sie einen gut belüfteten Ort für das Gerät aus.
Beachten Sie die Einbaumasse für das Gerät (Abb. 4, Seite 3 und
Abb. 5, Seite 4).
Gewährleisten Sie einen Mindestabstand von
– 200 mm zu den seitlichen Wänden
– 170 mm zur hinteren Wand
– 500 mm zwischen dem Brenner und der horizontalen Fläche über dem
Kocher
Achten Sie darauf, dass am Montageort kein Durchzug entsteht.
Betreiben Sie das Gerät nicht in explosionsgefährdeten Räumen.
Wenn Kardanaufhängungen verwendet werden, ist sicherzustellen, dass
der Kocher frei schwingen kann.
Lassen Sie reichlich Platz für die Schwingbewegungen der Kardan-
aufhängung.
7.2 Gerät einbauen
A
ACHTUNG! Beschädigungsgefahr!
Bevor Sie irgendwelche Bohrungen vornehmen, stellen Sie sicher,
dass keine elektrischen Kabel oder andere Teile des Fahrzeugs
durch Bohren, Sägen und Feilen beschädigt werden.
So bauen Sie das Gerät ein (Abb. 6, Seite 4 und Abb. 7, Seite 5):
➤ Befestigen Sie die Seitenplatten mit den mitgelieferten Schrauben mit ei-
nem Abstand von 134 mm zum Rand der Küchenmöbel.
➤ Hängen Sie das Gerät so ein, dass die Bolzen der Halterungsbleche in
die Seitenplatten einhaken (Abb. 7 , Seite 5).
DE
Gerät einbauen Dometic StarLight
30
7.3 Gerät an die Gasversorgung anschließen
!
WARNUNG! Verletzungsgefahr!
Das Gerät darf nur von einer Fachkraft gemäß den geltenden
Vorschriften und Normen (insbesondere EN 1949) an die Gasversorgung angeschlossen werden.
Verwenden Sie nur Propan- oder Butangasflaschen mit geprüf-
tem Druckreduzierventil und passendem Kopfstück. Vergleichen Sie die Druckangabe auf dem Typenschild mit der
Druckangabe auf der Propan- oder Butangasflasche.
Beachten Sie beim Anschluss folgende Hinweise:
Verwenden Sie eine Gasleitung aus Stahlrohr 8x1mm (geschweißt,
nahtloser Stahl oder nichtrostender Stahl), die Sie mittels Schneidringverschraubung dicht montieren.
Befestigen Sie die Rohre so an einer Seiten- oder Rückwand der umge-
benden Möbelteile, dass keine Kraftübertragung auf die Stellglieder erfolgt.
Die Verbindung darf nur mit Werkzeug lösbar sein. Beachten Sie dabei
die technischen Regeln der DVGW-Arbeitsblätter G607 und G608.
Die gesamte Verrohrung muss spannungsfrei sein.
Während des Betriebs müssen Lüftungsöffnungen mit einem freien Quer-
schnitt von mindestens 150 cm
2
im Aufstellungsraum vorhanden sein.
Diese Öffnungen können verschließbar sein, müssen aber bei Betrieb der
Brennstelle geöffnet werden.
Verbinden Sie das Gerät mit der Gasversorgung.
➤ Bringen Sie über dem Gerät ein Hinweisschild mit folgendem Text an:
„WARNUNG!
Beim Kochen ist es erforderlich, für zusätzliche Lüftung zu sorgen, z. B.
durch das Öffnen von Fenstern in der Nähe des Grill-, Koch-, und Backgerätes.
Diese Geräte dürfen nicht zur Raumheizung verwendet werden.“
➤ Öffnen Sie das Hauptsperrventil.
!
WARNUNG! Verletzungsgefahr!
Prüfen Sie die Dichtheit niemals bei offener Flamme oder in der
Nähe von Zündquellen.
 Loading...