

Dometic SP950C Installation Manual
SP950C
Fastening frame
for MAN TGA/TGX/TGS L, LX, XL
Installation Manual. . . . . . . . . . . . . . . . . . . . .6
Befestigungsrahmen
für MAN TGA/TGX/TGS L, LX, XL
Montageanleitung. . . . . . . . . . . . . . . . . . . . 10
Cadre de fixation
pour MAN TGA/TGX/TGS L, LX, XL
Instructions de montage . . . . . . . . . . . . . . . 14
Bastidor de fijación
para MAN TGA/TGX/TGS L, LX, XL
Instrucciones de montaje . . . . . . . . . . . . . . 18
Estrutura de fixação
para MAN TGA/TGX/TGS L, LX, XL
Instruções de montagem . . . . . . . . . . . . . .23
Telaio di fissaggio
per MAN TGA/TGX/TGS L, LX, XL
Indicazioni di montaggio . . . . . . . . . . . . . .27
Bevestigingsframe
voor MAN TGA/TGX/TGS L, LX, XL
Montagehandleiding . . . . . . . . . . . . . . . . . 31
Fastgørelsesramme
til MAN TGA/TGX/TGS L, LX, XL
Monteringsvejledning . . . . . . . . . . . . . . . . 35
Fästram
för MAN TGA/TGX/TGS L, LX, XL
Monteringsanvisning . . . . . . . . . . . . . . . . . 39
Festeramme
for MAN TGA/TGX/TGS L, LX, XL
Monteringsanvisning . . . . . . . . . . . . . . . . . 43
Kiinnityskehys
malliin MAN TGA/TGX/TGS L, LX, XL
Asennusohje . . . . . . . . . . . . . . . . . . . . . . . . 47
Крепежная рамка
для MAN TGA/TGX/TGS L, LX, XL
Инструкция по монтажу. . . . . . . . . . . . . . . 51
Rama mocująca
do MAN TGA/TGX/TGS L, LX, XL
Instrukcja montażu . . . . . . . . . . . . . . . . . . . 56
Upevňovací rám
pre MAN TGA/TGX/TGS L, LX, XL
Návod na montáž . . . . . . . . . . . . . . . . . . . . 60
Upevňovací rám
pro MAN TGA/TGX/TGS L, LX, XL
Návod k montáži. . . . . . . . . . . . . . . . . . . . . 64
Rögzítőkeret
MAN TGA/TGX/TGS L, LX, XL
Szerelési útmutató . . . . . . . . . . . . . . . . . . . 68
ENDEFR
ES
PT
IT
NLDASVNOFIRUPL
SKCSHU
AIR CONDITIONERS
COOLAIR

CoolAir SP950C
3
1
2
3
A
1
CoolAir SP950C
4
1
1
2
2

CoolAir SP950C
5
3

EN
Explanation of symbols CoolAir SP950C
6
Please read this manual carefully before installing and starting up and
store it in a safe place. If the device is resold, this instruction manual must
be handed over to the purchaser along with the device.
Table of contents
1 Explanation of symbols. . . . . . . . . . . . . . . . . . . . . . . . . . . . . . . . . . . . . . . . . . .6
2 General safety instructions . . . . . . . . . . . . . . . . . . . . . . . . . . . . . . . . . . . . . . . .7
3 Scope of delivery . . . . . . . . . . . . . . . . . . . . . . . . . . . . . . . . . . . . . . . . . . . . . . .7
4 Target group for this manual. . . . . . . . . . . . . . . . . . . . . . . . . . . . . . . . . . . . . . .8
5 Intended use . . . . . . . . . . . . . . . . . . . . . . . . . . . . . . . . . . . . . . . . . . . . . . . . . . .8
6 Fitting the fastening frame . . . . . . . . . . . . . . . . . . . . . . . . . . . . . . . . . . . . . . . .8
7 Guarantee . . . . . . . . . . . . . . . . . . . . . . . . . . . . . . . . . . . . . . . . . . . . . . . . . . . . .9
1 Explanation of symbols
!
!
A
I
WARNING!
Safety instruction: Failure to observe this instruction can cause fatal or
serious injury.
CAUTION!
Safety instruction: Failure to observe this instruction can lead to injury.
NOTICE!
Failure to observe this instruction can cause material damage and impair
the function of the product.
NOTE
Supplementary information for operating the product.

EN
CoolAir SP950C General safety instructions
7
2 General safety instructions
The manufacturer accepts no liability for damage in the following cases:
• Damage to the product resulting from mechanical influences and excess voltage
• Alterations to the product without express permission from the manufacturer
• Use for purposes other than those described in the operating manual
A
I
3Scope of delivery
Installation kit for MAN TGA/TGX/TGS L, LX, XL,
ref. no. 9100300049
Before starting the system, check that all the parts belonging to the scope of delivery
are present.
NOTICE!
The freedom of movement of semi-trailers (of the outer edges of the
semi-trailer when turning or jackknifing) and other vehicle attachments
must not be restricted.
NOTE
Observe the safety instructions in the installation manual for the CoolAir
SP950 parking cooler.
Quantity Designation Ref. number
1 Fastening frame 4442500732
1 Installation manual 4445102216
13 Retainer nut M8
7 U washer M8 (d1 = 8.4 mm, d2 = 20 mm)
2 Bolt M8 x 16
4 Bolt M8 x 30
12 U washer M8 (d1 = 8.4 mm, d2 = 16 mm)

EN
Target group for this manual CoolAir SP950C
8
4 Target group for this manual
The installation information in this manual is only intended for qualified personnel at
workshops, who are familiar with the guidelines and safety precautions to be applied
during the installation of vehicle accessory parts.
5 Intended use
The fastening rail is used for installing the SP950C condenser unit for the CoolAir
SP950 parking cooler to the following vehicles: MAN TGA/TGX/TGS L, LX, XL. The
fastening frame is attached on the left of the rear cab wall.
When fastening the fastening frame, use existing fastening points on the vehicle. You
do not need to drill new holes.
6 Fitting the fastening frame
A
I
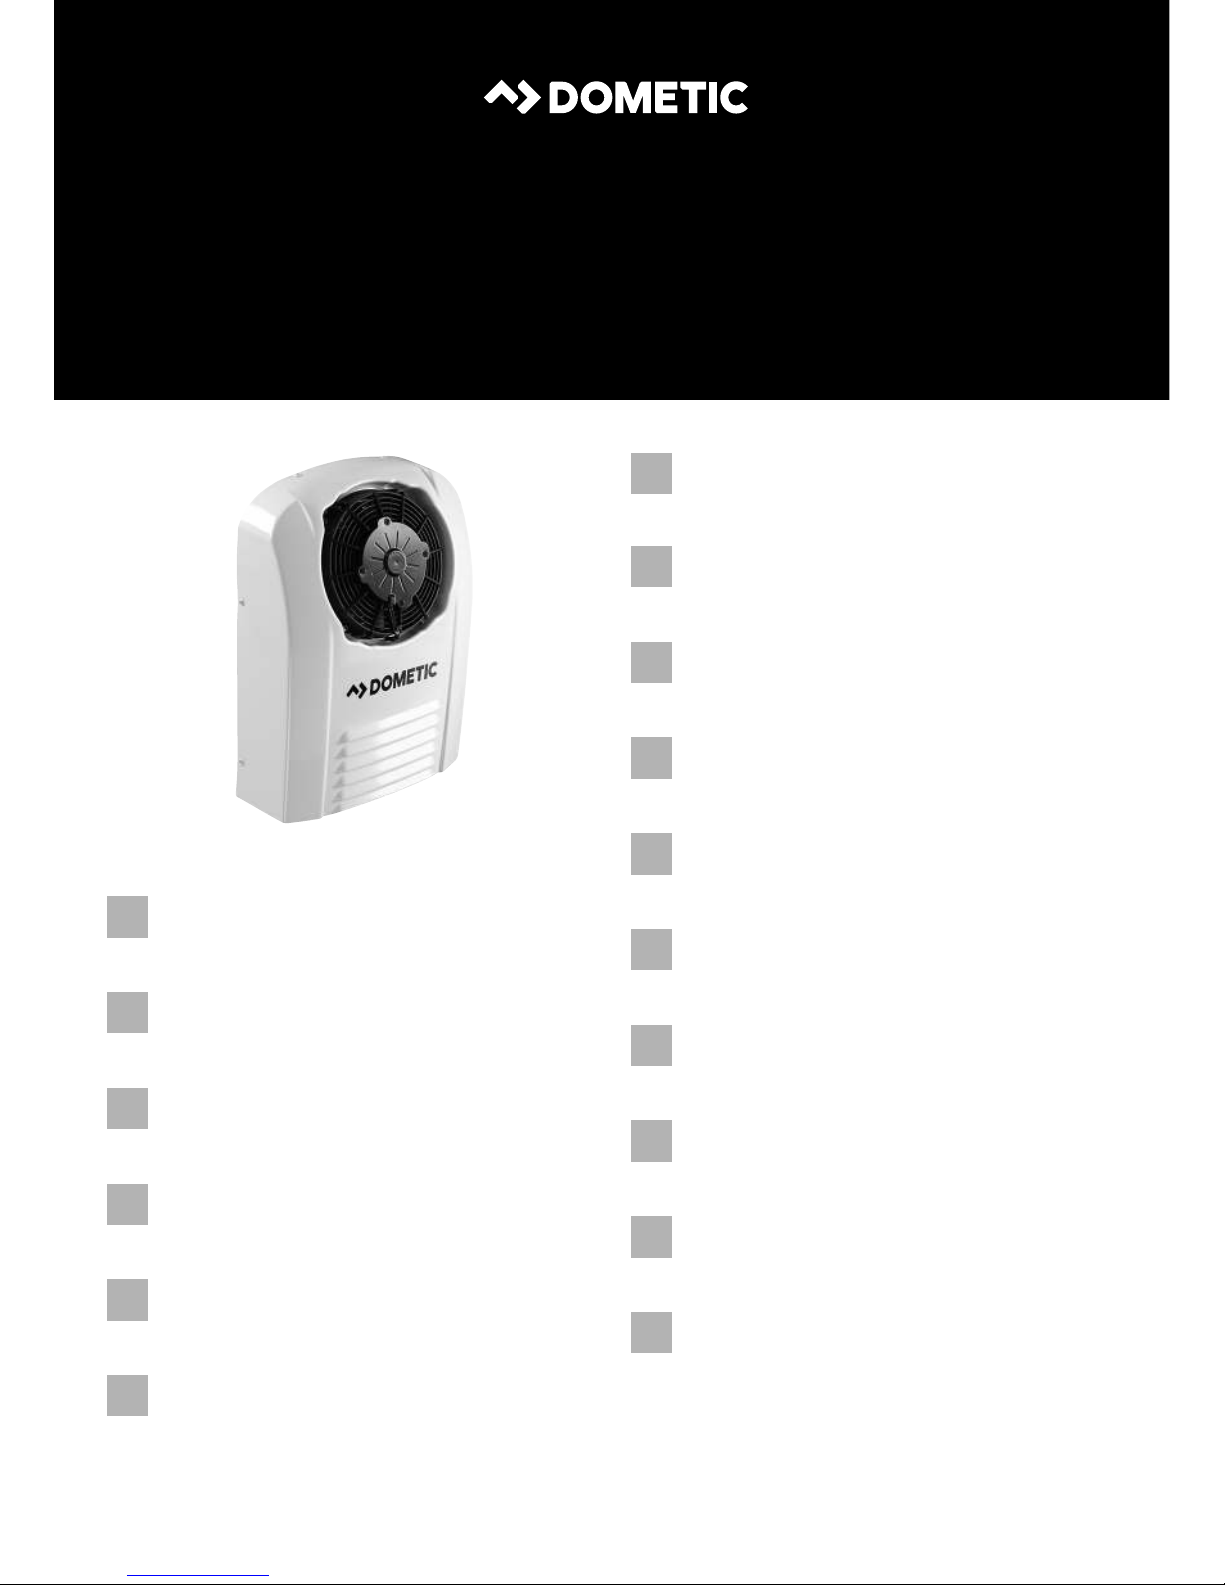
Basic assembly is described in fig. 1, page 3:
NOTICE!
Observe the information in the installation manual when fitting the
CoolAir SP950 parking cooler.
NOTE
Operating instructions can be found in the operating manual for the
CoolAir SP950 parking cooler.
Item Designation
1 Fastening frame
2Condenser unit
3Cover

EN
CoolAir SP950C Guarantee
9
Fit the fastening frame and the CoolAir SP950 parking cooler on the
MAN TGA/TGX/TGS L, LX, XL as follows:
➤ Insert and tighten the four M8 x 30 bolts, eight U washers M8 8.4 x 16 mm and
four M8 retaining nuts (fig. 1, page 3) in the mounting frame for the condenser
unit.
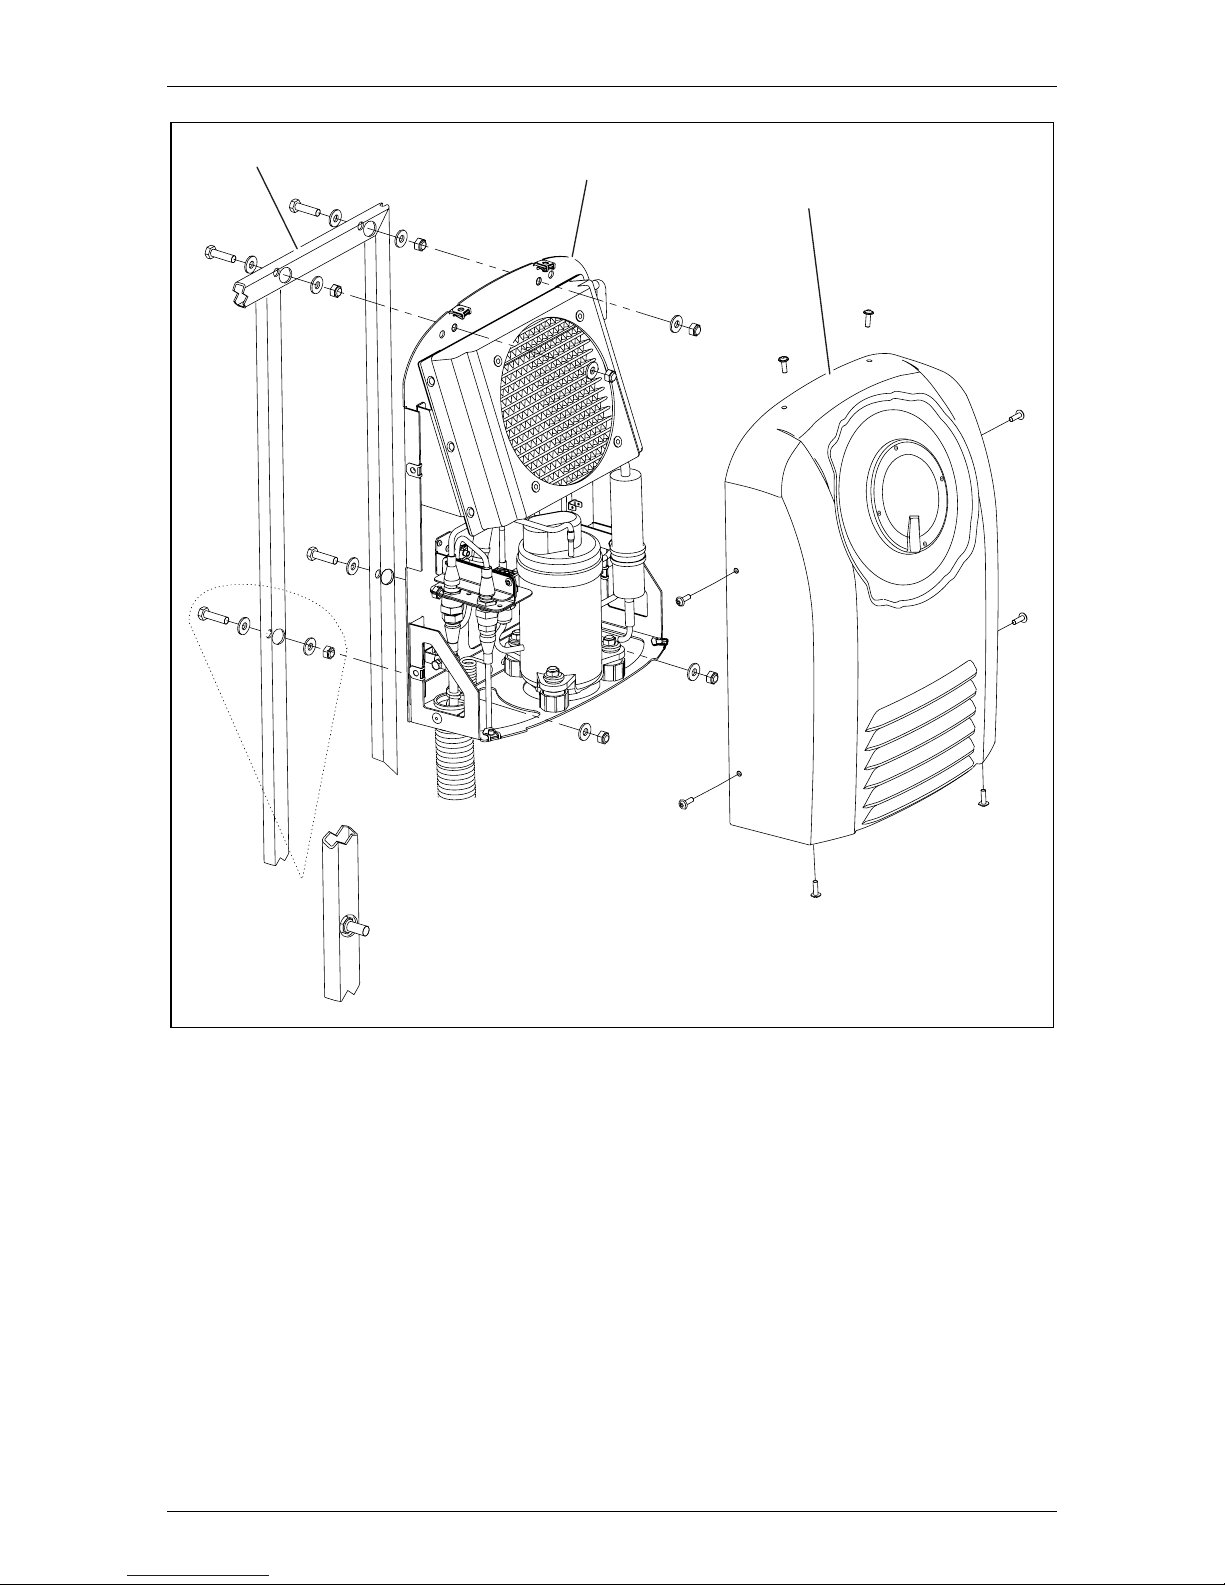
➤ Remove the existing nuts (fig. 2 1, page 4) from the fastening of the air intake
housing.
➤ Fasten the fastening frame to the fastening bolts using the U washers
M8 8.4 x 20 mm and M8 retaining bolts provided (fig. 2 1, page 4).
➤ Fasten the fastening frame to the bottom of the bracket with the M8 x 16 bolts,
U-washers M8 8.4 x 16 mm and M8 retaining nuts provided (fig. 2 2, page 4).
➤ Place the condenser unit on the projecting bolts of the mounting frame and bolt
to the four U washers M8 8.4 x 16 mm and four M8 retaining nuts.
➤ Check that all bolts are still tight after travelling approximately 200 km.
7Guarantee
The statutory warranty period applies. If the product is defective, please contact the
service partner in your country (addresses on the back on the instruction manual).
Our experts will be happy to help you and will discuss the warranty process with you
in more detail.

DE
Erklärung der Symbole CoolAir SP950C
10
Bitte lesen Sie diese Anleitung vor Einbau und Inbetriebnahme sorgfältig
und bewahren Sie sie auf. Geben Sie sie im Falle einer Weiterveräußerung
des Geräts an den Käufer weiter.
Inhaltsverzeichnis
1 Erklärung der Symbole . . . . . . . . . . . . . . . . . . . . . . . . . . . . . . . . . . . . . . . . . .10
2 Allgemeine Sicherheitshinweise . . . . . . . . . . . . . . . . . . . . . . . . . . . . . . . . . . 11
3 Lieferumfang . . . . . . . . . . . . . . . . . . . . . . . . . . . . . . . . . . . . . . . . . . . . . . . . . . 11
4 Zielgruppe dieser Anleitung . . . . . . . . . . . . . . . . . . . . . . . . . . . . . . . . . . . . .12
5 Bestimmungsgemäßer Gebrauch . . . . . . . . . . . . . . . . . . . . . . . . . . . . . . . . .12
6 Befestigungsrahmen montieren. . . . . . . . . . . . . . . . . . . . . . . . . . . . . . . . . . .12
7 Gewährleistung. . . . . . . . . . . . . . . . . . . . . . . . . . . . . . . . . . . . . . . . . . . . . . . .13
1 Erklärung der Symbole
!
!
A
I
WARNUNG!
Sicherheitshinweis: Nichtbeachtung kann zu Tod oder schwerer
Verletzung führen.
VORSICHT!
Sicherheitshinweis: Nichtbeachtung kann zu Verletzungen führen.
ACHTUNG!
Nichtbeachtung kann zu Materialschäden führen und die Funktion des
Produktes beeinträchtigen.
HINWEIS
Ergänzende Informationen zur Bedienung des Produktes.

DE
CoolAir SP950C Allgemeine Sicherheitshinweise
11
2 Allgemeine Sicherheitshinweise
Der Hersteller übernimmt in folgenden Fällen keine Haftung für Schäden:
• Beschädigungen am Produkt durch mechanische Einflüsse und Überspannungen
• Veränderungen am Produkt ohne ausdrückliche Genehmigung vom Hersteller
• Verwendung für andere als die in der Anleitung beschriebenen Zwecke
A
I
3 Lieferumfang
Montagesatz für MAN TGA/TGX/TGS L, LX, XL,
Artikel-Nr. 9100300049
Prüfen Sie vor Inbetriebnahme des Systems, ob alle zum Lieferumfang gehörenden
Teile vorhanden sind.
ACHTUNG!
Die Bewegungsfreiheit von Aufliegern (die äußeren Kanten des
Aufliegers beim Einlenken oder Einknicken) und anderen Fahrzeuganbauten darf nicht eingeschränkt werden.
HINWEIS
Beachten Sie die Sicherheitshinweise in der Einbauanleitung zur Standklimaanlage CoolAir SP950.
Menge Bezeichnung Artikelnummer
1 Befestigungsrahmen 4442500732
1 Montageanleitung 4445102216
13 Sicherungsmutter M8
7 U-Scheibe M8 (d1 = 8,4 mm, d2 = 20 mm)
2 Schraube M8 x 16
4 Schraube M8 x 30
12 U-Scheibe M8 (d1 = 8,4 mm, d2 = 16 mm)

DE
Zielgruppe dieser Anleitung CoolAir SP950C
12
4 Zielgruppe dieser Anleitung
Die Einbauinformationen in dieser Anleitung wenden sich ausschließlich an Fachleute in Werkstätten, die mit den anzuwendenden Richtlinien und Sicherheitsvorkehrungen beim Einbau von Fahrzeugzubehörteilen vertraut sind.
5 Bestimmungsgemäßer Gebrauch
Der Befestigungsrahmen dient zur Montage der Kondensatoreinheit SP950C von
der Standklimaanlage CoolAir SP950 an Fahrzeuge des Typs MAN TGA/TGX/TGS
L, LX, XL. Der Befestigungsrahmen wird links an der Fahrerhausrückwand montiert.
Bei der Befestigung des Befestigungsrahmens werden Originalbefestigungspunkte
am Fahrzeug verwendet. Sie müssen am Fahrzeug keine neuen Bohrungen
anfertigen.
6 Befestigungsrahmen montieren
A
I
Die grundsätzliche Montage stellt Abb. 1, Seite 3 dar:
ACHTUNG!
Beachten Sie beim Einbau auch die Informationen in der Einbauanleitung zur Standklimaanlage CoolAir SP950.
HINWEIS
Informationen zur Bedienung finden Sie in der Bedienungsanleitung zur
Standklimaanlage CoolAir SP950.
Pos. Bezeichnung
1 Befestigungsrahmen
2 Kondensatoreinheit
3 Abdeckhaube

DE
CoolAir SP950C Gewährleistung
13
Montieren Sie den Befestigungsrahmen und die Kondensatoreinheit
CoolAir SP950C am MAN TGA/TGX/TGS L, LX, XL wie folgt:
➤ Zur Aufnahme der Kondensatoreinheit die vier Schrauben M8 x 30, acht
U-Scheiben M8 8,4 x 16 mm und vier Sicherungsmuttern M8 (Abb. 1, Seite 3)
in den Befestigungsrahmen einsetzen und verschrauben.
➤ Vorhandene Muttern (Abb. 2 1, Seite 4) von der Befestigung des Luftansaug-
gehäuses entfernen.
➤ Befestigungsrahmen mit den beigefügten U-Scheiben M8 8,4 x 20 mm und
Sicherungsmuttern M8 an den Befestigungsbolzen befestigen (Abb. 2 1,
Seite 4).
➤ Befestigungsrahmen mit den beigefügten Schrauben M8 x 16, U-Scheiben
M8 8,4 x 20 mm und Sicherungsmuttern M8 unten am Winkel befestigen
(Abb. 2 2, Seite 4).
➤ Kondensatoreinheit auf die herausstehenden Schrauben am Befestigungs-
rahmen setzen und mit den vier U-Scheiben M8 8,4 x 16 mm und vier
Sicherungsmuttern M8 verschrauben.
➤ Alle Schrauben nach einer Fahrstrecke von ca. 200 km auf festen Sitz
kontrollieren.
7Gewährleistung
Es gilt die gesetzliche Gewährleistungsfrist. Sollte das Produkt defekt sein, wenden
Sie sich bitte an einen Service-Partner in Ihrem Land (Adressen siehe Rückseite der
Anleitung).
Unsere Spezialisten helfen Ihnen gerne weiter und besprechen mit Ihnen den
weiteren Verlauf der Gewährleistung.

FR
Explication des symboles CoolAir SP950C
14
Veuillez lire ce manuel avec attention avant le montage et la mise en service, puis le conserver. En cas de revente de l’appareil, veuillez le transmettre au nouvel acquéreur.
Table des matières
1 Explication des symboles . . . . . . . . . . . . . . . . . . . . . . . . . . . . . . . . . . . . . . . .14
2 Consignes de sécurité générales . . . . . . . . . . . . . . . . . . . . . . . . . . . . . . . . . .15
3 Contenu de la livraison . . . . . . . . . . . . . . . . . . . . . . . . . . . . . . . . . . . . . . . . . .15
4 Groupe cible de cette notice . . . . . . . . . . . . . . . . . . . . . . . . . . . . . . . . . . . . .16
5 Usage conforme . . . . . . . . . . . . . . . . . . . . . . . . . . . . . . . . . . . . . . . . . . . . . . .16
6 Monter le cadre de fixation. . . . . . . . . . . . . . . . . . . . . . . . . . . . . . . . . . . . . . .16
7 Garantie. . . . . . . . . . . . . . . . . . . . . . . . . . . . . . . . . . . . . . . . . . . . . . . . . . . . . .17
1 Explication des symboles
!
!
A
I
AVERTISSEMENT !
Consigne de sécurité : le non-respect de ces consignes peut entraîner
la mort ou de graves blessures.
ATTENTION !
Consigne de sécurité : le non-respect de ces consignes peut entraîner
des blessures.
AVIS !
Le non-respect de ces consignes peut entraîner des dommages
matériels et des dysfonctionnements du produit.
REMARQUE
Informations complémentaires sur l'utilisation du produit.

FR
CoolAir SP950C Consignes de sécurité générales
15
2 Consignes de sécurité générales
Le fabricant décline toute responsabilité pour des dommages dans les cas suivants :
• des influences mécaniques et des surtensions ayant endommagé le matériel
• des modifications apportées au produit sans autorisation explicite de la part du
fabricant
• une utilisation différente de celle décrite dans la notice
A
I
3 Contenu de la livraison
Kit de montage pour MAN TGA/TGX/TGS L, LX, XL,
N° d’article 9100300049
Avant de mettre le système en service, vérifiez si toutes les pièces faisant partie de la
livraison ont bien été livrées.
AVIS !
Veillez à ce que la liberté de mouvement des semi-remorques (les bords
extérieurs de la semi-remorque lors du braquage ou du pivotement) et
d'autres équipements du véhicule ne soit pas restreinte.
REMARQUE
Veuillez respecter les consignes de sécurité indiquées dans la notice de
montage du climatiseur auxiliaire CoolAir SP950.
Quantité Désignation Numéro d’article
1 Cadre de fixation 4442500732
1 Instructions de montage 4445102216
13 Ecrou de sécurité M8
7 Rondelle U M8 (d1 = 8,4 mm, d2 = 20 mm)
2 Vis M8 x 16
4 Vis M8 x 30
12 Rondelle U M8 (d1 = 8,4 mm, d2 = 16 mm)

FR
Groupe cible de cette notice CoolAir SP950C
16
4 Groupe cible de cette notice
Les informations concernant le montage fournies par ce manuel s’adressent
exclusivement à un personnel qualifié, travaillant dans des ateliers et connaissant les
directives et les consignes de sécurité à appliquer pour le montage d’accessoires
dans les véhicules.
5Usage conforme
Le cadre de fixation sert à monter l'unité du condenseur SP950C du climatiseur
auxiliaire CoolAir SP950 sur les véhicules du type MAN TGA/TGX/TGS L, LX, XL. Le
cadre de fixation est monté à droite sur la paroi arrière de la cabine.
Lors de la fixation du cadre de fixation, utilisez les points de fixation d’origine au
niveau du véhicule. Il n’est pas nécessaire de procéder à de nouveaux perçages au
niveau du véhicule.
6 Monter le cadre de fixation
A
I
Le montage de base est représenté sur la fig. 1, page 3 :
AVIS !
Lors du montage, tenez également compte des informations indiquées
dans la notice de montage du climatiseur auxiliaire CoolAir SP950.
REMARQUE
Vous trouverez des informations concernant l'utilisation dans le manuel
d'utilisation du climatiseur auxiliaire CoolAir SP950.
Pos. Désignation
1 Cadre de fixation
2 Condensateur
3 Cache de protection

FR
CoolAir SP950C Garantie
17
Montez le cadre de fixation et le climatiseur split pour poids lourds CoolAir SP950
sur MAN TGA/TGX/TGS L, LX, XL de la manière suivante :
➤ Pour mettre en place l'unité du condensateur, insérer et visser les quatre vis
M8 x 30, les huit rondelles U M8 8,4 x 16 mm et les quatre écrous de fixation M8
(fig. 1, page 3) dans le cadre de fixation.
➤ Retirez les écrous présents (fig. 2 1, page 4) de la fixation du boîtier
d’aspiration d’air.
➤ Fixez le cadre de fixation sur les boulons de fixation à l’aide des rondelles U
M8 8,4 x 20 mm et des écrous de sécurité M8 fournis (fig. 2 1, page 4).
➤ Fixez le cadre de fixation à l’aide des vis M8 x 16, des rondelles U
M8 8,4 x 16 mm et des écrous de sécurité M8 fournis en bas au niveau de la
cornière (fig. 2 2, page 4).
➤ Placer l'unité du condensateur sur les vis saillantes du cadre de fixation et la visser
avec les quatre rondelles U M8 8,4 x 16 mm et les quatre écrous de fixation M8.
➤ Contrôlez la fixation de toutes les vis après avoir parcouru un trajet de 200 km
env.
7 Garantie
Le délai légal de garantie s'applique. Si le produit s'avérait défectueux, veuillez vous
adresser à un de nos partenaires de service présent dans votre pays (voir adresses au
dos du présent manuel).
Nos spécialistes vous aideront avec plaisir et répondront à vos questions concernant
la suite de la procédure pour la garantie.

ES
Aclaración de los símbolos CoolAir SP950C
18
Lea atentamente estas instrucciones antes del montaje y de la puesta en
funcionamiento del aparato y consérvelas en un lugar seguro para futuras
consultas. En caso de vender o entregar el aparato a otra persona, entregue también este manual.
Índice
1 Aclaración de los símbolos. . . . . . . . . . . . . . . . . . . . . . . . . . . . . . . . . . . . . . .18
2 Indicaciones generales de seguridad . . . . . . . . . . . . . . . . . . . . . . . . . . . . . .19
3 Volumen de entrega . . . . . . . . . . . . . . . . . . . . . . . . . . . . . . . . . . . . . . . . . . . 20
4 Destinatarios de estas instrucciones . . . . . . . . . . . . . . . . . . . . . . . . . . . . . . 20
5 Uso adecuado . . . . . . . . . . . . . . . . . . . . . . . . . . . . . . . . . . . . . . . . . . . . . . . . .21
6 Montar el bastidor de fijación. . . . . . . . . . . . . . . . . . . . . . . . . . . . . . . . . . . . .21
7 Garantía legal . . . . . . . . . . . . . . . . . . . . . . . . . . . . . . . . . . . . . . . . . . . . . . . . 22
1 Aclaración de los símbolos
!
!
A
I
¡ADVERTENCIA!
Indicación de seguridad: su incumplimiento puede acarrear la
muerte o graves lesiones.
¡ATENCIÓN!
Indicación de seguridad: su incumplimiento puede acarrear
lesiones.
¡AVISO!
Su incumplimiento puede acarrear daños materiales y perjudicar el
correcto funcionamiento del producto.
NOTA
Información adicional para el manejo del producto.

ES
CoolAir SP950C Indicaciones generales de seguridad
19
2 Indicaciones generales de seguridad
El fabricante declina toda responsabilidad ante daños ocurridos en los siguientes
casos:
• daños en el producto debido a influencias mecánicas y sobretensiones
• modificaciones realizadas en el producto sin el expreso consentimiento del
fabricante
• utilización del aparato para fines distintos a los descritos en las instrucciones
A
I
¡AVISO!
La libertad de movimientos del semirremolque (los bordes exteriores
del semirremolque al tomar una curva o doblar una esquina) y de otros
accesorios montados en el vehículo no debe quedar mermada.
NOTA
Tenga en cuenta las indicaciones de seguridad en las instrucciones de
montaje del equipo de aire acondicionado para funcionamiento con
motor parado CoolAir SP950.

ES
Volumen de entrega CoolAir SP950C
20
3 Volumen de entrega
Juego de montaje para MAN TGA/TGX/TGS L, LX, XL,
n.° de art. 9100300049
Antes de poner en funcionamiento el sistema, compruebe si ha recibido todas las
piezas.
4 Destinatarios de estas instrucciones
La información referente a la instalación incluida en estas instrucciones va dirigida
exclusivamente al personal técnico de talleres familiarizado con las directivas y
medidas de seguridad que se hayan de aplicar durante la instalación de accesorios
de vehículos.
Cantidad Denominación Número de artículo
1 Bastidor de fijación
para
4442500732
1 Instrucciones de montaje 4445102216
13 Tuerca de seguridad M8
7 Arandela en U M8 (d1 = 8,4 mm, d2 = 20 mm)
2 Tornillo M8 x 16
4 Tornillo M8 x 30
12 Arandela en U M8 (d1 = 8,4 mm, d2 = 16 mm)

ES
CoolAir SP950C Uso adecuado
21
5Uso adecuado
El bastidor de sujeción sirve para montar la unidad de condensador SP950C del
equipo de aire acondicionado para funcionamiento con motor parado
CoolAir SP950 en vehículos del tipo MAN TGA/TGX/TGS L, LX, XL. El bastidor de
fijación se monta a la izquierda en la pared trasera de la cabina del conductor.
Para la fijación del bastidor de fijación se utilizan los puntos de sujeción originales del
vehículo. No es necesario realizar más perforaciones en el vehículo.
6 Montar el bastidor de fijación
A
I
La fig. 1, página 3 representa el montaje básico:
¡AVISO!
Durante el montaje tenga también en cuenta la información relativa al
montaje del equipo de aire acondicionado para funcionamiento con
motor parado CoolAir SP950.
NOTA
Encontrará más información sobre el manejo en las instrucciones de uso
del equipo de aire acondicionado para funcionamiento a motor parado
CoolAir SP950.
Pos. Denominación
1 Bastidor de fijación
2 Condensador
3 Cubierta

ES
Garantía legal CoolAir SP950C
22
Monte el bastidor de fijación y el equipo de aire acondicionado Split para camiones
CoolAir SP950 en el MAN TGA/TGX/TGS L, LX, XL de la siguiente forma:
➤ Para alojar el condensador, coloque y apriete los cuatro tornillos M8 x 30, las
ocho arandelas en U M8 8,4 x 16 mm y las cuatro tuercas de seguridad M8
(fig. 1, página 3) en el bastidor de fijación.
➤ Retire las tuercas existentes (fig. 2 1, página 4) de la fijación de la carcasa de
aspiración de aire.
➤ Fije el bastidor de fijación a los pernos de sujeción con las arandelas en U
M8 8,4 x 20 mm y las tuercas de seguridad M8 suministradas (fig. 2 1,
página 4).
➤ Fije el bastidor de fijación al ángulo con los tornillos M8 x 16, las arandelas en U
M8 8,4 x 16 mm y las tuercas de seguridad M8 suministradas (fig. 2 2,
página 4).
➤ Coloque el condensador con sus tornillos sueltos en el bastidor de fijación y
apriételos con las cuatro arandelas en U M8 8,4 x 16 mm y las cuatro tuercas de
seguridad M8.
➤ Una vez recorridos aprox. 200 km, compruebe que todos los tornilllos sigan
estando firmemente sujetos.
7 Garantía legal
Rige el plazo de garantía legal. Si el producto presenta algún defecto, diríjase a
nuestro socio de servicio en su país (ver direcciones en el dorso de este manual).
Nuestros especialistas estarán encantados de poder ayudarle y de poder orientarle
en los siguientes pasos a dar respecto a la garantía.
 Loading...