

Page 1

SMARTRVPRODUCTS
SMART SOLUTIONS FOR RV PROBLEMS
Smart RV Fridge-Fix Product #5
Installation Instructions
Dometic
NDR1292/1272 and RM7732
www.SmartRVProducts.com customerservice@SmartRVProducts.com (877) 472-7799
Page 2
SMARTRVPRODUCTS
How to install the Fridge-Fix refrigerator fan into the Dometic NDR1292/1272 and RM7732 series
refrigerators.
Tools You Will Need:
• Pliers
• Razor Knife
• Glass Cleaner/Paper Towels
This set of instructions will walk you through how to install the Fridge-Fix and provide power from
the interior light. Now let’s get started!
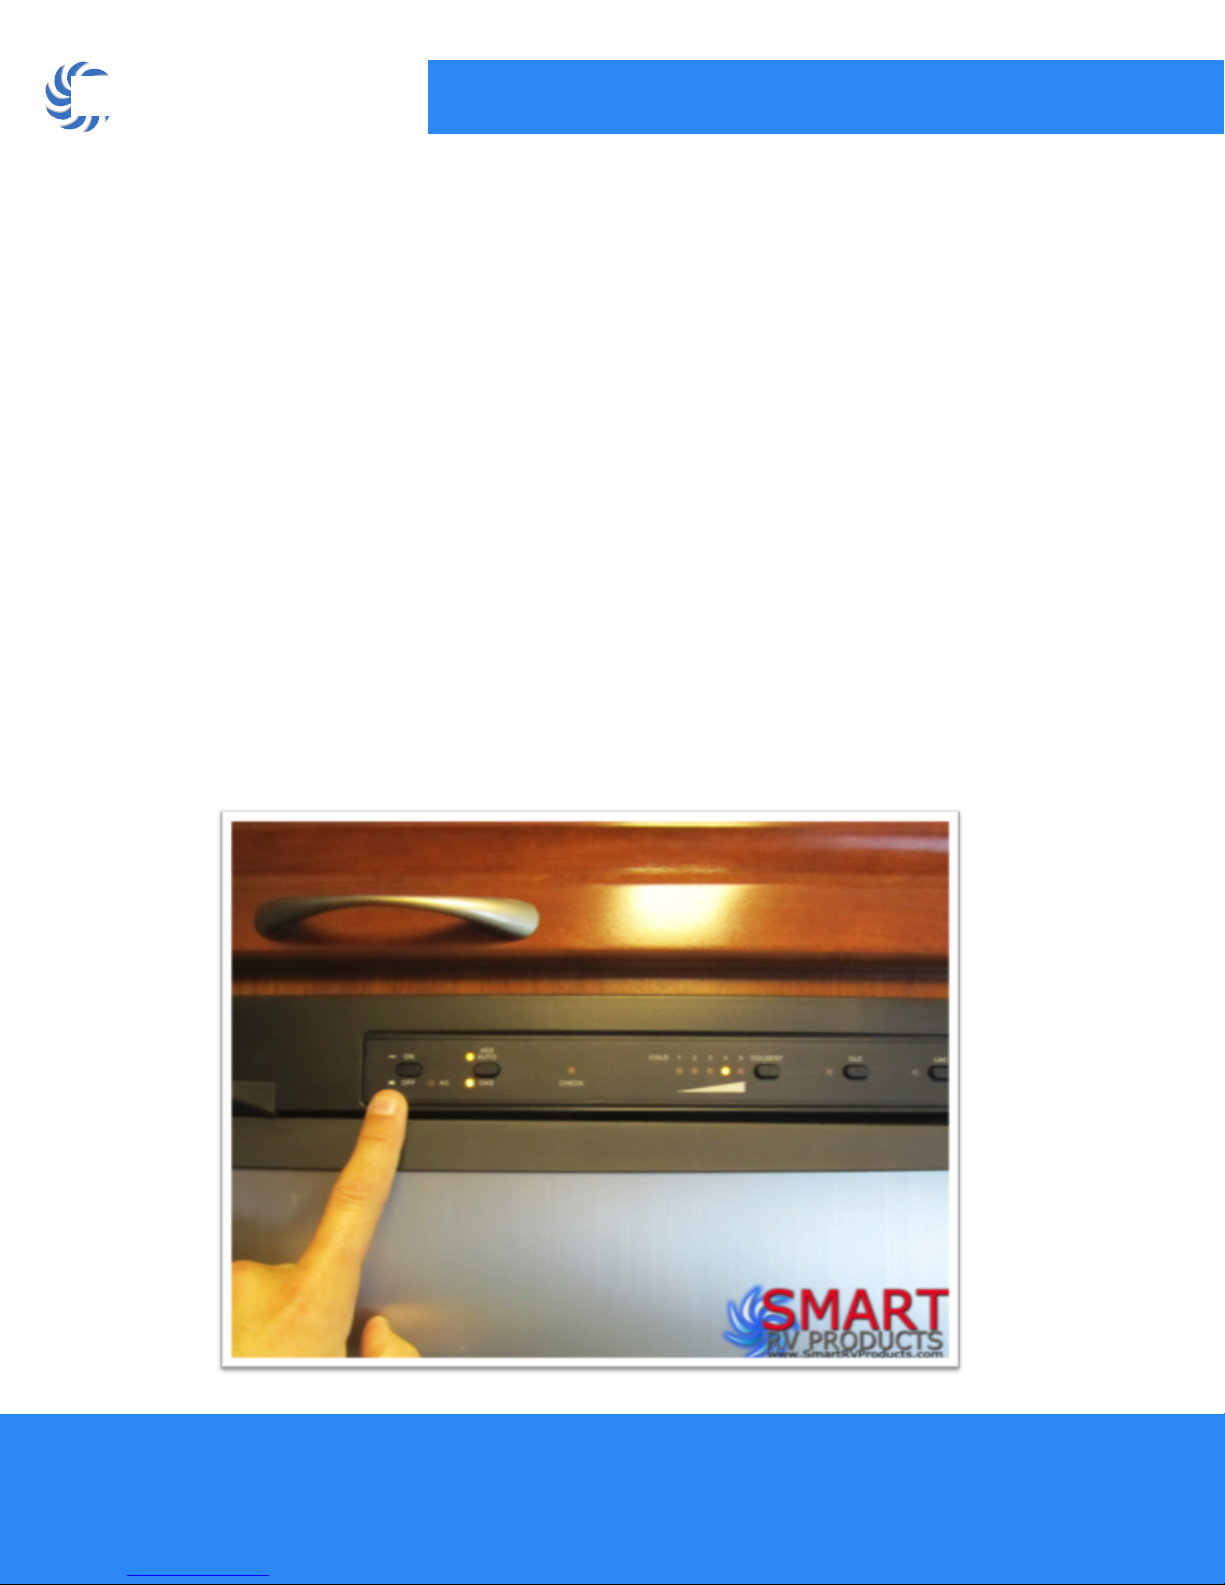
Verify that you are installing the unit into a Dometic 1292/1272 or RM7732 series fridge. The front
should have a control panel similar to this. The 7732 has a different control panel, but these
instructions still apply.
Now will be a good time to switch the refrigerator to the OFF position. You will see the interior light
“ON” in several of these shots, however, that was done for lighting purposes for the camera. Make
sure your fridge is OFF during the install.
SMART SOLUTIONS FOR RV PROBLEMS
Smart RV Fridge-Fix Product #5 Instructions
www.SmartRVProducts.com customerservice@SmartRVProducts.com (877) 472-7799
Page 3
SMARTRVPRODUCTS
SMART SOLUTIONS FOR RV PROBLEMS
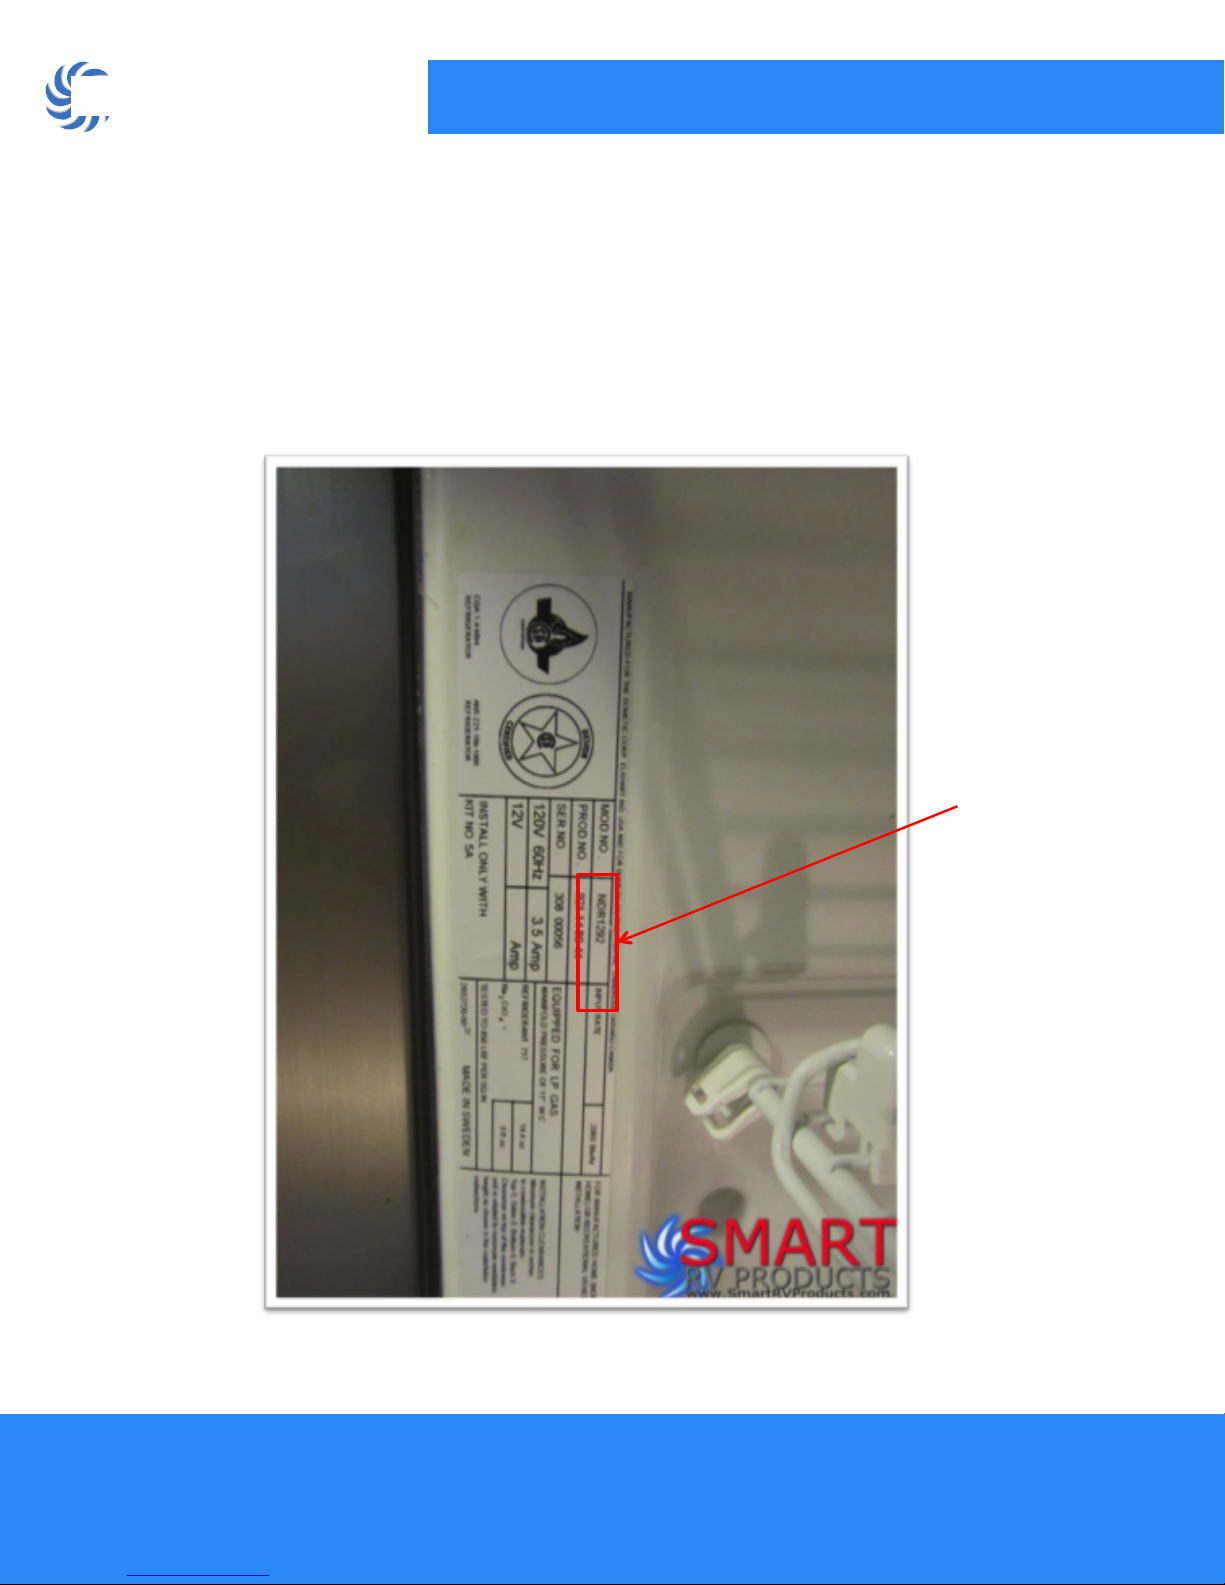
Inside the door, you should see a label, the model number either
Smart RV Fridge-Fix Product #5 Instructions
NDR1292, NDR1272, or RM7732.
www.SmartRVProducts.com customerservice@SmartRVProducts.com (877) 472-7799
Page 4
SMARTRVPRODUCTS
SMART SOLUTIONS FOR RV PROBLEMS
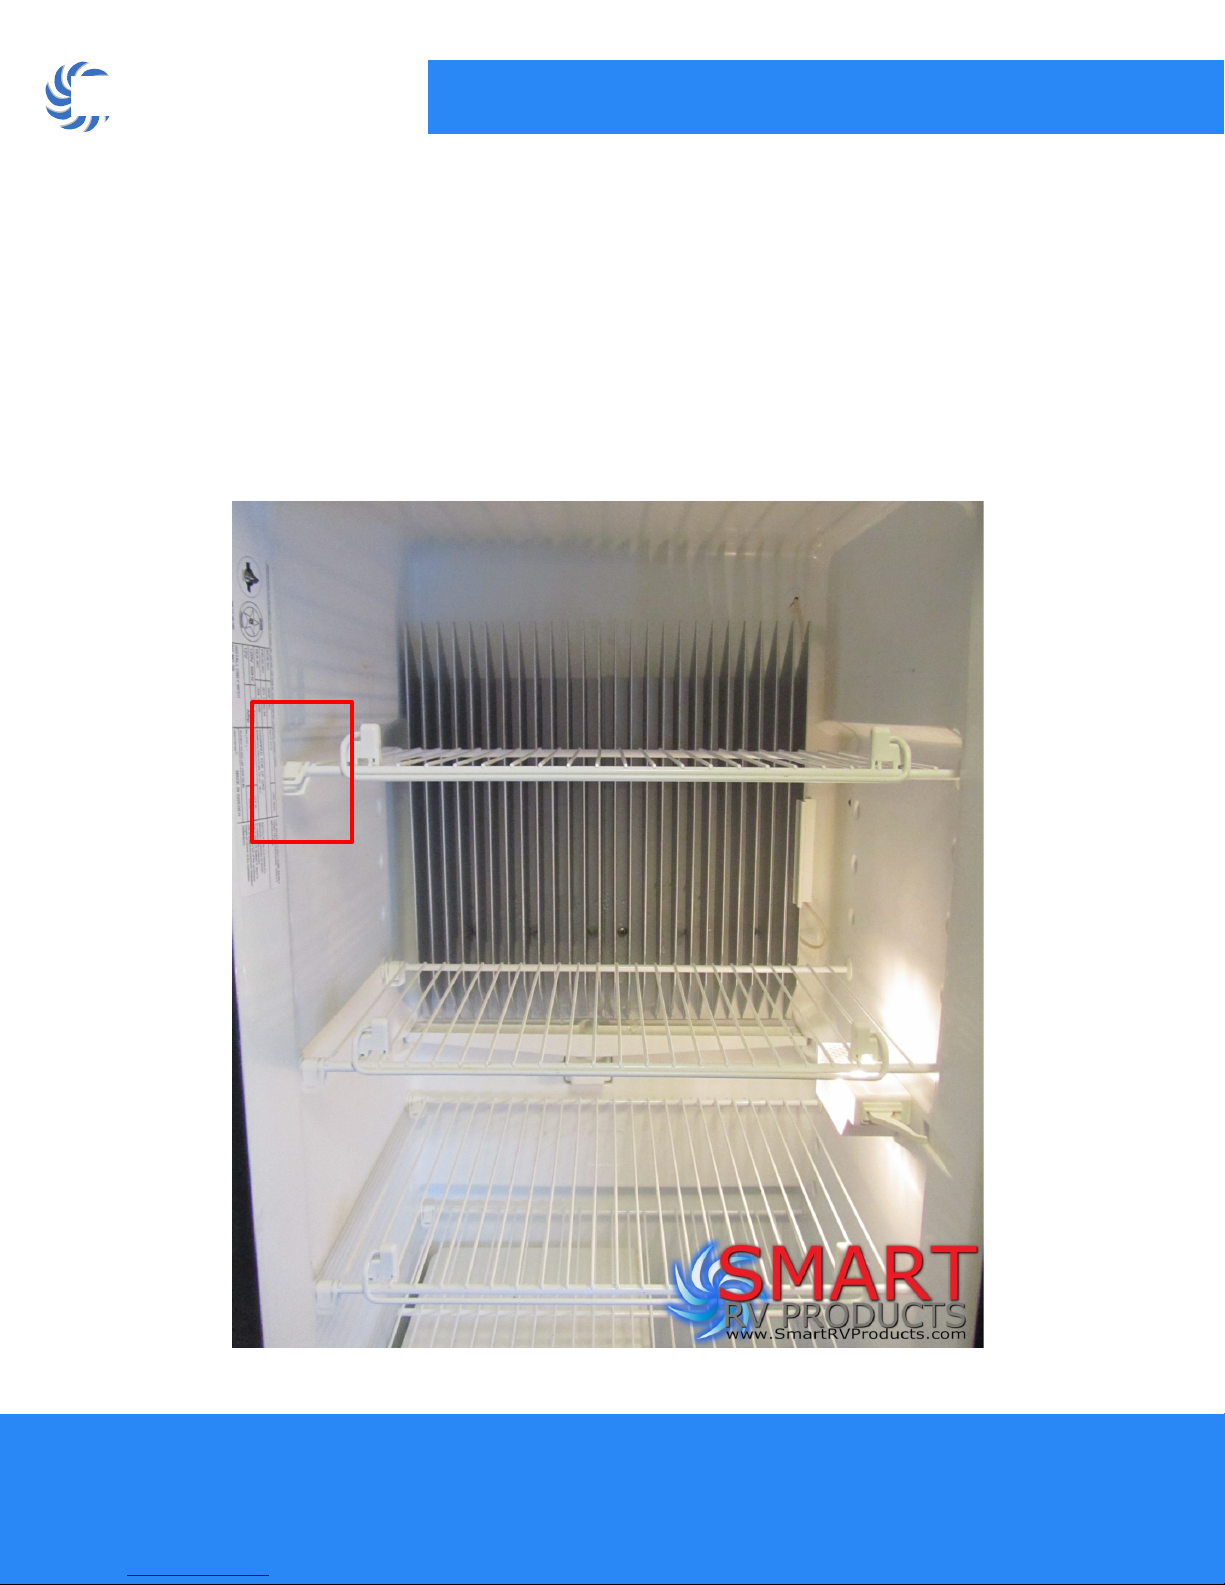
We will start by removing the upper shelf to make the install easier. You will need to
remove the forward and rear clips that lock the shelf into place.
Smart RV Fridge-Fix Product #5 Instructions
www.SmartRVProducts.com customerservice@SmartRVProducts.com (877) 472-7799
Page 5
SMARTRVPRODUCTS
SMART SOLUTIONS FOR RV PROBLEMS
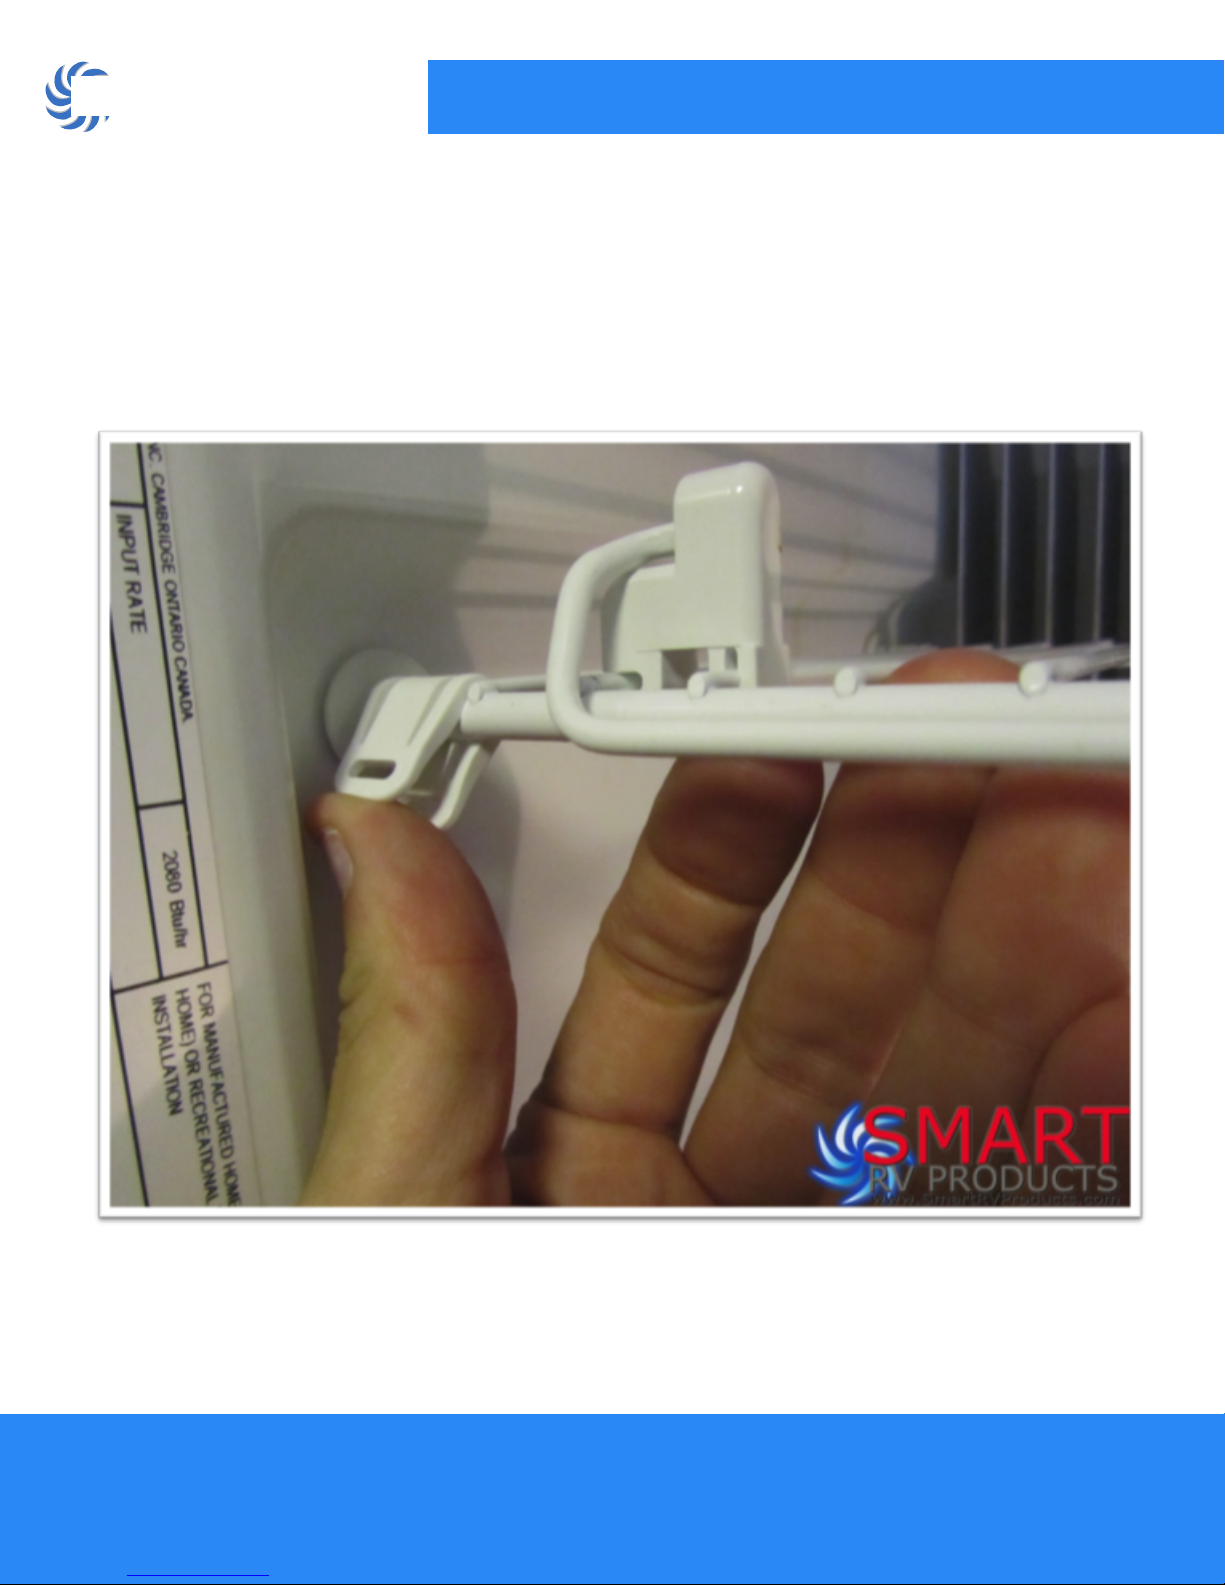
Push the clips upward as show to remove them from the shelf.
Smart RV Fridge-Fix Product #5 Instructions
You will reinstall them later.
www.SmartRVProducts.com customerservice@SmartRVProducts.com (877) 472-7799
Page 6
SMARTRVPRODUCTS
SMART SOLUTIONS FOR RV PROBLEMS
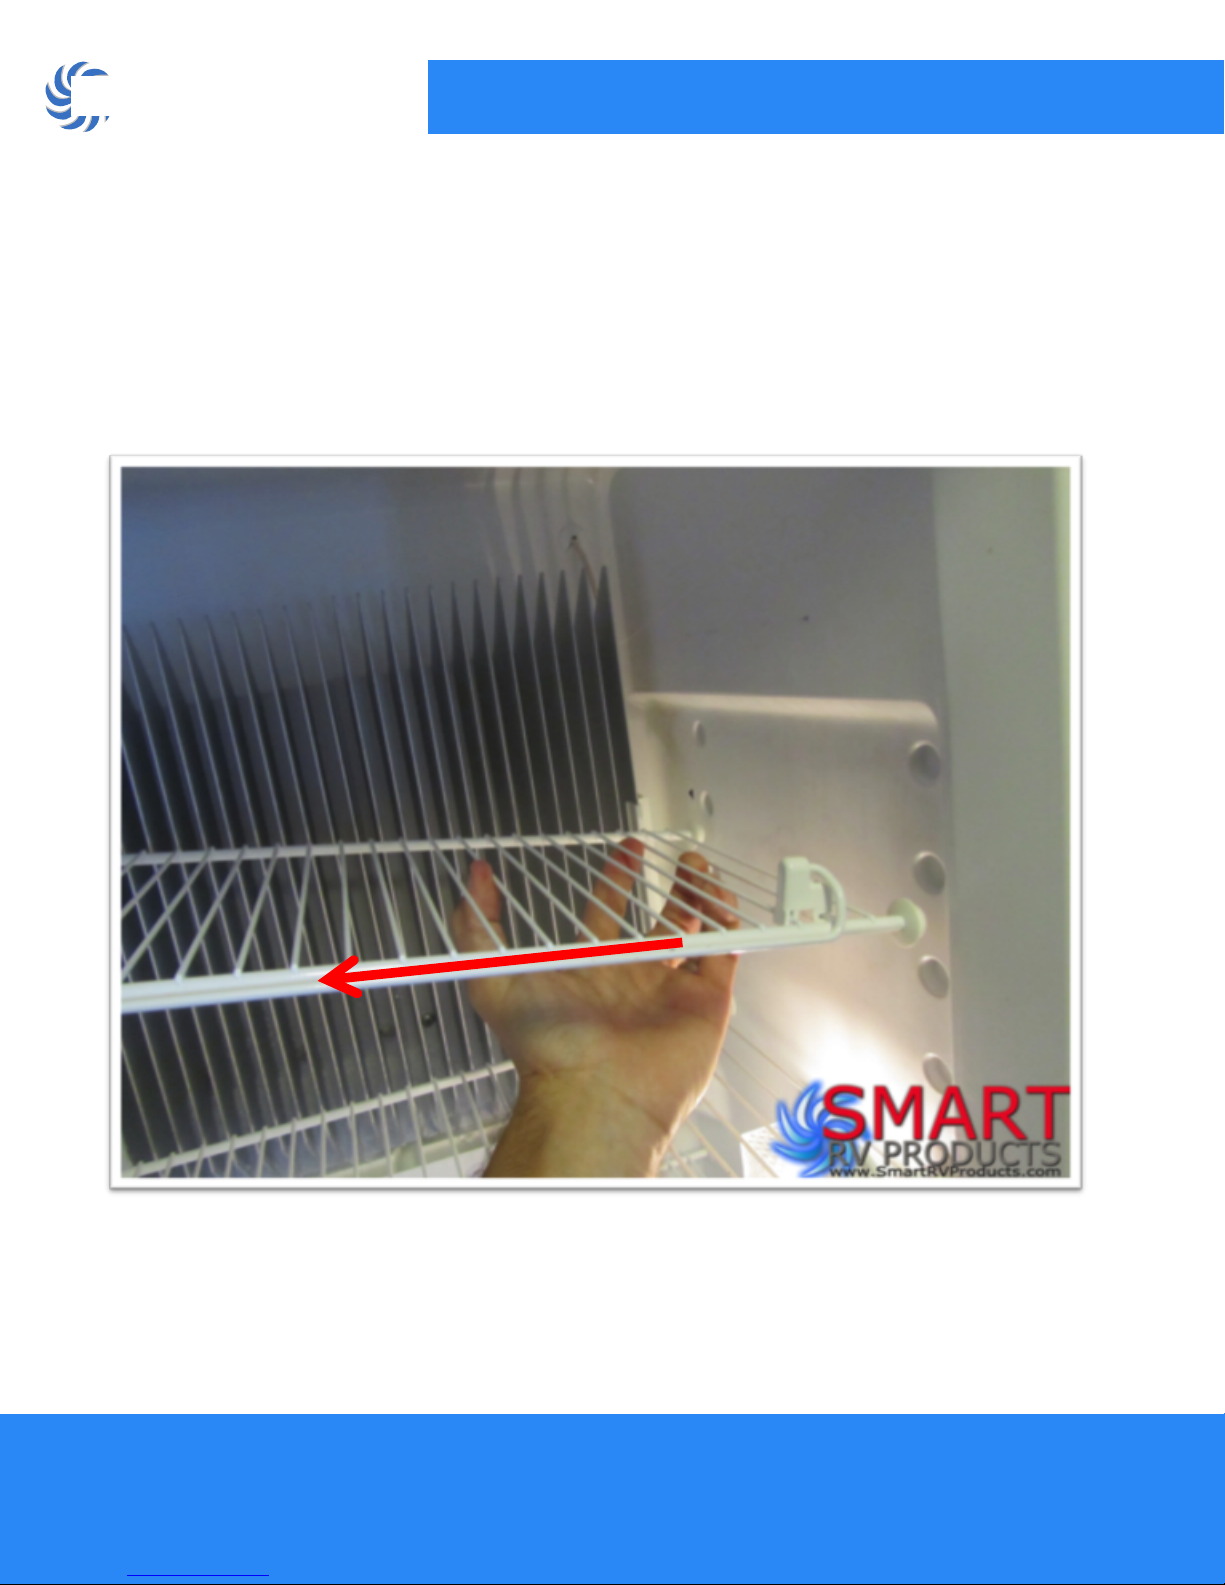
Remove the shelf: pull it out of the wall and towards the clips that were previously
removed. Move shelf in direction of arrow. Set the shelf aside.
Smart RV Fridge-Fix Product #5 Instructions
www.SmartRVProducts.com customerservice@SmartRVProducts.com (877) 472-7799
Page 7
SMARTRVPRODUCTS
SMART SOLUTIONS FOR RV PROBLEMS
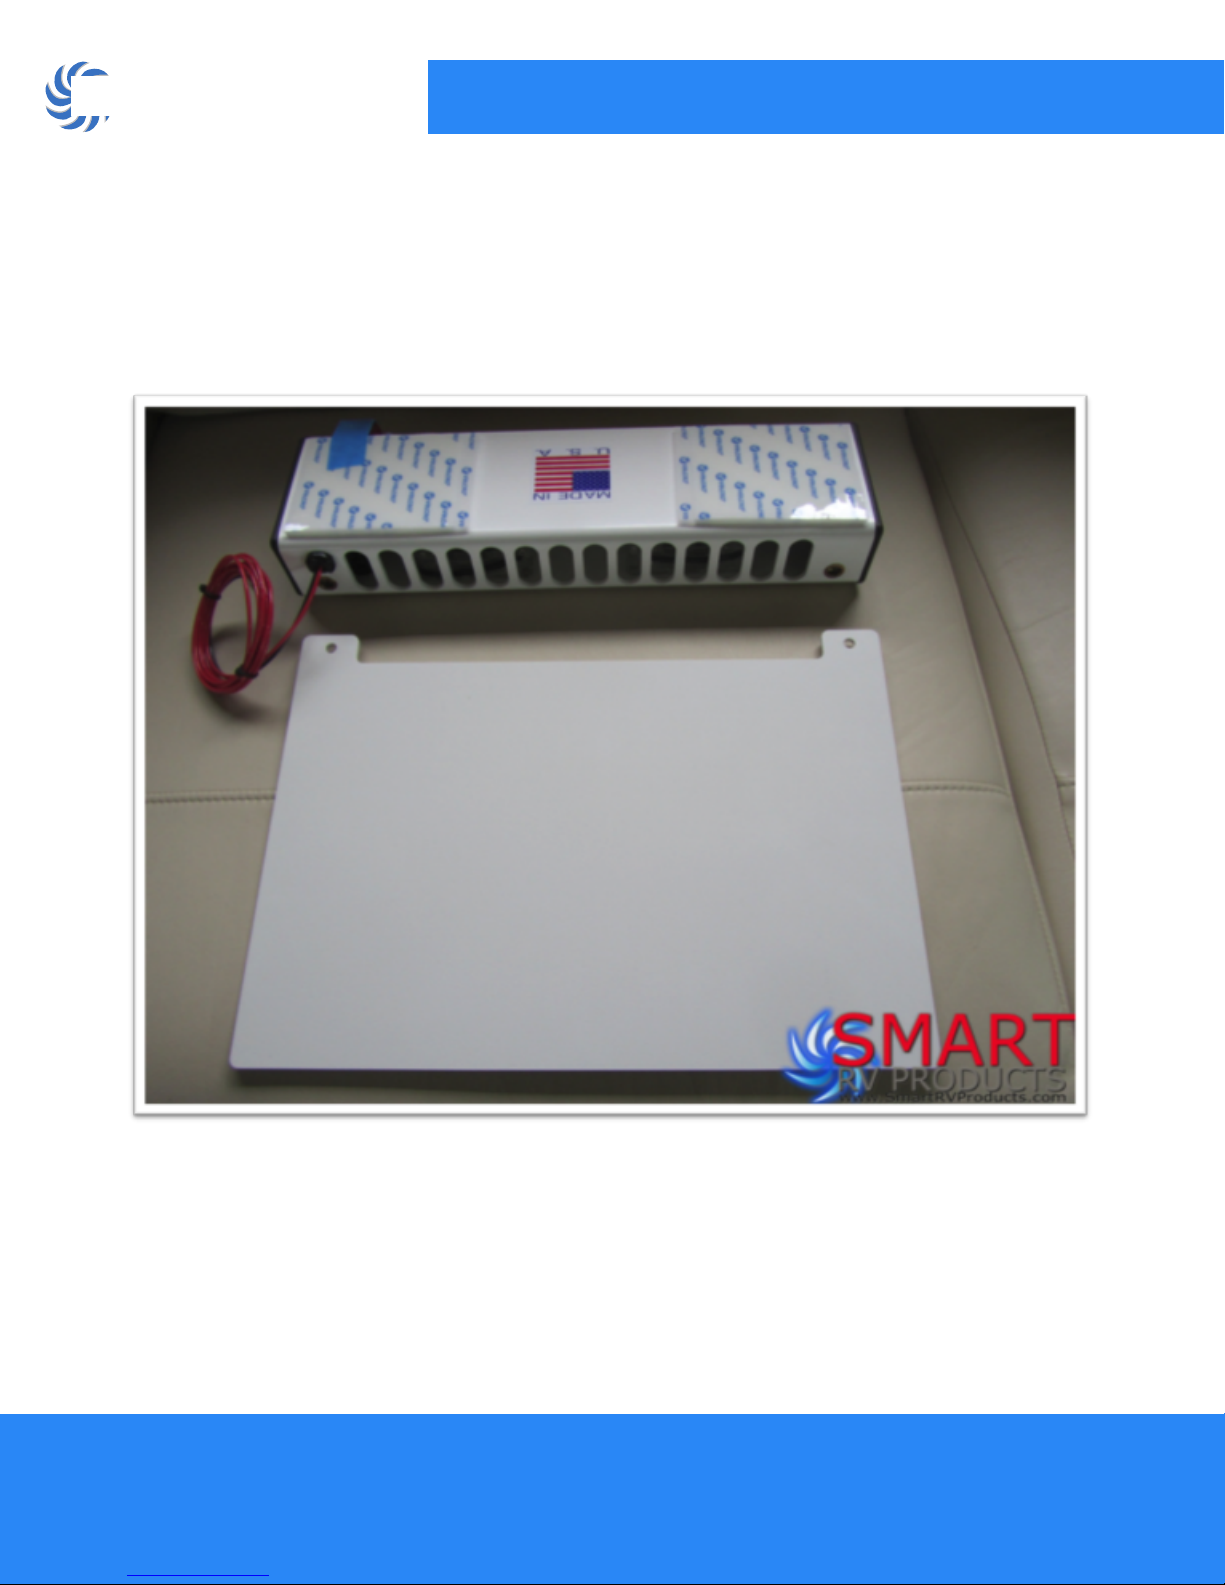
Now it is time to assemble the Fridge-Fix. The air bafe is reversible so you can choose
either a textured nish or a smooth nish to face forwards
Smart RV Fridge-Fix Product #5 Instructions
www.SmartRVProducts.com customerservice@SmartRVProducts.com (877) 472-7799
Page 8
SMARTRVPRODUCTS
Remove the bolts that come installed in the Fridge-Fix housing, and reinstall them as shown.
SMART SOLUTIONS FOR RV PROBLEMS
Smart RV Fridge-Fix Product #5 Instructions
www.SmartRVProducts.com customerservice@SmartRVProducts.com (877) 472-7799
Page 9

SMARTRVPRODUCTS
SMART SOLUTIONS FOR RV PROBLEMS
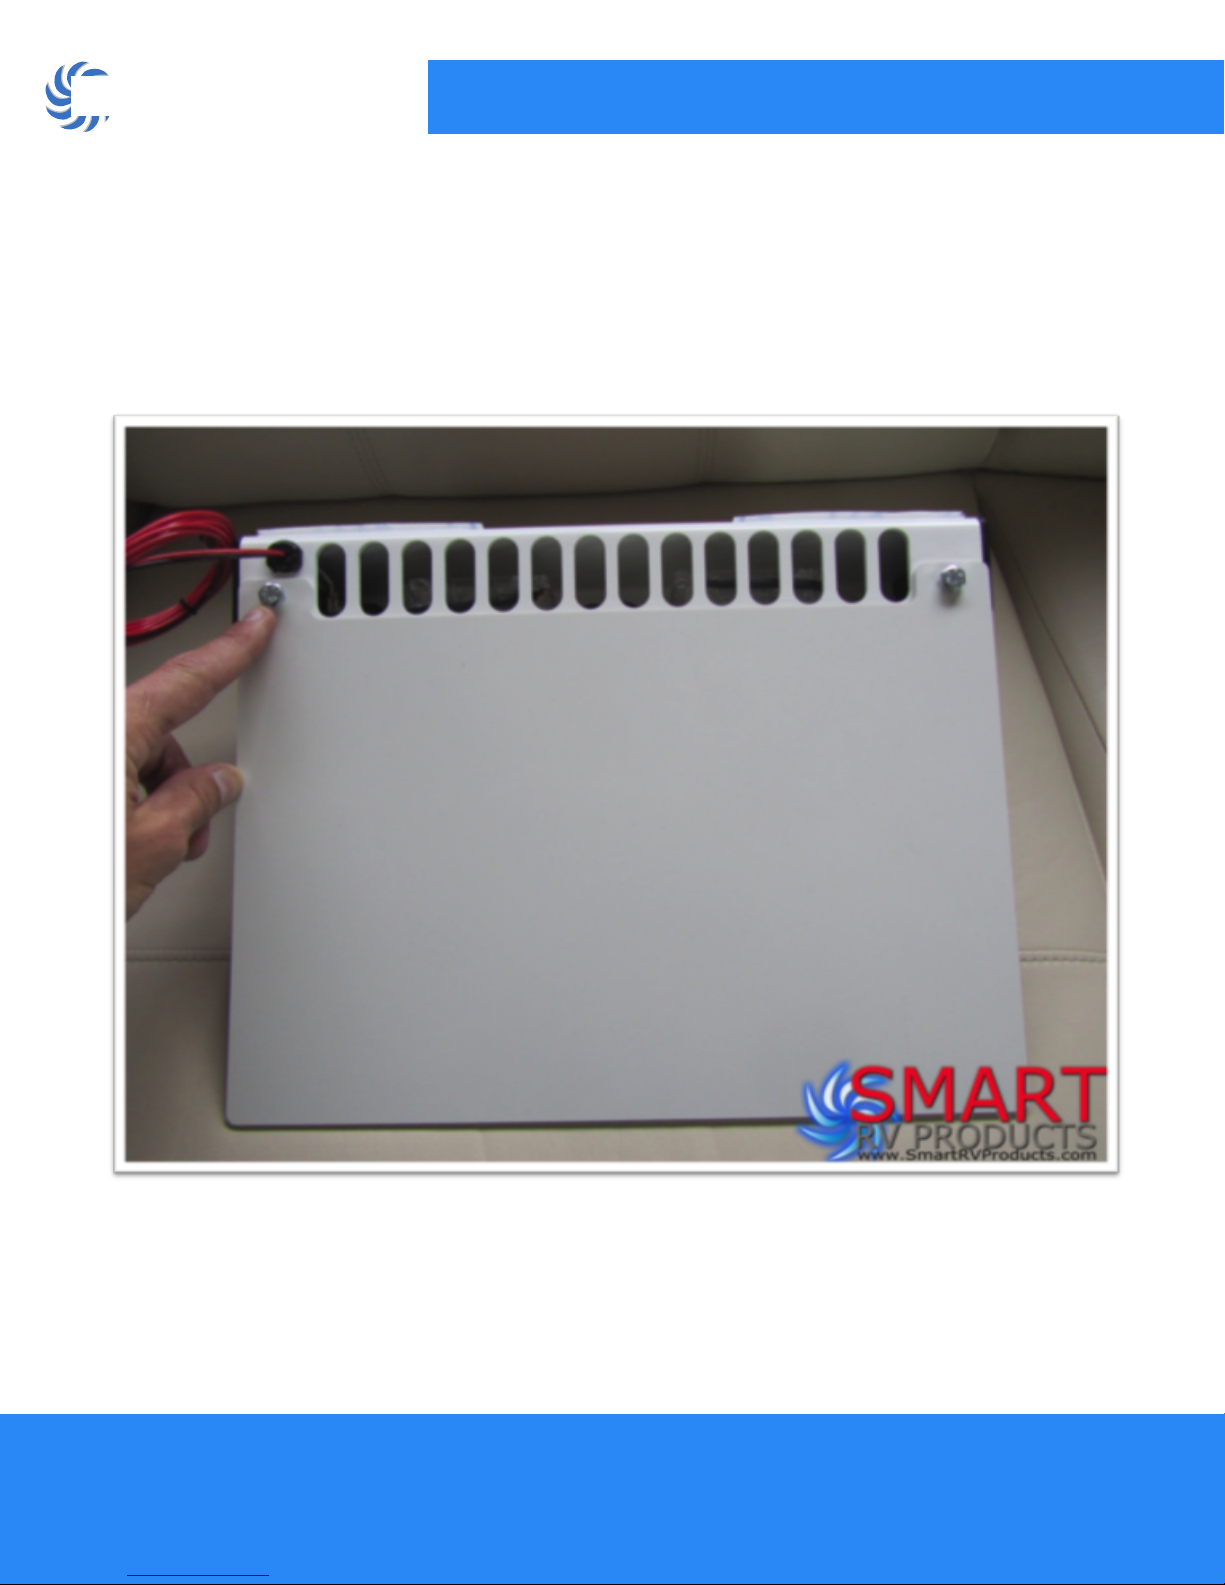
Tighten the bolts so they are SNUG. Do not over-tighten the bolts.
Smart RV Fridge-Fix Product #5 Instructions
(Please forgive our ugly pliers)
www.SmartRVProducts.com customerservice@SmartRVProducts.com (877) 472-7799
Page 10

SMARTRVPRODUCTS
Now it’s time to mount the Fridge-Fix. Start out by cleaning the top of the fridge with either glass
cleaner or alcohol. Thoroughly dry the top of the fridge with a paper towel. If the top of the
fridge is not dry, the adhesive on the Velcro will not stick.
SMART SOLUTIONS FOR RV PROBLEMS
Smart RV Fridge-Fix Product #5 Instructions
www.SmartRVProducts.com customerservice@SmartRVProducts.com (877) 472-7799
Page 11

SMARTRVPRODUCTS
SMART SOLUTIONS FOR RV PROBLEMS
Hold the Fridge-Fix up into the fridge near the cooling ns. You will need to install the
ground clip on the FAR RIGHT COOLING FIN. The clip is made of high tensile steel, so
you may have push hard.
Smart RV Fridge-Fix Product #5 Instructions
www.SmartRVProducts.com customerservice@SmartRVProducts.com (877) 472-7799
Page 12

SMARTRVPRODUCTS
SMART SOLUTIONS FOR RV PROBLEMS
Peel the clear plastic cover off of the Velcro and prepare to mount the Fridge-Fix.
Note the location of the Air Bafe in the photo below. For the Fridge-Fix to work
properly, the air bafe needs to be hanging directly in front of the cooling ns as shown.
Smart RV Fridge-Fix Product #5 Instructions
www.SmartRVProducts.com customerservice@SmartRVProducts.com (877) 472-7799
Page 13

SMARTRVPRODUCTS
SMART SOLUTIONS FOR RV PROBLEMS
DRY THE CEILING OFF WITH PAPER TOWEL
ONE MORE TIME BEFORE MOUNTING THE FRIDGE-FIX
Mount the Fridge-Fix to the roof of the refrigerator as shown. Press and hold the device
FIRMLY up to the roof for at least 20 seconds.
Smart RV Fridge-Fix Product #5 Instructions
www.SmartRVProducts.com customerservice@SmartRVProducts.com (877) 472-7799
Page 14

SMARTRVPRODUCTS
SMART SOLUTIONS FOR RV PROBLEMS
Now it’s time to install your power wire: Remove the lense on your light, and the light
bulb.
We will be working with the RED refrigerator wire in this install. If your wires look
different than this, just determine the wire that has constant 12 Volt+ power.
(Even with the door closed)
Smart RV Fridge-Fix Product #5 Instructions
www.SmartRVProducts.com customerservice@SmartRVProducts.com (877) 472-7799
Page 15

SMARTRVPRODUCTS
SMART SOLUTIONS FOR RV PROBLEMS
We need to enlarge the wire hole slightly to accommodate
the wire splice tting through the hole highlighted in this photo.
MOVE THE WIRES OUT OF THE WAY OF THE BLADE.
DO NOT LET THE KNIFE COME IN CONTACT WITH THE WIRES.
Smart RV Fridge-Fix Product #5 Instructions
www.SmartRVProducts.com customerservice@SmartRVProducts.com (877) 472-7799
Page 16

SMARTRVPRODUCTS
SMART SOLUTIONS FOR RV PROBLEMS
Open the wire hole up SLIGHTLY as shown with the knife.
Just enough so the wire splice will t through the hole.
Smart RV Fridge-Fix Product #5 Instructions
(It is a VERY SLIGHT adjustment)
www.SmartRVProducts.com customerservice@SmartRVProducts.com (877) 472-7799
Page 17

SMARTRVPRODUCTS
SMART SOLUTIONS FOR RV PROBLEMS
Smart RV Fridge-Fix Product #5 Instructions
Run the power wire for the Fridge-Fix
as shown (Power wires for the FridgeFix are now WHITE), and cut the
power wire to length.
Remember, you need enough power
wire to reach into the hole that was
just adjusted.
www.SmartRVProducts.com customerservice@SmartRVProducts.com (877) 472-7799
Page 18

SMARTRVPRODUCTS
SMART SOLUTIONS FOR RV PROBLEMS
Gently pull some of the extra red wire out of the wall cavity. Install the splice included with
your kit as shown. Leave roughly 2.5-3.0” of wire between the splice and the connector.
This will allow the splice to be inserted into the wall cavity when nished.
Smart RV Fridge-Fix Product #5 Instructions
Installthespliceroughly
2.53.0”fromtheendofthis
wire.Thiswillleaveenough
wireforthesplicetobe
insertedintothewallcavity
whenfinished
.
www.SmartRVProducts.com customerservice@SmartRVProducts.com (877) 472-7799
Page 19

SMARTRVPRODUCTS
(This photo was taken during a different installation, and is for splice installation reference only)
SMART SOLUTIONS FOR RV PROBLEMS
Install the splice using pliers as shown.
Smart RV Fridge-Fix Product #5 Instructions
www.SmartRVProducts.com customerservice@SmartRVProducts.com (877) 472-7799
Page 20

SMARTRVPRODUCTS
SMART SOLUTIONS FOR RV PROBLEMS
This is what the splice should look like when nished. The small plastic tab ips over and
clips to hold the metal clip in place. (This photo was taken during a different installation,
and is for splice installation reference only)
Smart RV Fridge-Fix Product #5 Instructions
www.SmartRVProducts.com customerservice@SmartRVProducts.com (877) 472-7799
Page 21

SMARTRVPRODUCTS
SMART SOLUTIONS FOR RV PROBLEMS
Gently tuck the splice back into the hole as shown. Reinstall the light bulb at this time.
Smart RV Fridge-Fix Product #5 Instructions
www.SmartRVProducts.com customerservice@SmartRVProducts.com (877) 472-7799
Page 22

SMARTRVPRODUCTS
SMART SOLUTIONS FOR RV PROBLEMS
Reinstall the light lense. The wire should look similar to this.
Smart RV Fridge-Fix Product #5 Instructions
www.SmartRVProducts.com customerservice@SmartRVProducts.com (877) 472-7799
Page 23

SMARTRVPRODUCTS
SMART SOLUTIONS FOR RV PROBLEMS
Reinstall the shelf that was removed. Remember, the left side goes in rst, then it slides
over to the right and ts into the holes in the wall. The last step is to install both clips.
Smart RV Fridge-Fix Product #5 Instructions
www.SmartRVProducts.com customerservice@SmartRVProducts.com (877) 472-7799
Page 24

SMARTRVPRODUCTS
SMART SOLUTIONS FOR RV PROBLEMS
For optimal performance with the Fridge-Fix installed, this plastic crisper cover should be
removed permanently. It impedes the ow of air in your fridge, and is no longer needed.
Smart RV Fridge-Fix Product #5 Instructions
www.SmartRVProducts.com customerservice@SmartRVProducts.com (877) 472-7799
Page 25

SMARTRVPRODUCTS
SMART SOLUTIONS FOR RV PROBLEMS
Smart RV Fridge-Fix Product #5 Instructions
You are now ready to use your Fridge-Fix
(Nice job on the install!)
www.SmartRVProducts.com customerservice@SmartRVProducts.com (877) 472-7799
Page 26

SMARTRVPRODUCTS
Some tips for best results:
If your fridge is on, the Fridge-Fix should be on.
If you are dry camping and concerned about power usage, occasional use of the Fridge-Fix
use will actually LOWER the consumption of propane by your refrigerator.
Don’t forget to turn off the device when storing your RV. Nobody likes a dead battery in the
spring….
The new drip tray allows for better airow beneath the cooling ns. If your fridge is packed too
tightly with food, it will disrupt this ow of air. For best results, try lightly packing the food around
the drip tray.
SMART SOLUTIONS FOR RV PROBLEMS
Above all, if you have any problems at all,call us at
(877)472-7799, or email : Customerservice@smartrvproducts.com
Smart RV Fridge-Fix Product #5 Instructions
Thank you so much for your business!
From our family to yours, happy camping!
- The Smart RV Products Family
www.SmartRVProducts.com customerservice@SmartRVProducts.com (877) 472-7799
 Loading...