

Page 1
EN
ENERGY & LIGHTING
SINEPOWER
MSI912, MSI1812T
Sine wave inverter
Installation and Operating Manual
Page 2

Page 3

EN
MSI
Please read this instruction manual carefully before installation and first
use, and store it in a safe place. If you pass on the product to another
person, hand over this instruction manual along with it.
Table of contents
1 Explanation of symbols. . . . . . . . . . . . . . . . . . . . . . . . . . . . . . . . . . . . . . . . . . .4
2 General safety instructions . . . . . . . . . . . . . . . . . . . . . . . . . . . . . . . . . . . . . . . .4
3 Scope of delivery . . . . . . . . . . . . . . . . . . . . . . . . . . . . . . . . . . . . . . . . . . . . . . .6
4 Accessories . . . . . . . . . . . . . . . . . . . . . . . . . . . . . . . . . . . . . . . . . . . . . . . . . . . .7
5 Target group for this manual. . . . . . . . . . . . . . . . . . . . . . . . . . . . . . . . . . . . . . .7
6 Intended use . . . . . . . . . . . . . . . . . . . . . . . . . . . . . . . . . . . . . . . . . . . . . . . . . . .8
7 Technical description . . . . . . . . . . . . . . . . . . . . . . . . . . . . . . . . . . . . . . . . . . . .8
8 Fitting the inverter . . . . . . . . . . . . . . . . . . . . . . . . . . . . . . . . . . . . . . . . . . . . . .13
9 Connecting the inverter . . . . . . . . . . . . . . . . . . . . . . . . . . . . . . . . . . . . . . . . .15
10 Using the inverter . . . . . . . . . . . . . . . . . . . . . . . . . . . . . . . . . . . . . . . . . . . . . 22
11 Cleaning and caring for the inverter. . . . . . . . . . . . . . . . . . . . . . . . . . . . . . . 26
12 Troubleshooting . . . . . . . . . . . . . . . . . . . . . . . . . . . . . . . . . . . . . . . . . . . . . . 26
13 Warranty . . . . . . . . . . . . . . . . . . . . . . . . . . . . . . . . . . . . . . . . . . . . . . . . . . . . 28
14 Disposal . . . . . . . . . . . . . . . . . . . . . . . . . . . . . . . . . . . . . . . . . . . . . . . . . . . . . 28
15 Technical data . . . . . . . . . . . . . . . . . . . . . . . . . . . . . . . . . . . . . . . . . . . . . . . . 29
3
Page 4

EN
Explanation of symbols MSI
1 Explanation of symbols
WARNING!
!
A
I
Safety instruction: Failure to observe this instruction can cause fatal or
serious injury.
NOTICE!
Failure to observe this instruction can cause material damage and impair
the function of the product.
NOTE
Supplementary information for operating the product.
2 General safety instructions
2.1 General safety
The manufacturer accepts no liability for damage in the following cases:
• Faulty assembly or connection
• Damage to the product resulting from mechanical influences and excess voltage
• Alterations to the product without express permission from the manufacturer
• Use for purposes other than those described in the operating manual
WARNING!
• Only use the device as intended.
• Do not operate the device in a damp or wet environment.
• Do not operate the device near any flammable materials.
• Do not operate the device in areas that are potentially explosive.
• Maintenance and repair work may only be carried out by qualified
personnel who are familiar with the risks involved and the relevant
regulations.
• People (including children) whose physical, sensory or mental
capacities or whose lack of experience or knowledge prevent them
from using this product safely should not use it without the supervision
or instruction of a responsible person.
4
Page 5

EN
MSI General safety instructions
• Electrical devices are not toys
Always keep and use the device out of the reach of children.
2.2 Safety when installing the device
WARNING!
!
A
• Installing the device may only be performed by qualified personnel
who are familiar with the guidelines and safety precautions to be
applied.
• If electrical devices are incorrectly installed on boats, corrosion
damage might occur. The device should be installed by a specialist
(marine) electrician.
• All the wiring must comply to AS3000 and AS3001.
NOTICE!
• Ensure that the device is standing firmly.
The device must be set up and fastened in such a way that it cannot tip
over or fall down.
• Do not expose the device to a heat source (such as direct sunlight or
heating). Avoid additional heating of the device in this way.
• If cables have to be fed through metal walls or other walls with sharp
edges, use ducts or tubes to prevent damage.
• Do not lay cables which are loose or bent next to electrically
conductive material (metal).
• Do not pull on the cables.
• Do not lay the 230 V mains cable and the 12/24 V DC cable in the
same duct.
• Fasten the cables securely.
• Lay the cables so that they cannot be tripped over or damaged.
5
Page 6

EN
Scope of delivery MSI
1
2.3 Operating the device safely
WARNING!
!
A
• Operate the device only if you are certain that the housing and the
cables are undamaged.
• Even after the fuse triggers, parts of the inverter remain live.
• Always disconnect the power supply when working on the device.
NOTICE!
• Make sure the air inlets and outlets of the device are not covered.
• Ensure good ventilation. The inverter produces dissipated heat which
has to be diverted.
• Do not connect the 230 V output of the inverter (fig. 4 5, page 11
and fig. 5 5, page 12) to a different 230 V source.
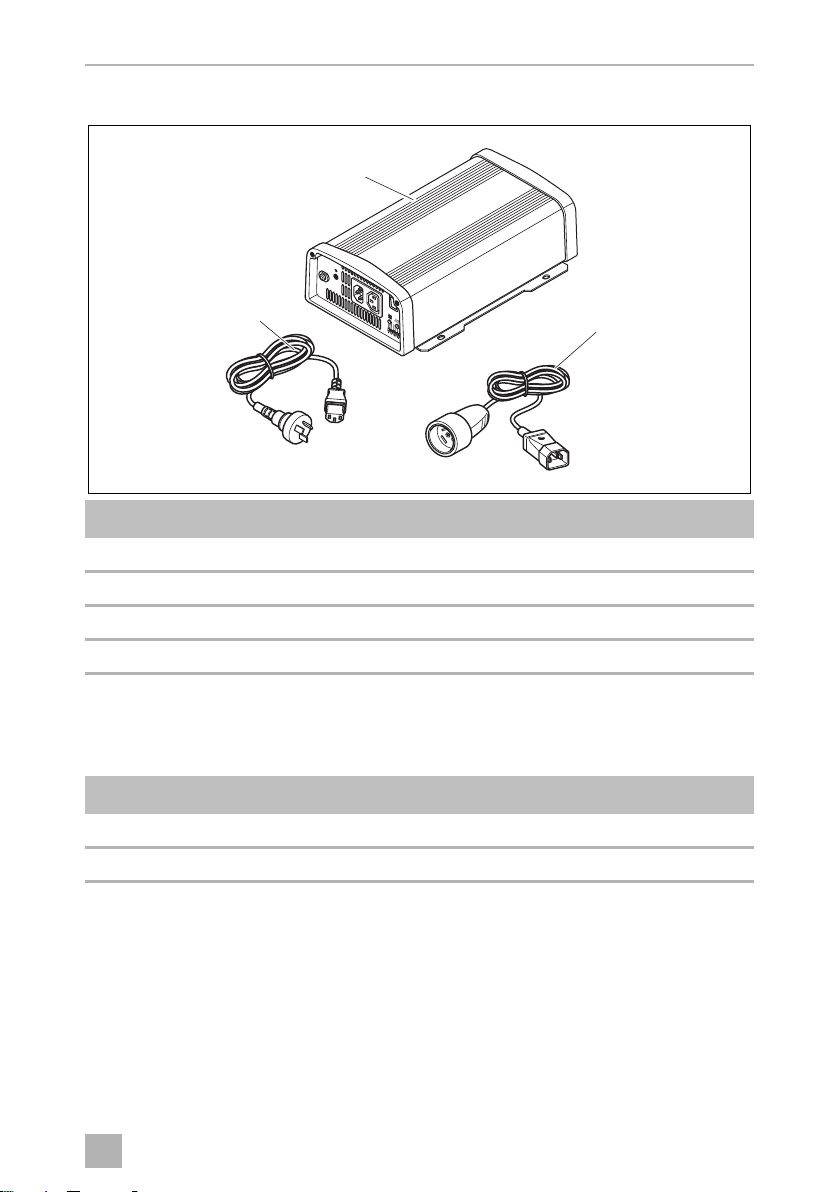
3Scope of delivery
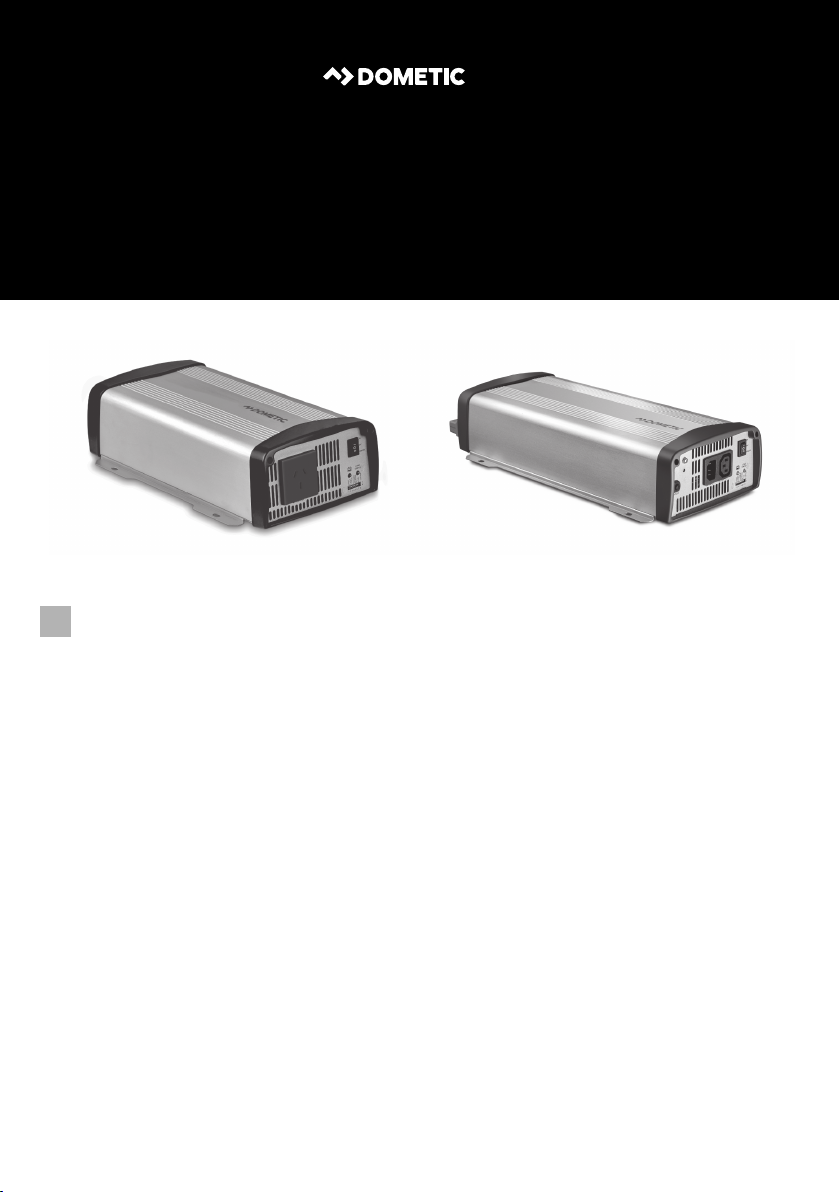
MSI912
1
No. Designation
1 Sine wave inverter
– Operating manual
6
Page 7
EN
MSI Accessories
2
MSI1812T
1
3
No. Designation
1 Sine wave inverter
2 Connection cable with safety coupling (for 230 Vw output)
3 Connection cable with safety plug (for 230 Vw supply)
– Operating manual
2
4Accessories
Designation Ref. no.
Remote control MCR-7 (on/off sleep mode)
Remote control MCR-9 (LED power monitoring)
5 Target group for this manual
The electrical installation (chapter “Connecting the inverter” on page 15) is intended
for professionals who are familiar with the applicable regulations of the country in
which the equipment is to be installed and/or used.
All other chapters are intended for the users.
7
Page 8

EN
Intended use MSI
6 Intended use
WARNING!
!
The wave inverter converts direct current of 12 Vg into a 200 – 240 V AC supply of
50 Hz or 60 Hz.
Never use the inverter on vehicles where the positive terminal of the battery is connected to the chassis.
7 Technical description
The inverters can be operated wherever a 12 Vg connection (MSI912, MSI 1812T) is
available. The light-weight and compact construction of this device allows for easy
installation in mobile homes, commercial vehicles or motor and sailing yachts.
The output voltage corresponds to the household voltage from the socket (pure sine
wave, THD < 3 %).
Please observe the values for constant output power and peak output power as
indicated in chapter “Technical data” on page 29. Never connect devices that have
a higher power requirement.
NOTE
I
Note when connecting devices with an electrical drive (such as power
drills and refrigerators), that they often require more power than is
indicated on the type plate.
The inverter has various protective mechanisms.
• Overvoltage shutdown: The inverter shuts itself off when the voltage exceeds
the cut-off value. It restarts when the voltage returns to the restart value.
• Undervoltage shutdown: The inverter shuts itself off when the voltage sinks
below the cut-off value. It restarts when the voltage rises to the restart value.
• Excess temperature shutdown: The inverter switches off when the
temperature inside the device or the temperature on the cooling element
exceeds a cut-off value. It restarts when the voltage rises to the restart value.
• Overload shutdown: The LED on the inverter indicates an operating fault
(constant red light) when an excess load is connected or a short circuit has
occurred. The fuse in the device must be pressed in again by hand after it is
triggered by excess current.
• Incorrect polarity protection: The incorrect polarity protection prevents the
wrong polarity when connecting the inverter.
8
Page 9

EN
MSI Technical description
• Fuses (MSI1812T only): The LED on the inverter indicates an operating fault
(constant red light). The fuse in the device must be pressed in again by hand after
it is triggered.
NOTE
I
The inverter can be switched to an energy-saving mode to prevent the connected
battery from discharging too quickly.
The inverter can be easily controlled using the remote control (accessory).
The SinePower MSI1812T inverters are fitted with a 230 Vw priority circuit. If an
external 230 Vw voltage is available, this will have priority. If no external 230 Vw
voltage is connected, then the connected battery will be used as the power supply.
The individual values are found in the chapter “Technical data” on
page 29.
9
Page 10
EN
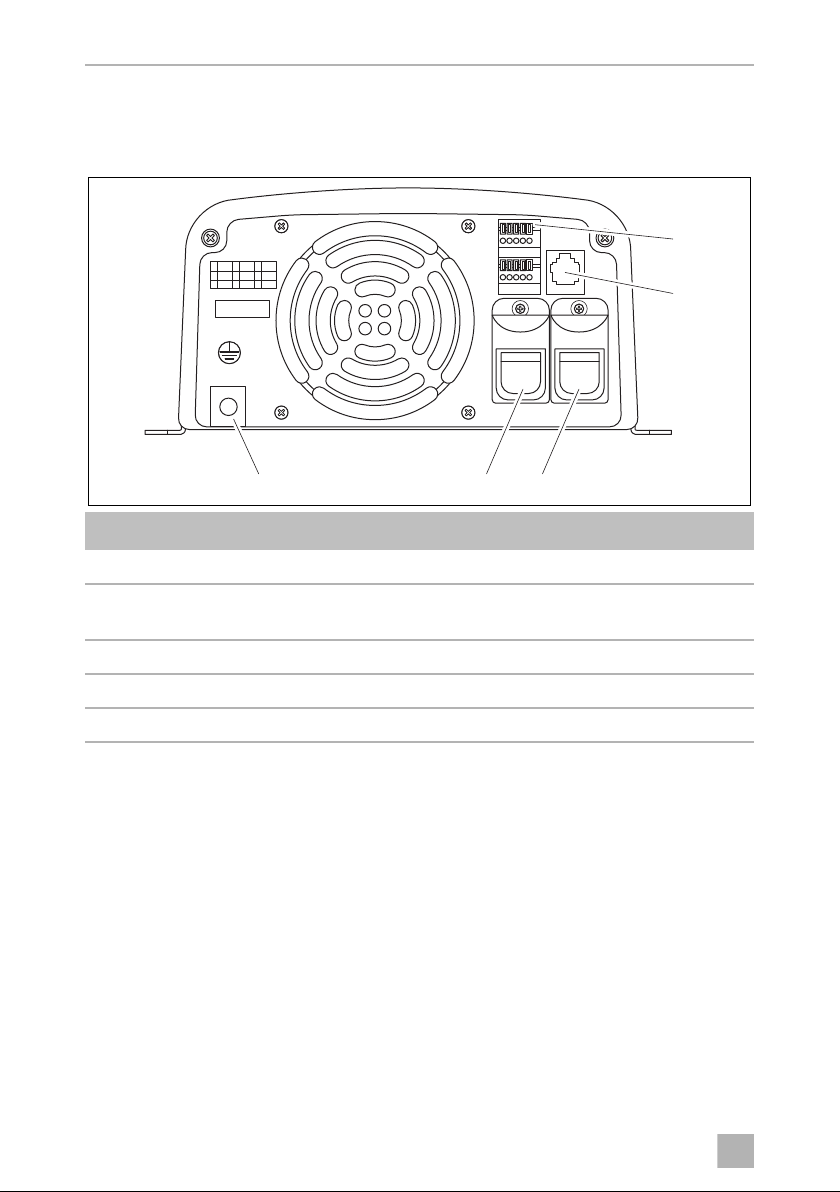
Technical description MSI
NEG (-)
REMOTE
CHASSIS
DC INPUT
GROUND
B
A
1
POS (+)
1
A
B
ENB
N.O.
ENB
COM
GND
N.C.
2
xxx
x
345
5
1
2
4 3
3
7.1 Control elements
The inverter has the following connections, displays and control elements on the
back:
No. Designation Description
1 Terminal Setup operation via remote control
2 REMOTE port Connection of a PC using a serial RS-232 interface or
connection of the MCR-7 or MCR-9 remote control
3 POS+ Positive terminal
4 NEG– Negative terminal
5 Earth terminal Earthing on the vehicle bodywork
10
Page 11

EN
MSI Technical description
4
MSI912
The inverter has the following connections, displays and control elements on the
front:
MSI912
1
2
ON
3
4
AC OUTPUT
LOAD
STATUS
OUT
VOLT.
FREQ.
POWER
SAVING
12345678
OFF
REMOTE
N.A.
OPTION
1
0
5
No. Designation Description
1 Main switch
“ON/OFF/REMOTE”
switch:
2 “Input Level” LED Displays the input voltage range
3 “Load Level” LED Displays the power being supplied
4 Dip switch Makes settings on the inverter (such as mains voltage,
5 Safety socket 230 V output
Switches the device on, off or to operation via the
remote control (accessory)
mains frequency, energy-saving mode).
11
Page 12

EN
Technical description MSI
5
MSI1812T
The inverter has the following connections, displays and control elements on the
front:
FREQ.
LOAD
STATUS
POWER
SAVING
ON
OFF
REMOTE
N.A.
OPTION
1
0
1
2
3
4
MSI1812T
8
BREAKER
AC OUTPUTAC INPUT
67
5
OUT
VOLT.
12345678
No. Designation Description
1 Main switch
“ON/OFF/REMOTE”
Switches the device on, off or to operation via the
remote control (accessory)
2 “Input Level” LED Displays the input voltage range
3 “Load Level” LED Displays the power being supplied
4 Dip switch Makes settings on the inverter (such as mains voltage,
mains frequency, energy-saving mode).
5 AC output 230 V output
6 AC input 230 V input
7 Fuse Protects the inverter from overload.
The fuse can be pressed in again once it has
triggered.
8 Grounding screw Sets or removes the grounding bridge
12
Page 13

EN
MSI Fitting the inverter
6
8 Fitting the inverter
8.1 Tools required
For the electrical connection you will need the following tools:
• Crimping tool
• 3multi-coloured, flexible connection cables. Determine the necessary thickness
from the table in chapter “Connecting the inverter” on page 15.
• Cable lugs and conductor sleeves
For fastening you will require the following tools:
• Machine bolts (M4) with washers and self-locking nuts or
• self-tapping screws or wood screws.
8.2 Mounting instructions
When selecting the installation location, observe the following instructions:
25 cm
BREAKER
25 cm
• The inverter can be mounted horizontally or vertically.
• The inverter must be installed in a place that is protected from moisture.
• The inverter may not be installed in the presence of flammable materials.
• The inverter may not be installed in a dusty environment.
13
Page 14

EN
Fitting the inverter MSI
AC
INPUT
AC
OUTPUT
BREAKER
AB
7
• The place of installation must be well ventilated. A ventilation system must be
available for installations in small, enclosed spaces. The minimum clearance
around the inverter must be at least 25 cm (fig. 6, page 13).
• The air intake on the underside or the air outlet on the back of the inverter must
remain clear.
• For ambient temperatures higher than 40 °C (such as in engine or heating
compartments, or direct sunlight), the heat from the inverter under load can lead
to automatic shutdown.
• The device must be installed on a level and sufficiently sturdy surface.
NOTICE!
A
Before drilling any holes, make sure that no electrical cables or other
parts of the vehicle can be damaged by drilling, sawing and filing.
8.3 Mounting the inverter
➤ Hold the inverter against the installation location and mark the fastening points
(fig. 7 A).
➤ Attach the inverter using your chosen fastening method (fig. 7 B).
14
Page 15

EN
MSI Connecting the inverter
9 Connecting the inverter
9.1 General instructions
WARNING!
!
• When installed in vehicles or boats, the inverter must be connected to the chassis
or earth.
• When setting up a socket distribution circuit (mains setup), comply with the
applicable regulations.
• Only use copper cables.
• Keep the cables as short as possible (< 1.8 m).
• Keep to the specified cable cross section and fit a cable fuse (fig. 8 3, page 16)
as close to the battery as possible on the positive cable (see the table).
• The inverter may only be connected by a qualified workshop.
The following inform ation is intended for technicians who are familiar
with the guidelines and safety precautions to be applied.
• Never use the inverter on vehicles where the positive terminal of the
battery is connected to the chassis.
• If you do not fit a fuse to the positive cable, the cables can
overload, which might result in a fire.
• Reversed polarity can damage the inverter.
• MSI912 only: The inverter should not be used to connect to a ring
main, it must only be used to power individual appliances that are
plugged into the inverter outlet either directly or using a purposemade, moulded extension lead
Device
MSI912 25 mm² 115 A
MSI1812T 35 mm² 228 A
Required cable cross
section
Cable fuse
(fig. 8 3, page 16)
15
Page 16

EN
Connecting the inverter MSI
1
4
2
3
8
9.2 Connecting the inverter to the battery
NOTE
I
Tighten the nuts and bolts to a maximum torque of 12 – 13 Nm. Loose
connections may cause overheating.
➤ Set the main switch (fig. 4 1, page 11 and fig. 5 1, page 12) to “OFF”.
➤ Loosen the screw (fig. 8 1) from the red positive terminal (fig. 8 2).
➤ Push the cable lug (fig. 8 2) of the positive cable into the red positive terminal
and fasten it with the screw.
➤ Connect the negative cable to the black negative terminal (fig. 8 4).
➤ Lay the positive cable from the inverter to the positive terminal of the vehicle
battery and connect it.
➤ Lay the negative cable from the inverter to the negative terminal of the vehicle
battery and connect it.
➤ Connect the earth terminal to the vehicle chassis.
16
Page 17

EN
MSI Connecting the inverter
9.3 Connecting the 230 V power cable
(MSI1812T only)
➤ Connect the 230 Vw connection cable with safety plug to the 230 Vw input jack
(fig. 5 6, page 12).
➤ Connect the safety plug to the 230 V AC mains.
9.4 Connecting the 230 V output cable
(MSI1812T only)
WARNING!
!
➤ Connect the 230 Vw connection cable with safety plug to the 230 Vw output
jack (fig. 5 5, page 12).
Before connecting the 230V output cable, make sure the inverter is
switched off at the main switch.
17
Page 18

EN
Connecting the inverter MSI
9
Input
230 V AC
Output
230 V AC
N
MSI
DC
Input
DC
230 V AC
FI 2
RCD
FI 1
RCD
PE
L1
N
PE
L1
N
PE
L1
N
PE
L1
654
1
3
7
2
9.5 Connect multiple appliances
(MSI1812T only)
The device is equipped at delivery with galvanic isolation. For the safe operation of
multiple appliances, it is essential that a circuit breaker (residual current circuit
breaker) is built into the socket distribution circuit, see sample circuit diagram in
fig. 9.
18
Page 19

EN
MSI Connecting the inverter
No. in
fig. 9,
page 18
1 230 Vw power source
2 Additional devices, e.g. battery charger, refrigerator
3 DC power source (battery)
4Inverter
5 Set grounding bridge (At delivery: not set, shown by dotted line)
6 Circuit breaker (residual current circuit breaker)
7 Socket distribution circuit for appliances
!
➤ Install a residual current circuit breaker in the socket distribution circuit.
Explanation
WARNING! Danger of electrocution!
If yo u wish to conn ect more th an one appliance to the inverter and install
a socket distribution circuit, you must arrange a circuit breaker (residual
current circuit breaker) and set a grounding bridge in the inverter.
9.6 Setting the earthing bridge (fig. 5 8, page 12)
(MSI1812T only)
➤ Remove the earthing screw from the top hole.
➤ Screw the screw into the bottom hole.
9.7 Connecting the MCR-7 or MCR-9 remote control
(accessory)
NOTICE!
A
➤ Connect the remote control (accessory) to the remote port (fig. 3 2, page 10).
• Only plug in the connection to the remote control in the remote port.
The device can be damaged by connecting it incorrectly.
• Ensure that the remote control and inverter are supplied with the
same input voltage.
• Follow the instruction manual of the remote control.
19
Page 20

EN
Connecting the inverter MSI
ENB
GND
OFF
ON
OFF:INV.
ON:INV.
0
OFF
ON
LOW:INV.
HI:INV.
GND
ENB
(TR ON)
(TR OFF)
TR
a
ENB
BAT+
BAT–
OFF
ON
OFF:INV.
ON:INV.
b
DC POWER
GND
ENB
+
–
OFF
ON
OFF:INV.
ON:INV.
c
9.8 Connecting the external switch for turning on and off
NOTE
I
You can use the following as an external switch:
• external switch, voltage supply from the inverter: fig. 0
• Control unit with relay or transistor circuit (TR): fig. a
• external switch with voltage supply from the battery (BAT) of the vehicle: fig. b
• external switch with its own voltage supply (DC POWER) e.g. from the ignition:
fig. c
Use cables with a cable cross section of 0.25 – 0.75 mm².
➤ Set the main switch (fig. 4 1, page 12 and fig. 5 1, page 12) to “OFF” and
make sure that the connection for the remote control (fig. 3 2, page 10) is not
assigned.
➤ Set the main switch (fig. 4 1, page 12 and fig. 5 1, page 12) to “REMOTE”.
➤ Connect the external on/off switch with the connection cable to the terminal
(fig. 3 1, page 10).
20
Page 21

EN
MSI Connecting the inverter
9.9 Pin assignment
NOTE
I
The pins of the RS-232 ports are assigned as follows:
Keep the cable lengths as short as possible (< 10 m), so there is no loss
in the signal transmission.
Inverter Computer
Pin Description Description Pin
1 Not assigned Not assigned 1
2GNDRXD 2
3RXDTXD3
4TXDDTR4
5 Not assigned GND 5
6 Not assigned DSR 6
RTS 7
CTS 8
Not assigned 9
The pins of the RJ11 remote control connection are assigned as follows:
Inverter
Pin Description
1–
2GND
3 RS-232 RXD
4 RS-232 TXD
5 RMT remote control
6 Not assigned
21
Page 22

EN
Using the inverter MSI
10 Using the inverter
10.1 Switching on the inverter
➤ Set the main switch (fig. 4 1, page 11 and fig. 5 1, page 12) of the inverter to
the “ON” position.
Set the On/Off switch to “OFF” to switch off.
➤ The inverter performs a self-test.
During the self-test, the built-in speaker emits tones and the LEDs flash.
✓ After the self-test is completed successfully, the “Input Level” (fig. 4 2, page 11
and fig. 5 2, page 12) and “Load Status” (fig. 4 3, page 11 and fig. 5 3,
page 12) LEDs light up green.
Observe the following when using the device (see also chapter “Troubleshooting”
on page 26)
The inverter switches off if:
• the battery voltage drops below 10.5 V (12 Vg connection),
• the battery voltage exceeds 16 V (12 Vg connection),
• the inverter overheats.
➤ If this happens, shut down the inverter with the main switch (fig. 4 1, page 11
and fig. 5 1, page 12).
➤ Check that the inverter is sufficiently ventilated and that the ventilation grilles are
unimpeded.
➤ Wait 5 – 10 minutes and switch the inverter on again without any electric
consumers.
When operating the inverter at high load for lengthy periods, it is advisable to start
the engine in order to recharge the vehicle battery.
22
Page 23

EN
MSI Using the inverter
10.2 Status indications
“Input Level” LED (fig. 4 2, page 11 and fig. 5 2, page 12)
The “Input Level” LED shows the present range of the input voltage.
Display Input voltage
MSI912, MSI1812T
Red, slow flash <10.6 V
Red 10.6 – 11.0 V
Orange 11.0 – 12.0 V
Green 12.0 – 14.2 V
Orange, flash 14.2 – 15.0 V
Red, quick flash >15.0
“Load Level” (fig. 4 3, page 11 and fig. 5 3, page 12)
The “Load Level” LED shows the power being supplied by the inverter.
Display Input voltage
MSI 912 MSI 1812T
Off 0 – 80 W 0 – 160 W
Green 80 – 320 W 160 – 640 W
Orange 320 – 720 W 640 – 1440 W
Red, slow flash 720 – 800 W 1440 – 1600 W
Red, quick flash >800 W >1600 W
23
Page 24

EN
Using the inverter MSI
10.3 Configuring the inverter
NOTE
I
You can adjust the device using the dip switch (fig. 4 4, page 11 and fig. 5 4,
page 12).
Setting the mains voltage
You can set the mains voltage using the S1 and S2 dip switches.
Setting the mains frequency
Settings can only be made using the dip switch if the S8 dip switch is
“On”.
Dip switch
Mains voltage S1 S2
200 V Off Off
220 V On Off
230 V Off On
240 V On On
WARNING! Danger of electrocution
!
You can set the mains frequency using the S3 dip switch.
Only adjust the S3 DIP switch when the respective frequency for the
output voltage should be used.
Dip switch
Net frequency S3
50 Hz Off
60 Hz On
24
Page 25

EN
MSI Using the inverter
Switching to energy-saving mode
You can set the energy-saving mode using the S4, S5 and S6 dip switches. In this
way, the battery you connect to the inverter is not discharged as quickly.
The inverter operates in energy-saving mode as long as the required power is below
the set level. If the required power exceeds the set level, the inverter works in normal
mode.
The values to be set on your inverter can be found in the following table:
Energy-saving mode Dip switch
MSI912 MSI1812T S4 S5 S6
Off Off Off Off Off
– 110 – 190 W On Off Off
70 – 110 W 190 – 240 W On On Off
180 – 240 W 240 – 300 W On On On
Defining settings
Using the S8 dip switch you can define whether the default settings or the settings of
dip switches S1 – S7 are used.
Dip switch
Parameter S8
Default settings On
Use dip switch S1 – S7 Off
Default settings
Mains voltage Net frequency Energy-saving mode
230 V 50 Hz Off
25
Page 26

EN
Cleaning and caring for the inverter MSI
11 Cleaning and caring for the inverter
NOTICE!
A
➤ Occasionally clean the product with a damp cloth.
Do not use sharp or hard objects or cleaning agents for cleaning as these
may damage the product.
12 Troubleshooting
WARNING!
!
I
The “Load Status” LED (fig. 4 3, page 11 and fig. 5 3, page 12) lights up red to
indicate the fault:
Do not open the device. You risk sustaining an electric shock by doing
this.
NOTE
If you have detailed questions on the specifications of the inverter
please contact the manufacturer (addresses on the back of the
instruction manual).
26
Page 27

EN
MSI Troubleshooting
LED display Cause Remedy
Quick flash Input voltage is too high Check the input voltage and reduce
it.
Slow flash Input voltage too low The battery needs recharging.
Check the cables and connections.
Occasional flash Overheating Switch off the inverter and the
consumer.
Wait 5 to 10 minutes and switch the
inverter on again without any
electric consumers.
Reduce the load and make sure the
inverter has better ventilation. Then
switch the consumer back on.
Constantly lit Short circuit or reversed
polarity
Excessive load
Switch off the inverter and remove
the consumer.
Then switch the inverter back on
without the consumer. If no
excessive load is now shown, then
there is a short circuit in the
consumer or the total load was
higher than the power specified on
the data sheet. MSI1812T: The fuse
in the device must be pressed in
again by hand after it is triggered.
Check the cables and connections.
27
Page 28

EN
Warranty MSI
13 Warranty
The statutory warranty period applies. If the product is defective, please contact the
manufacturer's branch in your country (see the back of the instruction manual for the
addresses) or your retailer.
For repair and guarantee processing, please include the following documents when
you send in the device:
• A copy of the receipt with purchasing date
• A reason for the claim or description of the fault
14 Disposal
➤ Place the packaging material in the appropriate recycling waste bins wherever
possible.
If you wish to finally dispose of the product, ask your local recycling centre
or specialist dealer for details about how to do this in accordance with the
M
applicable disposal regulations.
28
Page 29

EN
MSI Technical data
15 Technical data
NOTE
I
Rated input voltage: 12 V g
Output power
at 25 °C for 10 min:
Continuous output power
at 25 C:
Peak output power: 1600 W 3200 W
Output voltage: 200 – 240 Vw pure sine wave (THD < 3 %)
Output frequency: 50 or 60 Hz
Idle current consumption: 1.8 A 2.1 A
Standby current
consumption:
In the event of thermal overloading, the inverter reacts by reducing the
power for temperatures of 40 °C and above.
If the temperature exceeds 60 °C, the inverter switches off.
MSI912 MSI 1812T
900 W 1800 W
800 W 1600 W
0.5 A
Input voltage range: 10.5 V – 16 V
Efficiency up to: 89 % 90 %
Bypass relay: – 25 A/277 Vw
Ambient temperature for
operation:
Ambient temperature for
storage:
Priority circuit: – 230 V input protection: 10 A
Dimensions W x D x H: 197.5 x 94.3 x 291 mm, see
fig. d, page 30
Weight: 4 kg 6 kg
–20 °C to 40 °C
40 °C to 60 °C (reduced power)
–30 °C to +70 °C
Switchover time of bypass
relay:
< 30 m sec
197.5 x 94.3 x 406 mm
see fig. d, page 30
29
Page 30

EN
NEG (-)
REMOTE
CHASSIS
DC INPUT
GROUND
B
A
1
POS (+)
1
A
B
ENB
N.O.
ENB
COM
GND
N.C.
2
xxx
x
345
ON
OUT
VOLT.
FREQ.
POWER
SAVING
N.A.
OPTION
1
0
12345678
OFF
REMOTE
LOAD
STATUS
AC OUTPUTAC INPUT
BREAKER
ON
OUT
VOLT.
FREQ.
POWER
SAVING
N.A.
OPTION
1
0
12345678
OFF
REMOTE
LOAD
STATUS
AC OUTPUT
MSI912MSI1812T
186,6 mm
200,6 mm
10 mm
Ø7 mm
MSI1812T: 284 mm
MSI912: 313 mm
94,5 mm
200,6 mm
94,5 mm
d
Technical data MSI
Dimensions
30
Page 31

EN
MSI Technical data
Overvoltage shutdown
Device
MSI912, MSI1812T 16 V 14.5 V
Undervoltage shutdown
Device
MSI912, MSI1812T 11 V 10.5 V 12.5 V
Excess temperature shutdown
Internal temperature Temperature on cooling element
Shutdown Restart Shutdown Restart
60 °C 40 °C 95 °C <80 °C
Approvals
The device complies with Australian standard (AS/NZS 4763:2011) and
IEC 60068.2.6:2007.
The device has E13 certification.
Shutdown Restart
Undervoltage
warning
Overvoltage
Undervoltage
Shutdown Restart
E
In compliance with the EMC directive 2004/108/EC including 2009/19/EC and
the Low-voltage Directive 2006/95/EC
• EN55012: Class B
• EN55014:Class B
• EN61000-6-1/6-3: Class B
• EN61000-6-2/6-4: Class A
• EN61204-3
31
Page 32

AUSTRALIA
Dometic Australia Pty. Ltd.
1 John Duncan Court · Varsity Lakes QLD 4227
1800 212121 · +61 7 55076001
Mail: sales@dometic.com.au
www.dometic.com
AUSTRIA
Dometic Austria GmbH
Neudorferstraße 108
A-2353 Guntramsdorf
+43 2236 908070
+43 2236 90807060
Mail: info@dometic.at
BENELUX
Dometic Branch Office Belgium
Zincstraat 3
B-1500 Halle
+32 2 3598040
+32 2 3598050
Mail: info@dometic.be
BRAZIL
Dometic DO Brasil LTDA
Avenida Paulista 1754, conj. 111
SP 01310-920 Sao Paulo
+55 11 3251 3352
+55 11 3251 3362
Mail: info@dometic.com.br
DENMARK
Dometic Denmark A/S
Nordensvej 15, Taulov
DK-7000 Fredericia
+45 75585966
+45 75586307
Mail: info@dometic.dk
FINLAND
Dometic Finland OY
Mestarintie 4
FIN-01730 Vantaa
+358 20 7413220
+358 9 7593700
Mail: info@dometic.fi
FRANCE
Dometic SAS
ZA du Pré de la Dame Jeanne
B.P. 5
F-60128 Plailly
+33 3 44633525
+33 3 44633518
Mail : vehiculesdeloisirs@dometic.fr
GERMANY
Dometic WAECO International GmbH
Hollefeldstraße 63
D-48282 Emsdetten
+49 (0) 2572 879-195
+49 (0) 2572 879-322
Mail: info@dometic-waeco.de
HONG KONG
Dometic Group Asia Pacific
Suites 2207-11 · 22/F · Tower 1
The Gateway · 25 Canton Road,
Tsim Sha Tsui · Kowloon
+852 2 4611386
+852 2 4665553
Mail: info@waeco.com.hk
HUNGARY
Dometic Zrt. Sales Office
Kerékgyártó u. 5.
H-1147 Budapest
+36 1 468 4400
+36 1 468 4401
Mail: budapest@dometic.hu
ITALY
Dometic Italy S.r.l.
Via Virgilio, 3
I-47122 Forlì (FC)
+39 0543 754901
+39 0543 754983
Mail: vendite@domet ic.it
JAPAN
Dometic KK
Maekawa-Shibaura, Bldg. 2
2-13-9 Shibaura Minato-ku
Tokyo 108-0023
+81 3 5445 3333
+81 3 5445 3339
Mail: info@dometic.jp
MEXICO
Dometic Mx, S. de R. L. de C. V.
Circuito Médicos No. 6 Local 1
Colonia Ciudad Satélite
CP 53100 Naucalpan de Juárez
Estado de México
+52 55 5374 4108
+52 55 5393 4683
Mail: info@dometic.com.mx
NETHERLANDS
Dometic Benelux B.V.
Ecustraat 3
NL-4879 NP Etten-Leur
+31 76 5029000
+31 76 5029019
Mail: info@dometic.nl
NEW ZEALAND
Dometic New Zealand Ltd.
PO Box 12011
Penrose
Auckland 1642
+64 9 622 1490
+64 9 622 1573
Mail: customerservices@dometic.co.nz
NORWAY
Dometic Norway AS
Østerøyveien 46
N-3232 Sandefjord
+47 33428450
+47 33428459
Mail: firmapost@dometic.no
POLAND
Dometic Poland Sp. z o.o.
Ul. Puławska 435A
PL-02-801 Warszawa
+48 22 414 3200
+48 22 414 3201
Mail: info@dometic.pl
PORTUGAL
Dometic Spain, S.L.
Branch Office em Portugal
Rot. de São Gonçalo nº 1 – Esc. 12
2775-399 Carcavelos
+351 219 244 173
+351 219 243 206
Mail: info@dometic.pt
RUSSIA
Dometic RUS LLC
Komsomolskaya square 6-1
RU-107140 Moscow
+7 495 780 79 39
+7 495 916 56 53
Mail: info@dometic.ru
SINGAPORE
Dometic Pte Ltd
18 Boon Lay Way 06–140 Trade Hub 21
Singapore 609966
+65 6795 3177
+65 6862 6620
Mail: dometic@dometic.com.sg
SLOVAKIA
Dometic Slovakia s.r.o. Sales Office Bratis lava
Nádražná 34/A
900 28 Ivanka pri Dunaji
/ +421 2 45 529 680
Mail: bratislava@dom etic.com
SOUTH AFRICA
Dometic (Pty) Ltd.
Regional Office
South Africa & Sub-Saharan Africa
Unit 6-7 on Mastiff Linbro Park
2008 Johannesburg
+27 11 4504978
+27 11 4504976
Mail: info@dometic.co.za
SPAIN
Dometic Spain S.L.
Avda. Sierra del Guadarrama, 16
E-28691 Villanueva de la Cañada
Madrid
+34 902 111 042
+34 900 100 245
Mail: info@dometic.es
SWEDEN
Dometic Scandinavia AB
Gustaf Melins gata 7
S-42131 Västra Frölunda
+46 31 7341100
+46 31 7341101
Mail: info@dometicgroup.se
SWITZERLAND
Dometic Switzerland AG
Riedackerstrasse 7a
CH-8153 Rümlang
+41 44 8187171
+41 44 8187191
Mail: info@dometic.ch
UNITED ARAB EMIRATES
Dometic Middle East FZCO
P. O. Box 17860
S-D 6, Jebel Ali Freezone
Dubai
+971 4 883 3858
+971 4 883 3868
Mail: info@dometic.ae
UNITED KINGDOM
Dometic UK Ltd.
Dometic House, The Brewery
Blandford St. Mary
Dorset DT11 9LS
+44 344 626 0133
+44 344 626 0143
Mail: customerservices@dometic.co.uk
USA
Dometic RV Division
1120 North Main Street
Elkhart, IN 46515
+1 574-264-2131
4445102047 12/2016
 Loading...