

Page 1
207.5381.05
DS301H DS601H
Type: DSH20-60
Health Care refrigerator
Arzneimittel-Kühlgerät
Réfrigérateur pour Soins de santé
Frigorifero medicale
Koelkast voor medische doeleinden
Refrigeração medicinal
Kylskåp för läkemedel
Medisinkjøleskap
Køleboks til sundhedssektoren
Näyte/lääkejääkaappi
Frigorífico Health Care
Kórházi hűtőszekrény
BE
DE
GB
IT
NL
Operating Instructions
Bedienungsanleitung
Mode d'emploi
Istruzioni per l'uso
Handleiding
Käyttöohje
Bruksanvisning
Bruksanvisning
Betjeningsvejledning
Manual de instrucciones
Kezelési tájékoztató
SF
SE
NO
DK
E
HU
miniCool
Page 2
2
DS301H
DS601H
B
B
A
A
1.
2.
3.
4.
5.
6.
7.
8.
1
1
3
2
4
Page 3
3
Thank you for choosing our appliance. We are sure it will provide you with trouble-free use.
In the following, we would like to familiarise you with some symbols, which we bring to your attention to ensure the safe and
efficient operation of the appliance:
source of danger, in event of improper operation
suggested useful tips to read
information concerning environmental protection
This refrigerator is intended for the storage of drugs at temperatures within the range +2°C to +8°C. A digital type
thermometer is provided which may be fixed to the top of refrigerator. (Fig. 1., page 4)
Attention!
THIS REFRIGERATOR IS NOT SUITABLE FOR THE STORAGE OF BLOOD.
Attention!
This appliance is not intended for use by persons (including children) with reduced
physical, sensory or mental capabilities, or lack of experience and knowledge, unless
they have been given supervision or instruction concerning use of the appliance by a
person responsible for their safety.
Children should be supervised to ensure that they do not play with the appliance.
Any electrical work required to install this appliance should be carried out by a
qualified electrician.
This product should be serviced by an authorised Service Engineer, and only genuine
spare parts should be used.
It is dangerous to alter the specifications or modify this product in any way.
Care must be taken to ensure that the appliance does not stand on the electrical
supply cable.
There are working parts in this product which heat up. Always ensure that there is
adequate ventilation as a failure to do this will result in component failure and
possible content loss. See installation instructions.
Parts which heat up should not be exposed. The back of the product should be close
to a wall but leaving the required distance for ventilation as stated in the installation
instructions.
Before defrosting, cleaning or maintenance work is carried out, be sure to switch off
the appliance and unplug it.
DO NOT USE SHARP INSTRUMENTS to scrape off frost or ice. Under no circumstances
should solid ice be forced off the cooling fins. Solid ice should be allowed to thaw
when defrosting the appliance. See defrost instructions.
This appliance is heavy. Care should be taken when moving it.
Under no circumstances should you attempt to repair the appliance yourself. Repairs
carried out by inexperienced persons may cause injury or more serious
malfunctioning. Refer to your local Service Centre and always insist on genuine spare
parts.
In this appliance the storage of any toxic or explosive substance is forbidden!
Please read these operating instructions carefully before putting the refrigeration unit
into operation. If you later sell or dispose of it, please ensure that the new owner
receives these operating instructions.
Please follow the installation details below carefully Guarantee is valid for products
installed as described only.
GB
Page 4
4
Attention!
Warranty arrangements are in accordance with EC Directive 44/1999/CE and the
normal conditions applicable in the country concerned.
For warranty or other servicing, such as spare-parts, please contact our Dometic
Service Network.
The warranty does not cover any damage due to improper use.
The warranty does not cover any modifications to the appliance or the use of non-
original Dometic spare-parts.
The warranty does not apply if the installing and operating instructions are not
adhered to.
When contacting Dometic Service Network, please state the model, product number
and serial number. You will find this information on the data plate inside of the
refrigerator.
CONTENTS
CONTENTS
1. Unpacking
2. View of the appliance
3. Cleaning
4. Positioning the appliance
4.1. Installation instruction
5. Using the appliance
5.1. Initial operation
5.2. Temperature regulation
6. Thermometer
7. Useful suggestions
8. Defrosting, cleaning and maintenance
9. Interior light
10. Replacing the decorative door panel
11. Fitting up and removing the handle (optional)
11.1. Fitting up the handle
11.2. Removing the handle
12. Customer service
13. Putting into operation, technical data
13.1. Connecting to electrical mains
14. Environmental protection information
15. Recycling
GB
Page 5
GB
5
1. Unpacking
After removal from the cardboard packaging, make sure the
appliance is not damaged. If you find damage to the
2. View of the appliance (Fig 1)
IN CASE IF YOUR REFRIGERATOR IS EQUIPPED WITH LOCK, DOMETIC Zrt DO NOT ACCEPT LIABILITY FOR LOSS
OR DAMAGE OF KEYS. HOWEVER A COMPLETE LOCK CAN BE SUPPLIED.
appliance resulting from transport, report it immediately
to the transportation firm.
3. Cleaning
Clean the refrigerator thoroughly at intervals, as
necessary. Remove the shelves; these, the cabinet
interior and the door should be washed with a warm
solution of sodium bi-carbonate. Finally wipe over with a
cloth rinsed in warm water only, and dry with a clean cloth.
Do not wash any plastic parts in water that is more than hand
warm, and do not expose them to dry heat. The outside of
the cabinet should be wiped down regularly with a clean,
damp cloth.
NEVER USE STRONG CHEMICALS OR ABRASIVE
CLEANING MATERIALS ON ANY PART OF THE CABINET.
4. Positioning the appliance
When first using this refrigerator please consider the
following points:
ENSURE REFRIGERATOR IS LEVEL
THE PIPEWORK AT THE BACK GETS HOT IN USE
THE REFRIGERATOR HAS NO 'MOTOR' AND IS
THEREFORE VIRTUALLY SILENT
ALLOW AT LEAST 3 HRS. FOR SIGNS OF COOLING
During the refrigeration process, the appliance gives
off heat from the condenser (under the upper part of
the rear cover) into the surrounding air. The more
ventilated the condenser is, the more effective the
refrigeration will be.
The other condition for satisfactory operation is that the
appliance stands on a flat surface. This is best seen by
placing a glass of water on top of the appliance.
It is important that the appliance is not directly exposed to
radiated heat (sunlight, radiator, near an oven, etc.).
Please do not place the refrigerator onto thick carpet!
4.1. Installation instructions
This version is supposed to be freestanding. Cooling unit
room cover protects from the hot parts of the cooling unit.
Foot frame with grilles ensures sufficient ventilation.
5. Using the appliance
To start the refrigerator connect the plug to the socket
outlet and switch on the socket. The cooling fins should
show signs of cooling after about 1-2 hours depending on
ambiant temperature.
5.1. Initial operation
The device must be plugged into a properly earthed
socket.
The miniCool starts automatically with a self-test. The
LED illuminates after plugging-in several times and
after that continuous light can be seen if the door is
open.
The miniCool achieves its operating temperature after
several hours.
5.2. Temperature regulation
The Health Care refrigerator is fitted with a fully automatic
electronic temperature regulator. It is not needed to set
the temperature of the storage compartment manually.
6. Thermometer (Fig. 2)
Refer to the separate instruction leaflet supplied with the
thermometer. The thermometer can be stood up using
the attached stand or alternatively it can be fixed to the
refrigerator door, in which case the sensor wire should be
arranged so that it is not stretched or damaged when the
door is opened.
The temperature sensor is located inside the refrigerator
below the bottom shelf.
The display will then show the current, maximum and
minimum temperature inside the refrigerator.
After the first pull down of the refrigerator (allow four
hours) please make a "reset" on the thermometer
because otherwise it will keep as "maximum" the ambient
temperature.
IMPORTANT NOTIFICATION
The 3 trays of the appliance shall be placed by respecting the indicated positions as on Picture.
A ferrite ring serving for EMC compatibility is mounted on the wire of the digital thermometer's sensor.
Do not remove the ferrite ring!
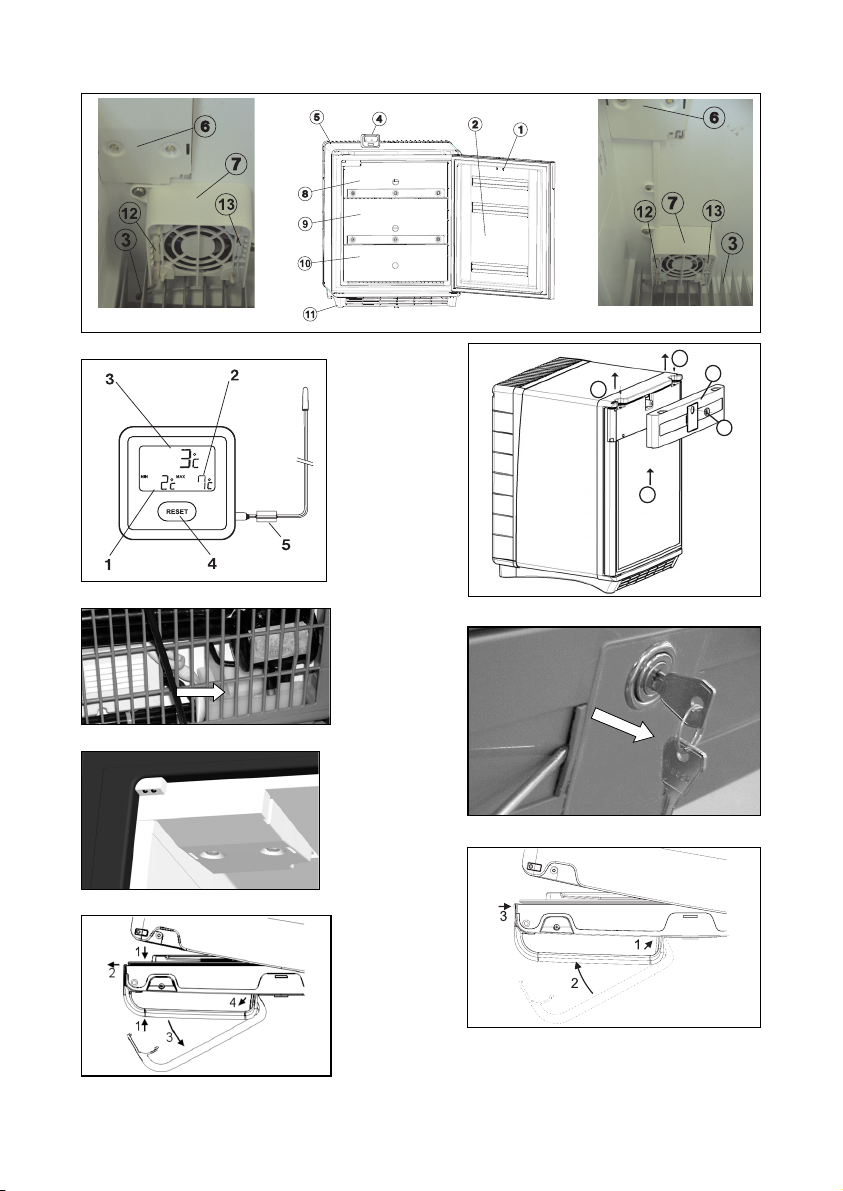
1. Door lock
2. Door
3. Evaporator
4. Thermometer
5. Cooling unit room cover
6. Interior light
7. Fan (housing)
8. Upper tray (Cutout on Upper Left Corner of Front Plate)
9. Middle tray (With Highest Front Plate)
10. Lower tray (Injection-moulded Compact Component)
11. Footframe
12. Sensor of Fuzzy Logic
13. Sensor of thermometer
Page 6
6
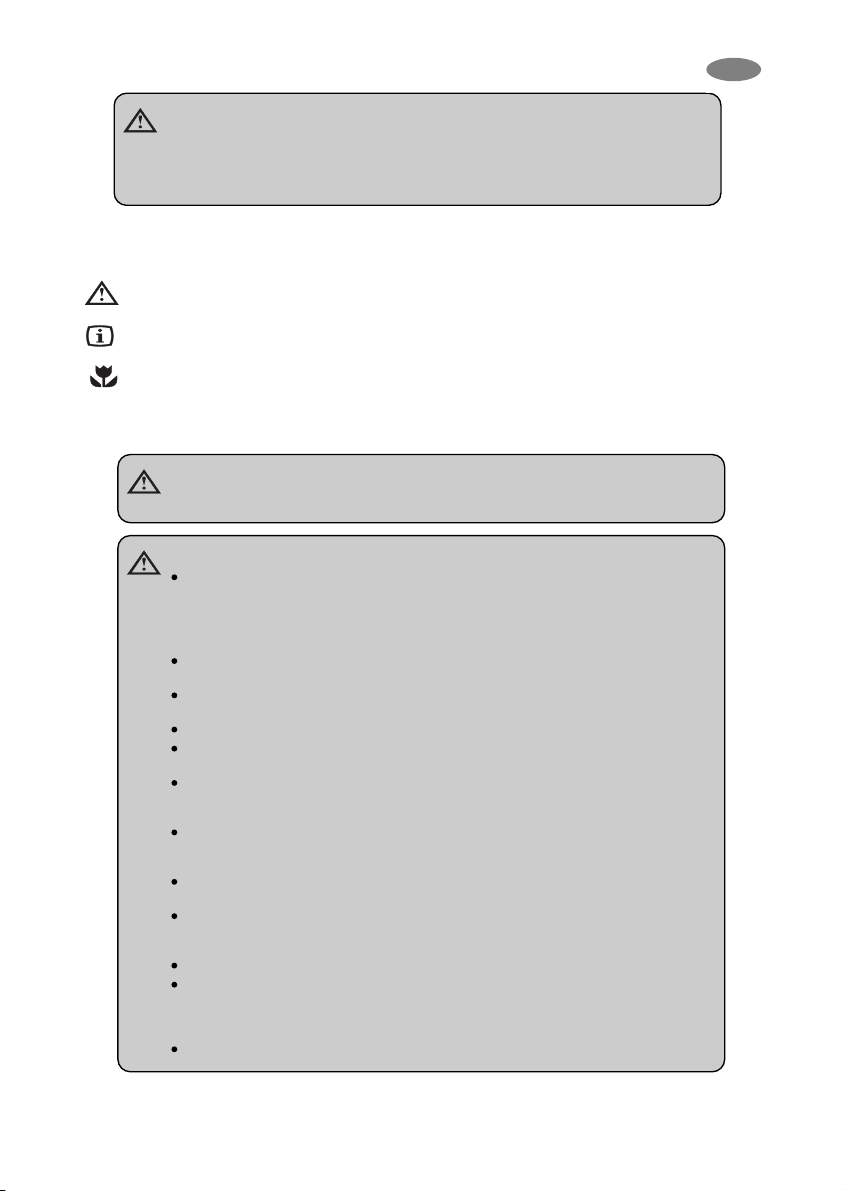
10. Replacing the decorative door
panel
(Fig. 5.)
If the refrigerator is furnished with handle, it is the handle
that should be first removed at the change of the door
panel.
Remove the mounter screws (1) of the forehead panel.(3)
Remove rosette (2) (in case of with lock version fridge).
Lift and remove the forehead panel.(3)
Slide the decorative panel (4) out of the door frame and
insert the new panel (thickness max. 2 mm).
Place back the forehead panel,rosette and screw in
reverse sequence.
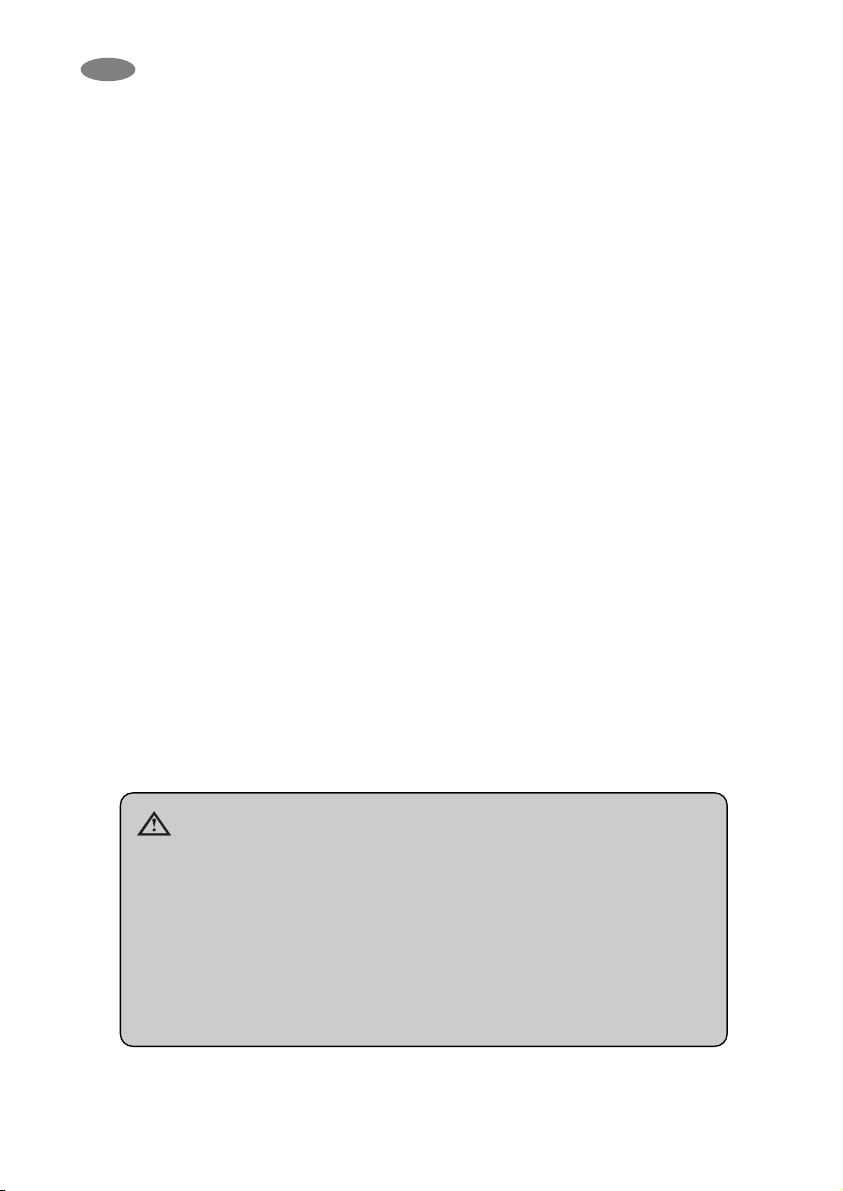
11. Fitting up and removing the
handle (optional)
The handle which can be found among the accessories of
the appliance should be fitted and removed as follows:
11.1. Fitting up the handle(fig. 6., 7.)
11.2. Removing the handle(fig. 8.)
12. Customer service
Before you call a service engineer, carry out the following
simple tests:
Is there a power failure? Check the fuses.
Is the plug firmly connected to the socket and is the
socket switched on? Check the socket by plugging in
another appliance, e.g. a table lamp.
Has the door not been closed properly causing the
inside temperature to rise too quickly?
Is the refrigerator level?
Has the ventilation become obstructed?
If after checking all the above points, the refrigerator is still
not working satisfactorily, contact your nearest service
engineer. State the problem, model, product- and serialnumber.
(Details of the model, product- and serialnumber are to
be found on the data label in the top left of the inside
compartment.)
This refrigerator is equipped with overheating protection.
An authorised service technician can check whether this
has been triggered or not.
In the event of a fault developing, contact your nearest
Service Centre-see local telephone directory.
www.dometic.com
GB
The more medicines you store in the refrigerator then
reduces the hazard of freezing, if the unit has a short period
of time undercooling.
We take no responsibility for damage to vaccines
through freezing, if there has been a cutout in the
electricity for a short period of time.
The temperature readings may rise temporarily after opening
the door or placing additional items inside the cabinet.
It is important to reset the thermometer regularly to ensure
that the temperature is maintained between 2 °C and 8 °C.
On the battery transit strip must be removed to activate the
temperature display.
Thermometer:
1. Min. Temperature
2. Max. Temperature
3. Current Temperature
4. Reset switch
5.Ferrite ring
7. Useful suggestion
The appliance is equipped with a fan in order to have a
uniform inner temperature. The fan is operating only if the
door is closed. At a door opening the fan will stop, then it
starts again working when the door is closed.
If the fan incidentally stops, and the door of the appliance is
closed, the electronincs will emmit an audible warning signal
(continouos signal)
Audible warning signals to tell the customer to close the
door: If the door is kept open for more then 20 s, the
electronics emmits an audible warning signal (intermitent
signal with beeping frequency of 1 Hz), then after another 40
s it emmits another audible warning signal (intermitent signal
with beeping frequency of 2 Hz).
Do not overfill the appliance. It is advisable to leave some
space between the products in the cabinet to ensure
efficient and even cooling. If the shelves are packed too
tightly there may be unacceptable temperature variations.
8. Defrosting, cleaning and
maintenance (Fig. 3)
Frost will gradually form on the cooling surfaces and it must
not be allowed to become too thick since it acts as an
insulator and interferes with the cooling.
We recommend to defrost the appliance in every 3 weeks,
or depending on the ice quantity on the cooling fins. While
defrosting the appliance should be switched off by
disconnecting the refrigerator from the electricity supply and
leave the cabinet door open.
The frost will melt and the defrost water will run through the
drain tube from the drip channel into an evaporating vessel
located at the bottom rear of the refrigerator. (Fig 3.)
After defrosting the cabinet interior should be wiped out
with a clean, damp cloth.
9. Interior light (Fig. 4)
Two light-emitting diodes (A) on an electronic PCB illuminate
the cooling compartment when the door is opened.
Two sensors (B) control whether the door is open or not and
the LEDs will work accordingly.
Page 7
7
13. Putting into operation
Technical data:
13.1. Connecting to electrical mains
The appliance may only be operated from nominal
voltage mains as shown on the data plate. The
appliance mains plug may be connected to a mains socket
earthed in accordance with regulations.
Any electrical work required to install this appliance should
be carried out by a qualified electrician or competent
person.
The manufacturer declines any liability should these
safety measures not be observed.
Electrical Requirements
Before switching on, make sure the electricity supply voltage
is the same as that indicated on the appliance rating plate.
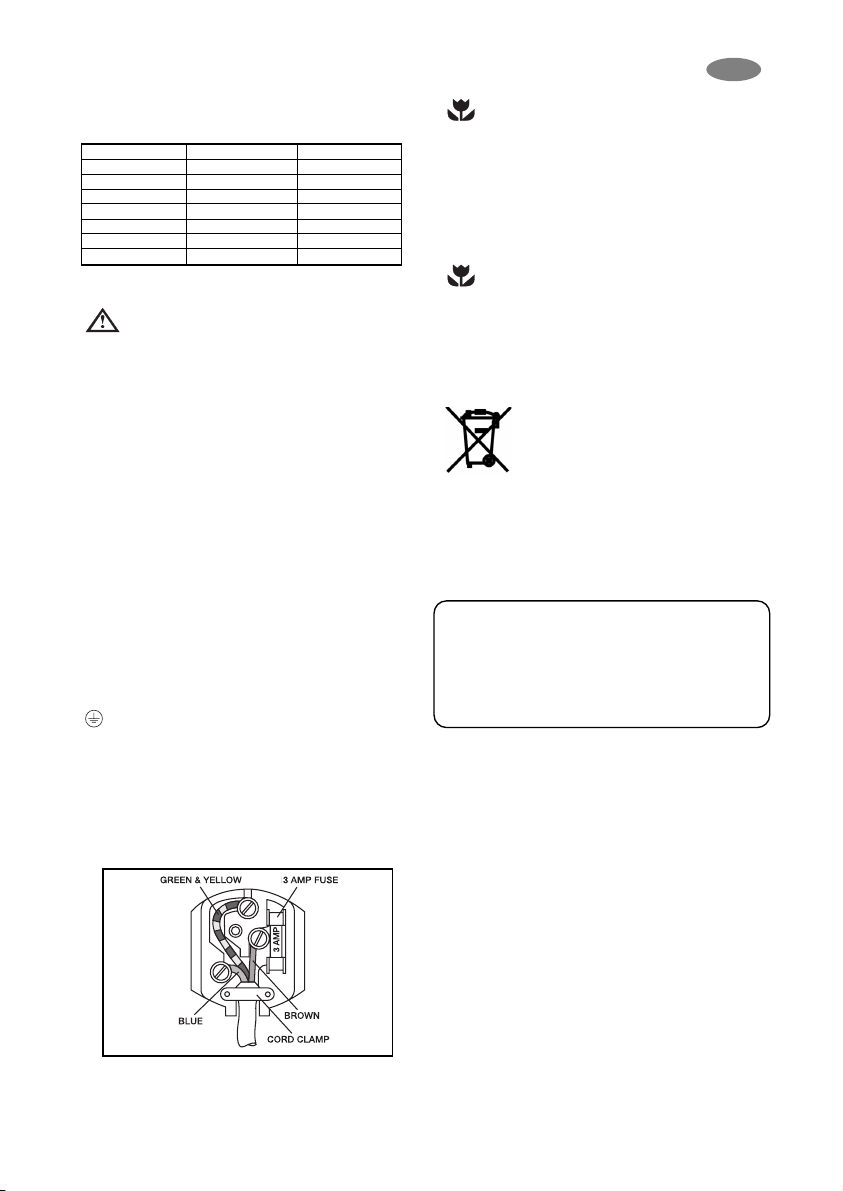
Only for UK:
The appliance is supplied with a 3 amp plug fitted. In the
event of having to change the fuse in the plug supplied, a 3
amp ASTA approved (BS 1362) fuse must be used. Should
the plug need to be replaced for any reason, the wires in the
mains lead are coloured in accordance with the following
code:
Green and Yellow: Earth
Blue: Neutral
Brown: Live
The wire coloured green and yellow must be connected to
the terminal marked with the letter „E“ or by the earth symbol
or coloured green and yellow.
The wire coloured blue must be connected to the terminal
„N“ or coloured black.
The wire coloured brown must be connected to the terminal
marked „L“ or coloured red.
Upon completion there must be no cut, or stray strands of
wire present and the cord clamp must be secure over the
outer sheath.
14. Environmental protection
information
The appliance does not contain any CFCs/HCFCs.
Ammonia (natural hydrogen and nitrogen compound) is
used as a refrigerating agent in the refrigeration unit.
The ozone-friendly cyclopentane is activated as a motive
agent for the PU foam insulation.
Sodium chromate is used for corrosion protection (less
than 2 weight % of the coolant).
15. Recycling
After unpacking the appliance, the packing materials
should be delivered to a local collection site. At the end
of its useful lifetime, the appliance should be delivered to
a specialised collection and reprocessing firm, which
reclaims the usable materials. The rest is properly
destroyed.
Appliances bearing this symbol must be
deposited at the designated local reception
point for the disposal of electrical and
electronic equipment.
It is not permitted that this product be
disposed of by way of the normal household refuse
collection system.
Dometic refrigerators bear this symbol on the
specifications plate (data plate) to be found in the interior
of the unit.
This appliance compiles whit the following EU
directives:
LVD-Directive 2014/35/EU
EMC-Directive 2014/30/EU
CE-Directive 93/68/EEC
RoHS-Directive 2011/65/EU
GB
Model DS301H DS601H
Type DSH20-60 DSH20-60
Gross volume 28 litre 53 litre
Mains operation 220 - 240V (AC) 220 - 240V (AC)
Input 65W 85W
Energy consumption0.86 kWh/24h 1.05 kWh/24h
Climate class SN SN
Ref rige rant 151g H
2
O + 101g NH3157g H2O + 105g NH
3
Page 8
8
D
Vielen Dank, dass Sie sich für eines unserer Produkte entschieden haben. Wir hoffen, es wird Ihnen jahrelang zuverlässige
Dienste leisten. In dieser Anleitung möchten wir Sie mit einigen Symbolen vertraut machen, die Ihnen beim sicheren und
effizienten Einsatz des Geräts helfen werden:
Gefahr bei unsachgemäßem Einsatz des Geräts
Empfehlungen für die Benutzung des Geräts
Informationen zum Umweltschutz
Dieses Kühlgerät eignet sich zum Kühlen von Arzneimitteln bei Temperaturen zwischen +2 °C und
+8 °C. Zum Lieferumfang gehört ein Digitalthermometer, das an der Oberseite des Kühlgerätes befestigt werden kann
(Abb. 1, Seite 11).
Achtung!
Dieses Gerät ist nicht für die Benutzung von Personen (auch Kindern) mit physischen,
sensorischen oder mentalen Beeinträchtigungen oder Mangel an Erfahrung und
Wissen vorgesehen. Außer, die für sie verantwortliche Person gibt ihnen Anleitung
und Beaufsichtigt sie. Kinder sollten Beaufsichtigt werden um sicher zu stellen, dass
sie nicht mit dem Gerät spielen.
Notwendige Wartungsarbeiten müssen von einem Elektriker durchgeführt und es
dürfen ausschließlich Originalersatzteile verwendet werden.
Es kann gefährlich sein, das Gerät oder einzelne Komponenten in irgendeiner Weise
zu verändern.
Achten Sie darauf, dass das Netzkabel niemals unter dem Gerät eingeklemmt wird
Einige Komponenten im Geräteinnern heizen sich im Betrieb auf. Stellen Sie sicher,
dass stets ausreichend Luftzirkulation zur Verfügung steht, da das Gerät sonst
beschädigt werden kann und der Inhalt verdirbt. Siehe auch
Installationsanweisungen.
Heiße Gerätekomponenten dürfen nicht frei zugänglich sein. Stellen Sie das Gerät
daher mit der Rückwand gegen eine Wand. Halten Sie dabei aber den in den
Installationsanweisungen angegebenen Mindestabstand ein, damit die erforderliche
Luftzirkulation gewährleistet ist.
Ziehen Sie vor dem Abtauen, der Reinigung oder Wartungsarbeiten stets den
Netzstecker.
Schaben Sie das Eis NICHT MIT EINEM SPITZEN GEGENSTAND ab. Entfernen Sie fest
sitzendes Eis niemals mit Gewalt von den Kühlrippen. Lassen Sie es in Ruhe abtauen.
Siehe dazu Abtauanweisungen.
Das Gerät hat ein beträchtliches Gewicht. Seien Sie vorsichtig, wenn Sie es bewegen.
Versuchen Sie niemals, das Gerät selbst zu reparieren. Reparaturen durch fachfremde
Personen können zu Verletzungen oder zu Schäden am Gerät führen. Wenden Sie sich
an Ihren örtlichen Händler und verlangen Sie ausdrücklich Originalersatzteile.
Die Lagerung von giftigen oder explosiven Stoffen in dem Kühlgerät ist nicht
gestattet!
Bitte lesen Sie diese Anleitung sorgfältig, bevor Sie das Gerät einsetzen. Sollten Sie das
Gerät weiter verkaufen oder entsorgen, übergeben Sie bitte diese Anleitung dem
neuen Besitzer.
Bitte beachten Sie die folgenden Installationsanweisungen genau. Garantieleistungen
können nur in Anspruch genommen werden, wenn die Installation gemäß den
Installationsanweisungen erfolgt. (siehe Kapitel 4.1)
Achtung!
DIESES KÜHLGERÄT IST ZUR LAGERUNG VON BLUTKONSERVEN NICHT GEEIGNET.
Page 9
9
D
INHALT
INHALT
1. Auspacken des Geräts
2. Ansicht des Geräts
3. Reinigung
4. Aufstellung des Geräts
4.1. Installationsanweisungen
5. Einsatz des Geräts
5.1. Erste Inbetriebnahme
5.2. Temperaturregelung
6. Thermometer
7. Nützliche Hinweise
8. Abtauen, Reinigung und Wartung
9. Innenbeleuchtung
10. Auswechseln der Türblende
11. Montage und Demontage des Türgriffs (optional)
11.1. .Montage des Türgriffs
11.2. Demontage des Türgriffs
12. Kundendienst
13. Inbetriebnahme, Technische Daten
13.1. Anschluss an das Stromnetz
14. Informationen zum Umweltschutz
15. Recycling
Achtung!
Die Garantiebedingungen entsprechen der EU-Richtlinie 44/1999/CE und den im
jeweiligen Bestimmungsland geltenden Gesetzen.
Bei Fragen zu Garantie und Kundendienst sowie für Ersatzteile wenden Sie sich bitte an
unser Dometic Servicenetzwerk.
Die Garantie deckt keine Schäden durch unsachgemäße Benutzung ab.
Die Garantie deckt keine Änderungen am Gerät oder den Einsatz nicht-originaler
Ersatzteile von Dometic ab.
Die Garantie erlischt, wenn das Gerät nicht gemäß den Anweisungen installiert und
benutzt wird.
Nennen Sie bitte das Modell sowie die Produkt- und die Seriennummer des Geräts,
wenn Sie sich mit dem Dometic Servicenetzwerk in Verbindung setzen. Diese
Informationen finden Sie auf dem Typenschild im Innern des Kühlgerätes.
Page 10
10
D
1. Auspacken des Geräts
Entfernen Sie den Verpackungskarton und prüfen Sie, ob
das Gerät Schäden aufweist. Bei Transportschäden wenden
2. Ansicht des Geräts (Abb. 1.)
FALLS IHR KÜHLGERÄT MIT EINEM TÜRSCHLOSS AUSGESTATTET IST, ÜBERNIMMT DOMETIC Zrt KEINE
HAFTUNG FÜR VERLOREN GEGANGENE ODER BESCHÄDIGTE SCHLÜSSEL. SCHLÖSSER SIND ALS KOMPLETTE
EINHEIT ALS ERSATZTEIL ERHÄLTLICH.
Sie sich bitte umgehend an das Transportunternehmen.
3. Reinigung
Reinigen Sie das Kühlgerät gründlich in regelmäßigen
Abständen und bei Bedarf. Räumen Sie das Gerät aus
und entfernen Sie die Einlegeböden und Türeinlagen.
Reinigen Sie die Innenflächen des Geräts und der Tür mit
einer warmen Lösung aus Natriumhydrogenkarbonat.
Wischen Sie mit klarem, warmem Wasser nach und trocknen
Sie das Gerät mit einem sauberen Tuch. Reinigen Sie die
Kunststoffteile nicht in Wasser, das mehr als handwarm ist.
Setzen Sie diese Teile keiner Heißluft aus. Reinigen Sie die
Außenwände des Geräts regelmäßig mit einem sauberen,
feuchten Tuch.
VERWENDEN SIE NIEMALS STARKE CHEMIKALIEN ODER
SCHEUERMITTEL ZUR REINIGUNG DES GERÄTS.
4. Aufstellung des Geräts
Beachten Sie bei der ersten Benutzung des Geräts folgende
Punkte:
ACHTEN SIE DARAUF, DASS DAS GERÄT WAAGERECHT
STEHT
DIE LEITUNGEN AUF DER RÜCKSEITE WERDEN IM
BETRIEB HEISS
DAS GERÄT ARBEITET OHNE KOMPRESSOR. ES LÄUFT
DAHER SEHR LEISE
ERST NACH DREI STUNDEN KANN MIT EINER
WAHRNEHMBAREN KÜHLLEISTUNG GERECHNET
WERDEN
Während des Kühlprozesses gibt das Gerät vom
Kondensator (im oberen Bereich der Rückseite)
Wärme in die Umgebung ab. Je besser die Belüftung
des Geräts ist, desto höher ist die Kühlleistung.
Wichtig für den einwandfreien Betrieb ist auch die
waagerechte Aufstellung des Geräts. Das kann sehr
einfach durch Stellen eines vollen Wasserglases auf
den Deckel geprüft werden.
Setzen Sie das Gerät nicht direkter Wärmestrahlung
aus (Sonnenlicht, Heizkörper, Ofen, usw.).
Stellen Sie das Gerät nicht auf einem dicken Teppich
auf!
4.1. Installationsanweisungen
Diese Versionen sind zur freien Aufstellung in einem Raum
gedacht. Eine Abdeckung schützt vor den heißen
Komponenten der Kühleinheit. Der Bodenrahmen sorgt
mit seinem Grill für ausreichende Luftzirkulation.
5. Einsatz des Geräts
Um das Gerät in Betrieb zu setzen, stecken Sie den
Netzstecker ein und schalten Sie die Steckdose ein (falls
erforderlich). Je nach Umgebungstemperatur beginnen
die Kühlrippen nach etwa ein bis zwei Stunden, kalt zu
werden.
5.1. Erste Inbetriebnahme
Schließen Sie das Gerät an eine geerdete Steckdose
an.
miniCool startet automatisch mit einem Selbsttest. Die
LED blinkt zunächst mehrfach und leuchtet dann
permanent. Bei geöffneter Tür leuchtet die
Innenbeleuchtung.
miniCool erreicht nach mehreren Stunden seine
Betriebstemperatur.
5.2. Temperaturregelung
Die Arzneimittel-Kühlgerät ist mit einer vollautomatischen,
elektronischen Temperatursteuerung ausgestattet. Die
Kühltemperatur muss daher nicht manuell eingestellt
werden.
WICHTIGER HINWEIS
Diese 3 Ablagen des Gerätes müssen gemäß der vorgegeben Position, wie im Bild gezeigt, platziert werden.
An der Leitung des digitalen Thermometers ist ein Eisenring zur Erreichung der EMV- Kompatibilität angebracht.
Entfernen Sie den Eisenring nicht!
1. Türschloss
2. Tür
3. Verdampfer
4. Thermometer
5. Abdeckung der
Kühleinheit
6. Innenbeleuchtung
7. Ventilator (Gehäuse)
8. Obere Ablage (Ausschnitt auf der oberen linken
Seite der Frontblende)
9. Mittlere Ablage ( mit der höchsten Frontblende)
10. Untere Ablage (Spritzguss-Kompakt-Einheit)
11. Ablagen
12. Bodenrahmen
13. Sensor der Elektronik
Page 11
11
D
8. Abtauen, Reinigung und
Wartung
(Abb. 3.)
Nach einiger Zeit bildet sich Eis auf den Kühlrippen.
Diese Eisschicht darf nicht zu dick werden, da sie
isolierend wirkt und die Kühlleistung beeinträchtigt.
Wir empfehlen das regelmäßige Abtauen des Geräts etwa
alle drei Wochen oder entsprechend der Eisbildung an
den Kühlrippen. Zum Abtauen das Gerät vom Stromnetz
trennen und die Kühlschranktür offen lassen.
Das Eis schmilzt und das entstehende Tauwasser läuft vom
Tropfkanal über einen Dränageschlauch in eine
Verdunstungswanne auf der Rückseite unter dem
Kühlgerät (Abb. 4). Nach dem Abtauen reinigen Sie das
Innere des Geräts mit einem sauberen, feuchten Tuch.
9. Innenbeleuchtung (Abb. 4.)
Zwei Leuchtdioden (A) auf einer elektronischen
Leiterplatte beleuchten den Innenraum des Geräts, wenn
die Tür geöffnet wird.
Zwei Sensoren (B) erkennen, ob die Tür geöffnet ist und
steuern die Leuchtdioden entsprechend.
10. Auswechseln der Türblende
(Abb. 5.)
Ist der Kühlschrank mit einem Türgriff ausgestattet,
muss dieser zuerst demontiert werden, wenn die
Türblende ausgetauscht werden soll.
Entfernen Sie die Schrauben (1) des Türrahmens (3).
Entfernen Sie die Rosette (2) (bei Versionen mit
Türschloss).
Heben Sie den Türrahmen (3) an und nehmen ihn ab.
Ziehen Sie die Türblende (4) aus dem Türrahmen und
setzen die gewünschte Blende (max. 2 mm stark) ein.
Setzen Sie den Türrahmen und die Rosette wieder auf und
verschrauben den Rahmen wieder.
11. Montage und Demontage des
Türgriffs (optional)
Der Türgriff befindet sich beim mitgelieferten Zubehör
und wird wie folgt montiert und demontiert:
11.1. Montage des Türgriffs(Abb. 6-7)
11.2. Demontage des Türgriffs (Abb. 8)
12. Kundendienst
Prüfen Sie bitte zuerst Folgendes, bevor Sie unseren
Kundendienst kontaktieren:
Ist Netzstrom verfügbar? Prüfen Sie die Sicherungen.
Sitzt der Stecker korrekt und ist die Steckdose
eingeschaltet (falls erforderlich)? Prüfen Sie die
Steckdose, indem Sie ein anderes Gerät anschließen,
z.B. eine Nachttischlampe.
War die Tür nicht ganz geschlossen und hat dadurch
ein starker Temperaturanstieg im Gerät stattgefunden?
Steht das Gerät waagerecht?
Ist die Luftzirkulation behindert?
6. Thermometer (Abb.2)
Bitte beachten Sie das dem Thermometer separat
beigefügte Merkblatt. Das Thermometer kann mit Hilfe des
integrierten Ständers aufrecht aufgestellt oder an der
Kühlschranktür befestigt werden. In diesem Fall ist darauf zu
achten, dass das Sensorkabel beim Öffnen und Schließen
der Tür nicht eingeklemmt oder gedehnt wird.
Der Temperatursensor befindet sich oben links vor dem
Verdampfer im Kühlschrank.
Das Thermometer zeigt die aktuelle, die maximale und die
minimale Temperatur im Kühlschrank an.
Führen Sie nach dem ersten Einschalten des Kühlschranks
(nach etwa vier Stunden) einen "Reset" am Thermometer
durch, da dieses sonst als maximale Temperatur die äußere
Umgebungstemperatur speichert.
Die Lagerung zahlreicher Präparate verringert die Gefahr des
Gefrierens, falls das Gerät kurzzeitig unterkühlt.
Wir übernehmen keine Haftung für beeinträchtigte
Impfstoffe, wenn diese aufgrund eines kurzzeitigen
Stromausfalls gefrieren.
Die abgelesene Temperatur kann kurzzeitig ansteigen, wenn
die Kühlschranktür geöffnet wird oder zusätzliche Präparate
eingelagert werden.
Zu Aufrechterhaltung einer Temperatur zwischen
2 °C und 8 °C ist ein regelmäßiger Reset des Thermometers
von großer Bedeutung.
Damit die Temperaturanzeige funktioniert, muss am
Thermometer die Transportsicherung der Batterie entfernt
werden.
Thermometer:
1. Minimale Temperatur
2. Maximale Temperatur
3. Aktuelle Temperatur
4. “RESET”-Knopf
5. Eisenring
7. Nützliche Hinweise
Dieses Gerät ist mit einem Ventilator ausgestattet, um eine
einheitliche Innentemperatur zu erreichen.
Der Ventilator funktioniert nur, wenn die Tür geschlossen ist.
Beim Öffnen der Tür schaltet der Ventilator sich aus, er startet
wieder, wenn die Tür geschlossen ist.
Stoppt der Ventilator im Fehlerfall und die Tür ist
geschlossen, gibt die Elektronik ein akustisches Signal aus
(Dauersignal).
Akustische Warnsignale sagen dem Kunden, die Tür zu
schließen. Bleibt die Tür mehr als 20 Sekunden geöffnet,
gibt die Elektronik ein unterbrochenes akustisches Signal mit
der Frequenz 1 Hz aus, nach weiteren 40 Sekunden ertönt
ein anderes unterbrochenes Signal mit der Frequenz 2 Hz.
Überladen Sie das Gerät nicht. Zwischen den
Kühlprodukten sollte etwas Platz gelassen werden, um eine
effiziente und gleichmäßige Kühlung zu gewährleisten. Ein
Überladen der Regalfächer kann zu
Temperaturschwankungen führen.
Page 12

12
D
Arbeitet das Gerät nach Prüfen der vorgenannten Punkte
trotzdem nicht einwandfrei, kontaktieren Sie bitte den
Kundendienst. Beschreiben Sie das Problem und nennen Sie
bitte Typ und Modell sowie Produkt- und Seriennummer.
(Einzelheiten zu Modell, Produkt- und Seriennummer finden
auf dem Typenschild im Innern des Kühlgerätes.)
Dieses Kühlgerät besitzt einen Überhitzungsschutz. Ein
autorisierter Elektriker kann überprüfen, ob die Sicherung
ausgelöst hat.
Kontaktieren Sie bei einem Gerätedefekt Ihren örtlichen
Händler. Die Anschrift finden Sie in Ihrem Telefonbuch.
www.dometic.com
13. Inbetriebnahme
Technische Daten:
13.1. Anschluss an das Stromnetz
Das Gerät darf nur mit der auf dem Typenschild
angegebenen Spannung betrieben werden. Der
Netzstecker des Geräts darf nur an eine geerdete
und den örtlichen Vorschriften entsprechende Steckdose
angeschlossen werden.
Notwendige elektrische Installationen zum Anschluss des
Geräts dürfen nur von einem Elektriker oder einer anderen
kompetenten Person durchgeführt werden.
Der Hersteller lehnt jegliche Haftung ab, wenn diese
Sicherheitsmaßnahmen nicht beachtet werden.
Elektrische Anforderungen
Prüfen Sie vor dem Einschalten, ob die Netzspannung den
Angaben auf dem Typenschild entspricht.
14. Informationen zum
Umweltschutz
Das Gerät enthält keinerlei FCKW/FKW.
Als Kältemittel wird Ammoniak (eine natürliche
Wasserstoff/Stickstoffverbindung) verwendet.
Als Einblasmittel für die PU-Schaumisolierung wird das
ozonfreundliche Zyklopentan verwendet.
Als Korrosionsschutz wird Natriumchromat verwendet
(weniger als 2 Gewichtsprozent des Kältemittels).
15. Recycling
Entsorgen Sie die Verpackung des Geräts bei Ihrer
örtlichen Müllabfuhr. Übergeben Sie das Gerät am Ende
seiner Lebensdauer einem Entsorgungsunternehmen,
dass die wieder verwendbaren Materialien aufbereiten
kann und den Restmüll fachgerecht entsorgt.
Geräte, die mit diesem Symbol
gekennzeichnet sind, müssen an dem
örtlichen Sammelpunkt für die Entsorgung
von elektrischen und elektronischen Geräten
abgegeben werden.
Dieses Produkt darf nicht über den normalen
Haushaltsabfall entsorgt werden.
Kühlschränke von Dometic enthalten das Symbol auf dem
Datenschild (Typenschild) im Inneren des Gerätes.
Dieses Gerät entspricht den folgenden EURichtlinien:
Niederspannungsgeräte-
Richtlinie 2014/35/EU
EMV Richtlinie 2014/30/EU
CE Kennzechnug Richtlinie 93/68/EEC
RoHS Richtlinie 2011/65/EU
Modell DS301H DS601H
Typ DSH20-60 DSH20-60
Bruttovolumen 28 Liter 53 Liter
Netzbetrieb 220 - 240V (AC) 220 - 240V (AC)
Stromaufnahme 65W 85W
Energieverbrauch 0,86 k Wh/24 h 1,0 5 kWh/ 24h
Klimaklasse SN SN
Käl temi ttel 151g H
2
O + 101g NH3157g H2O + 105g NH
3
Page 13
13
F
Nous vous remercions d'avoir porté votre choix sur l'un de nos produits. Nous espérons que cet appareil vous donnera
pendant longtemps entière satisfaction. Ce mode d'emploi a pour but de vous familiariser avec les symboles suivants et de
vous permettre une mise en œuvre efficace et sûre de votre appareil :
Danger lié à une mise en œuvre inappropriée de l'appareil
Recommandations pour l'utilisation de l'appareil
Informations relatives à la protection de l'environnement
Ce réfrigérateur est conçu pour le stockage de médicaments à des températures comprises entre +2 °C et
+8 °C. Un thermomètre digital peut être placé sur le réfrigérateur (voir fig. 1, page 18).
Attention!
Cet appareil n'est pas destiné à être utilisé par des personnes (y compris des enfants)
présentant des troubles physiques, sensoriels ou mentaux, ou ne possédant pas une
expérience ou une connaissance de l'appareil suffisante, à moins que ces personnes
aient été formées à l'utilisation de cet appareil ou soient supervisées par une
personne responsable de leur sécurité.
Les enfants doivent être surveillés pour éviter qu'ils jouent avec cet appareil.
Seul un électricien agréé devra se charger des travaux de maintenance, en utilisant
uniquement des pièces de rechange d'origine.
Toute modification de l'appareil ou de ses composants peut s'avérer dangereuse.
Faites attention à ce que le câble d'alimentation ne se coince jamais sous l'appareil.
La surface de quelques composants peut fortement s'échauffer au cours de
l'exploitation. Veillez à une aération suffisante, sous peine d'un endommagement de
l'appareil; les denrées périssables à l'intérieur du réfrigérateur pourraient également
s'abîmer. Veuillez bien comparer aux directives d'installation.
Tout contact avec les surfaces brûlantes des composants est à éviter. Il faudra donc
veiller à placer l'appareil, sa partie arrière tournée vers un mur. Tout en veillant à
respecter les distances minimales indiquées dans les directives d'installation afin de
garantir l'aération nécessaire.
Débranchez toujours l'appareil avant de le dégivrer, de le nettoyer ou d'effectuer des
travaux d'entretien.
N'essayez jamais d'enlever le givre EN UTILISANT UN INSTRUMENT POINTU.
N'essayez jamais d'employer la force pour enlever le givre adhérant aux nervures de
refroidissement. Le givre fondra lors du dégivrage de l'appareil. Veuillez bien
comparer aux directives de dégivrage.
L'appareil est assez lourd. Faites donc attention si vous voulez le déplacer.
N'essayez en aucun cas de réparer vous-même l'appareil. Des réparatures effectuées
par un personnel manquant de l'expérience nécessaire, pourront entraîner des
blessures corporelles ou des détoriations de l'appareil. Si vous avez besoin de pièces
détachées, adressez-vous à votre dépositaire local et demandez explicitement des
pièces de rechange d'origine.
Il est interdit de stocker des substances toxiques ou explosives au réfrigérateur !
Veuillez bien lire attentivement ce mode d'emploi avant de mettre cet appareil en
service. Si vous deviez vendre ou céder l'appareil ultérieurement, veuillez bien
remettre ce mode d'emploi à son nouveau propriétaire.
Veillez à respecter scrupuleusement les directives suivantes d'installation. Au cas où
vous n'auriez pas installé l'appareil en vous conformant aux directives d'installation,
vous n'auriez plus aucun droit aux prestations de garantie. (Comparez au chapitre 4.1)
Attention !
CE REFRIGERATEUR NE CONVIENT PAS POUR LE STOCKAGE DE SANG.
Page 14
14
F
SOMMAIRE
SOMMAIRE
1. Déballage de l'appareil
2. Vue de l'appareil
3. Nettoyage
4. Mise en place de l'appareil
4.1. Directives d'installation
5. Exploitation de l'appareil
5.1. Première mise en service
5.2. Réglage de la température
6. Thermomètre
7. Conseils utiles
8. Dégivrage, nettoyage et entretien
9. Éclairage intérieur
10. Remplacement de l'habillage de porte
11. Montage et démontage de la poignée de porte (option)
11.1. Montage de la poignée de porte
11.2. Démontage de la poignée de porte
12. Service après-vente
13. Mise en marche
13.1. Raccordement au secteur
14. Informations relatives à la protection de l'environnement
15.Recyclage
Attention!
Les conditions de garantie sont conformes à la Décision du Comité mixte de l'EEE nº
44/1999 du 26 mars 1999 modifiant l'annexe (environnement) de l'accord EEE, et
également conformes aux lois applicables dans les divers pays.
Si vous avez des questions concernant la garantie, le service après-vente ou les pièces
de rechange, veuillez bien vous adresser à notre réseau de services Dometic.
Les dommages résultant d'un usage inapproprié de l'appareil ne sont pas couverts
par la garantie.
Les modifications apportées à l'appareil ou l'utilisation de pièces de rechange qui ne
sont pas d'origine Dometic, ne sont pas couvertes par la garantie.
Le non-respect des instructions d'installation ou du mode d'emploi, entraîne
l'extinction totale de cette garantie.
Veuillez bien préciser le modèle d'appareil, la référence du produit et le numéro de
série si vous voulez contacter le réseau de services Dometic. Vous trouverez ces
informations sur la plaque signalétique, située à l'intérieur du réfrigérateur.
Page 15
15
F
1. Déballage de l'appareil
A la réception, assurez-vous après avoir déballé l'appareil
qu'il n'a pas été endommagé pendant le transport. En cas de
2. Vue de l'appareil (Fig. 1.)
1. Serrure de porte (sur certains modéls)
2. Porte
3. Evaporateur
4. Thermomètre
5. Capot arrière du bloc réfrigérant
6. Éclairage intérieur
7. Ventilateur (domestique)
8. Plateau supérieur (découpé sur le coin gauche)
9. Plateau du milieu (avec un rebord)
10. Plateau inférieur (composant moulé par injection)
11. Clayettes
12. Cadre inférieur
13. Capteur FUZZY LOGIC
SI VOTRE REFRIGERATEUR EST EQUIPE D'UNE SERRURE, DOMETIC Zrt N'ASSUME AUCUNE
RESPONSABILITE EN CAS DE PERTE DES CLES OU DOMMAGES A CELLES-CI.
dommages de transport, veuillez bien vous adresser
immédiatement à l'entreprise de transport.
3. Nettoyage
Nettoyez le réfrigérateur à intervalles réguliers et en
cas de besoin. Videz l'appareil, puis retirez les
clayettes et les balconnets. Nettoyez les surfaces
intérieures de l'appareil et de la porte, en utilisant une
solution tiède d'hydrogénocarbonate de sodium. Rincez
ensuite l'appareil à l'eau claire tiède, puis terminez en le
séchant à l'aide d'un chiffon non humidifié. N'utilisez pas
d'eau trop chaude pour nettoyer les parties en plastique.
N'exposez pas ces parties à de l'air trop chaud. Nettoyez
régulièrement les surfaces extérieures de l'appareil à l'aide
d'un chiffon propre et humide.
NE NETTOYEZ JAMAIS L'APPAREIL EN UTILISANT DES
PRODUITS CHIMIQUES TROP AGRESSIFS OU DES
PRODUITS ABRASIFS.
4. Mise en place de l'appareil
Veillez à respecter les indications suivantes lors de la
première mise en service de l'appareil:
FAITES ATTENTION À CE QUE L'APPAREIL SE TROUVE
SUR UNE SURFACE BIEN PLANE.
LORS DE L'EXPLOITATION, LA TUYAUTERIE ARRIÈRE PEUT
DÉGAGER UNE FORTE CHALEUR.
L'APPAREIL NE FAIT APPEL À AUCUN COMPRESSEUR. ET
FONCTIONNE DE CE FAIT TRÈS SILENCIEUSEMENT.
IL FAUDRA ATTENDRE AU MOINS TROIS HEURES POUR
OBTENIR UNE PERFORMANCE FRIGORIFIQUE
SIGNIFIANTE.
Au cours du processus de réfrigération, l'appareil
transmet la chaleur à l'air ambiant par l'intermédiaire
du condensateur (situé à la partie supérieure du
panneau arrière). Une bonne ventilation de l'appareil
améliorera de beaucoup sa performance frigorifique.
Pour garantir son bon fonctionnement, il faudra
également veiller à placer l'appareil sur une surface
plane. Vous pourrez contrôler très simplement le
niveau en posant un verre d'eau sur le couvercle de
l'appareil.
N'exposez pas l'appareil à une source de chaleur
directe (soleil, radiateur, four, etc.).
Ne placez pas l'appareil sur une moquette ou un tapis
trop épais!
4.1. Directives d'installation
Ces versions sont prévues pour une pose libre. Un
couvercle empêche tout contact avec la surface brûlante
des composants situés dans le compartiment du bloc
réfrigérant. La grille de ventilation située sur le cadre
inférieur garantit une circulation suffisante d'air.
5. Exploitation de l'appareil
Pour mettre l'appareil en marche, branchez d'abord la
fiche de prise de courant, puis allumez le commutateur.
Selon la température environnante, les nervures de
refroidissement prendront environ une ou deux heures
avant qu'elles ne commencent à se refroidir.
5.1. Première mise en service
Branchez l'appareil à une prise de courant mise à la
masse.
miniCool procédera automatiquement à un test
d'autocontrôle. La lampe LED commencera d'abord à
clignoter plusieurs fois, pour rester ensuite allumée en
permanence. L'éclairage intérieur s'allume en cas
d'ouverture de la porte.
Ce n'est qu'après plusieurs heures que miniCool
atteindra sa température de service.
IMPORTANT
Les 3 plateaux de l'appareil doivent être placés comme indiqué sur le dessin.
La sonde du thermomètre digital est équipé d'une bague magnétique compatible E.M.C (électromagnétique).
Ne pas enlever la bague magnétique!
Page 16
F
16
5.2. Réglage de la température
Le réglage de la température du Refrigerateur pour Soins de
santé se fait automatiquement, par commande électronique.
Ce qui vous évitera un réglage manuel de la température de
refroidissement.
6. Thermomètre (Fig. 2.)
Veuillez bien consulter la notice explicative jointe au
thermomètre. Vous pourrez placer le thermomètre dans le
réfrigérateur à l'aide du support intégré ou le fixer à la porte
du réfrigérateur. Si vous le fixez à la porte, faites bien
attention à ce que le câble de la sonde thermique ne
s'endommage pas lors de l'ouverture et de la fermeture de la
porte.
La sonde thermique se trouve en haut à gauche de
l'évaporateur du réfrigérateur.
Le thermomètre indique les températures réelle, maximale et
minimale du réfrigérateur.
Après la première mise en service du réfrigérateur (et avoir
attendu environ 4 heures), réinitialisez le thermomètre qui
enregistrait sans cela la valeur de la température
environnante en tant que valeur maximale.
Le stockage d'un nombre important de préparations
diminue le risque de congélation, au cas où l'appareil se
refroidirait brièvement.
Nous n'assumons aucune responsabilité pour des
vaccins endommagés, au cas de leur congélation à la
suite d'une coupure provisoire de courant.
La température indiquée pourra augmenter pour un bref
moment si vous ouvrez la porte du réfrigérateur ou stockez
un volume plus important de préparations dans l'appareil.
Une réinitialisation régulière du thermomètre est d'une
grande importance afin de maintenir une température
constante de 2 °C à 8 °C.
N'oubliez pas d'enlever le verrouillage de transport fixant la
batterie du thermomètre.
Thermomètre:
1. Température min.
2. Température ambiante
3. Current température
4. Bouton de remise à zéro
5. FERRITE ring
7. Conseils utiles
L'appareil est équipé d'un ventilateur afin d'obtenir une
température intérieure uniforme. Le ventilateur ne fonctionne
que si la porte est fermée. Lors de l'ouverture de la porte le
ventilateur s'arrêtera puis redémarrera à la fermeture. Si le
ventilateur s'arrêtait accidentellement, alors que la porte est
fermée, le système électronique émettrait un signal d'alerte
sonore (signal continu).
Les signaux d'alerte sonores pour avertir le client de fermer la
porte :
Si la porte reste ouverte plus de 20 s, le système
électronique émet un signal d'alerte sonore (signal
intermittent sur une fréquence de 1 Hz), puis après 40 s il
émet un autre signal sonore sonore (signal intermittent sur
une fréquence de 2 Hz).
Ne surchargez pas l'appareil. Il est recommandé de
laisser de l'espace entre les produits afin de garantir un
refroidissement efficace et uniforme. La surcharge des
étagères risque de provoquer des variations de
température non souhaitées.
8. Dégivrage, nettoyage et
entretien (Fig. 3.)
La formation de givre après une certaine période
d'exploitation est normale. Cette couche de givre ne
devra cependant pas par trop s'épaissir, son effet isolant
ayant une influence négative sur la performance
frigorifique.
Nous vous recommandons de dégivrer régulièrement
l'appareil toutes les trois semaines ou si une trop grande
quantité de givre adhère aux nervures de
refroidissement. Il vous suffira de débrancher le
réfrigérateur et d'en laisser la porte ouverte pour le faire
dégivrer.
L'eau de dégivrage résultant de la fonte du givre,
s'écoulera alors dans un bac collecteur situé à l'arrière du
réfrigérateur, en passant par la gouttière et un tube
d'écoulement (Fig 3).
Le dégivrage une fois effectué, nettoyez l'intérieur de
l'appareil à l'aide d'un chiffon propre et humide.
9. Éclairage intérieur (Fig. 4.)
Deux lampes LED (A) situées sur une carte de circuit
imprimé, éclaireront l'intérieur de l'appareil en cas
d'ouverture de la porte.
Les deux capteurs (B) détectent une porte ouverte et
commandent l'allumage des lampes LED en
conséquence.
10. Remplacement de l'habillage
de porte (Fig. 5.)
Si le réfrigérateur est équipé d'une poignée de porte, il
vous faudra d'abord retirer cette dernière avant de
pouvoir remplacer l'habillage de porte.
Démontez les vis (1) du cadre de la porte (3).
Retirez la rosette (2) (pour les versions munies d'une
serrure de porte).
Soulevez le cadre de la porte (3) et retirez-le.
Retirez l'habillage de porte (4) du cadre de la porte et
placez l'habillage désiré (épaisseur maximale de 2 mm).
Replacez le cadre de la porte ainsi que la rosette, puis
revissez le cadre.
11. Montage et démontage de la
poignée de porte (option)
La poignée de porte se trouve parmi les accessoires
(faisant partie de la livraison); le montage et démontage
de cette poignée s'effectuera de la manière suivante:
11.1. Montage de la poignée de porte
(Fig. 6 à 7)
11.2. Démontage de la poignée de
porte (Fig. 8)
Page 17
17
12. Service après-vente
Veuillez bien contrôler d'abord les points suivants avant de
contacter notre service après-vente:
Est-ce que l'appareil est alimenté en courant? Contrôlez
les fusibles.
Est-ce que l'appareil est correctement branché et le
commutateur allumé? Contrôlez la prise de courant, en y
connectant un autre appareil, tel qu'une lampe de chevet
par ex.
Est-ce que vous avez oublié de bien fermer la porte ce qui
aura entraîné une trop forte augmentation de température
à l'intérieur de l'appareil?
Est-ce que l'appareil se trouve sur une surface bien plane?
Est-ce que l'air peut circuler librement?
Si l'appareil ne fonctionne toujours pas de manière
satisfaisante après la vérification des points ci-dessus,
veuillez bien contacter le service après-vente. Décrivez le
problème et n'oubliez pas de préciser le type d'appareil, le
modèle ainsi que la référence du produit et le numéro de
série. (Vous trouverez tous les détails sur le modèle
d'appareil, la référence du produit et le numéro de série sur
la plaque signalétique qui se trouve à l'intérieur du
réfrigérateur.)
Ce réfrigérateur est muni d'une protection de surchauffe.Un
électricien agréé pourra vérifier si cette protection a été
déclenchée.
Dans le cas d'un appareil défectueux, contactez votre
dépositaire local le plus proche. Vous trouverez son adresse
dans l'annuaire téléphonique.
www.dometic.com
13. Mise en marche
Caractéristiques techniques:
13.1. Raccordement au secteur
La mise sous tension de l'appareil ne se fera qu'avec
la tension indiquée sur la plaque signalétique.
L'appareil ne doit être branché qu'à une prise de
courant mise à la terre et conforme aux réglementations
locales en vigueur.
Seul un électricien ou d'autres personnes ayant la
compétence nécessaire, pourront se charger des travaux
électriques indispensables au branchement de l'appareil.
Le fabricant décline toute responsabilité au cas de
non observance de ces consignes de sécurité.
Exigences électriques
Avant de mettre l'appareil en marche, assurez-vous que la
tension de secteur correspond à la valeur indiquée sur la
plaque signalétique.
14. Informations relatives à la
protection de
l'environnement
L'appareil ne contient pas de CFC/HCFC.
Le fluide frigorigène mis en œuvre est l'ammoniaque (un
composé naturel d'hydrogène et d'azote).
Le cyclopentane ne présentant aucun potentiel
d'appauvrissement de la couche d'ozone, a été utilisé
comme isolant thermique dans la mousse de
polyuréthane.
Le chromate de sodium est utilisé comme agent anticorrosion (dosé à moins de 2 % du pourcentage pondéral
du fluide frigorigène).
15. Recyclage
Après avoir déballé l'appareil, les matériaux d'emballage
devraient être acheminés vers votre site local de collecte
des déchets. En fin de vie, il est recommandé de confier
l'appareil à une entreprise spécialisée de collecte et de
recyclage qui pourra assurer la récupération des
matériaux recyclables et un recyclage écologique de
l'appareil.
Les appareils portant ce symbole doivent
être obligatoirement remis à un point de
collecte local pour la mise au rebut
d'appareils électriques et électroniques.
Il est interdit de jeter ce produit dans les
ordures ménagères.
Sur les réfrigérateurs Dometic, le symbole figure sur la
plaque des caractéristiques (plaque signalétique)
apposée à l'intérieur de l'appareil.
Cet appareil est conforme aux directives EU
suivantes :
Directive LVD 2014/35/EU
Directive EMC 2014/30/EU
Directive CE 93/68/EEC
Directive RoHS 2011/65/EU
F
Modèle DS301H DS601H
Type DSH20-60 DSH20-60
Volume total 28 litres 53 litres
Tension d’alimentation 220 - 240V (AC) 220 - 240V (AC)
Puissance 65W 85W
Consommation 0,86 kWh/24h 1.05 kWh/24h
Classe de climat SN SN
Fluid e frigo rigè ne 151g H
2
O + 101g NH3157g H2O + 105g NH
3
Page 18
18
I
Grazie per aver scelto il nostro apparecchio. Siamo certi che vi assicurerà un funzionamento perfetto nel tempo.
Nel seguente paragrafo vi faremo conoscere alcuni simboli necessari per garantire il funzionamento sicuro ed efficiente del
nostro apparecchio:
Può essere pericoloso in caso di uso improprio dell'apparecchio;
Suggerimenti utili da leggere;
Informazioni riguardanti la protezione ambientale.
Il frigorifero è destinato alla conservazione di medicinali a temperature comprese tra +2°C e +8°C. È dotato di un
termometro digitale che può essere fissato nella parte superiore del frigorifero. (fig.1, pag.25)
Attenzione!
Questa apparecchiatura non è intesa per l'uso da parte di persone (compresi i
bambini) con ridotte capacità fisiche, sensoriali o mentali, o la mancanza di
esperienza e conoscenza, a meno che non siano state istruite e siano sotto la
supervisione di personale responsabile per la loro sicurezza.
I bambini devono essere sorvegliati per garantire che essi non possano giocare con
l'apparecchiatura.
I collegamenti elettrici necessari per l'installazione del presente apparecchio devono
essere effettuati da un elettricista qualificato.
Si consiglia di affidare la manutenzione del frigo a un tecnico specializzato autorizzato
e di usare esclusivamente ricambi originali.
È pericoloso alterare le specifiche dell'apparecchio e apportarvi qualsiasi modifica.
Assicurarsi che il frigo non stia sopra il cavo di alimentazione, schiacciandolo.
Alcune parti di questo apparecchio si riscaldano durante il funzionamento. Garantire
sempre un'adeguata ventilazione del prodotto; l'eventuale inosservanza provocherà
dei guasti nei suoi componenti e il degrado dei cibi conservati all'interno. Vedere le
relative istruzioni per l'installazione.
Le parti che si riscaldano non devono essere messe allo scoperto. Pertanto si consiglia
di sistemare il frigo con la parte posteriore vicina al muro, rispettando la distanza
necessaria per garantirne un'adeguata ventilazione, conformemente a quanto
specificato nelle istruzioni per l'installazione.
Prima di procedere alle operazioni di sbrinamento, pulizia o manutenzione spegnere
l'interruttore del frigo e staccare la spina di corrente.
NON UTILIZZARE STRUMENTI TAGLIENTI per rimuovere la brina o il ghiaccio formatisi.
Non rimuovere mai con la forza gli eventuali depositi di ghiaccio formatisi sulle alette
di raffreddamento. Lasciare che gli eventuali depositi di ghiaccio si sciolgano durante
lo sbrinamento del frigorifero. Vedere le apposite istruzioni per lo sbrinamento del
frigo.
Questo apparecchio è pesante. Pertanto prestare particolare attenzione quando lo si
sposta.
Non tentare mai di riparare da soli l'apparecchio. Le eventuali riparazioni eseguite da
soggetti inesperti possono provocare danni alle persone e causare seri
malfunzionamenti. Contattare il proprio Centro di Assistenza tecnica locale e
richiedere sempre ricambi originali.
È severamente vietato utilizzare l'apparecchio per la conservazione di sostanze
tossiche o esplosive.
Leggere attentamente le presenti istruzioni per l'uso prima di mettere in funzione il
refrigeratore. Nel caso di eventuale rivendita o smaltimento del frigorifero, il presente
manuale d'uso dovrà essere consegnato al nuovo proprietario.
Seguire attentamente le istruzioni d'installazione qui elencate: La garanzia è valida
esclusivamente nel caso in cui il prodotto venga installato come specificato qui di
seguito. (Ved. capitolo 4.1.)
Attenzione!
IL FRIGORIFERO NON È INDICATO PER LA CONSERVAZIONE DI SANGUE
Page 19

19
I
INDICE
INDICE
1. Rimozione dell'imballaggio
2. Vista dell'apparecchio
3. Pulizia
4. Posizionamento dell'apparecchio
4.1. Istruzioni per l'installazione
5. Funzionamento dell'apparecchio
5.1. Messa in funzione
5.2. Regolazione della temperatura
6. Termometro
7. Suggerimenti utili
8. Sbrinamento, pulizia e manutenzione
9. Illuminazione interna
10. Inversione del senso di apertura della porta
11. Fissaggio e rimozione della (opzionale)
11.1. Fissaggio della maniglia
11.2. Rimozione della maniglia
12. Assistenza Clienti
13. Messa in servizio, caratteristiche tecniche
13.1. Collegamento alla rete elettrica
14. Informazioni per la protezione dell'ambiente
15. Riciclaggio
Attenzione!
Le condizioni di garanzia sono conformi alla direttiva CE 44/1999/CE nonché alle
disposizioni specifiche applicabili nel paese interessato.
Per questioni di garanzia o altre esigenze di assistenza tecnica (come p.es. i ricambi)
contattare Dometic Service Network.
La garanzia decade in caso di danni causati da un uso improprio dell'apparecchio.
La garanzia non comprende qualsiasi modifica apportata all'apparecchio o qualora
non fossero utilizzati ricambi originali Dometic.
La garanzia decade in caso di inosservanza delle istruzioni di installazione e uso.
Nel contattare Dometic Service Network occorre segnalare il modello, il codice
prodotto e il numero di serie. Queste informazioni sono riportate sulla targhetta
identificativa applicata all'interno del frigorifero.
Page 20

20
I
1. Rimozione dell'imballaggio
Verificare l'integrità dell'apparecchio dopo averlo rimosso
dalla confezione. Segnalare immediatamente al
2. Vista dell'apparecchio (fig. 1)
trasportatore eventuali danni riconducibili al trasporto
dell'apparecchio stesso.
1. Meccanismo di chiusura porta
2. Porta
3. Evaporatore
4. Termometro
5. Copertura gruppo refrigerante
6. Illuminazione interna
7. Ventola (alloggiamento)
8. Ripiano superiore (tagliato nell'angolo sinistro della
superficie frontale)
9. Ripiano intermedio ((con la superficie frontale più alta)
10. Ripiano inferiore (componente compatto stampato a
iniezione)
11. Ripiani interni
12. Telaio base
13. Sensore di logica Fuzzy
SE IL FRIGORIFERO FOSSE DOTATO DI SERRATURA, DOMETIC Zrt NON È RESPONSABILE DELL'EVENTUALE
PERDITA O DANNEGGIAMENTO DELLE RELATIVE CHIAVI. IN TAL CASO POTRÀ ESSERE FORNITA UNA
SERRATURA DI RICAMBIO COMPLETA.
3. Pulizia
Pulire regolarmente i ripiani del frigorifero a seconda
della necessità. Rimuovere i vari ripiani del frigorifero.
Si consiglia di lavare i ripiani del vano frigorifero e
quelli della porta utilizzando una soluzione di bicarbonato di
sodio e acqua tiepida. Infine, sciacquare usando
esclusivamente uno straccio imbevuto di acqua tiepida e
asciugare con un panno pulito. Usare solo ed
esclusivamente acqua tiepida (non calda) per lavare le parti
di plastica e non esporre queste ultime a calore per
asciugarle. Si consiglia di pulire il contenitore con regolarità,
utilizzando un panno umido e pulito.
NON UTILIZZARE MAI SOSTANZE CHIMICHE O PRODOTTI
ABRASIVI PER PULIRE LE PARTI DEL CONTENITORE
FRIGORIFERO.
4. Posizionamento dell'apparecchio
Alla prima messa in funzione del frigorifero verificare i
seguenti punti:
CONTROLLARE CHE IL FRIGORIFERO SIA
PERFETTAMENTE IN PIANO;
LE TUBAZIONI SITUATE SUL RETRO DEL FRIGORIFERO SI
SCALDANO DURANTE IL FUNZIONAMENTO;
IL FRIGORIFERO NON HA UN VERO E PROPRIO
'MOTORE' E PER QUESTO È VIRTUALMENTE
SILENZIOSO.
ATTENDERE ALMENO 3 ORE PER AVERE UN EFFETTO
REFRIGERANTE.
Durante il processo di refrigerazione l'apparecchio
emette calore dal condensatore (parte superiore del
riparo posteriore) nell'ambiente circostante. Pertanto,
con una migliore ventilazione del condensatore la
refrigerazione sarà più efficiente.
Altra condizione necessaria per un funzionamento
soddisfacente è che l'apparecchio sia posizionato
perfettamente in piano. Il modo migliore per verificarne
la planarità è quello di posare un bicchiere d'acqua sul
piano superiore dell'apparecchio.
È importante che l'apparecchio non venga esposto al
calore diretto (luce solare, radiatori, stufe, ecc.).
Non posizionare mai il frigorifero su una moquette o
un tappeto spessi.
4.1.Istruzioni per l'installazione
Questa versione è stata progettata e costruita per il
funzionamento normale, non da incasso. La copertura del
gruppo refrigerante protegge dalle parti calde del
gruppo refrigerante stesso. Le griglie di aerazione alla
base del frigorifero assicurano una sufficiente
ventilazione.
5. Funzionamento dell'apparecchio
Per la messa in funzione del frigorifero collegare la spina
di alimentazione alla presa elettrica. Se necessario,
inserire l'alimentazione della presa elettrica tramite
l'apposito interruttore. Le alette di raffreddamento, a
seconda della temperatura ambiente, dovrebbero
mostrare segni di corretto funzionamento dopo ca. 1-2
ore.
5.1. Messa in funzione
Il frigorifero deve essere connesso a una presa elettrica
debitamente collegata a terra.
Il miniCool si accende automaticamente effettuando
un test di autoverifica. Dopo un breve funzionamento
intermittente, il LED si accende in modo fisso qualora la
porta del frigorifero fosse aperta.
Il miniCool raggiunge la sua temperatura di esercizio
solo dopo alcune ore.
INFORMAZIONE IMPORTANTE
I 3 ripiani dell'apparecchiatura dovranno essere collocati nella posizione come da disegno.
Un anello di ferrite utile alla EMC (compatiilita' elettromagnetica) e' montato sul cavo del sensore del
termometro digitale.
Non rimuovere l'anello di ferrite.
Page 21

21
I
5.2. Regolazione della temperatura
Il Frigorifero medicale è dotato di un termoregolatore
elettronico completamente automatico. Non è necessario
impostare manualmente la temperatura dello scomparto
frigo.
6. Termometro(fig. 2)
Fare riferimento alle istruzioni separate fornite con il
termometro. Il termometro può essere montato
verticalmente, utilizzando il supporto integrato, oppure può
essere fissato alla porta del frigorifero. In questo caso si deve
fare attenzione che il cavo del sensore non venga schiacciato
o tirato quando si apre la porta.
Il sensore di temperatura si trova nel frigorifero, nell'angolo
in alto a sinistra, davanti all'evaporatore.
Il termometro indicherà quindi la temperatura attuale,
massima e minima all'interno del frigorifero.
Dopo la prima accensione del frigo (dopo circa quattro ore)
resettare il termometro, perché altrimenti questo
memorizzerà la temperatura ambiente come temperatura
massima.
La conservazione di molte medicine diminuisce il pericolo
del congelamento, nel caso che la temperatura
dell'apparecchio scenda eccessivamente. per breve tempo.
Non siamo responsabili di danni a vaccini, nel caso
che questi gelino a seguito di una breve interruzione
di corrente.
La temperatura rilevata può aumentare per breve tempo se la
porta del frigorifero viene aperta o se vengono inserite altre
medicine.
Per mantenere una temperatura tra 2 °C e 8 °C è molto
importante resettare regolarmente il termometro.
Per attivare il display della temperatura, è necessario
rimuovere la linguetta di protezione della batteria sul
termometro stesso.
Termometro:
1. Temperatura minima
2. Temperatura massima
3. Temperatura attuale
4. Tasto RESET
5. FERRITE ring
7. Suggerimenti utili
L'apparecchiatura è dotata di una ventola per mantenere la
temperatura interna del vano uniforme. La ventola lavora solo
se la porta e' chiusa. All'apertura della porta la ventola si
ferma e riprenderà a funzionare quando la porta sarà chiusa.
Se la ventola accidentalmente si ferma con la porta chiusa,
verrà emesso un suono di allarme (segnale continuo).
Il segnale di allarme avvisa il cliente di chiudere la porta: Se
la porta rimane aperta per più di 20 secondi, verra' emesso
un segnale di allarme (segnale intermittente con una
frequenza di beep di 1 Hz), poi dopo altri 40 secondi verra'
emesso un altro segnale di allarme (segnale intermittente
con una frequenza di beep di 2 Hz).
Evitare di riempire troppo l'apparecchio. Si consiglia di
lasciare dello spazio tra i prodotti all'interno dell'armadietto
per garantire un processo di raffreddamento efficiente e
uniforme. Ripiani troppo vicini possono causare gravi sbalzi
di temperatura.
8. Sbrinamento, pulizia e
manutenzione
(fig. 3)
Col tempo si formerà uno strato di ghiaccio sulle varie
superfici di raffreddamento. Evitare che questo strato
diventi troppo spesso, in quanto il ghiaccio che si viene a
formare fa da isolante impedendo un corretto
raffreddamento.
Si consiglia di sbrinare regolarmente l'apparecchio ogni
3 settimane o a seconda della quantità di ghiaccio
presente sulle alette di raffreddamento. Per sbrinare il
frigo staccare la presa di corrente e lasciare aperta la
porta.
Il ghiaccio formatosi verrà sciolto, e l'acqua di
sbrinamento passerà attraverso il tubo di scarico dalla
canalina di raccolta fin dentro l'apposita vaschetta
collocata nella parte inferiore della parete di fondo del
frigorifero. (Fig. 3).
A sbrinamento terminato, si consiglia di pulire le parti
interne del frigorifero utilizzando un panno umido e
pulito.
9. Illuminazione interna (fig. 4)
Aprendo la porta del frigorifero il vano interno viene
illuminato da due LED (A) posti su una scheda elettronica.
Lo stato della porta, "aperta" o "chiusa", è controllato da
due sensori (B) e segnalato dagli appositi LED.
10. Sostituzione del pannello
decorativo frontale(fig. 5)
Se il frigo viene fornito con la maniglia, questa deve
essere prima rimossa in caso di sostituzione del pannello
della porta.
Rimuovere le viti di fissaggio (1) del pannello frontale (3);
Rimuovere la rosetta (2) (per versioni dotate di serratura);
Sollevare e rimuovere il pannello frontale (3);
Sfilare il pannello decorativo (4) dal telaio della porta e
inserire il nuovo pannello (spessore max. 2 mm);
Rimontare il pannello frontale, la rosetta e le viti
precedentemente rimosse procedendo a ritroso rispetto
alla sequenza di smontaggio.
11. Fissaggio e rimozione della
maniglia (opzionale)
La maniglia, che fa parte degli accessori
dell'apparecchio, deve essere fissata e rimossa come
segue:
11.1. Fissaggio della maniglia
(fig. 6-7)
11.2. Rimozione della maniglia (fig. 8)
Page 22

22
I
12. Assistenza Clienti
Prima di chiamare l'Assistenza tecnica, effettuare un
semplice controllo dei seguenti punti:
È mancata la corrente? Controllare i fusibili.
La spina è collegata correttamente e l'alimentazione
elettrica della presa è stata inserita? Controllare la presa
elettrica collegando un altro dispositivo, p.es. una
lampada da tavolo.
Verificare la corretta chiusura della porta per accertare che
non sia rimasta aperta provocando un rialzo troppo
rapido della temperatura.
Verificare che il frigorifero sia perfettamente in piano.
Le prese d'aria sono state ostruite?
Se il frigorifero dovesse continuare a non funzionare
correttamente dopo aver effettuati i controlli sopra descritti,
contattare il Centro di Assistenza più vicino. Descrivere
brevemente il problema indicando il modello, il codice
prodotto e il numero di serie del frigorifero.
(Il modello, il codice prodotto e il numero seriale sono
riportati sulla targhetta di identificazione applicata in alto
sulla sinistra all'interno del vano frigorifero).
Questo frigorifero è dotato di un dispositivo di protezione
contro il surriscaldamento. Un tecnico autorizzato del
Servizio di assistenza sarà in grado di verificare se questo
dispositivo fosse intervenuto.
In caso di guasto o anomalia contattare il Centro di Assistenza più
vicino - consultare l'elenco telefonico locale.
www.dometic.com
13. Messa in servizio
Caratteristiche tecniche:
13.1. Collegamento alla rete elettrica
L'apparecchio deve essere utilizzato esclusivamente
con la tensione nominale riportata sull'apposita
targhetta identificativa. Il cavo di rete
dell'apparecchio deve essere solo connesso a una presa
collegata a terra secondo le disposizioni locali vigenti in
materia.
I collegamenti elettrici necessari per l'installazione del
presente apparecchio devono essere effettuati da un
elettricista qualificato o da un'altra persona competente in
materia.
Il costruttore declina ogni responsabilità in caso di
inosservanza di questi provvedimenti di sicurezza.
Requisiti elettrici
Prima di accendere il frigorifero assicurarsi che la tensione
elettrica corrisponda a quella riportata sulla targhetta
identificativa dell'apparecchio stesso.
14. Informazioni per la
protezione dell'ambiente
Il frigorifero non contiene CFC/HCFC.
Il refrigerante utilizzato nel circuito frigorifero è
ammoniaca (un composto naturale di idrogeno e azoto).
L'agente di espansione utilizzato nella produzione
dell'isolante (schiuma di poliuretano) è il ciclopentano,
sostanza non dannosa per l'ozono.
Per la protezione anticorrosione viene utilizzato il
cromato di sodio (meno del 2 % del peso del
refrigerante).
15. Riciclaggio
Dopo aver tolto l'apparecchio dalla confezione portare il
materiale d'imballaggio in un punto di raccolta locale.
Alla fine del suo ciclo vitale portare l'apparecchio presso
una ditta di riciclaggio specializzata per la raccolta e il
recupero dei materiali riutilizzabili. I materiali residui
saranno distrutti in base alla normativa vigente.
Gli apprecchi che sono contrassegnati con
questo simbolo devono essere consegnati al
posto di raccolta locale per lo smaltimento e
il trattamento di apparecchi elettrici ed
elettronici.
Questo prodotto non deve essere smaltito con i normali
rifiuti domestici.
Il simbolo si trova sulla targhetta dei dati tecnici dei
frigoriferi Dometic (targhetta del modello) all'interno
dell'apparecchio.
Il presente apparecchio è conforme alle seguenti
direttive EU:
LVD-Direttiva 2014/35/EU
EMC-Direttiva 2014/30/EU
CE-Direttiva 93/68/EEC
RoHS-Direttiva 2011/65/EU
Modello DS301H DS601H
Tipo DSH20-60 DSH20-60
Capacità totale 28 litri 53 litri
Alimentazione di rete 220 - 240V (c.a.) 220 - 240V (c.a.)
Assorbimento corrente 6 5W 85 W
Consumo d'energia 0,86 kWh/24h 1,05 kWh/24h
Classe climatica SN SN
Re fr ig er an te 151g H
2
O +101 g NH3157g H2O + 105 g NH
3
Page 23

23
I
NORME DI GARANZIA
Il periodo di garanzia per i nostri prodotti è di un anno dalla data di vendita.
Durante il periodo di garanzia la Società si impegna a sostituire gratuitamente tutte le parti Che presentassero difetti di
fabbricazione esclusi i pezzi ad usura.
Le riparazioni in garanzia si intendono franco Electrolux Commerciale S.r.l. - Moncalieri (To) o Sedi dei centri assistenza
autorizzati. Eventuali spese di trasporto del materiale, trasferte o trasporto del personale sono a carica del Cliente.
La garanzia decade automaticamente al verificarsi di una delle seguenti condizioni:
a) cambio di proprietà dell'apparecchio (la garanzia è valida solo per il cliente a cui è intestata);
b) guasto provocato da trascuratezza o imperizia nell'uso (urti o cadute dell'apparecchio, errata tensione di esercizio,
ecc.);
c) guasto provocato da impiego diverso da quello a cui l'apparecchio è destinato;
d) manomissione dell'apparecchio o riparazione eseguita da persone estranee alla nostra organizzazione (cioè non
dipendenti dalle nostre officine o dai centri di assistenza tecnica autorizzati).
Regione
Abruzzo
Calabria
Campania
Campania
Emilia Romagna
Emilia Romagna
Emilia Romagna
Emilia Romagna
Friuli Venezia Giulia
Friuli Venezia Giulia
Lazio
Lazio
Lombardia
Lombardia
Lombardia
Marche
Piemonte
Piemonte
Piemonte
Puglia
Sardegna
Sicilia
Sicilia
Toscana
Toscana
Trentino Alto Adige
Umbria
Veneto
Veneto
Veneto
Città
Pescara
Vibo Valentia
Napoli
Salerno
Bologna
Rimini
Vaciglio
Ferrara
Muggia
Beivars
7 Camini
Roma
Milano
Brescia
Vares e
Civitanova Marche
Trofarello
Genola
Vercelli
Bari
Olbia
Palermo
Catania
Porcari
Firenze
Bolzano
Perugia
Cavallino
Verona
Rubano
Indirizzo
Via Mazzini, 144
Via Terravecchia Inf. 99
Via Salomone, 23
Via Acquasanta-Zona Ind.
P.zza della Pace, 7/F
Via Paolucci, 14/B
Via Collegarola, 70
Via Darsena, 74
Str. Per I Laghetti, 1
Via Emilia, 127
Via Tiburtina, 1470 Ang.
Via Feo Belcari, 303/A
Via Cadibona, 9
Via Triumplina, 19
Via Beratti, 21
Via De Amicis, 1
Str. Rondello, 11
V.Div.Alp.Cuneense, 2
S.S.142 Biella Laghi
L.go Ciaia, 4
S.S. 127Km. 2,400Loc. Ist
L.go Pisani
V.le Africa, 190
Via Romana Est, 101
Via Sirtori, 39
V.le Europa, 60
Via S. Martino in Campo
Via Fausta, 269
P.zza Carrubbio, 6/A
Via Meucci, 13
Ditta
Centrolux
Vacatello Francesco Paolo
Superfreddo sas
Frigolettieri
Accorsi Prospero
C.R.E.
Caravan Market
Fabbri Claudio
Centro Vacanze
Punto Tre
L.A.R.E. di Botti
Valleriani
Erranti e Farina
Gialdini
Bariati
CAT Cluana Caravan
Camper Home
Grosso Vacanze
Valsesia Centro Caravan
C.A.I.P.
S.A.R.C.
Centro Caravan
SIMA
Emmemme Caravan
Italux
Pedrazzoli
E 7 Caravan
Camping Market
C.A.T.E.
Caravan Service
CAP
65100
89900
80144
84100
40100
47037
41010
44100
34015
33100
00131
00138
20100
25100
21100
62012
10028
12040
13060
70100
07025
90100
91100
55016
50100
39100
06079
30013
37123
35030
Prov
PE
VV
NA
SA
BO
RN
MO
FE
TS
UD
RM
RM
MI
BS
VA
MC
TO
CN
VC
BA
SS
PA
CT
LU
FI
BZ
PG
VE
VR
PD
Prefisso
085
0963
081
089
051
0541
059
0532
040
0432
06
06
02
030
0332
0733
011
0172
015
080
0789
091
095
0583
055
0471
075
041
045
049
Tel _ U f f
385128
547496
7803365
302565
6141928
384276
373588
765680
231711
565793
4192204
87121126
5466919
2002385
289596
771287
6804048
68288
985225
5425475
21783
420864
533519
297850
609208
914511
609451
5371001
8000854
8976009
Fax
4510506
547133
6804048
297850
5371031
8976009
Tipo
CAT
CAT
CAT
CAT
CAT
CAT
CAT
CAT
CAT
CAT
CAT
CAT
CAT
CAT
CAT
CAT
CAT
CAT
CAT
CAT
CAT
CAT
CAT
CAT
CAT
CAT
CAT
CAT
CAT
S-CAT
Page 24

24
NL
Hartelijk dank dat u voor ons heeft gekozen! Wij zijn ervan overtuigd dat u vele jaren ongestoord van het product zult
genieten.
Onderstaand vindt u een aantal symbolen om een veilig en efficiënt gebruik van het product te verzekeren:
Gevaar bij onjuist gebruik
Tip
informatie omtrent milieu
Deze koelkast is bedoeld voor het bewaren van geneesmiddelen tegen een temperatuur die schommelt van 2 tot 8°C. Er
wordt een soort van digitale thermometer meegeleverd die bovenop de koelkast kan worden bevestigd (Afbeelding 1,
pagina 33).
Let op!
Dit apparaat is niet bedoeld voor gebruik door personen (inclusief kinderen) met
verminderde lichamelijk, zintuiglijk of geestelijk vermogen of gebrek aan ervaring en
kennis, tenzij aan hen toezicht of instructie is gegeven, over het gebruik van het
apparaat, door een persoon die verantwoordelijk is voor hun veiligheid.
Er moet worden opgelet dat kinderen niet spelen met het apparaat.
Eventuele installatiewerkzaamheden die betrekking hebben op de energie mogen
uitsluitend door een electrien worden uitgevoerd.
Reparaties en service mogen uitsluitend worden uitgevoerd door een electricien.
Gebruik altijd originele onderdelen.
Het is gevaarlijk het apparaat eigenhandig te wijzigen of te modificeren.
Let erop dat het apparaat niet op de stroomkabel staat.
Het apparaat bevat delen welke zeer warm worden. Zorg voor voldoende ventilatie
om te voorkomen dat de koelprestatie onvoldoende is. Zie installatie instructies
Let op dat de warme delen van het koelaggregaat niet vrij toegankelijk zijn. Plaats de
koelkast daarom altijd met de achterkant naar een muur. Houdt hierbij wel rekening
met de ventilatiebepalingen zoals genoemd in de installatie instructies.
Voordat u de koelkast ontdooit, reinigt of onderhoudt dient u zich ervan te
verzekeren dat de koelkast uit staat en de stekker uit het stopcontact is.
GEBRUIK GEEN SCHERPE VOORWERPEN om het ijs af te krabben. IJsafzetting mag
nooit met kracht worden verwijderd; geef het ijs de tijd om te smelten. Zie ontdooi
instructies.
Dit apparaat is zwaar. Houdt daar rekening mee bij tillen of verplaatsen van het
product.
Repareer het apparaat nooit zelf! Reparaties door onervaren technici kunnen
persoonlijk letsel of beschadigingen aan het apparaat veroorzaken. Ga altijd naar de
gespecialiseerde dealer en vraag om originele onderdelen.
Giftige of explosieve stoffen mogen onder geen beding in deze koelkast worden
bewaard!
Lees de gebruiksaanwijzing aandachtig door voordat u het apparaat in gebruik neemt.
Als u het apparaat verkoopt of weggeeft, zorg er dan voor dat de nieuwe eigenaar de
gebruiksaanwijzing krijgt.
Neem aanwijzingen uit de handleiding zorgvuldig in acht. Garantie geldt alleen voor
apparaten welke conform de hier beschreven aanwijzingen zijn geinstalleerd. (zie
hoofdstuk 4.1)
Opgelet!
DEZE KOELKAST IS UITSLUITEND GESCHIKT VOOR DAGOPSLAG VAN TEMPERATUUR
GEVOELIGE PRODUCTEN. BLOED EN BLOEDPRODUCTEN MOGEN NIET IN DEZE
KOELKAST WORDEN BEWAARD!
Page 25

25
NL
INHOUD
1. Uitpakken
2. Afbeelding van de koelkast
3. Reiniging
4. Plaatsing van de koelkast
4.1 Installatie
5. Gebruik van de koelkast
5.1. Eerste ingebruikname
5.2. Temperatuurregeling
6. Thermometer
7. Nuttige tips
8. Ontdooien, reinigen en onderhoud
9. Binnenverlichting
10. Vervangen van het decorpaneel
11. Montage en demontage van de handgreep (optie)
11.1.Montage van de handgreep
11.2.Demontage van de handgreep
12. Klantenservice
13. Inwerkingstelling, technische gegevens
13.1. Aansluiting op het elektriciteitsnet
14. Informatie omtrent milieubescherming
15. Recycling
Let op!
Garantiebepalingen zijn conform EU-richtlijn 44/1999/CE en de wettelijke
bepalingen van het land waarin het product wordt gebruikt.
Voor vragen over garantie, klantenservice en onderdelen kunt u contact opnemen met
Dometic servicedienst.
Schade veroorzaakt door verkeerd gebruik, valt niet onder de garantie.
Schade als gevolg van modificaties of gebruik van onjuiste onderdelen valt niet onder
de garantie.
Als het apparaat niet is ingebouwd conform onze richtlijnen of onjuist wordt gebruikt,
vervalt de garantie.
Als u contact opneemt met onze servicedienst, dient u altijd het model, produkt- en
serienummer van de koelkast bij de hand te hebben. De gegevens vindt u op het
typeplaatje aan de binnenzijde van de koelkast.
Page 26

26
NL
1. Uitpakken
Controleer na het verwijderen van de kartonnen verpakking
of de koelkast onbeschadigd is. Als u een beschadiging ziet
welke is veroorzaakt door het transport, moet u dit direct
melden aan het transportbedrijf.
2. Afbeelding van de koelkast
1. slot
2. binnendeur
3. verdamper
4. thermometer
5. koelaggregaat
6. binnenverlichting
7. ventilator (behuizing)
8. bovenste lade (uitsparing linksboven in ladefront)
9. middelste lade (met het hoogste ladefront)
10. onderste lade
11. legplank
12. vloerframe
13. fuzzy logic sensor
WANNEER U EEN KOELKAST MET SLOT HEEFT, IS DOMETIC Zrt NIET AANSPRAKELIJK VOOR VERLIES OF
BESCHADIGING VAN SLEUTELS. SLOTEN KUNNEN ALS COMPLEET ONDERDEEL WORDEN VERVANGEN.
3. Reinigen
Reinig de koelkast zorgvuldig voor de eerste
ingebruikname en daarna indien nodig. Maak de
koelkast schoon met handwarm water en een zacht
niet bijtend reinigingsmiddel. Neem daarna af met een
droge zachte doek. Droog de koelkast nooit met behulp van
droge warme lucht. De buitenkant kan regelmatig worden
afgenomen met een vochtige doek.
REINIG HET APPARAAT NOOIT MET BIJTENDE
CHEMICALIEN OF SCHUURMIDDELEN.
4. Plaatsing van de koelkast
Voordat u de koelkast aansluit, dient u met de volgende
punten rekening te houden:
ZORG DAT DE KOELKAST WATERPAS STAAT
BIJ GEBRUIK WORDEN DE LEIDINGEN AAN DE
ACHTERKANT WARM
DE KOELKAST WERKT ZONDER COMPRESSOR EN
MAAKT DAAROM GEEN GELUID
NA DRIE UUR TREEDT WAARNEEMBARE KOELING OP
Tijdens het koelproces geeft de koelkast via de
condensor (bovenste gedeelte van de achterplaat)
warmte af aan de omgeving. Hoe beter de ventilatie
van de condensor, hoe efficiënter de koeling.
Een andere voorwaarde voor een efficiënt gebruik is dat
de koelkast op een vlakke ondergrond moet staan. Om te
kunnen zien of de koelkast waterpas staat, kunt u het
beste een glas water op de koelkast plaatsen.
Stel de koelkast niet bloot aan directe warmtestraling
(zonlicht, radiator, dicht bij een oven, enz.)
Plaats de koelkast niet op een dik tapijt!
4.1. Installatie
Deze modellen zijn ontworpen voor vrijstaand gebruik;
de warme delen van het koelaggregaat worden door een
kap afgeschermd. Het vloerframe met ventilatierooster
zorgt voor voldoende ventilatie.
5. Ingebruikname van de koelkast
Steek de stekker in het stopcontact en/of schakel het
stopcontact in (indien nodig). Afhankelijk van de
omgevingstemperatuur zullen de koelribben na
ongeveer één à twee uur koud te worden.
5.1.Eerste inbedrijfstelling
Sluit de koelkast aan op een geaard stopcontact.
De miniCool start automatisch met een zelftest. Het
LED lampje knippert meerdere malen en blijft daarna
constant branden als de deur open staat.
Na enkele uren bereikt de miniCool de juiste
koeltemperatuur.
5.2.Temperatuurregeling
De Koelkast voor medische doeleinden is uitgerust met
een volautomatische, elektronische
temperatuurregeling. Het is niet meer nodig de
temperatuur van de koelruimte handmatig in te stellen.
6. Thermometer (Afbeelding 2)
Let op de bijgeleverde toelichtingen behorend bij de
thermometer. De thermometer kan met behulp van een
ingebouwde standaard verticaal neergezet worden of
aan de koelkastdeur vastgemaakt worden. Let er in elk
geval op dat de sensorkabel tijdens het openen en
sluiten van de deur niet klem raakt en ook niet uitgerekt
wordt.
De temperatuursensor bevindt zich links boven i.b.v. de
verdamper in de koelkast.
BELANGRIJKE MEDEDELING
De 3 laden van het toestel dienen te worden geplaatst conform de aangegeven posities op de afbeelding.
Een ontstoringsfilter-ring is gemonteerd om het draad van de digitale temperatuursensor.
De ontstoringsfilter-ring niet verwijderen!
Page 27

27
NL
De thermometer geeft de actuele, maximale en minimale
temperatuur in de koelkast aan.
Na het eerste inschakelen van de koelkast (na ca. vier uur)
moet u de thermometer op "Reset" zetten, omdat anders de
omgevingstemperatuur buiten de koelkast als
maximumtemperatuur opgeslagen wordt.
Bij een opslag van een grotere hoeveelheid aan preparaten
bestaat er minder kans op bevriezing, mocht het apparaat
voor korte tijd onderkoelen.
Wij zijn niet aansprakelijk voor schade aan de
vaccins, wanneer deze tengevolge van een
kortstondige stroomuitval bevriezen.
De aangegeven temperatuur kan voor korte duur stijgen,
wanneer de koelkastdeur geopend wordt of extra
preparaten opgeslagen worden.
Voor een constante temperatuur tussen de 2 °C und 8 °C is
het van belang de thermometer op „reset" te zetten.
Voor het functioneren van de temperatuurweergave moet
de transportbeveiliging van de batterij verwijderd worden.
Thermometer:
1. Min. temperatuur
2. Max. temperatuur
3. Actuele temperatuur
4. RESET knop
5. Ontstoringsfilter-ring
7. Nuttige tips
De koelkast is uitgerust met een interne ventilator voor een
gelijkmatige verdeling van de temperatuur. De ventilator
werkt alleen wanneer de deur gesloten is. Bij opening van
de deur stopt de ventilator en deze start weer wanneer de
deur gesloten is.
Als de ventilator stopt en de deur van de koelkast is gesloten
, zal de electronia een akoestisch waarschuwingssignaal
genereren (continu signaal)
Een geluidssignaal vertelt de klant de deur af te sluiten:
Indien de deur langer dan 20 seconden open staat zal de
elektronica een akoestisch waarschuwingssignaal afgeven
(bij tussenpozen een pieptoon met een frequentie van 1 Hz),
na de volgende 40 seconden een andere signaal (een
pieptoon met een frequentie van 2 Hz)
Stouw het toestel niet te vol. Laat voor een doeltreffende en
gelijkmatige koeling wat ruimte tussen de opgeslagen
producten. Als de artikelen te dicht opeen worden
gestapeld, kan dit resulteren in onaanvaardbare
temperatuurschommelingen.
8. Ontdooien, reinigen en
onderhoud (Afbeelding 3)
Na verloop van tijd kan zich een ijslaagje op de koelribben
afzetten. Deze ijslaag mag niet te dik worden, omdat deze
dan isolerend werkt en het koelvermogen verminderd.
Wij adviseren het koelapparaat regelmatig te ontdooien, om
de 3 weken of afhankelijk van de ijslaag op de koelribben.
Het apparaat schakelt u uit door de stekker uit het
stopcontact te trekken en de koelkastdeur open te laten.
Het ijs smelt waarna het dooiwater van de druppelgoot via
een drainageslang in de verdampingsbak aan de achterkant
van de koelkast loopt (afbeeld. 3).
Na het ontdooien reinigt u de binnenkant van de koelkast
met een schoon en vochtig doekje (zie punt 3)
9. Binnenverlichting (Afbeelding 4)
Wanneer de deur opengaat, wordt het interieur van de
koelkast verlicht door twee lichtgevende diodes (A)op
een elektronische printplaat.
Twee sensoren (B) herkennen of de deur open is en
geven dit door aan de diodes.
10. Verwisselen van het
decorpaneel (Afbeelding 5)
Is de koelkast voorzien van een handgreep, moet de
greep eerst gedemonteerd worden, voor het geval dat
het deurpaneel verwisseld wordt.
rwijder de schroeven van het deurframe (3)
Verwijder de rozet (2) (bij modellen met slot).
Til het deurframe (3) op en haal hem eruit.
Trek het decorpaneel uit het deurframe en plaats het
nieuwe paneel (minimum dikte 2 mm).
Zet het deurframe en de rozet er weer in en schroef het
frame vast.
11. Montage en demontage van de
handgreep (optie)
De handgreep is te vinden bij de geleverde toebehoren
en wordt als volgt gemonteerd en gedemonteerd:
11.1. Montage van de handgreep
(Afbeelding 6-7)
11.2. Demontage van de handgreep
(Afbeelding 8)
12. Klantenservice
Bij storingen dient u eerst de onderstaande punten te
controleren voordat u contact opneemt met de
servicedienst:
Is er stroom beschikbaar? Controleer de zekeringen.
Zit de stekker goed in het stopcontact en is het
stopcontact ingeschakeld? Controleer het
stopcontact door er een ander apparaat op aan te
sluiten, bijvoorbeeld een lamp.
Was de deur niet helemaal dicht waardoor de
temperatuur in de koelkast sterk is gestegen?
Staat de koelkast waterpas?
Wordt de luchtcirculatie belemmerd?
Als de koelkast na deze controle nog steeds niet goed
functioneert, kunt u contact opnemen met de
servicedienst, telefoon 0172 468 300. Wanneer u de
storing meldt, vertel dan ook wat het probleem is samen
met type-, serie- en productnummer. Deze gegevens
vindt u op het typeplaatje in de koelkast.
Deze koelkast is beveiligd tegen oververhitting. Een
erkend elektricien kan controleren of deze extra zekering
het apparaat heeft uitgeschakeld. Neem hiervoor
eventueel contact op met uw plaatselijke dealer. Het
adres staat in uw telefoongids of in de Gouden Gids.
www.dometic.com
Page 28

28
NL
13. Inwerkingstelling
Technische gegevens:
13.1. Aansluiting op het
elektriciteitsnet
Het apparaat mag uitsluitend worden aangesloten
op de op het typeplaatje vermelde netspanning. De
stekker mag uitsluitend worden aangesloten op een
geaard stopcontact, conform de wettelijke voorschriften.
De vereiste elektrische installaties voor de aansluiting mag
alleen worden uitgevoerd door een elektricien of een
erkend bedrijf.
De producent aanvaardt geen enkele
aansprakelijkheid indien deze
veiligheidsmaatregelen niet in acht worden
genomen.
Elektrische eisen
Controleer of de aanwezige stroomspanning overeenkomt
met de gegevens op het typeplaatje.
14. Informatie omtrent
milieubescherming
Het apparaat bevat geen CFK's./HCKF’s
Ammoniakgas (natuurlijke waterstof en stikstofverbinding)
wordt gebruikt als koelmiddel in het koelaggregaat.
Het ozonvriendelijke cyclopentaan dient als blaasmiddel
voor de polyurethaan schuimisolatie.
Natriumchromaat wordt gebruikt als bescherming tegen
corrosie (minder dan 2 procent gewicht van het
koelmiddel).
15. Recycling
Nadat u de koelkast heeft uitgepakt, brengt u het
verpakkingsmateriaal bij voorkeur naar een plaatselijk
inzamelpunt. Na het einde van de levensduur moet de
koelkast worden ingeleverd bij een gemeentelijk
inzameldepot of bij een gespecialiseerd inzamel- en
recyclingbedrijf, dat de nog recyclebare materialen terug
zal winnen. Het restant wordt volledig vernietigd.
Apparaten, die met dit symbool zijn
voorzien, moeten bij het gemeentelijk
verzamelpunt voor afgedankte elektrische
en electronische apparatuur worden
afgegeven.
Ze mogen niet via het gewone huisafval worden
weggegooid.
Bij koelkasten van Dometic staat het symbool op het
typeplaatje aan de binnenkant van het apparaat.
Dit toestel voldoet aan de EU-richtlijnen als volgt:
LVD-Richtlijn 2014/35/EU
EMC-Richtlijn 2014/30/EU
CE-Richtlijn 93/68/EEC
RoHS-Richtlijn 2011/65/EU
Model DS301H DS601H
Type DSH20-60 DSH20-60
Bruto inhoud 28 liter 53 liter
Spanning 220 - 240V (AC) 220 - 240V (AC)
Vermogen 65W 85W
Energieverbruik 0,86 kWh/24h 1,05 kWh/24h
Klimaatklasse SN SN
Koe lmid del 151g H
2
O + 101g NH3157g H2O + 105g NH
3
Page 29

29
FI
Tässä ohjeessa käytetään seuraavia merkintöjä, joiden avulla halutaan varmistaa jääkaapin turvallinen ja tehokas käyttö:
Vaara käytettäessä laitetta väärin
Käytännön neuvoja
Tietoa ympäristönsuojelusta
Tämä jääkaappi on tarkoitettu näytteiden ja lääkeaineiden säilytykseen +2 °C…+8 °C lämpötilassa. Laitteen mukana on
digitaalinen lämpömittari, joka voidaan tarvittaessa kiinnittää jääkaapin päälle (kuva 1, sivu 47).
Huomio!
Tätä laitetta ei ole tarkoitettu lasten eikä fyysisesti, sensorisesti tai henkisesti
rajoittuneiden henkilöiden käyttöön ilman apua tai valvontaa. Lapsia on valvottava,
jotta he eivät leiki laitteella.
Laitteen asentamisessa vaadittavat sähkökytkennät saa tehdä vain valtuutettu
sähköasentaja.
Tämän tuotteen huollot on annettava valtuutetun huoltoliikkeen tehtäväksi ja
huoltotöissä on käytettävä ainoastaan alkuperäisiä varaosia.
Tämän tuotteen teknisten ominaisuuksien ja/tai asetusten muuttaminen on
vaarallista.
On tärkeää varmistaa, ettei laitetta sijoiteta sen virtajohdon päälle.
Tämä laite sisältää käytön aikana kuumenevia osia. Varmista aina, että laitteen
ilmanvaihto on riittävä toimintahäiriöiden ja sisällön vaurioitumisen ehkäisemiseksi.
Katso asennusohjeita.
Kuumenevien osien on oltava suojattuna. Mikäli mahdollista, laitteen takaosa on
sijoitettava lähelle seinää, kuitenkin riittävälle etäisyydelle seinästä asennusohjeiden
mukaisen ilmanvaihdon varmistamiseksi.
Ennen sulatusta, puhdistusta tai huoltotöitä, muista aina kytkeä laite pois päältä ja
irrottaa laitteen virtajohto pistorasiasta.
ÄLÄ KOSKAAN raaputa huurretta tai jäätä terävillä esineillä. Kovaa jäätä ei missään
olosuhteissa saa väkisin irrottaa jäähdytysrivoista. Anna kovan jään sulaa rauhassa.
Noudata sulatusohjeita.
Laite on painava. Noudata varovaisuutta laitteen siirtämisessä.
Älä koskaan yritä korjata laitetta itse. Asiantuntemattomien henkilöiden
korjaustoimet saattavat johtaa loukkaantumisiin ja entistä pahempiin
toimintavikoihin. Ota yhteyttä paikalliseen valtuutettuun huoltoliikkeeseen ja vaadi
aina alkuperäisten varaosien käyttämistä.
Myrkyllisten ja räjähtävien aineiden säilytys laitteessa ei ole sallittua!
Kiitämme Teitä miniCool-jääkaapin hankkimisen johdosta. Uskomme Teidän olevan
täysin tyytyväinen uuteen laitteeseenne.
Lue tarkoin tämä käyttöohje ennen kuin otat jääkaapin käyttöön. Anna käyttöohje
laitteen mukana uudelle omistajalle, kun myyt tai viet sen kierrätykseen.Noudata
tarkkaan seuraavia asennusohjeita. Takuu koskee vain ohjeiden mukaan asennettuja
tuotteita. (katso kappale 4.1)
Huomio!
TÄMÄ JÄÄKAAPPI EI SOVELLU VEREN SÄILYTYKSEEN.
Page 30

30
FI
Huomio!
Takuumääräykset vastaavat Euroopan Unionin direktiiviä 44/1999/CE ja kunkin maan
vastaavia lainmääräyksiä.
Dometic huoltoverkosto vastaa mielellään kaikkiin takuumääräyksiin ja
asiakashuoltoon liittyviin kysymyksiin ja huolehtii varaosien toimituksesta.
Takuu kattaa vain ohjeiden mukaan käytettyjä tuotteita.
Takuu ei kata laitteeseen tehtyjä muutoksia tai muiden kuin alkuperäisten Dometic-
varaosien käyttöä.
Takuu ei kata väärinasennettuja laitteita.
Mainitse laitteen malli, valmiste- ja sarjanumero, kun otat yhteyttä Dometic-
huoltoverkostoon. Nämä löydät laitteen sisällä olevasta tyyppikilvestä.
SISÄLTÖ
1. Pakkauksen purkaminen
2. Kuva jääkaapista
3. Puhdistus
4. Laitteen asentaminen paikoilleen
4.1. Asennusohjeet
5. Jääkaapin käyttö
5.1. Ensimmäinen käyttöönotto
5.2. Lämpötilan säätäminen
6. Lämpömittari
7. Käytännön neuvoja
8. Sulatus, puhdistus ja kunnossapito
9. Sisävalo
10. Oven koristepaneelin vaihtaminen
11. Oven kahvan asennus ja irrottaminen (valinnainen)
11.1. Oven kahvan asennus
11.2. Oven kahvan irrottaminen
12. Toimintahäiriöt, huolto ja takuu
13. Käyttöliitäntä, tekniset tiedot
13.1. Kytkeminen verkkovirtaan
14. Ympäristön suojelu
15. Kierrätys
Page 31

31
FI
1. Pakkauksen purkaminen
Ota laite ulos kuljetuslaatikosta ja tarkista mahdolliset vauriot.
Kuljetusvaurioista on välittömästi ilmoitettava
kuljetusliikkeelle.
2. Kuva jääkaapista
1. Ovilukko (ai kaikissa malleissa)
2. Ovi
3. Höyrystin
4. Lämpömittari
5. Jäähdytysyksikön kansi
6. Sisävalo
7. Sisätuuletin
8. Ylälokero (etulevyn vasen yläkulma lovettu)
9. Keskilokero (suurin etulevy)
10. Alalokero (ruiskuvalettu kokonaisuus)
11. Pohjakehys
12. Pohjakehys
13. Fuzzy Logic lämpötila-anturi
JOS JÄÄKAAPISSA ON LUKKO, DOMETIC Zrt EI OLE VASTUUSSA AVAIMIEN HÄVIÄMISESTÄ TAI
VAHINGOITTUMISESTA. TARVITTAESSA TOIMITAMME LAITTEESEEN UUDEN LUKON JA AVAIMET.
3. Puhdistus
Puhdista jääkaappi huolellisesti säännöllisin väliajoin.
Irrota hyllyt. Pese hyllyt, kaapin sisäosat ja ovi
lämpimällä vedellä, jossa on mietoa, hankaamatonta
pesuainetta. Pyyhi jääkaappi tämän jä
lkeen puhtaalla liinalla ja vedellä. Lopuksi kuivaa jääkaappi.
Älä koskaan pese muoviosia liian kuumalla vedellä
(kädenlämpöinen on sopivaa), äläkä altista osia liian kuumalle
lämpö
tilalle. Kaapin ulkopinta on pyyhittävä säännöllisesti
puhtaalla, kostealla liinalla.
ÄLÄ KOSKAAN KÄYTÄ KAAPIN PUHDISTUKSEEN
VOIMAKKAITA KEMIKAALEJA TAI KARKEITA
PUHDISTUSMATERIAALEJA.
4. Laitteen asettaminen paikoileen
Kiinnitä huomiota seuraaviin seikkoihin käyttäessäsi
jääkaappia ensimmäistä kertaa.
VARMISTA, ETTÄ JÄÄKAAPPI ON VAAKASUORASSA.
LAITTEEN TAKAOSASSA OLEVA PUTKISTO KUUMENEE
KÄYTÖN AIKANA.
LAITE KÄY ILMAN KOMPRESSORIA JA SEN TOIMINTA
ON KÄYTÄNNÖSSÄ ÄÄNETÖNTÄ.
TODETTAVA JÄÄHDYTYSTEHO ON ODOTETTAVISSA
VASTA KOLMEN TUNNIN KULUTTUA.
Jäähdytysvaiheen aikana laite luovuttaa lauhduttimen
kautta lämpöä ulos ympäröivään ilmaan.
Lauhdutinkoneisto sijaitsee jääkaapin takaosassa. Mitä
paremmin koneisto on tuuletettu, sitä tehokkaampi
jääkaappi on.
Jotta jääkaappi toimisi moitteettomasti, se täytyy sijoittaa
vaakasuoraan tasaiselle alustalle. Käytä esim. vesivaakaa
varmistamaan, että kaappi on vaakasuorassa.
Laitetta ei saa altistaa suoralle lämpösäteilylle (auringon
valo, lämpöpatteri, uunin läheisyys jne.).
Älä sijoita laitetta paksun maton päälle.
4.1. Asennusohjeet
Tämä malli on tarkoitettu vapaasti sijoitettavaksi.
Jäähdytyslaitteen kuumia komponentteja suojaa kotelo.
Pohjakehys varmistaa tuuletusritilällään riittävän
ilmavirtauksen.
5. Jääkaapin käyttö
Kytke jääkaappi liittämällä virtajohto pistorasiaan.
Jäähdytysrivoissa näkyy jäähtymisen merkkejä noin 3
tunnin kuluttua riippuen ulkolämpötilasta.
5.1. Ensimmäinen käyttöönotto
Kytke laite maadoitettuun pistorasiaan.
miniCool käynnistyy automaattisesti ja suorittaa
itsetestauksen. LED-valo vilkkuu ensin useampaan
kertaan ja palaa sitten jatkuvasti. Kun avaat oven, niin
sisävalo palaa.
miniCool saavuttaa käyttölämpötilan muutaman tunnin
kuluttua.
5.2. Lämpötilan säätäminen
Näyte/lääkejääkaappi on varustettu täysautomaattisella,
elektronisella lämpötilaohjauksella. Jäähdytyslämpötilaa
ei tarvitse säätää manuaalisti.
6. Lämpömittari (kuva 2)
Ota huomioon lämpömittarin mukana toimitettu erillinen
lehtinen. Voit asettaa lämpömittarin pystyasentoon sen
pidikkeeseen tai kiinnittää sen jääkaapin oveen. Varo siinä
tapauksessa, ettei tunnistinkaapeli juutu ja veny ovea
avatessa tai sulkiessa.
Lämpötilan tunnistin on jääkaapissa haihduttimen edessä
vasemmalla ylhäällä.
Lämpömittari näyttää jääkaapissa ajankohtaisen,
korkeimman ja alhaisimman lämpötilan.
TÄRKEÄ HUOMAUTUS
Kolme hyllyä pitää asentaa kuvassa näkyvällä tavalla omille paikoilleen.
Lämpömittarin anturin johtoon on asennettu ferriittirengas, joka varmistaa EMC-yhteensopivuuden.
Älä poista ferriittirengasta!
Page 32

32
Suorita jääkaapin ensimmäisen käyttöönoton jälkeen (noin
neljän tunnin kuluttua) lämpömittariin "Reset"
(takaisinasetus), koska se muuten tallentaa
ympäristölämpötilan korkeimmaksi lämpötilaksi.
Jäätymisvaara vähenee laitteen jäähtyessä ajoittain liikaa, kun
kaapissa on enemmän tavaraa.
Emme kanna vastuuta vahingoittuneista
rokotusaineista, jos ne ovat jäätyneet ajoittaisen
virtakatkon vuoksi.
Luettu lämpötila voi nousta lyhyesti ovea avatessa ja tavaroita
sisään laitettaessa.
Lämpömittarin säännöllinen takaisinasetus on erittäin tärkeää
pitämään lämpötilan 2 °C ja 8 °C välillä
Jotta lämpötilanäyttö toimii, täytyy lämpömittarissa poistaa
pariston kuljetusvarmistin.
Lämpömittari:
1. Min. lämpötila
2. Max. lämpötila
3. Nykyinen lämpötila
4. RESET-painike (muistin nollaus)
5. Ferriittirengas
7. Käytännön neuvoja
Laitteessa on sisätuuletin sisälämpötilan tasaamiseksi.
Tuuletin toimii ainoastaan oven ollessa suljettu. Avattaessa ovi
tuuletin pysähtyy ja käynnistyy uudelleen suljettaessa ovi.
Tuulettimen mahdollisista toimintahäiriöistä kaapin
elektroniikka varoittaa yhtenäisellä varoitusäänellä.
Kaappi hälyttää myös oven liian pitkästä aukiolosta. Mikäli ovi
on avoinna yhtäjaksoisesti yli 20 sek. tulee varoitusääni
(piippaus 1 Hz). Mikäli ovea pidetään edelleen auki 40 sek
ajan muuttuu hälytysääni nopeammaksi (2 Hz).
Älä täytä jääkaappia liian täyteen. Tehokkaan ja tasaisen
jäähdytyksen mahdollistamiseksi on suositeltavaa jättää tilaa
tuotteiden väliin. Lämpötilaerot vaihtelevat suuresti, jos
tuotteet on asetettu jääkaapin hyllyille liian lähekkäin.
8. Sulatus, puhdistus ja
kunnossapito
(kuva 3)
Höyrystimen jäähdytyspinnoille muodostuu hitaasti
huurrekerros, joka ei saa muodostua liian paksuksi, koska se
heikentää laitteen jäähdytystehoa.
Suosittelemme sulattamaan laite säännöllisesti aina kolmen
viikon välein tai jos laitteessa näkyy jään kehittymistä. Laitteen
sulattamiseen irrota laite verkosta ja jätä jääkaapin ovi auki.
Höyrystimen pinnalle muodostunut huurrekerros sulaa ja
sulavesi valuu poistoputken kautta jääkaapin takaosassa
olevaan haihdutusastiaan (kuva 3).
Sulatuksen jälkeen kaapin sisäosat on pyyhittävä puhtaaksi
kostealla liinalla.
9. Sisävalo (kuva 4
Valo (A) palaa kaapin sisällä, kun ovi avataan.
Kaksi tunnistinta (B) valvovat, onko ovi avattu vai ei, ja
valoledit toimivat vastaavasti.
FI
10. Oven koristepaneelin
vaihtaminen
(kuva 5)
Jos jääkaappi on varustettu oven kahvalla, se pitää irrottaa
vasta, kun aiot vaihtaa oveen uuden päällyksen.
Poista oven kehyksestä (3) ruuvit (1).
Poista lukon kehysrengas (2) (vain lukollisissa malleissa).
Nosta oven kehystä (3) ja irrota se.
Vedä ovipaneeli (4) pois ja vaihda se uuteen haluamaasi
ovipaneeliin (vähintään 2 mm paksu).
Aseta kehys ja lukon kehysrengas taas paikoilleen ja
ruuvaa kehys kiinni.
11. Oven kahvan asennus ja
irrottaminen (valinnainen)
Oven kahva on erillisesti pakattuna toimituksen mukana ja
se asennetaan ja irrotetaan seuraavalla tavalla:
11.1 Oven kahvan asennus (kuva 6-7)
11.2. Oven kahvan irrottaminen(kuva 8)
12. Toimintahäiriöt, huolto ja takuu
Tarkista ensin seuraavat asiat ennen kuin otat yhteyttä
huoltoon:
Onko virransyöttö kunnossa? Tarkista sulakkeet.
Onko virtajohdon pistoke kunnolla pistorasiassa ja
tuleeko pistorasiaan virtaa? Tarkista pistorasian toiminta
jonkin muun sähkölaitteen avulla.
Onko ovi huonosti suljettu, jolloin sisälämpötila on
päässyt nousemaan liian korkeaksi?
Onko jääkaappi vaakasuorassa?
Onko koneiston ilmanvaihto riittävä?
Jos laite ei vieläkään toimi kunnolla näiden seikkojen
tarkistamisen jälkeen, ota yhteys huoltoon. Huollot ja
mahdolliset korjaukset on annetttava valtuutetun
huoltoliikkeen tehtäviksi.
Varmistaaksesi laitteesi moiteettoman toiminnan vaadi
aina käytettäväksi sopivinta, siis alkuperäistä varaosaa.
Huollosta ja varaosien myynnistä vastaa Dometic Oy.
Lähimmän valtuutetun huoltoliikkeen numeron saat
soittamalla numeroon 09-6866 110.
Mainitse soittaessasi tuotteen merkki. Kopioi arvokilvestä
tuotteen tiedot alla olevaan kohtaan, niin ne löytyvät
helposti, jos sinun pitää ottaa yhteyttä huoltoon.
Malli..............................................................
Tuotenumero..................................................
Sarjanumero...................................................
Ostopäivä......................................................
Tämä laite on varustettu ylikuumenemissuojalla.
Valtuutettu sähköasentaja voi tarkastaa, onko
ylikuumenemissuoja lauennut.
www.dometic.com
Page 33

33
FI
13. Käyttöönotto
Tekniset tiedot:
13.1. Kytkeminen verkkovirtaan
Laitetta saa käyttää vain sen arvokilvessä mainitulla
verkkovirtajännitteellä. Laite kytketään säädösten mukaan
maadoitettuun pistorasiaan.
Laitteen asentamisessa vaadittavat sähkökytkennät saa tehdä
vain valtuutettu sähköasentaja.
Valmistaja ei ota vastuuta mahdollisista vahingoista,
jos näitä turvamääräyksiä ei noudateta.
Sähkökäytön vaatimukset
Ennen virran kytkemistä laitteeseen varmista, että
verkkovirran jännite on sama kuin laitteen arvokilvessä
ilmoitettu jännite.
14. Ympäristön suojelu
Laite ei sisällä CFC/HCFC- eikä fluorattuja hiilivety-yhdisteitä
(freonia).
Jääkaapin kylmäkoneistossa kylmäaineena käytetään
ammoniakkia (luonnollinen vety / typpiyhdistelmä).
Eristemateriaalina käytetyn polyuretaanivaahdon
reaktioaineena on ollut otsonikerrosta vahingoittamaton
syklopentaani.
Natriumikromaattia käytetään korroosiota ehkäisevänä
aineena (sen osuus kylmäaineessa on alle 2 painoprosenttia).
15. Kierrätys
Kierrätettävä pakkausmateriaali tulisi toimittaa
uusiokäytön varmistamiseksi paikalliseen
jätteenkeräysjärjestelmään. Kun laite hävitetään, se
toimitetaan paikalliseen kierrätyslaitokseen uudelleen
käytettävien materiaalien oikean käytön varmistamiseksi ja
muiden osien asianmukaiseksi hävittämiseksi.
Laitteet, jotka on merkitty viereisellä
symbolilla, tulee toimittaa paikalliseen
keräyspisteeseen sähkö- ja
elektroniikkalaitteiden jätehuoltomääräysten
mukaisesti.
Tätä tuotetta ei saa hävittää normaali kotitalousjätteiden
mukana.
Dometic jääkaapeissa symboli löytyy laitteen sisäpuolelle
sijoitetusta tyyppikilvestä.
Tämä laite täyttää seuraavat EU-direktiivit:
LVD-direktiivi 2014/35/EU
EMC-direktiivi 2014/30/EU
CE-direktiivi 93/68/EEC
RoHS-direktiivi 2011/65/EU
Malli DS301H DS601H
Tyyppi DSH20-60 DSH20-60
Kokonaistilavuus 28 litraa 53 litraa
Verkkovirta 220 - 240V (AC) 220 - 240V (AC)
Liitäntäteho 65W 85W
Energia kulutus 0,86 kWh/24h 1,05 kWh/24h
Ilmastoluokka SN SN
Jäähdytysaine 151g H
2
O + 101g NH3157g H2O + 105g NH
3
Page 34

34
SE
Tack för att du valde just vår produkt. Vi hoppas att den kommer att bli till stor glädje under många år. Här följer några
symboler som vi vill göra dig uppmärksam på. Vi informerar dig om dessa, så att du skall kunna använda kylenheten på ett
så säkert och effektivt sätt som möjligt.
fara, i händelse av felaktig användning
värt att veta
information om miljöskydd
Detta kylskåp är avsett för förvaring av läkemedel inom temperaturerna +2°C till +8°C. En digital termometer som kan fästas
överst på kylskåpets medföljer. (figur 1, sida 54)
Varning!
Denna anordning är inte avsedd för användning av personer (inklusive barn) med
nedsatt fysisk eller mental kompetens. Personer som saknar erfarenhet och kunskap
bör inte använda anordningen utan instruktioner eller övervakning av någon som
ansvarar för deras säkerhet.
Nödvändiga underhållsarbeten måste utföras av en behörig elektriker och bara
original reservdelar får användas.
Det kan vara farligt att förändra enheten eller dess komponenter på något vis.
Var särskild noga med att nätkabeln aldrig blir inklämd under enheten.
Några av komponenterna i insidan av enheten blir heta under drift. Det är viktigt att
det alltid finns tillräckligt med luftcirkulation, annars kan enheten bli skadad och
innehållet bli fördärvat. Se även installationsanvisningen.
Heta komponenter får inte vara åtkomliga. Därför ska enheten stå med baksidan mot
en vägg.
Samtidigt är det viktigt att följa installationsanvisningarna och bibehålla det angivna
minsta avståndet för att kunna garantera den nödvändiga luftcirkulationen.
Innan avfrostning, rengöring eller underhållsarbeten måste alltid nätkontakten dras
ur.
SKRAPA ALDRIG AV IS MED ETT VASST FÖREMÅL. Avlägsna aldrig hårt sittande is med
våld. Låt det tina i lugn och ro. Se avfrostningsanvisning.
Enheten har en ansenlig vikt. Var försiktigt när ni flyttar den.
Försök aldrig själv att reparera enheten. Reparationer som utförs av obehörig
personal kan leda till olyckor eller skador på enheten. Kontakta lokala kundservicen
och var tydlig att kräva original reservdelar.
Det är förbjudet att lagra giftiga eller explosiva ämnen i denna kylenhet!
Läs denna bruksanvisning noggrant innan du använder denna kylbox. Om du säljer
kylenheten eller ger bort den, se till att den nya ägaren får bruksanvisningen.
Läs denna bruksanvisning noggrant. Garantiåtaganden kan bara åberopas, om
installationen blir utförd enligt installationsanvisningen ( se avsnitt 4.1)
Obs!
DETTA KYLSKÅP ÄR INTE AVSEDD FÖR FÖRVARING AV BLOD.
Page 35

35
SE
INNEHÅLLSFÖRTECKNING
1. Uppackning
2. Bild på kylenheten
3. Rengöring
4. Placering av enheten
4.1. Installationsanvisning
5. Drift av apparaten
5.1. Igångsättning
5.2. Temperaturreglering
6. Termometer
7. Goda råd
8. Avfrostning,rengöring och underhåll
9. Innerbelysning
10. Byte av dörrdekor
11. Montering och demontering av dörrhandtaget (valfri)
11.1. Montering av dörrhandtaget
11.2. Demontering av dörrhandtaget
12. Kundservice
13. Att sätta igång kylenheten, teknisk information
13.1. Anslutning till elnätet
14. Information om miljöskydd
15. Återvinning
OBS!
Garantiåtaganden sköts enligt EU direktiv 44/1999/CE och enligt normala villkor för
aktuellt land. Vid garanti- eller servicefrågor så som angående reservdelar, kontakta
Dometic-Kundservice-avdelning. Eventuell skada orsakad av felaktig användning
täcks inte av garantin. Garantin täcker inte modifieringar av enheten eller om man
använder icke-original Dometicdelar, och garantin gäller inte om installations- och
driftinstruktioner inte följs, och inget ansvar kan då utkrävas.
Vid kontakt med Dometic-Kundservice ska man uppge modell- och produkt- och
serienummer. Du hittar denna information på typskylten på insidan av kylenheten.
Page 36

36
SE
1. Uppackning
Se till att kylenheten inte har utsatts för skada, när den packas
upp. Om du upptäcker att kylenheten har skadats skall detta
rapporteras till transportföretaget omedelbart.
2. Bild på kylenheten
1. Dörrlås (om sådan installerats)
2. Dörr
3. Förångare
4. Termometer
5. Skydd över kylaggregat
6. IInnerbelysning
7. Fläkthus
8. Övre lådhylla
9. Mellanlåda
10. Nedre lådhylla
11. Mellanfack
12. Golvram
13. Sensor för elektroniken
OM ER KYLENHET ÄR UTRUSTAD MED DÖRRLÅS, ANSVARAR DOMETIC Zrt INTE FÖR BORTTAPPADE ELLER
SKADADE NYCKLAR. LÅS FINNS ENDAST SOM KOMPLETTA ENHETER SOM RESERVDELAR.
3. Rengöring
Rengör kylenheten noga regelbundet och vid behov.
Töm kylenheten och ta ut mellanfacken och dörrhylla.
Rengör insidan av enheten och dörren med en varm
lösning av Natriumhydrogenkarbonat. Tvätta därefter med
varmt vatten och torka sen med en torr duk. Rengör inte
plastdelarna med mera än handvarmt vatten. Utsätt delarna
inte för hetluft. Rengör utsidan av enheten regelbundet med
en ren fuktig duk.
ANVÄND ALDRIG STARKA KEMIKALIER ELLER REPANDE
RENGÖRINGSMEDEL FÖR RENGÖRING AV ENHETEN.
4. Placering av enheten
Var särskilt noga med följande, start av enheten :
ENHETEN MÅSTE STÅ VÅGRÄTT
LEDNINGARNA PÅ BAKSIDAN BLIR HETA UNDER DRIFT
ENHETEN ARBETAR UTAN KOMPRESSOR.
DÄRFÖR GÅR DEN VÄLDIGT TYST
FÖRST EFTER TRE TIMMAR KAN MAN RÄKNA MED EN
MÄRKBAR KYLEFFEKT.
Under kylprocessen för kylenheten ut värme genom
kondensorn (under det bakre skyddets övre del) till
luften.
Ju mer ventilerad kondensorn är, desto effektivare är
kylenheten. Den andra förutsättningen för att kylenheten
skall fungera på ett tillfredsställande sätt är att den står på
ett plant underlag. Detta kontrolleras bäst genom att
placera ett glas vatten ovanpå kylenheten.
Det är viktigt att kylenheten inte utsätts för direkt
värmeutstrålning (solljus, element, nära en ugn, etc.).
Placera inte enheten på en tjock matta!
4.1. Installationsanvisning
Dessa versioner är tänkt att stå fritt i ett rum. Ett skydd
täcker dom heta delarna av kylaggregatet. Golvramen
med sitt ventilationsgaller tillåter den nödvändiga
luftcirkulationen.
5. Drift av enheten
För att ta enheten i drift, ska kontakten kopplas in och
uttaget om nödvändig kopplas på. Beroende på
omgivningstemperatur börjar förångaren att bli kall efter 1
till 2 timmar.
5.1. Första starten
Anslut enheten till ett jordad vägguttag.
miniCool startar automatiskt med ett självtest. LED
(innerbelysningen) blinkar först flera gånger och lyser
sen permanent. Vid öppen dörr lyser
innerbelysningen.
miniCool uppnår drifttemperatur efter några timmar.
5.2. Temperaturreglering
Kylskåp för läkemedel är försedd med helautomatisk
elektronisk temperaturreglering. Du behöver inte ställa in
temperaturen för förvaringsfacket manuellt.
6. Termometer(bild 2)
Ta hänsyn till det separata informationsbladet vilket är
bifogat med termometern. Termometern kan fixeras
upprätt med hjälp av det integrerade stativet, alternativt
kan den fästas på kylskåpsdörren, I vilket fall sensor
kabeln ska arrangeras så vid kylskåpsdörren, att den inte
kan tänjas eller klämmas när dörren öppnas.
Temperatursensorn sitter i kylskåpet, I övre vänstra hörnet,
framför avdunstaren.
Viktig information!
Lådhyllorna skall placeras i respetkive angiven position enl. bilden.
En ferritkärna sörjer för EMC-kompatibilitet. Den är monterad på kabeln från den digitala termometerns sensor.
OBS! Avlägsna inte ferritkärnan!
Page 37

37
SE
Termometern visar den aktuella, den maximala och minimala
temperaturen i kylskåpet.
Efter att kylskåpet har varit startad första gången (vänta fyra
timmar) ska det genomföras en "reset" på termometern,
eftersom den annars lagrar den omgivande
yttertemperaturen som maxtemperatur.
Lagringen av många preparat minskar risken av frysning, om
enheten kyler ner för mycket under en kort period.
Vi tar inte ansvar för vacciner som förstörts genom
frysning, om det har varit en kortvarig strömavbrott.
Den visade temperaturen kan kortvarigt stiga efter att dörren
har öppnats eller genom lagring av ytterligare preparat i
kylskåpet.
För att upprätthålla temperaturer mellan 2 °C and
8 °C är det viktigt att regelbundet genomföra ett "reset" på
termometern.
För att temperatur displayen ska fungera måste
transportsäkringen på batteriet tas bort.
Termometer:
1. Min. Temperatur
2. Max. Temperatur
3. Aktuell temperatur
4. Återställningknapp
5. Ferritkärna
7. Goda råd
Kylskåpet är utrustat med en invändig fläkt för jämn invändig
temperatur. Fläkten arbetar endast då dörren är stängd. När
dörren öppnas stannar fläkten och startar igen så snart
kylskåpsdörren stängs. Om fläkten oavsiktligt stannar trots att
kylskåpsdörren är stängd, larmar elektroniken med en
ihållande ljudsignal. Dörrlarmets ljudsignal informerar
(kunden/användaren) om att dörren är öppen. Om dörren är
öppen mer än 20 sek. hörs en återkommande ljudsignal
med en pipande frekvens på 1Hz. Efter ytterligare 40 sek.
avges återkommande ljudsignal med en frekvens på 2Hz.
Proppa inte kylenheten full. Lämna alltid lite mellanrum
mellan produkterna, så att kylluften kan cirkulera jämn och
obehindrat. Om hyllorna är för fulla kan det resultera i
oönskat höga temperaturskillnader i kylenheten.
8. Avfrostning,rengöring och
underhåll (bild 3)
Efter en viss tid bildas is på förångaren. Detta isskikt får inte bli
för tjock eftersom den har en isolerande verkan och påverkar
kyleffekten.
Vi rekommenderar att frosta av kylskåpet var tredje vecka,
eller beroende på is- mängden på kyl-ribborna. Vid
avfrostningen ska kylskåpet vara avstängd genom att dra ut
nätkontakten och kylskåpsdörren skall vara öppen.
Isen smälter och det uppstående smältvattnet rinner från
droppkanalen genom dräneringsslangen till
avdunstningsbaljan på baksidan under kylenheten (bild 3).
Efter avfrostningen rengör man insidan av enheten med en
ren, fuktig duk.
9. Innerbelysning (bild 4)
Två lysdioder (A) på en elektronisk ledarpanel belyser
insidan av enheten, när dörren är öppnad.
Två sensorer (B) känner av om dörren är öppnad och styr
lysdioderna.
10. Byte av dörr dekor (bild 5)
Om kylskåpet är utrustad med ett dörrhandtag måste
denna plockas av innan dörrpanelen kan bytas.
Avlägsna skruvarna (1) på dörrkarmen (3).
Avlägsna rosetten (2) (på versioner med dörrlås).
Lyft upp dörrkarmen (3) och ta loss denna.
Dra ut dörrdekoren (4) ur dörrkarmen och sätt in den
önskade dekoren (minsta tjocklek 2 mm).
Sätt tillbaka dörrkarmen och rosetten och skruva fast
karmen igen.
11. Montering och demontering av
dörrhandtaget (valfri)
Dörrhandtaget levereras med tillbehören och skall
monteras och demonteras enligt följande:
11.1. Montering av dörrhandtaget
(bild 6-7)
11.2. Demontering av dörrhandtaget
(bild 8)
12. Kundservice
Var god och kontrollera följande innan du kontaktar
kundservice
Finns det ström vägguttaget? Kontrollera säkringarna.
Sitter nätkontakten korrekt och är vägguttaget
påkopplad (om detta är nödvändig)? Kontrollera
vägguttaget, genom att koppla in en annan apparat,
t.ex. en sängbordslampa.
Har dörren inte varit helt stängd och har det därför
uppstått en temperaturökning i enheten?
Står enheten vågrätt?
Är luftcirkulationen hindrad?
Tag kontakt med kundservice om kylenheten fortfarandet
inte fungerar, efter att kontroll har utförts enligt ovan
nämnda punkter. När du gör din felanmälan, förklara vad
som är fel, vad du har för modell, samt det
produktnummer och serienummer som står på
kylenhetens typskylt.
(Information om modell, produkt och serienummer finns
på typskylten på insidan av kylenheten.)
Den här kylenheten har ett överhettningsskydd. En
auktoriserad elektriker kan kontrollera om säkringen har
löst ut.
Om det har uppstått en defekt i enheten kontakta lokal
kundservice. Adressen finns i lokala telefonkatalogen.
www.dometic.com
Page 38

38
SE
13. Att sätta igång kylenheten
Teknisk information:
13.1. Anslutning till elnätet
Kylenheten kan endast drivas med nominell
nätspänning, vilket anges på typskylten. Kylenhetens
nätkontakt får bara anslutas till jordat uttag och enligt
lokala föreskrifter.
Om det krävs el-arbeten för att installera produkten, skall
dessa utföras av behörig elektriker.
Tillverkaren påtar sig inte något ansvar, om dessa
säkerhetsåtgärder inte följs.
El-krav
Kontrollera att nätspänningen i vägguttaget stämmer
överens med det som anges på typskylten, innan enheten
kopplas på.
14. Information om miljöskydd
Denna kylenhet innehåller inga tillsatser av CFC/HCFC
Ammoniak (naturlig förening av väte och kväve) används som
kylmedium.
Ozonvänligt cyclopentan har använts i PU-skumisolering.
Natriumkromat används som korrosionsskydd (mindre än 2
vikt% av köldmediet).
15. Återvinning
När kylenhet har packats upp skall emballaget tas till en
lokal uppsamlingsplats. När kylenheten är uttjänt, skall
denna tas till en ändamålsenligt uppsamlings- och
återvinningsfirma, som återvinner användbara material.
Övrigt material förstörs på lämpligt sätt.
Apparater märkta med denna symbol skall
lämnas in till kommunens insamlingsställe för
omhändertagande av elektriska och
elektroniska apparater.
Denna produkt får inte slängas i
hushållsavfallet.
På kylskåp från Dometic sitter denna symbol på
märkskylten (typskylten) inuti kylskåpet.
Denna kylenhet uppfyller följande EU-direktiv:
LVD-Direktivet 2014/35/EU
EMC-Direktivet 2014/30/EU
CE-Direktivet 93/68/EEC
RoHS-Direktivet 2011/65/EU
Modell DS301H DS601H
Typ DSH20-60 DSH20-60
Bruttovolym 28 liter 53 liter
Nätdrift 220 - 240V (AC) 220 - 240V (AC)
Ineffekt 65W 85W
Energiförbrukning 0,86 kW h/24h 1 ,05 kWh/24 h
Klimatklass SN SN
Kylmed ium 151g H
2
O + 101g NH3157g H2O + 105g NH
3
Page 39

39
NO
Takk for at du valgte vårt produkt. Vi er sikre på at det vil fungere problemfritt.
Nedenfor vil vi gjøre deg kjent med noen symboler som er nødvendige for at du skal kunne bruke kjøleskapet trygt og
effektivt:
fører til fare ved feil bruk
nyttige tips
miljøverninformasjon
Dette kjøleskapet er laget for oppbevaring av medisin i temperaturer mellom 2 og 8 °C. Kjøleskapet leveres med et digitalt
termometer som du kan feste oppå kjøleskapet. (Figur 1, side 61)
Merk!
Deler som varmes opp, bør ikke være tildekket. Når det er mulig, bør baksiden av
apparatet stå inntil en vegg, men med tilstrekkelig avstand for ventilering, som angitt
i monteringsinstruksjonene.
Elektriske arbeider som er nødvendig for å montere dette apparatet, må utføres av
godkjent elektriker.
Vedlikehold og service på dette produktet må utføres av en godkjent elektriker og
bare originale reservedeler bør brukes.
Det kan være farlig å endre produktet eller enkeltkomponenter.
Påse at produktet ikke står på nettledningen.
Dette produktet inneholder deler som blir varme under drift. Påse at det alltid er
tilstrekkelig ventilasjon, da manglende ventilasjon kan føre til skader på kjøleskapet
og dermed også på innholdet. Se monteringsanvisningen.
Kjøleskapet må plasseres slik at deler som blir varme, ikke kan berøres. Baksiden av
kjøleskapet bør derfor stå inntil en vegg. Påse at avstanden til veggen er i samsvar
med monteringsanvisningen, slik at det er tilstrekkelig ventilasjon.
Før avriming, rengjøring eller service må apparatet slås av og nettledningen trekkes
ut av veggkontakten.
IKKE BRUK SKARPE GJENSTANDER til å skrape av rim eller is. Under ingen
omstendigheter må du prøve å fjerne is fra kjøleribbene med makt. Is må få smelte av
seg selv ved avriming av kjøleskapet. Se avsnittet om avriming.
Dette apparatet er tungt. Vær forsiktig når du flytter det.
Du må ikke under noen omstendigheter prøve å reparere kjøleskapet selv.
Reparasjoner utført av personer som ikke har den rette opplæringen, kan medføre
personskade og alvorlige feil på apparatet. Ta kontakt med din lokale forhandler og
be om at originaldeler blir brukt.
Det er forbudt å oppbevare giftige eller eksplosive stoffer i dette kjøleskapet!
Les denne bruksanvisningen nøye før du tar kjøleskapet i bruk. Hvis du senere skulle
selge eller avhende produktet på annen måte, ber vi deg gi den nye eieren denne
bruksanvisningen.
Monteringsanvisningen nedenfor må følges nøyaktig. Garantien gjelder bare for
produkter som er montert i samsvar med denne anvisningen. (Se kapittel 4.1.)
Viktig!
DETTE KJØLESKAPET ER IKKE EGNET TIL OPPBEVARING AV BLOD.
Page 40

40
NO
INNHOLD
1. Pakke opp
2. Oversikt over kjøleskapet
3. Renhold
4. Plassere kjøleskapet
4.1. Monteringsanvisning
5. Bruke kjøleskapet
5.1. Ved første gangs bruk
5.2. Regulere temperature
6. Termometer
7. Nyttige tips
8. Avriming, rengjøring og vedlikehold
9. Innvendig lys
10. Bytte ut dørpanelet
11. Montere og demontere håndtaket (valgfritt)
11.1. Montere håndtaket
11.2. Demontere håndtaket
12. Kundeservice
13. Ta kjøleboksen i bruk, tekniske data
13.1. Koble til veggstikkontakt
14. Miljøverninformasjon
15. Resirkulering
Merk!
Garanti gis i henhold til EU-direktiv 44/1999/CE og gjeldende lokale regler.
Kontakt Dometics servicenettverk dersom du har spørsmål om garanti eller annen
service, for eksempel reservedeler.
Garantien dekker ikke skader som følge av ukorrekt bruk.
Garantien dekker ikke endringer ved apparatet eller bruk av annet enn originale
Dometic-reservedeler.
Garantien gjelder ikke hvis ikke anvisningene om montering og bruk blir fulgt.
Når du kontakter Dometics servicenettverk, bes du oppgi modell, produktnummer og
serienummer. Disse opplysningene finner du på typeskiltet på innsiden av kjøleskapet.
Page 41

41
NO
1. Pakke opp
Etter at du har fjernet pappemballasjen, kontroller du at
kjøleskapet ikke er skadet. Hvis du finner skader som er
oppstått under frakt, melder du umiddelbart fra til
fraktselskapet.
2. Oversikt over kjøleskapet
1. Dørlås (hvis tiljengelig)
2. Dør
3. Fordamper
4. Termometer
5. Deksel til kjøleenheten
6. Innvendig lys
7. Vifte (viftehus)
8. Øverste skuff (Utkuttet på øverste venstre hjørne av frontplate)
9. Midt skuffen (Med høyeste front plate)
10. Nederste skuff (Injeksjon-formet kompakt komponent)
11. Hyller
12. Sokkelramme
13. Sensor til det elektroniske systemet
HVIS DITT KJØLESKAP ER UTSTYRT MED EN LÅS, TAR DOMETIC Zrt INTET ANSVAR VED TAP AV ELLER SKADE PÅ
NØKLENE. KOMPLETT LÅS FÅES SOM RESERVEDEL.
3. Renhold
Rengjør kjøleskapet grundig regelmessig, etter
behov. Ta ut hyllene - disse, innsiden av kjøleskapet og
døren vaskes med en varm
natriumbikarbonatoppløsning. Tørk av med en klut vridd
opp i lunkent, rent vann og tørk så med en tørr, ren klut. Ikke
vask plastdelene i vann som er varmere enn lunkent. De må
heller ikke utsettes for varmluft. Utsiden av kjøleskapet bør
rengjøres regelmessig med en ren, fuktig klut.
BRUK ALDRI STERKE KJEMIKALIER ELLER SLIPENDE
VASKEMIDLER PÅ NOEN DELER AV KJØLESKAPET.
4. Plassere kjøleskapet
Ta hensyn til følgende før du tar kjøleskapet i bruk:
SØRG FOR AT KJØLESKAPET STÅR VANNRETT
RØRENE PÅ BAKSIDEN BLIR VARME UNDER DRIFT
KJØLESKAPET HAR INGEN "MOTOR" OG ER DERFOR
SVÆRT STILLEGÅENDE
DET KAN TA OPPTIL 3 TIMER FØR KJØLEEFFEKTEN
INNTRER
Kjøleprosessen fører til varmestråling fra
kondensatoren (under den øvre delen av bakdekslet)
og ut i luften. Kjølingen blir mer effektiv jo bedre
ventilasjonen er rundt kondensatoren.
Den andre betingelsen for optimal drift er at kjøleskapet
står vannrett. Dette kan du kontrollere ved å sette et glass
vann oppå kjøleskapet.
Det er viktig at kjøleskapet ikke utsettes for varmestråling
(sollys, radiator, nær en panelovn osv.).
Ikke sett kjøleskapet på et tykt teppe!
4.1. Monteringsanvisning
Denne utførelsen er beregnet på å brukes frittstående.
Dekselet foran kjøleenheten dekker til de varme delene.
Sokkelrammen har ribber som sørger for tilstrekkelig
ventilasjon.
5. Bruke kjøleskapet
For å slå på kjøleskapet setter du støpselet inn i
stikkontakten (og slår eventuelt på bryteren på
stikkontakten). Kjøleribbene bør begynne å vise tegn til
kjøling etter ca. 1-2 timer, avhengig av romtemperaturen.
5.1. Ved første gangs bruk
Apparatet må være koblet til en jordet stikkontakt.
MiniCool starter automatisk med en selvtest. Lysdioden
blinker først en del ganger. Deretter lyses innsiden av
kjøleskapet kontinuerlig opp mens døren er åpen.
MiniCool når normal driftstemperatur først etter noen
timer.
5.2. Regulere temperature
Medisinkjøleskap har en helautomatisk, elektronisk
termostat. Det er ikke nødvendig å stille inn temperaturen
manuelt.
6. Termometer(fig. 2)
Les den egne bruksanvisningen som følger med
termometeret. Termometeret kan stilles på det
medfølgende stativet eller festes til kjøleskapdøren. I
sistnevnte tilfelle må giverledningen legges slik at den
ikke blir strukket eller klemt når døren åpnes.
Temperaturgiveren er plassert i øvre venstre hjørne av
kjøleskapet, foran fordamperen.
Displayet vil vise nåværende, høyeste og laveste
temperatur inne i kjøleskapet.
VIKTIG INFORMASJON
De 3 skuffene i enheten skal bli plassert ved å respektere de indikerte posisjonene på bildet.
En jernring for EMC kompatibilitet er montert på ledningen fra det digitale termometeret`s sensor.
Ikke ta bort jernringen!
Page 42

42
Etter at kjøleskapet blir tatt i bruk for første gang (la det gå fire
timer), bør du nullstille ("reset") termometeret. Ellers vil
romtemperaturen bli stående som høyeste temperatur.
Jo mer medisiner du oppbevarer i kjøleskapet, desto mindre
blir faren for frysing dersom temperaturen midlertidig skulle
falle i kjøleskapet.
Vi tar intet ansvar for skader på vaksiner dersom disse
fryser på grunn av et midlertidig strømbrudd.
Den avleste temperaturen kan stige midlertidig etter at døren
er blitt åpnet eller flere gjenstander er blitt plassert i
kjøleskapet.
Det er viktig å nullstille termometeret regelmessig for å sikre
at temperaturen holder seg mellom 2 °C og 8 °C.
Transportsikringen på termometeret må fjernes for at
termometerdisplayet skal bli aktivert.
Termometer:
1. Minimums temperatur
2. Maks temperatur
3. Nåværende temperatur
4. Reset knapp
5. FERRIT ring
7. Nyttig tips
Enheten er utstyrt med en vifte for å få en enhetlig indre
temperatur. Viften virker bare hvis døren er lukket. Er døren
åpen vil viften stoppe, så vil den begynne igjen når døren er
lukket.
Hvis viften uforutsett skulle stoppe, og døren på enheten er
lukket, vil elektronikken gi et lydvarsel (vedvarende signal)
Lydvarselet forteller kunden om å lukke døren: Hvis døren
holdes åpen for mer enn 20 sekunder, vil elektronikken gi et
lydsignal (vedvarende signal) (periodisk signal med pipe
frekvens på 1 Hz), og etter en 40 sekunder kommer det et
annet Lydsignal (periodisk signal med pipe frekvens på 2
Hz).
Ikke legg for mye i kjøleskapet. Det er lurt å la det være litt luft
mellom produktene i kabinettet, slik at kjølingen blir effektiv
og jevn. Hvis varene ligger for tett, kan det oppstå store
temperaturvariasjoner.
8. Avriming, rengjøring og
vedlikehold (fig. 3)
Det vil etter hvert bygge seg opp rim på kjøleoverflatene.
Rimlaget må ikke få vokse seg for tykt, da det fungerer som
isolasjon og reduserer kjøleeffekten.
Vi anbefaler at kjøleskapet avrimes hver 3. uke, eventuelt når
det er mye is på kjøleribbene. Når du vil avrime kjøleskapet,
trekker du ut nettledningen og lar døren stå åpen.
Rimet vil smelte og smeltevannet renner fra dryppkanalen
gjennom en avløpsslange til et fordamperkar i bunnen av
kjøleskapet (figur 3).
Etter avriming bør innsiden av kjøleskapet rengjøres med en
ren, fuktig klut.
NO
9. Innvendig lys (fig. 4)
To lysdioder (A) på et elektronisk kretskort lyser opp i
kjøleskapet mens døren er åpen.
To følere (B) kontrollerer om døren er åpen eller ikke og
sender signal om at lysdiodene skal være på eller av.
10. Bytte ut dørpanelet (figur 5)
Hvis kjøleskapet er utstyrt med håndtak, må dette
demonteres først ved utskifting av dørpanelet.
Skru ut skruene (1) i panelet over betjeningselementene
(3).
Ta av tetningsringen til låsen (på kjøleskap med dørlås).
Skyv dørpanelet (4) ut av dørbladet og sett inn et nytt
dørpanel (tykkelse maks. 2 mm).
Monter panelet til betjeningselementene og
tetningsringen til låsen igjen og skru dem fast i omvendt
rekkefølge.
11. Montere og demontere
håndtaket (valgfritt)
Håndtaket som leveres sammen med kjøleskapet,
monteres og demonteres som følger:
11.1 Montere håndtaket (figur 6-7)
11.2. Demontere håndtaket(figur 8)
12. Kundeservice
Før du tilkaller reparatør, bør du utføre disse enkle
kontrollene:
Får apparatet strøm? Sjekk sikringene
Sitter støpselet ordentlig i stikkontakten (er
stikkontakten evt. slått på)? Sjekk stikkontakten ved å
plugge inn et annet apparat, f.eks. en lampe
Har døren ikke vært ordentlig lukket, slik at
temperaturen i kjøleskapet har steget for raskt?
Står kjøleskapet vannrett?
Er det noe som hindrer ventilasjonen?
Dersom kjøleskapet fortsatt ikke fungerer tilfredsstillende
etter at du har sjekket punktene ovenfor, tar du kontakt
med reparatør. Oppgi problem og modell-, produkt- og
serienummer.
(Du finner disse opplysningene på typeskiltet øverst til
venstre på innsiden av kjøleskapet.)
Dette kjøleskapet er utstyrt med en mekanisme som
hindrer overoppheting. En godkjent elektriker kan
kontrollere om denne er blitt utløst.
Ved feil, ta kontakt med din nærmeste forhandler. Se i
telefonkatalogen. Løft og fjern panelet til
betjeningselementene).
www.dometic.com
Page 43

43
13. Ta kjøleskapet i bruk
Tekniske data:
13.1. Koble til veggstikkontakt
Kjøleskapet må bare brukes med den spenningen
som er oppgitt på typeskiltet. Nettkabelen må bare
kobles til en veggstikkontakt som er jordet i henhold til lokale
forskrifter.
Elektriske arbeider som er nødvendig for å montere dette
apparatet, må utføres av godkjent elektriker eller annen
kompetent person.
Produsenten frasier seg ethvert ansvar dersom disse
sikkerhetsforskriftene ikke overholdes.
Krav til elektrisitetskilde
Før du slår på kjøleskapet, må du kontrollere at
elektrisitetskilden har samme spenning som den som er
oppgitt på typeskiltet.
14. Miljøverninformasjon
Apparatet inneholder ikke KFK/HKFK.
Ammoniakkgass (en naturlig hydrogen-nitrogen-forbindelse)
brukes som kjølemiddel.
Til innblåsingen av PU-skumisolasjonen brukes syklopentan,
som ikke skader ozonlaget.
Som korrosjonsbeskyttelse brukes natriumkromat (mindre
enn 2 % (masse) av kjølemidlet).
NO
15. Resirkulering
Emballasjen bør leveres til den stedlige
avfallsbehandlingen. Når kjøleskapet ikke lenger
fungerer, bør det leveres til en resirkuleringsbedrift som
kan sørge for gjenbruk av de resirkulerbare materialene.
Resten blir forskriftsmessig destruert.
Apparater som er kjennetegnet med dette
symbolet, må deponeres på lokale deponier
for elektriske eller elektroniske apparater.
Dette produktet må ikke kastes sammen med
vanlig husholdningsavfall.
Kjøleskap fra Dometic bærer symbolet på typeskiltet inne
i apparatet.
Apparatet er i samsvar med følgende EUdirektiver:
LVD-Direktiv 2014/35/EU
EMC-Direktiv 2014/30/EU
CE-Direktiv 93/68/EEC
RoHS-Direktiv 2011/65/EU
Modell DS301H DS601H
Type DSH20-60 DSH20-60
Bruttovolum 28 liter 53 liter
Spenning strømnett 220 - 240 V~ 220 - 240 V~
Inngang 65 W 85 W
Energiforbruk 0,86 kWh/24 t 1,05 kWh/24 t
Klimaklasse SN SN
Kjølemiddel 151g H
2
O + 101g NH3157g H2O + 105g NH
3
Page 44

44
DK
Tak fordi De valgte vort produkt. Vi er sikre på, at det vil fungere uden problemer.
I det følgende vil vi gøre Dem fortrolig med nogle symboler, som vi informerer Dem om for at garantere en sikker og effektiv
anvendelse af produktet:
Farekilde ved uhensigtsmæssig anvendelse
Tip, som kan være nyttige at læse
Oplysning om miljøbeskyttelse
Denne køleboks er beregnet til opbevaring af medicinalvarer ved temperaturer mellem +2 °C og +8 °C. Der medfølger et
digitaltermometer, som kan fastgøres til køleboksens top. (Figur 1, side 67)
Bemærk!
Dette udstyr er ikke beregnet til brug af personer (herunder børn) med fysiske eller
psykiske lidelser, og mangel på erfaring og viden, med mindre de er blevet instrueret
i brug af udstyret af en person med ansvar for deres sikkerhed. Børn bør overvåges
for at sikre de ikke leger med apparatet.
Nødvendigt el-arbejde til installation af køleskabet må kun udføres af en kvalificeret
elektriker.
Køleskabet skal serviceres af en autoriseret servicetekniker, og der må kun anvendes
originale reservedele.
Det kan være farligt at overskride specifikationerne eller foretage nogen form for
ændringer af køleskabet.
Sørg for, at køleboksen aldrig står på netkablet.
Nogle komponenter i køleskabet bliver varme under drift. Sørg for, at der altid er god
luftcirkulation, da køleskabet ellers kan blive beskadiget, og indholdet fordærves. Se
installationsanvisningerne.
Varme dele må ikke være frit tilgængelige. Stil derfor køleskabet med bagsiden op ad
en væg, men husk at overholde minimumsafstanden, så den nødvendige
luftcirkulation er sikret.
Træk altid netstikket ud, før afrimning, rengøring eller servicearbejde udføres.
BRUG ALDRIG ET SKARPT INSTRUMENT til at skrabe isen af. Brug aldrig vold til at
fjerne fastsiddende is fra køleribberne. Fastsiddende is skal have tid til at tø, når
køleboksen afrimes. Se anvisninger om afrimning.
Køleskabet er tungt. Vær forsigtig, når det skal flyttes.
Prøv aldrig at reparere køleskabet på egen hånd. Reparationer udført af uerfarne
personer kan føre til personskade eller alvorlige funktionsfejl. Kontakt Deres lokale
servicecenter, og forlang udtrykkeligt, at der anvendes originale dele.
Der må aldrig opbevares giftige eller eksplosive stoffer i køleskabet!
Læs venligst brugsanvisningen omhyggeligt, før De tager produktet i brug. Hvis De på
et senere tidspunkt sælger eller bortskaffer køleskabet, bedes De sikre at
brugsanvisningen også overdrages til den nye ejer.
Følg nedenstående installationsanvisninger nøje. Eventuelle garantikrav kan kun gøres
gældende, hvis installationen foretages som beskrevet. (Se kapitel 4.1)
Bemærk!
DENNE KØLEBOKS ER IKKE EGNET TIL OPBEVARING AF BLOD.
Page 45

45
DK
INDHOLD
1. Udpakning
2. Afbildning af køleskabet
3. Rengøring
4. Opstilling af køleskabet
4.1. Installationsanvisninger
5. Anvendelse af køleskabet
5.1. Første ibrugtagning
5.2. Temperaturregulering
6. Termometer
7. Nyttige tip
8. Afrimning, rengøring og vedligeholdelse
9. Indvendigt lys
10. Udskiftning af dørpanelet
11. Montering og afmontering af dørhåndtag (valgfri)
11.1. Montering af dørhåndtag
11.1. Afmontering af dørhåndtag
12. Kundeservice
13. Ibrugtagning, tekniske data
13.1. Tilslutning til elnettet
14. Oplysninger om miljøbeskyttelse
15. Genbrug
Bemærk!
Garantibetingelserne er i overensstemmelse med EU-direktiv 44/1999/CE og med
lovgivningen i det pågældende bestemmelsesland.
Ved spørgsmål om garanti og kundeservice samt reservedele bedes De kontakte vort
Dometic Servicenetværk.
Garantien dækker ikke skader, der skyldes uhensigtsmæssig anvendelse.
Garantien omfatter ikke ændringer af køleskabet samt anvendelse af uoriginale
Dometic-reservedele.
Garantien bortfalder, hvis køleskabet ikke installeres og anvendes ifølge
anvisningerne.
Angiv venligst køleskabets model, produktnummer og serienummer, hvis De
kontakter Dometic's servicenetværk. Disse oplysninger findes på typeskiltet, som
sidder inde i køleskabet.
Page 46

46
DK
1. Udpakning
Fjern papemballagen og undersøg, om køleskabet er
beskadiget. Ved transportskader skal De omgående
kontakte transportfirmaet.
2. Afbildning af køleskabet
1. Dørlås (Tilbehør)
2. Dør
3. Fordamper
4. Termometer
5. Køleenhedens afdækning
6. Indvendigt lys
7. Ventilator (indbygget)
8. Øverste bakke, (udkæring i øverste venstre hjørne)
9. Mellemste bakke (højeste front plade)
10. Laveste bakke (indbyggede komponenter)
11. Hylder
12. Bundramme
13. Sensor for Fuzzy Logic
HVIS DERES KØLESKAB ER UDSTYRET MED EN DØRLÅS, KAN DOMETIC Zrt IKKE GØRES ANSVARLIG FOR
TABTE ELLER BESKADIGEDE NØGLER. KOMPLETTE LÅSE FÅS SOM RESERVEDEL.
3. Rengøring
Køleskabet skal rengøres grundigt med jævne
mellemrum samt efter behov. Tag alle hylder ud. Vask
de indvendige flader i køleskabet og på døren med
en varm opløsning af natriumhydrogenkarbonat (tvekulsurt
natron). Derefter tørres fladerne af med en klud skyllet i varmt
vand, og til sidst tørres der af med et rent viskestykke. Vask
ikke plastdele i vand, der er mere end håndvarmt, og udsæt
ikke sådanne dele for varmluft. Køleskabets udvendige flader
rengøres jævnligt med en ren, fugtig klud.
BRUG ALDRIG STÆRKE KEMIKALIER ELLER SKUREMIDLER TIL
RENGØRING AF KØLESKABET.
4. Opstilling af køleskabet
Vær opmærksom på følgende punkter, når køleskabet
benyttes første gang:
SØRG FOR, AT KØLESKABET STÅR VANDRET
RØRENE PÅ BAGSIDEN BLIVER VARME, NÅR
KØLESKABET ER I BRUG
KØLESKABET HAR INGEN 'MOTOR' OG ER DERFOR
MEGET STØJSVAG
KØLEVIRKNINGEN KAN FØRST FORNEMMES EFTER
MINDST 3 TIMER
Under køleprocessen afgiver køleskabet varme fra
kondensatoren (under den øverste del af
bagklædningen) til den omgivende luft. Jo bedre
ventilation omkring kondensatoren, desto bedre køleeffekt.
En anden betingelse for en tilfredsstillende funktion er, at
køleskabet står vandret. Dette kan lettest kontrolleres ved
at stille et glas vand oven på køleskabet.
Det er vigtigt, at køleskabet ikke udsættes for direkte
varmestråling (sollys, radiator, tæt på ovn osv.).
Stil ikke køleskabet på et tykt tæppe!
4.1. Installationsanvisninger
Denne version er udformet som fritstående model. En
afdækning beskytter mod køleenhedens varme dele.
Bundrammen sørger med sin rist for tilstrækkelig
luftcirkulation.
5. Anvendelse af køleskabet
For at tænde køleskabet sættes netstikket i, og strømmen
slås til ved stikkontakten. Alt efter
omgivelsestemperaturen skulle køleribberne begynde at
blive kolde efter 1-2 timer.
5.1. Første ibrugtagning
Køleskabet skal tilsluttes til en stikkontakt med jord.
Deres miniCool starter automatisk med en selvtest.
Efter tilslutningen blinker LED'en nogle gange,
hvorefter der er permanent lys, når døren er åben.
Driftstemperaturen i miniCool nås først efter adskillige
timer.
5.2. Temperaturregulering
Deres Køleboks til sundhedssektoren er udstyret med en
fuldautomatik, elektronisk temperaturstyring.
Køletemperaturen skal derfor ikke indstilles manuelt.
6. Termometer(fig. 2)
Bemærk venligst den separate folder, der er vedlagt
termometeret. Termometeret kan stå op ved hjælp af det
integrerede stativ eller fastgøres til køleskabets dør. I så
fald skal det sikres, at sensorkablet ikke klemmes eller
strækkes, når døren åbnes og lukkes.
Temperatursensoren befinder sig foroven til venstre foran
fordamperen i køleskabet.
Termometeret viser aktuel temperatur, maks. temperatur
og min. temperatur i køleskabet.
VIGTIG INFORMATION
De 3 bakker i skabet, skal placeres og respekteres med de anviste positioner, som fremgår af billedet.
Der er monteret en aflang ring (ferrit ring, transformation) der sikre EMC forenlighed, og den er monteret på
ledningen, se tegning.
Fjern IKKE denne ring.
Page 47

47
Når køleskabet er tændt første gang, skal De foretage en
"reset" på termometeret (efter ca. 4 timer), da det ellers
gemmer værdien for omgivelsestemperaturen udenfor som
maks. temperatur.
Opbevaring af mange præparater nedsætter risikoen for
frysning, hvis apparatet underkøler kortvarigt.
Vi påtager os intet ansvar for forringelse af vacciner,
hvis disse fryser på grund af kortvarige
strømafbrydelser.
Den aflæste temperatur kan stige kortvarigt, hvis køleskabets
dør åbnes, eller hvis flere præparater lægges i køleskabet.
For at opretholde en temperatur mellem 2 °C og
8 °C er meget vigtigt at resette termometeret med jævne
mellemrum.
Temperaturvisningen fungerer kun, hvis batteriets
transportsikring ved termometeret fjernes.
Termometer:
1. Min. temperatur
2. Maks. temperatur
3. Aktuel temperatur
4. Nulstillingskontakt
5. FERRITE ring
7. Nyttige tip
Skabet er udtyret med en ventilator, der er med til at skabe
har en ensartet temperatur. Ventilatoren er kun tændt, når
døren er lukket. Ventilatoren slukker ved døråbning, og
starter igen når døren lukkes. Hvis ventilatoren tilfældigvis
ikke starter automatisk igen ved dørlukning, vil skabet give
en alarm. Denne alarm er en akustisk ensartet lyd. Hvis døren
ikke er lukket korrekt, vil der også blive givet en alarm efter
20 sek. Hvis døren fortsat ikke er blevet lukket efter 40 sek.
Vil alarmen (lyden) blive højere.
Køleboksen må ikke overfyldes. Vi anbefaler Dem at sørge
for, at der er lidt plads mellem produkterne i køleboksen for
at sikre en effektiv og jævn køling. Hvis hylderne pakkes for
tæt, kan der være uacceptable temperaturudsving.
8. Afrimning, rengøring og
vedligeholdelse (fig. 3)
Efterhånden vil der dannes is på køleribberne. Islaget må
ikke blive for tykt, da det virker isolerende og forringer
køleeffekten.
Vi anbefaler at afrime køleskabet regelmæssigt ca. hver
tredje uge, alt efter isdannelsen på køleribberne. Træk
netstikket ud af stikkontakten ved afrimning, og lad
køleskabets dør stå åben.
Isen smelter, og smeltevandet løber fra dråbekanalen via en
slange til en fordampningsbakke, der er placeret helt nede
på bagsiden af køleboksen (fig. 3).
Efter afrimningen tørres køleskabet af indvendigt med et tørt,
rent viskestykke.
9. Indvendigt lys (fig. 4)
To lysemitterende dioder (A) på en elektronisk printplade
oplyser køleskabet indvendigt, når døren er åben.
To følere (B) registrerer, om døren er åben eller ej, og
styrer lysdioderne derefter.
10. Udskiftning af dørpanel(fig. 5)
Har køleskabet et dørhåndtag, skal håndtaget først
afmonteres, hvis dørpanelet skal udskiftes.
Fjern skruerne (1) til dørrammen (3).
Fjern rosetten (2) (ved modeller med dørlås).
Løft og afmonter dørrammen (3).
Træk panelet (4) ud af dørrammen, og indsæt det nye
panel (tykkelse maks. 2 mm).
Sæt dørramme, roset og skruer på plads i omvendt
rækkefølge.
11. Montering og afmontering af
dørhåndtag (valgfri)
Dørhåndtaget befinder sig i det vedlagte tilbehør og
monteres og afmonteres på følgende måde:
11.1. Montering af dørhåndtag(fig. 6-7)
11.2. Afmontering af dørhåndtag (fig. 8)
12. Kundeservice
Tjek venligst følgende, før De kontakter vores
kundeservice:
Er der netstrøm til stede? Tjek sikringerne.
Sidder stikket rigtigt i stikkontakten, og er der tændt
for strømmen? Tjek stikkontakten ved at tilslutte et
andet el-apparat, f.eks. en bordlampe.
Er temperaturen i køleskabet steget pludseligt, fordi
døren ikke var lukket ordentligt?
Står køleskabet vandret?
Er luftcirkulationen blokeret/hæmmet?
Hvis De har tjekket ovennævnte punkter, og køleskabet
stadig ikke fungerer som den skal, bedes De kontakte
vores kundeservice. Beskriv problemet, og angiv type og
model samt produkt- og serienummer, som findes på
typeskiltet.
(Oplysninger om model, produkt- og serienummer findes
på typeskiltet øverst til venstre inden i køleskabet.)
Køleskabet er udstyret med en overhedningsbeskyttelse.
En autoriseret servicetekniker kan tjekke, om denne er
udløst.
I tilfælde af fejl bedes De kontakte det nærmeste
Servicecenter - se efter i den lokale telefonbog.
www.dometic.com
DK
Page 48

48
13. Ibrugtagning
Tekniske data:
13.1 Tilslutning til netstrøm
Køleskabet må kun anvendes med den spænding,
der er angivet på typeskiltet. Køleskabet må kun
tilsluttes til en jordet stikdåse, der opfylder de lokale
bestemmelser.
Nødvendige elektriske installationer for tilslutning af
køleskabet må kun udføres af en elektriker eller en anden
kompetent person.
Fabrikanten afviser ethvert ansvar, hvis
sikkerhedsforanstaltningerne ikke iagttages.
Elektriske krav
Kontroller, at netspændingen svarer til oplysningerne på
typeskiltet, før køleskabet tændes.
14. Oplysninger om
miljøbeskyttelse
Køleskabet indeholder ingen CFC/HCFC.
Som kølemiddel anvendes ammoniak (en naturlig brint-
/nitrogenforbindelse.
Som blæsemiddel for PU-isoleringsskum anvendes det
ozonvenlige cyclolopentan.
Som korrosionsbeskyttelse anvende natriumchromat (mindre
end 2 vægtprocent af kølemidlet).
DK
15. Genbrug
Bortskaf emballagen via den sædvanlige dagrenovation.
Selve køleskabet skal bortskaffes via et specialfirma, der
kan indsamle de genanvendelige materialer og bortskaffe
restaffaldet på forsvarlig vis.
Apparater, som er mærket med dette
symbol, skal afleveres hos det lokale
opsamlingssted til bortskaffelse af elektriske
og elektroniske apparater.
Dette produkt må ikke bortskaffes gennem normal
husholdningsaffald.
Køleskabe fra Dometic har symbolet på dataskiltet
(typeskiltet) invendigt i apparatet.
Køleskabet er i overensstemmelse med følgende
EU-direktiver:
LVD-Directive 2014/35/EU
EMC-Directive 2014/30/EU
CE-Directive 93/68/EEC
RoHS-Directive 2011/65/EU
Model DS301H DS601H
Type DSH20-60 DSH20-60
Bruttovolumen 28 liter 53 liter
Netstrøm 220V-240 (AC) 220V-240 (AC)
Tilført effekt 65 W 85 W
Energiforbrug 0,86 kWh/24 t 1,05 kWh/24 t
Klimaklasse SN SN
Kølemiddel
151 g H2O + 101 g NH3157 g H2O + 105 g NH
3
Page 49

49
E
Le agradecemos que haya elegido nuestro electrodoméstico. Estamos seguros de que podrá utilizarlo sin problemas.
A continuación, le explicamos el significado de algunos símbolos, sobre los que deseamos llamar su atención, para
asegurar el uso seguro y eficiente del aparato.
Peligro en caso de uso incorrecto
Sugerencias útiles.
Información relativa a la protección del medio ambiente
Este frigorífico está destinado al almacenamiento de fármacos a temperaturas de entre 2 °C y 8 °C. Se suministra un
termómetro digital que se puede fijar en la parte superior del frigorífico. (Figura 1, página 4).
¡Atención!
ESTE FRIGORÍFICO NO ES ADECUADO PARA EL ALMACENAMIENTO DE SANGRE.
¡Atención!
Este electrodoméstico no debe ser utilizado por personas (incluidos niños) con capacidades
físicas, sensoriales o mentales reducidas, o con falta de experiencia o sin los conocimientos
necesarios, a no ser que sean supervisados o instruidos por personas que se responsabilicen de
su seguridad.
Los niños deben ser supervisados para asegurar que no jueguen con el aparato.
Cualquier trabajo eléctrico necesario para la instalación de esta unidad, deberá ser realizado por
personal técnico cualificado.
Este producto deberá ser atendido por un Técnico de Servicio autorizado, y solamente deberán
utilizarse piezas de recambio genuinas.
Es peligroso alterar las especificaciones o modificar este producto de cualquier forma.
Hay que tener cuidado y asegurarse de que la unidad no esté colocada sobre un cable de suministro
eléctrico.
En este producto hay algunas piezas que pueden calentarse durante su funcionamiento. Asegúrese
siempre de que tenga una ventilación adecuada, ya que, de lo contrario, se podría producir algún
fallo en sus componentes, así como el deterioro del contenido. Consulte las instrucciones de
instalación.
Antes de realizar la descongelación, limpieza o mantenimiento, asegúrese de apagar la unidad y
desenchufarla.
NO UTILICE INSTRUMENTOS AFILADOS para rascar el hielo de la congelación. Bajo ninguna
circunstancia deberá forzar la extracción del hielo de las superficies de enfriamiento. Deberá esperar
a que el hielo se licúe durante el proceso de descongelación. Consulte las instrucciones de
descongelación.
Este frigorífico tiene un peso considerable, que deberá tenerse en cuenta durante su traslado.
Aajo ninguna circunstancia intente reparar usted mismo el frigorífico. Las reparaciones realizadas
por personas sin experiencia pueden ocasionar daños o producir un funcionamiento defectuoso.
Consulte con su Centro de Servicio local , e insista siempre en recibir piezas de recambio genuinas.
Está prohibido el almacenamiento de sustancias tóxicas o explosivas en este aparato.
Rogamos que lea detenidamente este Manual de Instrucciones antes de poner en funcionamiento
el frigorífico. Si, posteriormente, lo vende o se desprende de él, asegúrese de entregar este
Manual de Instrucciones de utilización al nuevo propietario.
Siga cuidadosamente las instrucciones de instalación que se indican a continuación. La garantía
sólo es válida para los productos que se instalen según se describe aquí.
Page 50

50
ÍNDICE
ÍNDICE
1. Desembalaje
2. Componentes del aparato
3. Limpieza
4. Ubicación del aparato
4.1. Instrucciones de instalación
5. Uso del aparato
5.1. Operación inicial
5.2. Regulación de la temperatura
6. Termómetro
7. Sugerencias útiles
8. Descongelación, limpieza y mantenimiento
9. Luz interna
10. Reemplazo del panel decorativo de la puerta
11. Servicio al cliente
12. Puesta en servicio, datos técnicos
12.1. Conexión a un circuito eléctrico
13. Información sobre protección medioambiental
14. Reciclaje
¡Atención!
Las condiciones de la garantía corresponden a la Directiva 44/1999/CE de la Unión
Europea y las respectivas leyes vigentes del país donde se utilice este aparato.
Si usted tiene alguna pregunta sobre la garantía y el servicio al cliente o si necesita
piezas de recambio, diríjase por favor a la Red de Servicio de Dometic.
La garantía no cubre daños causados por el uso indebido de este aparato.
La garantía no cubre las modificaciones al aparato ni tampoco el empleo de piezas de
recambio que no sean piezas originales de Dometic.
La garantía quedará anulada si este aparato se instala o se utiliza de forma contraria a
la estipulada en las instrucciones.
Indique por favor el nombre del modelo así como el número del producto y su número
de serie al comunicarse con la Red de Servicio de Dometic. Hallará estos datos en la
placa de características técnicas situada en el interior del refrigerador.
E
Page 51

51
1. Desembalaje
Después de retirar la caja de embalaje, revise para detectar
cualquier daño que pueda haber sufrido el aparato. Si usted
2. Componentes del aparato
detecta algún daño ocurrido durante el transporte,
informe entonces inmediatamente a la empresa de
transporte.
1. Cerradura de la puerta (si esta disponible)
2. Puerta
3. Evaporator
4.Termómetro
5. Tapa de la unidad de refrigeración.
6. Luz interna
7. Ventilador (cabina)
8. Bandeja superior (Corte en la parte
superior izquierda del panel frontal)
9. Bandeja intermedia (con el mayor
panel frontal)
10.Bandeja inferior (componente de
inyección moldeada).
11. Bandejas
12. Bastidor inferior
13. Sensor de lógica difusa
EN EL CASO DE QUE SU REFRIGERADOR ESTÉ EQUIPADO CON UNA CERRADURA, DOMETIC Zrt NO ACEPTA
NINGUNA RESPONSABILIDAD POR LA PÉRDIDA O EL DAÑO DE LAS LLAVES. SE PUEDE SUMINISTRAR UNA
CERRADURA COMPLETA.
NOTA IMPORTANTE
Las tres bandejas del frigorífico deben colocarse respetando las indicaciones mostradas en la fotografía.
Un anillo de ferrita se encuentra montado en el cable del sensor del termómetro para asegurar la compatibilidad electro-
magnética EMC.
¡NO quitar el anillo de ferrita!
3. Limpieza
Limpie minuciosamente el refrigerador con
regularidad, según sea necesario. Retire las bandejas
de los estantes para lavarlas, al igual que debe lavar la
parte interior y la puerta del refrigerador con una solución
tibia de bicarbonato de sodio. Por último, pase un paño
empapado con agua tibia únicamente y séquelo con un
paño limpio. No lave ninguna pieza de plástico en agua que
esté a mayor temperatura que la temperatura del cuerpo y no
exponga esas piezas a una fuente de calor seco. La parte
exterior del refrigerador debe limpiarse regularmente con un
paño húmedo y limpio.
NUNCA USE AGENTES QUÍMICOS AGRESIVOS NI
MATERIALES ABRASIVOS EN NINGUNA PARTE DEL
REFRIGERADOR.
4. Ubicación del aparato
Al usar por primera vez el refrigerador, considere por favor
los siguientes aspectos:
ASEGÚRESE DE QUE EL REFRIGERADOR ESTÉ
NIVELADO
LOS TUBOS EN LA PARTE POSTERIOR SE PONEN
CALIENTES CON EL USO
EL REFRIGERADOR NO TIENE UN 'MOTOR' Y, POR
TANTO, ES VIRTUALMENTE SILENCIOSO.
ESPERE AL MENOS TRES HORAS PARA VER LAS
PRIMERAS SEÑALES DE ENFRIAMIENTO
Durante el proceso de refrigeración, el aparato
distribuye aire caliente a través del condensador
(situado en la parte superior de la cubierta posterior)
hacia el aire circundante. Cuanto más ventilado esté el
condensador, tanto más efectiva será la refrigeración.
La segunda condición para un funcionamiento
satisfactorio es que el aparato quede asentado sobre
una superficie plana. Esto puede apreciarse
colocando un vaso lleno de agua sobre el aparato.
Es importante que el aparato no esté expuesto a
ninguna fuente directa de radiación de calor (luz solar,
radiador, cerca de un horno, etc.).
Por favor no coloque el refrigerador sobre una
alfombra gruesa!
4.1. Instrucciones de instalación
Esta versión está diseñada para usar el refrigerador como
una unidad independiente en cualquier lugar. La tapa de
la unidad de refrigeración protege contra el contacto con
las partes calientes de la unidad de refrigeración. El
bastidor inferior tiene rejillas para garantizar suficiente
ventilación.
5. Uso del aparato
Para poner a funcionar el refrigerador, conéctelo a la toma
de corriente y encienda el interruptor. Las aletas de
refrigeración deben dar señales de enfriamiento
aproximadamente en 1 o 2 horas, dependiendo de la
temperatura ambiente.
5.1. Operación inicial
El aparato debe conectarse a una toma de corriente
que esté puesta correctamente a tierra.
El miniCool se pone en marcha automáticamente
iniciando también en forma automática una prueba de
E
Page 52

52
su propio funcionamiento. Después de enchufar el
refrigerador, el diodo luminoso destella primero varias
veces y después se queda iluminado permanentemente.
Se puede ver esa luz permanente si se abre la puerta del
refrigerador.
El miniCool llega a su temperatura normal de
funcionamiento después de varias horas.
5.2. Regulación de la temperatura
El Frigorífico Health Care está equipado con un regulador
de temperatura electrónico totalmente automático. Por lo
tanto, no es necesario ajustar manualmente la temperatura
del espacio interior.
6. Termómetro(Figura 2)
Consulte el folleto separado de instrucciones que viene con
el termómetro. Es posible colocar el termómetro en
posición vertical usando el soporte que viene con el
producto o, como alternativa, el termómetro puede fijarse a
la puerta del refrigerador, en cuyo caso el cable del sensor
no debe quedar estirado o en una posición en la que pueda
dañarse al abrir la puerta.
El sensor de temperatura está situado dentro del
refrigerador, en la esquina superior izquierda, frente al
evaporador. De ese modo se muestra en la pantalla la
temperatura actual, la máxima y la mínima dentro del
refrigerador.
Después de activar el refrigerador por vez primera (espere
unas cuatro horas), por favor actualice (haga un reset) el valor
en el termómetro, en caso contrario, seguirá indicando la
temperatura "máxima" como la temperatura ambiente.
Tanto mayor sea el número de medicinas que usted guarde
en el refrigerador, menor será el riesgo de congelación si la
unidad pasa por un corto período de enfriamiento.
No asumimos responsabilidad por los daños
ocasionados a las vacunas por congelación, si ocurre
algún corte en el suministro eléctrico durante un
breve período de tiempo.
Las lecturas de la temperatura pueden aumentar
temporalmente después de abrir la puerta o colocar
artículos adicionales en su interior.
Es importante reponer el valor del termómetro regularmente
para garantizar que la temperatura se mantenga entre 2 °C y
8 °C.
En el termómetro, se debe retirar la banda de seguridad de
transporte de la pila para activar la pantalla indicadora de
temperatura.
Termómetro:
1. Temperatura min.
2. Temperatura max.
3. Temperatura actual
4. RESET.
5. Ferrita.
7. Sugerencias útiles
El electrodoméstico está equipado con un ventilador para
distribuir uniformemente la temperatura. El ventilador
funciona solo con la puerta cerrada. Al abrir la puerta el
ventilador para, volviendo a ponerse en funcionamiento al
cerrarla de nuevo.
Si el ventilador se para accidentalmente estando la puerta
cerrada, el modulo electrónico emitirá un a señal de
alarma sonora.
Una alarma sonora advierte al cliente sobre la necesidad
de cerrar la puerta: Si la puerta queda abierta por más de
20 segundos, la placa electrónica emitirá un sonido de
alarma (sonido intermitente con una frecuencia de 1 Hz),
tras otros 40 segundos sin cerrar la puerta el sonido de
alarma cambiará ( sonido intermitente con una frecuencia
de 2Hz)
No llene la unidad en exceso. Es aconsejable dejar algún
espacio entre los productos dentro de la cabina para
garantizar un enfriamiento eficaz y uniforme. Si las
bandejas están demasiado llenas se pueden producir
variaciones de temperatura inapropiadas.
8. Descongelación,
limpieza y mantenimiento
(Figura 3)
La escarcha se formará gradualmente en las superficies de
enfriamiento y no se debe permitir que llegue a ser
demasiado gruesa puesto que actuaría como un
obstáculo aislante que afectaría el enfriamiento.
Recomendamos descongelar el aparato cada 3 semanas
aproximadamente, dependiendo de la cantidad de hielo
que se acumule en las aletas refrigeradoras. Durante la
descongelación, el aparato debe apagarse
desconectándolo de la fuente de suministro eléctrico y
dejando abierta la puerta del refrigerador.
La escarcha se derretirá y el agua de la descongelación
circulará por el tubo de desagüe desde el canal de goteo
cayendo en un recipiente de evaporación situado en la
parte inferior trasera del refrigerador (Figura 3).
Después de la descongelación, la parte interior del
refrigerador debe limpiarse con un paño húmedo y
limpio.
9. Luz interna (Figura 4)
Dos diodos luminosos (A) situados en una placa de
circuitos impresos electrónicos iluminan el
compartimiento de refrigeración al abrir la puerta.
Dos sensores (B) detectan si la puerta está o no está
abierta y los diodos se encienden o se apagan
dependiendo de ese estado.
10. Reemplazo del panel
decorativo de la puerta
(Figura 5)
Retire los tornillos de montaje (1) del panel frontal (3)
Retire la roseta (2) (en el caso de un refrigerador con
cerradura).
Levante y retire el panel frontal. (3)
Deslice el panel decorativo (4) sacándolo del marco de la
puerta e inserte el nuevo panel (el espesor máximo es 2
mm).
Vuelva a colocar en su sitio el panel frontal y la roseta,
atornillándolos y siguiendo los pasos anteriores en orden
inverso.
E
Page 53

53
11. Servicio al cliente
Antes de avisar al Servicio al Cliente, compruebe lo
siguiente:
¿Ha ocurrido un corte en el servicio eléctrico? Revise los
fusibles.
¿El enchufe está conectado firmemente en la toma de
corriente y esa toma recibe alimentación eléctrica?
Compruebe el buen funcionamiento de la toma
enchufando otro aparato en ella, por ejemplo, una
lámpara de mesa.
¿No se cerró bien la puerta, lo que ha provocado que la
temperatura interior aumente con demasiada rapidez?
¿El refrigerador está bien nivelado?
¿El ventilador tiene alguna obstrucción?
Si, después de comprobar todos estos aspectos, el
refrigerador sigue sin funcionar correctamente, avise
entonces al ingeniero de servicio más cercano a su
domicilio. Al llamar a este servicio, describa el problema e
indique el tipo y el modelo del aparato, así como el número
de la unidad y el número de serie.
(Los detalles sobre el modelo, el número de la unidad y el
número de serie se encuentran en la placa de características
técnicas situada en la parte superior izquierda del
compartimiento interior.)
Este refrigerador está equipado con protección contra
recalentamiento. Un técnico autorizado de servicio puede
comprobar si esta protección se ha disparado o no.
En caso de que ocurra cualquier falla, comuníquese con su
Centro de Servicio más cercano. De ser necesario, consulte
la guía de teléfonos de su localidad.
www.dometic.com
12. Puesta en servicio
Datos técnicos:
12.1. Connecting to electrical mains
Este aparato sólo debe ponerse a funcionar con la
tensión eléctrica nominal de la red indicada en la
placa de características técnicas del fabricante. El aparato
debe enchufarse a una toma de corriente con puesta a tierra,
conforme a las disposiciones locales vigentes.
Las instalaciones eléctricas necesarias para la conexión del
aparato deben ser realizadas únicamente por un electricista
u otro técnico cualificado.
El fabricante declina absolutamente cualquier
responsabilidad en caso de que no se tomen estas
medidas de seguridad.
Requisitos eléctricos
Antes de conectar la unidad, compruebe si la tensión de
la red eléctrica se corresponde con la tensión indicada en
la placa de características técnicas del fabricante.
13. Información sobre protección
medioambiental
Como agente refrigerante del aparato se emplea
amoníaco (un compuesto natural de nitrógeno e
hidrógeno).
El ciclopentano, inocuo para la capa de ozono, se utiliza
como agente de inyección para el aislamiento de espuma
de poliuretano.
Como protección contra la corrosión se utiliza cromato
de sodio (menos del 2 por ciento del peso del
refrigerante).
14. Reciclaje
Después de desempacar el aparato, los materiales de
embalaje deben ser enviados a un centro local de
recogida. Al final de su vida útil, el aparato deberá
enviarse a un centro especializado de recogida y
reprocesamiento, para que se recuperen los materiales
aprovechables. Deberá disponerse del resto de los
materiales conforme a las normas.
Los aparatos que lleven este símbolo
deberán depositarse en los lugares locales
de recogida de aparatos eléctricos y
electrónicos.
Este producto no debe desecharse en la basura
doméstica convencional.
Los refrigeradores de Dometic llevan el símbolo en la
placa de datos (placa indicadora) situada en el interior del
aparato.
Esta unidad cumple con las siguientes directivas
de la EU:
Directiva LVD 2014/35/EU
Directiva EMC 2014/30/EU
Directiva CE 93/68/EEC
Directiva RoHS 2011/65/EU
Modelo DS301H DS601H
Tipo DSH20-60 DSH20-60
Volumen bruto 28 litros 53 litros
Alimentación de red 220 - 240V (CA) 220 - 240V (CA)
Consumo de corriente 6 5W 85W
Consumo de energía 0,86 k Wh/24h 1,0 5 kWh/24h
Clase de clima SN SN
Soluc ión de abs orción 151g H
2
O +101 g NH3157g H2O +105 g NH
3
E
Page 54

HU
54
Örülünk,hogy választása a mi készülékünkre esett és reméljük,hogy hibátlan működésével az Ön megelégedését szolgálja.
Az alábbiakban megismertetjük Önt néhány szimbólummal,melyekkel a készülék biztonságos és hatékony működtetése
szempontjából fontos részekre hívjuk fel az Ön figyelmét:
veszélyforrás,helytelen kezelés esetén
elolvasása javasolt,hasznos tanácsok
környezetvédelemmel kapcsolatos információk
Ezt a hűtőszekrényt gyógyszerek +2 °C és +8 °C közötti hőmérséklettartományban történő tárolására tervezték. A szekrényt
a tetejére rögzíthető digitális hőmérővel látták el (4. oldal, 2. ábra).
Figyelem!
Ezt a terméket nem használhatják, illetve kezelhetik, csökkent fizikai-, érzékszervi-, vagy
mentális képességű személyek (beleértve gyermekek), tapasztalat és ismeretek hiányában,
kivéve ha a biztonságukért felelős személy felügyeli és irányítja őket.
Ügyelni kell arra, hogy gyermekek ne játsszanak a készülékkel.
A készülék üzembehelyezéséhez szükséges legcsekélyebb villanyszerelési munkát is
szakképzett szerelővel végeztessenek.
Ezt a terméket csak kizárólag szakképzett szervíz szerelő javíthatja és javításához csakis eredeti
szervíz alkatrészek használhatók fel.
A műszaki feltételek megváltoztatása, vagy a termék bárminemű módosítása veszélyes.
Ügyeljünk arra, hogy a készüléket ne állítsuk a villamos csatlakozó vezetékre.
Ebben a termékben az üzemelés során felhevülő alkatrészek találhatók. Mindíg megfelelő
szellőzést kell biztosítani, mert ennek nem teljesülése alkatrészmeghibásodáshoz és esetleg a
szekrény tartalmának tönkremenéséhez vezethet. Lásd a beszerelési útmutatót!
A felhevülő alkatrészeket nem szabad szabadon hagyni. A készüléket háttal állítsuk fal mellé úgy,
hogy közben biztosítsuk a beszerelési útmutatóban a szellőzéshez előírt távolságot.
Leolvasztás, tisztítás vagy javítás előtt feltétlenül kapcsoljuk ki a készüléket és a villásdugót
húzzuk ki a konnektorból.
A dér vagy jég lekaparásához NE HASZNÁLJUNK ÉLES SZERSZÁMOKAT! Semmiképpen ne
erőltessük a kemény jégnek a hűtőbordákról való leválasztását. Hagyjuk, hadd olvadjon le
leolvasztáskor. Lásd a leolvasztásra vonatkozó útmutatást!
A készülék nehéz. Óvatosan mozgassuk!
Semmiképp ne próbálkozzon a készülék sajátkezű javításával! Szakképzetlen személy által
végrehajtott javítás sérülést, vagy még súlyosabb üzemzavart okozhat. Keresse fel a területileg
illetékes Szervízállomást és mindíg ragaszkodjon eredeti szervíz alkatrészek beépítéséhez!
A hűtőszekrényben mérgező- vagy robbanásveszélyes anyagok tárolása tilos!
Mielõtt a hűtőkészüléket üzembe helyezi, kérjük figyelmesen olvassa el ezt a kezelési tájékoztatót.
Ha a hűtőkészüléket a későbbiekben értékesíti, vagy elajándékozza kérjük, gondoskodjon arról,
hogy az új tulajdonos a kezelési tájékoztatót is megkapja hozzá.
Kérjük kövesse a beépítési útmutatót, ugyanis a Garancia csak abban az esetben évényes, ha az
abban leírtakat betartja (lásd 4.1-es pont).
Figyelem!
EZ A HŰTŐSZEKRÉNY VÉR TÁROLÁSÁRA NEM ALKALMAS!
Page 55

55
TARTALOMJEGYZÉK
TARTALOMJEGYZÉK
1. Kicsomagolás
2. A készülék bemutatása
3. Tisztitás
4. Elhelyezés
4.1. Üzembehelyezési útmutató
5. A készülék használata
5.1. Az első bekapcsolás
5.2. Hőmérséklet szabályzás
6. Digitális hőmérő
7. Hasznos tanácsok
8. Leolvasztás, tisztitás és karbantartás
9. Belső világitás
10. Ajtólemez cseréje
11. Fogantyú fel-leszerelése
11.1. Felszerelés
11.2. Leszerelés
12. Vevőszolgálat
13. Üzembehelyezés, műszaki adatok
13.1.Csatlakozás a villamos hálózatra
14.Környezetvédelmi információ
15.Újra feldolgozás
Figyelem!
A garanciális előírások összhangban vannak a 44/1999/CE irányelvvel és az illető országban
alkalmazott normál feltételekkel.
Garancia és egyéb szolgáltatások, mint pl. szervíz-alkatrészek tekintetében kérjük keresse fel
Dometic Vevőszolgálati Részlegünket.
Nem rendeltetésszerű használat okozta bármely sérülés nem tárgya a garanciának.
A garancia nem vonatkozik a készülék bármely módosítására, vagy nem eredeti Dometic
alkatrész felhasználására.
A garancia nem érvényes, ha a beszerelési és üzemeltetési útmutatót nem követték.
Ha a Dometic Vevőszolgálati Részlegét hívja, kérjük közölje a modellt, a termékszámot és a
gyártási sorszámot.
Ezeket az adatokat a hűtőszekrényben levő adattáblán lehet megtalálni.
HU
Page 56

56
1. Kicsomagolás
A csomagoló karton eltávolítása után győződjön meg arról,
hogy a készülék sértetlen. Ha a készüléken szállításból
származó sérülést talál, úgy haladéktalanul jelezze azt a
szállítást végző cégnek.
2. A készülék bemutatása (1. ábra)
1. Zár
2. Ajtó
3. Elpárologtató
4. Hőmérő
5. Aggregáttér burkolat
6. Belső világítás
7. Ventilátor
8. Felső tálca (Az előtét jobb felső sarok kivágva)
9. Középső tálca
10. Alsó tálca (Egy darabból készült)
11. Lábkeret
12. Fuzzy Logic érzékelője
13. Hőmérő érzékelője
A DOMETIC Zrt. NEM VÁLLAL FELELŐSSÉGET A KULCS ELVESZTÉSÉÉRT, VAGY ELTÖRÉSÉÉRT. KOMPLETT
ZÁRAT A GYÁRTÓMŰTŐL LEHET BESZEREZNI.
Figyelem!
A digitális hőmérő érzékelő vezetékére egy ferrit-gyűrű kerül felhelyezésre.
A gyűrű eltávolítása tilos!
A három polcot a készülékbe az ábrán mutatott sorrendbe kell berakni.
3. Tisztitás
Időnként szükség szerint alaposan tisztítsuk meg a
hűtőszekrényt. Vegyük ki a polcokat; ezeket, a
belsőkamrát és az ajtót mossuk le langyos nátriumbikarbonát oldattal. Végül töröljük át langyos vízben
kiöblített ruhával és tiszta ruhával töröljük szárazra. A
műanyag alkatrészeket sose mossuk kézmelegnél melegebb
vízzel és ne tegyük ki őket szárító meleg hatásának. A
szekrény külső részét rendszeresen tiszta, puha ruhával kell
letörölgetni.
A SZEKRÉNYEKHEZ SEHOVA NEM SZABAD MARÓ
HATÁSÚ VEGYSZEREKET VAGY SÚROLÓ
TISZTÍTÓSZEREKET HASZNÁLNI!
4. Elhelyezés
A hűtőszekrény első bekapcsolásakor kérjük vegye
figyelembe a következőket:
A HŰTŐSZEKRÉNYT VIZSZINTES HELYZETBE KELL
ÁLLÍTANI.
HASZNÁLAT SORÁN A HŰTŐSZEKRÉNY HÁTULJÁN
TALÁLHATÓ CSŐRENDSZER FELFORRÓSODIK
A HŰTŐSZEKRÉNYBEN NINCS "MOTOR" EZÉRT
GYAKORLATILAG HANGTALAN
A HŰTÉS JELENTKEZÉSÉRE LEGALÁBB 3 ÓRÁT KELL
VÁRNI
A hűtési kőrfolyamat során a készülék kondenzátora (a
hátlap felső része alatt) hőt ad le a környező
levegőnek. Minél jobb a kondenzátor szellőzése,
annál hatékonyabb a hűtés.
A megfelelő üzemelés másik előfeltétele, hogy a készülék
vízszintes felületen álljon. Ez legkönnyebben úgy
ellenőrizhető, ha a készülék tetejére egy pohár vizet
teszünk.
Fontos,hogy ne tegyük ki a készüléket közvetlen
sugárzó hő hatásának (napsugárzás, radiátor, sütőhöz
közel, stb.).
Kérjük a hűtőszekrényt ne helyezze hosszúszőrű
szőnyegre.
4.1. Üzembehelyezési útmutató
Ezt a változatot szabadonálló felhasználásra tervezték. Az
aggregát felhevült alkatrészeitől az aggregáttér burkolat
véd. A rácsos lábkeret megfelelő szellőzést biztosít.
5. A készülék használata
A hűtőszekrény indításához dugjuk be a villásdugót a
hálózati konektorba és a konektort helyezzük feszültség
alá. A hűtőbordák a környezeti hőmérséklettől függően
kb. 1-2 óra múlva a hűtés jeleit kell, hogy mutassák.
5.1. Az első bekapcsolás
A készüléket szakszerűen földelt hálózati konektorba
kell csatlakoztatni.
A korházi hűtőszekrény automatikusan ön-teszttel
indul. A villásdugónak a hálózati konektorba történt
csatlakoztatása után a LED néhányszor felvillan, majd
folyamatosan világít, ha az ajtó nyitva van.
A készülék néhány óra múlva éri el üzemi
hőmérsékletét.
5.2. Hőmérséklet szabályzás
A kórházi hűtőszekrény egy teljesen automata
hőmérsékletszabályozóval van felszerelve. A hűtőtér
hőmérsékletét ezért nem szükséges szabályozni, mert az
HU
Page 57

57
automatika a környezeti hőmérséklet függvényében a gyár
által beállított hőmérsékleten tartja a hűtőkészüléket.
6. Digitális hőmérő (2. ábra)
Lásd a hőmérőhöz mellékelt külön kezelési útmutatót. A
hőmérő felállítható a mellékelt tartó segítségével vagy a
hűtőszekrény ajtajára rögzíthető, ebben az esetben az
érzékelő huzalt úgy kell vezetni, hogy az az ajtó nyitásakor ne
feszüljön, vagy sérüljön meg.
A hőmérsékletérzékelő a szekrényben, a ventillátor házban
helyezkedik el.
A kijelző a szekrény belsejében uralkodó pillanatnyi
maximum és minimum hőmérsékletet mutatja.
A hűtőszekrény legelső bekapcsolását követően (várjunk 4
órát) nullázzuk le a hőmérőt, mert máskülönben
“maximumként" a környezeti hőmérsékletet fogja tárolni.
Minél több gyógyszert tárol a hűtőszekrényben, annál
kisebb a megfagyás kockázata, ha a készülék egy rövid időre
túlhűlne.
Nem vállalunk felelősséget az oltóanyagok fagyás
következtében beálló károsodásáért, ha rövid időre
áramkimaradás történne.
A mutatott hőfokérték átmenetileg megemelkedhet
ajtónyitást követően, vagy ha újabb tárolandó anyagot
teszünk a hűtőszekrénybe.
Fontos, hogy rendszeresen kinullázzuk a hőmérőt, mert csak
így győződhetünk meg arról, hogy a hőfok +2 °C és +8 °C
között ingadozik.
Az elem szállítási biztosító szalagját el kell távolítani a
hőmérsékletkijelző üzembehelyezéséhez.
Digitális hőmérő:
1. minimum hőmérséklet
2. maximum hőmérséklet
3. aktuális hőmérséklet
4. nullázó gomb
5. FERRIT-gyűrű
7. Hasznos tanácsok
A készülék belsejében az egyenletes hőmérséklet kialakulása
érdekében, egy ventilátor került beépítésre.
A ventilátor csak zárt ajtó esetében működik. Az ajtó
kinyitásakor a ventilátor leáll, az ajtó bezárása után a
ventilátor ismét működni kezd. Amennyiben a készülék ajtaja
zárva van, és a ventillátor mégis megáll, az elektronika figyelmeztető hangjelzést ad a hibára.(folyamatos hangjelzés)
A kinyitott ajtó becsukására is hangjelzés figyelmeztet:
Az ajtó kinyitása után 20 sec eltelte után az elektronika
hangjelzést ad (1 Hz erősségű szaggatott hangjelzés), újabb
40 sec eltelte után az elektronika másfajta hangjelzést ad (2
Hz erősségű szaggatott hangjelzés)
Ne terheljük túl a készüléket! Célszerű a szekrényben egy kis
helyet hagyni a termékek között a hatékony és egyenletes
hűtés érdekében. Ha a polcokat túl sűrűre pakoljuk meg,
elfogadhatatlan hőfokkülönbségek jelentkezhetnek.
8. Leolvasztás, tisztitás és
karbantartás (3. ábra)
A hűtőkészüléken fokozatosan dér képződik és nem
szabad megengedni, hogy ez túl vastaggá váljék, mert
hőszigetelőként működik és akadályozza a hűtést.
A készüléket 3 hetente, vagy a hűtőbordán össszegyült
jégréteg mennyiségének függvényében ajánljuk
leolvasztani.
A dér leolvad és a cseppvíz a cseppgyüjtőböl a kivezető
csövön keresztûl a hűtőszekrény hátulján található
elpárologtató tálcába folyik (4.ábra).
Ha a készüléket ki akarjuk kapcsolni, húzzuk ki a hálózati
csatlakozóját és hagyjuk nyitva az ajtaját.
A leolvasztás után a hűtőkészüléket belülről tiszta puha
törlőkendővel kell megtörölni.
9. Belső világitás (4. ábra)
Egy elektronikus nyomtatott áramköri lapon lévő
2 db LED (A) világítja meg a hűtőrekeszt, amikor az ajtó
nyitva van.
Két szenzor érzékeli (B) az ajtó nyitott vagy csukott állapotát
és a LED-ek ennek megfelelően működnek.
10. Ajtólemez cseréje (5. ábra)
Ha a hűtőszekrényre a fogantyú fel van szerelve, az
ajtólemez cseréjekor először a fogantyút kell eltávolítani a
helyéről.
Távolitsa el a homlokpanel ƒ tartócsavarjait .
Távolítsa el a zártakarót ‚. (Záras kivitel esetében!)
Húzza ki majd távolítsa el a homlokpanelt ƒ.
Az ajtókeretből húzza ki az ajtólemezt „,majd ezután
helyezze be az új lemezt (max. 2 mm vastag).
Tegye helyére a homlokpanelt, a zártakarót és ezután
rögzítse azt a csavarokkal.
11. Fogantyú fel - leszerelése
A készülék tartozékai között található fogantyút az
alábbiak szerint lehet fel- és leszerelni:
11.1. Felszerelés: (6-7 ábra)
11.2. Leszerelés: (8. ábra)
12. Vevőszolgálat
Mielőtt szervizes szerelőt hívna, végezze el a következő
egyszerű vizsgálatokat:
Nincs véletlenül feszültségkimaradás? Ellenõrizze a
biztosítékokat.
A villásdugó szorosan illeszkedik-e a konektorba, és a
konektor feszültség alatt van-e? Ellenőrizze a konektort
más készülék, pl. egy asztali lámpa csatlakoztatásával!
Az ajtó be van-e csukva rendesen; nem ennek hiánya
okozza a belső hőmérséklet hirtelen
megemelkedését?
HU
Page 58

58
Vízszintbe van-e állítva a hűtőszekrény?
A hűtőszekrény szellõzése jó-e?
Ha valamennyi fenti szempontot ellenőrizve a hűtőszekrény
még mindig nem üzemel kielégítően, akkor lépjen
kapcsolatba a legközelebbi szervizes szerelővel.
Hivatkozzon a problémára, a modellre, valamint a termék- és
a gyártási számra. (A modellre, a termék- és gyártási
sorszámra vonatkozó adatok a belsőkamra bal felső sarkában
található adattáblán vannak.)
Ezt a hűtőszekrényt túlfűtés elleni védelemmel látták el. Az
illetékes szervizes szerelő ellenőrizni tudja, hogy ez a
védelem lekapcsolta-e a készüléket, vagy sem.
Amennyiben meghibásodás jelentkezik, keresse fel a
legközelebbi Dometic Vevőszolgálati Részlegünket - lásd a
helyi telefonkönyvet!
www.dometic.com
13. Üzembehelyezés
Műszaki adatok:
13.1. Csatlakozás a villamos hálózatra
A készülék csakis az adattáblán szereplő
névleges feszültséggel megegyező hálózatról
működtethető. A készülék hálózati csatlakozó
vezetéke csakis az előírásoknak megfelelően földelt fali
konektorhoz csatlakoztatható.
A készülék üzembehelyezéséhez szükséges bármely
villanyszerelési munkát csak szakképzett villanyszerelő vagy
meghatalmazott szakember végezheti.
A gyártó semmiféle, a biztonsági rendszabály be nem
tartásából származó kárért nem vállal felelősséget.
Villamos követelmények
Bekapcsolás előtt ellenőrizzük, hogy a villamos hálózatunk
feszültsége megegyezik-e a készülék adattábláján szereplő
értékkel.
14. Környezetvédelmi
információ
A készülék nem tartalmaz sem CFC-t sem HCFC-t.
Az aggregátban a hűtőközeg ammónia vizes oldata
(természetes hidrogén-nitrogén vegyület). A poliuretán
hőszigetelés hajtóanyaga az ózonréteget nem károsító
ciklopentán.
Korrózióvédő adalékként az aggregátban
nátriumkromátot alkalmazunk (kevesebb, mint a
hűtőközeg 2 súlyszázaléka).
15. Újra feldolgozás
A készülék kicsomagolása után a csomagolóanyagot a
helyi gyüjtőhelyre kell leadni. A készüléket élettartamának végén - egy erre szakosodott gyüjtő- és
ujrafeldolgozó cégnek kell leadni, mely belőle a
hasznosítható anyagokat visszanyeri, a többit pedig
szakszerűen megsemmisíti.
Az ezzel a jelképpel ellátott készülékeket le
kell adni az elektromos és elektronikus
készülékek ártalmatlanítása céljából
kialakított helyi gyüjtőállomásra.
Ezt a terméket nem szabad a normál háztartási szeméttel
együtt ártalmatlanítani.
A Dometic hűtőszekrények a készülékek belsejében
található adattáblán tüntetik fel ezt a jelképet.
MINÖSÉGTANUSÍTÁS
A 2/1984.(III.10.) BkM-IpM számú rendelete alapján
tanusítjuk, hogy a készülék a közölt müszaki adatoknak
megfelel.
A készülék megfelel a következő EU
irányelveknek:
LVD-irányelv 2014/35/EU
EMC-irányelv 2014/30/EU
CE-irányelv 96/68/EEC
RoHS-irányelv 2011/65/EU
Modell DS301H DS601H
Tipus DSH20-60 DSH20-60
Bruttó űrtartalom 28 liter 53 liter
Hálózati üzem 220 - 240V (AC) 220 - 240V (AC)
Teljesitmény 65W 85W
Energiafogyasztás 0,86 kWh/24h 1.05 kWh/24h
Klimaosztály SN SN
Hű tő köz eg 151g H
2
O + 101g NH3157g H2O + 105g NH
3
HU
Page 59

59
Page 60

2016. 12. 28.
 Loading...