

Page 1
MaCave A 192 G
MaCave A 192 D
EN
OPERATING MANUAL WINE CELLAR
3
DE
BedienungsanleitunG WEINKLIMASCHRANK
7
ES
INSTRUCCIONES DE USO CAVA PARA ENVEJECIMIENTO DEL VINO
11
FR
Notice d’utilisatioN CAVE À VINS DE VIEILLISSEMENT
15
IT
ISTRUZIONI PER L’USO CANTINA PER L’INVECCHIAMENTO DEI VINI
19
PT
MANUAL DE INSTRUÇÕES CAVE PARA ENVELHECIMENTO DE VINHOS
23
SE
BRUKSANVISNING VINLAGRINGSSKÅP
27
NO
BRUKSANVISNING VINSKAP
31
DK
Betjeningsvejledning VINKÆLDER
35
Type C***
825129802
Page 2

EN
Appliances bearing this symbol must be deposited at the designated local reception point for the disposal
of electrical and electronic equipment. It is not permitted that this product be disposed of by way of the
normal household refuse collection system.
DE
Geräte, die mit diesem Symbol versehen sind, müssen bei der angegebenen lokalen Annahmestelle für die
Entsorgung von Elektrik- und Elektronikgeräten abgegeben werden. Es ist unzulässig, dieses Produkt im
normalen Hausmüll zu entsorgen.
ES
Los aparatos que lleven este símbolo deberán depositarse en los lugares locales de recogida de aparatos
eléctricos y electrónicos. Este producto no debe desecharse en la basura doméstica convencional.
FR
Les appareils portant ce symbole doivent être obligatoirement remis à un point de collecte local pour la
mise au rebut d’appareils électriques et électroniques. Il est interdit de jeter ce produit dans les ordures
ménagères.
IT
Gli apprecchi che sono contrassegnati con questo simbolo devono essere consegnati al posto di raccolta
locale per lo smaltimento e il trattamento di apparecchi elettrici ed elettronici. Questo prodotto non deve
essere smaltito con i normali riuti domestici.
PT
Aparelhos caracterizados com este símbolo precisam ser jogados fora nos pontos de recolha locais especiais para descarte de aparelhos eléctricos e electrónicos. Este aparelho não deve ser jogado fora junto
com o lixo doméstico normal!
SE
Apparater märkta med denna symbol skall lämnas in till kommunens insamlingsställe för omhändertagande av elektriska och elektroniska apparater. Denna produkt får inte slängas i hushållsavfallet.
NO
Apparater som er merket med dette symbolet må ikke avhendes ved det lokale leveringspunktet for deponering av elektrisk og elektronisk utstyr. Det er ikke tillatt å avhende dette produktet sammen med vanlig
husholdningsavfall.
DK
Apparater med dette symbol skal bortskaffes på det pågældende lokale indsamlingssted for bortskaffelse
af elektrisk og elektronisk udstyr. Det er ikke tilladt at bortskaffe dette produkt med det normale husholdningsaffaldssystem.
Waste management*
* Valid for EU countries only.
Waste Electrical and Electronic Equipment (WEEE)
The European Union (EU) has implemented the WEEE Directive to ensure there are systems in place in the EU
countries for the collection, treatment and recycling of waste electronic products. Products that are marked with
the crossed-out wheeled bin should not be disposed as unsorted municipal waste.
Page 3
- 3 -
INTRODUCTION
Thank you for choosing the Dometic wine cellar.
Please read the instructions carefully before install-
ing your new wine cellar. We trust that you will be
completely satised with your purchase.
The wine cellar must be installed and used according to these instructions in order to operate correctly and economically.
This appliance is intended to be used exclusively
for the storage of wine.
This appliance is intended to be used in households, restaurants and other residential-like applications.
This appliance is not intended for use by persons
(including children) with reduced physical, sensory
or mental capabilities, or lack of experience and
knowledge, unless they have been given supervision or instruction concerning use of the appliance
by a person responsible for their safety.
Children should be supervised to ensure that they
do not play with the appliance.
Do not store explosive substances such as aerosol
cans with a ammable propellant in this appliance.
TRANSIT DAMAGE
Inspect the wine cellar for transit damage. You
must report any damage the company responsible
for the delivery within the legal or stated time for
this type of product. If there is no such established
report time, the damage must be reported within
seven days of delivery.
CONTENT OF DELIVERY
When unpacking the wine cellar, please check that
the following accessories are included:
• Storage shelves
• Support (oor)
• Shelf supports
• Keys
• Spanner
• Instruction manual
Necessary additional tools not included:
• Screwdriver (star quad)
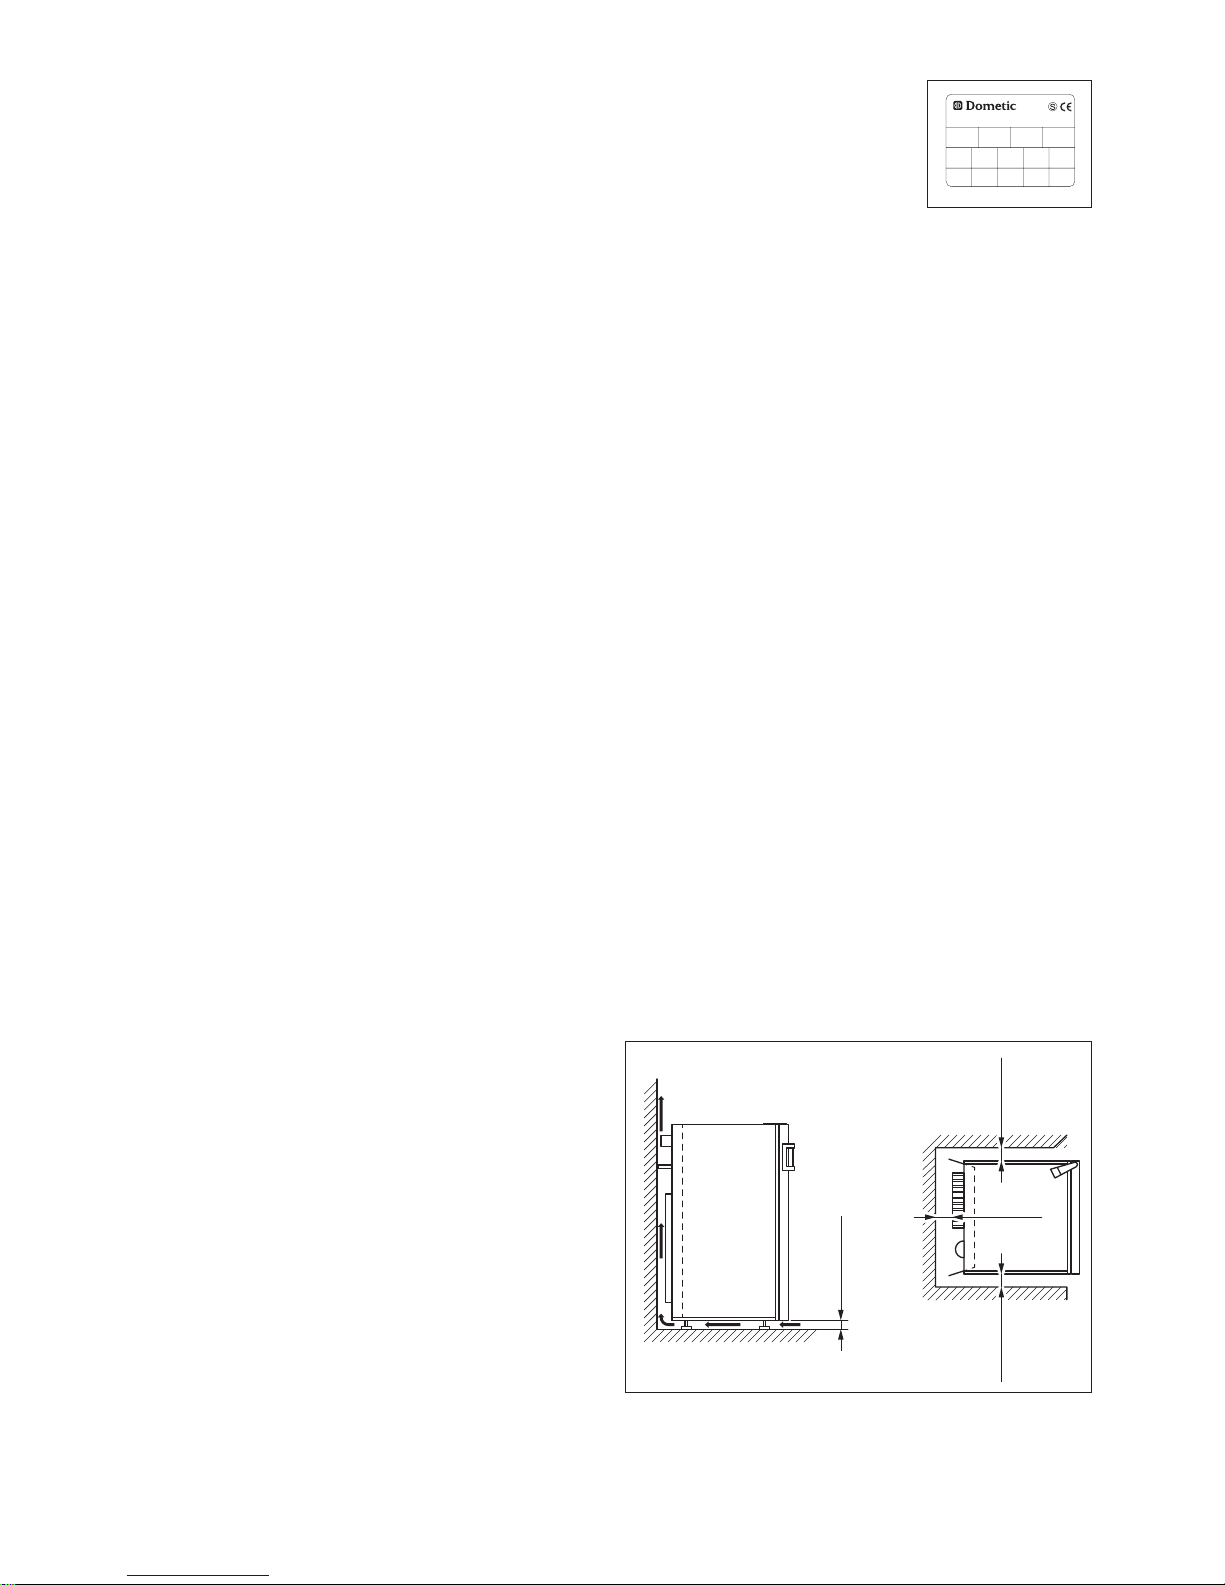
DATA PLATE
Check the data plate, inside
the wine cellar at the top left,
to ensure you have received
the right model.
The data plate shows details that you will need to
quote if you have to contact service personnel.
It is a good idea to make a note of them here:
Model designation ........................
Product number ..........................
Serial number ...........................
Voltage ................................
CONTACT INFORMATION
EUROPE
Please contact your dealer for service/support.
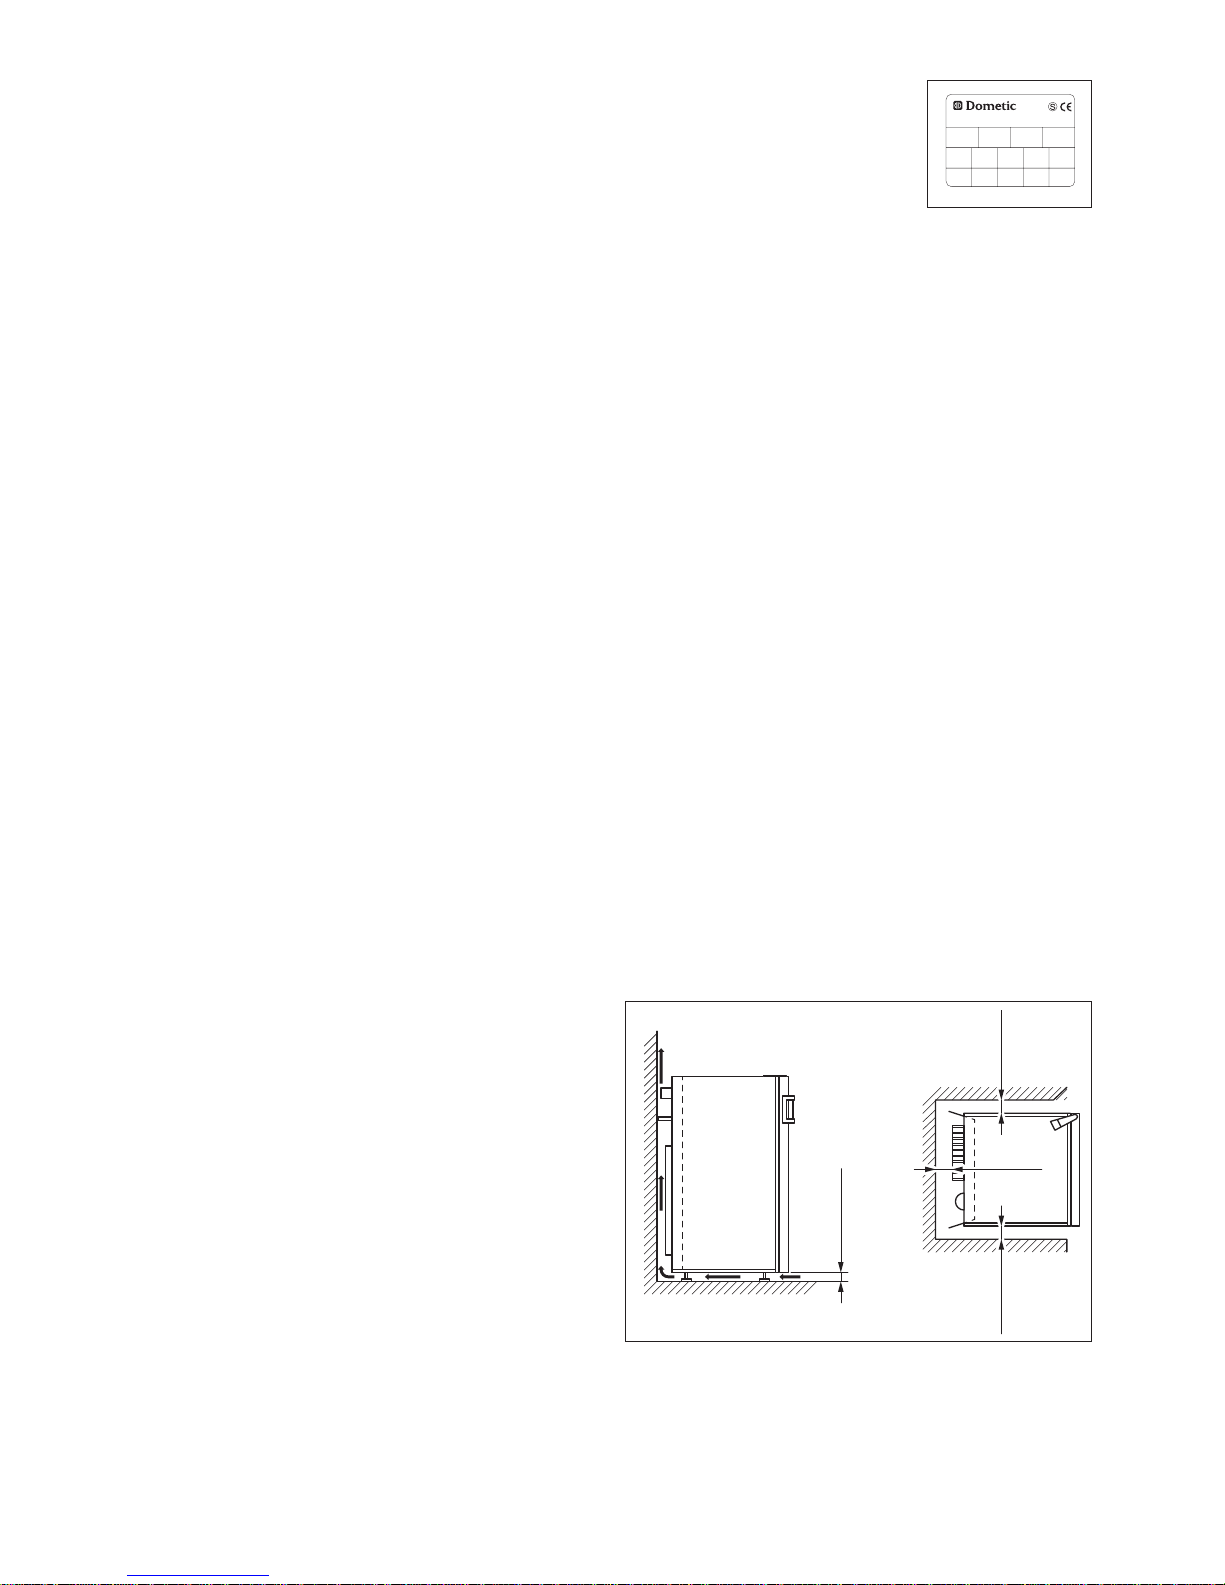
INSTALLATION
Please follow these instructions:
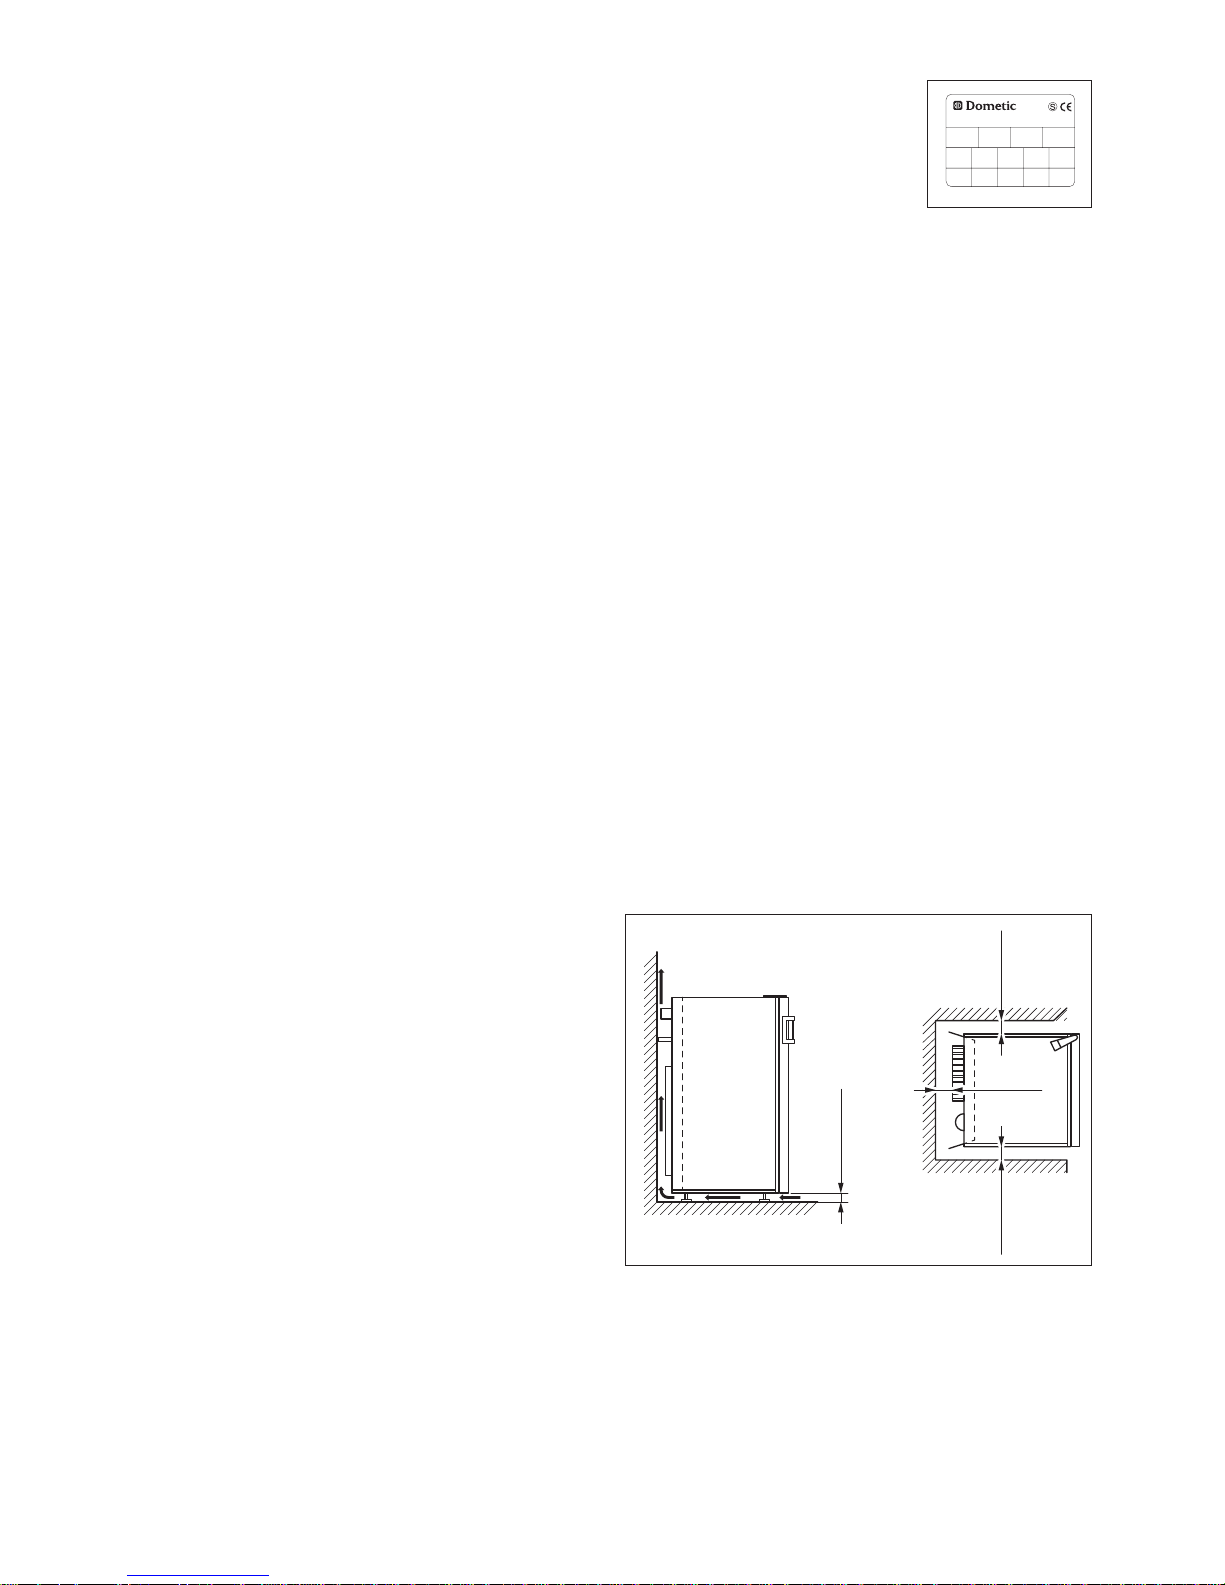
• For best performance, air needs to circulate freely over the cooling unit behind the wine cellar.
• The free-standing design of the cellar means that
it should stand at least 100 mm (4”) from the
rear and 50 mm (2”) from the side walls.
• Allow a clearance of at least 100 mm (4”) above
the wine cellar.
30 mm (1.2”)
50 mm (2”)50 mm (2”)
rear
Wall
Wall
100 mm (4”)
• Place your wine cellar far away from any source
of heat, e.g. radiator, cooker or intense sunlight.
• Note that it must be possible to open the wine
cellar door at least 90° to allow the sliding
shelves to be pulled out.
Page 4
- 4 -
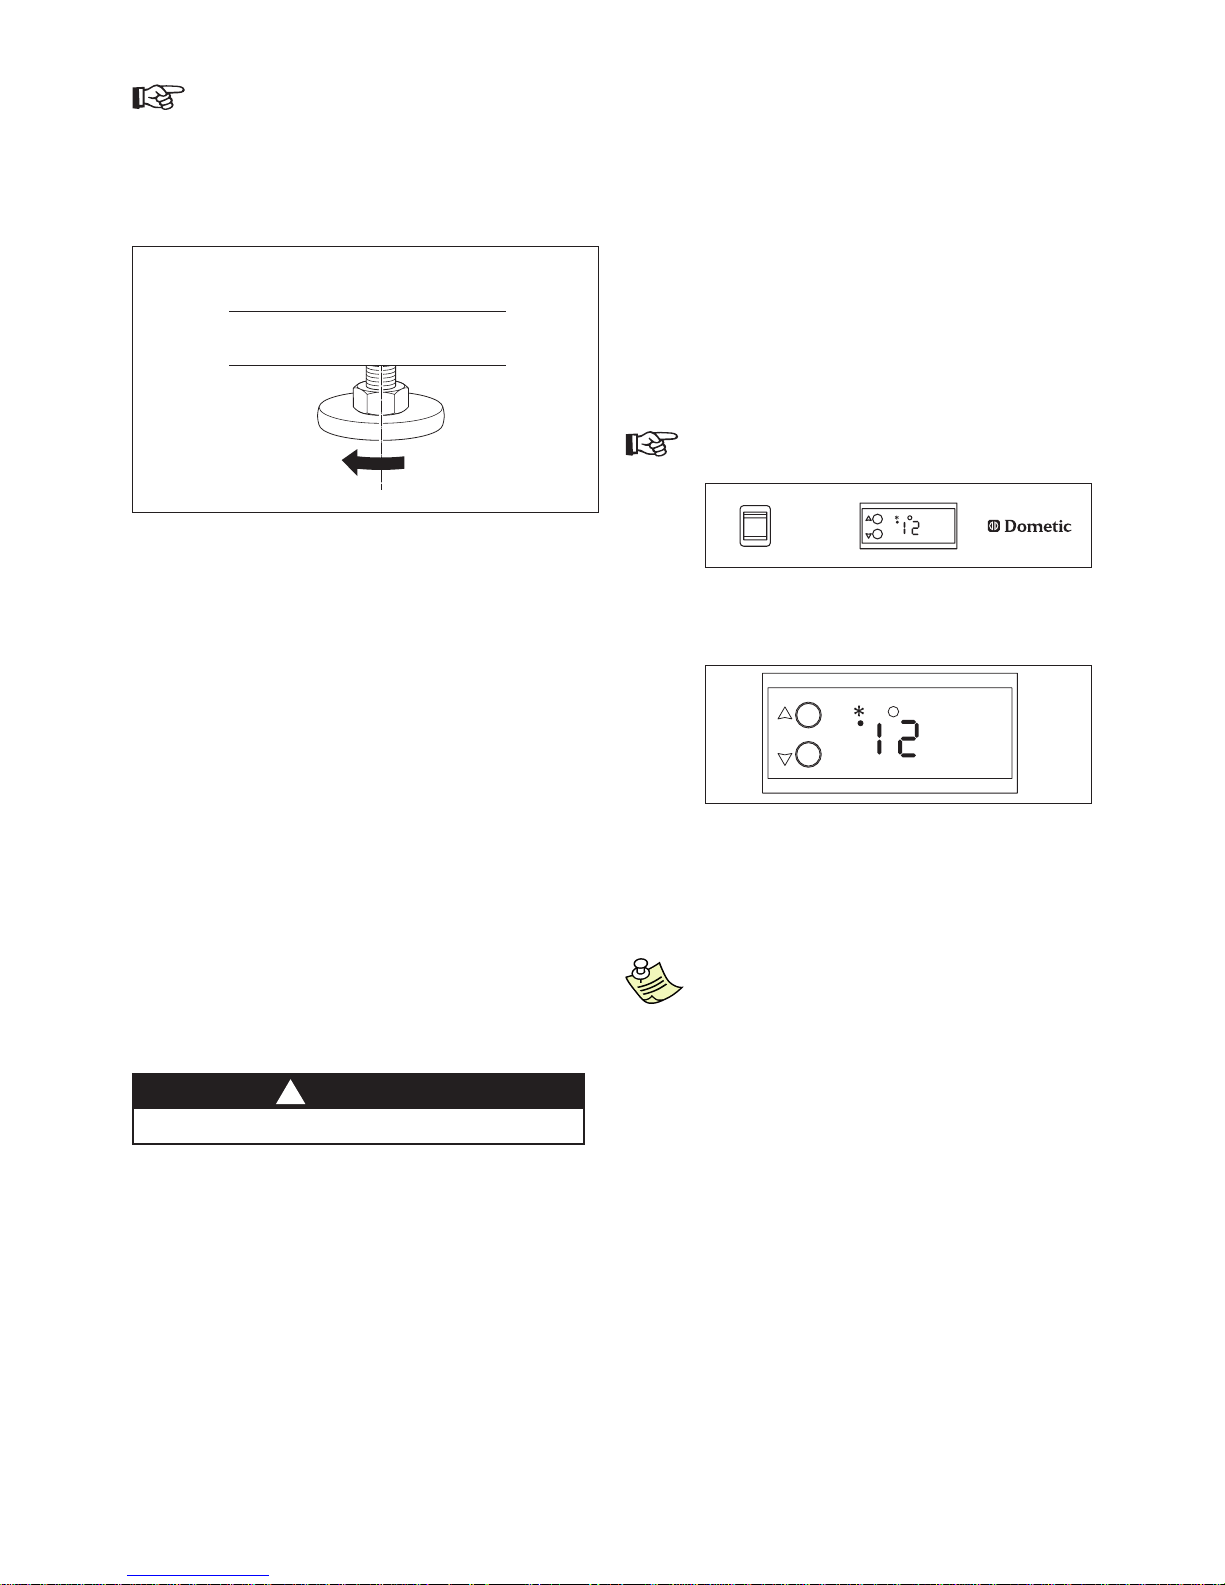
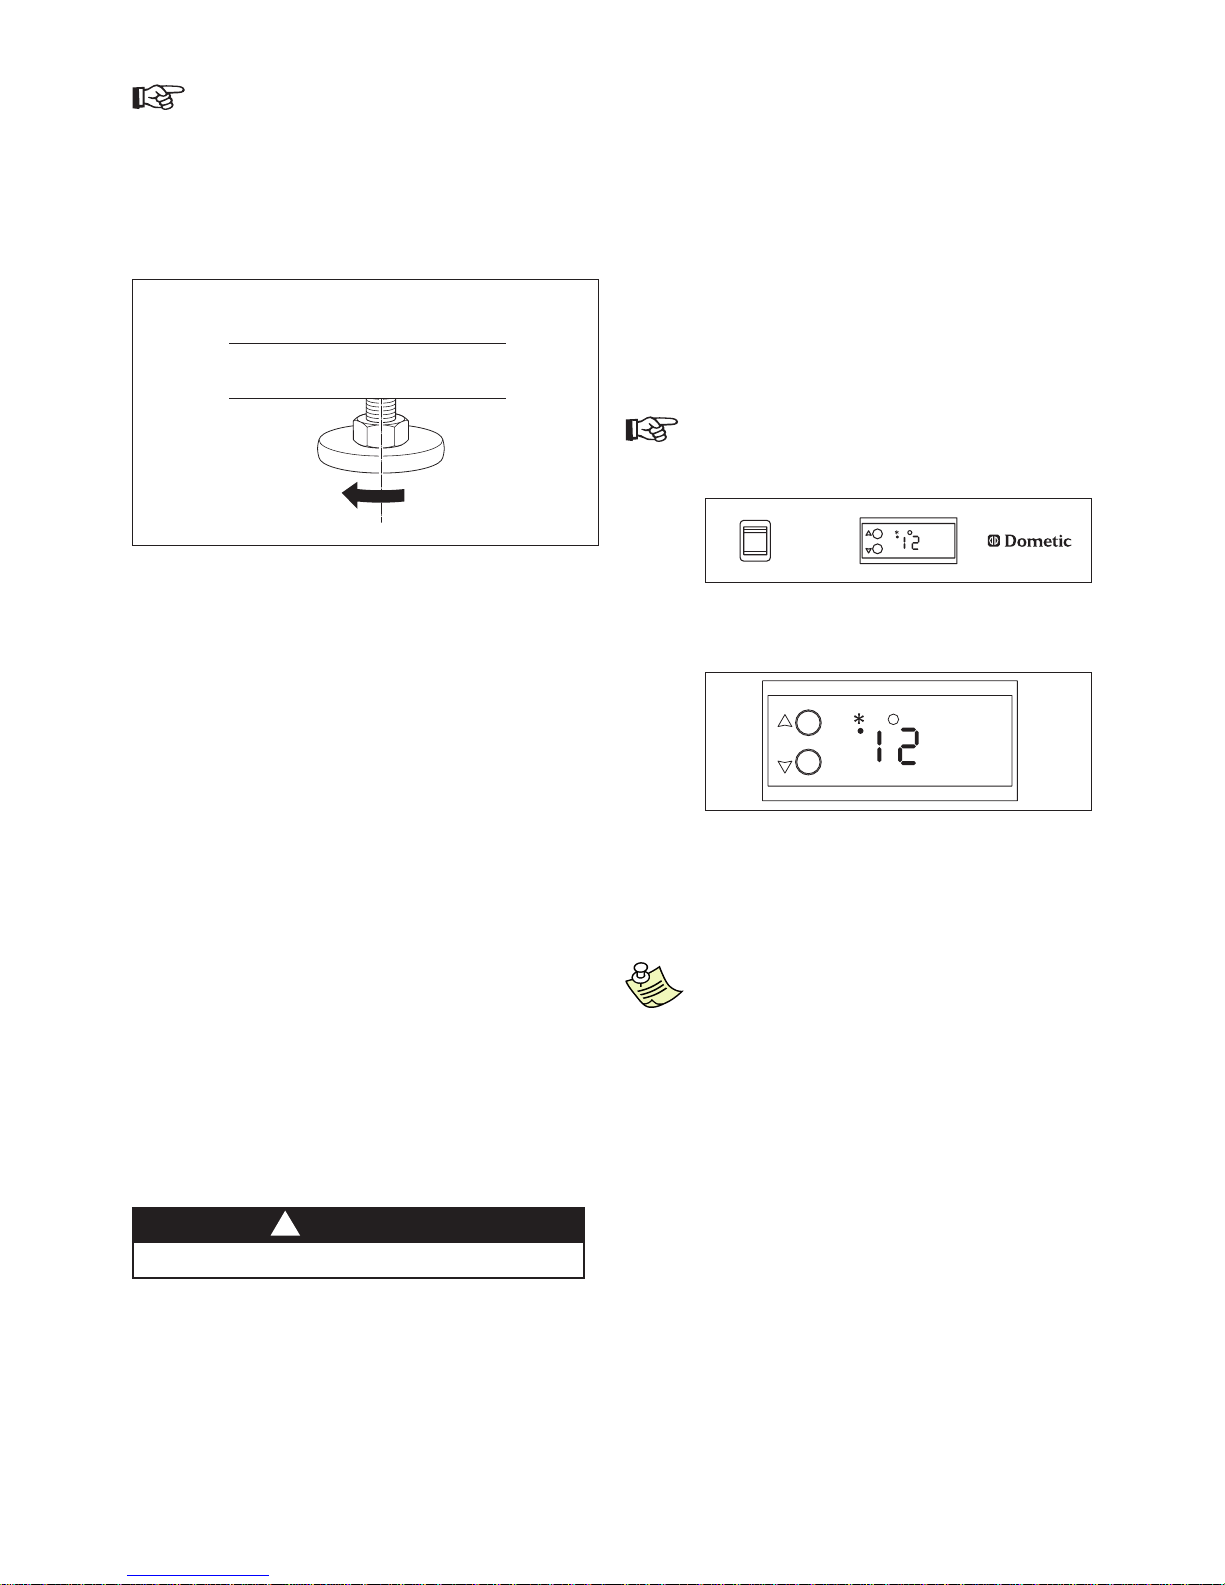
TEMPERATURE SETTING
The wine cellar is equipped with an electronic
control. This allows you to program the temperature inside the wine cellar. Your wine will be stored
between 10 °C (50 °F) and 15 °C (59 °F) according
to expert advice.
The temperature, pre-set in the factory, is shown
on the display. The temperature, pre-set at
12 °C (54 °F), can be changed on demand between
8 °C (46 °F) and 18 °C (64 °F) depending on the
wine stored.
1. Plug in the wine cellar and turn it on with
the ON/OFF switch.
0
1
2. Press and hold the UP or DOWN
arrow button for a few seconds until the
display starts blinking.
3. Release the button. Press the UP/DOWN
arrow buttons to set the temperature.
The new value is saved automatically after
6 seconds.
A certain smell may be noticeable when
using the wine cellar for the rst time.
This will disappear after a few hours.
1. Remove the transport pallet on which your
wine cellar rests.
2. Adjust the feet to allow a 30 mm (1.2”)
clearance under the wine cellar and verify
that it stands in a vertical position in both
directions. If necessary, use a spirit level.
3. Check that the charcoal lter is in place at
the top left corner inside the wine cellar.
ELECTRICAL CONNECTION
The electrical installation must be carried out correctly, taking into account all relevant regulations
and codes of practice.
The wine cellar operates on a single-phased
alternating current.
Please check that the voltage shown on the data
plate corresponds to your power supply.
The wine cellar is tted with a plug intended for a
grounded socket. Dometic and its subsidiaries will
not be held responsible for any incident due to nonexistent or defective ground wires.
Electrical leads must be routed and secured so
that they cannot come into contact with hot or
sharp parts of the wine cellar.
Warning
The wine cellar must be grounded.
!
▲
( )
( )
▼
Page 5
- 5 -
MAINTENANCE
We recommend that you keep your wine cellar as
clean as possible. Unplug the cellar before cleaning. Do not use any abrasive or strong scented
substances. Use a smooth cloth or sponge and light
detergent.
It is very important to check regularly that the air
circulation underneath and behind the cellar is not
blocked.
Condensation collects in a small cup placed at
the back of the wine cellar. The cup has a sponge
which helps the condensation to evaporate. Check
that the plastic pipe routing the water from the
inside to the cup is not blocked by dust or dirt.
You should replace the inside ventilation charcoal
lter every second year. The lter is tted in the
upper left corner inside the wine cellar.
If the wine cellar fails to work, check the following
points before calling a service technician:
• Is the fuse of power supply intact?
• Is the plug properly inserted in its socket?
• Is the wine cellar switched on?
If the cause of failure is not to be found among the
points listed above, contact an authorised service
technician.
The wine cellar is equipped with an overheating
protection. An authorised service technician can
check whether this has been triggered or not.
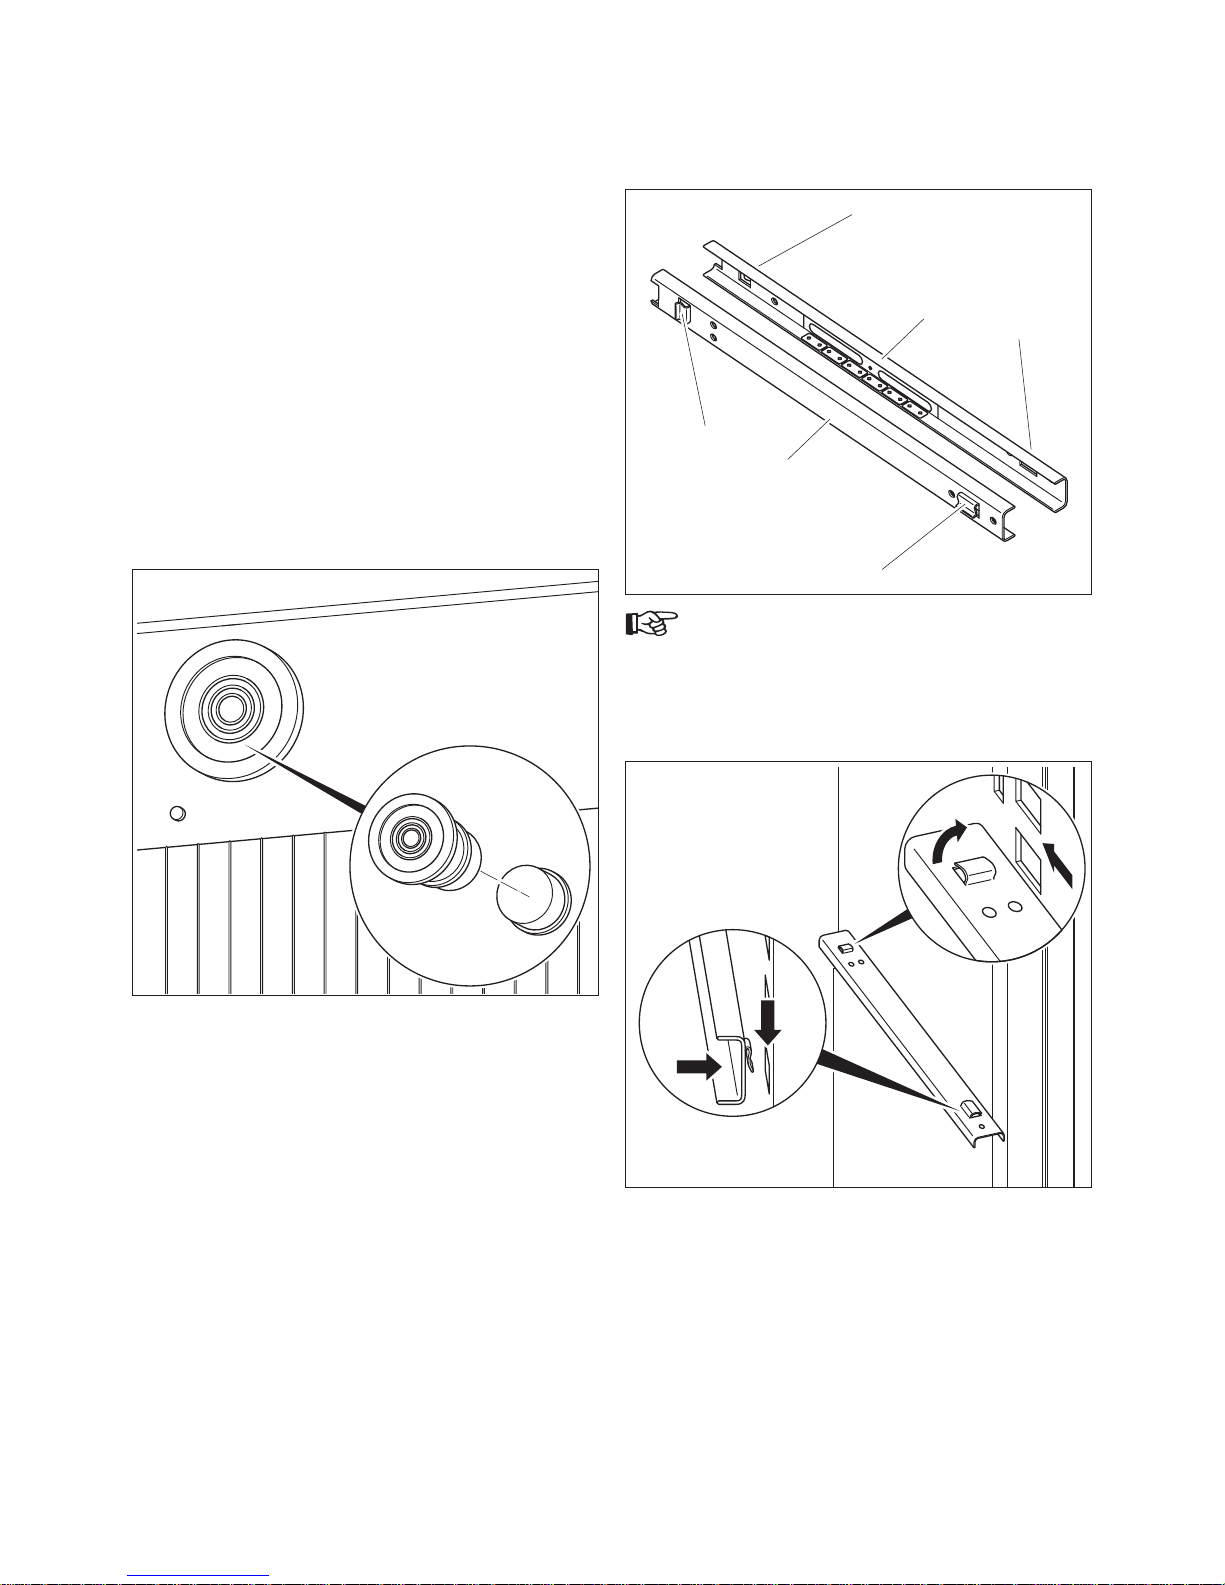
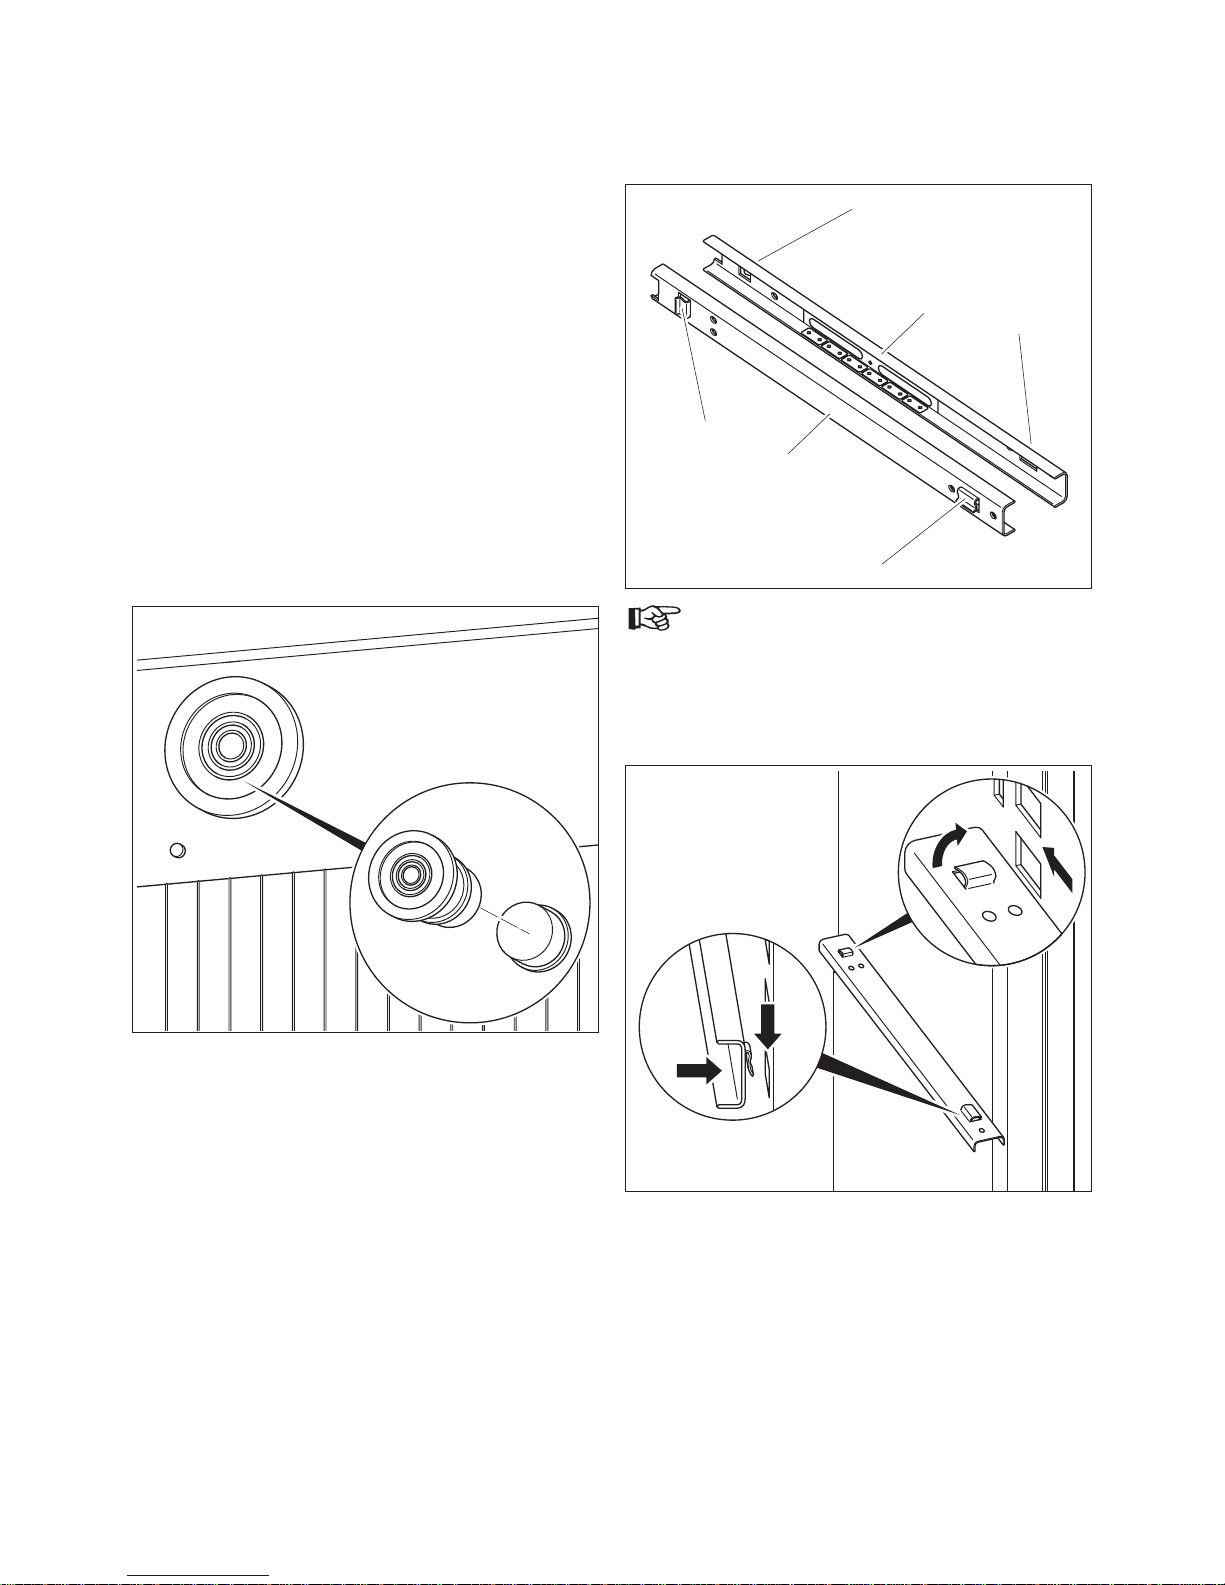
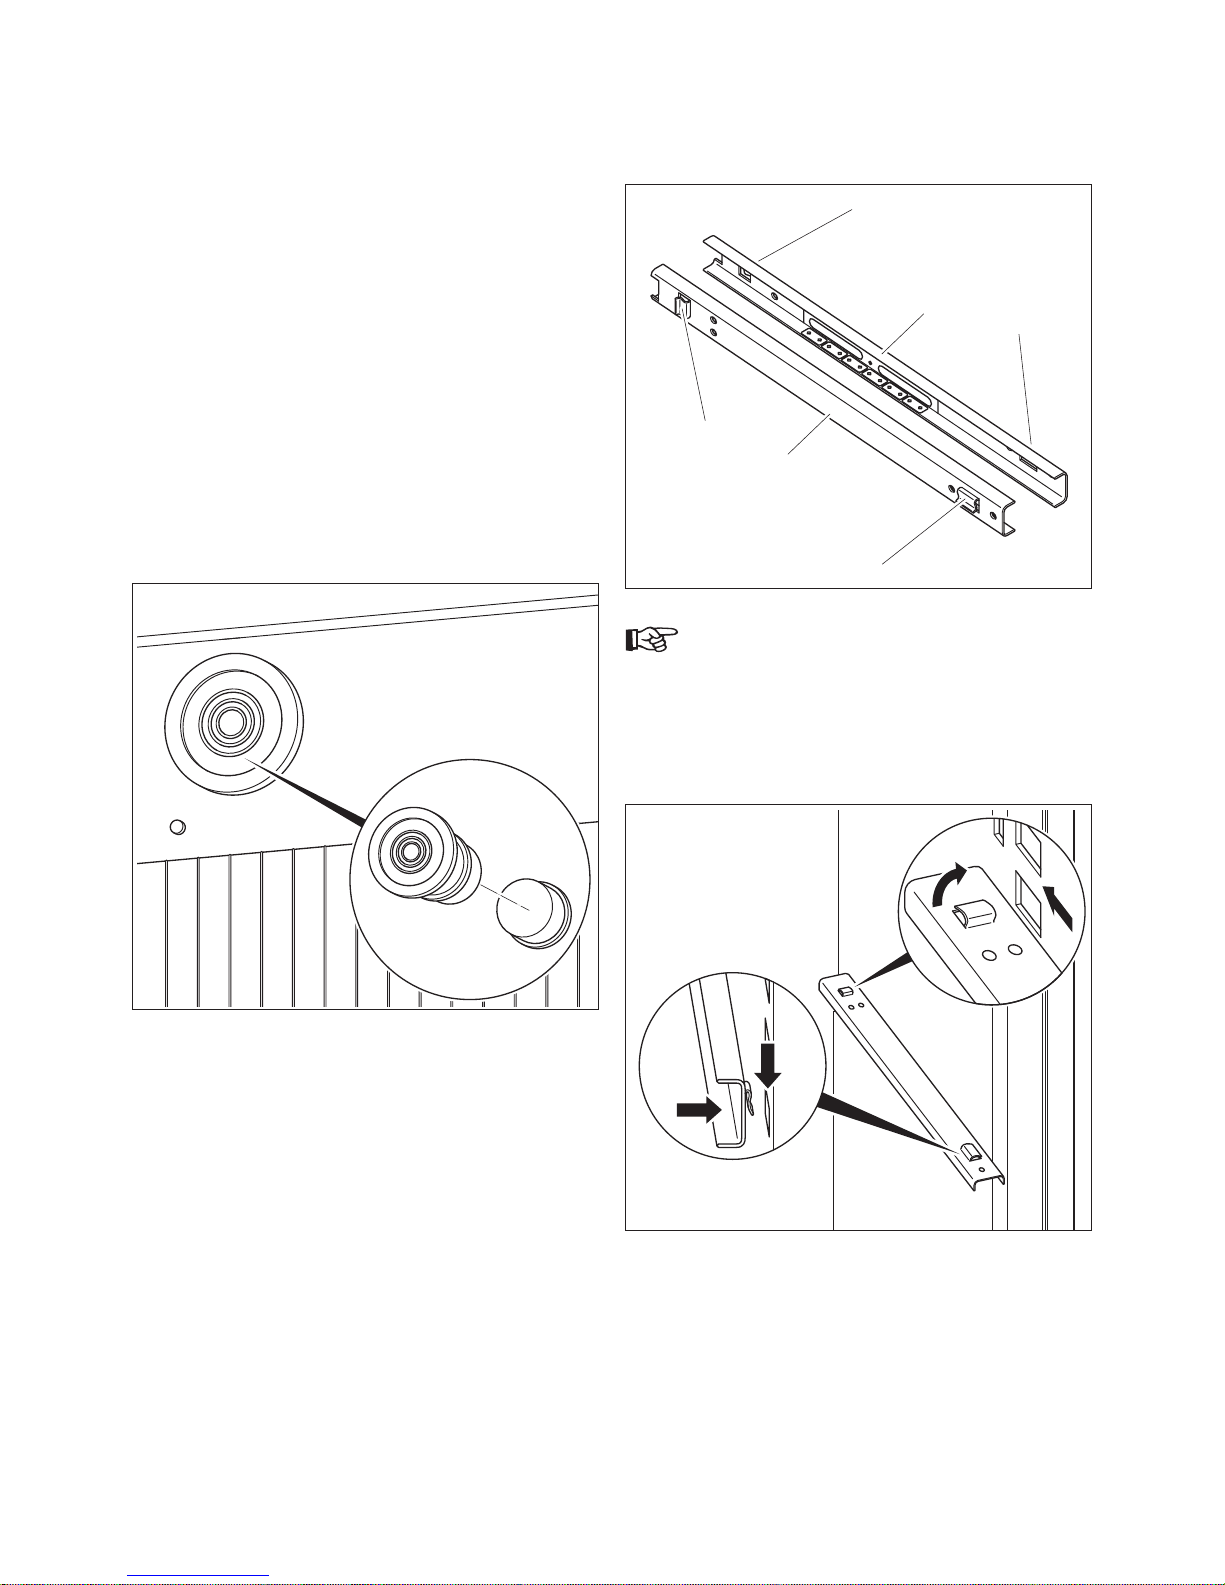
INSTALLATION OF GUIDES AND SHELF
SUPPORTS
INSTALL RAIL TO CABINET SIDE
2
1
1
2
rail, right side
rail, left side
1. Insert hook no.1 into notch in the rear of
the cabinet side and push it in.
2. Install hook no.2 into notch in the front
of the cabinet side and push it down as
shown in the picture.
3.
4.
1.
2.
3. Insert the sliding shelf to cabinet rails and
push it in.
Page 6
- 6 -
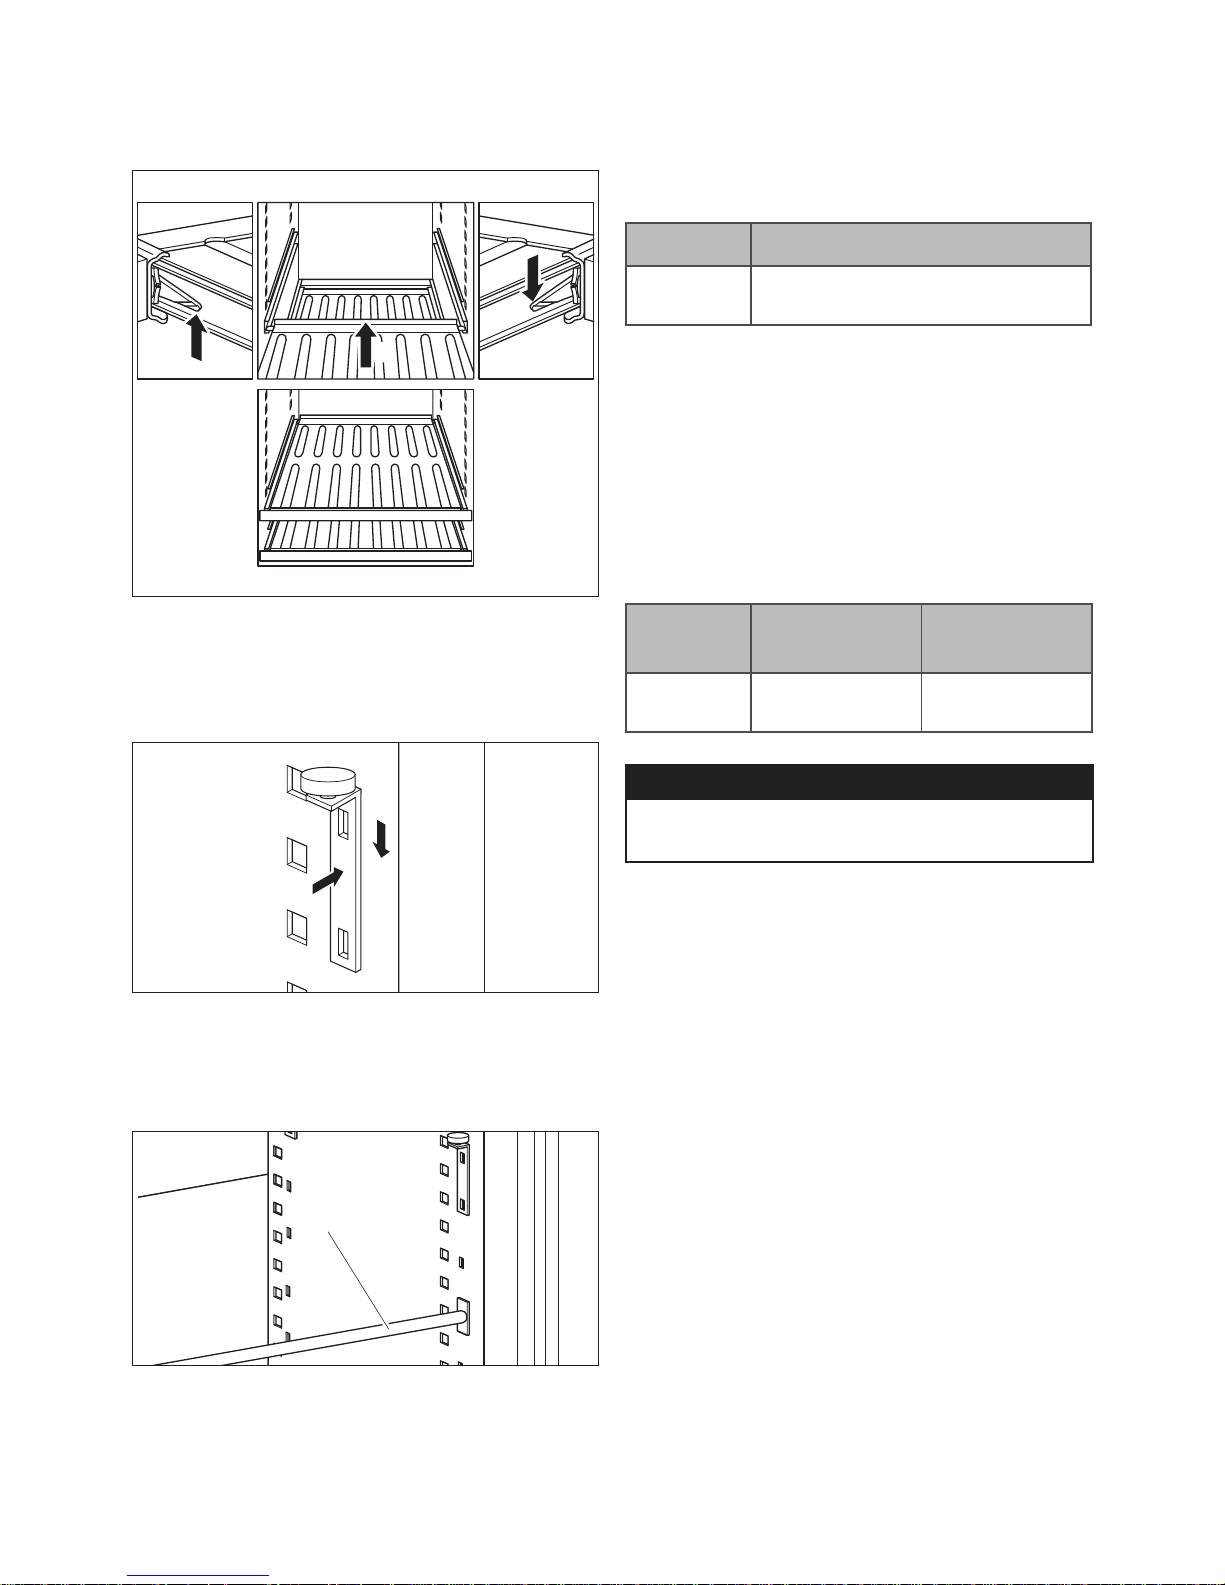
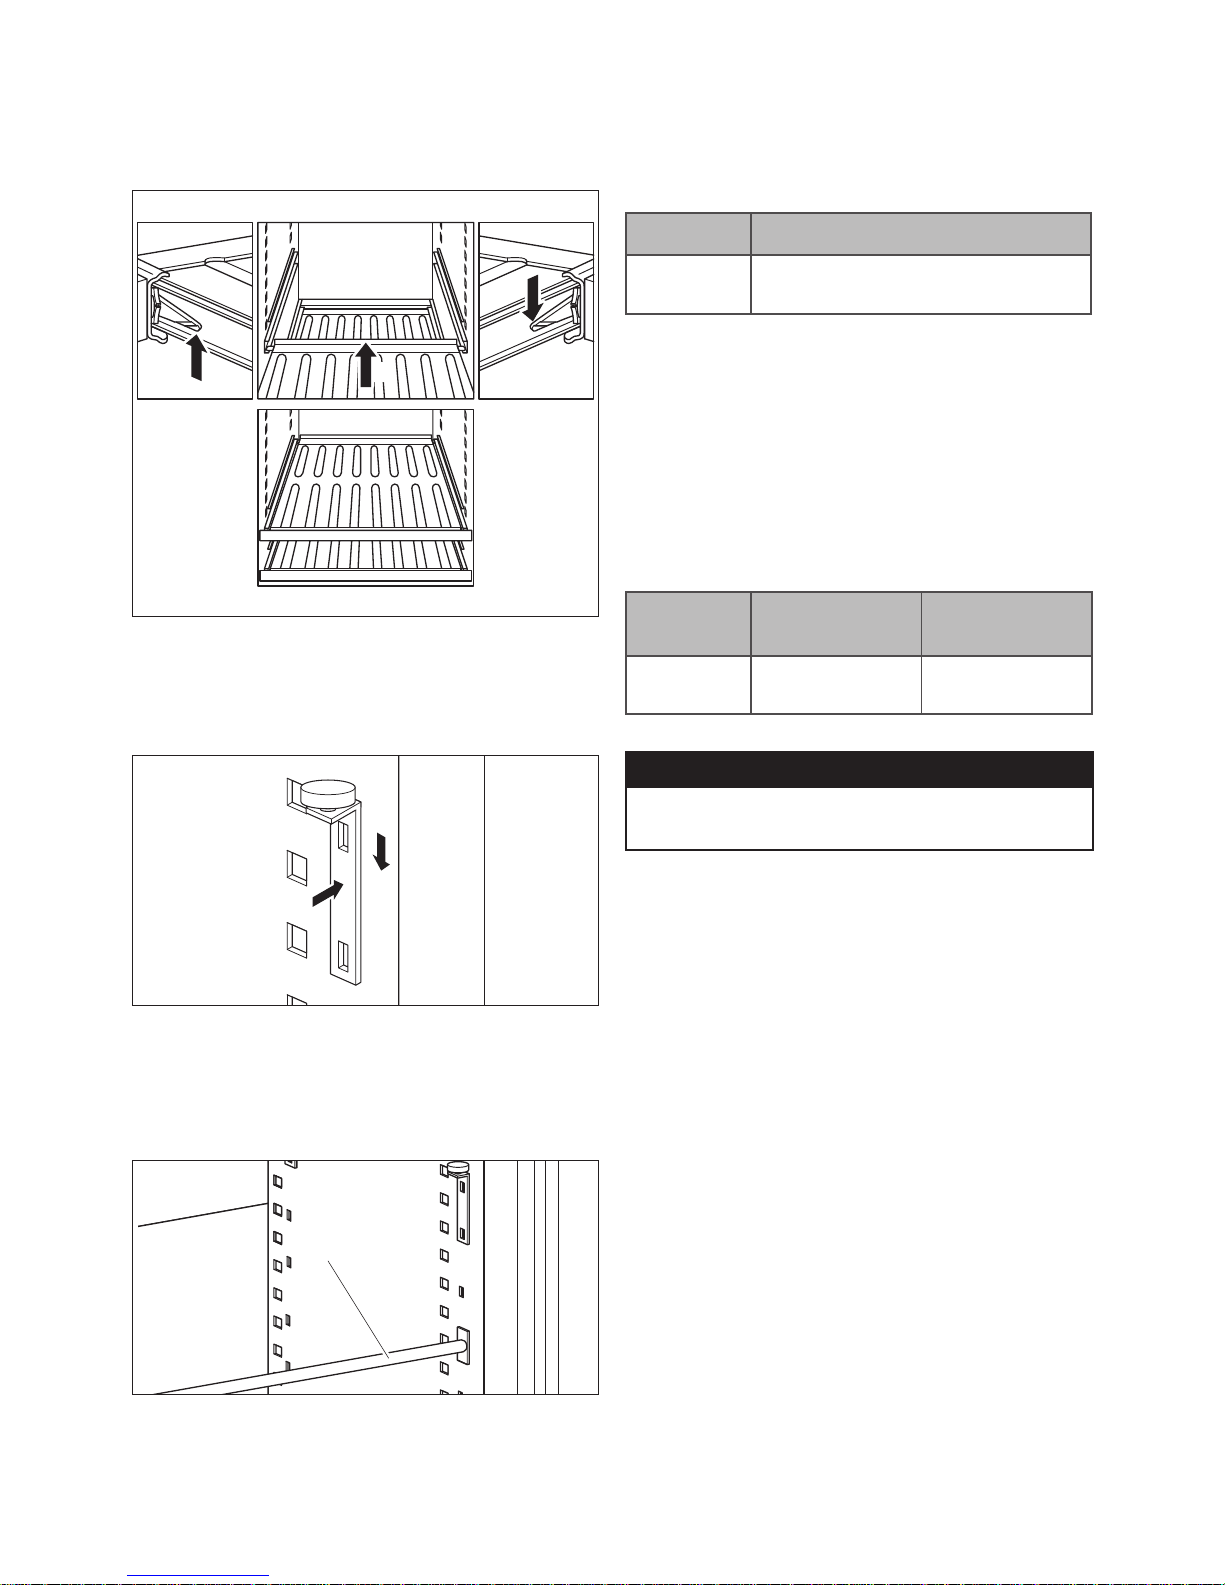
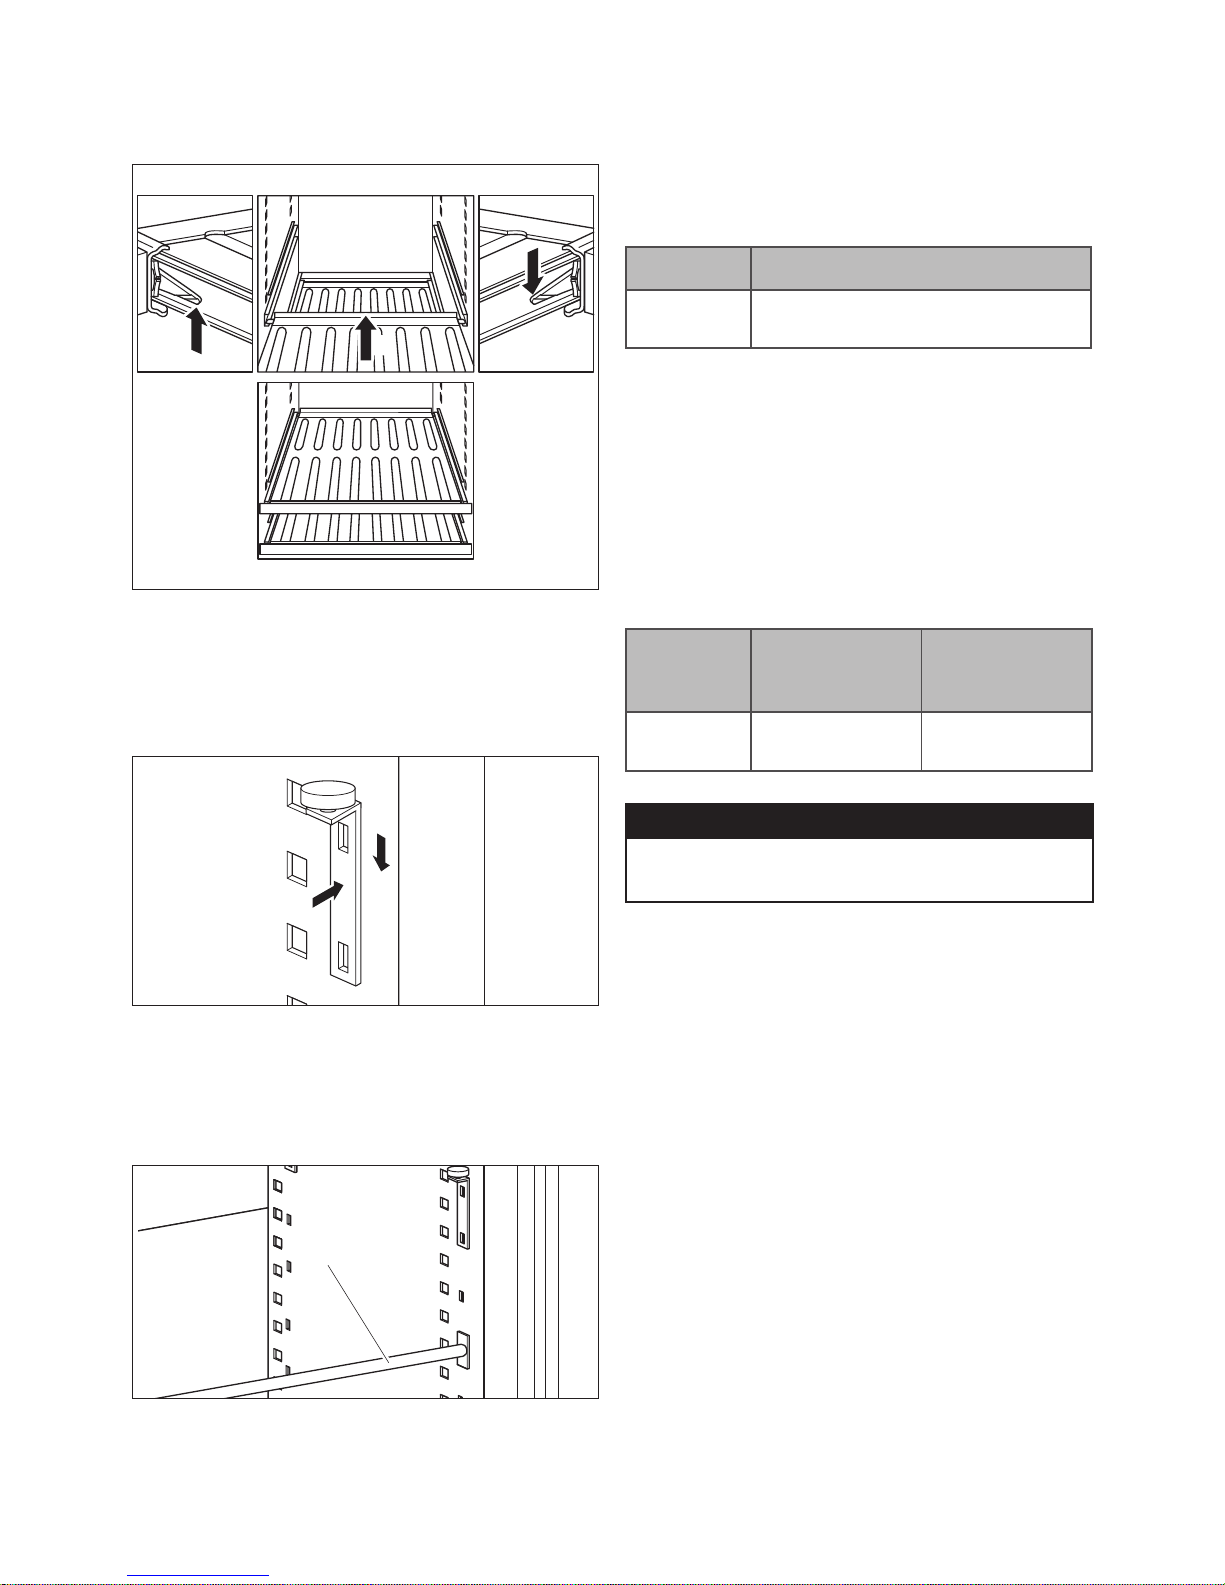
HOW TO REMOVE THE SHELF
Release the looking mechanism on each side as
shown by the arrows and pull out the shelf.
2.
1.
3.
SHELF SUPPORT FOR STORAGE SHELF
Place the support hooks in the holes at desired
level, press in as arrow 1 indicates and push down
as arrow 2 indicates.
1.
2.
REINFORCEMENT BAR
The reinforcement bar no. 1 is a shelf support and
must not be removed for safety reasons.
1
ACCESSORIES
Each kit contains two shelves and shelf supports.
• Sliding shelf
• Storage shelf
Model Max. no. of sliding shelves
A 192 G
A 192 D
15
STORING THE WINE
Bottles should be stored in your wine cellar according to their size (diameters and heights.) Take these
differences into account when storing your wine
and avoid mixing the bottles.
The maximum number of “Bordeaux tradition”
bottles that can be stored in a wine cellar that is
tted with storage shelves and one sliding shelf:
Model
No. of
storage shelves
No. of bottles
A 192 G
A 192 D
3+2 192
CaUtiOn
Note that you should store no more than one layer
of bottles on the sliding shelves.
The sliding shelves and the storage shelves can be
placed in several positions depending on the size of
your wine cellar.
It is important to store bottles on their side in order
for the cork to remain in contact with the wine.
Place bottles top to bottom in the cellar for
optimum volume use.
See Appendix A for information about the best
way to stack the “Burgundy”/”Bourgogne” and the
“Bordeaux Tradition” bottles.
Page 7
- 7 -
EINFÜHRUNG
V ielen Dank, dass Sie sich für den Dometic Wine
Cellar entschieden haben.
Bitte lesen Sie die Anleitung sorgfältig durch, bevor
Sie mit der Montage Ihres neuen Weinkellers beginnen. Wir sind zuversichtlich, dass Sie mit Ihrem
Kauf zufrieden sein werden.
Damit das Gerät einwandfrei funktioniert, muss bei
der Montage der Anlage nach den hier aufgeführten
Anweisungen vorgegangen werden.
Das Gerät ist ohne Aufsicht nicht zur Benutzung
durch Kinder und gebrechliche Personen vorgesehen. Kleinkinder müssen beaufsichtigt werden, um
sicherzustellen, dass sie nicht mit dem Gerät spielen.
Dieses Produkt ist ausschließlich für die Lagerung
von W ein bestimmt.
Dieses Produkt ist für den Hausgebrauch und ähnliche Anwendungsbereiche vorgesehen wie zum
Beispiel Restaurants oder Gästeunterkünfte.
Personen (einschließlich Kinder), die aufgrund
ihrer physischen, sensorischen oder geistigen
Fähigkeiten oder ihrer Unerfahrenheit oder Un–
kenntnis nicht in der Lage sind, das Gerät sicher zu
benutzen, sollten dieses Gerät nicht ohne Aufsicht
oder Anweisung durch eine verantwortliche Person
nutzen.
Kinder sollten beaufsichtigt werden, um sicherzustellen, dass sie nicht mit dem Gerät spielen.
Lagern Sie keine explosionsfähigen Substanzen
wie z. B. Sprühdosen mit Treibgas im Gerät.
TRANSPORTSCHÄDEN
Untersuchen Sie den Weinkeller auf Transportschäden. Unterrichten Sie das mit der Lieferung
beauftragte Transportunternehmen ggf. innerhalb
der angegebenen bzw . für dieses Produkt rechtlich
vorgeschriebenen Frist. Ist keine Frist angegeben,
muss der Schaden innerhalb von sieben Tagen nach
Lieferung gemeldet werden.
LIEFERUMFANG
Prüfen Sie bitte beim Auspacken des Weinkellers,
dass das nachfolgende Zubehör vorhanden ist:
• Ablageregale
• Bodenauageäche
• Bodenträger
• Schlüssel
• Schraubenschlüssel
• Einbauanleitung
Benötigtes Werkzeug, das nicht enthalten ist:
• Schraubendreher (Kreuzschlitz)
TYPENSCHILD
Überprüfen Sie das Typenschild
auf der Innenseite des Geräts
oben links, um sicherzustellen,
dass Sie das richtige Modell
erhalten haben.
Das Typenschild enthält alle Informationen, nach
denen Sie im Gespräch mit Servicepersonal eventuell gefragt werden.
Wir empfehlen, die Daten hier einzutragen:
Modellbezeichnung . . . . . . . . . . . . . . . . . . . . . . . .
Artikelnummer . . . . . . . . . . . . . . . . . . . . . . . . . . . .
Seriennummer. . . . . . . . . . . . . . . . . . . . . . . . . . . . .
Spannung . . . . . . . . . . . . . . . . . . . . . . . . . . . . . . . .
KONTAKTINFORMATIONEN
EUROPA
Für Service/Unterstützung wenden Sie sich bitte an
Ihren Fachhändler.
MONTAGE
Befolgen Sie bei der Montage bitte folgende Anweisungen:
• Um seine volle Leistung zu erreichen, muss das
Aggregat des Weinkellers von Luft umströmt
werden können.
• Die freistehende Konstruktion des Kellers benötigt
einen Mindestabstand von 50 mm (2”) von seinen
Seiten- und 100 mm (4”) von der Rückwand.
• Zur Decke wird ein Mindestabstand von 100 mm
benötigt.
30 mm (1.2”)
50 mm (2”)50 mm (2”)
rückseite
Wand
Wand
100 mm (4”)
• Stellen Sie Ihren W einkeller so weit wie möglich
von Wärmequellen wie z. B. Heizung, Herd oder
starker Sonneneinstrahlung auf.
• Beachten Sie, dass die W einkellertür mindestens
90° weit zu öffnen sein soll, damit die Auszüge
herausgezogen werden können.
Page 8
- 8 -
TEMPERATUREINSTELLUNG
Der Weinkeller ist mit einer elektronischen Steuerung ausgestattet. Mit dieser Steuerung können Sie
den gewünschten Temperaturbereich im Inneren des
Weinkellers steuern. Ihr W ein wird im von Fachleuten empfohlenen Temperaturbereich zwischen
10–15 °C gelagert.
Die Temperatur, die zuvor im Werk eingestellt
wurde, wird auf dem Display angezeigt. Die Temperatur, die auf 12 °C voreingestellt ist, kann je nach
Bedarf und abhängig vom gelagerten Wein in einem
Bereich zwischen 8–18 °C geändert werden.
1. Stecken Sie den Hauptstecker des Weinkellers in die Steckdose und schalten Sie ihn
mithilfe des EIN-/AUS-Schalters ein.
0
1
2. Halten Sie die AUF- ( ▲ ) oder AB- ( ▼ )
Pfeiltaste für einige Sekunden gedrückt, bis
das Display blinkt.
3. Lassen Sie die Taste los. Drücken Sie die
AUF-/AB-Pfeiltasten, um die gewünschte
Temperatur einzustellen.
Der neue Wert wird automatisch nach 6 Sekunden gespeichert.
Bei der ersten Inbetriebnahme Ihres Weinkellers kann es zu einer gewissen Geruchsentwicklung kommen.
Dieser Effekt verschwindet allerdings nach
einigen Stunden.
1. Entfernen Sie die Transportpalette, auf der
der W einkeller steht.
2. Stellen Sie die Stellfüße so ein, dass zwischen Boden und Weinkeller ein Abstand
von 30 mm besteht und stellen Sie sicher,
dass der Weinkeller senkrecht steht. Falls
erforderlich, verwenden Sie eine Wasser-
waage.
3. Prüfen Sie, ob der Kohlelter sich an sei-
nem Einbauort an der oberen linken Ecke
bendet.
ELEKTRISCHE ANSCHLÜSSE
Vorschriftsmäßige elektrische Anschlüsse sind von
essentieller Wichtigkeit. Beachten Sie alle gültigen
Vorschriften und führen Sie alle Arbeiten fachmännisch durch.
Der Weinkeller wird mit Einphasen-W echselstrom
betrieben.
Bitte überprüfen Sie, ob die auf dem Typenschild
angegebene Spannung mit Ihrer Stromversorgung
übereinstimmt.
Der Weinkeller ist mit einem Schutzkontaktstecker
ausgestattet. Dometic und seine Tochterrmen übernehmen keine Verantwortung für Unfälle, die durch
nicht vorhandene oder defekte Masseleitungen
hervorgerufen werden.
Elektrische Kabel müssen so verlegt und befestigt
werden, dass sie nicht mit heißen oder scharfen
Bauteilen des Weinkellers in Kontakt kommen
können.
WarnUng
Der Weinkeller muss geerdet sein.
!
Page 9
- 9 -
WARTUNG
Halten Sie Ihren Weinkeller so sauber wie möglich.
Trennen Sie das Gerät von der Stromversorgung, bevor Sie es reinigen. Benutzen Sie keine scheuernden
oder stark aromatisierten Substanzen. Benutzen Sie
ein weiches Tuch bzw. einen Schwamm und mildes
Reinigungsmittel.
Prüfen Sie regelmäßig, ob entlang der Unter- und
Rückseiten des Weinkellers freie Luftzirkulation
gewährleistet ist.
Entstehendes Kondenswasser wird auf der Rückseite
des Weinkellers in einem kleinen Becher gesammelt.
Er ist mit einem Schwamm ausgestattet, der bei der
Verdunstung des Wassers hilft. Überprüfen Sie die
Kunststofeitungen, die das Wasser aus dem Inneren des Weinkellers in den Becher leiten. Stellen
Sie sicher, dass sie nicht durch Staub oder Schmutz
verstopft sind.
Tauschen Sie den Kohlelter für die Innenluft-Um-
wälzung alle zwei Jahre aus. Der Filter bendet sich
in der oberen linken Ecke des Weinkellers.
Bitte bearbeiten Sie vor dem Anruf bei einem Ser-
vicetechniker folgende Prüiste, falls der Weinkeller
nicht mehr funktioniert:
• Wurde die Sicherung der Stromversorgung ausgelöst?
• Sitzt der Stecker korrekt in der Steckdose?
• Ist das Gerät angeschaltet?
Kann der Grund der Störung nicht über diese Liste
ermittelt werden, nehmen Sie bitte Kontakt zu einem
autorisierten Servicetechniker auf.
Der Weinkeller ist mit einem elektronischen Überhitzungsschutz ausgestattet. Ihr autorisierter Servicetechniker kann prüfen, ob dieser ausgelöst wurde.
MONTAGE VON FÜHRUNGEN UND AUSZUGSTRÄGERN
BRINGEN SIE DIE SCHIENE AN DER SCHRANKSEITE AN
2
1
1
2
schiene, rechte seite
schiene, linke seite
1. Setzen Sie Haken Nr. 1 in die hintere Aufnahme der Schrankseite und befestigen Sie
diesen.
2. Setzen Sie Haken Nr. 2 in die vordere Aufnahme der Schrankseite und befestigen Sie
diesen wie hier abgebildet.
3.
4.
1.
2.
3. Setzen Sie den Auszug auf die Schiene
und schieben Sie diesen hinein.
Page 10
- 10 -
WIE SIE DEN AUSZUG WIEDER HERAUSNEHMEN
Entriegeln Sie die beidseitig angebrachte Verrieglung, wie durch die Pfeile auf dem Bild dargestellt,
und ziehen Sie den Auszug heraus.
2.
1.
3.
BODENTRÄGER FÜR ABLAGEBÖDEN
Bringen Sie die Haken an den Löchern auf gewünschter Höhe an und befestigen Sie diese wie
durch Pfeil 1 und 2 auf dem Bild dargestellt.
1.
2.
VERSTÄRKUNGSSTAB
Der Verstärkungsstab Nr. 1 dient als Bodenträger
und darf aus Sicherheitsgründen nicht entfernt werden.
1
ZUBEHÖR
Jedes Kit enthält je zwei Böden und Bodenträger.
• Auszug
• Ablageboden
Modell Max. Anzahl an Auszügen
A 192 G
A 192 D
15
WEIN LAGERN
Flaschen sollten nach Größe (Durchmesser und
Höhe) sortiert gelagert werden. Achten Sie bei der
Einlagerung Ihres Weins auf diese Unterschiede und
vermeiden Sie es, Flaschen durcheinanderzubringen.
Die maximale Anzahl an „Bordeaux Tradition“Flaschen, die in einem Weinkeller gelagert werden
können, der mit Ablageböden und einem Auszug
ausgestattet ist:
Modell
Anzahl an
Ablageböden
Anzahl an
Flaschen
A 192 G
A 192 D
3+2 192
VOrsiCHt
Achten Sie darauf, dass Sie den Auszug nur einlagig befüllen.
Die Auszüge und Ablageböden können abhängig
von der Größe Ihres Weinkellers verschieden angebracht werden.
Bei der Lagerung ist es wichtig, die Flaschen auf
die Seite zu legen, damit der Korken in Kontakt mit
dem W ein bleibt.
Legen Sie für die optimale Nutzung des Ladevolumens die Flaschen abwechselnd mit dem Boden
nach vorne und nach hinten weisend in den Weinkeller.
Siehe Anhang A für Informationen über die optimale Lagerung von „Burgunder“- und „Bordeaux
Tradition“-Flaschen.
Page 11
- 11 -
INTRODUCCIÓN
Gracias por elegir el botellero de Dometic.
Lea detenidamente estas instrucciones antes de
instalar y usar su nuevo botellero. Conamos en que
quedará completamente satisfecho con su adquisición.
El botellero debe instalarse y utilizarse siguiendo
estas instrucciones con objeto de obtener un funcionamiento correcto y rentable.
Este producto está diseñado únicamente para almacenar botellas de vino.
Únicamente se ha de utilizar para almacenar vino en
hogares, restaurantes o semejantes.
Las personas (incluidos los niños) que, debido a
sus capacidades físicas, sensoriales o mentales, a su
falta de experiencia o a desconocimiento, no pueden utilizar el producto de forma segura, no tienen
permitido utilizar este producto sin la vigilancia y
las instrucciones de una persona sobre la que recae
tal responsabilidad.
Guarde y utilice el aparato fuera del alcance de los
niños.
No guarde en el aparato sustancias con peligro de
explosión como p. ej. atomizadores con gas.
DAÑOS DURANTE EL TRANSPORTE
Inspeccione el botellero por si hubiera quedado
dañado durante el transporte. Debe informar de
cualquier daño a la empresa responsable del envío,
dentro del plazo legal o denido para este tipo de
producto. Si no existe dicho plazo, los daños deberán comunicarse durante los siete días posteriores al
envío.
VOLUMEN DE ENTREGA
Al desembalar el botellero, compruebe que están
incluidos los siguientes accesorios:
• Estantes de almacenamiento
• Base (suelo)
• Soportes para estantes
• Llaves
• Llave ja
• Instrucciones
Herramientas adicionales necesarias no incluidas:
• Destornillador (cuadrete en estrella)
PLACA DE CARACTERÍSTICAS
Compruebe la placa de característica dentro del botellero,
situada en la parte superior
izquierda, para asegurarse de que ha recibido el
modelo correcto.
La placa de características incluye los datos que
necesitará comunicar al personal de mantenimiento
cuando contacte con ellos.
Nunca está de más recordar estos datos:
Descripción del modelo . . . . . . . . . . . . . . . . . . . . .
Número de producto . . . . . . . . . . . . . . . . . . . . . . . .
Número de serie . . . . . . . . . . . . . . . . . . . . . . . . . . .
Tensión . . . . . . . . . . . . . . . . . . . . . . . . . . . . . . . . . .
INFORMACIÓN DE CONTACTO
EUROPA
Contacte con su distribuidor cuando necesite asistencia técnica.
INSTALACIÓN
Siga las siguientes instrucciones:
• Para obtener el mejor rendimiento, el aire debe
circular libremente por la unidad de refrigeración
ubicada detrás del botellero.
• El diseño autónomo del botellero requiere su
colocación separado al menos 50 mm (2”) de las
paredes trasera y 100 mm (4”) de las laterales.
• Deje una separación de al menos 100 mm (4”) por
encima del botellero.
30 mm (1.2”)
50 mm (2”)50 mm (2”)
Parte
trasera
Pared
Pared
100 mm (4”)
• Coloque el botellero lejos de cualquier fuente de
calor (radiador, cocina o radiación solar intensa).
• La puerta del botellero debe poder abrirse al menos 90° para así extraer los estantes deslizantes.
Page 12

- 12 -
AJUSTE DE LA TEMPERATURA
El botellero está equipado con un regulador electrónico con el que puede programar la temperatura
en su interior. El vino se almacenará entre 10 °C
(50 °F) y 15 °C (59 °F), lo recomendable según los
expertos.
La temperatura (preajustada de fábrica) aparece
en la pantalla. La temperatura preajustada a 12 °C
(54 °F) puede modicarse entre 8 °C (46 °F) y 18 °C
(64 °F), en función del vino que se almacene.
1. Enchufe el botellero y enciéndalo con el
interruptor ON/OFF.
0
1
2. Pulse y mantenga pulsado el botón con
la echa ARRIBA ( ▲ ) o ABAJO ( ▼ )
durante unos segundos hasta que la pantalla
empiece a parpadear.
3. Suelte el botón. Pulse los botones de echa
ARRIBA/ABAJO para ajustar la temperatura.
El nuevo valor se guarda automáticamente
pasados 6 segundos.
Puede ser que aprecie cierto olor al usar por
primera vez el botellero.
Éste desaparecerá después de unas horas.
1. Retire el botellero del palet sobre el que
descansa.
2. Ajuste las patas de forma que exista una
holgura de 30 mm (1.2”) por debajo del
botellero y compruebe que éste reposa en
posición vertical en ambas direcciones. En
caso necesario, utilice un nivel de burbuja.
3. Compruebe que el ltro de carbón esté en
su lugar correcto en la esquina superior
izquierda dentro del botellero.
CONEXIONES ELÉCTRICAS
Es esencial que la instalación eléctrica se lleve a
cabo correctamente, respetando todas las normativas
y códigos deontológicos relevantes.
El botellero funciona con corriente alterna monofásica.
Compruebe que la tensión mostrada en la placa de
características coincide con la de alimentación.
El botellero cuenta con una clavija pensada para una
caja de enchufe con conexión a masa. Dometic y
sus empresas subsidiarias no se responsabilizan de
ningún accidente debido a los cables a masa inexistentes o defectuosos.
Los cables eléctricos deben tenderse y asegurarse
de forma que no entren en contacto con compo-
nentes calientes o alados del botellero.
adVertenCia
El botellero debe estar conectado a masa.
!
Page 13
- 13 -
MANTENIMIENTO
Recomendamos mantener el botellero lo más limpio
posible. Desenchúfelo de la corriente antes de limpiarlo. No utilice productos abrasivos o que desprendan un fuerte olor. Utilice un paño suave o esponja y
un detergente suave.
Es muy importante comprobar a intervalos regulares
que la circulación de aire por debajo y detrás del
botellero no quede bloqueada.
La condensación se recoge en un recipiente pequeño
situado detrás del botellero. Este recipiente cuenta
con una esponja que ayuda a que la condensación
se evapore. Compruebe que la tubería de plástico
que conduce el agua desde el interior del botellero al
recipiente colector no quede bloqueada por el polvo
o por la suciedad acumulada.
Sustituya el ltro de carbón para la ventilación
interior cada dos años. El ltro está colocado en la
esquina superior izquierda en el interior del botellero.
Si el botellero deja de funcionar correctamente,
compruebe los siguientes puntos antes de llamar a
un técnico de mantenimiento:
• ¿El fusible de la alimentación presenta daños?
• ¿La clavija está bien enchufada en la caja de
enchufe?
• ¿Está encendido el botellero?
Si el motivo del fallo no se encuentra entre los nombrados anteriormente, contacte con un técnico de
mantenimiento autorizado.
El botellero está equipado con una protección contra
sobrecalentamiento. Un técnico de mantenimiento
autorizado puede comprobar si esta protección ha
saltado o no.
INSTALACIÓN DE LAS GUÍAS Y SOPORTES
PARA ESTANTES
INSTALAR EL CARRIL EN EL LATERAL DEL ARMARIO
2
1
1
2
Carril, lado derecho
Carril, lado izquierdo
1. Inserte el gancho n.°1 en la muesca de la
parte trasera del lateral del armario y empújelo en esa posición.
2. Coloque el gancho n.° 2 en la muesca de
la parte delantera del lateral del armario y
empújelo hacia abajo como se muestra en
la imagen.
3.
4.
1.
2.
3. Introduzca el estante deslizante en el carril.
Page 14
- 14 -
CÓMO RETIRAR EL ESTANTE
Suelte el mecanismo de bloqueo a ambos lados
como muestran las echas y extraiga el estante.
2.
1.
3.
SOPORTE PARA ALOJAR EL ESTANTE
Introduzca los ganchos del soporte en los oricios
a la altura que desee, presiónelos como indica la
echa 1 y empújelos hacia abajo como indica la
echa 2.
1.
2.
BARRA DE REFUERZO
La barra de refuerzo n.°1 se trata de un soporte
para el estante y , por razones de seguridad, no debe
retirarse.
1
Modelo
N.° de estantes
de almacenamiento
N.° de botellas
A 192 G
A 192 D
3+2 192
PreCaUCiÓn
No coloque más de una capa de botellas en cada
estante deslizante.
ACCESORIOS
Cada juego contiene dos estantes y soportes para
estantes.
• Estante deslizante
• Estante de almacenamiento
Modelo N.° máx. de estantes deslizantes
A 192 G
A 192 D
15
ALMACENAR VINO
Guarde las botellas en el botellero en función de su
tamaño (diámetro y altura). Tenga en cuenta estas
diferencias a la hora de guardar sus botellas para así
evitar mezclarlas.
El número máximo de botellas “Bordeaux tradition”
que pueden guardarse en un botellero que cuenta
con estantes de almacenamiento y un estante deslizante:
Los estantes deslizantes y de almacenamiento pueden situarse en diversas posiciones dependiendo del
tamaño del botellero.
Es importante colocar las botellas en horizontal para
que el corcho permanezca en contacto con el vino.
Coloque las botellas en vertical para aprovechar la
capacidad al máximo.
Véase el apéndice A para más información sobre la
forma adecuada de almacenar botellas “Burgundy”,
”Bourgogne” y “Bordeaux Tradition”.
Page 15

- 15 -
INTRODUCTION
Merci d’avoir choisi la cave à vin Dometic.
Veuillez lire ces instructions soigneusement avant
d’installer votre nouvelle cave à vin. Nous sommes
persuadés que vous serez entièrement satisfait de
votre achat.
La cave à vin doit être installée et utilisée selon ces
instructions an de fonctionner correctement et de
manière économique.
L’appareil est destiné exclusivement au stockage
du vin.
L’appareil est destiné à être utilisé chez les particu-
liers, dans des restaurants et d’autres installations
de type résidentiel.
Ne laissez pas des personnes (enfants compris)
incapables d’utiliser le produit de manière sûre,
en raison de déciences physiques, sensorielles ou
mentales ou de leur manque d’expérience ou de
connaissances, utiliser ce produit sans surveillance.
Placez et utilisez l’appareil hors de portée des
enfants.
Ne stockez aucune substance explosive comme p.
ex. des aérosols contenant des agents propulseurs
dans l’appareil.
DOMMAGE DUS AU TRANSPORT
Vériez que la cave à vin ne présente aucun dommage dû au transport. Vous devez signaler tout dommage à la société responsable de la livraison dans les
délais légaux ou convenus pour ce type de produits.
S'il n'y a pas de délai établi pour le signalement,
le dommage doit être signalé dans les sept jours à
compter de la livraison.
CONTENU DE LA LIVRAISON
Lors du déballage de la cave à vin, veuillez vérier
la présence des accessoires suivants :
• clayettes de stockage
• support (plancher)
• supports pour clayettes
• clés
• clé xe
• manuel
Outils supplémentaires nécessaires non compris
dans la livraison :
• tournevis (en étoile)
PLAQUE SIGNALÉTIQUE
Vériez sur la plaque signalétique, se trouvant à l'intérieur de
la cave à vin en haut à gauche,
que vous avez bien reçu le
modèle adéquat.
La plaque signalétique donne des détails qui vous
seront nécessaires au cas où vous contactez le service clientèle.
Nous vous conseillons de les noter ici :
Désignation du modèle . . . . . . . . . . . . . . . . . . . . . .
Numéro de produit . . . . . . . . . . . . . . . . . . . . . . . . .
Numéro de série . . . . . . . . . . . . . . . . . . . . . . . . . . .
Tension . . . . . . . . . . . . . . . . . . . . . . . . . . . . . . . .
CONTACTS
EUROPE
Veuillez contacter votre revendeur pour tout service/
assistance technique.
INSTALLATION
Veuillez suivre ces instructions :
• Pour de meilleures performances, l'air doit cir-
culer librement au-dessus du groupe frigorique
derrière la cave à vin.
• L ’installation sur pied de la cave suppose un écart
minimal de 100 mm (4”) par rapport à la paroi
arrière et de 50 mm (2”) par rapport aux parois
latérales.
• Laissez un espace d'au moins 100 mm (4”) audessus de la cave à vin.
30 mm (1.2”)
50 mm (2”)50 mm (2”)
arrière
Paroi
Paroi
100 mm (4”)
• Placez votre cave à vin loin de toute source de
chaleur, radiateur, cuisinière ou lumière du soleil.
• Notez qu'il doit être possible d'ouvrir la porte de
la cave à vin à 90° au moins an que les clayettes
coulissantes puissent être extraites.
Page 16

- 16 -
RÉGLAGE DE LA TEMPÉRATURE
La cave à vin est équipée d’une commande électronique. Elle vous permet de programmer la température à l’intérieur de la cave à vin. Votre vin sera
stocké entre 10 °C (50 °F) et 15 °C (59 °F), selon les
conseils des experts.
La température, pré-réglée en usine, est afchée sur
l’écran. La température, pré-réglée à 12 °C (54 °F),
peut être modiée à volonté à une valeur comprise
entre 8 °C (46 °F) et 18 °C (64 °F), selon le vin
stocké.
1. Branchez la cave à vin et mettez-la en
marche en tournant le commutateur
MARCHE/ARRÊT.
0
1
2. Pressez et maintenez enfoncée la touche
échée HAUT ( ▲ ) ou BAS ( ▼ ) pen-
dant quelques secondes jusqu'à ce que
l'écran commence à clignoter.
3. Relâchez la touche. Appuyez sur les
touches HAUT/BAS pour régler la température.
La nouvelle valeur est mémorisée automatiquement au bout de 6 secondes.
Une certaine odeur peut se dégager lors de
la première utilisation de la cave à vin.
Elle disparaît au bout de quelques heures.
1. Retirez la palette de transport sur laquelle
se trouve votre cave à vin.
2. Ajustez les pieds an de laisser un espace
de 30 mm (1.2”) sous la cave à vin et
vériez qu'ils sont bien en position verticale dans les deux directions. Si nécessaire,
utilisez un niveau à bulle d'air.
3. Vériez que le ltre au charbon est en
place en haut à gauche à l'intérieur de la
cave à vin.
RACCORDEMENT ÉLECTRIQUE
L'installation électrique doit être effectuée correctement, en tenant compte de toutes les réglementations
en vigueur et des règles de l'art.
La cave à vin fonctionne sur courant alternatif monophasé.
Veuillez vérier que la tension indiquée sur la plaque signalétique correspond à votre alimentation en
tension.
La cave à vin est équipée d'une che conçue pour
une prise mise à la terre. Dometic et ses liales ne
peuvent être tenus responsables de tout incident dû
à des lignes de mise à la terre inexistantes ou défectueuses.
Les lignes électriques doivent être posées et protégées de telle sorte qu'elles ne puissent pas entrer
en contact avec des parties chaudes ou coupantes
de la cave à vin.
aVertissement
La cave à vin doit être mise à la terre.
!
Page 17

- 17 -
MAINTENANCE
Il est recommandé que vous mainteniez votre cave
à vin aussi propre que possible. Débranchez votre
cave avant de la nettoyer. N’utilisez aucune substance abrasive ou ayant une forte odeur. Utilisez un
chiffon doux ou une éponge et un détergent doux.
Il est très important de vérier régulièrement que la
circulation de l’air sous et derrière la cave à vin n’est
pas bloquée.
L’eau de condensation est collectée dans un petit
récipient placé à l’arrière de la cave à vin. Le récipient contient une éponge qui contribue à l’évapora-
tion de l’eau de condensation. Vériez que le tuyau
en plastique acheminant l’eau de l’intérieur vers le
récipient n’est pas obstrué par de la poussière ou de
la saleté.
Il est conseillé que vous remplaciez le ltre à charbon de la ventilation intérieure tous les deux ans. Le
ltre est placé dans le coin en haut à gauche dans la
cave à vin.
Si la cave à vin ne fonctionne pas, vériez les points
suivant avant d’appeler un technicien de maintenance :
• le fusible de l’alimentation électrique est-il
intact ?
• la che est-elle correctement insérée dans sa
prise ?
• la cave à vin est-elle allumée ?
Si la cause du dysfonctionnement ne se trouve pas
dans les points de la liste ci-dessus, contactez un
technicien de maintenance agréé.
La cave à vin est équipée d’une protection contre
la surchauffe. Un technicien de maintenance peut
vérier si elle a été déclenchée ou non.
MONTAGE DES GUIDES ET DES SUPPORTS
DE CLAYETTES
MONTAGE DES RAILS SUR LES CÔTÉS DU CONTENEUR
2
1
1
2
rail, côté droit
rail, côté gauche
1. Insérez le crochet no.1 dans le cran à
l’arrière du conteneur et encliquetez-le.
2. Insérez le crochet no.2 dans le cran à
l’avant du conteneur et poussez-le vers le
bas tel qu’indiqué sur l’illustration.
3.
4.
1.
2.
3. Insérez la clayette coulissante sur les rails
et poussez-la à l’intérieur du conteneur.
Page 18

- 18 -
RETRAIT DES CLAYETTES
Desserrez le mécanisme de verrouillage de cha-
que côté, tel qu'indiqué par les èches, et retirez la
clayette.
2.
1.
3.
SUPPORT DE CLAYETTE POUR CLAYETTE DE
STOCKAGE
Placez les crochets supports dans les alésages au niveau que vous souhaitez, poussez-les vers l'intérieur
comme indiqué par la èche 1 et vers le bas comme
indiqué par la èche 2.
1.
2.
BARRE DE RENFORT
La barre de renfort no.1 est un support de clayette et
ne doit pas être enlevée pour des raisons de sécurité.
1
Modèle
Nombre de
clayettes de
stockage
Nombre de
bouteilles
A 192 G
A 192 D
3+2 192
attentiOn
Notez que vous ne devez pas ranger plus d'un
étage de bouteilles sur les clayettes coulissantes.
ACCESSOIRES
Chaque kit comprend deux clayettes et des supports
pour clayettes.
• Clayette coulissante
• Clayette de stockage
Modèle
Nombre max. de clayettes
coulissantes
A 192 G
A 192 D
15
STOCKAGE DU VIN
Les bouteilles doivent être stockées dans votre cave
à vin selon leur taille (diamètres et hauteurs). Tenez
compte de ces différences lorsque vous rangez votre
vin et évitez de mélanger les bouteilles.
Nombre maximum de bouteilles « tradition Bordeaux » pouvant être stockées dans une cave à vin
munie de clayettes de stockage et d'une clayette
coulissante :
Les clayettes coulissantes et de stockage peuvent
être placées en différentes positions en fonction de la
taille de votre cave à vin.
Il est important de ranger les bouteilles en position
allongée an que le bouchon reste en contact avec le
vin.
Placez les bouteilles de haut en bas dans la cave an
d'utiliser au mieux l'espace disponible.
Voir Appendice A pour de plus amples informations
concernant la meilleure façon de ranger vos bouteilles « Burgundy » / « Bourgogne » et « Tradition
Bordeaux ».
Page 19

- 19 -
INTRODUZIONE
Grazie per avere scelto il frigo cantina Domentic.
Vi preghiamo di leggere attentamente le istruzioni
prima di installare e usare il vostro frigo cantina.
Siamo sicuri che sarete completamente soddisfatti
del vostro acquisto.
Il frigo cantina deve essere installato e usato
conformemente alle presenti istruzioni, affinché
funzioni in modo corretto ed economico.
Questo apparecchio è destinato esclusivamente alla
conservazione del vino.
Questo apparecchio è destinato per l’uso in abitazioni, ristoranti e in altre applicazioni simili.
Persone (bambini compresi) che a causa della proprie capacità fisiche, sensoriali o mentali, oppure
che a causa della propria inesperienza e scarsa
conoscenza non siano in grado di utilizzare il prodotto in modo sicuro, devono evitare di utilizzarlo
se non in presenza e seguendo le istruzioni di una
persona per loro responsabile.
Conservare e impiegare l’apparecchio lontano dalla
portata dei bambini.
Nell’apparecchio non conservare sostanze esplosive come ad es. bombolette spray con gas propellente.
DANNI DOVUTI AL TRASPORTO
Controllare se il frigo cantina ha subito danni durante il trasporto. Eventuali danni devono essere comunicati all'azienda responsabile della consegna entro
la data prevista per legge o concordata per questo
tipo di prodotto. Se non è stata stabilita nessuna data
per la comunicazione, il danno deve essere comunicato entro e non oltre sette giorni a partire dalla data
di consegna.
DOTAZIONE
In fase di disimballaggio del frigo cantina verificare
che siano compresi nella dotazione i seguenti
accessori:
• Ripiani per conservazione
• Supporto (pavimento)
• Supporti mensole
• Chiavi
• Chiave fissa
• Manuale di istruzioni
Attrezzi supplementari necessari non inclusi:
• Cacciavite (a stella)
TARGHETTA IDENTIFICATIVA
Controllare la targhetta identificativa, all'interno del frigo
cantina in altro a sinistra, per
assicurarsi di aver ricevuto il
modello giusto.
La targhetta identificativa indica i dettagli necessari nel caso si debba contattare il personale addetto
all'assistenza.
È una buona idea annotarli qui:
designazione del modello . . . . . . . . . . . . . . . . . . . .
numero del prodotto . . . . . . . . . . . . . . . . . . . . . . . .
numero di serie . . . . . . . . . . . . . . . . . . . . . . . . . . . .
tensione . . . . . . . . . . . . . . . . . . . . . . . . . . . . . . . . . .
INFORMAZIONI CONTATTO
EUROPA
Per supporto e assistenza siete pregati di contattare il
vostro rivenditore.
INSTALLAZIONE
V i preghiamo di seguire le presenti istruzioni per
l'installazione:
• Per ottenere la massima prestazione è necessario
che l'aria circoli liberamente sopra l'unità di raffreddamento posta dietro il frigo cantina.
• Il modello a libera installazione del frigo cantina
deve essere posizionato almeno a 100 mm (4”)
dalla parete posteriore e a 50 mm (2”) dalle pareti
laterali.
• Consentire che ci sia uno spazio di almeno
100 mm (4”) sopra il frigo cantina.
30 mm (1.2”)
50 mm (2”)
50 mm (2”)
lato
posteriore
Parete
Parete
100 mm (4”)
• Posizionare il vostro frigo cantina lontano da
qualsiasi fonte di calore, come ad esempio termosifoni, fornelli o luce intensa del sole.
• Tenere presente che deve essere possibile aprire la
porta del frigo cantina di almeno 90°, per permettere l'estrazione dei ripiani scorrevoli.
Page 20

- 20 -
IMPOSTAZIONE DELLA TEMPERATURA
Il frigo cantina è dotato di un sistema di controllo
elettronico. Esso consente di programmare la temperatura all'interno del frigo cantina. Il vino viene
quindi conservato a una temperatura fra i 10 °C
(50 °F) e i 15 °C (59 °F), secondo i consigli degli
esperti.
La temperatura preimpostata di fabbrica viene
visualizzata sul display . Su richiesta è possibile
modificare la temperatura preimpostata di fabbrica
su 12 °C (54 °F), portandola ad un valore compreso
tra 8 °C (46 °F) e 18 °C (64 °F), a seconda del vino
conservato.
1. Inserire la spina nel frigo cantina e accenderlo con l'interruttore ON/OFF.
0
1
2. Premere e tenere premuto il tasto freccia
SU ( ▲ ) o GIÙ ( ▼ ) per alcuni secondi
finché il display comincia a lampeggiare.
3. Rilasciare il tasto. Per impostare la temperatura premere i tasti freccia SU/GIÙ.
Il nuovo valore viene salvato automaticamente dopo 6 secondi.
È possibile percepire un certo odore quando si usa per la prima volta il frigo cantina.
L'odore scomparirà dopo poche ore.
1. Rimuovere il pallet dove poggia il vostro
frigo cantina.
2. Regolare i piedini per garantire una distanza di 30 mm (1.2”) sotto il frigo cantina
e verificare che esso si trovi in posizione
verticale in entrambe le direzioni. Se neces-
sario utilizzare una livella.
3. Controllare che il filtro a carbone sia posizionato sull'angolo in alto a sinistra all'interno del frigo cantina.
COLLEGAMENTO ELETTRICO
L'installazione elettrica deve essere eseguita correttamente, tenendo in considerazione tutte le norme
rilevanti e le regole di procedura.
Il frigo cantina funziona con corrente alternata monofase.
Controllare che la tensione indicata sulla targhetta
identificativa corrisponda a quella dell'alimentazione
elettrica sul posto.
Il frigo cantina è dotato di una spina per una presa
di terra. Dometic e le sue filiali non saranno ritenute
responsabili per qualsiasi incidente dovuto a fili di
terra mancanti o difettosi.
I cavi elettrici devono essere posati e fissati in
modo che non possano entrare in contatto con
parti calde o taglienti del frigo cantina.
aVVertenza
Il frigo cantina deve essere collegato a massa.
!
Page 21

- 21 -
MANUTENZIONE
Raccomandiamo di tenere il frigo cantina il più pulito possibile. Staccare la spina del frigo cantina prima
di pulirlo. Non usare sostante abrasive o molto
aromatiche. Usare un panno morbido o una spugna e
un detergente delicato.
È molto importante controllare regolarmente che
la circolazione dell'aria al di sotto e dietro il frigo
cantina non sia bloccata.
La condensa viene raccolta in una vaschetta posta
dietro al frigo cantina. La vaschetta dispone di una
spugna che aiuta a evaporare la condensa. Controllare che il tubo in plastica che porta l'acqua dall'interno alla vaschetta non sia bloccato da polvere o
sporcizia.
Occorre sostituire il filtro a carbone per la ventilazione interna ogni due anni. Il filtro è inserito
nell'angolo in alto a sinistra all'interno del frigo
cantina.
Se il frigo cantina non funziona, controllare i seguenti punti prima di chiamare un tecnico del servizio assistenza:
• Il fusibile dell'alimentazione elettrica è intatto?
• La presa è inserita correttamente nella rispettiva
spina?
• Il frigo cantina è acceso?
Se la causa dell'avaria non è stata trovata fra i punti
elencati sopra, contattare un tecnico del servizio
assistenza autorizzato.
Il frigo cantina è dotato di una protezione contro il
sovrariscaldamento. Un tecnico del servizio assistenza autorizzato può controllare se la protezione è
scattata oppure no.
INSTALLAZIONE DELLE GUIDE E DEI SUPPORTI PER RIPIANI
INSTALLAZIONE DELLA GUIDA SUL LATO DEL
MOBILE
2
1
1
2
guida, lato destro
guida, lato sinistro
1. Inserire il gancio nr.1 nell'incavo nel retro
del lato del mobile e premerlo all'interno di
esso.
2. Installare il gancio nr. 2 nell'incavo sul lato
anteriore del mobile e premerlo verso il
basso come indicato nella figura.
3.
4.
1.
2.
3. Inserire il ripiano scorrevole nel mobile e
premerlo in esso.
Page 22

- 22 -
COME RIMUOVERE UN RIPIANO
Sbloccare il meccanismo di blocco su ogni lato
come mostrato dalle frecce ed estrarre il ripiano.
2.
1.
3.
SUPPORTO PER RIPIANO RELATIVO AL RIPIANO
PER CONSERVAZIONE
Collocare i ganci di supporto nei fori al livello desiderato, premere verso il basso come indicato dalla
freccia 1 e 2.
1.
2.
BARRA DI RINFORZO
La barra di rinforzo nr.1 è un supporto per ripiano e
per motivi di sicurezza non deve essere estratta.
1
Modello
Nr. di ripiani
per conservazione
Nr. di
bottiglie
A 192 G
A 192 D
3+2 192
attenziOne
Non dimenticare di conservare non più di una fila
di bottiglie sui ripiani scorrevoli.
ACCESSORI
Ogni kit contiene due ripiani e supporti per ripiani.
• Ripiano scorrevole
• Ripiano per conservazione
Modello Nr. massimo di ripiani scorrevoli
A 192 G
A 192 D
15
CONSERVAZIONE DEL VINO
Le bottiglie devono essere conservate nel frigo
cantina in base alla dimensione (diametro e altezza).
Tenere conto di queste differenze quando si conserva il vino ed evitare di raggruppare tipi differenti di
bottiglie.
Il numero massimo di bottiglie di “Bordeaux tradition” che può essere conservato in un frigo cantina
dotato di ripiani per conservazione e di un ripiano
scorrevole:
I ripiani scorrevoli a i ripiani per conservazione
possono essere collocati in diverse posizioni, in base
alle dimensioni del vostro frigo cantina.
È importante conservare le bottiglie orizzontalmente
in modo che il tappo rimanga in contatto con il vino.
Posizionare le bottiglie dell'alto al basso nel frigo
cantina per sfruttare la volumetria in modo ottimale.
Vedi l'Appendice A per informazioni riguardo
alla modalità per impilare al meglio le bottiglie
“Burgundy”/“Bourgogne” e “Bordeaux Tradition”.
Page 23

- 23 -
INTRODUÇÃO
Obrigado por escolher a Cave de vinhos da Dometic.
Leia cuidadosamente estas instruções antes de
instalar a sua nova cave de vinhos. Esperamos que
fique totalmente satisfeito com a sua compra.
A cave de vinhos deve ser instalada e utilizada de
acordo com estas instruções de modo a funcionar
de forma correta e económica.
Este equipamento destina-se exclusivamente ao
armazenamento de vinho.
Este equipamento destina-se à utilização doméstica, em restaurantes e outras aplicações semelhantes
à doméstica.
As pessoas (incluindo crianças) que não estão
aptas a utilizar o produto de modo seguro devido a
incapacidade física, sensorial ou mental ou devido
à sua inexperiência, não devem utilizar o produto
sem a supervisão ou as instruções de uma pessoa
responsável.
Guarde e utilize o aparelho fora do alcance das
crianças.
Não guarde as substâncias com risco de explosão,
tais como, p. ex. latas de spray com gás carburante
no aparelho.
DANOS PROVOCADOS PELO TRANSPORTE
Inspeccione a cave de vinhos quanto a danos causados pelo transporte. Deve comunicar qualquer
dano à empresa responsável pela entrega, dentro dos
prazos legais estipulados para este tipo de produto.
Se não existir um prazo de comunicação estipulado,
o dano deverá ser comunicado dentro de sete dias a
partir da data de entrega.
MATERIAL FORNECIDO
Ao desempacotar a cave de vinhos verifique se os
seguintes acessórios se encontram incluídos:
• Prateleiras de armazenamento
• Suportes (chão)
• Suportes de prateleiras
• Chaves
• Chave de bocas
• Manual de instruções
Ferramentas adicionais necessárias não incluídas:
• Chave de parafusos (em forma de estrela)
PLACA DE CARACTERÍSTICAS
Verifique a placa de características localizada no interior da
cave de vinhos (na zona superior
esquerda da mesma) para ter a
certeza de que recebeu o modelo
correcto.
A placa de características apresenta detalhes que
serão necessários se quiser contactar o serviço de
assistência.
Sugerimos que anote estes detalhes aqui:
Designação do modelo . . . . . . . . . . . . . . . . . . . . . .
Número do produto . . . . . . . . . . . . . . . . . . . . . . . .
Número de série . . . . . . . . . . . . . . . . . . . . . . . . . . .
Tensão . . . . . . . . . . . . . . . . . . . . . . . . . . . . . . . . . . .
DADOS DE CONTACTO
EUROPA
Contacte o seu distribuidor para obter serviços de
assistência.
INSTALAÇÃO
Siga estas instruções:
• Para um melhor desempenho, o ar necessita de
circular livremente sobre a unidade de refrigeração por trás da cave de vinhos.
• A conceção vertical da cave de vinhos significa
que deve ser mantida uma distância de, no mínimo, 100 mm (4”) para a parede traseira e 50 mm
(2”) para as paredes laterais.
• Deixe um espaço de, pelo menos, 100 mm (4")
por cima da cave de vinhos.
30 mm (1.2”)
50 mm (2”)50 mm (2”)
atrás
Parede
Parede
100 mm (4”)
• Posicione a sua cave de vinhos afastada de todas
as fonte de calor como, por exemplo, radiadores,
fogões ou radiações solares intensas.
• Tenha em atenção que tem de ser possível abrir
a porta da cave de vinhos num ângulo de, pelo
menos, 90° de modo a permitir que as prateleiras
deslizantes possam ser puxadas.
Page 24

- 24 -
DEFINIÇÃO DA TEMPERATURA
A cave de vinhos está equipada com um controlo
electrónico. Isto permite programar a temperatura do
interior da cave de vinhos. O seu vinho será armazenado entre 10 °C (50 °F) e 15 °C (59 °F), de acordo
com o aconselhamento especializado.
A temperatura, que se encontra predefinida de
fábrica, é exibida no visor. A temperatura, que se
encontra predefinida para os 12 °C (54 °F), pode
ser alterada mediante solicitação para valores entre
os 8 °C (46 °F) e os 18 °C (64 °F), dependendo do
vinho a armazenar.
1. Ligue a cave de vinhos à corrente eléctrica
e ligue-a no interruptor ON (LIGAR)/OFF
(DESLIGAR).
0
1
2. Prima e mantenha o botão da seta UP
(PARA CIMA) ( ▲ ) ou DOWN (PARA
BAIXO) ( ▼ ) premido até que o visor
comece a piscar.
3. Solte o botão. Prima o botão da seta UP/
DOWN (PARA CIMA/BAIXO) para definir a temperatura.
O novo valor será guardado automaticamente após 6 segundos.
Poderá sentir um certo odor quando utilizar
a cave de vinhos pela primeira vez.
O odor desaparecerá após algumas horas.
1. Retire a palete de transporte sobre a qual a
cave de vinhos está colocada.
2. Ajuste os pés de modo a deixar um espaço de 30 mm (1,2") por baixo da cave de
vinhos e verifique se a mesma se mantém
na posição vertical em ambas as direcções.
Se necessário, utilize um nível.
3. Verifique se o filtro de carvão está correctamente posicionado no canto superior
esquerdo, no interior da cave de vinhos.
LIGAÇÃO ELÉCTRICA
A instalação eléctrica tem de ser correctamente efectuada, tendo em consideração todos os regulamentos
pertinentes e códigos de conduta.
A cave de vinhos funciona com uma corrente alternada monofásica.
Certifique-se de que a tensão indicada na placa de
características corresponde à sua fonte de alimentação.
A cave de vinhos está equipada com uma ficha destinada a uma tomada com ligação à terra. A Dometic
e/ou qualquer subsidiária não serão responsáveis por
qualquer incidente que possa ocorrer devido a fios
de ligação à terra defeituosos ou não existentes.
A cablagem eléctrica deve ser instalada e fixada
de modo a não entrar em contacto com peças
quentes ou afiadas da cave de vinhos.
aVisO
A cave de vinhos tem de ter ligação à terra.
!
Page 25

- 25 -
MANUTENÇÃO
Recomendamos que mantenha a sua cave de vinhos
o mais limpa possível. Desligue a cave da corrente
eléctrica antes de iniciar a limpeza. Não utilize substâncias abrasivas ou com odores fortes. Utilize um
pano macio ou uma esponja e um detergente suave.
É muito importante verificar regularmente se a
circulação de ar por baixo e atrás da cave não está
bloqueada.
A condensação é direccionada para um pequeno
recipiente posicionado atrás da cave de vinhos. O
recipiente tem uma esponja que facilita a evaporação
da condensação. Certifique-se de que o tubo de plástico que direcciona a água do interior da cave para o
recipiente não está bloqueado por pó ou sujidade.
Deve substituir o filtro de carvão da ventilação
interior a cada dois anos. O filtro é ajustado no canto
superior esquerdo, no interior da cave de vinhos.
Se a cave de vinhos não funcionar, verifique os
seguintes pontos antes de contactar a assistência
técnica:
• O fusível da fonte de alimentação está intacto?
• A ficha está correctamente inserida na tomada?
• A cave de vinhos está ligada?
Se a causa da avaria não está entre os pontos listados
acima, contacte a assistência técnica autorizada.
A cave de vinhos está equipada com protecção
contra sobreaquecimento. Um técnico de assistência
autorizado pode verificar se a protecção foi accionada ou não.
INSTALAÇÃO DE CALHAS E SUPORTES DE
PRATELEIRAS
INSTALAÇÃO DA CALHA NA PARTE LATERAL DO
ARMÁRIO
2
1
1
2
Calha, lado direito
Calha, lado esquerdo
1. Introduza o gancho n. 1 no entalhe localizado na zona traseira da parte lateral do
armário e encaixe-o.
2. Introduza o gancho n. 2 no entalhe localizado na zona dianteira da parte lateral
do armário e encaixe-o pressionando para
baixo tal como se encontra representado na
fotografia.
3.
4.
1.
2.
3. Introduza a prateleira deslizante nas calhas
do armário e encaixe-a.
Page 26

- 26 -
COMO REMOVER A PRATELEIRA
Solte o dispositivo de imobilização em cada um dos
lados (indicado pelas setas) e retire-o da prateleira.
2.
1.
3.
SUPORTE DE PRATELEIRA PARA A PRATELEIRA DE
ARMAZENAMENTO
Coloque os ganchos de suporte nos orifícios ao nível
desejado, introduzindo-os do modo representado
pela seta 1 e encaixando-os de acordo com a indicação exibida pela seta 2.
1.
2.
BARRA DE REFORÇO
A barra de reforço n. 1 é um suporte de prateleiras e,
por razões de segurança, não pode ser removida.
1
Modelo
N. de prateleiras de armazenamento
N. de
garrafas
A 192 G
A 192 D
3+2 192
atenÇÃO
Tenha em atenção que não deve armazenar mais do
que uma fila de garrafas nas prateleiras deslizantes.
ACESSÓRIO
Cada kit contém duas prateleiras e suportes de prateleiras.
• Prateleira deslizante
• Prateleira de armazenamento
Modelo N. máx. de prateleiras deslizantes
A 192 G
A 192 D
15
ARMAZENAR O VINHO
As garrafas devem ser armazenadas na cave de vinhos de acordo com o seu tamanho (diâmetro e altura). Tenha em consideração estas diferenças quando
armazenar o seu vinho e evite misturar as garrafas.
Número máximo de garrafas ("Bordeaux Tradition")
que podem ser armazenadas numa cave de vinho
equipada com prateleiras de armazenamento e uma
prateleira deslizante:
As prateleiras deslizantes e as prateleiras de armazenamento podem ser colocadas em várias posições,
dependendo do tamanho da sua cave de vinhos.
É importante armazenar as garrafas lateralmente de
maneira a que a rolha permaneça em contacto com o
vinho.
Coloque as garrafas de cima para baixo na cave para
obter uma óptima economia de espaço.
Consulte o Apêndice A para obter informações acerca do melhor modo de armazenamento de garrafas
"Burgundy"/"Bourgogne" e "Bordeaux Tradition".
Page 27

- 27 -
INNLEDNING
Takk for at du valgte Dometic vinskap.
Les denne veiledningen nøye før du installerer det
nye vinskapet ditt. Vi tror du vil bli svært fornøyd
med kjøpet.
Vinskapet må installeres og betjenes i samsvar med
disse instruksjonene for at det skal fungere som
tiltenkt og på en mest mulig økonomisk måte.
Dette apparatet er kun beregnet til oppbevaring av
vin.
Dette apparatet er beregnet for bruk i husholdninger, restauranter og andre private bruksområder.
Personer (inklusive barn) som på grunn av sine
fysiske, sensoriske eller mentale ferdigheter eller på grunn av sin uerfarenhet eller manglende
kjennskap ikke er i stand til å bruke produktet på
en sikker måte, må ikke bruke dette produktet uten
oppsyn eller anvisning fra en ansvarlig person.
Oppbevar og bruk apparatet utenfor barns rekkevidde.
Ikke lagre eksplosjonsfarlige stoffer som f. eks.
spraybokser med drivgass i apparatet.
TRANSPORTSKADER
Undersøk vinskapet med tanke på transportskader.
Eventuelle skader må rapporteres til speditøren
innen fastsatt frist for denne typen produkter. Hvis
det ikke er fastsatt noen slik rapporteringsfrist, må
skaden rapporteres innen sju dager etter levering.
LEVERANSEN OMFATTER
Når du pakker ut vinskapet, må sjekke at følgende
utstyr følger med:
• Oppbevaringshyller
• Støtte (gulv)
• Hyllestøtter
• Nøkler
• Fastskrunøkkel
• Bruksanvisning
Nødvendig verktøy som ikke følger med:
• Skrutrekker (stjerne)
MERKEPLATE
Sjekk merkeskiltet øverst til
venstre på innsiden av vinskapet
for å være sikker på at du har
mottatt riktig modell.
Merkeplaten inneholder informasjon som du må
oppgi hvis du må kontakte serviceavdelingen vår.
Det er lurt å notere dem ned her:
Modellbetegnelse . . . . . . . . . . . . . . . . . . . . . . . .
Produktnummer . . . . . . . . . . . . . . . . . . . . . . . . . .
Serienummer . . . . . . . . . . . . . . . . . . . . . . . . . . . .
Spenning . . . . . . . . . . . . . . . . . . . . . . . . . . . . . . .
KONTAKTINFORMASJON
EUROPA
Kontakt din forhandler for service/hjelp.
INSTALLASJON
Følg disse instruksjonene:
• For best mulig ytelse må luften kunne sirkulere
fritt over kjøleenheten på baksiden av vinskapet.
• Den fristående av källaren betyder att den ska stå
minst 100 mm (4”) från den bakre väggen och
50 mm (2”) från sidoväggarna.
• Sørg for en klaring på minst 100 mm (4") over
vinskapet.
30 mm (1.2”)
50 mm (2”)50 mm (2”)
Bak
Vegg
Vegg
100 mm (4”)
• Plasser vinskapet langt unna eventuelle varmekilder som f.eks. radiator, komfyr eller sterkt
sollys.
• Vær oppmerksom på at det må være mulig å
åpne vinskapet minst 90° slik at skyvehyllene
kan trekkes ut.
Page 28

- 28 -
TEMPERATURINNSTILLING
Vinskapet har en elektronisk styring. Dette gjør at
du kan programmere temperaturen inne i vinskapet. Vinen kan da lagres mellom 10 °C (50 °F) og
15 °C (59 °F) avhengig av ekspertenes råd.
Temperaturen, som er forhåndsinnstilt fra fabrikken, vises i displayet. Temperaturen, som er
forhåndsinnstilt på 12 °C (54 °F), kan endres på
forespørsel mellom 8 °C (46 °F) og 18 °C (64 °F),
avhengig av vinen som lagres.
1. Plugg inn vinskapet og slå det på med AV/
PÅ-bryteren.
0
1
2. Trykk og hold inne OPP- ( ▲ ) eller ( ▼ )
NED-pilknappen noen sekunder til displayet begynner å blinke.
3. Slipp knappen. Trykk på OPP-/NED-pilknappene for å stille inn temperaturen.
Den nye verdien lagres automatisk etter 6
sekunder.
Første gang skapet tas i bruk, kan du
merke litt lukt.
Denne forsvinner etter noen timer.
1. Fjern transportpallen som vinskapet står
på.
2. Juster føttene slik at det blir en klaring på
30 mm (1,2") under vinskapet og kontroller at det står i vertikal stilling i begge
retninger. Bruk vater om nødvendig.
3. Kontroller at kulllteret er på plass øverst
i venstre hjørne inne i vinskapet.
ELEKTRISK TILKOBLING
Den elektriske tilkoblingen må utføres korrekt i
samsvar med alle gjeldende bestemmelser og tekniske regler.
Vinskapet drives på en-fas vekselstrøm.
Kontroller at spenningen som er angitt på merke-
platen samsvarer med strømtilførselen din.
Vinskapet er utstyrt med et støpsel for jordet stik-
kontakt. Dometic og dets datterselskaper tar ikke
ansvar for ulykker grunnet manglende eller defekte
jordingskabler.
Elektriske ledninger må legges og sikres slik at
de ikke kan komme i kontakt med varme eller
skarpe deler på vinskapet.
adVarsel
Vinskapet må jordes.
!
Page 29

- 29 -
VEDLIKEHOLD
Vi anbefaler at du holder vinskapet så rent som
mulig. Koble fra skapet før rengjøring. Ikke bruk
slipende midler eller midler med sterk lukt. Bruk
en myk klut eller svamp og et mildt rengjøringsmiddel.
Det er svært viktig å kontrollere regelmessig at
luftsirkulasjonen under og bak skapet ikke er blokkert.
Kondens samles i en liten kopp på baksiden av
vinskapet. Koppen har en svamp som hjelper kondensen til å fordampe. Kontroller at plastrøret som
fører vannet fra innsiden til koppen ikke er blokkert av støv eller smuss.
Det innvendige kulllteret for den innvendige
ventilasjonen må byttes annethvert år. Filteret er
montert øverst i venstre hjørne i vinskapet.
Hvis vinskapet ikke fungerer, kontrollerer du følgende punkter før du kontakter en servicetekniker:
• Er sikringen for strømtilførselen intakt?
• Er støpslet korrekt plugget inn i stikkontakten?
• Er vinskapet slått på?
Hvis årsaken til feilen ikke er blant disse punktene,
må du kontakte en autorisert servicetekniker.
Vinskapet har en overopphetingsbeskyttelse. En
autorisert servicetekniker kan kontrollere om denne
er utløst eller ikke.
INSTALLERE GUIDES OG HYLLESTØTTER
INSTALLERE SKINNE PÅ SKAPETS INNSIDE
2
1
1
2
skinne, høyre side
skinne, venstre side
1. Sett krok nr.1 inn i sporet bak på skapsiden og trykk den inn.
2. Sett krok nr. 2 inn i sporet i fronten av
skapsiden og trykk den ned som vist på
bildet.
3.
4.
1.
2.
3. Sett skyvehyllen inn på skapskinnene og
skyv den inn.
Page 30

- 30 -
SLIK FJERNER DU HYLLEN
Løsne låsemekanismen på hver side som vist med
pilene og trekk ut hyllen.
2.
1.
3.
HYLLESTØTTE FOR OPPBEVARINGSHYLLE
Plasser støttekrokene i hullene i ønsket høyde,
trykk inn som pil 1 viser og skyv ned som pil 2
viser.
1.
2.
FORSTERKINGSSTANG
Forsterkingsstangen nr.1 er en hyllestøtte og må
ikke fjernes av sikkerhetsmessige grunner.
1
Modell
Ant. oppbevaringshyller
Ant. asker
A 192 G
A 192 D
3+2 192
FOrsiKtig
Legg merke til at du ikke må lagre mer enn ett lag
med asker på skyvehyllene.
TILBEHØR
Hvert sett inneholder to hyller og hyllestøtter.
• Skyvehylle
• Oppbevaringshylle
Modell Maks. ant. skyvehyller
A 192 G
A 192 D
15
LAGRING AV VINEN
Flasker bør lagres i vinskapet i henhold til størrelsen (diameter og høyde). Ta hensyn til disse
forskjellene når du skal lagre vinen, unngå å blande
askene.
Maksimum antall "Bordeaux tradition"-asker som
kan lagres i et vinskap som har oppbevaringshyller
og én skyvehylle:
Skyvehyllene og oppbevaringshyllene kan plasseres i forskjellige posisjoner, avhengig av størrelsen
på vinskapet.
Det er viktig å lagre askene liggende slik at korken er i kontakt med vinen.
Plasser asker fra bunn til tak i skapet for å utnytte
volumet optimalt.
Se V edlegg A for å få informasjon om hvordan du
stabler "Burgundy"/"Bourgogne"- og "Bordeaux
Tradition"-asker på en best mulig måte.
Page 31

- 31 -
INLEDNING
Tack för att du valt ett vinlagringsskåp från Dometic.
Läs de här anvisningarna noga innan du installerar
vinlagringsskåpet. Vi hoppas att du blir helt nöjd
med ditt köp.
För att det ska fungera korrekt och på ett ekonomiskt sätt måste vinlagringsskåpet installeras och
användas i enlighet med dessa anvisningar.
Detta skåp är endast avsett för lagring av vin.
Detta skåp är avsett för användning i hushåll, på
restauranger och på andra bostadsliknande platser.
Personer (och barn), som på grund av fysiska, sen-
soriska eller mentala funktionshinder eller på grund
av oerfarenhet eller ovetande inte kan använda
produkten på ett säkert sätt, bör inte använda denna
produkt utan uppsikt eller hjälp av en ansvarig
person.
Förvara och använd apparaten utom räckhåll för
barn.
Lagra inga ämnen som kan explodera i apparaten,
som t.ex. sprayburkar med drivgas.
TRANSPORTSKADOR
Kontrollera om vinlagringsskåpet uppvisar några
transportskador. Skador måste anmälas till leveransföretaget inom lagstadgad tid, eller inom den
tid som anges för produkttypen i fråga. Om det inte
nns några etablerade regler för skadeanmälningar,
ska skadan anmälas inom sju dagar efter leverans.
LEVERANSOMFATTNING
Kontrollera att följande tillbehör nns med när du
packar upp vinlagringsskåpet:
• Lagringshyllor
• Stöd (golv)
• Hyllstöd
• Nycklar
• Fast nyckel
• Bruksanvisning
Nödvändiga verktyg, ingår ej i leveransen
• Skruvmejsel (stjärna fyrkant)
TYPSKYLT
Kontrollera att du har fått
rätt modell genom att läsa
uppgifterna på typskylten,
som sitter upptill till vänster
i skåpet.
På typskylten nns de uppgifter du behöver ange
om du kontaktar service.
Anteckna dem gärna här nedan:
Modellbeteckning . . . . . . . . . . . . . . . . . . . . . . . .
Produktnummer . . . . . . . . . . . . . . . . . . . . . . . . . .
Serienummer . . . . . . . . . . . . . . . . . . . . . . . . . . . .
Spänning . . . . . . . . . . . . . . . . . . . . . . . . . . . . . . .
KONTAKTINFORMATION
EUROPA
Kontakta din återförsäljare för service/support.
INSTALLATION
Följ nedanstående anvisningar:
• För optimal prestanda måste luften kunna cirkulera fritt över kylaggregatet på vinlagringsskåpets baksida.
• Kjellerens frittstående konstruksjon betyr at den
må stå minst 100 mm (4”) fra bakveggen og
50 mm (2”) fra sideveggene.
• Ovanför vinlagringsskåpet ska det nnas minst
100 mm (4”) fritt utrymme.
30 mm (1.2”)
50 mm (2”)50 mm (2”)
Baksida
Vägg
Vägg
100 mm (4”)
• Placera vinlagringsskåpet så långt bort från
eventuella värmekällor som möjligt, t.ex. värmeelement, spis, starkt solljus.
• Tänk på att vinlagringsskåpets dörr ska kunna
öppnas minst 90° så att man kan dra ut de utdragbara hyllorna.
Page 32

- 32 -
TEMPERATURINSTÄLLNING:
Vinlagringsskåpet har elektronisk temperaturreglering. Du har möjlighet att programmera temperaturen i vinlagringsskåpet. Vinet lagras i en temperatur mellan 10 ° C (50 °F) och 15 °C (59 °F), enligt
vinexperternas rekommendationer.
Den förinställda temperaturen (fabriksinställning)
visas på displayen. Temperaturen är förinställd på
12 °C (54 °F) och kan ändras till värden mellan
8 °C (46 °F) och 18 °C (64 °F), beroende på vilket
vin som ska lagras.
1. Anslut vinlagringsskåpet till eluttaget och
slå på det med PÅ/AV-knappen.
0
1
2. Tryck på pilknapp UPP ( ▲ ) eller NED
( ▼ ) och håll den nedtryckt några sekun-
der tills displayen börjar blinka.
3. Släpp knappen. Ställ in temperaturen med
pilknapparna UPP/NED.
Det nya värdet sparas automatiskt efter
6 sekunder.
Det kan förekomma en viss luktbildning
första gången vinlagringsskåpet används.
Detta försvinner efter några timmar.
1. Ta bort transportpallen som vinlagringsskåpet levereras på.
2. Justera skåpfötterna så att det nns en
luftspalt på 30 mm (1.2”) under vinlagringsskåpet, se till att skåpet står vågrätt i
båda riktningarna. Använd ett vattenpass
vid behov.
3. Kontrollera att kolltret sitter på plats,
upptill till vänster inuti vinlagringsskåpet.
ELANSLUTNING
Elanslutningen ska göras på ett korrekt sätt, alla
bestämmelser och regler ska följas noga.
Vinlagringsskåpet ansluts till enfas växelström.
Kontrollera att spänningsuppgifterna på typskylten
stämmer överens med elnätet.
Vinlagringssskåpet har en stickkontakt som är
avsedd för jordade uttag. Dometic inkl. dotterbolag
övertar inget ansvar för skador som orsakas p.g.a.
att jordledningar saknas eller är skadade.
Elkablar ska dras och säkras så att de inte kommer i kontakt med vinlagringsskåpets heta eller
vassa delar.
Varning
Vinlagringsskåpet måste jordas.
!
Page 33

- 33 -
UNDERHÅLL OCH SKÖTSEL
Vinlagringsskåpet bör alltid hållas så rent möjligt.
Dra ut kontakten från eluttaget innan du rengör
skåpet. Använd inga repande eller starkt parfymerade medel. Använd en mjuk trasa eller svamp och
ett milt rengöringsmedel.
Kontrollera regelbundet att luftcirkulationen under
och bakom vinlagringsskåpet inte blockeras.
Kondensvattnet samlas upp i en liten skål på skåpets baksida. I skålen nns en svamp som underlättar avdunstningen av vattnet. Kontrollera att plaströret som leder ut vattnet från skåpet inte täpps
igen av damm eller smuts.
Kolltret inne i vinlagringsskåpet ska bytas vartannat år. Filtret sitter upptill till vänster i skåpet.
Om vinlagringsskåpet skulle sluta fungera, kontrollera nedanstående punkter innan du kontaktar
service:
• Är säkringen hel?
• Är stickkontakten ordentligt ansluten?
• Är vinlagringsskåpet påslaget?
Om felet inte kan åtgärdas med hjälp av ovanstående, kontakta en auktoriserad servicetekniker.
Vinlagringsskåpet har ett överhettningsskydd. En
auktoriserad servicetekniker kan kontrollera om det
har löst ut.
MONTERING AV SKENOR OCH HYLLSTÖD
MONTERA SKENOR I SKÅPET
2
1
1
2
skena, höger sida
skena, vänster sida
1. Sätt in krok 1 i slitsen baktill på skåpets
vägg, skjut in den riktigt.
2. Sätt in krok 2 i slitsen framtill på skåpväggen, skjut nedåt, se bilden.
3.
4.
1.
2.
3. Sätt in den utdragbara hyllan på skenorna
och skjut in den.
Page 34

- 34 -
TA BORT HYLLAN
Lås upp låsanordningen på varje sida, se pilarna,
och dra ut hyllan.
2.
1.
3.
HYLLSTÖD FÖR LAGRINGSHYLLOR
Sätt in stödkrokarna på önskad höjd; sätt in dem i
hålen, tryck inåt, se pil 1, och skjut nedåt, se pil 2.
1.
2.
FÖRSTÄRKNINGSLIST
Förstärkningslisten 1 är ett hyllstöd, som av säkerhetsskäl inte får tas bort.
1
Modell
Antal
lagringshyllor
Antal
askor
A 192 G
A 192 D
3+2 192
OBser Vera
Stapla inte askorna i era rader på de utdragbara
hyllorna (endast en rad).
TILLBEHÖR
Varje sats består av två hyllor och hyllstöd.
• Utdragbar hylla
• Lagringshylla
Modell Max. antal utdragbara hyllor
A 192 G
A 192 D
15
LAGRING AV VIN
Flaskorna ska lagras efter storlek (diameter och
höjd) i vinlagringsskåpet. Tänk på detta när du fyl-
ler på skåpet, blanda inte olika askstorlekar.
Maximalt antal askor av typen "Bordeaux Tradi-
tion", som kan förvaras i ett vinlagringsskåp som är
utrustat med lagringshyllor och en utdragbar hylla:
Beroende på vinlagringsskåpets storlek kan de
utdragbara hyllorna och lagringshyllorna placeras i
era olika lägen.
Det är viktigt att askorna lagras liggande så att
vinet kommer i kontakt med korken hela tiden.
Lägg askorna "omlott" i vinlagringsskåpet så får
du plats med så många som möjligt.
Se Bilaga A för information om hur man bäst lag-
rar askor av typen "Bourgogne" och "Bordeaux
Tradition".
Page 35

- 35 -
INDLEDNING
Tak, fordi du har valgt Dometic vinkælderen.
Læs disse anvisninger omhyggeligt, før du instal-
lerer og anvender din nye vinkælder. Vi er sikre på,
at du vil blive meget tilfreds med dit køb.
Vinkælderen skal installeres og bruges i overensstemmelse med disse anvisninger for, at den fungerer korrekt og økonomisk.
Dette apparat er udelukkende beregnet til brug til
opbevaring af vin.
Dette apparat er beregnet til brug i husholdninger,
restauranter og andre beboelseslignende anvendelser.
Personer (inkl. børn), der på grund af deres fysiske,
sanse- eller mentale evner eller deres uerfarenhed eller uvidenhed ikke er i stand til at anvende
produktet sikkert, bør kun anvende dette produkt
under en ansvarlig persons opsyn eller anvisning.
Opbevar og anvend apparatet uden for børns rækkevidde.
Opbevar ikke eksplosive stoffer som f.eks. spraydåser med drivgas i apparatet.
TRANPORTSKADER
Efterse vinkælderen for transportskader. Du skal
rapportere alle skader til rmaet, der er ansvarlig
for leveringen, inden for den lovmæssige eller
anførte tid for denne produkttype. Hvis der ikke
ndes en fastlagt rapporteringstid, skal skaden rapporteres inden for syv dage efter leveringen.
LEVERINGSOMFANG
Kontrollér, at følgende tilbehør er indeholdt, når du
pakker vinkælderen ud:
• Opbevaringshylder
• Støtte (gulv)
• Hyldestøtter
• Nøgler
• Gaffelnøgle
• Betjeningsvejledning
Nødvendigt ekstra værktøj, der ikke er indeholdt:
• Skruetrækker (stjerne)
DATASKILT
Kontrollér dataskiltet i vinkælderen øverst til venstre for at
sikre, at du har modtaget den
rigtige model.
Dataskiltet viser detaljer, som du skal citere, hvis
du kontakter servicepersonale.
Det er en god idé at notere dem her:
Modelbetegnelse . . . . . . . . . . . . . . . . . . . . . . . . .
Produktnummer . . . . . . . . . . . . . . . . . . . . . . . . . .
Serienummer . . . . . . . . . . . . . . . . . . . . . . . . . . . .
Spænding. . . . . . . . . . . . . . . . . . . . . . . . . . . . . . .
KONTAKTINFORMATION
EUROPA
Kontakt din forhandler for service/støtte.
INSTALLATION
Følg disse nvisninger:
• For at opnå den bedste funktion skal luft cirkulere frit over køleenheden bagved vinkælderen.
• Den fritstående konstruktion af kælderen betyder, at den bør stå mindst 100 mm (4”) fra
bagvæggen og 50 mm (2”) fra sidevæggene.
• Sørg for en afstand på mindst 100 mm (4”) over
vinkælderen.
30 mm (1.2”)
50 mm (2”)50 mm (2”)
Bagside
Væg
Væg
100 mm (4”)
• Placér ikke din vinkælder i nærheden af varmekilder, f.eks. radiator, kogeapparat eller kraftigt
sollys.
• Bemærk, at det skal være muligt at åbne vinkælderens dør mindst 90°, så glidehylderne kan
trækkes ud.
Page 36

- 36 -
TEMPERATURINDSTILLING
Vinkælderen er udstyret med en elektronisk styring. Det gør det muligt for dig at programmere
temperaturen i vinkælderen. Din vin opbevares
mellem 10 °C (50 °F) og 15 °C (59 °F) i henhold
til ekspertråd.
Temperaturen, der er indstillet fra fabrikken, vises
på displayet. Temperaturen, der er indstilllet på
12 °C (54 °F), kan efter behov ændres mellem 8 °C
(46 °F) og 18 °C (64 °F) afhængigt af den opbevarede vin.
1. Tilslut vinkælderen, og tænd den med
afbryderen ON/OFF.
0
1
2. Tryk på pileknappen OP ( ▲ ) eller NED,
( ▼ ) og hold den inde i et par sekunder,
indtil displayet begynder at blinke.
3. Slip knappen. Tryk på pileknapperne OP/
NED for at indstille temperaturen.
Den nye værdi gemmes automatisk efter 6
sekunder.
Man kan bemærke en lugt, når vinkælderen anvendes første gang.
Den forsvinder efter et par timer.
1. Fjern transportpallen, som din vinkælder
står på.
2. Justér fødderne, så der er en afstand på
30 mm (1.2”) under vinkælderen, og
kontrollér, at den står i en vertikal position
i begge retninger. Anvend om nødvendigt
et vaterpas.
3. Kontrollér, at trækulslteret er på plads
i øverste venstre hjørne i vinkælderen.
ELEKTRISK TILSLUTNING
Den elektriske installation skal udføres korrekt, og
der skal tages højde for alle relevante forskrifter og
praksiskodekser.
Vinkælderen tilsluttes til enfaset vekselstrøm.
Kontrollér, at spændingen, der er angivet på data-
skiltet, svarer til din netforsyning.
Vinkælderen er udstyret med et stik, der er bereg-
net til en jordforbundet stikdåse. Dometic og dets
underleverandører er ikke ansvarlige for ulykker på
grund af manglende eller defekte jordforbindelsesledninger.
Elektriske ledninger skal trækkes og sikres, så
de ikke kan komme i kontakt med vinkælderens
varme eller skarpe dele.
adVarsel
Vinkælderen skal jordforbindes.
!
Page 37

- 37 -
VEDLIGEHOLDELSE
Vi anbefaler, at du holder din vinkælder så ren
som mulig. Træk kælderens stik ud før rengøring.
Anvend ikke slibende eller kraftigt lugtende stoffer.
Anvend en glat klud eller svamp og let rengøringsmiddel.
Det er meget vigtigt regelmæssigt at kontrollere, at
luftcirkulationen under og bagved kælderen ikke er
blokeret.
Kondens opsamles i en lille beholder, der er placeret bag på vinkælderen. Beholderen har en svamp,
som hjælper kondensen til at fordampe. Kontrollér,
at plastikrøret, der leder vandet fra det indvendige
rum til beholderen, ikke er blokeret af støv eller
snavs.
Du skal udskift det indvendige trækulsventilati-
onslter hvert andet år. Filteret er monteret i det
øverste venstre hjørne i vinkælderen.
Hvis vinkælderen ikke fungerer, skal du kontrollere
følgende punkter, før du ringer til en servicetekniker:
• Er netforsyningens sikring intakt?
• Er stikket sat ordentligt i stikdåsen?
• Er vinkælderen tændt?
Kontakt en autoriseret servicetekniker, hvis årsagen
til fejlen ikke ndes blandt ovennævnte punkter.
Vinkælderen er udstyret med en overophedningsbeskyttelse. En autoriseret serivicetekniker kan
kontrollere, hvorvidt den er blevet udløst.
INSTALLATION AF FØRINGER OG HYLDESTØTTER
INSTALLATION AF SKINNE PÅ KABINETTETS SIDE
2
1
1
2
skinne, højre side
skinne, venstre side
1. Sæt krog nr.1 i indhakket bagest i kabinettets side, og skub den ind.
2. Installér krog nr. 2 i indhakket forrest i
kabinettets side, og skub den ned som vist
på billedet.
3.
4.
1.
2.
3. Sæt glidehylden i kabinettets skinner, og
skub den ind.
Page 38

- 38 -
SÅDAN FJERNES HYLDEN
Åbn låsemekanismen på hver side som vist med
pilene, og træk hylden ud.
2.
1.
3.
HYLDESTØTTE TIL OPBEVARINGSHYLDE
Placér støttekrogene i hullerne på det ønskede niveau, tryk dem ind, som pil 1 angiver, og tryk ned,
som pil 2 viser.
1.
2.
FORSTÆRKNINGSSTANG
Forstærkningsstangen nr.1 er en hyldestøtte og må
af hensyn til sikkerheden ikke fjernes.
1
Model
Antal opbevaringshylder
Antal
asker
A 192 G
A 192 D
3+2 192
FOrsigtig
Bemærk, at du ikke bør opbevare mere end et lag
asker på glidehylderne.
TILBEHØR
Hvert sæt indeholder to hylder og hyldestøtter.
• Glidehylde
• Opbevaringshylde
Model Maks. antal glidehylder
A 192 G
A 192 D
15
OPBEVARING AF VINEN
Flasker bør opbevares i din vinkælder i henhold til
deres størrelse (diameter og højde). Tag højde for
disse forskelle, når du opbevarer vin, og undgå at
blande askerne.
Det maks. antal “Bordeaux”-asker, som kan opbe-
vares i en vinkælder, som er udstyret med opbevaringshylder og en glidehylde:
Glidehylderne og opbevaringshylderne kan place-
res i ere positioner afhængigt af din vinkælders
størrelse.
Det er vigtigt at opbevare asker liggende, så prop-
pen forbliver i kontakt med vinen.
Placér asker oppefra og ned i vinkælderen for
optimal brug af volumen.
Se Bilag A for information om den bedste måde
at stable “Burgundy”/”Bourgogne”-asker og
“Bordeaux”-asker på.
Page 39

- 39 -
APPENDIX A - HOW TO STORE DIFFERENT
TYPES OF BOTTLES
APPENDIX A - EINLAGERUNG UNTERSCHIEDLICHER FLASCHENTYPEN
APPÉNDICE A - MODO DE ALMACENAR
DISTINTOS TIPOS DE BOTELLAS
ANNEXE A - COMMENT RANGER
DIFFÉRENTS TYPES DE BOUTEILLES
Bordeaux/Bordolese tradition
Burgunder/Burgundy/
Bourgogne/Borgogna tradition
Example of mixed bottle types
Beispiel für Kombilagerung
Ejemplo de almacenamiento de distintos tipos de botellas
Exemple de bouteilles mixtes
Esempio con diversi tipi di bottiglie
Exemplo de tipos de garrafas misturados
Exempel på blandade fl asktyper
Eksempel på blandede fl asketyper
Eksempel blandede fl asketyper
APPENDIX A
APPENDICE A - COME CONSERVARE
DIVERSI TIPI DI BOTTIGLIE
APÊNDICE A - COMO ARMAZENAR VÁRIOS
TIPOS DE GARRAFAS
APPENDIX A - HUR MAN LAGRAR OLIKA
FLASKTYPER
TILLEGG A - HVORDAN LAGRE
FORSKJELLIGE FLASKETYPER
BILAG A - SÅDAN OPBEVARER DU
FORSKELLIGE TYPER FLASKER
Page 40

- 40 -
SLIDING SHELF
Use the sliding shelf when storing specially shaped
bottles. NOTE! Only one layer of bottles.
SCHIEBERREGAL
Lagern Sie Flaschen mit Spezialform auf dem Schieberegal.
HINWEIS! Nur eine Lage Flaschen.
ESTANTERÍA DESLIZANTE
Utilice la estantería deslizante cuando se disponga a almacenar botellas con formas especiales.
NOTA! Coloque una sola
capa de botellas.
CLAYETTE COULISSANTE
Utilisez la clayette coulissante pour stocker des bouteilles de
forme spéciale.
N.B. Une seule rangée de bouteilles.
RIPIANO SCORREVOLE
Utilizzare il ripiano scorrevole quando si conservano
bottiglie di forma particolare. NOTA! Riporre un solo
strato di bottiglie.
PRATELEIRA DESLIZANTE
Utilize a prateleira deslizante aquando do armazenamento de garrafas de formato especial.
NOTA! Só é
possível colocar uma la de garrafas.
UTDRAGBAR HYLLA
Använd den utdragbara hyllan när du skall lagra olik-
formade asktyper.
OBS! Endast ett lager av askor.
SKYVEHYLLE
Bruk skyvehyllen når du lagrer asker med spesiell
fasong.
MERK! Kun ett lag med asker.
GLIDEHYLDE
Anvend glidehylden, når du opbevarer specielt formede
asker.
BEMÆRK! Kun et lag asker.
APPENDIX A
Page 41

- 41 -
APPENDICE B - SCHEMA ELETTRICO
APÊNDICE B - DIAGRAMA ELÉCTRICO
APPENDIX B - ELSCHEMA
APPENDIX B - ELECTRIC DIAGRAM
APPENDIX B - ELEKTRISCHES SCHALTBILD
APPÉNDICE B - DIAGRAMA ELÉCTRICO
ANNEXE B - SCHÉMA ÉLECTRIQUE
APPENDIX B
Grau/Gris/Gris/Grigio/Cinzento/Grå
Weiß/ Blanco/Blanc/Bianco/Branco/Vit/Hvid
Schwarz/ Negro/Noir/Nero/Preto/Svart/Sort
Blau/Azul/Bleu /Blu/Azul/Blå
Rot/Rojo/Rouge/Rosso/Vermelho/Röd/Rød
Braun/Marrón/Brun/Marrone/Marrom/Brun
Gelb/Amarillo/Jaune/Giallo/Amarelo/Gul
Regler/Regulador/ Régulateur/Regolatore/
Regulador/Regulator
Schalter/ Interruptor/Interrupteur/Interruttore/
Interruptor/Strömbrytare/Bryter/ Afbryder
Trafo/Transformador/Transformateur/
Trasformatore/Transformador/Transformator/
Heizpatrone/Calentador/Elément chauffant/
Resistenza/Aquecedor/Värmepatron/
Varme-/kjøleenhet/Varme-/køleenhed
Heizelement/Elemento calentador/Elément chauffant/
Riscaldatore/Resistencia/Värmare/Varmeenhet/
Varmeelement
Thermosicherung Wasserabscheider/Condensador
de agua del termofusible/Séparateur d’eau à
thermofusible/Separatore d’acqua del termofusibile/
Separador de água do termofusível/ Termosäkring
vattenavskiljare/Termosikring kondensutskiller/
Termosikring vandseparator
Thermosicherung Boiler/ Cubierta de caldera del
termofusible/Enveloppe de la chaudière à
thermofusible/Involucro del boiler del termofusible/
Invólucro da caldeira do termofusível/Termosäkring
kokarsvep/ Termosikring kompressorkapsling/
Termosikring kedelbeklædning
Heißleiter/Termistor/Thermistance/Termistore/
Termistor/Termistor
A
B
C
D
E
F
1
2
3
4
5
6
G
H
7
Page 42

Page 43

Page 44

 Loading...