

Page 1
ENDEFR
NL
REFRIGERATION
COOLMATIC
MR07, MRR07, MH07
Refrigerator MR07, MRR07
Heating cabinet MH07
Installation and Operating Manual. . . . . . . . 7
Kühlschrank MR07, MRR 07
Wärmeschrank MH 07
Montage- und Bedienungsanleitung . . . . . 21
Réfrigérateur MR07, MRR 07
Etuve MH07
Instructions de montage et de service . . . .35
Koelkast MR07, MRR 07
Warmtekast MH 07
Montagehandleiding en
gebruiksaanwijzing . . . . . . . . . . . . . . . . . . .50
Page 2

L = 1,5 m
1
MR07
1
2
1
2
3
3
3
MR07
MR07, MRR07, MH07
2
Page 3
MR07, MRR07, MH07
min. 50 mm
min. 30 mm
min. 50 mm
min.
50 mm
min. 30 mm
11
4
3
2
11
4
2
4
MR07, MH07 MRR07
1
1
5
3
Page 4
MR07, MRR07, MH07
6
1
3
2
5
4
7
123
4
Page 5
MR07, MRR07, MH07
Ø/mm²
l/m
12 V
0 2 4 6 8 10 12 14 16 18 20 22 24 26 28
0
2
6
10
14
8
9
2
1
5
Page 6
MR07, MRR07, MH07
165
278
269
520
165
246
351
0
MR07
a
MH07
b
MRR07
6
165
278
165
278
405
405
351
461
165
246
269
165
269
417
Page 7

EN
MR07, MRR07, MH07 Explanation of symbols
Please read this instruction manual carefully before installation and first
use, and store it in a safe place. If you pass on the product to another
person, hand over this instruction manual along with it.
Contents
1 Explanation of symbols. . . . . . . . . . . . . . . . . . . . . . . . . . . . . . . . . . . . . . . . . . .7
2 Safety instructions . . . . . . . . . . . . . . . . . . . . . . . . . . . . . . . . . . . . . . . . . . . . . . .8
3 Scope of delivery . . . . . . . . . . . . . . . . . . . . . . . . . . . . . . . . . . . . . . . . . . . . . . .9
4 Intended use . . . . . . . . . . . . . . . . . . . . . . . . . . . . . . . . . . . . . . . . . . . . . . . . . . 10
5 Technical description . . . . . . . . . . . . . . . . . . . . . . . . . . . . . . . . . . . . . . . . . . .10
6 Installing and connecting the device . . . . . . . . . . . . . . . . . . . . . . . . . . . . . . . 11
7 Using the device . . . . . . . . . . . . . . . . . . . . . . . . . . . . . . . . . . . . . . . . . . . . . . . 14
8 Cleaning and maintenance. . . . . . . . . . . . . . . . . . . . . . . . . . . . . . . . . . . . . . . 16
9 Guarantee . . . . . . . . . . . . . . . . . . . . . . . . . . . . . . . . . . . . . . . . . . . . . . . . . . . .17
10 Disposal. . . . . . . . . . . . . . . . . . . . . . . . . . . . . . . . . . . . . . . . . . . . . . . . . . . . . .17
11 Troubleshooting . . . . . . . . . . . . . . . . . . . . . . . . . . . . . . . . . . . . . . . . . . . . . . .17
12 Technical data . . . . . . . . . . . . . . . . . . . . . . . . . . . . . . . . . . . . . . . . . . . . . . . . 20
1 Explanation of symbols
DANGER!
D
!
!
Safety instruction: Failure to observe this instruction will cause fatal or
serious injury.
WARNING!
Safety instruction: Failure to observe this instruction can cause fatal or
serious injury.
CAUTION!
Safety instruction: Failure to observe this instruction can lead to injury.
7
Page 8

EN
Safety instructions MR07, MRR07, MH07
NOTICE!
A
I
Failure to observe this instruction can cause material damage and impair
the function of the product.
NOTE
Supplementary information for operating the product.
2 Safety instructions
The manufacturer accepts no liability for damage in the following cases:
• Damage to the product resulting from mechanical influences and incorrect
connection voltage
• Alterations to the product without express permission from the manufacturer
• Use for purposes other than those described in the operating manual
2.1 General safety
WARNING!
!
• Before you start up the appliance for the first time, check that the
operating voltage matches the battery voltage (see type plate).
• If the cable is damaged, it must be replaced to prevent possible
electrical hazards. Only replace a damaged cable with one of the
same type and specifications.
• Have a trained technician perform the installation in wet rooms.
• Do not operate the appliance if it is visibly damaged.
• This appliance may only be repaired by qualified personnel.
Inadequate repairs can cause considerable hazards.
If you device should need repairing, please contact customer service.
A
8
NOTICE!
• Do not open the refrigerant or caloric circuit under any circumstances.
• Set up the appliance in a dry location where it is protected against
splashing water.
• Do not mount the device near other heat sources (heater, strong direct
sunlight, gas ovens, etc.)
• Ensure that the ventilation slots are not covered.
Page 9

EN
MR07, MRR07, MH07 Scope of delivery
• The appliance is not suitable for the storage of caustic materials or
materials containing solvents.
• Do not store any explosive substances, such as spray cans with propellants in the device.
2.2 Operating the appliance safely
DANGER!
D
!
• Danger of fatal injury!
Do not touch exposed cables with your bare hands. This especially
applies when operating the appliance from an AC mains.
WARNING!
• Electronic devices are not toys.
Always keep and use the device well out of the reach of children.
• Persons (including children) whose physical, sensory or mental
capabilities or lack of experience and knowledge prevent them from
using the refrigerator safely should not use this appliance without
initial supervision or instruction by a responsible person.
• If you connect the appliance to a battery, make sure that no food
comes into contact with the battery acid.
• Protect the device and the cable against heat and moisture.
• Disconnect the device and other consumers from the battery before
charging the battery with a quick charging device.
Over voltages can damage the electronics of the device.
NOTE
I
• Defrost the appliance in good time to save energy.
• Disconnect the device if you are not going to use it for a prolonged
period.
3Scope of delivery
Quantity Description
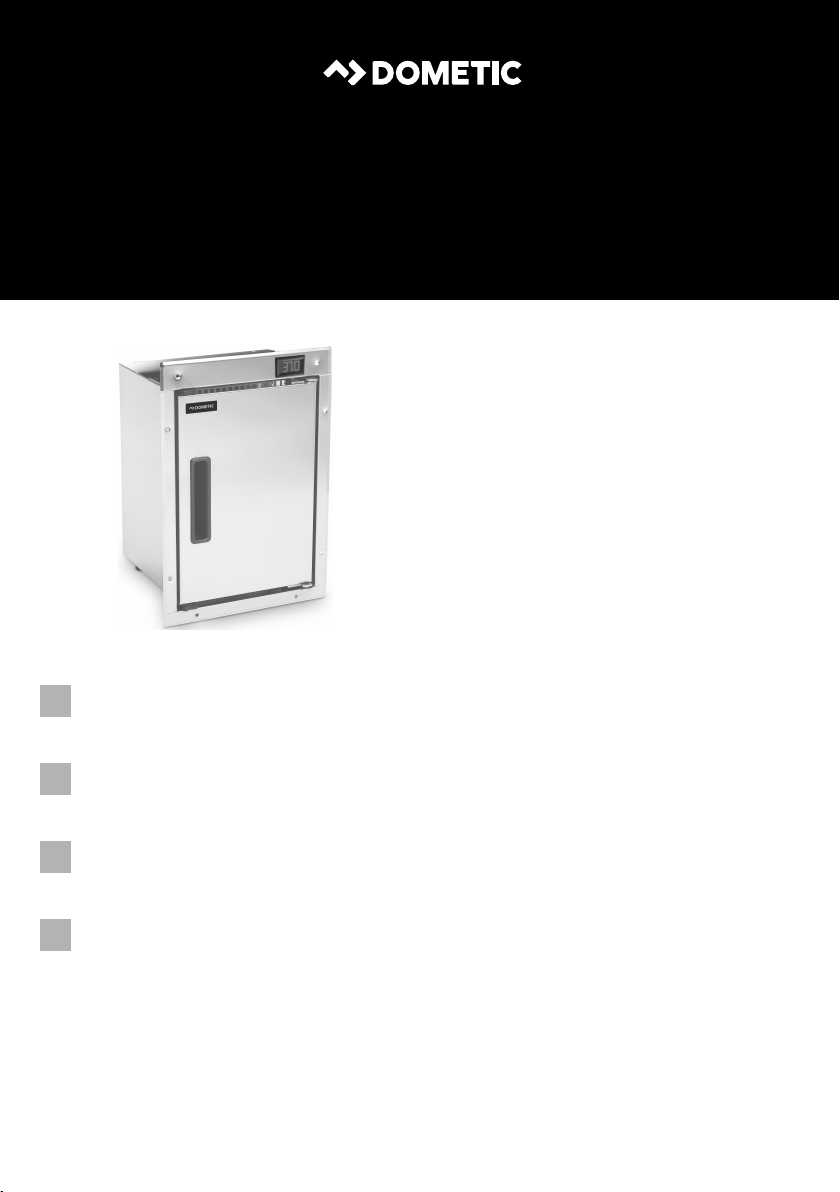
1 Stainless steel refrigarator or heating cabinet
1 Operating manual
9
Page 10

EN
Intended use MR07, MRR07, MH07
4 Intended use
The regrigerator or heating cabinet is especially suited for use in emergency
vehicles.
The MR07 and MRR07 refrigerators are ideal for cooling goods down to a
temperature of 5 °C and keeping them cool.
The heating cabinet MH07 is suitable for heating goods to a temperature of 37 °C
and for keeping them warm.
In continuous operation, the air humidity may not exceed 90 %.
CAUTION! Health hazard!
!
Please check if the cooling capacity of the device is suitable for storing
the food or medicine you wish to cool.
5 Technical description
5.1 Refrigerator MR07
The refrigerator MR 07 is suitable for use with a voltage of 12 Vg and can therefore be
used in emergency vehicles.
The refrigerator can cool goods to a fixed temperature of 5 °C and keep them cool.
The refrigerant circuit is maintenance-free.
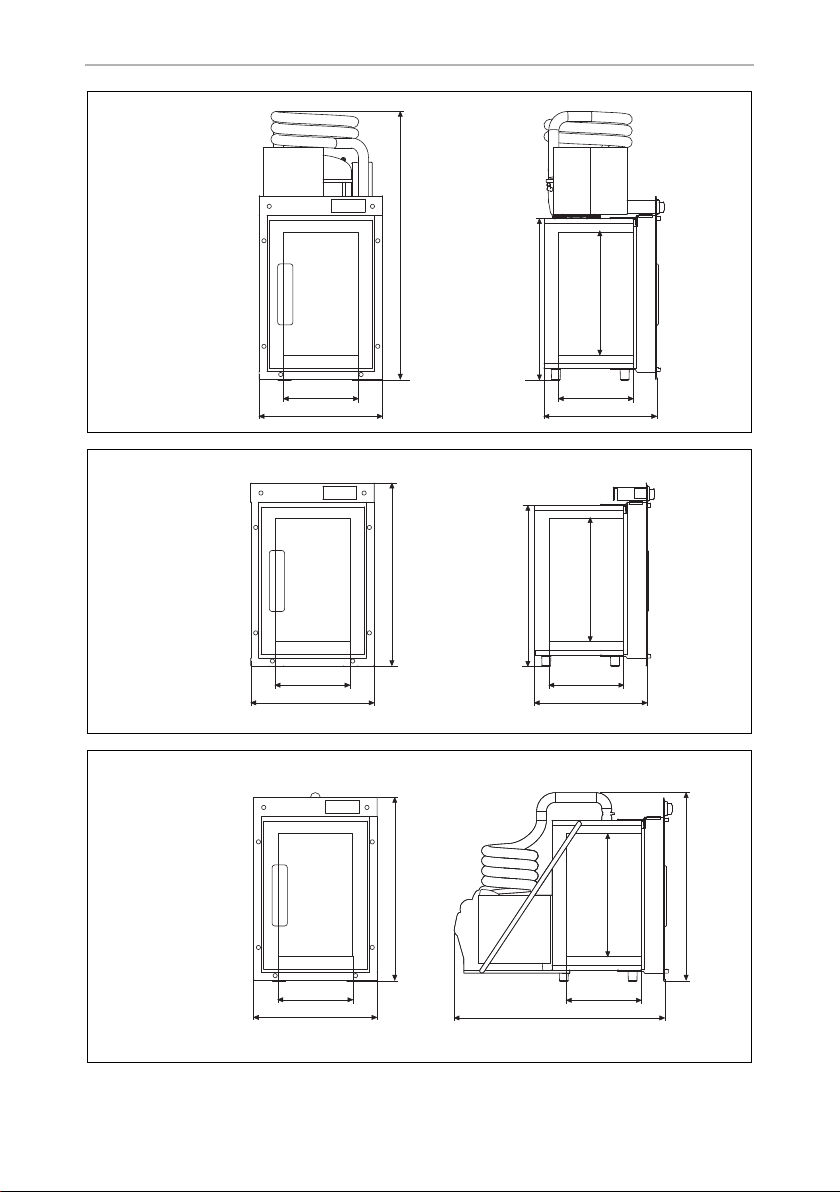
The device is equipped with a removable and separable mountable cooling unit
(fig. 1, page 2).
5.2 Refrigerator MRR07
The refrigerator MRR07 is suitable for use with a voltage of 12 Vg and can therefore
be used in emergency vehicles.
The refrigerator can cool goods to a fixed temperature of 5 °C and keep them cool.
The refrigerant circuit is maintenance-free.
10
Page 11
EN
MR07, MRR07, MH07 Installing and connecting the device
5.3 Heating cabinet MH07
The heating cabinet MH07 is suitable for use with a voltage of 12 Vg and can therefore be used in emergency vehicles.
The heating cabinet can warm up goods to a fixed temperature of 37 °C and keep
them warm.
5.4 Control elements MR07/MRR07/MH07
No. in fig. 2,
page 2
1 Temperature indication
Explanation
6 Installing and connecting the device
6.1 Removing the cooling unit (MR07 only)
➤ Bend back the guard plate (fig. 3 1, page 2) slightly.
➤ Remove the two fastening screws (fig. 3 3, page 2) using a long Phillips screw-
driver.
➤ Remove the cable binder from the rolled up cable.
➤ Unroll the cable.
➤ With the help of another person, lift up the cooling unit and turn it in the opposite
coiling direction of the suction line (fig. 3 2, page 2), until the suction line is
unrolled.
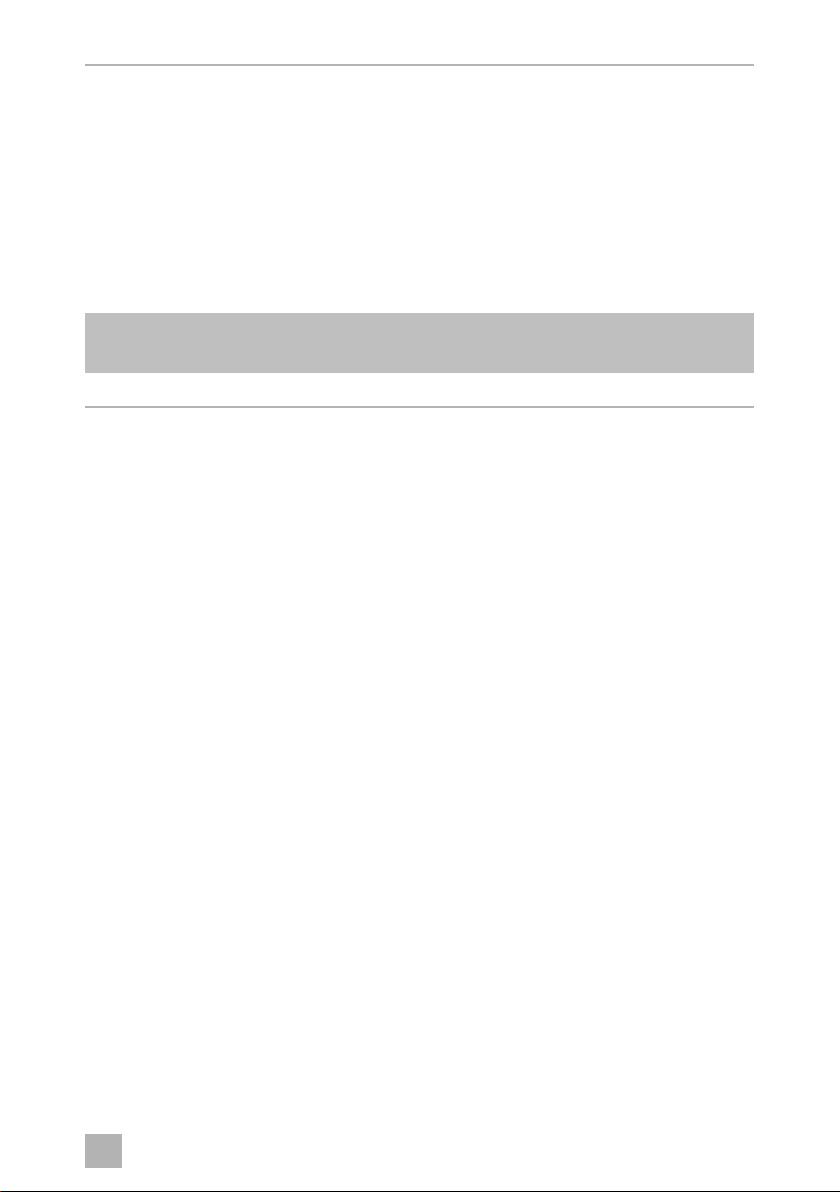
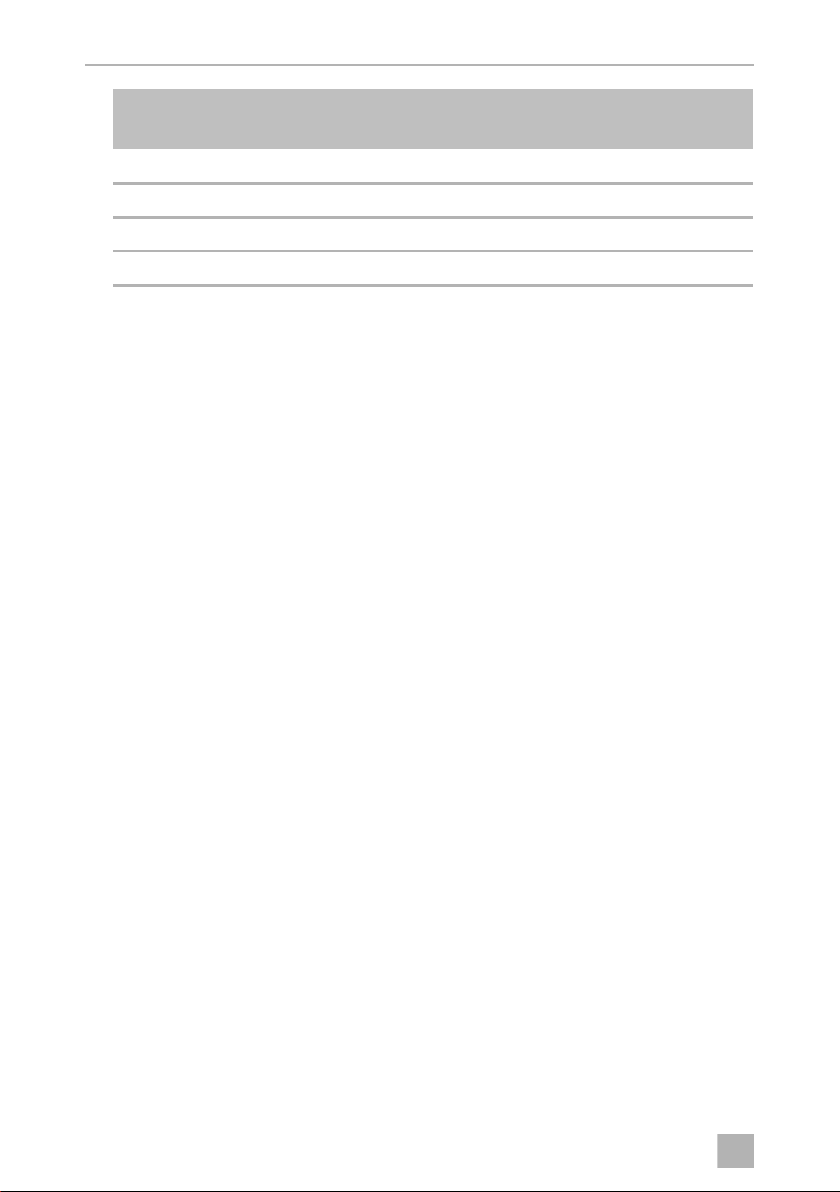
6.2 Installing the device
➤ Observe the following installation instructions for the place of installation:
– Avoid placing the device next to heat sources such as heaters, gas ovens, hot
water pipes, etc.
– Install the device in a dry, sheltered place.
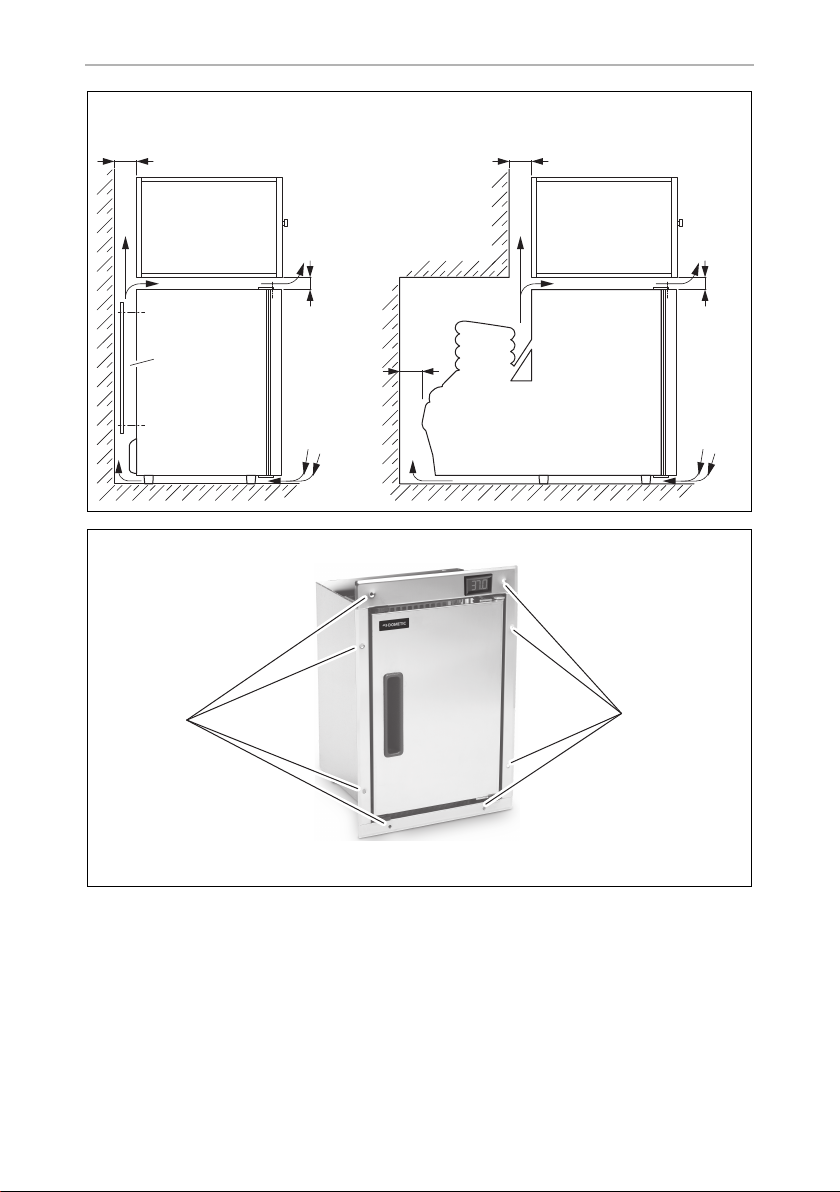
– The device must be installed so that heated air from it can dissipate easily.
Therefore make sure there is adequate ventilation (fig. 4, page 3).
11
Page 12
EN
Installing and connecting the device MR07, MRR 07, MH07
No. in fig. 4,
page 3
1 Hot waste air
2 Cold intake air
3 Condenser
4 With decorative panel 50 mm space at the top!
➤ Fix the device with eight screws (fig. 5 1, page 3).
Explanation
6.3 Removing the transport protection
The device has a locking mechanism to protect it during transport. The following
settings are possible (fig. 6, page 4):
• Position 1 (transport lock): (1). The door is locked and secured. To open the door,
turn the bolt to position 2.
• Position 2: (2). The door can be opened.
• Position 3 (“VENT” position): (3). The door is slightly open, but fixed in position.
Use this position, for example, if you are not going to use the device for a long
time.
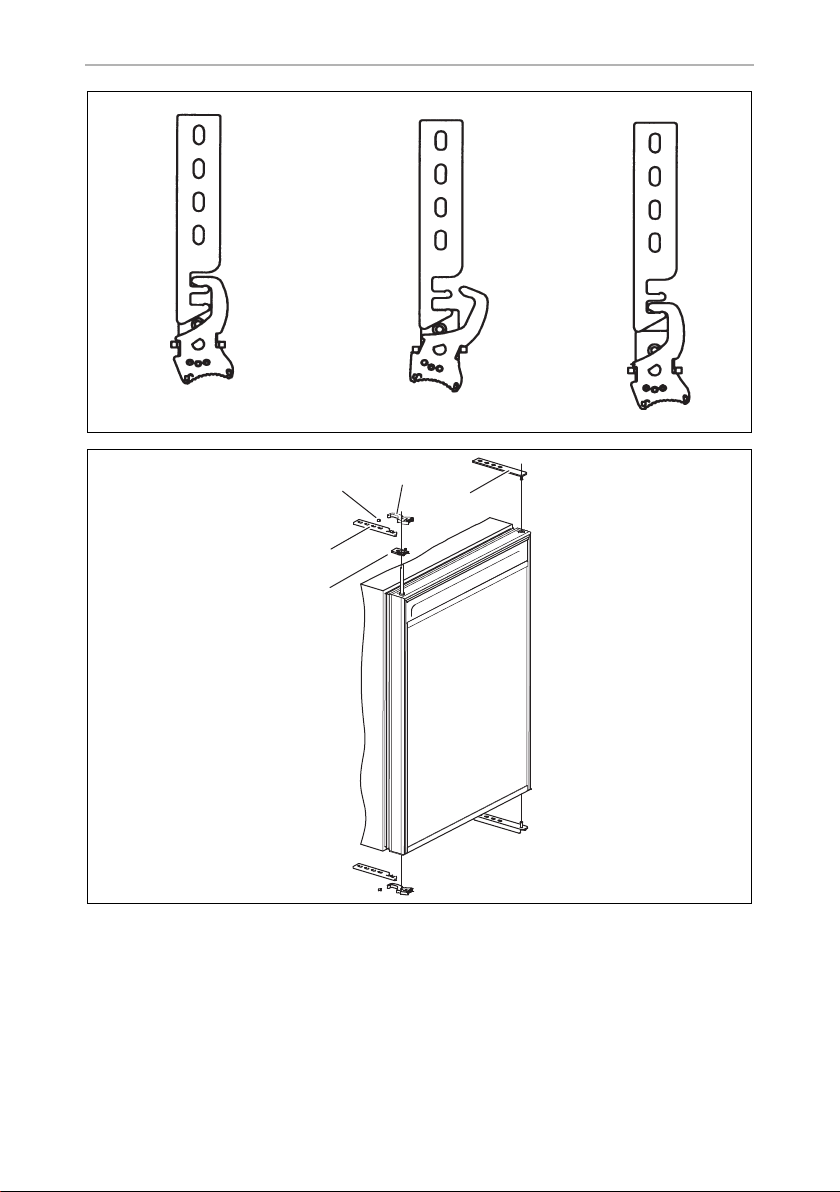
6.4 Changing the door hinge
You can also change the hinge of the door, so that it opens to the left rather than the
right.
To change the door hinge, proceed as follows (fig. 7, page 4):
➤ Remove the upper door hinge (1).
➤ Carefully lift out the door.
➤ Remove the threaded pins (2).
➤ Pull the locking hook (3) off the rod.
➤ Remove the locking plate (4) and fit it on the opposite side.
➤ Pull the rod downwards and out and put it in the other side.
➤ Fasten the locking hook (3) back on the rod.
➤ Detach the top and bottom lock holders (5) on the left side.
➤ Detach the top and bottom door hinges (1) on the right side.
12
Page 13
EN
MR07, MRR07, MH07 Installing and connecting the device
➤ Fasten the top and bottom door hinges (1) to the left side.
➤ Fasten the top and bottom lock holders (5) to the left side.
6.5 Connecting the device to a battery
NOTICE!
A
For safety reasons the device is equipped with an electronic system to prevent
polarity reversal. This protects the device against short-circuiting when it is
connected to a battery.
MR07 and MRR07 only: To protect the battery, the device switches off
automatically if the voltage is insufficient (see table below).
• To avoid voltage drops and loss of performance, keep the cable as
short as possible and avoid joins. For this reason avoid additional
switches, plugs or multi-way adapters.
• Disconnect the refrigerator and other electric loads from the battery
before connecting the battery to a quick charging device.
Overvoltage can damage the electronics of the device.
• Fit a fuse of at least 15 A to the positive connection.
• If possible, connect the device directly to the battery‘s pole.
12 V
Cut-off voltage
Cut-in voltage
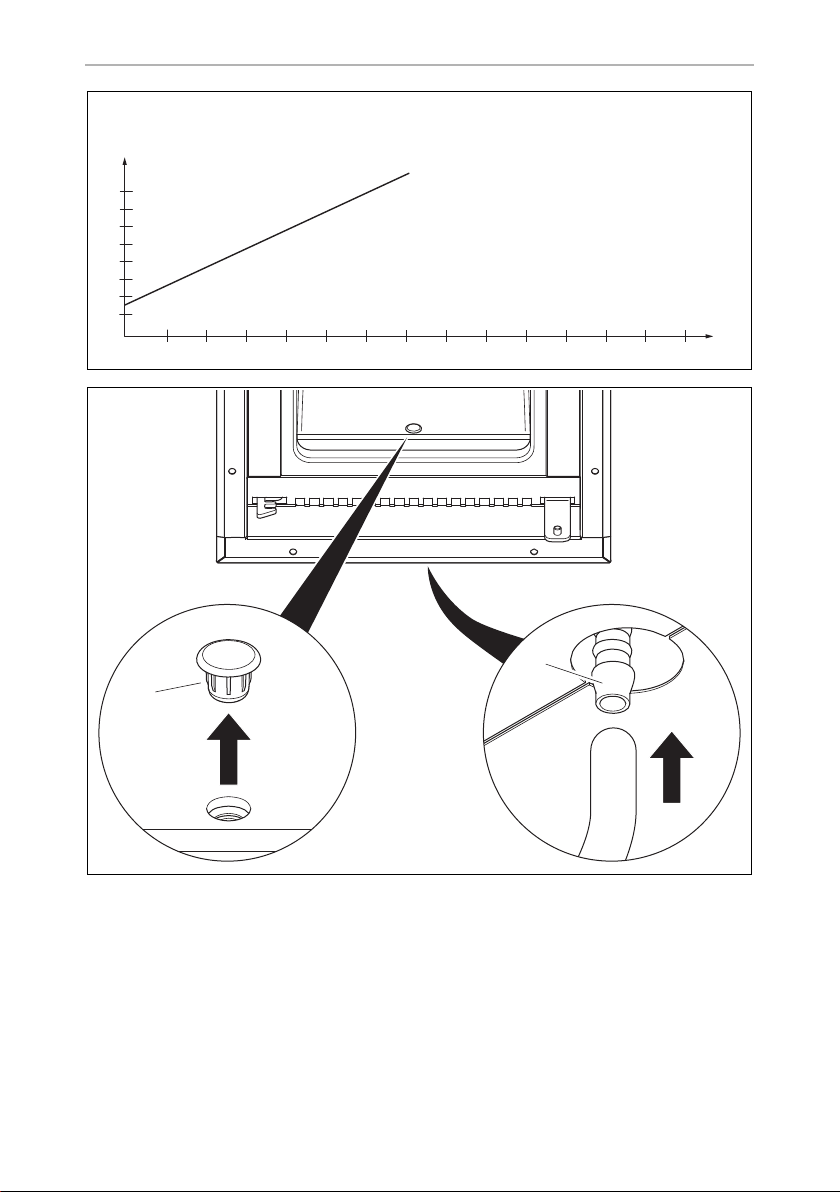
➤ Determine the required cross section of the cable in relation to the cable length
according to fig. 8, page 5.
Key to fig. 8, page 5
Co-ordinate axis Meaning Unit
l Cable length m
∅ Cable cross section mm²
NOTICE!
A
➤ Before starting up the device for the first time, check whether the operating
voltage and the battery voltage match (see type plate).
When connecting the battery, observe the correct polarity.
11.6 V
12.1 V
13
Page 14

EN
Using the device MR07, MRR07, MH07
MR07, MRR07
➤ Connect the red cable to the positive pole of the battery.
➤ Connect the black cable to the negative pole of the battery.
NOTE
I
➤ Connect the red/yellow cable to a switch (not included in the supply).
➤ Connect the other side of the switch to the positive connection.
MH07
➤ Connect the positive pole of the battery to the positive socket terminal block.
➤ Connect the negative pole of the battery to the negative socket terminal block.
The red/yellow cable is the starter cable for the device. When the
red/yellow cable is switched to 12 V, the device is switched on.
7 Using the device
NOTICE!
A
The interior temperature of the device is affected by the ambient
temperature.
• MR 07 and MRR07 only: Observe that the set fixed temperature of
5 °C is fallen below, if the ambient temperature sinks to below 4 °C.
• Only MH07: Observe that the set fixed temperature of 37 °C is
exceeded, if the ambient temperature rises to above 37 °C.
I
14
NOTE
Before using the device for the first time, clean it inside and out with a
damp cloth for hygienic reasons (see also chapter “Cleaning and maintenance” on page 16).
Page 15

EN
MR07, MRR07, MH07 Using the device
7.1 Energy saving tips
• Choose a well ventilated location which is protected from direct sunlight.
• Do not open the device more often than necessary.
• Do not leave the door open for longer than necessary.
• MR07 and MRR07 only: Defrost your refrigerator as soon as a layer of ice
forms.
• MR07 and MRR07 only: Clean dust and dirt from the condenser at regular
intervals.
7.2 Using the device
NOTICE!
A
I
• The goods may only be stored in their original packaging or in
suitable containers.
• Only put items in the refrigerator which can be cooled or heated to
the selected temperature:
– MR 07 and MRR07: 5°C
– MH 07: 37 °C
NOTE
MR07 and MRR07 only: After switching on, the refrigerator requires
approx. 60 s until the compressor starts up.
Defrosting the refrigerator (MR07 and MRR07 only)
Humidity can form frost in the interior of the refrigerator or on the vaporiser. This
reduces the cooling capacity. Defrost the device in good time to avoid this.
NOTICE!
A
This is how to defrost the refrigerator:
➤ Take the contents out.
➤ If necessary, put them in another cooling device.
➤ Leave the door open.
Never use hard or sharp tools to remove ice or to loosen objects stuck to
the device.
15
Page 16

EN
Cleaning and maintenance MR07, MRR07, MH07
➤ If you wish to drain the thawed water through a hose:
Connect a hose with an inside diameter of 6 mm to the outlet port (fig. 9 2,
page 5).
➤ Remove the drain plug (fig. 9 1, page 5).
➤ The thawed water now drains off through the hose.
➤ Wipe the refrigerator dry with a cloth after thawing.
Switching off and storing the device
If you do not intend to use the device for a prolonged period, proceed as follows:
➤ Disconnect the connecting cable from the battery.
➤ Clean the device (see chapter “Cleaning and maintenance” on page 16).
➤ Set the lock to the “VENT” position (see chapter “Removing the transport protec-
tion” on page 12).
This prevents odours from forming.
Securing the cabinet door
You can prevent the cabinet door from being opened inadvertently.
➤ Put the locking mechanism on the top of the door to position 1 (fig. 6 1,
page 4).
8 Cleaning and maintenance
NOTICE!
A
➤ Clean the device regularly with a damp cloth once it becomes dirty.
➤ Make sure that no water drips into the seals. This can damage the electronics.
➤ If necessary, wipe up the condensation that has gathered on the floor.
➤ Wipe the device dry with a cloth after cleaning.
16
Do not use abrasive cleaning agents or hard objects during cleaning as
these can damage the device.
Page 17
EN
MR07, MRR07, MH07 Guarantee
9Guarantee
The statutory warranty period applies. If the product is defective, please contact the
manufacturer's branch in your country (see the back of the instruction manual for the
addresses) or your retailer.
For repair and warranty processing, please include the following documents when
you send in the device:
• A copy of the receipt with purchasing date
• A reason for the claim or description of the fault
10 Disposal
➤ If possible, always take the packaging material for recycling.
If you wish to finally dispose of the device, ask your local recycling centre or
specialist dealer for details about how to do this in accordance with the
applicable disposal regulations.
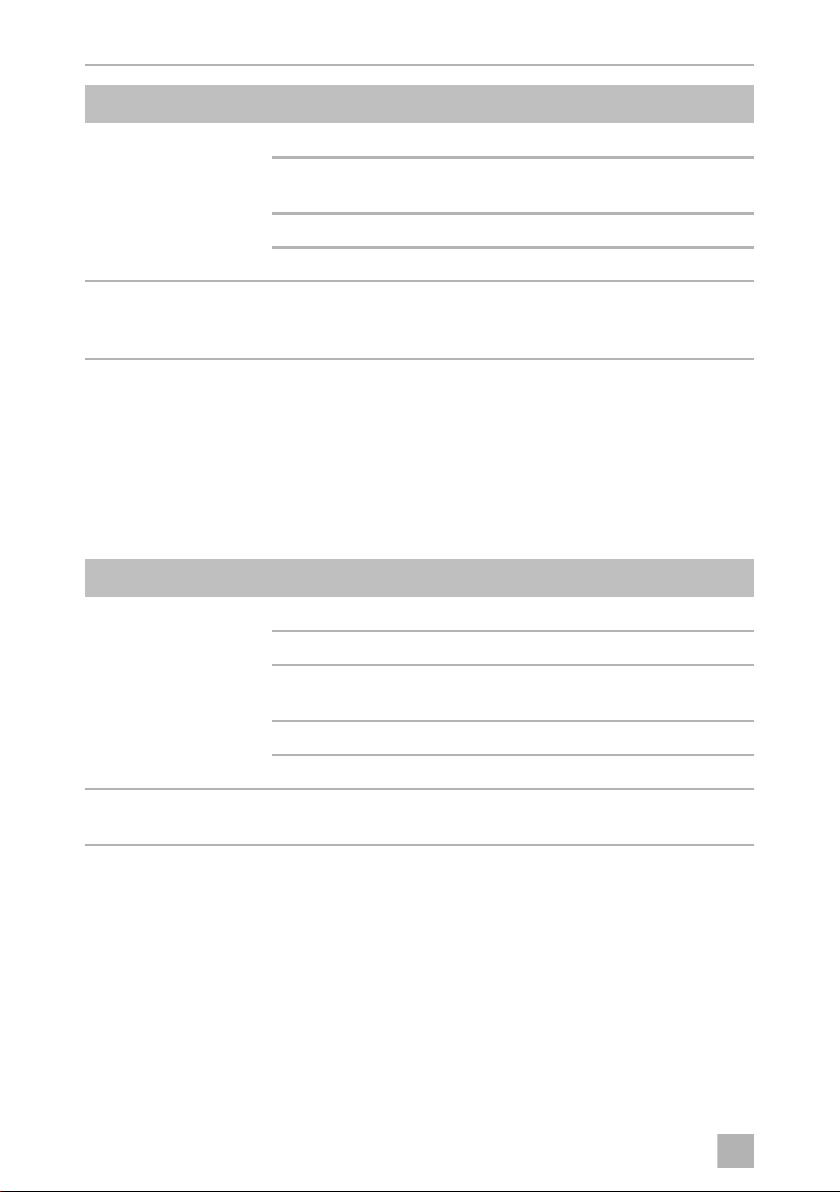
11 Troubleshooting
Compressor does not run
Fault Possible cause Remedy
U
= 0 V There is an interruption in the
TERM
≤ U
U
TERM
Start attempt with
U
TERM
≤ U
ON
OFF
connection between the battery and
the electronics
Additional supply line fuse has blown
(if installed)
Battery voltage is too low Charge the battery
Loose cables
Poor contact (corrosion)
Battery capacity too low Replacing the battery
Cable cross section too small Replace the cable
Establish a connection
Replace the supply line
fuse
Establish a connection
(fig. 8, page 5)
17
Page 18
EN
Troubleshooting MR07, MRR07, MH07
Fault Possible cause Remedy
Start attempt with
U
≥ U
TERM
ON
Ambient temperature too high –
Insufficient ventilation and/or air
supply
Move the refrigerator to
another location
Condenser is dirty Clean the condenser
Fan defective (if installed) Replace the fan
Electric circuit between
the pins in the compressor interrupted
U
U
U
Voltage between the positive and negative terminals of the electronics
TERM
Cut-in voltage of the electronics
ON
Cut-off voltage of the electronics
OFF
Defective compressor This can only be repaired
by an authorised
customer services unit.
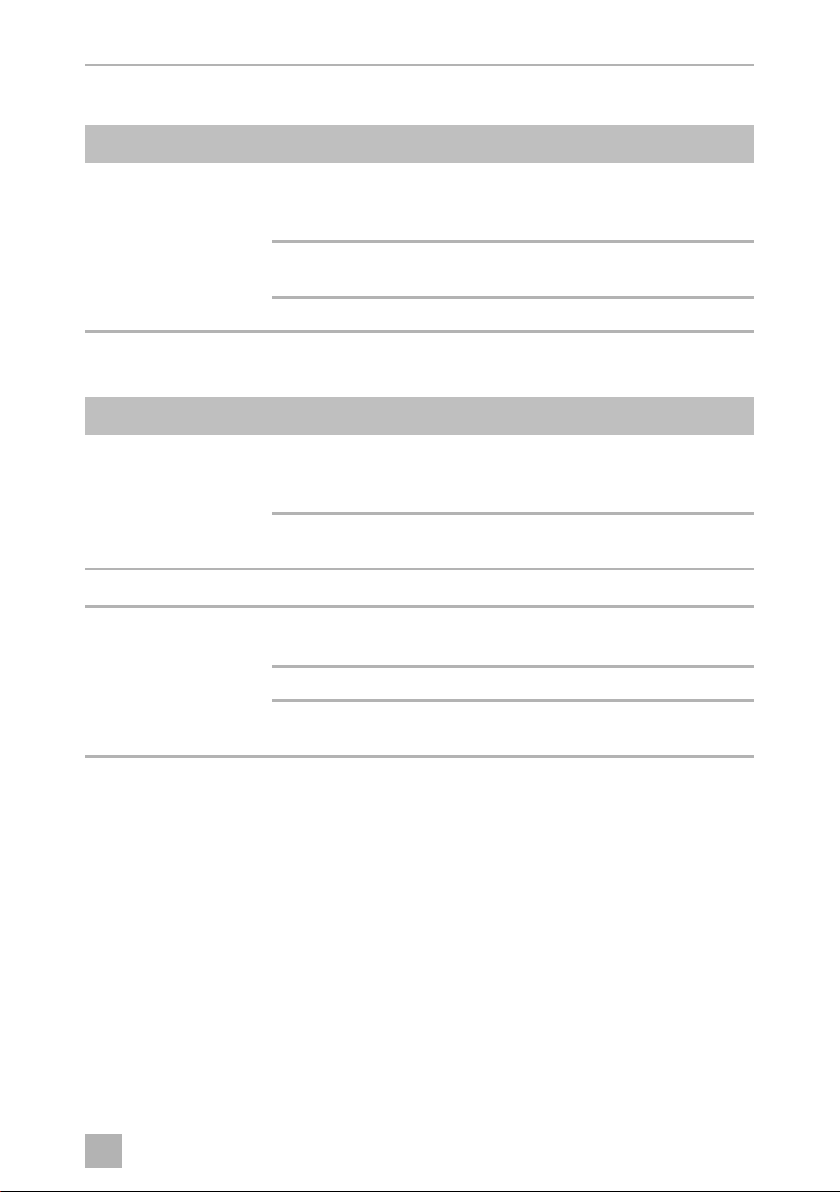
Poor cooling, interior temperature increases
Fault Possible cause Remedy
Compressor runs for a
long time/continuously
Vaporiser is iced over Defrost the vaporiser
Ambient temperature too high –
Insufficient ventilation and/or air supply
Move the refrigerator to
another location
Compressor runs
intermittently
18
Condenser is dirty Clean the condenser
Fan defective (if installed) Replace the fan
Battery capacity exhausted Charge the battery
Page 19
EN
MR07, MRR07, MH07 Troubleshooting
Unusual noises
Fault Possible cause Remedy
Loud humming A component of the refrigerant circuit
cannot move freely (touching the
wall)
Foreign body jammed between the
Bend the component
carefully away from the
obstruction
Remove the foreign body
cooling unit and the wall
Fan noise (if installed) –
Device does not heat
Fault Possible cause Remedy
U
= 0 V There is an interruption in the connec-
TERM
tion between the battery and
the electronics
Additional supply line fuse has blown
(if installed)
U
≤ U
TERM
ON
Start attempt with
U
≤ U
TERM
OFF
Battery voltage is too low Charge the battery
Loose cables
Poor contact (corrosion)
Battery capacity too low Replacing the battery
Cable cross section too small Replace the cable
Establish a connection
Replace the supply line
fuse
Establish a connection
(fig. 8, page 5)
U
U
U
Voltage between the positive and negative terminals of the electronics
TERM
Cut-in voltage of the electronics
ON
Cut-off voltage of the electronics
OFF
19
Page 20
EN
Technical data MR07, MRR07, MH07
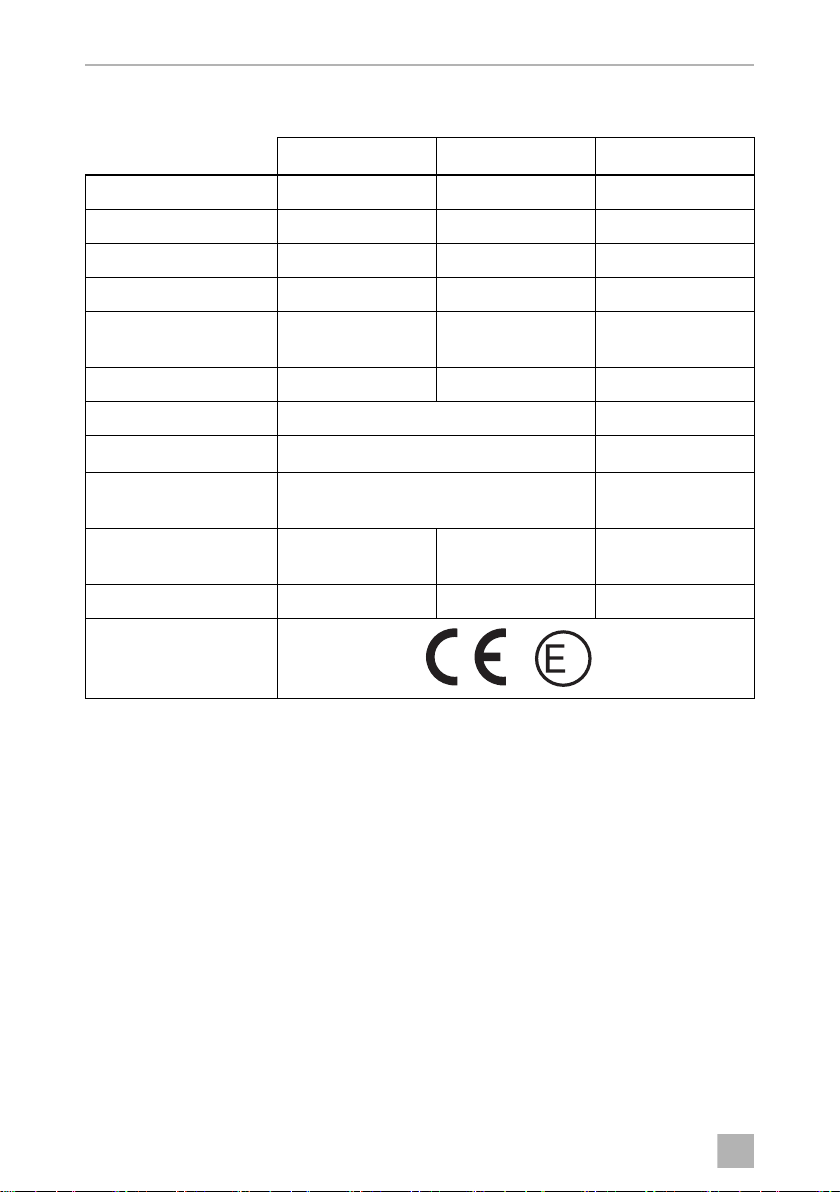
12 Technical data
MR07 MRR07 MH07
Ref. no.: 9105204550 9105204552 9105204551
Voltage: 12 Vg 12 Vg 12 Vg
Overall capacity: 7 l 7 l 7 l
Fixed temperature: 5±1.5°C 5±1.5°C 37±1.5°C
Average power
consumption:
Relative humidity: maximum 90 % maximum 90 % maximum 90 %
Coolant quantity: 45 g –
equivalent: 0.064 t –
CO
2
Global warming potential (GWP):
Dimensions (W x H x D)
in mm:
Weight: 8 kg 8.7 kg 4.3 kg
Test/certificates:
32 W 32 W 56 W
1430 –
fig. 0, page 6 fig. b, page 6 fig. a, page 6
7
The coolant circuit contains R134a.
Contains fluorinated greenhouse gases
Hermetically sealed equipment
20
Page 21

DE
MR07, MRR07, MH07 Erklärung der Symbole
Bitte lesen Sie diese Anleitung vor Einbau und Inbetriebnahme sorgfältig
durch und bewahren Sie sie auf. Geben Sie sie im Falle einer Weitergabe
des Produktes an den Nutzer weiter.
Inhaltsverzeichnis
1 Erklärung der Symbole . . . . . . . . . . . . . . . . . . . . . . . . . . . . . . . . . . . . . . . . . .21
2 Sicherheitshinweise . . . . . . . . . . . . . . . . . . . . . . . . . . . . . . . . . . . . . . . . . . . 22
3 Lieferumfang . . . . . . . . . . . . . . . . . . . . . . . . . . . . . . . . . . . . . . . . . . . . . . . . . 24
4 Bestimmungsgemäßer Gebrauch . . . . . . . . . . . . . . . . . . . . . . . . . . . . . . . . 24
5 Technische Beschreibung . . . . . . . . . . . . . . . . . . . . . . . . . . . . . . . . . . . . . . 24
6 Gerät einbauen und anschließen . . . . . . . . . . . . . . . . . . . . . . . . . . . . . . . . . 25
7 Gerät benutzen . . . . . . . . . . . . . . . . . . . . . . . . . . . . . . . . . . . . . . . . . . . . . . . 29
8 Reinigung und Pflege . . . . . . . . . . . . . . . . . . . . . . . . . . . . . . . . . . . . . . . . . . .31
9 Gewährleistung. . . . . . . . . . . . . . . . . . . . . . . . . . . . . . . . . . . . . . . . . . . . . . . . 31
10 Entsorgung . . . . . . . . . . . . . . . . . . . . . . . . . . . . . . . . . . . . . . . . . . . . . . . . . . .31
11 Störungen beseitigen . . . . . . . . . . . . . . . . . . . . . . . . . . . . . . . . . . . . . . . . . . 32
12 Technische Daten . . . . . . . . . . . . . . . . . . . . . . . . . . . . . . . . . . . . . . . . . . . . . 34
1 Erklärung der Symbole
GEFAHR!
D
!
!
Sicherheitshinweis: Nichtbeachtung führt zu Tod oder schwerer
Verletzung.
WARNUNG!
Sicherheitshinweis: Nichtbeachtung kann zu Tod oder schwerer
Verletzung führen.
VORSICHT!
Sicherheitshinweis: Nichtbeachtung kann zu Verletzungen führen.
21
Page 22

DE
Sicherheitshinweise MR07, MRR07, MH07
ACHTUNG!
A
I
Nichtbeachtung kann zu Materialschäden führen und die Funktion des
Produktes beeinträchtigen.
HINWEIS
Ergänzende Informationen zur Bedienung des Produktes.
2 Sicherheitshinweise
Der Hersteller übernimmt in folgenden Fällen keine Haftung für Schäden:
• Beschädigungen am Produkt durch mechanische Einflüsse und Überspannungen
• Veränderungen am Produkt ohne ausdrückliche Genehmigung vom Hersteller
• Verwendung für andere als die in der Anleitung beschriebenen Zwecke
2.1 Allgemeine Sicherheit
WARNUNG!
!
• Kontrollieren Sie vor Inbetriebnahme des Gerätes, ob die Betriebsspannung und die Batteriespannung übereinstimmen (siehe Typenschild).
• Wenn das Anschlusskabel beschädigt ist, müssen Sie es ersetzen, um
Gefährdungen zu vermeiden. Tauschen Sie ein beschädigtes
Anschlusskabel nur gegen ein Anschlusskabel gleicher Art und
Spezifikation aus.
• Lassen Sie Installationen in Feuchträumen nur vom Fachmann
verlegen.
• Wenn das Gerät sichtbare Beschädigungen aufweist, dürfen Sie es
nicht in Betrieb nehmen.
• Reparaturen an diesem Gerät dürfen nur von Fachkräften
durchgeführt werden. Durch unsachgemäße Reparaturen können
erhebliche Gefahren entstehen.
Wenden Sie sich im Reparaturfall an den Kundendienst.
A
22
ACHTUNG!
• Öffnen Sie auf keinen Fall den Kühl- bzw. Wärmekreislauf.
• Stellen Sie das Gerät an einem trockenen und gegen Spritzwasser
geschützten Platz auf.
Page 23

DE
MR07, MRR07, MH07 Sicherheitshinweise
• Bauen Sie das Gerät nicht in der Nähe von anderen Wärmequellen
(Heizung, starke Sonneneinstrahlung, Gasöfen usw.) ein.
• Achten Sie darauf, dass die Lüftungsschlitze nicht abgedeckt werden.
• Das Gerät ist nicht geeignet für den Lagerung ätzender oder
lösungsmittelhaltiger Stoffe.
• Lagern Sie keine explosionsfähigen Substanzen wie z. B. Sprühdosen
mit Treibgas im Gerät.
2.2 Sicherheit beim Betrieb des Gerätes
GEFAHR!
D
!
• Lebensgefahr!
Fassen Sie nie mit bloßen Händen an blanke Leitungen. Dies gilt vor
allem beim Betrieb am Wechselstromnetz.
WARNUNG!
• Elektrogeräte sind kein Kinderspielzeug!
Verwahren und benutzen Sie das Gerät außerhalb der Reichweite von
Kindern.
• Personen (einschließlich Kinder), die aufgrund ihrer physischen, sensorischen oder geistigen Fähigkeiten oder ihrer Unerfahrenheit oder
Unkenntnis nicht in der Lage sind, das Produkt sicher zu benutzen,
sollten dieses Produkt nicht ohne Aufsicht oder Anweisung durch eine
verantwortliche Person nutzen.
• Wenn Sie das Gerät an eine Batterie anschließen, stellen Sie sicher,
dass Lebensmittel nicht mit Batteriesäure in Berührung kommen.
• Schützen Sie das Gerät und die Kabel vor Hitze und Nässe.
• Klemmen Sie das Gerät und andere Verbraucher von der Batterie ab,
bevor Sie die Batterie mit einem Schnellladegerät aufladen.
Überspannungen können die Elektronik der Geräte beschädigen.
I
HINWEIS
• Tauen Sie das Gerät rechtzeitig ab, um Energie zu sparen.
• Klemmen Sie das Gerät ab, wenn Sie es lange nicht brauchen.
23
Page 24

DE
Lieferumfang MR 07, MRR07, MH07
3 Lieferumfang
Menge Bezeichnung
1 Edelstahl-Kühl- bzw. Wärmeschrank
1 Bedienungsanleitung
4 Bestimmungsgemäßer Gebrauch
Der Kühl- bzw. Wärmeschrank eignet sich speziell für den Einsatz in Rettungsfahrzeugen.
Die Kühlschränke MR07 und MRR07 eignen sich zum Kühlen von Waren auf
eine Temperatur von 5 °C und zum Kühlhalten.
Der Wärmeschrank MH07 eignet sich zum Wärmen von Waren auf eine
Temperatur von 37 °C und zum Warmhalten.
Im Dauerbetrieb darf die Luftfeuchtigkeit nicht über 90 % liegen.
VORSICHT! Gesundheitsgefahr!
!
Prüfen Sie bitte, ob die Kühlleistung des Gerätes den Anforderungen
der Lebensmittel oder Medikamente entspricht, die Sie kühlen wollen.
5 Technische Beschreibung
5.1 Kühlschrank MR07
Der Kühlschrank MR07 ist geeignet für den Einsatz an einer Gleichspannung von
12 V und kann somit in Rettungsfahrzeugen eingesetzt werden.
Der Kühlschrank kann Waren auf eine Festtemperatur von 5 °C abkühlen und kühl
halten.
Der Kühlkreislauf ist wartungsfrei.
Das Gerät ist mit einem abnehmbaren und separat montierbaren Kühlaggregat
ausgestattet (Abb. 1, Seite 2).
24
Page 25

DE
MR07, MRR07, MH07 Gerät einbauen und anschließen
5.2 Kühlschrank MRR07
Der Kühlschrank MRR07 ist geeignet für den Einsatz an einer Gleichspannung von
12 V und kann somit in Rettungsfahrzeugen eingesetzt werden.
Der Kühlschrank kann Waren auf eine Festtemperatur von 5 °C abkühlen und kühl
halten.
Der Kühlkreislauf ist wartungsfrei.
5.3 Wärmeschrank MH 07
Der Wärmeschrank MH07 ist geeignet für den Einsatz an einer Gleichspannung von
12 V und kann somit in Rettungsfahrzeugen eingesetzt werden.
Der Wärmeschrank kann Waren auf eine Festtemperatur von 37 °C erwärmen und
warm halten.
5.4 Bedienelemente MR07/MRR07/MH07
Nr. in Abb. 2,
Seite 2
1 Temperaturanzeige
Erklärung
6 Gerät einbauen und anschließen
6.1 Kühlaggregat abnehmen (nur MR07)
➤ Biegen Sie das Schutzblech (Abb. 3 1, Seite 2) etwas auf.
➤ Entfernen Sie die beiden Befestigungsschrauben (Abb. 3 3, Seite 2) mit einem
langen Kreuzschlitz-Schraubendreher.
➤ Entfernen Sie die Kabelbinder der aufgerollten Kabel.
➤ Rollen Sie die Kabel ab.
➤ Heben Sie das Kühlaggregat an und drehen Sie es zusammen mit einer zweiten
Person entgegen der Wickelrichtung der Saugleitung (Abb. 3 2, Seite 2), bis
die Saugleitung abgewickelt ist.
25
Page 26

DE
Gerät einbauen und anschließen MR07, MRR07, MH07
6.2 Gerät einbauen
➤ Beachten Sie folgende Einbauhinweise für den Einbauort:
– Vermeiden Sie das Aufstellen neben Wärmequellen wie Heizungen, Gas-
öfen, Warmwasserleitungen usw.
– Bauen Sie das Gerät an einem trockenen, geschützten Platz ein.
– Das Gerät muss so eingebaut sein, dass die erwärmte Luft gut abziehen kann.
Stellen Sie daher eine ausreichende Belüftung sicher (Abb. 4, Seite 3).
Nr. in Abb. 4,
Seite 3
1 warme Abluft
2 kalte Zuluft
3 Kondensator
4 mit Zierblende 50mm Abstand oberhalb!
➤ Befestigen Sie das Gerät mit acht Schrauben (Abb. 5 1, Seite 3).
Erklärung
6.3 Transportsicherung lösen
Das Gerät verfügt über einen Verriegelungsmechanismus, der auch als Transportsicherung dient. Folgende Einstellungen sind möglich (Abb. 6, Seite 4):
• Position 1: (Transportsicherung): (1) Die Tür ist geschlossen und gesichert. Um
die Tür zu öffnen, drehen Sie den Riegel in Position 2.
• Position 2: (2) Die Tür kann geöffnet werden.
• Position 3 („VENT“-Stellung): (3) Die Tür ist leicht geöffnet, aber fixiert. Nutzen
Sie diese Position, wenn Sie z. B. das Gerät längere Zeit außer Betrieb nehmen.
6.4 Türanschlag ändern
Sie können den Anschlag der Tür ändern, so dass die Tür nach links statt nach rechts
aufschwingt.
Gehen Sie wie folgt vor, um den Türanschlag zu ändern (Abb. 7, Seite 4):
➤ Entfernen Sie den oberen Türanschlag (1).
➤ Heben Sie die Tür vorsichtig heraus.
➤ Lösen Sie die Gewindestifte (2).
➤ Ziehen Sie die Verschlusshaken (3) von der Stange.
26
Page 27

DE
MR07, MRR07, MH07 Gerät einbauen und anschließen
➤ Entfernen Sie die Verschlussplatte (4) und montieren Sie sie an der gegenüber-
liegenden Seite.
➤ Ziehen Sie die Stange nach unten heraus und setzen Sie sie an der
gegenüberliegenden Seite ein.
➤ Befestigen Sie die Verschlusshaken (3) wieder an der Stange.
➤ Demontieren Sie die Verschlusshalter (5) links oben und unten.
➤ Demontieren Sie die Türanschläge (1) rechts oben und unten.
➤ Befestigen Sie die Türanschläge (1) auf der linken Seite oben und unten.
➤ Befestigen Sie die Verschlusshalter (5) auf der rechten Seite oben und unten.
6.5 Gerät an eine Batterie anschließen
ACHTUNG!
A
• Um Spannungs- und Leistungsverluste zu vermeiden, sollte das
Kabel möglichst kurz und nicht unterbrochen sein.Vermeiden Sie
deshalb zusätzliche Schalter, Stecker oder Verteilerdosen.
• Klemmen Sie das Gerät und andere Verbraucher von der Batterie ab,
bevor Sie die Batterie mit einem Schnellladegerät aufladen.
Überspannungen können die Elektronik der Geräte beschädigen.
• Sichern Sie die positive Leitung mit mindestens 15 A ab.
• Schließen Sie das Gerät möglichst direkt an die Pole der Batterie an.
Zur Sicherheit ist das Gerät mit einem elektronischen Verpolungsschutz
ausgestattet, der es gegen Verpolung beim Batterieanschluss und gegen
Kurzschluss schützt.
Nur MR07 und MRR07: Zum Schutz der Batterie schaltet sich das Gerät
automatisch ab, wenn die Spannung nicht mehr ausreicht (siehe folgende Tabelle).
12 V
Ausschaltspannung
Wiedereinschaltspannung
➤ Bestimmen Sie den notwendigen Querschnitt des Kabels in Abhängigkeit von
der Kabellänge gemäß Abb. 8, Seite 5.
Legende zu Abb. 8, Seite 5
11,6 V
12,1 V
27
Page 28

DE
Gerät einbauen und anschließen MR07, MRR07, MH07
Koordinatenachse Bedeutung Einheit
lKabellänge m
∅ Kabelquerschnitt mm²
ACHTUNG!
A
➤ Kontrollieren Sie vor Inbetriebnahme des Gerätes, ob die Betriebsspannung und
die Batteriespannung übereinstimmen (siehe Typenschild).
MR07, MRR07
➤ Verbinden Sie das rote Kabel mit dem positiven Pol der Batterie.
➤ Verbinden Sie das schwarze Kabel mit dem negativen Pol der Batterie.
I
➤ Verbinden Sie das rot/gelbe Kabel mit einem Schalter (nicht im Lieferumfang
enthalten).
Beachten Sie beim Anschluss an die Batterie die richtige Polarität.
HINWEIS
Der rot/gelbe Kabel ist der Starterkabel des Geräts. Wenn das
rot/gelbe Kabel an die 12 V zugeschaltet ist, schaltet sich das Gerät ein.
➤ Verbinden Sie die gegenüberliegende Seite des Schalters mit der positiven
Leitung der Batterie
MH07
➤ Verbinden Sie den positiven Pol der Batterie mit dem positiven Anschluss auf
dem Anschlussblock.
➤ Verbinden Sie den negativen Pol der Batterie mit dem negativen Anschluss auf
dem Anschlussblock.
28
Page 29

DE
MR07, MRR07, MH07 Gerät benutzen
7 Gerät benutzen
ACHTUNG!
A
I
7.1 Tipps zum Energiesparen
• Wählen Sie einen gut belüfteten und vor Sonnenstrahlen geschützten Einsatzort.
• Öffnen Sie das Gerät nicht häufiger als nötig.
• Lassen Sie die Tür nicht länger offen stehen als nötig.
• Nur MR07 und MRR07: Tauen Sie den Kühlschrank ab, sobald sich eine
Eisschicht gebildet hat.
• Nur MR07 und MRR07: Befreien Sie den Kondensator in regelmäßigen
Abständen von Staub und Verunreinigungen.
Die Innentemperatur des Gerätes wird durch die Umgebungstemperatur beeinflusst.
• Nur MR07 und MRR07: Beachten Sie, dass die eingestellte
Festpunkt-Temperatur von 5 °C unterschritten wird, wenn die
Umgebungstemperatur unter 4 °C sinkt.
• Nur MH07: Beachten Sie, dass die eingestellte FestpunktTemperatur von 37 °C überschritten wird, wenn die
Umgebungstemperatur 37 °C übersteigt.
HINWEIS
Bevor Sie das neue Gerät in Betrieb nehmen, sollten Sie es aus
hygienischen Gründen innen und außen mit einem feuchten Tuch
reinigen (siehe auch Kapitel „Reinigung und Pflege“ auf Seite 31).
7.2 Gerät benutzen
ACHTUNG!
A
• Die Waren dürfen nur in Originalverpackungen oder geeigneten
Behältern eingelagert werden.
• Achten Sie darauf, dass sich nur Gegenstände bzw. Waren im Kühlschrank befinden, die auf die gewählte Temperatur gekühlt oder
aufgewärmt werden dürfen:
– MR 07 und MRR07: 5°C
– MH 07: 37 °C
29
Page 30

DE
Gerät benutzen MR07, MRR07, MH07
HINWEIS
I
Kühlschrank abtauen (Nur MR07 und MRR07)
Luftfeuchtigkeit kann sich am Verdampfer oder im Innenraum des Kühlschranks als
Reif niederschlagen, der die Kühlleistung verringert. Tauen Sie das Gerät rechtzeitig
ab.
A
Gehen Sie wie folgt vor, um den Kühlschrank abzutauen:
➤ Nehmen Sie das Kühlgut heraus.
➤ Lagern Sie es ggf. in einem anderen Kühlgerät, damit es kalt bleibt.
➤ Lassen Sie die Tür offen.
➤ Wenn Sie das Tauwasser durch einen Schlauch ablassen möchten:
Schließen Sie einen Schlauch mit einem Innendurchmesser von 6 mm an den
Auslassstutzen an (Abb. 9 2, Seite 5).
Nur MR07 und MRR07: Nach dem Einschalten benötigt der
Kühlschrank etwa 60 s, bis der Kompressor anläuft.
ACHTUNG!
Verwenden Sie nie harte oder spitze Werkzeuge zum Entfernen von
Eisschichten oder zum Lösen festgefrorener Gegenstände.
➤ Entfernen Sie den Abflussstopfen (Abb. 9 1, Seite 5).
➤ Das Tauwasser läuft nun durch den Schlauch ab.
➤ Wischen Sie das Gerät nach dem Abtauen mit einem Tuch trocken.
Gerät ausschalten und stilllegen
Wenn Sie das Gerät für längere Zeit stilllegen wollen, gehen Sie wie folgt vor:
➤ Klemmen Sie die Anschlusskabel von der Batterie ab.
➤ Reinigen Sie das Gerät (siehe Kapitel „Reinigung und Pflege“ auf Seite 31).
➤ Stellen Sie die Verriegelung auf „VENT“-Stellung (siehe Kapitel „Transportsiche-
rung lösen“ auf Seite 26).
So verhindern Sie, dass sich Gerüche bilden.
30
Page 31

DE
MR07, MRR07, MH07 Reinigung und Pflege
Schranktür sichern
Sie können die Schranktür z. B. gegen unbeabsichtigtes Öffnen sichern.
➤ Stellen Sie den Verriegelungsmechnismus an der Türoberseite auf Position 1
(Abb. 6 1, Seite 4).
8 Reinigung und Pflege
ACHTUNG!
A
➤ Reinigen Sie das Gerät regelmäßig und sobald es verschmutzt ist mit einem
feuchten Tuch.
➤ Achten Sie darauf, dass kein Wasser in die Dichtungen tropft. Dies kann die
Elektronik beschädigen.
➤ Wischen Sie nach Bedarf Kondensat auf, das sich am Boden aufgesammelt hat.
➤ Wischen Sie das Gerät nach dem Reinigen mit einem Tuch trocken.
Verwenden Sie zur Reinigung keine scharfen Reinigungsmittel oder
harten Gegenstände, da diese das Gerät beschädigen können.
9Gewährleistung
Es gilt die gesetzliche Gewährleistungsfrist. Sollte das Produkt defekt sein, wenden
Sie sich bitte an die Niederlassung des Herstellers in Ihrem Land (Adressen siehe
Rückseite der Anleitung) oder an Ihren Fachhändler.
Zur Reparatur- bzw. Gewährleistungsbearbeitung müssen Sie folgende Unterlagen
mitschicken:
• eine Kopie der Rechnung mit Kaufdatum,
• einen Reklamationsgrund oder eine Fehlerbeschreibung.
10 Entsorgung
➤ Geben Sie das Verpackungsmaterial möglichst in den entsprechenden
Recycling-Müll.
Wenn Sie das Gerät endgültig außer Betrieb nehmen, informieren Sie sich
bitte beim nächsten Recyclingcenter oder bei Ihrem Fachhändler über die
zutreffenden Entsorgungsvorschriften.
31
Page 32

DE
Störungen beseitigen MR07, MRR07, MH07
11 Störungen beseitigen
Kompressor läuft nicht
Störung Mögliche Ursache Lösung
UKL = 0 V Unterbrechung in der Anschluss-
leitung Batterie – Elektronik
Zusätzliche Leitungsabsicherung
durchgebrannt (falls vorhanden)
U
≤ U
KL
EIN
Startversuch mit
≤ U
U
KL
AUS
Batteriespannung zu niedrig Batterie laden
Lose Kabelverbindung
Schlechter Kontakt (Korrosion)
Batteriekapazitat zu gering Batterie wechseln
Kabelquerschnitt zu gering Kabel wechseln
Startversuch mit
U
≥ U
KL
EIN
Umgebungstemperatur zu hoch –
Be- und Entlüftung nicht ausreichend Kühlschrank umstellen
Kondensator verschmutzt Kondensator reinigen
Lüfter defekt (falls vorhanden) Lüfter wechseln
Elektrische Unter-
Kompressor defekt Die Reparatur kann nur
brechung im
Kompressor zwischen
den Stiften
Spannung zwischen Plus- und Minusklemme der Elektronik
U
KL
U
Einschaltspannung Elektronik
EIN
U
Ausschaltspannung Elektronik
AUS
Verbindung herstellen
Leitungsabsicherung
wechseln
Verbindung herstellen
(Abb. 8, Seite 5)
von einem zugelassenen
Kundendienstbetrieb
durchgeführt werden.
32
Page 33

DE
MR07, MRR07, MH07 Störungen beseitigen
Kühlleistung lässt nach, Innentemperatur steigt
Störung Mögliche Ursache Lösung
Kompressor läuft
lange/dauernd
Kompressor läuft selten Batteriekapazität erschöpft Batterie laden
Verdampfer vereist Verdampfer abtauen
Umgebungstemperatur zu hoch –
Be- und Entlüftung nicht ausreichend Kühlschrank umstellen
Kondensator verschmutzt Kondensator reinigen
Lüfter defekt (falls vorhanden) Lüfter wechseln
Ungewöhnliche Geräusche
Störung Mögliche Ursache Lösung
Lautes Brummen Bauteil des Kältekreislaufes kann nicht
frei schwingen (liegt an Wandung an)
Fremdkörper zwischen Kühlmaschine
und Wand eingeklemmt
Lüftergeräusch (falls vorhanden) –
Bauteil vorsichtig
abbiegen
Fremdkörper entfernen
Gerät wärmt nicht
Störung Mögliche Ursache Lösung
UKL = 0 V Unterbrechung in der Anschluss-
leitung Batterie – Elektronik
Zusätzliche Leitungsabsicherung
durchgebrannt (falls vorhanden)
Verbindung herstellen
Leitungsabsicherung
wechseln
U
≤ U
KL
EIN
Startversuch mit
U
≤ U
KL
AUS
Batteriespannung zu niedrig Batterie laden
Lose Kabelverbindung
Schlechter Kontakt (Korrosion)
Batteriekapazitat zu gering Batterie wechseln
Kabelquerschnitt zu gering Kabel wechseln
Verbindung herstellen
(Abb. 8, Seite 5)
33
Page 34

DE
Technische Daten MR07, MRR07, MH 07
7
U
Spannung zwischen Plus- und Minusklemme der Elektronik
KL
U
Einschaltspannung Elektronik
EIN
U
Ausschaltspannung Elektronik
AUS
12 Technische Daten
MR07 MRR07 MH07
Art.-Nr.: 9105204550 9105204552 9105204551
Anschlussspannung: 12 Vg 12 Vg 12 Vg
Inhalt 7 l 7 l 7 l
Festpunkt-Temperatur: 5 ± 1,5 °C 5 ± 1,5 °C 37 ± 1,5 °C
Mittlere Leistungsaufnahme:
Luftfeuchtigkeit: maximal 90 % maximal 90 % maximal 90 %
Kühlmittelmenge: 45 g –
CO2 Äquivalent: 0,064 t –
32 W 32 W 56 W
Treibhauspotential
(GWP):
Abmessungen (B x H x T)
in mm:
Gewicht: 8 kg 8,7 kg 4,3 kg
Prüfung/Zertifikate:
Abb. 0, Seite 6 Abb. b, Seite 6 Abb. a, Seite 6
1430 –
Der Kühlkreis enthält R134a.
Enthält fluorierte Treibhausgase
Hermetisch geschlossene Einrichtung
34
Page 35

FR
MR07, MRR07, MH07 Explication des symboles
Veuillez lire attentivement cette notice avant le montage et la mise en
service. Veuillez ensuite la conserver. En cas de passer le produit, veuillez
le transmettre au nouvel acquéreur.
Table des matières
1 Explication des symboles . . . . . . . . . . . . . . . . . . . . . . . . . . . . . . . . . . . . . . . 35
2 Consignes de sécurité . . . . . . . . . . . . . . . . . . . . . . . . . . . . . . . . . . . . . . . . . 36
3 Contenu de la livraison . . . . . . . . . . . . . . . . . . . . . . . . . . . . . . . . . . . . . . . . . 38
4 Usage conforme . . . . . . . . . . . . . . . . . . . . . . . . . . . . . . . . . . . . . . . . . . . . . . 38
5 Description technique . . . . . . . . . . . . . . . . . . . . . . . . . . . . . . . . . . . . . . . . . 38
6 Montage et raccordement de l’appareil . . . . . . . . . . . . . . . . . . . . . . . . . . . 39
7 Utilisation de l’appareil . . . . . . . . . . . . . . . . . . . . . . . . . . . . . . . . . . . . . . . . . 43
8 Entretien et nettoyage . . . . . . . . . . . . . . . . . . . . . . . . . . . . . . . . . . . . . . . . . 45
9 Garantie. . . . . . . . . . . . . . . . . . . . . . . . . . . . . . . . . . . . . . . . . . . . . . . . . . . . . 46
10 Retraitement . . . . . . . . . . . . . . . . . . . . . . . . . . . . . . . . . . . . . . . . . . . . . . . . . 46
11 Guide de dépannage . . . . . . . . . . . . . . . . . . . . . . . . . . . . . . . . . . . . . . . . . . 46
12 Caractéristiques techniques. . . . . . . . . . . . . . . . . . . . . . . . . . . . . . . . . . . . . 49
1 Explication des symboles
DANGER !
D
!
!
Consigne de sécurité : le non-respect de ces consignes entraîne la
mort ou de graves blessures.
AVERTISSEMENT !
Consigne de sécurité : le non-respect de ces consignes peut entraîner
la mort ou de graves blessures.
ATTENTION !
Consigne de sécurité : le non-respect de ces consignes peut entraîner
des blessures.
35
Page 36

FR
Consignes de sécurité MR07, MRR07, MH07
AVIS !
A
I
Le non-respect de ces consignes peut entraîner des dommages
matériels et des dysfonctionnements du produit.
REMARQUE
Informations complémentaires sur l'utilisation du produit.
2 Consignes de sécurité
Le fabricant décline toute responsabilité pour des dommages dans les cas suivants :
•
des sollicitations mécaniques et une tension de raccordement incorrecte ayant
endommagé le matériel
•
des modifications apportées au produit sans autorisation explicite de la part du
fabricant
•
une utilisation différente de celle décrite dans la notice
2.1 Sécurité générale
AVERTISSEMENT !
•
!
Avant de mettre l'appareil en service, vérifiez que la tension de service
et celle de de la batterie correspondent (cf. plaque signalétique).
•
Si le câble de raccordement est endommagé, vous devez le
remplacer afin d'éviter tout danger. Le câble de raccordement neuf
qui va remplacer celui qui est endommagé doit être de même type et
de même spécification.
•
Seul un spécialiste doit procéder à l'installation dans des endroits
humides.
•
Si l'appareil présente des dégâts visibles, il est interdit de le mettre en
service.
•
Seul un personnel qualifié est habilité à effectuer des réparations sur
l'appareil. Toute réparation mal effectuée risque d'entraîner de graves
dangers.
Si des réparations sont nécessaires, adressez-vous au service aprèsvente.
A
36
AVIS !
•
N’ouvrez jamais le circuit frigorifique ou le circuit de chauffage.
Page 37

FR
MR07, MRR07, MH07 Consignes de sécurité
•
Installez l'appareil dans un endroit sec et à l'abri des éclaboussures
d'eau.
•
Ne montez pas l’appareil à proximité d’autres sources de chaleur
(chauffage, fort rayonnement solaire, etc.).
•
Assurez-vous que les fentes d'aération ne sont pas recouvertes.
•
L'appareil ne convient pas pour le stockage de produits caustiques ou
de solvants.
•
Uniquement pour les bateaux de plus de 20 m de longueur.
2.2 Consignes de sécurité concernant le fonctionnement
de l'appareil
DANGER !
•
D
!
Danger de mort
Ne touchez jamais les lignes électriques dénudées en ayant les mains
nues. Cela est particulièrement valable en cas de fonctionnement sur
secteur alternatif.
AVERTISSEMENT !
•
Les appareils électriques ne sont pas des jouets pour enfants.
Placez et utilisez l'appareil hors de leur portée.
•
Les personnes qui ne sont pas en mesure d'utiliser le réfrigérateur en
toute sécurité – que ce soit en raison de déficiences physiques,
sensorielles ou mentales ou bien par manque d'expérience ou de
connaissances – ne sont pas autorisées à le faire sans surveillance.
•
Lorsque vous raccordez l'appareil à une batterie, assurez-vous que les
aliments ne sont pas en contact avec les acides de la batterie.
•
Tenez l’appareil et les câbles à l’abri de la chaleur et de l’humidité.
•
Débranchez l'appareil et les autres consommateurs d'énergie de la
batterie avant de recharger la batterie avec un chargeur rapide.
Les surtensions peuvent endommager les composants électroniques
des appareils.
I
REMARQUE
•
Dégivrez l'appareil en temps utile, afin d'économiser de l'énergie.
•
Débranchez l'appareil si vous ne l'utilisez pas pendant une période
prolongée.
37
Page 38

FR
Contenu de la livraison MR07, MRR07, MH07
3 Contenu de la livraison
Quantité Désignation
1 Réfrigérateur ou étuve en acier inoxydable
1 Notice d’utilisation
4Usage conforme
Le réfrigérateur/étuve est spécialement approprié pour l’emploi dans les véhicules
de secours.
Les réfrigérateurs MR07 et MRR07 permettent de refroidir des denrées à une
température de 5 °C et de les conserver au frais.
L’étuve MH 07 permet de réchauffer des denrées à une température de 37 °C et de
les conserver au chaud.
S’il fonctionne de manière continue, l’humidité de l’air ne doit pas dépasser 90 %.
ATTENTION ! Risque pour la santé !
!
Veuillez vérifier si la puissance frigorifique de l'appareil correspond à la
température de conservation recommandée pour les aliments ou les
médicaments que vous souhaitez refroidir.
5 Description technique
5.1 Réfrigérateur MR07
Le réfrigérateur MR07 de est destiné à l’emploi avec une tension continue de 12 V et
peut ainsi être utilisé dans les véhicules de secours.
Le réfrigérateur permet de refroidir et conserver au frais des denrées à une
température de 5 °C.
Le circuit de refroidissement ne requiert pas d’entretien.
L’appareil est équipé d’un groupe frigorifique amovible et montable séparément
(fig. 1, page 2).
38
Page 39

FR
MR07, MRR07, MH07 Montage et raccordement de l’appareil
5.2 Réfrigérateur MRR07
Le réfrigérateur MRR07 de est destiné à l’emploi avec une tension continue de 12 V
et peut ainsi être utilisé dans les véhicules de secours.
Le réfrigérateur permet de refroidir et conserver au frais des denrées à une
température de 5 °C.
Le circuit de refroidissement ne requiert pas d’entretien.
5.3 Etuve MH07
L’étuve MH07 de est destinée à l’emploi avec une tension continue de 12 V et peut
ainsi être utilisée dans les véhicules de secours.
L’étuve permet de réchauffer et conserver des denrées à une température de 37 °C.
5.4 Eléments de commande de MR07/MRR07/MH07
N° dans fig. 2,
page 2
1 Affichage de la température
Signification
6 Montage et raccordement de l’appareil
6.1 Retrait du groupe frigorifique (MR07 uniquement)
➤ Courbez un peu la plaque de protection (fig. 3 1, page 2).
➤ Retirez les deux vis de fixation (fig. 3 3, page 2) avec un long tournevis
cruciforme.
➤ Retirez les serre-câbles du câble enroulé.
➤ Déroulez le câble.
➤ Soulevez le groupe frigorifique et tournez-le, avec une deuxième personne, dans
le sens inverse d'enroulement de la conduite d'aspiration (fig. 3 2, page 2),
jusqu'à ce que la conduite d'aspiration soit déroulée.
39
Page 40

FR
Montage et raccordement de l’appareil MR07, MRR07, MH07
6.2 Montage de l’appareil
➤ Veuillez observer les instructions de montage suivante concernant l’endroit de
montage :
– Evitez de placer l’appareil à proximité de sources de chaleur telles que des
chauffages, des fours à gaz, des conduites d’eau chaude, etc.
– Montez l’appareil dans un endroit sec et protégé.
– L’appareil doit être monté de manière à ce que l’air réchauffé puisse être faci-
lement évacué. Veillez à ce que la ventilation soit suffisante (fig. 4, page 3).
N° dans fig. 4,
page 3
1 Air évacué chaud
2 Air entrant froid
3 Condenseur
4 50 mm d’écart sur le dessus, enjoliveur compris !
Signification
➤ Fixez l’appareil avec huit vis (fig. 5 1, page 3).
6.3 Desserrer la fixation de transport
L’appareil dispose d’un mécanisme de verrouillage servant également de fixation de
transport. Les réglages suivants sont possibles (fig. 6, page 4):
•
Position 1 (fixation de transport) : (1) La porte est fermée et fixée. Pour ouvrir la
porte, tournez la barre sur la position 2.
•
Position 2 : (2) la porte peut être ouverte.
•
Position 3 (réglage « VENT ») : (3) La porte est légèrement ouverte, mais toutefois
fixée. Réglez cette position si par ex. vous devez éteindre l’appareil pour une
durée relativement longue.
40
Page 41

FR
MR07, MRR07, MH07 Montage et raccordement de l’appareil
6.4 Modification du côté d’ouverture de la porte
Vous pouvez modifier le côté d’ouverture de la porte de sorte que la porte s’ouvre
vers la gauche plutôt que vers la droite.
Procédez de la manière suivante pour modifier le côté d’ouverture de la porte
(fig. 7, page 4) :
➤ Retirez la butée supérieure de la porte (1).
➤ Soulevez la porte avec précaution.
➤ Retirez la tige filetée (2).
➤ Retirez les crochets de verrouillage (3) de la barre.
➤ Retirer la plaque de verrouillage (4) et montez-la sur le côté opposé.
➤ Démontez la barre en la tirant vers le bas et posez-la sur le côté opposé.
➤ Resserrez les crochets de verrouillage (3) sur la barre.
➤ Démontez les supports de verrouillage (5) en haut et en bas, à gauche.
➤ Démontez les butées de la porte (1) en haut et en bas, à droite.
➤ Serrez les butées de la porte (1) sur le côté gauche, en haut et en bas.
➤ Serrez les supports de verrouillage (5) sur le côté droit, en haut et en bas.
6.5 Raccordement de l’appareil à une batterie
AVIS !
A
Pour des raisons de sécurité, l’appareil est équipé d’un système électronique pour
empêcher l’inversion de polarité. Cela protège l’appareil contre un court-circuit lors
de la connexion à une batterie.
• Pour éviter des pertes de tension et de puissance frigorifique, le
câble doit être le plus court possible et ne doit pas être interrompu.
Évitez pour cette raison de placer des interrupteurs, des connecteurs ou des multi-adaptateurs supplémentaires.
• Débranchez le réfrigérateur et les autres charges électriques de la
batterie avant de connecter la batterie à un chargeur rapide. Les
surtensions peuvent endommager l’électronique des appareils.
• Montez un fusible d’au moins 15 A sur le raccordement positif.
• Connectez si possible l’appareil directement au pôle de la batterie.
41
Page 42

FR
Montage et raccordement de l’appareil MR07, MRR07, MH07
Uniquement MR07 et MRR 07 : Pour protéger la batterie, l’appareil s’éteint automatiquement lorsque la tension n’est plus suffisante (voir tableau suivant).
12 V
Tension d'arrêt
Tension de remise en marche
➤ Déterminez la section nécessaire du câble en fonction de sa longueur, selon la
fig. 8, page 5.
Légende de la fig. 8, page 5
Axe des coordonnées Signification Unité
l Longueur de câble m
∅ Section du câble mm²
AVIS !
A
➤ Avant de mettre l’appareil en service, vérifiez que la tension de service et celle de
la batterie sont identiques (voir la plaque signalétique).
MR07, MRR07
➤ Raccordez le câble rouge au pôle positif de la batterie.
➤ Raccordez le câble noir au pôle négatif de la batterie.
Lors du branchement de la batterie, respectez la polarité correcte.
11,6 V
12,1 V
REMARQUE
I
➤ Raccordez le câble rouge/jaune à un interrupteur (non fourni).
➤ Branchez l’autre côté de l’interrupteur au raccordement positif.
MH07
➤ Connectez le pôle positif de la batterie au bornier de la prise positive.
➤ Connectez le pôle négatif de la batterie au bornier de la prise négative.
Le câble rouge/jaune est le câble de démarrage de l’appareil. L’appareil
se met en marche lorsque le câble rouge/jaune est commuté sur 12 V.
42
Page 43

FR
MR07, MRR07, MH07 Utilisation de l’appareil
7 Utilisation de l’appareil
AVIS !
A
I
7.1 Comment économiser de l’énergie ?
•
Choisissez un emplacement bien aéré et à l’abri du soleil.
•
N’ouvrez pas l’appareil plus souvent que nécessaire.
•
Ne laissez pas la porte ouverte plus longtemps que nécessaire.
•
Uniquement MR07 et MRR07 : dégivrez le réfrigérateur dès qu’une couche
de glace s’est formée.
•
Uniquement MR 07 et MRR07 : nettoyez régulièrement le condensateur pour
enlever la poussière et les salissures.
La température intérieure de l’appareil est déterminée par la
température ambiante.
•
Uniquement MR07 et MRR07 : veillez à ce que la température
franchisse le point fixe réglé de 5 °C quand la température ambiante
chute au-dessous de 4 °C.
•
Seulement MH07 : veillez à ce que la température franchisse le
point fixe réglé de 37 °C quand la température ambiante dépasse
les 37 °C.
REMARQUE
Avant de mettre l’appareil en service, vous devez, pour des raisons
d’hygiène, le nettoyer à l’intérieur et à l’extérieur à l’aide d’un tissu
humide (voir également chapitre « Entretien et nettoyage », page 45).
43
Page 44

FR
Utilisation de l’appareil MR07, MRR07, MH07
7.2 Utilisation de l’appareil
AVIS !
•
A
I
Dégivrer réfrigérateur (uniquement MR07 et MRR07)
L’ hum idi té d e l’ air peut se c ond ens er s ous for me d e gi vre au n ive au de l’é vap ora teu r
ou à l’intérieur du réfrigérateur et diminuer ainsi sa puissance frigorifique. Veillez
donc à dégivrer l’appareil à temps.
A
Les denrées doivent être conservées dans leurs emballages originaux ou dans des récipients appropriés.
•
Veillez à ne déposer dans le réfrigérateur que des objets ou aliments
qui peuvent être réfrigérés/réchauffés à la température
sélectionnée :
– MR 07 et MRR07 : 5°C
– MH 07 : 37 °C
REMARQUE
Uniquement MR07 et MRR07 : après la mise en marche, le réfrigéra-
teur a besoin d’environ 60 s avant que le compresseur ne se mette en
marche.
AVIS !
N’utilisez jamais d’outils durs ou pointus pour enlever les couches de
glace ou pour détacher des objets pris dans le givre.
Procédez de la manière suivante pour dégivrer le réfrigérateur :
➤ Retirez les aliments.
➤ Placez-les éventuellement dans un autre réfrigérateur pour qu’ils restent froids.
➤ Laissez la porte ouverte.
➤ Si vous souhaitez évacuer l'eau de dégivrage par un flexible :
Raccordez un flexible d'un diamètre intérieur de 6 mm à la tubulure d'évacuation
(fig. 9 2, page 5).
➤ Retirez le bouchon (fig. 9 1, page 5).
➤ L'eau de dégivrage s'évacue alors par le flexible.
➤ Essuyez l'appareil avec un chiffon après l'avoir dégivré.
44
Page 45

FR
MR07, MRR07, MH07 Entretien et nettoyage
Extinction de l’appareil et mise hors service
Si vous souhaitez mettre l’appareil hors service pendant une période prolongée,
procédez de la façon suivante :
➤ Débranchez le câble de raccordement de la batterie.
➤ Nettoyez l’appareil (voir chapitre « Entretien et nettoyage », page 45).
➤ Réglez le verrouillage sur la position « VENT », chapitre « Desserrer la fixation de
transport », page 40 cela empêche la formation d’odeurs.
Verrouillage de la porte
Vous pouvez sécuriser la porte de l’appareil, par ex. contre une ouverture
involontaire.
➤ Réglez le mécanisme de verrouillage situé sur la partie supérieure de la porte sur
la position 1 (fig. 6 1, page 4).
8 Entretien et nettoyage
AVIS !
A
N’utilisez ni produits abrasifs ni objets durs pour le nettoyage, ceux-ci
pouvant endommager l’appareil.
➤ Nettoyez la glacière régulièrement et dès qu’elle est sale, avec un chiffon
humide.
➤ Veillez à ce que de l’eau ne goutte pas sur les joints. Cela risque d’endommager
les composants électroniques.
➤ Au besoin, nettoyez le condensat qui s’est accumulé sur le sol.
➤ Essuyez l’appareil avec un chiffon après l’avoir nettoyé.
45
Page 46

FR
Garantie MR07, MRR07, MH07
9 Garantie
Le délai légal de garantie s'applique. Si le produit s'avérait défectueux, veuillez vous
adresser à la filiale du fabricant située dans votre pays (voir adresses au verso du
présent manuel) ou à votre revendeur spécialisé.
Veuillez y joindre les documents suivants pour la gestion des réparations et de la
garantie :
•
une copie de la facture avec la date d'achat,
•
le motif de la réclamation ou une description du dysfonctionnement.
10 Retraitement
➤ Jetez les emballages dans les conteneurs de déchets recyclables prévus à cet
effet.
Lorsque vous mettrez votre appareil définitivement hors service, informezvous auprès du centre de recyclage le plus proche ou auprès de votre
revendeur spécialisé sur les prescriptions relatives au retraitement des
déchets.
11 Guide de dépannage
Le compresseur ne fonctionne pas
Dysfonctionnement Cause possible Solution
U
= 0 V Interruption de la ligne de
Bornes
U
Bornes
≤ U
Marche
raccordement entre la
batterie et l’électronique
Le fusible supplémentaire de la ligne
est grillé (s’il fait partie des composants)
Tension de batterie trop faible Charger la batterie
46
Etablir la connexion
Changer le fusible de la
ligne
Page 47

FR
MR07, MRR07, MH07 Guide de dépannage
Dysfonctionnement Cause possible Solution
Tentative de démarrage
avec U
Bornes
≤ U
Arret
Les câbles sont débranchés
Mauvais contact (corrosion)
Etablir la connexion
Capacité de batterie trop faible Changement des piles
Section du câble trop petite Changer le câble (fig. 8,
page 5)
Tentative de démarrage
Bornes
≥ U
Marche
avec U
Température ambiante trop élevée –
Ventilation et aération insuffisantes Déplacer l’appareil
Le condensateur est sale Nettoyer le condensateur
Ventilateur défectueux (s’il fait partie
Changer le ventilateur
des composants)
Interruption électrique
dans le compresseur
entre les broches
Compresseur défectueux La réparation peut être
effectuée uniquement par
un service après-vente
agréé.
U
Bornes
U
Marche
U
Arret
Tension entre la borne positive et la borne négative de l’électronique
Tension de démarrage de l’électronique
Tension d’arrêt de l’électronique
Diminution de la puissance frigorifique, augmentation de la température
intérieure
Dysfonctionnement Cause possible Solution
Longue durée de fonctionnement/fonctionnement continu du
compresseur
Givrage de l’évaporateur Dégivrer l’évaporateur
Température ambiante trop élevée –
Ventilation et aération insuffisantes Déplacer l’appareil
Le condensateur est sale Nettoyer le condensateur
Ventilateur défectueux (s’il fait partie
Changer le ventilateur
des composants)
Le compresseur fonc-
Batterie à plat Charger la batterie
tionne rarement
47
Page 48

FR
Guide de dépannage MR07, MRR07, MH07
Bruits inhabituels
Dysfonctionnement Cause possible Solution
Fort ronflement Les mouvements d’un élément du
circuit de refroidissement sont
Redresser l’élément avec
précaution
bloqués (l’élément est coincé contre
la paroi)
Corps étranger coincé entre l’unité
Retirer le corps étranger
de réfrigération et la paroi
Bruit du ventilateur (s’il fait partie des
–
composants)
L’appareil ne chauffe pas
Dysfonctionnement Cause possible Solution
U
= 0 V Interruption de la ligne de
Bornes
raccordement entre la batterie et
l’électronique
Le fusible supplémentaire de la ligne
est grillé (s’il fait partie des composants)
U
≤ U
Bornes
Marche
Tentative de démarrage
avec U
Bornes
≤ U
Arret
Tension de batterie trop faible Charger la batterie
Les câbles sont débranchés
Mauvais contact (corrosion)
Capacité de batterie trop faible Changement des piles
Section du câble trop petite Changer le câble (fig. 8,
Etablir la connexion
Changer le fusible de la
ligne
Etablir la connexion
page 5)
U
Bornes
U
Marche
U
Arret
48
Tension entre la borne positive et la borne négative de l’électronique
Tension de démarrage de l’électronique
Tension d’arrêt de l’électronique
Page 49

FR
MR07, MRR07, MH07 Caractéristiques techniques
12 Caractéristiques techniques
MR07 MRR07 MH07
N° d'article : 9105204550 9105204552 9105204551
Te ns ion de
raccordement : 12 Vg 12 Vg 12 Vg
Capacité : 7 l 7 l 7 l
Température de point
fixe : 5±1,5°C 5±1,5°C 37±1,5°C
Puissance moyenne
absorbée : 32 W 32 W 56 W
Humidité de l’air : 90 % maximum 90 % maximum 90 % maximum
Quantité de fluide
frigorigène : 45 g
Équivalent CO
Potentiel d'effet de serre
(GWP) : 1430
: 0,064 t –
2
–
–
Dimensions
(l x h x p, mm) :
Poids : 8 kg 8,7 kg 4,3 kg
Contrôle/certificats :
fig. 0, page 6 fig. b, page 6 fig. a, page 6
7
Le circuit de refroidissement contient du R134a.
Contient des gaz à effet de serre fluorés
Equipement hermétiquement scellé
49
Page 50

NL
Verklaring van de symbolen MR07, MRR07, MH07
Lees deze handleiding voor de montage en de ingebruikname zorgvuldig
door en bewaar hem. Geef de handleiding bij het doorgeven van het
product aan de gebruiker.
Inhoudsopgave
1 Verklaring van de symbolen . . . . . . . . . . . . . . . . . . . . . . . . . . . . . . . . . . . . . 50
2 Veiligheidsinstructies . . . . . . . . . . . . . . . . . . . . . . . . . . . . . . . . . . . . . . . . . . . 51
3 Omvang van de levering . . . . . . . . . . . . . . . . . . . . . . . . . . . . . . . . . . . . . . . 53
4 Gebruik volgens de voorschriften . . . . . . . . . . . . . . . . . . . . . . . . . . . . . . . . 53
5 Technische beschrijving . . . . . . . . . . . . . . . . . . . . . . . . . . . . . . . . . . . . . . . . 53
6 Toestel inbouwen en aansluiten. . . . . . . . . . . . . . . . . . . . . . . . . . . . . . . . . . 54
7 Toestel gebruiken . . . . . . . . . . . . . . . . . . . . . . . . . . . . . . . . . . . . . . . . . . . . . 58
8 Reiniging en onderhoud. . . . . . . . . . . . . . . . . . . . . . . . . . . . . . . . . . . . . . . . 60
9 Garantie. . . . . . . . . . . . . . . . . . . . . . . . . . . . . . . . . . . . . . . . . . . . . . . . . . . . . 60
10 Afvoer . . . . . . . . . . . . . . . . . . . . . . . . . . . . . . . . . . . . . . . . . . . . . . . . . . . . . . 60
11 Storingen verhelpen . . . . . . . . . . . . . . . . . . . . . . . . . . . . . . . . . . . . . . . . . . . . 61
12 Technische gegevens. . . . . . . . . . . . . . . . . . . . . . . . . . . . . . . . . . . . . . . . . . 63
1 Verklaring van de symbolen
GEVAAR!
D
!
!
50
Veiligheidsaanwijzing: Het niet naleven leidt tot overlijden of ernstig
letsel.
WAARSCHUWING!
Veiligheidsaanwijzing: Het niet naleven kan leiden tot overlijden of
ernstig letsel.
VOORZICHTIG!
Veiligheidsaanwijzing: Het niet naleven kan leiden tot letsel.
Page 51

NL
MR07, MRR07, MH07 Veiligheidsinstructies
LET OP!
A
I
Het niet naleven ervan kan leiden tot materiële schade en de werking
van het product beperken.
INSTRUCTIE
Aanvullende informatie voor het bedienen van het product.
2 Veiligheidsinstructies
De fabrikant kan in de volgende gevallen niet aansprakelijk worden gesteld voor
schade:
•
beschadiging van het product door mechanische invloeden en verkeerde
aansluitspanning
•
veranderingen aan het product zonder uitdrukkelijke toestemming van de
fabrikant
•
gebruik voor andere dan de in de handleiding beschreven toepassingen
2.1 Algemene veiligheid
WAARSCHUWING!
•
!
Controleer voor ingebruikneming van het toestel, of de bedrijfsspanning en de accuspanning overeenkomen (zie typeplaatje).
•
Als de aansluitkabel is beschadigd, moet deze worden vervangen om
gevaren te voorkomen. Vervang een beschadigde aansluitkabel
alleen door een aansluitkabel van hetzelfde type en met dezelfde
specificatie.
•
Laat installaties in vochtige ruimtes alleen door een vakman plaatsen.
•
Als het toestel zichtbaar beschadigd is, mag het niet in gebruik
worden genomen.
•
Reparaties aan dit toestel mogen uitsluitend door vaklui uitgevoerd
worden. Door ondeskundige reparaties kunnen grote gevaren
ontstaan.
Neem contact op met de klantenservice wanneer een reparatie nodig
is.
A
LET OP!
•
Open in geen geval het koel- of warmtecircuit.
51
Page 52

NL
Veiligheidsinstructies MR07, MRR07, MH07
•
Stel het toestel op een droge en tegen spatwater beschermde plaats
op.
•
Monteer het toestel niet in de buurt van andere warmtebronnen
(verwarming, sterke zonnestraling, gasovens enz.).
•
Let erop dat de ventilatiesleuven niet worden afgedekt.
•
Het toestel is niet geschikt voor de opslag van bijtende of oplosmiddelhoudende stoffen!
•
Bewaar geen explosiegevaarlijke stoffen zoals bijvoorbeeld spuitbussen met drijfgas in het toestel.
2.2 Veiligheid bij het gebruik van het toestel
GEVAAR!
•
D
!
Levensgevaar!
Raak nooit blanke leidingen met blote handen aan. Dit geldt vooral bij
het gebruik op het wisselstroomnet.
WAARSCHUWING!
•
Elektrische toestellen zijn geen speelgoed!
Bewaar en gebruik het toestel buiten het bereik van kinderen.
•
Personen (ook kinderen) die door hun fysieke, sensorische of geestelijke vaardigheden, of hun onervarenheid of onwetendheid niet in
staat zijn om het product veilig te gebruiken, mogen dit niet zonder
toezicht of instructie door een verantwoordelijke persoon doen.
•
Als u het toestel op een accu aansluit, zorg er dan voor, dat levensmiddelen niet met accuzuur in aanraking komen.
•
Bescherm het toestel en de kabels tegen hitte en vocht.
•
Koppel het toestel en andere verbruikers van de accu los, voordat u
de accu met een snellader oplaadt.
Overspanningen kunnen de elektronica van de toestellen
beschadigen.
I
52
INSTRUCTIE
•
Ontdooi het toestel op tijd, om energie te sparen.
•
Koppel het toestel van de accu los als u het lang niet gebruikt.
Page 53

NL
MR07, MRR07, MH07 Omvang van de levering
3 Omvang van de levering
Aantal Omschrijving
1 Roestvrijstalen koel- of warmtekast
1 Gebruiksaanwijzing
4 Gebruik volgens de voorschriften
De koel- of warmtekast is uitermate geschikt voor reddingsvoertuigen.
De koelkasten MR07 en MRR07 zijn geschikt om waren tot een temperatuur van
5 °C te koelen en koel te houden.
De warmtekast MH07 is geschikt om waren tot een temperatuur van 37 °C op te
warmen en warm te houden.
Bij continubedrijf mag de luchtvochtigheid niet boven de 90 % liggen.
VOORZICHTIG! Gevaar voor de gezondheid!
!
Controleer of het koelvermogen van het toestel voldoet aan de eisen
van de levensmiddelen of geneesmiddelen die u wilt koelen.
5 Technische beschrijving
5.1 Koelkast MR07
De koelkast MR07 is geschikt voor het gebruik met gelijkspanning van 12 V en kan
zodoende worden gebruikt in reddingsvoertuigen.
De koelkast kan waren tot een constante temperatuur van 5 °C afkoelen en koel
houden.
Het koelcircuit is onderhoudsvrij.
Het toestel is met een afneembaar en afzonderlijk monteerbaar koelaggregaat
uitgerust (afb. 1, pagina 2).
5.2 Koelkast MRR07
De koelkast MRR07 is geschikt voor het gebruik met gelijkspanning van 12 V en kan
zodoende worden gebruikt in reddingsvoertuigen.
53
Page 54

NL
Toestel inbouwen en aansluiten MR07, MRR07, MH07
De koelkast kan waren tot een constante temperatuur van 5 °C afkoelen en koel
houden.
Het koelcircuit is onderhoudsvrij.
5.3 Warmtekast MH 07
De warmtekast MH07 is geschikt voor het gebruik met gelijkspanning van 12 V en
kan zodoende worden gebruikt in reddingsvoertuigen.
De warmtekast kan waren tot een constante temperatuur van 37 °C verwarmen en
warm houden.
5.4 Bedieningselementen MR07/MRR07/MH07
Nr. in afb. 2,
pagina 2
1 Temperatuurindicatie
Verklaring
6 Toestel inbouwen en aansluiten
6.1 Koelaggregaat afnemen (alleen MR07)
➤ Buig de beschermplaat (afb. 3 1, pagina 2) een beetje open.
➤ Verwijder de beide bevestigingsschroeven (afb. 3 3, pagina 2) met een lange
kruiskopschroevendraaier.
➤ Verwijder de kabelbinders van de opgerolde kabels.
➤ Rol de kabels af.
➤ Til het koelaggregaat op en draai het samen met een tweede persoon tegen de
wikkelrichting van de zuigleiding (afb. 3 2, pagina 2) in tot de zuigleiding afgewikkeld is.
54
Page 55

NL
MR07, MRR07, MH07 Toestel inbouwen en aansluiten
6.2 Toestel inbouwen
➤ Gelieve de volgende montage-instructies voor de montageplaats in acht te
nemen:
– Vermijd opstelling naast warmtebronnen zoals verwarmingen, gasovens,
warmwaterleidingen etc.
– Bouw het toestel op een droge, beschermde plaats in.
– Het toestel moet zo zijn ingebouwd dat de verwarmde lucht goed kan
wegtrekken. Zorg daarom voor voldoende ventilatie (afb. 4, pagina 3).
Nr. in afb. 4,
pagina 3
1 Warme afvoerlucht
2 Koude toevoerlucht
3 Condensator
4 Met sierstrip 50 mm afstand aan bovenzijde!
Verklaring
➤ Bevestig het toestel met acht schroeven (afb. 5 1, pagina 3).
6.3 Transportbeveiliging ontgrendelen
Het toestel beschikt over een vergrendelingsmechanisme dat ook als transportbeveiliging dient. De volgende instellingen zijn mogelijk (afb. 6, pagina 4):
•
Positie 1 (transportbeveiliging): (1) de deur is gesloten en vergrendeld. Om de
deur te openen, draait u de grendel in positie 2.
•
Positie 2: (2) de deur kan worden geopend.
•
Positie 3 („VENT”-stand): (3) de deur is iets geopend maar wel vastgezet.
Gebruik deze positie als u bijv. het toestel langere tijd buiten bedrijf stelt.
6.4 Deuraanslag wijzigen
U kunt de aanslag van de deur wijzigen, zodat de deur naar links in plaats van naar
rechts opengaat.
Ga als volgt te werk om de deuraanslag te wijzigen (afb. 7, pagina 4):
➤ Verwijder de bovenste deuraanslag (1).
➤ Til de deur er voorzichtig uit.
➤ Draai de schroefdraadpennen los (2).
➤ Trek de afsluithaak (3) van de stang.
55
Page 56

NL
Toestel inbouwen en aansluiten MR07, MRR07, MH07
➤ Verwijder de afsluitplaat (4) en monteer deze aan de tegenoverliggende zijde.
➤ Trek de stang er langs de onderkant uit en breng deze op de tegenoverliggende
zijde aan.
➤ Bevestig de afsluithaak (3) weer op de stang.
➤ Demonteer de afsluithouders (5) linksboven en -onder.
➤ Demonteer de deuraanslagen (1) rechtsboven en -onder.
➤ Bevestig de deuraanslagen (1) op de linkerkant boven en onder.
➤ Bevestig de afsluithouders (5) op de rechterkant boven en onder.
6.5 Het toestel op de accu aansluiten
LET OP!
A
• Om spannings- en vermogensverlies te vermijden, moet de aansluitkabel zo kort mogelijk zijn en mag de kabel niet onderbroken worden. Vermijd daarom extra schakelaars, stekkers of
meerwegadapters.
• Maak de koelkast en andere elektrische ladingen los van de accu
alvorens de accu met een snellader op te laden. Overspanning kan
de elektronica van het toestel beschadigen.
• Beveilig de positieve aansluiting met minimaal 15 A.
• Sluit het toestel, indien mogelijk, direct op de accupool aan.
Uit veiligheidsredenen is het toestel uitgerust met een elektronisch systeem dat
beschermt tegen verkeerd polen. Dit beschermt het toestel tegen kortsluiting na
aansluiting op een accu.
Alleen MR07 en MRR07: ter bescherming van de accu schakelt het toestel automatisch uit als de spanning niet meer voldoende is (zie de volgende tabel).
12 V
Uitschakelspanning
Herinschakelspanning
➤ Bepaal de vereiste kabeldiameter afhankelijk van de kabellengte aan de hand van
afb. 8, pagina 5.
Legenda bij afb. 8, pagina 5
11,6 V
12,1 V
56
Page 57

NL
MR07, MRR07, MH07 Toestel inbouwen en aansluiten
Coördinatenas Betekenis Eenheid
l Kabellengte m
∅ Kabeldiameter mm²
LET OP!
A
➤ Controleer voor ingebruikneming van het toestel of de bedrijfsspanning en de
accuspanning overeenkomen (zie typeplaatje).
MR07, MRR07
➤ Verbind de rode kabel met de pluspool van de accu.
➤ Verbind de zwarte kabel met de minpool van de accu.
I
➤ Sluit de rood/gele kabel aan op een schakelaar (niet meegeleverd).
Let bij het aansluiten van de accu op de correcte polariteit.
INSTRUCTIE
De rood/gele kabel is de startkabel voor het toestel. Wanneer de
rood/gele kabel op 12 V wordt geschakeld, wordt het toestel ingeschakeld.
➤ Sluit de andere kant van de schakelaar aan op de positieve verbinding.
MH07
➤ Sluit de pluspool van de accu aan op de positieve aansluiting van de
multistekker.
➤ Sluit de minpool van de accu aan op de negatieve aansluiting van de
multistekker.
57
Page 58

NL
Toestel gebruiken MR07, MRR07, MH07
7Toestel gebruiken
LET OP!
A
I
7.1 Tips om energie te sparen
•
Kies een goed geventileerde en tegen zonnestralen beschermde plaats.
•
Open het toestel niet vaker dan nodig.
•
Laat de deur niet langer openstaan dan nodig.
•
Alleen MR07 en MRR07: Ontdooi de koelkast zodra er zich een ijslaag
gevormd heeft.
•
Alleen MR07 en MRR07: Verwijder regelmatig stof en vuil van de condensator.
De binnentemperatuur van het toestel word door de omgevingstemperatuur beïnvloed.
•
Alleen MR07 en MRR 07: Let erop dat de ingestelde constante
temperatuur van 5 °C daalt zodra de omgevingstemperatuur onder
de 4 °C komt te liggen.
•
Alleen MH07: Let erop dat de ingestelde constante temperatuur
van 37 °C (MH-07) stijgt zodra de omgevingstemperatuur boven de
37 °C komt te liggen.
INSTRUCTIE
Voordat u het nieuwe toestel in gebruik neemt, moet u het om
hygiënische redenen van binnen en buiten met een vochtige doek
reinigen (zie ook hoofdstuk „Reiniging en onderhoud” op pagina 60).
7.2 Toestel gebruiken
LET OP!
•
A
De waren mogen alleen in de originele verpakkingen of in geschikte
bakken worden opgeslagen.
•
Zorg ervoor dat er zich enkel voorwerpen of waren in de koelkast
bevinden die op de gekozen temperatuur gekoeld of opgewarmd
mogen worden.
– MR 07 en MRR07: 5°C
– MH 07: 37 °C
58
Page 59

NL
MR07, MRR07, MH07 Toestel gebruiken
INSTRUCTIE
I
Koelkast ontdooien (alleen MR07 en MRR07)
Luchtvochtigheid kan zich op de verdamper of in de binnenruimte van de koelkast
als rijp afzetten, waardoor het koelvermogen vermindert. Ontdooi het toestel op
tijd.
A
Ga als volgt te werk om de koelkast te ontdooien:
➤ Neem de waren eruit.
➤ Bewaar deze evt. in een ander koeltoestel zodat zij koud blijven.
➤ Laat de deur open.
➤ Indien u dooiwater door een slang wilt afvoeren:
Sluit een slang met een binnendiameter van 6 mm aan op de afvoeraansluiting
(afb. 9 2, pagina 5).
Alleen MR07 en MRR07: Na het inschakelen heeft de koelkast
ongeveer 60 s nodig tot de compressor begint te lopen.
LET OP!
Gebruik nooit hard of spits gereedschap voor het verwijderen van
ijslagen of het losmaken van vastgevroren voorwerpen.
➤ Verwijder de afvoerstop (afb. 9 1, pagina 5).
➤ Het dooiwater loopt nu weg door de slang.
➤ Wis het toestel na het ontdooien met een doek droog.
Toestel uitschakelen en stilleggen
Ga als volgt te werk als u het toestel lange tijd wilt stilleggen:
➤ Koppel de aansluitkabels van de accu los.
➤ Reinig het toestel (zie hoofdstuk „Reiniging en onderhoud” op pagina 60).
➤ Zet de vergrendeling op de „VENT”-stand (hoofdstuk „Transportbeveiliging ont-
grendelen” op pagina 55).
Zo voorkomt u geurvorming.
59
Page 60

NL
Reiniging en onderhoud MR07, MRR07, MH07
Kastdeur vergrendelen
U kunt de kastdeur bijv. tegen onbedoeld openen vergrendelen.
➤ Zet het vergrendelingsmechanisme aan de bovenkant van de deur op positie 1
(afb. 6 1, pagina 4).
8 Reiniging en onderhoud
LET OP!
A
➤ Reinig het toestel regelmatig en als het vuil is met een vochtige doek.
➤ Let erop dat er geen water in de afdichtingen druppelt. Dit kan de elektronica
beschadigen.
➤ Wis, indien nodig, de condens die zich op de vloer verzameld heeft op.
➤ Wis het toestel na het reinigen met een doek droog.
Gebruik voor het reinigen geen bijtende schoonmaakmiddelen of
harde voorwerpen, het toestel zou hierdoor beschadigd kunnen raken.
9 Garantie
De wettelijke garantieperiode is van toepassing. Als het product defect is, wendt u
zich tot het filiaal van de fabrikant in uw land (adressen zie achterkant van de handleiding) of tot uw speciaalzaak.
Voor de afhandeling van de reparatie of garantie dient u de volgende documenten
mee te sturen:
•
een kopie van de factuur met datum van aankoop,
•
reden van de klacht of een beschrijving van de storing.
10 Afvoer
➤ Laat het verpakkingsmateriaal indien mogelijk recyclen.
Als u het toestel definitief buiten bedrijf stelt, informeer dan bij het dichtstbijzijnde recyclingcentrum of uw speciaalzaak naar de betreffende afvoervoorschriften.
60
Page 61

NL
MR07, MRR07, MH07 Storingen verhelpen
11 Storingen verhelpen
Compressor loopt niet
Storing Mogelijke oorzaak Oplossing
UKL = 0 V Onderbreking in de aansluitleiding
accu – elektronica
Extra leidingbeveiliging doorgebrand (indien voorhanden)
≤ U
U
KL
AAN
Startpoging met
≤ U
U
KL
UIT
Accuspanning te laag Accu laden
Losse kabelverbinding
Slecht contact (corrosie)
Accucapaciteit te gering Accu vervangen
Kabeldiameter te gering Kabel vervangen
Startpoging met
UKL≥ U
AAN
Omgevingstemperatuur te hoog –
Be- en ontluchting niet voldoende Koelkast anders zetten
Condensator vuil Condensator reinigen
Ventilator defect (indien voorhanden) Ventilator vervangen
Elektrische onder-
Compressor defect De reparatie kan alleen
breking in de
compressor tussen de
pennen
Spanning tussen plus- en minklem van de elektronica
U
KL
U
Inschakelspanning elektronica
AAN
U
Uitschakelspanning elektronica
UIT
Verbinding tot stand
brengen
Leidingbeveiliging
vervangen
Verbinding tot stand
brengen
(afb. 8, pagina 5)
door een geautoriseerd
servicebedrijf uitgevoerd
worden.
61
Page 62

NL
Storingen verhelpen MR07, MRR07, MH07
Koelvermogen vermindert, binnentemperatuur stijgt
Storing Mogelijke oorzaak Oplossing
Compressor loopt
lang/permanent
Compressor loopt
zelden
IJsvorming op verdamper Verdamper ontdooien
Omgevingstemperatuur te hoog –
Be- en ontluchting niet voldoende Koelkast anders zetten
Condensator vuil Condensator reinigen
Ventilator defect (indien voorhanden) Ventilator vervangen
Accucapaciteit uitgeput Accu laden
Abnormale geluiden
Storing Mogelijke oorzaak Oplossing
Luid brommen Onderdeel van het koelcircuit kan
niet vrij trillen (ligt tegen de wand aan)
Vreemde voorwerpen tussen koel-
machine en wand ingeklemd
Ventilatorgeluid (indien voorhanden) –
Onderdeel voorzichtig
buigen
Vreemde voorwerpen
verwijderen
To e st e l ve rw ar mt nie t
Storing Mogelijke oorzaak Oplossing
UKL = 0 V Onderbreking in de aansluitleiding
accu – elektronica
Extra leidingbeveiliging doorge-
brand (indien voorhanden)
≤ U
U
KL
AAN
Startpoging met
U
≤ U
KL
UIT
Accuspanning te laag Accu laden
Losse kabelverbinding
Slecht contact (corrosie)
Accucapaciteit te gering Accu vervangen
Kabeldiameter te gering Kabel vervangen
62
Verbinding tot stand
brengen
Leidingbeveiliging
vervangen
Verbinding tot stand
brengen
(afb. 8, pagina 5)
Page 63

NL
MR07, MRR07, MH07 Technische gegevens
7
U
Spanning tussen plus- en minklem van de elektronica
KL
U
Inschakelspanning elektronica
AAN
U
Uitschakelspanning elektronica
UIT
12 Technische gegevens
MR07 MRR07 MH07
Artikelnr.: 9105204550 9105204552 9105204551
Aansluitspanning: 12 Vg 12 Vg 12 Vg
Inhoud: 7 l7 l7 l
Constante temperatuur: 5 ± 1,5 °C 5 ± 1,5 °C 37 ± 1,5 °C
Gemiddeld opgenomen
vermogen: 32 W 32 W 56 W
Luchtvochtigheid: maximaal 90 % maximaal 90 % maximaal 90 %
Koelmiddelhoeveelheid: 45 g –
-equivalent: 0,064 t –
CO
2
Aardopwarmingsvermogen (GWP): 1430
Afmetingen (b x h x d)
in mm: afb. 0, pagina 6 afb. b, pagina 6 afb. a, pagina 6
–
Gewicht: 8 kg 8,7 kg 4,3 kg
Keurmerk/certificaten:
Het koelcircuit bevat R134a.
Bevat gefluoreerde broeikasgassen
Hermetisch afgesloten apparatuur
63
Page 64

GERMANY
Dometic WAECO International GmbH
Hollefeldstraße 63 · D-48282 Emsdetten
+49 (0) 2572 879-0 · +49 (0) 2572 879-300
Mail: info@dometic-waeco.de
dometic.com
AUSTRALIA
Dometic Australia Pty. Ltd.
1 John Duncan Court
Varsity Lakes QLD 4227
1800 212121
+61 7 55076001
Mail: sales@dometic.com.au
AUSTRIA
Dometic Austria GmbH
Neudorferstraße 108
A-2353 Guntramsdorf
+43 2236 908070
+43 2236 90807060
Mail: info@dometic.at
BENELUX
Dometic Branch Office Belgium
Lourdesstraat 84
B-8940 Geluwe
+32 2 3598040
+32 2 3598050
Mail: info@dometic.be
BRAZIL
Dometic DO Brasil LTDA
Avenida Paulista 1754, conj. 111
SP 01310-920 Sao Paulo
+55 11 3251 3352
+55 11 3251 3362
Mail: info@dometic.com.br
DENMARK
Dometic Denmark A/S
Nordensvej 15, Taulov
DK-7000 Fredericia
+45 75585966
+45 75586307
Mail: info@dometic.dk
FINLAND
Dometic Finland OY
Mestarintie 4
FIN-01730 Vantaa
+358 20 7413220
+358 9 7593700
Mail: info@dometic.fi
FRANCE
Dometic SAS
ZA du Pré de la Dame Jeanne
B.P. 5
F-60128 Plailly
+33 3 44633525
+33 3 44633518
Mail : vehiculesdeloisirs@dometic.fr
HONG KONG
Dometic Group Asia Pacific
Suites 2207-11 · 22/F · Tower 1
The Gateway · 25 Canton Road,
Tsim Sha Tsui · Kowloon
+852 2 4611386
+852 2 4665553
Mail: info@waeco.com.hk
HUNGARY
Dometic Zrt. Sales Office
Kerékgyártó u. 5.
H-1147 Budapest
+36 1 468 4400
+36 1 468 4401
Mail: budapest@dometic.hu
ITALY
Dometic Italy S.r.l.
Via Virgilio, 3
I-47122 Forlì (FC)
+39 0543 754901
+39 0543 754983
Mail: vendite@domet ic.it
JAPAN
Dometic KK
Maekawa-Shibaura, Bldg. 2
2-13-9 Shibaura Minato-ku
Tokyo 108-0023
+81 3 5445 3333
+81 3 5445 3339
Mail: info@dometic.jp
MEXICO
Dometic Mx, S. de R. L. de C. V.
Circuito Médicos No. 6 Local 1
Colonia Ciudad Satélite
CP 53100 Naucalpan de Juárez
Estado de México
+52 55 5374 4108
+52 55 5393 4683
Mail: info@dometic.com.mx
NETHERLANDS
Dometic Benelux B.V.
Ecustraat 3
NL-4879 NP Etten-Leur
+31 76 5029000
+31 76 5029019
Mail: info@dometic.nl
NEW ZEALAND
Dometic New Zealand Ltd.
PO Box 12011
Penrose
Auckland 1642
+64 9 622 1490
+64 9 622 1573
Mail: customerservices@dometic.co.nz
NORWAY
Dometic Norway AS
Østerøyveien 46
N-3232 Sandefjord
+47 33428450
+47 33428459
Mail: firmapost@dometic.no
POLAND
Dometic Poland Sp. z o.o.
Ul. Puławska 435A
PL-02-801 Warszawa
+48 22 414 3200
+48 22 414 3201
Mail: info@dometic.pl
PORTUGAL
Dometic Spain, S.L.
Branch Office em Portugal
Rot. de São Gonçalo nº 1 – Esc. 12
2775-399 Carcavelos
+351 219 244 173
+351 219 243 206
Mail: info@dometic.pt
RUSSIA
Dometic RUS LLC
Komsomolskaya square 6-1
RU-107140 Moscow
+7 495 780 79 39
+7 495 916 56 53
Mail: info@dometic.ru
SINGAPORE
Dometic Pte Ltd
18 Boon Lay Way
06–141 Trade Hub 21
Singapore 609966
+65 6795 3177
+65 6862 6620
Mail: dometic@dometic.com.sg
SLOVAKIA
Dometic Slovakia s.r.o.
Sales Office Bratislava
Nádražná 34/A
900 28 Ivánka pri Dunaji
/ +421 2 45 529 680
Mail: bratislava@dom etic.com
SOUTH AFRICA
Dometic (Pty) Ltd.
Regional Office
South Africa & Sub-Saharan Africa
2 Avalon Road
West Lake View Ext 11
Modderfontein 1645
Johannesburg
+27 87 3530380
Mail: info@dometic.co.za
SPAIN
Dometic Spain S.L.
Avda. Sierra del Guadarrama, 16
E-28691 Villanueva de la Cañada
Madrid
+34 91 833 60 89
+34 900 100 245
Mail: info@dometic.es
SWEDEN
Dometic Scandinavia AB
Gustaf Melins gata 7
SE-42131 Västra Frölunda
+46 31 7341100
+46 31 7341101
Mail: info@dometicgroup.se
SWITZERLAND
Dometic Switzerland AG
Riedackerstrasse 7a
CH-8153 Rümlang
+41 44 8187171
+41 44 8187191
Mail: info@dometic.ch
UNITED ARAB EMIRATES
Dometic Middle East FZCO
P. O. Box 17860
S-D 6, Jebel Ali Freezone
Dubai
+971 4 883 3858
+971 4 883 3868
Mail: info@dometic.ae
UNITED KINGDOM
Dometic UK Ltd.
Dometic House, The Brewery
Blandford St. Mary
Dorset DT11 9LS
+44 344 626 0133
+44 344 626 0143
Mail: customerservices@dometi c.co.uk
USA
Dometic RV Division
1120 North Main Street
Elkhart, IN 46515
+1 574-264-2131
4445101994 207.5924.26 07/2018
 Loading...