

Page 1
CSMP2
ENDEFR
NL
REFRIGERATION
COOLMATIC
Compressor cooler
Installation and Operating Manual. . . . . . . .6
Kompressor-Kühlbox
Montage- und Bedienungsanleitung . . . . . 15
Glacière à compression
Instructions de montage
et de service . . . . . . . . . . . . . . . . . . . . . . . . .26
Compressorkoelbox
Montagehandleiding en
gebruiksaanwijzing . . . . . . . . . . . . . . . . . . .36
Page 2
Page 3
CSMP2
1
2
3
1
1
2
2
4
X7
5
110
280
50
120
6
3
Page 4

CSMP2
7
8
9
0
1
2
a
b
4
Page 5
CSMP2
c
1
d
226
493
554
451
390
163
229
5
Page 6
EN
CSMP2
Please read this operating manual carefully before starting the device.
Keep it in a safe place for future reference. If the device is passed on to
another person, this operating manual must be handed over to the user
along with it.
The manufacturer cannot be held liable for damage resulting from improper usage
or incorrect operation.
Contents
1 Explanation of symbols . . . . . . . . . . . . . . . . . . . . . . . . . . . . . . . . . . . . . . . . . 7
2 Safety instructions . . . . . . . . . . . . . . . . . . . . . . . . . . . . . . . . . . . . . . . . . . . . . 7
3 Scope of delivery . . . . . . . . . . . . . . . . . . . . . . . . . . . . . . . . . . . . . . . . . . . . . . 9
4 Intended use . . . . . . . . . . . . . . . . . . . . . . . . . . . . . . . . . . . . . . . . . . . . . . . . . . 9
5 Technical description . . . . . . . . . . . . . . . . . . . . . . . . . . . . . . . . . . . . . . . . . . 10
6 Installation and connection . . . . . . . . . . . . . . . . . . . . . . . . . . . . . . . . . . . . . . 11
7 Operation . . . . . . . . . . . . . . . . . . . . . . . . . . . . . . . . . . . . . . . . . . . . . . . . . . . 12
8 Cleaning and care . . . . . . . . . . . . . . . . . . . . . . . . . . . . . . . . . . . . . . . . . . . . 13
9 Guarantee . . . . . . . . . . . . . . . . . . . . . . . . . . . . . . . . . . . . . . . . . . . . . . . . . . . 13
10 Disposal . . . . . . . . . . . . . . . . . . . . . . . . . . . . . . . . . . . . . . . . . . . . . . . . . . . . 13
11 Technical data . . . . . . . . . . . . . . . . . . . . . . . . . . . . . . . . . . . . . . . . . . . . . . . 14
6
Page 7
EN
CSMP2 Explanation of symbols
1 Explanation of symbols
DANGER!
D
!
Safety instruction: Failure to observe this instruction will cause fatal or
serious injury.
WARNING!
Safety instruction: Failure to observe this instruction can cause fatal or
serious injury.
CAUTION!
Safety instruction: Failure to observe this instruction can lead to injury.
!
NOTICE!
A
Failure to observe this instruction can cause material damage and impair
the function of the product.
NOTE
Supplementary information for operating the product.
I
2 Safety instructions
2.1 General safety
WARNING!
• Do not operate the device if it is visibly damaged.
!
• This device may only be repaired by qualified personnel. Improper
repairs can lead to considerable hazards.
• Persons (including children) whose physical, sensory or mental
capacities or whose lack of experience or knowledge prevent
them from using this product safely should not operate it without
the supervision or instruction of a responsible person.
• Electrical devices are not toys.
Always keep and use the device out of the reach of children.
• Children must be supervised to ensure that they do not play with the
device.
7
Page 8

EN
Safety instructions CSMP2
• If this device's power cable is damaged, it must be replaced by the
manufacturer, customer service or a similarly qualified person in order
to prevent safety hazards.
• Do not store any explosive substances such as spray cans with
propellants in the device.
CAUTION!
!
A
2.2 Operating the device safely
D
• Disconnect the device from the mains
– before cleaning and maintenance
–after use
• Food may only be stored in its original packaging or in suitable
containers.
NOTICE!
• Check that the voltage specification on the type plate corresponds to
that of the energy supply.
• The cooling device is not suitable for transporting caustic materials or
materials containing solvents.
• Disconnect the cooler and other power consuming devices from the
battery before connecting the quick charging device.
DANGER!
• Do not touch exposed cables with your bare hands. This especially
applies when operating the device with an AC mains power supply.
NOTICE!
A
8
• In order to work properly, the cooler must have been standing upright
for at least an hour before you switch it on.
• The cooler has a built-in inclination sensor which switches it off when it
is tilted. Nevertheless, always switch off the cooler before tilting the
cab.
Before switching the cooler on again, let it stand for at least 15 minutes
after lowering the cab.
• Do not use electrical devices inside the cooler unless they are
recommended by the manufacturer for the purpose.
• Install the device in a dry location where it is protected against
splashing water.
Page 9

EN
CSMP2 Scope of delivery
• Do not install the device near naked flames or other heat sources
(heaters, direct sunlight, gas ovens etc.)
• Danger of overheating!
Ensure at all times that there is sufficient ventilation so that the heat that
arises during operation does not build up. Make sure that the device
is sufficiently far away from walls and other objects so that the air can
circulate.
• Ensure that the ventilation slots are not covered.
• Do not fill the inner container with ice or fluid.
• Never immerse the device in water.
• Protect the device and the cable against heat and moisture.
3Scope of delivery
Quantity Description
1Cooler
1 Set of fastening material
1 Operating manual
4 Intended use
The CoolMatic CSMP2 (ref. no. 9105204453) is a cooler for installing in a
Mercedes-Benz Actros (L and LH cab). It is suitable for cooling food.
CAUTION! Be careful when cooling perishable medicines.
!
If you wish to cool medicines, please check if the cooling capacity of the
device is suitable for the medicine in question.
9
Page 10
EN
Technical description CSMP2
5 Technical description
5.1 Function description
The cooler chills products and keeps them cool. A maintenance-free refrigerant
circuit with compressor provides the cooling.
The cooler is designed for continuous operation at ambient temperatures between
–10 °C and +55 °C and air humidity up to 90 %.
It can be tilted sideways up to 30°.
Before exposing the cooler to extreme conditions – such as on expeditions – please
contact the manufacturer. All materials used in the cooling device are compatible for
use with foodstuffs.
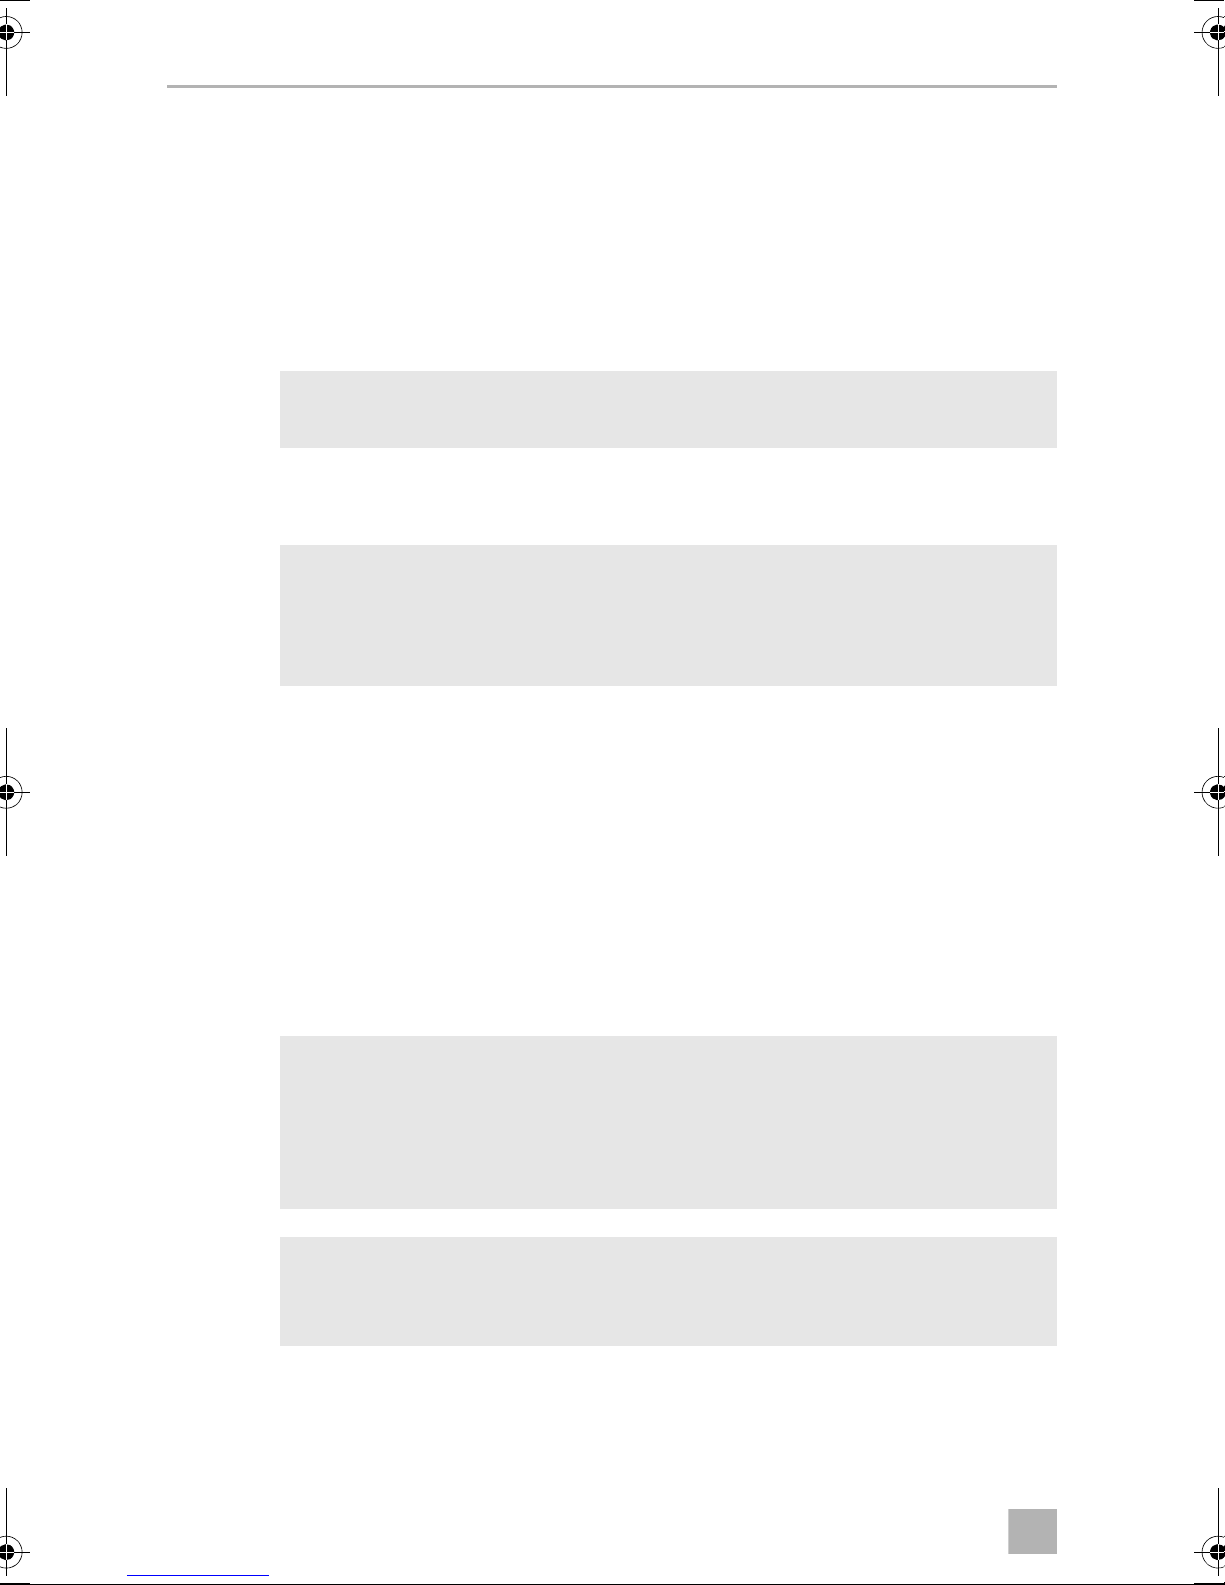
Battery monitor
The device is equipped with a multi-level battery monitor that protects your vehicle
battery against excessive discharging when the device is connected to the on-board
12/24 V supply.
If the cooler is operated when the vehicle ignition is switched off, the cooler switches
off automatically as soon as the supply voltage falls below a set level. The cooler will
switch back on once the battery has been recharged to the restart voltage level.
NOTICE! Risk of damage
A
The switch-off and switch-on points measured at the connection terminals of the
compressor are listed in the following table.
Cut-off voltage 11.3 V 24.6 V
Restart voltage 12.5 V 26.0 V
When switched off by the battery monitor, the battery will no longer be
fully charged. Avoid starting repeatedly or operating electric consumers
without longer charging phases. Ensure that the battery is recharged.
Vol tage
12 V 24 V
10
Page 11
EN
CSMP2 Installation and connection
5.2 Operating and display elements
No. in
fig. c,
page 5
1 Temperature controller – Switches the cooler on or off
Description Explanation
– Adjusts the temperature
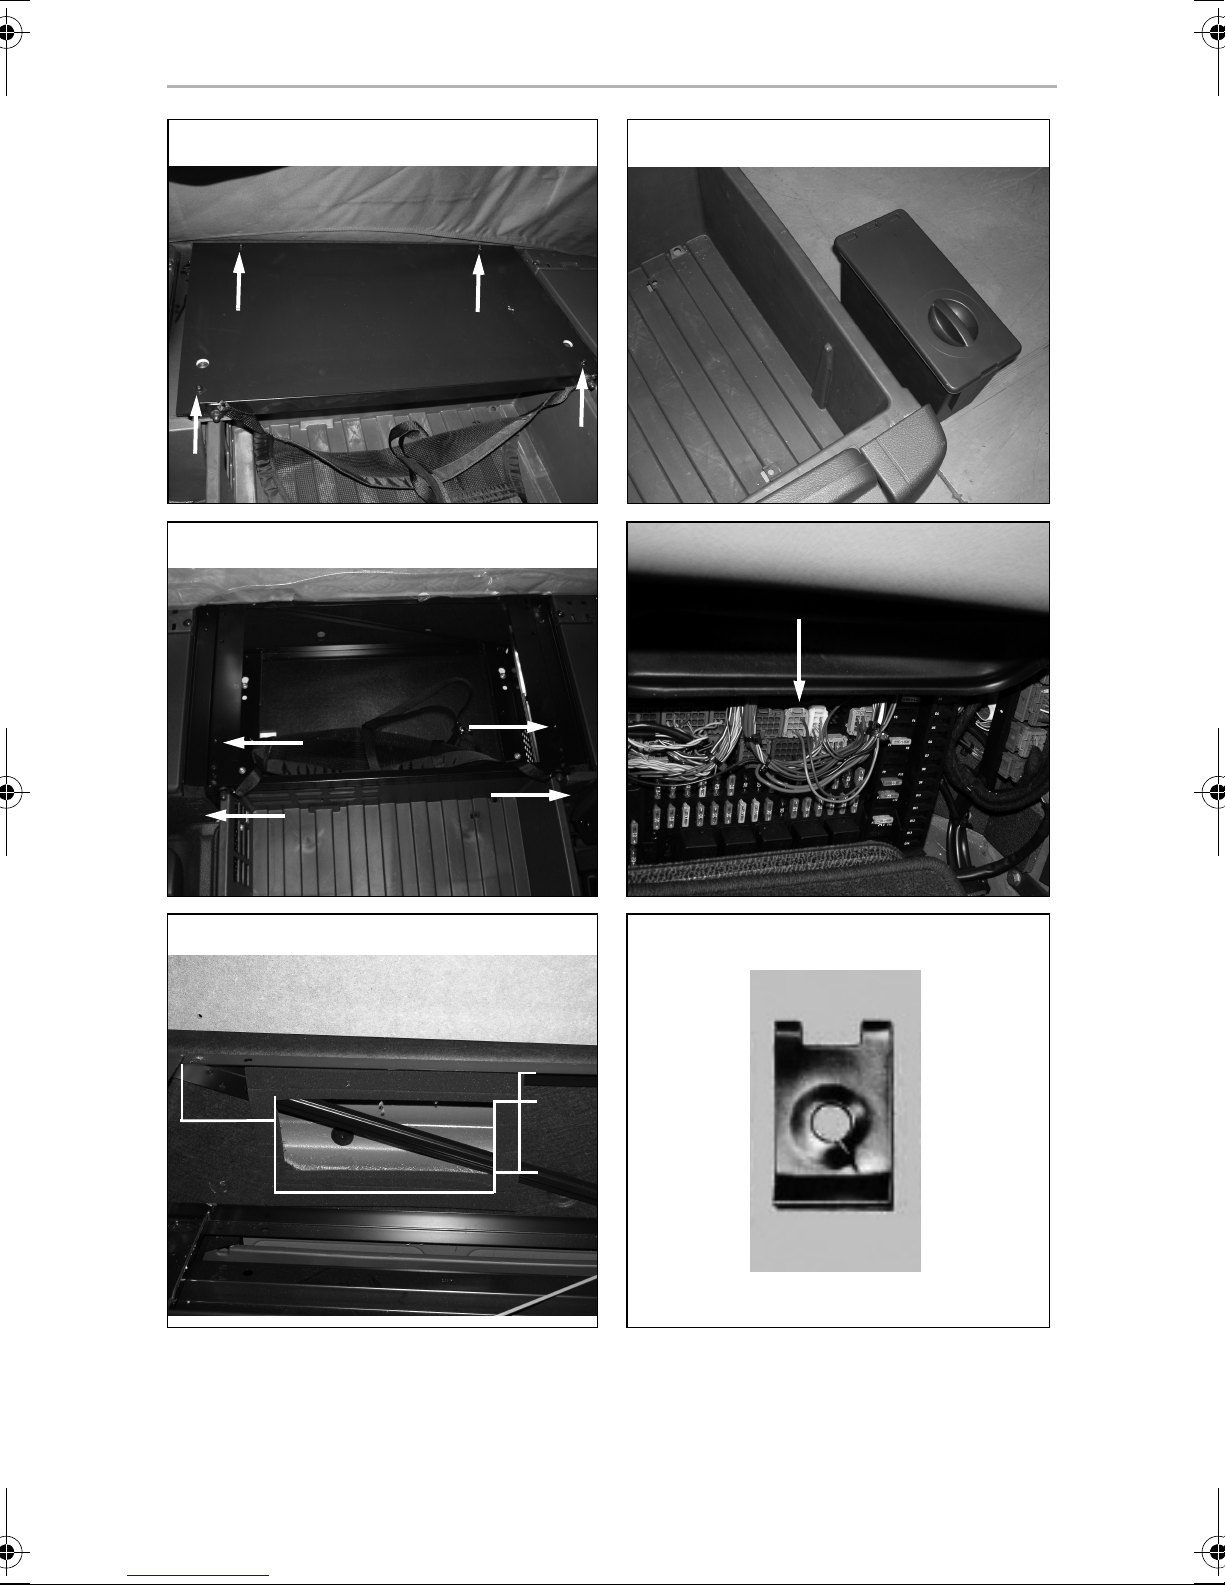
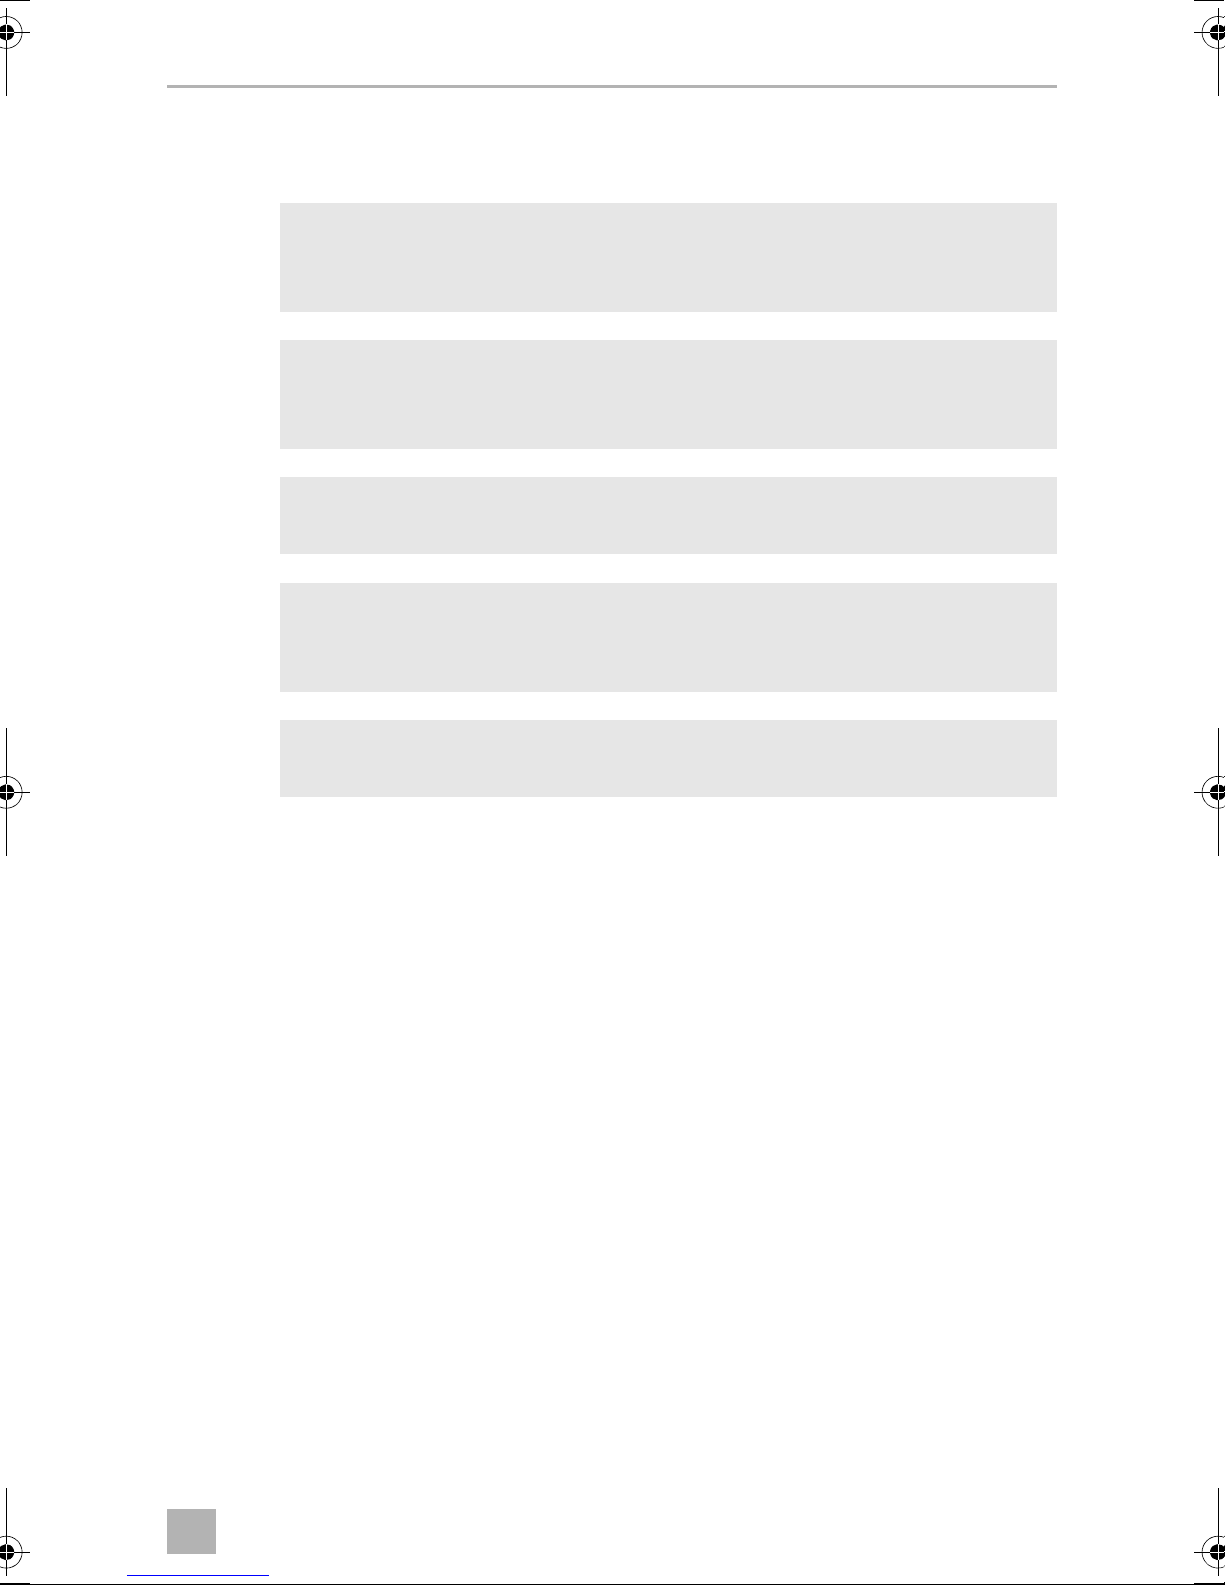
6 Installation and connection
The cooler is installed in the drawer under the bed.
➤ Lift the mattress.
➤ Unscrew the four screws (fig. 1, page 3) and take off the board.
➤ Pull out the drawer and take out the container (fig. 2, page 3).
After you fit the cooler, you can put the container back in.
NOTE
If you cannot fully pull out the drawer, this is how to release it:
I
➤ Remove the screws (fig. 3 1, page 3) and unplug the panel beside the drawer
(fig. 3 2, page 3).
➤ Have the supply cable from slot X 7 (fig. 4, page 3) to the cooler laid by a
specialist Mercedes Benz garage.
➤ Cut out a section for ventilation at the appropriate position on the panel (fig. 5,
page 3).
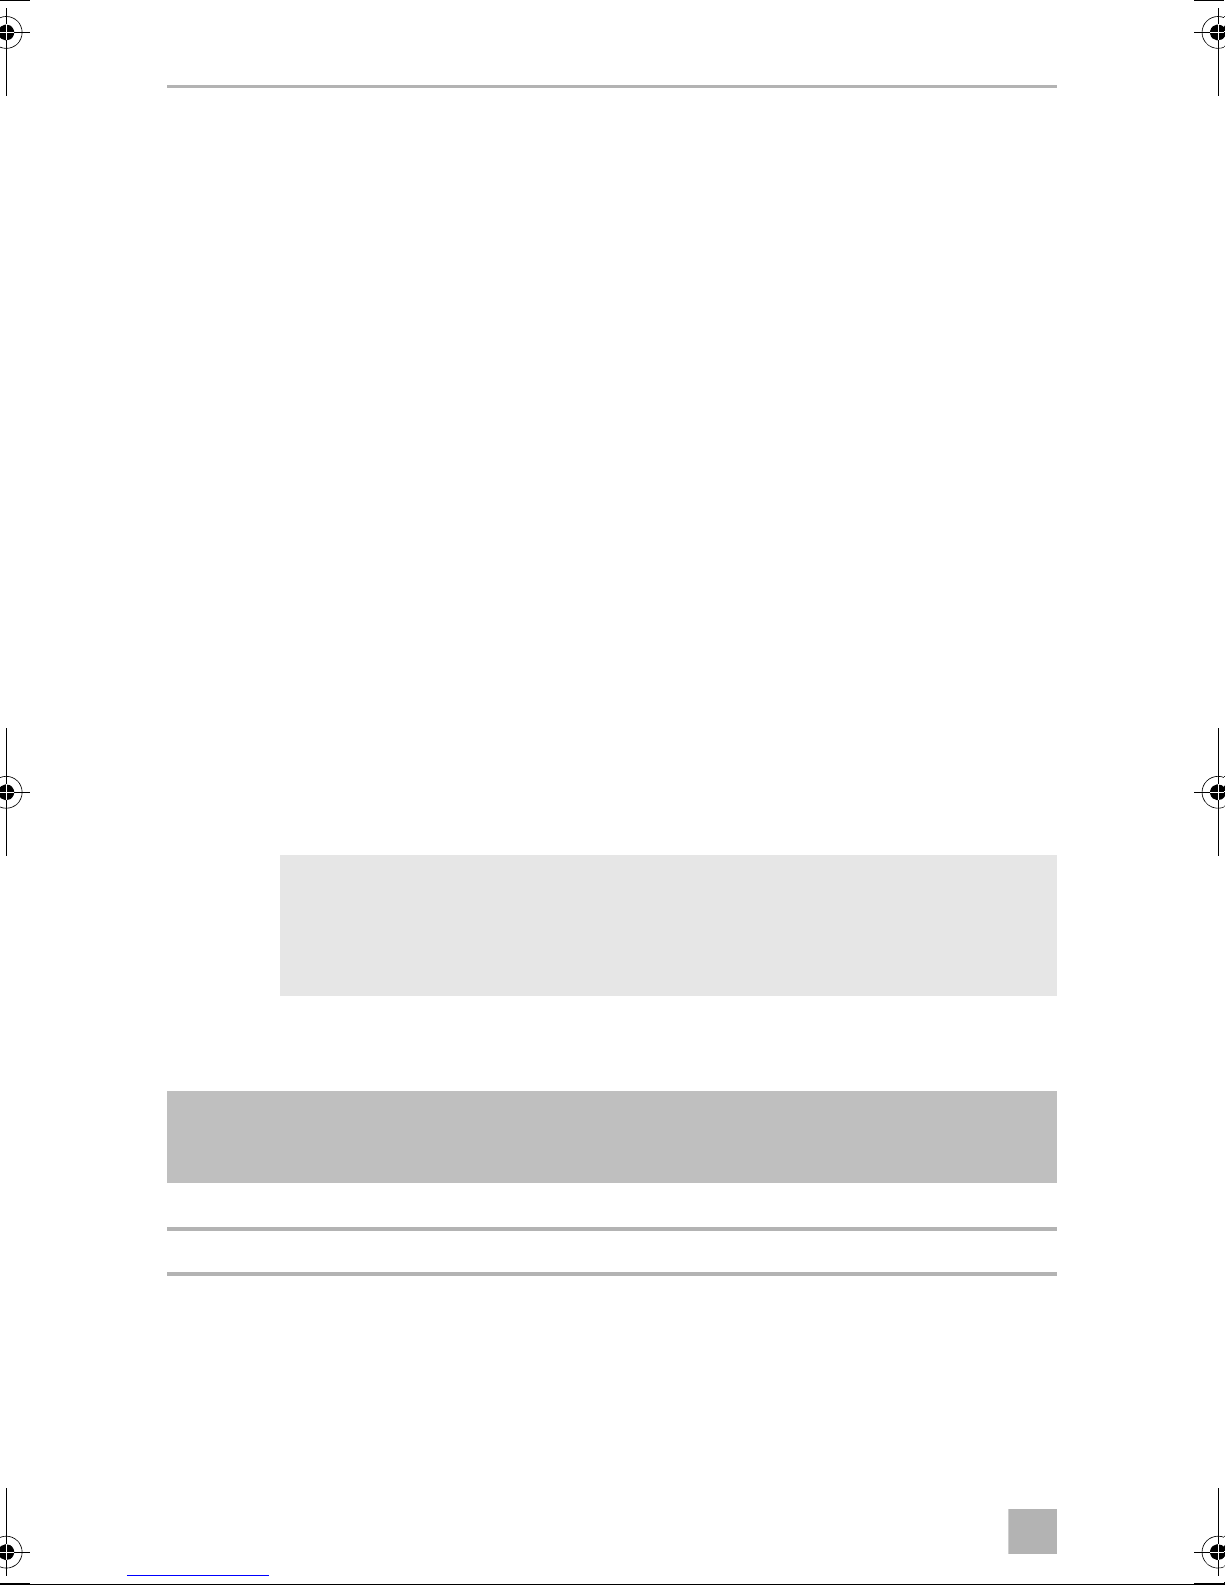
➤ Push on the plate nuts supplied (fig. 6, page 3 and fig. 7, page 4).
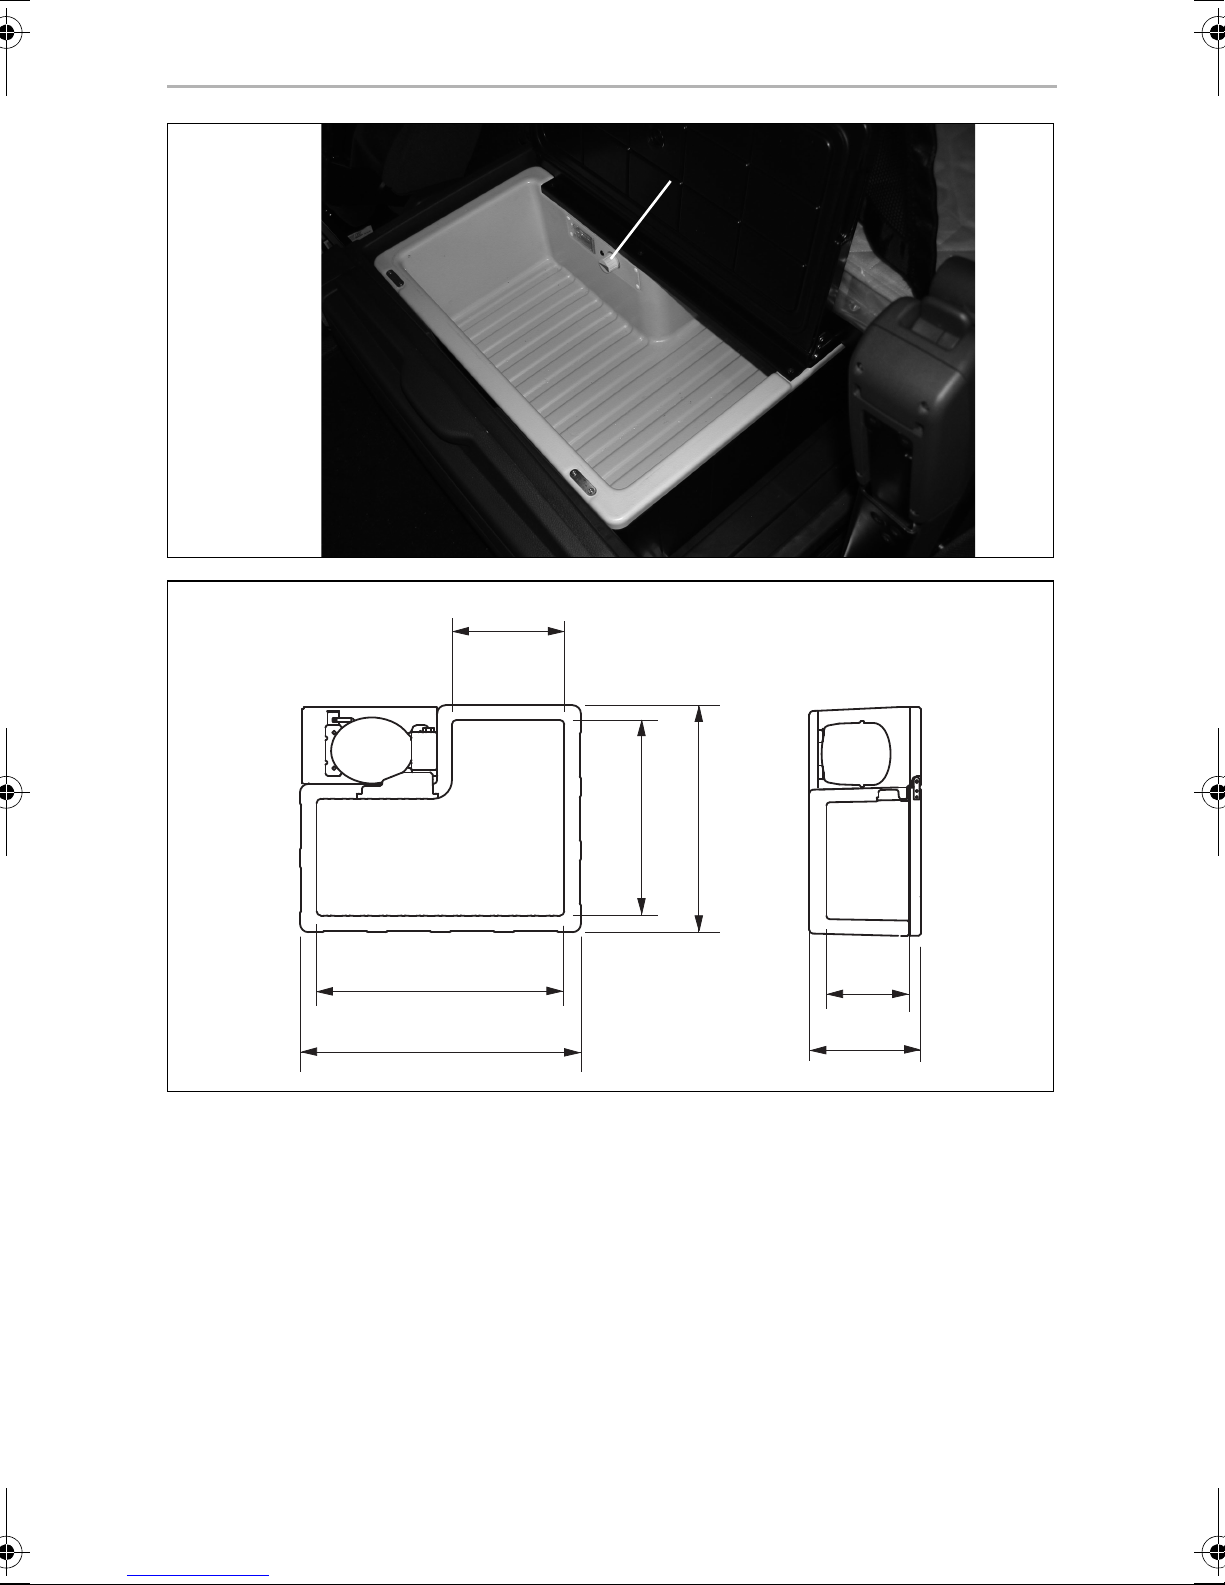
➤ Feed the connection cable for the cooler through the hole provided (fig. 8,
page 4).
➤ Fasten the cooler with the screws provided at the appropriate positions (fig. 9,
page 4).
➤ Fasten the cooler cable to the position marked on the drawer using the clip
provided and place the rubber in the appropriate position (fig. 0, page 4).
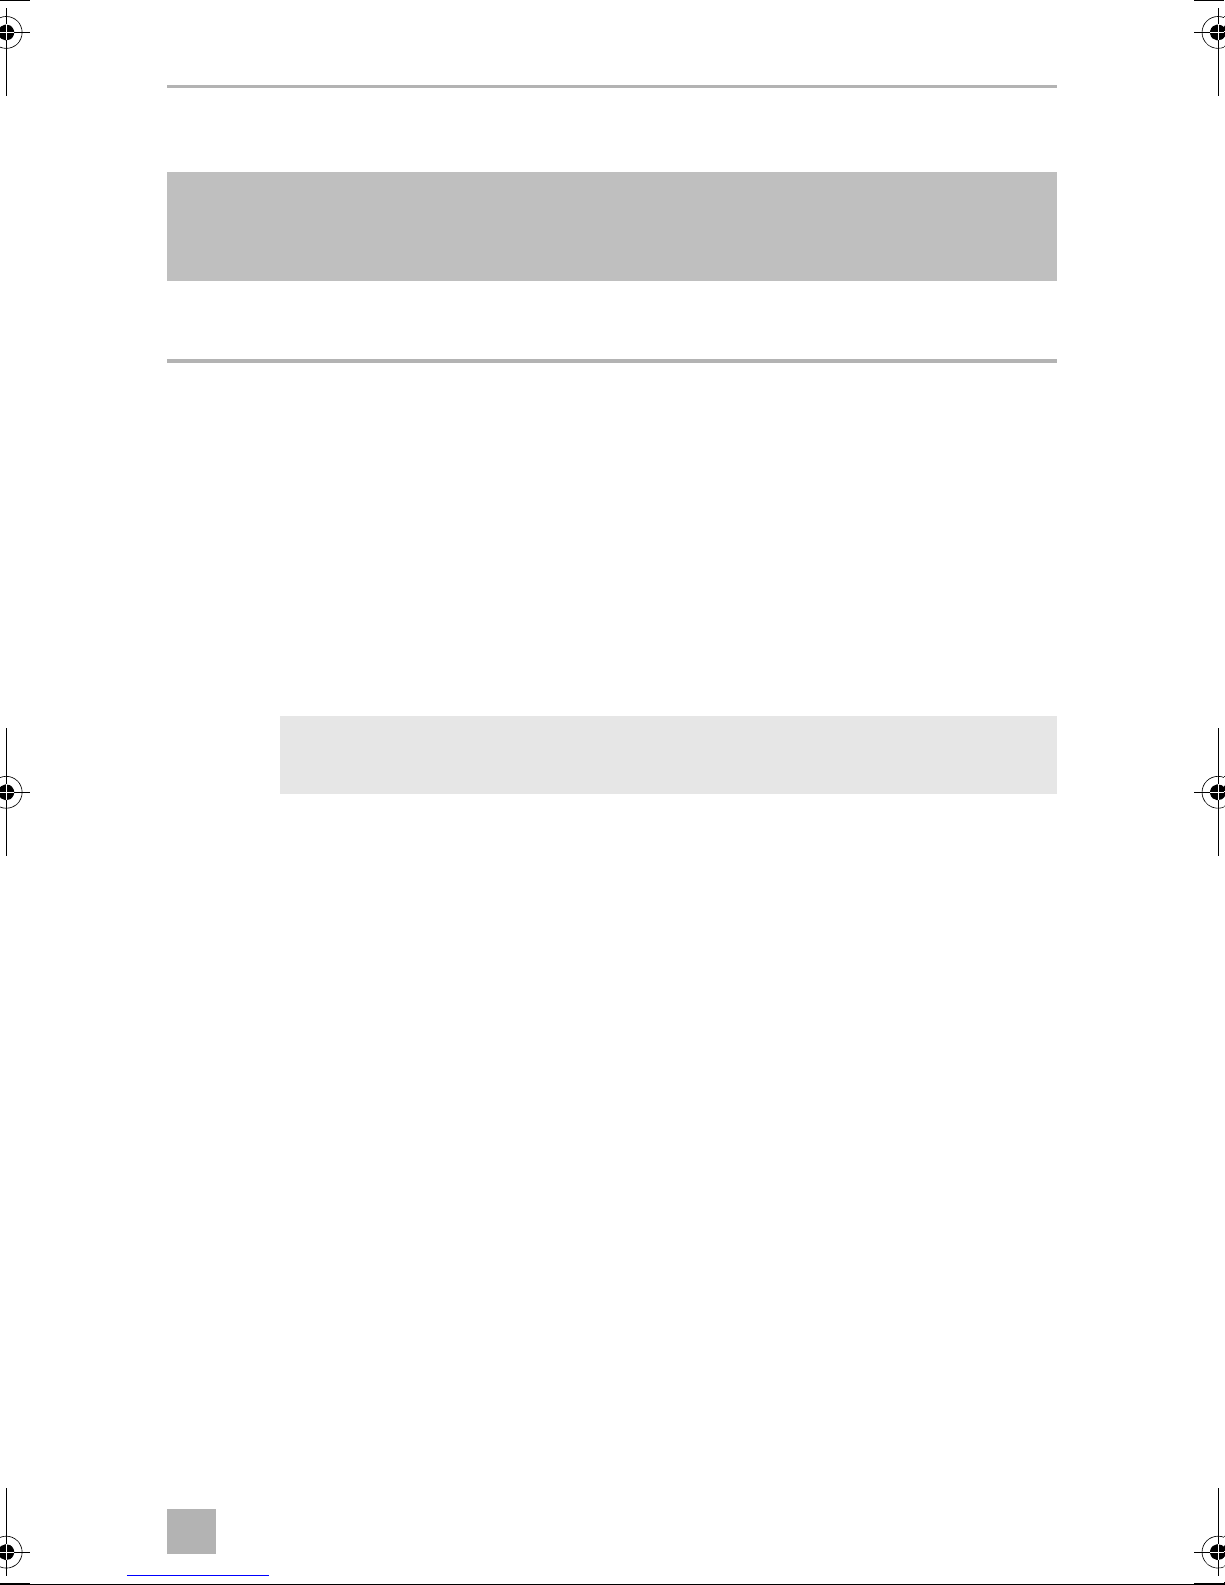
➤ Have the cooler cable connected to the cable laid by the Mercedes-Benz garage
from the fuse box behind the cover panel (fig. a, page 4).
➤ Push the drawer back in (fig. b, page 4).
11
Page 12
EN
Operation CSMP2
➤ Screw the lock tight again and put the panel back on.
➤ Fasten the board again and put the mattress back on.
✓ Installation is complete.
7Operation
NOTE
Empty the cool box and switch it off before tilting the cab.
I
7.1 Before initial use
NOTE
I
Before starting your new cooler for the first time, you should clean it
inside and outside with a damp cloth for hygienic reasons
(see "Cleaning and care" on page 13).
7.2 Energy saving tips
• Allow hot food to cool down first before you place it into the device.
• Do not open the cooler more often than necessary.
• Do not leave the cooler open for longer than necessary.
• Avoid unnecessarily low temperature settings.
7.3 Using the cooler
NOTICE! Danger of overheating
A
A
Ensure at all times that there is sufficient ventilation so that the heat that
generated during operation can dissipate. Ensure that the ventilation
slots are not covered. Make sure that the device is sufficiently far away
from walls and other objects so that the air can circulate.
NOTICE! Danger from excessively low temperature
Ensure that the only those objects are placed in the cooler that are
intended to be cooled at the selected temperature.
➤ Switch on the cooler on by turning the temperature control knob to the right.
✓ The cooler starts cooling the interior.
12
Page 13

EN
CSMP2 Cleaning and care
➤ Set the cooling temperature using the temperature control knob.
Turn right = colder, turn left = warmer.
NOTE
I
If you do not want to use the cooler for a longer period of time:
Leave the cooler slightly open. This prevents smells from building up.
8 Cleaning and care
NOTICE! Danger of damaging the device
A
➤ Occasionally clean the inside of the device with a damp cloth.
Never clean the device under running water or in dish water.
Do not use abrasive cleaning agents or hard objects during cleaning as
these can damage the device.
9Guarantee
The statutory warranty period applies. If the product is defective, please contact the
manufacturer's branch in your country (see the back of the instruction manual for the
addresses) or your retailer.
For repair and guarantee processing, please include the following documents when
you send in the device:
• A copy of the receipt with purchasing date
• A reason for the claim or description of the fault
10 Disposal
➤ Place the packaging material in the appropriate recycling waste bins wherever
possible.
If you wish to finally dispose of the product, ask your local recycling centre
or specialist dealer for details about how to do this in accordance with the
M
applicable disposal regulations.
13
Page 14
EN
Technical data CSMP2
11 Technical data
CSMP2
Ref. no.: 9105204453
Capacity: 25 litres
Voltage: 12/24 Vg
Cooling capacity: +10 °C to 0 °C
Coolant quantity: 30 g
CO2 equivalent: 0.043 t
Global warming potential (GWP): 1430
Weight: 12.5 kg
The coolant circuit contains R134a.
Contains fluorinated greenhouse gases
Hermetically sealed equipment
Certification
The device has e1 certification.
This device conforms to the following EC guideline:
• EMC Directive 72/245/EEC version 95/54/EC
14
Page 15
DE
CSMP2
Bitte lesen Sie diese Anleitung vor der Inbetriebnahme sorgfältig durch
und bewahren Sie sie auf. Geben Sie sie im Falle einer Weitergabe des
Kühlgerätes an den Nutzer weiter.
Der Hersteller haftet nicht für Schäden, die durch nicht bestimmungsgemäßen
Gebrauch oder falsche Bedienung verursacht werden.
Inhaltsverzeichnis
1 Erklärung der Symbole . . . . . . . . . . . . . . . . . . . . . . . . . . . . . . . . . . . . . . . . . .16
2 Sicherheitshinweise . . . . . . . . . . . . . . . . . . . . . . . . . . . . . . . . . . . . . . . . . . . .16
3 Lieferumfang . . . . . . . . . . . . . . . . . . . . . . . . . . . . . . . . . . . . . . . . . . . . . . . . . .19
4 Bestimmungsgemäßer Gebrauch . . . . . . . . . . . . . . . . . . . . . . . . . . . . . . . . .19
5 Technische Beschreibung . . . . . . . . . . . . . . . . . . . . . . . . . . . . . . . . . . . . . . .19
6 Montage und Anschluss . . . . . . . . . . . . . . . . . . . . . . . . . . . . . . . . . . . . . . . . .21
7 Bedienung. . . . . . . . . . . . . . . . . . . . . . . . . . . . . . . . . . . . . . . . . . . . . . . . . . . 22
8 Reinigung und Pflege . . . . . . . . . . . . . . . . . . . . . . . . . . . . . . . . . . . . . . . . . . 24
9 Gewährleistung. . . . . . . . . . . . . . . . . . . . . . . . . . . . . . . . . . . . . . . . . . . . . . . 24
10 Entsorgung . . . . . . . . . . . . . . . . . . . . . . . . . . . . . . . . . . . . . . . . . . . . . . . . . . 24
11 Technische Daten . . . . . . . . . . . . . . . . . . . . . . . . . . . . . . . . . . . . . . . . . . . . . 25
15
Page 16

DE
Erklärung der Symbole CSMP2
1 Erklärung der Symbole
GEFAHR!
D
!
Sicherheitshinweis: Nichtbeachtung führt zu Tod oder schwerer
Verletzung.
WARNUNG!
Sicherheitshinweis: Nichtbeachtung kann zu Tod oder schwerer
Verletzung führen.
VORSICHT!
Sicherheitshinweis: Nichtbeachtung kann zu Verletzungen führen.
!
ACHTUNG!
A
Nichtbeachtung kann zu Materialschäden führen und die Funktion des
Produktes beeinträchtigen.
HINWEIS
Ergänzende Informationen zur Bedienung des Produktes.
I
2 Sicherheitshinweise
2.1 Allgemeine Sicherheit
WARNUNG!
!
• Wenn das Gerät sichtbare Beschädigungen aufweist, dürfen Sie es
nicht in Betrieb nehmen.
• Reparaturen an diesem Gerät dürfen nur von Fachkräften durchgeführt werden. Durch unsachgemäße Reparaturen können
erhebliche Gefahren entstehen.
• Personen (einschließlich Kinder), die aufgrund ihrer physischen,
sensorischen oder geistigen Fähigkeiten oder ihrer Unerfahrenheit
oder Unkenntnis nicht in der Lage sind, das Gerät sicher zu benutzen,
sollten dieses Gerät nicht ohne Aufsicht oder Anweisung durch eine
verantwortliche Person nutzen.
16
Page 17

DE
CSMP2 Sicherheitshinweise
• Elektrogeräte sind kein Kinderspielzeug!
Verwahren und benutzen Sie das Gerät außerhalb der Reichweite von
Kindern.
• Kinder sollten beaufsichtigt werden, um sicherzustellen, dass sie nicht
mit dem Gerät spielen.
• Wenn das Anschlusskabel dieses Gerätes beschädigt wird, muss es
durch den Hersteller, seinen Kundendienst oder eine ähnlich qualifizierte Person ersetzt werden, um Gefährdungen zu vermeiden.
• Lagern Sie keine explosionsfähigen Substanzen wie z. B. Sprühdosen
mit Treibgas im Gerät.
VORSICHT!
!
A
• Trennen Sie das Gerät vom Netz
– vor jeder Reinigung und Pflege
– nach jedem Gebrauch
• Lebensmittel dürfen nur in Originalverpackungen oder geeigneten
Behältern eingelagert werden.
ACHTUNG!
• Vergleichen Sie die Spannungsangabe auf dem Typenschild mit der
vorhandenen Energieversorgung.
• Das Kühlgerät ist nicht geeignet für den Transport ätzender oder
lösungsmittelhaltiger Stoffe.
• Klemmen Sie Ihr Kühlgerät und andere Verbraucher von der Batterie
ab, bevor Sie ein Schnellladegerät anschließen.
17
Page 18

DE
Sicherheitshinweise CSMP2
2.2 Sicherheit beim Betrieb des Gerätes
GEFAHR!
D
A
• Fassen Sie nie mit bloßen Händen an blanke Leitungen. Dies gilt vor
allem beim Betrieb am Wechselstromnetz.
ACHTUNG!
• Das Kühlgerät muss vor dem Einschalten ca. 1 Stunde in waagerechter
Position gestanden haben, um eine einwandfreie Funktion zu gewährleisten.
• Das Kühlgerät wird durch den eingebauten Neigungsschalter bei
Schräglage abgeschaltet. Trotzdem sollte, bevor das Fahrerhaus
gekippt wird, das Kühlgerät abgeschaltet werden.
Bevor das Kühlgerät wieder eingeschaltet wird, muss es mindestens
15 Minuten stehen, nachdem das Fahrerhaus wieder gesenkt wurde.
• Benutzen Sie keine elektrischen Geräte innerhalb des Kühlgerätes,
außer wenn diese Geräte vom Hersteller dafür empfohlen werden.
• Bauen Sie das Gerät an einem trockenen und gegen Spritzwasser
geschützten Platz ein.
• Bauen Sie das Gerät nicht in der Nähe von offenen Flammen oder
anderen Wärmequellen (Heizung, starke Sonneneinstrahlung,
Gasöfen usw.) ein.
• Überhitzungsgefahr!
Achten Sie stets darauf, dass beim Betrieb entstehende Wärme
ausreichend abgeführt werden kann. Sorgen Sie dafür, dass das Gerät
in ausreichendem Abstand zu Wänden oder Gegenständen steht,
sodass die Luft zirkulieren kann.
• Achten Sie darauf, dass die Lüftungsöffnungen nicht abgedeckt
werden.
• Füllen Sie keine Flüssigkeiten oder Eis in den Innenbehälter.
• Tauchen Sie das Gerät nie in Wasser.
• Schützen Sie das Gerät und die Kabel vor Hitze und Nässe.
18
Page 19

DE
CSMP2 Lieferumfang
3 Lieferumfang
Menge Bezeichnung
1Kühlbox
1 Satz Befestigungsmaterial
1 Bedienungsanleitung
4 Bestimmungsgemäßer Gebrauch
CoolMatic CSMP2 (Artikel-Nr. 9105204453) ist eine Kühlbox zum Einbau in einen
Mercedes-Benz Actros (L- und LH-Kabine). Sie eignet sich zum Kühlen von Lebensmitteln.
VORSICHT! Gesundheitsgefahr!
!
Prüfen Sie bitte, ob die Kühlleistung des Gerätes den Anforderungen
der Lebensmittel oder Medikamente entspricht, die Sie kühlen wollen.
5 Technische Beschreibung
5.1 Funktionsbeschreibung
Die Kühlbox kann Waren abkühlen und kühl halten. Die Kühlung erfolgt durch einen
wartungsfreien Kühlkreislauf mit Kompressor.
Die Kühlbox ist für Umgebungstemperaturen zwischen –10 °C und +55 °C sowie für
eine Luftfeuchtigkeit von höchstens 90 % im Dauerbetrieb geeignet.
Sie ist für eine Dauer-Krängung von maximal 30° ausgelegt.
Bevor Sie das Kühlgerät extremen Beanspruchungen aussetzen – wie etwa
Expeditionen – sollten Sie sich mit dem Hersteller in Verbindung setzen. Alle im
Kühlgerät verarbeiteten Materialien sind unbedenklich für Lebensmittel.
19
Page 20

DE
Technische Beschreibung CSMP2
Batteriewächter
Das Gerät ist mit einem mehrstufigen Batteriewächter ausgestattet, der Ihre
Fahrzeugbatterie beim Anschluss an das 12/24-V-Bordnetz vor zu tiefer Entladung
schützt.
Wird die Kühlbox bei ausgeschalteter Zündung im Fahrzeug betrieben, schaltet sich
die Kühlbox selbstständig ab, sobald die Versorgungsspannung unter einen
bestimmten Wert abfällt. Die Kühlbox schaltet sich wieder ein, sobald durch
Aufladung der Batterie die Wiedereinschaltspannung erreicht wird.
ACHTUNG! Beschädigungsgefahr!
A
Die Ein- und Ausschaltpunkte, gemessen an den Anschlussklemmen des
Kompressors, sind in folgender Tabelle aufgeführt:
Die Batterie besitzt beim Abschalten durch den Batteriewächter nicht
mehr ihre volle Ladekapazität, vermeiden Sie mehrmaliges Starten oder
den Betrieb von Stromverbrauchern ohne längere Aufladephasen.
Sorgen Sie dafür, dass die Batterie wieder aufgeladen wird.
Anschlussspannung
12 V 24 V
Ausschaltspannung 11,3 V 24,6 V
Wiedereinschaltspannung 12,5 V 26,0 V
5.2 Bedien- und Anzeigeelemente
Pos. in
Abb. c,
Seite 5
1 Temperaturregler – Schaltet die Kühlbox ein oder aus
Bezeichnung Erklärung
– Stellt die Temperatur ein
20
Page 21

DE
CSMP2 Montage und Anschluss
6 Montage und Anschluss
Die Kühlbox wird in die Schublade unter dem Bett montiert.
➤ Heben Sie die Matratze an.
➤ Lösen Sie die vier Schrauben (Abb. 1, Seite 3) und entfernen Sie das Brett.
➤ Ziehen Sie die Schublade heraus und entnehmen Sie den Behälter (Abb. 2,
Seite 3).
Nach dem Einbau der Kühlbox kann der Behälter wieder hinein gestellt werden.
HINWEIS
I
➤ Entfernen Sie die Schrauben (Abb. 3 1, Seite 3) und bauen Sie die Verkleidung
neben der Schublade ab (Steckverbindung) (Abb. 3 2, Seite 3).
Falls Sie die Schublade nicht vollständig heraus ziehen können, gehen
Sie wie folgt vor, um die Arretierung zu lösen:
➤ Lassen Sie die Versorgungsleitung vom Steckplatz X7 (Abb. 4, Seite 3) zur
Kühlbox von einer Mercedes Benz-Fachwerkstatt legen.
➤ Schneiden Sie den Lüftungsausschnitt an der vorgesehenen Position aus der
Verkleidung heraus (Abb. 5, Seite 3).
➤ Schieben Sie die beigefügte Blechmuttern auf (Abb. 6, Seite 3 und Abb. 7,
Seite 4).
➤ Führen Sie das Anschlusskabel für die Kühlbox durch die dafür vorgesehene
Öffnung. (Abb. 8, Seite 4).
➤ Verschrauben Sie die Kühlbox mit den beigefügten Schrauben an den dafür
vorgesehenen Positionen (Abb. 9, Seite 4).
➤ Befestigen Sie das Kabel der Kühlbox an der markierten Stelle mit der
beigefügten Schelle an der Schublade und hängen Sie das Gummi an der
vorgegebenen Stelle ein (Abb. 0, Seite 4).
➤ Lassen Sie das Kabel der Kühlbox mit dem von einer Mercedes-Benz-
Fachwerkstatt verlegten Kabel vom Sicherungskasten hinter der Abdeckung
(Abb. a, Seite 4) verbinden.
➤ Schieben Sie die Schublade wieder ein (Abb. b, Seite 4).
➤ Schrauben Sie die Arretierung wieder fest und bauen Sie die Verkleidung an.
➤ Befestigen Sie das Brett wieder und legen Sie die Matratze auf.
✓ Die Montage ist abgeschlossen.
21
Page 22

DE
Bedienung CSMP2
7Bedienung
HINWEIS
I
7.1 Vor dem ersten Gebrauch
I
7.2 Tipps zum Energiesparen
• Lassen Sie warme Speisen erst abkühlen, bevor Sie sie einlagern.
Leeren Sie die Kühlbox und schalten Sie sie aus, bevor das Fahrerhaus
gekippt wird.
HINWEIS
Bevor Sie die neue Kühlbox in Betrieb nehmen, sollten Sie sie aus
hygienischen Gründen innen und außen mit einem feuchten Tuch
reinigen (siehe auch „Reinigung und Pflege“ auf Seite 24).
• Öffnen Sie die Kühlbox nicht häufiger als nötig.
• Lassen Sie die Kühlbox nicht länger offen stehen als nötig.
• Vermeiden Sie eine unnötig tiefe Innentemperatur.
22
Page 23

DE
CSMP2 Bedienung
7.3 Kühlbox benutzen
ACHTUNG! Überhitzungsgefahr!
A
A
➤ Schalten Sie das Gerät ein, indem Sie den Temperaturregler nach rechts drehen.
✓ Die Kühlbox startet mit dem Kühlen des Innenraums.
Achten Sie stets darauf, dass beim Betrieb entstehende Wärme
ausreichend abgeführt werden kann. Achten Sie darauf, dass die
Lüftungsschlitze nicht abgedeckt werden. Sorgen Sie dafür, dass das
Gerät in ausreichendem Abstand zu Wänden oder Gegenständen steht,
sodass die Luft zirkulieren kann.
ACHTUNG! Gefahr durch zu niedrige Temperatur!
Achten Sie darauf, dass sich nur Gegenstände bzw. Waren in der
Kühlbox befinden, die auf die gewählte Temperatur gekühlt werden
dürfen.
➤ Stellen Sie die Kühltemperatur mit dem Temperaturregler ein:
Nach rechts drehen = kälter, nach links drehen = wärmer.
HINWEIS
I
Wenn Sie die Kühlbox für längere Zeit nicht benutzen wollen:
Lassen Sie die Kühlbox leicht geöffnet. So verhindern Sie, dass sich
Gerüche bilden.
23
Page 24

DE
Reinigung und Pflege CSMP2
8 Reinigung und Pflege
ACHTUNG! Gefahr von Geräteschäden!
A
➤ Reinigen Sie das Gerät innen gelegentlich mit einem feuchten Tuch.
Reinigen Sie das Gerät niemals unter fließendem Wasser oder gar im
Spülwasser.
Verwenden Sie zur Reinigung keine scharfen Reinigungsmittel oder
harten Gegenstände, da diese das Gerät beschädigen können.
9Gewährleistung
Es gilt die gesetzliche Gewährleistungsfrist. Sollte das Produkt defekt sein, wenden
Sie sich bitte an die Niederlassung des Herstellers in Ihrem Land (Adressen siehe
Rückseite der Anleitung) oder an Ihren Fachhändler.
Zur Reparatur- bzw. Gewährleistungsbearbeitung müssen Sie folgende Unterlagen
mitschicken:
• eine Kopie der Rechnung mit Kaufdatum,
• einen Reklamationsgrund oder eine Fehlerbeschreibung.
10 Entsorgung
➤ Geben Sie das Verpackungsmaterial möglichst in den entsprechenden
Recycling-Müll.
Wenn Sie das Produkt endgültig außer Betrieb nehmen, informieren Sie
sich bitte beim nächsten Recyclingcenter oder bei Ihrem Fachhändler
M
über die zutreffenden Entsorgungsvorschriften.
24
Page 25

DE
CSMP2 Technische Daten
11 Technische Daten
CSMP2
Artikel-Nr.: 9105204453
Inhalt: 25 Liter
Anschlussspannung: 12/24 Vg
Kühlleistung: +10 °C bis 0 °C
Kühlmittelmenge: 30 g
CO2-Äquivalent: 0,043 t
Treibhauspotential (GWP): 1430
Gewicht: 12,5 kg
Der Kühlkreis enthält R134a.
Enthält fluorierte Treibhausgase
Hermetisch geschlossene Einrichtung
Zulassungen
Das Gerät hat die e1-Zulassung.
25
Page 26

FR
CSMP2
Veuillez lire ce manuel avec attention avant de mettre l’appareil en
service. Conservez ensuite ce manuel. En cas de passer de l’appareil,
veuillez le transmettre au nouvel acquéreur.
Le fabricant décline toute responsabilité en cas de dommages provoqués par une
utilisation non-conforme de l'appareil ou par des erreurs de manipulation.
Table des matières
1 Explication des symboles . . . . . . . . . . . . . . . . . . . . . . . . . . . . . . . . . . . . . . . 27
2 Consignes de sécurité . . . . . . . . . . . . . . . . . . . . . . . . . . . . . . . . . . . . . . . . . 27
3 Pièces fournies . . . . . . . . . . . . . . . . . . . . . . . . . . . . . . . . . . . . . . . . . . . . . . . 29
4 Utilisation conforme . . . . . . . . . . . . . . . . . . . . . . . . . . . . . . . . . . . . . . . . . . . 29
5 Description technique . . . . . . . . . . . . . . . . . . . . . . . . . . . . . . . . . . . . . . . . . 30
6 Montage et raccordement . . . . . . . . . . . . . . . . . . . . . . . . . . . . . . . . . . . . . . .31
7 Utilisation. . . . . . . . . . . . . . . . . . . . . . . . . . . . . . . . . . . . . . . . . . . . . . . . . . . . 32
8 Nettoyage et entretien . . . . . . . . . . . . . . . . . . . . . . . . . . . . . . . . . . . . . . . . . 34
9 Garantie. . . . . . . . . . . . . . . . . . . . . . . . . . . . . . . . . . . . . . . . . . . . . . . . . . . . . 34
10 Recyclage . . . . . . . . . . . . . . . . . . . . . . . . . . . . . . . . . . . . . . . . . . . . . . . . . . . 34
11 Caractéristiques techniques . . . . . . . . . . . . . . . . . . . . . . . . . . . . . . . . . . . . . 35
26
Page 27

FR
CSMP2 Explication des symboles
1 Explication des symboles
DANGER !
D
!
!
A
Consigne de sécurité : le non-respect de ces consignes entraîne la
mort ou de graves blessures.
AVERTISSEMENT !
Consigne de sécurité : le non-respect de ces consignes peut entraîner
la mort ou de graves blessures.
ATTENTION !
Consigne de sécurité : le non-respect de ces consignes peut entraîner
des blessures.
AVIS !
Le non-respect de ces consignes peut entraîner des dommages
matériels et des dysfonctionnements du produit.
REMARQUE
Informations complémentaires sur l'utilisation du produit.
I
2 Consignes de sécurité
2.1 Sécurité générale
AVERTISSEMENT !
!
• Si l’appareil présente des dégâts visibles, vous ne devez pas le mettre
en service.
• Seul un personnel qualifié est habilité à effectuer des réparations sur
l’appareil. Toute réparation mal effectuée risque d’entraîner de graves
dangers.
• Ne laissez pas des personnes (enfants compris) incapables d’utiliser le
produit de manière sûre, en raison de déficiences physiques, sensorielles ou mentales ou de leur manque d’expérience ou de connaissances, utiliser ce produit sans surveillance.
• Les appareils électriques ne sont pas des jouets pour enfants !
Placez et utilisez l’appareil hors de portée des enfants.
27
Page 28

FR
Consignes de sécurité CSMP2
• Les enfants doivent être surveillés pour s’assurer qu’ils ne jouent pas
avec l’appareil.
• Si le câble de raccordement de l’appareil est endommagé, il doit être
remplacé par le fabricant, son service après-vente ou une personne de
qualification similaire, afin d’éviter tout danger.
• Ne stockez aucune substance explosive comme p. ex. des aérosols
contenant des agents propulseurs dans l’appareil.
ATTENTION !
!
A
2.2 Consignes de sécurité concernant le fonctionnement
• Débranchez l'appareil du secteur
– avant tout nettoyage et entretien
– après chaque utilisation
• Les aliments ne peuvent être conservés que dans leurs emballages
originaux ou dans des récipients appropriés.
AVIS !
• Comparez la tension indiquée sur la plaque signalétique avec
l’alimentation électrique dont vous disposez.
• N’utilisez pas la glacière pour le transport de produits corrosifs ou de
solvants.
• Débranchez de la batterie la glacière et les autres consommateurs
d’énergie avant de raccorder un chargeur rapide.
de l’appareil
DANGER !
D
A
28
• Ne touchez jamais les lignes électriques dénudées avec les mains
nues. Cela est surtout valable en cas de fonctionnement sur secteur.
AVIS !
• Le réfrigérateur doit rester en position verticale pendant 1 heure
environ avant la mise en marche, afin de garantir un fonctionnement
optimal.
• Le commutateur d’inclinaison intégré éteint le réfrigérateur si celui-ci
est en position inclinée. Il est toutefois recommandé d’éteindre
l’appareil avant d’incliner la cabine.
Avant de rallumer le réfrigérateur, il faut le laisser en position verticale
pendant au moins 15 minutes une fois que la cabine du conducteur a
été remise en place.
Page 29

FR
CSMP2 Pièces fournies
• N'utilisez aucun appareil électrique dans la glacière, sauf si ces
appareils sont recommandés par le fabricant pour cet usage.
• Installez l’appareil dans un endroit sec et à l’abri des projections
d’eau.
• Ne placez pas l’appareil près de flammes ou d’autres sources de
chaleur (chauffage, rayons solaires, fours à gaz, etc.).
• Danger de surchauffe !
Veillez toujours à ce que la chaleur produite lors du fonctionnement
soit suffisamment dissipée. Veillez à ce que l'appareil se trouve à une
distance suffisante des murs ou des objets, de sorte que l'air puisse
circuler.
• Assurez-vous que les fentes d’aération ne sont pas recouvertes.
• Ne pas remplir le bac intérieur de substances liquides ou de glace.
• Ne plongez jamais l’appareil dans l’eau.
• Tenez l’appareil et les câbles à l’abri de la chaleur et de l’humidité.
3Pièces fournies
Quantité Désignation
1Glacière
1 Jeu de matériel de fixation
1 Mode d’emploi
4 Utilisation conforme
CoolMatic CSMP2 (N° d’article 9105204453) est une glacière prévue pour le
montage dans une Mercedes-Benz Actros (cabine L et LH). Elle est conçue pour la
réfrigération d’aliments.
ATTENTION ! Pensez aux médicaments périssables !
!
Si vous souhaitez conserver au frais des médicaments, veuillez vérifier si
la puissance frigorifique de l’appareil correspond à la température de
conservation recommandée pour le médicament.
29
Page 30

FR
Description technique CSMP2
5 Description technique
5.1 Description du fonctionnement
La glacière permet de réfrigérer et de tenir au frais des denrées alimentaires.
La réfrigération est assurée par un circuit de refroidissement à compresseur qui
fonctionne ne nécessite aucune maintenance.
La glacière est conçue pour des températures ambiantes entre –10 °C et +55 °C
ainsi que pour une humidité relative de 90 % maximum en fonctionnement continu.
Elle est conçue pour un angle de gîte permanent de 30° maximum.
Veuillez contacter le fabricant avant de soumettre la glacière à des conditions
extrêmes - comme des expéditions. Aucun des matériaux utilisés lors de la
construction de la glacière n’altère la qualité des aliments.
Protecteur de batterie
L’appareil est équipé d’un protecteur de batterie qui protège la batterie de votre
véhicule, afin qu’elle ne se décharge pas excessivement lorsque la glacière est
raccordée au réseau 12/24 V du véhicule.
Si la glacière est mise en service alors que l’allumage du véhicule est éteint, elle
s’éteint automatiquement dès que la tension d’alimentation descend en dessous
d’une certaine valeur. La glacière se rallume dès que la batterie est rechargée et que
la tension de rallumage est atteinte.
AVIS ! Risque d’endommagement !
A
Les points de démarrage et d’arrêt, mesurés aux bornes de raccordement du
compresseur, sont représentés dans le tableau suivant:
Au moment de l’arrêt par le protecteur de batterie, la batterie ne
possède plus toute sa capacité de charge ; évitez les démarrages
répétés ou la mise en marche de consommateurs d’énergie tant que la
batterie n’a pas été rechargée. Veillez à recharger la batterie.
Tension de raccordement
Ten sio n d’ar r êt 11 ,3 V 24 , 6 V
Tension de remise en marche 12,5 V 26,0 V
30
12 V 24 V
Page 31

FR
CSMP2 Montage et raccordement
5.2 Commandes et affichage
Pos. dans
fig. c,
page 5
Désignation Signification
1 Régulateur de tem-
pérature
– Permet d’allumer ou d’éteindre la glacière
– Permet de régler la température
6 Montage et raccordement
La glacière est montée dans le tiroir situé sous le lit.
➤ Soulevez le matelas.
➤ Desserrez les 4 vis (fig. 1, page 3) et retirez la planche.
➤ Sortez le tiroir et retirez le conteneur (fig. 2, page 3).
Après le montage de la glacière, il est possible de remettre le conteneur en
place.
REMARQUE
I
Si vous ne pouvez pas retirer complètement le tiroir, procédez de la
manière suivante pour enlever le dispositif de blocage:
➤ Retirez les vis (fig. 3 1, page 3) et démontez le revêtement à côté du tiroir
(pièce emboîtable) (fig. 3 2, page 3).
➤ Faites poser la ligne d’alimentation allant du point de connexion X 7 (fig. 4,
page 3) à la glacière par un garage spécialisé Mercedes-Benz.
➤ Pratiquez la découpe d’aération à la position prévue dans le revêtement (fig. 5,
page 3).
➤ Placez les écrous à tôle fournis dans la livraison (fig. 6, page 3 et fig. 7,
page 4).
➤ Faites passer le câble de raccordement de la glacière à travers l’ouverture prévue
à cet effet (fig. 8, page 4).
➤ Vissez la glacière avec les vis comprises dans la livraison aux positions prévues à
cet effet (fig. 9, page 4).
➤ Fixez au tiroir le câble de la glacière à l’endroit marqué, avec le collier compris
dans la livraison. Suspendez l’élastique à l’endroit indiqué (fig. 0, page 4).
31
Page 32

FR
Utilisation CSMP2
➤ Faites relier le câble de la glacière au câble posé par un garage spécialisé
Mercedes-Benz et partant de la boîte à fusibles derrière le cache (fig. a,
page 4).
➤ Replacez le tiroir (fig. b, page 4).
➤ Vissez de nouveau le dispositif de blocage et montez le revêtement.
➤ Replacez la planche, fixez-la et reposez le matelas dessus.
✓ Le montage est terminé.
7Utilisation
REMARQUE
I
Videz la glacière et débranchez-la avant d’incliner la cabine du
conducteur.
7.1 Avant la première utilisation
REMARQUE
I
7.2 Conseils pour économiser de l’énergie
• Laissez refroidir les aliments chauds avant de les mettre dans la glacière.
• N’ouvrez pas la glacière plus souvent que nécessaire.
• Ne laissez pas la glacière ouverte plus longtemps que nécessaire.
• Evitez une température intérieure inutilement basse.
Avant de mettre en service votre nouvelle glacière, vous devez, pour
des raisons d’hygiène, la nettoyer à l’intérieur et à l’extérieur à l’aide
d’un tissu humide (voir aussi chapitre « Nettoyage et entretien »,
page 34).
32
Page 33

FR
CSMP2 Utilisation
7.3 Utilisation de la glacière
AVIS ! Danger de surchauffe !
A
A
➤ Allumez le réfrigérateur en tournant le régulateur de température vers la droite.
✓ La glacière commence par la réfrigération du compartiment intérieur.
➤ Réglez la température de refroidissement à l’aide du régulateur de température:
Rotation vers la droite = plus froid, rotation vers la gauche = plus chaud.
Veillez toujours à ce que la chaleur produite lors du fonctionnement
puisse se dissiper suffisamment. Assurez-vous que les fentes d’aération
ne sont pas recouvertes. Veillez à ce que l’appareil se trouve à distance
suffisante des murs ou des objets, de sorte que l’air puisse circuler.
AVIS ! Risque de températures trop basses !
Veillez à ne déposer dans la glacière que des objets ou des aliments qui
peuvent être réfrigérés à la température sélectionnée.
I
REMARQUE
Lorsque vous ne voulez pas utiliser la glacière pendant une période
prolongée :
Laissez la porte de la glacière légèrement ouverte. Vous évitez ainsi la
formation d’odeurs.
33
Page 34

FR
Nettoyage et entretien CSMP2
8 Nettoyage et entretien
AVIS ! L’appareil peut être endommagé !
A
➤ Nettoyez l’appareil avec un tissu humide.
Ne nettoyez jamais l’appareil à l’eau courante et ne le plongez pas non
plus dans l’eau.
N’utilisez pas de produits de lavage abrasifs ou d’objets durs pour le
nettoyage, car ceux-ci pourraient endommager l’appareil.
9 Garantie
Le délai légal de garantie s'applique. Si le produit s'avérait défectueux, veuillez vous
adresser à la filiale du fabricant située dans votre pays (voir adresses au verso du
présent manuel) ou à votre revendeur spécialisé.
Veuillez y joindre les documents suivants pour la gestion des réparations et de la
garantie :
• une copie de la facture avec la date d'achat,
• le motif de la réclamation ou une description du dysfonctionnement.
10 Recyclage
➤ Jetez les emballages dans les conteneurs de déchets recyclables prévus à cet
effet.
Lorsque vous mettrez votre produit définitivement hors service, informezvous auprès du centre de recyclage le plus proche ou auprès de votre
M
revendeur spécialisé sur les prescriptions relatives au retraitement des
déchets.
34
Page 35

FR
CSMP2 Caractéristiques techniques
11 Caractéristiques techniques
CSMP2
N° d’article : 9105204453
Capacité : 25 litres
Tension de raccordement : 12/24 Vg
Puissance frigorifique : +10 °C à 0 °C
Quantité de fluide frigorigène : 30 g
Équivalent CO2 : 0,043 t
Potentiel d'effet de serre (GWP) : 1430
Poids : 12,5 kg
Le circuit de refroidissement contient du R134a.
Contient des gaz à effet de serre fluorés
Equipement hermétiquement scellé
Certifications
Cet appareil possède la certification e1.
Cet appareil est conforme à la directive européenne suivante :
• « Directive CEM » 72/245/CEE version 95/54/CE
35
Page 36

NL
CSMP2
Lees deze handleiding voor de ingebruikname zorgvuldig door en bewaar
deze. Geef de handleiding bij doorgeven van het toestel door aan de
gebruiker.
De fabrikant kan niet aansprakelijk worden gesteld voor schade die door gebruik
tegen de voorschriften in of door verkeerde bediening wordt veroorzaakt.
Inhoudsopgave
1 Verklaring van de symbolen . . . . . . . . . . . . . . . . . . . . . . . . . . . . . . . . . . . . . 37
2 Veiligheidsinstructies . . . . . . . . . . . . . . . . . . . . . . . . . . . . . . . . . . . . . . . . . . 37
3 Omvang van de levering . . . . . . . . . . . . . . . . . . . . . . . . . . . . . . . . . . . . . . . 39
4 Gebruik volgens de voorschriften . . . . . . . . . . . . . . . . . . . . . . . . . . . . . . . . 39
5 Technische beschrijving . . . . . . . . . . . . . . . . . . . . . . . . . . . . . . . . . . . . . . . . 40
6 Montage en aansluiting . . . . . . . . . . . . . . . . . . . . . . . . . . . . . . . . . . . . . . . . .41
7 Bediening . . . . . . . . . . . . . . . . . . . . . . . . . . . . . . . . . . . . . . . . . . . . . . . . . . . 42
8 Reiniging en onderhoud. . . . . . . . . . . . . . . . . . . . . . . . . . . . . . . . . . . . . . . . 43
9 Garantie. . . . . . . . . . . . . . . . . . . . . . . . . . . . . . . . . . . . . . . . . . . . . . . . . . . . . 44
10 Afvoer . . . . . . . . . . . . . . . . . . . . . . . . . . . . . . . . . . . . . . . . . . . . . . . . . . . . . . 44
11 Technische gegevens. . . . . . . . . . . . . . . . . . . . . . . . . . . . . . . . . . . . . . . . . . 45
36
Page 37

NL
CSMP2 Verklaring van de symbolen
1 Verklaring van de symbolen
GEVAAR!
D
!
Veiligheidsaanwijzing: Het niet naleven leidt tot overlijden of ernstig
letsel.
WAARSCHUWING!
Veiligheidsaanwijzing: Het niet naleven kan leiden tot overlijden of
ernstig letsel.
VOORZICHTIG!
Veiligheidsaanwijzing: Het niet naleven kan leiden tot letsel.
!
LET OP!
A
Het niet naleven ervan kan leiden tot materiële schade en de werking
van het product beperken.
INSTRUCTIE
Aanvullende informatie voor het bedienen van het product.
I
2 Veiligheidsinstructies
2.1 Algemene veiligheid
WAARSCHUWING!
!
• Als het toestel zichtbaar beschadigd is, mag het niet in gebruik
worden genomen.
• Reparaties aan dit toestel mogen uitsluitend door vakmonteurs
uitgevoerd worden. Door ondeskundige reparaties kunnen grote
gevaren ontstaan.
• Personen (ook kinderen) die door hun fysieke, sensorische of
geestelijke vaardigheden, of hun onervarenheid of onwetendheid
niet in staat zijn om het product veilig te gebruiken, mogen dit niet
zonder toezicht of instructie door een verantwoordelijke persoon
doen.
• Elektrische toestellen zijn geen speelgoed!
Bewaar en gebruik het toestel buiten het bereik van kinderen.
37
Page 38

NL
Veiligheidsinstructies CSMP2
• Er moet toezicht worden gehouden op kinderen, zodat ze niet met
toestel gaan spelen.
• Als de aansluitkabel van dit toestel wordt beschadigd, moet deze, om
gevaren te vermijden, door de fabrikant, diens klantenservice of een
gelijkwaardig gekwalificeerd persoon vervangen worden.
• Bewaar geen explosiegevaarlijke stoffen zoals bijvoorbeeld
spuitbussen met drijfgas in het toestel.
VOORZICHTIG!
!
A
2.2 Veiligheid bij het gebruik van het toestel
D
• Scheid het toestel van het net
– voor iedere reiniging en ieder onderhoud
–na elk gebruik
• Levensmiddelen mogen alleen in de originele verpakkingen of
geschikte bakken worden opgeslagen.
LET OP!
• Vergelijk de spanning op het typeplaatje met de voorhanden
energievoorziening.
• Het koeltoestel is niet geschikt voor het transport van bijtende of
oplosmiddelhoudende stoffen.
• Klem uw koeltoestel en andere verbruikers van de accu af voor u een
snellader aansluit.
GEVAAR!
• Neem nooit blanke leidingen met blote handen vast. Dit geldt vooral
bij het gebruik aan het wisselstroomnet.
LET OP!
A
38
• Het koeltoestel moet voor het inschakelen ca. 1 uur in horizontale
positie hebben gestaan om een storingsvrije functie te garanderen.
• Het koeltoestel wordt door een ingebouwde hellingshoekschakelaar
bij een schuine stand uitgeschakeld. Toch moet u het koeltoestel
uitschakelen, voordat de bestuurderscabine wordt gekanteld.
Voordat het koeltoestel weer wordt ingeschakeld, moet het
tenminste 15 minuten staan, nadat de bestuurderscabine weer is
neergelaten.
• Gebruik geen elektrische toestellen binnen de koeltoestel, behalve
als deze toestellen daarvoor door de fabrikant worden aanbevolen.
Page 39

NL
CSMP2 Omvang van de levering
• Monteer het toestel op een droge en tegen spatwater beschermde
plaats.
• Monteer het toestel niet in de buurt van open vuur of andere
warmtebronnen (verwarming, sterke zonnestraling, gasovens enz.).
• Oververhittingsgevaar!
Let er altijd op dat de warmte, die bij het bedrijf ontstaat, goed
afgevoerd kan worden. Zorg ervoor, dat het toestel op voldoende
afstand tot wanden en voorwerpen staat, zodat de lucht kan
circuleren.
• Let erop dat de ventilatiesleuven niet worden afgedekt.
• Doe geen vloeistoffen of ijs in het binnenreservoir.
• Dompel het toestel nooit onder water.
• Bescherm het toestel en de kabels tegen hitte en vocht.
3 Omvang van de levering
Aantal Omschrijving
1Koelbox
1 Set bevestigingsmateriaal
1 Gebruiksaanwijzing
4 Gebruik volgens de voorschriften
CoolMatic CSMP2 (artikel-nr. 9105204453) is een koelbox voor montage in een
Mercedes-Benz Actros (L- en LH-cabine). Deze is geschikt voor het koelen van
levensmiddelen.
VOORZICHTIG! Voorzichtig met bederfelijke medicijnen!
!
Als u medicijnen wilt koelen, gelieve dan te controleren of het
koelvermogen van het toestel aan de vereisten van het betreffende
medicijn voldoet.
39
Page 40

NL
Technische beschrijving CSMP2
5 Technische beschrijving
5.1 Beschrijving van de werking
De koelbox kan waren afkoelen en koel houden. De koeling gebeurt door een
onderhoudsvrij koelcircuit met compressor.
De koelbox is voor omgevingstemperaturen tussen –10 °C en +55 °C en voor een
luchtvochtigheid van maximaal 90 % in continu bedrijf geschikt.
Het toestel is voor een permanente helling van maximaal 30° ontworpen.
Voor u het koeltoestel aan extreme belastingen blootstelt – bijv. expedities – dient u
met de fabrikant contact op te nemen. Alle in het koeltoestel verwerkte materialen
zijn geschikt voor levensmiddelen.
Accubewaker
Het toestel is uitgerust met een meertraps accumeter, die uw voertuigaccu bij de
aansluiting op het 12/24-V-boordnet beschermt tegen te diepe ontlading.
Als de koelbox bij uitgeschakeld contact in het voertuig wordt gebruikt, schakelt de
koelbox automatisch uit zodra de voedingsspanning onder een bepaalde waarde
daalt. De koelbox schakelt weer in zodra door oplading van de accu de
herinschakelspanning is bereikt.
LET OP! Gevaar voor beschadiging!
A
De in- en uitschakelpunten, gemeten aan de aansluitklemmen van de compressor,
zijn in de volgende tabel vermeld:
Uitschakelspanning 11,3 V 24,6 V
Herinschakelspanning 12,5 V 26,0 V
De accu beschikt bij het uitschakelen door de accubewaker niet meer
over de volledige laadcapaciteit. Vermijd veelvuldig starten of het
gebruik van stroomverbruikers zonder lange laadfasen. Zorg ervoor dat
de accu weer geladen wordt.
Aansluitspanning
12 V 24 V
40
Page 41

NL
CSMP2 Montage en aansluiting
5.2 Bedienings- en indicatie-elementen
Pos. in
afb. c,
pagina 5
1 Temperatuurregelaar – Schakelt de koelbox in of uit
Omschrijving Verklaring
– Stelt de temperatuur in
6 Montage en aansluiting
De koelbox wordt in de lade onder het bed gemonteerd.
➤ Til de matras op.
➤ Draai de 4 schroeven (afb. 1, pagina 3) los en verwijder de plank.
➤ Trek de lade eruit en verwijder het reservoir (afb. 2, pagina 3).
Na de montage van de koelbox kan het reservoir er opnieuw worden ingezet.
INSTRUCTIE
I
➤ Verwijder de schroeven (afb. 3 1, pagina 3) en demonteer de bekleding naast
de lade (stekkerverbinding) (afb. 3 2, pagina 3).
➤ Laat de voedingsleiding van insteekplaats X 7 (afb. 4, pagina 3) naar de
koelbox door een vakkundige Mercedes-Benz-werkplaats aanleggen.
➤ Snijd de ventilatieopening op de daarvoor bestemde positie uit de bekleding
(afb. 5, pagina 3).
➤ Schuif de meegeleverde plaatmoeren op (afb. 6, pagina 3 en afb. 7,
pagina 4).
➤ Leid de aansluitkabel voor de koelbox door de daarvoor bestemde opening.
(afb. 8, pagina 4)
➤ Schroef de koelbox met de meegeleverde schroeven op de daarvoor bestemde
posities vast (afb. 9, pagina 4).
Als u de lade er niet volledig uit kunt trekken, gaat u als volgt te werk om
de vergrendeling los te maken:
➤ Bevestig de kabel van de koelbox op de gemarkeerde plaats met de
meegeleverde bevestigingsklem op de lade en hang het rubber op de
daarvoor bestemde plaats in (afb. 0, pagina 4).
41
Page 42

NL
Bediening CSMP2
➤ Laat de kabel van de koelbox met de door een vakkundige Mercedes-Benz-
werkplaats aangelegde kabel van de zekeringenkast achter de afdekking
(afb. a, pagina 4) verbinden.
➤ Schuif de lade er weer in (afb. b, pagina 4).
➤ Schroef de vergrendeling opnieuw vast en bouw de bekleding in.
➤ Bevestig de plank weer en leg de matras erop.
✓ De montage is afgesloten.
7 Bediening
INSTRUCTIE
I
Leeg de koelbox en schakel deze uit, voordat de bestuurderscabine
wordt gekanteld.
7.1 Voor het eerste gebruik
INSTRUCTIE
I
7.2 Tips om energie te besparen
• Laat warme spijzen eerst afkoelen, voordat u ze in het koeltoestel legt.
• Open de koelbox niet vaker dan nodig.
• Laat de koelbox niet langer open staan dan nodig.
• Vermijd een onnodig lage binnentemperatuur.
Voor u de nieuwe koelbox in gebruik neemt, moet u hem om
hygiënische redenen van binnen en van buiten reinigen met een
vochtige doek (zie ook hoofdstuk „Reiniging en onderhoud” op
pagina 43).
42
Page 43

NL
CSMP2 Reiniging en onderhoud
7.3 Koelbox gebruiken
LET OP! Oververhittingsgevaar!
A
A
➤ Schakel het toestel in door de temperatuurregelaar naar rechts te draaien.
✓ De koelbox start met het koelen van de binnenruimte.
➤ Stel de koeltemperatuur in met de temperatuurregelaar:
naar rechts draaien = kouder, naar links draaien = warmer.
Let er altijd op dat de warmte, die bij het gebruik ontstaat, goed
afgevoerd kan worden. Let erop dat de ventilatiesleuven niet worden
afgedekt. Zorg ervoor dat het toestel op voldoende afstand tot wanden
en voorwerpen staat, zodat de lucht kan circuleren.
LET OP! Gevaar door te lage temperatuur!
Zorg ervoor dat er zich alleen voorwerpen of waren in de koelbox
bevinden die op de gekozen temperatuur gekoeld mogen worden.
INSTRUCTIE
I
Als u de koelbox gedurende langere tijd niet wilt gebruiken:
laat de koelbox licht geopend. Zo verhindert u geurvorming.
8 Reiniging en onderhoud
LET OP! Gevaar voor beschadiging van het toestel!
A
➤ Reinig het toestel van binnen af en toe met een vochtige doek.
Reinig het toestel nooit onder stromend water of in afwaswater.
Gebruik voor het reinigen geen bijtende schoonmaakmiddelen of
harde voorwerpen, het toestel zou hierdoor beschadigd kunnen raken.
43
Page 44

NL
Garantie CSMP2
9 Garantie
De wettelijke garantieperiode is van toepassing. Als het product defect is, wendt u
zich tot het filiaal van de fabrikant in uw land (adressen zie achterkant van de handleiding) of tot uw speciaalzaak.
Voor de afhandeling van de reparatie of garantie dient u de volgende documenten
mee te sturen:
• een kopie van de factuur met datum van aankoop,
• reden van de klacht of een beschrijving van de storing.
10 Afvoer
➤ Laat het verpakkingsmateriaal indien mogelijk recyclen.
Als u het product definitief buiten bedrijf stelt, informeer dan bij het
dichtstbijzijnde recyclingcentrum of uw speciaalzaak naar de betreffende
M
afvoervoorschriften.
44
Page 45

NL
CSMP2 Technische gegevens
11 Technische gegevens
CSMP2
Artikel-nr.: 9105204453
Inhoud: 25 liter
Aansluitspanning: 12/24 Vg
Koelvermogen: +10 °C tot 0 °C
Koelmiddelhoeveelheid: 30 g
CO2-equivalent: 0,043 t
Aardopwarmingsvermogen (GWP): 1430
Gewicht: 12,5 kg
Het koelcircuit bevat R134a.
Bevat gefluoreerde broeikasgassen
Hermetisch afgesloten apparatuur
Certificaties
Het toestel heeft het e1-certificaat.
Dit toestel voldoet aan de volgende EG-richtlijn:
• „EMC-richtlijn” 72/245/EEG in de versie 95/54/EG
45
Page 46

Page 47

Page 48

GERMANY
Dometic WAECO International GmbH
Hollefeldstraße 63 · D-48282 Emsdetten
+49 (0) 2572 879-195 · +49 (0) 2572 879-322
Mail: info@dometic-waeco.de
dometic.com
AUSTRALIA
Dometic Australia Pty. Ltd.
1 John Duncan Court
Varsity Lakes QLD 4227
1800 212121
+61 7 55076001
Mail: sales@dometic.com.au
AUSTRIA
Dometic Austria GmbH
Neudorferstraße 108
A-2353 Guntram sdorf
+43 2236 908070
+43 2236 90807060
Mail: info@dometic.at
BENELUX
Dometic Branch Office Belgium
Zincstraat 3
B-1500 Halle
+32 2 3598040
+32 2 3598050
Mail: info@dometic.be
BRAZIL
Dometic DO Brasil LTDA
Avenida Paulista 1754, conj. 111
SP 01310-920 Sao Paulo
+55 11 3251 3352
+55 11 3251 3362
Mail: info@dometic.com.br
DENMARK
Dometic Denmark A/S
Nordensvej 15, Taulov
DK-7000 Fredericia
+45 75585966
+45 75586307
Mail: info@dometic.dk
FINLAND
Dometic Finland OY
Mestarintie 4
FIN-01730 Vantaa
+358 20 7413220
+358 9 7593700
Mail: info@dometic.fi
FRANCE
Dometic SAS
ZA du Pré de la Dame Jeanne
B.P. 5
F-60128 Plailly
+33 3 44633525
+33 3 44633518
Mail : vehiculesdeloisirs@dometic.fr
HONG KONG
Dometic Group Asia Pacific
Suites 2207-11 · 22/F · Tower 1
The Gateway · 25 Canton Road,
Tsim Sha Tsui · Kowloon
+852 2 4611386
+852 2 4665553
Mail: info@waeco.com.hk
HUNGARY
Dometic Zrt. Sales Office
Kerékgyártó u. 5.
H-1147 Budapest
+36 1 468 4400
+36 1 468 4401
Mail: budapest@dometic.hu
ITALY
Dometic Italy S.r.l.
Via Virgilio, 3
I-47122 Forlì (FC)
+39 0543 754901
+39 0543 754983
Mail: vendite@d ometic.it
JAPAN
Dometic KK
Maekawa-Shibaura, Bldg. 2
2-13-9 Shibaura Minato-ku
Tokyo 108-0023
+81 3 5445 3333
+81 3 5445 3339
Mail: info@dometic.jp
MEXICO
Dometic Mx, S. de R. L. d e C. V.
Circuito Médicos No. 6 Local 1
Colonia Ciudad Satélite
CP 53100 Naucalpan de Juárez
Estado de México
+52 55 5374 4108
+52 55 5393 4683
Mail: info@dometic.com.mx
NETHERLANDS
Dometic Benelux B.V.
Ecustraat 3
NL-4879 NP Etten-Leu r
+31 76 5029000
+31 76 5029019
Mail: info@dometic.nl
NEW ZEALAND
Dometic New Zealand Ltd.
PO Box 12011
Penrose
Auckland 1642
+64 9 622 1490
+64 9 622 1573
Mail: customerservices@dometic.co.nz
NORWAY
Dometic Norway AS
Østerøyveien 46
N-3232 Sandefjord
+47 33428450
+47 33428459
Mail: firmapost@dometic.no
POLAND
Dometic Poland Sp. z o.o .
Ul. Puławska 435A
PL-02-801 Warszaw a
+48 22 414 3200
+48 22 414 3201
Mail: info@dometic.pl
PORTUGAL
Dometic Spain, S.L.
Branch Office em Portugal
Rot. de São Gonçalo nº 1 – Esc. 12
2775-399 Carcavelos
+351 219 244 173
+351 219 243 206
Mail: info@dometic.pt
RUSSIA
Dometic RUS LLC
Komsomolskaya square 6-1
RU-107140 Moscow
+7 495 780 79 39
+7 495 916 56 53
Mail: info@dometic.ru
SINGAPORE
Dometic Pte Ltd
18 Boon Lay Way 06–140 Trade Hub 21
Singapore 609966
+65 6795 3177
+65 6862 6620
Mail: dometic@dometic.com.sg
SLOVAKIA
Dometic Slovakia s.r.o. Sales Office Bratislava
Nádražná 34/A
900 28 Ivánka pri Dunaji
/ +421 2 45 529 680
Mail: bratislava@ dometic.com
SOUTH AFRICA
Dometic (Pty) Ltd.
Regional Office
South Africa & Sub-Saharan Africa
2 Avalon Road
West Lake View Ext 11
Modderfontein 1645
Johannesburg
+27 11 4504978
+27 11 4504976
Mail: info@dometic.co.za
SPAIN
Dometic Spain S.L.
Avda. Sierra del Guadarrama, 16
E-28691 Villanueva de la Cañada
Madrid
+34 91 833 60 89
+34 900 100 245
Mail: info@dometic.es
SWEDEN
Dometic Scandinavia AB
Gustaf Melins gata 7
S-42131 Västra Frölunda
+46 31 7341100
+46 31 7341101
Mail: info@dometicgroup.se
SWITZERLAND
Dometic Switzerland AG
Riedackerstrasse 7a
CH-8153 Rümlang
+41 44 8187171
+41 44 8187191
Mail: info@dometic.ch
UNITED ARAB EMIRATES
Dometic Middle East FZCO
P. O. Box 17860
S-D 6, Jebel Ali Freezone
Dubai
+971 4 883 3858
+971 4 883 3868
Mail: info@dometic.ae
UNITED KINGDOM
Dometic UK Ltd.
Dometic House, The Brewery
Blandford St. Mar y
Dorset DT11 9LS
+44 344 626 0133
+44 344 626 0143
Mail: customerservices@ dometic.co.uk
USA
Dometic RV Division
1120 North Main Street
Elkhart, IN 46515
+1 574-264-2131
4445101990 207.5924.67 03/2017
 Loading...