

Dodge 46RE Service Manual
DODGE RAM 46RE TRANSMISSION TEARDOWN/REBUILD HELP MANUAL
1

DODGE 46RE Transmission Teardown/Rebuild
March 2009
I recently removed, disassemble and rebuilt my 46RE transmission on my 1996 Dodge Ram. This tutorial is designed to
be a help guide used in conjunction with the Dodge Shop Manual (a must have).
Pre-Removal:
I) Soak all exhaust bolts in PB Blaster a week before you remove the tranny!!! It makes the removal much easier.
II) Remove the spark plugs BEFORE you jack the truck up (just makes it easier to reach)!!! The only reason you
III) Cut your exhaust behind the CAT. This will save time trying to pry it apart!
Special Tools/Items:
I) Transmission jack! Harbor freight has a nice scissor type jack for around $80 that really works well.
II) Air ratchet. This is a huge time saver. Many bolts that are in hard to reach places are easy to take off with an
III) Foot lbs and inch lbs torque wrenches. Again, Harbor Freight has these fairly inexpensively.
IV) Get a 1 1/4" socket for the front crank (so you can turn the crank when you need to remove the flywheel
V) Have plenty of lights available. A magnetic light(s) works great. You can stick it to the frame rail and position
VI) Have a digital camera ready! A picture is worth a thousand words when it comes to re-installation.
VII) Get several large boxes (computer paper boxes work good) to separate all your parts into each section. For
VIII) Various extension drives for your ratchets. To get the bellhousing bolts and exhaust header bolts out, you will
IX) At least ½ a dozen spray cans of brake cleaner. This stuff works great cleaning the exterior of the tranny as
X) Plenty of bench space. I had a 10’ bench that was 2’ deep and still could have used more space. You will need
XI) Several old towels for soaking up spills, cleaner etc..
XII) If you can get the video (I have a copy. ‘cdgobbell@fedex.com’) it is extremely helpful, especially on the
XIII)
Removal:
I) Follow all the steps from the shop manual
II) Concerning a transmission jack, the lower the better. I got a scissor type jack from harborfreight for $80 and it
III) When removing the top bolts from the bell-housing (10 o’clock and 2 o’clock), lower the tranny about an inch
IV) You will also have to remove the oil filter (there is one bell-housing bolt that is behind the filter)
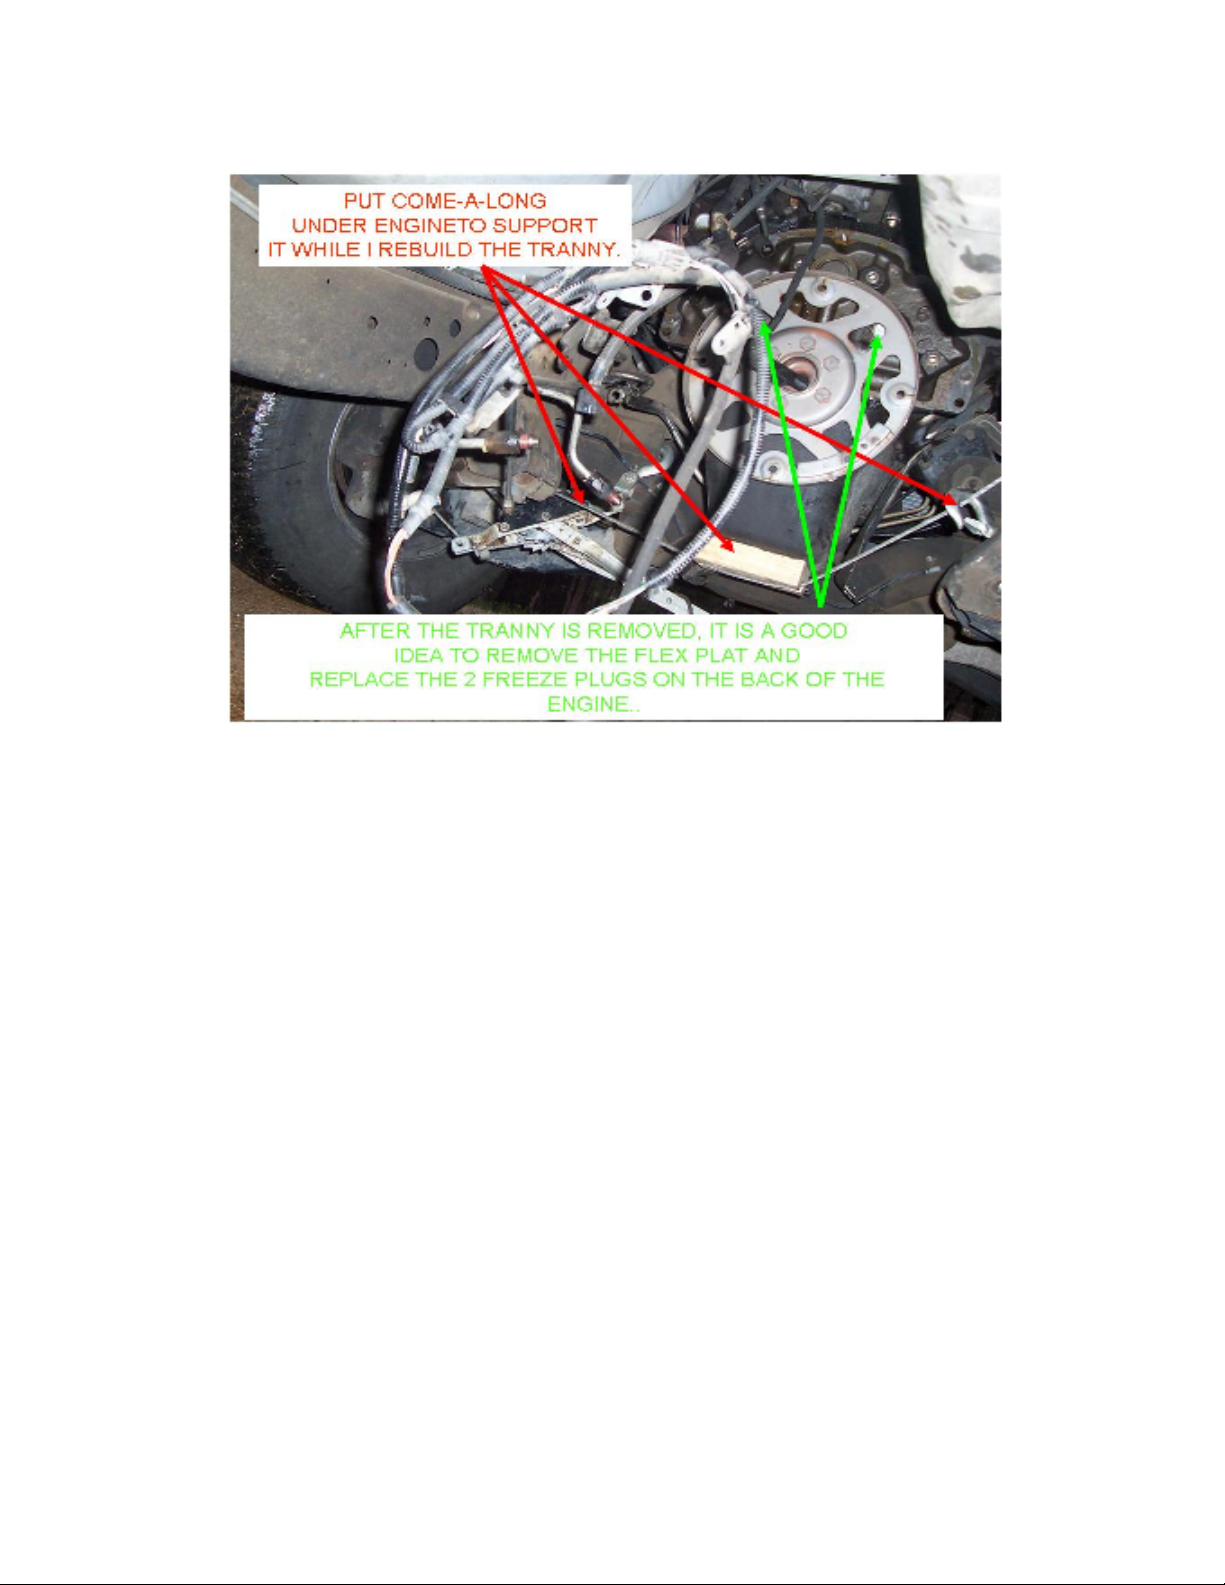
V) After the tranny is removed, you will need to support the weight of the engine either by a jack or by a sling. In
Especially the hangar bolts along the exhaust pipes, since you will have to remove the entire exhaust system.
remove the spark plugs is the make turning the crank easier when you remove the flywheel bolts.
air ratchet.
bolts).
it where you want!
example, all overdrive section parts go into the box labeled “OVERDRIVE” etc… This makes reassembly simple.
need 15-20” of extension.
well as cleaning out little nooks/crannies of the valve body and some gears.
space as you take things apart, to store the new parts, to hold the book/manual as you read it etc… The more
space the better.
overdrive unit. Further, having a DVD player on your workbench is extremely valuable also as you can watch,
pause, rewind etc…as you go along. Worth every penny.
worked like a charm. Its main benefit was that it only had a 7-8” height when collapsed. This meant that I
didn’t have to raise the truck so high to remove the tranny.
so you see into the cavity above the bell-housing. It just makes it easier!
my case, I opted for a sling because I wanted to move the truck out of my garage until I got the tranny back
together. This picture shows what I am referring to. I used a come-a-long to support the engine in the interim.
2
VI) Once the tranny is removed, several issues need to be addressed before you install the rebuilt tranny. They
are:
a) Remove or Replace the check valve in the trans-cooler line. This check valve will collect dirt/grime over the
years and not allow sufficient fluid to return to the tranny, thus causing a rebuild. There is a procedure on the
dodgeforum.com to remove this line.
b) Flush the cooler lines. There is a product in a blue spray can called “Trans-Flush” that allows you to connect
to the cooler lines and flush them out. This is not a transmission flush, but rather a line flush (to get all the
debris out after you drop your tranny). It works great. Just hook it up to outbound line and put a collection
pan under the inbound and let ‘er rip.
c) Remove and replace the 2 freeze plugs on the back of your engine. Even if they are not leaking, now is the
time to do this job!!!! If you are feeling really froggy, go ahead and replace the 2 freeze plugs in the cylinder
heads also. They are much harder to get to though. I opted to pass on this exercise!
3
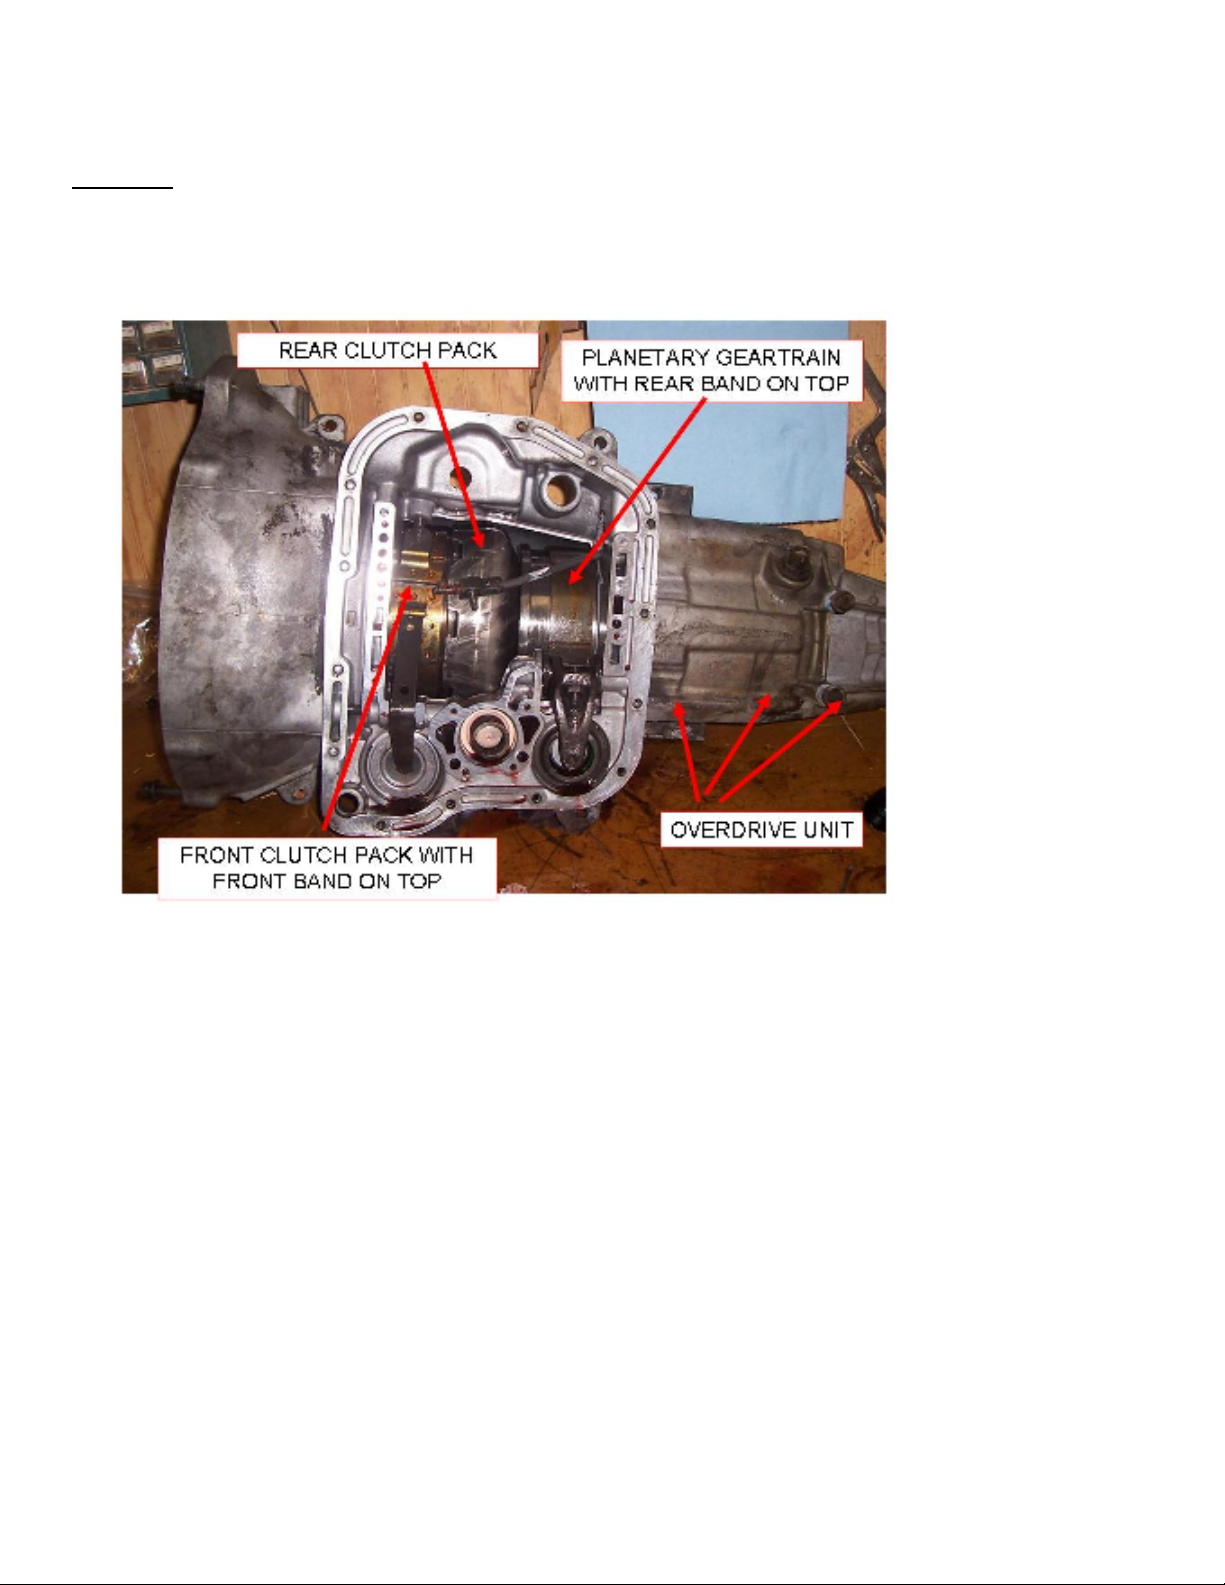
Teardown:
I) Get familiar with the different parts of the tranny and what they are called. This is a must so you can keep
track of everything mentally when the book/video is referencing something. Here is a pic of the major
remaining components in the tranny. Note that valve body has been removed so you can see the front and rear
clutch packs and the planetary geartrain.
II) At this point I HIGHLY recommend having the following at your disposal before proceeding.
a) Several boxes of gallon and sandwich size Ziploc bags. Go to the dollar store and get the no-name brand. If
you can get the type with a “writing surface”, that’s even better. Remember that when you write on these
bags, you will be touching them with fluids, cleaners etc…so some of the marker may rub off.
b) Sharpie permanent marker
c) Medium to large boxes mentioned earlier. Old copy paper boxes work great.
III) Follow the recommended steps per the manual for removing each component.
IV) You can either a) teardown the whole tranny and then reassemble later or b) teardown each section then
assemble each section in order. It’s your choice…each has its own pros/cons.
V) As you remove each piece of the tranny, do the following:
a) Put it in a plastic bag
b) Label the bag with the removal step # and part name (i.e. Step 1 – oil pump, step 2 – thrust washer etc…). This
may sound tedious, but when you get ready to reassemble, the step # along with the part name will tell you
the order of how everything came apart. Trust me, all the little parts get confusing if you’ve never done it
before.
c) Put all the bags in a box for that section. You should have a section for a) front clutch, b) rear clutch, c)
intermediate shaft/planetaries, d) overdrive, e) valve body and f) all else
4
Overdrive Unit:
1. Speed Reference Sensor
3. Overdrive clutch pack. This is the first set of
clutches you see in the OD unit. When you remove
them, keep them in order and put tape around them so
you will know the order they go into when you
reassemble. Each clutch pack will have a front and
back plate that is thicker than the steel plates in the
middle.
2. Looking into overdrive unit once it has been removed
from barrel
4. Access cover on the outside of the OD case. You
must remove this cover and spread the snap ring out to
remove the OD planetaries from the OD case
5
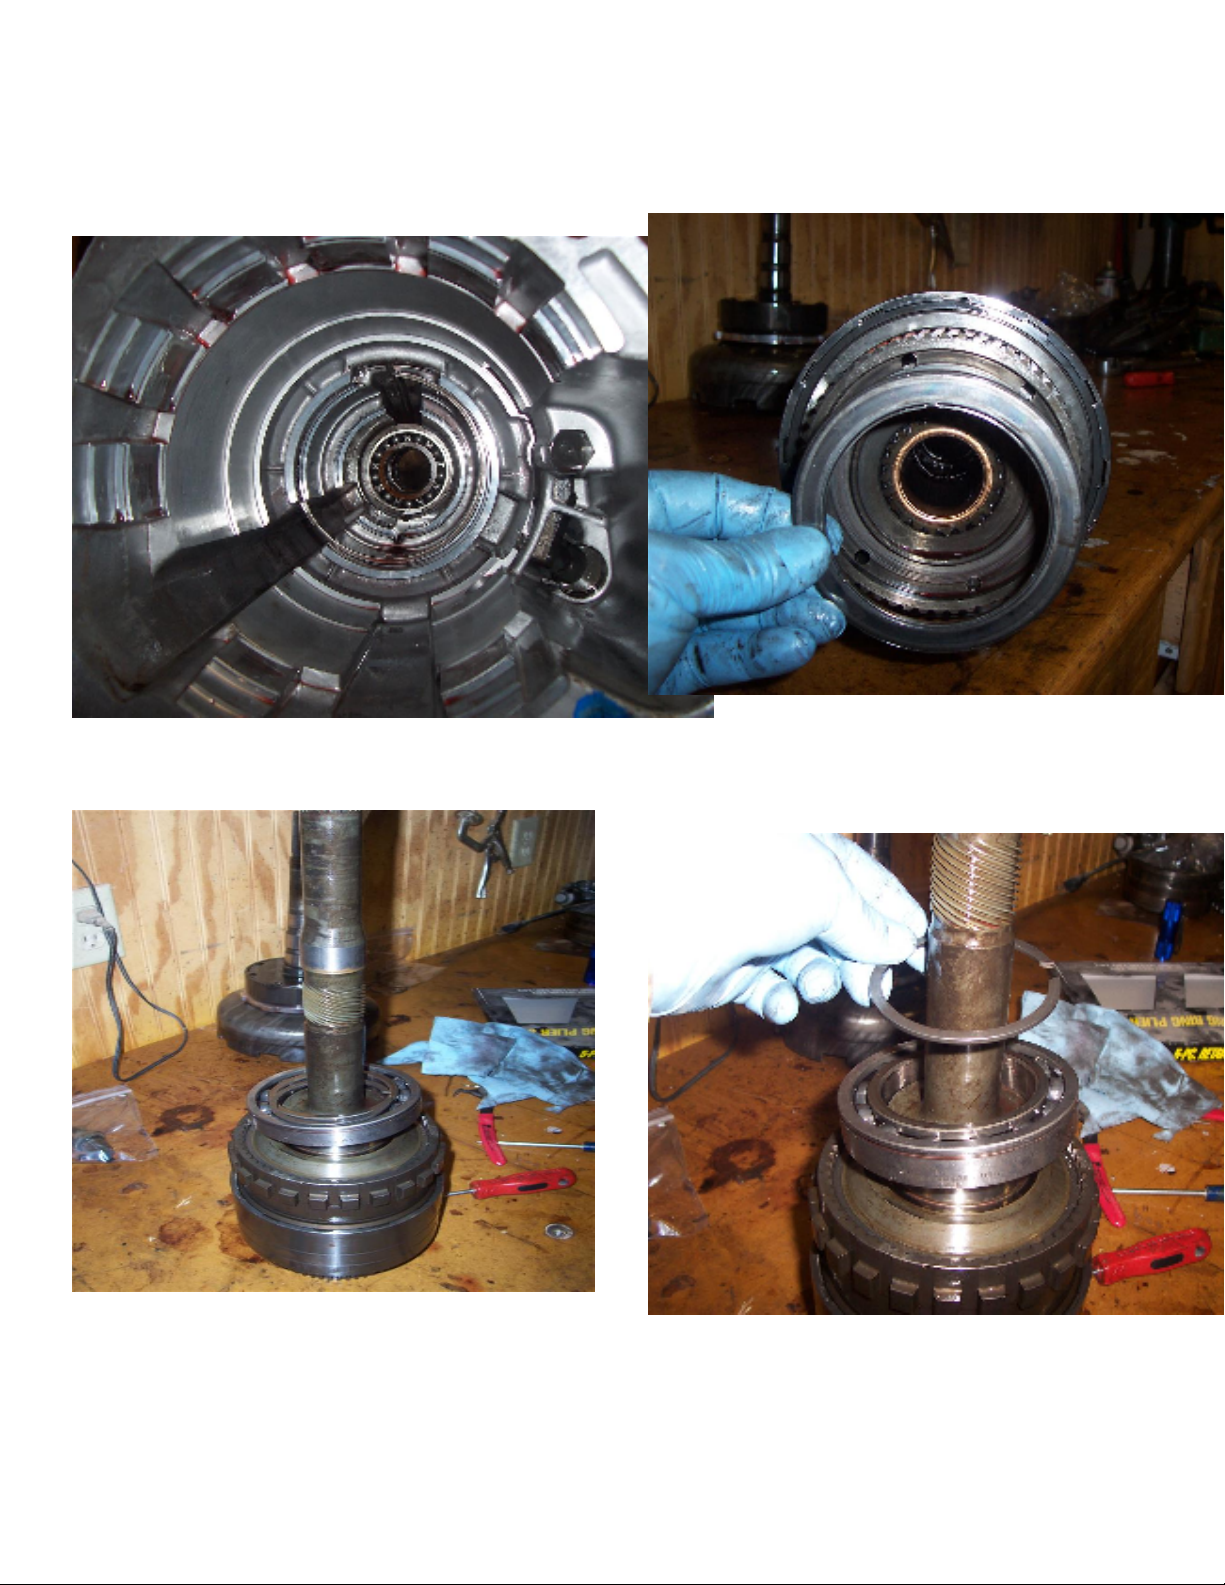
5. Inside of OD case without the internal
shaft/assembly
6. Overdrive thrust bearing which rides on top of the
huge annulus gear
6. OD assembly that is inside the OD unit case. This is
the assembly that has the 800 pound spring in it.
7. Back end of OD unit, showing rear bearing and snap
ring. The shaft you see is what actually exits from the
rear of the tranny. The worm gear at the top of the pic
is for the speedo gear.
6
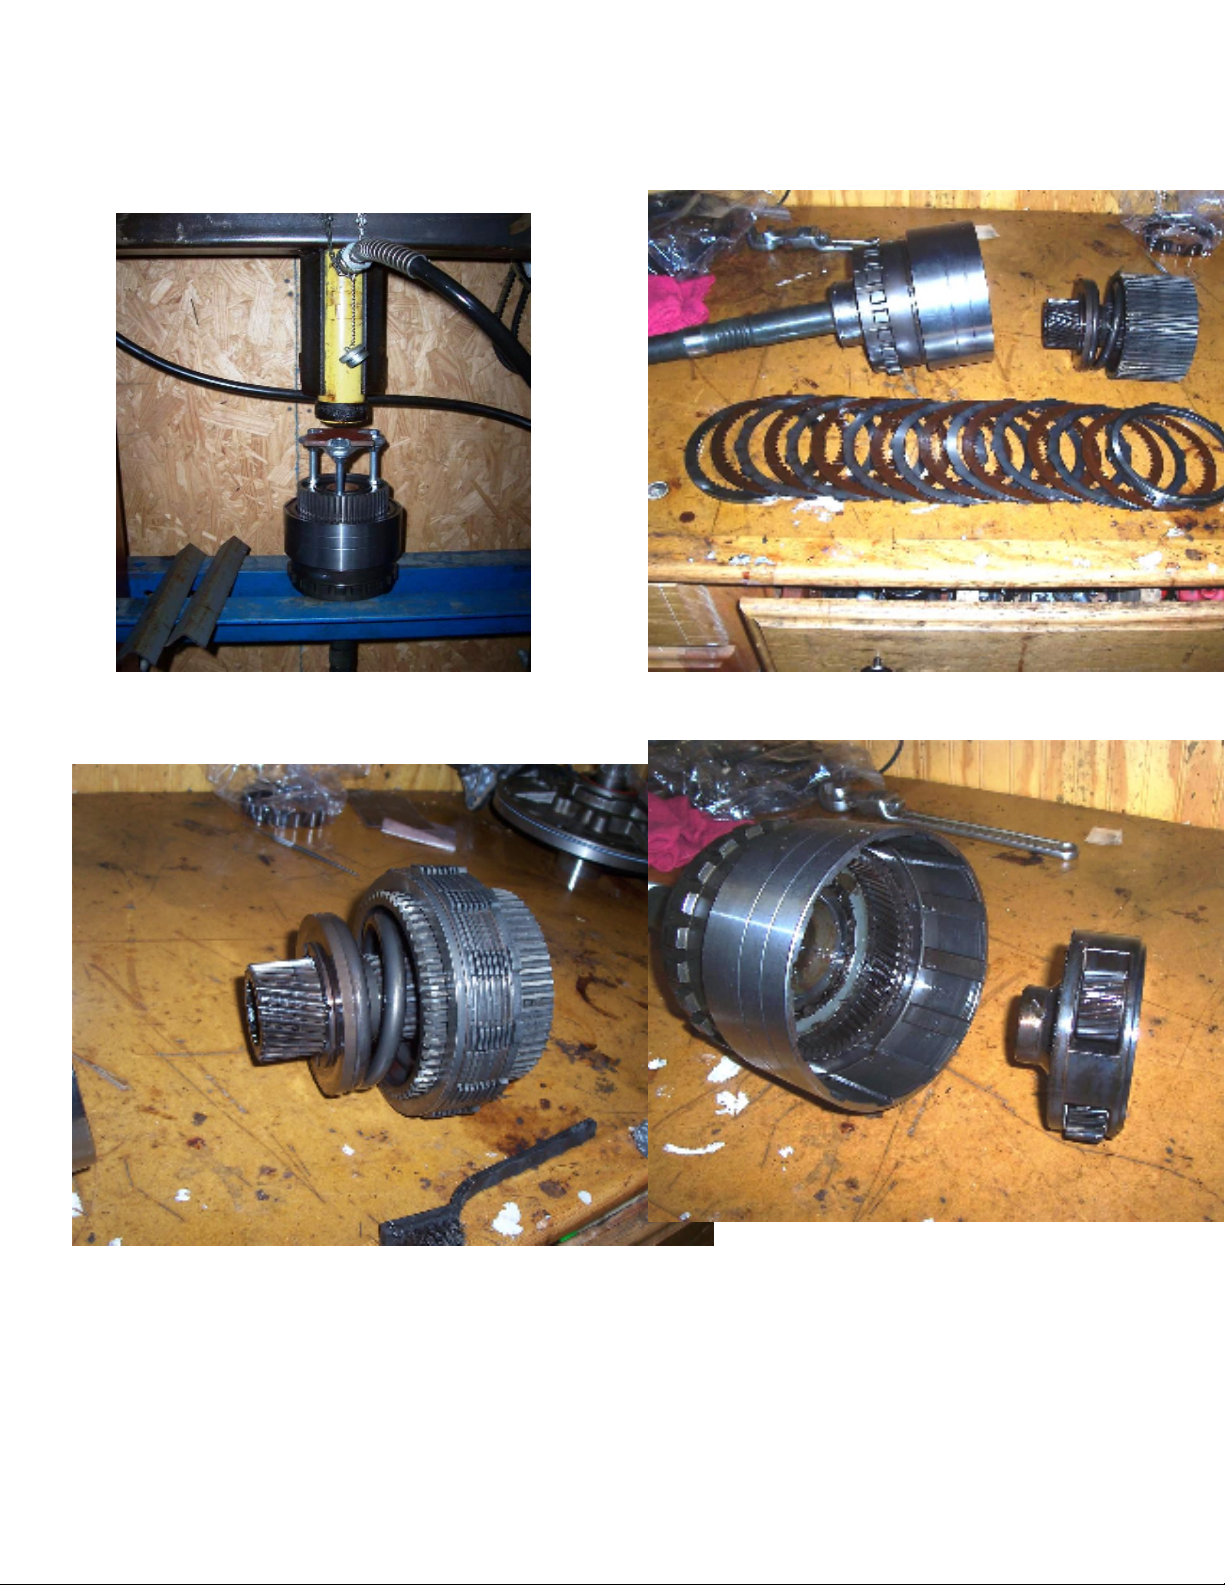
8. OD unit in a press getting ready to remove the snap
rings that hold the 800lb spring
10. OD clutch pack underneath the 800lb spring. The
clutches go inside the shell you see up top.
9. Post spring removal. The rear of the annulus gear
with the 800lb spring exposed and sungear.
11. OD planetary that sits underneath the clutch pack.
7
 Loading...