


SECTION
TABLE OF CONTENTS
PAGE
1
2
3
4
5
6
7
8
9
10
. . . . . . . . . . . . . . . . . . . . . . . . . . . . . . . . . . . . . . . . . . . . . . . . . . . . . . . . . . .INTRODUCTION |
. . 3 |
1 |
|
|
|
THINGS TO KNOW BEFORE STARTING YOUR VEHICLE . . . . . . . . . . . . . . . . . . . . . . . . . . . . |
. . 9 |
2 |
|
|
|
UNDERSTANDING THE FEATURES OF YOUR VEHICLE . . . . . . . . . . . . . . . . . . . . . . . . . . . . . |
. 87 |
3 |
|
|
|
UNDERSTANDING YOUR INSTRUMENT PANEL . . . . . . . . . . . . . . . . . . . . . . . . . . . . . . . . . . . |
187 |
4 |
|
|
|
STARTING AND OPERATING . . . . . . . . . . . . . . . . . . . . . . . . . . . . . . . . . . . . . . . . . . . . . . . . . |
289 |
5 |
|
|
|
WHAT TO DO IN EMERGENCIES . . . . . . . . . . . . . . . . . . . . . . . . . . . . . . . . . . . . . . . . . . . . . . |
343 |
6 |
|
|
|
MAINTAINING YOUR VEHICLE . . . . . . . . . . . . . . . . . . . . . . . . . . . . . . . . . . . . . . . . . . . . . . . |
371 |
7 |
|
|
|
MAINTENANCE SCHEDULES . . . . . . . . . . . . . . . . . . . . . . . . . . . . . . . . . . . . . . . . . . . . . . . . . . |
425 |
8 |
|
|
|
IF YOU NEED CONSUMER ASSISTANCE . . . . . . . . . . . . . . . . . . . . . . . . . . . . . . . . . . . . . . . . . |
447 |
9 |
|
|
|
INDEX . . . . . . . . . . . . . . . . . . . . . . . . . . . . . . . . . . . . . . . . . . . . . . . . . . . . . . . . . . . . . . . . . . . . |
457 |
10 |

|
INTRODUCTION |
|
|
|
|
|
|
|
1 |
||
|
|
|
|
|
|
CONTENTS |
|
|
|
|
|
Introduction . . . . . . . . . . . . . . . . . . |
. . . . . . . . . 4 |
Vehicle Identification Number . . . . . . . . . . . . . . . |
6 |
|
|
How To Use This Manual . . . . . . . . . |
. . . . . . . . . 4 |
Vehicle Modifications / Alterations . . . . . . . . . . . |
7 |
|
|
Warnings And Cautions . . . . . . . . . . |
. . . . . . . . . 6 |
|
|
|
|

4 INTRODUCTION
INTRODUCTION
This manual has been prepared with the assistance of service and engineering specialists to acquaint you with the operation and maintenance of your new vehicle. It is supplemented by a Warranty Information Booklet and various customer oriented documents. You are urged to read these publications carefully. Following the instructions and recommendations in this manual will help assure safe and enjoyable operation of your vehicle.
NOTE: After you read the manual, it should be stored in the vehicle for convenient reference and remain with the vehicle when sold, so that the new owner will be aware of all safety warnings.
When it comes to service, remember that your dealer knows your vehicle best, has the factory-trained technicians and genuine Mopar parts, and is interested in your satisfaction.
WARNING!
Engine exhaust, some of its constituents, and certain vehicle components contain or emit chemicals known to the State of California to cause cancer and birth defects or other reproductive harm. In addition, certain fluids contained in vehicles and certain products of component wear contain or emit chemicals known to the State of California to cause cancer and birth defects or other reproductive harm.
HOW TO USE THIS MANUAL
Consult the table of contents to determine which section contains the information you desire.
The detailed index, at the rear of this manual, contains a complete listing of all subjects.
Consult the following table for a description of the symbols that may be used on your vehicle or throughout this owner’s manual:
 User Manual")
INTRODUCTION 5
1
6 INTRODUCTION |
|
WARNINGS AND CAUTIONS |
|
This manual contains WARNINGS against operating |
|
procedures which could result in an accident or bodily |
|
injury. It also contains CAUTIONS against procedures |
|
which could result in damage to your vehicle. If you do |
|
not read this entire manual you may miss important |
|
information. Observe all Warnings and Cautions. |
|
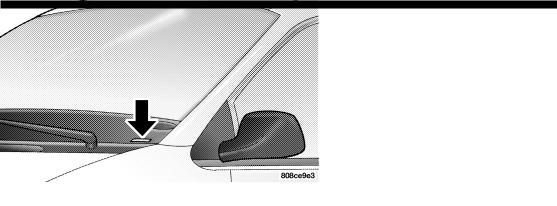
VEHICLE IDENTIFICATION NUMBER |
|
The vehicle identification number (VIN) is found on the |
|
left front corner of the instrument panel, visible from |
|
outside of the vehicle through the windshield. This |
|
number also appears on the Automobile Information |
Vehicle Identification Number |
Disclosure Label affixed to a window on your vehicle. |
NOTE: It is illegal to remove the VIN plate. |
Save this label for a convenient record of your vehicle |
|
identification number and optional equipment. |
|

VEHICLE MODIFICATIONS / ALTERATIONS
WARNING!
Any modifications or alterations to this vehicle could seriously affect its roadworthiness and safety and may lead to an accident resulting in serious injury or death.
INTRODUCTION 7
1

THINGS TO KNOW BEFORE STARTING YOUR VEHICLE
2
CONTENTS
A Word About Your Keys . . . . . . . . . . . . . . . . . . |
12 |
▫ Ignition Key Removal . . . . . . . . . . . . . . . . . . . |
12 |
▫ Key-In-Ignition Reminder . . . . . . . . . . . . . . . . |
13 |
Sentry Key . . . . . . . . . . . . . . . . . . . . . . . . . . . . |
13 |
▫ Replacement Keys . . . . . . . . . . . . . . . . . . . . . . |
15 |
▫ Customer Key Programming . . . . . . . . . . . . . . |
15 |
▫ General Information . . . . . . . . . . . . . . . . . . . . |
16 |
Illuminated Entry System — If Equipped . . . . . . . |
16 |
Door Locks . . . . . . . . . . . . . . . . . . . . . . . . . . . . |
17 |
▫ Manual Door Locks . . . . . . . . . . . . . . . . . . . . . |
17 |
▫ Power Door Locks — If Equipped . . . . . . . . . . |
18 |
Remote Keyless Entry — If Equipped . . . . . . . . . |
20 |
▫ To Unlock The Doors And Liftgate . . . . . . . . . . |
22 |
▫ To Lock The Doors And Liftgate . . . . . . . . . . . . |
22 |
▫ Using The Panic Alarm . . . . . . . . . . . . . . . . . . |
23 |
▫ To Program Transmitters . . . . . . . . . . . . . . . . . |
23 |
▫ General Information . . . . . . . . . . . . . . . . . . . . |
25 |
▫ Transmitter Battery Service . . . . . . . . . . . . . . . |
26 |

10 THINGS TO KNOW BEFORE STARTING YOUR VEHICLE
Vehicle Theft Alarm — If Equipped . . . . . . . . . . . |
27 |
Sliding Side Door . . . . . . . . . . . . . . . . . . . . . . . . |
29 |
▫ Sliding Door Open Flash . . . . . . . . . . . . . . . . . |
30 |
▫ Power Sliding Door — If Equipped . . . . . . . . . |
31 |
▫ Child Protection Door Lock . . . . . . . . . . . . . . . |
33 |
Liftgate . . . . . . . . . . . . . . . . . . . . . . . . . . . . . . . |
35 |
▫ Power Liftgate — If Equipped . . . . . . . . . . . . . |
36 |
Windows . . . . . . . . . . . . . . . . . . . . . . . . . . . . . |
38 |
▫ Manual Rear Vent Windows . . . . . . . . . . . . . . . |
38 |
▫ Power Vent Windows — If Equipped . . . . . . . . |
38 |
▫ Power Windows — If Equipped . . . . . . . . . . . . |
39 |
Occupant Restraints . . . . . . . . . . . . . . . . . . . . . . |
41 |
▫ Lap/Shoulder Belts . . . . . . . . . . . . . . . . |
. . . . .42 |
▫ Lap/Shoulder Belt Untwisting Procedure |
. . . . .48 |
▫ Center Lap Belts . . . . . . . . . . . . . . . . . . . |
. . . .50 |
▫ Seat Belt Pretensioners . . . . . . . . . . . . . . . |
. . . .50 |
▫ Enhanced Driver Seat Belt Use Reminder System |
|
(BeltAlert) . . . . . . . . . . . . . . . . . . . . . . . |
. . . .51 |
▫ Seat Belts And Pregnant Women . . . . . . . . |
. . . .52 |
▫ Seat Belt Extender . . . . . . . . . . . . . . . . . . |
. . . .52 |
▫ Driver And Front Passenger Supplemental |
|
Restraint Systems (SRS) — Airbags . . . . . . |
. . . .53 |
▫ DaimlerChrysler Corporation Integrated |
|
Child Seat — If Equipped . . . . . . . . . . . . |
. . . .68 |
▫ Child Restraint . . . . . . . . . . . . . . . . . . . . |
. . . .69 |
Rear Seat Delete Feature (Commercial Vehicles |
|
Only) — If Equipped . . . . . . . . . . . . . . . . . . . . . |
78 |
▫Restraining Infants And Small Children With Seat Delete Feature
(Commercial Vehicles Only) . . . . . . . . . . . . . . .79
Engine Break-In Recommendations . . . . . . . . . . .82
THINGS TO KNOW BEFORE STARTING YOUR VEHICLE |
11 |
Safety Tips . . . . . . . . . . . . . . . . . . . . . . . . . . . . |
83 |
▫ Exhaust Gas . . . . . . . . . . . . . . . . . . . . . . . . . . |
83 |
▫ Safety Checks You Should Make |
2 |
Inside The Vehicle . . . . . . . . . . . . . . . . . . . . . . |
84 |
▫ Periodic Safety Checks You Should Make Outside |
|
The Vehicle . . . . . . . . . . . . . . . . . . . . . . . . . . |
85 |
12 THINGS TO KNOW BEFORE STARTING YOUR VEHICLE |
|
|
|
A WORD ABOUT YOUR KEYS |
be used to order duplicate keys from your dealer. Ask |
|
your dealer for these numbers and keep them in a safe |
|
place. |
|
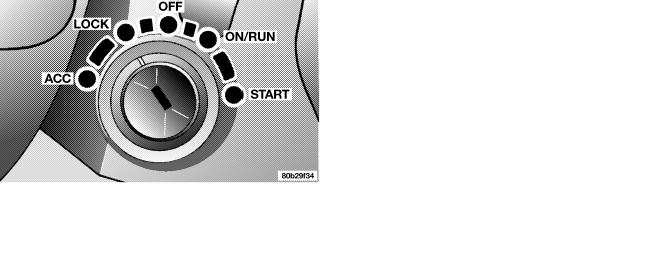
Ignition Key Removal |
|
The shift lever must be in PARK. Turn the key to the OFF |
|
position, then the LOCK position. Remove the key. |
Vehicle Key
You can insert the double sided keys into the locks with either side up.
The dealer that sold you your new vehicle has the key code numbers for your vehicle locks. These numbers can
Ignition Key Position

NOTE: The power window switches, radio, power outlets, and removable console (if equipped), will remain active for up to 45 seconds after the ignition switch has been turned off. Opening a vehicle front door will cancel this feature.
WARNING!
Leaving children in a vehicle unattended is dangerous for a number of reasons. A child or others could be injured. Children should be warned not to touch the parking brake, brake pedal or the gear selector lever. Don’t leave the keys in the ignition. A child could operate power windows, other controls, or move the vehicle.
THINGS TO KNOW BEFORE STARTING YOUR VEHICLE 13
CAUTION!
An unlocked car is an invitation to thieves. Always remove key from the ignition and lock all doors 2 when leaving the vehicle unattended.
Key-In-Ignition Reminder
If you open the driver’s door and the key is in the ignition switch, a chime will sound to remind you to remove the key.
SENTRY KEY
The Sentry Key Immobilizer System prevents unauthorized operation of the vehicle by disabling the engine. The system will shut the engine off after 2 seconds of running if an invalid key is used to start the vehicle. This system utilizes ignition keys which have an electronic

14 THINGS TO KNOW BEFORE STARTING YOUR VEHICLE
chip (transponder) embedded into them. Only keys that have been programmed to the vehicle can be used to start and operate the vehicle.
The Sentry Key Immobilizer System does not need to be armed or activated. Operation of the system is automatic regardless of whether or not the vehicle is locked or unlocked. During normal operation, the Theft Alarm/ Immobilizer Light will come on for three (3) seconds immediately after the ignition switch is turned on for a bulb check. Afterwards, if the bulb remains on, this indicates a problem with the electronics.
If the bulb begins to flash after the bulb check, this indicates that an invalid key has been used to start the vehicle. Both of these conditions will result in the engine being shut off after two (2) seconds of running.
Keep in mind that a key which has not been programmed is also considered an invalid key even if it is cut to fit the ignition lock cylinder for that vehicle.
If the Theft Alarm/Immobilizer Light comes on during normal vehicle operation (vehicle has been running for longer than 10 seconds), a fault has been detected in the electronics and the vehicle should be serviced as soon as possible.
NOTE:
•The Sentry Key Immobilizer System is not compatible with remote starting systems. Use of these systems may result in vehicle starting problems and loss of security protection.
•Exxon/Mobil Speed Pass,™ additional Sentry Keys, or any other transponder equipped components on the same keychain will not cause a key-related (transponder) fault unless the additional part is physically held against the ignition key being used when starting the vehicle. Cell phones, pagers, or other RF electronics will not cause interference with this system.

All of the keys provided with your new vehicle have been programmed to the vehicle electronics.
Replacement Keys
NOTE: Only keys that have been programmed to the vehicle electronics can be used to start the vehicle. Once a Sentry Key has been programmed to a vehicle, it can not be programmed to any other vehicle.
At the time of purchase, the original owner is provided with a four digit PIN number. This number is required for dealer replacement of keys. Duplication of keys may be performed at an authorized dealer or by using the Customer Key Programming procedure. This procedure consists of programming a blank key to the vehicle electronics. A blank key is one which has never been programmed.
THINGS TO KNOW BEFORE STARTING YOUR VEHICLE 15
NOTE: When having the Sentry Key Immobilizer System serviced, bring all vehicle keys with you to the dealer.
2
Customer Key Programming
You can program new sentry keys to the system if you have two valid sentry keys by performing the following procedure:
1.Cut the additional Sentry Key Transponder blank(s) to match the ignition switch lock cylinder key code.
2.Insert the first valid key into the ignition switch and turn the ignition switch ON for at least 3 seconds but no longer than 15 seconds. Turn the ignition switch OFF and remove the first key.
3.Insert the second valid key and turn the ignition switch ON within 15 seconds. After ten seconds a chime will sound and the Theft Alarm Light will begin to flash. Turn the ignition switch OFF and remove the second key.

16 THINGS TO KNOW BEFORE STARTING YOUR VEHICLE
4. Insert a blank Sentry Key into the ignition switch and turn the ignition switch ON within 60 seconds. After 10 seconds a single chime will sound. The Theft Alarm Light will stop flashing, turn on for 3 seconds; then turn off.
The new Sentry Key has been programmed. The Keyless
Entry Transmitter will also be programmed during this procedure.
Repeat this procedure to program up to a total of 8 keys. If you do not have a programmed sentry key, contact your dealer for details.
NOTE: If a programmed key has been lost, see your dealer to have all remaining keys erased from the systems memory. The remaining keys must then reprogrammed. This will prevent the lost key from starting your vehicle. All vehicle keys must be taken to the dealer at the time of service to be reprogrammed.
General Information
The Sentry Key system complies with FCC rules part 15 and with RSS-210 of Industry Canada. Operation is subject to the following conditions:
•This device may not cause harmful interference.
•This device must accept any interference that may be received, including interference that may cause undesired operation.
ILLUMINATED ENTRY SYSTEM — IF EQUIPPED
The courtesy lights will turn on when you use the keyless entry transmitter or open the doors. This feature is only available if you have Remote Keyless Entry.
The lights will fade to off after about 30 seconds or they will immediately fade to off once the ignition switch is turned on.

NOTE:
•The front courtesy overhead console, door courtesy and liftgate lights do not turn on if the dimmer control is in the interior lights ON position (extreme top position).
•The illuminated entry system will not operate if the dimmer control is in the “defeat” position (extreme downward position).
DOOR LOCKS
Manual Door Locks
Lock the doors by pushing down on the lock plungers on each door trim panel.
THINGS TO KNOW BEFORE STARTING YOUR VEHICLE 17
2
Door Lock Plunger
If the lock plunger is down when you shut the door, the door will lock. Therefore, make sure the keys are not inside the vehicle before closing the door.
18 THINGS TO KNOW BEFORE STARTING YOUR VEHICLE
WARNING!
•For personal security and safety in the event of an accident, lock the vehicle doors as you drive as well as when you park and leave the vehicle.
•When leaving the vehicle always remove the key from the ignition lock, and lock your vehicle. Do not leave children unattended in the vehicle, or with access to an unlocked vehicle. Unsupervised use of vehicle equipment may cause severe personal injuries and death.
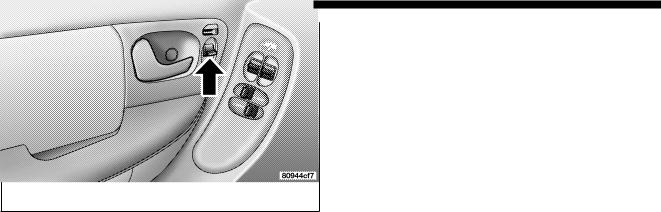
Power Door Locks — If Equipped
A power door lock switch is on each front door trim panel. Use this switch to lock or unlock the doors.
Power Door Lock switch
If you press the power door lock switch while the key is in the ignition, and any front door is open, the power locks will not operate. This prevents you from accidentally locking your keys in the vehicle. Removing the key or closing the door will allow the locks to operate. A

chime will sound if the key is in the ignition switch and a door is open, as a reminder to remove the key.
If you press the power door lock switch while the sliding door is open, the sliding door will lock.
Auto Door Locks — If Equipped
The doors will lock automatically on vehicles with power door locks if:
1.The transmission is in gear,
2.all doors are closed,
3.the vehicle speed is above 18 mph (29 km/h) and
4.the doors were not previously locked using the power door lock switch or remote keyless entry transmitter.
The Automatic Door Locks can be enabled or disabled by performing the following procedure:
THINGS TO KNOW BEFORE STARTING YOUR VEHICLE 19
1.Close all doors and place the key in the ignition switch.
2.Cycle the ignition switch ON/OFF four times ending 2 in the OFF position. (do not start the engine)
3.Within 10 seconds of the final cycle, press the interior driver’s door lock switch to the LOCK position.
4.A single chime will sound to signify that you have successfully completed the programming.
You can turn the feature back on by repeating the above mentioned procedure or by performing the procedure in the Electronic Vehicle Information Center (EVIC), Customer Programmable Features section on vehicles so equipped.

20 THINGS TO KNOW BEFORE STARTING YOUR VEHICLE
Auto Unlock On Exit— If Equipped
The doors will unlock automatically on vehicles with power door locks if:
1.The Auto Door Locks feature is enabled and the Auto Unlock On Exit feature is enabled,
2.the transmission was in gear and the vehicle speed returned to 0 mph (0 km/h),
3.the transmission is in NEUTRAL or PARK,
4.any door is opened (excluding liftgate) and
5.the vehicle speed is 0 mph (0 km/h).
The Auto Unlock On Exit feature can be enabled or disabled by performing the procedure in the Electronic Vehicle Information Center (EVIC), Customer Programmable Features section on vehicles so equipped.
NOTE: Use the Auto Door Locks and Auto Unlock features in accordance with local laws.
REMOTE KEYLESS ENTRY — IF EQUIPPED
This system allows you to lock or unlock the doors and liftgate, and activate the panic alarm, optional power liftgate, left power sliding door, and right power sliding door from distances up to about 23 feet (7 meters) using a hand held radio transmitter. The transmitter need not be pointed at the vehicle to activate the system.
NOTE: If the key is in the ignition switch, then all buttons on that transmitter will be disabled. The buttons on the remaining transmitters will work. If the vehicle is shifted out of PARK, all the transmitter buttons are disabled for all keys.
Two (2) transmitters may be supplied with the vehicle. Vehicles built without the powered options will be equipped from the factory with three button transmitters and those built with power options will be equipped with six button transmitters.
Three button transmitters will provide basic UNLOCK, LOCK and PANIC functions.
Three Button Transmitter
Six button transmitters will provide functions that allow the same basic operation as the three button, but may also be used to Open/Close the optional power liftgate, left power sliding door, or right power sliding door. Other
THINGS TO KNOW BEFORE STARTING YOUR VEHICLE 21
options of the system allow you to turn ON/OFF the Sound Horn On Lock, Remote Unlock Driver’s Door 1st,
and Flash Lights On Lock/Unlock features.
2
Six Button Transmitter

22 THINGS TO KNOW BEFORE STARTING YOUR VEHICLE
To unlock the doors and liftgate:
Press and release the UNLOCK button on the transmitter once to unlock the driver’s door side of the vehicle, or twice to unlock all doors and liftgate. The illuminated entry system also turns on.
The Remote Unlock Driver’s Door 1st feature can be enabled or disabled by performing the following procedure:
1.Press the UNLOCK button for 5 to 10 seconds.
2.While the UNLOCK button is pressed, (after 5 seconds) press the LOCK button. Release both buttons.
The “Remote Unlock Driver’s Door 1st” feature can be reactivated by repeating the above mentioned procedure or by performing the procedure in the Electronic Vehicle Information Center (EVIC), Customer Programmable Features section on vehicles so equipped.
To lock the doors and liftgate:
Press and release the LOCK button on the transmitter to lock all doors and liftgate. The horn will chirp once to acknowledge the signal.
If desired, the “Sound Horn On Lock” feature can be turned on and off by performing the following procedure:
1.Press the LOCK button for 5 to 10 seconds.
2.While the LOCK button is pressed (after 5 seconds), press the PANIC button. Release both buttons.
The “Sound Horn On Lock” feature can be reactivated by repeating this procedure or by performing the procedure in the Electronic Vehicle Information Center (EVIC), Customer Programmable Features section on vehicles so equipped.

Using The Panic Alarm:
To turn the panic alarm feature ON or OFF, press and hold the PANIC button on the transmitter for at least one second and release. When the panic alarm is on, the headlights and park lights will flash, the horn will pulse on and off and the interior lights will turn on.
The panic alarm will stay on for 3 minutes unless you turn it off by pressing the PANIC button a second time or by turning the ignition switch to the ON position.
NOTE: When you turn off the panic alarm by pressing the PANIC button a second time, you may have to be closer to the vehicle due to the radio frequency noises of the system.
THINGS TO KNOW BEFORE STARTING YOUR VEHICLE 23
To Program Transmitters:
Refer to SENTRY KEY “Customer Key Programming.”
If you do not have a programmed transmitter, contact 2 your dealer for details.
To Open/Close Power Liftgate — If Equipped
Press the LIFTGATE button twice within five seconds to open/close the power liftgate. The liftgate will beep for 2 seconds and then open/close. If the button is pushed while the liftgate is being power closed, the liftgate will reverse to the full open position.
If the liftgate is locked and is not equipped with a powered liftgate, pressing the button twice will result in the liftgate becoming unlocked for 30 seconds allowing you to manually access the liftgate area.

24 THINGS TO KNOW BEFORE STARTING YOUR VEHICLE
To Open/Close Left Power Sliding Door — If Equipped
Press the LEFT button twice within five seconds to open/close the left power sliding door. If the button is pushed while the door is being power closed, the door will reverse to the full open position.
If the vehicle is not equipped with a left power sliding door and the door is closed and locked, pressing the button twice will result in the left side doors becoming unlocked.
To Open/Close Right Power Sliding Door — If Equipped
Press the RIGHT button twice within five seconds to open/close the right power sliding door. If the button is pushed while the door is being power closed, the door will reverse to the full open position.
If the vehicle is not equipped with a right power sliding door and the door is closed and locked, pressing the button twice will result in the right side doors becoming unlocked.
To Turn Off “Flash Lights On Lock/Unlock” — If Equipped
If desired, the “Flash Lights On Lock/Unlock” feature can be turned on and off by performing the following procedure:
1.Press the LOCK button for 5 to 10 seconds.
2.While the LOCK button is pressed, (after 5 seconds) press the UNLOCK button. Release both buttons.
The “Flash Lights On Lock/Unlock” feature can be reactivated by repeating this procedure or by performing

the procedure in the Electronic Vehicle Information Center (EVIC), Customer Programmable Features section on vehicles so equipped. The table below explains the Lamp Flash options.
Function |
Which Turn Signal |
Number of |
|
Lamps |
Flashes |
Lock |
All |
1 |
Unlock 1st |
Left Side |
2 |
Press |
|
|
Unlock All |
All |
2 |
Doors |
|
|
Left Side |
Left Side |
2 |
Right Side |
Right Side |
2 |
Liftgate |
All |
2 |
THINGS TO KNOW BEFORE STARTING YOUR VEHICLE 25
General Information |
|
This device complies with part 15 of the FCC rules and |
|
RSS 210 of Industry Canada. Operation is subject to the |
2 |
following conditions: |
•This device may not cause harmful interference.
•This device must accept any interference received, including interference that may cause undesired operation.
If your Remote Keyless Entry transmitter fails to operate from a normal distance, check for these two conditions.
1.A weak battery in the transmitter. The expected life of the battery is a minimum of three years.
2.Closeness to a radio transmitter such as a radio station tower, airport transmitter, and some mobile or CB radios.
26 THINGS TO KNOW BEFORE STARTING YOUR VEHICLE
Transmitter Battery Service
The recommended replacement battery is one CR2032 battery.
NOTE: Do not touch the battery terminals that are on the back housing or the printed circuit board.
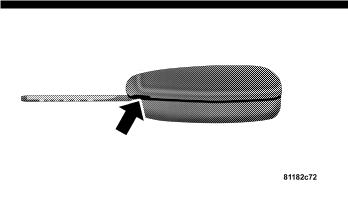
1. With the transmitter buttons facing down, use a thin coin to pry the two halves of the transmitter apart. Make sure not to damage the rubber gasket during removal.
Separating Transmitter Halves
2. Remove and replace the batteries. Avoid touching the new batteries with your fingers. Skin oils may cause battery deterioration. If you touch a battery, clean it with rubbing alcohol.

3. To reassemble the transmitter case snap two halves together. Make sure there is an even “gap” between the two halves. Test transmitter operation.
VEHICLE THEFT ALARM — IF EQUIPPED
This system monitors the vehicle doors and ignition switch for unauthorized entry or operation. When the alarm is activated, the system provides both audible and visual signals. The horn will pulse, headlights/park lights will flash, the Vehicle Theft Alarm/Immobilizer light, located in the instrument cluster, will flash, and the vehicle will not start. If the alarm is triggered and no action is taken to disarm it, the system will turn off the horn after three minutes and after 15 minutes of light only operation the system will then rearm itself.
THINGS TO KNOW BEFORE STARTING YOUR VEHICLE 27
To arm the system: Remove the key from the ignition switch and either:
1.Press a power door lock button while the driver’s or 2 passenger’s door is open.
2.Press the LOCK button on the keyless entry transmitter.
After the last door is closed, or if all doors are closed, the system will arm itself in about 16 seconds. During that time, the Vehicle Theft Alarm/Immobilizer light will flash. If it does not illuminate, the system is not arming. If you open a door during this arming period, the system will cancel the arming process. You must repeat one of the previously described arming sequences to rearm the system.

28 THINGS TO KNOW BEFORE STARTING YOUR VEHICLE
To disarm the system: Press the UNLOCK button on the keyless entry transmitter. Also, using a valid sentry key and moving the ignition switch to the ON/START position will disarm the system. If you disarm the system and access the liftgate area, the system must be rearmed, as described previously, when closing the liftgate. If something has triggered the system in your absence, the horn will sound three times when you disarm the system. Check the vehicle for tampering.
NOTE:
•The driver’s door and liftgate key cylinders cannot arm or disarm the system.
•Once the alarm is set, and the liftgate button on the keyless entry transmitter is pressed, on a non-power liftgate vehicle, you have a 30 second one time access into the liftgate area. If the liftgate is not opened within 30 seconds the liftgate will remain locked.
•The system remains armed during liftgate entry, pressing the liftgate button will not disarm the system, if someone enters the vehicle through the liftgate and opens any door the alarm will sound.
•When the system is armed, the doors can not be unlocked from the interior power door lock switches.
The Vehicle Theft Alarm system is designed to protect your vehicle, however, you can create conditions where the system will give you a false alarm. If one of the previously described arming sequences has occurred, the system will arm regardless of whether you are in the vehicle or not. If you remain in the vehicle and open a door, the alarm will sound. If this occurs, disarm the system.
The alarm system will be activated when the battery is connected if the system was previously armed. The
THINGS TO KNOW BEFORE STARTING YOUR VEHICLE 29
exterior lights will flash, the horn will sound, and the ignition will not start the vehicle. If this occurs, disarm
the system.
2
SLIDING SIDE DOOR
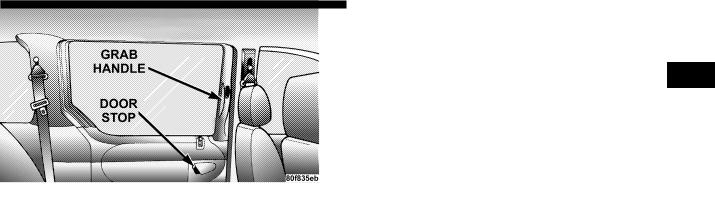
The sliding door may be opened from the inside or the outside. Pull out on the outside handle to open the sliding door from the outside. To open the sliding door from the inside, press the button on the grab handle and open the door.
Sliding Door Hardware

30 THINGS TO KNOW BEFORE STARTING YOUR VEHICLE
To keep your door operating properly, observe the following guidelines:
•Always open the door smoothly.
•Avoid high impacts against the door stop when opening the door. This is very important when your vehicle is parked on an incline as the door will slide faster in the downhill direction.
•There is a hold-open latch that is activated when the sliding door is fully opened. This latch will keep your sliding door open on any incline. To close the sliding door after the hold-open latch is activated, you must push the button on the inside grab handle or pull out on the outside sliding door handle.
•Use the grab handle on the inside of the sliding door to assist you in closing and securing the door.
Always make sure that the sliding door is fully latched any time the vehicle is in motion.
NOTE: The driver’s side sliding door cannot be opened while the fuel door is open. This feature operates only when the sliding door is fully closed prior to opening the fuel door.
Sliding Door Open Flash
When the sliding door(s) are opened, the left and right exterior hazard lights will flash for 12 seconds to alert other drivers in the area that passenger(s) could be entering or exiting the vehicle.
The Sliding Door Open Flash can be enabled or disabled by performing the following procedure:
1.Place the key in the ignition switch.
2.Cycle the ignition switch ON/OFF four times ending in the OFF position. (do not start the engine)
3.Within 10 seconds of the final cycle, press the hazard switch.
 Loading...