

Page 1

Page 2

Page 3

1
S1+
S1+
S1+
S1+ Use
Use
Use
Use Manual
Manual
Manual
Manual
Table
Table
Table
Table of
of
of
of Contents
Contents
Contents
Contents
Preface
Preface
Preface
Preface ··························································································
··························································································
··························································································
·························································································· 03
03
03
03
General
General
General
General ·························································································
·························································································
·························································································
························································································· 04
04
04
04
Product
Product
Product
Product Features
Features
Features
Features ··········································································
··········································································
··········································································
·········································································· 05
05
05
05
Product
Product
Product
Product Structure
Structure
Structure
Structure ········································································
········································································
········································································
········································································ 07
07
07
07
Use
Use
Use
Use and
and
and
and Installation
Installation
Installation
Installation ·····································································
·····································································
·····································································
····································································· 08
08
08
08
Operating
Operating
Operating
Operating Instruction
Instruction
Instruction
Instruction ·································································
·································································
·································································
································································· 09
09
09
09
Files
Files
Files
Files Saving
Saving
Saving
Saving and
and
and
and Videos
Videos
Videos
Videos Play
Play
Play
Play ing
ing
ing
ing ·················································
·················································
·················································
················································· 12
12
12
12
Button
Button
Button
Button Function
Function
Function
Function ···········································································
···········································································
···········································································
··········································································· 13
13
13
13
Menu
Menu
Menu
Menu Setup
Setup
Setup
Setup ··················································································
··················································································
··················································································
·················································································· 14
14
14
14
Specifications
Specifications
Specifications
Specifications ···············································································
···············································································
···············································································
··············································································· 15
15
15
15
Package
Package
Package
Package Accessories
Accessories
Accessories
Accessories ·····································································
·····································································
·····································································
····································································· 16
16
16
16
Easy
Easy
Easy
Easy Troubleshooting
Troubleshooting
Troubleshooting
Troubleshooting ··································································
··································································
··································································
·································································· 16
16
16
16
Installation
Installation
Installation
Installation Instruction
Instruction
Instruction
Instruction for
for
for
for Bracket
Bracket
Bracket
Bracket ···········································
···········································
···········································
··········································· 17
17
17
17
Page 4

2
S1+
S1+
S1+
S1+ 使用說明書
目錄
前言
.......................................................................................................
.......................................................................................................
.......................................................................................................
....................................................................................................... 18
18
18
18
產品概述
.................................................................................................
.................................................................................................
.................................................................................................
................................................................................................. 19
19
19
19
產品特性
...............................................................................................
...............................................................................................
...............................................................................................
............................................................................................... 2
2
2
2 0
0
0
0
產品結構
................................................................................................
................................................................................................
................................................................................................
................................................................................................ 2
2
2
2 2
2
2
2
使用安裝 ................................................................................................
................................................................................................
................................................................................................
................................................................................................ 2
2
2
2 3
3
3
3
操作指南
.................................................................................................
.................................................................................................
.................................................................................................
................................................................................................. 2
2
2
2 4
4
4
4
檔 案 儲存及視訊播放
..............................................................................
..............................................................................
..............................................................................
.............................................................................. 2
2
2
2 7
7
7
7
按鍵功能 ..............................................................................
..............................................................................
..............................................................................
.............................................................................. 28
28
28
28
選單設定
..................................................................................................
..................................................................................................
..................................................................................................
.................................................................................................. 29
29
29
29
產品規格
..................................................................................................
..................................................................................................
..................................................................................................
.................................................................................................. 30
30
30
30
包裝附件
..................................................................................................
..................................................................................................
..................................................................................................
.................................................................................................. 3
3
3
3 1
1
1
1
簡易問題排除
..........................................................................................
..........................................................................................
..........................................................................................
.......................................................................................... 3
3
3
3 1
1
1
1
支架安裝說明
..........................................................................................
..........................................................................................
..........................................................................................
.......................................................................................... 3
3
3
3 2
2
2
2
Page 5

3
Preface
Preface
Preface
Preface
Thank you for purchasing the DOD series products, this S1+ product can capture the moving
photos efficiently. It has a high definition lens with one million pixels, which is uniquely
lens of 180 ° overturn. The product is designed for safety recording of car driving process and
can also be used as a DV for video recording/taking photos. It is exquisite in appearance and
has won many patents and certifications, in a word, S1+ will make your life more wonderful.
This manual will teach you how to use the product and give you more detailed information,
including the use, operation and installation precautions and technical specifications, etc.
Before the use, please read it carefully and keep it properly.
We
hope that the product can
meet your demand and serve you permanently.
Page 6
4
General
General
General
General
This product is a high-definition driving recorder to cater to the market demand. It has leading
functions such as high-definition video recording/photos taking, hi-speed USB data
transmission, USB charging and car charging.
Widely
Widely
Widely
Widely Used,
Used,
Used,
Used, Convenient
Convenient
Convenient
Convenient for
for
for
for Video
Video
Video
Video Recording
Recording
Recording
Recording at
at
at
at any
any
any
any time
time
time
time any
any
any
any where
where
where
where
Page 7

5
Product
Product
Product
Product Features
Features
Features
Features
� lens rotation design with multi-functions, easy for high-definition video recording/photo
taking at anywhere, capture high-resolution photo at will.
� Lens: 10 0 ° wide-angle lens
� Exposure Compensation: EV(-2.0/+2 adjustable)
� Screen: 2.5 inch high-definition TFT LCD
� 4X digital zoom
� Infrared rays
� In-bu ilt microphone/loudspeaker
� High-capacity rechargeable lithium battery
� Support high-capacity SD (SDHC) memory card
� Cycle video recording
� Motion detection
� Seamless connection
� Outage auto-save
� Recording time can be set
� Video recording is realizable while charging
� Auto power on to make records when starting car
� Manual emergency lock (SOS)
� G-SENSOR gravity file protection
Page 8

6
Capacity
Capacity
Capacity
Capacity Display
Display
Display
Display
The
The
The
The number
number
number
number of
of
of
of videos
videos
videos
videos or
or
or
or photos
photos
photos
photos vary
vary
vary
vary with
with
with
with different
different
different
different setting
setting
setting
setting of
of
of
of host
host
host
host machine,
machine,
machine,
machine, brand
brand
brand
brand of
of
of
of
memory
memory
memory
memory card,
card,
card,
card, file
file
file
file size
size
size
size etc.
etc.
etc.
etc.
1G 2G 4G 8G
1440*1080(FPS 15 ) 17min 34min 69min 139min
1280*720(FPS 3 0) 16min 32min 65min 130min
848*480(FPS60) 18min 36min 73min 146min
10M 287photos 574photos 1148photos 2296photos
8M 354photos 708photos 1416photos 2832photos
5M 572photos 1144photos 2288photos 4576photos
3M 1003photos 2006photos 4012photos 8024photos
Page 9
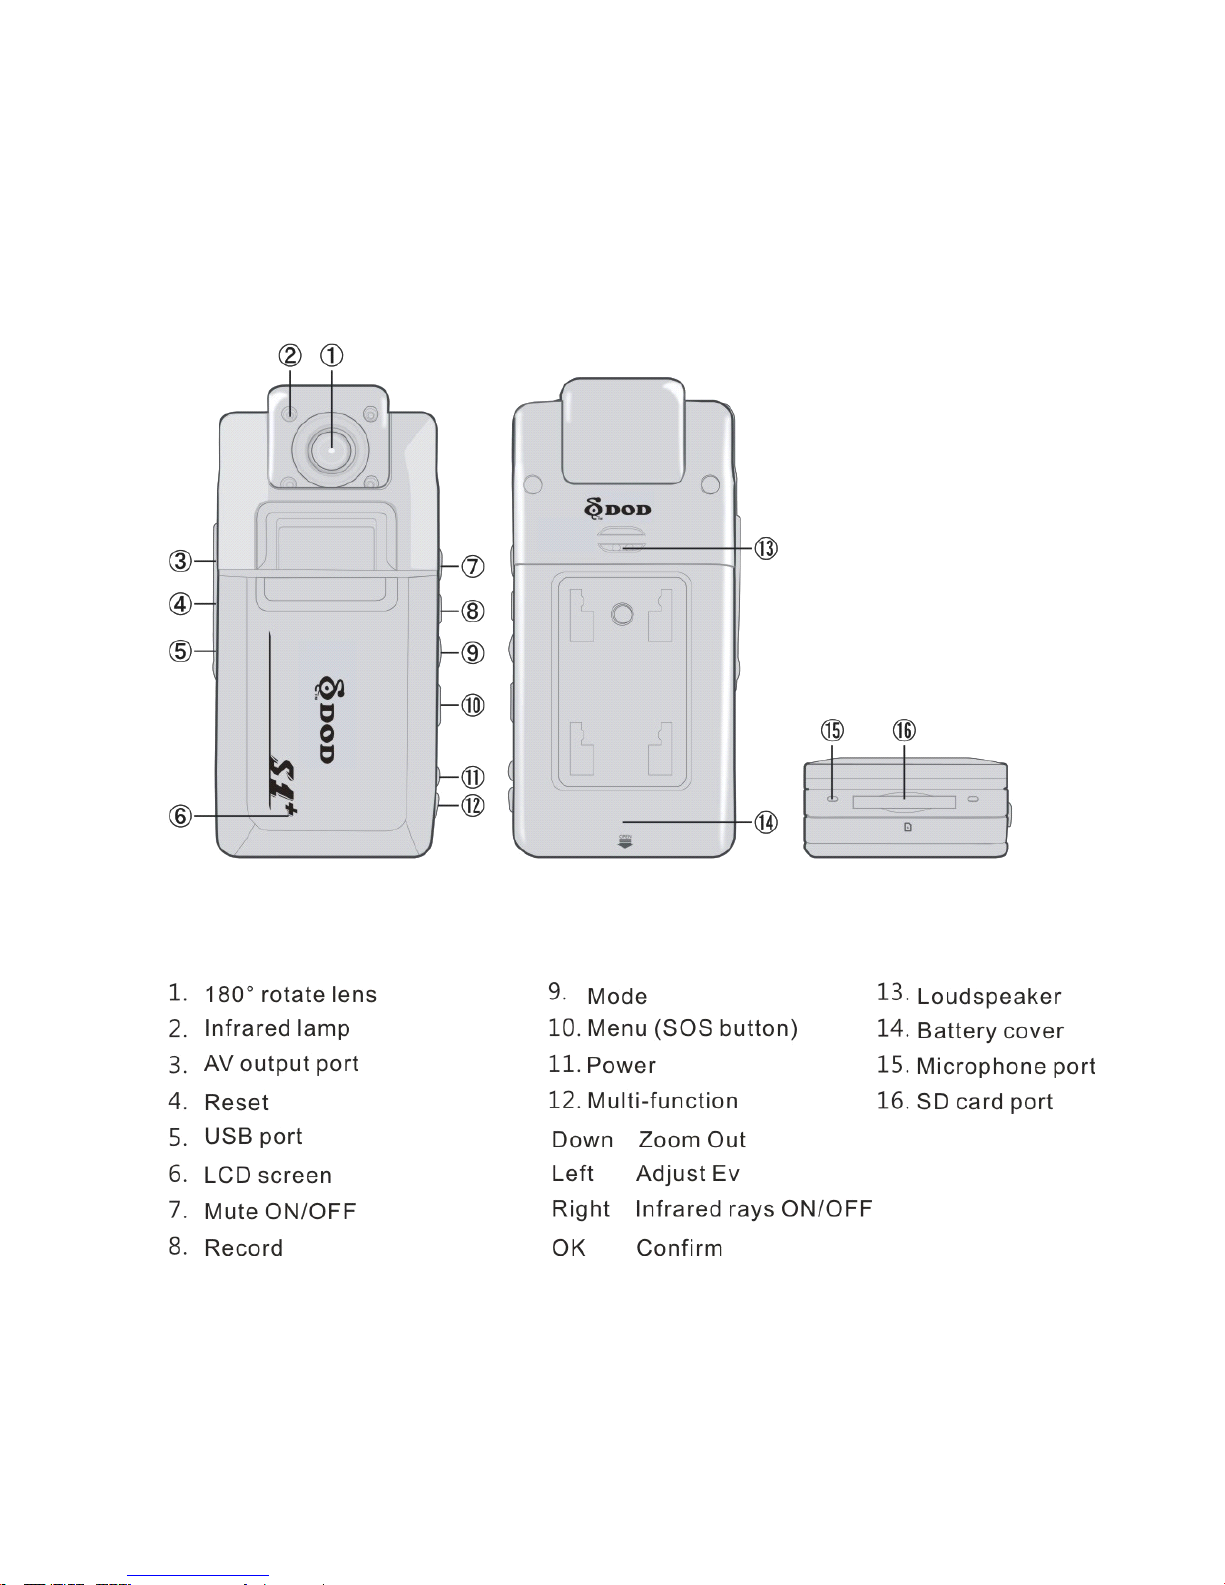
7
Product
Product
Product
Product Structure
Structure
Structure
Structure
Page 10

8
Use
Use
Use
Use and
and
and
and Installation
Installation
Installation
Installation
�
�
�
� Install
Install
Install
Install and
and
and
and Take
Take
Take
Take out
out
out
out Battery
Battery
Battery
Battery
1. Slide battery cover downward to open it.
2. Put battery into battery case based on plus-minus marks on it until it is installed in position.
3. Battery power symbols are shown as below:
4. Push open the battery cover and take it out.
�
�
�
� Install
Install
Install
Install and
and
and
and Take
Take
Take
Take out
out
out
out Memory
Memory
Memory
Memory Card
Card
Card
Card
1. Insert memory card into the slot as instructed until it is fixed in the slot.
2. When taking memory card out, press it down gently and take it out after the card pops up.
Attentions:
Attentions:
Attentions:
Attentions:
1.
1.
1.
1. Insert
Insert
Insert
Insert in
in
in
in the
the
the
the SD
SD
SD
SD memory
memory
memory
memory card
card
card
card before
before
before
before use.
use.
use.
use.
2.
2.
2.
2. Before
Before
Before
Before use,
use,
use,
use, check
check
check
check if
if
if
if the
the
the
the write-protect
write-protect
write-protect
write-protect switch
switch
switch
switch on
on
on
on the
the
the
the card
card
card
card is
is
is
is on
on
on
on or
or
or
or off.
off.
off.
off.
3.
3.
3.
3. Please
Please
Please
Please pay
pay
pay
pay attention
attention
attention
attention to
to
to
to the
the
the
the direction
direction
direction
direction of
of
of
of card,
card,
card,
card, if
if
if
if it
it
it
it is
is
is
is inserted
inserted
inserted
inserted reversely,
reversely,
reversely,
reversely, the
the
the
the machine
machine
machine
machine and
and
and
and
card
card
card
card might
might
might
might be
be
be
be damaged.
damaged.
damaged.
damaged.
4.
4.
4.
4. If
If
If
If the
the
the
the memory
memory
memory
memory card
card
card
card is
is
is
is incompatible
incompatible
incompatible
incompatible with
with
with
with the
the
the
the machine,
machine,
machine,
machine, please
please
please
please insert
insert
insert
insert it
it
it
it again
again
again
again or
or
or
or retry
retry
retry
retry
with
with
with
with another
another
another
another card.
card.
card.
card.
Page 11

9
Operating
Operating
Operating
Operating Instruction
Instruction
Instruction
Instruction
�
�
�
�
Set
Set
Set
Set Menu
Menu
Menu
Menu Mode
Mode
Mode
Mode
1. In photo taking/video/replay mode, press “ MENU ” to set relevant menus, please refer to the
“ Set Menu ” for details.
2. In “ Set Menu ” in any mode, press OK to get into the next menu, press Up and Down to
select relevant settings, and then press OK to confirm and then press MENU to exit.
�
�
�
� T urn
Turn
Turn
Turn on/off
on/off
on/off
on/off and
and
and
and Auto-off
Auto-off
Auto-off
Auto-off Settings
Settings
Settings
Settings of
of
of
of Camera
Camera
Camera
Camera
1. Press on Power button for about 1s to turn on the camera, when it is on, press on the Power
button for 3s and then release it to turn it off.
2.
To
save battery power, you can set auto-off time in the menu. When no operation happens
within the setting time, it will shut down automatically.
3. Turn the power on, press MENU button twice to switch to Setup Menu, and then press
Down to select “ Auto-off ” and then press OK to get into the next menu. The auto-off time can
be set as “ OFF, 2Min, 5Min and 10Min ” .
�
�
�
� Set
Set
Set
Set Date
Date
Date
Date and
and
and
and Time
Time
Time
Time
Turn the power on, press MENU button twice and switch to the Setup Menu, then press Down
to select “ Date/Time ” and then press OK to enter into
Year,
Month, Day, Hour, Minute and
Second, then press Up, Down, Left and Right to select the item to be set and then press OK.
When the item turns red, press Up or Down to make adjustment, after that, press OK to exit,
and then press Down to move to “ √” and then press OK.
Page 12

10
�
�
�
� Video
Video
Video
Video Mode
Mode
Mode
Mode
1. Turn the power on, the camera is then started. The Camera mode appears on the screen,
then the symbol “ ” appears at the top right corner, and the screen shows video information
and time displays at the bottom right corner. If the “ ” twinkles on the screen, it means it has
already got into the auto-recording mode.
2. Press “ REC ” button to start video recording and press it again to stop.
While video recording, red “ ” and timer will appear at the bottom of screen, and they will
disappear once it stops.
3. Infrared rays
When you take videos with your hand, you can press “ Right ” arrow key to open or close
infrared rays. If open infrared rays in nonluminous condition, you can see photos through
screen that cannot be seen due to darkness.
�
�
�
� Photo
Photo
Photo
Photo Mode
Mode
Mode
Mode
Turn the power on, the camera is then started. Press “ MODE ” button in video mode, then the
symbol “ ” will appear at the top left corner, which means it has already got into photo
mode.
1. Aim the lens at the subjects and press Up or Down button to realize digital zoom, at this
time, hold on the camera tightly and do not shake it.
2. Press “ REC ” button, the camera give a crack sound, and then the photo is taken.
Shooting
Shooting
Shooting
Shooting Method
Method
Method
Method
Select “ MENU ” button in photo mode, then press “ Down ” to select “ Shooting Method ” , and
then press OK to select the “ Continuous Shooting, Single Shot, 2s, 5s and 10s ” for self-timer.
Notes
Notes
Notes
Notes :
1.
1.
1.
1. Press
Press
Press
Press “
“
“
“ MODE
MODE
MODE
MODE ”
”
”
” in
in
in
in Video
Video
Video
Video or
or
or
or Photo
Photo
Photo
Photo mode
mode
mode
mode can
can
can
can switch
switch
switch
switch to
to
to
to the
the
the
the other
other
other
other mode.
mode.
mode.
mode.
2.
2.
2.
2. Press
Press
Press
Press “
“
“
“ MODE
MODE
MODE
MODE ”
”
”
” Video
Video
Video
Video or
or
or
or Photo
Photo
Photo
Photo mode
mode
mode
mode can
can
can
can enter
enter
enter
enter replay
replay
replay
replay mode.
mode.
mode.
mode.
Page 13

11
�
�
�
� Replay
Replay
Replay
Replay Mode
Mode
Mode
Mode
1. Press “ MODE ” Photo or Video mode can replay photos or videos, and then select the
photo or video with Left or Right button. When browsing the photos, press REC button to
play or stop, and press “ Preview ” button to pause.
2. Delete
When replaying photos or videos, press “ MENU ” button to select the current file mode, and
then press OK to delete the current video or photo. Select all files and press OK to confirm,
and then press OK again to delete all files.
�
�
�
� Set
Set
Set
Set Motion
Motion
Motion
Motion Detection
Detection
Detection
Detection
When the Motion Detection Function is open, the relative displacement in photos will be
detected automatically, if the object moves out of the default displacement, the record is
started automatically. Each time, the record lasts for 15s, after that, the machine will continue
detecting.
When the power is on, press “ MENU ” button to select detected item, and then press Up or
Down to select ON/OFF, and then press OK to save or exit.
�
�
�
� Set
Set
Set
Set G-SENSOR
G-SENSOR
G-SENSOR
G-SENSOR Function
Function
Function
Function
After starting of gravity sensing function, in case of vehicle collision or impact during video
recording, it will lock and save current video automatically and set to avoid the previous video
and following video files of loop recording cycle from being covered by the loop recording
lock of the machine in order to guarantee safety of important video.
In the “ ON ” status, press MENU key to enter the option of gravity sensing strength. Press up
or down key to select sensitivity . Press OK key to save the option and exit.
Page 14

12
�
�
�
� Set
Set
Set
Set SOS
SOS
SOS
SOS Emergency
Emergency
Emergency
Emergency Lock
Lock
Lock
Lock File
File
File
File
When the SOS emergency lock file is started, you can save any photo segment at will during
the recording without being covered.
In the video mode, long press OK button, then “ ” appears and the current video is saved,
but the video will disappear automatically when next video starts.
�
�
�
� Charging-Recording
Charging-Recording
Charging-Recording
Charging-Recording Mode
Mode
Mode
Mode
when the power is off, connect the car charger power to the machine. Once the car is started, it
will turn on automatically and starts recording, meanwhile, the battery will be charged.
Attention: when the car stops, it will use battery power until auto power-off.
Files
Files
Files
Files Saving
Saving
Saving
Saving and
and
and
and Videos
Videos
Videos
Videos Play
Play
Play
Play ing
ing
ing
ing
�
�
�
� USB
USB
USB
USB Backup
Backup
Backup
Backup Mode
Mode
Mode
Mode
When the power is on, connect the machine to computer with USB cable, if disc drive and IP
camera appear on the screen, then it is in USB mode. Open “ My Computer ” on the desktop
and find the s ave d files in “ DCIM\******** ” .
�
�
�
� Connect
Connect
Connect
Connect to
to
to
to TV
TV
TV
TV and
and
and
and Play
Play
Play
Play Videos
Videos
Videos
Videos
1. Connect camera to TV with TV connecting line to browse or play Videos/Photos.
Note:
Note:
Note:
Note: without
without
without
without the
the
the
the need
need
need
need to
to
to
to install
install
install
install driver,
driver,
driver,
driver, the
the
the
the portable
portable
portable
portable disk
disk
disk
disk can
can
can
can only
only
only
only be
be
be
be used
used
used
used when
when
when
when the
the
the
the
camera
camera
camera
camera is
is
is
is on.
on.
on.
on.
Page 15

13
Button
Button
Button
Button Function
Function
Function
Function
Video/Photo
Video/Photo
Video/Photo
Video/Photo Mode
Mode
Mode
Mode ·
·
·
·
Power On/Off
Shutter Record/Stop Recording/Photo Taking
Arrow Key (Up) Select Up to zoom in
Arrow Key (Down) Select Down to zoom out
Arrow Key (Left) Adjust EV value
Arrow Key (Right) Open/Close infrared rays
OK Confirm
Menu Menu ( SOS button )
Mode Mode selection/browse photos and videos
Replay
Replay
Replay
Replay Mode
Mode
Mode
Mode ·
·
·
·
Power Off
Arrow Key (Left) Last/fast backward
Arrow Key (Right) Next/fast forward
Menu Menu selection
OK Confirm/replay: start/pause
Mode Back to video/photo/pause play
Page 16

14
Menu
Menu
Menu
Menu Setup
Setup
Setup
Setup
Mode
Mode
Mode
Mode Menu
Menu
Menu
Menu Menu
Menu
Menu
Menu Setup
Setup
Setup
Setup Note
Note
Note
Note
Video
Recordi
ng
Resolution 1080I/720P/QVGA
Cycle recording OFF/2 min/5 min
Motion detection ON/OFF
Audio ON/OFF
G-sensor OFF/High/ Medium/Low
Audio ON/OFF
Date record ON/OFF
Camera
Shooting method Continuous shooting/single shot/2s/5s/10s
Resolution 10M/8M/7MHD/5M/3M/2MHD
Image quality Best/good/ordinary
Sharpness Strong/ordinary/soft
White balance Auto/sunlight/cloudy/bulb/daylight lamp
Special effect Color/black & white/nostalgic
Exposure
compensation
+2.0 、 +5/3 、 +4/3 、 +1.0 、 +2/3 、 +1/3+0.0 、 -1/3
、
-2.3 、 -1.0 、 -4/3 、 -5/3 、 -2.0
ISO Auto/100/200/400
Face detection Off/Face detection
Anti-shake ON/OFF
Quick view Off/2s/5s
Date record Off/Date/Date, time
Replay
Delete Current file/all files
Formatting Built-in RAM/Memory card
Setting
Frequency 50HZ/60HZ
Screen protection Off/2 min/5min/10 min/
Tone √ / ×
Auto-off OFF/2 min/5 min/10 min
TV output NTSC/PAL
Default √ / ×
Language
Multinational language
Version S12012*****
Date/time
Year,
month, day/hour, minute, second
Page 17

15
Specifications
Specifications
Specifications
Specifications
Sensor 1 Mage pixels CMOS
Lens 3.5mm
Focal range 10cm -Infinity
LCD screen 2.5" TFT LCD
Video output TV synthetic symbol: NTSC/PAL
Photo format
Photo format: JPEG
Maximum output: 10M(3648 x 2736)
Video format H.264
Video signal
1440*1080(15/s)
1280*720 ( 30/s )
848*480 ( 60/s )
Zoom 4x digital zoom
Video medium
SD card ( maximum 32G )
Audio Built-in microphone/loudspeaker(Mono)
Shutter Electronic shutter
Shutter speed 1/2-1/1000s
White balance Auto/sunlight/cloudy/CFL/Tungsten lamp
LED On/Off
Connector USB2.0/HDMI/TV
Battery External lithium battery, 3.7V 800mAh
USB USB2.0 hi-speed transmission
Size Length 111 × Width 5 9 × Thickness 2 9 mm
Work temperature/humidity
-10 ℃ -60 ℃ /10%-80%
Page 18

16
Package
Package
Package
Package Accessories
Accessories
Accessories
Accessories
Warm
Warm
Warm
Warm Tips:
Tips:
Tips:
Tips: to
to
to
to avoid
avoid
avoid
avoid any
any
any
any loss,
loss,
loss,
loss, please
please
please
please check
check
check
check the
the
the
the accessories
accessories
accessories
accessories when
when
when
when purchasing
purchasing
purchasing
purchasing this
this
this
this product.
product.
product.
product.
1. Vehicle Power Cable ×
×
×
× 1
1
1
1
2. Bracket ×
×
×
× 1
1
1
1
3.
AV
Video Cable ×
×
×
× 1
1
1
1
4. USB Cable ×
×
×
× 1
1
1
1
5. Lithium battery ×
×
×
× 1
1
1
1
6. User Manual ×
×
×
× 1
1
1
1
Easy
Easy
Easy
Easy Troubleshooting
Troubleshooting
Troubleshooting
Troubleshooting
�
�
�
� No
No
No
No function
function
function
function of
of
of
of photographing
photographing
photographing
photographing or
or
or
or video
video
video
video recording?
recording?
recording?
recording?
Please change the resolution of photographing or video recording or replace a memory card
with sufficient space, and check whether the memory card is locked or not.
�
�
�
� Photo
Photo
Photo
Photo or
or
or
or video
video
video
video not
not
not
not clear?
clear?
clear?
clear?
Please use it after wipe clean the lens, or check whether the far-near focus setting correct or not.
Operation
Operation
Operation
Operation Tips
Tips
Tips
Tips
The
The
The
The camera
camera
camera
camera is
is
is
is similar
similar
similar
similar to
to
to
to the
the
the
the computer,
computer,
computer,
computer, in
in
in
in case
case
case
case of
of
of
of any
any
any
any malfunction,
malfunction,
malfunction,
malfunction, please
please
please
please follow
follow
follow
follow the
the
the
the
following
following
following
following steps:
steps:
steps:
steps:
1.
1.
1.
1. Take
Take
Take
Take out
out
out
out battery,
battery,
battery,
battery, re-load
re-load
re-load
re-load it
it
it
it and
and
and
and then
then
then
then restart
restart
restart
restart camera.
camera.
camera.
camera.
2.
2.
2.
2. If
If
If
If camera
camera
camera
camera goes
goes
goes
goes wrong,
wrong,
wrong,
wrong, please
please
please
please press
press
press
press RESET
RESET
RESET
RESET button
button
button
button to
to
to
to restart
restart
restart
restart it.
it.
it.
it.
3.
3.
3.
3. Please
Please
Please
Please use
use
use
use RESET
RESET
RESET
RESET button
button
button
button with
with
with
with caution,
caution,
caution,
caution, otherwise,
otherwise,
otherwise,
otherwise, data
data
data
data might
might
might
might disappear.
disappear.
disappear.
disappear.
Page 19

17
Installation
Installation
Installation
Installation Instruction
Instruction
Instruction
Instruction for
for
for
for Bracket
Bracket
Bracket
Bracket
Installation
Installation
Installation
Installation Steps:
Steps:
Steps:
Steps:
After
After
After
After assembling
assembling
assembling
assembling the
the
the
the bracket
bracket
bracket
bracket to
to
to
to the
the
the
the machine,
machine,
machine,
machine, knock
knock
knock
knock the
the
the
the host
host
host
host machine
machine
machine
machine to
to
to
to engage
engage
engage
engage it
it
it
it with
with
with
with
the
the
the
the bracket.
bracket.
bracket.
bracket.
Page 20

18
前言
感謝您購買 DOD 系列產品,本產品 S1+ 可高速捕捉移動畫面,擁有高畫質 100 萬像素攝
影鏡頭,有獨特的鏡頭 180 ° 翻轉功能。本產品適合使用在汽車行車過程安全記錄,也
可做 DV 錄影 / 拍攝相片本產品外觀精緻並榮獲各項專利及認證, S1+ 令你的生活更添精
彩。
本用戶手冊將詳細說明如何使用 , 同時提供給你的詳細資訊 , 包括使用 、 操作 、 安裝注
意事項及技術規格等 , 使用前請仔細閱讀並妥善保管本手冊 , 我們希望本產品能夠滿足
您的需要並長期為您服務!
Page 21

19
產品概述
此款產品是針對市場需求推出的一款高畫質行車記錄器 。 該產品具有領先群雄的高解析
影音錄影、拍照、高速 USB 資料傳輸, USB 充電,汽車充電等功能。
使用範圍廣泛,可方便隨時隨地錄影
Page 22

20
產品特性
� 鏡頭 翻轉功能設計配合多功能使用,方便各種場合輕鬆高解析視訊拍攝、拍照,超
清晰畫面隨意捕捉。
� 鏡 頭:廣角 100 度
� 曝光補償 :EV ( -2.0/+2 可調)
� 螢幕: 2.5 寸高清 TFT LCD
� 4X 數位變焦
� 紅外燈補光
� 內建麥克風 / 喇叭
� 高容量充電鋰電池
� 支持高容量 S D ( SDHC )記憶卡
� 循環 錄影功能
� 移動偵測功能
� 無縫鏈接功能
� 斷電自動保存
� 錄影時間可自行設定
� 可邊供電邊錄影
� 汽車發動自動開機錄影
� 手動緊急鎖檔功能( SOS )
� G-SENSOR 重力檔案保護功能
Page 23

21
容量顯示
根據拍攝主機 、 記憶卡品牌 、 檔尺寸以及其他設定的不同 , 可拍攝的數量將會有所
不同。
1G 2G 4G 8G
1440*1080(FPS 15 ) 17 min 34 min 69 min 139 min
1280*720(FPS 30 ) 16 min 32 min 65 min 130 min
848*480(FPS60) 18 min 36 min 73 min 146 min
1 0 M 2 87 photos 574 photos 1148 photos 2296 photos
8M 354 photos 708 photos 14 16 photos 2832 photos
5M 572 photos 1144 photos 2288 photos 4576 photos
3M 1003 photos 2006 photos 4012 photos 8024 photos
Page 24

22
產品結構
Page 25

23
使用安裝
�
�
�
� 安裝和取出電池
1. 向下滑動電池蓋可將它開啟。
2. 按照電池上標識的正負符號指示把電池裝入攝影機電池槽內,直至安裝到位。
3. 電池電量指示,請參考圖示
4. 取出電池,推開電池蓋即可將電池取出
�
�
�
� 安裝和取出記憶卡
1. 按照指示方向將記憶卡插入記憶卡槽,直至記憶卡被固定在卡槽中為止。
2. 取出記憶卡時,輕輕壓下記憶卡,待卡片彈出後,即可取出
注意:
1.
1.
1.
1. 使用前請先裝入 SD
SD
SD
SD 記憶卡。
2.
2.
2.
2. 使用 SD
SD
SD
SD 記憶卡前請確定記憶卡上防寫開關是否打開。
3.
3.
3.
3. 請注意記憶卡的插入方向,若倒轉插入,可能會損壞機器與記憶卡。
4.
4.
4.
4. 如果記憶卡與機器不相容時,請重新再插一次或再換一張記憶卡重試。
Page 26

24
操作指南
�
�
�
�
設定選單模式
1. 在拍照 / 攝影 / 回放任意模式狀態下按選單 “ MENU ” 鍵可進入其相對應的選單設定 , 詳
細請 參考 設定目錄。
2. 在任何模式的選單設定下 , 按 OK 鍵進入下一級選單,按上下鍵選擇相應的設定後 , 按
OK 鍵確定,再按 MENU 鍵退出選單。
�
�
�
� 攝影機開啟 /
/
/
/ 關閉及自動關閉設定
1. 按住電源鍵 1 秒左右自動開機,在開機狀態下,按電源鍵 3 秒後鬆開電源鍵即關機。
2. 為節省電池電量,可在選單內設定自動關機時間。當攝影機在設定時間內沒有操作便
會自動關機。
3. 打開電源,按兩次 MENU 鍵切換到設定選單,按下鍵選擇到 “ 自動關機 ” ,在按 O K
鍵進入下一級菜單,可設定自動關機時間為 “ OFF , 2 Min , 5 Min , 10 Min ” 。
�
�
�
� 設定日期與時間
打開電源 , 按兩次 MENU 鍵切換到設定選單 , 按下鍵選擇到 “ 日期 / 時間 ” , 按 OK 鍵進
入年 、 月 、 日 、 時 、 分 、 秒 , 按上 、 下 、 左 、 右鍵調到需要設置的項上按 OK 鍵 , 當前
項顯示為紅色,即可按上下鍵調整,調整好後按 OK 鍵退出,再按下鍵移動到 “√ ” ,
再按 OK 鍵確定即可。
Page 27

25
�
�
�
� 攝影模式
1. 打開電源 , 攝影機完成開機程式 , 螢幕顯示攝影模式 , 隨即左上角出現攝影模式 “
”
符號 , 上面顯示錄影資訊 , 右下角顯示錄影時間 , 螢幕上 “ ” 閃爍表示已進入自動錄
影狀態。
2. 按下 “ REC ” 按鈕開始錄影,再按下 “ REC ” 按鈕停止錄影。
錄影進行時 , 螢幕下方將顯示紅色 “ ” 及計時器 , 錄影停止同時 , 紅色 “ ” 及計時
器消失。
3. 紅外燈補光
當 您在手持錄影時 , 您可以按方向鍵 “ 右鍵 ” 來開啟或關閉紅外線功能 。 在無光的環境
開啟紅外線,可以透過螢幕看見原本過暗而看不見的影像
�
�
�
� 拍照模式
打開電源 , 攝影機完成開機程式 , 在攝影模式 , 按下 “ MODE ” 鍵 , 隨即左上角將出現
拍照模式 “ ” 符號,此時已進入拍照模式。
1. 將相機對準拍照主體,可按上下鍵進行數位變焦,此時要抓穩攝影機儘量不要抖動。
2. 按下 “ REC ” 按鈕,相機發出 “ 咔嚓 ” 一聲,拍照完成。
拍攝方式
在拍照模式下按 “ MENU ” 鍵 , 然後按下鍵選擇 “ 拍攝方式 ” 選項 , 再按 OK 鍵可選擇
將自拍時間設置為 “ 連拍,單張, 2 秒 , 5 秒 , 10 秒 ” 。
提示:
1.
1.
1.
1. 在攝影,拍照模式可按 “ MODE
MODE
MODE
MODE ” 鍵 循環 切換錄影,拍照模式。
2.
2.
2.
2. 在攝影和拍照模式,按 “ MODE
MODE
MODE
MODE ” 鍵可進入回放模式。
Page 28

26
�
�
�
� 回放模式
1. 在拍照模式或攝影模式,按 “ MODE
MODE
MODE
MODE ” 鍵,分別可進入圖片回放及錄影回放,按左鍵
或右鍵可對圖片及錄影進行選擇流覽 。 流覽錄影檔時 , 可以按 REC 鍵播放或停止播放
,
按預覽鍵暫停。
2. 刪除
回放圖片及錄影檔時 , 按 “ MENU ” 鍵 , 選擇目前檔案模式 , 此時再按 OK 鍵 , 刪除當
前錄影或圖片檔。選擇全部檔案,按 OK 鍵確認,再按 OK 鍵,刪除全部當案。
�
�
�
� 移動偵測功能設定
移動偵測功能開啟後會自動偵測攝影畫面中的相對位移量 , 若物體移動超過預設位移量
則主機自動開啟錄影,每次觸發並錄影持續 15 秒,錄製完畢後主機會持續偵測。
在開機狀態下,按 MENU 鍵,進入選單移動偵測選項,按上下鍵進行選擇 ON/OFF , 按
確認鍵保存選擇及退出。
�
�
�
� G-SENSOR
G-SENSOR
G-SENSOR
G-SENSOR 重力感應功能設定
重力感應功能開啟後 , 影像錄製過程中車輛受到碰撞或者撞擊時 , 會自動鎖定保存當前
影像及設定 循環 錄影週期的前一段 、 後一段三段影像檔不被機器 循環 錄影 所 覆蓋 , 已保
證重要影像的安全。
在開機狀態下,按 MENU 鍵,進入重力感應強度選項,按上下鍵進行選擇 靈敏度 ,按
確認鍵保存選擇及退出。
�
�
�
� SOS
SOS
SOS
SOS 緊急鎖檔功能設定
SOS 緊急鎖檔功能啟動後 , 在影像錄製過程中隨時隨意保存你想保存的影像片段在循環
錄製過程中不被覆蓋 。
在攝像模式下長按 “ MENU ” 鍵 , 畫面中會出現 “ ” 保存目前影像週期的視頻 , 進入
下一視頻週期時影像自動消失。
Page 29

27
�
�
�
� 邊供電邊錄影模式
關機狀態下 , 以車充電源與機器連接 , 汽車啟動後 , 會自動開機並開始錄影 , 同時會對
電池行充電。
注意:汽車停止後,會自動使用電池供電,直到電池低電自動關機。
檔 案 儲存及視訊播放
�
�
�
� USB
USB
USB
USB 備份模式
開機狀態下,以 USB 線將機器與電腦連接後,屏上顯示為 磁碟機、網路攝像機, 即表
示已進入 USB 模式,打開電腦桌面 “ 我的電腦 ” ,在 “ DCIM\ ******** ” 路徑下找到被
儲存的影像。
�
�
�
� 連接電視機視訊播放
1. 用 TV 連接線可連接攝影機至電視機,進入錄影 / 拍照 / 流覽播放圖片及錄影。
提示:無需安裝驅動程式,在攝影機開機狀態下才能使用移動式磁碟。
Page 30

28
按鍵功能
錄影 /
/
/
/ 拍照模式 ·
電源鍵 開 / 關 機
快門鍵 錄影 / 停止錄影 / 拍照
方向鍵(上鍵) 選單上鍵放大
方向鍵(下鍵) 選單下鍵縮小
方向鍵(左鍵) EV 值調整
方向鍵(右鍵) 红外線開啟 / 關閉
OK 鍵 確 認
選單鍵 選單選擇 ( SOS 按键)
模式鍵 模式選擇 / 流覽圖片及錄影檔
回放模式 ·
電源鍵 關機
方向鍵(左鍵) 上一張 / 快退
方向鍵(右鍵) 下一張 / 快進
選單鍵 選單選擇
OK 鍵 確認 / 回放:開始 / 暫停
模式鍵 返回錄影 / 返回拍照 / 暫停播放
Page 31

29
選單設定
模式 選單 選單設定 注釋
錄影
分辨率 1080I / 720P/QVGA
循環錄影 OFF / 2 分鐘 / 5 分鐘
移動偵測 ON/OFF
錄影聲音 ON/OFF
重力感應 關、高、中、低
錄影聲音 ON/OFF
日期記錄 ON/OFF
相機
拍攝方式 連拍 / 單張 /2 秒 /5 秒 /10 秒
解析度 10M/8M/7MHD/5M/3M/2MHD
影像品質 最佳 / 較佳 / 一般
銳利度 強烈 / 一般 / 柔和
白平衡 自動 / 日光 / 陰天 / 燈泡 / 日光燈
特效 彩色 / 黑白 / 復古
曝光補償
+2.0
、
+5/3、+4/3、+1.0
、
+2/3、+1/3+0.0
、
-1/3
、
-2.3
、
-1.0
、
-4/3、-5/3、-2.0
ISO 自動 / 100 / 200 / 400
人臉偵測 關 / 人臉偵測 / 笑臉偵測
防手震 ON/OFF
快速檢視 關 / 2 秒 /5 秒
日期記錄 關 / 日期 / 日期、時間
回放
刪除 目前檔案 / 全部檔案
格式化 內建記憶體 / 記憶卡
設定
頻率 50HZ / 60HZ
螢幕保護 關 /2 分種 /5 分種 /10 分種 /
提示音 √ / ×
自動關機 OFF / 2 分鐘 / 5 分鐘 / 10 分鐘
電視輸出 NTSC/PAL
預設值 √ / ×
語 系 多國語言
版本 S12012*****
日期 / 時間 年月日 / 時分秒
Page 32

30
產品規格
感光原件 1 Mage pixels CMOS
鏡頭 3.5 mm
焦距範圍 10cm - 無限遠
液晶螢幕 2. 5 " TFT LCD
視訊輸出 電視合成訊號: NTSC/PAL
照片格式
照片格式: JPEG
最高輸出: 10 M (3648 x 2736)
錄影格式 H.264
視訊
1440*1080( 15 張 / 秒 )
1280*720 ( 30 張 / 秒)
848*480 ( 60 張 / 秒)
變焦 4 倍數位變焦
錄影媒介 SD 卡(最高支持 32 G )
音訊 內建麥克風 / 喇叭 ( 單聲道 )
快門 電子快門
快門速度 1/2-1/1000 秒
白平衡 自動 / 日光 / 陰天 / 螢光燈 / 鎢絲燈
LED
開啟 / 關閉
接頭 USB2.0 /TV
電池 外置鋰電池, 3.7V 800 mAh
USB USB2.0 高速傳輸
尺寸 長 111 × 寬 59 × 厚 29 mm
工作溫度 / 濕度 -10 ℃ -60 ℃ /10%-80%
Page 33

31
包裝附件
溫馨提示:您在購買本產品的時候,請清點附件,以免造成您的 損失。
1.
1.
1.
1. 車用電源 × 1
1
1
1
2.
2.
2.
2. 支架 × 1
1
1
1
3.
3.
3.
3. A V
A V
A V
A V 視訊線 × 1
1
1
1
4.
4.
4.
4. USB
USB
USB
USB 連接線 × 1
1
1
1
5.
5.
5.
5. 鋰電池 × 1
1
1
1
6.
6.
6.
6. 使用說明書 × 1
1
1
1
簡易疑難排除
�
�
�
� 不能拍照、攝影?
請更改拍照或錄影解析度或更換有足夠空間的記憶卡。並檢查記憶卡是否鎖住。
�
�
�
� 拍出的照片及拍攝錄影不清晰?
請將鏡頭擦拭乾淨後再使用,或檢查遠近焦設置是否正確。
操作小提示
本攝影機和電腦很相似,如果發生攝影機無動作的情況,請按照以下步驟操作:
1.
1.
1.
1. 取出電池,重新裝入電池,重新開機。
2.
2.
2.
2. 在攝影機出現異常情況,請按 RESET
RESET
RESET
RESET 鍵重啟攝像機。
3.
3.
3.
3. 請謹慎使用 RESET
RESET
RESET
RESET 鍵,否則可能會引起資料遺失。
Page 34

32
支架安裝說明
安裝步驟:
支架與主機結合 後 ,將主機壓至與支架完全咬緊即結合完成。
Page 35

Page 36

 Loading...