

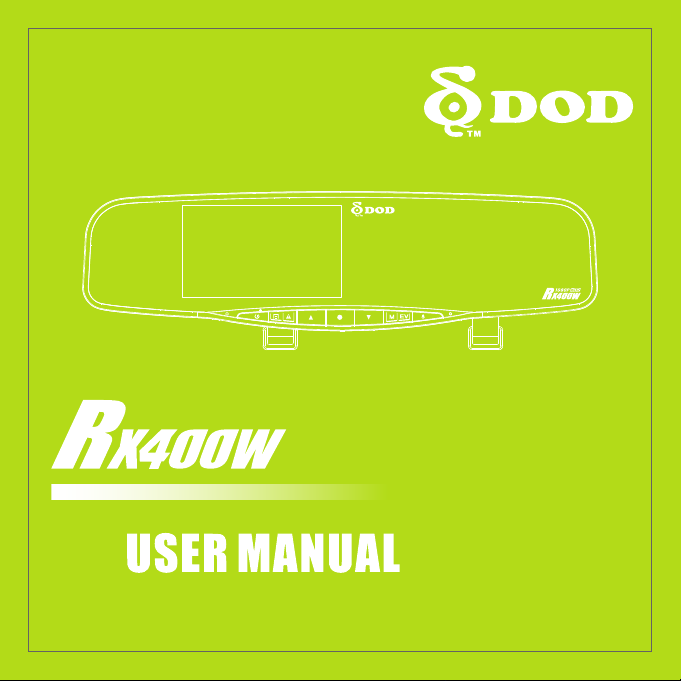
Page 1
Page 2

Copyright ©2015 DOD Tech
All Rights Reserved
Page 3

Table of Contents
Safety Precautions ....................................................................................... 2
Package Contents ........................................................................................ 3
Camera Controls .......................................................................................... 4
Getting Started ............................................................................................ 6
Installing Your Camera ................................................................................. 8
Basic Camera Operation ............................................................................ 10
Camera Modes .......................................................................................... 11
Video Recording Mode........................................................................... 11
Photo Mode .......................................................................................... 12
Playback Mode ...................................................................................... 13
Camera Settings ........................................................................................ 15
Video Recording Settings ....................................................................... 15
System Settings ..................................................................................... 18
Photo Settings ....................................................................................... 19
Back-Up Camera Support ........................................................................... 20
Transferring Files ....................................................................................... 21
Video Output ............................................................................................ 21
Firmware Update....................................................................................... 21
DOD Video Player ...................................................................................... 22
DOD Tech reserves the right to change specification of the products and
discontinue products without notice and without further obligation.
1
Page 4

Safety Precautions
Product
Do not disassemble, repair, modify your camera or power related accessories. For
warranty service, please contact DOD Tech Support.
Do not adjust camera while driving.
Avoid exposing your camera to extended periods of humidity and/or heat.
Prolonged exposure may reduce the product’s lifespan.
Do not spray water or cleaning agents directly onto the camera.
Fluids may cause fire, electric shocks, or malfunctions.
Avoid installing camera where it may obstruct the driver’s view or airbag deployment.
Car Charger
Use only the power adapter supplied with your unit.
Other power adapters may create a safety hazard or damage the unit.
Do not use damaged power adapters or cords. If damaged, please disconnect the power
adapter and contact DOD Tech Support for assistance.
Do not pull, insert, or bend the power cable using excessive force.
Do not operate or handle power cable with wet hands.
Battery
Keep the device away from heaters or other hot objects.
Store the camera at lower temperatures to reduce the rate of self-discharge and preserves
the initial energy stored in the battery. The battery in the device self discharges over a
period of time naturally whether the battery is used or not.
Charge the dash camera for 5 minutes if you are unable to turn on the camera.
2
Page 5
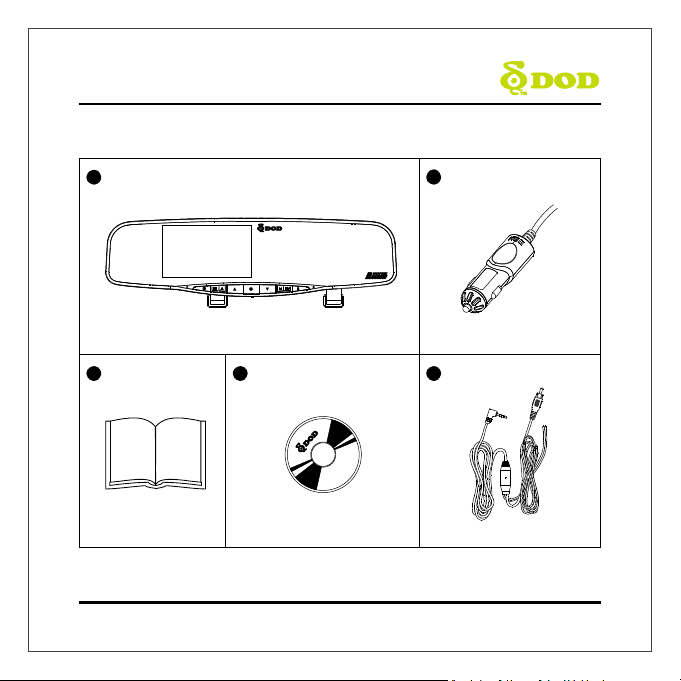
Package Contents
1
DOD RX400W Dash Camera Power Adapter
3 4 5
2
User Manual
Note: Supplied accessories may vary by region.
DOD Player Installation CD AV-IN to RX400W
3
Page 6
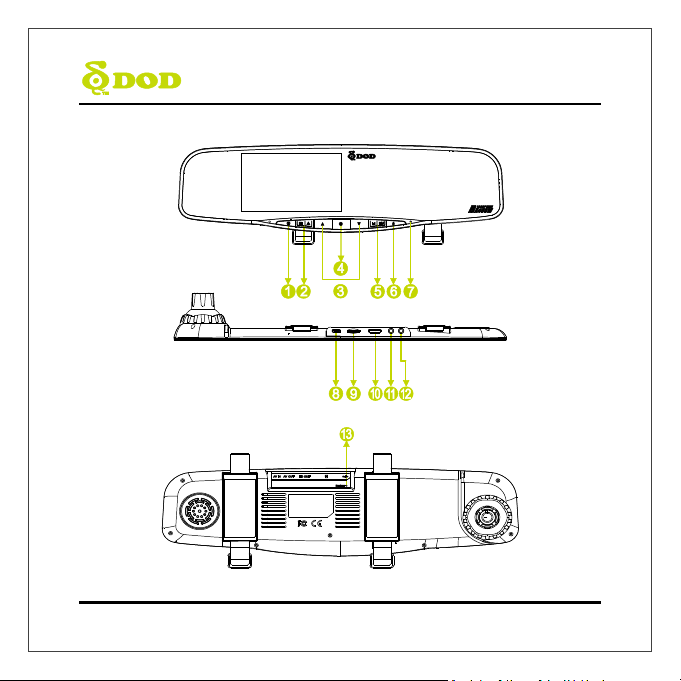
Camera Controls
4
Page 7
●
1
●
7
Camera Controls
Power [ ]
Turn on/off the unit.
2
●
Menu/SOS Emergency File Lock[ ]
Press [●]stop recording to access the setting
menu. Press [ ] while recording videos to lock
the current file from being overwritten.
3
●
Arrow Key[▲]/[▼]
Used to navigate through menus and select videos
for playback.
4
●
Record/Shutter/Confirm [●]
Video Recording-Starts/Stops recording.
Photo- Takes a photo.
Video Playback-Plays/Pauses video.
Settings- Selects highlighted item.
5
●
Mode/ Display off/ Exposure Value [ ]
Switch camera to photo mode and playback mode
when camera at standby mode.
During recording, press [ ] to turn off the
display; In Standby Mode, press and hold [ ]
to the desired exposure value.
6
●
Mutes Microphone[ ]
To turn off the audio recording, press [ ] and hold
it until the icon appears.
Operation Status LED
Indicates the camera’s operating status.
Steady Blue-Powered off and charging.
Steady Pink-Powering up while charging or is in
Playback Mode.
Steady Red-In Standby Mode but not charging.
Flashing Red-Recording video, not charging.
Flashing Blue & Pink-Recording video &charging.
8
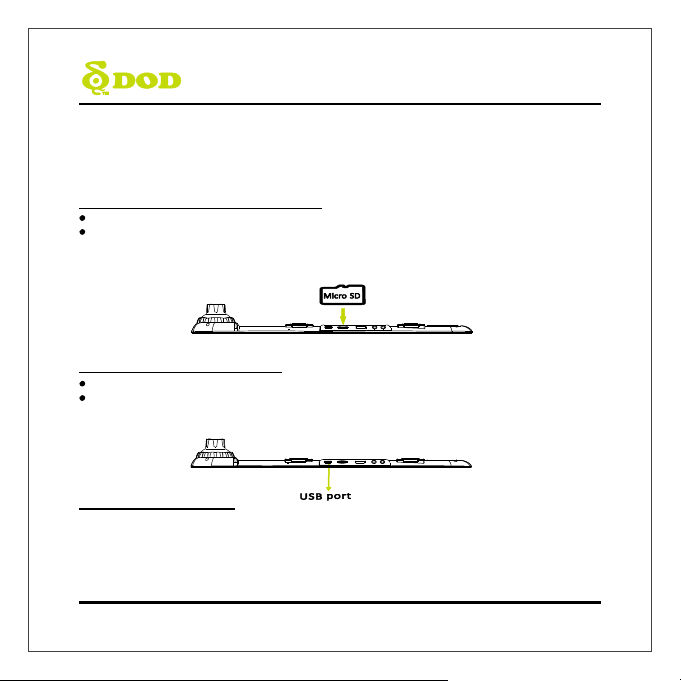
●
USB Port
9
●
Micro SD Slot
A Micro SDHC card rated at class 10 or above is
required.
Supports up to 32GB.
10
●
HDMI Out Port
Outputs either live or previously recorded video
over the HDMI connection.
The camera is unable to record while HDMI
output is enabled.
11
●
A/V Video Out Port
12
●
A/V Video In Port
13
●
Reset Button
Press to force the device to reboot. If camera
freezes, use a small pin to press button.
5
Page 8
Getting Started
Setting Up Your Camera
Set up your camera inside your vehicle to ensure easy access to power.
1. Insert the Micro SD Memory Card.
Format the Micro SD card when using the unit for the first time.
To save recorded videos stably, DOD Tech recommends formatting your SD card every two
weeks.
Note: Please purchase a micro SD card for use with this unit.
Note: After formatting the SD card, all of your data will be lost. Be sure that you have backed up the
important files.
2. Connect the Power Adapter.
Plug the DOD power adapter into your vehicle’s power outlet.
Insert the USB plug into the USB port.
3. Turn on Your Vehicle.
Power from your vehicle through the outlet will automatically turn on your camera and
when power is turned off your camera will shut off automatically. The camera automatically
begins recording every time it is turned on and stops recording when it is turned off.
Note: In some vehicles, the power outlet is continuously providing power, even when the vehicle is turned
off.
6
Page 9
Getting Started
4. Turn on/off Your Camera.
Press [ ] to turn on or turn off the unit.
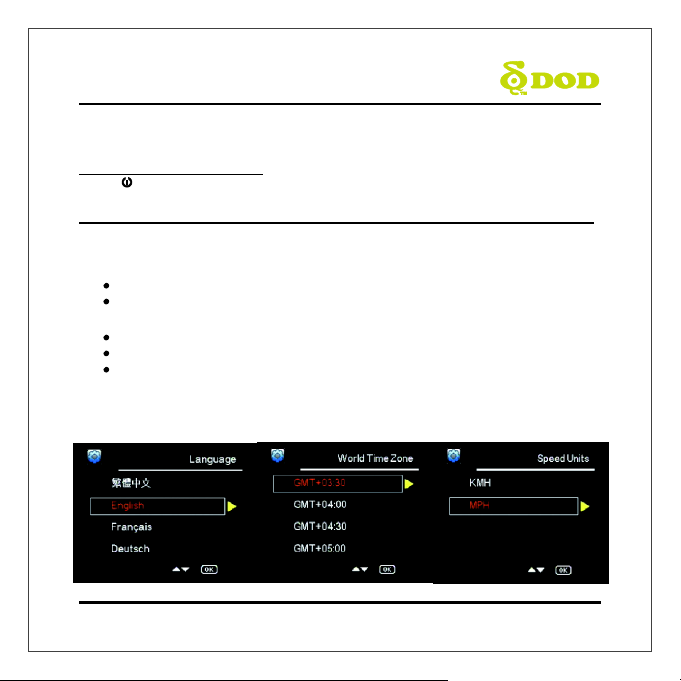
5. Select Language→Set the Time Zone→Select the Speed Unit of Your Choice
Upon powering up the camera for the first time or after upgrading the firmware on the
device, you will need to go through the Settings below.
Select Language
Select the language of your choice by pressing[▲]/[▼ ].
Press [●] found on the top of your unit to confirm your selection.
Set the Time Zone
Scroll down and select your respective time zone.
Press [●].
Your camera will automatically sync with the time and date to the atomic clock once
the time zone is correctly set.
Note: The time zone must be manually adjusted for daylight savings.
Select the Speed Unit of Your Choice
7
Page 10

Installing Your Camera
1. Clean Windshield
Wipe down both the interior and exterior glass for the best image quality and to keep the
mount secured to the windshield.
Remove the protective lens cover.
2. Insert SD Card
Please insert Micro SD card to the unit, and fix the unit on the vehicle’s rearview mirror
with the mounting straps.
8
Page 11

Installing Your Camera
3. Adjust the Angle
Set your camera to the best angle, which do not be blocked by the rearview mirror. The
mount has an adjustable ball joint, which can be loosened using the plastic locking nut.
Angle your camera slightly below the horizon line to minimize glare.
4. Fix the Unit
Tighten the mounting strap to the rearview mirror to avoid the unit from falling loose. Cut
off excess tapes as needed.
5. Connect the Cigarette Lighter Adapter
If you have not done so previously plug the cigarette adapter into your vehicle’s power port.
Insert the USB plug (opposite end of the power adapter) into the USB port on the camera.
The wiring can be hidden in the headliner and the various seams and rubber strips around
the perimeter of the windshield.
Congratulations! Your camera is now installed and ready for daily use.
Tips:
Remove any grease, fingerprints, or dirt and dust from the external or internal side of your
windshield to ensure the best recording.
Do not turn on Motion Detection unless your vehicle is parked. If Motion Detection is
enabled while driving, the camera may not continuously record.
DOD Tech recommends setting the G-Sensor to low.
9
Page 12

Basic Camera Operation
Everyday Operation
Your dash camera will automatically turn on and start recording when it starts receiving
power. The camera will record over the oldest videos when the memory card is full (looped
recording) by default.
Continuously Powered Electrical Outlet
If your electrical outlet is always powered, the adapter must be manually removed to shut
down the camera. Alternatively, the camera may be left on while parked to capture video
while you are away.
This operation will slowly drain your vehicle’s battery and may eventually
prevent your vehicle from starting.
Manually Turning On / Off Your Camera
Press [ ] to turn on /off your camera.
Press [●]to begin recording.
10
Page 13

Record Audio
(on) White Balance (Auto)
Date/Time
GPS Status (on)
Exposure Value (Auto)
Loop Recording (3 Minutes)
WDR Enabled
Recording
Status Video Recording Mode
Video Resolution
Motion Detection
Memory Card Inserted
Time Elapsed Power Status
Time Lapse (200ms)
Head up Display
GPS Speed
Warning
Driver Fatigue Warning
SOS Emergency File Lock
Camera Modes
When the camera is not recording video, you can switch to Photo mode and Video playback
mode by pressing the [ ]:
1. Video Recording Mode
The camera defaults to video recording when the camera is first turned on.
Recording Mode: Press[●]to stop recording.
Standby Mode: Press[ ] to access two Modes: Photo Mode and Playback Mode.
Note: GPS Icon keeps flashing when it has not received the GPS signal. HUD and Speed Warning only work
when received the GPS signals.
11
Page 14

Memory Card Inserted
Image Quality
White Balance
(Auto)
Power Connected
ISO Sensitivity
(A
uto)
Exposure Value
(Auto)
Image
Stabilization (
on)
WDR Enabled
Camera Mode
Photo Resolution
Self-Timer (
2s)
Camera Modes
2. Photo Mode
Press [ ] once to enter the Photo Mode during the Standby Mode.
Press [●] to take a photo.
Note: Photo Mode is only accessible during the Standby Mode.
12
Page 15

Camera Modes
3.Playback Mode
You can watch previously recorded videos in Playback Mode.
Press [ ] twice to enter the Playback Mode during the Standby Mode.
Play the Video
Press [●] to play and pause.
Press[
]/[▼]to move or back forwards and press [ ] to enter the Playback Mode.
▲
Delete Files from the card (This cannot be undone).
Press [ ] to enter Playback Menu during Playback Mode.
Press [
]/[▼]to delete the file and press [
▲
Protect the current file from being overwritten or erased
Press [ ] to enter Playback Menu during Playback Mode.
Press [
]/[▼]to lock the file and press [
▲
If protected, a blue padlock icon will appear at the top of the screen.
Note: The “Format” setting will erase all files including locked files.
] to confirm.
●
] to confirm and press [ ] to exit.
●
13
Page 16

Video File Name
Video Resolution
Power
Connected
Playback Mode
Play/Pause Indicator
Camera Modes
3. Playback Mode
Slideshow
Press the menu button [ ]and navigate to slideshow.
Photos and the first frame of each video will be shown in order.
14
Page 17

WDR (Wide Dynamic Range)
Resolution
Recommended
s
etting: 1080P FHD.
Exposure
Value
Recommended
s
etting: 0.
White Balance
Record Audio
[].
Date Stamp
Two Camera
Settings pages are accessible:
Camera Settings
Each mode has a unique set of settings. See the description below.
Video Recording Settings
System Settings
The menu settings can be switched by pressing [ ].
If you move the cursor before pressing [ ], you must exit and try again.
Note: Press [●] to enter the camera settings when recording.
Video Recording: First Settings Page
Accessed by pressing[ ] once.
Cannot be changed.
Shows WDR processing is enabled.
Sets the brightness /darkness of the video.
Video too bright? Set between -1 to -3.
Video too dark? +1 to +3.
Switches the microphone on/off.
Can be used during recording by pressing button
Changes the video resolution. Lower the
resolution for smaller file sizes but this reduces
video quality.
Sets the white balance.
Recommended setting: Auto.
Imprints the time and date on the recorded
video.
15
Page 18

Loop Recording
card is filled.
G -Sensor
recorded
video.
reminding the
driver to take a break.
Default
: On.
this screen
.
Camera Settings
Video Recording: First Settings Page
Accessed by pressing [ ] once.
Can be set to 2, 3 or 5 minutes. Video recordings
of the selected length will be recorded onto the
memory card. When the memory card is full, the
oldest files will be overwritten, excluding locked
clips. Turing off loop recording will prevent the
camera from writing new files when the memory
Motion Detection
For use when vehicle is parked. Saves memory
space by only recording when motion is detected.
Motion detection must be manually disabled
before driving. If motion detection is activated
while driving, you may have significant gaps in the
Driver Fatigue Warning
Sets a timed delay before showing a visible alert
Head Up Display
After a customized period of time a new screen
will appear showing speed and direction. If
enabled, the GPS speed warning will appear on
Measures shock forces. The settings from “low
to high” determine the amount of force needed
to lock the file from being overwritten.
Recommended setting: low.
Plate Stamp
Imprints a customized set of 8 digits to the
recorded video. Add license plates or other
identifying features to watermark your video.
GPS Logging
Speed Warning
Shows a visual warning on the Head Up Display
when the set speed has been exceeded.
16
On/Off
Page 19

regular driv
ing.
second/5 seconds.
The default setting is “off”
Camera Settings
Video Recording: First Settings Page
Accessed by pressing [ ] once.
Set Time Zone
Sets the current time zone for GPS time and date
calibration.
Note: The time zone must be manually adjusted
for daylight savings
Password Settings
Set a password lock which will prevent files from
being deleted or the settings changed on the
device.
Note: This does not prevent other users from
extracting the memory card or changing the
files. This feature should be turned off during
Speed Units
Select Metric or Imperial units.
Path Analysis
Calculates the total distance, travel time, and average speed of your journey from the beginning of
your trip to the end (when camera is turned on to when turned off). If Path Analysis is set to “on”, the
results will be displayed when the unit is turned off.
Time-Lapse
The time-lapse function is used to create a
sped-up video. When set, the camera will record
one frame every 200ms (milliseconds)/500 ms/1
17
Page 20

card for recording.
video.
Turns on/
off notification sounds.
Turns
off the scree
n after the set time.
standard.
video
version.
Camera Settings
System Settings: Second Setting Page
Accessed by pressing [ ] twice.
Format Memory Card
Completely deletes all files including locked
footage on the Memory Card and optimizes the
Language
Sets the language.
Date/Time
Sets Year/Date/Time format.
Beep
Video Output
Switches between the NTSC and PAL video output
Firmware Version
Shows the model name and current firmware
Flicker Reduction
Adjusts the camera's frequency setting to
minimize flickering and banding in the recorded
Screen Saver
Speed Stamp
Imprints your current speed onto the recorded
Factory Reset
Sets all settings back to the original settings.
18
Page 21

enabled.
increases
file size and details.
Fine/Normal/Basic.
Strong/Normal/Soft.
Camera Settings
Photo Settings
Accessed in “Photo Mode”.
WDR (Wide Dynamic Range)
Cannot be changed. Shows WDR processing is
Photo Resolution
Adjusts the size of the image. Higher megapixels
Color Filter
Apply a color filter to the photo.
Self-Timer
Sets a timed delay before taking a photo.
ISO
Change the ISO settings. Higher ISO reduces
motion blur at night but lowers video quality.
Image Quality
Date Stamp
Imprints the date at the captured photo.
Image Stabilization
Helps reduce the effects of shaking when taking a
photo.
White Balance
Set the White Balance.
Recommended setting: Auto
Exposure Value
Sets the brightness /darkness of the video.
Photo too bright?
Set between -1 to -3.
Photo too dark? +1 to +3.
Recommended setting: 0.
Sharpness
19
Page 22

Back-Up Camera Support
RX400W supports back-up camera through receiving signals from wires* provided by DOD.
*Note: DOD provides supporting cable only; the back-up camera is not included.
Back-up camera can transmit images to the rearview mirror dashcam. When you are
backing your car, the monitor will synchronously display the video from the back-up camera.
The LCD display will return to the original scenes after backing. The front camera is
continuously recording even when vehicle is reversing; display showing reversing view does
not affect recording. The rear camera sends only images to RX400W instead of recording.
Please refer to the wiring diagram below and follow the instructions:
1. Plug in the power cable to proper connectors before installing the back-up camera.
2. Use the power sources to supply 12V DC when the system is applied as a reversing
camera.
3.
Back-Up Camera
Power to Battery
AV-IN to RX400W
Power to Reversing Lamps
20
Page 23

Transferring Files
Video files can be transferred to your electronic device for viewing and storage.
USB Cable
1. Connect a USB cable from the camera’s USB port to computer.
2. Turn on your camera. A black screen will appear showing “Mass Storage”.
3. Press the “record/select” button. A blue screen will appear labeled “Mass Storage”.
4. Your computer will now detect a new device. The memory card and videos can be
accessed similar to a USB flash drive.
Card Reader/Micro SD Slot
Use a memory card reader (separately purchased) or a compatible electronic device with a
Micro SD slot (ex: tablet). Follow the manufacturer’s instructions.
Video Output
HDMI (TV)
Connecting a mini-HDMI to HDMI from your camera to a compatible television/monitor will
automatically output the camera’s screen. Recording functions are disabled while streaming
video.
AV Port
Using a 3.5mm AV cable, plug the 3.5mm connector into the camera’s AV port. Plug the RCA
end into a compatible port on your television or monitor.
Firmware Update
See the support section on DOD-Tech’s website for any available firmware updates and
instructions.
21
Page 24

DOD Video Player
The DOD Video Player is a user-friendly program to playback videos and to visualize your
position and speed on your PC or Mac. Please see the “Transferring Files” section to find
out how to view or transfer your video files.
Installing the DOD Video Player
Insert and launch the installer from the CD included or download the software from the
support section on DOD Tech’s website.
Launching the DOD Video Player
Once launched, the player will appear on your screen.
22
Page 25

Speed
DOD Video Player
Video Display
Acceleration Times
G-Force Strength
& Graph
Settings
Fast Backward
Play/Pause
G-Force Indicator
Fast Forward
Open/Close Location Map
Open Video Folder
Take a Screenshot
Direction of Travel
To Play a Video
Add your file to the list of videos. To do this, there are three options:
Click “File”, click “Open”, and navigate to the location of your files.
Press the “ADD” button located below the list of videos.
Drag and drop the desired file into the DOD Player window, the video file will
automatically start.
Double click on the video you wish to play. The video will then load into the Player
23
Remove Video from Playlist
Preview
Add Video to Playlist
Export Multi-Clips
intoOne Video
Max Speed
Average Speed
Total Distance
Page 26

Page 27

Page 28

 Loading...