

Page 1

TN230
Off-the-Shelf Solutions for 802.11b
Wireless Networking
This document describes some off-the-shelf solutions for using wireless networking with Rabbit products.
Although these solutions have certain limitations, they may be useful in some circumstances.
What Wireless Solutions Exist?
Currently, the most popular methods for achieving wireless networking are with 802.11b and 802.11a.
Bluetooth is another common alternative, although it is generally shorter-range and has not achieved the
widespread commercial success of 802.11b. 802.11b operates in the 2.4 GHz spectrum and offers data
rates of up to 1 1 Mbps. 802. 1 1 a opera tes in the 5 GHz spectr um and has dat a rates of up to 54 Mbps. Some
vendor-specific solutions offer higher data rates, but these rates are usually not interoperable with other
vendors’ products. 802.11b products usually claim ranges of up to 300 feet indoors and about 1000 feet
outdoors, but these figures are subject to such concerns as number of obstructions and interference.
802.11a’s range tends to be slightly less (although it is capable of higher bandwidth). Bandwidth will
decrease as th e range increases. Unfortunate ly, there is no substitute for experimentation i n testing the
range of a wireless solution.
Wireless Bridging
A number of wireless networking products are currently on the market that can be used with Rabbit solutions. In particular, some, but not all, wireless access points are capable of “wireless bridging,” which
allows the bridging of two wired networks with a wireless connection. Unfortunately, it can be difficult to
determine which products support wireless bridging. Even looking for the term “bridging” in the product
documentation is not always helpful, since wireless access points are often described as bridging a wired
and a wireless network. If the documentation explicitly discusses bridging two wired networks via a wireless connection, then the product should work for the purposes of connecting one or more Rabbits wirelessly. If the product is advertised as a wireless broadband router (usually with a 4 or 8 port hub included),
it probably does not support wireless bridging.
022-0078 Rev. B www.rabbit.com 1
Page 2

Some other devices are now being released that are designed specifically to connect a wired Ethernet
device to a wireless network. These are called “wireless bridges” or “802.11b Ethernet media converters.”
It is importan t to note that you cannot use two of these devices to create a wireless bridge between the
device and an existing wired network. Instead, these devices must communicate with a wireless access
point. These devices are smaller and slightly cheaper than access points .
At the current writing, the following access points are examples that support wireless bridging:
• Linksys WAP11
• Netgear ME102
• D-Link DWL-900AP
• D-Link DWL-900AP+
In general, these devices will not perform wireless bridging with competing devices—that is, don’t expect
to be able to mix and match. Some examples of the new wireless bridges are:
• Linksys WET11
• D-Link DWL-810
• Buffalo Technology WLI-T1-S11G
These can be used with any standards-compliant 802.11b access point. Note, how ever, that the Linksys
WET11 has a physical layer compatibility problem with Realtek RTL8019AS Ethernet devices (the
chipset used by many Rabbit devices) that causes the WET11 device to repeatedly reboot or lock up. We
have tested the D-Link DWL-810, and it does not exhibit the same problem. Hence, it is recommended
over the Linksys WET11.
When Is a Wireless Solution Useful?
Currently, inexpensive wireless access points that perform wireless bridging cost about $100 to $200.
Since two are needed to complete a wireless bridge, this is an expensive solution for wirelessly connecting
a Rabbit device. The range and susceptibility to interference also limit the usefulness of wireless bridging,
particularly in industrial settings. However, wireless bridging may be useful for connecting two wired networks when it is inc onv enient to connect them via a wir e. Al s o, if a number of Rabbit products c an be connected via a traditional wired Ethernet, but they need to communicate with another server or the global
Internet, then a shared wireless connection for all of them can be convenient.
It is possible to extend the range of some wireless access points with a custom antenna. For instance, the
Linksys WAP11 (and most other Linksys wireless products) feature replaceable antennae. However, care
should be taken that FCC regulations are obeyed if the devices are modified.
2 www.rabbit.com TN230
Page 3
How Do I Set Up a Wireless Connection?
Rabbit Semiconductor has tested Rabbit products with Linksys WAP11 access points and the D-Link
DWL-810 wireless bridge. The following explanation on how to set up a wireless connection will be centered around using two WAP11s, but othe r acc es s poi nt s and wir el es s bri dg es may be set up simi la r ly.
In general, you will need a pa ir of acces s points o f the s ame model to perf orm wir eless br idgi ng, unl ess t he
documentation states that it is compatible with other products. Connect one access point to an existing
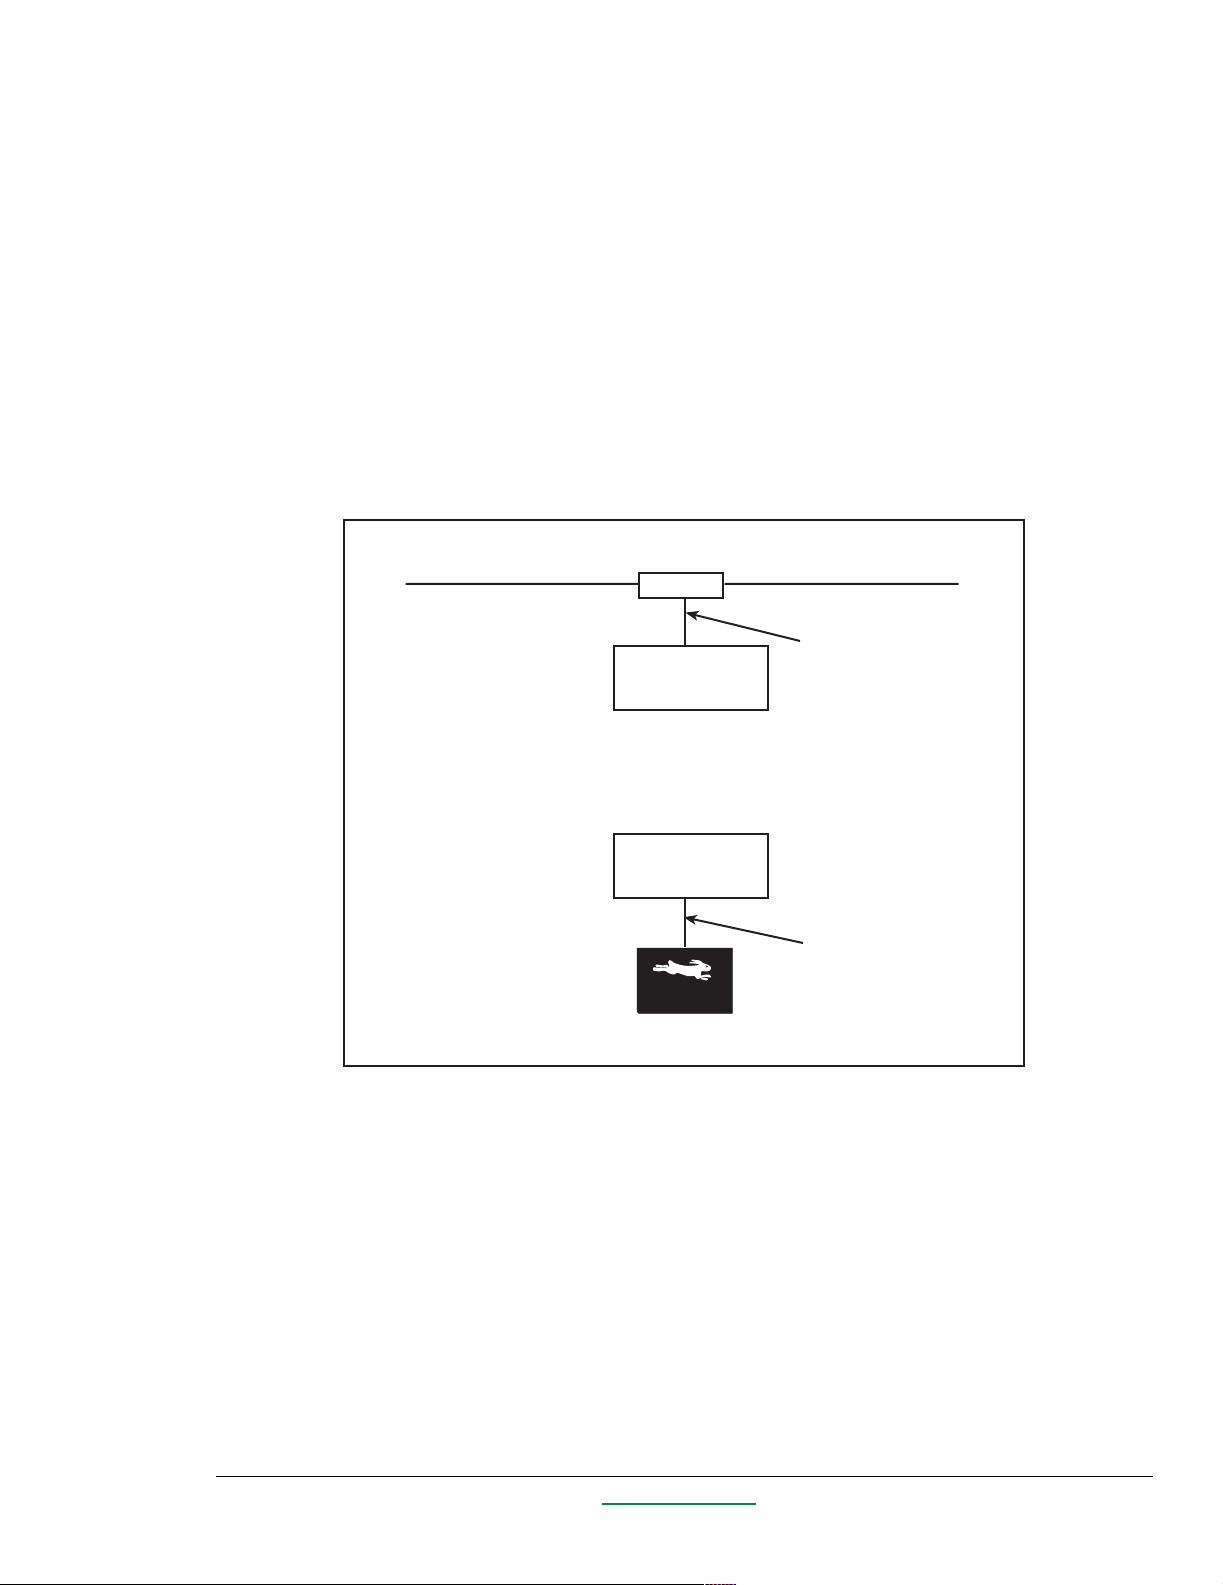
wireless network, and the other to a Rabbit device via a crossover Ethernet cable, as detailed in Figure 1.
Some access points have a crossover switch that allows you to flip the switch to the crossover se tting and
use a normal straight-through cable rather than a crossover cable. The access point connected to the Rabbit
can be replaced with one of the wireless bridge products, but the other side will need to be an actual wireless access po int.
Figure 1. Connecting a Single Rabbit Wirelessly to an Existing Ethernet Network
Existing Ethernet network
Wireless
Straight-through cable
Access Point
Wireless
Access Point
Hub
Crossover cable
Note that it is possible that the “Existing Ethernet network” above is a single PC so that in effect you are
wirelessly connecting a PC and a Rabbit. In this case, the cable connecting the PC and the wireless access
point should be a crossover Ethernet cable (or, if your access point has it, you should use the crossover
switch).
TN230 www.rabbit.com 3
Page 4

Alternatively, you may wish to connect a wi r ed network of Rabbits (and po ss ibly other devices) to another
network wirelessly. This is pictured in the figure below.
Figure 2. Connecting a Network of Rabbits to an Existing Ethernet Network
Existing Ethernet network
Wireless
Straight-through cable
Access Point
Wireless
Access Point
Hub
Straight-through cable
To configure the Linksys WAP11, you will need to connect each one in turn to the same wired network as
a PC (probably your existing Ethernet network). Each of the following things needs to be configured on
the WAP11. How to configure it will be covered shortly; s ince there are multiple ways to configure the
WAP11, you should first know what you can configure.
Hub
Things to configure :
• SSID (Service Set Identifier): This identifi er is used to ident ify your wireless network. All ac cess
points and clients on your wireless network must have the same SSID.
• Channel: 802.11b can operate over a number of channels. All access points and clients on a single
wireless network must use the same channel.
• Access Point Name: This name will help identify which access point is which on your wireless net-
work. Assign a unique name for every access point.
• IP Address: Choose a static IP address in your local subnet. Alternatively, if you have a DHCP
server on the lo cal s ubnet , you can use DHCP t o ac quire a dyna mic addr ess. We suggest choosing a
static address, s in ce you will need to use the web server configuration interface la te r. If you choose
a static address, you will know which address to use to login to the access point.
• Subnet Mask (or IP Mask or Netmask): This should be provided by your network administrator
along with the static IP addre ss. Often, this is “255.255.255.0”, but it can v ary. This parameter is
not required if you use DHCP to acquire the access point’s IP address.
4 www.rabbit.com TN230
Page 5

• Gateway: This should be the gateway address for your local subnet. This should be provided by
your network administ ra tor along with the static IP addre ss and ne tma sk. The gateway address cannot be specified if you use DHCP to acqui re the ac ces s poi nt ’s IP address.
• WEP (Wired Equivalent Privacy): This option enables encryption on your wireless network. This
should be enabled. Different products have different capabilities. The Linksys WAP11 does 64-bit,
128-bit, or 256-bit shared key encryption. Choose the level according to the importance of keeping
your wireless networ k pr iv at e. Not enabling this at all can leave yo ur wireless network open to any
Joe Hacker with a lapt op and an 80 2.11b card. Note that you wil l need to pick a key lengt h that will
work with all wireless devices you wish to use on the wireless network. Different products support
differen t key lengths.
• Passphrase : Thi s passphrase is used to generate the key used by the WE P al gorithm. This same key
must be used on all acc ess poi nts and wire less clie nts t o commu nica te on th e wire less networ k. The
passphrase is a c onv eni ent shorthand for generati ng t he ke y. Unfortunately, not all products us e t he
same algorithm for generating the key from the passphrase, so you cannot depend upon the same
passphrase working on different models of wireless products.
• WEP Key: This is the key that can be generated from the passphrase. You can also explicitly spec-
ify the WEP key, although it is more difficult to enter the full key on every wireless device.
• AP (Access Point) Mode: For the Linksys WAP11, this can take on one of four modes: Access
Point, Access Poi nt Cl ient , Wireless Bridge, and Wireless Bridge Po int t o Mult point . Thes e op tion s
are described below.
The parameters listed above all the way down to “passphrase” can be configured via the Linksys setup
wizard. The other two parameters can only be configured via the web interface.
To use the Linksys setup wizard, first attach a WAP to the local wired Ethernet. Then, use the CD that
came with the documentation to start the setup wizard. It should detect the WAP on the local network and
allow you to c onfigure it. Follow the directions, and see the manual that came with the product for more
information. Alternatively, you can use the web interface from the start (for instance, if you are trying to
configure the pr oduct from a Ma c or a Linux b ox). You will need to c onfigur e y our PC s uch th at it thi nks it
is on the network 192.168.1.x. Use the web browser to browse to 192.168.1.251, which is the default
address of the WAP11. It will prompt for a username and password. Leave the username empty, and enter
“admin” as the password (although you should check your manual—details may have changed since this
writing).
To complete the configuration, use a web browser to browse to the IP address you gave the WAP in the
setup wizard. It will prompt for a username and password—leave the username blank and use “admin” as
the password (as mentioned in the previous paragraph, you should confirm this in your manual). From the
setup screen, you can configure everything listed above. Setting the WEP key is done from a popup window.
TN230 www.rabbit.com 5
Page 6

In particular, you will need to conf igur e the AP mode, de pendi ng on how y ou pla n to us e the acces s poin ts.
The simplest method is to use the Wireless Bridge setting for both WAPs. This setting also requires you to
set the MAC address of the other WAP. (The MAC address of each WAP should be located on the bottom
of each unit.) This creates a one-to-one bridge between the two access points. No other wireless devices
will be able to communicate w ith the access points. Any data that an access point receives on its Ethernet
interface wil l be forwarded to the other access p oint and its Ethernet interface, and vice versa.
If you need to wirelessly connect more than two existing networks, you will need to use the “Wireless
Bridge - Point to Multipoint” setting. All WAP11s with the sa me wireless netw ork parameters (SSID,
channel, and WEP key) will forward their traffic am ongst themselv es. Be careful with this method si nce
busy networks can degrade network performance. Linksys recommends no more than three LANs be connected this way.
If you want to use one of the WAP11s as an access point for other wireless clients (such as PCs), then you
can set the WAP connected to the existing Ethernet network to be in Access Point mode, and the other one
connected to the Rabbit(s) to Access Point Client mode. This mode requires you to enter the MAC address
of the Access Point to which y ou wish to connect.
After you have completed configuring one of the access points, you will need to go through the above process again for the other access point. Make sure you choose a different IP addres s for the second access
point. Also, if you set one access point to “Access Point” mod e, make sure to set the other to “Access
Point Client” mode.
Configuration for devices other than the Linksys WAP11 will be somewhat different. For example, the DLink DWL-810 does not have a dedicated setup wizard. Instead, you must temporarily change the IP
address of your PC to be able to use a web browser to contact the device. Once you have changed the IP
address of the device, you can set your PC’s network settings back to the original values.
Testing the Connection
Once the configuration is done, you can attach the access points as directed earlier . To test the conne ct ion,
you can use the sample program SAMPLES\ICMP\PINGYOU.C. First, have the Rabbit ping the IP
address of th e a cc ess point to which it i s di re ctly connected. This ve ri fi e s t hat the Rabbit can communicate
with the local access point. Next, run the prog ram again with the IP address of the remote access point.
This verifies that the wireless bridge is working. Finally, try running the program again with the IP address
of some machine on the remote network. You can also try running PINGME.C on the Rabbit and pinging
the Rabbit from a PC on the remote network.
6 www.rabbit.com TN230
Page 7

It Isn’t Working! Why not?
Rabbit-based Ethernet products should work with any access points that perform wireless bridging. There
is nothing special to do in order to get Rabbit Ethernet support working. It should also work with the
“wireless bridging” products, with the exception of the Linksys WET11 mentioned earlier.
If you have a Linksys WET11 device and a Rabbit device with a Realtek Ethernet chipset, you may have
problems with the WET11 constantly re boo ting and l ockin g u p. It can b e made t o wor k by co nne ctin g wit h
a 50 foot or longer Ethernet cable or by adding 15 ohm resistors inline on the TX+ and TX- lines of the
Ethernet cable on the WET11 side of the cable. Because of this problem, we do not recommend the
Linksys WET11.
If you cannot ping the local access point from the Rabbit, then check that you are using a crossover cable
from the Rabbit to the access po int. If your access point has a crossover switch, t hen set it to the “X” position and use a straight-through cable. Try hooking a PC directly to the access point (reconfigure the network interface on the PC to be on the same subnet as the access point, if necessary).
If the wireless connection is not working, there are several possible sources of errors. Make sure that all
devices are on the same su bne t (wit h the sa me netmas k) . Check th e SSID and ch annel values on the ac ce ss
points. Make sure that the encryption keys match—if you entered it via a passphrase, check that the passphrases and the keys are the same on each access point. You could be outside the ra nge of the access
points, or interference coul d be causing problems. The more walls between the access points, the smaller
the range. Try testing the connection with the access points close to each other. If it still is not working, try
connecting a PC with the access points and verify that that works.
Also note that your two wireless access points will probably need to be the same model. It is also possible
that the model of access point you have does not support wireless bridging. Query the product’s technical
support if you are unsure.
If, after all of this, your wireless connection with your Rabbit is still not working, try hooking the Rabbit
up through a wired connection to make sure that there is not a more general problem. If you are all out of
ideas, and a wireles s conne ctio n betwe en PCs work s, the n con tact Rabb it Semi co nduct or techni cal suppor t
for further assistance.
http://www.rabbitsemiconductor.com/support/questionSubmit.shtml
TN230 www.rabbit.com 7
 Loading...