

Page 1
EyeOn Baby Camera User Guide
for Android smartphone and tablet
• Important safety information
• Inside the box
• Minimum requirements
• The EyeOn Baby Camera at a glance
• Let’s get started
• Start monitoring
• Don’t miss out
Page 3
Page 5
Page 5
Page 6
Page 7
Page 10
Page 16
Page 2
Page 2
1
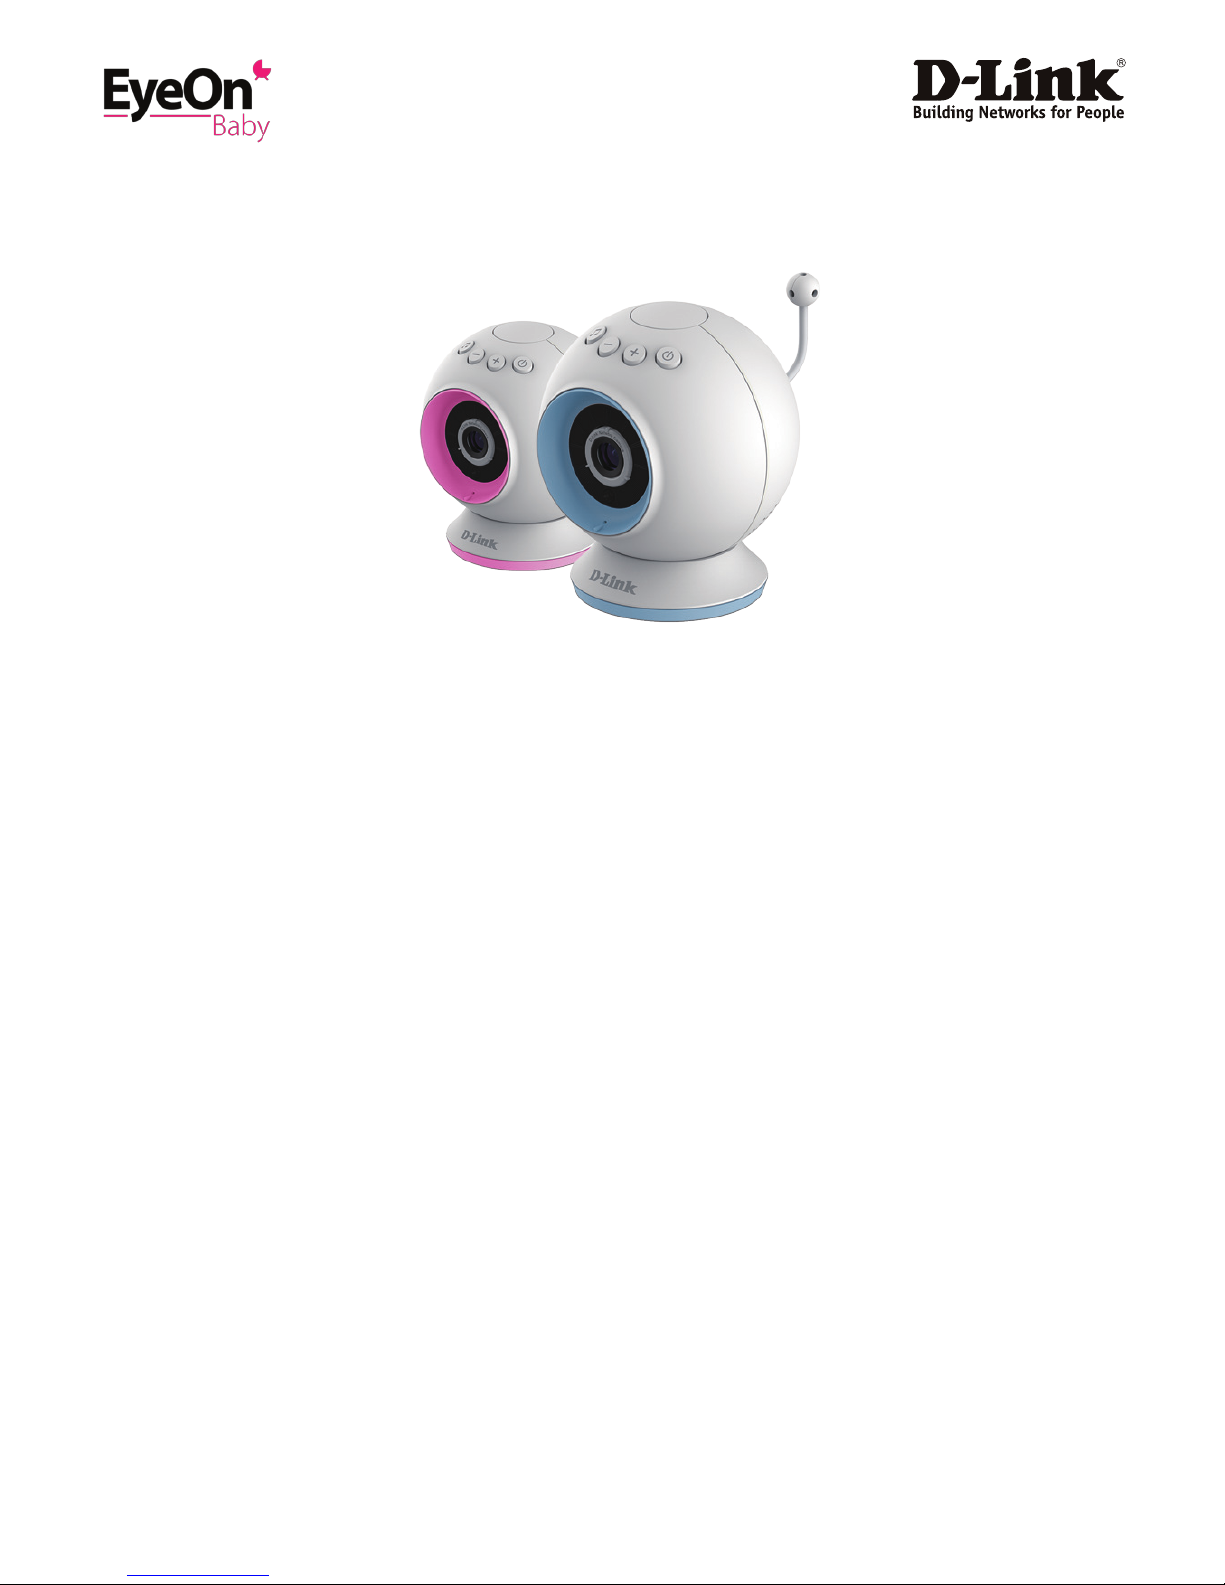
Thank you for choosing the EyeOn Baby Camera
Keep an eye on your little one with the EyeOn™ Baby Camera. This portable camera transforms your mobile device into a
versatile, yet easy to use baby monitor. Connect to the camera wirelessly at home or through the Internet when you are
at work, so you can check on your infant no matter where you are. It’s packed with features to help you care for your child,
including motion, sound, and temperature monitoring, as well as night vision, automatic snapshots and recording. It can
even play gentle lullabies to help ease your baby to sleep!
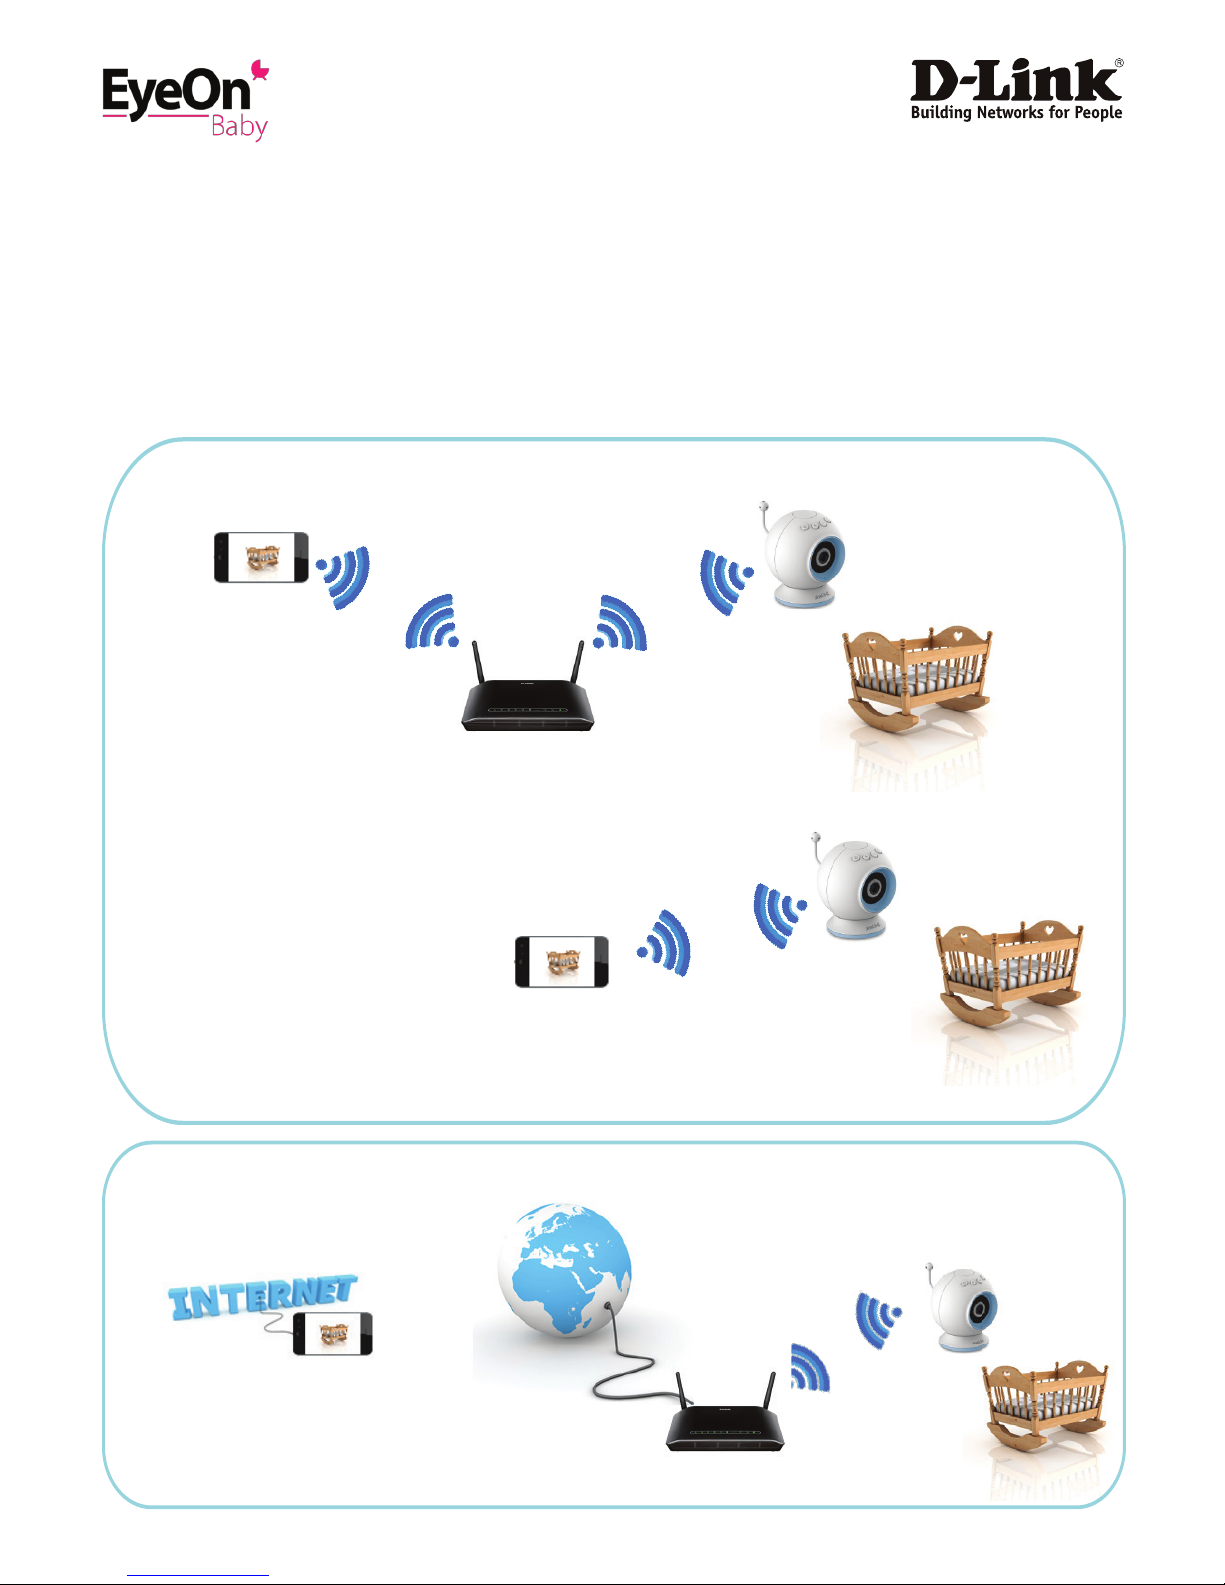
3 ways to keep an eye on your baby with the EyeOn Baby Camera…
1. At home
Connect to your EyeOn Baby Camera through your home wireless network
2...or on the move...
Connect directly to your EyeOn Baby Camera’s
wireless so no need for an Internet connection
3. Remotely
Connect to your EyeOn Baby Camera through the Internet
Page 3
Page 3
Important safety information
The EyeOn Baby Camera has been designed to meet the highest safety standards. However, please make sure that it is set
up and used correctly. Below are important safety guidelines you should follow.
Strangulation Hazard: Keep the EyeOn Baby Camera and any attached cords at least 3 feet out of reach of any
children. Keep any attached cords out of your baby’s crib/cot.
Mounting the EyeOn Baby Camera on table tops. Place the EyeOn Baby
Camera on a table top no less than 3 feet away from your baby’s crib. Feed
the power cord down the back of the table or use wall clips to secure the
cord away so your baby cannot reach the cord. Plug in the power cord,
check your smartphone or tablet to ensure that you are getting a good
view of your child and that there are no obstructions.
Make sure the EyeOn Baby Camera and cord are out of baby’s reach. In
general, this means the EyeOn Baby Camera and cord should be placed at
least 3 feet away from baby’s crib.
Use caution if using the wall-mounting for the EyeOn Baby Camera. Be
careful not to allow the EyeOn Baby Camera cord to dangle between the
cot and a wall. You should use the 3 foot minimum spacing between baby
and the cord in this case, too.
Watch for other cord hazards, too. While you’re securing the EyeOn Baby
Camera cord, take a moment to look around for any other strangulation
hazards, as well. One common culprit is window blind cords that are within
baby’s reach. Cords for other electronics and nursery decor with ribbons or
decorative cords may also be a risk.
Don’t place the EyeOn Baby Camera on the cot rail. Even if you think your
baby would not touch the EyeOn Baby Camera, it’s too risky to leave it
within easy reach of your baby. Even baby camera cords that are secured to
the rail could be yanked or twisted by a curious child.
As your baby reaches toddlerhood, re-evaluate the EyeOn Baby Camera
placement. When little arms get longer and toddlers learn to climb and
reach for things, you may need to move the EyeOn Baby Camera to prevent
access to the cord.
When using the EyeOn Baby Camera in other places, such as outside.
Don’t forget to check those locations to be sure you can place the EyeOn
Baby Camera out of baby’s reach.
Do not use the EyeOn Baby Camera near water. Do not use the EyeOn
Baby Camera near water (such as bathtub, sink, etc.) and safely keep the
baby camera away from heat sources (such as stoves, radiators, etc.).
Page 4
Page 4
Adhering to these baby camera safety tips will help you to ensure your child stays safe and you can eectively enjoy the
best use of your EyeOn Baby Camera.
How to ensure your EyeOn Baby Camera is secure. The rst step is to make sure you turn on security features during
the installation process. Follow the instructions, and make sure you set up a strong password at least eight characters
long with a mix of symbols and upper and lower case letters. Make sure you keep the EyeOn Baby Camera software and
mydlink Baby app is up-to-date.
Cleaning your EyeOn Baby Camera. Clean the camera with a dry cloth only; do not allow the camera to get wet. The
sticky pad on the desktop base may be cleaned with water and air dried(do not use a cloth to dry it); make sure the base
is completely dry before using it with the camera again.
Make sure there is proper ventilation. Make sure there is proper ventilation
around the EyeOn Baby Camera and do not place on sofas, cushions, beds,
etc. which may block ventilation.
The EyeOn Baby Camera is not a toy. The EyeOn Baby Camera is not a
toy. Do not allow children to play with the camera and do not attempt to
disassemble.
The EyeOn Baby Camera is not a babysitter. The EyeOn Baby Camera
should only be used as a parenting aid for monitoring your baby or child.
Whilst it does have the ability to remote view your baby or child, an
adult should always be in the same house with the baby or child in safe
conditions. The EyeOn Baby Camera is not a replacement for responsible
adult supervision and you should still check on your baby or child regularly.
Page 5
Page 5
Inside the box:
EyeOn Baby Camera with desktop base
Pink accent rings (blue accent rings are pre-installed
Power adapter
Wall-mount kit
Quick installation guide
Multilingual cord safety stickers
Product safety documentation
Minimum requirements
• Smartphone or tablet with
• iPhone / iPad / iPod Touch: iOS 5.1.1 or higher
• Android: 4.01 or higher
• 802.11g/n Wi-Fi network (Wireless N network recommended for optimal performance)
• Internet access required for remote viewing
Page 6
Page 6
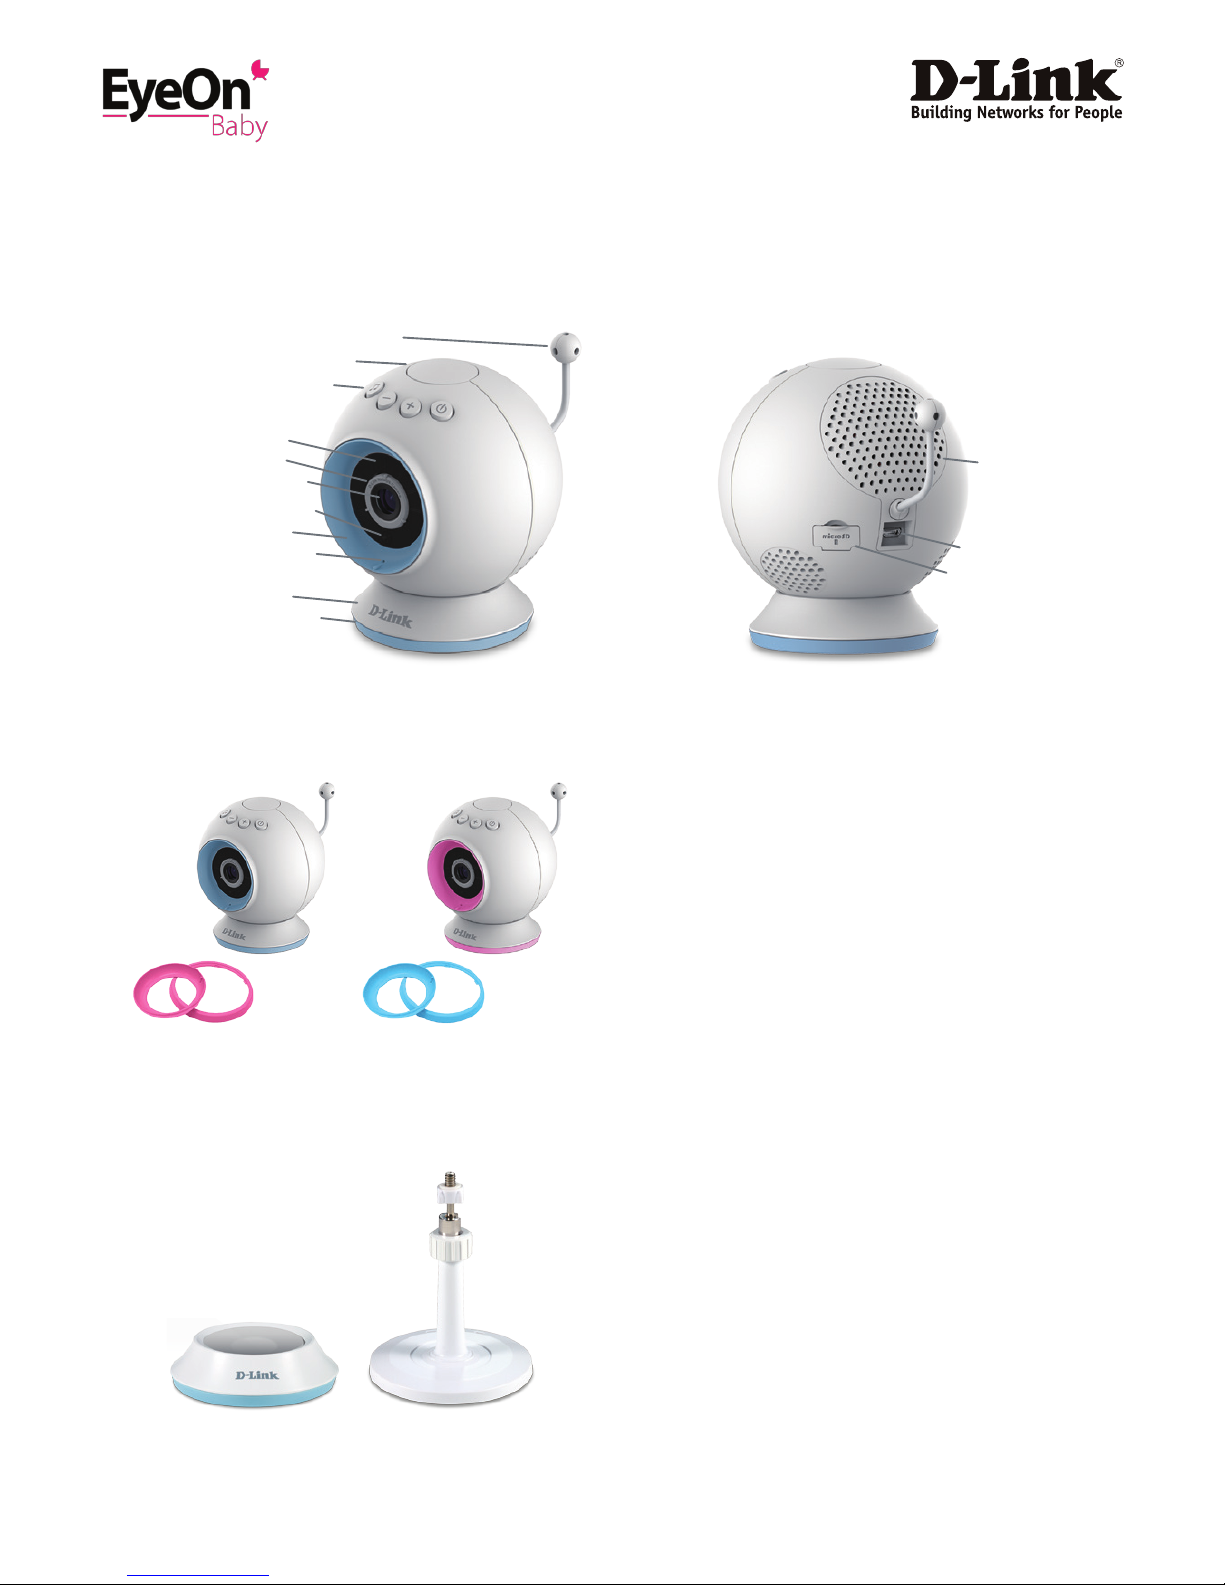
The EyeOn Baby Camera at a glance
Back View
Speaker
Power port (Micro-USB)
MicroSD card slot
Front View
Temperature light
Lullaby/Volume/Power buttons
Infrared night vision LEDs
Focus ring
Camera lens
Ambient light sensor
Accent ring
Temperature sensor
Microphone
Desktop base
Accent ring
Included Camera Mounts
Desktop Base
Wall Mount
Switchable Accent Rings
First choose the colour of the accent ring. To remove the
accent ring simply turn counter clockwise to lift o. Then
Place the new accent ring on, and rotate it clockwise until
it clicks into place.
Decide where you would like to place the camera. Wall
Mounted or desktop.
Page 7

Page 7
Let’s get started!
To get started, simply download the free app from Google Play Store by
• Scanning the QR code on the packaging
or…
• Downloading the mydlink Baby app from the Google Play Store on your Android smartphone or tablet
• Tap on the App Store icon
• Search for “mydlink baby” in the search eld within the App Store
Page 8

Page 8
• Install the “mydlink Baby app”
Once the mydlink Baby app is installed, simply tap on the app...
Page 9

Page 9
...and follow the in-app Setup Wizard to set up your EyeOn Baby Camera.
If you are unsure about anything during the setup process, simply look for the symbol. Tap on this and useful hints
will appear to help you.
Page 10

Page 10
Start monitoring
mydlink Baby app Home Screen
Once the setup process is complete, you will be taken to the mydlink Baby app Home Screen.
From the Home Screen, you can…
• Log into your mydlink account to remote view your EyeOn Baby Camera
• Hear and see alerts when motion or sound is detected, or when temperature becomes too cold or warm
• Access the frequently asked questions and answers should you have problems
• Add additional EyeOn Baby Cameras
Tap on Refresh to scan for EyeOn Baby Cameras on
your network that have not been added to the app
(useful when installing mydlink Baby Camera on an
additional Android smartphone or tablet
Tap on ? for frequently
asked questions and
answers
Alerts to notify you
if sound or motion is
detected or if temperature
exceeds range set in
conguration. Tap on alerts
icons to reset alerts.
Tap on Camera Setup
Wizard to setup another
EyeOn Baby Camera
Tap on mydlink Login
to remote access your
EyeOn Baby Camera
Tap on your EyeOn Baby
Camera to access Live
View and to have access
to change your camera
settings
Page 11

Page 11
Live View
Tap on the EyeOn Baby camera on the Home Screen to go to Live View.
The rst time you access your EyeOn Baby Camera Live View, you will get a reminder to adjust the focus on the camera.
This will ensure you get the best possible image. You only need to do this once and can turn the reminder o once it’s
done.
From the Home Screen, you can…
• See sound and motion alerts as well as current temperature and temperature alert, which can all be customised within
Conguration
• Access Settings to change your EyeOn Baby Camera’s video resolution, brightness and speaker volume
• Access Recording mode to take snapshots or record videos to your Android smartphone or tablet. If you have installed
a microSD card in the camera, you can also playback videos clips that have been automatically recorded whenever
motion is detected.
• Choose from a set of 5 popular lullabies to play on your EyeOn Baby Camera speakers. The time duration of the lullaby
play time can be set in Conguration.
• Talk to your baby through the mydlink Baby app and the built-in EyeOn Baby Camera speakers
Tap to access
Congurations
You can tap on the Live
View screen at anytime
to access the Setting and
Conguration buttons,
as well as return to Home
Screen
EyeOn Baby Camera
Wi-Fi signal reception
Tap microphone icon to
enable/disable 2-way
audio
Tap return icon to return to Home Screen Tap to access Settings
Date and time
Tap camera icon to
access snapshot and
video recording and
playback mode
Tap ! icon to enable/
disable sound, motion
and temperature alert
notication
Tap music icon to
select or enable/
disable lullaby
music
Tap speaker icon to enable and disable Live View
sound. Live View sound
volume can be controlled
through the Android
smartphone or tablet’s
physical volume buttons
on the side of the device
Sound
alert
Motion
alert
Current
temperature
Page 12

Page 12
Conguration
Tap on the Conguration icon to access the Conguration menu below.
Tap to access
Camera Information
Tap to access
Wireless Settings
Tap to access
Events Setting
Tap to access
Lullaby Settings
Turn on/o the
temperature indictor
night light
Change the camera’s
day/night mode to Auto,
All Day or All Night
Enable background
audio, to play live sound
when mydlink Baby app
is minimised or when
the Android smartphone
or tablet is in standby
mode.
Turn on/o and change alert
sound
Page 13

Page 13
From the Conguration menu, you can…
• Under Camera info…
• Under Wireless Settings…
Change EyeOn Baby
Camera passwords
Sync your EyeOn Baby
Camera’s time and
date of your Android
smartphone or tablet
Change the wireless
network you want your
EyeOn Baby Camera to
connect to
Page 14

Page 14
From the Conguration menu, you can…
• Under Events…
• Under Lullaby…
Change the temperature
unit
Change the resolution
of the even triggered
video recording to the
microSD card if you
have installed one
Change the lullaby
playing time when
activated
Change the temperature
alert range
Check ambient sound
level, the level number
will change depending
how noisy the
background is.
Change sound detection
sensitivity. Please note
that the sensitivity level
must be higher than the
Current Level above,
otherwise there will be
no alerts. You can also put
sensitivity to the lowest
setting to disable sound
alerts
Change motion detection
sensitivity. You can also
put sensitivity to the
lowest setting to disable
motion alerts
Page 15

Page 15
Settings
By tapping on Settings, you can…
Recording Mode
By tapping on the camera icon to access recording mode, you can...
* microSD card not included and must be purchased separately
Change your EyeOn
Baby Camera resolution
between 360P and 720P.
360P resolution will give
you a faster response,
whereas the 720P
resolution will give you a
higher resolution image.
Change the speaker
volume on your EyeOn
Baby Camera for 2-way
audio and lullabies.
Change the brightness
of the image
Tap Camera icon to
take snapshot or
record video
Tap Done to return to
Live View
Slide to toggle
between snapshot or
video recording mode
Playback event triggered videos from the microSD card* in the EyeOn Baby Camera. You
can access snapshots or videos recorded directly to your Android smartphone or tablet in
the device photo library.
Page 16

Page 16
Don’t miss out!
Easy to setup, remote view with mydlink
During the setup process, you will have the opportunity to create a mydlink account. This gives you the ability to securely
monitor your baby or child when you are away from home, absolutely free and without monthly subscription.
If you decide not to take advantage of this free service but change your mind later, you can always create your mydlink
account by tapping the “Join mydlink” tab on the mydlink Baby app home screen.
Page 17

For more information: www.dlink.com
D-Link European Headquarters. D-Link (Europe) Ltd., D-Link House, Abbey Road, Park Royal, London, NW10 7BX.
Specications are subject to change without notice. D-Link is a registered trademark of D-Link Corporation and its overseas subsidiaries.
All other trademarks belong to their respective owners. ©2013 D-Link Corporation. All rights reserved. E&OE.
Updated November 2013
Page 17
Never miss a thing
You can save images and videos directly to your smartphone or tablet. However, if you need additional memory, the
EyeOn Baby Camera has an integrated microSD card slot. Simply pop in a microSD card and it will automatically record
videos whenever sound or movement is detected. What’s more, you can see the picture or watch the video from anywhere
in the world*. Never miss a precious moment again!
• The highlights dates indicate that you have video
stored. Click on the date to view the video.
* Android smartphone or tablet must have Internet access
 Loading...