

Page 1
t
b
b
t
N
This product can be se
up using any current we
rowser, i.e., Interne
Explorer 6 or Netscape
avigator 6.2.3.
DSL-300T
ADSL Modem
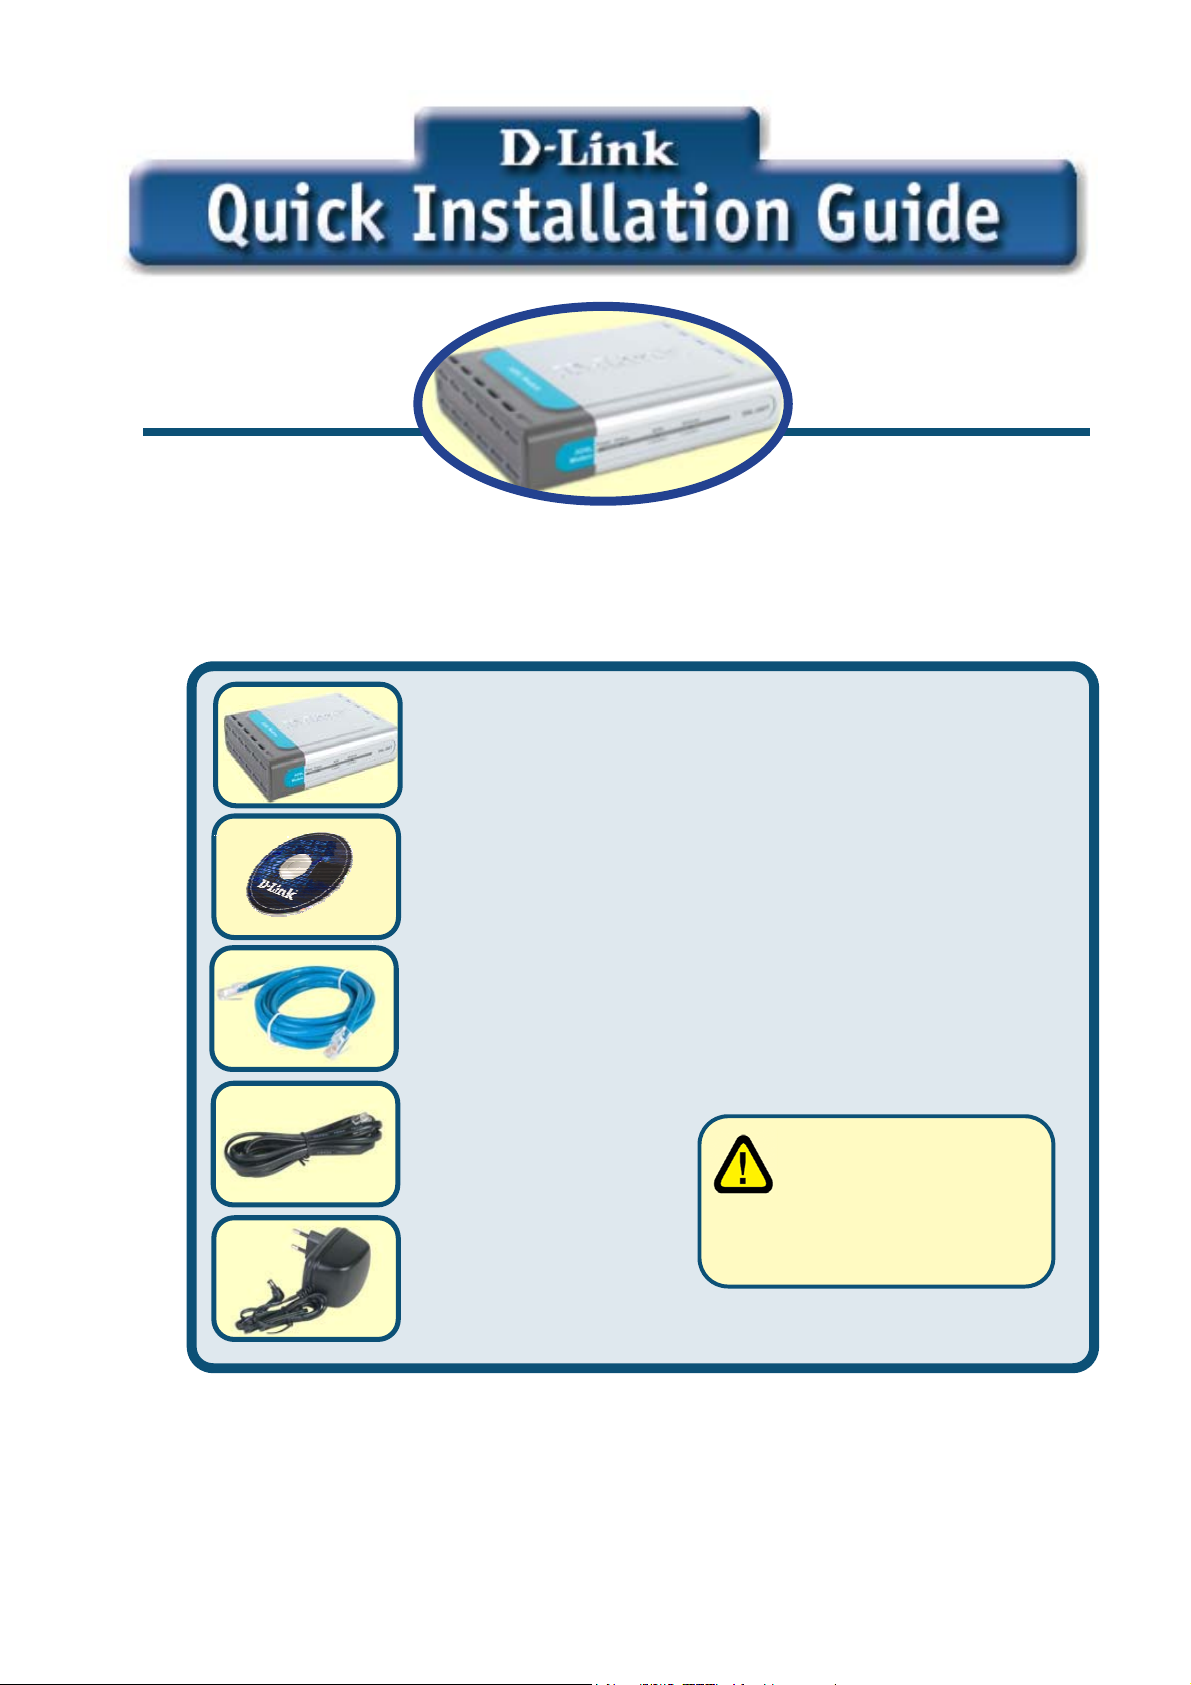
Before You Begin
Make sure you have all the necessary information and equipment on hand before beginning
the installation.
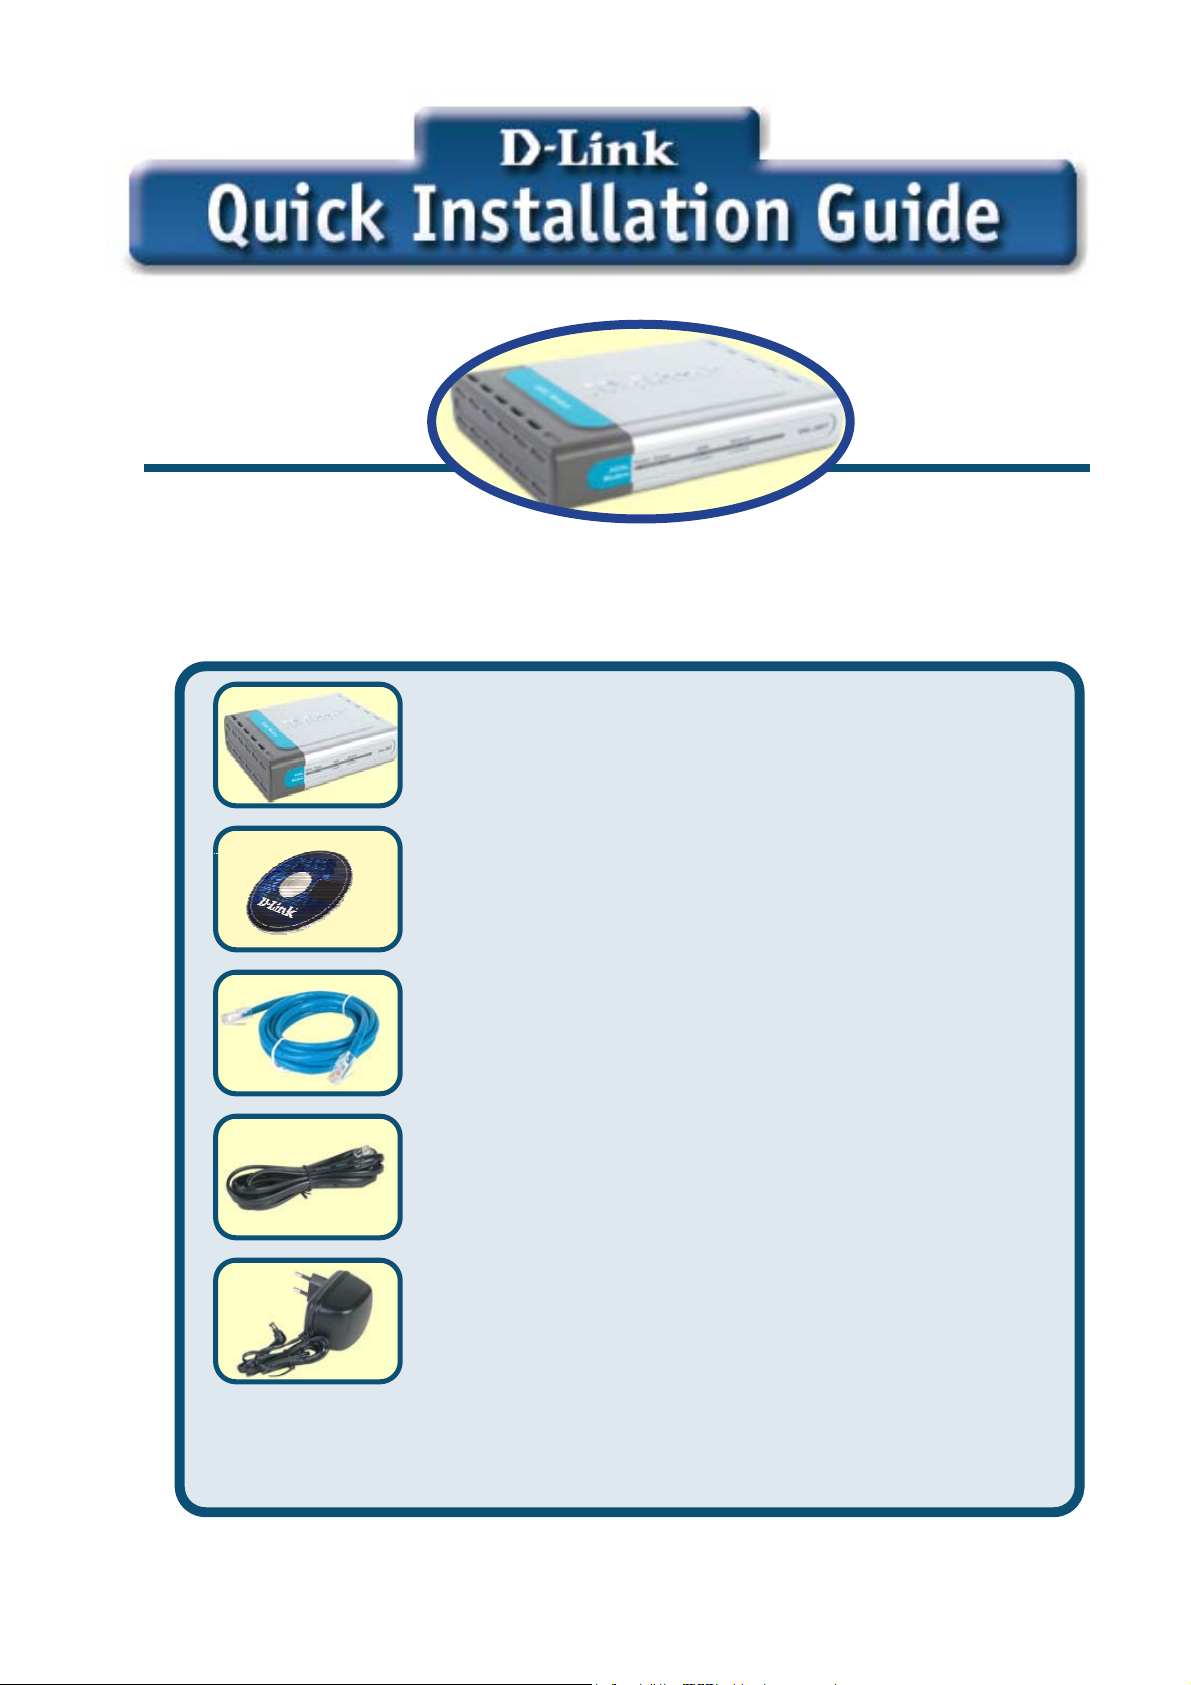
Check Your Package Contents
DSL-300T ADSL Modem
CD-ROM (containing Manual)
Ethernet (CAT5 UTP) Cable
Telephone Cable
Power Adapter
If any of the above items are missing, please contact your reseller
Using a power supply
with a different voltage
rating will damage and void
the warranty for this product.
1
Page 2
pter
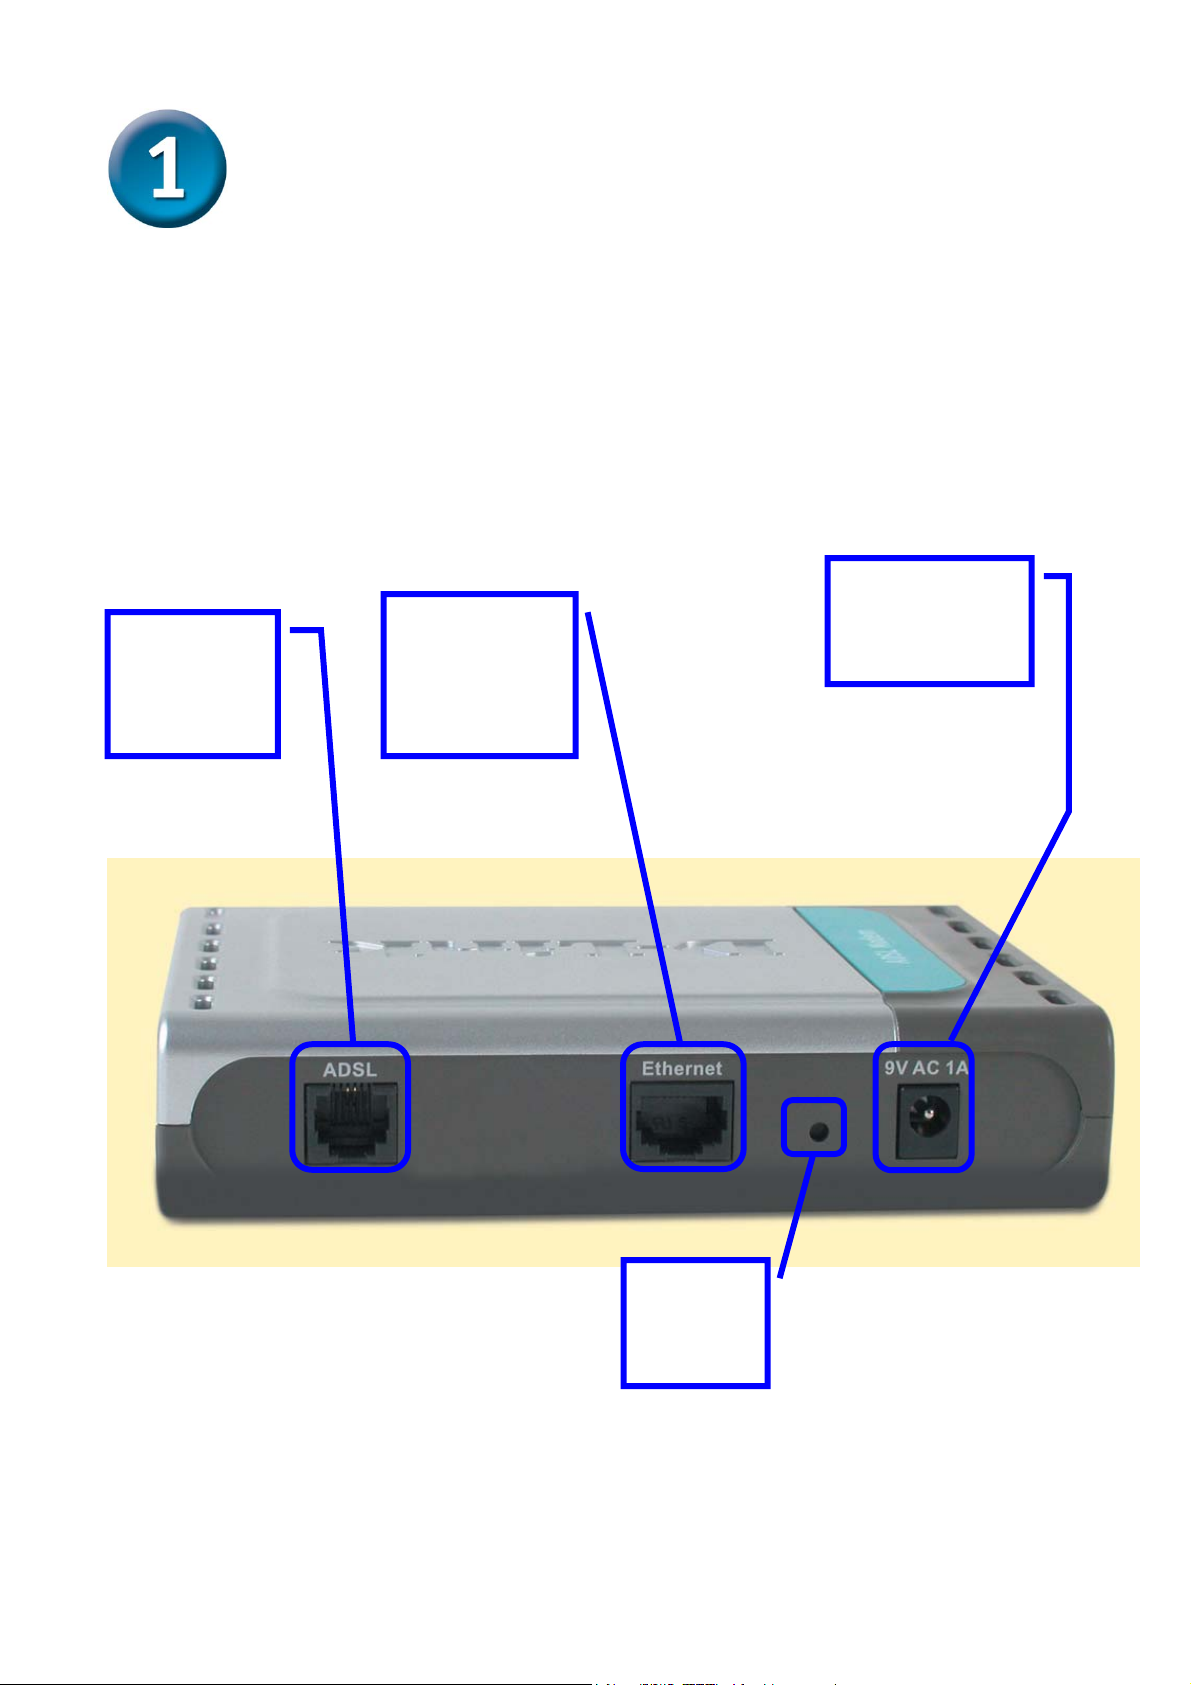
Connecting the Modem to Your Computer
A.
First, connect the power adapter to the receptor at the back panel of the
DSL-300T and then plug the other end of the power adapter to a wall outlet or
power strip. The Power LED will turn ON to indicate proper operation.
B.
Insert one end of the cable into the Ethernet port on the back panel of the
DSL-300T and the other end of the cable to an Ethernet Adapter or available
Ethernet port on your computer.
ADSL port -
connect to
ADSL line
Ethernet port -
connect to
Ethernet cable
Power input -
connect to power
ada
Factory
Reset
button
2
Page 3
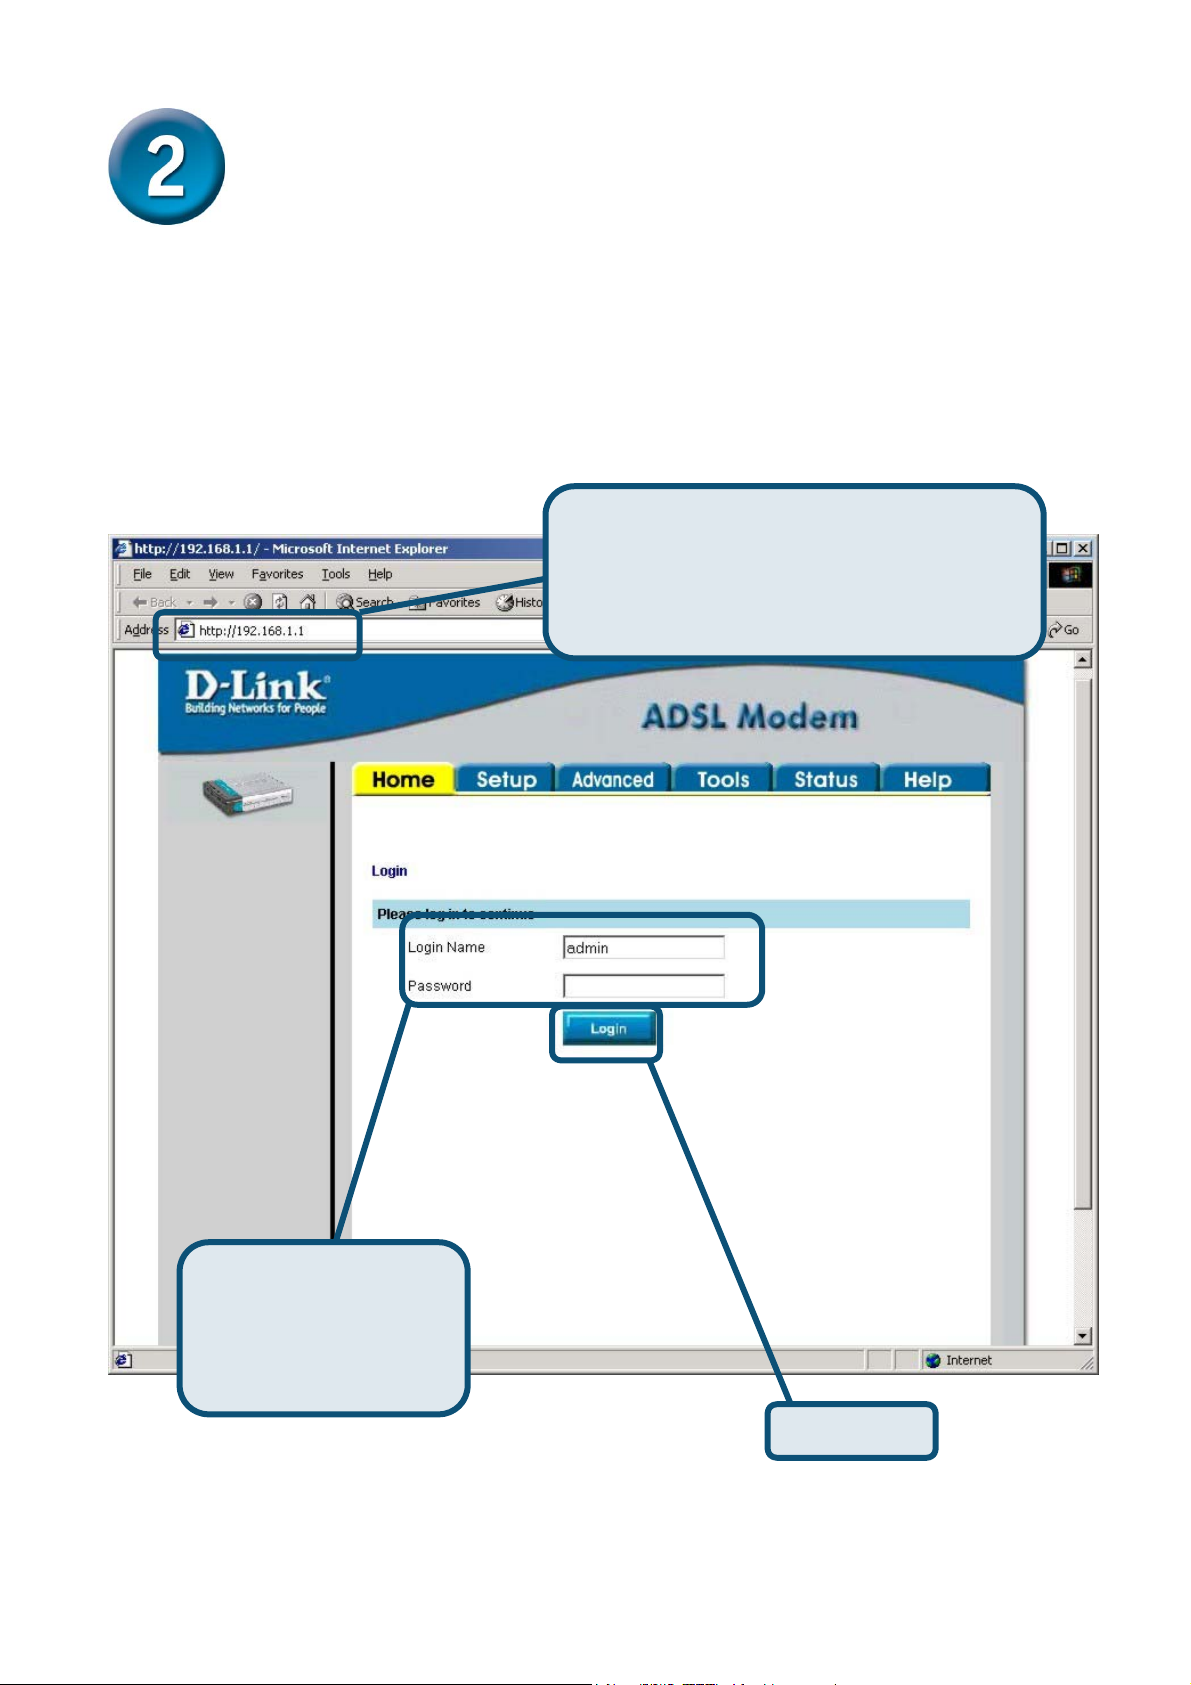
Configuring the Modem
To use your Web browser to access the web pages used to setup the Modem, your computer
must be configured to “Obtain an IP address automatically”, that is, you must change the
IP network settings of your computer so that it is a DHCP Client. If you are using Windows
XP and do not know how to change your network settings, skip ahead to Appendix A and
read the instructions provided. You may also read the User Manual for instructions on
changing IP settings for computers running Windows operating systems.
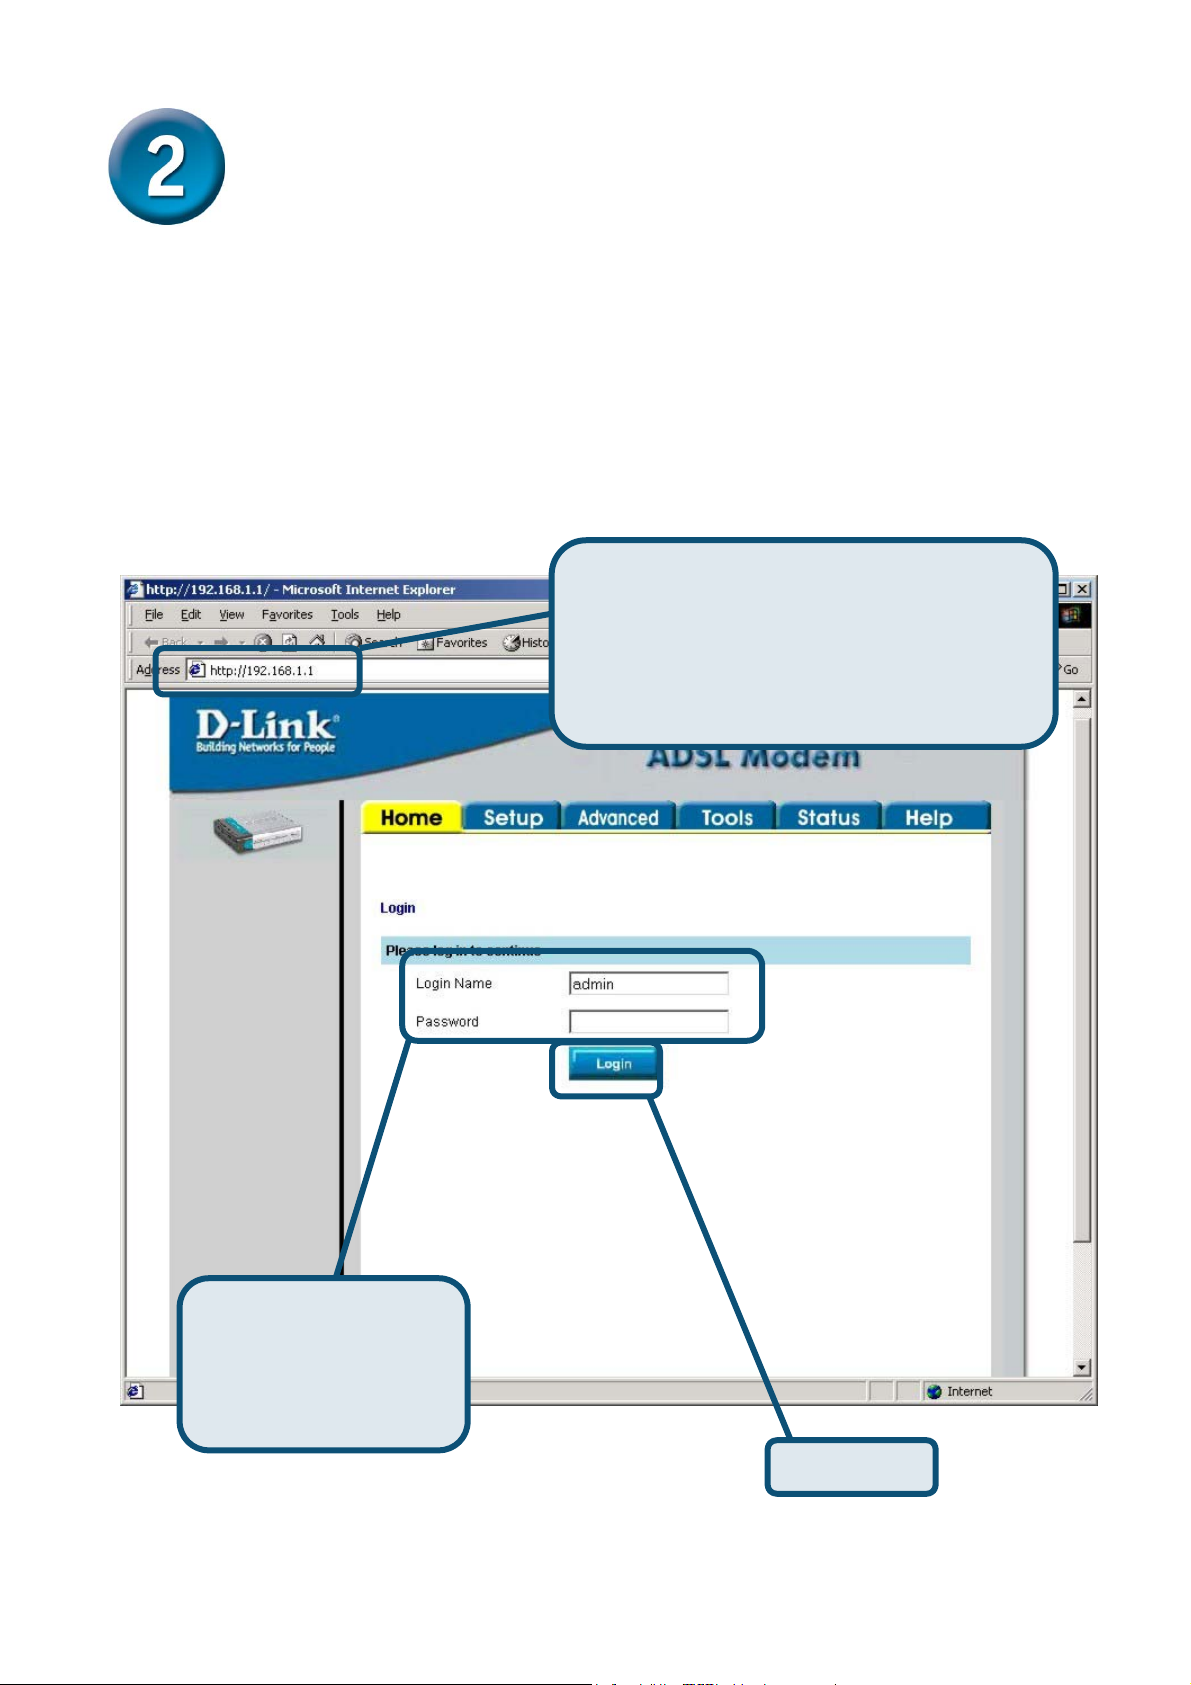
Open your Web browser and type
“http://192.168.1.1” into the URL address
box. Then press the Enter or Return key.
The Login page appears.
Type “admin” for the
Login Name and
“admin” in the
Password field.
3
Click Login
Page 4
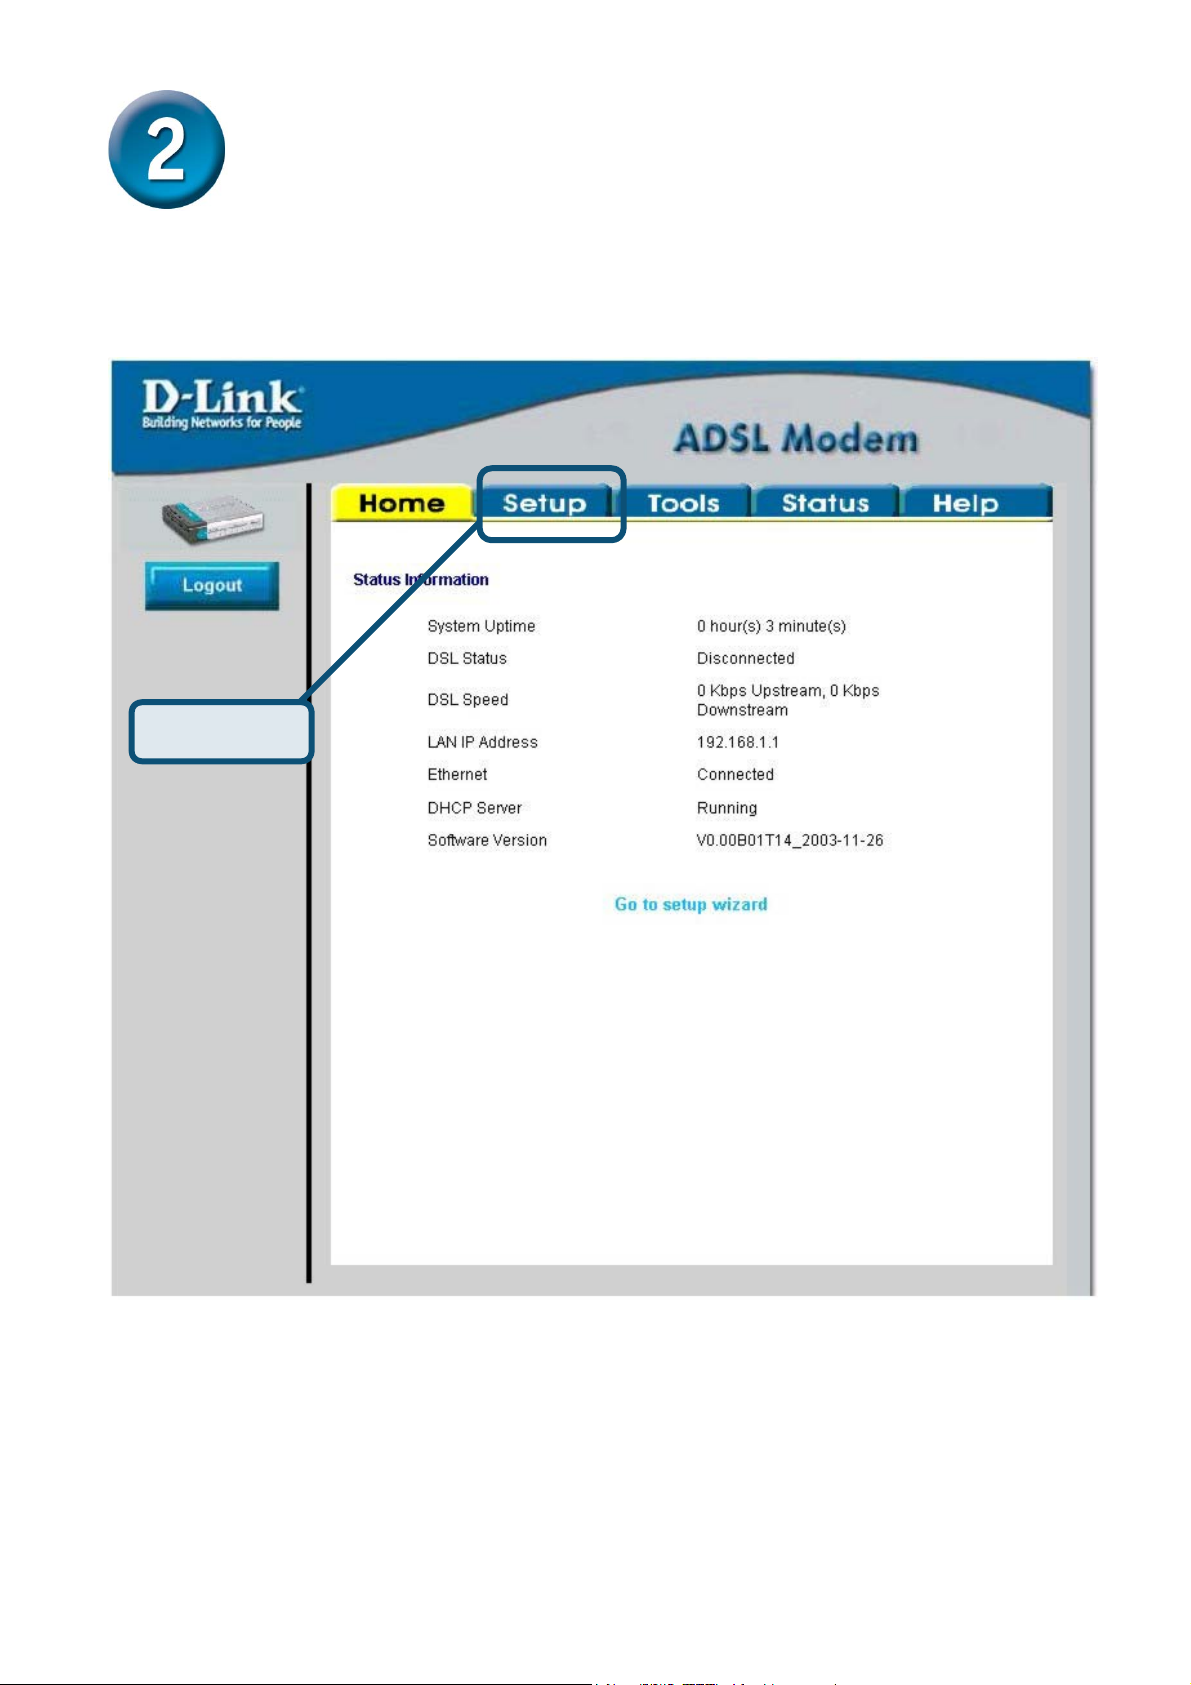
Configuring the Modem (continued)
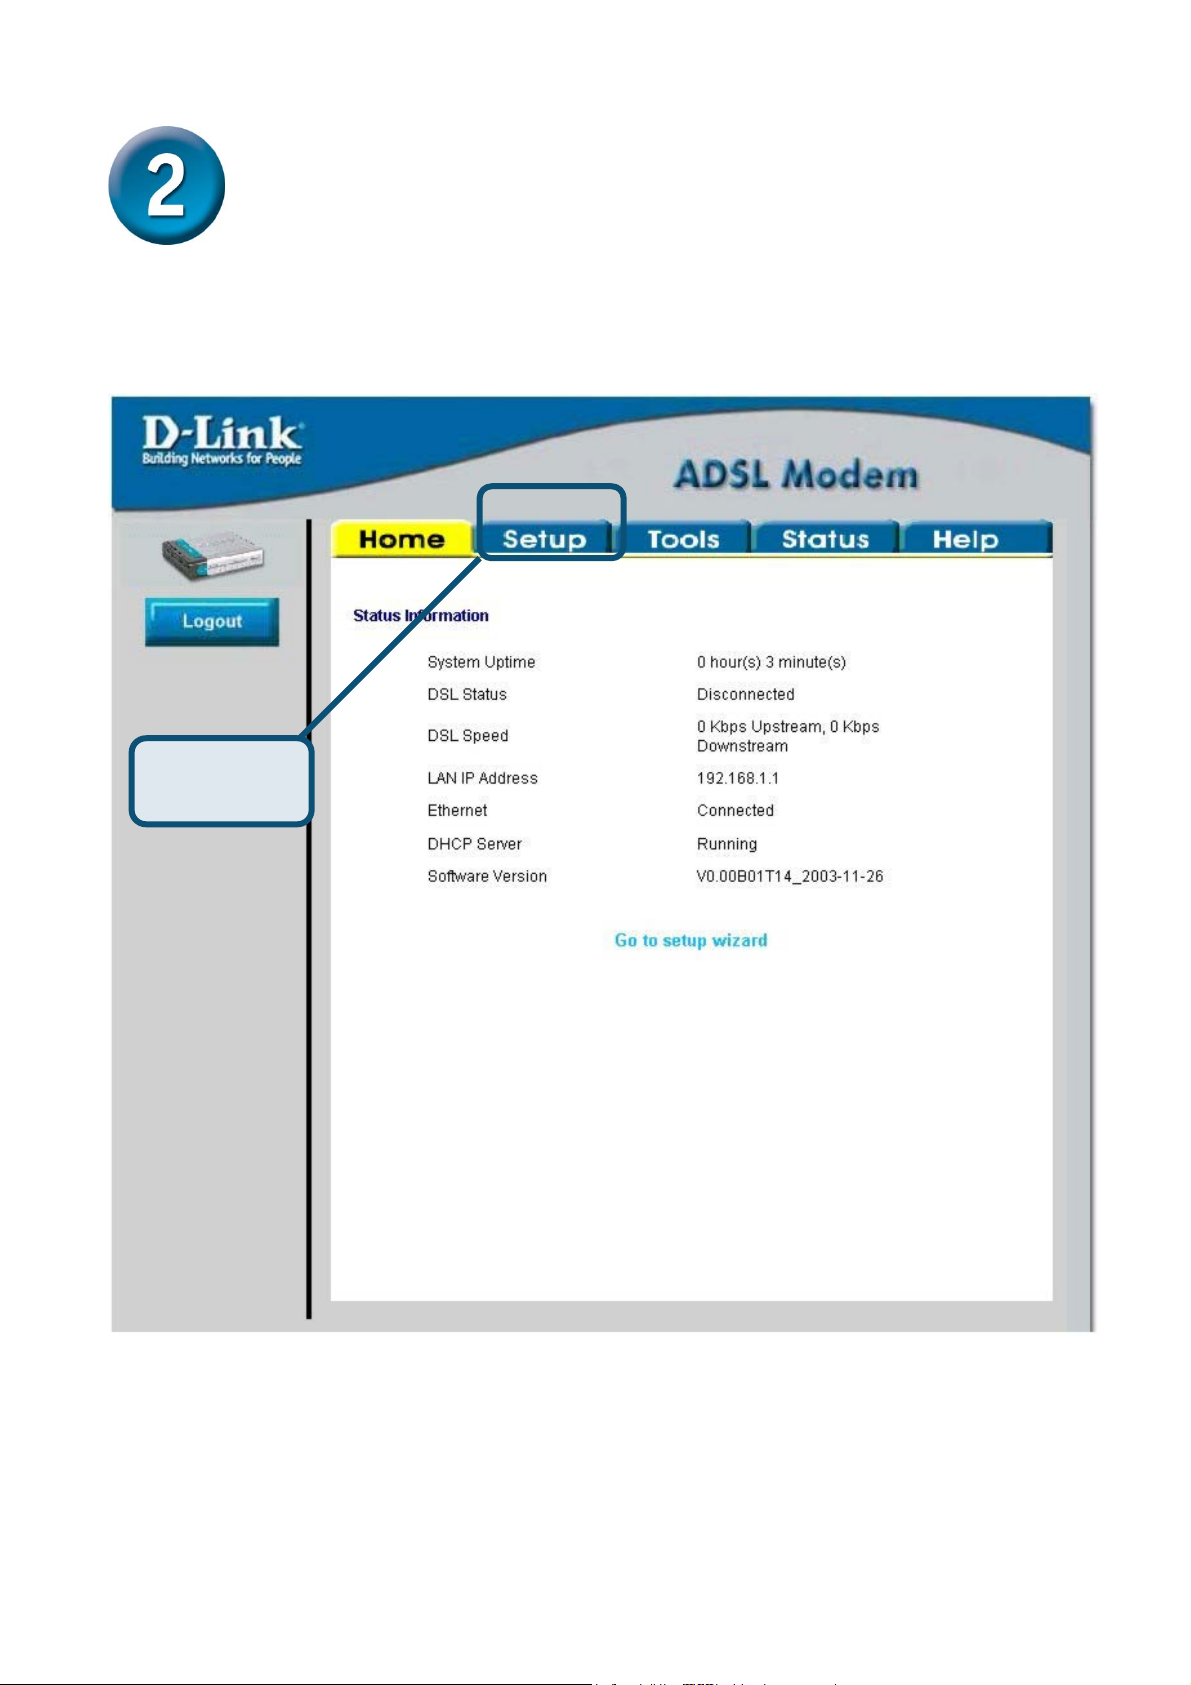
Once you have logged in, the Home screen will appear. Click the Setup tab to go to the Setup
menu and configure the Modem.
Click Setup
4
Page 5
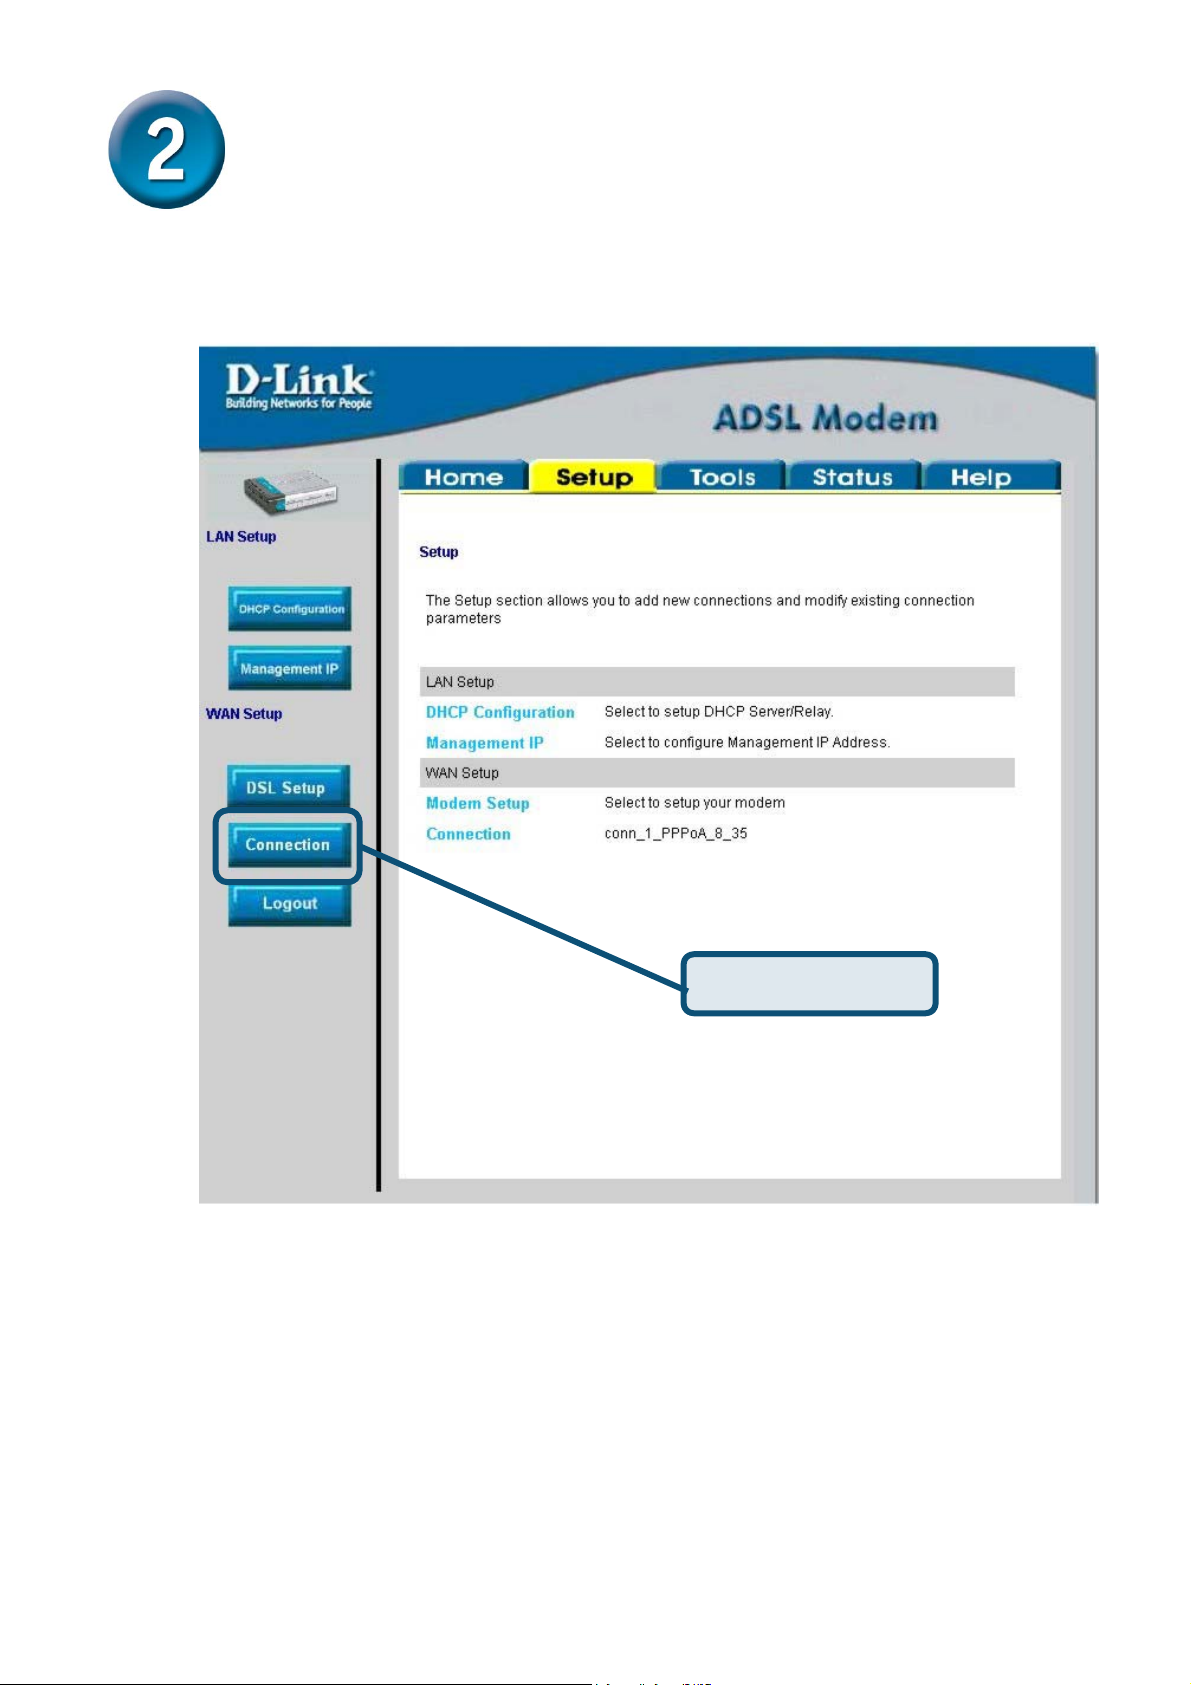
Configuring the Modem (continued)
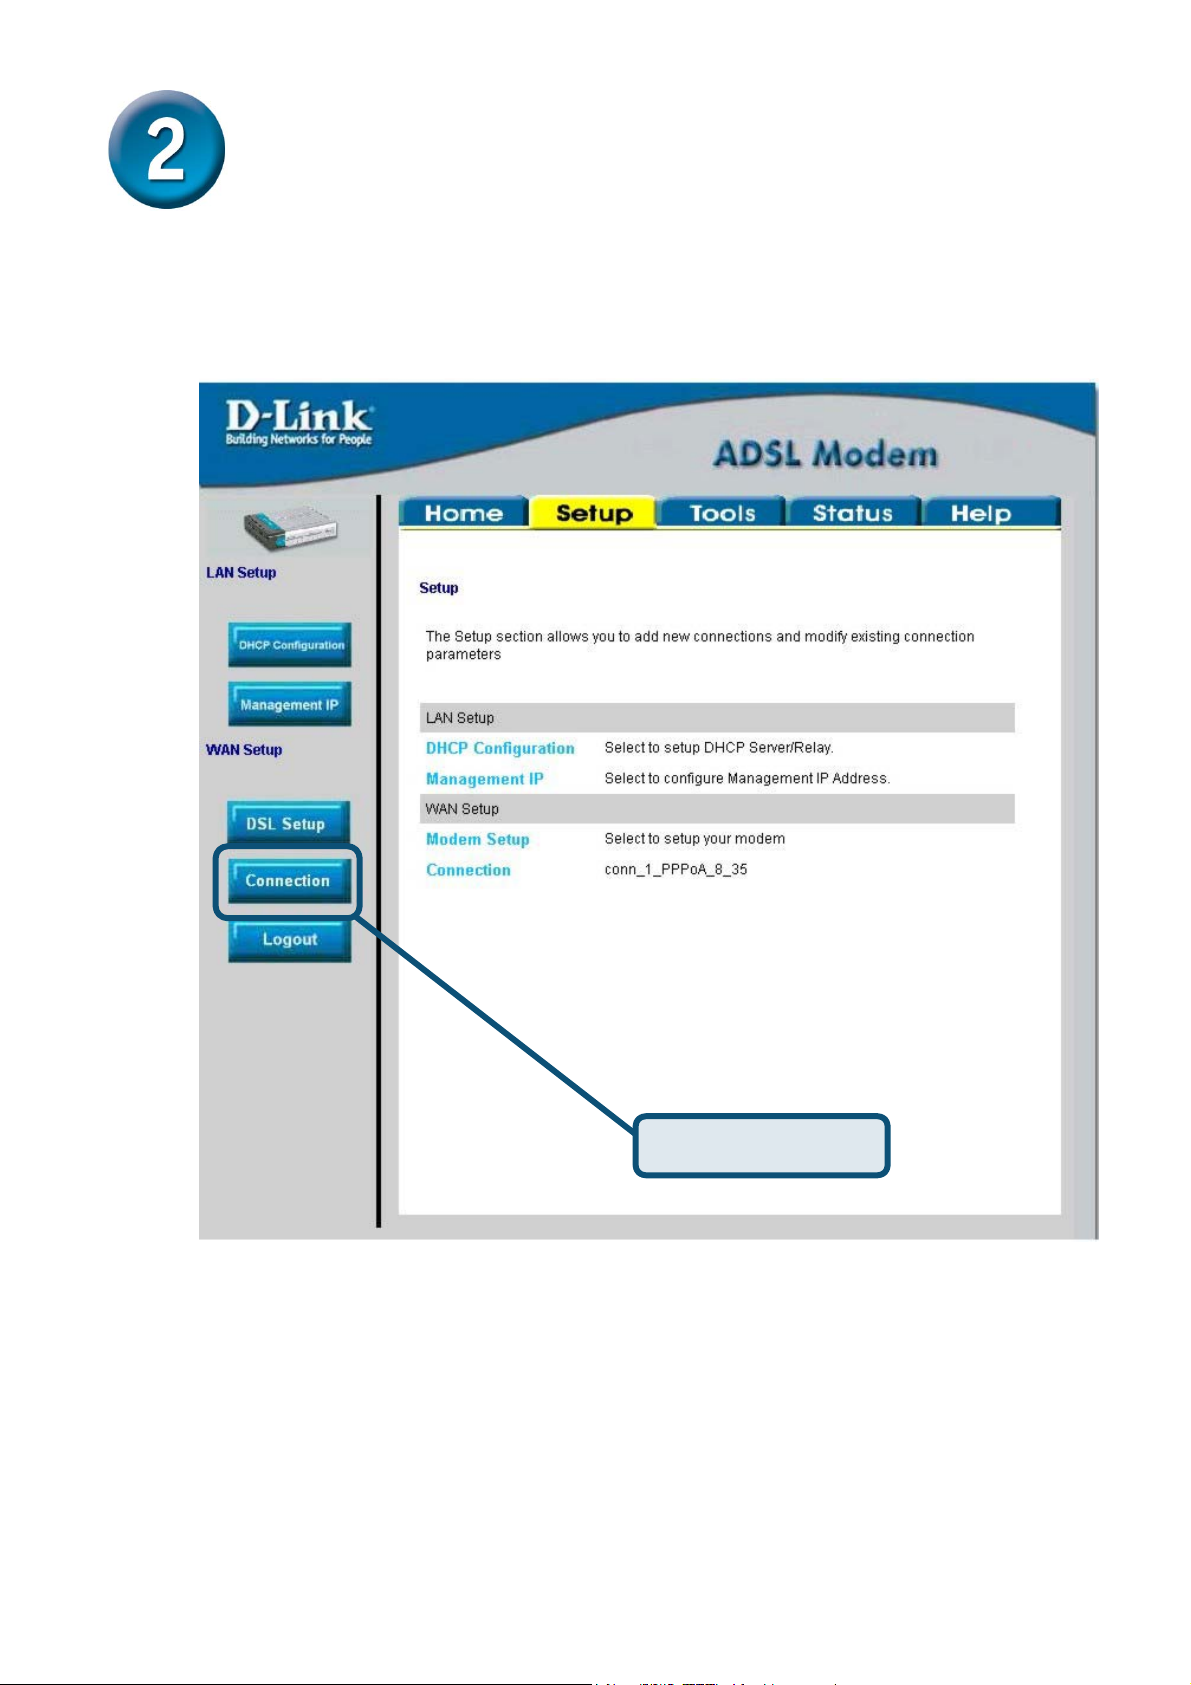
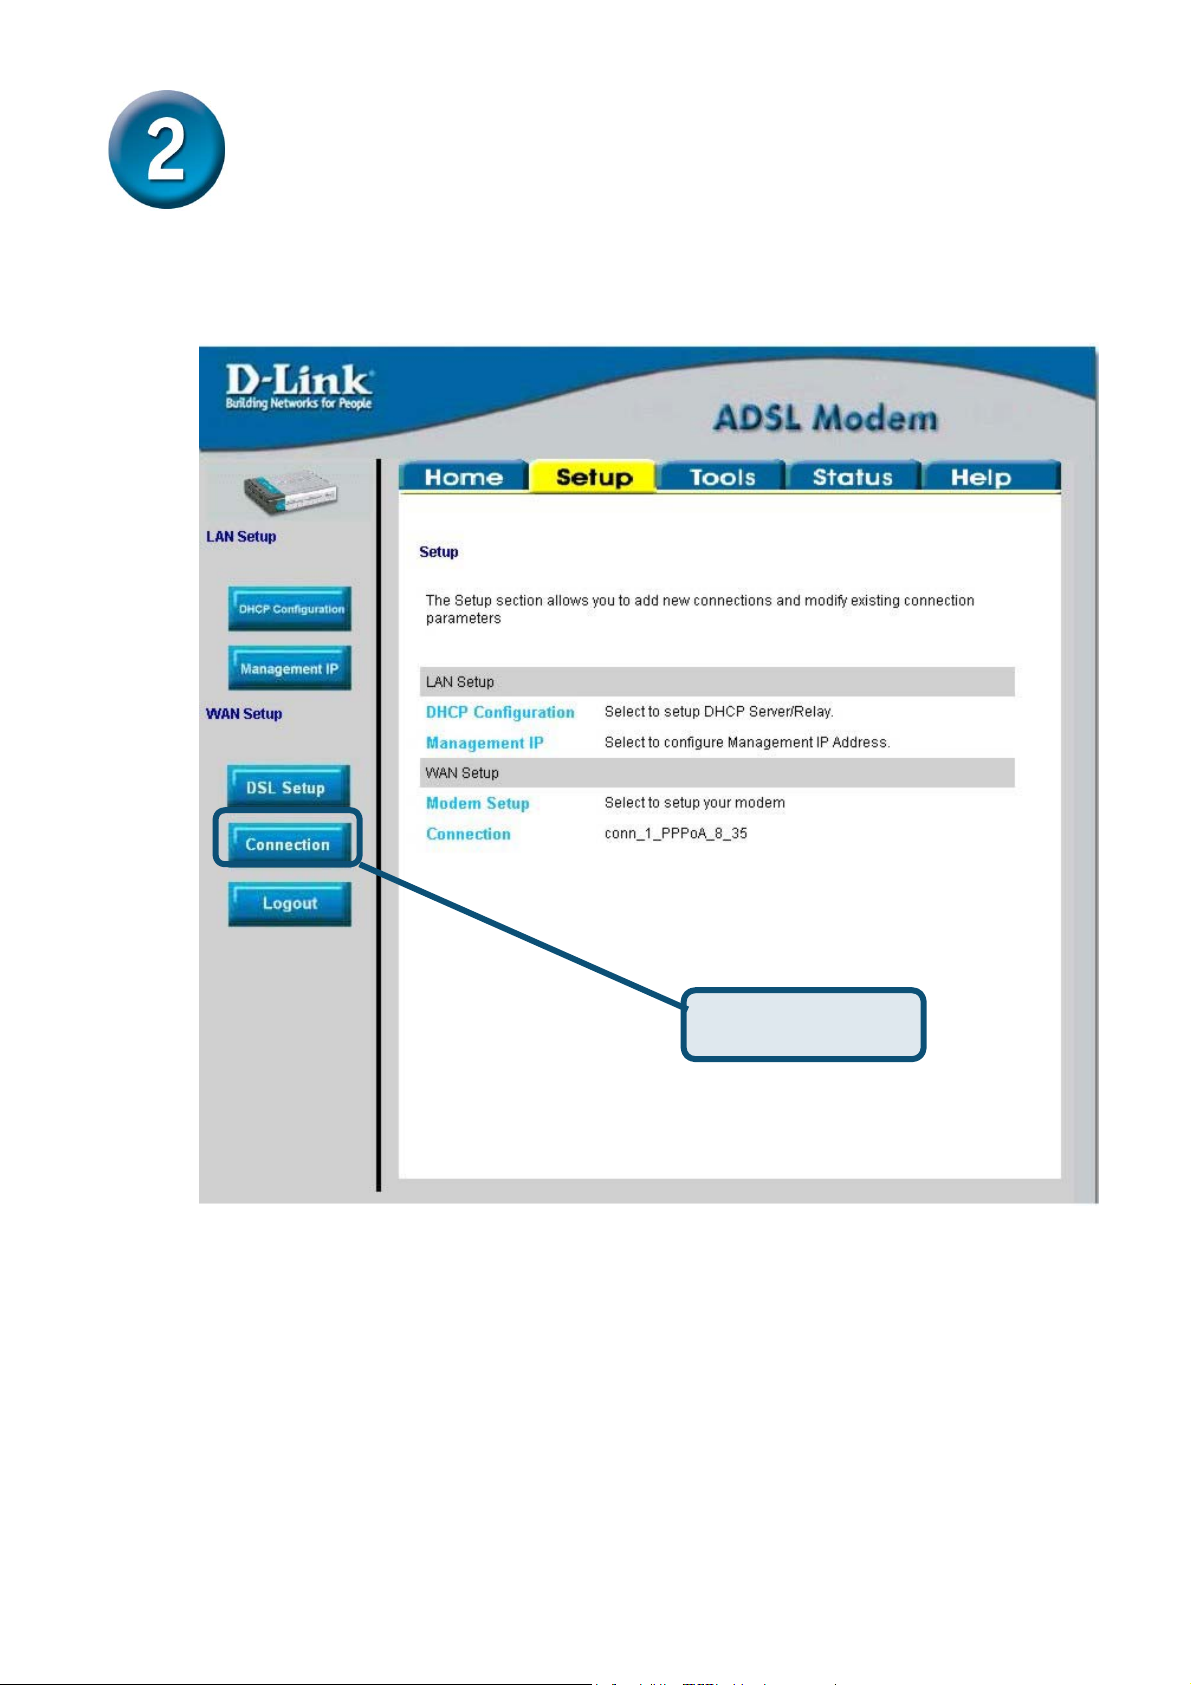
In the Setup menu, click the Connection button to go to the configuration menu for the
Internet connection.
Click Connection
5
Page 6
Configuring the Modem (continued)
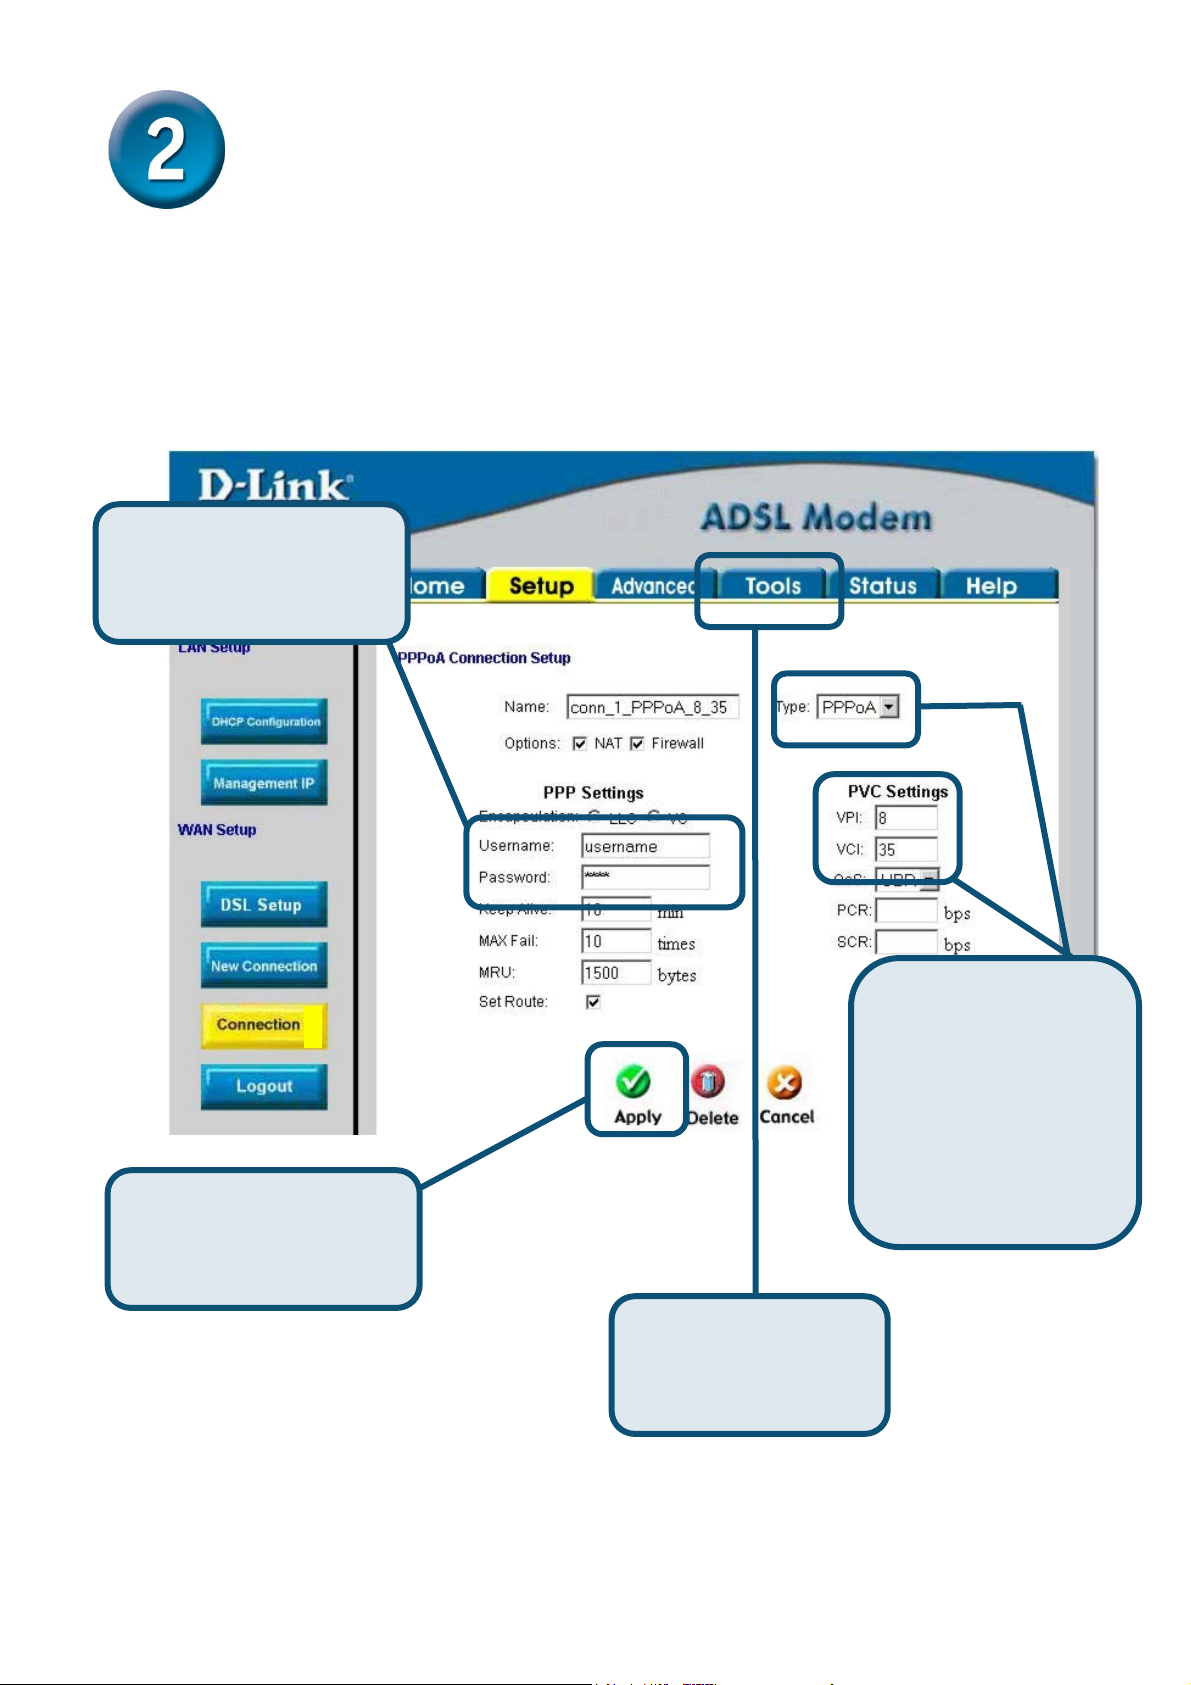
In the Connection menu, type the Username and Password used to verify the identity of
your ISP account. It may be necessary to change the PPP encapsulation Type used for your
connection. You may also need to change the VPI or VCI value. Your ISP will give these
settings to you if they need to be changed. Click the Apply button when you have entered all
the information. To save the changes made to Connection, click the Tools tab and follow the
instructions on the next page.
A. Type the Username
and Password used for
your account.
C. Click the Apply button
after you have entered the
account information.
D. Click Tools when
you have applied the
new settings.
6
B. Check the PPP
encapsulation Type,
VPI: and VCI: - if these
values are not correct,
change these according
to the instructions of
your ISP.
Page 7
Configuring the Modem (continued)
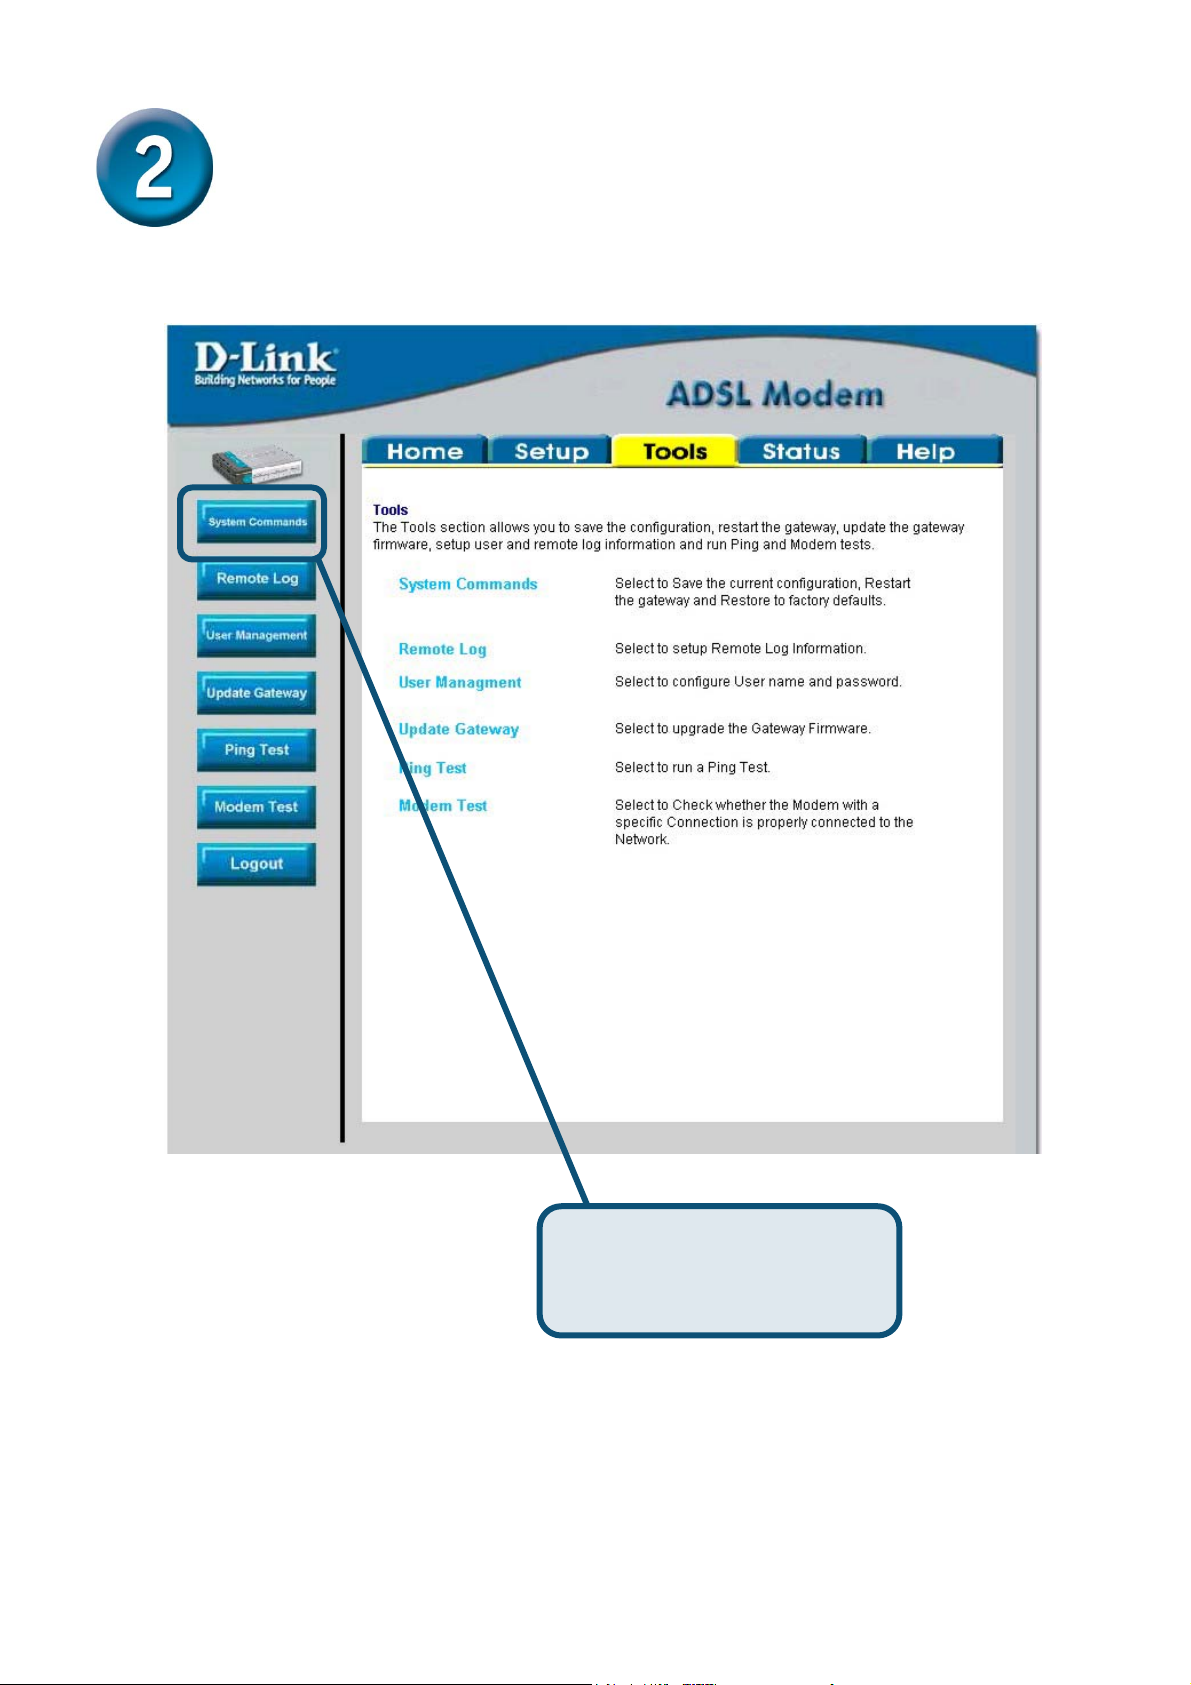
Now save the changes you have just made. The Save function is accessed from the System
Commands menu. Click the System Commands button to view that menu.
Click System Commands to
view the menu used to save
changes.
7
Page 8
Configuring the Modem (continued)
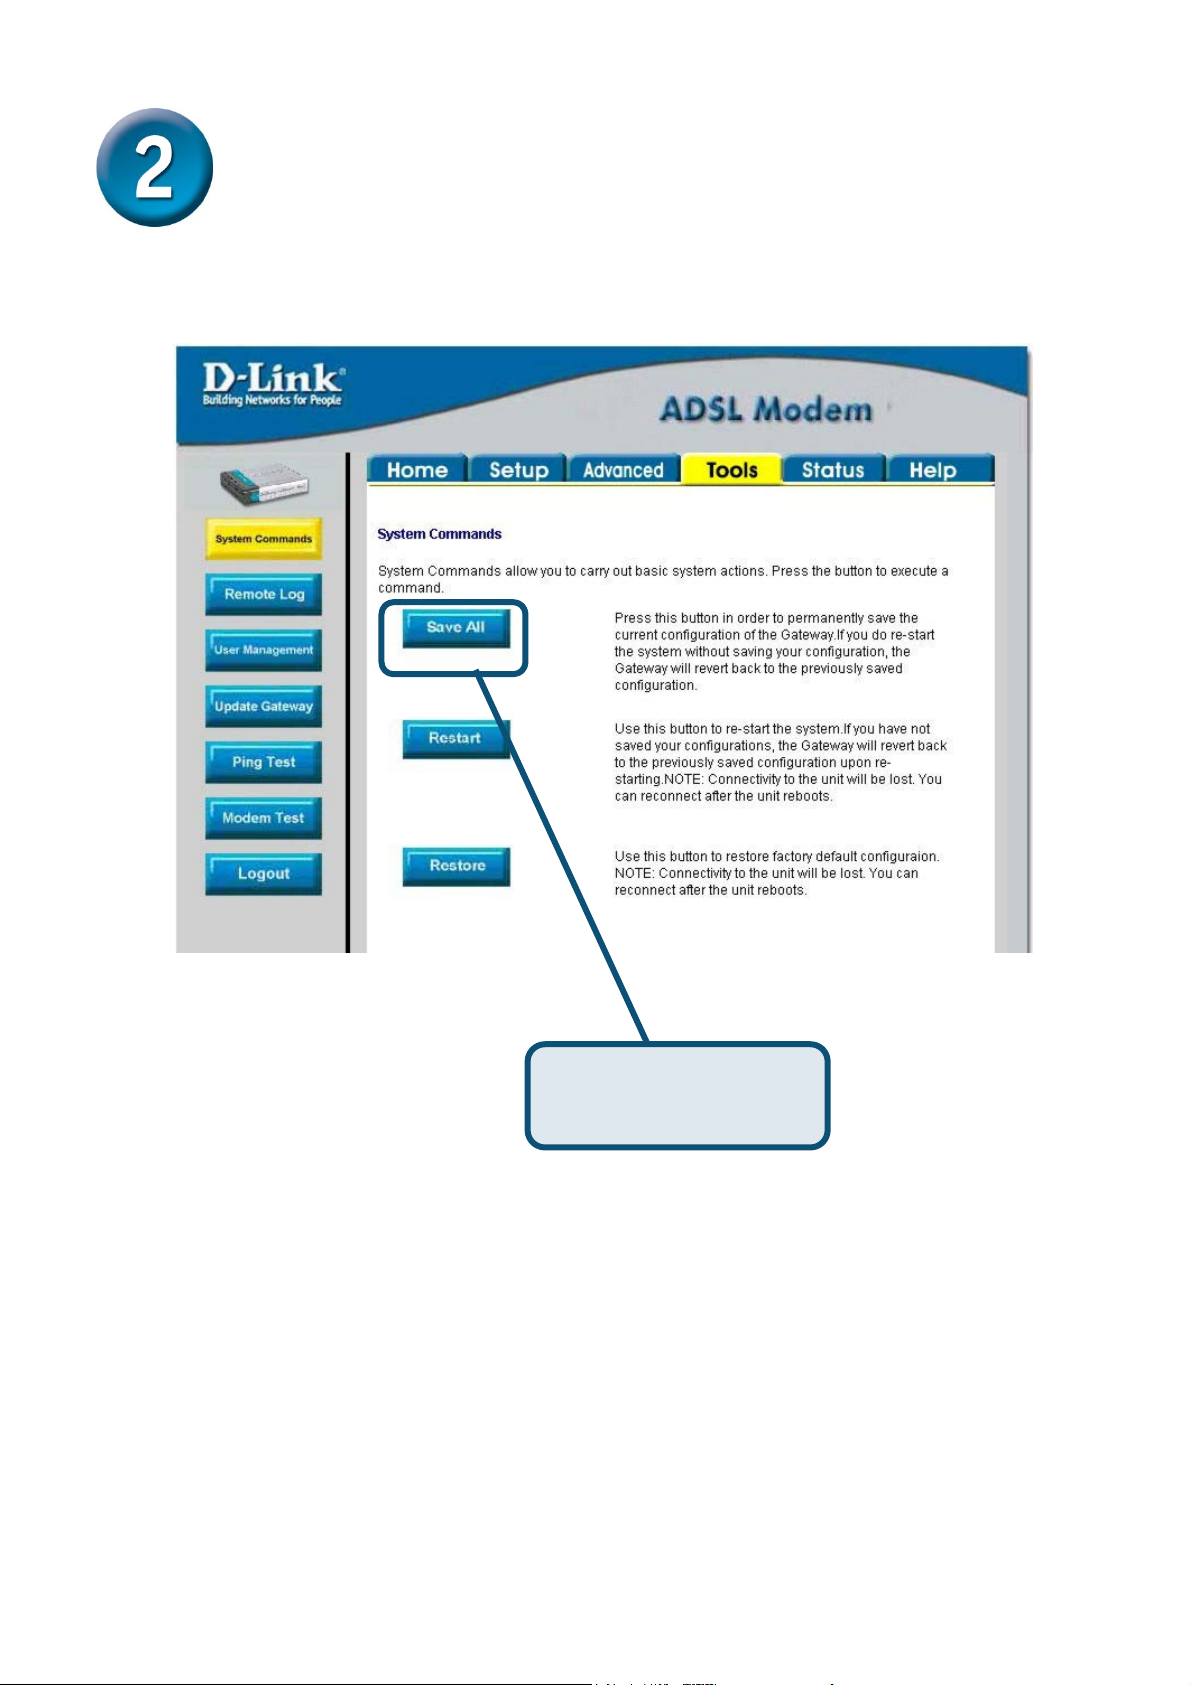
To save the new settings, click the Save All button in the System Commands menu. After a
few seconds, the changes will be saved. The Modem will automatically establish the Internet
connection after a few more seconds.
Wait a few seconds for the Internet connection to be established and proceed to access the
Internet via your web browser.
Click Save All to save
the new settings.
8
Page 9
Appendix
For additional settings or information, refer to the Advanced, Tools, or Status tabs on the
web-management interface; or to the manual located on the CD-ROM.
Configuring IP Settings in Windows XP
Use the following steps to configure a computer running Windows XP to be a DHCP client.
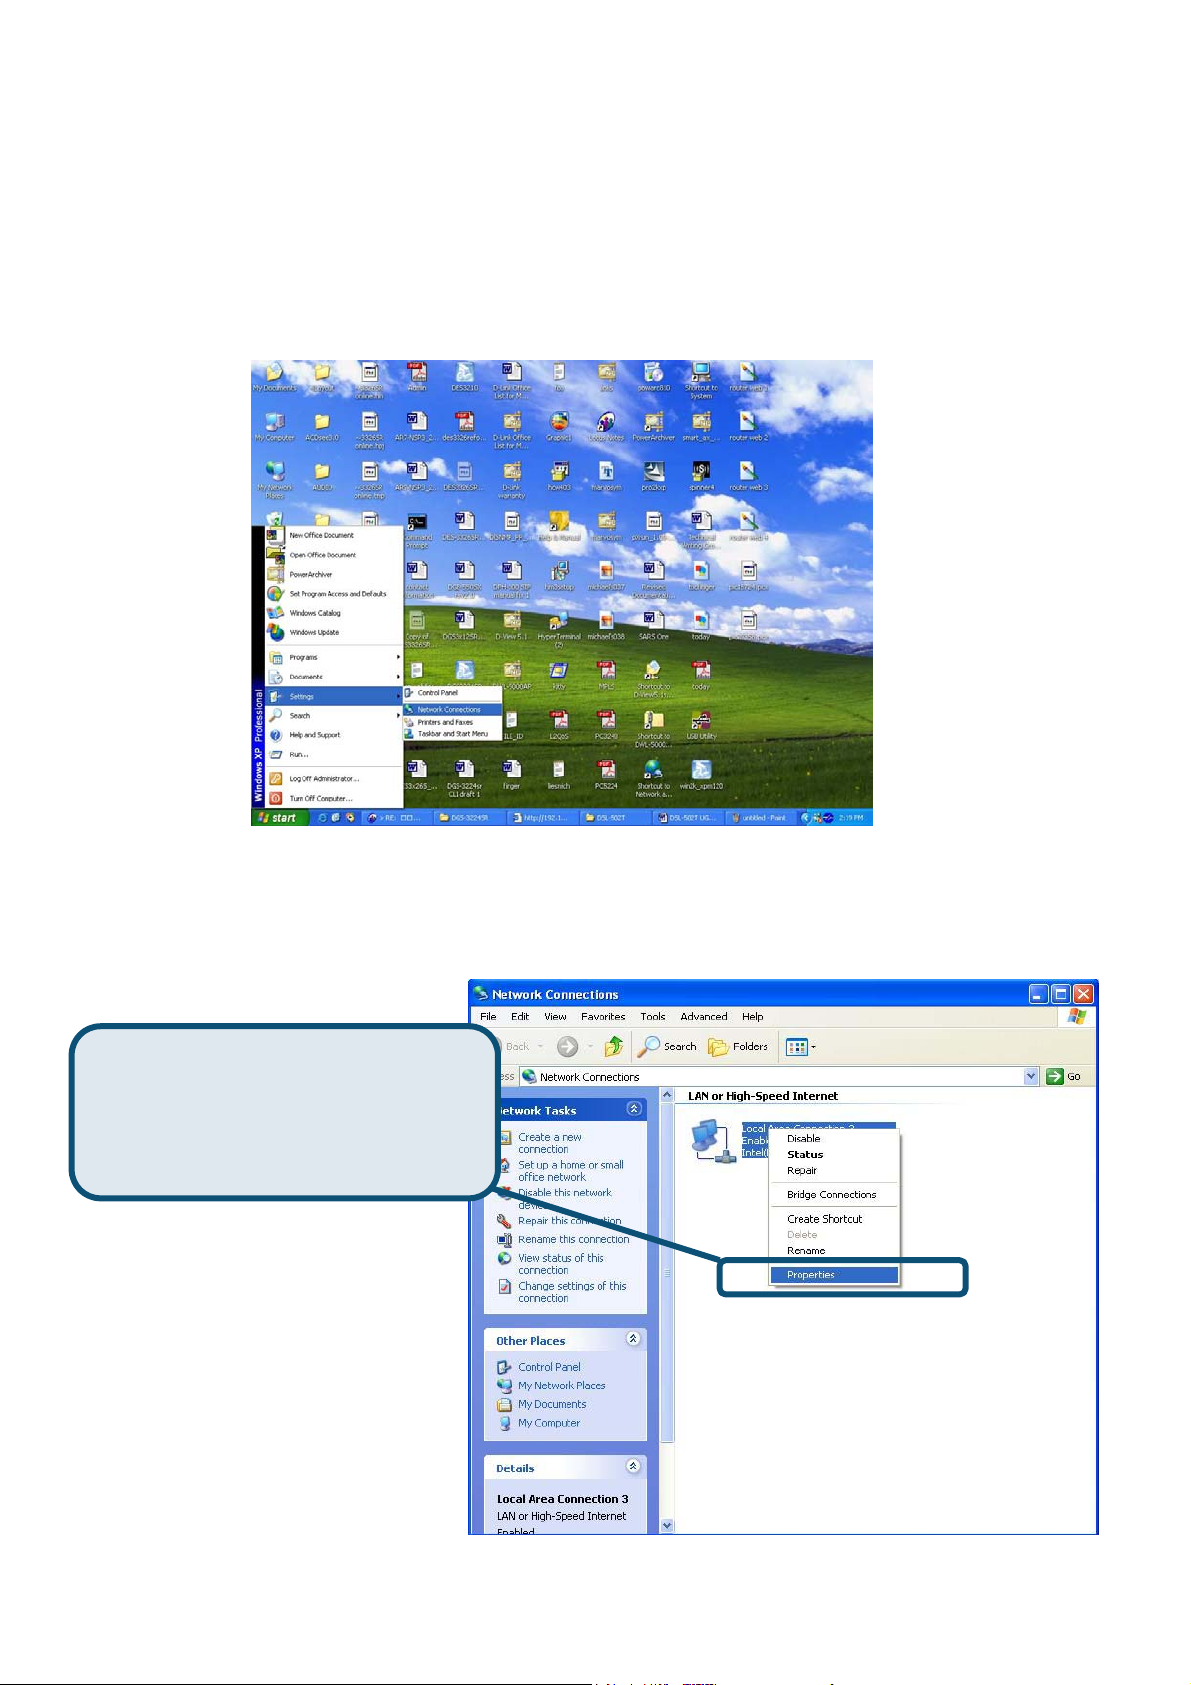
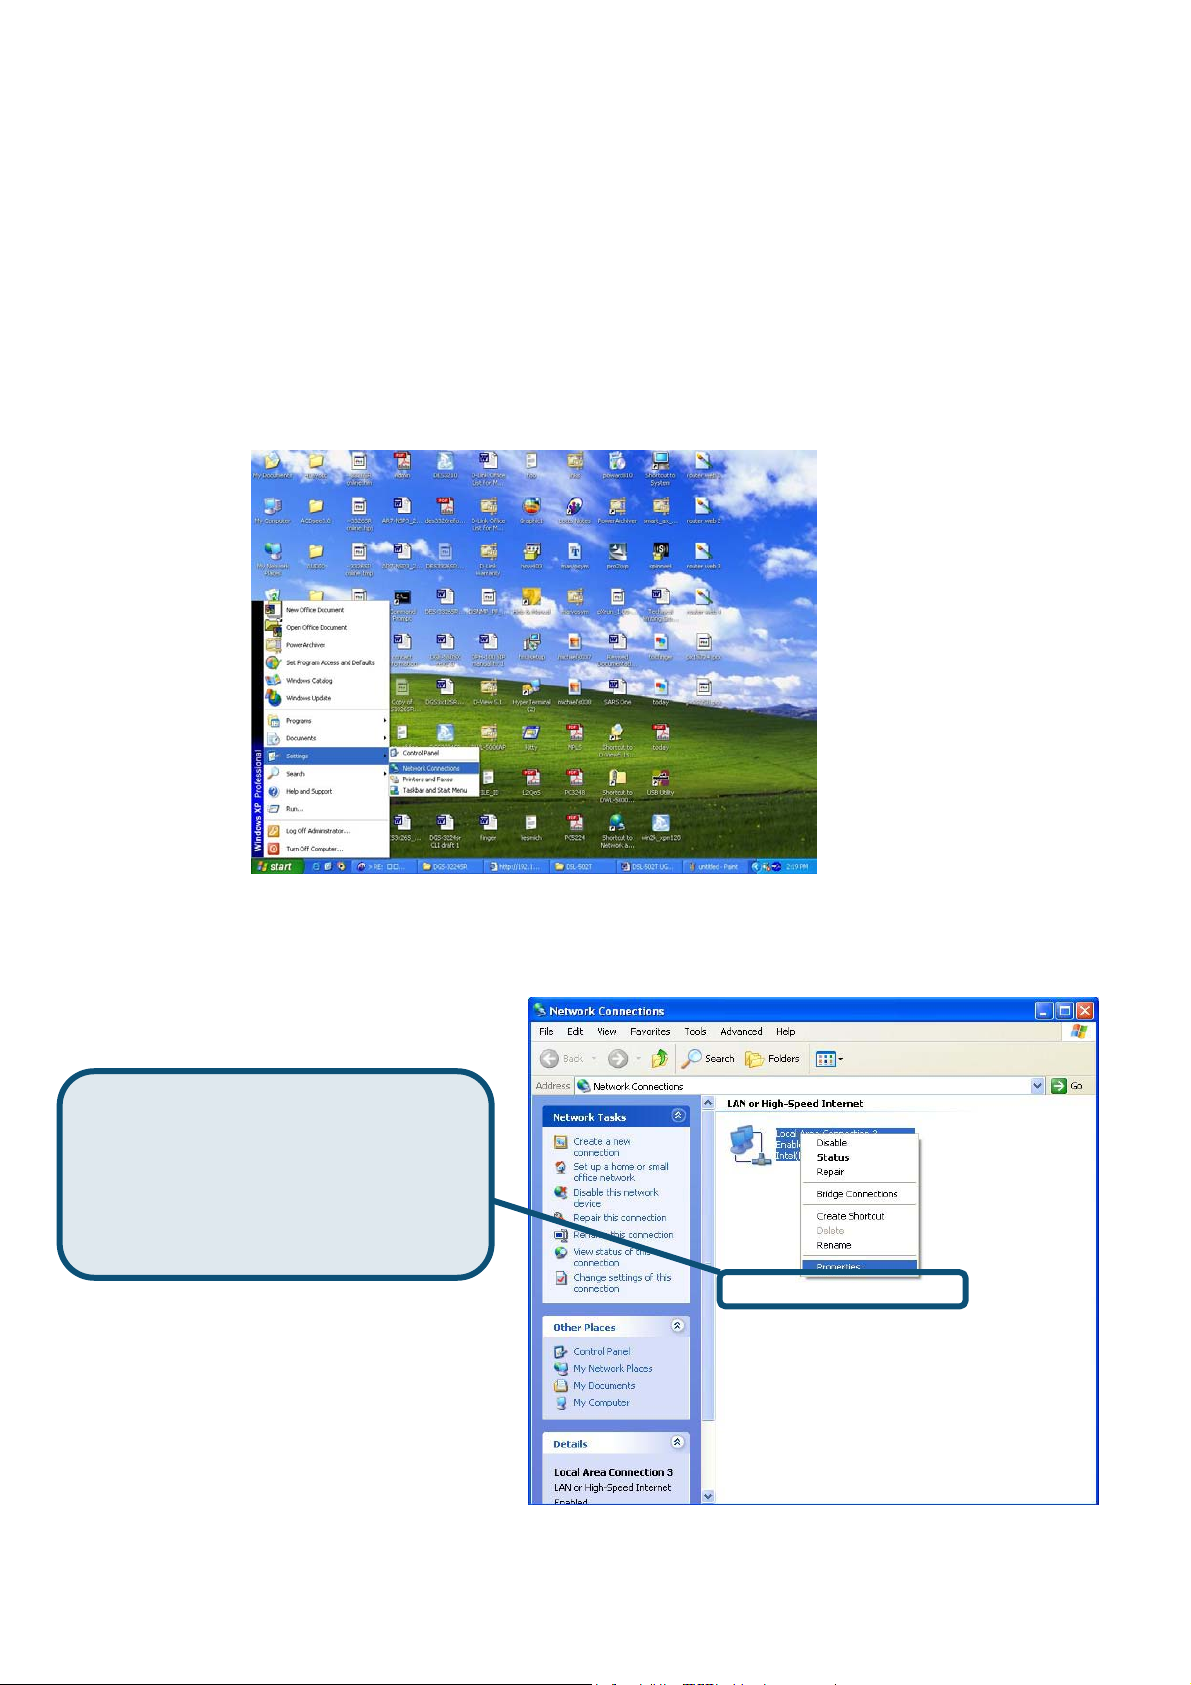
1. From the Start menu on your desktop, go to Settings, then click on Network
Connections.
2. In the Network Connections window, right-click on LAN (Local Area Connection),
then click Properties.
Right-click on the Local Area
Connection icon and Select the
Properties option from the pull-down
menu.
9
Page 10
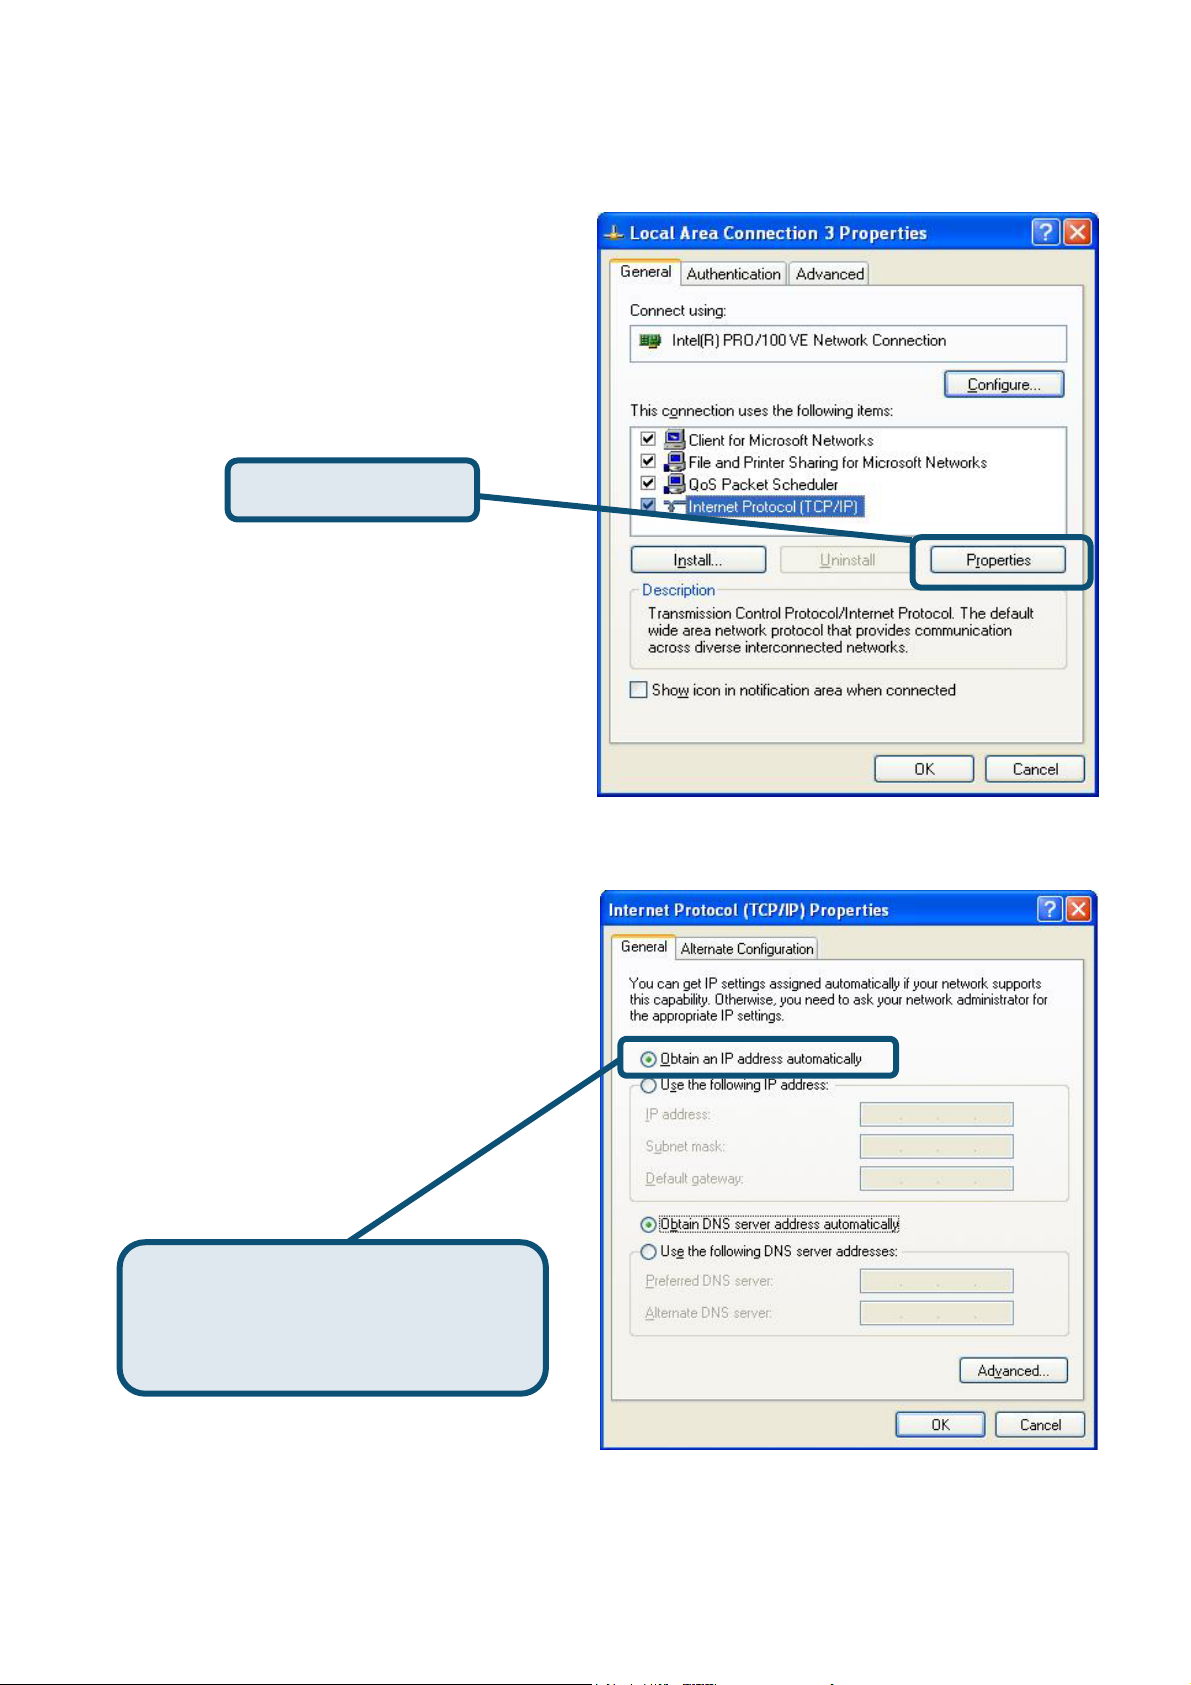
3. In the General tab of the Local Area Connection Properties menu, highlight Internet
Protocol (TCP/IP) under “This connection uses the following items:” by clicking on it
once. Click on the Properties button.
Click Properties
4. Select “Obtain an IP address automatically” by clicking once in the circle. Click the
OK button.
Select Obtain an IP address
automatically in the Internet
Protocol (TCP/IP) Properties window
Your computer is now ready to use the Modem’s DHCP server.
10
Page 11

You can find software updates and user documentation on the D-Link website.
D-Link provides free technical support for customers within the United States
and within Canada for the duration of the warranty period on this product.
U.S. and Canadian customers can contact D-Link technical support through
Tech Support for customers within the United States:
Tech Support for customers within Canada:
Technical Support
our website, or by phone.
D-Link Technical Support over the Telephone:
(877) 453-5465
24 hours a day, seven days a week.
D-Link Technical Support over the Internet:
http://support.dlink.com
email:support@dlink.com
D-Link Technical Support over the Telephone:
(800) 361-5265
Monday to Friday 8:30am to 9:00pm EST
D-Link Technical Support over the Internet:
http://support.dlink.ca
email:support@dlink.ca
11
Page 12
t
W
Dieses Produkt kann mi
jedem aktuellen
ebbrowser
eingerichtet werden
DSL-300T
ADSL-Modem
Vor dem Start
Stellen Sie vor der Installation sicher, dass Sie über alle notwendigen Informationen und
Komponenten verfügen.
Lieferumfang überprüfen
DSL-300T ADSL-Modem
CD-ROM mit Handbuch
Ethernet-Kabel (CAT5 UTP-kompatibel)
ADSL-Kabel
Netzteil
Die Verwendung eines Netzteils mit abweichender Spannung
führt zur Beschädigung des Geräts und zum Erlöschen der
12
Page 13

Modem mit dem Computer verbinden
A. Verbinden Sie das Netzteil zunächst mit der Buchse auf der Rückseite des
DSL-300T, und schließen Sie das Netzteil danach an eine Steckdose an. Die
LED-Betriebsanzeige leuchtet und zeigt damit den ordnungsgemäßen Betrieb des
Geräts an.
B. Verbinden Sie das eine Ende des Kabels mit dem Ethernet-Anschluss auf der
Rückseite des DSL-502T und das andere Ende mit einem Ethernet-Adapter oder
einem verfügbaren Ethernet-Anschluss an Ihrem Computer.
Anschluss für das
ADSL-Kabel
Anschluss
für das
Ethernet-K
abel
Stromanschluss
Rücksetztaste
13
Page 14
Modem konfigurieren
Um über Ihren Webbrowser auf die Webseiten zum Einrichten des Modems zu gelangen,
muss die Option „IP-Adresse automatisch beziehen“ aktiviert sein. Das bedeutet, dass Sie
Ihren Computer über die IP-Netzwerkeinstellungen als DHCP-Client konfigurieren müssen.
Falls Sie Windows XP verwenden und nicht wissen, wie Sie Ihre Netzwerkeinstellungen
verändern können, fahren Sie mit den Anweisungen in Anhang A fort. Weitere Informationen
zur Änderung der IP-Einstellungen bei Computern mit Betriebssystemen von Windows finden
Sie auch im Benutzerhandbuch.
Starten Sie den Webbrowser, und geben
Sie in das Adressfeld
„http://192.168.1.1“ ein. Drücken Sie
anschließend die Eingabetaste.
Die Anmeldeseite wird angezeigt.
Geben Sie als Login
Name und als
Password „admin“ ein.
14
Klicken Sie
Page 15
Modem konfigurieren (Fortsetzung)
Nach der Anmeldung wird der Bildschirm Home (Startseite) angezeigt. Klicken Sie auf die
Registerkarte Setup, um das Setup-Menü aufzurufen, und konfigurieren Sie das Modem.
Klicken Sie
auf Setup.
15
Page 16
Modem konfigurieren (Fortsetzung)
Klicken Sie im Setup-Menü auf die Schaltfläche Connection (Verbindung 1), um zu dem
Konfigurationsmenü für die Internetverbindung zu gelangen.
Klicken Sie auf
16
Page 17

Modem konfigurieren (Fortsetzung)
Geben Sie im Menü Connection 1 (Verbindung 1), den Benutzernamen und das Kennwort
Ihres ISP-Kontos ein. Klicken Sie auf die Schaltfläche Apply (Anwenden), nachdem Sie alle
Informationen eingegeben haben. Um die Änderungen für Connection 1 (Verbindung 1) zu
übernehmen, klicken Sie auf die Registerkarte Tools (Extras) und folgen Sie den
Anweisungen auf der nächsten Seite.
A.Geben Sie in den
Feldern Username und
Password den
Benutzernamen und das
Kennwort für Ihr Konto ein.
C. Klicken Sie auf die
Schaltfläche Apply, wenn
Sie alle Informationen
eingegeben haben.
D. Klicken Sie auf Tools,
nachdem Sie die neuen
Einstellungen
vorgenommen haben.
B. Überprüfen Sie die
Einstellungen unter
Type, VPI und VCI.
Falls diese Werte nicht
korrekt sind, ändern Sie
diese nach den
Anweisungen Ihres ISP.
17
Page 18
Anhang
Weitere Informationen, z. B. zu zusätzlichen Einstellungen, finden Sie auf den Registerkarten
Advanced, Tools und Status auf der webbasierten Verwaltungsoberfläche oder im Handbuch
auf der CD-ROM.
IP-Einstellungen in Windows XP konfigurieren
Führen Sie die folgenden Schritte aus, um einen Computer mit Windows XP als DHCP-Client
zu konfigurieren.
1. Klicken Sie auf dem Desktop im Menü Start auf Einstellungen und anschließend auf
Netzwerkverbindungen.
2. Klicken Sie im Fenster
LAN-Verbindung und anschließend auf Eigenschaften.
Klicken Sie mit der rechten
Maustaste auf das Symbol
LAN-Verbindung, und wähle
der Dropdown-Liste die Option
Eigenschaften.
n Sie in
Netzwerkverbindungen mit der rechten Maustaste auf
18
Page 19

3. Aktivieren Sie im Dialogfeld Eigenschaften von LAN-Verbindung auf der
Registerkarte Allgemein unter Von der Verbindung verwendete Komponenten: das
Kontrollkästchen Internetprotokoll (TCP/IP), indem Sie einmal darauf klicken. Klicken
Sie auf die Schaltfläche Eigenschaften.
Klicken Sie auf
Eigenschaften.
4. Wählen Sie IP-Adresse automatisch beziehen, indem Sie einmal auf den Kreis
klicken. Klicken Sie auf die Schaltfläche OK.
Wählen Sie nun Folgende
IP-Adresse verwenden im Fenster
Eigenschaften von Internet
Protokoll (TCP/IP) aus.
Der Computer ist nun so konfiguriert, dass der DHCP-Server des Modems verwendet wird.
19
Page 20

Aktualisierte Versionen von Software und Benutzerhandbuch finden Sie auf der
D-Link bietet kostenfreie technische Unterstützung für Kunden innerhalb
Unsere Kunden können technische Unterstützung über unsere
Telefonische technische Unterstützung erhalten Sie montags bis
donnerstags von 08.00 bis 19.00 Uhr, freitags von 08.00 bis 17.00
Wenn Sie Kunde von D-Link außerhalb Deutschlands, Österreichs,
der Schweiz und Osteuropas sind, wenden Sie sich bitte an die
zuständige Niederlassung aus der Liste im Benutzerhandbuch.
Technische Unterstützung
Website von D-Link.
Deutschlands, Österreichs, der Schweiz und Osteuropas.
Website, per E-Mail oder telefonisch anfordern.
Web: http://www.dlink.de
E-Mail: support@dlink.de
Telefon: 00800 7250 4000
Uhr.
20
Page 21

r
M
A
Ce produit peut s’installe
à l’aide de n’importe quel
navigateur web courant :
Internet Explorer 6 ou
DSL-300T
Modem ADSL
Avant de commencer
Assurez-vous de disposer des renseignements et du matériel nécessaires avant de
commencer l’installation.
Vérifiez le contenu de votre coffret
odem ADSL DSL-300T
CD-ROM (contenant le manuel et le pilote USB)
Câble Ethernet (CAT5 UTP)
Câble ADSL
daptateur d’alimentation
L’utilisation d'une alimentation de
tension nominale différente risque
d’endommager l’appareil et d’annuler la
garantie.
21
Page 22

Connexion du modem à l’ordinateur
A. Tout d’abord, connectez l’adaptateur d’alimentation au récepteur situé sur le
panneau arrière du DSL-300T, puis branchez l’autre extrémité de l’adaptateur
d’alimentation à une prise murale ou à une bande d’alimentation. Le LED
d’alimentation s’allume pour indiquer que le système fonctionne correctement.
B. Introduisez une extrémité du câble dans le port Ethernet situé sur le panneau
arrière du DSL-300T, puis branchez l’autre extrémité du câble à un adaptateur
Ethernet ou au port Ethernet disponible de votre ordinateur.
Port ADSL,
connectez le
câble ADSL
ici
Port Ethernet,
connectez le
câble Ethernet
ici
Connectez le cordon
d’alimentation ici
Bouton de
réinitialisati
on usine
22
Page 23

Configuration du modem
Pour utiliser votre navigateur Web pour accéder aux pages web utilisées pour configurer le
modem, votre ordinateur doit être configuré pour l’« Obtention automatique d’adresse IP ».
Autrement dit, vous devez modifier les paramètres réseau IP de votre ordinateur de telle sorte
qu’il soit client DHCP. Si vous utilisez Windows XP et ne savez pas comment modifier vos
paramètres réseau, passez à l’Annexe A et lisez les instructions qui vous sont données. Vous
pouvez également consulter le Manuel d’utilisation qui contient les instructions de
modification des paramètres IP pour les ordinateurs qui tournent sous Windows.
Ouvrez votre navigateur web et tapez
“http://192.168.1.1” dans la zone réservée
à l’URL. Ensuite, appuyez sur la touche Entrée
ou Retour.
La page de connexion (login) s’affiche.
Tapez “admin” pour le
Nom d’utilisateur et
“admin” pour le Mot de
passe.
23
Cliquez sur Se connecter
Page 24

Configuration du modem (suite)
Une fois que vous vous êtes connecté, la Page d’accueil s’affiche. Cliquez sur l’onglet
Configuration pour vous rendre au menu Configuration et configurer le modem.
Cliquez sur
Configurer
24
Page 25

Configuration du modem (suite)
Dans le menu Configuration, cliquez sur le bouton Connexion 1 pour vous rendre au menu
de configuration de la connexion Internet.
25
Page 26

Cliquez sur
Connexion
26
Page 27

Configuration du modem (suite)
Dans le menu Connexion , tapez le Nom d’utilisateur et le Mot de passe utilisés pour
vérifier l’identité de votre compte chez votre FAI. Cliquez sur le bouton Appliquer après avoir
saisi l’ensemble des informations. Pour sauvegarder les modifications apportées à la
Connexion 1, cliquez sur l’onglet Outils et suivez les instructions données en page suivante.
A. Tapez le Nom
d’utilisateur et le Mot de
passe correspondant à
votre compte.
C. Cliquez sur Appliquer
après avoir saisi les
informations relatives à
votre compte.
B. Vérifiez le Type
d’encapsulation PPP, le
VPI: et le VCI: - si ces
valeurs sont incorrectes,
changez-les en fonction
des instructions de votre
FAI.
D. Cliquez sur Outils
après avoir appliqué les
nouveaux paramètres.
27
Page 28

Annexe
Pour connaître les autres paramètres ou obtenir de plus amples informations, reportez-vous
aux onglets Avancés, Outils et Statut de l’interface de gestion web. Vous pouvez également
consulter le manuel qui figure sur le CD-ROM.
Configuration des paramètres IP sous Windows XP
Suivez la procédure ci-dessous pour configurer un ordinateur qui tourne sous Windows XP de
manière à ce qu’il devienne client DHCP.
1. A partir du menu Démarrer de votre bureau, allez à Paramètres, puis cliquez sur
Connexions réseau.
2. Dans la fenêtre Connexions réseau, faites un clic droit sur LAN (connexion locale),
puis cliquez sur Propriétés.
Faites un clic droit sur l’icône
Connexion locale et Sélectionnez
l’option Propriétés dans le menu
déroulant.
28
Page 29

3. Dans l’onglet Général du menu Propriétés de la connexion locale, sélectionnez
Protocole Internet (TCP/IP) sous « Cette connexion utilise les éléments suivants »,
en cliquant dessus une fois. Cliquez sur le bouton Propriétés.
Cliquez sur
Propriétés
4. Sélectionnez « Obtention automatique d’adresse IP » en cliquant une fois dans
l’anneau. Cliquez sur OK.
Sélectionnez Obtention
automatique d’adresse IP dans la
fenêtre Propriétés du protocole
Internet (TCP/IP)
Votre ordinateur est à présent prêt à utiliser le serveur DHCP du modem.
29
Page 30

Vous trouverez la documentation et les logiciels les plus
Le service technique de D-Link est gratuit pour les
clients aux Etats-Unis durant la période de garantie.
Assistance technique
récents sur le site web D-Link.
Ceuxci peuvent contacter le service technique de
D-Link par notre site internet ou par téléphone.
Assistance technique D-Link par téléphone :
0 820 0803 03
Assistance technique D-Link sur internet :
Web :http://www.dlink.fr
E-mail :support@dlink.fr
30
Page 31

t
N
Este producto puede
configurarse usando
cualquier navegador web
habitual, p. ej., Interne
Explorer 6 o Netscape
avigator 6.2.3.
DSL-300T
ADSL Modem
Antes de empezar
Compruebe que dispone de toda la información y del equipo necesarios para iniciar la instalación.
Comprobar el contenido del paquete
• Módem ADSL DSL-300T
• CD-ROM (incluye Manual y )
• Cable Ethernet (CAT5 UTP)
•Cable ADSL
• Adaptador de alimentación
perjudicial y anular la garantía de este
producto.
El uso de una fuente
de alimentación con
distinto voltaje puede ser
Si falta alguno de los componentes, por favor contacte con su proveedor.
31
Page 32

A. Conecte el adaptador de alimentación al receptor que se encuentra en el
B. Introduzca un extremo del cable en el puerto Ethernet que se encuentra
Puerto ADSL,
para conectar
Conexión del módem al ordenador
panel trasero del DSL-300T, y enchufe el otro extremo del adaptador de
alimentación en una base de pared o regleta de alimentación. El LED de
alimentación se pondrá en ON para indicar que la operación se ha
realizado correctamente.
en el panel trasero del DSL-300T, y el otro extremo del cable, en un
Conexión para el
cable de
Puerto Ethernet,
para conectar el
cable Ethernet
Botón Reset
32
Page 33

Configuración del módem
Para poder usar el navegador web a fin de acceder a las páginas web de configuración del
módem, el ordenador ha de estar configurado para obtener una dirección IP automáticamente
(“Obtain an IP address automatically”); para ello, debe cambiar los parámetros de red IP del
ordenador, ya que es un cliente DHCP. Si su sistema es Windows XP y no sabe cómo
cambiar los parámetros de red, consulte el Apéndice, que recoge las instrucciones necesarias
para realizar este cambio. En el Manual del usuario también se encuentran las instrucciones
para llevar a cabo el cambio de los parámetros IP en ordenadores con sistemas operativos
Windows.
Abra su navegador web y escriba
“http://192.168.1.1” en el cuadro de dirección
URL. Después, apriete la tecla Intro.
Se mostrará la pantalla de entrada al sistema.
Escriba “admin” en Login Name,
y “admin”, en Password
Haga clic en
Login
33
Page 34

Configuración del módem (continuación)
Tras haber entrado en el sistema, aparecerá la pantalla Home. Haga clic en la ficha Setup
para acceder al menú Setup y poder configurar el módem.
Haga clic en
Setup
34
Page 35

Configuración del módem (continuación)
En el menú Setup, haga clic en el botón Connection para acceder al menú de configuración
de la conexión a internet.
Haga clic en
Connection
35
Page 36

Configuración del módem (continuación)
En el menú Connection , escriba el nombre de usuario (Username) y la clave de acceso
(Password) que permiten verificar la identidad de su cuenta ISP. Cuando haya introducido
estos datos, haga clic en el botón Apply. Para guardar los cambios realizados en
Connection 1, haga clic en la ficha Tools y siga las instrucciones de la página siguiente.
Escriba el nombre de
usuario en Username, y la
clave de acceso, en
Password.
Haga clic en el boton
Apply cuando ya haya
introducido la información
Haga clic en Tools
cuando ya haya aplicado
los nuevos parámetros.
Compruebe la
encapsulación PPP
Type, VPI: y VCI:.
Si no son correctos,
cámbielos según las
36
Page 37

Apéndice
Si desea información sobre otros parámetros u de otro tipo, vea las fichas Advanced, Tools, o
Status de la interfaz de gestión web, o consulte el manual que se encuentra en el CD-ROM.
Configuración de parámetros IP en Windows XP
Realice los pasos siguientes para configurar un ordenador con Windows XP de forma que
actúe como un cliente DHCP.
1. Desde el menú Start del escritorio, vaya a Settings y, después, haga clic en Network
Connections.
2. En la ventana Network Connections, haga clic con el botón de la derecha en LAN
(Local Area Connection) y, después, haga clic en Properties.
Haga clic con el botón de la
derecha en el icono Local Area
Connection y seleccione la opción
Properties en el menú desplegable.
37
Page 38

3. En la ficha General del menú Local Area Connection Properties, marque Internet
Protocol (TCP/IP), bajo “This connection uses the following items:”; para ello, haga
clic en la casilla de verificación correspondiente. Haga clic en el botón Properties.
Haga clic en
Properties
4. Seleccione “Obtain an IP address automatically” haciendo clic en el círculo
correspondiente. Haga clic en el botón OK.
Seleccione Obtain an IP address
automatically en la ventana Internet
Protocol (TCP/IP) Properties.
El ordenador está listo para poder usar el servidor DHCP del módem.
38
Page 39
Asistencia Técnica
Puede encontrar el software más reciente y documentación
para el usuario en el sitio web de D-Link . D-Link ofrece
asistencia técnica gratuita para clientes dentro de España
durante el periodo de garantía del producto. Los clientes
españoles pueden ponerse en contacto con la asistencia
técnica de D-Link a través de nuestro sitio web o por
teléfono.
Asistencia Técnica de D-Link por teléfono:
93 409 0775
de lunes a viernes desde las 9:00 hasta las14:00 y de las
15:30 hasta las 18:30
Asistencia Técnica de D-Link a través de Internet:
http://www.dlink.es/supporto/main/view.html
email: soporte@dlink.es
39
Page 40

e
b
o
N
M
Il presente prodotto può esser
configurato con un qualunque
rowser web aggiornato, per
esempio Internet Explorer 6
etscape Navigator 6.2.3.
DSL-300T
Modem ADSL
Prima di cominciare
Prima di cominciare verificare la disponibilità di tutte le attrezzature e le
informazioni necessarie.
Contenuto del pacchetto
odem ADSL DSL-300T
CD-ROM (con manuale e driver USB)
Cavo Ethernet (CAT5 UTP)
Cavo ADSL
Trasformatore
trasformatore con
voltaggio differente danneggia
il prodotto e compromette la
validità della garanzia
Se uno dei componenti dovesse risultare mancante, contattare il rivenditore
L’utilizzo di un
40
Page 41

Connessione del modem al computer
A. Connettere il trasformatore al relativo connettore posto sul pannello posteriore
del dispositivo DSL-300T e alla presa di corrente. Il LED Power si accende per
indicare il corretto funzionamento del dispositivo.
B. Inserire le due estremità del cavo Ethernet rispettivamente nella porta Ethernet
posta sul pannello posteriore del dispositivo DSL-300T e nell’adattatore
Ethernet del computer.
Porta ADSL
per la
connessione
del cavo
ADSL
Porta Ethernet per
a connessione del
l
cavo Ethernet
Connettore per il
trasformatore
Tasto per
Factory
Reset
41
Page 42

Configurazione del modem
Per accedere all’interfaccia di configurazione del modem mediante un browser, è necessario
configurare il computer come client DHCP, abilitando l’opzione “Obtain an IP address
automatically”. Nell’appendice A viene descritta la procedura per modificare le impostazioni
di rete di un computer con sistema operativo Windows XP. Le procedure per computer dotati
di altri sistemi operativi Windows sono descritte nel manuale utente.
Aprire il browser e digitare
“http://192.168.1.1” nel campo URL.
Premere il tasto Enter o Invio.
Il sistema visualizza la finestra Login.
Digitare “admin” nel
campo Login Name e
“admin” nel campo
Password.
Cliccare su Login
42
Page 43

Configurazione del modem (continua)
Una volta eseguito il login, il sistema visualizza la finestra Home. Cliccare sulla scheda Setup
per accedere al menu di configurazione del modem.
Cliccare su Setup
43
Page 44
Configurazione del modem (continua)
Nel menu Setup, cliccare sul pulsante Connection per accedere al menu di configurazione
della connessione a Internet.
Cliccare su Connection
44
Page 45

Configurazione del modem (continua)
Nei campi Username e Password del menu Connection , inserire il nome utente e la
password utilizzati dall’ISP per identificare l’account. Dopo avere inserito le informazioni
richieste, cliccare sul pulsante Apply. Per salvare le modifiche effettuate nel menu
Connection 1, cliccare sulla scheda Tools e seguire le istruzioni contenute nella pagina
successiva.
Nei campi Username e
Password inserire le
informazioni relative all’account.
Cliccare sul pulsante
Apply dopo avere inserito
le informazioni relative
all’account.
Verificare i valori dei
campo Type, VPI: e
VCI:. Se necessario
modificare i campi in
base alle informazioni
fornite dall’ISP.
Cliccare su Tools dopo avere
confermato le nuove impostazioni
con il pulsante Apply.
45
Page 46

Appendice
Per maggiori informazioni sulle impostazioni, accedere alle schede Advanced, Tools o
Status dell’interfaccia di gestione basata sul Web oppure consultare il manuale utente
contenuto nel CD-ROM.
Configurazione delle impostazioni IP in ambiente Windows XP
In seguito viene descritta la procedura per configurare come client DHCP un computer dotato
di sistema operativo Windows XP.
1. Dal menu Start del desktop, selezionare Impostazioni e cliccare su Connessioni di
rete.
2. Nella finestra Connessioni, cliccare su LAN (Local Area Connection) col tasto destro
del mouse e cliccare su Proprietà.
Col tasto destro del mouse,
cliccare sull’icona Connessione alla
rete locale e Selezionare l’opzione
Proprietà dal menu a cascata
46
Page 47

3. Nella scheda Generale del menu Proprietà della Connessione di Rete, evidenziare
con un clic la voce Protocollo Internet (TCP/IP) nel riquadro “La connessione
utilizza gli elementi seguenti:”. Cliccare sul pulsante Proprietà.
Cliccare su Proprietà
4. Selezionare l’opzione “Ottieni un indirizzo IP automaticamente”. Cliccare su OK.
Nella finestra Protocollo Internet
(TCP/IP) Proprietà selezionare
Ottieni un indirizzo IP
automaticamente
Il computer è pronto per utilizzare il server DHCP del modem.
47
Page 48

Le ultime versioni del software e la documentazione aggiornata sono
disponibili al sito D-Link.
D-Link fornisce un supporto tecnico gratuito ai clienti residenti in Italia per
tutto il periodo di validità della garanzia del prodotto.
I clienti italiani possono contattare il supporto tecnico D-Link
telefonicamente o attraverso il Web
Supporto tecnico
Supporto tecnico negli USA:
Supporto tecnico D-Link telefonico:
02-39607160
Dal Lunedì al Venerdì dalle 9:00 alle 19.00
Supporto tecnico D-Link via Internet:
http://www.dlink.it/supporto/main/view.html
email: tech@dlink.it
48
Page 49

А
Это устройство может быть
настроено с помощью
WEB-браузера, например
Internet Explorer 6 или Netscape
DSL-300T
ADSL Модем
Прежде чем начать
Прежде чем приступить к установке, убедитесь, что у Вас имеется вся необходимая
информация и оборудование.
Проверьте содержимое комплекта
DSL-300T ADSL модем
CD-ROM
Ethernet (CAT5 UTP) кабель
ADSL кабеля
даптер питания
Использование источника
питания с другими
характеристиками и
напряжением может повлечь
выход из строя устройства и
потерю гарантии
49
Page 50

Подключение модема к компьютеру
A. Подключите адаптер питания к разъему на задней панели DSL-300T, а
другой его конец к силовой розетке или другому источнику питания.
Индикатор Power загорится, что говорит о правильной работе.
B. Подключите один конец кабеля к порту Ethernet на задней панели
DSL-300T, а другой конец подключите к адаптеру Ethernet или свободному
порту Ethernet компьютера.
Порт ADSL
для
подключения
ADSL кабеля
Подключение
адаптера
Порт Ethernet для
питания
подключения
Ethernet кабеля
Кнопка
сброса
50
Page 51

Настройка Модема
Чтобы Web-браузер мог загрузить web-страницы, используемые для настройки Модема,
компьютер должен быть сконфигурирован для получения IP-адреса автоматически
(“Obtain an IP address automatically”), поэтому необходимо изменить IP настройки
компьютера так, чтобы он стал клиентом DHCP. Если Вы используете Windows XP и не
знаете, как изменить сетевые настройки, то прочитайте приведенные в Приложении
инструкции. Помимо этого, в Руководстве Пользователя содержатся инструкции по
изменению IP настроек для компьютеров, на которых установлены операционные
системы Windows.
Откройте Web-браузер и наберите
“http://192.168.1.1” в строке адреса URL.
Затем нажмите Enter или Return.
Появится страница регистрации.
Введите “admin” в
поле Login Name и
“admin” в поле
Password.
51
Нажмите Login
Page 52

Настройка Модема (продолжение)
После регистрации появится окно Home. Нажмите Setup, чтобы перейти в меню Setup и
настроить Модем.
Нажмите Setup
52
Page 53

Настройка Модема (продолжение)
В меню Setup нажмите кнопку Connection для перехода в меню настройки
соединения с Интернет.
Нажмите Connection
53
Page 54

Настройка Модема (продолжение)
В меню Connection 1 введите имя пользователя в поле Username и пароль в поле
Password, используемые для проверки Вашей учетной записи Интернет-провайдером.
Нажмите кнопку Apply после ввода информации. Для сохранения настроек соединения
Connection 1, нажмите Tools и следуйте инструкциям, приведенным на следующей
странице.
Введите Username и
Password Вашей
учетной записи.
Нажмите кнопку Apply
после ввода информации
об учетной записи.
Нажмите Tools после
сохранения настроек.
54
Page 55

Приложение
По поводу дополнительных настроек или иной информации обращайтесь к страницам
Advanced, Tools или Status Web-интерфейса управления или к Руководству
Пользователя на CD-ROM.
Изменение IP настроек в Windows XP
Выполните следующие шаги для настройки компьютера под управлением Windows XP в
качестве DHCP-клиента.
1. В меню Пуск (Start) выберите пункт Настройка (Settings)и затем Сетевые
подключения (Network Connections).
2. В окне Сетевые подключения щелкните правой кнопкой мыши на Подключение
по локальной сети (Local Area Connection), затем выберите Свойства
(Properties).
Щелкните правой кнопкой на
значок Подключение по локальной
сети и выберите пункт Свойства
из выпадающего меню.
55
Page 56

3. На вкладке Общие (General) меню Подключение по локальной сети-свойства
(Local Area Connection Properties) , выделите пункт Протокол Интернета (TCP/IP)
(Internet Protocol (TCP/IP)) под заголовком “Компоненты, используемые этим
подключением:”. Нажмите на кнопку Свойства.
Нажмите Свойства
4. Выберите опцию “Получить IP-адрес автоматически” (Obtain an IP address
automatically). Нажмите кнопку OK.
Выберите Получить IP-адрес
автоматически в окне Свойства:
Протокол Интернета (TCP/IP).
Теперь компьютер готов к использованию DHCP-сервера модема.
56
Page 57

Вы можете найти последнюю версию програмного
обеспечения и документацию по продуктам на сайте
поддержку клиентов в течение гарантийного срока
Клиенты могут связаться со службой технической
Телефоны службы технической поддержки D-Link:
Техническа поддержка
D-Link
D-Link обеспечивает бесплатную техническую
изделия.
поддержки D-Link через наш web-сайт, или по
телефону.
+7 (095) 744 00 99
Техническая Поддержка D-Link через Internet:
support@dlink.ru
57
 Loading...