

Page 1
Version 1.0 | 1/13/2017
User Manual
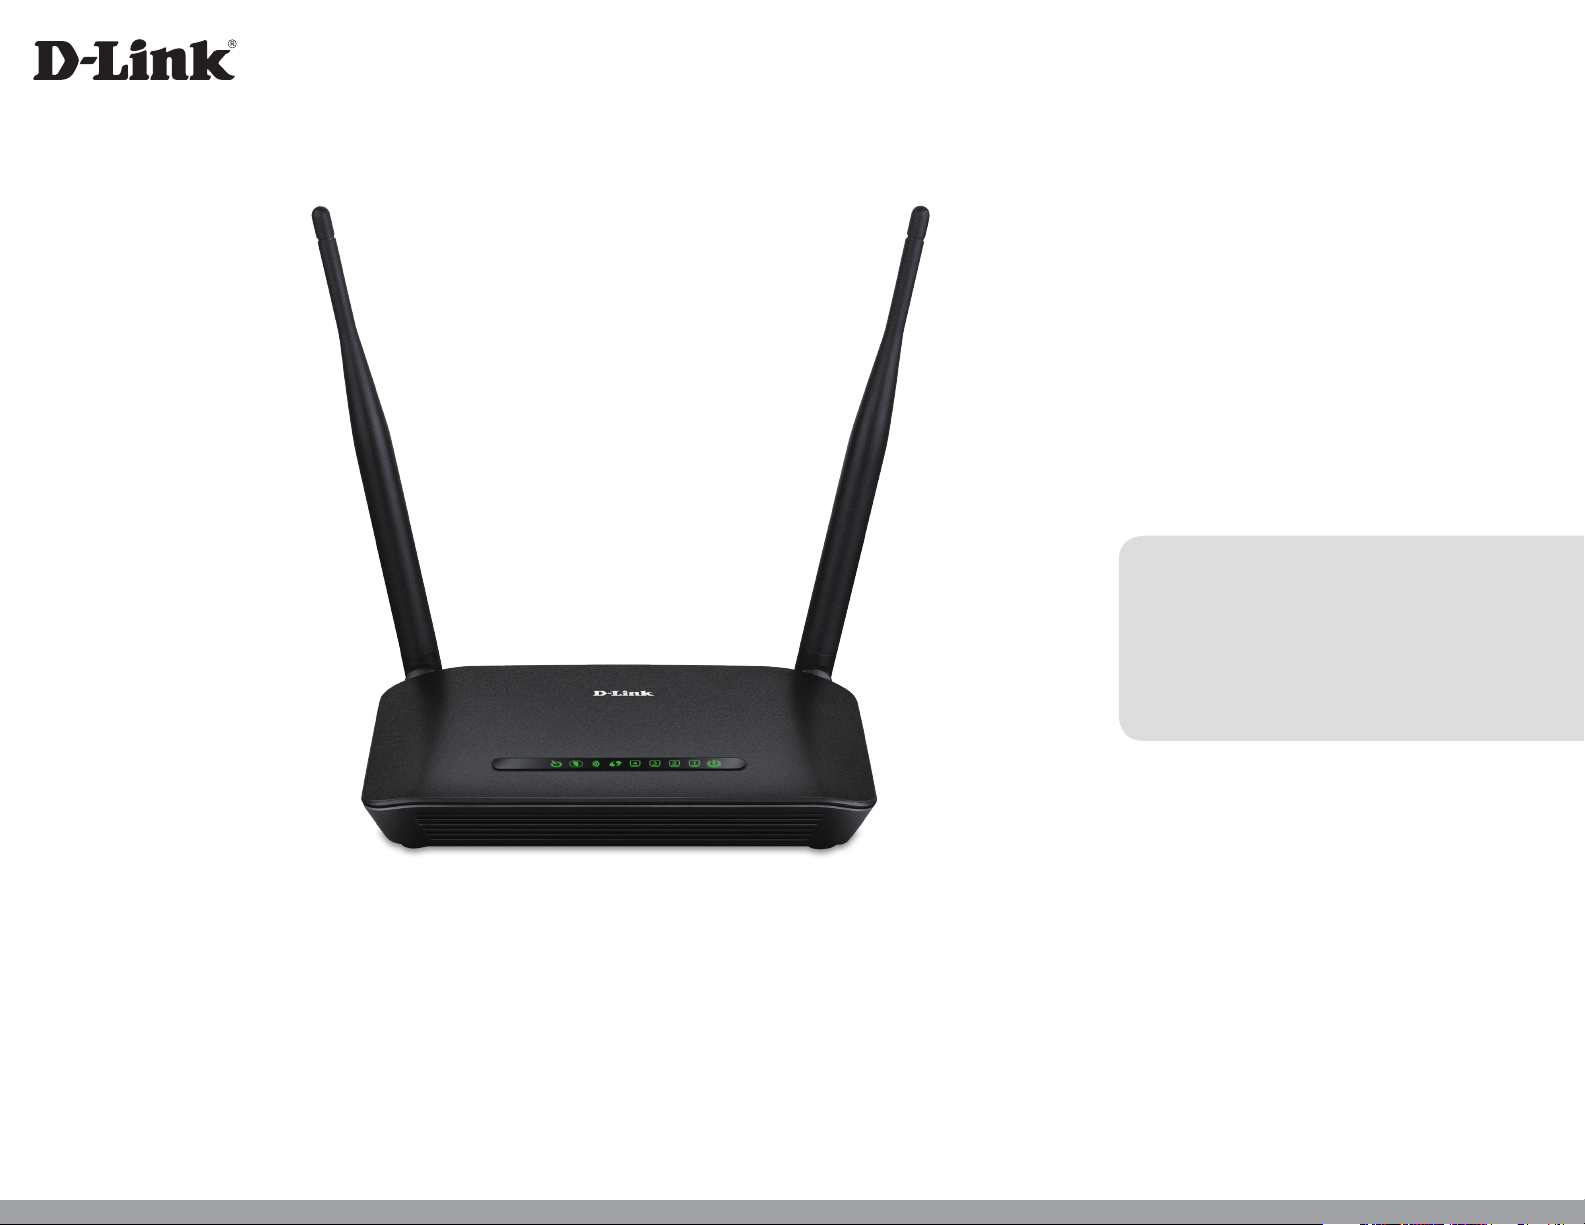
Wireless N300 ADSL2+ Modem Router
DSL-2740M
Page 2
Preface
D-Link reserves the right to revise this publication and to make changes in the content hereof without obligation to notify any person or organization
of such revisions or changes.
Manual Revisions
Revision Date Description
1.00 January 13, 2017 • Release for revision A1
Trademarks
D-Link and the D-Link logo are trademarks or registered trademarks of D-Link Corporation or its subsidiaries in the United States or other countries.
All other company or product names mentioned herein are trademarks or registered trademarks of their respective companies.
Chrome™ browser, Google Play™ and Android™ are trademarks of Google Inc.
Internet Explorer®, Windows® and the Windows logo are trademarks of the Microsoft group of companies.
Copyright © 2017 by D-Link Corporation, Inc.
All rights reserved. This publication may not be reproduced, in whole or in part, without prior expressed written permission from D-Link Corporation, Inc.
iD-Link DSL-2740M User Manual
Page 3

Table of Contents
Table of Contents
Product Overview .............................................................. 1
Package Contents .........................................................................1
System Requirements ................................................................. 2
Introduction ................................................................................... 3
Features ............................................................................................4
Hardware Overview ..................................................................... 5
LED Panel ................................................................................. 5
Back Panel ...............................................................................6
Installation ......................................................................... 7
Before you Begin ...........................................................................7
Wireless Installation Considerations ......................................8
Hardware Setup ............................................................................9
Conguration ...............................................................................12
Setup Wizard ................................................................................13
Others .....................................................................................15
PPPoE/PPPoA...................................................................16
Dynamic IP Address ......................................................17
Static IP Address .............................................................18
Bridge Mode ....................................................................19
Finish .......................................................................................20
Static IP Address .............................................................28
Bridge Mode ....................................................................29
Virtual Circuit Settings ......................................................30
Dual Stack Lite .....................................................................31
Wireless Setup ......................................................................32
Wireless Network Setup Wizard ................................33
Add Wireless Device with WPS (Wi-Fi Protected
Setup) Wizard ..................................................................34
Manual Wireless Network Setup ..............................35
LAN Setup ..............................................................................39
IPv6 Setup .............................................................................42
Time and Date ......................................................................43
Logout ....................................................................................45
Advanced ......................................................................................46
Port Forwarding ..................................................................47
QoS Setup ..............................................................................48
Wireless QoS Settings ...................................................49
LAN QoS Settings ...........................................................50
Outbound Filter ...................................................................51
Inbound Filter ......................................................................52
Static Route ...........................................................................53
Manual Conguration .....................................................21
Web UI Table of Contents ........................................................22
Setup ...............................................................................................23
ADSL Setup ...........................................................................24
PPPoE/PPPoA...................................................................25
Dynamic IP Address ......................................................27
DNS Setup .............................................................................54
VLAN ........................................................................................55
Firewall & DMZ .....................................................................56
Advanced ADSL ...................................................................57
Advanced Wireless .............................................................58
Wi-Fi Protected Setup .......................................................60
iiD-Link DSL-2740M User Manual
Page 4

Table of Contents
Wireless Mac Filter ..............................................................61
Advanced LAN .....................................................................62
Remote Management .......................................................63
Logout ....................................................................................64
Maintenance ................................................................................65
Password ................................................................................66
Save/Restore Settings .......................................................67
Firmware Update ................................................................68
Diagnostics ...........................................................................69
System Log ............................................................................70
Logout ....................................................................................71
Status ..............................................................................................72
Device Info ............................................................................73
Connected Clients ..............................................................74
Statistics .................................................................................75
Logout ....................................................................................76
Help .................................................................................................77
Wireless Basics .................................................................93
What is Wireless? .........................................................................94
Wireless Modes ............................................................................97
Networking Basics ........................................................... 98
Check your IP address ...............................................................98
Statically Assign an IP address ...............................................99
Wireless Security ......................................................... 100
What is WPA? ................................................................ 100
Technical Specications ................................................101
Connecting to a Wireless Network .................................78
WPS Button ...................................................................................78
Windows® 10 ................................................................................79
Windows® 8 ...................................................................................81
WPA/WPA2 ............................................................................81
Windows® 7 ...................................................................................83
WPA/WPA2 ............................................................................83
Windows Vista® ............................................................................86
WPA/WPA2 ............................................................................87
Troubleshooting .............................................................. 89
iiiD-Link DSL-2740M User Manual
Page 5
Section 1 - Product Overview
Product Overview
Package Contents
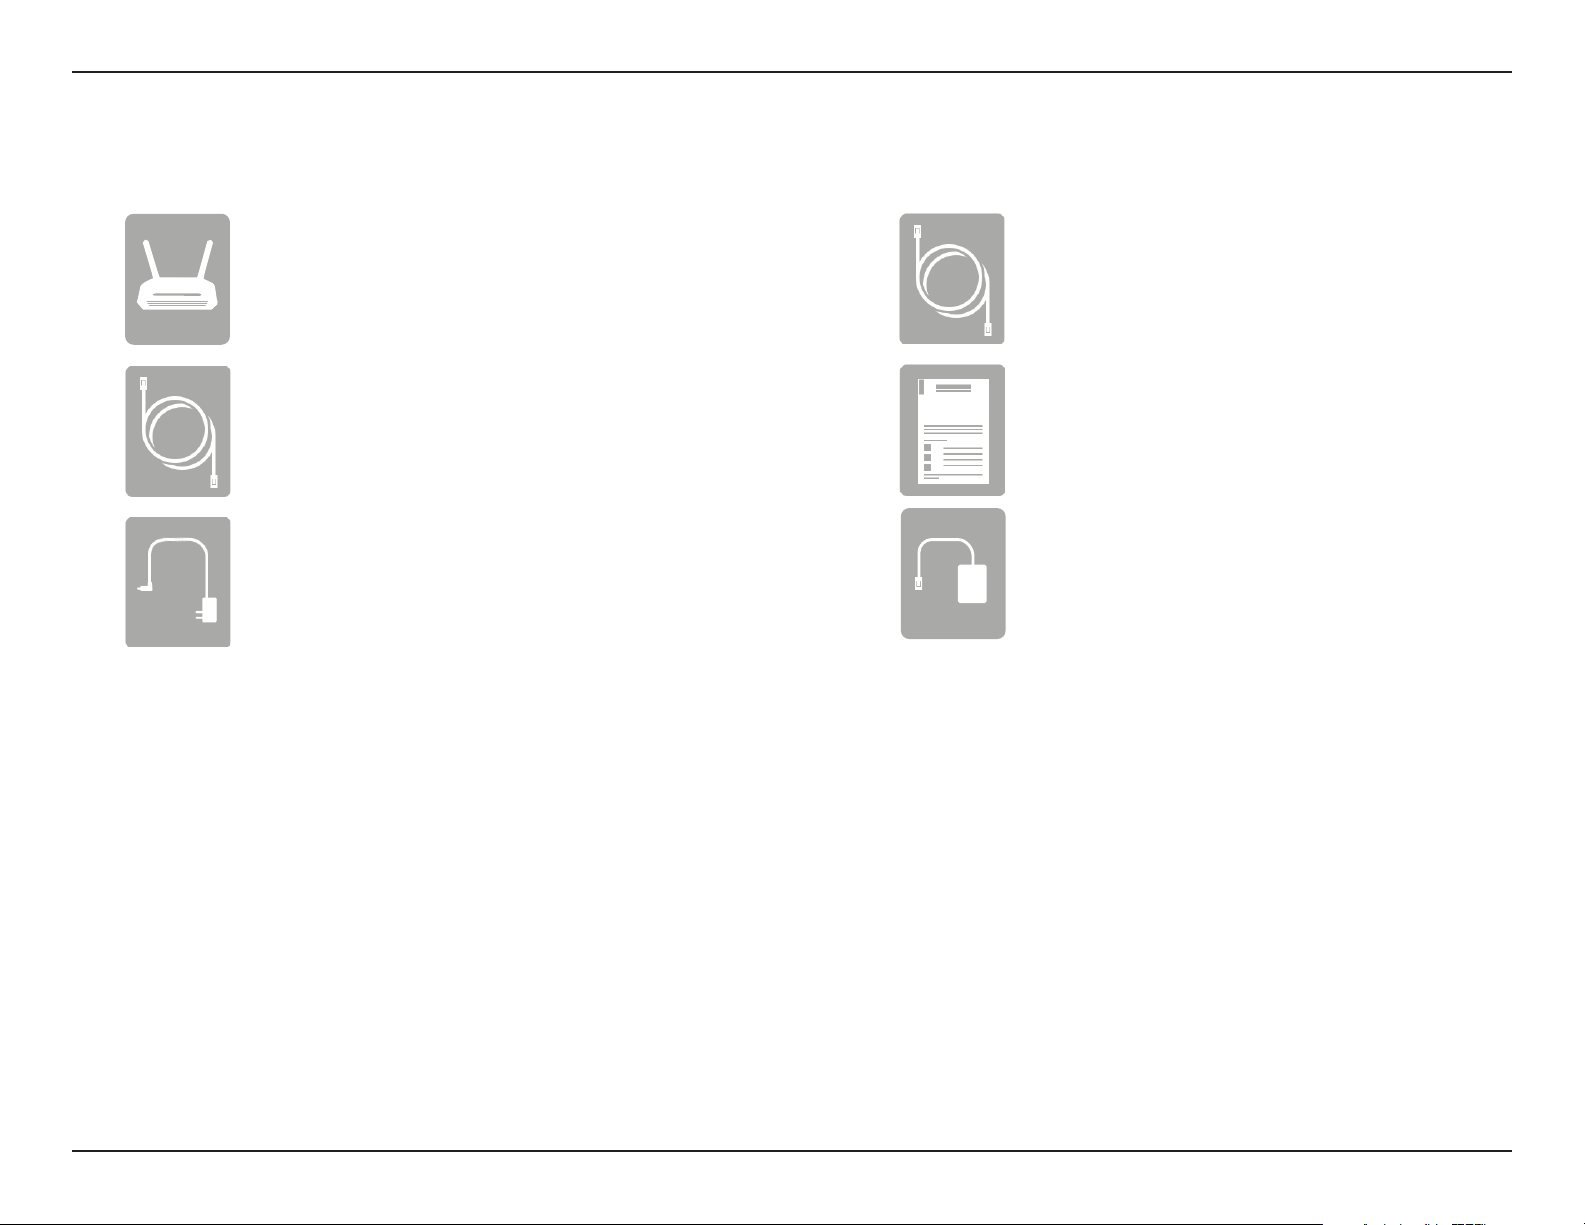
DSL-2740M Wireless N300 ADSL2+ Modem Router
Ethernet Cable
Power Adapter
If any of the above items are missing, please contact your reseller.
RJ-11 Phone Cable
Quick Installation Guide
ADSL Splitter
Note: Using a power supply with a dierent voltage rating than the one included with the device will cause damage and void the warranty
for this product.
1D-Link DSL-2740M User Manual
Page 6
Section 1 - Product Overview
Network Requirements
Web-based Conguration
Utility Requirements
System Requirements
• Wired 10/100 Ethernet Devices/Computers or Wireless Ethernet
802.11 n/g/b Devices/Computers
• A DSL enabled Internet Connection with a subscription to an
Internet Service Provider
Computer with the following:
• Windows®, Macintosh, or Linux-based operating system
• An installed Ethernet adapter
Browser Requirements:
• Internet Explorer 8 or higher
• Firefox 2 or higher
• Safari 4 or higher
• Chrome 25 or higher
®
Windows
installed. Visit www.java.com to download the latest version.
Users: Make sure you have the latest version of Java
2D-Link DSL-2740M User Manual
Page 7

Section 1 - Product Overview
Introduction
The DSL-2740M Wireless N300 ADSL2+ Modem Router is a versatile, high-performance router for homes and small oces. With integrated ADSL2/2+
supporting up to 24 Mbps download speeds, rewall protection, Quality of Service (QoS), 802.11n wireless LAN, and 4 Ethernet switch ports, this
router provides all the functions that a home or small oce needs to establish a secure and high-speed link to the outside world. The latest ADSL2/2+
standards provide Internet transmission of up to 24 Mbps downstream, 1 Mbps upstream.
Featuring 802.11n, the DSL-2740M reaches wireless speeds that are up to six times faster than 802.11g1. Maximize wireless performance by connecting
it to computers equipped with wireless N interfaces and stay connected from virtually anywhere in the home and in the oce. Featuring a 2 x
2 MIMO antenna conguration, wireless devices can take advantage of expanded wireless coverage. Supporting 802.11g and 802.11b, existing
wireless devices can also connect to the network easily and quickly while enjoying signicantly improved reception.
The DSL-2740M has a host of security features, meaning you can access the Internet without fear of your network being compromised. Wi-Fi
Protected Access (WPA) / Wi-Fi Protected Access II (WPA2) encryption secures wireless trac across your network, preventing unauthorized access
and eavesdropping. Meanwhile, the NAT rewall protects your network from attacks and intrusions via the Internet. No matter whether you are
shopping online, doing your banking, or accessing your personal information, the DSL-2740M keeps your data and your network safe.
With a high-speed WAN connection, high-speed wireless LAN, and four Fast Ethernet 10/100 switch ports for your wired devices, the DSL-2740M
Wireless N300 ADSL2+ Modem Router provides all the functions that a home or small oce needs to establish a secure and high-speed link to the
outside world, allowing you to enjoy fast le transfers, seamless web surng, and smooth online gaming.
1
Maximum wireless signal rate derived from IEEE Standard 802.11n, 802.11g, and 802.11b specications. Actual data throughput will vary. Network conditions and environmental
factors, including volume of network trac, building materials and construction, and network overhead, lower actual data throughput rate. Environmental conditions will
adversely aect wireless signal range.
3D-Link DSL-2740M User Manual
Page 8

Section 1 - Product Overview
Features
Faster Wireless Networking - The DSL-2740M provides up to 300 Mbps1 wireless connection with other 802.11n wireless clients. This
capability allows users to participate in real-time activities online, such as video streaming, online gaming, and real-time audio.
Compatible with 802.11n/g/b Devices - The DSL-2740M is fully backwards compatible with IEEE 802.11g and IEEE 802.11b standards,
so it can connect with your existing wireless equipment.
Advanced Firewall Features - The web-based user interface displays a number of advanced network management features.
Precise ATM Trac Shaping - Trac shaping is a method of controlling the ow rate of ATM data cells. This function helps to establish
Quality of Service for ATM data transfer.
User-friendly Setup Wizard - Through its easy-to-use web-based user interface, the DSL-2740M lets you control what information is
accessible to those on the wireless network, whether from the Internet or from your company’s server. Congure your router to your
specic settings within minutes.
IPv6 Ready - Fully compliant with IPv6. The DSL-2740M supports a variety of IPv6 connection standards preparing you for the day when
your ISP implements IPv6.
1
Maximum wireless signal rate derived from IEEE Standard 802.11n, 802.11g, and 802.11b specications. Actual data throughput will vary. Network conditions and environmental
factors, including volume of network trac, building materials and construction, and network overhead, lower actual data throughput rate. Environmental conditions will
adversely aect wireless signal range.
4D-Link DSL-2740M User Manual
Page 9
Section 1 - Product Overview
Hardware Overview
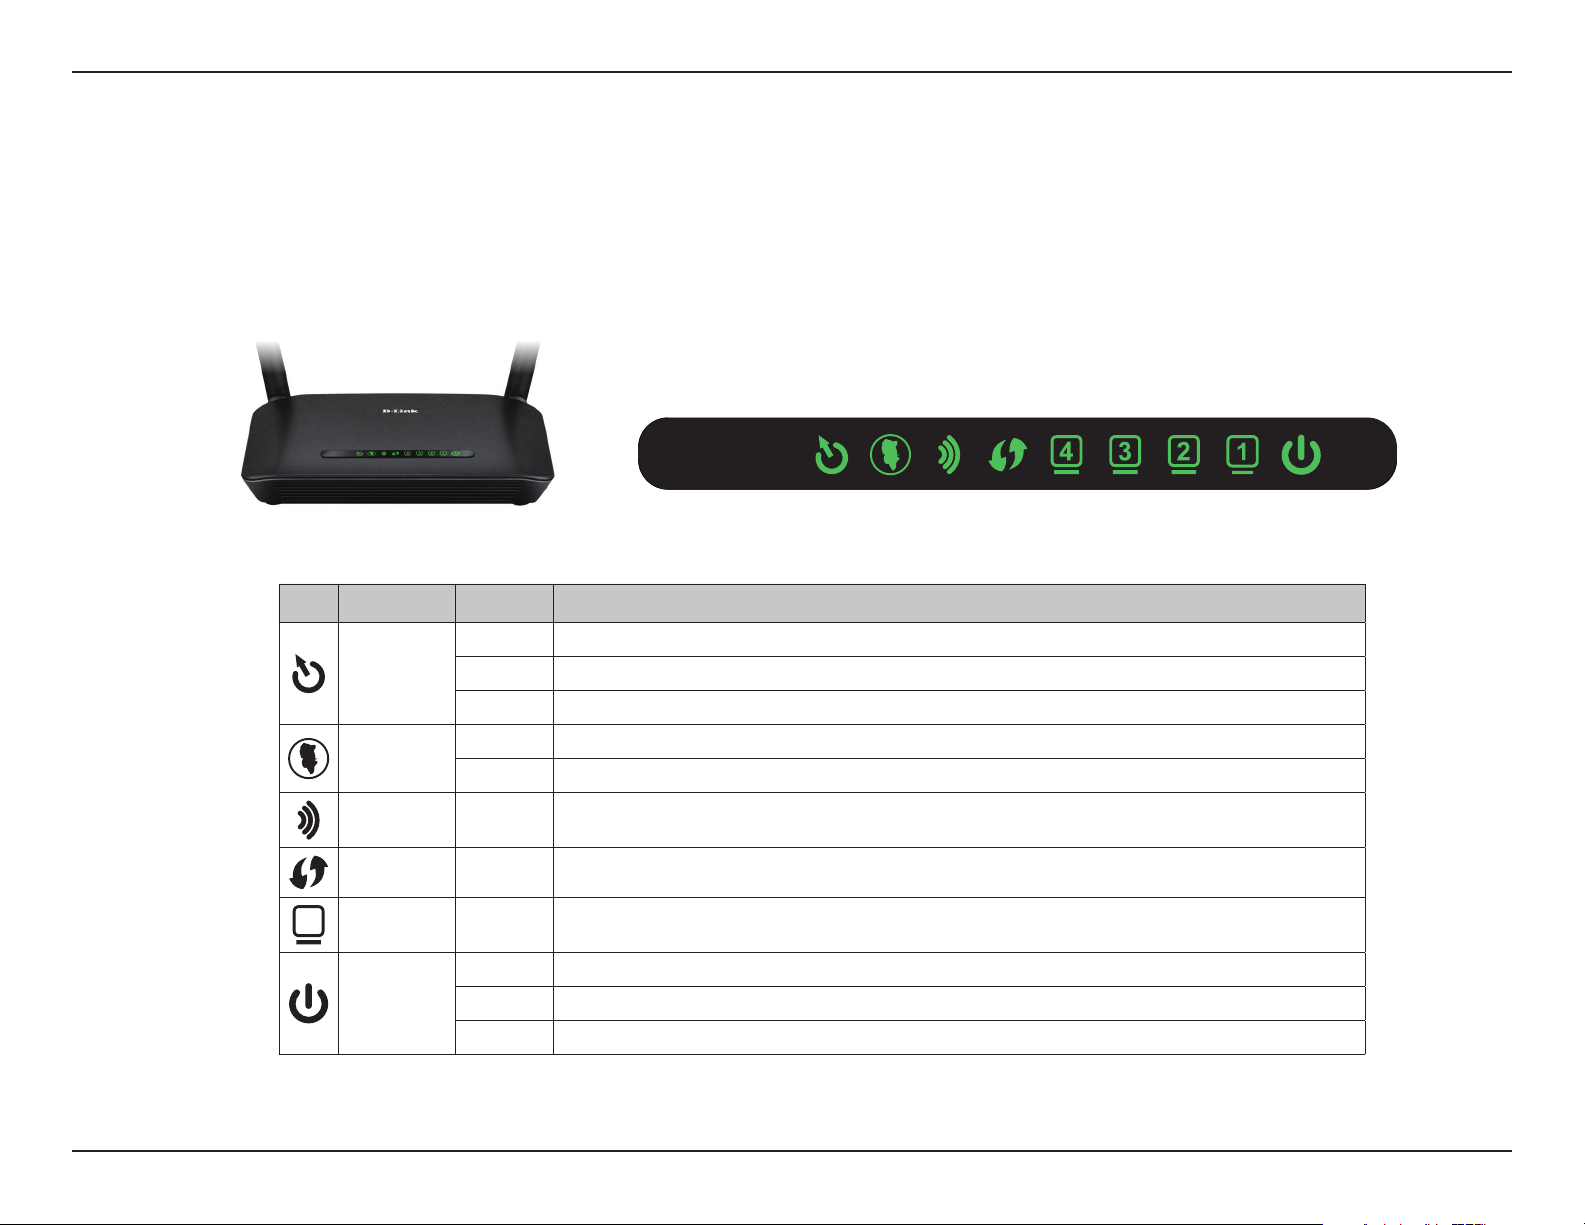
LED Panel
LED Color Description
Green The device is connected to a ADSL enabled telephone line.
DSL
Internet
Wireless Green The 2.4 GHz Wi-Fi network is ready. The light blinks during data transmission.
WPS Green The light blinks during the WPS process.
LAN4-1 Green A device is connected on this port. The light blinks during data transmission.
Power
Red The device has failed to establish a connection to the phone network.
O No connection detected.
Green The device is connected to a broadband service.
Red The device failed to connect to the Internet.
Green The device is powered on and functioning properly.
Red The device is booting, encountered an error, or is in recovery mode.
O The device is powered o or not receiving power.
5D-Link DSL-2740M User Manual
Page 10
Section 1 - Product Overview
Hardware Overview
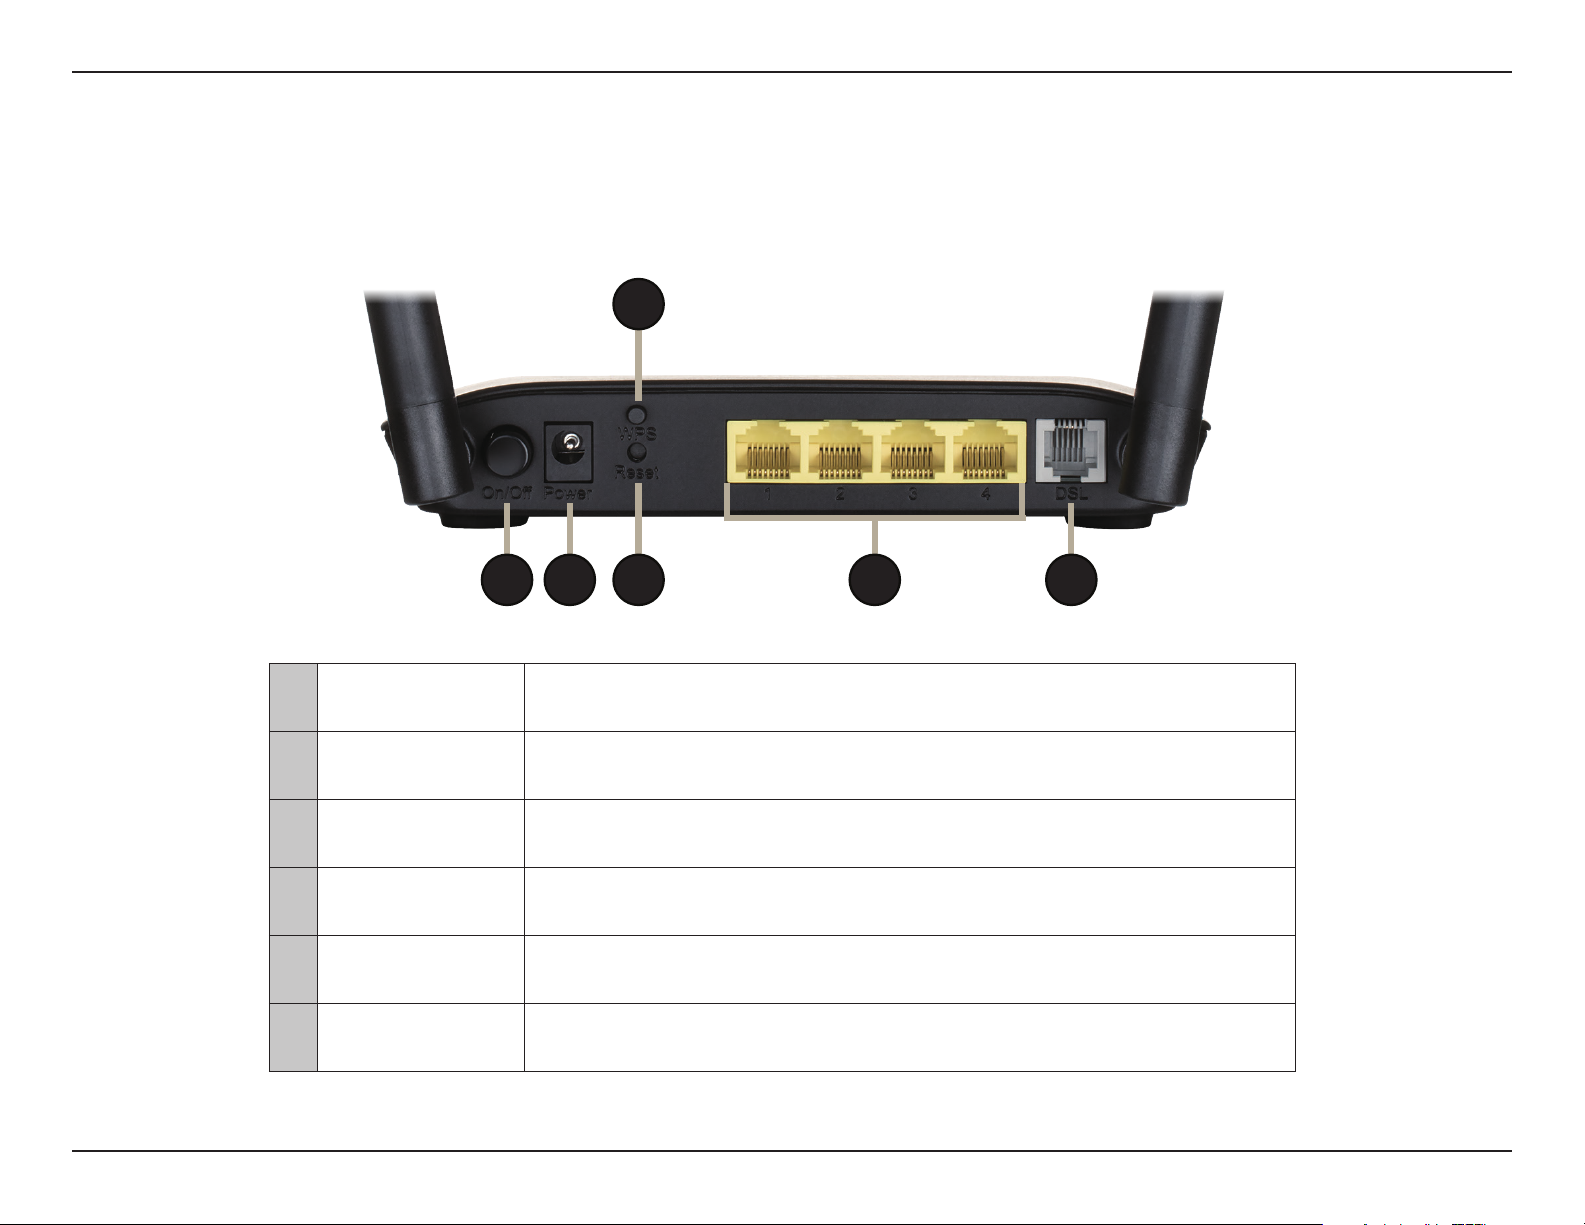
Back Panel
1
2 3 4
1 WPS Button
2 Power Button Press to power the DSL-2740M on or o.
3 Power Connector Connector for the supplied power adapter.
4 Reset Button
5 LAN Ports (1-4)
6 DSL Port Connects to a DSL-enabled telephone line.
Press for 5 seconds to to start the WPS process for the 2.4 GHz network and
automatically create a secure connection to a WPS client.
To reset the device to its factory default settings, press and hold the reset
button for ve seconds.
Connects to Ethernet devices such as computers, switches, storage (NAS)
devices, and game consoles.
5
6
6D-Link DSL-2740M User Manual
Page 11

Section 2 - Installation
Installation
This installation section is written for users who are setting up their home Internet service with the DSL-2740M Wireless N300 ADSL2+ Modem Router
for the rst time. If you are replacing an existing DSL modem and/or router, you may need to modify these steps.
Before you Begin
• Make sure to have your DSL service information provided by your Internet Service Provider (ISP) handy. This information is likely to
include your DSL account’s Username and Password. Your ISP may also supply you with additional WAN conguration settings which
are necessary to establish a connection. This information may include the connection type (DHCP IP, Static IP, PPPoE, or PPPoA) and/
or ATM PVC details.
• If you are connecting a considerable amount of networking equipment, it may be a good idea to take the time to label each cable
or take a picture of your existing setup before making any changes.
• We suggest setting up your DSL-2740M from a single device and verifying that it is connected to the Internet before connecting
additional devices.
• Placement of the router is very important. Do not place the router in an enclosed area such as a closet, cabinet, attic, or garage.
• If you have DSL and are connecting via PPPoE, make sure you disable or uninstall any PPPoE software such as WinPoET, BroadJump,
or EnterNet 300 from your computer or you will not be able to connect to the Internet.
7D-Link DSL-2740M User Manual
Page 12

Section 2 - Installation
Wireless Installation Considerations
The D-Link wireless router lets you access your network using a wireless connection from virtually anywhere within the operating range of your
wireless network. Keep in mind that the number, thickness and location of walls, ceilings, or other objects that the wireless signals must pass through
may limit the range. Typical ranges vary depending on the types of materials and background RF (radio frequency) noise in your home or business.
The key to maximizing wireless range is to follow these basic guidelines:
1. Keep the number of walls and ceilings between the D-Link router and other network devices to a minimum - each wall or ceiling
can reduce your adapter’s range from 1 to 30 meters (3 to 90 feet). Position your devices so that the number of walls or ceilings is
minimized.
2. Be aware of the direct line between network devices. A wall that is 0.5 meters (1.5 feet) thick, at a 45-degree angle appears to be
almost 1 meter (3 feet) thick. At a 2-degree angle it looks over 14 meters (42 feet) thick! Position devices so that the signal will
travel straight through a wall or ceiling (instead of at an angle) for better reception.
3. Building materials make a dierence. A solid metal door or aluminum studs may have a negative eect on range. Try to position
access points, wireless routers, and computers so that the signal passes through drywall or open doorways. Materials and objects
such as glass, steel, metal, walls with insulation, water (sh tanks), mirrors, le cabinets, brick, and concrete will degrade your
wireless signal.
4. Keep your product away at least 1 to 2 meters (3 to 6 feet) from electrical devices or appliances that generate RF noise.
5. If you are using 2.4 GHz cordless phones or X-10 (wireless products such as ceiling fans, lights, and home security systems), your
wireless connection may degrade dramatically or drop completely. Make sure your 2.4 GHz phone base is as far away from your
wireless devices as possible. The base transmits a signal even if the phone is not in use.
8D-Link DSL-2740M User Manual
Page 13
Section 2 - Installation
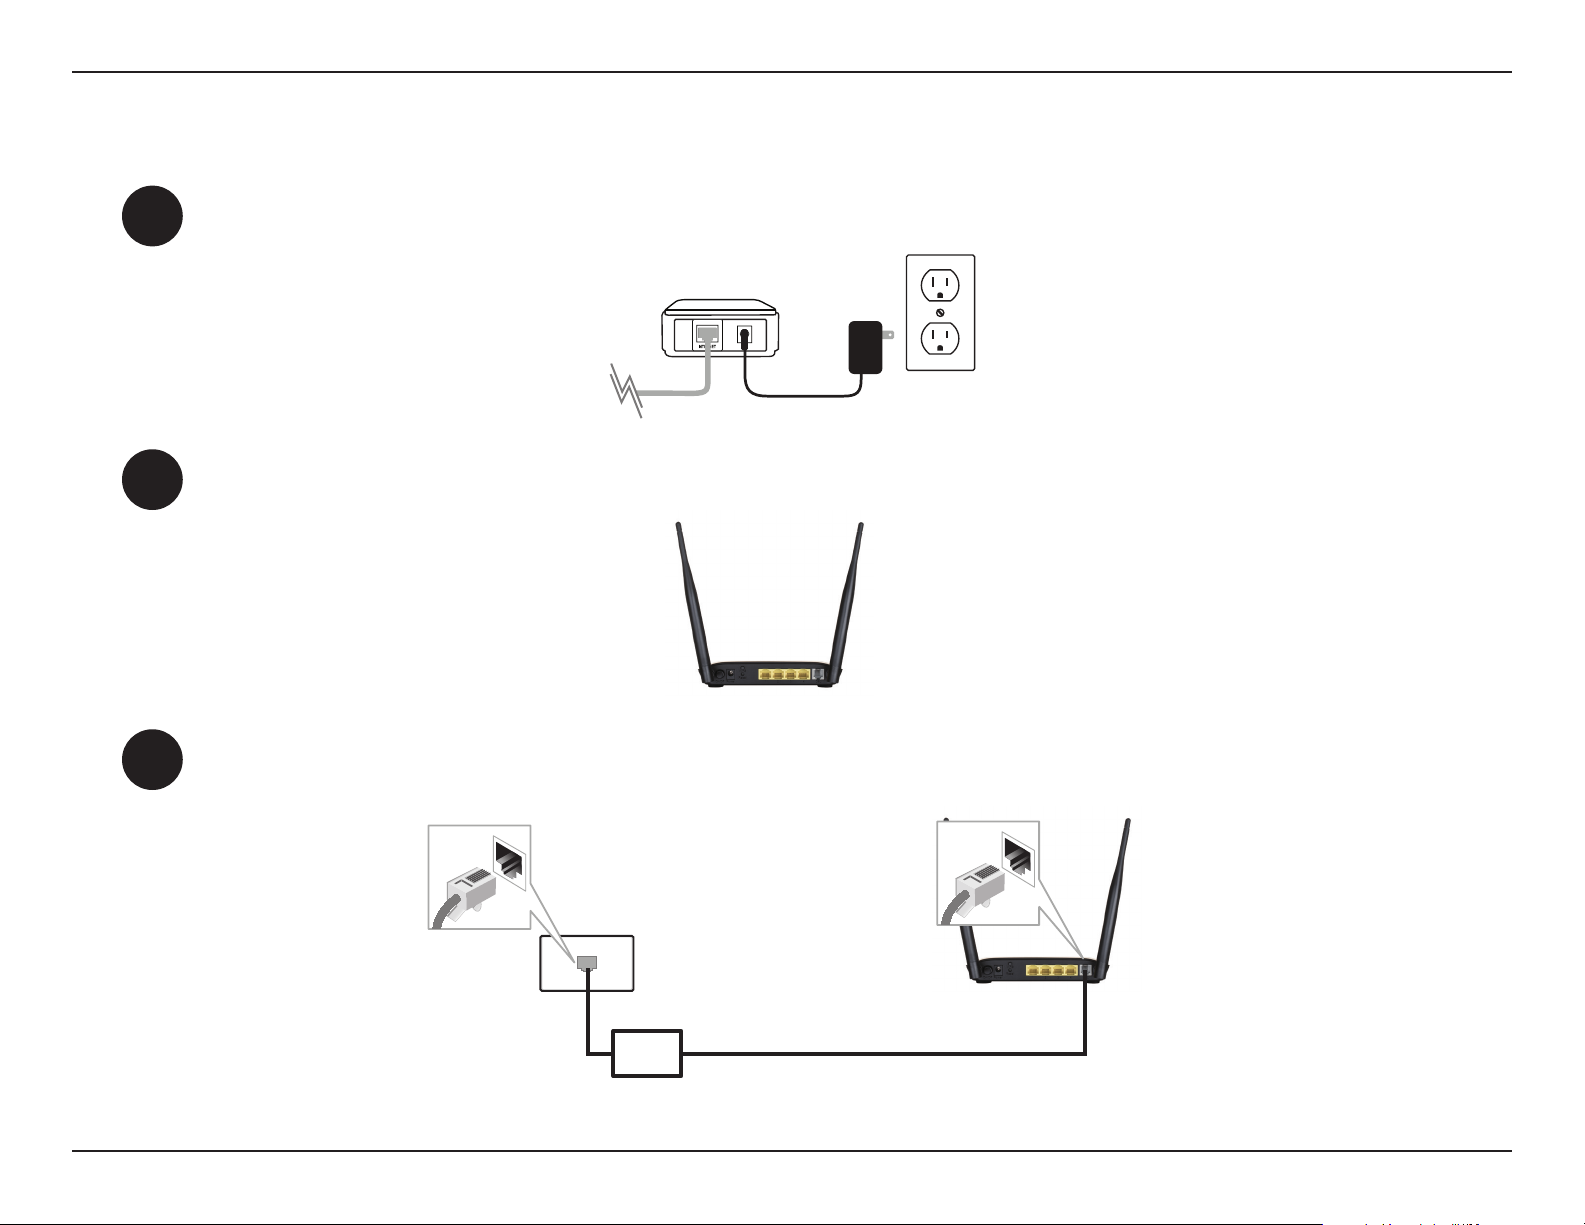
Hardware Setup
1
2
3
Turn o and unplug your existing DSL broadband modem. This is required.
Existing Modem
Position your DSL-2740M close to a telephone outlet which provides DSL service. Place the router in an open area of your
intended work area for better wireless coverage.
DSL-2740M
Connect the included ADSL splitter to a telephone outlet. Attach the included telephone cable from the DSL port on the splitter
to the DSL port on your DSL-2740M.
Telephone Outlet
ADSL splitter
DSL-2740M
9D-Link DSL-2740M User Manual
Page 14
Section 2 - Installation
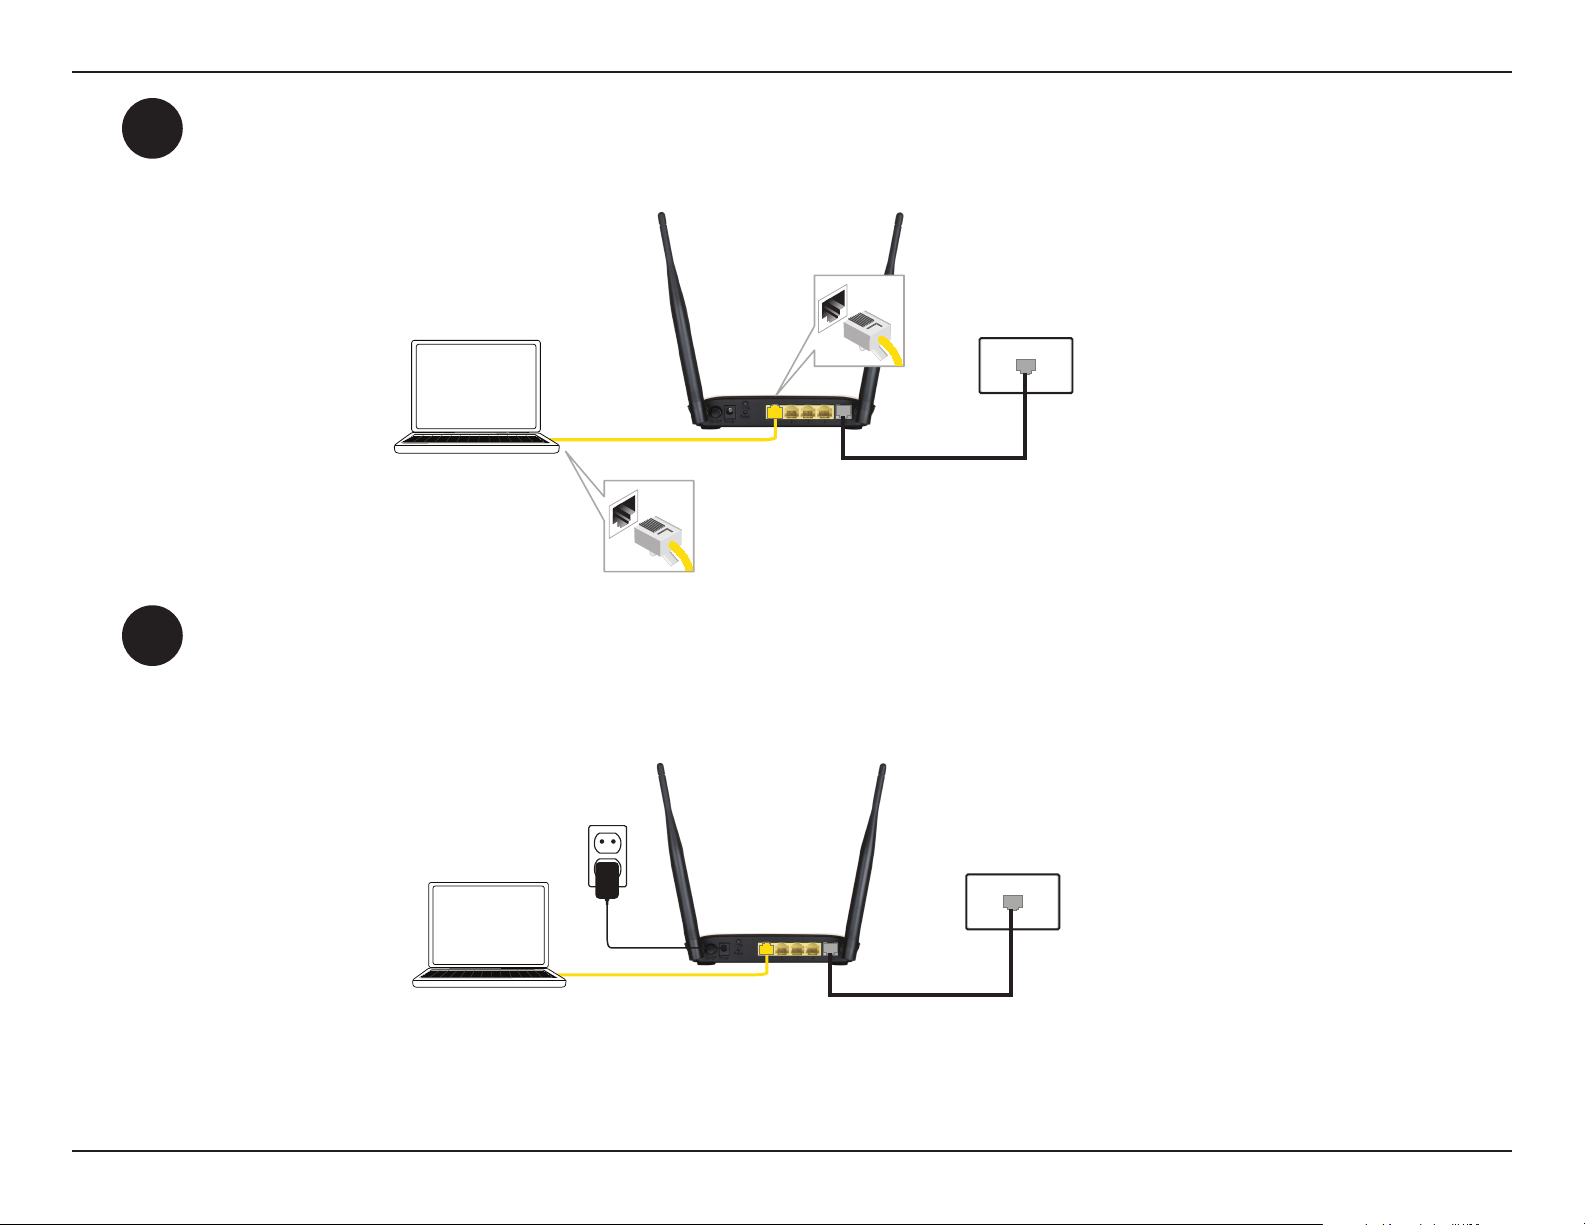
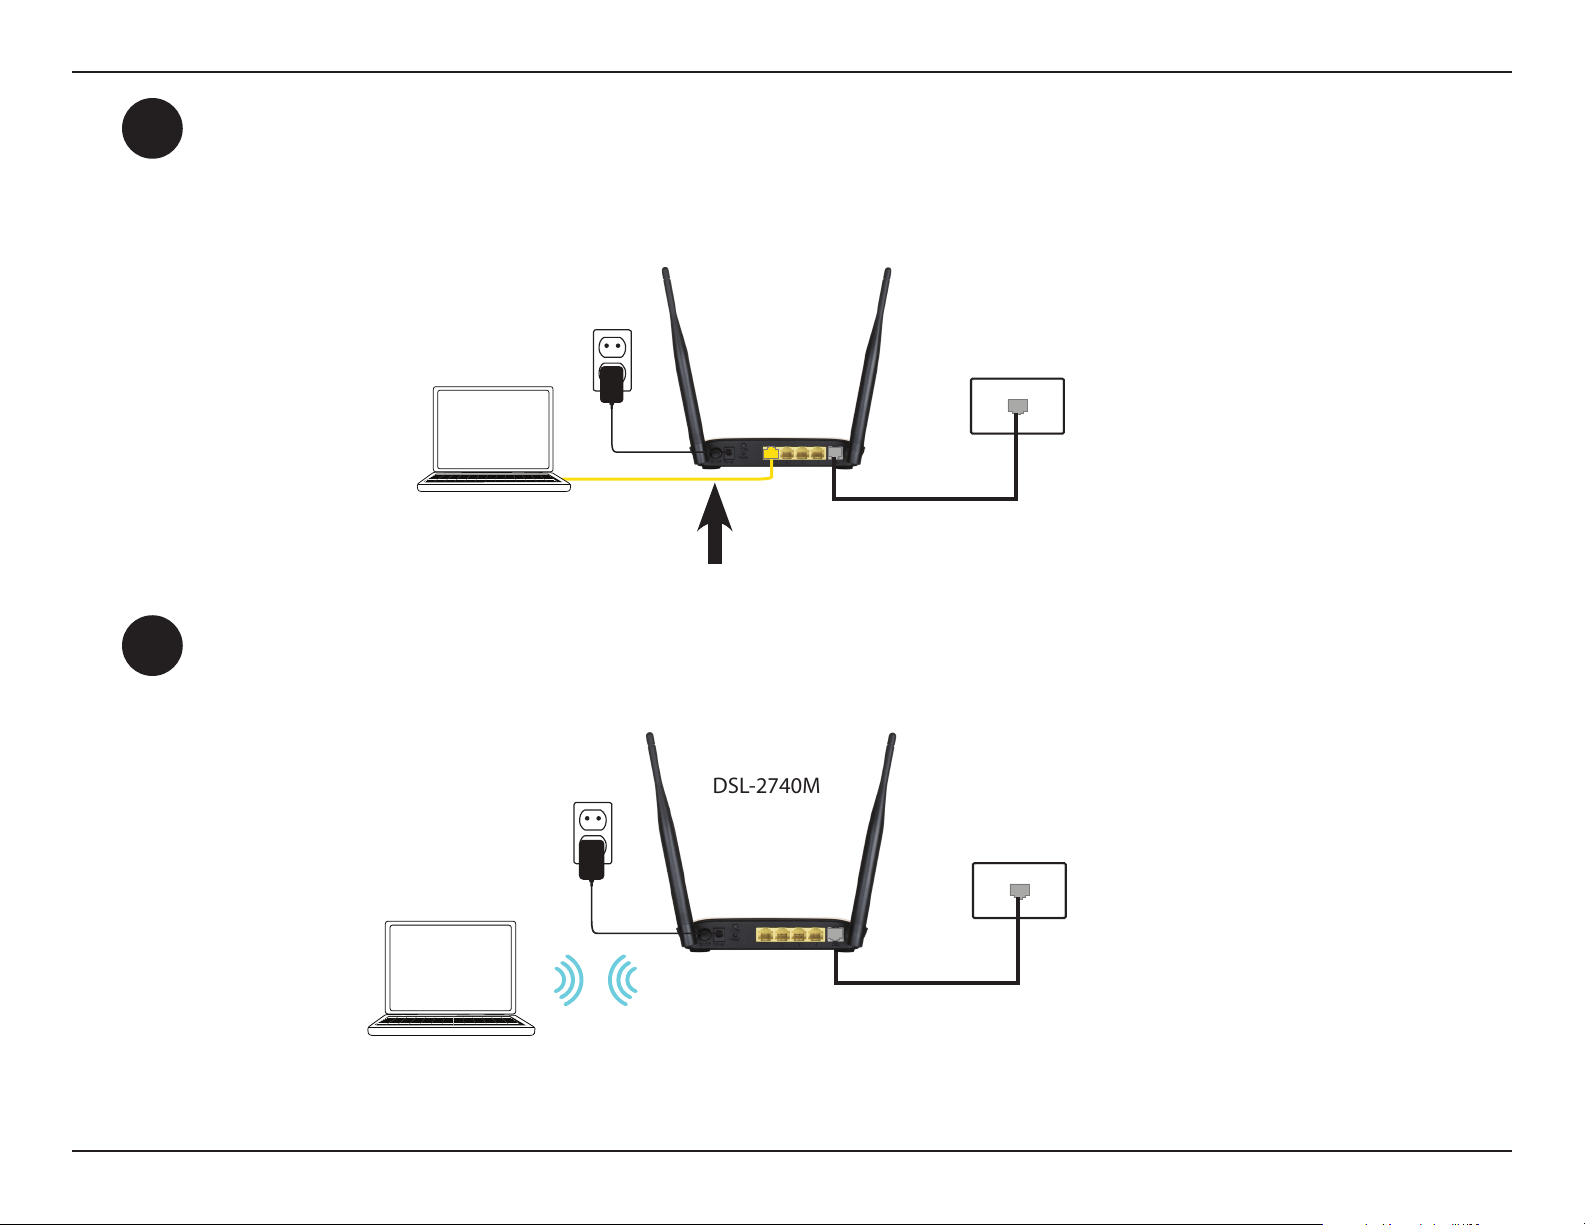
If you wish to use a wired connection, connect the Ethernet cable from a LAN port of the DSL-2740M to the Ethernet port on
4
your computer.
DSL-2740M
5
Computer
Plug the power adapter into your DSL-2740M and connect to an available power outlet or surge protector.
Caution: Only use the included power adapter with this product.
Power Adapter
Computer
Ethernet Cable
DSL-2740M
10D-Link DSL-2740M User Manual
Page 15
Section 2 - Installation
6
7
Press the power button and verify that the power LED is lit. Allow 1 minute for the router to boot up.
Power Adapter
DSL-2740M
Computer
If connecting to the DSL-2740M wirelessly, access the wireless utility on your computer or mobile device. Scan for available
Wi-Fi networks (SSID). Select and join the Wi-Fi network printed on the label on the back of your DSL-2740M.
Power Adapter
Computer
DSL-2740M
11D-Link DSL-2740M User Manual
Page 16

Section 3 - Conguration
Conguration
There are two dierent ways you can congure your router to connect to the Internet and connect to your clients:
• Setup Wizard - This wizard will launch when you log into the DSL-2740M for the rst time. Refer to Setup Wizard on page 13.
• Manual Setup - To manually congure your DSL-2740M, refer to Manual Conguration on page 21.
12D-Link DSL-2740M User Manual
Page 17
Section 3 - Conguration
Setup Wizard
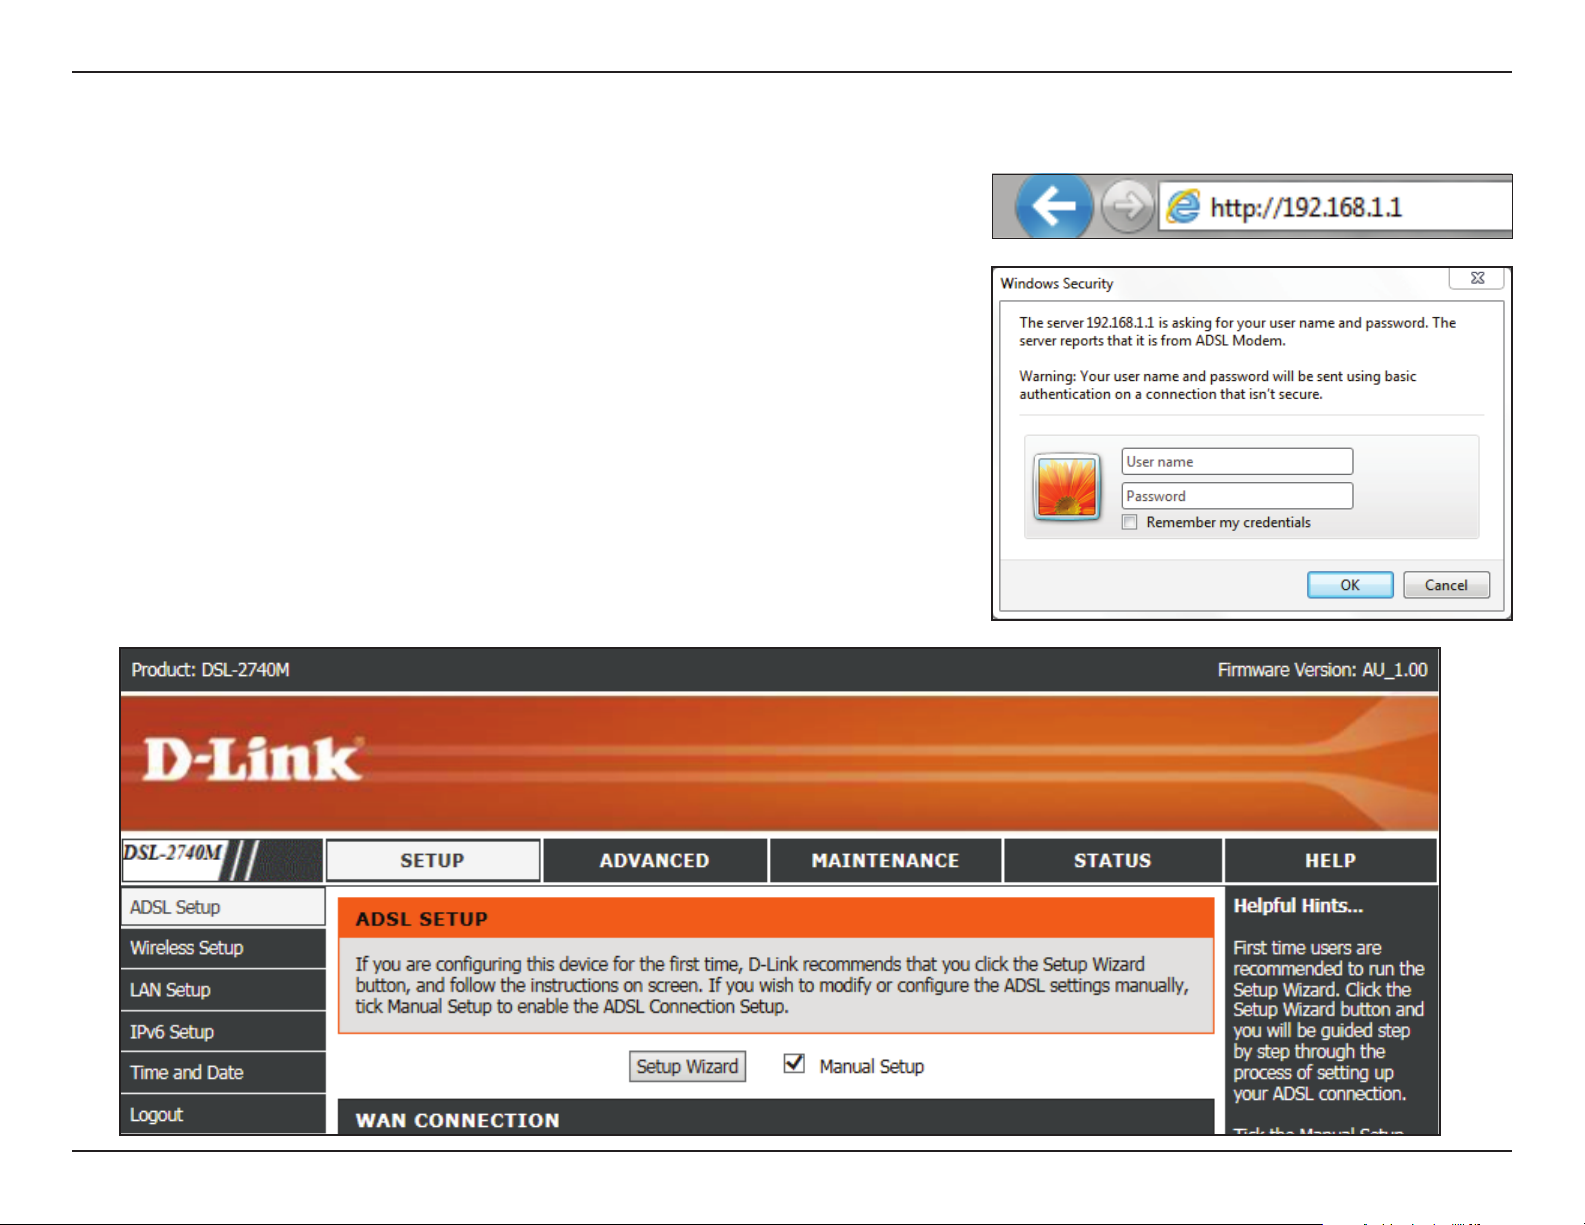
This section guides you through how to congure D-Link DSL-2740M for the rst time using
the web-based conguration utility’s Setup Wizard.
To access the conguration utility, open a web browser such as Internet Explorer and enter
http://192.168.1.1 in the address eld. Enter admin as the username and admin as the
password. Click Login.
You are taken to the Setup > ADSL Setup page. Click Setup Wizard to begin.
If you want to congure the DSL-2740M manually without running the wizard, refer to
Manual Conguration on page 21.
13D-Link DSL-2740M User Manual
Page 18
Section 3 - Conguration
Setup Wizard
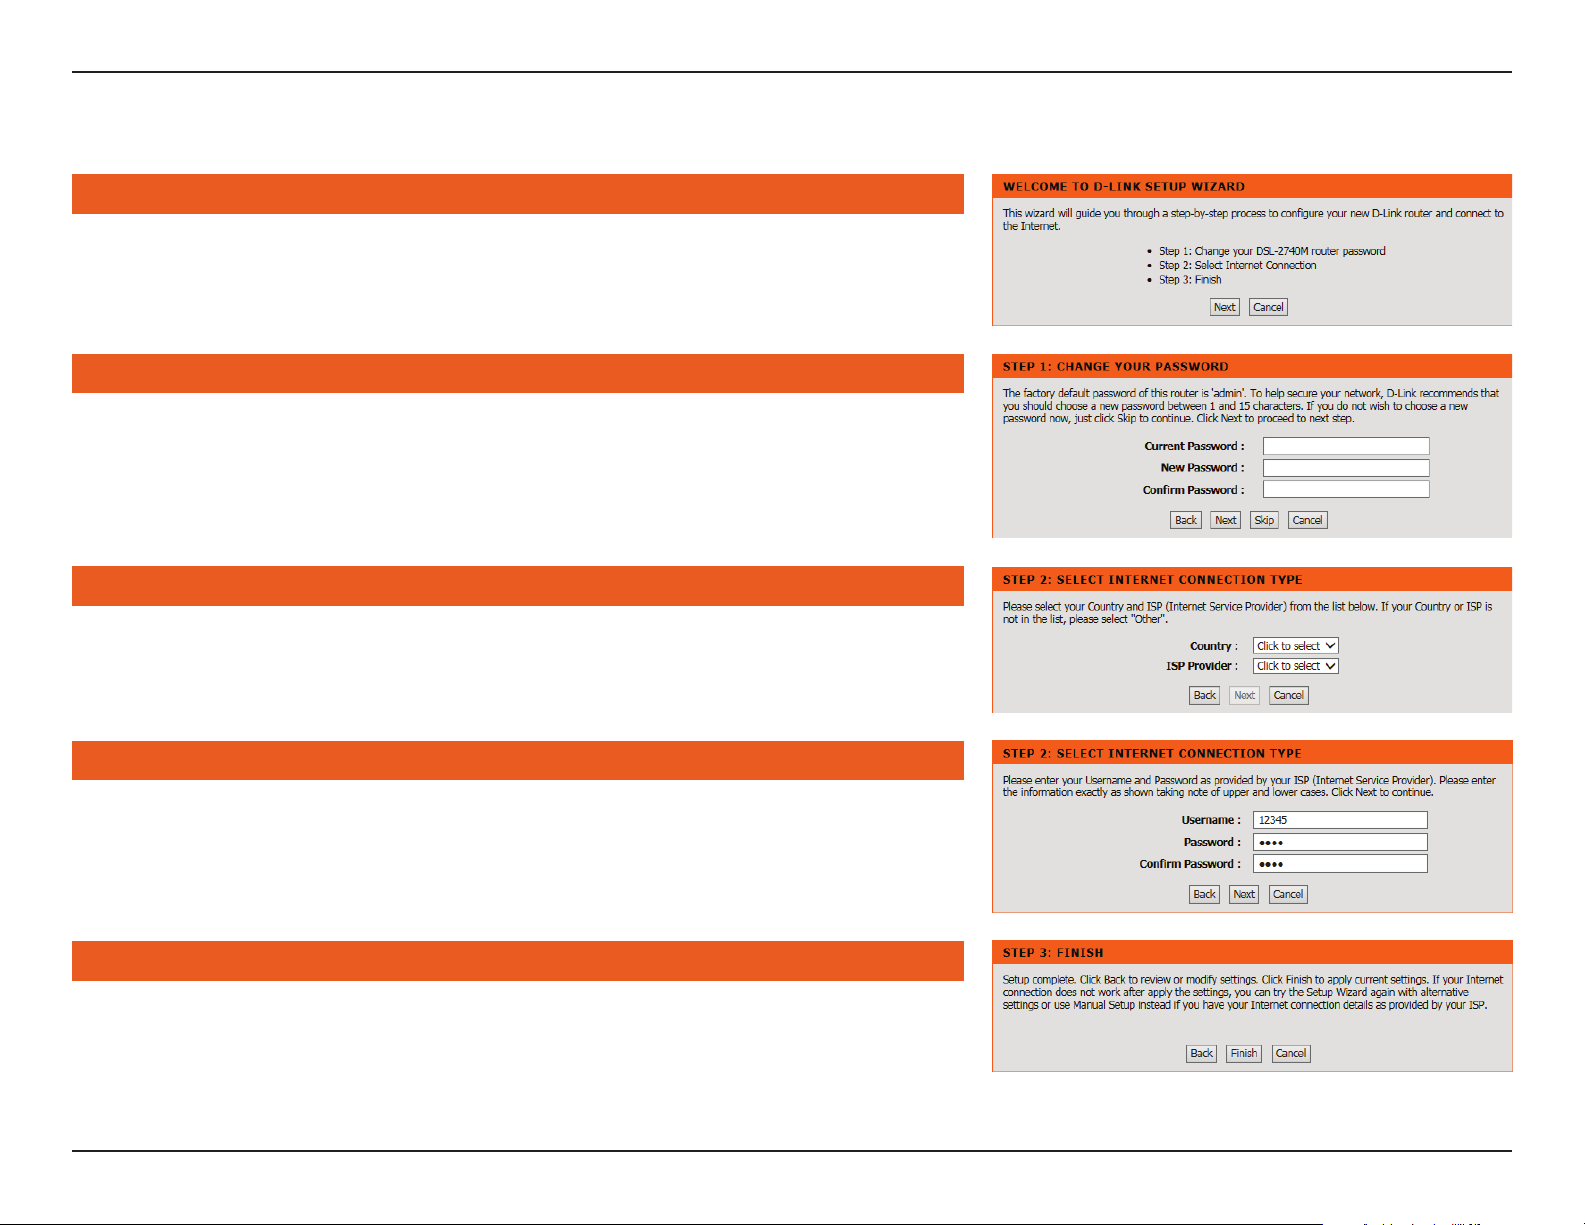
WELCOME TO THE DLINK SETUP WIZARD
Follow the on-screen instructions. Click Next to continue.
STEP 1: CHANGE YOUR PASSWORD
Enter a new administrator password which will be used to access your DSL-2740M. Click
Next to continue or Skip if you do not wish to change the password at this time.
STEP 2: SELECT INTERNET CONNECTION TYPE
This step of the wizard allows you to congure your Internet connection type. Select your
Country and Internet Service Provider (ISP) from the drop down list. If you have sucessfully
located your ISP, click Next. Otherwise, select Others and go on.
STEP 2: SELECT INTERNET CONNECTION TYPE
Enter your account’s username and password if prompted. Click Next.
STEP 3: FINISH
Click Finish to apply your settings. Click Back to review or modify settings.
Congratulations, setup is complete.
14D-Link DSL-2740M User Manual
Page 19
Section 3 - Conguration
Others
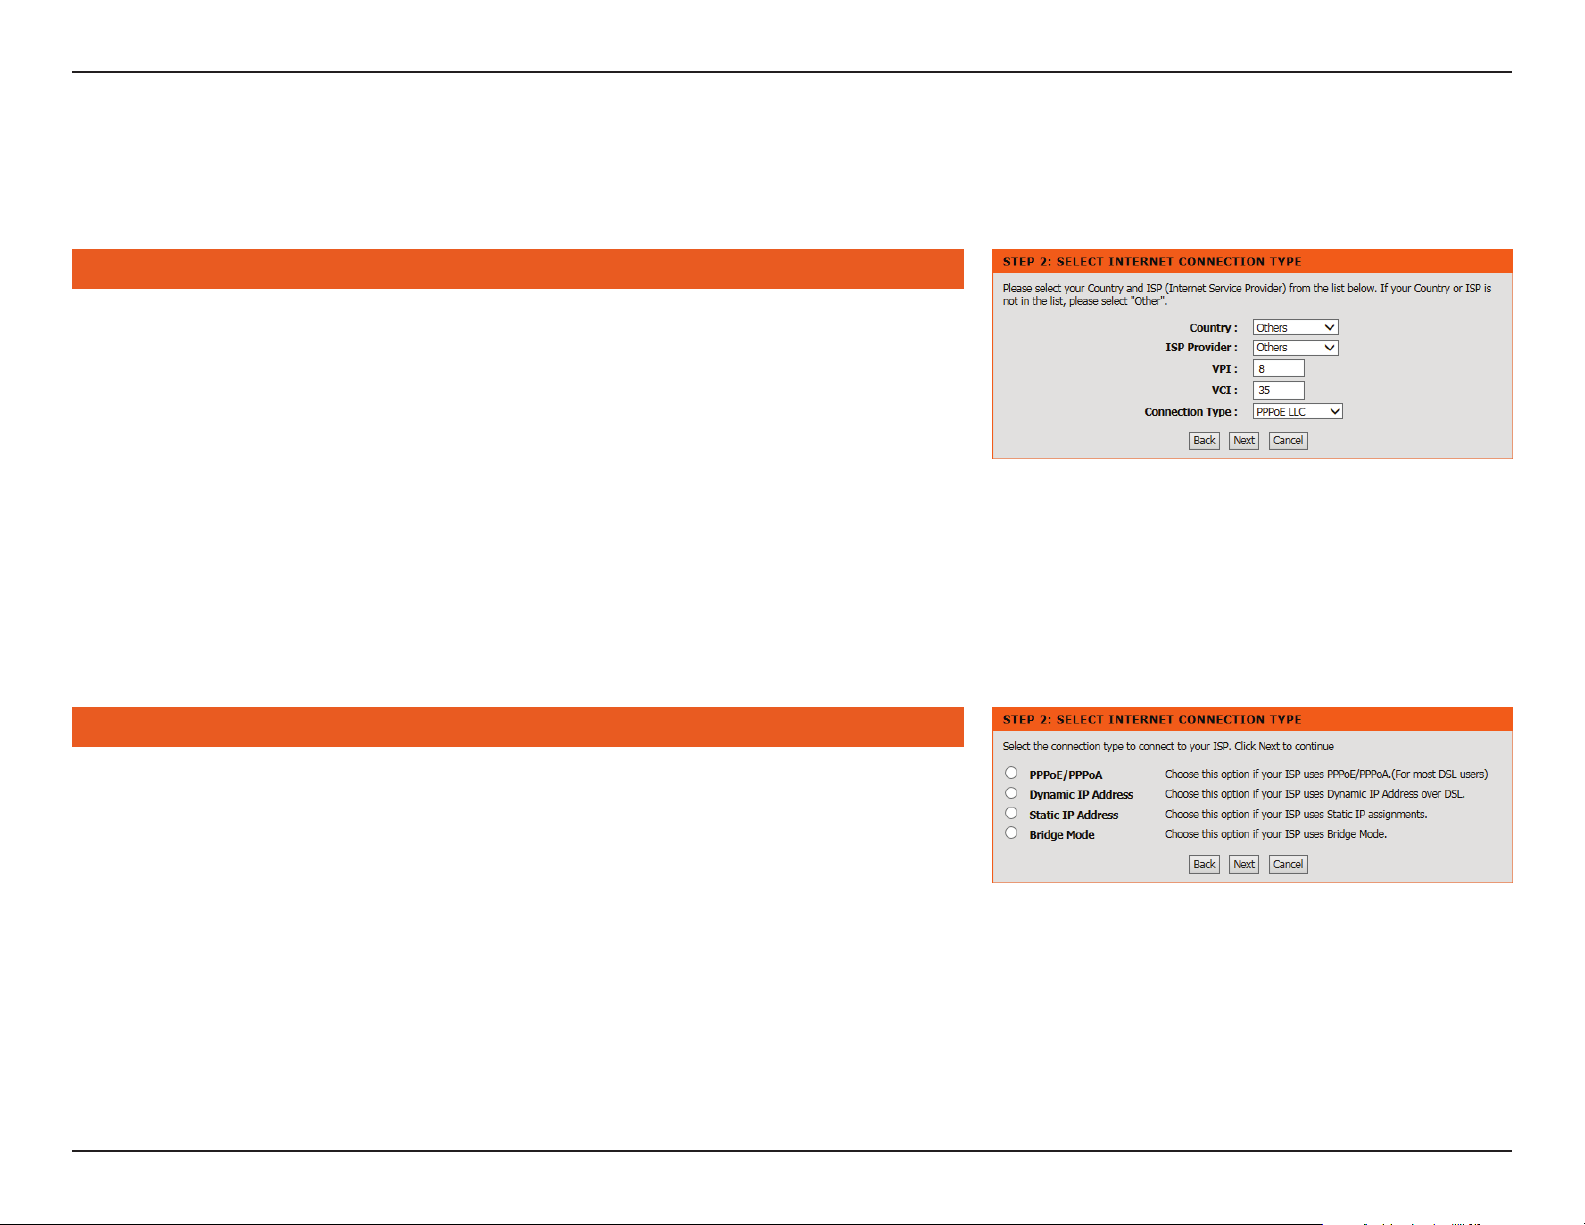
If you wish to manually set up your Internet connection (Others, Others), or have been
directed by your ISP to make adjustments, follow these steps.
STEP 2: SELECT INTERNET CONNECTION TYPE
VPI: Virtual path identifier (VPI) is the virtual path between two
points in an Asynchronous Transfer Network (ATM) network.
Enter the correct VPI provided by your ISP. Values may be
between 0 and 255.
VCI: Virtual channel identifier (VCI) is the virtual channel between
two points in an ATM network. Its valid value is between 32 and
65535. Enter the correct VCI provided by your ISP.
Connection Type: Select the type of encapsulation your ISP uses, PPPoE LLC,
PPPoE VC-Mux, PPPoA LLC, or PPPoA VC-Mux.
Click Next to continue.
STEP 2: SELECT INTERNET CONNECTION TYPE
Select your ISP’s connection type.
PPPoE/PPPoA: Select PPPoE/PPPoA if your ISP provided you with a username
and password.
Dynamic IP Address: Select DHCP if your ISP automatically assigns you an IP address.
Static IP Address: Select Static IP Address if your ISP provided you with one.
Bridge Mode: Select Bridge Mode if you intend to connect another device to
act as a Gateway/Router.
Click Next to continue.
15D-Link DSL-2740M User Manual
Page 20
Section 3 - Conguration
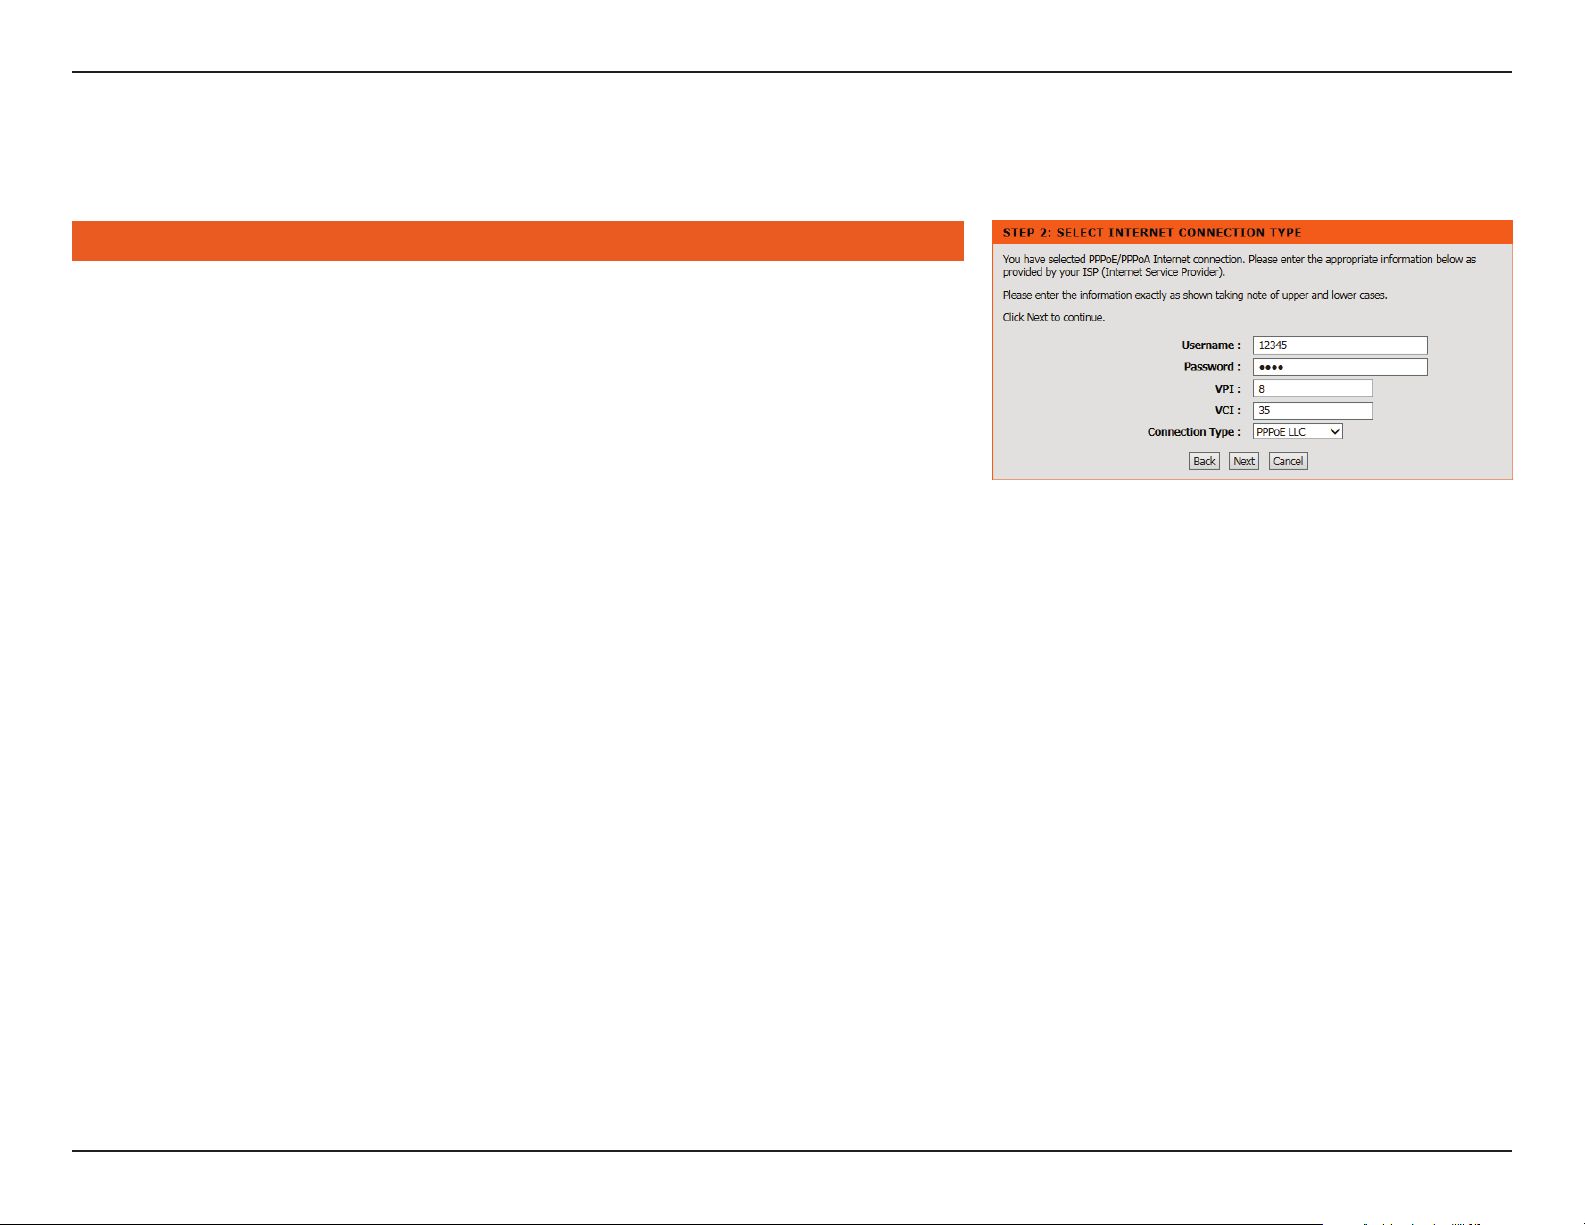
PPPoE/PPPoA
If you selected PPPoE/PPPoA, congure the following information:
STEP 2: SELECT INTERNET CONNECTION TYPE
Username: Enter your ISP account username.
Password: Enter your ISP account password.
VPI: Virtual path identifier (VPI) is the virtual path between two
points in an Asynchronous Transfer Network (ATM) network. Its
valid value is between 0 and 255. Enter the correct VPI provided
by your ISP.
VCI: Virtual channel identifier (VCI) is the virtual channel between
two points in an ATM network. Its valid value is between 32 and
65535. Enter the correct VCI provided by your ISP.
Connection Type: Select the type of encapsulation your ISP uses, PPPoE LLC,
PPPoE VC-Mux, PPPoA LLC, or PPPoA VC-Mux.
Click Next to continue and proceed to step 3.
16D-Link DSL-2740M User Manual
Page 21
Section 3 - Conguration
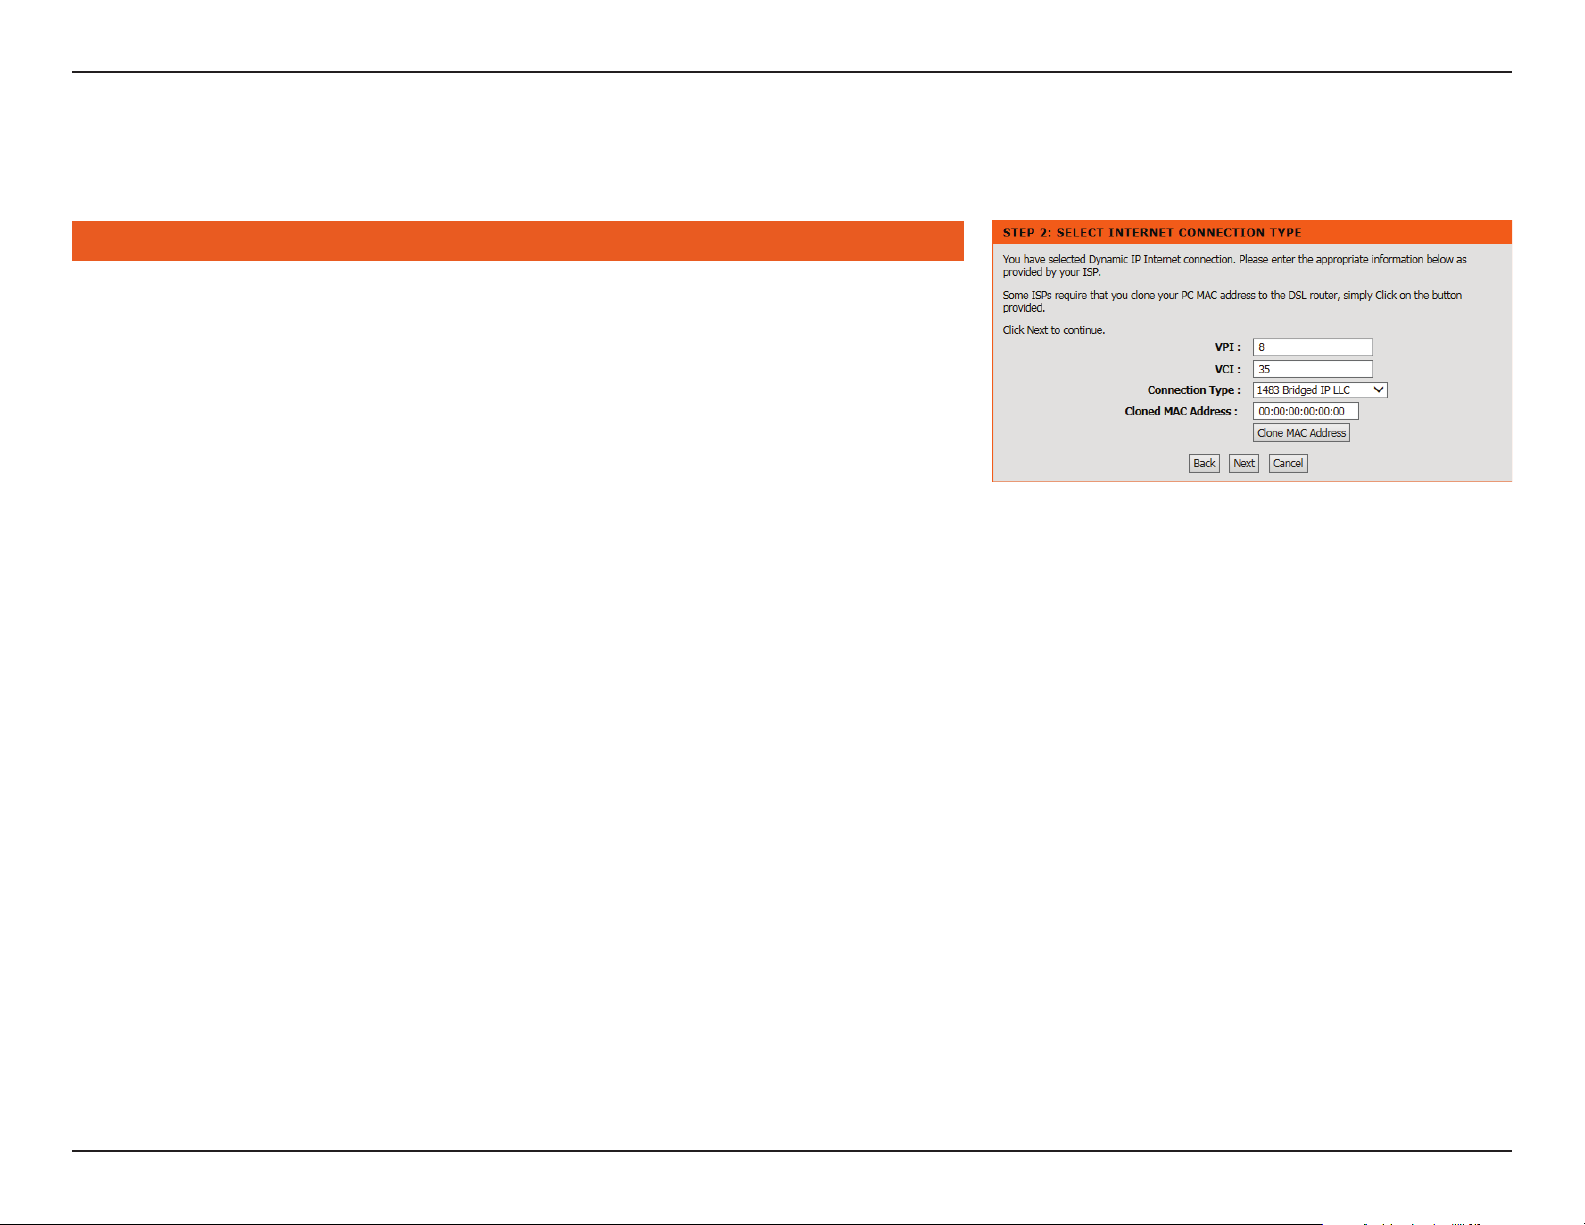
Dynamic IP Address
If you selected Dynamic IP address, congure the following information:
STEP 2: SELECT INTERNET CONNECTION TYPE
VPI: Virtual path identifier (VPI) is the virtual path between two
points in an Asynchronous Transfer Network (ATM) network. Its
valid value is between 0 and 255. Enter the correct VPI provided
by your ISP.
VCI: Virtual channel identifier (VCI) is the virtual channel between
two points in an ATM network. Its valid value is between 32 and
65535. Enter the correct VCI provided by your ISP.
Connection Type: Select either 1483 Bridged IP LLC or 1483 Bridged IP VC-
Mux.
Cloned MAC Address: If your ISP locks your account to a specific device, you can clone
that device’s MAC address to your DSL-2740M so that you may
connect to the Internet. Click the Clone MAC Address button
to clone the MAC address of the device you are currently using
to access to the web configuration utility.
Click Next to continue and proceed to step 3.
17D-Link DSL-2740M User Manual
Page 22
Section 3 - Conguration
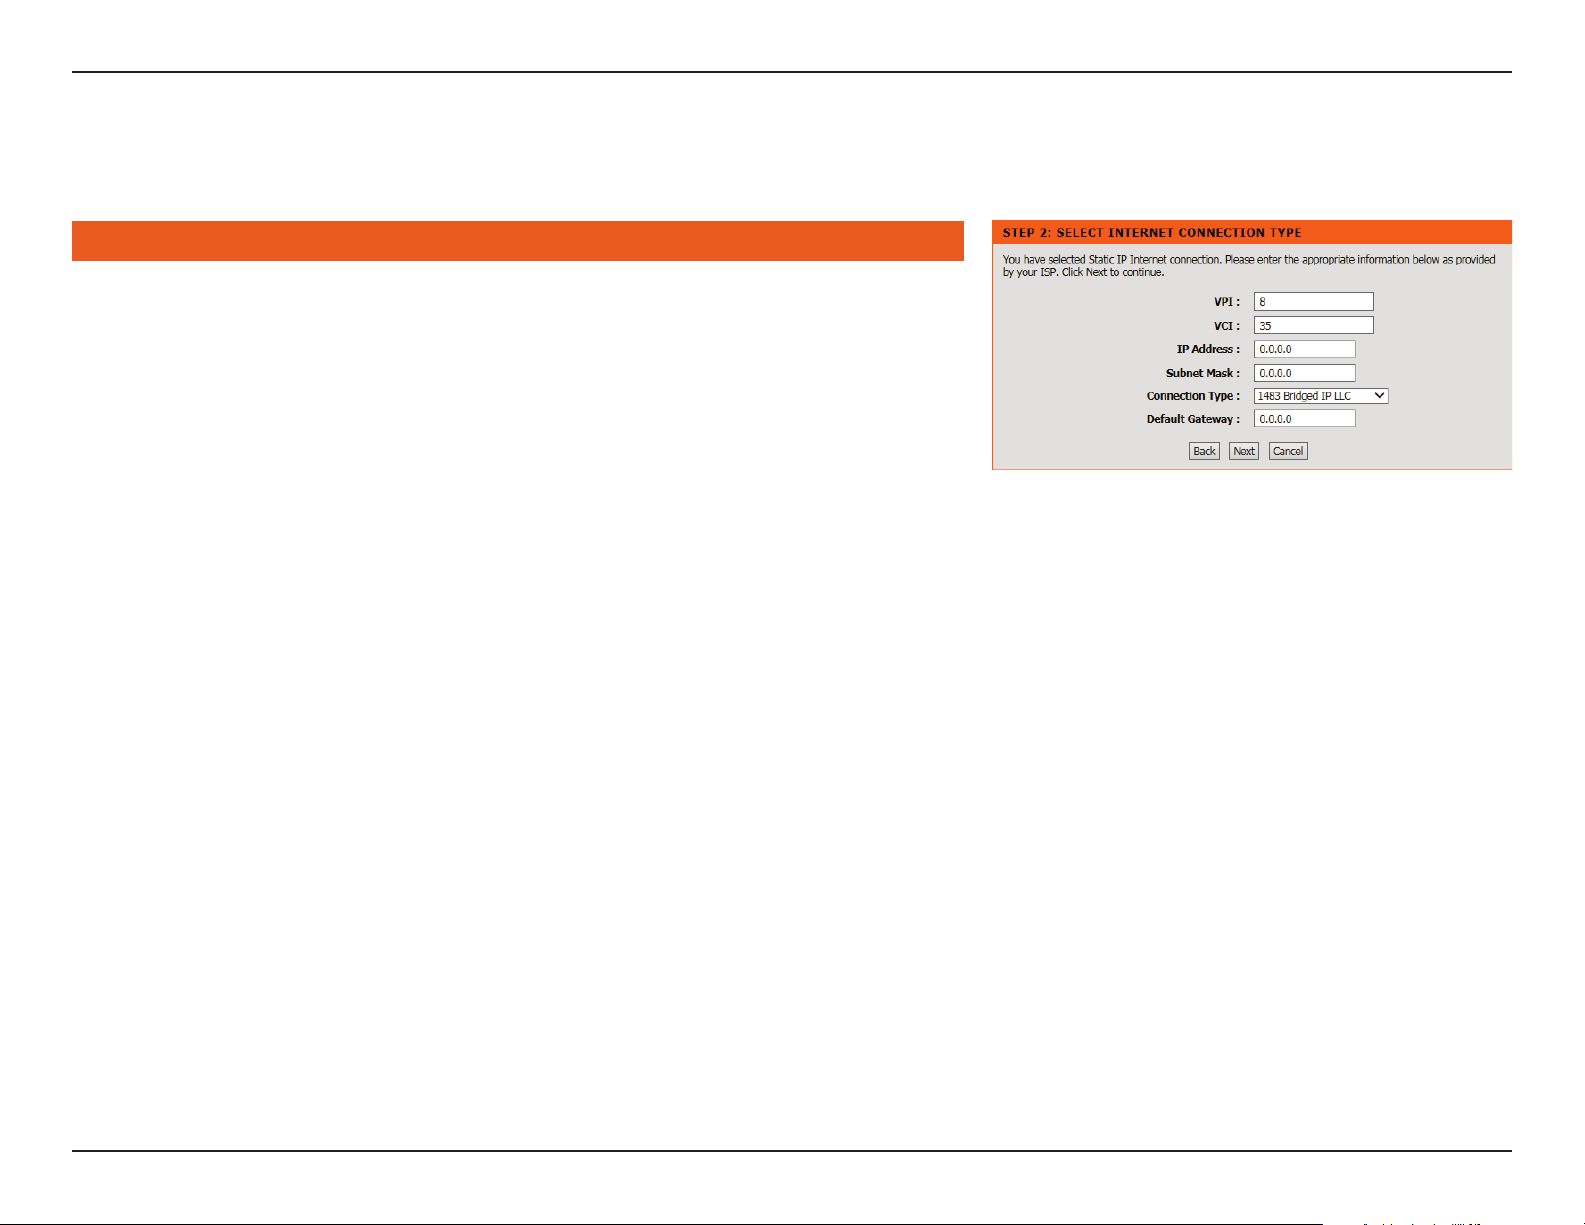
Static IP Address
If you selected Static IP Address, congure the following information:
STEP 2: SELECT INTERNET CONNECTION TYPE
VPI: Virtual path identifier (VPI) is the virtual path between two
points in an Asynchronous Transfer Network (ATM) network. Its
valid value is between 0 and 255. Enter the correct VPI provided
by your ISP.
VCI: Virtual channel identifier (VCI) is the virtual channel between
two points in an ATM network. Its valid value is between 32 and
65535. Enter the correct VCI provided by your ISP.
IP Address: Enter the IP address provided by your ISP.
Subnet Mask: Enter the subnet mask provided by your ISP.
Connection Type: Select either 1483 Bridged IP LLC or 1483 Bridged IP VC-
Mux.
Default Gateway: Enter the default gateway provided by your ISP.
Click Next to continue and proceed to step 3.
18D-Link DSL-2740M User Manual
Page 23

Section 3 - Conguration
Bridge Mode
If you selected Bridge Mode, congure the following information:
STEP 2: SELECT INTERNET CONNECTION TYPE
VPI: Virtual path identifier (VPI) is the virtual path between two
points in an Asynchronous Transfer Network (ATM) network. Its
valid value is between 0 and 255. Enter the correct VPI provided
by your ISP.
VCI: Virtual channel identifier (VCI) is the virtual channel between
two points in an ATM network. Its valid value is between 32 and
65535. Enter the correct VCI provided by your ISP.
Connection Type: Select either 1483 Bridge IP LLC or 1483 Bridge IP VC-Mux.
Click Next to continue and proceed to step 3. When setup is complete you may then
congure your additional device to act as a Gateway/Router.
19D-Link DSL-2740M User Manual
Page 24
Section 3 - Conguration
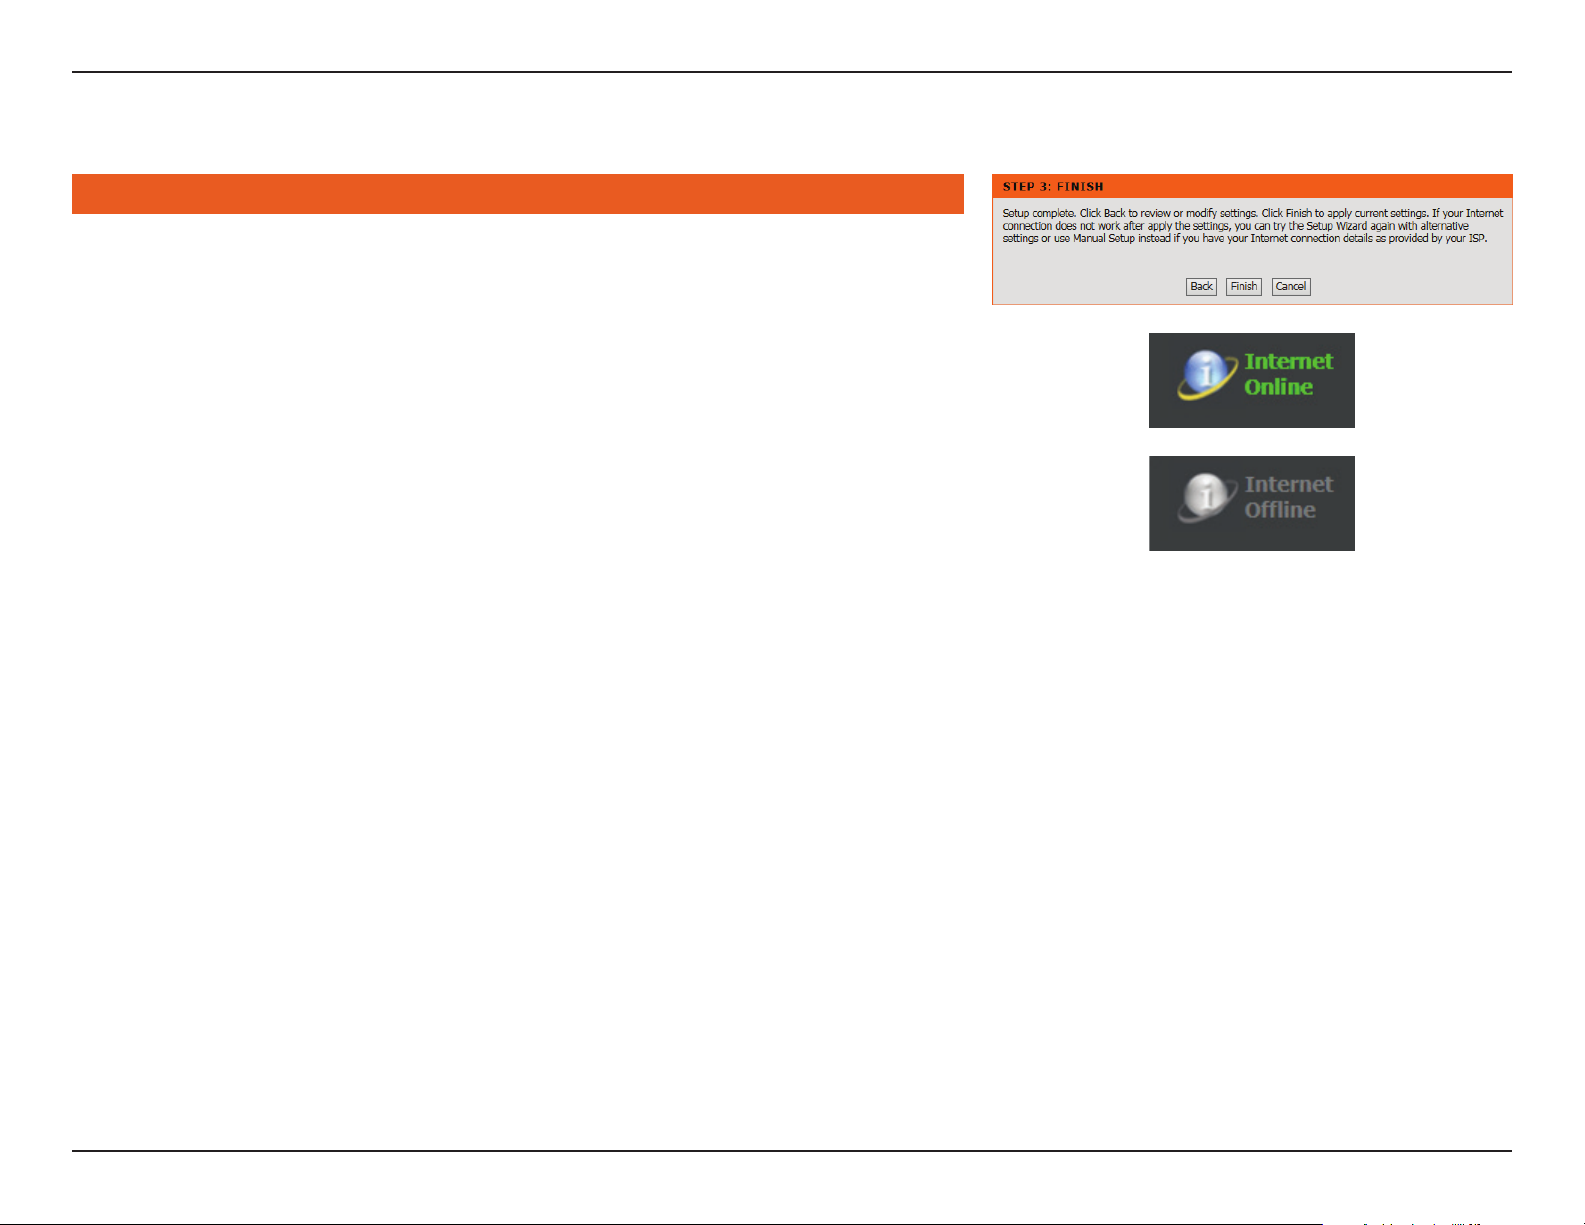
Finish
STEP 3: FINISH
Click Finish to apply your settings. Click Back to review or modify settings.
Congratulations, setup is complete.
You can verify your connection status by viewing the Internet Icon on the left hand side of
the page.
20D-Link DSL-2740M User Manual
Page 25
Section 3 - Conguration
Manual Conguration
This section will show you how to congure or change the default settings your D-Link
DSL-2740M using the web-based conguration utility.
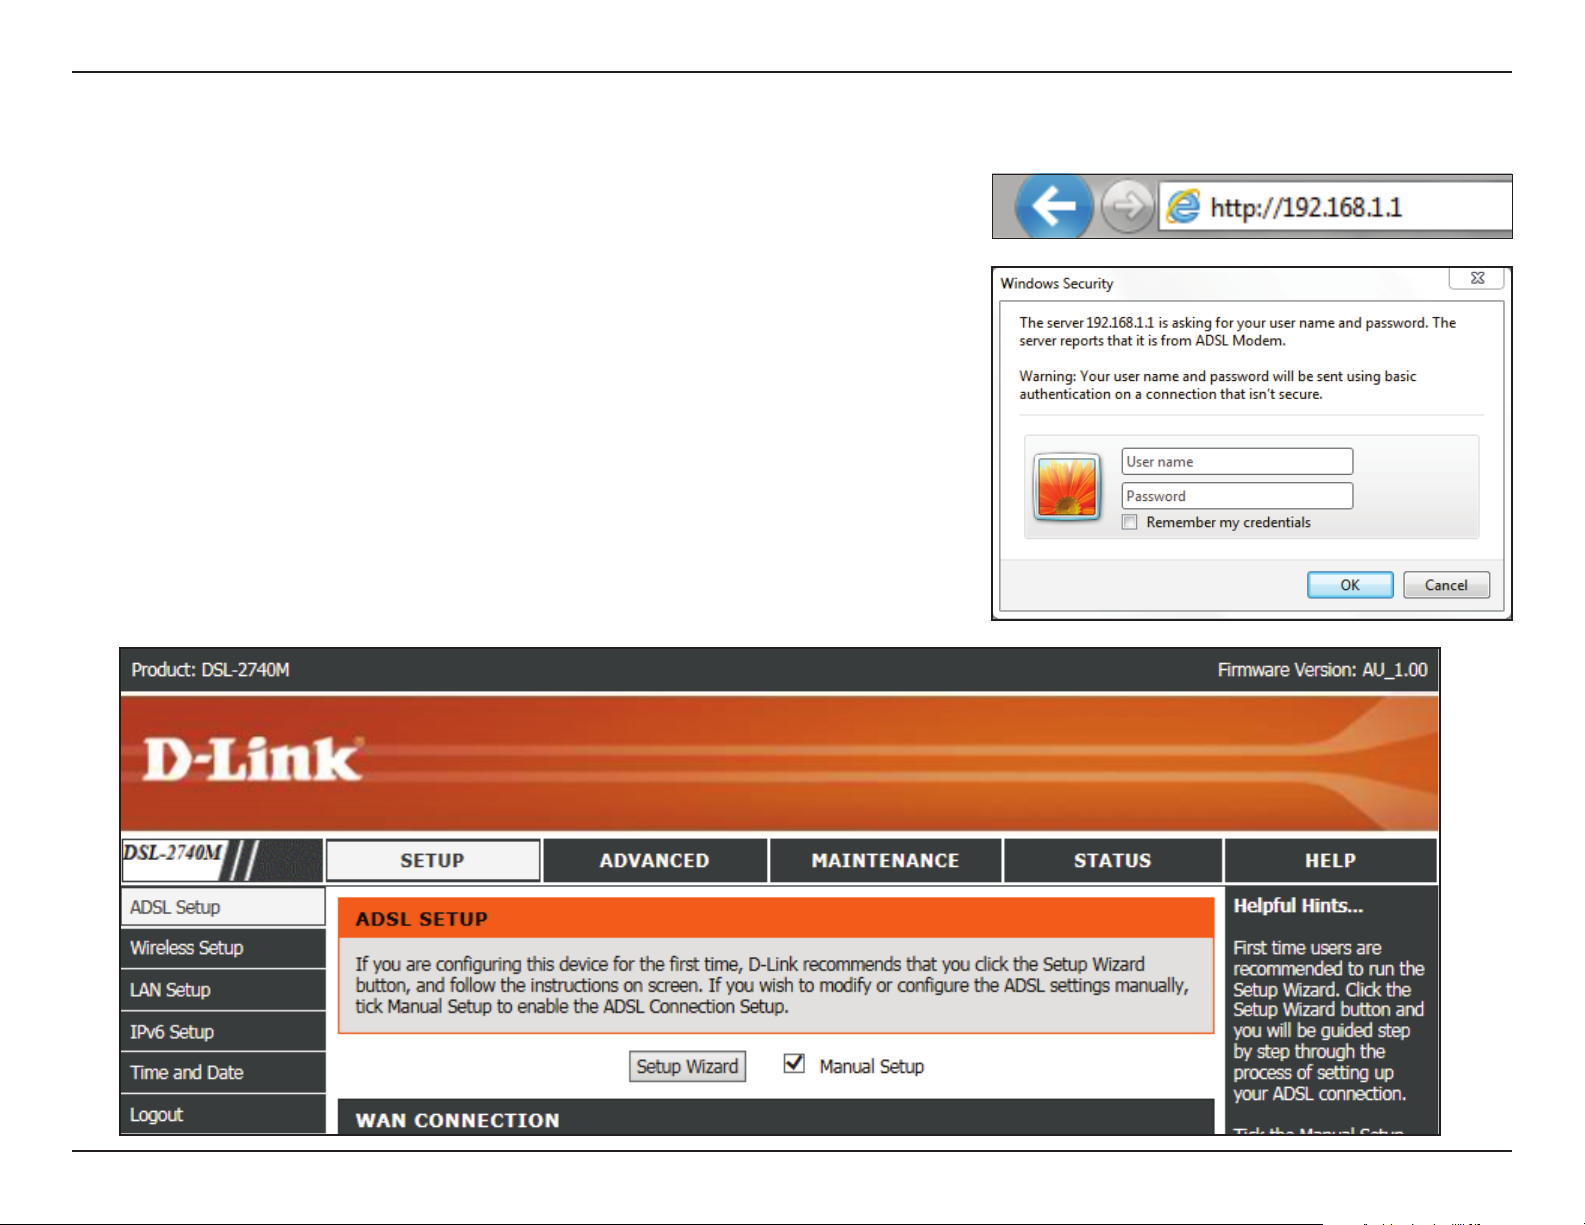
To access the conguration utility, open a web browser such as Internet Explorer and enter
http://192.168.1.1 in the address eld. Enter admin as the username and admin as the
password. Click Login.
After logging in in you will be taken to the Setup > ADSL Setup page.
21D-Link DSL-2740M User Manual
Page 26

Section 3 - Conguration
Web UI Table of Contents
The web-based interface is divided into 5 horizontal tabs, each with a vertical menu bar running along the left side.
You may click on these section titles to quickly navigate to a section of this document.
SETUP ADVANCED MAINTENANCE STATUS HELP
Reboot
ADSL Setup
Wireless Setup
LAN Setup
IPv6 Setup
Time and Date
Logout
Port Forwarding
QoS Setup
Outbound Filter
Inbound Filter
Static Route
DNS Setup
VLAN
Firewall & DMZ
Advanced ADSL
Advanced Wireless
Wi-Fi Protected Setup
Wireless Mac Filter
Advanced LAN
Remote Management
Logout
Password
Save/Restore Settings
Diagnostics
System Log
Logout
Device Info
Connected Clients
Statistics
Logout
To return to this Web UI Table of Contents page, simply click the D-Link logo on the top
right of each page.
SETUP
ADSL SETUPADSL Setup
22D-Link DSL-2740M User Manual
Page 27
Section 3 - Conguration
Setup
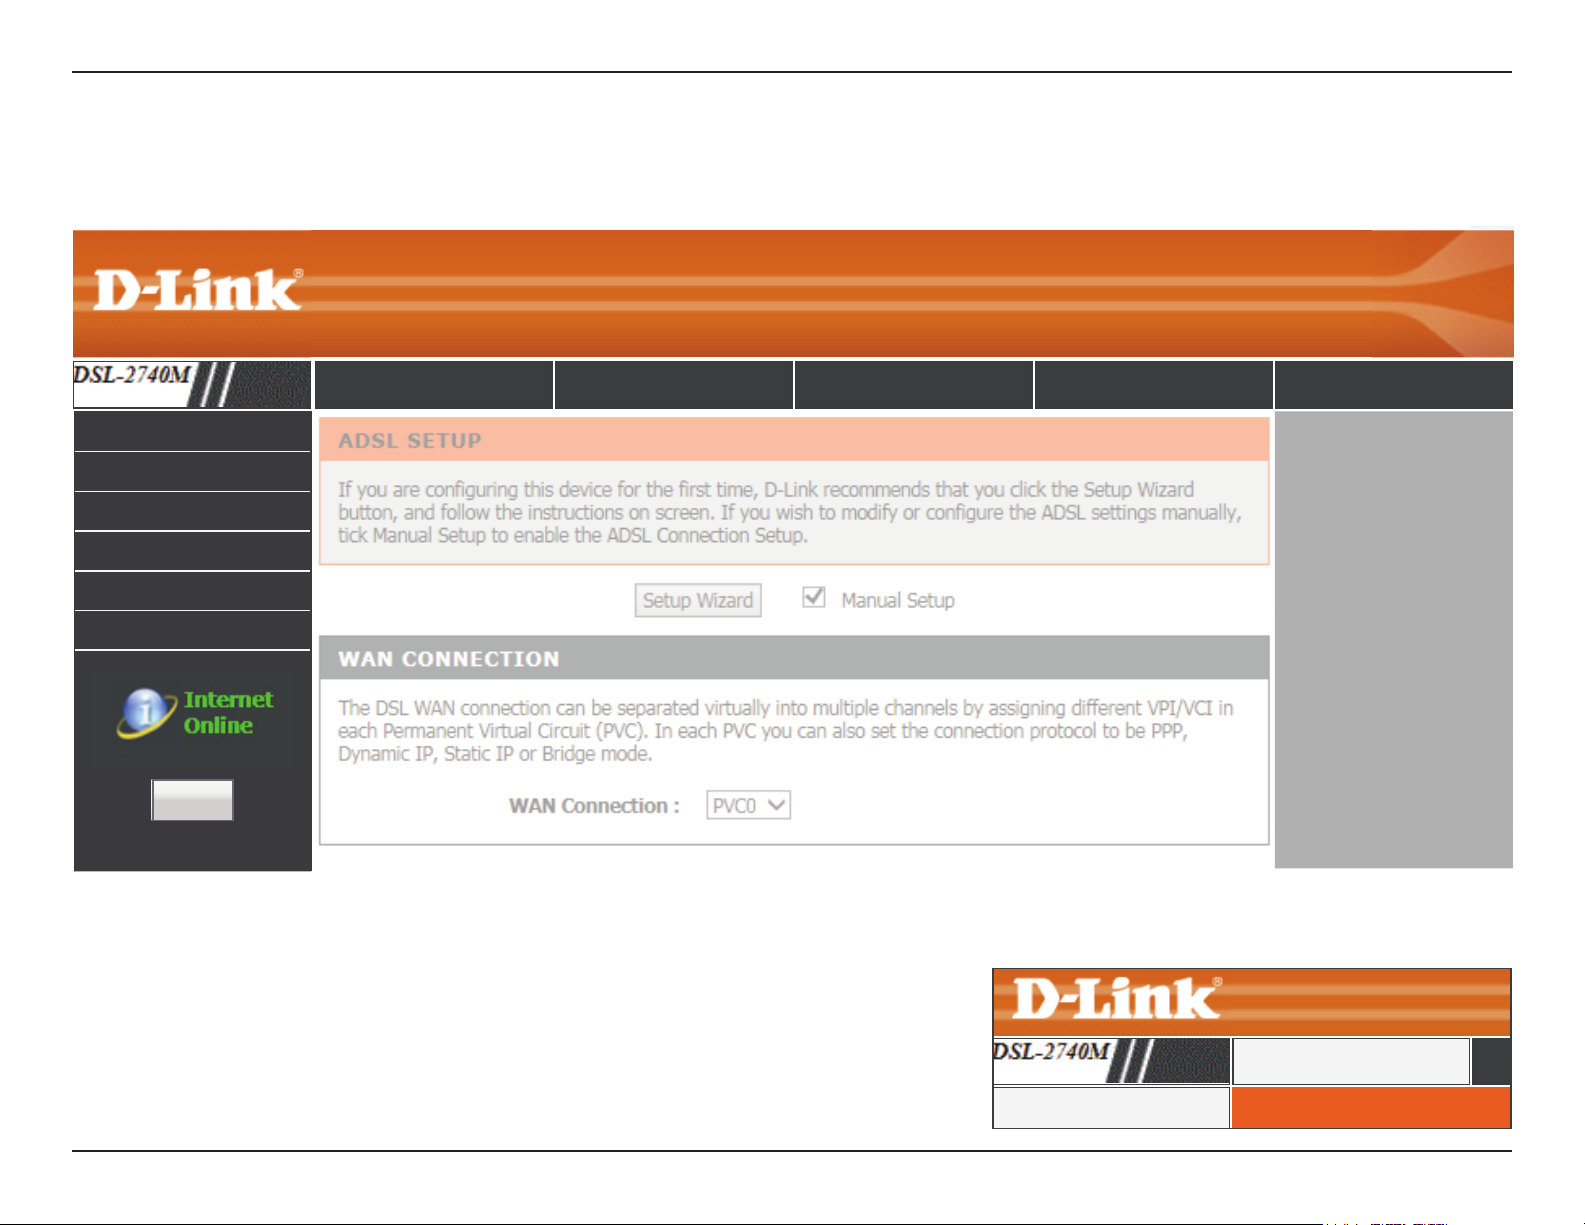
The Setup tab provides access to congure the basic conguration settings of your DSL-2740M.
SETUP ADVANCED MAINTENANCE STATUS HELP
ADSL Setup
Wireless Setup
LAN Setup
IPv6 Setup
Time and Date
Logout
Reboot
To return to this Web UI Table of Contents page, simply click the D-Link logo on the top
right of each page.
SETUP
ADSL SETUPADSL Setup
23D-Link DSL-2740M User Manual
Page 28
Section 3 - Conguration
ADSL Setup
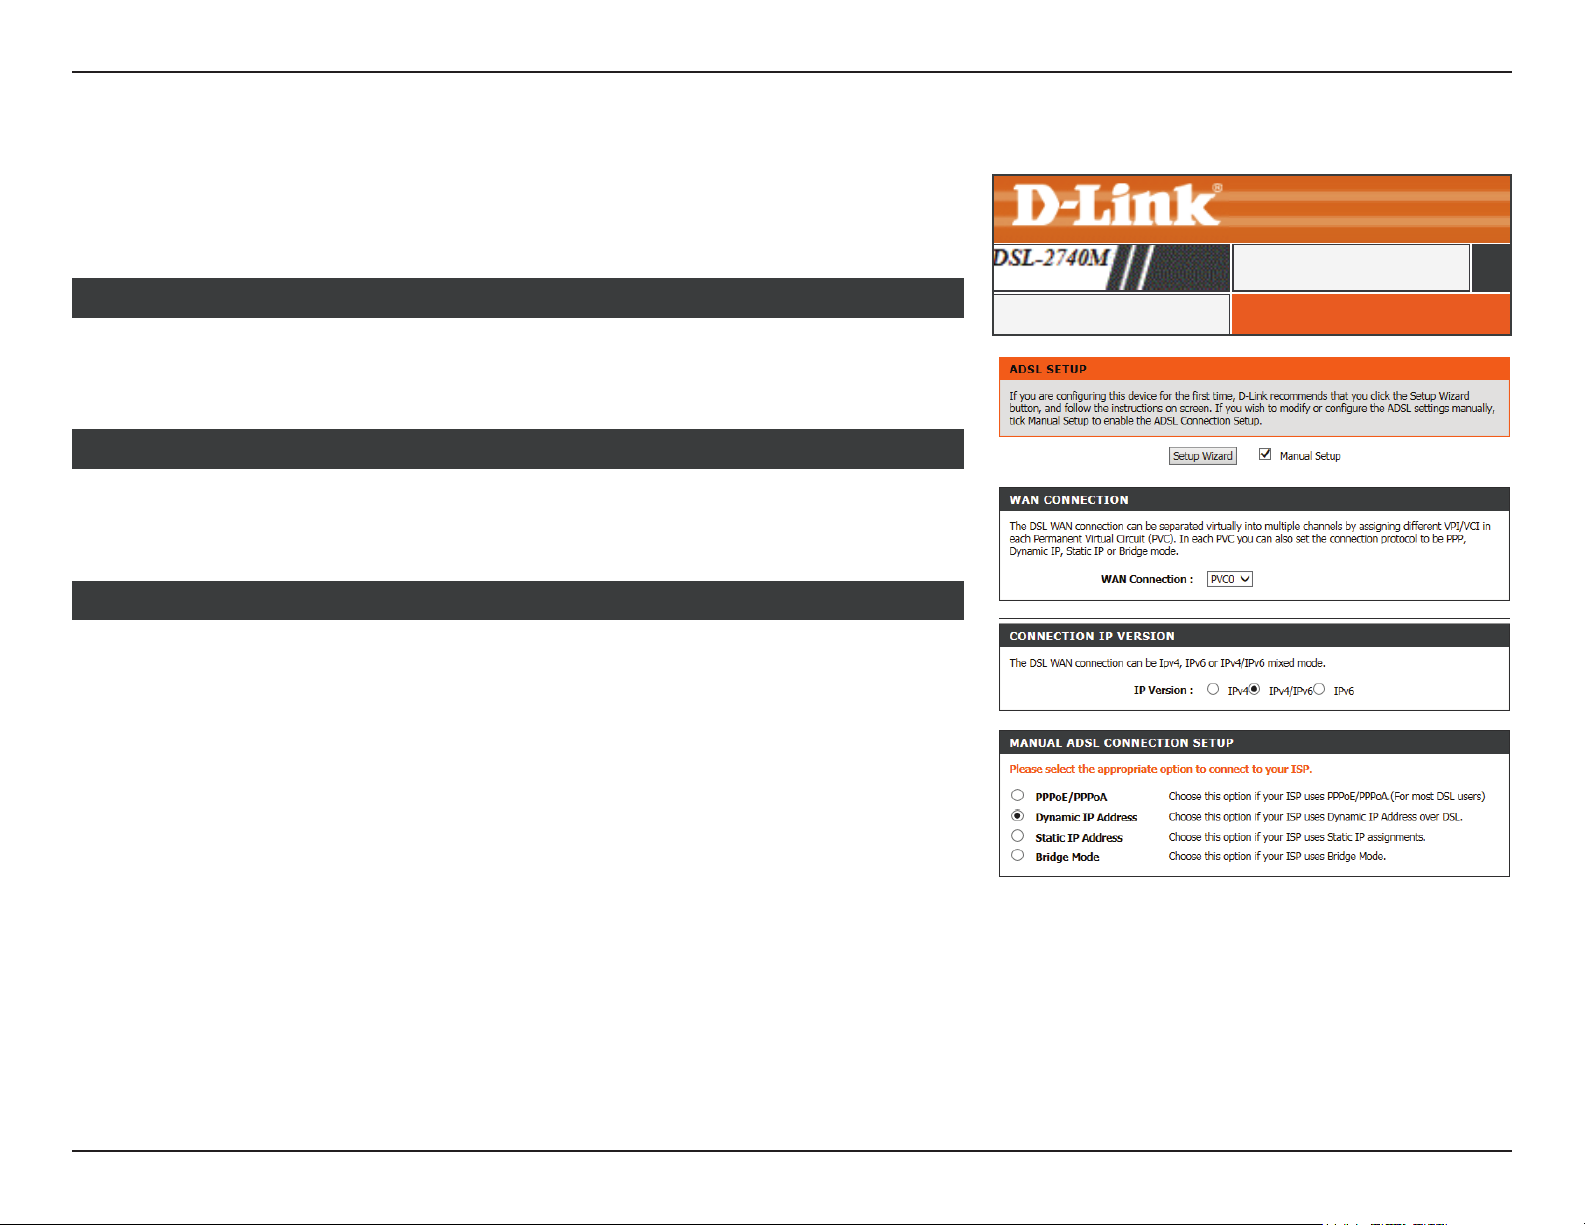
You may manually congure the DSL-2740M from the Internet Setup option. This section is
recommended for advanced users. Novice users are advised to run the Setup Wizard. Click
the Setup Wizard button and refer to Setup Wizard on page 13 for more information.
SETUP
WAN CONNECTION
WAN Connection: Select the Permanent Virtual Circuit you wish to congure from
the drop down menu.
CONNECTION IP VERSION
IP Version: Select the version of the IP protocol your ISP uses. The options
are IPv4, IPv4/IPv6, or IPv6.
MANUAL ADSL CONNECTION SETUP
Select your ISP’s connection type.
PPPoE/PPPoA: Select PPPoE/PPPoA if your ISP provided you with a username
and password.
Refer to page PPPoE/PPPoA on page 25.
Dynamic IP Address: Select DHCP if your ISP automatically assigns you an IP address.
Refer to page Dynamic IP Address on page 27.
ADSL SETUPADSL Setup
Static IP Address: Select Static IP Address if your ISP provided you with one.
Refer to page Static IP Address on page 28.
Bridge Mode: Select Bridge Mode if you intend to connect another device to
act as a Gateway/Router.
Refer to page Bridge Mode on page 29.
24D-Link DSL-2740M User Manual
Page 29
Section 3 - Conguration
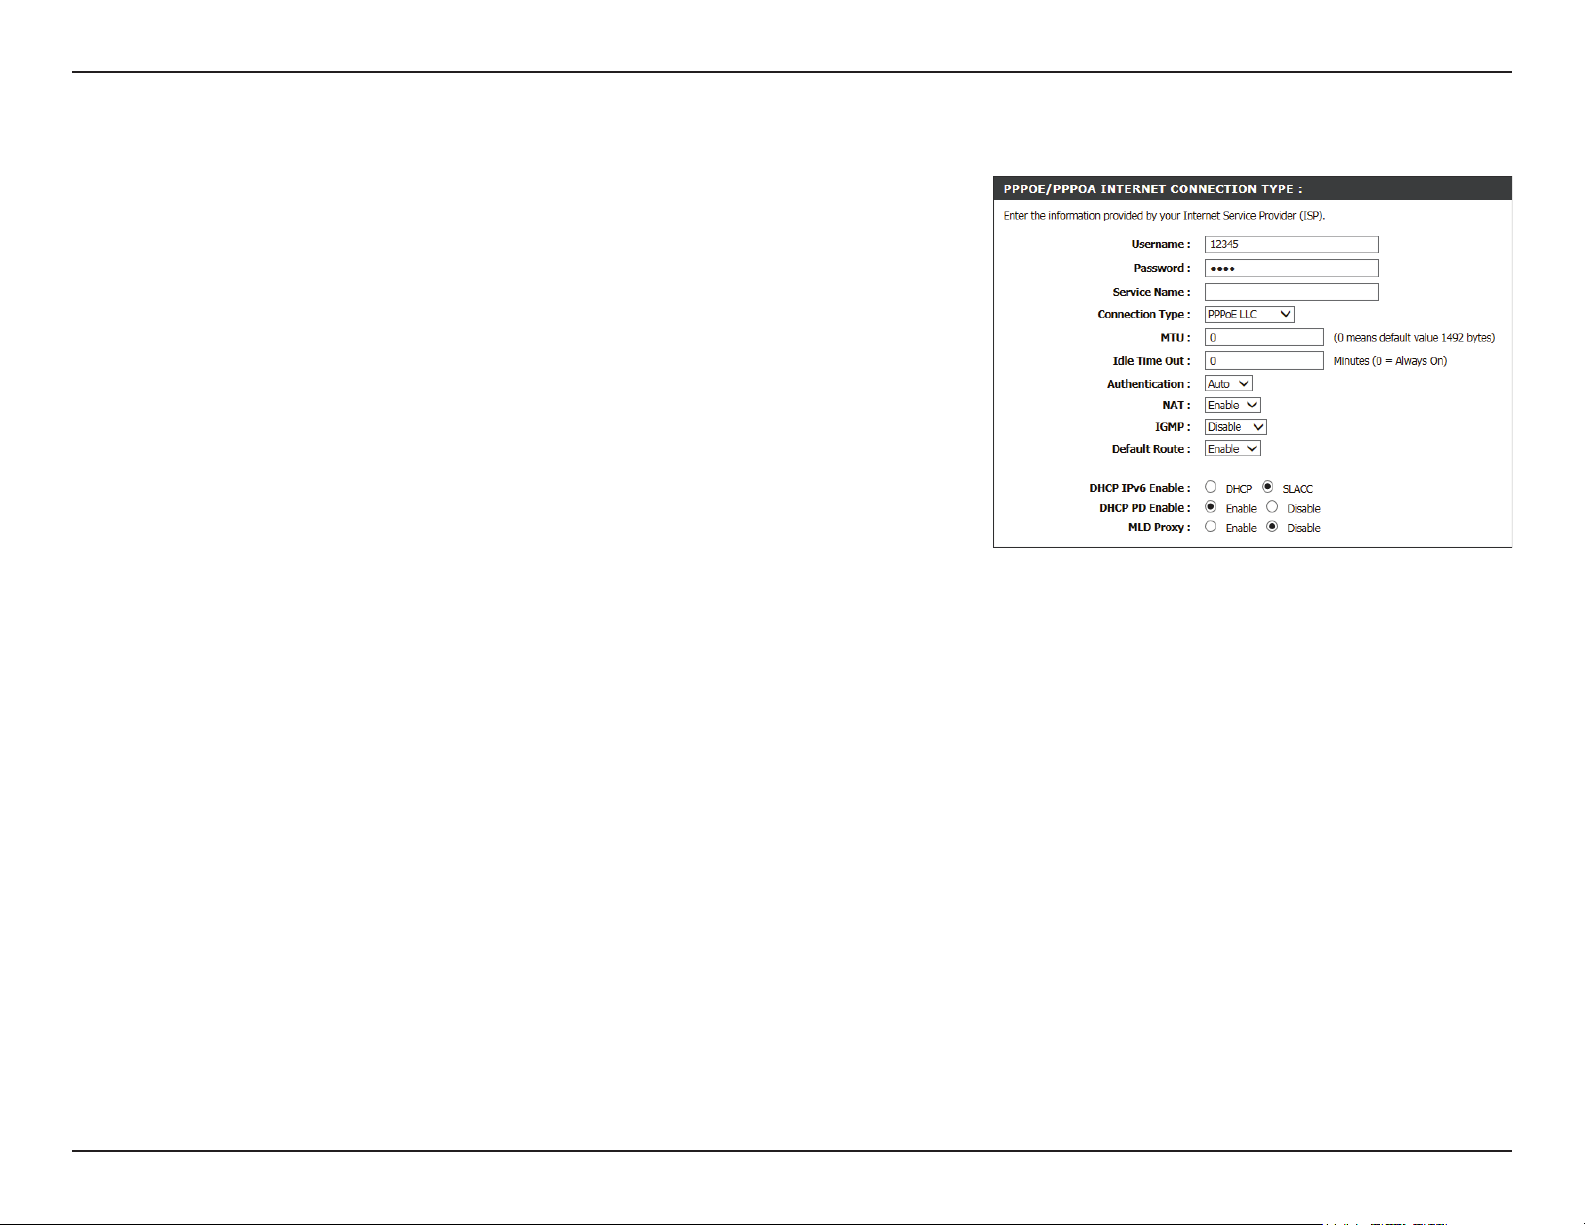
PPPoE/PPPoA
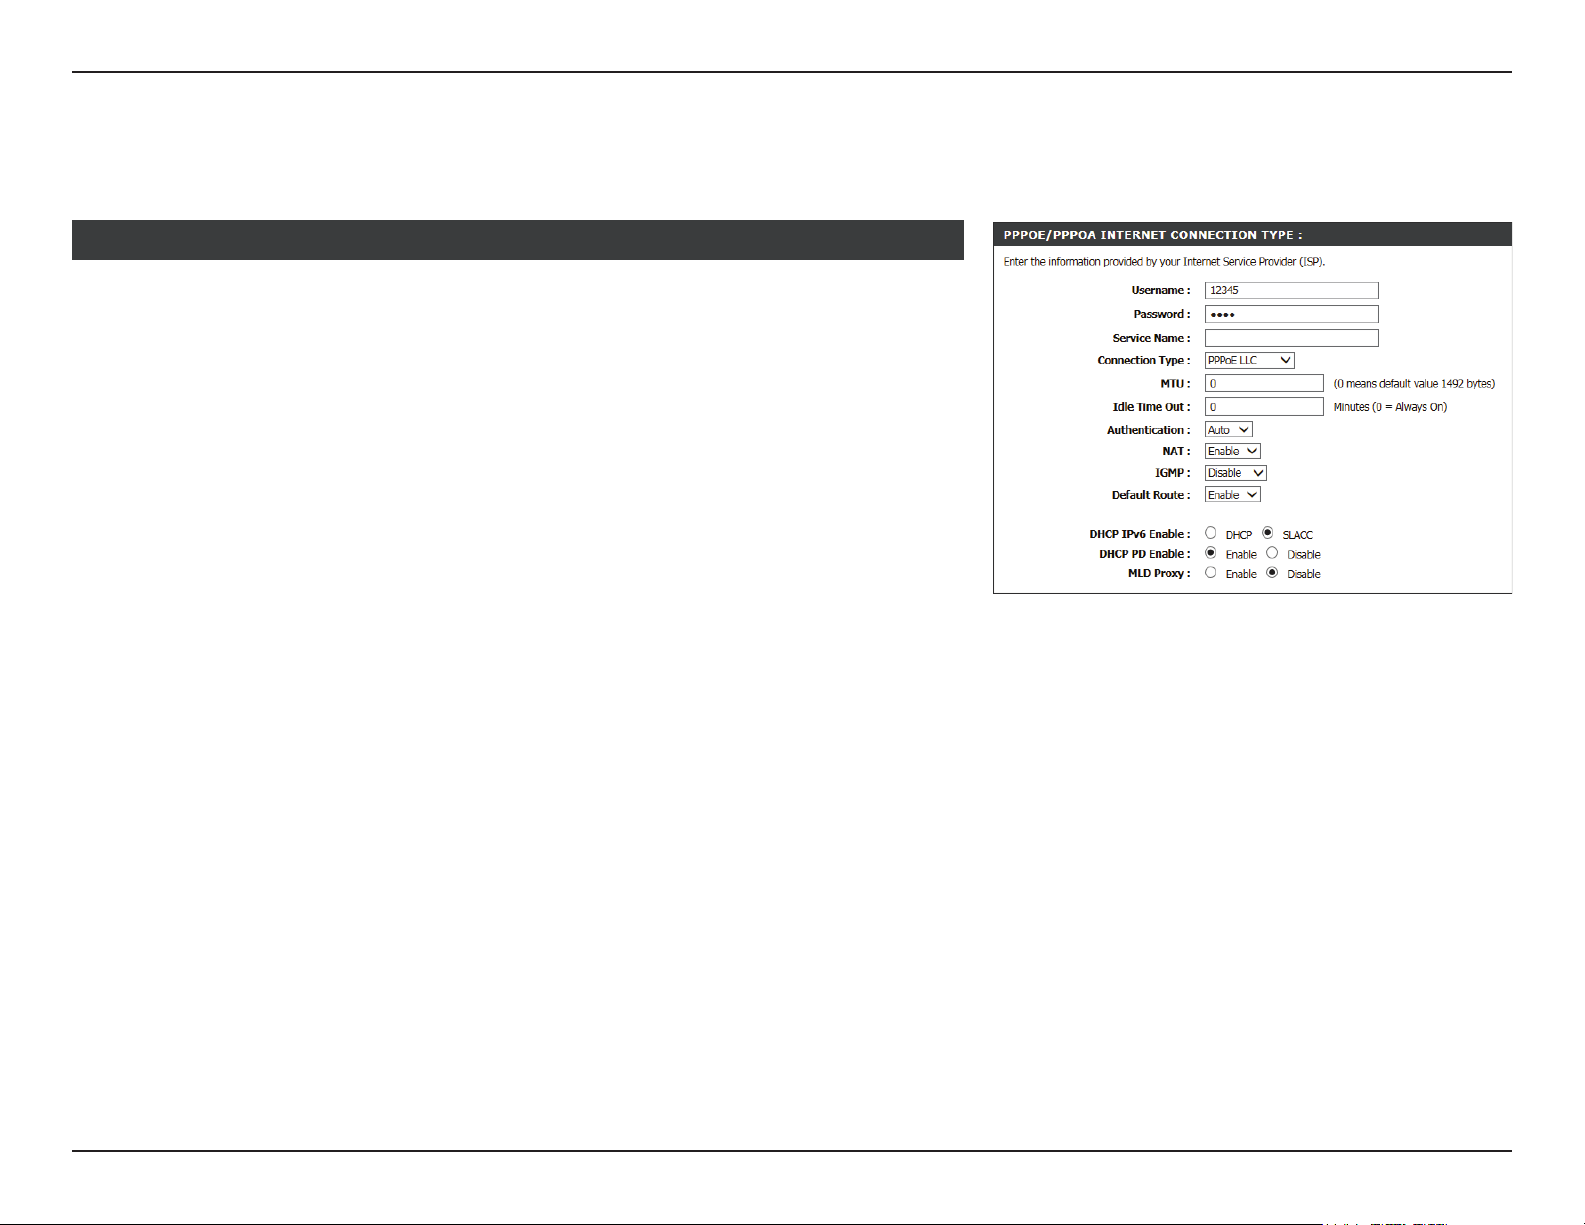
If you selected PPPoE/PPPoA, congure the following information:
PPPOE/PPPOA INTERNET CONNECTION TYPE :
Username: Enter your ISP account username.
Password: Enter your ISP account password.
Service Name: Enter your service name (Optional).
Connection Type: Select the type of encapsulation your ISP uses, PPPoE LLC,
PPPoE VC-Mux, PPPoA LLC, or PPPoA VC-Mux.
MTU: Enter the maximum receive unit (MTU) packet size. (IPv4 only)
Idle Time Out: Enter the amount time the router waits if there is no activity
before disconnecting.
Authtenticiaton: Select the authentication protocol your ISP uses. The options are
PAP, CHAP, or AUTO.
NAT: Check this box to Enable Network Address Translation (NAT).
(IPv4 only)
IGMP: Select Disable, IGMP-v1, or IGMP -v2. (IPv4 only)
Default Route: Select Enable or Disable.
If IPv4/IPv6 or IPv6 is selected, congure the following settings:
DHCP IPv6 Enable: Select either DHCP or SLAAC addressing.
25D-Link DSL-2740M User Manual
Page 30
Section 3 - Conguration
PPPoE/PPPoA (continued)
DHCP PD Enable: Enable or disable DHCP-PD for other IPv6 routers connected to
the LAN interface. Note: This feature requires a smaller subnet
prex than /64 (i.e. allowing for a larger address allocation), such
as /63. Contact your ISP for more information.
MLD Proxy: Enable to allow IPv6 multicast trac to pass through the router
from the Internet.
Proceed to Virtual Circuit Settings on page 30.
26D-Link DSL-2740M User Manual
Page 31
Section 3 - Conguration
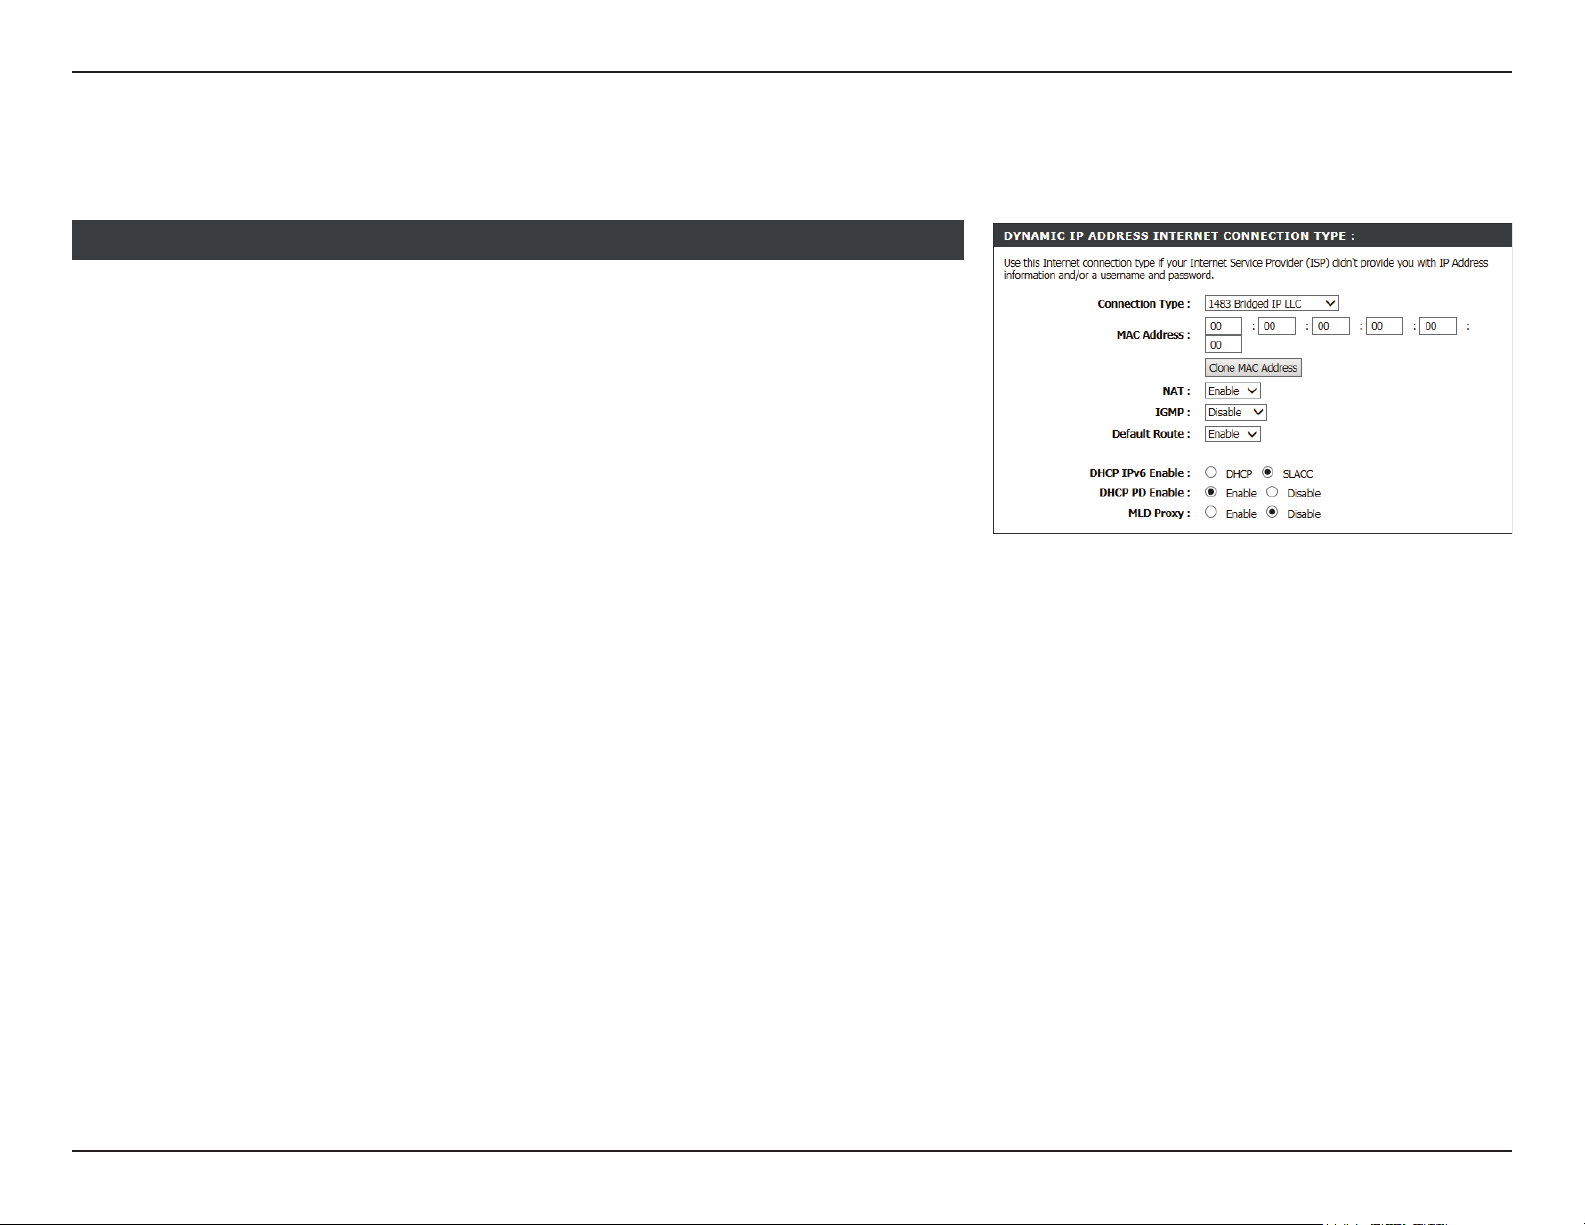
Dynamic IP Address
If you selected Dynamic IP address, congure the following information:
DYNAMIC IP ADDRESS INTERNET CONNECTION TYPE :
Connection Type: Select either 1483 Bridged IP LLC or 1483 Bridged IP VC-
Mux.
MAC Address: If your ISP locks your account to a specific device, you can clone
that device’s MAC address to your DSL-2740M so that you may
connect to the Internet. Click the Clone MAC Address button
to clone the MAC address of the device you are currently using
to access to the web configuration utility.
If IPv4 or IPv4/IPv6 is selected, congure the following settings:
NAT: Check this box to Enable Network Address Translation (NAT).
IGMP: Select Disable, IGMP-v1, or IGMP -v2.
Default Route: Select Enable or Disable.
If IPv4/IPv6 or IPv6 is selected, congure the following settings:
DHCP IPv6 Enable: Select either DHCP or SLAAC addressing.
DHCP PD Enable: Enable or disable DHCP-PD for other IPv6 routers connected to
the LAN interface. Note: This feature requires a smaller subnet
prex than /64 (i.e. allowing for a larger address allocation), such
as /63. Contact your ISP for more information.
MLD Proxy: Enable to allow IPv6 multicast trac to pass through the router
from the Internet.
Proceed to Virtual Circuit Settings on page 30.
27D-Link DSL-2740M User Manual
Page 32
Section 3 - Conguration
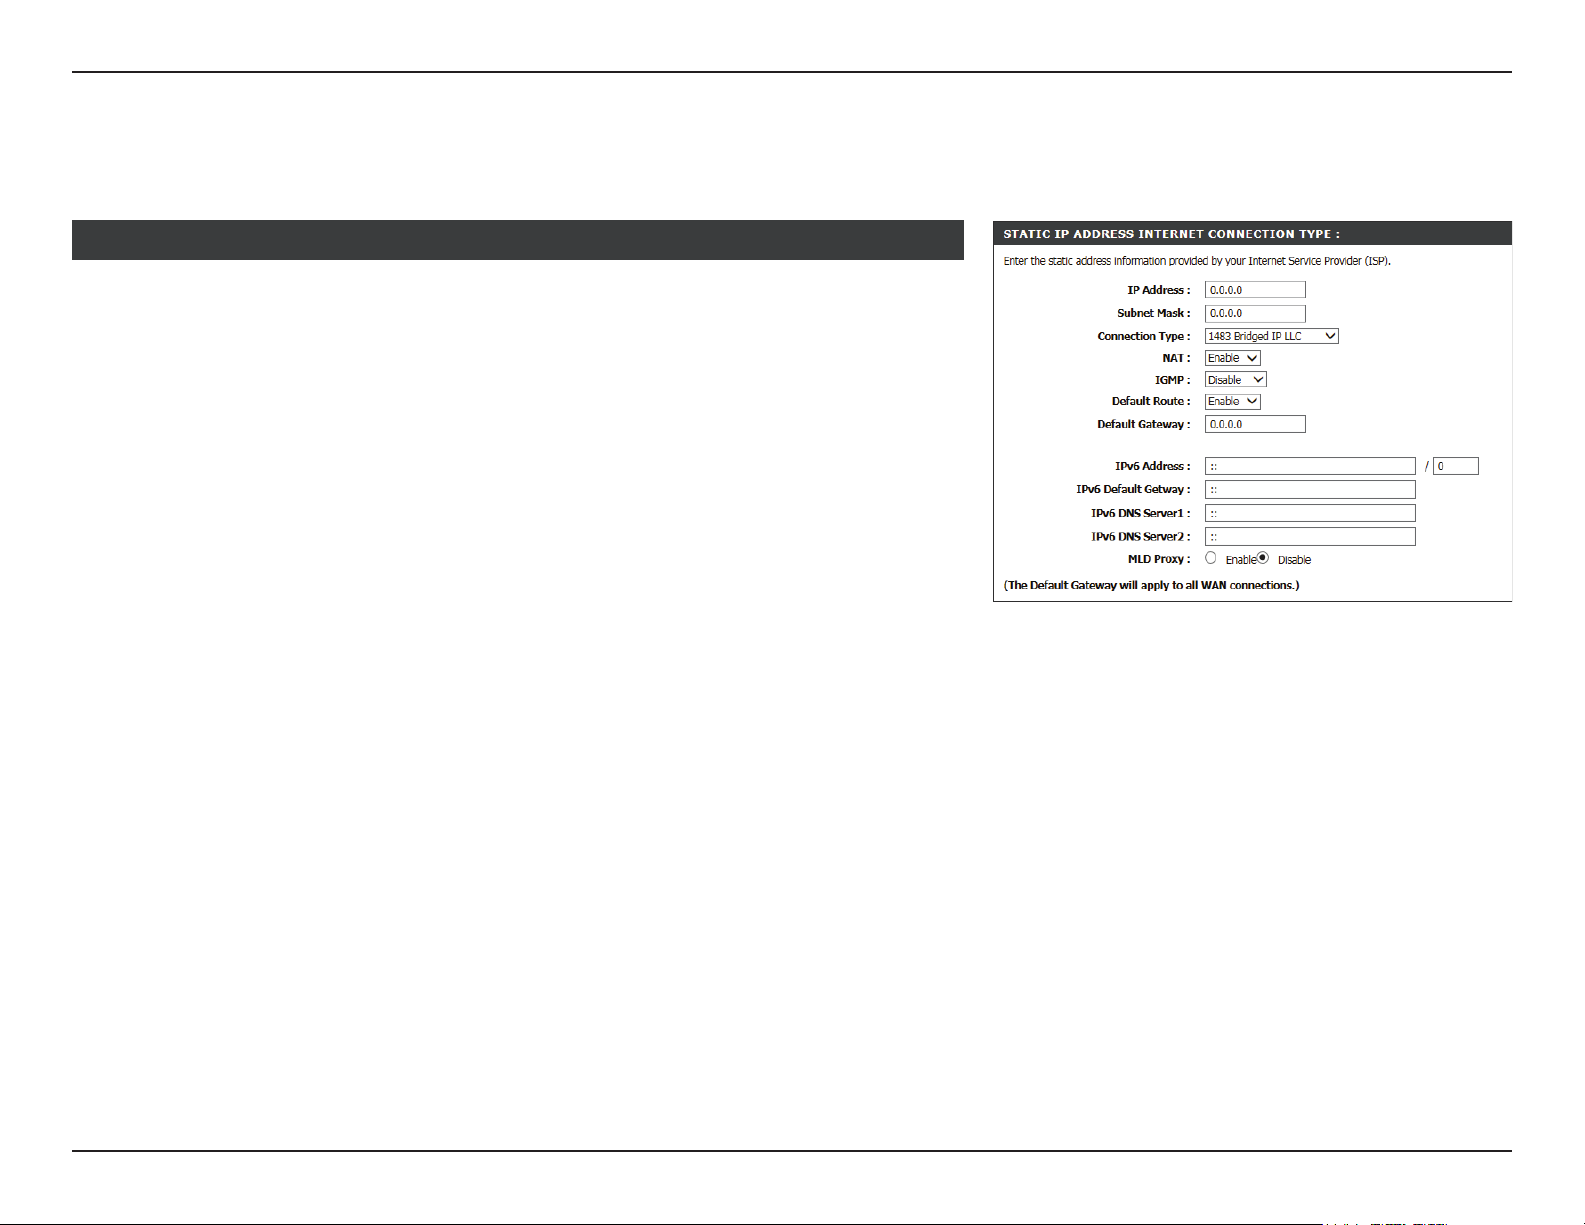
Static IP Address
If you selected Static IP Address, congure the following information:
STATIC IP ADDRESS INTERNET CONNECTION TYPE :
IP Address: Enter the IP address provided by your ISP.
Subnet Mask: Enter the subnet mask provided by your ISP.
Connection Type: Select 1483 Bridged IP LLC, 1483 Bridged IP VC-Mux, 1483
Routed IP LLC or 1483 Routed IP VC-Mux.
If IPv4 or IPv4/IPv6 is selected, congure the following settings:
NAT: Check this box to Enable Network Address Translation (NAT).
IGMP: Select Disable, IGMP-v1, or IGMP -v2.
Default Route: Select Enable or Disable.
Default Gateway: Enter the default gateway provided by your ISP.
If IPv4/IPv6 or IPv6 is selected, congure the following settings:
IPv6 Address: Enter the address supplied by your ISP.
IPv6 Default Gateway: Enter the default gateway for your IPv6 connection.
IPv6 DNS Server1: Enter the primary DNS server address.
IPv6 DNS Server2: Enter the secondary DNS server address.
MLD Proxy: Enable to allow IPv6 multicast trac to pass through the router
from the Internet.
Proceed to Virtual Circuit Settings on page 30.
28D-Link DSL-2740M User Manual
Page 33
Section 3 - Conguration
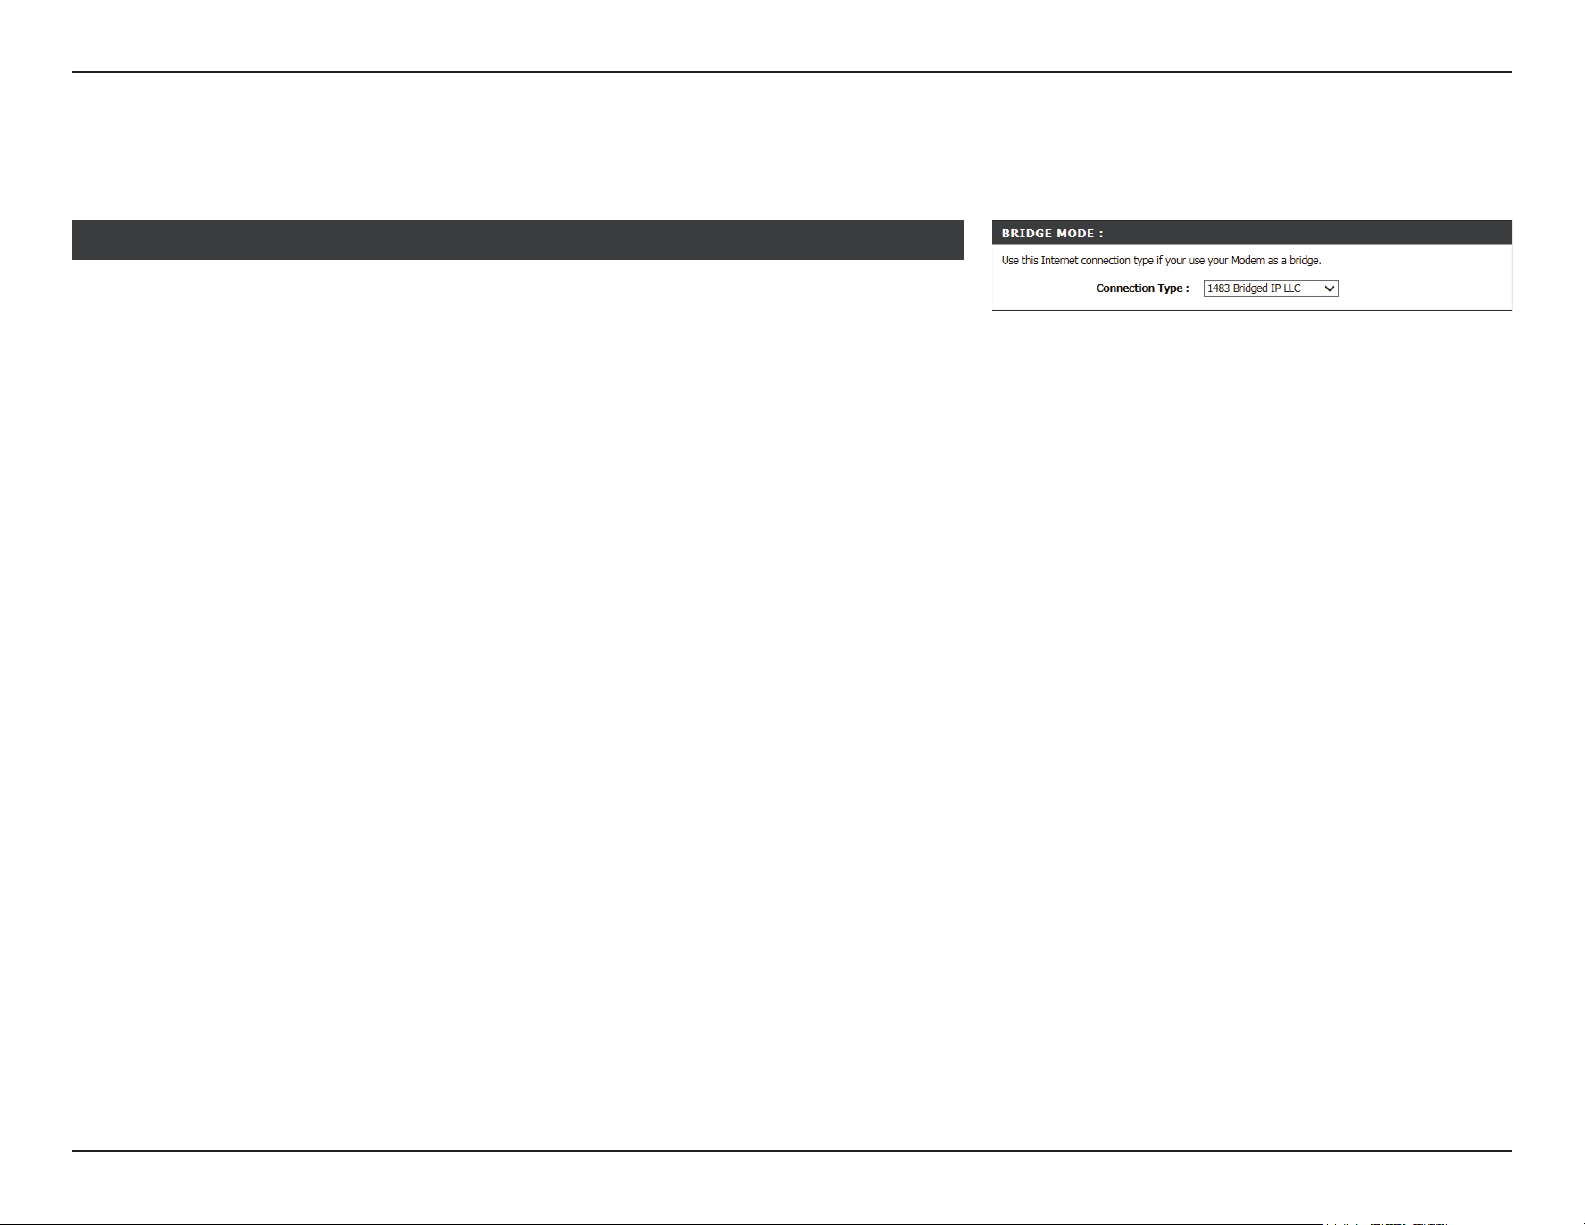
Bridge Mode
If you selected Bridge Mode, congure the following information:
BRIDGE MODE :
Connection Type: Select either 1483 Bridge IP LLC or 1483 Bridge IP VC-Mux.
Proceed to Virtual Circuit Settings on page 30. When setup is complete, you may then
congure your additional device to act as a Gateway/Router.
29D-Link DSL-2740M User Manual
Page 34
Section 3 - Conguration
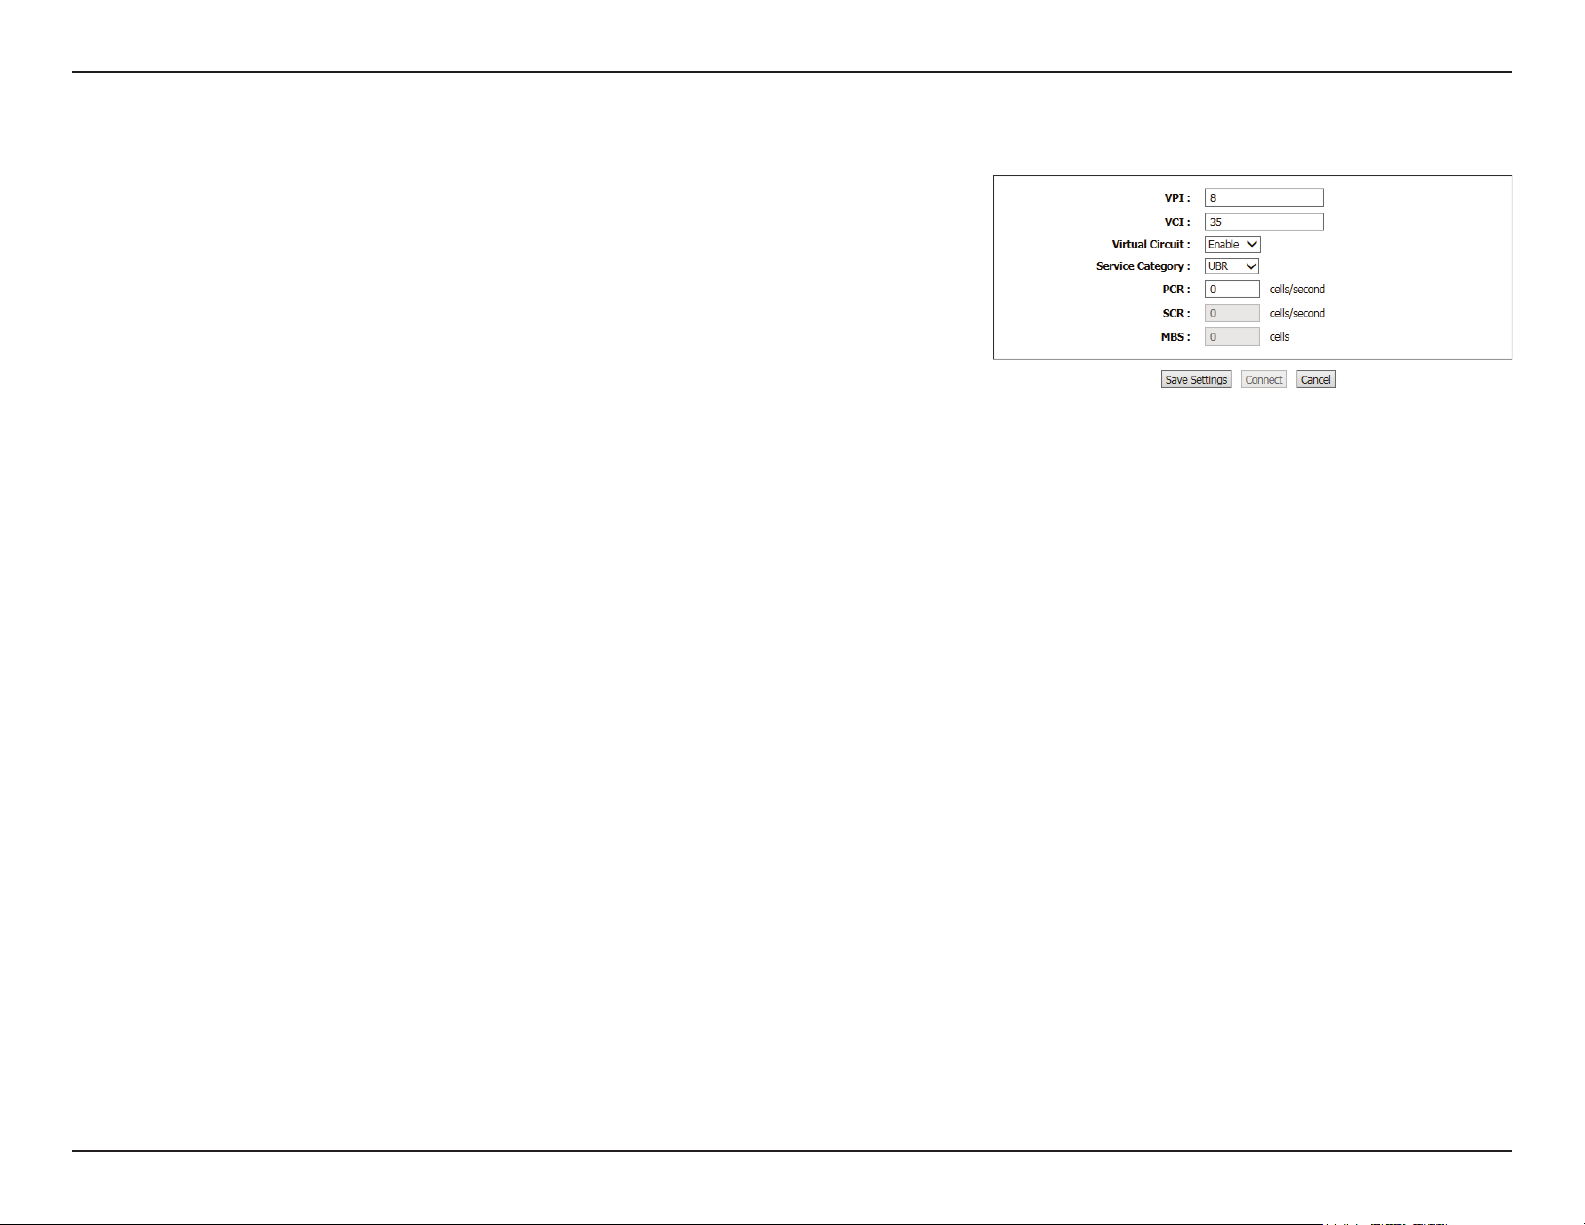
Virtual Circuit Settings
Once you have congured your ISP’s connection type, congure the Virtual Circuit Settings:
VPI: Virtual path identifier (VPI) is the virtual path between two
points in an Asynchronous Transfer Network (ATM) network. Its
valid value is between 0 and 255. Enter the correct VPI provided
by your ISP.
VCI: Virtual channel identifier (VCI) is the virtual channel between
two points in an ATM network. Its valid value is between 32 and
65535. Enter the correct VCI provided by your ISP.
Virtual Circuit: Enable or disable virtual circuit.
Service Category: Select the Service Category your ISP uses. The options are CBR,
UBR, nrtVBR (non-realtime VBR), or rtVBR (realtime VBR)
PCR: Enter the Peak Cell Rate
If you selected nrtVBR or rtVBR congure the the following options:
SCR: Enter the Sustainable Cell Rate.
MBS: Enter the Maximum Burst Size.
If IPv6 is selected as the Connection IP Version, proceed to Dual Stack Lite on page 31.
Otherwise, click Save Settings or Connect to test your settings. Setup is complete.
30D-Link DSL-2740M User Manual
Page 35
Section 3 - Conguration
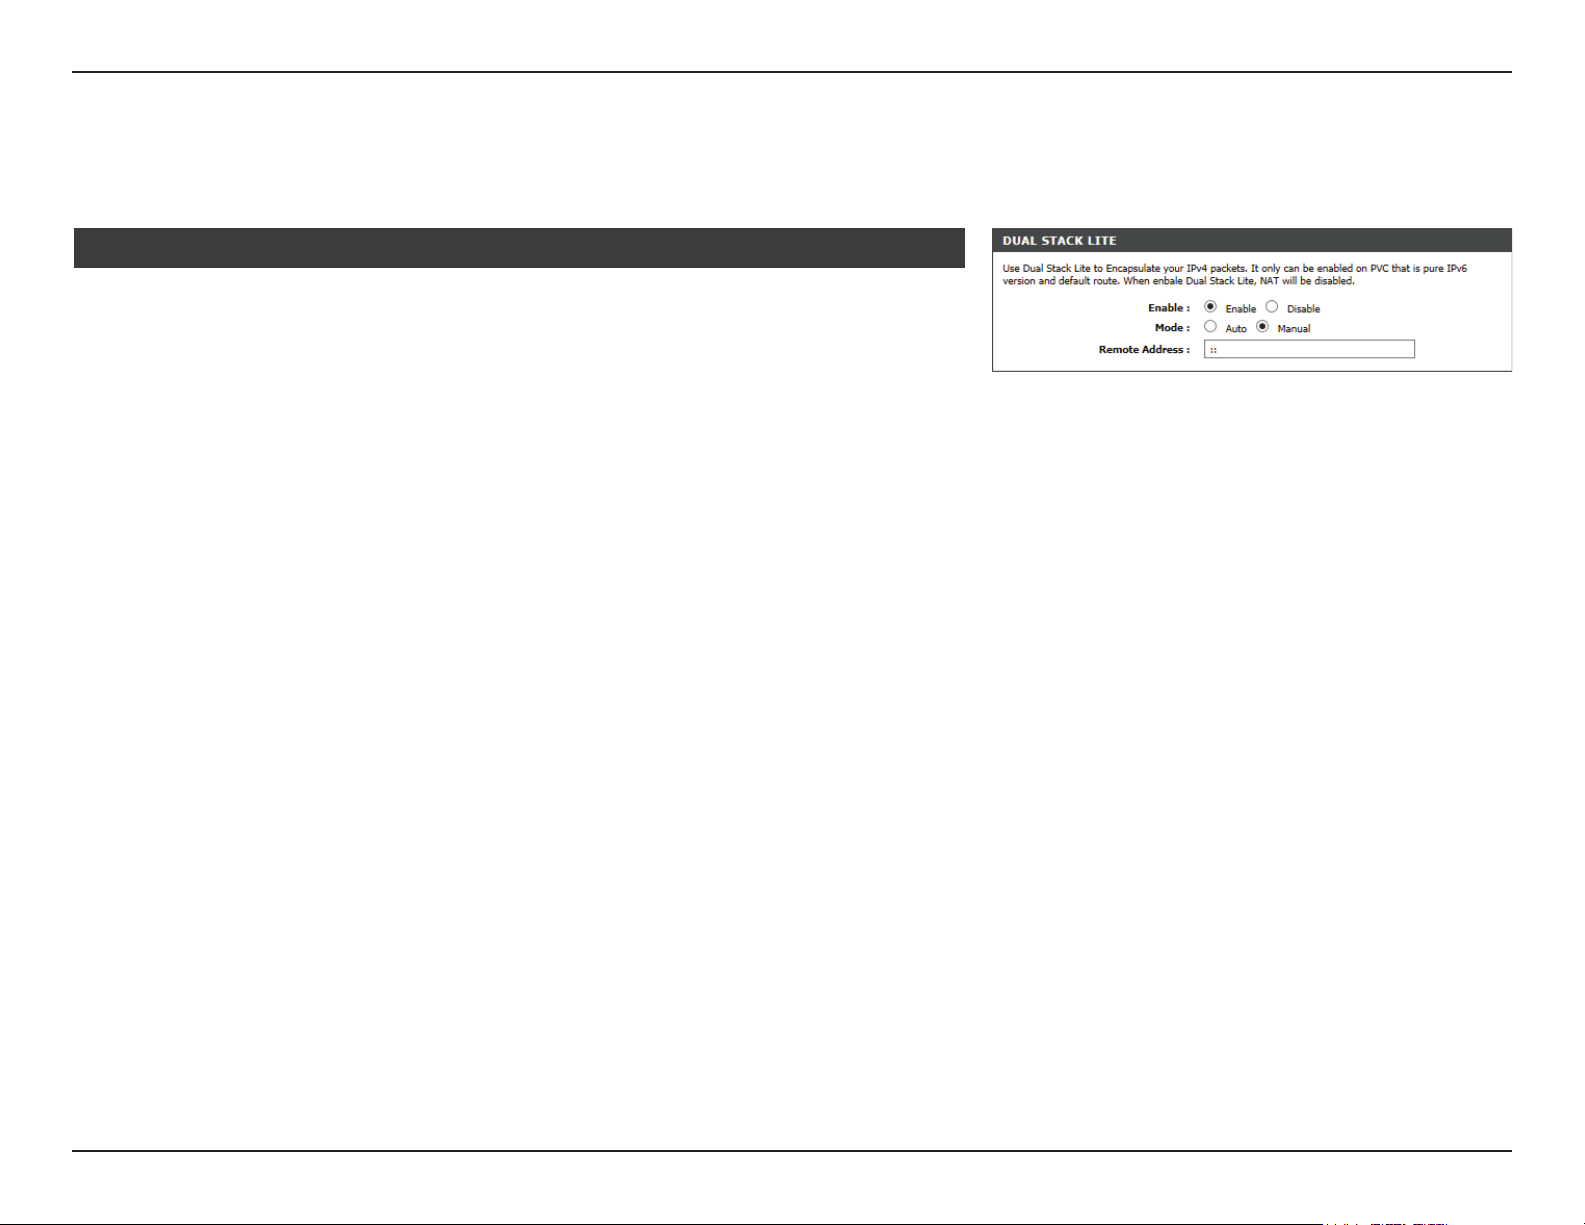
Dual Stack Lite
If IPv6 is selected as the Connection IP Version, congure the following settings:
DUAL STACK LITE
Enable: Enable or Disable DS-Lite.
Mode: Select Auto or Manual.
If you selected Manual, input the IPv6 encapsulation server.
Remote Address: Enter the DS-Lite IPv6 encapsulation server address.
Otherwise, click Save Settings or Connect to test your settings. Setup is complete.
31D-Link DSL-2740M User Manual
Page 36
Section 3 - Conguration
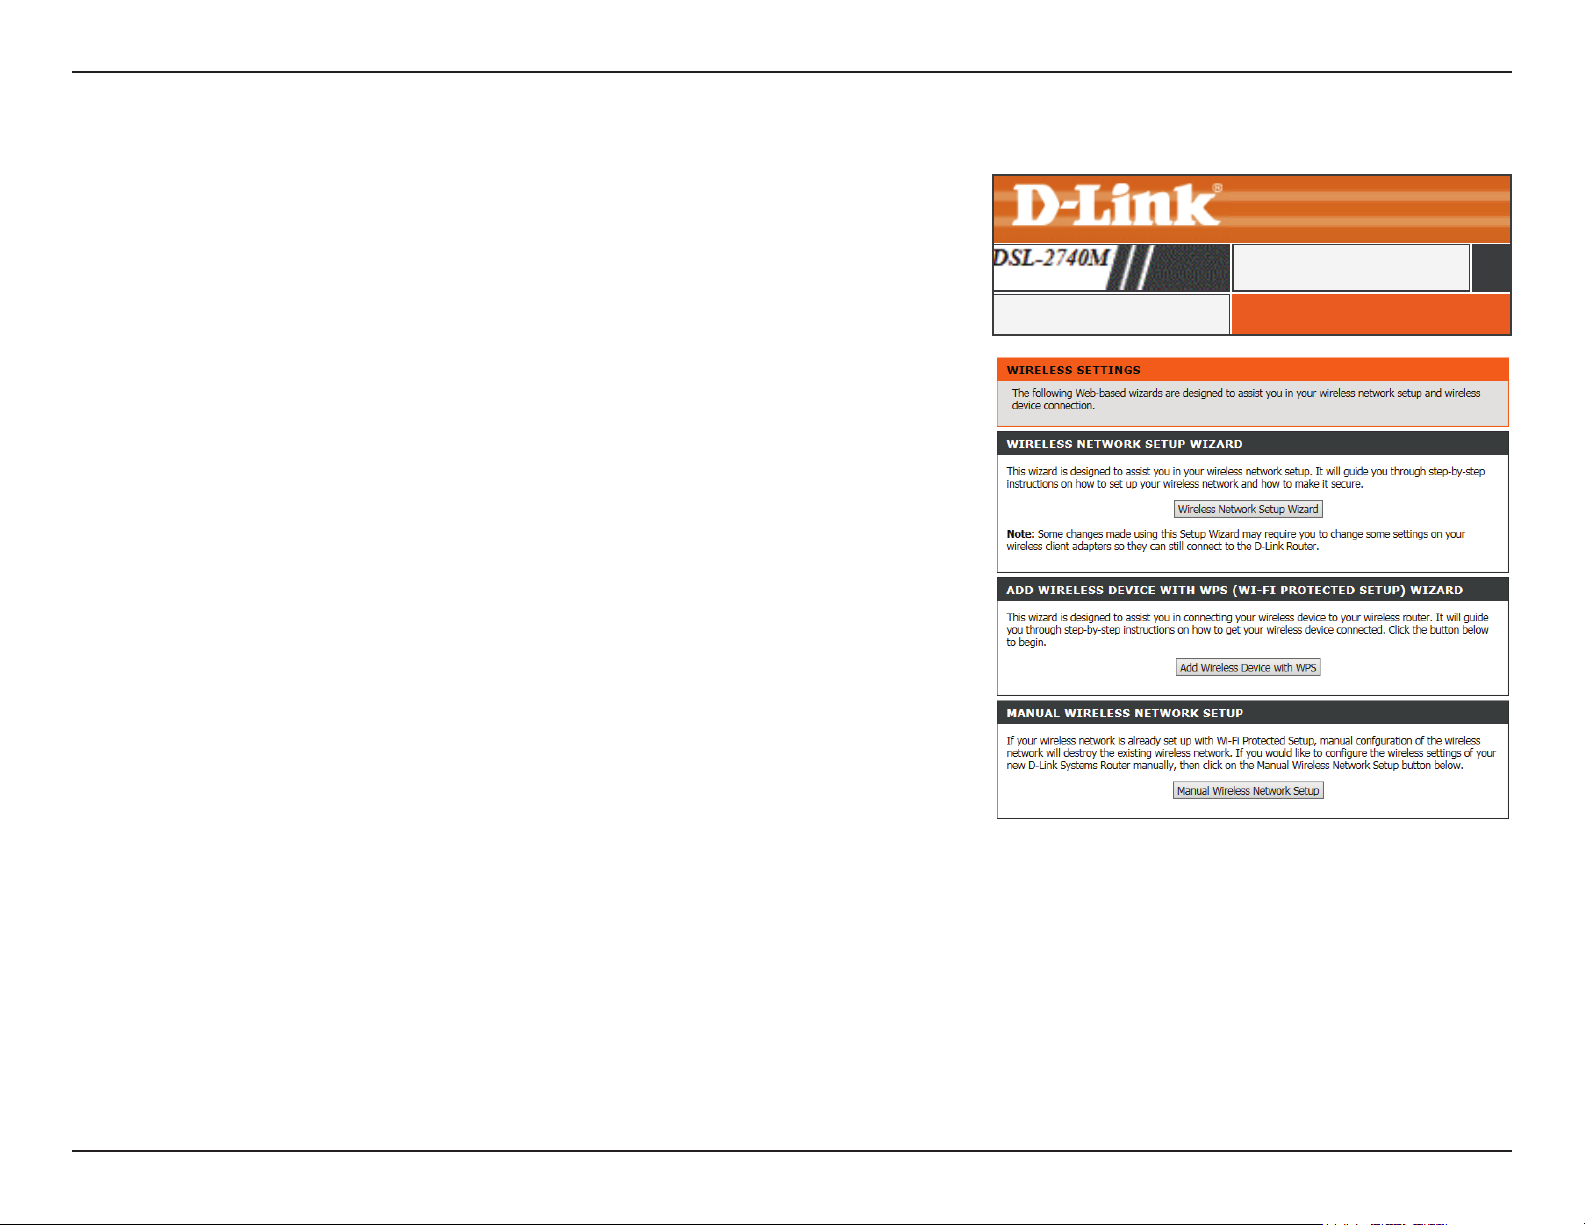
Wireless Setup
This section will help you congure your wireless network.
To easily congure your wireless network, click Wireless Network Setup Wizard and refer
to page 33.
SETUP
To easily add devices to your network using WPS, click Add Wireless Device with WPS (WiFi Protected Setup) Wizard and refer to page 34.
To manually congure your wireless network settings, click Manual Wireless Network
Setup and refer to page 35.
WIRELESS SETTINGSWireless Setup
32D-Link DSL-2740M User Manual
Page 37
Section 3 - Conguration
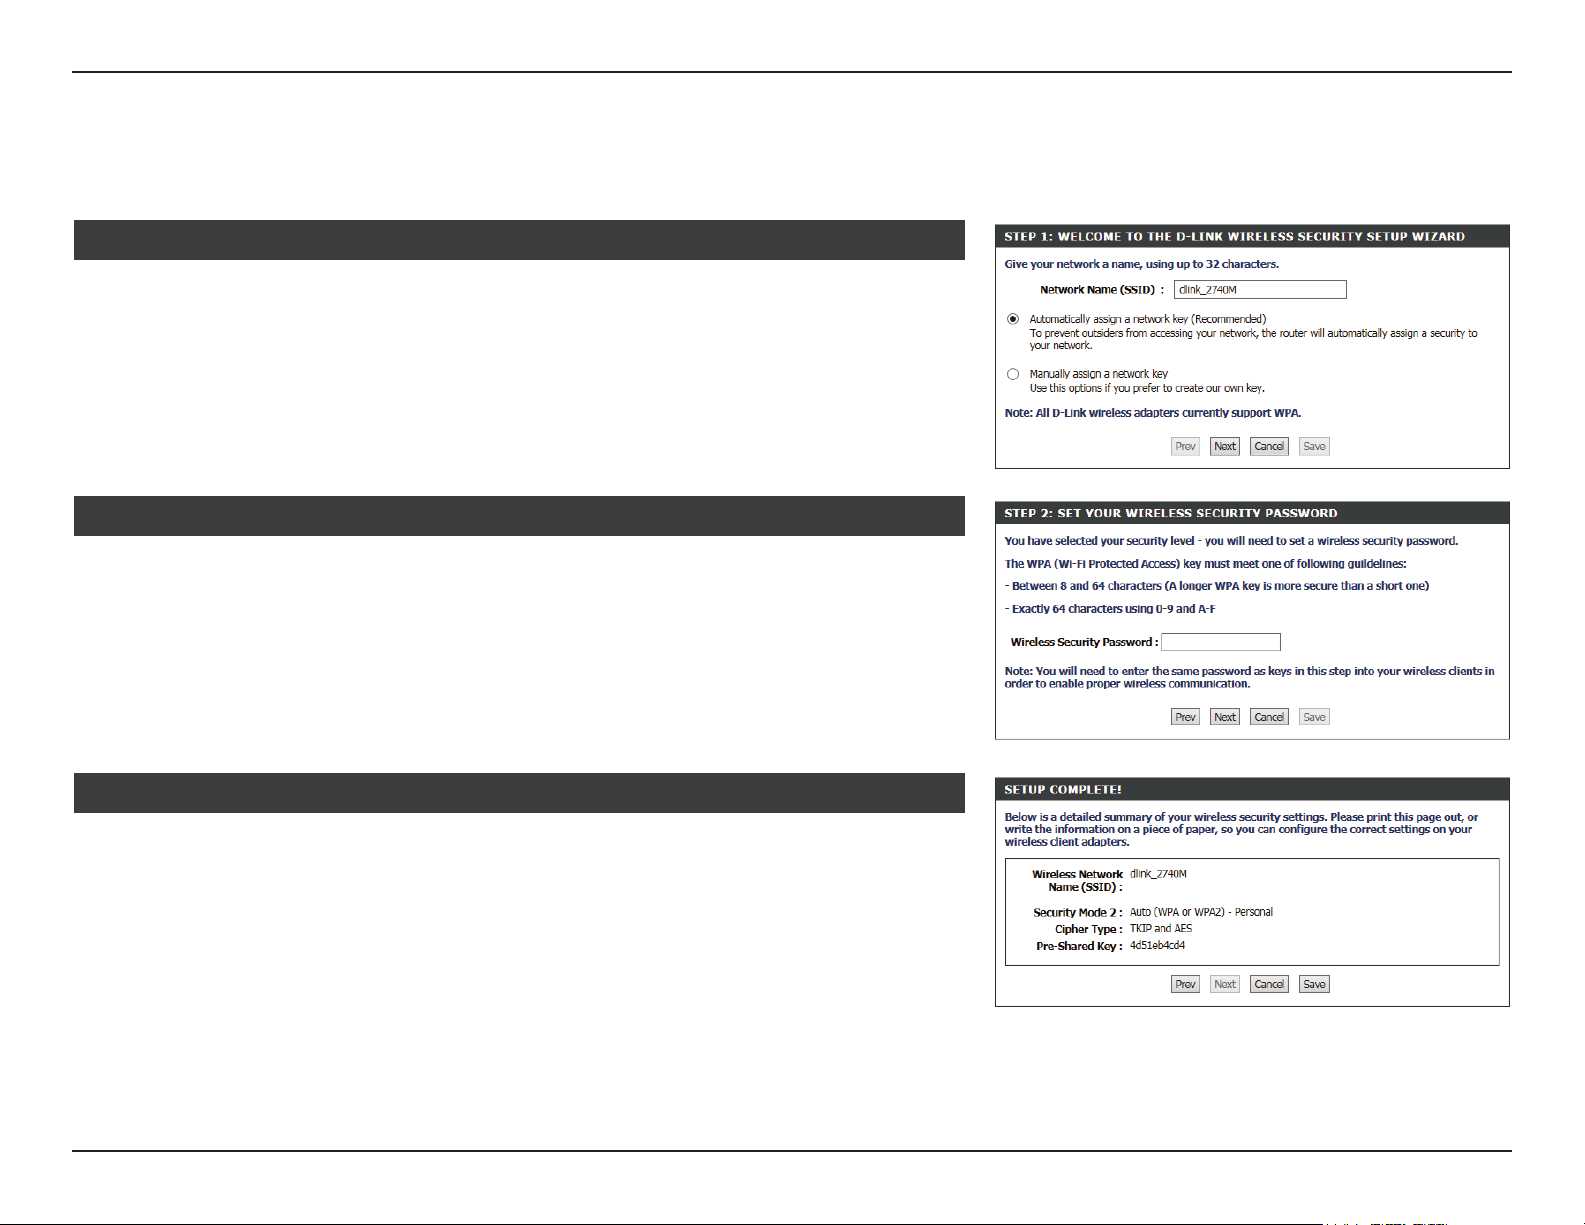
Wireless Network Setup Wizard
This section will guide you through the Wireless Network Setup Wizard.
STEP 1: WELCOME TO THE DLINK WIRELESS SECURITY SETUP WIZARD
Network Name (SSID): Enter a name for your wireless network.
If you selected Automatically assign a network key, click Next and proceed to Setup
Complete.
If you selected Manually assign a network key, click Next and proceed to Step 2.
STEP 2: SET YOUR WIRELESS SECURITY PASSWORD
Wireless Security
Password:
Click Next and proceed to Setup Complete.
Enter a password for your wireless network according to the onscreen instructions.
SETUP COMPLETE!
Your wireless settings are displayed in the table.
Click Save to nish.
33D-Link DSL-2740M User Manual
Page 38
Section 3 - Conguration
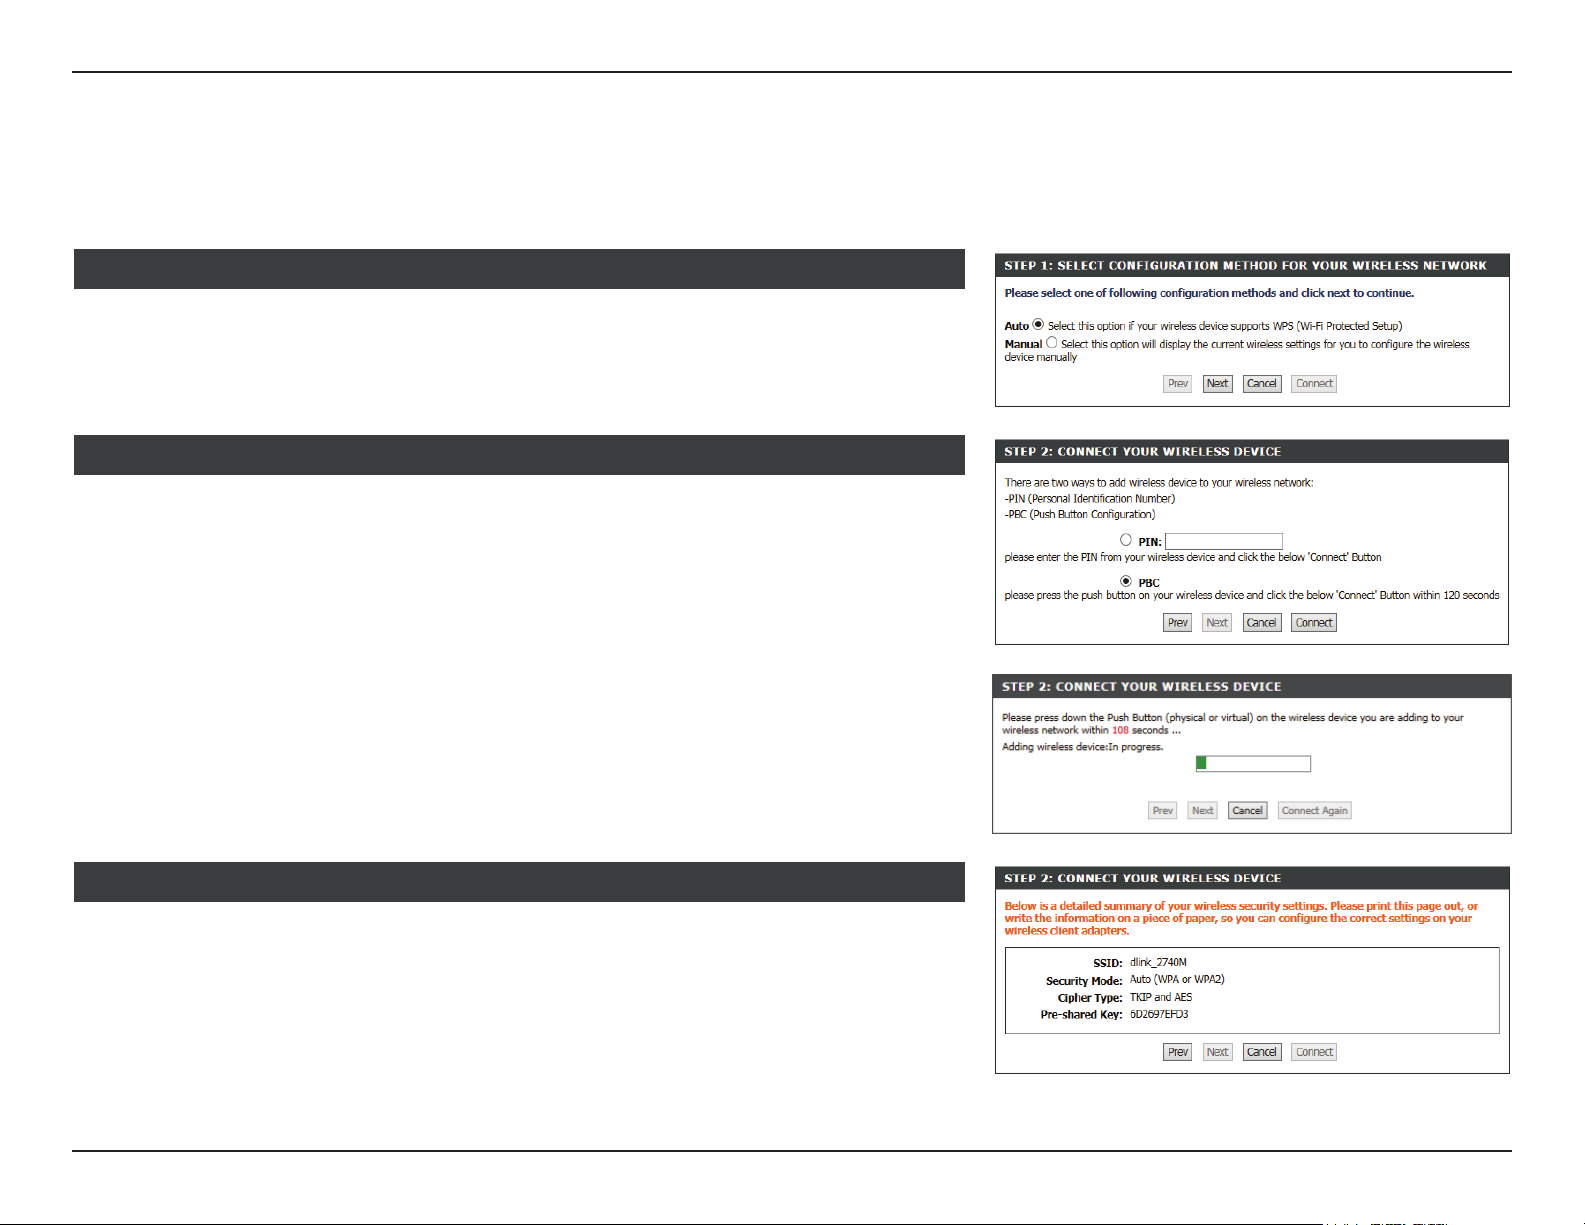
Add Wireless Device with WPS (Wi-Fi Protected Setup) Wizard
This section will guide you through the Add Wireless Device with WPS (Wi-Fi Protected
Setup) Wizard.
STEP 1: SELECT CONFIGURATION METHOD
Select your WPS conguration method.
STEP 2: CONNECT YOUR WIRELESS DEVICE
If you selected Auto, select your WPS Connection type, PIN or PBC.
Select your WPS conguration method and press the Connect button.
STEP 2: CONNECT YOUR WIRELESS DEVICE
If you selected Manual, your currently congured wireless settings are displayed.
Your currently congured wireless network settings are displayed here.
34D-Link DSL-2740M User Manual
Page 39
Section 3 - Conguration
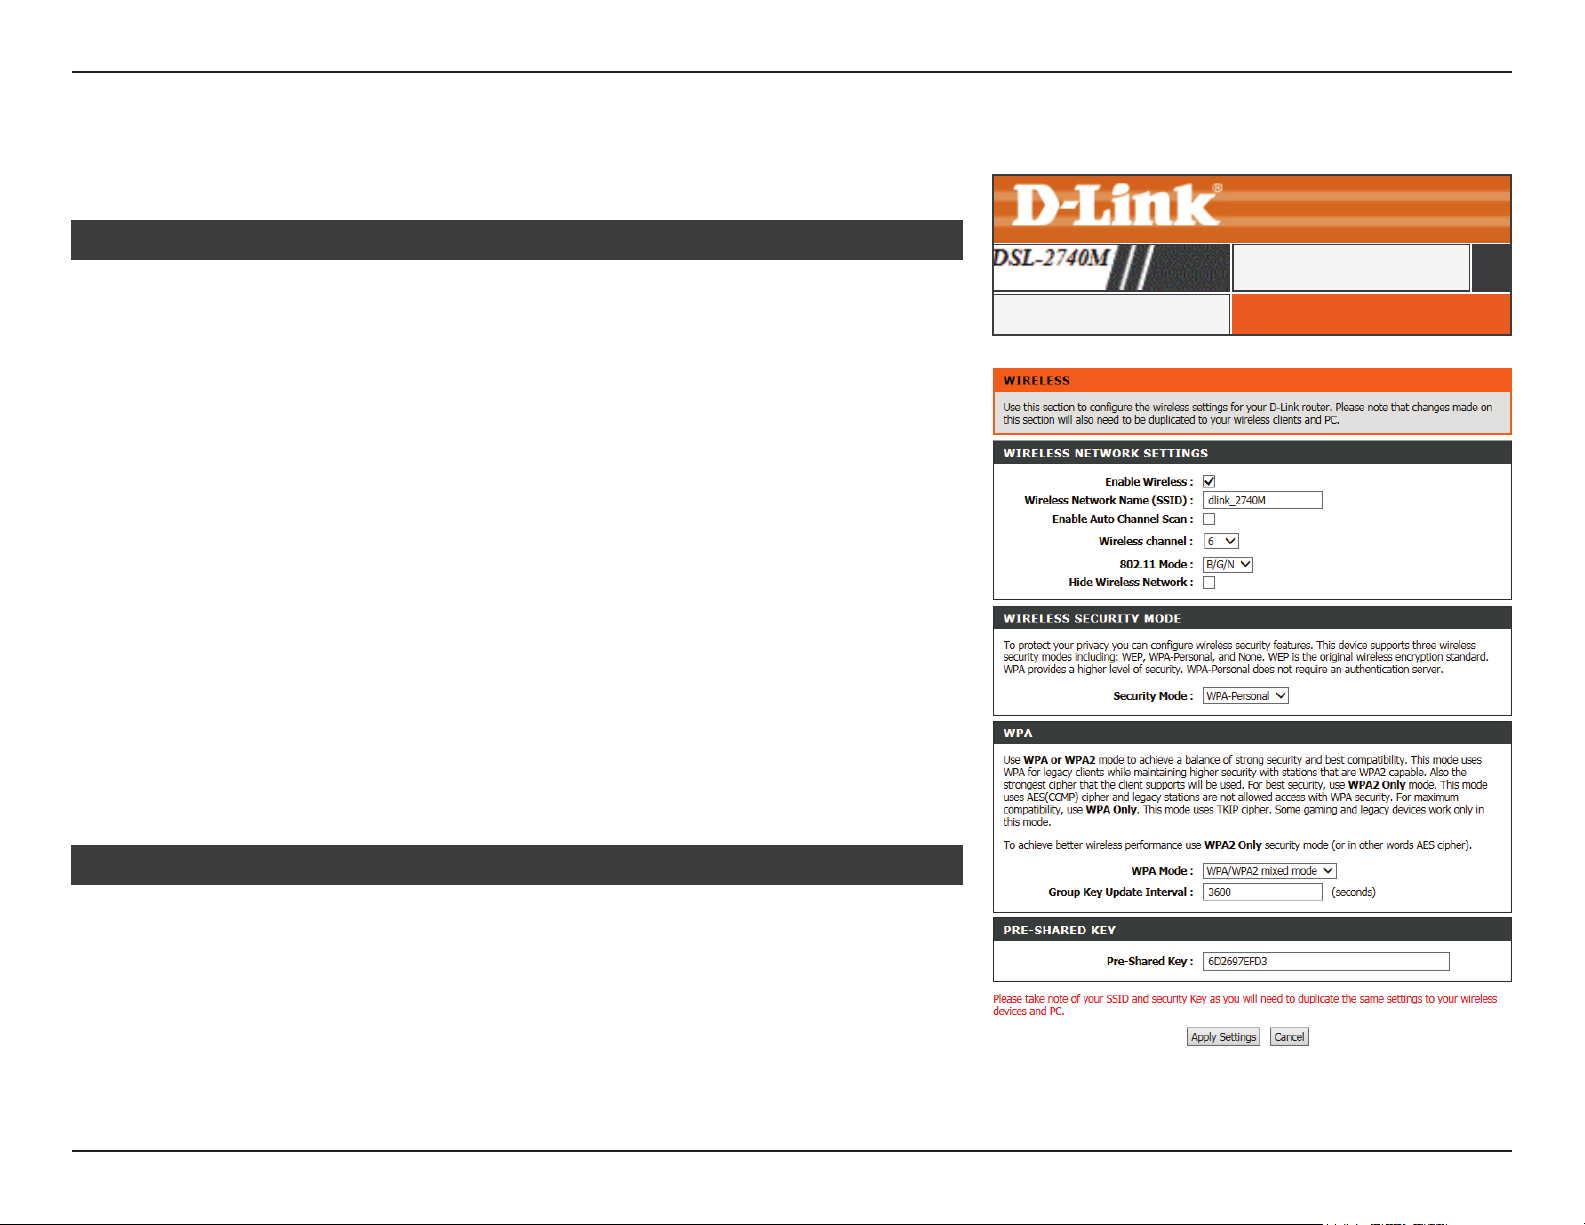
Manual Wireless Network Setup
This page allows you to manually congure the router’s wireless connectivity settings.
WIRELESS NETWORK SETTINGS
Enable Wireless: Check this box to enable the wireless network.
Wireless Network
Name (SSID):
The wireless network name for your network. To change your SSID,
enter a new name and click Apply Settings. Remember to update
the settings on your devices.
SETUP
WIRELESS SETTINGSWireless Setup
Enable Auto
Channel Scan:
Wireless Channel: Select the channel number for your wireless network to operate
802.11 Mode: Select the wireless standards to use on your network. The options
Hide Wireless
Network.
Check this box to enable the router to automatically find the
optimal channel.
on. These options are region-dependent.
are B, G, B/G, N, G/N, or B/G/N.
Visible networks conveniently advertise their existence to devices
looking for Wi-Fi networks to join. Invisible, or hidden, networks
do not. To join an invisible network, users must manually input its
SSID. Note: Making a network Hidden is not a form of security.
WIRELESS SECURITY MODE
Security Mode: Select the type of security you wish to use. The available options
are WPA-Personal, WEP, and None. Using WPA-Personal is
recommended.
For WPA-Personal, refer to WPA-Personal on page 36.
For WEP, refer to WEP on page 37.
For None, refer to None on page 38.
35D-Link DSL-2740M User Manual
Page 40
Section 3 - Conguration
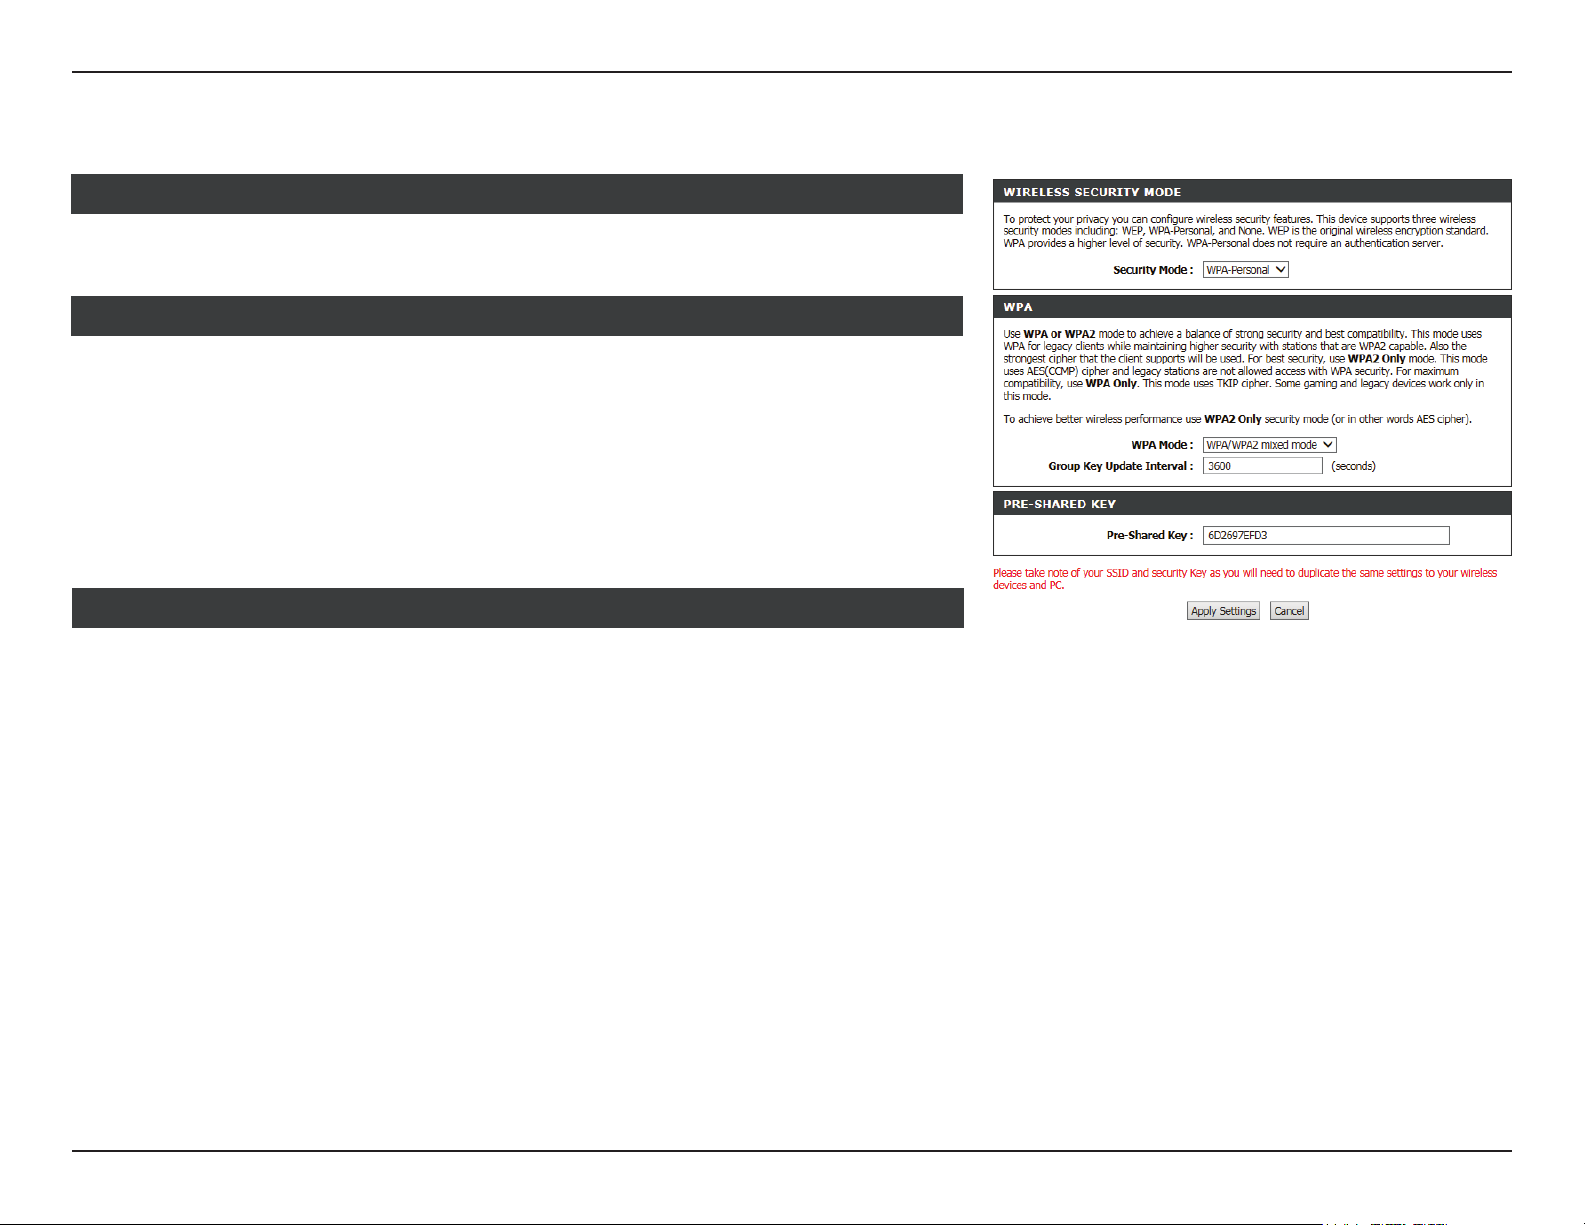
WIRELESS SECURITY MODE
Security Mode: WPA-Personal
WPA Mode: Select WPA/WPA2 mixed mode, WPA Only, or WPA2 Only.Using
WPA2 only is recommended since it is the strongest encryption
type. Use WPA/WPA2 Mixed if you have older clients which do not
support WPA2 Only. Your wireless network will be less secure.
WPA-Personal
WPA
Group Key Update
Interval:
Enter the group key update interval.
PRE-SHARED KEY
Pre-Shared Key: The current password for your wireless network. To change your
password, enter a new one (between 8-63 characters) and click Apply
Settings. Your wireless clients need this key to join your wireless
network. The longer your password, the more secure your data.
For improved security, you should change your wireless password
every three to six months. Remember to update the settings on your
devices.
Click Apply Settings to have your changes take eect.
36D-Link DSL-2740M User Manual
Page 41
Section 3 - Conguration
WEP
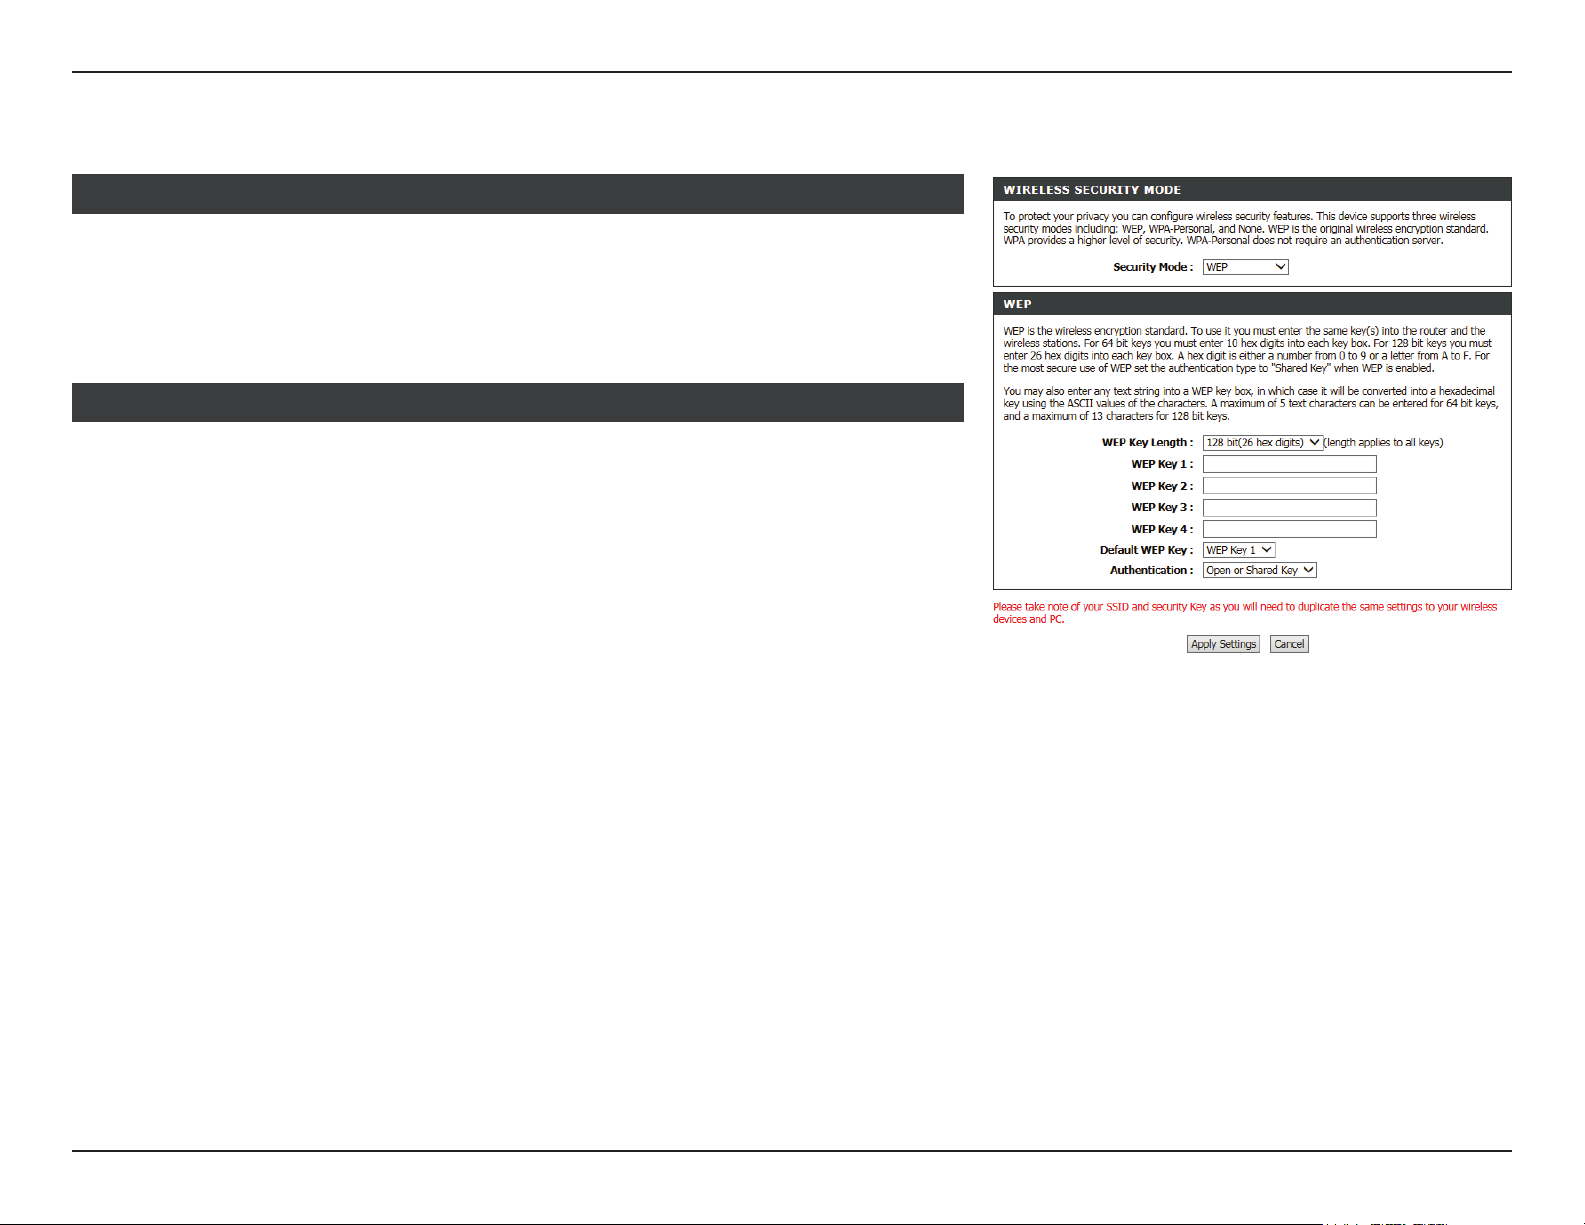
WIRELESS SECURITY MODE :
Security Mode: WEP. Using WEP encryption is not recommended, as it only oers a
trivial amount of protection for your wireless data. WEP encryption
is only available for use with 802.11b, 802.11g, and 802.11a.
WEP
WEP Key Length: Select the Encryption cipher key bit strength. The available options
are 64 bits or 128 bits.
WEP Key1 - 4: Enter a wireless key to use on your wireless network.
Default WEP Key: Select WEP Key 1 - 4 to use.
Authentication: Select either Open or Share Key.
Click Apply Settings to have your changes take eect.
37D-Link DSL-2740M User Manual
Page 42
Section 3 - Conguration
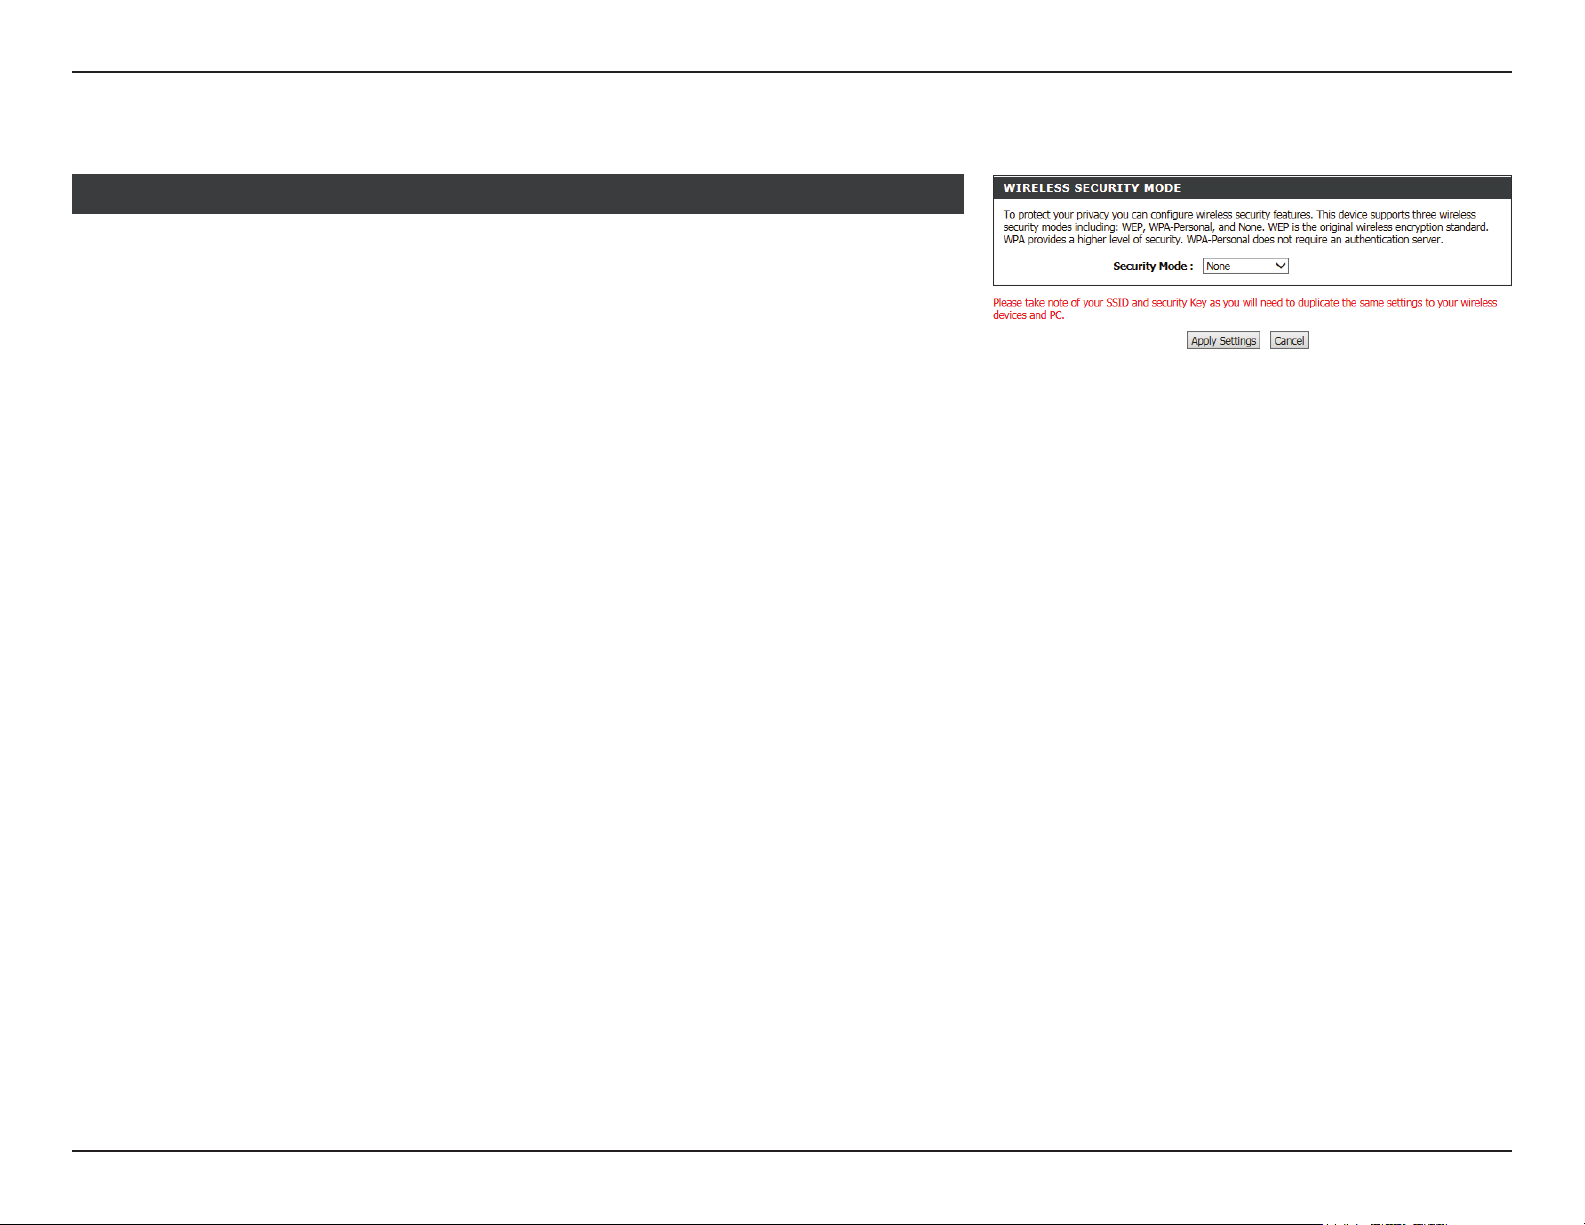
None
WIRELESS SECURITY MODE :
Security Mode: Not using wireless security (None) is not recommended because any
wireless client will be able to access your network and devices and
use your Internet connection. Not using encryption leaves you open
to security threats.
Click Apply Settings to have your changes take eect.
38D-Link DSL-2740M User Manual
Page 43
Section 3 - Conguration
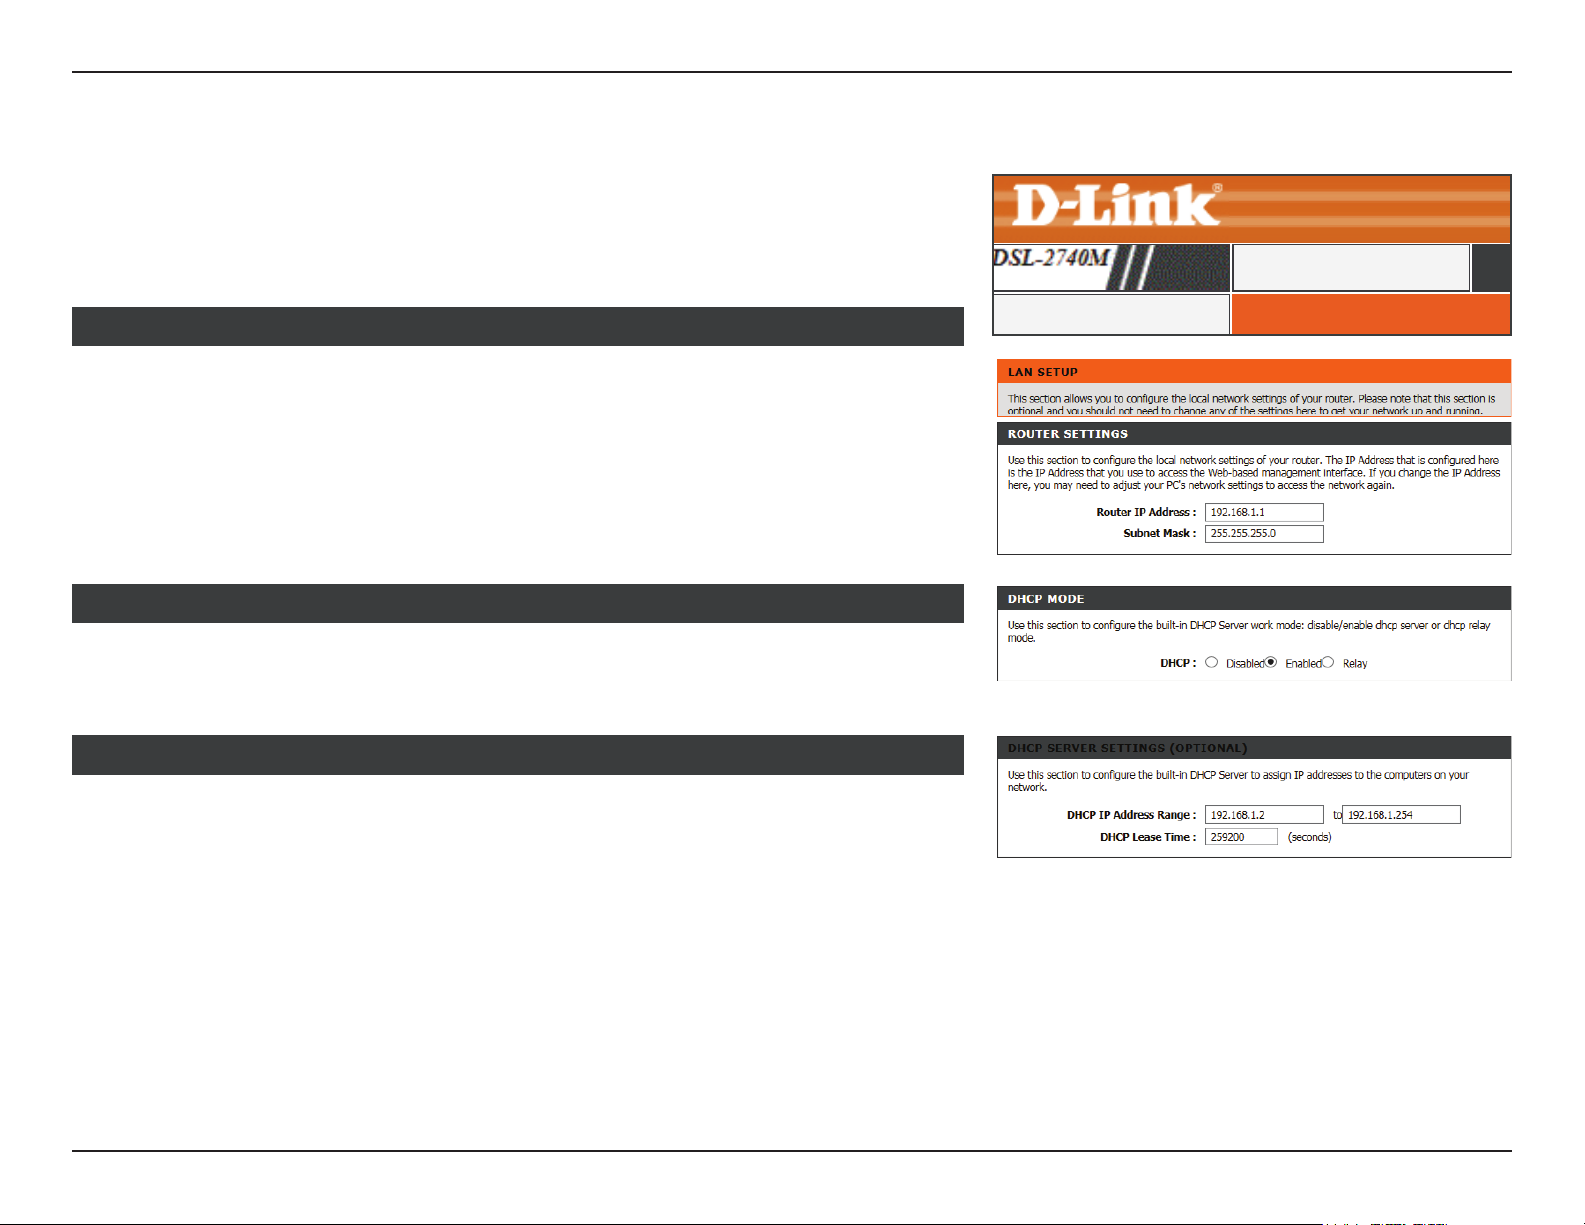
LAN Setup
Click LAN Setup on the navigation menu to change the local network settings of the router,
congure the DHCP or how devices on your network obtain IP addresses, add new DHCP
reservations, and view the currenly assigned DHCP reservations. When you have nished
conguring the Local Network, click the Apply button.
SETUP
ROUTER SETTINGS
Router IP Address: Enter the IP address of the router. The default IP address is 192.168.1.1.
If you change the IP address, once you click Save Settings, you will
need to enter the new IP address in your browser to get back into
the conguration utility.
Subnet Mask: Enter the subnet mask. The default subnet mask is 255.255.255.0.
DHCP MODE
DHCP: Select your desired DHCP operation mode. The options are Disabled,
Enabled, or Relay. The default is Enabled.
DHCP SERVER SETTINGS OPTIONAL
DHCP IP Address
Range:
DHCP Lease Time: The lease time determines the period that the host retains the
Enter the range of IP addresses the DHCP server can issue from.
assigned IP addresses before a new IP address is requested.
LAN SETUPLAN Setup
39D-Link DSL-2740M User Manual
Page 44
Section 3 - Conguration
LAN Setup (continued)
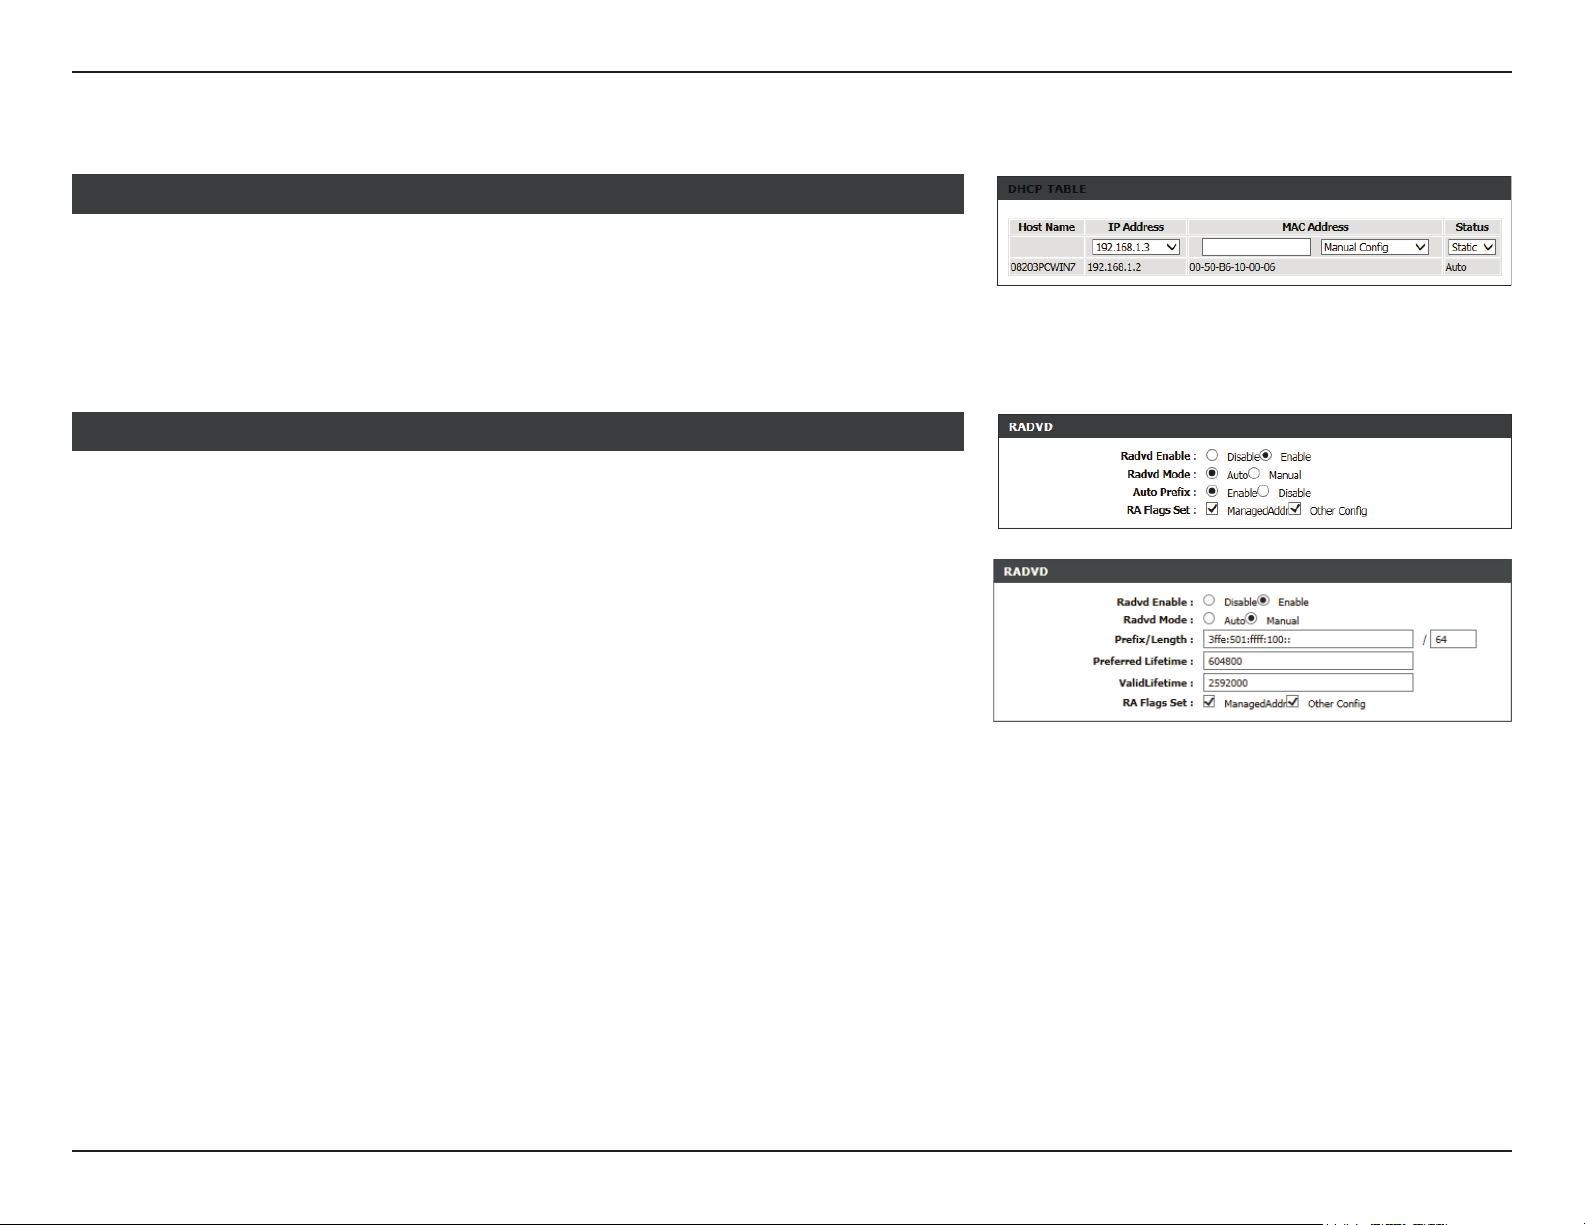
DHCP TABLE
This table displays the currently assigned DHCP addresses. You may also use this table to
assign a static, or reserved, DHCP address to a specic device. To assign a static IP address,
select it from the IP Address drop down menu. Next enter the MAC address of the device,
or select an existing device from the Manual Cong drop down menu. Click Save Settings
when you are satised.
RADVD
Radvd Enable: Enable or disable the Router Advertisement Daemon. (Unique Local
Address Conguration)
Radvd Mode: Select either Auto or Manual.
If you selected to Auto, congure the following options:
Auto Prex: Enable or disable Auto Prex.
If you selected to Manual, congure the following options:
Prex/Length: Enter your ULA prex.
Preferred Lifetime: Enter the preferred liftetime of this address.
ValidLifetime: Enter the valid lifetime of this address.
For both Auto and Manual, congure the RA Flags:
RA Flags Set: Select to enable Managed Addresses and/or Other Cong.
40D-Link DSL-2740M User Manual
Page 45
Section 3 - Conguration
LAN Setup (continued)
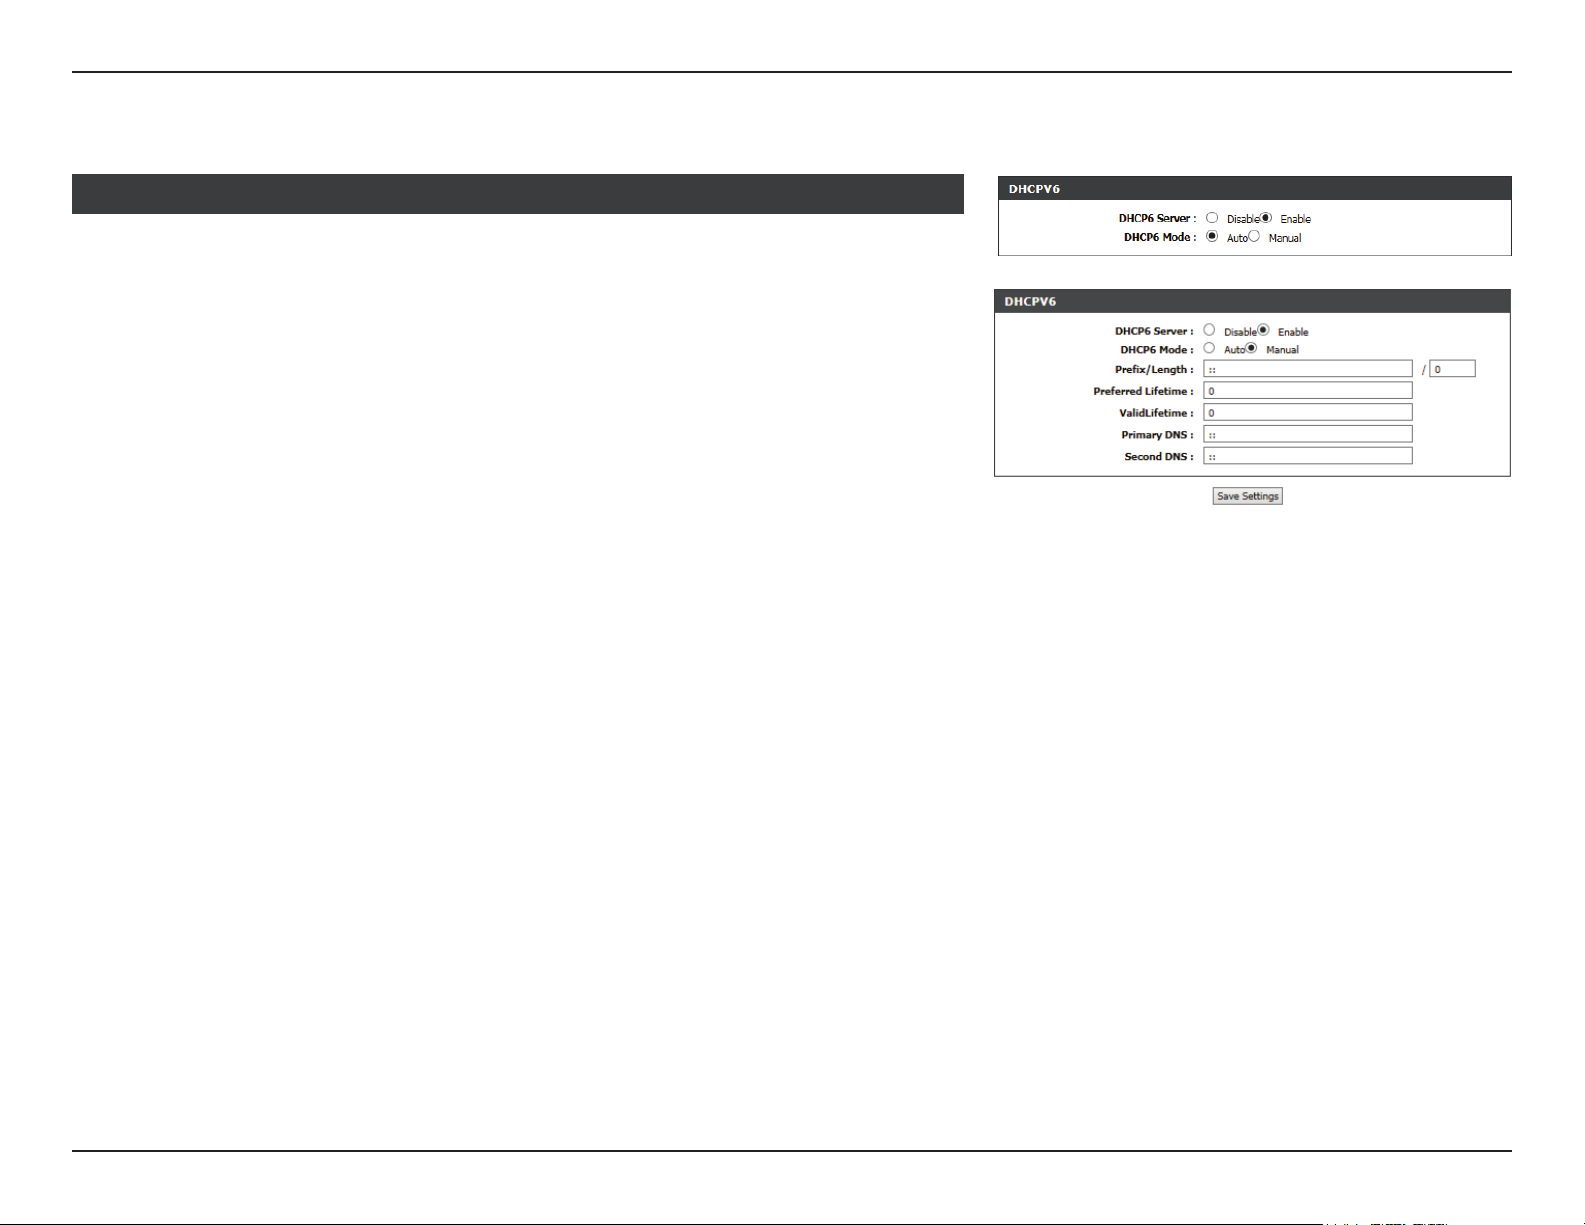
DHCPV6
DHCP6 Server: Enable or Disable the DHCP6 server.
DHCP6 Mode: Select either Auto or Manual address assignment.
If you select Manual, congure your DHCP6 address assignment settings:
Prex/Length: Enter your ULA prex.
Preferred Lifetime: Enter the preferred IPv6 address lifetime.
ValidLifetime: Enter the valid IPv6 address lifetime.
Primary DNS: Enter the primary DNS server address.
Second DNS: Enter the secondary DNS server address.
Click Save Settings to have your changes take eect.
41D-Link DSL-2740M User Manual
Page 46
Section 3 - Conguration
IPv6 Setup
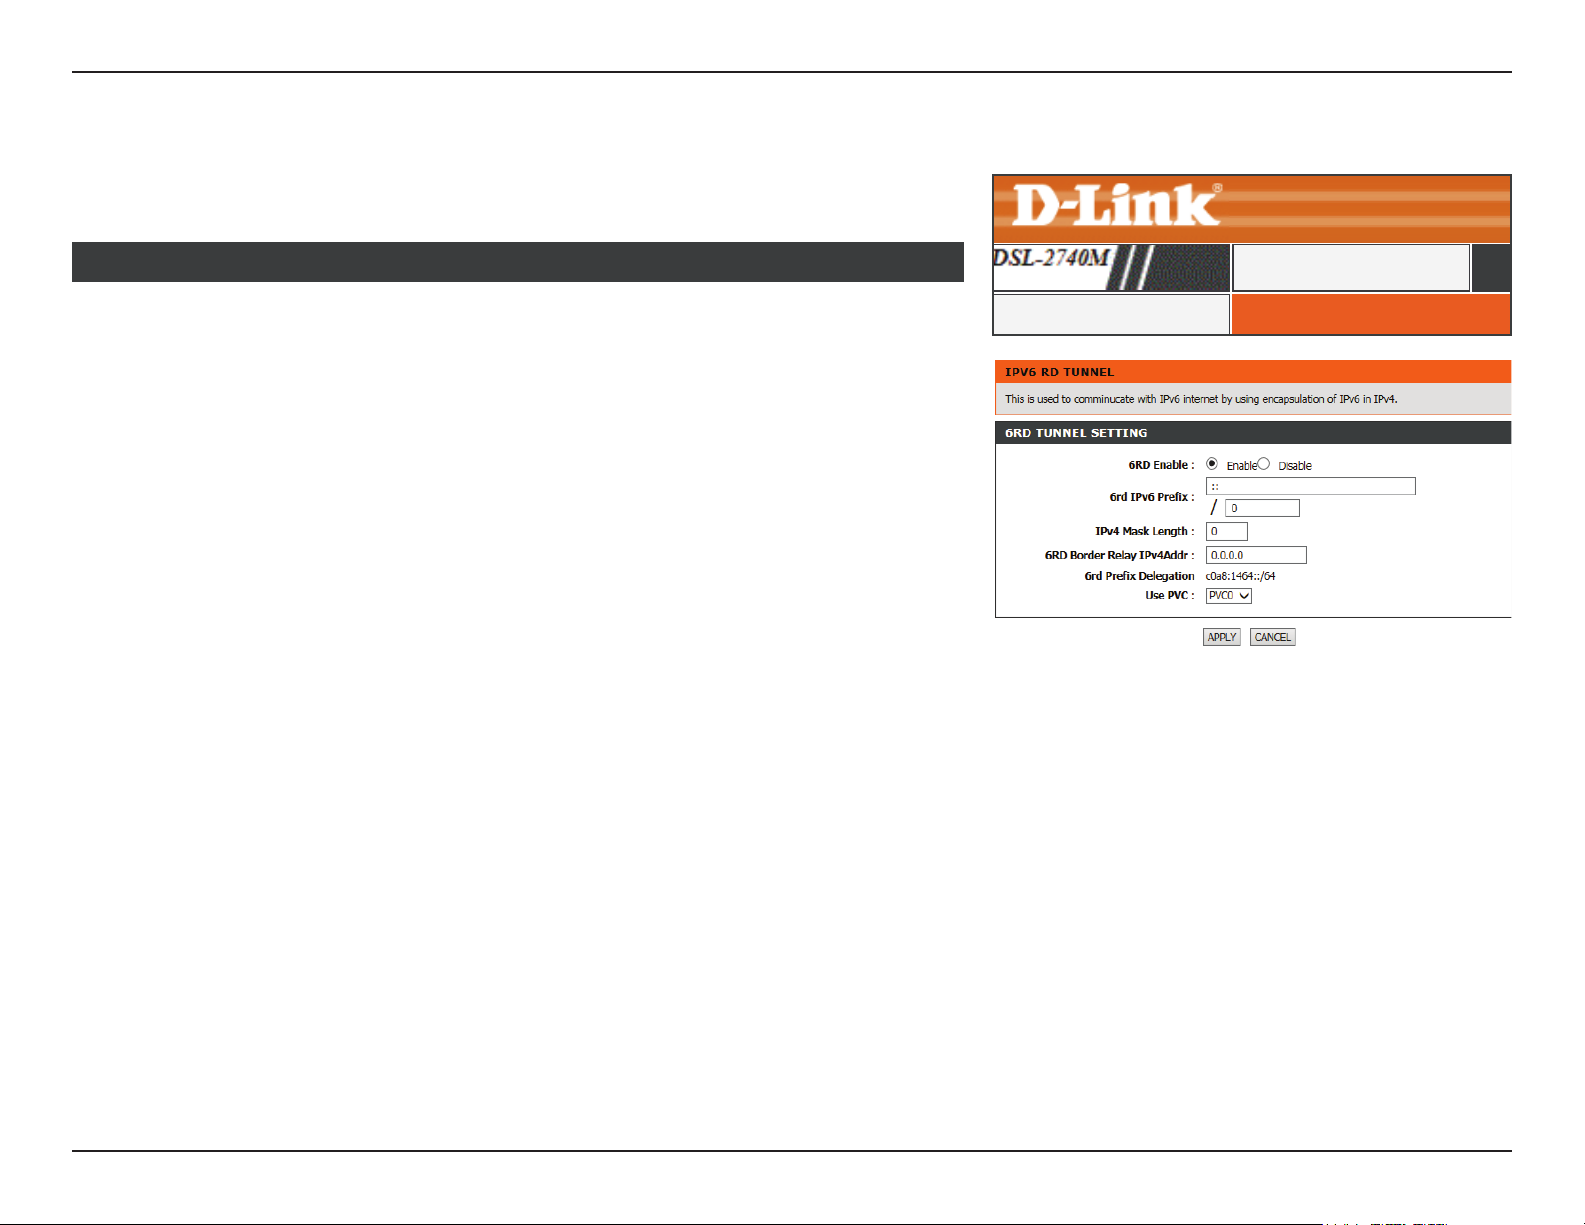
Click the IPv6 Setup button to manually congure your IPv6 connection to your ISP.
6RD TUNNEL SETTING
6rd Enable: Enable or Disable 6rd.
6rd IPv6 Prefix: Enter the 6rd IPv6 prex and mask length supplied by your ISP.
IPv4 Mask: Enter the IPv4 mask length.
6rd Border Relay
IPv4 Address:
6rd Prefix
Delegation:
Use PVC: Select the WAN interface to enable 6rd on.
Click Apply to have your changes take eect.
Enter the 6rd border relay IPv4 address settings supplied by your ISP.
The currently congured 6rd Prex Delegation is listed here.
SETUP
IPV6 RD TUNNELIPv6 Setup
42D-Link DSL-2740M User Manual
Page 47
Section 3 - Conguration
Time and Date
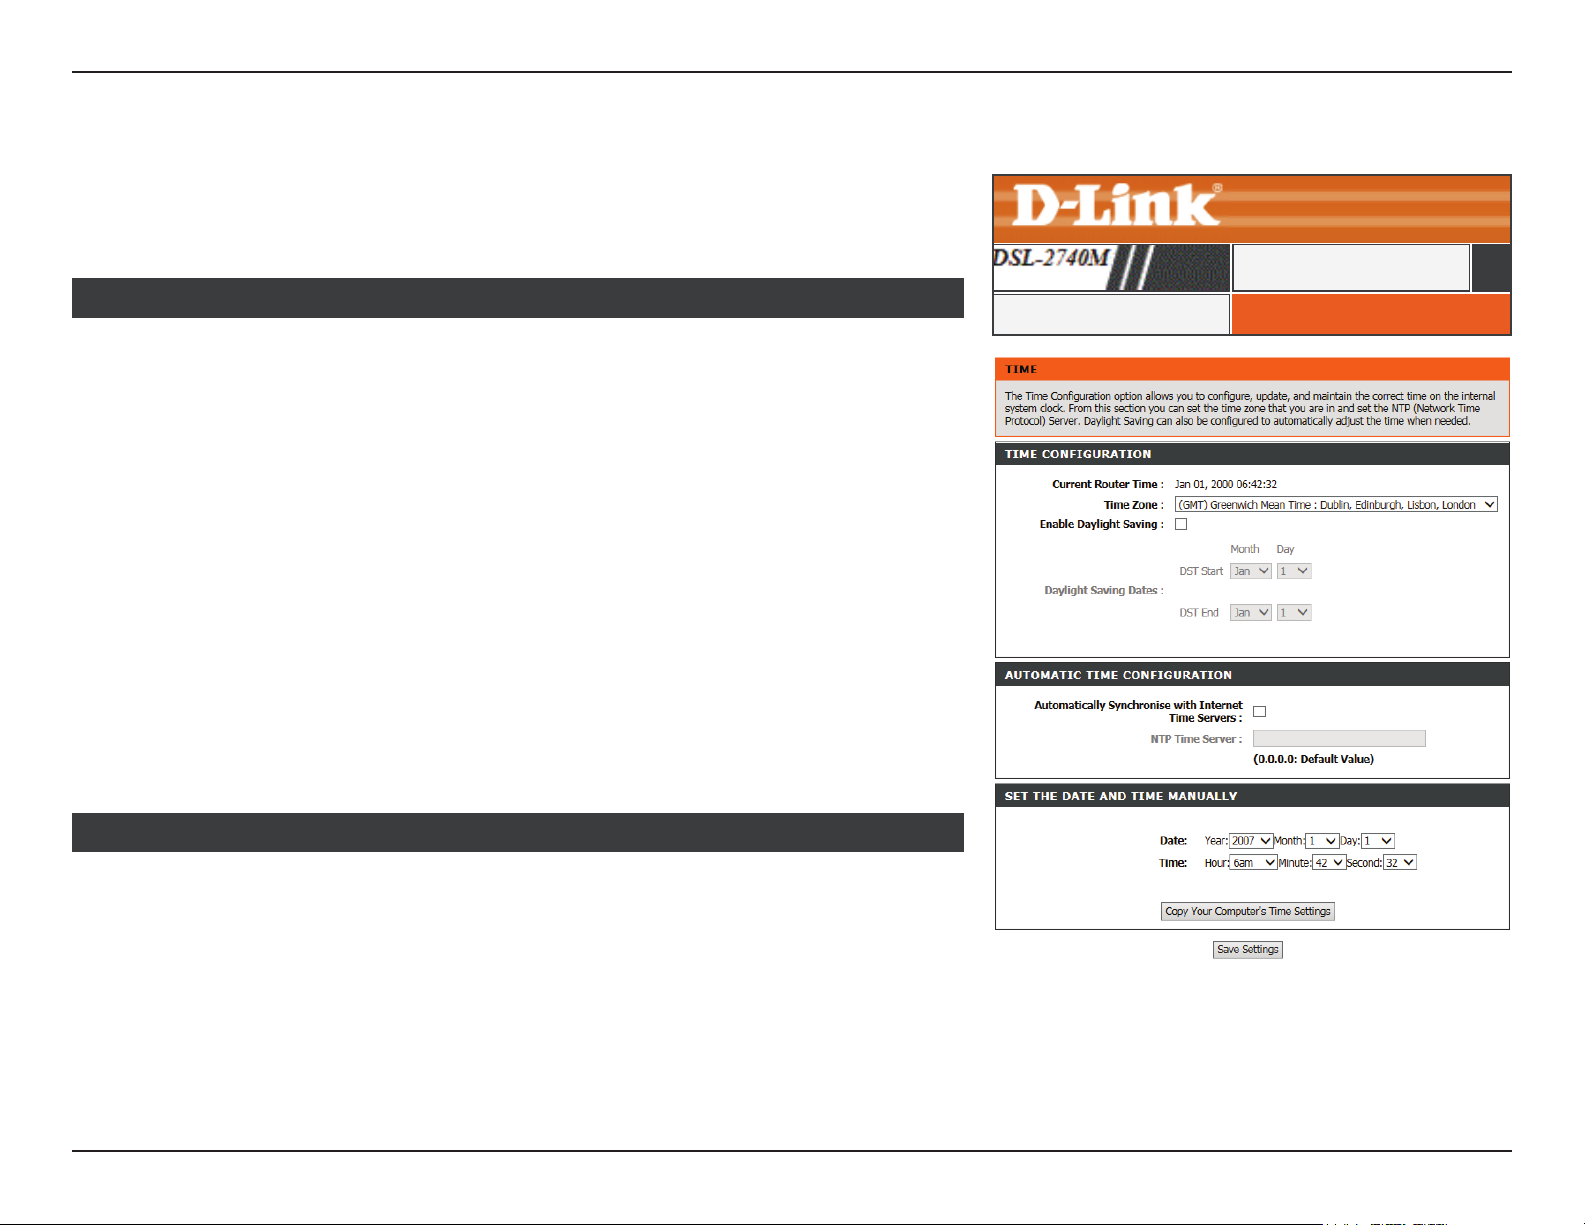
This page allows you to edit the system time. You can congure, update, and maintain the
correct time on the system clock, congure Daylight Saving, or congure automatic time
setting by using a Network Time Protocol (NTP) server.
SETUP
TIME CONFIGURATION
Current Router
Time:
Time Zone: Select the appropriate time zone for your location. This information
Enable Daylight
Saving:
If you enable Daylight Saving, congure the daylight savings start and end times:
DST Start: Specify the time and date when daylight saving should start.
DST End: Specify the time and date when daylight saving should end.
Displays the router’s currently set time.
is required to congure the time-based options for the router.
Check this box to enable daylight saving.
Click Apply to have your changes take eect.
AUTOMATIC TIME CONFIGURATION
Automatically
synchronize with
Internet time
servers:
Check this box to enable automatic time synchronization.
IPV6 RD TUNNELTime and Date
If you enable Automatically synchronize with Internet time servers, enter the Network
Time Protocol (NTP) server addresse:
NTP Time Server: Specify an address for the Internet time server.
43D-Link DSL-2740M User Manual
Page 48
Section 3 - Conguration
Time and Date (continued)
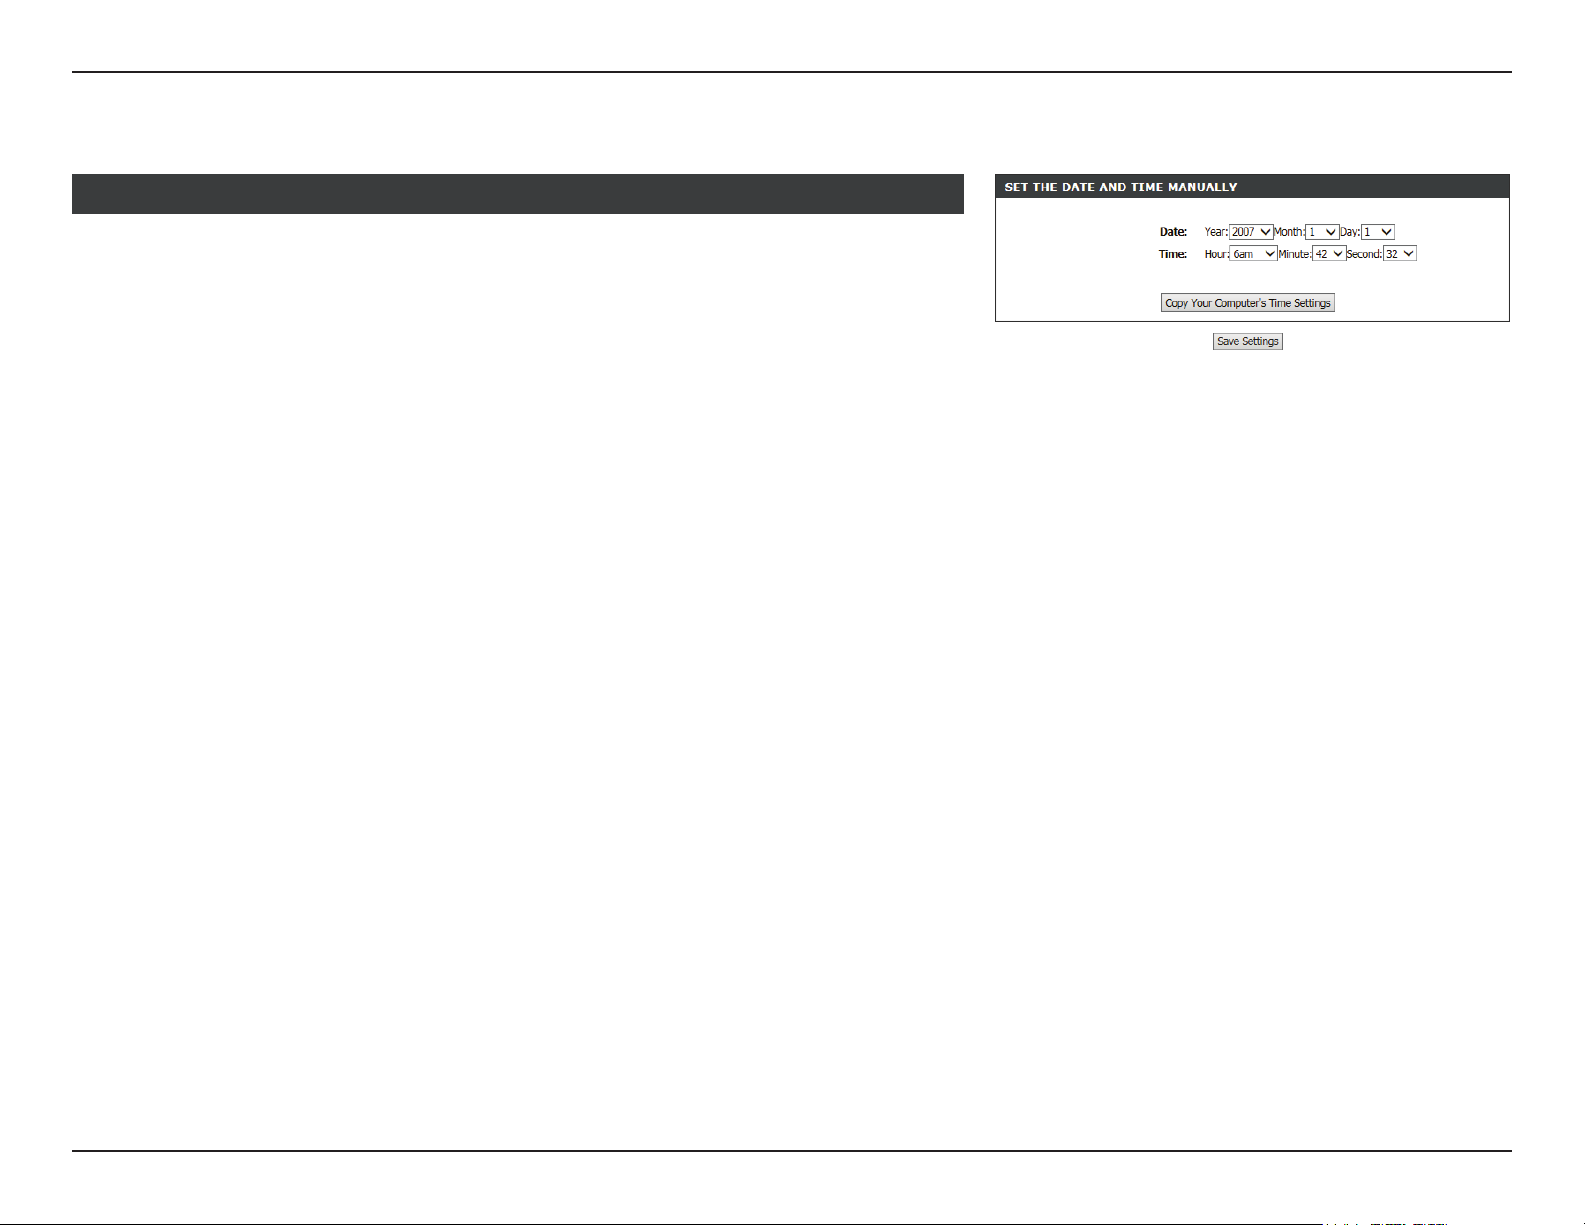
SET THE DATE AND TIME MANUALLY
Date: Enter the date from the drop down menus.
Time: Enter the time from the drop down menus.
Click Save Settings to have your changes take eect.
44D-Link DSL-2740M User Manual
Page 49
Section 3 - Conguration
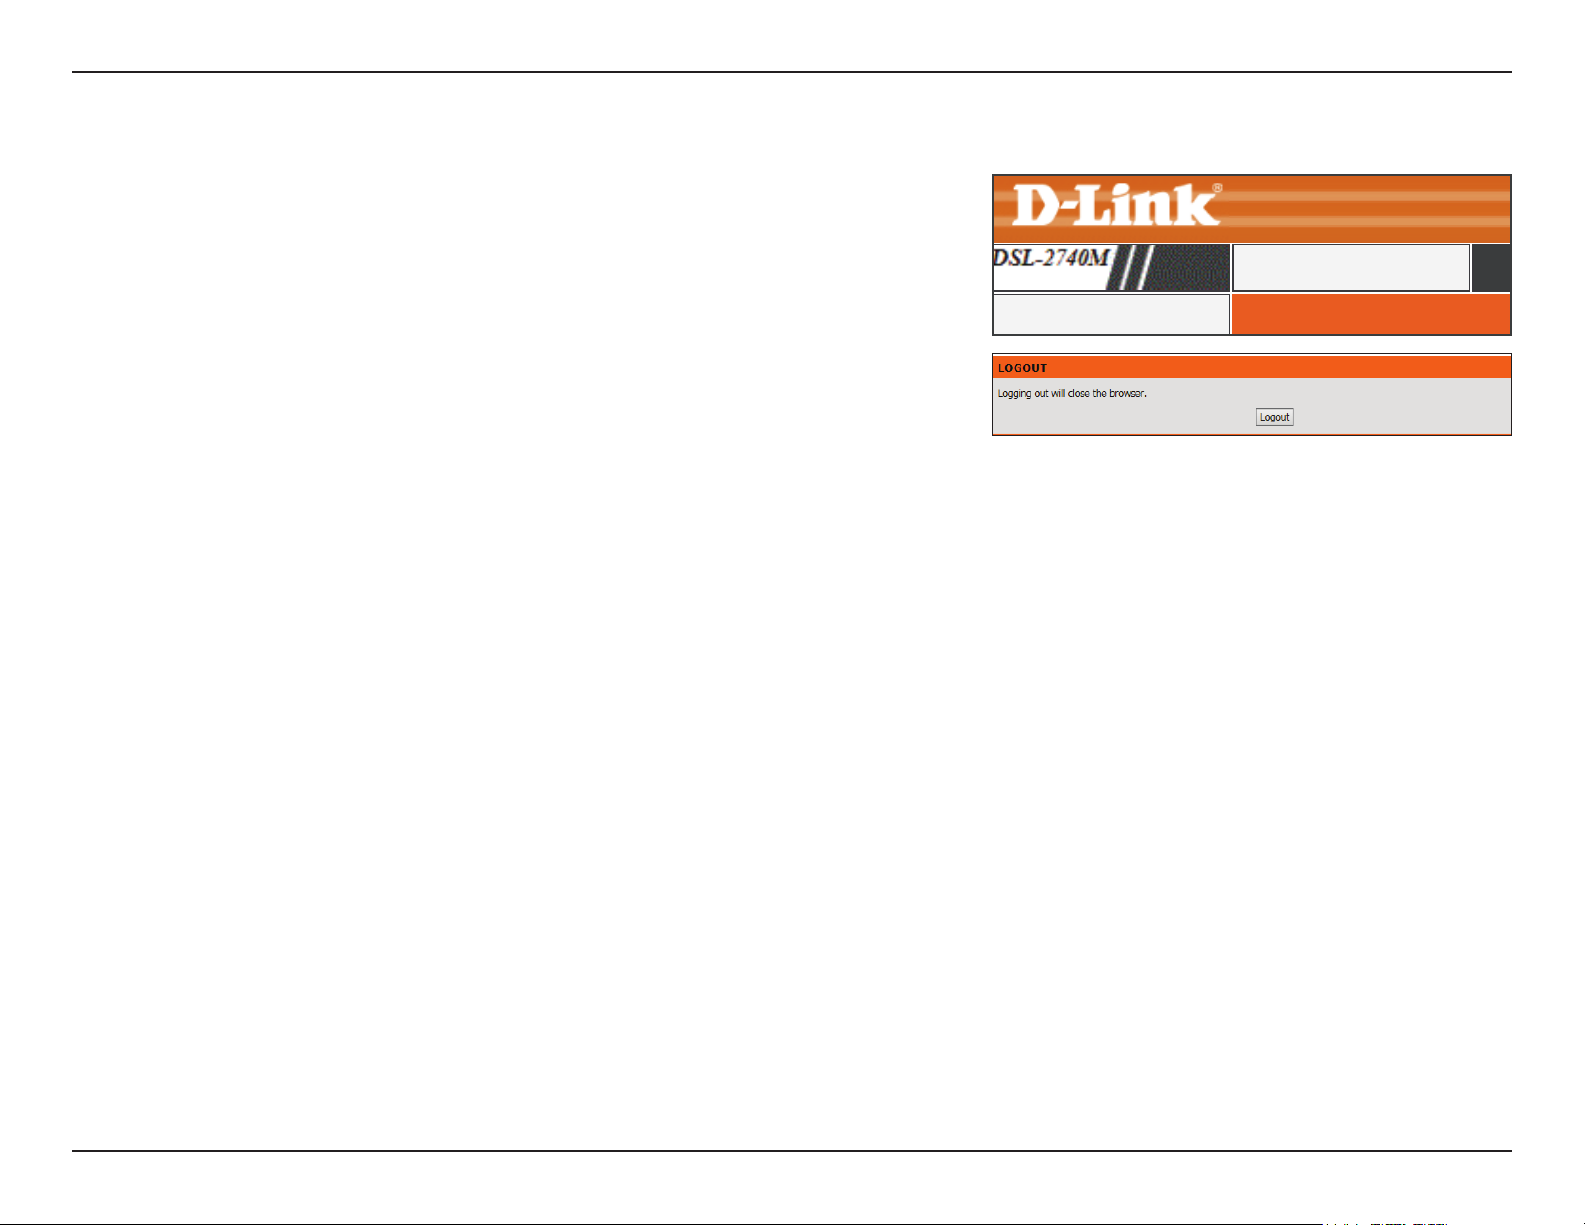
Click Logout when you are done conguring your router.
Logout
SETUP
LOGOUTLogout
45D-Link DSL-2740M User Manual
Page 50
Section 3 - Conguration
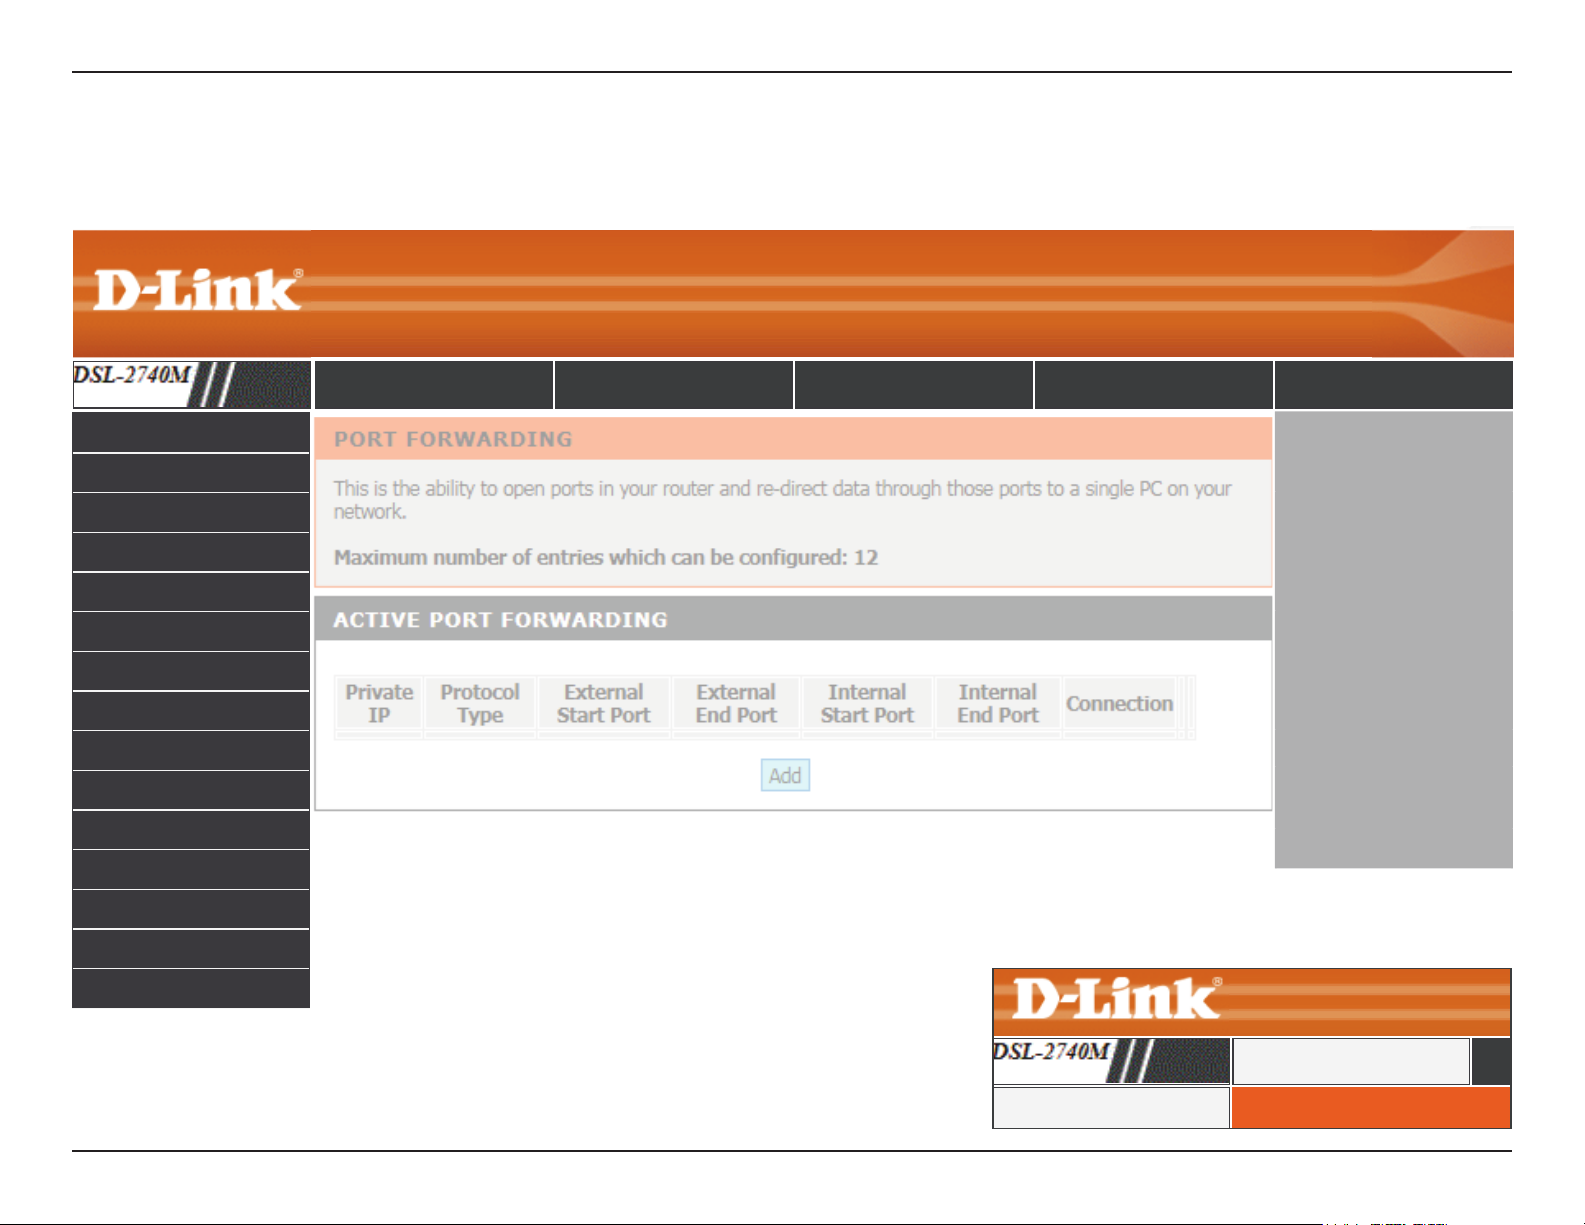
Advanced
The Setup tab provides access to congure the advanced features of your DSL-2740M.
SETUP ADVANCED MAINTENANCE STATUS HELP
Port Forwarding
QoS Setup
Outbound Filter
Inbound Filter
Static Route
DNS Setup
VLAN
Firewall & DMZ
Advanced ADSL
Advanced Wireless
Wi-Fi Protected Setup
Wireless Mac Filter
Advanced LAN
Remote Management
Logout
To return to this Web UI Table of Contents page, simply click the D-Link logo on the top
To return to this Web UI Table of Contents page, simply click the D-Link logo on the top
right of each page.
right of each page.
SETUP
SETUP
ADSL SETUPADSL SETUP
ADSL SETUPADSL Setup
46D-Link DSL-2740M User Manual
Page 51
Section 3 - Conguration
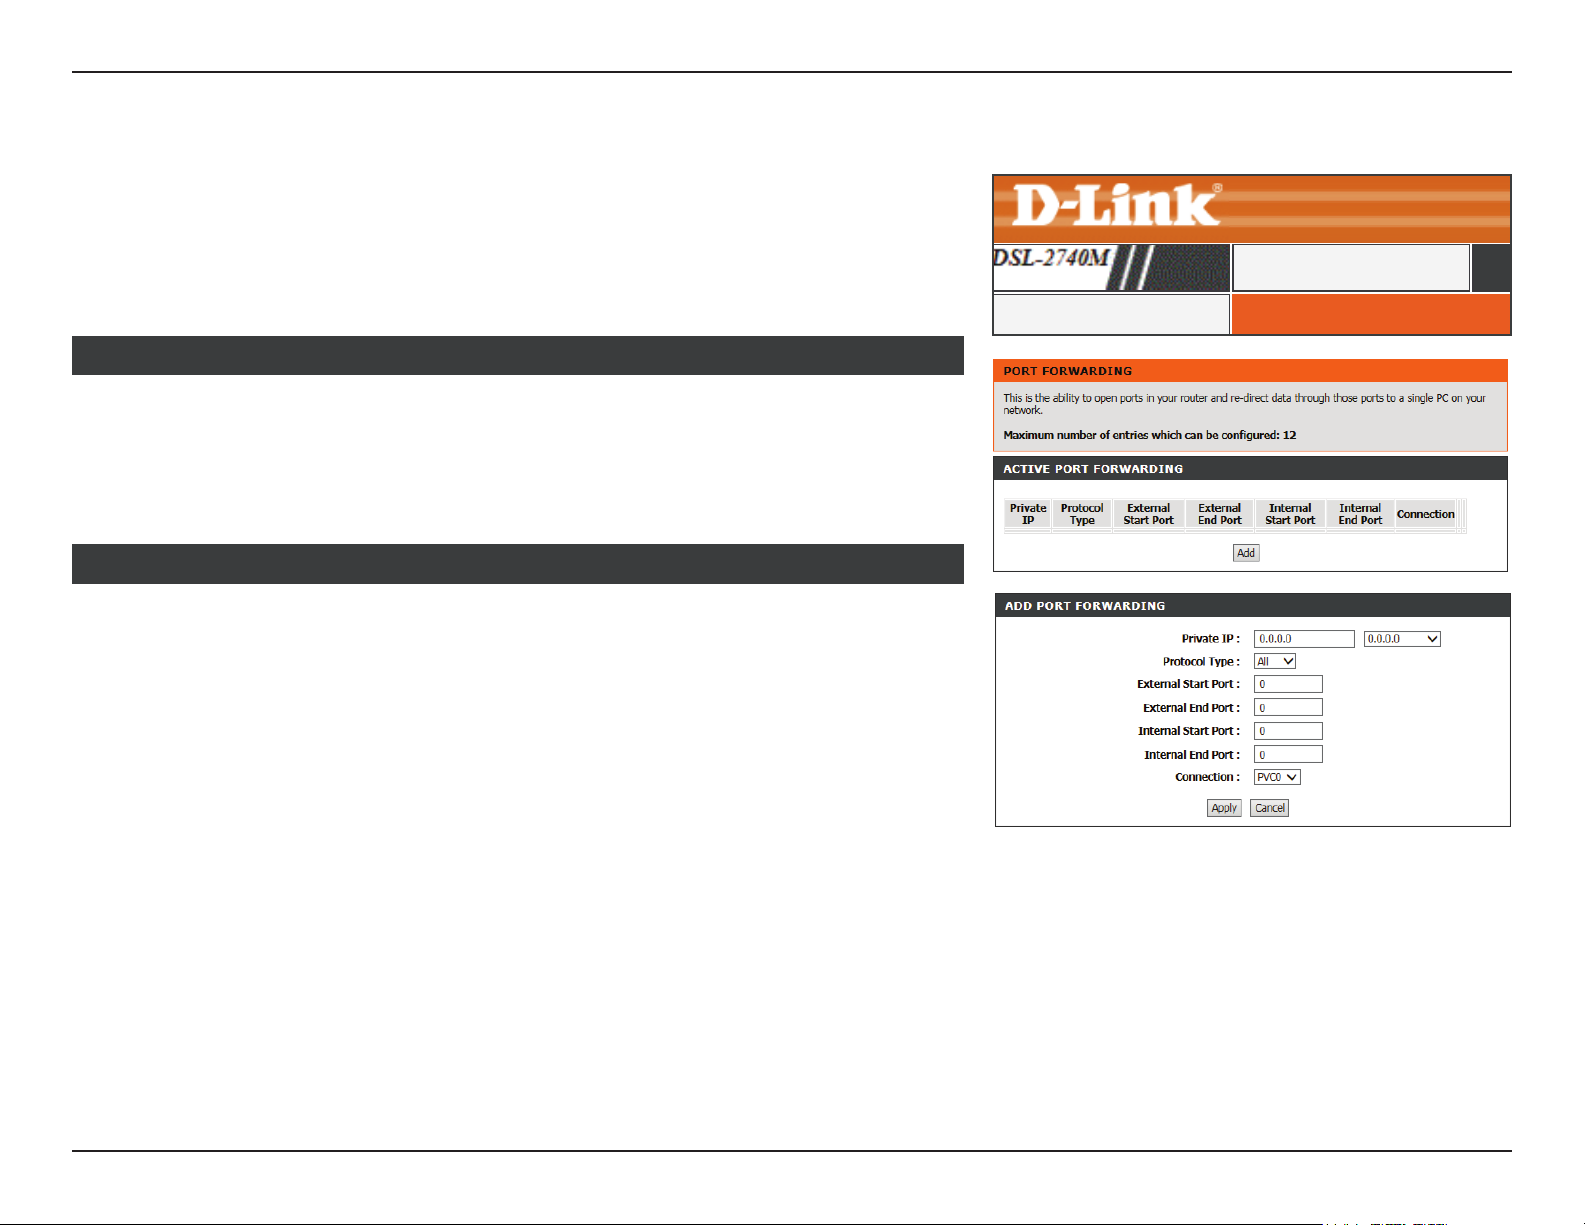
Port Forwarding
Click Port Forwarding on the navigation menu to congure Port Forwarding. Port forwarding
allows you to specify a port or range of ports to open for specic devices on the network.
This might be necessary for certain applications to connect through the router. In some
cases you may have two applications running on dierent devices which require the same
public port. Port forwarding also allows you to remap a dierent external port to each device.
ACTIVE PORT FORWARDING
This table displays the current port fowarding rules in eect. Click the Edit (Pencil) icon to
edit a corresponding port forwarding rule’s settings. Click the Delete (Trashcan) icon to
delete a corresponding port forwarding rule. Click the Add button to dene a new port
forwarding rule.
ADD PORT FORWARDING
Private IP: Enter the IP address of the computer on your local network that you
want to allow the incoming service to or use the dropdown menu to
quickly insert an active device’s IP address.
ADVANCED
PORT FORWARDINGPort Forwarding
Protocol: Select either All, TCP, or UDP.
External Start Port: Enter the starting external port number to forward. You can enter a
single port or a range of ports.
External End Port: Enter the ending external port number to forward.
Internal Start Port: Enter the starting internal port number to receive trac on.
Internal End Port: Enter the ending internal port number to forward. Remapped port
ranges must be alloted in sequential blocks.
Connection: Select the WAN connection to apply the port forwarding rule to.
Click the Apply button when you are nished.
47D-Link DSL-2740M User Manual
Page 52
Section 3 - Conguration
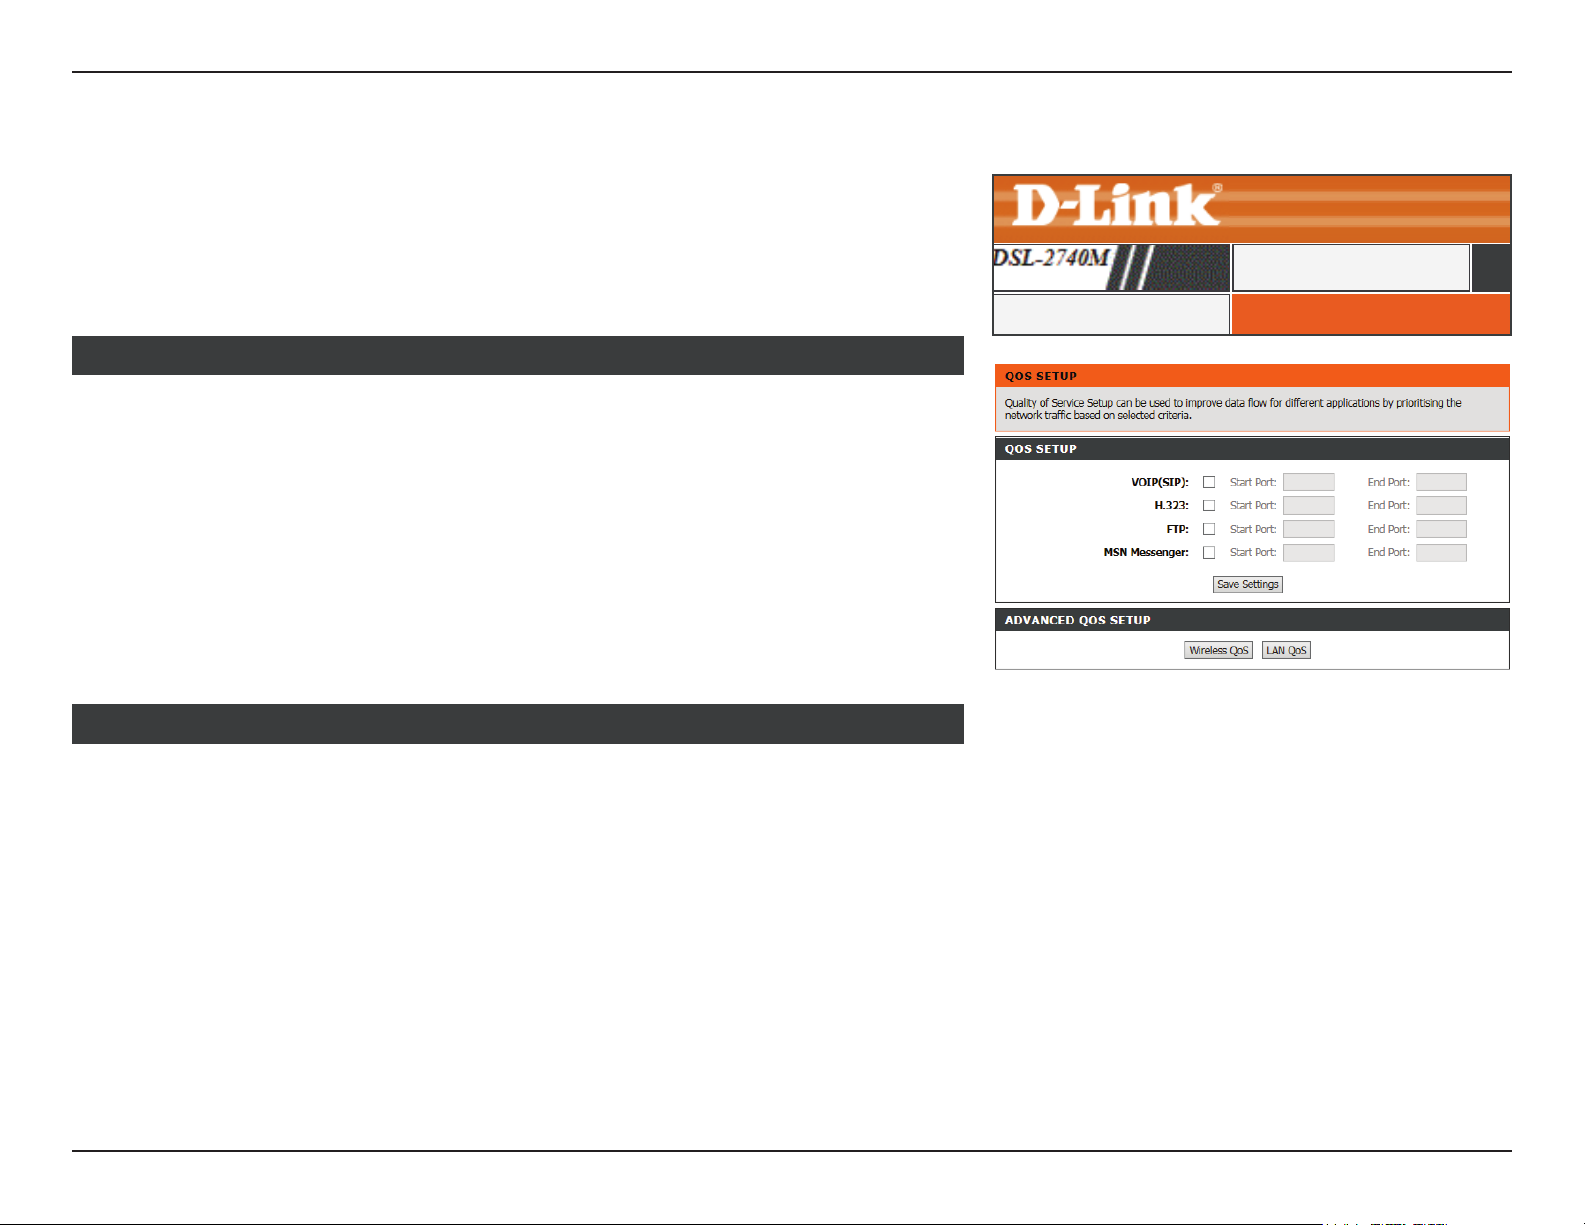
QoS Setup
Click QoS Setup on the navigation menu to congure Quality of Service (QoS). QoS allows
you to prioritize Internet trac to ensure a better web browsing experience in situations
where bandwidth is limited or large numbers of devices are in use. QoS can improve your
online experience by ensuring that specic trac is prioritized over other network trac,
such as VoIP, FTP, or Web.
QOS SETUP
VOIP(SIP) Enable or disable QoS for VOIP, enter the Start Port and End Port.
H.323: Enable or disable QoS for H.323, enter the Start Port and End Port.
FTP: Enable or disable QoS for FTP, enter the Start Port and End Port.
MSN Messenger: Enable or disable QoS for MSN Messenger, enter the Start Port and
End Port.
ADVANCED
QOS SETUPQoS Setup
When you are satised with your conguration, click Save Settings.
ADVANCED QOS SETUP
Wireless QoS: Click this button to congure the Wireless QoS Settings. Refer to
Wireless QoS Settings on page 49.
LAN QoS: Click this button to congure the LAN QoS Settings. Refer to LAN
QoS Settings on page 50.
48D-Link DSL-2740M User Manual
Page 53
Section 3 - Conguration
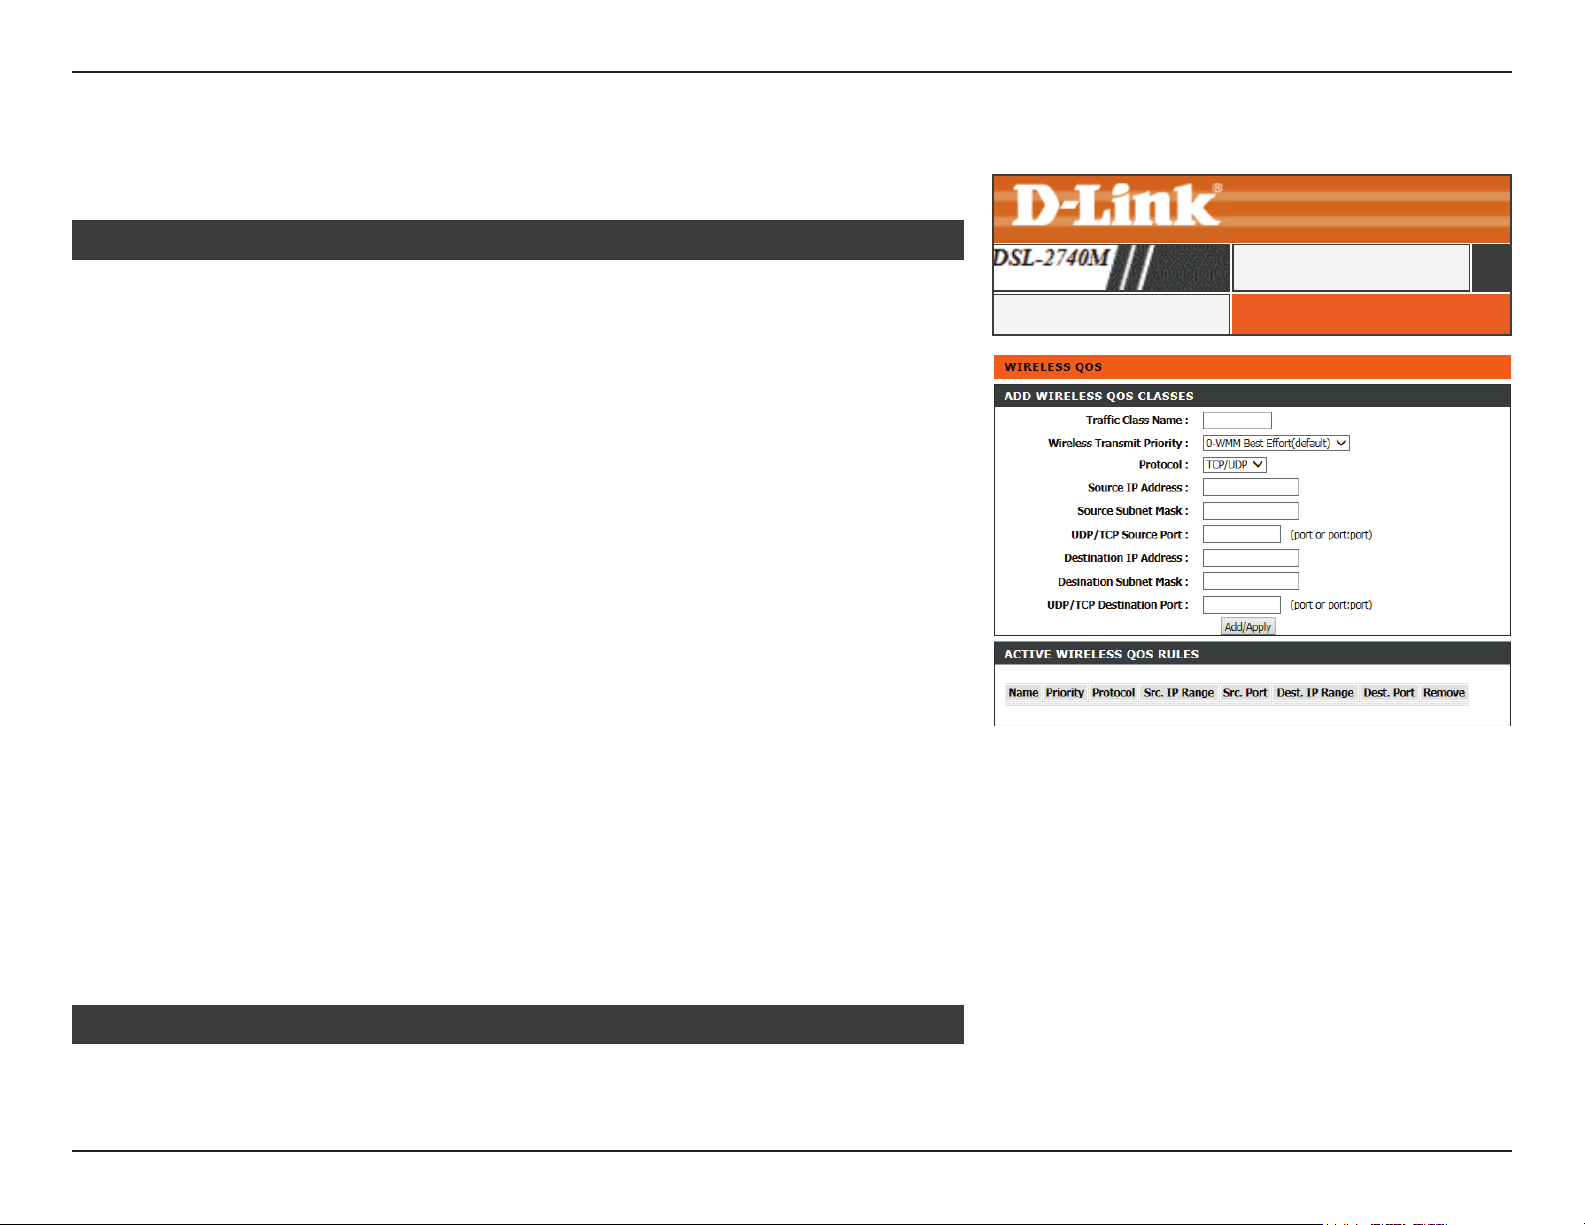
Wireless QoS Settings
This page allows you to congure the Wireless QoS (WMM) Settings.
ADD WIRELESS QOS CLASSES
Trac Class Name: Enter a name for this QoS rule.
Wireless Transmit
Priority:
Protocol: Select the protocol to apply the rule to: TCP/UDP, ICMP, TCP, UDP.
Source IP address: Enter the source IP address.
Select the wireless transmission priority from the dropdown menu.
ADVANCED
WIRELESS QOSQoS Setup
Source Subnet
Mask:
UDP/TCP Source
Destination IP
address:
Destination Subnet
Mask:
UDP/TCP
Destination Port:
Click the Add/Apply button when you are nished.
Enter the source subnet mask.
Enter the source port number or range.
Port:
Enter the destination IP address.
Enter the destination subnet mask.
Enter the destination port number or range.
ACTIVE WIRELESS QOS RULES
The currently dened wireless QOS rules are displayed here.
49D-Link DSL-2740M User Manual
Page 54
Section 3 - Conguration
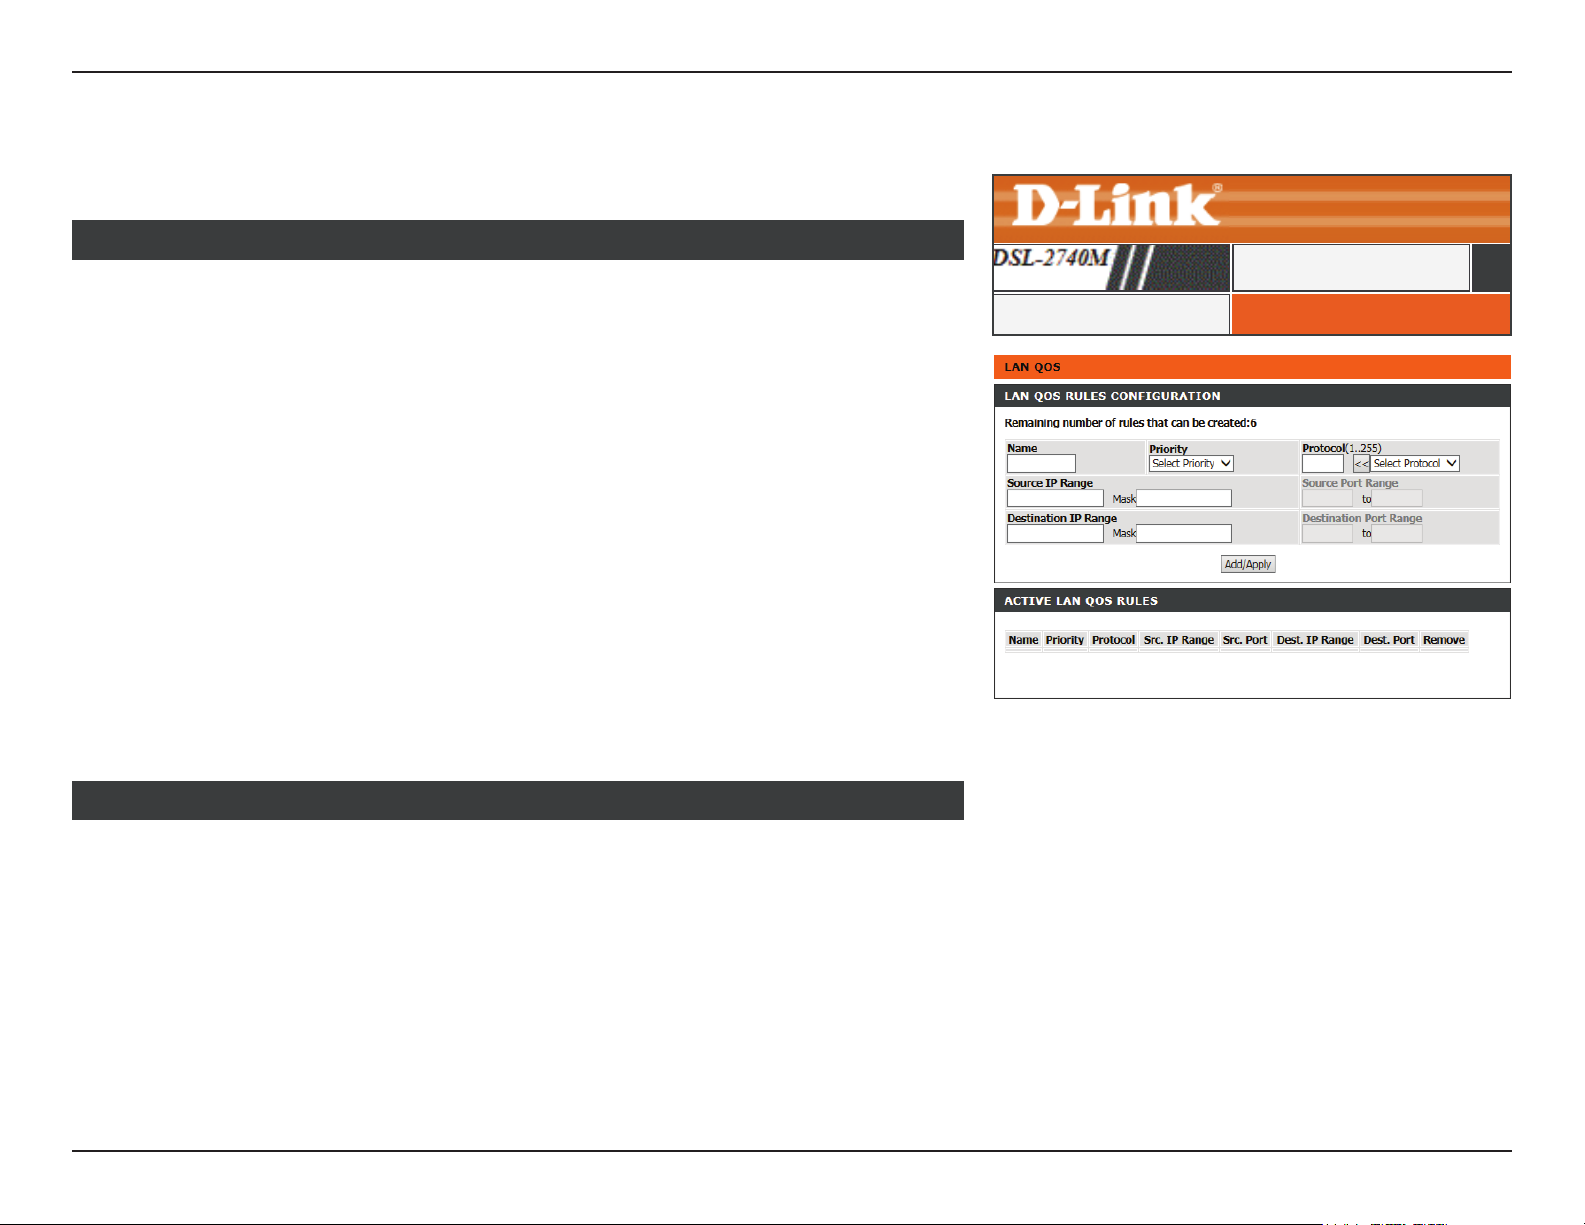
LAN QoS Settings
This page allows you to congure the LAN QoS Settings.
LAN QOS RULES CONFIGURATION
Name: Enter a name for this QoS rule.
Priority: Select the priority to apply to the rule: Low, Medium, High.
Protocol: Select the protocol to apply the rule to: ICMP, TCP, UDP.
Source IP Range: Enter the source IP address range and subnet mask.
Source Port Range. Enter the source port range.
ADVANCED
LAN QOSQoS Setup
Destination IP
Range:
Destination Port
Range:
Click the Add/Apply button when you are nished.
Enter the destination IP address and subnet mask.
Enter the destination port range.
ACTIVE LAN QOS RULES
The currently dened LAN QOS rules are displayed here.
50D-Link DSL-2740M User Manual
Page 55
Section 3 - Conguration
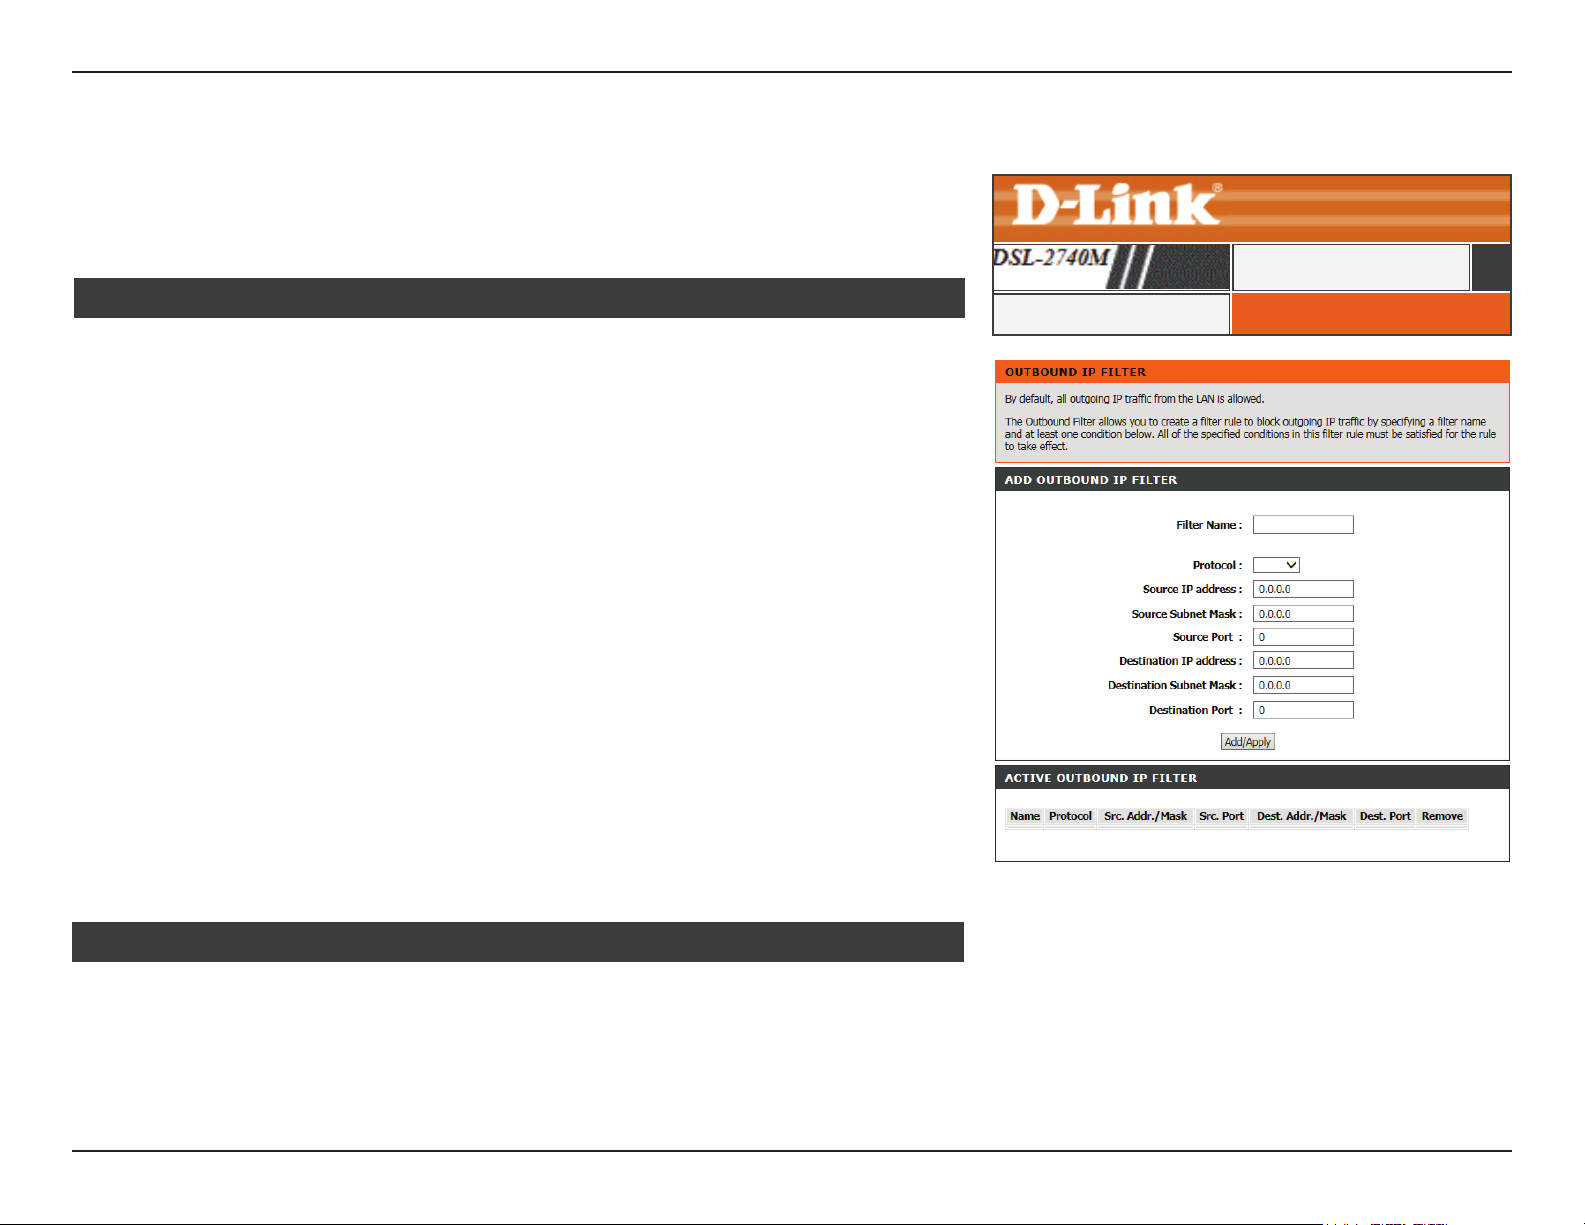
Outbound Filter
Click Outbound Filter on the navigation menu to congure the Outbound Filter. The
Outbound Filter allows you to place ltering rules on a per IP basis. Using this tool you may
restrict access to or block trac to a specic remote IP address or range.
ADVANCED
ADD OUTBOUND IP FILTER
Filter Name: Enter a name for this Outbound Filter.
Protocol: Select TCP, UDP, or ICMP from the dropdown menu.
Source IP address: Enter the source IP address.
Source Subnet
Mask:
Source Port: Enter the source port.
Destination IP
address:
Destination Subnet
Mask:
Destination Port: Enter the destination port.
Enter the source subnet mask.
Enter the destination IP address.
Enter the destination subnet mask.
Click the Add/Apply button to add your Outbound IP Filter Rule.
OUTBOUND IP FILTEROutbound Filter
ACTIVE OUTBOUND FILTER
The currently dened Outbound Filter rules are listed here. Click Remove to remove a
dened rule.
51D-Link DSL-2740M User Manual
Page 56
Section 3 - Conguration
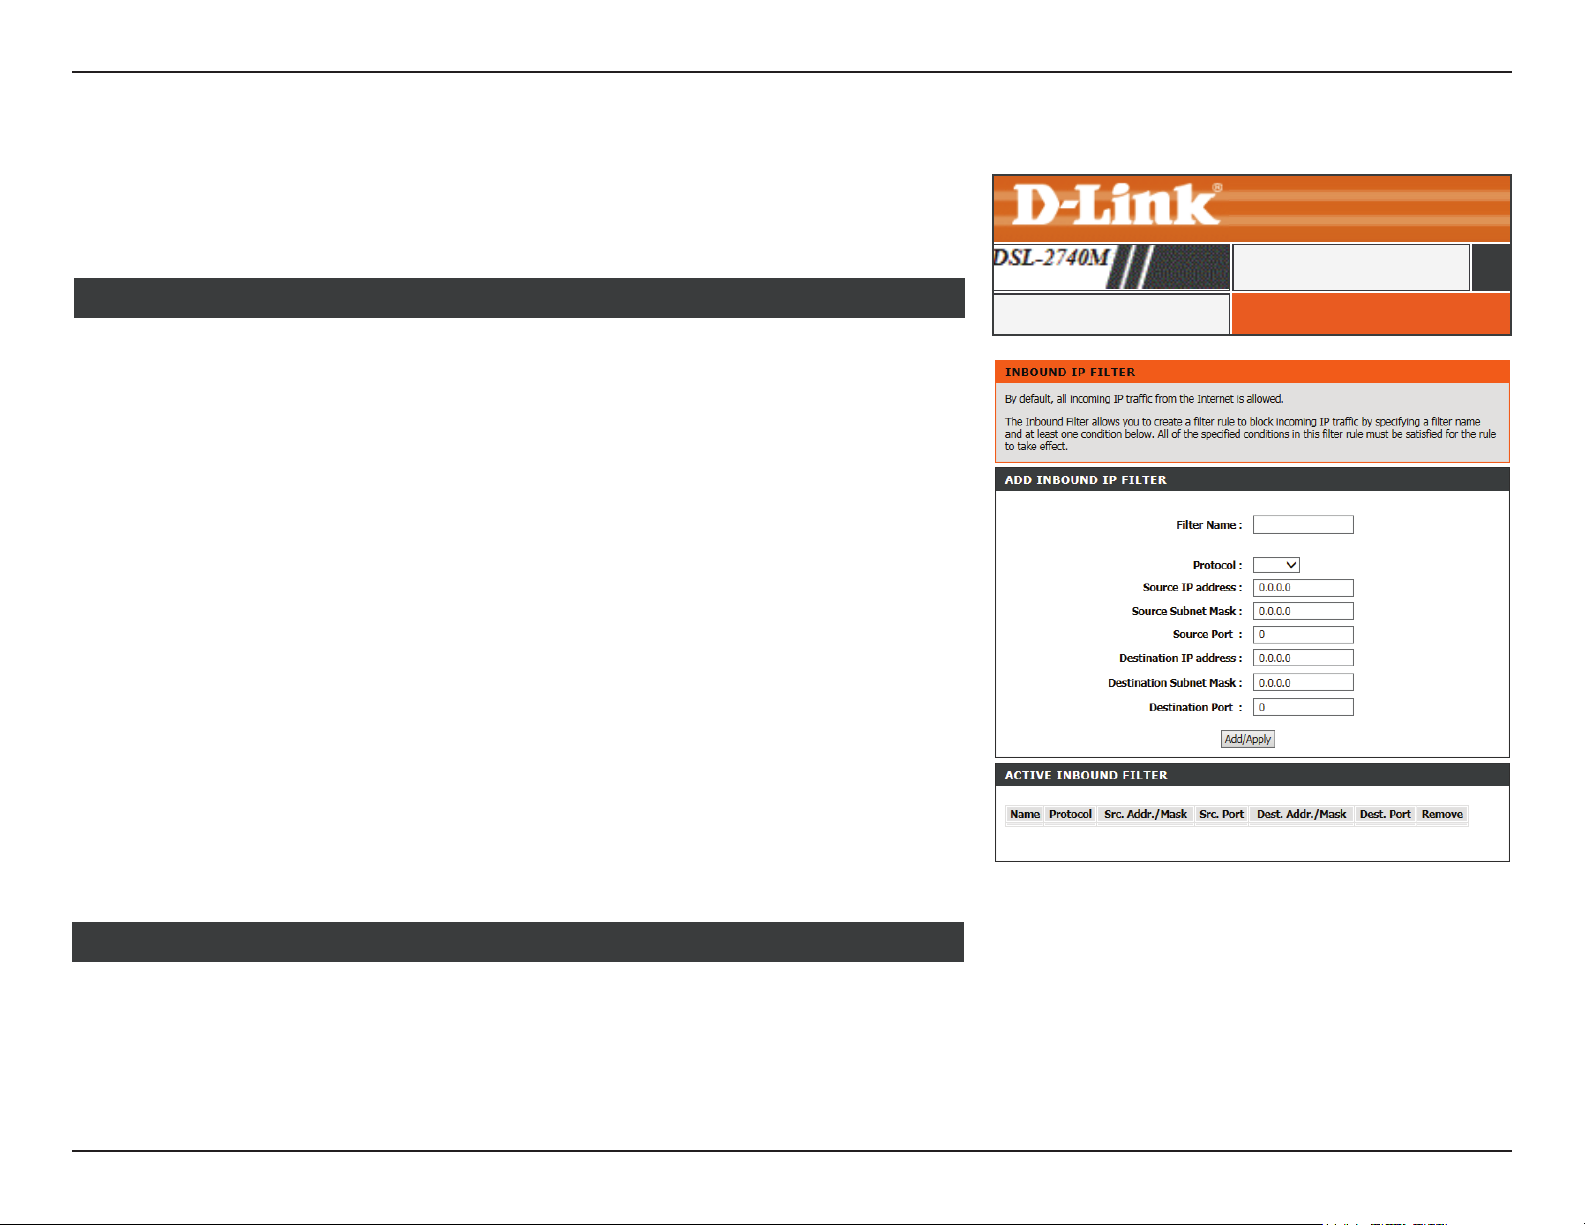
Inbound Filter
Click Inbound Filter on the navigation menu to congure the Inbound Filter. The Inbound
Filter allows you to place ltering rules on a per IP basis. Using this tool you may restrict
access to or block trac from a specic remote IP address or range.
ADVANCED
ADD INBOUND IP FILTER
Filter Name: Enter a name for this Inbound Filter.
Protocol: Select TCP, UDP, or ICMP from the dropdown menu.
Source IP address: Enter the source IP address.
Source Subnet
Mask:
Source Port: Enter the source port.
Destination IP
address:
Destination Subnet
Mask:
Destination Port: Enter the destination port.
Enter the source subnet mask.
Enter the destination IP address.
Enter the destination subnet mask.
Click the Add/Apply button to add your Inbound IP Filter Rule.
INBOUND IP FILTERInbound Filter
ACTIVE INBOUND FILTER
The currently dened Inbound Filter rules are listed here. Click Remove to remove a dened
rule.
52D-Link DSL-2740M User Manual
Page 57
Section 3 - Conguration
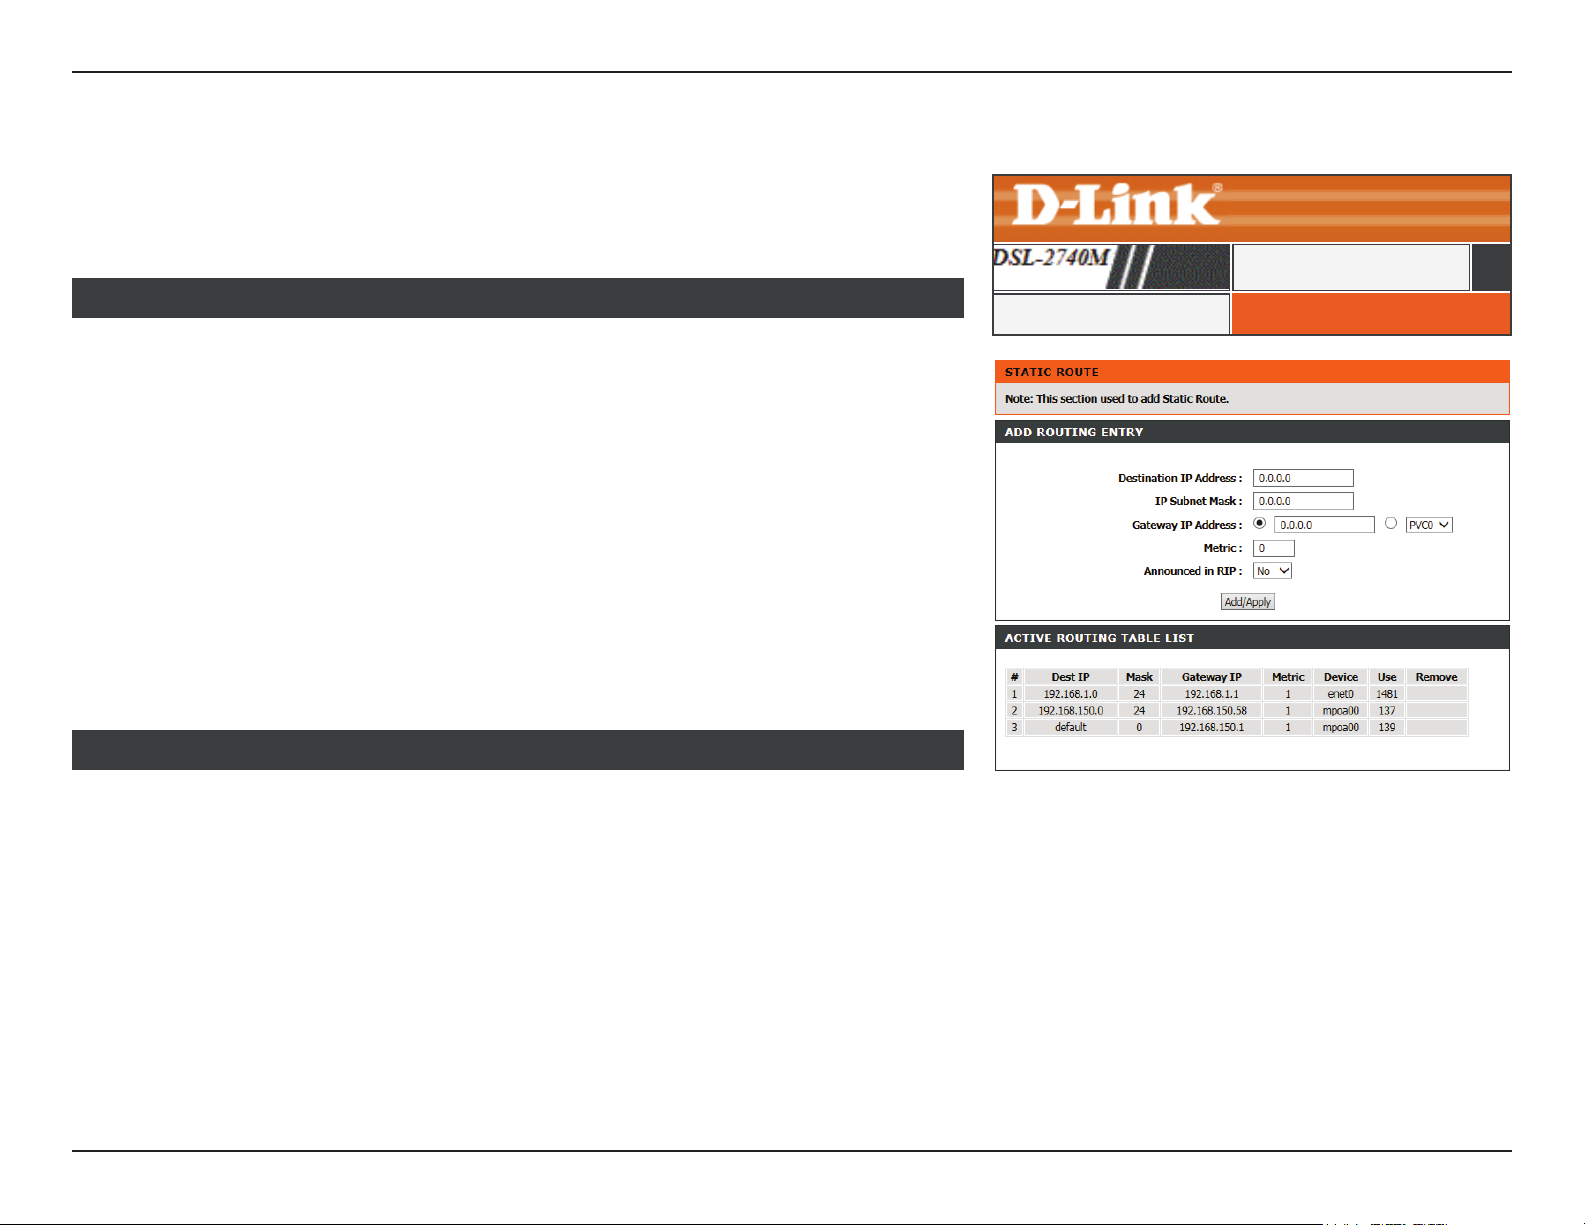
Static Route
Click Static Routes on the navigation menu to congure the Static Route. The Static Routes
section allows you to dene custom routes to control how data trac is moved out of your
network.
ADVANCED
ADD ROUTING ENTRY
Destination IP
Address:
IP Subnet Mask: Enter the subnet mask of the destination IP address.
Gateway IP
Address:
Metric: Enter the metric value.
Announced in RIP: Enable this route to be announced in RIP updates.
Enter the IP address of the destination router.
Enter the IP address of the gateway router to be used or select if rom
the dropdown menu.
Click Apply to have your changes take eect.
ACTIVE ROUTING TABLE LIST
The currently dened Static Routes are displayed here. If you wish to remove a rule, select
it from the table and click the Remove button.
STATIC ROUTEStatic Route
53D-Link DSL-2740M User Manual
Page 58
Section 3 - Conguration
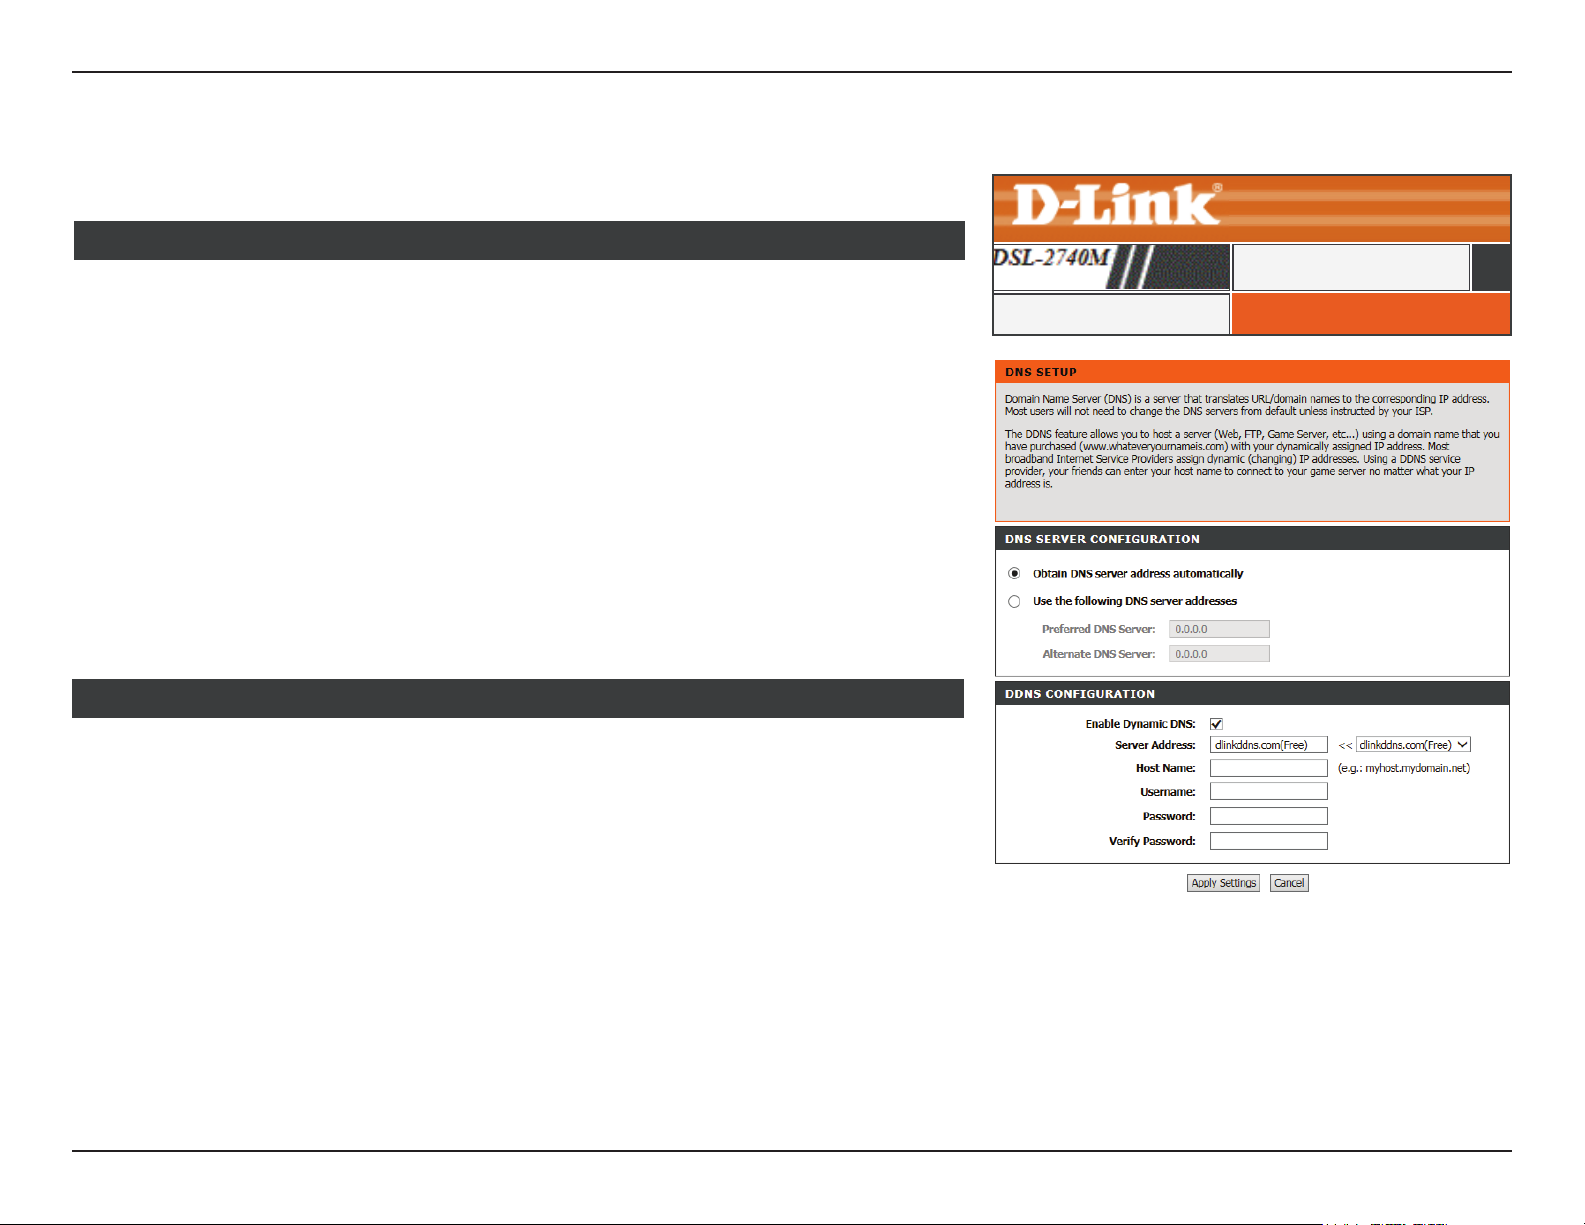
DNS Setup
Click DNS Setup on the navigation menu to congure your DNS and DDNS settings.
DNS SERVER CONFIGURATION
Obtain DNS
Server address
automatically:
Select this option to automatically obtain the DNS server address from
your WAN conguration.
ADVANCED
DNS SETUPDNS Setup
Use the following
DNS Server
Address:
If you select Obtain DNS Server address automatically, enter your DNS information.
Preferred DNS
Server:
Alternate DNS
Server:
Select this option to input custom DNS settings.
Enter the provided DNS server IP address.
Enter the secondary DNS server IP address.
DDNS CONFIGURATION
Enable Dynamic
Server Address: Enter Dynamic DNS provider or select it from the dropdown menu.
Host Name: Enter your hostname.
Username: Enter the username for your Dynamic DNS account.
Check this box to enable DDNS.
DNS:
Password: Enter the password for your Dynamic DNS account.
Verify Password: Conrm the password for your Dynamic DNS account.
Click Apply Settings when you are done.
54D-Link DSL-2740M User Manual
Page 59
Section 3 - Conguration
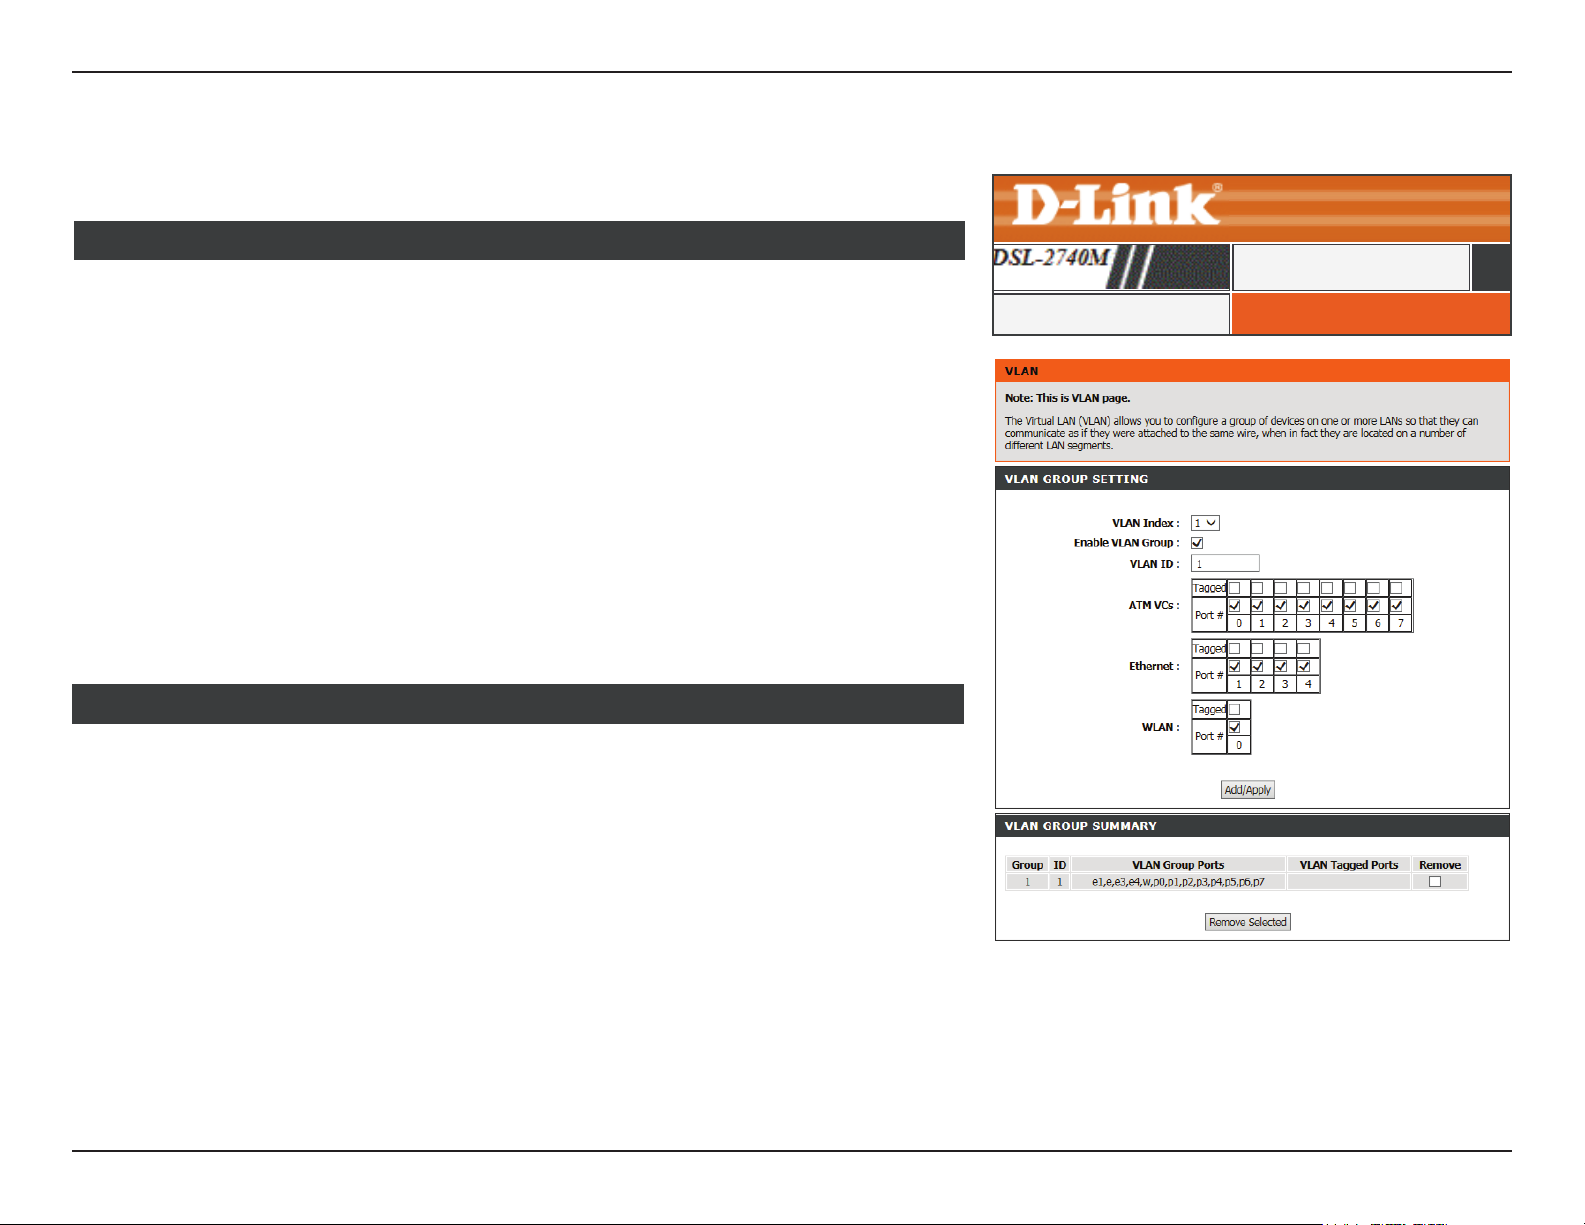
VLAN
Click VLAN on the navigation menu to congure your VLAN settings.
VLAN GROUP SETTING
VLAN Index: Select the VLAN index from the drop down menu.
Enable VLAN
Group:
VLAN ID: Enter the VLAN ID.
ATM VCS: Select the corresponding ATM ports to tag for this VLAN.
Ethernet: Select the corresponding Ethernet ports to tag for this VLAN.
WLAN: Select the corresponding WLAN ports to tag for this VLAN.
Click Apply Settings when you are done.
Check this box to enable this VLAN group.
ADVANCED
VLANVLAN
VLAN GROUP SUMMARY
The currently dened VLANs are displayed here. If you wish to remove a rule, select it from
the table and click the Remove Selected button.
55D-Link DSL-2740M User Manual
Page 60
Section 3 - Conguration
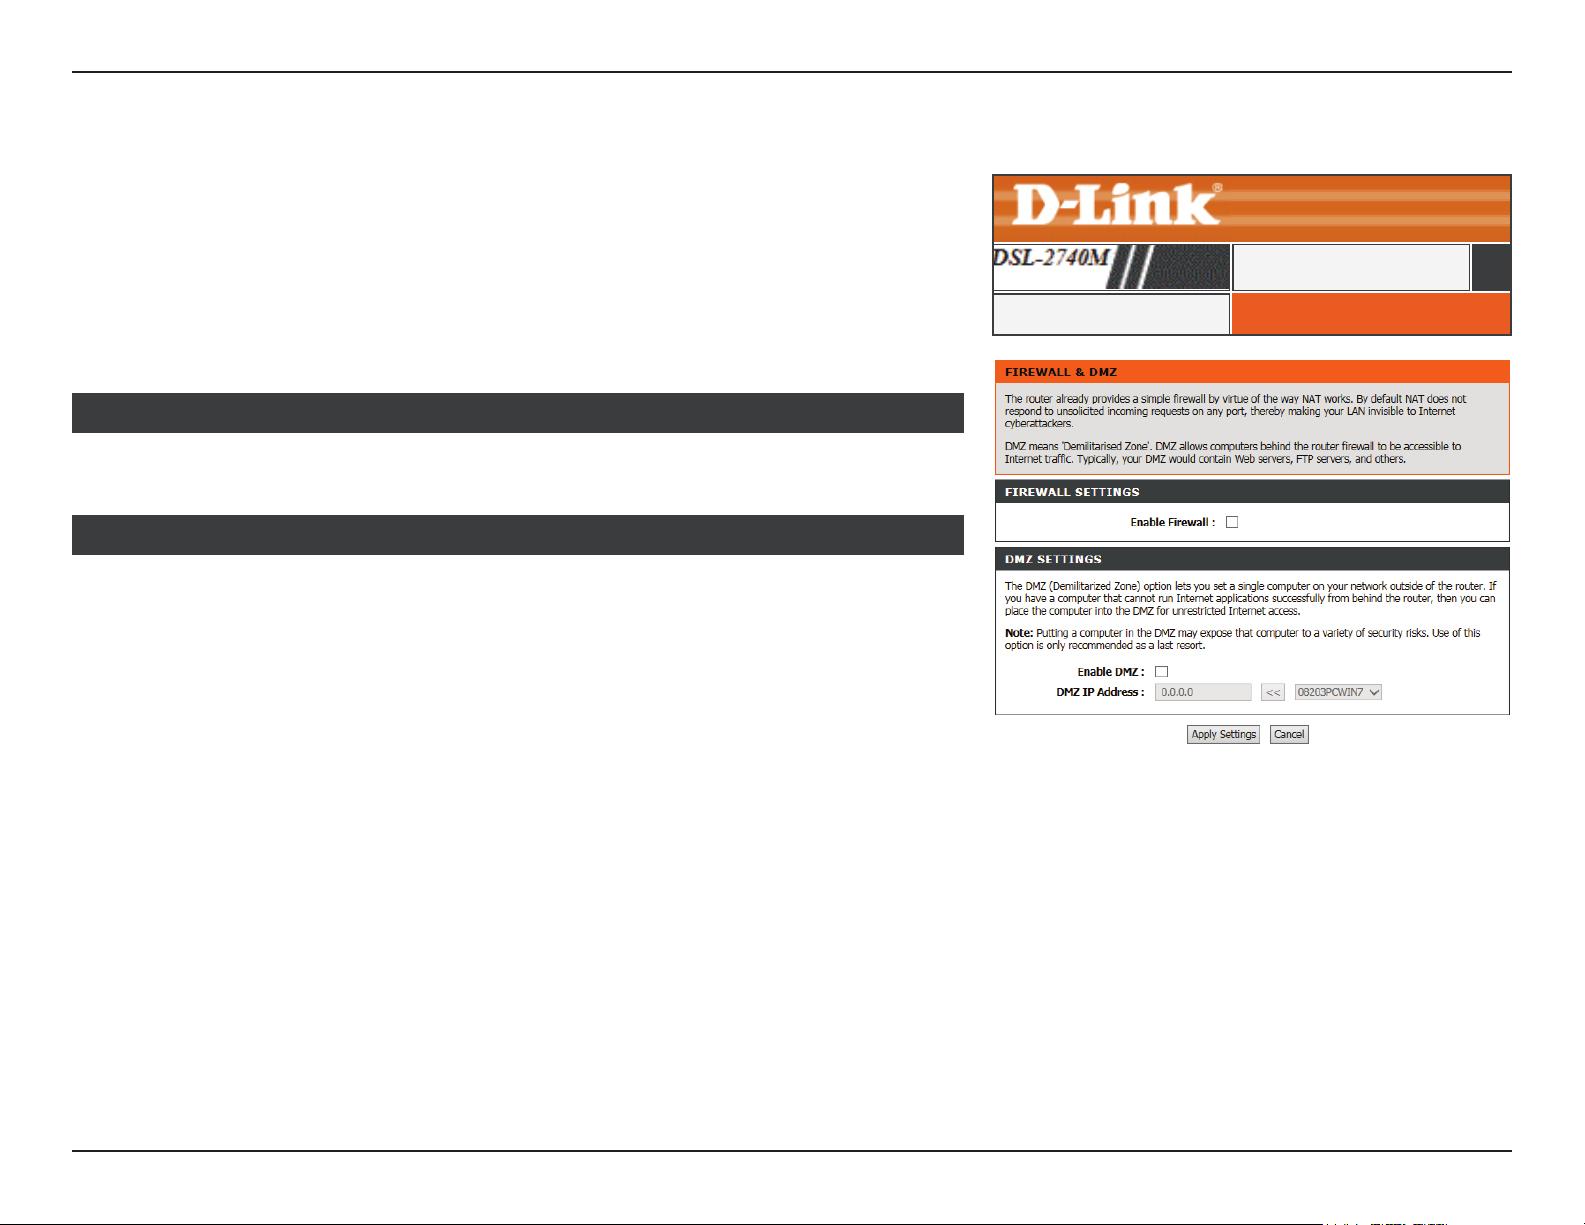
Firewall & DMZ
This page allows you to manually congure the router’s rewall & DMZ settings. Since some
applications are not compatible with NAT, the device supports the use of a DMZ IP address
for a single host on the LAN. This IP address is not protected by NAT and it is visible on the
Internet with the correct type of software. Note that any client PC in the DMZ is exposed
to various types of security risks. If you use DMZ, take measures (such as client-based virus
protection) to protect the remaining client PCs on your LAN from possible contamination
through DMZ.
FIREWALL SETTINGS
Enable Firewall: Check this box to enable or disable the rewall.
DMZ HOST
Enable DMZ: Check to enable or disable DMZ functionality.
ADVANCED
FIREWALL & DMZFirewall & DMZ
DMZ Host IP
Address:
Click Apply Settings to have your changes take eect.
Enter an IP address to be included in the DMZ or use the << button
to select a device connected to the router.
56D-Link DSL-2740M User Manual
Page 61
Section 3 - Conguration
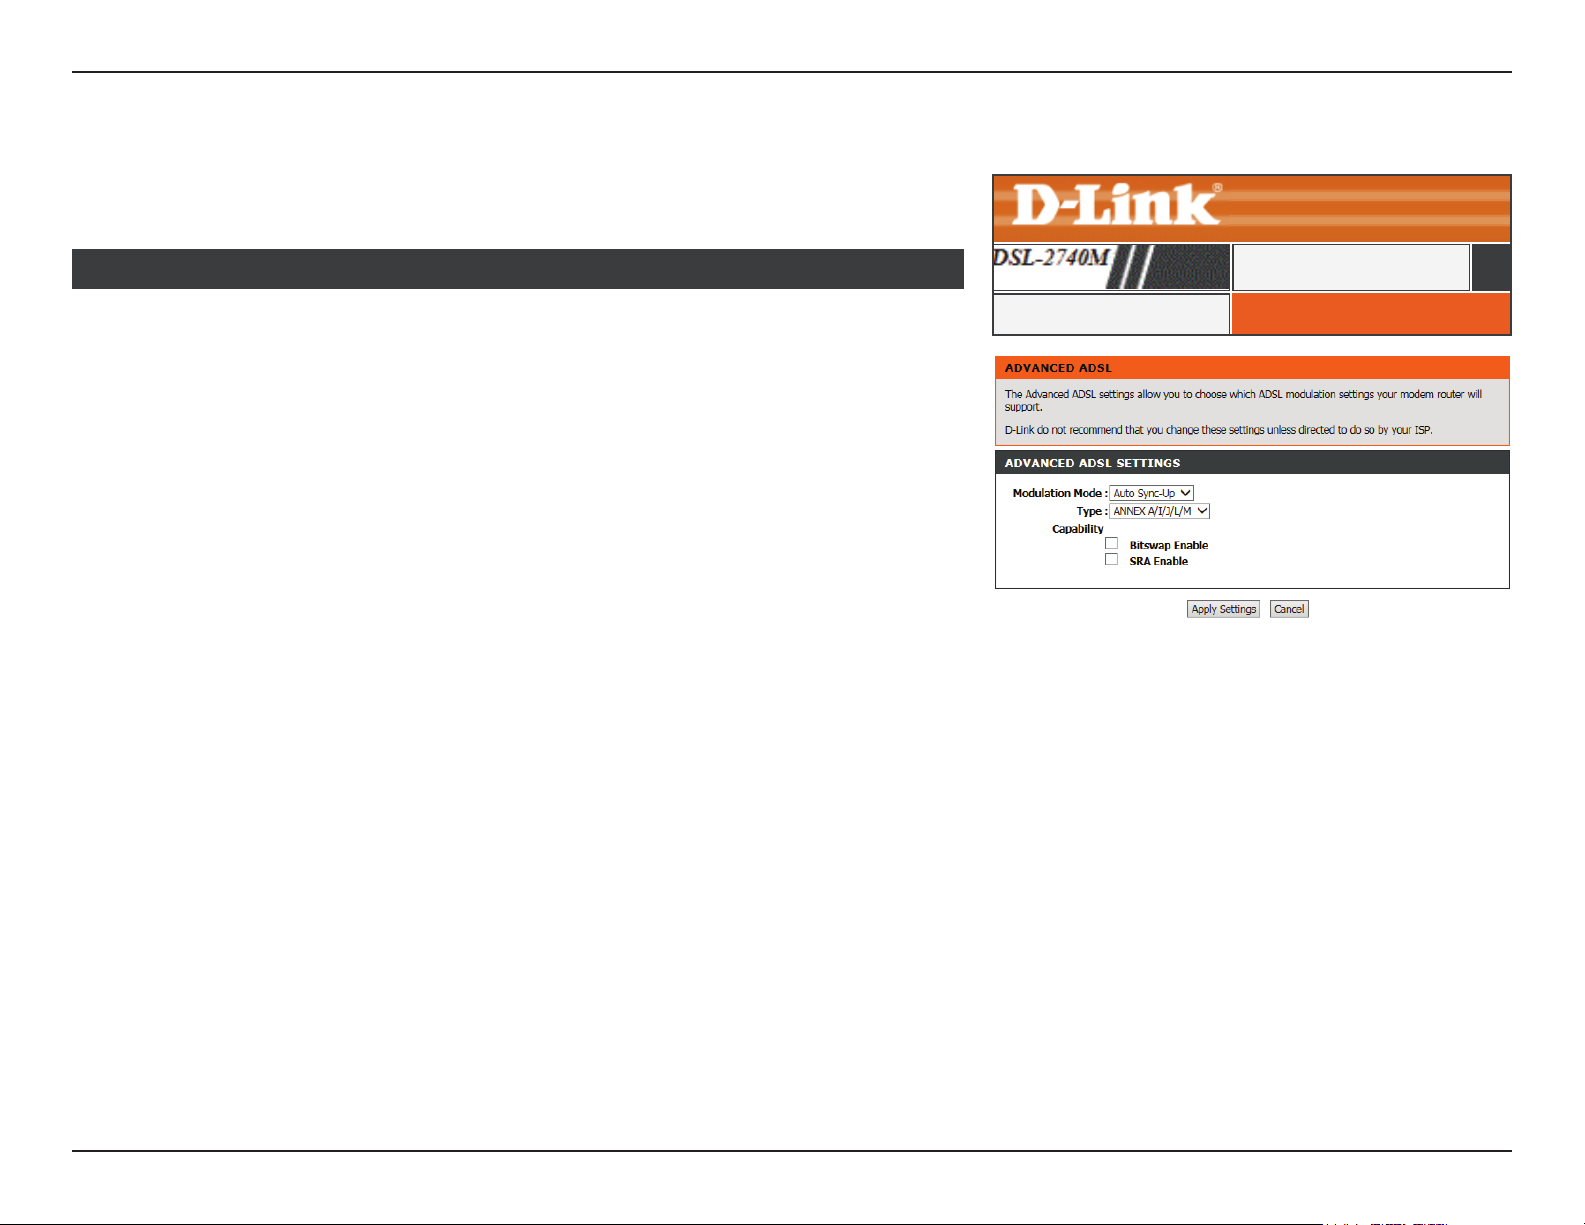
Advanced ADSL
This page lets you set the ADSL mode and type. It is recommended that you use the default
settings.
DISPLAY LIST
Modulation Mode: Select between Auto Sync-Up, VDSL, ADSL2+, ADSL2, G.DMT, T1.413,
G.lite modes.
Type: Select the correct Annex type for your DSL connection.
Compatibility: Check the boxes to enable Bitswap or SRA if instructed by your ISP’s
technical support.
Click Apply Settings when you are done.
ADVANCED
ADVANCED ADSLAdvanced ADSL
57D-Link DSL-2740M User Manual
Page 62
Section 3 - Conguration
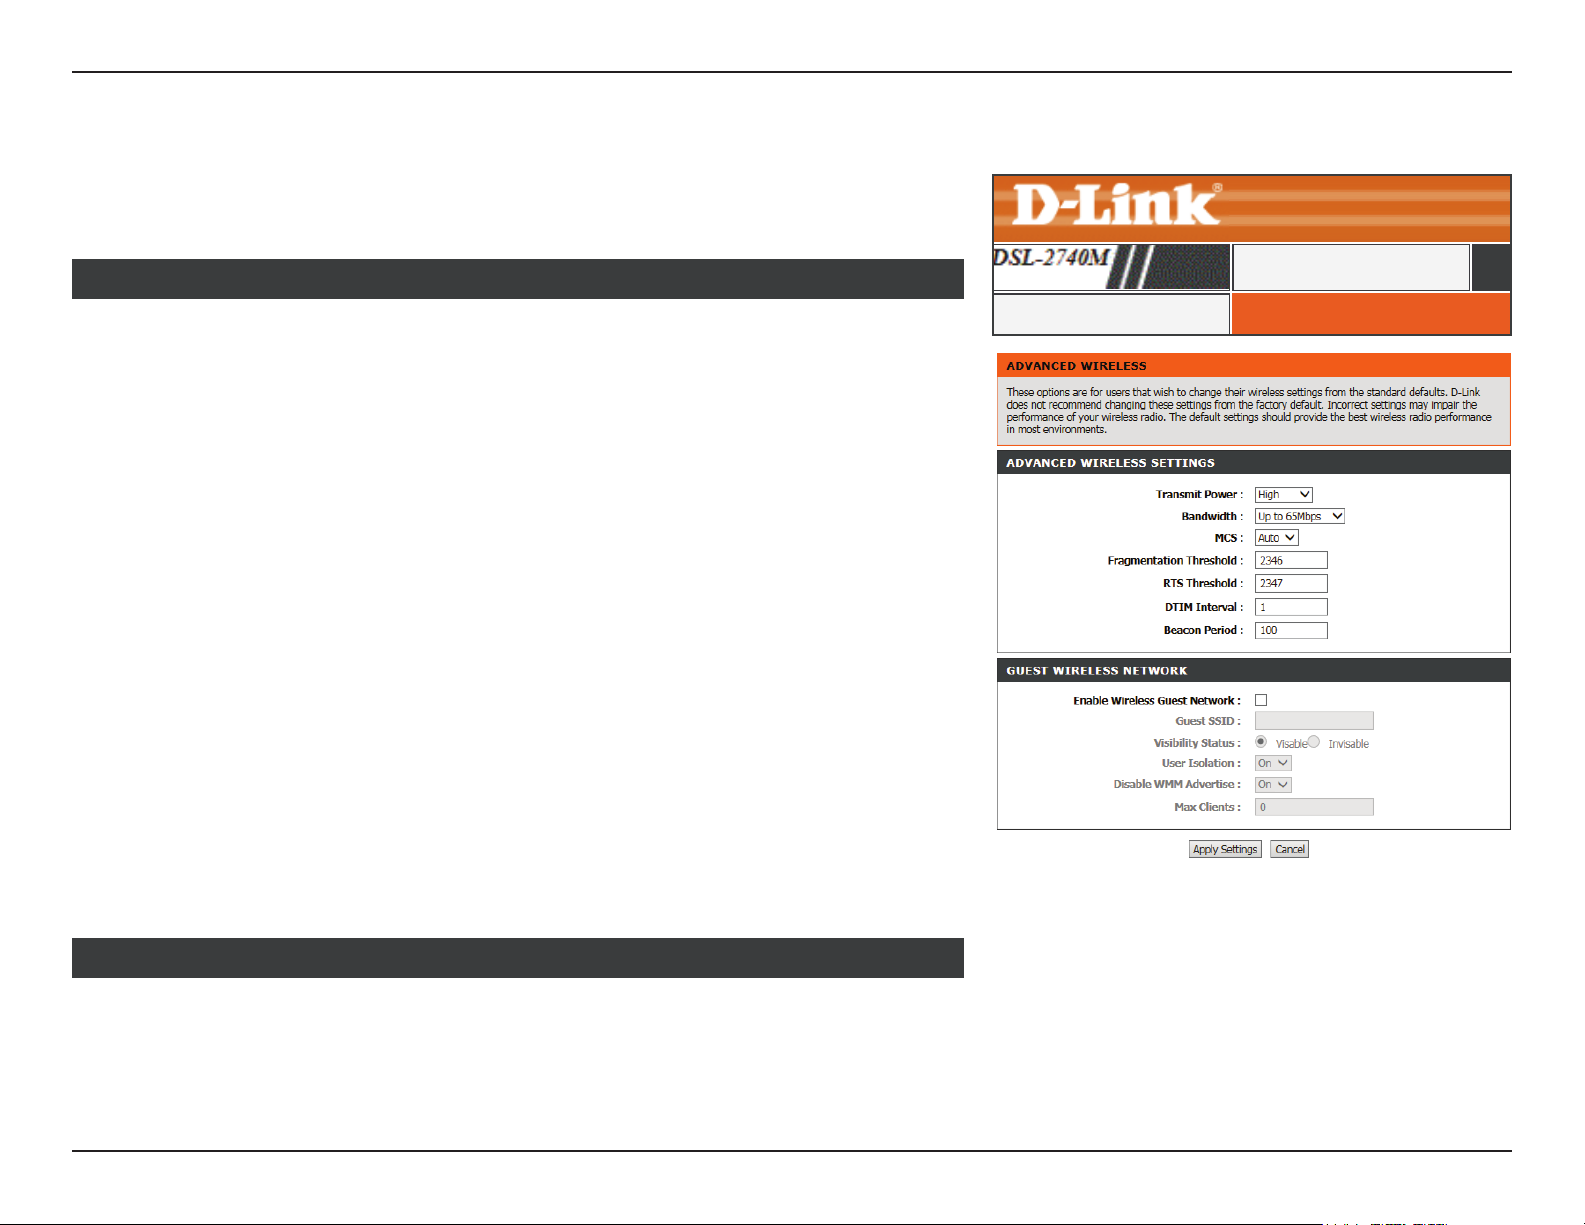
Advanced Wireless
Click Advanced Wireless on the navigation menu to congure the advanced wireless
options.
ADVANCED WIRELESS SETTINGS
Transmit Power: Select the desired wireless transmission power.
Bandwidth: Select the amount of allowed bandwidth.
MCS: If Auto Scan is disabled, use the dropdown menu to select the wireless
channel to use.
Fragmentation
Threshold:
RTS Threshold: This value should remain at its default setting of 2346. If inconsistent
DTIM Interval: DTIM range can be set from 1 to 255. A delivery trac indication
The fragmentation threshold, which is specied in bytes, determines
whether packets will be fragmented. Packets exceeding the 2346 byte
setting will be fragmented before transmission. 2346 is the default
setting.
data ow is a problem, only a minor modication should be made.
message (DTIM) is a kind of trac indication message (TIM) which
informs the clients of the presence of buered multicast/broadcast
data on the access point.
ADVANCED
ADVANCED WIRELESSAdvanced Wireless
Beacon Period: Set the AP advertisement frame interval.
GUEST WIRELESS NETWORK
Enable Guest Zone: Enable or disable this guest wireless network.
Guest SSID: Create a name for your guest wireless network.
58D-Link DSL-2740M User Manual
Page 63
Section 3 - Conguration
Advanced Wireless (continued)
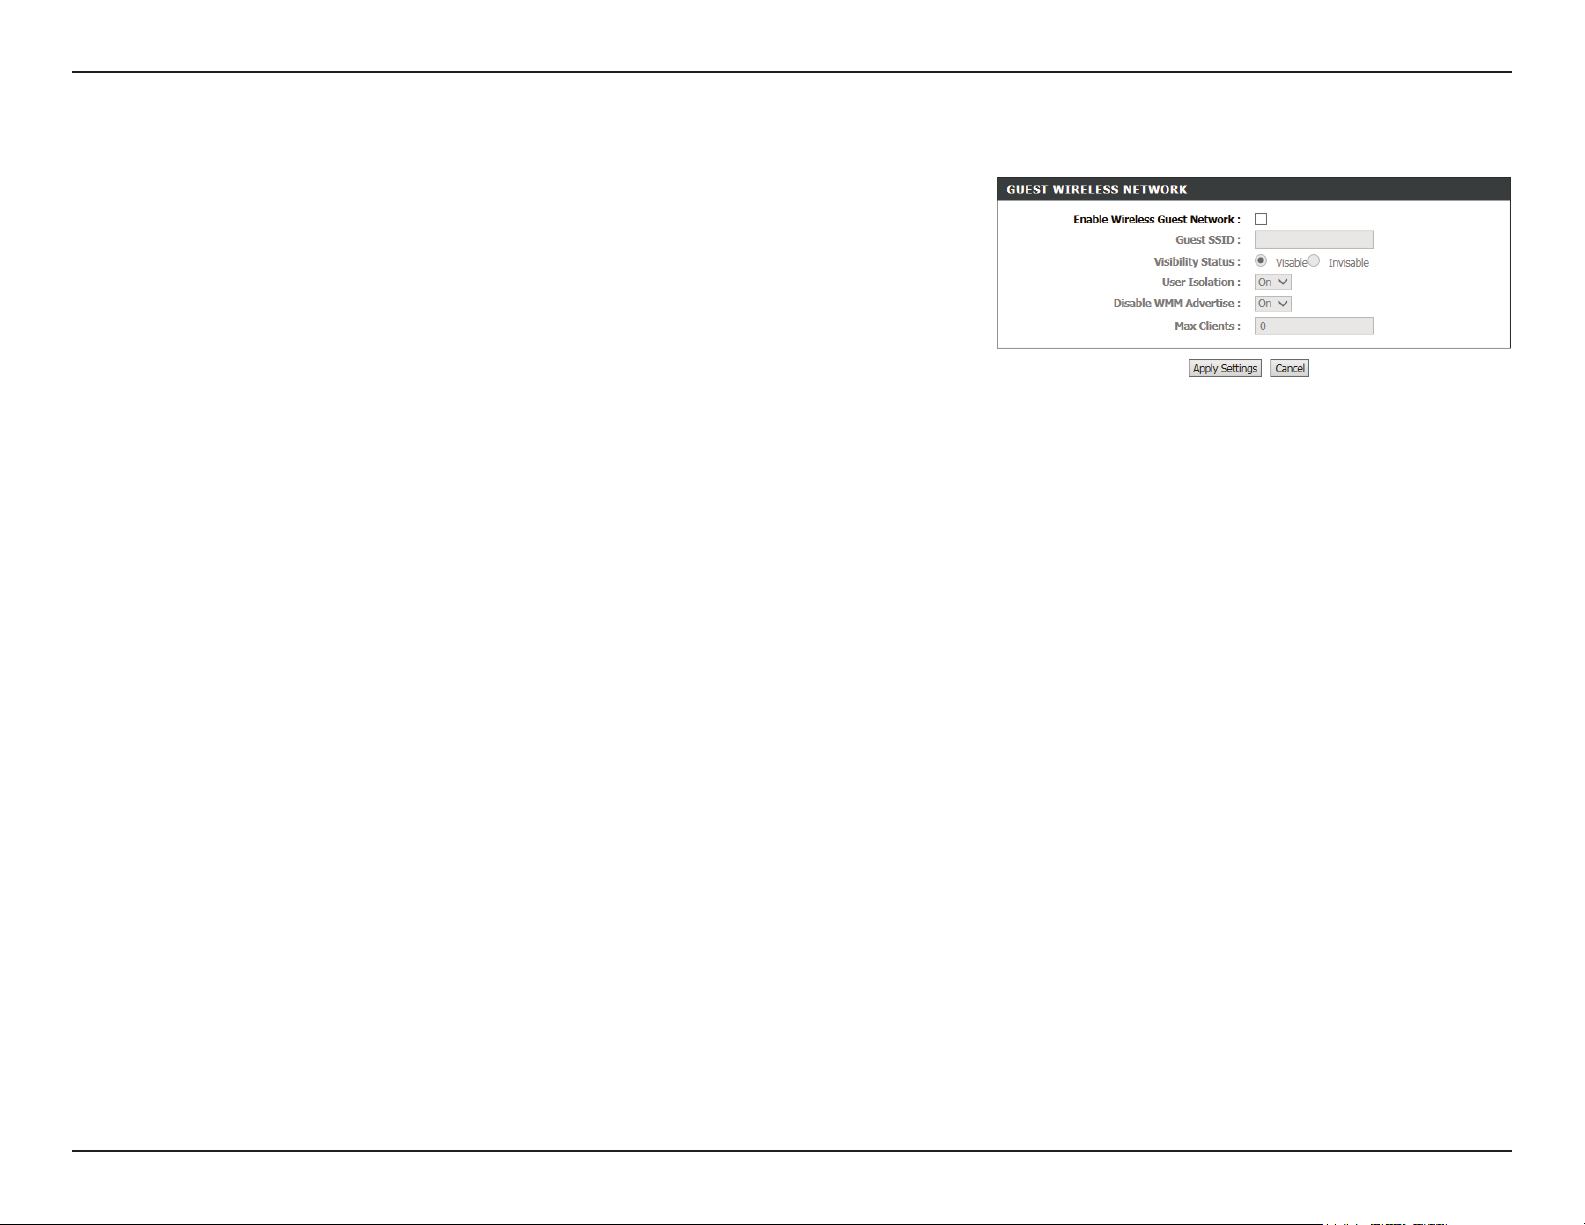
Visibility Status: The default setting is Visible. Select Invisible if you do not want to
broadcast the SSID of your wireless network.
Note: Making a network invisible is not a form of security alone.
User Isolation: Enable or disable user isolation. User isolation forces wireless clients
to communicate with each other through the access point.
Disable WMM
Advertise:
Max Clients: Enter the maximum number of guest wireless devices allowed on
Click the Apply Settings button when you are nished.
Enable or disable Wi-Fi MultiMedia QoS.
the network.
59D-Link DSL-2740M User Manual
Page 64
Section 3 - Conguration
Wi-Fi Protected Setup
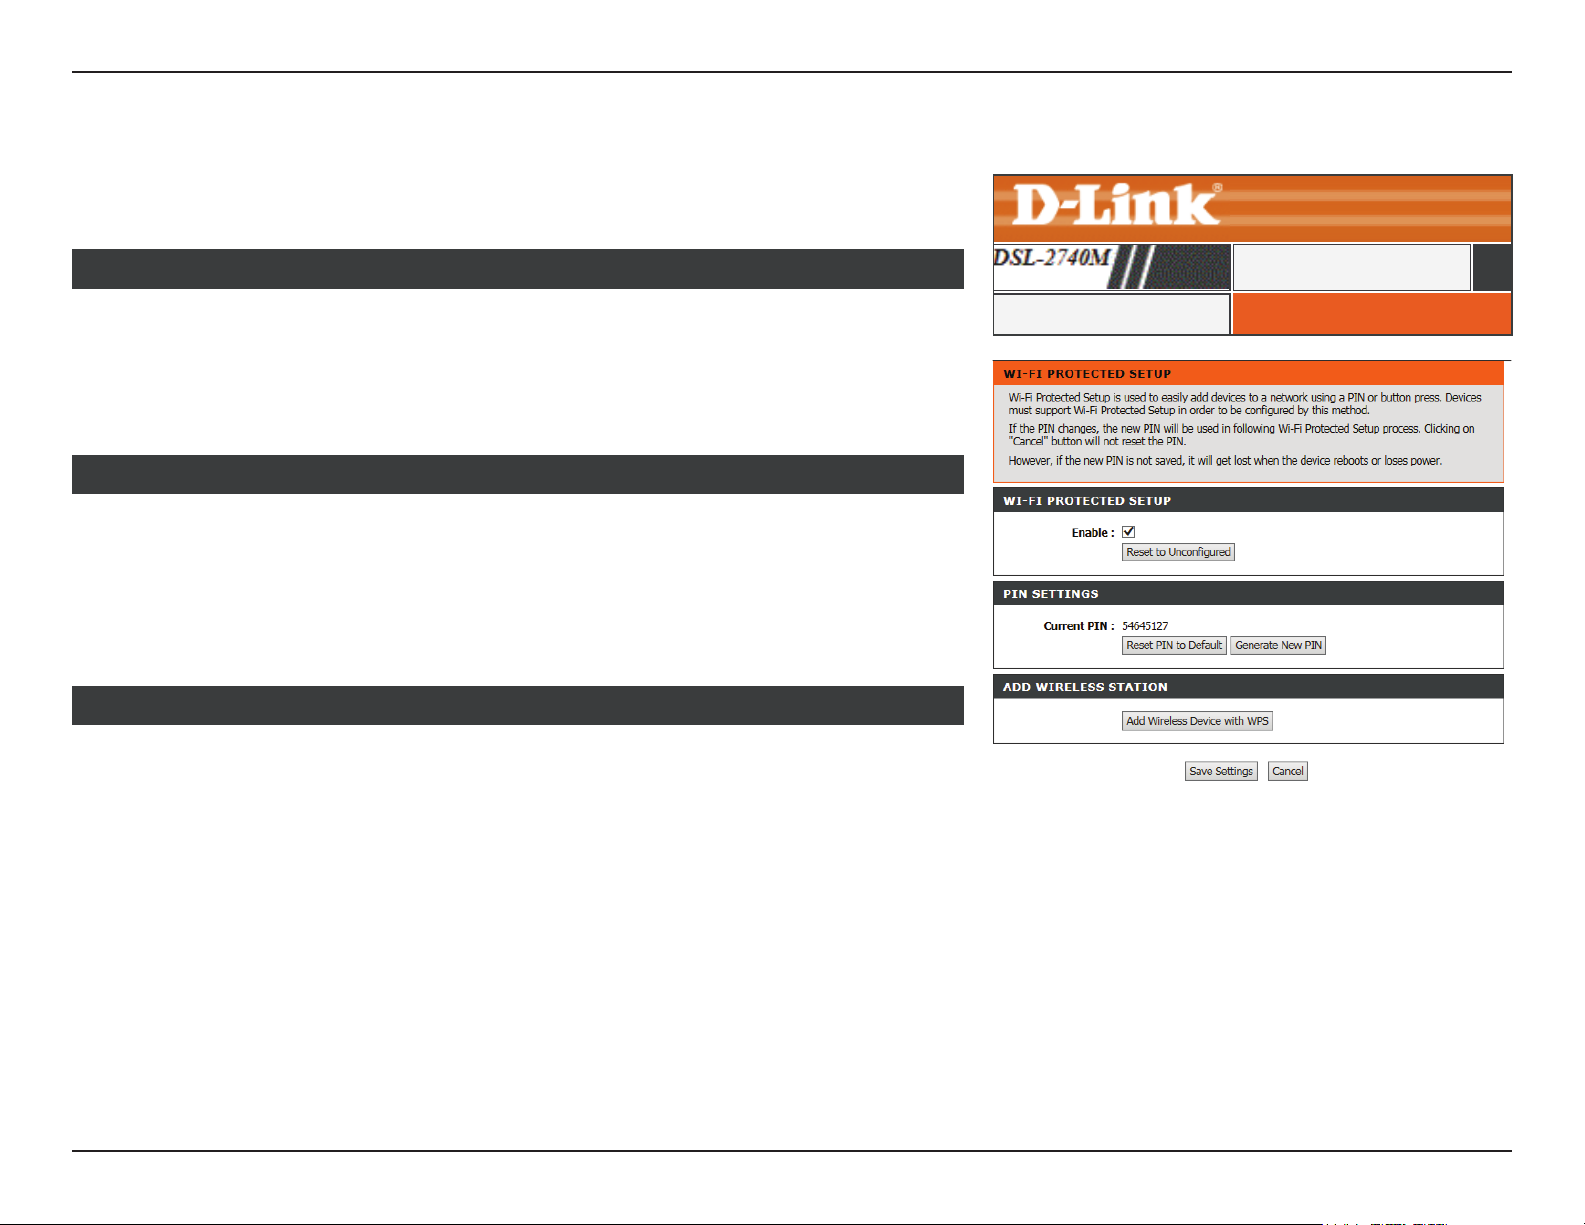
Click Wi-Fi Protected Setup on the navigation menu to congure the Wi-Fi Protected Setup
(WPS) feature. Refer to WPS Button on page 134 for more information about WPS.
WIFI PROTECTED SETUP
Enable: Check the box to enable WPS.
Reset to
Uncongured:
Click this button to reset the WPS settings.
PIN SETTINGS
PIN: The currently dened WPS-PIN is displyaed here.
Reset PIN to Default Click this button to reset the WPS-PIN to the factory default.
Generate New PIN Click this button to generate a new WPS PIN.
ADD WIRELESS STATION
Connect your
Wireless Device:
Click this button to launch the WPS Add Device Wizard. Refer to Add
Wireless Device with WPS (Wi-Fi Protected Setup) Wizard on page
34 for more information.
ADVANCED
WI-FI PROTECTED SETUPWi-Fi Protected Setup
Click the Save Settings button when you are nished.
60D-Link DSL-2740M User Manual
Page 65
Section 3 - Conguration
Wireless Mac Filter
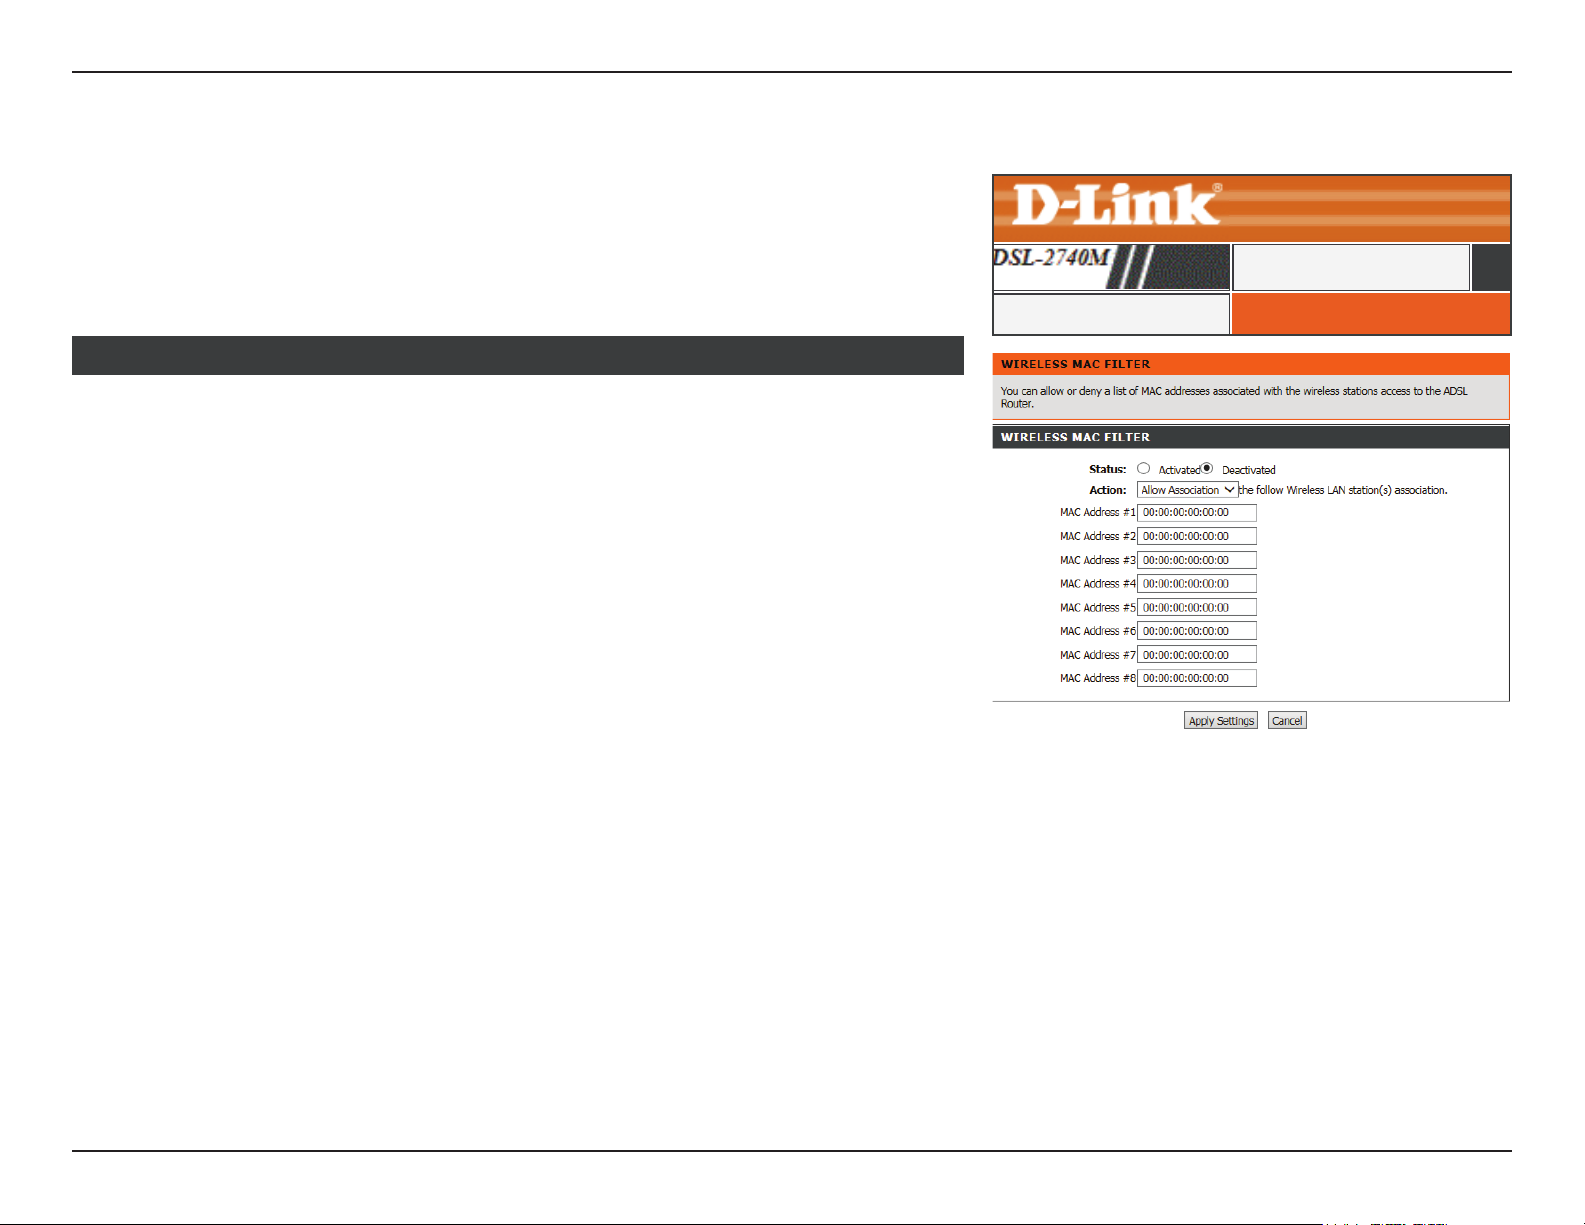
Click Wireless Mac Filter on the navigation menu to congure the MAC address ltering
feature. This feature allows you to congure lters to control which wireless clients can
access your network, and which network resources they can access.
Note: MAC ltering on wireless networks is not a form of security alone.
WIRELESS MAC FILTER
Status: Use this option to activate or deactivate the Wireless MAC lter.
Wireless SSID: Select the Wireless SSID from the dropdown menu which you wish
to apply MAC ltering to.
Action: Select the access control type: Allow Association to allow only the
listed clients or Deny Association to deny the listed clients.
You may add up to 8 MAC addresses to the Wireless Mac Filter.
ADVANCED
WIRELESS MAC FILTERWireless Mac Filter
Click Apply Settings when you are done.
61D-Link DSL-2740M User Manual
Page 66
Section 3 - Conguration
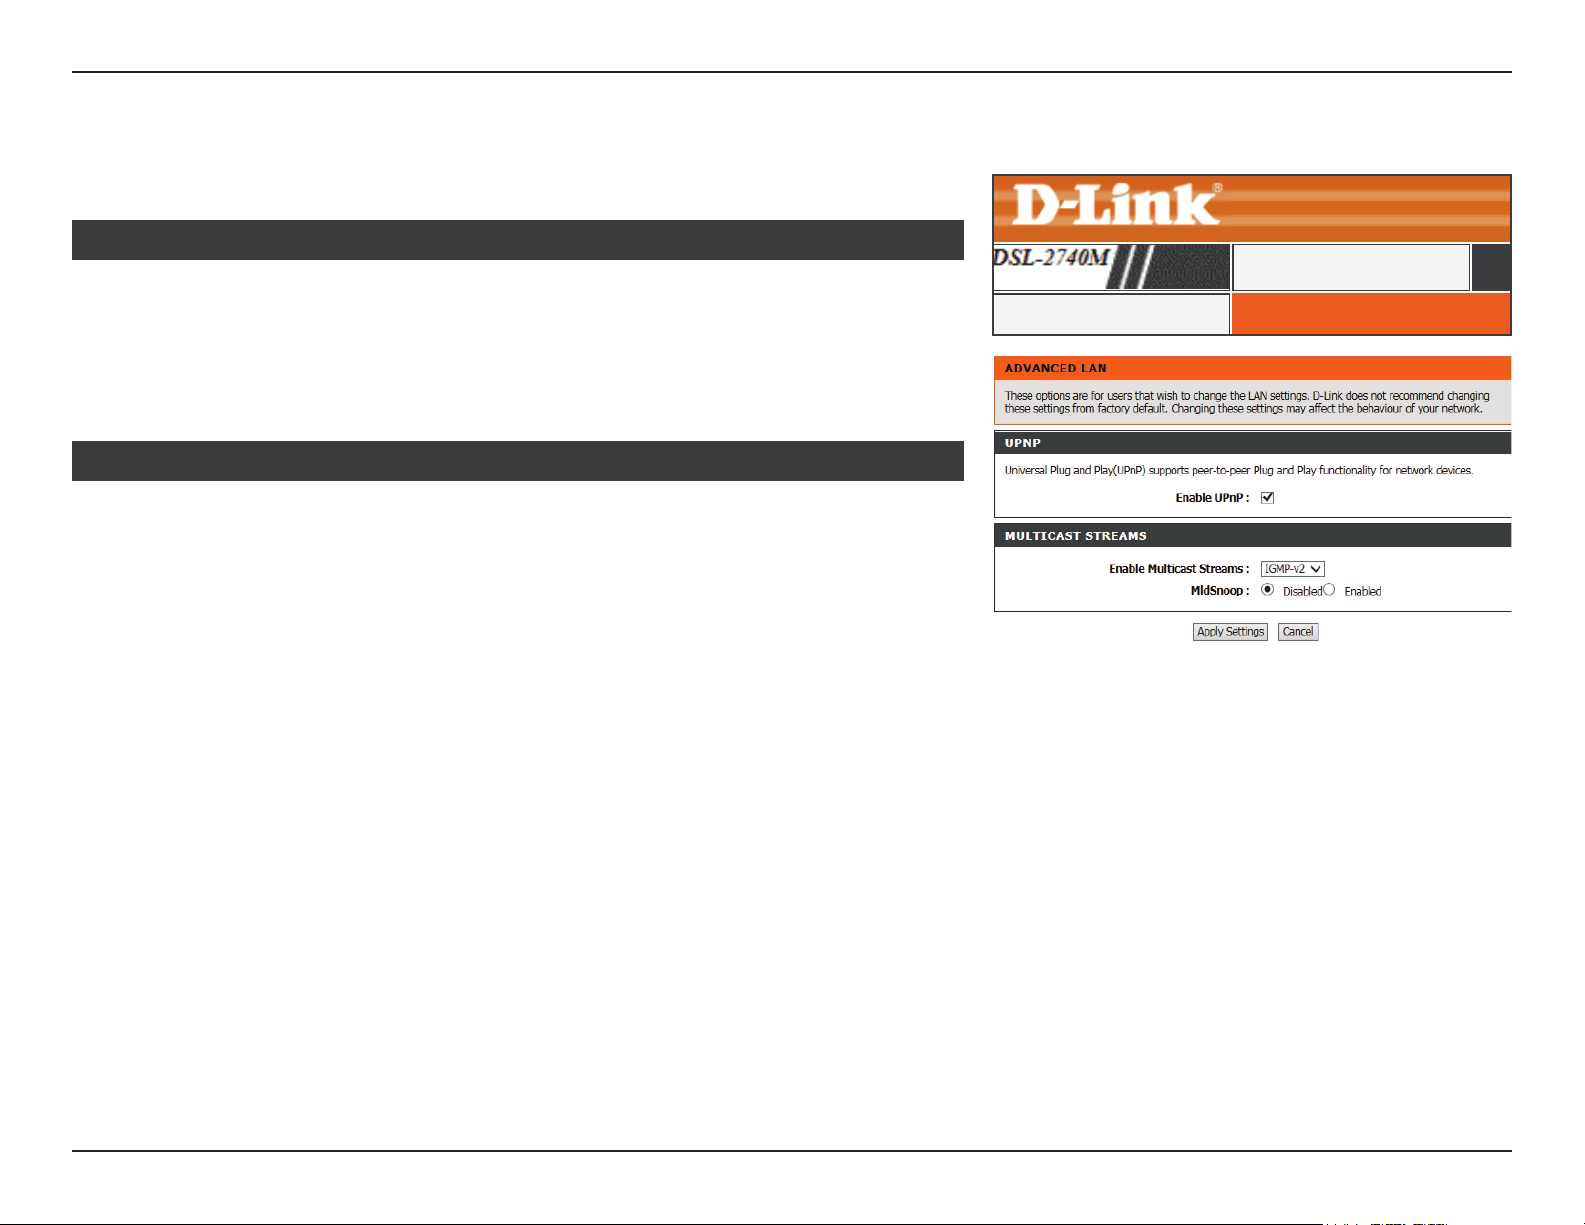
Advanced LAN
Click Advanced LAN on the navigation menu to congure UPNP and Multicast streams.
UPNP SETUP
Enable UPnP: Enable or disable UPnP. UPnP helps to automatically configure
software and devices on your network to access the resources they
require.
Click Apply when you are done.
MULTICAST STREAMS
Enable IGMP: Check this box to enable IGMP. Enabling this option allows the router
to listen for Internet Group Management Protocol (IGMP) trac, which
can help to detect clients which require multicast streams.
ADVANCED
ADVANCED LANAdvanced LAN
Click Apply Settings when you are done.
62D-Link DSL-2740M User Manual
Page 67
Section 3 - Conguration
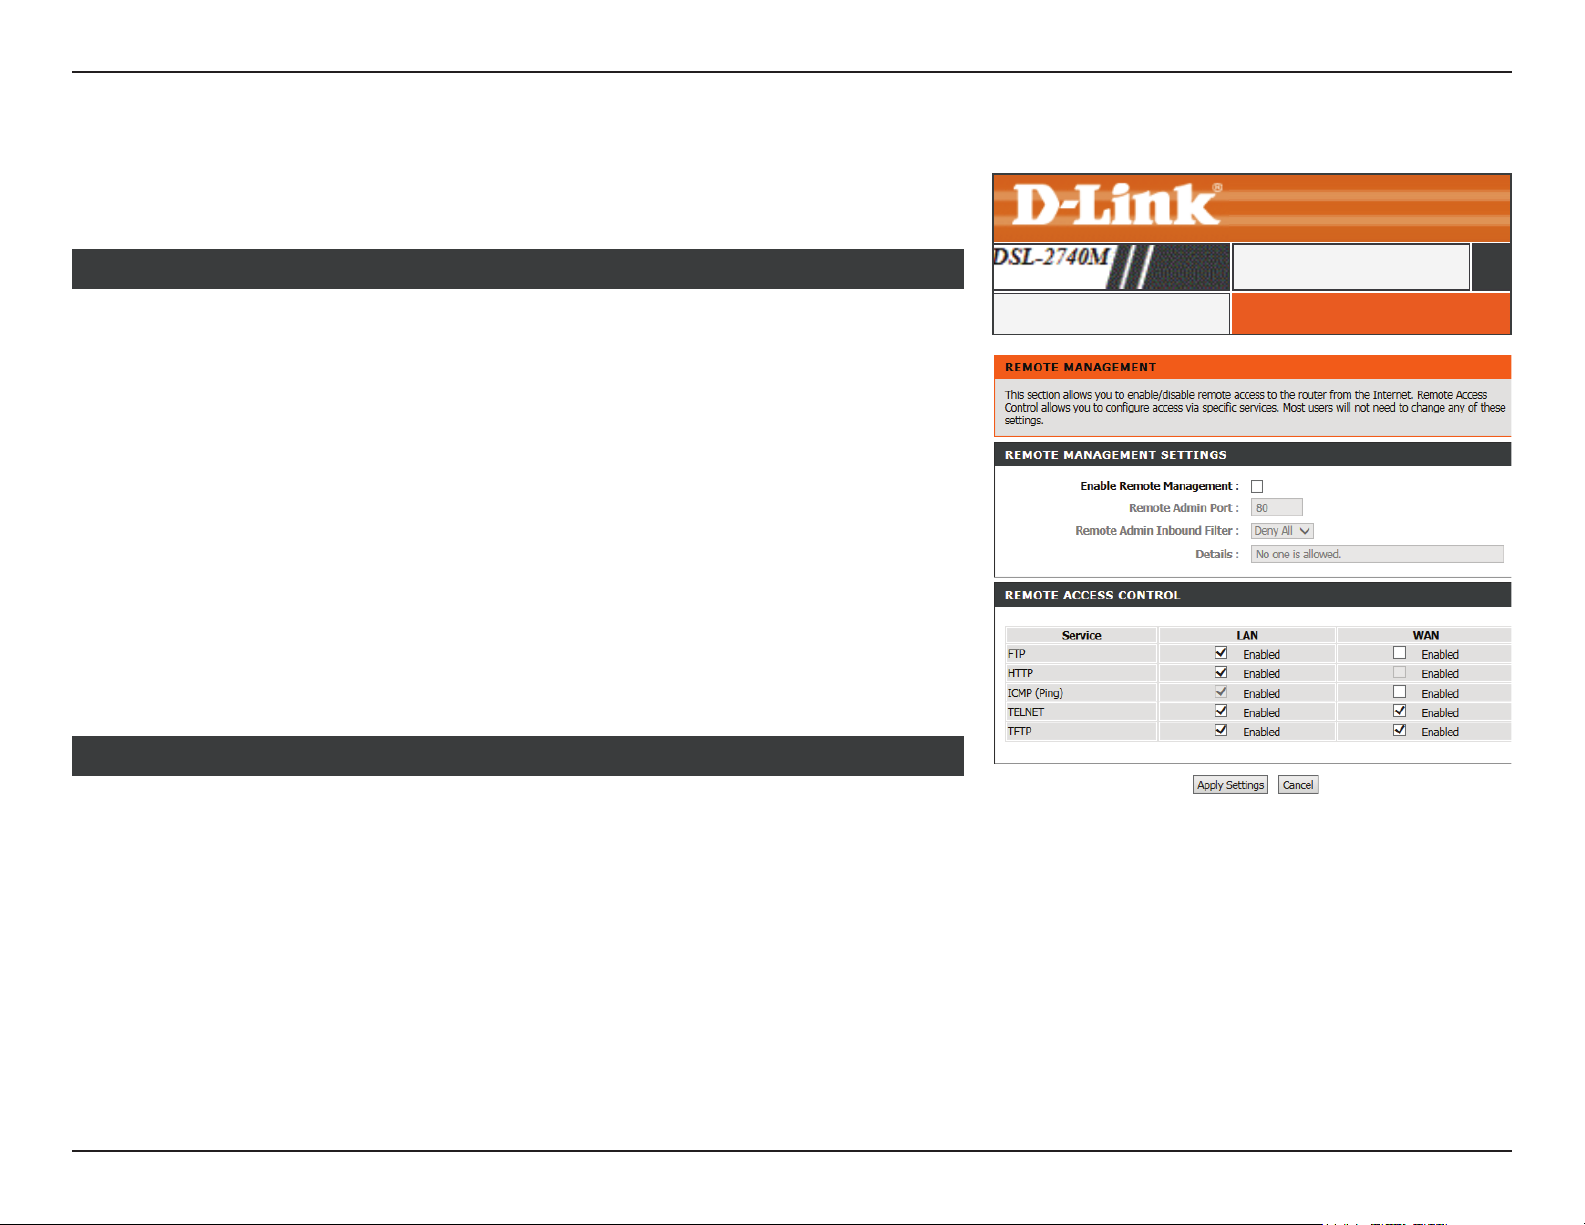
Remote Management
Click Remote Management on the navigation menu to congure the remote management
options.
REMOTE MANAGEMENT SETTINGS
Enable Remote
Management:
Remote Admin
Remote Admin
Inbound Filter:
Details: The current status of the Remote Administration Inbound lter is
Remote management allows the DSL-2740M to be congured from
the Internet by a web browser. A password is still required to access
the web management interface.
Enter the port number you wish to use to access the DSL-2740M’s
Port:
web conguration utility. Example: http://x.x.x.x:8080 where x.x.x.x
is the Internet IP address of the DSL-2740M and 8080 is the port used
for the web management interface.
You may select an inbound lter from the drop down menu to restrict
or allow remote administration.
displayed here.
REMOTE ACCESS CONTROL
You may select or deslect the services you wish to be available on the LAN and WAN from
this section of the web conguration utility.
ADVANCED
REMOTE MANAGEMENTRemote Management
Click the Apply Settings button when you are nished.
63D-Link DSL-2740M User Manual
Page 68
Section 3 - Conguration
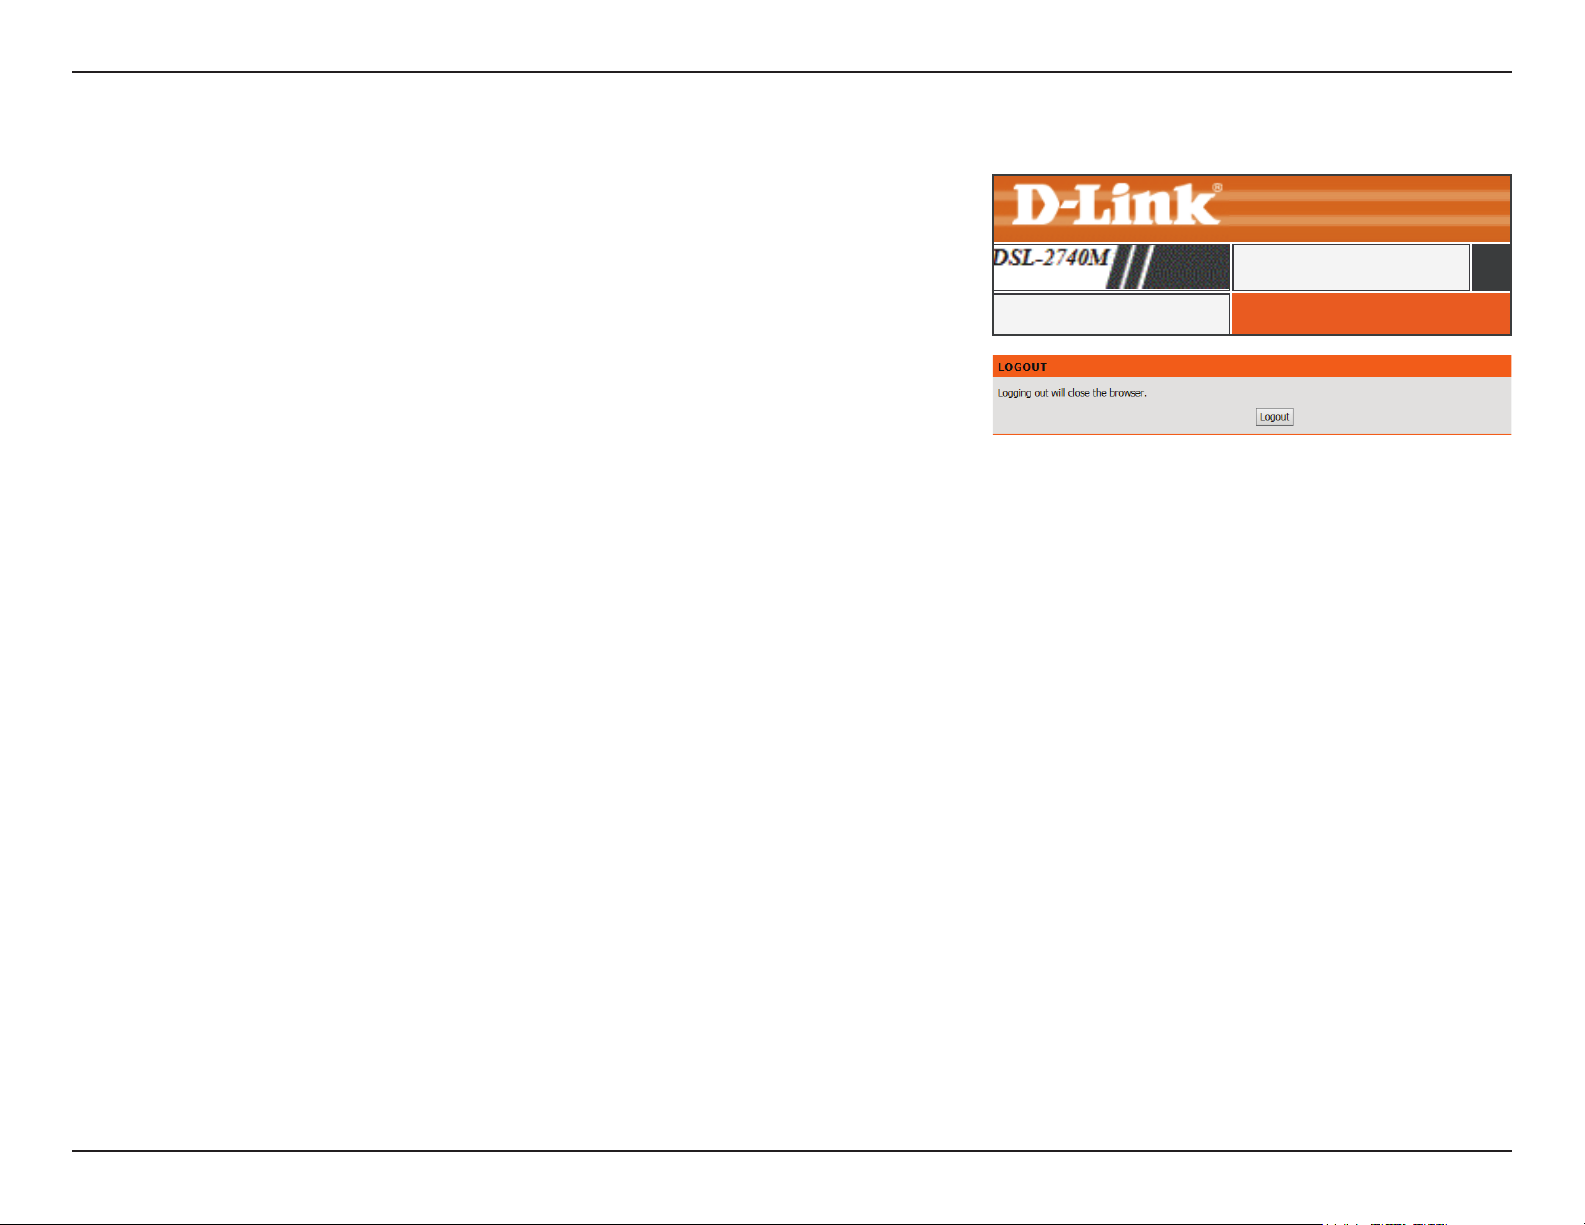
Click Logout when you are done conguring your router.
Logout
ADVANCED
LOGOUTLogout
64D-Link DSL-2740M User Manual
Page 69
Section 3 - Conguration
Maintenance
The Maintenance tab provides access to administration related settings of your DSL-2740M.
SETUP ADVANCED MAINTENANCE STATUS HELP
Password
Save/Restore Settings
Diagnostics
System Log
Logout
Reboot
To return to this Web UI Table of Contents page, simply click the D-Link logo on the top
To return to this Web UI Table of Contents page, simply click the D-Link logo on the top
right of each page.
right of each page.
SETUP
SETUP
ADSL SETUPADSL SETUP
ADSL SETUPADSL Setup
65D-Link DSL-2740M User Manual
Page 70
Section 3 - Conguration
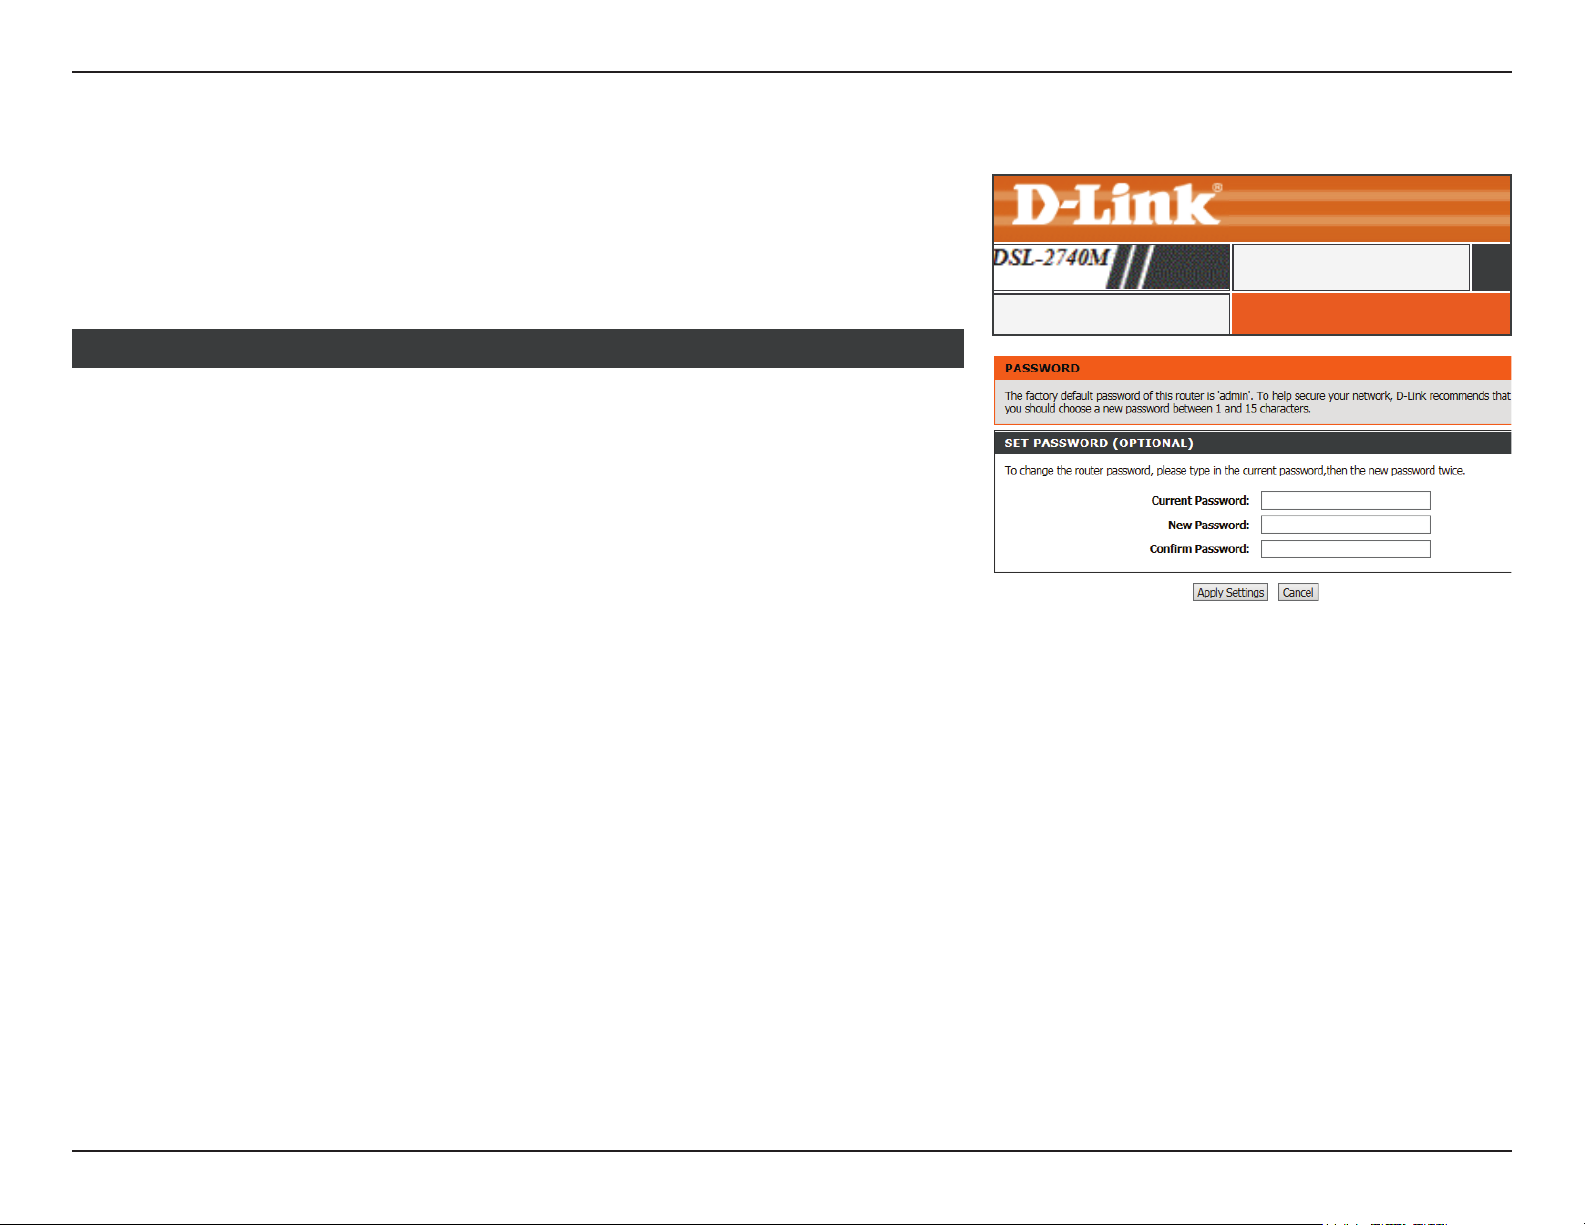
Password
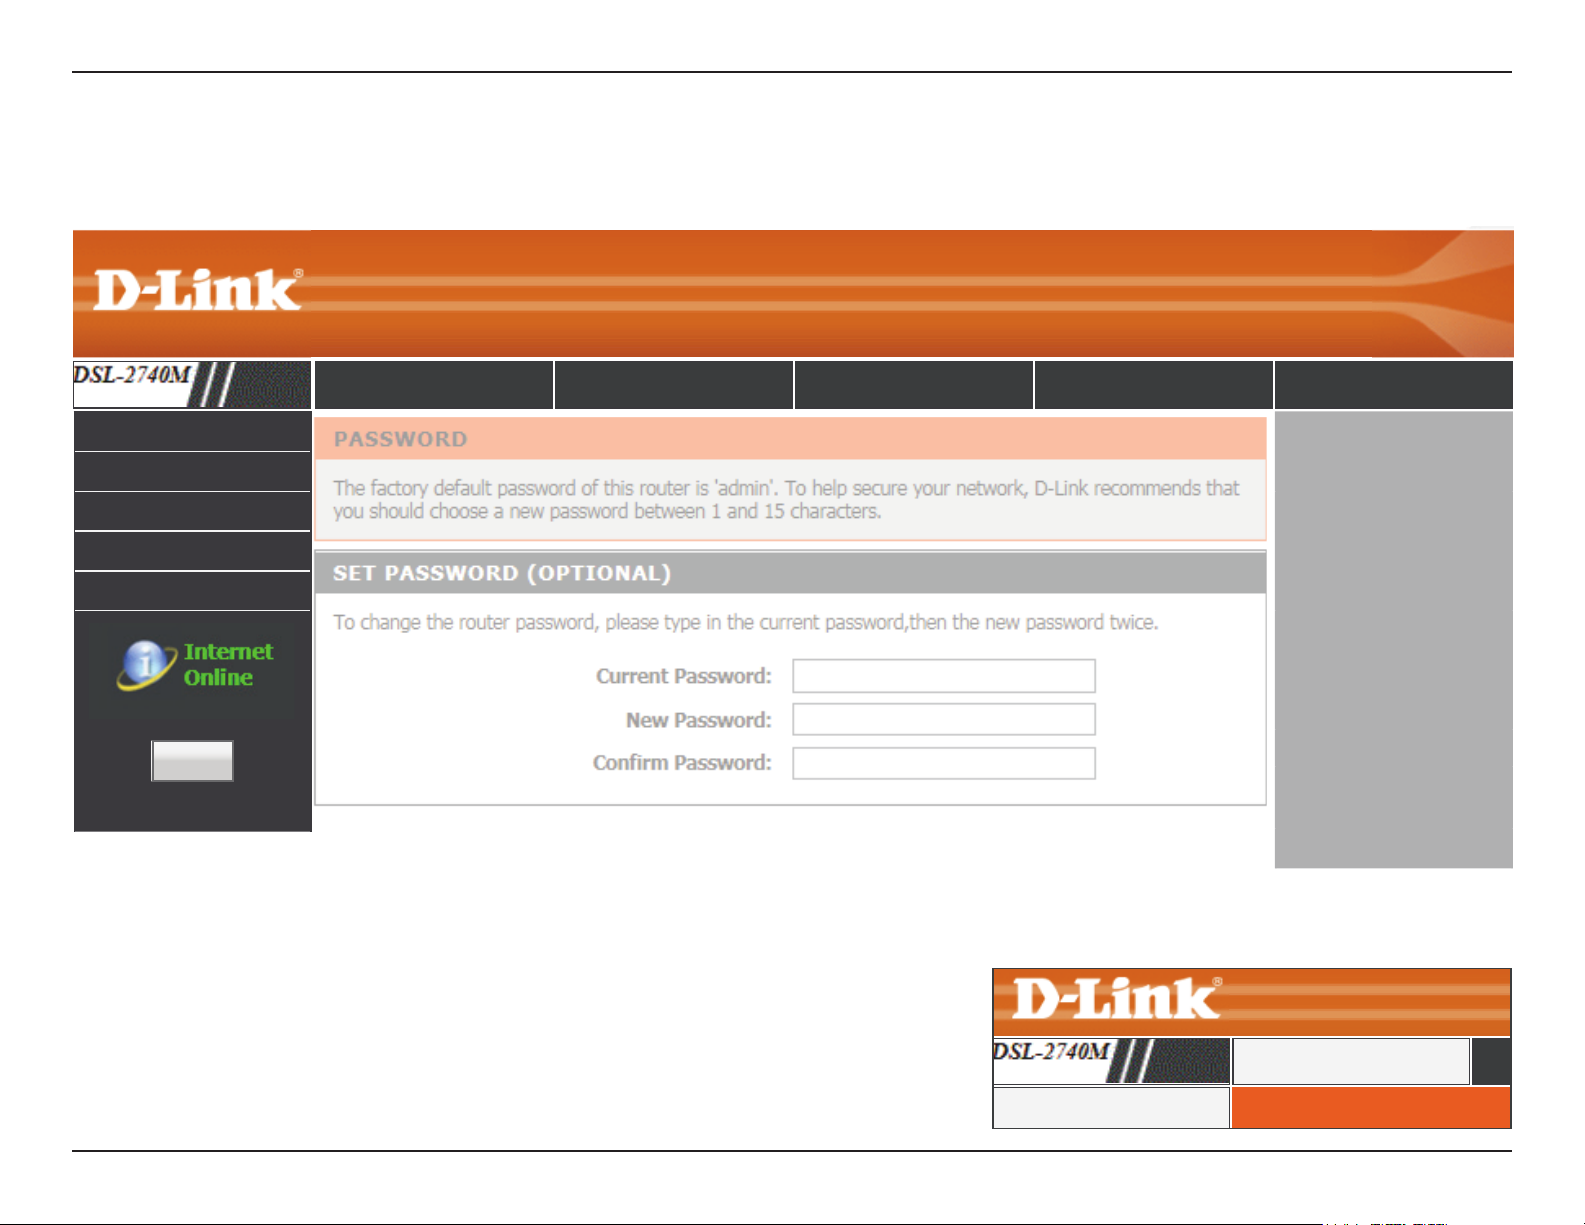
The Password section enables you to manage the router password. You should change
the default admin password to secure your network. Ensure that you remember the new
password or write it down and keep it in a safe and separate location for future reference.
If you forget the password, you will need to reset the device to the factory default settings
and all conguration settings of the device will be lost.
SET PASSWORD OPTIONAL
Current Password: Enter the current password.
New Password: Enter the new password.
Conrm Password: Re-enter the new password.
Click Apply Settings to have your changes take eect.
MAINTENANCE
PASSWORDPassword
66D-Link DSL-2740M User Manual
Page 71
Section 3 - Conguration
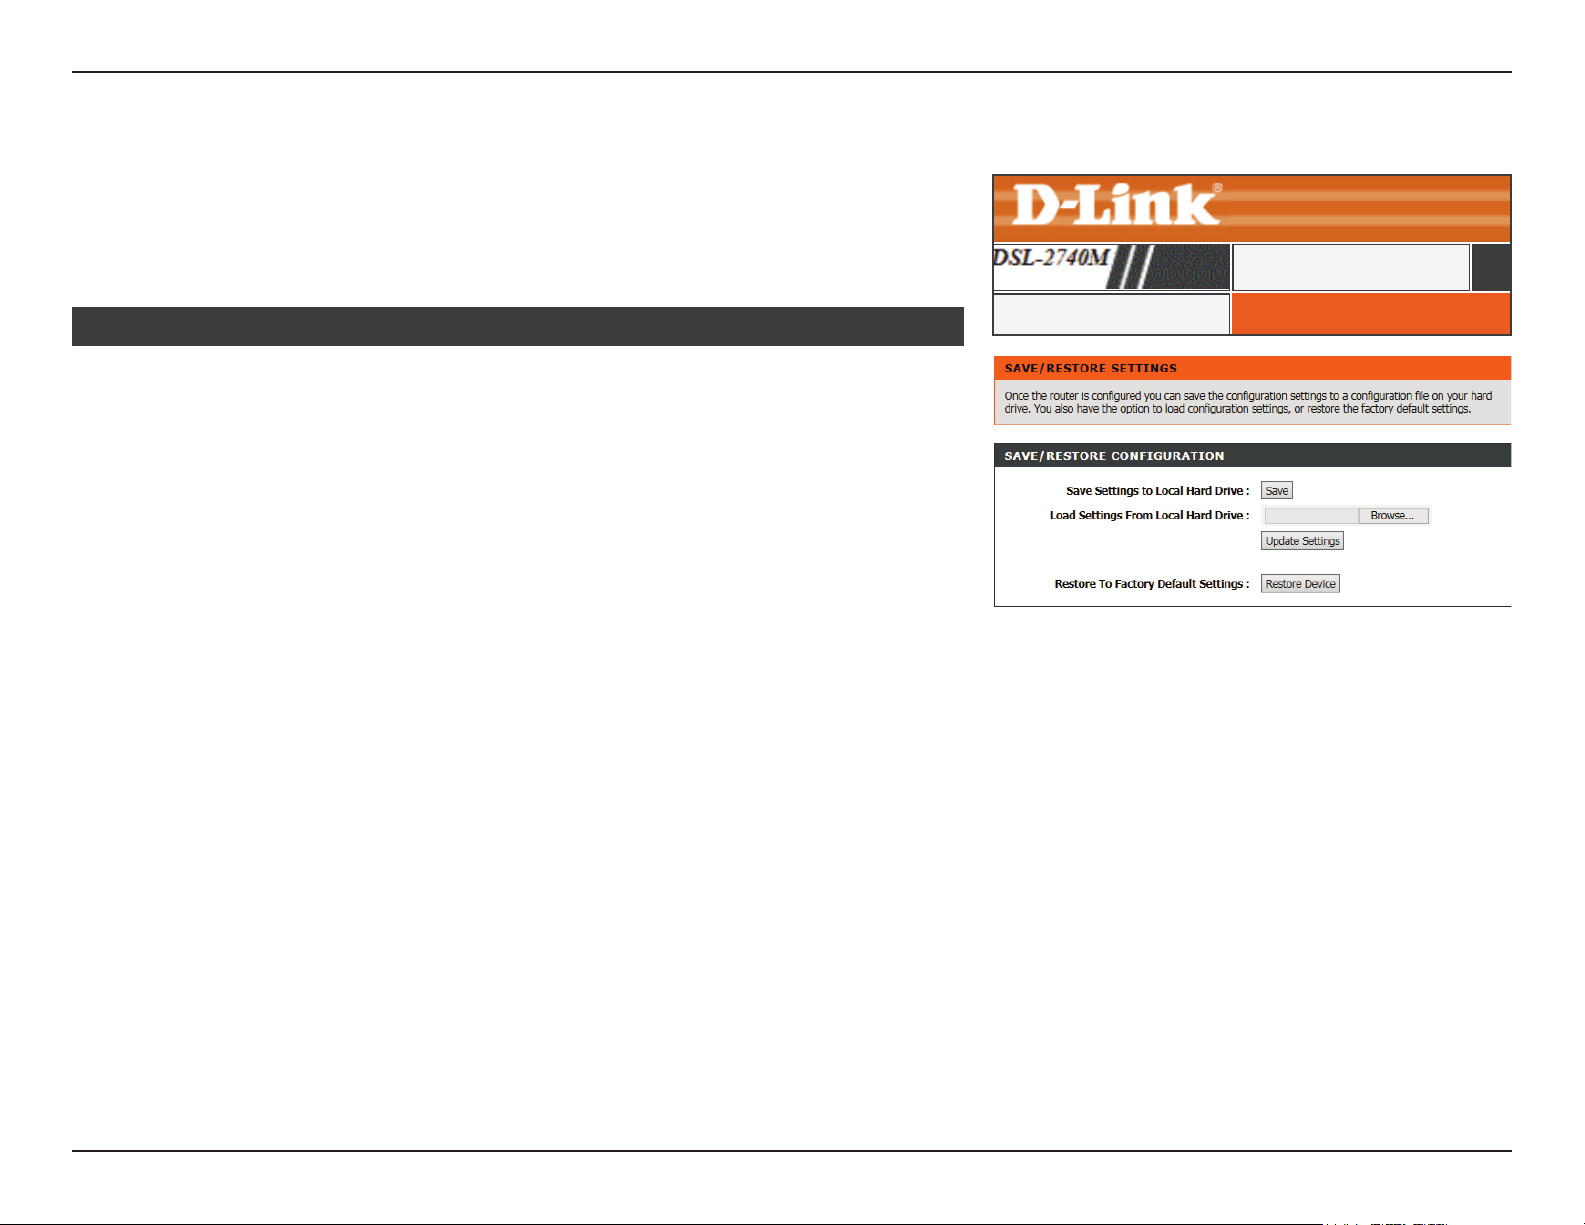
Save/Restore Settings
Click System on the navigation menu to congure the system settings. This section allows
you to manage the router’s conguration settings, reboot the router, and restore the router
to the factory default settings. Restoring the unit to the factory default settings will erase
all settings, including any rules that you’ve created.
MAINTENANCE
Save Settings To
Local Hard Drive:
Load Settings From
Local Hard Drive:
Restore To Factory
Default Settings:
SAVE AND RESTORE SETTINGS
SAVE/RESTORE SETTINGSSave/Restore Settings
Use this option to save the current router conguration settings to
a le on the hard disk of the computer you are using. Click the Save
button. A le dialog will appear, allowing you to select a location and
le name for the settings.
Use this option to load previously saved router conguration settings.
Use the Browse option to nd a previously saved conguration
settings le and then click the Update Settings button to transfer
those settings to the router.
This option will restore all conguration settings back to the settings
that were in eect at the time the router was shipped from the factory.
Any settings that have not been saved will be lost, including any
rules that you have created. If you want to save the current router
conguration settings, use the Save button above.
67D-Link DSL-2740M User Manual
Page 72
Section 3 - Conguration
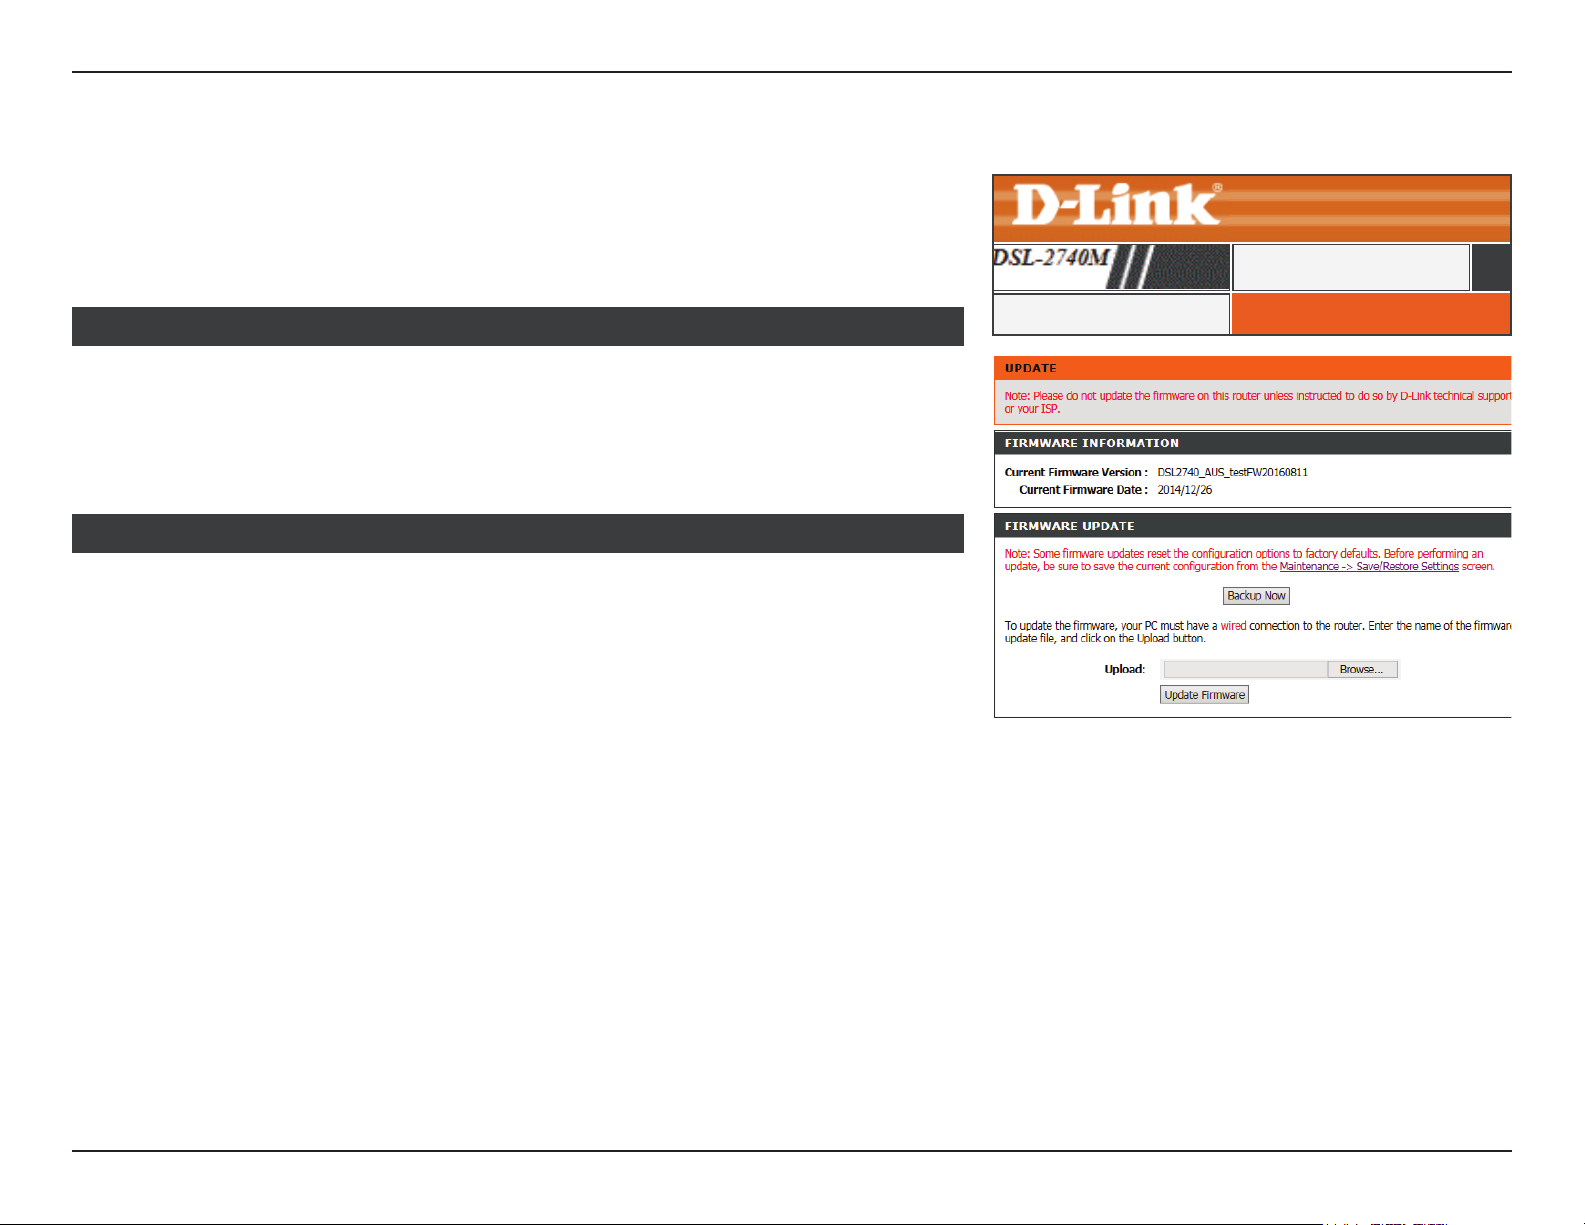
Firmware Update
You can upgrade the rmware of the access point here. Please check the D-Link support
website for rmware updates at http://support.dlink.com. You can download rmware
upgrades to your hard drive from this site. Make sure the rmware you want to use is on
the local hard drive of your computer.
MAINTENANCE
FIRMWARE INFORMATION
Current Firmware
Version:
Current Firmware
Date:
This eld displays information about the current rmware.
This eld displays the date of the current rmware.
FIRMWARE UPDATE
Click the Backup Now button to save the current conguration.
Upload: Click Browse to locate the rmware le required.
Click Update Firmware to upload and install the selected rmware.
UPDATEFirmware Update
68D-Link DSL-2740M User Manual
Page 73
Section 3 - Conguration
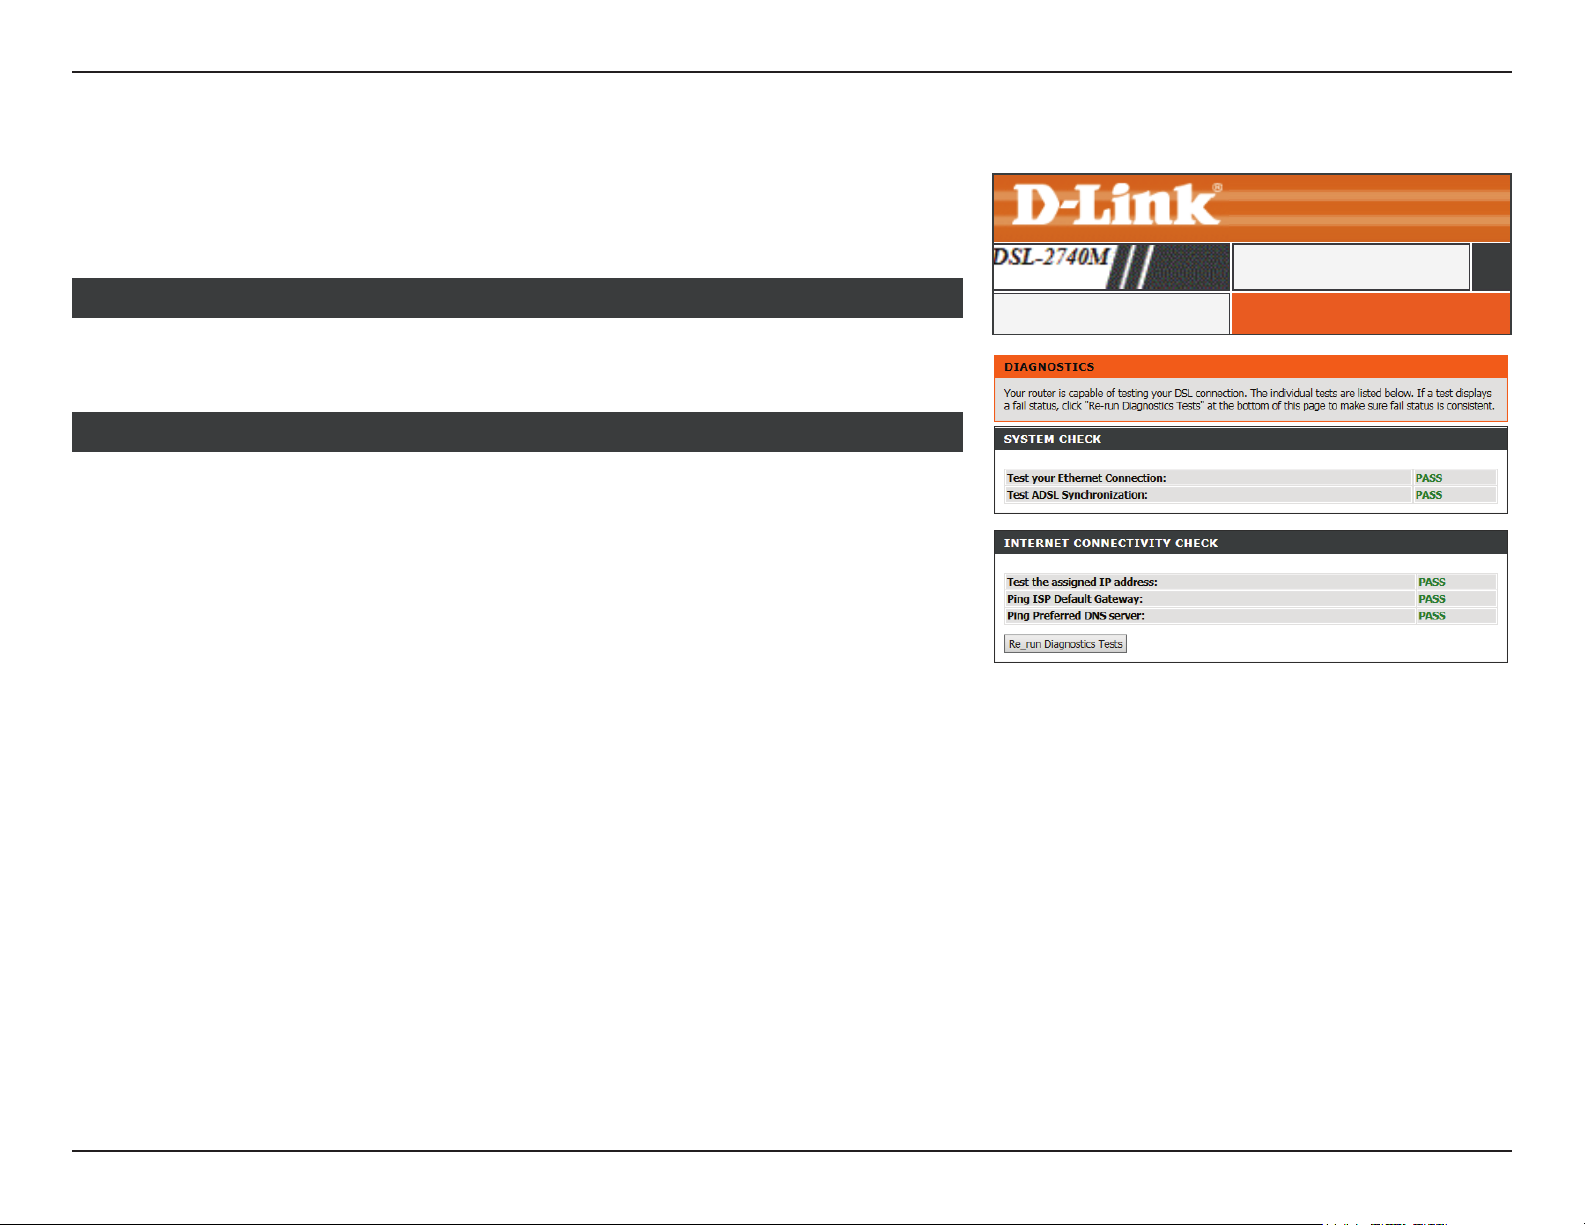
Diagnostics
This page is used to test the connection to your local network, the connection to your DSL
service provider, and the connection to your Internet service provider. Tests run automatically
when this page is loaded.
MAINTENANCE
SYSTEM CHECK
This section displays the results of your Ethernet connection and ADSL connection check.
INTERNET CONNECTIVITY CHECK
This section displays the results of the Internet connectivity check. Click Re_run Diagnostics
Tests to test them again.
DIAGNOSTICSDiagnostics
69D-Link DSL-2740M User Manual
Page 74
Section 3 - Conguration
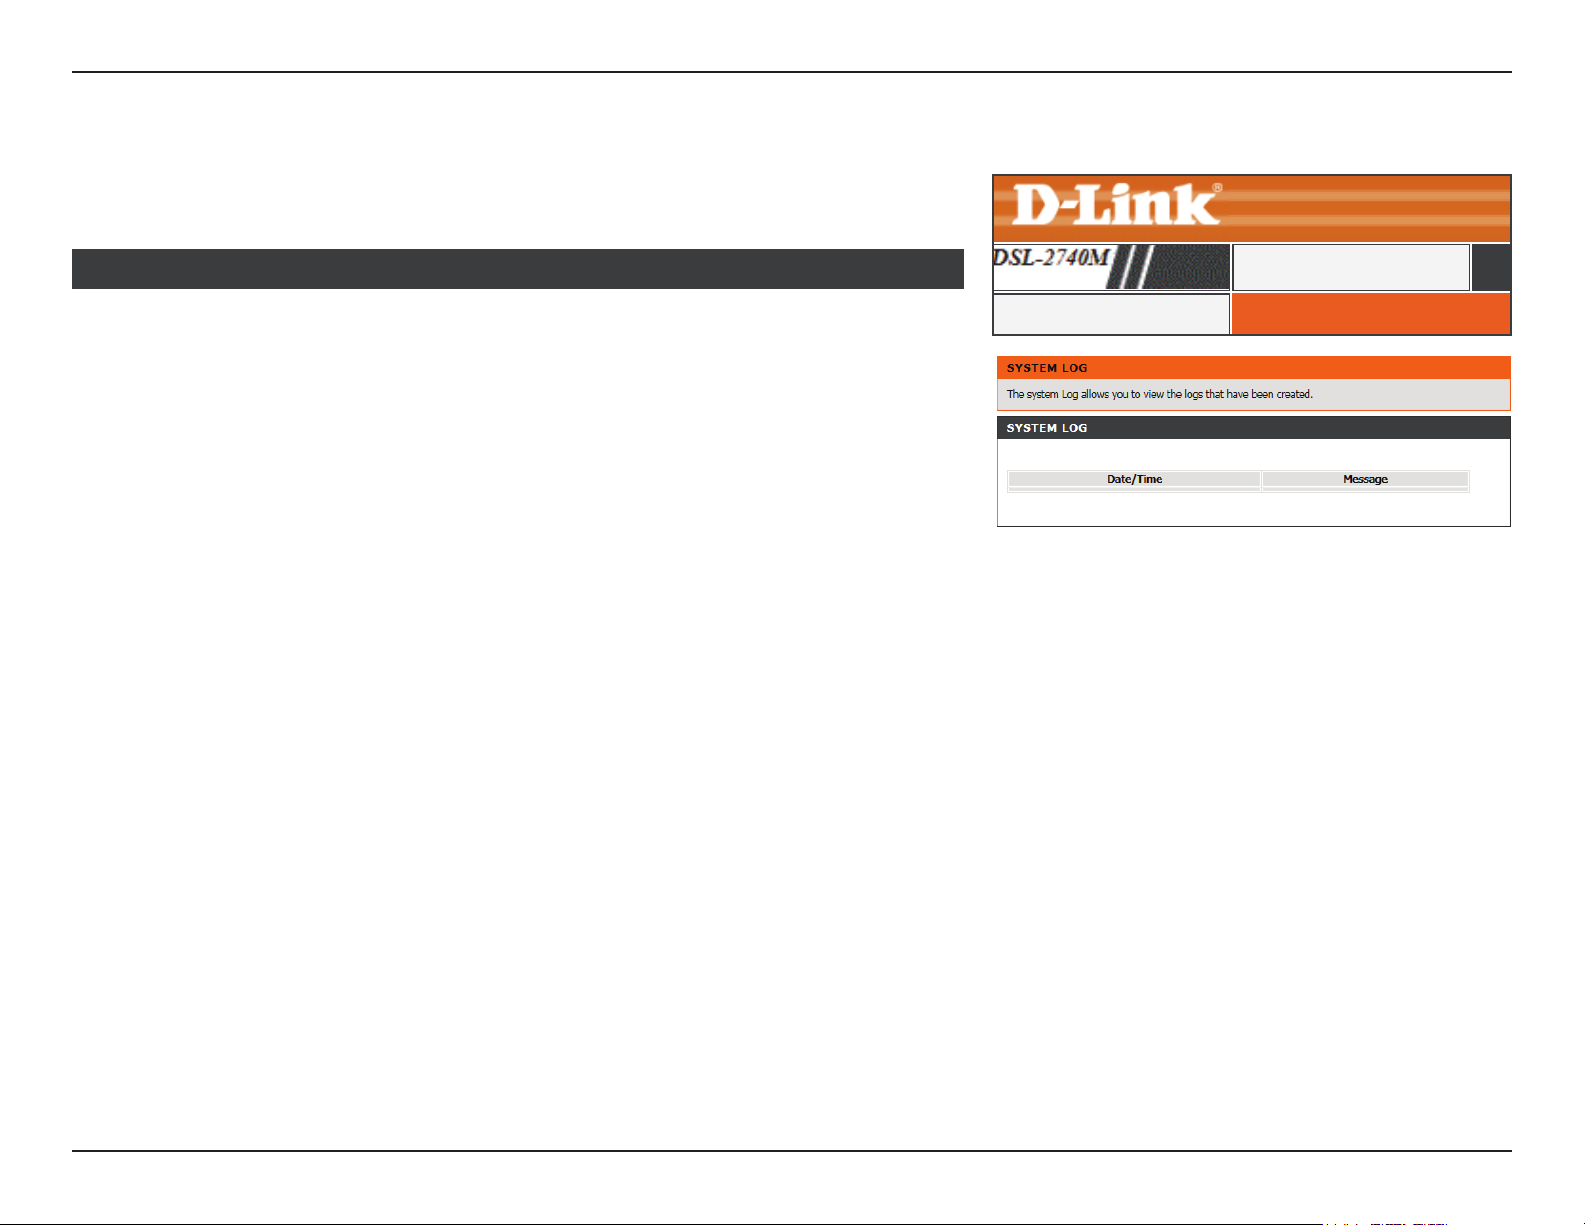
System Log
The DSL-2740M keeps a running log of events and network activities passing through the
router. If the device is rebooted, the logs are reset.
SYSTEM LOG
The router automatically logs (records) events in its internal memory. If there isn’t enough
internal memory for all events, logs of older events are deleted to make room for new events.
MAINTENANCE
SYSTEM LOGSystem Log
70D-Link DSL-2740M User Manual
Page 75
Section 3 - Conguration
Click Logout when you are done conguring your router.
Logout
MAINTENANCE
LOGOUTLogout
71D-Link DSL-2740M User Manual
Page 76
Section 3 - Conguration
Status
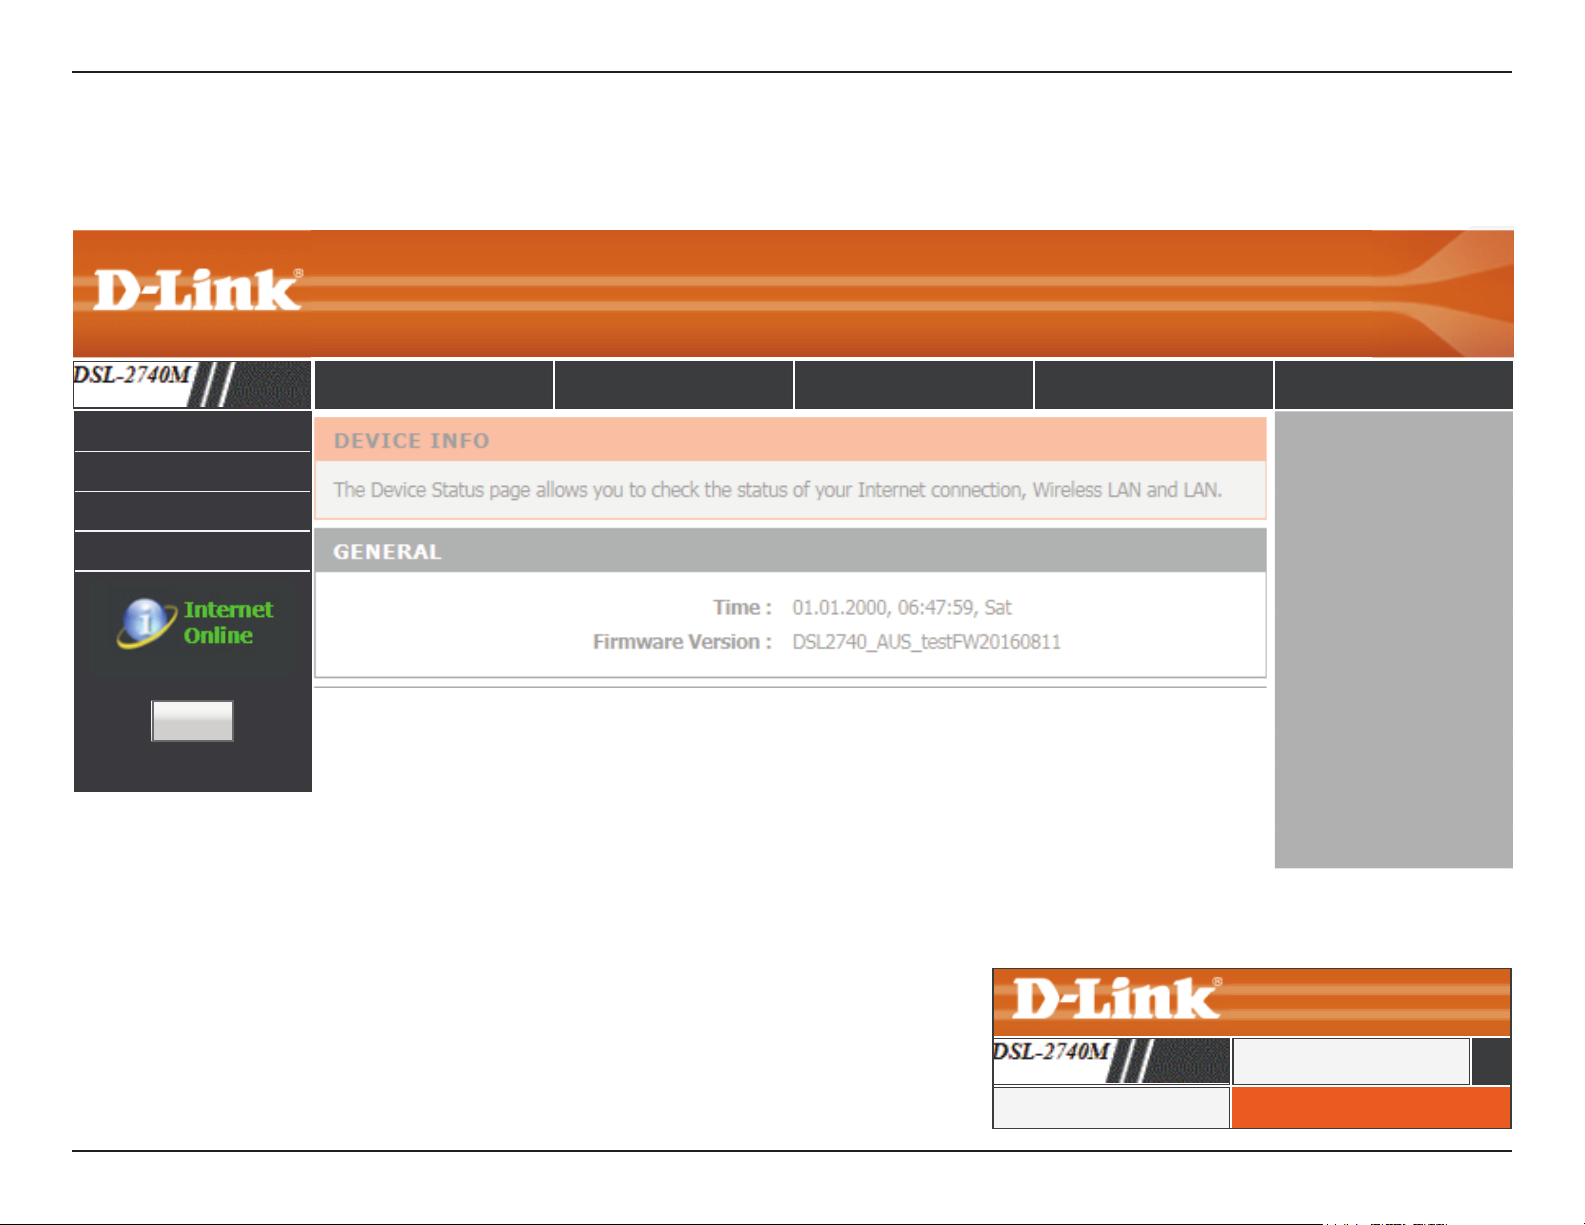
The Status tab provides information about the DSL-2740M’s current status.
SETUP ADVANCED MAINTENANCE STATUS HELP
Device Info
Connected Clients
Statistics
Logout
Reboot
To return to this Web UI Table of Contents page, simply click the D-Link logo on the top
To return to this Web UI Table of Contents page, simply click the D-Link logo on the top
right of each page.
right of each page.
SETUP
SETUP
ADSL SETUPADSL SETUP
ADSL SETUPADSL Setup
72D-Link DSL-2740M User Manual
Page 77
Section 3 - Conguration
Device Info
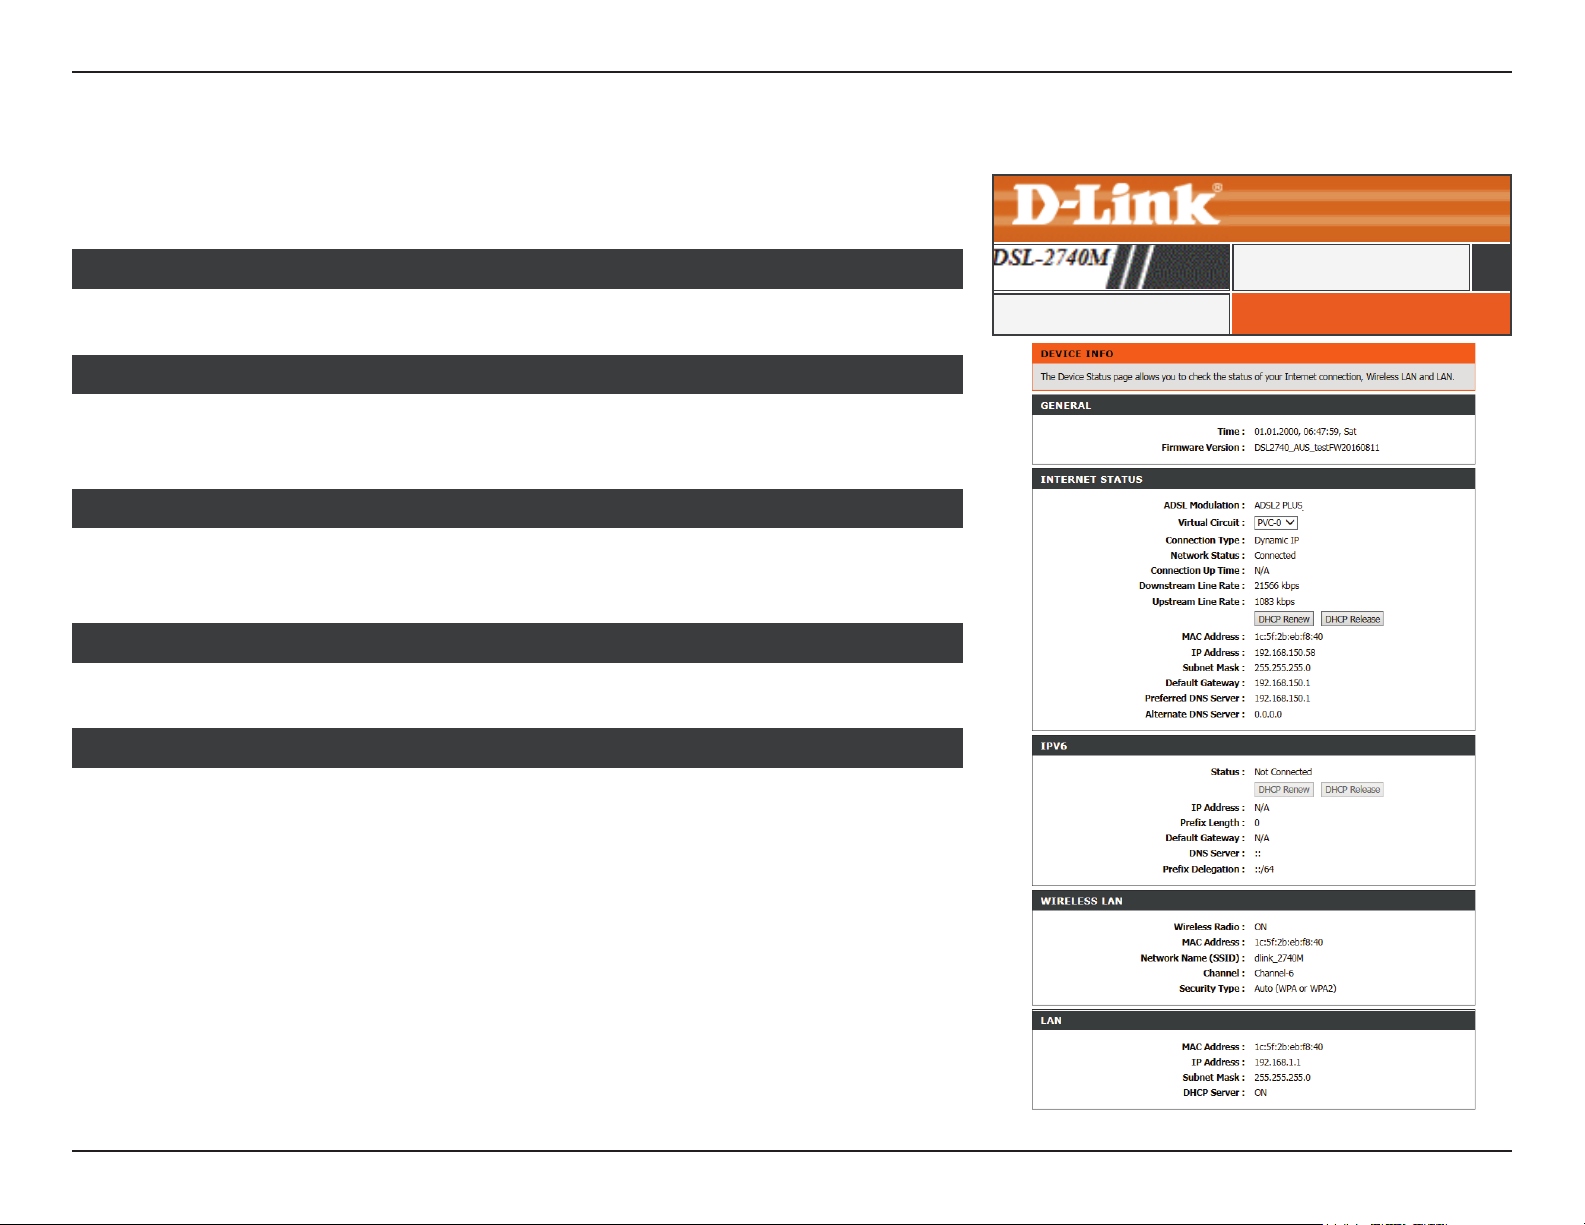
This page displays the current information for the DSL-2740M, such as LAN and wireless
LAN information and statistics.
GENERAL
This section displays a summary of the system settings.
INTERNET STATUS
This section displays the current Internet connection settings. If you are using a Dynamic
WAN IP address, you may renew or release it here.
IPV6
This section displays the current IPv6 connection settings. If you are using a Dynamic WAN
IP address, you may renew or release it here.
WIRELESS LAN
This section displays a summary of the wireless network settings.
LAN
This section displays a summary of the local network settings.
STATUS
DEVICE INFODevice Info
73D-Link DSL-2740M User Manual
Page 78
Section 3 - Conguration
Connected Clients
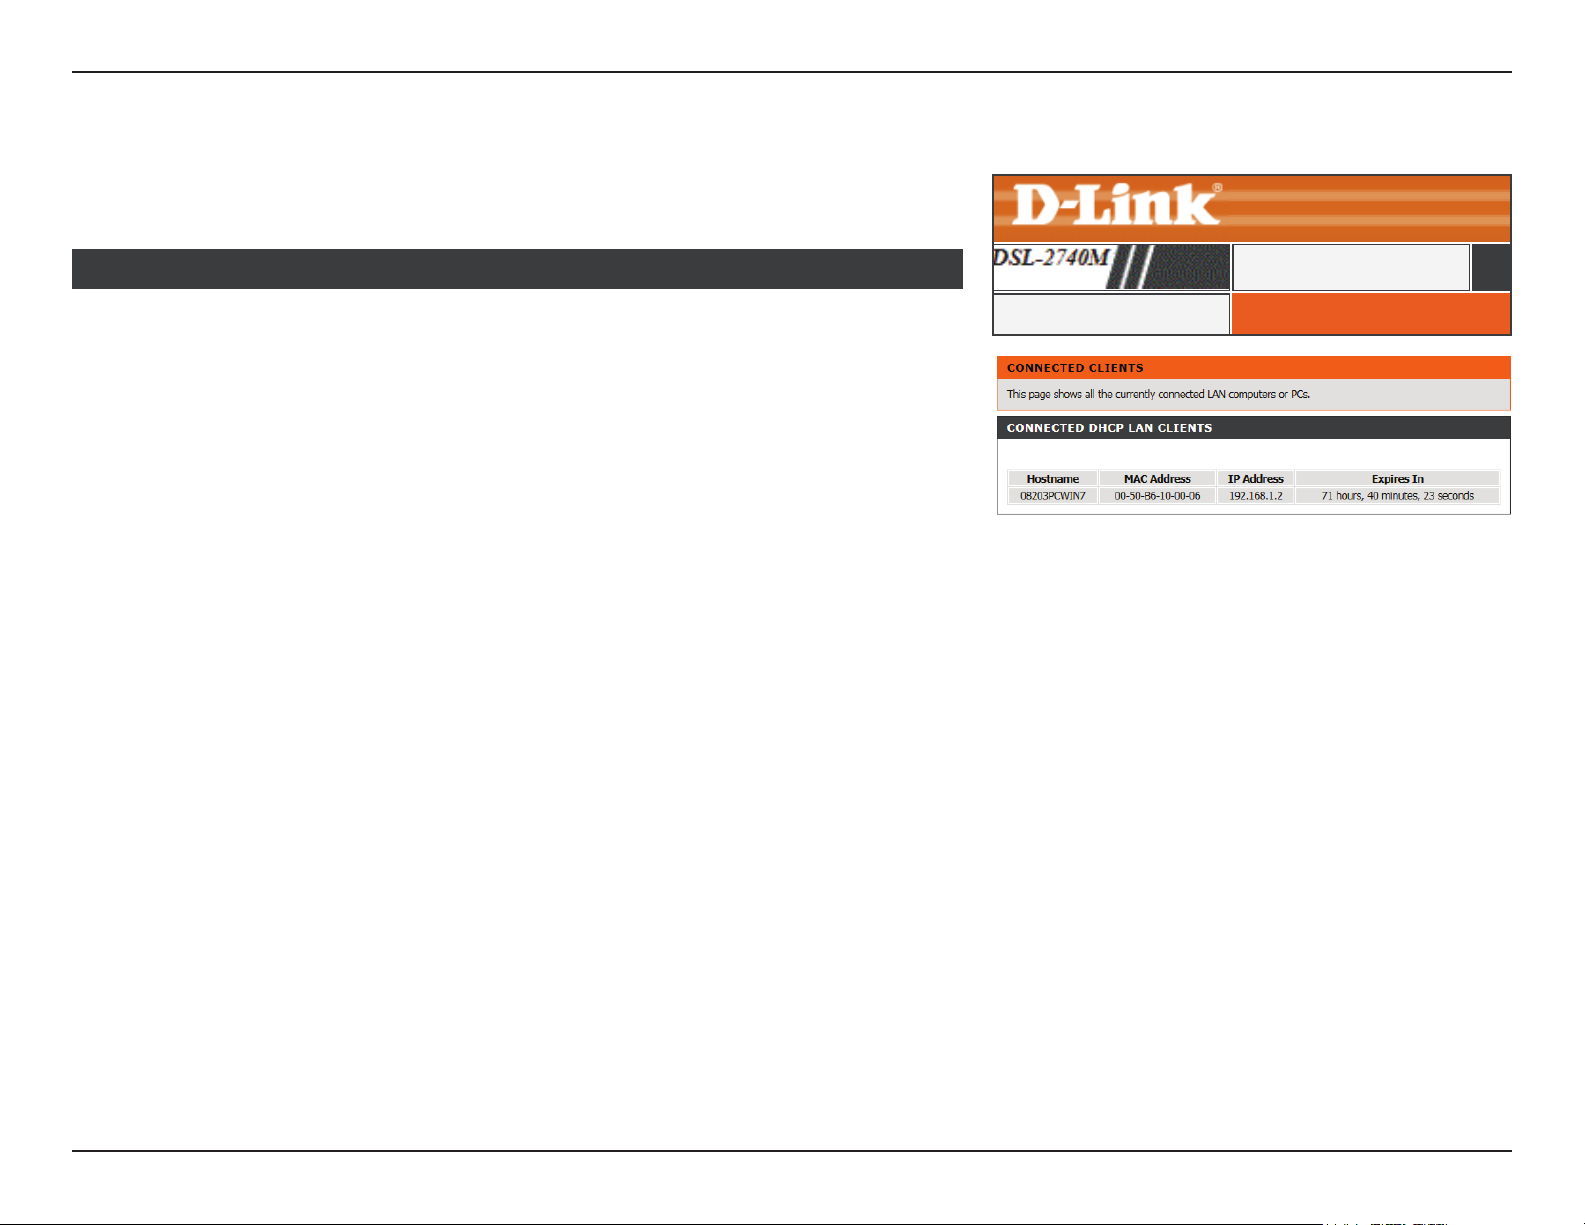
The DHCP Clients section allows you to view the clients that are connected to your router
using DCHP.
CONNECTED DHCP LAN CLIENTS
This section displays all of the currently connected DHCP clients. The Host Name, IP address,
MAC Address, and expiration time of each client is displayed in the table.
STATUS
CONNECTED CLIENTSConnected Clients
74D-Link DSL-2740M User Manual
Page 79
Section 3 - Conguration
Statistics
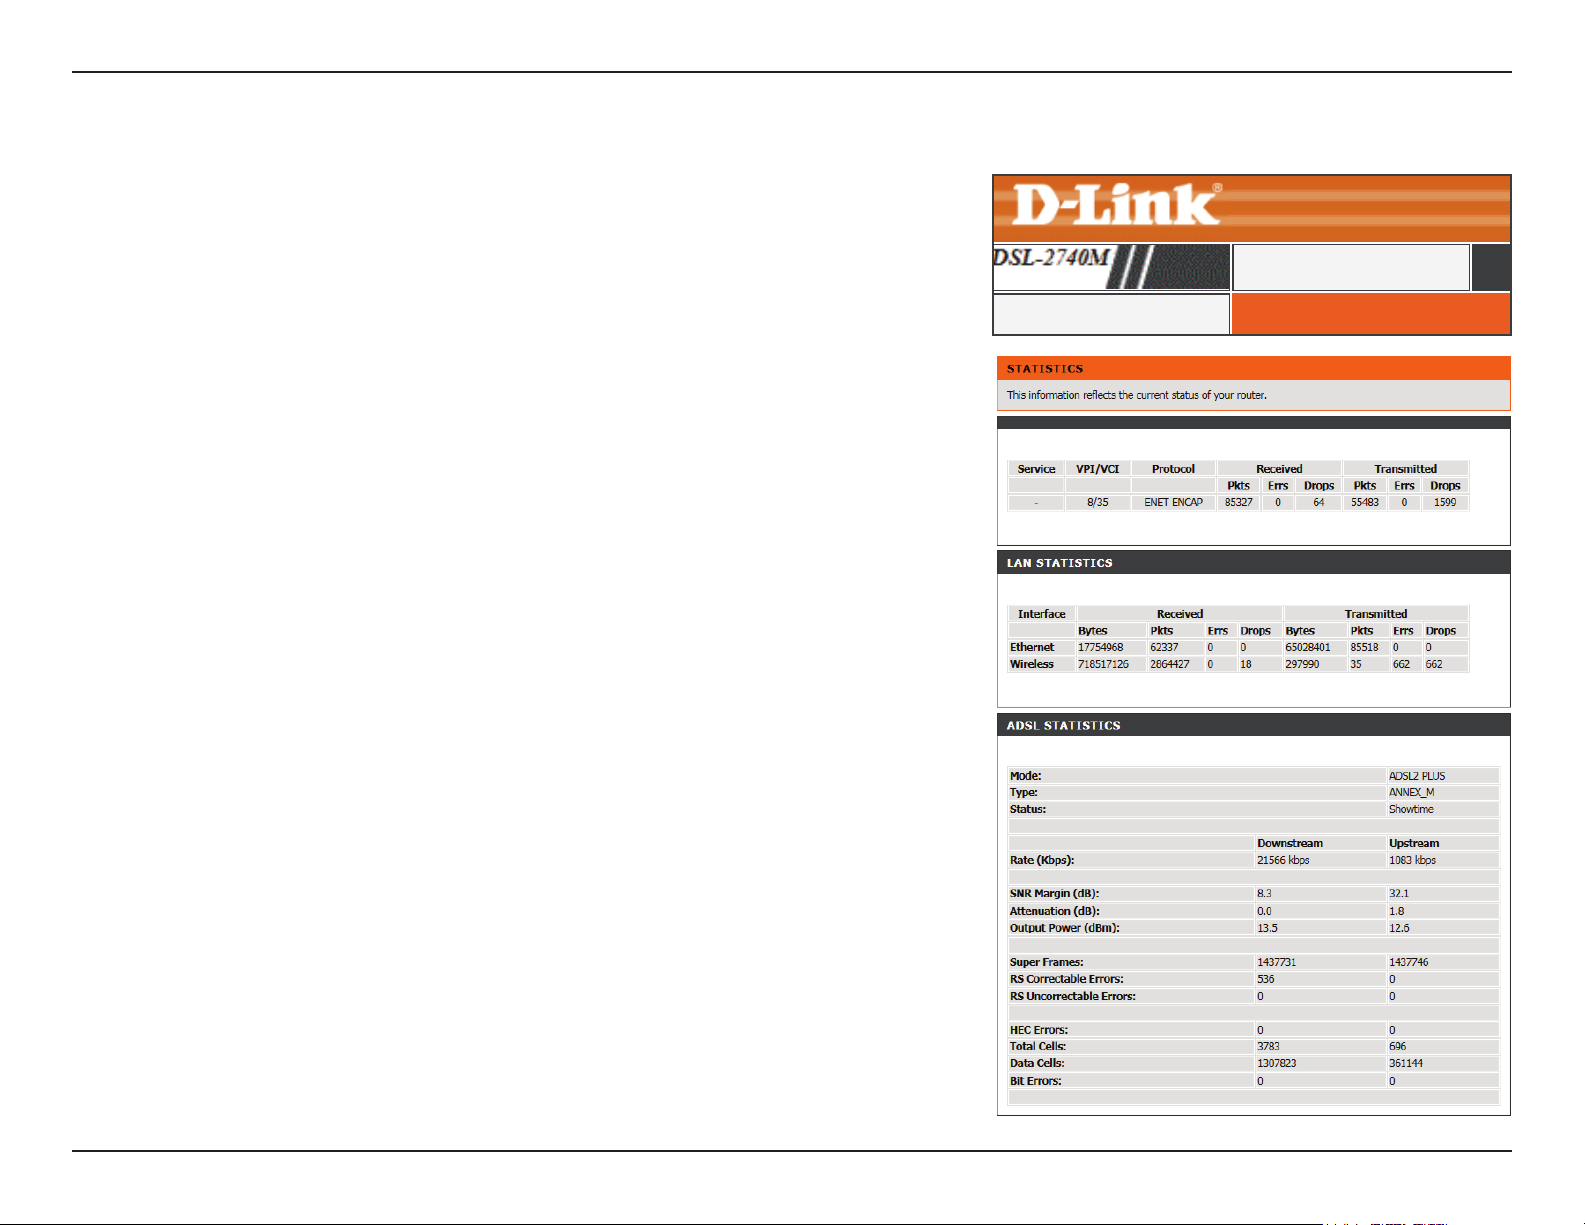
Click Statistics on the navigation menu to view statistics on the amount of trac which
has passed through the DSL-2740M. You can view the amount of packets that pass through
the LAN, ADSL, and wireless portions of the network. The trac counter is reset if the router
point is rebooted.
STATUS
STATISTICSStatistics
75D-Link DSL-2740M User Manual
Page 80
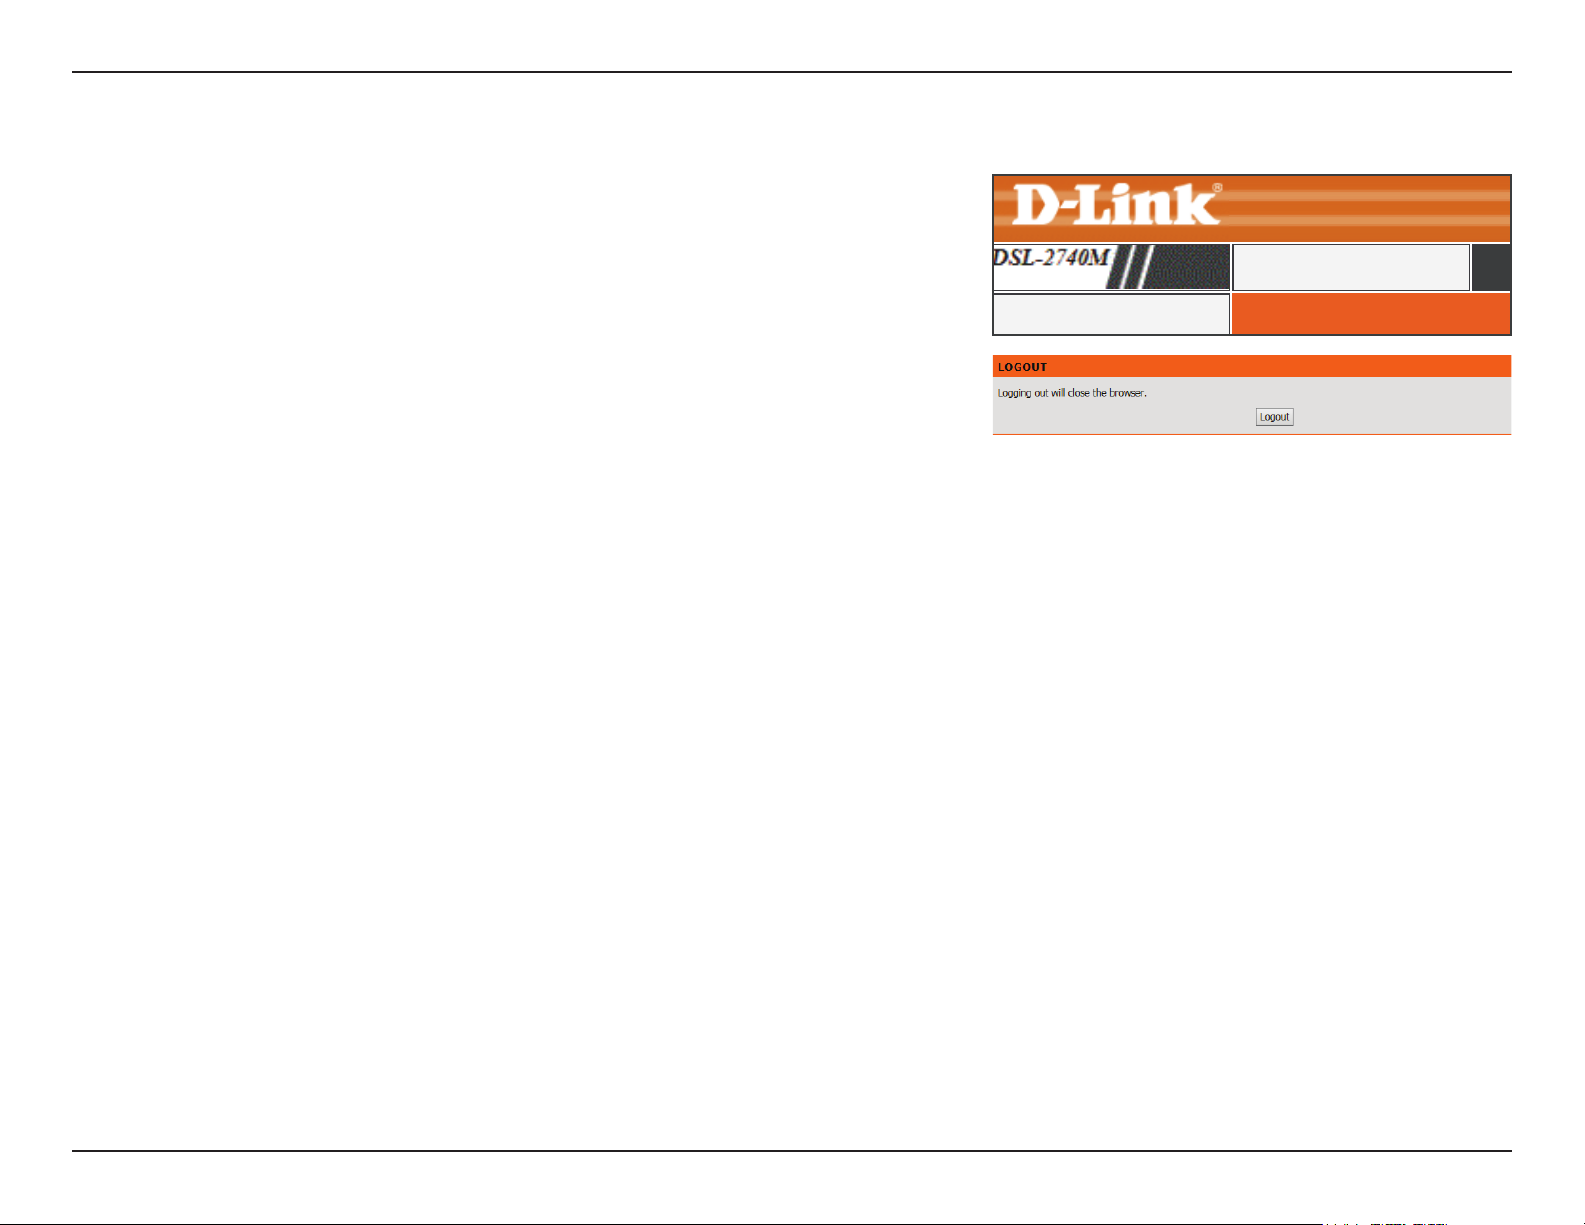
Section 3 - Conguration
Click Logout when you are done conguring your router.
Logout
STATUS
LOGOUTLogout
76D-Link DSL-2740M User Manual
Page 81
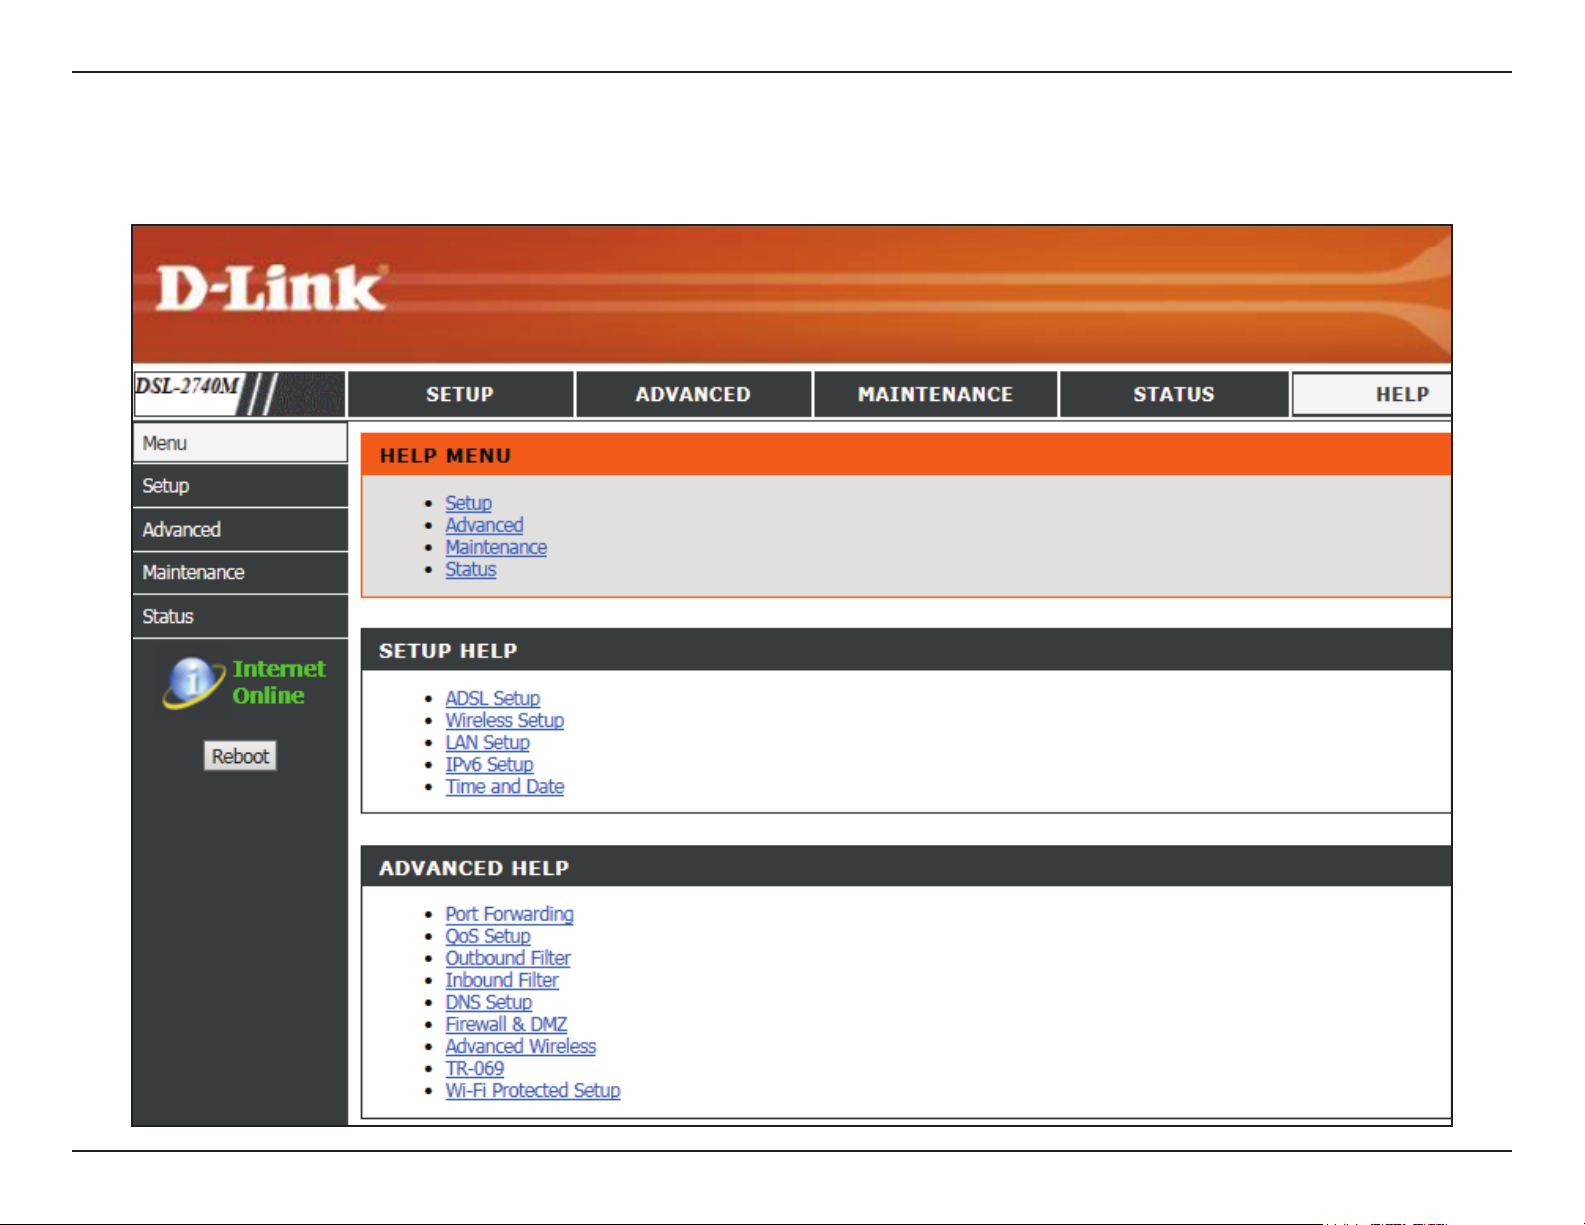
Section 3 - Conguration
The Help tab provides online help for the DSL-2740M.
Help
77D-Link DSL-2740M User Manual
Page 82
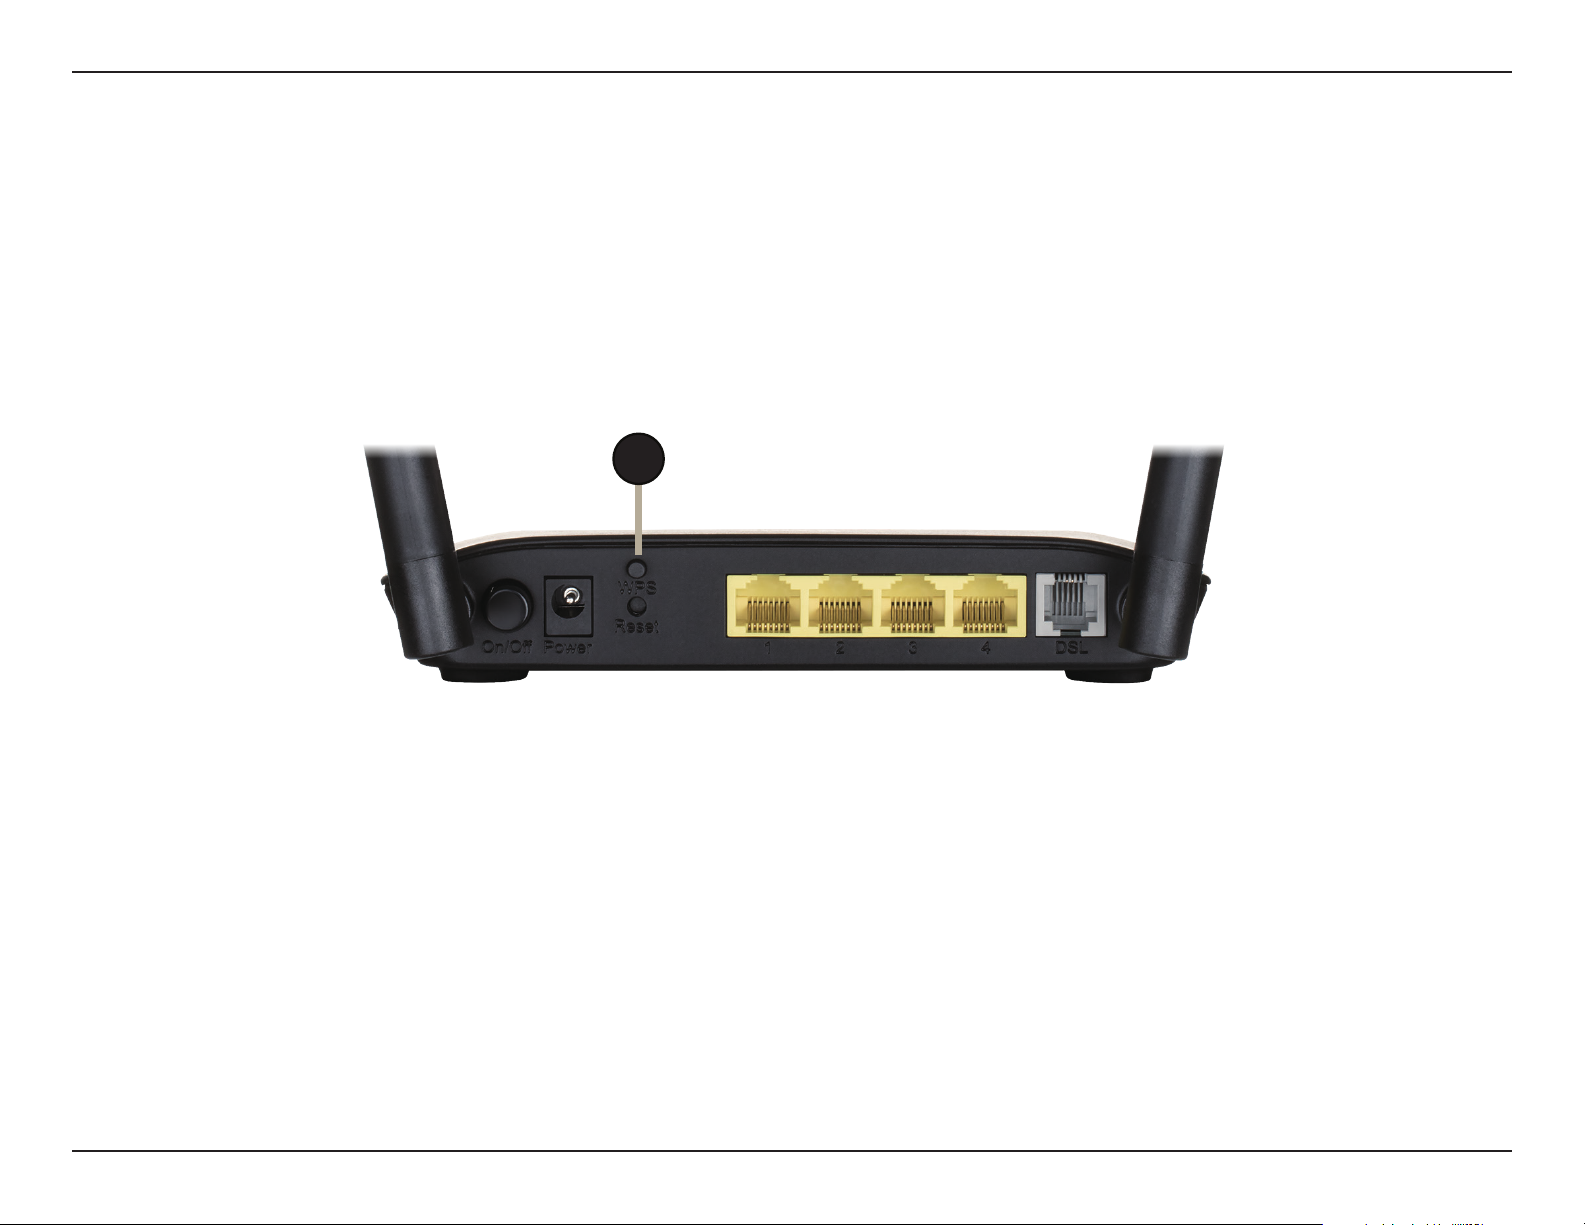
Section 4 - Connecting to a Wireless Network
Connecting to a Wireless Network
WPS Button
The easiest and most secure way to connect your wireless devices to the router is with WPS (Wi-Fi Protected Setup). Most wireless devices such as
wireless adapters, media players, Blu-ray DVD players, wireless printers, and cameras will have a WPS button (or a software utility with WPS) that
you can press to connect to the DSL-2740M router. Please refer to your user manual for the wireless device you want to connect to make sure you
understand how to enable WPS. Once you know, follow the steps below:
Step 1 - Press the WPS button on the DSL-2740M. The WPS LED on the front will start to blink.
1
Step 2 - Within 2 minutes, press the WPS button on your wireless device (or launch the software utility and start the WPS process).
Step 3 - Allow up to 1 minute for your connection to be congured. Once the WPS LED stops blinking, you will be connected and your wireless
connection will be secured with the currently set encryption type.
78D-Link DSL-2740M User Manual
Page 83
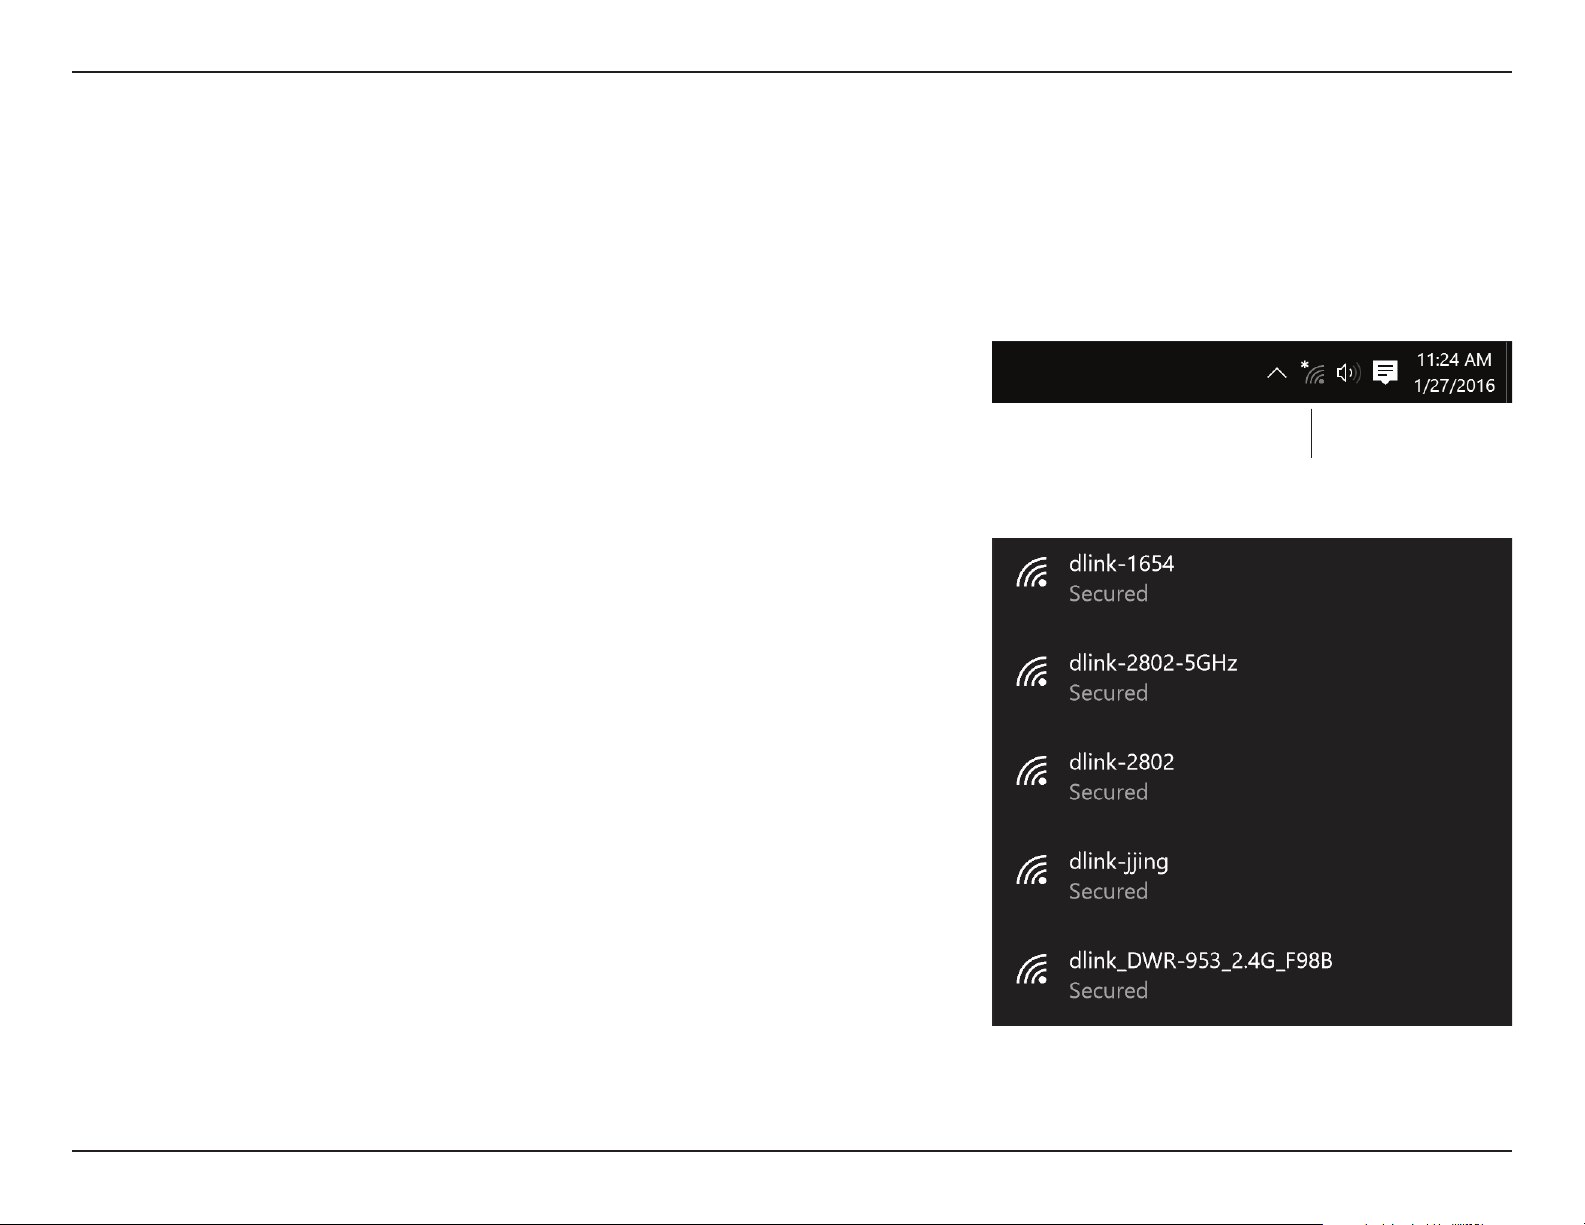
Section 4 - Connecting to a Wireless Network
Windows® 10
When connecting to the DSL-2740M wirelessly for the rst time, you will need to input the wireless network name (SSID) and Wi-Fi password
(security key) of the device you are connecting to. If your product has a Wi-Fi conguration card, you can nd the default network name and Wi-Fi
password on it. Otherwise, refer to the product label for the default Wi-Fi network SSID and password, or enter the Wi-Fi credentials set during the
product conguration.
To join an existing network, locate the wireless network icon in the taskbar next to the time
display and click on it.
Wireless Icon
Clicking on this icon will display a list of wireless networks which are within range of your
computer. Select the desired network by clicking on the SSID.
79D-Link DSL-2740M User Manual
Page 84
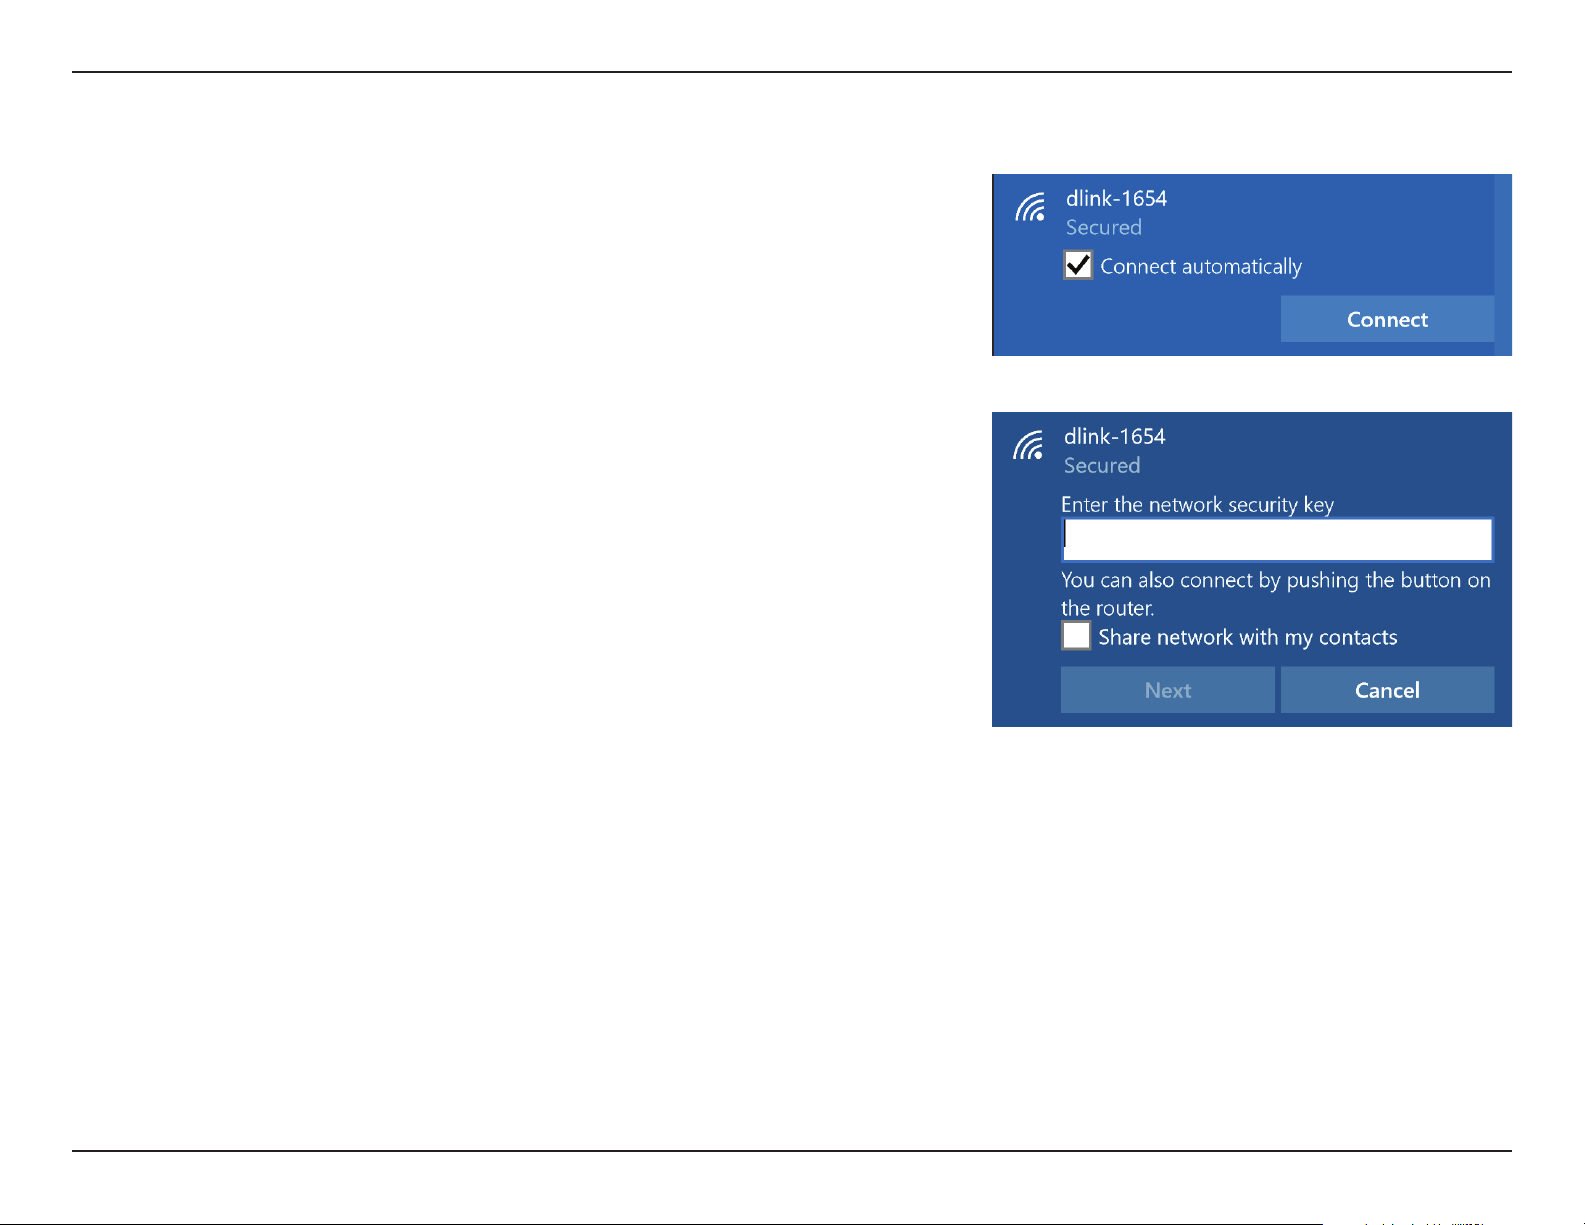
Section 4 - Connecting to a Wireless Network
To connect to the SSID, click Connect.
To automatically connect to the router when your device detects the SSID, click the Connect
Automatically check box.
You will then be prompted to enter the Wi-Fi password (network security key) for the wireless
network. Enter the password into the box and click Next to connect to the network. Your
computer will now automatically connect to this wireless network when it is detected.
You can also use Wi-Fi Protected Setup (WPS) to connect to the router. Press the WPS button
on your D-Link device and you will be automatically connected.
80D-Link DSL-2740M User Manual
Page 85
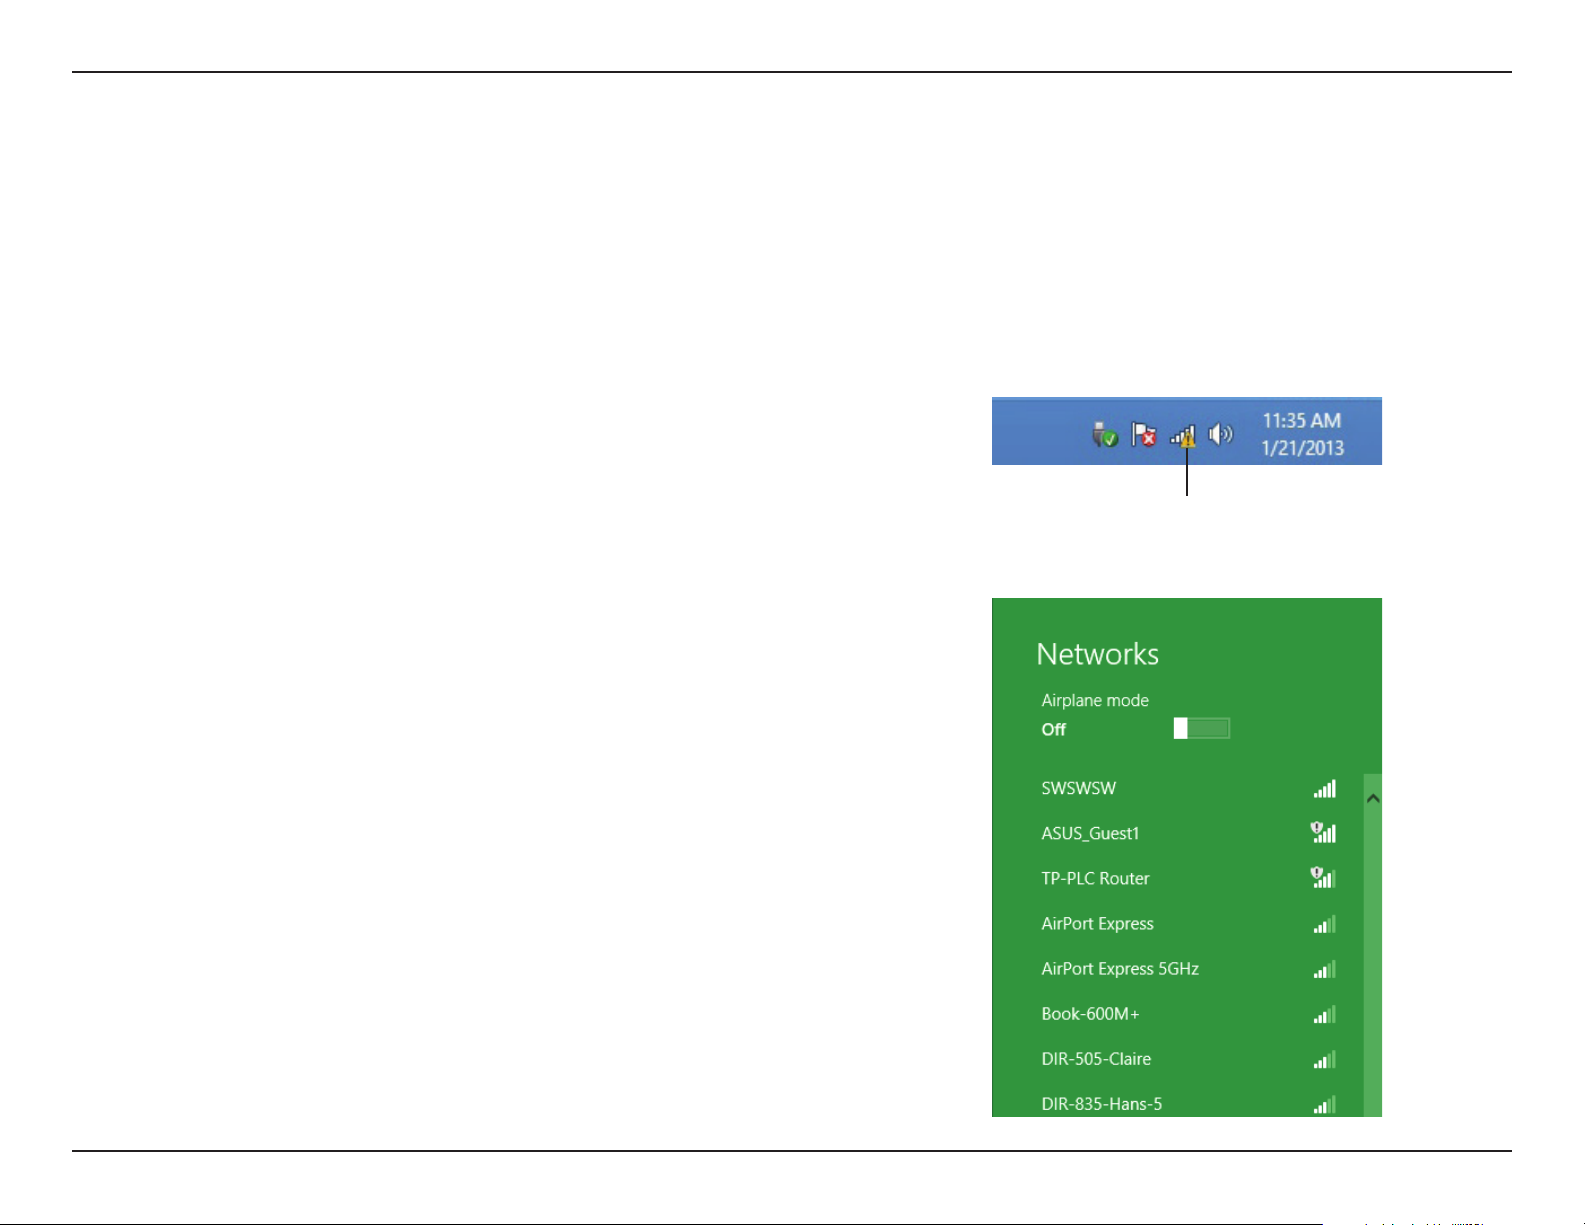
Section 4 - Connecting to a Wireless Network
Windows® 8
WPA/WPA2
It is recommended that you enable wireless security (WPA/WPA2) on your wireless router or access point before conguring your wireless adapter.
If you are joining an existing network, you will need to know the security key (Wi-Fi password) being used.
To join an existing network, locate the wireless network icon in the taskbar next to the time
display.
Wireless Icon
Clicking on this icon will display a list of wireless networks that are within connecting
proximity of your computer. Select the desired network by clicking on the network name.
81D-Link DSL-2740M User Manual
Page 86
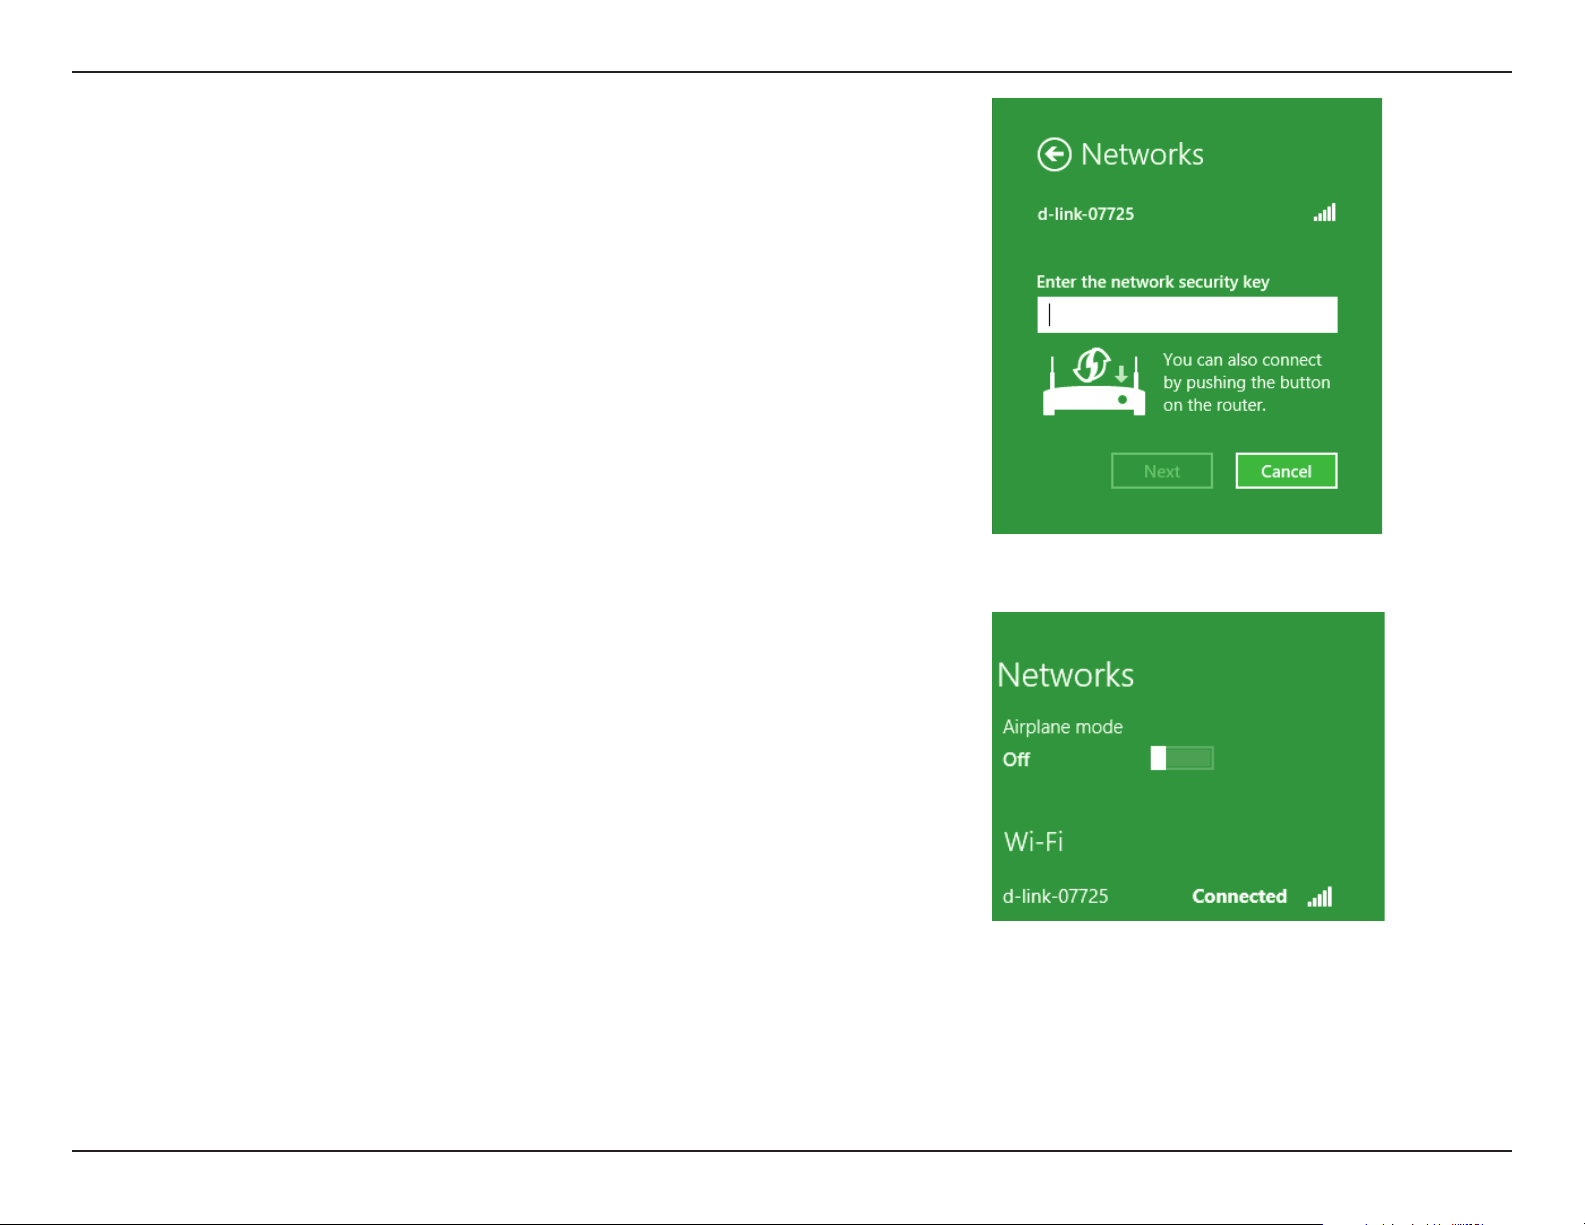
Section 4 - Connecting to a Wireless Network
You will then be prompted to enter the network security key (Wi-Fi password) for the wireless
network. Enter the password into the box and click Next.
If you wish to use Wi-Fi Protected Setup (WPS) to connect to the router, you can also press
the WPS button on your router during this step to enable the WPS function.
When you have established a successful connection to a wireless network, the word
Connected will appear next to the name of the network to which you are connected to.
82D-Link DSL-2740M User Manual
Page 87
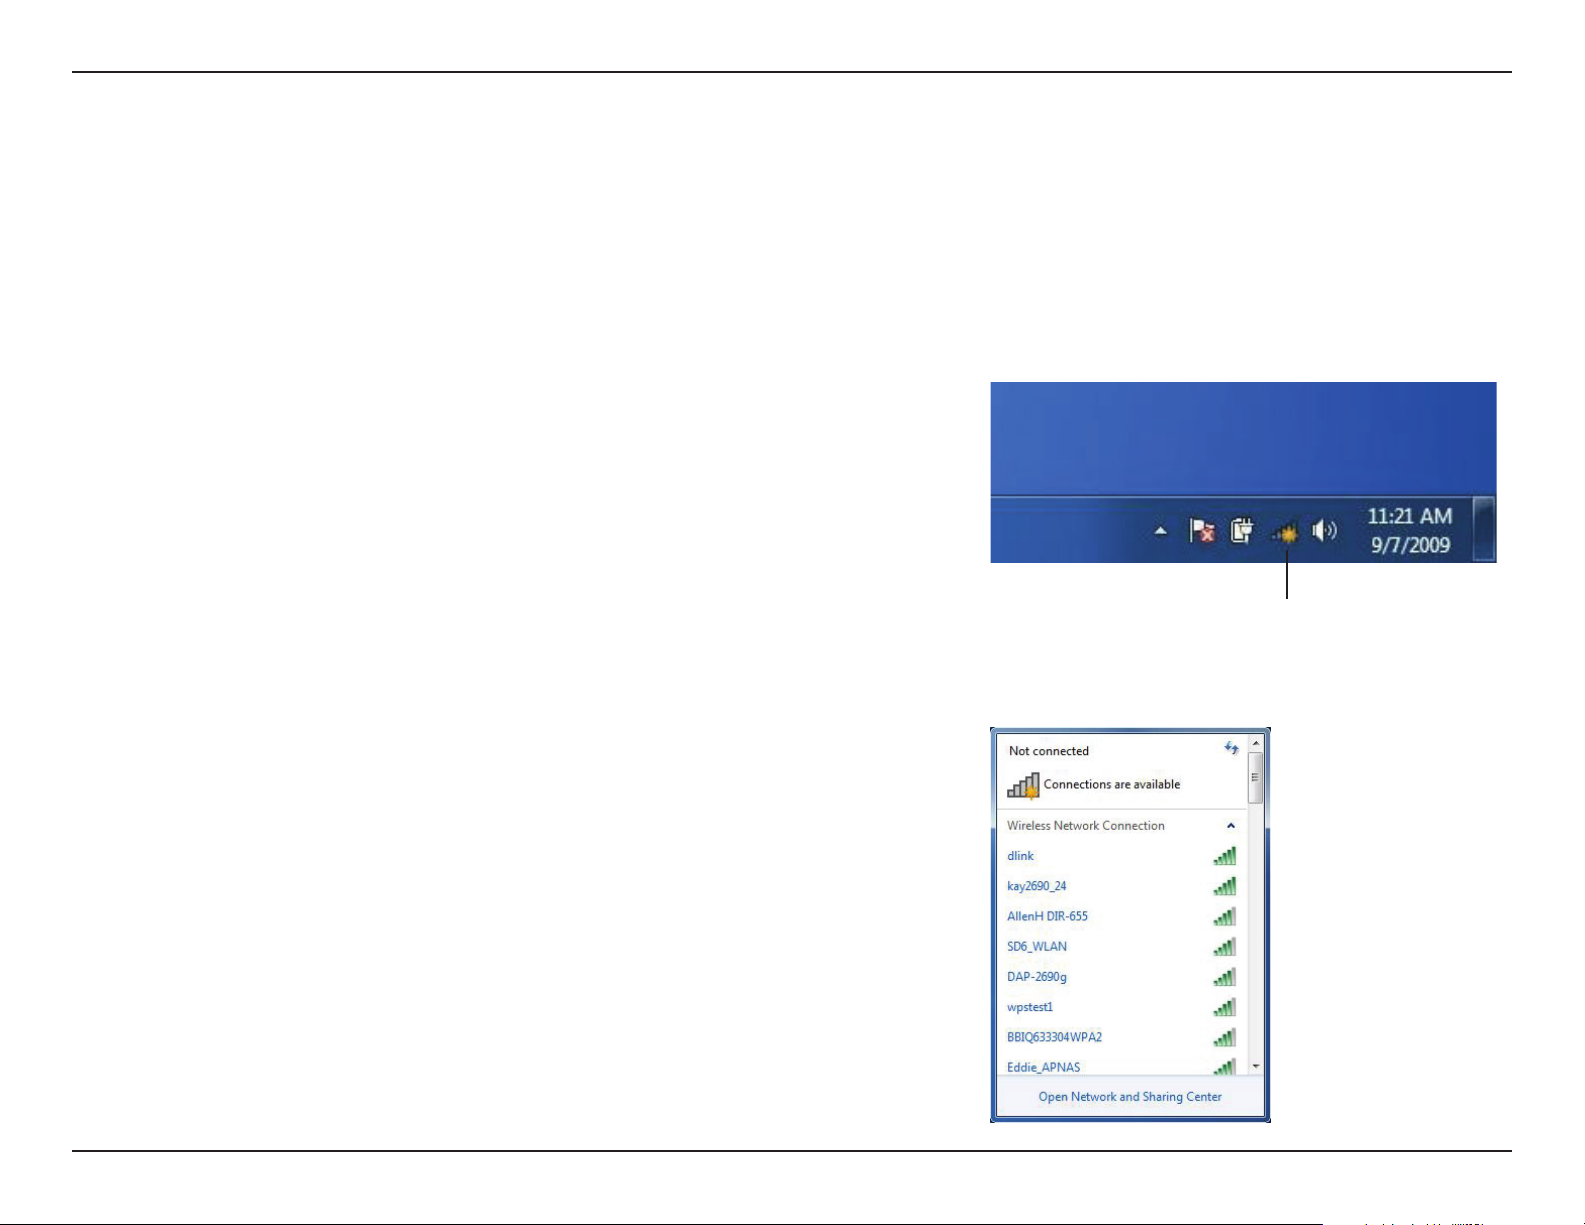
Section 4 - Connecting to a Wireless Network
Windows® 7
WPA/WPA2
It is recommended that you enable wireless security (WPA/WPA2) on your wireless router or access point before conguring your wireless adapter.
If you are joining an existing network, you will need to know the security key or passphrase being used.
Click on the wireless icon in your system tray (lower-right corner).
Wireless Icon
The utility will display any available wireless networks in your area.
83D-Link DSL-2740M User Manual
Page 88
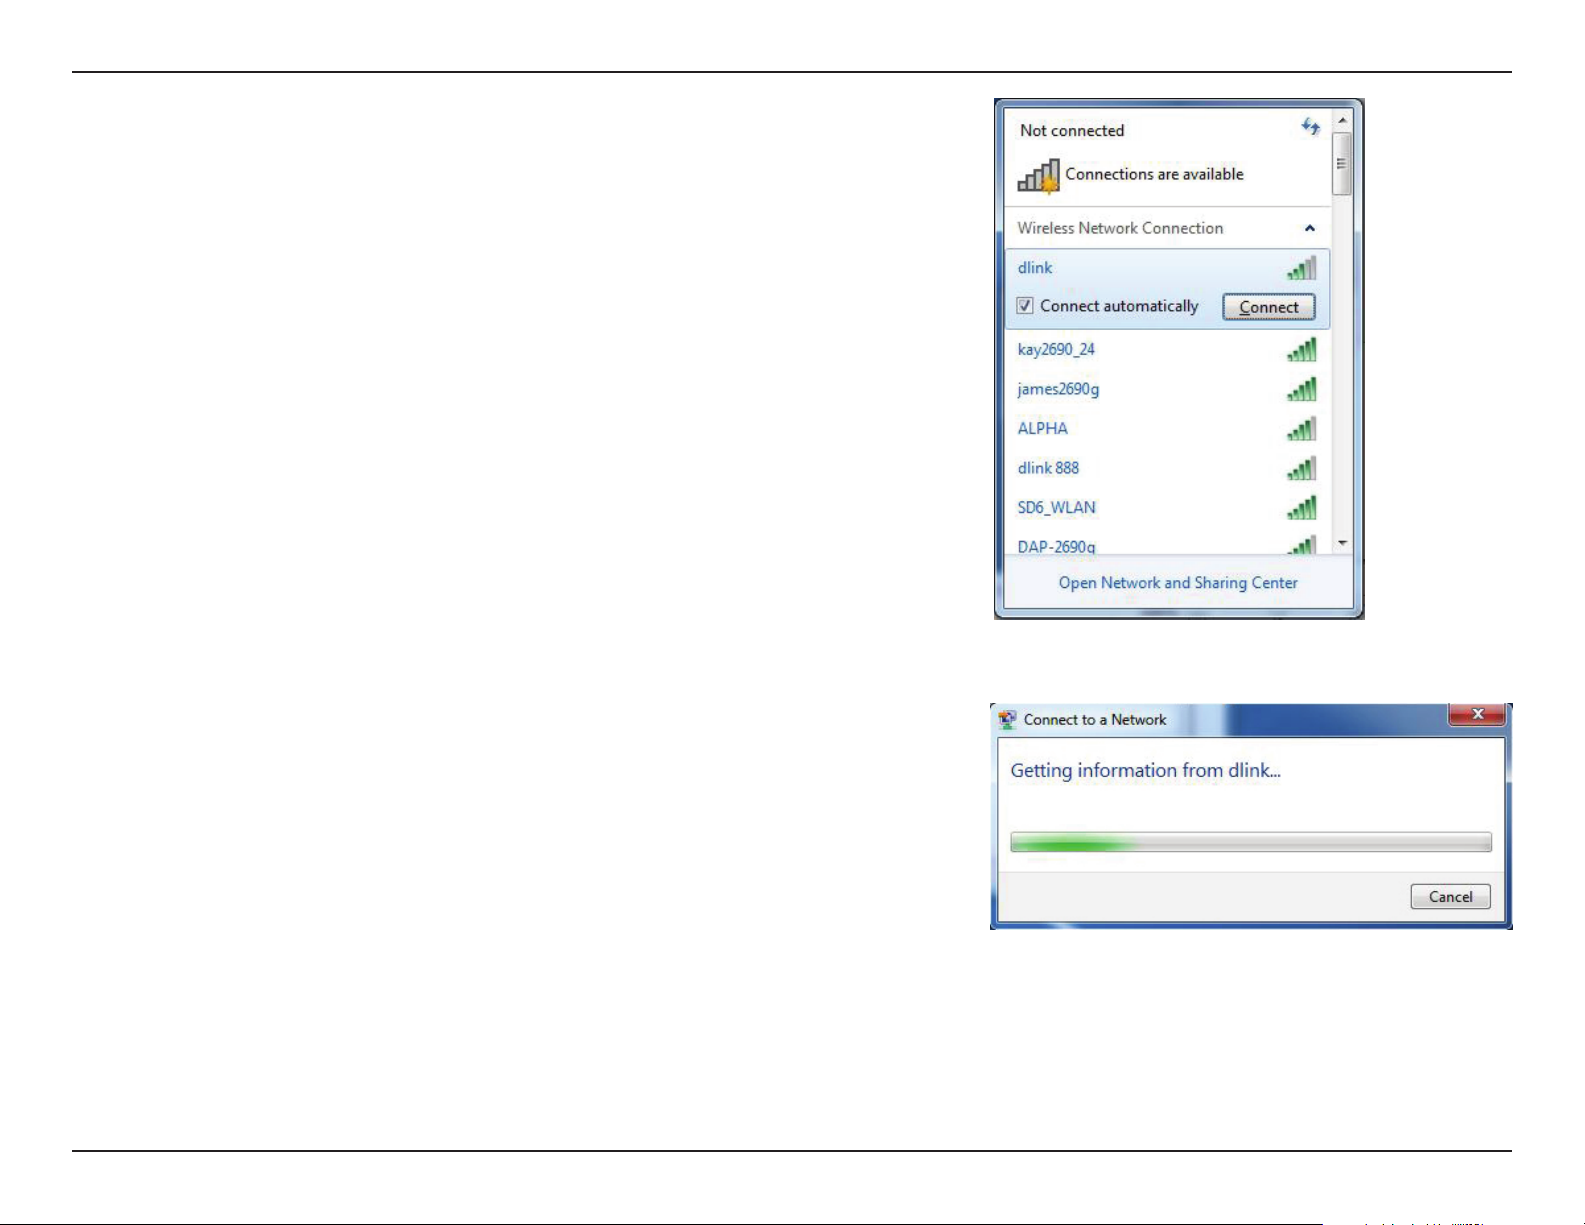
Section 4 - Connecting to a Wireless Network
Highlight the wireless connection with Wi-Fi name (SSID) you would like to connect to and
click the Connect button.
If you get a good signal but cannot access the Internet, check your TCP/IP settings for your
wireless adapter. Refer to the Networking Basics section in this manual for more information.
The following window appears while your computer tries to connect to the router.
84D-Link DSL-2740M User Manual
Page 89
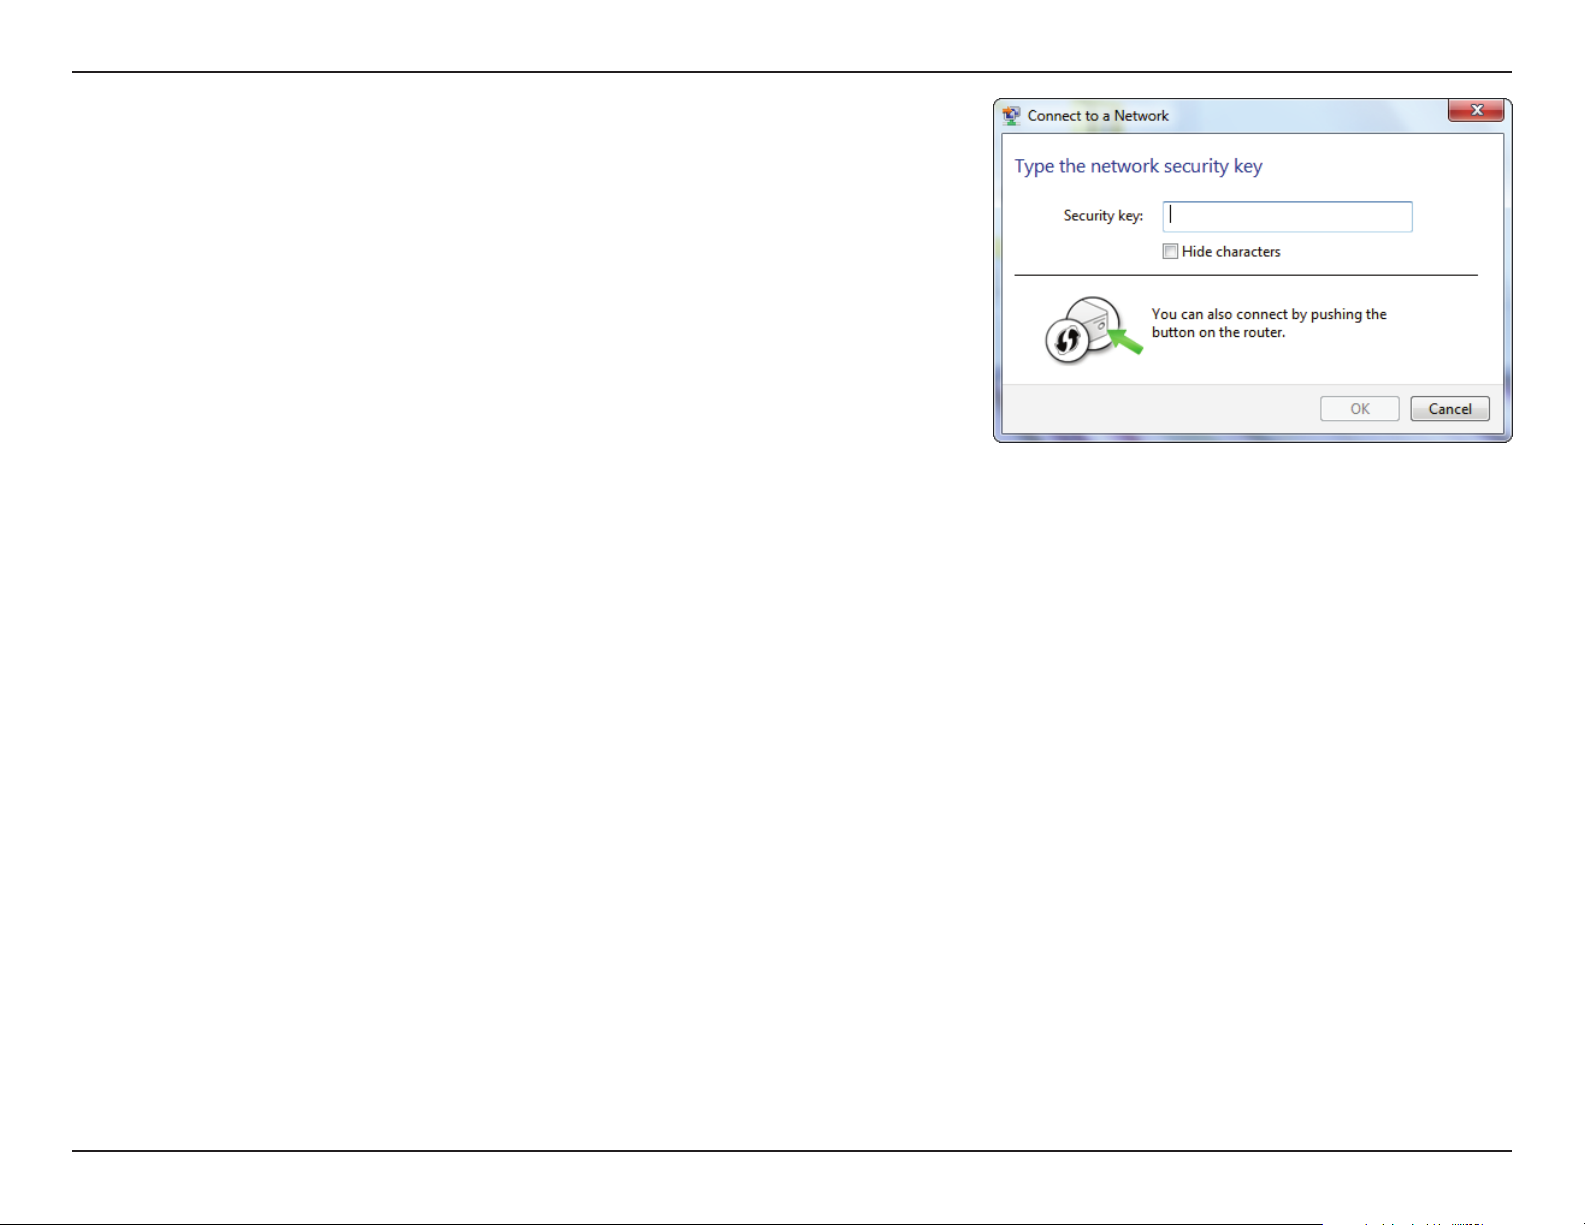
Section 4 - Connecting to a Wireless Network
Enter the same security key or passphrase (Wi-Fi password) that is on your router and click
Connect. You can also connect by pushing the WPS button on the router.
It may take 20-30 seconds to connect to the wireless network. If the connection fails, please
verify that the security settings are correct. The key or passphrase must be exactly the same
as the one on the wireless router.
85D-Link DSL-2740M User Manual
Page 90
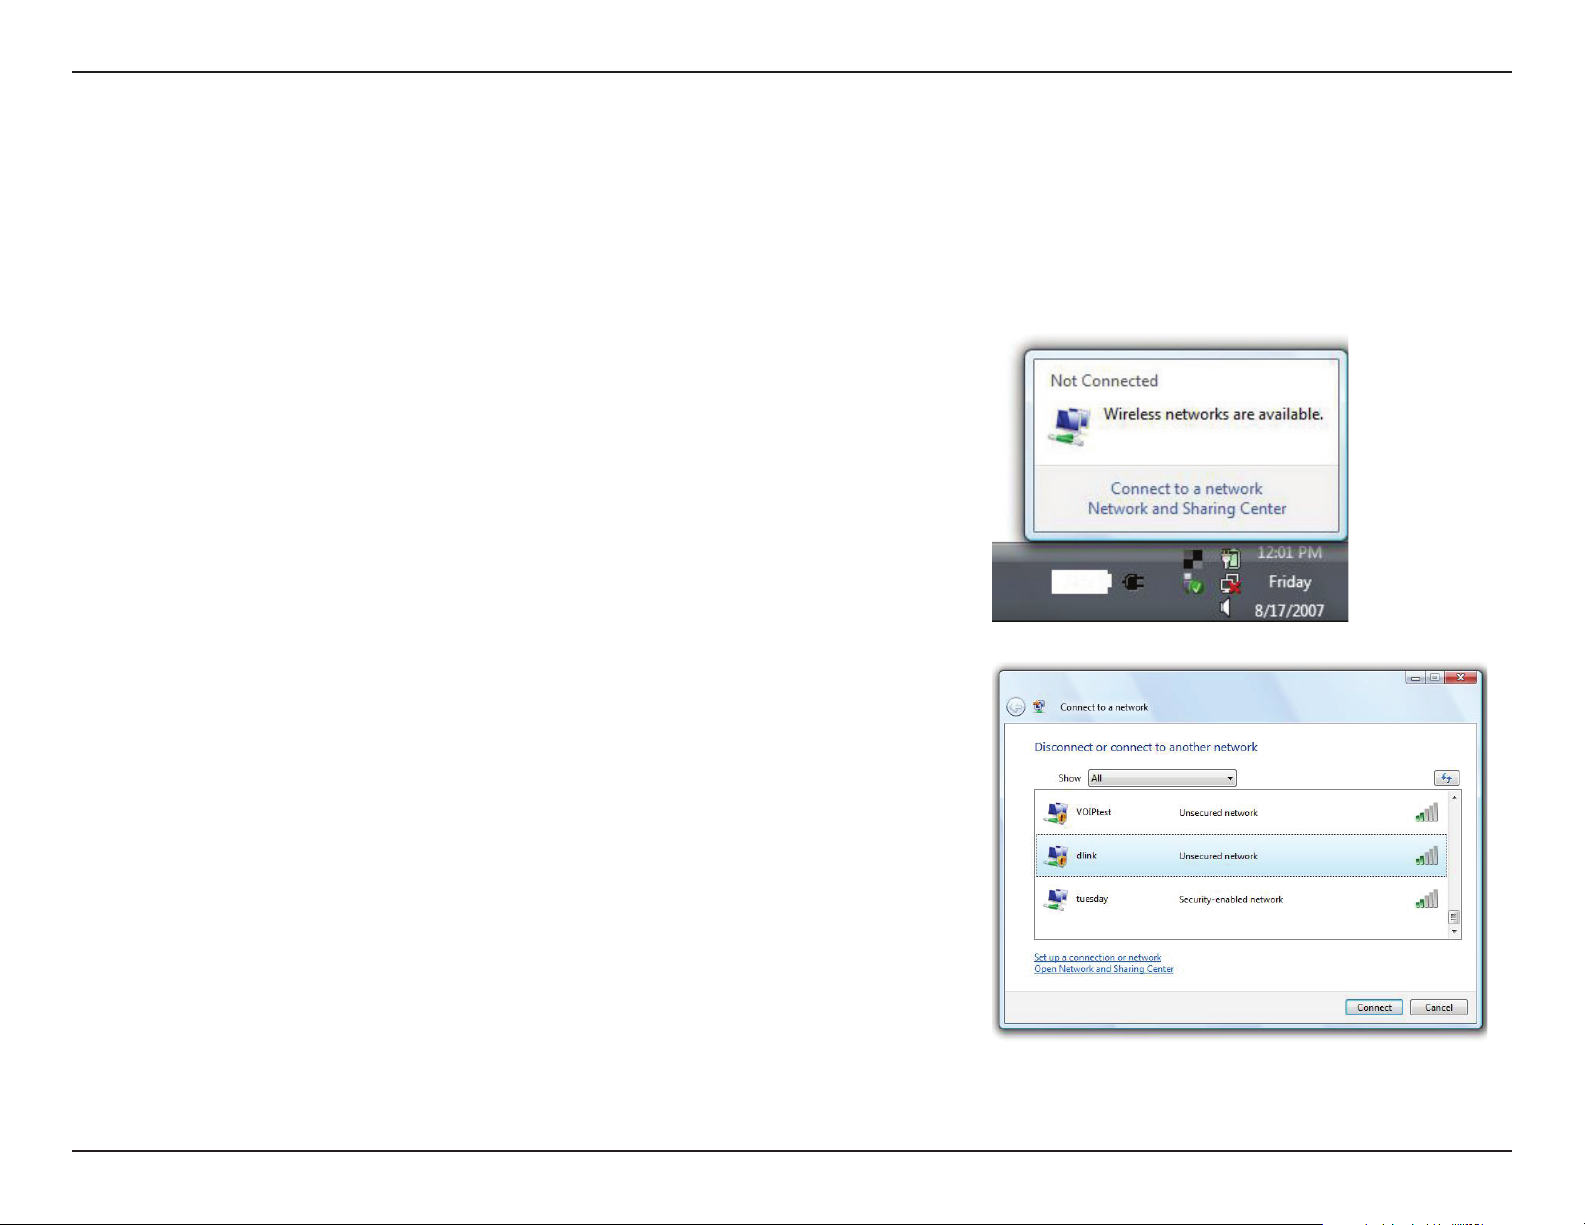
Section 4 - Connecting to a Wireless Network
Windows Vista®
Windows Vista® users may use the built-in wireless utility. If you are using another company’s wireless utility, please refer to the user manual of
your wireless adapter for help connecting to a wireless network. Most wireless utilities will have a “site survey” option similar to the Windows Vista®
utility as seen below.
If you receive the Wireless Networks Detected bubble, click on the center of the bubble
to access the utility.
or
Right-click on the wireless computer icon in your system tray (lower-right corner next to
the time). Select Connect to a network.
The utility will display any available wireless networks in your area. Click on a network
(displayed using the SSID) and click the Connect button.
If you get a good signal but cannot access the Internet, check your TCP/IP settings for your
wireless adapter. Refer to the Networking Basics section in this manual for more information.
86D-Link DSL-2740M User Manual
Page 91
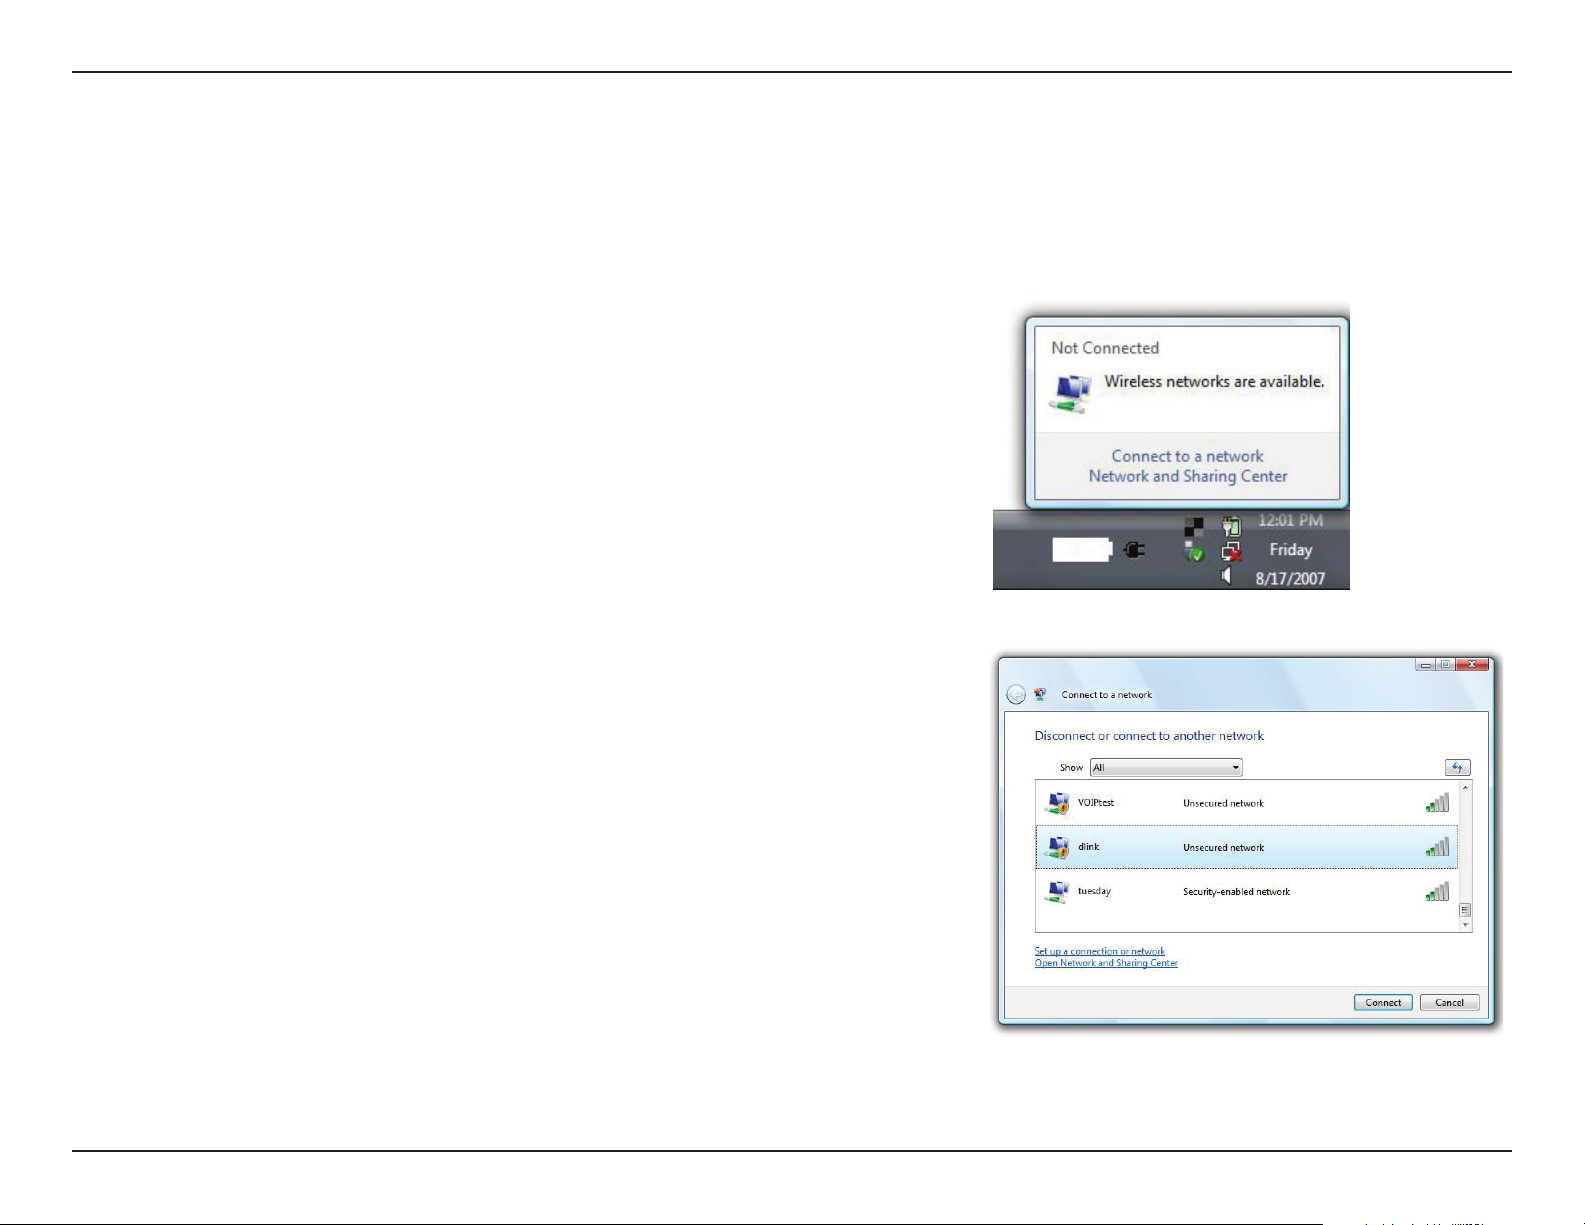
Section 4 - Connecting to a Wireless Network
WPA/WPA2
It is recommended that you enable wireless security (WPA/WPA2) on your wireless router or access point before conguring your wireless adapter.
If you are joining an existing network, you will need to know the security key or passphrase being used.
Open the Windows Vista® Wireless Utility by right-clicking on the wireless computer icon in
your system tray (lower right corner of screen). Select Connect to a network.
Highlight the Wi-Fi name (SSID) you would like to connect to and click Connect.
87D-Link DSL-2740M User Manual
Page 92
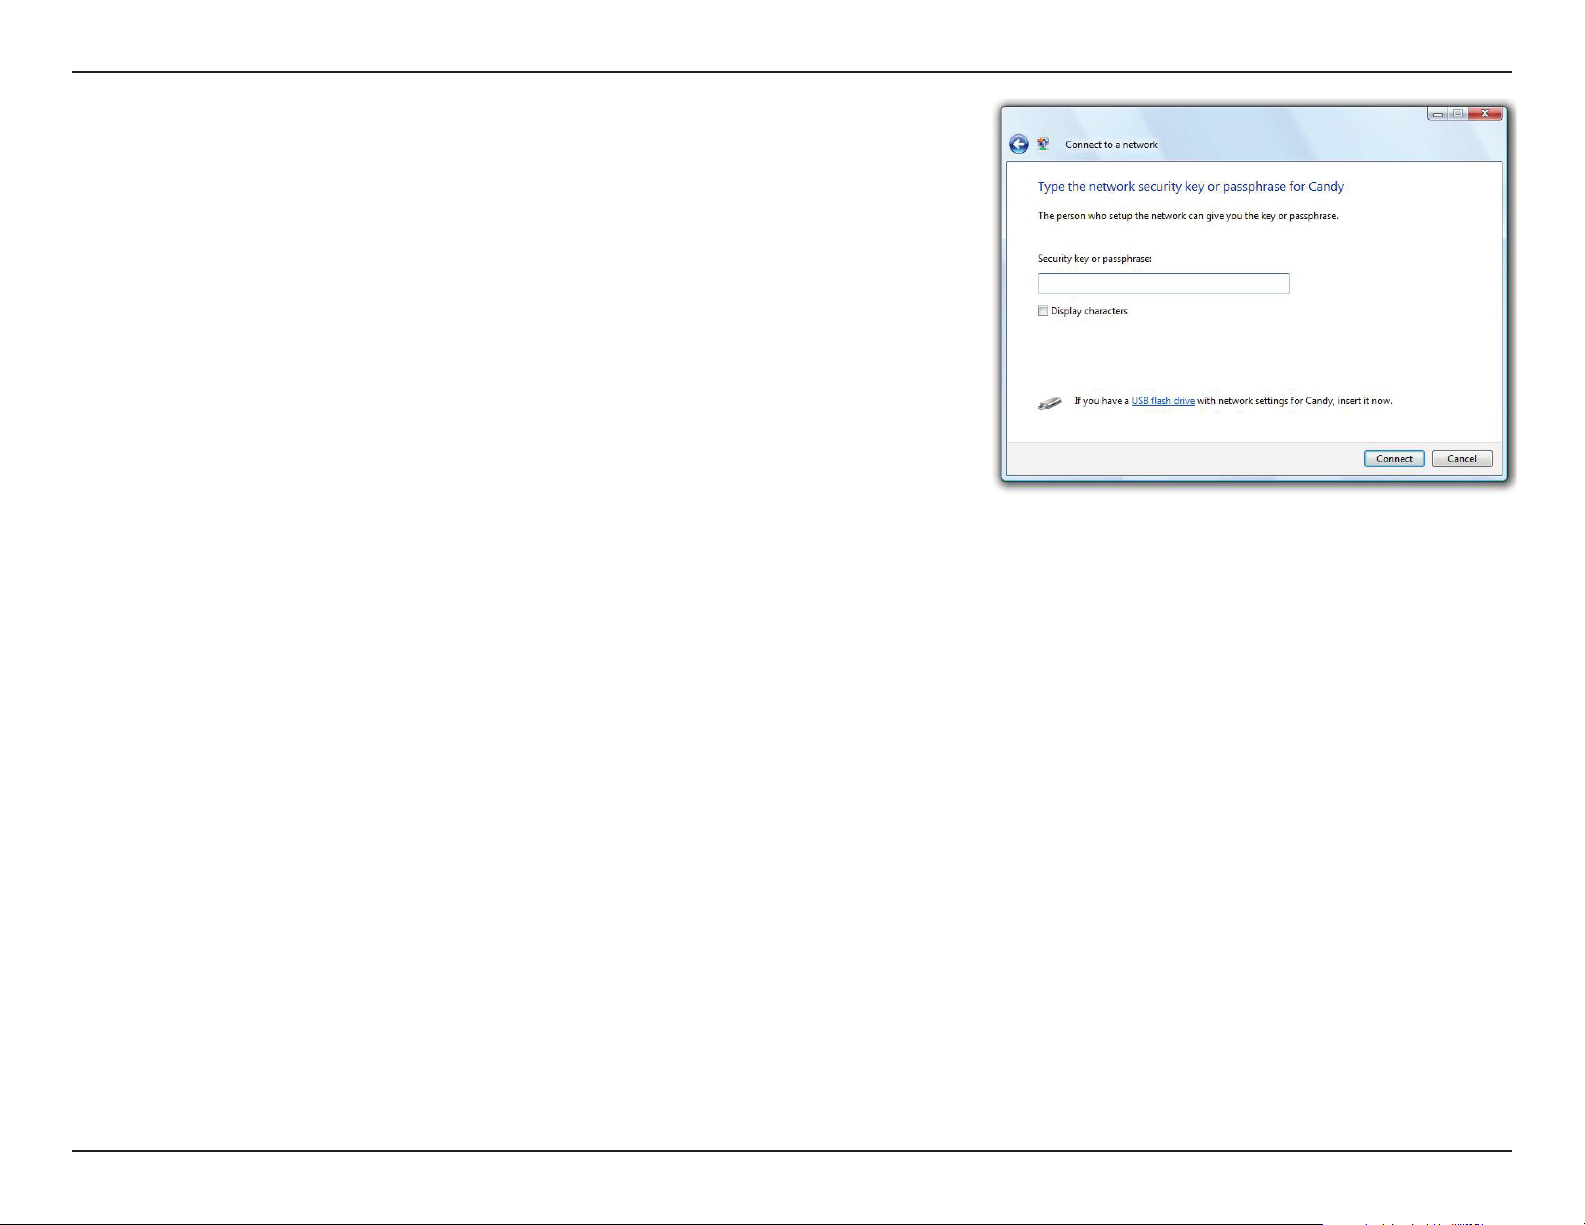
Section 4 - Connecting to a Wireless Network
Enter the same security key or passphrase (Wi-Fi password) that is on your router and click
Connect.
It may take 20-30 seconds to connect to the wireless network. If the connection fails, please
verify that the security settings are correct. The key or passphrase must be exactly the same
as the one on the wireless router.
88D-Link DSL-2740M User Manual
Page 93

Section 5 - Troubleshooting
Troubleshooting
This chapter provides solutions to problems that can occur during the installation and operation of the DSL-2740M. Read the following descriptions
if you are having problems. The examples below are illustrated in Windows® XP. If you have a dierent operating system, the screenshots on your
computer will look similar to these examples.
Why can’t I access the web-based conguration utility?
When entering the IP address of the D-Link router (192.168.1.1 for example), you are not connecting to a website, nor do you have to be connected
to the Internet. The device has the utility built-in to a ROM chip in the device itself. Your computer must be on the same IP subnet to connect to
the web-based utility.
• Make sure you have an updated Java-enabled web browser. We recommend the following:
- Microsoft Internet Explorer® 10 or higher
- Mozilla Firefox 28 or higher
- Google™ Chrome 28 or higher
- Apple Safari 6 or higher
• Verify physical connectivity by checking for solid link lights on the device. If you do not get a solid link light, try using a dierent cable, or connect
to a dierent port on the device if possible. If the computer is turned o, the link light may not be on.
• Disable any Internet security software running on the computer. Software rewalls such as ZoneAlarm, BlackICE, Sygate, Norton Personal Firewall,
®
and Windows
on disabling or conguring it.
XP rewall may block access to the conguration pages. Check the help les included with your rewall software for more information
89D-Link DSL-2740M User Manual
Page 94

Section 5 - Troubleshooting
• Congure your Internet settings:
• Go to Start > Settings > Control Panel. Double-click the Internet Options Icon. From the Security tab, click the button to restore the settings
to their defaults.
• Click the Connection tab and set the dial-up option to Never Dial a Connection. Click the LAN Settings button. Make sure nothing is checked.
Click OK.
• Go to the Advanced tab and click the button to restore these settings to their defaults. Click OK three times.
• Close your web browser (if open) and open it.
• Access the web management. Open your web browser and enter the IP address of your D-Link router in the address bar. This should open the
login page for your web management.
• If you still cannot access the conguration, unplug the power to the router for 10 seconds and plug back in. Wait about 30 seconds and try accessing
the conguration. If you have multiple computers, try connecting using a dierent computer.
What can I do if I forgot my password?
If you forgot your password, you must reset your router. This process will change all your settings back to the factory defaults.
To reset the router, locate the reset button (hole) on the rear panel of the unit. With the router powered on, use a paperclip to hold the button
down for 10 seconds. Release the button and the router will go through its reboot process. Wait about 30 seconds to access the router. The default
IP address is 192.168.1.1. When logging in, leave the password box empty.
90D-Link DSL-2740M User Manual
Page 95
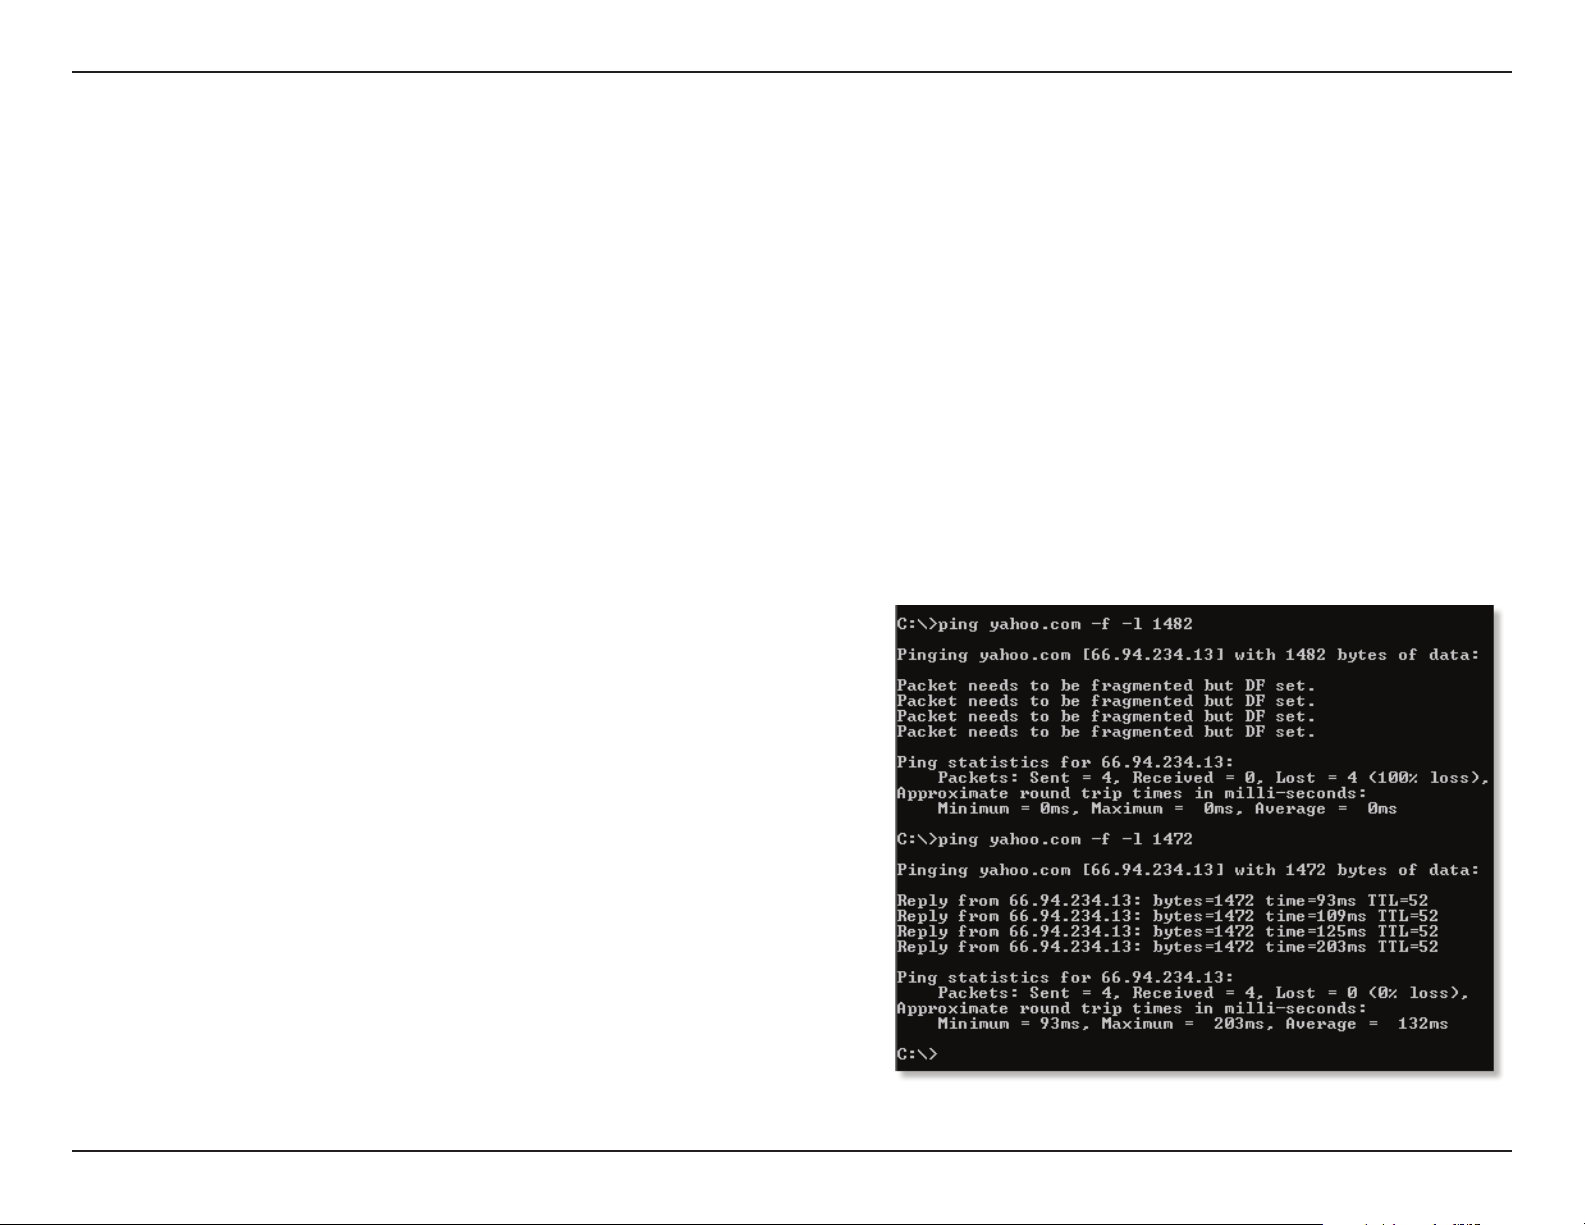
Section 5 - Troubleshooting
Why can’t I connect to certain sites or send and receive emails when connecting through my router?
If you are having a problem sending or receiving email, or connecting to secure sites such as eBay, banking sites, and Hotmail, we suggest lowering
the MTU in increments of ten (Ex. 1492, 1482, 1472, etc).
To nd the proper MTU Size, you’ll have to do a special ping of the destination you’re trying to go to. A destination could be another computer, or
a URL.
• Click on Start and then click Run.
• Windows® 95, 98, and Me users type in command (Windows® NT, 2000, XP, Vista®, and 7 users type in cmd) and press Enter (or click OK).
• Once the window opens, you’ll need to do a special ping. Use the following syntax:
ping [url] [-f] [-l] [MTU value]
Example: ping yahoo.com -f -l 1472
91D-Link DSL-2740M User Manual
Page 96

Section 5 - Troubleshooting
You should start at 1472 and work your way down by 10 each time. Once you get a reply, go up by 2 until you get a fragmented packet. Take that
value and add 28 to the value to account for the various TCP/IP headers. For example, lets say that 1452 was the proper value, the actual MTU size
would be 1480, which is the optimum for the network we’re working with (1452+28=1480).
Once you nd your MTU, you can now congure your router with the proper MTU size.
To change the MTU rate on your router follow the steps below:
• Open your browser, enter the IP address of your router (192.168.1.1) and click OK.
• Enter your username (admin) and password (sometimes blank by default). Click OK to enter the web conguration page for the device.
• Click on Setup and then click Manual Congure.
• To change the MTU, enter the number in the MTU eld and click Save Settings to save your settings.
• Test your email. If changing the MTU does not resolve the problem, continue changing the MTU in increments of ten.
92D-Link DSL-2740M User Manual
Page 97

Appendix A - Wireless Basics
Wireless Basics
D-Link wireless products are based on industry standards to provide easy-to-use and compatible high-speed wireless connectivity within your
home, business, or on public access wireless networks. Strictly adhering to the IEEE standard, the D-Link wireless family of products will allow you
to securely access the data you want, when, and where you want it. You will be able to enjoy the freedom that wireless networking delivers.
A wireless local area network (WLAN) is a cellular computer network that transmits and receives data with radio signals instead of wires. Wireless
LANs are used increasingly in both home and oce environments, and public areas such as airports, coee shops and universities. Innovative ways
to utilize WLAN technology are helping people work, and communicate more eciently. Increased mobility and the absence of cabling and other
xed infrastructure have proven to be benecial for many users.
Wireless users can use the same applications they use on a wired network. Wireless adapter cards used on laptop and desktop systems support the
same protocols as Ethernet adapter cards.
Under many circumstances, it may be desirable for mobile network devices to link to a conventional Ethernet LAN in order to use servers, printers
or an Internet connection supplied through the wired LAN. A wireless router is a device used to provide this link.
93D-Link DSL-2740M User Manual
Page 98

Appendix A - Wireless Basics
What is Wireless?
Wireless or Wi-Fi technology is another way of connecting your computer to the network without using wires. Wi-Fi uses radio frequency to connect
wirelessly so you have the freedom to connect computers anywhere in your home or oce network.
Why D-Link Wireless?
D-Link is the worldwide leader and award winning designer, developer, and manufacturer of networking products. D-Link delivers the performance
you need at a price you can aord. D-Link has all the products you need to build your network.
How does wireless work?
Wireless works similarly to how cordless phones work, through radio signals that transmit data from one point A to point B. But wireless technology
has restrictions as to how you can access the network. You must be within the wireless network range area to be able to connect your computer.
There are two dierent types of wireless networks: Wireless Local Area Network (WLAN), and Wireless Personal Area Network (WPAN).
Wireless Local Area Network (WLAN)
In a wireless local area network, a device called an Access Point (AP) connects computers to the network. The access point has a small antenna
attached to it, which allows it to transmit data back and forth over radio signals. With an indoor access point the signal can travel up to 300 feet.
With an outdoor access point the signal can reach out up to 30 miles to serve places like manufacturing plants, industrial locations, university and
high school campuses, airports, golf courses, and many other outdoor venues.
Wireless Personal Area Network (WPAN)
Bluetooth is the industry standard wireless technology used for WPAN. Bluetooth devices in WPAN operate in a range up to 30 feet away.
Compared to WLAN the speed and wireless operation range are both less than WLAN, but in return it doesn’t use nearly as much power. This makes
94D-Link DSL-2740M User Manual
Page 99

Appendix A - Wireless Basics
it ideal for personal devices, such as mobile phones, PDAs, headphones, laptops, speakers, and other devices that operate on batteries.
Who uses wireless?
Wireless technology as become so popular in recent years that almost everyone is using it, whether it’s for home, oce, business, D-Link has a
wireless solution for it.
Home Uses/Benets
• Gives everyone at home broadband access
• Surf the web, check email, instant message, etc.
• Gets rid of the cables around the house
• Simple and easy to use
Small Oce and Home Oce Uses/Benets
• Stay on top of everything at home as you would at oce
• Remotely access your oce network from home
• Share Internet connection and printer with multiple computers
• No need to dedicate oce space
95D-Link DSL-2740M User Manual
Page 100

Appendix A - Wireless Basics
Where is wireless used?
Wireless technology is expanding everywhere, not just at home or oce. People like the freedom of mobility and it’s becoming so popular that
more and more public facilities now provide wireless access to attract people. The wireless connection in public places is usually called “hotspots”.
Using a D-Link USB adapter with your laptop, you can access the hotspot to connect to the Internet from remote locations like: airports, hotels,
coee shops, libraries, restaurants, and convention centers.
Wireless network is easy to setup, but if you’re installing it for the rst time it could be quite a task not knowing where to start. That’s why we’ve put
together a few setup steps and tips to help you through the process of setting up a wireless network.
Tips
Here are a few things to keep in mind, when you install a wireless network.
Centralize your router or access point
Make sure you place the router/access point in a centralized location within your network for the best performance. Try to place the router/access
point as high as possible in the room, so the signal gets dispersed throughout your home. If you have a two-story home, you may need a repeater
to boost the signal to extend the range.
Eliminate Interference
Place home appliances such as cordless telephones, microwaves, and televisions as far away as possible from the router/access point. This would
signicantly reduce any interference that the appliances might cause since they operate on same frequency.
Security
Don’t let your next-door neighbors or intruders connect to your wireless network. Secure your wireless network by turning on the WPA or WEP
security feature on the router. Refer to the product manual for detail information on how to set it up.
96D-Link DSL-2740M User Manual
 Loading...