

Page 1
- 1 -
Installation Guide Contents:
Section 1: Installing the DSB-650TX
Section 2: Windows XP Driver Installation
Section 3: Windows 2000 Driver Installation
Section 4: Windows Me Driver Installation
Section 5: Windows 98/98SE Driver Installation
Section 6: Tips & Technical Support
Review Package Contents:
Make sure that the package contains the following items. If any items are
missing, please contact your reseller.
§ D-Link DSB-650TX
§ Drivers on Floppy Disk
§ This Installation Guide
Minimum System Requirements:
The following hardware must be available to use this product correctly…
§ Pentium Class 166 MHz or Equivalent or Faster
§ 16 MB of RAM
§ Floppy Disk Drive
§ One Available USB Port
§ Windows XP, Windows 2000, Windows Me, Windows 98SE/98
This
product can be installed on the
following Operating Systems:
Windows XP, 2000, Me, 98SE, 98.
DSB
-
650TX
D-
Link USB Fast
Ethernet Adapter
Page 2
- 2 -
Installing the DSB-650TX
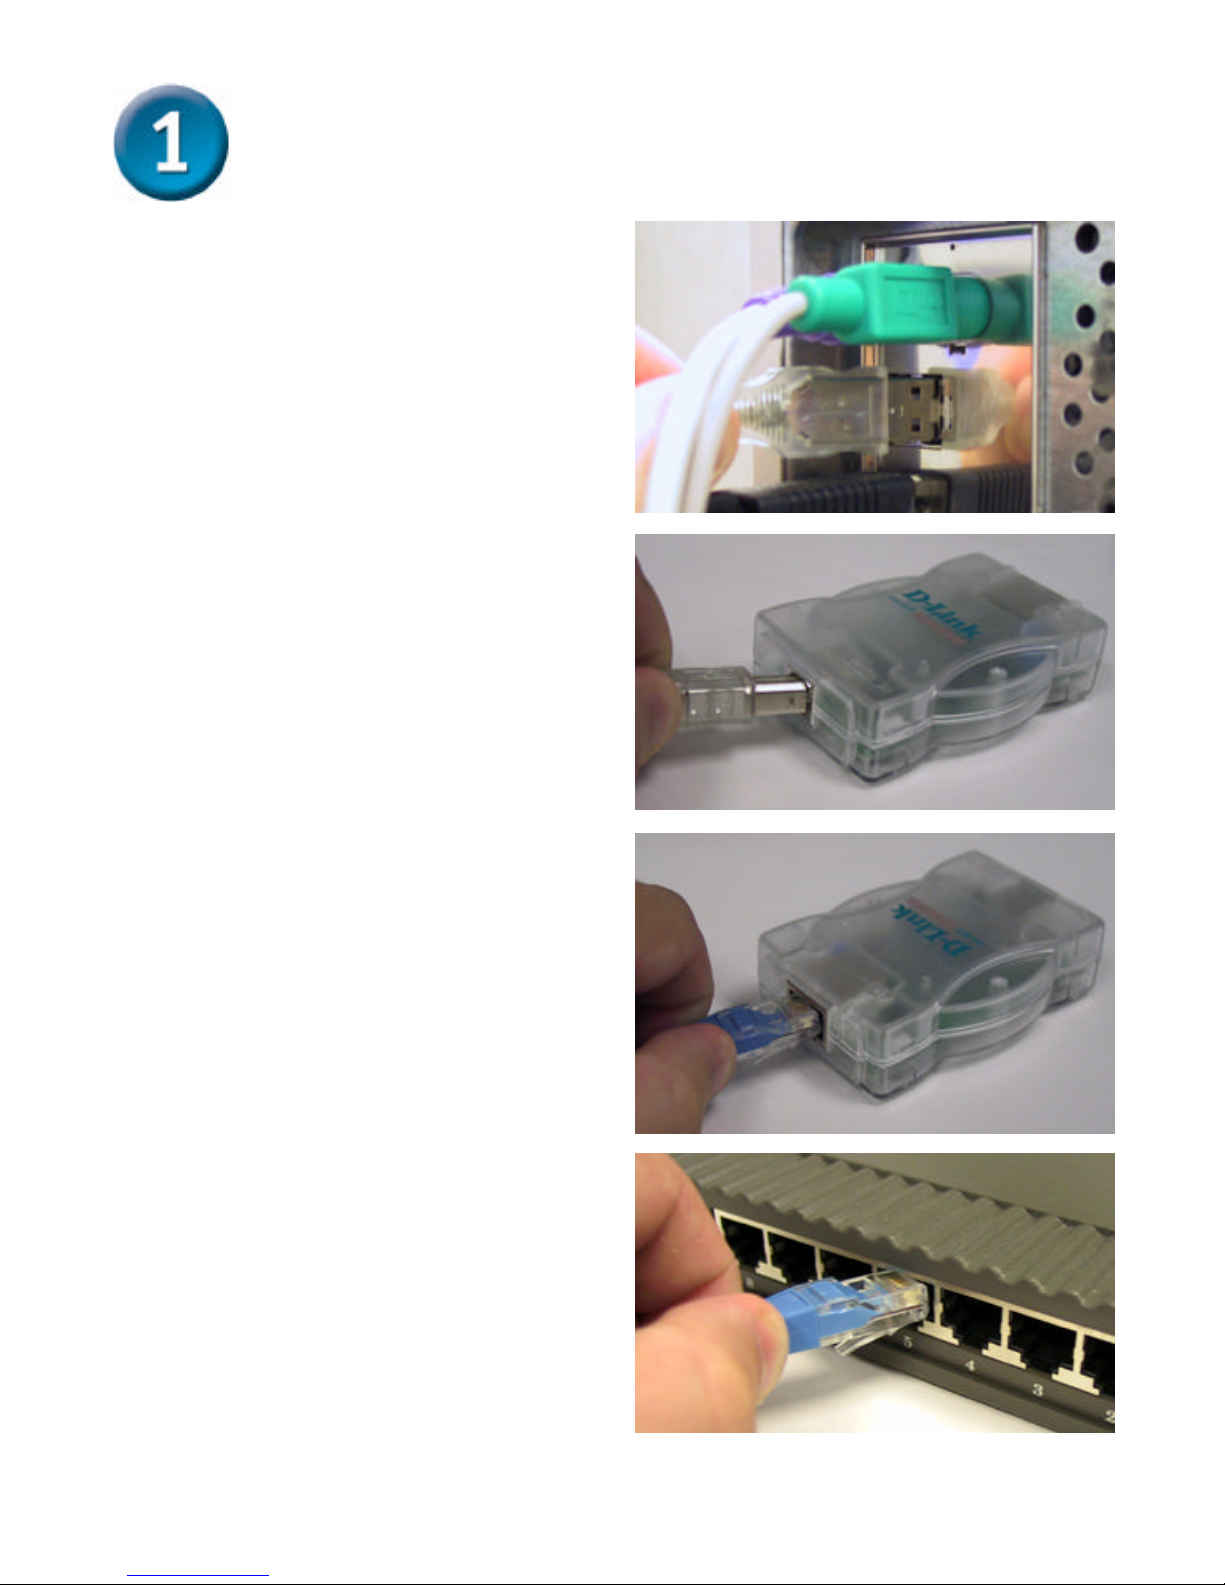
§ Plug the “A” connector of the
USB cable provided into an
available USB slot on your
computer. This is the narrow
end of the cable.
§ Plug the “B” connector of the
USB cable into the
DSB-650TX. This is the larger
end of the cable.
§ Connect one end of a
straight-through Ethernet cable
to the RJ-45 port of the
DSB-650TX.
§ Connect the other end of the
Ethernet cable to a switch or
broadband modem.
§ Windows will detect the
DSB-650TX and ask you for the
drivers. Refer to the following
section below that correspond s
to your operating system.
Type A
Type B
RJ45
RJ45
Page 3
- 3 -
Windows XP Driver Installation
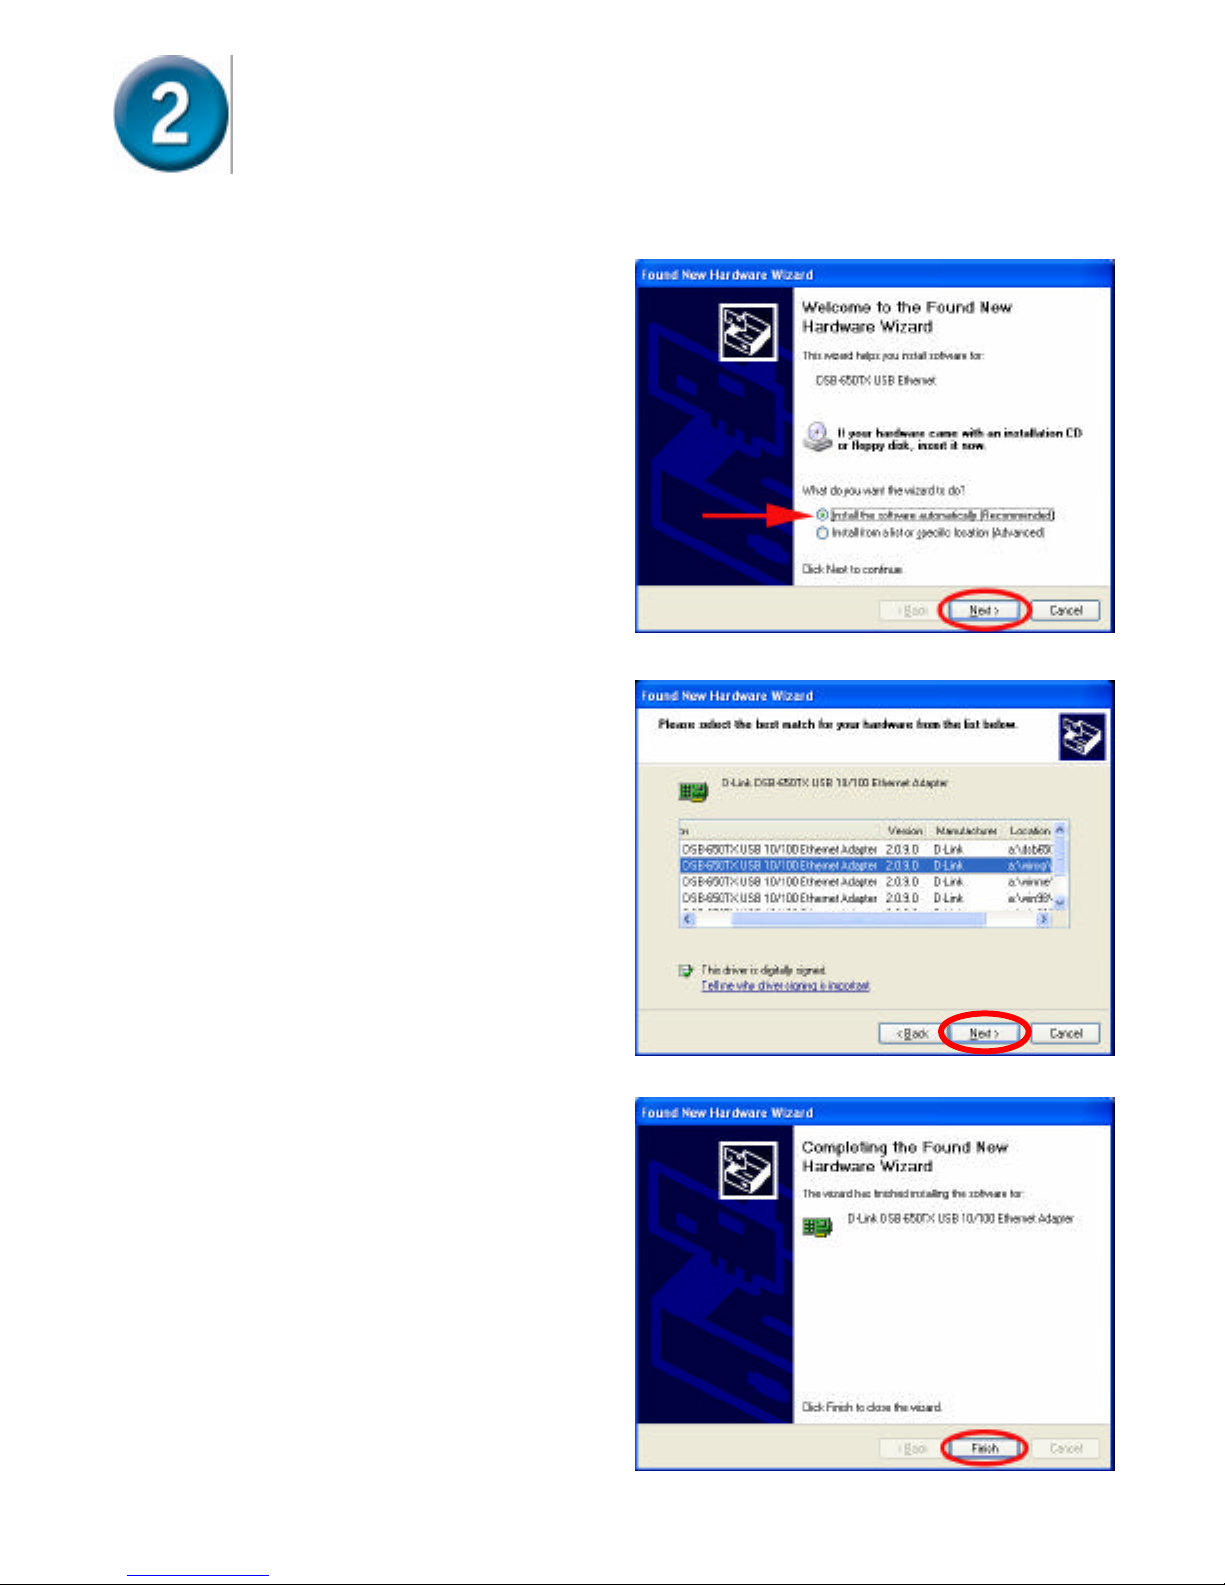
§ Insert the DSB-650TX Driver Disk into your Floppy Drive.
§ The “Found New Hardware”
window will appear.
§ Select “Next”.
§ Select “Next.”
§ Select “Finish”
§ The installation is complete.
Page 4
- 4 -
Windows 2000 Driver Installation
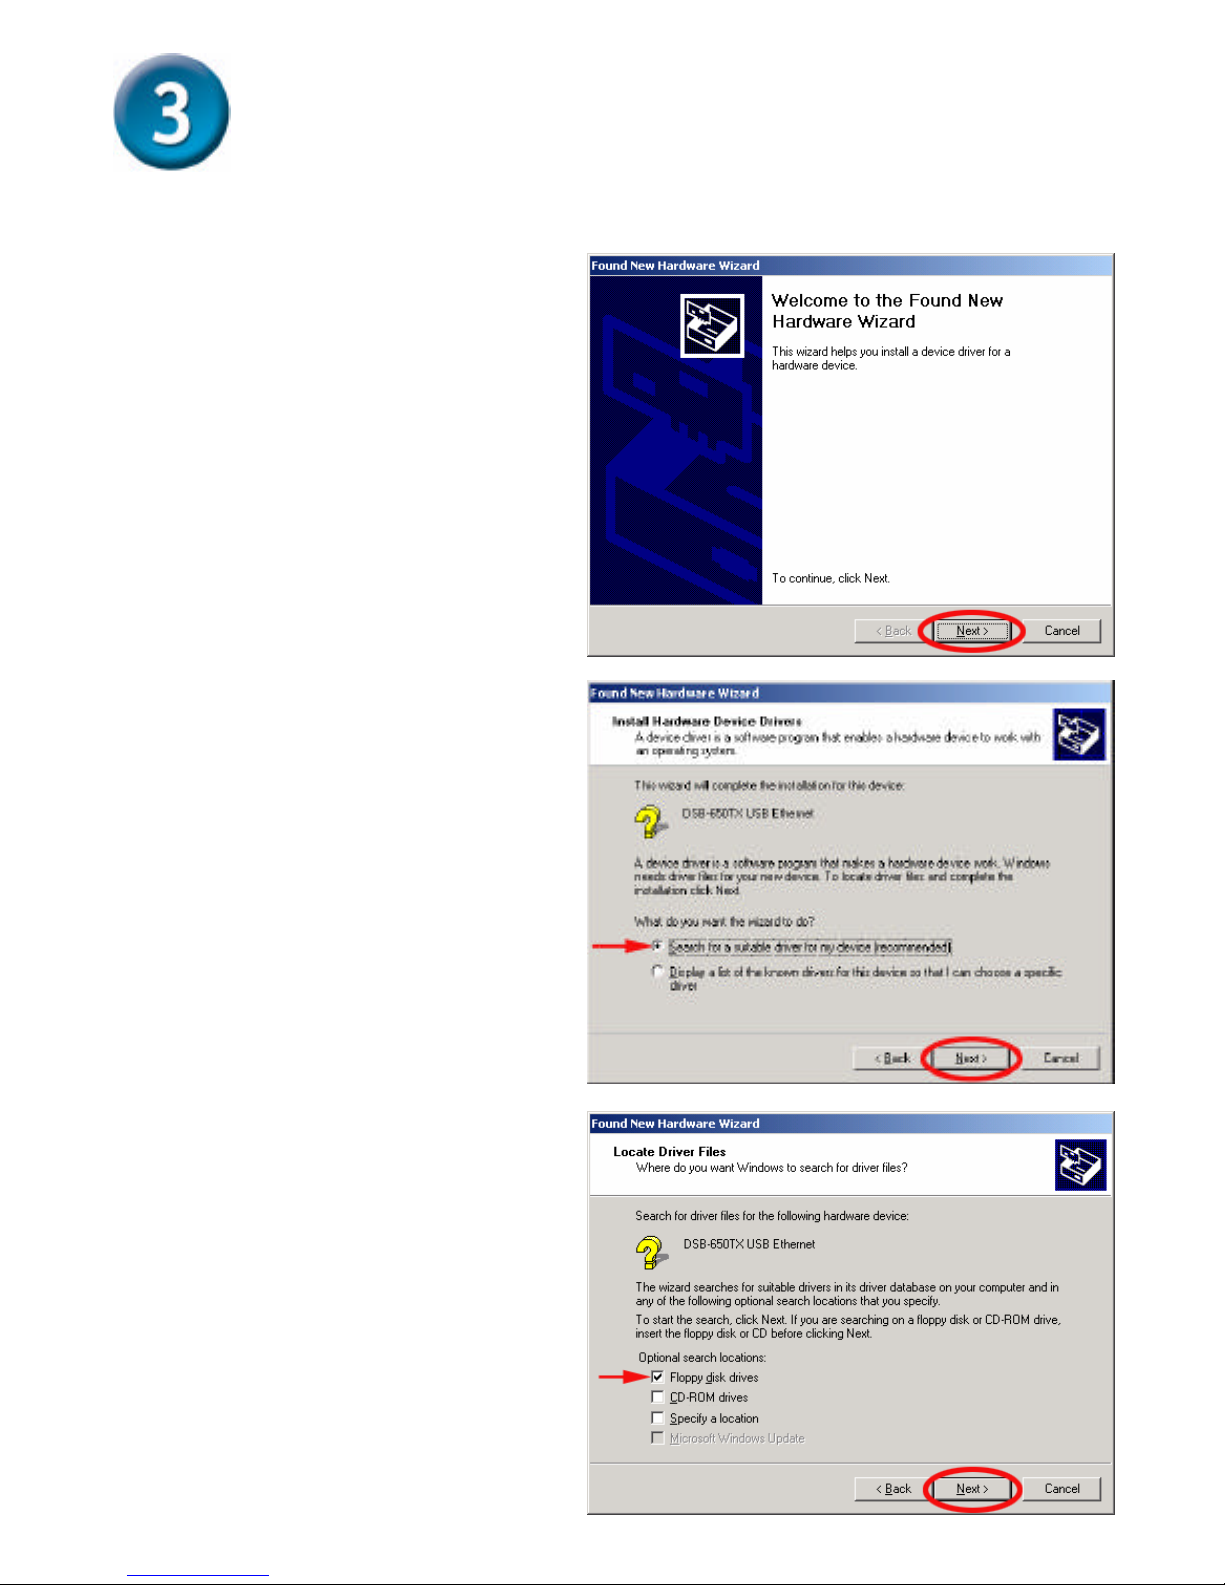
§ Insert the DSB-650TX Driver Disk into your Floppy Drive.
§ The “Found New
Hardware Wizard” will
appear
§ Select “Next”.
§ Select “Search for a
suitable driver for my
device (recommended)”.
Insert the driver disk into
the floppy disk drive and
select “Next”.
§ Select “Floppy disk drives”
and then select “Next”.
Page 5
- 5 -
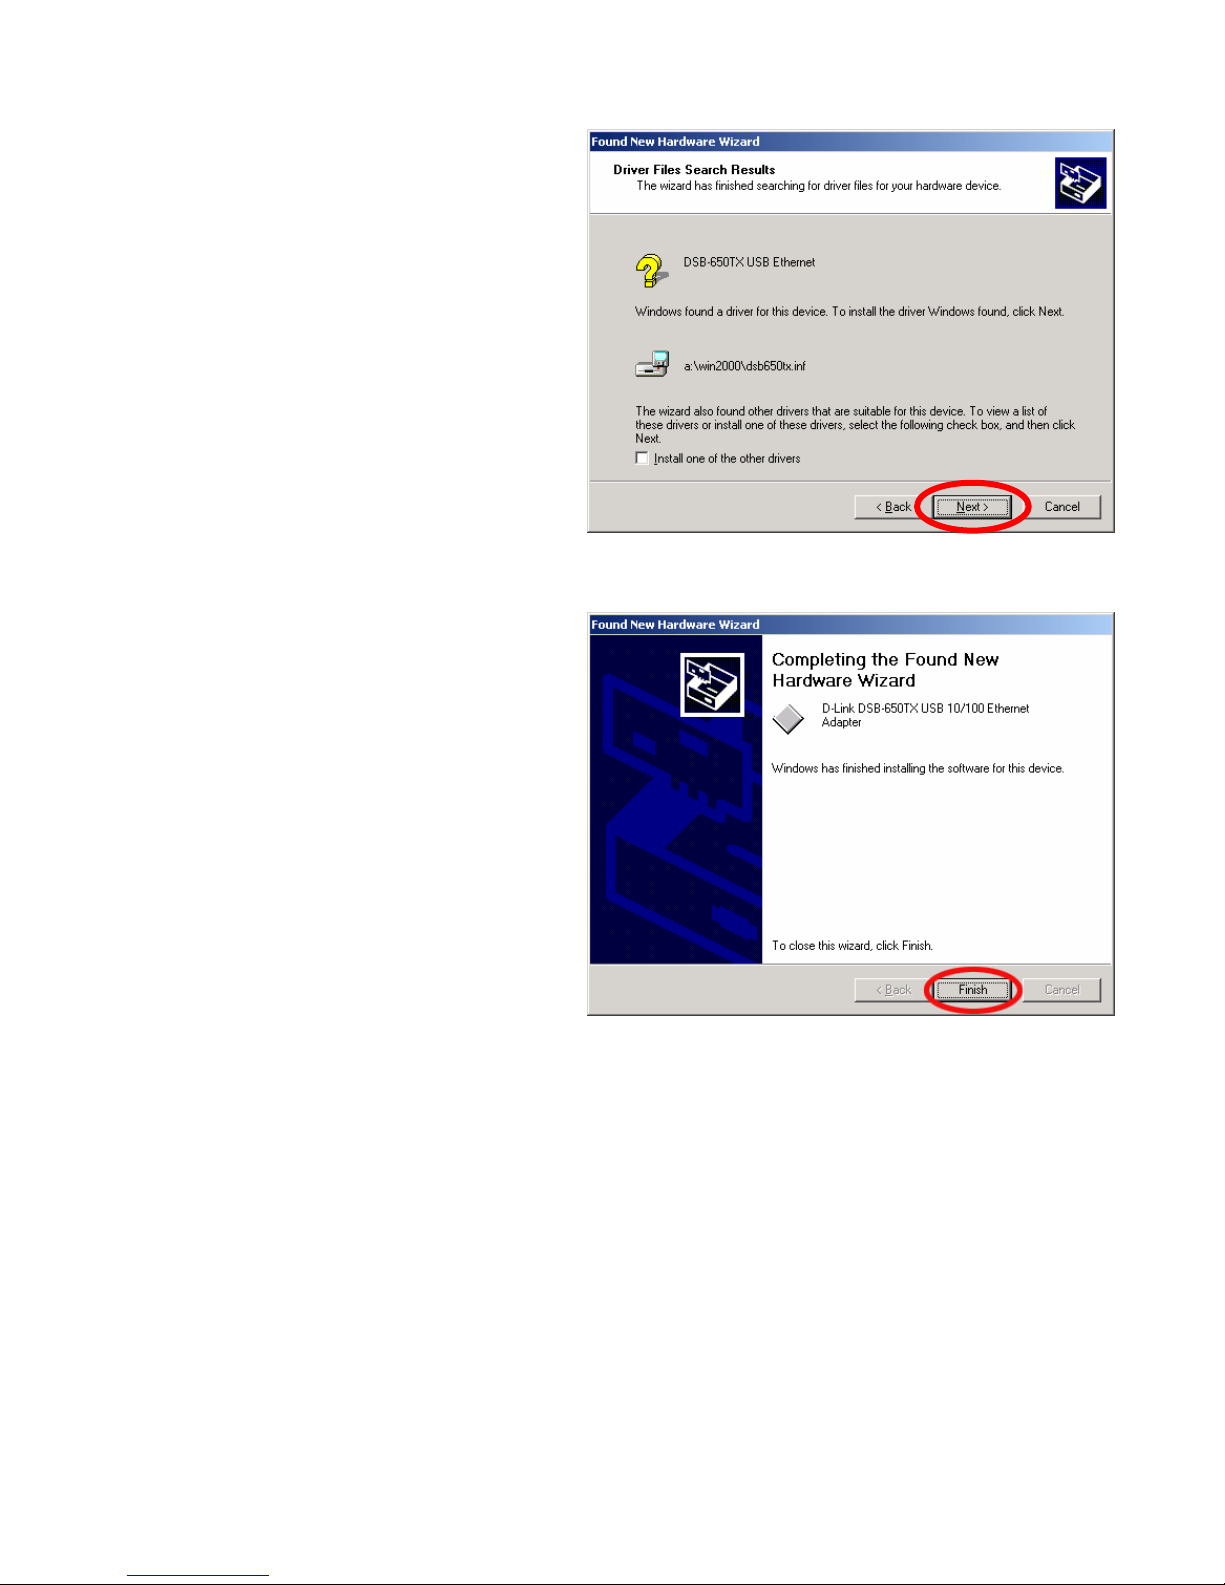
§ Select “Next” to install the
driver.
§ Select “Finish” to complete
the installation.
Page 6
- 6 -
Windows Me Driver Installation
§ Insert the DSB-650TX Driver Disk into your Floppy Drive.
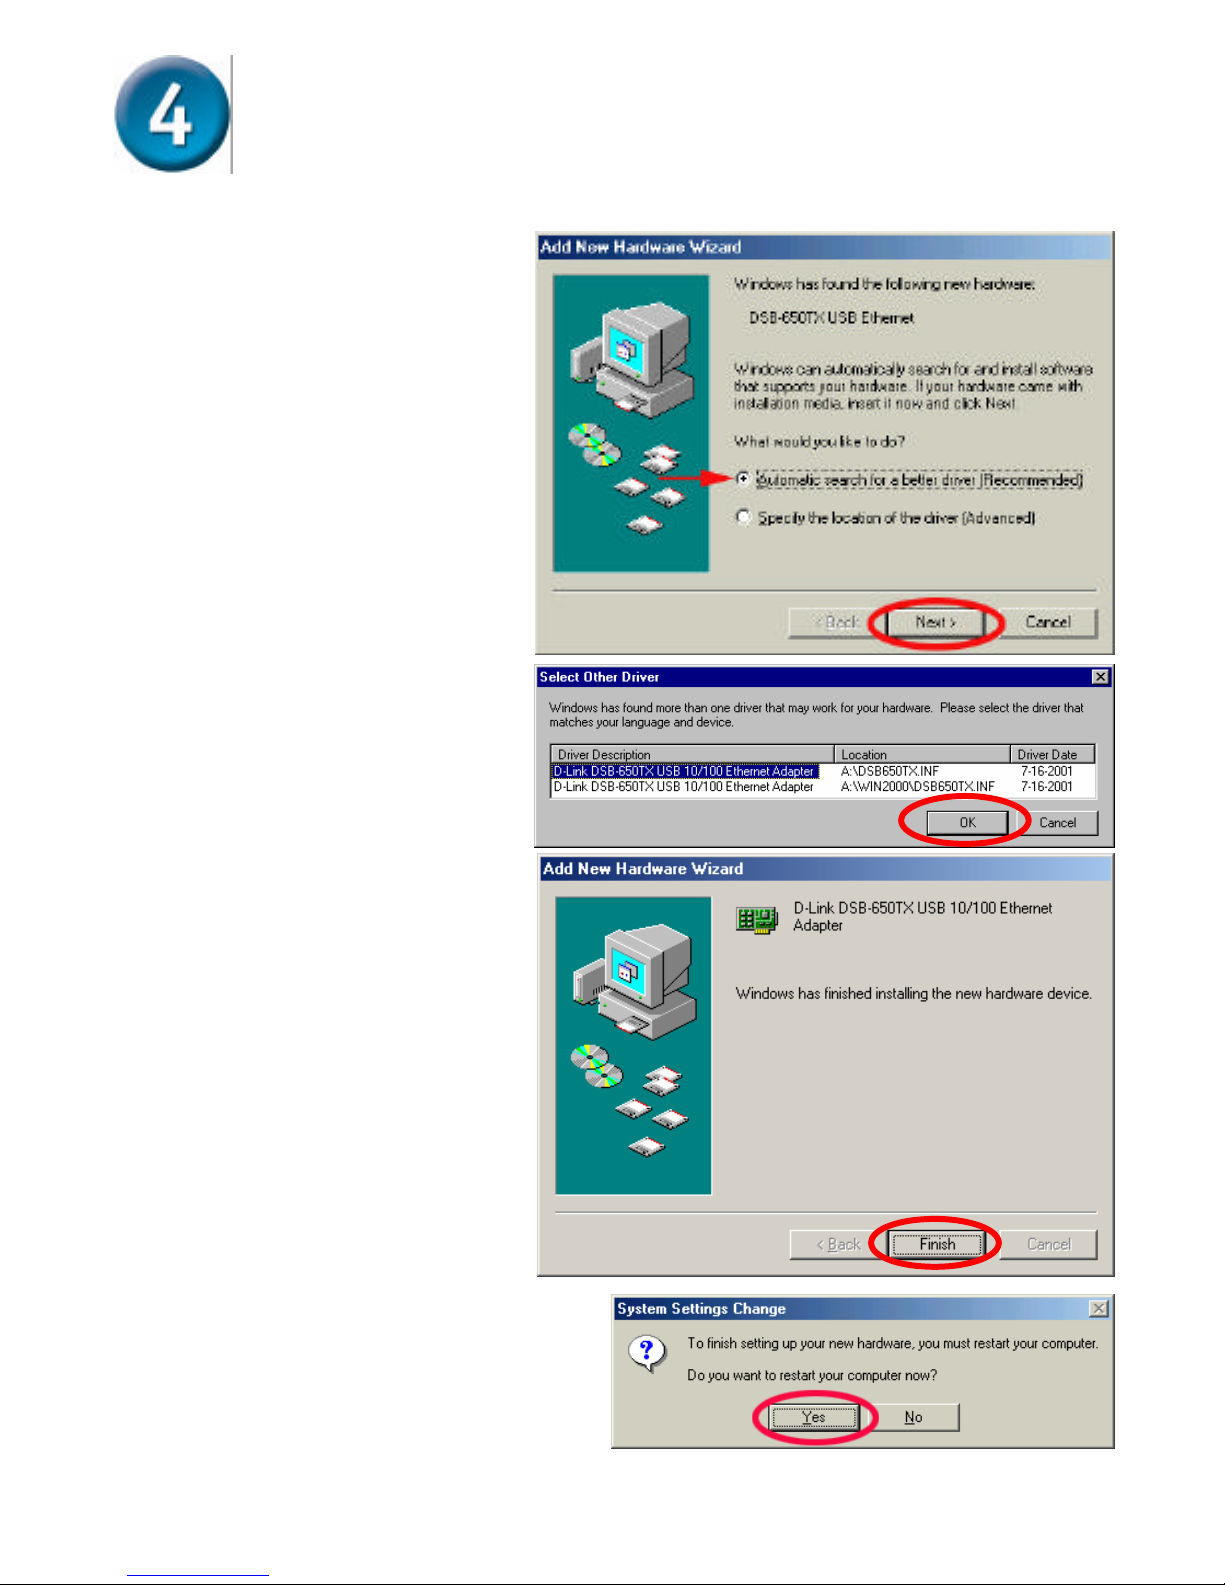
§ The “Found New
Hardware Wizard”
will appear.
§ Insert the driver disk
into the floppy disk
drive. Select
“Automatic search for
a better driver
(Recommended)” and
then click “Next”.
§ Make sure the first line
is selected and click
“OK”.
§ Click “Finish”.
§ The “System Setting
Change” window will appear.
Select “Yes” to restart your
computer and complete the
installation.
Page 7
- 7 -
Windows 98/98SE Driver Installation
§ Insert the DSB-650TX Driver Disk into your Floppy Drive.
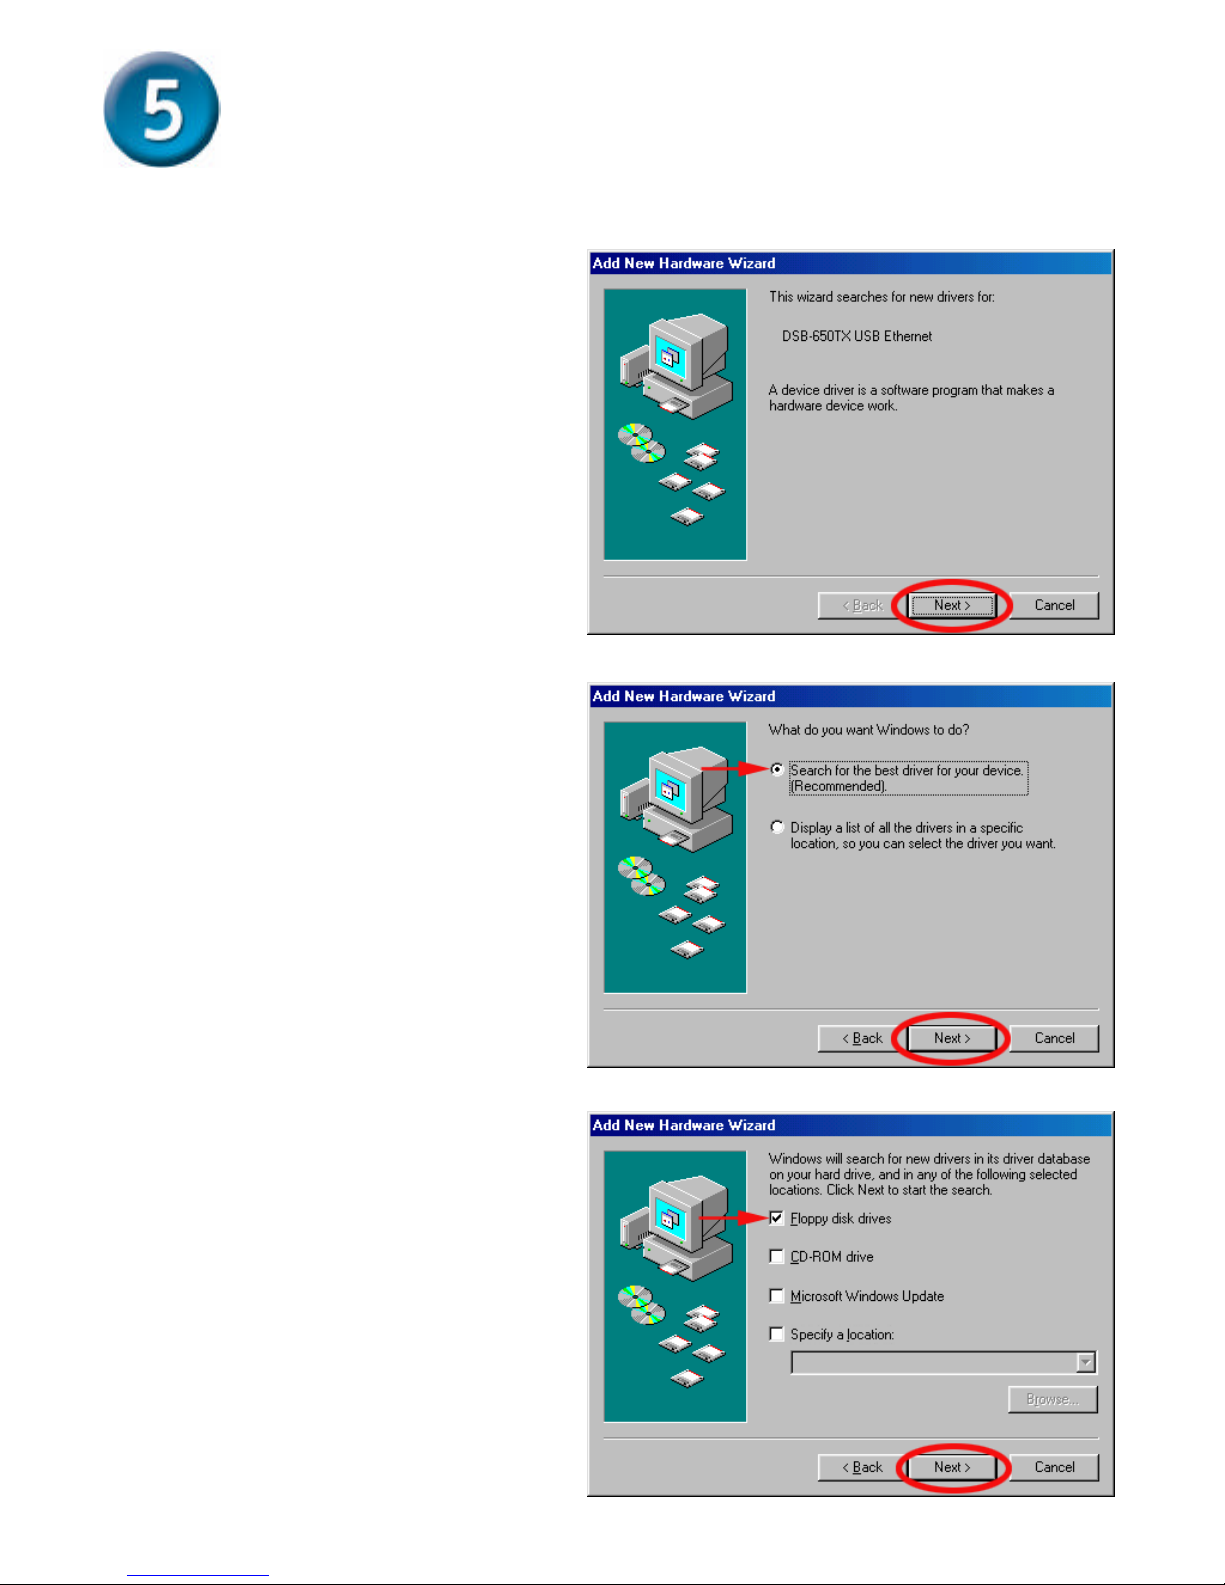
§ The “Found New
Hardware Wizard” will
appear.
§ Select “Next”.
§ Select “Next”.
§ Select “Floppy disk
drives”.
§ Select “Next”.
Page 8
- 8 -
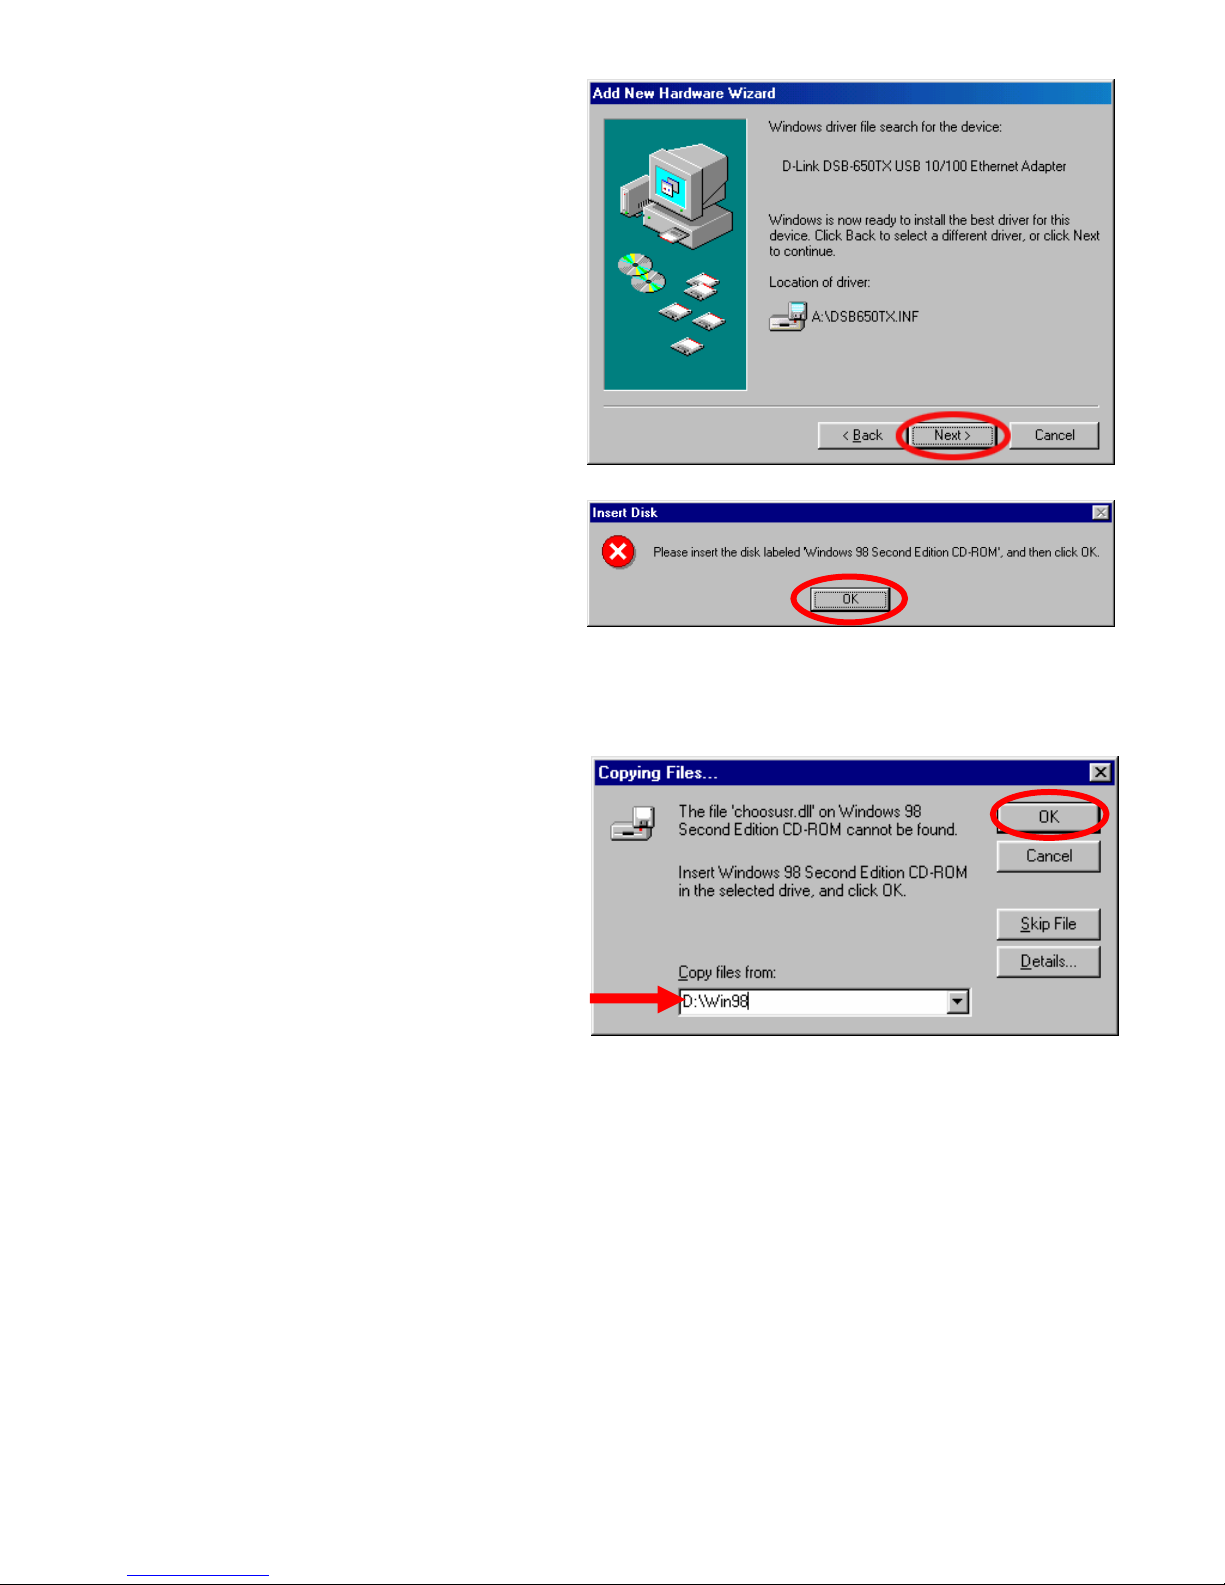
§ Click “Next” to continue.
§ If prompted for the
Windows 98 CD, insert the
Windows 98 CD into the
CD-ROM drive and click
“OK”.
§ Specify the correct location
of the Windows 98 setup
files in the “Copy files
from:” box. If the CD-ROM
drive is the “D” drive, then
type “D:\Win98” in the box.
Note: Some computers will
have these files in the “C:\Windows\options\cabs\” directory.) After
typing in the location, click OK. Windows will copy the necessary files.
Page 9
- 9 -
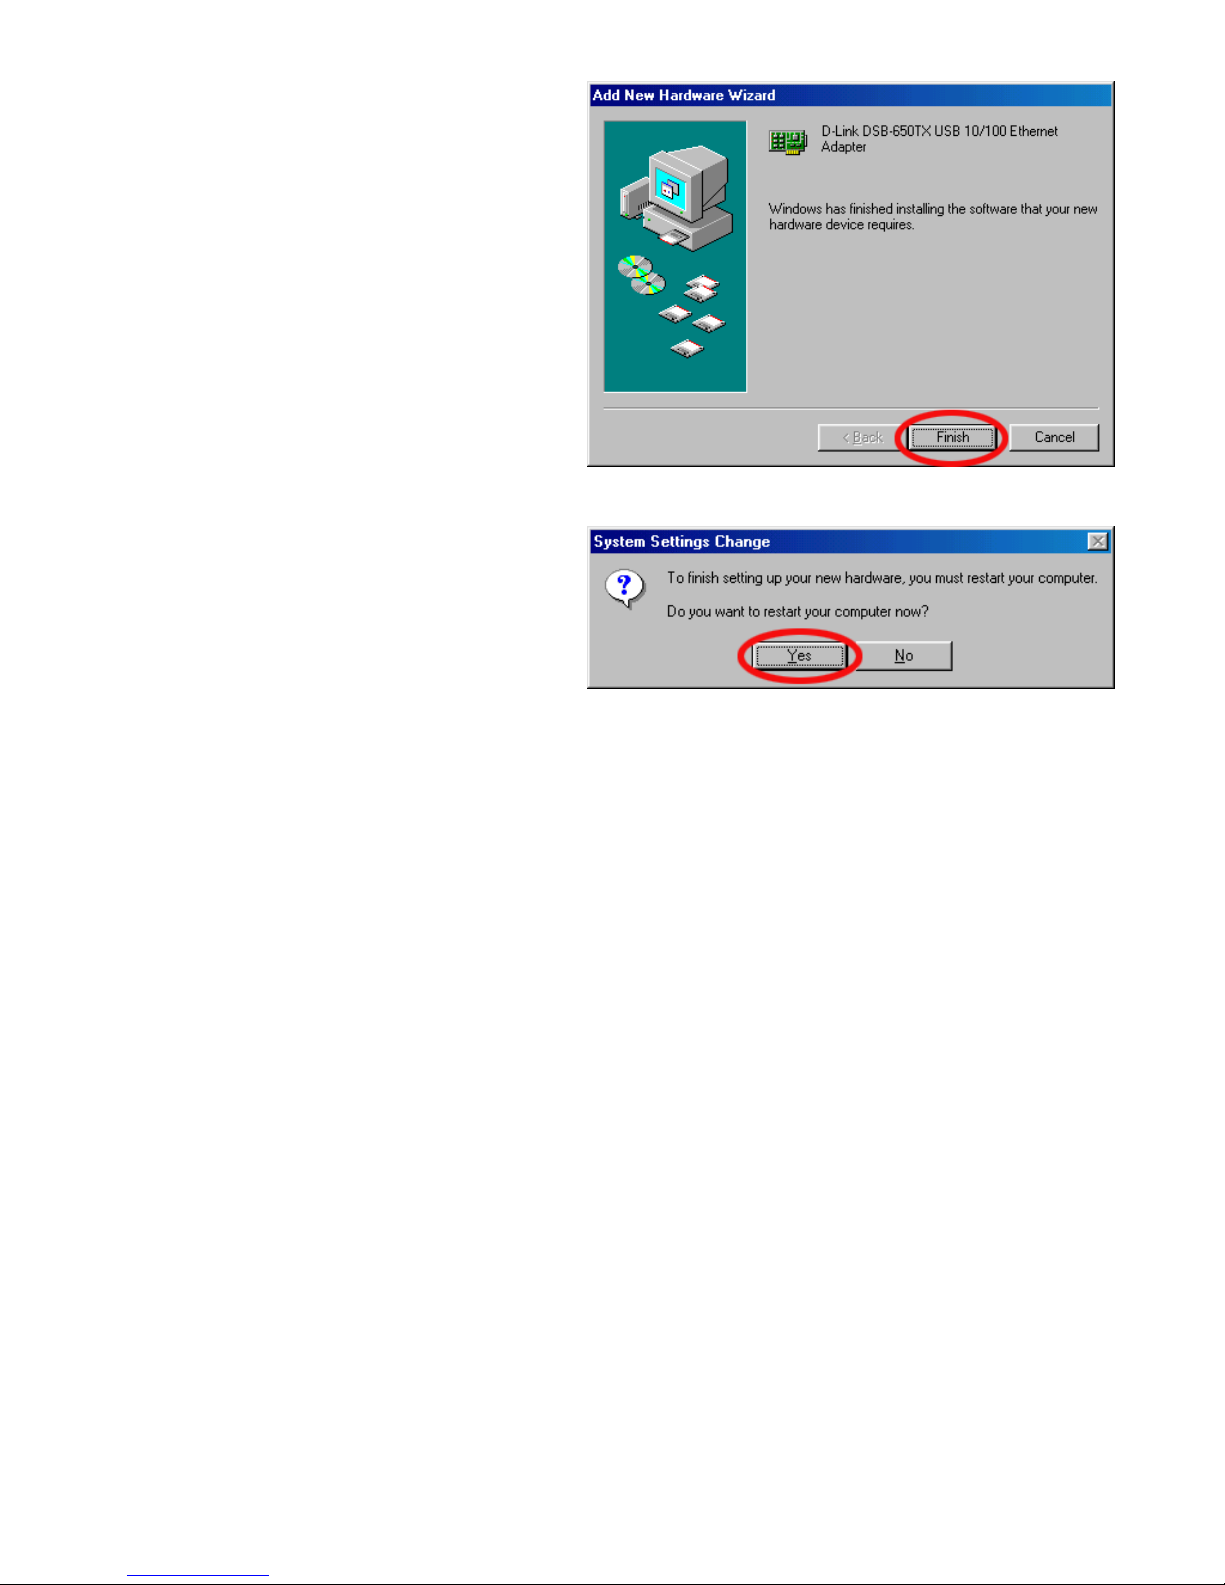
§ Click “Finish”.
§ Click “Yes” to restart your
computer and complete the
installation.
Page 10

- 10 -
Tips & Technical Support
Tips
§ When inserting the DSB-650TX into the USB port of your computer,
make sure that you insert it securely.
§ For best performance, use certified CAT5 Fast Ethernet cable.
§ Remember that you must connect a CAT5 Fast Ethernet cable from the
DSB-650TX to a switch or broadband gateway to connect to your
network.
§ When setting IP addresses, make sure that you are on the same IP
address scheme as the other computers in the network. For example, if
the rest of your network uses an IP address of 192.168.0.XXX, then
you must set your IP address to the same scheme, such as 192.168.0.5.
If your network uses a DHCP server, then you don’t have to worry
about it as the server will assign the correct IP address automatically.
Also, make sure that you have the same workgroup name.
Technical Support
D-Link provides free technical support for customers within the United
States during the warranty period. U.S. customers can contact D-Link
Technical Support through our web site, e-mail or by phone.
D-Link Technical Support over Telephone:
§ 1-877-453-5465
§ 24 Hours a Day, 7 Days a Week
D-Link Technical Support over the Internet:
§ support.dlink.com
 Loading...