

Page 1
Page 2

DPH-C160S – DECT Cordless VoIP Phone – User Manual
Contents
CONTENTS............................................................................................ 2
PACKAGE DETAILS................................................................................ 4
CONTENTS OF PACKAGE ............................................................................ 4
SYSTEM REQUIREMENTS FOR CONFIGURATION ................................................... 4
PRODUCT FEATURES............................................................................. 5
DECT FEATURES.................................................................................... 5
INTRODUCTION.................................................................................... 5
BASE UNIT CONNECTIONS.................................................................... 6
BASE UNIT LEDS................................................................................... 7
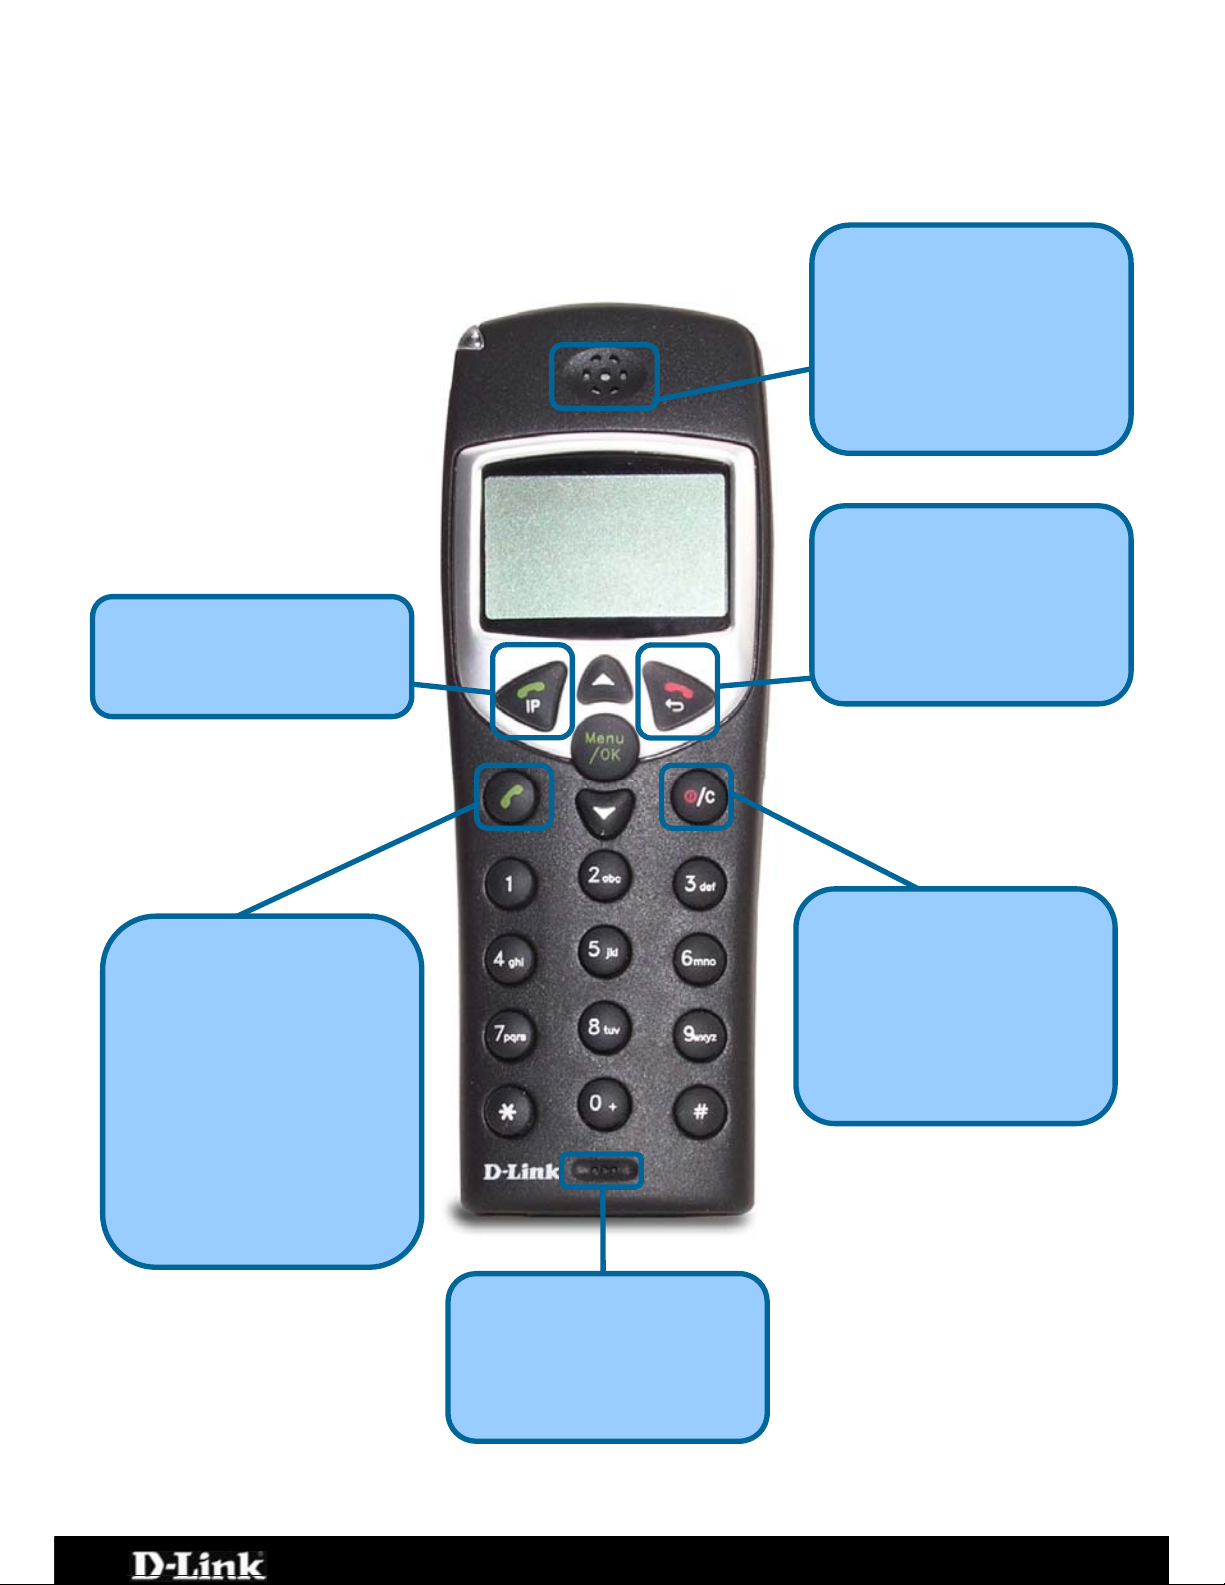
HANDSET BUTTONS AND FUNCTIONS................................................... 8
INSTALLING BATTERIES INTO THE HANDSET..................................... 10
CHARGING THE HANDSET................................................................... 11
USING THE HANDSET ......................................................................... 12
TURNING THE HANDSET ON AND OFF ........................................................... 13
MAKING A CALL TO THE PSTN (REGULAR TELEPHONE NETWORK) ............................ 14
MAKING A CALL TO THE PSTN IN STANDBY MODE ............................................ 15
RECEIVING A CALL ................................................................................ 16
LAST NUMBER REDIAL ............................................................................ 17
USING THE SPEAKERPHONE ...................................................................... 18
ADJUSTING THE VOLUME LEVEL.................................................................. 19
CONNECTING THE DPH-C160S TO YOUR NETWORK............................ 20
CONNECTING/ACTIVATING YOUR VOIP SERVICE............................... 21
CONFIGURING THE DPH-C160S FOR USE WITH YOUR VOIP SERVICE
PROVIDER .......................................................................................... 22
USING THE WEB INTERFACE............................................................... 25
WEB INTERFACE MENU ITEMS ................................................................... 26
Home > LAN > Dynamic IP Address ...............................................................26
Home > LAN > Static IP Address ...................................................................28
Advanced > VOIP > Server Configuration .......................................................30
Advanced > VOIP > Provisioning....................................................................33
Advanced > VOIP > STUN Configuration.........................................................34
Advanced > VOIP > User Agent.....................................................................36
Advanced > VOIP > Peer to Peer ...................................................................38
Advanced > VOIP > Telephony ......................................................................40
Advanced > VOIP > Call Forwarding...............................................................42
Advanced > VOIP > Speed Dial/Contact List....................................................44
Advanced > Misc..........................................................................................46
Tools > Admin.............................................................................................47
Tools > System ...........................................................................................49
Page 2 of 67
Page 3

DPH-C160S – DECT Cordless VoIP Phone – User Manual
Tools > Firmware.........................................................................................50
Tools > Time...............................................................................................51
Tools > Reboot............................................................................................52
Status > Device Info ....................................................................................53
Status > Stats.............................................................................................54
Status > Diagnostics ....................................................................................55
Help > Help .................................................................................................56
HOW TO FACTORY RESET BASE STATION ....................................................... 56
TECHNICAL SPECIFICATIONS............................................................. 57
APPENDIX .......................................................................................... 60
CONFIGURING YOUR PC’S IP ADDRESS......................................................... 60
Configure Windows XP for DHCP ....................................................................60
WINDOWS 2000 IP PROTOCOL ................................................................. 63
Configure Windows 2000 for DHCP.................................................................64
WINDOWS ME IP PROTOCOL .................................................................... 64
Configure Windows ME for DHCP....................................................................65
WINDOWS 95 AND WINDOWS 98 IP PROTOCOL .............................................. 65
Configure Windows 95 and Windows 98 for DHCP ............................................65
Page 3 of 67
Page 4
DPH-C160S – DECT Cordless VoIP Phone – User Manual
Package Details
Contents of Package
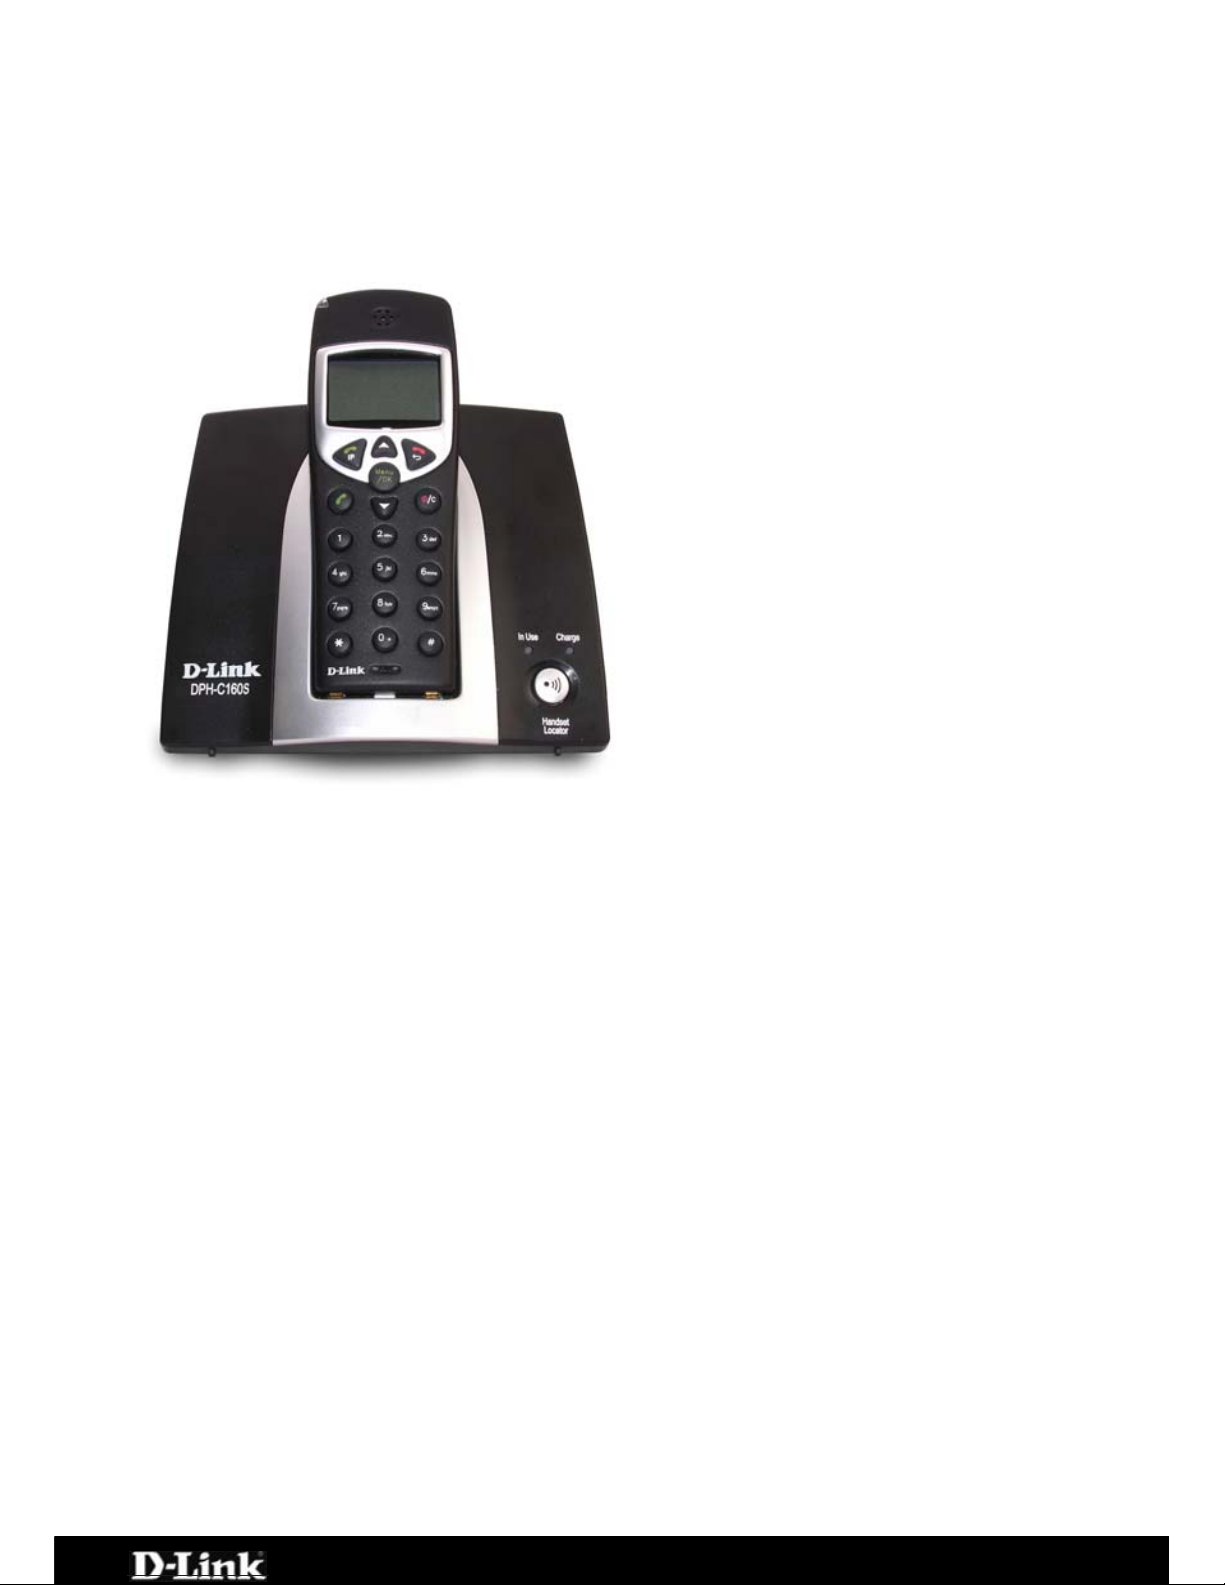
D-Link DPH-C160S DECT
Cordless VoIP Phone Handset
+ Base Station
3 x AAA NiMH Rechargeable
Batteries
Ethernet Cable (the DPH-
C160S’s Ethernet port is
Auto-MDIX)
Telephone Cable (RJ-11)
Power Adapter - 9VAC, 1A
Manual and Warranty on CD
Quick Installation Guide
Note:
Using a power supply with a different voltage rating than the one included with
the DPH-C160S will cause damage and void the warranty for this product.
If any of the above items are missing, please contact your reseller.
System Requirements for Configuration
Ethernet-Based Cable or DSL Modem
A multi-port Ethernet router (may be included in the same
box as the Cable or DSL Modem mentioned above)
Computer with Windows, Macintosh, or Linux-based operating
system and an installed Ethernet adapter
Internet Explorer Version 6.0 or Netscape Navigator Version
6.0 and Above
Page 4 of 67
Page 5

DPH-C160S – DECT Cordless VoIP Phone – User Manual
Product Features
Dialling via PSTN to standard telephone numbers
Dialling via Ethernet port for VoIP calls
1 NWay 10/100BASE-TX Fast Ethernet port for network connection
Voice Activity Detection (VAD) / Comfort Noise Generation (CNG)
Configurable comfort noise insertion and handset echo cancellation
Audio Compression: G.711a-law, G.711u-law, G.726, G.729a, iLBC
Static IP, DHCP Client support
Support TCP/IP, UDP, RTP and RTCP
Lost packet recovery ability for improved voice quality
Adjustable speaker / ringer volume control
Dialling by last 10 calls
Call Log (Missed, Received, Dialled)
DECT Features
Frequency: 1880~1900 MHZ
GAP Compatible
Range: Outdoors – 300 Metres; Indoors – 50 Metres
Handset: 150 Hours Standby Time & 10 Hours Talk Time
Handset: Caller ID Function (FSK & DTMF)
Handset: Phonebook Memory - 50 Locations
Intercom
Call transfer of external calls
Ringer melody selection − 9 different melodies
Ringer volume adjustment − 9 levels
Handset earpiece volume setting − 9 levels
Delete single or all records in phonebook
Redialling and preparation dialling functions
Handset Locator
Clicking key tone on or off
Speakerphone
Hands-free dialling
Introduction
The D-Link DPH-C160S DECT Cordless VoIP Phone links traditional telephony
networks to IP networks with a built in DECT Cordless Phone. It can reduce
long distance phone charges and deliver toll-quality voice communication over
the IP network. This device provides one loop start Foreign Exchange
Subscriber (FXS) port, one PSTN failover port and one Ethernet port.
Page 5 of 67
Page 6
DPH-C160S – DECT Cordless VoIP Phone – User Manual
Base Unit Connections
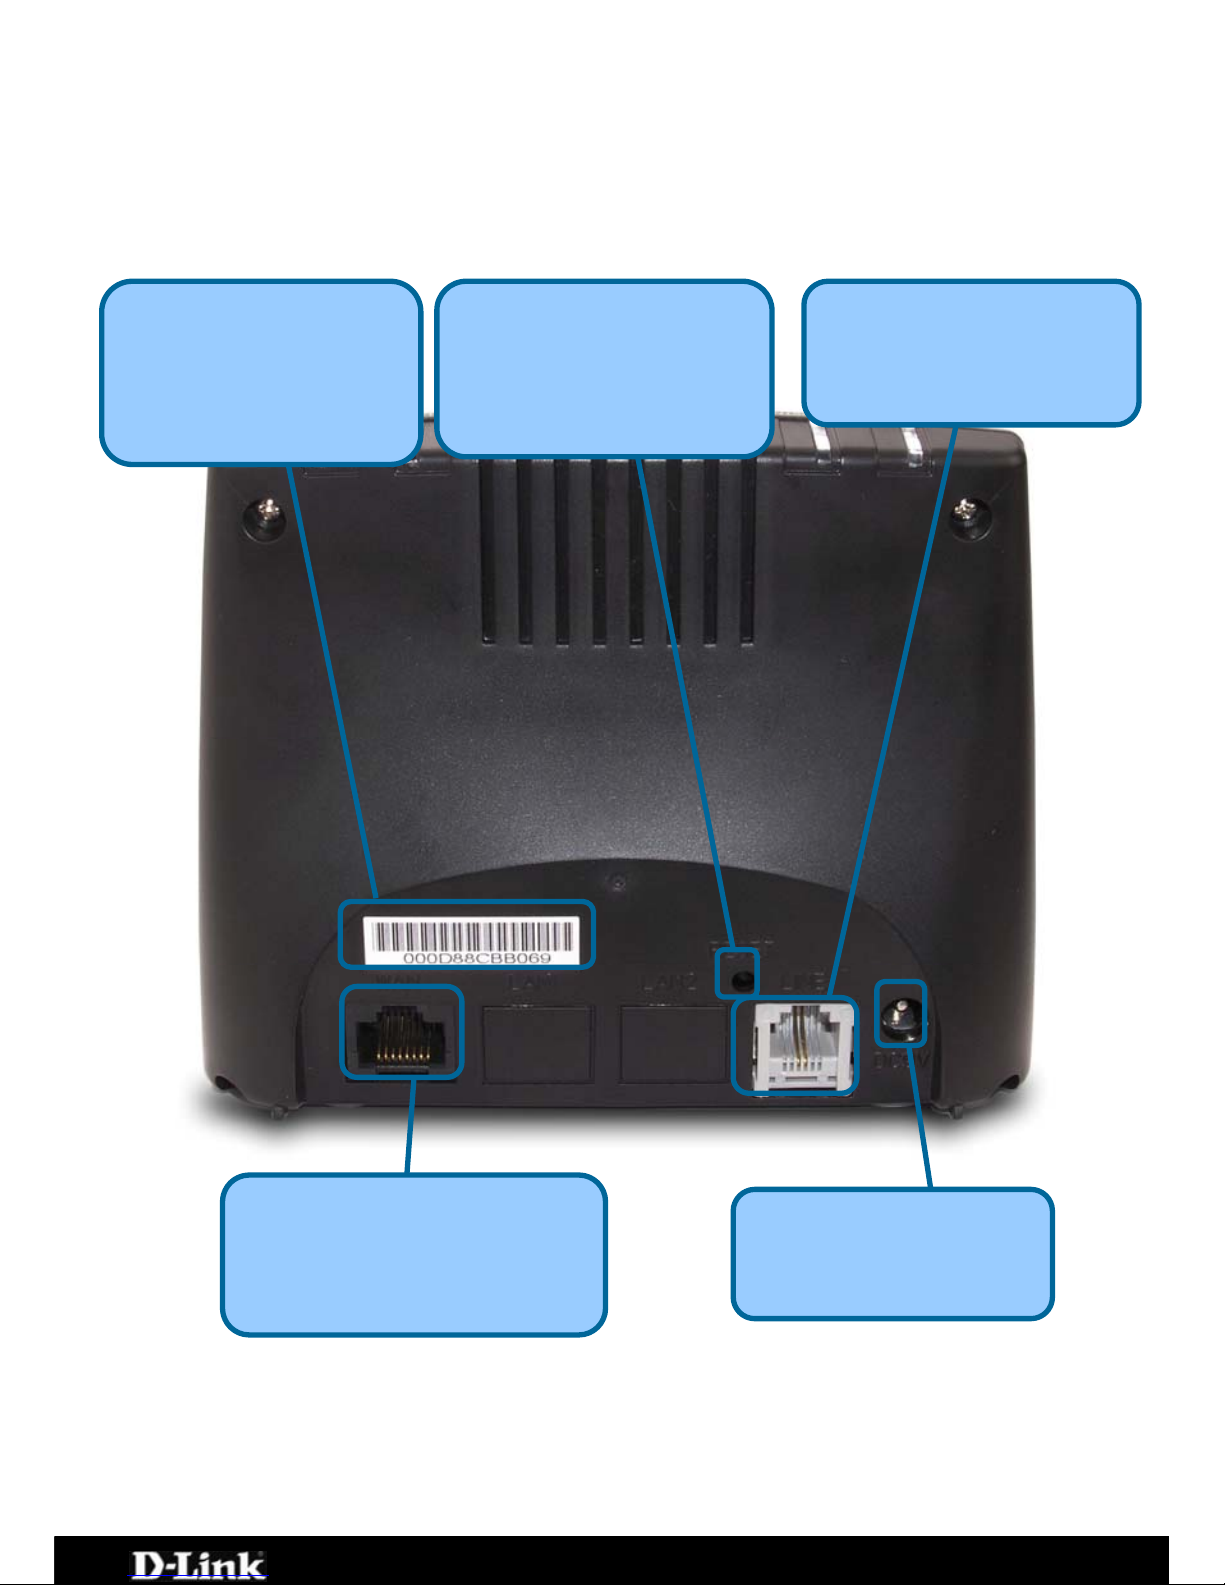
The Ethernet Port (LAN) is auto MDI/MDIX, meaning you can use either
connect a straight-through or crossover Ethernet cable.
Phone Connection
Connect to your existing
phone line using standard
p
hone cabling.
LAN Port
Connect the Ethernet cable
from a computer on your LAN
to this port.
Factory Reset
Press this button to
restore the DPH-C160S
to its factory default
settin
g
s.
MAC Address
The MAC address
assigned to your DPH-
C160S by the factory.
Power Adapte
r
Connect your 9VAC 1A
power adapter here.
Page 6 of 67
Page 7
DPH-C160S – DECT Cordless VoIP Phone – User Manual
Base Unit LEDs
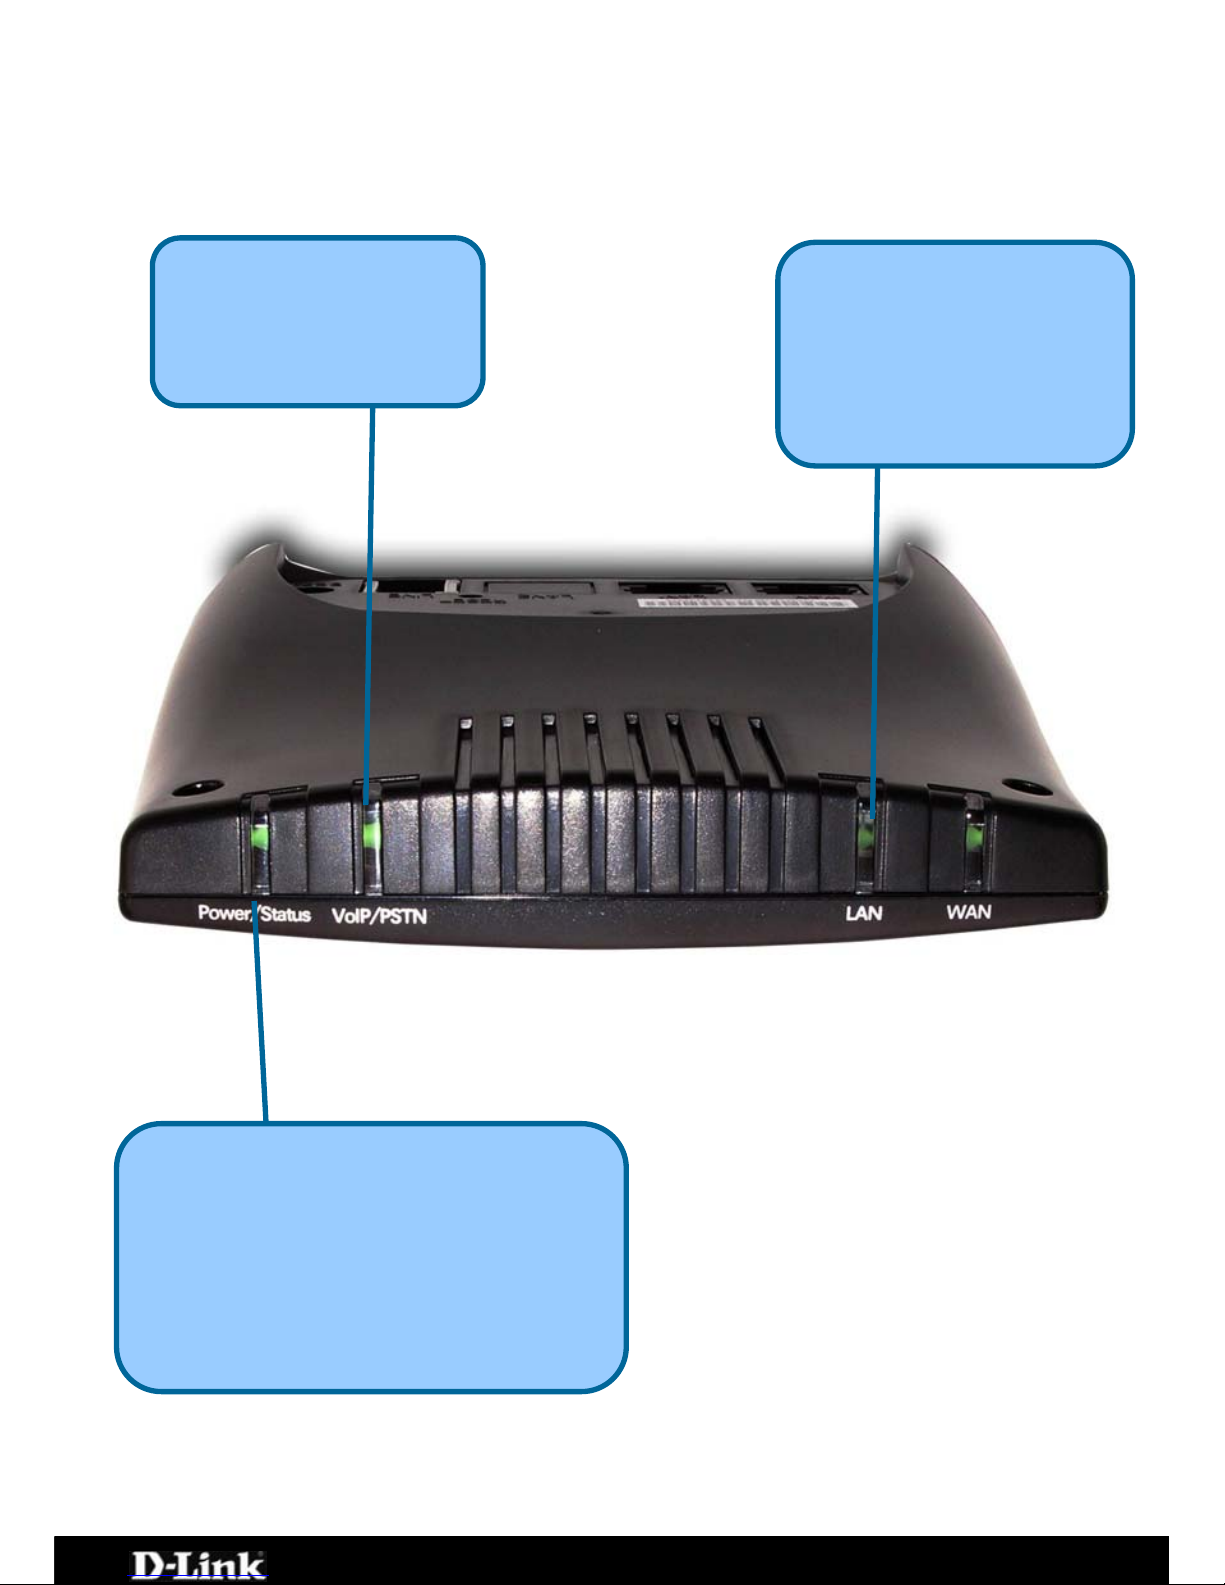
Power/Status LED
A blinking LED indicates the DPH-C160S is
functioning properly, but has not yet
registered with a SIP server.
A solid LED indicates the DPH-C160S has
registered with a SIP server and ready for a
VoIP call.
VoIP/PSTN
An active LED indicates a
VoIP session has been
established.
LAN LED
A solid LED indicates an
Ethernet link has been
established. The LED will
blink when there is activity on
this link
Page 7 of 67
Page 8
DPH-C160S – DECT Cordless VoIP Phone – User Manual
Handset Buttons and Functions
Ear Speaker
Sensitive microphone for
making your voice clearly
heard.
High quality speaker for
privately hearing
telephone calls. Another,
larger speaker is on the
rear of the handset for use
as a speakerphone
IP
Use this button to initiate
a VoIP call.
PSTN Dial Tone
On Hook
Use this button to switch
the Handset off by holding
the button until Good Bye
appears in the display.
Also, this button is used to
clear an input.
Use this button to hang up
the Handset after you
have finished a
VoIP/PSTN call.
Power / Clear
Use this button to initiate
a PSTN call (over your
existing phone line). It is
also used to switch the
Handset to
speakerphone mode by
holding the button down
for several seconds until
the speaker icon
appears in the display
Microphone
Page 8 of 67
Page 9
DPH-C160S – DECT Cordless VoIP Phone – User Manual
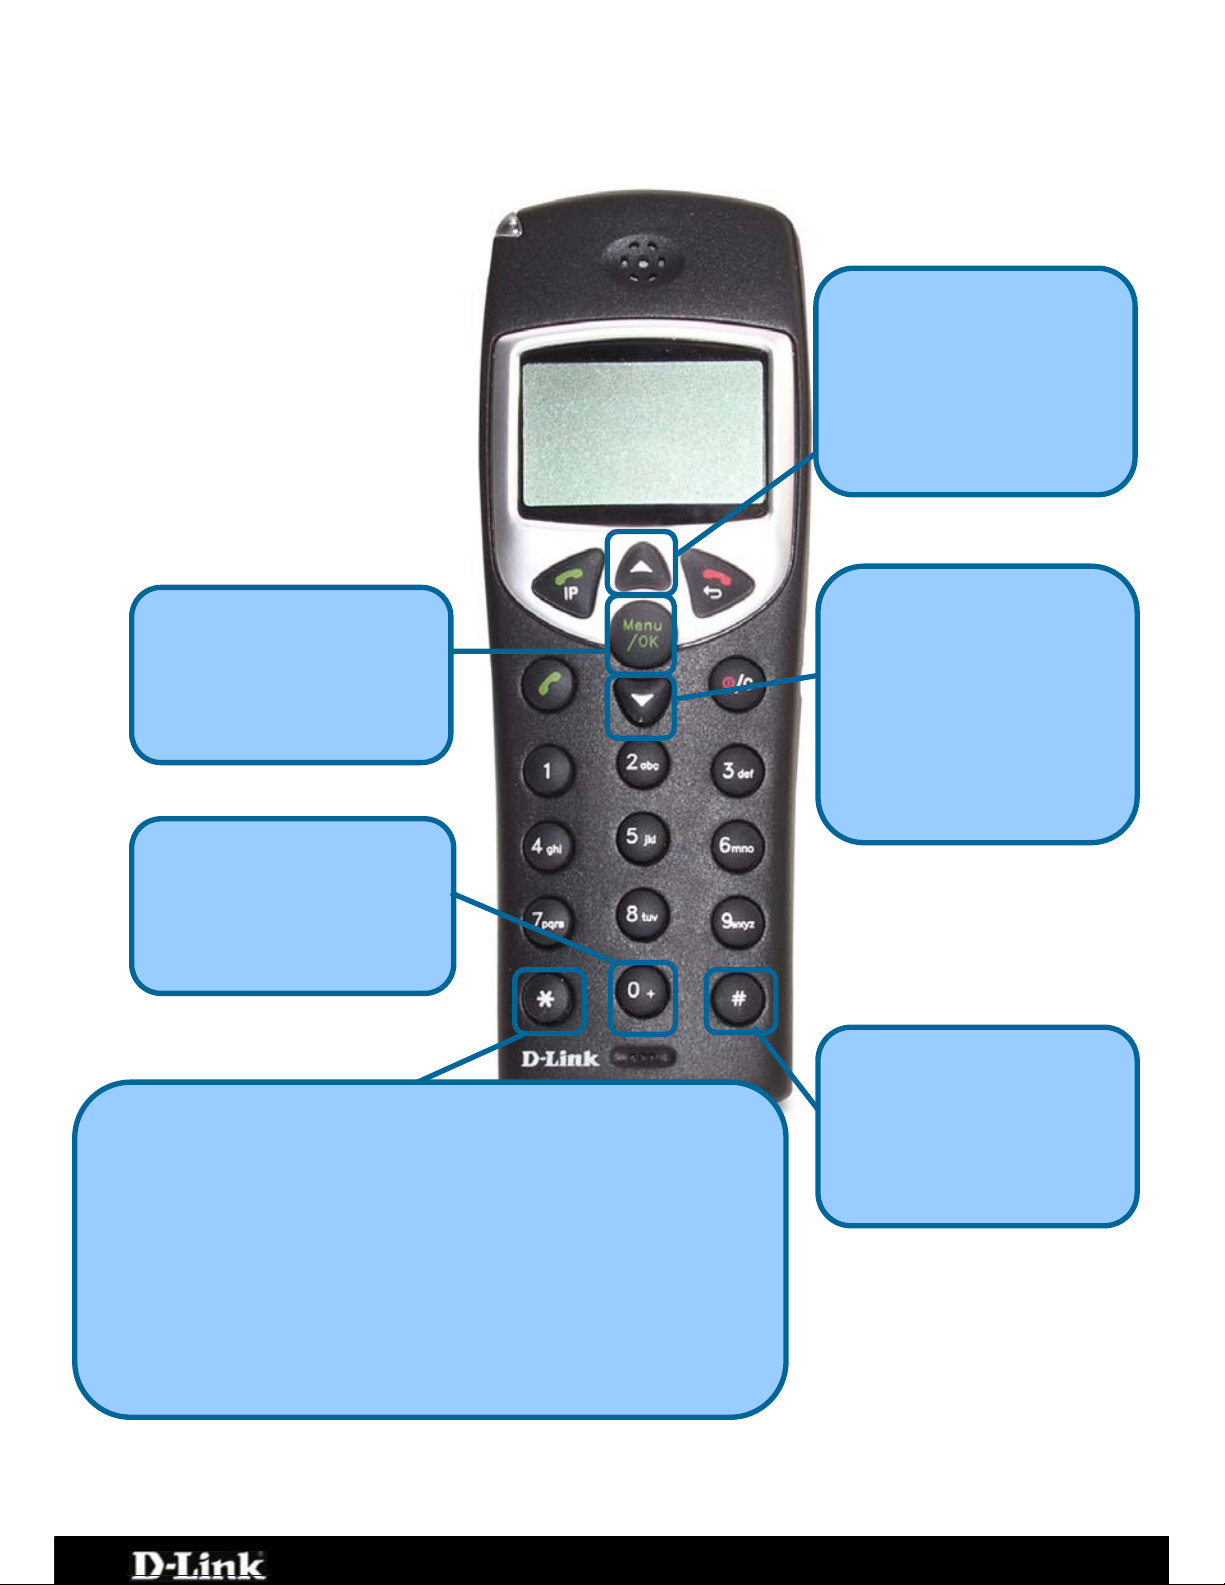
Up Arrow
Use this button to open
the Contact List when the
Handset is idle. Pressing
this button during a call
will increase the volume.
Press 1 for DHCP mode
Press 2 for Static IP mode, followed by the IP address separated
by *’s and then the # key (for example, 192*168*1*110#)
**2 − will play your DPH-C160S’s phone number
**3 − to set the Internet connection type.
Pressing the following, followed by the IP button:
**1 − will play your DPH-C160S’s IP address
Pound Key
Use this button for various
input functions such as to
enter a static IP address,
as described to the left.
Down Arrow
Use the button to open
the Phone Book numbers
stored for your use.
Pressing this button
during a telephone call will
decrease the volume.
Menu/OK
Use this button to open
the Handset’s setup and
information menus.
Star/Asterisk
0 / +
Use this button to input a
zero or hold the button
down for a few seconds to
input a + sign.
Page 9 of 67
Page 10
DPH-C160S – DECT Cordless VoIP Phone – User Manual
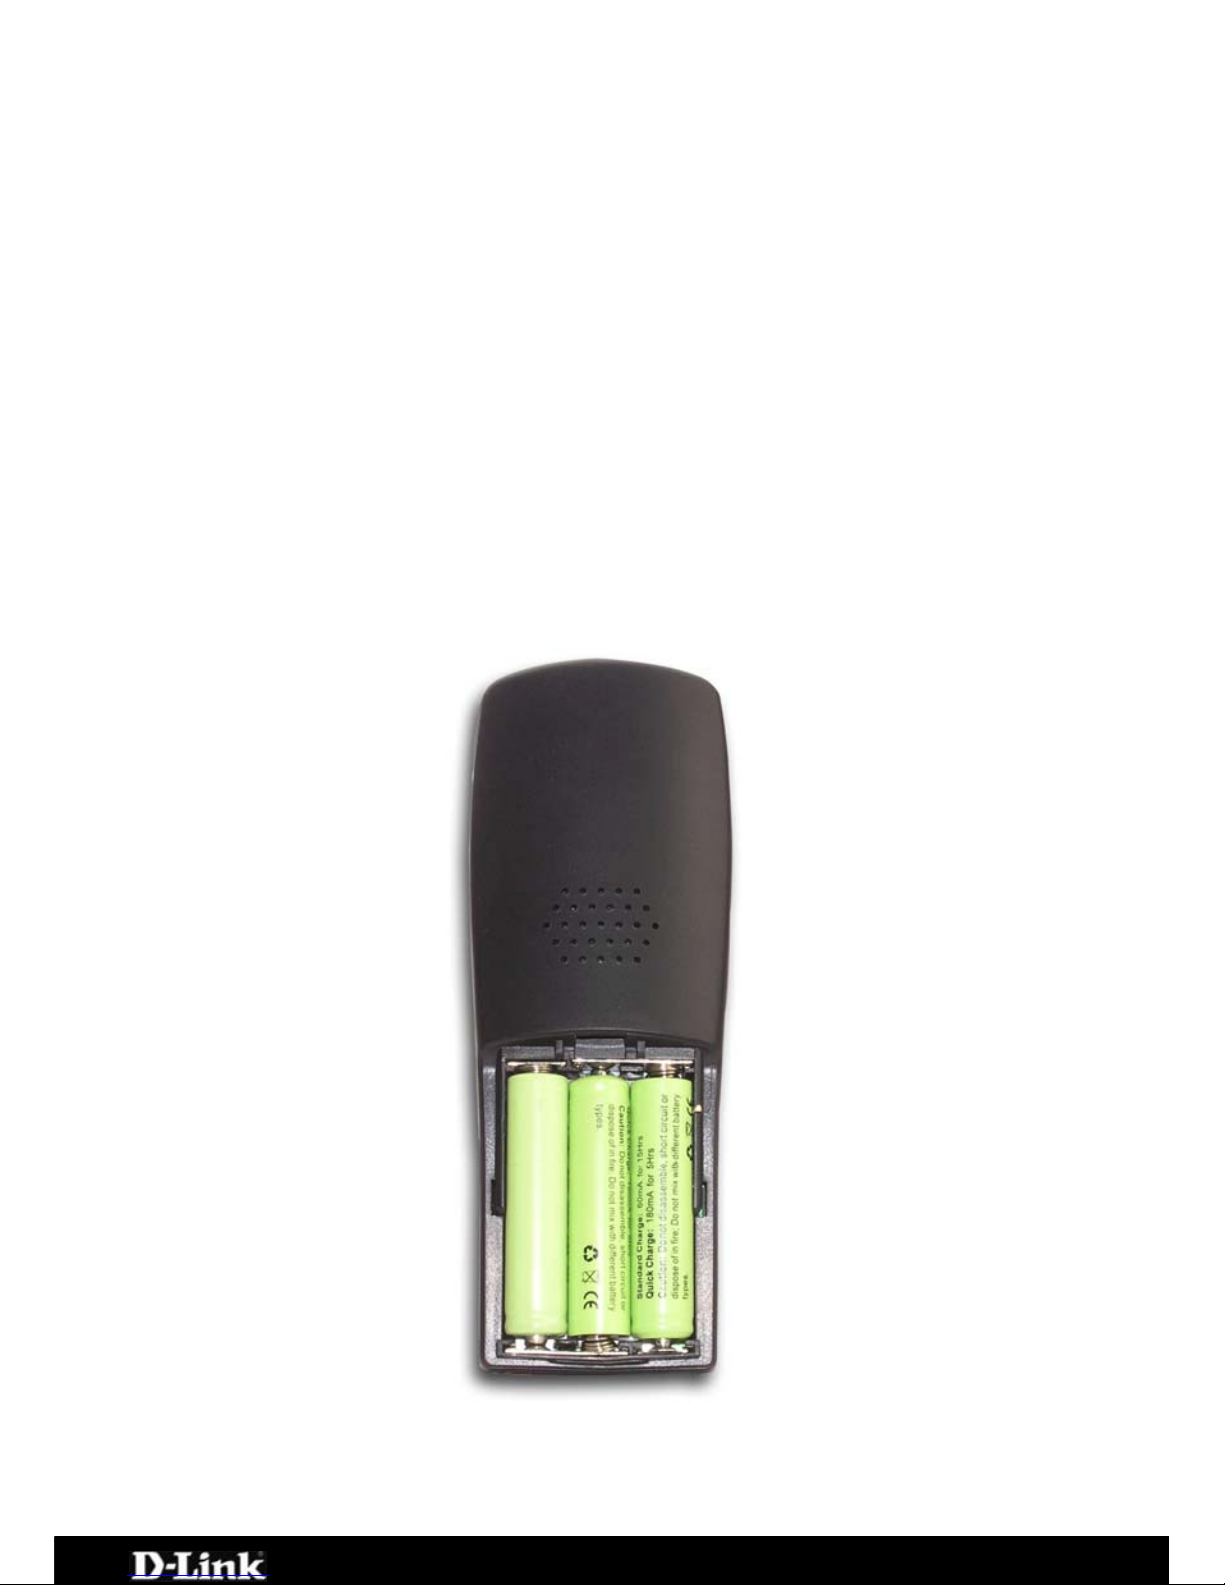
Installing Batteries into the Handset
You must install three AAA NiMN batteries (included in the package) into the
DPH-C160S handset and charge them in the base for about 12 hours before
you can use your new DPH-C160S DECT Cordless VoIP Phone.
1. Slide the battery cover in the direction of the arrow.
2. Insert the new batteries, as indicated, matching the correct polarity
(+,-).
3. Replace the battery cover and slide it up until it snaps shut.
4. Put the Handset into the Base.
5. Connect the Base to the AC mains using the supplied AC adapter.
6. Allow the batteries to charge for about 12 hours before using the
Handset to insure a proper first time charge.
Page 10 of 67
Page 11
DPH-C160S – DECT Cordless VoIP Phone – User Manual
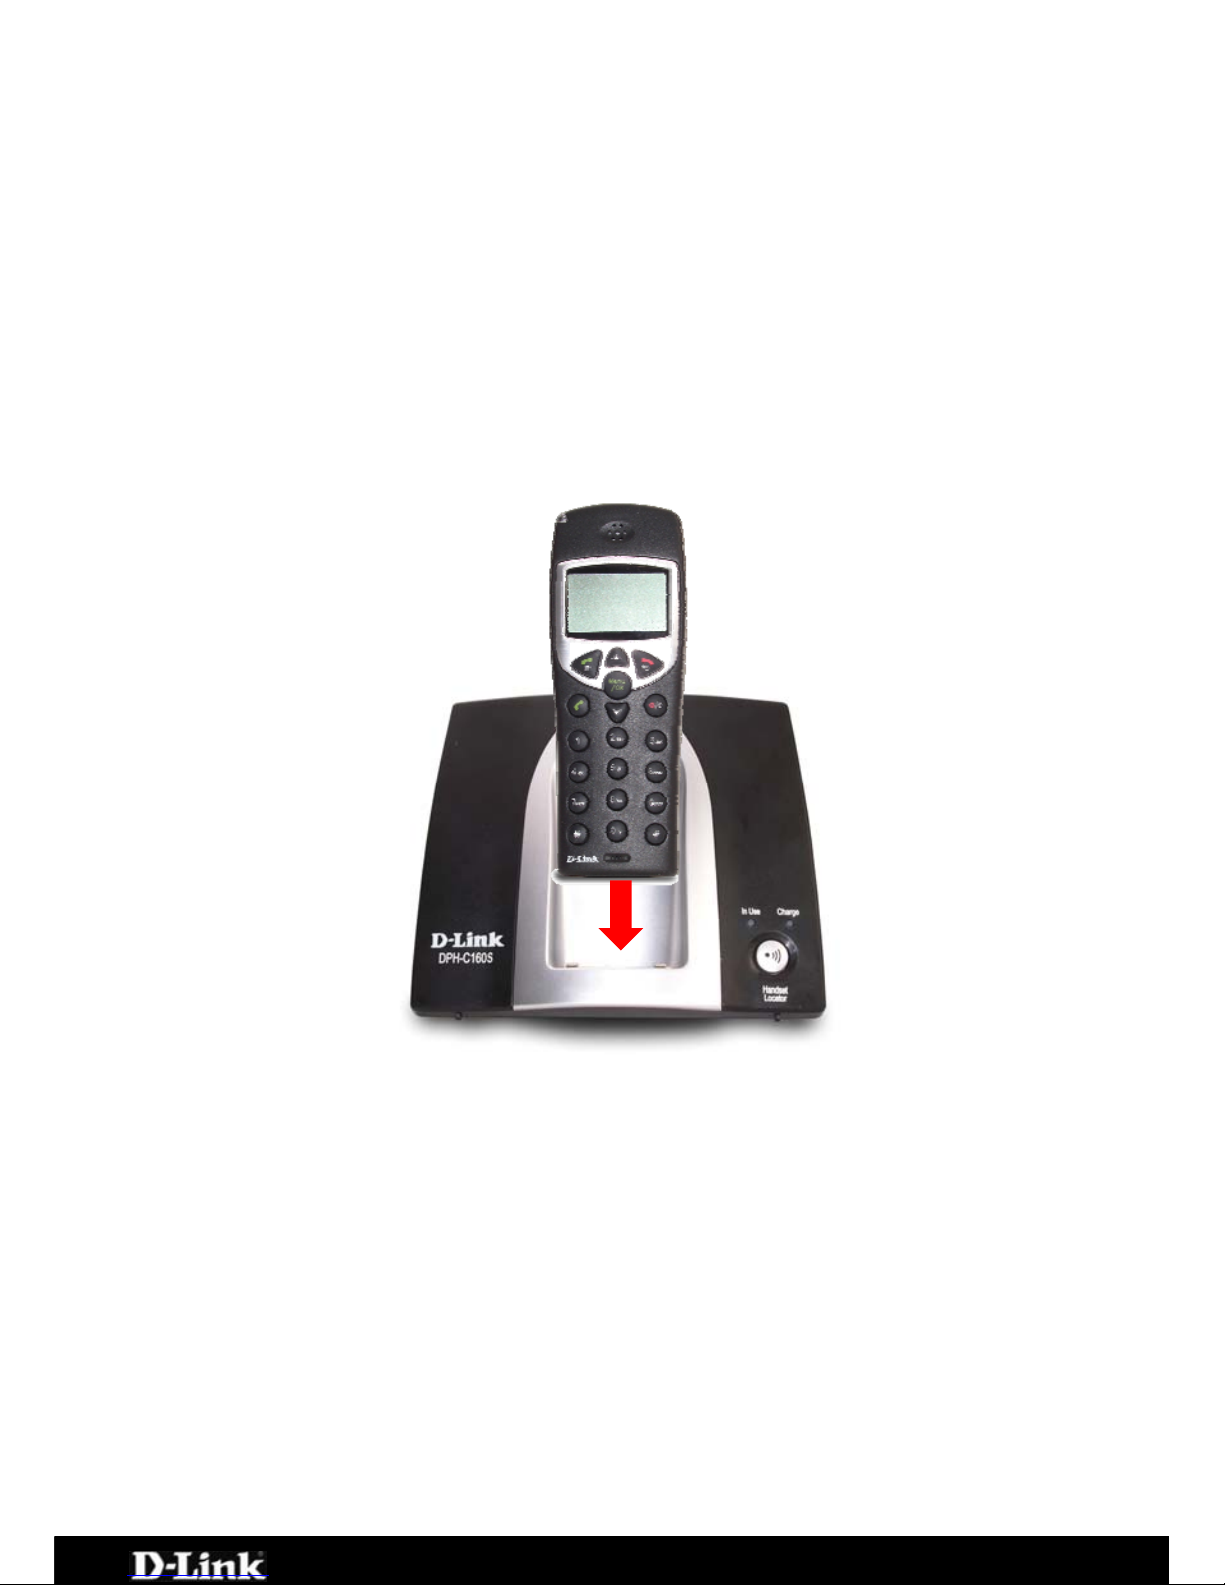
Charging the Handset
Please Note:
Before you use the Handset for the first time, you
should full charge the new batteries for about 12 hours.
After the initial charging, the Handset will recharge much more quickly
typically in less than 30 minutes.
To charge the Handset, simply place it on the charger base, as shown.
When the Handset is recharging, the battery icon on the LCD display is turned
on.
Please Note:
Reversing the orientation of the batteries (their polarity (+,-) may
damage the Handset
The batteries need to be replaced when they do not recover their full
capacity after recharging
When replacing the batteries, use good quality NiMH, rechargeable, AAA
size batteries.
Never use conventional alkaline batteries in the Handset.
Page 11 of 67
Page 12
DPH-C160S – DECT Cordless VoIP Phone – User Manual
Using the Handset
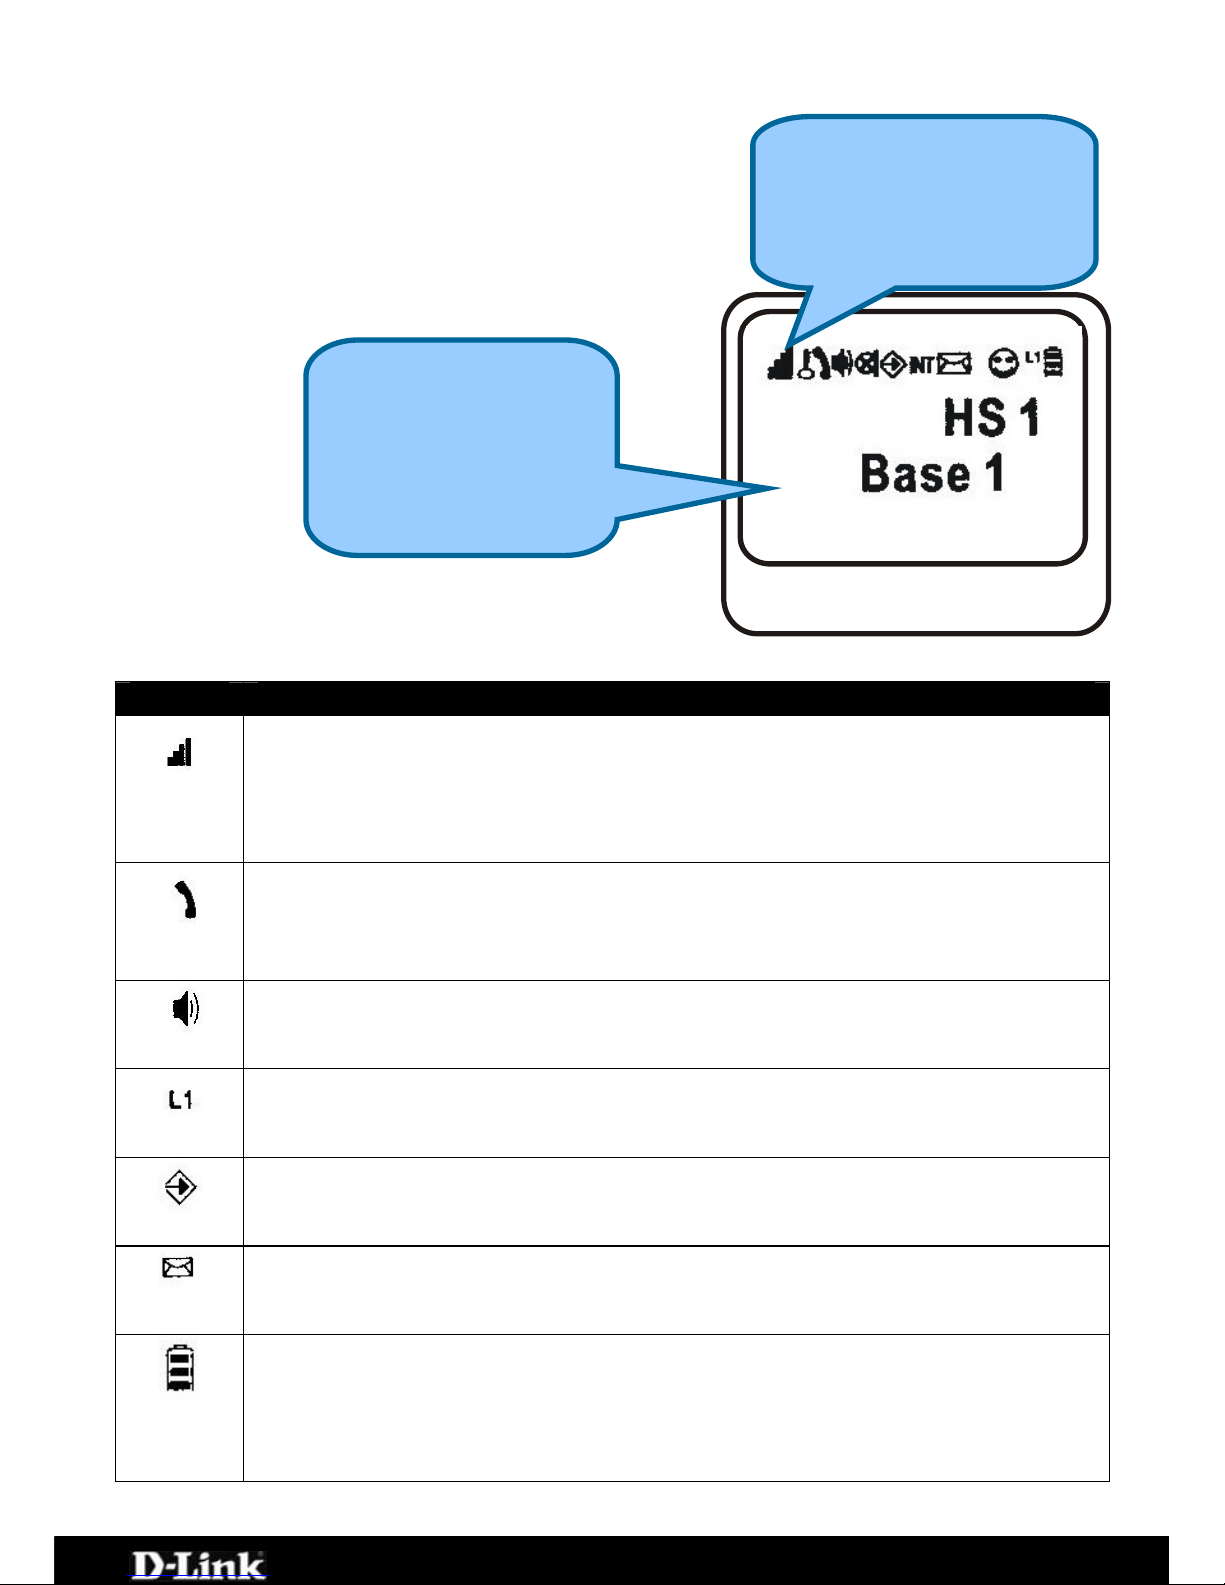
The LCD display of the DPH-C160S handset can
display various icons (at the top of the display)
to indicate the operational status of the
telephone. These icons are described in the
table below.
Icon Description
Signal Strength
Indicates the current signal strength between the handset and the
base more bars indicate higher signal strength. This icon is always
displayed when the telephone is on.
In Use
Displayed when the telephone is in use (i.e., a telephone call is in
progress).
Speakerphone
Indicates the handset is in speakerphone mode.
Line
Indicates the line is engaged.
Operation Mode
Displayed when the handset is in operation mode.
Caller ID
Indicates a new call. To view the caller, access the Caller ID menu.
Battery Status
Indicates the relative charge state of the handset’s batteries more
bars indicates a higher level of battery charge. During the charging
cycle, this icon will flash. This icon is always displayed when the
telephone is on.
Icons that indicate the
operation of the
handset are shown in
this area
Information such as
connection status
and telephone
numbers are shown
in this area
Page 12 of 67
Page 13
DPH-C160S – DECT Cordless VoIP Phone – User Manual
Turning the Handset On and Off
When you place the handset in the charger to charge, it is automatically turned
on. The handset is now ready for use. To turn the handset off, press the Mute
button until “Good-Bye” appears in the handset’s LCD display, as shown
below.
Good-Bye
The handset will then turn off and the display will become blank.
Please note: nothing will appear in the handset’s LCD display when the
battery power is very low.
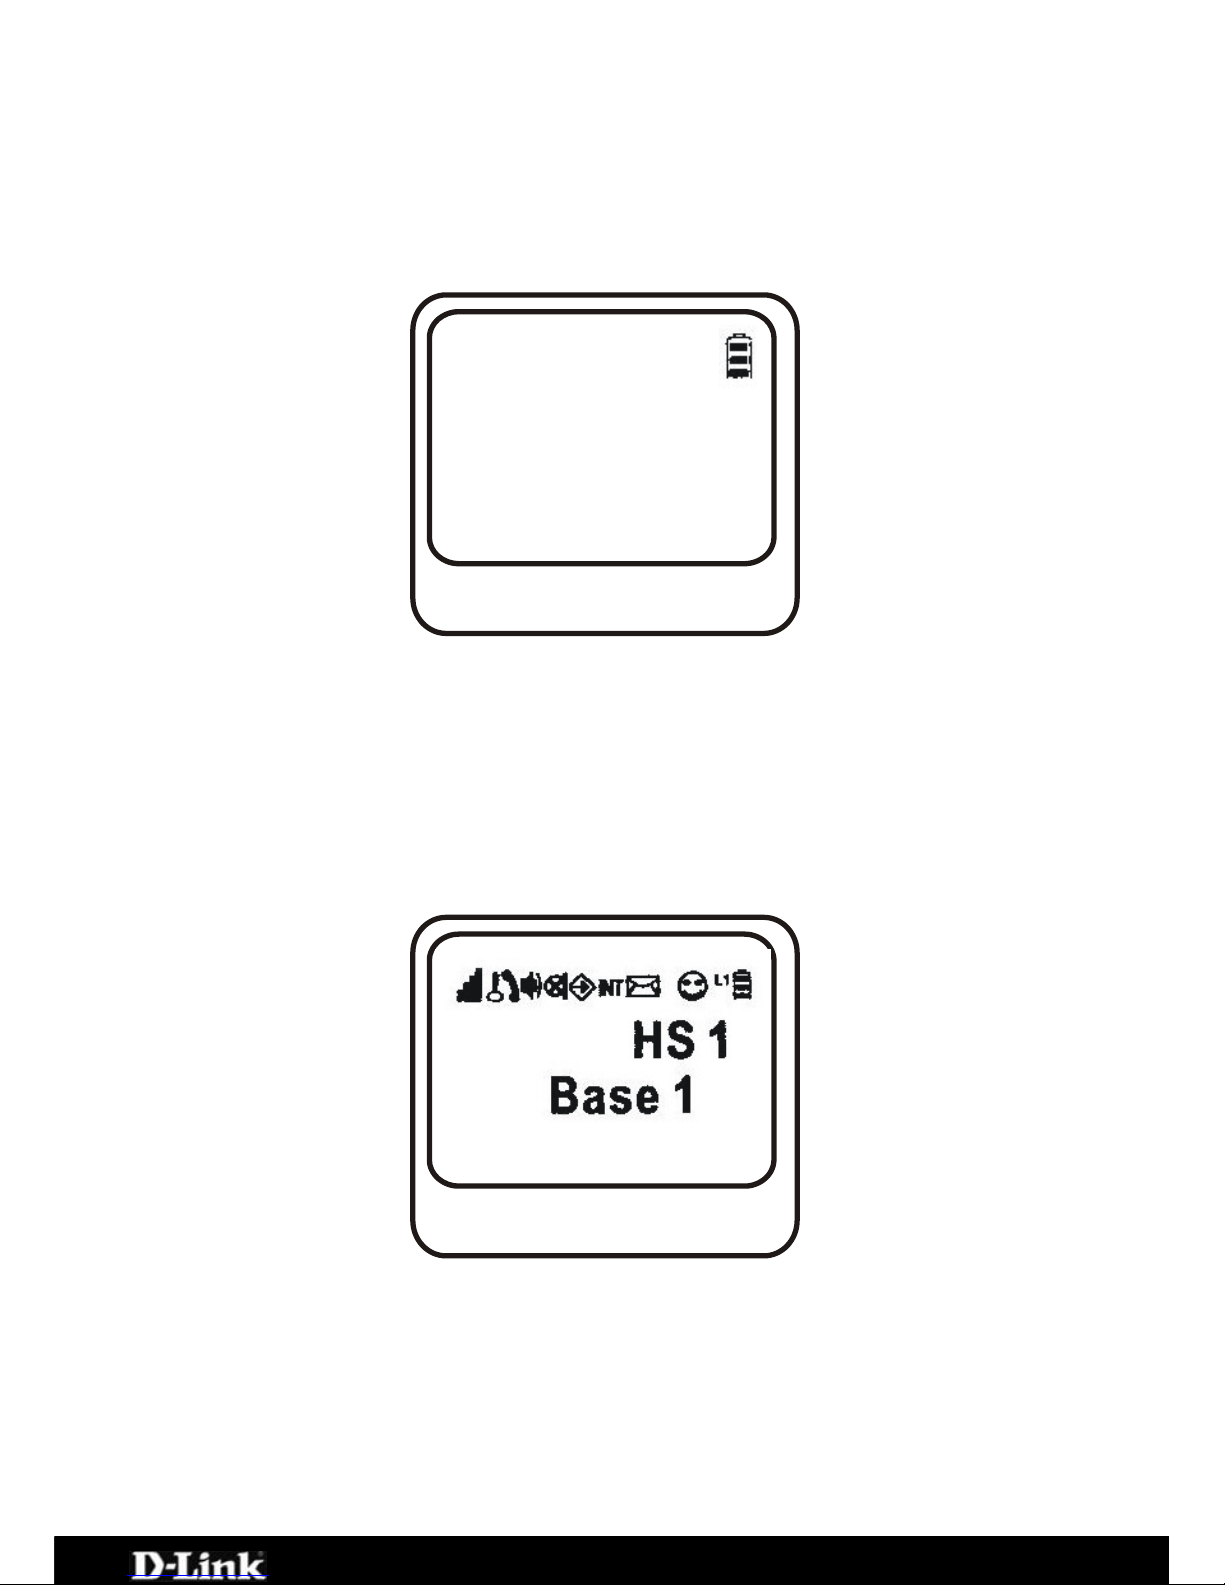
When you first turn on the handset, the initial screen displays the handset
number and the base number or base name (if you have a name saved for the
base).
In the case shown above, the display indicates that this is handset 1 (HS 1)
and base 1 (Base 1). When the DPH-C160S has contacted the SIP server and
becomes registered, the name of the SIP service provider will be displayed, as
shown below. In addition, the Power/Status LED on the top edge of the DPH-
C160S’s Charging Base will stop blinking and glow a constant green when the
telephone has registered with the SIP server and is ready to make and receive
VoIP telephone calls.
Page 13 of 67
Page 14
DPH-C160S – DECT Cordless VoIP Phone – User Manual
Making a Call to the PSTN (regular telephone
network)
If you have connected your PSTN telephone line to the DPH-C160S’s Base, you
can make a telephone call to any regular telephone using the PSTN normal
telephone usage charges will apply by following these steps:
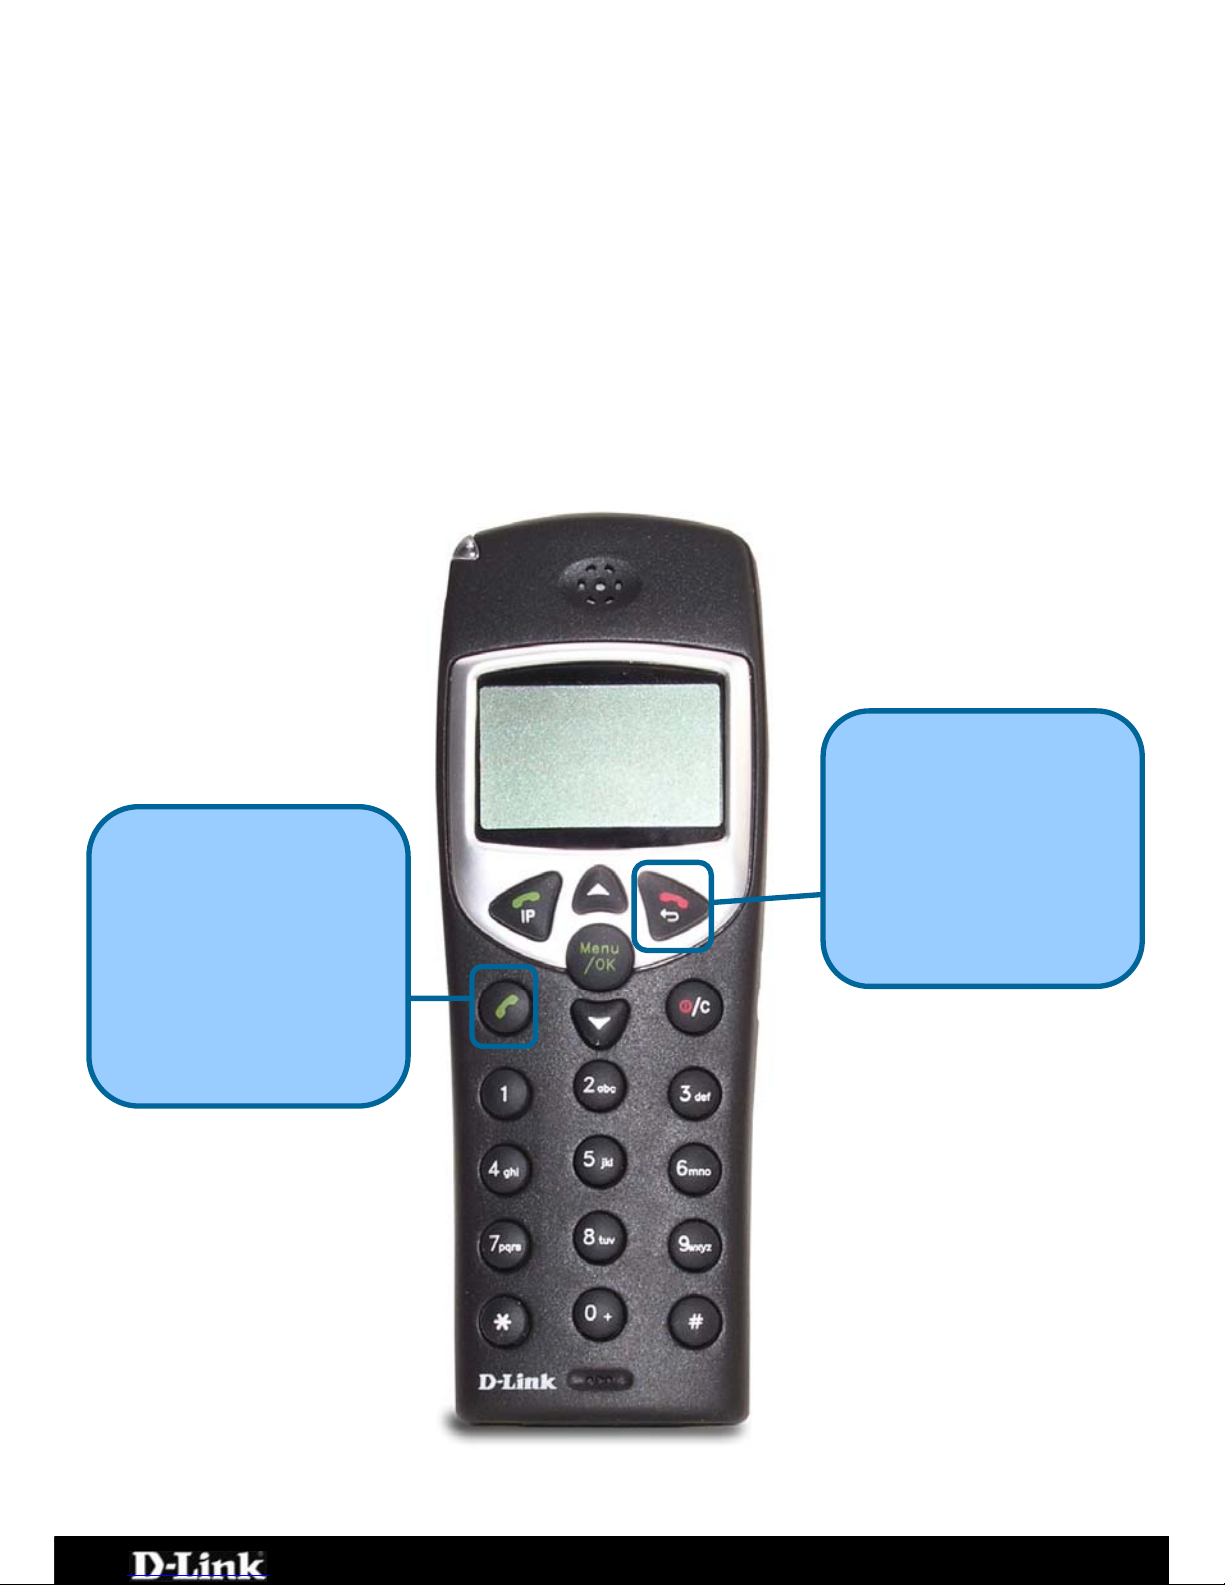
Pick up the handset and press the PSTN Dial Tone button. You will hear the
familiar PSTN dial tone, the handset and L1 icon will appear in the handset’s
LCD display.
Dial the number you want to call. The handset’s LCD will display the phone
number as you enter it. This number is also dialled as you enter it.
To end the call, either press the On-hook button or replace the handset on the
charger.
On-hook
Press this button to end
the call. You can also
simply place the handset
in the charger base to end
any call.
This will end both a PSTN
and a VoIP call.
Press this button to initiate
a call over the regular
telephone line (PSTN).
You will hear the familiar
dial tone − and then dial
the telephone number as
you would on a normal
telephone.
PSTN Dial Tone
Page 14 of 67
Page 15
DPH-C160S – DECT Cordless VoIP Phone – User Manual
Making a Call to the PSTN in Standby Mode
If you have connected your PSTN telephone line to the DPH-C160S’s Base, you
can make a telephone call to any regular telephone using the PSTN normal
telephone usage charges will apply by following these steps:
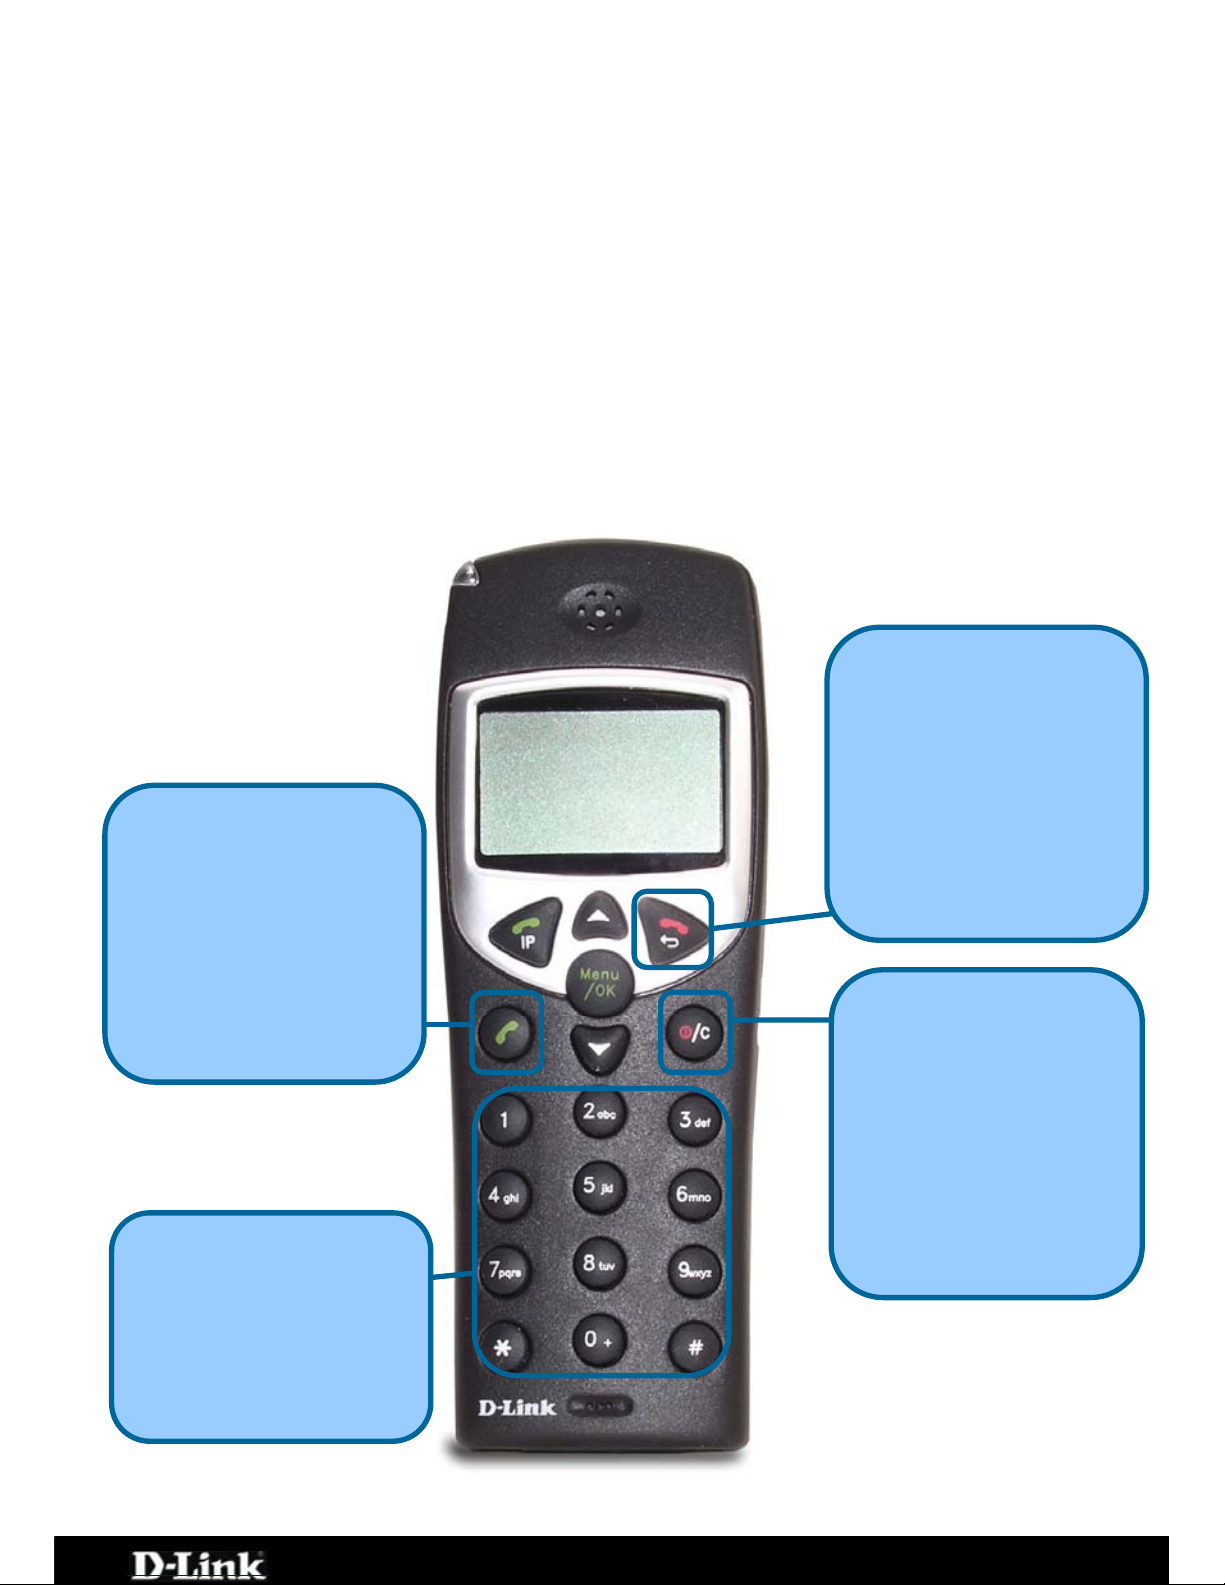
Pick up the handset and dial the number as you normally would. You can clear
any or all of the numbers you have entered by pressing the Clear button. You
will hear the familiar PSTN dial tone, the handset and L1 icon will appear on the
handset’s LCD display.
This number will be dialled as you entered it.
To end the call, either press the On-hook button or replace the handset on the
charger.
Press this button to erase
a single digit of a
telephone number you
have entered while the
handset is in Standby
Mode. Holding this button
for a couple of seconds
will erase all of the digits
of the telephone number.
Clear
Keypad
You can just dial a regular
telephone number and
then press the PSTN Dial
Tone button. The number
will be displayed in the
LCD.
PSTN Dial Tone
Press this button to dial a
telephone number (over
the regular telephone line
(PSTN)). You will hear
the familiar dial tone − and
then the handset will dial
the telephone number as
you entered it.
This will end both a PSTN
and a VoIP telephone call.
On-hook
Press this button to end a
telephone call. You can
also simply place the
handset in the charger
base to end any
telephone call.
Page 15 of 67
Page 16

DPH-C160S – DECT Cordless VoIP Phone – User Manual
Receiving a Call
When an incoming PSTN or VoIP telephone call is detected, the handset will
ring and the L1 icon will be displayed in the LCD. If the caller can be identified,
the caller’s number or Buddy List entry will be displayed. If the caller’s
telephone number is currently stored in the handset’s phone book, the caller’s
name will be displayed along with the telephone number.
To answer the call, simply pick the handset up from the charger base or press
the PSTN Dial Tone button, if the handset is not in the charger.
To end the call, either press the On-hook button or replace the handset on the
charger.
PSTN Dial Tone
Press this button to
answer an incoming
PSTN or VoIP telephone
call.
Press this button to end a
telephone call. You can
also simply place the
handset in the charger
base to end any
telephone call.
This will end both a PSTN
and a VoIP telephone call.
On-hook
IP
Press this button to
answer an incoming
VoIP telephone call.
Incoming Call LED
This red LED will flash to
indicate an incoming
PSTN or VoIP telephone
ca
ll.
If the AnyKey Answer function is activated, you can press any button on the
keypad to answer an incoming telephone call.
Page 16 of 67
Page 17
DPH-C160S – DECT Cordless VoIP Phone – User Manual
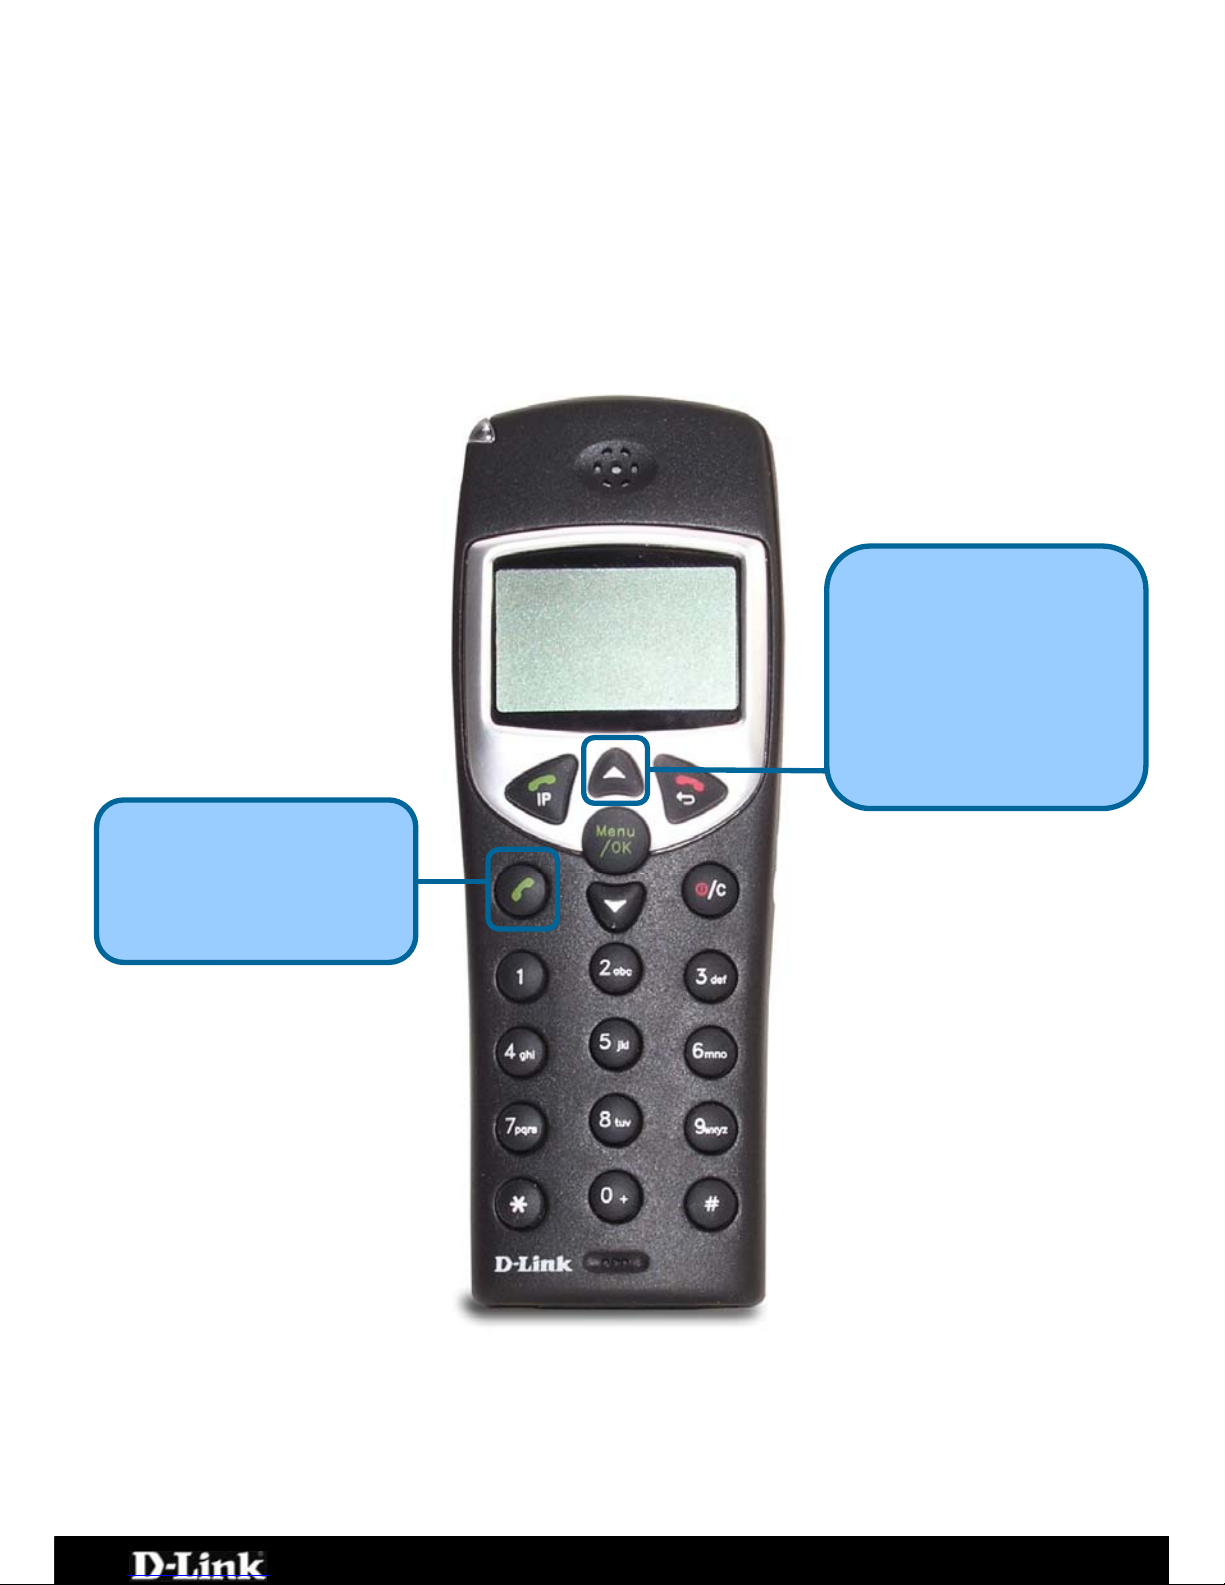
Last Number Redial
The handset stores the last three telephone numbers you have dialled.
To view and retrieve the last three numbers you have dialled, press the Scroll
Up button. To scroll through the list, press the Scroll Up button repeatedly.
To end the call, either press the On-hook button or replace the handset on the
charger.
Scroll Up
Press this button to redial
the displayed previously
dialed telephone number.
Press this button to view
the last number dialed. To
scroll through the last
three numbers dialed,
press this button
repeatedly.
PSTN Dial Tone
Page 17 of 67
Page 18
DPH-C160S – DECT Cordless VoIP Phone – User Manual
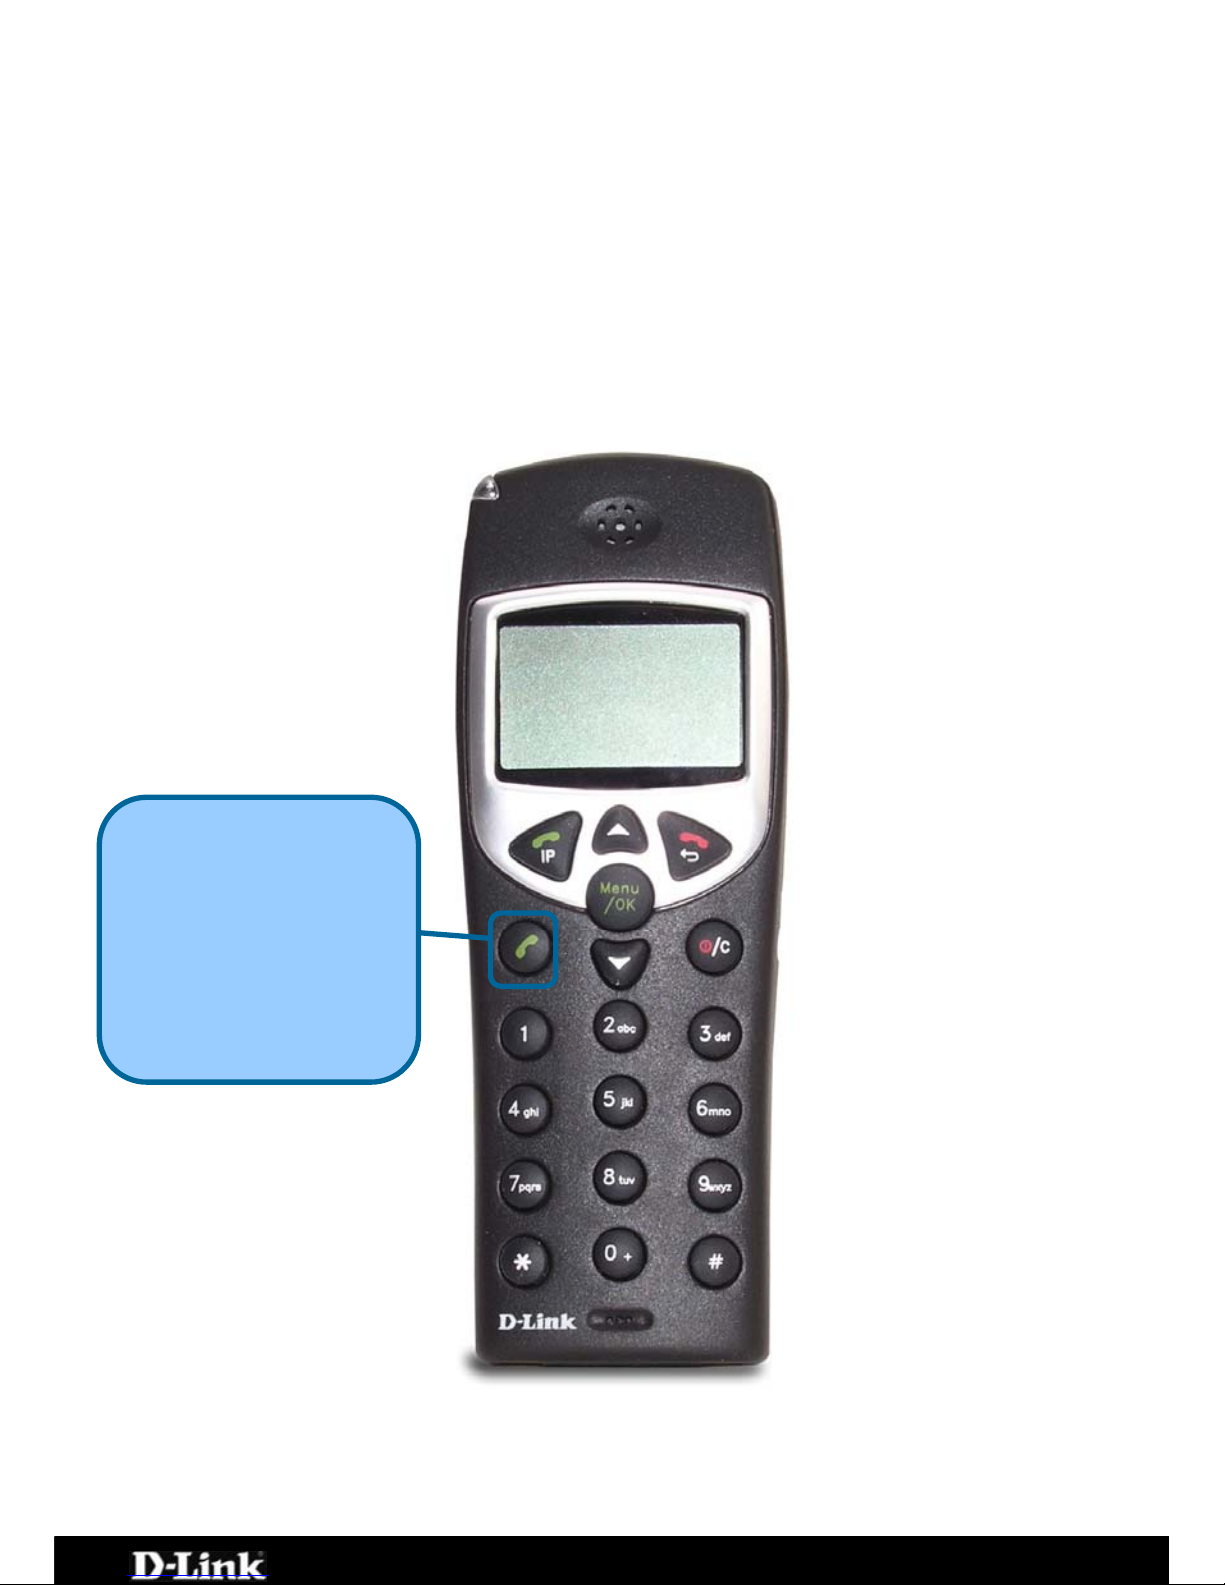
Using the Speakerphone
While making a call, you can engage the handset’s built in speaker to make
both ends of the conversation audible to several people on your end of the line.
To activate the speakerphone press and hold the PSTN Dial Tone button until
the speakerphone icon is displayed and you can hear the activity on the line
from the speaker built in to the back of the handset. To deactivate the
speakerphone, press the PSTN Dial Tone button until the speakerphone icon
disappears. The handset can then be used normally.
Press and hold this button
to activate the
speakerphone function.
To deactivate the
speakerphone function,
press and hold this button
a second time.
PSTN Dial Tone
Page 18 of 67
Page 19
DPH-C160S – DECT Cordless VoIP Phone – User Manual
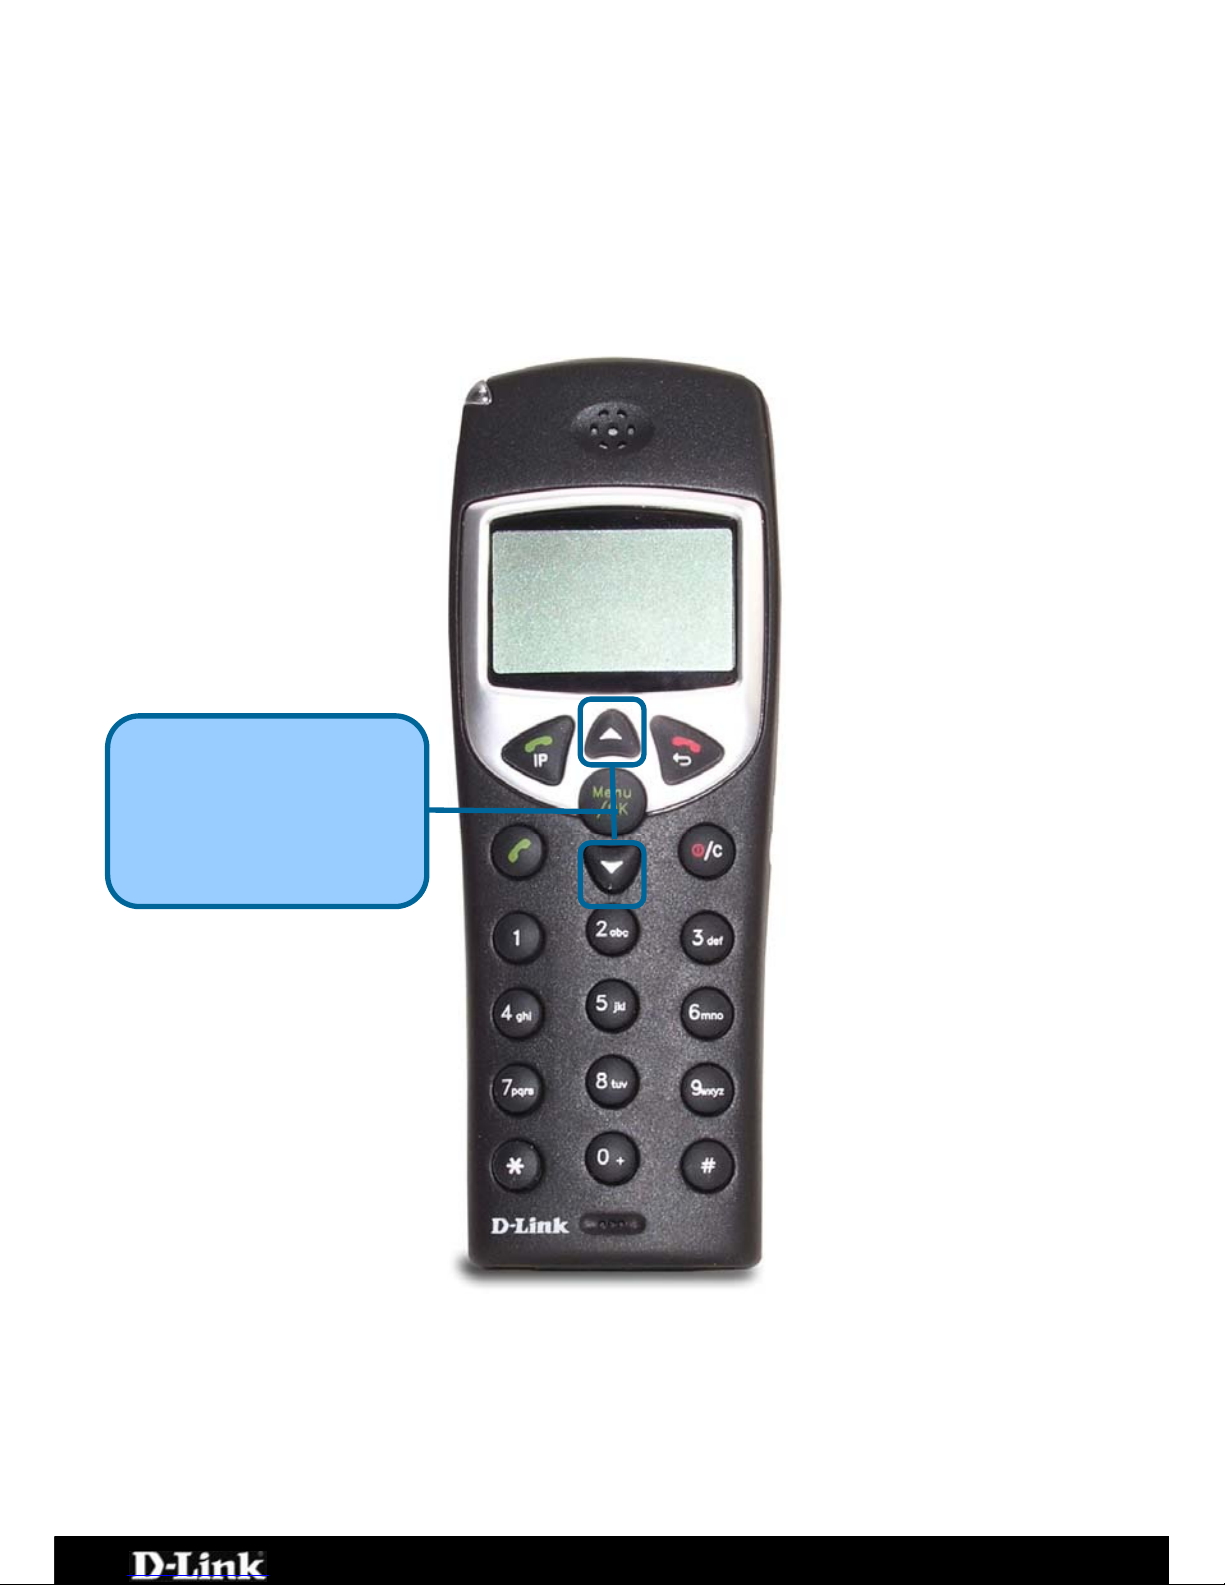
Adjusting the Volume Level
While making a call, you can adjust the earpiece volume level from 1 to 9. A
higher number indicates a higher volume level.
To adjust the volume level, press the Scroll Up or Scroll Down button during a
telephone call.
Press these buttons to
adjust the earpiece
volume level during a
telephone call
Scroll Up/Down
Page 19 of 67
Page 20
DPH-C160S – DECT Cordless VoIP Phone – User Manual
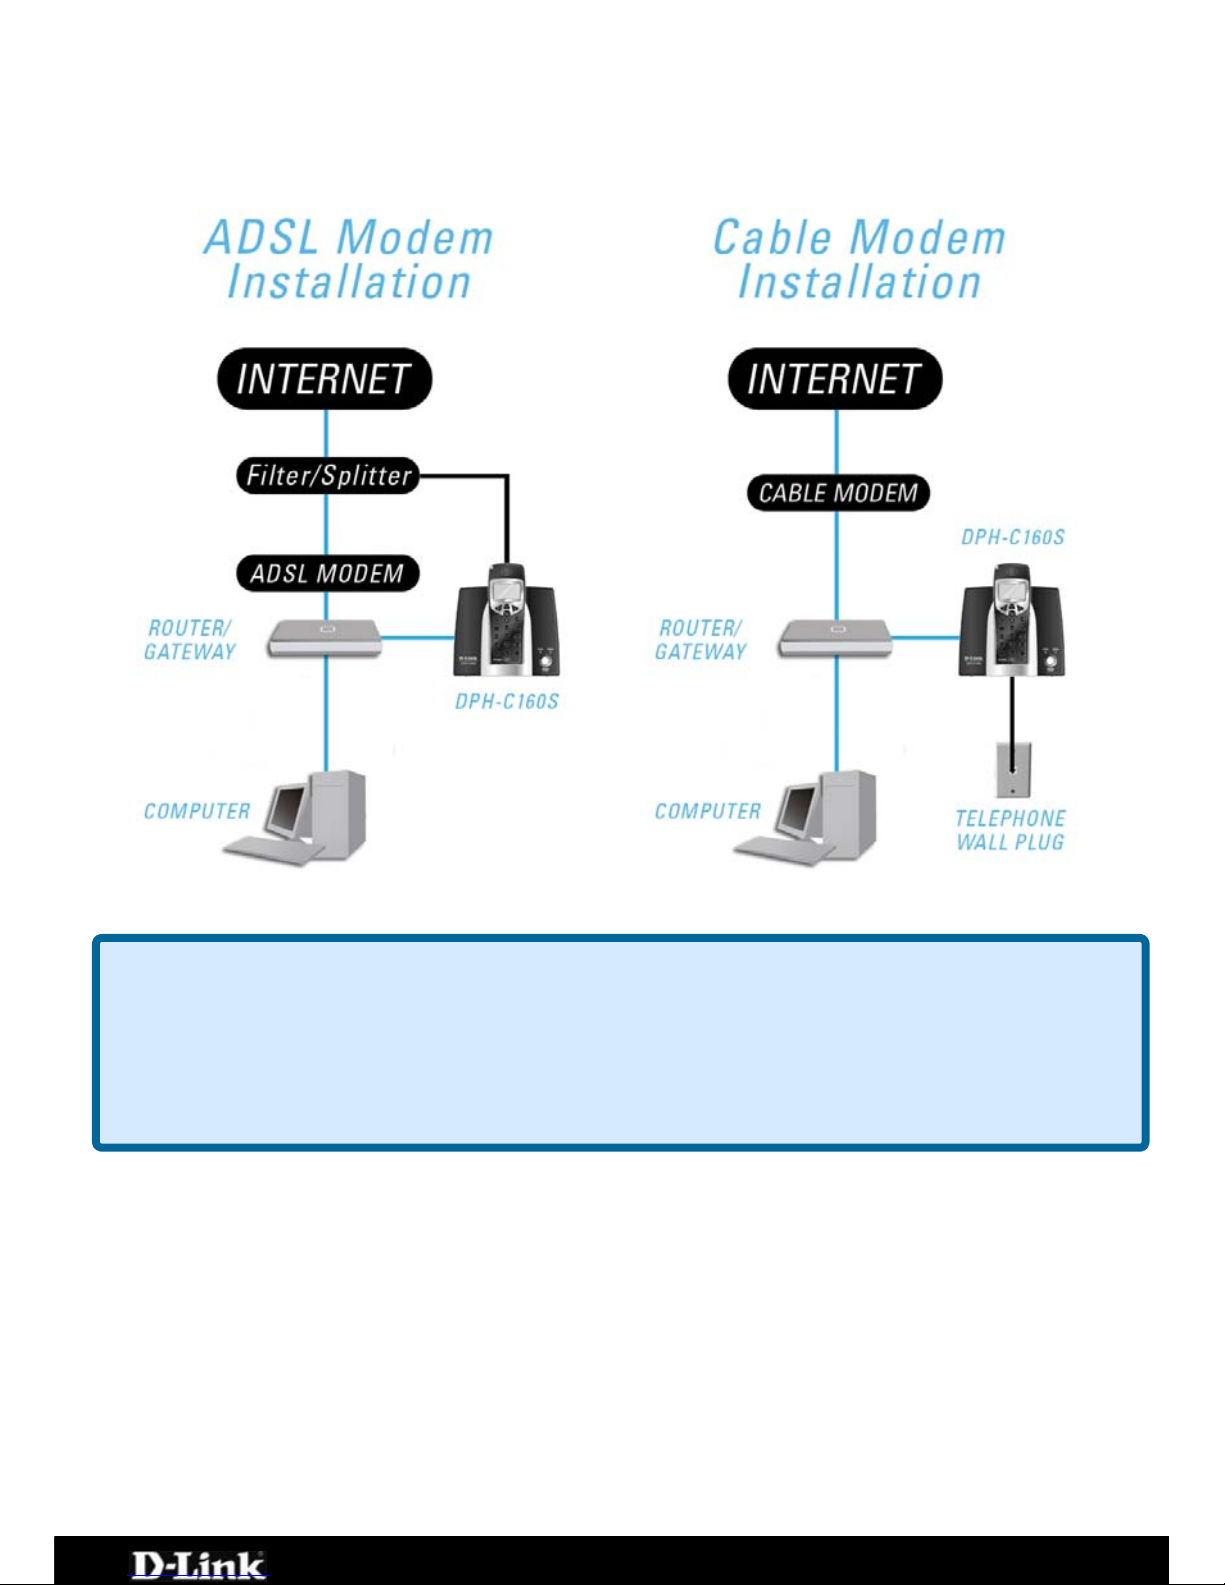
Connecting the DPH-C160S to your
Network
Figure 1: Possible Network Configurations
How to Obtain the DPH-C160S’s IP Address:
You can dete rmine the IP address of your DPH-C160S at any time by pressing
IP/OK button followed by **1 (that is ‘star star one’ on the cordless
A prerecorded voice message will read the IP address currently
gned to the DPH-C160S over the handset’s speaker.
the
handset).
assi
Please write down the IP address of your DPH-C160S below for your future
reference, please note that this IP may change if your router or DPH-C160S is
powered off for a period of time.
IP Address of DPH-C160S: ___ . ___ . ___ . ___
Figure 2: IP Address of DPH-C160S
Page 20 of 67
Page 21
DPH-C160S – DECT Cordless VoIP Phone – User Manual
Connecting/Activating your VoIP
Service
The first step in connecting your new DPH-C160S DECT Cordless VoIP Phone to
your VoIP Service Provider is to open your web browser and navigate to the
VoIP Service Providers website (you may even find a detailed leaflet inside the
box with this product with more details on the activation of your account if it is
not already activated). Please follow the instructions on the VoIP Service
Providers website to activate / setup your account your so you can start
making calls.
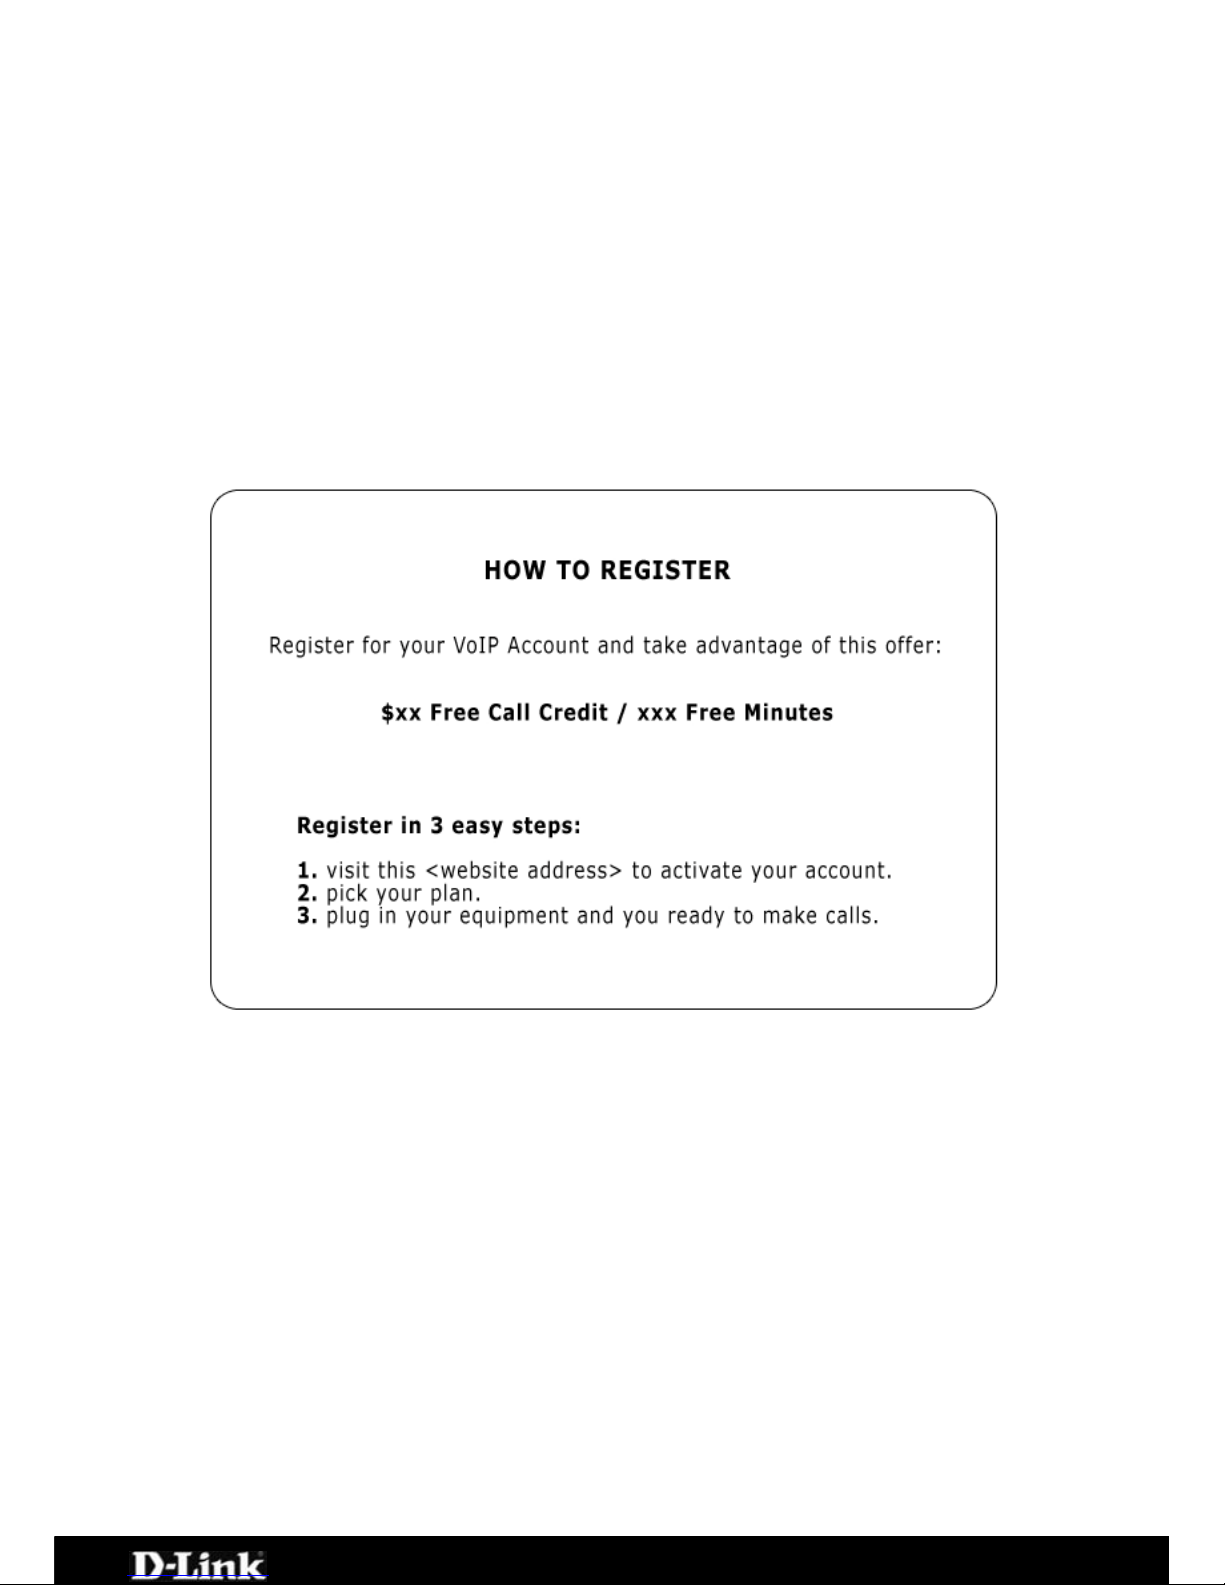
An example of this is shown below:
Figure 3: Activation Leaflet
We recommend that you fill in Figure 4 with all of your details for future
reference.
VoIP Account Number:
________________________
VoIP Username /
Phone Number:
________________________
VoIP Password:
________________________
Figure 4: VoIP Service Provider Account Details
Page 21 of 67
Page 22
DPH-C160S – DECT Cordless VoIP Phone – User Manual
Configuring the DPH-C160S for use with
your VoIP Service Provider
Once you have an VoIP Service Provider account established and activated, you
can configure your DPH-C160S DECT Cordless VoIP Phone to use the VoIP
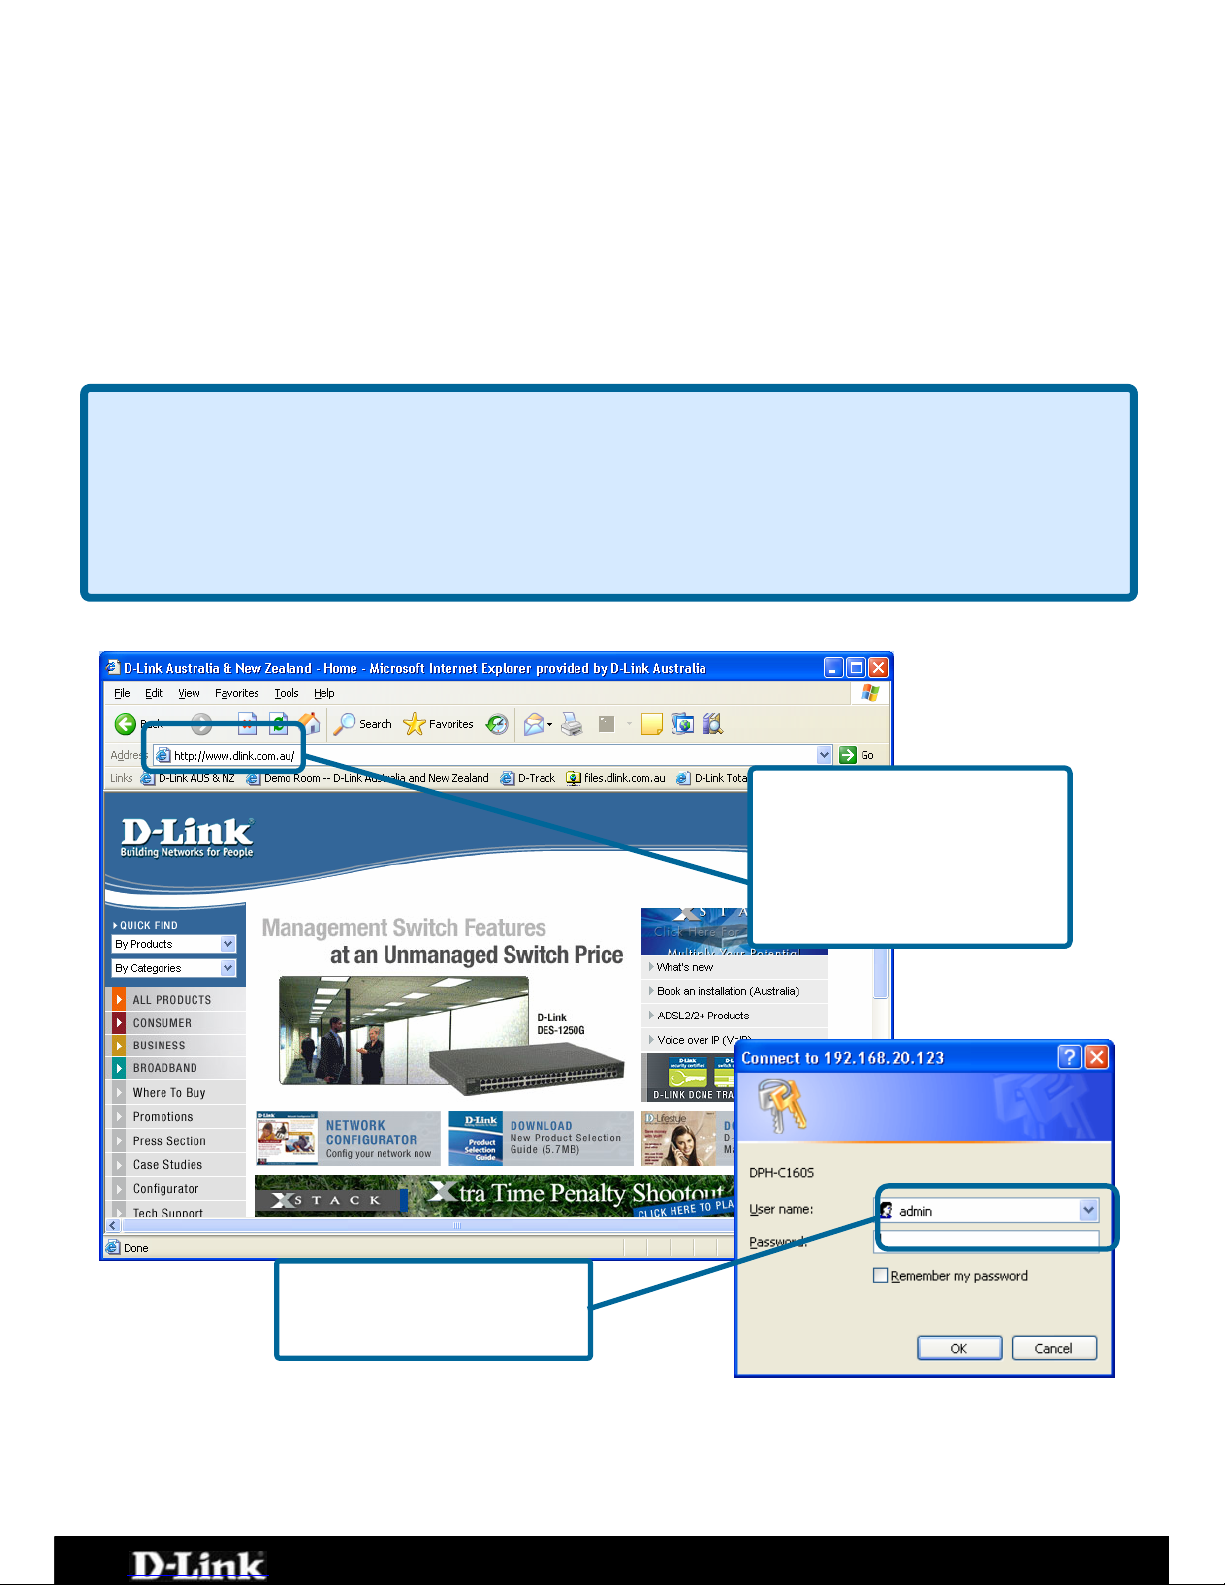
Service Provider VoIP service. Open your web browser and enter the IP
address assigned to your DPH-C160S by your multi-port Ethernet router in the
Address field.
How to Obtain the DPH-C160S’s IP Address:
You can determine the IP address of your DPH-C160S at any time by pressing
the IP/OK button followed by **1 (that is ‘star star one’ on the cordless
handset). A prerecorded voice message will read the IP address currently
assigned to the DPH-C160S over the handset’s speaker.
Type the IP address of the
DPH-C160S into the
address bar of your
browser. See figure 2 for
the correct IP address.
Enter the Username and
Password as “admin”
This will now open the DPH-C160S’s web-based configuration menu.
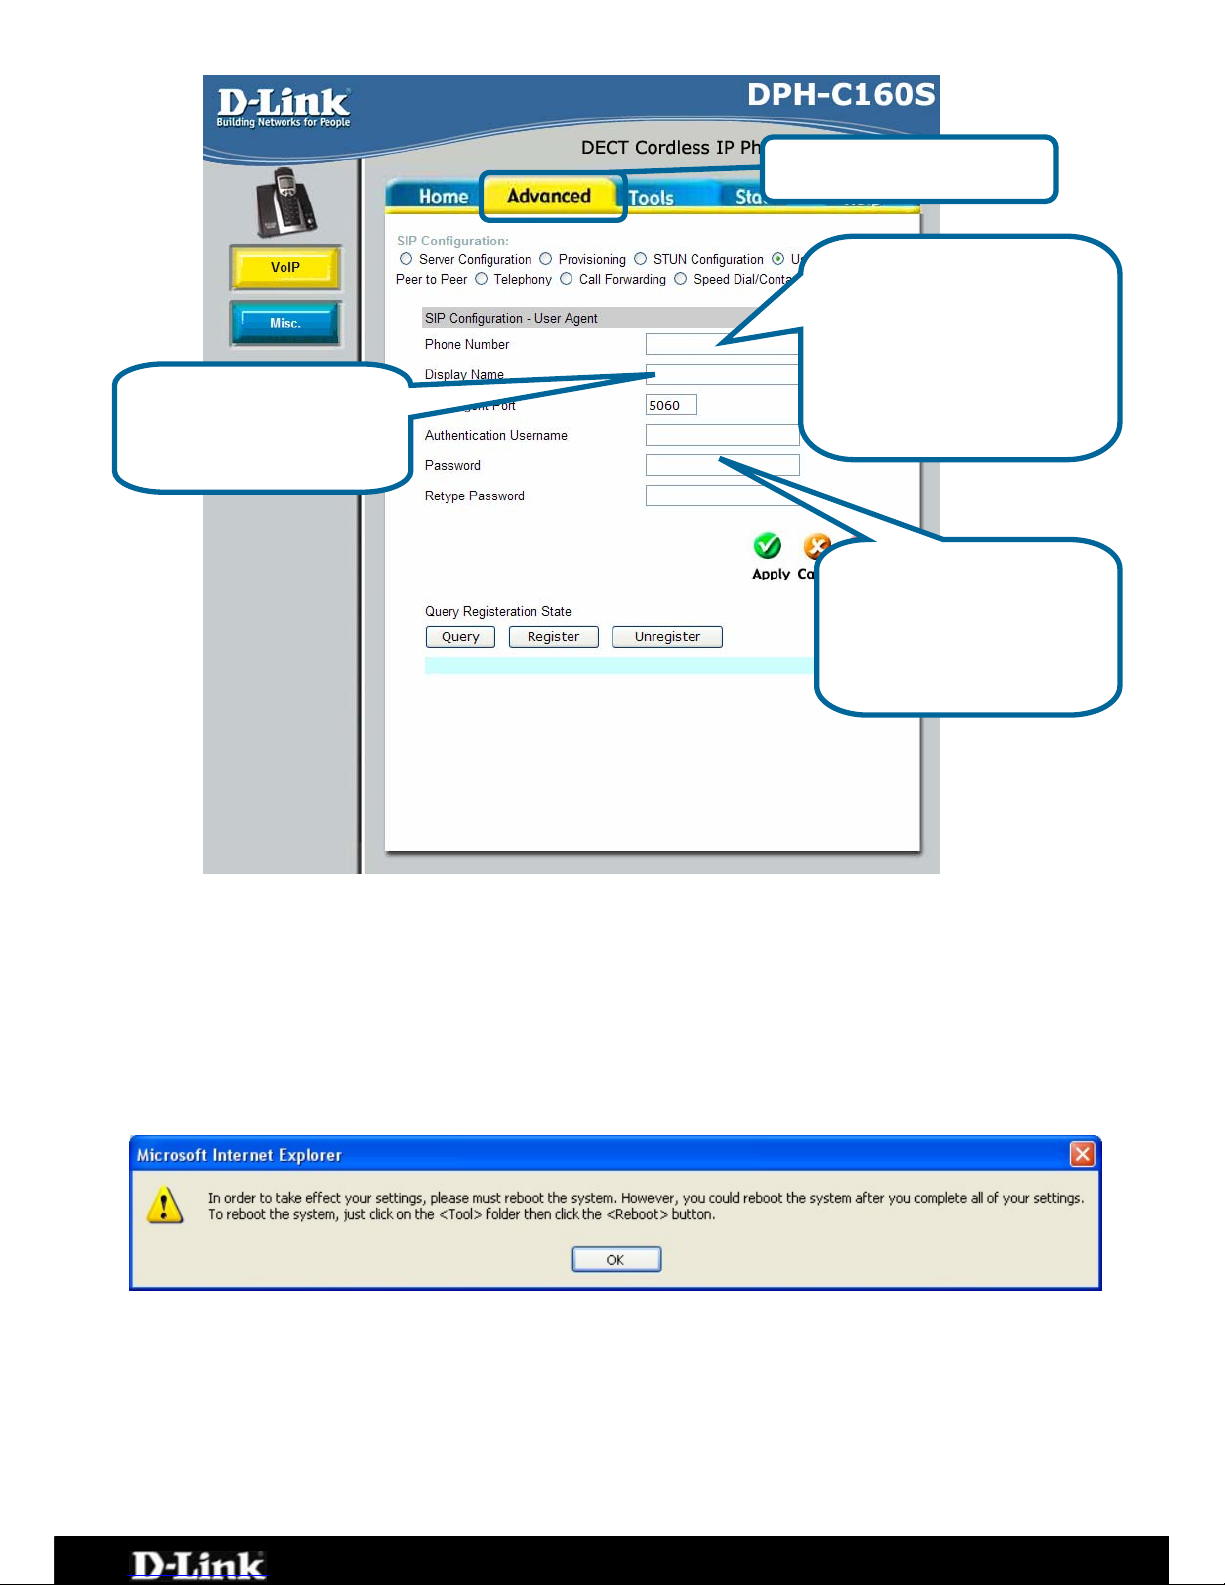
The first step is to configure the DPH-C160S to use the VoIP Service. Click the
Advanced tab and then click the VoIP button in the left hand menu.
Page 22 of 67
Page 23
DPH-C160S – DECT Cordless VoIP Phone – User Manual
Click Advanced.
Step 1: Enter your
Username/Phone
Number from Figure 4
into the Phone Number
and Authentication
Username fields.
Step 3: Enter your
Password from Figure 4
into the Password and
Retype Password
fields.
Step 2: Enter your Full
Name into the Display
Name field.
You should leave all of the other default settings unless instructed to change
them by VoIP Service Provider.
To save the changes click the Apply button.
The following dialog box will open to prompt you to restart the DPH-C160S
DECT Cordless VoIP Phone to make your new settings take effect.
Page 23 of 67
Page 24
DPH-C160S – DECT Cordless VoIP Phone – User Manual
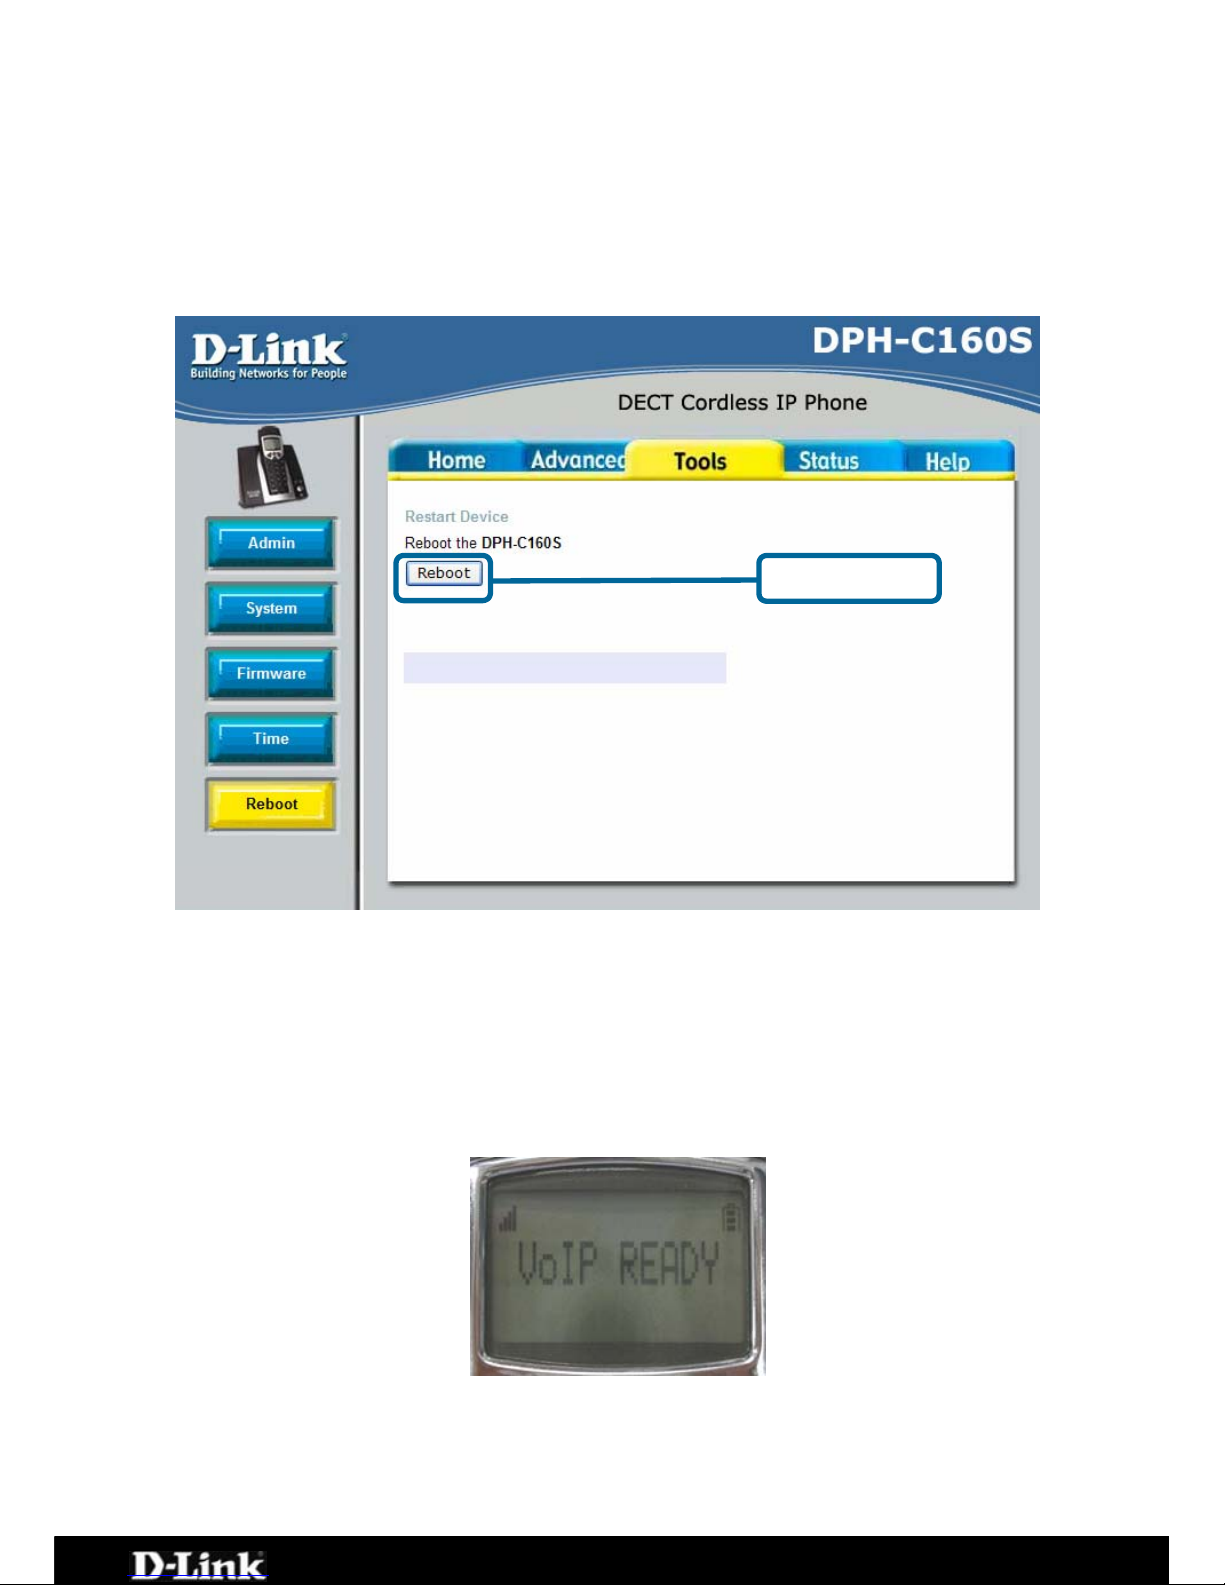
To reboot the DPH-C160S and make the settings you entered become
permanent and active, click on the Tools tab and the click the Reboot button.
This will open the following screen.
Click the Reboot button to restart the DPH-C160S and activate the new
settings.
Click Reboot
You will hear a short tone on the telephone and also see the words “VOIP
Ready” written on the LCD after the DPH-C160S has successfully connected to
the VoIP Service Provider. This means that the DPH-C160S DECT Cordless VoIP
Phone has now been registered with the VoIP Service Provider. You should see
this image (right) on the LCD when the DPH-C160S is registered with the VoIP
Service Provider.
Page 24 of 67
Page 25
DPH-C160S – DECT Cordless VoIP Phone – User Manual
Using the Web Interface
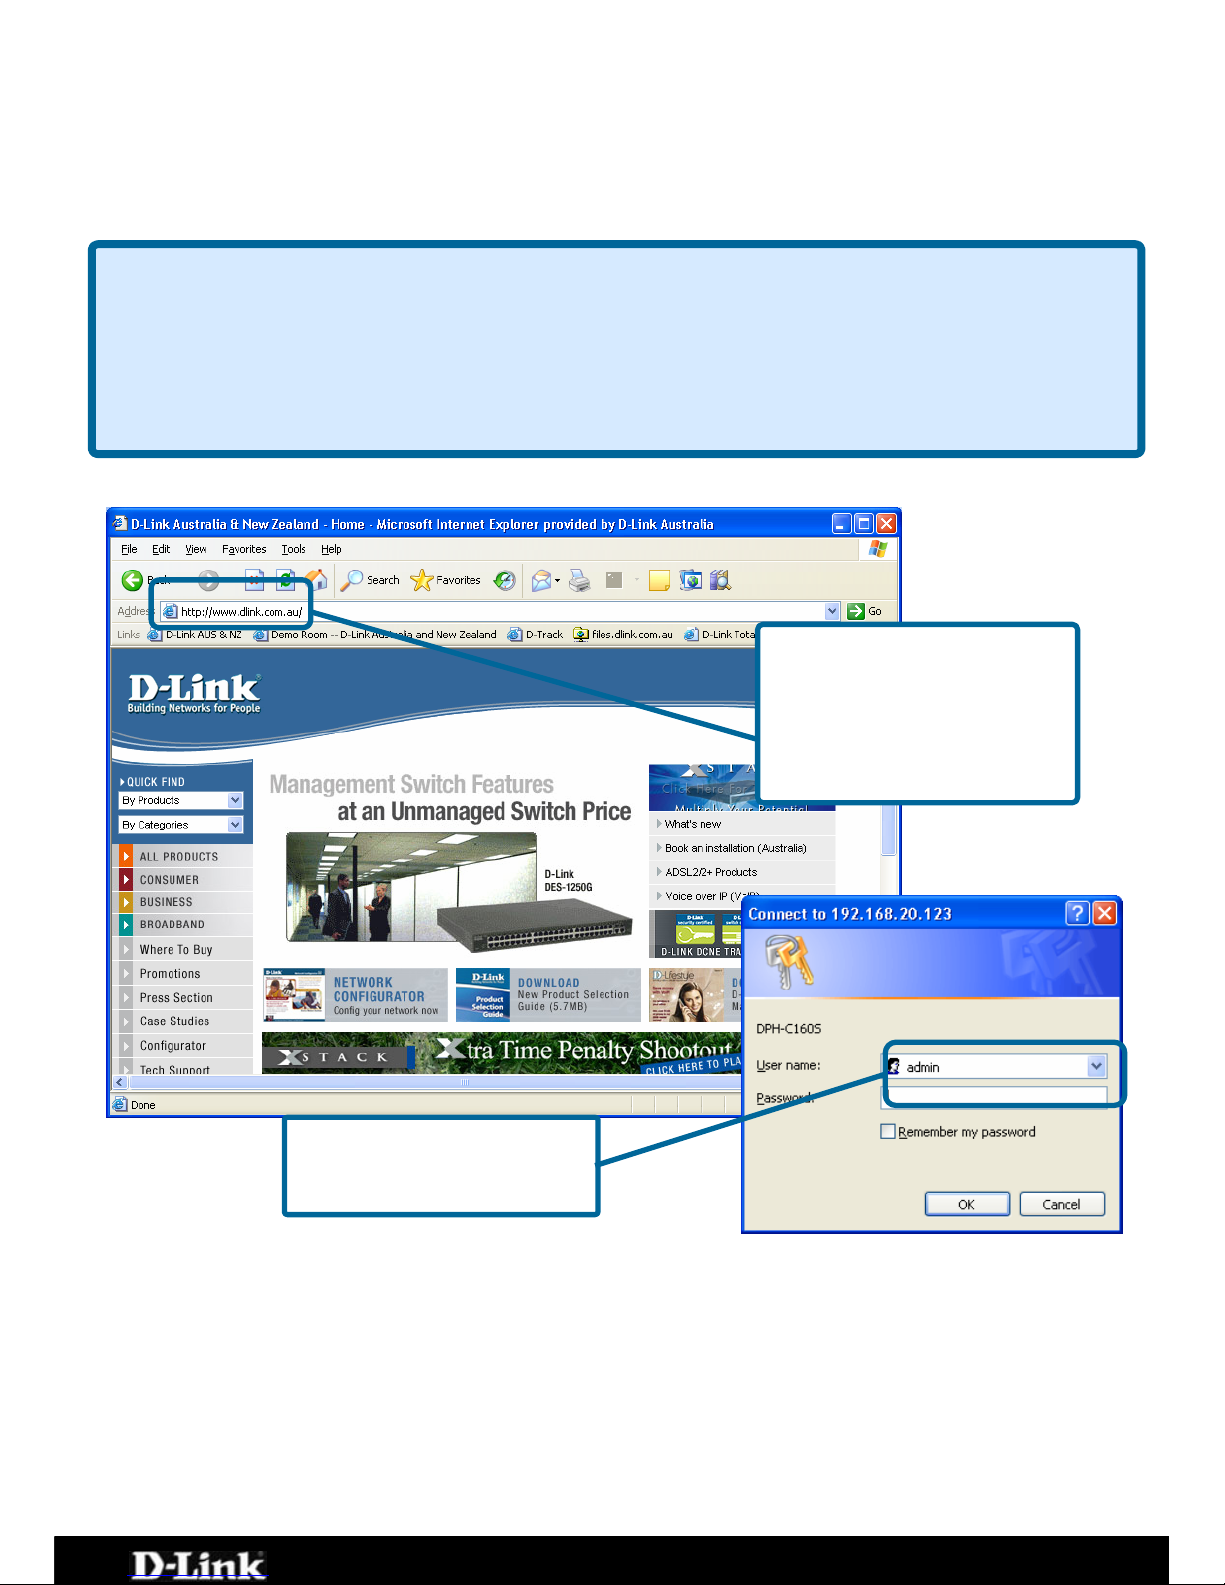
Open your web browser and enter the IP address assigned to your DPH-C160S
by your multi-port Ethernet router in the Address field.
How to Obtain the DPH-C160S’s IP Address:
You can determine the IP address of your DPH-C160S at any time by pressing
the IP/OK button followed by **1 (that is ‘star star one’ on the cordless
handset). A prerecorded voice message will read the IP address currently
assigned to the DPH-C160S over the handset’s speaker.
Type the IP address of the
DPH-C160S into the
address bar of your
browser. See figure 2 for
the correct IP address.
Enter the Username and
Password as “admin”
This will now open the DPH-C160S’s web-based configuration menu.
Page 25 of 67
Page 26
DPH-C160S – DECT Cordless VoIP Phone – User Manual
Web Interface Menu Items
Below we will cover all of the possible features under each menu item within
the Web Interface.
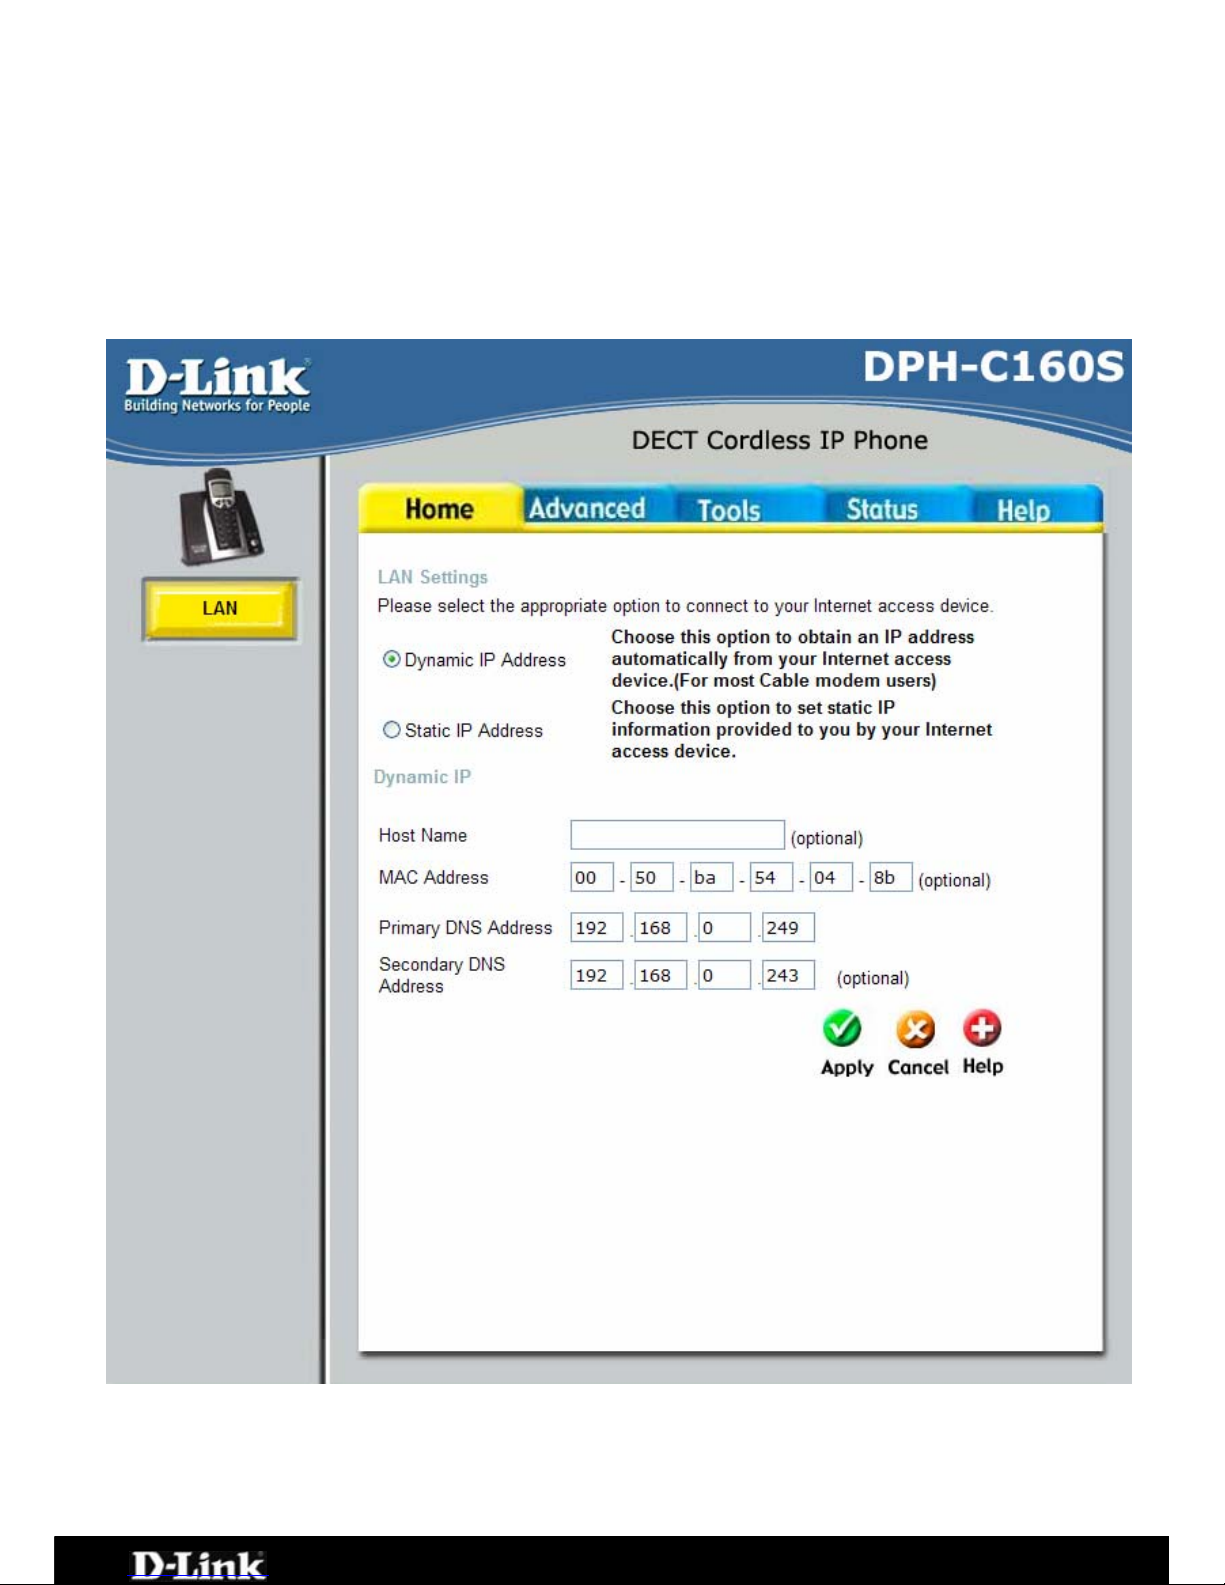
Home > LAN > Dynamic IP Address
Dynamic IP Address Choose Dynamic IP Address to obtain IP Address information
automatically from your router/gateway. This option should be
Page 26 of 67
Page 27

DPH-C160S – DECT Cordless VoIP Phone – User Manual
selected if your router/gateway has not supplied you with an IP
address.
Host Name The Host Name is optional but may be required by some
routers/gateways. The default host name is the device name of
the DPH-C160S and may be changed.
MAC Address The default MAC Address is set to the LAN’s physical interface
MAC address on the DPH-C160S. It is not recommended that
you change the default MAC address unless required by your
network administrator.
Primary DNS Address Input the primary DNS (Domain Name Server) IP address
provided by your ISP.
Secondary DNS
Address
This is an optional DNS Address entry to be used if the primary
DNS Fails. Enter a DNS Address if you wish not to use the
address provided by your ISP.
Page 27 of 67
Page 28
DPH-C160S – DECT Cordless VoIP Phone – User Manual
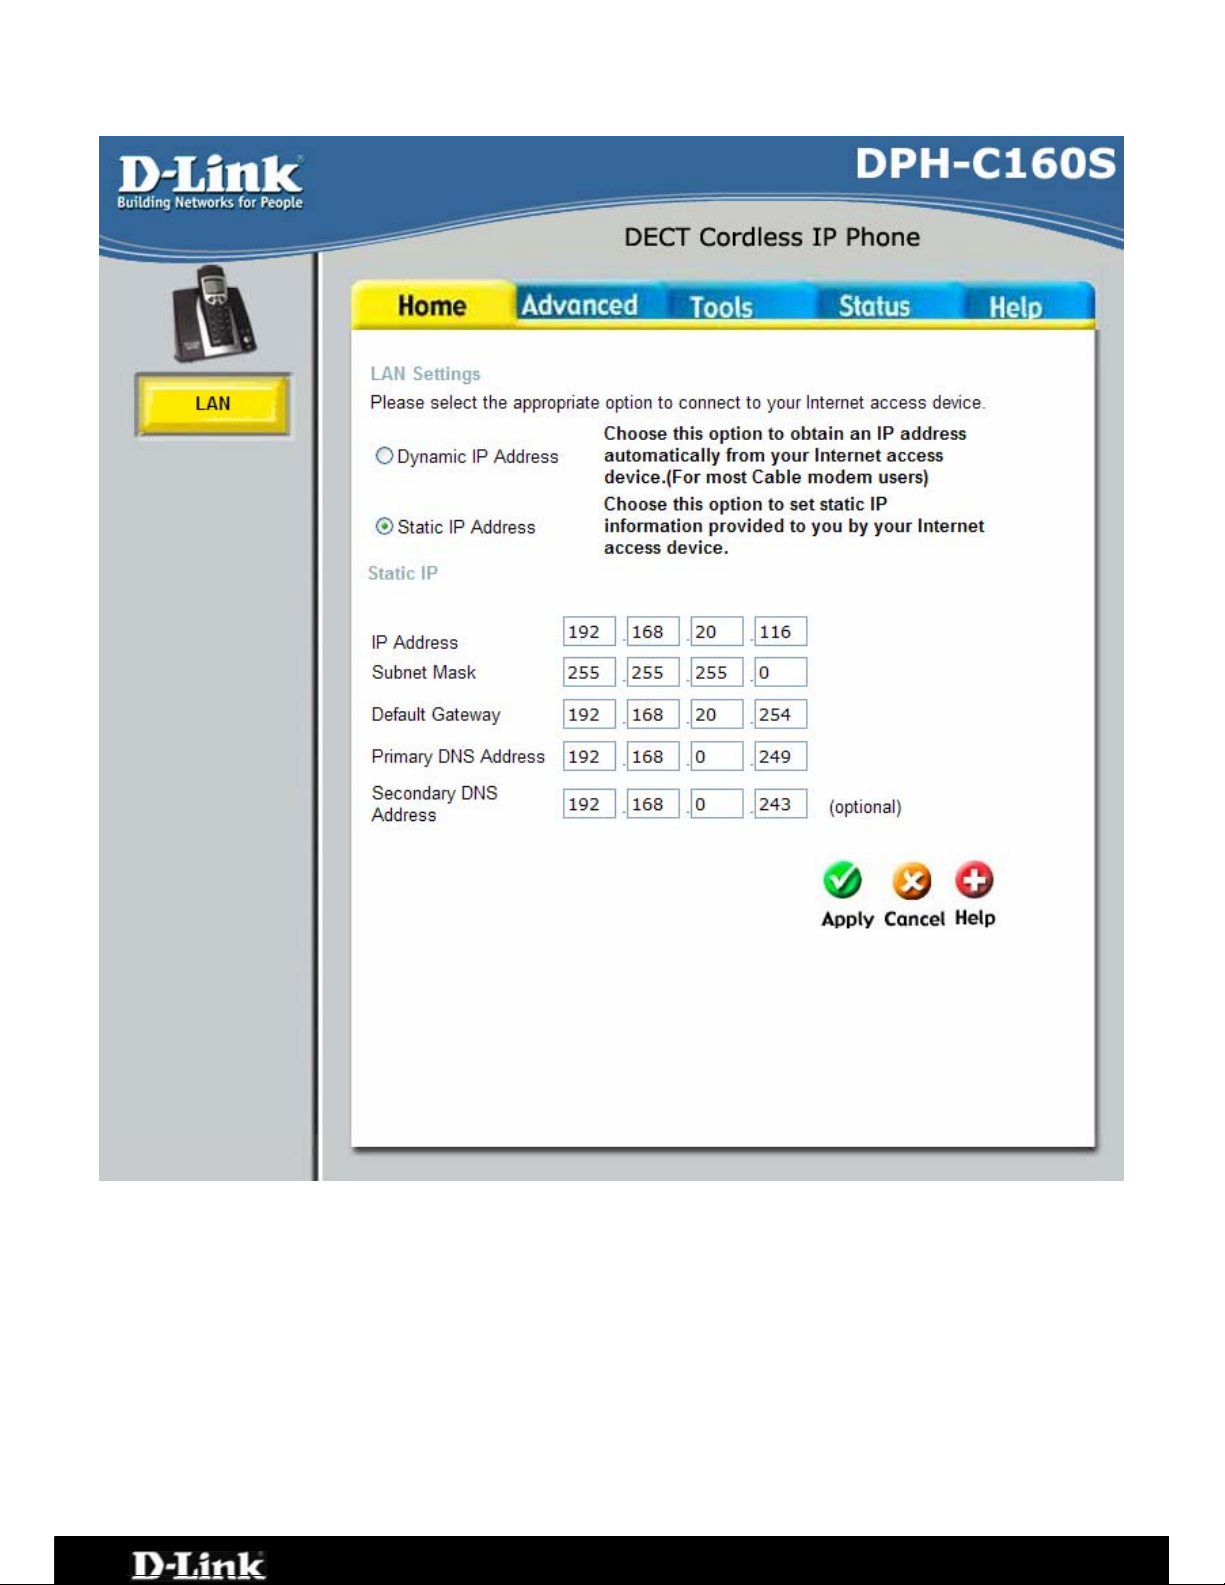
Home > LAN > Static IP Address
Static IP Address Choose Static IP Address if all LAN IP information is provided to
you by your network administrator. You will need to enter in the
IP address, subnet mask, gateway address, and DNS
address(es) provided to you by your network administrator.
Each IP address entered in the fields must be in the appropriate
IP form, which are four octets separated by a dot (x.x.x.x). The
Router will not accept the IP address if it is not in this format.
IP Address Input the public IP Address provided by your network
administrator.
Subnet Mask Input your Subnet mask. (All devices in the network must have
Page 28 of 67
Page 29

DPH-C160S – DECT Cordless VoIP Phone – User Manual
the same subnet mask.)
Default Gateway Input the IP address of the router/gateway to which you are
connecting.
Primary DNS Address Input the primary DNS (Domain Name Server) IP address
provided by your ISP.
Secondary DNS
Address
This is an optional DNS Address entry to be used if the primary
DNS Fails.
Page 29 of 67
Page 30
DPH-C160S – DECT Cordless VoIP Phone – User Manual
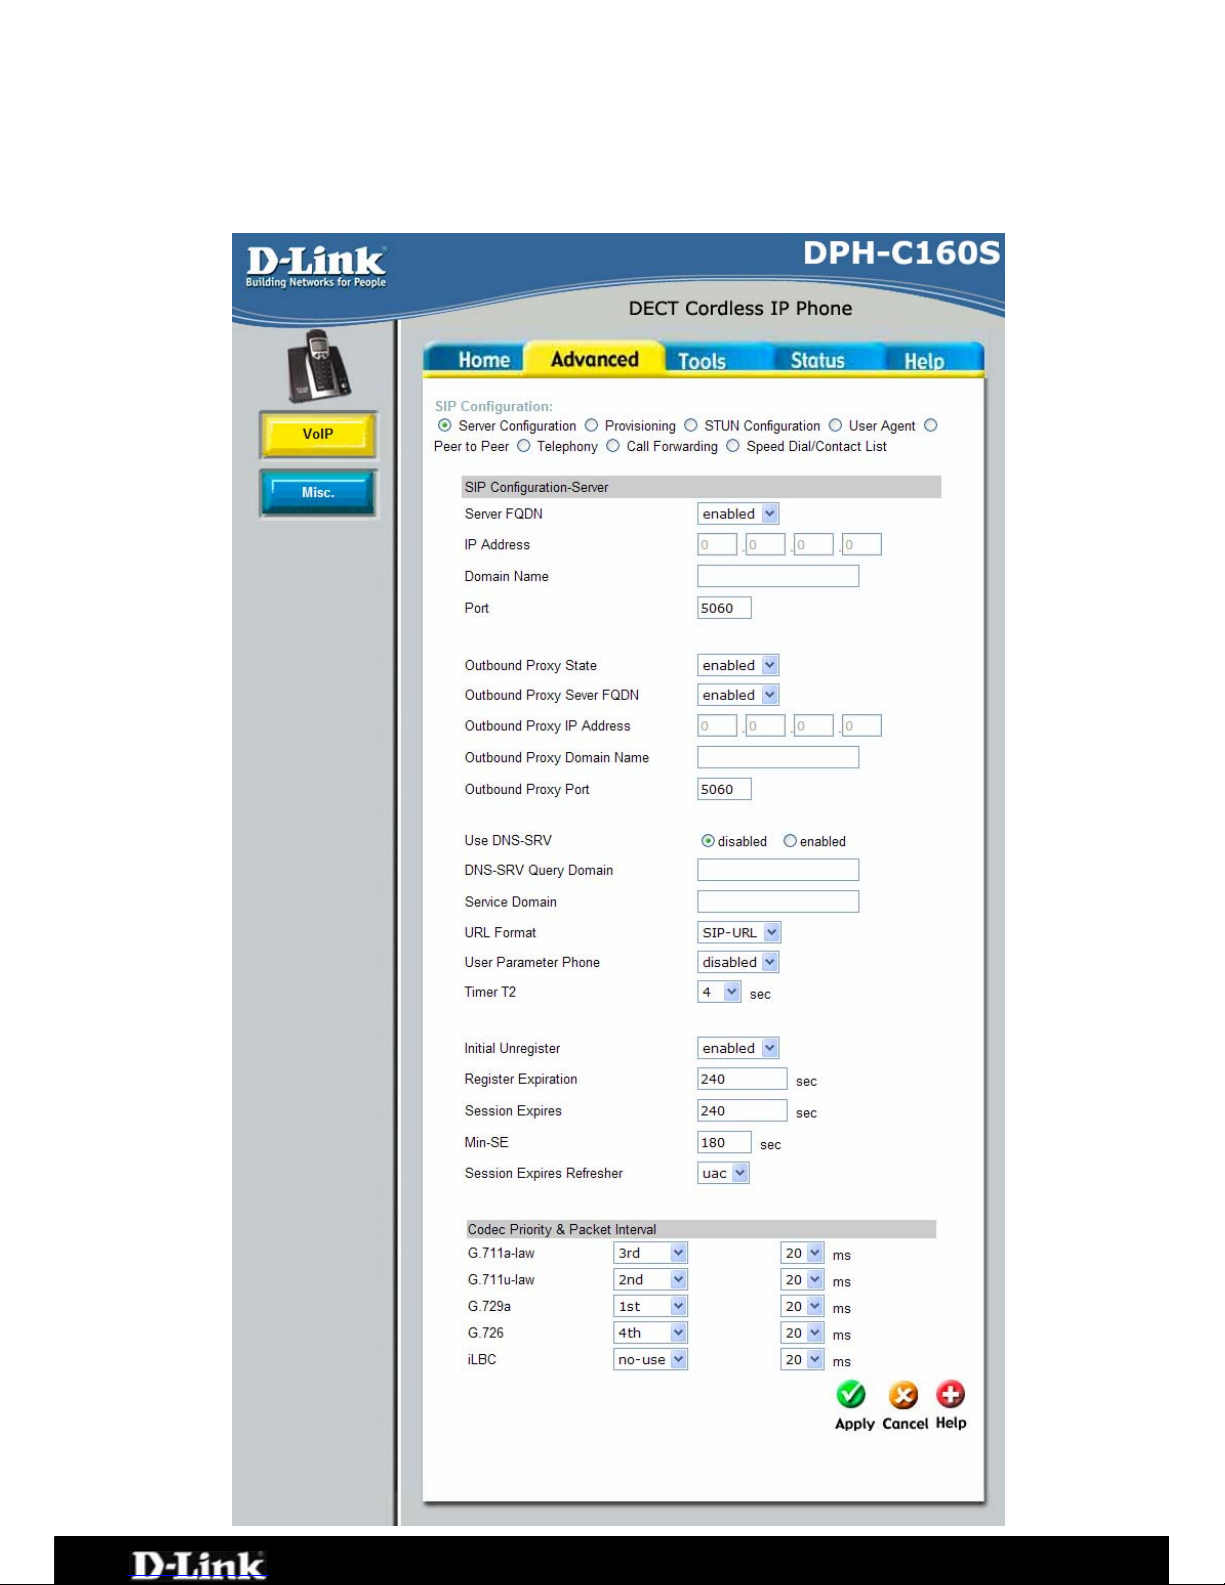
Advanced > VOIP > Server Configuration
The DPH-C160S must be configured with your VoIP Service Providers server
details in order to establish a connection and make calls.
Page 30 of 67
Page 31

DPH-C160S – DECT Cordless VoIP Phone – User Manual
Server FQDN Use this drop-down menu to Enable or Disable the Server Fully
Qualified Domain Name (FQDN) function. This is disabled when
the SIP URL domain name is different from the SIP proxy server
domain name. The phone will then use the domain name in
Domain Name field as part of SIP URL but send and receive SIP
messages through the SIP proxy server defined in the Service
Domain field.
IP Address Enter the IP address of the SIP Server in this field.
Domain Name Enter the domain name corresponding to the IP address entered
above in this field.
Port Enter the SIP server’s listening port for the SIP Server in this
field. Leave this field set to the default if your VoIP service
provider did not give you a server port number for the SIP
server.
Outbound Proxy
State
Allows you to Enable or Disable the use of an Outbound Proxy
for all VoIP traffic. Basically acts as a relay or backup for the
main SIP server.
Outbound Proxy
Server FQDN
See Server FQDN for more information.
Outbound Proxy IP
Address
See IP Address for more information.
Outbound Proxy
Domain Name
See Port for more information.
Outbound Proxy Port See Domain Name for more information.
Use DNS-SRV Enables you to Enable or Disable the DNS-SRV function.
DNS-SRV Query
Domain
The Domain Name of DNS-SRV server.
Service Domain Enter the SIP service domain name in this field.
URL Format Select SIP-URL to have the router include the domain name
with the SIP number in the SIP messages that it sends.
Select TEL-URL to have the router use the SIP number without
a domain name in the SIP messages that it sends.
User Parameter
Phone
You can set this to Enabled or Disabled. This determines whether
or not the phone number is appended to the information
forwarded to your SIP server. Your VoIP service provider will
instruct you on which setting to use.
Timer T2 Use the drop-down menu provided to select the desired time
increment.
Initial Unregister You can set this to Enabled or Disabled. The default is
Enabled.
Register Expiration Use this field to set how long the router will wait before sending
a repeat registration request if a registration attempt fails or
there is no response from the registration server.
Session Expires This field will set the longest time that the router will allow a SIP
session to remain idle (without traffic) before dropping it.
Min-SE When two SIP devices negotiate a SIP session, they must
negotiate a common expiration time for idle SIP sessions. This
field sets the shortest expiration time that the router will accept.
The router checks the session expiration values of incoming SIP
INVITE requests against the minimum session expiration value
that you enter here. If the session expiration of an incoming
INVITE request is less than this value, the router negotiates with
the other SIP device to increase the session expiration value to
match the minimum session expiration value.
Session Expires This determines which side of an expired call session will initiate
Page 31 of 67
Page 32

DPH-C160S – DECT Cordless VoIP Phone – User Manual
Refresher the session refresh. uac – specifies the Caller side will initiate
the session refresh. uas – specifies the Call receiver (the
“Callee”) will initiate the session refresh.
Codec Priority &
Packet Interval
Allows you to configure the order in which the codec’s will be
used to establish and maintain a call. It is recommended to
leave these in their default state unless required to change via
VoIP Service Provider. The Packet Interval is used to specify the
size of the packet used for the VoIP traffic while used in
conjunction with the specific codec. It is not recommended that
you change this unless specified via your VoIP Service Provider.
Page 32 of 67
Page 33
DPH-C160S – DECT Cordless VoIP Phone – User Manual
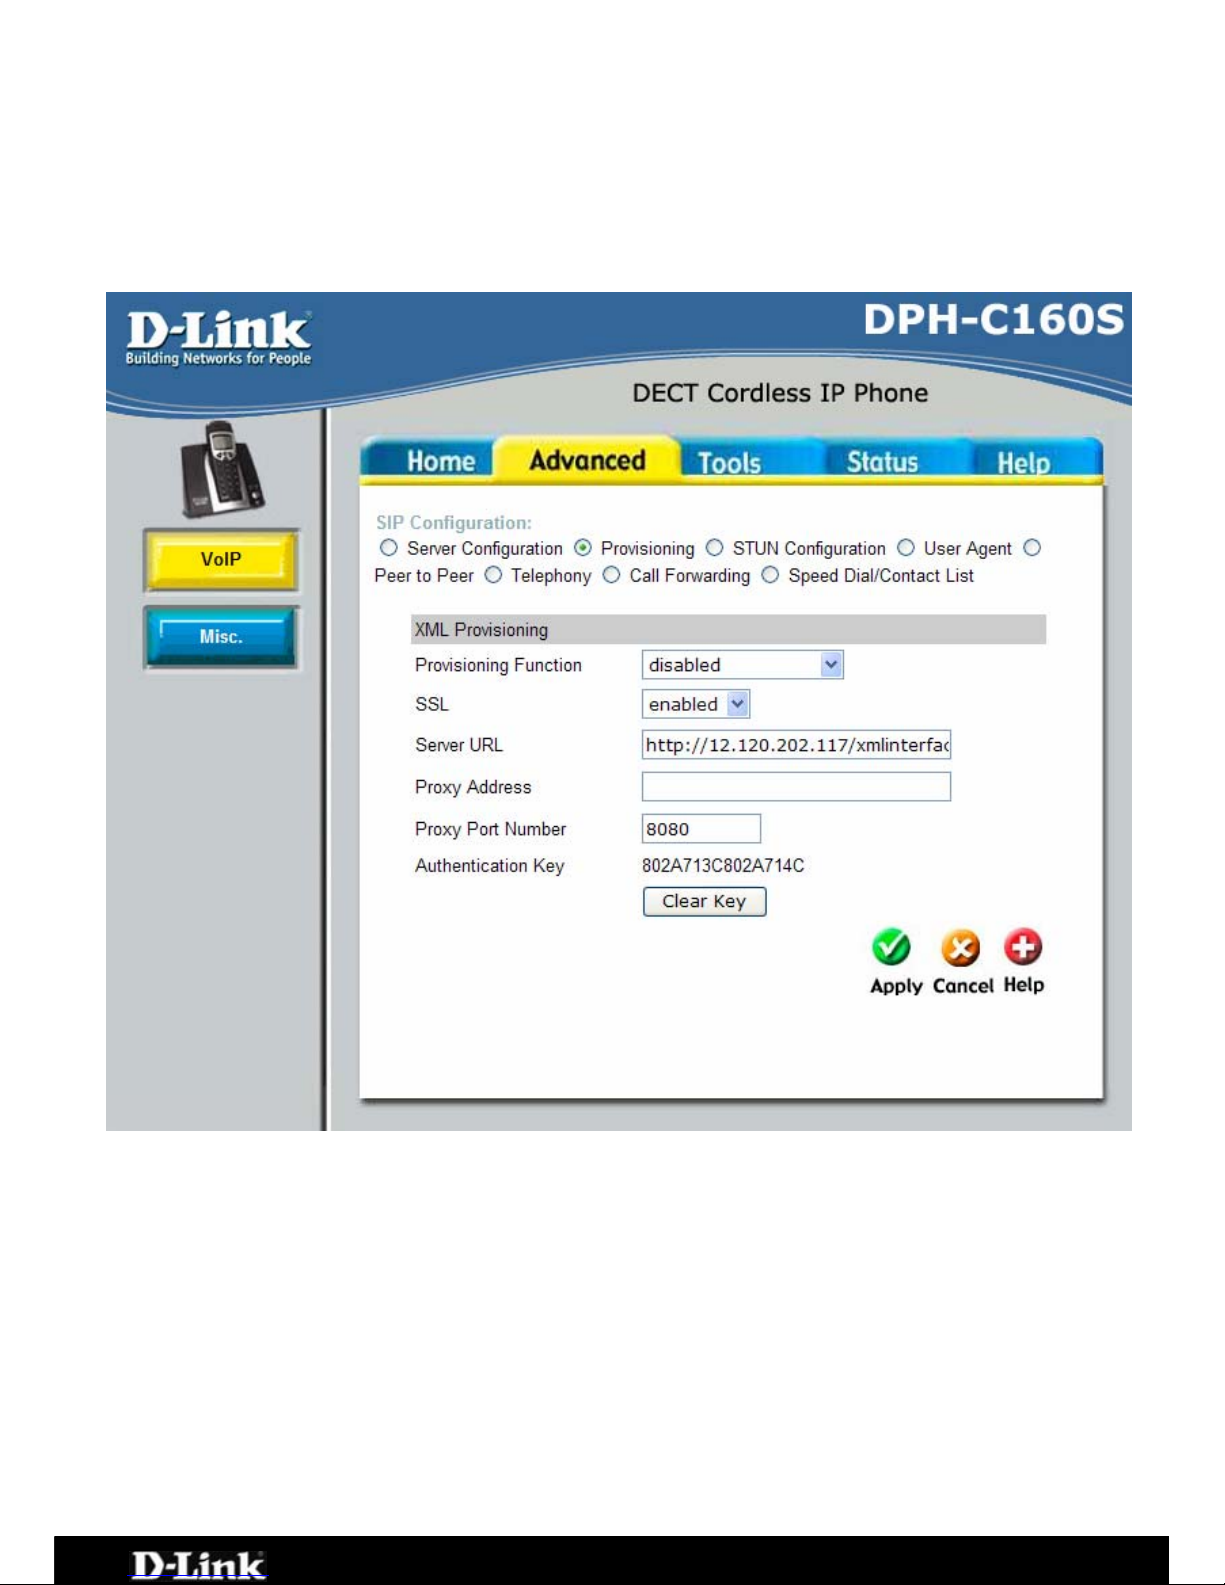
Advanced > VOIP > Provisioning
Provisioning is a function that automatically updates your DPH-C160S’s VoIP
configuration by using a TFTP server located on the Internet. If you have
accesses to such a service, you will need to know the URL and Proxy Address of
the Provisioning Server.
rovisioning Function Use this drop-down menu to enable or disable the Provisioning
SSL nable Secure Shell (SSL).
r URL
s
ber ke the
Authentication Key ion key used for a secure connection
P
Function on the DPH-C160S.
Use the drop-down menu to e
Serve Enter the URL of the Provisioning Server in this field.
Proxy Addres Enter the IP address of the Proxy Server in this field.
Proxy Port Num Enter the port number the Proxy Server will use to ma
connection in this field.
This shows the Authenticat
to the Provisioning Server.
Page 33 of 67
Page 34
DPH-C160S – DECT Cordless VoIP Phone – User Manual
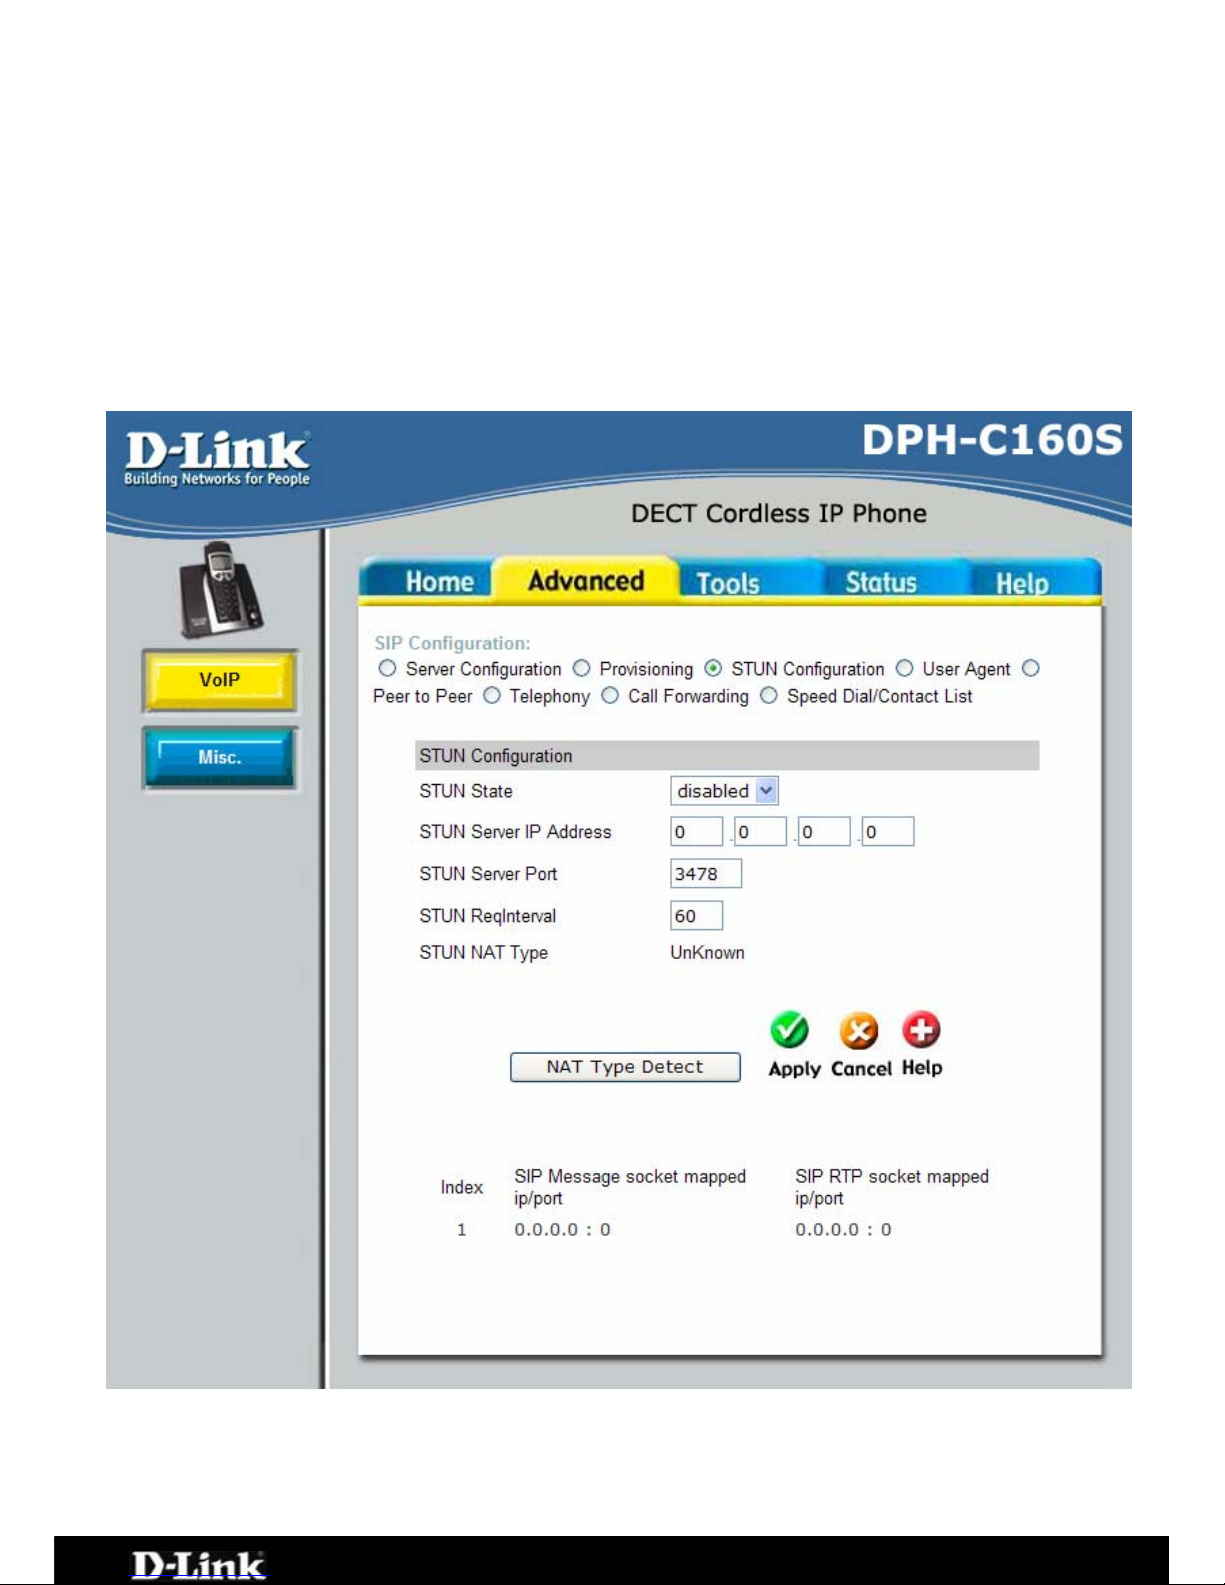
Advanced > VOIP > STUN Configuration
Simple Traversal of UDP over NAT (STUN) − is a protocol that enables a VoIP
t the presence and type of
AT behind which the phone is placed. This router supports STUN and can
SIP
device, such as this router or an IP phone, to detec
N
intelligently modify the private IP address and port in its SIP/SDP message by
using the NAT mapped public IP address and port through a series of STUN
queries against a STUN server located on the public Internet. This will allow
signalling and RTP media to successfully traverse a NAT without requiring any
configuration changes on the NAT.
STUN is useful if you need to use the DPH-C160S behind a modem or router
that provides the connection to your ISP and then to the Internet and does not
Page 34 of 67
Page 35

DPH-C160S – DECT Cordless VoIP Phone – User Manual
support symmetric NAT. You will need access to a STUN server on the Internet
er in this field.
rt number,
and its IP address to use STUN on the DPH-C160S.
STUN State Use this drop-down menu to Enable or Disable STUN on the
router.
TUN Server IP Enter the IP address of a STUN serv
S
Address
STUN Server Port
Enter the port number the STUN server will use in this field. If
you do not have any information as to the proper po
leave the default setting here.
STUN ReqInterval This determines the amount of time, in seconds, between STUN
requests. If you do not have any information as to the proper
interval, leave the default setting here.
STUN NAT Type
Displays the result of the STUN NAT examination.
Page 35 of 67
Page 36
DPH-C160S – DECT Cordless VoIP Phone – User Manual
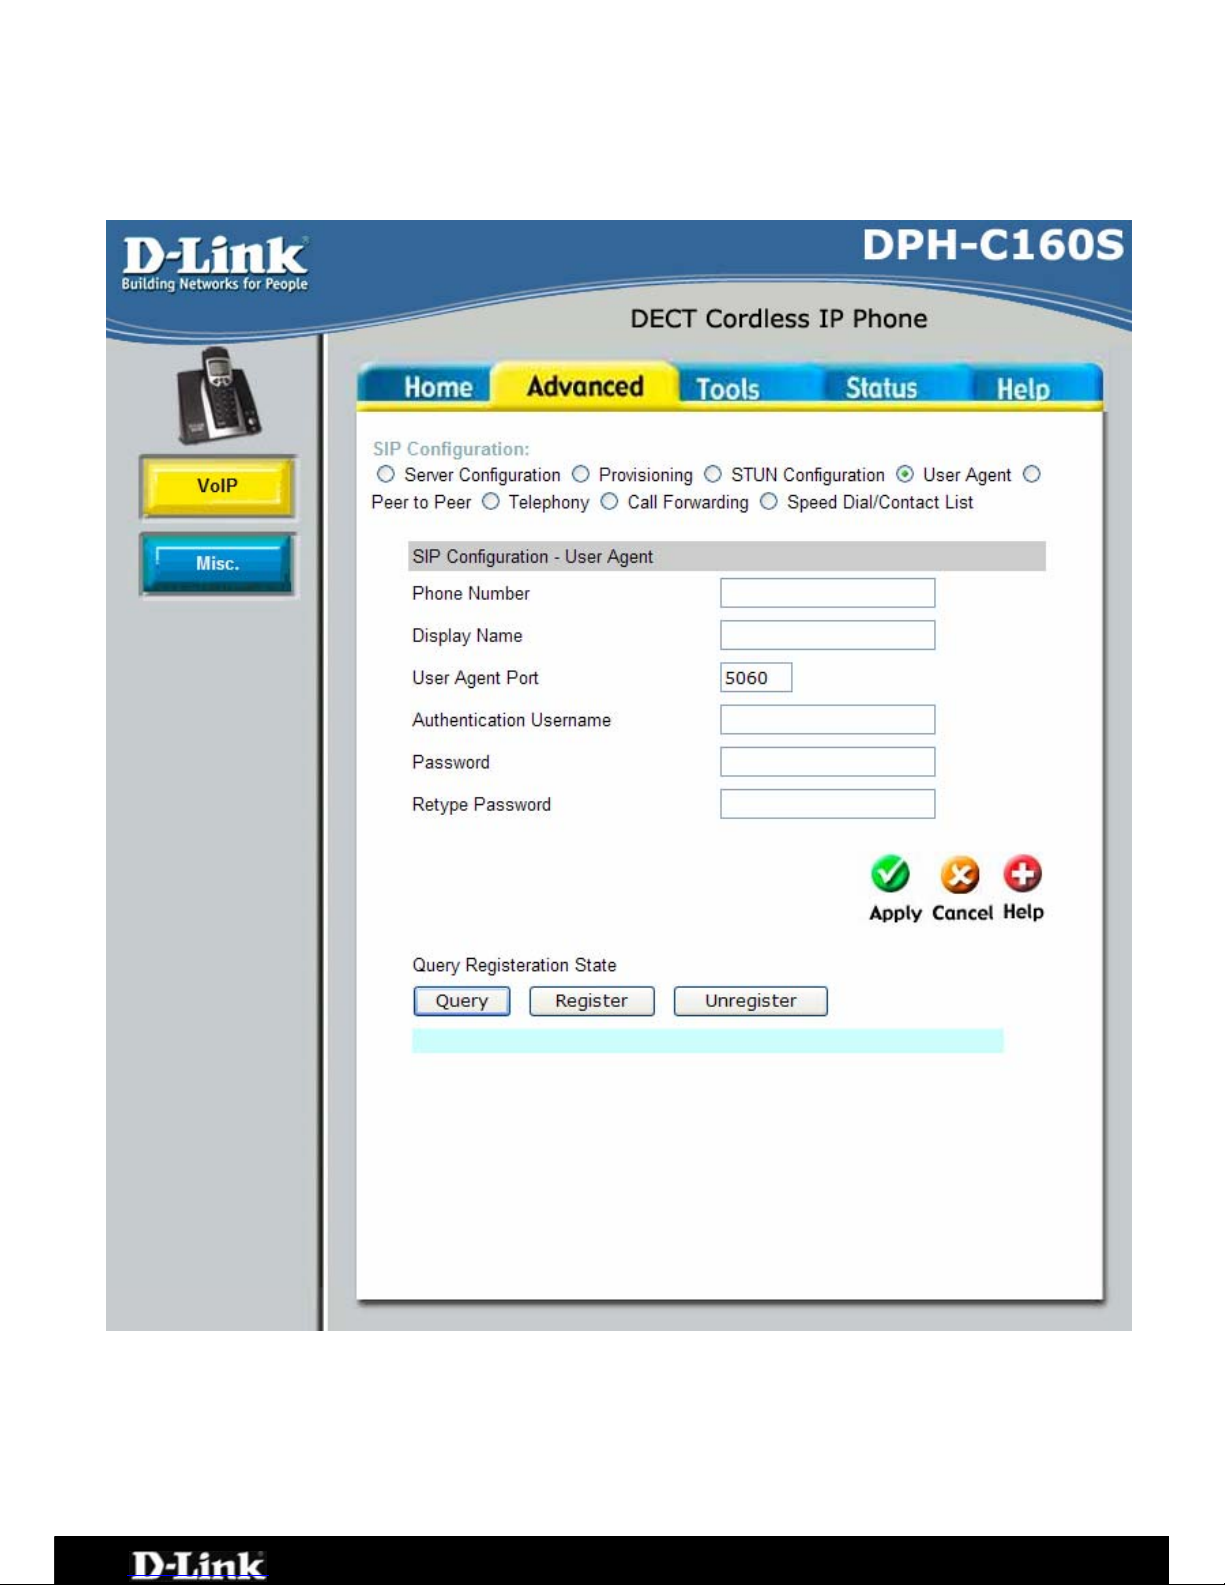
Advanced > VOIP > User Agent
The User Agent page allows you to configure your VoIP Account Information to
ser Agent Port This selects the port number the router will listen to when
ter unless
)
connect to the VoIP Service Provider
Phone Number The telephone number assigned to your account.
Display Name The name that will be displayed when the account is in use.
U
determining when calls are being made. (Do not al
informed to by VoIP Service Provider or Support D
epartment
Page 36 of 67
Page 37

DPH-C160S – DECT Cordless VoIP Phone – User Manual
Authentication
Username
vice
Password .
d
The Username used to access the VoIP Service Provider ser
The Password used to access the VoIP Service Provider service
Retype Passwor
Retype your password to confirm.
Page 37 of 67
Page 38
DPH-C160S – DECT Cordless VoIP Phone – User Manual
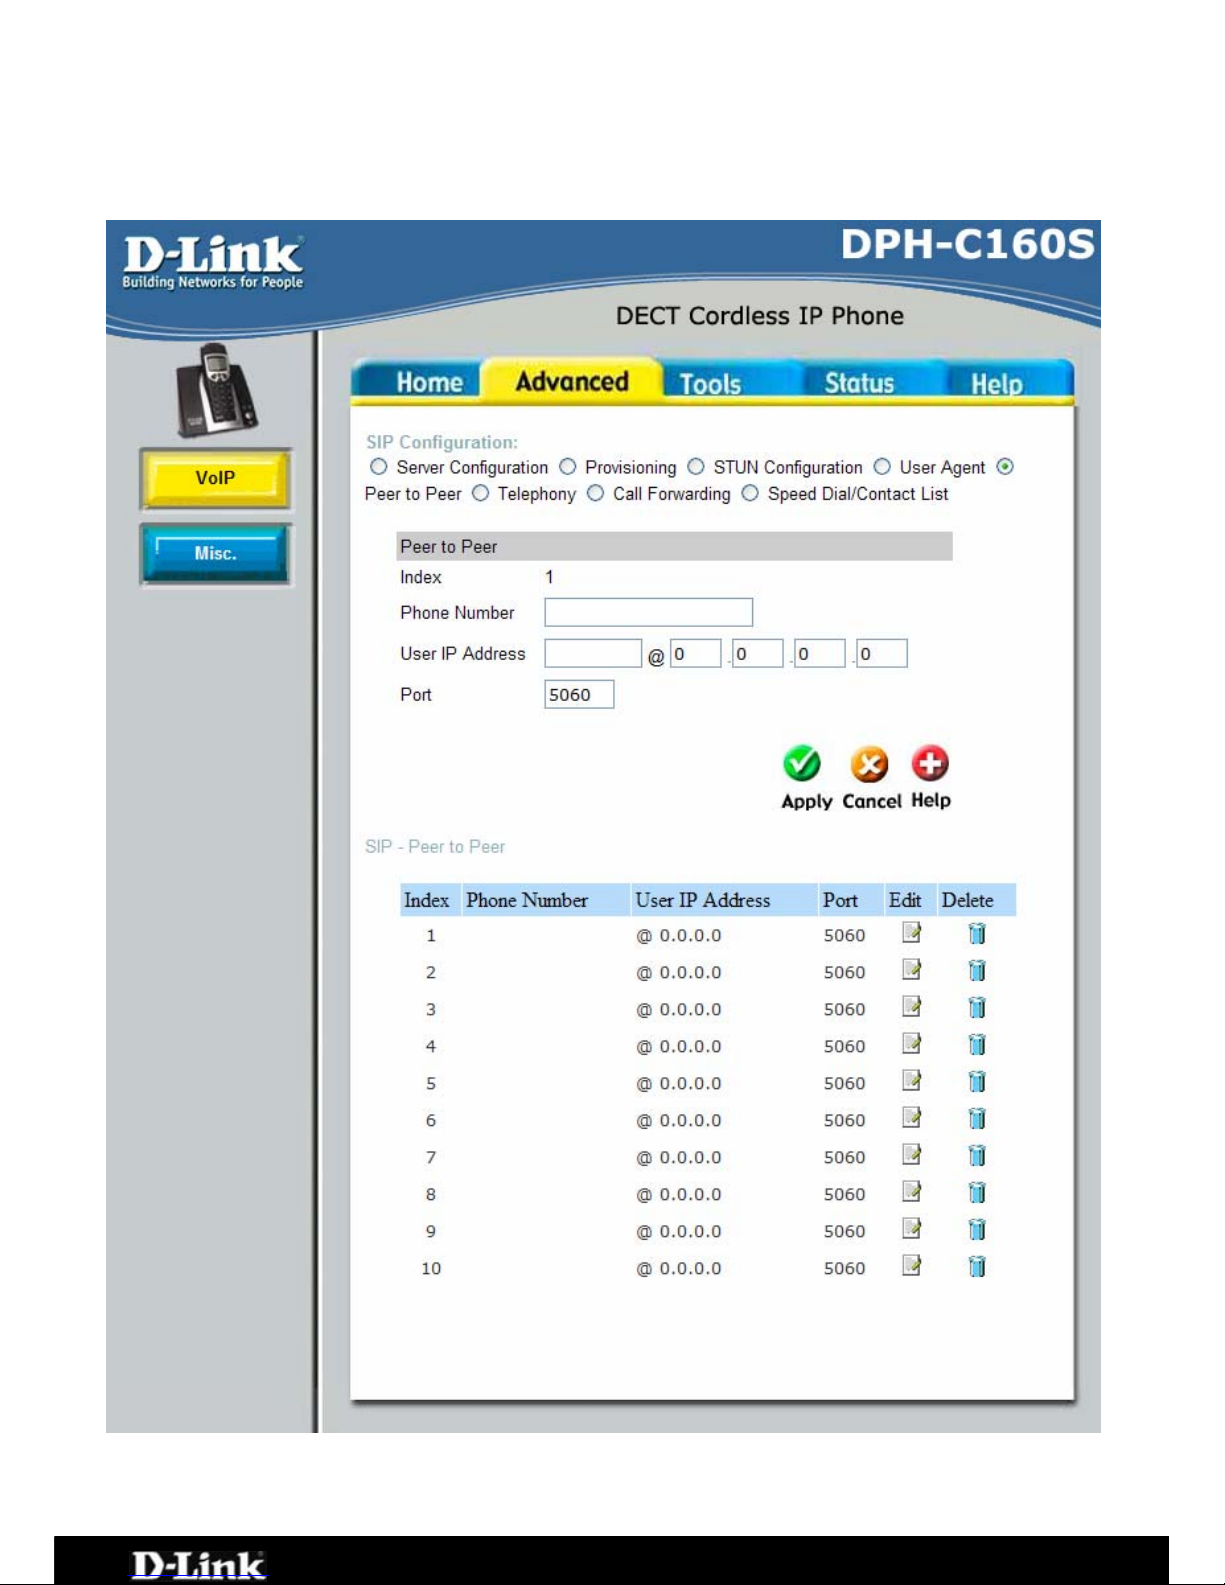
Advanced > VOIP > Peer to Peer
This page allows you to configure your device to make direct calls to another
Index This field specifies the settings to the information entered in the
VoIP device via an IP address.
Page 38 of 67
Page 39

DPH-C160S – DECT Cordless VoIP Phone – User Manual
User Agent.
Phone Number The telephone number assigned to this entry.
User IP Address Enter the IP address of the remote peer in this field.
Port Enter the UDP port number the remote peer will use to make the
connection in this field. If you do not have any information as to
the proper port number, leave the default setting here.
Page 39 of 67
Page 40
DPH-C160S – DECT Cordless VoIP Phone – User Manual
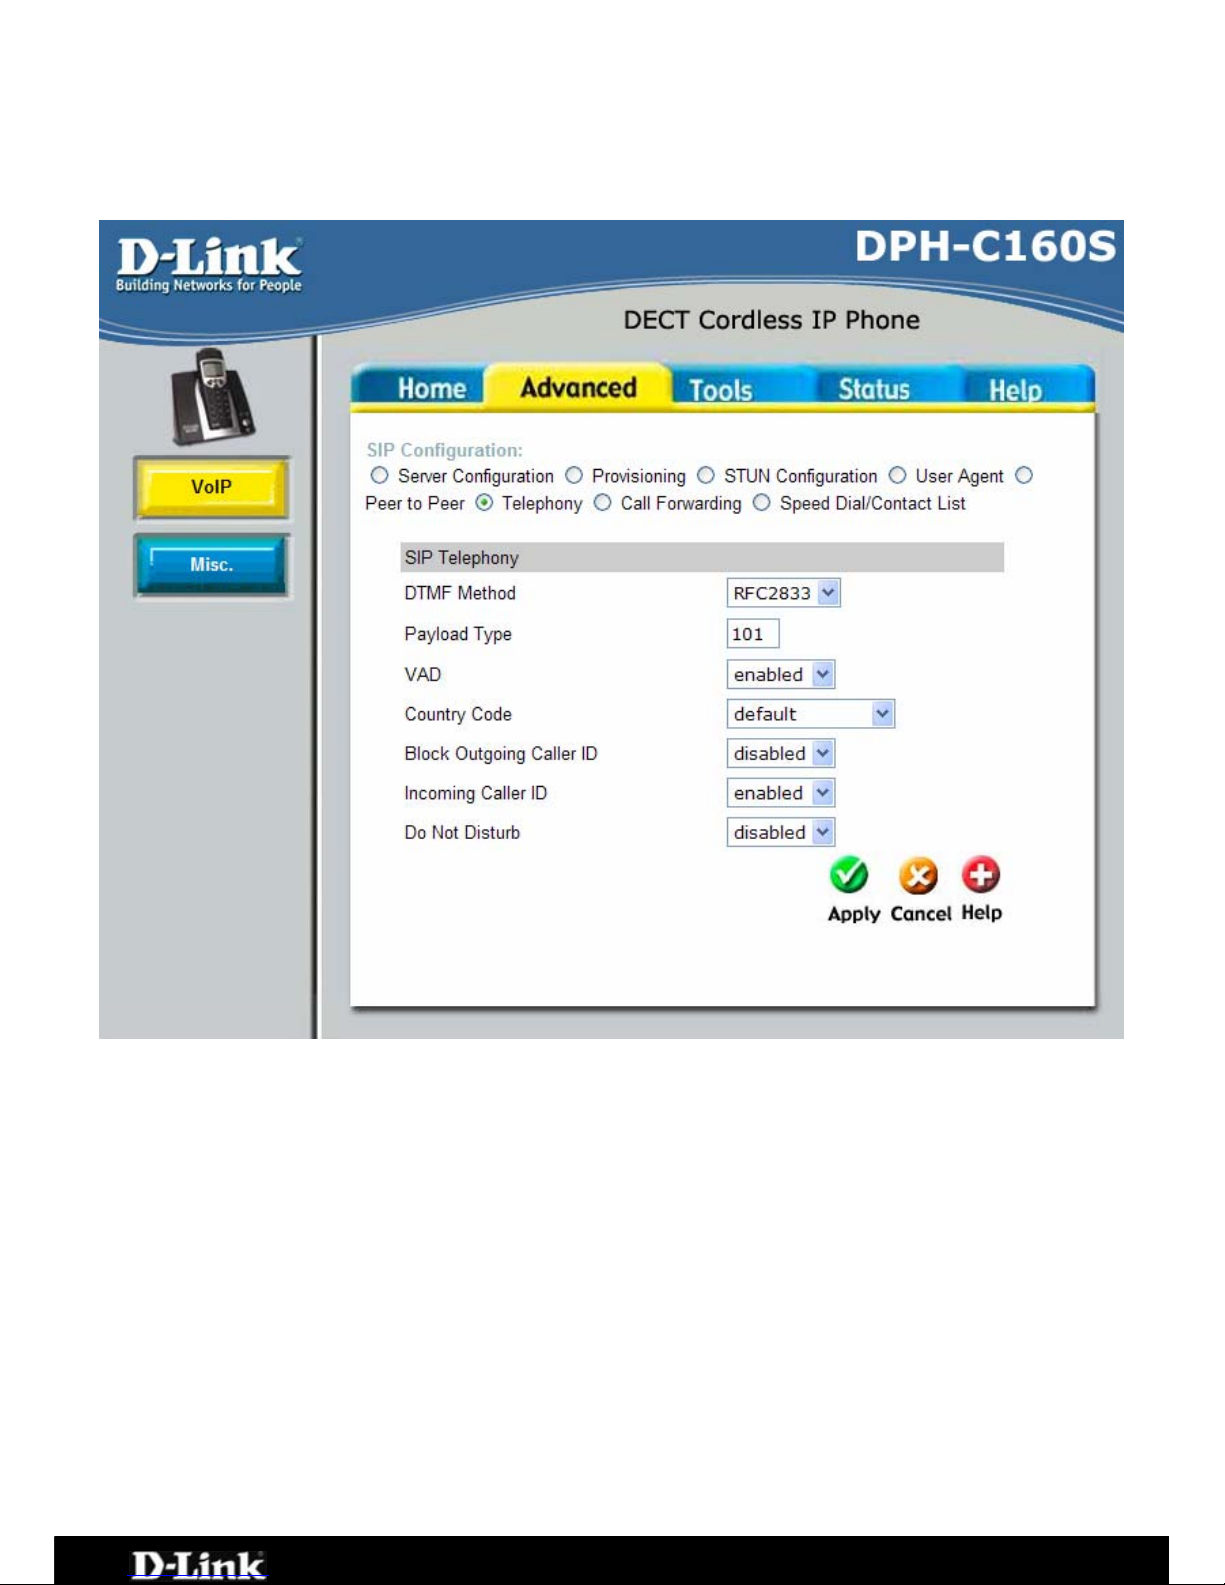
Advanced > VOIP
his page allows configuring some of the more advanced features for your VoIP
onnection.
TMF Method Out-of band Dual Tone Multi-frequency – The Dual Tone Multi-
frequency (DTMF) mode sets how the router will handle the
tones that your telephone makes when you push its buttons. It
is recommended that you use the same mode that your VoIP
service provider uses. Select Enabled (RFC 2833) to send the
DTMF tones in RTP packets. Select Disabled (G.711) to include
the DTMF tones in the voice date stream. This method works
best when you are using a codec that does not use compression
(like G.711).
Payload Type The payload type (PT) field identifies the format of the RTP
ines its interpretation by the receiving
bandwidth that a call uses by not transmitting “silent Packets”
> Telephony
T
c
D
payload and determ
application
VAD Voice Activity Detection (VAD) – Detects whether or not speech
is present. This lets the VoIP Terminal Adapter reduce the
Page 40 of 67
Page 41

DPH-C160S – DECT Cordless VoIP Phone – User Manual
when you are not speaking.
Country Code Allows you to set the country code settings – default setting is
for Australian tones.
Block Outgoing Caller
ID
When Enabled this will block your Outgoing Caller ID so that
when you make a call it will make you appear to be an
anonymous caller.
Incoming Caller ID Allows you to see the Callers ID when they make a call to you.
Do Not Disturb This will stop all calls from coming through and either relay them
to a Voice Mail if the VoIP Service Provider uses this feature or it
just drop the call.
Page 41 of 67
Page 42
DPH-C160S – DECT Cordless VoIP Phone – User Manual
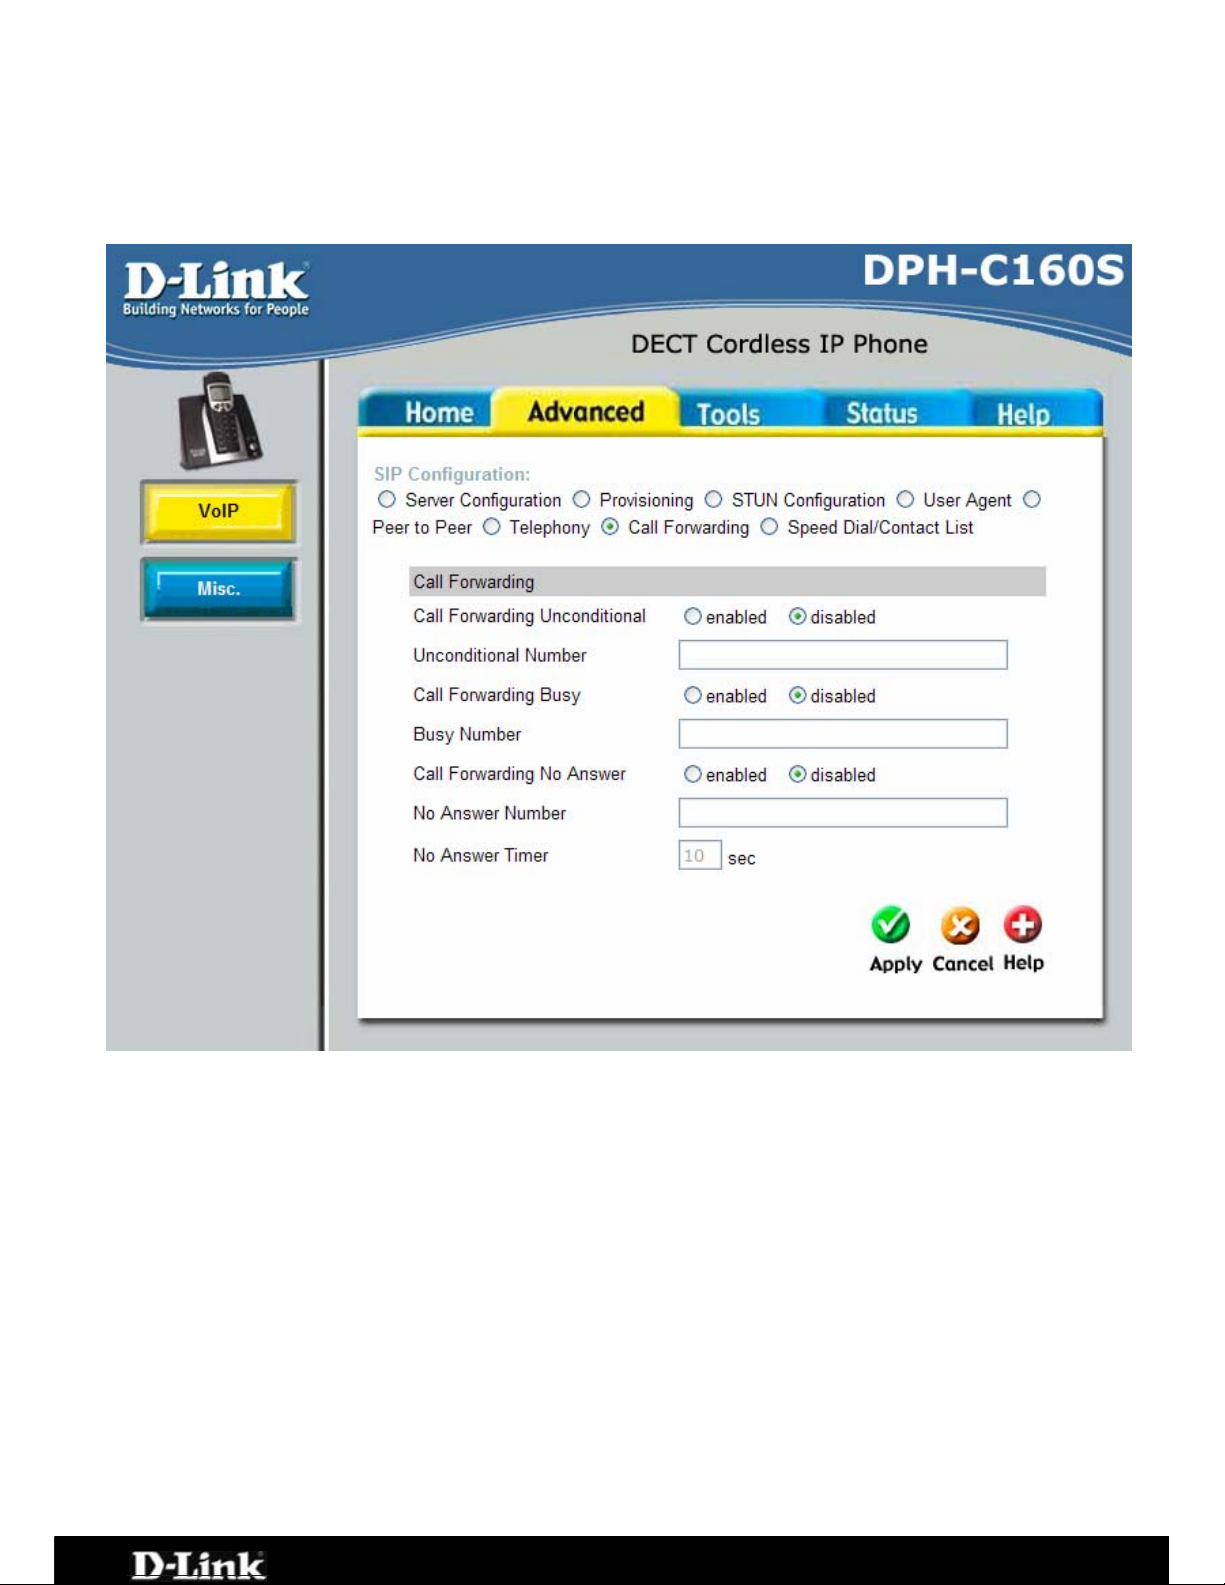
Advanced > VOIP ding
llow y
different number. See etails.
all Forwarding
nconditional
Allows you to Enable or Disable the Call Forwarding
Unconditional feature. When Enabled it will relay all calls to a
different number specified below.
nconditional
umber
This will be the number that all calls are to be forwarded to
when Unconditional is Enabled.
all Forwarding Busy Allows you to Enable or Disable the Call Forwarding Busy
feature. When Enabled it will relay all calls when you are already
on another call to a different number specified below.
usy Number This will be the number that calls when you are busy are to be
forwarded to when Busy is Enabled.
Call Forwarding No Allows you to Enable or Disable the Call Forwarding No Answer
ill relay all calls when you are already
number specified below.
o Answer Number This will be the number that calls when you do not answer the
phone are to be forwarded to when No Answer is Enabled.
> Call Forwar
This page will a
ou to configure methods for which you can relay calls to a
below for more d
C
U
U
N
C
B
Answer feature. When Enabled it w
on another call to a different
N
Page 42 of 67
Page 43

DPH-C160S – DECT Cordless VoIP Phone – User Manual
No Answer Timer This is the delay for the No Answer feature before calls are
relayed to the No Answer Nu
mber.
Page 43 of 67
Page 44
DPH-C160S – DECT Cordless VoIP Phone – User Manual
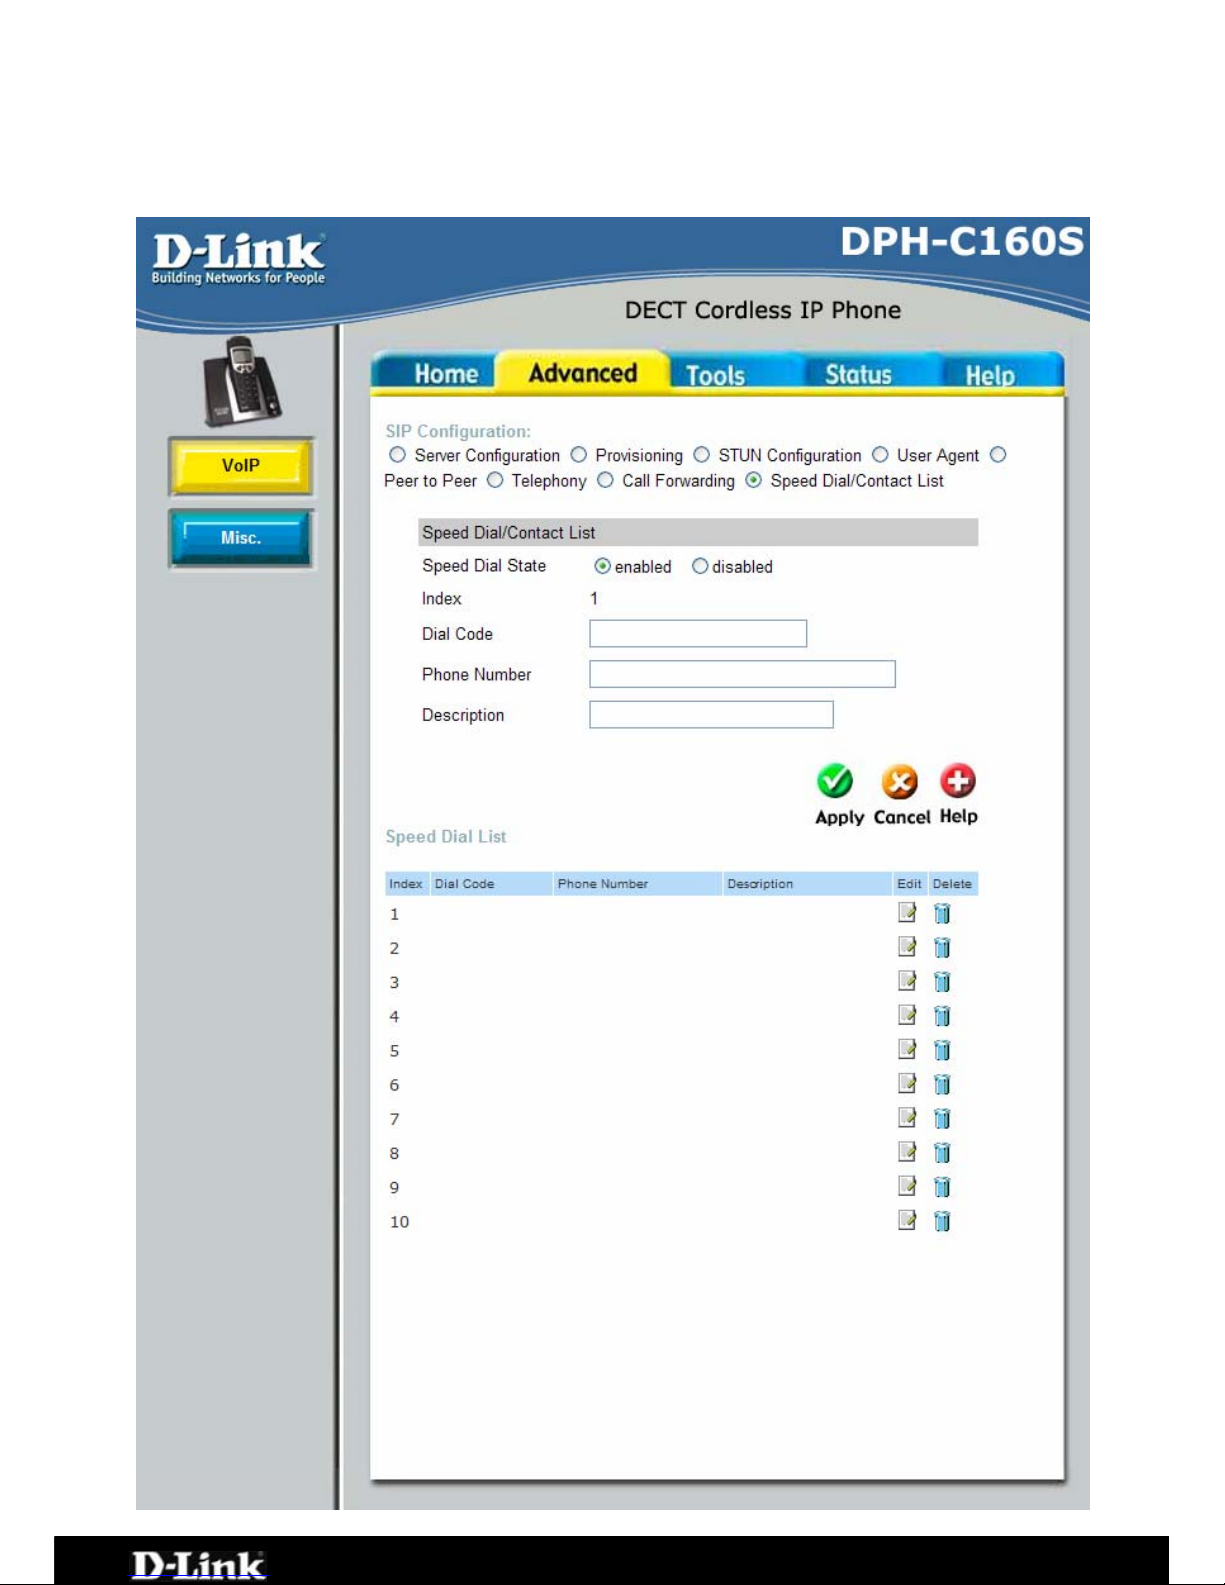
Advanced > VOIP > Speed Dial/Contact List
his page allows you to configured a Speed Dial and Contact List for making
alls quickly from your handset.
T
c
Page 44 of 67
Page 45

DPH-C160S – DECT Cordless VoIP Phone – User Manual
SInpeed Dial State This will enable the Speed Dial function on the DPH-C160S.
e
e will be the number that you use for the Speed Dial
dex This field specifies the settings to the information entered in th
below table.
Dial Code The Dial Cod
feature to engage the required Index.
Phone Number Basically the number that you wish the unit to dial when you
enter the Dial Code.
Description A Brief Description to Identify the Index.
Page 45 of 67
Page 46
DPH-C160S – DECT Cordless VoIP Phone – User Manual
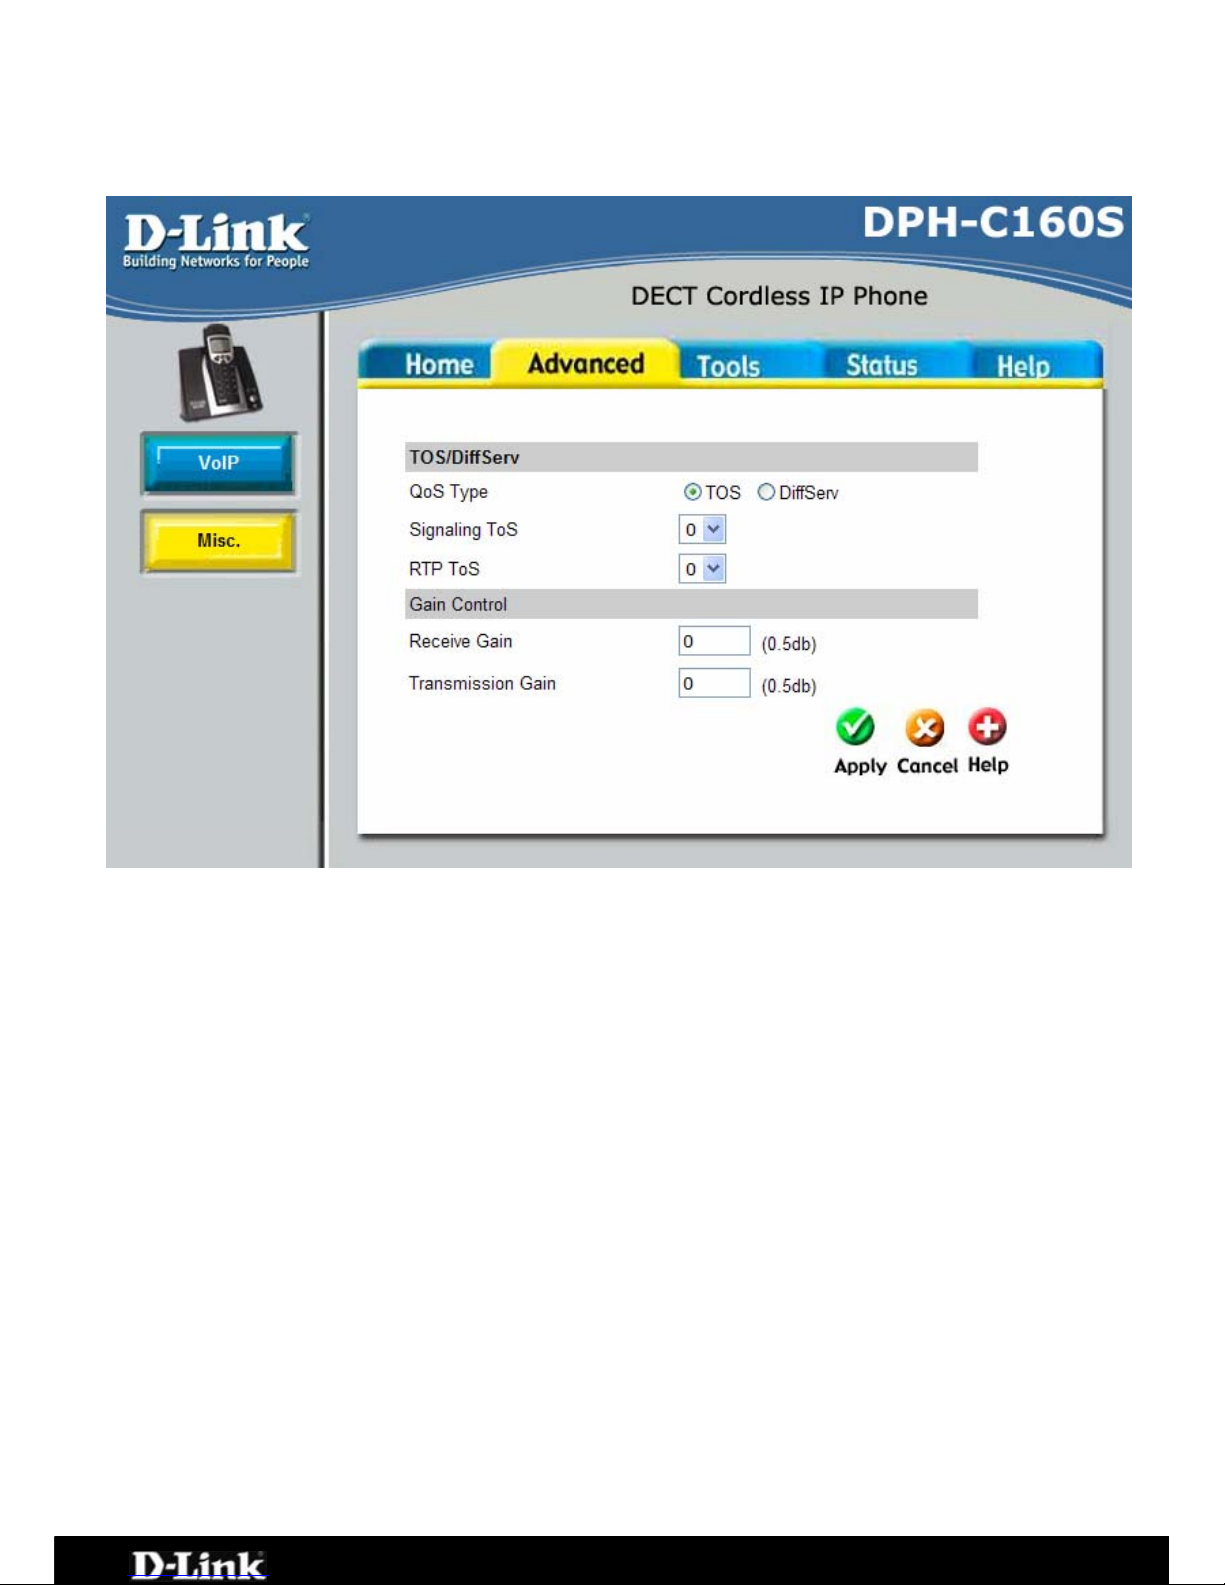
Advanced > Misc.
lows you
oS Type This allows you to select to use Type of Service (ToS) or Diffserv
for the QoS feature.
ignalling ToS Signalling ToS - ToS field value in UDP IP Packets carrying a SIP
Message.
TP ToS RTP ToS - ToS field value in UDP IP Packets carrying a RTP data.
eceive Gain Used to raise or lower the gain (volume) of signals that come in
from the IP and are sent to the line-side or trunk-side interface.
The Rx Gain dB level may be set in 0.5 db increments from –20
dBm to 20 dBm.
ransmission Gain Used to raise or lower the gain (volume) of signals that go out to
the IP from the line-side or trunk-side interface. The Tx Gain dB
level may be set in 0.5 db increments from –20 dBm to 20 dBm.
This page al to configure the ToS / Diffserv settings for your network.
Q
S
R
R
T
Page 46 of 67
Page 47
DPH-C160S – DECT Cordless VoIP Phone – User Manual
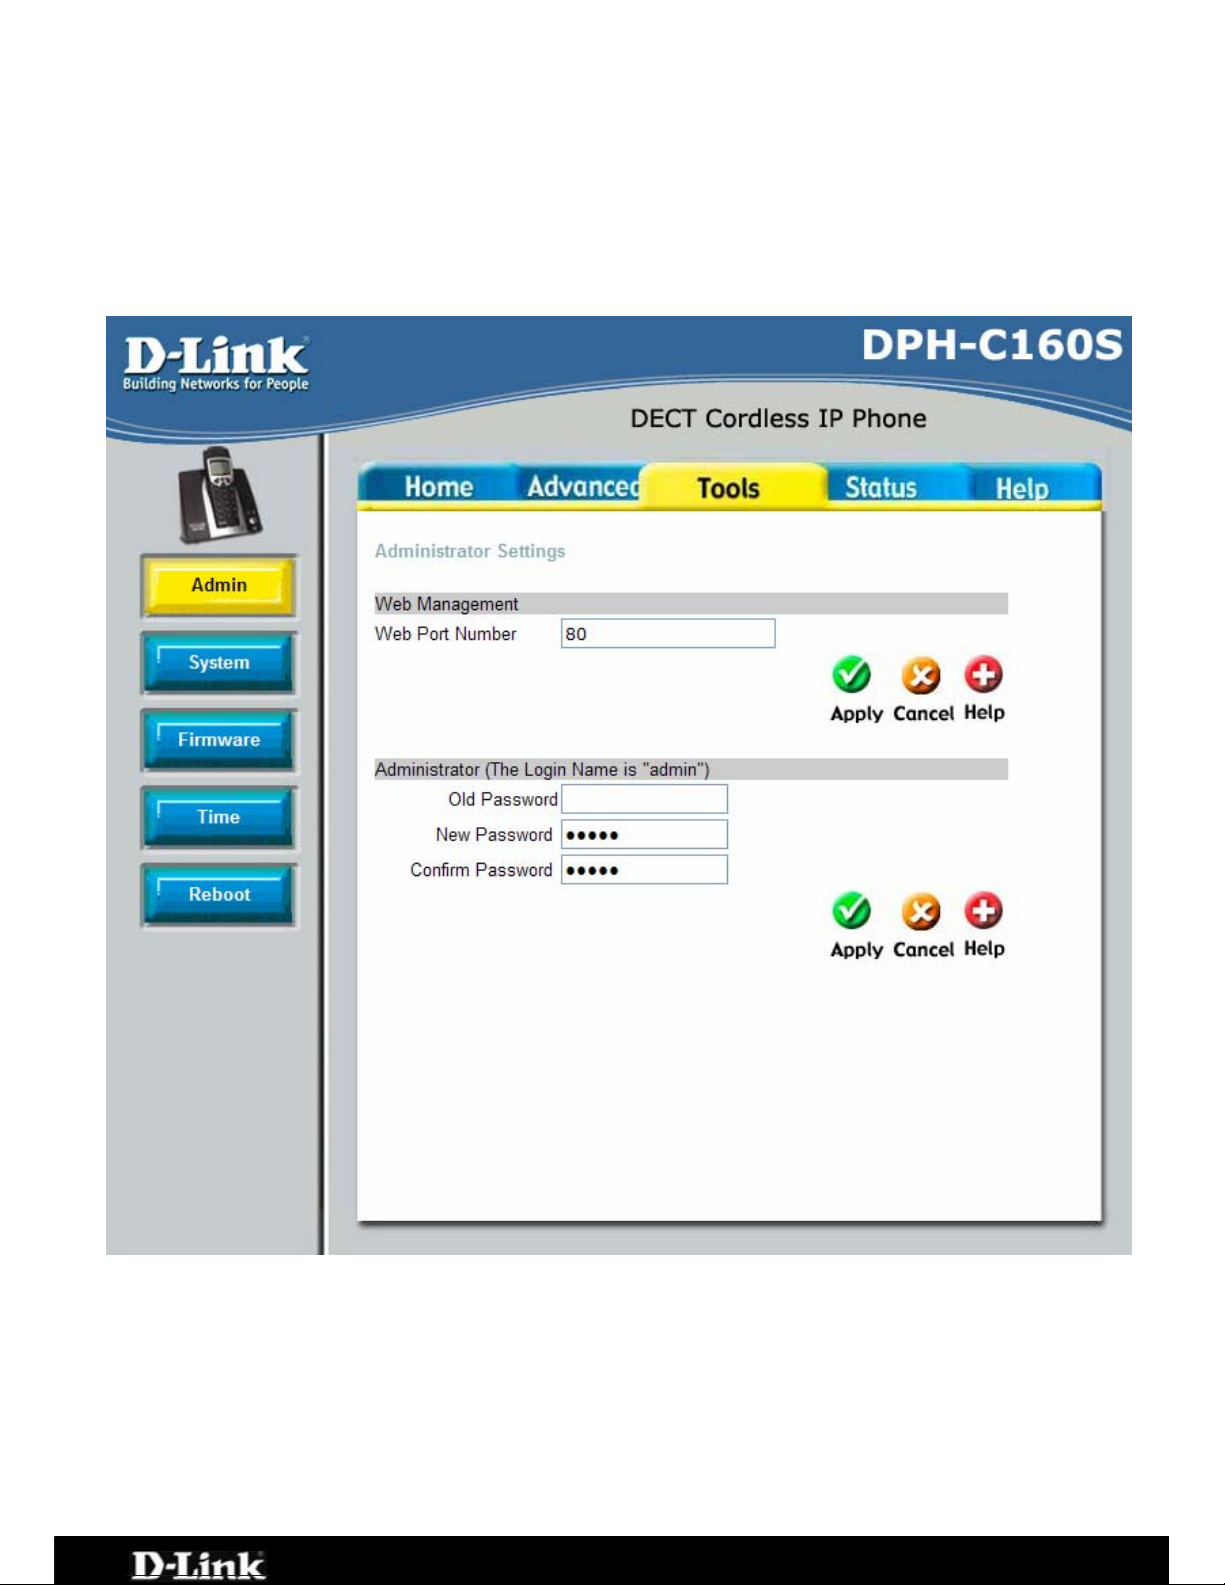
Tools > Admin
This page allows you to change the password used to access the web interface,
type the New Password and Confirm Password to be certain you have typed it
correctly. Click the Apply button to activate the new password. The System
User Name remains “admin”, this cannot be changed using the web manager
interface. Be sure to save the new setting.
Web Management Web Management allows the DECT Cordless VoIP Phone to be
configured from the Internet by a web browser. A username and
password is required to access the Web-Management interface.
In general, only a member of your network can browse the built-
in web pages to perform Administrator tasks.
Web Port Number The port number used to access the VoIP Terminal Adapter. The
default port number for web management is 80.
Administrator admin is the Administrator login name.
Page 47 of 67
Page 48

DPH-C160S – DECT Cordless VoIP Phone – User Manual
Old Password Enter the old password in order to confirm that you are an
Administrator.
New Password Enter the password here and the same password in the Confirm
Password field. This will be the password that the administrator
will use to gain access to the configuration menu of the device.
The default password is “admin.”
Confirm Password See above.
Page 48 of 67
Page 49
DPH-C160S – DECT Cordless VoIP Phone – User Manual
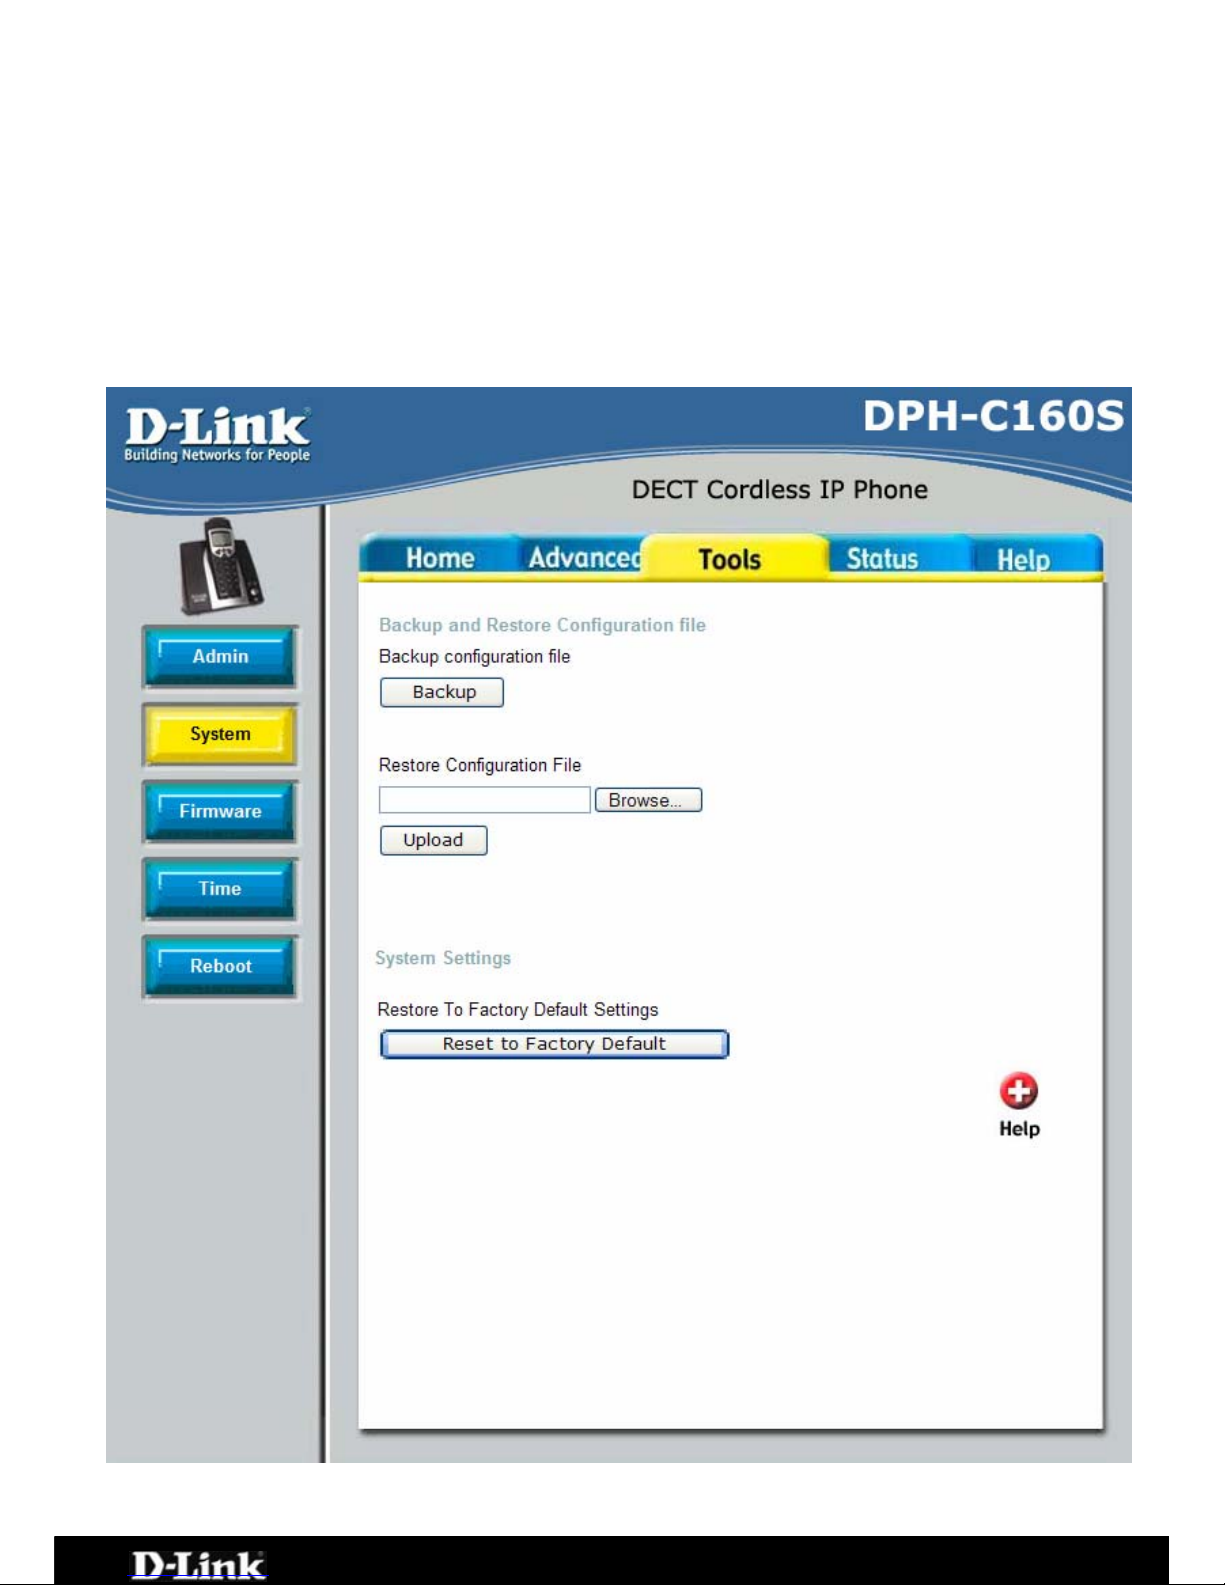
Tools > System
ows yo
to initiate the backing
uploading of the conf ated it by using the Browse
ou can also reset the unit to Factory Default Settings. This will restore all
onfigurations to the default value for the firmware and restart the unit.
This screen all
u to backup and restore configuration files. Click Backup
up of a configuration file. Click Upload to initiate the
iguration file once you have loc
button.
Y
c
Page 49 of 67
Page 50
DPH-C160S – DECT Cordless VoIP Phone – User Manual
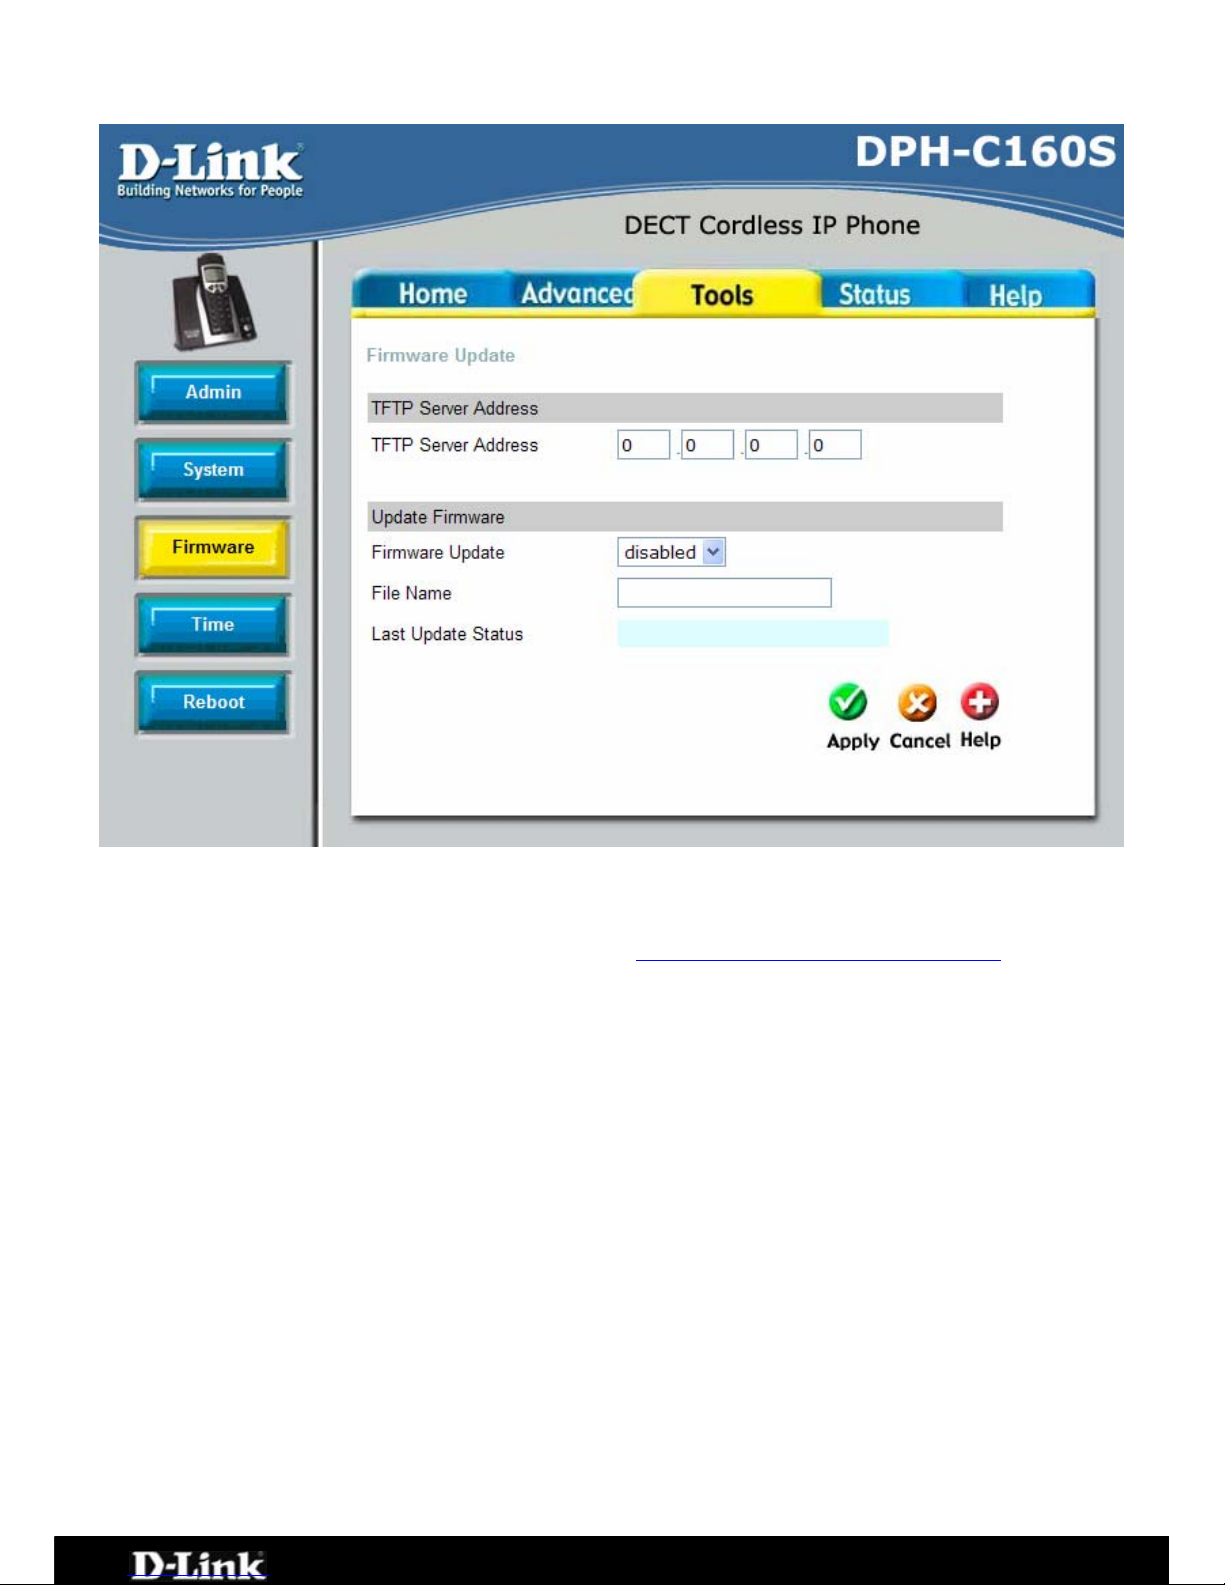
Tools > Firmware
You can upgrade the firmware of the DPH-C160S here. Make sure the firmware
you want to use is on the local hard drive of the computer. Please check the DLink Support site for firmware updates at http://www.dlink.com.au/tech
. You
can download firmware upgrades to your hard drive from the D-Link support
site.
TFTP Server Address Type in the IP address of the computer you are loading the
firmware from / running the TFTP server application on.
Firmware Update Gives you the option to enable / disable the firmware update
feature.
File Name Enter the firmware file name in this field. For example:
“dph_c160s-100003DPH-AUS-20060718.tfp”
Click Apply to complete the firmware upgrade.
Page 50 of 67
Page 51
DPH-C160S – DECT Cordless VoIP Phone – User Manual
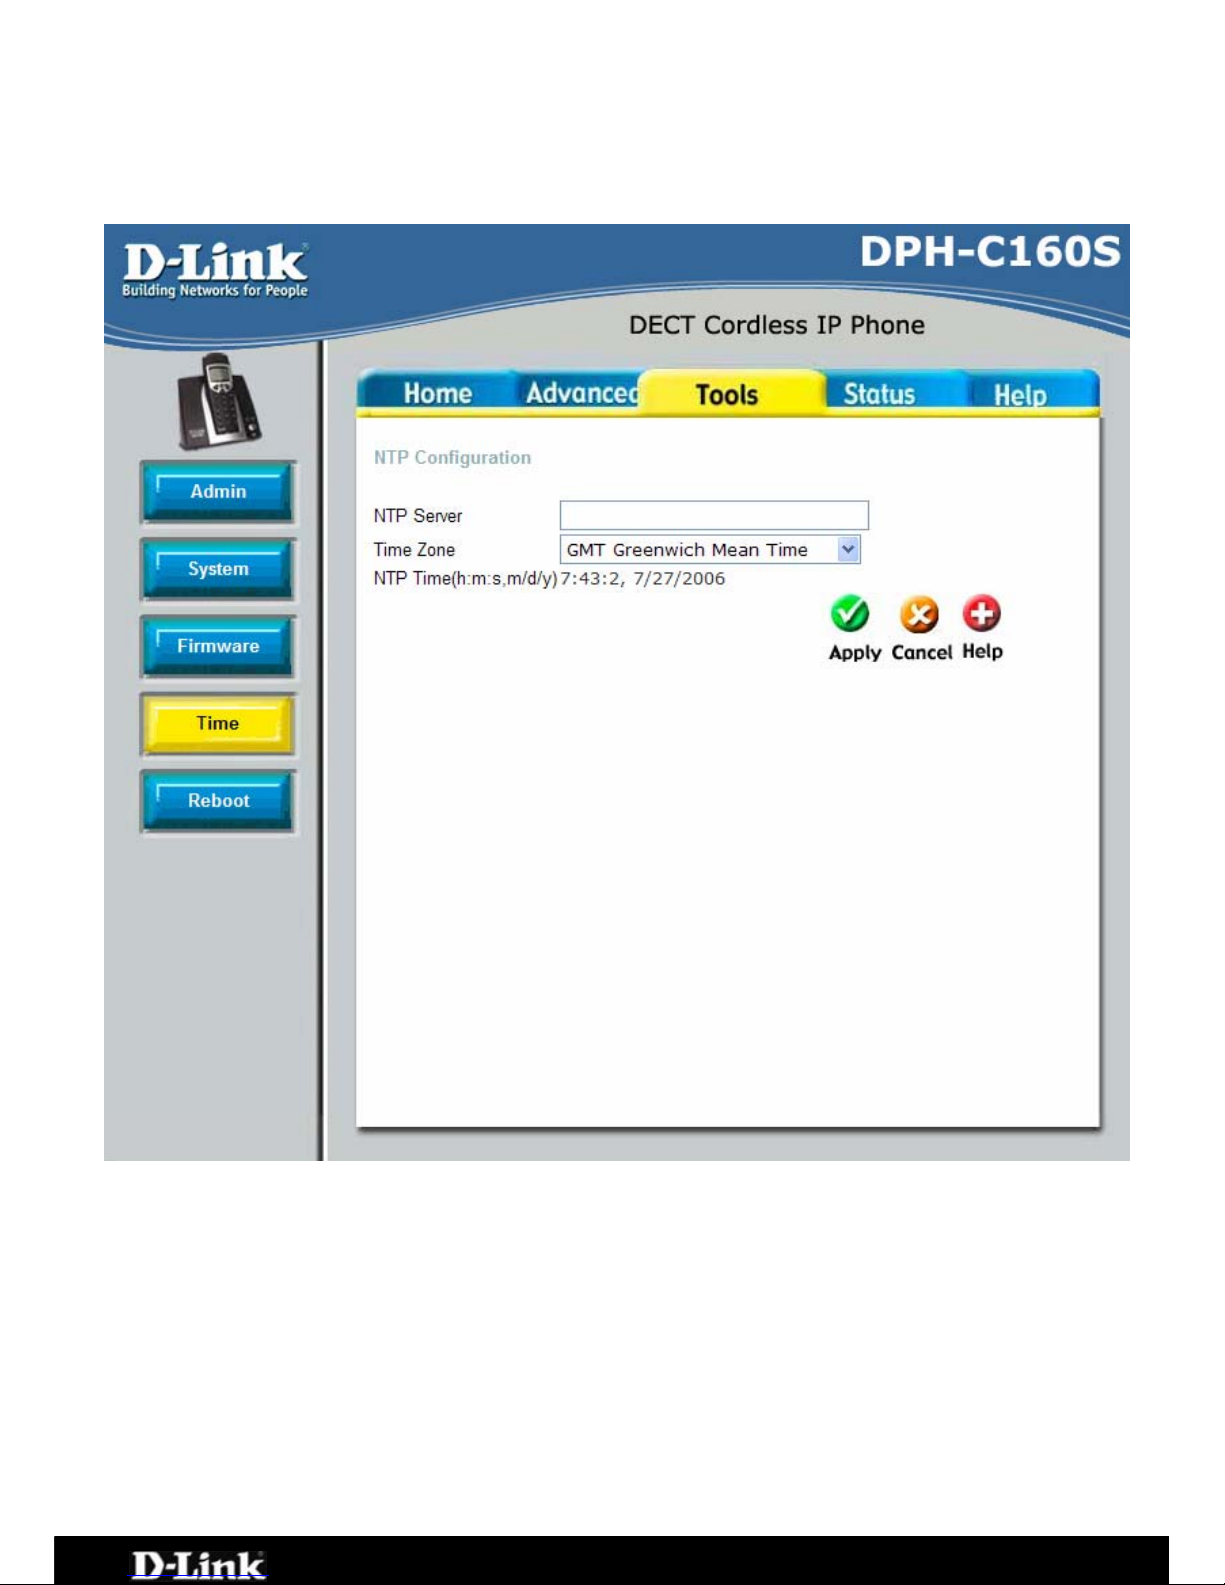
Tools > Time
The Router provides a number of options to maintain current date and time
including SNTP.
NTP Server This will be the IP Address of ei
SNTP Server.
ther an Internet or LAN based
ime Zone The GMT Time Zone that you are currently in to ensure the
correct time is on the unit.
TP Time Shows the current time on the unit.
you opt to use SNTP, you must enter the SNTP server URL or IP address.
lick the Apply button to set the system time.
T
N
If
C
Page 51 of 67
Page 52
DPH-C160S – DECT Cordless VoIP Phone – User Manual
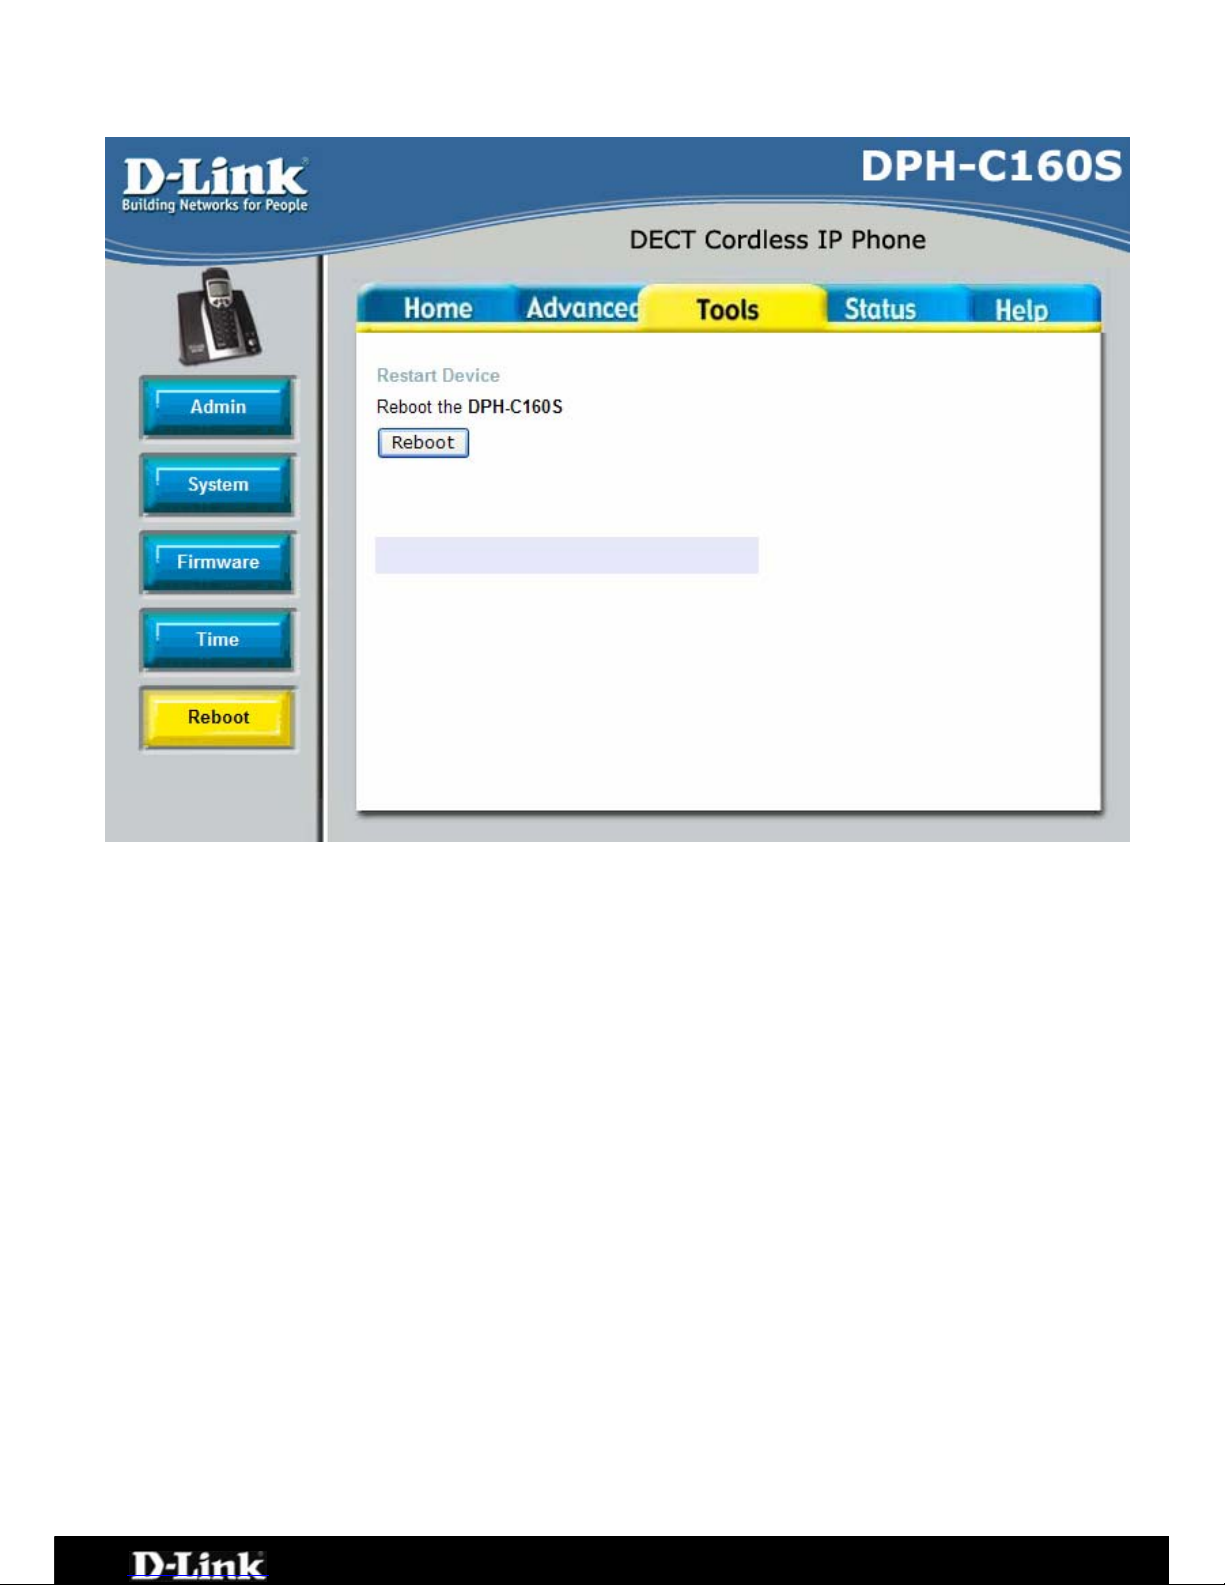
Tools > Reboot
Restart Device Click the Reboot button to restart the DPH-C160S with the
latest changes made to the configuration.
Page 52 of 67
Page 53
DPH-C160S – DECT Cordless VoIP Phone – User Manual
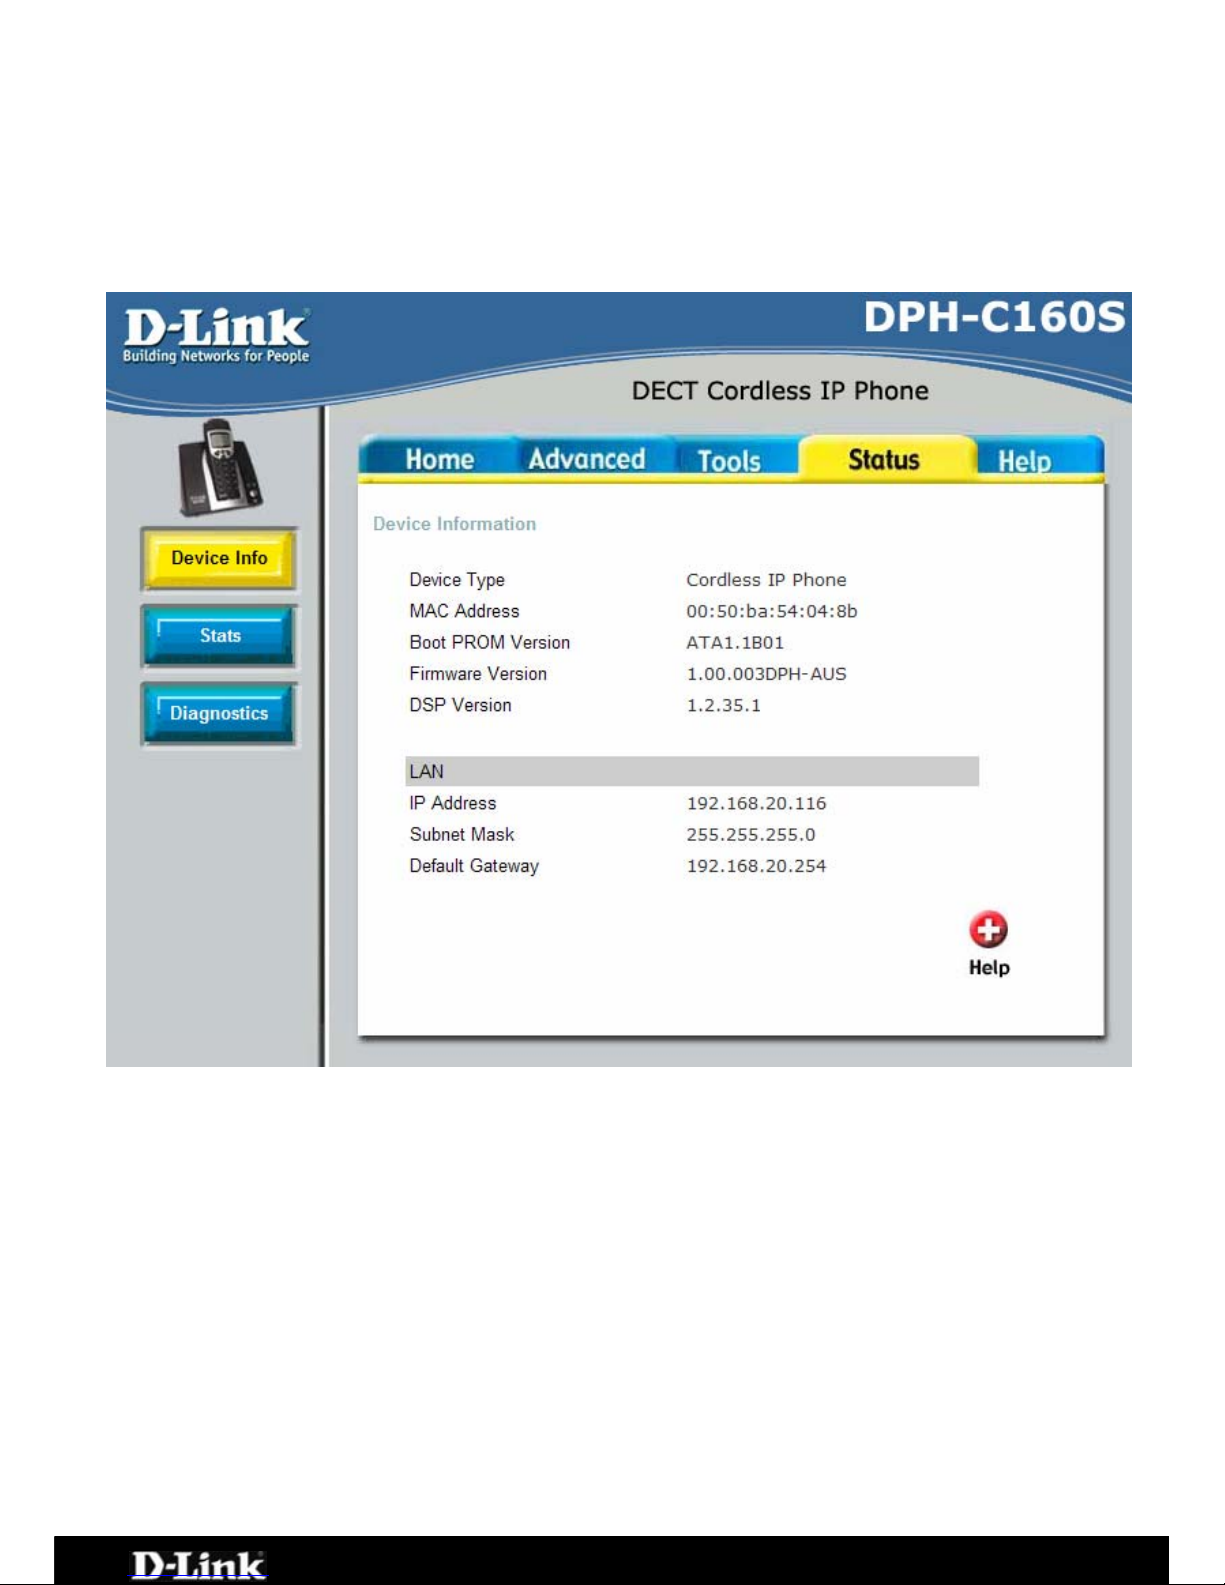
Status > Device Info
N LAN MAC Address: MAC address of the DPH-C160S.
IP Address: LAN/Private IP Address of the DPH-C160S.
Subnet Mask: LAN/Private Subnet Mask of the DPH-C160S.
This page displays the current information for the DPH-C160S. It will display
the LAN Information statistics.
This window will show the DPH-C160S’s working status:
LA
Page 53 of 67
Page 54
DPH-C160S – DECT Cordless VoIP Phone – User Manual
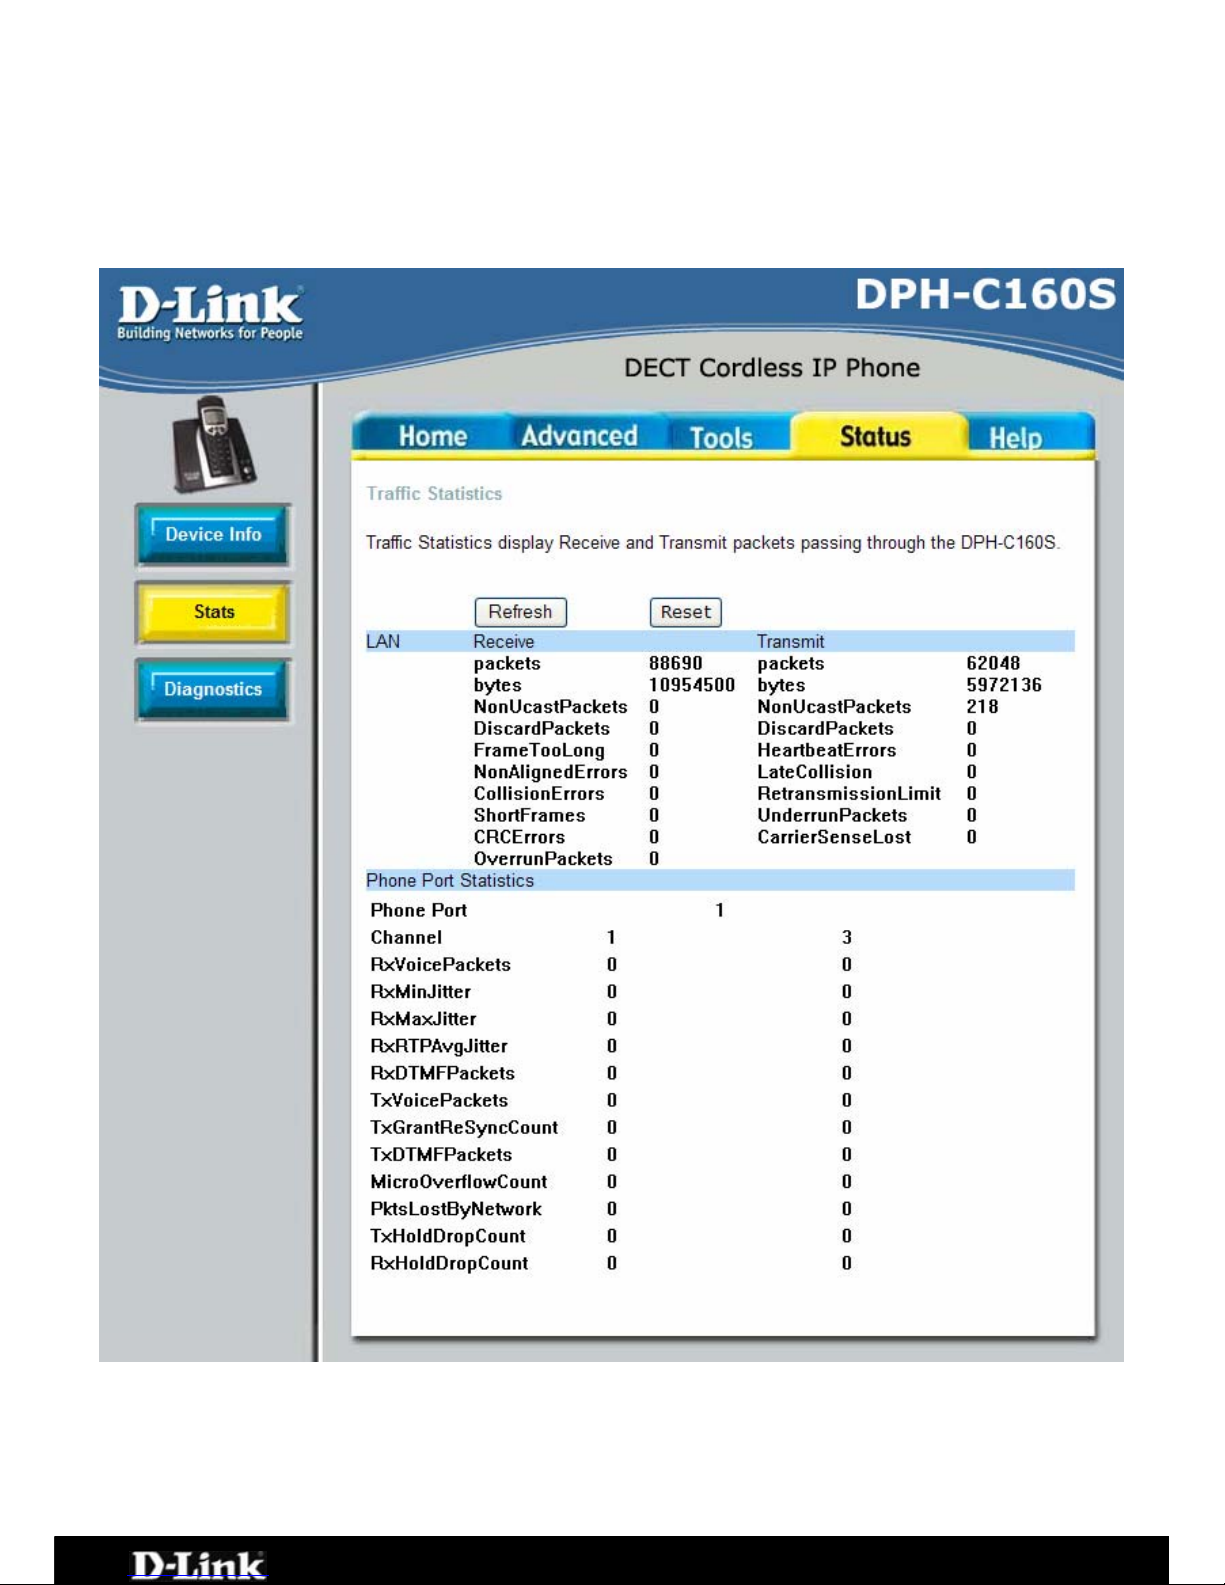
Status > Stats
The DPH-C160S keeps a running log of statistics and activities occurring on th
DECT Cordless VoIP Phone. If the e device is rebooted, the statistics are
utomatically cleared.
a
Page 54 of 67
Page 55
DPH-C160S – DECT Cordless VoIP Phone – User Manual
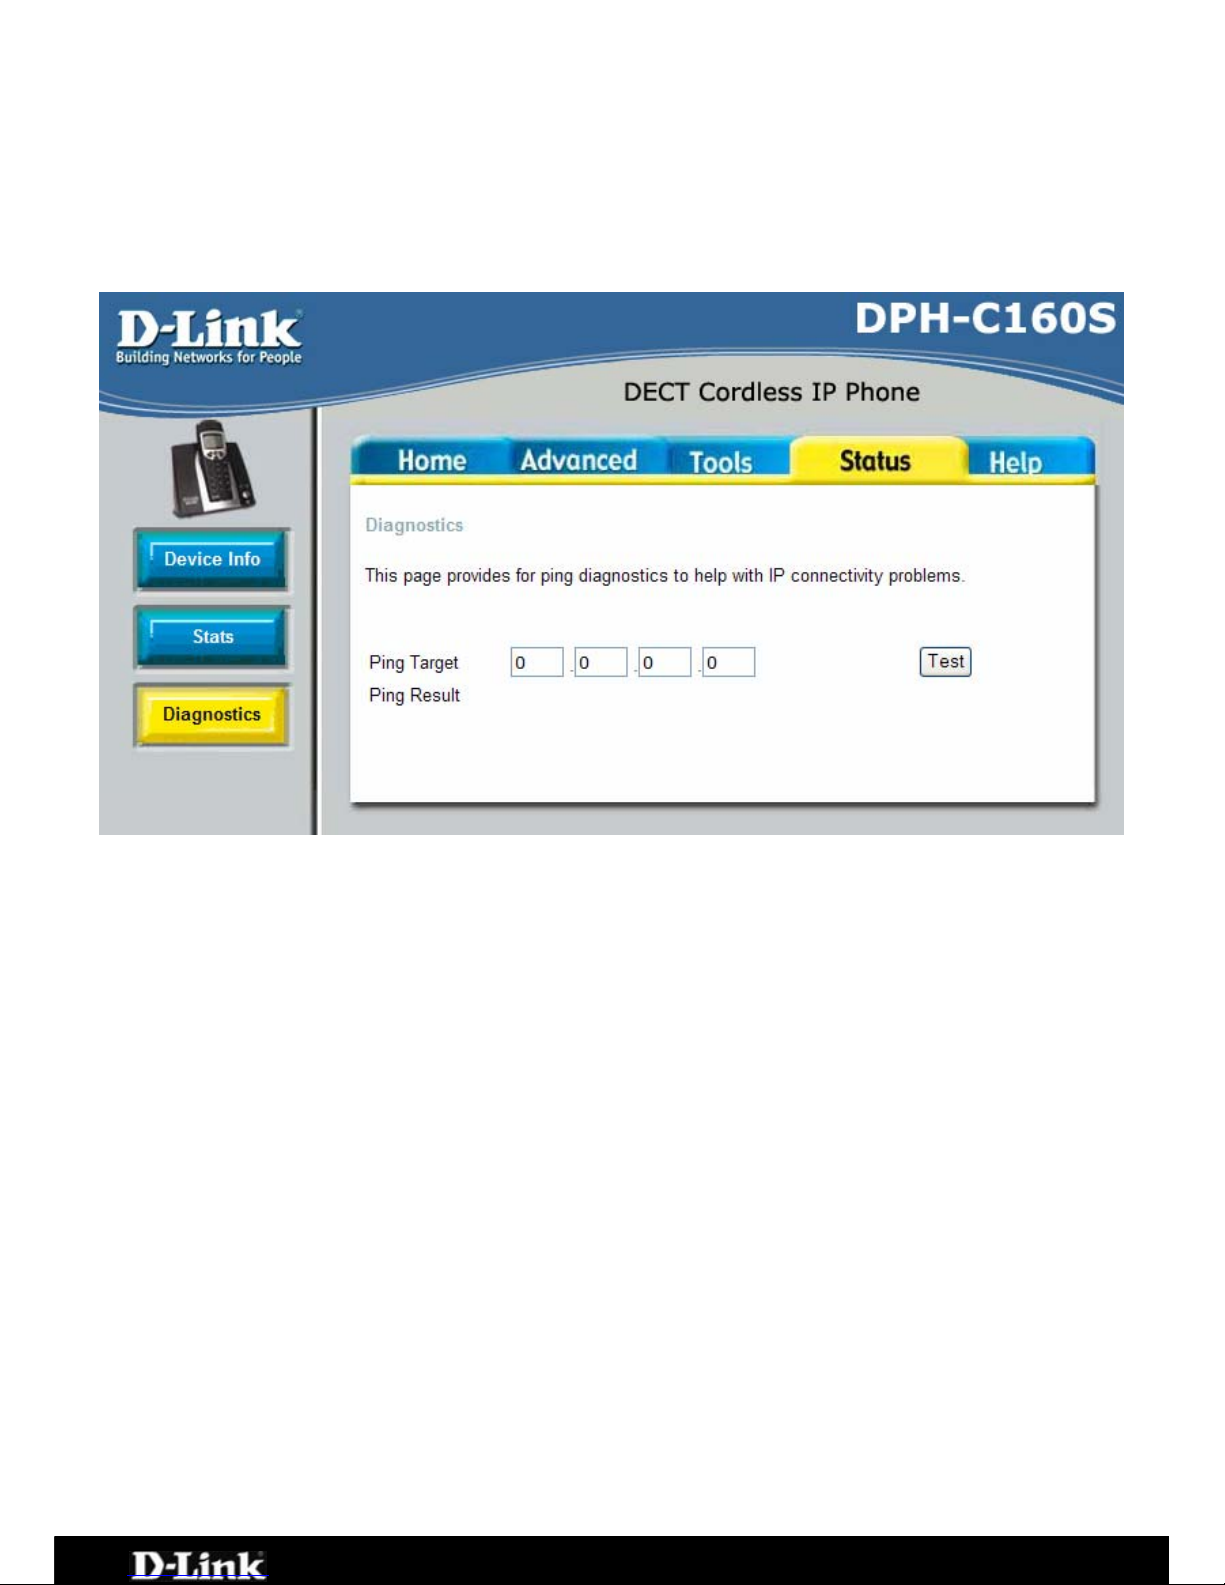
Status > Diagnostics
ows you to run a basic network diagnostic PING to
etermine if there is a network connection. The best check that can be done is
The DPH-C160S all
d
to enter your router/gateway’s IP address to see if there is a connection
between the two devices.
Page 55 of 67
Page 56
DPH-C160S – DECT Cordless VoIP Phone – User Manual
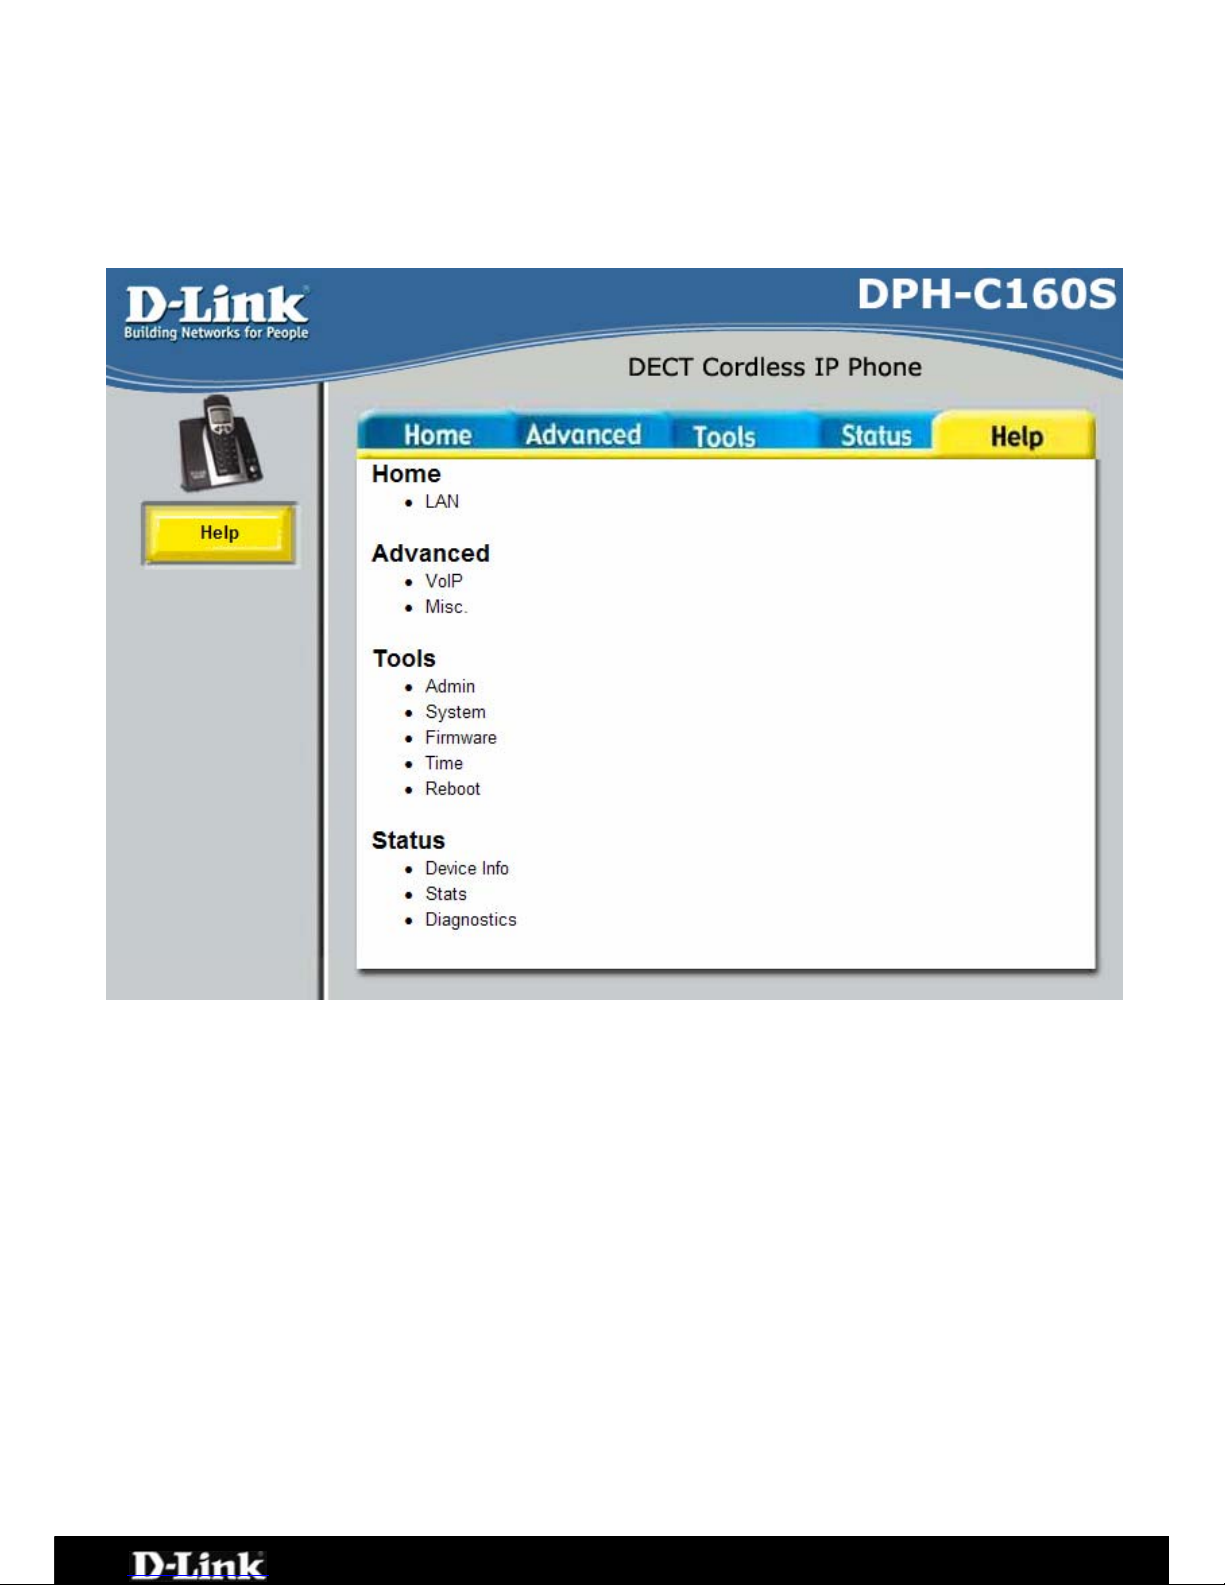
Help > Help
The Help tab will give basic information referring to various screens located in
ew a specific section, click on its hyperlinked
ame. A new window will appear with the required information.
ow to Factory Reset Base Station
order to reset the unit you will need to follow the below steps:
tep 1: Unplug power from the Base Station.
tep 2: Locate the factory reset button at the back of the Base Station.
tep 3: Insert a paper clip in to the reset pinhole. Press and hold the reset
utton with light pressure (you should feel the button click in).
tep 4: Power the device back on by plugging the power in. Continue to hold
e reset button for 8-10 seconds then release.
he phone is now reset to factory defaults.
the DPH-C160S interface. To vi
n
H
In
S
S
S
b
S
th
T
Page 56 of 67
Page 57

DPH-C160S – DECT Cordless VoIP Phone – User Manual
Technical Specifications
Ethernet Ports
One Port for Fast Ethernet
Connections
RJ-45, Auto MDI/MDI-X, 10/100
Mbps
Standard Compliance IEEE 802.3 for 10 Mbps Ethernet
IEEE 802.3u for 100 Mbps Ethernet
Rate Adaptation 10/100 Mbps, Auto-Negotiation
Cordless Phone Interface
Standard Compliance DECT (Digital Europe Cordless
Telecommunication)
GAP (Generic Access Profile)
Frequency 1880-1900 MHz
RF Channels 10 Channels
Modulation GFSK
Voice Coding ADPCM< 32K bit/s t.
LED Indicators
Condition Colour Activity
Power/Status Power ON
Power Off
System
ready but
not yet
registered
System
ready and
registered
Green
N/A
Green
Green
Blinking
N/A
Blinking
Solid
Ethernet Link/Act Ethernet
Port Link
Ethernet
Port Tx/Rx
Activity
Green
Green
Solid
Blinking
VoIP/PSTN VoIP
PSTN
Green
Dark
Solid
N/A
On/Off Hook On Hook
Off Hook
Ringing
Dark
Green
Green
N/A
Solid
Blinking
Charger On
Off
Green
N/A
Solid
N/A
CHASSIS REQUIREMENTS:
Material ABS+PC
Width 60.5mm
Depth 128mm
Page 57 of 67
Page 58

DPH-C160S – DECT Cordless VoIP Phone – User Manual
Height 110mm
Weight 312g
Regulatory EMC, Safety, Model No, Serial No,
r. Ve
MAC Address Label On rear of Base Unit
POWER REQUIREMENT:
External Power Adapter AC Power Adapter, AC 9V, 1A
Embedded Fac
r of Base Unit
tory Reset Switch
On rea
TELEPHONY SUPPORT:
Call Control Protocol SIP (RFC3261)
CODEC G.711 (A-law and U-law)
G.726
G.729A
iLBC
Echo Cancellation G.168
CONFIGURATION/MANAGEMENT:
DHCP (Dynamic Host Configuration
Protocol)
DHCP Client (RFC2131)
Embedded Web Server
Configuration Restore/Backup
TELNET
TFTP Client For firmwa
configuratio
re upgrade and
n fi download le
Performance Monitor
SECURITY:
User Authentication Administration Username/Password control for
d WEB configurati
TELNET an on
SIP Authentication SIP Authent
password
ication with MD5
encryption
VoIP NAT Traversal SIP/STUN
SAFETY/EMI REQUIREMENTS:
UL/CUL
Page 58 of 67
Page 59

DPH-C160S – DECT Cordless VoIP Phone – User Manual
EMI CERTIFICATION:
FCC Class B
BSMI Class B
CE Class B
ENVIRONMENTAL
SPECIFICATIONS:
Operating Temperature 0° to 40°C
Storage Temperature -10° to 55°C
Operating Humidity Range 5 to 95%, Non-condensing
Page 59 of 67
Page 60
DPH-C160S – DECT Cordless VoIP Phone – User Manual
Appendix
Configuring your PC’s IP Address
In order to configure your system to recei e IP settings from the Router it must
first have the TCP/IP protocol installed. If you have an Ethernet port on your
computer, it probably already has TCP/IP protocol installed. If you are using
Windows XP the TCP/IP is enabled by default for standard installations. Below
is an illustrated example of how to configure a Windows XP system to
automatically obtain IP settings from the Router. Following this example is a
step-by-step description of the procedures used on the other Windows
operating systems to first check if the TCP/IP protocol has been installed; if it is
not, instructions are provided for installing it. Once the protocol has been
installed you can configure the system to receive IP settings from the Router.
For computers running non-Windows operating systems, follow the instructions
for your OS that configure the system to receive an IP address from the
Router, that is, configure the system to be a DHCP client.
v
If you are using a Router to provide Internet access for more than
one computer, you can use these instructions later to change the IP
settings for the other computers. However, you cannot use the same
IP address since every computer must have its own IP address that is
NOTE
unique on the local network.
Configure Windows XP for DHCP
Use the following steps to configure a computer running Windows XP to be a
DHCP client.
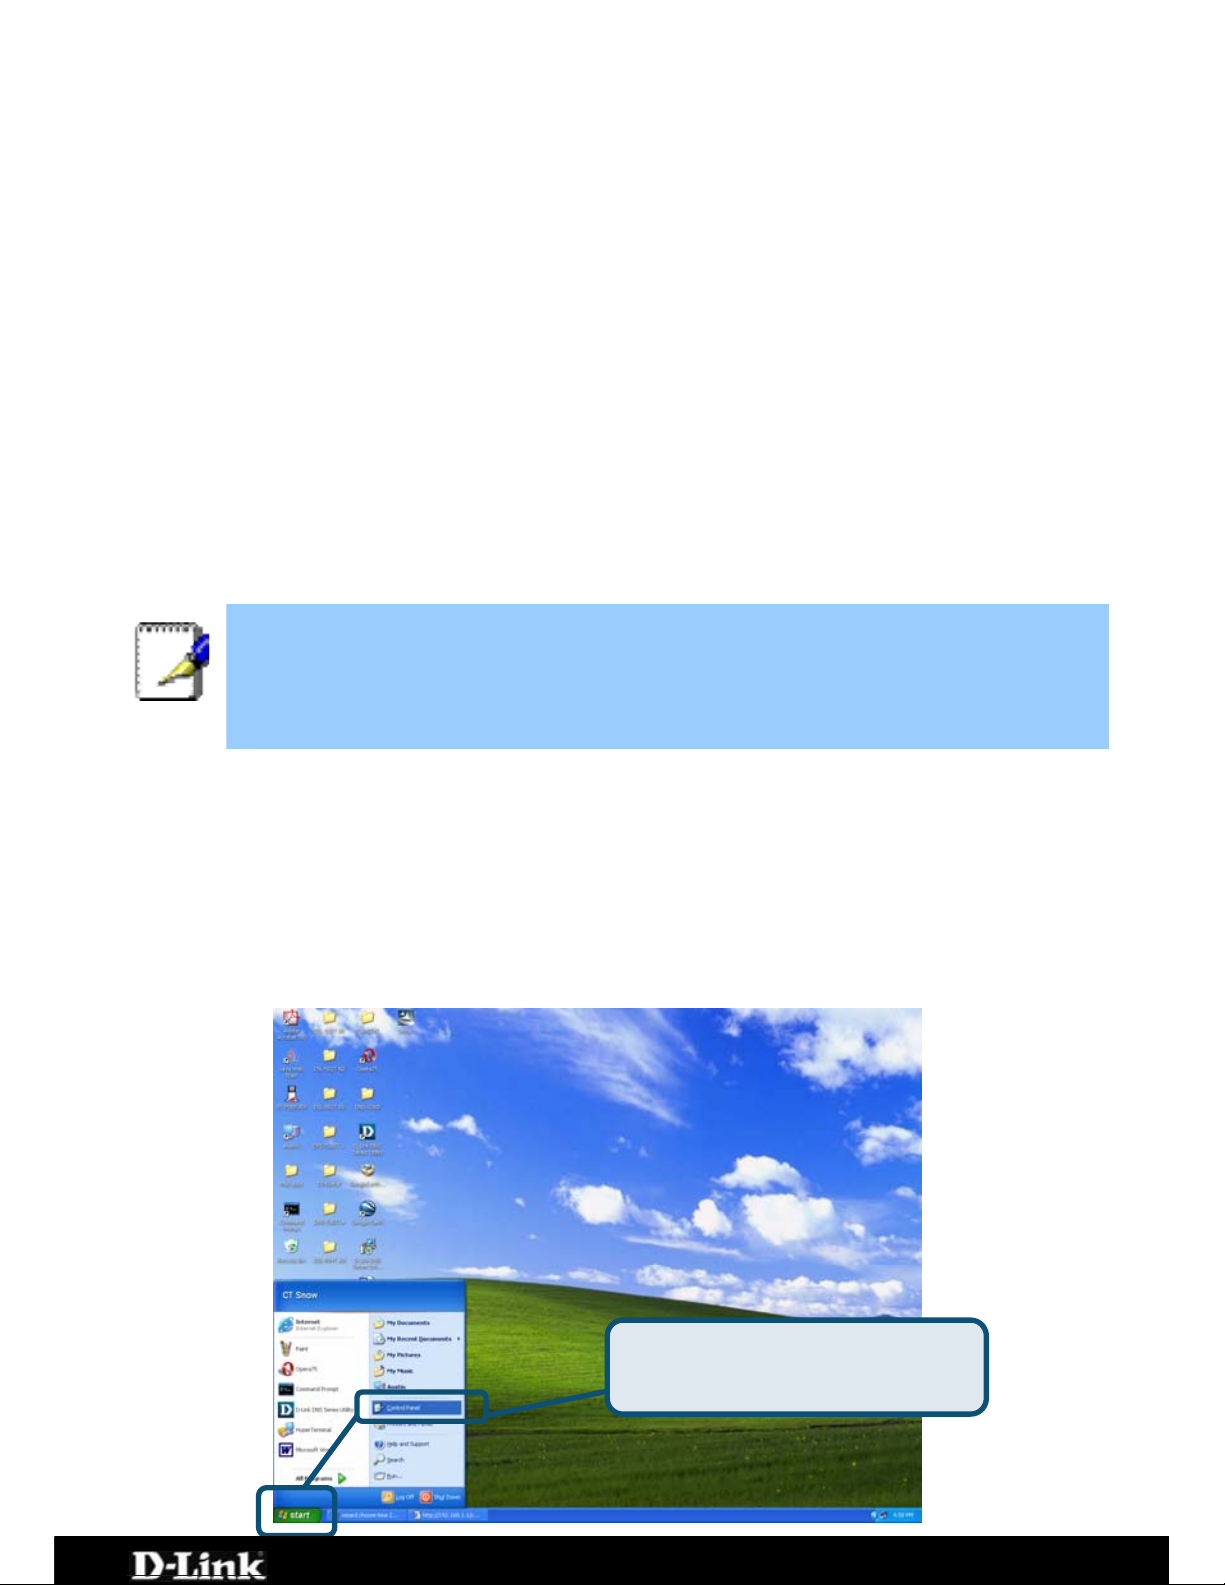
1. From the Start menu on your desktop, go to Control Panel.
From the Start menu, go to
Control Panel.
Page 60 of 67
Page 61
DPH-C160S – DECT Cordless VoIP Phone – User Manual
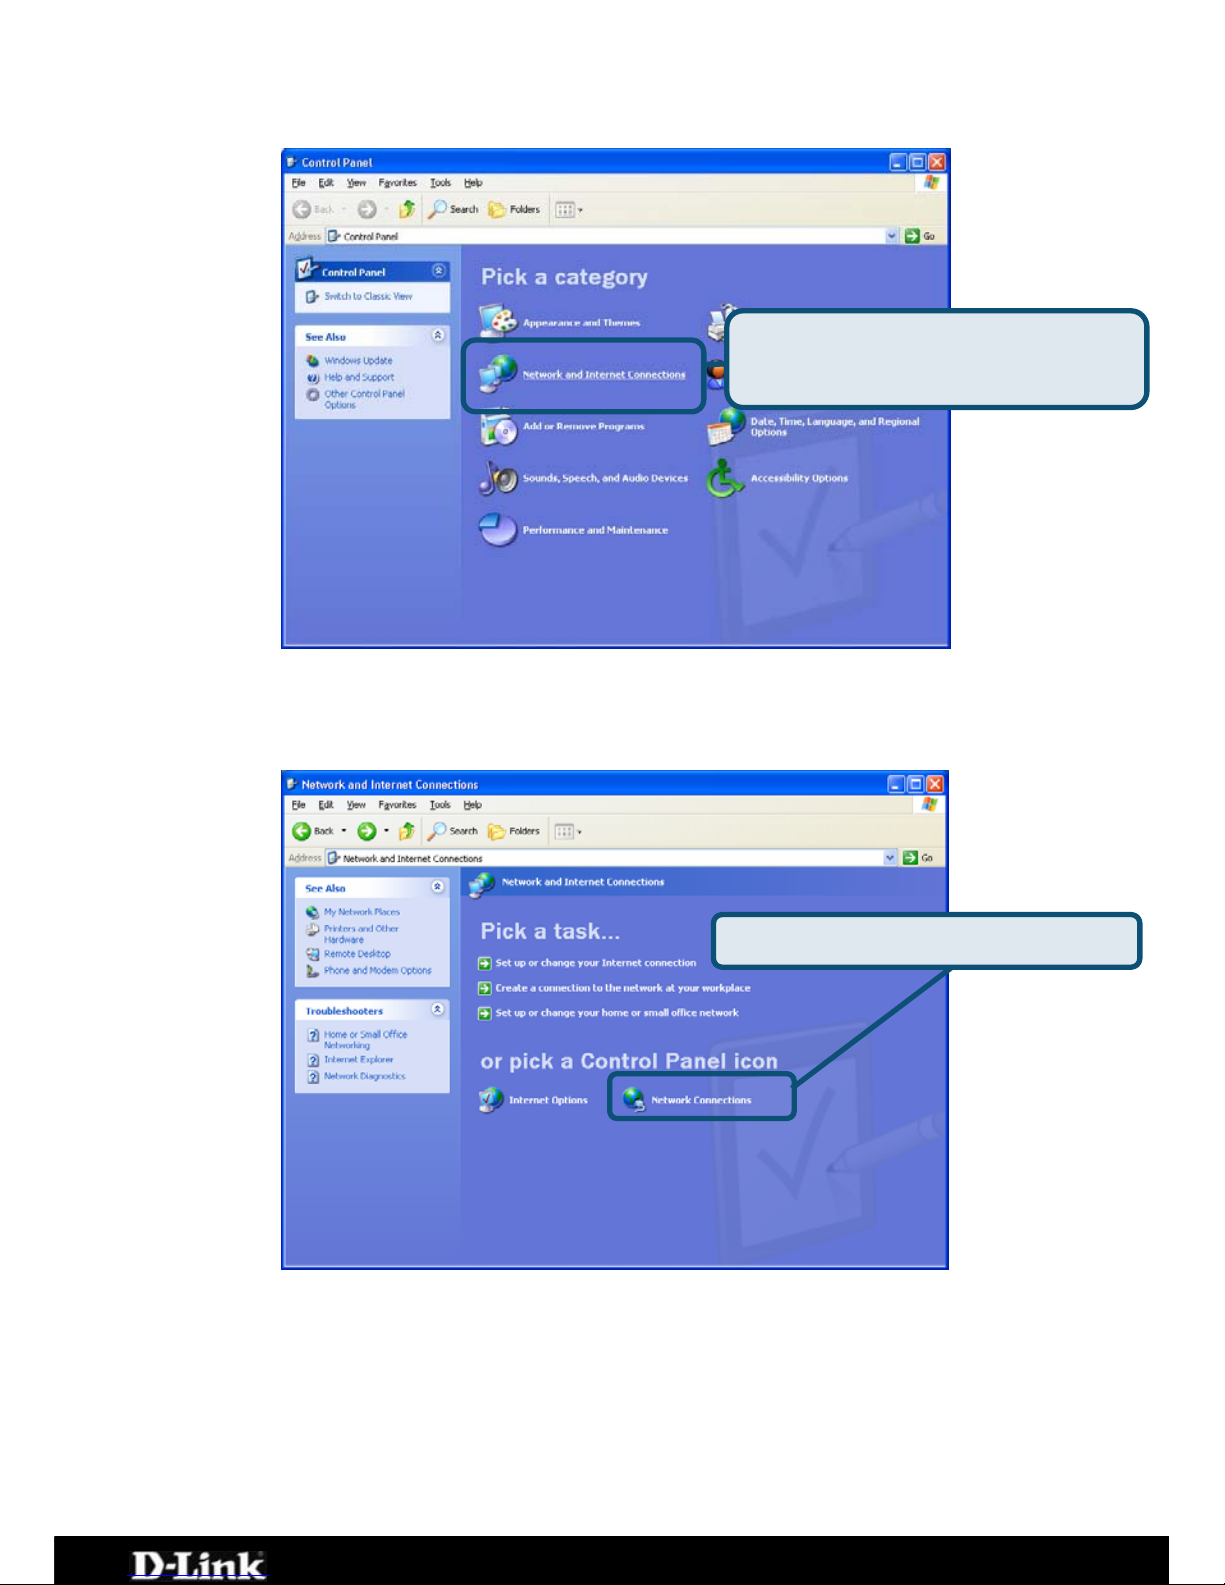
2. In the Control Panel window, click Network and Internet Connections.
3. In the Network and Internet Connections window, click Network
Connections.
Click Network and Internet
Connections.
Click Network Connections.
Page 61 of 67
Page 62
DPH-C160S – DECT Cordless VoIP Phone – User Manual
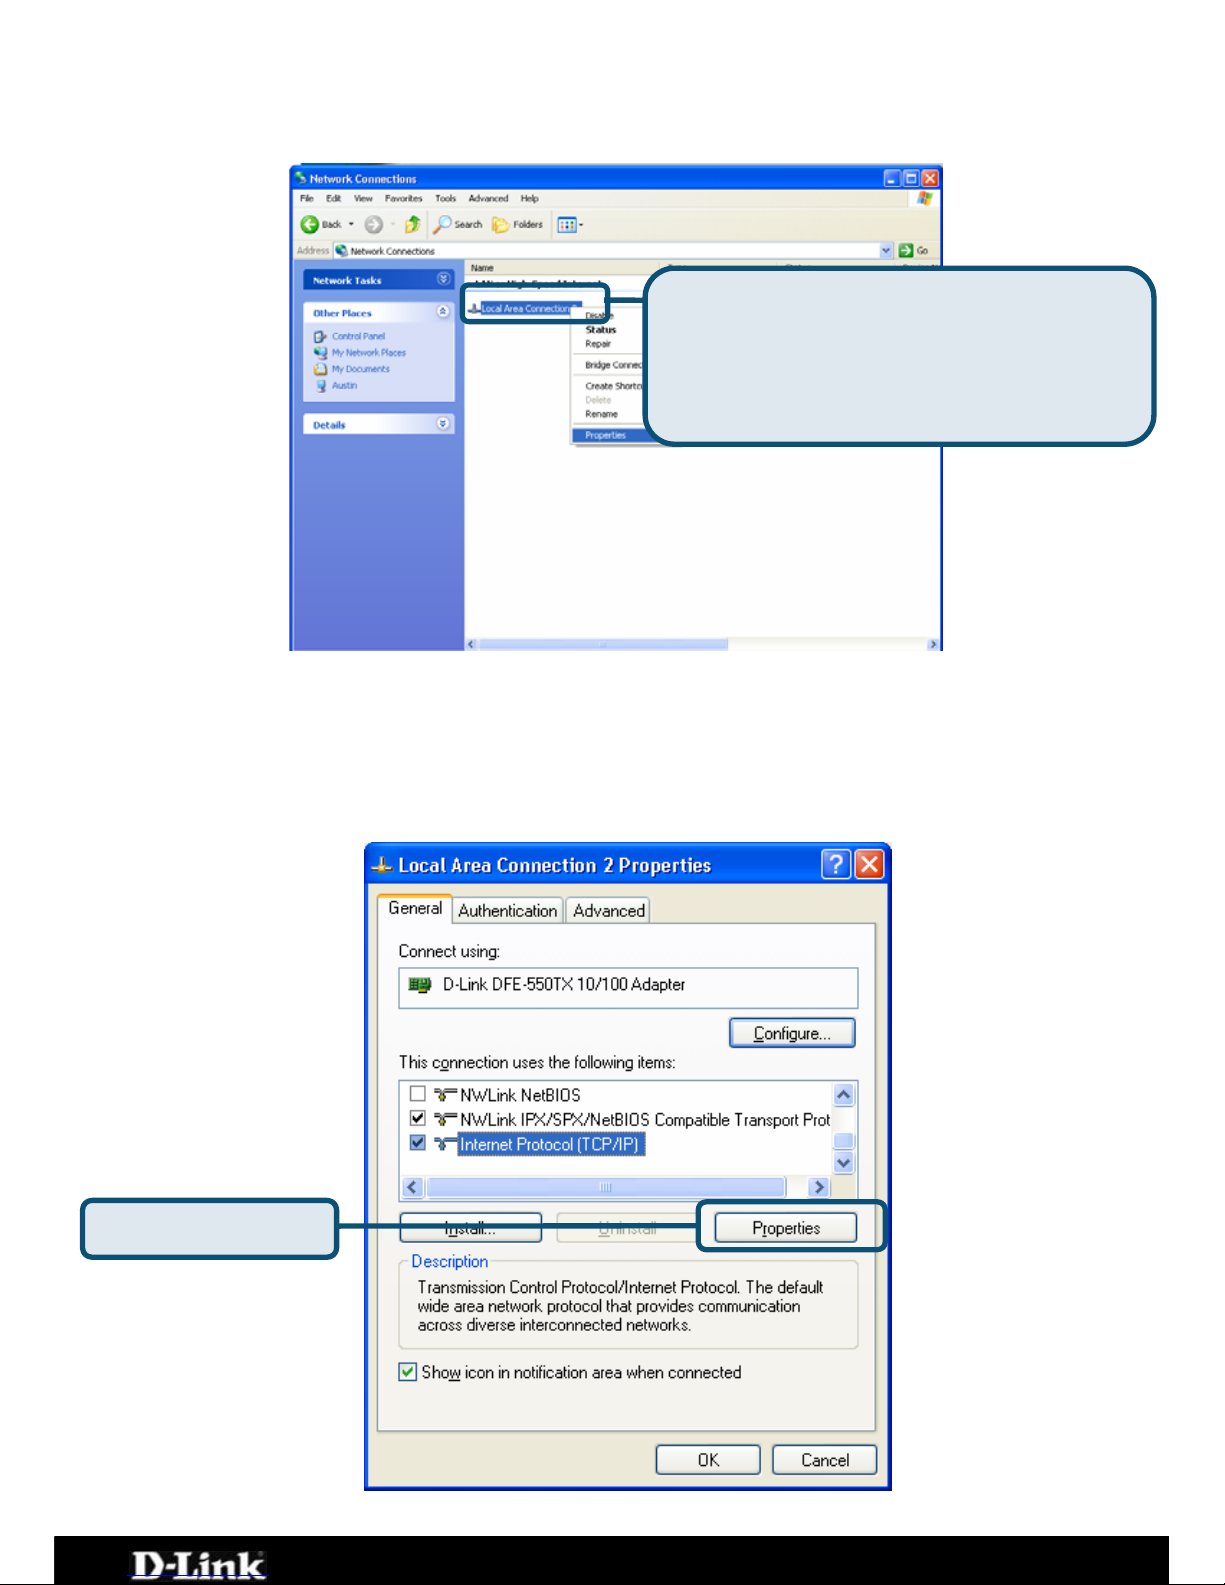
4. In the Netwo
Connection
rk Connections window, right-click on Local Area
, then click Properties.
I
w
c ems:” by clicking on it once. Click on
Right-click on the Local Area
Connection icon and selec
Properties option from the pull-d
menu.
t the
own
5. n the General tab of the Local Area Connection Properties
indow, highlight Internet Protocol (TCP/IP) under “This
onnection uses the following it
the Properties button.
Click Properties.
Page 62 of 67
Page 63
DPH-C160S – DECT Cordless VoIP Phone – User Manual
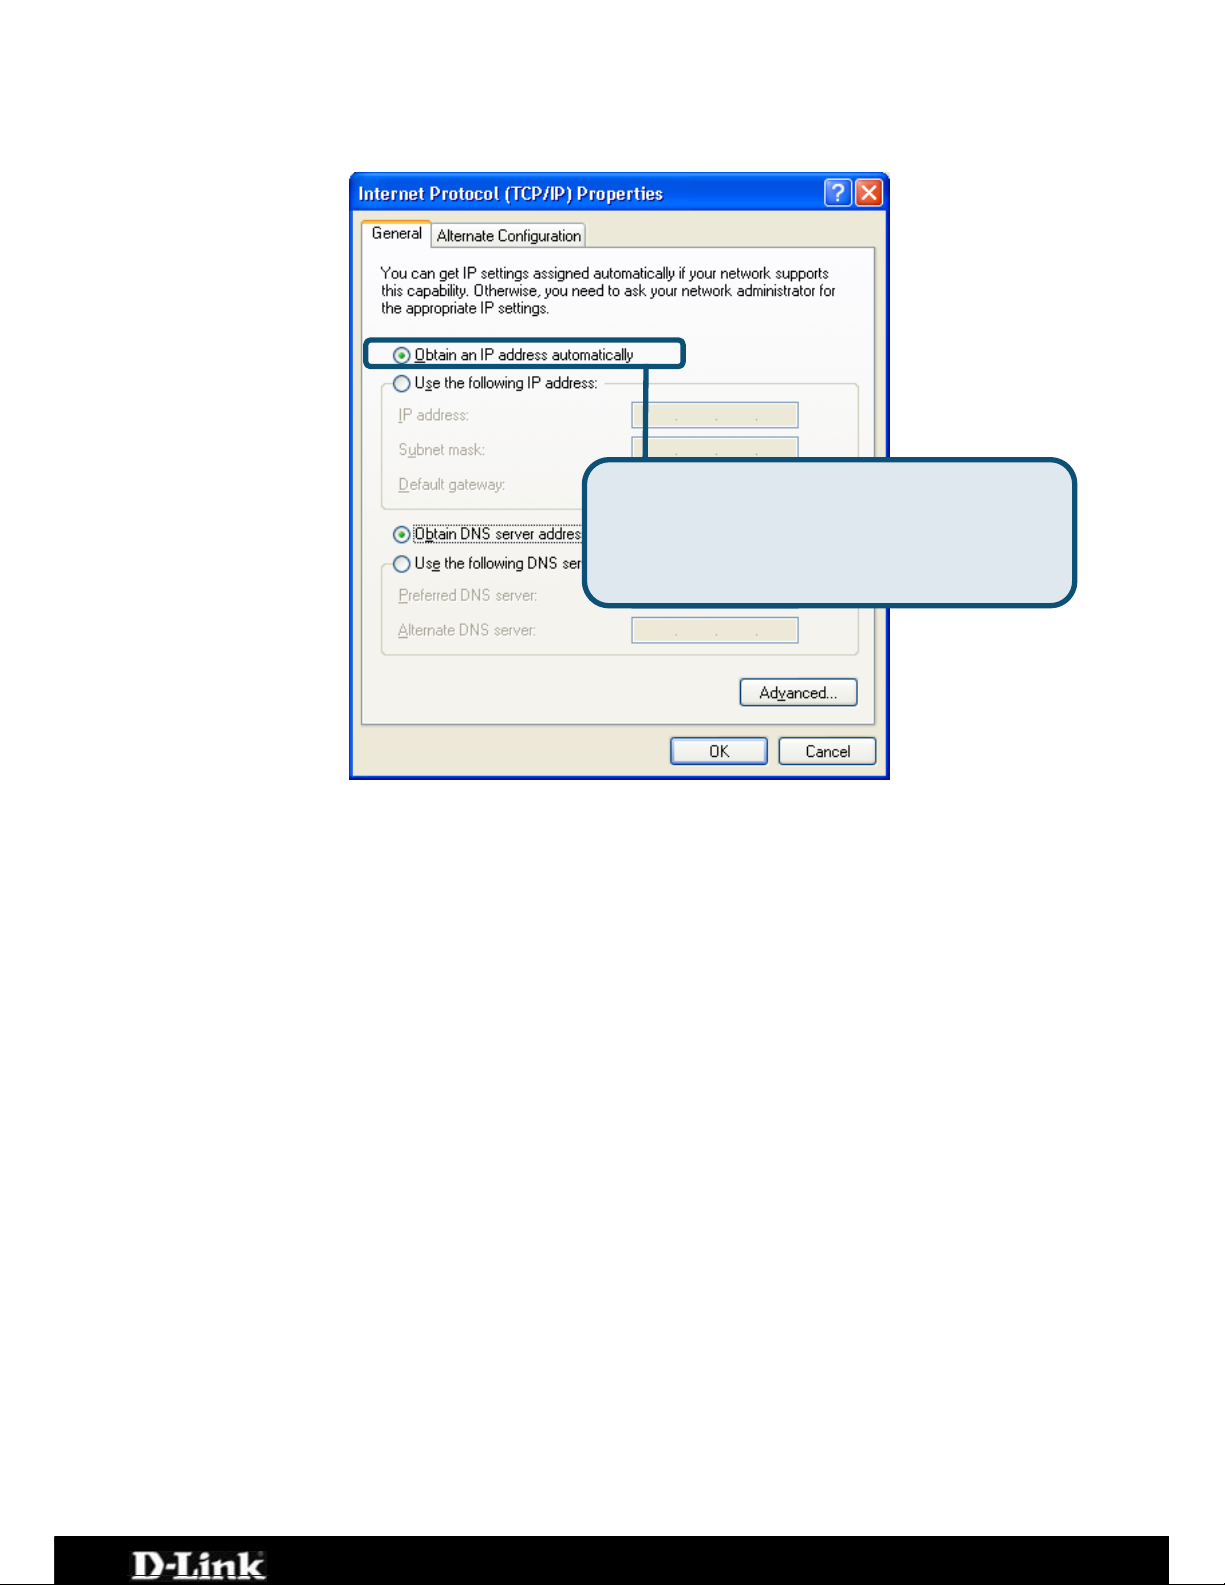
6. Select “Obtain an IP address automatically” by clicking once in the
circle. Click the OK button.
Your comput
Please Note:
select Subnet
mask, and
Windows 2000 IP Protocol
First, check for the IP protocol and, if necessary, instal
1. In the Windows task bar, clic nt to Settings,
and then click Control Panel .
2. Double-click the Network and Dial-up Connections icon.
3. In the Network and Dial-up Connections window, right-click the
Local Area Connection icon, and then select Properties.
4. The Local Area Connection Properties dialog box displays with a list
of currently installed network components. If the list includes Internet
Protocol (TCP/IP), then the protocol has already been enabled, skip
ahead to Configure Windows 2000 for DHCP.
5. If Internet Protocol (TCP/IP) does not display as an installed
component, click Install.
6. In the Select Network Component Type dialog box, select Protocol,
and then click Add.
Select Obtain an IP address
automatically in the Internet
Protocol (TCP/IP) Properties wi
ndow.
er is now ready to use the Router’s DHCP server.
if you need to assign a specific IP address to your PC, you can
Use the following IP address: and enter the IP address,
Default gateway addresses in the corresponding fields.
l it:
k the Start button, poi
Page 63 of 67
Page 64

DPH-C160S – DECT Cordless VoIP Phone – User Manual
7. Select Internet Protocol (TCP/IP) in the Network Protocols li
then click OK.
st, and
8. You may be prompted to install files from your Windows 2000
installation CD or other media. Follow the instructions to install the
files.
9. If prompted, click OK to restart your computer with the new settings.
Configure Windows 20 HCP
1. In the Control Panel, double-clic
Connections icon.
2. In Network and Dial-up Connections window, right-click the Local
Area Connection icon, and then select Properties.
3. In the Local Area Connection Properties dialog box, select Internet
Protocol (TCP/IP), and then click Properties.
4. In the Internet Protocol (TCP/IP) Properties dialog box, click the
button labelled Obtain an IP address automatically.
5. Double-click OK to confirm and save your changes, and then close the
Control Panel.
You
indow
Fi
1. In the ettings,
and
2. Doub
3. In the ck the
4. The st of currently
install col
(TCP/IP ahead to
led
6. In the Select Network Component Type ect Protocol,
and then click Add.
7. Select Microsoft in the Manufacturers box.
8. Select Internet Protocol (TCP/IP) in the Network Protocols list, and
then click OK.
9. You may be prompted to install files from your Windows Me installation
CD or other media. Follow the instructions to install the files.
10. If prompted, click OK to restart your computer with the new settings.
00 for D
k the Network and Dial-up
r computer is now ready to use the Router’s DHCP server.
W s ME IP Protocol
rst, check for the IP protocol and, if necessary, install it:
Windows task bar, click the Start button, point to S
then click Control Panel.
le-click the Network and Dial-up Connections icon.
Network and Dial-up Connections window, right-cli
Network icon, and then select Properties.
Network Properties dialog box displays with a li
ed network components. If the list includes Internet Proto
), then the protocol has already been enabled. Skip
Configure Windows ME for DHCP.
5. If Internet Protocol (TCP/IP) does not display as an instal
component, click Add.
dialog box, sel
Page 64 of 67
Page 65

DPH-C160S – DECT Cordless VoIP Phone – User Manual
Con
1. In the Control Panel window, double-click the Network and Dial-up
Connections
2. In the ight-click the
Network i
3. In the , and then click
Properties
4. In the TC Obtain and IP address
automatica
5. Double
close the Control
Your computer is
Windows 95 and
First, check for the IP prot
1. In the t to Settings,
and then ork icon.
2. The Network y installed
, and then the protocol
has already been enabled, skip to Configure IP Information Windows
otocol
dialog box displays.
cturers list box, and then click
st box.
6. Click OK to return to the Network dialog box, and then click OK again.
ows 95/98
installation CD. Follow the instructions to install the files.
Con
2.
ed with
figure Windows ME for DHCP
icon.
Network and Dial-up Connections window, r
con, and then select Properties.
Network Properties dialog box, select TCP/IP
.
P/IP Settings dialog box, click the
lly option.
-click OK twice to confirm and save your changes, and then
Panel.
now ready to use the Router’s DHCP server.
Windows 98 IP Protocol
ocol and, if necessary, install it:
Windows task bar, click the Start button, poin
click Control Panel. Double-click the Netw
dialog box displays with a list of currentl
network components. If the list includes TCP/IP
95, 98.
3. If TCP/IP does not display as an installed component, click Add. The
Select Network Component Type dialog box displays.
4. Select Protocol, and then click Add. The Select Network Pr
5. Click on Microsoft in the Manufa
TCP/IP in the Network Protocols li
You may be prompted to install files from your Wind
7. Click OK to restart the PC and complete the TCP/IP installation.
figure Windows 95 and Windows 98 for DHCP
1. Open the Control Panel window, and then click the Network icon.
Select the network component labelled TCP/IP, and then click
Properties.
3. If you have multiple TCP/IP listings, select the listing associat
your network card or adapter.
4. In the TCP/IP Properties dialog box, click the IP Address tab.
5. Click the Obtain an IP address automatically option.
Page 65 of 67
Page 66

DPH-C160S – DECT Cordless VoIP Phone – User Manual
6. Double-click OK to confirm and save your changes. You will be
prompted to res
tart Windows.
When it started, your computer is ready to use the Router’s DHCP server.
7. Click Yes.
has re
Page 66 of 67
Page 67

DPH-C160S – DECT Cordless VoIP Phone – User Manual
Technical Support
ntation on the D-Link website.
1 Giffnock Avenue
Zealand: 0800-900-900
You can find software updates and user
docume
D-Link Australia
North Ryde, NSW 2113
Sydney, Australia
TEL: +61-2-8899-1800
FAX: +61-2-8899-1868
Australia: 1300-766-868
New
URL:
www.dlink.com.au
www.dlink.co.nz
E-MAIL:
V1.00AU
Page 67 of 67
 Loading...