

Page 1
6
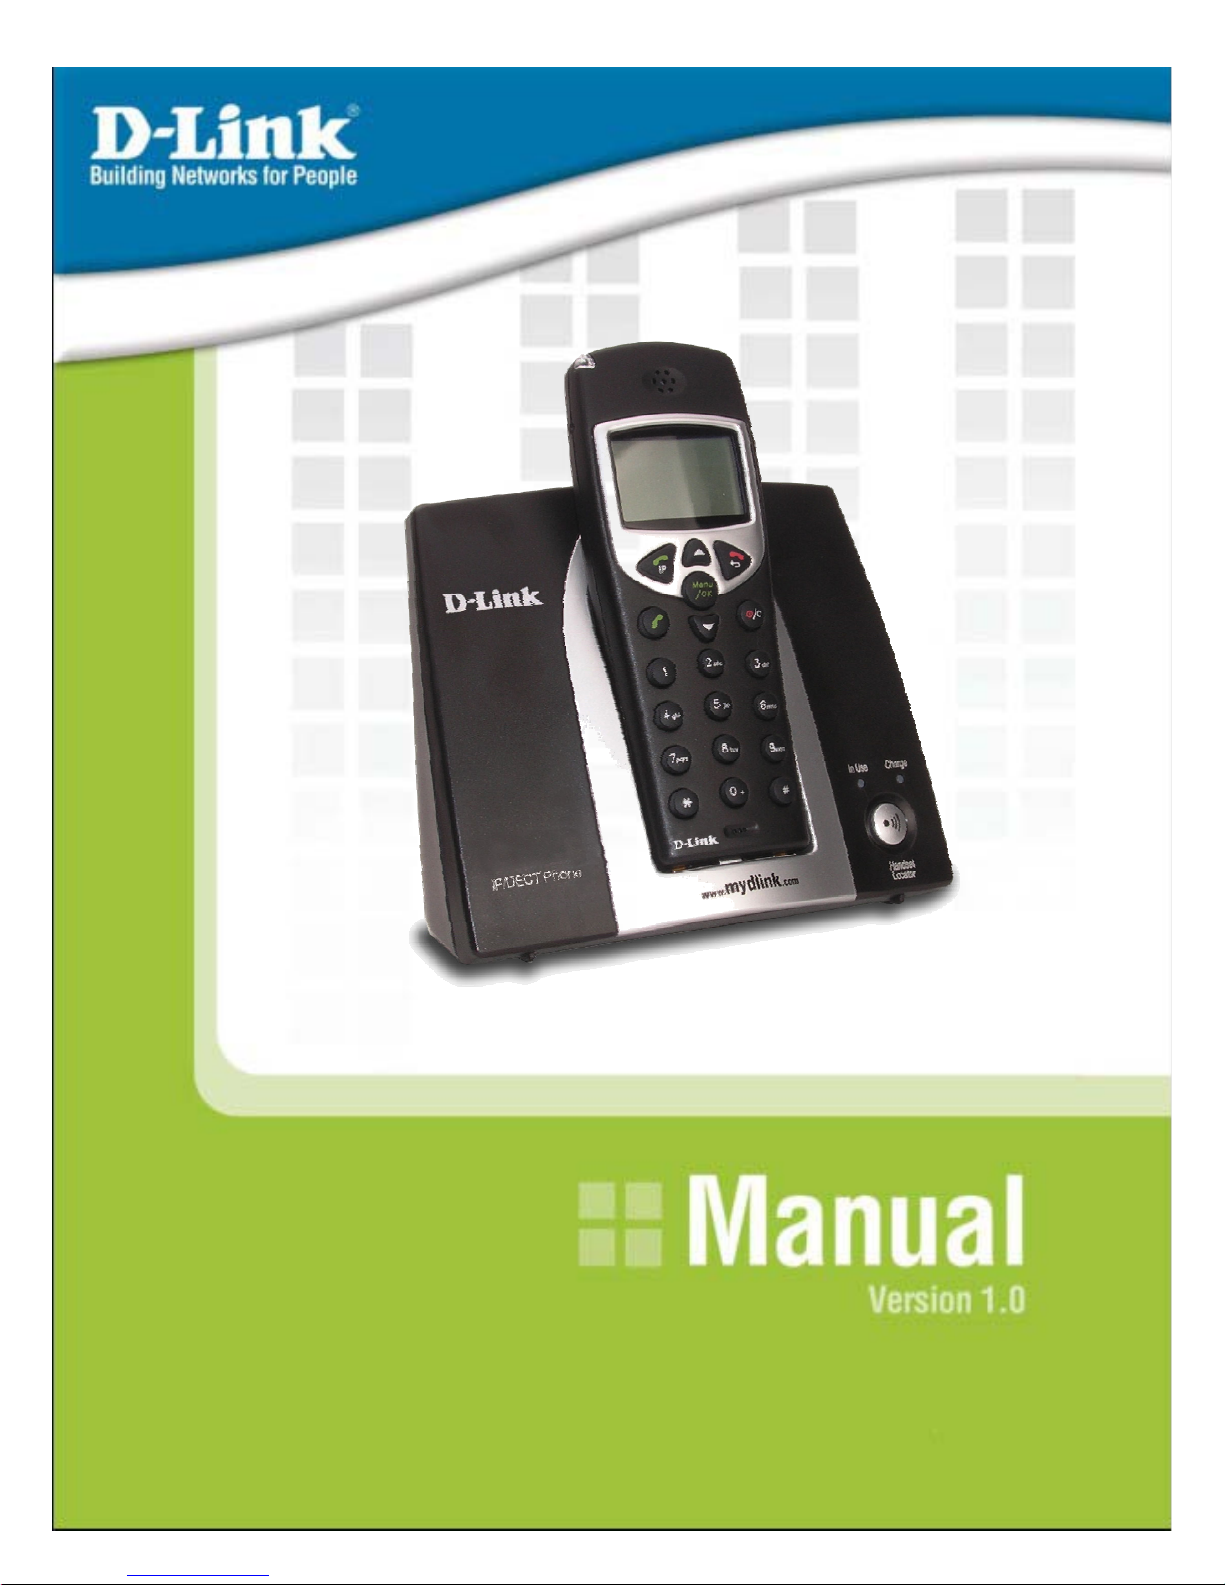
DPH-300
IP/DECT Dual-Mode
Cordless Phone
Page 2

DPH-300 User’
s Manual
T
able of Contents
T
able of Contents
1
D-Link Corporation
Package Contents.... .. .. .. .. .... .. .. .. .. .. .. .. ... .. .. .. .. .. .. .. .. .. .. .. .. .. .. .. ... .... .. .. .. .. .. .. .. .. .. .. ..3
Minimum System Requirements.....................................................................3
Important Battery Information...................................... .. .. ... .. .. .. .. .. .. .. .. .. .. .. .. .. ..4
Introduction......................................... ... .... .. .. .. .. .. .. .. .. .. .. .. .. .. ... .. .. .... .. .. .. .. .. .. .. .. ..5
Features and Benefits.................. .. .. ... .. .. .... .. .. .. .. .. .. .. .. .. .. .. .. ..... .. .. .. .. .. .. .. .. .. .. .. ..6
Hardware Overview........................................... .... .... .... .... .... ..... .... .... ...... .... ....7
Connections......................... .. ... .. .. .. .. .. .. .. .. .. .. .. .. .. .... .. ... .. .. .. .. .. .. .. .. .. .. .. .. ..7
Physical Connection Met hod s............................................... .... .... .... ....8
LEDs.......................... .. .. .. .. .. .. ... .. .. .. .. .. .. .. .. .. .. .. .. .. .. .. .. ... .. .. .. .. .. .. .. .. .. .. .. .. ..9
Factory Reset......................................... .... .... .... .... .. ..... .... .... .... .... .... ..10
Keypad .......................... .. .. .. .. ... .. .. .. .. .. .. .. .. .. .. .. .. .. .. .. .. ... .. .. .. .. .. .. .. .. .. .. .. ..11
Basic Handset Instructions................................... ..... ...... .... .... .... .... ....14
Getting Started.................................. ..... .. .. .. .. .. .. .. .. .. .. .. .. .. .. .. ... .... .. .. .. .. .. .. .. .. .. ..20
Connecting to the Configuration We b Page................................................21
Using the Setup Wizard............................ .. .. .. .. .... .. .. .. .. .. .. .. ... .. .... .. .. .. .. .. .. .. .. ..22
Configuring the WAN (Inter ne t) Con ne cti on. .... .. .. .... ... .. .. .. .. .... .. .. .. .. .. ..22
Selecting the Type o f LAN Co n nect i on............................. .. .. .. .... .. .. .. ..23
Set Dynamic IP Address................................ .. .. .. .. .. ... .. .. .. .... .. .. .. .. .. .. ..24
Set Static IP Address....... .... ..... .... .... .... .... .... .... .... ..... .... .... .... .... .... .... ..25
PPPoE.......................................... .. .. .. .. .. .. .... .. .. .. .. .. .. ... .. .. .. .. .. .. .. .. .. .... ..26
Restart the DPH-300............................ .. .. .. .. .. .. .. .. .. ... .. .. .. .... .. .. .. .. .. .. .. ..27
Auto-provisioning........................... .. ..... .. .. .. .. .. .. .. .. .. .... .. .. .. .. .. ... .. .. .. .... .. .. .. .. .. ..28
Verification................... .. .. .... .. .. ... .. .. .... .. .. .. .. .. .. .. .... .. .. .. ... .. .. .. .... .. .. .. .. .. ..29
mydlink.......................... .... .. .. .. .. .. .. .. .. ... .. .. .. .. .. .. .. .... .. .. .. .. .. .. .. ... .. .. .. .. .. .. .. .. .... .. ..32
Sign in to the www.mydlink.com
website...................... ...... ...... ...... ....32
My Account > Summary........................... .... .... .... ....... .... .... .... .... .... ....33
My Account > Summary > My De vice Group.................................. ....34
My Account > Product Profile..............................................................35
My Account > Call History.................................. ....... .... .... .... .... .... .... ..36
My Account > Order History............................. .... .... ..... .... .... .... .... ......37
My Account > Change PIN Code........................................................38
My Account > Contact Email.................... .... .... .... ...... ..... .... .... .... .... ....39
My Services > Call Forwardin g....................................... .... .... .... .... ....40
My Services > Contact Managemen t............................ .... .... .... .... ......41
Redeem.................................... .. .. .. .. .. .. .. .. .. .. .. .. .. .. .. .. .. ... .. .. .. .. .. .. .. .. .... ..43
My Store > mydlink St o r e............................. .. .. .. .. .. .. ... .. .. .. .. .. .. .. .. .. .. .. ..44
My Store > TelTel Store............................. .. .. .. .. .. .. ... .. .... .. .. .. .. .. .. .. .. .. ..45
Support > Sites.................. .... ..... .... .... .... ...... .... .... .... ..... .... .... .... ...... ....46
Support > FAQ ................................................. .... .... ..... .... .... .... ...... ....47
Support > Download .................................................. .... ...... .... .... .... ..47
Support > Tutorial............ .... ..... .... .... .... .... .... .... .... .... ..... ...... .... .... .... ....48
Using the Configuration Page............................................... .. .. .. .. .. .. .... .. .. .. ..49
Home > Wizard........................... .. .. .. .... .. .. .. .. .. .. .. .. .. .. .. ... .. .. .. .. .... .. .. .. .. ..49
Home > LAN > Dynamic IP Address................................... .... .... .... ....50
Page 3
D-LinkCorporation
2
DPH-300 User’
s Manual
T
able of Contents
Using the Configuration Page (continued)
Home > LAN > Static IP Add re ss................................ .. .. .. .. .. .. .. .. .. .. .. ..51
Home > LAN > PPPoE.................................................... .. .. .. .. .. .. .... .. ..52
Advanced > VoIP > User Agent [Read Only].......... .. .. .... .. .. .. .. .. .. .. .. ..53
Firmware Upgrades............................................ ..... .... .... .... .... .... .... ....54
Making Phone Calls................................................. .... .. .. .. ... .. .. .. .. .. .. .. .. .... .. .. ..55
Making a Call to the PSTN (regular telephone network).....................55
Making a Call to the PSTN in Stan dby Mod e............ .... .... .... .... .... .... ..56
Making a VoIP Call to another DPH-300 or mydlink number..............57
Making a VoIP Call to a Me mb e r of your Contact List ........................58
Making a TelTel Out Call to a PSTN Phone........................................59
Receiving a Call – PSTN or VoIP..................... .... ..... ...... .... .... .... .... ....60
Last Ten VoIP Numbers Dia l ed – Redi al................. .. .. .. .... .. .. .. .. .. .. .. .. ..61
Using the Speakerphon e...................... .. .... .. .. .. .. .. ... .. .. .. .. .. .. .. .. .. .. .. .. .. ..62
Adjusting the Volu me Level....................................... .. .. .. .. .. .. .. .. .. .. .. .. ..63
Calling Notes............ .... .... ..... .... .... .... .... .... .... .... .... ..... .... .... .... .... .... .... ..64
Router Port Configuration................................ .. .... .. .. .. .. ... .. .. .. .. .. .. .. .... .. .. .. .. ..65
Using the DPH-300 with D-Link Routers.............................................65
Opening Ports on Routers and Gateways...........................................66
How to Open Ports on a Router ................................................ .. .. .. .. ..67
Network Configuration...................... .. .. .. .. .. .. .. .. .. .. .. .. .. .. ... .. .... .. .. .. .. .. .. .. .. .. .. .. ..69
Network with Multiple Publi c IP Ad d resse s.........................................69
Broadband Modem and One PC.........................................................69
Broadband Modem, Multiple PCs, and a Hub.....................................70
Broadband Modem, Multiple PCs, and a Router.................................70
Broadband Modem Only......................................................................70
Troubleshooting................ .. .. .... .. .. .. ... .. .. .. .. .... .. .. .. .. .. .. .. .. .. ..... .. .. .. .. .. .. .. .. .. .... .. ..71
Glossary................................... .. .. .. ... .. .... .. .. .. .. .. .. .. .. .. .. .. .. ..... .. .. .. .. .. .. .. .. .. .. .. .... ..72
Technical Specifications................................... .... .... .... ....... .... .... .... .... .... .... ..75
Country Codes....................................... .. .. .. .. .. .. .. .. .. .. .. .. .. ... .. .. .. .. .. .. .. .. .. .. .. .. .. ..77
Contacting D-Link..................... ...... ..... .... .... .... .... ...... .... ..... .... .... .... .... ...... .... ..79
Notices................................................ .. .. .. .. .. .. .. .. .. .. .. .. .. .. ..... .. .. .. .. .. .. .. .. .. .. .. .. .. ..80
Page 4
DPH-300 User’
s Manual
Package Contents
PackageContents
D-Link Corporation
3
Minimum System Requirements
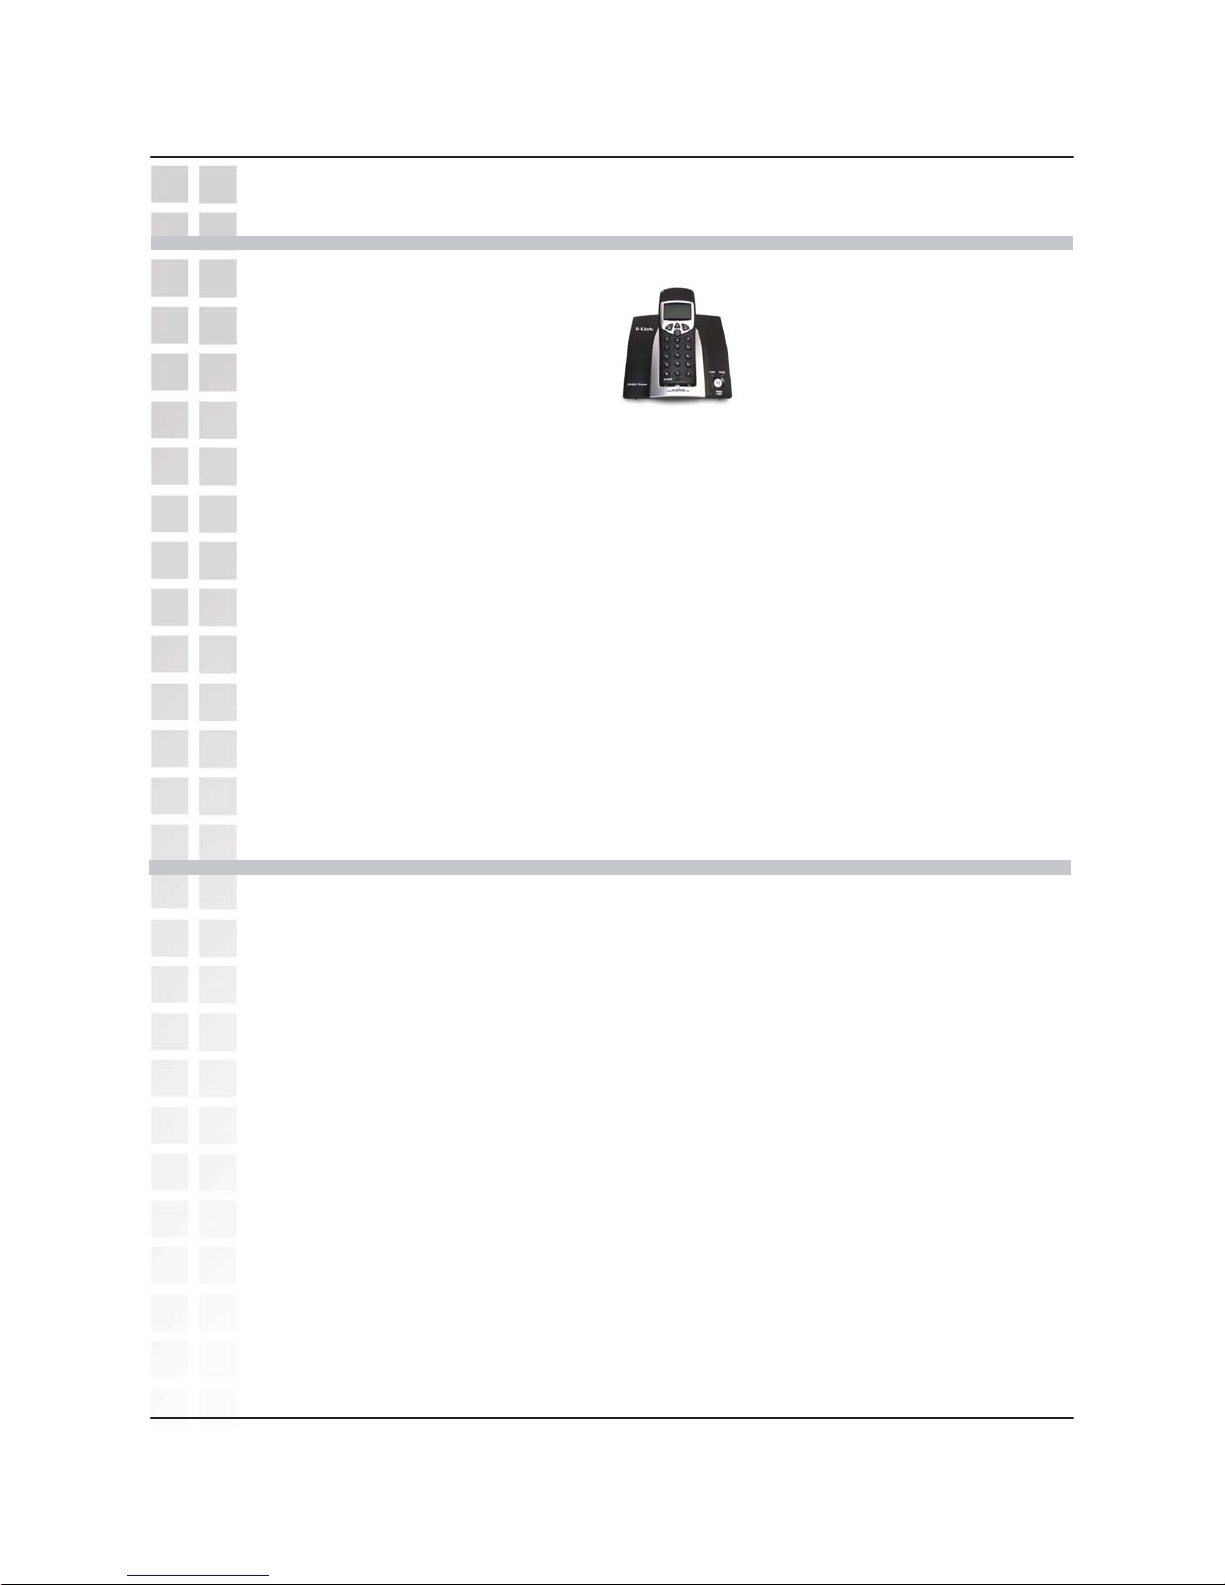
• D-Link DPH-300 Cordless IP Telephone
• D-Link DPH-300 Cordless IP Telephone Connector Base
• Power Adapter-AC 9V AC, 1000 mA
• Manual and Warranty on CD
• Quick Installation Guide
• Ethernet Cable (the DPH-300’s Ethernet port is Auto-MDIX)
•
Broadband Internet connection
• Ethernet-Based Cable or DSL Modem
• A multi-port Ethernet router (possibly integrated as
part of the Cable or DSL Modem listed above).
• 100Mbps of available Internet bandwidth
• Computer with Windows, Macintosh, or Linux-based
operating system and an installed Ethernet adapter
• Internet Explorer Version 6.0 or Netscape Navigator
Version 6.0 and Above
Note: Using a power supply with a different voltage rating than the one
included with the DPH-300 will cause damage and void the warranty for this
product.
If any of the above items are missing, please contact your reseller.
Page 5
** BATTERY CHARGING NOTE **
Before you connect your DPH-300 to the Internet, your network, or your PC, you should install
the batteries in the handset and place it on the base station for charging. The batteries need
to be charged for at least 12 hours before the first time you use the DPH-300.
1. Install the batteries.
2. Plug in the A/C adapter.
3. Put the handset on the base station
4. Wait 12 hours.
IMPORTANT BATTERY SAFETY INSTRUCTIONS
CAUTION: TO REDUCE THE RISK OF FIRE OR INJURY CAUSED BY THE
BATTERIES, READ AND FOLLOW THESE INSTRUCTIONS.
1. Use Only AAA, 1.2V 600mAh Ni-MH (Nickel Metal Hydride) batteries
supplied by D-Link or D-Link Authorized Distributors.
2. Contact D-Link to purchase replacement batteries if needed.
3. Do not mix old and new batteries in this product.
4. Do not mix different battery types or batteries from different manufacturers in
this product.
5. Batteries are intended to be charged while in the ha ndset. Charging with other
chargers or in any other manner may cause the batteries to explo de.
6. Do not dispose of the batteries in a fire. The batteries may explode. Check
with local codes for possible special disposal instructions.
7. Do not open or mutilate the batteries. Released electrolyte is corrosive and may
cause damage to the eyes or skin. It may be toxic if swallowed.
8. Exercise care in handling the batteries in orde r not to short them with conducting
materials such as rings, bracelets, keys, or tools. The battery or conductor may
overheat and cause burns.
9. Observe proper polarity orient atio n between the batteries and the battery
receptacle of the handset.
10. Be aware that NiMH batteries, regardless of their apparent charge state, may be
capable of producing electrical current sufficient to cause injury and property
damage.
11. Never expose NiMH batteries to temperatures above 50 °C.
Statement of Liability
D-Link Corporation / D-Link Systems, Inc. does NOT assume any liability for death,
injury or damage to equipment or property resulting from the use of this phone in a
manner inconsistent with the use for which it was intended. D-Link Corporation / DLink Systems, Inc, will not be liable for consequences that may result from tampering
with the batteries or charger-base or consequences resulting from their use thereafter.
4
Page 6
Introduction
Introduction
DPH-300 User’s Manual
5
D-Link Corporation
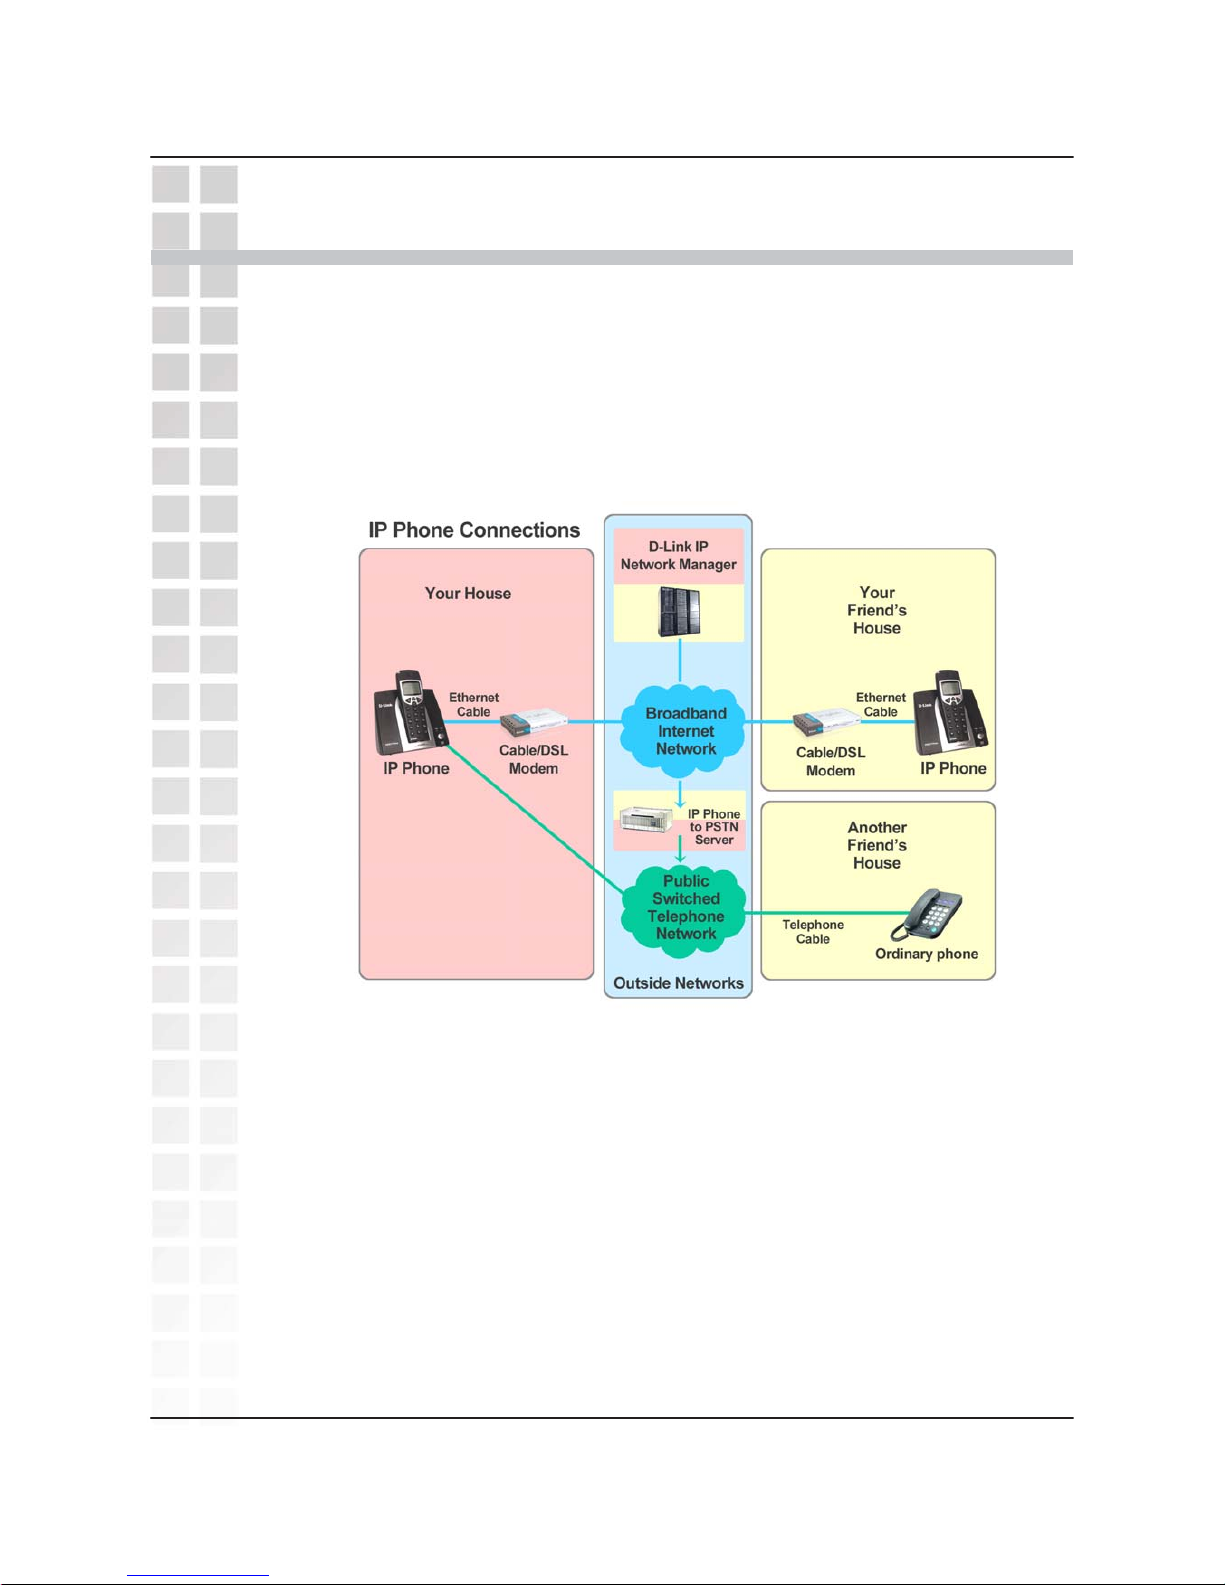
Before you start, your new DPH-300 Dual-mode Cordless Phone will require a
connection to the Internet to function. The connection may be directly through a
Cable or DSL modem, or it may be through a broadband router. Your DPH-300
phone will enable you to make VoIP (Voice over Internet Protocol) telephone
calls − at zero or a very much reduced cost when compared to regular
telephone service − to nearly anywhere, over the Internet.
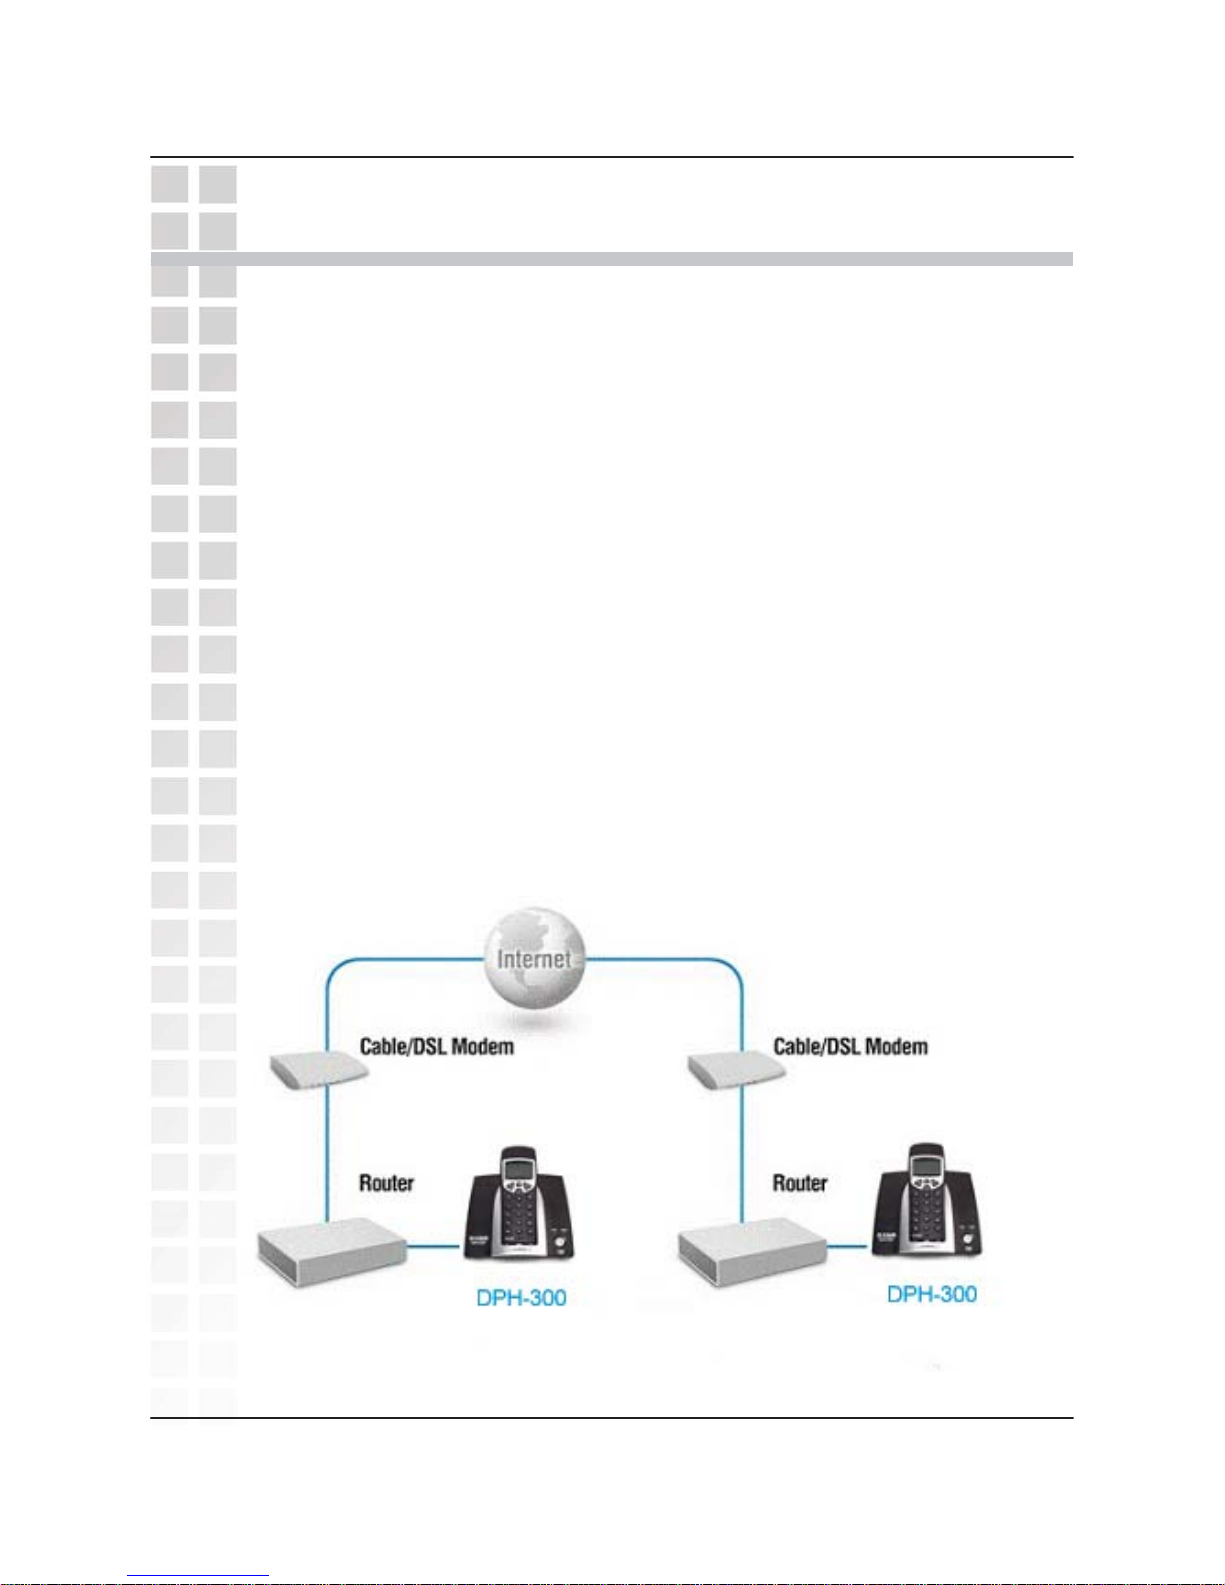
The DPH-300 phone allows you to make and receive calls from both ordinary
phone service and from IP telephony over the Internet. The basic diagram
shown above outlines how your new dual-mode IP phone works.
Page 7

DPH-300 User’
s Manual
Features and Benefits
Features andBenefits
D-Link Corporation6
• User-friendly configuration and diagnostic utilities
• 1 Foreign Exchange Subscriber (FXS) POTS port (RJ-11 Jack)
• 2 NWay 10/100BASE-TX Fast Ethernet ports for network connections
• Voice Activity Detection (VAD)/Comfort Noise Generation (CNG)
• Silence suppression to reduce bandwidth consumption
• Adaptive jitter buffer for smooth voice reception
• Lost packet recovery ability for improved voice quality
• IP address assignment using DHCP or static configuration
• Support Caller ID function
• Remote configuration and management over the Internet using web browsers
• FSK and DTMF dual mode CLIP (Calling Line Identification Presentation)
• Stores up to 30 calling numbers, in three types
• Stores up to 10 last dialed IP numbers, up to 12 digits for each number
• Stores up to 50 phonebook numbers, up to 12 characters for each name and 12
digits for each number
• LCD displays calling and dialing number
• Barring numbers setting (up to 5 numbers)
• Ringer tone selection − 9 different melodies
• IP and PSTN ringer tone independently configurable
• Ringer volume adjustment − 9 levels
• Handset earpiece volume setting − 9 levels
• Delete single or all records in phonebook
• Redialing and preparation dialing functions
• Page on base unit to look for the handset easily
• Clicking key tone on or off
• Supports GAP function
• Speakerphone
Page 8
Hardware Overview
Hardware Over
view
Connections
DPH-300 User’s Manual
7D-Link Corporation
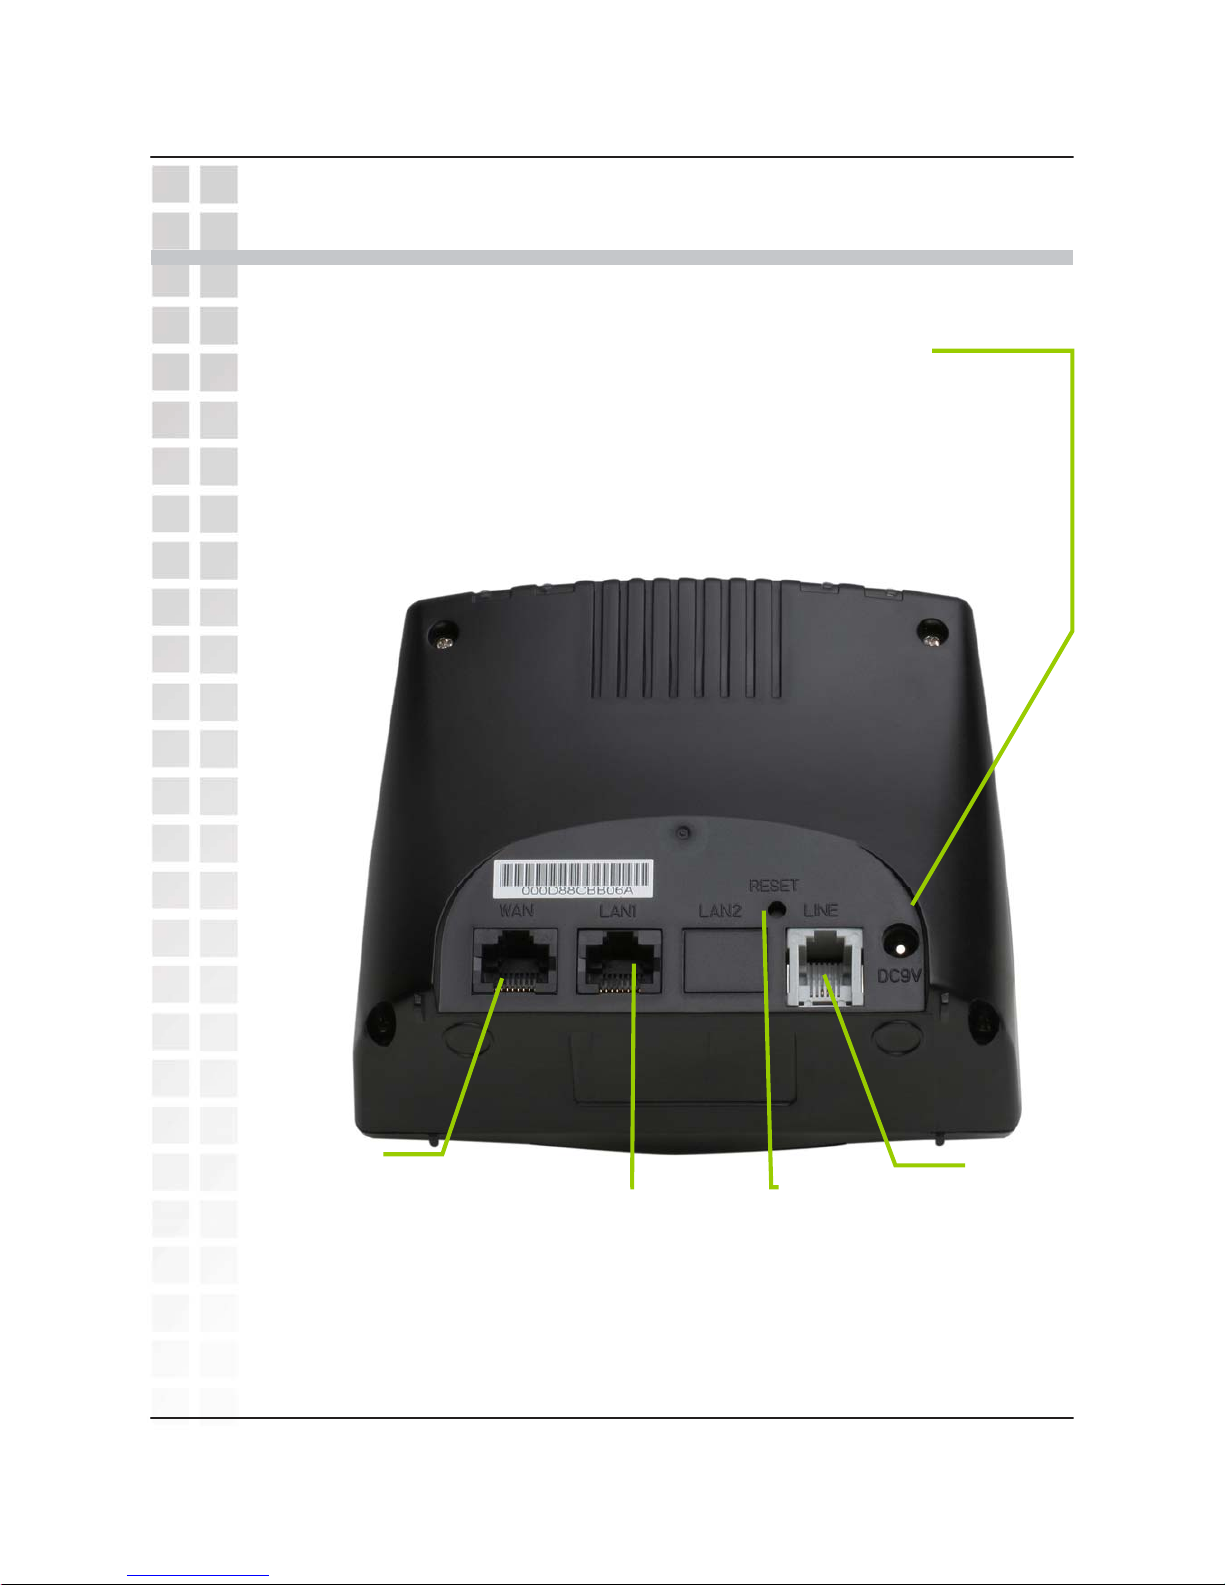
LAN1 Port
Connect the
Ethernet
cable from
your
Cable/DSL
modem to
this port.
LAN2 Port
Connect the
Ethernet
cable from a
computer on
your LAN to
this port.
Phone
Connection
Connect to your
phones using
standard phone
cabling.
Power Adapter
Connect your 9V AC 1000 mA
power adapter here.
Factory Reset
Button
Pressing this
button will
restore the
DPH-300 to its
factory default
settings.
Page 9
DPH-300 User’
s Manual
Hardware Overview
D-LinkCorporation8
Physical Connection Methods
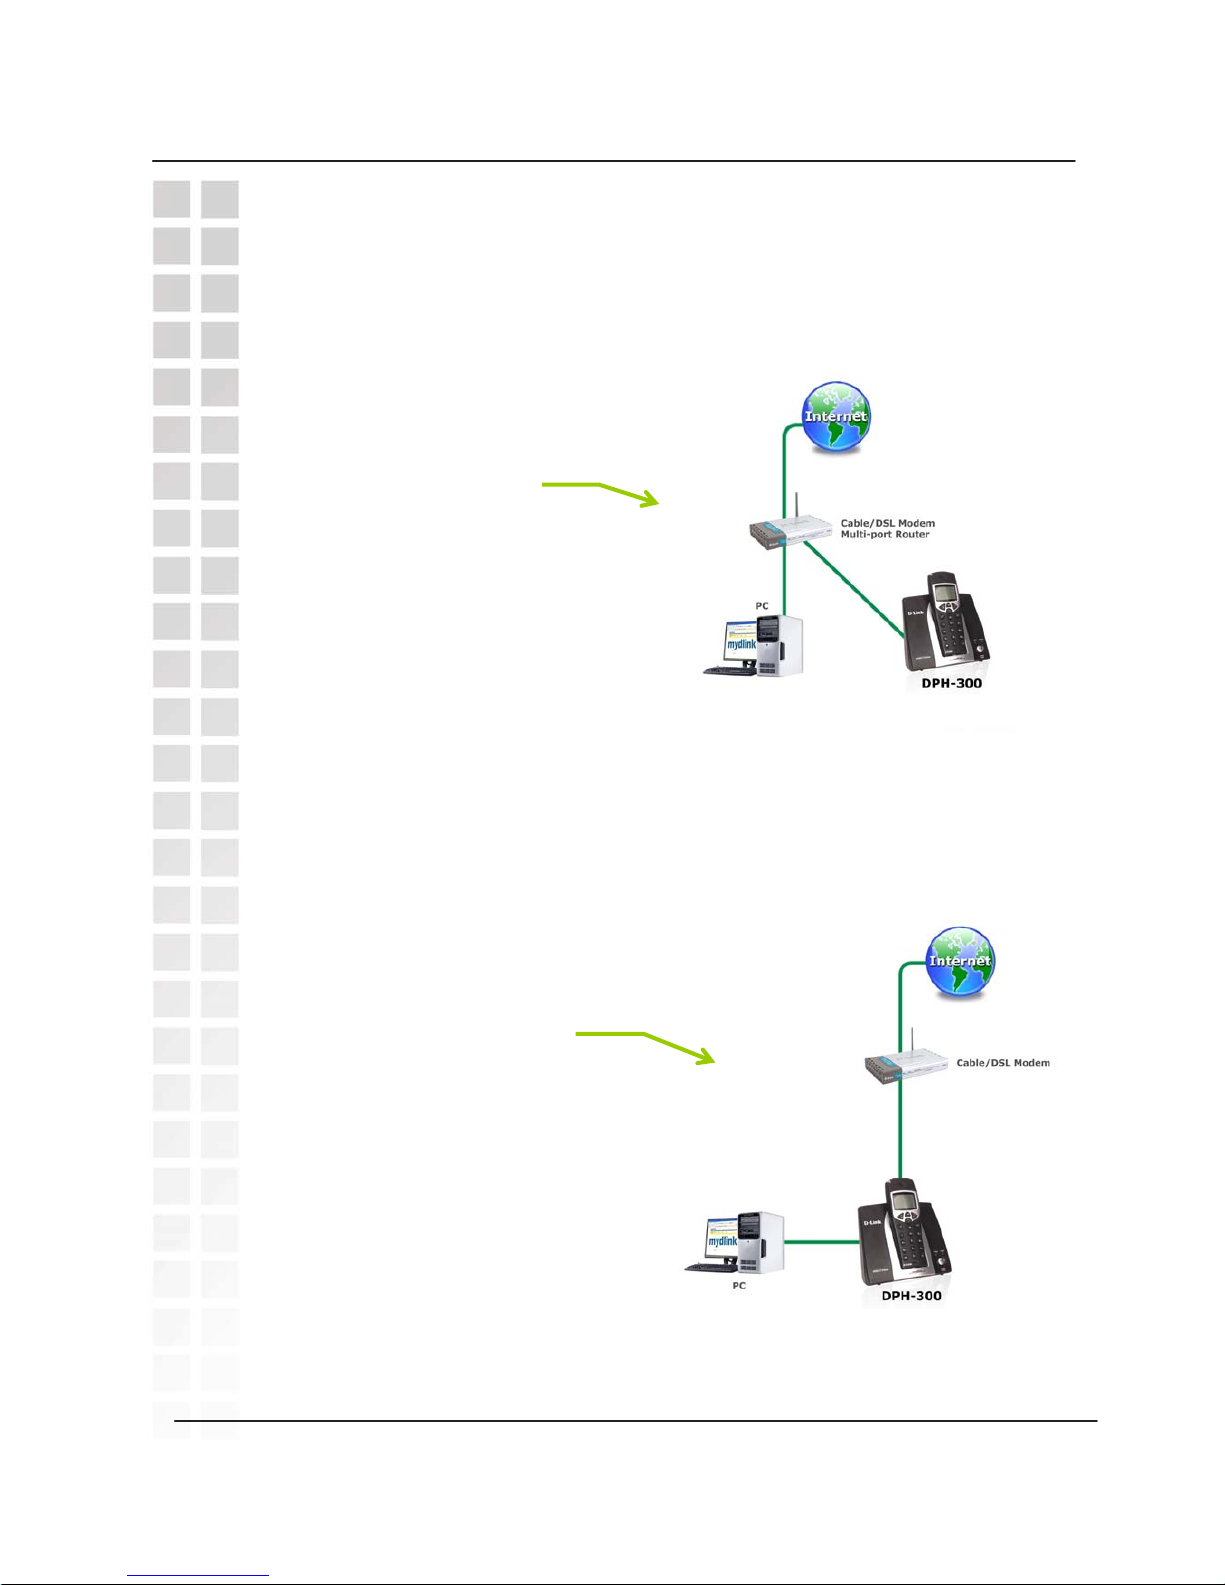
The DPH-300 can either be connected to an available port on a Cable/DSL
modem multi-port router, with other devices connected to their own ports (as
below).
Or it can be connected to the WAN port of a Cable/DSL modem with a PC
connected to the DPH-300 for Internet access as in the figure below.
Multi-port Router
Connection
Single-port Cable/DSL
Modem Connection
Page 10
DPH-300 User’
s Manual
Hardware Overview
LEDs
D-Link Corporation
9
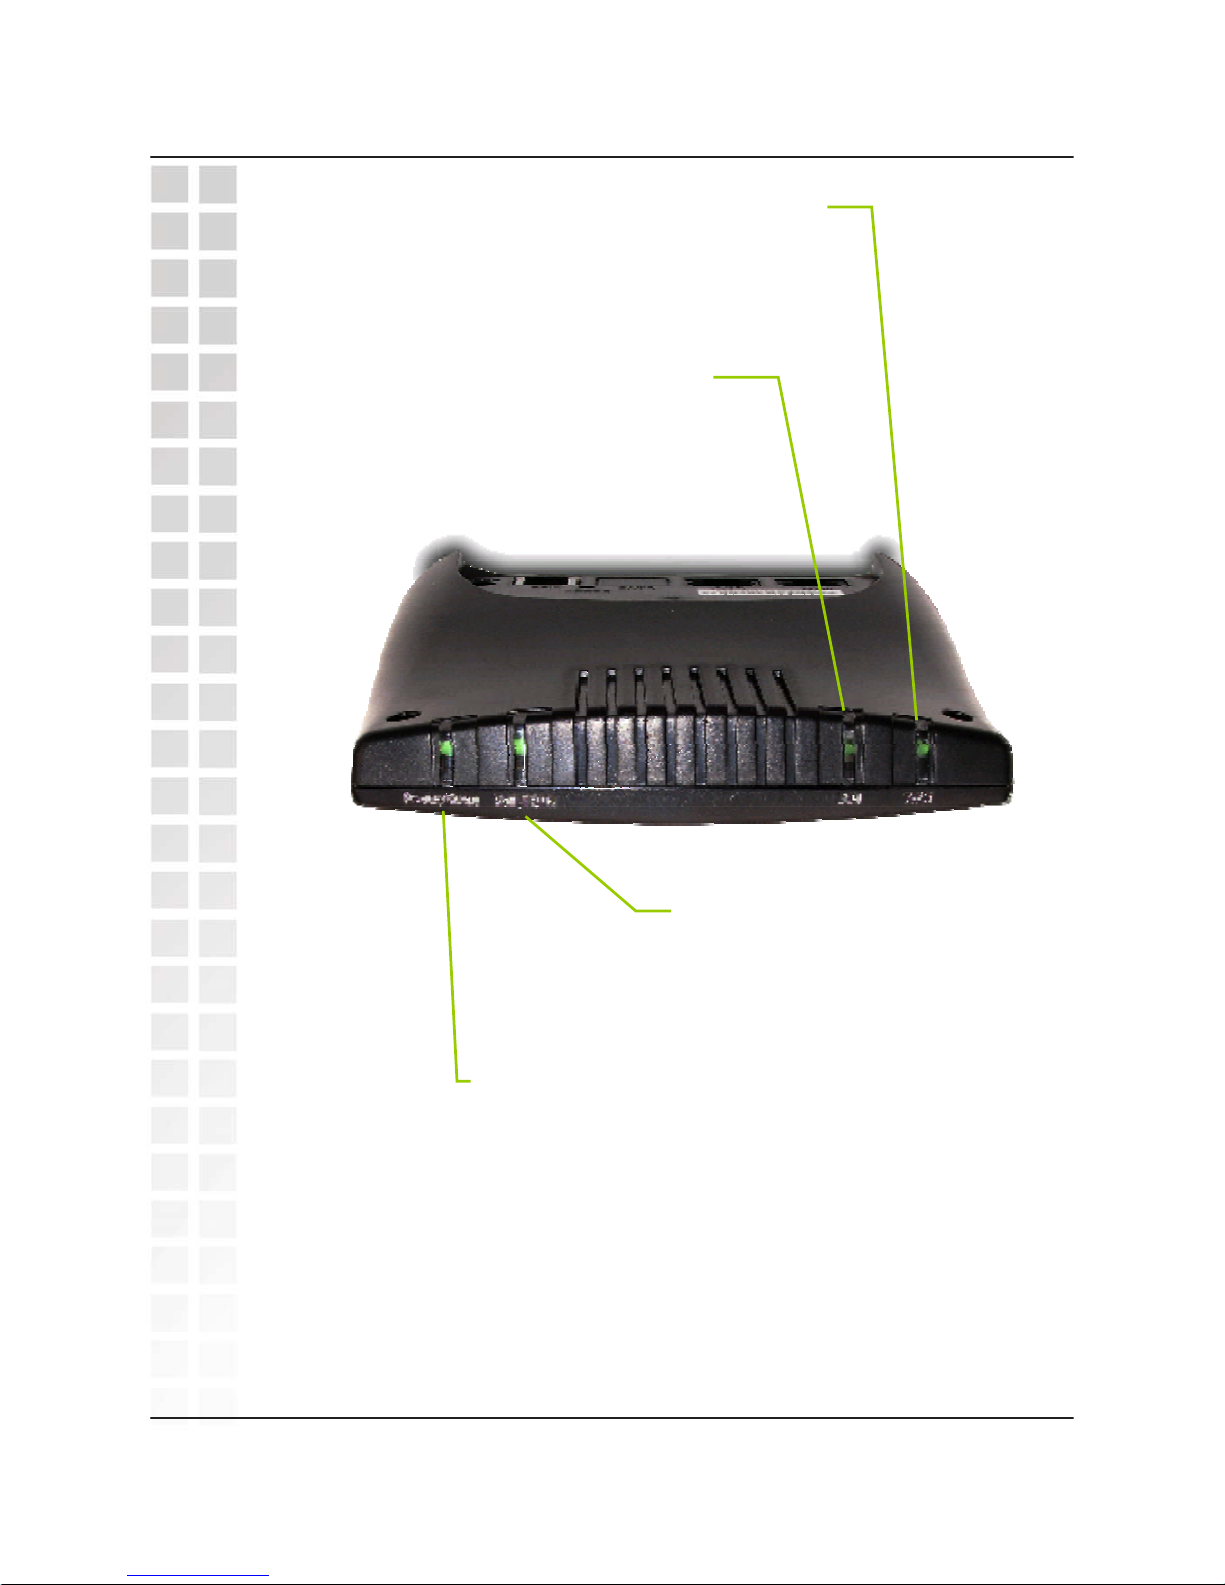
Power/Status
A blinking LED indicates the DPH-300 is
functioning properly, but has not yet registered
with a VoIP server.
A solid LED indicates the DPH-300 has registered
with a VoIP server and is ready for a call.
VoIP
An active LED indicates a
VoIP session has been
established.
LAN2
A solid LED indicates an Ethernet link
has been established. The LED will
blink when there is activity on this link
LAN1
A solid LED indicates an Ethernet
link has been established. The
LED will blink when there is activity
on this link
Page 11

In order to accomplish a Factory Reset of the DPH-300, it is necessary to do the
following:
1) Remove the handset from the base station.
2) Place the base station face-down on a flat surface (such as a table or
desk top).
3) Insert a bent paperclip or a toothpick in the hole for the Factory Reset
Button (see the photo on page 7 for the button’s location), and hold the
button down.
4) While still holding the button down, unplug the power adapter.
5) Wait 10 seconds, then reconnect the power adapter without letting go of
the Factory Reset Button.
6) Once you have restored power, continue holding the Factory Reset
Button down for another 10 seconds.
7) Complete! The DPH-300 should have had the following factory default
settings restored: IP Address; Call Logs (all).
8) Note that if your DPH-300 is still connected to the Internet, the autoprovisioning process should repeat itself after the factory reset, and the
phone should return to a ready-state showing “D-Link” in the handset
display and allowing IP calling.
If you need to reset the handset to its original factory default settings, see page
19, HS Setting > Set Default.
Factory Reset
Hardware Overview
DPH-300 User’s Manual
10
D-Link Corporation
Page 12
Hardware Overview
DPH-300 User’s Manual
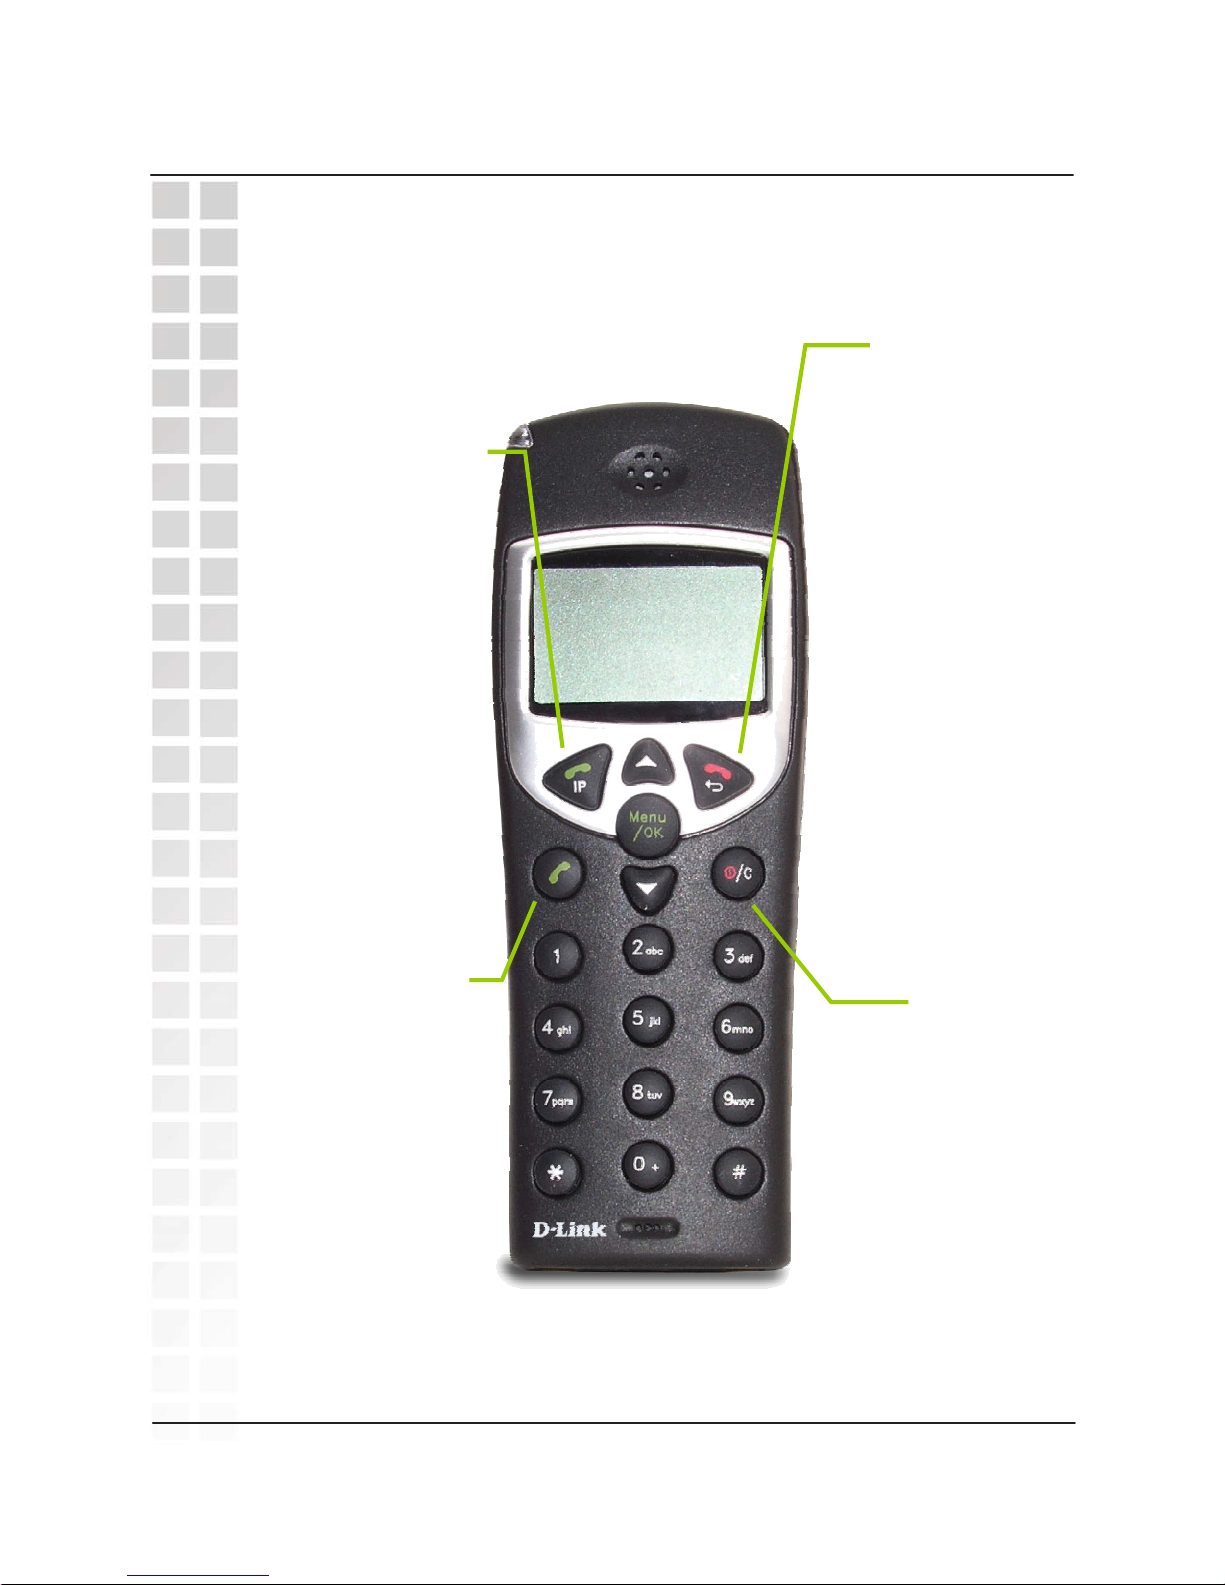
Keypad
11D-Link Corporation
On Hook
Use this button to
hang up the
Handset after you
have finished a
telephone call.
Clear
Use this button to
switch the Handset
off by holding the
button until Good
Bye appears in the
display. Also, this
button is used to
clear an input.
IP
Use this button to
initiate a VoIP
telephone call. It is
also used to switch
the Handset to
speakerphone mode
by holding the button
down for several
seconds until the
speaker icon appears
in the display
PSTN Dial Tone
Use this button to
initiate a PSTN
telephone call (over
your existing phone
line). It is also used
to switch the
Handset to
speakerphone
mode by holding the
button down for
several seconds
until the speaker
icon appears in the
display
Page 13
Hardware Overview
DPH-300 User’s Manual
12
D-Link Corporation
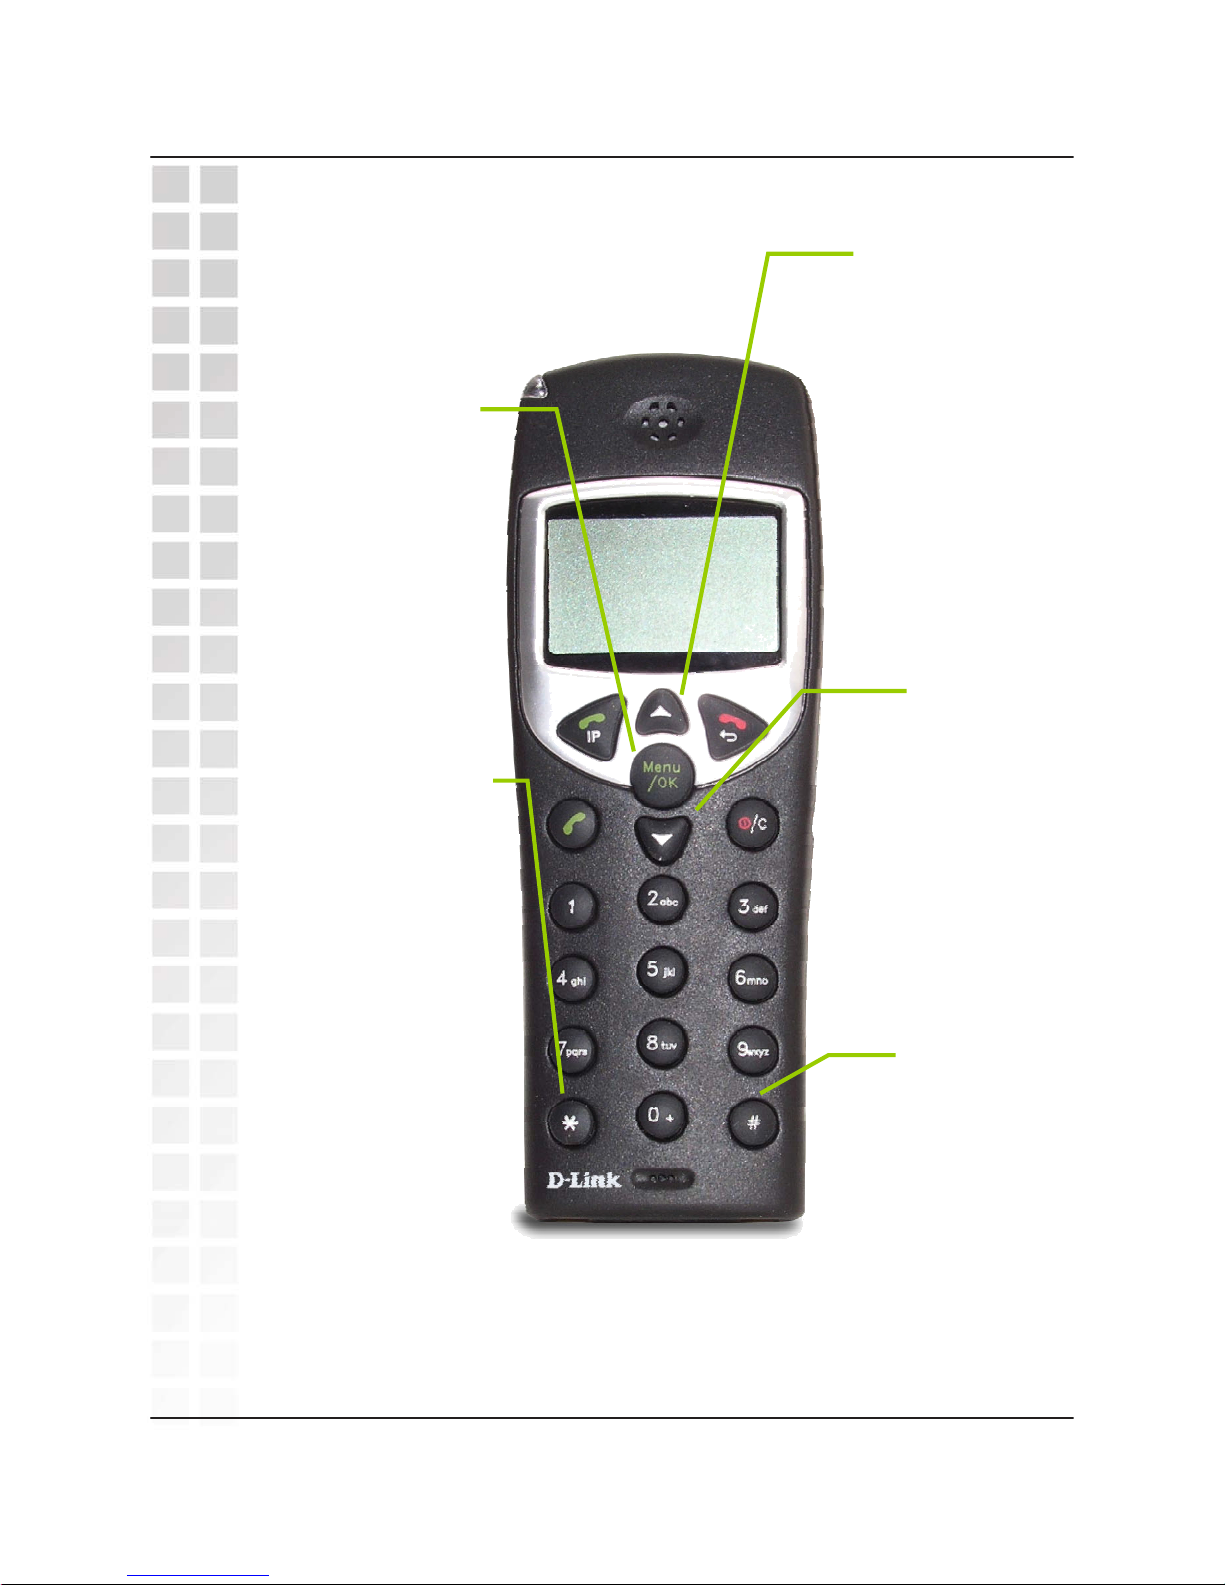
Up
Use this button
to open the
Contact List
when the
Handset is idle.
Pressing this
button during a
telephone call
will increase the
volume
Down
Use the button
to open the
Phone Book
telephone
numbers stored
for your use.
Pressing this
button during a
telephone call
will decrease the
volume.
Menu/OK
Use this button
to open the
Handset’s
setup and
information
menus.
Star
Pressing the
following, then press
the IP button:
**1 [IP] − will play your
DPH-300’s IP address
**2 [IP] − will play your
DPH-300’s phone number
**3 [IP] − to set the Internet
connection type.
Press 1 for DHCP
mode
Press 2 for Static IP
mode, followed by the
IP address separated by
*’s and then the # key (for
example, 192*168*1*110#)
Pound Key
Use this button
for various input
functions such as
to enter a static
IP address, as
described to the
left (under Star).
Page 14
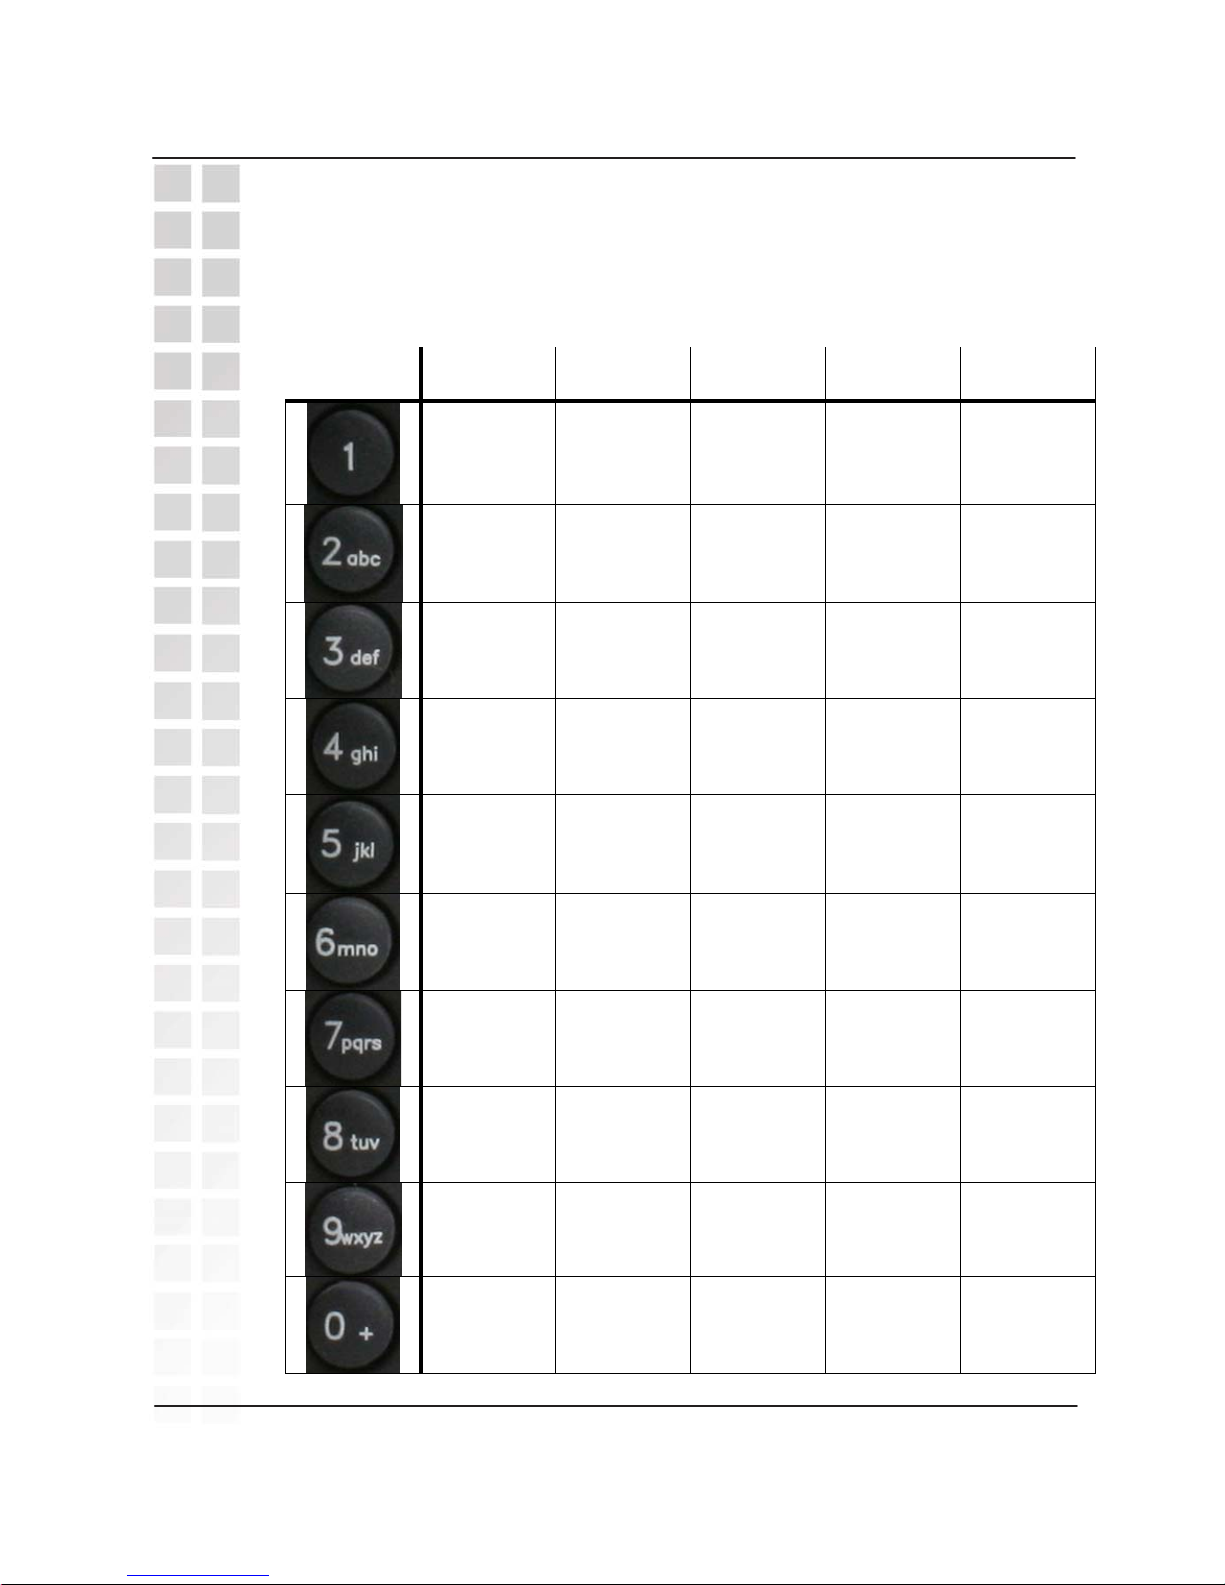
1X 2X 3X 4X 5X
1 (space) < > -
Aa Bb Cc 2 @
Dd Ee Ff 3 :
Gg Hh Ii 4 +
Jj Kk Ll 5 *
Mm Nn Oo 6 #
Pp Qq Rr Ss 7
Tt Uu Vv 8 .
Ww Xx Yy Zz 9
0 Ææ Ää Öö Üü
13
Hardware Overview
DPH-300 User’s Manual
D-Link Corporation
Keypad Table
The keys on the handset can be used to enter all of the numbers, letters, and
symbols in the table below for features like the Phone Book or Handset User
Page 15
IP vs PSTN
The primary difference between IP dialing and PSTN dialing is that with IP
dialing you enter the number you want to call then push the IP button. The IP
button functions like the Enter (Return) key on a computer keyboard. For more
detailed information about making different types of calls, see page 55, Making
Phone Calls.
PSTN calls follow the standard ordinary phone service way of dialing, which is
to say that to make a PSTN call, you first press the PSTN button, listen for a dial
tone, then dial the number. PSTN dialing in “standby mode” is also supported,
see page 56 for details.
A second important difference between IP and PSTN dialing is that all IP calls to
non-IP numbers (also called, “TelTel Out” calls) require that you first enter a “+”
sign and then the number before pressing the IP button.
Handset Display
Once your DPH-300 has been successfully installed, auto-provisioned, account
verified, and you have begun using it to make and receive calls, you will notice
various displays in the handset, including settings menus. The displays provide
information about the current status of the DPH-300 and its related services.
The three most basic displays are: D-Link / Searching. . . / VoIP Offline.
When the unit is working normally and has an Internet connection, the handset
display will show “D-Link.”
While the unit is auto-provisioning – the first time or anytime thereafter such as
following a power outage or network failure of some kind, the handset LCD will
display “Searching. . .” and both the power and WAN LEDs on the base unit will
flash until either a successful Internet connection is achieved or fails completely.
If the DPH-300 is unable to complete the auto-provisioning process, the handset
LCD will display “VoIP Offline.”
Also note that when you press the Handset Locator button on the base station,
the handset display will show “---Paging---” until you press the Handset Locator
button again.
Basic Handset Instructions
Note: press and hold the “0” key to enter a “+” sign.
14
Hardware Overview
DPH-300 User’s Manual
D-Link Corporation
Page 16
Handset Display (continued)
The handset has a maximum range rated at 50 meters (indoor) and up to 300
meters (outdoor) for clear line-of-sight operation. Local environment conditions
will reduce the functional operating range, particularly when there are
obstructions between the handset and base station. The indicator in the upper
right corner of the LCD will indicate when signal strength is reduced due to
obstructions or distance. When the signal is lost, the handset will display
“Searching. . .” until it is back in range. While the handset is out of range, none
of the handset menus or settings are available for either display or modification.
Note, however, that handset menus and settings are available when the handset
is in range of the base station but is “VoIP Offline” due to some difficulty with the
network.
Handset Symbols
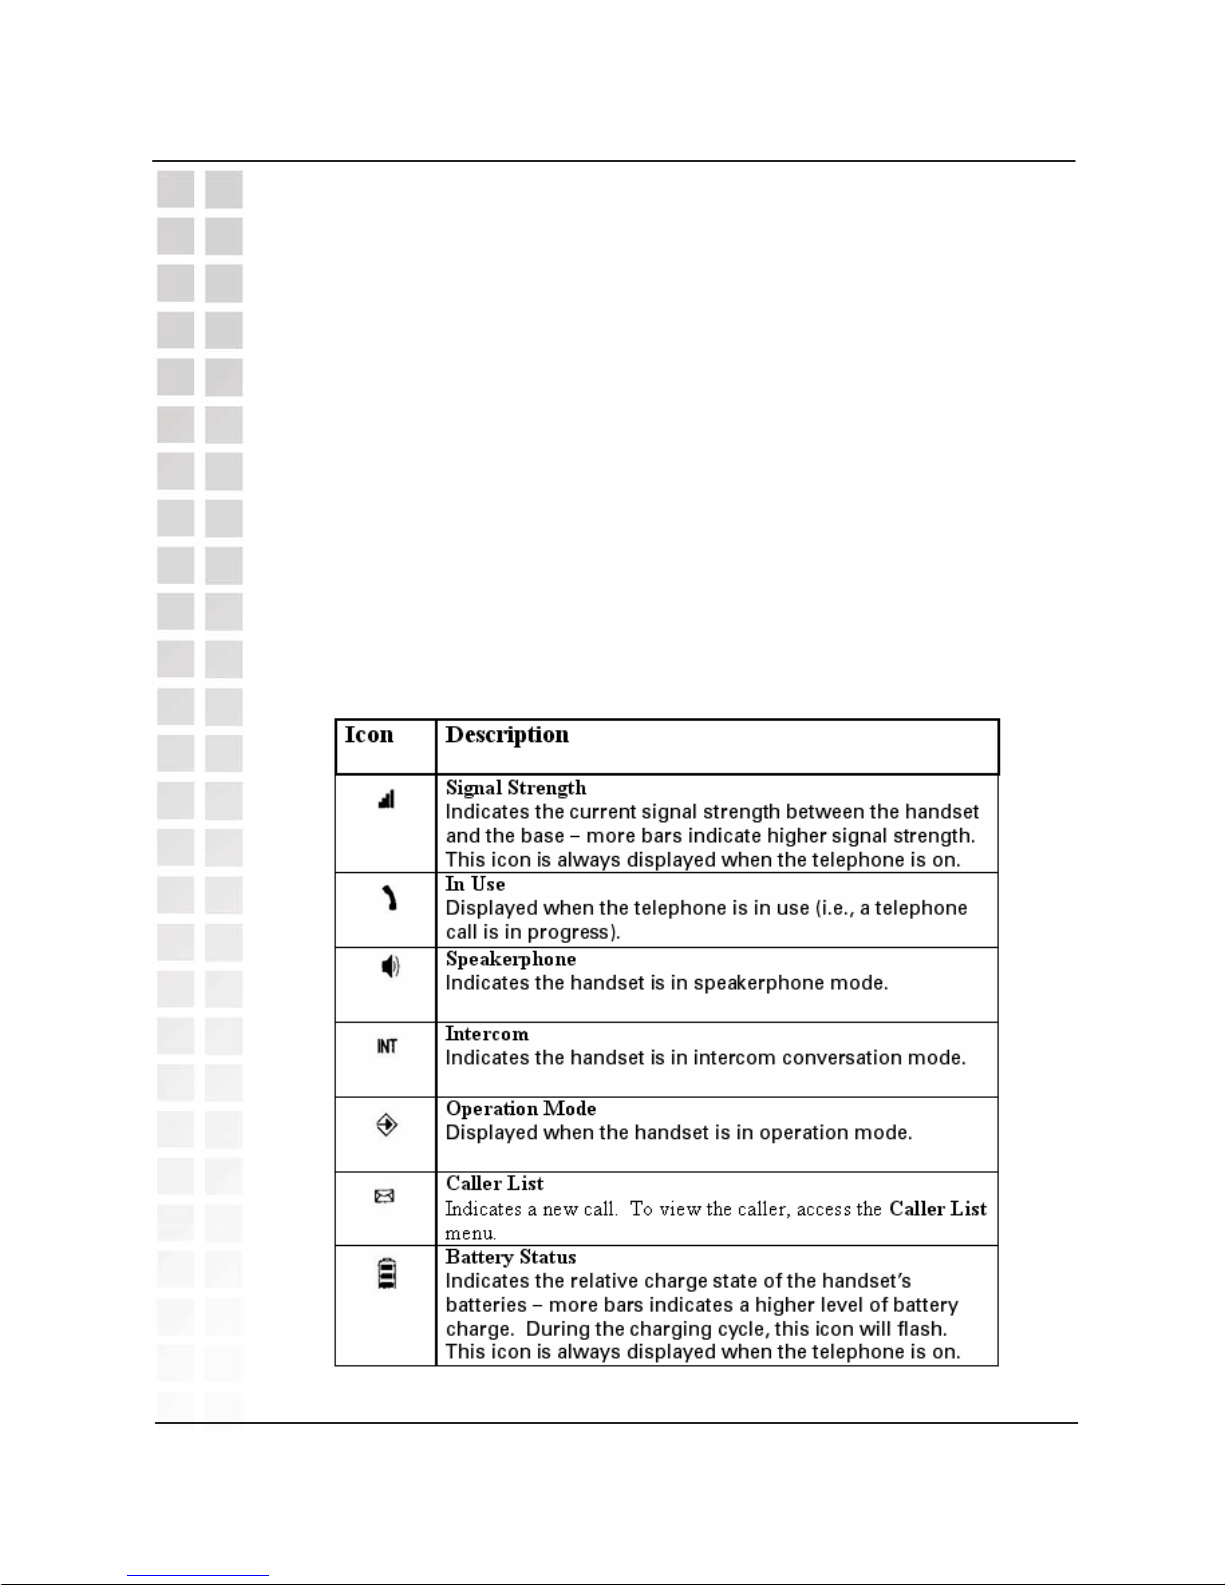
The handset LCD includes symbols indicating various things about the current
status and operation of the DPH-300 phone. Please see the table below for
information about the handset symbols.
15
Hardware Overview
DPH-300 User’s Manual
D-Link Corporation
Page 17
Phone Book and ContactList
Each handset has two lists independent list of phone contacts: Phone Book and
ContactList. Phone Book entries are numbers you have entered in the handset
directly using the Handset Menus (described in the next section). The Phone
Book can store up to 50 entries. Note that entries must be entered exactly as
necessary for dialing purposes. To dial a number entered in your handset
Phone Book, press the down arrow key, scroll through the entries to select the
number, then press either the IP key or PSTN key as appropriate for the call you
wish to make. See the Handset Settings / Menus sub-section below for
information on adding entries to the Phone Book.
ContactList entries are displayed in the handset but can not be added or
modified using the handset. To create new ContactList entries or edit existing
entries, you must access your account on the mydlink.com website. See page
41 for information about the My Services > Contact Management section of
mydlink.com.
Handset Settings / Menus
Handset menus described in this section are listed in the order they are
displayed by the handset. To see the top level of menus, press the Menu/OK
key. Also press the Menu/OK key to open the next menu level or to confirm an
entry or setting (much like the Enter key on a computer keyboard).
System Info > My IP
Æ Displays the IP address currently assigned to the DPH-300.
System Info > mydlink No.
Æ Displays the mydlink number assigned to the DPH-300 after initial
auto-provisioning.
Call LOG > Missed
Æ Displays recent calls that have gone unanswered.
Call LOG > Received
Æ Displays a list of recent calls received.
Call LOG > Dialed
Æ Displays a list of recently dialed numbers.
ContactList
Æ Displays the current list of contacts entered in the mydlink.com
Contact Management webpage. See the sub-section above and page
41 for more information about the ContactList and how to use it.
16
Hardware Overview
DPH-300 User’s Manual
D-Link Corporation
Page 18
Handset Settings / Menus (continued)
Phone Book > Add
Æ Allows you to create a new Phone Book entry by creating a name
(enter a maximum of 12 characters and press Menu/OK), entering the
number exactly as it needs to be dialed (maximum of 24 digits), and
finally pressing Menu/OK again. If you have successfully created a new
entry, the handset will display “Stored” and return to the usual D-Link
ready screen. You may create up to 50 entries.
Phone Book > Edit
Æ Allows you to edit existing Phone Book entries. Press Menu/OK,
select the entry to edit from the list, and press Menu/OK again. Edit the
name and press Menu/OK. Edit the number and press Menu/OK again.
If you have successfully edited the entry, the handset will display “Stored”
and return to the usual D-Link ready screen.
Phone Book > View
Æ Displays the current Phone Book entries. Press Menu/OK to access
the list and then use the up and down arrow keys to display the entries.
Phone Book > Delete
Æ Allows you to delete Phone Book entries one at a time. Press
Menu/OK to access the list, use the up and down arrow keys to scroll
through the entries, select the one you want to delete, and press the
Menu/OK key again. You will be prompted with “Sure ?” before the
entry will be deleted. Press the Menu/OK key again to delete the entry
you chose or press the Clear key to cancel.
Phone Book > Erase all
Æ Allows you to delete all Phone Book entries. Press Menu/OK to
erase the entire list. You will be prompted with “Sure ?” before the
entries will be deleted. Press the Menu/OK key again to delete all
entries or press the Clear key to cancel.
Caller List > PSTN Calls
Æ Displays a list of up to the last 50 PSTN calls received, including the
name and number of the caller using standard Caller ID data.
Caller List > Erase all
Æ Allows you to delete all Caller List entries. Press Menu/OK to erase
the entire list. You will be prompted with “Sure ?” before the entries will
be deleted. Press the Menu/OK key again to delete all entries or press
the Clear key to cancel.
17
Hardware Overview
DPH-300 User’s Manual
D-Link Corporation
Page 19
Handset Settings / Menus (continued)
HS Setting > PSTN Ring
Æ Allows you to select a different ring tone for incoming PSTN calls.
There are nine tones to choose from (Ering 1 ~ Ering 9). Scroll through
the list using the up and down arrow keys and press Menu/OK to select
the one you want. After you select a tone, it will be followed by a
volume setting indicated by a number. To raise or lower the volume, use
the up and down arrow keys.
HS Setting > VoIP Ring
Æ Allows you to select a different ring tone for incoming VoIP calls.
There are nine tones to choose from (Iring 1 ~ Iring 9). Scroll through
the list using the up and down arrow keys and press Menu/OK to select
the one you want. After you select a tone, it will be followed by a
volume setting indicated by a number. To raise or lower the volume, use
the up and down arrow keys.
HS Setting > Set keytone
Æ Allows you to turn on and off the sound which accompanies any press
of a handset button. Select On and press Menu/OK if you want to hear
the tone when you press handset buttons. Select Off and press
Menu/OK if you do not want to hear the tone.
HS Setting > User name
Æ Allows you to assign a user name to the handset.
HS Setting > Set PIN
Æ Allows you to assign a PIN code to the handset. The factory default
PIN code is: 1590. You must enter it first in order to change the PIN.
HS Setting > Auto answer
Æ Allows you to turn the auto answer feature on and off. Enabling auto
answer allows you to answer incoming calls by simply picking-up the
handset from the base station. Choose On and press Menu/OK to
enable auto answer. Select Off and press Menu/OK if you do not want to
enable auto answer.
HS Setting > Anykey talk
Æ Allows you to turn the anykey talk feature on and off. Enabling
anykey talk allows you to answer incoming calls by pressing any key on
the handset. Choose On and press Menu/OK to enable anykey talk.
Select Off and press Menu/OK if you do not want to enable anykey talk.
18
Hardware Overview
DPH-300 User’s Manual
D-Link Corporation
Page 20
Handset Settings / Menus (continued)
HS Setting > Language
Æ Allows you to change the display language of the handset. Choose
English, Deutsch, Italiano, Francais, or Espanol and press Menu/OK.
HS Setting > Set default
Æ Allows you to return all handset settings to their factory default values.
BS Setting > [future feature]
Æ BS (base station) settings relate to technical aspects of handset
management for mult-handset environments. Multi-handset
environments are a future supported feature. It is not recommended for
users to try and change these settings at this time.
Select Base > Base 1 ~ 4, Auto [future feature]
ÆSelect Base settings relate to technical aspects of handset ÅÆ base
station management relative to multiple base stations. Multiple ba se
station environments are a future feature. It is not
recommended for users to try and change these settings at this time.
HS Register > Base 1 ~ 4 [future feature]
Æ HS (handset) Register settings relate to technical aspects of handset
management relative to multiple base stations and multi-handset
enviroments. Multi-handset and multiple base station environments are
a future feature. It is not recommended for users to try and
change these settings at this time.
Intercom Function [future feature]
The Intercom function allows one handset to call another, in a manner similar to
walkie-talkies, and is activated when you press the clear button without being in
the middle of a call. You will see “Intercom” and the INT symbol in the LCD.
Transfer Function [future feature]
The Transfer function allows one handset to send an outside call to another
handset. Transfer is activated when you press the clear button during a call.
You will see “Transfer” in the display.
Multi-Handset Use [future feature]
If you would like more information about acquiring and using multiple handsets,
contact your nearest D-Link distributor or local D-Link office, or choose a
website from the list at the end of this user manual to contact us for help.
19
Hardware Overview
DPH-300 User’s Manual
D-Link Corporation
Page 21
DPH-300 User’
s Manual
Getting Started
GettingStarted
BEFORE Y OU BEGIN!
Charge the handset batteries (see page 4).
Read the
Opening Ports on Routers and Gateways
section of this manual if you are
using the DPH-300 with a router or gateway.
The DPH-300 needs to be setup before use. You can use the Quick
Installation Guide (included with the DPH-300) to perfor m the hardware
installation. There is an easy to use setup Wizard built-in to the D P H - 3 0 0 to accomplish
the IP ad dress setup. You will need to run th e W iz a rd and enter your Internet connection
information in order to use your phone for IP ca ll ing o nl y i f y o u d o no t h ave a c ces s to
Dynamic IP Addressing.
Dynamic IP Address is the default setting and requires no user changes.
If you have Dynamic IP Addressing (also called, “DHCP”), check the Quick
Installation Guide for information on the physical connection of the DPH-300, and
skip to page 28 of this document: Auto-provisioning. Otherwise, continue to the
next section.
D-Link Corporation
20
Page 22
Connecting to the Web Page
DPH-300 User
’
s Manual
21
D-Link Cor
p
oration
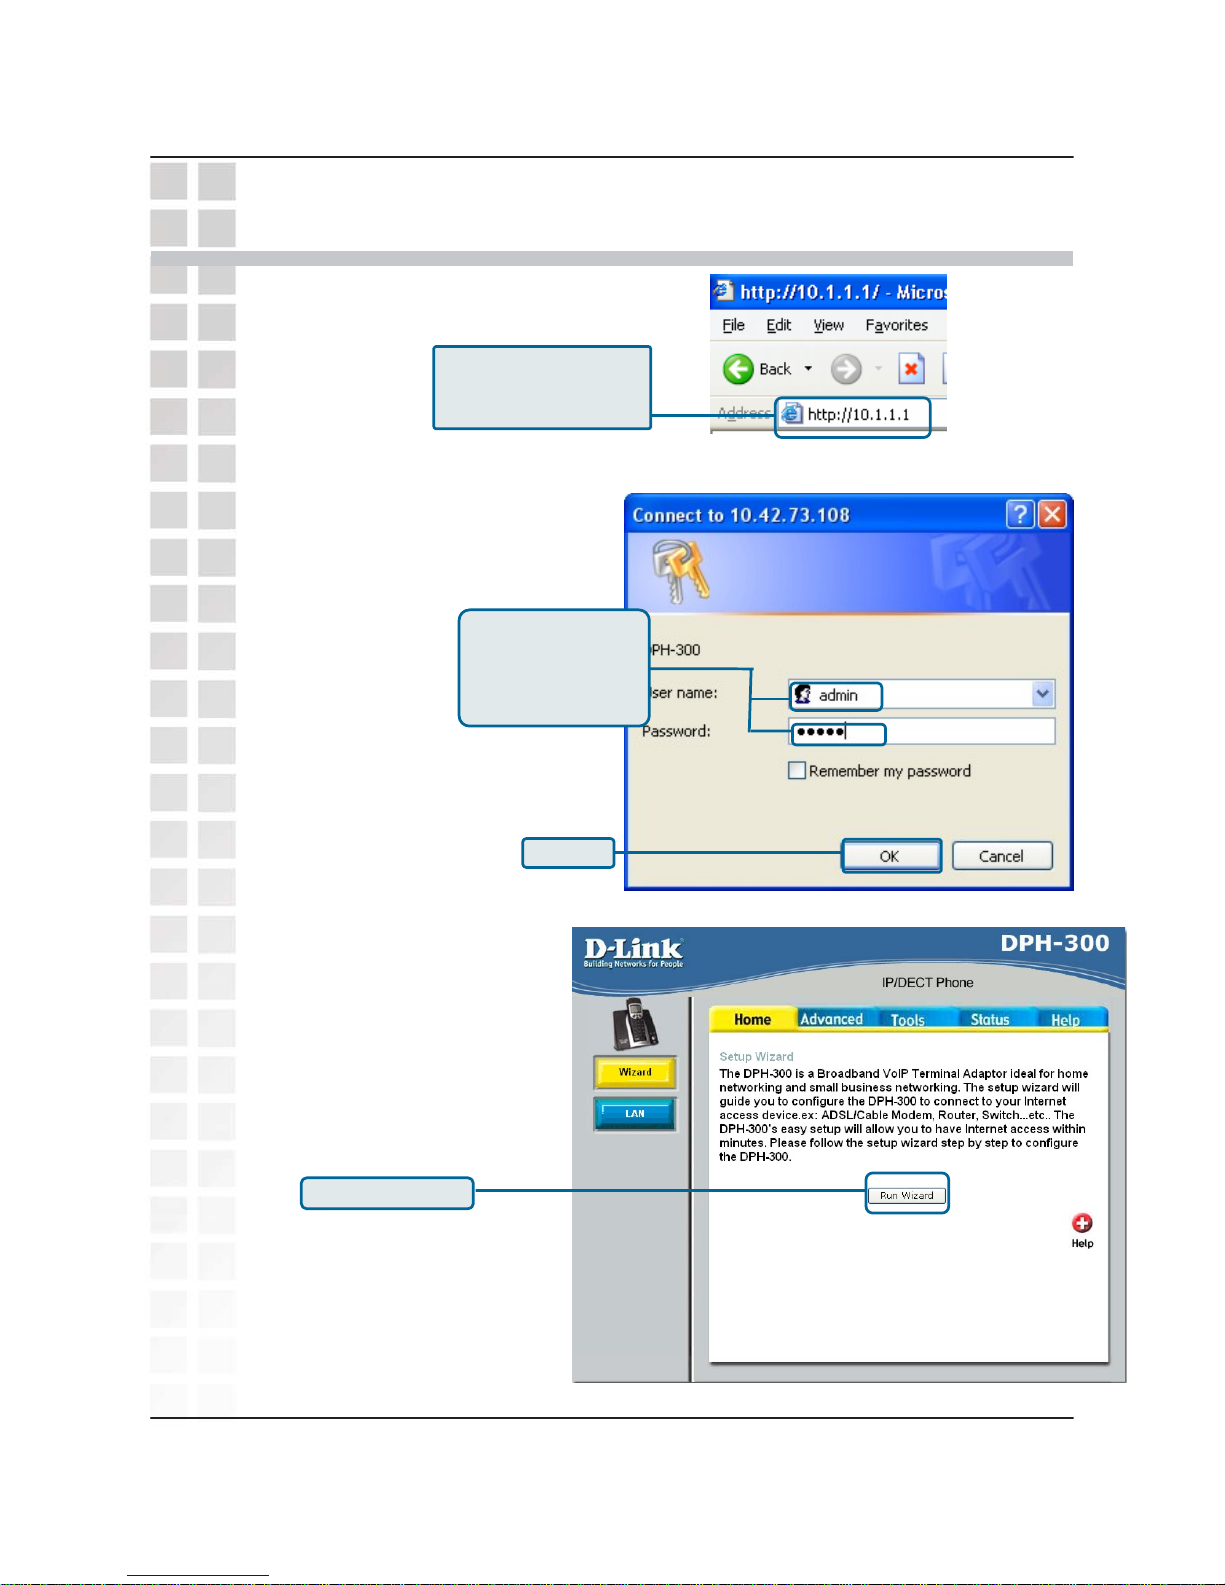
Open your Web browser and
type http://10.1.1.1 into the
URL address box. Press Enter or
Return.
When you first log in, the
User name is admin and
the Password is also
admin. You may change
these later.
Click OK.
Click Run Wizard.
Connecting to the Configuration Web Pa
g
e
Page 23
Configuring the WAN (Internet) Connection
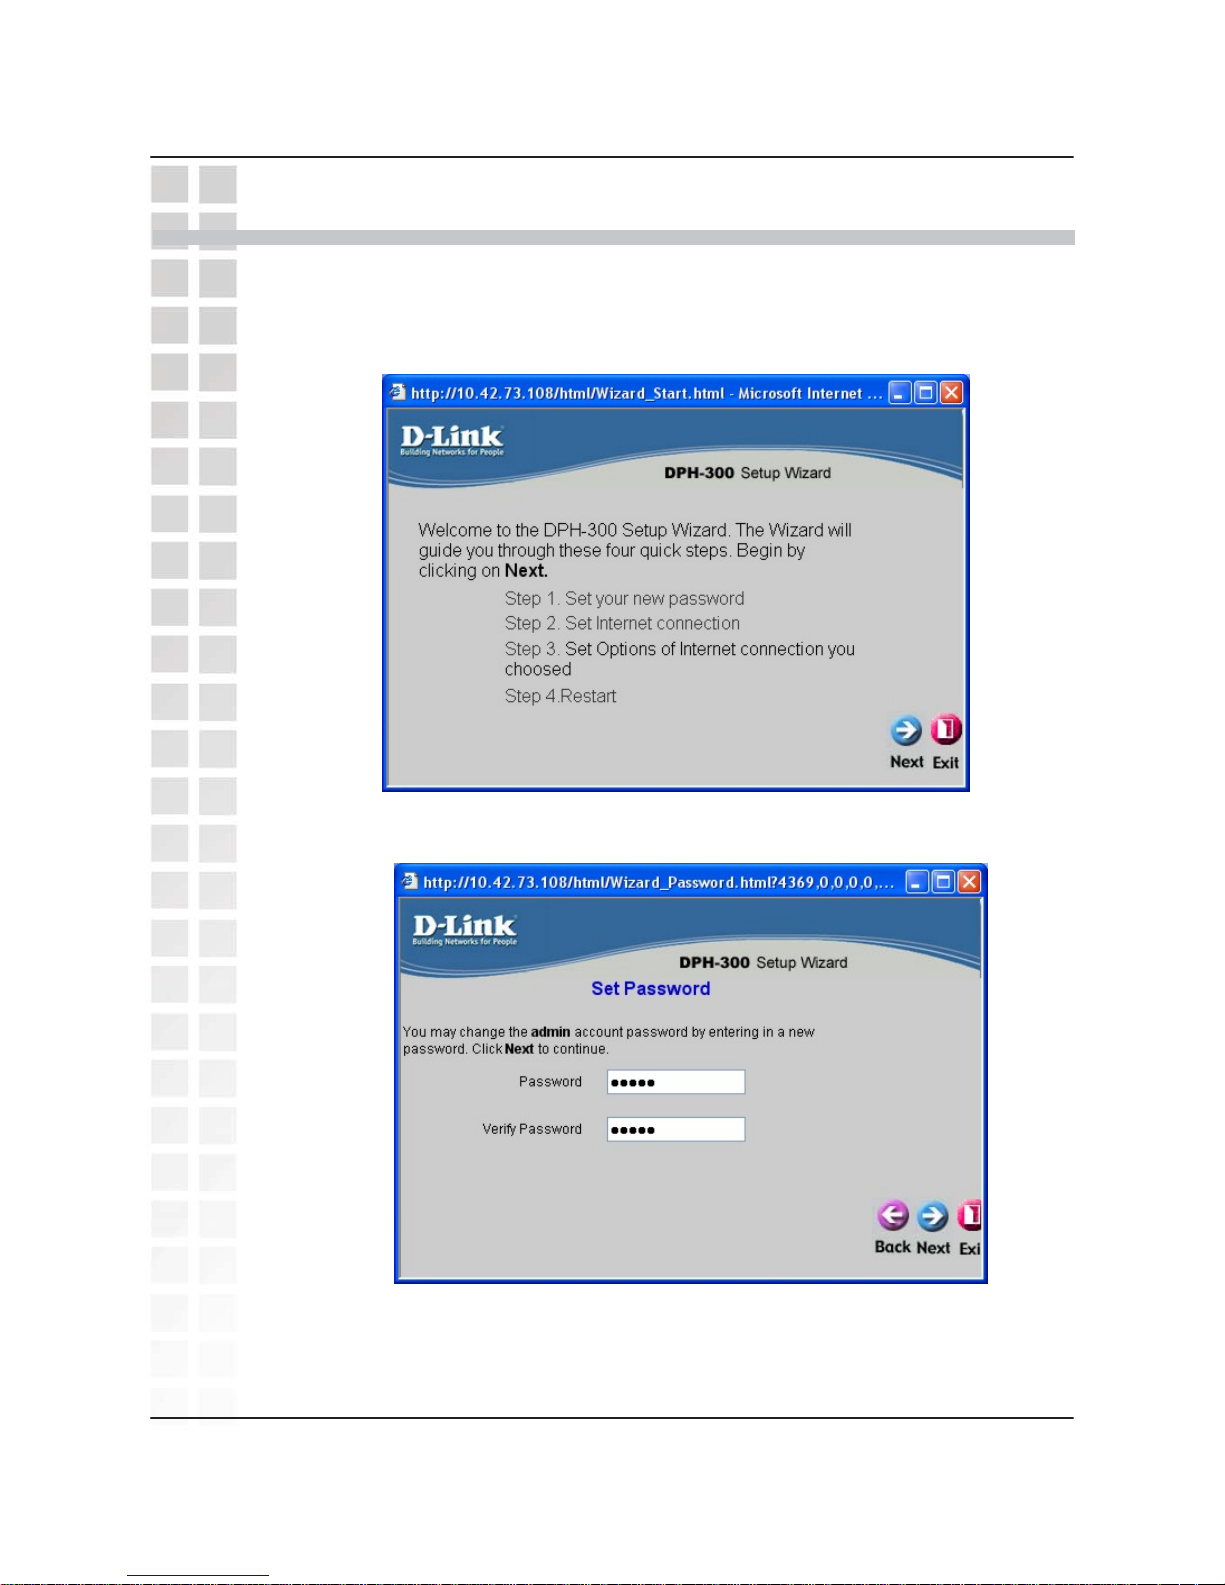
Click Run Wizard on the main Web page above to view the following Setup
Wizard window:
DPH-300 User’
s Manual
Using the Setup Wizard
Using the SetupWizard
D-Link Corporation.
22
Click the Next button on the menu above to view the following Wizard window:
Enter a new password for the DPH-300 in the Password field.
Confirm the new password by entering it again in the Verify Password field.
Click the Next button to continue.
Page 24
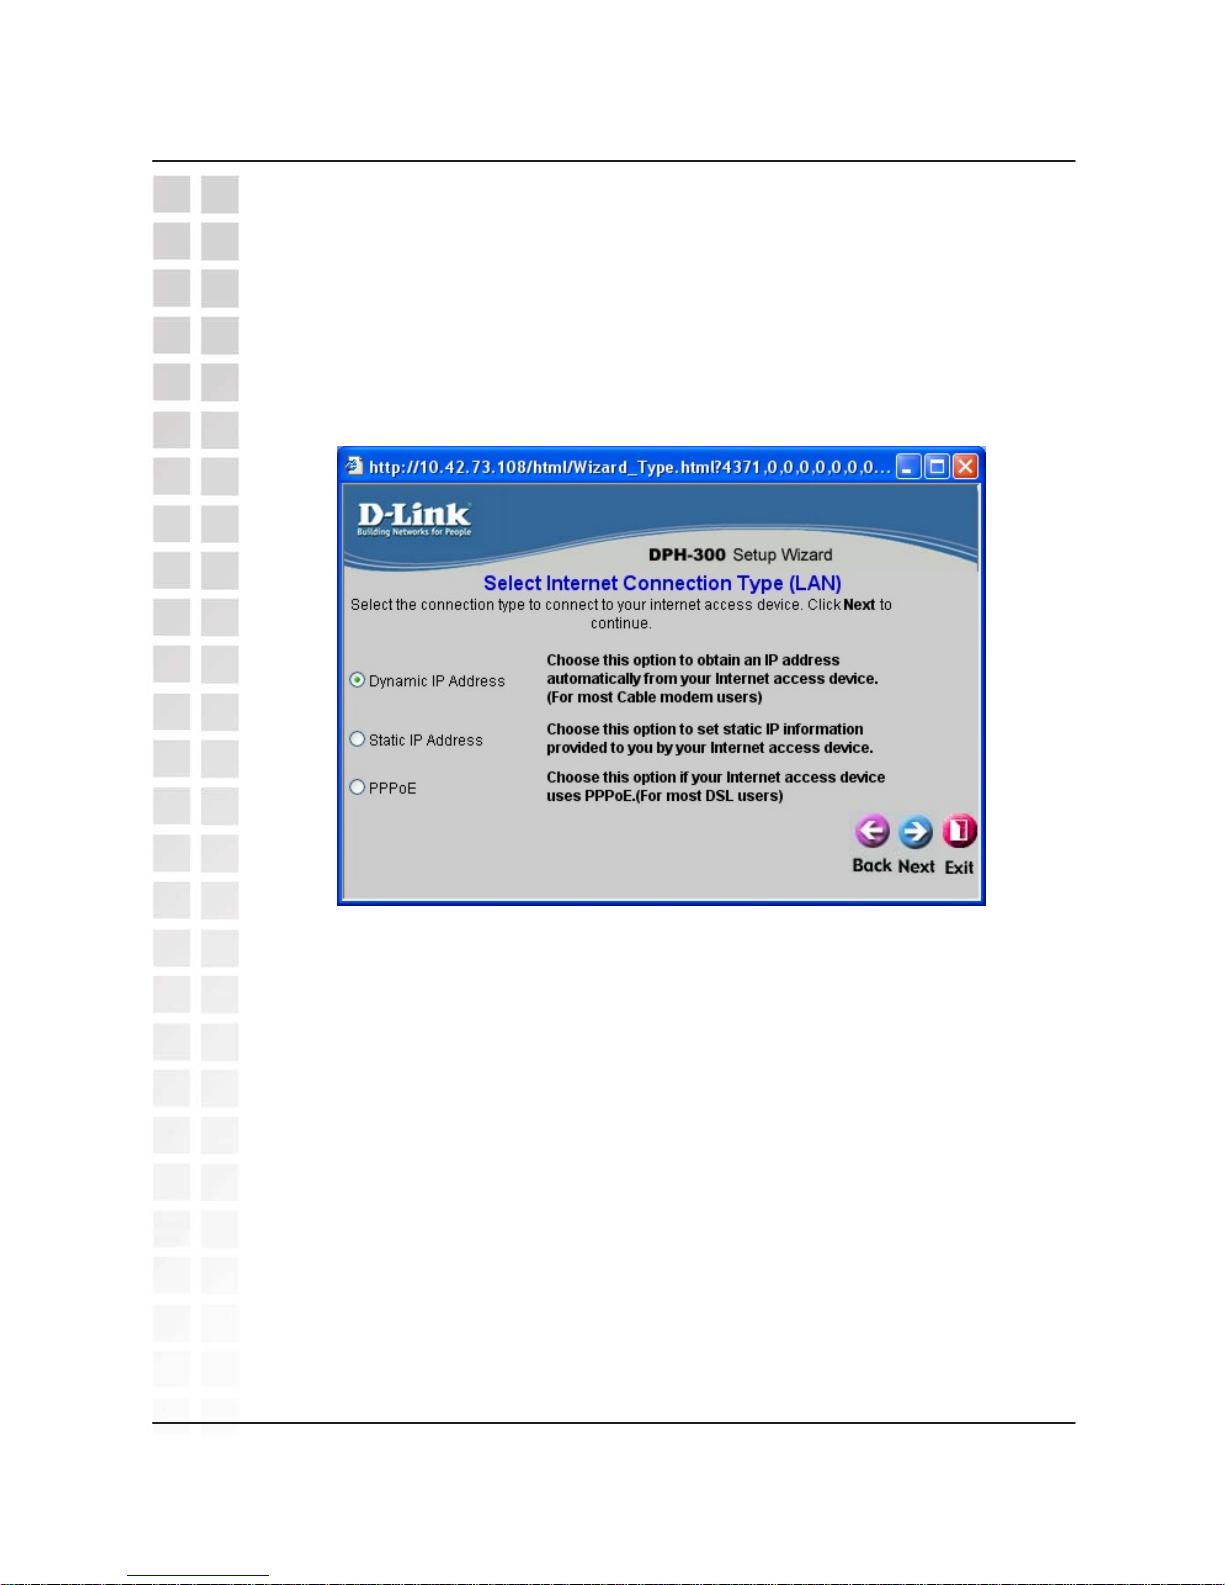
The window above allows you to select between the three most common ways
to connect to your ISP’s WAN (Internet).
Select Dynamic IP Address if your DPH-300 will be connected directly to a
broadband modem or a router/DHCP server. This is the most common way of
connecting devices such as the DPH-300 to the Internet.
Select Static IP Address when connecting to a broadband connection that
offers static IP addressing or when behind a router that does not have a DHCP
server enabled. This choice requires the input of specific IP address
information.
PPPoE (Point-to-Point Protocol over Ethernet) is used when connecting directly
to a DSL modem that offers a PPPoE connection. This choice requires you to
input the User Name and Password of your PPPoE account − provided by your
ISP.
Click the Next button to continue.
Selecting the Connection Type
DPH-300 User’s Manual
D-Link Corporation
23
Selecting the Type of LAN Connection
Dynamic IP Address (using DHCP) is both the default option, and the most
commonly used method to assign devices on a LAN IP address information
when connecting to a broadband modem or multi-port Ethernet router or DHCP
server.
Most DPH-300 users should select the Dynamic IP Address option.
Page 25
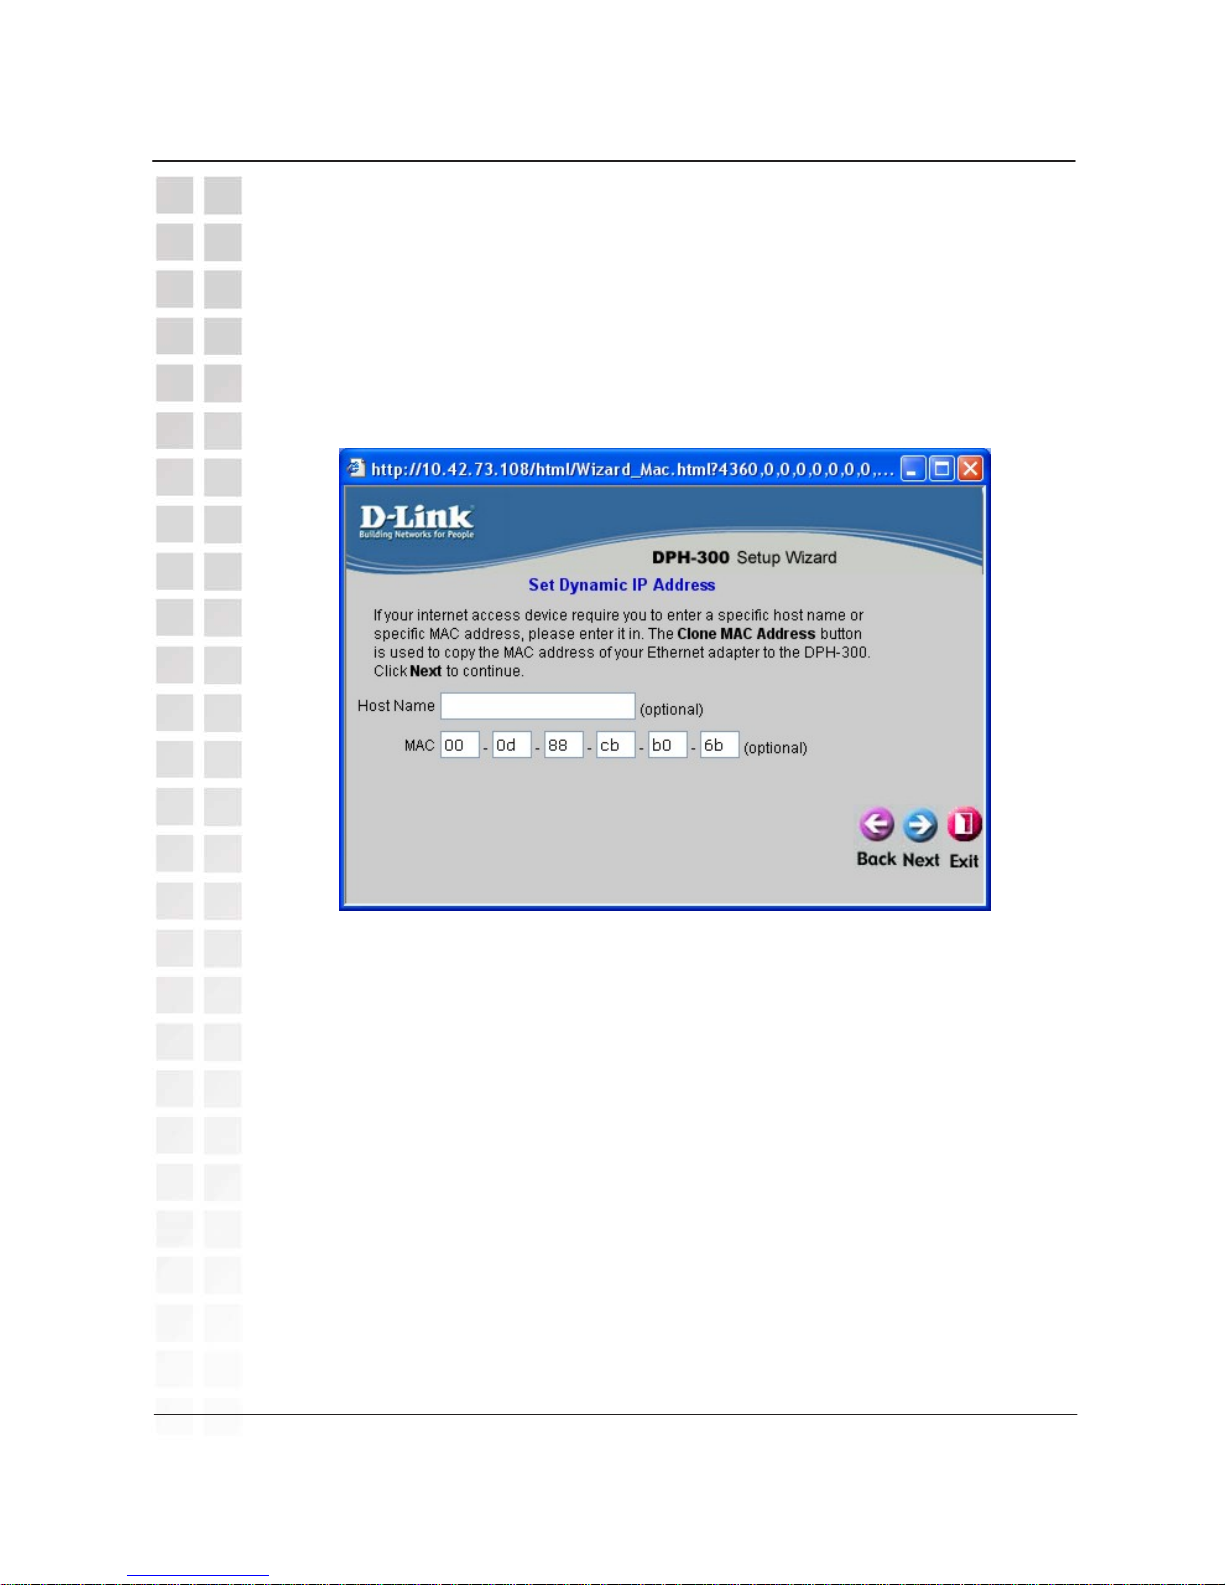
Host Name − Your Internet Service Provider may require you to provide a host
name to connect to the Internet. If this is required, you can enter it here.
MAC − the Media Access Control (MAC) address is a unique identifier for the
Ethernet network hardware of your DPH-300. If you need to know the MAC
address of your DPH-300, it can be found here. The DPH-300 MAC address is
also printed on a sticker on the back of the DPH-300 base. (Cable modems
commonly use the MAC address of the first PC to log into the Internet as the
identifier for an account.)
Click the Next button to continue.
Set D
y
namic IP Address
DPH-300 User’s Manual
D-Link Corporation
24
Set Dynamic IP Address
Dynamic IP Address (using DHCP) is both the default option, and the most
commonly used method to assign devices on a LAN IP address information
when connecting to a broadband modem or multi-port Ethernet router/DHCP
server.
Most DPH-300 users should select the Dynamic IP Address option.
Page 26
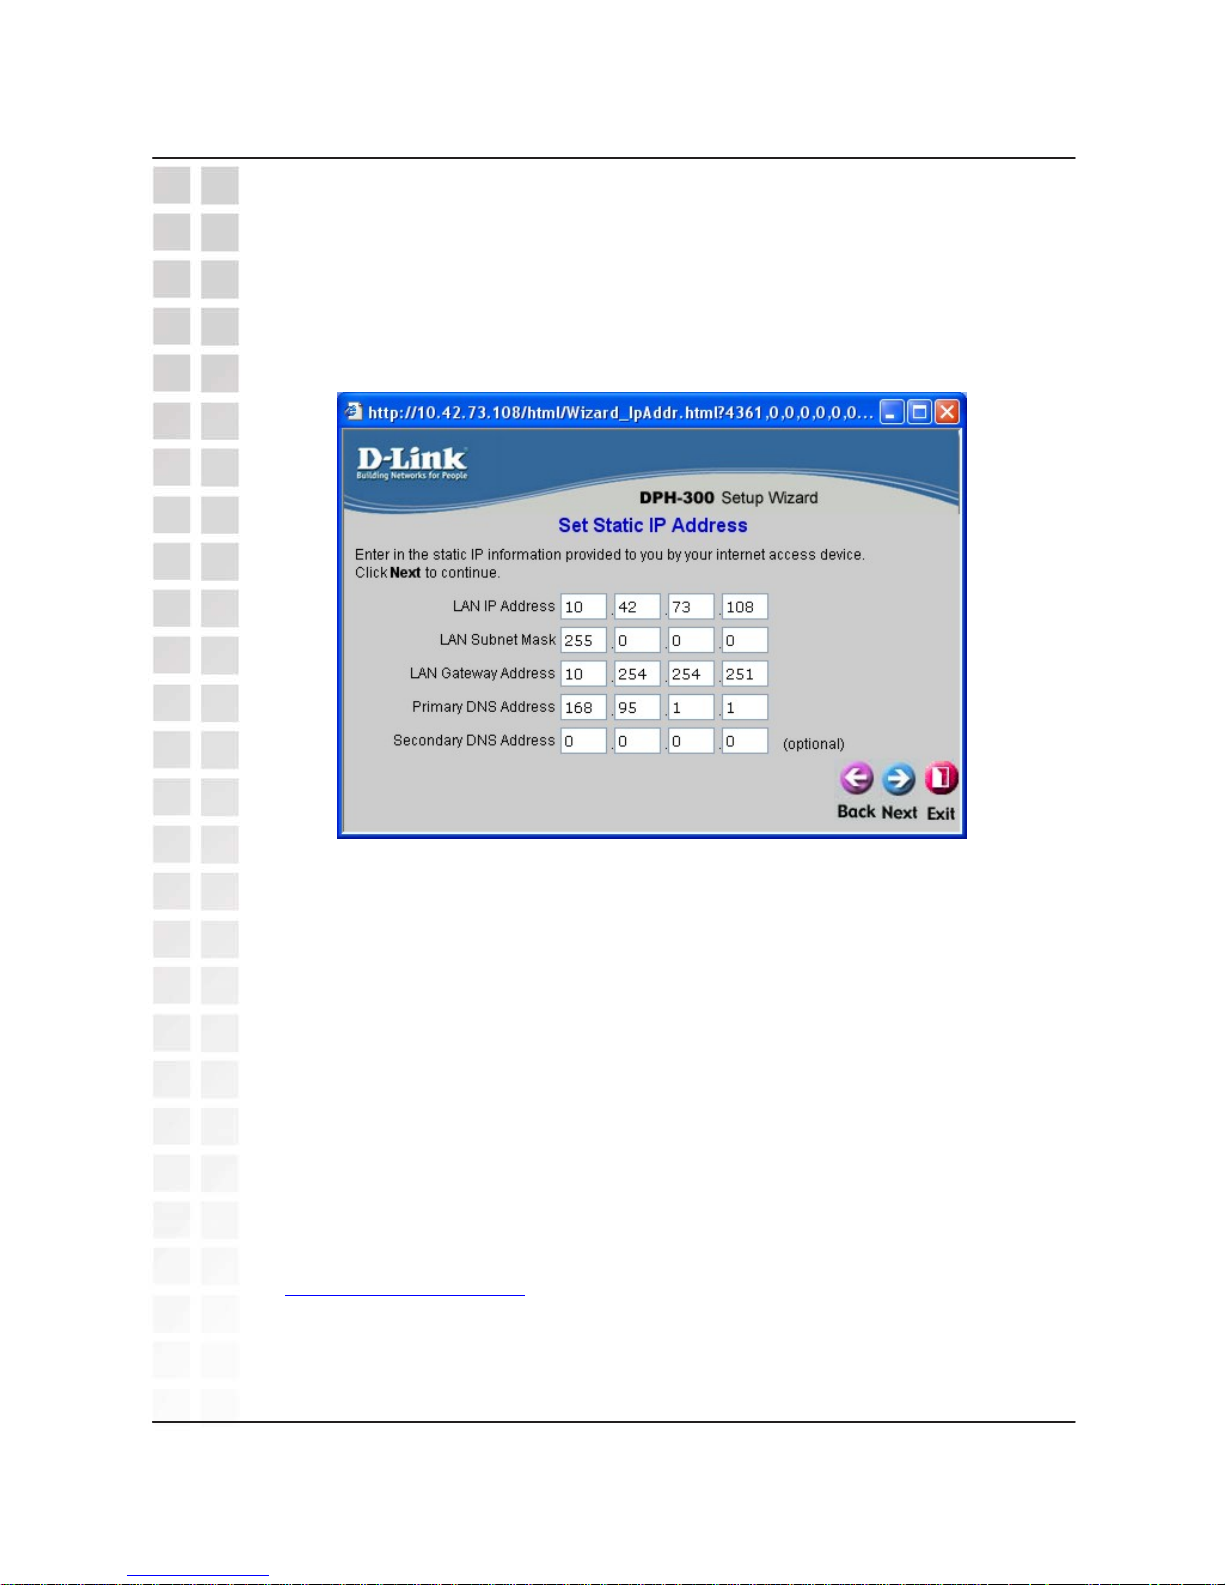
LAN IP Address − Input the IP address provided from you router configuration
settings, ISP, or network administrator.
LAN Subnet Mask − Input the Subnet mask provided from your router configuration
settings, ISP, or network administrator.
LAN Gateway Address − Input the Gateway address provided from your router
configuration settings, ISP, or network administrator.
Primary DNS Address − Input the DNS address provided from your router
configuration settings, ISP, or network administrator.
Secondary DNS Address − Input a secondary DNS address (optional) provided
from your router configuration settings, ISP, or network administrator.
The Domain Name System (DNS) translates Internet domain names (for example
https://www.mydlink.com
which is easy for people to use and remember) to IP
addresses, which are what computers use to find each other on the Internet.
Click the Next button to continue.
Set Static IP Address
DPH-300 User’s Manual
D-Link Corporation
25
Set Static IP Address
Static IP (or Fixed IP) addressing is used when connecting to a broadband
connection the requires static IP addressing or when connecting behind a router
that does not offer a DHCP server function. This choice requires the input of
specific IP address information.
Page 27
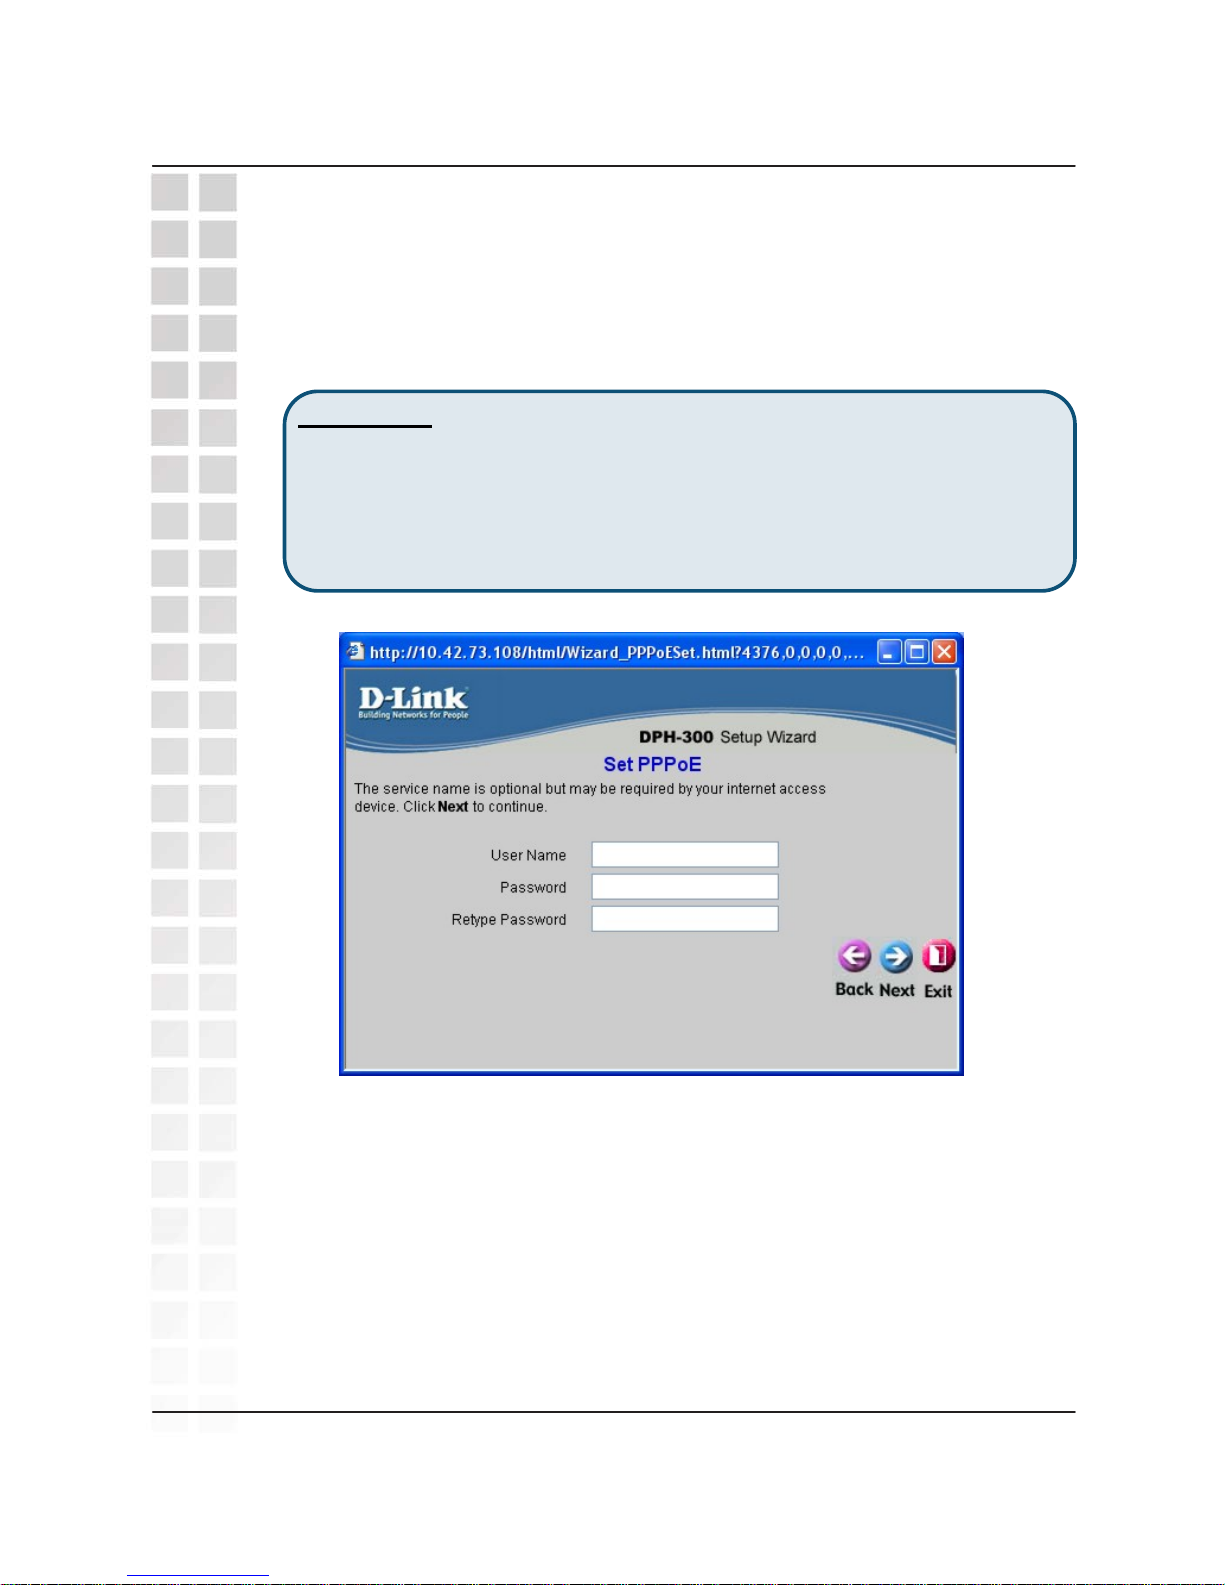
User Name − your PPPoE User Name as provided by your ISP.
Password − Enter your PPPoE Password.
Retype Password − Retype your PPPoE Password to confirm.
Click the Next button to continue.
PPPoE
PPPoE (Point-to-Point Protocol over Ethernet) is used when connecting directly
to a DSL modem that offers a PPPoE connection. This choice requires that
you input the User Name and Password of your PPPoE account − provided by
your ISP.
PPPoE
DPH-300 User’s Manual
D-Link Corporation
26
PPPoE Note: The DPH-300 can connect to the Internet using PPPoE but will
not provide IP addresses to other devices on your network (like a PC). If you
have a PPPoE connection and need to connect your PC to the Internet
through the DPH-300, you will need to configure your PC’s IP address
information manually, and the IP address, default gateway, subnet mask
settings will need to be consistent with the IP settings of your DPH-300. See
your OS documentation for information on changing your PC’s IP settings.
Page 28
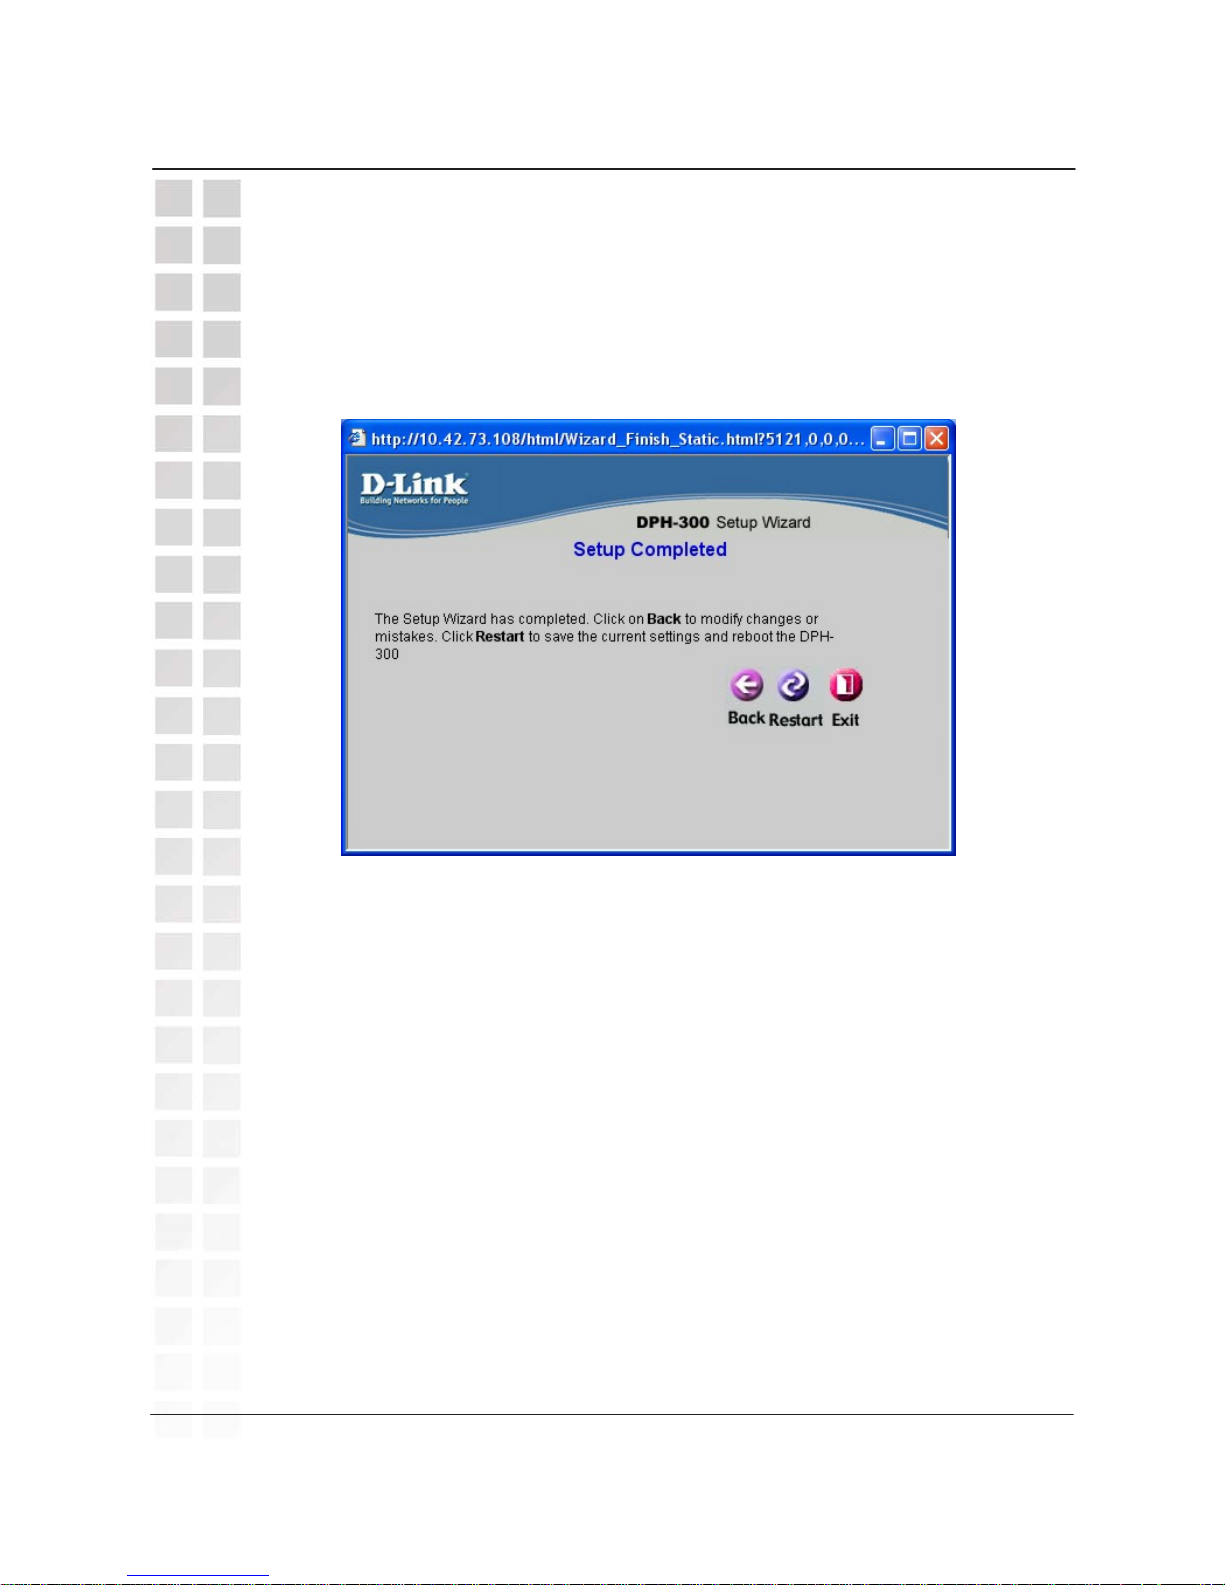
Click the Restart button to save the settings and restart the router.
You will now be able to connect the DPH-300 to the Internet so it can contact
the SIP server and make telephone calls over the Internet using VoIP
technology.
Connect the DPH-300 to an available Ethernet port on your broadband router or
modem and use your VoIP telephone. You will hear a short tone on the
telephone after you have dialed a number to indicate that the DPH-300 has
successfully connected to the SIP server (registered) and the Power/Status LED
will glow continuously.
Restart the DPH-300
DPH-300 User’s Manual
D-Link Corporation
27
Restart the DPH-300
Once you have completed the Setup Wizard to configure the DPH-300 for its
Internet connection, you will need to save the settings and restart the DPH-300
before the settings become active. When you have restarted the DPH-300, it
will automatically connect to the D-Link IP Network Manager and complete the
auto-provisioning process.
Page 29
D-Link Corporation
28
When you first connect your DPH-300 phone to the Internet through a Cable or DSL
modem or a router, it will automatically contact the D-Link IP Network Manager
service and complete the first half of the process required to allow you to begin
making IP telephone calls.
The first half of this process is called, “auto-provisioning” and involves identifying the
presence and status of your DPH-300 for the mydlink global Internet telephony
system. This part of the process is completely automatic once the DPH-300 is
successfully connected to the Internet.
The auto-provisioning process may take a minute or so to complete. While the unit
is auto-provisioning, the handset LCD will display “Searching. . .” and both the power
and WAN LEDs on the base unit will flash. When the auto-provisioning process is
complete, the handset will display “D-Link” and the LEDs will stop flashing.
A
fter you have completed the setup and auto-provisioning processes and your
phone is ready to use, you should note the following information:
Your mydlink number (8-digits) : __________________________________
Your mydlink account PIN : ______________________________________
Your PSTN phone number : _____________________________________
Your DPH-300 IP address : ______________________________________
Your mydlink primary contact e-mail address : _____________________
A
fter auto-provisioning, you must use a web browser to access and verify your
account on the mydlink website at https://www.mydlink.com
.
DPH-300 User’
s Manual
Auto-provisioning
Auto-provisionin
g
mydlink Number / PIN Note: Your mydlink No. and PIN code are provided in
the box with your DPH-300. There is a sticker on the front of the DPH-300
base station with your 8-digit mydlink number and your initial PIN code.
Page 30
Verification
DPH-300 User’s Manual
D-Link Corporation
29
Verification
When you first enter the mydlink website, you are asked to input your mydlink No.
and PIN Code, as provided in the box with your DPH-300. The website’s login
homepage is shown on page 32. It is highly recommended that you change your
PIN Code to improve the security of your VoIP connection, but changing the PIN
Code is not necessary to complete the account verification.
Once you have signed in, you will see a Disclaimer that you should read and then
click the Yes, I agree button if you agree. The disclaimer will only be displayed the
first time you access your mydlink account once you click Y es, I agree.
A
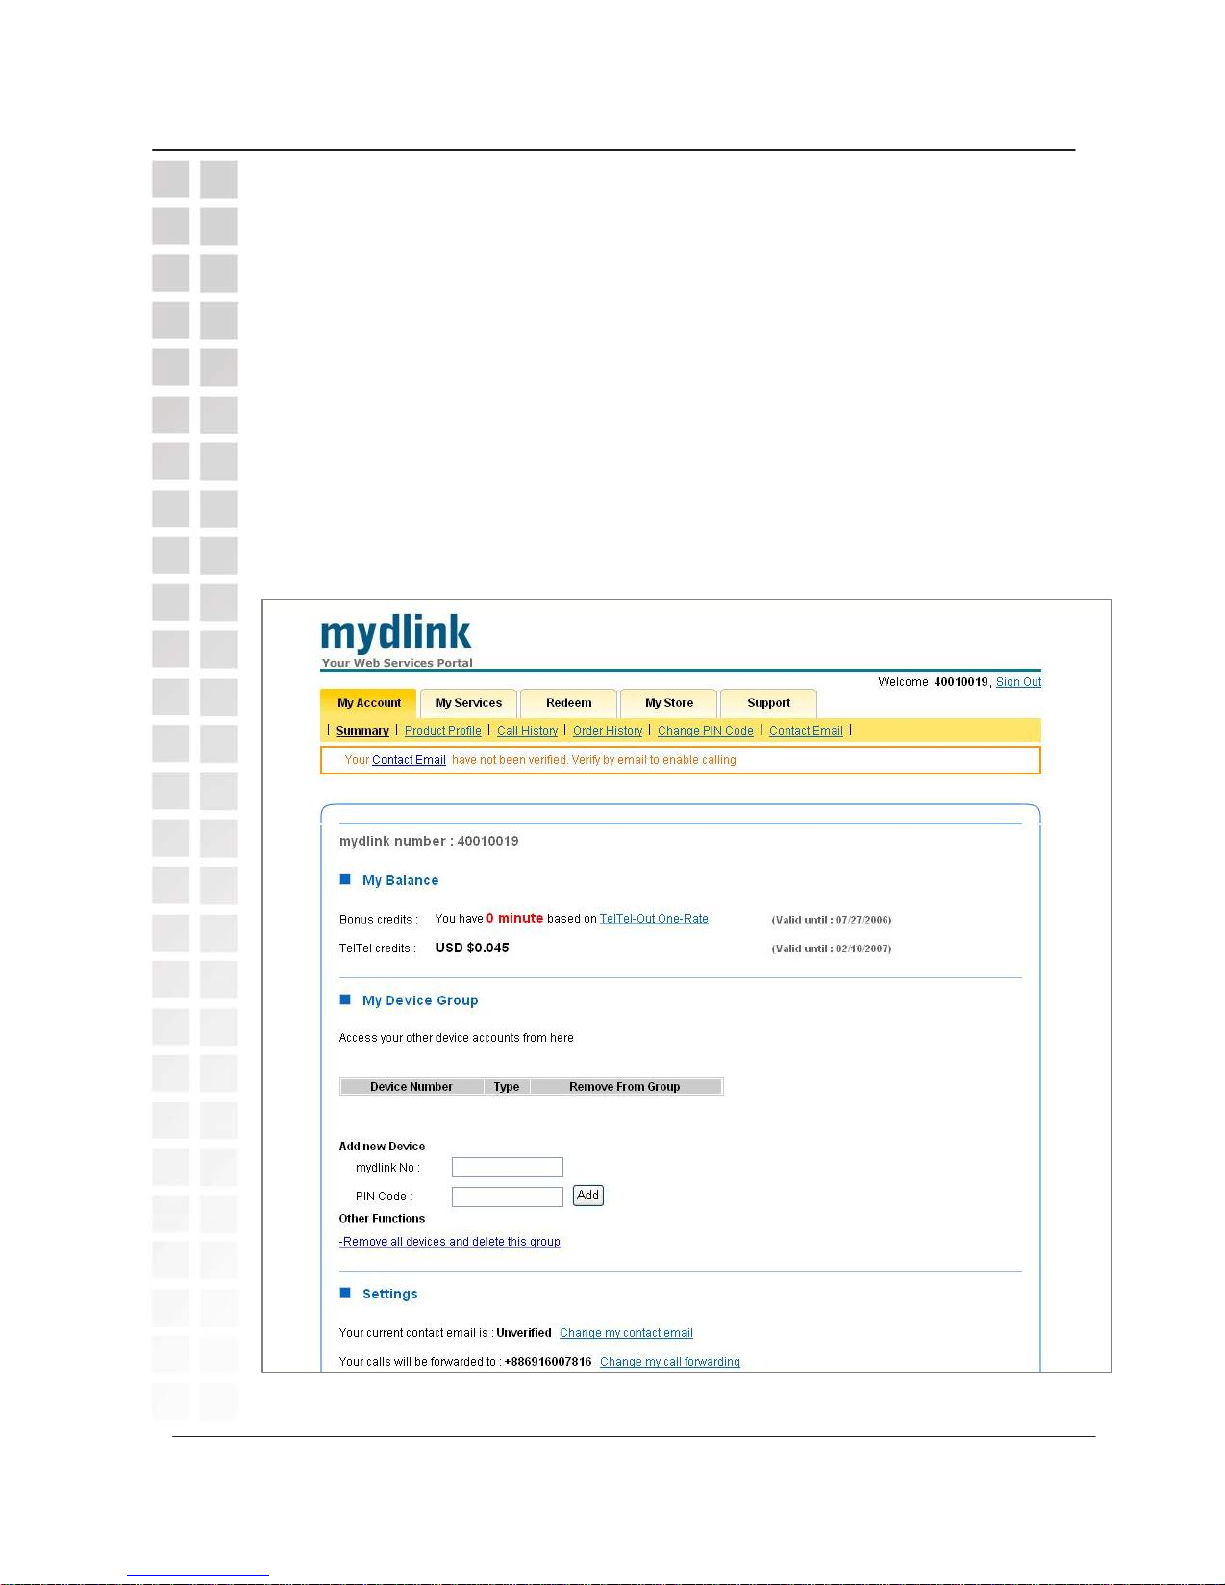
fter you have accepted the disclaimer, a Summary page (below) will present the
details of your account − including the amount of TelTel credit you have toward
making TelTel Out IP calls using your DPH-300 phone.
Page 31
DPH-300 User’s Manual
D-Link Corporation30
Verification
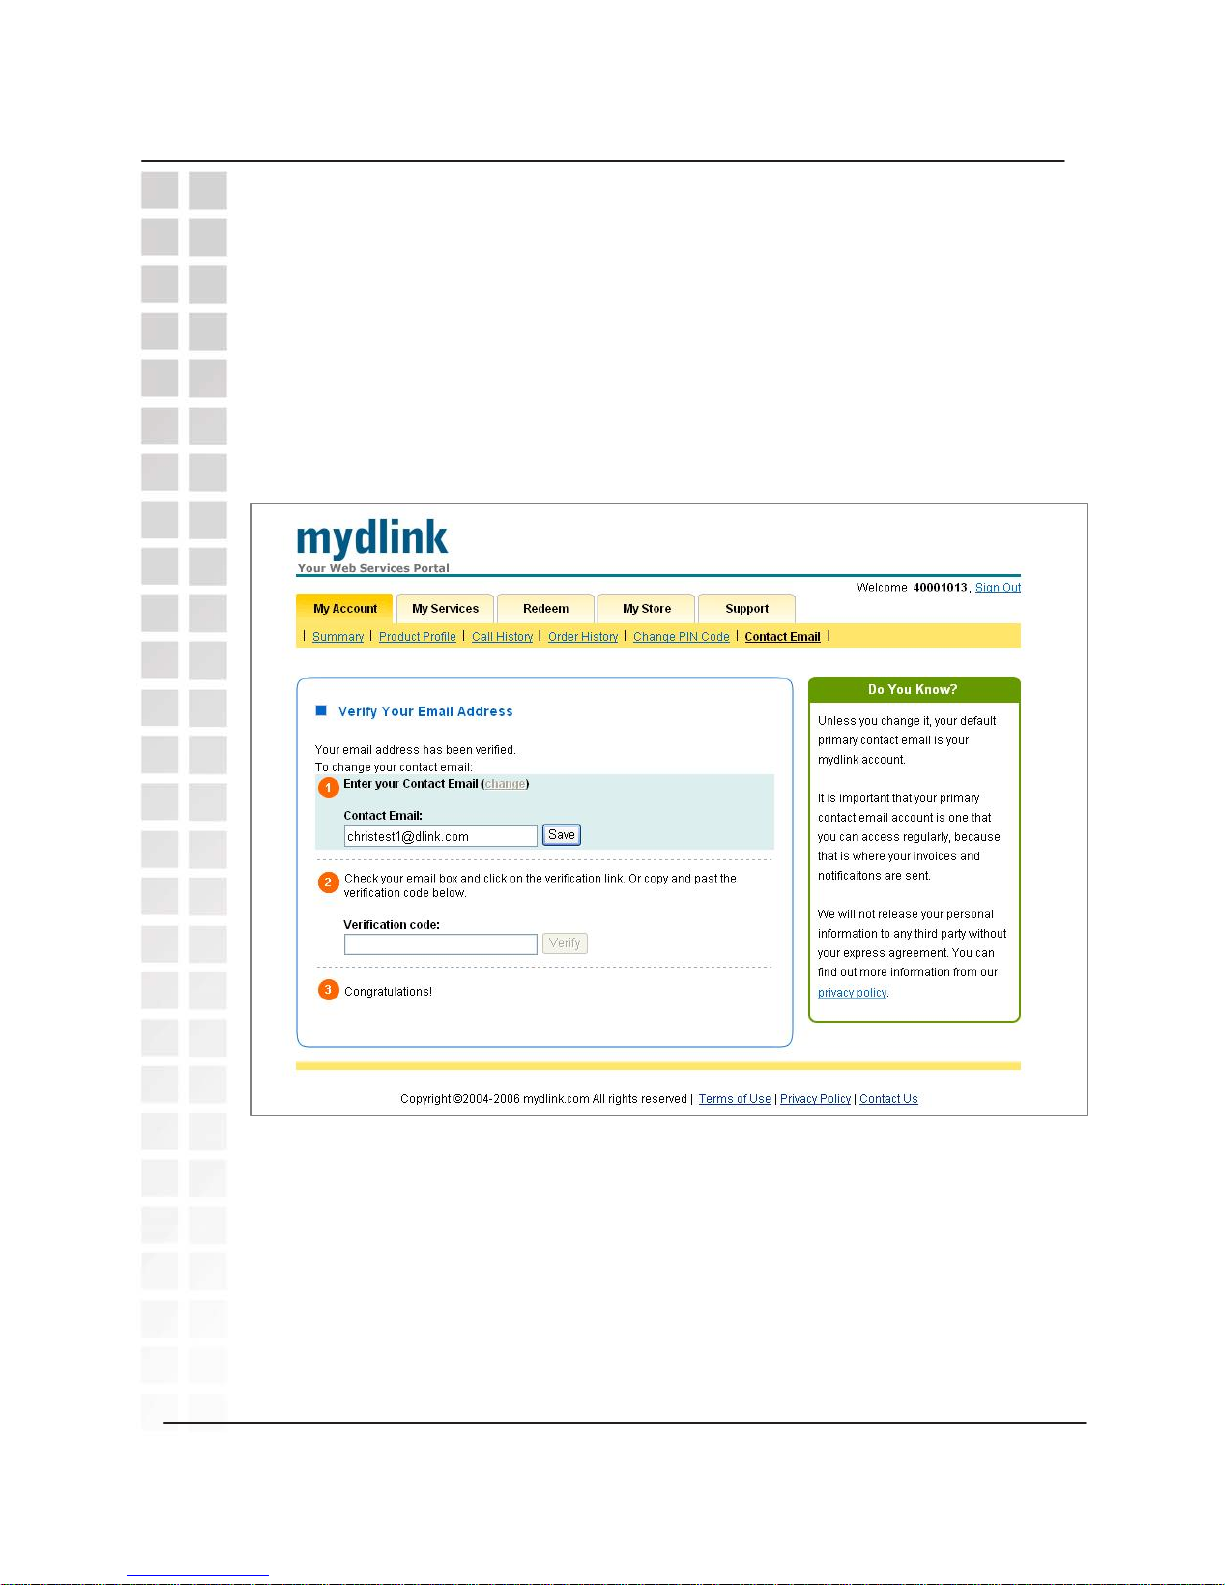
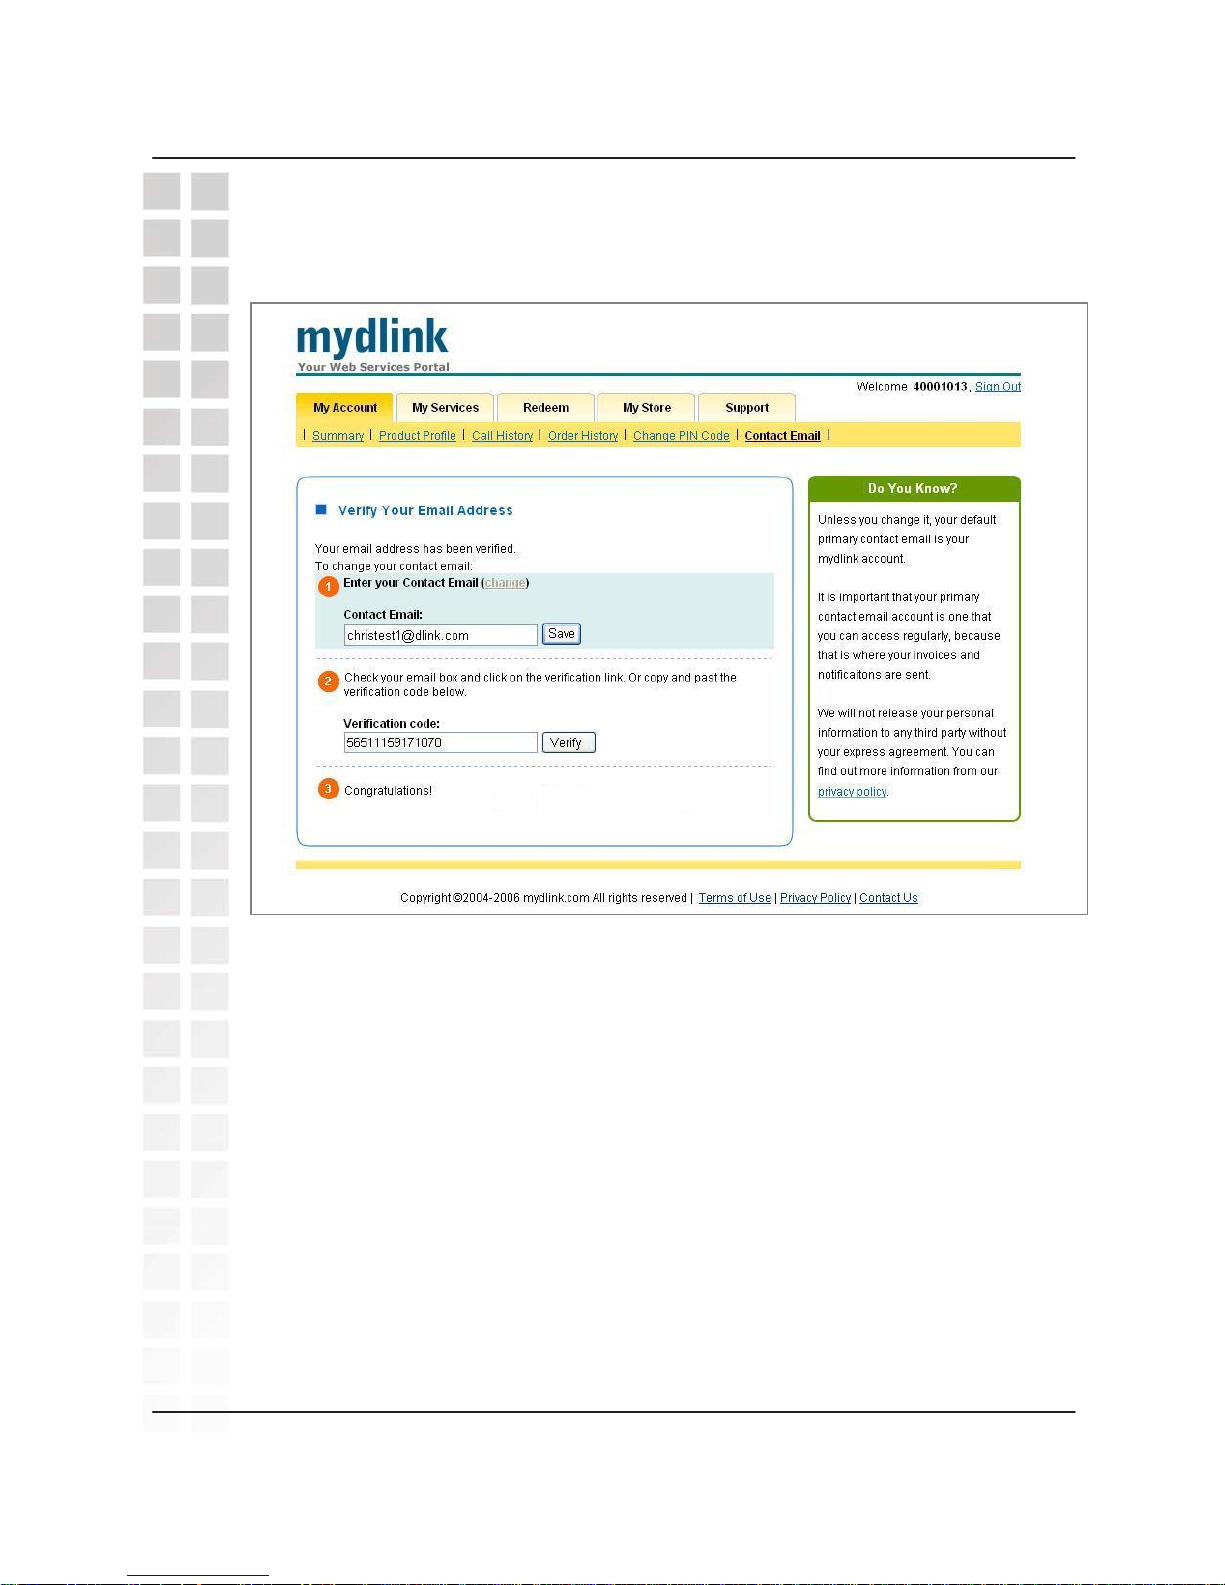
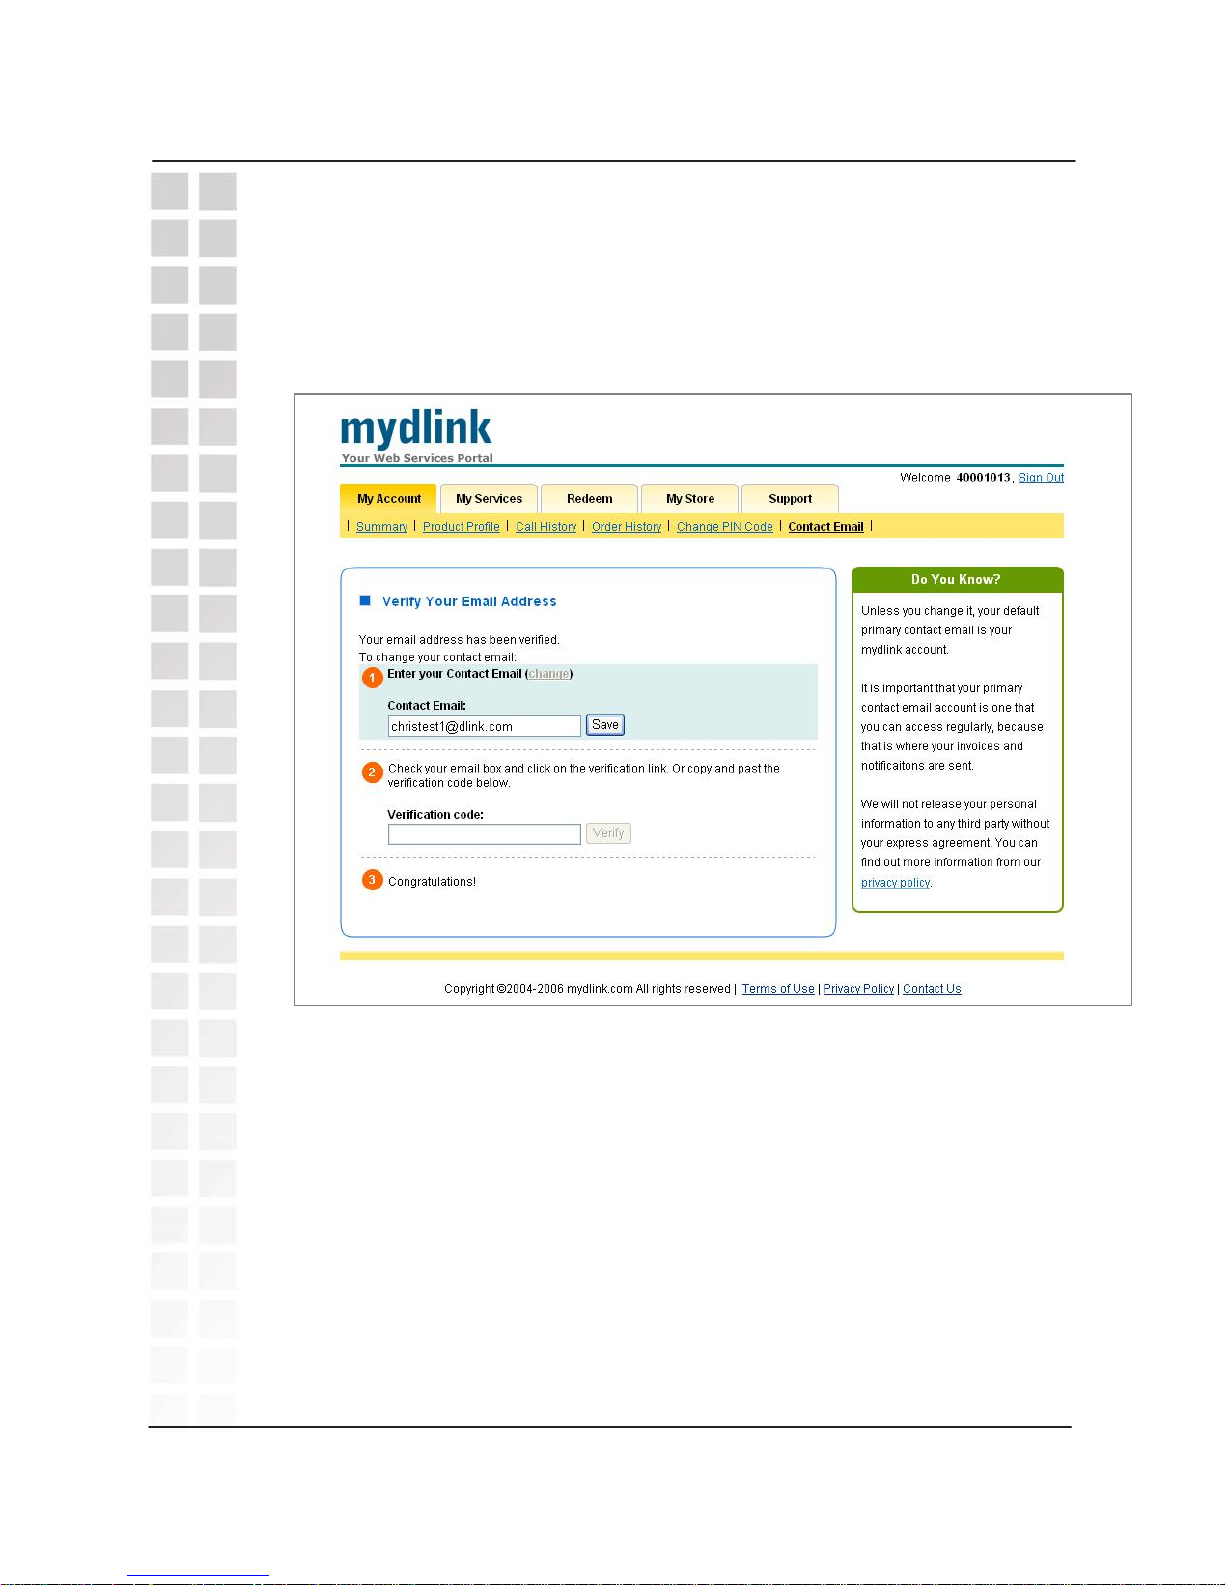
The first time you sign in to the mydlink website, you will be asked to verify your
account by entering your e-mail address in the Contact Email page which is a
subcategory of My Account. Click either Contact Email link to access the Verify
Y
our Email Address page and enter your e-mail address.
You must enter your e-mail address in the Contact Email field and click the Save
button.
mydlink will send an e-mail message to the address you entered. Follow the
instructions in the e-mail message to enter the verification code in the Verify Your
Email Address page of mydlink.
Page 32
DPH-300 User’s Manual
D-Link Corporation
31
Verification
Once you receive e-mail from mydlink, you must return to this screen (below) in
mydlink, enter the Verification Code sent to you by e-mail, and click the Verify
button.
A
fter you have verified your account, your DPH-300 is ready to make and receive IP
phone calls from other mydlink users, and to use mydlink’s other calling services.
Once your account is activated, you may receive Bonus credits for IP calls to
ordinary phones (TelTel Out calls). Check the Summary under My Account for
information about your current call credits (Bonus and TelTel credits under My
Balance).
Page 33
www.mydlink.com
DPH-300 User’s Manual
D-Link Corporation32
mydlink
Sign in to the www.mydlink.com website
Once you have completed the Setup Wizard, your DPH-300 is pre-configured to
use auto-provisioning to download the appropriate SIP configuration for use with
the D-Link IP Network Manager service. You can then make VoIP calls to other
mydlink users without charge. To make other types of telephone calls (for
example, from your VoIP phone to a regular (PSTN) telephone) you will need to
visit the mydlink website at https://www.mydlink.com
to purchase call-out credits
for your account.
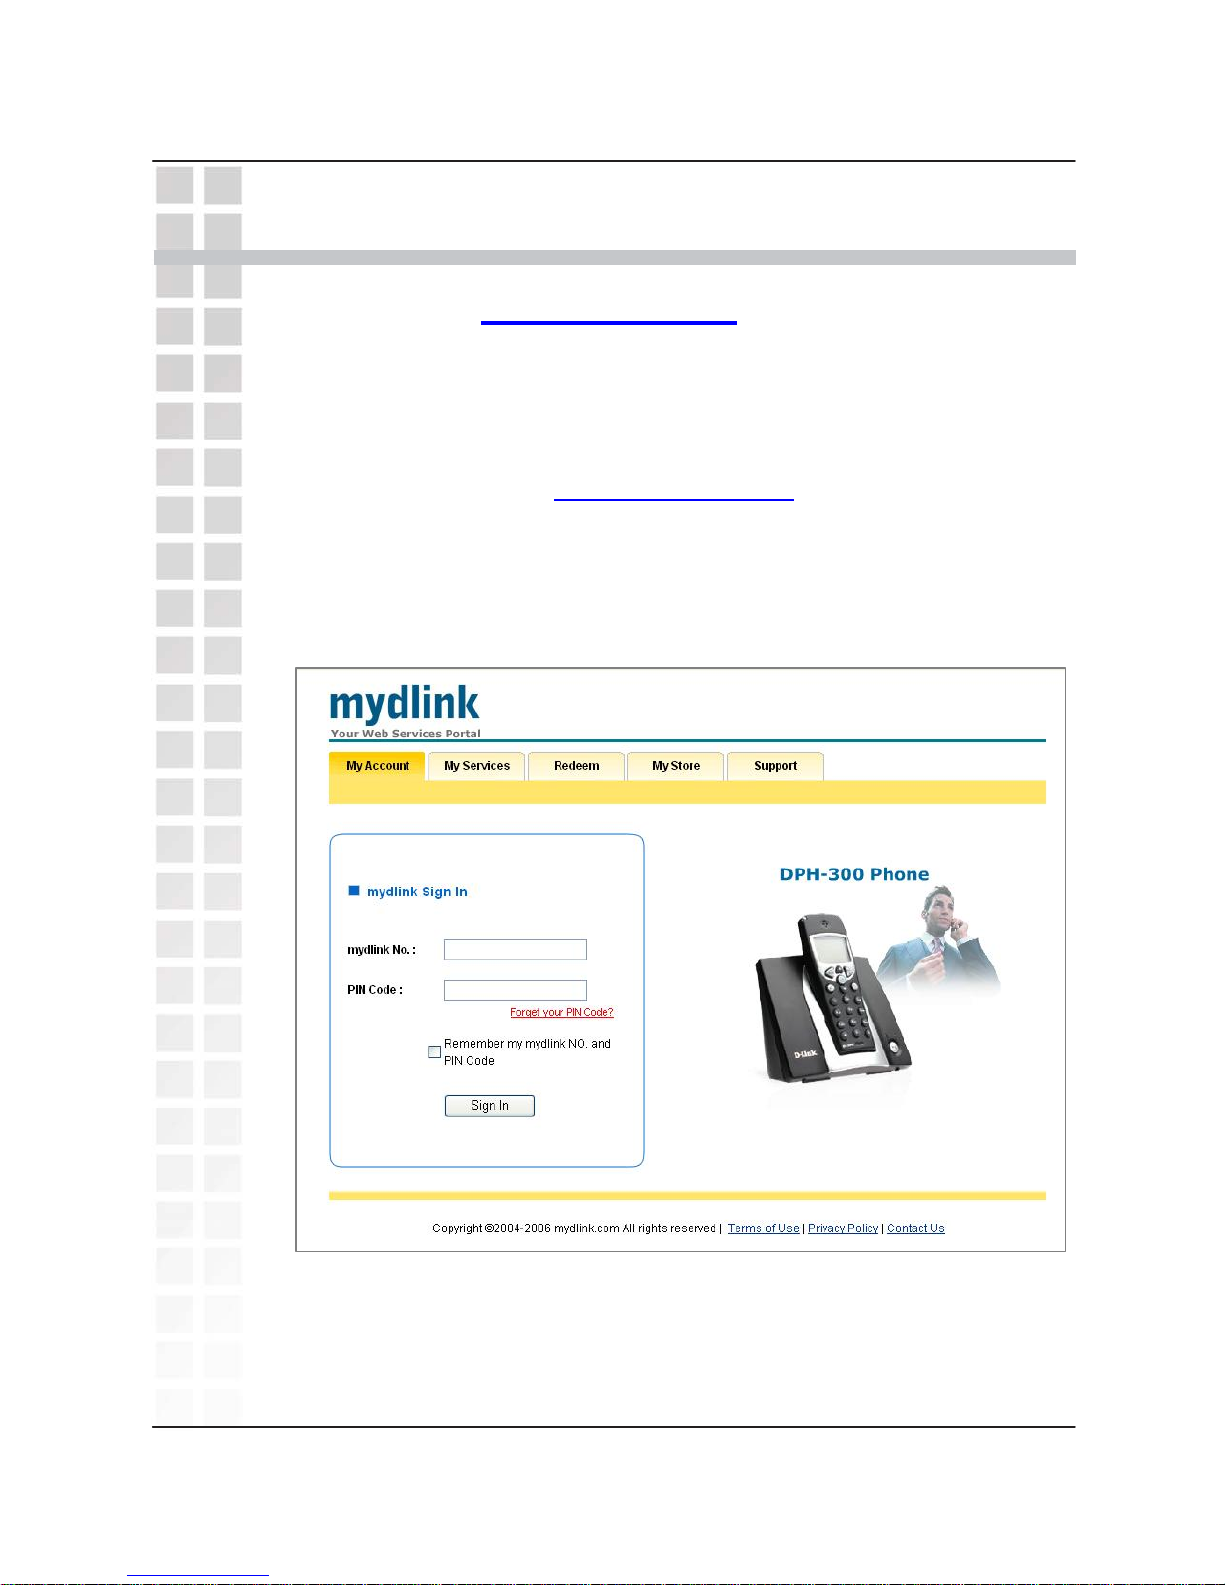
When you first enter the mydlink website, you are asked to input your mydlink
No. and PIN Code, as provided with your DPH-300. The website’s homepage is
shown below. It is highly recommended that you change your PIN Code to
improve the security of your VoIP connection.
Type in your mydlink number in the mydlink No. field, and your PIN Code as
provided with your DPH-300. Click the Sign In button. This will open the My
Account page, as shown below. Click Forget your PIN Code? if you need
to have mydlink send your PIN to your verified Contact Email address.
Page 34
mydlink
DPH-300 User’s Manual
D-Link Corporation
33
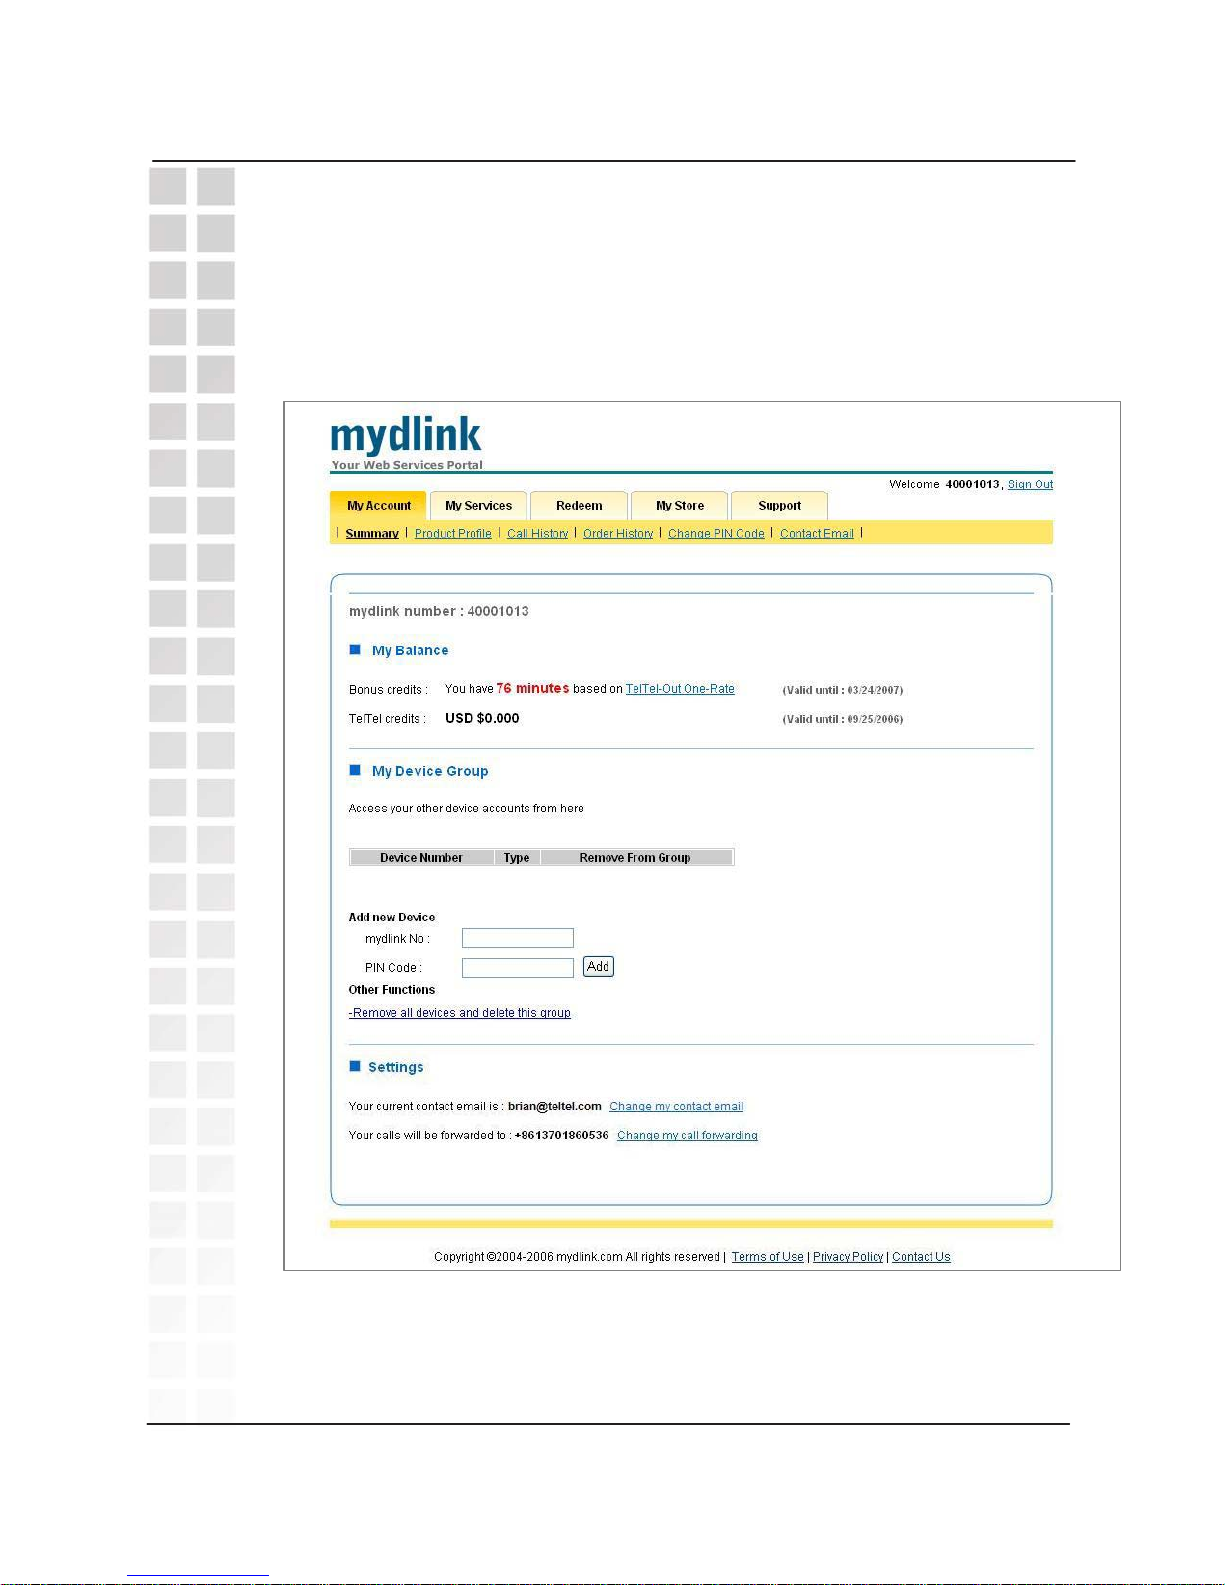
Once you have signed in, a Summary page will present the details of your
account − including the amount of TelTel credit you have toward making TelTel
Out calls from your DPH-300 VoIP phone and a PSTN (regular) phone. You
can also check your current contact e-mail and call forwarding status in the
page shown below.
You can navigate through the mydlink website by selecting a folder tab at the
top of the page, and then a category within the selected folder from the yellow
bar under the tab.
My Account > Summary
Page 35
My Account > Summary > My Device Group
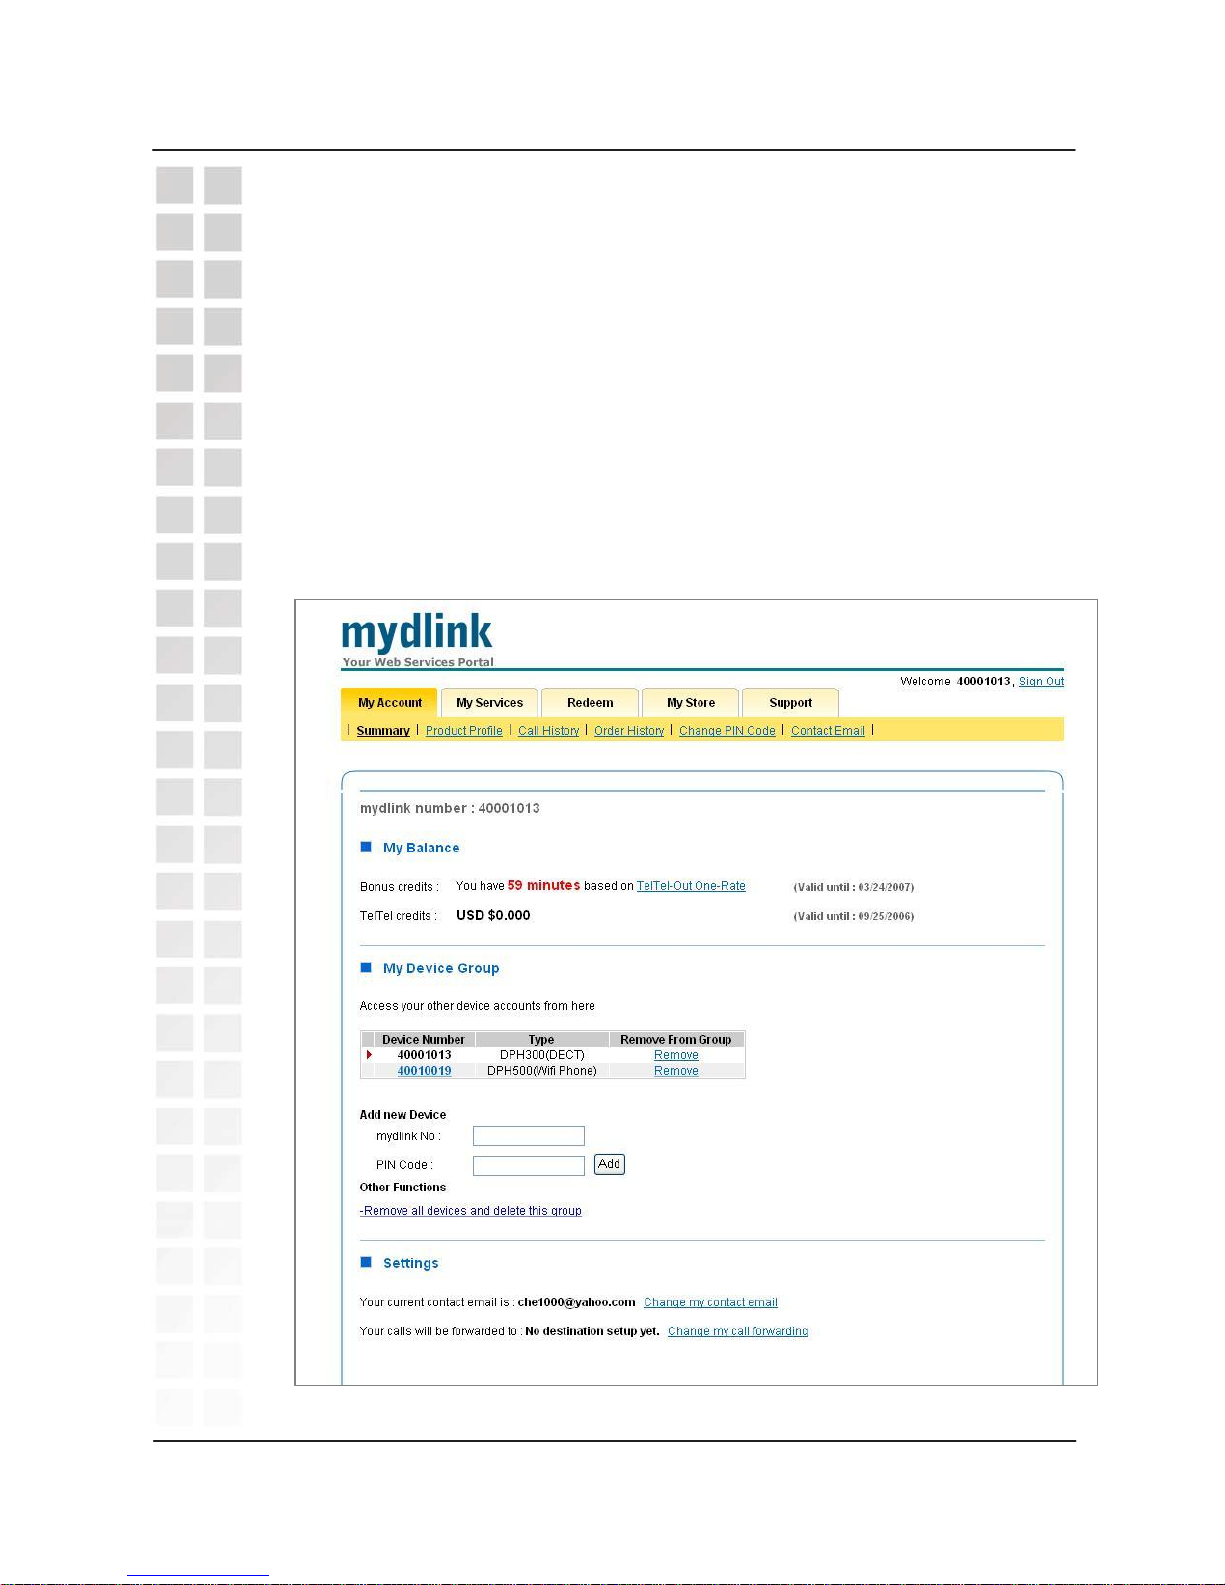
The Summary page includes a Device Group function that allows you to view
and manage more than one mydlink device account after logging-in to only
one. Once you have logged in, if you have other mydlink device accounts that
you would like to manage, add them to your Device Group by entering each
device’s mydlink number and PIN code in the appropriate fields and then
click Add. When you add your first device to the group, mydlink will
automatically add the mydlink account that you used when you logged in to
the website.
All devices in the group will be displayed and each can be accessed starting
from this Summary page. Each device can also be removed from the group
individually, or the entire group can be deleted using the link at the bottom of
the My Device Group section.
34
m
y
dlink
DPH-300 User’s Manual
D-Link Corporation
Page 36
mydlink
DPH-300 User’s Manual
D-Link Corporation
35
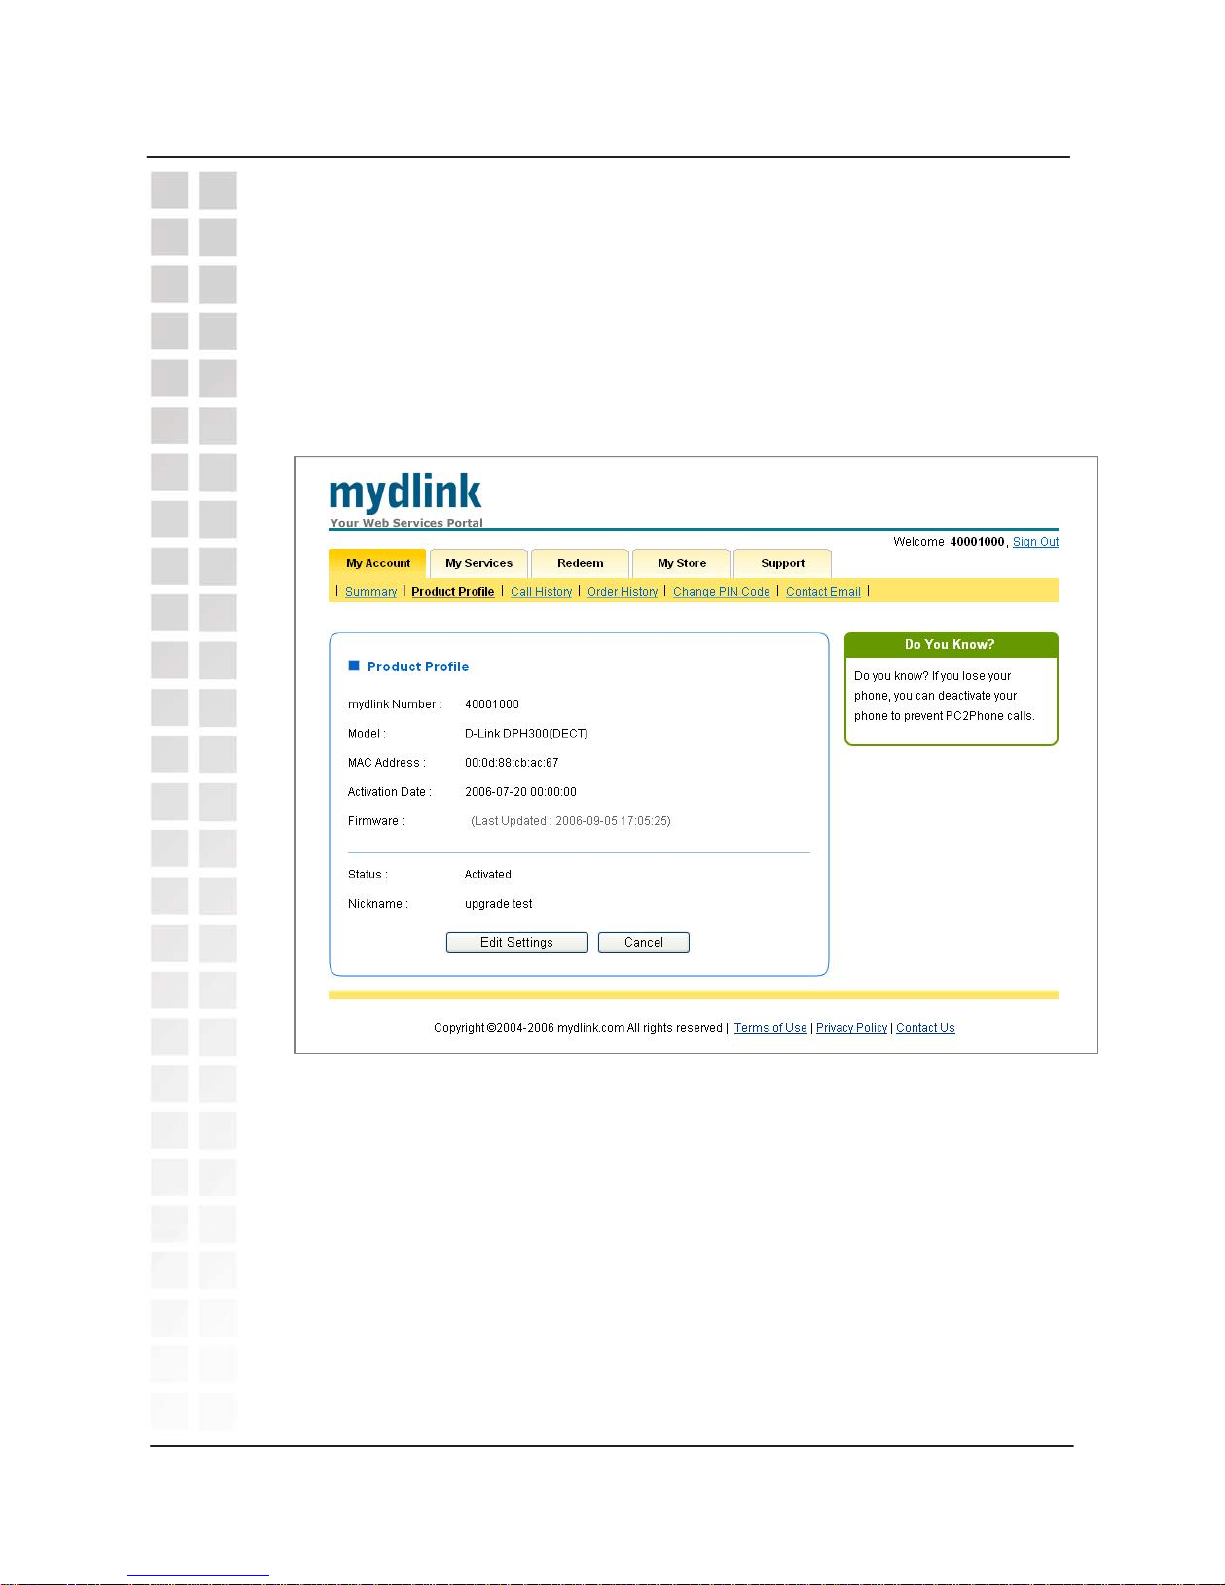
You can navigate through the mydlink website by selecting a folder tab at the
top of the page, and then a category within the selected folder from the yellow
bar under the tab.
The next category under the My Account tab is Call History. Selecting this
category will open the page shown below.
The Product Profile page displays your mydlink Number − which functions
as your VoIP telephone number. This is the number another mydlink user will
enter to place a VoIP telephone call to you.
Other important data such as the model, serial number and firmware version
are listed on this page.
My Account > Product Profile
Page 37
mydlinkDPH-300 User’s Manual
D-Link Corporation
36
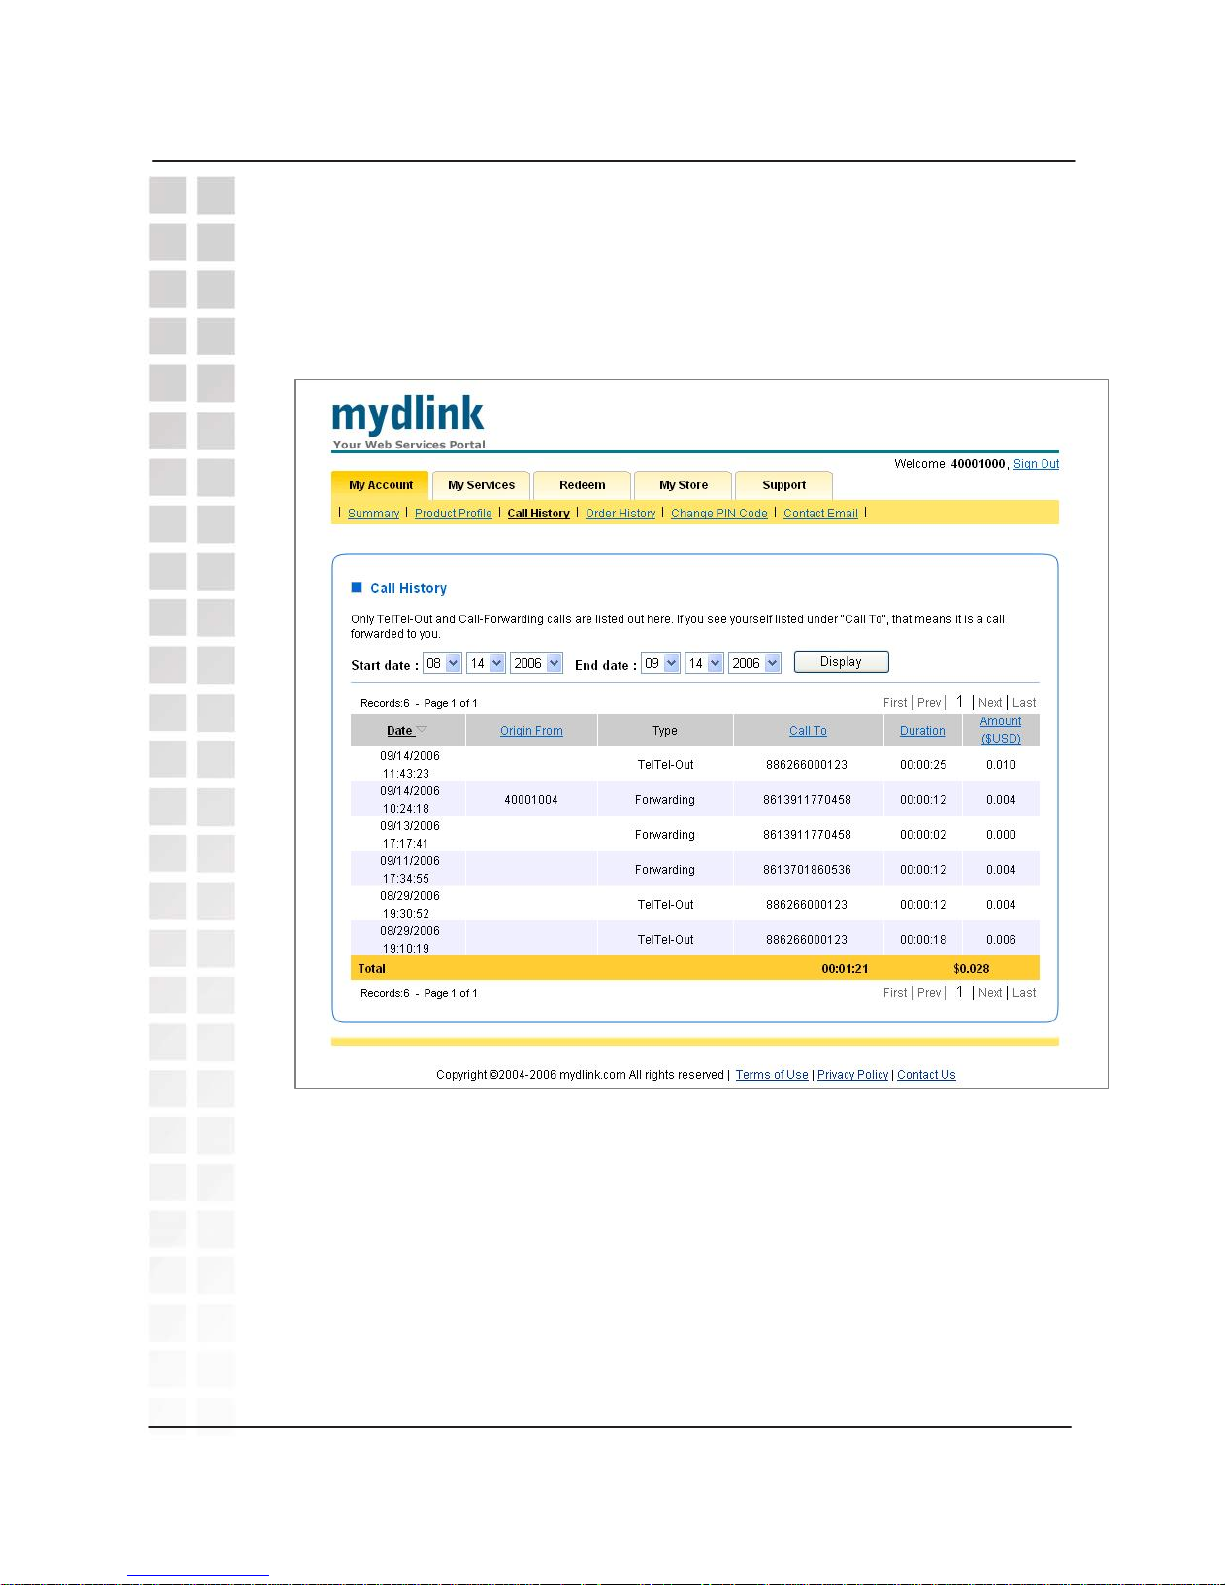
New call entries are added to the Call History list within one or two minutes of
the completion of the call.
You can navigate through the mydlink website by selecting a folder tab at the
top of the page, and then a category within the selected folder from the yellow
bar under the tab.
Order History is the next category under the My Accoun t tab. Selecting this
category will open the page shown below.
The Call History page displays all of your recent TelTel Out and TelTel Call-
Forwarding calls (all of the types of IP calls you can be charged for) on one
simple to read page, as shown below.
My Account > Call History
Page 38
mydlink
DPH-300 User’s Manual
D-Link Corporation
37
You can purchase TelTel Credits by clicking the My Store tab, and then
selecting the TelTel Store category.
Change PIN Code is the next category under the My Account tab. Selecting
this category will open the page shown below.
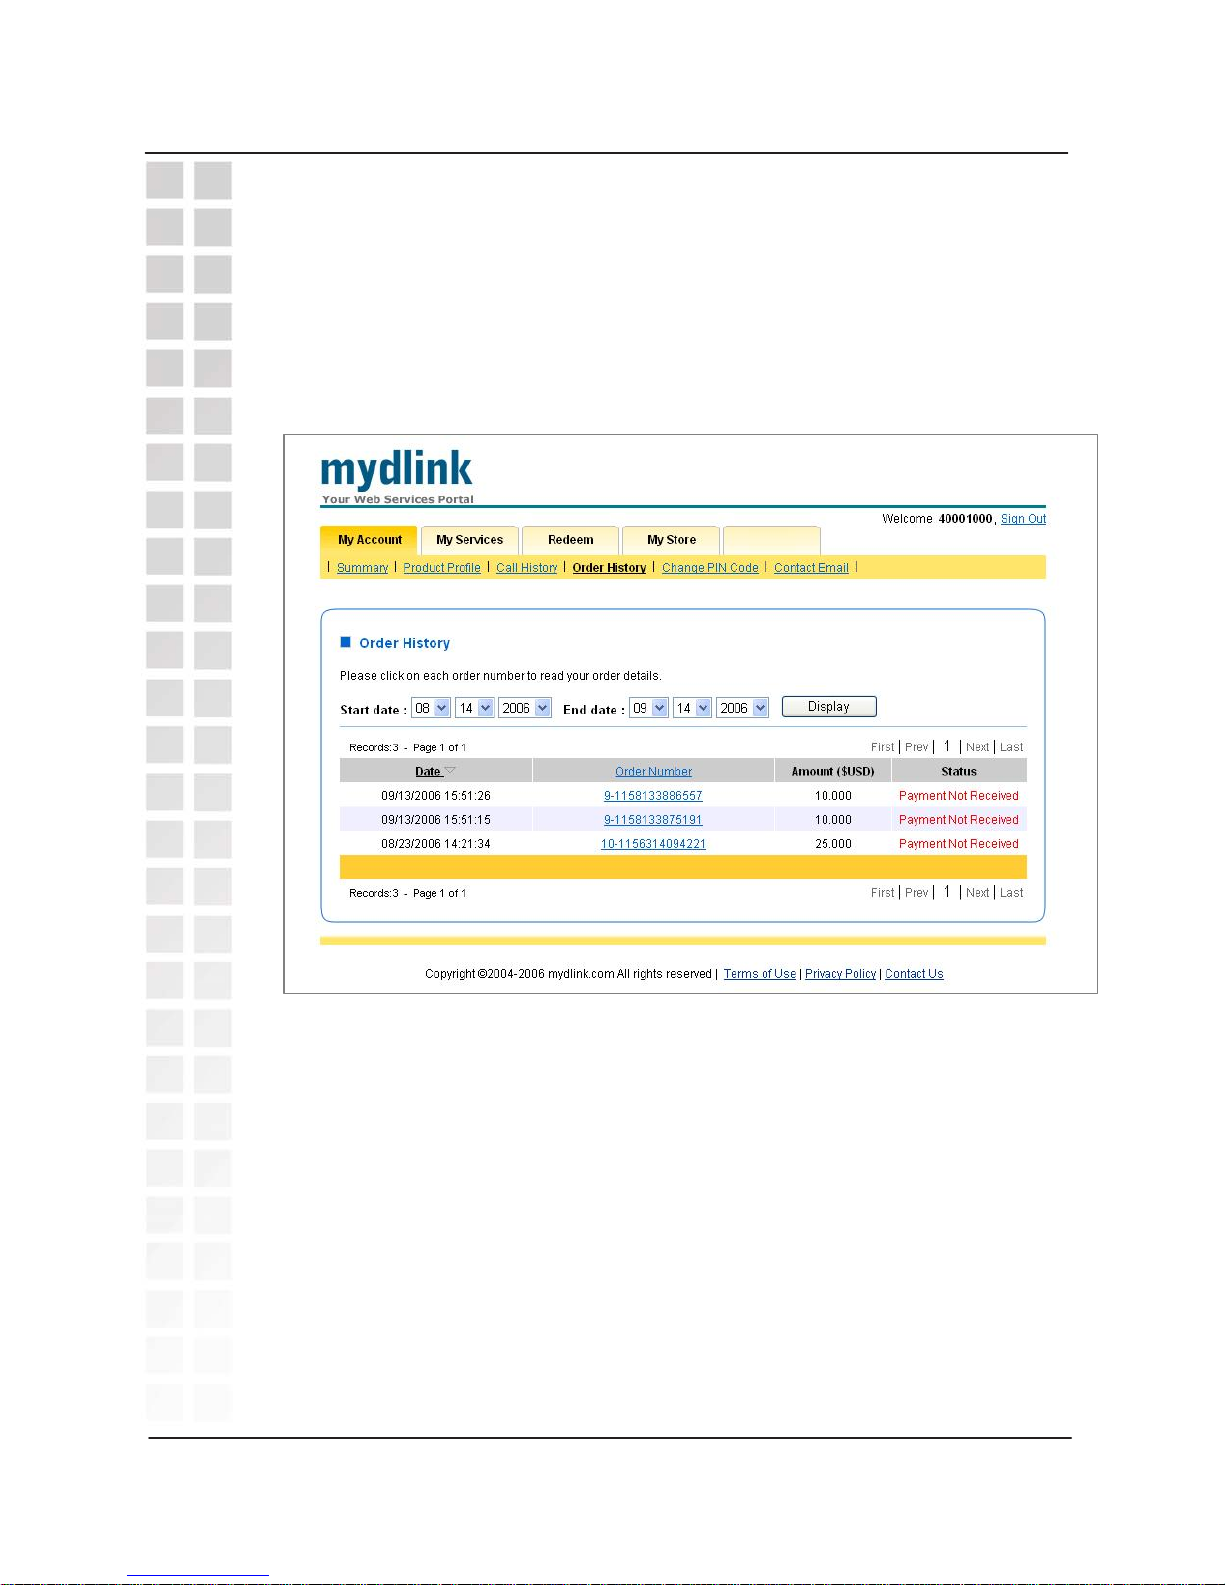
The Order History page displays all of your recent TelTel credit purchases
(TelTel credits are used to pay for all of the VoIP calls y ou can be charged for,
such as TelTel Out or TelTel Call-Forwarding calls) on one simple to read
page, as shown below.
My Account > Order History
Page 39
mydlinkDPH-300 User’s Manual
D-Link Corporation
38
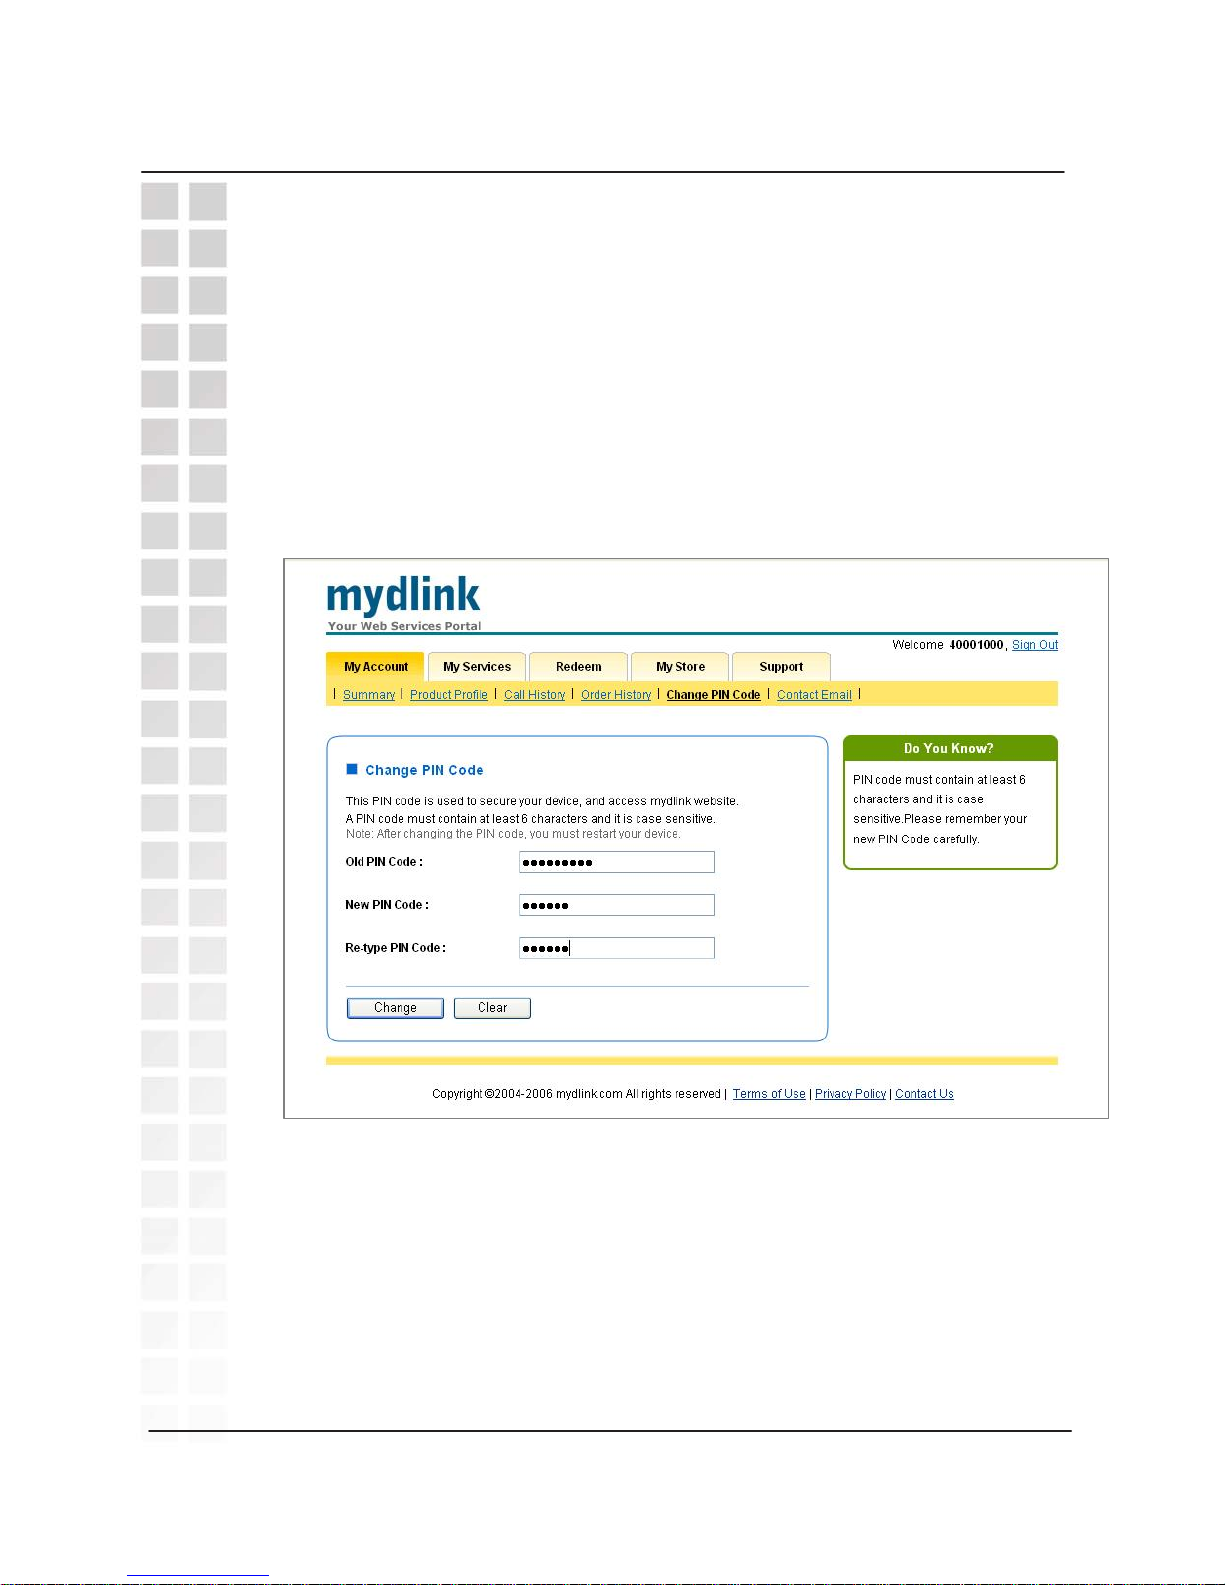
The Change PIN Code page allows you to change your PIN code from the
one printed in the material packaged with your DPH-300. This will allow you
more security and reduce the chance that your TelTel Credit might be used by
an unauthorized user.
It is highly recommended that you change your PIN Code from the one issued
by the factory to one that only you and authorized users know. Be sure to
write your new PIN Code down and keep it in a secure place for future
reference.
You can navigate through the mydlink website by selecting a folder tab at the
top of the page, and then a category within the selected folder from the yellow
bar under the tab.
Contact Email is the next category under the My Account tab. Selecting
this category will open the page shown below.
My Account > Change PIN Code
Page 40
mydlink
DPH-300 User’s Manual
D-Link Corporation
39
When you first Sign In to the mydlink website, you will then be asked to verify
your account by entering your Contact Email address.
You can navigate through the mydlink website by selecting a folder tab at the
top of the page, and then a category within the selected folder from the yellow
bar under the tab.
Selecting the My Services tab will open the page shown below.
My Account > Contact Email
Page 41
mydlin
k
DPH-300 User’s Manual
D-Link Corporation
40
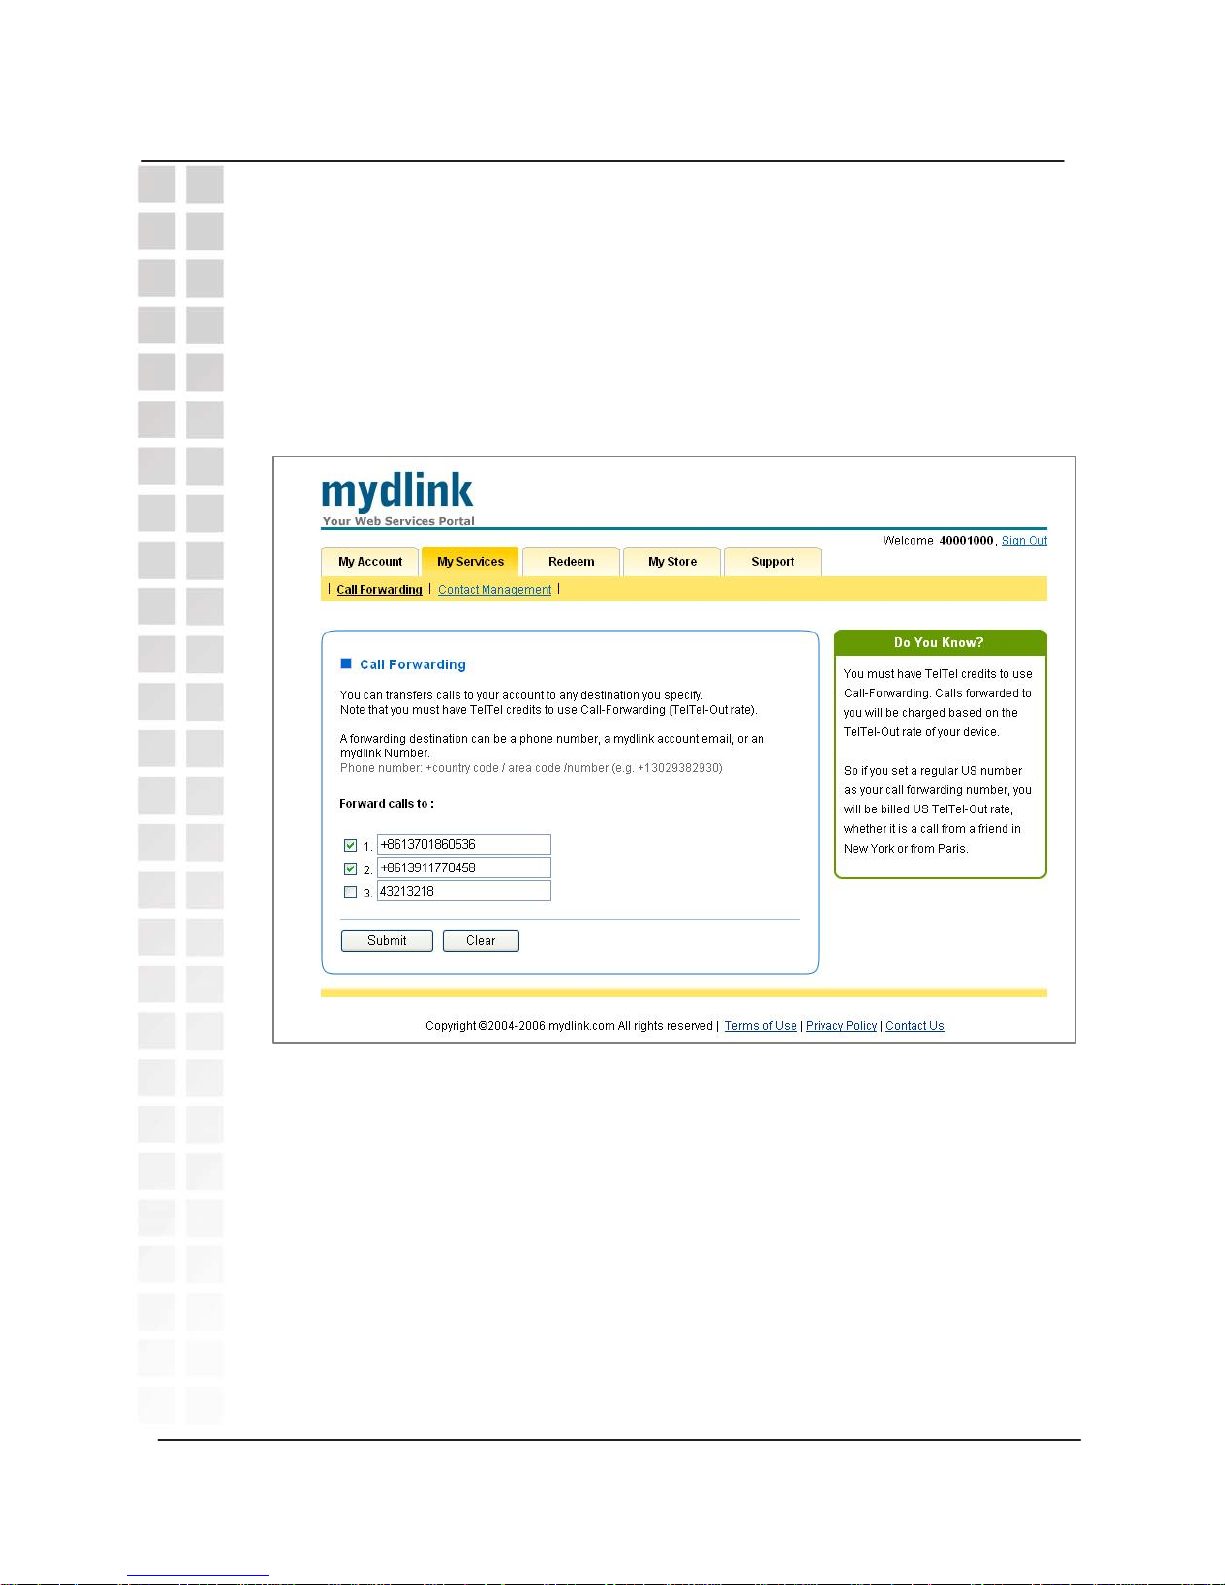
You can configure the My Services page to forward VoIP phone calls to
another mydlink account, a SIP number, or a PSTN number. You must have
TelTel credits to use the Call Forwarding feature, and the forwarded calls will
be billed at the TelTel-Out rate.
Enter the appropriate number or account information in the Forward Calls to:
fields, as shown in the page below.
In order for calls to be forwarded, you must put a check mark in the box in
front of the entry and click the Submit button. If you check more than one
entry, calls will be simultaneously forwarded to all selected numbers. Also,
since calls forwarded to ordinary (PSTN) phone numbers are charged at the
applicable TelTel Out rate, you must also have sufficient calling credit (Bonus
credits or TelTel credits) to complete the calls.
You can navigate through the mydlink website by selecting a folder tab at the
top of the page, and then a category within the selected folder from the yellow
bar under the tab.
Contact Management is the next category under the My Services tab.
Selecting this category will open the page shown below.
My Services > Call Forwarding
Page 42
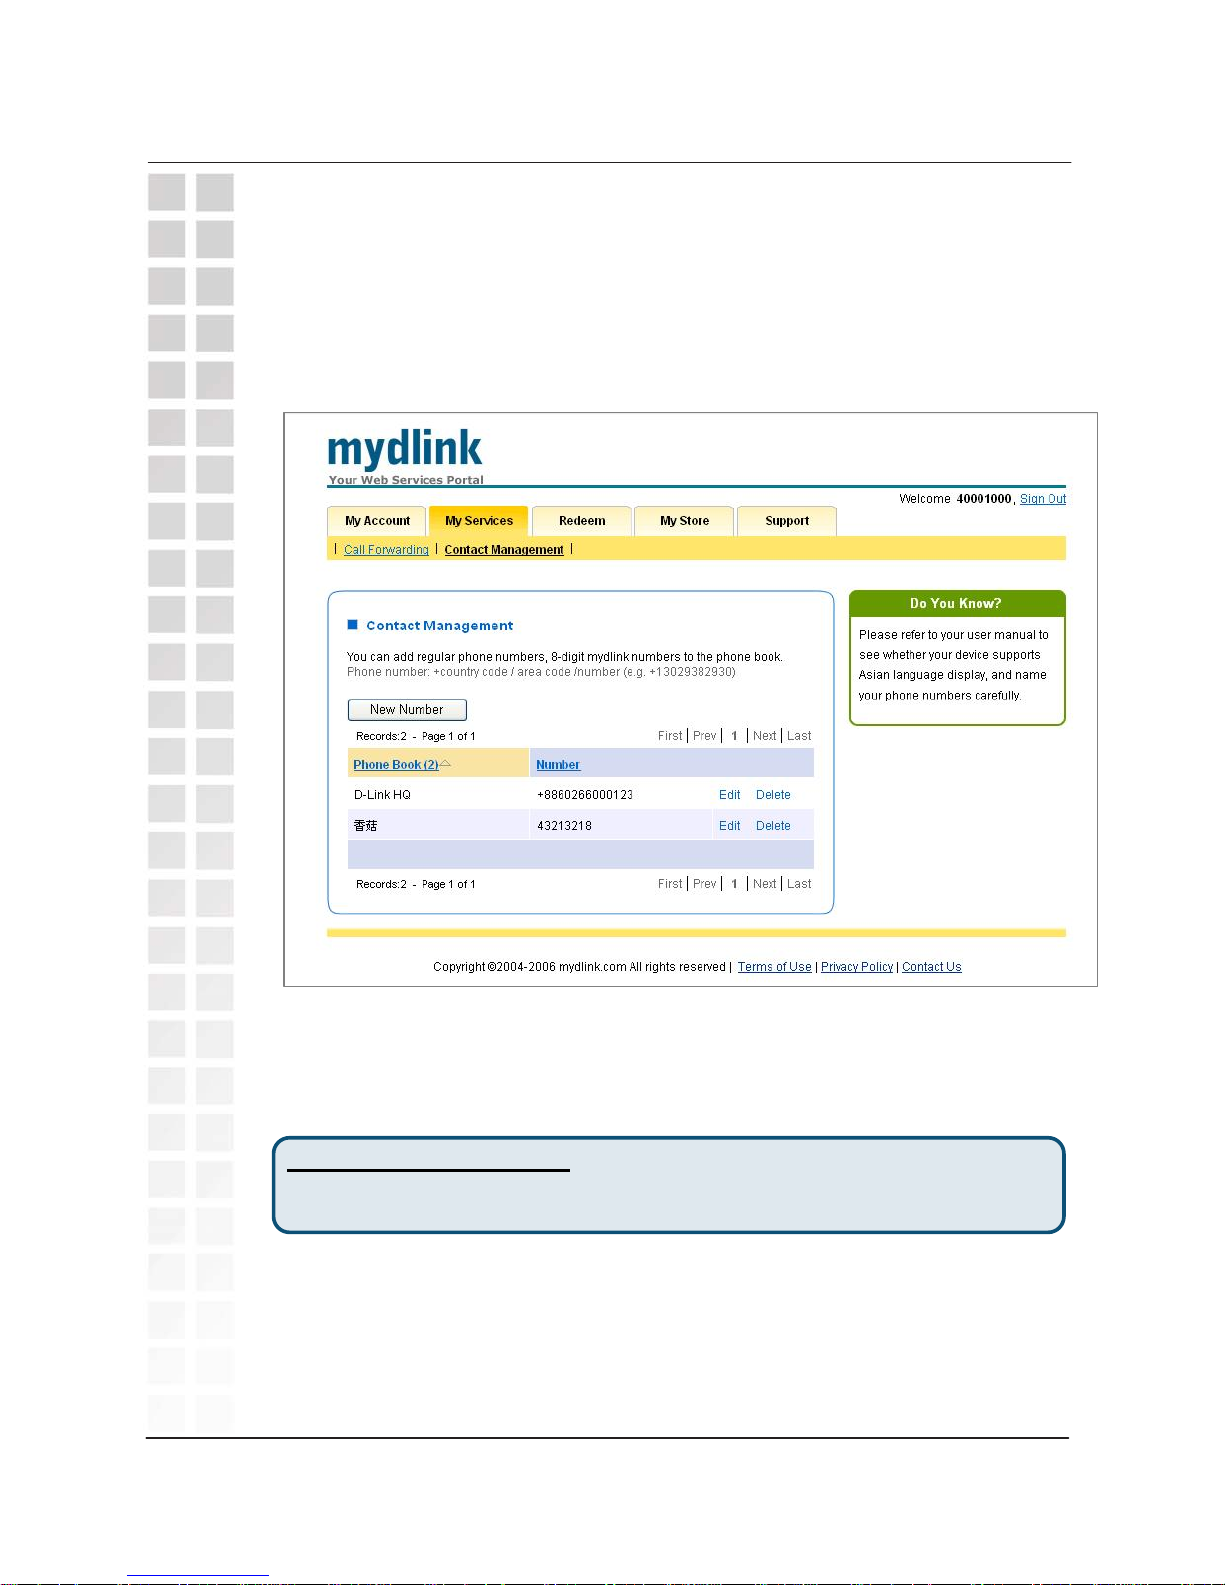
The Contact Management page − shown below − allows you to add, store,
edit, and delete telephone numbers (both IP and PSTN) to and from your
handset ContactList. The current contents of your phone book are
displayed as shown on the webpage below.
mydlink
DPH-300 User’s Manual
D-Link Corporation
41
Click the New Number button to open the Contact Management / Add a
New Number webpage − shown on the next page.
My Services > Contact Management
Contact Management Note: You may enter a maximum of 100 entries in the
Contact Management page.
Page 43
mydlinkDPH-300 User’s Manual
D-Link Corporation
42
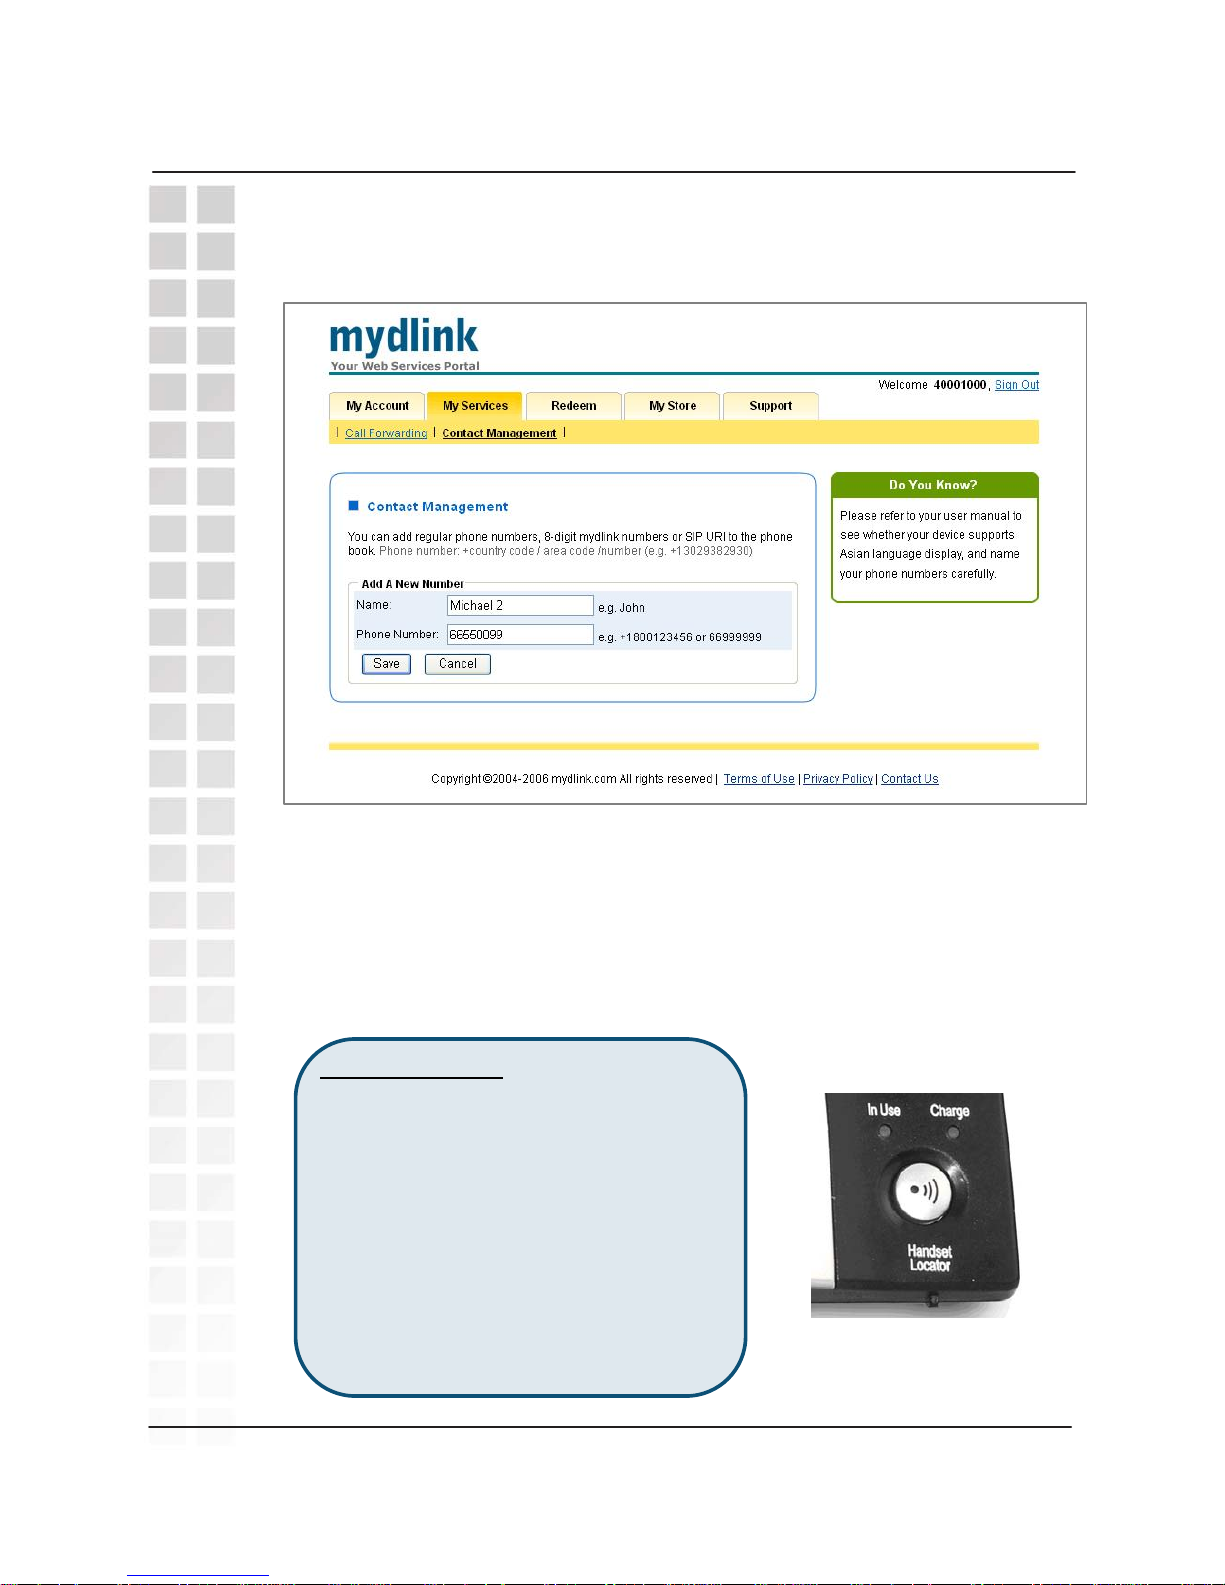
To add a new number to your phone book, enter a name in the Name field and
the phone number in the Phone Number field. The name can be any name
you want to use to identify this phone book entry.
The Phone Number can be an 8-digit mydlink number − for a contact t o
someone who also has a D-Link IP device. You can also enter VoIP phone
numbers in the form of a SIP URI
(sip:[email protected], is an example of a SIP URI for the e-mail
account [email protected]), or you can enter a PSTN phone number.
Click the Save button to save the entry into your Contact Management list.
ContactList Note: After you modify a
contact or add a new contact using the
mydlink website, you must press the
Handset Locator button (see photo at
right) on the front of the DPH-300 base
station to update the ContactList
information in your handset. After you
press the Handset Locator button, your
handset will ring and the LCD will display
“---Paging---”. To stop the handset from
ringing, press the Handset Locator button
again. Your handset ContactList should
be updated.
Handset Locator Button
Page 44
mydlink
DPH-300 User’s Manual
D-Link Corporation
43
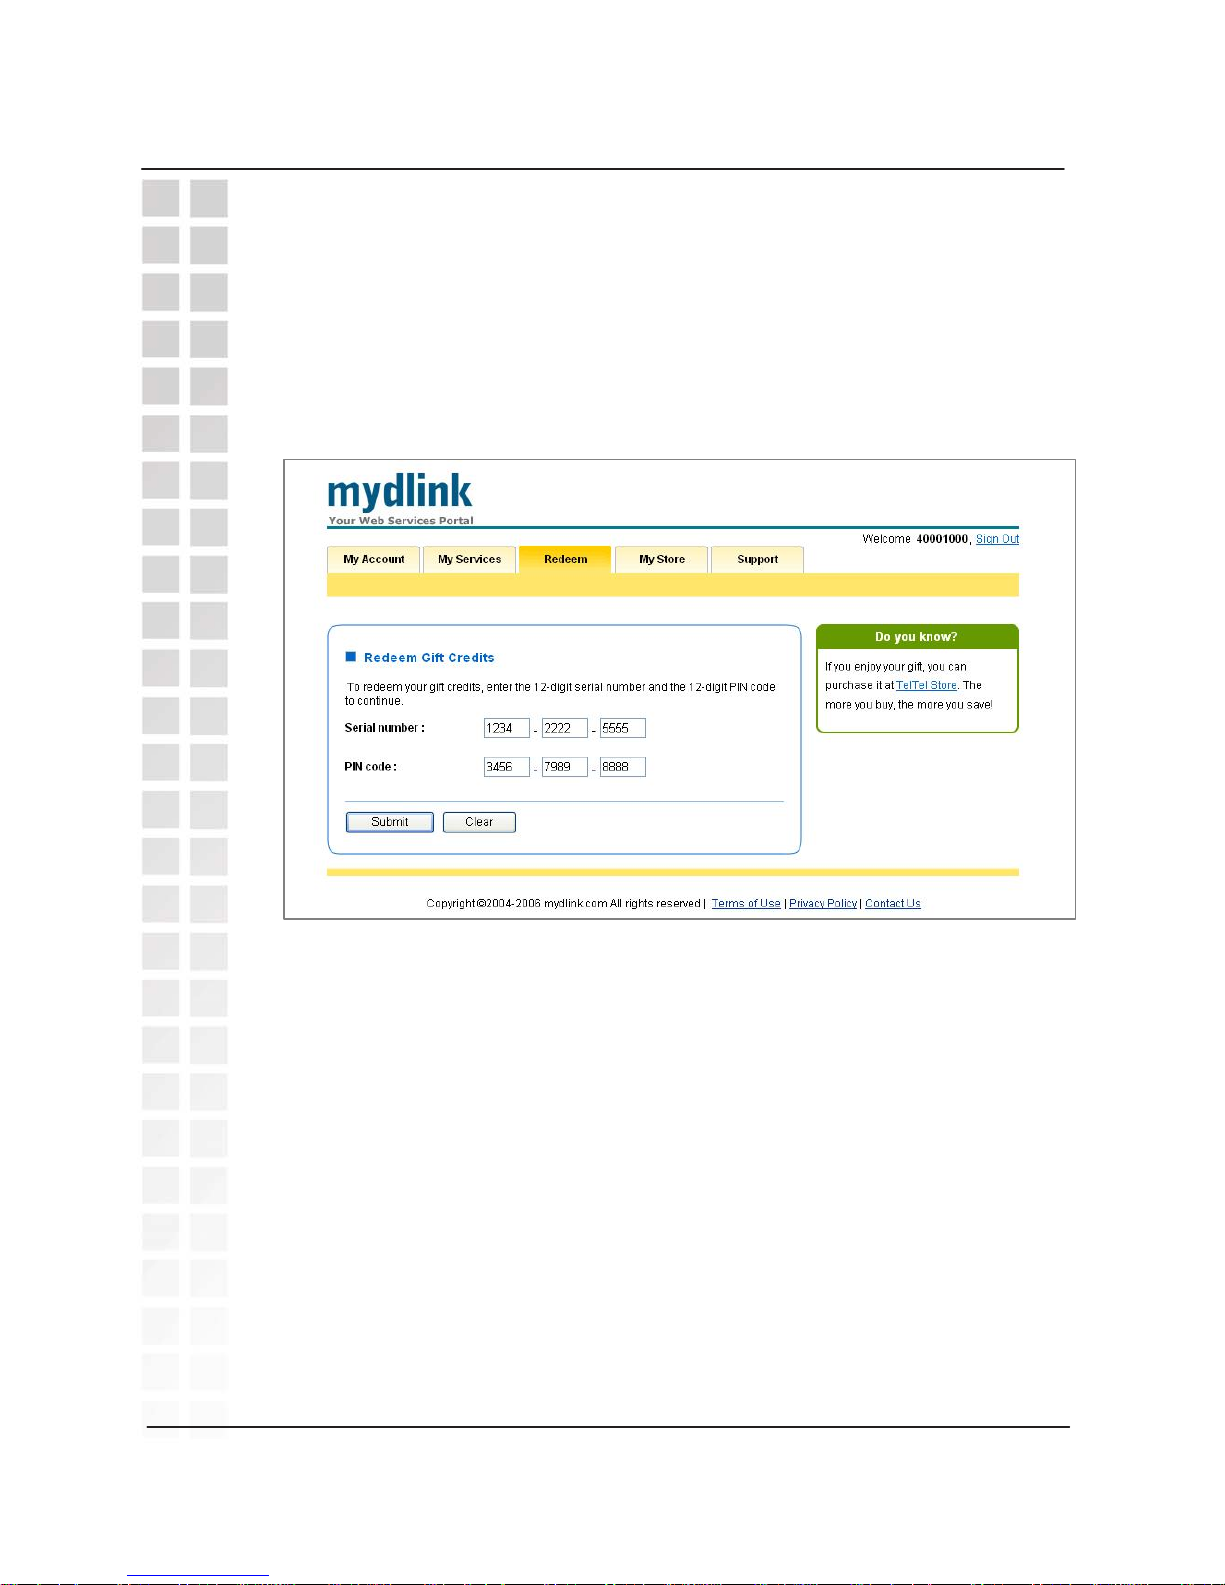
When you receive Gift Credits for your mydlink service account, you can
redeem them on the Redeem page − shown below.
Simply enter the Serial number and PIN Code for the gift credits in the
appropriate fields and click the Submit button. These credits will then appear
on your Summary page.
You can navigate through the mydlink website by selecting a folder tab at the
top of the page, and then a category within the selected folder from the yellow
bar under the tab.
Redeem
Page 45
mydlinkDPH-300 User’s Manual
D-Link Corporation
44
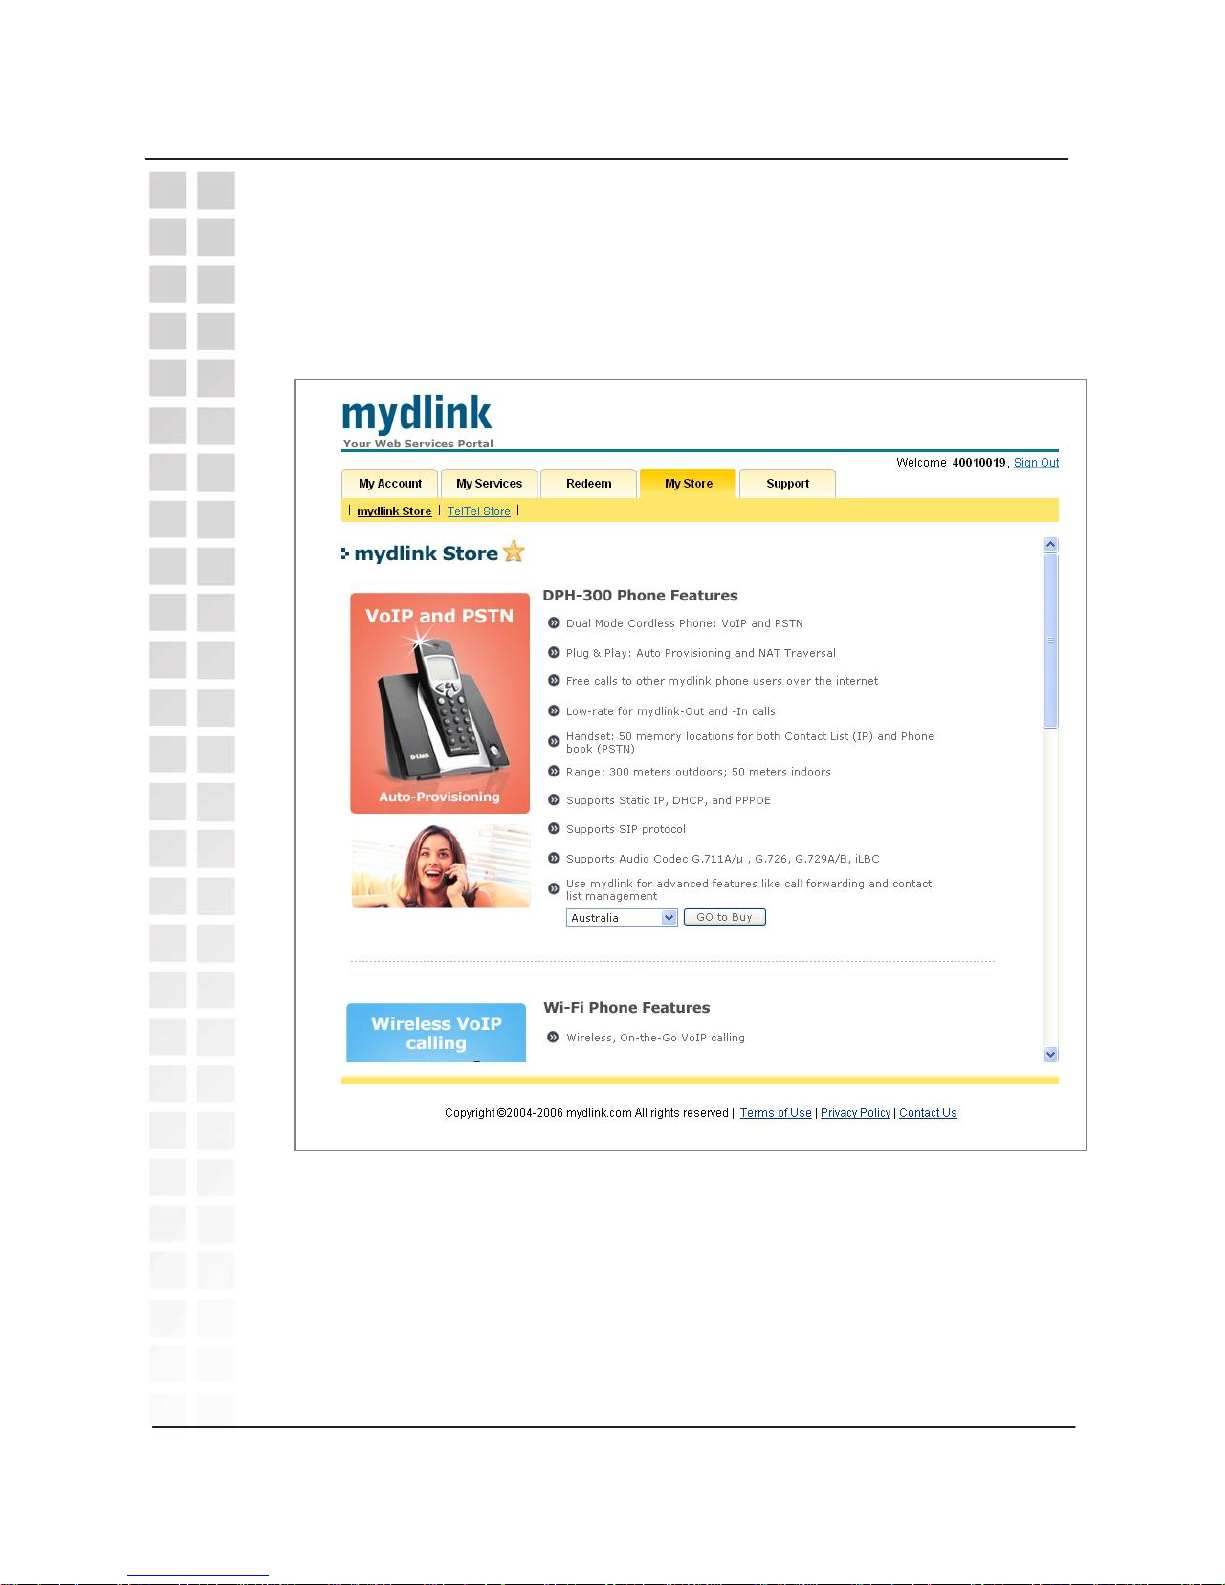
The My Store tab opens a group of pages that allow you to purchase
applicable products from D-Link and services from TelTel. The first page is My
Store > mydlink Store. You can check these pages from time to time for
special discounts and service offers.
You can navigate through the mydlink website by selecting a folder tab at the
top of the page, and then a category within the selected folder from the yellow
bar under the tab.
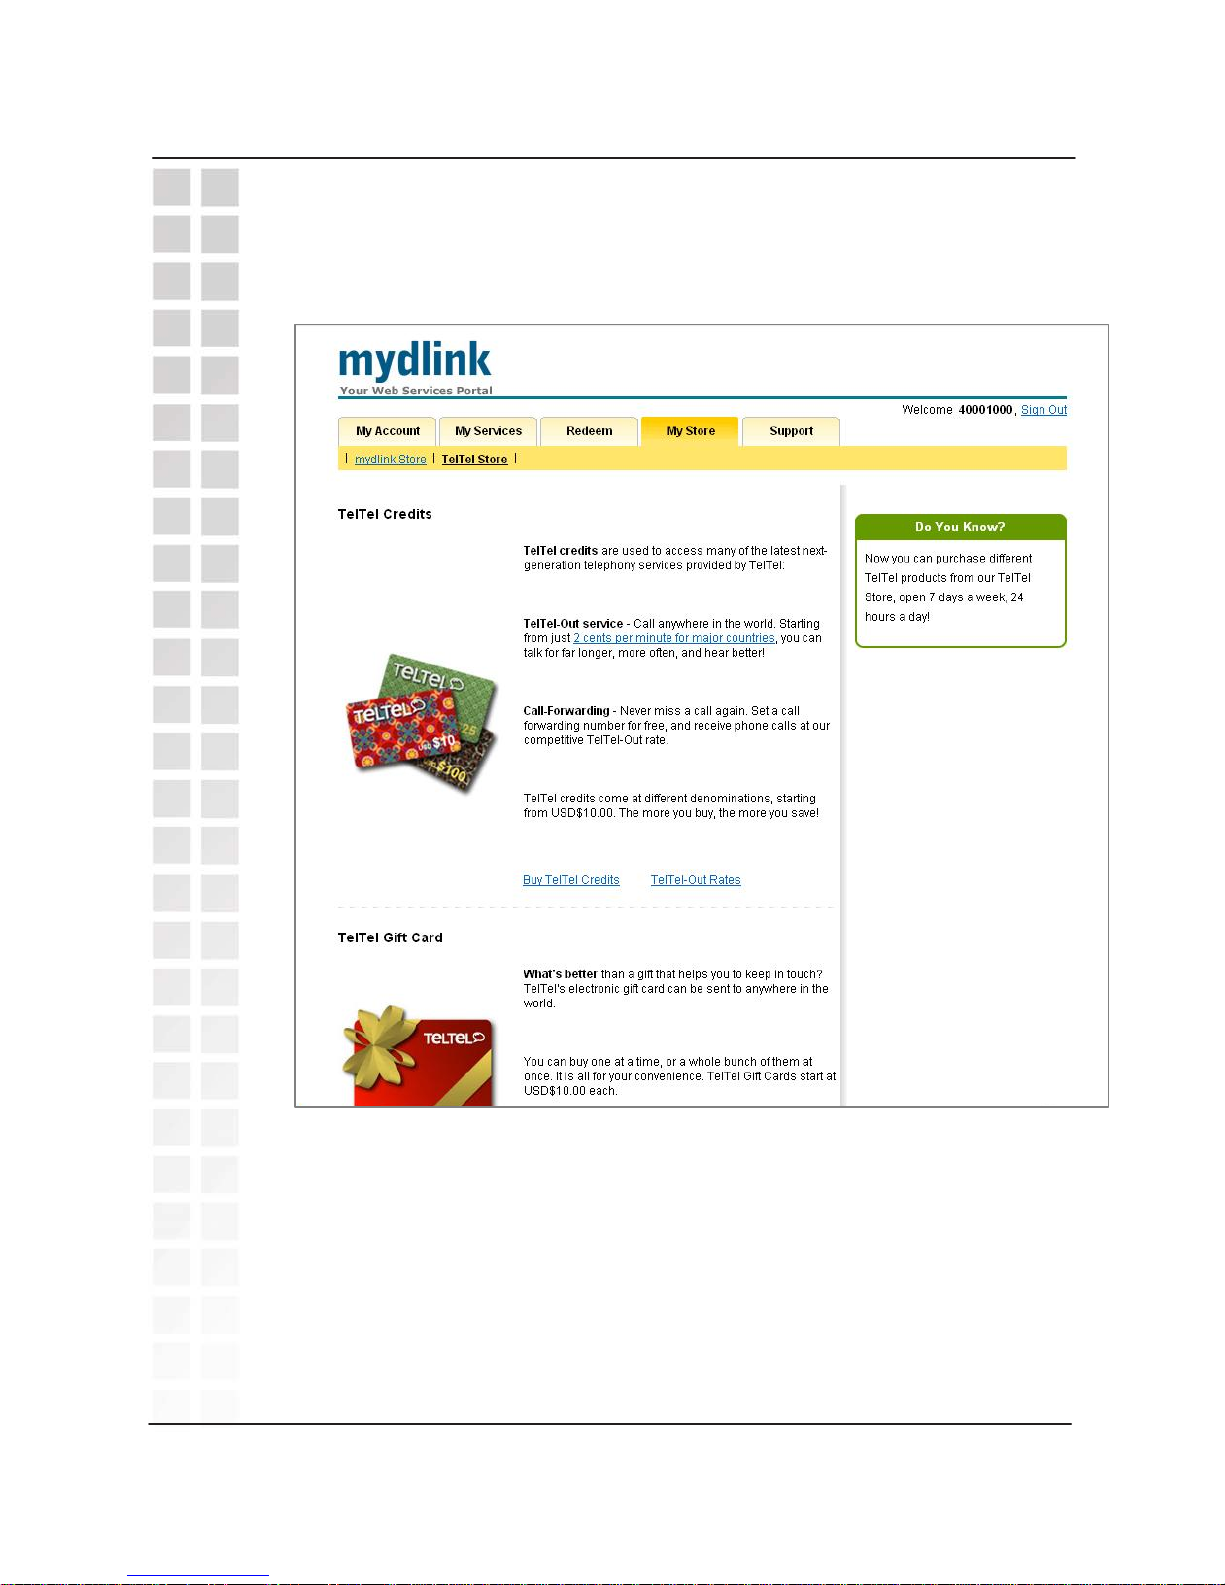
The next category under the My Store tab is TelTel Store. Selecting this
category will open the page shown below.
My Store > mydlink Store
Page 46
mydlink
DPH-300 User’s Manual
D-Link Corporation
45
You can purchase TelTel credits directly from TelTel using the mydlink website.
Use the My Store > TelTel Store page, as shown below.
You can navigate through the mydlink website by selecting a folder tab at the
top of the page, and then a category within the selected folder from the yellow
bar under the tab.
You can also purchase TelTel credits to give to a friend as a gift directly from
TelTel using the mydlink website and the My Store > TelTel Store page.
My Store > TelTel Store
Page 47
mydlinkDPH-300 User’s Manual
D-Link Corporation
46
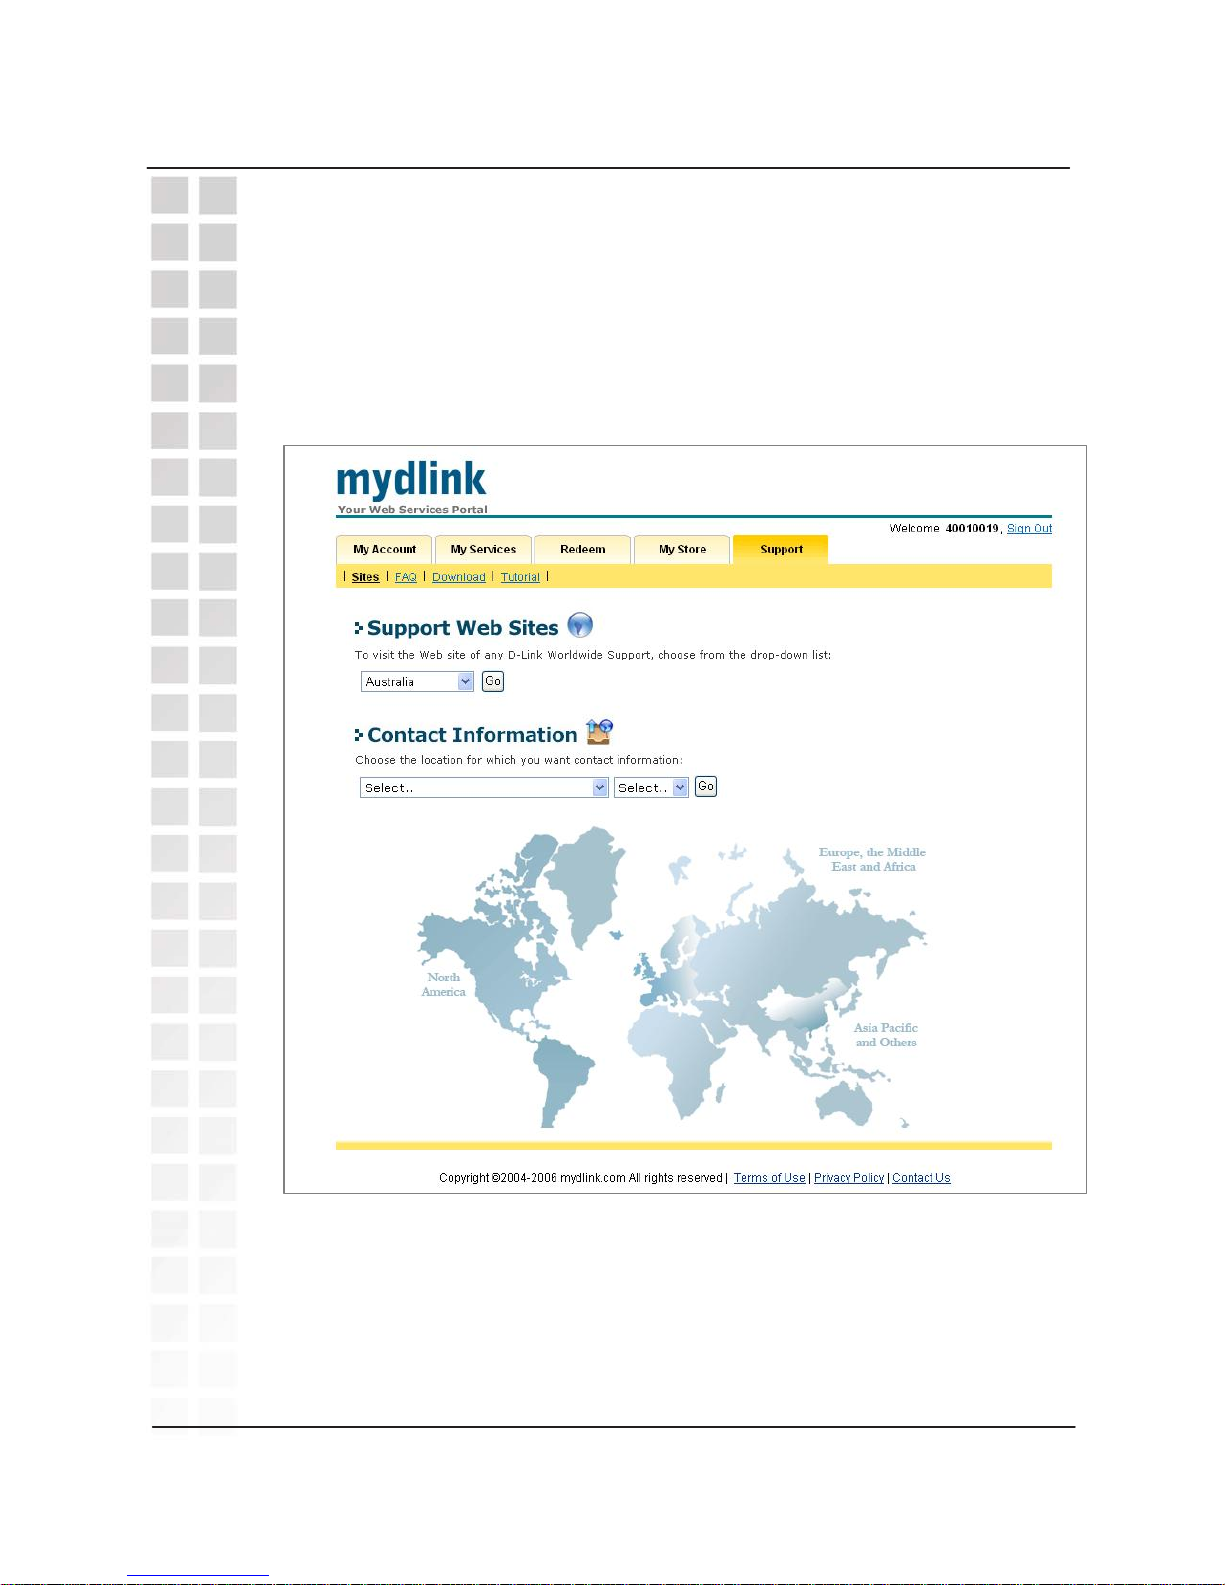
You can get various kinds of help from the Support section of the mydlink
website, including the Sites page, shown below.
The Sites category contains links to all D-Link websites worldwide. Select the
office in your country or the nearest office from the pull-down menus.
Support > Sites
Page 48
mydlink
DPH-300 User’s Manual
D-Link Corporation
47
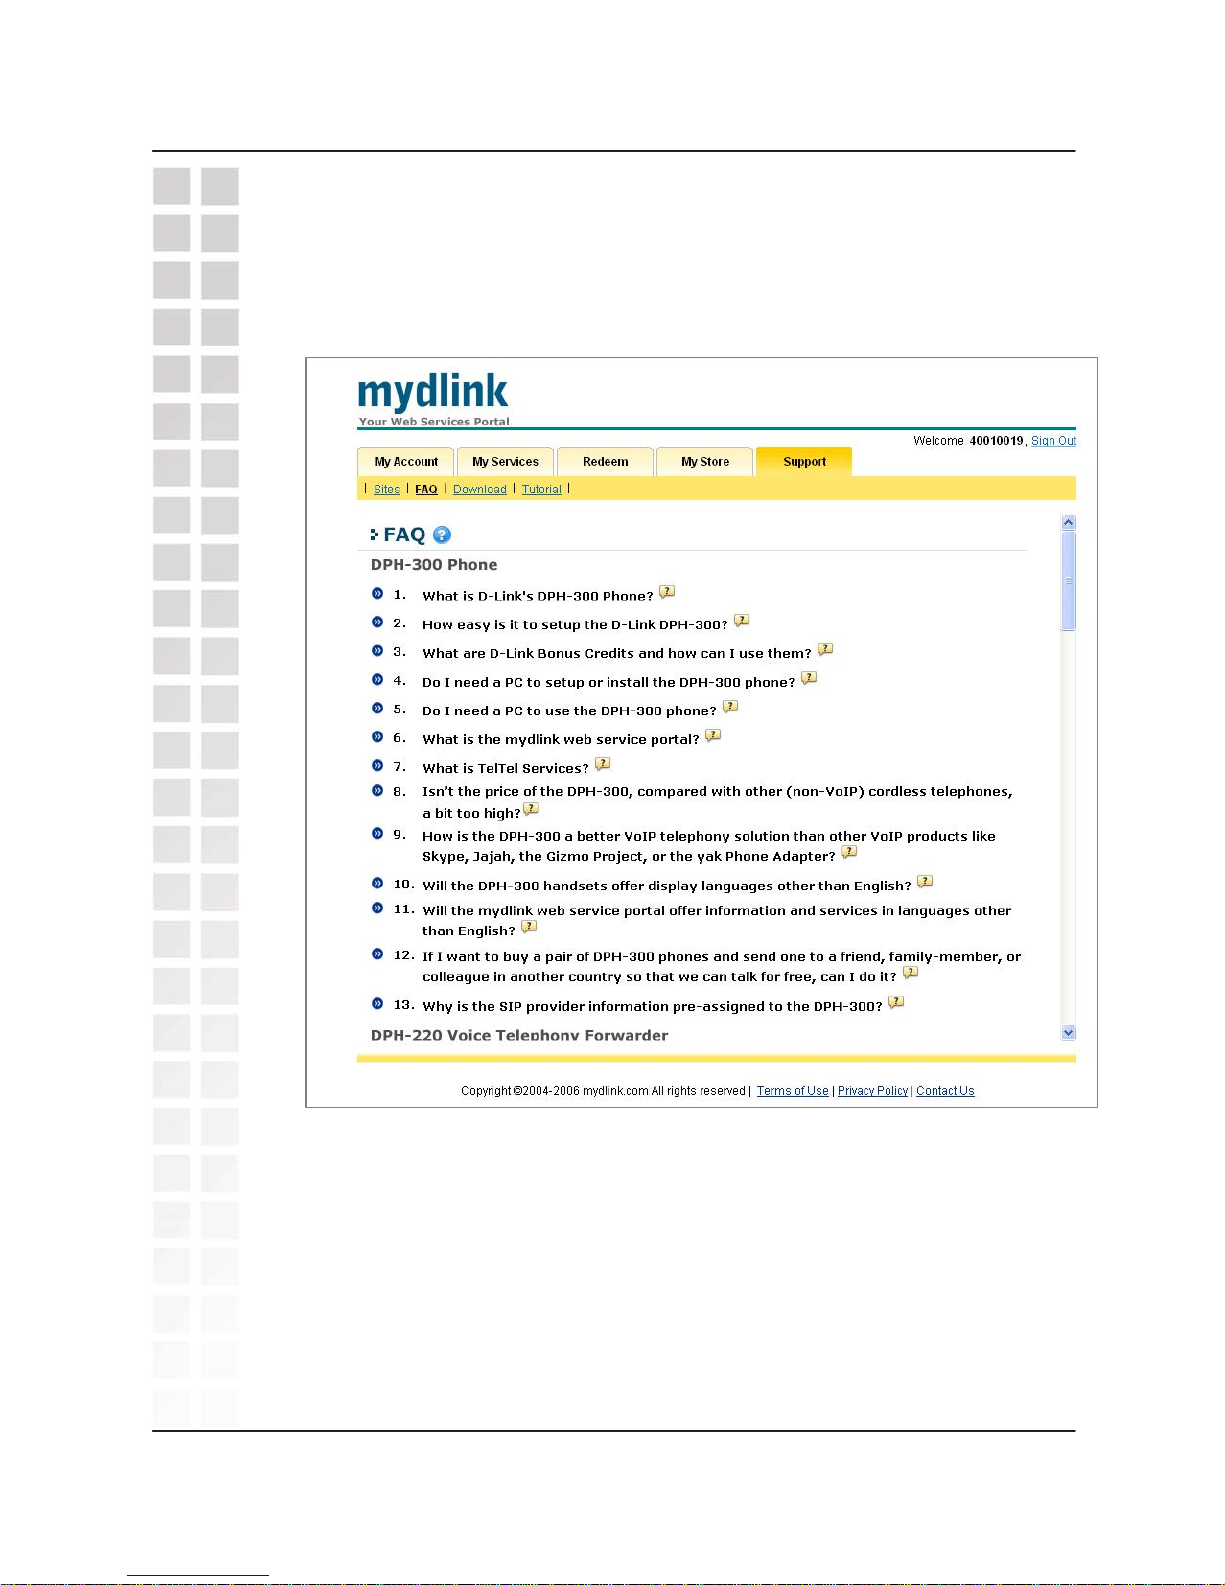
The Support section of the website includes the FAQ page, shown below. The
FAQs explain certain aspects of mydlink products and services.
Support > Download
The Download category contains links to updated firmware versions, user’s
manuals, installation guides, and release notes that may be applicable to
mydlink products.
Support > FAQ
Page 49
mydlinkDPH-300 User’s Manual
D-Link Corporation
48
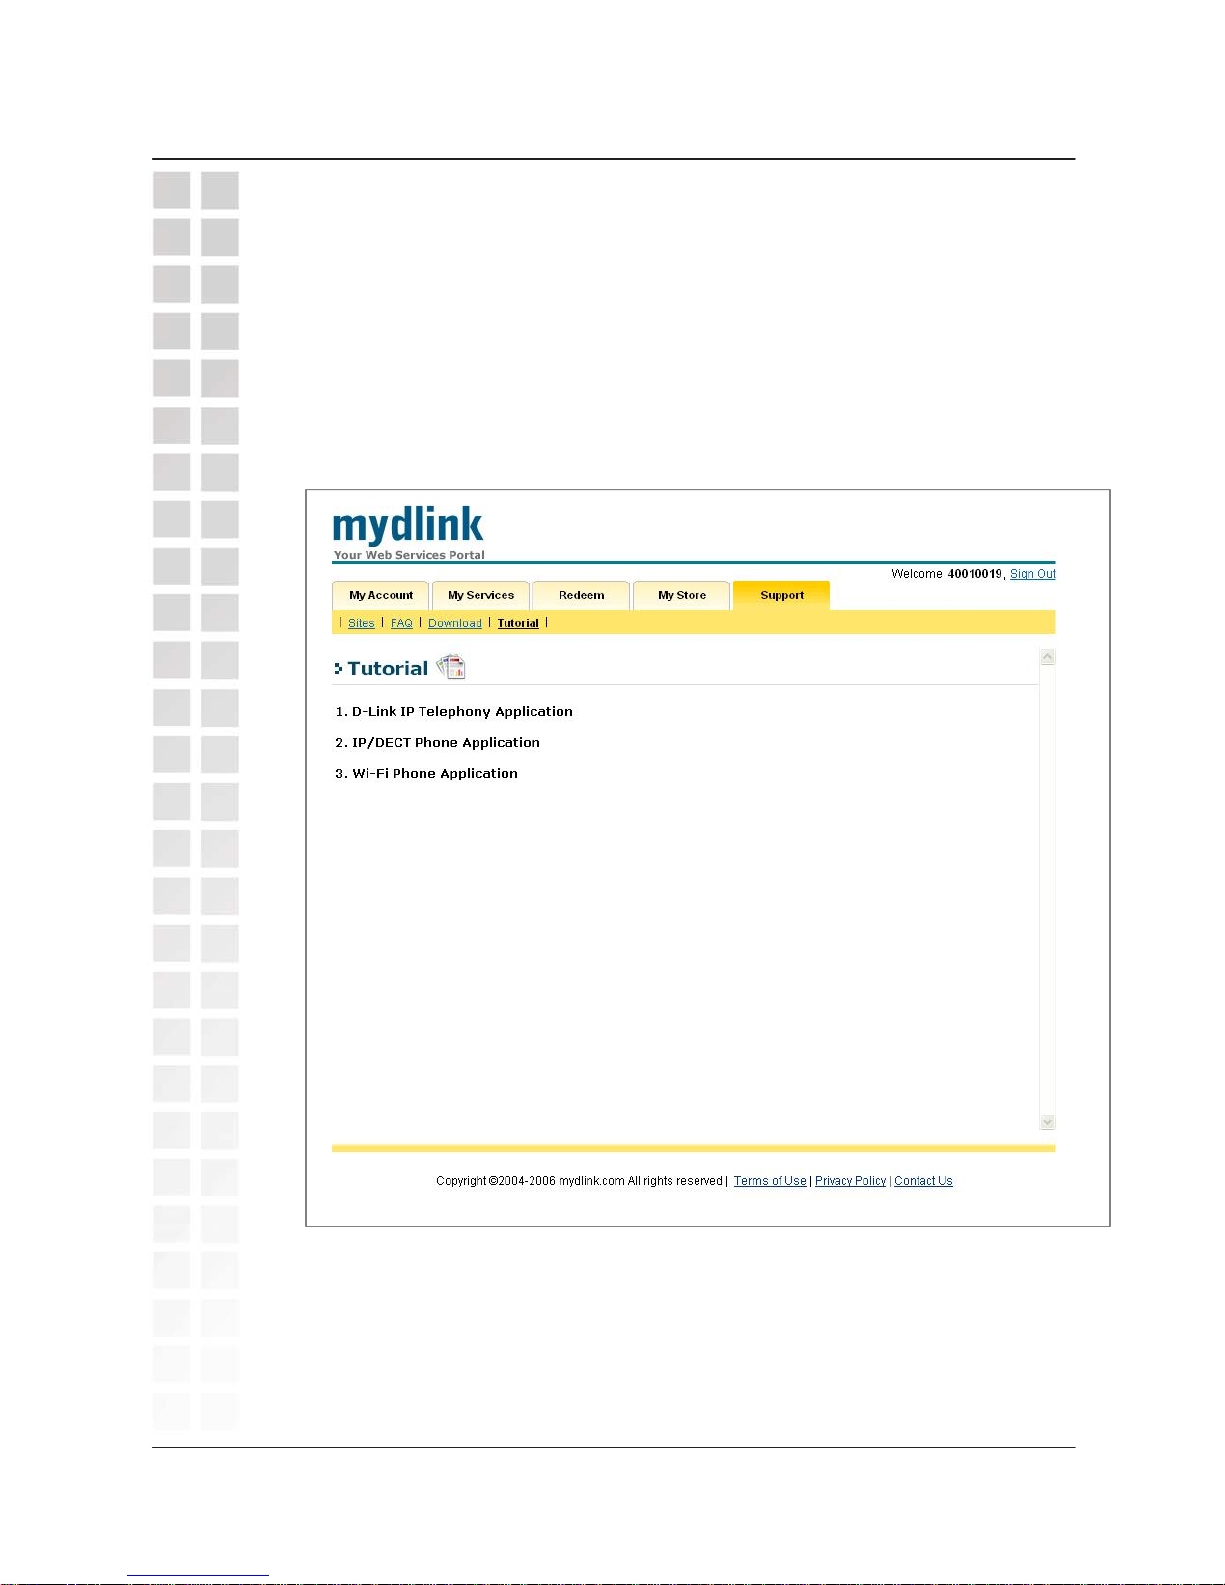
The Support section of the mydlink webpage contains Tutorials in the form of
diagrams that illustrate the path the various types of telephone calls the DPH300 is capable of, as well as the application and use of other mydlink devices.
You can trace the route of a call from the DPH-300 to another mydlink VoIP
user (Box to Box), or the route to the PSTN (through a Trunk Gateway) or to a
WiFi Phone (through a wireless AP).
Support > Tutorial
Page 50
Using the Configuration Page
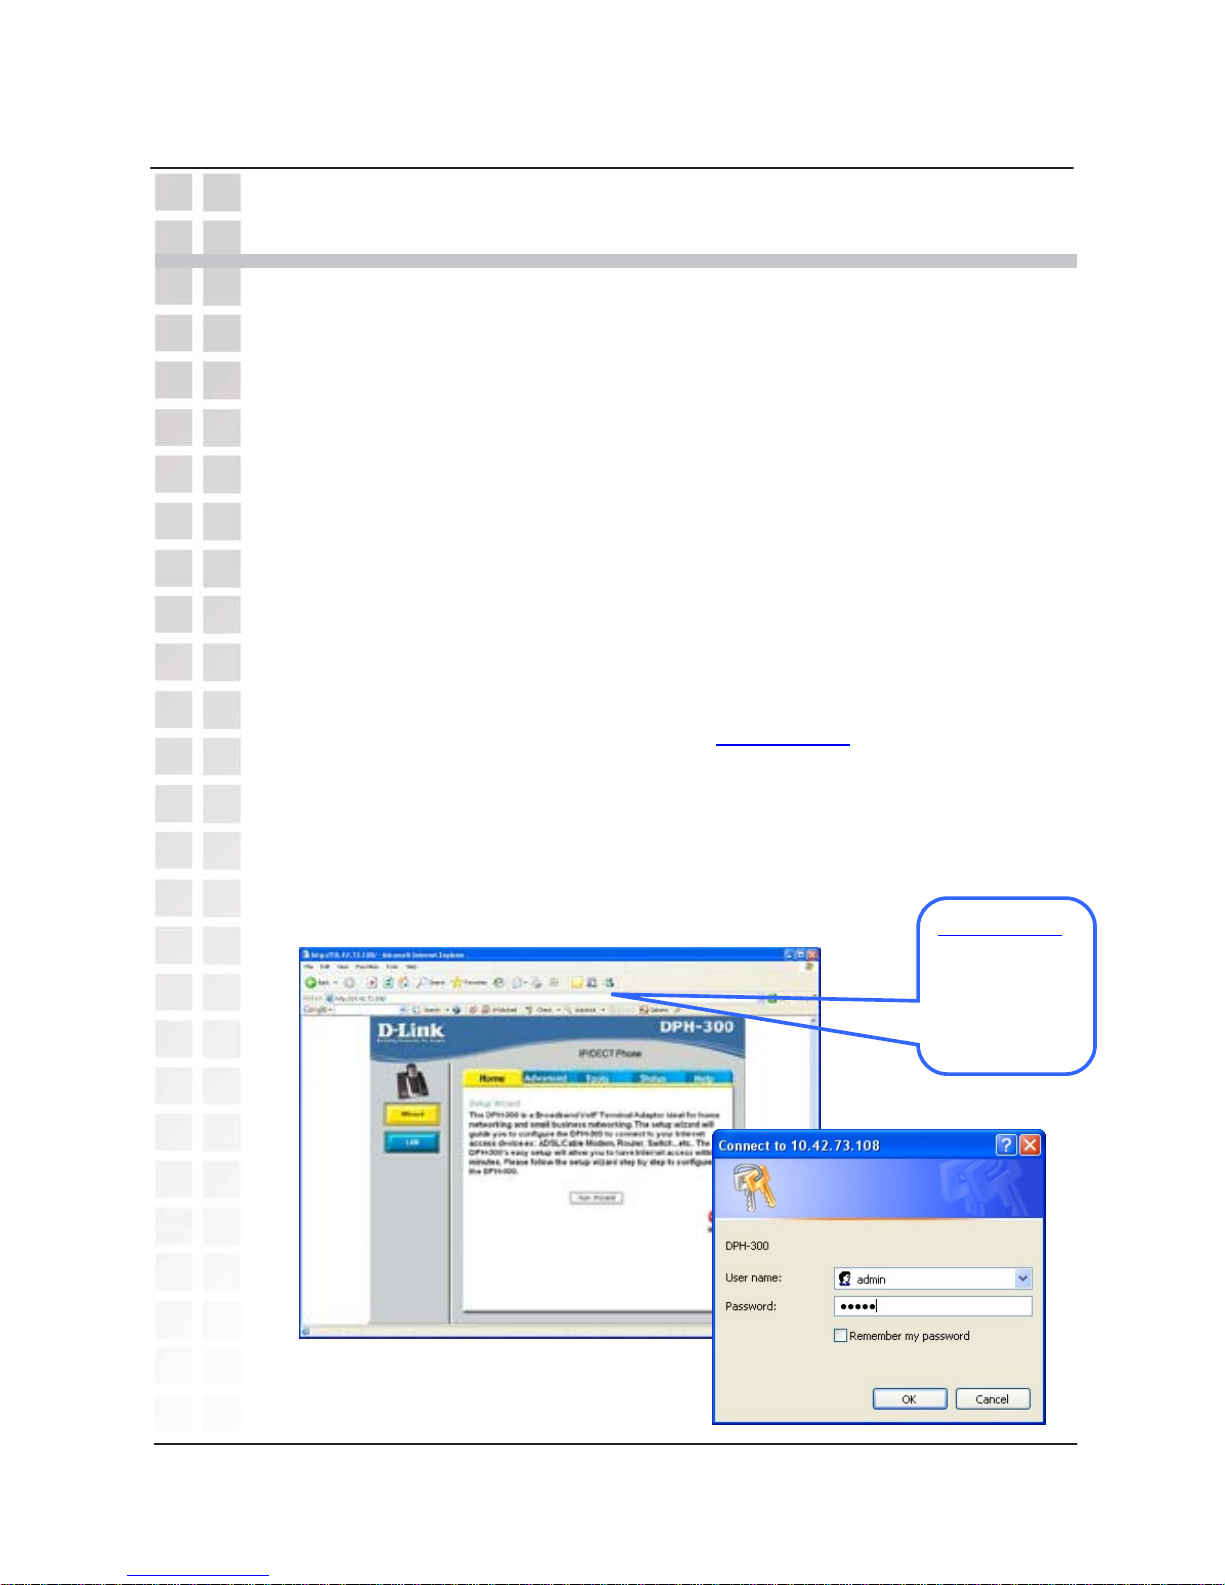
Whenever you want to configure your DPH-300, you can access the Configuration
Menu by opening the web-browser and typing in the IP Addr ess assigned to the
DPH-300. The DPH-300 has DHCP enabled by default, so its IP Address will be
that assigned by the DHCP server on your LAN. This DHCP server is often
contained in a multi-port Ethernet router. See your router’s documentation to
determine the addresses assigned by its DHCP server. If you do not know the IP
address assigned to the DPH-300 (or you do not yet have a multi-port Ethernet
router) you can connect to the DPH-300 by the following method:
• Connect the WAN port on the DPH-300 directly to the Ethernet port on your
PC.
• Set your PC to have a static IP address of 10.1.1.2 with a subnet mask of
255.0.0.0 and a default gateway of 10.1.1.1
• Switch the DPH-300 on
• Open the web browser on your PC
• Type in the IP Address of the DPH-300 (http://10.1.1.1
)
• Type admin in the User Name field
• Type admin in the Password field
• Click OK
The Home > Wizard screen will appear . Please refer to the Quick Installation
Guide for more information regarding the Setup Wizard.
http://10.1.1.1
or the IP
address
assigned by
your LAN’s
DHCP serve
r
Using the Configuration Page
DPH-300 User’s Manual
D-Link Corporation
49
Page 51
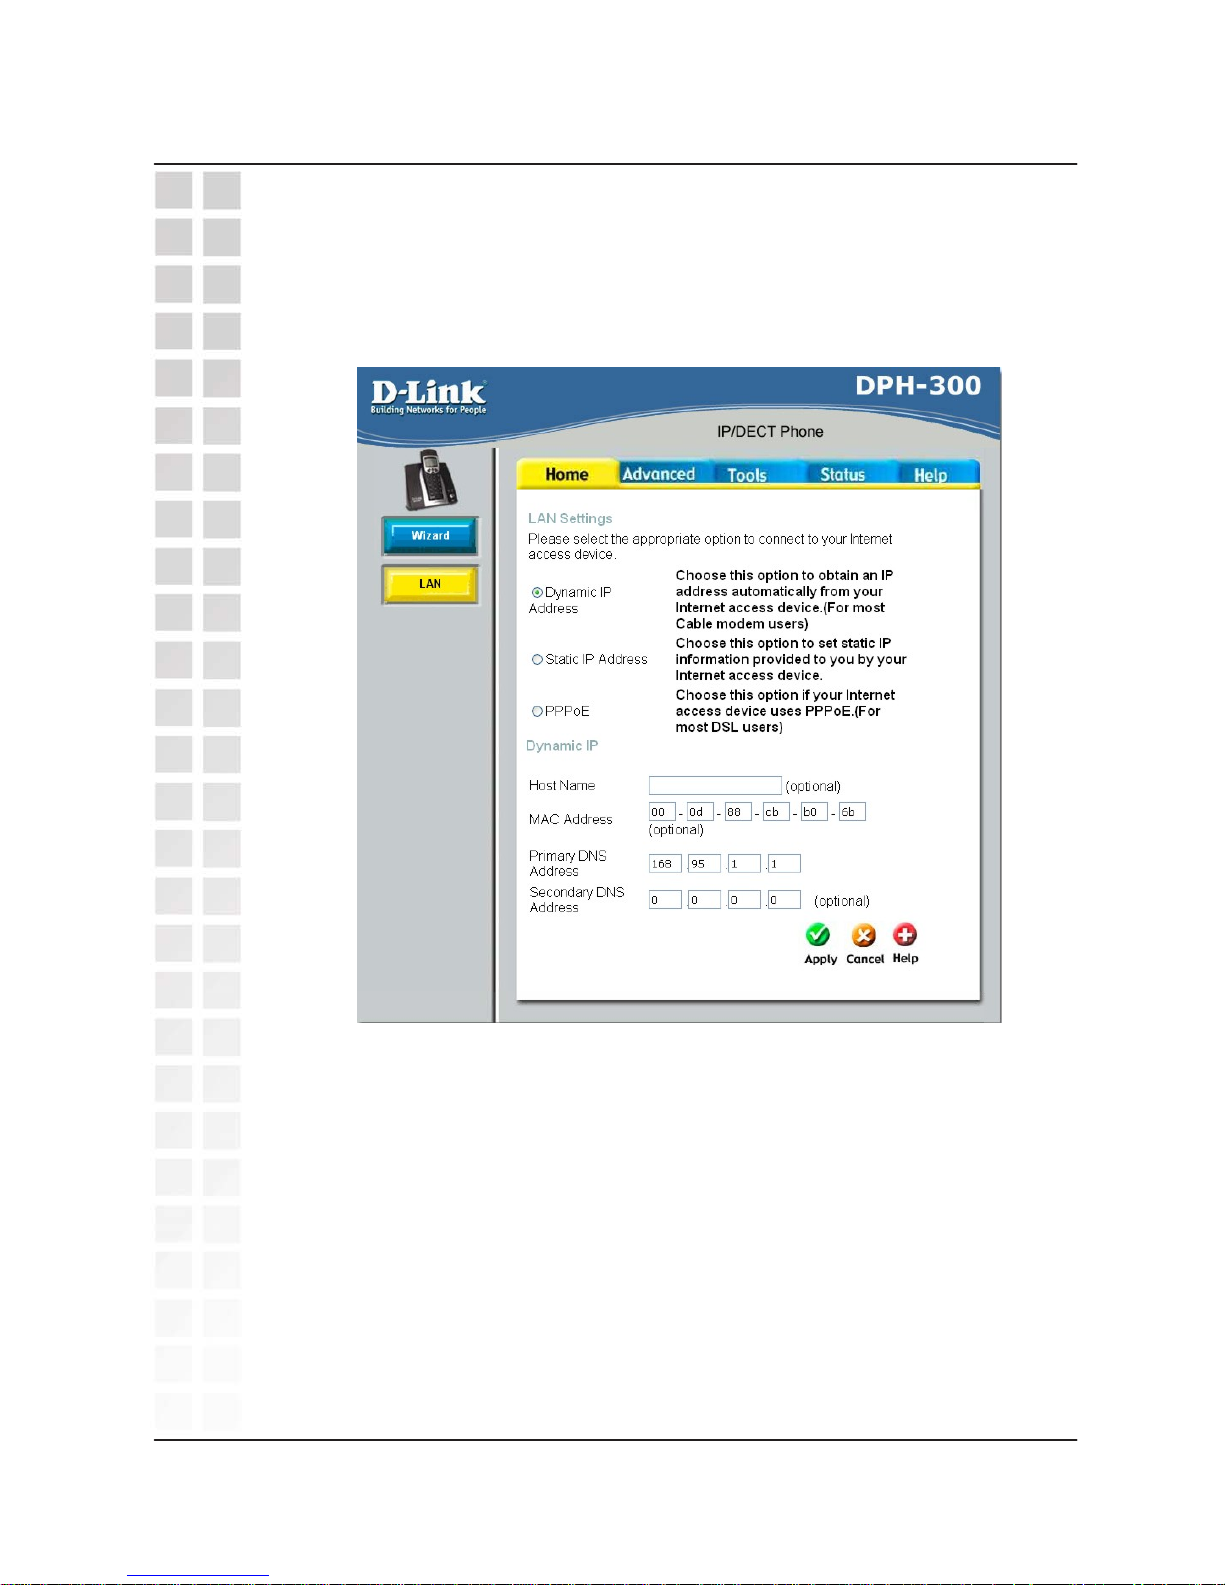
Host Name The Host Name is optional but may be required by
some ISPs. The default host name is the device
name of the Router and may be changed.
MAC Address The default MAC address is set to the WAN’s
physical interface MAC address on the Broadband
Router. You can use the “Clone MAC Address”
button to copy the MAC address of the Ethernet
Card installed by your ISP and replace the WAN
MAC address with the MAC address of the router. It
is not recommended that you change the default
MAC address unless required by your ISP.
Primary/Secondary DNS Enter a DNS Address if you wish not to use the
address provided by your ISP.
Dynamic IP Address
DPH-300 User’s Manual
D-Link Corporati on
50
Home > LAN > Dynamic IP Address
Dynamic IP Address (using DHCP) is both the default option, and the most
commonly used method to assign devices on a LAN IP address information
when connecting to a broadband modem or multi-port Ethernet router/DHCP
server.
Page 52
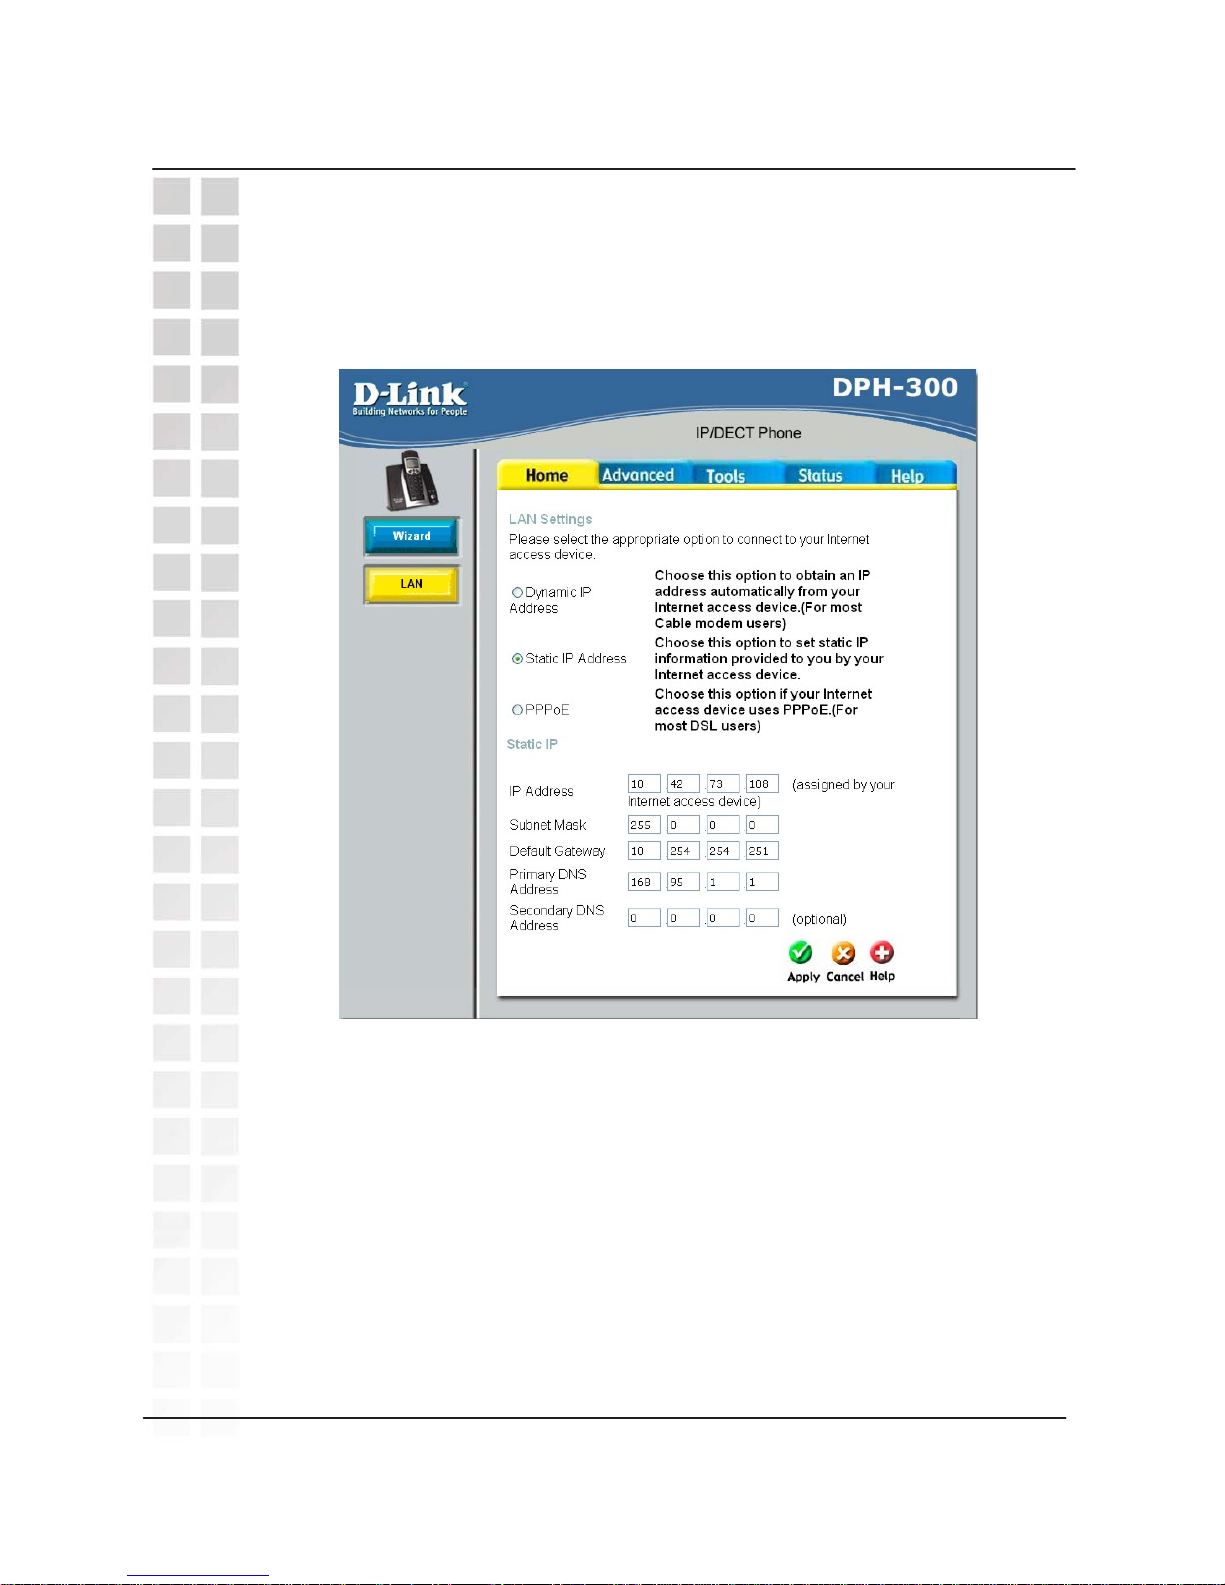
Home > LAN > Static IP Address
Static IP (or Fixed IP) addressing is used when connecting to a broadband
connection the requires static IP addressing or when connecting behind a router
that does not offer a DHCP server function. This choice requires the input of
specific IP address information.
Static IP Address
DPH-300 User’s Manual
D-Link Corporation
51
IP Address − Input the IP address provided from you router configuration settings,
ISP, or network administrator.
Subnet Mask − Input the Subnet mask provided from your router configuration
settings, ISP, or network administrator.
Default Gateway address − Input the Gateway address provided from your router
configuration settings, ISP, or network administrator.
Primary DNS Address − Input the DNS address provided from your router
configuration settings, ISP, or network administrator.
Secondary DNS Address − Input a secondary DNS address (optional) provided
from your router configuration settings, ISP, or network administrator.
Page 53
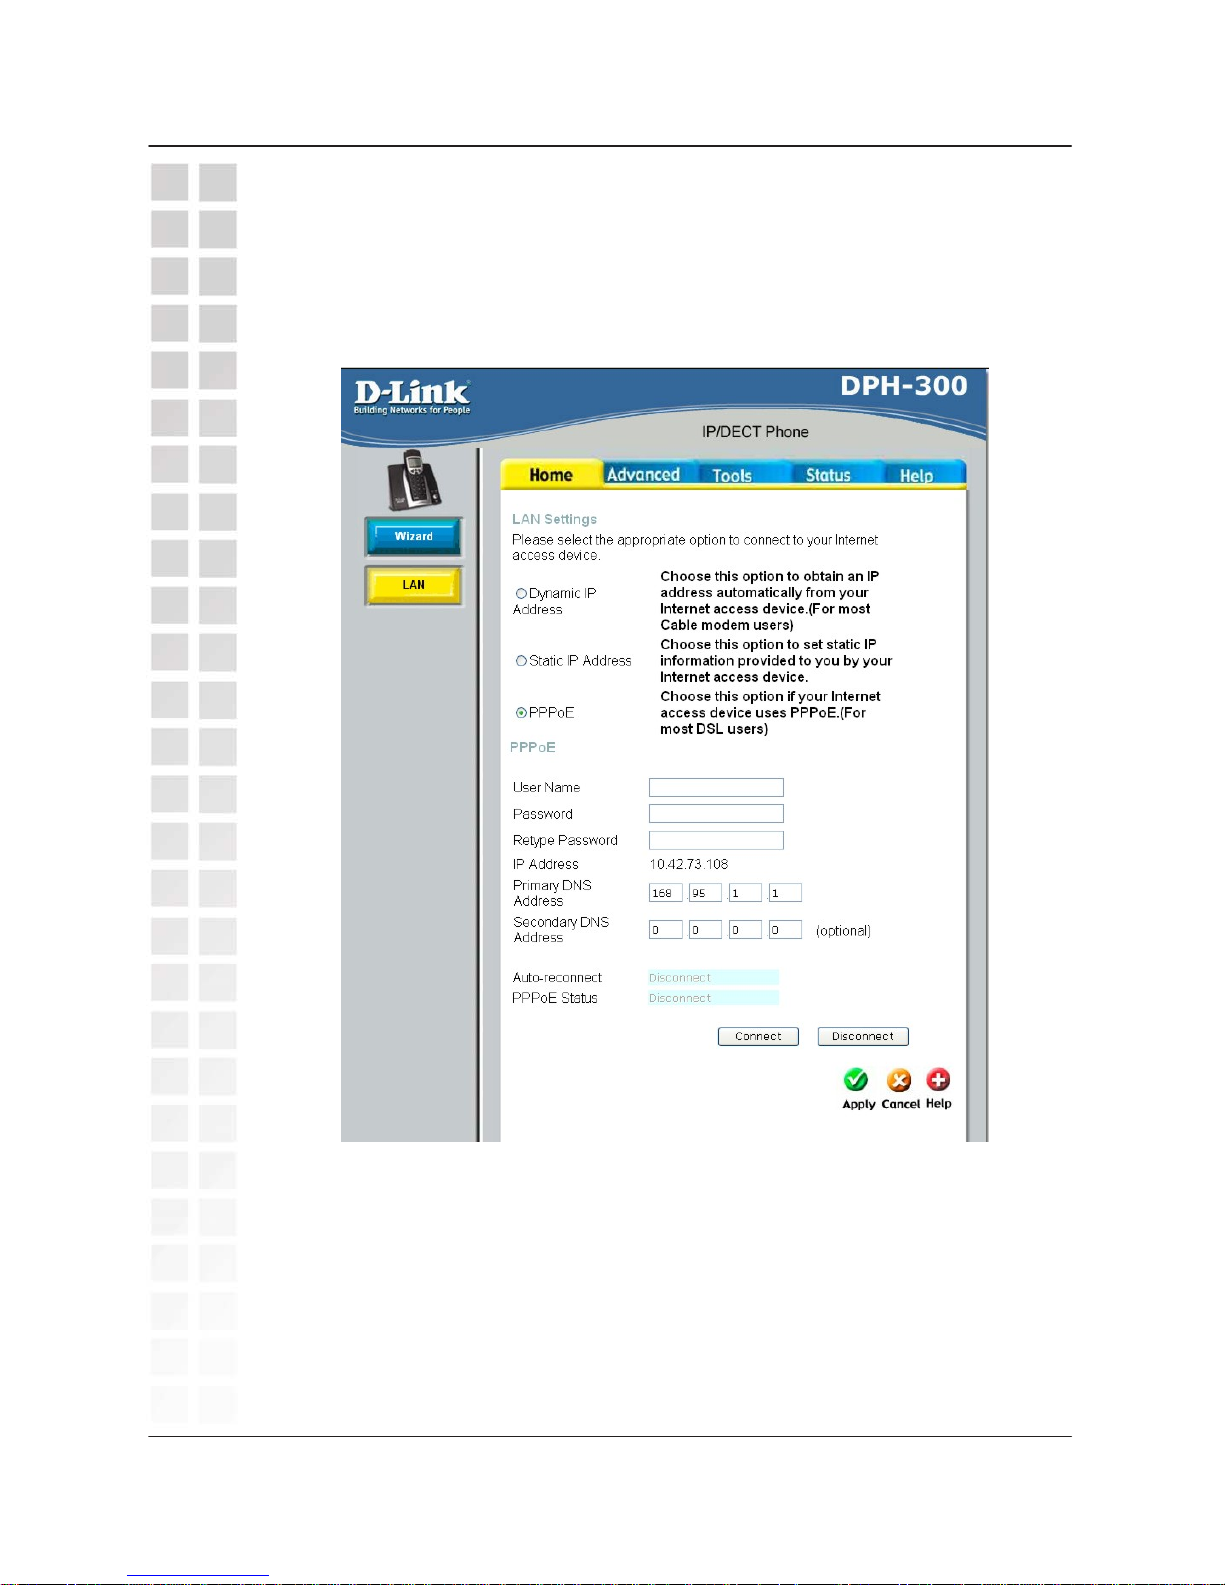
Home > LAN > PPPoE
PPPoE (Point-to-Point Protocol over Ethernet) is used when connecting directly
to a DSL modem that offers a PPPoE connection. This choice requires the
input the User name and Password of your PPPoE account − provided by your
ISP.
User Name − Enter your PPPoE User Name as provided by your ISP.
Password − Enter your PPPoE Password.
Primary / Secondary DNS Addresses − Enter the DNS addresses provided by
your ISP.
Retype Password − Retype your PPPoE Password to confirm.
Click the Connect button to continue.
PPPoE
DPH-300 User’s Manual
D-Link Corporation
52
Page 54
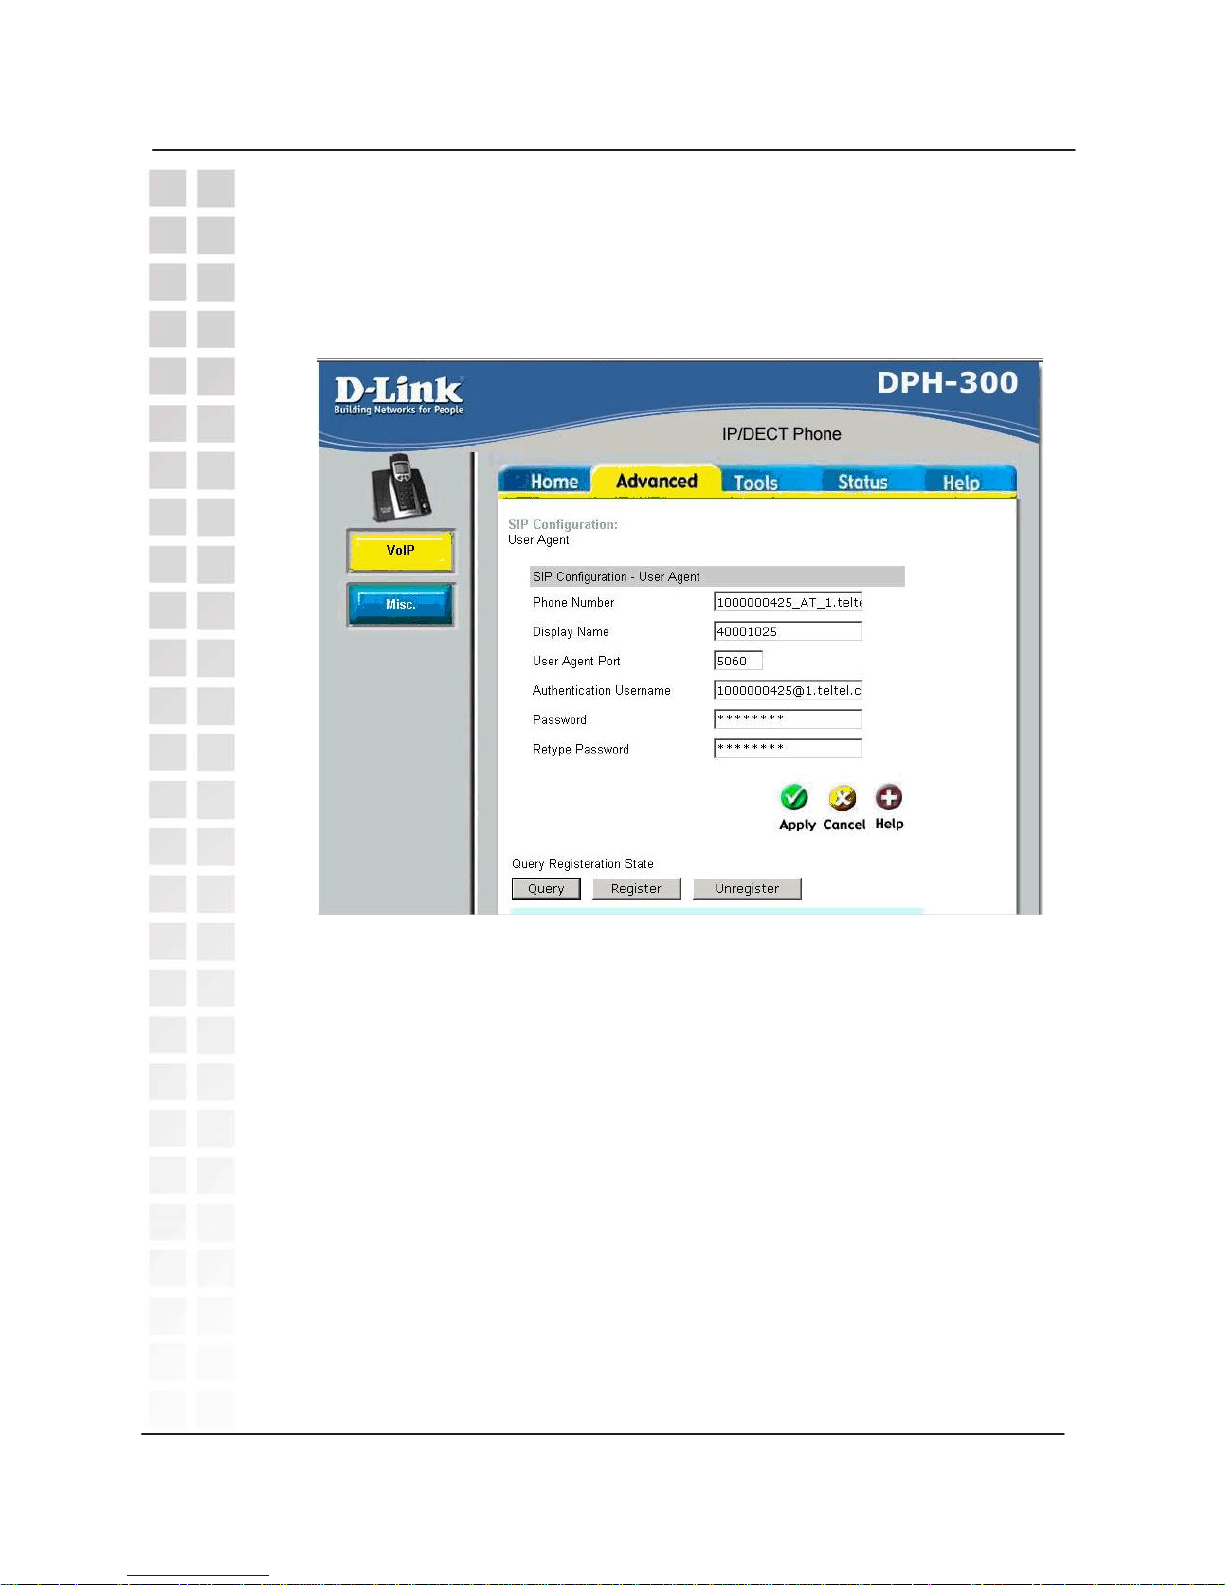
Advanced > VoIP > User Agent [Read-Only]
A SIP User Agent is a logical entity capable of handling VoIP calls between peers.
This section of the web manager for the DPH-300 is for reference purposes only.
You will not be able to modify and save changes to the values displayed in the fields
on this
pag
e.
Phone Number The telephone number assigned to the User Agent by
the SIP VoIP telephony service provider.
Display Name The name used in place of the Phone Number to identify
the device or user in ContactLists and other contact
indices. For the DPH-300, the display name is your 8digit mydlink number.
User Agent Port This selects the port number the router will listen to when
determining when calls are being made.
Authentication Name The Username used to access your SIP server and your
VoIP service provider.
Password The Password used to access your SIP server and your
VoIP service provider.
Retype Password Retype your password to confirm and click Apply.
D-Link Corporation
53
User Agent
DPH-300 User’s Manual
Page 55
D-Link Corporation
54
Firmware Upgrade
s
DPH-300 User’s Manual
Note: For all of the other functions in the web GUI, refer to the Help tab for
guidance and information.
Firmware Upgrades
The DPH-300 firmware can be upgraded two ways. First, anytime you unplug
the power adapter and then restore power, the auto-provisioning process will
compare the current firmware version with the latest update and upgrade the
DPH-300’s firmware if a newer version is available.
The other way the DPH-300 firmware can be upgraded is through the web
configuration manager’s Tools menu. The mydlink.com website provides
firmware upgrade files for download by mydlink users. Go to mydlink and then
Support > Download > Firmware Upgrade and download the most recent
firmware upgrade for the DPH-300.
If you select the Firmware button under the Tools tab, you will be able to enter
the name of the file you downloaded. Click the Apply button to upgrade the
firmware and then go to Tools > Reboot to restart your DPH-300.
Note that we recommend that you use the auto-upgrade feature that is part of
the auto-provisioning process.
Page 56
Making Phone Calls
DPH-300 User’s Manual
Making Phone Calls
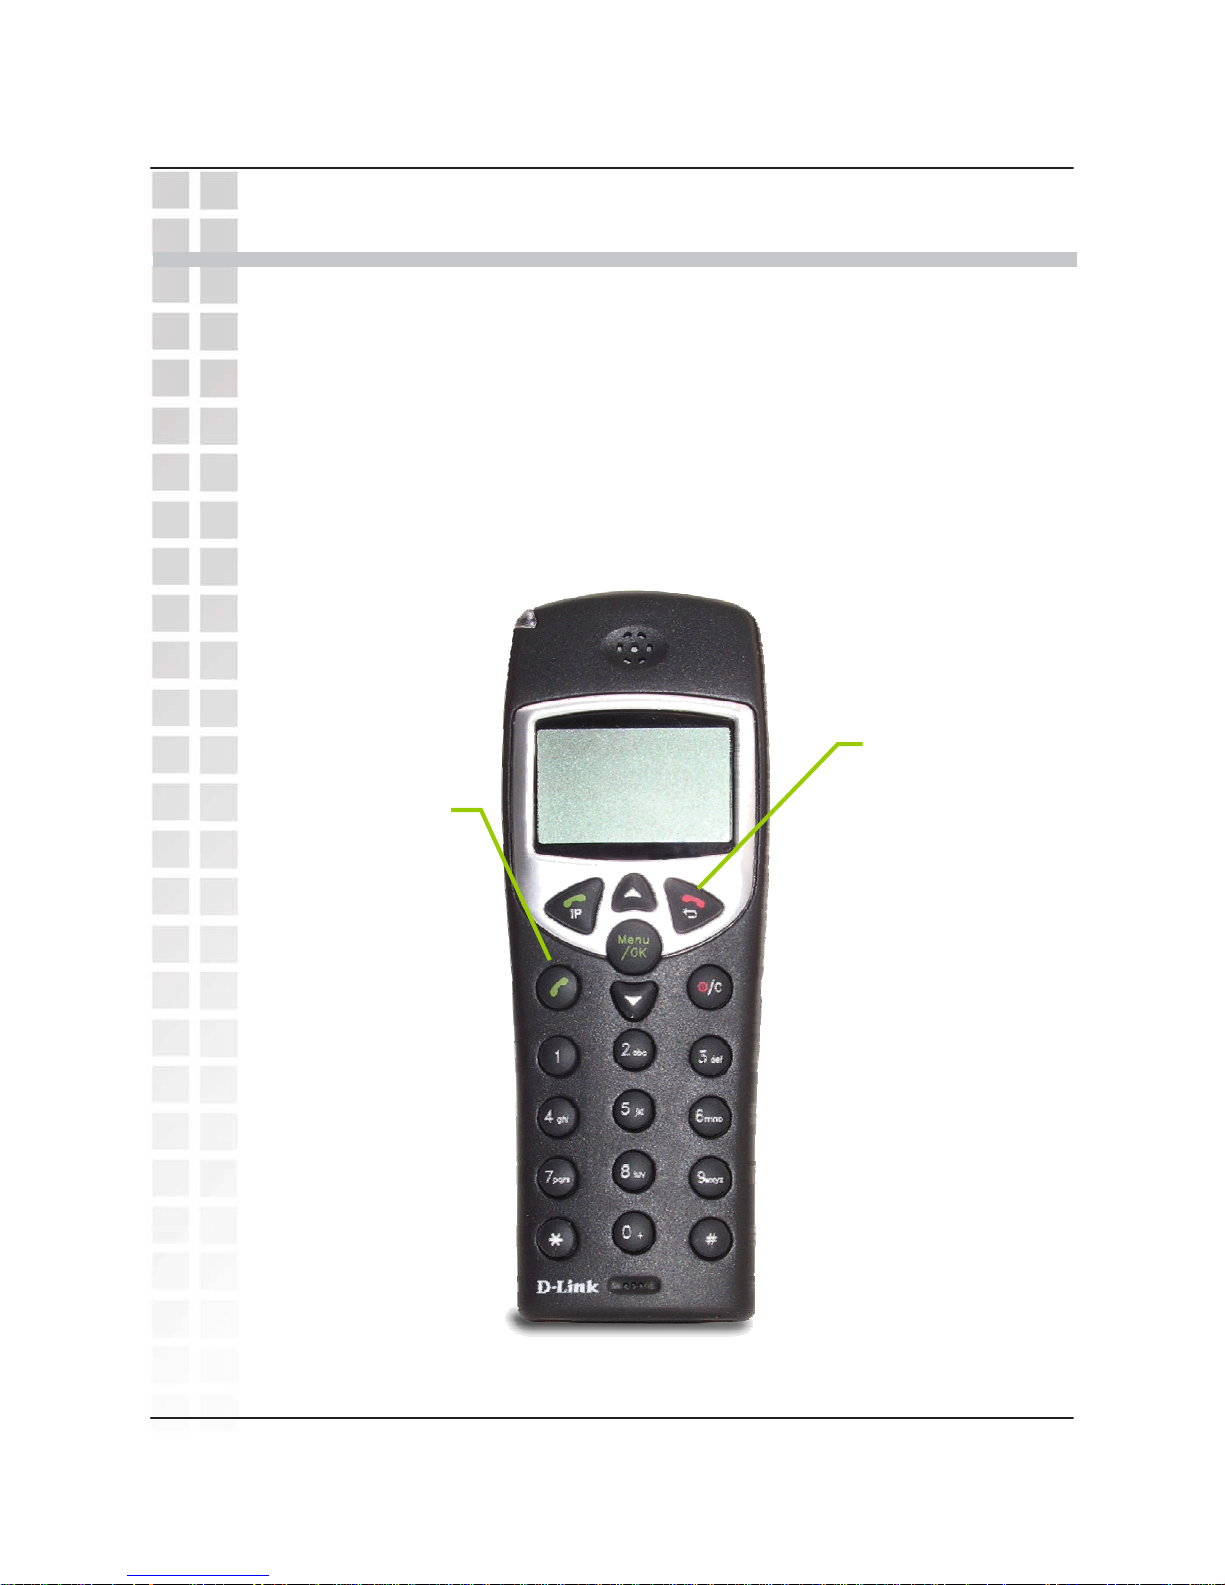
Making a Call to the PSTN (regular telephone network)
If you have connected your PSTN telephone line to the DPH-300’s Base, you can
make a telephone call to any regular telephone using the PSTN − normal telephone
usage charges will apply − by following these steps:
Pick up the handset and press the PSTN Dial Tone button. You will hear the
familiar PSTN dial tone, the handset and L1 icon will appear in the handset’s LCD
display.
Dial the number you want to call. The handset’s LCD will display the phone number
as you enter it. This number is also dialed as you enter it.
To end the call, either press the On Hook button or replace the handset on the
charger.
PSTN Mode
55D-Link Corporation
PSTN Dial Tone
Press this button
to initiate a
telephone call
over the regular
telephone line
(PSTN). You
will hear the
familiar dial tone
− and then dial
the telephone
number as you
would on a
normal telephone.
On Hook
Press this button
to end a
telephone call.
You can also
simply place the
handset in the
charger base to
end any
telephone call.
This will end both
a PSTN and a
VoIP telephone
call.
Page 57
Making a Call to the PSTN in Standby Mode
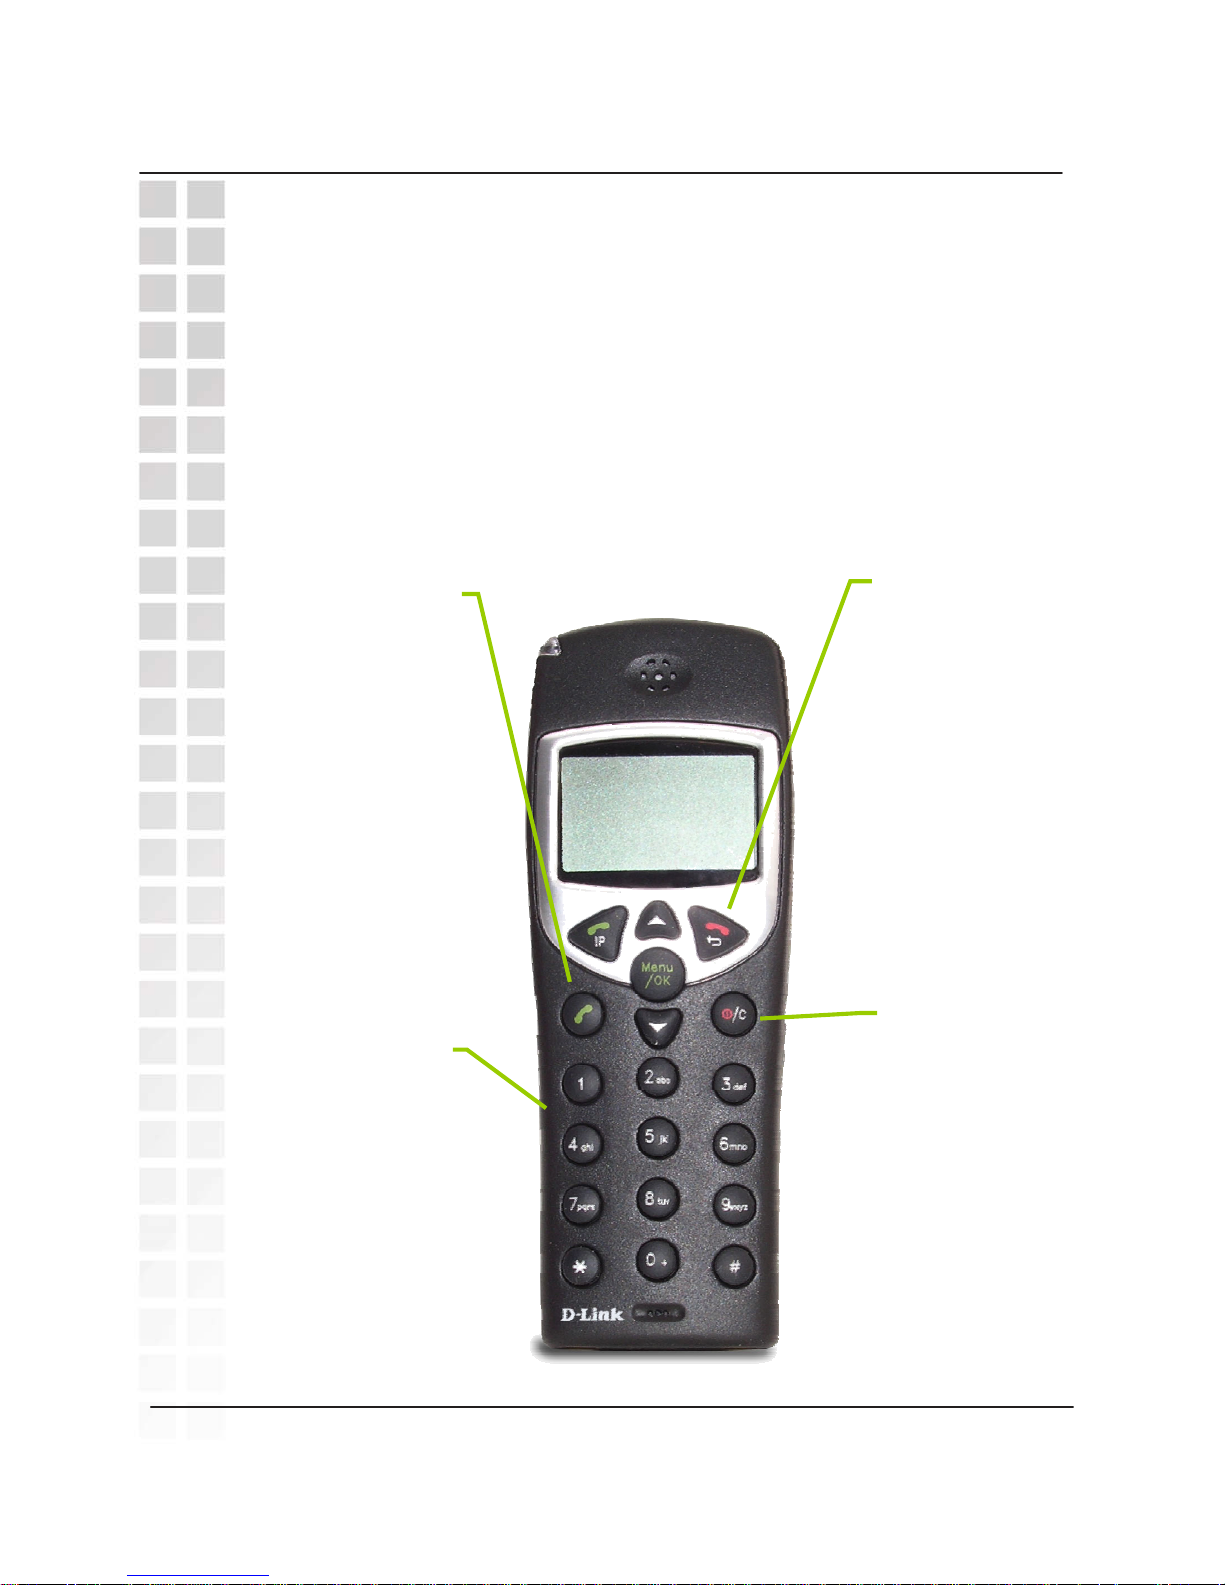
If you have connected your PSTN telephone line to the DPH-300’s Base, you can
make a telephone call to any regular telephone using the PSTN by following these
steps:
Pick up the handset and dial the number as you normally would. You can clear any
or all of the numbers you have entered by pressing the Clear button. You will hear
the familiar PSTN dial tone, the handset and L1 icon will appear in the handset’s
LCD display.
This number will be dialed as you enter it.
To end the call, either press the On Hook button or replace the handset on the
charger.
Clear
Press this button
to erase a single
digit of a telephone
number you have
entered while the
handset is in
Standby Mode.
Holding this button
for a couple of
seconds will erase
all of the digits of
the telephone
number
PSTN Dial Tone
Press this button
to dial a
telephone
number (over the
regular telephone
line (PSTN)).
You will hear the
familiar dial tone
− and then the
handset will dial
the telephone
number as you
entered it.
On Hook
Press this
button to end
a telephone
call. You can
also simply
place the
handset in the
charger base
to end any
telephone call.
This will end
both a PSTN
and a VoIP
telephone call.
Keypad
You can just
dial a regular
telephone
number and
then press the
PSTN Dial
Tone button.
The number
will be
displayed in
the LCD.
Making Phone Calls
DPH-300 User’s Manual
56
D-Link Corporation
Page 58
Making a VoIP Call to another DPH-300 or mydlink number
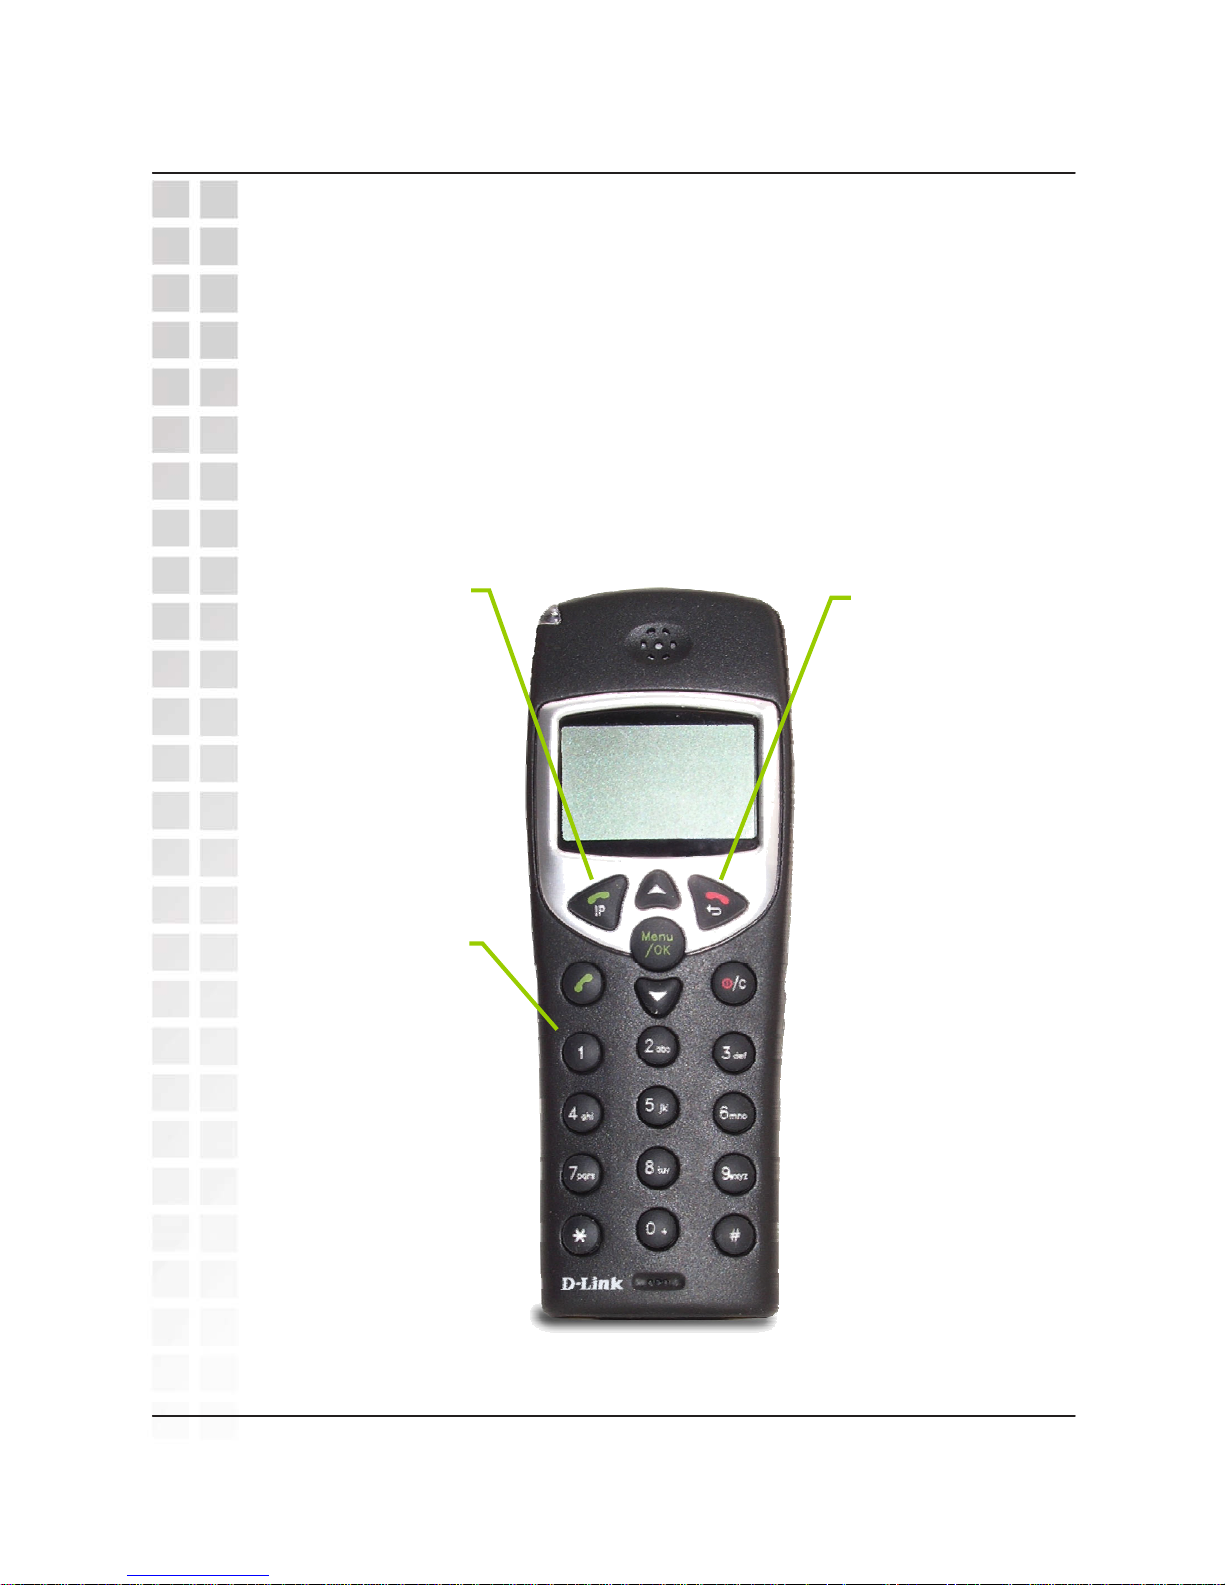
You can dial another mydlink user’s number directly. Simply enter the eight digit
number − 66990011, for example − and press the IP button. You will be connected
to that user shortly (provided they are currently connected to the Internet).
To end the call, either press the On Hook button or replace the handset on the
charger.
Making Phone Calls
DPH-300 User’s Manual
57
D-Link Corporation
On Hook
Press this
button to end
a telephone
call. You can
also simply
place the
handset in the
charger base
to end any
telephone call.
This will end
both a PSTN
and a VoIP
telephone call.
IP
Press this button
after you have
dialed the mydlink
number to initiate
the VoIP call to
another DPH-300
phone or mydlink
user.
Keypad
Enter a mydlink
number directly − in
the same way you
would dial a PSTN
telephone number.
Then press the IP
button to initiate the
call.
Page 59
Making a VoIP Call to a Member of your Contact List
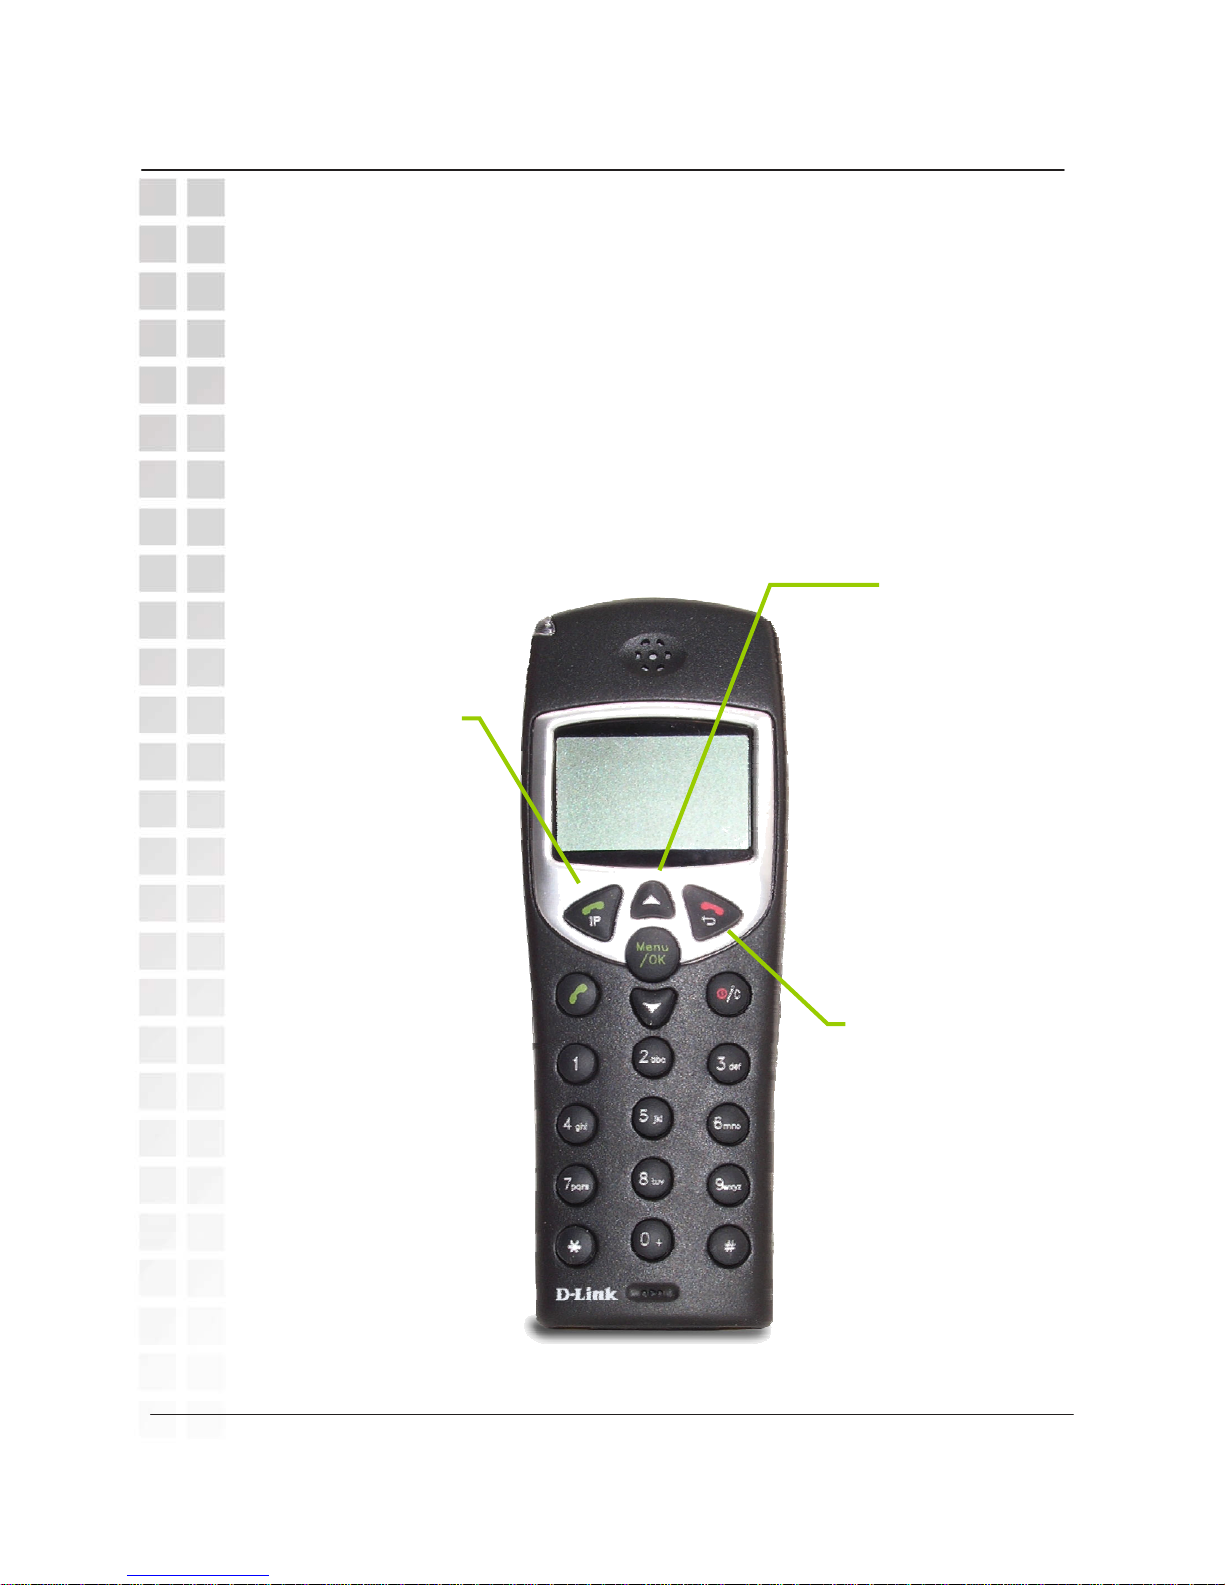
You can enter mydlink or other VoIP phone numbers through the mydlink website.
Numbers entered under Contact Management on the mydlink website will be entered
into your handset’s ContactList after you press the Handset Locator button on the
DPH-300 base station. See page 42.
Pressing the Up scroll button will open the ContactList. You can then use the Up or
Down arrow buttons to select a number/entry you want to call. Pressing the IP
button will initiate the call to the selected listing.
To end the call, either press the On Hook button or replace the handset on the
charger.
Making Phone Calls
DPH-300 User’s Manual
58
D-Link Corporation
On Hook
Press this button to
end a telephone call.
You can also simply
place the handset in
the charger base to
end any telephone
call.
This will end both a
PSTN and a VoIP
telephone call.
IP
Press this button
to initate the
VoIP call to a
number selected
from your
Contact List.
Up
Use this button
to open the
Contact List
when the
Handset is idle.
Pressing this
button during a
telephone call
will increase the
volume
Page 60
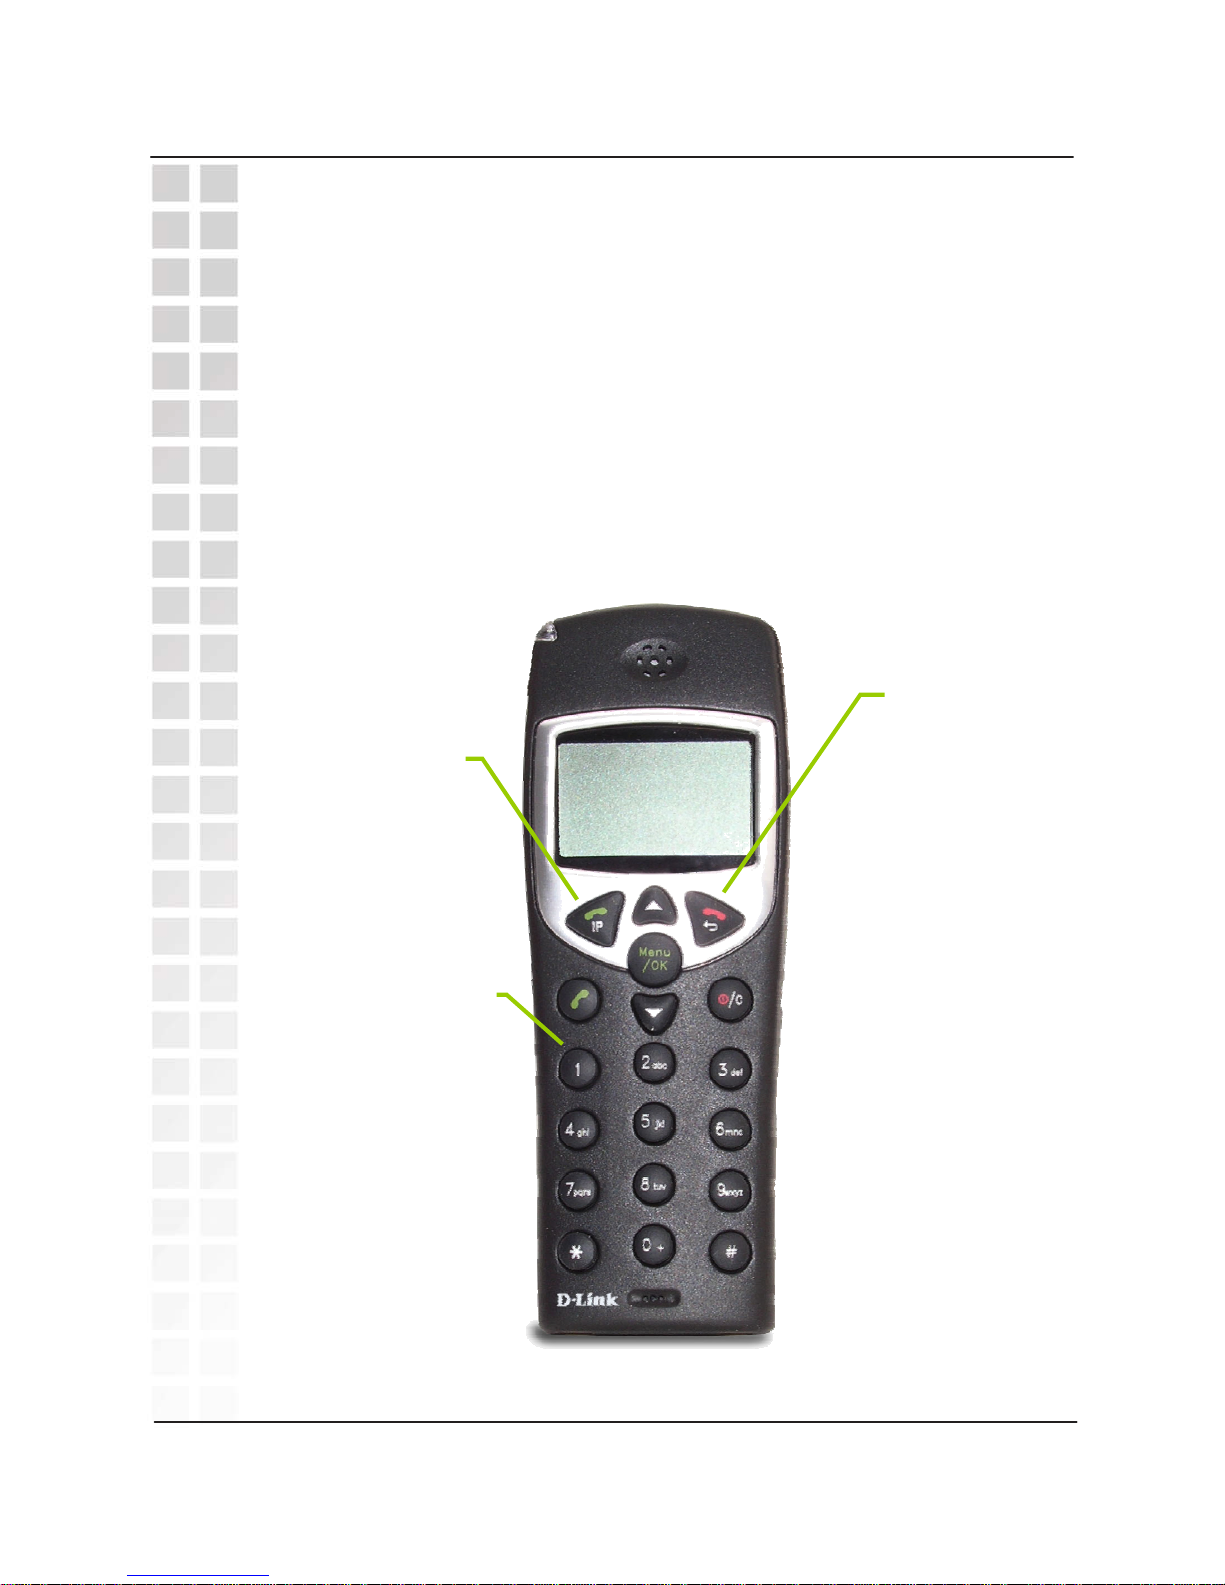
Making a TelTel Out Call to a PSTN Phone
If you have sufficient TelTel Credits to cover the cost of connecting the VoIP network
to the PSTN network using TelTel Out, you can make VoIP telephone calls to a
regular PSTN telephone by entering the PSTN number:
+ Country Code, the Area Code, and finally the PSTN telephone number
For example +14089703318 to call into the US area code 408, telephone
number 970-3318
Then press the IP button to initiate the call.
To end the call, either press the On Hook button or replace the handset on the
charger.
Making Phone Calls
DPH-300 User’s Manual
59
D-Link Corporation
On Hook
Press this
button to end
a telephone
call. You can
also simply
place the
handset in the
charger base
to end any
telephone call.
This will end
both a PSTN
and a VoIP
telephone call.
IP
Press this
button to
initaite a VoIP
to PSTN
(TelTel Out)
call.
Keypad
Enter a PSTN
number directly − +
followed by the
country code, the
area code, and
finally the telephone
number. Then
press the IP button
to initiate the call.
Page 61
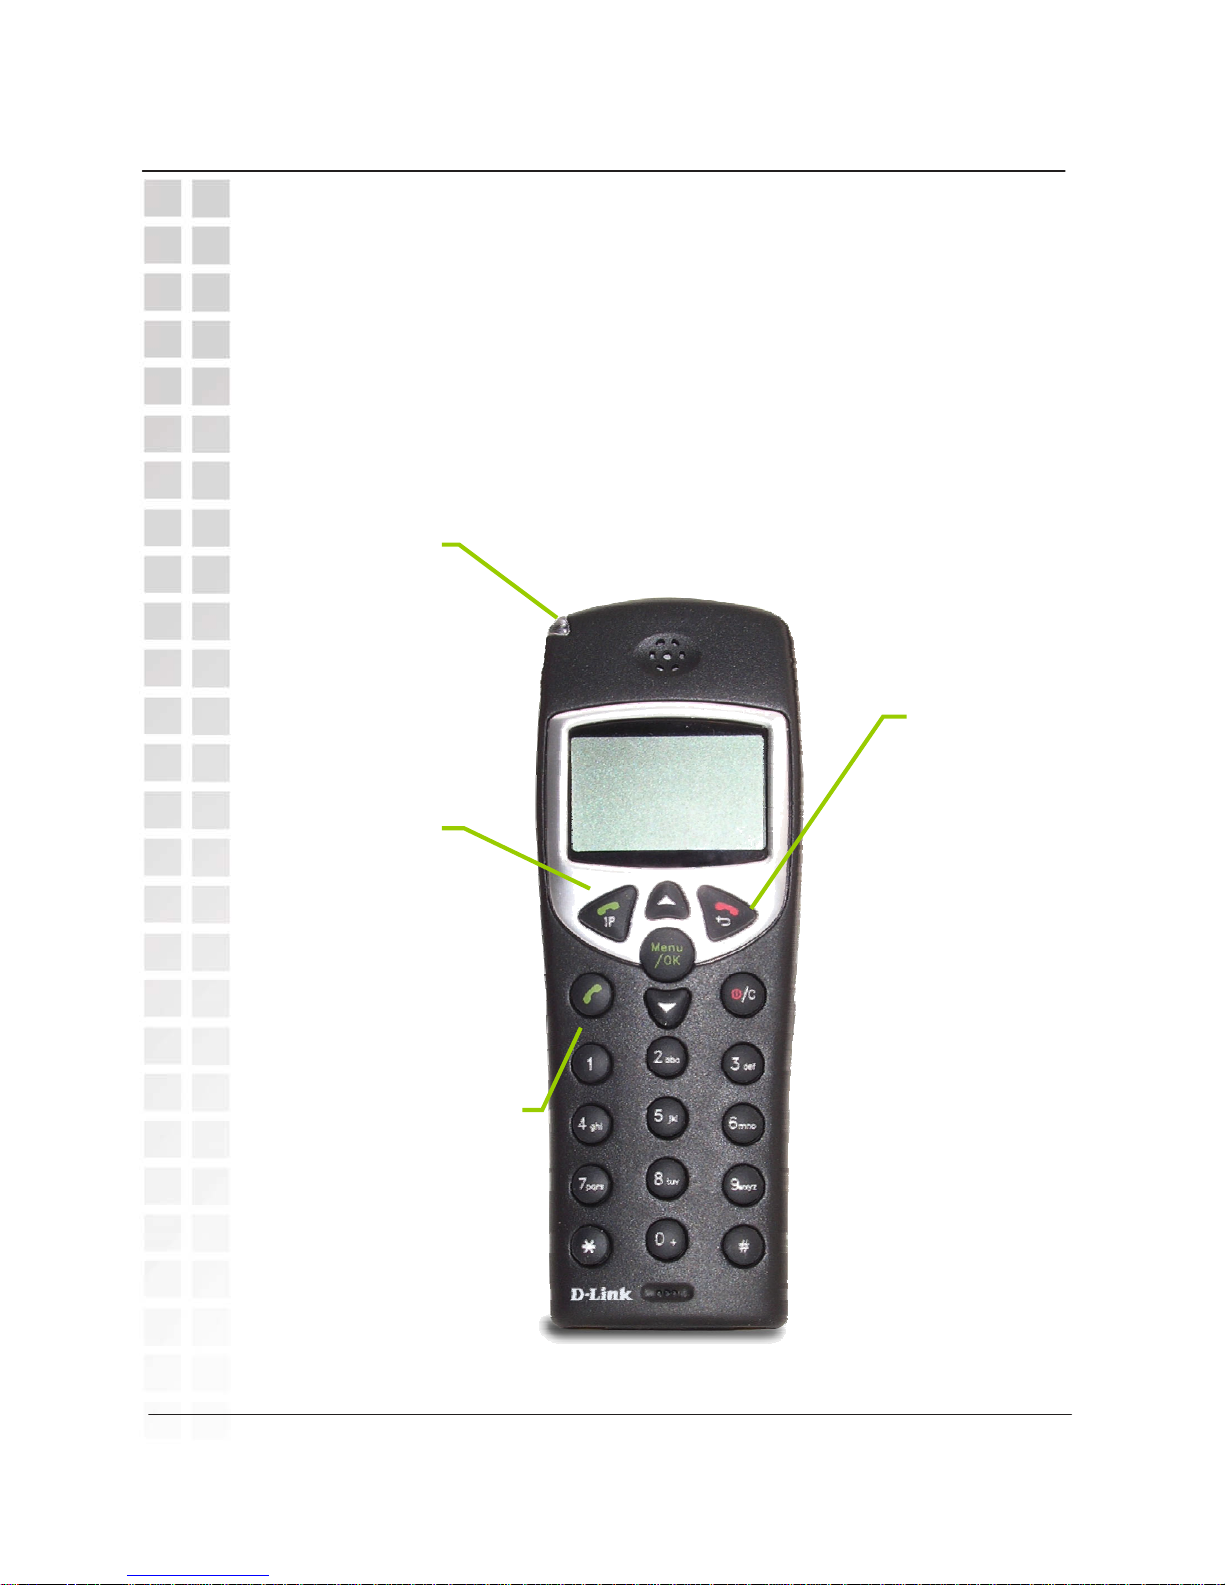
Receiving a Call : PSTN or VoIP
When an incoming PSTN or VoIP telephone call is detected, the handset will ring
and the L1 icon will be displayed in the LCD. If the caller can be identified, the
caller’s number or ContactList entry will be displayed. If the caller’s telephone
number is currently stored in the handset’s phone book, the caller’s name will be
displayed along with the telephone number.
To answer the call, simply pick the handset up from the charger base and press the
PSTN Dial Tone button.
To end the call, either press the On Hook button or replace the handset on the
charger base.
Incoming Call
LED
This red LED
will flash to
indicate an
incoming
PSTN or VoIP
telephone call
IP
Press this
button to
answer an
incoming
VoIP
telephone call.
PSTN Dial Tone
Press this button to dial a
telephone number (over
the regular telephone line
(PSTN)). You will hear
the familiar dial tone −
and then the handset will
dial the telephone
number as you entered it.
On Hook
Press this
button to end
a telephone
call. You can
also simply
place the
handset in the
charger base
to end any
telephone call.
This will end
both a PSTN
and a VoIP
telephone call.
Making Phone Calls
DPH-300 User’s Manual
60
D-Link Corporation
Page 62
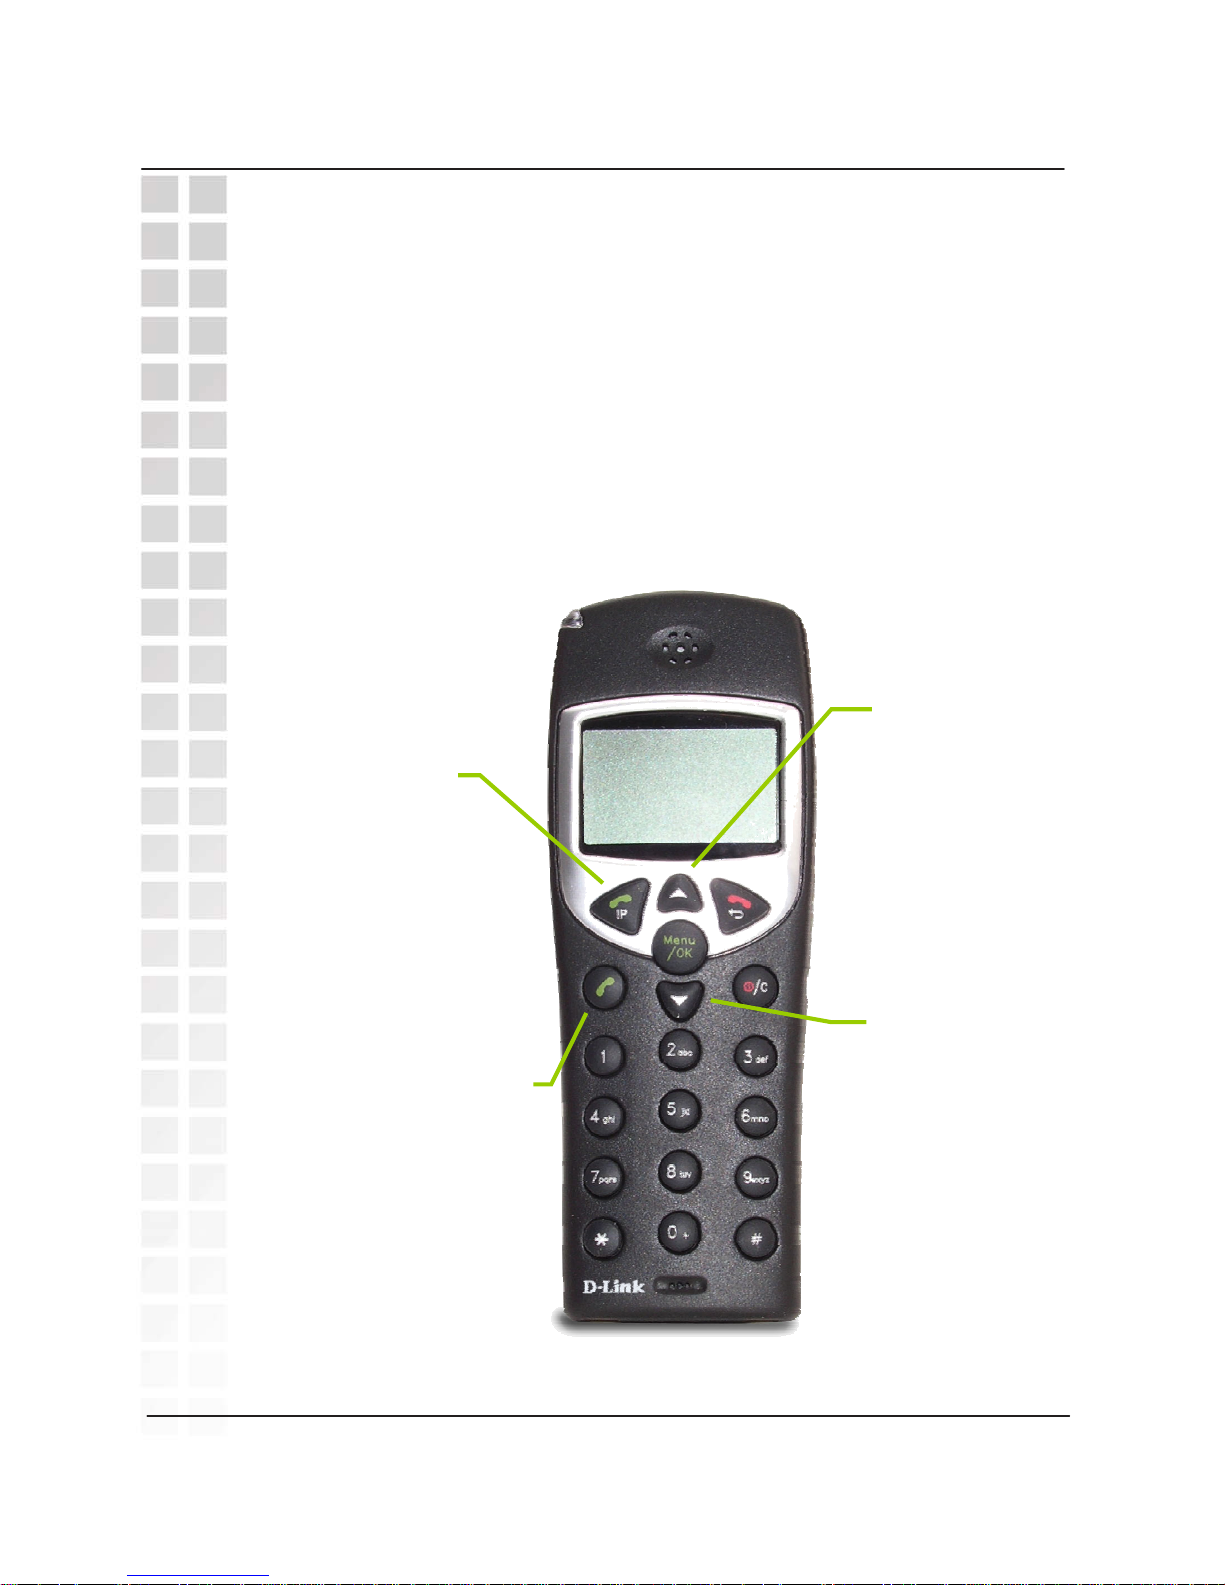
Last Ten VoIP Numbers Dialed : Redial
The handset stores the last ten VoIP telephone numbers you have dialed.
To view and retrieve the last ten numbers you have dialed, press the IP Button and
then Scroll Up or Scroll Down buttons to select one of the displayed VoIP telephone
numbers you want to redial.
To call the selected VoIP number, press the IP button. The Handset will then dial the
selected number.
To end the call, either press the On Hook button or replace the handset on the
charger.
Making Phone Calls
DPH-300 User’s Manual
61
D-Link Corporation
PSTN Dial Tone
Press this button to dial a
telephone number (over
the regular telephone line
(PSTN)). You will hear
the familiar dial tone −
and then the handset will
dial the telephone
number highlighted.
Scroll Up
Press this button to
view the last ten
VoIP numbers
dialed. To scroll
through the ten
numbers, press this
button repeatedly.
IP
Press this
button to dial a
previously
dialed VoIP
number and
initiate the
telephone call.
Scroll Down
Press these buttons
to view the last ten
VoIP numbers
dialed. To scroll
through the ten
numbers, press this
button repeatedly.
Page 63
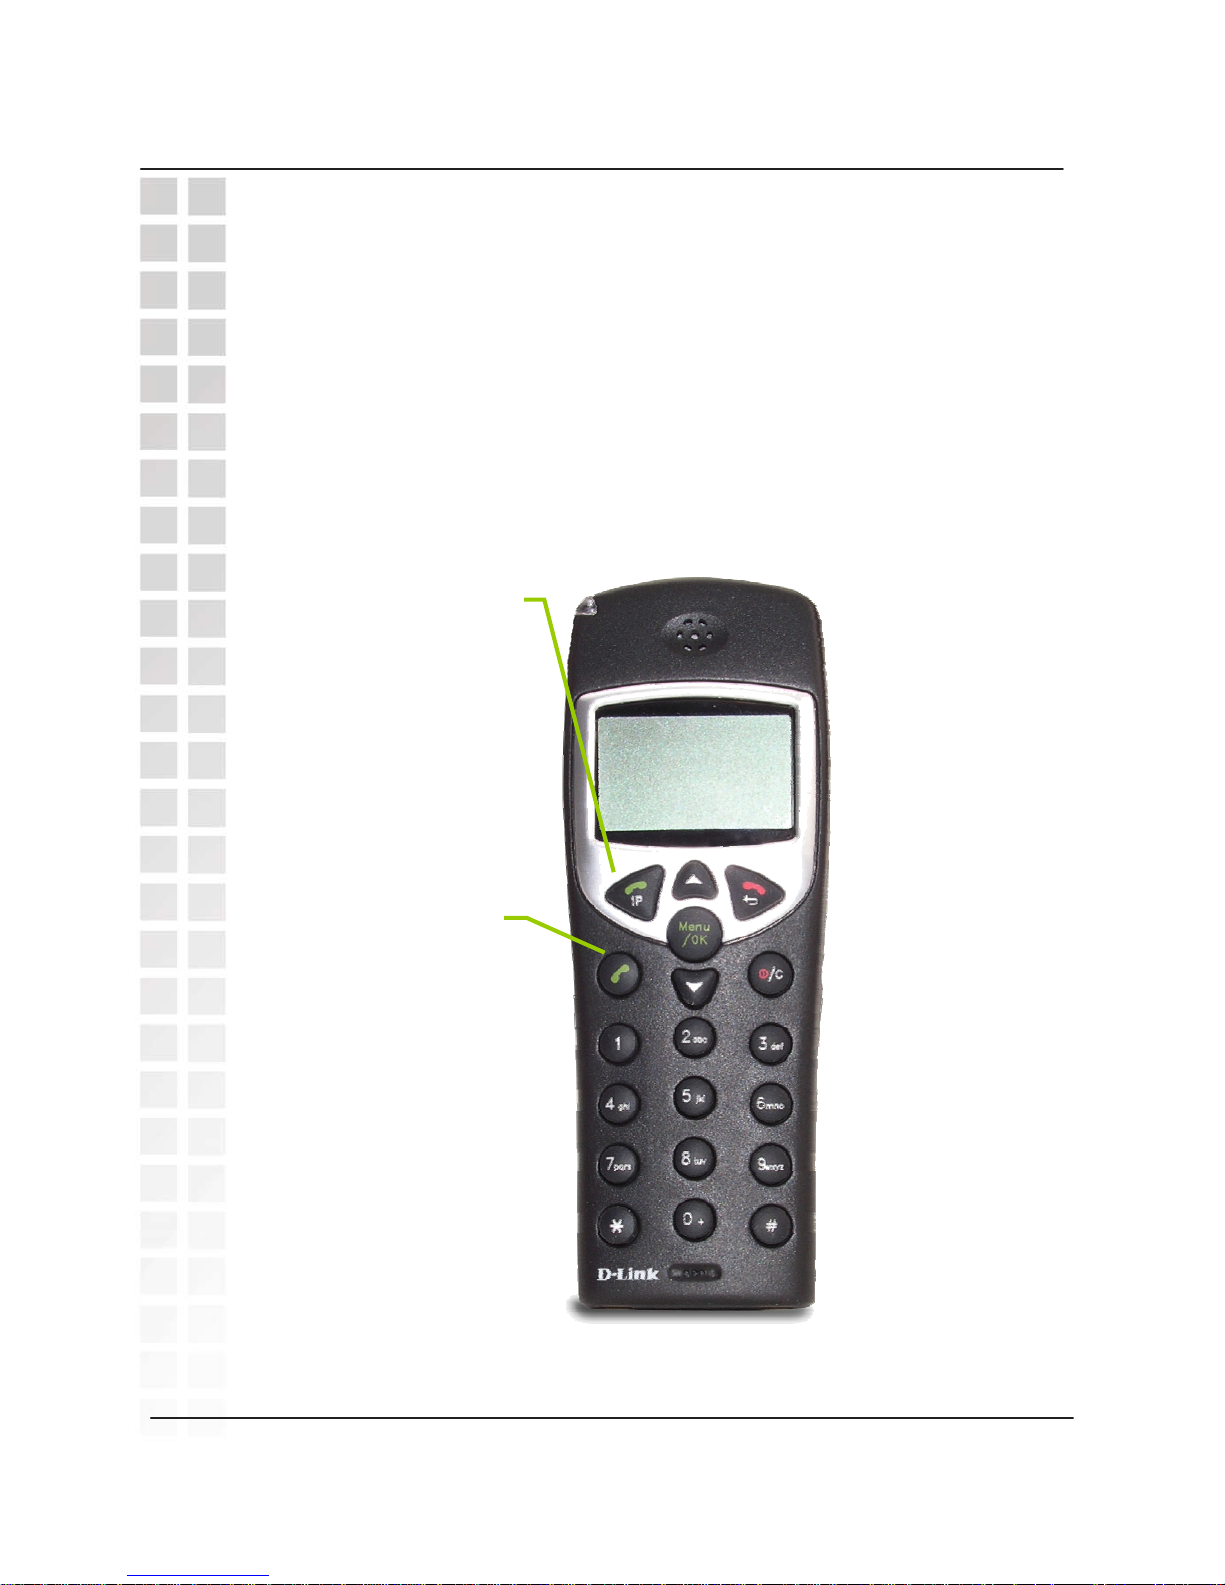
Using the Speakerphone
While making a call, you can engage the handset’s built in speaker to make both
ends of the conversation audible to several people on your end of the line.
To activate the speakerphone press and hold the PSTN Dial Tone button until the
speakerphone icon is displayed and you can hear the activity on the line from the
speaker built in to the back of the handset or the IP button until the speakerphone
icon appears and then your list of IP calls. To deactivate the speakerphone, press
the PSTN Dial Tone or IP button until the speakerphone icon disappears. The call
then be continued using the handset normally.
Making Phone Calls
DPH-300 User’s Manual
62
D-Link Corporation
PSTN Dial Tone
Press and hold this
button to activate the
speakerphone
function for PSTN
calls. To deactivate
the speakerphone
function, press and
hold this button a
second time
IP
Press and hold this
button to activate the
speakerphone function
for VoIP calls. To
deactivate the
speakerphone
function, press and
hold this button a
second time
Page 64
Adjusting the Volume Level
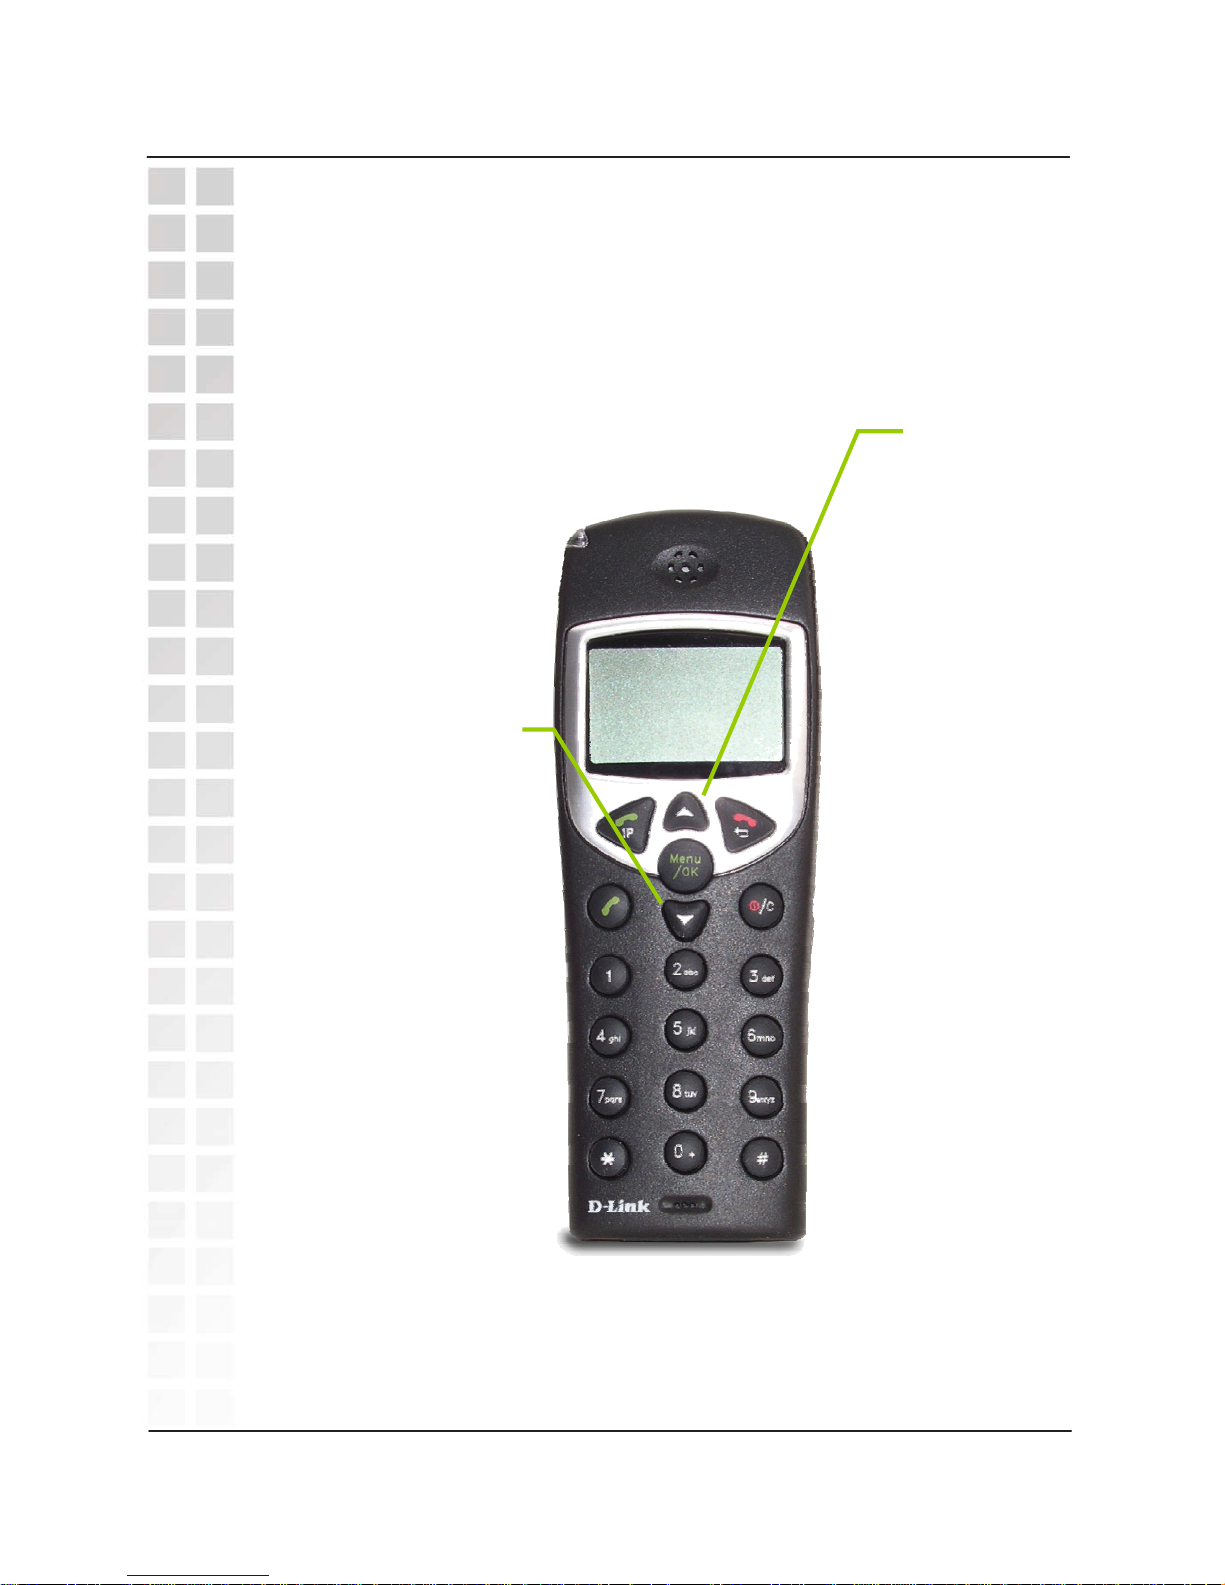
While making a call, you can adjust the earpiece volume level from 1 to 9. A higher
number indicates a higher volume level.
To adjust the volume level, press the Scroll Up or Scroll Down button during a
tele
p
hone call.
Making Phone Calls
DPH-300 User’s Manual
63
D-Link Corporation
Scroll Down
Press these buttons
to adjust the
earpiece volume
level during a
telephone call
Scroll Down will
decrease the
volume level.
Scroll Up
Press these buttons
to adjust the
earpiece volume
level during a
telephone call
Scroll Up will
increase the
volume level.
Page 65

Calling Notes
Unless you configure your handset to use the Anykey talk feature (see page 18 for
more information), incoming calls can be answered by pressing either the PSTN or
IP buttons (two “green phone” buttons on the upper left side of the keypad)
regardless of which type of call is being made.
When you call a mydlink number that is currently offline (that is, not connected to the
Internet for some reason), there will be a long pause (30 seconds or so) before you
hear a busy signal.
TelTel Out calls can not be placed to “Toll-Free” numbers in any country.
TelTel Out rates vary depending on where the call is received. See the
http://www.teltel.com/Tel-OutRates.php
webpage for a detailed table of TelTel Out
phone rates.
TelTel In calling is possible from ordinary PSTN phones or cell phones using PsipTN
access numbers where available. A list of current PsipTN access numbers is
available at: http://www.psiptn.org/html/services.html
Choose the country you
want to call from and a list of cities and their local access numbers will be displayed
at the bottom of the page. To make a TelTel In call, dial the PsipTN access number
using an ordinary phone, then after the prompt, dial the 8-digit mydlink number of the
person you want to reach.
64
Making Phone Calls
DPH-300 User’s Manual
D-Link Corporation
Page 66
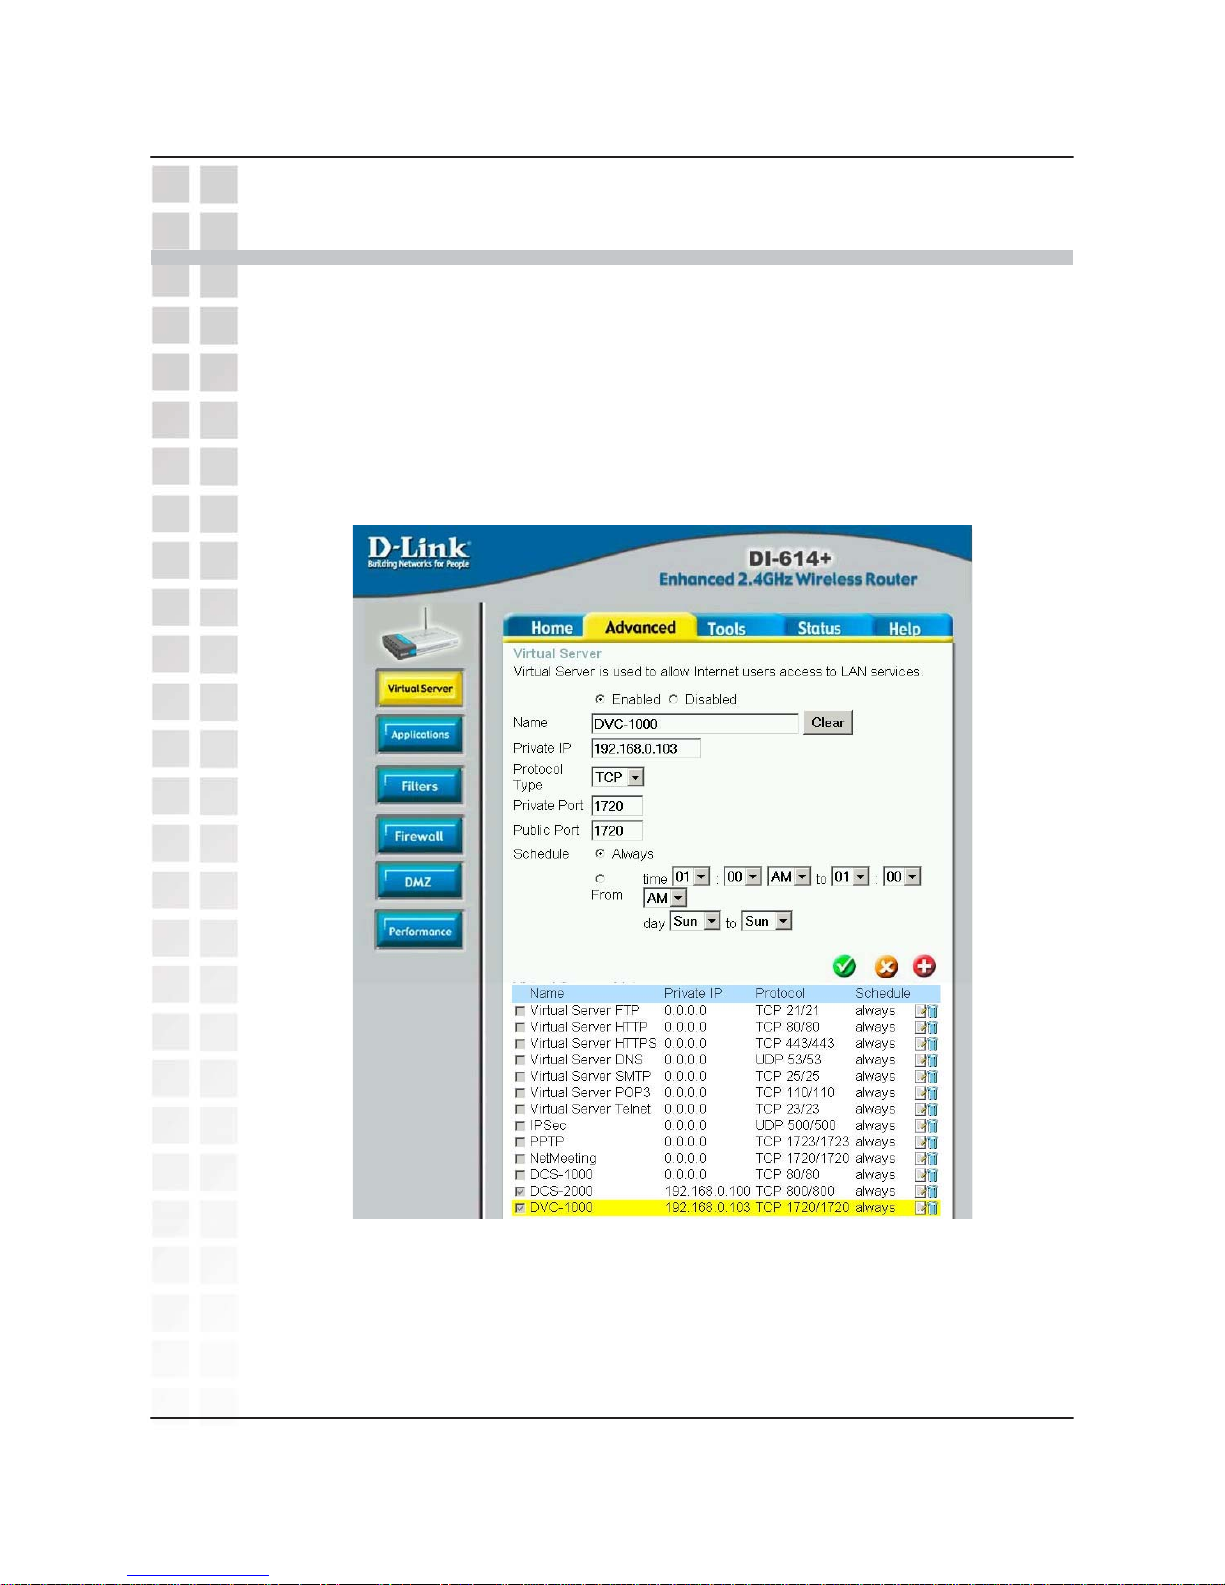
Router Port Configuration
Router Port Configuration
DPH-300 User’s Manual
Using the DPH-300 with D-Link Routers
Most D-Link routers support a feature that allows easy one-click configuration of
the DPH-300. You will not need to manually configure the ports. Upgrading your
router to the lat est firmware might be necessar y to support this feature. If you have
other routers or you are having difficulty with the DPH-300, please read the
information on the nex t three pages to learn how to open ports on routers.
65
D-Link Corporation
Page 67

DPH-300 User’
s Manual
RouterPort Configuration
OpeningPorts on Routers and Gateways
The firewall security features built into most routers and gateways may prevent users
from accessing the VoIP features of their DPH-30 0.
A
router connects to the Internet through a series of numbered ports. The ports used by
the DPH-300 are often blocked from access over the Internet by the firewall features of
the router.
You may be able to connect to another VoIP telephone but not receive any audio. This is
a typical scenario of a firewall blocking the ports needed by the DPH-300 to send
audio.
If this is the case, you need to open the ports on your router to the Internet to allow
access to the DPH-300 .
The port numbers used by the DPH-30 0 are:
3478
5060
8080
9090
The router or gateway that you are using may be different from the D-Link
DI-614+ wireless router example shown on the following pages. Ho w ever, the general
procedure for opening ports will be similar. (If y ou do not ha ve a D-Link router, look f or
Virtual Server, Firewall Rules, Port Forwarding, Advanced or Firewall
in your router’s
configuration utility .)
In the example that follows we begin b y opening the DI-614+ Web configuration utility
and going to Advanced > Virtual Server
.
Follow the steps on the follo wing pages to open the ports on your router for successful
operation of the DPH-300.
D-Link Corporation66
Page 68
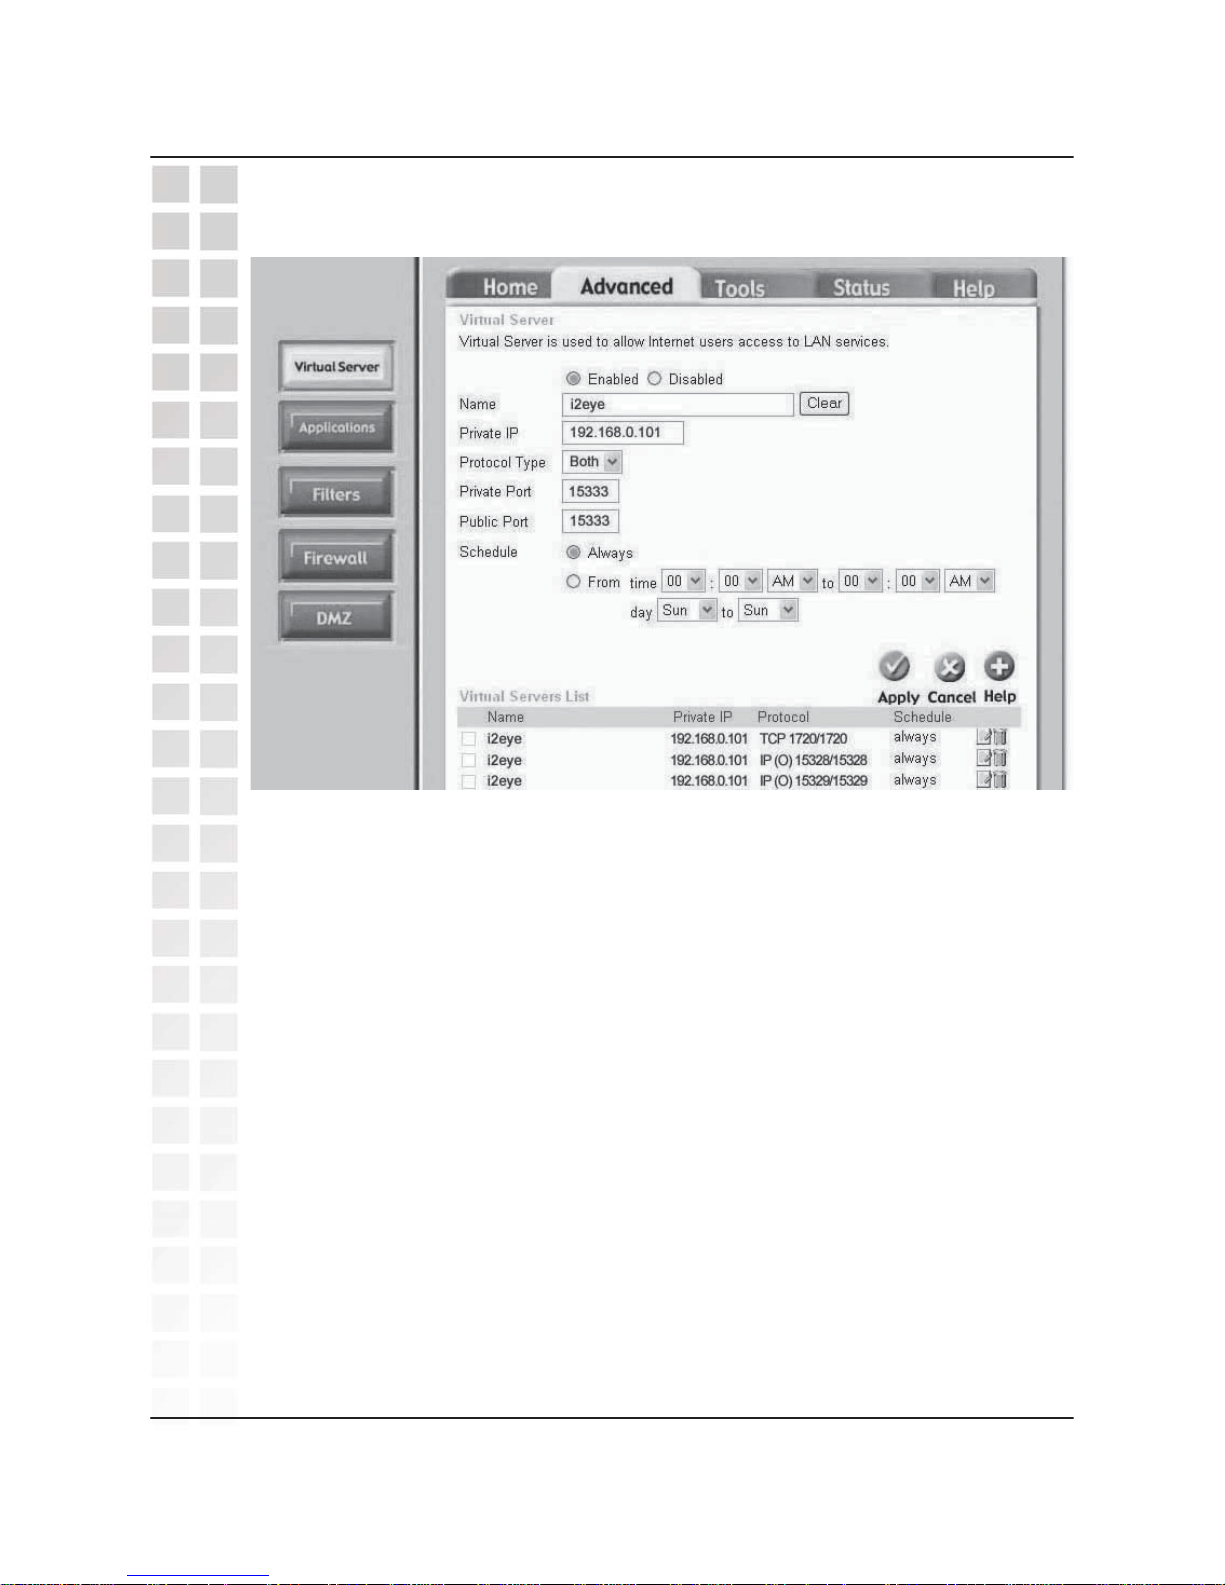
RouterPort Configuration
DPH-300 User’s Manual
How to Open Ports on a Router
A
total of 7 ports must be opened fo r the DP H - 300 to work with most routers or firewalls. To
open these ports, please do the following:
A. Click Enabled
B. Give t h e Virtual Serve r a Name (such as i2eye)
C. Under Private IP, enter the IP address obtained from the D P H -30 0
(How to obtain an IP address from the DPH-300:
Tu rn th e DPH-300 on . H i g h l i g h t
the Settings button on the Main Screen. Navigate to
Settings>Network>Network Addres s >IP address)
D. Under Protocol T ype, choose Both (TCP and UDP)
E. Under Private Port and Public Port, enter 3478
F. Under Schedule, click Always
G. Click Apply to save this entry
67
D-Link Corporation
Page 69

DPH-300 User’
s Manual
Router Port Configuration
You have now completed the entering of one port to be opened. You will need to open
six more ports.
Repeat steps A through G five more times for each one of the following five ports:
5060, 8080, and 9090.
You have now completed the opening of the 4 ports. Your DPH-300 is ready to use
with your router or gateway!
(Important: Not all routers and gate wa ys are the same. Ple ase refer to your user product’ s
manual for specific instructions on opening ports).
D-Link Corporation
68
Page 70
Network Configuration
Network Configuration
DPH-300 User’s Manual
From the following sections, choose the heading that best applies to your equipment or
networking configuration.
Network with Multiple Public IPAddresses
A
Public IP address is visible on the Internet. (Most commonly found in business
environments.)
Recommended Procedure: If there is an available pu blic IP address, simply enter th
e
IP address, subnet mask, and gateway into the applicable fields in the Network Setting
s
screen. If the network has a DHCP server, select the checkbox under the Networ
k
Settings that says, “Aut omatically obtain IP address.” (The network administrator wil
l
be able to tell you whether or not the network has a DHCP server.)
Potential Issues: Some firewalls are configured in a way that could potentially restric
t
H.323 data flow. Most current corporate firewalls are H.323 compliant. If this is the case
,
configuring the firewall is accomplished by simply opening the necessary H.323 port
s
into the network:
Port 1720 (TCP)
Ports 15328 – 15333 (UDP & TCP)
If your particular firewall does not have this option, consult the firewall’ s documentation
on how to open specific ports needed for H.323 communications.
Broadband Modem and One PC
(This is the most common scenario found in a home or home office that currently has
one PC connected to its broadband modem.)
Recommended Procedure: Request from your ISP an additional public IP address.
With a second public IP address, the DPH-300 will be visible to the outside world just
as the existing PC. The ISP can either assign a static IP address or allow you to
dynamically request the IP address via DHCP. Follow the instructions in
Broadband
Modem Only
section, below, depending on what your ISP requires.
Because most broadband modems have only one Ethernet port, it will be necessary to
install a hub or switch between the modem and the rest of the network. Using an Ethernet
cable, connect the modem’s Ethernet port to the applicable uplink port on the hub.
Once that is done, you can plug the PC and DPH-300 into any other available port.
69
D-Link Corporation
Page 71

DPH-300 User’
s Manual
Network Configuration
Broadband Modem, Mu ltiple PC’s, and a Hub
Commonly found in small offices, home offices, or homes with more than one PC where
multiple public IP addresses are available.
In order to install the DP H - 3 0 0 as another device behind a hub assign an available
public IP address to the DPH-300.
Refer to the
Broadband Modem Only
section, below , for detailed in stallation instructions
.
Broadband Modem, Multiple PC’ s, and a Router
Commonly found in small offices, home offices, or homes with more than one PC where
only one public IP address is available.
Refer to the
Opening Ports on Routers and Gateways
section starting on page 51 for
detailed installation instructions.
Broadband Modem Onl
y
This section applies only in the instance that the broadband connection is use
d
exclusively with the DPH-300 and there are no PCs or other devices connected t
o
the broadband modem. Broadband cable modems allow this type of installation.
Recommended Procedure: Many ISPs act as DHCP servers and dynamically assign
a
public IP address whenever the modem requests one. If your ISP has a DHCP server,
select the checkbox under the Network Settings . By choosing this option, you are no
t
required to know the IP address, gateway, subnet mask, or DNS numbers. They will al
l
be filled in automatically.
If your ISP offers Fixed IP addresses (also called Static IPs), all of the networking value
s
will have to be manually entered. Simply enter the public IP address, subnet mask,
gatewa y, and DNS numbers given to y ou b y the ISP into the appropriate network setting
s
fields.
If you have a DSL modem, which offers a PPP oE connection, choose the PPPoE option
on the network settings screen. Fill in your username and password to authenticate.
Potential Issues: In order for the DPH-300 to function properly over the Internet, ther
e
must exist a public IP address f or the world t o see. If yo ur ISP is ac ting as a NAT an
d
assigning private IP addresses, you will have to request a public IP address in order fo
r
your DPH-30 0 to be able to receive calls.
D-Link Corporation
70
Page 72

Troubleshooting
T
roubleshootin
g
DPH-300 User’s Manual
1. The DPH-300 will not make a call using a phone number
„
Check that you did not misdial the number.
„
The phone is not connected to the Internet.
The phone is not registered with the D-Link IP Network Manager. It
may take the phone a few minutes to register. Verify all network
settings, including DNS.
Far side of the call is not registered with the D-Link IP Network Manager.
If you are calling someone who has an videoconference device
in addition to a DPH-300, you ma y h av e t o m a ke d ir ec t IP ca lls t o
them.
2. The DPH-300 can’t make direct IP calls
„
The phone is not connected to the Internet. See the Internet Connection
sections of this user manual.
„
The person you are trying to call is unreachable. Ensure the IP address
of the person you are trying to call is correct.
3. The DPH-300 p roduces an off-hook signal
„
The telephone is off the hook. Hang up the phone.
4. The DPH-300 produces a fast busy signal
„
Person you are trying to call is not registered with the D-Link IP Netw ork
Manager. Call the person using direct IP or wait until the person is
registered with the D-Link IP Network Manager.
„
P erson you are trying to call is in a call or has rejected your call. Try your
call at a later time.
5. DPH-300 doesn’t ring with an incoming call
„
Telephone cable is not properly plugged into the wall or the DPH-300.
Verify that the cable is connected properly.
6. Phone freezes-up while answering a call
„
Phone is not functioning properly behind a fir ewall. See page 65 “Router
Port Configuration”.
7. No audio in call
„
Port forward the appropriate ports to the phone. The phone needs ports
1720 (TCP) and ports 15328-15333 (TCP and UDP) open to function
properly. See the section
Opening Ports on Routers and Gatewa ys
on
page 58, or consult your router’s documentation or your network
administrator for help on doing this.
71
D-Link Corporation
Page 73

Glossar
y
DPH-300 User’s Manual
Glossa
r
y
Bandwidth: A measure of the rate at which data can be sent and received th rou gh a
network. This value is usually given in bits per second (bps) or mega bits per second
(Mbps).
CIF (Common Intermediate Format): An inter mediate video for mat
.
Wh en DPH-300 video is transmitted over a network, the sizes will be CIF, QCIF, o
r
SQCIF. The VideoPhone will default to CIF. CIF resolution is 352 x 288.
DHCP (Dynamic Host Configuration Protocol): A protocol that network devices us
e
to obtain an IP address, subnet mask, gateway and DNS addresses automatically.
A
DHCP server can be a router, ISP server, or PC running Internet connection sharing.
See Static IP address.
Directory Service: A service that allows users to make videoconf erencing calls with
telephone numbers. It does this by correlating teleph one numbers to actual public I
P
addresses.
DMZ (Demilitarized Zone): Devices set up to be in the router’s DMZ will see all network
traffic.
DNS (Domain Name System): A system used to translate computer names into I
P
addresses. F or e x ample , a DNS server would translate www.dlink.com into 64.7.210.132
.
DSL (Digital Subscribers Line): A technology that delivers digital information at
a
high speed through a user’s telephone line. The most common DSL is ADSL
(Asymmetrical Digital Subscribers Line) where the download speed is usua lly much
higher than the upload speed.
Dynamic IP address: An IP address for a particular network device (PC, VideoPhone,
router) that is dynamically assigned b y a router or ISP and will not remain the sam
e
from session to session. See DHCP.
Ethernet: The port on the back of the DPH -30 0 VideoPhone that is used to send and
receive data over a network.
Far side: The remote connection of the videoconference. Your connection is the Local
Connection.
Firewall: A security mechanism placed between networks, which restricts certain types
of data to devices behind the firewall.
H.323: Standard defining videoconferencing over the Internet.
Home Gateway: A term commonly interchanged with router. Also called a residential
gateway.
72
D-Link Corporation
Page 74

DPH-300 User’
sManual
Glossary
IP address (Internet Protocol Address): An IP address is a number that identifies
a
computer connected to the Internet. Ever y computer that is connected to the Interne
t
must have a unique IP address. An IP addr ess consists of four sect ions separated b
y
periods. Each section contains an 8-bit value represented as a number ranging f rom
0
to 255.
ISP (Internet Service Provider): A commercial organization that provides subscribers
with access to the Internet.
LAN (Local Area Network): A network that is designed to span small distances. Thes
e
are most commonly used in small buildings, businesses and homes with multiple PCs.
See WAN.
NAT (Network Address Translation): A technology that allows multiple network device
s
to share the same IP address. NAT devices forward all incoming and outgoin
g
information to the correct network devices. Most NAT devices have firewall capabilities.
Port Forwarding: The router will f orward public-side incoming inf ormation to a specifie
d
device on the private side. The rout er will forward only the data that is received on th
e
specified ports. This is usually set thro ugh the advanced settings in the router’s we
b
interface. Also known as Virtual Server or Firewall Rules.
Ports: A port is a specified path in which data tra vels . Each type of data that is transmit te
d
over the Internet travels down a specified port. A router will forward information fro
m
one port to another, and a firewall will open only a specified number of ports.
Private IP address: An IP address that is behind a NAT, which is not visible to th
e
Internet. The preferred ranges for private IP address are either 192.168.x.x or 10.0.0.x.
Public IP address: An IP address that is not behind a NAT router. This IP address i
s
visible from the Internet.
QCIF (Quarter Common Intermediate Format): An intermediate video format. QCI
F
resolution is 176x144. The DPH-300 VideoPhone will send QCIF-sized video only if th
e
remote endpoint cannot decode CIF.
QoS (Quality of Service): Allows guaranteed bandwidth and packet delivery between
network devices over a network.
Router: A device that attaches two or more network devices and forwards
data accordingly. Most consumer type routers act as DHCP servers, NATs and
firewalls. SLIC (Subscriber -Line Interface Circuit): Provides a phone’ s analog dial
tone, busy tone, dual-tone multiple-frequency (DT MF) generation and decoding, caller
ID and ri ng- signaling functions. The SLIC allows the DPH- 300 to work with a standard
telephone without connecting to the phone system.
SQCIF (Subquarter Common Interm ediate Format): An interm ediate video format.
SQCIF resolution is 128x96. The DPH-300 VideoPhone will send SQCIF-sized vide
o
only if the remote endpoint cannot decode CIF or QCIF.
D-Link Corporation
73
Page 75

Glossar
y
DPH-300 User’s Manual
Static IP address: An IP address for a particular network device (PC, VideoPhone,
router) that doesn’t change. See DHCP.
TCP (Transmission Control Protocol): An Inter net protocol used by
the
DPH-300 VideoPhone in addition to UDP.
UDP (User Datagram Protocol): The Internet protocol most commonly used by the
DPH-300 VideoPhone to send and receive audio and video data.
WAN (Wide Area Network): A network that is designed to span large distances. See
74
D-Link Corporation
Page 76

DPH-300 User’
s Manual
T
echnical Specifications
T
echnical Specifications
D-Link Corporation
75
Ethernet Ports
Two Ports for Fast Ethernet
Connections
RJ-45, Auto MDI/MDI-X, 10/100
Mbs
Standard Compliance IEEE 802.3 for 10 Mbps Ethernet
IEEE 802.3u for 100 Mbps Ethernet
Rate Adaptation 10/100 Mbps, Auto-Negotiation
Cordless Phone Interface
Standard Compliance DECT (Digital Europe Cordless
Telecommunication)
GAP (Generic Access Profile)
Frequency 1880-1900 MHz
RF Channels 10 Channels
Modulation GFSK
Voice Coding ADPCM< 32K bit/s t.
Power Requirement:
External Power Adapter AC Power Adapter, AC 9V , 1 A
Embedded Factory Reset Switch On rear of Base Unit
Telephony Support:
Call Control Protocol SIP (RFC3261)
CODEC G.711 (A-law and U-law)
G.726
G.729A
iLBC
Echo Cancellation G.168
Configuration/Management:
DHCP (Dynamic Host
Configuration Protocol)
DHCP Client (RFC2131)
Embedded Web Server
Configuration Restore/Back up
TELNET
TFTP Client For firmware upgrade and
configuration file download
Performance Monitor
Security:
User Authentication Administration Username/Password control for
TELNET and WEB configuration
SIP Authentication SIP Authentication with MD5
password encryption
VoIP NAT Travers al SIP/STUN
Page 77

T
echnical Specifications
DPH-300 User’s Manual
76
D-Link Corporation
Safety/EMI Certifications:
UL/CUL
EMI Certification:
FCC Class B
BSMI Class B
CE Class B
Environmental Specifications:
Operating Temperature 0° to 40°C
Storage Temperature -10° to 55°C
Operating Humidity Range 5 to 95%, Non-condensing
Page 78

DPH-300 User’
s Manual
Country Codes
CountryCodes
Code Count
r
y
Code Count
r
y
93 Afghanistan
355 Albania
213 Algeria
684 American Samoa
376 Andorra
244 Angola
809 Anguilla
268 Antigua
54 Argentina
374 Armenia
297 Aruba
247 Ascension Island
61 Australia
43 Austria
994 Azerbaijan
242 Bahamas
973 Bahrain
880 Bangladesh
246 Barbados
375 Belarus
32 Belgium
501 Belize
229 Benin
809 Bermuda
975 Bhutan
591 Bolivia
387 Bosnia and Hercegovina
267 Botswana
55 Brazil
284 British Virgin Islands
673 Brunei
359 Bulgaria
257 Burundi
855 Cambodia
237 Cameroon
1 Canada
238 Cape Verdi
345 Cayman Islands
236 Central African Republic
235 Chad
56 Chile
86 China
57 Colombia
269 Comoros and Mayotte
242 Congo
682 Cook Islands
506 Costa Rica
385 Croatia
53 Cuba
357 Cyprus
420 Czech Republic
45 Denmark
246 Diego Garcia
253 Djibouti
767 Dominca
809 Dominican Republic
593 Ecuador
20 Egypt
503 El Salvador
240 Equatorial Guinea
291 Eritrea
372 Estonia
251 Ethiopia
500 Falkland Islands
679 Fiji
358 Finland
33 France
596 French Antilles
594 French Guiana
241 Gabon
220 Gambia
995 Georgia
49 Germany
233 Ghana
350 Gibraltar
30 Greece
299 Greenland
473 Grenada
671 Guam
502 Guatemala
224 Guinea
245 Guinea-Bissau
592 Guyana
509 Haiti
504 Honduras
852 Hong Kong
36 Hungary
354 Iceland
91 India
62 Indonesia
98 Iran
964 Iraq
353 Ireland
972 Israel
39 Italy
225 Ivory Coast
876 Jamaica
81 Japan
962 Jordan
7 Kazakhstan
254 Kenya
965 Kuwait
856 Laos
371 Latvia
961 Lebanon
266 Lesotho
77
D-Link Corporation
Page 79

CountryCodesDPH-300 User’s Manual
Code Count
r
y
Code Count
r
y
78
231 Liberia
218 Libya
423 Liechtenstein
370 Lithuania
352 Luxembourg
853 Macao
389 Macedonia
261 Madagascar
265 Malawi
60 Malaysia
960 Maldives
223 Mali
356 Malta
692 Marshall Islands
222 Mauritania
230 Mauritius
52 Mexico
373 Moldova
33 Monaco
976 Mongolia
473 Montserrat
212 Morocco
258 Mozambique
95 Myanmar (Burma)
264 Namibia
674 Nauru
977 Nepal
31 Netherlands
599 Netherlands Antilles
869 Nevis
687 New Caledonia
64 New Zealand
505 Nicaragua
227 Niger
234 Nigeria
683 Niue
850 North Korea
967 North Yemen
47 Norway
968 Oman
92 Pakistan
680 Palau
507 Panama
675 Papua New Guinea
595 Paraguay
51 Peru
63 Philippines
48 Poland
351 Portugal
974 Qatar
40 Romania
7 Russia
250 Rwanda
670 Saipan
378 San Marino
239 Sao Tome and Principe
966 Saudi Arabia
221 Sene
g
al
381 Serbia and Montenegro
248 Seychelles
232 Sierra Leone
65 Singapore
421 Slovakia
386 Slovenia
677 Solomon Islands
252 Somalia
27 South Africa
82 South Korea
34 Spain
94 Sri Lanka
290 St. Helena
869 St. Kitts/Nevis
249 Sudan
597 Suriname
268 Swaziland
46 Sweden
41 Switzerland
963 Syria
886 Taiwan
7 Tajikistan
255 Tanzania
66 Thailand
228 Togo (Togolese Republic)
690 Tokelau
676 Tonga
216 Tunisia
90 Turkey
688 Tuvalu (Ellice Islands)
256 Uganda
380 Ukraine
971 United Arab Emirates
44 United Kingdom
598 Uruguay
1 USA
7 Uzbekistan
678 New Hebrides
39 Vatican City
58 Venezuela
84 Viet Nam
681 Wallis and Futuna
685 Western Samoa
381 Yemen
243 Zaire
260 Zambia
263 Zimbabwe
D-Link Corporation
Page 80

USA dlink.com Greece dlink.gr
Canada dlink.ca Luxembourg dlink.be
Europe (UK) dlink.co.uk Poland dlink.pl
Germany dlink.de Hungary dlink.hu
France dlink.fr Singapore dlink-intl.com
Netherlands dlink.nl Australia dlink.com.au
Belgium dlink.be India dlink.co.in
Italy dlink.it Dubai, Egypt dlink-me.com
Sweden dlink.se Turkey dlink.com.tr
Denmark dlink.dk Israel dlink.co.il
Norway dlink.no Latin America dlink.cl
Finland dlink.fl Brazil dlinkbrasil.com.br
Spain, Portugal dlink.es South Africa d-link.co.za
Czech Republic dlink.cz Russia dlink.ru
Switzerland dlink.ch China dlink.com.cn
Taiwan, HQ dlink.com.tw
DPH-300 User’
sManual
Contacting D-Link
Contacting D-Link
Support for D-Link products is available over the internet 24 hours a day at the
following web addresses:
When contacting technical support, please pr ovide the following information:
•
Serial number of the unit
•
Model number or product name
•
Software type and version number
D-Link Corporation
79
Page 81

Notices
Trademarks:
D-Link is a registered trademark of D-Link Corporation/D-Link Systems, Inc. Other trademarks or
registered trademarks are the property of their respective owners.
Copyright Statement:
No part of this publication or documentation accompanying this product may be reproduced in
any form or by any means or used to make any derivative such as translation, transformation, or
adaptation without permission from D-Link Corporation/D-Link Systems, Inc., as stipulated by the
United States Copyright Act of 1976 and any amendments thereto. Contents are subject to
change without prior notice.
©
Copyright 2006 by D-Link Corporation/D-Link Systems, Inc. All rights reserved.
Information in this document is subject to change without notice.
CE Mark Warning:
This is a Class B product. In a domestic environment, this product may cause radio interference,
in which case the user may be required to take adequate measures.
FCC Statement:
This equipment has been tested and found to comply with the limits for a Class B digital device,
pursuant to part 15 of the FCC Rules. These limits are designed to provide reasonable protection
against harmful interference in a residential installation. This equipment generates, uses, and
can radiate radio frequency energy and, if not installed and used in accordance with the
instructions, may cause harmful interference to radio communication. However, there is no
guarantee that interference will not occur in a particular installation. If this equipment does cause
harmful interference to radio or television reception, which can be determined by turning the
equipment off and on, the user is encouraged to try to correct the interference by one or more of
the following measures:
• Reorient or relocate the receiving antenna.
• Increase the separation between the equipment and receiver.
• Connect the equipment into an outlet on a circuit different from that to which
the receiver is connected.
• Consult the dealer or an experienced radio/TV technician for help.
80
D-Link Corporation
 Loading...