

Page 1
Version 1.0 | 27/03/2013
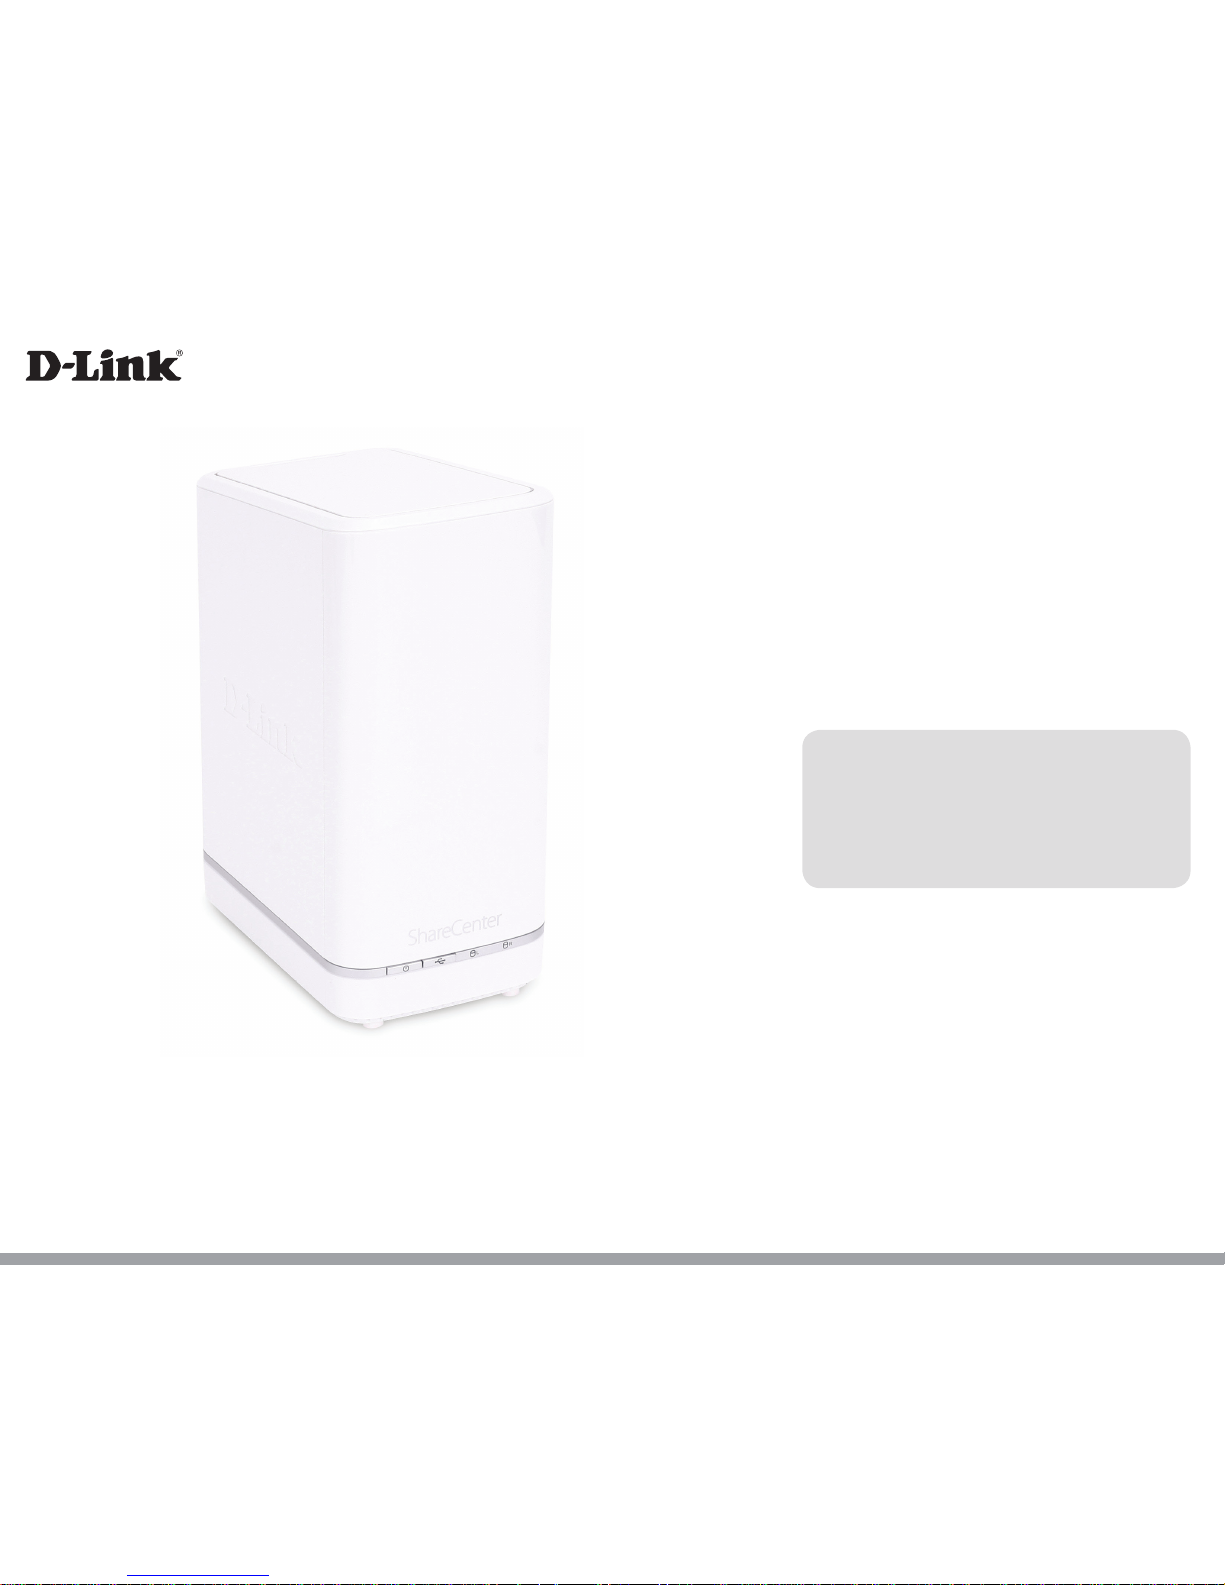
DNS-327L
User Manual
ShareCenter™ + 2-Bay Cloud Network Storage Enclosure
Page 2
i
D-Link ShareCenter DNS-327L User Manual
Table of Contents
Table of Contents
Product Overview .............................................................. 1
Before you Begin ........................................................................... 2
System Requirements ................................................................. 2
Package Contents ......................................................................... 2
Features ............................................................................................ 3
Checking the Hardware Requirements ................................ 7
Hardware Overview ..................................................................... 8
Front Panel ..............................................................................8
LED Description ................................................................ 9
Rear Panel (Connections) .................................................10
Bottom Panel ........................................................................11
Getting Started ................................................................12
Hardware Setup ..........................................................................12
Zero Conguration Setup ........................................................15
mydlink on the DNS-327L .....................................22
Windows Installation .......................................................23
Setup Wizard ................................................................................23
Mapping a Drive ..................................................................62
Alternative methods to Mapping a Drive ..................65
Mac - Setup Wizard Installation ......................................66
Conguration ................................................................... 87
Managing your DNS-327L .......................................................87
D-Link Storage Utility ................................................................88
D-Link Storage Utility - For Mac ............................................90
Web UI Login ................................................................................97
Web UI General Layout .....................................................98
Home ..................................................................................98
Applications .....................................................................99
Management ................................................................ 100
Management ..................................................................... 101
Setup Wizard (Web UI) .............................................. 101
Disk Management ......................................................106
Hard Drive Conguration ................................... 106
Hard Drive Conguration Wizard ..............107
JBOD ....................................................................115
RAID 0 .................................................................. 121
RAID 1 .................................................................. 128
Upgrade from Standard Mode to RAID 1 136
S.M.A.R.T. Test .........................................................142
Creating a Schedule ....................................... 144
Scan Disk .................................................................. 145
Volume Encryption ............................................... 147
Account Management .............................................. 151
Users / Groups ........................................................ 151
Creating a Single User ...................................151
Creating Multiple Users ................................156
Modify Users ..................................................... 160
Deleting Users .................................................. 164
Importing Users ............................................... 165
Creating a Group ............................................. 168
Page 3
ii
D-Link ShareCenter DNS-327L User Manual
Table of Contents
Modifying a Group .......................................... 173
Deleting a Group ............................................. 179
Quotas ....................................................................... 180
Network Shares ...................................................... 185
Add/Modify Network Shares Wizard ........ 186
Deleting a Network Share ............................ 193
Resetting the Network Shares .................... 195
ISO Shares Setup Wizard ............................... 196
Creating an ISO Image ..................................200
ISO image Creation Wizard .......................... 201
ISO Name and File Path Settings ............... 202
ISO Tree Editing ................................................ 205
Verifying the ISO image ................................ 206
Admin Password .................................................... 207
Network Management .............................................. 208
LAN Setup ................................................................ 208
IPv6 Settings .....................................................211
IPv6 Setup .......................................................... 212
Link Speed and LLTD Settings .................... 214
DDNS .........................................................................215
Port Forwarding.....................................................216
Application Management ........................................ 220
FTP server ................................................................ 220
Block IP List .............................................................. 221
Add-ons .................................................................... 225
Add-Ons ...................................................................226
Installing Add-Ons from the Setup Wizard .. 226
Installing Add-ons from the Web UI ............... 229
AFP Service .............................................................. 231
NFS Service .............................................................. 231
Multimedia Services ............................................. 232
UPnP AV Server ...................................................... 236
iTunes Server .......................................................... 237
System Management ................................................238
Language ................................................................. 238
Time and Date ........................................................ 239
Device .......................................................................240
System Settings ..................................................... 241
Power Management ............................................ 242
Notications ............................................................ 244
Email Settings ................................................... 244
SMS Settings .....................................................245
Adding an SMS Service Provider ............... 246
Event Settings ..................................................247
Logs ............................................................................ 248
Firmware Upgrade ................................................ 249
USB Devices ............................................................250
UPS Settings ...................................................... 250
USB Storage Information .............................. 250
Printer Information ......................................... 251
System Status ............................................................... 252
System Info .............................................................. 252
Home .................................................................................... 254
My Photos ...................................................................... 255
Creating an Album ...............................................257
Photo Album Wizard ............................................ 258
Editing Photos in an Album .............................. 262
Select a Photo as a Cover image......................265
Page 4
iii
D-Link ShareCenter DNS-327L User Manual
Table of Contents
Select a Photo to Move ....................................... 267
Delete a Photo .......................................................269
Share a Photo to Picasa ....................................... 270
Share a Photo to Facebook ................................ 273
Share a Photo to Flickr ........................................276
Deleting an Album ............................................... 279
Refreshing the Album Database .....................281
Managing Photos ................................................. 282
Slideshow Toolbar ........................................... 283
Beam a Slideshow to your TV .....................292
Photo Gallery .......................................................... 293
My Files ........................................................................... 295
My Files - Icons ............................................................. 296
Upload ......................................................................297
Download ................................................................ 299
Copy ........................................................................... 301
Move .......................................................................... 304
Delete ........................................................................ 306
Rename ..................................................................... 308
Properties................................................................. 310
Create a Zip le from the Selected Folder ....311
Add to Zip ................................................................ 312
Unzipping a Zipped File ..................................... 314
Unzipping a Tar File ..............................................315
Opening a File ........................................................ 316
Previewing a File ................................................... 317
Share to Facebook ................................................ 318
Share to Picasa ....................................................... 319
Share to Flickr ......................................................... 320
My Music ........................................................................ 321
My Music - The Interface .......................................... 323
My Music - The Categories ....................................... 324
My Music - The Categories ....................................... 325
My Music - Music on your DNS-327L ................... 326
My Music - Playback Music on an Apple device 328
My Music - The Player ................................................ 329
My Music - Create a Playlist ..................................... 330
My Surveillance ...........................................................332
My Surveillance ...........................................................341
My Surveillance - Live View ..................................... 342
My Surveillance - Live View ..................................... 343
My Surveillance - Live View ..................................... 344
My Surveillance - Live Camera Panel Explained
II ......................................................................................... 345
My Surveillance - Single Camera Live Video
Mode ...............................................................................346
My Surveillance - Full Screen Live Video Mode 347
My Surveillance - Digital Zoom Video Mode.....348
My Surveillance - E-Map View ................................ 349
My Surveillance - Snapshot View .......................... 350
My Surveillance - Motion Detection Camera
Mode ...............................................................................351
My Surveillance - Conguring Patrol Settings .. 352
My Surveillance - Conguring Patrol Preset
Points ............................................................................... 353
My Surveillance - Viewing Preset Points ............. 354
My Surveillance - Live Video/Playback Settings 355
My Surveillance - OSD Settings ............................. 356
Page 5
iv
D-Link ShareCenter DNS-327L User Manual
Table of Contents
My Surveillance - Playback ...................................... 357
My Surveillance - Playback ...................................... 358
My Surveillance - Playback ...................................... 359
My Surveillance - Recording Information ..........360
My Surveillance - Setup ............................................ 361
My Surveillance - Setup - Camera Setup ............ 362
My Surveillance -Search and Add Camera ......... 370
My Surveillance -Setup - Audio and Video ........ 373
My Surveillance - Setup - Recording Setup ....... 375
My Surveillance -Setup - Event Setup .................384
My Surveillance - Setup - E-map Upload ............ 387
My Surveillance - Setup - Backup .......................... 391
My Surveillance - Setup - Server Port ..................396
My Surveillance - Status ...........................................397
My Surveillance - Status ...........................................398
My Favorites Application.......................................... 401
Adding Applications ............................................ 402
Applications ....................................................................... 403
FTP/HTTP Downloads ............................................... 403
Remote Backups .......................................................... 405
Create Wizard .........................................................406
Local Backups ......................................................... 410
Time Machine ......................................................... 411
Time Machine - On the Mac .............................. 412
Time Machine - Delete a Volume ....................419
USB Backups ...........................................................422
MTP Backups ..................................................... 423
USB Backups .....................................................423
MTP Backup Process.......................................424
USB Backup Process ....................................... 426
P2P Downloads ...................................................... 428
Settings ............................................................... 428
Downloads ........................................................429
Amazon S3 ............................................................... 430
Creating an AWS Account ............................ 431
mydlink ..................................................................... 437
mydlink Verication ............................................. 438
mydlink Java Runtime Machine ....................... 440
Creating a New Folder ......................................... 445
mydlink Settings Details ..................................... 446
ShareCenter™ NAS Status ................................. 447
Deleting a mydlink device ................................. 448
Deleting a mydlink account .............................. 449
The mydlink Access NAS App ........................... 451
The mydlink Access NAS App - Features ......452
The mydlink Access NAS App - Compatibility 453
Knowledge Base ............................................................455
What is RAID? ............................................................................ 455
RAID Options ..................................................................... 457
UPS Connectivity .....................................................................459
Deleting a UPS Slave ....................................................... 463
USB Print Server .......................................................................465
Setting up a printer using Mac OS 10.8 ...................468
Setting up a printer using Mac OS 10.8 ...........................
................................................................................................ 469
Page 6
1
D-Link ShareCenter DNS-327L User Manual
Section 1 - Product Overview
The D-Link ShareCenter™ DNS-327L is a 2-Bay Cloud Network Storage device. When used with internal SATA drives, it enables
you to share documents, les, and digital media such as music, photos, and video with everyone in your home or in the oce
network. Remotely accessing les through the internet is also possible using the built-in FTP server, Web File server and the
WebDAV protocol. Whether you are allowing access locally or over the internet, you can keep data safe by only giving rights
to specic users or groups. Users can also access their DNS-327L remotely using the mydlink portal, or using mobile devices
with the mydlink Access-NAS app on a mobile phone or tablet. When conguring the DNS-327L, you can create and assign
users and groups to folders with either read or read/write permissions. This is ideal for an oce environment with employeespecic sensitive data or for the home where you can limit your children to age appropriate material. The DNS-327L will be
available to any computer (PC,Mac, or Linux) on your network, without the need to install any software.
You may back up yoru music, photos, and video collections to teh DNS-327L for safekeeping. Then enjoy the benets of the
built-in UPnP AV media server as you stream digital content to compatible media players
2
(such as those found in D-Link’s
MediaLounge product line). This feature is highly convenient as it allows you to turn o a computer that would normally be
needed for the same function.
The availability of four dierent hard drive modes (Standard, JBOD, RAID 0, RAID1) allows you to choose the conguration
best suited to your needs. Standard mode creates two separately accessible hard drives. JBOD combines both drives in linear
fashion for maximum space eciency. RAID 0 combines both drives in a ‘striped’ conguration, which provides the highest
performance when using a Gigabit Ethernet connection. RAID 1 causes the drives to mirror each other, providing maximum
protection. If one drive fails while congured as RAID 1, the unaected drive continues to function as a single drive until the
failed drive is replaced. The new drive will then be re-mirrored, allowing the DNS-327L to return to its full protection.
To further enhance your ShareCenter’s™ capabilities, the DNS-327L supports a proprietary mydlink service, provided to D-Link
customers only, serves as a portal to those users who wish to access their data from any location. Mydlink service supports list,
download, upload or delete les/folders and can see the status of a ShareCenter™ from any location via web browser.
The DNS-327L also has several Add-on features to enhance your experience, including PhotoCenter, Blogging, Transmission
and Audio Streamer among others.
Product Overview
1 Hard Drive(s) not included.
2 D-Link cannot guarantee full compatibility or proper playback with all codecs. Playback capability depends on the codec support of the UPnP™ AV media player.
Page 7
2
D-Link ShareCenter DNS-327L User Manual
Section 1 - Product Overview
• Check box contents
• Check system requirements
• Ensure that you have the hardware you need for your ShareCenter™ device
Before you Begin
System Requirements
For best results, the following minimum requirements are recommended on any system used to congure and use the
ShareCenter™:
• Computer with: 1Ghz processor / 512MB RAM / 200MB available space / CD-ROM drive
• Internet Explorer® version 8, Mozilla® Firefox® 4, Google® Chrome 3, or Apple® Safari® 4 and above
• Windows® XP (with Service Pack 2), Windows Vista®, Windows® 7, Windows® 8
• Mac OS® X 10.5.6 or greater
• 3.5” SATA Hard Drive(s)
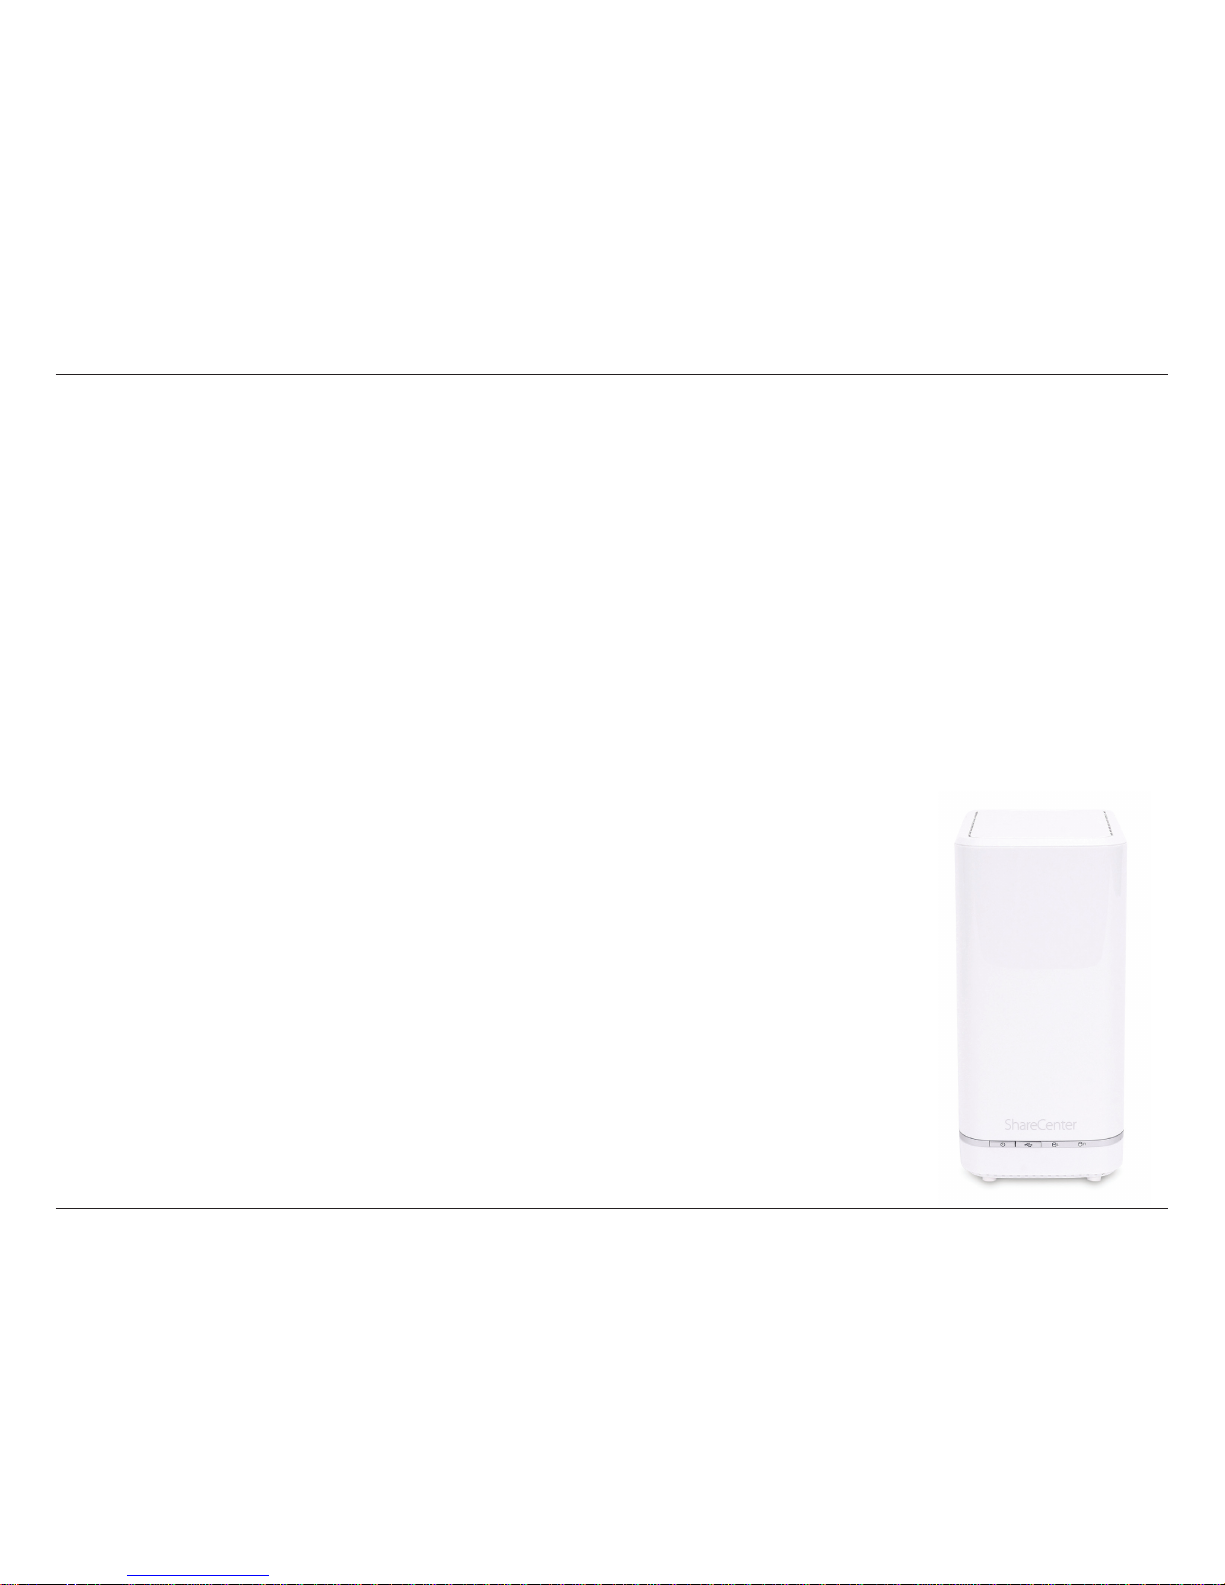
• D-Link ShareCenter™ DNS-327L
• CD-ROM with Manual and Software
• Quick Installation Guide
• 12VDC 3A Output Power Adapter
• CAT5E Ethernet Cable
Package Contents
Page 8
3
D-Link ShareCenter DNS-327L User Manual
Section 1 - Product Overview
Features
The ShareCenter™ DNS-327L is an easy to install data storage platform used for remote access through a local network or from the
Internet. This ShareCenter
™ supports up to 2 SATA hard drives and includes the product features listed below:
Equipped one 10/100/1000 Mbps auto-MDIX Gigabit Ethernet
LAN port, 1000BASE-T support Half duplex and Full duplex mode
Embedded two SATA II 3.5” HDD interface, support 4TB HDD
2-bay Serial ATA with RAID 0/1 and JBoD supported
Equipped Ultra Cooler (Plastic housing + FAN speed control)
Trays for the hard drives.
Supports Real-Time Clock (RTC)
Network Options
• DHCP Client or Static IP
• NTP Client
• Windows 7/ Vista x32/64 PnP-X/ LLTD
• Dynamic DNS
• Bonjour
• UPnP Port Forwarding
• IPv6
Network File Services
• Supports Windows XP/ Vista/ 7/ 8, Mac OSX 10.5+, Linux clients
• CIFS/SMB for Windows and Mac OS X and Linux
• NFSv3 Server for Linux and UNIX
• AFP3.3 for Mac OS X
• HTTP and HTTP/S for web browsers
• WebDAV
File System
• EXT4 for internal HDD
• FAT32, NTFS for USB external Storage
File System Management
• Unicode Support for both Samba and FTP server
• File sharing: Windows/ Mac/ Linux
• File Searching
FTP server
• FTP over explicit SSL/ TLS mode (FTPES)
• FTP bandwidth and connection control
• FTP support FXP
• IP Blocking
Disk Management
• Hot Swappable
• RAID: Standard, JBOD, 0, 1
• RAID 1 Auto/Manual Rebuild
• RAID migration: Standard to RAID 1
• Disk Status Monitoring (S.M.A.R.T)
• HDD S.M.A.R.T test
• Scandisk
• Support Advanced Format HDD
• AES based volume encryption
• Disk Roaming
• RAID roaming
Page 9
4
D-Link ShareCenter DNS-327L User Manual
Section 1 - Product Overview
Folder Management
• Share Folder Level Permission
• Supports ISO mount
• ISO creator
Remote File Sharing
• My Files (Web File Server)
• WebDAV
• FTP Server
• Mobile device accesss (mydlink Access NAS)
User/Group Management
• User/Group assignmentfor network sharing and FTP server
• Quota for user and group
• Assign users to multiple groups
• Create User/Import User(s) batch les
Backup Management
• Schedule Backup from PC to NAS (ShareCenter
™ Sync)
• Remote network backup (Rsync, Remote Snapshot)
• Apple Time Machine support
• Local Backup
• USB Backup
• USB Copy button
• Cloud Storage Backup (Amazon S3)
Download Management
• HTTP/FTP schedule download
• Peer-to-peer (P2P) downloads, aMule and Transmission support
System Management
• Support mydlink portal
• Support D-Link Storage Utility / Setup Wizard
• OS Support: Windows XP, Vista, 7, 8 and Mac OS X
• Two access modes supported: Open (Share) mode and Account
(User) mode, no setup Account and Password necessary in open
mode
• Support Conguration le save/load
• System Status
• Email / SMS notications
• Network Recycle Bin
• System /FTP Log (Syslog Client)
• Rescue F/W image
• Resource Monitor
• Multi-lingual GUI support
Power Management
• Power Saving (Disk idle spin-down)
• Automatic power recovery (with UPS)
• Schedule power on/o
• Auto-shutdown on UPS low battery
• Smart FAN control
• Network UPS
USB port support
• Print Server
• UPS monitoring
• External storage device
• MTP/PTP
Media Streaming
• UPnP AV Server
Page 10
5
D-Link ShareCenter DNS-327L User Manual
Section 1 - Product Overview
• Support PS3 / XBOX 360
• Support UPnP AV > 4GB
• Comply with DLNA HNv1.5
• D-Link new Media Player (including Boxee) compatible
• Supports Logitech Squeeze Center
• Support Sonos Digital Music System via Samba
• iTunes Server
• Audio Streamer (icestation)
• My Music (Music Center)
• My Photos (Photo Center)
Cloud Service-mydlink Portal Web Access
• Remote Files Access through Web Browser
• Browse, Upload/Download, and Manage File/Folders
• Redirect to NAS Device UI for the Access of NAS Applications
• Email Notication to Registered mydlink Account
• Supports Zero conguration
Cloud Service–Mobile Apps (the “mydlink Access-NAS” app)
• Ability to Access Content from Mobile Devices
• Browse, Upload/Download, Open, and Manage File/Folders
• View Photo and Playback Multimedia Files
• Access to Media: Streaming for Music, Photo Galleries
• Content Classication : Classify Contents by “Photo, Music, Video,
and Document”
• Supports iOS, Android
Built-in Applications
• My Files (Web File Server)
• My Photos (Photo Center)
• My Music (Music Center)
• My Surveillance (Surveillance Center)
My Files
• Access, and Manage (Copy, Move, Delete, Rename, zip/
unzip) Files through Web Browser
• Open Files on Web Browser or from PC’s Default Program
• Share Files to Social Network (Facebook, Picasa, Flickr)
• Shows File Properties
My Photos
• Generates Photo Library, and Sort by All Photos, and by
Timeline
• Creates Albums and Manage Photos
• Share Photos to Social Networks (Facebook, Picasa, Flickr)
• Views Photos through Cooliris
• Slideshows
• Supports AirPlay
• Shows and Adds GPS information of Photos
My Music
• Generates Music Library, and Sort by All Tracks, Albums,
Artists, and Genres
• Supports Playlist
• Integrates Music Player
• Supports AirPlay
Page 11
6
D-Link ShareCenter DNS-327L User Manual
Section 1 - Product Overview
My Surveillance
• Camera Auto Installation
• 4-Channel Motion JPEG, MPEG4 or H.264 Recording
• Audio & Video recording in Synchronization
• Auto Recycling Recording
• 4-channel Live Video
• 4-channel Synchronous Playback
• Recording Type : Record by Schedule, Manual Record
• E-map Support
• Backup Recorded Video
Add-ons Applications
• Multilingual Language Package
• Photo Center (Gallery2)
• Blog (Wordpress)
• Audio Streamer (icestation)
• Logitech Squeeze Center
• AjaXplorer
• aMule
• phpMyAdmin
• phpBB
• Joomla
• Transmission
Web Browsers supported
• Internet Explorer 8+
• Mozilla Firefox 4
• Apple Safari 4+
• Google Chrome 3+
• Opera 10
Page 12
7
D-Link ShareCenter DNS-327L User Manual
Section 1 - Product Overview
Checking the Hardware Requirements
To use your DNS-327L, you will need at least one hard drive. If you plan to use RAID 1, which protects your data against one
hard drive failure, you will need two hard drives.
This section will help you:
• Select the hard drives
• Determine hard disk space you will need
• Ensure your data is protected
• Understand the basic requirements for a router or switch
Selecting Hard Drives:
You can use hard drives from any manufacturer and with any capacity with your DNS-327L The D-Link ShareCenter™
supports standard 3.5” internal SATA drives#. If you are unsure, ask your administrator or hard drive retailer/manufacturer
to verify that your hard drives meet this standard.
*Warning - Any pre-existing data on the drives will be erased during installation.
Determining How Much Hard Drive Space you Need:
In order to protect your data from hard drive failure, your DNS-327L requires more space than what you will use for your data,
sometimes more than double the amount of space required.
Using a Router or Switch:
If you are connecting your ShareCenter™ to a router or switch, your router or switch needs to support Gigabit Ethernet
(1000Mbit/s) for maximum performance. The ShareCenter™ will auto-negotiate the highest connection speed available to
your router or switch. If you are using Port Bonding, use a managed switch.
Using an Uninterrupted Power Supply (UPS):
We highly recommend that you use your ShareCenter™ in conjunction with an uninterrupted power supply (UPS), which will
protect against sudden loss in power and power surges.
# Please check D-Link support website for a list of tested and compatible Hard Drives
Page 13
8
D-Link ShareCenter DNS-327L User Manual
Section 1 - Product Overview
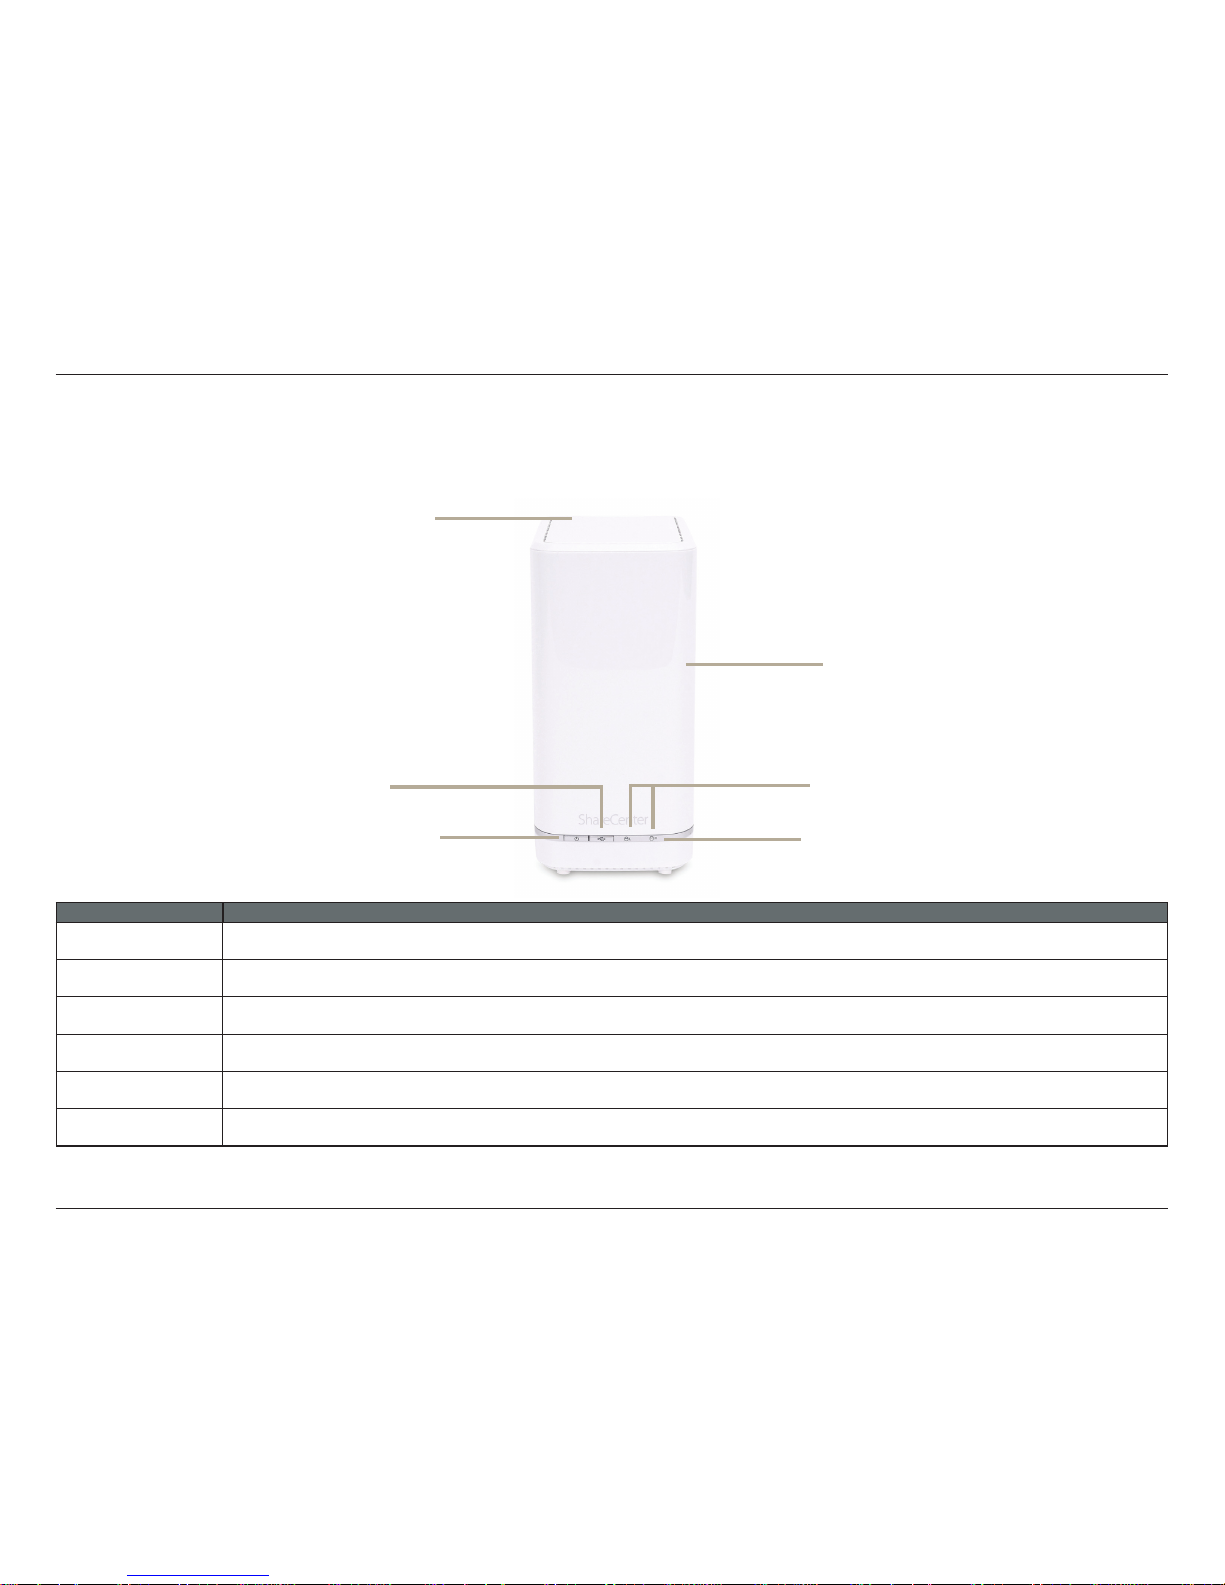
Hardware Overview
Front Panel
LED Indicators
Power Button
Left HDD/ Right HDD
COMPONENT DESCRIPTION
Top Panel This panel unlatches simply by pressing the lever at the back. Unhook and lift up to insert or remove your hard drive(s).
Front Panel The casing of the entire NAS
Power Button
Press once to power on the ShareCenter
™. Press and hold the button for more than 5 seconds to power it down.
USB Button Press once to activate USB or press and hold the button for more than 5 seconds to release USB activity.
Left HDD/Right HDD Indicates the position of the drive (Left or Right)
LED Indicators Illuminates blue or red depending on activity (see the next page for details)
Front Panel
Top Panel
USB Button
Page 14
9
D-Link ShareCenter DNS-327L User Manual
Section 1 - Product Overview
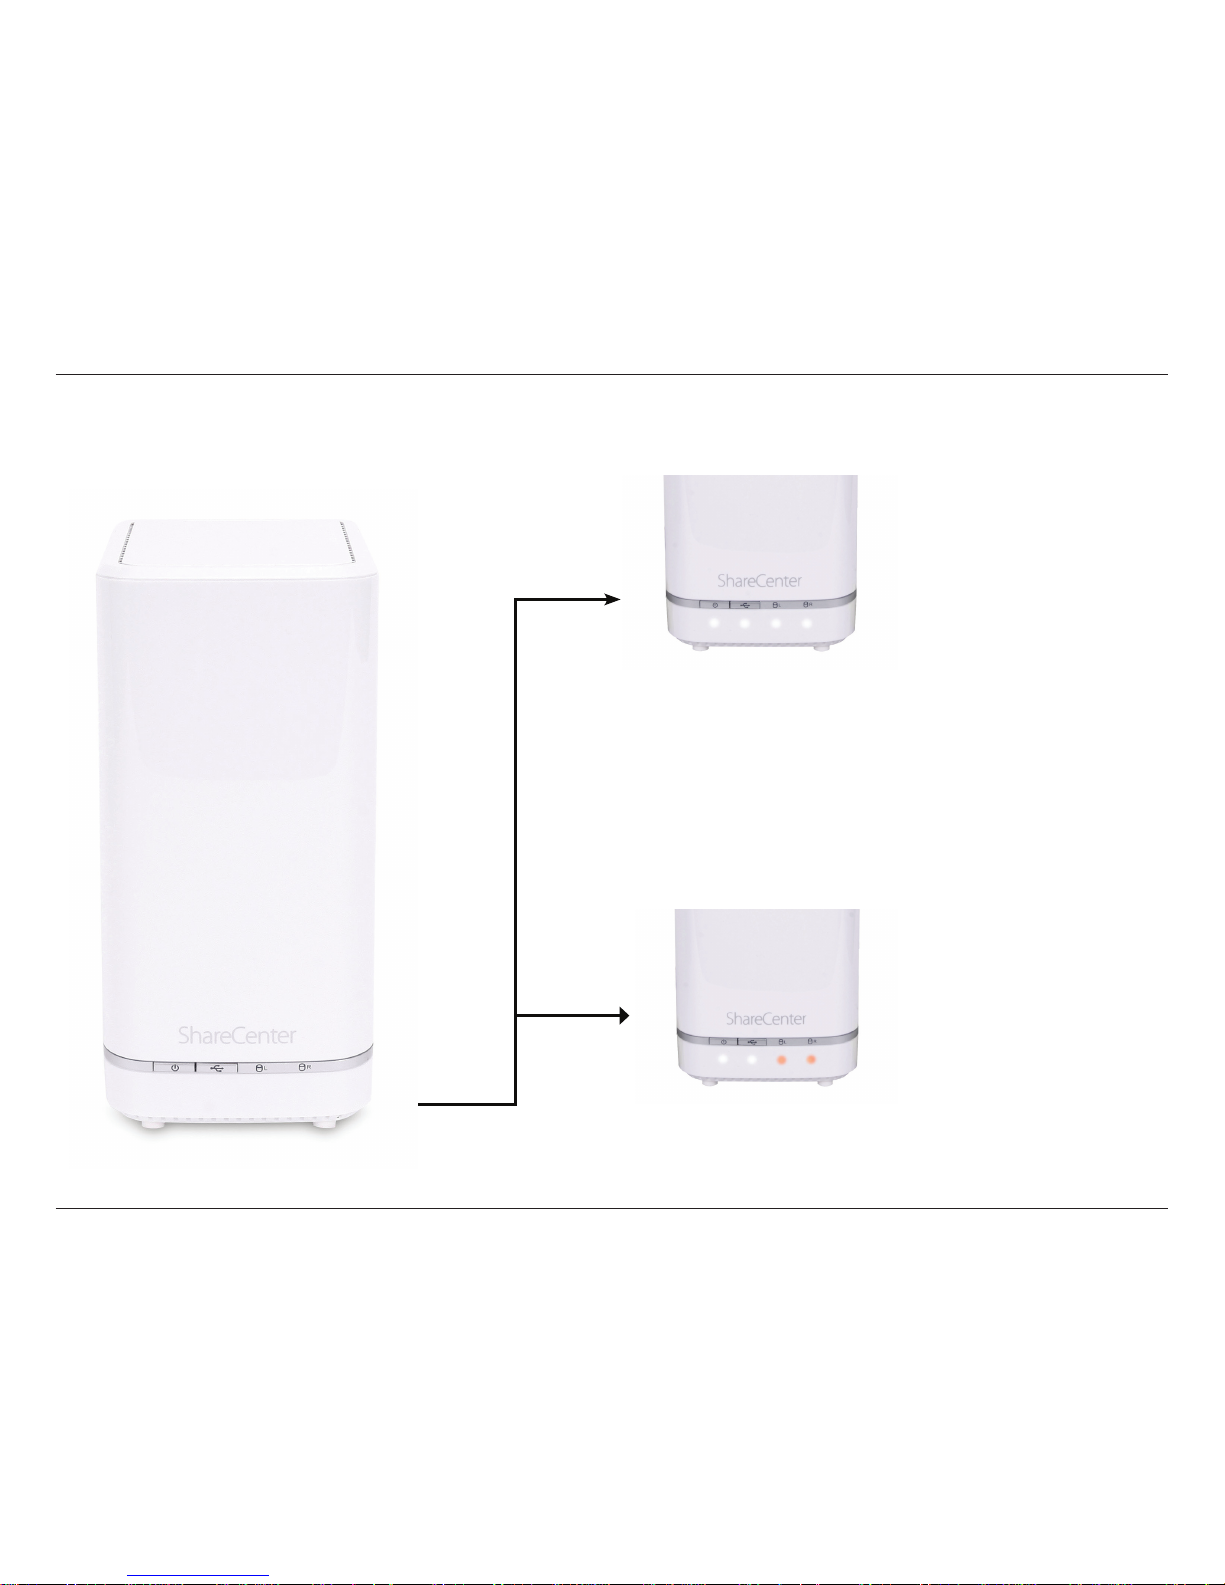
Power On/O:
White Light - the device is on
Blinking Orange - the device
is booting or restarting
No Light - the device is o
LED Description
USB On/O:
White Light - the USB Storage is connected
Blinking Orange - transferring data, a USB device is being
installed or unmounted
Orange Light - USB storage failed to mount
No Light - No USB Storage or the device is o
HDD On/O:
Orange Light(s) - the hard drives are faulty
No Light(s) - the hard drives are inactive
HDD On/O:
White Light(s) - the hard drives are working
Blinking Orange Light(s) - the HDD(s) is writing/reading
Page 15
10
D-Link ShareCenter DNS-327L User Manual
Section 1 - Product Overview
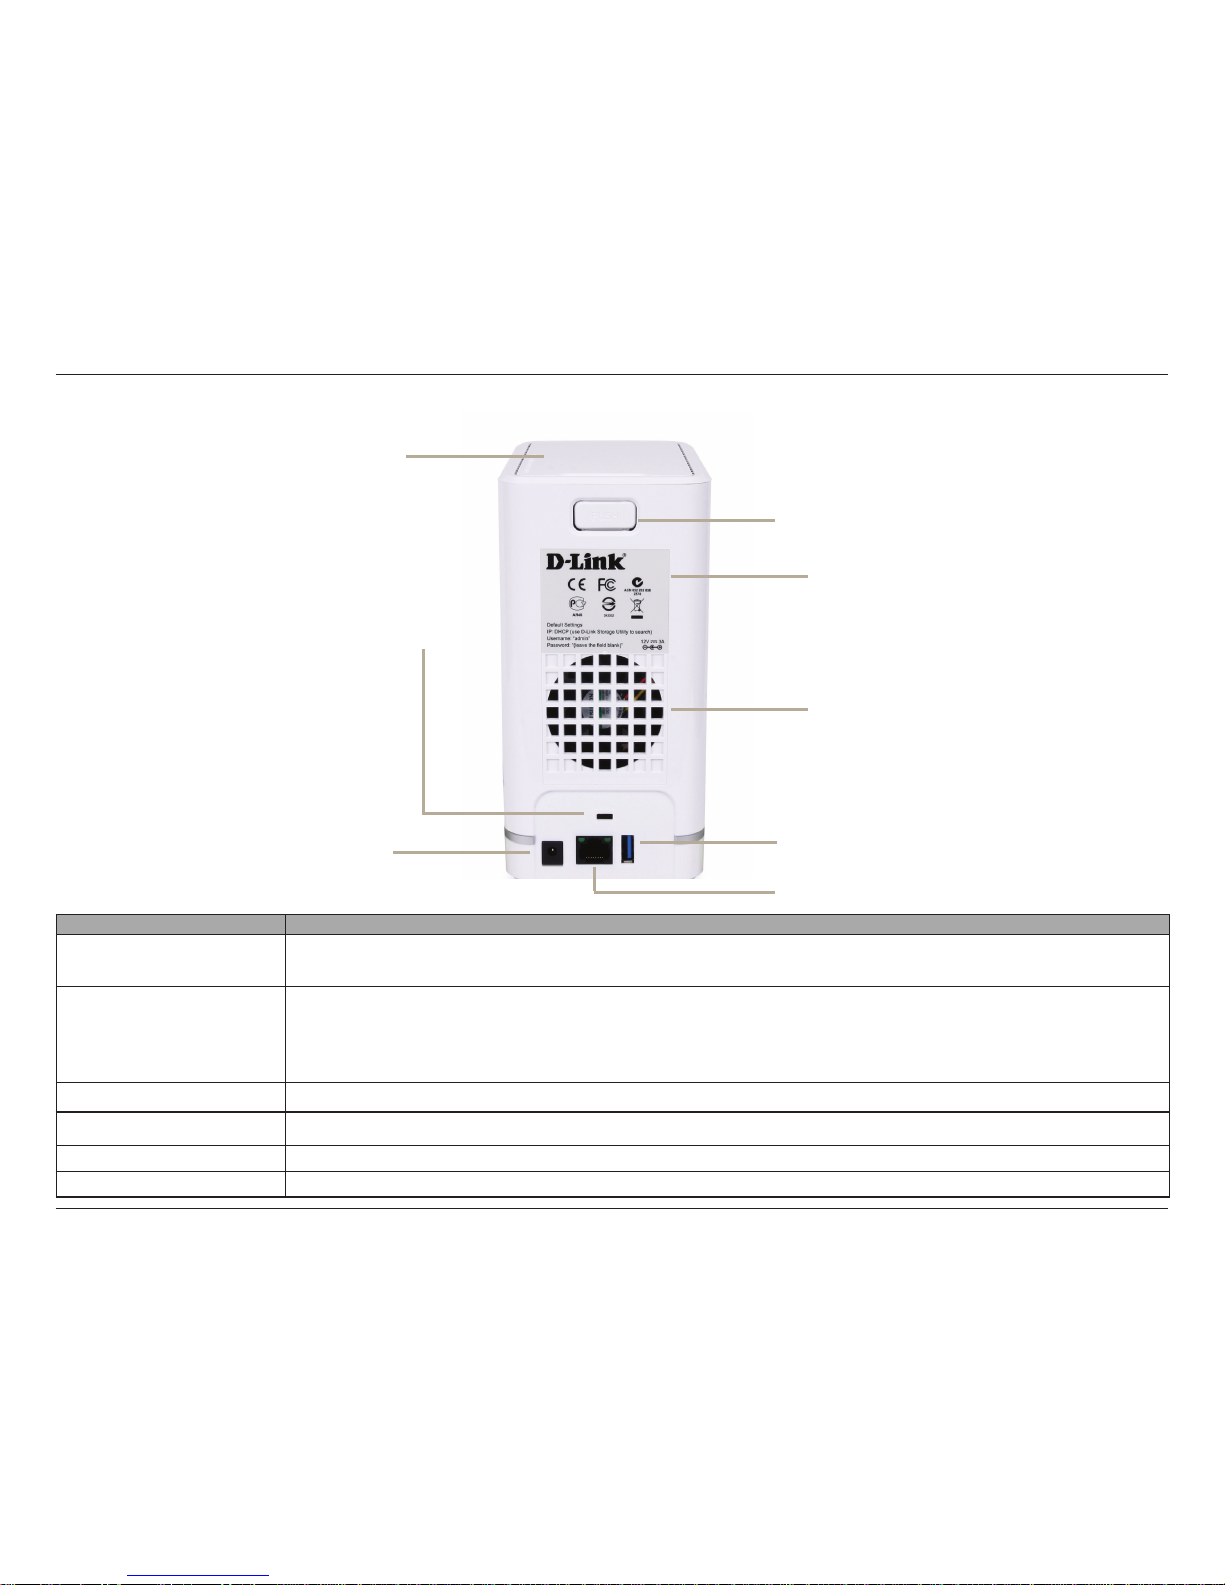
Rear Panel (Connections)
COMPONENT DESCRIPTION
Cooling Fan
The cooling fan is used to cool the hard drives and features speed control. When the unit is rst powered on, the fans
rotate at a low speed and later rotate at a high speed when the temperature rises above 49 °C.
Gigabit Ethernet Ports
Use the Gigabit Ethernet port to connect the ShareCenter
™ to the local network. The port is equipped with 2 LEDs. The
LED on the left will illuminate solid green for a good connection and will blink during data transmission. If this LED is
o, check the connection/cable to the device you are connecting to. The LED on the right will light solid for a Gigabit
connection and will remain o when connected to a 10/100 device.
Power Receptacle
Connect the supplied power cord to the receptacle.
USB Port
A single USB 3.0 (Type A) connector. The USB Host port is for Print Servers, USB memory disks, or USB UPS monitoring.
Latch
Press the latch to release the Top Panel and insert or remove the hard drives
Security Lock
Prevent theft by tying a cable to the ShareCenter
™ NAS and a desk. Cable is sold separately.
Top Panel
Latch
Cooling Fan
Power Receptacle
Gigabit Ethernet Port
USB Port
Security Lock
Label
Page 16
11
D-Link ShareCenter DNS-327L User Manual
Section 1 - Product Overview
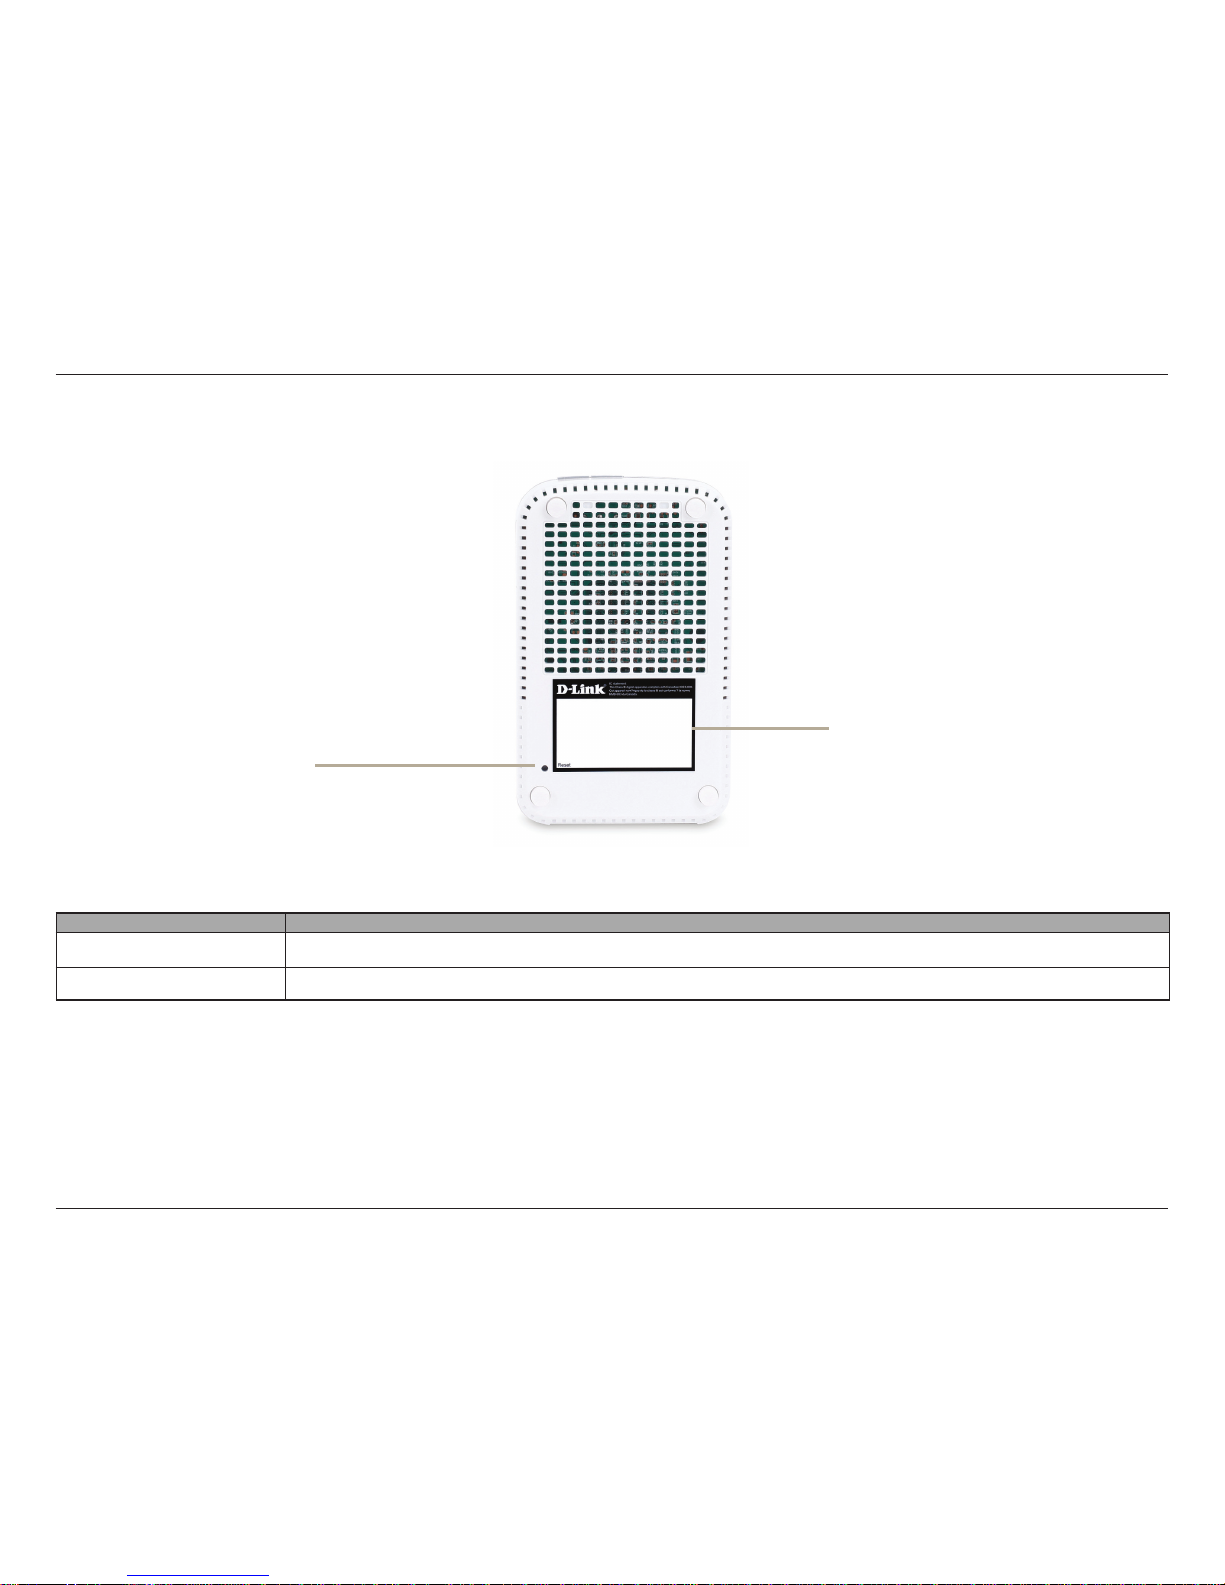
Bottom Panel
COMPONENT DESCRIPTION
Product Details
Information about the product - DNS-327L Serial Number, Part Number, Manufacturer Number
Reset Button
Press and hold this button for more than 5 seconds to reset the unit to factory defaults.
Reset Button
Product Details
Page 17
12
D-Link ShareCenter DNS-327L User Manual
Section 2 - Getting Started
This User Guide will help you get your ShareCenter™ set up in just a few steps. To install the ShareCenter™ on your local network,
refer to the steps below, or skip to page 17 to run the setup wizard which will show you how to install and congure your
DNS-327L.
Getting Started
Hardware Setup
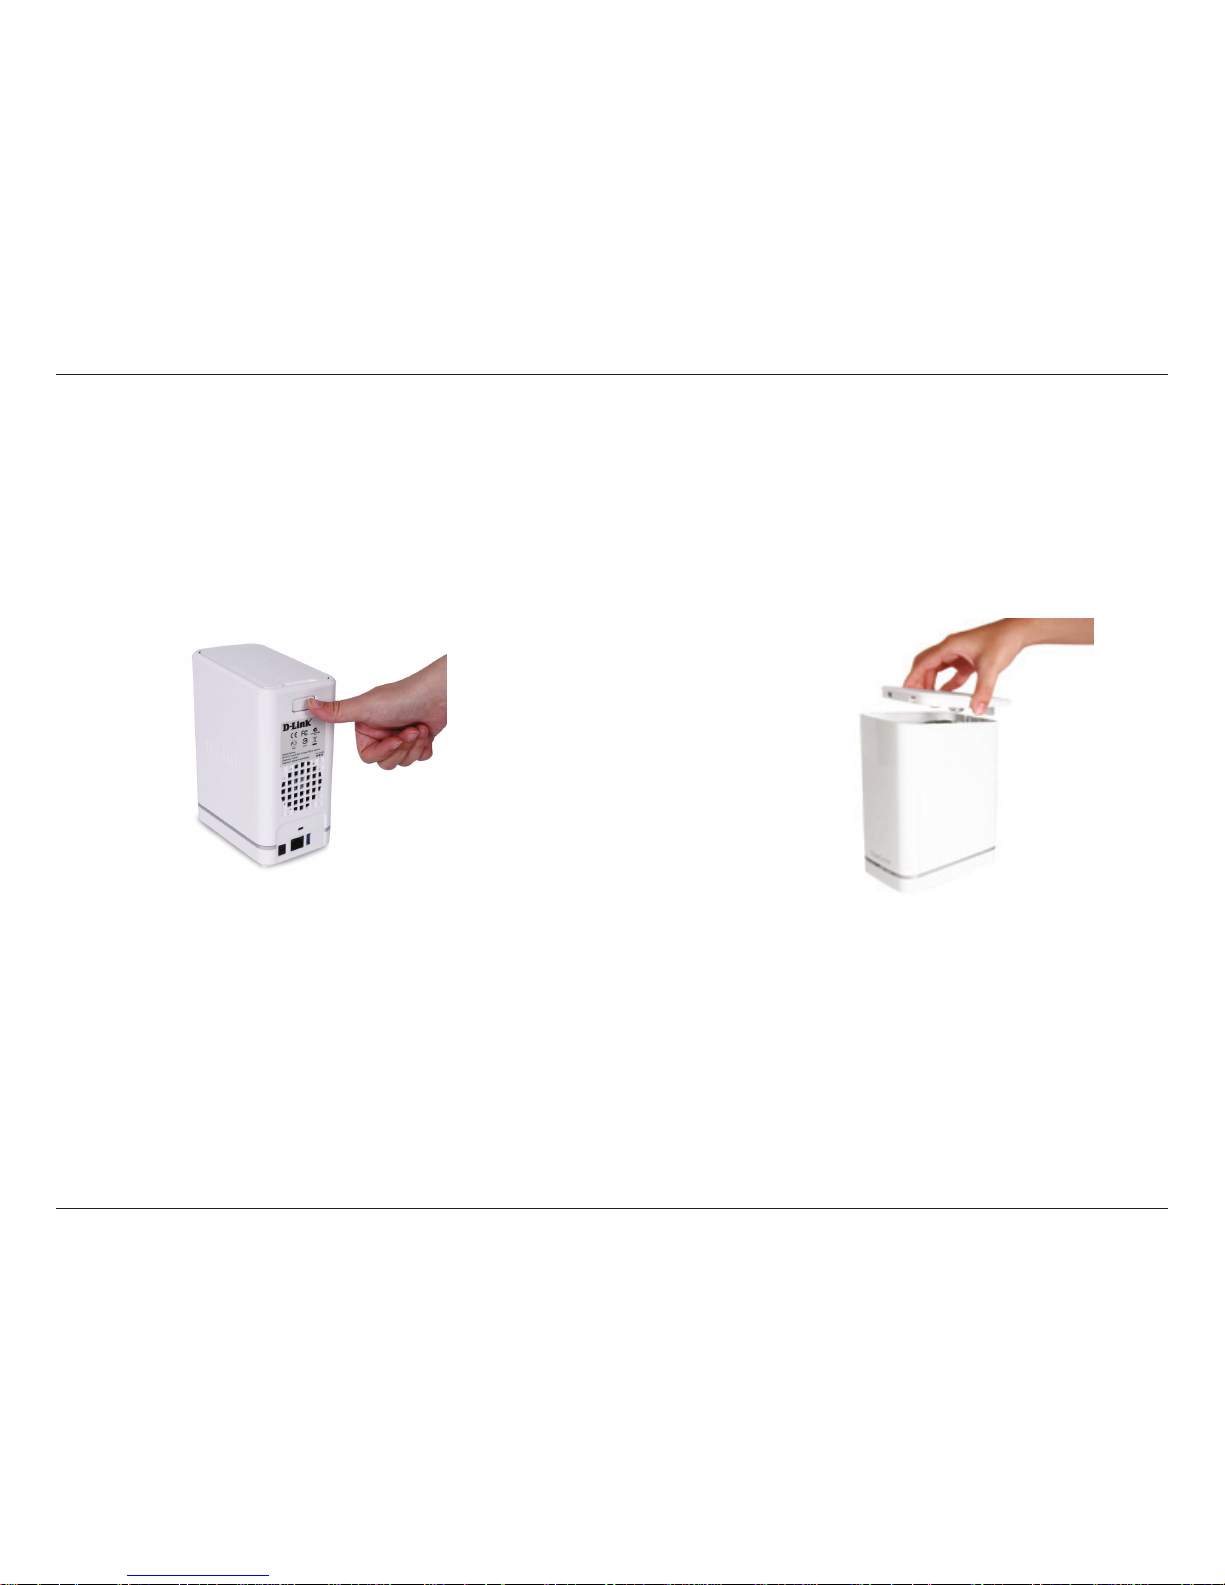
Step 1 - Remove the top panel by rmly
pressing the latch at the back.
Step 2 - Once the faceplate is unlatched,
pull it off the the device to expose the
devices’s bays.
Page 18
13
D-Link ShareCenter DNS-327L User Manual
Section 2 - Getting Started
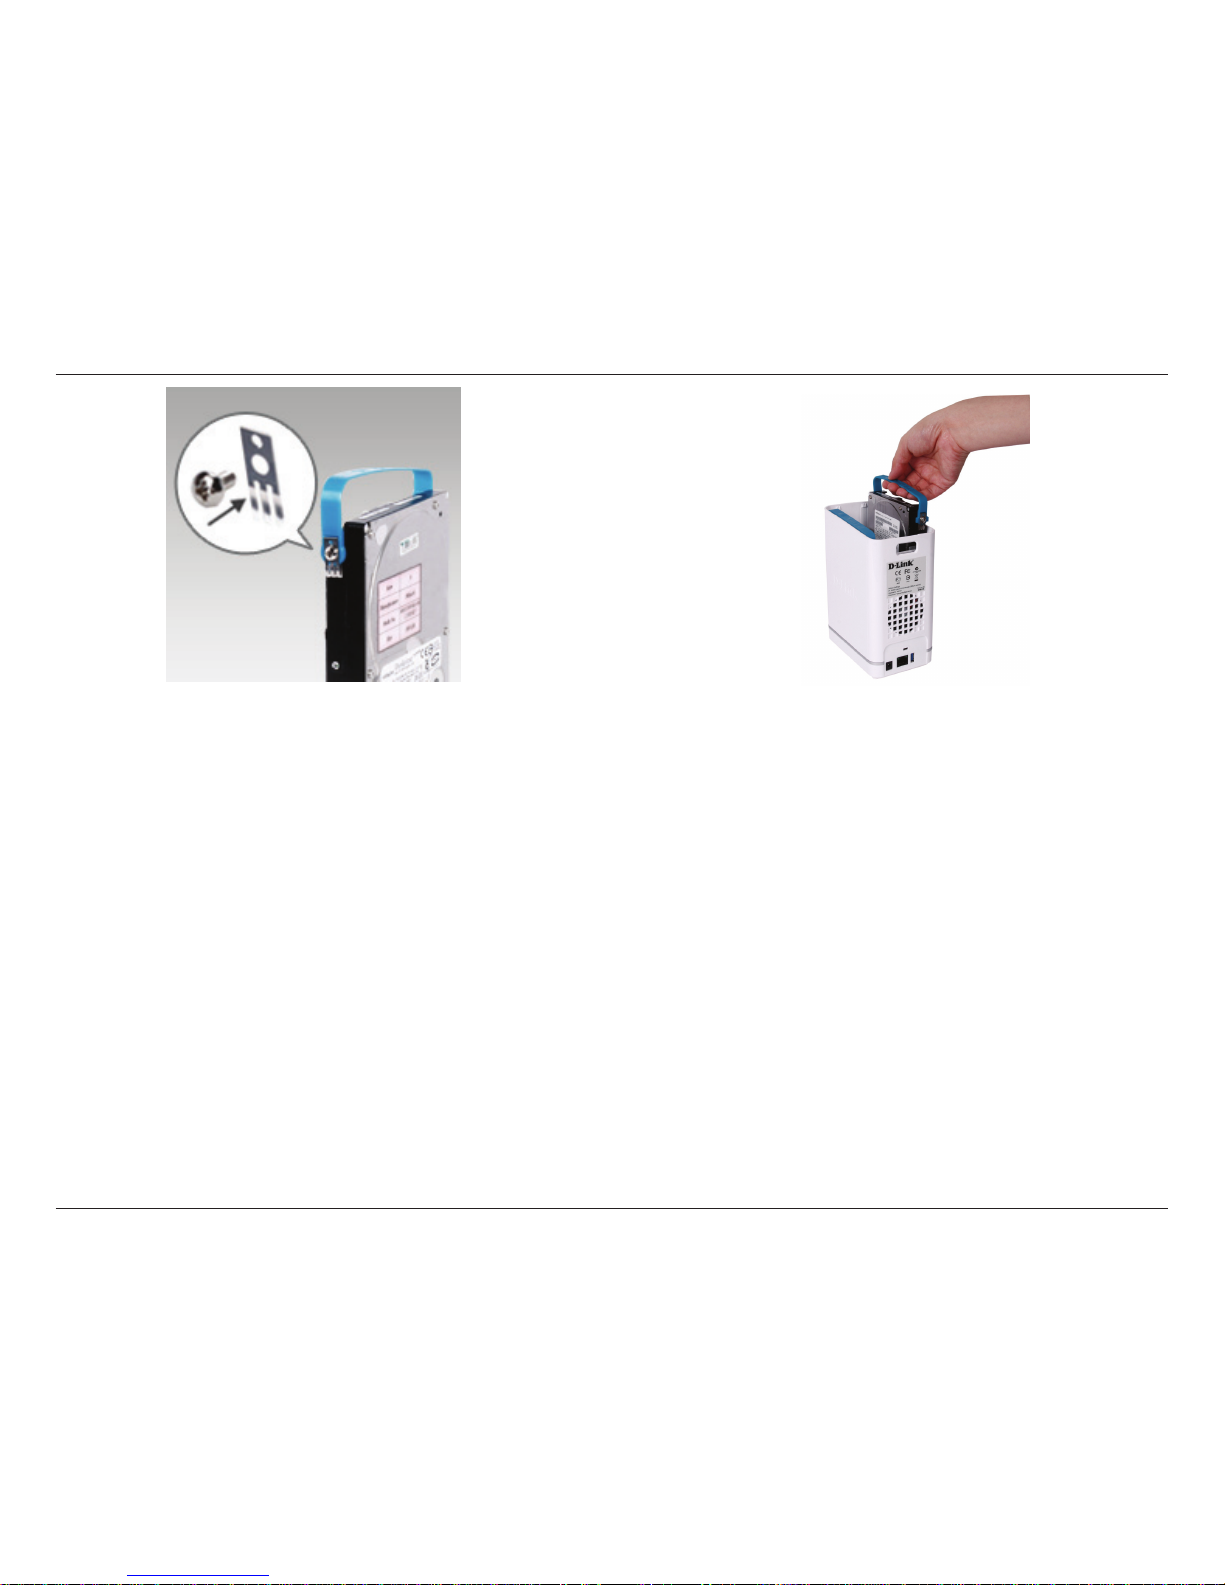
Step 3 - Attach the hard drive brackets
to the sides of your hard drives with the
included screws. Ensure the brackets are
aligned so that when the hard drive is
inserted, the arrow on the bracket points
to the front of the ShareCenter™ .
Step 4 - Insert up to two 3.5” SATA hard
drives into the drive bays.
Note: Make sure to align the drive connector to the SATA connector at the back edge inside the drive bay of the ShareCenter™.
Gently push the drive in until it connects. When a drive is inserted properly, you will feel it “set” into the connector. Some hard
drives that are thin or oddly shaped may need to be inserted carefully into position. If a drive is not properly set in place, the
hard drive LED will not illuminate after powering on the device.
Page 19
14
D-Link ShareCenter DNS-327L User Manual
Section 2 - Getting Started
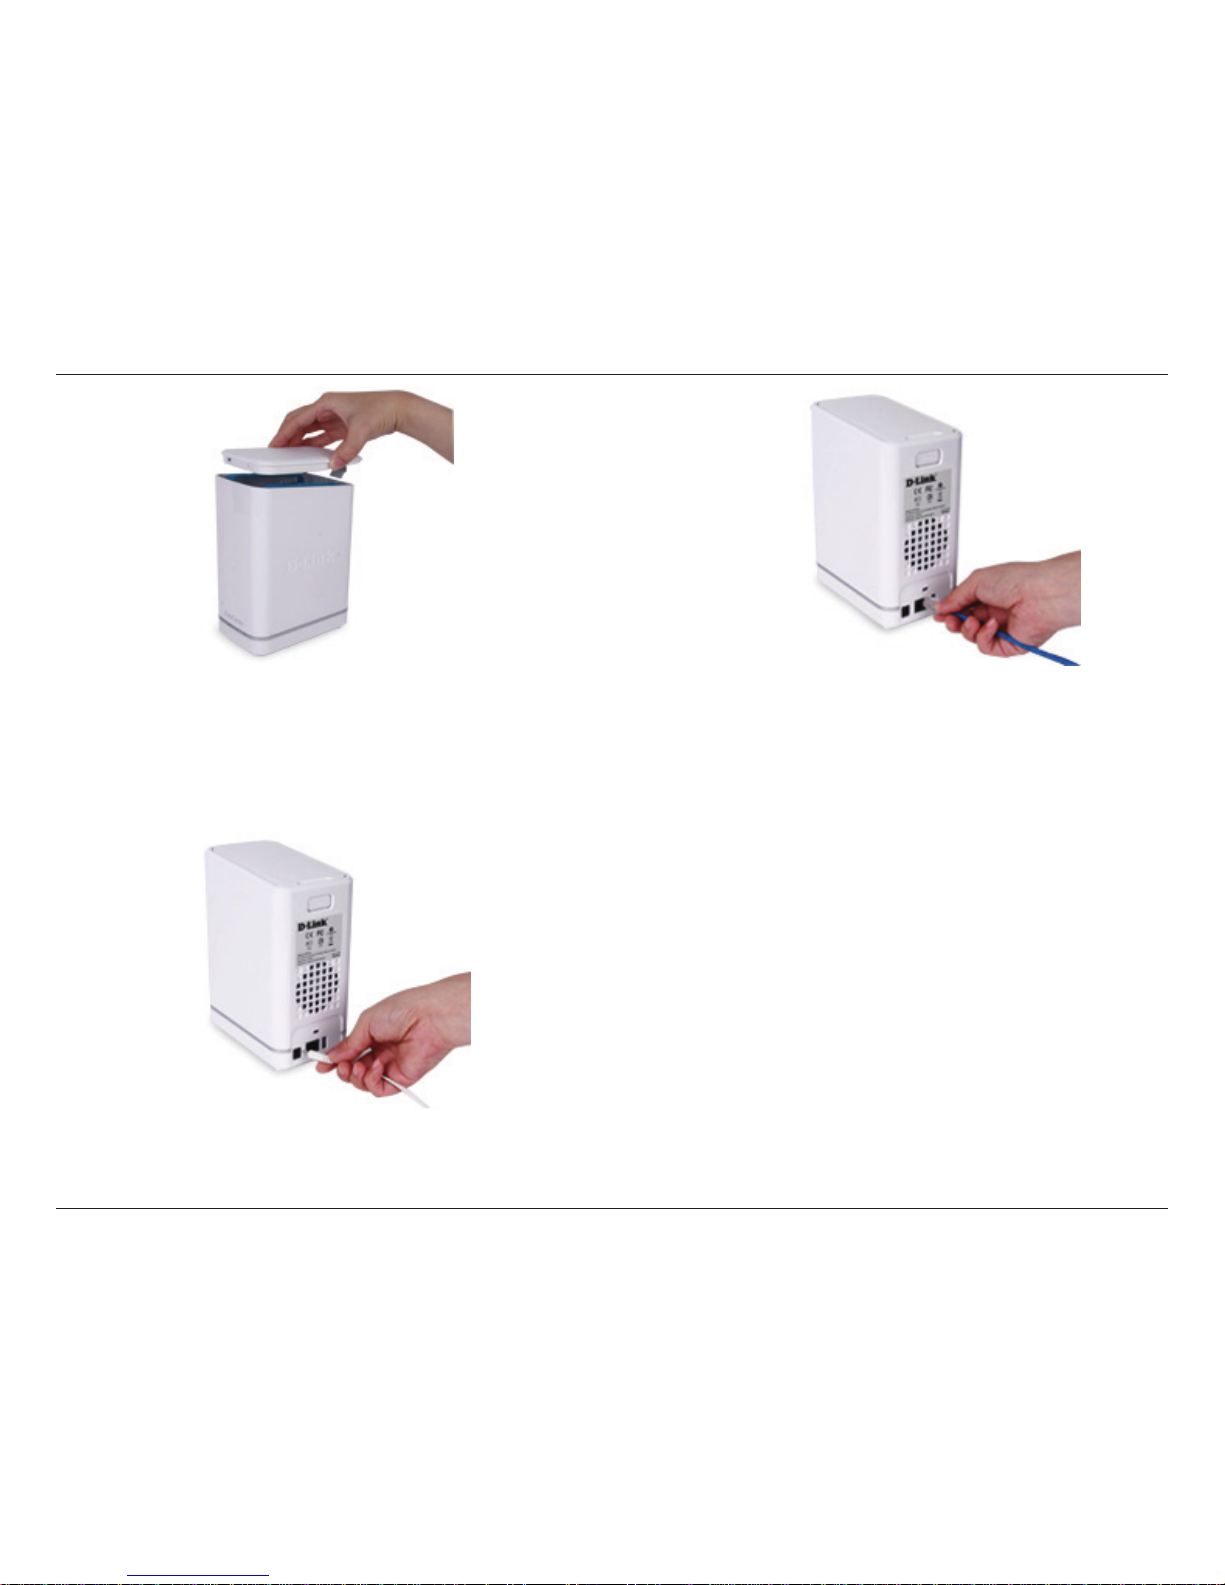
Step 5 - Re-attach the top panel. Ensure the
latch is inserted inside the panel.
Step 6 - Connect an Ethernet cable to the
Ethernet port. This cable should connect
the ShareCenter™ to your local network via
a router, switch, or directly to a computer for
conguration (cross-over cable required).
Step 7 - Connect the power adapter to
the power receptacle.
Page 20
15
D-Link ShareCenter DNS-327L User Manual
Section 2 - Getting Started
Zero Conguration Setup
If you have a mydlink-enabled Cloud Router, you can take advantage of Zero Conguration. Zero Conguration automatically
congures your NAS’s settings for you, and adds it to your mydlink account automatically. This type of setup allows you to
set up your DNS-327L by simply plugging it in and connecting it to your router.
Connect your NAS to your mydlink-enabled Cloud Router and Zero Conguration will automatically congure your DNS-327L
and automatically add it to your mydlink account. After the short time it takes to do this you can remotely access
your NAS from the www.mydlink.com website to manage and monitor your DNS-327L.
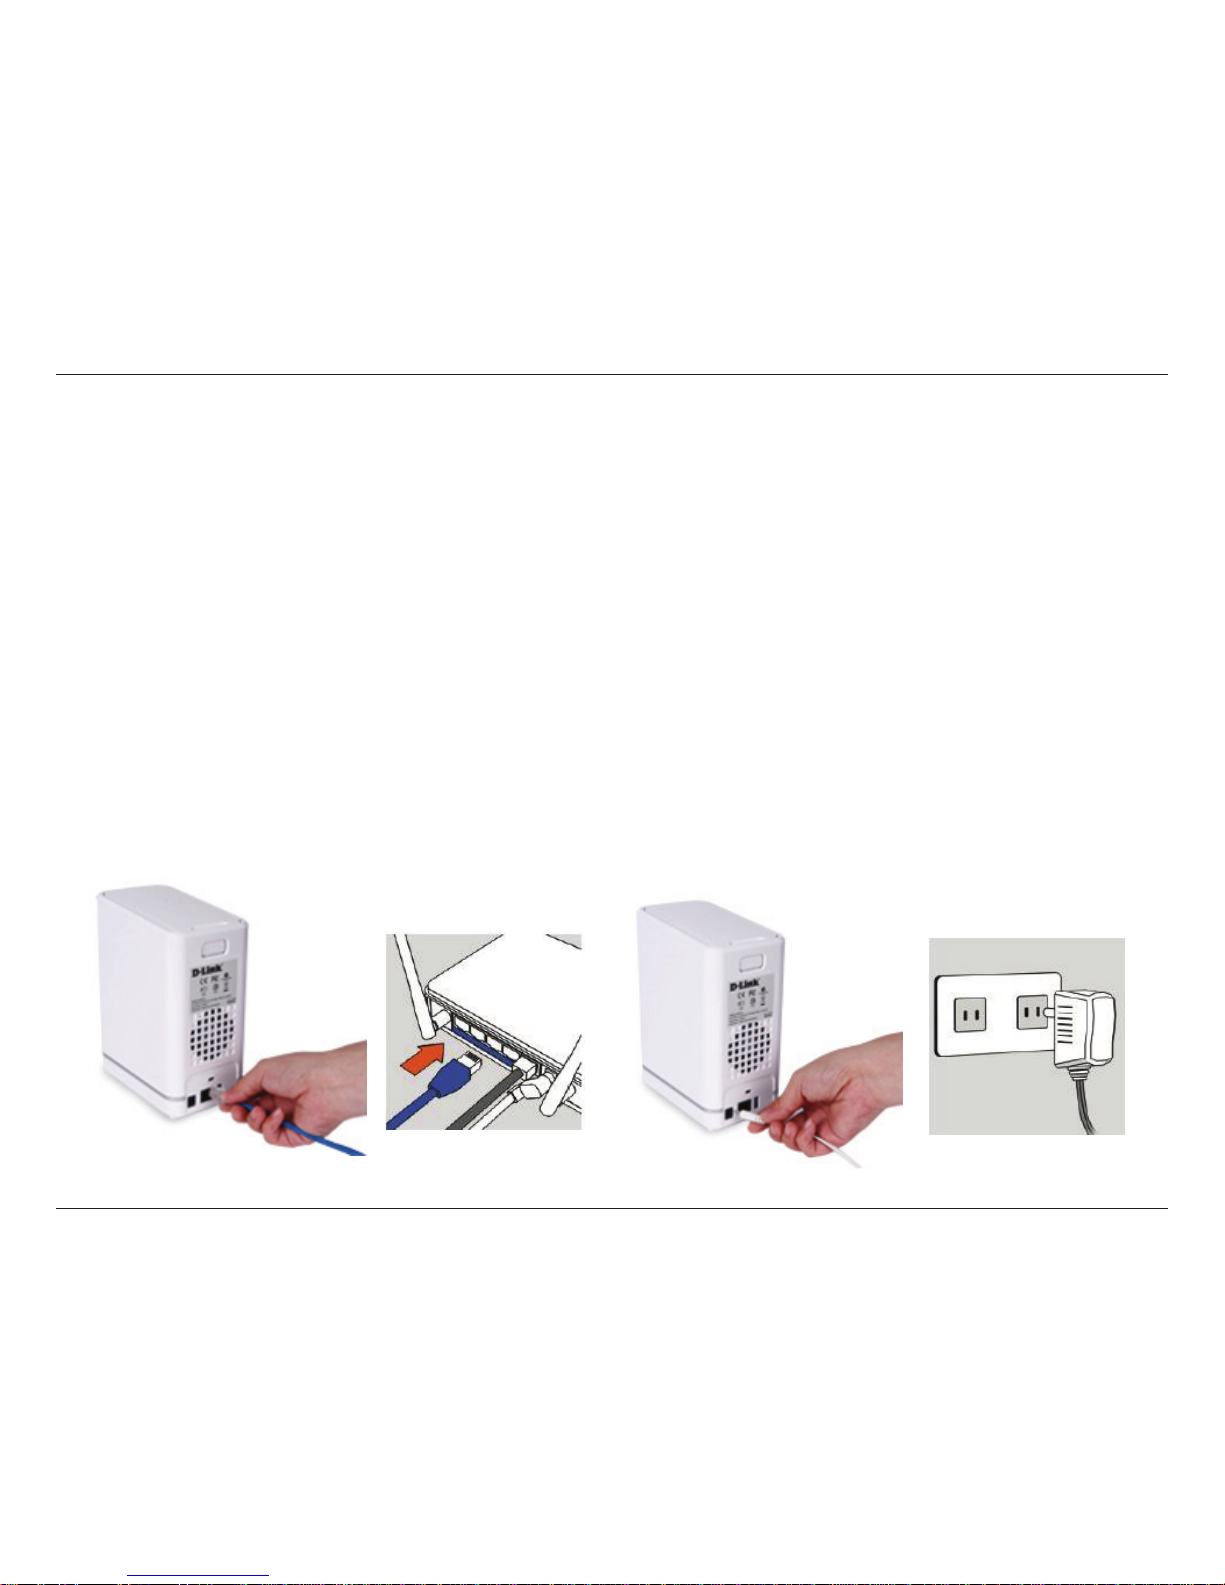
Connect the Ethernet Cable
Use the included Ethernet cable and plug it into the NAS. Plug the other end into an available port on your router. If you wish
to use your NAS wirelessly, you will be able to remove the cable from the router after Zero Conguration Setup is complete.
Attach the External Power Adapter
Connect the power adapter to the power connector on your NAS, then plug the power adapter into a wall outlet.
Page 21
16
D-Link ShareCenter DNS-327L User Manual
Section 2 - Getting Started
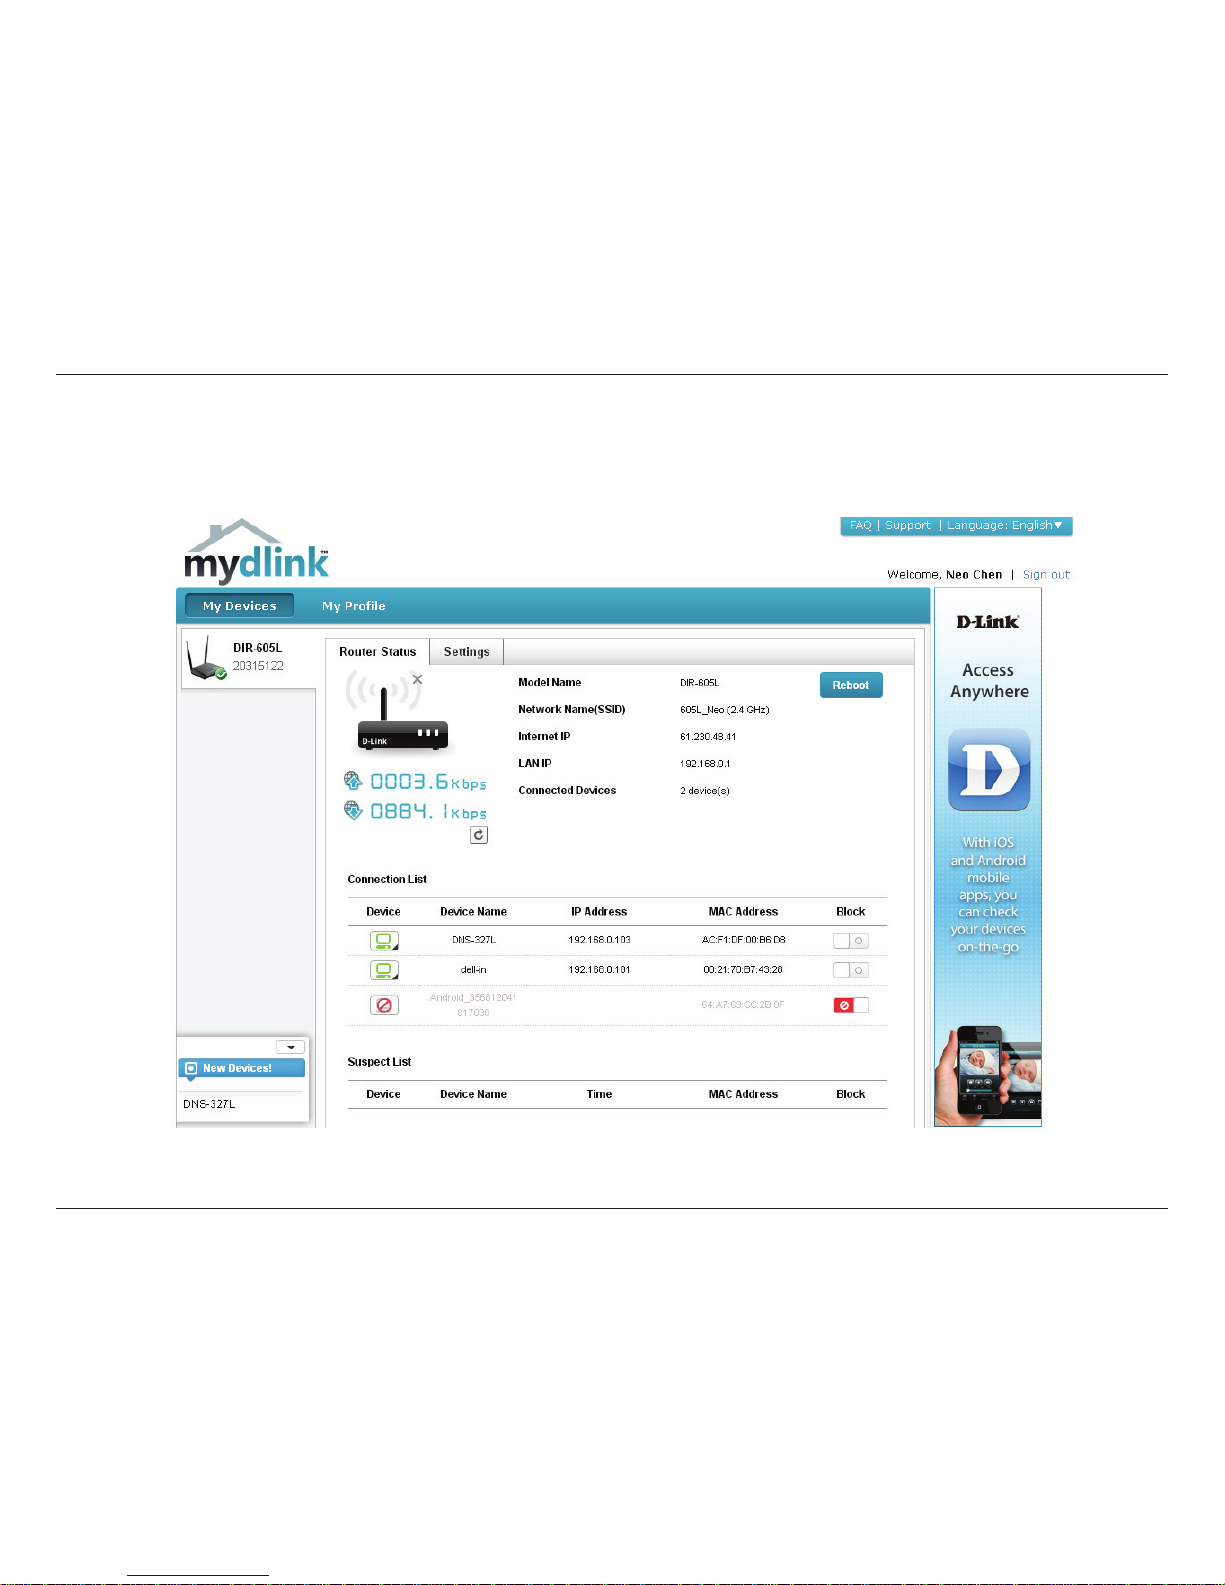
Check Your mydlink Account
Open a web browser and login to your mydlink account. The mydlink page will check for new devices and display a New device
Found! pop-up notication in the bottom-left corner. Click the notication to continue.
Page 22
17
D-Link ShareCenter DNS-327L User Manual
Section 2 - Getting Started
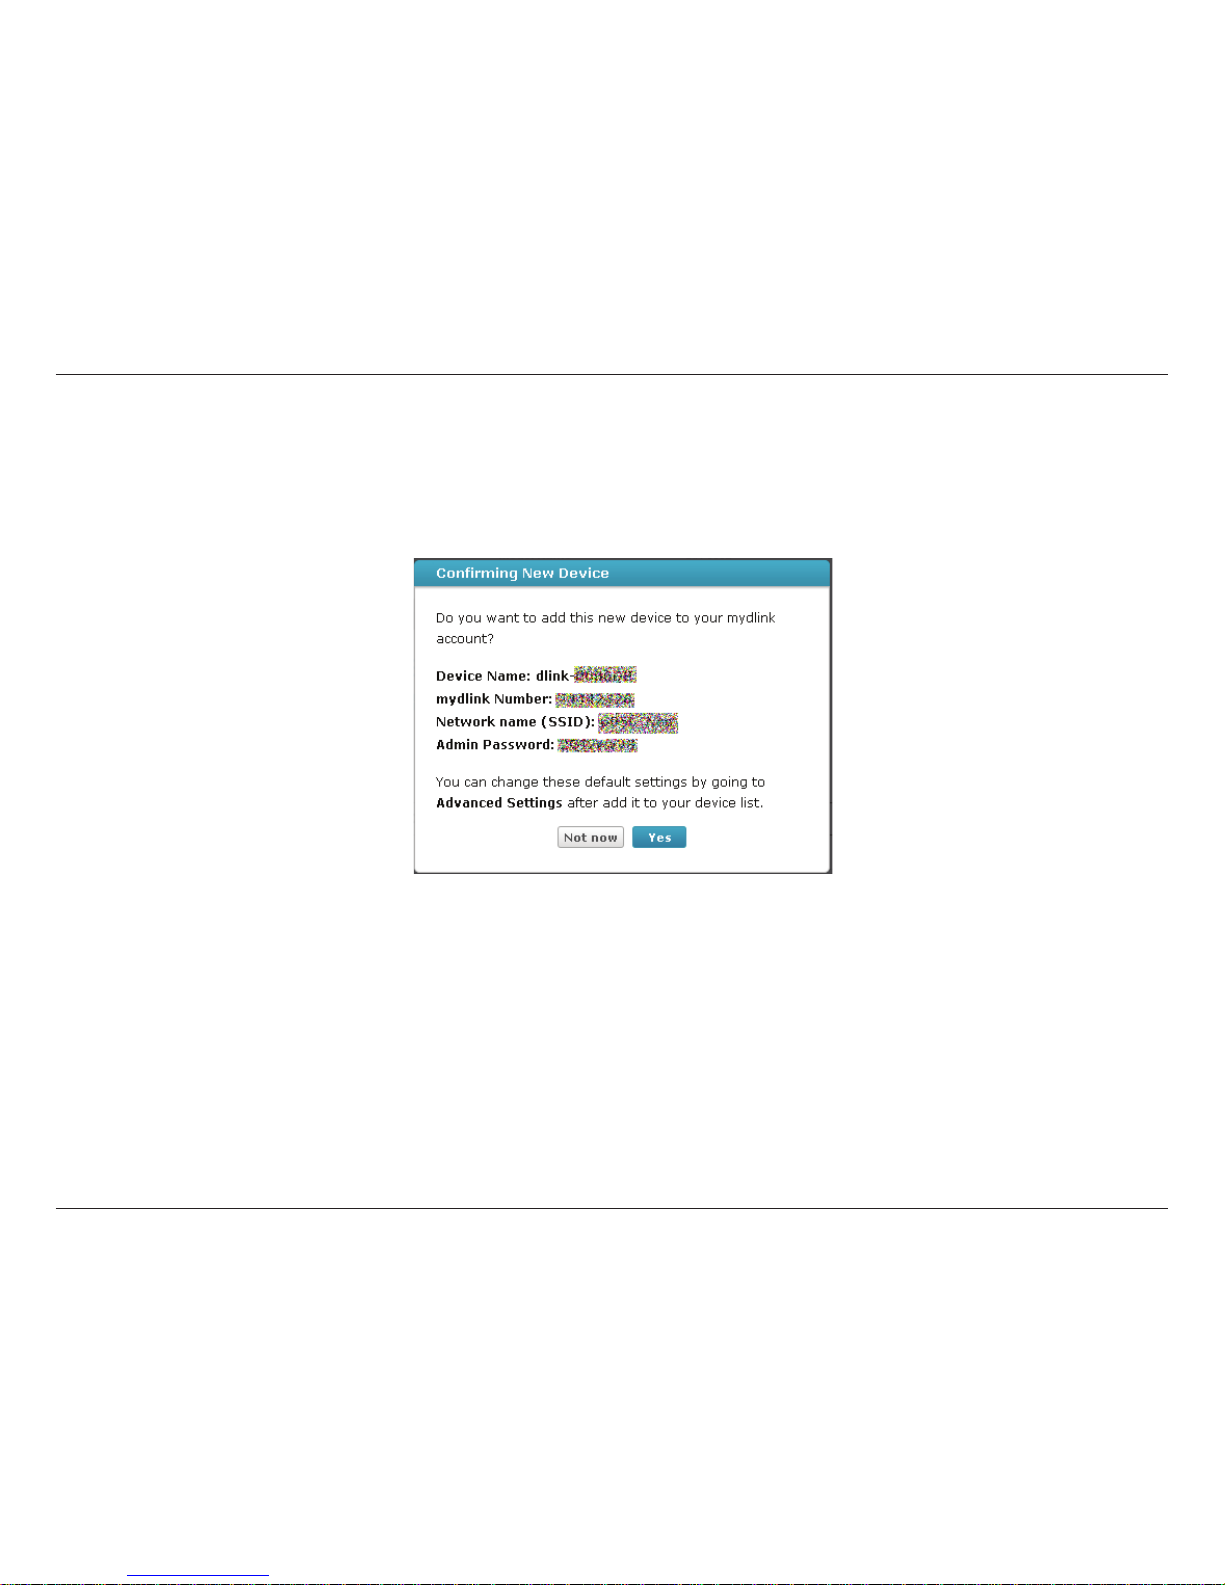
Double-click the device to add it to your mydlink devices. If you wish to add it immediately, click Yes, but if you are unsure of what to do click No.
The pop-up screen displays the Device Name, mydlink number, Network Name, and Admin Password. If you are unsure of what to do, you can
always go back to Advanced Settings.
Page 23
18
D-Link ShareCenter DNS-327L User Manual
Section 2 - Getting Started
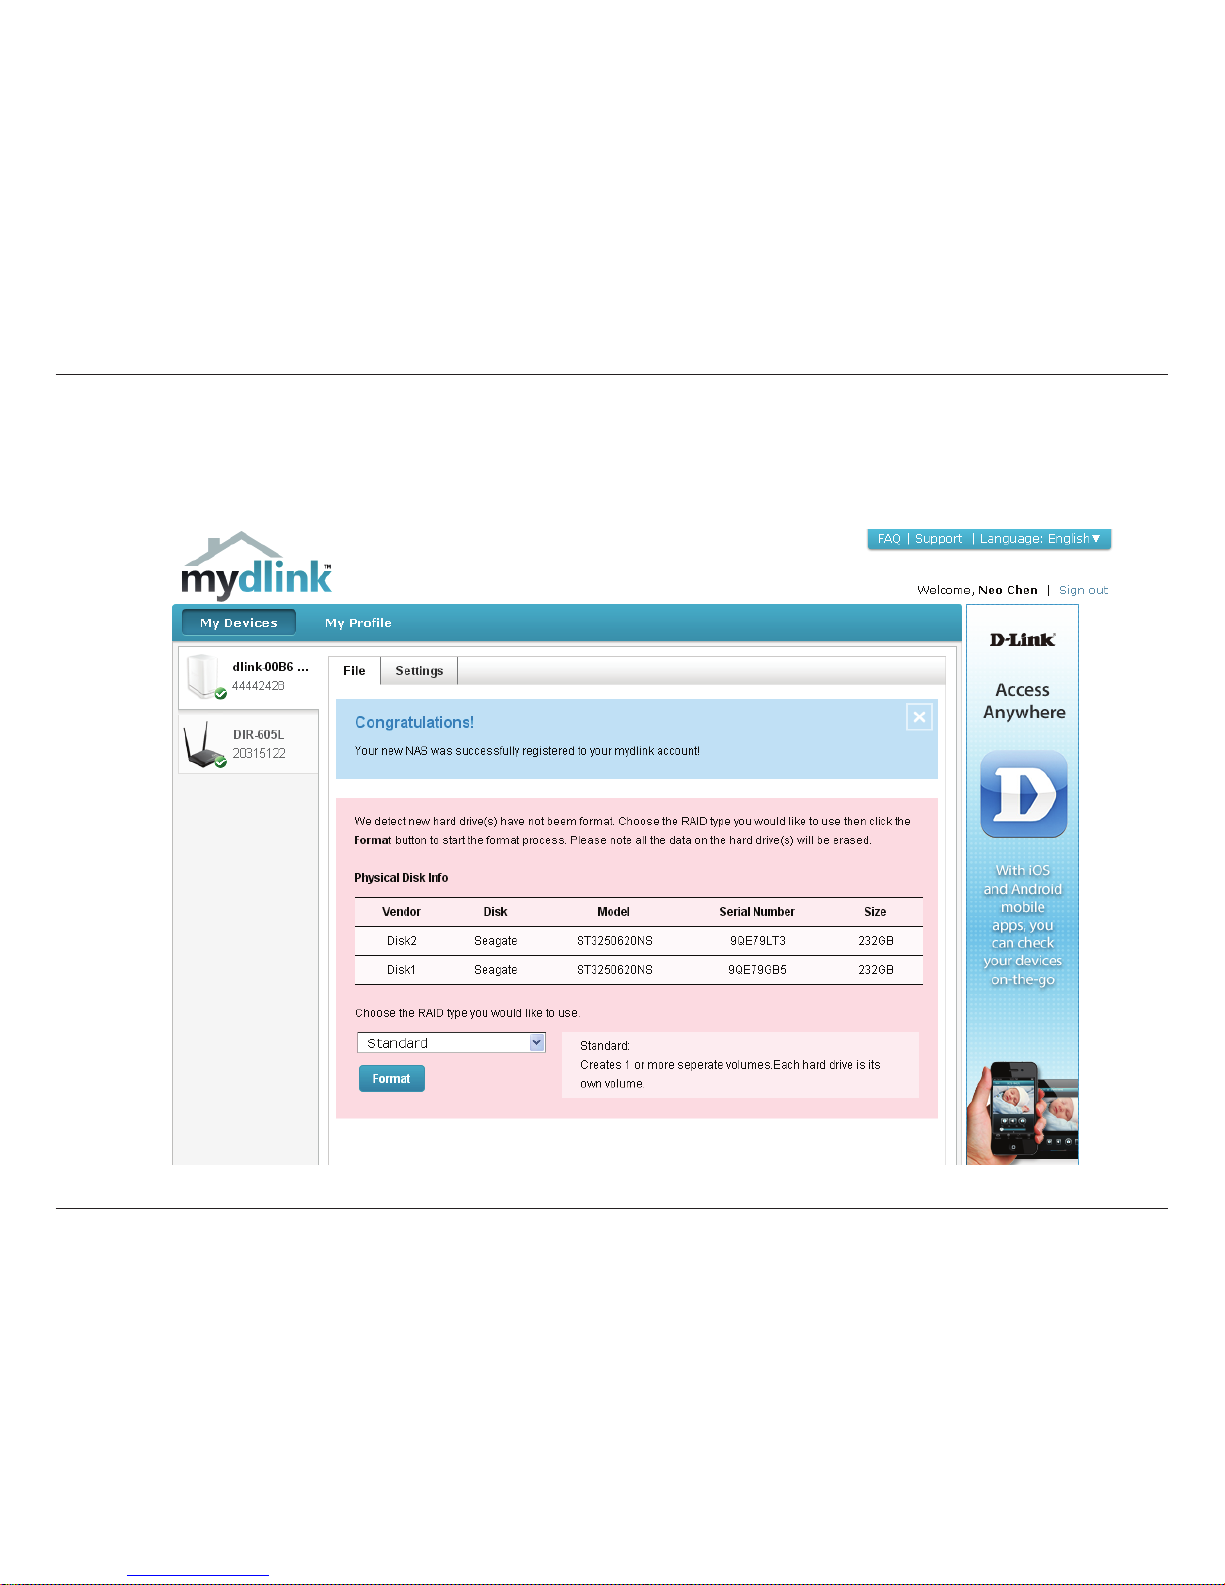
After the DNS-327L is registered, you will be able to access all information about the NAS from the cloud service. This service is already available
locally but the mydlink service provides a way for you to view these details from any location. From this location, you can view all physical disk
information, and congure RAID. Please be advised that conguring RAID over the mydlink service will slow your system down and this service
depends on your ISP and the speeds you are using to connect to mydlink.
Page 24
19
D-Link ShareCenter DNS-327L User Manual
Section 2 - Getting Started
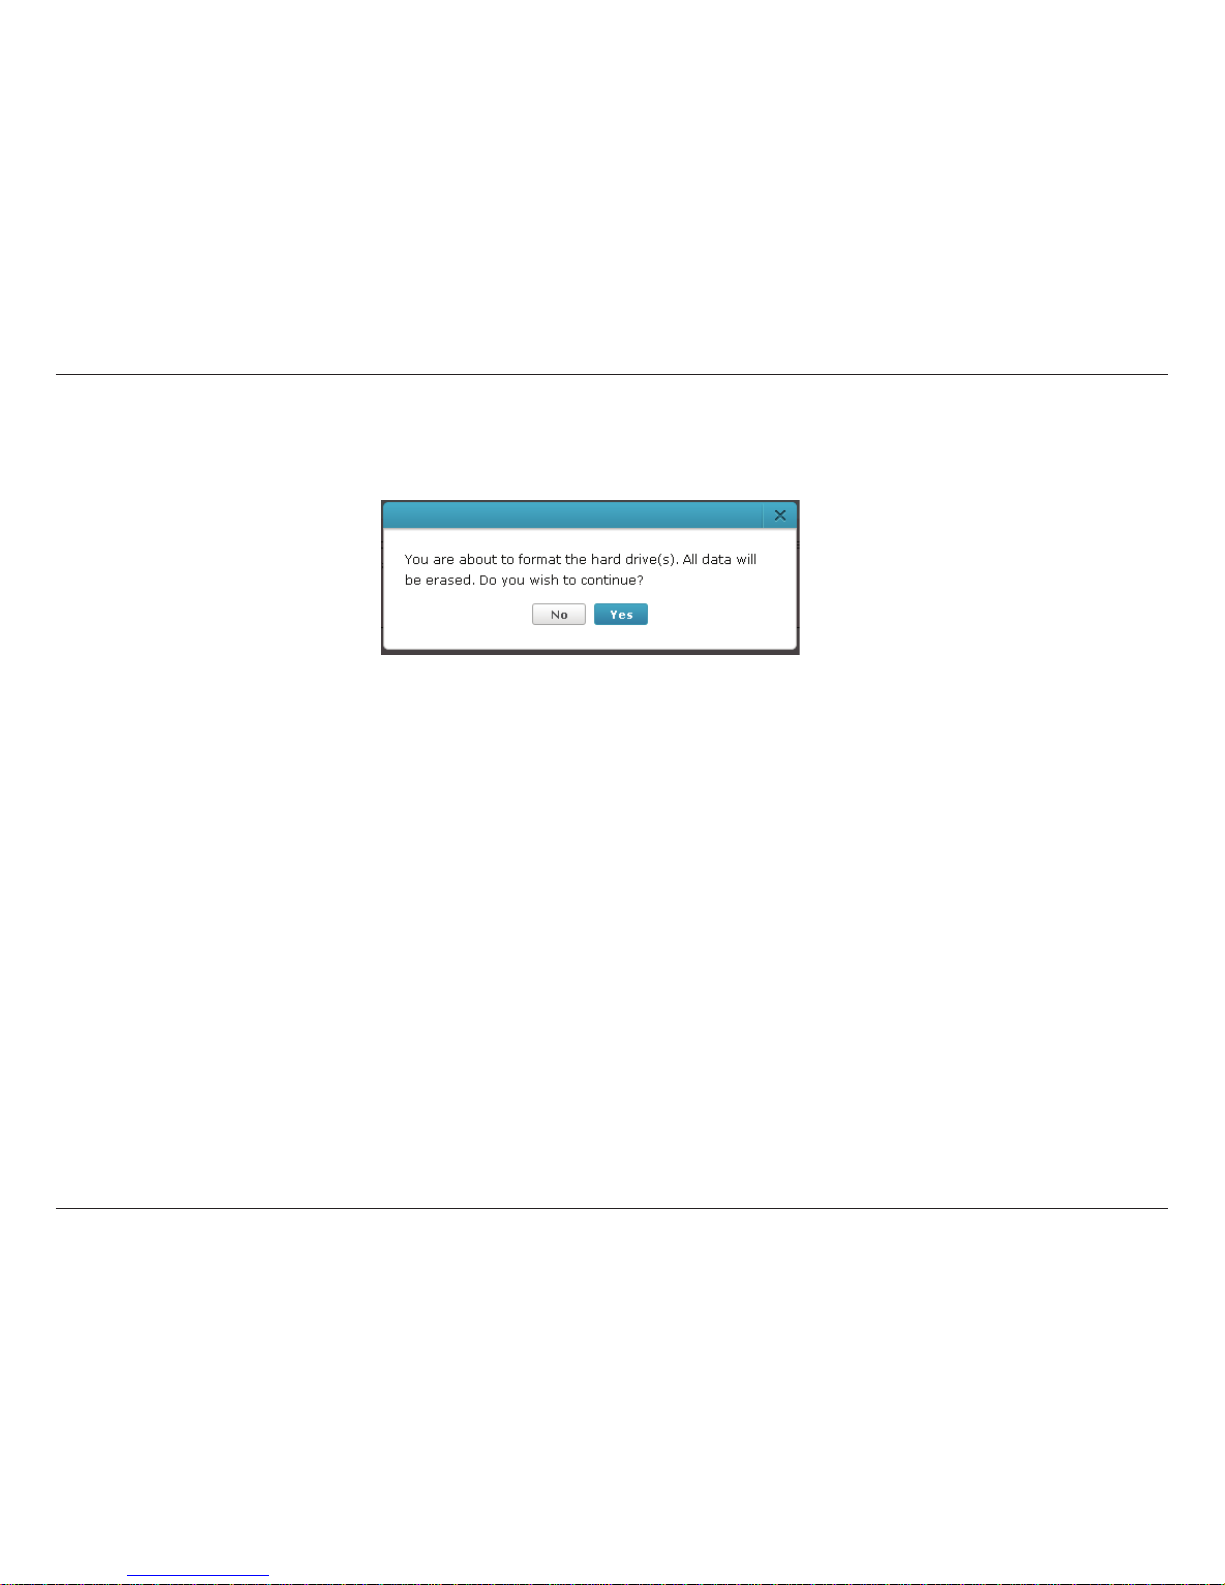
If you have decided to format your NAS using mydlink, select the RAID method from the drop-down list and the click Format button. A pop-up
message appears asking you to conrm your choice to format the volume using mydlink. Click Yes to format, No to return to the menu.
Page 25
20
D-Link ShareCenter DNS-327L User Manual
Section 2 - Getting Started
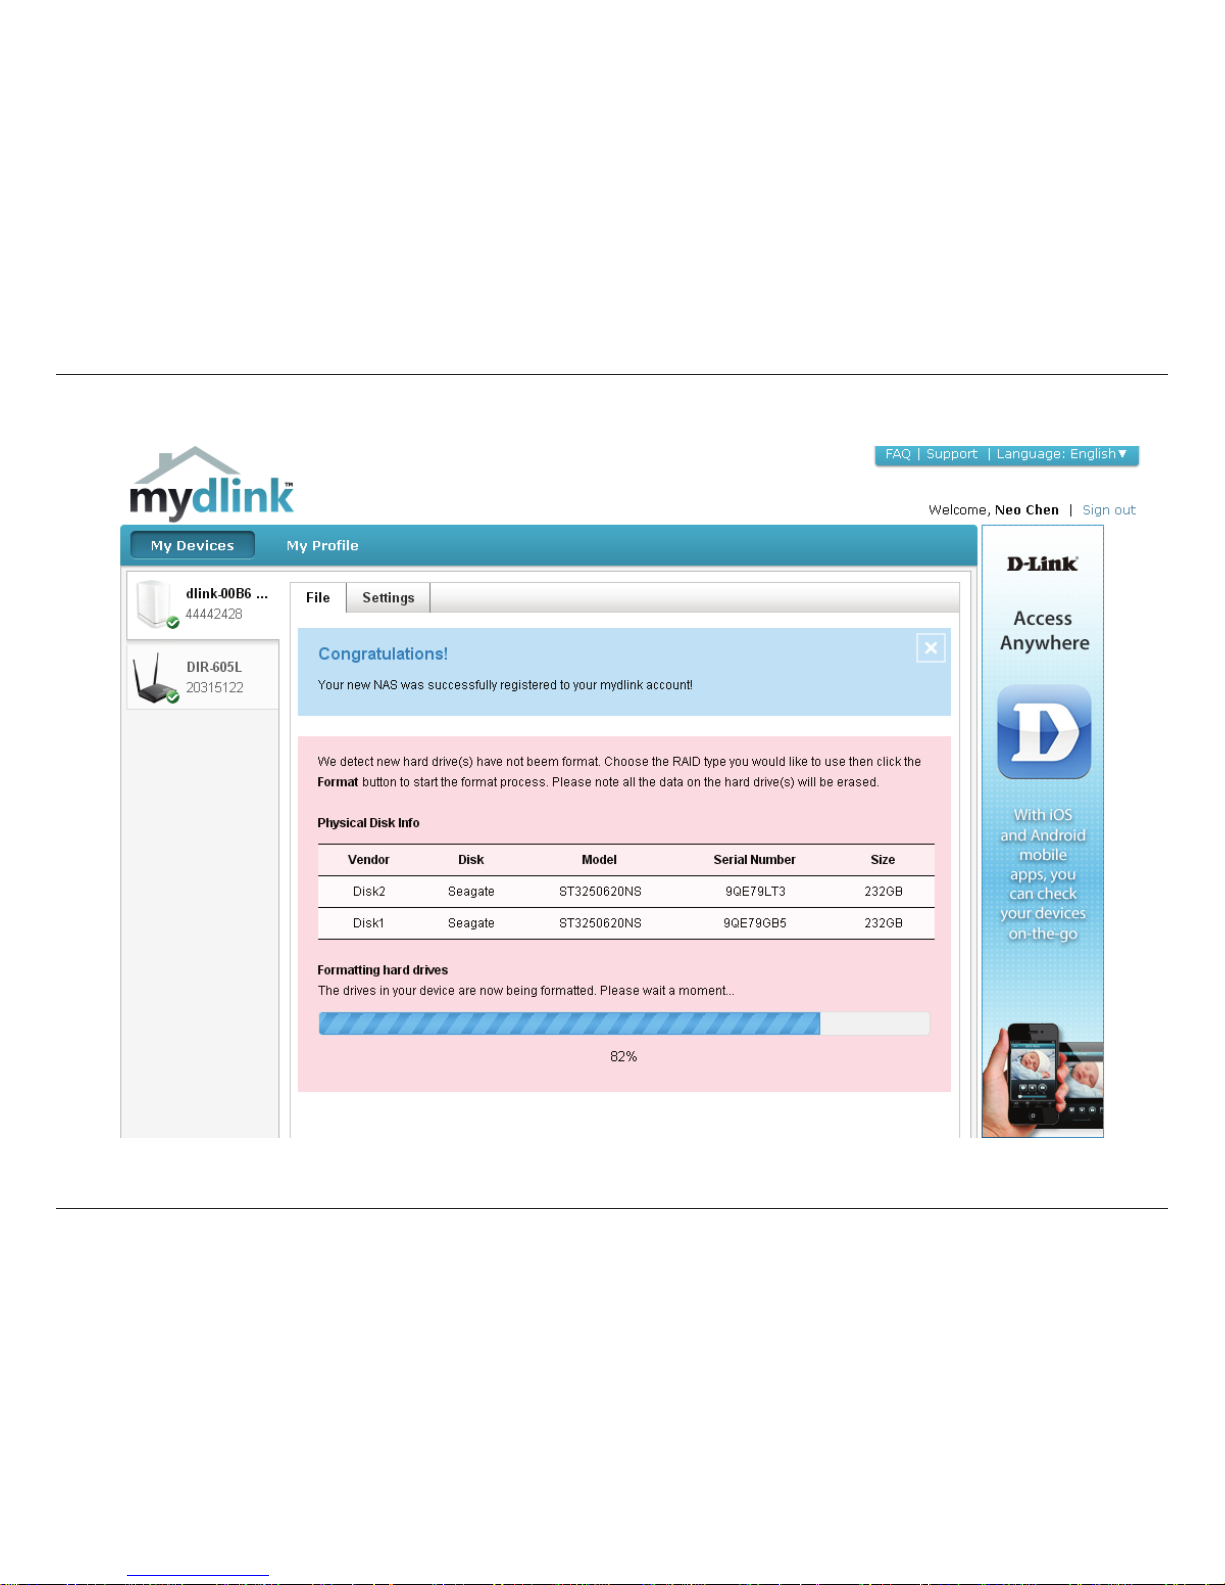
The format process takes a while to nish. The format process depends on the speed of your network connection and client CPU.
Page 26
21
D-Link ShareCenter DNS-327L User Manual
Section 2 - Getting Started
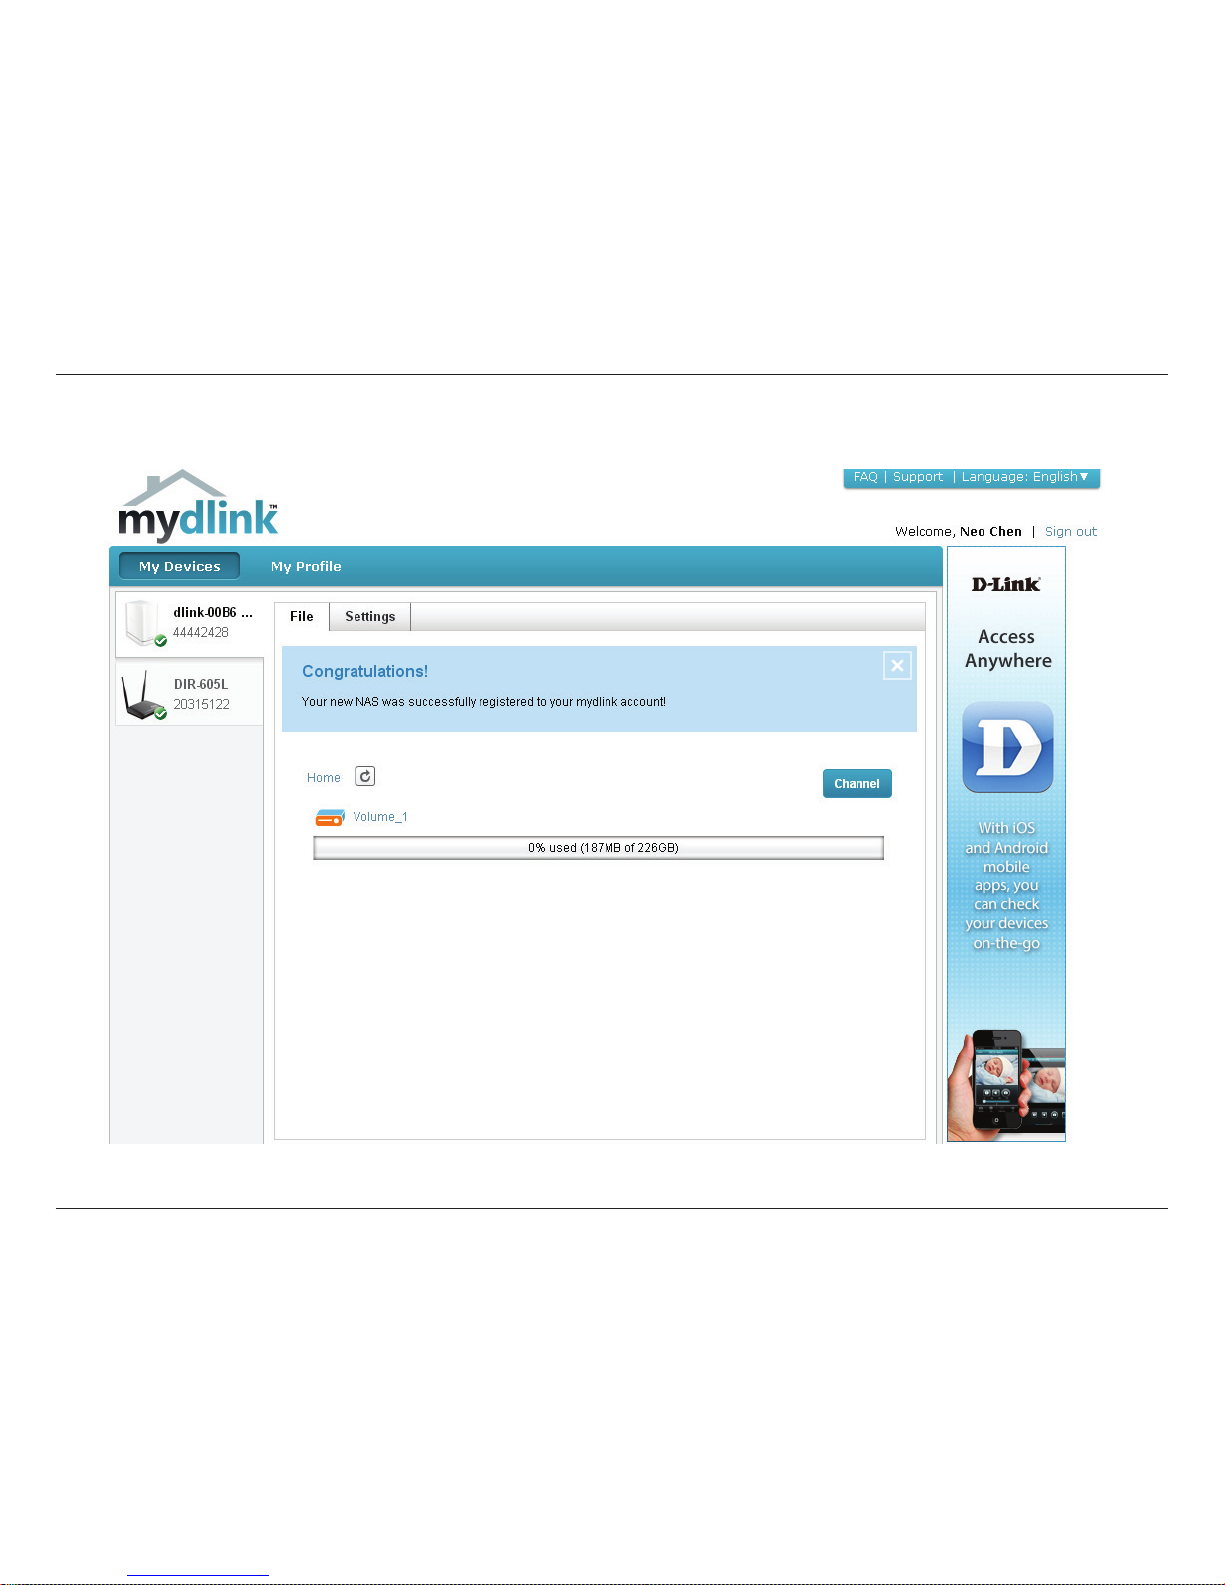
Once the format process is complete, mydlink cloud will show you the RAID status and the Volume Status. It also displays the size of the drive
avaiable and used.
Page 27
22
D-Link ShareCenter DNS-327L User Manual
Section 2 - Getting Started
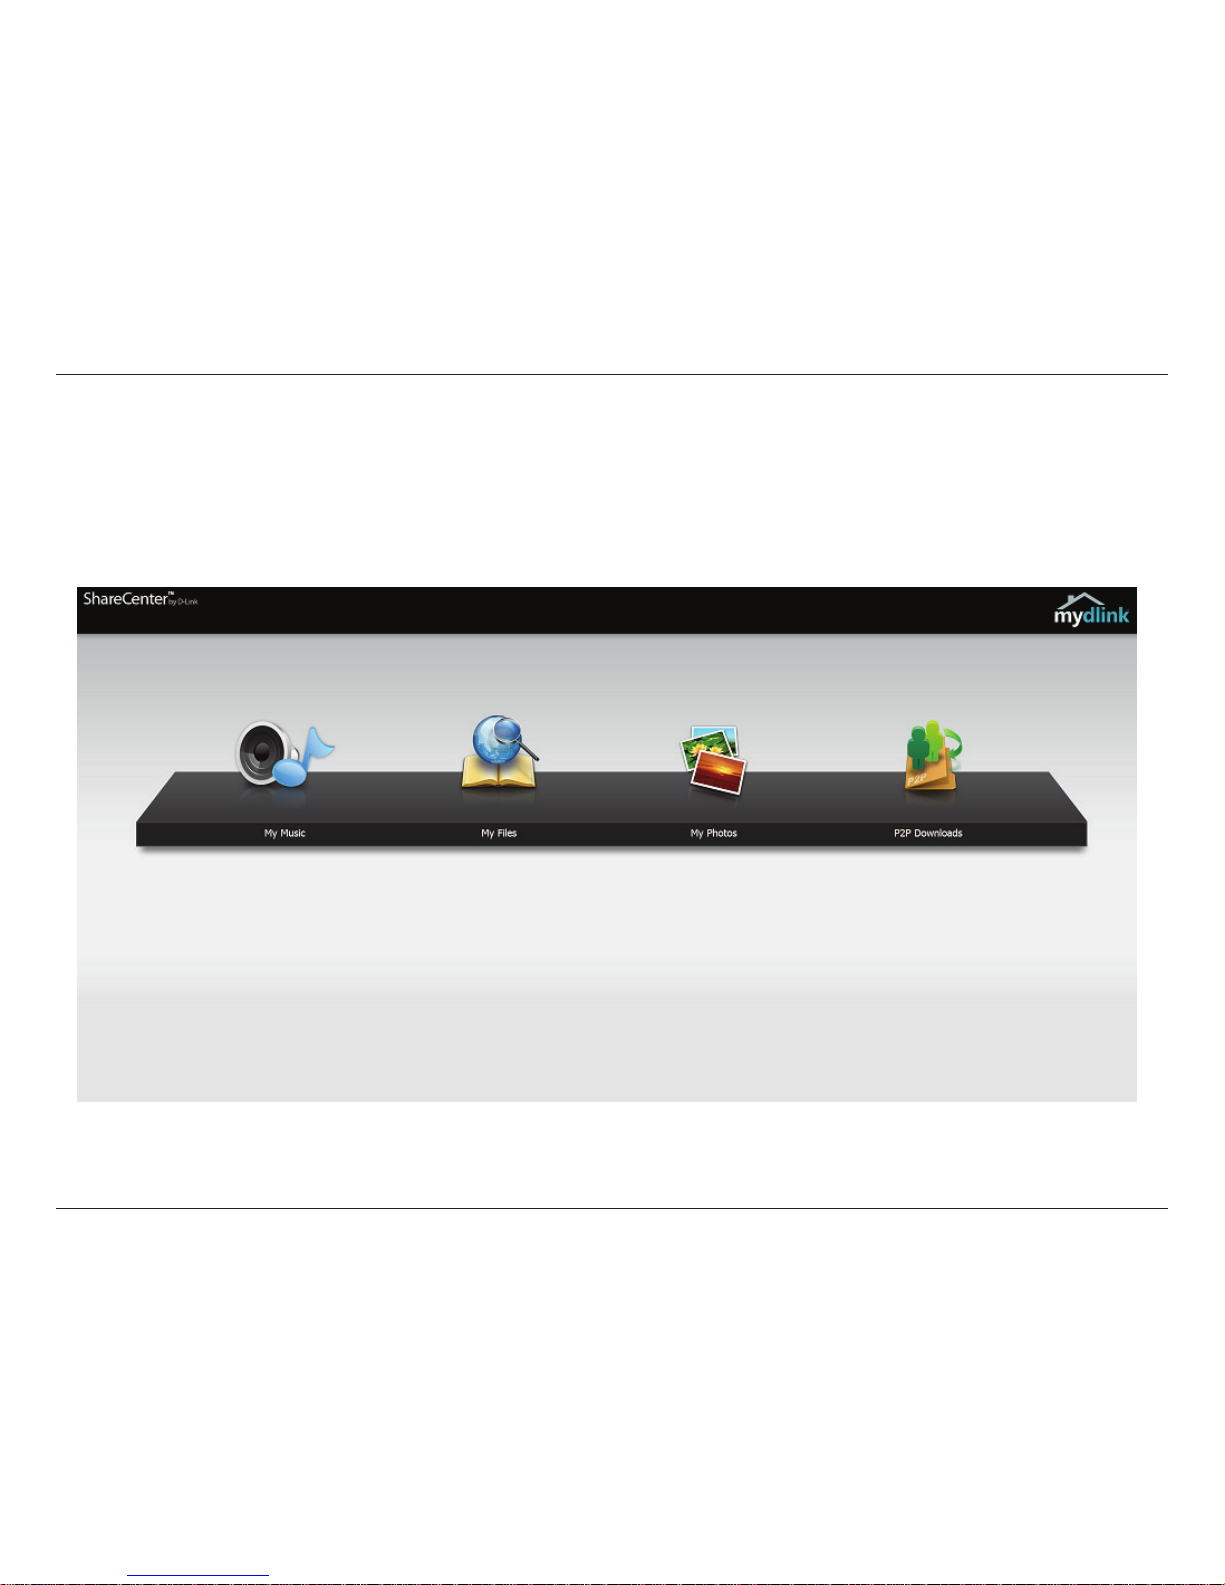
The DNS-327L provides a dierent UI experience than the usual NAS interface. once connected to the mydlink service. Click the Application button
you can access My Music, My Files, My Photos, and P2P Downloads from the main panel.
mydlink on the DNS-327L
Page 28
23
D-Link ShareCenter DNS-327L User Manual
Section 3 - Installation
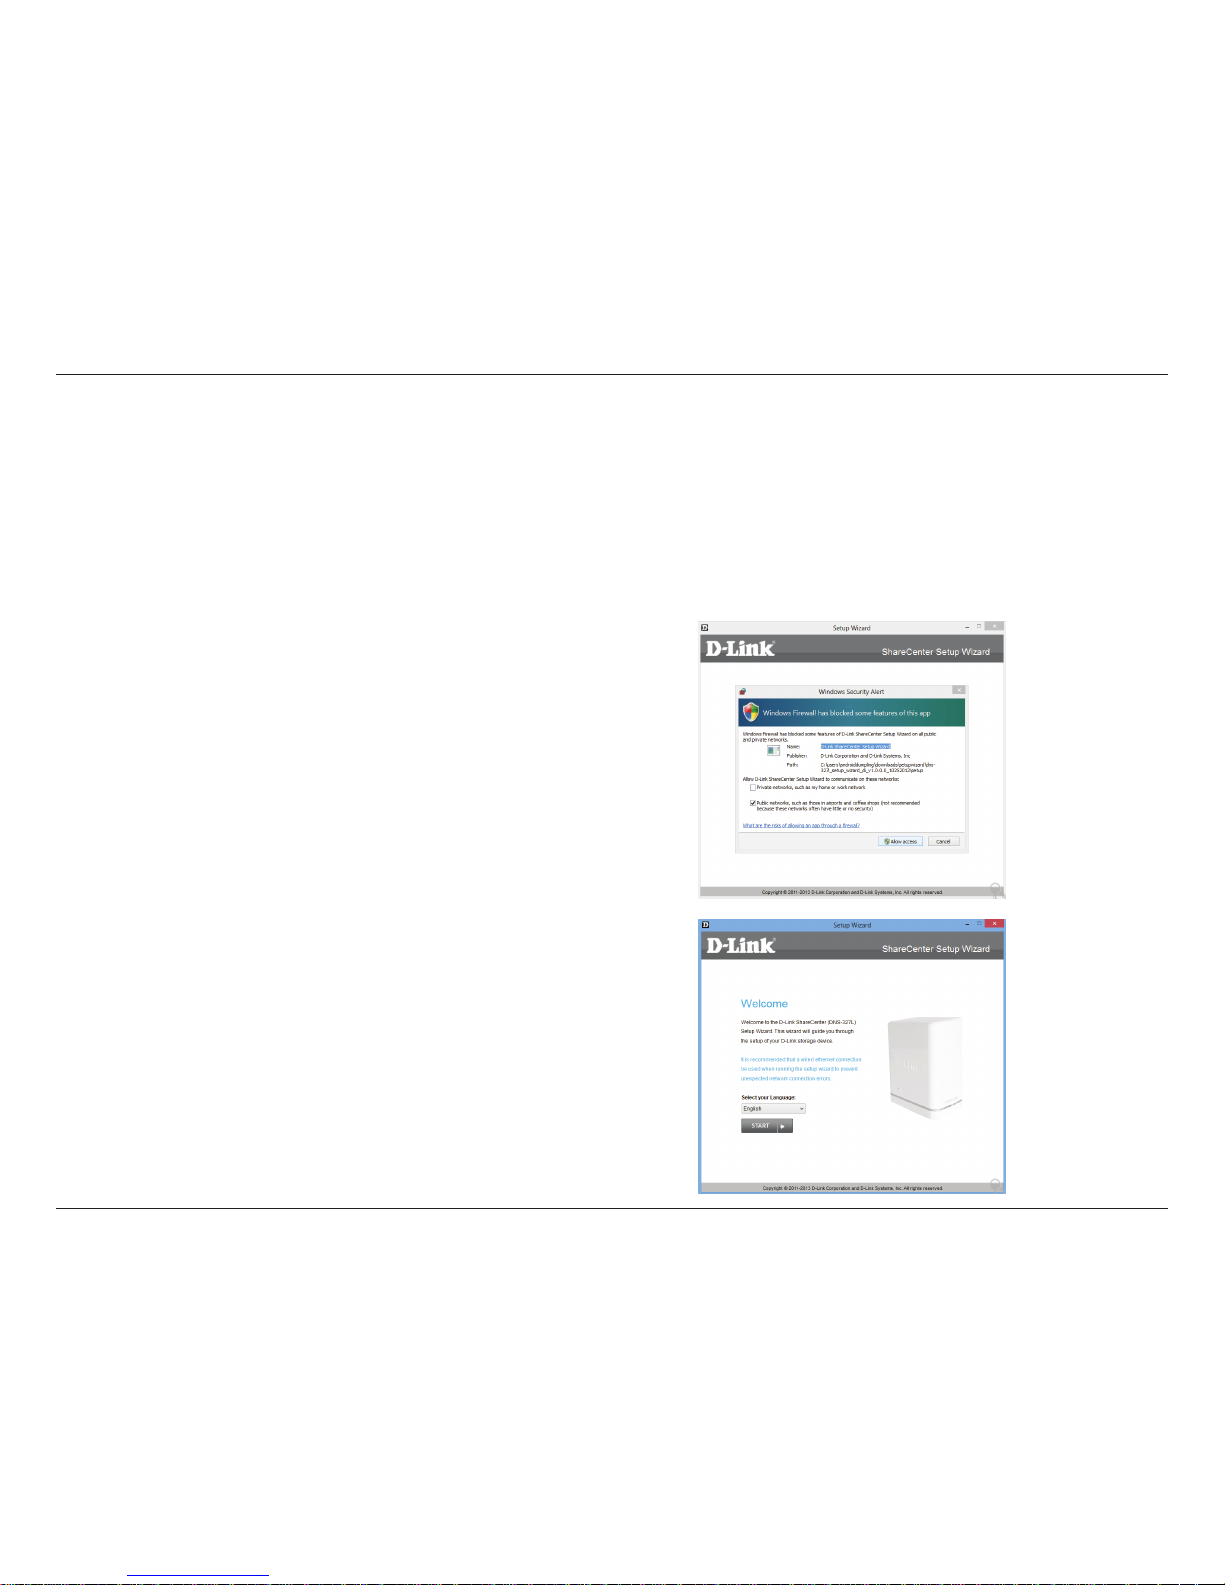
To run the Setup Wizard, insert the ShareCenter™ CD into your CD-ROM drive.
Step 1 - When the autorun screen appears, click Install
Step 2 - Select the Language of your choice and then click the Start
button.
Note: Windows Firewall presents you with a warning message to
unblock the device. Click Unblock to give your computer access to
the NAS.
Windows Installation
Setup Wizard
Page 29
24
D-Link ShareCenter DNS-327L User Manual
Section 3 - Installation
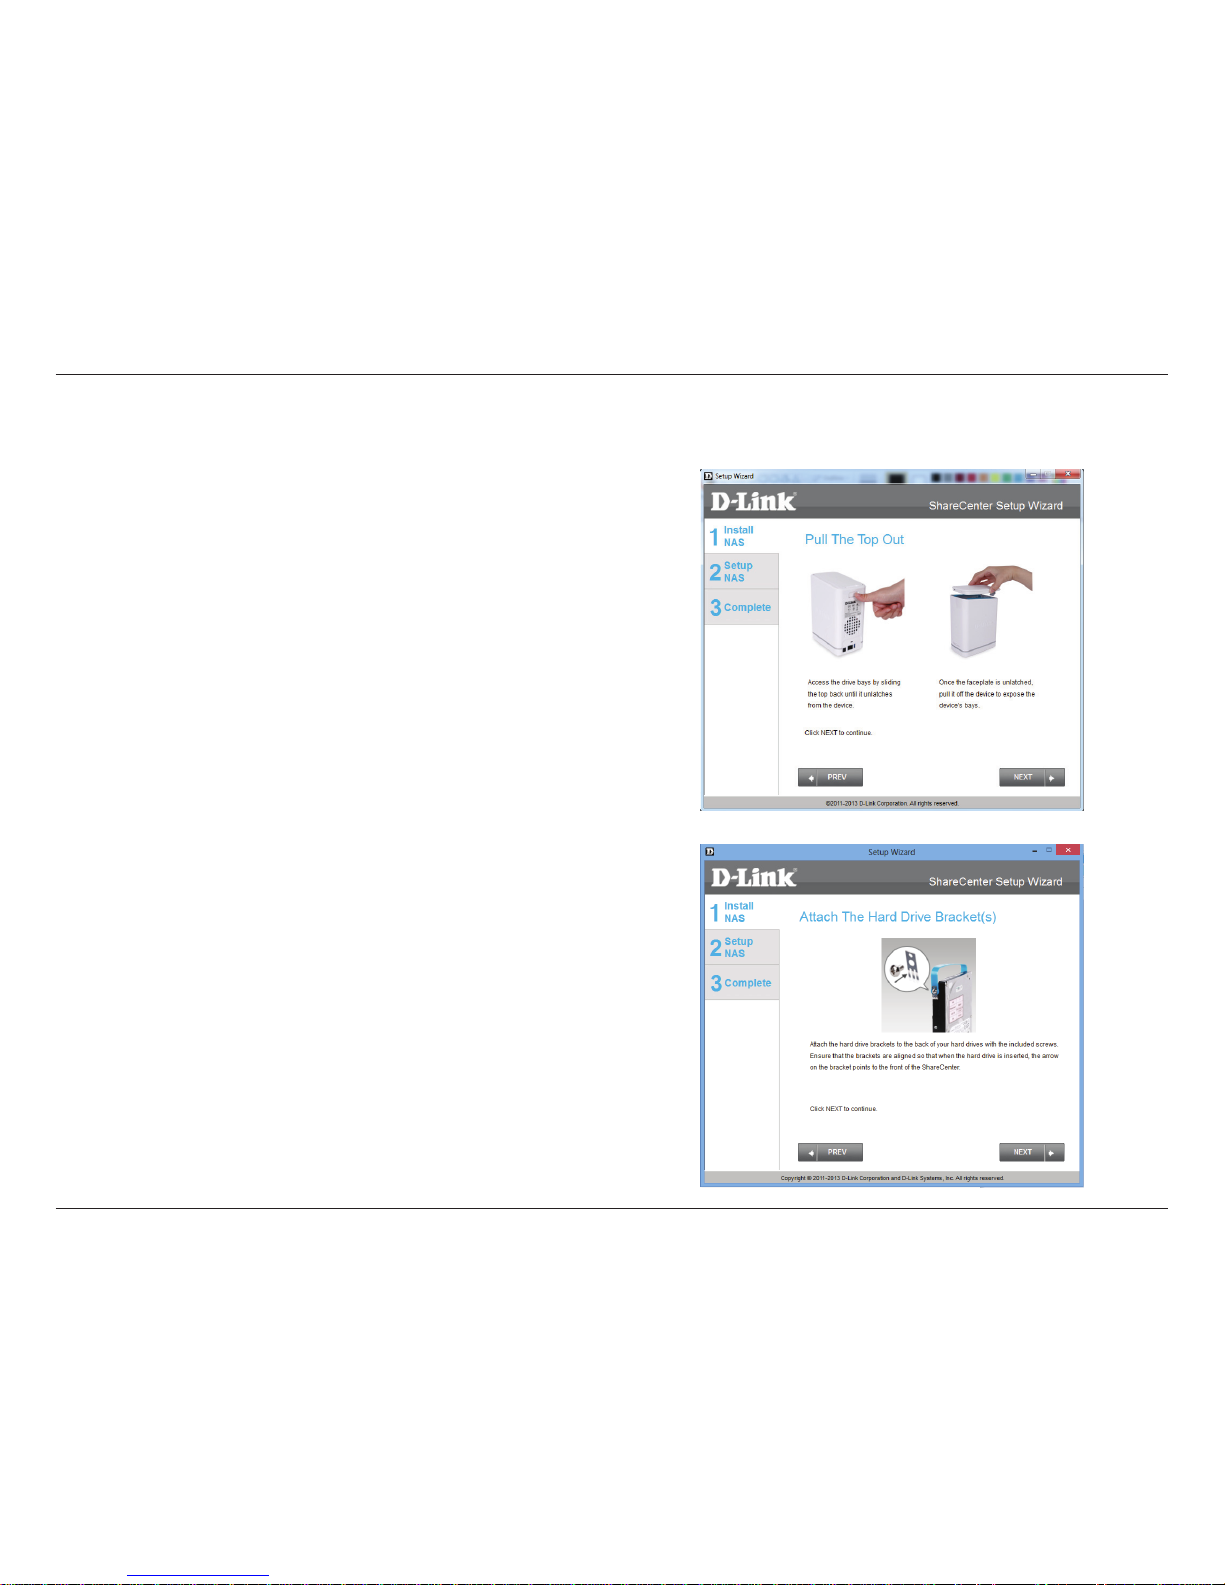
Step 3 - Follow the instructions to remove the top cover of your
ShareCenter™ .
Click Next to continue.
Install the Hard Drives
Step 4 - Attach the Hard Drives Bracket(s) to the side of the hard
drives as indicated.
Click Next to continue.
Page 30
25
D-Link ShareCenter DNS-327L User Manual
Section 3 - Installation
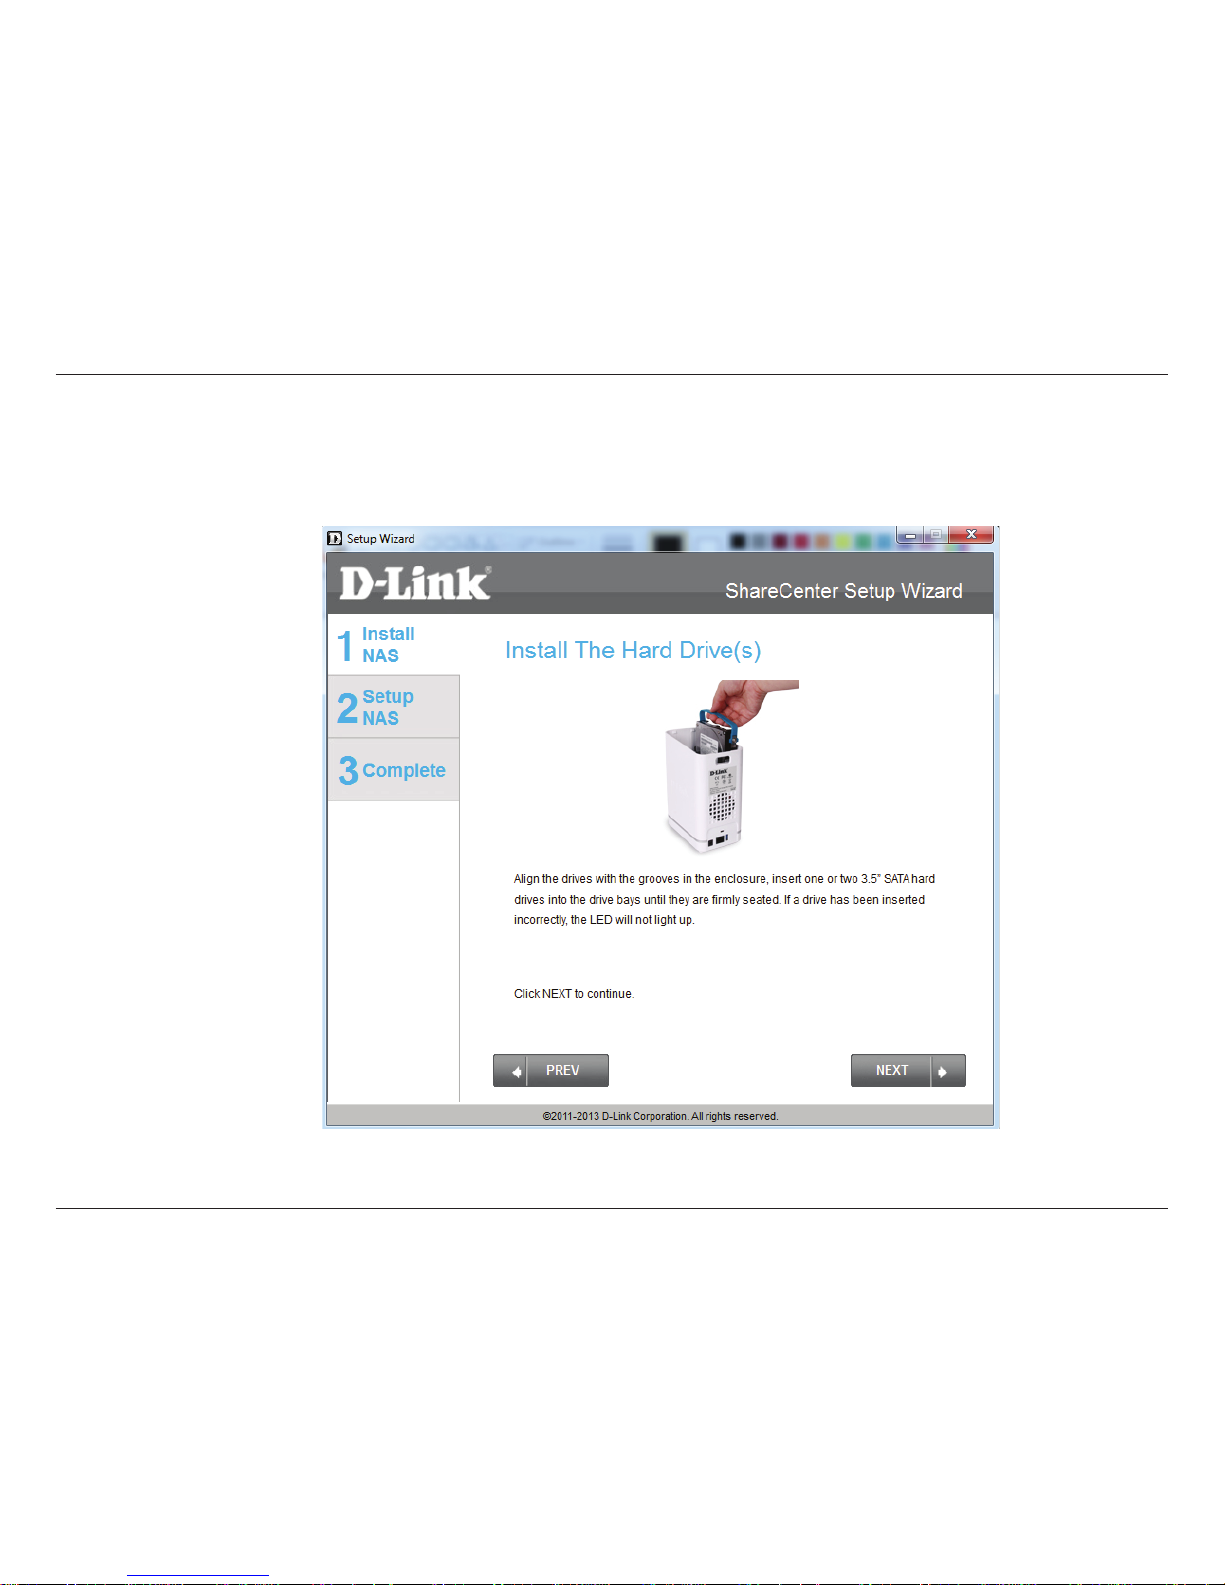
Step 5 - Slide one, or two hard drive into an available hard drive bay of your ShareCenter™.
Click Next to continue.
Page 31
26
D-Link ShareCenter DNS-327L User Manual
Section 3 - Installation
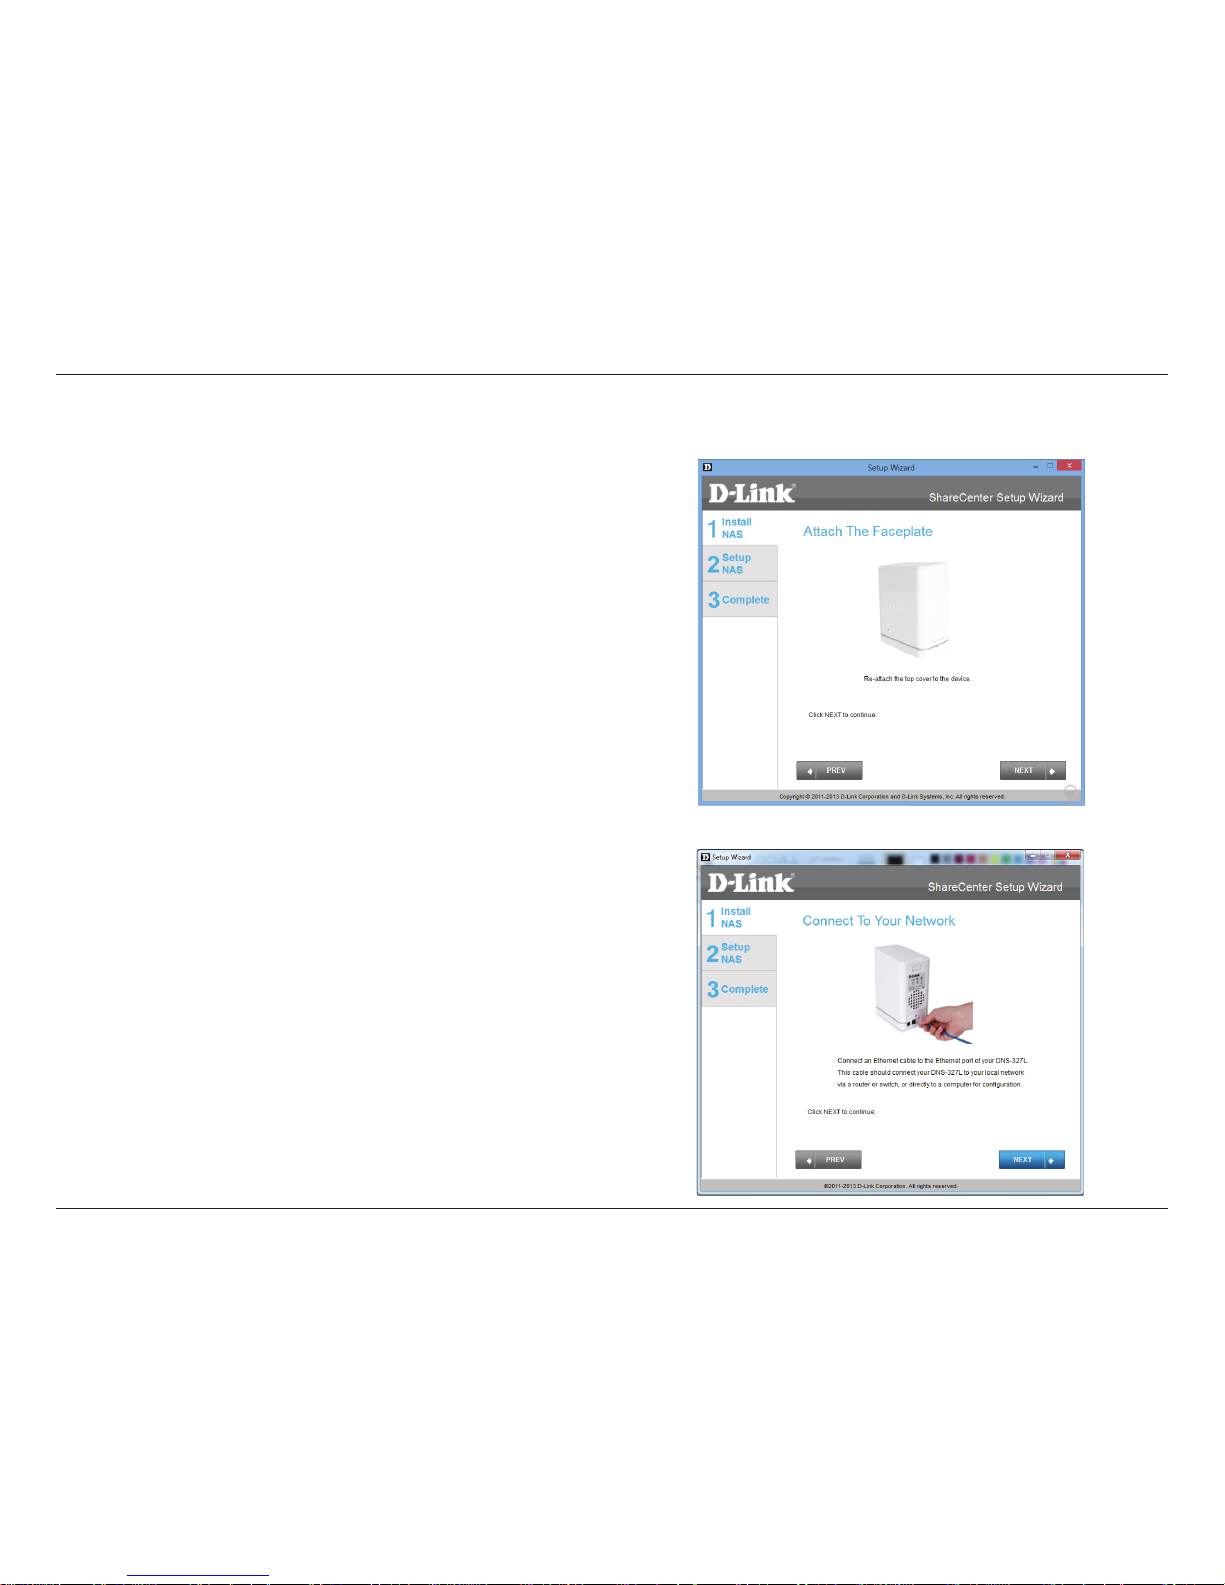
Step 6 - With the hard drives installed properly into each bay, close
the chassis by re-attaching the top panel into place.
Click Next to continue.
Step 7 - Connect a CAT5 Ethernet cable to your ShareCenter™ and
connect the other end to a switch or router (Local LAN).
Click Next to continue.
Connect to your Network
Page 32
27
D-Link ShareCenter DNS-327L User Manual
Section 3 - Installation
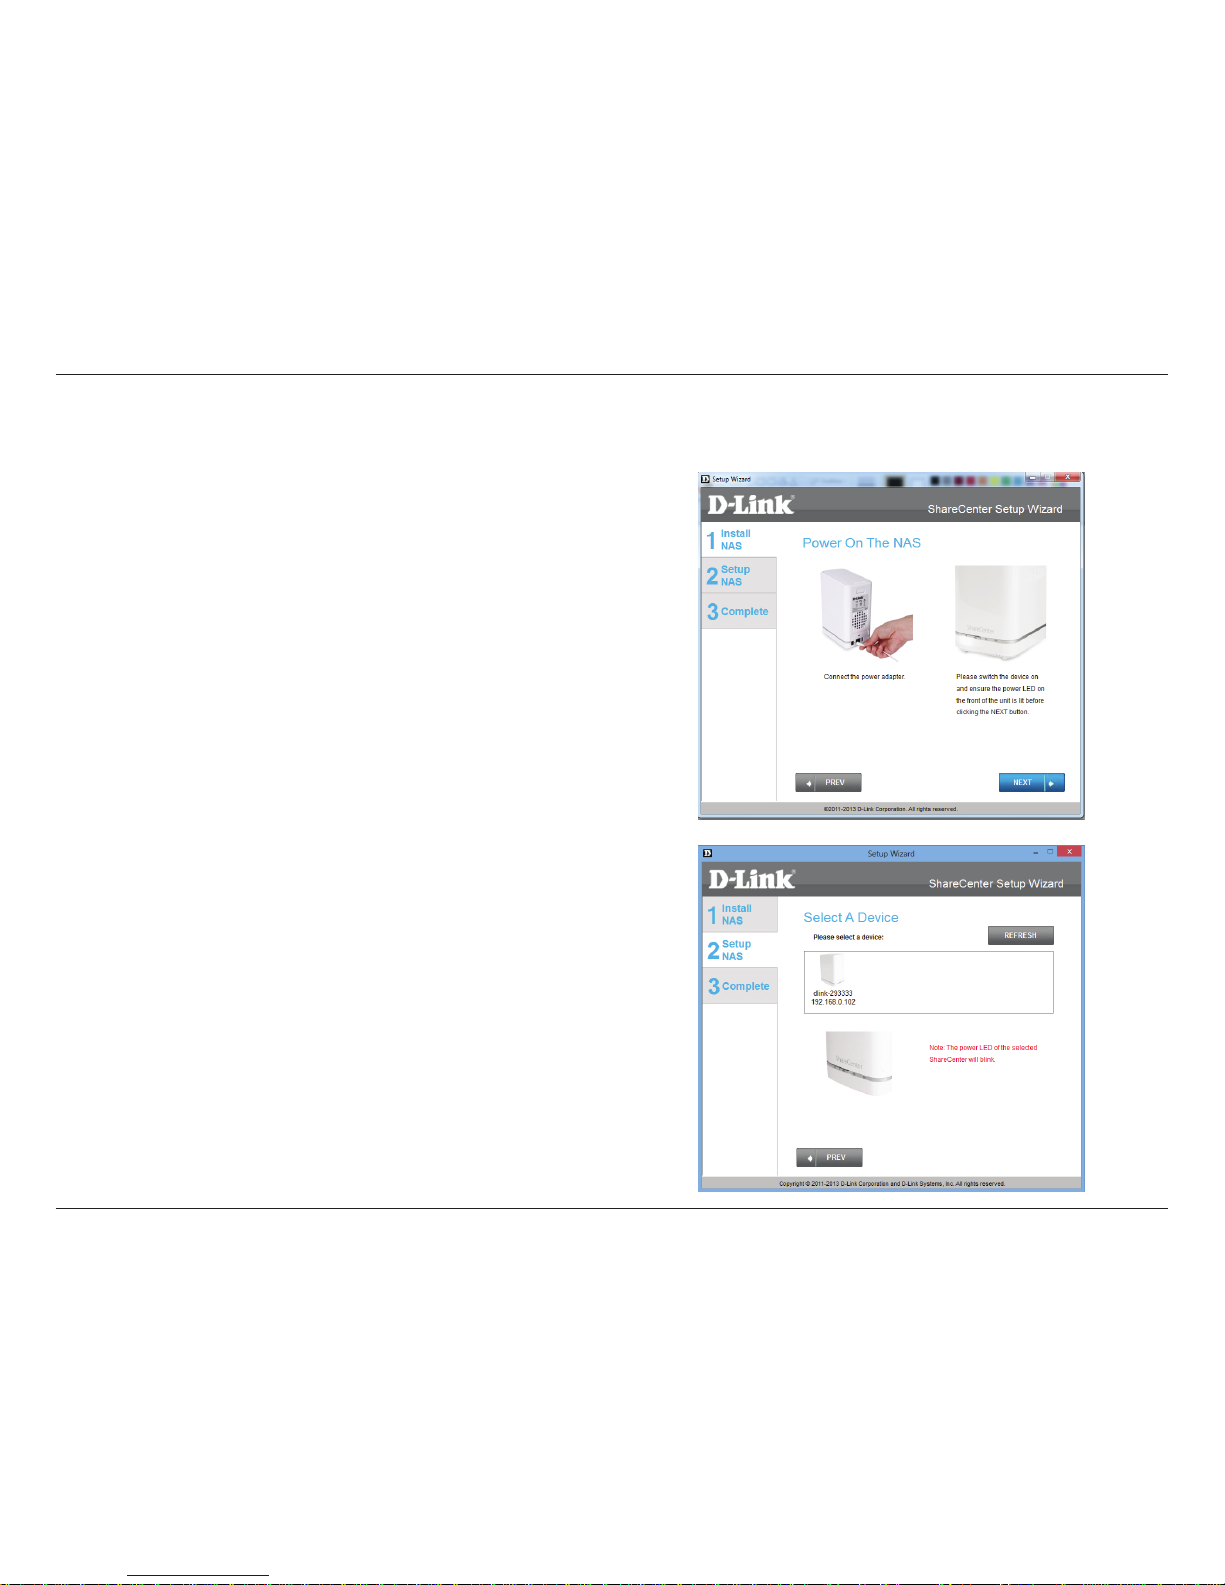
Step 8 - Connect the power adapter connector to the power
receptacle on the back of the ShareCenter™ . Then, power on the
ShareCenter™ by pressing the power button located in the front
panel.
Click Next to continue.
Step 9 - With the power on, press the Next button on the device and
check and make sure the IP address of your ShareCenter™ matches
what you see on the screen.
Note: Allow 1-2 minutes for the DNS-327L to be recognized.
Click Next to continue.
Power and Device Selection
Page 33
28
D-Link ShareCenter DNS-327L User Manual
Section 3 - Installation
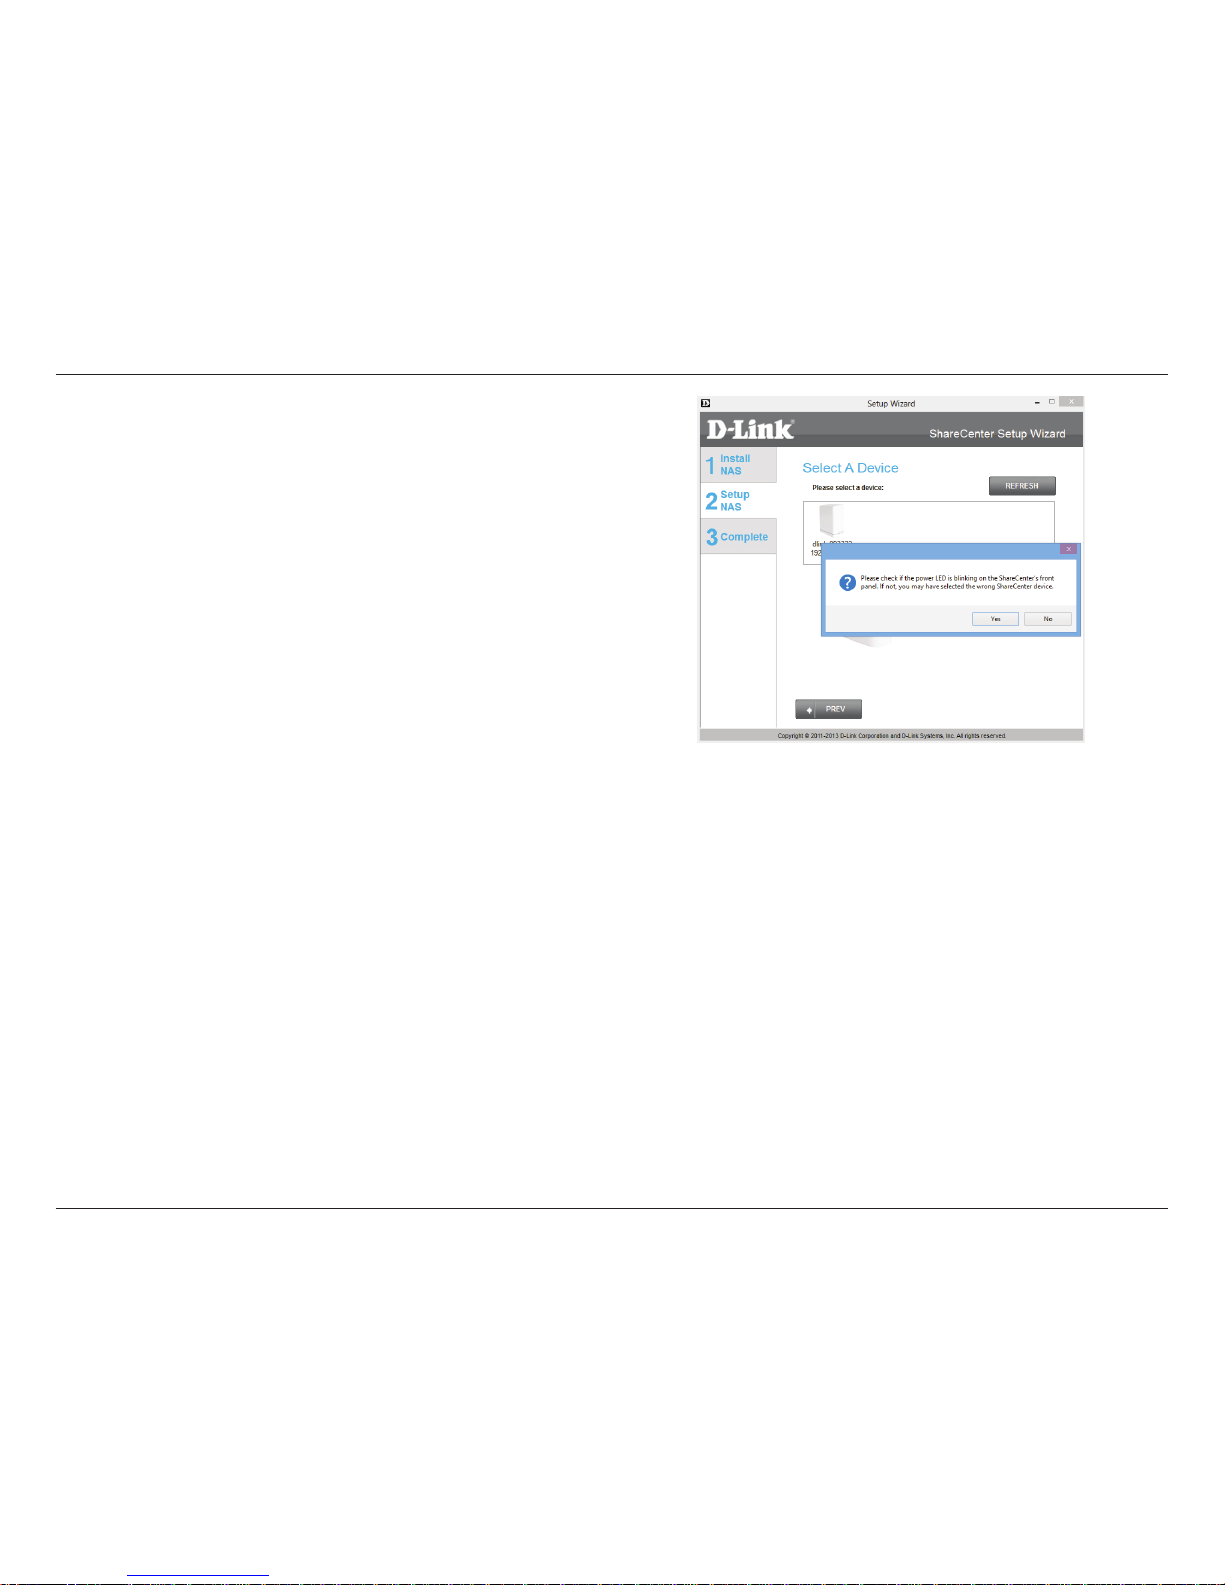
Step 10 - A warning message will appear prompting you to conrm
the device. Click Yes, to proceed.
Click Next to continue.
Page 34
29
D-Link ShareCenter DNS-327L User Manual
Section 3 - Installation
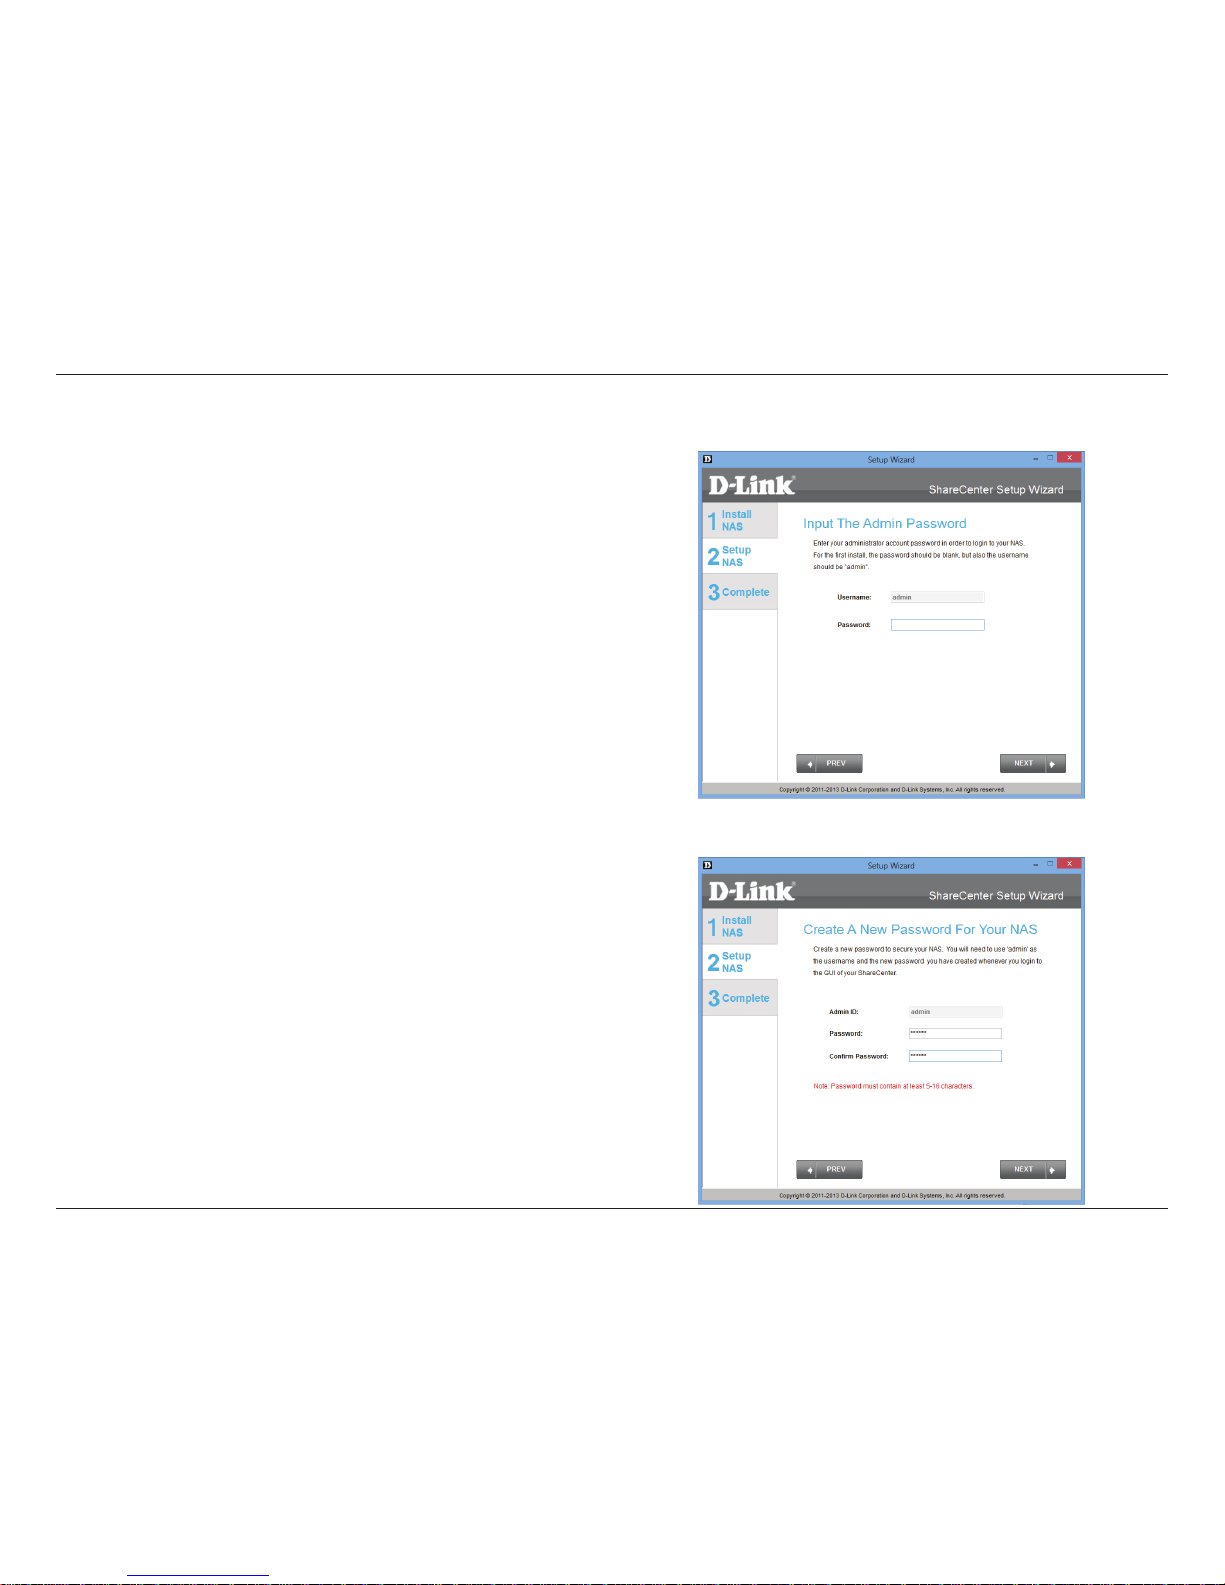
Step 11 - Enter the administrator password. If this is the rst time
you are doing the installation on this NAS, leave the password blank.
Click Next to continue.
Step 12 - In this step you can create a new password for the Admin
username. It is recommended you set a password, however you may
also leave the elds blank.
Click Next to continue.
Admin Password
Page 35
30
D-Link ShareCenter DNS-327L User Manual
Section 3 - Installation
Networking Setup
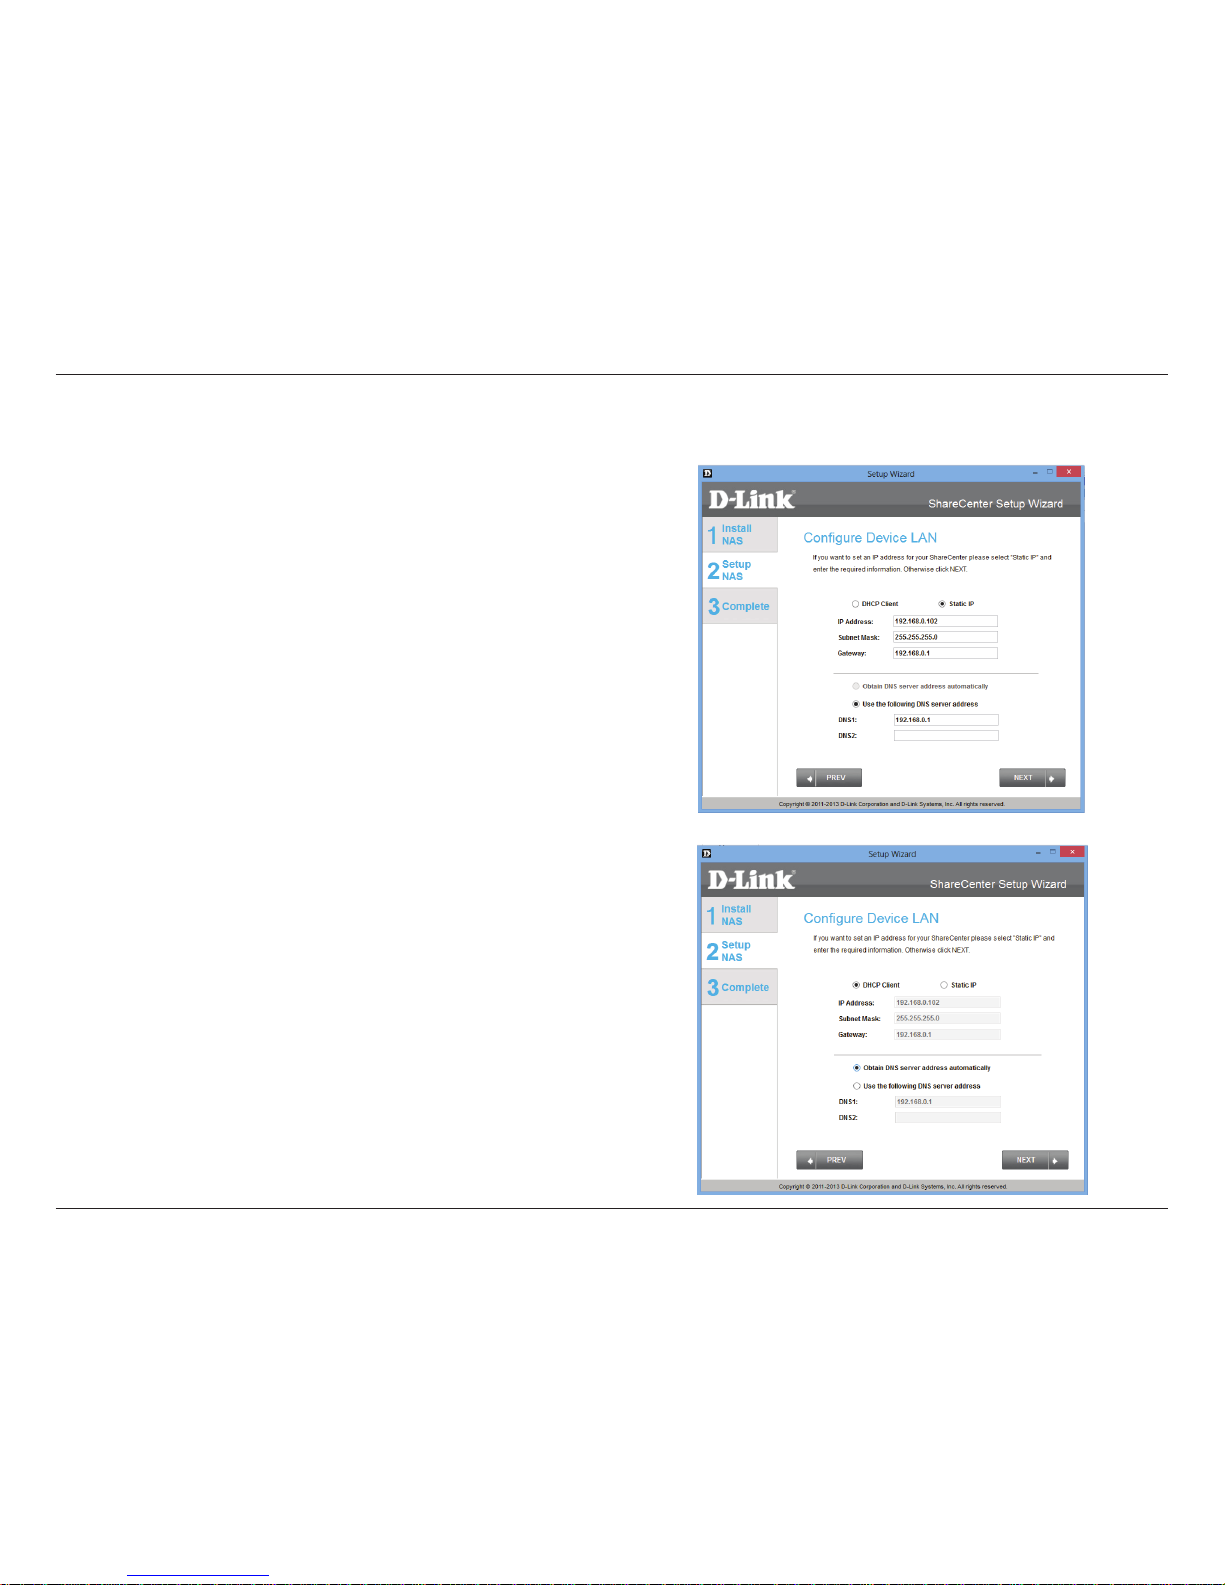
Step 13 - You may either use Static IP or DHCP to congure the IP
network settings of the ShareCenter™. If you select Static IP, then
enter the IP parameters as listed.
Click Next to continue.
You may also use DHCP to congure the IP network settings of the
ShareCenter™. In this situation, leave the parameters blank as your
router should automatically congure them.
Click Next to continue.
Page 36
31
D-Link ShareCenter DNS-327L User Manual
Section 3 - Installation
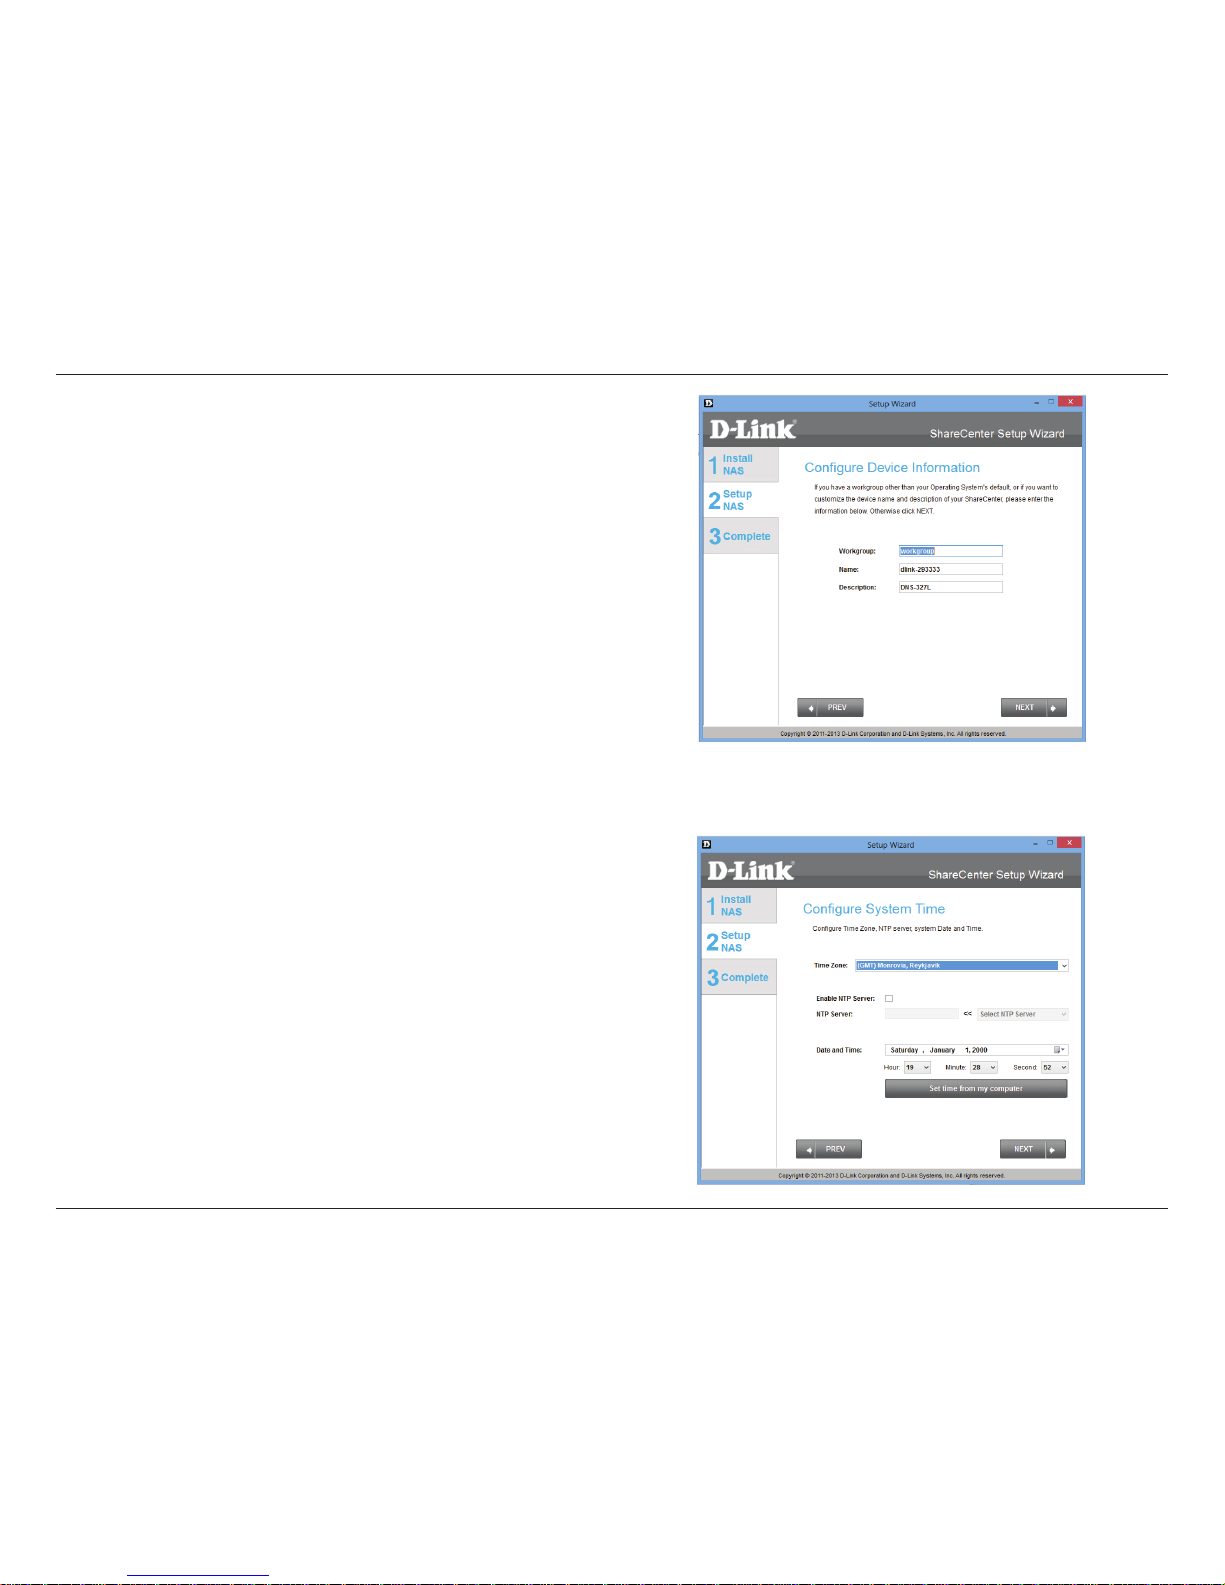
Step 14 - Congure the Device Information. Type the workgroup
name, a name and a description for the device. This workgroup
works best when it uses the same name as your current workgroup
settings. If you haven’t setup a workgroup yet, type a name that
best suits the environment or leave the default “workgroup” name.
Click Next to continue.
Step 15 - Congure the System Time. Select a Time Zone from
the drop-down list. Click Enable NTP Server and select NTP Server
from the drop-down list if your network is conected to the internet.
Set the Date & Time settings using the calendar drop-down menu.
Congure the time settings by manually conguring the Hour,
Minute, and Second settings or just click the “Set time from my
computer” button.
Click Next to continue.
Page 37
32
D-Link ShareCenter DNS-327L User Manual
Section 3 - Installation
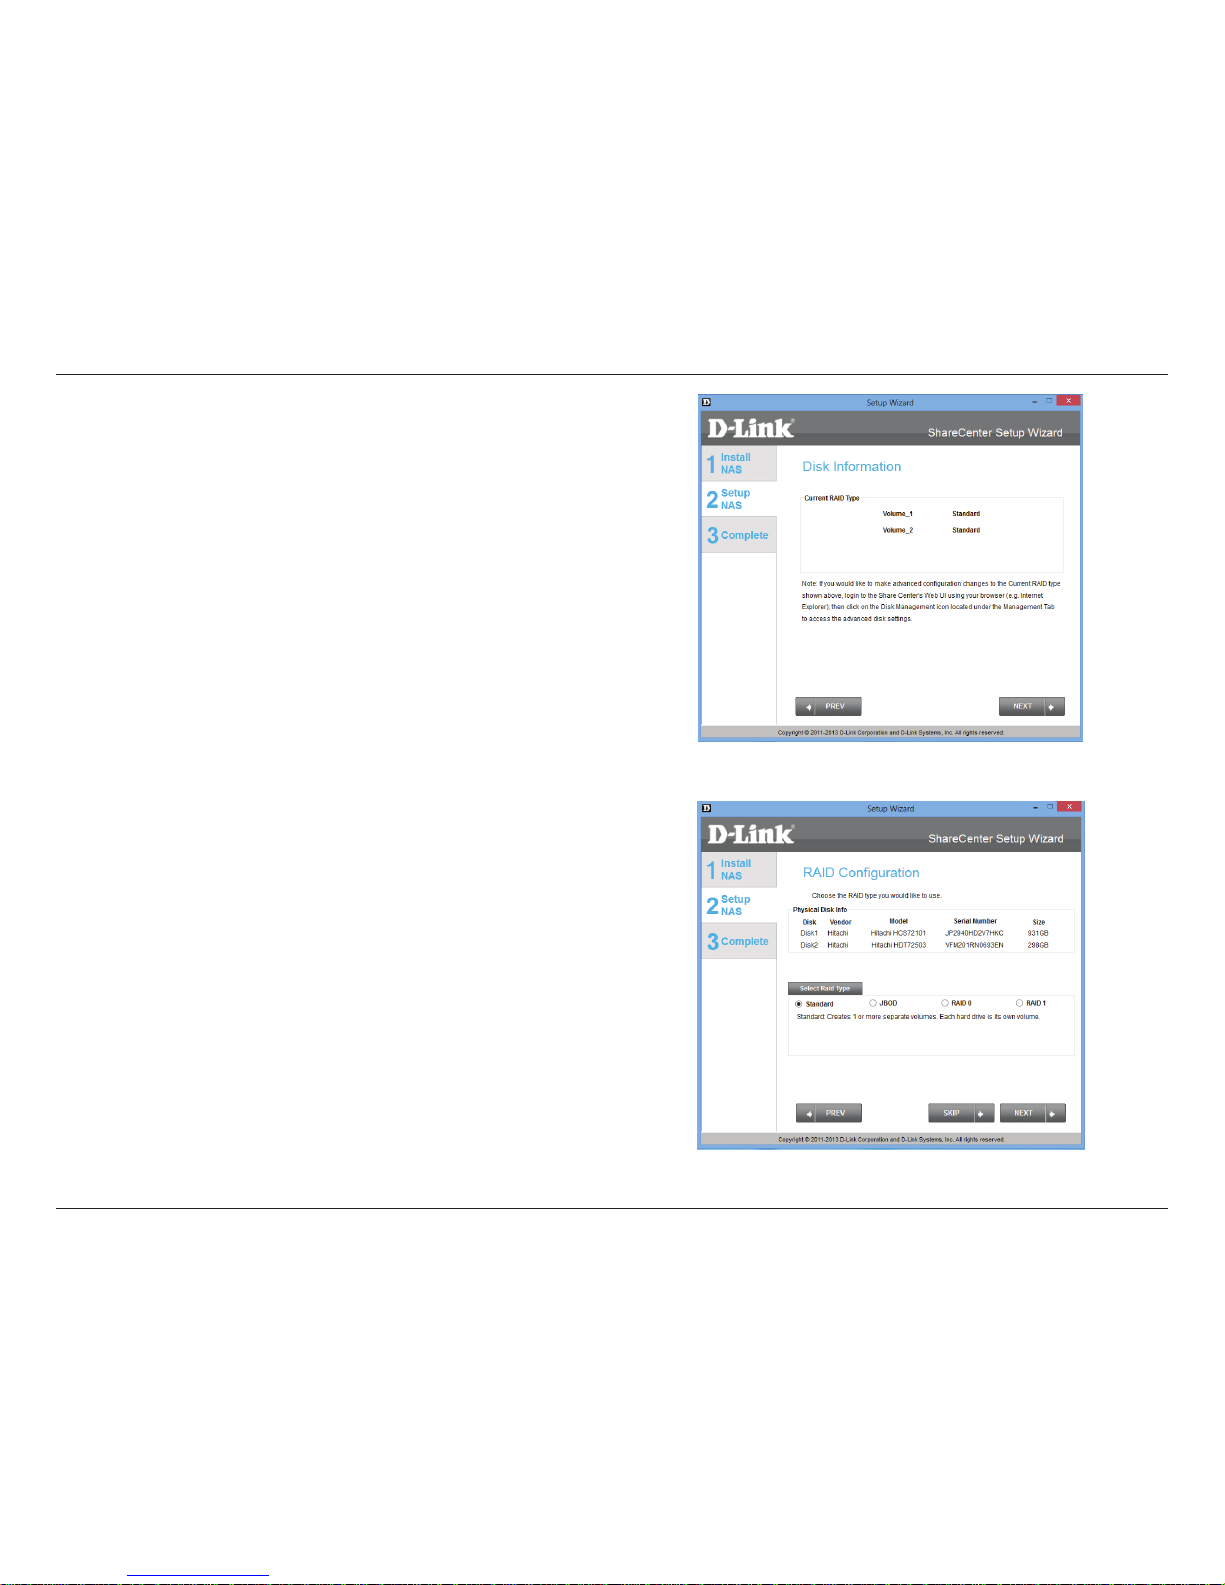
Step 16 - The Disk Information window provides the current RAID
Type. However, if this isn’t already congured, read the instructions
under the Note.
Click Next to continue.
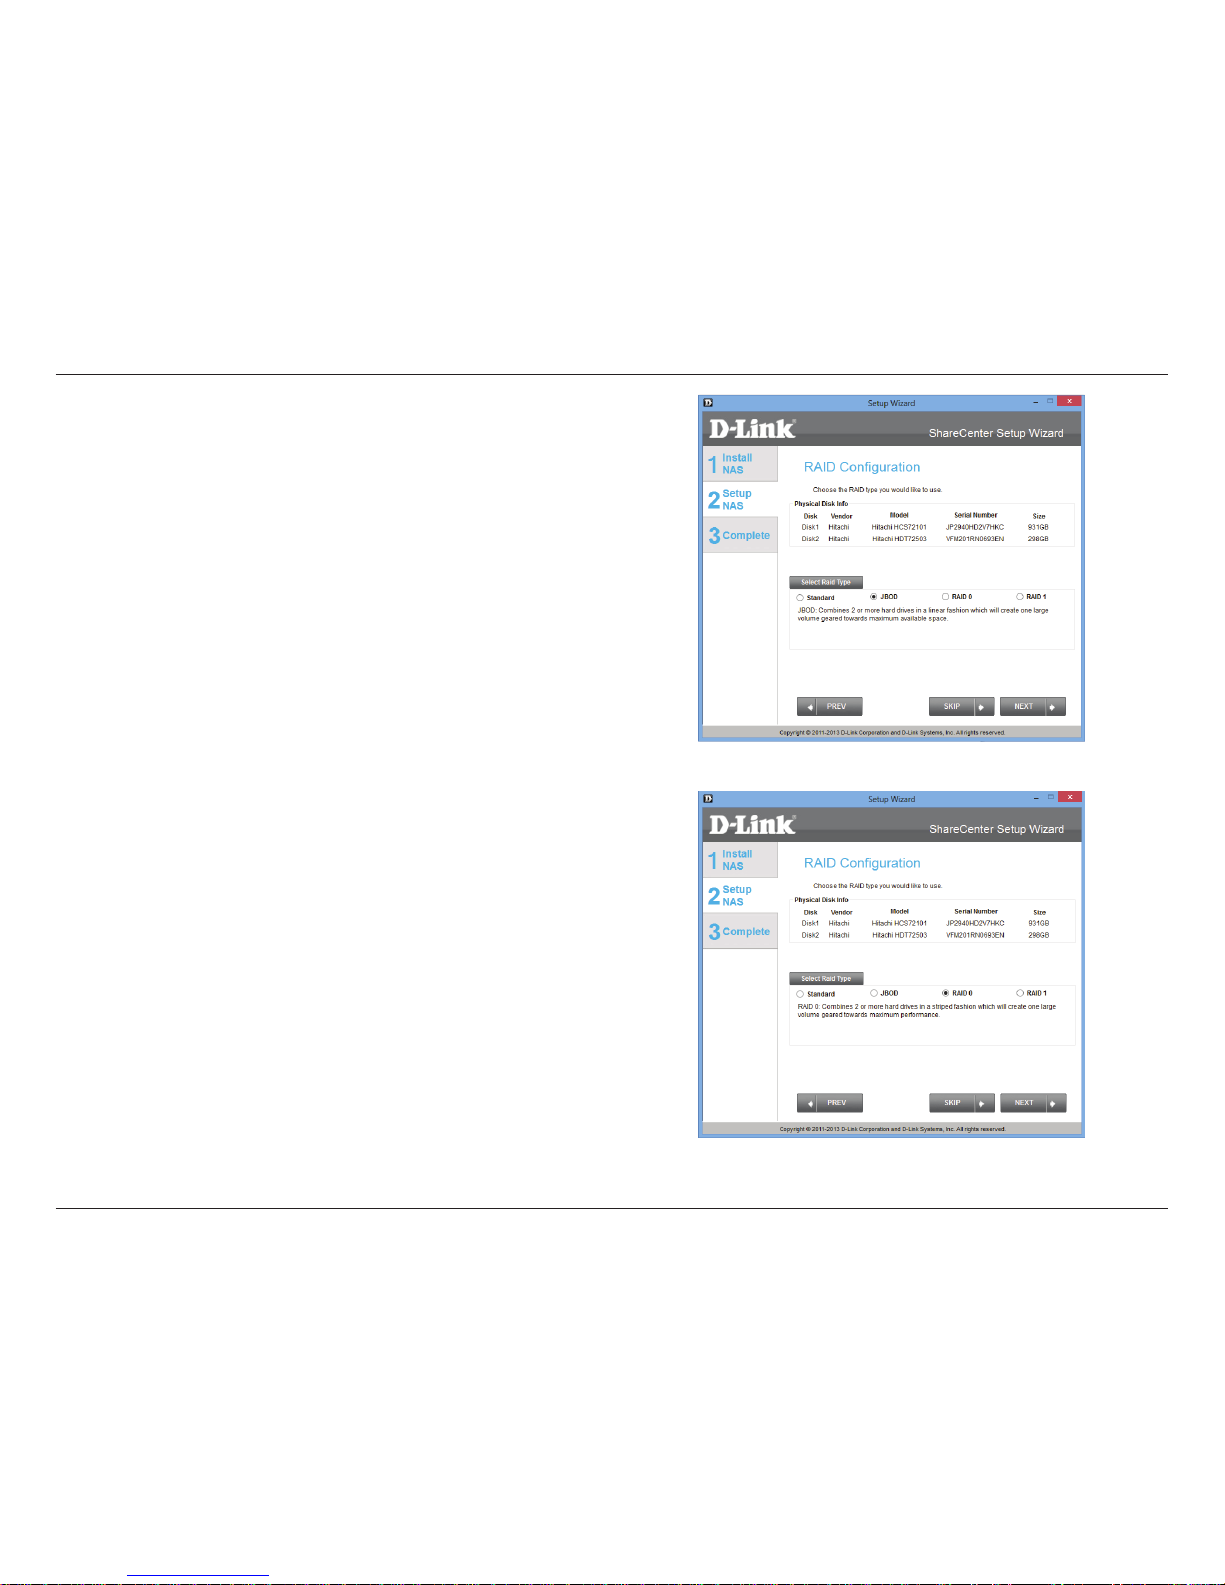
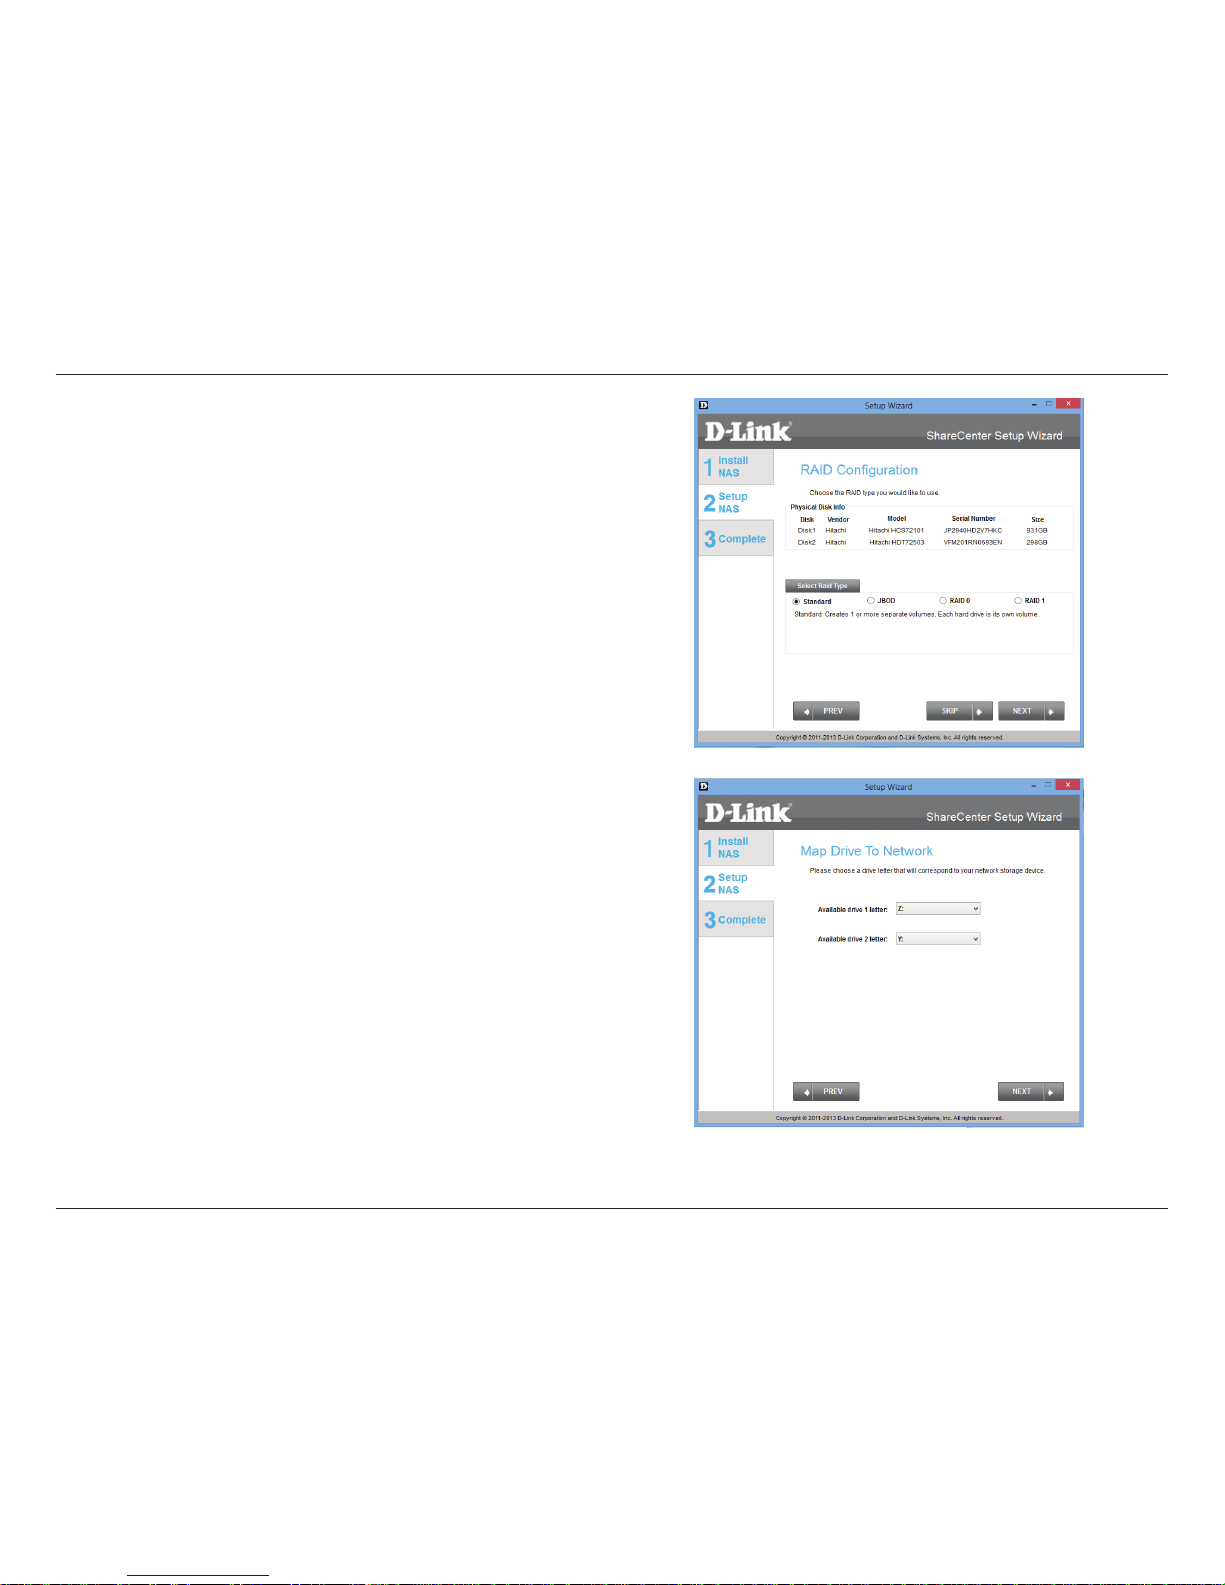
Step 17 - The RAID Conguration window provides more detailed
Physical Disk information. Here you can analyse your Disk, Vendor,
Model number, Serial number, and Disk size. Under Select RAID
Type, there are four options to choose from. Standard, JBOD, RAID
0, and RAID 1. Selecting each one provides a brief description of
which each RAID format oers. See illustrations below and check
the Knowledge Base at the back of this manual for more RAID
descriptions. Skip this step if you have setup this system before.
By default Standard is selected.
Page 38
33
D-Link ShareCenter DNS-327L User Manual
Section 3 - Installation
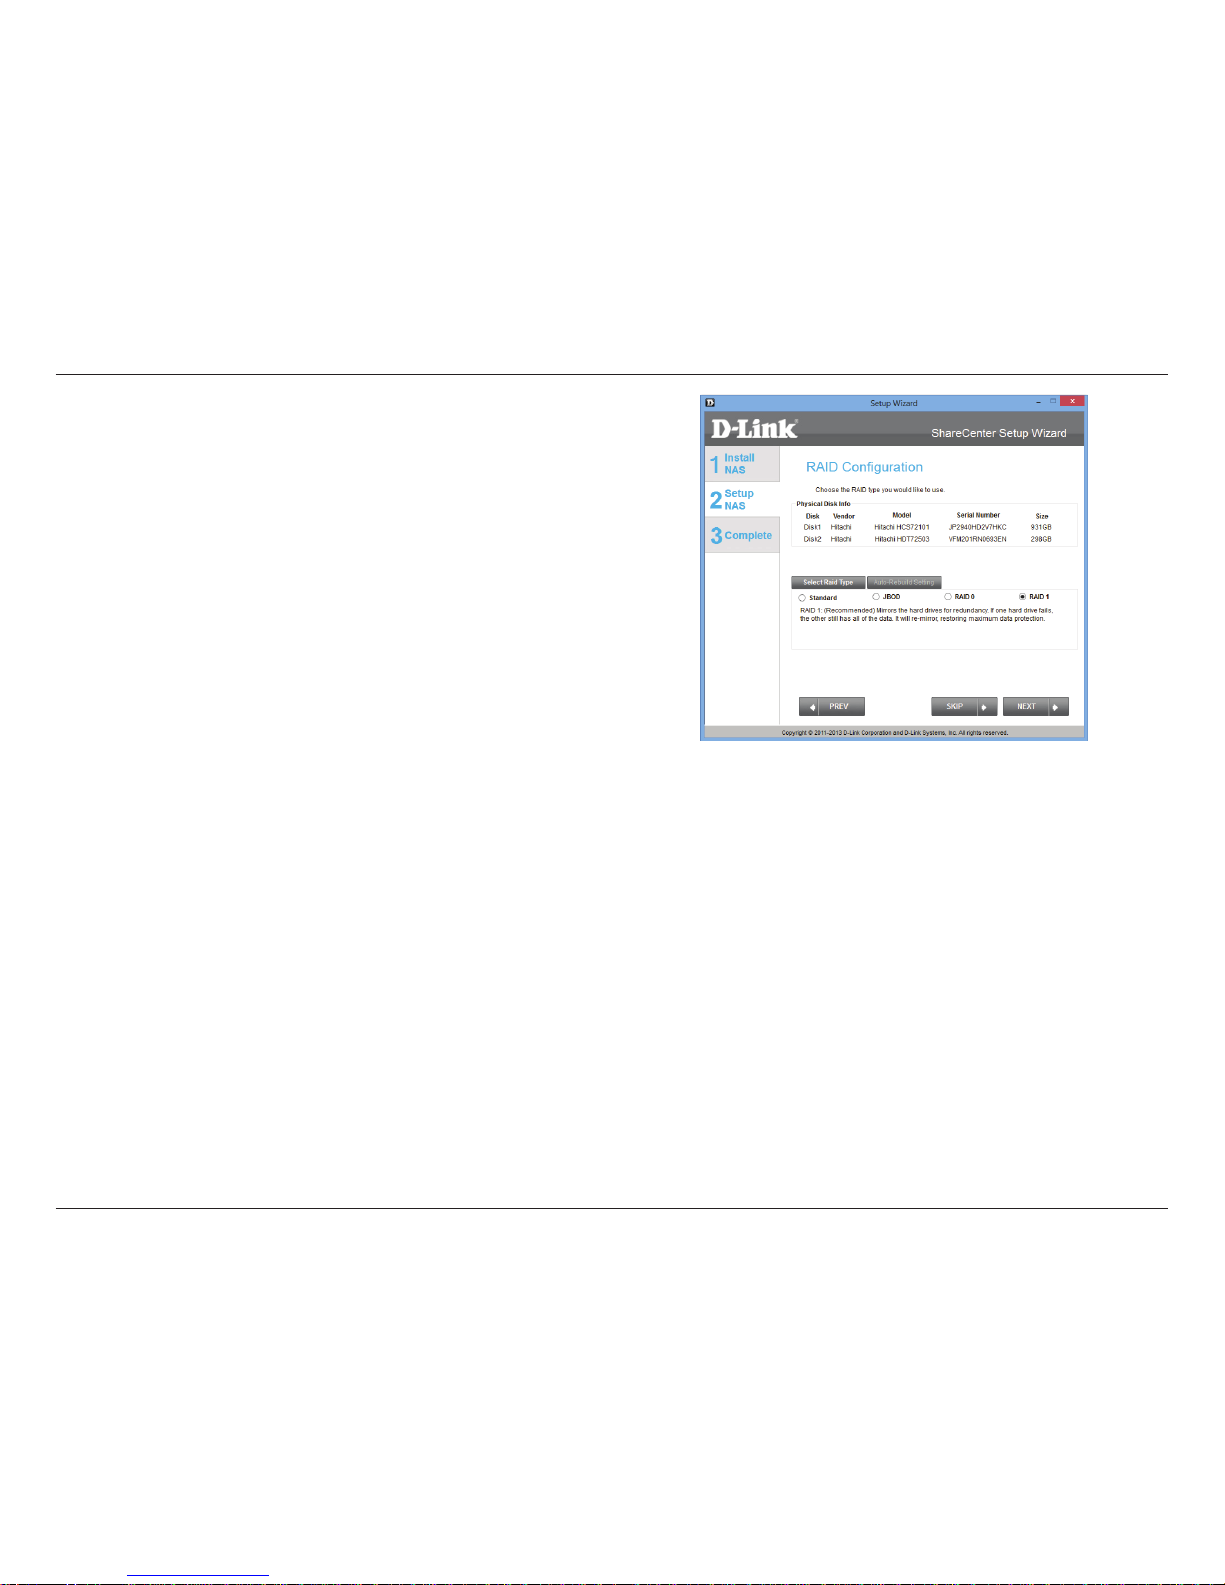
Step 17 - Select JBOD to see your conguration options.
Step 17 - Select RAID 0 to see your conguration options.
Page 39
34
D-Link ShareCenter DNS-327L User Manual
Section 3 - Installation
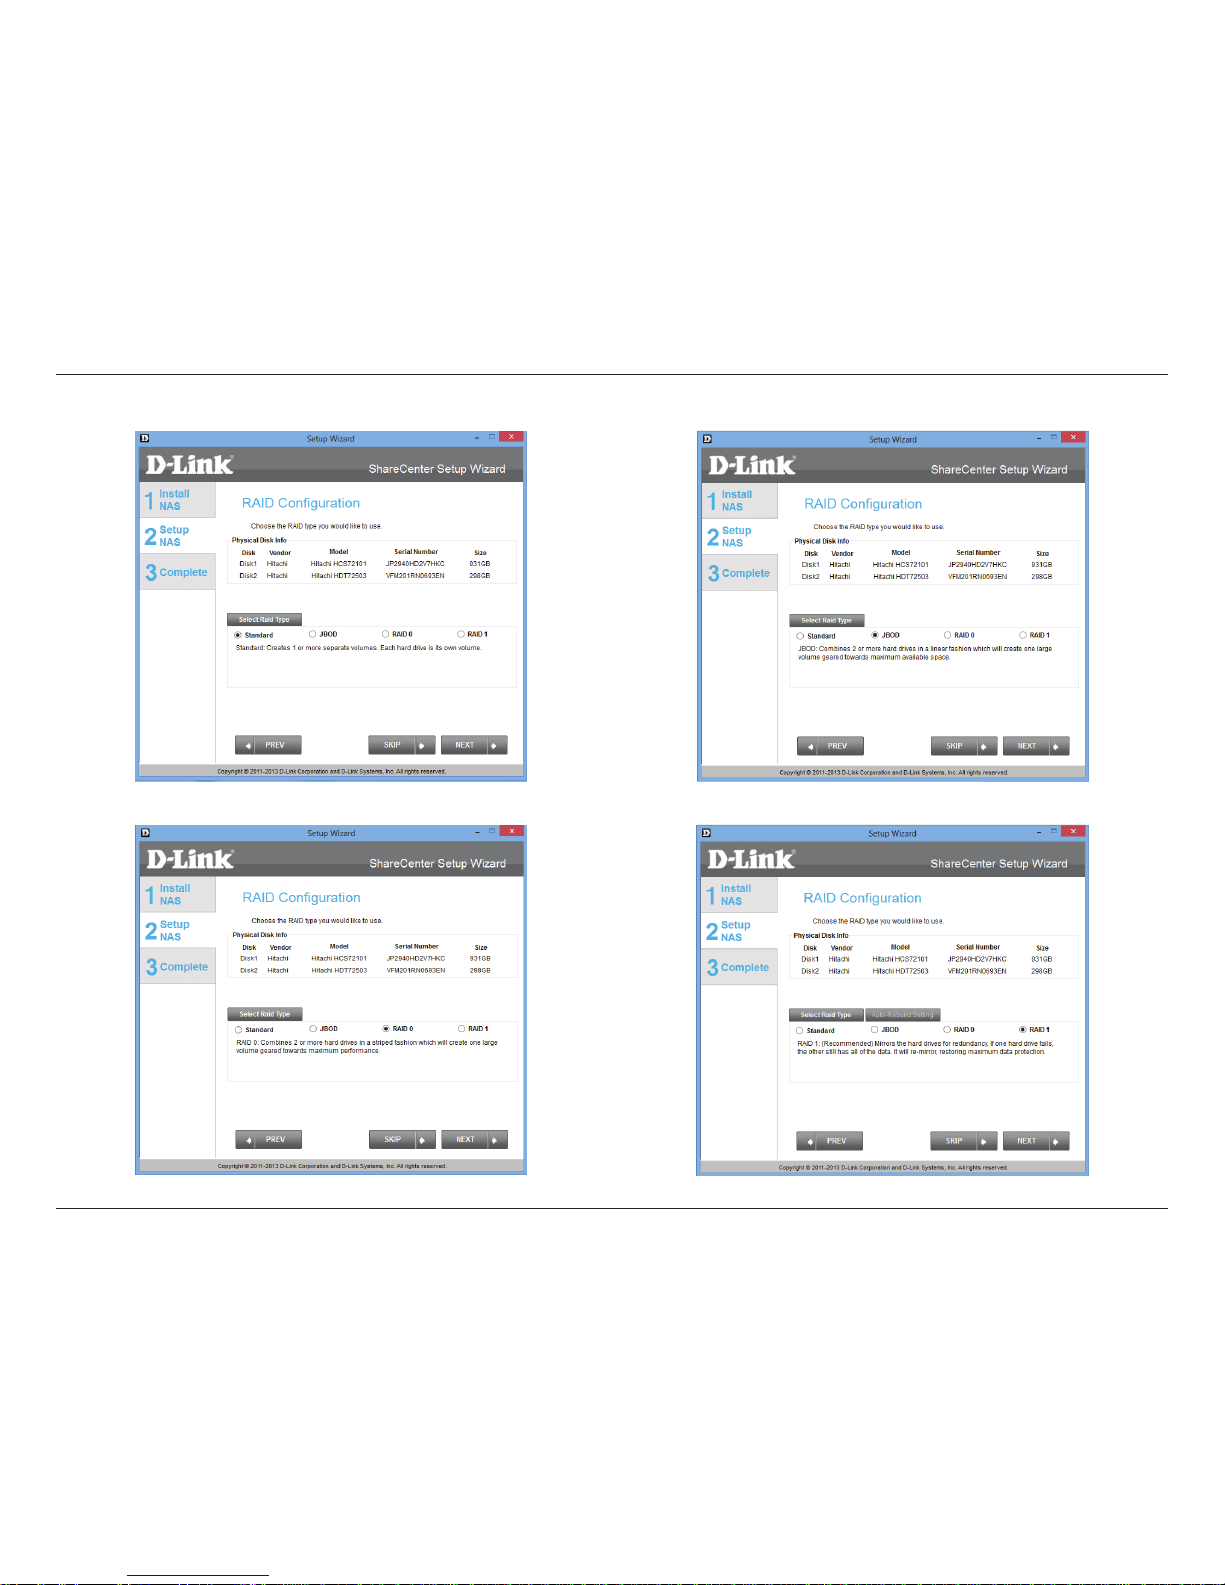
Step 17 - Select RAID 1 to see your conguration options. When you
select RAID 1, the Auto-Rebuild Settings tab appears. The Auto-
Rebuid Settings tab allows you to enable or disable Auto-Rebuild
the RAID. This is necessary should the RAID fail.
Note - In Step 18 we resume the settings wizard using the Standard
RAID configuration. Please see images further down for other
congurations.
Note - Once you have congured the RAID of your choice, skip ahead
to Step 41. Otherwise scroll through this manual to view other RAID
installation options.
Page 40
35
D-Link ShareCenter DNS-327L User Manual
Section 3 - Installation
RAID OPTIONS
Standard - Step 18 JBOD - Step 23
RAID 0 - Step 29 RAID 1 - Step 35
Page 41
36
D-Link ShareCenter DNS-327L User Manual
Section 3 - Installation
Step 18 - Click Next to congure the Standard RAID or click SKIP
to bypass this step.
Step 19 - Map Drive to Network. This window makes it possible
for you and users on your network to communicate with your NAS
directly. The Map Drive assigns a letter to each Volume on your NAS.
See Mapping a Drive further in the manual for more details.
Click Next to continue.
Page 42
37
D-Link ShareCenter DNS-327L User Manual
Section 3 - Installation
Once you have completed the previous step, the Wizard automatically
creates mapping drives to your congured Volumes.
Click Next to continue.
Page 43
38
D-Link ShareCenter DNS-327L User Manual
Section 3 - Installation
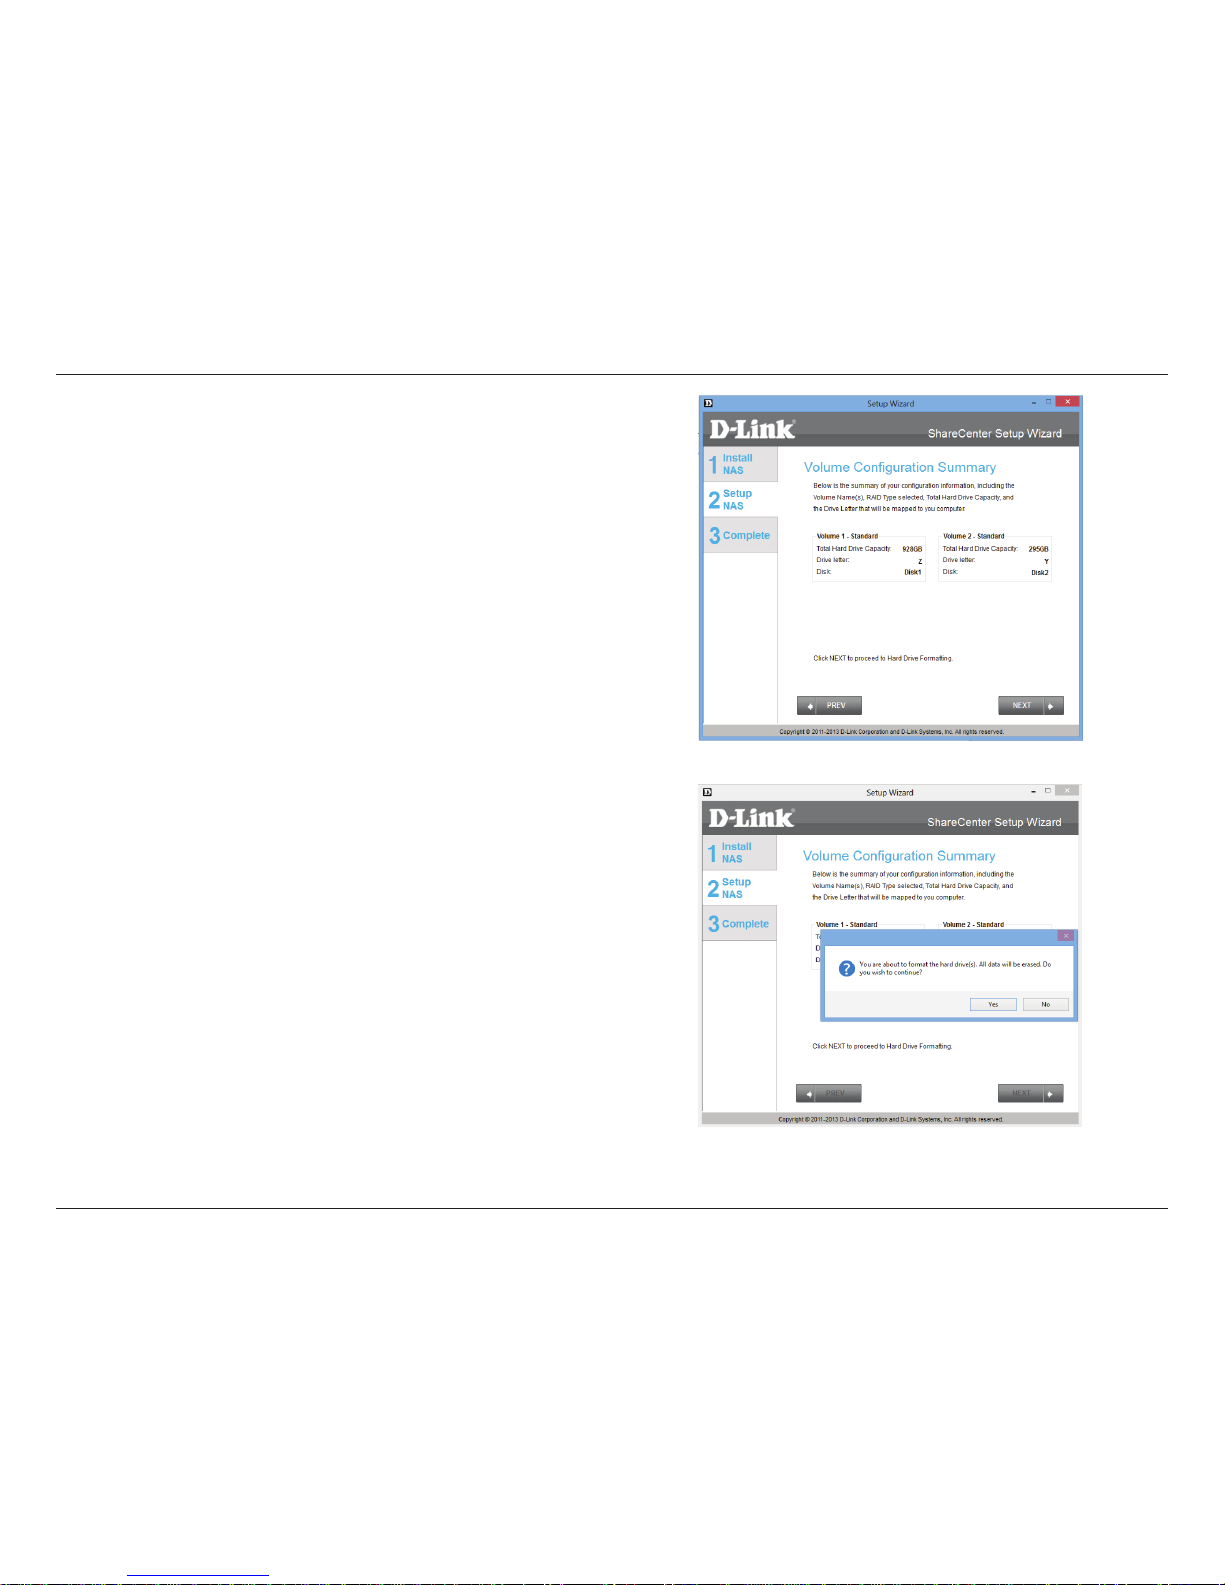
Step 20 - Volume Conguration Summary. This window provides
a detailed summary of your current conguration. If you are satised
with your conguration click Next or if you want to change your
settings click PREV to go back and change your settings. Read the
details carefully before making your choice.
Step 21 - When you click Next, you are prompted to verify your
decision before you continue.
Page 44
39
D-Link ShareCenter DNS-327L User Manual
Section 3 - Installation
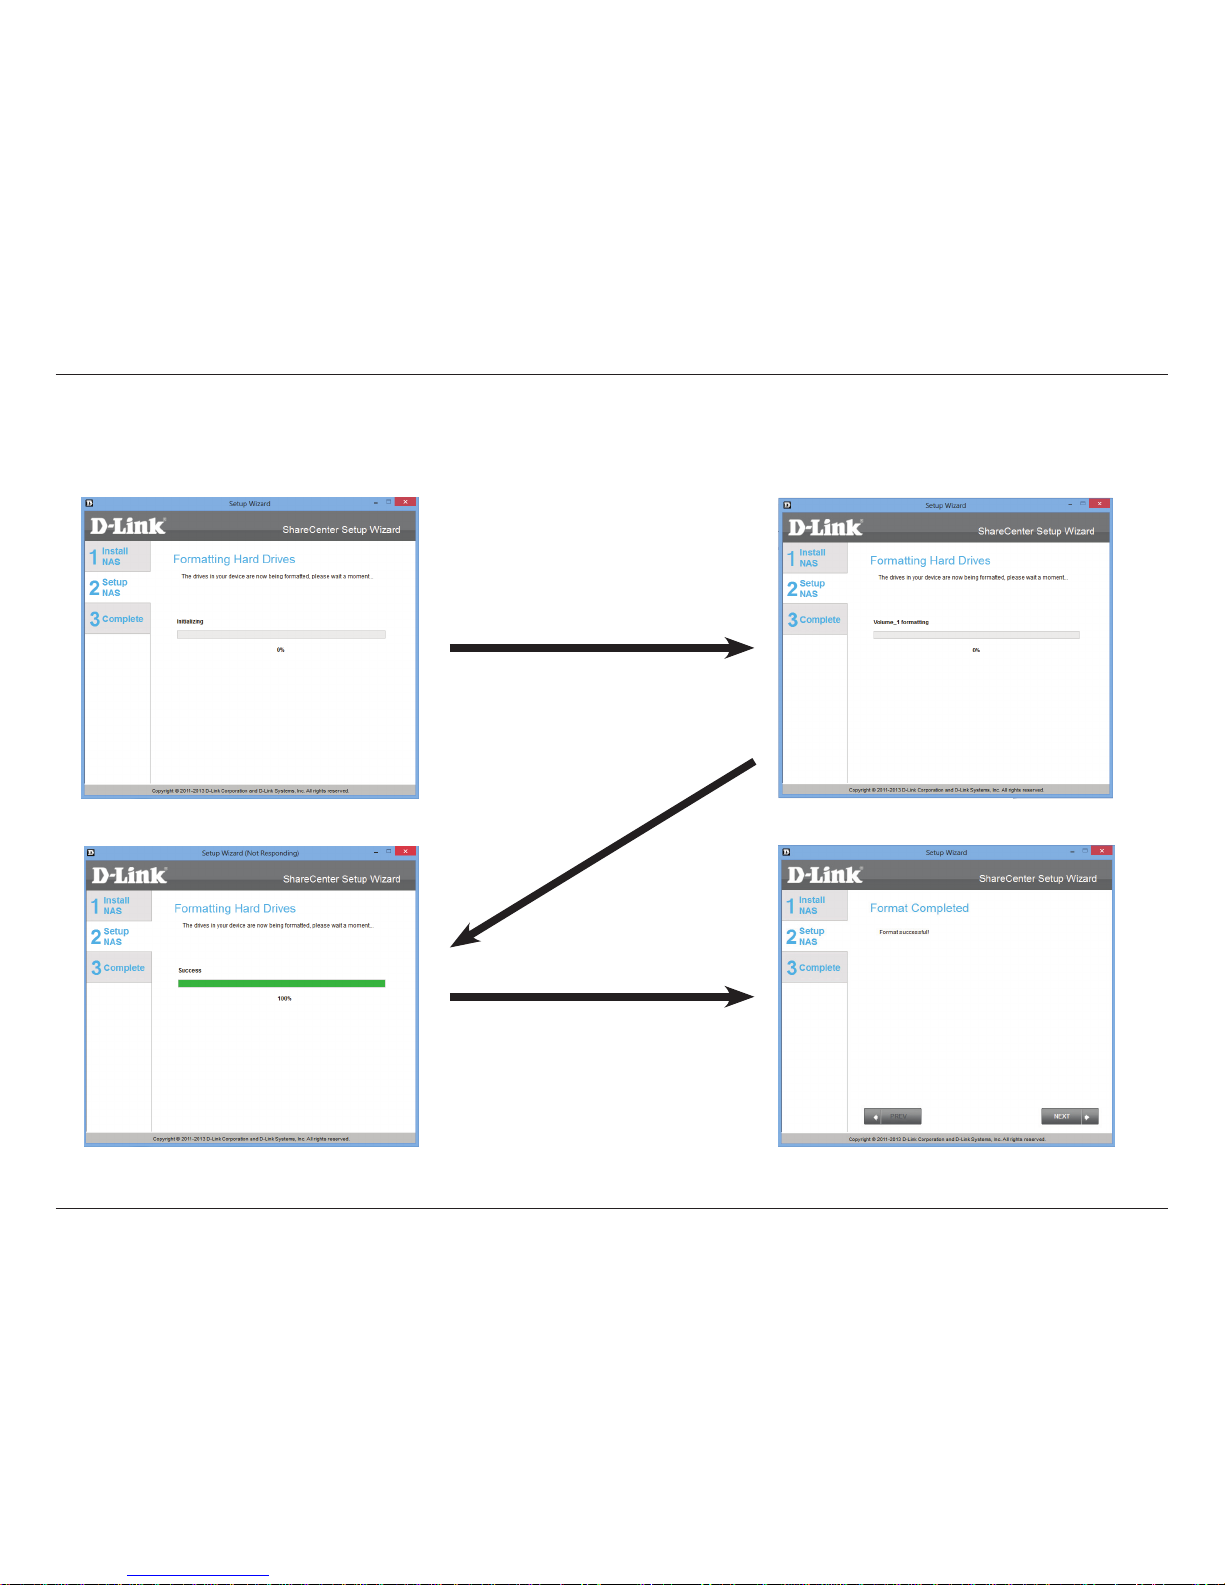
Step 22 - The Wizard software starts the formatting process.
Initializing, formatting and nally Success. This completes the
Format process. Click Next to continue.
Page 45
40
D-Link ShareCenter DNS-327L User Manual
Section 3 - Installation
Step 23 - Under RAID Conguration, Select RAID Type, choose
JBOD. Read the JBOD RAID conguration requirements.
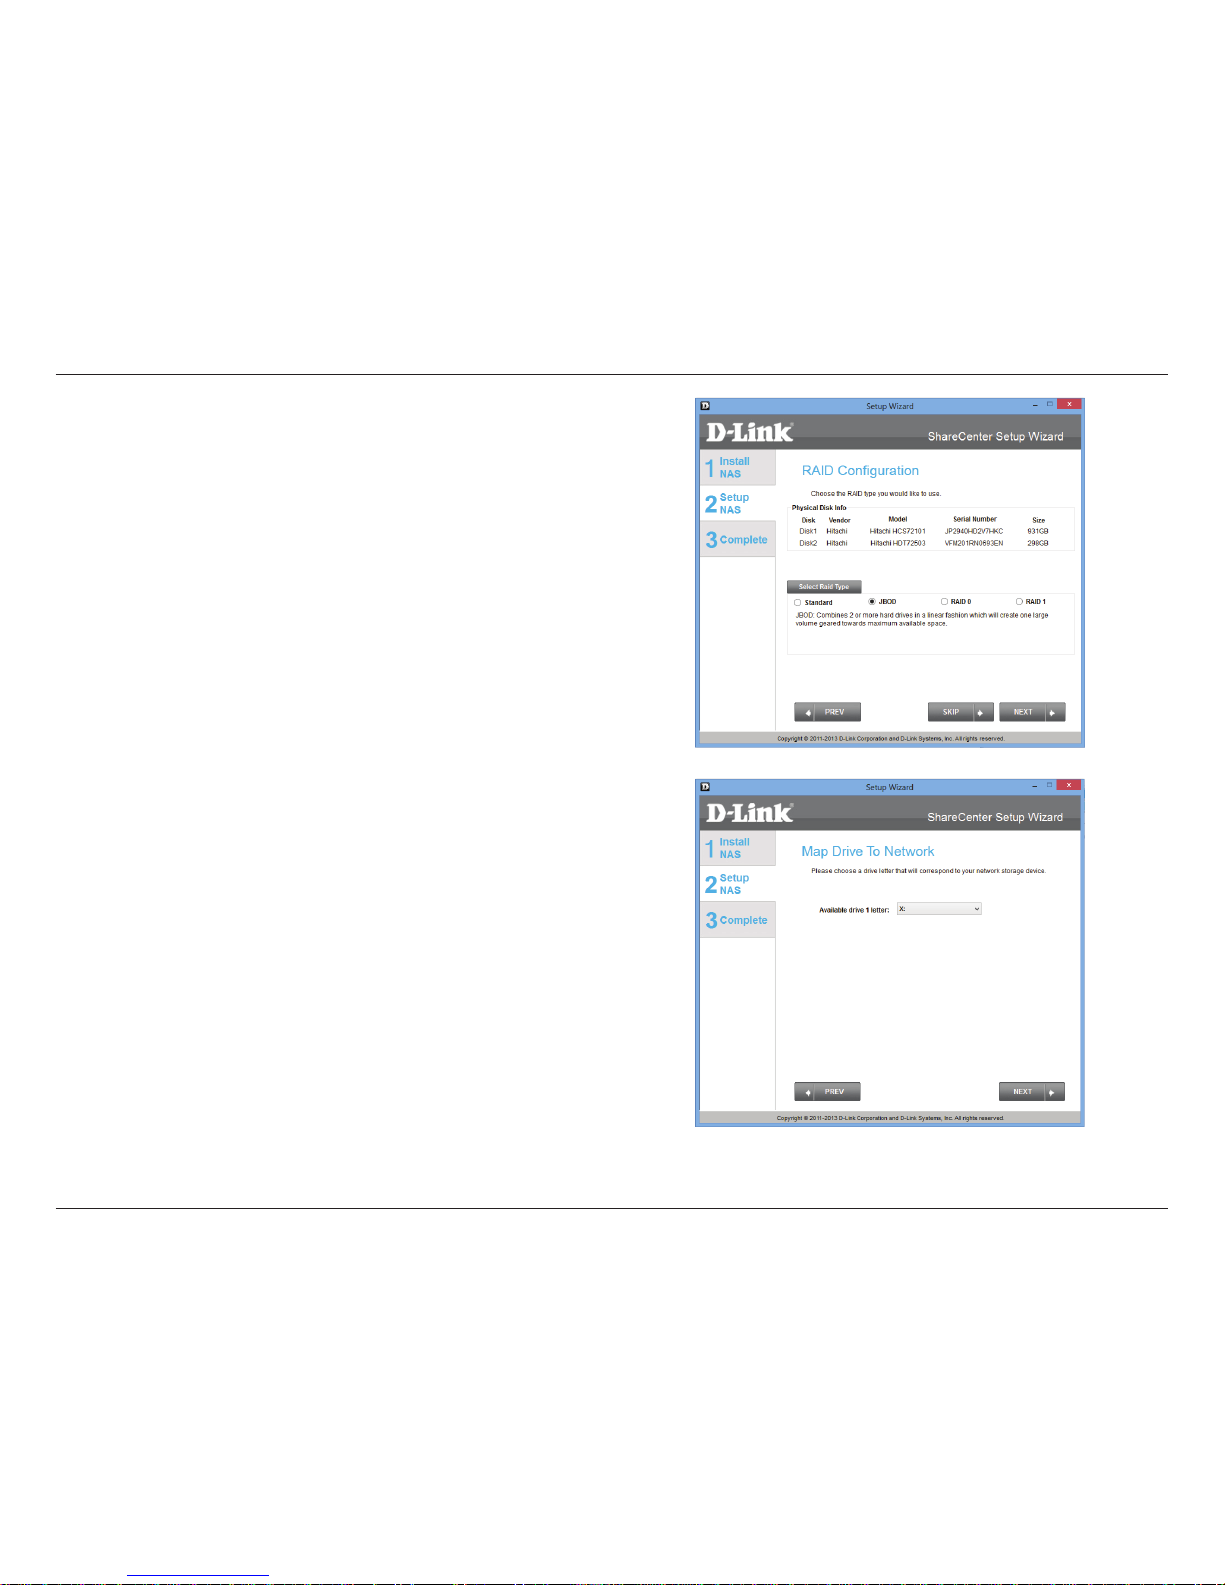
Click Next to continue.
Step 24 - Under JBOD more than one disk is classied as a complete
Volume so when mapping a drive, only one drive letter is needed.
Map Drive to Network only shows one drive.
Click Next to continue.
Page 46
41
D-Link ShareCenter DNS-327L User Manual
Section 3 - Installation
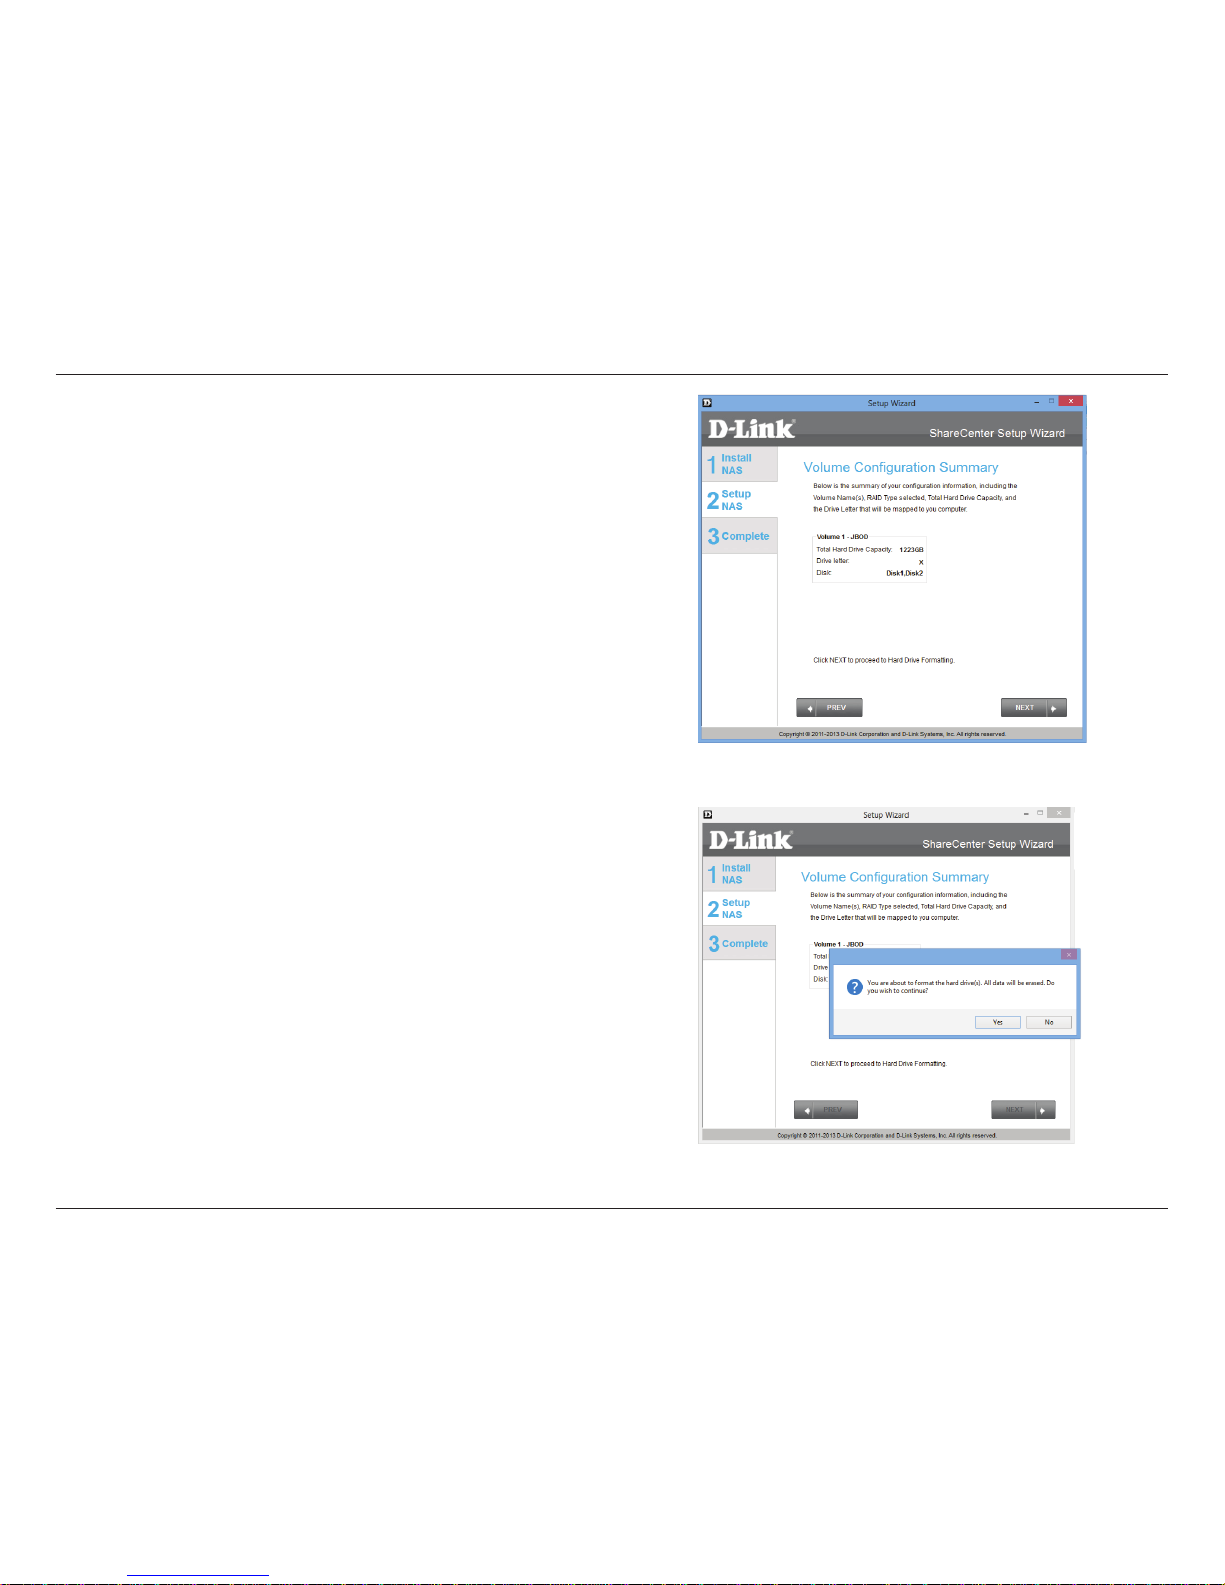
Step 25 - The Volume Conguration Summary displays a detailed
summary of JBOD.
Click Next to continue.
Step 26 - Click Next, you are prompted to verify your decision before
you continue. Click Yes to continue.
Page 47
42
D-Link ShareCenter DNS-327L User Manual
Section 3 - Installation
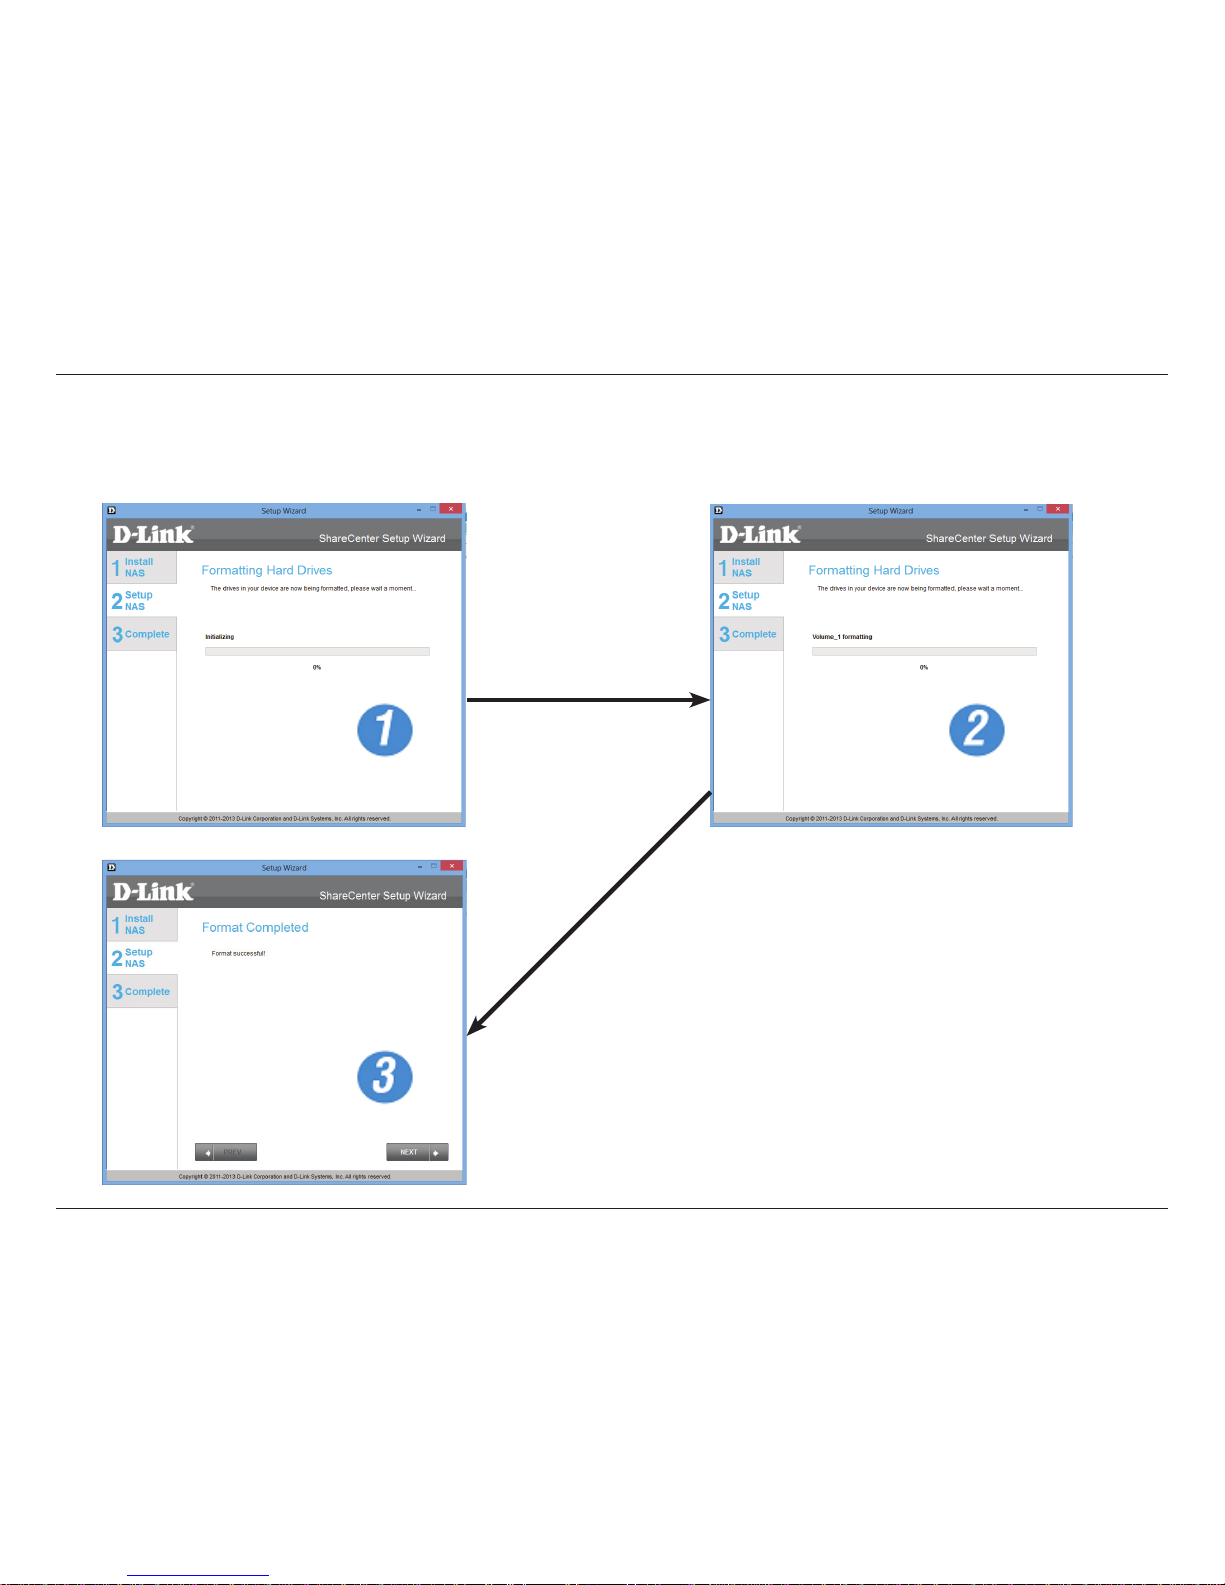
Step 27 - The JBOD is initialized, formatted, and complete in 3
easy steps. Do not click any buttons while this process is ongoing.
Page 48
43
D-Link ShareCenter DNS-327L User Manual
Section 3 - Installation
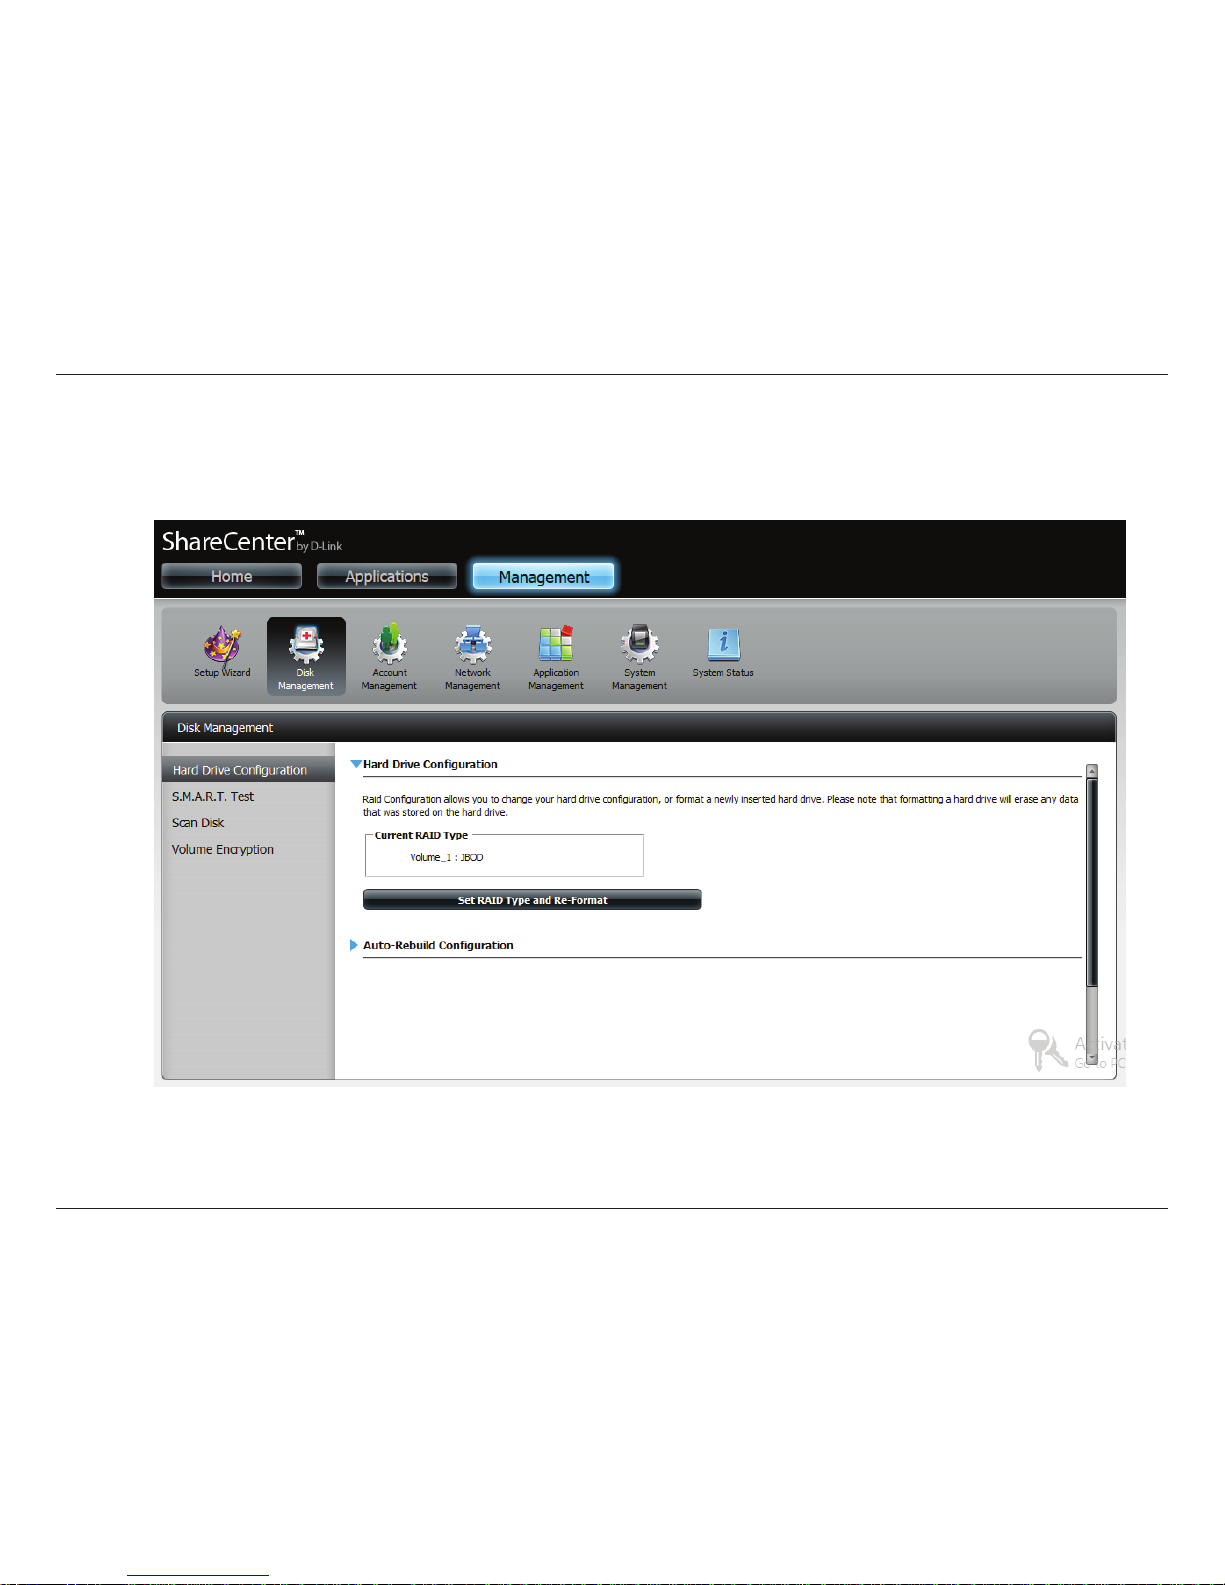
Step 28 - To verify your JBOD, login to your NAS, go to Management. Disk Management, and Hard Drive Conguration.
This shows the current status of your drives.
Page 49
44
D-Link ShareCenter DNS-327L User Manual
Section 3 - Installation
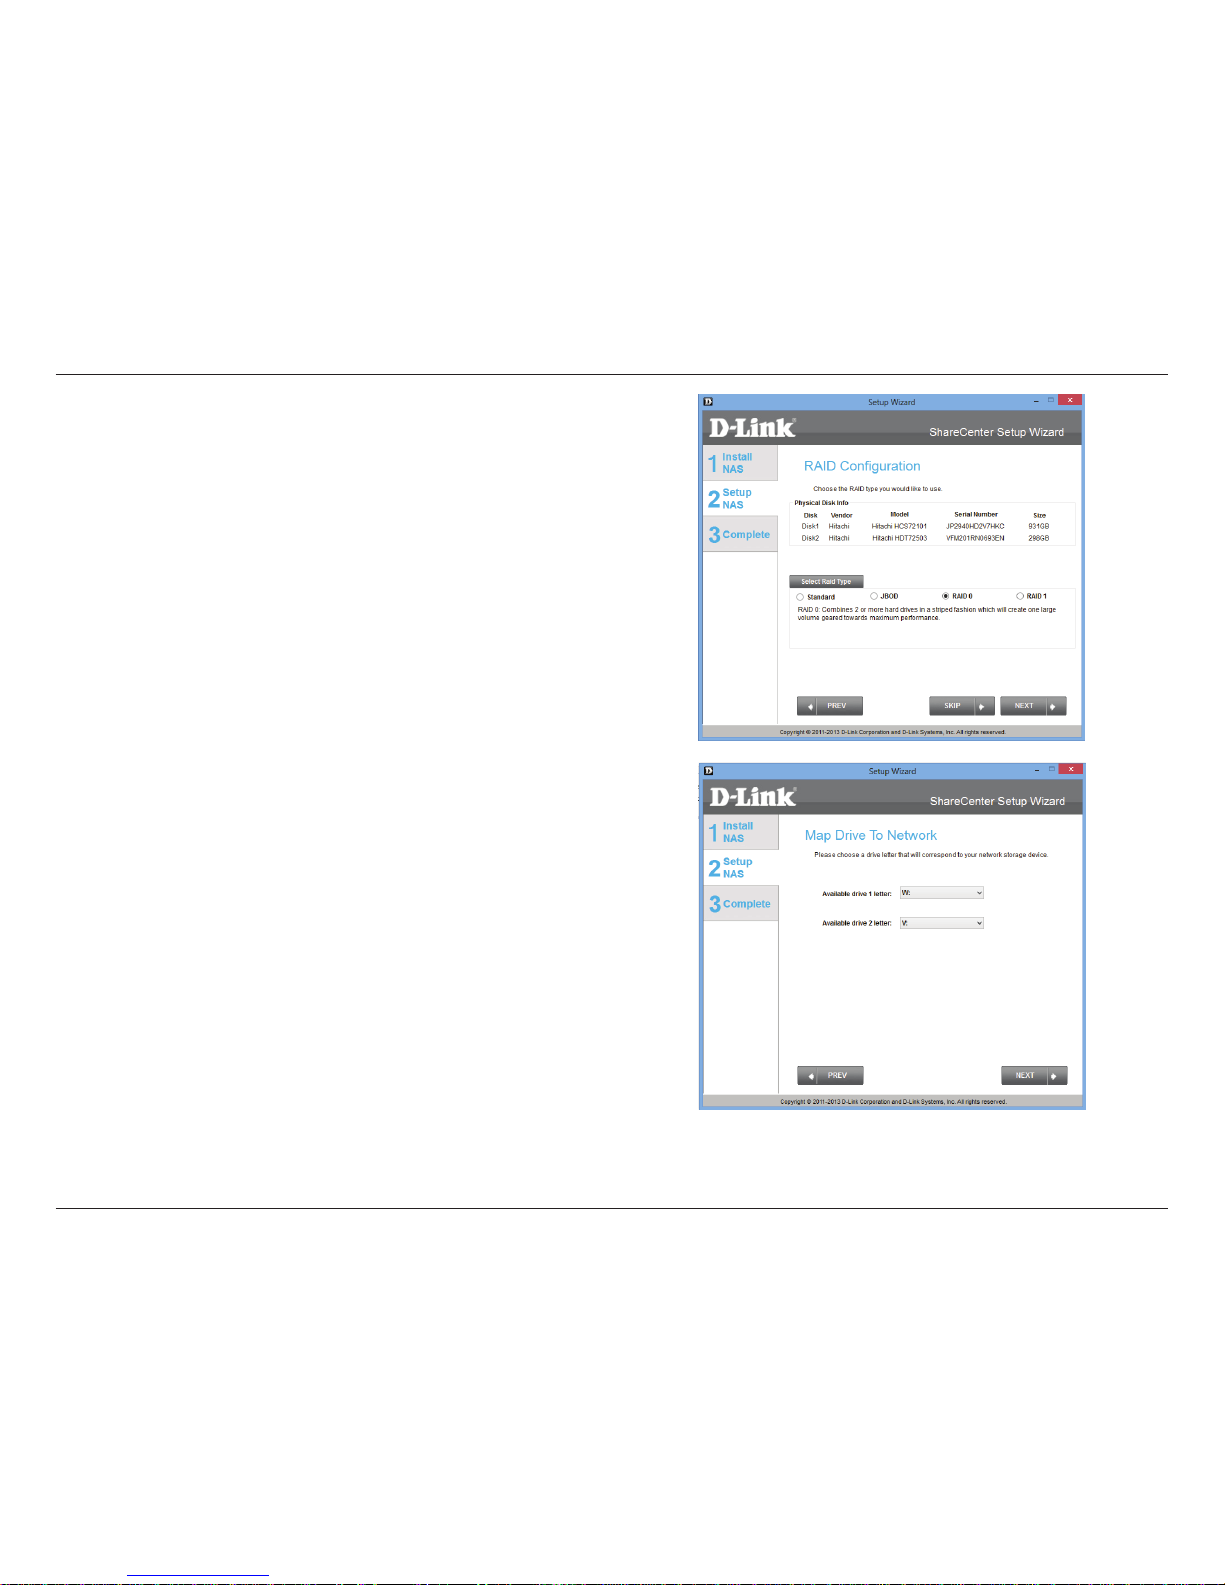
Step 29 - Under RAID Conguration, Select RAID Type, choose
RAID 0. Read the RAID 0 conguration requirements.
Click Next to continue.
Step 30 - With RAID 0, the two drives are striped into one Volume,
making it appear that you have one drive.
Map Drive to Network indicates that the NAS has separated the
drive into 2 Volumes. To explain, if the size of the two drives are
dierent , the spare drive space will be formatted as a JBOD volume.
It is better to have drives of the same sizes.
Click Next to continue.
Page 50
45
D-Link ShareCenter DNS-327L User Manual
Section 3 - Installation
Step 31 - The Volume Conguration Summary, displays the details
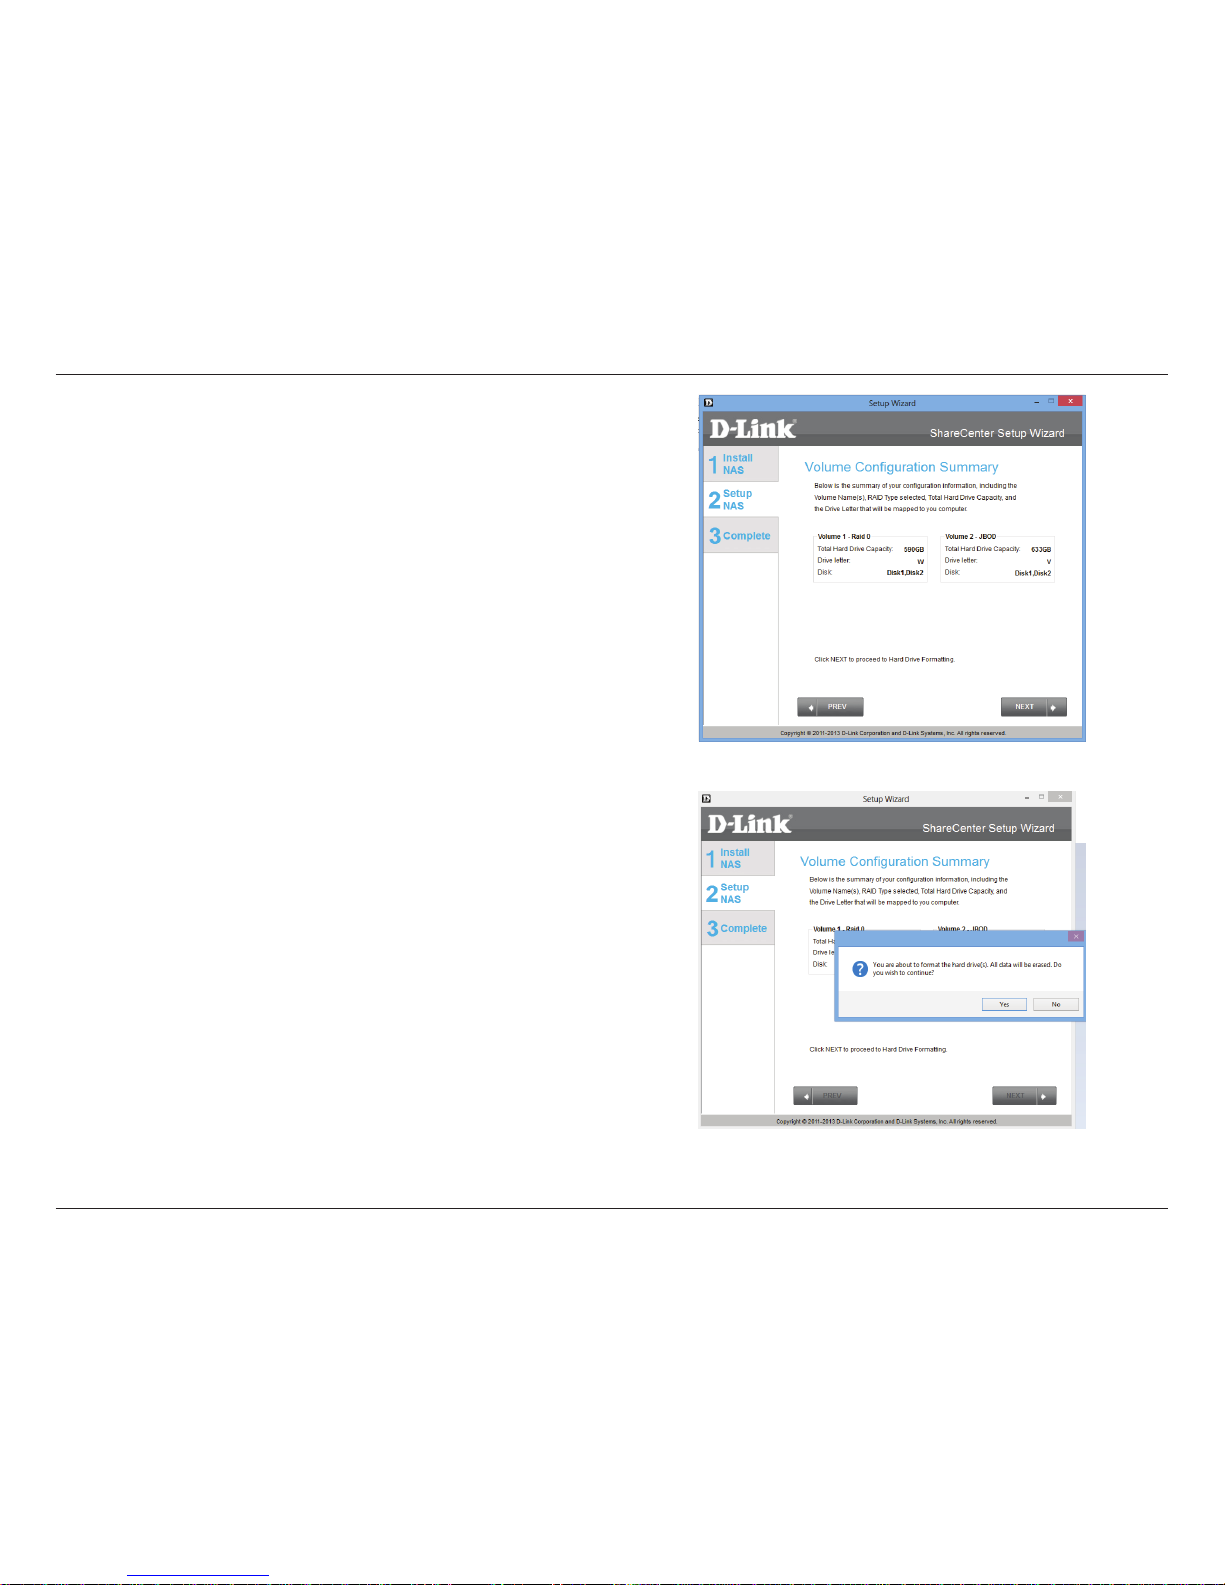
of the new conguration.
Click Next to continue.
Step 32 - Verify your conguration selection before continuing. Click
Yes to continue
Page 51
46
D-Link ShareCenter DNS-327L User Manual
Section 3 - Installation
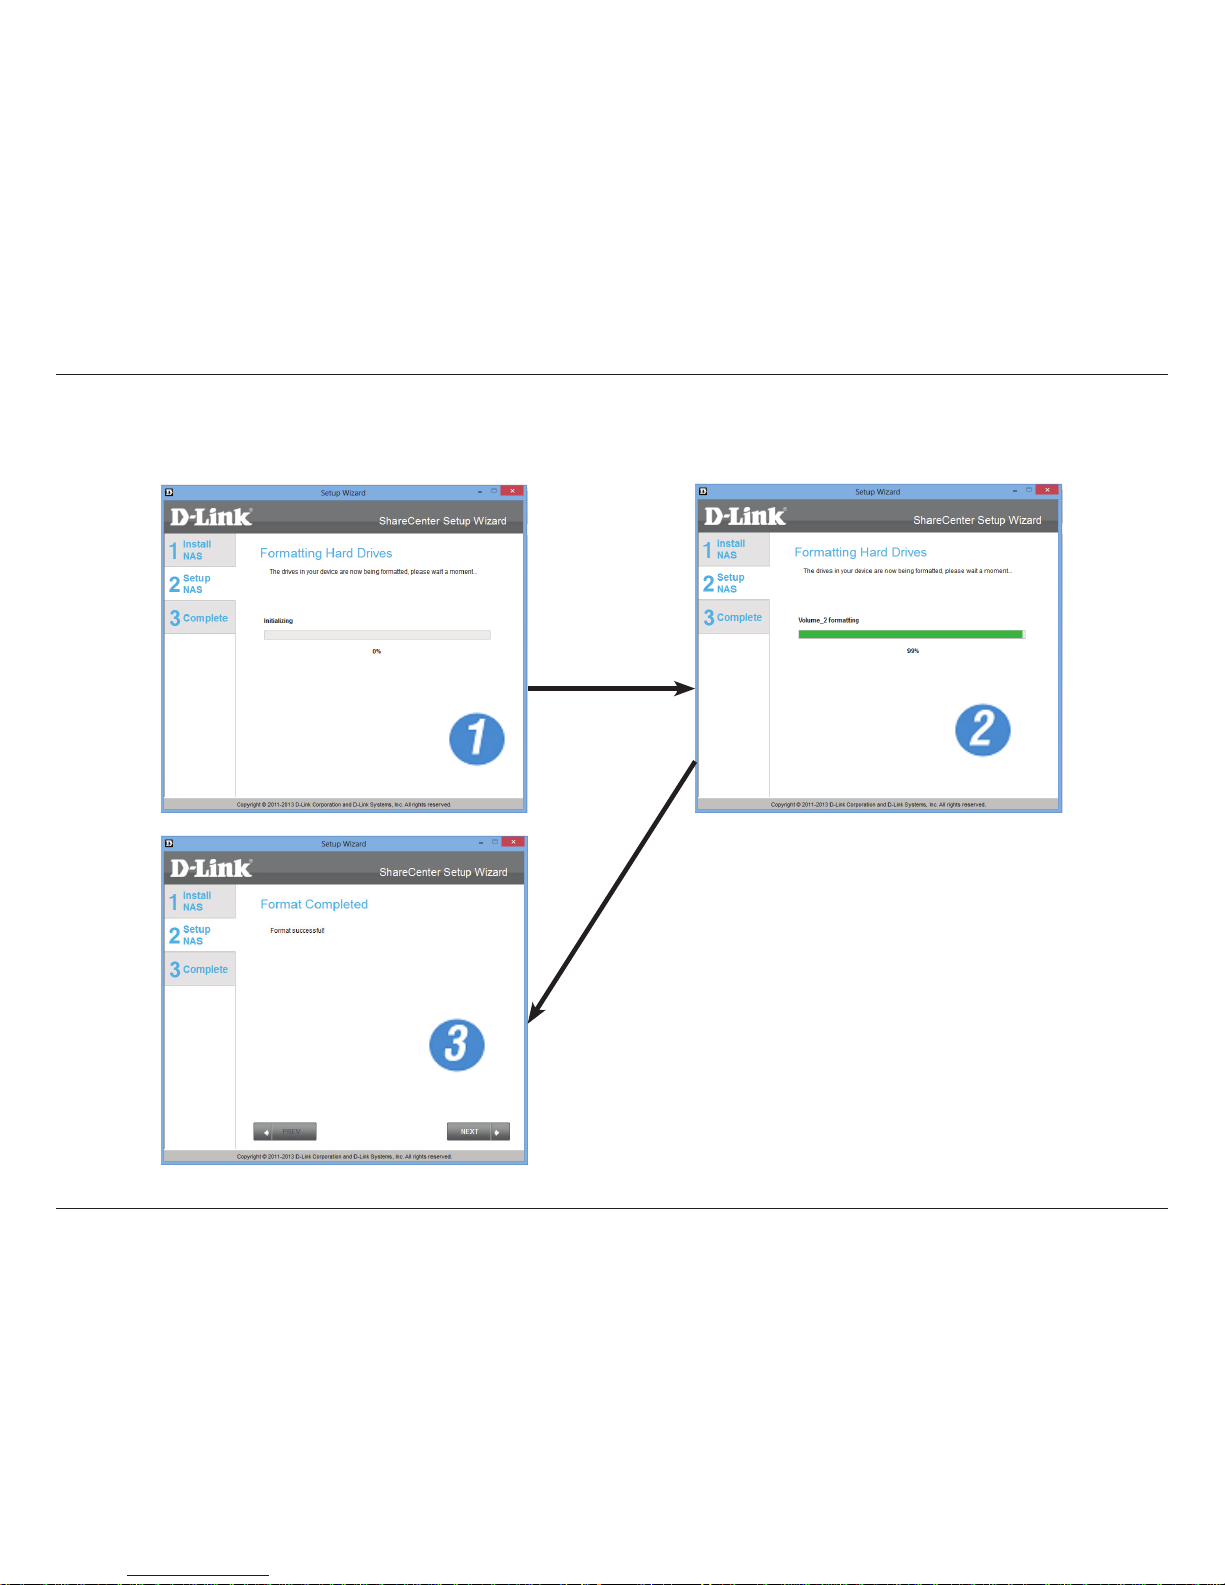
Step 33 - The RAID 0 is initialized, formatted, and complete in 3 easy steps. Do not click any buttons while this process is
ongoing.
Page 52
47
D-Link ShareCenter DNS-327L User Manual
Section 3 - Installation
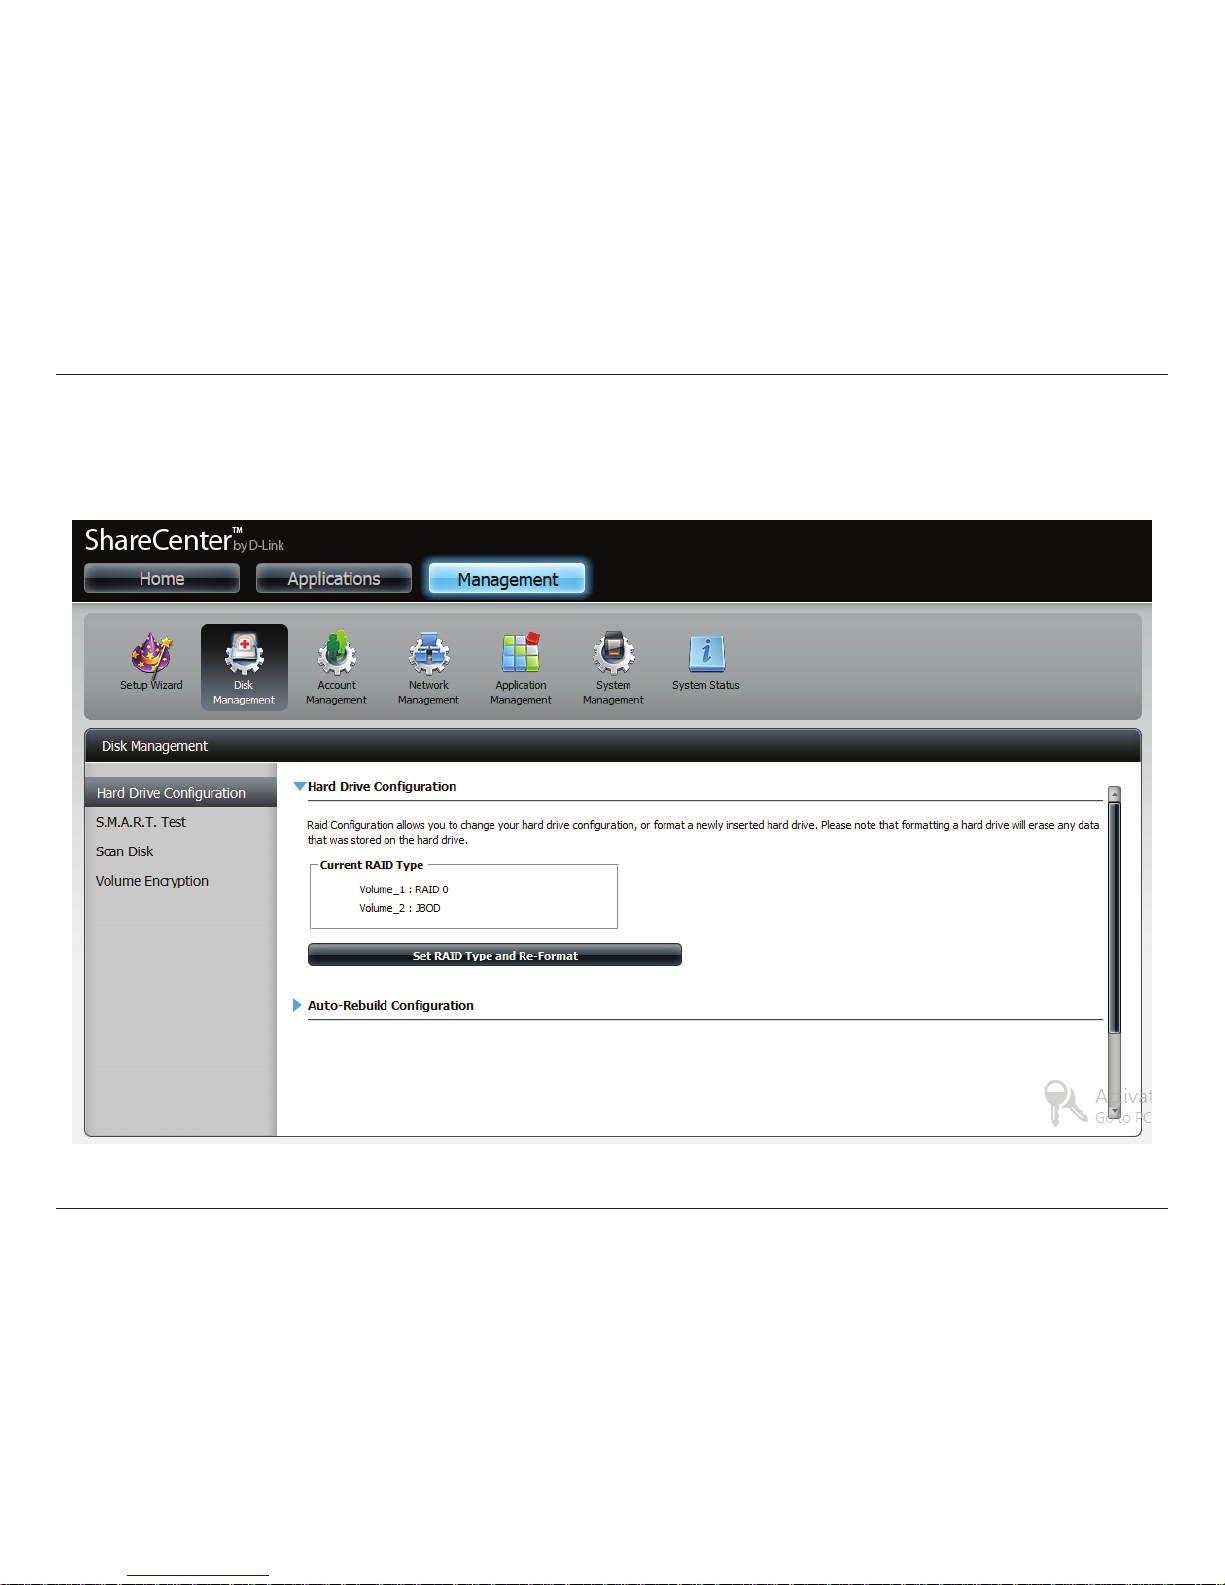
Step 34 - To verify your RAID 0, login to your NAS, go to Management. Disk Management, and Hard Drive Conguration.
This shows the current status of your drives.
Page 53
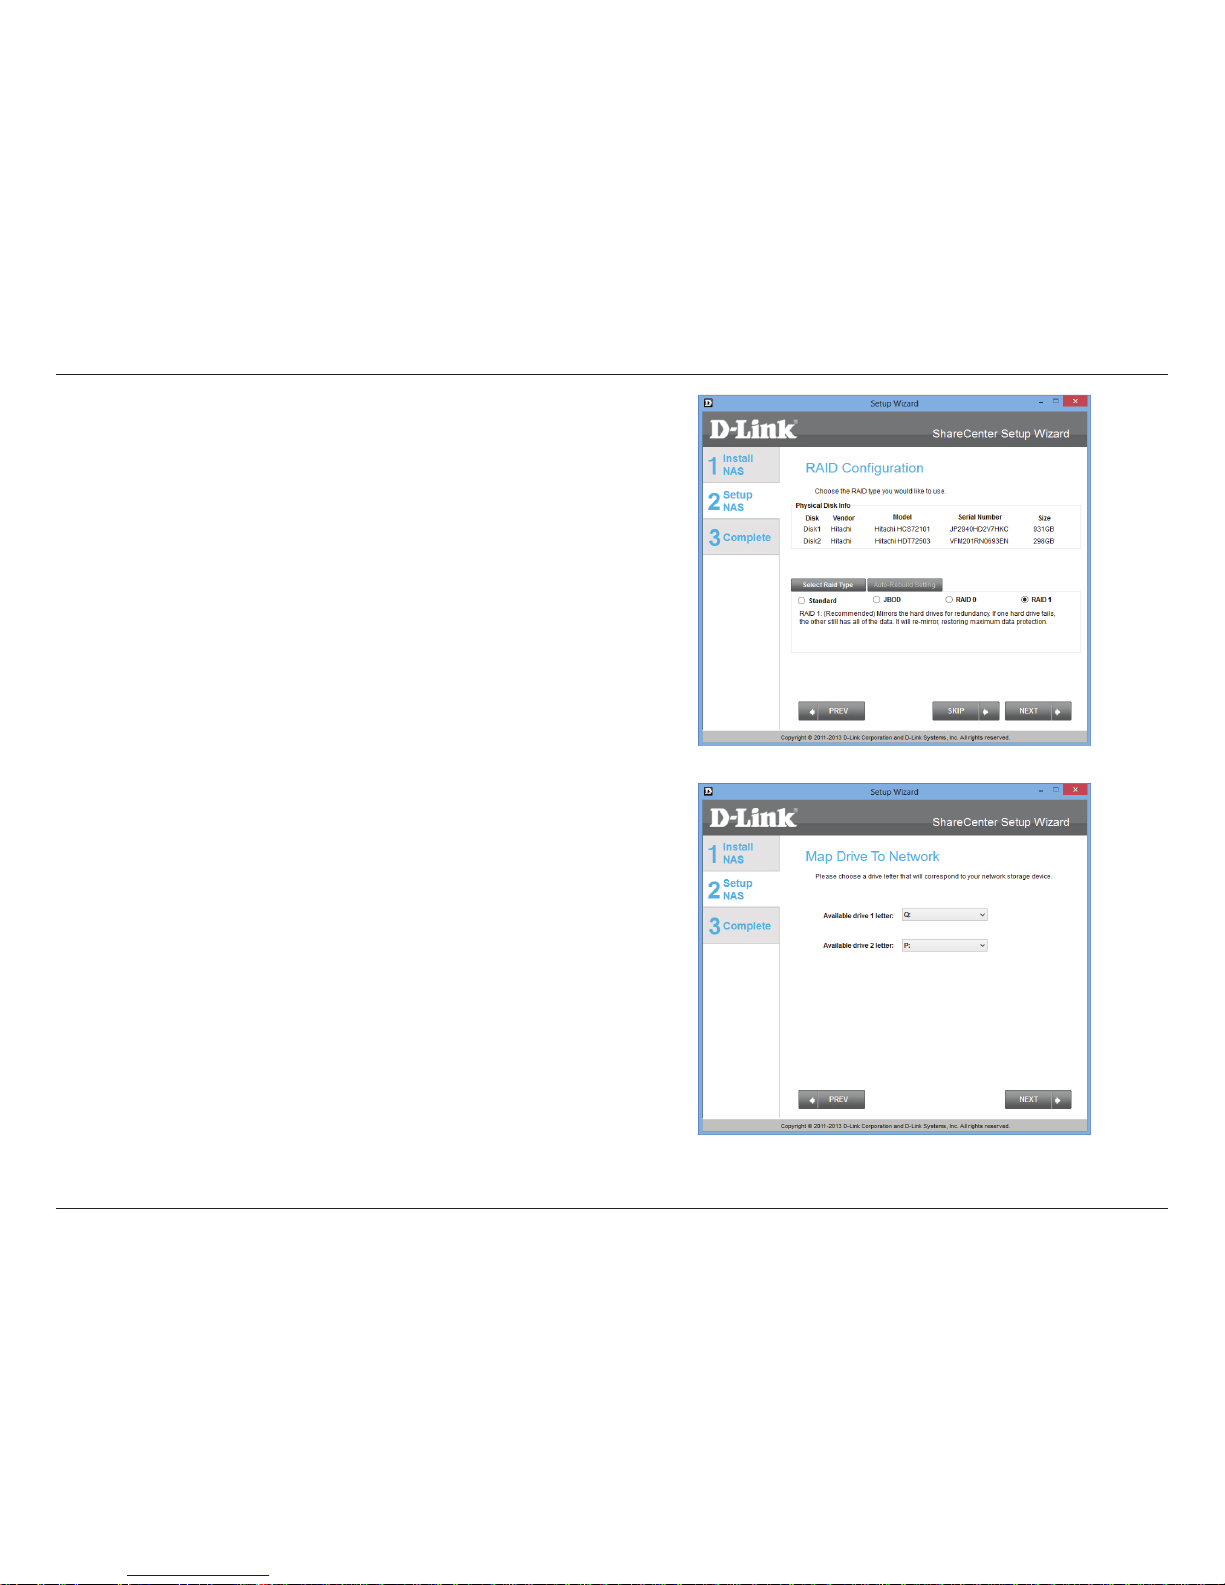
48
D-Link ShareCenter DNS-327L User Manual
Section 3 - Installation
Step 35 - Under RAID Conguration, Select RAID Type, choose
RAID 1. Read the RAID 1 conguration requirements.
Click Next to continue.
Step 36 - With RAID 1, the drives are mirrored for redundancy. Map
Drive to Network indicates that the NAS has separated the drive
into a RAID array.
Note: If the size of these two drives are dierent, the spare drive
space will be formatted as JBOD Volume.
Click Next to continue.
Page 54
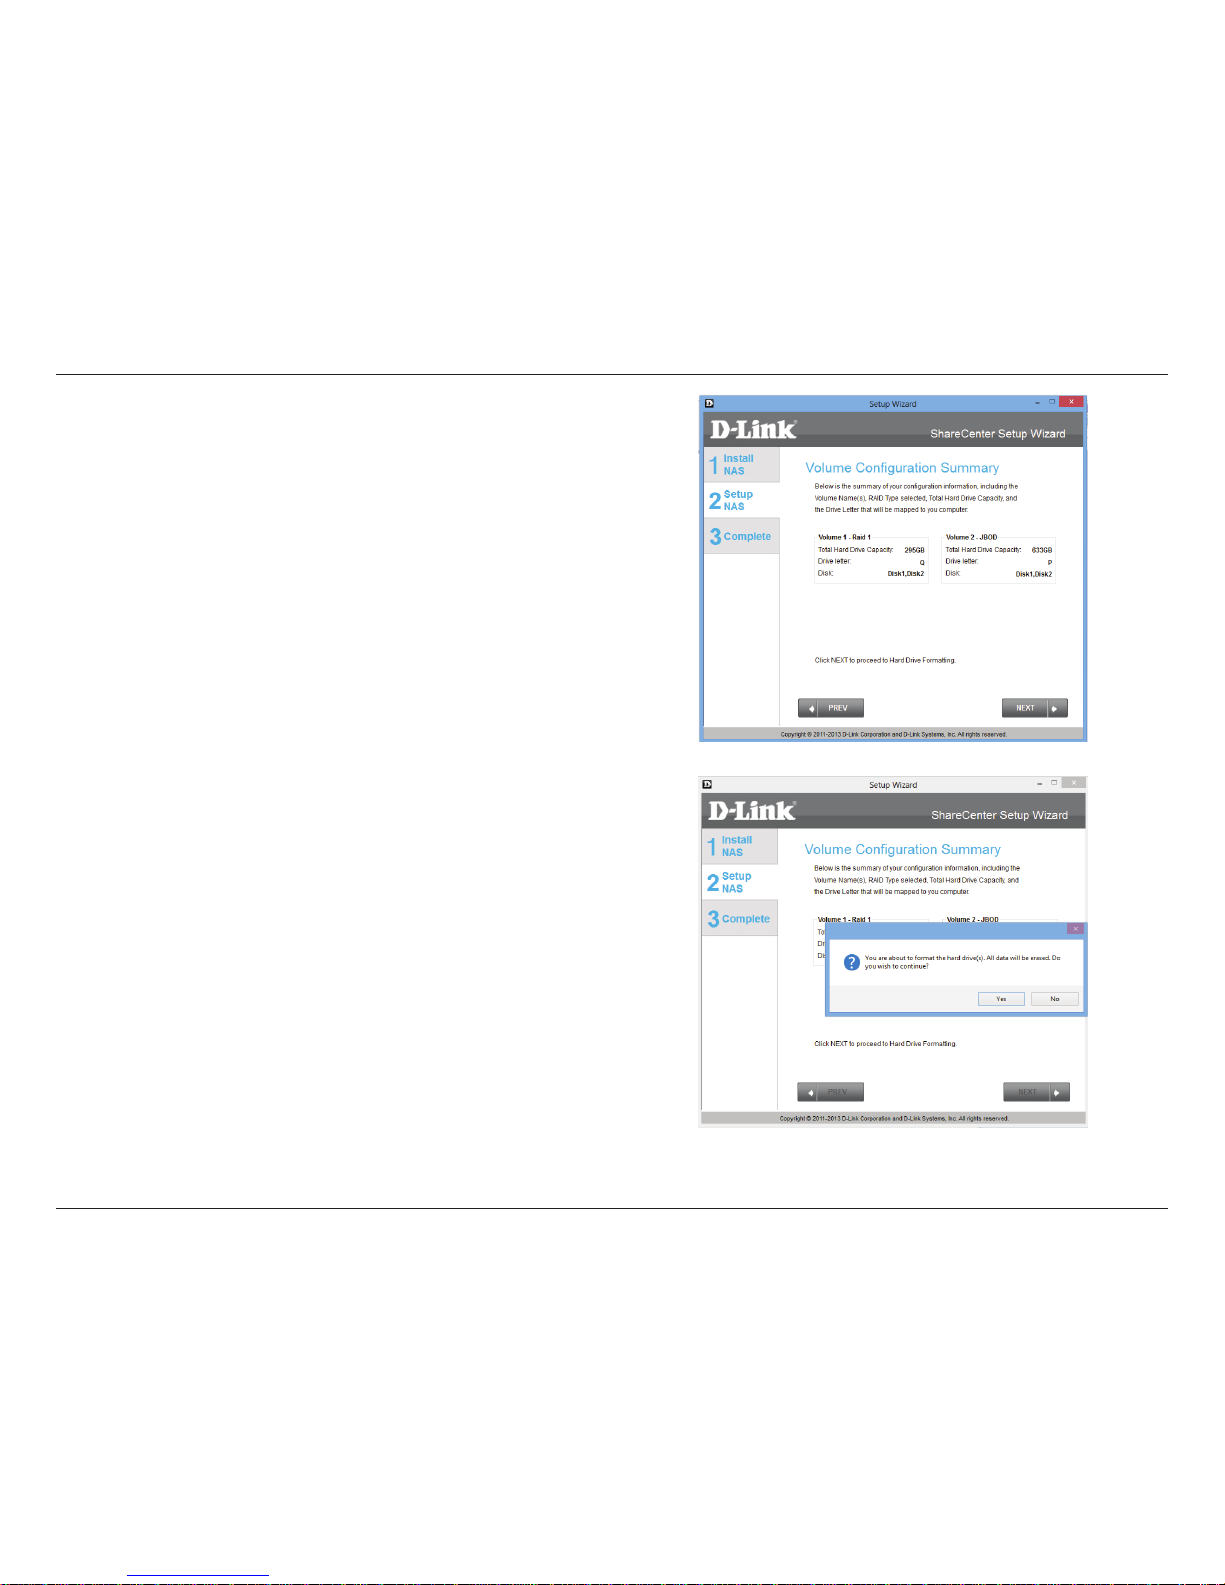
49
D-Link ShareCenter DNS-327L User Manual
Section 3 - Installation
Step 37 - The Volume Conguration Summary, displays the details
of the new conguration.
Click Next to continue.
Step 38 - Verify your conguration selection before continuing. Click
Yes to continue
Page 55
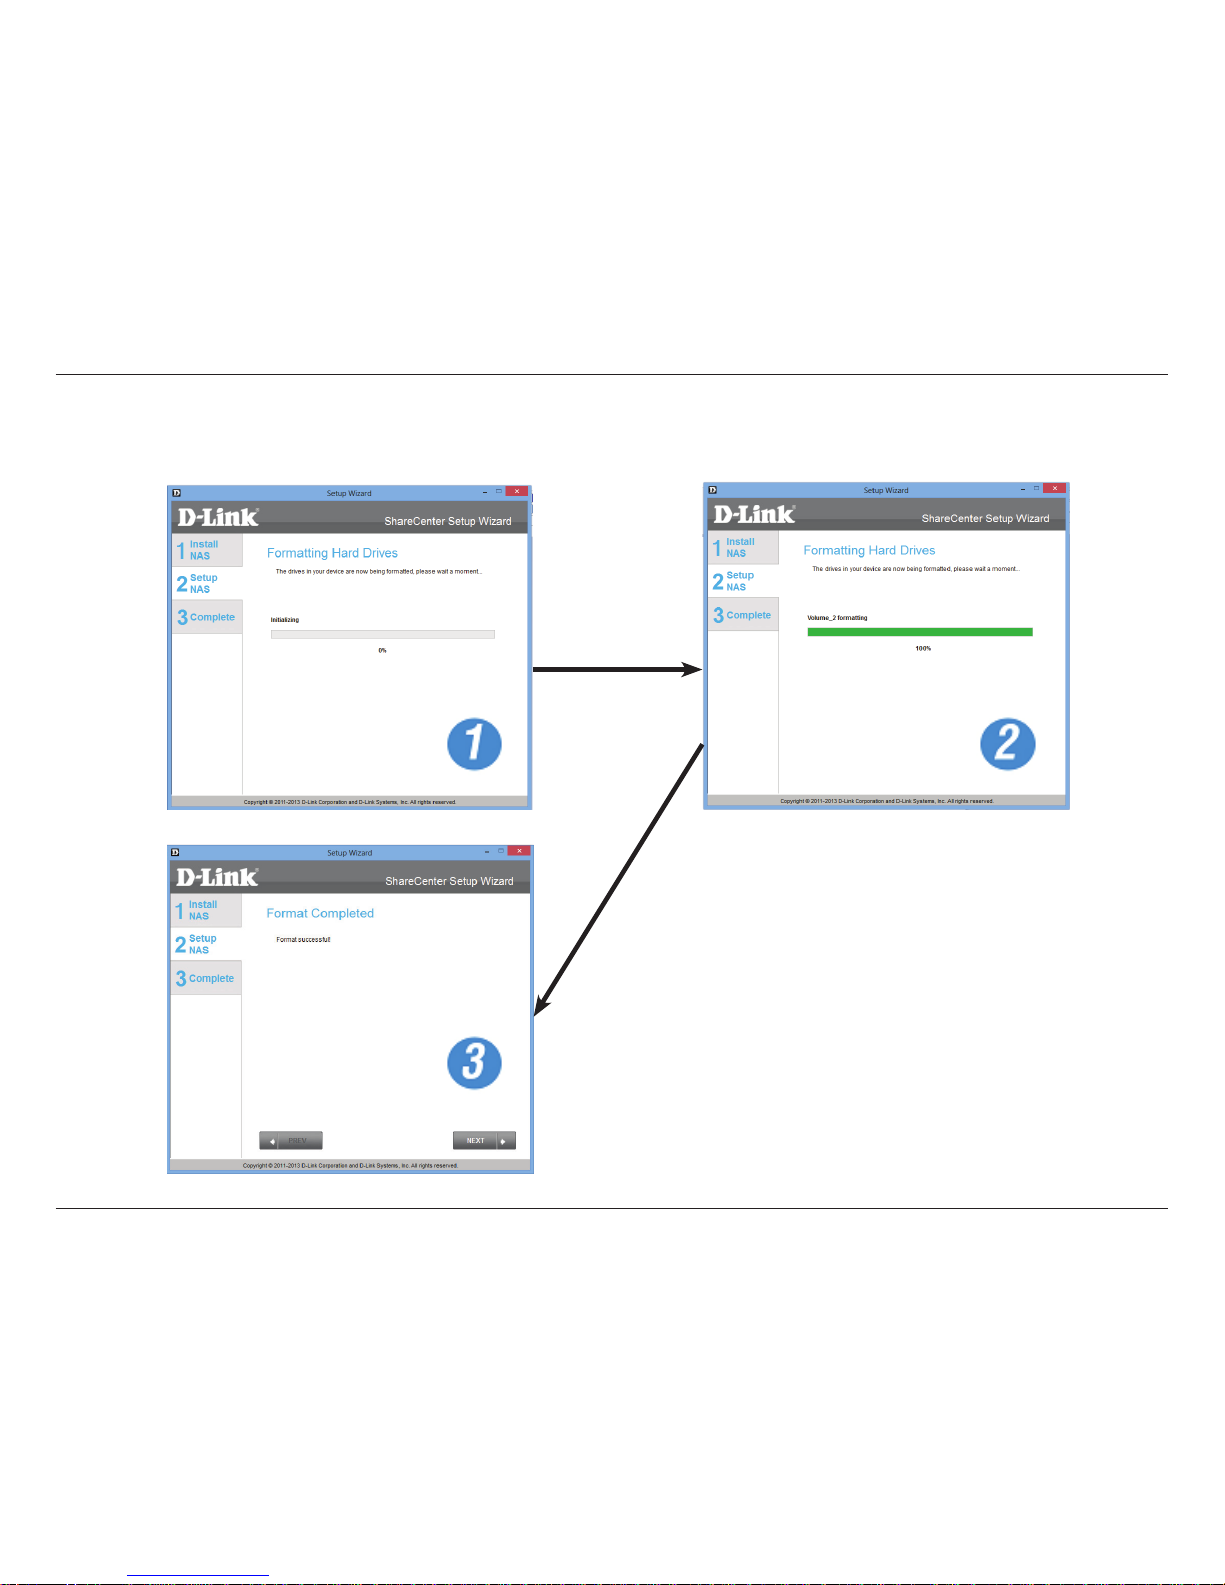
50
D-Link ShareCenter DNS-327L User Manual
Section 3 - Installation
Step 39 - The RAID 1 is initialized, formatted, and complete in 3 easy steps. Do not click any buttons while this process is
ongoing.
Page 56
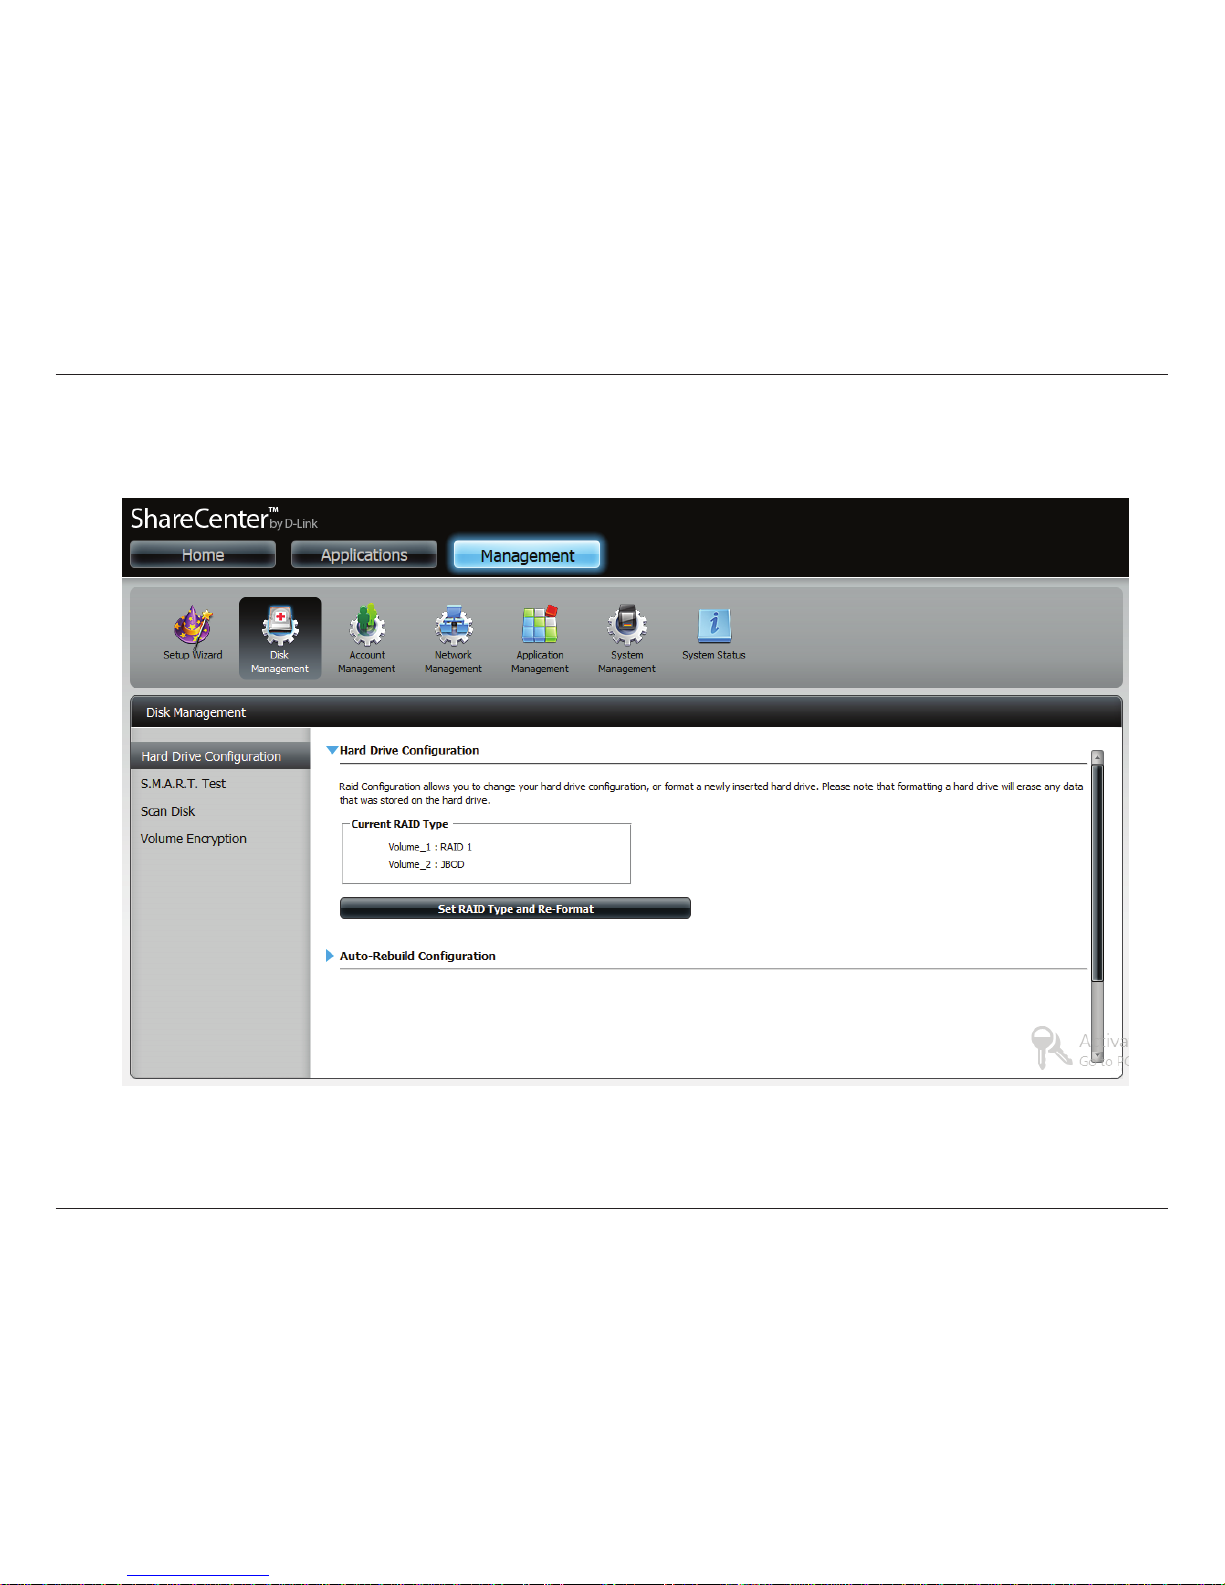
51
D-Link ShareCenter DNS-327L User Manual
Section 3 - Installation
Step 40 - To verify your RAID 1, login to your NAS, go to Management. Disk Management, and Hard Drive Conguration.
This shows the current status of your drives.
Page 57
52
D-Link ShareCenter DNS-327L User Manual
Section 3 - Installation
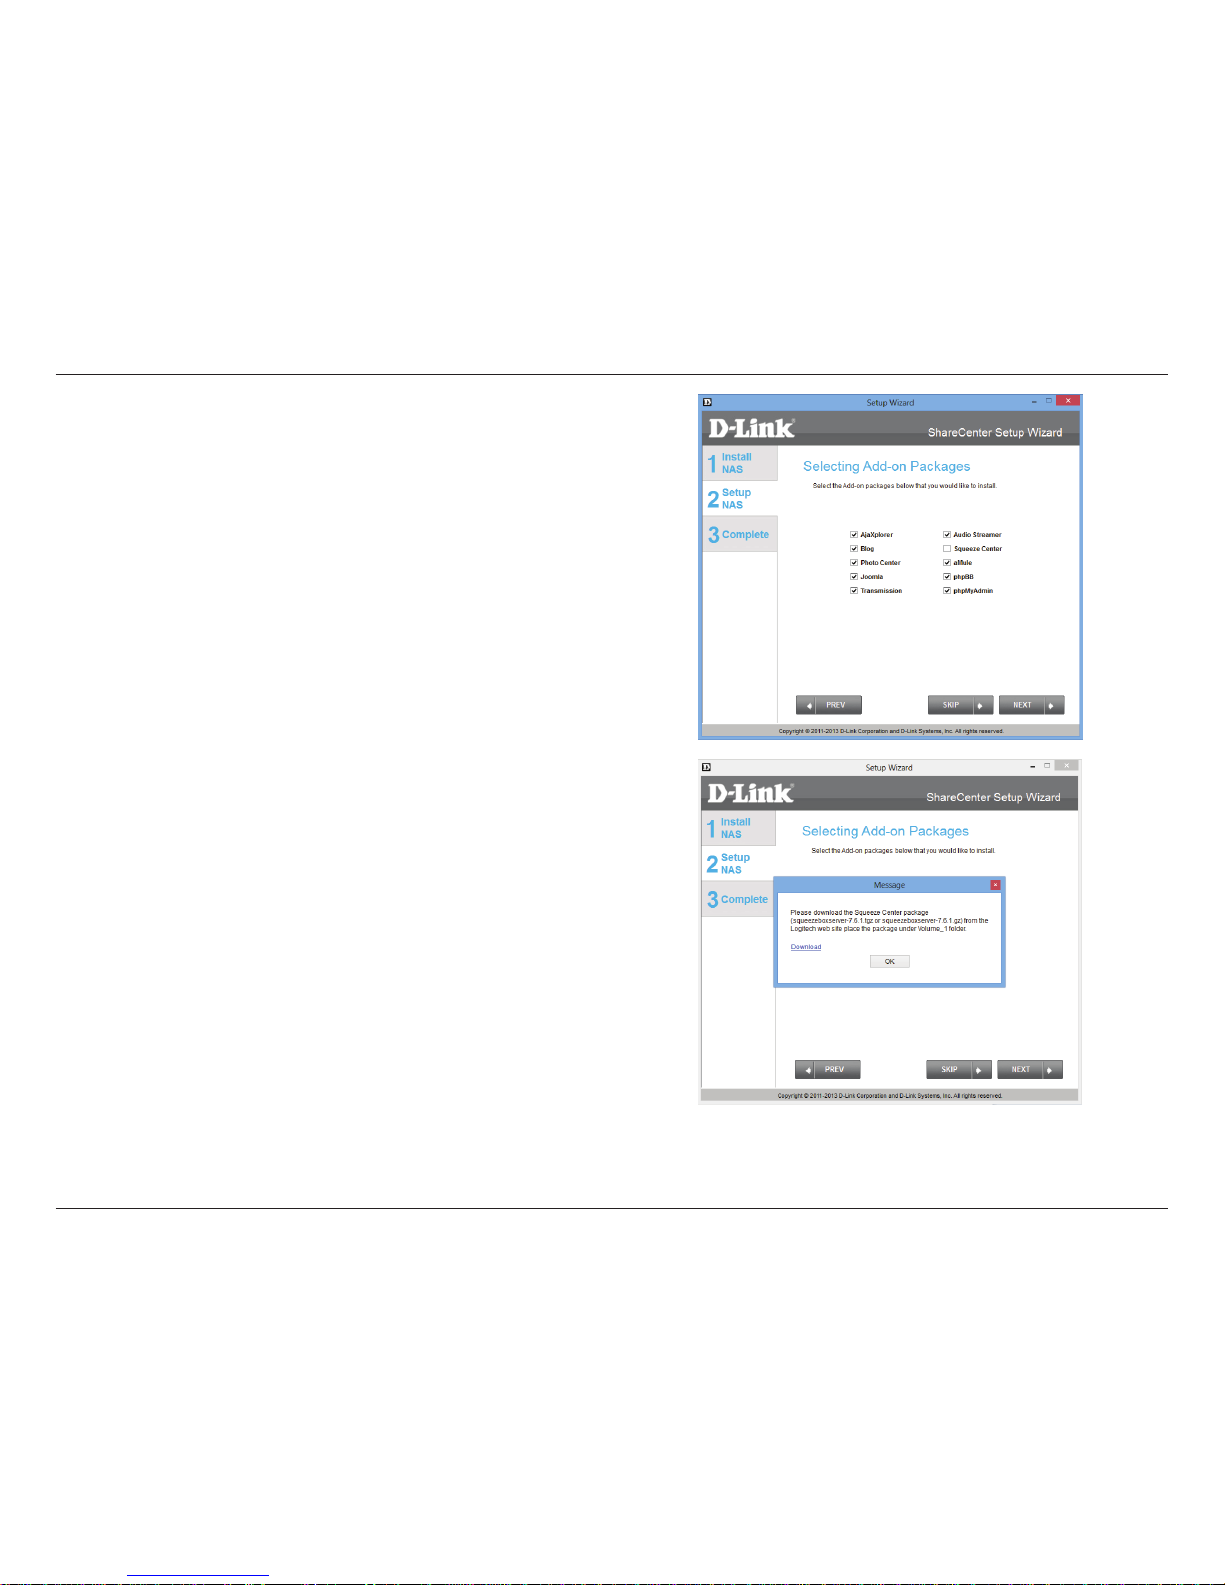
Step 41 - The DNS-327L also oers Add-on Packages. AjaXplorer,
Blog, Photo Center, Joomla, Transmission, Audio Streamer,
aMule, phpBB, and phpMyAdmin are oered by default.
Alternatively, you can install the add-on packages available on the
CD or from the D-Link website at a later stage. Refer to page 223 for
details.
Click Next to accept these installations or click SKIP to continue. If
you wish not to install Squeeze Center please continue to Step 45
Step 42 - If you wish to install the remaining Add-on Package, click
the box next to Squeeze Center. However, if you are not sure what
Squeeze Center does or do not wish to install it, skip this process.
Squeeze Center is a Logitech Media Server application. More
information can be found at http://en.wikipedia.org/wiki/Logitech_
Media_Server.
Click Next to accept these installations or click SKIP to continue.
Once you have selected it and clicked Next a window will appear
for you to download the application at a dierent location.
Click Next to accept these installations or click SKIP to continue.
Page 58
53
D-Link ShareCenter DNS-327L User Manual
Section 3 - Installation
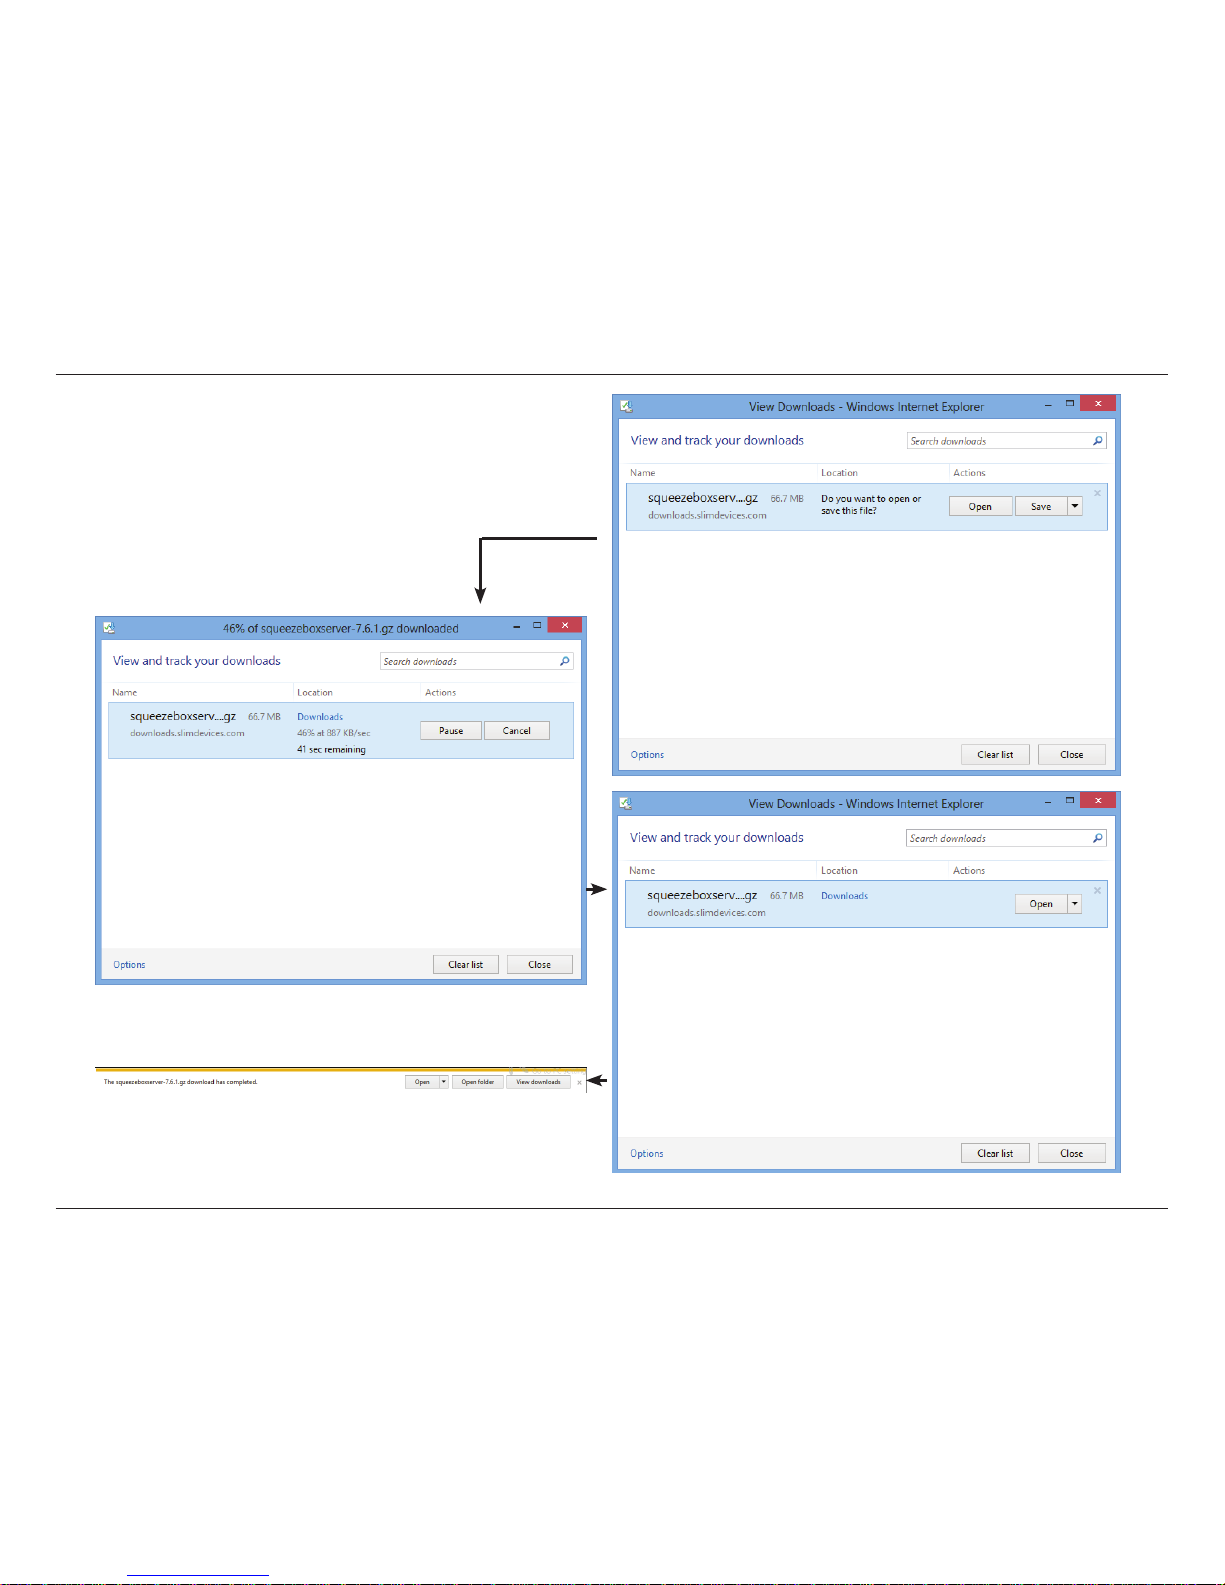
Step 43 - Opting to download the Squeeze Center
automatically opens your default browser to download the
application. Once Squeeze Center is downloaded, continue
with the rest of the installation. Click Save to save the le to
your local hard drive.
Page 59
54
D-Link ShareCenter DNS-327L User Manual
Section 3 - Installation
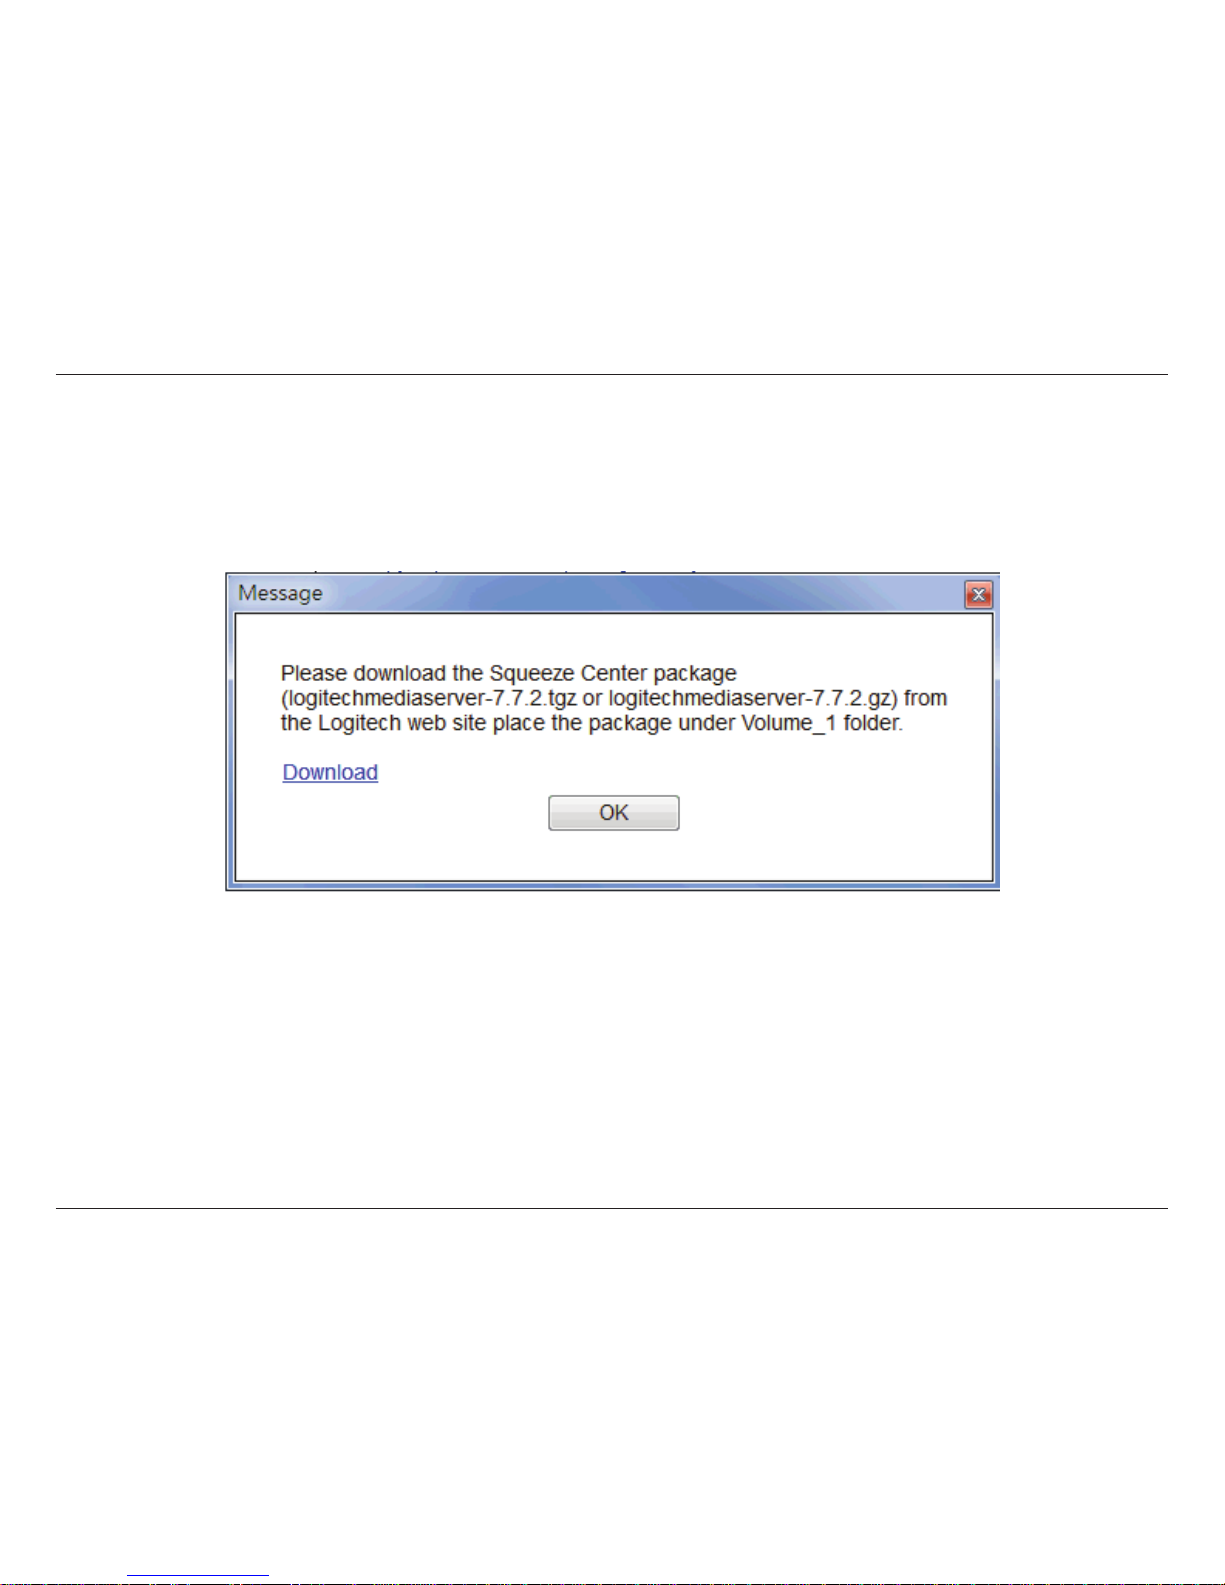
Step 44 - Copy the Squeeze Center package from your local hard drive to Volume_1 of the ShareCenter™ .
Page 60
55
D-Link ShareCenter DNS-327L User Manual
Section 3 - Installation
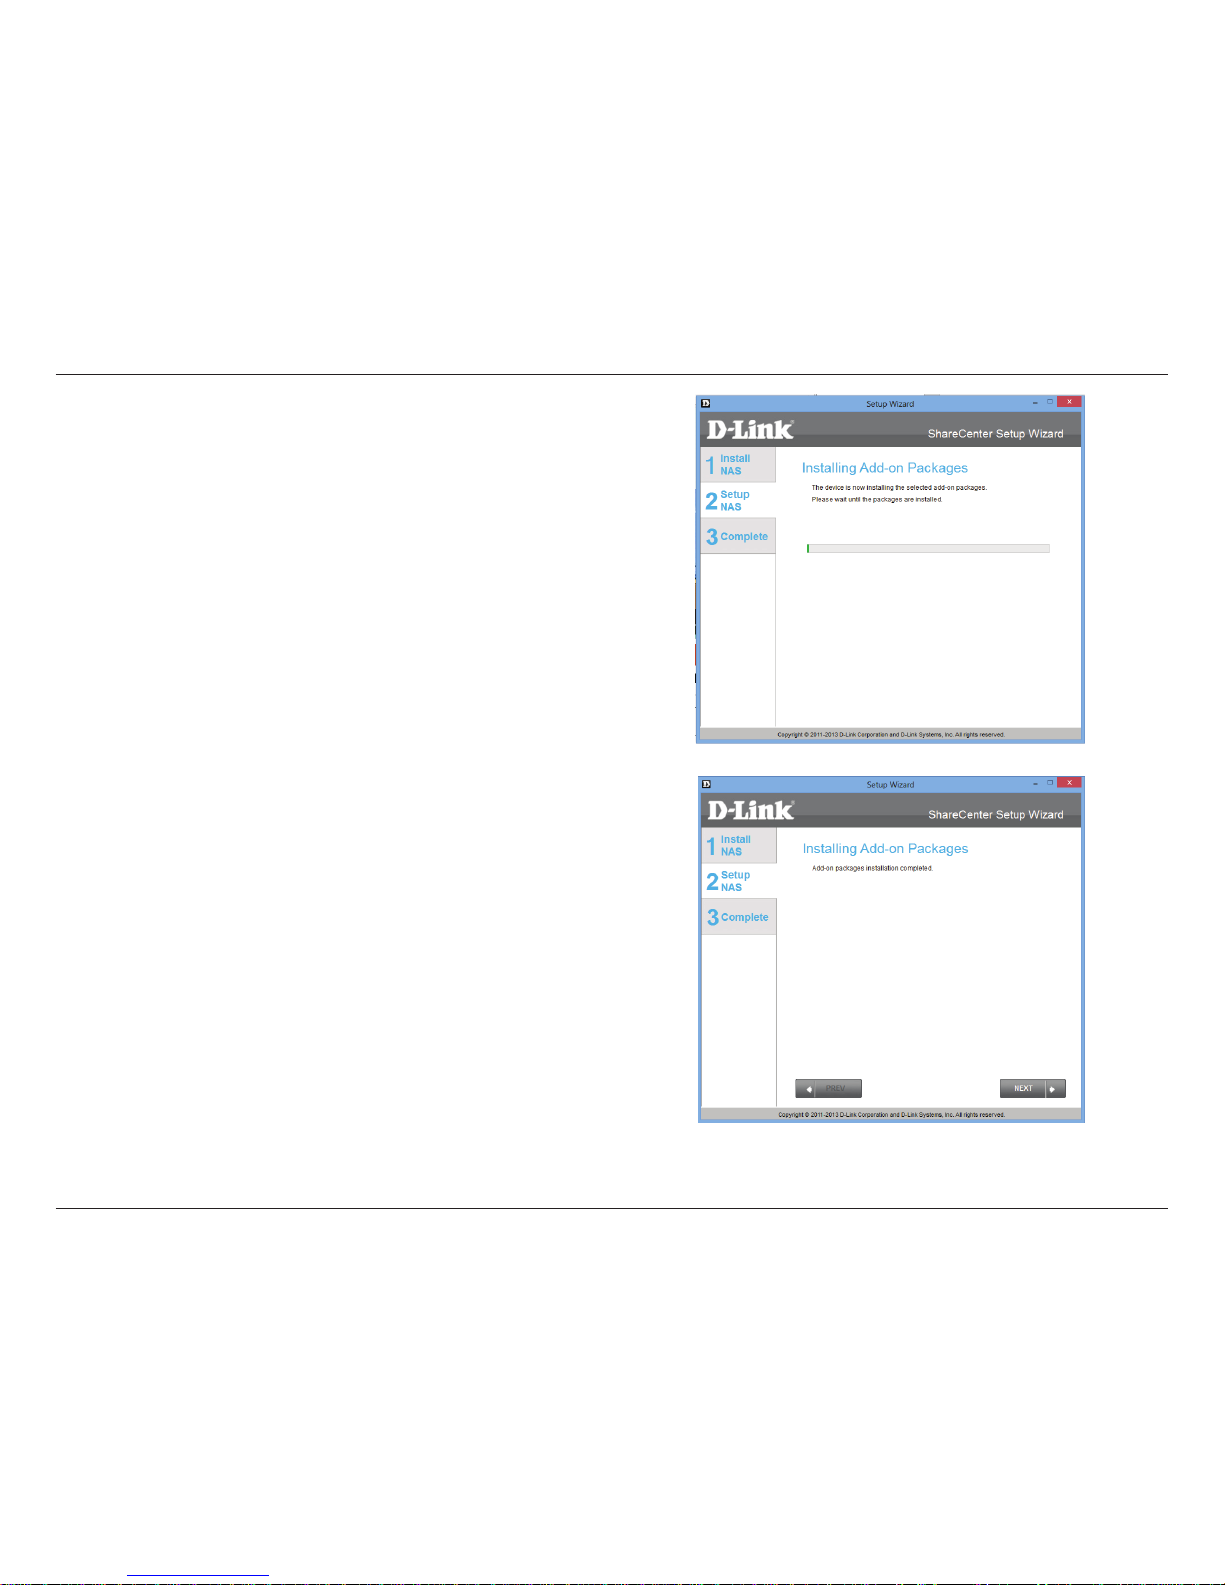
Step 45 - Watch the Add-on Packages being installed.
Step 46 - Once the Add-on Packages are installed click Next.
Page 61
56
D-Link ShareCenter DNS-327L User Manual
Section 3 - Installation
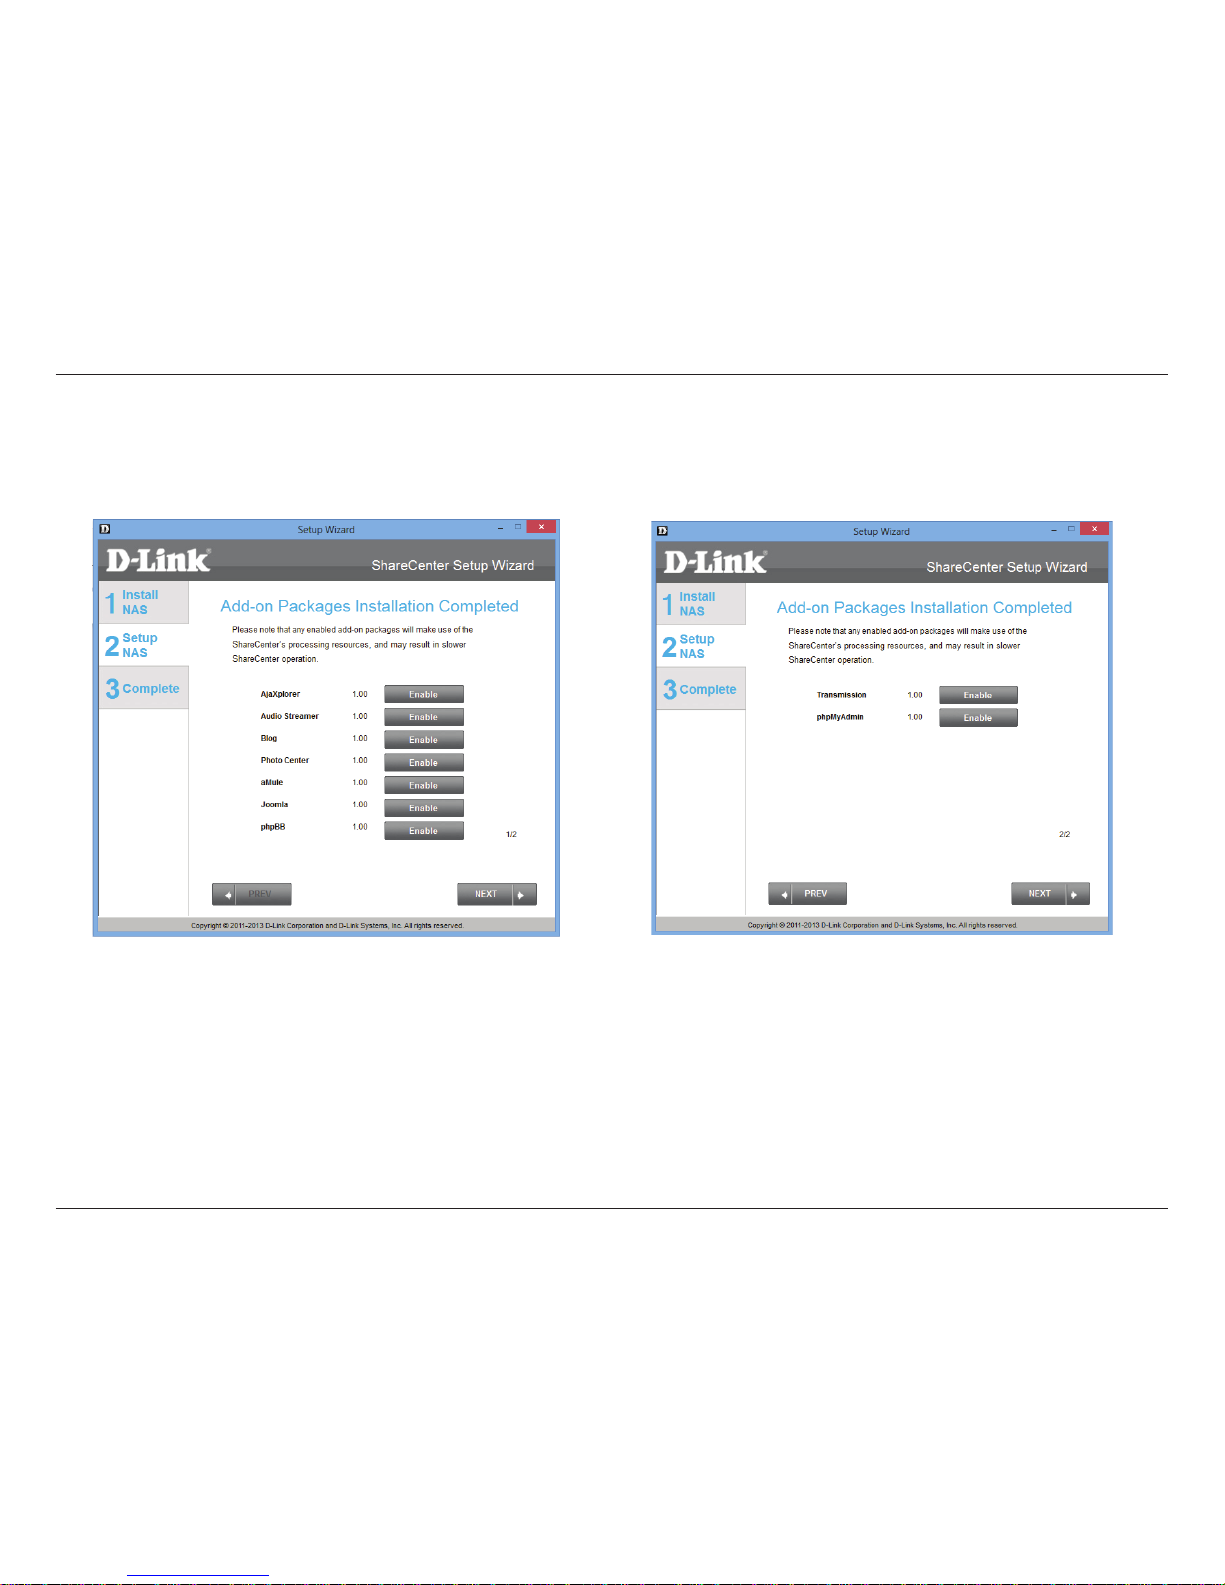
Step 47 - The next two screens displays the installed Add-on Packages. Click Next to continue to the next window.
Page 62
57
D-Link ShareCenter DNS-327L User Manual
Section 3 - Installation
Connecting to the mydlink
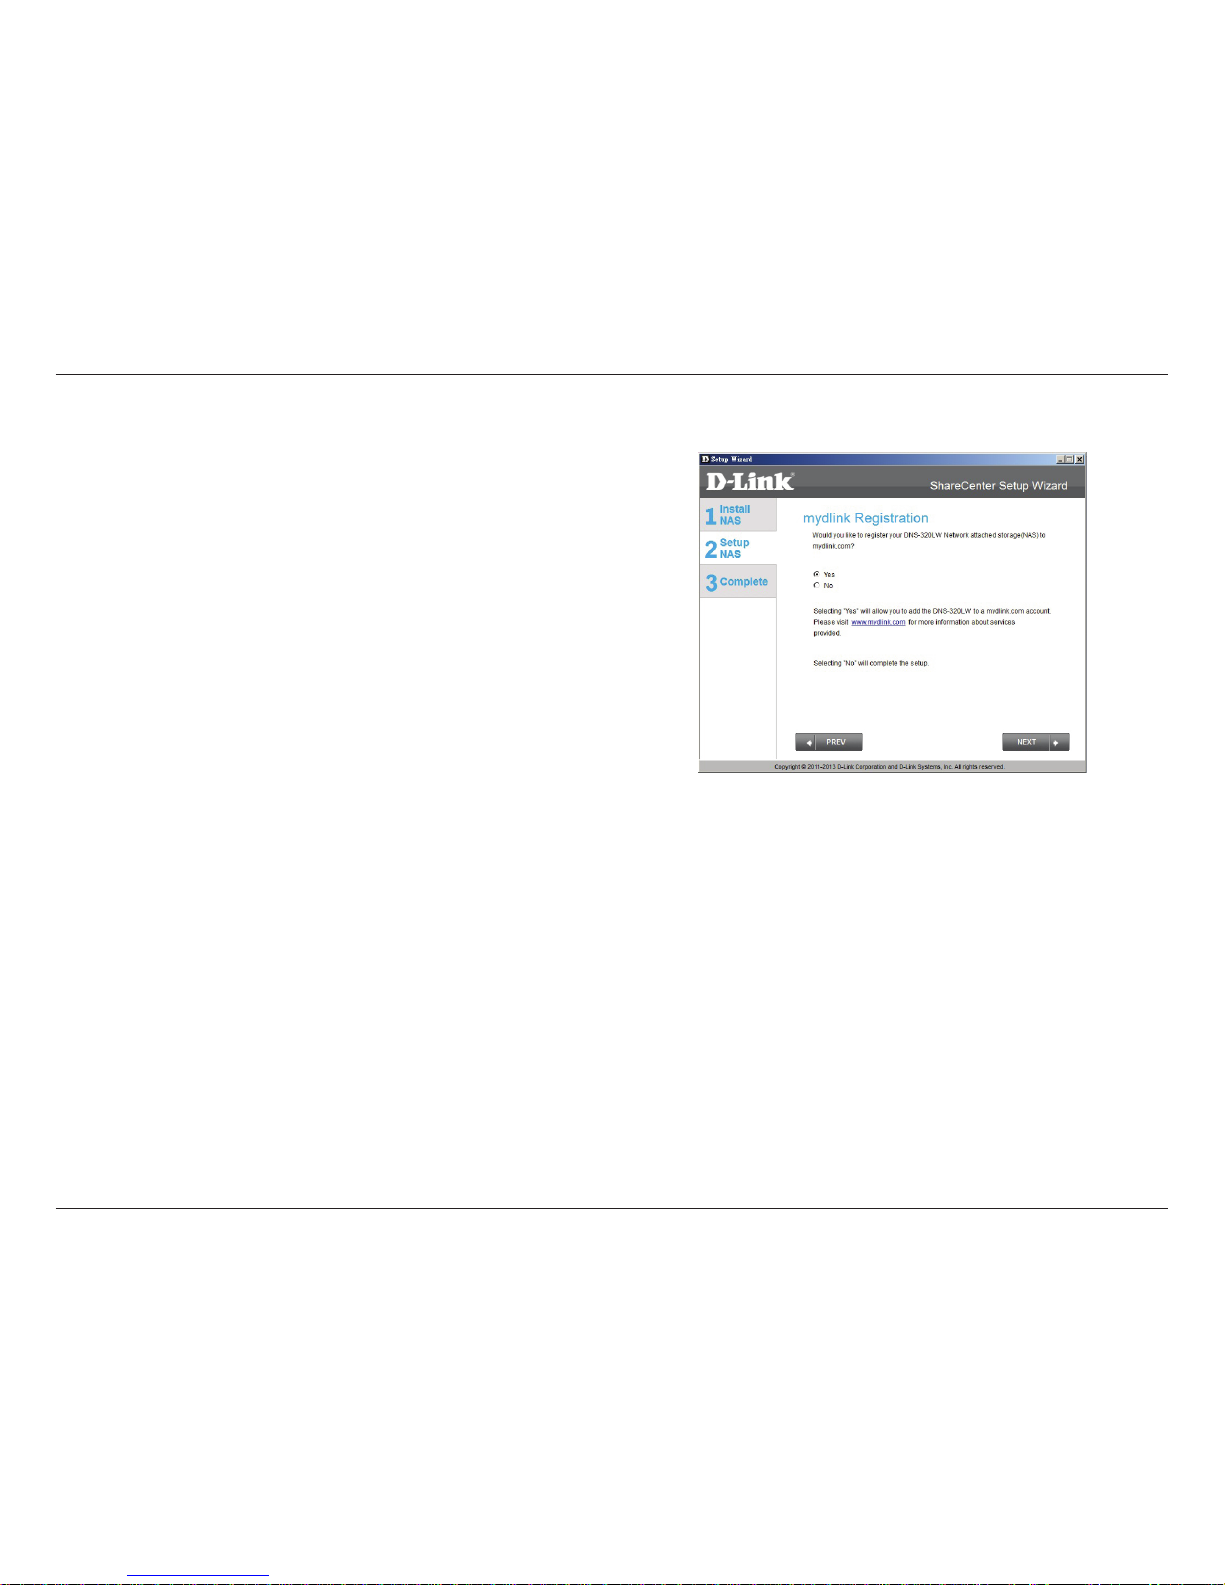
Step 48 - D-Link has provided a mydlink service that allows you
to remotely access the les from your NAS through the mydlink
portal. Read the installation instructions and wait for the process
to complete.
Click Next to continue.
Page 63
58
D-Link ShareCenter DNS-327L User Manual
Section 3 - Installation
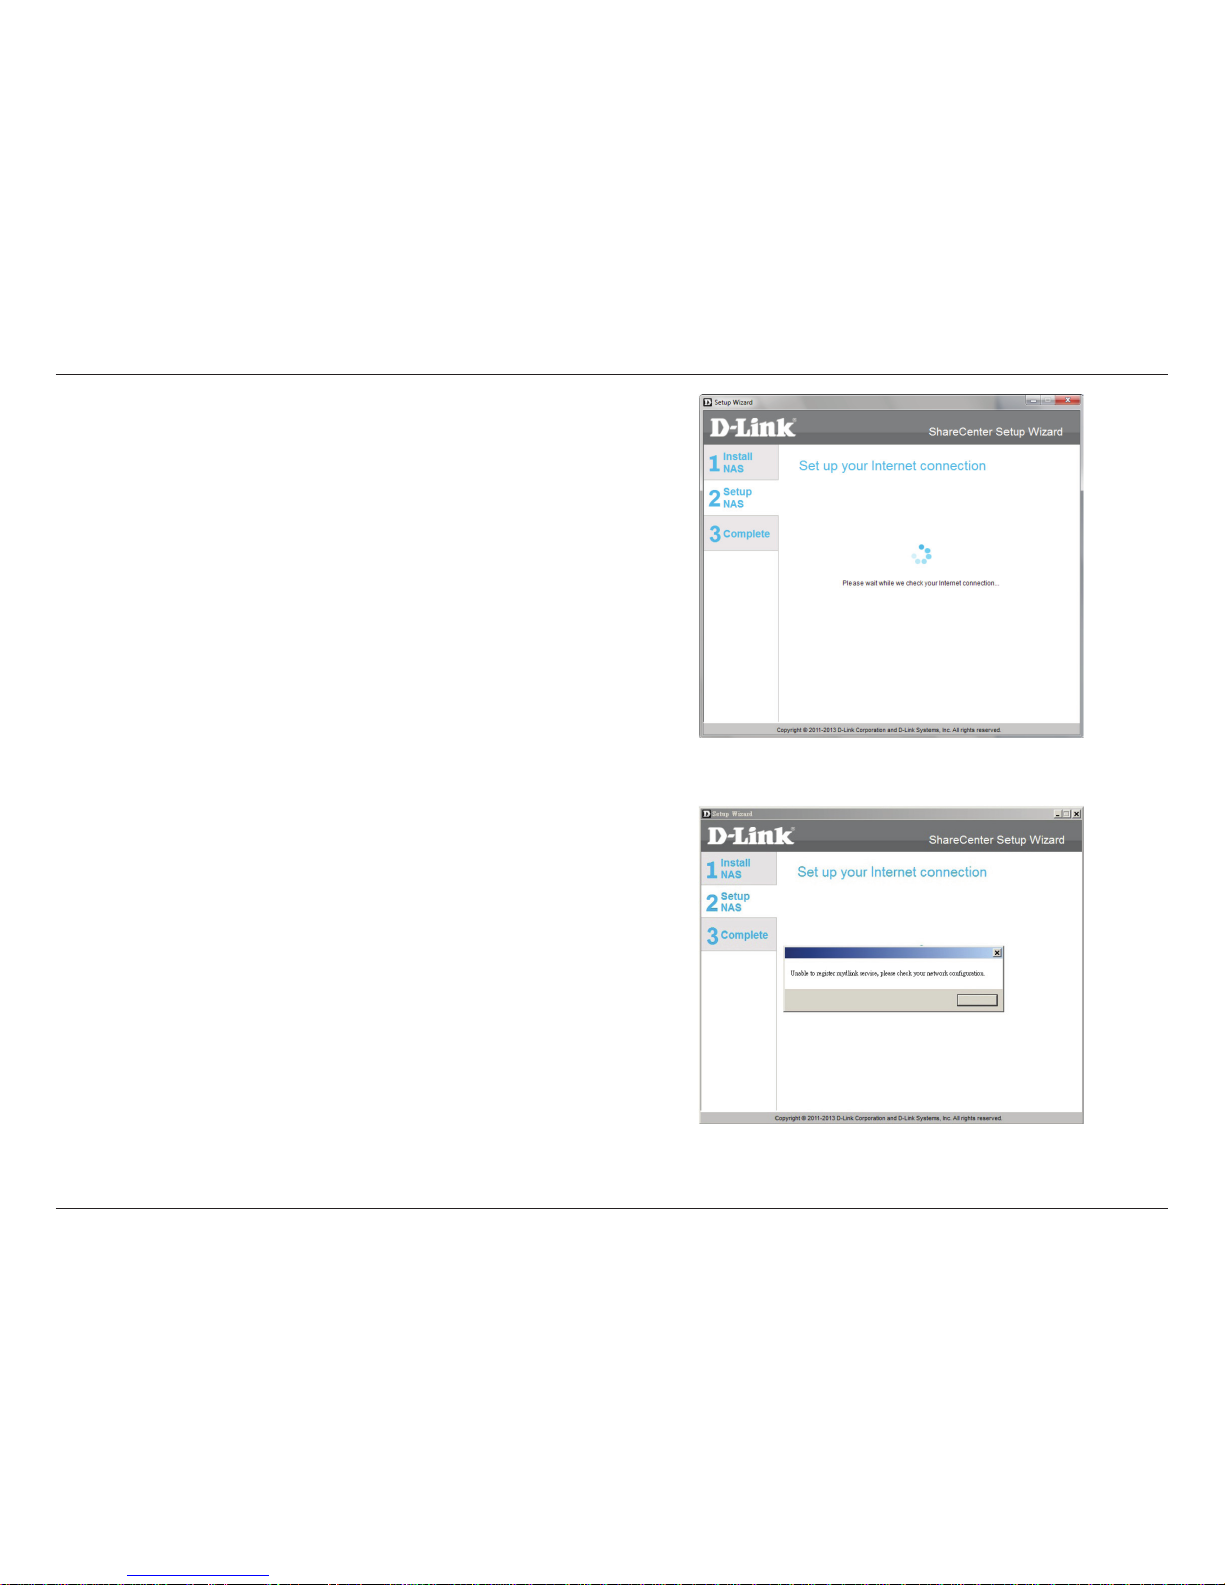
Step 49 - The wizard connects you to the mydlink servers and
congures your cloud service.
Click Next to continue.
Step 50 - When the wizard fails to connects you to the mydlink
servers and congures your cloud service, the following screen
appears to warn you of your network conguration.
Click Next to continue.
Page 64
59
D-Link ShareCenter DNS-327L User Manual
Section 3 - Installation
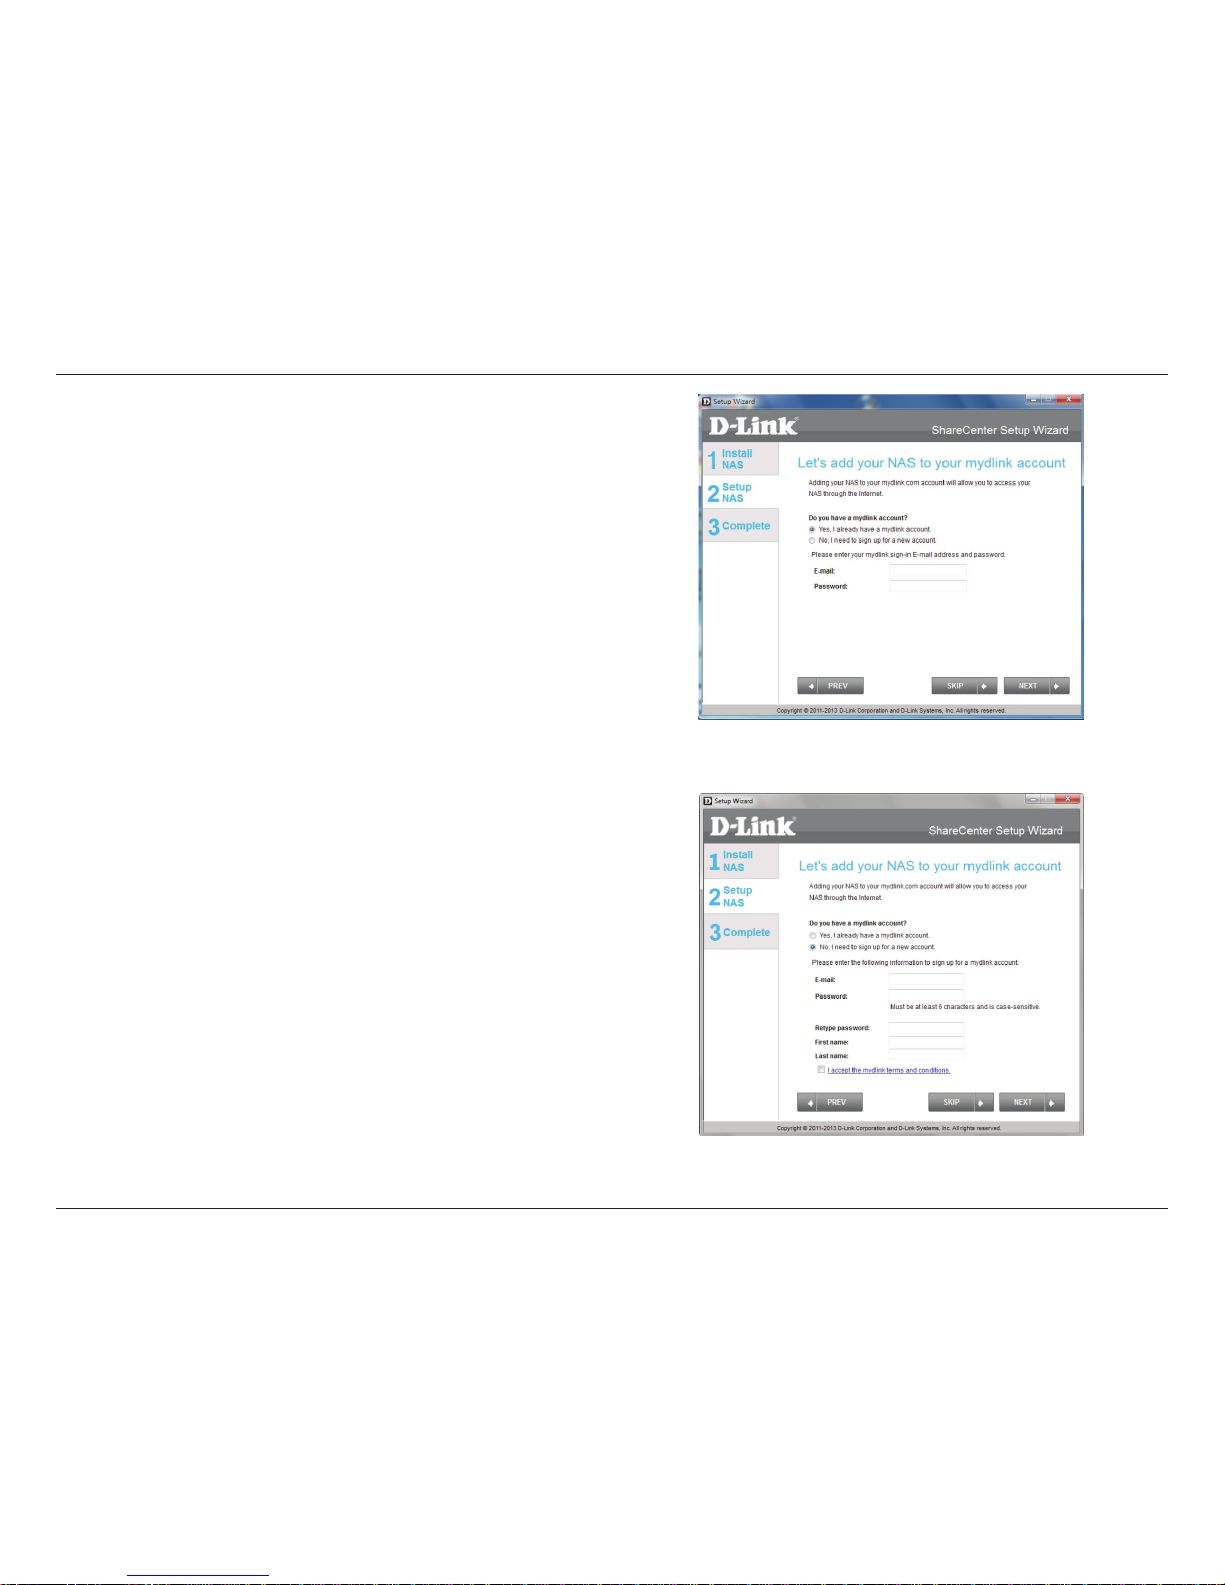
Step 51 - The next screen allows you to setup the remote mydlink
cloud service. Select the Yes radio button if you already have a
mydlink account.
Enter your email address and password.
Click Next to continue.
Step 52 - Alternatively, you can create a new account if you select
“No, I need to sign up for a new account.”
Enter your email address and a password that you can remember.
Then retype the password, enter a First Name and a Last Name. Then
click the checkbox that reads:
“I accept the mydlink terms and conditions.”
Click Next to continue.
Page 65
60
D-Link ShareCenter DNS-327L User Manual
Section 3 - Installation
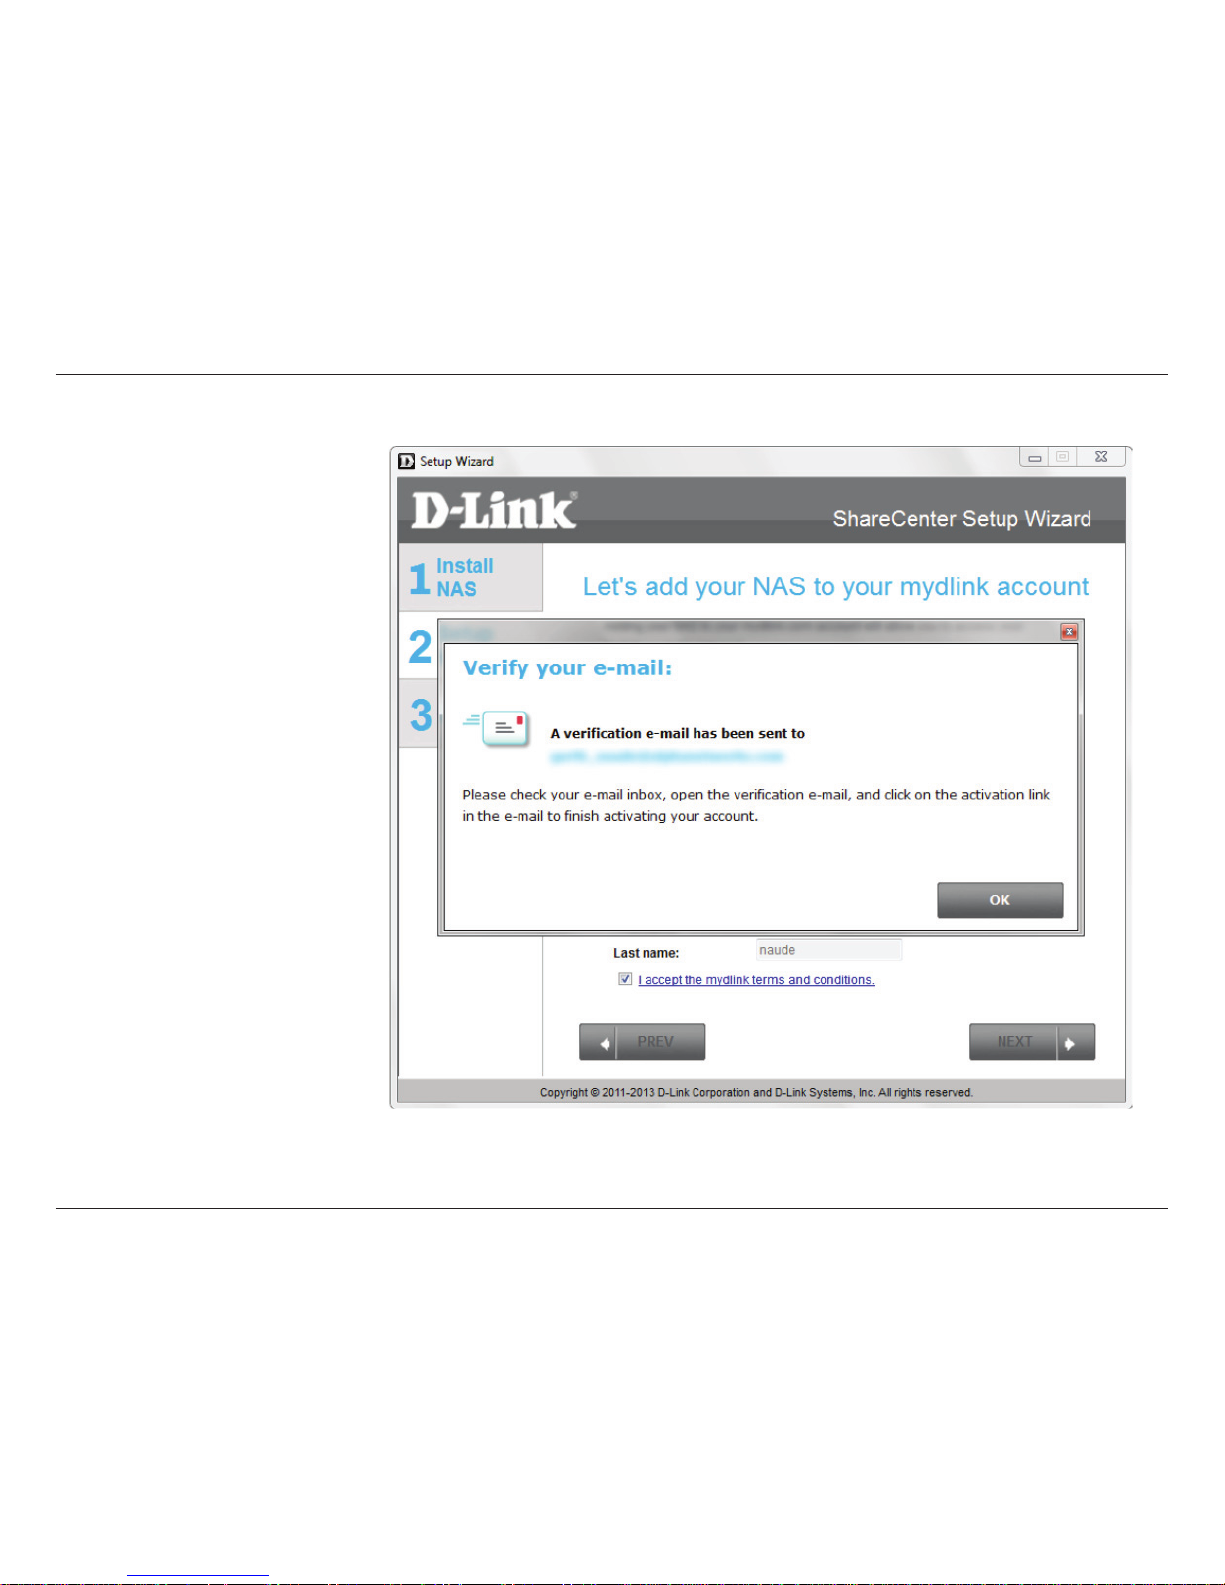
Step 53 - A message appears asking you to verify your email address
and account.
Click OK to continue.
Page 66
61
D-Link ShareCenter DNS-327L User Manual
Section 3 - Installation
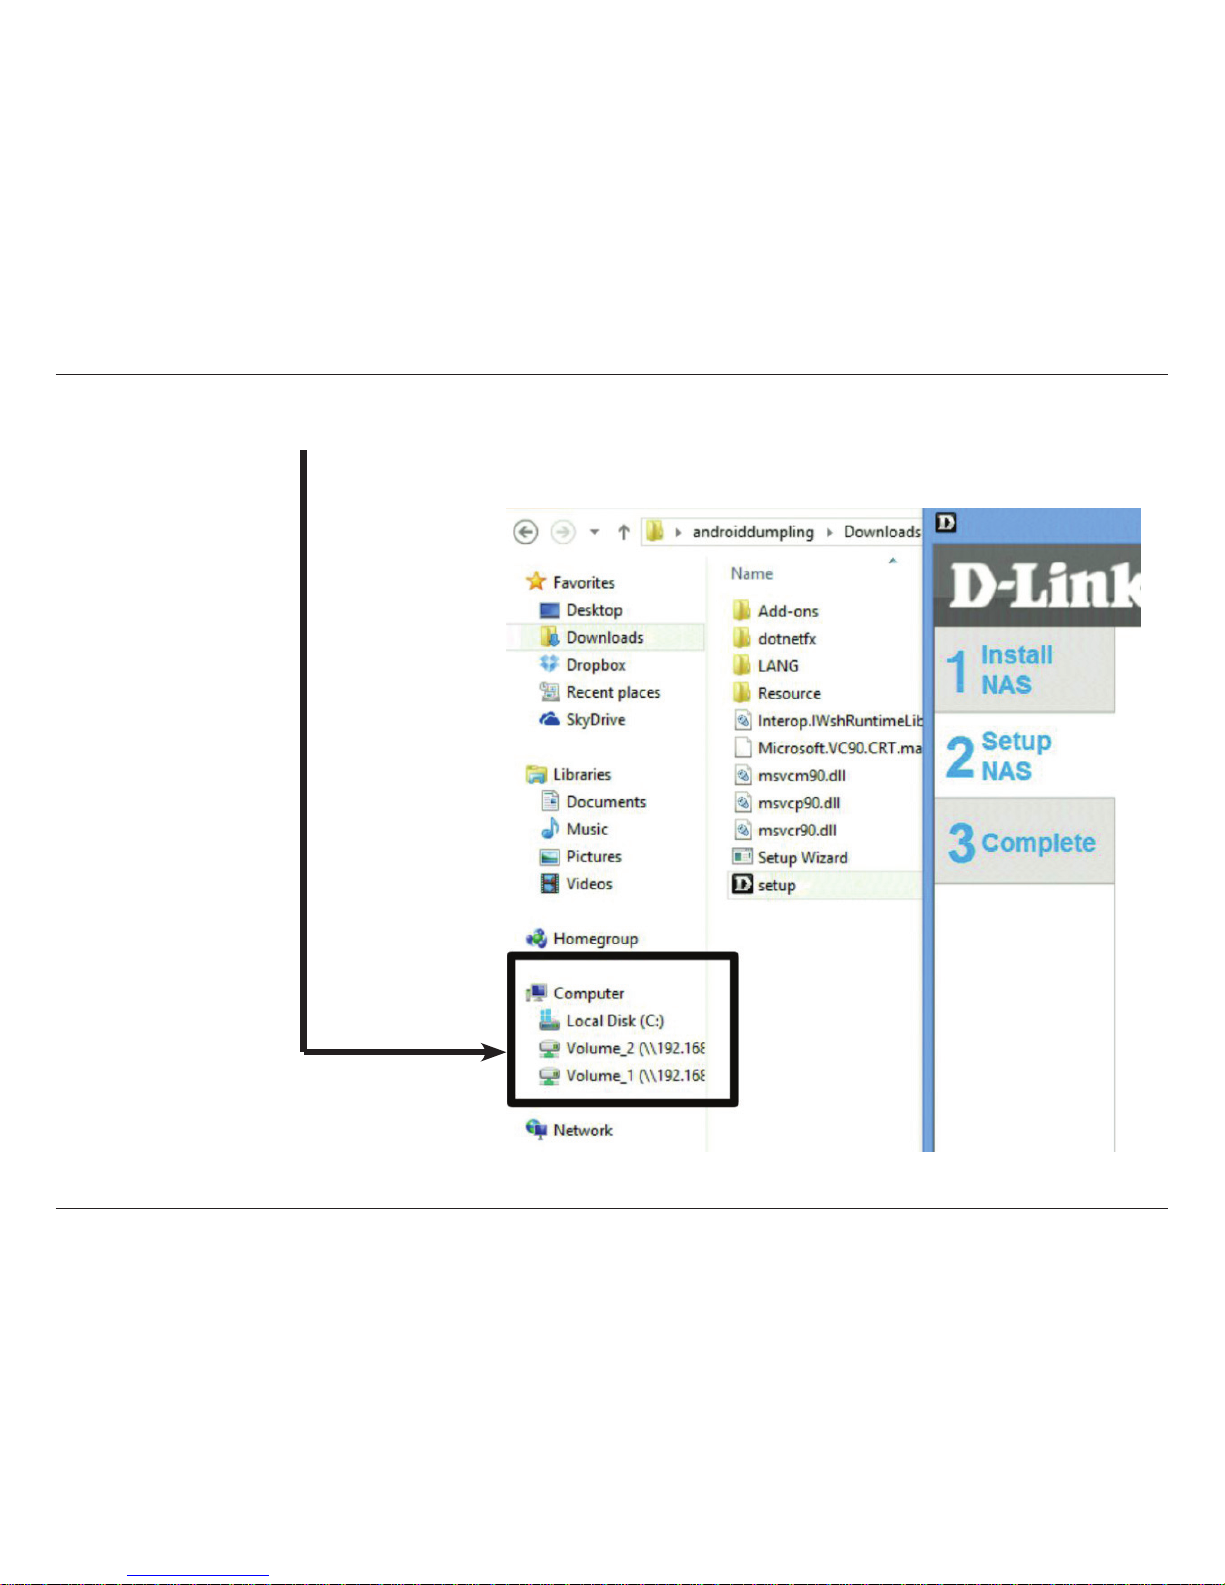
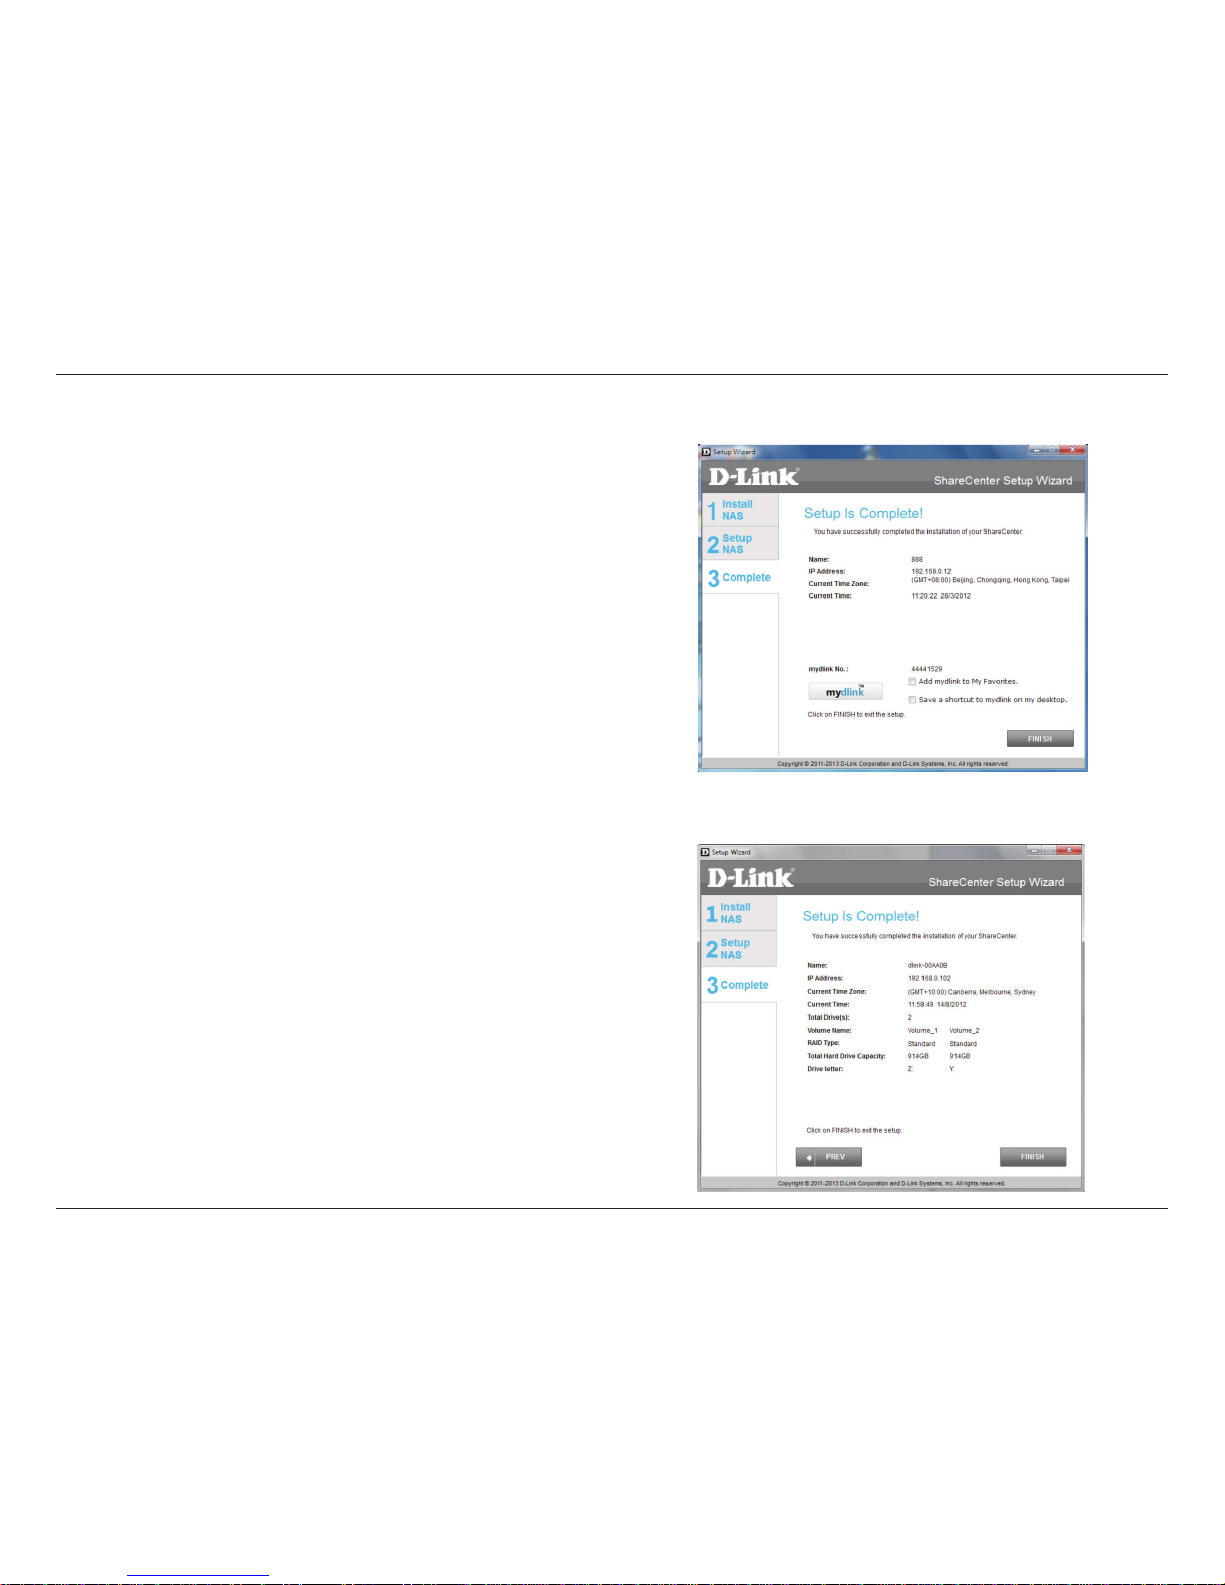
Step 55 - The ShareCenter™ Setup Wizard is complete. Click Finish
to exit the wizard and start using your DNS-327L.
Wizard Complete
Your ShareCenter™ is now installed and ready to use. If your drives
are mapped using the wizard, you will be able to access them under
your ‘My Computer’ icon.
If you did not use the wizard to map the drives, you can manually map
or access the created volumes through your computers operating
system. Detailed congurations using the Web UI is explained in the
conguration section of this manual.
Step 54 - The mydlink section of the wizard installation is complete.
The wizard provides you with a mydlink number. You can also tick
the Add mydlink to My Favorites checkbox, or Save a shortcut
to mydlink on my computer checkbox. You can use this mydlink
number for future reference.
Click Finish to continue.
Page 67
62
D-Link ShareCenter DNS-327L User Manual
Section 3 - Installation
Mapping a Drive
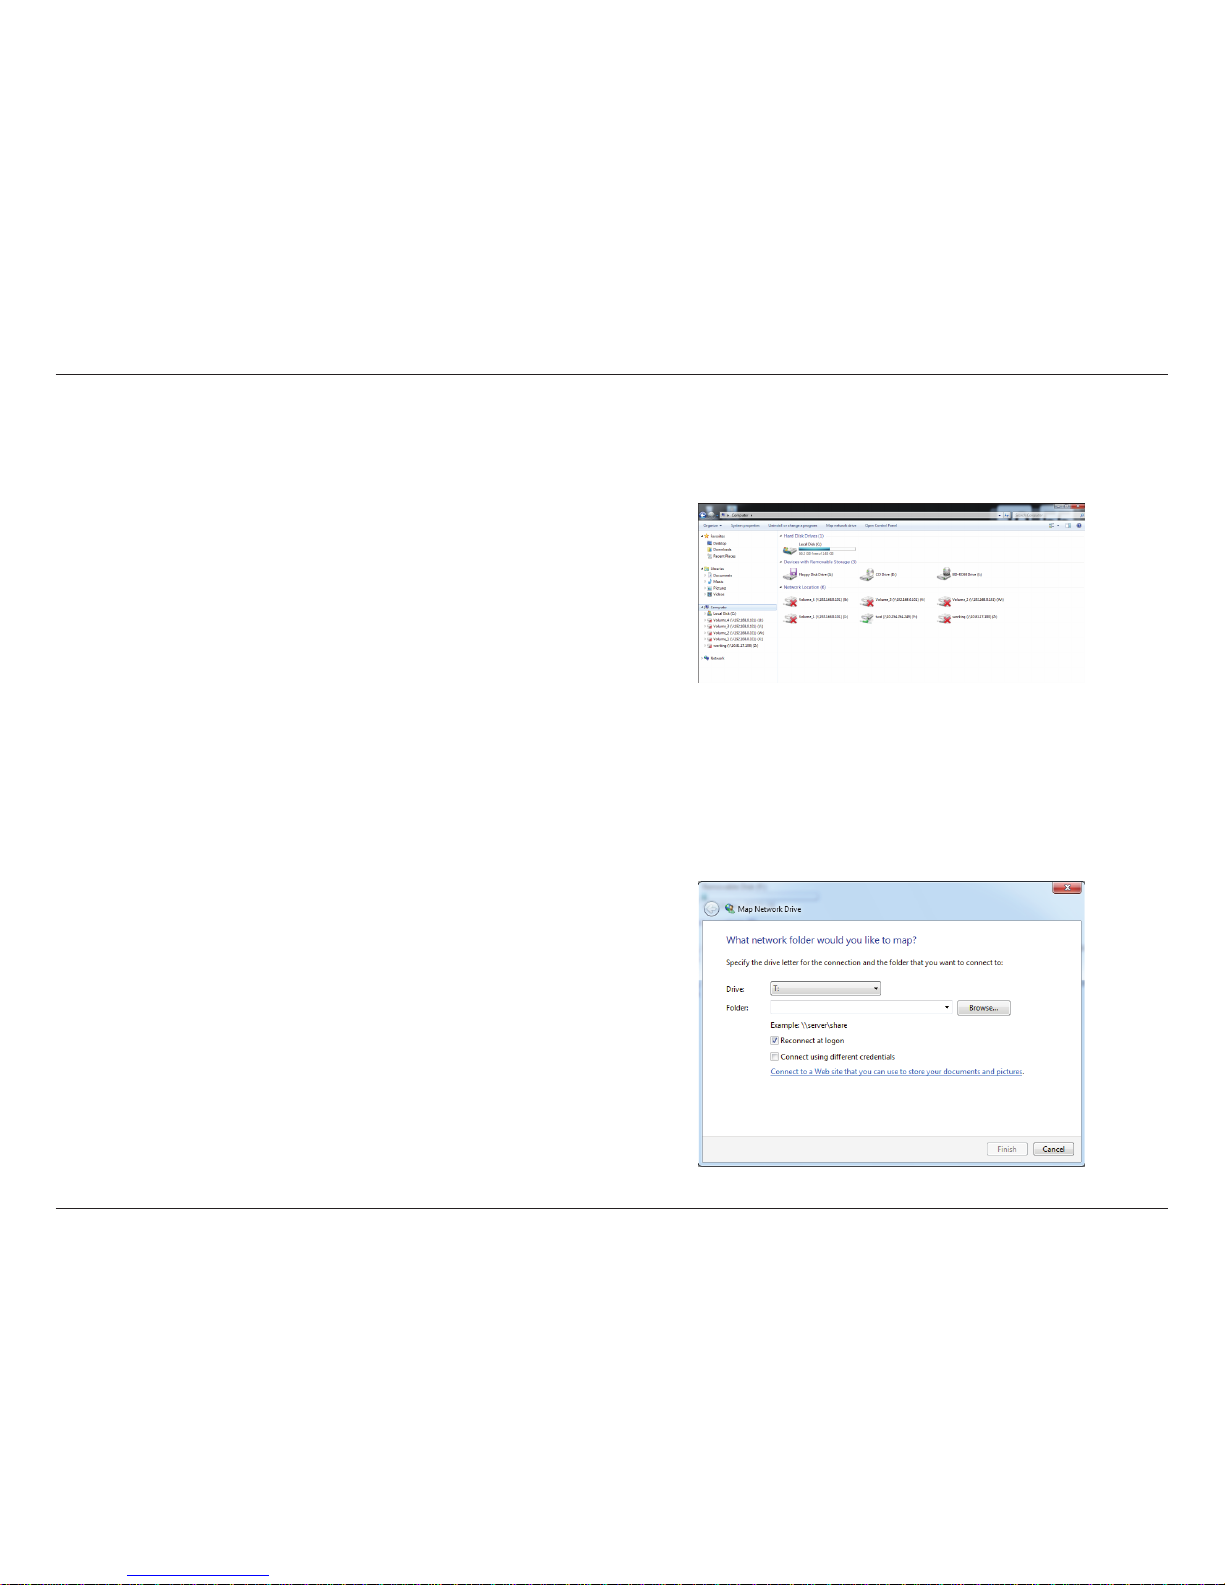
Map a Volume on your DNS-327L using Windows® Explorer in Windows® 7.
Step 1 - Press the Windows key and the letter E on your keyboard
at the same time.
The right-side panel displays a list of your hard drives, removable
storage, and network locations. If you do not have any network
locations, this may be the rst time you set up a network drive.. Begin
by clicking on ‘Map Network Drive’
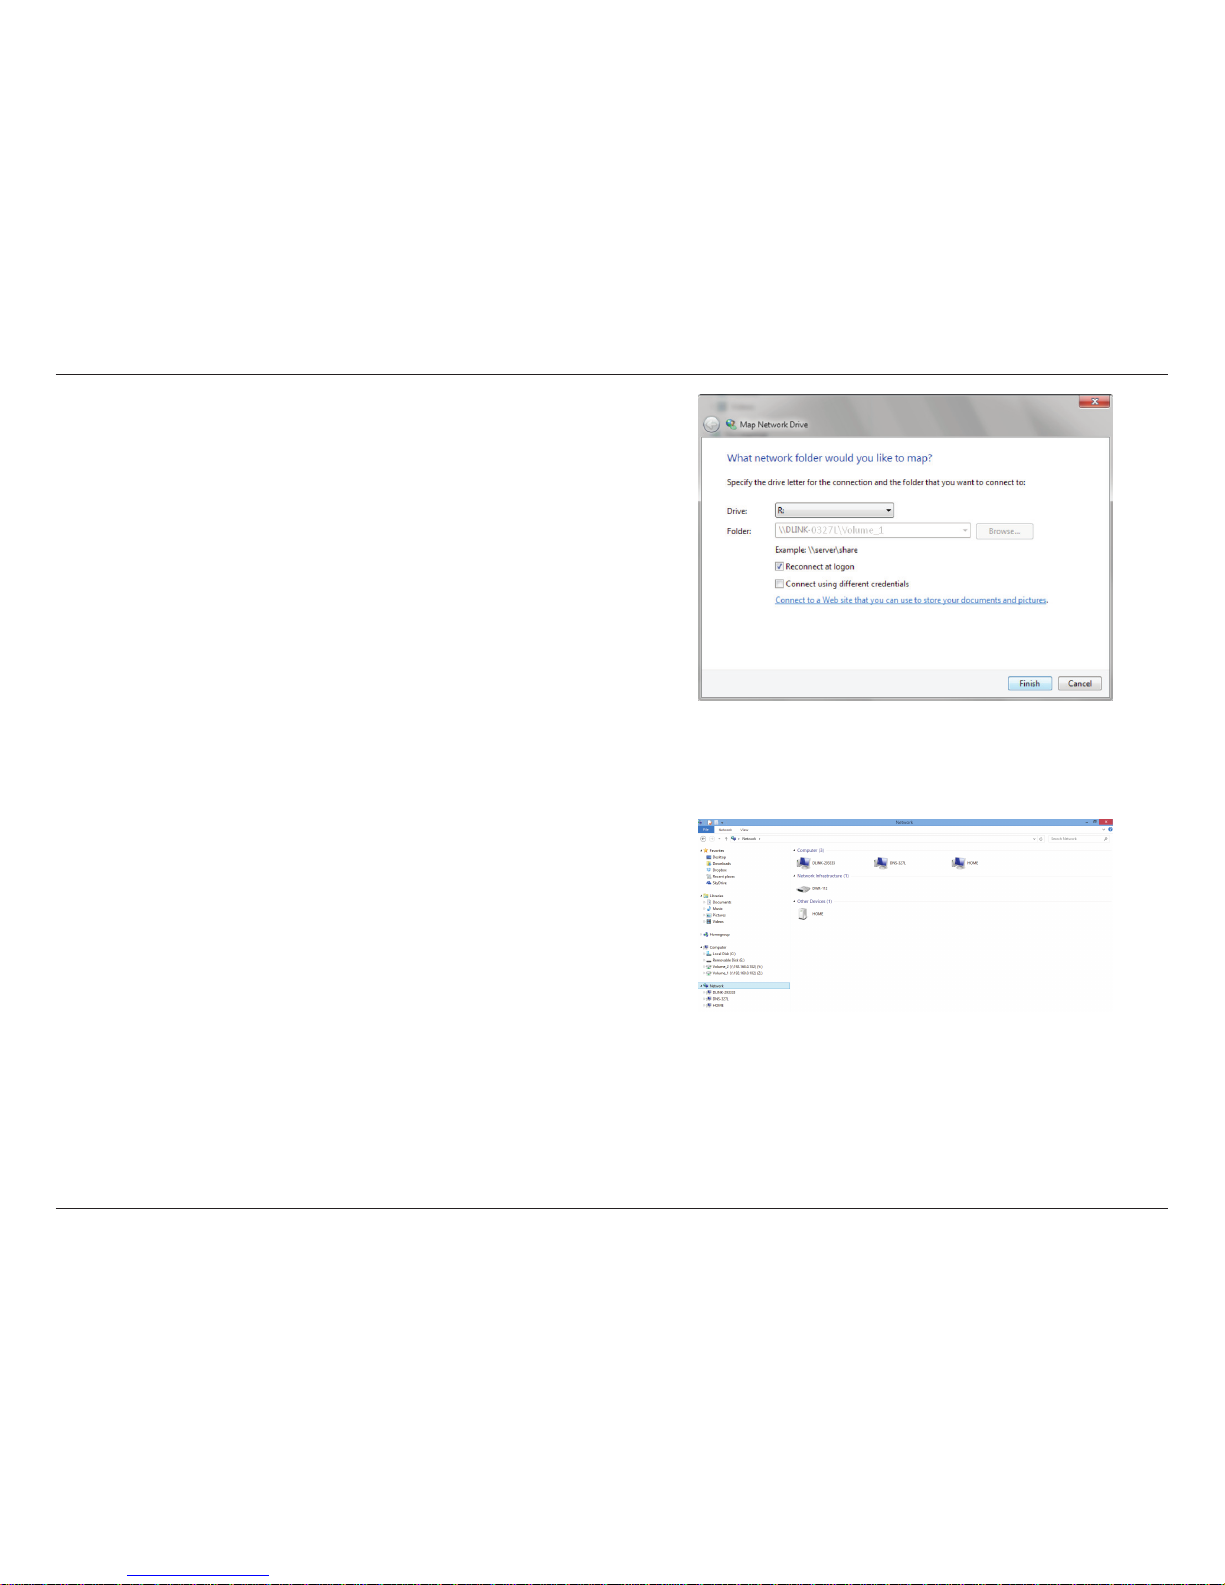
Step 2 - The Map Network Drive screen appears. Choose a Drive letter,
click Browse to nd your network.
Page 68
63
D-Link ShareCenter DNS-327L User Manual
Section 3 - Installation
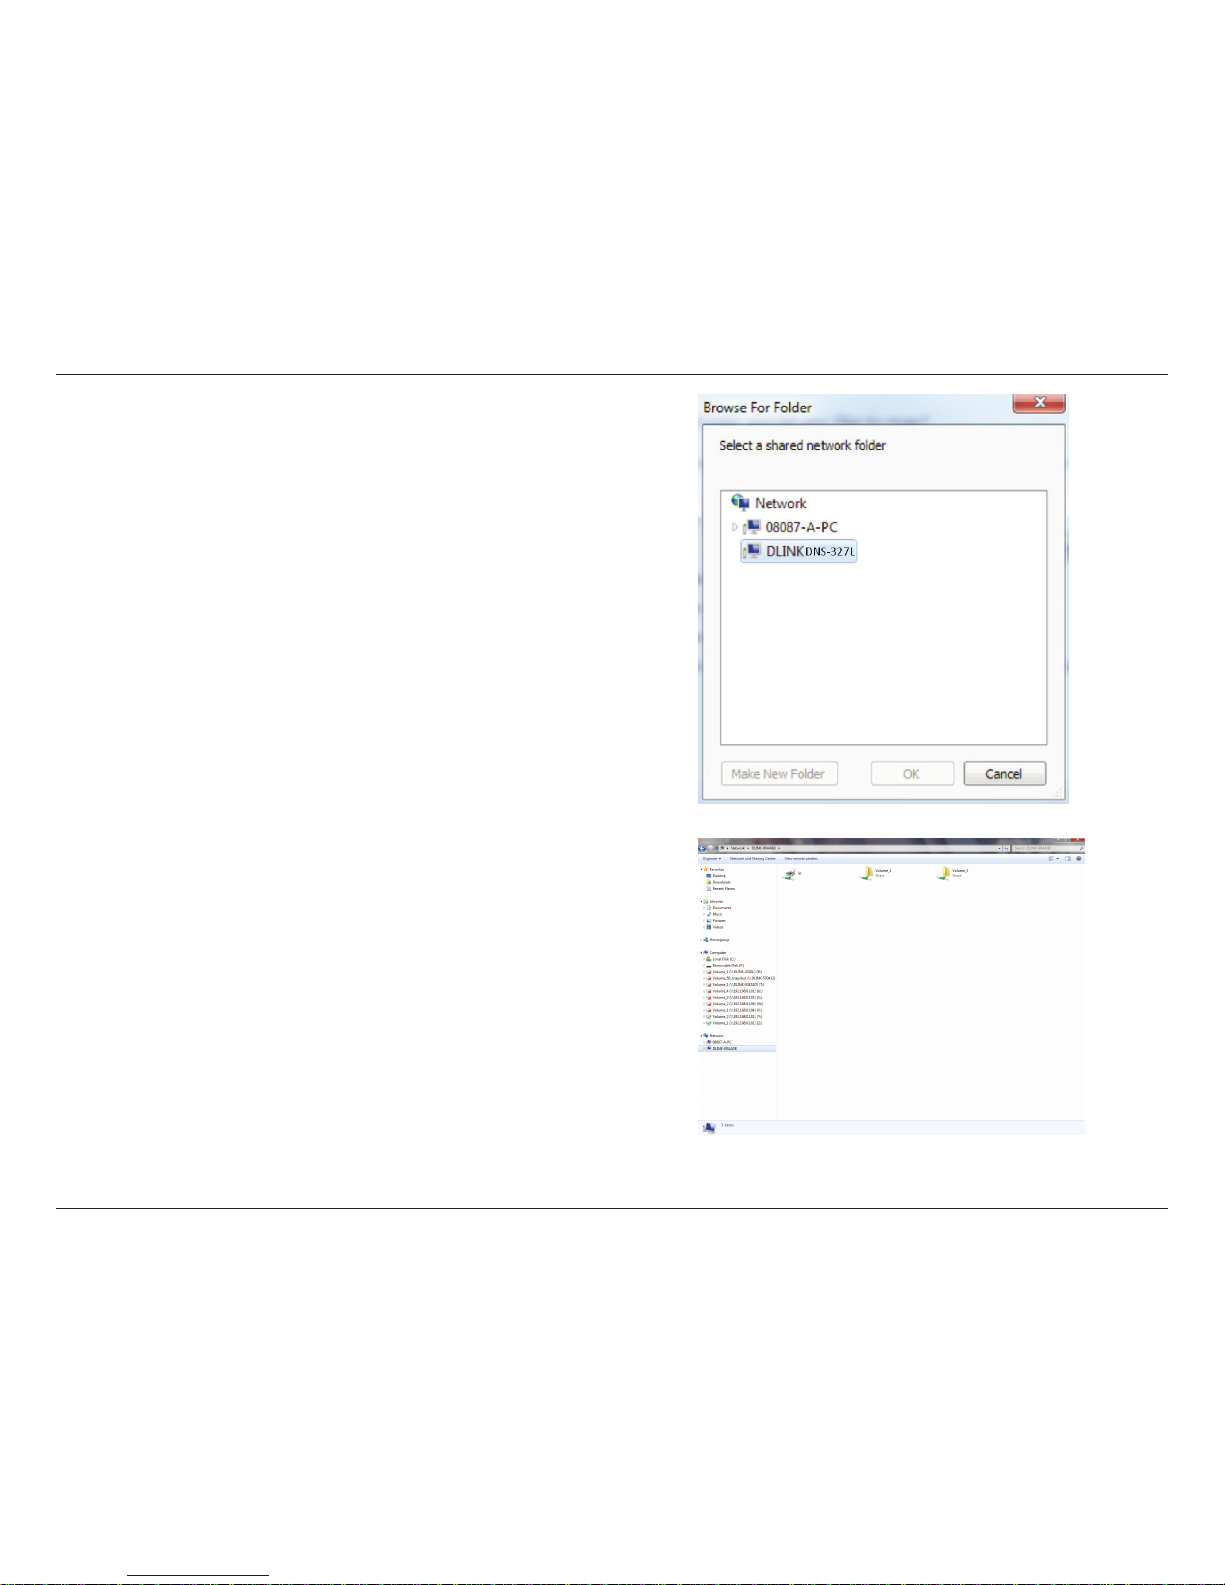
Step 3 - Windows will automatically detect all devices on your
network including your ShareCenter™
Step 4 - Click on your ShareCenter™ to see the volumes you created
earlier. Then select the volume that you wish to access and click OK.
Page 69
64
D-Link ShareCenter DNS-327L User Manual
Section 3 - Installation
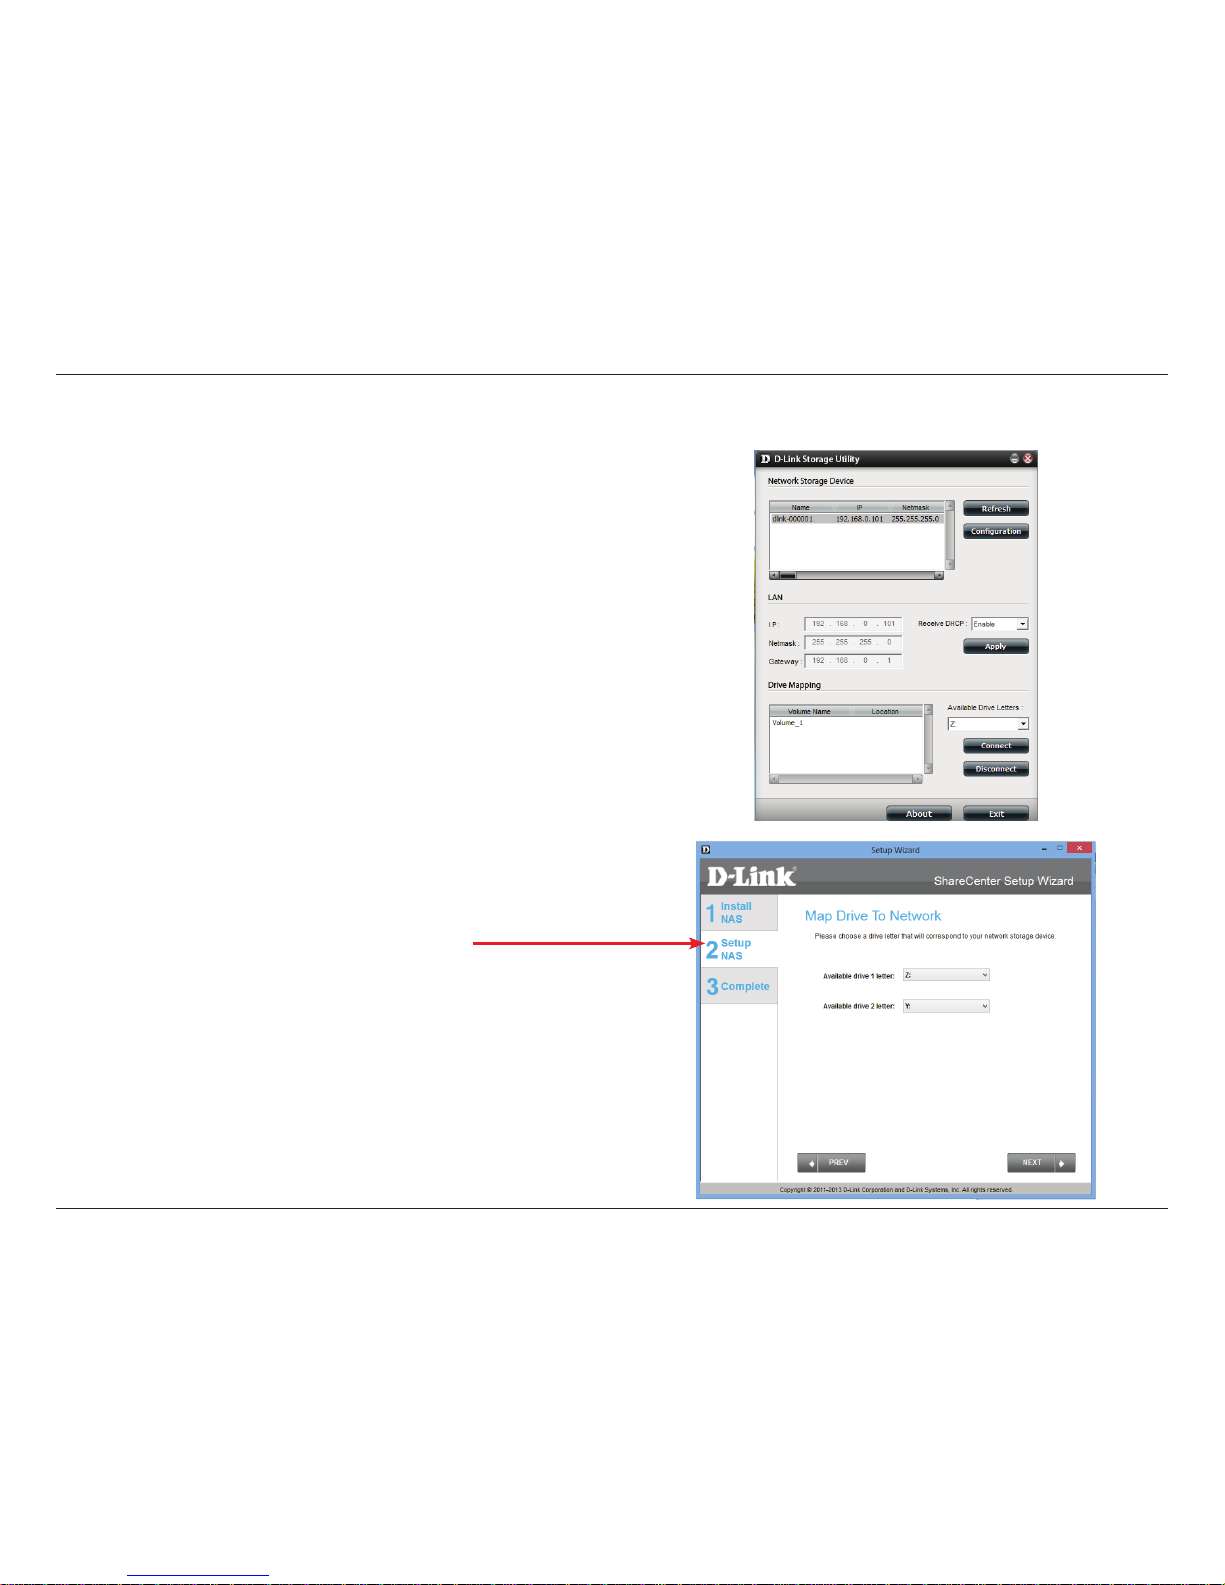
Step 5 - After selecting your volume, click Finish to proceed.
Step 6 - The drive will then appear in your Windows® Explorer under
Network. This means the drive is active and ready for use.
Page 70
65
D-Link ShareCenter DNS-327L User Manual
Section 3 - Installation
Alternative methods to Mapping a Drive
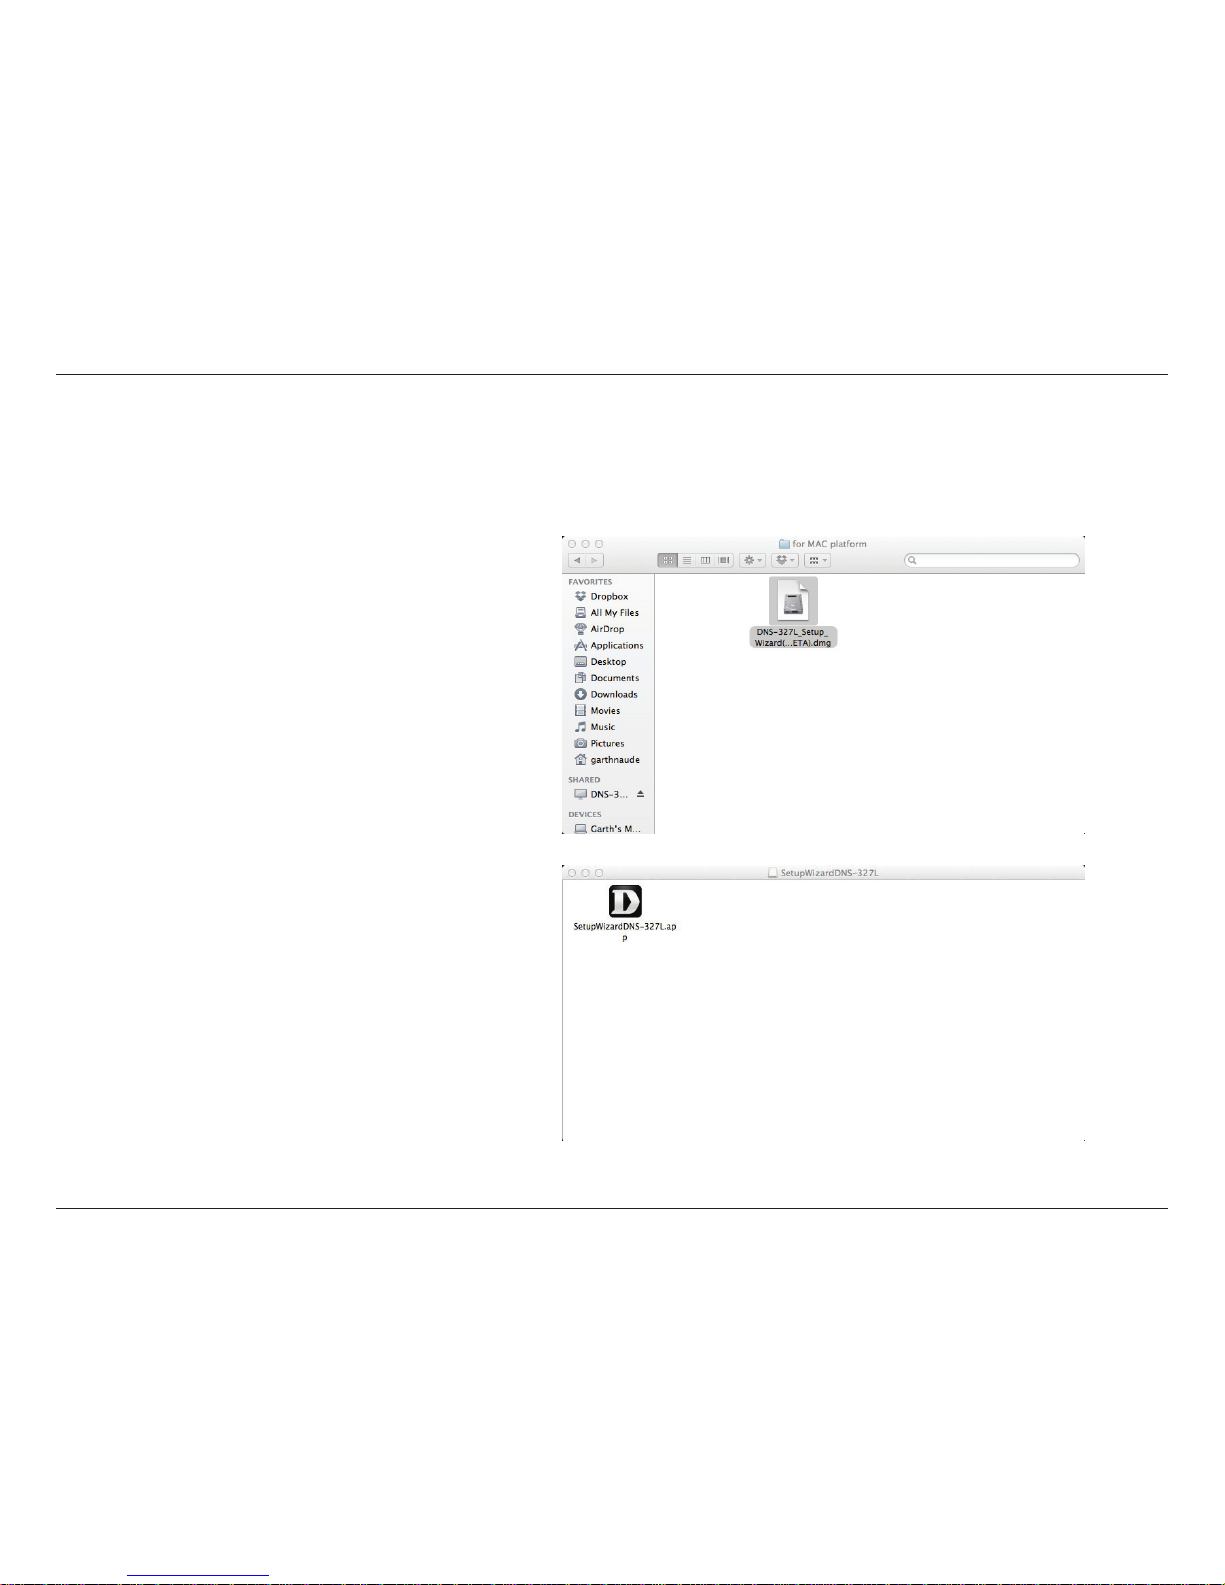
You can also map a drive using the D-Link Storage Utility. Once
the DNS-327L is discovered in the Storage Utility, and the LAN
conguration settings are complete, nding the drives happens
automatically. Select the drive letter and click Connect. To disconnect
the drive, click the Disconnect button.
Another method is using the Setup Wizard. As you go
through the Setup Wizard process, there is a step in the
process to map the drive. See the image here.
Page 71
66
D-Link ShareCenter DNS-327L User Manual
Section 3 - Installation
Mac - Setup Wizard Installation
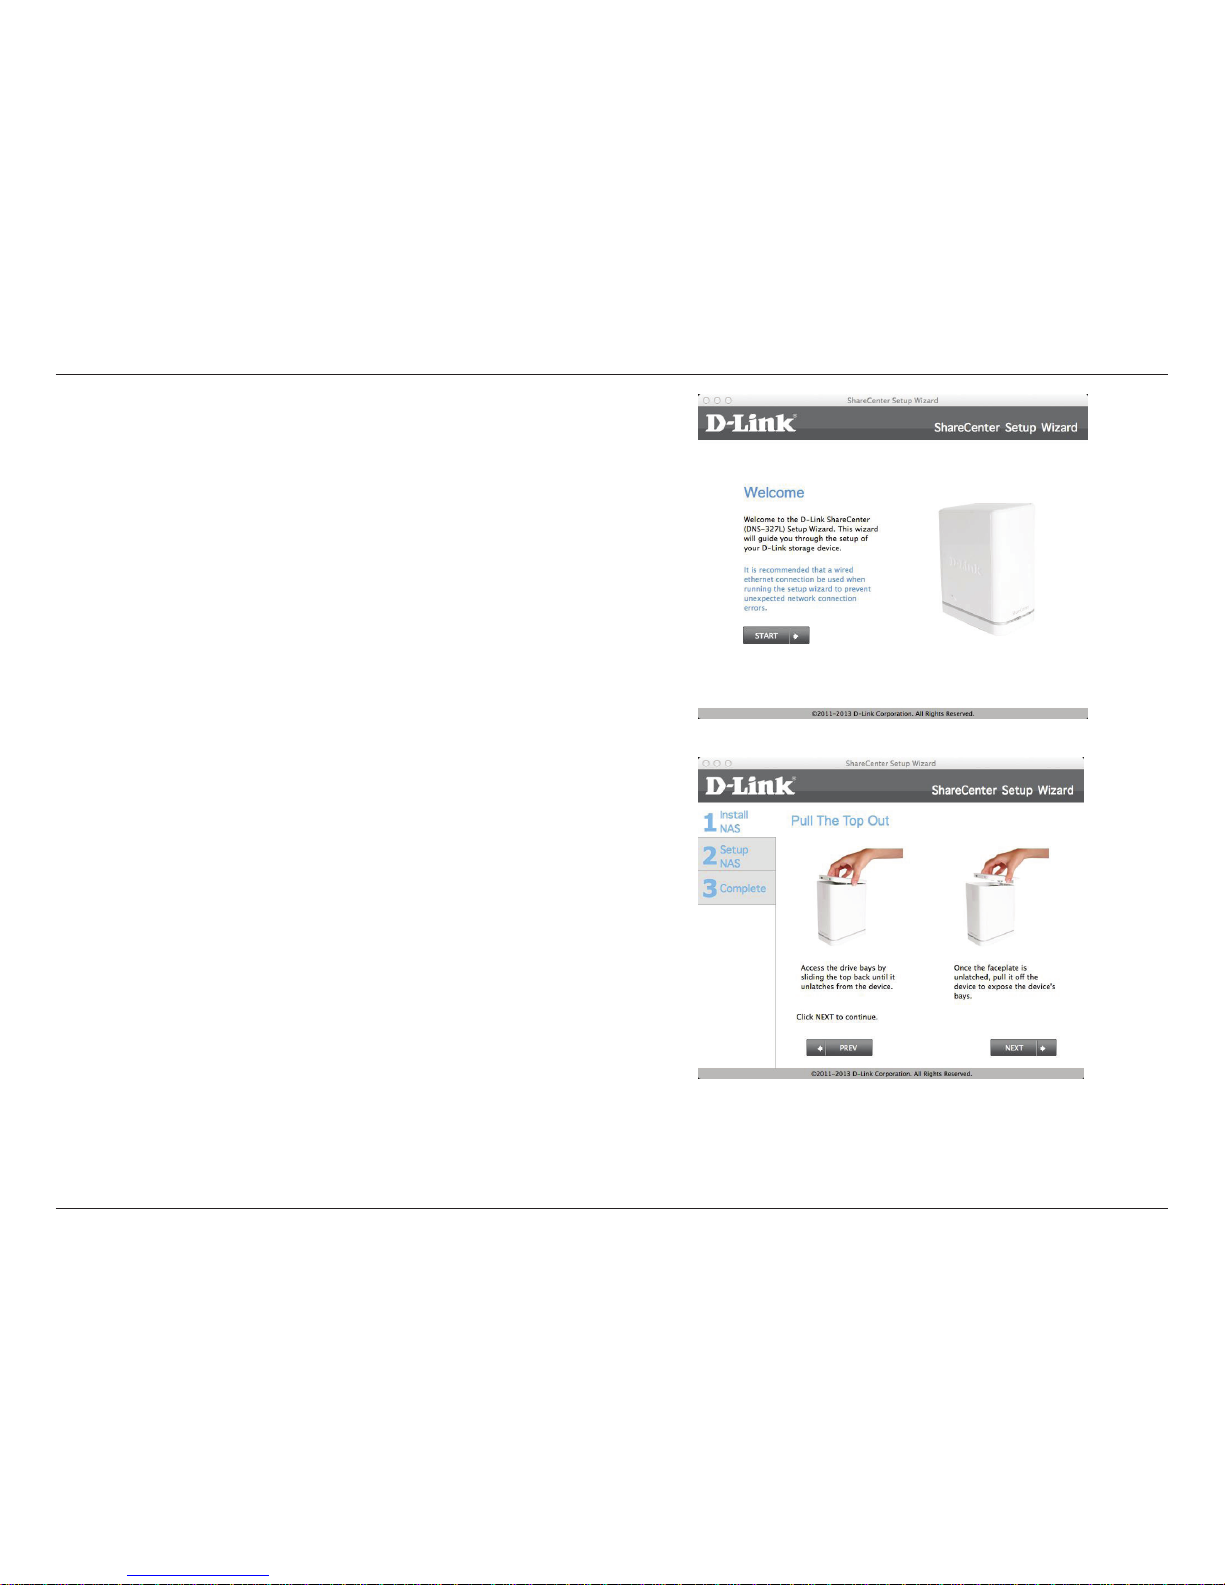
To run the Setup Wizard, insert the ShareCenter™ CD into your CD-ROM drive.
Step 2 - Double-click the SetupWizardDNS icon.
Step 1 - When the autorun screen appears, double-
click the dmg le.
Page 72
67
D-Link ShareCenter DNS-327L User Manual
Section 3 - Installation
Step 3 - Click Start to begin the wizard.
Step 4 - Follow the instructions on the screen (Pull the Top out) and
click Next.
Click Previous if you want to go back and make changes to any parts
of your past conguration options.
Page 73
68
D-Link ShareCenter DNS-327L User Manual
Section 3 - Installation
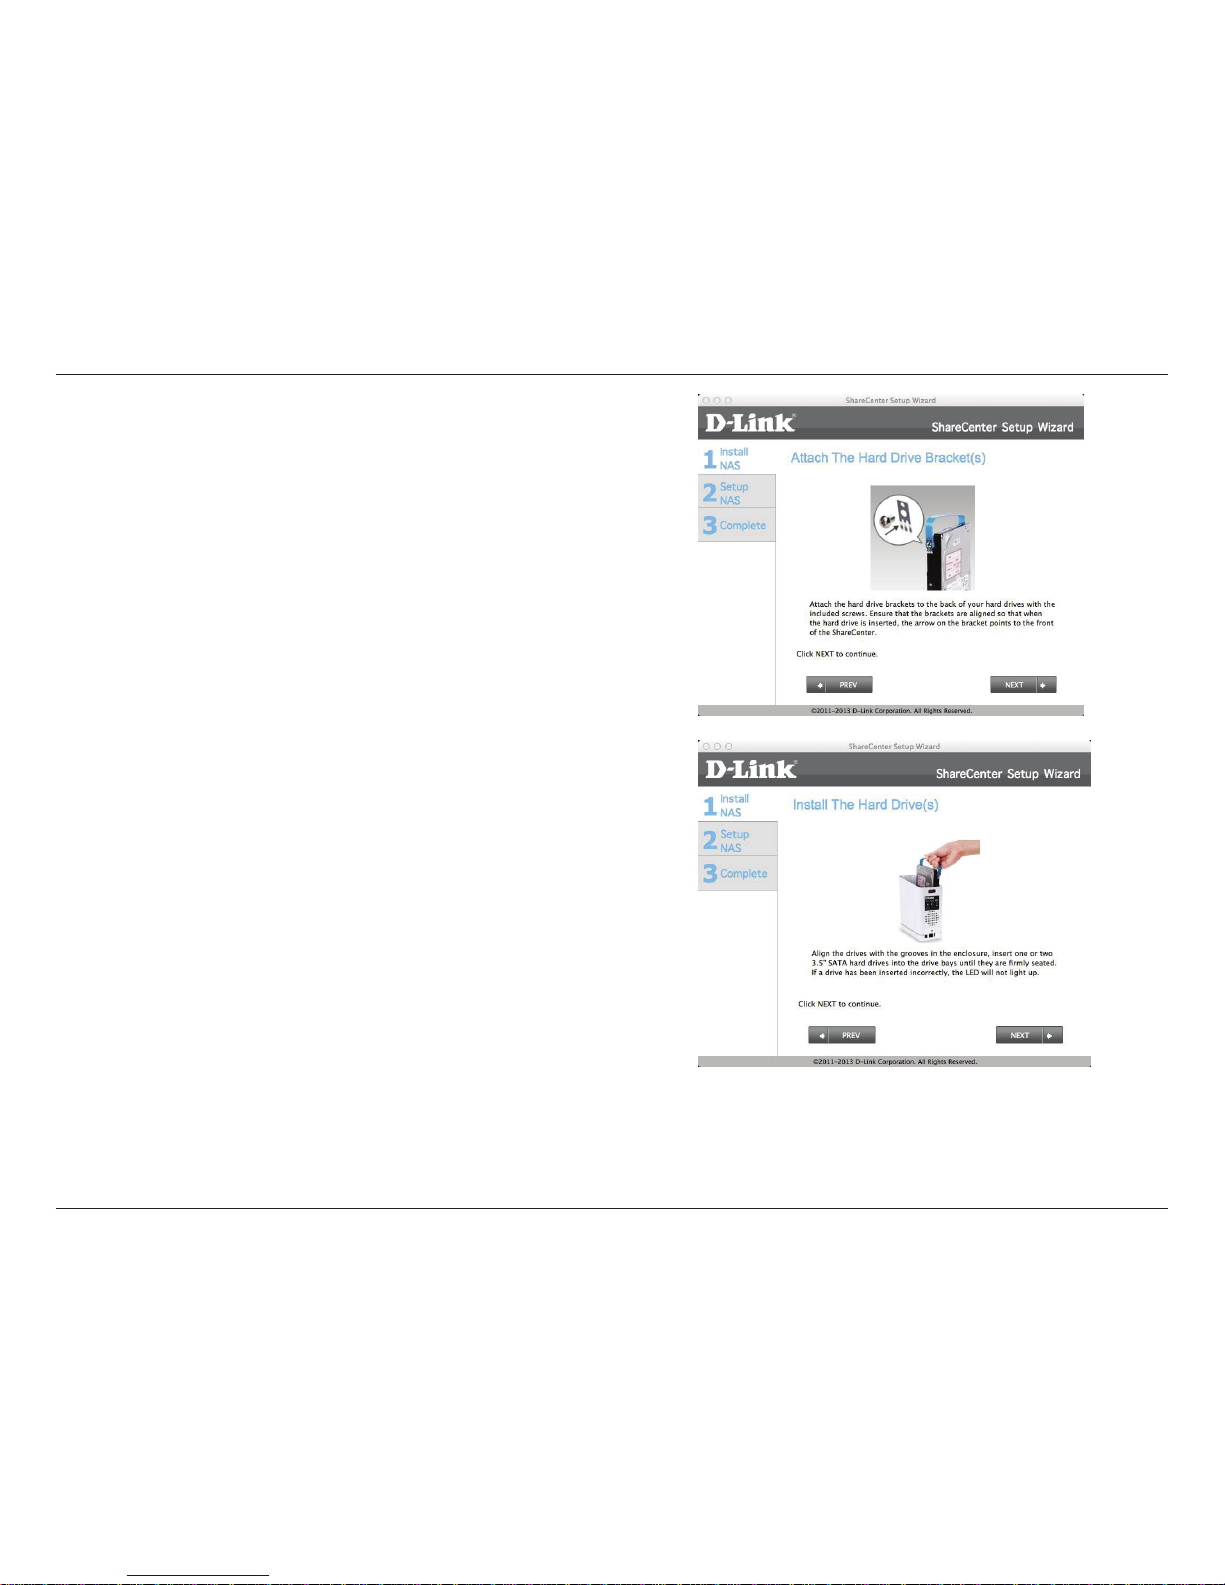
Step 5 - Follow the instructions on the screen (Attach the Hard Drive
Bracket(s) and click Next.
Step 6 - Follow the instructions on the screen (Install the Hard
Drive(s) and click Next.
Page 74
69
D-Link ShareCenter DNS-327L User Manual
Section 3 - Installation
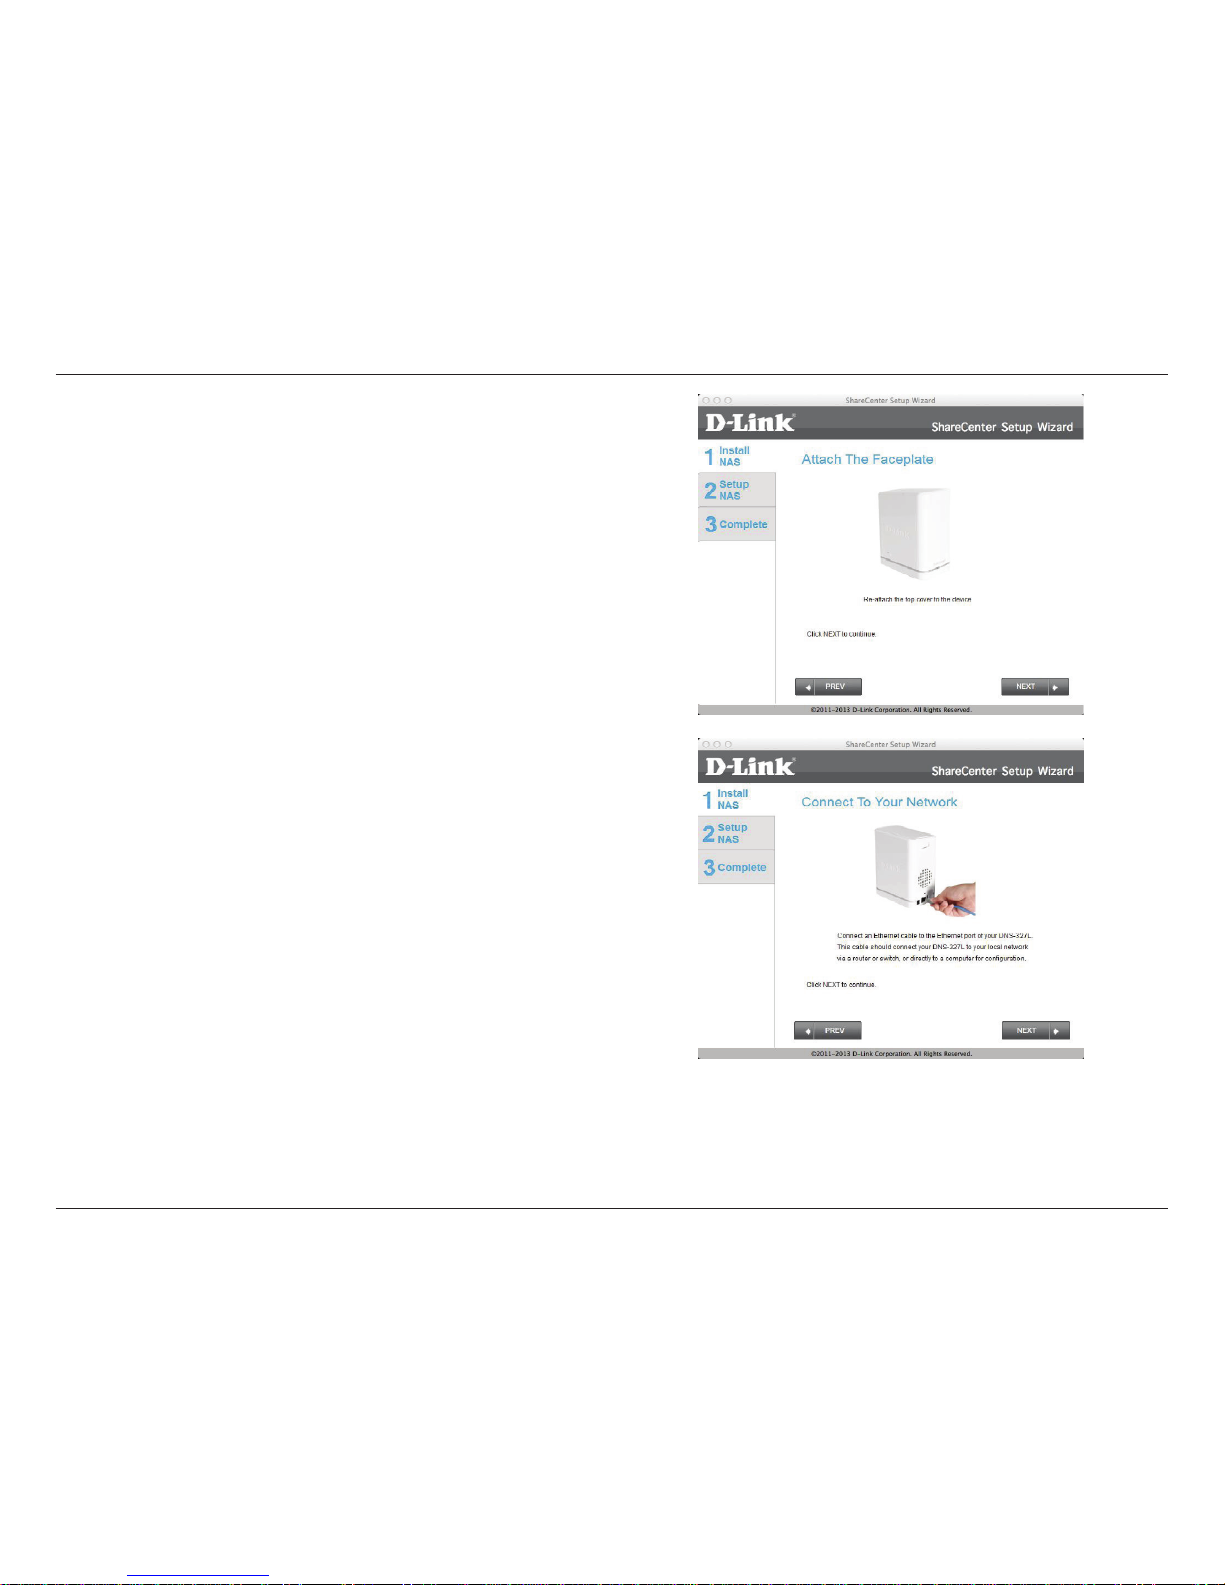
Step 7 - Follow the instructions on the screen (Attach the Faceplate)
and click Next.
Step 8 - Follow the instructions on the screen (Connect to your
Network) and click Next.
Page 75
70
D-Link ShareCenter DNS-327L User Manual
Section 3 - Installation
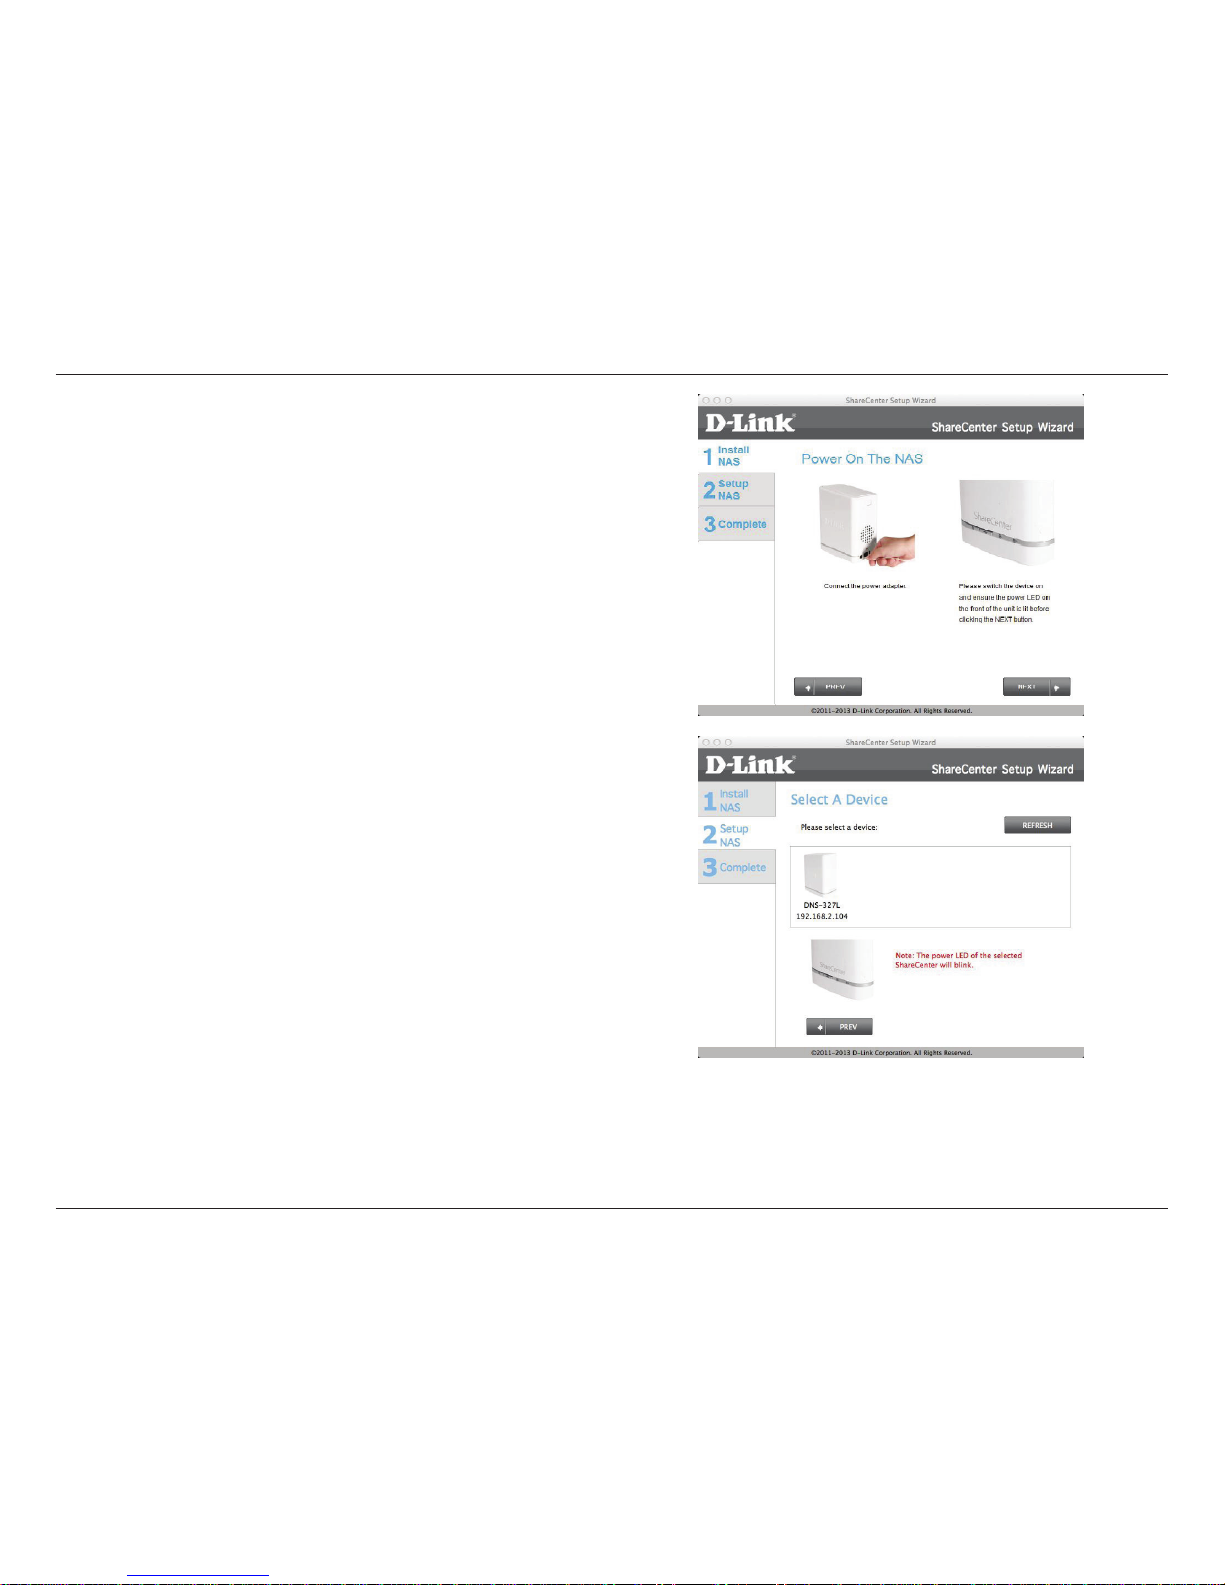
Step 9 - Follow the instructions on the screen (Power on the NAS)
and click Next.
Step 10 - Return to the DNS-327L on your desktop and click the
device if you see it onscreen. Alternatively, if you do not see the
DNS-327L , check the settings as explained previously.
Page 76
71
D-Link ShareCenter DNS-327L User Manual
Section 3 - Installation
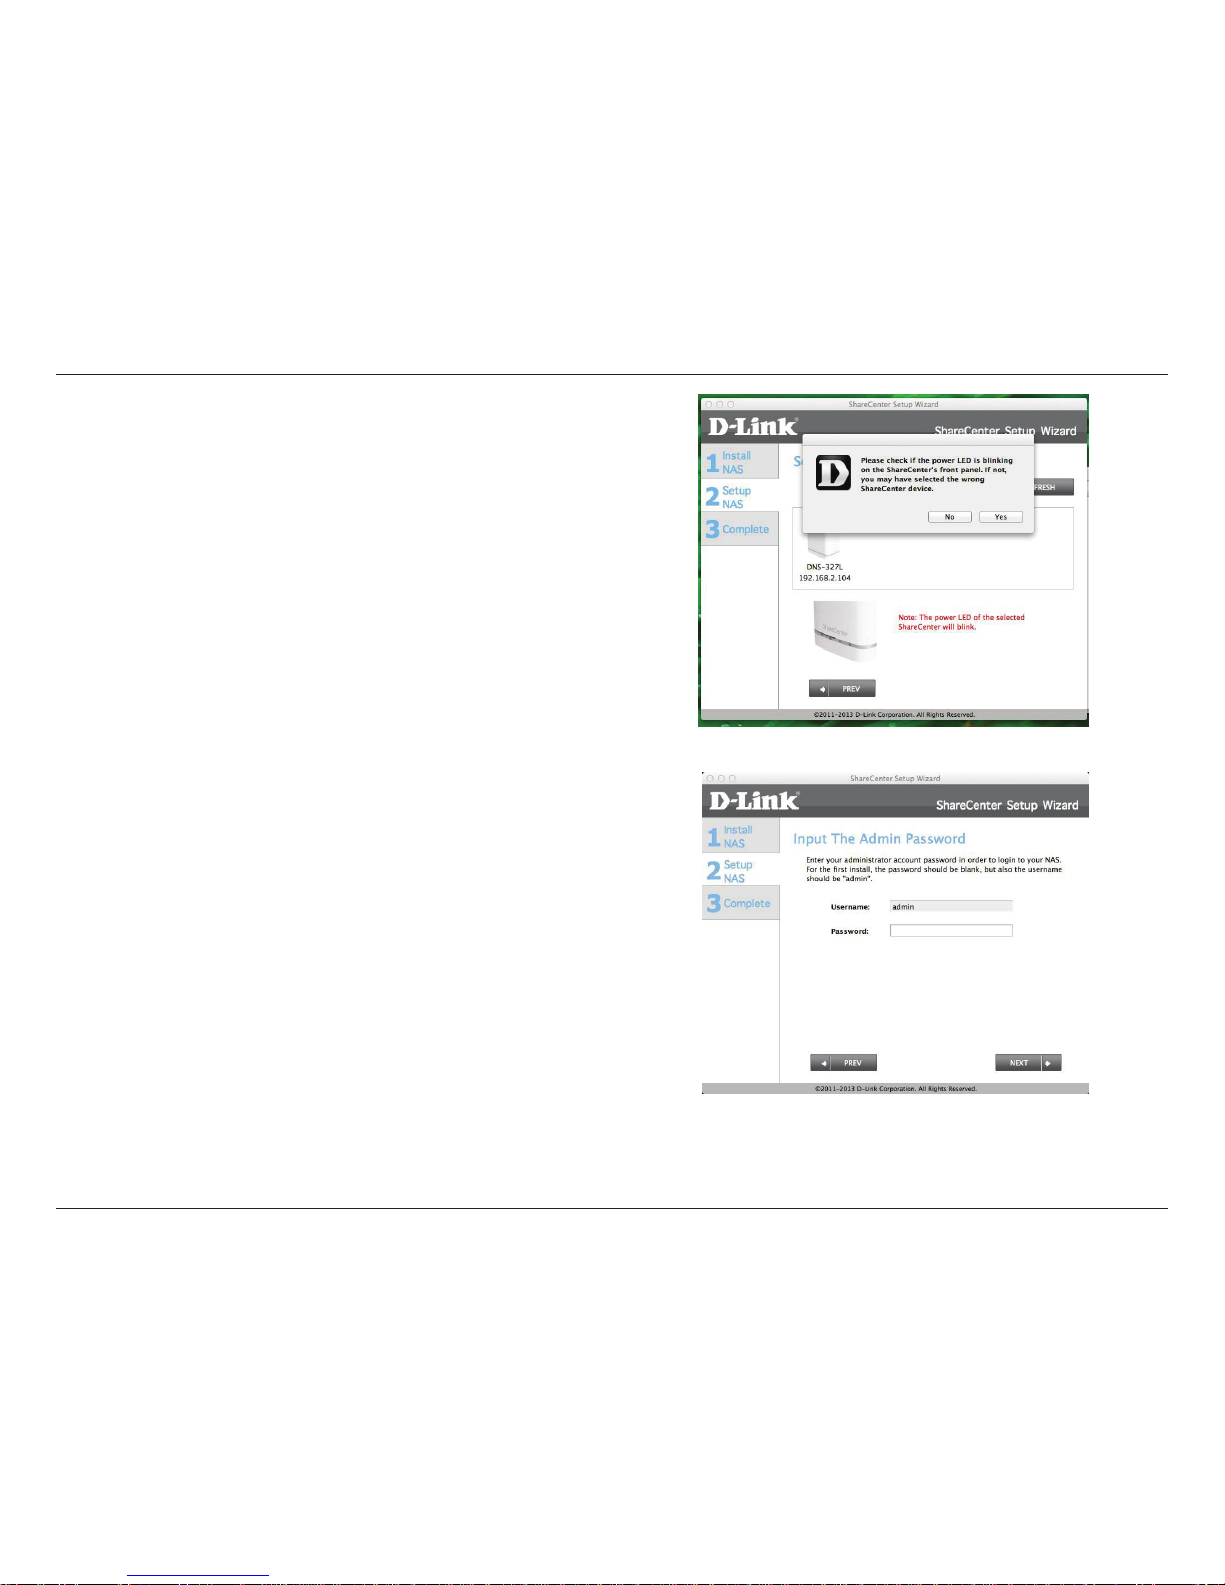
Step 11 - A warning message appears. Read the instructions before
proceeding. If all is working, click Yes. Otherwise click No and check
your set up again.
Step 12 - Enter an admin Password. If you have setup this system
before, use the password you used before. Otherwise leave the
password eld blank. Click Next to continue.
Page 77
72
D-Link ShareCenter DNS-327L User Manual
Section 3 - Installation
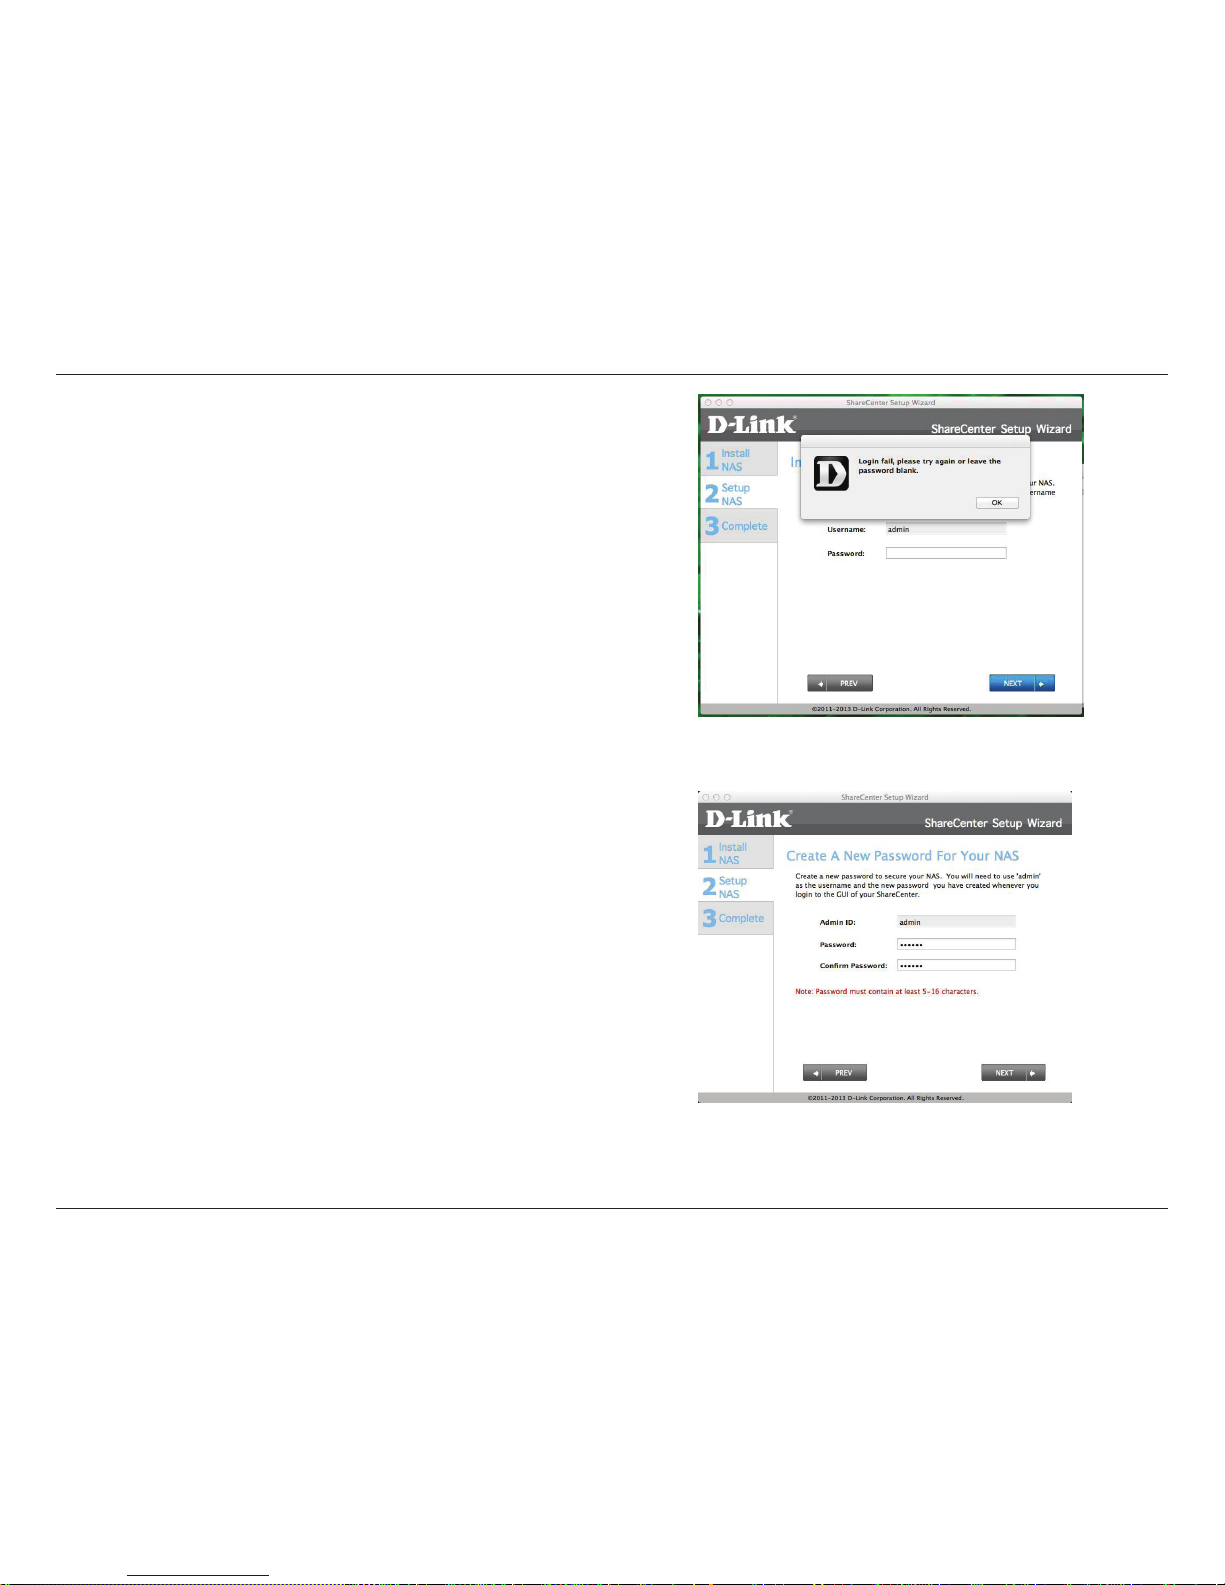
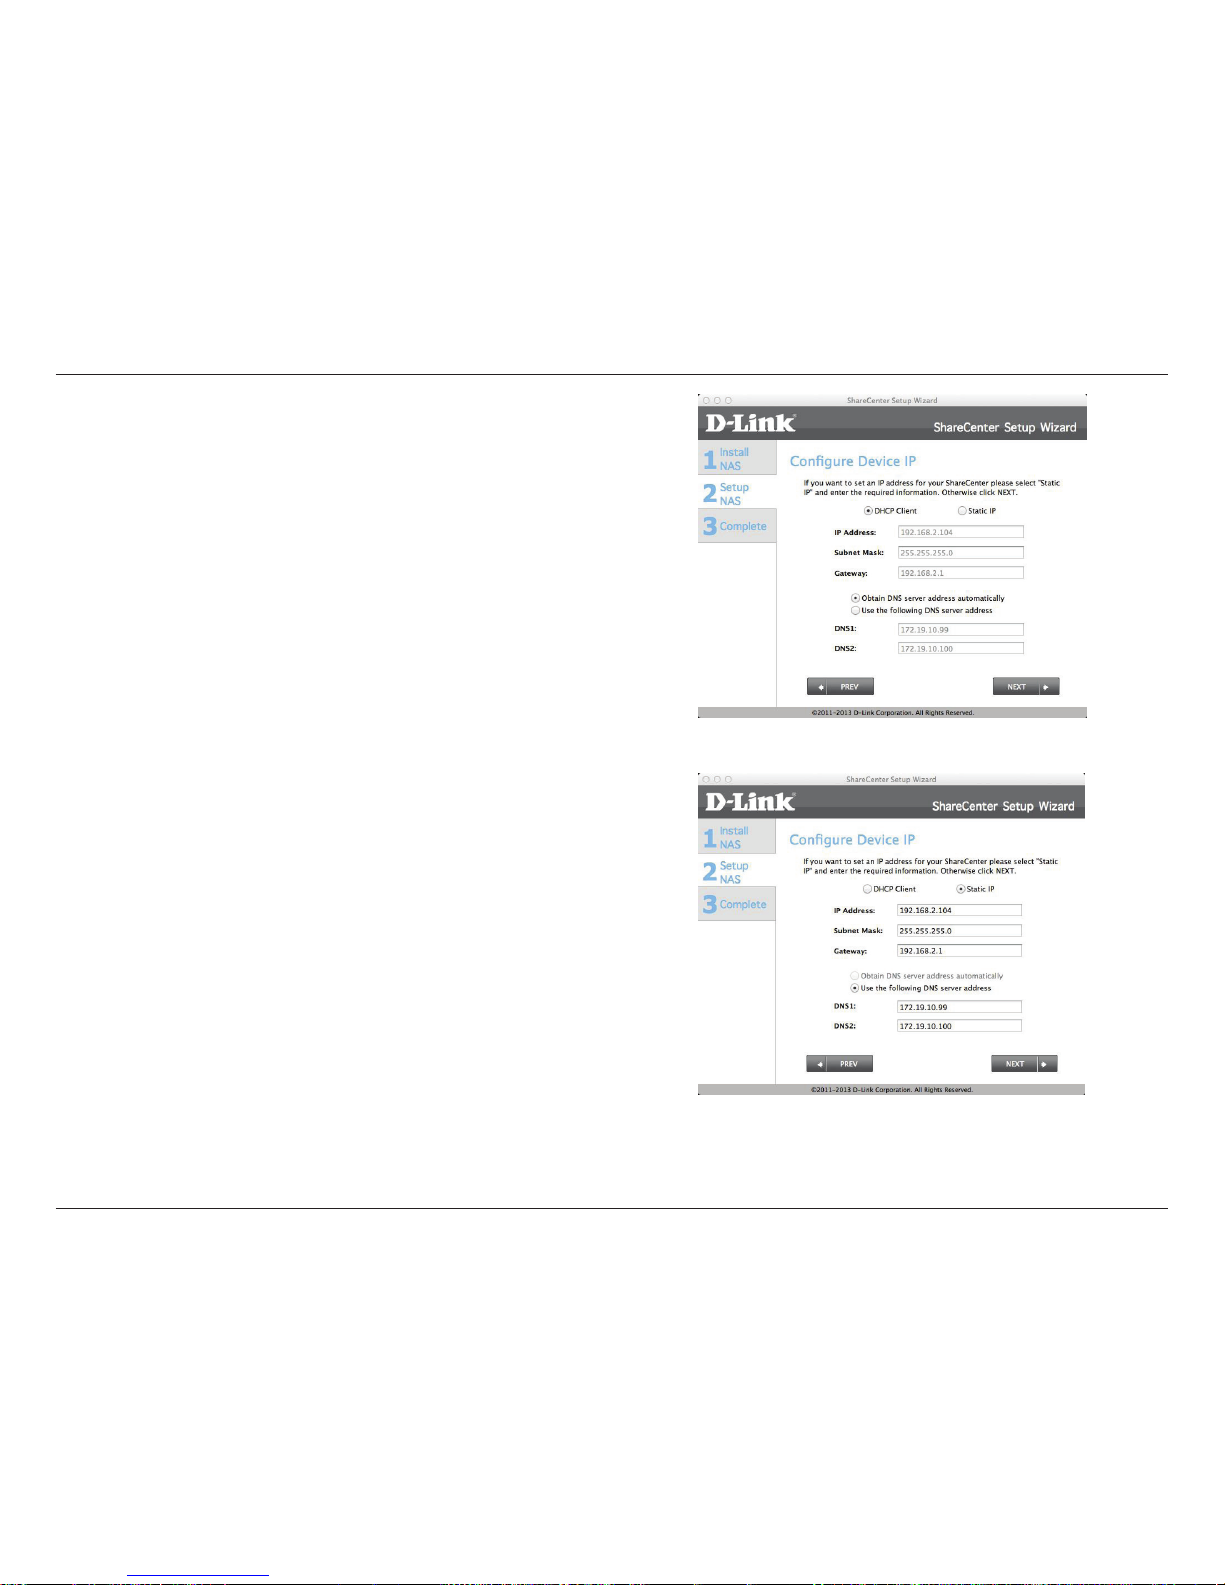
Step 13 - If you have entered a wrong password from a previous
installation, a warning message prompts you to relog-in. Click OK
to continue.
Step 14 - Create a new password and verify that password by lling
in the Conrm Password eld.
Click Next.
Click Previous if you want to go back and make changes to any parts
of your past conguration options.
Page 78
73
D-Link ShareCenter DNS-327L User Manual
Section 3 - Installation
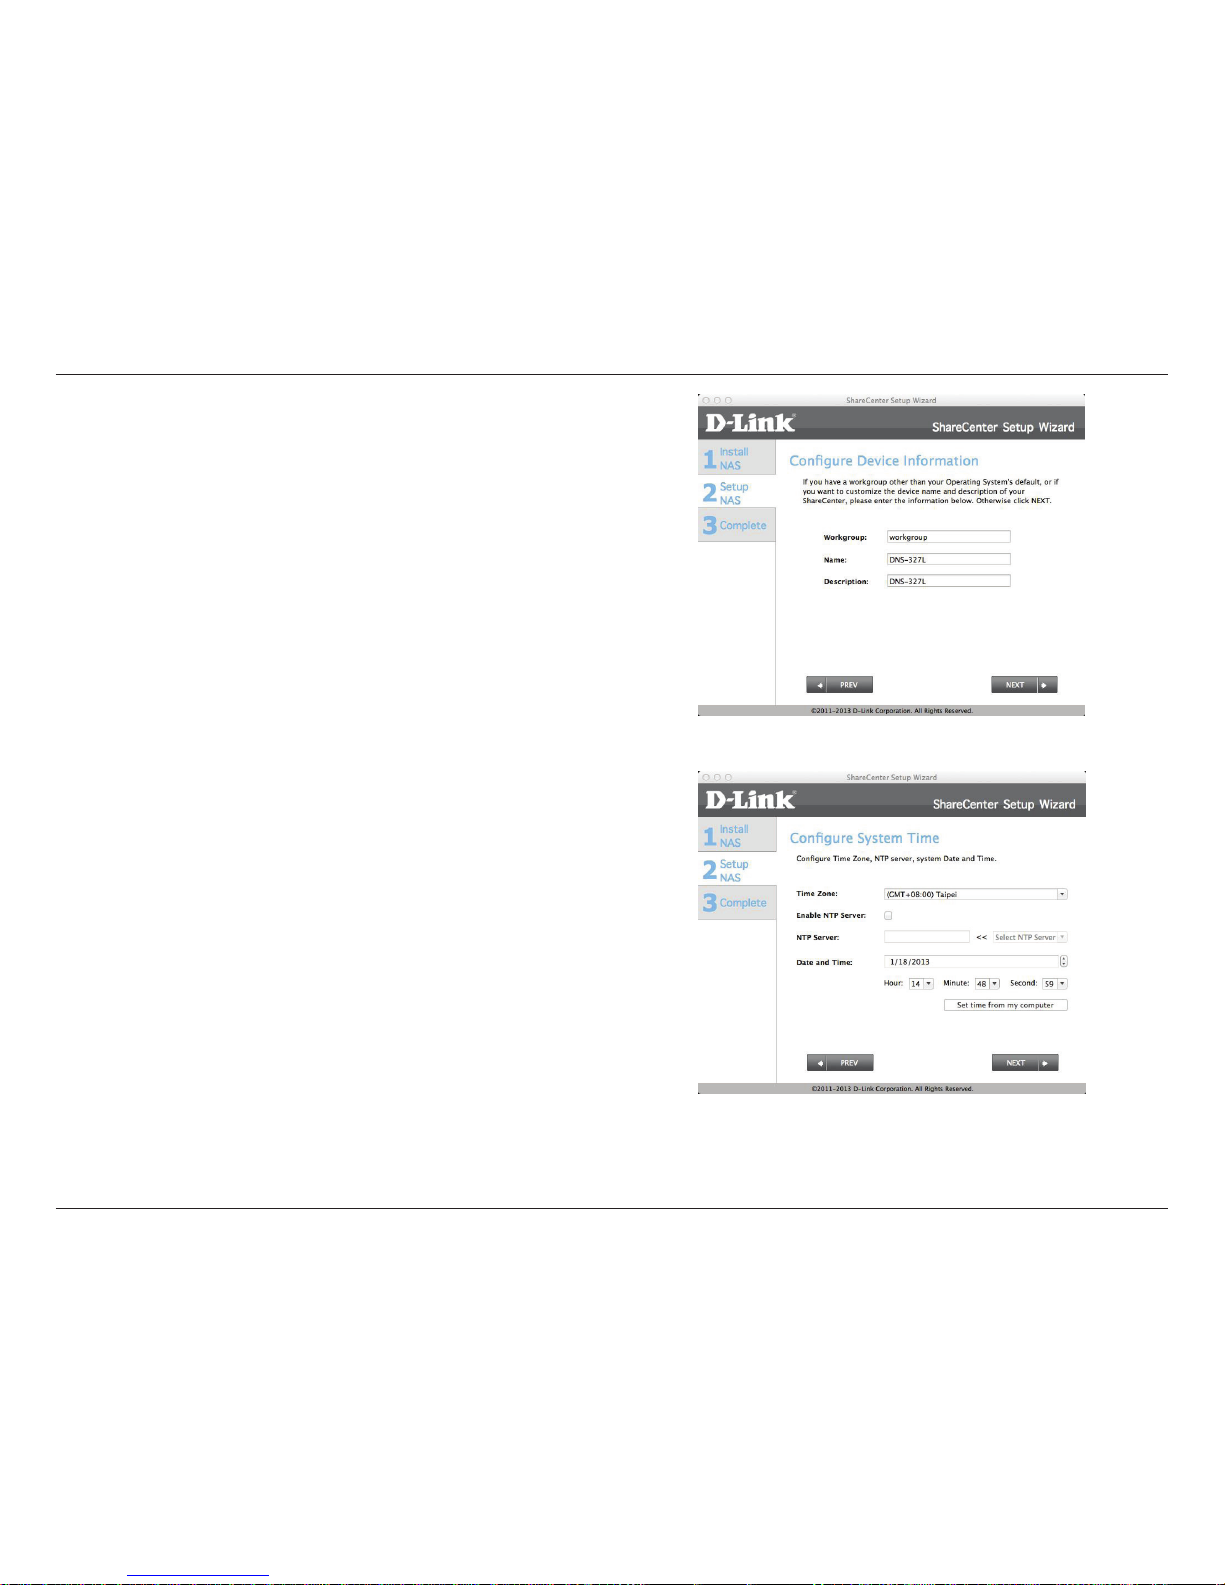
Step 15 - To congure the Device IP, select either DHCP or Static IP.
In this window, we select DHCP (the router automatically congures
the Device IP ) and click Next.
Click Previous if you want to go back and make changes to any parts
of your past conguration options.
Step 16 - To congure the Device IP, select either DHCP or Static
IP. In this window, we select Static IP (you manually congure the
Device IP ) and click Next.
Click Previous if you want to go back and make changes to any parts
of your past conguration options.
Page 79
74
D-Link ShareCenter DNS-327L User Manual
Section 3 - Installation
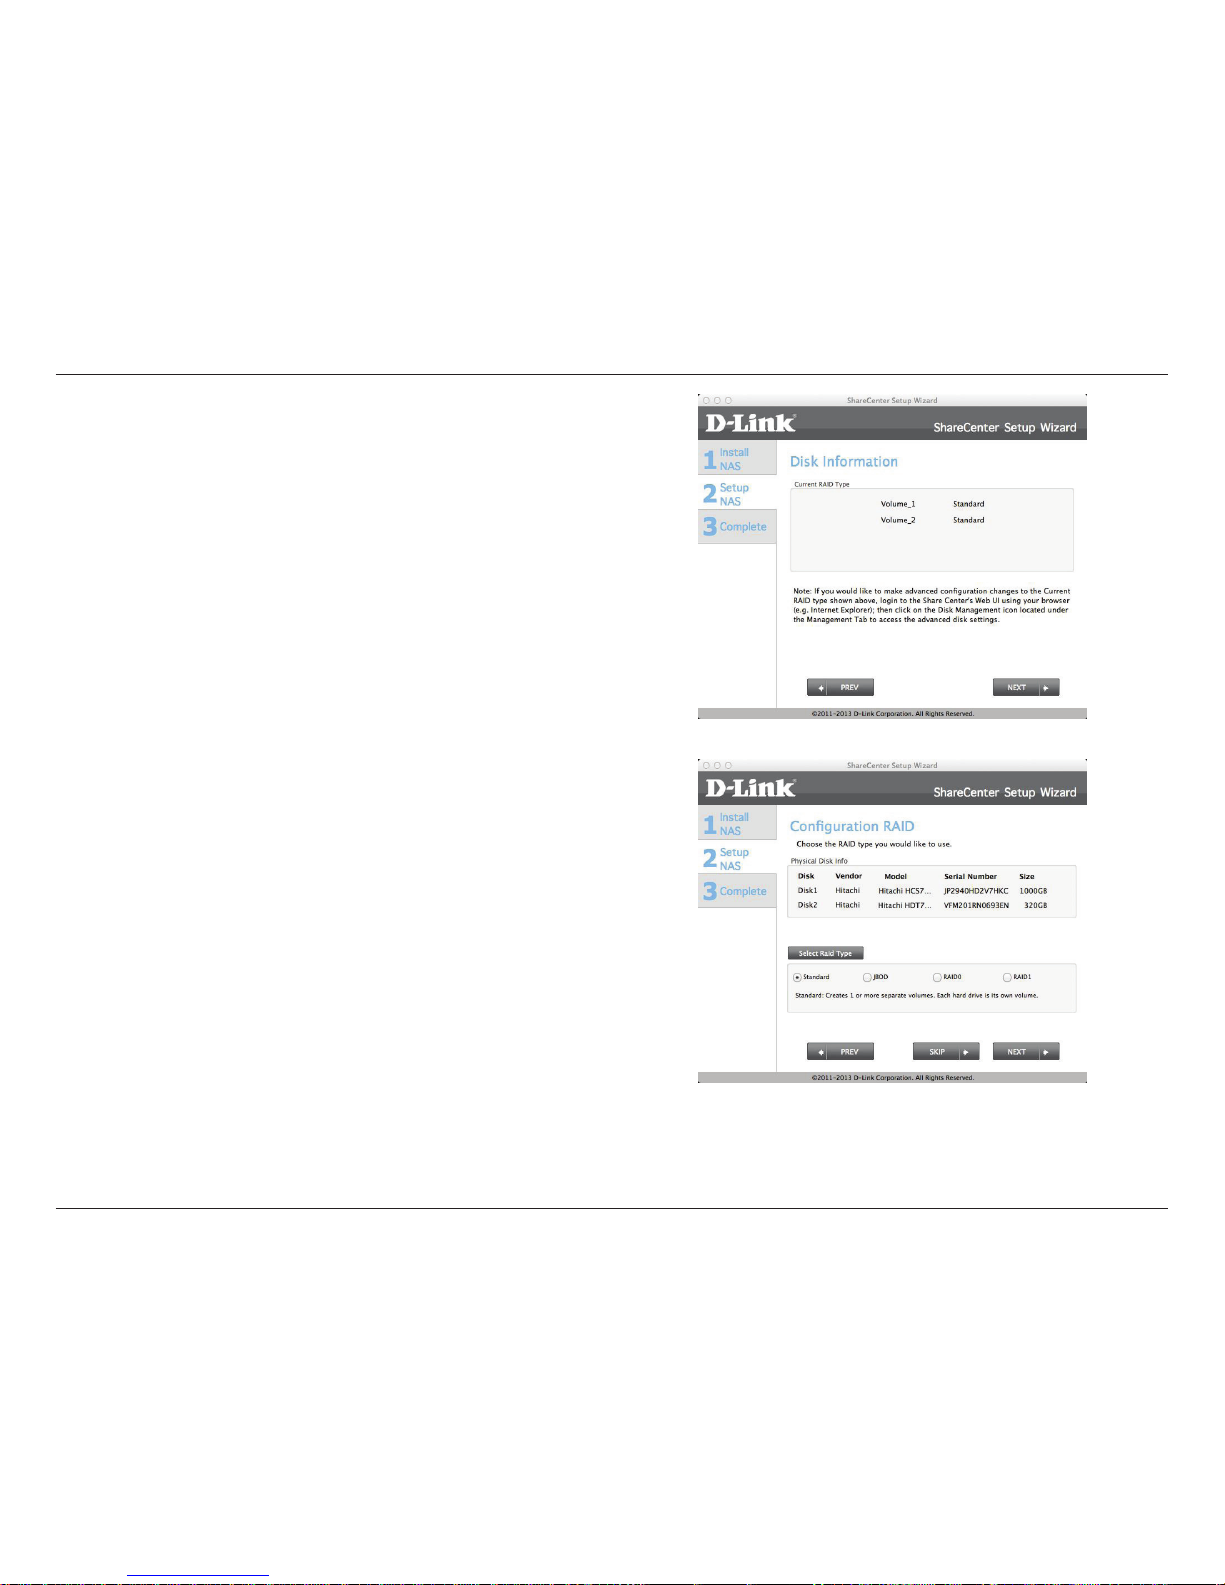
Step 17 - To congure the Device Information, enter the particulars
in the elds provided: Workgroup, Name, and Description.
Click Next.
Click Previous if you want to go back and make changes to any parts
of your past conguration options.
Step 18 - To congure the System Time, select a Time Zone from the
drop-down list. Click Enable NTP Server if you are connected to one.
Select a NTP server from the drop-down list. Enter a Date and Time
manually or click Set time from my computer.
Click Next.
Click Previous if you want to go back and make changes to any parts
of your past conguration options.
Page 80
75
D-Link ShareCenter DNS-327L User Manual
Section 3 - Installation
Step 19 - The Wizard displays the Disk Information.
Click Next.
Click Previous if you want to go back and make changes to any parts
of your past conguration options.
Step 20 - To congure RAID, select one of the RAID Types from the list
(Standard, JBOD, RAID 0, and RAID 1). Selecting each one provides a
brief description of which each RAID format oers. See illustrations
below and check the Knowledge Base at the back of this manual for
more RAID descriptions. Skip this step if you have setup this system
before
Click Next.
Click Previous if you want to go back and make changes to any parts
of your past conguration options.
Page 81
76
D-Link ShareCenter DNS-327L User Manual
Section 3 - Installation
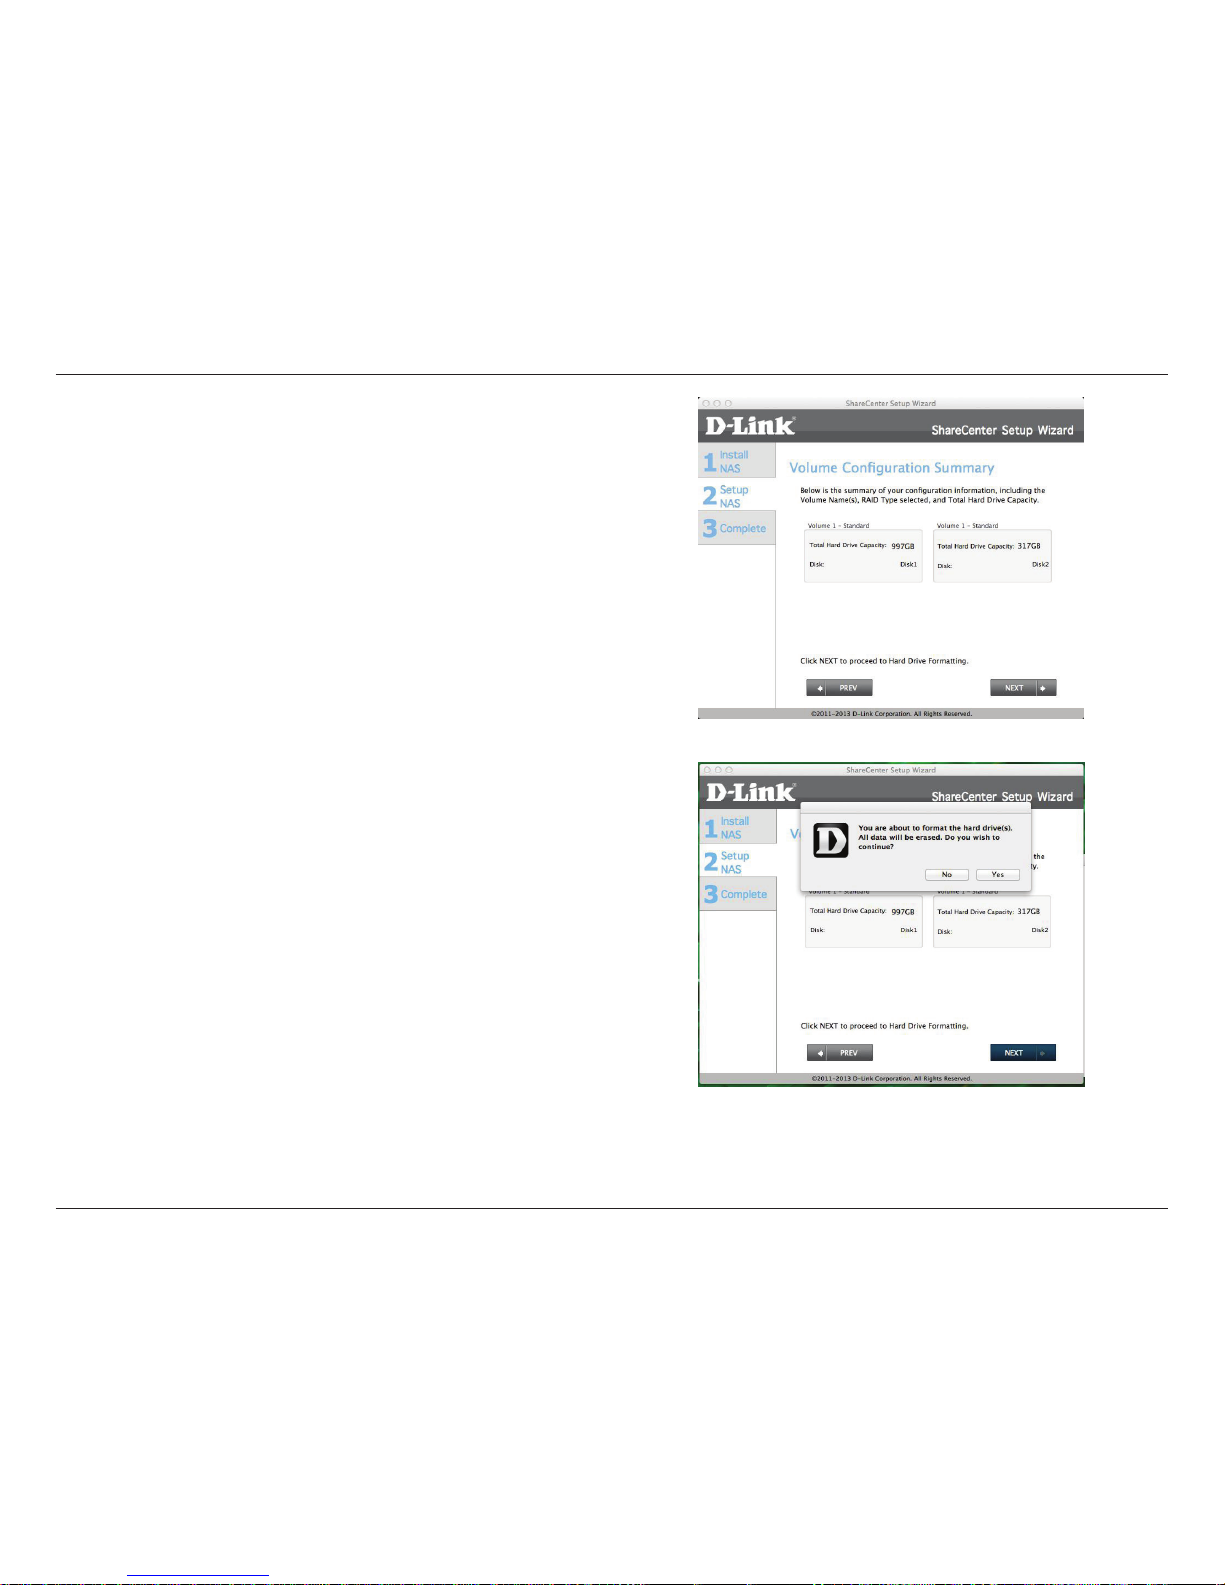
Step 21 - Now that you have set the RAID, a Volume Conguration
Summary shows you details about your settings.
Click Next.
Click Previous if you want to go back and make changes to any parts
of your past conguration options.
Step 22 - Before the RAID conguration is set, a warning message
appears to inform you that all data will be erased.
Click Next.
Click Previous if you want to go back and make changes to any parts
of your past conguration options.
Page 82
77
D-Link ShareCenter DNS-327L User Manual
Section 3 - Installation
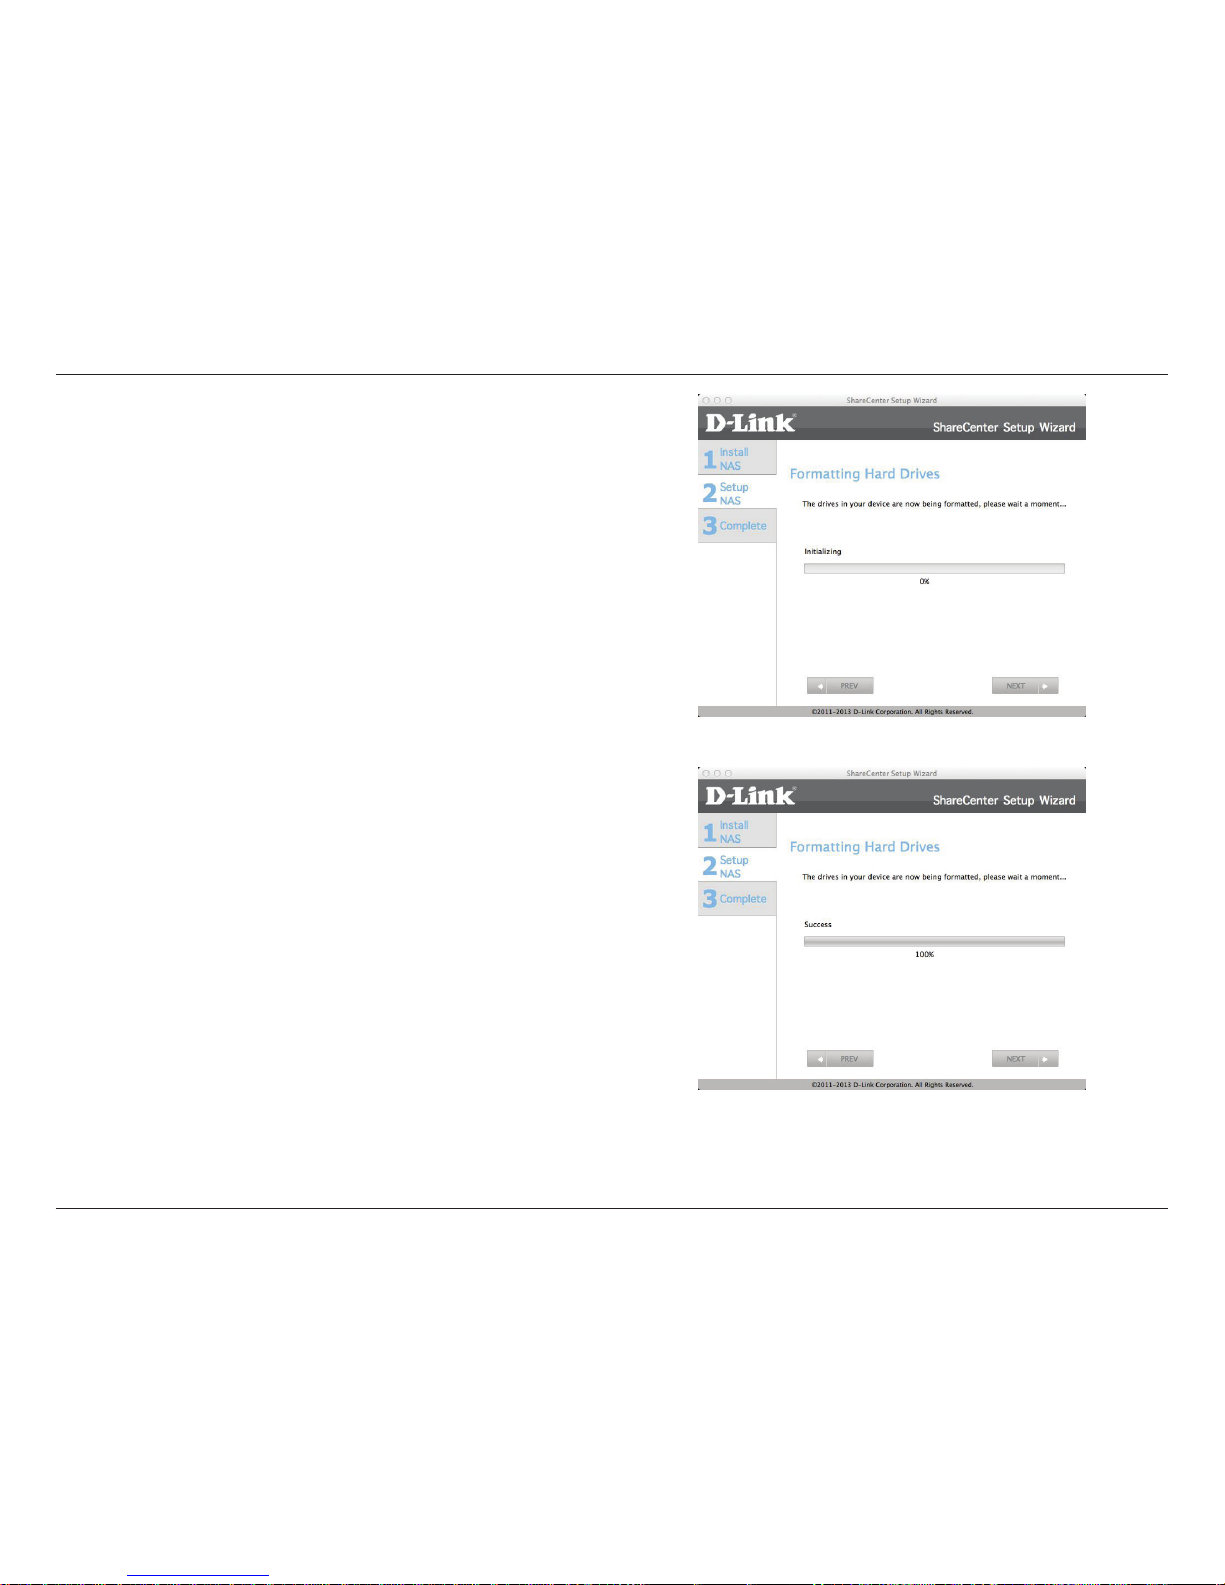
Step 23 - The format begins.
Click Next.
Click Previous if you want to go back and make changes to any parts
of your past conguration options.
Step 24 - The formated process is successful.
Click Next.
Click Previous if you want to go back and make changes to any parts
of your past conguration options.
Page 83
78
D-Link ShareCenter DNS-327L User Manual
Section 3 - Installation
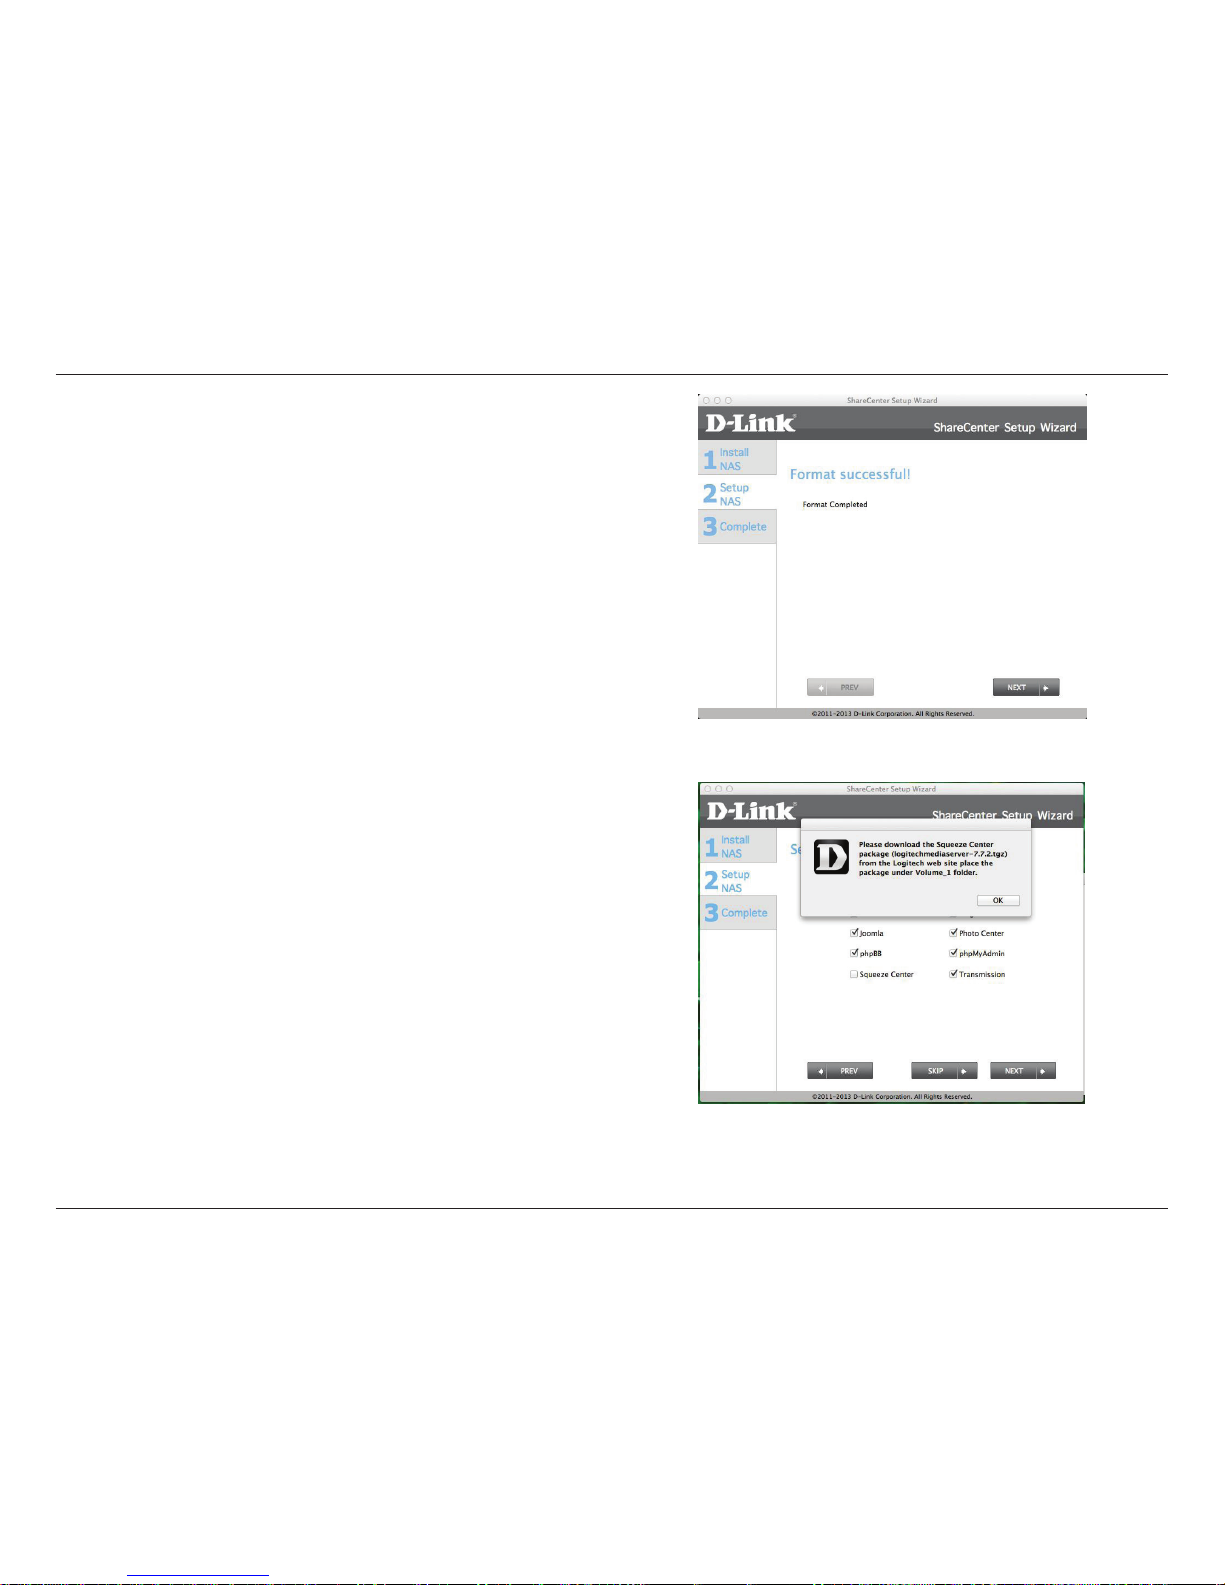
Step 25 - The format is complete.
Click Next.
Click Previous if you want to go back and make changes to any parts
of your past conguration options.
Step 26 - To install the Add-ons, select the Add-ons. you wish to
install. The Squeeze Center is the only Add-on that is not checked
by default. When you click this. download details are provided.
Click OK.
Page 84
79
D-Link ShareCenter DNS-327L User Manual
Section 3 - Installation
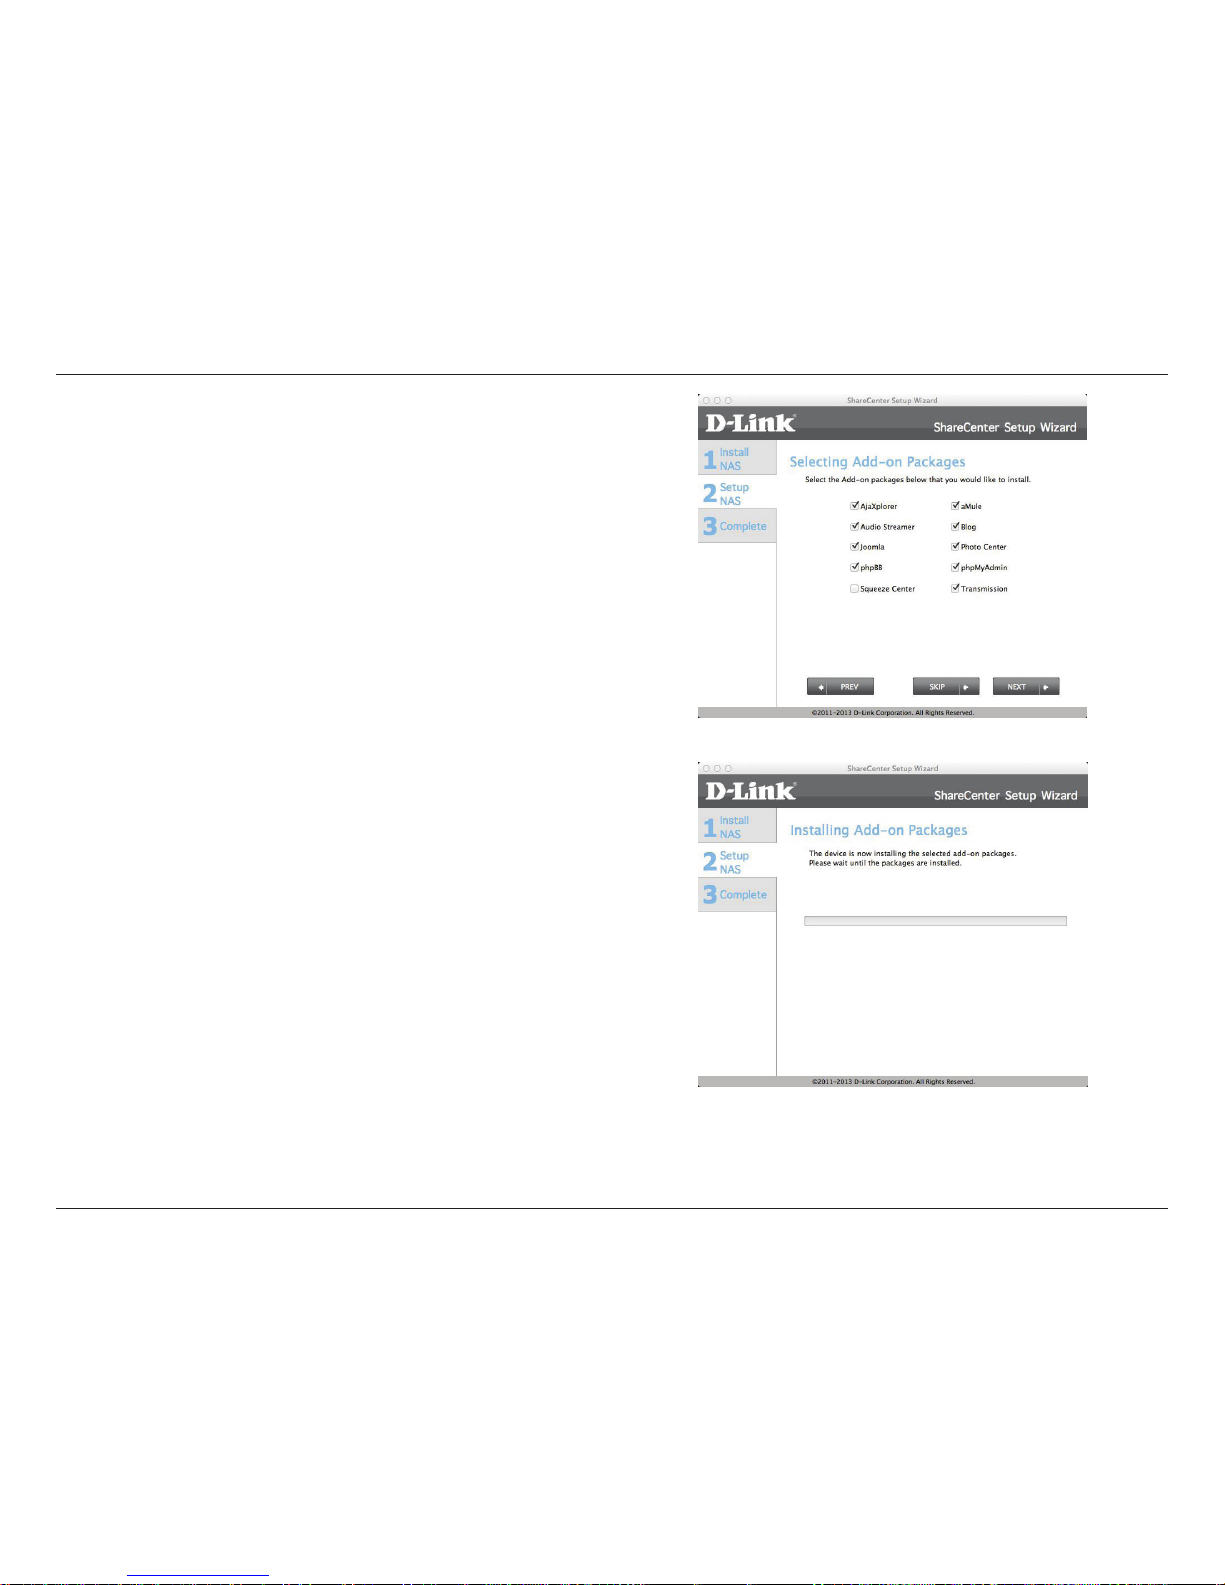
Step 27- Alternatively, install the default Add-ons.
Click Next.
Click Previous if you want to go back and make changes to any parts
of your past conguration options.
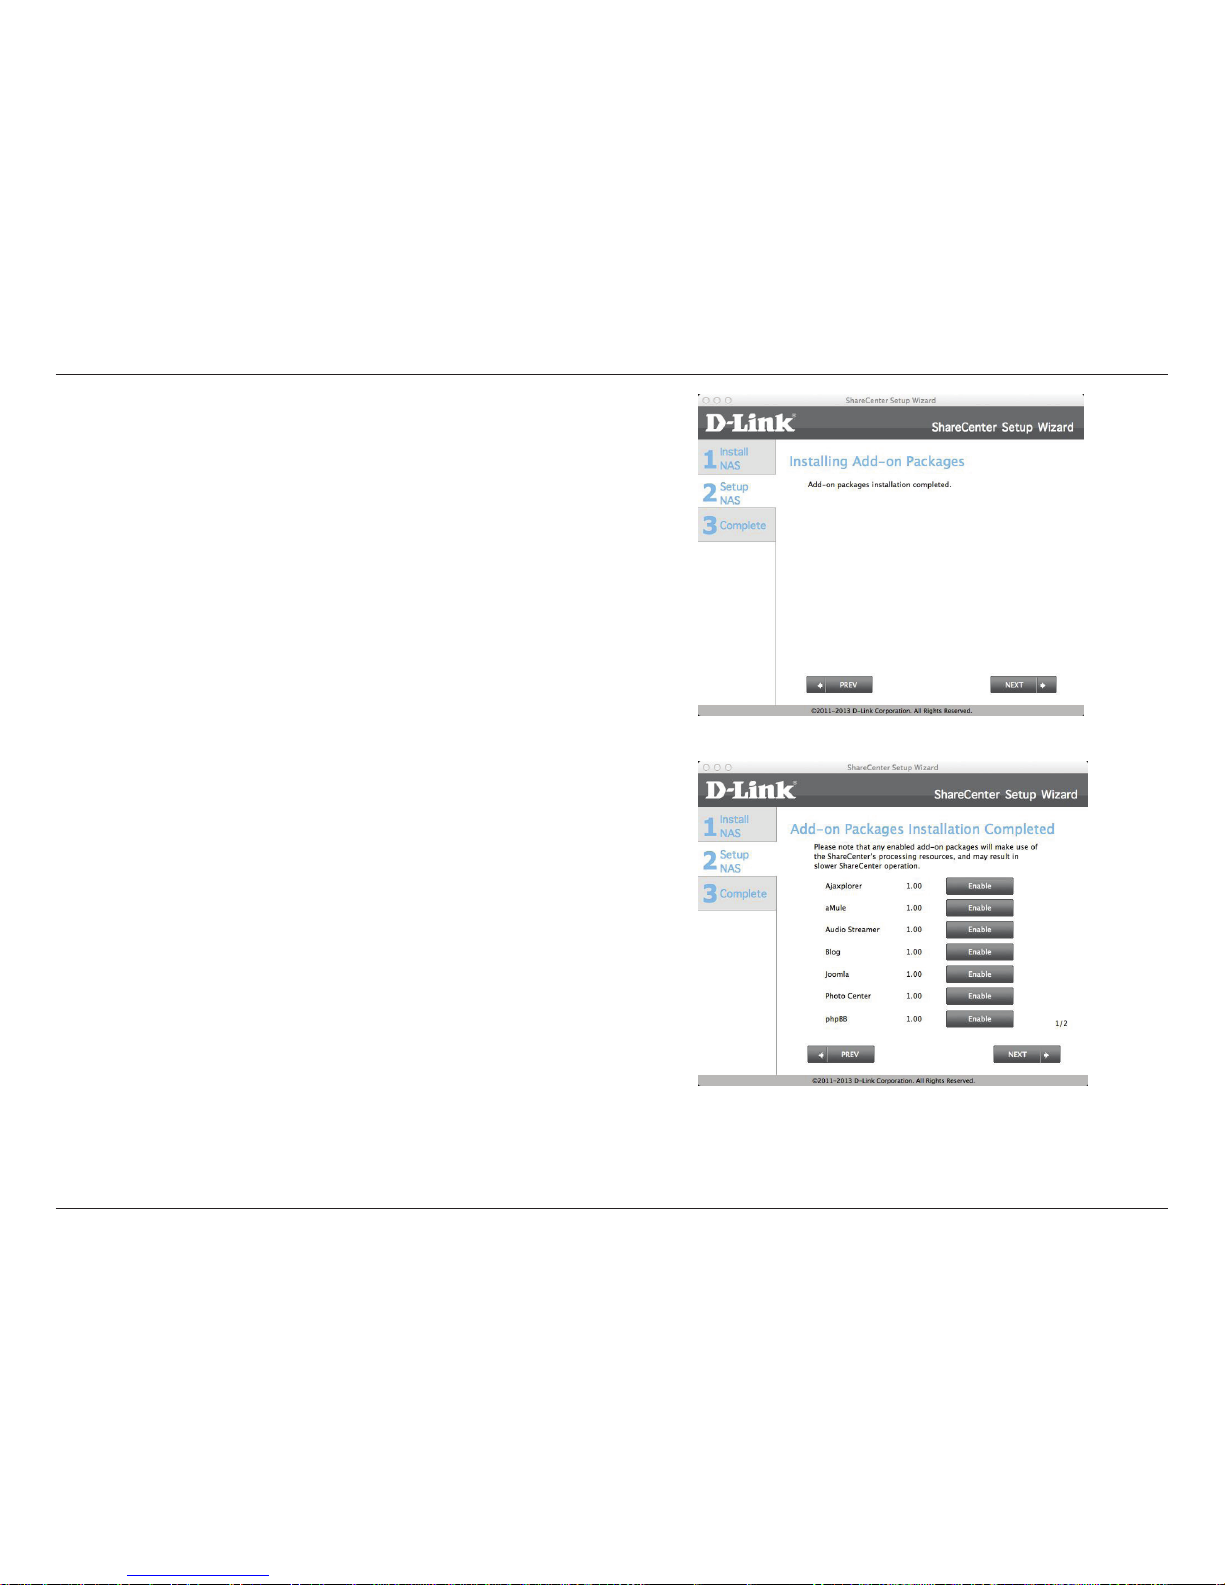
Step 28 - The Add-on packages are installed.
Click Next.
Click Previous if you want to go back and make changes to any parts
of your past conguration options.
Page 85
80
D-Link ShareCenter DNS-327L User Manual
Section 3 - Installation
Step 29 - Add-ons complete.
Click Next.
Click Previous if you want to go back and make changes to any parts
of your past conguration options.
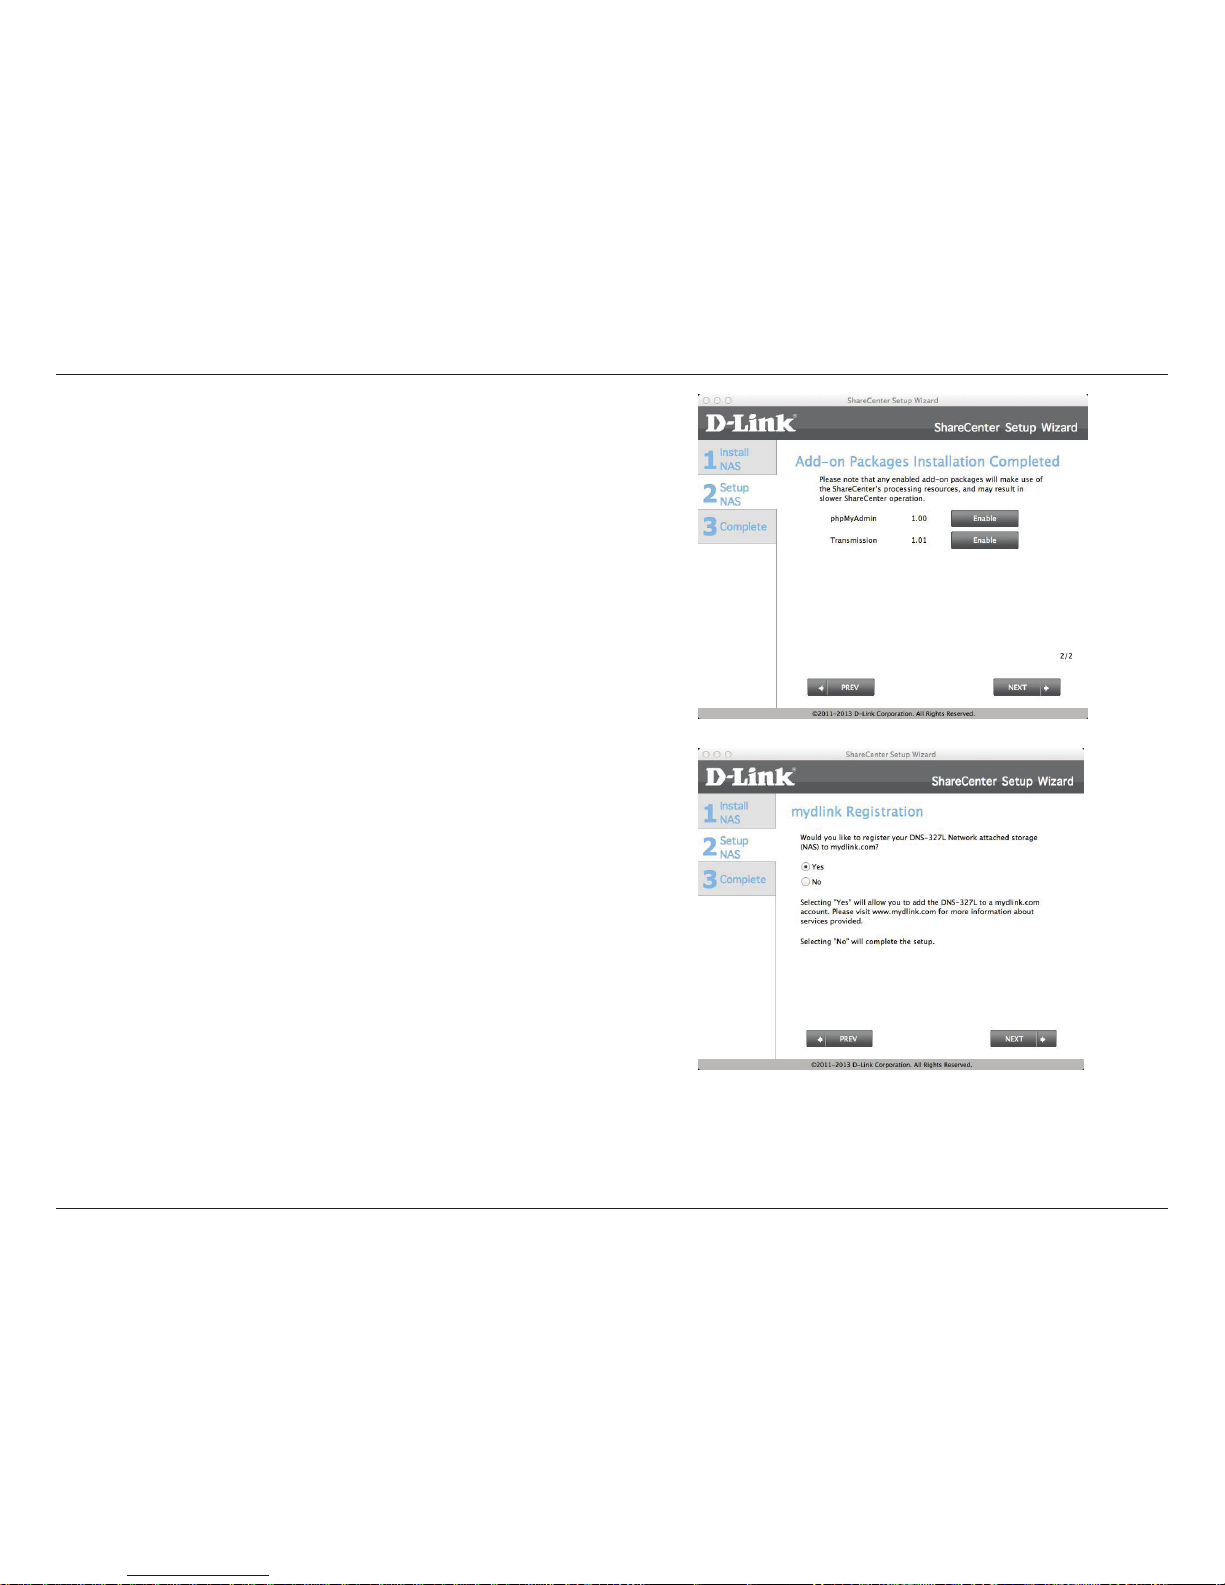
Step 30 - This screen displays all the packages installed but it
doesn’t enable all the packages by default. Depending on how many
packages you initially installed, there are two package screens.
Click Next to view the next screen.
Click Previous if you want to go back and make changes to any parts
of your past conguration options.
Page 86
81
D-Link ShareCenter DNS-327L User Manual
Section 3 - Installation
Step 31 - The second screen.
Click Next to view the next screen.
Click Previous if you want to go back and make changes to any parts
of your past conguration options.
Step 32 - Setup the mydlink administration.
Click Next to view the next screen.
Click Previous if you want to go back and make changes to any parts
of your past conguration options.
Page 87
82
D-Link ShareCenter DNS-327L User Manual
Section 3 - Installation
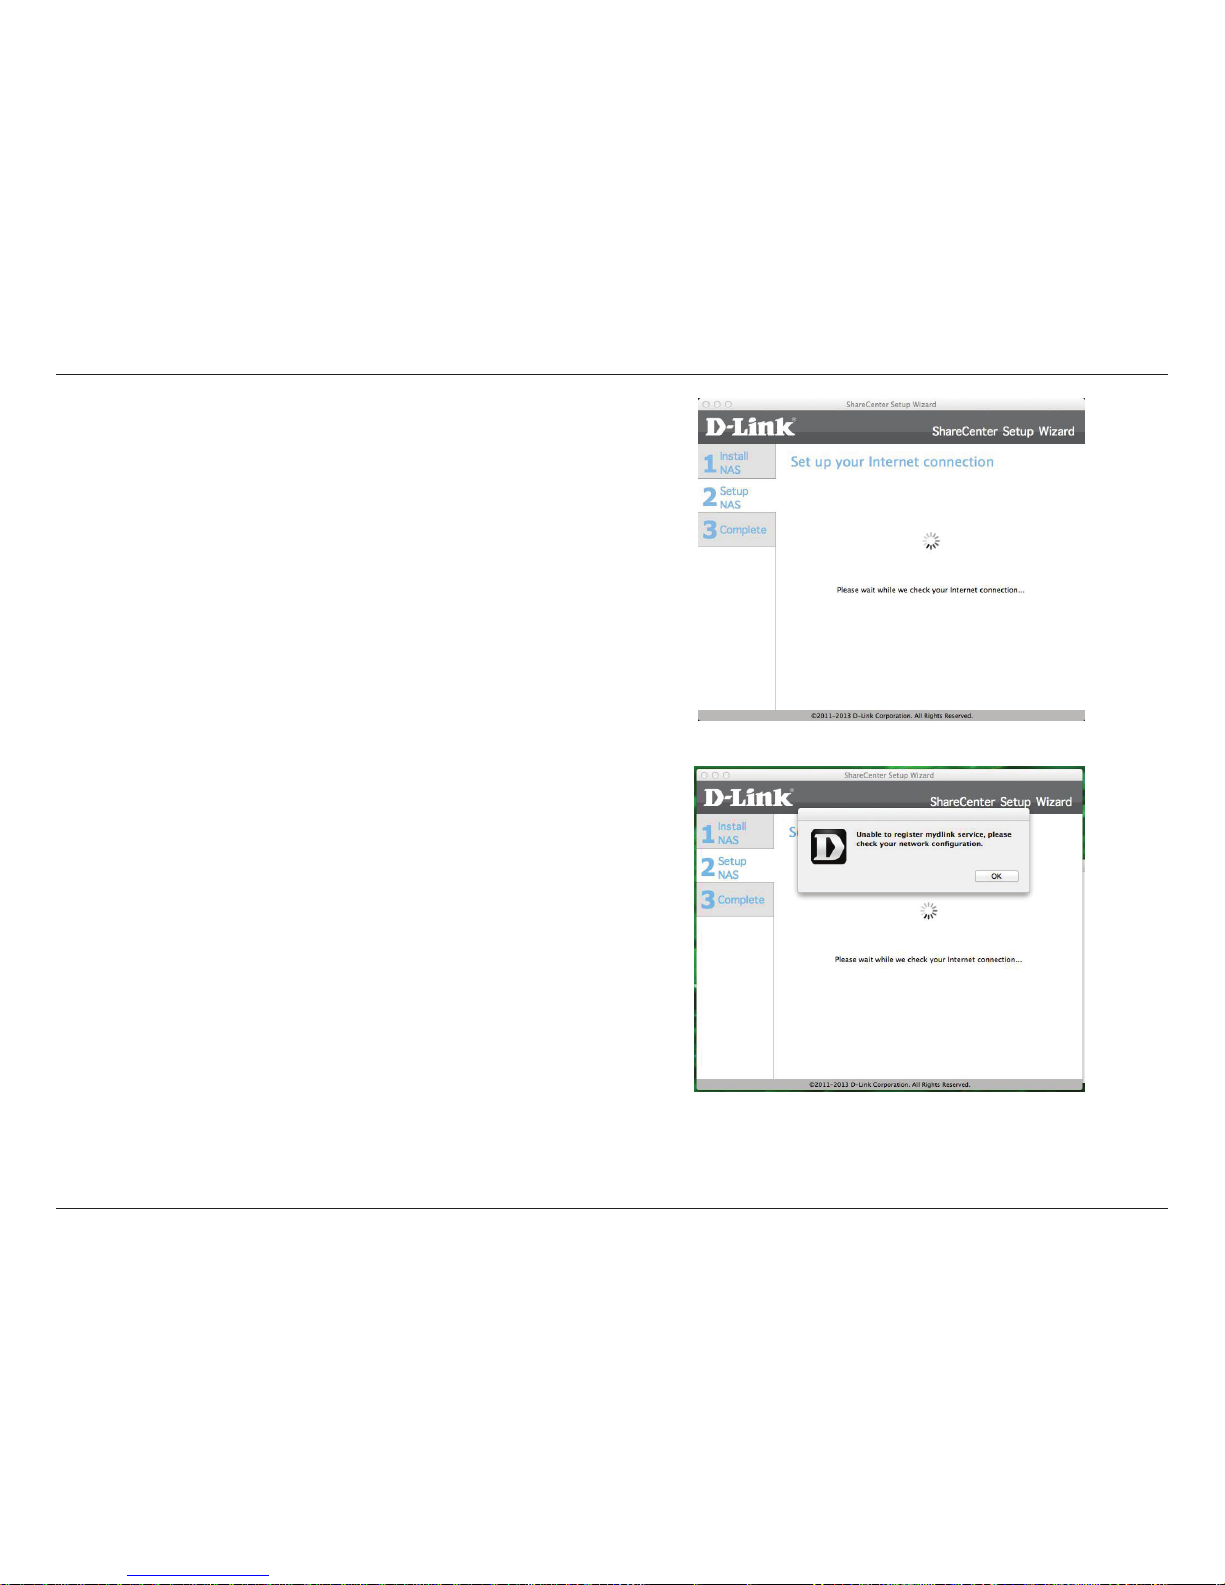
Step 33 - The NAS starts to link to the internet and register mydlink.
Click Next to view the next screen.
Click Previous if you want to go back and make changes to any parts
of your past conguration options.
Step 34- If you are unable to connect to the mydlink registration
site, a warning message noties you of an unsuccessful connection.
Click OK to continue. Check your connection settings or your NAS
settings.
Click Previous if you want to go back and make changes to any parts
of your past conguration options.
Page 88
83
D-Link ShareCenter DNS-327L User Manual
Section 3 - Installation
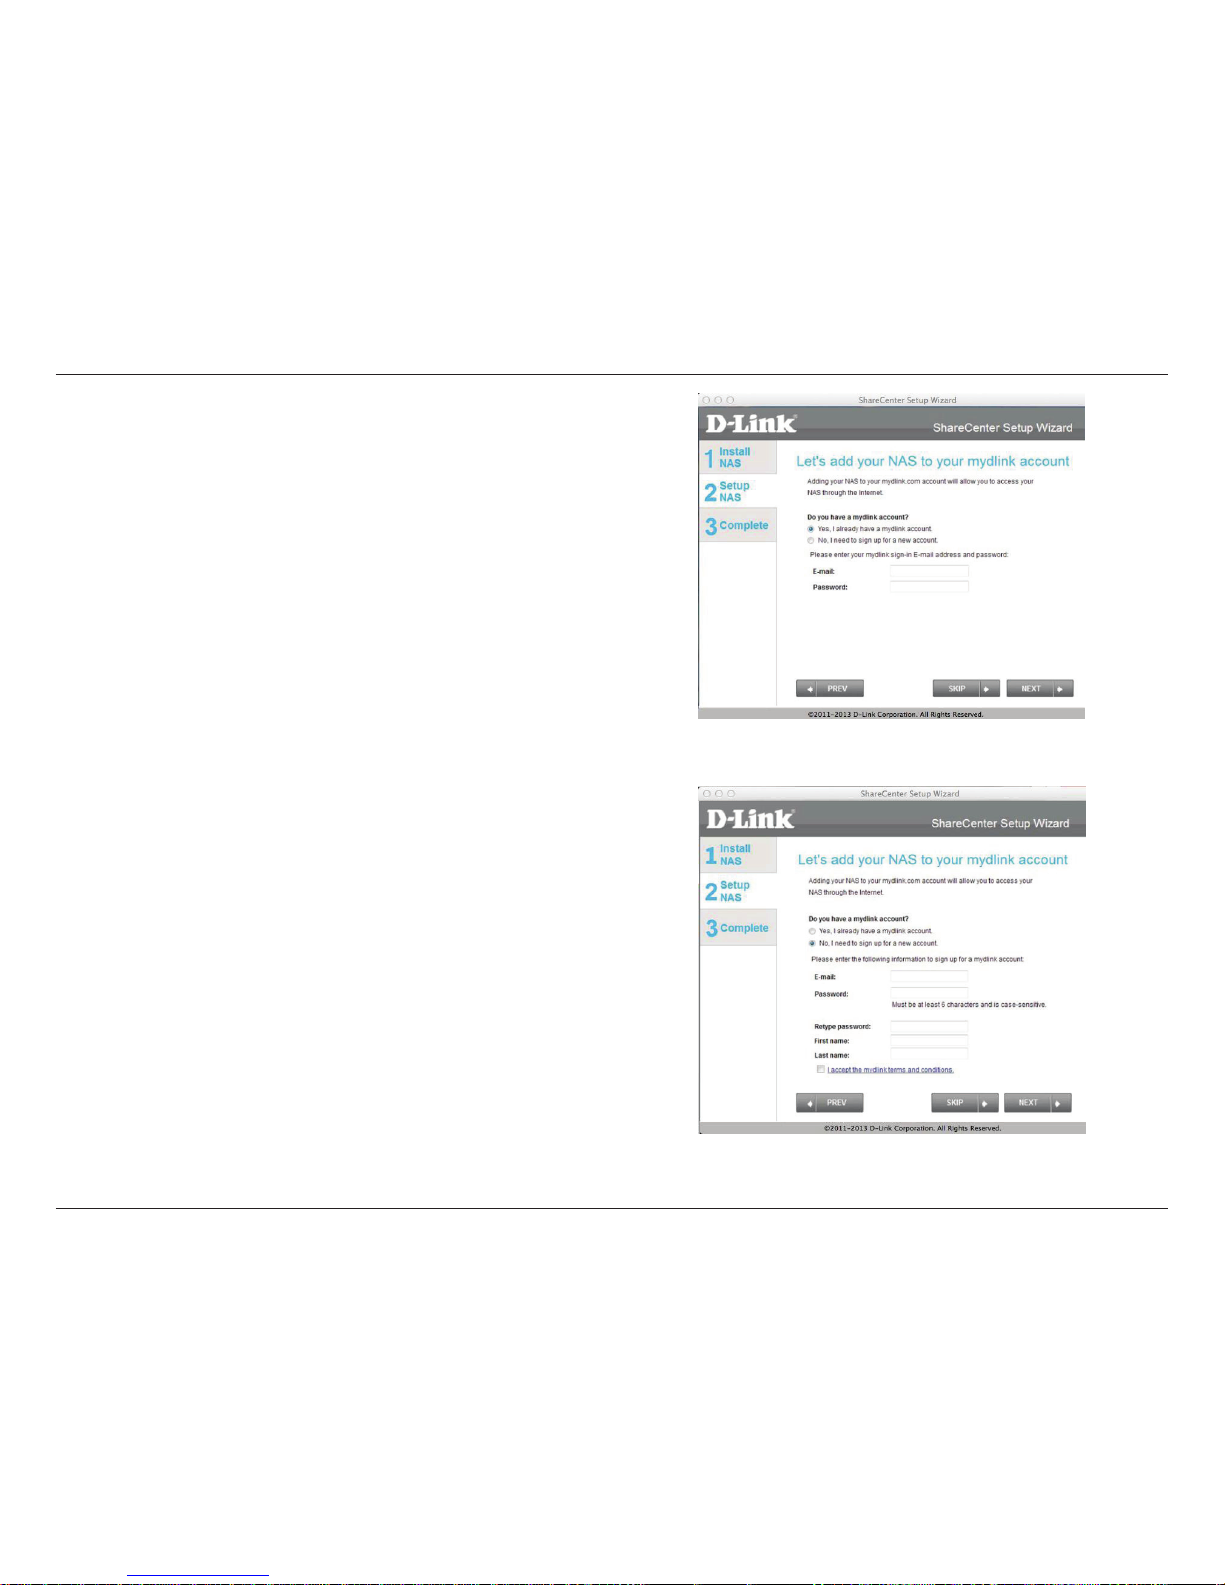
Step 35 - When the connection settings are correct, the mydlink
server provides the connection details.
The next screen allows you to setup the
remote mydlink cloud service. Select the Yes radio
button if you already have a mydlink account.
Enter your email address and password.
Click Next to view the next screen.
Click Previous if you want to go back and make changes to any parts
of your past conguration options.
Step 36 - Alternatively, you can create a new account if you select
“No, I need to sign up for a new account.”
Enter your email address and a password that you can remember.
Then retype the password, enter a First Name and a Last Name. Then
click the checkbox that reads:
“I accept the mydlink terms and conditions.”
Click Next to continue.
Page 89
84
D-Link ShareCenter DNS-327L User Manual
Section 3 - Installation
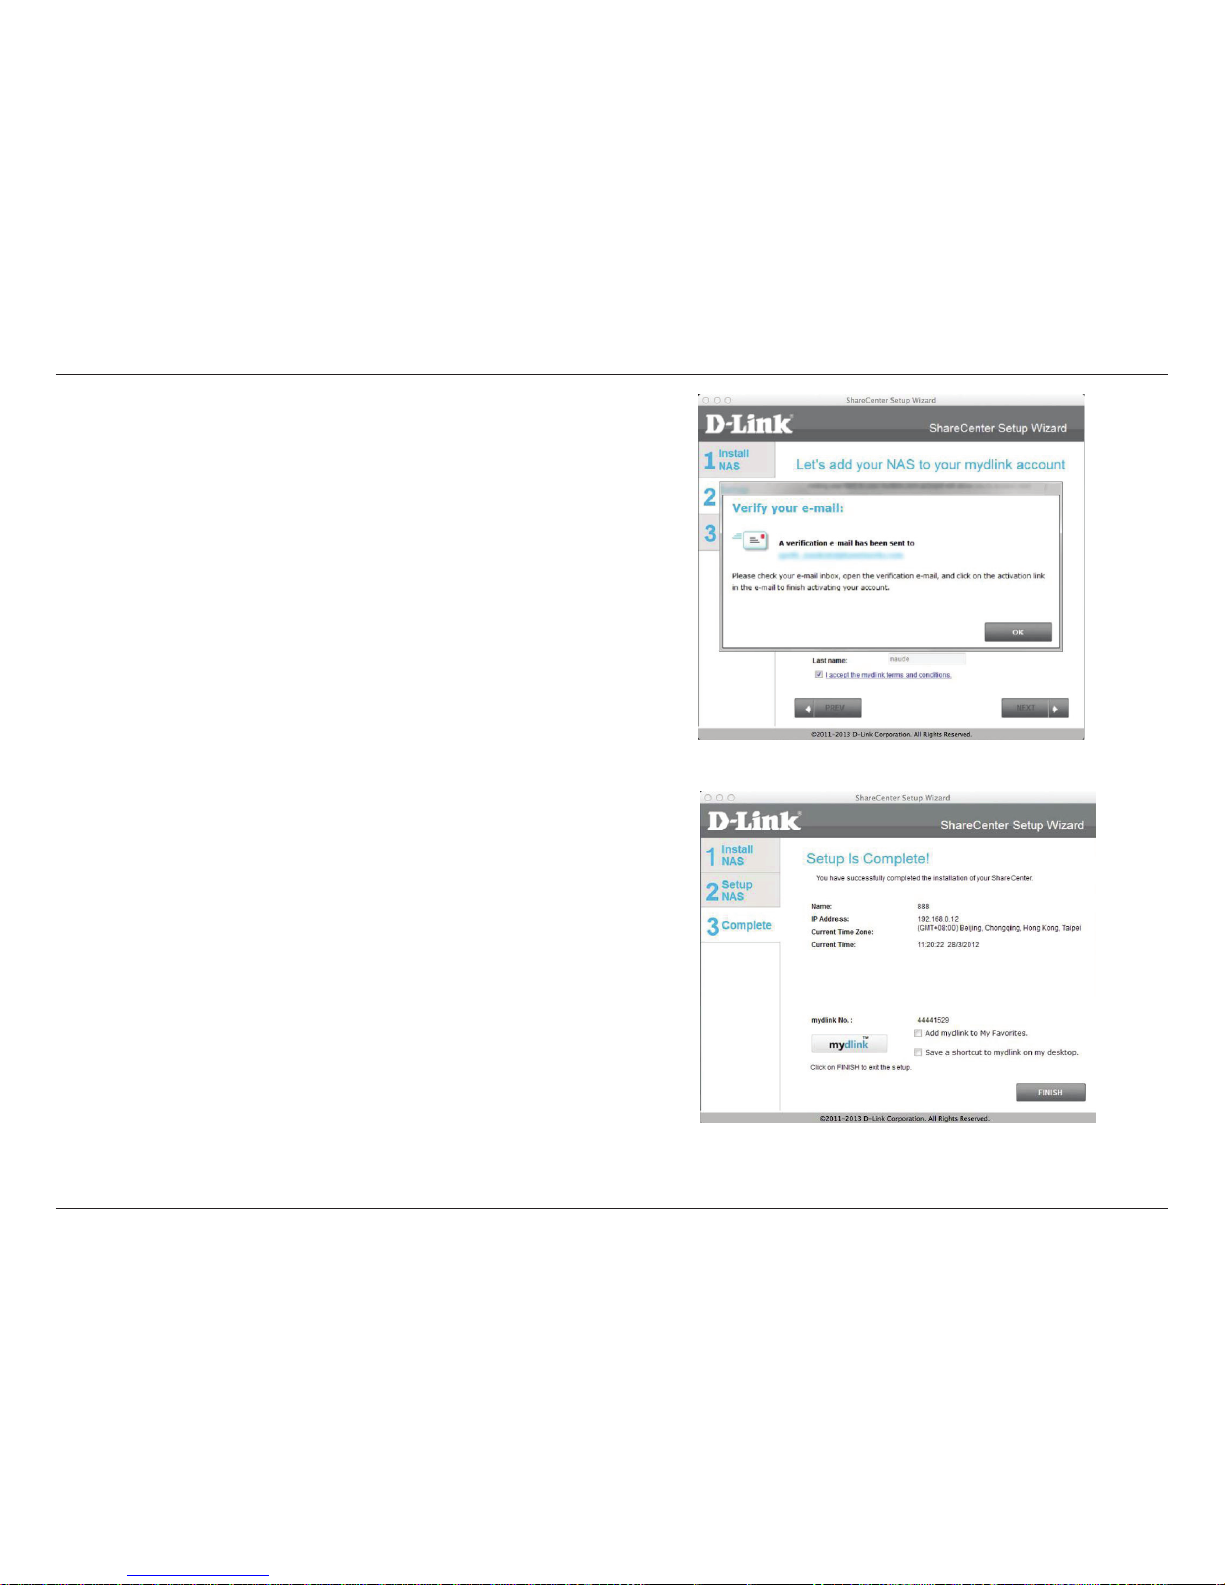
Step 37 - A message appears asking you to verify your email address
and account.
Click OK to continue.
Step 38 - The mydlink section of the wizard installation is complete.
The wizard provides you with a mydlink number. You can also tick
the Add mydlink to My Favorites checkbox, or Save a shortcut
to mydlink on my computer checkbox. You can use this mydlink
number for future reference.
Click Finish to continue.
Page 90
85
D-Link ShareCenter DNS-327L User Manual
Section 3 - Installation
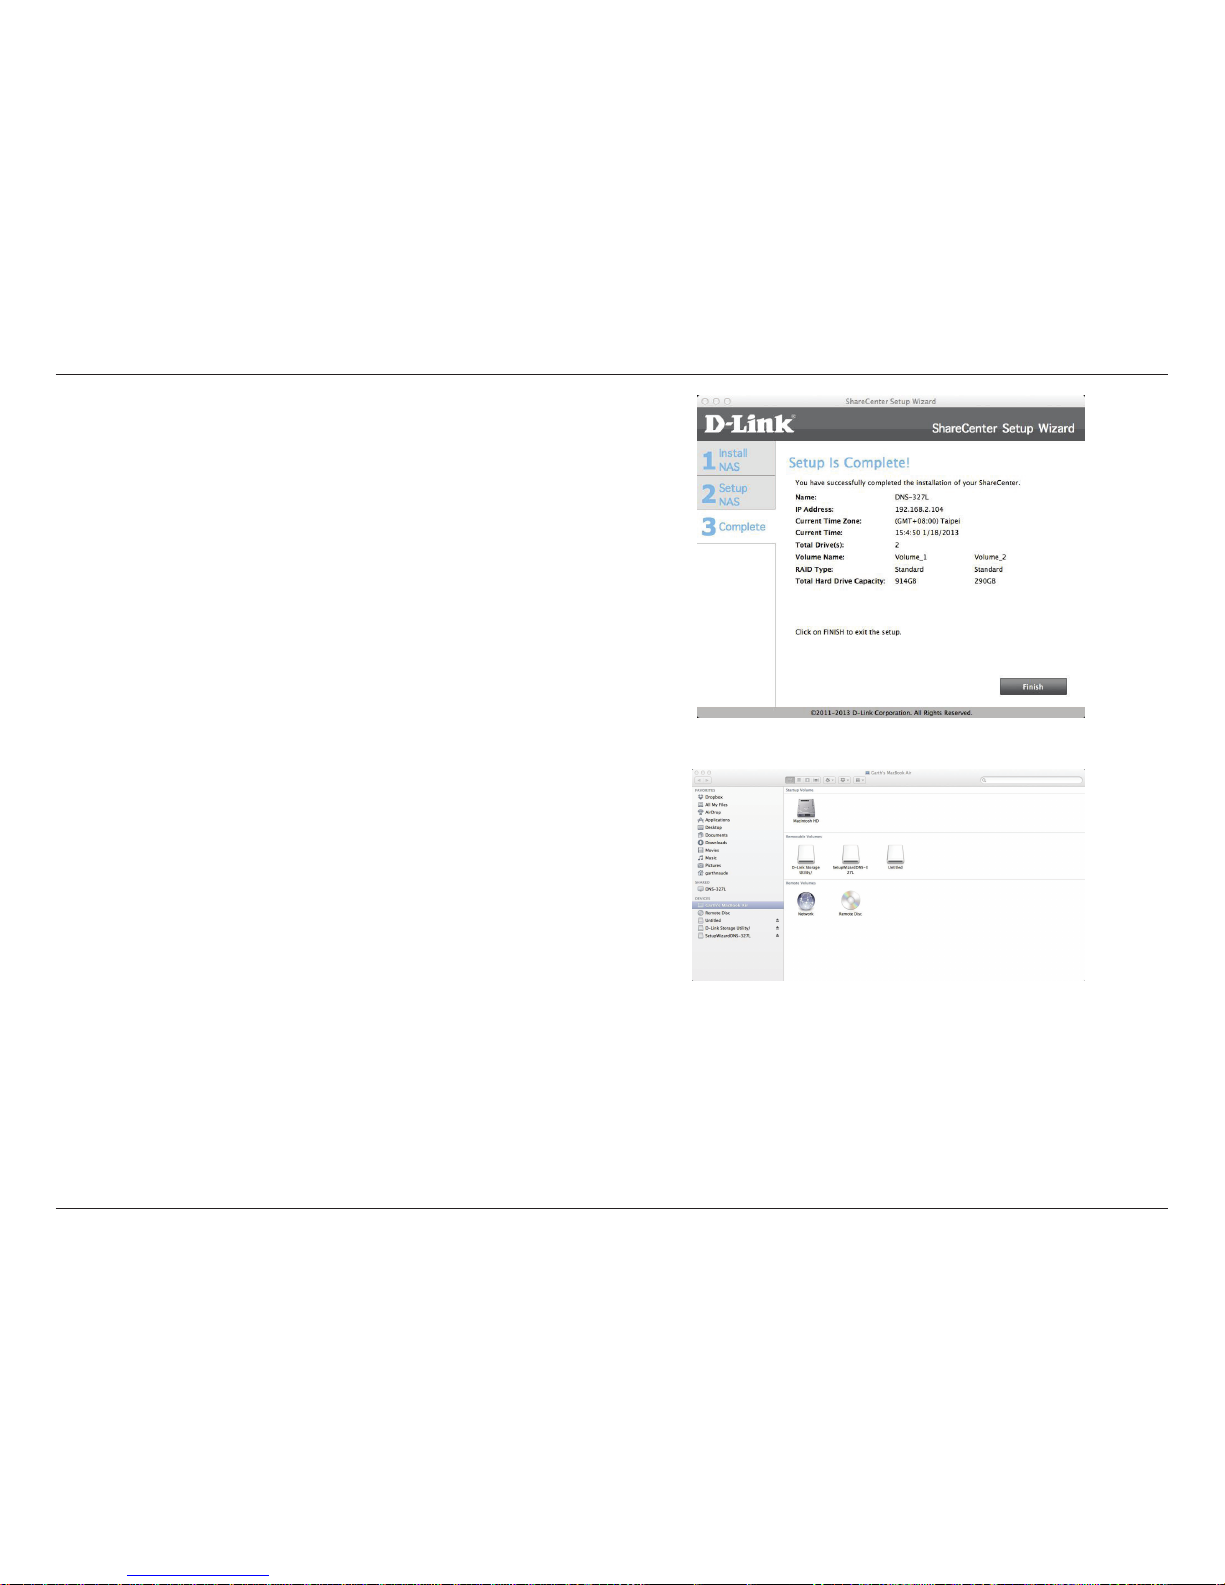
Step 39 - The setup is complete.
Click Finish.
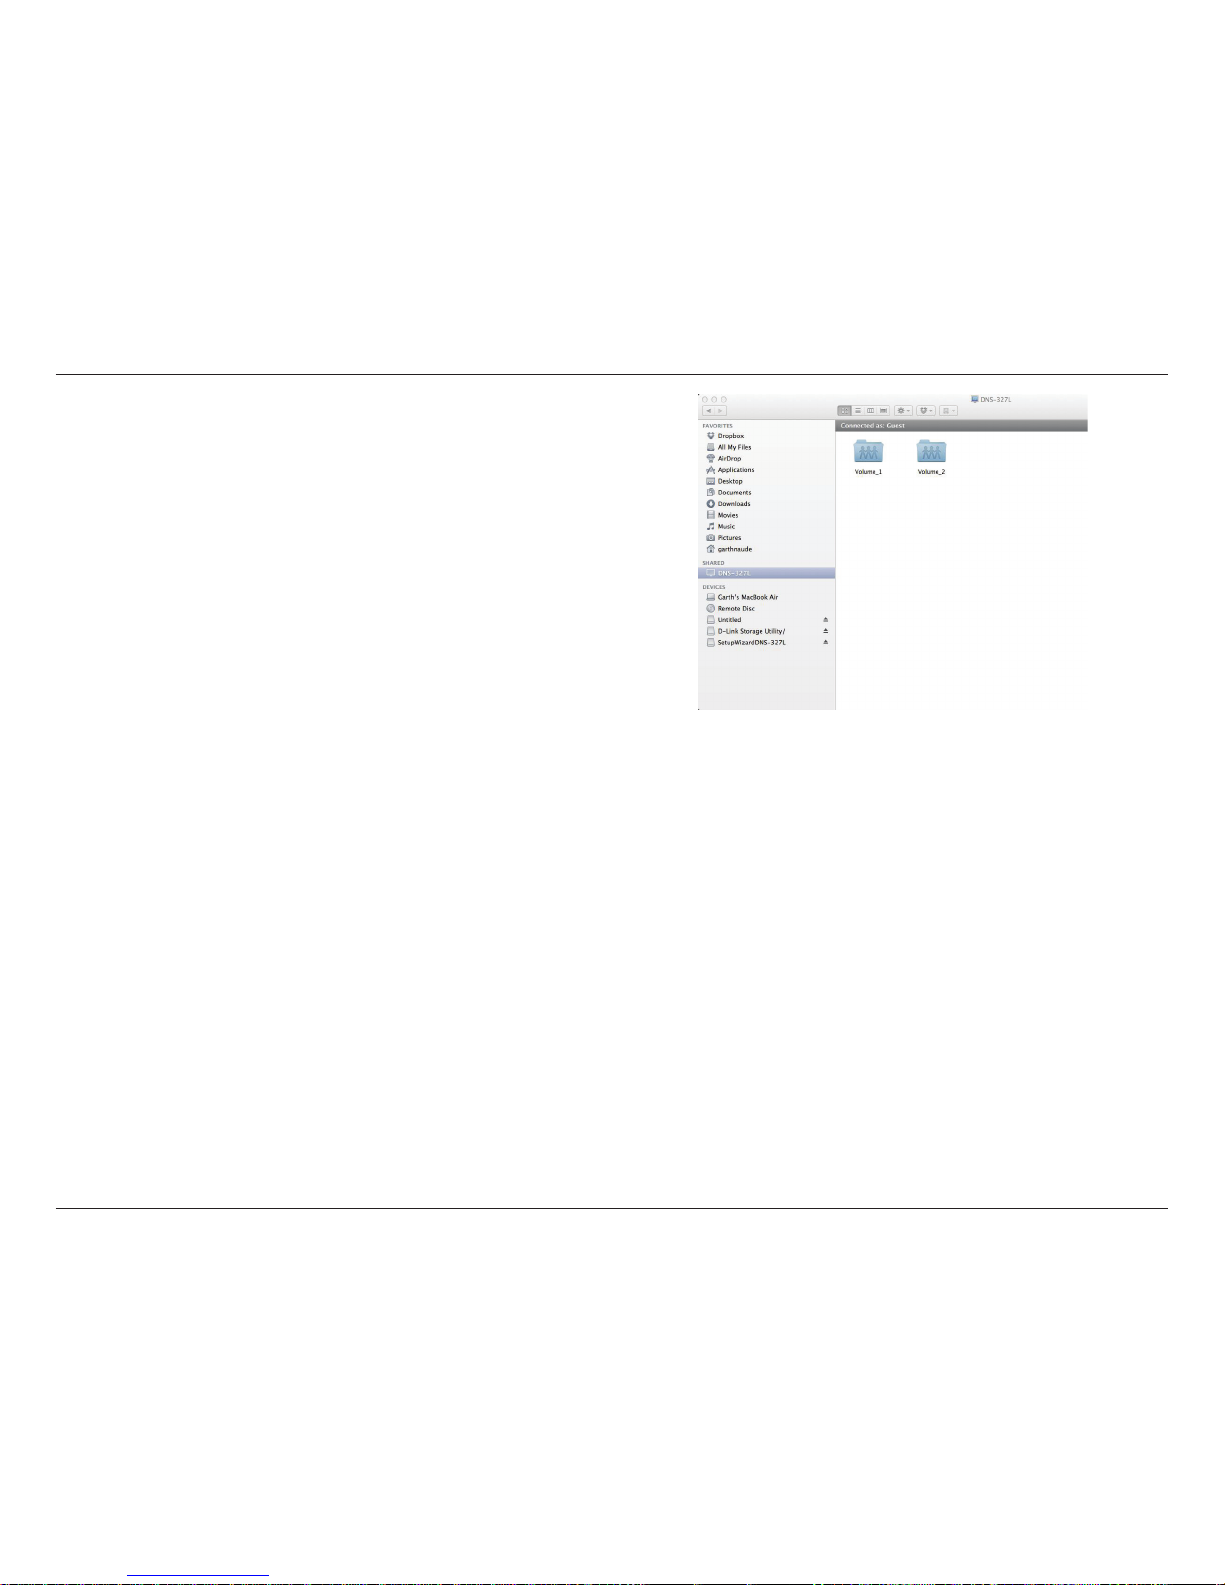
Step 40 - You can now view the DNS-327L in the
Finder on the left panel.
Page 91
86
D-Link ShareCenter DNS-327L User Manual
Section 3 - Installation
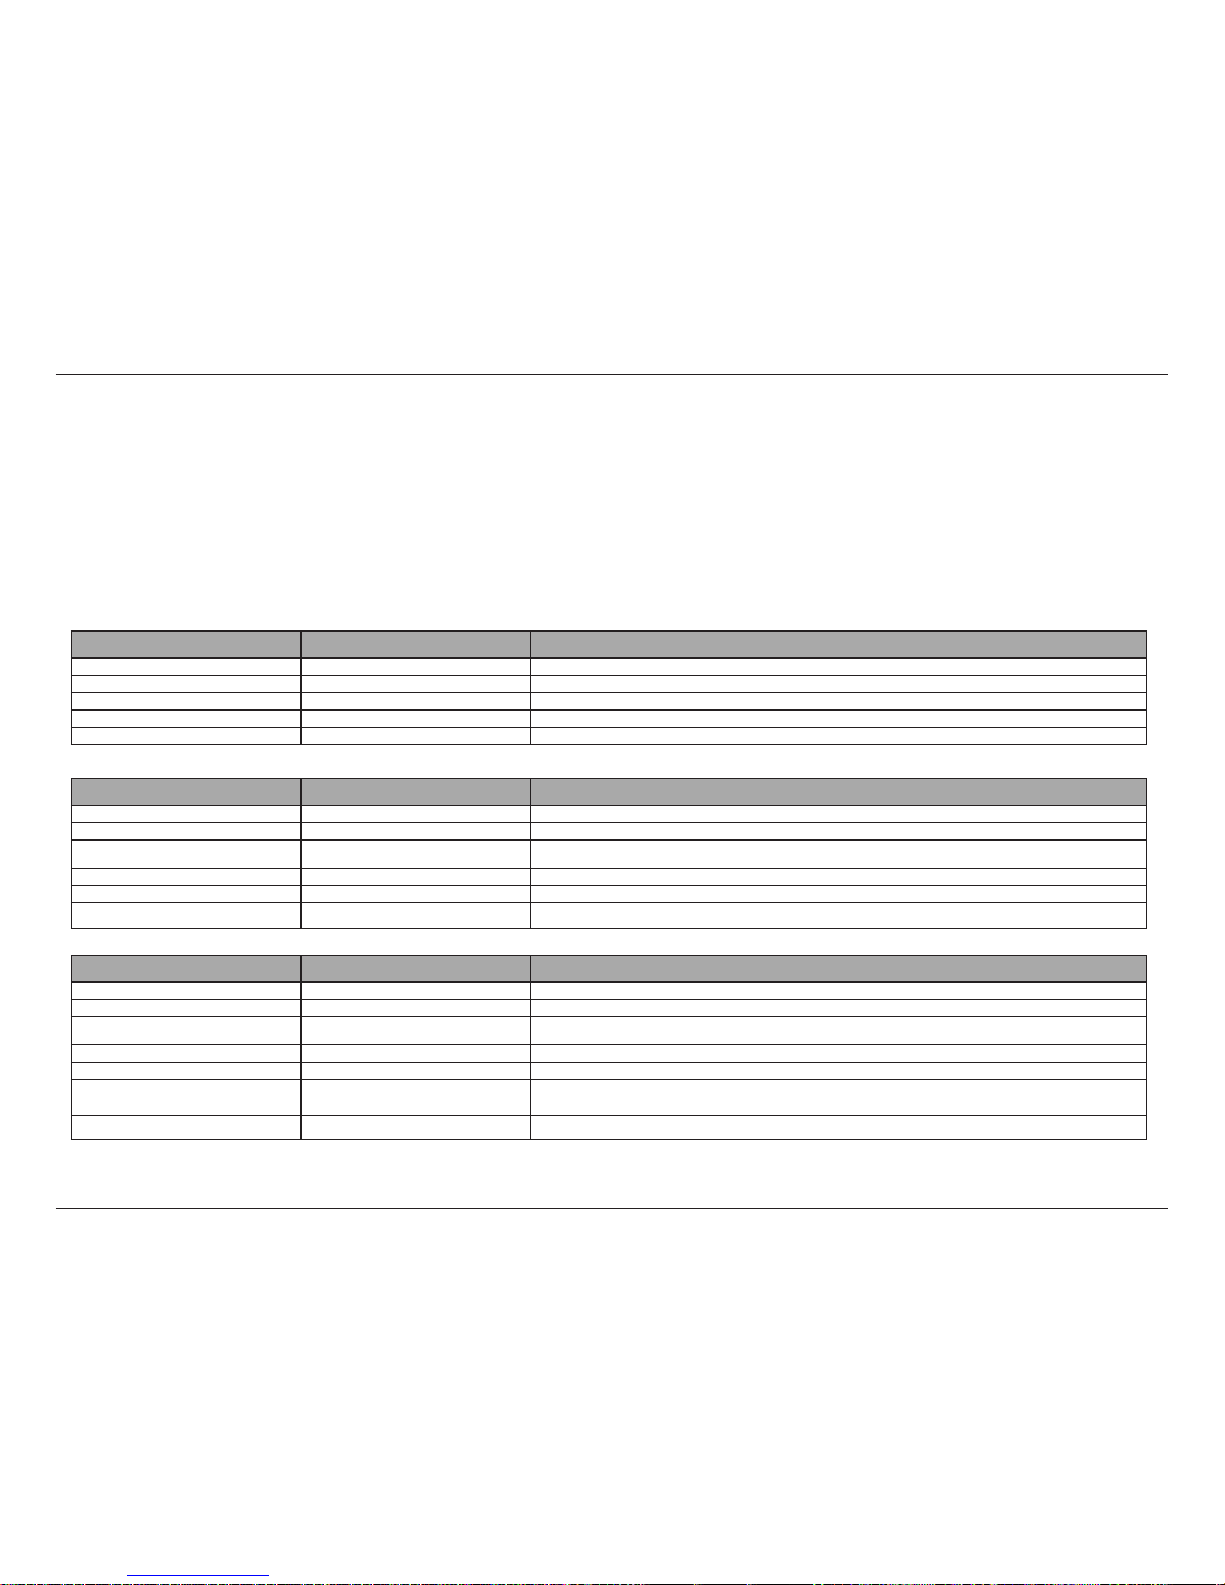
Step 41 - Click the icon to view contents on your NAS.
Page 92
87
D-Link ShareCenter DNS-327L User Manual
Section 4 - Conguration
ShareCenter
™ Web UI (User Interface) is a browser-based utility that allows you to manage and congure the dierent tools and services. The Web
UI is divided into three main sections:
1. Home
2. Applications
3. Management
Managing your DNS-327L
SECTION OPTION DESCRIPTION
Management Setup Wizard Step by step guide through password & time settings, connectivity, and device conguration
Disk Management Congures disk volumes, RAID, and performs disk diagnostics
Account Management Congures user and group management, network shares
Network Management Congures LAN, Dynamic DNS, and Port Forwarding
Application Management Congures FTP, add-ons, AFP, NFS, and multimedia services
System Management Congures language, time and date, device, and system settings. Also allows you to control power,
notications, view logs, do rmware upgrades, and manage USB devices.
System Status Displays system and hard drive information along with resource monitoring
SECTION OPTION DESCRIPTION
Applications FTP/HTTP Downloads Congure FTP and HTTP download settings
Remote Backup Congure remote backup services
Local Backups Congures local backups, Time Machine© settings, and USB backups
P2P Downloads Congure your P2P downloads and control your download schedules
My Files Access les on your NAS via a web browser
Amazon S3 Create, modify, and delete your Amazon S3© settings
Conguration
SECTION OPTION DESCRIPTION
Home - My Folder My Photos Create albums and manage photos, share photos through social networking sites, and slideshows
My Files Access les on your NAS via a web browser
My Music Access your music collection. Add tracks, albums, etc
My Surveillance View and control security cameras connected to your NAS
My Favorites Application Add the favorite applications you use on a regular basis to the Home page
Page 93
88
D-Link ShareCenter DNS-327L User Manual
Section 2 - Getting Started
When rst powered on, during the initial boot sequence, the ShareCenter™ will wait to be assigned an IP address via DHCP. If it
does not receive a DHCP assigned IP address, the ShareCenter™ will be automatically assigned a 169.254.xxx.xxx address. It is
recommended that you use the included D-Link Storage Utility software when accessing and conguring the ShareCenter™ for
the rst time. If you want to change the IP address before logging in or you are having trouble connecting to the ShareCenter™
IP address, you can use the Storage Utility software included on the product CD to locate the device on your network and
make any necessary changes.
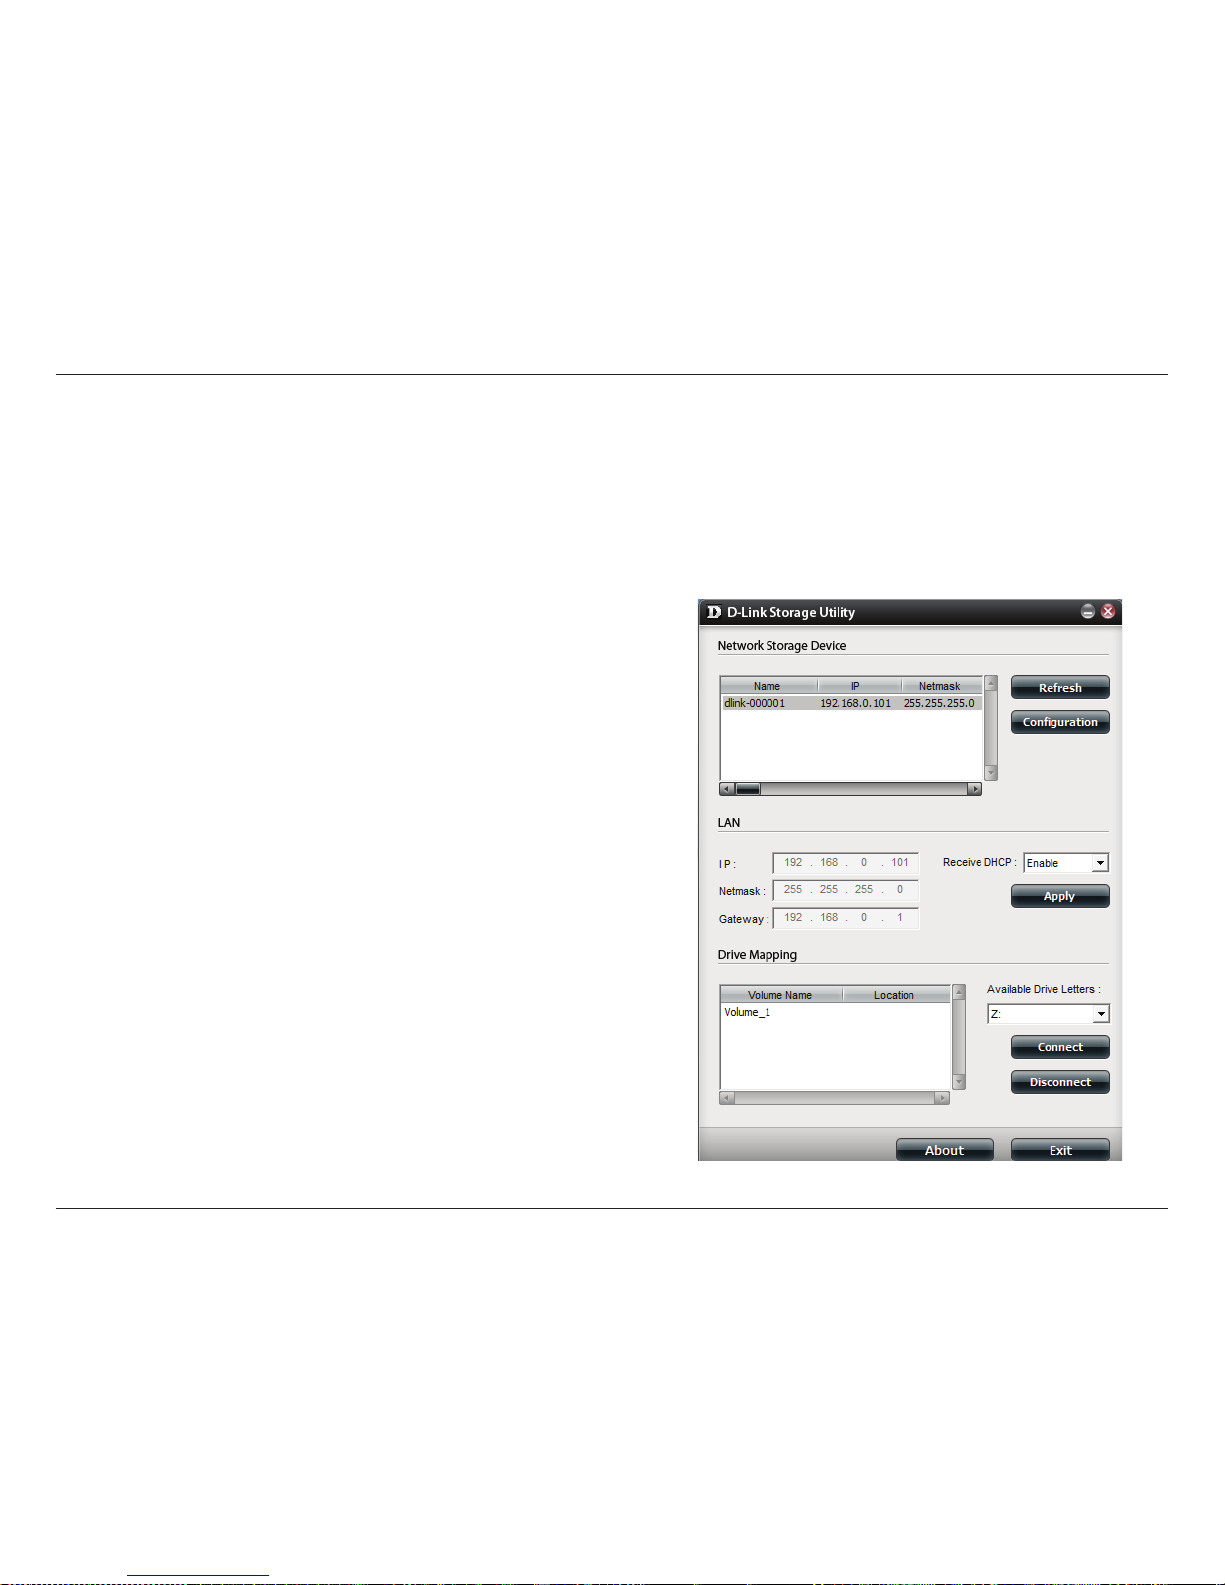
D-Link Storage Utility
Network Storage
Device:
The D-Link Storage Utility displays any ShareCenter
™
devices it detects on the network here.
Refresh: Click Refresh to refresh the device list.
Conguration: Click Conguration to access the Web based conguration
of the ShareCenter
™.
LAN:
Congure the LAN Settings for the ShareCenter
™ here.
Apply: Click Apply to save changes to the LAN Settings.
Drive Mapping: Volumes available for mapping are displayed here.
Available Drive
Letters:
Choose an available drive letter. Click Connect to map
the selected volume. Click Disconnect to disconnect the
selected mapped volume.
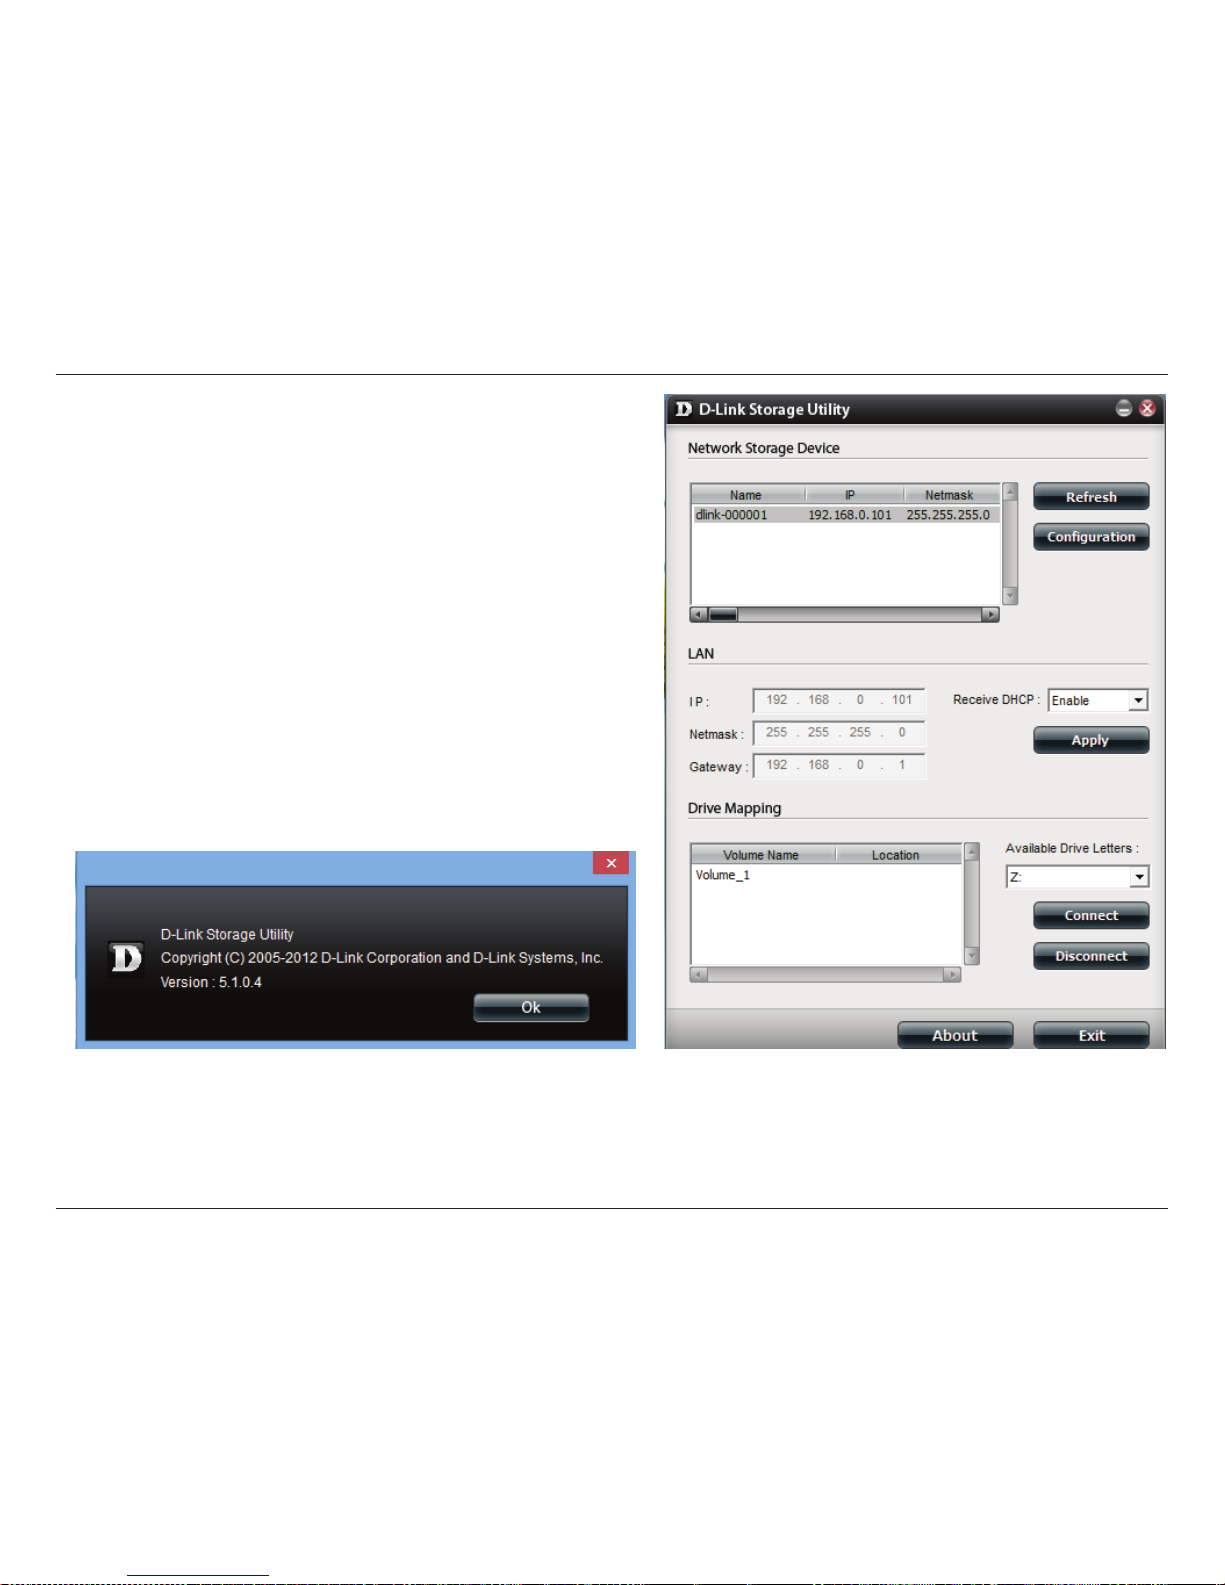
About: Click About to view the software version of the Easy
Search Utility.
Exit: Click Exit to close the utility.
Page 94
89
D-Link ShareCenter DNS-327L User Manual
Section 2 - Getting Started
Select the ShareCenter™ from the list and click the Conguration
button. This will launch the computer’s default web browser and
direct it to the IP address listed for the device. Make sure the browser
is not congured to use a proxy server.
Note: The computer used to access the ShareCenter™ web-
based configuration manager must be on the same subnet as
the ShareCenter.
™
If your network is using a DHCP server and the
computer receives IP settings from DHCP server, the ShareCenter
™
will automatically be in the same subnet.
Page 95
90
D-Link ShareCenter DNS-327L User Manual
Section 2 - Getting Started
D-Link Storage Utility - For Mac
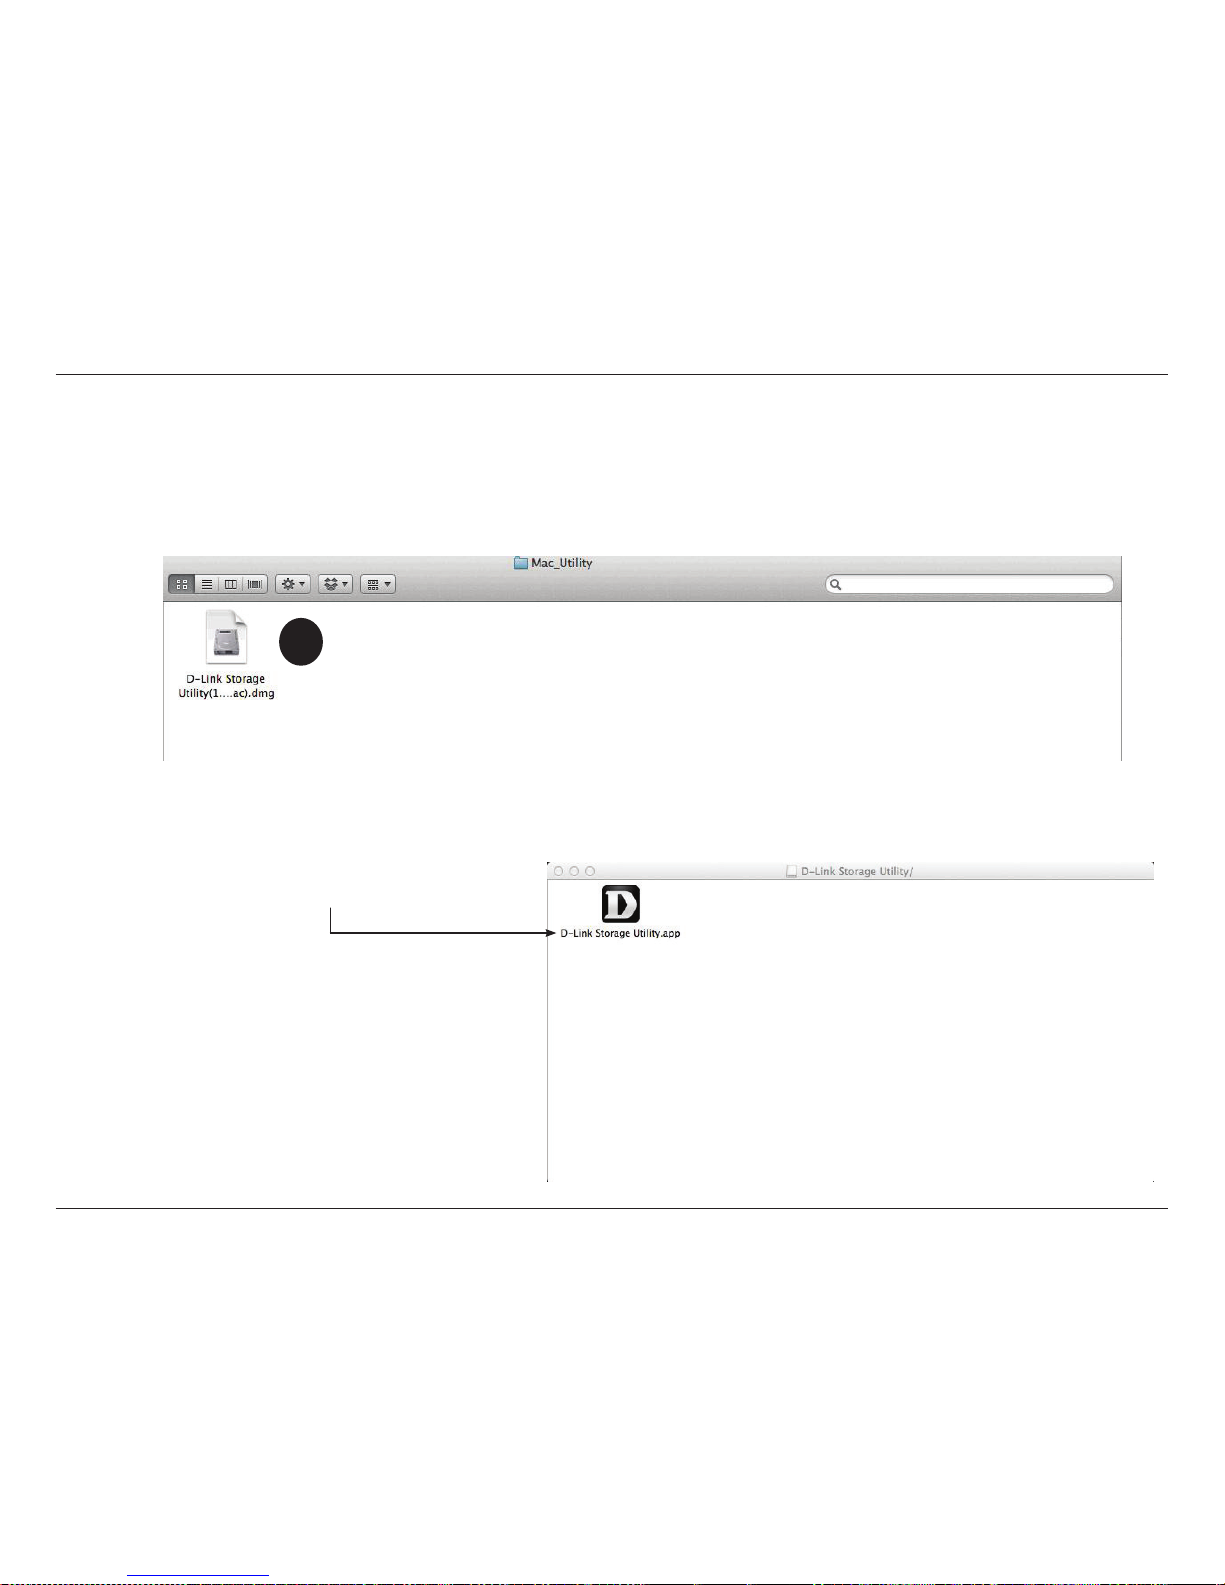
Step 1: To get started with the ShareCenter™ Storage Utility for Mac, insert the
supplied CD into your CD-ROM drive: Double-click the .dmg le.
1
Step 2: Double-click the .dmg le to install the program. In the
end you should have the D-link Storage Utility for Mac.
Page 96
91
D-Link ShareCenter DNS-327L User Manual
Section 2 - Getting Started
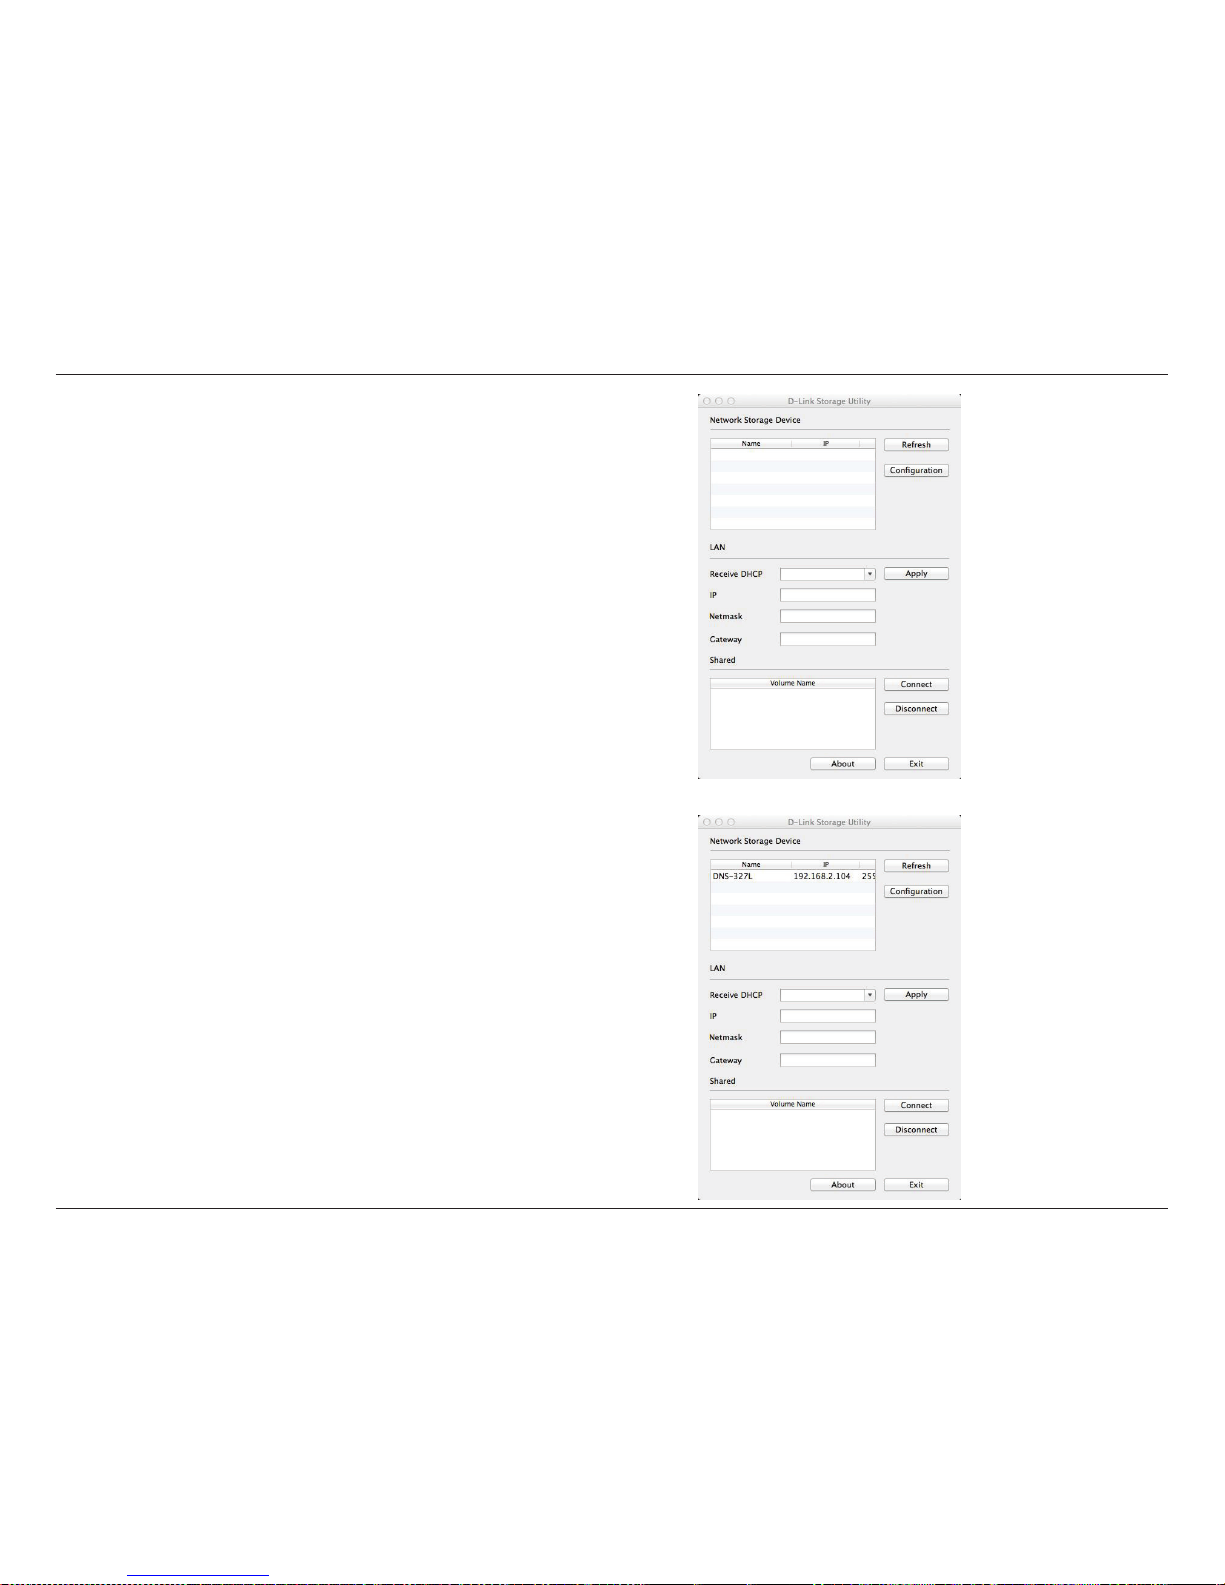
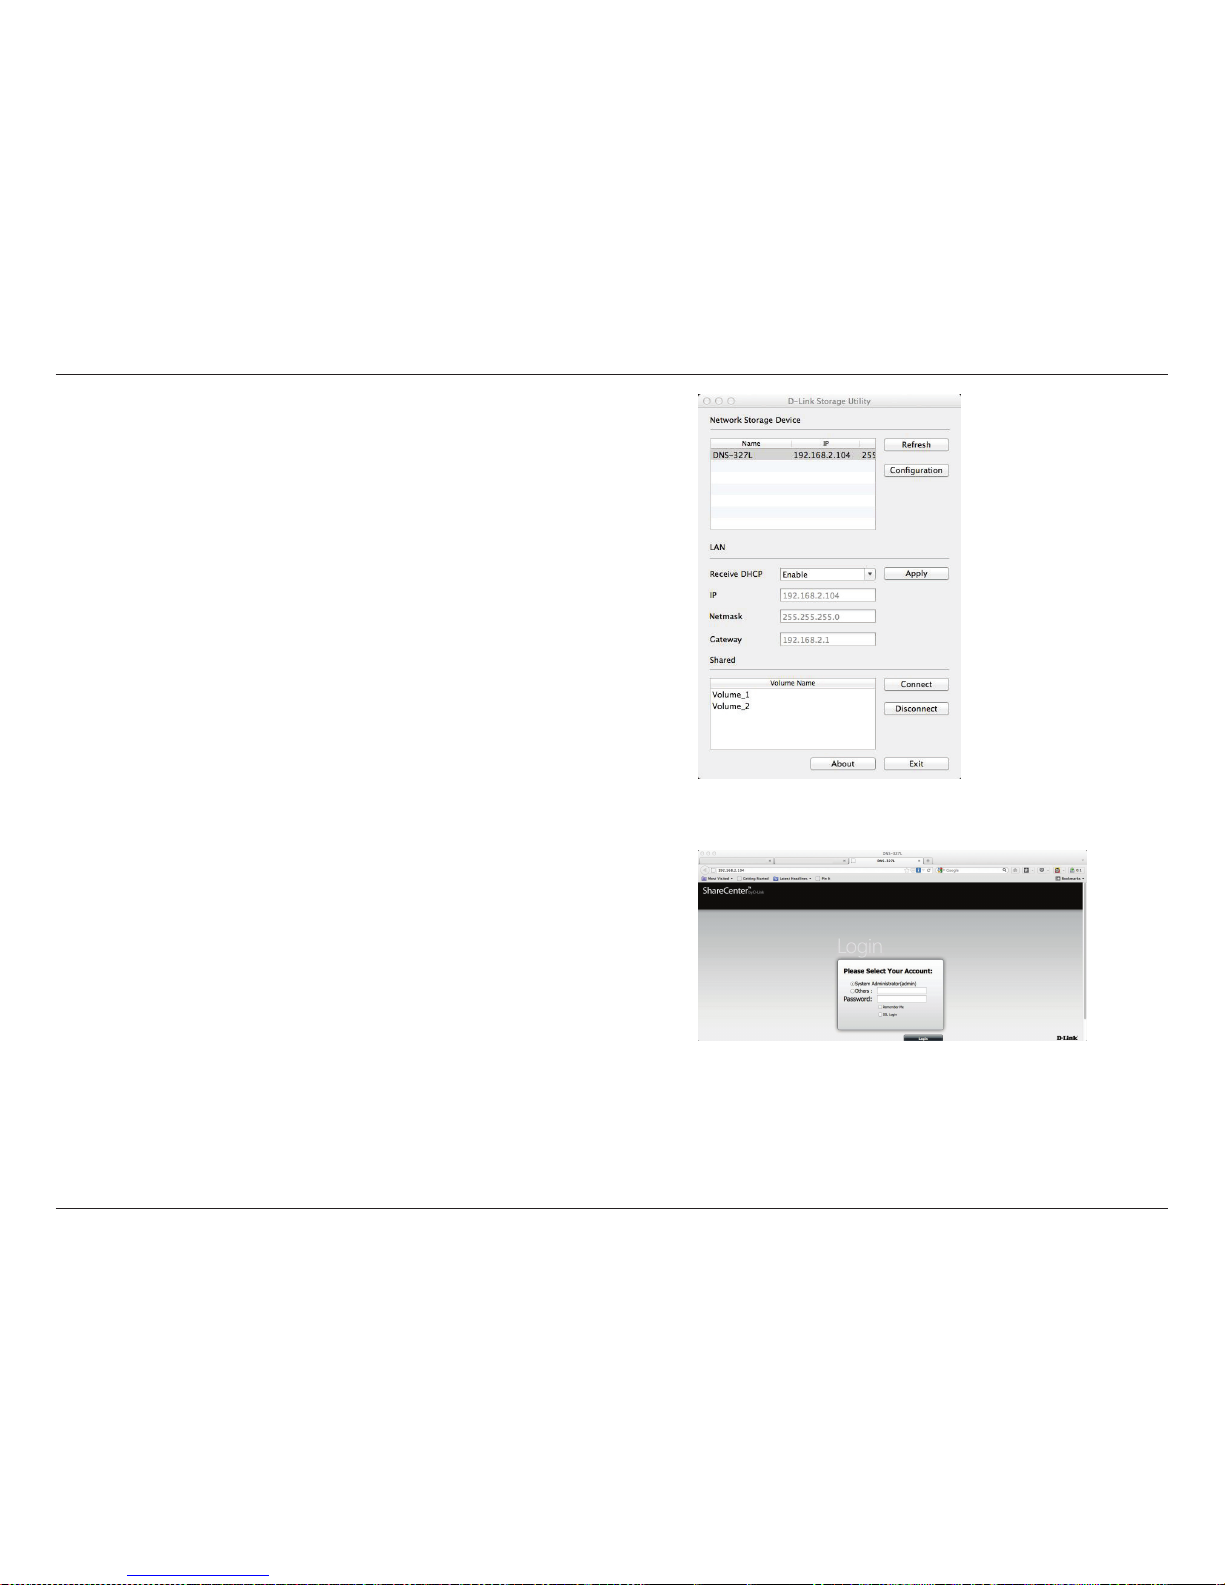
Step 3: This opens the D-Link Storage Utility
Step 4: Make sure you are connected to your local LAN. Click the Refresh button.
The D-Link Storage Utility displays the D-Link DNS-327L.
Page 97
92
D-Link ShareCenter DNS-327L User Manual
Section 2 - Getting Started
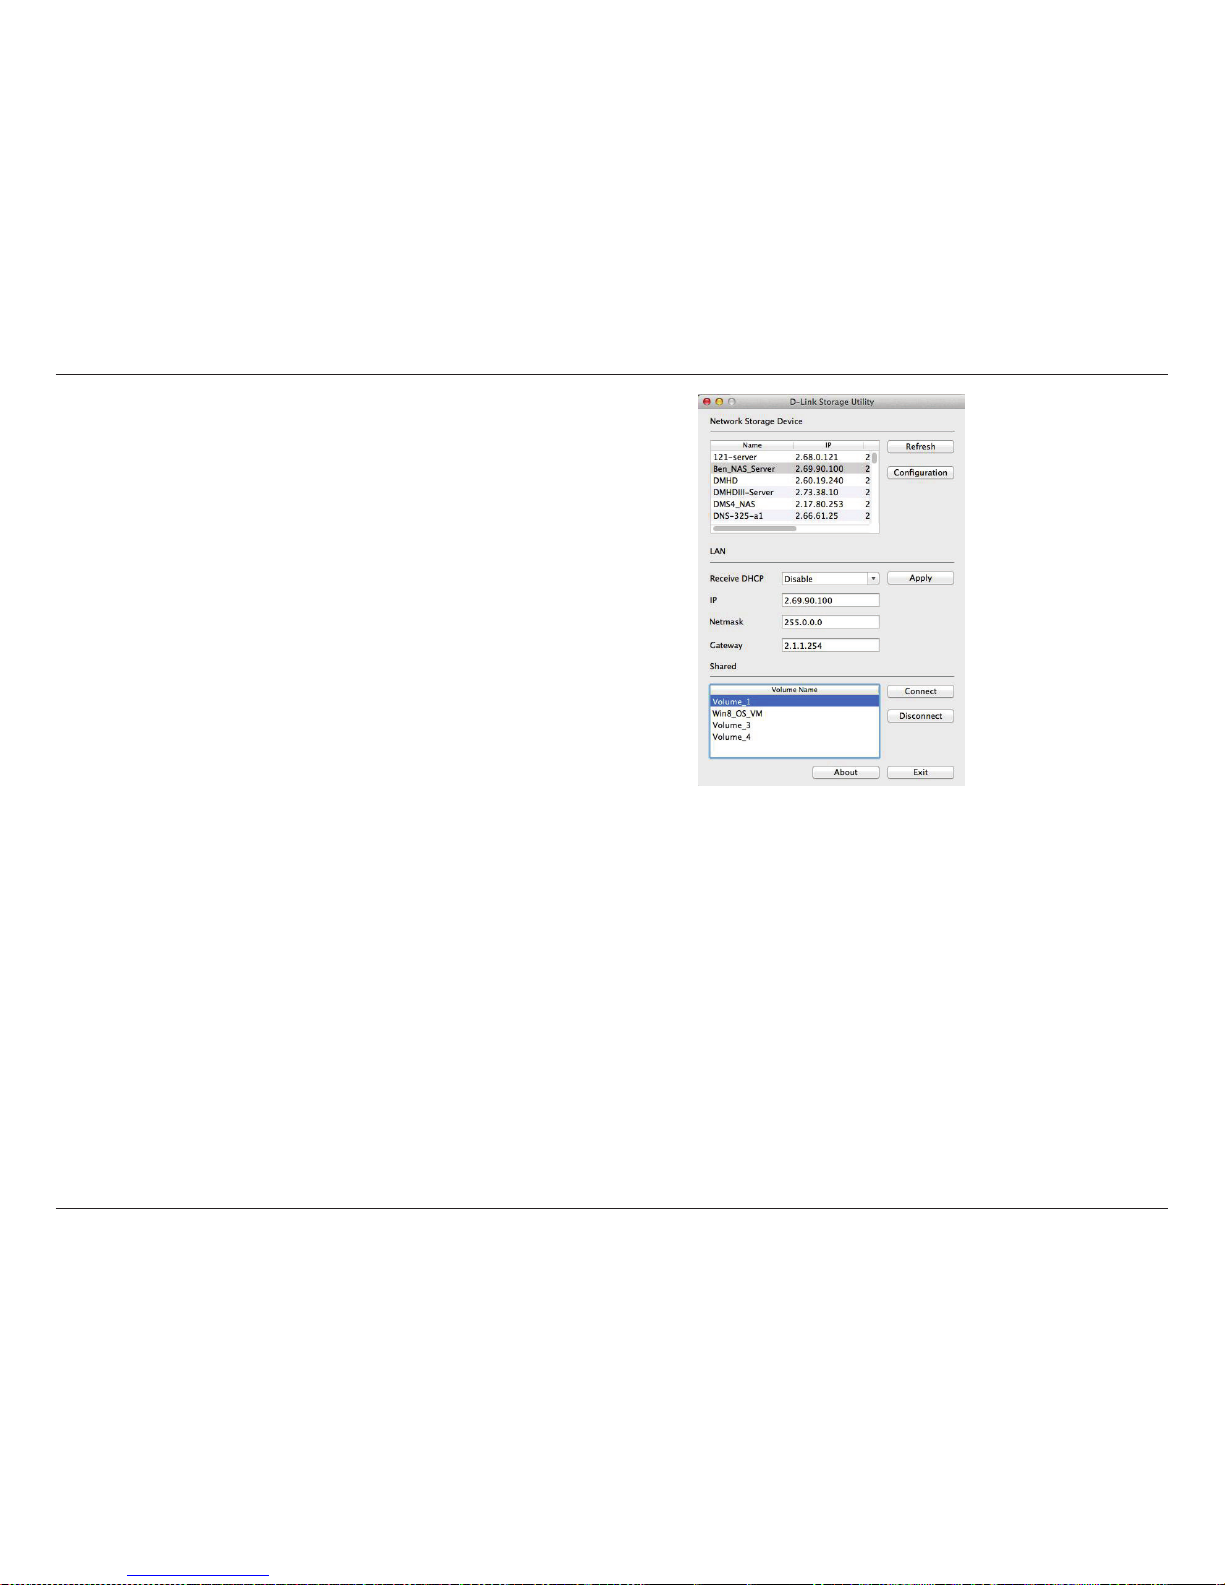
Step 5: The Storage Utility now shows the DNS-327L, the LAN conguration
(toggle between DHCP and manual), and the Volume details.
Use the drop-down list to congure your LAN settings and click Apply.
Step 6: To congure the NAS, click the conguration button. This opens your
default browser. Log in and congure.
Page 98
93
D-Link ShareCenter DNS-327L User Manual
Section 2 - Getting Started
Step 7: To map the NAS volume, select a Volume from the list then click the
Connect button.
Page 99
94
D-Link ShareCenter DNS-327L User Manual
Section 2 - Getting Started
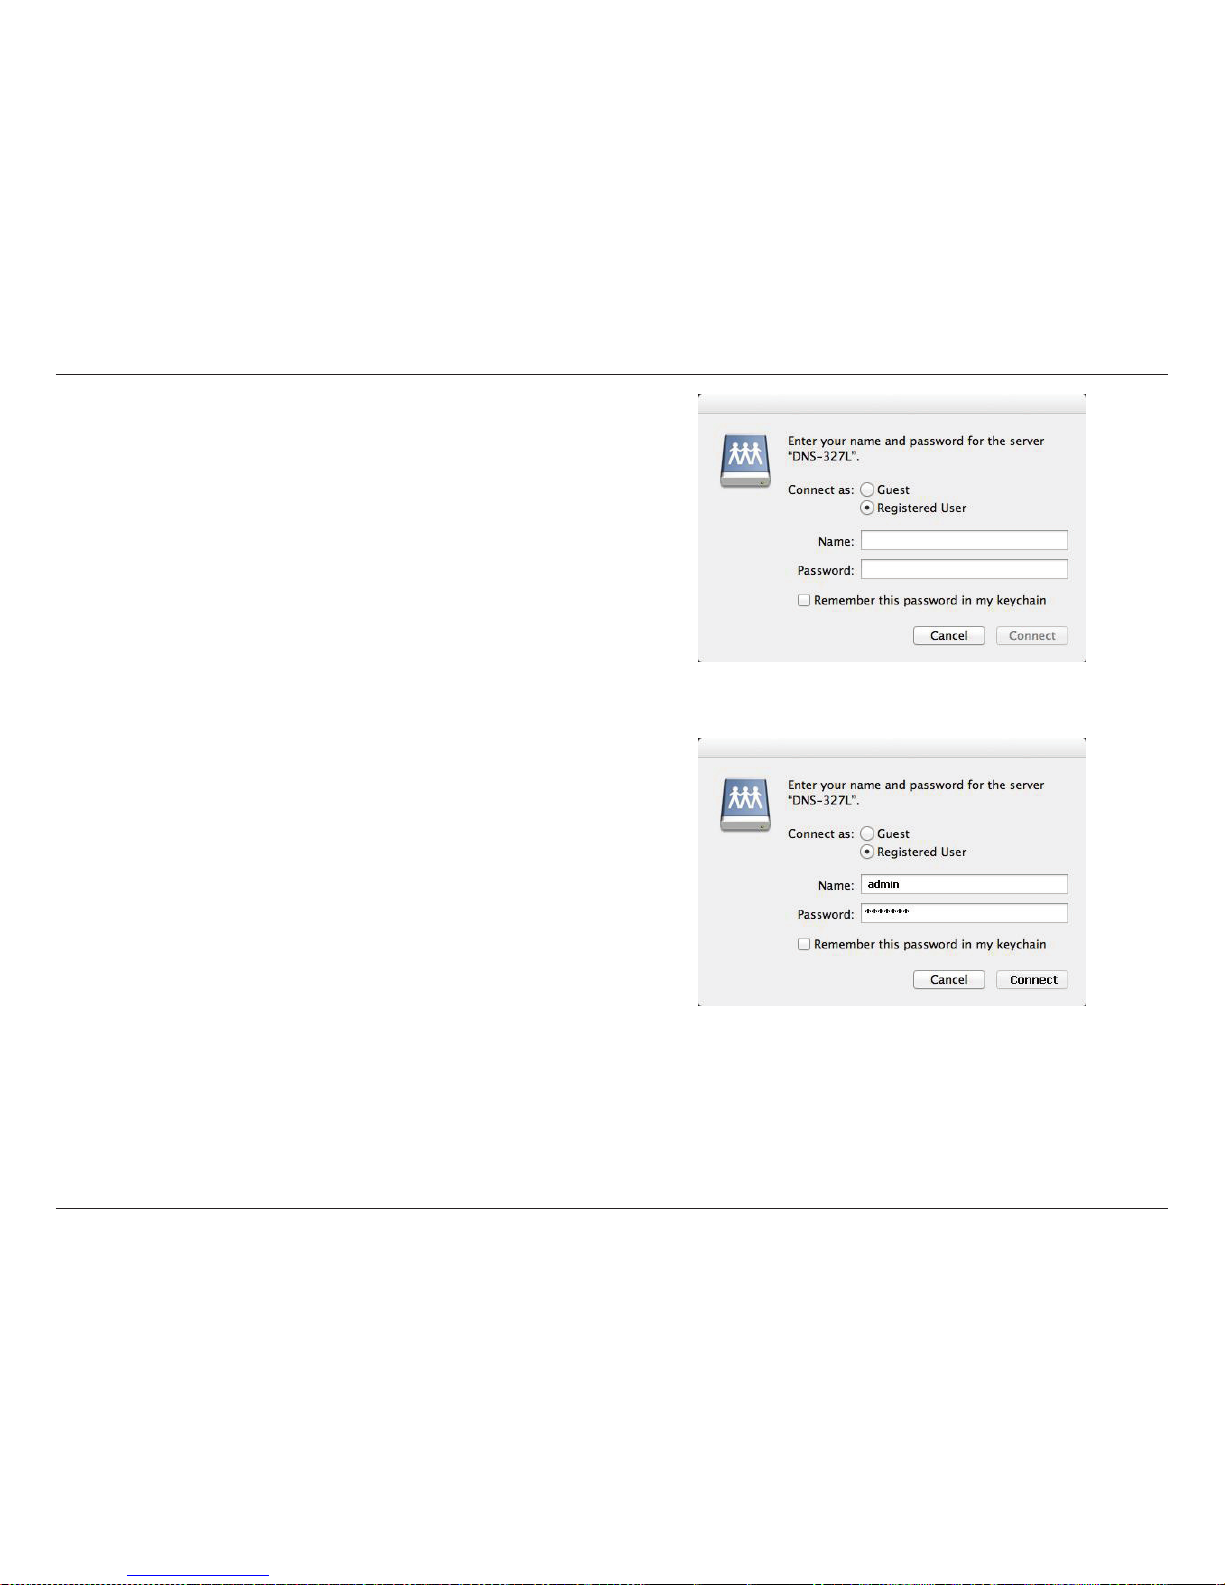
Step 8: The Log-in window appears. Select Guest or Registered User.
Step 9: Enter a username and password for the DNS-327L and click Connect.
Page 100
95
D-Link ShareCenter DNS-327L User Manual
Section 2 - Getting Started
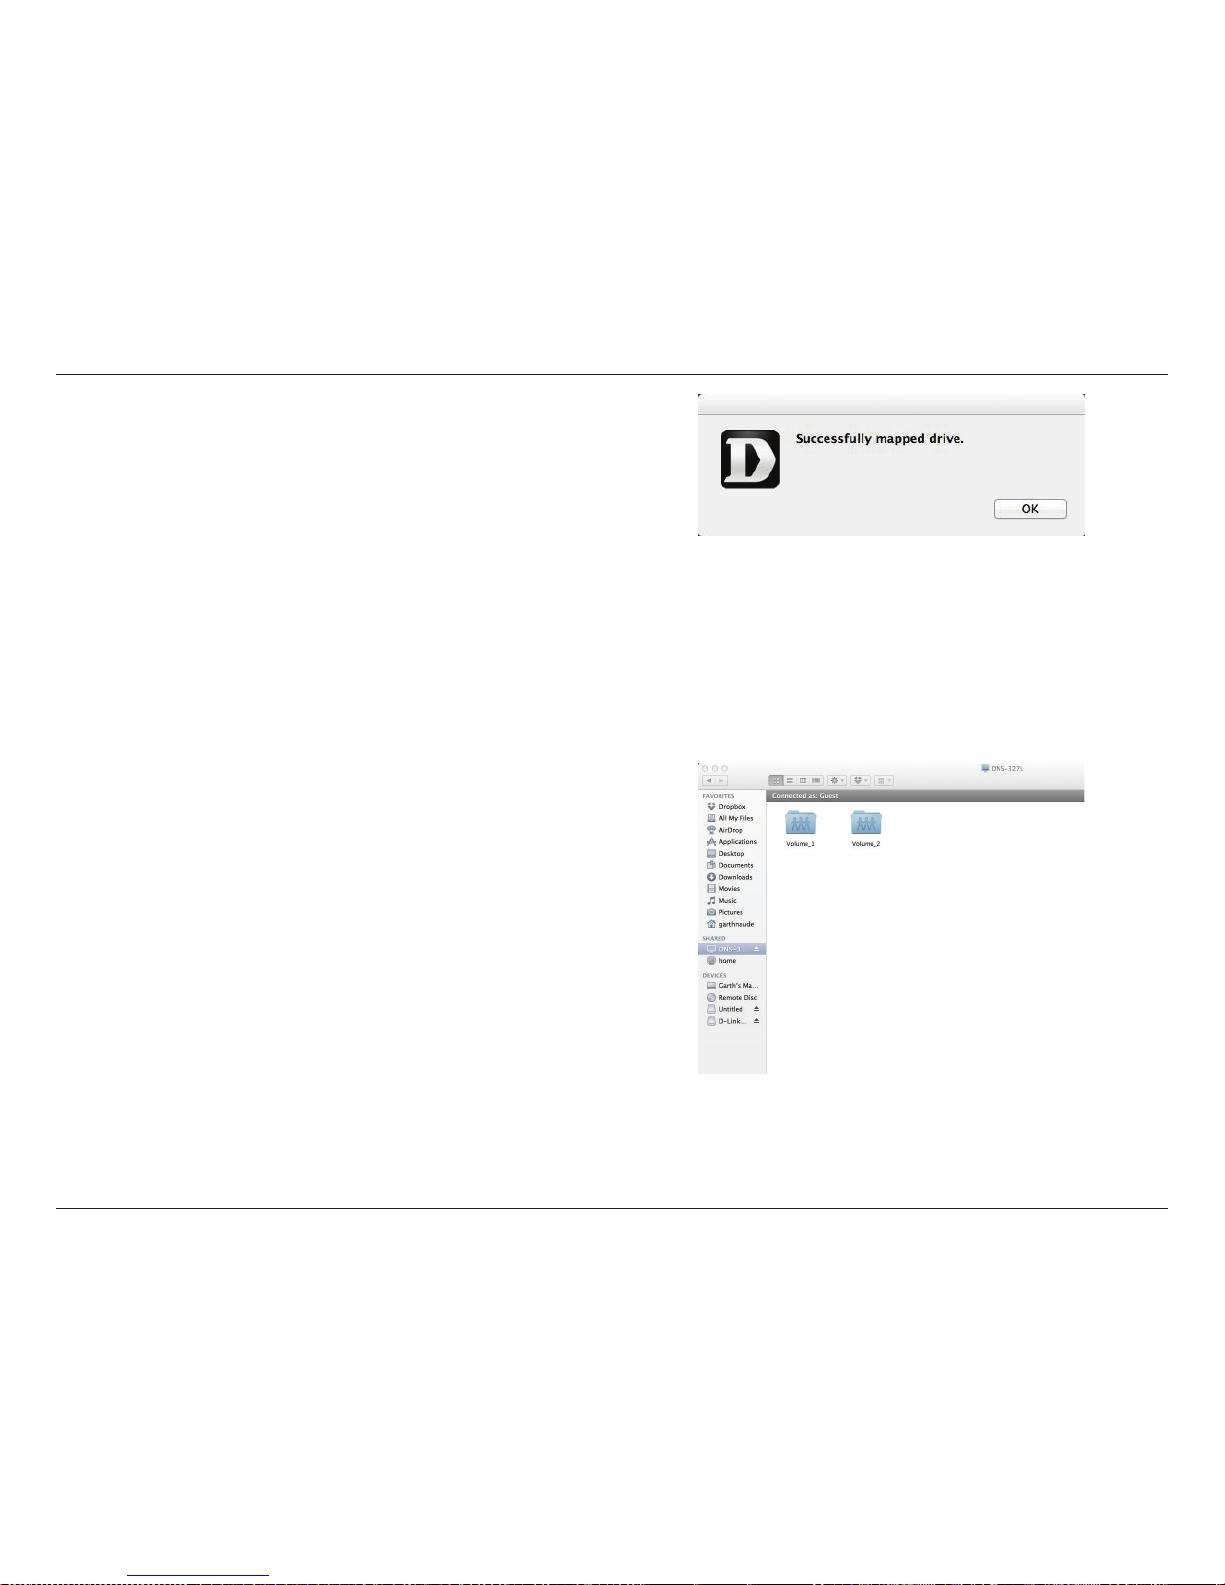
Step 10: A pop-up window appears notifying you that mapping the drive was
a success. Click OK to continue. Use the Disconnect button to disconnect from
the mapped drive(s).
Step 11: Finder now opens the drive and displays the DNS-327L under the
Shared column on the left and the Volumes on the right.
 Loading...