


DIR-866L
Wireless AC1750
Dual Band Gigabit Cloud Router
Quick Install Guide
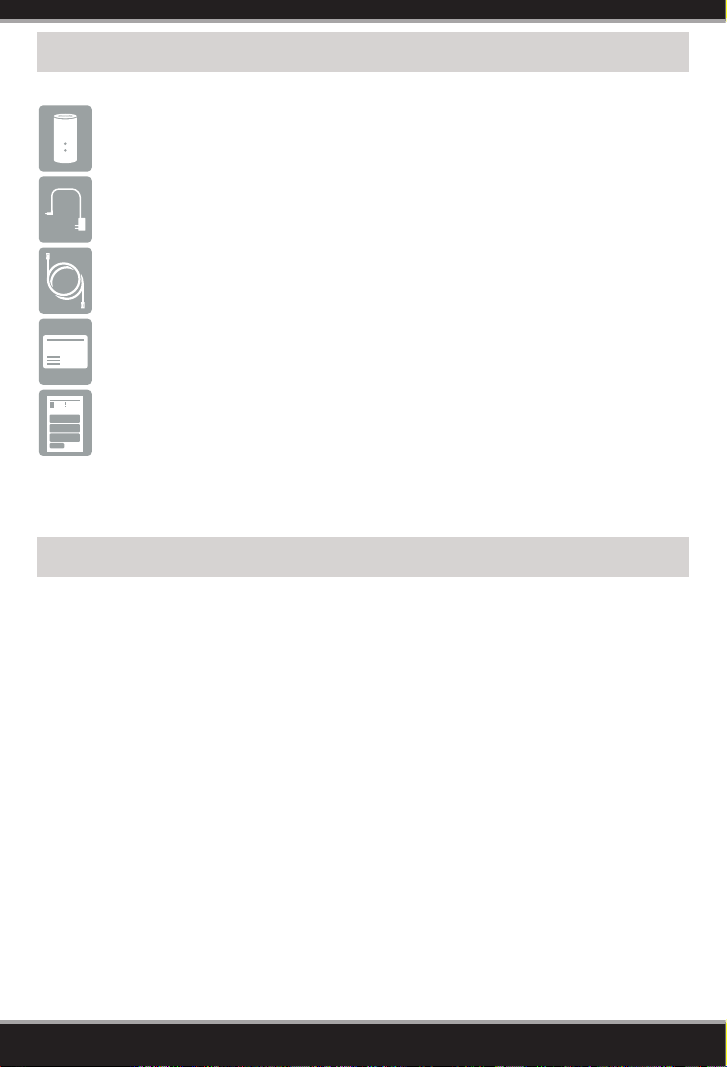
Package Contents
DIR-866L Dual Band Gigabit Cloud Router
Power Adapter
Ethernet Cable
Wi-Fi Conguration Card
Quick Install Guide
If any of the above items are missing, please contact your reseller.
Minimum Requirements
Network Requirements:
• An Ethernet-based broadband modem
Web-based Conguration Requirements
Computer with the following:
• Windows® or Mac OS® X operating system
• An installed Ethernet adapter or wireless adapter
Supported Browsers:
• Internet Explorer® 7 or higher, Safari® 5 or higher, Firefox® or Chrome™
Make sure you have the latest version of Java installed. Visit www.java.com
to download the latest version.
mydlink Requirements
• For mydlink and mydlink app requirements refer to:
http://www.mydlink.com
2
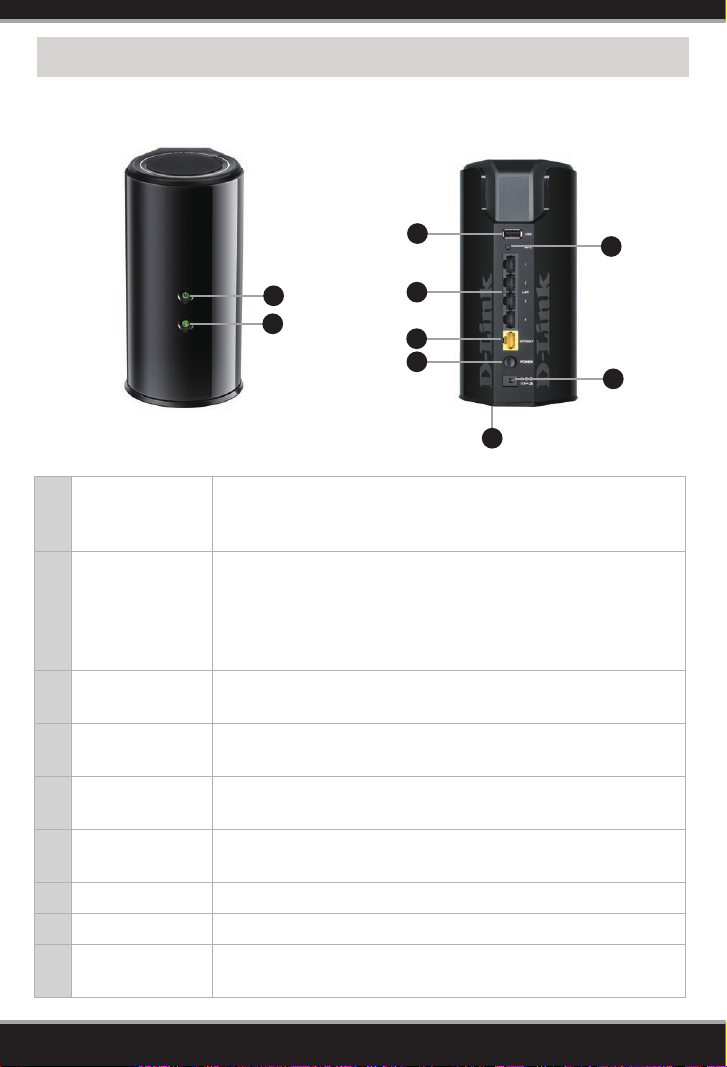
Hardware Overview
3
1
2
5
6
7
9
A solid green light indicates a proper connection to the
1 Power LED
power supply. The light will be solid orange during boot-up
and will blink green during the WPS process.
A solid green light indicates a connection to the Internet
port. If the LED is orange, the connection is good but the
2 Internet LED
router cannot connect to the Internet. If this LED is blinking
orange, this indicates that the “on demand” connection
type is set and the Internet connection is idle.
3 USB Port
4 WPS Button
5 LAN Ports (1-4)
6 Internet Port
Connect a USB ash drive to share content throughout
your network.
Press to start the WPS process. The Power LED will start to
blink green.
Connect Ethernet devices such as computers, switches,
and game consoles.
Connect your broadband modem to this port using an
Ethernet cable.
7 Power Button Press to power the router on and o.
8 Power Port Connect the supplied power adapter.
9 Reset Button
Press and hold the reset button with a paper clip for six
seconds to reset the router to the factory default settings.
4
8
3
Before you Start
12V
2A
USB
WPS
1
2
3
LAN
4
INTERNET
POWER
• Users with DSL providers - If you are using a PPPoE connection, you will need
your PPPoE user name and password. If you do not have this information, contact
your Internet provider. Do not proceed until you have this information.
• Users with Cable providers - Make sure you unplug the power to your modem.
In some cases, you may need to turn it o for up to ve minutes.
• Advanced Users - If your ISP provided you with a modem/router combo, you will
need to set it to “bridge” mode so the DIR-866L router can work properly. Please
contact your ISP or refer to the user manual for your modem/router device.
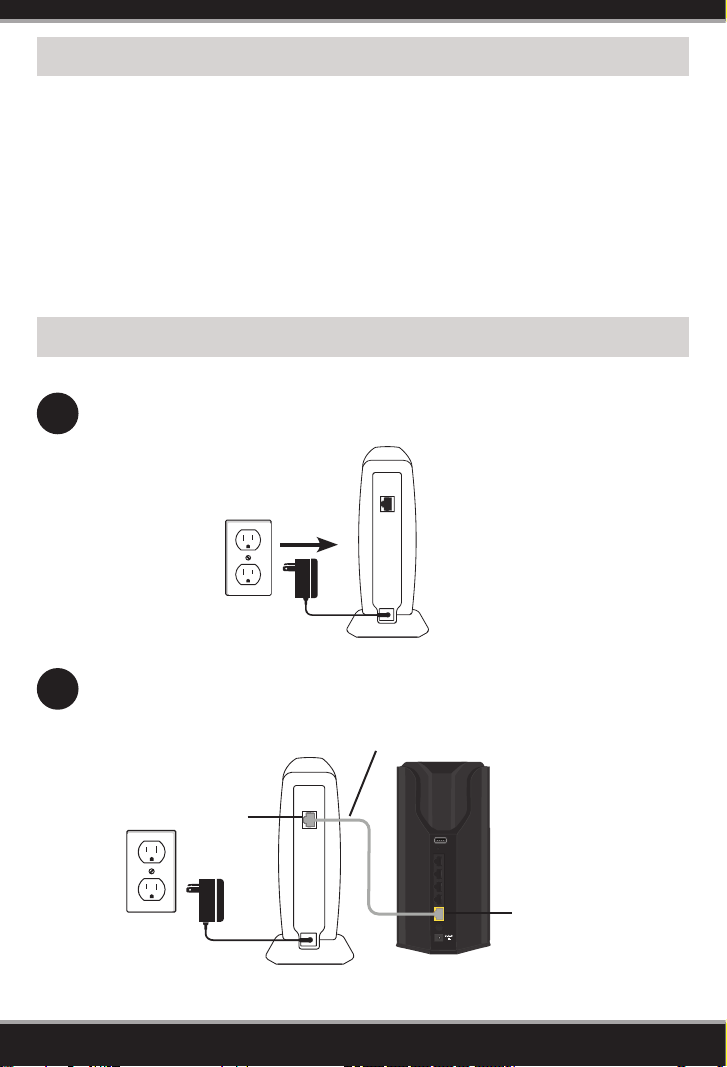
Connect your Router
Unplug the power to your DSL or Cable modem.
1
Modem
Connect an Ethernet cable from the Internet port of the router to the
2
Ethernet port on your DSL or Cable modem.
Ethernet Cable
Ethernet Port
Modem
4
T
DIR-866L
Internet Port (yellow)
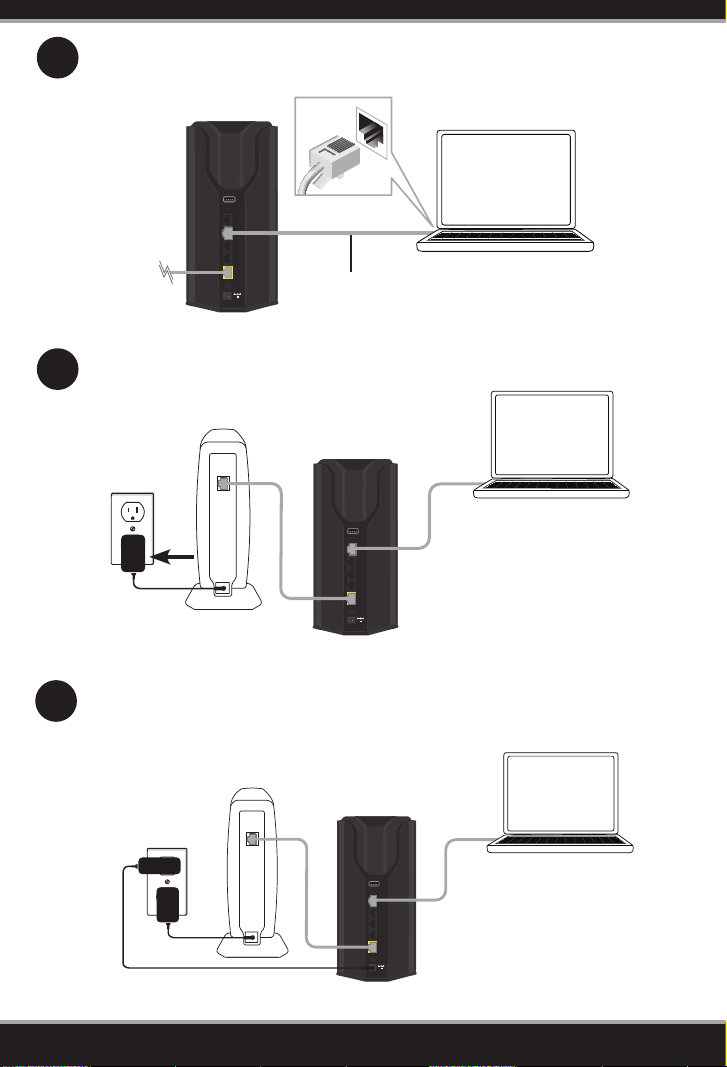
Connect another Ethernet cable from the Ethernet port on your
3
computer to one of the LAN ports on the router.
USB
WPS
1
2
LAN
3
4
INTERNET
POWER
12V
2A
Ethernet Cable
Computer
DIR-866L
Plug the power back into your DSL or cable modem. Please wait about
4
one minute before continuing.
Computer
Modem
USB
WPS
1
2
LAN
3
4
INTERNET
POWER
2A
12V
DIR-866L
Plug the power adapter into your router and connect to an available
5
power outlet or surge protector. If the Power LED does not light up, press
the Power button on the back of the router.
Modem
USB
WPS
1
2
LAN
3
4
INTERNET
POWER
2A
12V
DIR-866L
Computer
5

After the router has powered up, verify that the Power (green) and Internet
6
(orange or green) LEDs are both lit. Proceed with router conguration.
Conguration
There are two ways to congure your router:
A. Web Browser - Use a web browser from your computer.
B. QRS Mobile app - Use a mobile device with the D-Link QRS Mobile app.
Refer to the QRS Mobile Setup section for more information.
A. Web Browser Conguration
Open a web browser (e.g., Internet Explorer, Chrome, Firefox, or Safari)
1
and enter http://dlinkrouter.local./ or enter the IP address of the router
(192.168.0.1).
When the Welcome screen appears, click Next to continue.
2
The router may automatically detect your Internet connection type. If this
3
happens, skip to step 8. If not, then select your Internet connection type and
click Next to continue.
6

DSL (PPPoE) users enter your PPPoE user name and password supplied by
4
your ISP (Internet Service Provider). Click Next and skip to step 8.
If you have a PPTP connection, enter the user name, password, IP information,
5
and DNS settings supplied by your ISP. Click Next and skip to step 8.
If you have a L2TP connection, enter the user name, password, IP information,
6
and DNS settings supplied by your ISP. Click Next and skip to step 8.
7

If you have a Static IP connection, enter the IP information and DNS settings
7
supplied by your ISP. Click Next to continue.
For both the 2.4GHz and 5GHz bands, create a name for your Wi-Fi Network
8
and a password. Your wireless devices (i.e., tablets, smartphones, and
laptops) will need to have this information entered to be able to connect to
your wireless network. Click Next to continue.
Continue with the Setup Wizard to nish conguring your DIR-866L router.
9
When you see the summary screen, make a note of your settings.
Note: Setting up “mydlink” is optional and not required for the router to function.
Congratulations! You have completed the router installation.
After you complete the conguration process, the Internet LED will turn
green indicating that your router is connected to the Internet.
8

B. QRS Mobile Setup
Scan the code below or search “QRS Mobile” (App Store or Google Play) to
1
download the QRS Mobile App to your iPhone, iPad, or Android device.
iOS
Once your app is installed, you may now congure your router. Connect to
2
the router wirelessly by going to your wireless utility on your device. Scan
Android QRS Mobile App
for the wireless network name as listed on the supplied Wi-Fi Conguration
card/sticker. Select the network and then enter the Wi-Fi Password.
Wi-Fi Name(SSID) 2.4Ghz:
dlink-xxxx
Wi-Fi Name(SSID) 5GHz:
dlink-xxxx-5GHz
Password: xxxxxxxx
To congure your router, go to:
http://dlinkrouter.local.
Or http://192.168.0.1
Username: “Admin”
Password:” “ (leave the eld blank)
Once you connect to the router, tap on the QRS Mobile icon from your
3
mobile device, then tap Start to continue. Follow the on-screen instructions
to complete the setup.
After the Setup Complete screen appears, click Save and write down the
4
new Wi-Fi Network name and password on your companion card for future
reference.
Note: To reconnect to your router, launch your wireless utility, select the new
Wi-Fi Network you created, and then enter your new Wi-Fi password.
9

Troubleshooting
How do I connect my wireless devices to the DIR-866L router?
1. Open your wireless network utility that displays available wireless networks.
2. Select the Wi-Fi Network name you assigned in the wizard and connect.
Note: If you did not run the setup wizard or you reset the router to its default
settings, refer to the Wi-Fi Conguration Card included for the default Wi-Fi
Network Name and Wi-Fi Password.
You can also connect wireless devices to the DIR-866L router using WPS:
1. Press the WPS button on the DIR-866L for a minimum of three seconds.
2. Within one minute press the WPS button on your wireless device.
3. Allow up to two minutes to connect.
Note: Some devices may require you to log in to a utility to start the WPS process.
Refer to the user manual of the device you want to connect to the router if you do
not know how to start the WPS process.
How do I change the wireless settings on the DIR-866L router?
1. Open a web browser (e.g., Internet Explorer, Chrome, Firefox, or Safari) and
enter http://dlinkrouter.local./. You can also enter the IP address of the
router (192.168.0.1).
2. At the login screen, type in admin for the user name and enter the router
password you created in the wizard (no password by default).
3. Go to Setup > Wireless Settings > Manual Wireless Network Setup to
create a new Wi-Fi network name (SSID) and Wi-Fi password.
What can I do if I forget my password?
If you forget your password, you must reset your router.
Unfortunately, this process will change all your settings
back to factory default.
To reset the router, locate the reset button (hole) on the
bottom of the unit. With the router powered on, use
an unfolded paper clip to press and hold the button
down for about 10 seconds. Release the button and the
router will go through its reboot process. Wait about
30 seconds to access the router.
Documentation available at http://www.dlink.com/DIR-866L.
10
Reset Button

GPL Code Statement
This D-Link product includes software code developed by third parties, including
software code subject to the GNU General Public License (“GPL”) or GNU Lesser
General Public License (“LGPL”). As applicable, the terms of the GPL and LGPL,
and information on obtaining access to the GPL code and LGPL code used in this
product, are available to you at:
http://tsd.dlink.com.tw/GPL.asp
The GPL code and LGPL code used in this product is distributed WITHOUT ANY
WARRANTY and is subject to the copyrights of one or more authors. For details,
see the GPL code and the LGPL code for this product and the terms of the GPL and
LGPL.
Written Oer for GPL and LGPL Source Code
Where such specic license terms entitle you to the source code of such software,
D-Link will provide upon written request via email and/or traditional paper mail
the applicable GPL and LGPLsource code les via CD-ROM for a nominal cost to
cover shipping and media charges as allowed under the GPL and LGPL.
Please direct all inquiries to:
Email:
GPLCODE@dlink.com
Snail Mail:
Attn: GPLSOURCE REQUEST
D-Link Systems, Inc.
17595 Mt. Herrmann Street
Fountain Valley, CA 92708
GNU GENERAL PUBLIC LICENSE
Version 3, 29 June 2007
Copyright (C) 2007 Free Software Foundation, Inc. <http://fsf.org/>
View the full GPL Code Statement at http://www.gnu.org/licenses/gpl.html
11

Notes
12

Notes
13

Notes
14

Notes
15

Technical Support
Having trouble installing your new product? D-Link’s website contains the latest
user documentation and software updates for D-Link products. U.S. and Canadian
customers can contact D-Link Technical Support through our website.
United States
Internet: http://support.dlink.com
Canada
Internet: http://support.dlink.ca
Version 1.0(US)
June 30, 2014
29072600866LA10
©2014 D-Link. All rights reserved. D-Link and the D-Link logo are trademarks or registered trademarks
of D-Link Corporation or its subsidiaries. iPhone, iPad, and iPod touch are registered trademarks of
Apple Inc. Android is a trademark of Google, Inc. All other third-party marks mentioned herein may
be trademarks of their respective owners. Maximum wireless signal rate derived from IEEE Standard
802.11ac, 802.11g, and 802.11n specications. Actual data throughput will vary. Network conditions and
environmental factors, including volume of network trac, building materials and construction, and
network overhead, lower actual data throughput rate. Environmental conditions will adversely aect
wireless signal range. Product specications, size and shape are subject to change without notice, and
actual product appearance may dier from that depicted on the packaging. This publication may not
be reproduced, in whole or in part, without prior express written permission from D-Link Systems, Inc.
Visit www.dlink.com for details.
16
 Loading...