

Page 1
ll
Page 2

xStack® DGS-3120 Series Managed Switch CLI Reference Guide
I
Table of Contents
Chapter 1 Using Command Line Interface ............................................................................................. 1
Chapter 2 Basic Command List ............................................................................................................. 8
Chapter 3 802.1Q VLAN Command List .............................................................................................. 23
Chapter 4 802.1X Command List ......................................................................................................... 39
Chapter 5 Access Authentication Control Command List .................................................................... 64
Chapter 6 Access Control List (ACL) Command List ........................................................................... 85
Chapter 7 Access Control List (ACL) Egress Command List (EI Mode Only) ................................... 105
Chapter 8 Address Resolution Protocol (ARP) Command List .......................................................... 124
Chapter 9 ARP Spoofing Prevention Command List ......................................................................... 129
Chapter 10 Asymmetric VLAN Command List ..................................................................................... 131
Chapter 11 Auto-Configuration Command List .................................................................................... 133
Chapter 12 Basic Commands Command List ...................................................................................... 135
Chapter 13 BPDU Attack Protection Command List ............................................................................ 152
Chapter 14 Cable Diagnostics Command List ..................................................................................... 157
Chapter 15 Command Logging Command List.................................................................................... 160
Chapter 16 Compound Authentication Command List ........................................................................ 162
Chapter 17 Configuration Command List ............................................................................................. 171
Chapter 18 Configuration Trap Command List .................................................................................... 176
Chapter 19 Connectivity Fault Management (CFM) Command List (EI Mode Only)........................... 178
Chapter 20 Connectivity Fault Management (CFM) Extension Command List (EI Mode Only) .......... 206
Chapter 21 CPU Interface Filtering Command List ............................................................................. 210
Chapter 22 Debug Software Command List ........................................................................................ 221
Chapter 23 DHCP Local Relay Command List .................................................................................... 233
Chapter 24 DHCP Relay Command List .............................................................................................. 237
Chapter 25 DHCP Server Screening Com mand List ........................................................................... 254
Chapter 26 DHCPv6 Relay Command List (EI Mode Only) ................................................................ 258
Chapter 27 D-Link Unidirectional Link Detection (DULD) Command List (EI Mode Only) .................. 263
Chapter 28 Ethernet Ring Protection Switching (ERPS) Command List (EI Mode Only).................... 265
Chapter 29 Filter Command List .......................................................................................................... 275
Chapter 30 Filter Database (FDB) Command List ............................................................................... 278
Chapter 31 Flash File System (FFS) Command List ........................................................................... 288
Chapter 32 Gratuitous ARP Command List ......................................................................................... 299
Chapter 33 IGMP / MLD Snooping Command List .............................................................................. 305
Chapter 34 IP-MAC-Port Binding (IMPB) Command List (EI Mode Only) ........................................... 349
Page 3

xStack® DGS-3120 Series Managed Switch CLI Reference Guide
II
Chapter 35 IPv6 Neighbor Discover Command List (EI Mode Only) ................................................... 365
Chapter 36 IPv6 Route Command List (EI Mode Only) ....................................................................... 369
Chapter 37 Japanese Web-Based Access Control (JWAC) Command List ....................................... 372
Chapter 38 Jumbo Frame Command List ............................................................................................ 396
Chapter 39 Layer 2 Protocol Tunneling (L2PT) Command List ........................................................... 398
Chapter 40 Link Aggregation Command List ....................................................................................... 402
Chapter 41 Link Layer Discovery Protocol (LLDP) Command List ...................................................... 409
Chapter 42 Loop Back Detection (LBD) Command List ...................................................................... 435
Chapter 43 MAC Notification Command List ....................................................................................... 441
Chapter 44 MAC-based Access Control Command List ...................................................................... 446
Chapter 45 MAC-based VLAN Command List..................................................................................... 462
Chapter 46 Mirror Command List ......................................................................................................... 465
Chapter 47 MSTP debug enhancement Command List ...................................................................... 468
Chapter 48 Multicast Filter Command List ........................................................................................... 475
Chapter 49 Multicast VLAN Command List ......................................................................................... 486
Chapter 50 Multiple Spanning Tree Protocol (MSTP) Command List ................................................. 500
Chapter 51 Network Load Balancing (NLB) Command List ................................................................ 513
Chapter 52 Network Monitoring Command List ................................................................................... 519
Chapter 53 OAM Commands (EI Mode Only) ..................................................................................... 526
Chapter 54 Peripherals Command List ................................................................................................ 534
Chapter 55 Ping Command List ........................................................................................................... 540
Chapter 56 Port Security Command List ............................................................................................. 542
Chapter 57 Power over Ethernet (PoE) Command List ....................................................................... 550
Chapter 58 Power Saving Command List ............................................................................................ 555
Chapter 59 PPPoE Circuit ID Insertions Command List (EI Mode Only) ............................................ 561
Chapter 60 Protocol VLAN Command List .......................................................................................... 565
Chapter 61 QinQ Command List (EI Mode Only) ................................................................................ 571
Chapter 62 Quality of Service (QoS) Command List ........................................................................... 579
Chapter 63 Remote Switched Port ANalyzer (RSPAN) Command List............................................... 596
Chapter 64 RPC PortMapper Command List ....................................................................................... 602
Chapter 65 Safeguard Engine Command List ..................................................................................... 604
Chapter 66 SD Card Management Command List .............................................................................. 606
Chapter 67 Secure Shell (SSH) Command List ................................................................................... 613
Chapter 68 Secure Sockets Layer (SSL) Command List .................................................................... 621
Chapter 69 sFlow Command List (EI Mode Only) ............................................................................... 627
Chapter 70 Show Technical Support Command List ........................................................................... 639
Page 4

xStack® DGS-3120 Series Managed Switch CLI Reference Guide
III
Chapter 71 Simple Mail Transfer Protocol (SMTP) Command List ..................................................... 642
Chapter 72 Simple Network Management Protocol (SNMP) Command List ...................................... 647
Chapter 73 Single IP Management Command List ............................................................................. 673
Chapter 74 Stacking Command List .................................................................................................... 683
Chapter 75 Syslog and Trap Source-interface Command List ............................................................ 691
Chapter 76 System Log Command List ............................................................................................... 695
Chapter 77 System Severity Command List ........................................................................................ 707
Chapter 78 Telnet Client Command List .............................................................................................. 709
Chapter 79 TFTP Client Command List ............................................................................................... 710
Chapter 80 Time and SNTP Command List ........................................................................................ 715
Chapter 81 Trace Route Command List .............................................................................................. 722
Chapter 82 Traffic Control Command List ........................................................................................... 725
Chapter 83 Traffic Segmentation Command List ................................................................................. 730
Chapter 84 Trusted Host Command List ............................................................................................. 732
Chapter 85 Unicast Routing Command List ......................................................................................... 736
Chapter 86 VLAN Trunking Command List .......................................................................................... 741
Chapter 87 Voice VLAN Command List ............................................................................................... 746
Chapter 88 Web-Based Access Control (WAC) Command List .......................................................... 757
Chapter 89 Password Recovery Command List .................................................................................. 772
Appendix A Mitigating ARP Spoofing Attacks Using Packet Content ACL .......................................... 774
Appendix B Password Recovery Procedure ......................................................................................... 781
Appendix C System Log Entries ........................................................................................................... 783
Appendix D Trap Log Entries ................................................................................................................ 798
Appendix E RADIUS Attributes Assignment ......................................................................................... 806
Page 5
xStack® DGS-3120 Series Managed Switch CLI Reference Guide
1
Chapter 1 Using Command Line
Interface
The Switch can be managed through the Switch’s serial port, Telnet, SNMP or the Web-based
management agent. The Command Line Interface (CLI) can be used to configure and manage the
Switch via the serial port or Telnet interfaces.
This manual provides a reference for all of the commands contained in the CLI. Every command
will be introduced in terms of purpose, format, description, parameters, and examples.
Configuration and management of the Switch via the Web-based management agent are
discussed in the Web UI Reference Guide. For detailed information on installing hardware please
also refer to the Hardware Installation Guide.
1-1 Accessing the Switch via the Seri al Port
The Switch’s serial port’s default settings are as follows:
• 115200 baud
• no parity
• 8 data bits
• 1 stop bit
A computer running a terminal emulation program capable of emulating a VT-100 terminal and a
serial port configured as above are then connected to the Switch’s Console port via an included
RS-232 to RJ-45 convertor cable.
With the serial port properly connected to a management computer, the following screen should be
visible. If this screen does not appear, try pressing Ctrl+r to refresh the console screen.
DGS-3120-24TC Gigabit Ethernet Switch
Command Line Interface
Firmware: Build 2.00.010
Copyright(C) 2011 D-Link Corporation. All rights reserved.
UserName:
PassWord:
DGS-3120-24TC:admin#
There is no initial username or password. Just press the Enter key twice to display the CLI input
cursor − DGS-3120-24TC:admin# . This is the command line where all commands are input.
1-2 Setting the Switch’s IP Address
Each Switch must be assigned its own IP Address, which is used for communication with an
SNMP network manager or other TCP/IP application (for example BOOTP, TFTP). The Switch’s
Page 6

xStack® DGS-3120 Series Managed Switch CLI Reference Guide
2
default IP address is 10.90.90.90. You can change the default Switch IP address to meet the
specification of your networking address scheme.
The Switch is also assigned a unique MAC address by the factory. This MAC address cannot be
changed, and can be found on the initial boot console screen – shown below.
Boot Procedure V2.00.003
-------------------------------------------------------------------------------
Power On Self Test ........................................ 100 %
MAC Address : 00-01-02-03-04-00
H/W Version : A1
Please Wait, Loading V2.00.010 Runtime Image .............. 100 %
UART init ................................................. 100 %
Starting runtime image
Device Discovery .......................................... \
The Switch’s MAC address can also be found in the Web management program on the Switch
Information (Basic Settings) window on the Configuration menu.
The IP address f or the S w it ch must be set before it ca n be managed with the Web-based manager.
The Switch IP address can be automatically set using BOOTP or DHCP protocols, in which case
the actual address assigned to the Switch must be known.
Starting at the command line prompt, enter the commands config ipif System ipaddress
xxx.xxx.xxx.xxx/yyy.yyy.yyy.yyy. Where the x’s represent the IP address to be assigned to the
IP interface named System and the y’s represent the corresponding subnet mask.
Alternatively, you can enter config ipif System ipaddress xxx.xxx.xxx.xxx/z. Where the x’s
represent the IP address to be assigned to the IP interface named System and the z represents
the corresponding number of subnets in CIDR notation.
The IP interface named System on the Switch can be assigned an IP address and subnet mask
which can then be used to connect a management station to the Switch’s Telnet or Web-based
management agent.
DGS-3120-24TC:admin# config ipif System ipaddress 10.24.22.100/255.0.0.0
Command: config ipif System ipaddress 10.24.22.100/8
Success.
DGS-3120-24TC:admin#
In the above example, the Switch was assigned an IP address of 10.24.22.100 with a subnet mask
of 255.0.0.0. The system message Success indicates that the command was executed
successfully. The Switch can now be configured and managed via Telnet, SNMP MIB browser and
the CLI or via the Web-based management agent using the above IP address to connect to the
Switch.
Page 7
xStack® DGS-3120 Series Managed Switch CLI Reference Guide
3
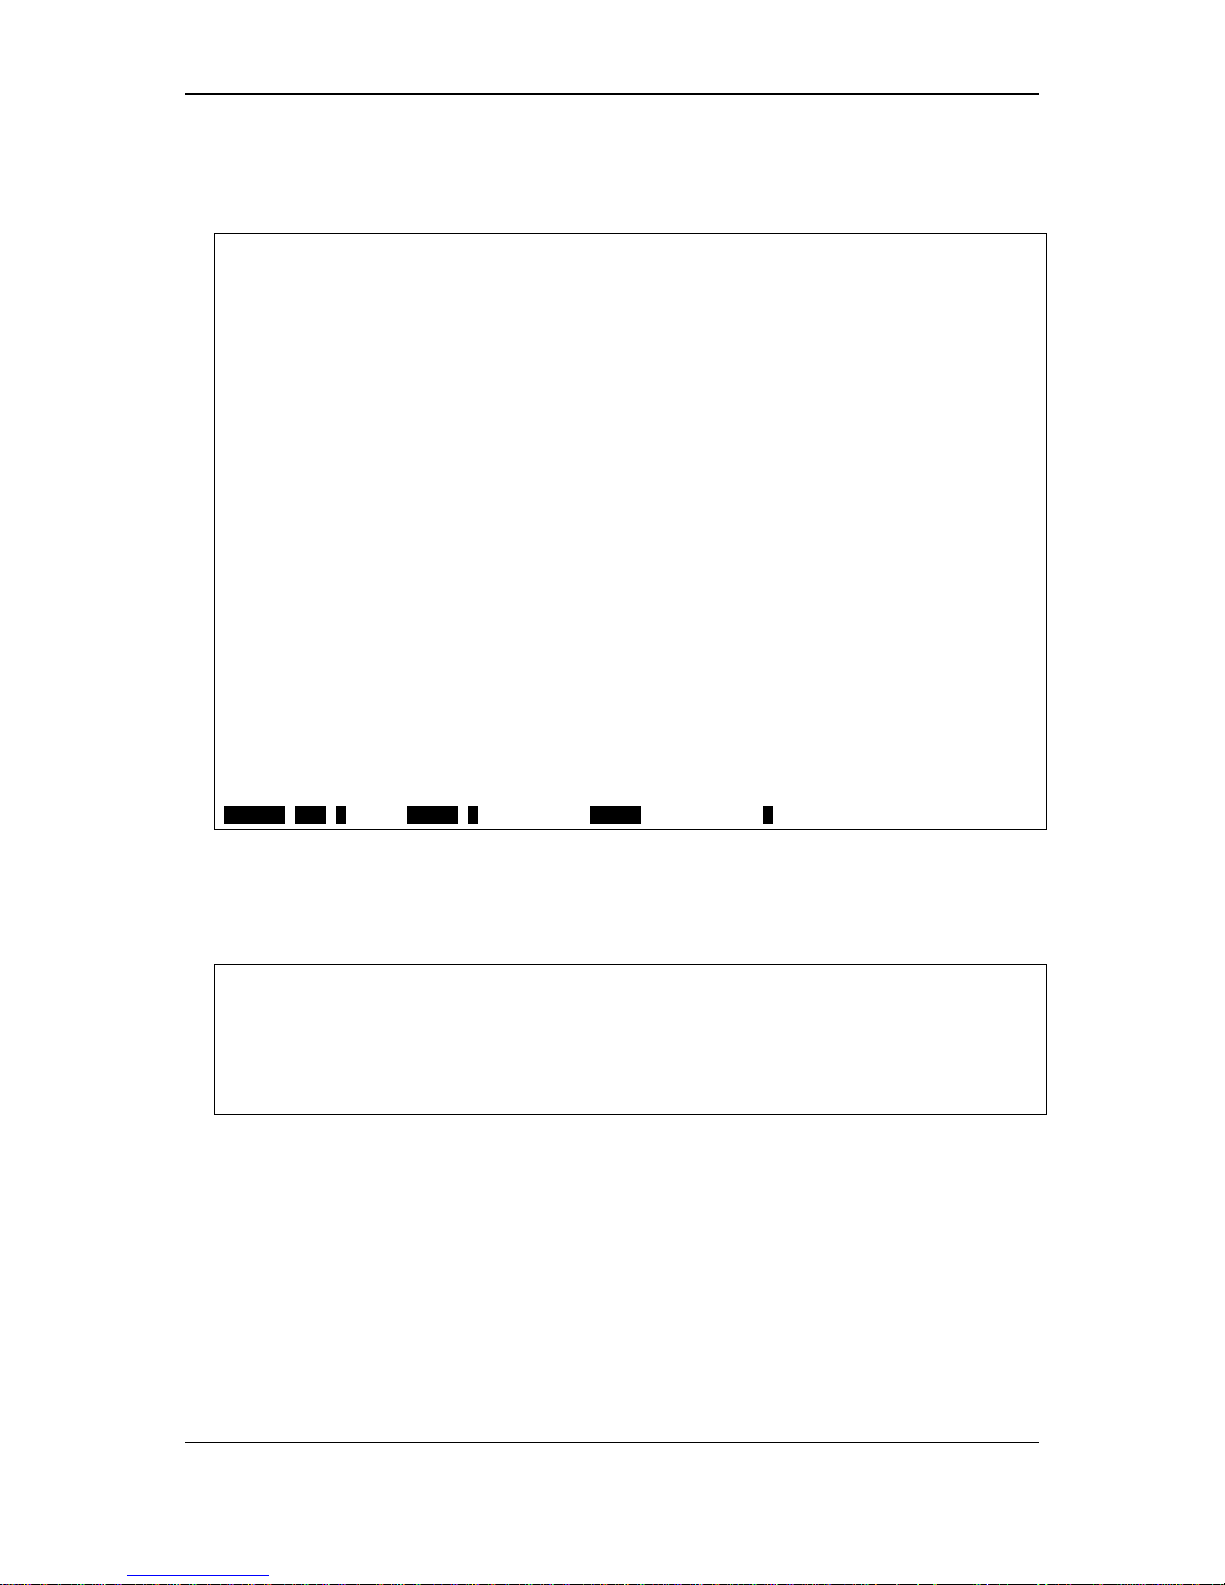
There are a number of helpful features included in the CLI. Entering the ? command will display a
list of all of the top-level commands.
..
?
cable_diag ports
cd
cfm linktrace
cfm lock md
cfm loopback
change drive
clear
clear address_binding dhcp_snoop binding_entry ports
clear arptable
clear attack_log
clear cfm pkt_cnt
clear counters
clear fdb
clear igmp_snooping data_driven_group
clear igmp_snooping statistics counter
clear log
clear mac_based_access_control auth_state
clear mld_snooping data_driven_group
clear mld_snooping statistics counter
clear port_security_entry
CTRL+C ESC q Quit SPACE n Next Page ENTER Next Entry a All
When entering a command without its required parameters, the CLI will prompt you with a Next
possible completions: message.
DGS-3120-24TC:admin# config account
Command: config account
Next possible completions:
<username>
DGS-3120-24TC:admin#
In this case, the command config account was entered with the parameter <username>. The CLI
will then prompt to enter the <username> with the message, Next possible completions:. Every
command in the CLI has this feature, and complex commands have several layers of parameter
prompting.
In addition, after typing any given command plus one space, users can see all of the next possible
sub-commands, in sequential order, by repeatedly pressing the Tab key.
To re-enter the previous command at the command prompt, press the up arrow cursor key. The
previous command will appear at the command prompt.
Page 8

xStack® DGS-3120 Series Managed Switch CLI Reference Guide
4
DGS-3120-24TC:admin# config account
Command: config account
Next possible completions:
<username>
DGS-3120-24TC:admin# config account
In the above example, the command config account was entered without the required parameter
<username>, the CLI returned the Next possible completions: <username> prompt. The up
arrow cursor control key was pressed to re-enter the previous command (config account) at the
command prompt. Now the appropriate username can be entered and the config account
command re-executed.
All commands in the CLI function in this way. In addition, the syntax of the help prompts are the
same as presented in th is manual − angle brackets < > indicate a numerical value or character
string, braces { } indicate optional parameters or a choice of parameters, and brackets [ ] indicate
required parameters.
If a command is entered that is unrecognized by the CLI, the top-level commands will be displayed
under the Available comm an ds: prompt.
GS-3120-24TC:admin#the
Available commands:
.. ? cable_diag cd
cfm change clear config
copy create debug del
delete dir disable download
enable erase execute format
login logout md move
no ping ping6 rd
reboot reconfig rename reset
save show smtp telnet
traceroute traceroute6 upload
DGS-3120-24TC:admin#
The top-level commands consist of commands such as show or config. Most of these commands
require one or more param eters to nar ro w th e top-level command. This is equivalent to show what?
or config what? Where the what? is the next parameter.
For example, entering the show command with no additional parameters, the CLI will then display
all of the possible next parameters.
DGS-3120-24TC:admin#show
Command: show
Next possible completions:
802.1p 802.1x access_profile account
accounting acct_client address_binding
arp_spoofing_prevention arpentry asymmetric_vlan
attack_log auth_client auth_diagnostics
auth_session_statistics auth_statistics authen
Page 9

xStack® DGS-3120 Series Managed Switch CLI Reference Guide
5
authen_enable authen_login authen_policy authentication
authorization autoconfig bandwidth_control boot_file
bpdu_protection cfm command command_history
config cpu current_config device_status
dhcp_local_relay dhcp_relay dot1v_protocol_group
dscp egress_access_profile egress_flow_meter
environment erps error fdb
filter flow_meter gratuitous_arp greeting_message
gvrp hol_prevention igmp_snooping ipfdb
ipif ipif_ipv6_link_local_auto iproute
ipv6 ipv6route jumbo_frame lacp_port
limited_multicast_addr link_aggregation lldp
log log_save_timing log_software_module
loopdetect mac_based_access_control
mac_based_access_control_local mac_based_vlan mac_notification
max_mcast_group mcast_filter_profile mirror
mld_snooping multicast multicast_fdb nlb
packet password_recovery per_queue poe
port port_group port_security
port_security_entry port_vlan ports
power_saving private_vlan pvid qinq
radius rmon router_ports rspan
safeguard_engine scheduling scheduling_mechanism
serial_port session sflow sim
snmp sntp ssh ssl
stack_device stack_information stacking_mode
storage_media_info stp switch
syslog system_severity tech_support terminal
time time_range traffic
traffic_segmentation trap trusted_host
utilization vlan vlan_translation vlan_trunk
voice_vlan wac
DGS-3120-24TC:admin#
In the above example, all of the possible next parameters for the show command are displayed. At
the next command prompt, the up arrow was used to re-enter the show command, followed by the
account parameter. The CLI then displays the user accounts configured on the Switch.
1-3 Command Syntax Symbols
Syntax
Description
angle brackets < >
Encloses a variable or value. Users must specify the variable or value.
For example, in the syntax
create ipif <ipif_name 12 > {<network_address>} <vlan_name 32>
{secondary | state [enable | disable] | proxy_arp [ ena ble | disable ]
{local [enable | disable]}}
users must supply an IP interface name for <ipif_name 12> ,a VLAN
name for <vlan_name 32> and an address for <network_address>
Page 10
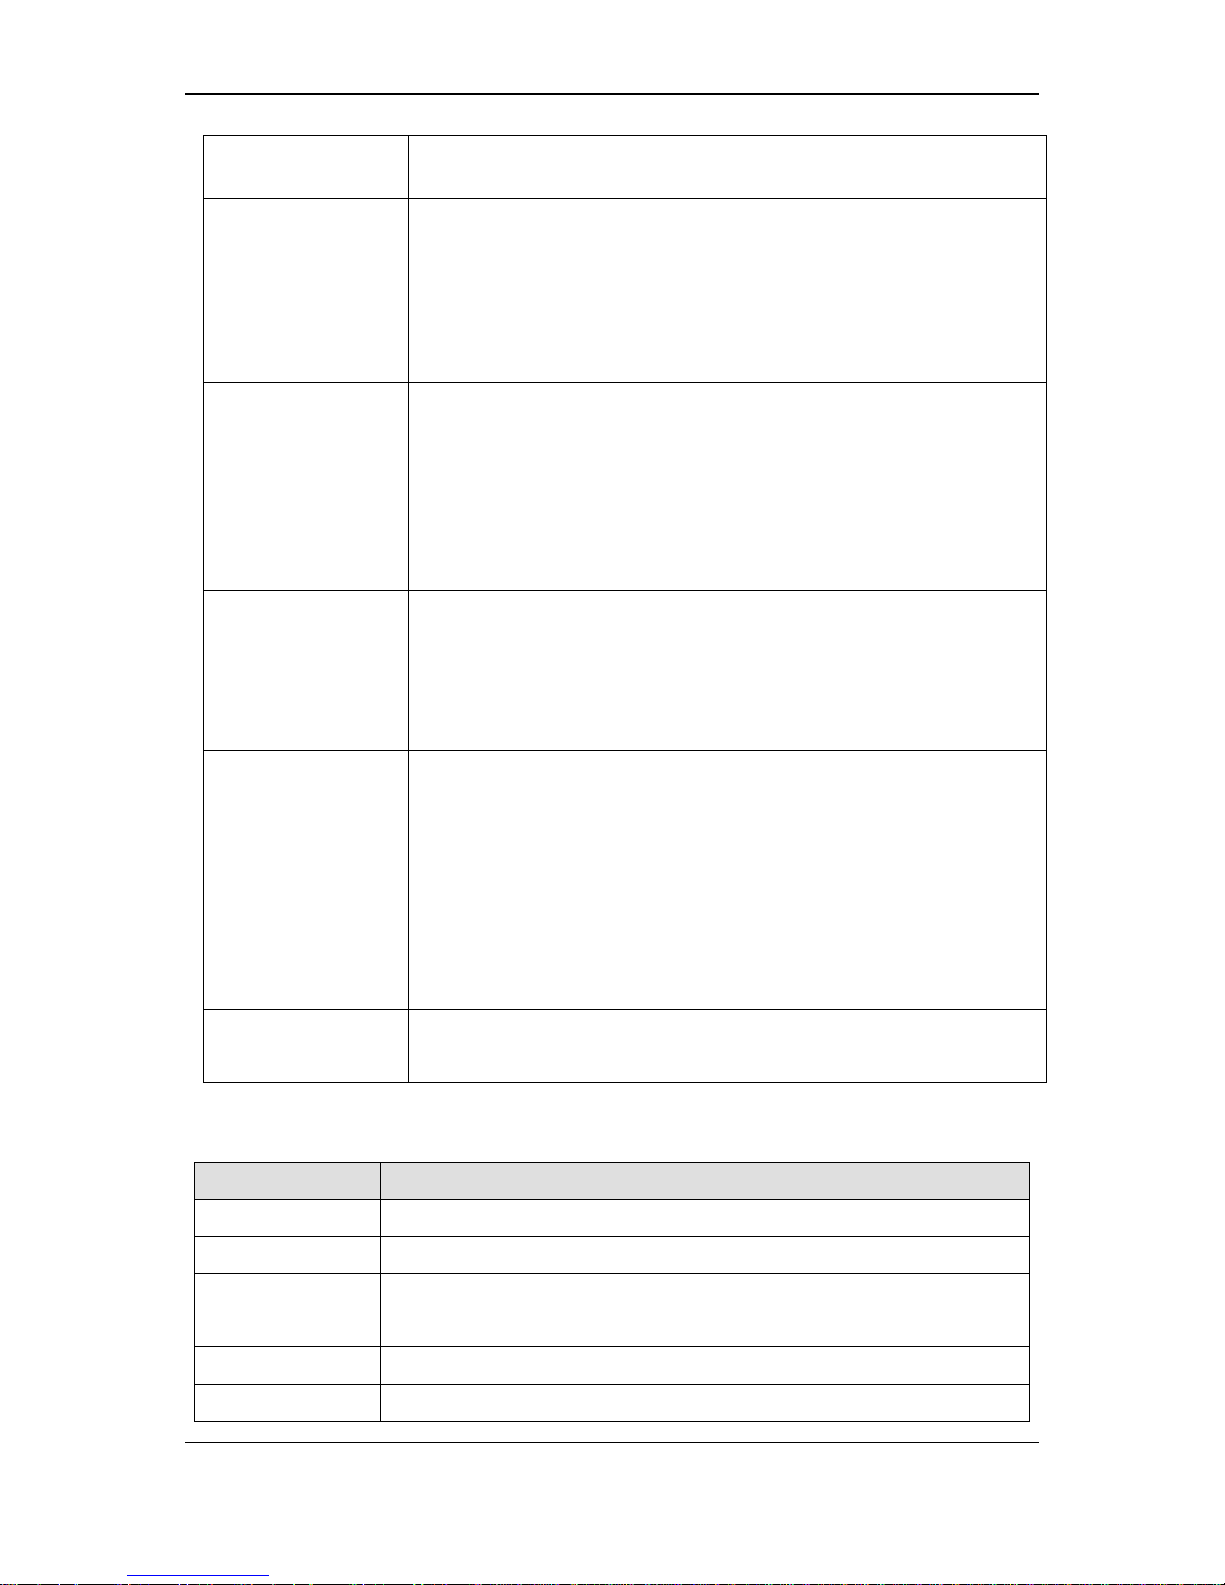
xStack® DGS-3120 Series Managed Switch CLI Reference Guide
6
when entering the command. DO NOT TYPE THE ANGLE
BRACKETS.
square brackets [ ]
Encloses a required value or list of required arguments. Only one
value or argument must be specified. For example, in the syntax
create account [admin | operator | power_user | user] <username
15> {encrypt [plain_text | sha_1] <password>}
users must specify either the admin-level or user-level account when
entering the command. DO NOT TYPE THE SQUARE BRACKETS.
vertical bar |
Separates mutually exclusive items in a list, one of which must be
entered. For example, in the syntax
create ipif <ipif_name 12> {<network_address>} <vlan_name 32>
{secondary | state [enable | disable] | proxy_arp [enable | disable]
{local [enable | disable]}}
users must specify either the community or trap receiver in the
command. DO NOT TYPE THE VERTICAL BAR.
braces { }
Encloses an optional value or a list of optional arguments. One or
more values or arguments can be specified. For example, in the syntax
reset {[config | system]} {force_agree}
users may choose configure or system in the command. DO NOT
TYPE THE BRACES.
parentheses ( )
Indicates at least one or more of the values or arguments in the
preceding syntax enclosed by braces must be specified. For example,
in the syntax
config bpdu_protection por t s [<portlist > | all] {state [enable | disable] |
mode [drop | block | shutdown]}(1)
users have the option to specify hops or time or both of them. The "(1)"
following the set of braces indicates at least one argum ent or value
within the braces must be specified. DO NOT TYPE THE
PARENTHESES.
ipif <ipif_name 12>
metric <value 1-31>
12 means the maximum length of the IP interface name.
1-31 means the legal range of the metric value.
1-4 Line Editing Keys
Keys
Description
Delete Delete character under cursor and shift remainder of line to left.
Backspace
Delete character to left of cursor and shift remainder of line to left.
Insert
Toggle on and off. When toggled on, inserts text and shifts previous
text to right.
Left Arrow
Move cursor to left.
Right Arrow
Move cursor to right
Page 11

xStack® DGS-3120 Series Managed Switch CLI Reference Guide
7
Tab
Help user to select appropriate token.
P
Display the previous page.
N or Space
Display the next page.
CTRL+C Escape from displayed pages.
ESC
Escape from displayed pages.
Q
Escape from displayed pages.
R refresh the displayed pages
a Display the remaining pages. (The screen display will not pause again.)
Enter
Display the next line.
The screen display pauses when the show command output reaches the end of the page.
In the above example, all of the possible next parameters for the show command are displayed. At
the next command prompt, the up arrow was used to re-enter the show command, followed by the
account parameter. The CLI then displays the user accounts configured on the Switch.
Page 12

xStack® DGS-3120 Series Managed Switch CLI Reference Guide
8
Chapter 2 Basic Command List
show session
show serial_port
config serial_port {bau d_rate [9600 | 19200 | 38400 | 115200] | auto_logout [n e ver | 2_m inutes |
5_minutes | 10_minutes | 15_m inutes]}
enable clipaging
disable clipaging
login
logout
?
clear
show command_history
config command_history <value 1-40>
config greeting_message {default}
show greeting_message
config command_prompt [<string 16> | username | default]
config terminal width [default | <value 80-200>]
show terminal width
config ports [<portlist> | all] {medium_type [fiber | copper]} {speed [auto | 10_half | 10_full |
100_half | 100_full | 1000_full {[master | slave]} ] | flow_control [enable | disable] | learning
[enable | disable] | state [enable | disable] |mdix [auto | nor mal | cross] | [description <desc 1-
32> | clear_description]}
show ports {<portlist>} {[description | err_dis ab led | detai ls | media_type]}
2-1 show session
Description
This command is used to display a list of currently users which are login to CLI sessions.
Format
show session
Parameters
None.
Restrictions
Only Administrator and Operator-level users can issue this command.
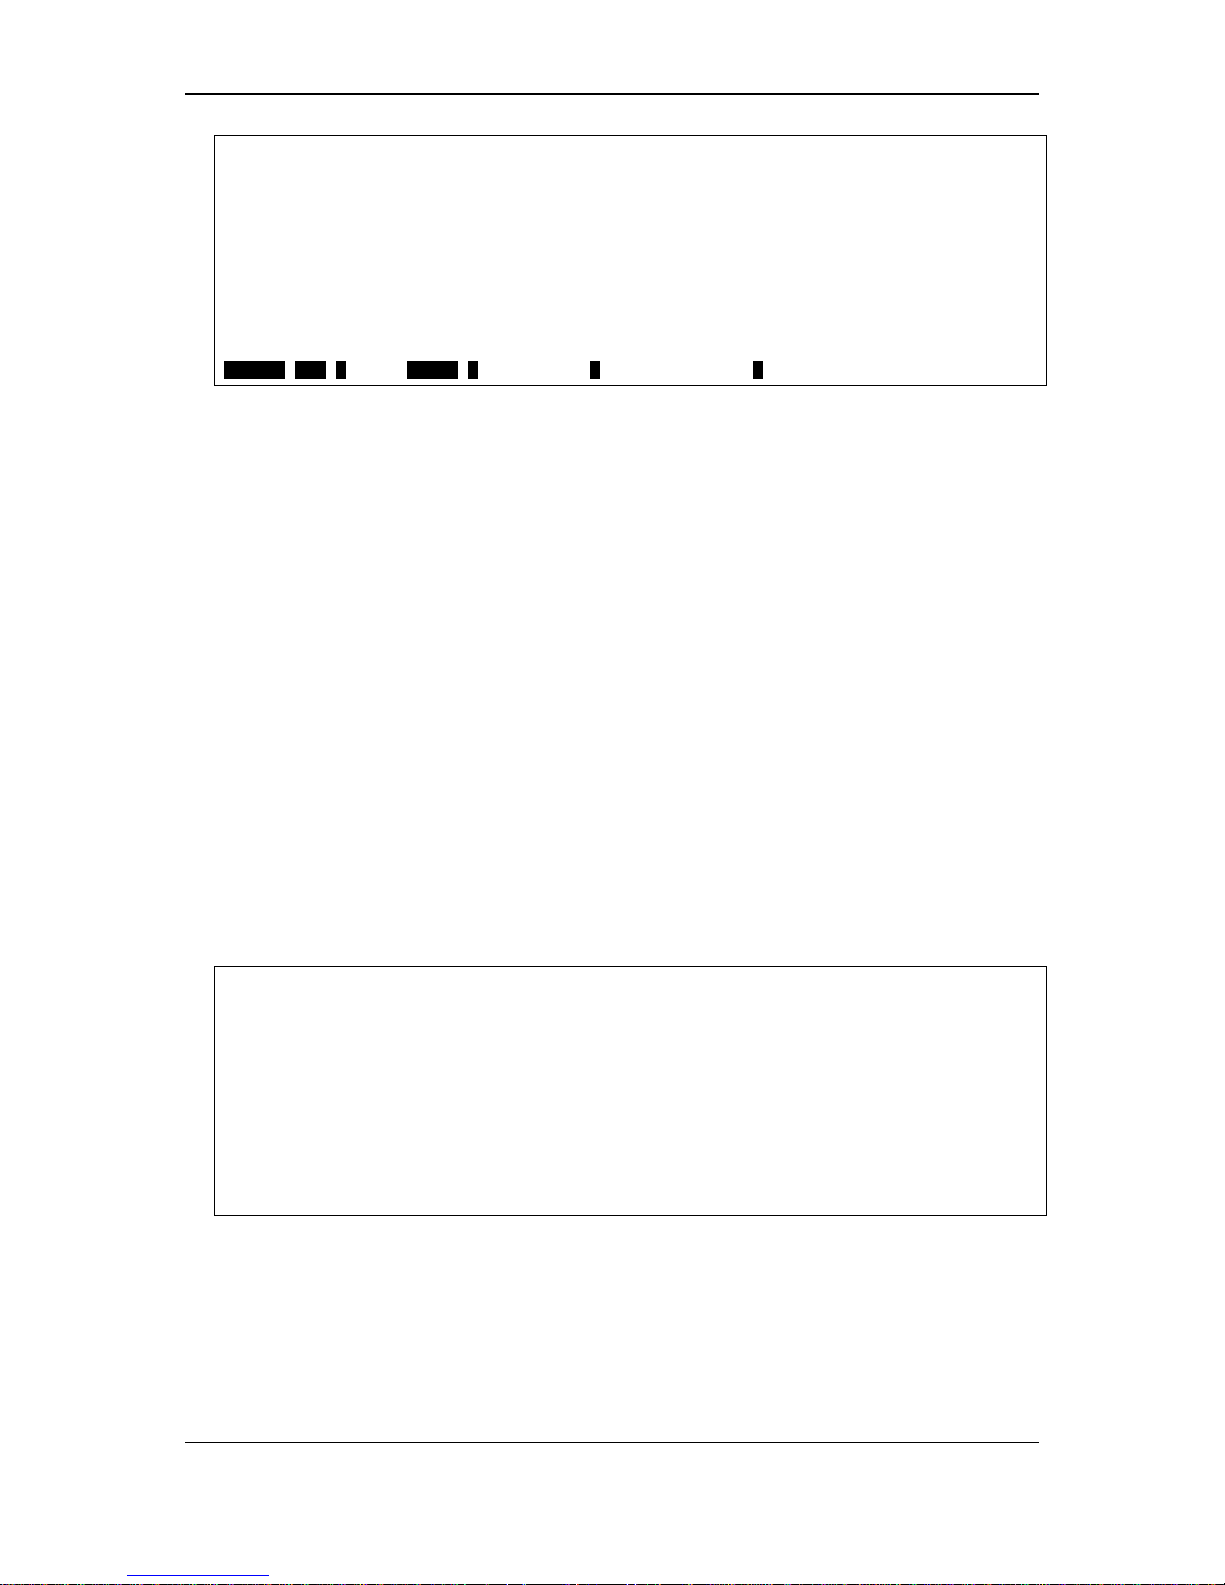
Example
To disable the password encryption:
Page 13
xStack® DGS-3120 Series Managed Switch CLI Reference Guide
9
DGS-3120-24TC:admin#show session
Command: show session
ID Live Time From Level User
--- ------------ --------------------------------------- ----- -------------- 8 00:04:17.870 Serial Port admin Anonymous
Total Entries: 1
CTRL+C ESC q Quit SPACE n Next Page p Previous Page r Refresh
2-2 show serial_port
Description
This command is used to display the current serial port settings.
Format
show serial_port
Parameters
None.
Restrictions
None.
Example
To display the serial port setting:
DGS-3120-24TC:admin# show serial_port
Command: show serial_port
Baud Rate : 9600
Data Bits : 8
Parity Bits : None
Stop Bits : 1
Auto-Logout : 10 minutes
DGS-3120-24TC:admin#
2-3 config serial_port
Description
This command is used to configure the serial bit rate that will be used to communicate with the
management host and the auto logout time for idle connections.
Page 14

xStack® DGS-3120 Series Managed Switch CLI Reference Guide
10
Format
config serial_port {baud_rate [9600 | 19200 | 38400 | 115200] | auto_logout [never |
2_minutes | 5_minutes | 10_minutes | 15_minutes]}
Parameters
baud_rate - (Optional) The serial bit rate that will be used to communicate with the management
host. The default baud rate is 115200.
9600 - Specify the serial bit rate to be 9600.
19200 - Specify the serial bit rate to be 19200.
38400 - Specify the serial bit rate to be 38400.
115200 - Specify the serial bit rate to be 115200.
auto_logout - (Optional) The auto logout time out setting:
never - Never timeout.
2_minutes - When idle over 2 minutes, the device will auto logout.
5_minutes - When idle over 5 minutes, the device will auto logout.
10_minutes - When idle over 10 minutes, the device will auto logout.
15_minutes - When idle over 15 minutes, the device will auto logout.
Restrictions
Only Administrator and Operator-level users can issue this command.
Example
To configure baud rate:
DGS-3120-24TC:admin# config serial_port baud_rate 9600
Command: config serial_port baud_rate 9600
Success.
DGS-3120-24TC:admin#
2-4 enable clipaging
Description
This command is used to enable the pausing of the screen display when the show command
output reaches the end of the page. For those show commands that provide the display refresh
function, the display wil l not be refreshed when clipagin g is dis a ble d. T he def aul t s etti ng is e nab led .
Format
enable clipaging
Parameters
None.
Page 15
xStack® DGS-3120 Series Managed Switch CLI Reference Guide
11
Restrictions
Only Administrator and Operator-level users can issue this command.
Example
To enable pausing of the screen display when show command output reaches the end of the page:
DGS-3120-24TC:admin# enable clipaging
Command: enable clipaging
Success.
DGS-3120-24TC:admin#
2-5 disable clipaging
Description
This command is used to disable the pausing of the screen display when the show command
output reaches the end of the page. The default setting is enabled.
Format
disable clipaging
Parameters
None.
Restrictions
Only Administrator and Operator-level users can issue this command.
Example
To disable pausing of the s c r een disp lay when show command output reaches the end of the p ag e:
DGS-3120-24TC:admin# disable clipaging
Command: disable clipaging
Success.
DGS-3120-24TC:admin#
2-6 login
Description
This command is used to allow user login to the Switch.
Page 16

xStack® DGS-3120 Series Managed Switch CLI Reference Guide
12
Format
login
Parameters
None.
Restrictions
None.
Example
To login the Switch with a user name dlink:
DGS-3120-24TC:admin# login
Command: login
UserName:dlink
PassWord:****
DGS-3120-24TC:admin#
2-7 logout
Description
This command is used to logout the facility.
Format
logout
Parameters
None.
Restrictions
None.
Example
To logout current user:
Page 17

xStack® DGS-3120 Series Managed Switch CLI Reference Guide
13
DGS-3120-24TC:admin# logout
Command: logout
**********
* Logout *
**********
Press any key to login...
DGS-3120-24TC Gigabit Ethernet Switch
Command Line Interface
Firmware: Build 2.00.010
Copyright(C) 2011 D-Link Corporation. All rights reserved.
UserName:
2-8 ?
Description
This command is used to display the usage description for all commands or the specific one.
Format
?
Parameters
None.
Restrictions
None.
Example
To get “ping” command usage, descriptions:
DGS-3120-24TC:admin#? ping
Command: ? ping
Command: ping
Usage: <ipaddr> { times <value 1-255> | timeout <sec 1-99>}
Description: Used to test the connectivity between network devices.
DGS-3120-24TC:admin#
Page 18

xStack® DGS-3120 Series Managed Switch CLI Reference Guide
14
2-9 clear
Description
The command is used to clear screen.
Format
clear
Parameters
None.
Restrictions
None.
Example
To clear screen:
DGS-3120-24TC:admin# clear
Command: clear
DGS-3120-24TC:admin#
2-10 show command_history
Description
The command is used to display command history.
Format
show command_history
Parameters
None.
Restrictions
None.
Example
To display command history:
Page 19

xStack® DGS-3120 Series Managed Switch CLI Reference Guide
15
DGS-3120-24TC:admin#show command_history
Command: show command_history
? ping
login
show serial_port
show session
? config bpdu_protection ports
? reset
? create account
? create ipif
show
the
?
DGS-3120-24TC:admin#
2-11 config command_history
Description
This command is used to configure the number of commands that the Switch can recall. The
Switch “remembers” upto the last 40 commands you entered.
Format
config command_history <value 1-40>
Parameters
<value 1-40> - Enter the number of commands that the Switch can recall. This value must be
between 1 and 40.
Restrictions
None.
Example
To configure the number of command history:
DGS-3120-24TC:admin# config command_history 25
Command: config command_history 25
Success.
DGS-3120-24TC:admin#
2-12 config greeting_message
Description
This command is used to configure the greeting message (or banner).
Page 20

xStack® DGS-3120 Series Managed Switch CLI Reference Guide
16
Format
config greeting_message {default}
Parameters
default - (Optional) Adding this parameter to the “config greeting_message” command will return
the greeting message (banner) to its original factory default entry.
Restrictions
Only Administrator and Operator-level users can issue this command.
Example
To edit the banner:
DGS-3120-24TC:admin#config greeting_message
Command: config greeting_message
Greeting Messages Editor
================================================================================
DGS-3120-24TC Gigabit Ethernet Switch
Command Line Interface
Firmware: Build 2.00.010
Copyright(C) 2011 D-Link Corporation. All rights reserved.
================================================================================
<Function Key> <Control Key>
Ctrl+C Quit without save left/right/
Ctrl+W Save and quit up/down Move cursor
Ctrl+D Delete line
Ctrl+X Erase all setting
Ctrl+L Reload original setting
--------------------------------------------------------------------------------
2-13 show greet ing_message
Description
The command is used to display greeting message.
Format
show greeting_message
Parameters
None.
Page 21

xStack® DGS-3120 Series Managed Switch CLI Reference Guide
17
Restrictions
Only Administrator and Operator-level users can issue this command.
Example
To display greeting message:
DGS-3120-24TC:admin#show greeting_ message
Command: show greeting_message
================================================================================
DGS-3120-24TC Gigabit Ethernet Switch
Command Line Interface
Firmware: Build 2.00.010
Copyright(C) 2011 D-Link Corporation. All rights reserved.
================================================================================
DGS-3120-24TC:admin#
2-14 config command_prompt
Description
This command is used to modify the command prompt.
The current command prompt consists of four parts: “product name” + “:” + ”user level” + ”#” (e.g.
“DGS-3120-24TC:admin#”). This command is used to modify the first part (1. “product name”) with
a string consisting of a maximum of 16 characters, or to be replaced with the users’ login user
name.
When users issue the “reset” command, the current command prompt will remain in tact. Yet,
issuing the “reset system” will return the command prompt to its original factory default value.
Page 22
xStack® DGS-3120 Series Managed Switch CLI Reference Guide
18
Format
config command_prompt [<string 16> | username | default]
Parameters
<string 16> - Enter the new command prompt string of no more than 16 characters.
username - Enter this command to set the login username as the command prompt.
default - Enter this command to return the command prompt to its original factory default value.
Restrictions
Only Administrator and Operator-level users can issue this command.
Example
To edit the command prompt:
DGS-3120-24TC:admin#config command_prompt Prompt#
Command: config command_prompt Prompt#
Success.
Prompt#:admin#
2-15 config term inal width
Description
The command is used to set current terminal width.
The usage is described as below:
1. Users login and configure the terminal width to 120, this configuration take effect on this
login section. If users implement “save” command, the configuration is saved. After users
log out and log in again, the terminal width is 120.
2. If user did not save the configuration, an oth er us er logi n, the terminal width is default val ue.
3. If at the same time, two CLI sessions are running, once section configure to 120 width and
save it, the other section will not be effected, unless it log out and then log in.
Format
config terminal width [default | <value 80-200>]
Parameters
default - The default setting of terminal width. The default value is 80.
<value 80-200> - The term inal wid th whic h wi ll be confi gured. T he widt h is bet wee n 80 and 200
characters.
Page 23
xStack® DGS-3120 Series Managed Switch CLI Reference Guide
19
Restrictions
None.
Example
To configure the current terminal width:
DGS-3120-24TC:admin# config terminal width 120
Command: config terminal width 120
Success.
DGS-3120-24TC:admin#
2-16 show ter minal width
Description
The command is used to display the configuration of current terminal width.
Format
show terminal width
Parameters
None.
Restrictions
None.
Example
To display the configuration of current terminal width:
DGS-3120-24TC:admin#show terminal width
Command: show terminal width
Global terminal width : 80
Current terminal width : 80
DGS-3120-24TC:admin#
2-17 config ports
Description
This commands is used to configure the Switch's port settings.
Page 24

xStack® DGS-3120 Series Managed Switch CLI Reference Guide
20
Format
config ports [<portlist> | all] {m edium_type [fiber | copper]} {speed [auto | 10_half | 10_full |
100_half | 100_full | 1000_full {[master | slave]} ] | flow_control [enable | disable] | learning
[enable | disable] | state [enable | disable] |mdix [auto | normal | cross] | [description <desc
1-32> | clear_description]}
Parameters
<portlist> - Enter a list of ports used here.
all - Specify that all the ports will be used for this configuration.
medium_type - (Optional) Specify the medium type while the configure ports are combo ports
fiber - Specify that the medium type will be set to fiber.
copper
- Specify that the medium type will be set to copper.
speed - (Optional) Specify the port speed of the specified ports .
auto - Set port speed to auto negotiation.
10_half - Set port speed to 10_half.
10_full - Set port speed to 10_full.
100_half - Set port speed to 100_half.
100_full - Set port speed to 100_full._
1000_full - 1000_full set port speed to 1000_full. While set port speed to 1000_full,user
should specify master or slave mode for 1000 base TX interface, and leave the 1000_full
without any master or slave setting for other interface.
master - Specify that the port(s) will be set to master.
slave - Specify that the port(s) will be set to slave.
flow_control - (Optional) You can turn on or turn off flow control on one or more ports. By set
flow_control to enable or disable.
enable - Specify that the flow control option will be enabled.
disable - Specify that the flow control option will be disabled.
learning - (Optional) You can turn on or turn off MAC address learning on one or more ports.
enable - Specify that the learning option will be enabled.
disable - Specify that the learning option will be disabled.
state - (Optional) Enables or disables the specified port. If the specificed ports are in error-
disabled status , configure their state to enable will recover these ports from disabled to
enable state.
enable - Specify that the port state will be enabled.
disable - Specify that the port state will be disabled.
mdix - (Optional) MDIX mode can be specified as auto, normal, and cross. If set to normal state,
the port is in MDIX mode and can be connected to PC NIC using a straight cale. If set to cross
state, the port is in mdi mode, and can be connected to a port (in mdix mode) on another
switch thru a straight cabe.
auto - Specify that the MDIX mode for the port will be set to auto.
normal - Specify that the MDIX mode for the port will be set to normal.
cross - Specify that the MDIX mode for the port will be set to cross.
description - (Optional) Specify the description of the port interface.
<desc 1-32> - Enter the port interface description here. This value can be up to 32 characters
long.
clear_description - ( Opt ional) Spec ify that the description field will be cleared.
Restrictions
Only Administrator and Operator-level users can issue this command.
Example
To configure the ports:
Page 25

xStack® DGS-3120 Series Managed Switch CLI Reference Guide
21
DGS-3120-24TC:admin#config ports all medium_type copper speed auto
Command: config ports all medium_type copper speed auto
Success.
DGS-3120-24TC:admin#
2-18 show port s
Description
This command is used to display the current configurations of a range of ports.
Format
show ports {<portlist>} {[description | err_disabled | details | media_type]}
Parameters
ports - Specify a range of ports to be displayed.
<portlist> - (Optional) Enter the list of ports to be configured here.
description - (Optional) Indicates if port description will be included in the display .
err_disabled - (Optional) Indicates if ports are disabled by some reasons will be displayed.
details - (Optional) Displays the port details.
media_type
- (Optional) Displays port transceiver type.
Restrictions
None.
Example
To display the port details:
Page 26
xStack® DGS-3120 Series Managed Switch CLI Reference Guide
22
DGS-3120-24TC:admin#show ports details
Command: show ports details
Port : 1:1
-------------------Port Status : Link Down
Description :
HardWare Type : Gigabits Ethernet
MAC Address : 00-01-02-03-04-10
Bandwidth : 1000000Kbit
Auto-Negotiation : Enabled
Duplex Mode : Full Duplex
Flow Control : Disabled
MDI : Auto
Address Learning : Enabled
Last Clear of Counter : 0 hours 10 mins ago
BPDU Hardware Filtering Mode: Disabled
Queuing Strategy : FIFO
TX Load : 0/100, 0 bits/sec, 0
packets/sec
RX Load : 0/100, 0 bits/sec, 0
packets/sec
CTRL+C ESC q Quit SPACE n Next Page p Previous Page r Refresh
Page 27

xStack® DGS-3120 Series Managed Switch CLI Reference Guide
23
Chapter 3 802.1Q VLAN Command List
create vlan <vlan_name 32> tag <vlanid 2-4094> {type [1q_vlan | private_vlan]} {advertisement}
create vlan vlanid <vidlist> {type [1q_vlan | private_vlan]} {advertisement}
delete vlan <vlan_name 32>
delete vlan vlanid <vidlist>
config vlan <vlan_name 32> {[add [tagged | untagged | forbidde n] | del ete] <p ort list> |
advertisement [enable | disable]}(1)
config vlan vlanid <vidlist> {[add [tagged | untagged | forbidden] | delete] <portlist > |
advertisement [enable | disable] | name <vlan_name 32>}(1)
config port_vlan [<portlist> | all] {gvrp_state [enable | disable] | ingres s _chec king [enable |
disable] | acceptable_fram e [tagged _only | admit_all] | pvid <vlanid 1-4094>}(1)
show vlan {<vlan_name 32>}
show vlan ports {<portlist>}
show vlan vlanid <vidlist>
show port_vlan {<portlist>}
enable pvid auto_assign
disable pvid auto_assign
show pvid auto_assign
config gvrp [timer [join | leave | leaveall] < value 100-100000> | nni_bpdu_addr [dot1d | dot1ad]]
show gvrp
enable gvrp
disable gvrp
config private_vlan [<vlan_name 32> | vid <vlanid 2-4094>] [add [isolated | community] | remove]
[<vlan_name 32> | vlanid <vidlist>]
show private_vlan {[<vlan_name 32> | vlanid<vidlist > ]}
3-1 create vlan
Description
This command is used to create a VLAN on the Switch. The VLAN ID must be always specified for
creating a VLAN.
Format
create vlan <vlan_name 32> tag <vlanid 2-4094> {type [1q_vlan | private_vlan]}
{advertisement}
Parameters
vlan - The name of the VLAN to be created.
<vlan_name 32> - Enter the VLAN name here. The VLAN name can be up to 32 characters
long.
tag - The VLAN ID of the VLAN to be created.
<vlanid 2-4094> - Enter the VLAN ID here. The VLAN ID value must be between 2 and 4094.
type - (Optional) Specify the type of VLAN here.
1q_vlan - (Optional) Specify that the type of VLAN used is based on the 802.1Q standard.
private_vlan – (Option al) Spec ify that the private VLAN type will be used.
advertisement - (Optional) Specify the VLAN as being able to be advertised out.
Page 28

xStack® DGS-3120 Series Managed Switch CLI Reference Guide
24
Restrictions
Only Administrator, Operator and Power-User level users can issue this command.
Example
To create a VLAN with name “v2” and VLAN ID 2:
DGS-3120-24TC:admin# create vlan v2 tag 2 type 1q_vlan advertisement
Command: create vlan v2 tag 2 type 1q_vlan advertisement
Success.
DGS-3120-24TC:admin#
3-2 create vlan vlanid
Description
This command is used to create more than one VLANs at a time. A unique VLAN name (e.g.
VLAN10) will be automaticall y assigned by the system. The automatic assignment of VLAN name
is based on the following rule: “VLAN”+ID. For example, for VLAN ID 100, the VLAN name will be
VLAN100. If this VLAN name is conflict with the name of an existing VLAN, then it will be renamed
based on the following rule: “VLAN”+ID+”ALT”+ collision count. For example, if this conflict is the
second collision, then the name will be VLAN100ALT2.
Format
create vlan vlanid <vidlist> {type [1q_vlan | private_vlan]} {advertisement}
Parameters
vlanid - The VLAN ID list to be created.
<vidlist> - Enter the VLAN ID list here.
type - (Optional) Specify the type of VLAN to be created.
1q_vlan - (Optional) Specify that the VLAN created will be a 1Q VLAN.
private_vlan – (Option al) Spec ify that the private VLAN type will be used.
advertisement - (Optional) Specify the VLAN as being able to be advertised out.
Restrictions
Only Administrator, Operator and Power-User level users can issue this command.
Example
To create some VLANs using VLAN ID:
DGS-3120-24TC:admin# create vlan vlanid 10-30
Command: create vlan vlanid 10-30
Success.
DGS-3120-24TC:admin#
Page 29

xStack® DGS-3120 Series Managed Switch CLI Reference Guide
25
3-3 delete vlan
Description
This command is used to delete a previously configured VLAN by the name on the Switch.
Format
delete vlan <vlan_name 32>
Parameters
vlan - The VLAN name of the VLAN to be deleted.
<vlan_name 32> - Enter the VLAN name here. This name can be up to 32 characters long.
Restrictions
Only Administrator, Operator and Power-User level users can issue this command.
Example
To remove a vlan v1:
DGS-3120-24TC:admin# delete vlan v1
Command: delete vlan v1
Success.
DGS-3120-24TC:admin#
3-4 delete vlan vlanid
Description
This command is used to delete one or a number of previously configured VLAN by VID list.
Format
delete vlan vlanid <vidlist>
Parameters
vlanid - The VLAN ID list to be deleted.
<vidlist> - Enter the VLAN ID list here.
Restrictions
Only Administrator, Operator and Power-User level users can issue this command.
Page 30

xStack® DGS-3120 Series Managed Switch CLI Reference Guide
26
Example
To remove VLANs from 10-30:
DGS-3120-24TC:admin# delete vlan vlanid 10-30
Command: delete vlan vlanid 10-30
Success.
DGS-3120-24TC:admin#
3-5 config vlan
Description
This command is used to configure a VLAN based on the name.
Format
config vlan <vlan_name 32> {[add [tagged | untagged | forbidden] | delete] <portlist> |
advertisement [enable | disable]}(1)
Parameters
<vlan_name 32> - Enter the VLAN name you want to add ports to. This name can be up to 32
characters long.
add - (Optional) Specif y to add tagged, untagg ed or for bidden por ts to the VLAN.
tagged - Specify the additional ports as tagged.
untagged - Specify the additional ports as untagged.
forbidden
- Specify the additional ports as forbidden.
delete - (Optional) Specify to delete ports from the VLAN.
<portlist> - (Optional) Enter the list of ports used for the configuration here.
advertisement - (Optional) Specify the GVRP state of this VLAN.
enable - Specify to enable advertisement for this VLAN.
disable - Specify to disable advertisement for this VLAN.
Restrictions
Only Administrator, Operator and Power-User level users can issue this command.
Example
To add 4 through 8 of unit 2 as tagged ports to the VLAN v1:
DGS-3120-24TC:admin# config vlan v1 add tagged 2:4-2:8
Command: config vlan v1 add tagged 2:4-2:8
Success.
DGS-3120-24TC:admin#
Page 31

xStack® DGS-3120 Series Managed Switch CLI Reference Guide
27
3-6 config vlan vlanid
Description
This command allows you to configure multiple VLANs at one time. But conflicts will be generated
if you configure the name of multiple VLANs at one time.
Format
config vlan vlanid <vidlist> {[add [tagged | untagged | forbidden] | delete] <portlist> |
advertisement [enable | disable] | name <vlan_name 32>}(1)
Parameters
<vidlist> - Enter a list of VLAN IDs to configure.
add - (Optional) Specif y to add tagged, untagg ed or for bidden por ts to the VLAN.
tagged - Specify the additional ports as tagged.
untagged - Specify the additional ports as untagged.
forbidden - Specify the additional ports as forbidden.
delete - (Optional) Specify to delete ports from the VLAN.
<portlist> - (Optional) Enter the list of ports used for the configuration here.
advertisement - (Optional) Specify the GVRP state of this VLAN.
enable - Specify to enable advertisement for this VLAN.
disable - Specify to disable advertisement for this VLAN.
name - (Optional) The new name of the VLAN.
<vlan_name 32> - Enter the VLAN name here. This name can be up to 32 characters long.
Restrictions
Only Administrator, Operator and Power-User level users can issue this command.
Example
To add 4 through 8 of unit 2 as tagged ports to the VLAN ID from 10-20:
DGS-3120-24TC:admin# config vlan vlanid 10-20 add tagged 2:4-2:8
Command: config vlan vlanid 10-20 add tagged 2:4-2:8
Success.
DGS-3120-24TC:admin#
3-7 config port_vlan
Description
This command is used to set the ingress checking status, the sending and receiving GVRP
information.
Format
config port_vlan [<portlist> | all] {gvrp_state [enable | disable] | ingress_checking [enable |
disable] | acceptable_frame [tagged_only | admit_all] | pvid <vlanid 1-4094>}(1)
Page 32

xStack® DGS-3120 Series Managed Switch CLI Reference Guide
28
Parameters
<portlist> - A range of ports for which you want ingress checking. The port list is specified by
listing the lowest switch number and the beginning port number on that switch, separated by a
colon. Then highest switch number, and the highest port number of the range (also separated
by a colon) are specified. The beginning and end of the port list range are separated by a
dash. For example, 1:3 would specify switch number 1, port 3. 2:4 specifies switch number 2,
port 4. 1:3-2:4 specifies all of the ports between switch 1, port 3 and switch 2, port 4 − i n
numerical order.
all - Specify that all the port will be used for this configuration.
gvrp_state - (Optional) Enabled or disables GVRP for the ports specified in the port list.
enable - Specify that GVRP for the specified ports will be enabled.
disable - Specify that GVRP for the specified ports will be disabled.
ingress_checking - (Optional) Enables or disables ingress checking for the specified portlist.
enable - Specify that ingress checking will be enabled for the specified portlist.
disable
- Specify that ingress checking will be disabled for the specified portlist.
acceptable_frame - (Optional) The type of frame will be accepted by the port. There are two
types:
tagged_only - Only tagged packets can be accepted by this port.
admit_all - All packets can be accepted.
pvid - (Optional) Specify the PVID of the ports.
<vlanid 1-4094> - Enter the VLAN ID here. The VLAN ID value must be between 1 and 4094.
Restrictions
Only Administrator and Operator-level users can issue this command.
Example
To sets the ingress checking status, the sending and receiving GVRP information:
DGS-3120-24TC:admin# config port_vlan 1:1-1:5 gvrp_state enable
ingress_checking enable acceptable_frame tagged_only pvid 2
Command: config port_vlan 1:1-1:5 gvrp_state enable ingress_checking enable
acceptable_frame tagged_only pvid 2
Success
DGS-3120-24TC:admin#
3-8 show vlan
Description
This command is used to display the vlan information including of parameters setting and
operational value.
Format
show vlan {<vlan_name 32>}
Parameters
<vlan_name 32> - (Optional) Enter the VLAN name to be displayed. The VLAN name can be up
to 32 characters long.
Page 33

xStack® DGS-3120 Series Managed Switch CLI Reference Guide
29
Restrictions
None.
Example
To display VLAN settings:
DGS-3120-24TC:admin#show vlan
Command: show vlan
VLAN Trunk State : Disabled
VLAN Trunk Member Ports :
VID : 1 VLAN Name : default
VLAN Type : Static Advertisement : Enabled
Member Ports : 1:1-1:24
Static Ports : 1:1-1:24
Current Tagged Ports :
Current Untagged Ports: 1:1-1:24
Static Tagged Ports :
Static Untagged Ports : 1:1-1:24
Forbidden Ports :
Total Static VLAN Entries: 1
Total GVRP VLAN Entries: 0
DGS-3120-24TC:admin#
3-9 show vlan ports
Description
This command is used to display the vlan information per ports.
Format
show vlan ports {<portlist>}
Parameters
<portlist> - (Optional) Enter the list of ports for which the VLAN information will be displayed.
Restrictions
None.
Example
To display the VLAN configuration for port 6 of unit 1:
Page 34

xStack® DGS-3120 Series Managed Switch CLI Reference Guide
30
DGS-3120-24TC:admin#show vlan ports 1:6
Command: show vlan ports 1:6
Port VID Untagged Tagged Dynamic Forbidden
----- ---- -------- ------ ------- -------- 1:6 1 X - - -
DGS-3120-24TC:admin#
3-10 show vlan v lanid
Description
This command is used to display the vlan information using the VLAN ID.
Format
show vlan vlanid <vidlist>
Parameters
<vidlist> - Enter the VLAN ID to be displayed.
Restrictions
None.
Example
To display the VLAN configuration for VLAN ID 1:
DGS-3120-24TC:admin# show vlan vlanid 1
Command: show vlan vlanid 1
VID : 1 VLAN Name : default
VLAN Type : Static Advertisement : Enabled
Member Ports : 1:1-1:24
Static Ports : 1:1-1:24
Current Tagged Ports :
Current Untagged Ports: 1:1-1:24
Static Tagged Ports :
Static Untagged Ports : 1:1-1:24
Forbidden Ports :
Total Entries : 1
DGS-3120-24TC:admin#
Page 35

xStack® DGS-3120 Series Managed Switch CLI Reference Guide
31
3-11 show port _ vlan
Description
This command is used to display the ports’ VLAN attributes on the Switch.
Format
show port_vlan {<portlist>}
Parameters
<portlist> - (Optional) Specify a range of ports to be displayed. (UnitID:port number).
If no parameter specified, system will display all ports gvrp information.
Restrictions
None.
Example
To display 802.1Q port setting:
DGS-3120-24TC:admin# show port_vlan
Command: show port_vlan
Port PVID GVRP Ingress Checking Acceptable Frame Type
------- ---- -------- ---------------- -------------------------- 1:1 1 Disabled Enabled All Frames
1:2 1 Disabled Enabled All Frames
1:3 1 Disabled Enabled All Frames
1:4 1 Disabled Enabled All Frames
1:5 1 Disabled Enabled All Frames
1:6 1 Disabled Enabled All Frames
1:7 1 Disabled Enabled All Frames
1:8 1 Disabled Enabled All Frames
1:9 1 Disabled Enabled All Frames
1:10 1 Disabled Enabled All Frames
1:11 1 Disabled Enabled All Frames
1:12 1 Disabled Enabled All Frames
1:13 1 Disabled Enabled All Frames
1:14 1 Disabled Enabled All Frames
1:15 1 Disabled Enabled All Frames
1:16 1 Disabled Enabled All Frames
1:17 1 Disabled Enabled All Frames
1:18 1 Disabled Enabled All Frames
1:19 1 Disabled Enabled All Frames
1:20 1 Disabled Enabled All Frames
CTRL+C ESC q Quit SPACE n Next Page ENTER Next Entry a All
Page 36
xStack® DGS-3120 Series Managed Switch CLI Reference Guide
32
3-12 enable pvid aut o as s ign
Description
This command is used to enable the auto-assignment of PVID.
If “Auto-assign PVID” is enabled, PVID will be possibly changed by PVID or VLAN configuration.
When user configures a port to VLAN X’s untagged membership, this port’s PVID will be updated
with VLAN X. In the form of VLAN list command, PVID is updated with last item of VLAN list. When
user removes a port from the untagged membership of the PVID’s VLAN, the port’s PVID will be
assigned with “default VLAN” .
The default setting is enabled.
Format
enable pvid auto_assign
Parameters
None.
Restrictions
Only Administrator, Operator and Power-User level users can issue this command.
Example
To enable the auto-as sign PVID:
DGS-3120-24TC:admin# enable pvid auto_assign
Command: enable pvid auto_assign
Success.
DGS-3120-24TC:admin#
3-13 disable pvid auto assign
Description
This command is used to disable auto assignment of PVID.
Format
disable pvid auto_assign
Parameters
None.
Page 37
xStack® DGS-3120 Series Managed Switch CLI Reference Guide
33
Restrictions
Only Administrator, Operator and Power-User level users can issue this command.
Example
To disable the auto-as s ig n PVID:
DGS-3120-24TC:admin# disable pvid auto_assign
Command: disable pvid auto_assign
Success.
DGS-3120-24TC:admin#
3-14 show pvid auto_assign
Description
This command is used to display the PVID auto-assignment state.
Format
show pvid auto_assign
Parameters
None.
Restrictions
None.
Example
To display PVID auto-assignment state:
DGS-3120-24TC:admin#show pvid auto_assign
Command: show pvid auto_assign
PVID Auto-assignment: Enabled
DGS-3120-24TC:admin#
3-15 config gvrp
Description
The config gvrp timer command set the GVRP timer’s value. The default value for Join time is 200
milliseconds; for Leave time is 600 milliseconds; for LeaveAll time is 10000 milliseconds.
Page 38
xStack® DGS-3120 Series Managed Switch CLI Reference Guide
34
Format
config gvrp [timer [join | leave | leaveall] < value 100-100000> | nni_bpdu_addr [dot1d |
dot1ad]]
Parameters
timer - Specify that the GVRP timer parameter will be configured.
join - (Optional) Specify the Join time will be set.
leave - (Optional) Specify the Leave time will be set.
leaveall - (Optional) Spec if y the Lea veAl l tim e will be set.
<value 100-100000> - Enter the time used here. This value must be between 100 and 100000.
nni_bpdu_addr - Used to determine the BPDU protocol address for GVRP in service provide
site. It can use 802.1d GVRP address, 802.1ad service provider GVRP address or a user
defined multicast address. The range of the user defined address is 0180C2000000 0180C2FFFFFF.
dot1d - Specify that the NNI BPDU protocol address value will be set to Dot1d.
dot1ad - Specify that the NNI BPDU protocol address value will be set to Dot1ad.
Restrictions
Only Administrator, Operator and Power-User level users can issue this command.
Example
To set the Join time to 200 milliseconds:
DGS-3120-24TC:admin# config gvrp timer join 200
Command: config gvrp timer join 200
Success.
DGS-3120-24TC:admin#
3-16 show gvrp
Description
This command is used to display the GVRP global setting.
Format
show gvrp
Parameters
None.
Restrictions
None.
Page 39
xStack® DGS-3120 Series Managed Switch CLI Reference Guide
35
Example
To display the global setting of GVRP:
DGS-3120-24TC:admin#show gvrp
Command: show gvrp
Global GVRP : Disabled
Join Time : 200 Milliseconds
Leave Time : 600 Milliseconds
LeaveAll Time : 10000 Milliseconds
NNI BPDU Address: dot1d
DGS-3120-24TC:admin#
3-17 enable gvrp
Description
This commands is used to enable the Generic VLAN Registration Protocol (GVRP).
Format
enable gvrp
Parameters
None.
Restrictions
Only Administrator, Operator and Power-User level users can issue this command.
Example
To enable the generic VLAN Registration Protocol (GVRP):
DGS-3120-24TC:admin# enable gvrp
Command: enable gvrp
Success.
DGS-3120-24TC:admin#
3-18 disable gvrp
Description
This command is used to disable the Generic VLAN Registration Protocol (GVRP).
Format
disable gvrp
Page 40

xStack® DGS-3120 Series Managed Switch CLI Reference Guide
36
Parameters
None.
Restrictions
Only Administrator, Operator and Power-User level users can issue this command.
Example
To disable the Generic VLAN Registration Protocol (GVRP):
DGS-3120-24TC:admin# disable gvrp
Command: disable gvrp
Success.
DGS-3120-24TC:admin#
3-19 config priv ate_vlan
Description
This command is used to add or remove a secondary VLAN from a private VLAN.
Format
config private_vlan [<vlan_name 32> | vid <vlanid 1-4094>] [add [isolated | community] |
remove] [<vlan_name 32> | vlanid <vidlist>]
config private_vlan [<vlan_name 32> | vid <vlanid 2-4094>] [add [isolated | community] |
remove] [<vlan_name 32> | vlanid <vidlist>]
Parameters
<vlan_name 32> - Specify the name of the private VLAN.
vid - Specify the VLAN ID of the private VLAN.
<vlanid 2-4094> - Enter the VLAN ID used here. This value must be between 1 and 4094.
add - Specify that a secondary VLAN will be added to the private VLAN.
isolated - Specify the secondar y VLAN as iso lat ed VL AN.
community - Specify the secondary VLAN as community VLAN.
remove - Specify that a secondary VLAN will be removed from the private VLAN.
<vlan_name 32> - Specify the secondary VLAN name used. This name can be up to 32
characters long.
vlanid - A range of secondary VLAN to add or remove to the private VLAN.
<vidlist> - Enter the secondary VLAN ID used here.
Restrictions
Only Administrator and Operator-level users can issue this command.
Page 41

xStack® DGS-3120 Series Managed Switch CLI Reference Guide
37
Example
To associate secondary vlan to private vlan p1:
DGS-3120-24TC:admin# config private_vlan p1 add community vlanid 2-5
Command: config private_vlan p1 add community vlanid 2-5
Success.
DGS-3120-24TC:admin#
3-20 show pri v ate vlan
Description
This command is used to show the private VLAN inf or mation.
Format
show private_vlan {[<vlan_name 32> | vlanid<vidlist>]}
Parameters
<vlan_name 32> - (Optional) Specify the name of the private VLAN or its secondary VLAN. This
name can be up to 32 characters long.
vlanid - (Optional) Specif y the VLAN ID of the private VL AN or its sec ond ar y VLA N.
<vidlist> - Enter the VLAN ID used here.
Restrictions
None.
Example
To display private VLAN settings:
Page 42

xStack® DGS-3120 Series Managed Switch CLI Reference Guide
38
DGS-3120-24TC:admin# show private_vlan
Command: show private_vlan
Private VLAN 100
----------------- Promiscuous Ports: 1:1
Trunk Ports : 1:2
Isolated Ports : 1:3-1:5 Isolated VLAN : 20
Community Ports : 1:6–1:8 Community VLAN: 30
Community Ports: : 1:9–1:10 Community VLAN: 40
Private VLAN 200
----------------- Promiscuous Ports: 1:11
Trunk Ports : 1:12
Isolated Ports : 1:13-1:15 Isolated VLAN : 20
Community Ports : 1:16–1:18 Community VLAN: 30
DGS-3120-24TC:admin#
Page 43

xStack® DGS-3120 Series Managed Switch CLI Reference Guide
39
Chapter 4 802.1X Command List
enable 802.1x
disable 802.1x
create 802.1x user <username 15>
delete 802.1x user <username 15>
show 802.1x user
config 802.1x auth_protocol [local | radius_eap]
config 802.1x fwd_pdu system [enable | disable]
config 802.1x fwd_pdu ports [<portlist> | all] [enable | disable]
config 802.1x authorization attributes radius [enable | disable]
show 802.1x {[auth_state | auth_configuration] ports {<portlist>}}
config 802.1x capability ports [<portlist> | all] [authenticator | none]
config 802.1x max_users [<value 1–448> | no_limit]
config 802.1x auth_parameter ports [<portlist> | all] [default | {direction [bot h | in] | port_contr o l
[force_unauth | auto | force_auth] | quiet_period <sec 0-65535> | tx_period <sec 1-65535> |
supp_timeout <sec 1-65535> | server_timeout <sec 1-65535> | max_req <value 1-10> |
reauth_period <sec 1-65535> | max_users [<value 1-448> | no_limit] | enable_re a uth [ ena ble
| disable]}(1)]
config 802.1x auth_mode [port_based | mac_based]
config 802.1x init [port_based ports [<portlist> | all] | mac_based ports [<portlist> | all]
{mac_address <macaddr>}]
config 802.1x reauth [port_based ports [<portlist> | all] | mac_based ports [<portlist> | all]
{mac_address <macaddr>}]
create 802.1x guest_vlan {<vlan_name 32>}
delete 802.1x guest_vlan {<vlan_name 32>}
config 802.1x guest_vlan ports [<portlist> | all] state [enable | disable]
show 802.1x guest_vlan
config radius add <server_index 1-3> [<server_ip> | <ipv6addr>] key <password 32> [default |
{auth_port <udp_port_number 1-65535> | acct_port <udp_port_number 1-65535> | timeout
<sec 1-255> | retransmit <int 1-20>}]
config radius delete <server_index 1-3>
config radius <server_index 1-3> {ipaddress [<s erver _ip > | <ipv6 addr >] | ke y <pass word 32 > |
auth_port [<udp_port_number 1-65535> | default] | acct_port [<udp_port_number 1-65535> |
default] | timeout [<sec 1-255> | default] | retransmit [<int 1-20> | default]}
show radius
show auth_statistics {ports <portlist>}
show auth_diagnostics {ports <portlist>}
show auth_session_statistics {ports <portlist>}
show auth_client
show acct_client
config accounting service [network | shell | system] state [enable | disable]
show accounting service
4-1 enable 802.1x
Description
This command is used to enable the 802.1X function.
Format
enable 802.1x
Page 44
xStack® DGS-3120 Series Managed Switch CLI Reference Guide
40
Parameters
None.
Restrictions
Only Administrator, Operator and Power-User level users can issue this command.
Example
Used to enable the 802.1X function:
DGS-3120-24TC:admin# enable 802.1x
Command: enable 802.1x
Success.
DGS-3120-24TC:admin#
4-2 disable 802.1x
Description
This command is used to disable the 802.1X function.
Format
disable 802.1x
Parameters
None.
Restrictions
Only Administrator, Operator and Power-User level users can issue this command.
Example
To disable the 802.1X function:
DGS-3120-24TC:admin# disable 802.1x
Command: disable 802.1x
Success.
DGS-3120-24TC:admin#
Page 45

xStack® DGS-3120 Series Managed Switch CLI Reference Guide
41
4-3 create 802.1x user
Description
This command is used to create an 802.1X user.
Format
create 802.1x user <username 15>
Parameters
<username 15> - Enter the username to be added. This value can be up to 15 characters long.
Restrictions
Only Administrator, Operator and Power-User level users can issue this command.
Example
To create a 802.1x user “test”:
DGS-3120-24TC:admin#create 802.1x user test
Command: create 802.1x user test
Enter a case-sensitive new password:****
Enter the new password again for confirmation:****
Success.
DGS-3120-24TC:admin#
4-4 delete 802.1x user
Description
This command is used to delete an 802.1X user.
Format
delete 802.1x user <username 15>
Parameters
<username 15> - Enter the username to be deleted. This value can be up to 15 characters long.
Restrictions
Only Administrator, Operator and Power-User level users can issue this command.
Example
To delete user “test”:
Page 46

xStack® DGS-3120 Series Managed Switch CLI Reference Guide
42
DGS-3120-24TC:admin#delete 802.1x user test
Command: delete 802.1x user test
Success.
DGS-3120-24TC:admin#
4-5 show 802.1x user
Description
This command is used to display the 802.1X user.
Format
show 802.1x user
Parameters
None.
Restrictions
None.
Example
To display the 802.1X user information:
DGS-3120-24TC:admin#show 802.1x user
Command: show 802.1x user
Current Accounts:
Username Password
--------------- -------------- test test
Total Entries:1
DGS-3120-24TC:admin#
4-6 config 802.1x auth_protocol
Description
This command is used to configure the 802.1X auth protocol.
Format
config 802.1x auth_protocol [local | radius_eap]
Page 47

xStack® DGS-3120 Series Managed Switch CLI Reference Guide
43
Parameters
local - Specify the authentic ation protoc ol as local.
radius_eap - Specify the authentication protocol as RADIUS EAP.
Restrictions
Only Administrator, Operator and Power-User level users can issue this command.
Example
To configure the 802.1X authentication protocol to RADIUS EAP:
DGS-3120-24TC:admin# config 802.1x auth_protocol radius_eap
Command: config 802.1x auth_protocol radius_eap
Success.
DGS-3120-24TC:admin#
4-7 config 802.1x fwd_pdu system
Description
This command is used to globally control the forwarding of EAPOL PDU. When 802.1X
functionality is disabled globally or for a port, and if 802.1X fwd_pdu is enabled both globally and
for the port, a received EAPOL packet on the port will be flooded in the same VLAN to those ports
for which 802.1X fwd_pdu is enabled and 802.1X is disabled (globally or just for the port). The
default state is disabled.
Format
config 802.1x fwd_pdu system [enable | disable]
Parameters
enable - Enable the forwarding of EAPOL PDU.
disable - Disable the forwarding of EAPOL PDU.
Restrictions
Only Administrator, Operator and Power-User level users can issue this command.
Example
To configure forwarding of EAPOL PDU system state enable:
Page 48

xStack® DGS-3120 Series Managed Switch CLI Reference Guide
44
DGS-3120-24TC:admin# config 802.1x fwd_pdu system enable
Command: config 802.1x fwd_pdu system enable
Success.
DGS-3120-24TC:admin#
4-8 config 802.1x fwd_pdu ports
Description
This command is used to control the forwarding of EAPOL PDU. When 802.1X functionality is
disabled globally or for a port, and if 802.1X fwd_pdu is enabled both globally and for the port, a
received EAPOL packet on the port will be flooded in the same VLAN to those ports for which
802.1X fwd_pdu is enabled and 802.1X is disabled (globally or just for the port). The default state
is disabled.
Format
config 802.1x fwd_pdu ports [<portlist> | all] [enable | disable]
Parameters
<portlist> - Enter the list of ports used for the configuration.
all - Specify that all the ports will be used.
enable - Enable forwarding EAPOL PDU receive on the ports.
disable - Disable forwarding EAPOL PDU receive on the ports.
Restrictions
Only Administrator, Operator and Power-User level users can issue this command.
Example
To configure 802.1X fwd_pdu for ports:
DGS-3120-24TC:admin#config 802.1x fwd_pdu ports 1:1-1:2 enable
Command: config 802.1x fwd_pdu ports 1:1-1:2 enable
Success.
DGS-3120-24TC:admin#
4-9 config 802.1x authorization attributes
Description
This command is used to enable or disable acception of authorized configuration.
When the authorization is enabled for 802.1X’s RADIUS authentication, the authorized attributes
(for example VLAN, 802.1p default priority, and ACL) assigned by the RADUIS server will be
accepted if the global authorization status is enabled.
Page 49

xStack® DGS-3120 Series Managed Switch CLI Reference Guide
45
Format
config 802.1x authorization attributes radius [enable | disable]
Parameters
radius - If specified to enable, the authorization attributes (for example VLAN, 802.1p default
priority, and ACL) assigned by the RADUIS server will be accepted if the global authorization
status is enabled. The default state is enabled.
enable - Specify to enable the auth ori zat ion attri but es .
disable - Specify to disable the authorization attributes.
Restrictions
Only Administrator, Operator and Power-User level users can issue this command.
Example
The following example wil l disab le t o ac c ept t he a utho r ized dat a as s ig ned f rom the RADIUS server:
DGS-3120-24TC:admin#config 802.1x authorization attributes radius disable
Command: config 802.1x authorization attributes radius disable
Success.
DGS-3120-24TC:admin#
4-10 show 802.1x
Description
This command is used to display the 802.1X state or configurations.
Format
show 802.1x {[auth_state | auth_configuration] ports {<portlist>}}
Parameters
auth_state - (Optional) Used to display 802.1X authentication state machine of some or all ports
auth_configuration - (Optional) Used to display 802.1X configurations of some or all ports.
port - (Optional) Specify a range of ports to be displayed. If no port is specified, all ports will be
displayed.
<portlist>
- Enter the list of ports used for the configuration here.
If no parameter is specified, the 802.1X system configurations will be displayed.
Restrictions
None.
Example
To display the 802.1X port level configurations:
Page 50
xStack® DGS-3120 Series Managed Switch CLI Reference Guide
46
DGS-3120-24TC:admin#show 802.1x auth_configuration ports 1:1
Command: show 802.1x auth_configuration ports 1:1
Port Number : 1:1
Capability : None
AdminCrlDir : Both
OpenCrlDir : Both
Port Control : Auto
QuietPeriod : 60 sec
TxPeriod : 30 sec
SuppTimeout : 30 sec
ServerTimeout : 30 sec
MaxReq : 2 times
ReAuthPeriod : 3600 sec
ReAuthenticate : Disabled
Forward EAPOL PDU On Port : Enabled
Max User On Port : 16
CTRL+C ESC q Quit SPACE n Next Page p Previous Page r Refresh
4-11 config 802.1x cap ability
Description
This command is used to configure the port capability.
Format
config 802.1x capability ports [<portlist> | all] [authenticator | none]
Parameters
ports - Specify a range of ports to be configured.
<portlist> - Enter the list of ports used for the configuration here.
all - Specify all ports to be configured.
authenticator - The port that wishes to enforce authentication before allowing access to services
that are accessible via that port adopts the authenticator role.
none - Disable authentication on the specified ports.
Restrictions
Only Administrator, Operator and Power-User level users can issue this command.
Page 51

xStack® DGS-3120 Series Managed Switch CLI Reference Guide
47
Example
To configure the port capability:
DGS-3120-24TC:admin# config 802.1x capability ports 1:1-1:10 authenticator
Command: config 802.1x capability ports 1:1-1:10 authenticator
Success.
DGS-3120-24TC:admin#
4-12 config 802.1x max_users
Description
This command is used to limit the maximum number of users that can be learned via 802.1X
authentication. In addition to the global limitation, maximum user for per port is also limited. It is
specified by config 802.1x auth_parameter command.
Format
config 802.1x max_users [<value 1–448> | no_limit]
Parameters
<value 1-448> - Enter the maximum number of users. This value must be between 1 and 448.
no_limit – Specify that the maximum user limit will be set to 448.
Restrictions
Only Administrator, Operator and Power-User level users can issue this command.
Example
To configure 802.1X number of users to be limited to 200:
DGS-3120-24TC:admin#config 802.1x max_users 200
Command: config 802.1x max_users 200
Success.
DGS-3120-24TC:admin#
4-13 config 802.1x auth_parameter
Description
This command is used to configure the parameters that control the operation of the authenticator
associated with a port.
Page 52

xStack® DGS-3120 Series Managed Switch CLI Reference Guide
48
Format
config 802.1x auth_parameter ports [<portlist> | all] [default | {direction [both | in] |
port_control [force_unauth | auto | force_auth] | quiet_period <sec 0-65535> | tx_period
<sec 1-65535> | supp_timeout <sec 1-65535> | server_timeout <sec 1-65535> | max_req
<value 1-10> | reauth_period <sec 1-65535> | max_users [<value 1-448> | no_limit] |
enable_reauth [enable | disable]}(1)]
Parameters
ports - Specify a range of ports to be configured.
<portlist> - Enter the list of ports used for the configuration here.
all - Specify that all the ports will be used.
default - Sets all parameter to be default value.
direction - (Optional) Sets the direction of access control.
both - For bidirectional access control.
in - For unidirectional access control.
port_control - (Optional) You can force a specific port to be unconditionally authorized or
unauthorized by setting the parameter of port_control to be force_authorized or
force_unauthorized. Besides, the controlled port will reflect the outcome of authentication if
port_control is auto.
force_unauth - Force a specific port to be unconditionally unauthorized.
auto - The controlled port will reflect the outcome of authentication.
force_auth - Force a specific port to be unconditionally authorized.
quiet_period - (Optional) It is the initialization value of the quietWhile timer. The default value is
60 seconds and can be any value among 0 to 65535.
<sec 0-65535> - Enter the quiet period value here. This value must be between 0 and 65535
seconds.
tx_period - (Optional) It is the initialization value of the transmit timer period. The default value is
30 seconds and can be any integer value among 1 to 65535.
<sec 1-65535> - Enter the tx period value here. This value must be between 1 and 65535
seconds.
supp_timeout - (Optional) The initialization value of the aWhile timer when timing out the
supplicant. Its default value is 30 seconds and can be any integer value among 1 to 65535.
<sec 1-65535> - Enter the supplicant timeout value here. This value must be between 1 and
65535 seconds.
server_timeout - (Optional) The initialization value of the aWhile timer when timing out the
authentication server. Its default value is 30 seconds and can be any integer value among 1 to
65535.
<sec 1-65535> - Enter the server timeout value here. This value must be between 1 and
65535 seconds.
max_req - (Optional) The maximum number of times that the authentication PAE state machine
will retransmit an EAP Request packet to the supplicant. Its default value is 2 and can be any
integer number among 1 to 10.
<value 1-10> - Enter the maximum required value here. This value must be between 1 and
10.
reauth_period - (Optional) It’s a nonzero number of seconds, which is used to be the re-
authentication timer. The default value is 3600.
<sec 1-65535> - Enter the re-authentication period value here. This value must be between 1
and 65535 seconds.
enable_reauth - (Optional) You can enable or disable the re-authentication mechanism for a
specific port.
enable - Specify to enable the re-authentication mechanism for a specific port.
disable - Specify to disable the re-authentication mechanism for a specific port.
max_users - (Optional) Specify per port maximum number of users. The default value is 16.
<value 1-448> - Enter the maximum users value here. This value must be between 1 and
448.
no_limit - Specify that no limit is enforced on the maximum users used.
Page 53

xStack® DGS-3120 Series Managed Switch CLI Reference Guide
49
Restrictions
Only Administrator, Operator and Power-User level users can issue this command.
Example
To configure the parameters that control the operation of the authenticator associated with a port:
DGS-3120-24TC:admin# config 802.1x auth_parameter ports 1:1-1:20 direction
both
Command: config 802.1x auth_parameter ports 1:1-1:20 direction both
Success.
DGS-3120-24TC:admin#
4-14 config 802.1x auth_mode
Description
This command is used to configure 802.1X authentication mode.
Format
config 802.1x auth_mode [port_based | mac_based]
Parameters
port_based - Configure the authentication as port based mode.
mac_based - Configure the authentication as MAC based mode.
Restrictions
Only Administrator, Operator and Power-User level users can issue this command.
Example
To configure the authentication mode:
DGS-3120-24TC:admin# config 802.1x auth_mode port_based
Command: config 802.1x auth_mode port_based
Success.
DGS-3120-24TC:admin#
4-15 config 802.1x init
Description
This command is used to initialize the authentication state machine of some or all ports.
Page 54

xStack® DGS-3120 Series Managed Switch CLI Reference Guide
50
Format
config 802.1x init [port_based p o rts [<portlist> | all] | mac_based ports [<portlist> | all]
{mac_address <macaddr>}]
Parameters
port_based ports- Configure the authentication as port based mode.
<portlist> - Enter the list of ports used for the configuration here.
all - Specify that all ports will be used.
mac_based ports - Configure the authentication as MAC based mode.
<portlist> - Enter the list of ports used for the configuration here.
all - Specify that all ports will be used.
mac_address - (Optional) Specify the MAC address of client.
<macaddr>
- Enter the MAC address used here.
Restrictions
Only Administrator, Operator and Power-User level users can issue this command.
Example
To initialize the authentication state machine of some or all:
DGS-3120-24TC:admin# config 802.1x init port_based ports all
Command: config 802.1x init port_based ports all
Success.
DGS-3120-24TC:admin#
4-16 config 802.1x reauth
Description
This command is used to re-authenticate the device connected to the port. During the reauthentication period, the port status remains authorized until failed re-authentication.
Format
config 802.1x reauth [port_based ports [<portlist> | all] | mac_based ports [<portlist> | all]
{mac_address <macaddr>}]
Parameters
port_based ports - Configure the authentication as port based mode.
<portlist> - Enter the list of ports used for the configuration here.
all - Specify that all ports will be used.
mac_based ports - Configure the authentication as MAC based mode.
<portlist> - Enter the list of ports used for the configuration here.
all
- Specify that all ports will be used.
mac_address - (Optional) Specify the MAC address of client.
<macaddr> - Enter the MAC address used here.
Page 55

xStack® DGS-3120 Series Managed Switch CLI Reference Guide
51
Restrictions
Only Administrator, Operator and Power-User level users can issue this command.
Example
To re-authenticate the device connected to the port:
DGS-3120-24TC:admin# config 802.1x reauth port_based ports all
Command: config 802.1x reauth port_based ports all
Success.
DGS-3120-24TC:admin#
4-17 create 802.1x guest_vlan
Description
This command is used to assign a static VLAN to be guest VLAN. The specific VLAN which
assigned to guest VLAN must be existed. The specific VLAN which assigned to guest VLAN can’t
be deleting.
Format
create 802.1x guest_vlan {<vlan_name 32>}
Parameters
<vlan_name 32> - (Optional) Specify the VLAN to be guest VLAN. The VLAN name can be up to
32 characters long.
Restrictions
Only Administrator, Operator and Power-User level users can issue this command.
Example
To create a VLAN named “guestVLAN” as 802.1X guest VLAN:
DGS-3120-24TC:admin# create 802.1x guest_vlan guestVLAN
Command: create 802.1x guest_vlan guestVLAN
Success.
DGS-3120-24TC:admin#
4-18 delete 802.1x guest_vlan
Description
This command is used to delete guest VLAN setting, but not delete the static VLAN. All ports
which enabled guest VLAN will remove to original VLAN after deleted guest VLAN.
Page 56

xStack® DGS-3120 Series Managed Switch CLI Reference Guide
52
Format
delete 802.1x guest_vlan {<vlan_name 32>}
Parameters
<vlan_name 32> - (Optional) Enter the VLAN name here. The VLAN name can be up to 32
characters long.
Restrictions
Only Administrator, Operator and Power-User level users can issue this command.
Example
To delete the guest VLAN named “guestVLAN”:
DGS-3120-24TC:admin# delete 802.1x guest_vlan guestVLAN
Command: delete 802.1x guest_vlan guestVLAN
Success.
DGS-3120-24TC:admin#
4-19 config 802.1x gue s t_vlan
Description
This command is used to configure guest VLAN setting. If the specific port state is changed from
enabled state to disable state, this port will move to its original VLAN.
Format
config 802.1x guest_vlan ports [<portlist> | all] state [enable | disable]
Parameters
ports - A range of ports enable or disable guest VLAN function.
<portlist> - Enter the list of ports used for the configuration here.
all - Specify that all the port will be included in this configuration.
state - Specify the guest VLAN port state of the configured ports.
enable - Specify to join the guest VLAN.
disable - Specify to be removed from the guest VLAN.
Restrictions
Only Administrator, Operator and Power-User level users can issue this command.
Example
Enable on port 1 – 8 to configure 802.1X guest VLAN:
Page 57

xStack® DGS-3120 Series Managed Switch CLI Reference Guide
53
DGS-3120-24TC:admin#config 802.1x guest_vlan ports 1:2-1:8 state enable
Command: config 802.1x guest_vlan ports 1:2-1:8 state enable
Warning, The ports are moved to Guest VLAN.
Success.
DGS-3120-24TC:admin#
4-20 show 802.1x guest_vlan
Description
This command is used to show the information of guest VLANs.
Format
show 802.1x guest_vlan
Parameters
None.
Restrictions
None.
Example
To show 802.1X guest VLAN on the Switch:
DGS-3120-24TC:admin#show 802.1x guest_vlan
Command: show 802.1x guest_vlan
Guest VLAN Setting
----------------------------------------------------------Guest VLAN : guestVLAN
Enabled Guest VLAN Ports : 1:2-1:8
DGS-3120-24TC:admin#
4-21 config radius add
Description
This command is used to add a new RADIUS server. The server with lower index has higher
authenticative priority.
Page 58

xStack® DGS-3120 Series Managed Switch CLI Reference Guide
54
Format
config radius add <server_index 1-3> [<server_ip> | <ipv6addr>] key <password 32>
[default | {auth_port <udp_port_numb er 1-65535> | acct_port <udp_port_number 1-65535> |
timeout <sec 1-255> | retransmit <int 1-20>}]
Parameters
<server_index 1-3> - Enter the RADIUS server index. This value must be between 1 and 3.
<server_ip> - Enter the IP address of the RADIUS server here.
<ipv6addr> - Enter the IPv6 address of the RADIUS server here. (EI Mode Only)
key - The key pre-negotiated between switch and the RADIUS server. It is used to encrypt user’s
authentication data before being transmitted over internet. The maximum length of the key is
32.
<password 32> - Enter the password here. The password can be up to 32 characters long.
default - Sets the authentication UDP port number to 1812 accounting UDP port number to 1813,
timeout to 5 seconds and retransmit to 2.
auth_port - (Optional) Specify the UDP port number which is used to transmit RADIUS
authentication data between the Switch and the RADIUS server. The range is 1 to 65535.
<udp_port_number 1-65535> - Enter the authentication port number here. This value must
be between 1 and 65535.
acct_port - (Optional) Specify the UDP port number which is used to transmit RADIUS
accounting statistics between the Switch and the RADIUS server. The range is 1 to 65535.
<udp_port_number 1-65535> - Enter the accounting port number here. This value must be
between 1 and 65535.
timeout - (Optional) The time in second for waiting server reply. The default value is 5 seconds.
<sec 1-255> - Enter the timeout value here. This value must be between 1 and 255 seconds.
retransmit - (Optional) The count for re-transmitting. The default value is 2.
<int 1-20> - Enter the re-transmit value here. This value must be between 1 and 20.
Restrictions
Only Administrator, Operator and Power-User level users can issue this command.
Example
To add a new RADIUS server:
DGS-3120-24TC:admin# config radius add 1 10.48.74.121 key dlink default
Command: config radius add 1 10.48.74.121 key dlink default
Success.
DGS-3120-24TC:admin#
4-22 config radius delete
Description
This command is used to delete a RADIUS server.
Format
config radius delete <server_index 1-3>
Page 59

xStack® DGS-3120 Series Managed Switch CLI Reference Guide
55
Parameters
<server_index 1-3> - Sp ec ify to delete a RADIUS server.Enter the RADIUS server index.
Restrictions
Only Administrator, Operator and Power-User level users can issue this command.
Example
To delete a radius server:
DGS-3120-24TC:admin# config radius delete 1
Command: config radius delete 1
Success.
DGS-3120-24TC:admin#
4-23 config radius
Description
This command is used to configure a RADIUS server.
Format
config radius <server_index 1-3> {ipaddress [<server_ip> | <ipv6addr>] | key <password
32> | auth_port [<udp_port_number 1-65535> | default] | acct_port [<udp_port_number 165535> | default] | timeout [<sec 1-255> | default] | retransmit [<int 1-20> | default]}
Parameters
<server_index 1-3> - Enter the RADIUS server index here. This value must be between 1 and 3.
ipaddress - (Optional) The IP address of the RADIUS server.
<server_ip> - Enter the RADIUS server IP address here.
<ipv6addr> - Enter the RADIUS server IPv6 address used here. (EI Mode Only)
key - (Optional) The key pre-negotiated between switch and RADIUS server. It is used to encrypt
user’s authentication data before being transmitted over internet. The maximum length of the
key is 32.
<password 32>
- Enter the key here. The key can be up to 32 characters long.
auth_port - (Optional) Specify the UDP port number which is used to transmit RADIUS
authentication data between the Switch and the RADIUS server. The range is 1 to 65535. The
default value is 1812.
<udp_port_number 1-65535> - Enter the authentication port number here. This value must
be between 1 and 65535.
default - Specify that the default port num ber will be us ed.
acct_port - (Optional) Specify the UDP port number which is used to transmit RADIUS
accounting statistics between the Switch and the RADIUS server. The range is 1 to 65535.
The default value is 1813.
<udp_port_number 1-65535> - Enter the accounting port number here. This value must be
between 1 and 65535.
default - Specify that the default port number will be used.
timeout - (Optional) The time in second for waiting server reply. The default value is 5 seconds.
<sec 1-255> - Enter the timeout value here. This value must be between 1 and 255 seconds.
Page 60
xStack® DGS-3120 Series Managed Switch CLI Reference Guide
56
default - Specify that the default timeout value will be used.
retransmit - (Optional) The count for re-transmitting. The default value is 2.
<int 1-20> - Enter the re-transmit value here. This value must be between 1 and 20.
default - Specify that the default re-transmit value will be used.
Restrictions
Only Administrator, Operator and Power-User level users can issue this command.
Example
To configure a radius server:
DGS-3120-24TC:admin# config radius 1 auth_port 60
Command: config radius 1 auth_port 60
Success.
DGS-3120-24TC:admin#
4-24 show radi us
Description
This command is used to display RADIUS server configurations.
Format
show radius
Parameters
None.
Restrictions
None.
Example
To display RADIUS server configurations:
Page 61

xStack® DGS-3120 Series Managed Switch CLI Reference Guide
57
DGS-3120-24TC:admin# show radius
Command: show radius
Index 1
IP Address : 172.18.211.71
Auth-Port : 1812
Acct-Port : 1813
Timeout : 5 sec
Retransmit : 2
Key : 1234567
Index 2
IP Address : 172.18.211.108
Auth-Port : 1812
Acct-Port : 1813
Timeout : 5 sec
Retransmit : 2
Key : adfdslkfjefiefdkgjdassdwtgjk6y1w
Total Entries : 2
DGS-3120-24TC:admin#
4-25 show auth_s tatistics
Description
This command is used to display information of authenticator statistics.
Format
show auth_statistics {ports <portlist>}
Parameters
ports - (Optional) Specify a range of ports to be displayed.
<portlist> - Enter the list of ports that will be displayed here.
Restrictions
None.
Example
To display authenticator statistics information for port 1:
Page 62
xStack® DGS-3120 Series Managed Switch CLI Reference Guide
58
DGS-3120-24TC:admin#show auth_statistics ports 1:1
Command: show auth_statistics ports 1:1
Port Number : 1:1
EapolFramesRx 0
EapolFramesTx 9
EapolStartFramesRx 0
EapolReqIdFramesTx 6
EapolLogoffFramesRx 0
EapolReqFramesTx 0
EapolRespIdFramesRx 0
EapolRespFramesRx 0
InvalidEapolFramesRx 0
EapLengthErrorFramesRx 0
LastEapolFrameVersion 0
LastEapolFrameSource 00-00-00-00-00-00
CTRL+C ESC q Quit SPACE n Next Page p Previous Page r Refresh
4-26 show auth_diagnostics
Description
This command is used to display information of authenticator diagnostics.
Format
show auth_diagnostics {ports <portlist>}
Parameters
ports - (Optional) Specify a range of ports to be displayed.
<portlist> - Enter the list of ports that will be displayed here.
Restrictions
None.
Example
To display authenticator diagnostics information for port 1:
Page 63

xStack® DGS-3120 Series Managed Switch CLI Reference Guide
59
DGS-3120-24TC:admin#show auth_diagnostics ports 1:1
Command: show auth_diagnostics ports 1:1
Port Number : 1:1
EntersConnecting 11
EapLogoffsWhileConnecting 0
EntersAuthenticating 0
SuccessWhileAuthenticating 0
TimeoutsWhileAuthenticating 0
FailWhileAuthenticating 0
ReauthsWhileAuthenticating 0
EapStartsWhileAuthenticating 0
EapLogoffWhileAuthenticating 0
ReauthsWhileAuthenticated 0
EapStartsWhileAuthenticated 0
EapLogoffWhileAuthenticated 0
BackendResponses 0
BackendAccessChallenges 0
BackendOtherRequestsToSupplicant 0
BackendNonNakResponsesFromSupplicant 0
BackendAuthSuccesses 0
BackendAuthFails 0
CTRL+C ESC q Quit SPACE n Next Page p Previous Page r Refresh
4-27 show auth_s ession_statistics
Description
This command is used to display information of authenticator session statistics.
Format
show auth_session_statist ics {po rts <po rtlist>}
Parameters
ports - (Optional) Specify a range of ports to be displayed.
<portlist> - Enter the list of ports that will be displayed here.
Restrictions
None.
Example
To display authenticator session statistics information for port 1:
Page 64
xStack® DGS-3120 Series Managed Switch CLI Reference Guide
60
DGS-3120-24TC:admin# show auth_session_statistics ports 1:1
Command: show auth_session_statistics ports 1:1
Port Number : 1:1
SessionOctetsRx 0
SessionOctetsTx 0
SessionFramesRx 0
SessionFramesTx 0
SessionId
SessionAuthenticMethod Remote Authentication Server
SessionTime 0
SessionTerminateCause SupplicantLogoff
SessionUserName
CTRL+C ESC q Quit SPACE n Next Page p Previous Page r Refresh
4-28 show auth_client
Description
This command is used to display information of RADIUS authentication client.
Format
show auth_client
Parameters
None.
Restrictions
None.
Example
To display authentication client information:
Page 65

xStack® DGS-3120 Series Managed Switch CLI Reference Guide
61
DGS-3120-24TC:admin# show auth_client
Command: show auth_client
radiusAuthClient ==>
radiusAuthClientInvalidServerAddresses 0
radiusAuthClientIdentifier
radiusAuthServerEntry ==>
radiusAuthServerIndex :1
radiusAuthServerAddress 0.0.0.0
radiusAuthClientServerPortNumber 0
radiusAuthClientRoundTripTime 0
radiusAuthClientAccessRequests 0
radiusAuthClientAccessRetransmissions 0
radiusAuthClientAccessAccepts 0
radiusAuthClientAccessRejects 0
radiusAuthClientAccessChallenges 0
radiusAuthClientMalformedAccessResponses 0
radiusAuthClientBadAuthenticators 0
radiusAuthClientPendingRequests 0
radiusAuthClientTimeouts 0
radiusAuthClientUnknownTypes 0
radiusAuthClientPacketsDropped 0
DGS-3120-24TC:admin#
4-29 show acct_client
Description
This command is used to display information of RADIUS accounting client.
Format
show acct_client
Parameters
None.
Restrictions
None.
Example
To display information of RADIUS accounting client:
Page 66

xStack® DGS-3120 Series Managed Switch CLI Reference Guide
62
DGS-3120-24TC:admin# show acct_client
Command: show acct_client
radiusAcctClient ==>
radiusAcctClientInvalidServerAddresses 0
radiusAcctClientIdentifier
radiusAuthServerEntry ==>
radiusAccServerIndex : 1
radiusAccServerAddress 0.0.0.0
radiusAccClientServerPortNumber 0
radiusAccClientRoundTripTime 0
radiusAccClientRequests 0
radiusAccClientRetransmissions 0
radiusAccClientResponses 0
radiusAccClientMalformedResponses 0
radiusAccClientBadAuthenticators 0
radiusAccClientPendingRequests 0
radiusAccClientTimeouts 0
radiusAccClientUnknownTypes 0
radiusAccClientPacketsDropped 0
DGS-3120-24TC:admin#
4-30 config account ing service
Description
This command is used to configure the state of the specified RADIUS accounting service.
Format
config accounting service [network | shell | system] state [enable | disable]
Parameters
network - Accounting service for 802.1X port access control. By default, the service is disabled.
shell - Accounting service for shell events: When user logs on or out the Switch (via the console,
Telnet, or SSH) and timeout occurs, accounting information will be collected and sent to
RADIUS server. By default, the service is disabled.
system - Accounting service for system events: reset, reboot. By default, the service is disabled.
state - Specify the state of the specified service.
enable - Specify to enable the specified accounting service.
disable
- Specify to disable the specified accounting service.
Restrictions
Only Administrator and Operator-level users can issue this command.
Page 67
xStack® DGS-3120 Series Managed Switch CLI Reference Guide
63
Example
Enable it to configure accounting shell state:
DGS-3120-24TC:admin# config accounting service shell state enable
Command: config accounting service shell state enable
Success.
DGS-3120-24TC:admin#
4-31 show accounti ng s ervice
Description
This command is used to show the status of RADIUS accounting services.
Format
show accounting service
Parameters
None.
Restrictions
None.
Example
To show information of RADIUS accounting services:
DGS-3120-24TC:admin# show accounting service
Command: show accounting service
Accounting Service
------------------Network : Enabled
Shell : Enabled
System : Enabled
DGS-3120-24TC:admin#
Page 68

xStack® DGS-3120 Series Managed Switch CLI Reference Guide
64
Chapter 5 Access Authentication
Control Command List
enable password encryption
disable password encryption
enable authen_policy
disable authen_policy
show authen_policy
create authen_login method_list_name <string 15>
config authen_login [default | method_list_name <string 15>] method {tacacs | xtacacs | tacacs+
| radius | server_group <string 15> | local | none}
delete authen_login method_list_name <string 15>
show authen_login [default | method_list_name <string 15> | all]
create authen_enable method_list_name <string 15>
config authen_enable [default | method_list_name <string 15>] method {tacacs | xtacacs |
tacacs+ | radius | server_group <string 15> | loca l _enabl e | none}
delete authen_enable method_list_name <string 15>
show authen_enable [default | method_list_name <string 15> | all]
config authen application [console | telnet | ssh | http | all] [login | enable] [default |
method_list_name <string 15>]
show authen application
create authen server_group <string 15>
config authen server_group [tacacs | xtacacs | tacacs+ | radius | <string 15>] [add | delete]
server_host <ipaddr> protocol [tacacs | xtacacs | tacacs+ | radius]
delete authen server_group <string 15>
show authen server_group {<string 15>}
create authen server_host <ipaddr> protocol [tacacs | xtacacs | tacacs+ | radius] { port <int 1-
65535> | key [<key_string 254> | none] | timeout <int 1-255> | retransmit <int 1-20> }
config authen server_host
<ipaddr> protocol [tacacs | xtacacs | tacacs+| radius] {port <int 1-
65535> | key [<key_string 254> | none] | timeout <int 1-255> | retransmit <int 1-20>}
delete authen server_host <ipaddr> protocol [tacacs | xtacacs | tacacs+ | radius]
show authen server_host
config authen parameter response_timeout <int 0-255>
config authen parameter attempt <int 1-255>
show authen parameter
enable admin
config admin local_enable {encrypt [plain_text | sha_1] <password>}
5-1 enable password encryption
Description
This command is used to enable password encryption. The user account configuration information
will be stored in the configuration file, and can be applied to the system later.
If the password encryption is enabled, the password will be in encrypted form.
Format
enable password encryption
Page 69

xStack® DGS-3120 Series Managed Switch CLI Reference Guide
65
Parameters
None.
Restrictions
Only Administrator-level users can issue this command.
Example
To enable the password encryption:
DGS-3120-24TC:admin#enable password encryption
Command: enable password encryption
Success.
DGS-3120-24TC:admin#
5-2 disable password encryption
Description
This command is used to disable password encryption. The user account configuration information
will be stored in the configuration file, and can be applied to the system later.
When password encryption is disabled, if the user specifies the password in plain text form, the
password will be in plan text form. However, if the user specifies the password in encrypted form,
or if the password has been converted to encrypted form by the last enable password encryption
command, the password will still be in the encrypted form. It can not be reverted to the plaintext.
Format
disable password encryption
Parameters
None.
Restrictions
Only Administrator-level users can issue this command.
Example
To disable the password encryption:
DGS-3120-24TC:admin#disable password encryption
Command: disable password encryption
Success.
DGS-3120-24TC:admin#
Page 70

xStack® DGS-3120 Series Managed Switch CLI Reference Guide
66
5-3 enable authen_policy
Description
This command is used to enable system access authentication policy.
Enable system access authentication policy. When authentication is enabled, the device will adopt
the login authentication method list to authenticate the user for login, and adopt the enable
authentication method list to authenticate the enable password for promoting the user‘s privilege to
Admin level.
Format
enable authen_policy
Parameters
None.
Restrictions
Only Administrator-level users can issue this command.
Example
To enable system access authentication policy:
DGS-3120-24TC:admin# enable authen_policy
Command: enable authen_policy
Success.
DGS-3120-24TC:admin#
5-4 disable authen_policy
Description
This command is used to disable system access authentication policy.
Disable system access authentication policy. When authentication is disabled, the device will
adopt the local user account database to authenticate the user for login, and adopt the local
enable password to authenticate the enable password for promoting the user‘s privilege to Admin
level.
Format
disable authen_policy
Parameters
None.
Page 71
xStack® DGS-3120 Series Managed Switch CLI Reference Guide
67
Restrictions
Only Administrator-level users can issue this command.
Example
To disable system access authentication policy:
DGS-3120-24TC:admin# disable authen_policy
Command: disable authen_policy
Success.
DGS-3120-24TC:admin#
5-5 show authen_policy
Description
This command is used to display that system access authentication policy is enabled or disabled.
Format
show authen_policy
Parameters
None.
Restrictions
Only Administrator-level users can issue this command.
Example
To display system access authentication policy:
DGS-3120-24TC:admin# show authen_policy
Command: show authen_policy
Authentication Policy : Enabled
DGS-3120-24TC:admin#
5-6 create authen_login
Description
This command is used to create a user-defined method list of authentication methods for user
login. The maximum supported number of the login method lists is 8.
Page 72

xStack® DGS-3120 Series Managed Switch CLI Reference Guide
68
Format
create authen_login method_list_name <string 15>
Parameters
<string 15> - The user-defined method list name. This value can be up to 15 characters long.
Restrictions
Only Administrator-level users can issue this command.
Example
To create a user-defined method list for user login:
DGS-3120-24TC:admin# create authen_login method_list_name login_list_1
Command: create authen_login method_list_name login_list_1
Success.
DGS-3120-24TC:admin#
5-7 config authen_login
Description
Configure a user-defined or default method list of authentication methods for user login. The
sequence of methods will effect the altercation result. For example, if the sequence is tacacs+ first,
then tacacs and local, when user trys to login, the authentication request will be sent to the first
server host in tacacs+ built-in server group. If the first server host in tacacs+ group is missing, the
authentication request will be sent to the second server host in tacacs+ group, and so on. If all
server hosts in tacacs+ group are missing, the authentication request will be sent to the first server
host in tacacs group…If all server hosts in tacacs group are missing, the local account database in
the device is used to authenticate this user. When user logins the device successfully while using
methods like tacacs/xtacacs/tacacs+/radius built-in or user-defined server groups or none, the
“user” privilege level is assigned only. If user wants to get admin privilege level, user must use the
“enable admin” command to promote his privilege level. But when local method is used, the
privilege level will depend on this account privilege level stored in the local device.
Format
config authen_login [default | metho d _list_name <string 15>] method {tacacs | xtacacs |
tacacs+ | radius | server_group <string 15> | local | none}
Parameters
default - The default method list of authentication methods.
method_list_name - The user-defined method list of authentication methods.
<string 15> - Enter the method list name here. This value can be up to 15 characters long.
method
- Specify the authentication method used.
tacacs - (Optional) Authentication by the built-in server group “tacacs”.
xtacacs - (Optional) Authentication by the built-in server group “xtacacs”.
Page 73

xStack® DGS-3120 Series Managed Switch CLI Reference Guide
69
tacacs+ - (Optional) Authentication by the built-in server group “tacacs+”.
radius - (Optional) Authentication by the built-in server group “radius”.
server_group - (Optiona l) Auth ent icati on b y the user -defined server group.
<string 15> - Enter the server group value here. This value can be up 15 characters long.
local - (Optional) Authentication by local user account database in device.
none - (Optional) No authentication.
Restrictions
Only Administrator-level users can issue this command.
Example
To configure a user-defined method list for user login:
DGS-3120-24TC:admin# config authen_login method_list_name login_list_1 method
tacacs+ tac
acs local
Command: config authen_login method_list_name login_list_1 method tacacs+ tacac
s local
Success.
DGS-3120-24TC:admin#
5-8 delete authen_login
Description
This command is used to delete a user-defined method list of authentication methods for user login.
Format
delete authen_login method_list_ n ame <string 15>
Parameters
<string 15> - The user-defined method list name. This value can be up to 15 characters long.
Restrictions
Only Administrator-level users can issue this command.
Example
To delete a user-defined method list for user login:
DGS-3120-24TC:admin# delete authen_login method_list_name login_list_1
Command: delete authen_login method_list_name login_list_1
Success.
DGS-3120-24TC:admin#
Page 74

xStack® DGS-3120 Series Managed Switch CLI Reference Guide
70
5-9 show authen_login
Description
This command is used to display the method list of authentication methods for user login.
Format
show authen_login [default | method_list_name <string 15> | all]
Parameters
default - Display default user-defined method list for user login.
method_list_name - Display the specific user-defined method list for user login.
<string 15> - Enter the method list name here. This value can be up to 15 characters long.
all - Display all method lists for user login.
Restrictions
Only Administrator-level users can issue this command.
Example
To display a user-defined method list for user login:
DGS-3120-24TC:admin# show authen_login method_list_name login_list_1
Command: show authen_login method_list_name login_list_1
Method List Name Priority Method Name Comment
---------------- -------- --------------- -----------------login_list_1 1 tacacs+ Built-in Group
2 tacacs Built-in Group
3 mix_1 User-defined Group
4 local Keyword
DGS-3120-24TC:admin#
5-10 create authen_ enable
Description
This command is used to create a user-defined method list of authentication methods for
promoting user's privilege to Admin level.
Format
create authen_enable method_list_name <string 15>
Parameters
<string 15> - The user-defined method list name. This value can be up to 15 characters long.
Page 75

xStack® DGS-3120 Series Managed Switch CLI Reference Guide
71
Restrictions
Only Administrator-level users can issue this command.
Example
To create a user-defined method list for promoting user's privilege to Admin level:
DGS-3120-24TC:admin# create authen_enable method_list_name enable_list_1
Command: create authen_enable method_list_name enable_list_1
Success.
DGS-3120-24TC:admin#
5-11 config authen_enable
Description
This command is used to configure a user-defined or default method list of authentication methods
for promoting user's privilege to Admin level. The sequence of methods will affect the altercation
result. For example, if the sequence is tacacs+ first, then tacacs and local_enable, when user try
to promote user's privilege to Admin level, the authentication request will be sent to the first server
host in tacacs+ built-in server group. If the first server host in tacacs+ group is missing, the
authentication request will be sent to the second server host in tacacs+ group, and so on. If all
server hosts in tacacs+ group are missing, the authentication request will be sent to the first server
host in tacacs group…If all server hosts in tacacs group are missing, the local enable password in
the device is used to authenticate this user’s password.
Format
config authen_enable [default | method_list_name <string 15>] method {tacacs | xtacacs |
tacacs+ | radius | server_group <string 15> | local _enable | none}
Parameters
default - The default method list of authentication methods.
method_list_name - The user-defined method list of authentication methods.
<string 15> Enter the method list name here. This value can be up to 15 characters long.
method - Specify the authentication method used.
tacacs - (Optional) Authentication by the built-in server group “tacacs”.
xtacacs - (Optional) Authentication by the built-in server group “xtacacs”.
tacacs+ - (Optional) Authentication by the built-in server group “tacacs+”.
radius - (Optional) Authentication by the built-in server group “radius”.
server_group - (Optiona l) Auth ent icati on b y the user-defined server group.
<string 15> - Enter the server group name here. This value can be up to 15 characters
long.
local_enable - (Optional) Authentication by local enable password in device.
none - (Optional) No authentication.
Restrictions
Only Administrator-level users can issue this command.
Page 76

xStack® DGS-3120 Series Managed Switch CLI Reference Guide
72
Example
To configure a user-defined method list for promoting user's privilege to Admin level:
DGS-3120-24TC:admin# config authen_enable method_list_name enable_list_1 method
tacacs+ tac
acs local_enable
Command: config authen_ enable method_list_name enable_list_1 method tacacs+
tacac
s local_enable
Success.
DGS-3120-24TC:admin#
5-12 delete authen_ enable
Description
This command is used to delete a user-defined method list of authentication methods for
promoting user's privilege to Admin level.
Format
delete authen_enable method_list_name <string 15>
Parameters
<string 15> - The user-defined method list name. This value can be up to 15 characters long.
Restrictions
Only Administrator-level users can issue this command.
Example
To delete a user-defined method list for promoting user's privilege to Admin level:
DGS-3120-24TC:admin# delete authen_enable method_list_name enable_list_1
Command: delete authen_enable method_list_name enable_list_1
Success.
DGS-3120-24TC:admin#
5-13 show authen_enable
Description
This command is used to display the method list of authentication methods for promoting user's
privilege to Admin level.
Page 77

xStack® DGS-3120 Series Managed Switch CLI Reference Guide
73
Format
show authen_enable [default | method_list_name <string 15> | all]
Parameters
default - Display default user-defined method list for promoting user's privilege to Admin level.
method_list_name - Display the specific user-defined method list for promoting user's privilege
to Admin level.
<string 15> - Enter the method list name here. This value can be up to 15 characters long.
all - Display all method lists for promoting user's privilege to Admin level.
Restrictions
Only Administrator-level users can issue this command.
Example
To display all method lists for promoting user's privilege to Admin level:
DGS-3120-24TC:admin# show authen_enable method_list_name enable_list_1
Command: show authen_enable method_list_name enable_list_1
Method List Name Priority Method Name Comment
---------------- -------- --------------- -----------------enable_list_1 1 tacacs+ Built-in Group
2 tacacs Built-in Group
3 mix_1 User-defined Group
4 local Keyword
Total Entries : 1
DGS-3120-24TC:admin#
5-14 config authen application
Description
This command is used to configure login or enable method list for all or the specified application.
Format
config authen application [console | telnet | ssh | http | all] [login | enable] [default |
method_list_name <string 15>]
Parameters
console - Application: console.
telnet - Application: telnet.
ssh - Application: SSH.
http - Application: web.
all - Application: console, telnet, SSH, and we b.
login - Select the method list of authentication methods for user login.
Page 78
xStack® DGS-3120 Series Managed Switch CLI Reference Guide
74
enable - Select the method list of authentication methods for promoting user's privilege to Admin
level.
default - Default method list.
method_list_name - The user-defined method list name.
<string> - Enter the method list name here. This value can be up to 15 characters long.
Restrictions
Only Administrator-level users can issue this command.
Example
To configure the login method list for telnet:
DGS-3120-24TC:admin# config authen application telnet login method_list_name
login_list_1
Command: config authen application telnet login method_list_name login_list_1
Success.
DGS-3120-24TC:admin#
5-15 show authen appl ication
Description
This command is used to display the login/enable method list for all applications.
Format
show authen application
Parameters
None.
Restrictions
Only Administrator-level users can issue this command.
Example
To display the login/enable method list for all applications:
Page 79
xStack® DGS-3120 Series Managed Switch CLI Reference Guide
75
DGS-3120-24TC:admin# show authen application
Command: show authen application
Application Login Method List Enable Method List
----------- ----------------- -----------------Console default default
Telnet login_list_1 default
SSH default default
HTTP default default
DGS-3120-24TC:admin#
5-16 create authen s erver_group
Description
This command is used to create a user-defined authentication server group. The maximum
supported number of server groups including built-in server groups is 8. Each group consists of 8
server hosts as maximum.
Format
create authen server_group <string 15>
Parameters
<string 15> - The user-defined server group name. This value can be up to 15 characters long.
Restrictions
Only Administrator-level users can issue this command.
Example
To create a user-defined authentication server group:
DGS-3120-24TC:admin# create authen server_group mix_1
Command: create authen server_group mix_1
Success.
DGS-3120-24TC:admin#
5-17 config authen server_group
Description
This command is used to add or remove an authentication server host to or from the specified
server group. Built-in server group “tacacs”, “xtacacs”, “tacacs+”, “radius” accepts the server host
with the same protocol only, but user-defined server group can accept server hosts with different
protocols.
Page 80

xStack® DGS-3120 Series Managed Switch CLI Reference Guide
76
Format
config authen server_group [tacacs | xtacacs | tacacs+ | radius | <string 15>] [add | delete]
server_host <ipaddr> protocol [tacacs | xtacacs | tacacs+ | radius]
Parameters
server_group - User-defined server group.
tacacs - Built-in server group “tacacs”.
xtacacs - Built-in server group “xtacacs”.
tacacs+ - Built-in server group “tacacs+”.
radius - Built-in server group “radius”.
<string 15> - Enter the server group name here. This value can be up to 15 characters long.
add - Add a server host to a server group.
delete - Remove a server host from a server group.
server_host - Server host’s IP address.
<ipaddr> - Enter the server host IP address here.
protocol - Specify the authentication protocol used.
tacacs - Specify that the TACACS authentication protocol will be used.
xtacacs - Specify that the XTACACS authentication protocol will be used.
tacacs+ - Specify that the TACACS+ authentication protocol will be used.
radius - Specify that the radius authentication protocol will be used.
Restrictions
Only Administrator-level users can issue this command.
Example
To add an authentication server host to an server group:
DGS-3120-24TC:admin# config authen server_group mix_1 add server_host
10.1.1.222 protocol
tacacs+
Command: config authen server_group mix_1 add server_host 10.1.1.222 protocol
ta
cacs+
Success.
DGS-3120-24TC:admin#
5-18 delete authen s erver_group
Description
This command is used to delete a user-defined authentication server group.
Format
delete authen server_group <string 15>
Page 81

xStack® DGS-3120 Series Managed Switch CLI Reference Guide
77
Parameters
<string 15> - The user-defined server group name. This value can be up to 15 characters long.
Restrictions
Only Administrator-level users can issue this command.
Example
To delete a user-defined authentication server group:
DGS-3120-24TC:admin# delete authen server_group mix_1
Command: delete authen server_group mix_1
Success.
DGS-3120-24TC:admin#
5-19 show authen server_group
Description
This command is used to display the authentication server groups.
Format
show authen server_group {<string 15>}
Parameters
<string 15> - (Optional) The built-in or user-defined server group name. This value can be up to
15 characters long.
Restrictions
Only Administrator-level users can issue this command.
Example
To display all authentication server groups:
Page 82

xStack® DGS-3120 Series Managed Switch CLI Reference Guide
78
DGS-3120-24TC:admin# show authen server_group
Command: show authen server_group
Group Name IP Address Protocol
--------------- --------------- -------mix_1 10.1.1.222 TACACS+
10.1.1.223 TACACS
radius 10.1.1.224 RADIUS
tacacs 10.1.1.225 TACACS
tacacs+ 10.1.1.226 TACACS+
xtacacs 10.1.1.227 XTACACS
Total Entries : 5
DGS-3120-24TC:admin#
5-20 create authen s erver_host
Description
This command is used to create an authentication server host. When an authentication server host
is created, IP address and protocol are the index. That means over 1 authentication protocol
services can be run on the same physical host. The maximum supported number of server hosts is
16.
Format
create authen server_host <ipaddr> protocol [tacacs | xtacacs | tacacs+ | radius] {port <int
1-65535> | key [<key_string 254> | none] | timeout <int 1-255> | retransmit <int 1-20> }
Parameters
<ipaddr> - Enter the server host IP address.
protocol - Specify the host's authentication protocol.
tacacs - Server host’s authentication protocol.
xtacacs - Server host’s authentication protocol.
tacacs+ - Server host’s authentication protocol.
radius - Server host’s authentication protocol.
port - (Optional) The port number of authentication protocol for server host. Default value for
TACACS/XTACACS/TACACS+ is 49. Default value for RADIUS is 1812.
<int 1-65535> - Enter the authentication protocol port number here. This value must be
between 1 and 65535.
key - (Optional) The key for TACACS+ and RADIUS authentication. If the value is null, no
encryption will apply. This value is meaningless for TACACS and XTACACS.
<key_string 254> - Enter the TACACS+ or the RADIUS key here. This key can be up to 254
characters long.
none - No encryption for TACACS+ and RADIUS authentication. This value is meaningless
for TACACS and XTACACS.
timeout - (Optional) The time in second for waiting server reply. Default value is 5 seconds.
<int 1-255> - Enter the timeout value here. This value must be between 1 and 255 seconds.
retransmit - (Optional) The count for re-transmit. This value is meaningless for TACACS+.
Default value is 2.
<int 1-20>
- Enter the re-transmit value here. This value must be between 1 and 20.
Page 83

xStack® DGS-3120 Series Managed Switch CLI Reference Guide
79
Restrictions
Only Administrator-level users can issue this command.
Example
To create a TACACS+ authentication server host, its listening port number is 15555 and timeout
value is 10 seconds:
DGS-3120-24TC:admin#create authen server_host 10.1.1.222 protocol tacacs+ port
15555 timeout 10
Command: create authen server_host 10.1.1.222 protocol tacacs+ port 15555
timeout 10
Key is empty for TACACS+ or RADIUS.
Success.
DGS-3120-24TC:admin#
5-21 config authen server_host
Description
This command is used to configure an authentication server host.
Format
config authen server_host <ipaddr> protocol [tacacs | xtacacs | tacacs+ | radius] {port <int
1-65535> | key [<key_string 254> | none ] | timeout <int 1-255> | retransmit <int 1-20>}
Parameters
<ipaddr> - Enter the server host IP address.
protocol - Specify the server host's authentication protocol.
tacacs - Server host’s authentication protocol.
xtacacs - Server host’s authentication protocol.
tacacs+ - Server host’s authentication protocol.
radius
- Server host’s authentication protocol.
port - (Optional) The port number of authentication protocol for server host. Default value for
TACACS/XTACACS/TACACS+ is 49. Default value for RADIUS is 1812.
<int 1-65535> - Enter the port number here. This value must be between 1 and 65535.
key - (Optional) The key for TACACS+ and RADIUS authentication. If the value is null, no
encryption will apply. This value is meaningless for TACACS and XTACACS.
<key_string 254> - Enter the TACACS+ key here. This value can be up to 254 characters
long.
none - No encryption for TACACS+ and RADIUS authentication. This value is meaningless
for TACACS and XTACACS.
timeout - (Optional) The time in second for waiting server reply. Default value is 5 seconds.
<int 1-255> - Enter the timeout value here. This value must be between 1 and 255 seconds.
retransmit - (Optional) The count for re-transmit. This value is meaningless for TACACS+.
Default value is 2.
<int 1-20> - Enter the re-transmit value here. This value must be between 1 and 20.
Restrictions
Only Administrator-level users can issue this command.
Page 84
xStack® DGS-3120 Series Managed Switch CLI Reference Guide
80
Example
To configure a TACACS+ authentication server host’s key value:
DGS-3120-24TC:admin#config authen server_host 10.1.1.222 protocol tacacs+ key
"This is a secret."
Command: config authen server_host 10.1.1.222 protocol tacacs+ key "This is a
secret."
Success.
DGS-3120-24TC:admin#
5-22 delete authen s erver_host
Description
This command is used to delete an authentication server host.
Format
delete authen server_host <ipaddr> protocol [tacacs | xtacacs | tacacs+ | radius]
Parameters
<ipaddr> - Enter the server host's IP address.
protocol
- Specify that server host's authentication protocol.
tacacs - Server host’s authentication protocol.
xtacacs - Server host’s authentication protocol.
tacacs+ - Server host’s authentication protocol.
radius - Server host’s authentication protocol.
Restrictions
Only Administrator-level users can issue this command.
Example
To delete an authentication server host:
DGS-3120-24TC:admin# delete authen server_host 10.1.1.222 protocol tacacs+
Command: delete authen server_host 10.1.1.222 protocol tacacs+
Success.
DGS-3120-24TC:admin#
5-23 show authen server_host
Description
This command is used to display the authentication server hosts.
Page 85

xStack® DGS-3120 Series Managed Switch CLI Reference Guide
81
Format
show authen server_host
Parameters
None.
Restrictions
Only Administrator-level users can issue this command.
Example
To display all authentication server hosts:
DGS-3120-24TC:admin#show authen server_host
Command: show authen server_host
IP Address Protocol Port Timeout Retransmit Key
--------------- -------- ----- ------- ---------- -------------------------
10.1.1.222 TACACS+ 15555 10 ------ This is a secret.
Total Entries : 1
DGS-3120-24TC:admin#
5-24 config authen parameter response_timeout
Description
This command is used to configure the amount of time waiting or user input on console, telnet,
SSH application.
Format
config authen parameter response_timeout <int 0-255>
Parameters
<int 0-255>
- The amount of time for user input on console or telnet or SSH. 0 means there is no
time out. This value must be between 0 and 255. Default value is 30 seconds.
Restrictions
Only Administrator-level users can issue this command.
Example
To configure the amount of time waiting or user input to be 60 seconds:
Page 86

xStack® DGS-3120 Series Managed Switch CLI Reference Guide
82
DGS-3120-24TC:admin# config authen parameter response_timeout 60
Command: config authen parameter response_timeout 60
Success.
DGS-3120-24TC:admin#
5-25 config authen parameter attempt
Description
This command is used to configure the maximum attempts for user's trying to login or promote the
privilege on console, telnet, SSH application.
Format
config authen parameter attempt <int 1-255>
Parameters
<int 1-255> - The amount of attempts for user's trying to login or promote the privilege on console
or telnet or SSH. This value must be between 1 and 255. Default value is 3.
Restrictions
Only Administrator-level users can issue this command.
Example
To configure the maximum attempts for user's trying to login or promote the privilege to be 9:
DGS-3120-24TC:admin# config authen parameter attempt 9
Command: config authen parameter attempt 9
Success.
DGS-3120-24TC:admin#
5-26 show authen par am eter
Description
This command is used to display the parameters of authentication.
Format
show authen parameter
Parameters
None.
Page 87
xStack® DGS-3120 Series Managed Switch CLI Reference Guide
83
Restrictions
Only Administrator-level users can issue this command.
Example
To display the parameters of authentication:
DGS-3120-24TC:admin# show authen parameter
Command: show authen parameter
Response Timeout : 60 seconds
User Attempts : 9
DGS-3120-24TC:admin#
5-27 enable admin
Description
This command is used to enter the administrator level privilege. Promote the "user" privilege level
to "admin" level. When the user enters this command, the authentication method tacacs, xtacacs,
tacacs+, user-defined ser v er groups , loca l_e na ble or none will be us ed to authe n tic ate the user .
Because TACACS, XTACACS and RADIUS don't support "enable" function in itself, if user wants
to use either one of these 3 protocols to do enable authentication, user must create a special
account on the server host first, which has a username "enable" and then configure its password
as the enable password to support "en ab le " func tion.
This command can not be used when authenticat ion p olicy is disabled.
Format
enable admin
Parameters
None.
Restrictions
None.
Example
To enable administrator lever privilege:
DGS-3120-24TC:puser# enable admin
Password:********
DGS-3120-24TC:admin#
Page 88

xStack® DGS-3120 Series Managed Switch CLI Reference Guide
84
5-28 config admin l ocal_enable
Description
This command is used to config the local enable password of administrator level privilege. When
the user chooses the “local_enable” method to promote the privilege level, the enable password of
local device is needed. When the password information is not specified in the command, the
system will prompt the user to input the password interactively. For this case, the user can only
input the plain text password. If the password is present in the command, the user can select to
input the password in the plain text form or in the encrypted form. The encryption algorithm is
based on SHA-I.
Format
config admin local_enable {encrypt [plain_text | sha_1] <password>}
Parameters
encrypt - (Optional) Specify the password form.
plain_text - Specify the password in plain text form.
sha_1
- Specify the password in SHA-1 encrypted form.
<password> - (Optional) The password for promoting the privilege level. The length for a
password in plain-text form and SHA-1 encrypted form are different.
plain-text: Passwords can be from a minimum of 0 to a maximum of 15 characters.
SHA-1: The length of Encrypted passwords is fixed to 35 bytes longand the password is case-
sensitive.
Restrictions
Only A dministrator-level users can issue this command.
Example
To configure the administrator password:
DGS-3120-24TC:admin# config admin local_enable
Command: config admin local_ebable
Enter the old password:
Enter the case-sensitive new password:******
Enter the new password again for confirmation:******
Success.
DGS-3120-24TC:admin#
Page 89

xStack® DGS-3120 Series Managed Switch CLI Reference Guide
85
Chapter 6 Access Control List (ACL)
Command List
create access_profile profile_id <value 1-6> profile_name <name 1-32> [ethernet {vlan {<hex
0x0-0x0fff>} | source_mac <macmask 000000000000-ffffffffffff> | destination_mac <macmask
000000000000-fffff fffff ff > | 802.1p | ethernet_type} | ip {vlan {<hex 0x0-0x0fff>} |
source_ip_mask <netmask> | destination_ip_mask <netmask> | dscp | [icmp {type | code } |
igmp {type} | tcp {src_port_mask <hex 0x0-0xffff> | dst_port_mask <hex 0x0-0xf ff f> |
flag_mask [all | {urg | ack | psh | rst | syn | fin}]} | udp {src_port_mask <hex 0x0-0x ffff > |
dst_port_mask <hex 0x0-0xffff>} | protocol_id_mask <hex 0x0-0xff> {user_define_mask <hex
0x0-0xffffffff>}]} | packet_content_mask {offset_chunk_1 <value 0-31> <hex 0x0-0xffffffff> |
offset_chunk_2 <value 0-31> <hex 0x0-0xffffffff> | offset_chunk_3 <value 0-31> <hex 0x00xffffffff> | offset_chunk_4 <value 0-31> <hex 0x0-0xffffffff>} | ipv6 {class | flowlabel |
source_ipv6_mask <ipv6mask> | destination_ipv6_mask <ipv6mask> | [tcp { src_port_mask
<hex 0x0-0xffff> | dst_port_mask <hex 0x0-0xffff>} | udp {src_port_mask <hex 0x0-0xffff> |
dst_port_mask <hex 0x0-0xffff> } | icmp { type | code}]}]
delete access_profile [profile_id <value 1-6> | profile_name <name 1-32> | all]
config access_profile [profile_id <value 1-6> | profile_name <name 1-32>] [add access_id
[auto_assign | <value 1-256>] [ethernet {[vlan <vlan_name 32> | vlan_id <vlanid 1-4094>]
{mask <hex 0x0-0x0fff>} | source_mac <macaddr> {mask <macmask>} | destination_mac
<macaddr> {mask <macmask>} | 802.1p <value 0-7> | ethernet_type <hex0x 0-0xffff>} | ip
{[vlan <vlan_name 32> | vlan_id <vlanid 1-4094>] {mask <hex 0x0-0x0fff>} | source_ip
<ipaddr> {mask <netmask>} | destination_ip <ipaddr> {mask <netmask>} | dscp <value 0-63>
| [icmp {type <value 0-255> | code <value 0-2 55 >} | igmp {type <value 0-255>} | tcp {src_port
<value 0-65535> {mask <hex 0x0-0xffff>} | dst_port <value 0-65535> {mask <hex 0x0-0xffff>}
| flag [all | {urg | ack | psh | rst | syn | fin}]} | udp {src_port <value 0-65535> {mask <hex 0x00xffff>} | dst_port <value 0-65535> {mask <hex 0x0-0xffff>}} | protocol_id <value 0-255>
{user_define <hex 0x0-0xffffffff> {mask <hex 0x0-0xffffffff>}}]} | packet_content
{offset_chunk_1 <hex 0x0-0xffffffff> {mask <hex 0x0-0xffffffff>} | offset_chunk_2 <hex 0x00xffffffff> {mask <hex 0x0-0xffffffff>} | offset_chunk_3 <hex 0x0-0xffffffff> {mask <hex 0x00xffffffff>} | offset_chunk_4 <hex 0x0-0xffffffff> {mask <hex 0x0-0xffffffff>}}| ipv6 {class <value
0-255> | flowlabel <hex 0x0-0xfffff> | source_ipv6 <ipv6addr> {mask <ipv6mask>} |
destination_ipv6 <ipv6addr> {mask <ipv6mask>} | [tcp {src_port <value 0-65535> {mask <hex
0x0-0xffff>} | dst_port <value 0-65535> {mask <hex0x0-0xffff>}} | udp {src_port <value 065535> {mask <hex 0x0-0xffff>} | dst_port <value 0-65535> {mask <hex 0x0-0xffff>}} | icm p
{type<value 0-255> | code <value 0-255>}]}] [port [<po r tlist> | all] | vlan_bas ed [v lan
<vlan_name 32> | vlan_id <vlanid 1-4094>]] [permit {priority <value 0-7> {replace_priority} |
[replace_dscp_with <value 0-63> | replace_tos _prec ed enc e_ with < value 0-7>] |
counter[enable | disable]} | mirror | deny] {time_range <range_name 32>} | delete access_id
<value 1-256>]
show access_profile {[profile_id <value 1-6> | profile_name <name 1-32>]}
config flow_meter [profile_id <value 1-6> | profile_name <name 1-32>] access_id <value 1-256>
[rate [<value 0-1048576>] {burst_size [<value 0-131072>]} rate_exceed [drop_packet |
remark_dscp <value 0-63>] | tr_tcm cir <value 0-1048576> {cbs <value 0-131072>} pir
<value 0-1048576> {pbs <value 0-131072>} {[color_blind | color_aware]} {conform [permit |
replace_dscp <value 0-63>] {counter [enable |disable]}} exceed [permit {replace_dscp <value
0-63>} | drop] {counter [enable |disable]} violate [permit {replace_dscp <value 0-63>} | drop]
{counter [enable |disable]} | sr_tcm cir <value 0-1048576> cbs <value 0-131072> ebs <value
0-131072> {[color_blind | color_aware]} {conform [permit | replace_dscp <value 0-63>]
{counter [enable |disable]}} exceed [permit {replace_dscp <value 0-63>} | drop] {counter
[enable |disable]} violate [permit {replace_dscp <value 0-63>} | drop] {counter [enable
|disable]} | delete]
show flow_meter {[pr of ile_id < value 1-6> | profile_name <name 1-32>] {access_id <value 1-
256>}}
Page 90

xStack® DGS-3120 Series Managed Switch CLI Reference Guide
86
config time_range <range_name 32> [hours start_time <time hh:mm:ss> end_time <time
hh:mm:ss> weekdays <daylist> | delete]
show time_range
show current_config access_profile
6-1 create access_profile
Description
This command is used to create access list rules.
Support for field selections can have additional limitations that are project dependent.
For example, for some hardware, it may be invalid to specify a class and source IPv6 address at
the same time. The user will be prompted with these limitations.
Format
create access_profile profile_id <value 1-6> profile_name <name 1-32> [ethernet {vlan
{<hex 0x0-0x0fff>} | source_mac <macmask 000000000000-ffffffffffff> | destination_mac
<macmask 000000000000-ffffffffffff> | 802.1p | ethernet_type} | ip {vlan {<hex 0x0-0x0fff>} |
source_ip_mask <netmask> | destination_ip_mask <netmask> | dscp | [icmp {type | code } |
igmp {type} | tcp {src_port_mask <hex 0x0-0xffff> | dst_port_mask <hex 0x0-0xffff> |
flag_mask [all | {urg | ack | psh | rst | syn | fin}]} | udp {src_port_mask <hex 0x0-0xffff> |
dst_port_mask <hex 0x0-0xffff>} | protocol_id_mask <hex 0x0-0xff> {user_define_mask
<hex 0x0-0xffffffff>}]} | packet_content_mask {offset_chunk_1 <value 0-31> <hex 0x00xffffffff> | offset_chunk_2 <value 0-31> <hex 0x0-0xffffffff> | offset_chunk_3 <value 0-31>
<hex 0x0-0xffffffff> | offset_chunk_4 <value 0-31> <hex 0x0-0xffffffff>} | ipv6 {class |
flowlabel | source_ipv6_mask <ipv6mask> | destination_ipv6_mask <ipv6mask> | [tcp
{ src_port_mask <hex 0x0-0xffff> | dst_port_mask <hex 0x0-0xffff>} | udp {src_port_mask
<hex 0x0-0xffff> | dst_port_mask <hex 0x0-0xffff> } | icmp { type | code}]}]
Option 1:
packet_content_mask {offset_chunk_1 <value 0-31> <hex 0x0-0xffffffff> | offset_chunk_2
<value 0-31> <hex 0x0-0xffffffff> | offset_chunk_3 <value 0-31 > <hex 0x0-0xffffffff> |
offset_chunk_4 <value 0-31> <hex 0x0-0xffffffff>}
Parameters
profile_id - Specify the index of the access list profile.
<value 1-6>
- Enter the profile ID here. This value must be between 1 and 6.
profile_name - The name of the profile must be specified. The maximum length is 32 characters.
<name 1-32> - Enter the profile name here.
ethernet - Specify this is an ethernet mask.
vlan - (Optional) Specif y a VLAN mask. Only the last 12 bits of the mask will be considered.
<hex 0x0-0x0fff> - Enter the VLAN mask value here.
source_mac - (Optional) Specify the source MAC mask.
<macmask> - Enter the source MAC address used here.
destination_mac - (Optional) Specify the destination MAC mask.
<macmask> - Enter the destination MAC address used here.
802.1p - (Optional) Specify the 802.1p priority tag mask.
ethernet_type - (Opti ona l) Spec ify the Ethernet type mask.
ip - Specify this is a IPv4 mask.
Page 91

xStack® DGS-3120 Series Managed Switch CLI Reference Guide
87
vlan - (Optional) Specify a VLAN mask. Only the last 12 bits of the mask will be considered.
<hex 0x0-0x0fff> -Enter the VLAN mask value here.
source_ip_mask - (Optional) Specify a source IP address mask.
<netmask> - Enter the source IP address mask here.
destination_ip_mask - (Optional) Specify a destination IP address mask.
<netmask>
- Enter the destination IP address mask here.
dscp - (Optional) Specify the DSCP mask.
icmp - (Optional) Specify that the rule applies to ICMP traffic.
type - Specify the type of ICMP traffic.
code - Specify the code of ICMP traffic
igmp - (Optional) Specify that the rule applies to IGMP traffic.
type - Specify the type of IGMP traffic.
tcp - (Optional) Specify that the rule applies to TCP traffic.
src_port_mask - Specify the TCP source port mask.
<hex 0x0-0xffff> - Enter the TCP source port mask here.
dst_port_mask - Specify the TCP destination port mask.
<hex 0x0-0xffff> - Enter the TCP destination port mask here.
flag_mask - (Optional) Specify the TCP flag field mask.
all – Specify that all the flags will be used for the TCP mask.
urg – Specify that the TCP flag field will be set to ‘urg’.
ack - Specify that the TCP flag field will be set to ‘ack’.
psh - Specify that the TCP flag field will be set to ‘psh’.
rst - Specify that the TCP flag field will be set to ‘rst’.
syn - Specify that the TCP flag field will be set to ‘syn’.
fin - Specify that the TCP flag field will be set to ‘fin’.
udp - (Optional) Specify that the rule applies to UDP traffic.
src_port_mask - Specify the UDP source port mask.
<hex 0x0-0xffff> - Enter the UDP source port mask here.
dst_port_mask - Specify the UDP destination port mask.
<hex 0x0-0xffff> - Enter the UDP destination port mask here.
protocol_id_mask - (Optional) Specify that the rule applies to IP protocol ID traffic.
<0x0-0xff> - Enter the protocol ID mask here.
user_define_mask - (Optional) Specify that the rule applies to the IP protocol ID, and that the
mask option behind the IP header length is 20 bytes.
<hex 0x0-0xffffffff> - Enter a user-defined mask value here.
packet_content_mask - Specify the packet content mask. Only one packet_content_mask profile
can be created.
offset_chunk_1 - (Optional) Specify that the offset chunk 1 will be used.
<value 0-31> - Enter the offset chunk 1 value here. This value must be between 0 and 31.
<hex 0x0-0xffffffff> - Enter the offset chunk 1 mask here.
offset_chunk_2 - (Optional) Specify that the offset chunk 2 will be used.
<value 0-31> - Enter the offset chunk 2 value here. This value must be between 0 and 31.
<hex 0x0-0xffffffff> - Enter the offset chunk 2 mask here.
offset_chunk_3 - (Optional) Specify that the offset chunk 3 will be used.
<value 0-31> - Enter the offset chunk 3 value here. This value must be between 0 and 31.
<hex 0x0-0xffffffff> - Enter the offset chunk 3 mask here.
offset_chunk_4 - (Optional) Specify that the offset chunk 4 will be used.
<value 0-31> - Enter the offset chunk 4 value here. This value must be between 0 and 31.
<hex 0x0-0xffffffff> - Enter the offset chunk 4 mask here.
ipv6 - (Optional) Specify this is the IPv6 mask. (EI Mode Only)
class - (Optional) Specify the IPv6 class. (EI Mode Only)
flowlabel - (Optional) Specify the IPv6 flow label. (EI Mode Only)
source_ipv6_mask - (Optional) Specify an IPv6 source sub-mask. (EI Mode Only)
<ipv6mask> - Enter the source IPv6 mask value here.
destination_ipv6_mask - (Optional) Specify an IPv6 destination sub-mask. (EI Mode Only)
<ipv6mask> -Enter the destination IPv6 mask value here.
tcp - (Optional) Specify that the rule applies to TCP traffic. (EI Mode Only)
src_port_mask - Specify an IPv6 Layer 4 TCP source port mask.
<hex 0x0-0xffff> - Enter the TCP source port mask value here.
Page 92

xStack® DGS-3120 Series Managed Switch CLI Reference Guide
88
des_port_mask - Specify an IPv6 Layer 4 TCP destination port mask.
<hex 0x0-0xffff> - Enter the TCP destination port mask value here.
udp - (Optional) Specify that the rule applies to UDP traffic. (EI Mode Only)
src_port_mask - Specify the UDP source port mask.
<hex 0x0-0xffff> - Enter the UDP source port mask value here.
dst_port_mask - Specify the UDP destination port mask.
<hex 0x0-0xffff> - Enter the UDP destination port mask value here.
icmp - (Optional) Specify a mask for ICMP filtering. (EI Mode Only)
type - Specify the inclusion of the ICMP type field in the mask.
code
- Specify the inclusion of the ICMP code field in the mask.
Restrictions
Only Administrator, Operator and Power-User level users can issue this command.
Example
To create an access profile:
DGS-3120-24TC:admin# create access_profile profile_id 1 profile_name t1
ethernet vlan source_mac 00-00-00-00-00-01 destination_mac 00-00-00-00-00-02
802.1p ethernet_type
Command: create access_profile profile_id 1 profile_name 1 ethernet vlan
source_mac 00-00-00-00-00-01 destination_mac 00-00-00-00-00-02 802.1p
ethernet_type
Success.
DGS-3120-24TC:admin# create access_profile profile_id 2 profile_name 2 ip vlan
source_ip_mask 20.0.0.0 destination_ip_mask 10.0.0.0 dscp icmp type code
Command: create access_profile profile_id 2 profile_name t2 ip vlan
source_ip_mask 20.0.0.0 destination_ip_mask 10.0.0.0 dscp icmp type code
Success.
DGS-3120-24TC:admin# create access_profile profile_id 4 profile_name 4
packet_content_mask offset_chunk_1 3 0xFFFF offset_chunk_2 5 0xFF00
offset_chunk_3 14 0xFFFF0000 offset_chunk_4 16 0xFF000000
Command: create access_profile profile_id 4 profile_name 4 packet_content_mask
offset_chunk_1 3 0xFFFF offset_chunk_2 5 0xFF00 offset_chunk_3 14 0xFFFF0000
offset_chunk_4 16 0xFF000000
Success.
DGS-3120-24TC:admin#
6-2 delete access_profile
Description
This command is used to delete access list profiles. This command can only delete profiles that
were created using the ACL module.
Format
delete access_profile [profile_id <value 1-6> | profile_name <name 1-32> | all]
Page 93
xStack® DGS-3120 Series Managed Switch CLI Reference Guide
89
Parameters
profile_id - Specify the index of the access list profile.
<value 1-6> - Enter the profile ID value here. This value must be between 1 and 6.
profile_name - Specify the name of the profile. The maximum length is 32 characters.
<name 1-32> - Enter the profile name here. This value must be between 1 and 32.
all - Specify that the whole access list profile will be deleted.
Restrictions
Only Administrator, Operator and Power-User level users can issue this command.
Example
To delete the access list rule with a profile ID of 10:
DGS-3120-24TC:admin# delete access_profile profile_id 10
Command: delete access_profile profile_id 10
Success.
DGS-3120-24TC:admin#
6-3 config access_profile
Description
This command is used to configure an access list entry. The ACL mirror function works after the
mirror has been enabled and the mirror port has been configured using the mirror command.
When applying an access rule to a target, the setting specified in the VLAN field will not take effect
if the target is a VLAN.
Format
config access_profile [profile_id <value 1-6> | profile_name <name 1-32>] [add access_id
[auto_assign | <value 1-256>] [ethernet {[vlan <vlan_name 32> | vlan_id <vlanid 1-4094>]
{mask <hex 0x0-0x0fff>} | source_mac <macaddr> {mask <macmask>} | destination_mac
<macaddr> {mask <macmask>} | 802.1p <value 0-7> | ethernet_type <hex0x0-0xffff>} | ip
{[vlan <vlan_name 32> | vlan_id <vlanid 1-4094>] {mask <hex 0x0-0x0fff>} | source_ip
<ipaddr> {mask <netmask>} | destination_ip <ipaddr> {mask <netmask>} | dscp <value 063> | [icmp {type <value 0-255> | code <value 0-255>} | igmp {type <value 0-255>} | tcp
{src_port <value 0-65535> {mask <hex 0x0-0xffff>} | dst_port <value 0-65535> {mask <hex
0x0-0xffff>} | flag [all | {urg | ack | psh | rst | syn | fin}]} | udp {src_port <value 0-65535>
{mask <hex 0x0-0xffff>} | dst_port <value 0-65535> {mask <hex 0x0-0xffff>}} | protocol_id
<value 0-255> {user_define <hex 0x0-0xffffffff> {mask <hex 0x0-0xffffffff>}}]} |
packet_content {offset_c hun k_1 <hex 0x0-0xffffffff> {mask <hex 0x0-0xffffffff>} |
offset_chunk_2 <hex 0x0-0xffffffff> {mask <hex 0x0-0xffffffff>} | offset_chunk_3 <hex 0x00xffffffff> {mask <hex 0x0-0xffffffff>} | offset_chunk_4 <hex 0x0-0xffffffff> {mask <hex 0x00xffffffff>}}| ipv6 {class <value 0-255> | flowlabel <hex 0x0-0xfffff> | source_ipv6 <ipv6addr>
{mask <ipv6mask>} | destination_ipv6 <ipv6addr> {mask <ipv6mask>} | [tcp {src_port
<value 0-65535> {mask <hex 0x0-0xffff>} | dst_port <value 0-65535> {mask <hex0x0-0xffff>}}
| udp {src_port <value 0-65535> {mask <hex 0x0-0xffff>} | dst_port <value 0-65535> {mask
Page 94

xStack® DGS-3120 Series Managed Switch CLI Reference Guide
90
<hex 0x0-0xffff>}} | icmp {type<value 0-255> | code <value 0-255>}]}] [port [<portlist> | all] |
vlan_based [vlan <vlan_name 32> | vlan_id <vlanid 1-4094>]] [permit {priority <value 0-7>
{replace_priority} | [replace_dscp_with <value 0-63> | replace_tos_precedence_with <value
0-7>] | counter[enable | disable]} | mirror | deny] {time_range <range_name 32>} | delete
access_id <value 1-256>]
Option 1:
packet_content {offset_c hun k_1 <hex 0x0-0xffffffff> | offset_chunk_2 <hex 0x0-0xffffffff> |
offset_chunk_3 <hex 0x0-0xffffffff> | offset_chunk_4 <hex 0x0-0xffffffff>}
Parameters
profile_id - Specify the index of the access list profile.
<value 1-6> - Enter the profile ID value here. This value must be between 1 and 6.
profile_name - Specify the name of the profile.
<name 1-32> - Enter the profile name here. This name can be up to 32 characters long.
add - Specify that a profile or a rule will be added.
access_id - Specify the index of the access list entry. The value range is 1-256, but the
supported maximum number of entries depends on the project. If the auto_assign option is
selected, the access ID is automatically assigned, when adding multiple ports.
auto_assign - Specify that the access ID will automatically be assigned.
<value 1-256> - Enter the access ID used here. This value must be between 1 and 256.
ethernet - Specify to configure the ethernet access profile.
vlan - (Optional) Specify the VLAN name.
<vlan_name 32> - Enter the name of the VLAN here. This name can be up to 32 characters
long.
vlan_id - (Optional) Specif y the VLA N ID used.
<vlanid 1-4094> - Enter the VLAN ID used here. This value must be between 1 and 4094.
mask - (Optional) Specify an additional mask parameter that can be configured.
<hex 0x0-0x0fff> - Enter the mask value here.
source_mac
- (Optional) Specify the source MAC address.
<macaddr> - Enter the source MAC address used for this configuration here.
mask - (Optional) Specify an additional mask parameter that can be configured.
<macmask> - Enter the source MAC mask used here.
destination_mac - (Optional) Specify the destination MAC addres s.
<macaddr> - Enter the destination MAC address used for this configuration here.
mask - (Optional) Specify an additional mask parameter that can be configured.
<macmask> - Enter the destination MAC mask here.
802.1p - (Optional) Specify the value of the 802.1p priority tag. The priority tag ranges from 1 to
7.
<value 0-7> - Enter the 802.1p priority tag value here.
ethernet_type - (Opti ona l) Spec ify the Ethernet type.
<hex 0x0-0xffff>
- Enter the Ethernet type mask here.
ip - (Optional) Specify to configure the IP access profile.
vlan - (Optional) Specify a VLAN name.
<vlan_name 32> - Enter the name of the VLAN here. This name can be up to 32 characters
long.
vlan_id - (Optional) Spec ify that VL AN ID used.
<vlanid 1-4094> - Enter the VLAN ID used here. This value must be between 1 and 4094.
mask - Specify an additional mask parameter that can be configured.
<hex 0x0-0x0fff> - Enter the mask value here.
source_ip
- (Optional) Specify an IP source address.
<ipaddr> - Enter the source IP address used for this configuration here.
mask - Specify an additional mask parameter that can be configured.
<netmask> - Enter the source netmask used here.
destination_ip - (Optional) Specify an IP destination address.
Page 95

xStack® DGS-3120 Series Managed Switch CLI Reference Guide
91
<ipaddr> - Enter the destination IP address used for this configuration here.
mask - Specify an additional mask parameter that can be configured.
<netmask>
- Enter the destination netmask used here.
dscp - (Optional) Specify the value of DSCP. The DSCP value ranges from 0 to 63.
<value> - Enter the DSCP value here.
icmp - (Optional) Specify to configure the ICMP parameters.
type - Specify that the rule will apply to the ICMP Type traffic value.
<value 0-255> - Enter the ICMP type traffic value here. This value must be between 0 and
255.
code - Specify that the rule will apply to the ICMP Code traffic value.
<value 0-255> - Enter the ICMP code traffic value here. This value must be between 0 and
255.
igmp - (Optional) Specify to configure the IGMP parameters.
type - Specify that the rule will apply to the IGMP Type traffic value.
<value 0-255> - Enter the IGMP type traffic value here. This value must be between 0 and
255.
tcp - Specify to configure the TCP parameters.
src_port - (Optional) Specify that the rule will apply to a range of TCP source ports.
<value 0-65535> - Enter the TCP source port value here. This value must be between 0
and 65535.
mask - (Optional) Specify an additional mask parameter that can be configured.
<hex 0x0-0xffff> - Enter the source port mask here.
dst_port - (Optional) Specify that the rule will apply to a range of TCP destination ports.
<value 0-65535> - Enter the TCP destination port value here. This value must be between
0 and 65535.
mask - (Optional) Specify an additional mask parameter that can be configured.
<hex 0x0-0xffff>
- Enter the destination port mask here.
flag - (Optional) Specify the TCP flag fields.
all - Specify that all the TCP flags will be used in this configuration.
urg - Specify that the TCP flag field will be set to 'urg'.
ack - Specify that the TCP flag field will be set to 'ack'.
psh - Specify that the TCP flag field will be set to 'psh'.
rst - Specify that the TCP flag field will be set to 'rst'.
syn - Specify that the TCP flag field will be set to 'syn'.
fin - Specify that the TCP flag field will be set to 'fin'.
udp - Specify to configure the UDP parameters.
src_port - (Optional) Specify the UDP source port range.
<value 0-65535> - Enter the UDP source port value here. This value must be between 0
and 65535.
mask - (Optional) Specify an additional mask parameter that can be configured.
<hex 0x0-0xffff> - Enter the source port mask here,
dst_port - (Optional) Specify the UDP destination port range.
<value 0-65535> - Enter the UDP destination port value here. This value must be between
0 and 65535.
mask - (Optional) Specify an additional mask parameter that can be configured.
<hex 0x0-0xffff>
- Enter the destination port mask here.
protocol_id - Specify that the rule will apply to the value of IP protocol ID traffic.
<value 0-255> - Enter the protocol ID used here.
user_define - (Optional) Specify that the rule will apply to the IP protocol ID and that the mask
options behind the IP header , which has a length of 20 bytes.
<hex 0x0-0xffffffff> - Enter the user-defined mask value here.
mask - Specify an additional mask parameter that can be configured.
<hex 0x0-0xffffffff>
- Enter the mask value here.
packet_content - A maximum of 11 offsets can be specified. Each offset defines 2 bytes of data
which is identified as a single UDF field. The offset reference is also configurable. It can be
defined to start at the end of the tag, the end of the ether type or the end of the IP header. To
qualify the fields before the end of the tag, the destination address, source address, and the
VLAN tags are also included
offset_chunk_1 – (Optional) Specify the value of the packet bytes to be matched. Offset
Page 96

xStack® DGS-3120 Series Managed Switch CLI Reference Guide
92
chunk 1 will be used.
<hex 0x0-0xffffffff> - Enter the offset chunk 1 mask here.
offset_chunk_2 - (Optional) Specify the value of the packet bytes to be matched. Offset
chunk 2 will be used.
<hex 0x0-0xffffffff> - Enter the offset chunk 2 mask here.
offset_chunk_3 - (Optional) Specify the value of the packet bytes to be matched. Offset
chunk 3 will be used.
<hex 0x0-0xffffffff> - Enter the offset chunk 3 mask here.
offset_chunk_4 - (Optional) Specify the value of the packet bytes to be matched. Offset
chunk 4 will be used.
<hex 0x0-0xffffffff>
- Enter the offset chunk 4 mask here.
ipv6 - Specify that the rule applies to IPv6 fields. (EI Mode Only)
class - (Optional) Specify the value of the IPv6 class. (EI Mode Only)
<value 0-255>
- Enter the IPv6 class value here. This value must be between 0 and 255.
flowlabel - (Optional) Specify the value of the IPv6 flo w la bel . (EI Mode Only)
<hex 0x0-0xffff> - Enter the IPv6 flow label mask used here.
source_ipv6 - (Optional) Specify the value of the IPv6 source address. (EI Mode Only)
<ipv6addr> - Enter the source IPv6 address used for this configuration here.
mask - (Optional) Specify an additional mask parameter that can be configured. (EI Mode Only)
<ipv6mask> - Enter the source IPv6 mask here.
destination_ipv6 - (Optional) Specify the value of the IPv6 destination address. (EI Mode Only)
<ipv6addr> - Enter the destination IPv6 address used for this configuration here.
mask - (Optional) Specify an additional mask parameter that can be configured. (EI Mode Only)
<ipv6mask> - Enter the destination IPv6 mask here.
tcp - (Optional) Specify to configure the TCP parameters. (EI Mode Only)
src_port - Specify the value of the IPv6 Layer 4 TCP source port.
<value 0-65535> - Enter the TCP source port value here. This value must be between 0
and 65535.
mask - Specify an additional mask parameter that can be configured.
<hex 0x0-0xffff> - Enter the TCP source port mask value here.
dst_port - (Optional) Specify the value of the IPv6 Layer 4 TCP destination port.
<value 0-65535> - Enter the TCP destination port value here. This value must be between
0 and 65535.
mask - Specify an additional mask parameter that can be configured.
<hex 0x0-0xffff> - Enter the TCP destination port mask value here.
udp - (Optional) Specify to configure the UDP parameters. (EI Mode Only)
src_port - Specify the value of the IPv6 Layer 4 UDP source port.
<value 0-65535> - Enter the UDP source port value here. This value must be between 0
and 65535.
mask - Specify an additional mask parameter that can be configured.
<hex 0x0-0xffff> - Enter the UDP source port mask value here.
dst_port - Specify the value of the IPv6 Layer 4 UDP destination port.
<value 0-65535> - Enter the UDP destination port value here. This value must be between
0 and 65535.
mask - Specify an additional mask parameter that can be configured.
<hex 0x0-0xffff> - Enter the UDP destination port mask value here.
icmp - (Optional) Specify to configure the ICMP parameters used. (EI Mode Only)
type - Specify that the rule applies to the value of ICMP type traffic.
<value 0-255> - Enter the ICMP type traffic value here. This value must be between 0 and
255.
code - Specify that the rule applies to the value of ICMP code traffic.
<value 0-255> - Enter the ICMP code traffic value here. This value must be between 0 and
255.
port - Specify the port list used for this configuration.
<portlist> - Enter a list of ports used for the configuration here.
all - Specify that all the ports will be used for this configuration.
vlan_based - Specify that the rule will be VLAN based.
vlan - Specify the VLAN name used for this configuration.
<vlan_name> - Enter the VLAN name used for this configuration here.
Page 97

xStack® DGS-3120 Series Managed Switch CLI Reference Guide
93
vlan_id - Specify the VLAN ID used for this configuration.
<vlanid 1-4094> - Enter the VLAN ID used here. This value must be between 1 and 4094.
permit - Specify that packets matching the access rule are permitted by the Switch.
priority - (Optional) Specify that the priority of the packet will change if the packet matches the
access rule.
<value 0-7>
- Enter the priority value here. This value must be between 0 and 7.
replace_priority - (Optional) Specify that the 802.1p priority of the outgoing packet will be
replaced.
replace_dscp_with - (Optional) Specify that the DSCP of the outgoing packet is changed with
the new value. If using this action without an action priority, the packet will be sent to the
default TC.
<value 0-63> - Enter the replace DSCP with value here. This value must be between 0 and
63.
replace_tos_precedence_with - (Optional) Specify that the IP precedence of the outgoing
packet is changed with the new value. If used without an action priority, the packet is sent to
the default TC.
<value 0-7> - Enter the replace ToS precedence with value here. This value must be between
0 and 7.
counter - (Optional) Specify whether the ACL counter feature is enabled or disabled. This
parameter is optional. The default option is disabled. If the rule is not bound with the
flow_meter, all matching packets are counted. If the rule is bound with the flow_meter, then
the “counter” is overridden.
enable - Specify that the ACL counter feature will be enabled.
disable - Specify that the ACL counter feature will be disabled.
deny - Specify that packets matching the access rule are filtered by the Switch.
mirror - Specify that packets matching the access rules are copied to the mirror port.
time_range - (Optional) Specify the name of the time range entry.
<range_name 32> - Enter the time range name here. This name can be up to 32 characters
long.
delete - Specify that a profile or a rule will be deleted.
access_id - Specify the index of the access list entry. The value range is 1-256, but the
supported maximum number of entries depends on the project. If the auto_assign option is
selected, the access ID is automatically assigned, when adding multiple ports.
<value 1-256> - Enter the access ID used here. This value must be between 1 and 256.
Restrictions
Only Administrator, Operator and Power-User level users can issue this command.
Example
To configure a rule entry for a packet content mask profile (option 3):
DGS-3120-24TC:admin# config access_profile profile_id 5 add access_id
auto_assign packet_content offset5 0xF0 port all deny
Command: config access_profile profile_id 5 add access_id auto_assign
packet_content offset5 0xF0 port all deny
Success.
DGS-3120-24TC:admin#
6-4 show access_profile
Description
This command is used to display the current access list table.
Page 98

xStack® DGS-3120 Series Managed Switch CLI Reference Guide
94
Format
show access_profile {[profile_id <value 1-6> | profile_name <name 1-32>]}
Parameters
profile_id - (Optional) Specify the index of the access list profile.
<value 1-6> - Enter the profile ID used here. This value must be between 1 and 6.
profile_name - (Optional) Specify the name of the profile.
<name 1-32> - Enter the profile name used here. This name can be up to 32 characters long.
Restrictions
None.
Example
To display the current access list table:
DGS-3120-24TC:admin#show access_profile
Command: show access_profile
Access Profile Table
Total User Set Rule Entries : 4
Total Used HW Entries : 5
Total Available HW Entries : 1531
==============================================================================
Profile ID: 1 Profile name: EtherACL Type: Ethernet
MASK on
VLAN : 0xFFF
802.1p
Ethernet Type
Available HW Entries : 255
-----------------------------------------------------------------------------Rule ID : 1 Ports: 1:1
Match on
VLAN ID : 1
802.1p : 0
Ethernet Type : 0xFFFE
Action:
Permit
==============================================================================
==============================================================================
Page 99

xStack® DGS-3120 Series Managed Switch CLI Reference Guide
95
Profile ID: 2 Profile name: IPv4ACL Type: IPv4
MASK on
VLAN : 0xFFF
DSCP
ICMP
Available HW Entries : 255
-----------------------------------------------------------------------------Rule ID : 1 Ports: 1:2
Match on
VLAN ID : 1
DSCP : 0
Action:
Permit
==============================================================================
==============================================================================
Profile ID: 3 Profile name: IPv6ACL Type: IPv6
MASK on
Class
TCP
Available HW Entries : 254
-----------------------------------------------------------------------------Rule ID : 1 Ports: 1:3
Match on
Class : 0
Action:
Permit
==============================================================================
==============================================================================
Profile ID: 4 Profile name: PCACL Type: User Defined
MASK on
offset_chunk_1 : 0 value : 0x00000000
offset_chunk_2 : 1 value : 0x00000000
offset_chunk_3 : 2 value : 0x00000000
offset_chunk_4 : 3 value : 0x00000000
Available HW Entries : 255
-------------------------------------------------------------------------------
-
Rule ID : 1 Ports: 1:4
Page 100

xStack® DGS-3120 Series Managed Switch CLI Reference Guide
96
Match on
offset_chunk_1 : 0 value : 0x0000FFEE Mask : 0x0000FFEE
Action:
Permit
Priority : 1
Replace DSCP : 1
==============================================================================
DGS-3120-24TC:admin#
The following example displays an access profile that supports an entry mask for each rule:
DGS-3120-24TC:admin# show access_profile profile_id 2
Command: show access_profile profile_id 2
Access Profile Table
Profile ID: 2 Profile Name: 2 Type : Ethernet
Mask on
VLAN : 0xF
Source MAC : FF-FF-FF-00-00-00
Destination MAC : 00-00-00-FF-FF-FF
Available HW Entries: 255
-------------------------------------------------------------------------------Rule ID : 22 Ports: 1-7
Match on
VLAN ID : 8 Mask : 0xFFF
Source MAC : 00-01-02-03-04-05 Mask : FF-FF-FF-FF-FF-FF
Destination MAC :00-05-04-03-02-00 Mask : FF-FF-FF-FF-FF-00
Action:
Deny
DGS-3120-24TC:admin#
The following example displays the packet content mask profile for the profile with an ID of 5:
 Loading...