

Page 1

Version 1.10 | 04/16/2021
User Manual
Vigilance H.265 Outdoor Bullet Camera
DCS-4612EK
DCS-4614EK
DCS-4618EK
Page 2

Preface
D-Link reserves the right to revise this publication and to make changes in the content hereof without obligation to notify any person or
organization of such revisions or changes. Information in this document may become obsolete as our services and websites develop and
change.
Manual Revisions
Revision Date Description
1.00 03/17/2021 Initial release
1.10 04/16/2021 Hardware Overview update
Trademarks
D-Link and the D-Link logo are trademarks or registered trademarks of D-Link Corporation or its subsidiaries in the United States or other
countries. All other company or product names mentioned herein are trademarks or registered trademarks of their respective companies.
Copyright © 2021 D-Link Corporation.
All rights reserved. This publication may not be reproduced, in whole or in part, without prior expressed written permission from D-Link Corporation.
2D-Link Vigilance H.265 Outdoor Bullet Camera User Manual
Page 3

Table of Contents
Product Overview ........................................................4
Package Contents ................................................................. 4
Introduction ............................................................................ 5
System Requirements ......................................................... 5
Features .................................................................................... 6
Hardware Overview (DCS-4612EK/DCS-4614EK) ...... 7
Hardware Overview (DCS-4618EK) ................................ 8
Installation ...................................................................9
Mounting the Camera .........................................................9
Adjusting the Camera's Lens ..........................................11
Waterproong Your Installation ....................................12
Using the DCS-37-5 Mount (optional) .........................15
Using the DCS-37-6 Mount (optional) .........................16
Using the DCS-37-4 Mount (optional) .........................18
Inserting the microSD Card .............................................19
Settings ..................................................................................38
Network Settings ...........................................................38
Camera Settings ..............................................................43
Image Settings .................................................................44
Recording Management ..............................................53
Advanced Setup ..................................................................57
Advanced ...........................................................................57
Camera Conguration ...................................................64
Camera Options ..................................................................67
Camera Info .......................................................................67
Date and Time ..................................................................68
Administration Settings ...............................................69
Camera Log .......................................................................71
Camera Log / Alarm .......................................................72
Technical Specications - DCS-4612EK ....................75
Conguration ............................................................20
Installing the Setup Wizard .............................................20
Accessing the Admin Interface ......................................21
Live Video ..............................................................................22
Playback .................................................................................23
Controlling the Playback ..............................................24
Setup Wizard ........................................................................26
Network Setup Wizard ..................................................27
Motion Detection Setup Wizard ................................33
Technical Specications - DCS-4614EK ....................77
Technical Specications - DCS-4618EK ....................79
Regulatory Information ............................................ 81
3D-Link Vigilance H.265 Outdoor Bullet Camera User Manual
Page 4

Section 1: Product Overview
Vigilance H.265 Outdoor Bullet Camera
Cable Waterproong Connector
Mounting Kit
• Allen Key
• Alignment Sticker
Documentation
Product Overview
Package Contents
If any of the above items are missing, please contact your reseller.
Safety Notice: Installation and servicing should be done by certied technicians to conform with all local codes and prevent voiding
your warranty.
4D-Link Vigilance H.265 Outdoor Bullet Camera User Manual
Page 5

Section 1: Product Overview
Introduction
The Vigilance H.265 2/4/8 Megapixel Outdoor Bullet Camera is a professional surveillance and security solution for small, medium, and large
enterprises. It uses a full-HD progressive scan CMOS sensor to deliver low-noise video and low-light capability ideal for surveillance applications. It
oers a complete surveillance solution featuring a built-in IR cut lter and IR LEDs eective up to 30 meters with built-in smart IR function, avoiding
overexposure of near objects at night, allowing it to stream simultaneous real-time full-HD resolution video 24/7. In addition, the IP66 certied
weatherproof housing make this camera ideal for both indoor and outdoor applications.
To maximize bandwidth eciency and improve image quality, it provides real-time video compression using H.265, H.264, and MJPEG codecs for
simultaneous video streaming and recording. It also incorporates Power over Ethernet (PoE), allowing it to be easily installed in a variety of locations,
especially with D-Link Surveillance Switches.
This camera can be accessed remotely, controlled, and congured from any computer over your local network or through the Internet via a web
browser. The simple installation and intuitive web-based interface oer easy conguration across the full range of its advanced feature set and
make it an ideal choice for a dependable and cost-eective surveillance solution with easy clutter-free installation.
System Requirements
• Computer running Microsoft Windows® 10
• Internet Explorer 11, Google Chrome or Firefox (MJPEG only)
5D-Link Vigilance H.265 Outdoor Bullet Camera User Manual
Page 6

Section 1: Product Overview
Features
H.265/H.64 Compression
This camera supports the H.265 and H.264 compression algorithms to bring out the best combination of performance, quality, bandwidth, and
storage space.
Better Night Vision
Supports night vision technology which optimizes the display for increased image quality in low-light environments.
microSD Card
The camera comes equipped with an optional microSD card slot for local storage. Recordings can be saved to the microSD card.
IR LEDs for Day and Night Functionality
The built-in infrared LEDs enable night time viewing of up to 30 meters. With built-in smart IR function, it can avoid overexposure of near objects
at night.
IP66 Weatherproof and Vandal-Proof Housing
This camera uses IP66 weatherproof housing, allowing you to rest assured that in the toughest of conditions, it will continue to provide round-theclock surveillance.
PoE (Power over Ethernet) for Flexible Installation
Your camera can draw all the power it needs from a PoE switch or PoE injector for a simple and clutter-free installation. You can also power it with
an optional 12 V / 1.5 A power adapter.
Remote Monitoring Utility
The D-Link D-ViewCam™ application adds enhanced features and functionality for the camera and allows administrators to congure and access
the camera from a separate site via Intranet or Internet. Other features include image monitoring, recording images to a hard drive, viewing up to
64 cameras on one screen, and taking snapshots.
6D-Link Vigilance H.265 Outdoor Bullet Camera User Manual
Page 7

Section 1: Product Overview
Hardware Overview (DCS-4612EK/DCS-4614EK)
1
2
4
6
7
3
5
1 microSD Slot Slot for a microSD card.
2 Vertical Adjustment Screw Loosen to adjust the vertical angle of the camera
3 IR LED Provides illumination for low-light environments
4
5 Camera Lens Fixed camera lens
6 Ethernet Jack
Horizontal
Adjustment Screw
Loosen to adjust the horizontal angle of the camera
RJ-45 connector for Ethernet. Can also be used to power the camera using Power over
Ethernet (PoE).
8
7 Power Connector Connects to an optional 12 V / 1.5 A power adapter (not included).
8 Reset Button Press and hold for more than ve seconds, then release to perform a factory reset.
7D-Link Vigilance H.265 Outdoor Bullet Camera User Manual
Page 8

Section 1: Product Overview
1
Hardware Overview (DCS-4618EK)
5
4
6
2
7
3
1 Vertical Adjustment Screw Loosen to adjust the vertical angle of the camera.
2 IR LED Provides illumination for low-light environments
3 Camera Lens Motorized camera lens
4 microSD Slot Slot for microSD card.
5 Ethernet Jack
6 Power Connector Connects to an optional 12 V / 1.5 A power adapter (not included).
7 Reset Button Press and hold for more than ve seconds, then release to perform a factory reset.
RJ-45 connector for Ethernet. Can also be used to power the camera using Power
over Ethernet (PoE).
8D-Link Vigilance H.265 Outdoor Bullet Camera User Manual
Page 9

Section 2: Installation
Installation
Mounting the Camera
Note: It is highly recommended that you congure and test your camera before mounting it.
The DCS-4612EK/DCS-4614EK and DCS-4618EK can be installed on the ceiling or wall. The process is identical for both cameras.
Mounting the Camera
Step 1
Use the included T10 or T15 screwdriver to unscrew the three screws on the dome cover and
remove it.
Step 2
Press the sides of the plastic lining and gently lift it to remove the lining from the camera.
9D-Link Vigilance H.265 Outdoor Bullet Camera User Manual
Page 10

Section 2: Installation
Step 3
Place the installation sticker on the ceiling or wall. Using a 4 mm drill bit, drill three holes 30
mm deep into the wall or ceiling. Drive the plastic wall anchors into the holes.
Step 4
Insert three mounting screws into the holes in the base of the device. Place the device against
the mounting sticker and screw it in to attach it to the wall or ceiling.
10D-Link Vigilance H.265 Outdoor Bullet Camera User Manual
Page 11

Section 2: Installation
Adjusting the Camera's Lens
Adjust the Camera’s Lens gimbal; Turn the lens module left and right, up and down and the orientation until the desired position is achieved.
Tighten the pan, tile and the adjustment screw once completed.
15˚ - 90˚15˚ - 90˚
0 - 350˚0 - 350˚
0 - 335˚0 - 335˚
0 - 350˚0 - 350˚
10˚ - 90˚10˚ - 90˚
0 - 335˚0 - 335˚
11D-Link Vigilance H.265 Outdoor Bullet Camera User Manual
Page 12

Section 2: Installation
Waterproong Your Installation
To waterproof your camera, follow the instructions below. A round Ethernet cable, a crimping tool, and RJ-45 plugs are required for this procedure.
Step 1
Place the washer around the base of the Ethernet connector as shown.
Step 2
Thread the bare Ethernet cable through the waterproof connector as shown, then crimp an
RJ-45 plug onto the cable.
12D-Link Vigilance H.265 Outdoor Bullet Camera User Manual
Page 13

Section 2: Installation
Step 3
Connect the RJ-45 plug into the Ethernet connector, then screw the waterproof connector to
the Ethernet connector by turning it about a half-turn clockwise.
Step 4
Screw the back part of the waterproof connector clockwise until there is a tight seal around
the Ethernet cable.
13D-Link Vigilance H.265 Outdoor Bullet Camera User Manual
Page 14

Section 2: Installation
Step 5
The power connector and reset button cables are not waterproof. It is recommended
to use waterproof tape to protect them. Wind the tape around each cable in an
overlapping manner to cover them.
14D-Link Vigilance H.265 Outdoor Bullet Camera User Manual
Page 15

Section 2: Installation
Using the DCS-37-5 Mount (optional)
2.1.
3.
4.
15D-Link Vigilance H.265 Outdoor Bullet Camera User Manual
Page 16

Section 2: Installation
Using the DCS-37-6 Mount (optional)
2.1.
6.5.
3.
7.
4.
8.
16D-Link Vigilance H.265 Outdoor Bullet Camera User Manual
Page 17

Section 2: Installation
11.10.9.
17D-Link Vigilance H.265 Outdoor Bullet Camera User Manual
Page 18

Section 2: Installation
Using the DCS-37-4 Mount (optional)
PM4*10mm PM4*10mm
Installation Information
Model no.
DCS-4612EK
DCS-4614EK
DCS-37-6
DCS-37-4
PM4*8mm
DCS-37-4 DCS-37-5 DCS-37-6
Screw hole Screw size Screw hole Screw size Screw hole Screw size
- - B PM4*8mm B PM4*10mm
DCS-37-5
PM5*16mm
DCS-37-4
DCS-4618EK - - G PM4*8mm A PM4*10mm
DCS-37-5 H PM5*16mm - - - -
DCS-37-6 F PM4*10mm - - - -
18D-Link Vigilance H.265 Outdoor Bullet Camera User Manual
Page 19

Section 2: Installation
Inserting the microSD Card
You can insert an (optional) microSD card to store recordings. To insert the microSD card, rst remove the dome cover from the camera. For the
DCS-4612EK/DCS-4614EK, insert the microSD card into the slot located on the side as shown below. For the DCS-4618EK, insert the microSD card
into the slot located at the base of the camera.
DCS-4612EK/DCS-4614EK
DCS-4618EK
19D-Link Vigilance H.265 Outdoor Bullet Camera User Manual
Page 20

Section 3: Conguration
Conguration
Installing the Setup Wizard
1. Using a web browser, navigate to dlink.com/support/ and select your region.
2. On the next screen, enter the model number of your camera in the search bar and click Search. Click the picture of your camera. On the product
page, click the Download button next to Setup Wizard.
3. Once the executable le has nished downloading, click it and follow the instructions to install the Setup Wizard.
20D-Link Vigilance H.265 Outdoor Bullet Camera User Manual
Page 21

Section 3: Conguration
Accessing the Admin Interface
1. Ensure that your camera is plugged in (either using a 12 V 1.5 A power adapter or a PoEenabled device) and connected to your computer with an Ethernet cable.
2. Open the Setup Wizard. It will display the MAC address and IP address of your camera.
If you have a DHCP server on your network, this will be a dynamic IP address. If your
network does not use a DHCP server, the network camera's default static IP 192.168.0.20
will be displayed. Select your camera, then click the Link button to continue.
3. If this is your rst time logging in, you will be prompted to create a password, which
must be between 8 and 30 characters and must contain both letters and numbers.
Press Saves.
4. To view the camera display and congure the camera, on the main screen of the Setup
Wizard, click the Search button, then select your camera and click the Link button to
open the Web UI. Alternatively, open a web browser and type the camera's IP address
(displayed in step 2) into the URL bar and press Enter.
5. Enter the password you created, and click Login to continue.
21D-Link Vigilance H.265 Outdoor Bullet Camera User Manual
Page 22

Section 3: Conguration
Live Video
On the Home screen, you can view the camera display and use the icons at the top of the
screen to navigate to dierent pages of the web UI. The icons are:
Setup: Clicking this will take you to the camera conguration
pages.
Playback: Click this to view saved recordings.
Video Stream: Select a video prole to use. For more on setting
up video proles, refer to Video Stream on page 45.
Snapshot: This will save a snapshot to your PC using the storage
folder you have selected.
Record: This will start recording a video clip to a selected folder
on your computer.
Select a Folder: Select a storage folder to save snapshots and
video clips to.
Alarm: This will ash red when motion is detected.
Recording Status: This will turn red when the camera is recording.
DCS-4618EK
Logout: Click this to log out of the web interface.
22D-Link Vigilance H.265 Outdoor Bullet Camera User Manual
Page 23

Section 3: Conguration
Playback
On this page you can view recorded video stored on your camera's microSD card. Use the buttons below the image to control the playback, and
use the bar below the buttons to select which period of time you would like to view recordings from.
DCS-4618EK
Displays the
video playback
Controls the
playback
Display the date
and time by
adjusting the start/
end time settings.
Use this to select
the date and
time to play the
recording from
23D-Link Vigilance H.265 Outdoor Bullet Camera User Manual
Page 24

Section 3: Conguration
Controlling the Playback
1 2 3
1 Play Play the recording from the selected location.
2 Pause Pause the playback.
3 Stop Stop the playback.
4 Frame back Step back a frame
5 Frame play Step forward a frame
4 5 6
8 9
7
10
11
12
13
6 Go back Play in reverse
7 1/16x speed Play at 1/16x speed.
8 1/8x speed Play at 1/8x speed.
9 1/4x speed Play at 1/4x speed.
10 1/2x speed Play at 1/2x speed.
11 2x speed Play at 2x speed.
12 4x speed Play at 4x speed.
13 8x speed Play at 8x speed.
24D-Link Vigilance H.265 Outdoor Bullet Camera User Manual
Page 25

Section 3: Conguration
17
18
19
20
14
15
16
21
14 Current Time Displays the current playback time.
15 Snapshot Take a snapshot of the current frame.
16 Backup
17 Zoom In Narrow the range of dates being displayed.
18 Zoom Out Widen the range of dates being displayed.
19 Default Reset the zoom settings to the default view.
20 Select Date and Time Click this bar to start the playback from a particular date and time.
21 Video File Indicator A red bar indicates recording triggered by a motion alarm, a green bar indicates scheduled recording.
22 Select Time Select a range of dates and times to view in the bar above.
Display the backup le. To back up the video, click the right mouse button and select the desired date/time range
to back up.
22
25D-Link Vigilance H.265 Outdoor Bullet Camera User Manual
Page 26

Section 3: Conguration
Setup Wizard
On this screen you can access your camera's two Setup Wizards.
The Network Setup Wizard will walk you through conguring your camera on your local
network.
The Motion Detection Setup Wizard will walk you through setting an alarm to trigger
when a motion detection event occurs.
26D-Link Vigilance H.265 Outdoor Bullet Camera User Manual
Page 27

Section 3: Conguration
Network Setup Wizard
You can use this wizard to set up your camera on your network. For more information on each
step, refer to the following pages.
Step 1: Congure LAN Settings
Step 2: Congure Dynamic DNS
Step 3: Assign a Name to the Camera
Step 4: Set your Camera’s Time Zone
27D-Link Vigilance H.265 Outdoor Bullet Camera User Manual
Page 28

Section 3: Conguration
Step 1: Congure LAN Settings
DHCP
IP Address
Subnet Mask
Default
Gateway
Default Router
Primary DNS
MTU (1280-
1500)
Select this connection if you have a DHCP server running on your network
and would like your camera to obtain an IP address automatically.
If you choose DHCP, you do not need to ll out the IP address settings.
Enter the xed IP address in this eld.
This number is used to determine if the destination is in the same subnet.
The default value is 255.255.255.0.
Enter the gateway used to forward frames to destinations in a dierent
subnet. Invalid gateway settings may cause the failure of transmissions to
a dierent subnet.
Enter the IP address of the default router.
Enter the primary domain name server for translating domain names to IP
addresses.
Enter the maximum transmission unit. The default value is 1500.
28D-Link Vigilance H.265 Outdoor Bullet Camera User Manual
Page 29
Section 3: Conguration
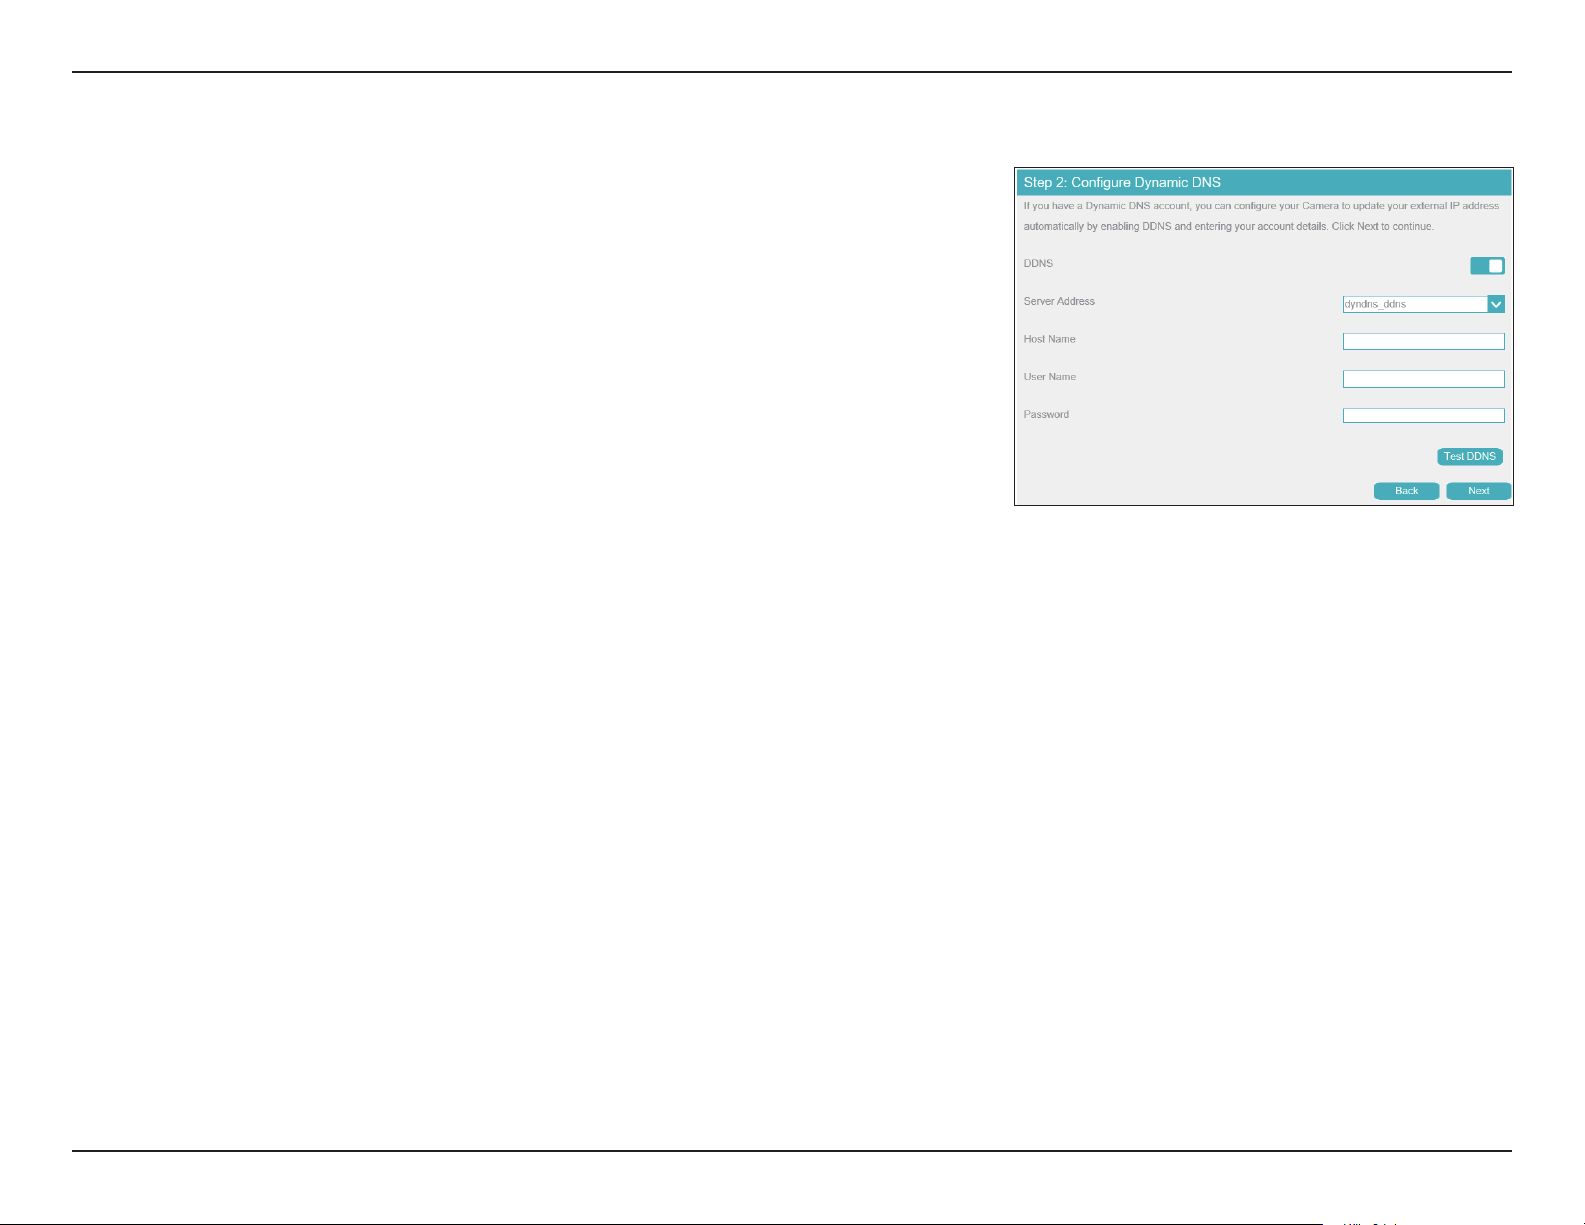
Step 2: Congure Dynamic DNS
DDNS
Server IP
Address
Host Name
User Name
Password
Check this box to enable the DDNS function.
Enter your DDNS server address, or select a service from the drop-down
menu.
Enter the host name of the DDNS service.
Enter the username or e-mail address used to connect to the DDNS service.
Enter the password used to connect to the DDNS service.
29D-Link Vigilance H.265 Outdoor Bullet Camera User Manual
Page 30
Section 3: Conguration
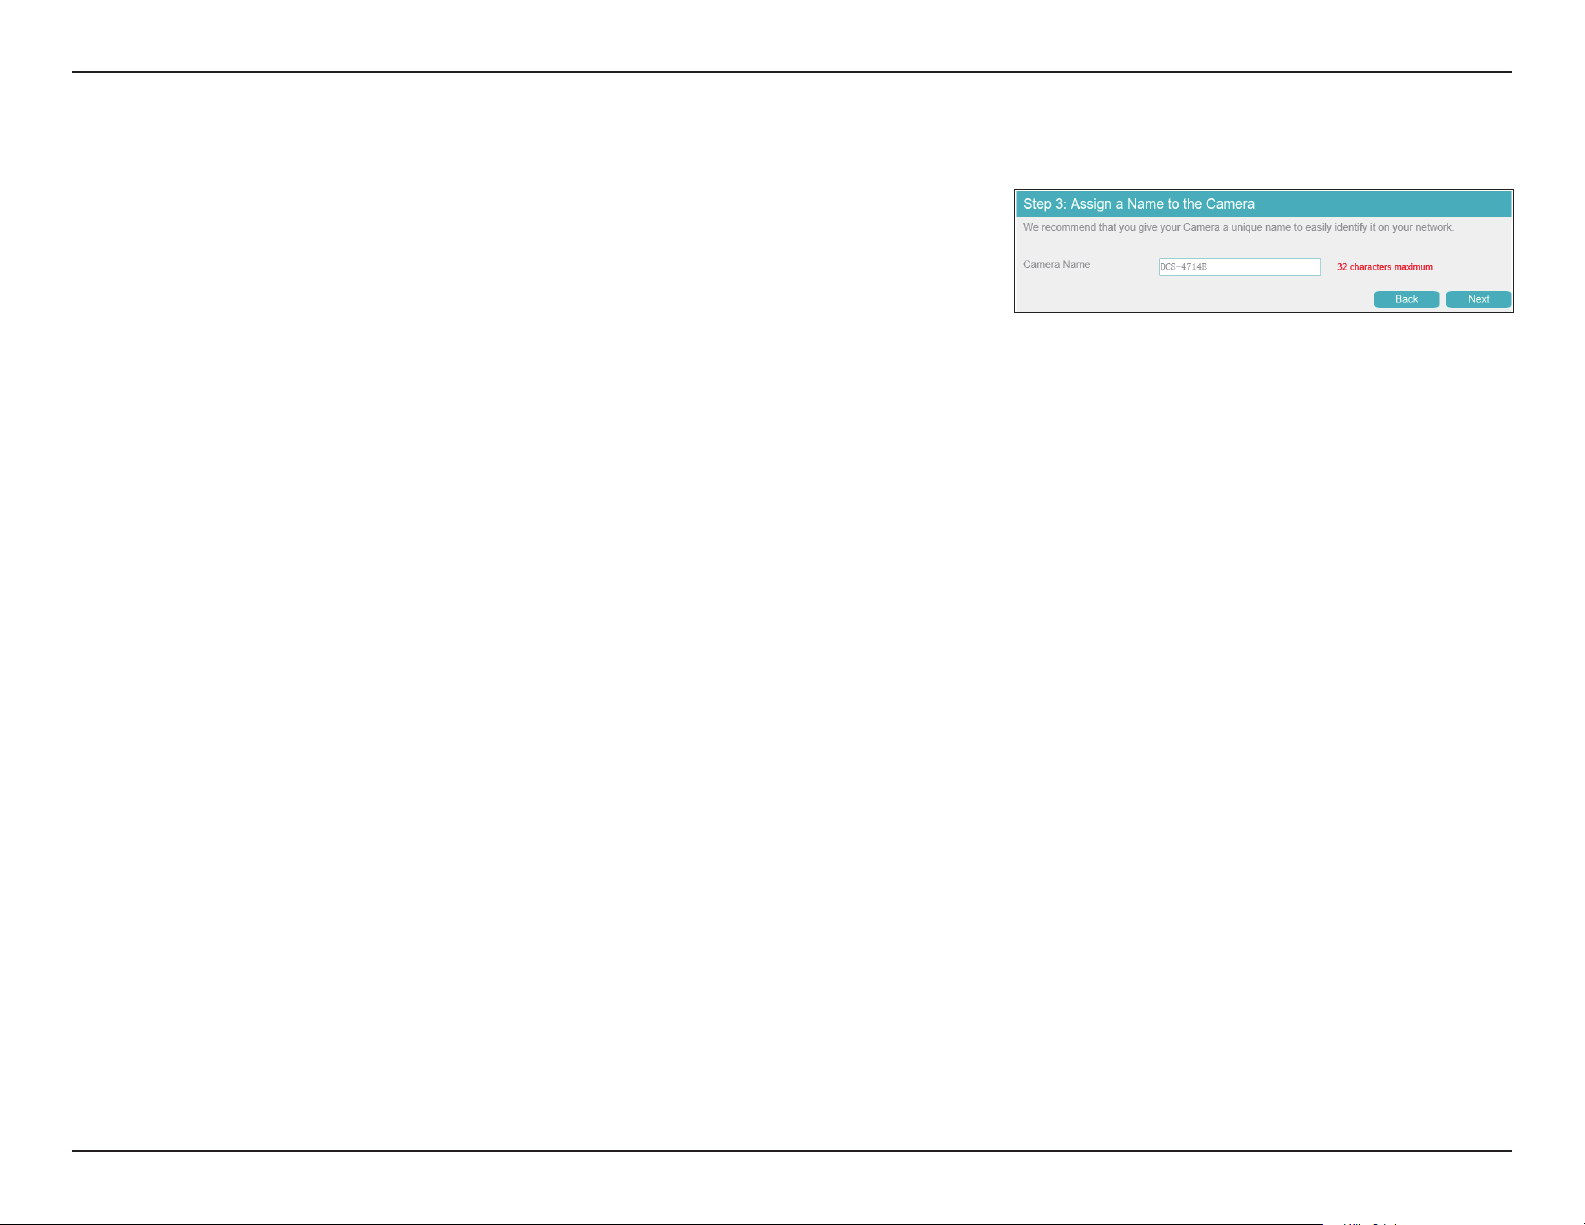
Step 3: Assign a Name to the Camera
Camera Name
Enter a name that will be used to identify the camera.
30D-Link Vigilance H.265 Outdoor Bullet Camera User Manual
Page 31
Section 3: Conguration
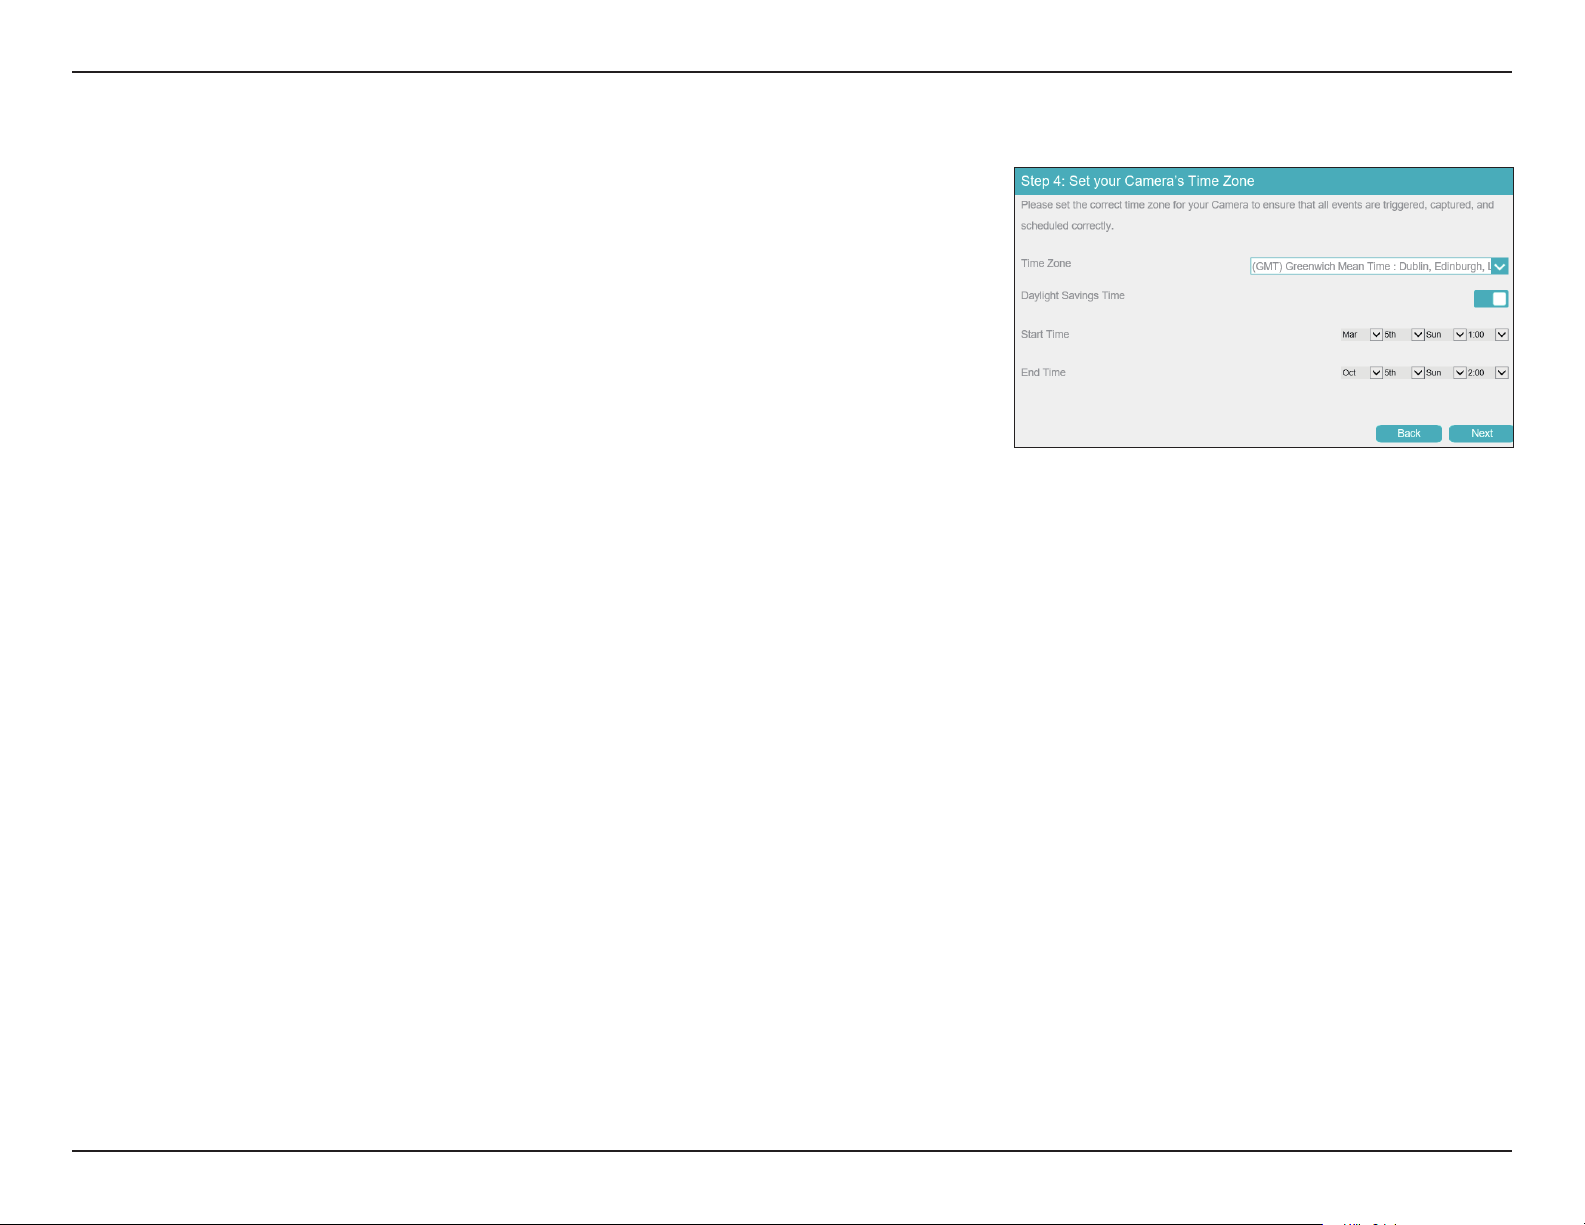
Step 4: Set your Camera's Time Zone
Time Zone
Daylight
Savings Time
Start Time
End Time
Select your time zone.
Toggle this to enable daylight saving time.
Select when daylight saving time should start.
Select when daylight saving time should end.
31D-Link Vigilance H.265 Outdoor Bullet Camera User Manual
Page 32
Section 3: Conguration
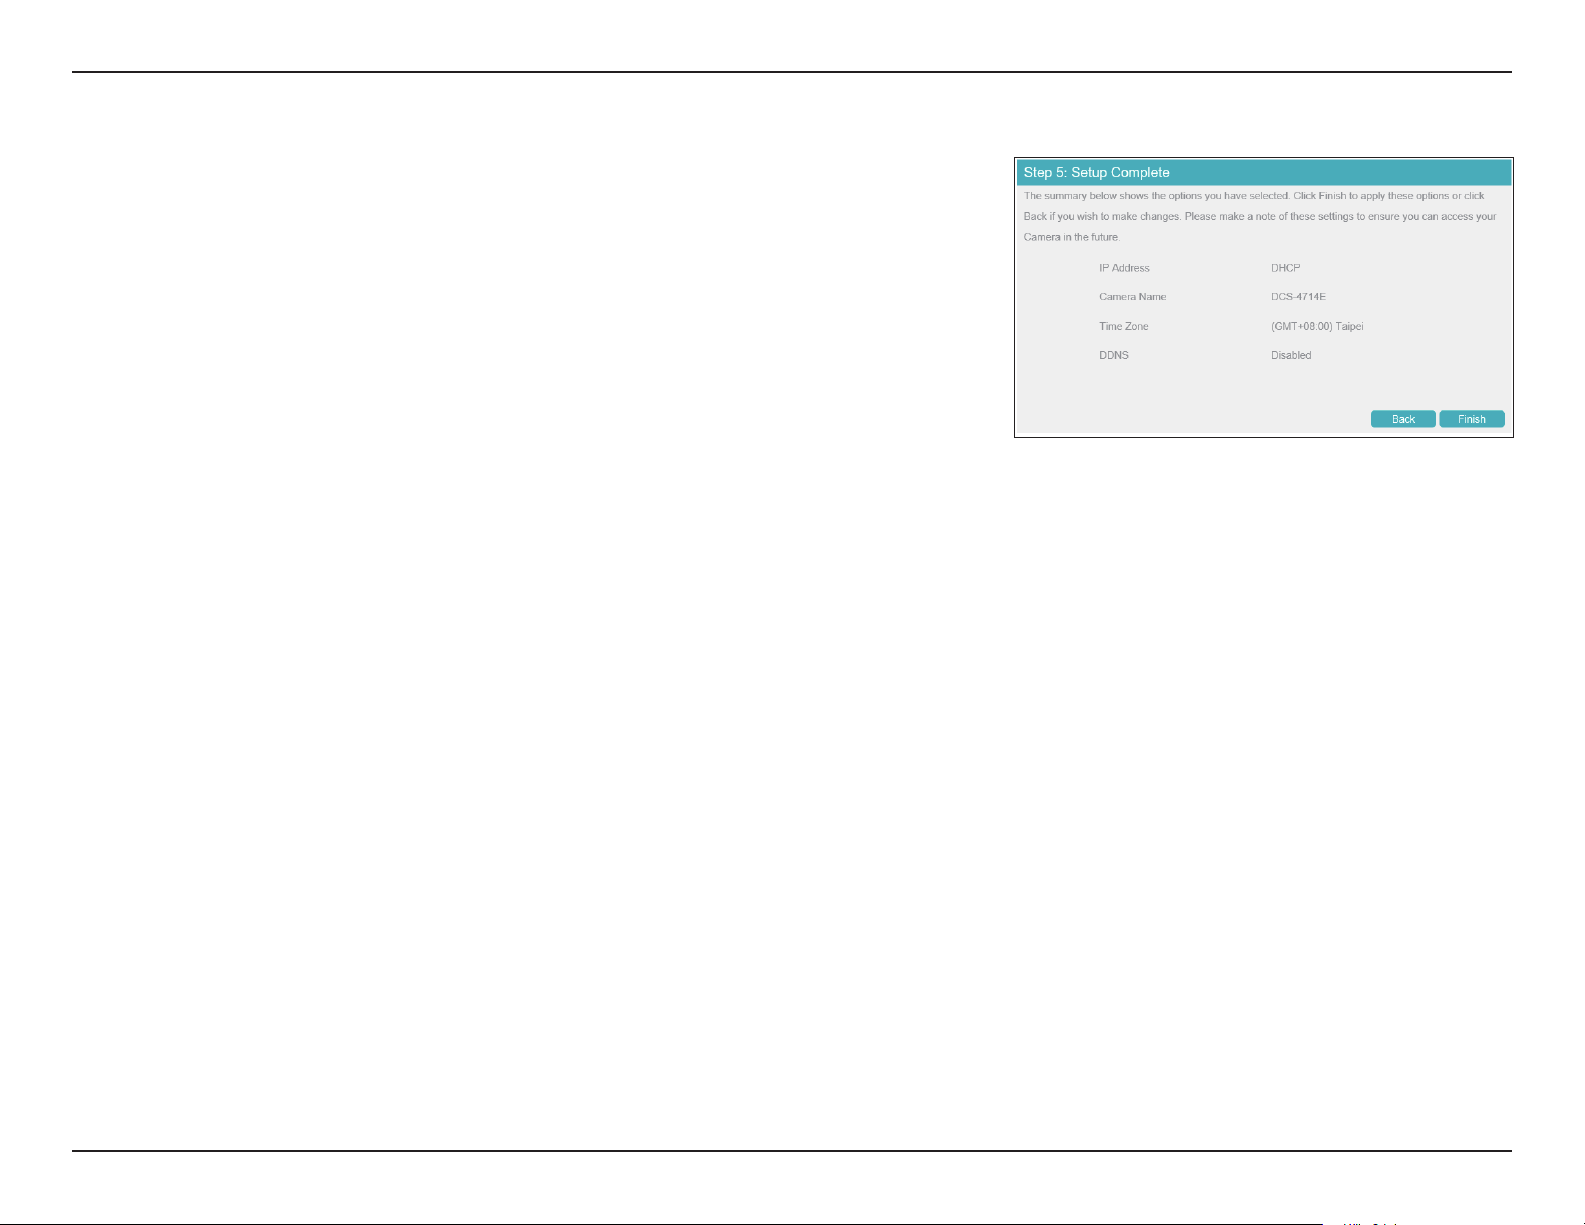
Step 5: Setup Complete
Review the settings you selected and click Finish to complete the setup wizard process.
32D-Link Vigilance H.265 Outdoor Bullet Camera User Manual
Page 33
Section 3: Conguration
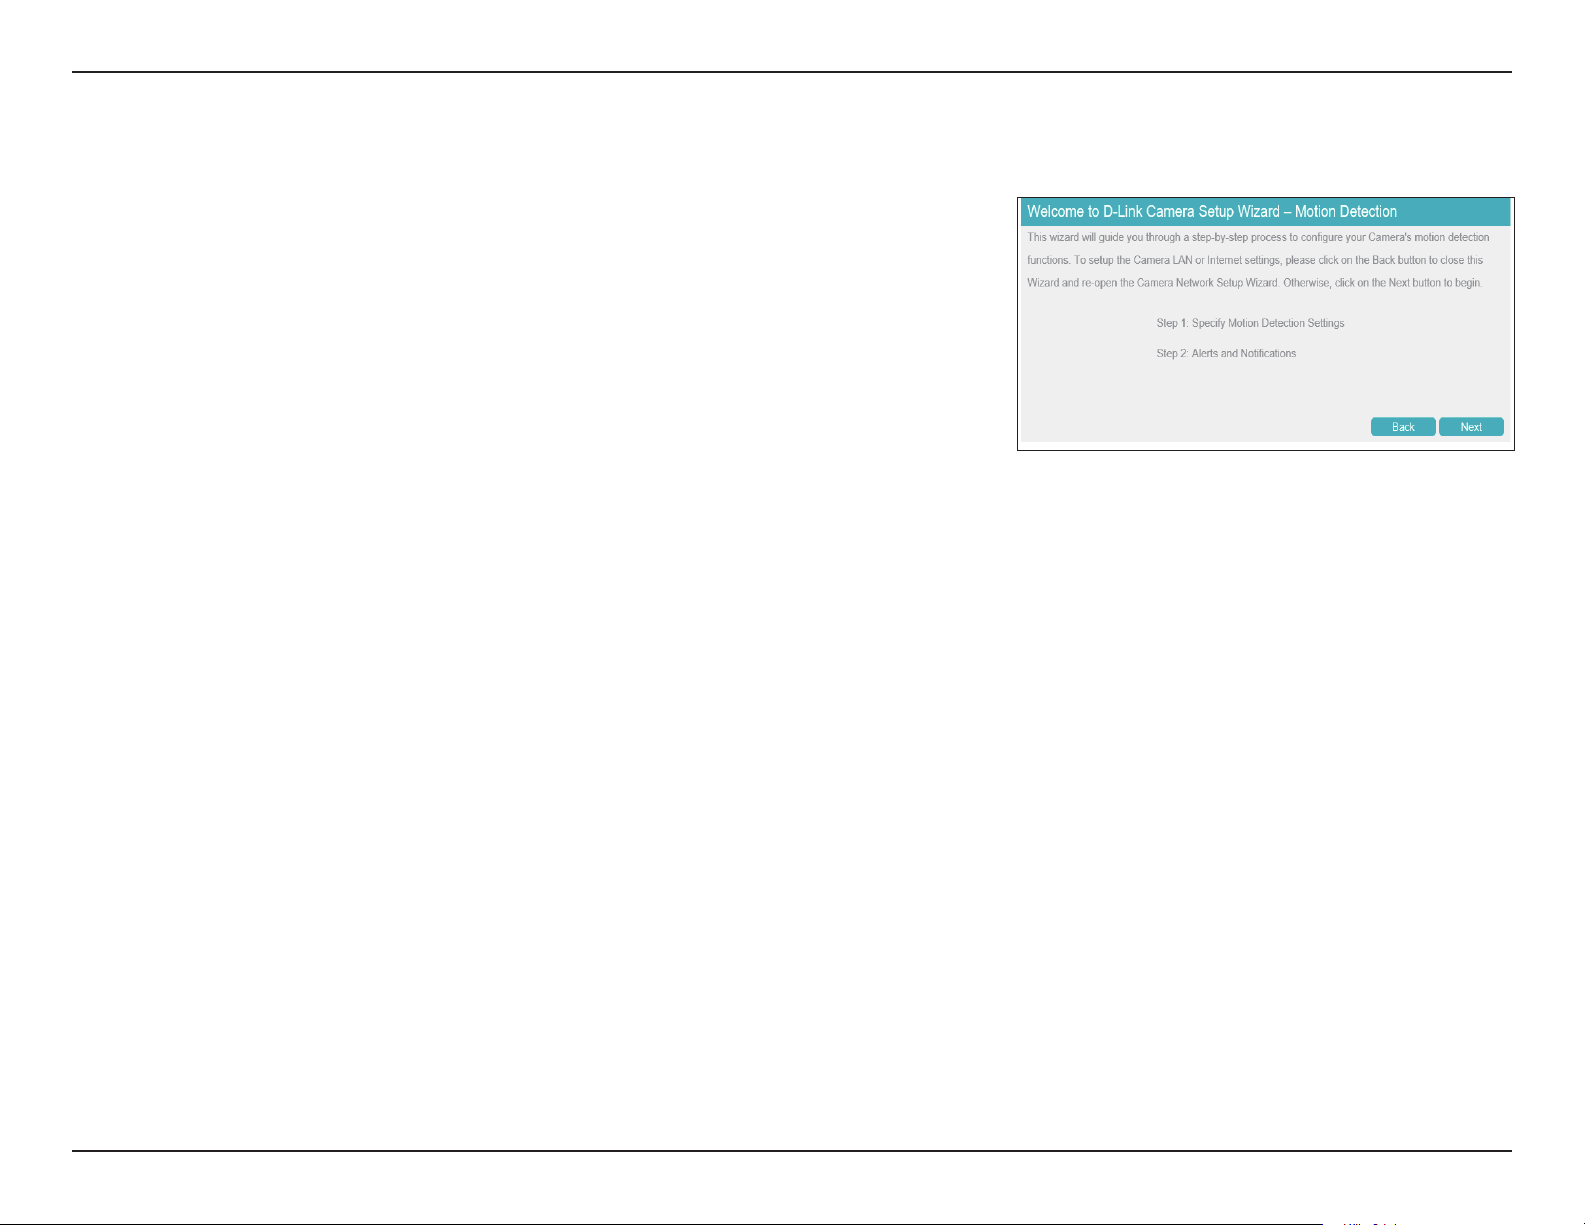
Motion Detection Setup Wizard
You can use this wizard to congure your camera's motion detection functions. For more
information on each step, refer to the following pages.
Step 1: Specify Motion Detection Settings
Step 2: Alerts and Notications
33D-Link Vigilance H.265 Outdoor Bullet Camera User Manual
Page 34
Section 3: Conguration
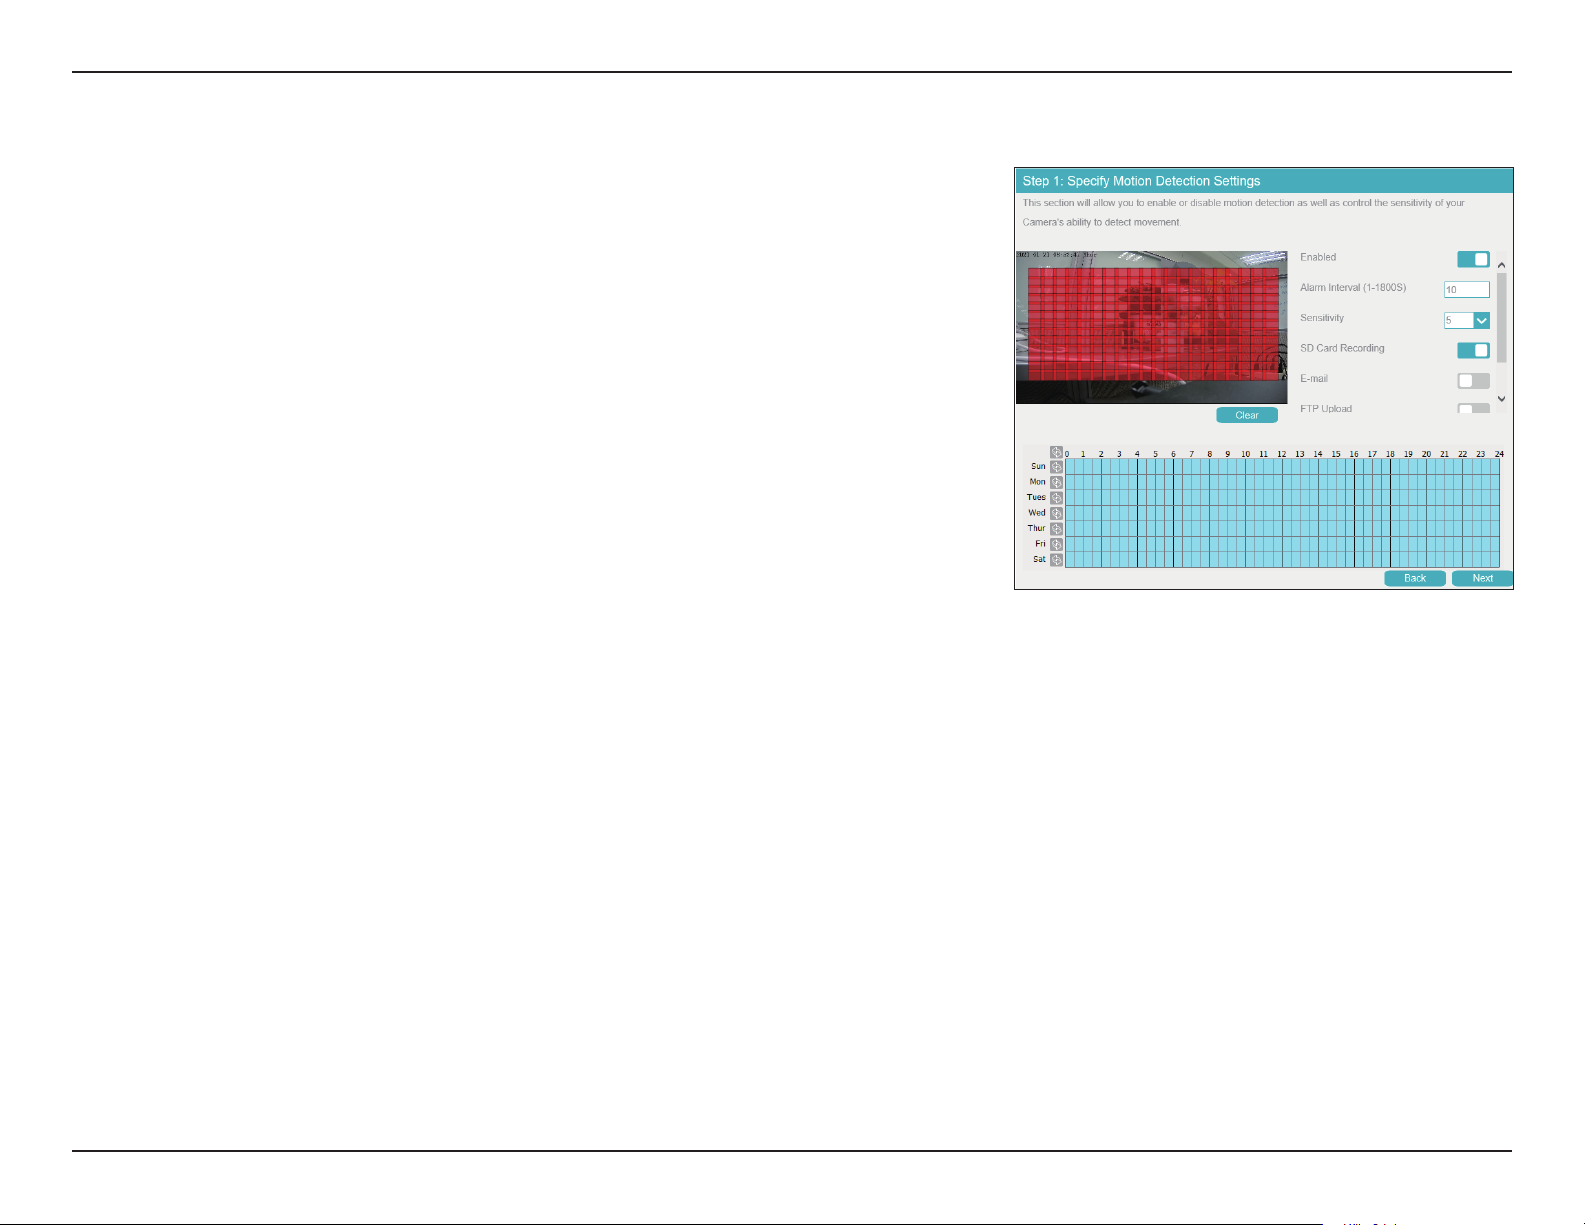
Step 1: Specify Motion Detection Settings
Enabled
Alarm Interval
(1-1800S)
Sensitivity
SD Card
Recording
E-mail
FTP Upload
Show motion
detection on
NVR
Click this to activate the motion detection alarm.
Set the alarm interval in seconds.
Set the motion detection sensitivity. A higher number indicates greater
sensitivity.
Toggle this to record video on the inserted microSD card.
Toggle this to send snapshots via e-mail.
Toggle this to upload snapshots via FTP.
Toggle this to display motion detection alarms on the connected NVR.
Click the schedule at the bottom to enable motion detection on a schedule.
34D-Link Vigilance H.265 Outdoor Bullet Camera User Manual
Page 35
Section 3: Conguration
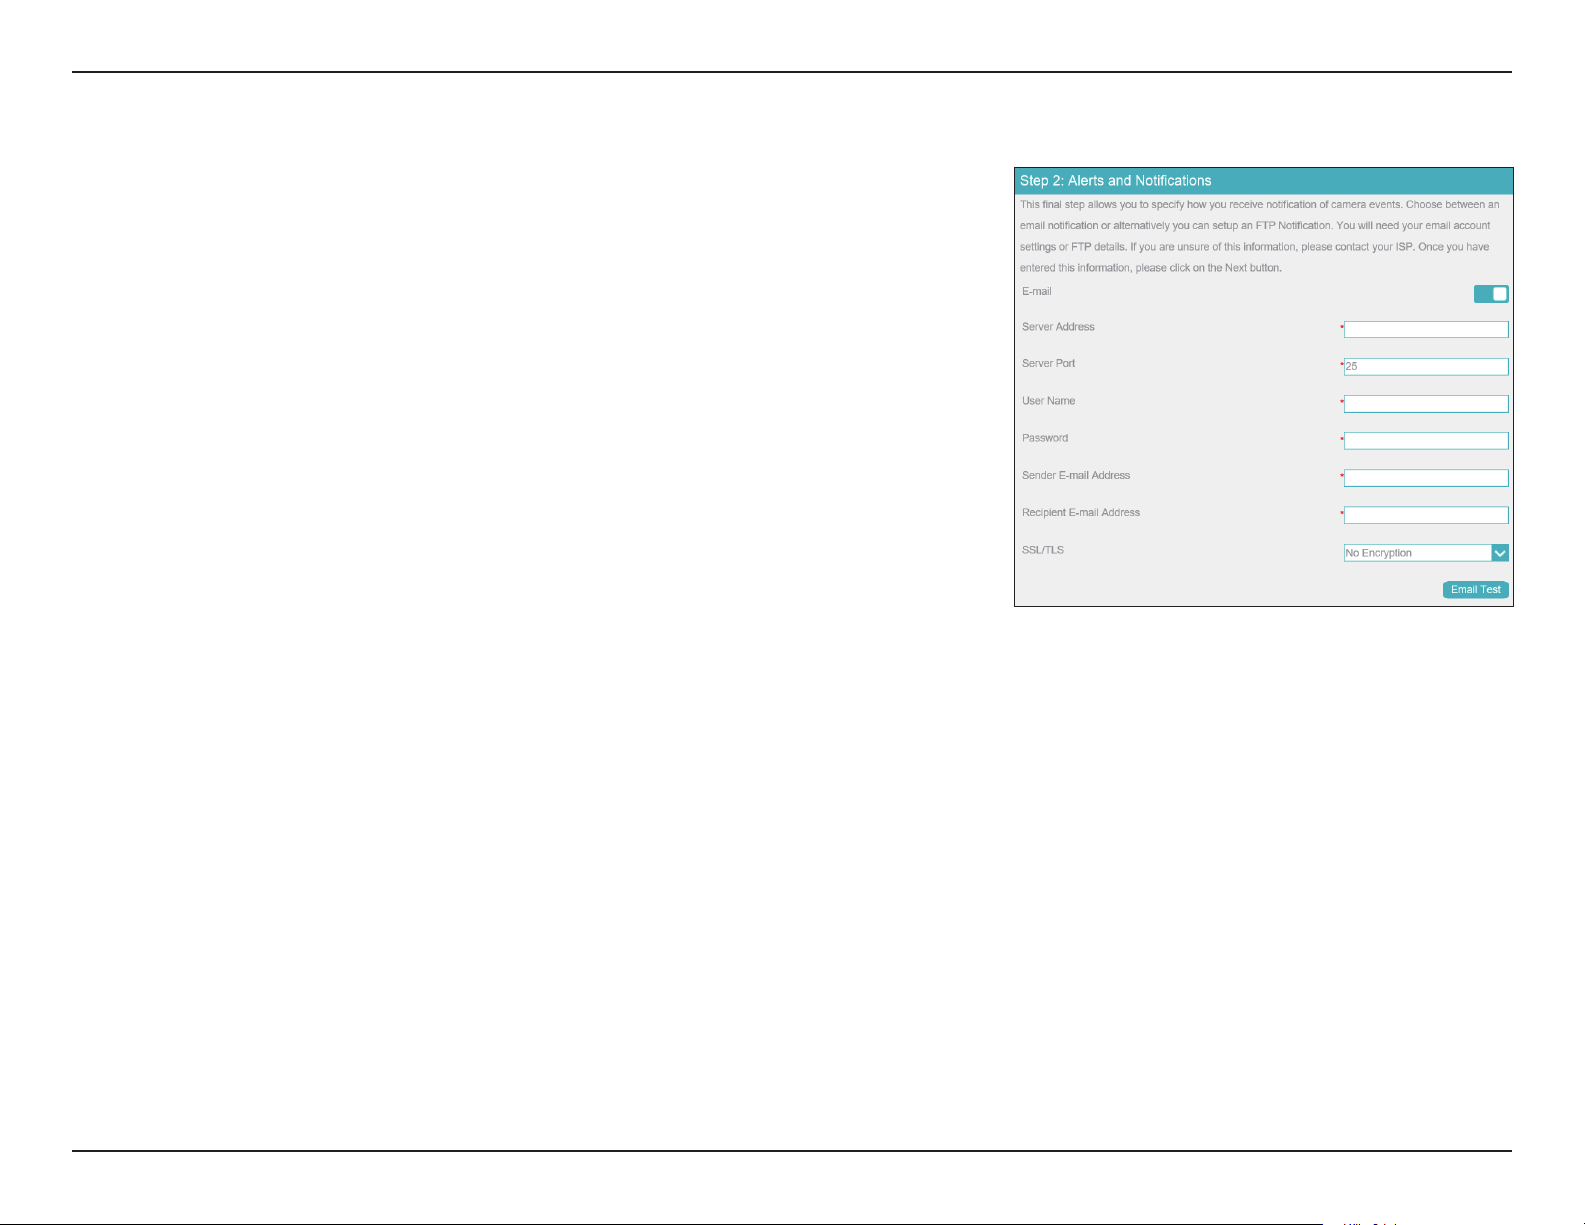
Step 2: Alerts and Notications
E-mail
Server Address
Server Port
User Name
Password
Sender E-mail
Address
Recipient
E-mail Address
SSL/TLS
E-mail Test
Check this box to congure the camera to send snapshots to an e-mail
address when a motion detection event occurs.
Enter the address of the email server.
Enter the port to use to connect to the email server.
Enter the username associated with the email account.
Enter the password associated with the above username.
Enter the email address that the email should be sent from.
Enter the recipients to send the snapshot to.
Select the protocol to use to secure your email.
Click this to send a test email.
35D-Link Vigilance H.265 Outdoor Bullet Camera User Manual
Page 36
Section 3: Conguration
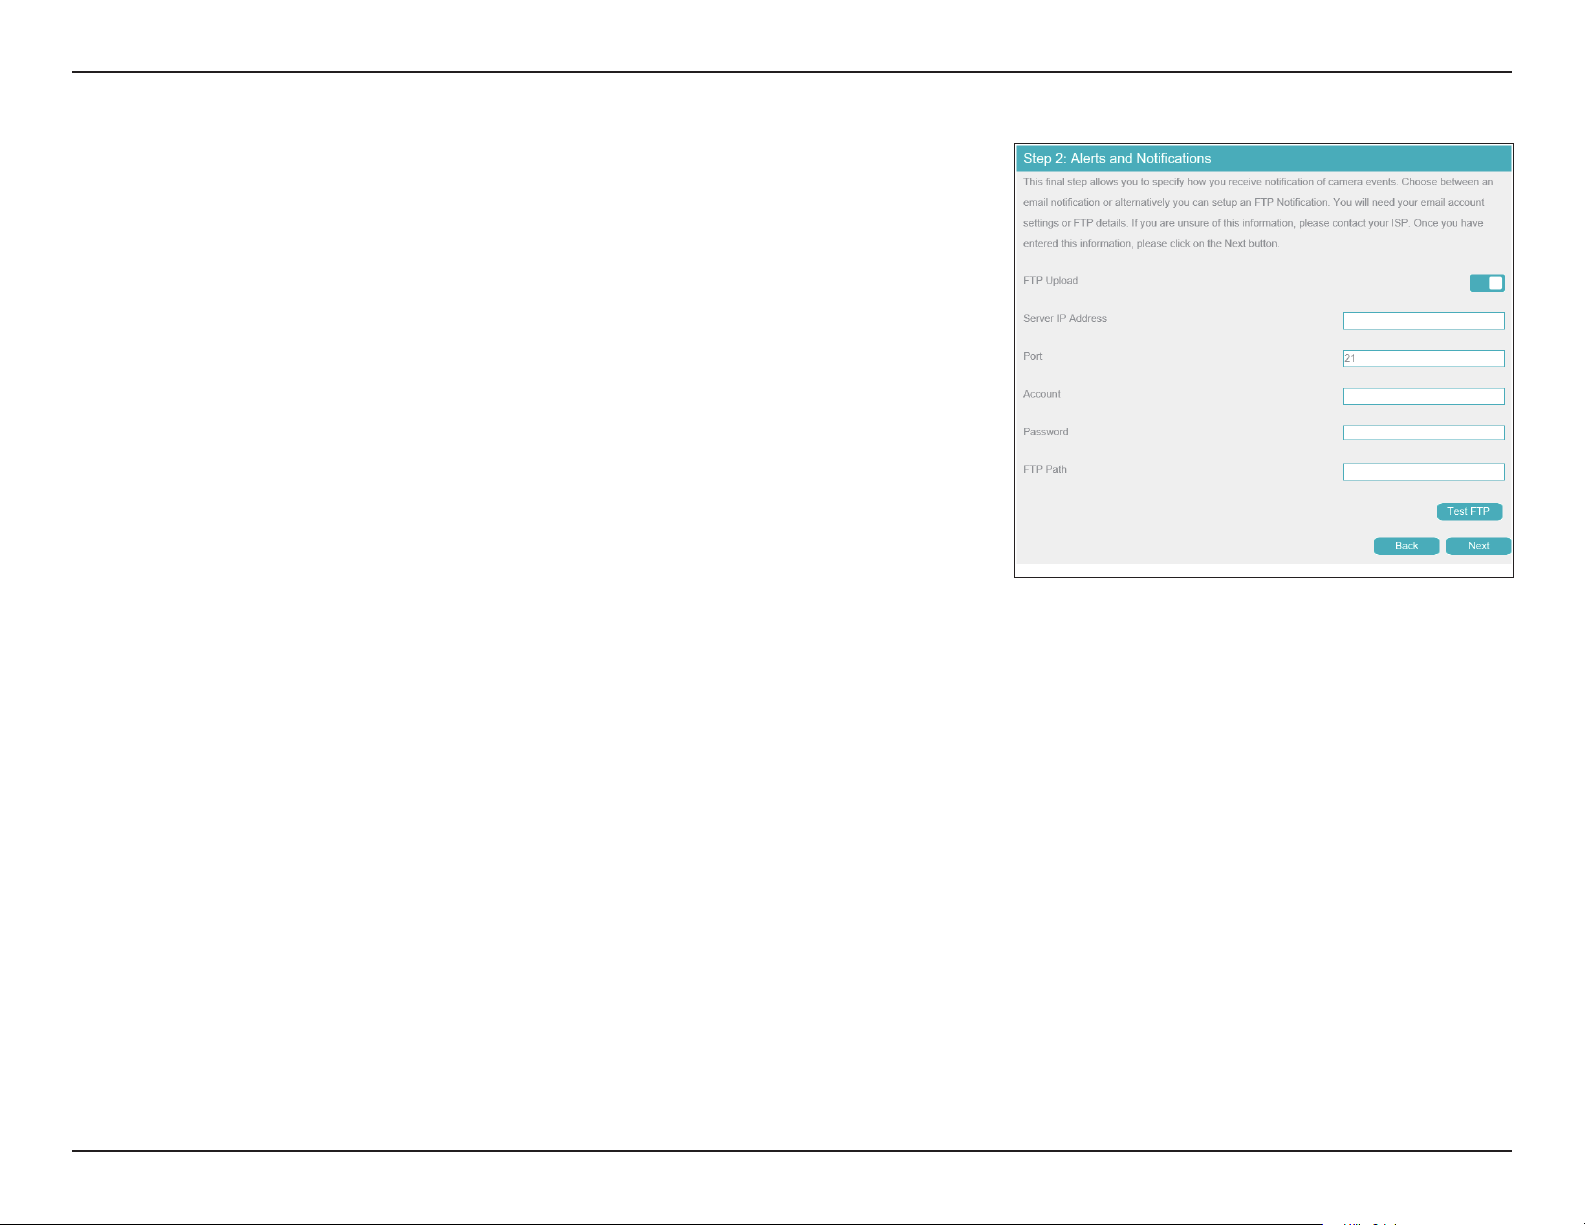
FTP Upload
Server IP
Address
Port
Account
Password
FTP Path
Check this box to congure the camera to upload snapshots to an FTP
server when a motion detection event occurs.
Enter the address of the FTP server.
Enter the port to use to connect to the FTP server.
Enter the account to use to access the FTP server.
Enter the password associated with the above username.
Enter the path to the directory where you would like your snapshots to be
stored.
36D-Link Vigilance H.265 Outdoor Bullet Camera User Manual
Page 37
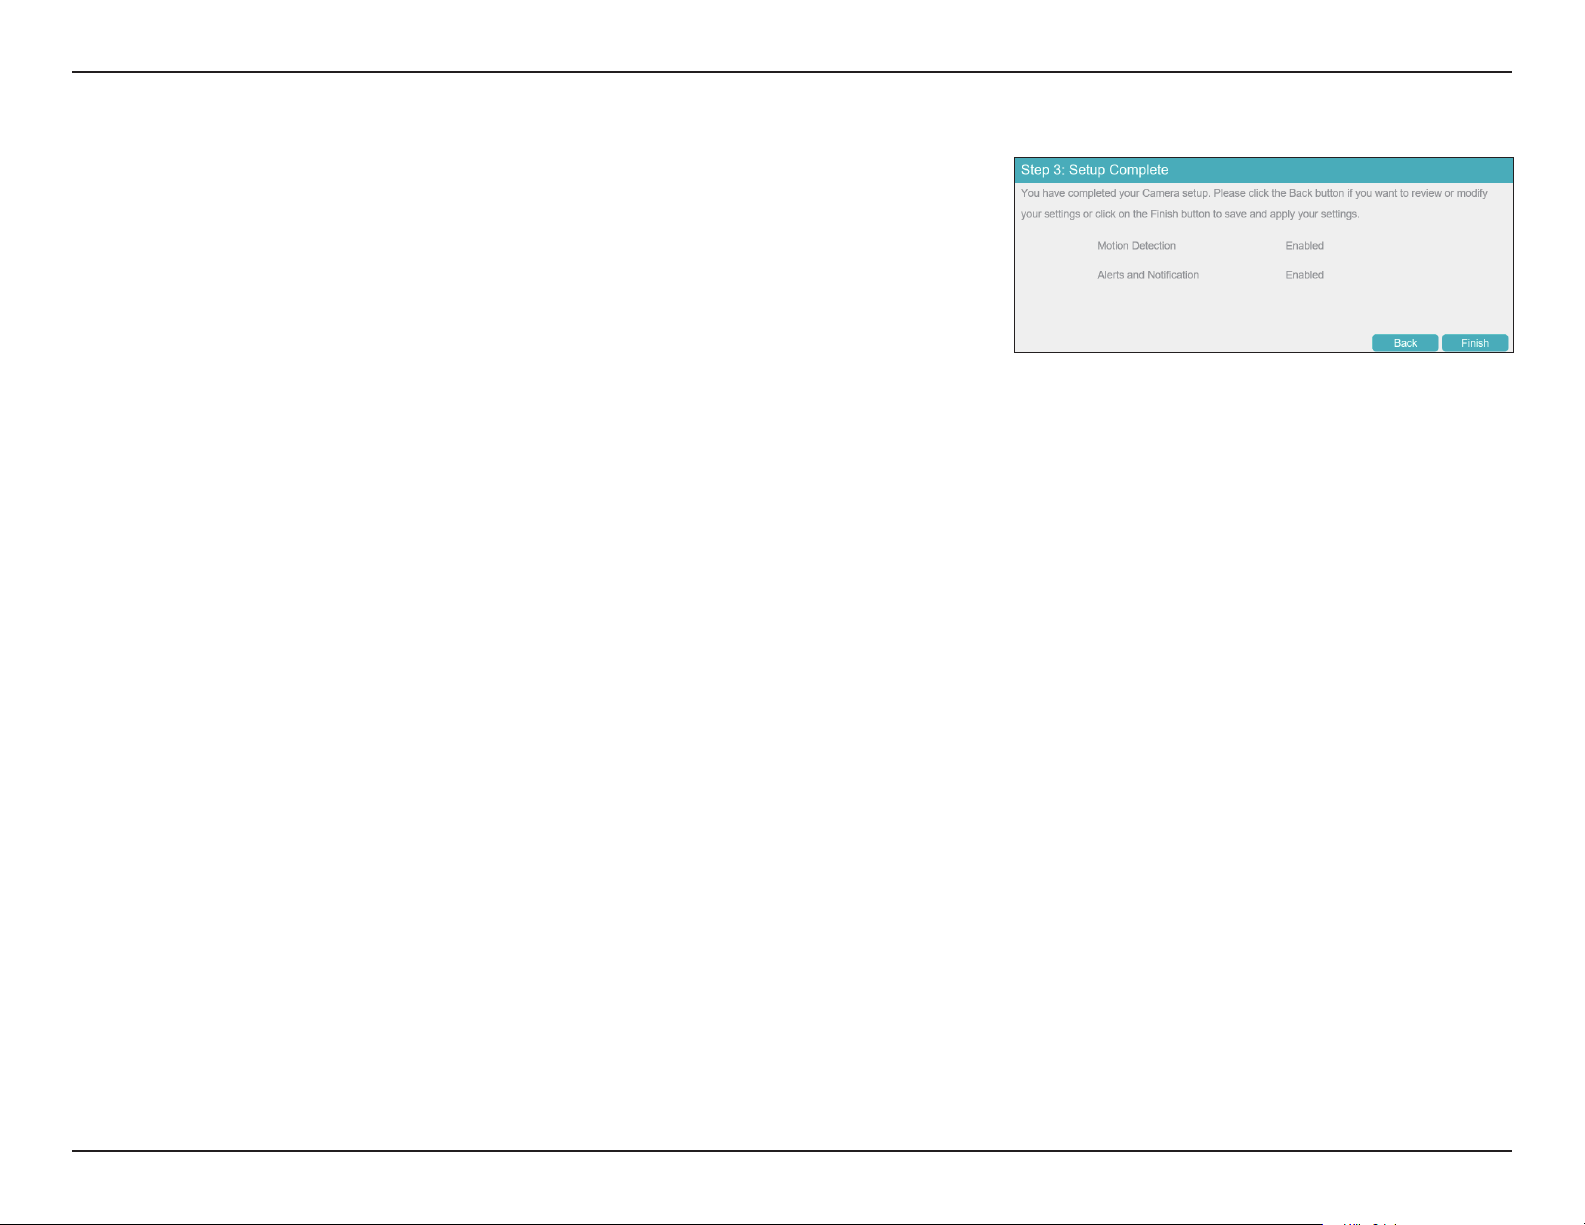
Section 3: Conguration
Step 3: Setup Complete
Review the settings you selected and click Finish to complete the setup wizard process.
37D-Link Vigilance H.265 Outdoor Bullet Camera User Manual
Page 38
Section 3: Conguration
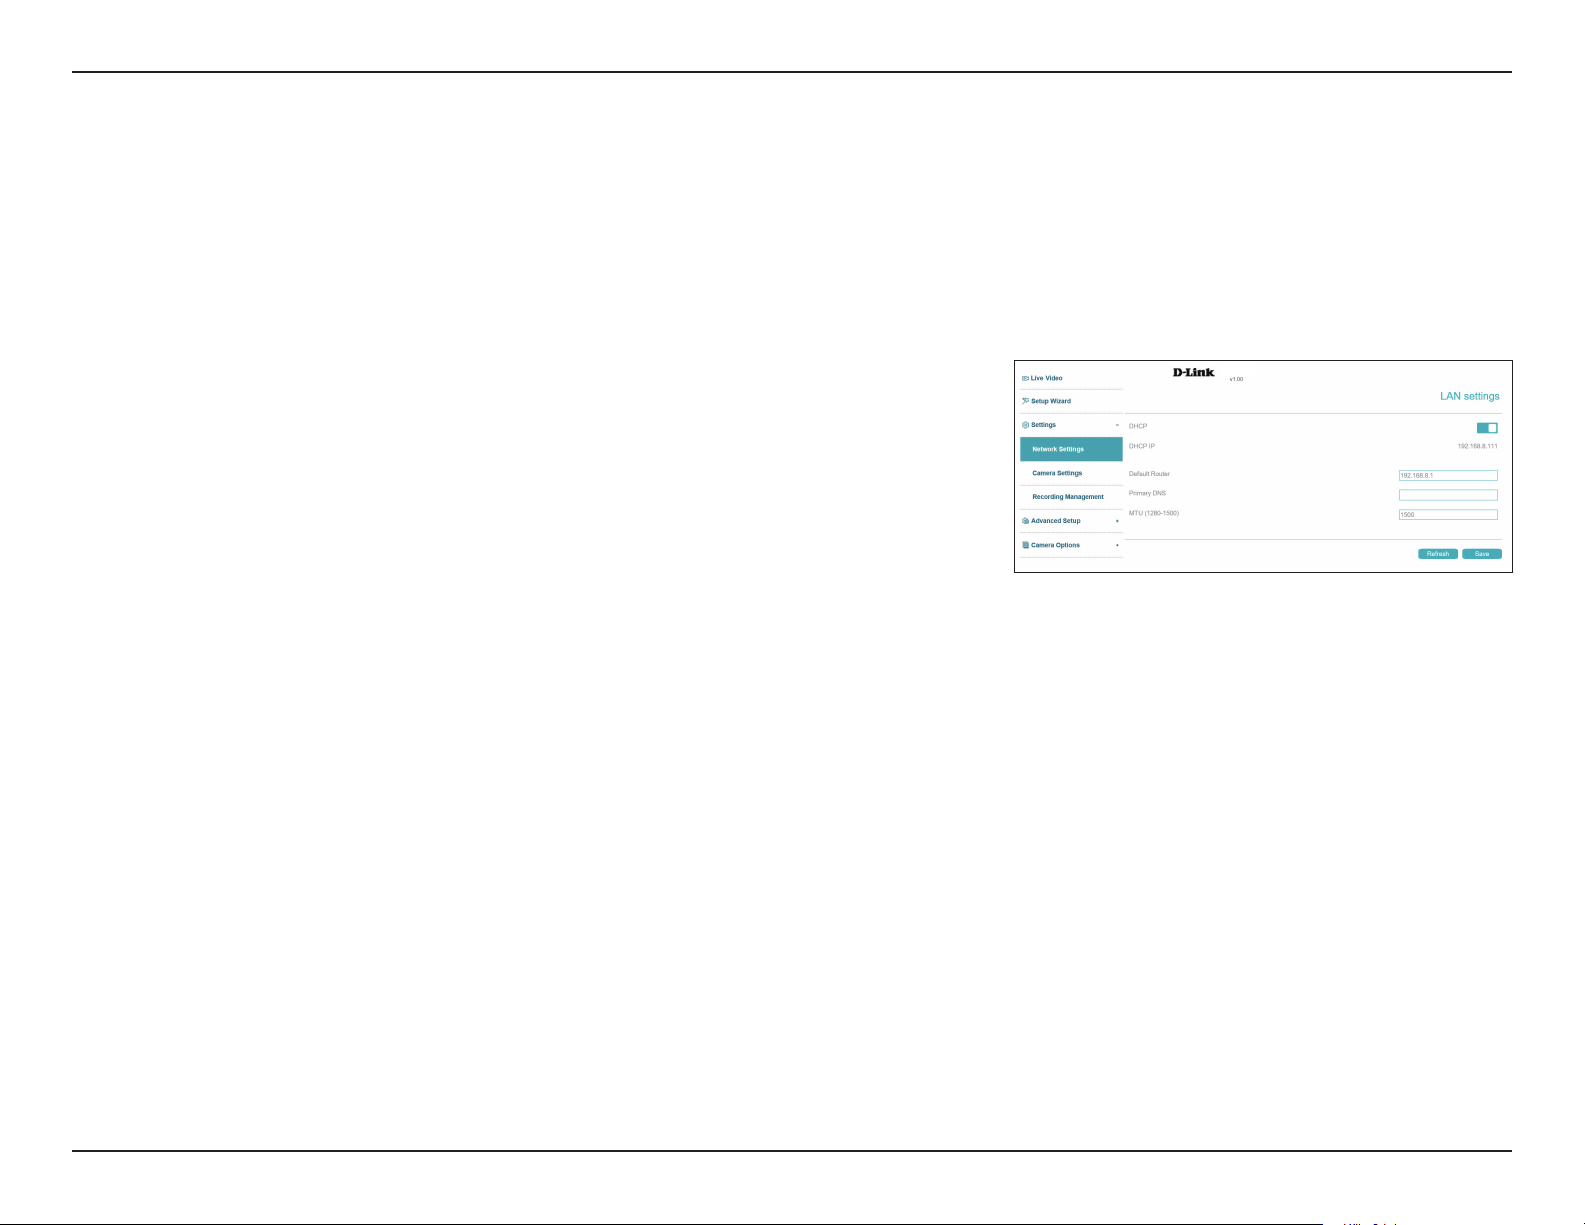
Settings
Network Settings
LAN Settings
Use this section to congure the network connections for your camera. All relevant information must be entered accurately. Please note that PPPoE
must be disabled to make any changes on this page; refer to "PPPoE" on page 39 for more details. After making any changes, click the Save
button.
DHCP
IP Address
Subnet Mask
Default
Gateway
Select this if you have a DHCP server running on your network and would
like your camera to obtain an IP address automatically. If you choose DHCP,
you do not need to ll out the IP address settings.
Enter a static IP address in this eld.
This number is used to determine if the destination is in the same subnet.
The default is 255.255.255.0.
Enter the gateway used to forward frames to destinations in a dierent
subnet.
DCS-4618EK
38D-Link Vigilance H.265 Outdoor Bullet Camera User Manual
Page 39
Section 3: Conguration
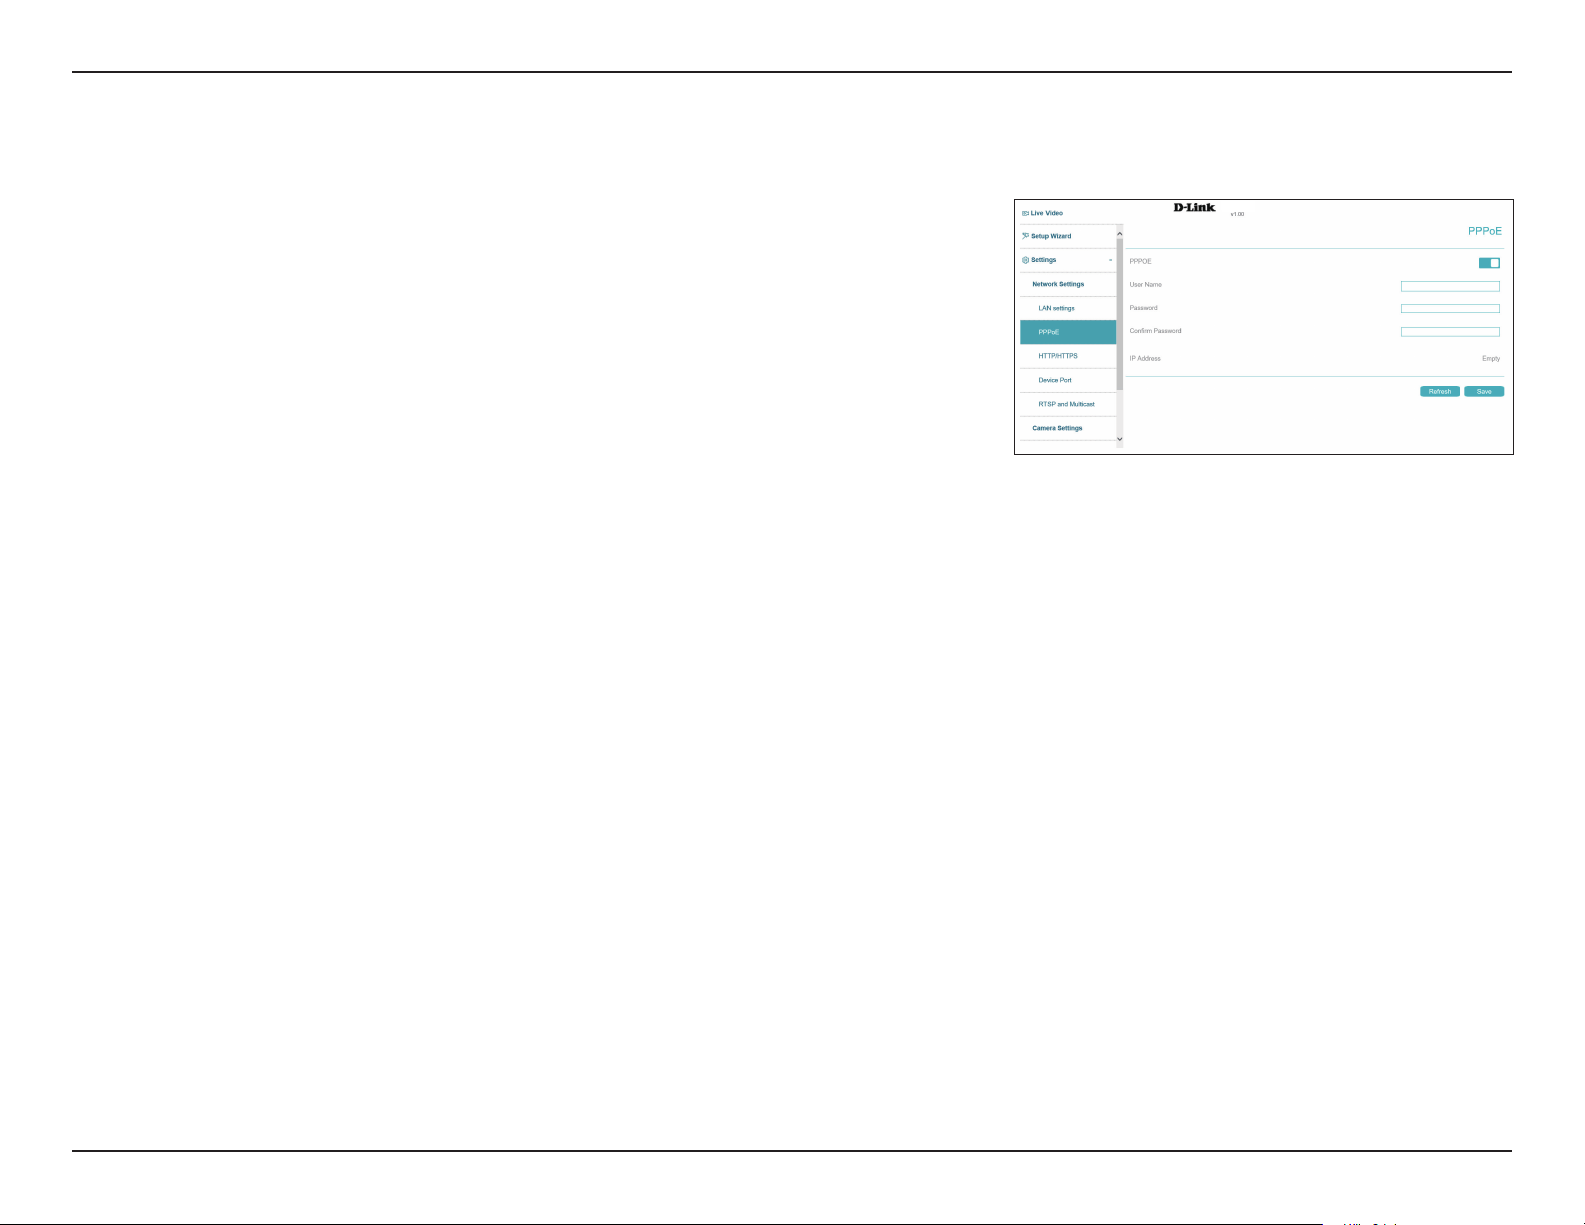
PPPoE
Use this section to congure your camera's PPPoE settings. After making any changes, click the Save button to save your changes.
PPPoE
User Name /
Password
IP Address
Enable this setting if your network uses PPPoE.
Enter the username and password for your PPPoE account. Re-enter your
password in the Conrm Password eld. You may obtain this information
from your ISP.
This shows your current IP address.
DCS-4618EK
39D-Link Vigilance H.265 Outdoor Bullet Camera User Manual
Page 40
Section 3: Conguration
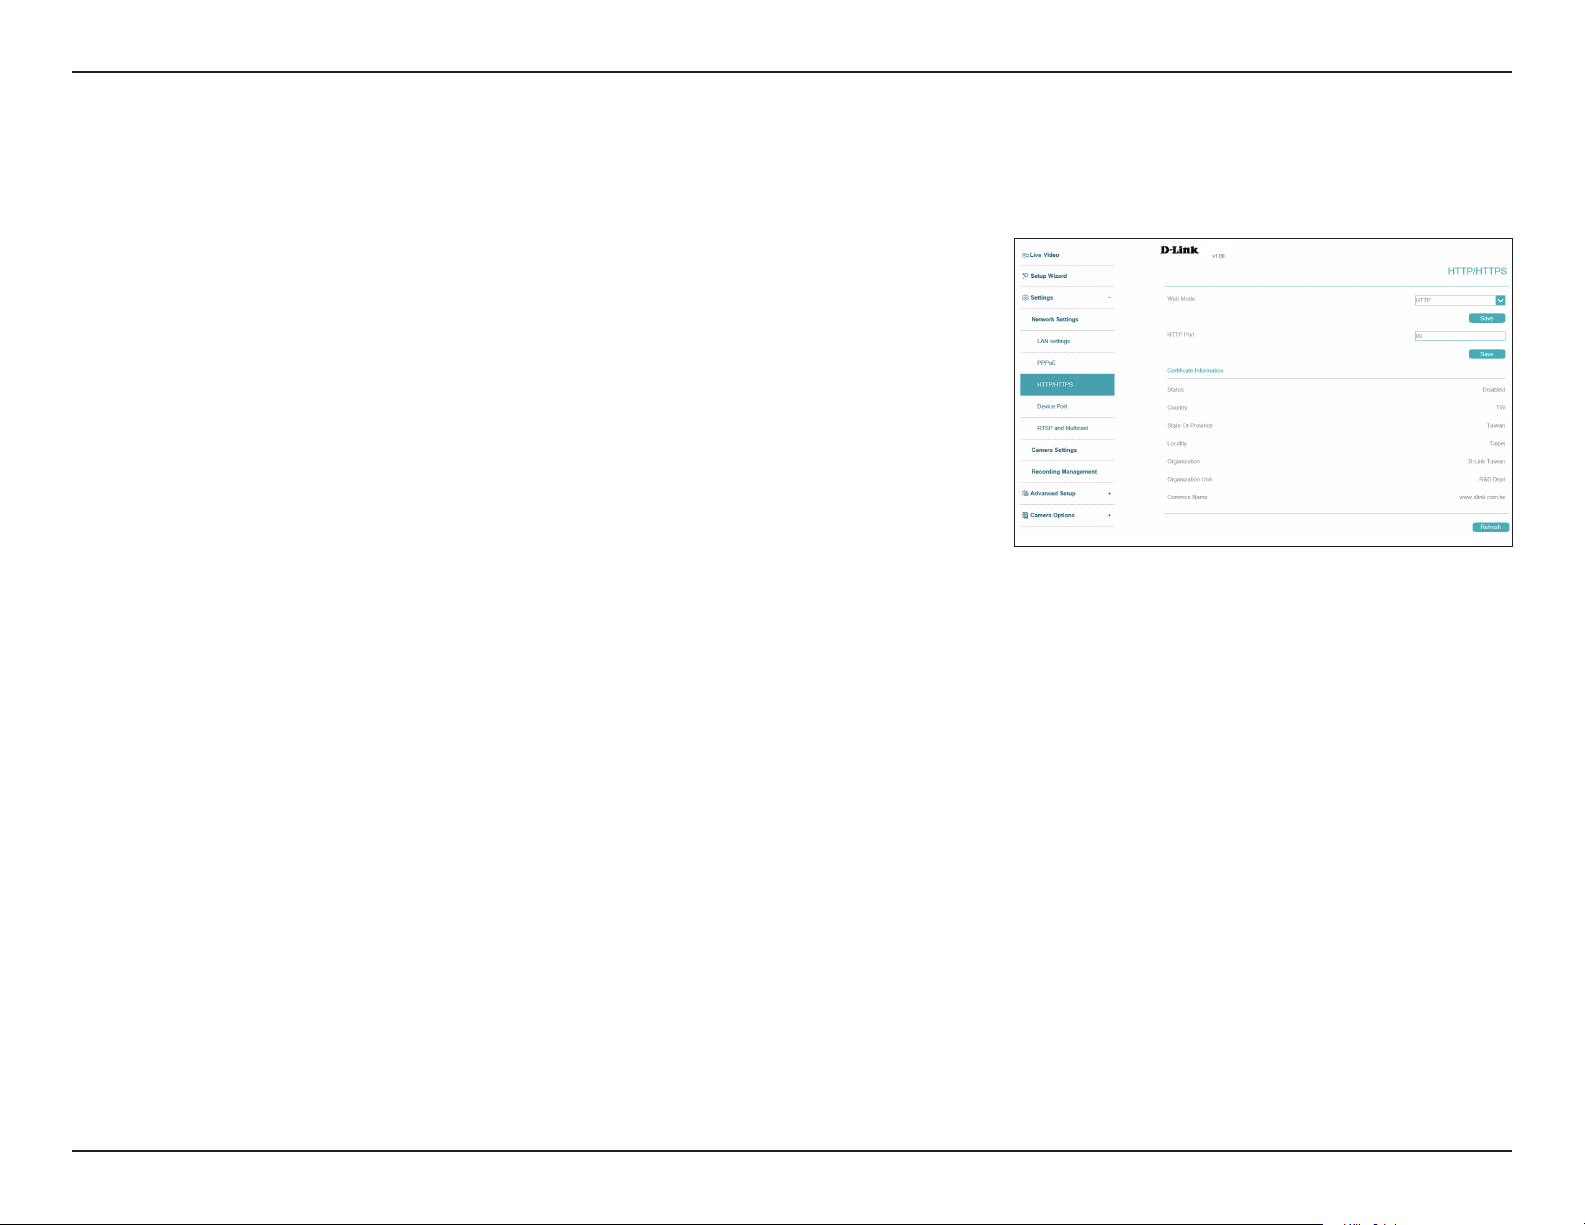
HTTP and HTTPS
Use this section to congure the HTTP and HTTPS access settings for your camera. After making any changes, click the Save button to save your
changes.
Web Mode
HTTP Port
Certicate
Information
Choose whether to use HTTP or HTTPS to access your camera.
Select the port to use to access your camera via HTTP. The default is 80.
Displays information on your camera's HTTPS certicate. The camera's
default HTTPS port is 443.
DCS-4618EK
40D-Link Vigilance H.265 Outdoor Bullet Camera User Manual
Page 41
Section 3: Conguration
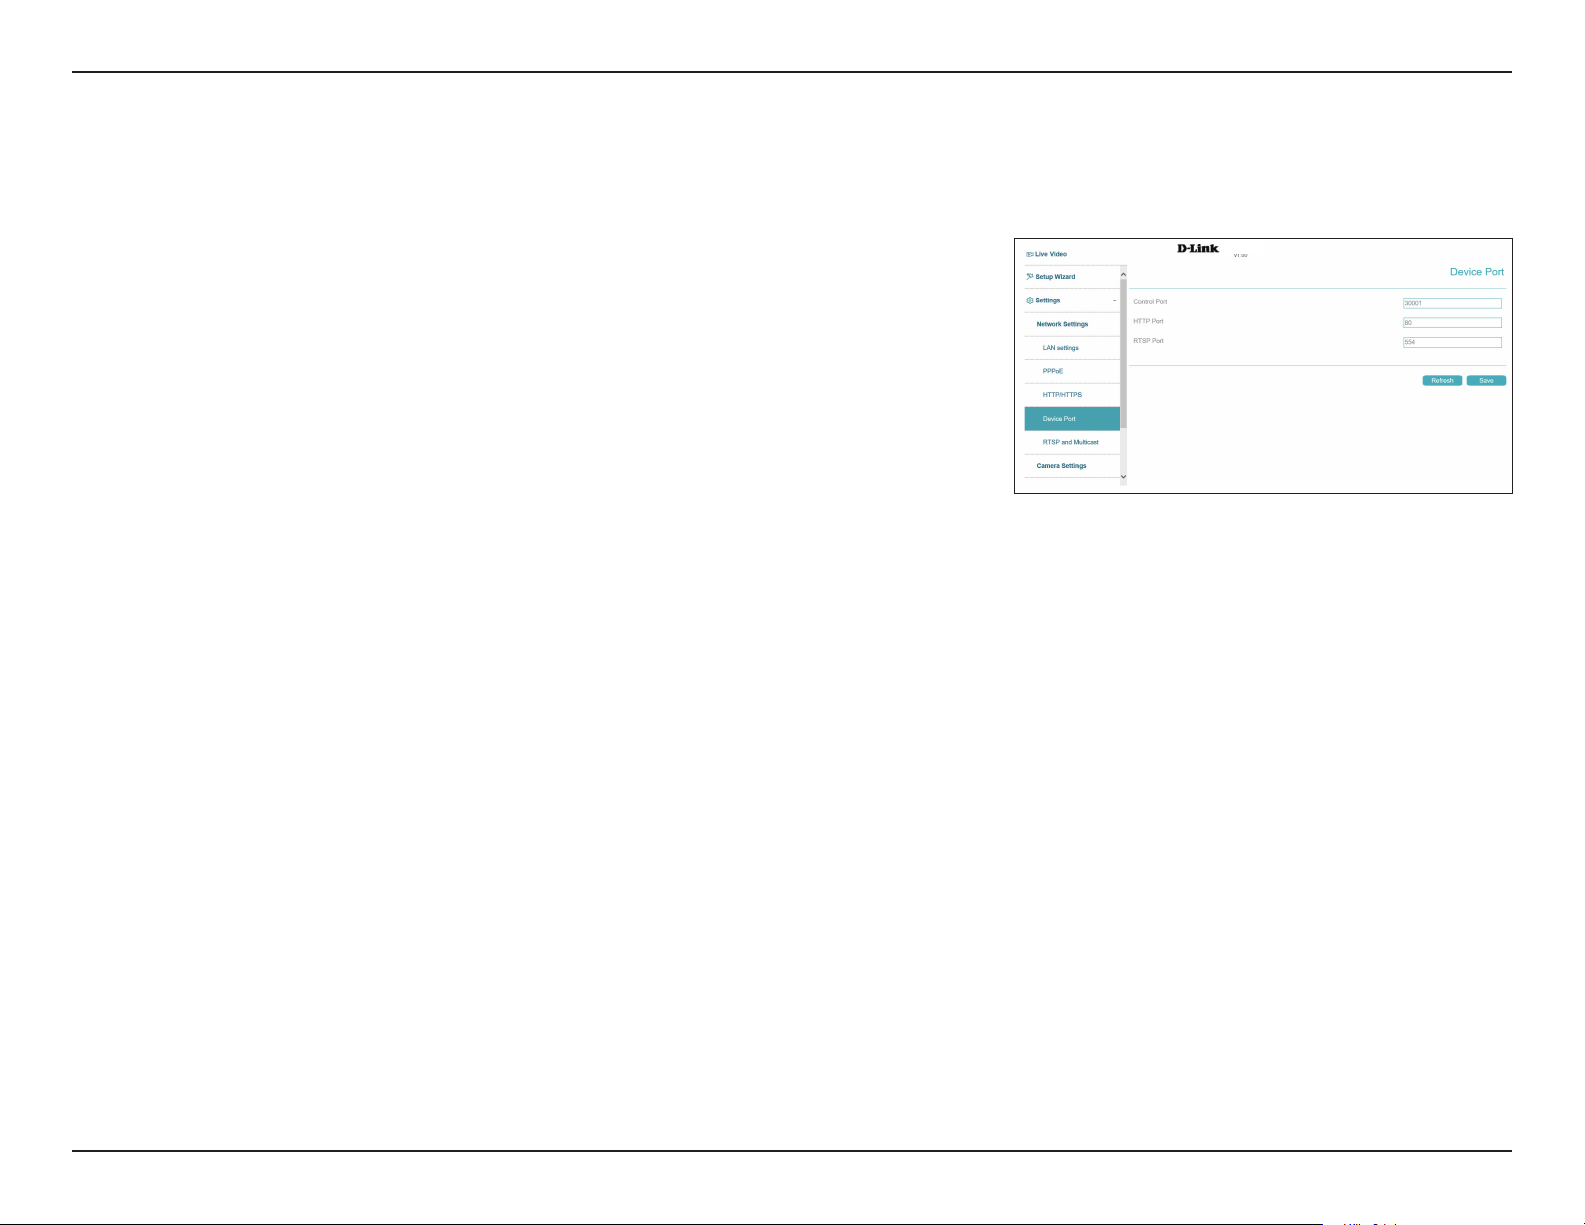
Device Port
On this page you can set the ports on which users can access the camera's features.
Control Port
HTTP Port
RTSP Port
Set the camera's control port to be used by a connected NVR. The default
is 30001.
Set the camera's HTTP port. The default is 80.
Set the camera's RTSP port. The default is 554.
DCS-4618EK
41D-Link Vigilance H.265 Outdoor Bullet Camera User Manual
Page 42
Section 3: Conguration
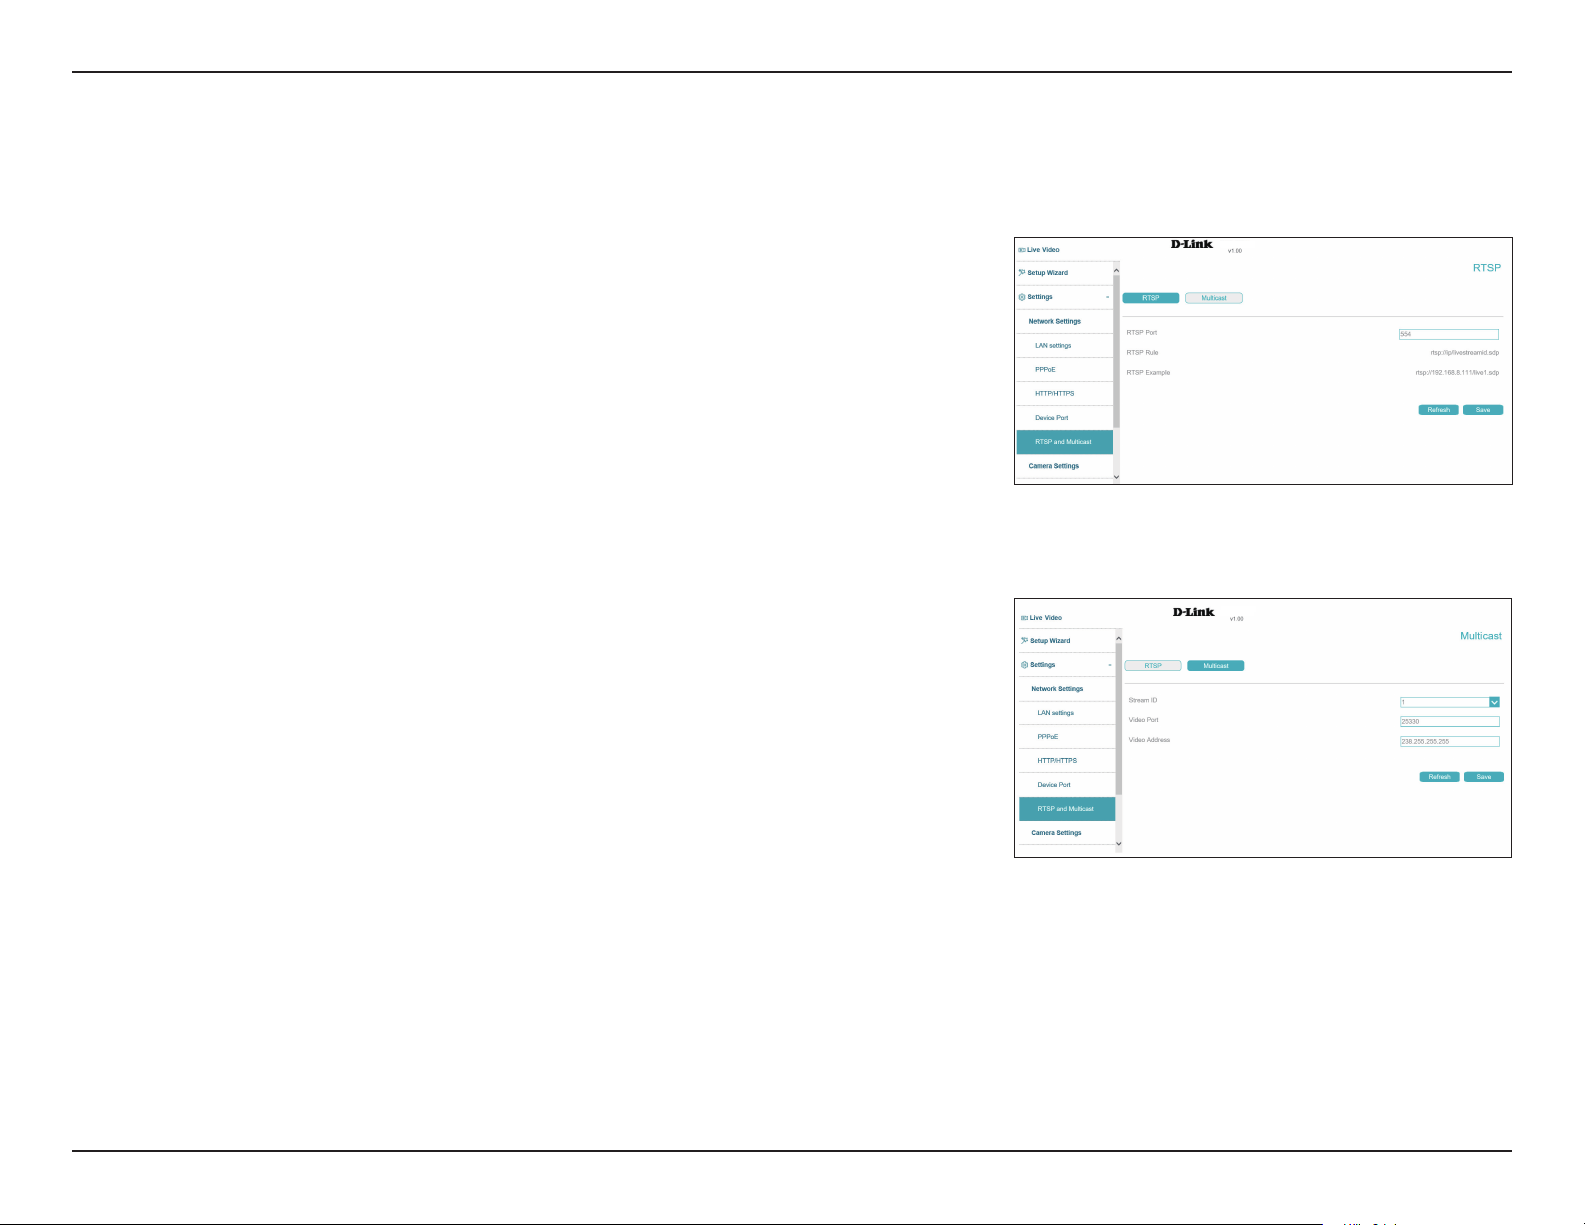
RTSP and Multicast
Use this section to congure your camera's RTSP and multicast stream settings. After making any changes, click the Save button to save your
changes.
RTSP
RTSP Port:
RTSP Rule
RTSP Example
The camera allows you to multicast each of the available streams via a group address. Enter
the port and settings you wish to use.
Set the port to use for RTSP streaming. The default is 554.
This indicates the format of the RTSP path.
This provides an example of an RTSP path.
Multicast
Stream ID
Video Port
Video Address
Select an ID for the stream.
Select the port to multicast the stream over.
Enter an address for the multicast stream.
DCS-4618EK
DCS-4618EK
42D-Link Vigilance H.265 Outdoor Bullet Camera User Manual
Page 43
Section 3: Conguration
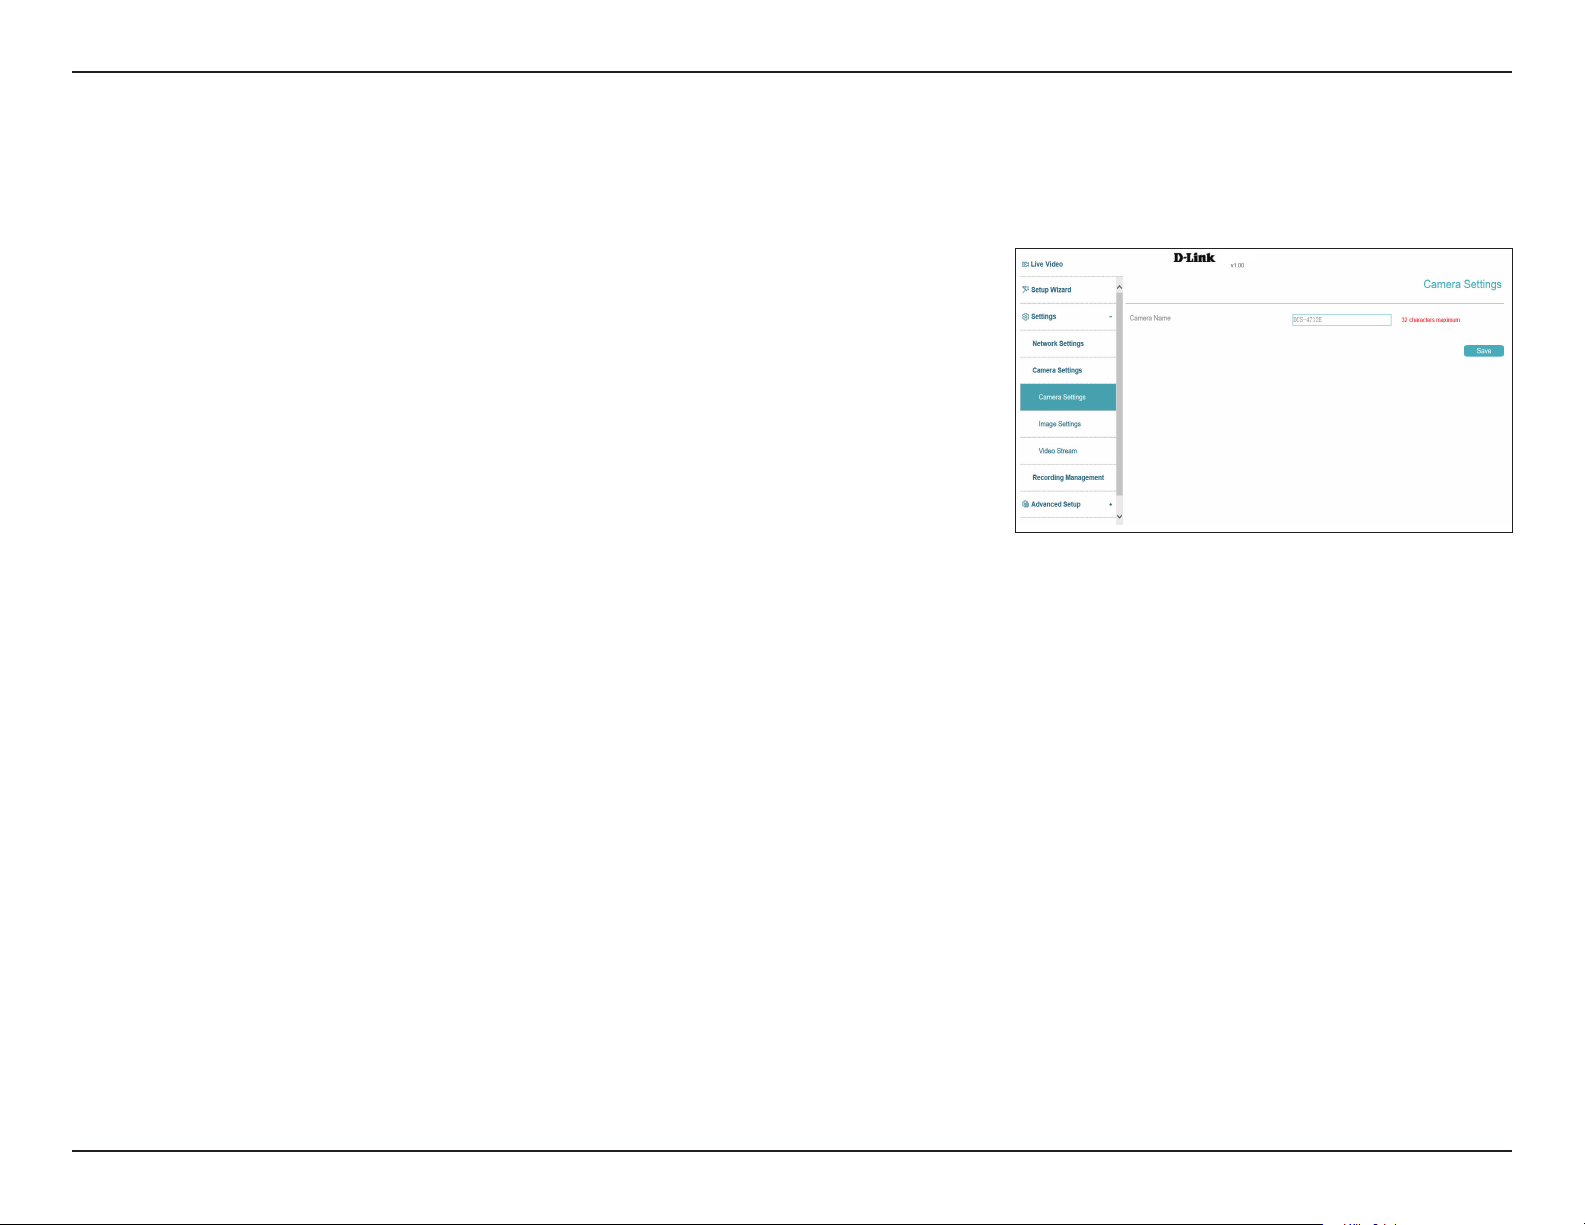
Camera Settings
Use this section to congure the name used to identify your camera. After making any changes, click the Save button.
Camera Name Create a unique name for your camera.
DCS-4618EK
43D-Link Vigilance H.265 Outdoor Bullet Camera User Manual
Page 44
Section 3: Conguration
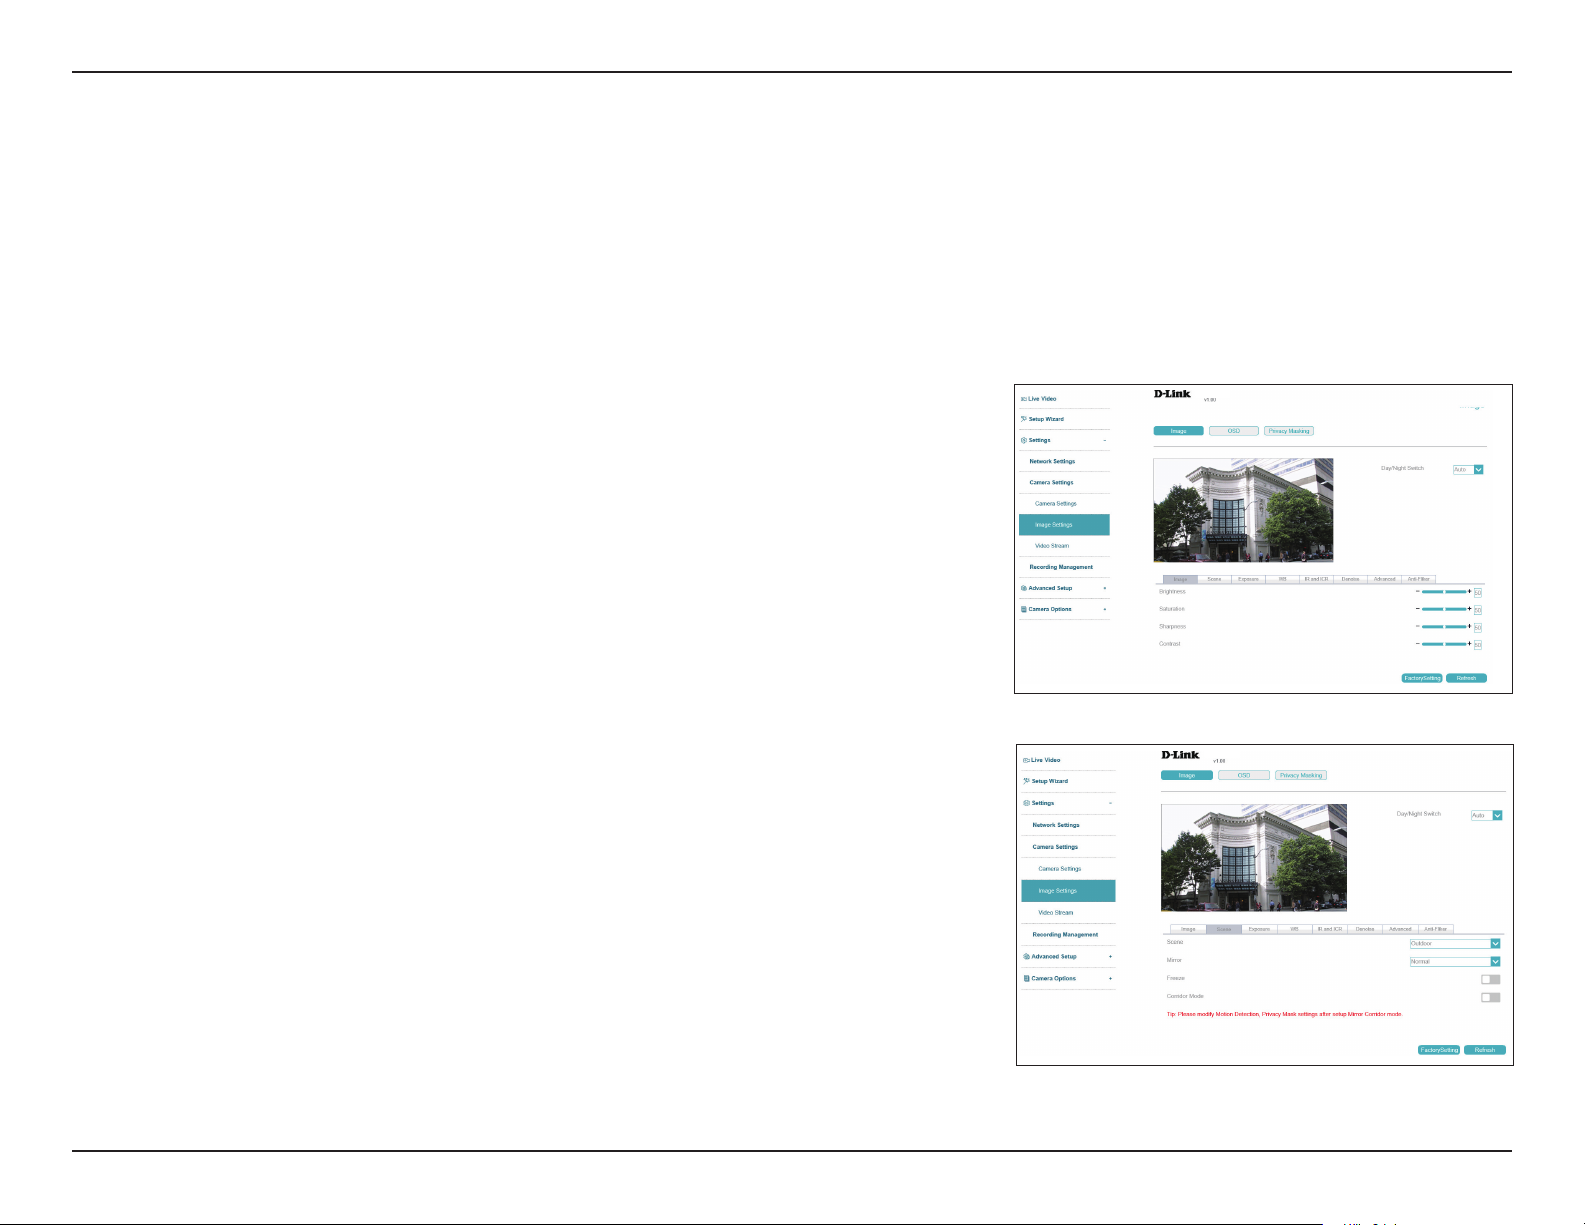
Image Settings
In this section, you may congure the video image settings for your camera. All changes in the Image Settings section will be made immediately.
For the other sections, after making any changes, click the Save button to save your changes.
Day/Night
Switch
Brightness
Sharpness
Saturation
Contrast
Scene
Mirror
The image settings in the tabs below will change according to whether it is
day or night. Select Timing to schedule this manually.
Image
DCS-4618EK
Adjust the brightness from 0% to 100%.
Adjust the image sharpness level from 0% to 100%.
Adjust the image saturation level from 0% to 100%.
Adjust the contrast level from 0% to 100%.
Scene
DCS-4618EK
Select either Indoor or Outdoor.
Mirror the image horizontally, vertically, or both.
Corridor Mode
Toggle this to narrow the view and prioritize the center of the display. This
optimizes the display for narrow environments, such as corridors and aisles.
44D-Link Vigilance H.265 Outdoor Bullet Camera User Manual
Page 45
Section 3: Conguration
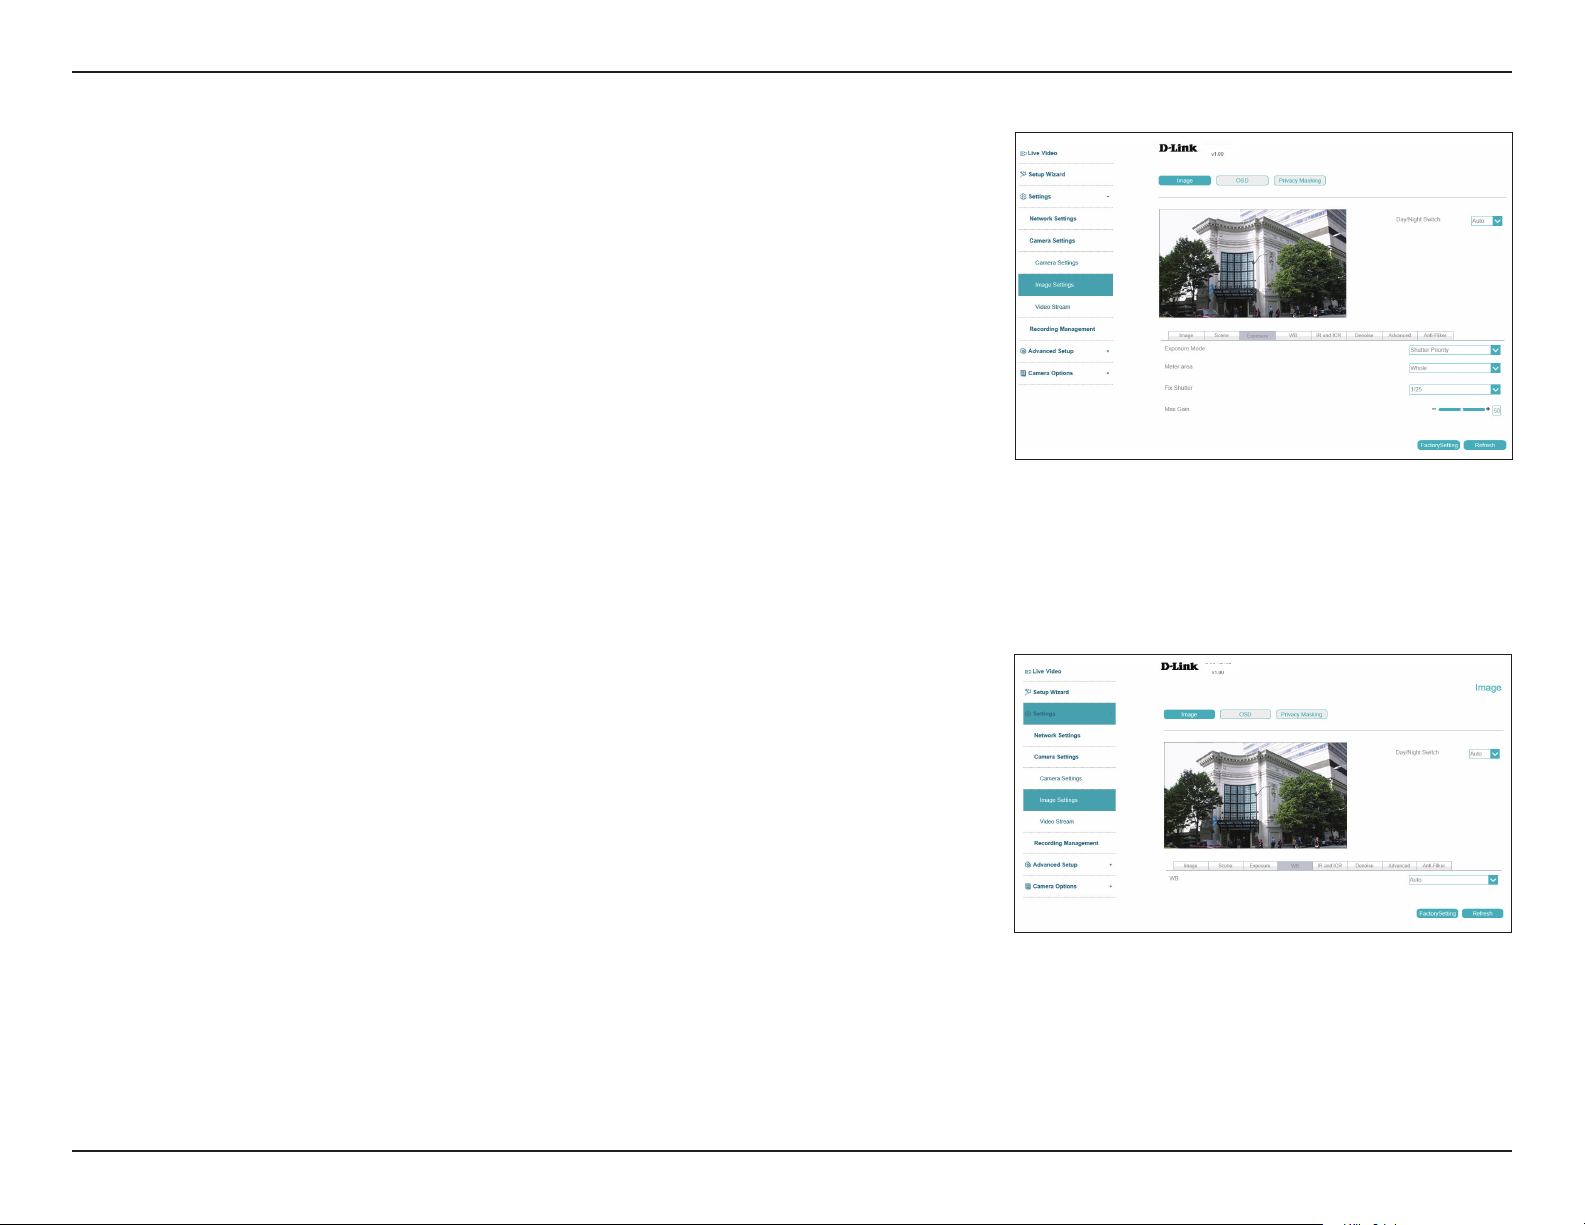
Exposure
Exposure Mode
Choose an appropriate mode to limit exposure from backlit subjects. Select
Shutter Priority to set the exposure time automatically and then adjust
the video gain. Select Manual to set the shutter speed manually with the
settings below.
DCS-4618EK
Meter Area
Max Shutter
Max Gain
WB Select the White Balance mode from a variety of options. If you select
Select the area of the frame to use to determine the exposure.
Select the maximum shutter speed (in seconds) to use. Shorter shutter
speeds provide a sharper picture, but require more light.
Set the maximum camera gain. A higher gain amplies the value of each
pixel of the display.
WB
DCS-4618EK
Manual, you will need to set the red and blue levels yourself.
45D-Link Vigilance H.265 Outdoor Bullet Camera User Manual
Page 46
Section 3: Conguration
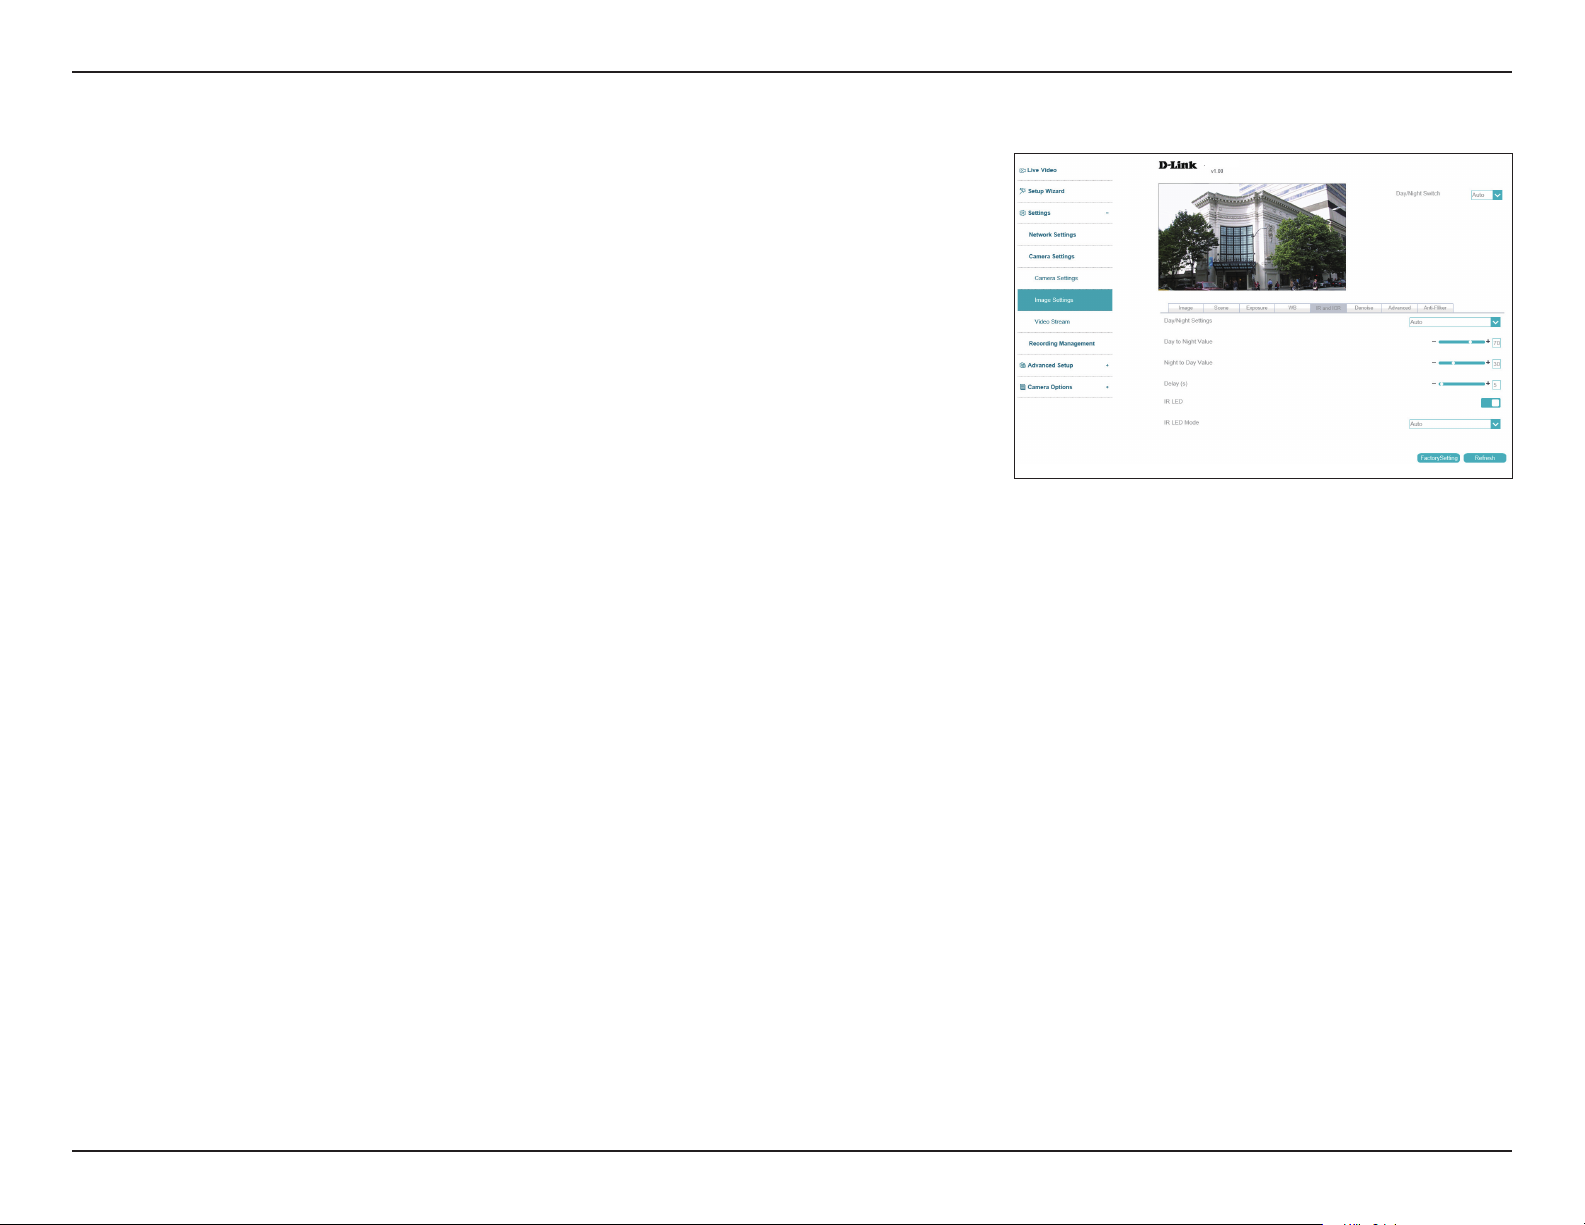
ICR & IR
D/N Setting
Delay/
Sensitivity
IR LED
IR LED Mode
Use this section to congure the IR LED and IR-cut removable lter behavior
for your camera.
Day Mode enables the IR Cut Filter and turns o the IR LEDs. Night Mode
disables the IR Cut Filter and turns on the IR LEDs. Select Auto to set the
day/night mode automatically according to the amount of light in the
environment, or Timing to set it according to a schedule.
If Auto is selected, congure how long the camera should wait after a change
in lighting conditions to adjust the day/night mode, and how sensitive it
should be to changes in the environment.
Toggle this to enable or disable the IR LED.
Select Manual to set the IR LED level or Auto to have the camera adjust it
automatically.
DCS-4618EK
46D-Link Vigilance H.265 Outdoor Bullet Camera User Manual
Page 47
Section 3: Conguration
2D/3D Denoise
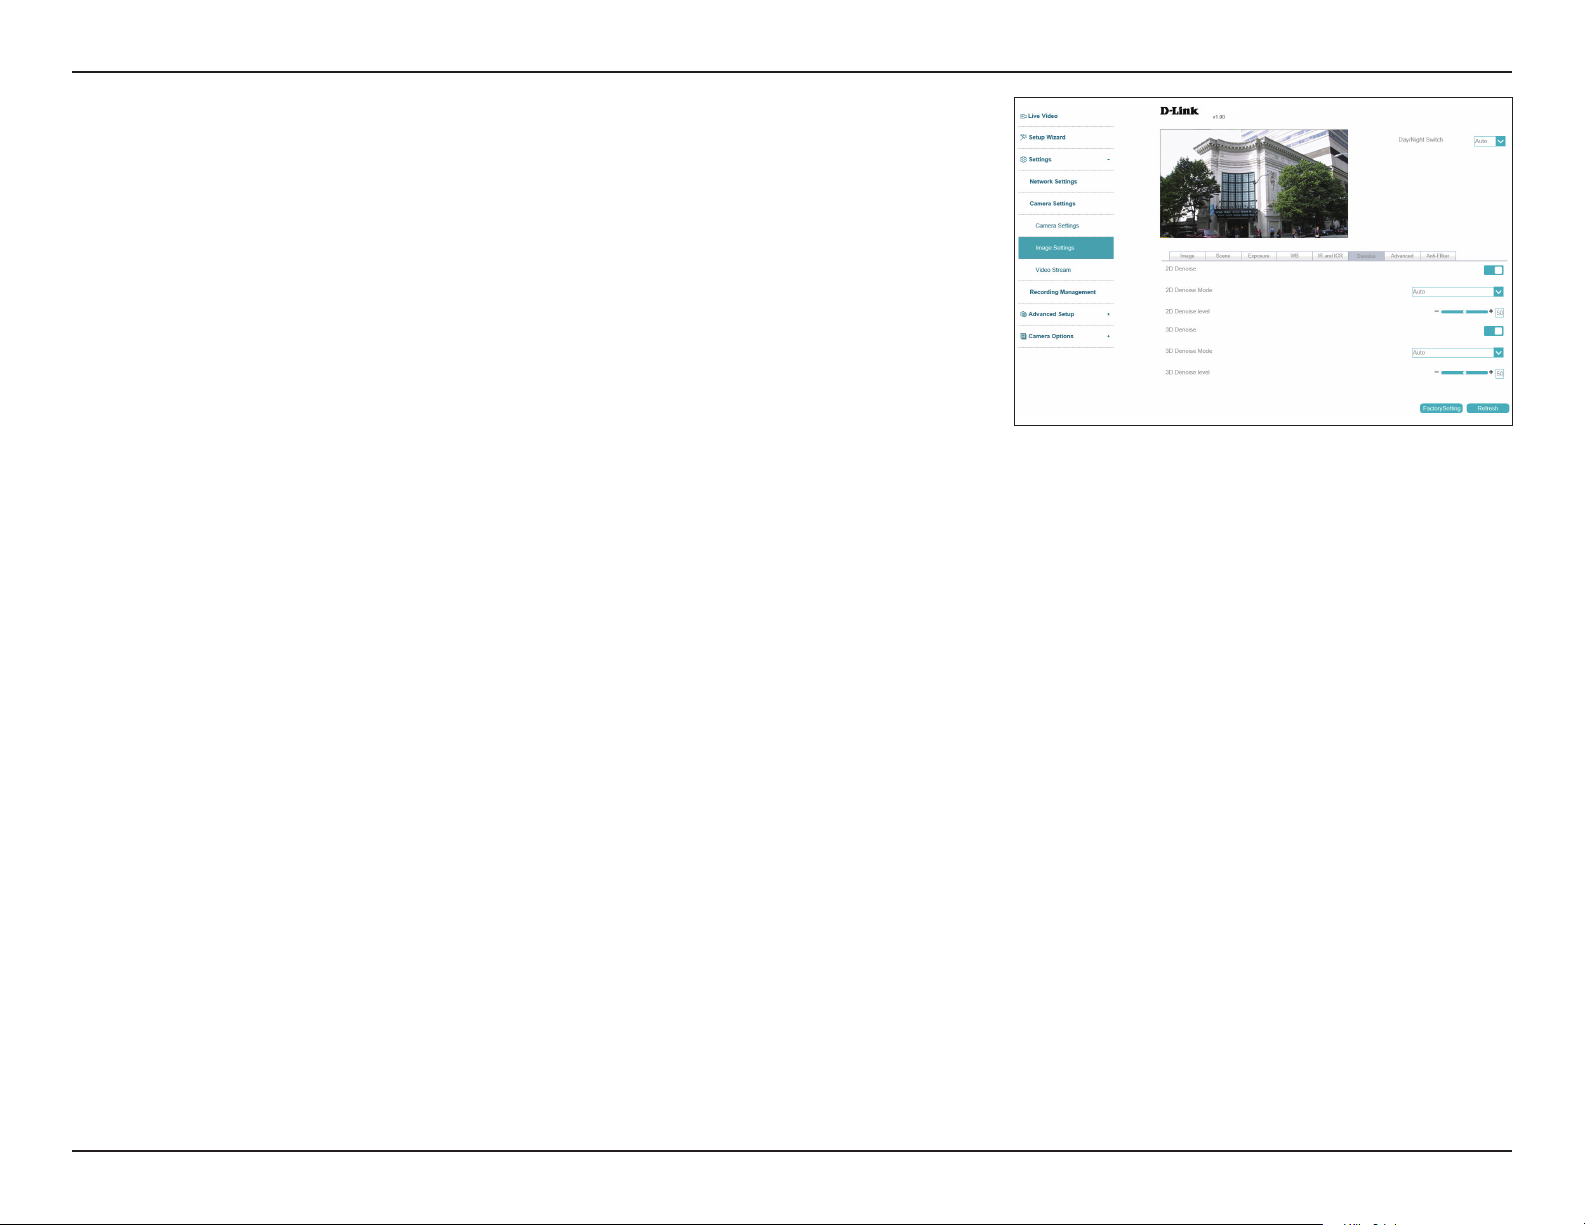
2D/3D Denoise
Mode
2D/3D Denoise
Level
Denoise
Toggle this to enable 2D/3D noise reduction for the image.
Choose whether to congure the denoise settings automatically or manually.
Congure the amount of noise reduction to apply. When noise reduction
is enabled in a low-light environment with quickly moving objects, an
afterimage trail may appear. To compensate for this, select a lower strength
level or disable this function.
DCS-4618EK
47D-Link Vigilance H.265 Outdoor Bullet Camera User Manual
Page 48
Section 3: Conguration
Advanced
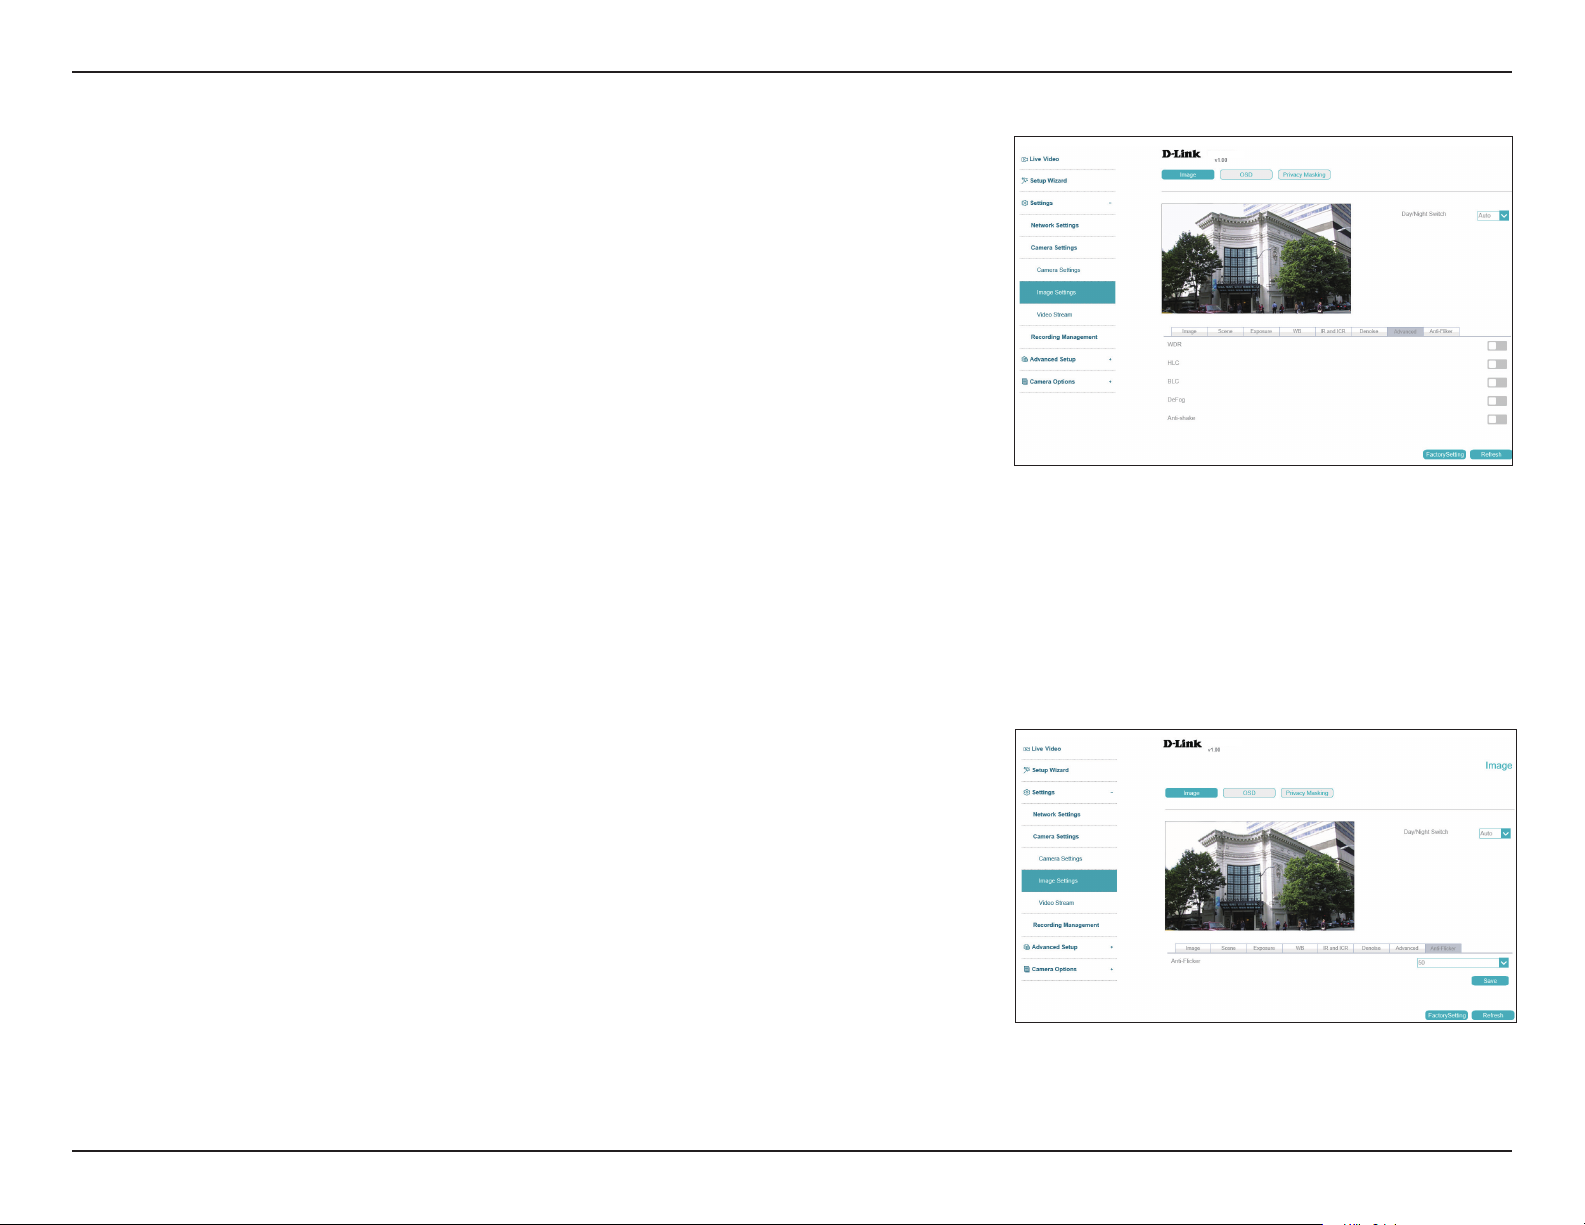
WDR
HLC
BLC
DeFog
Anti-shake
Wide Dynamic Range (WDR) helps improve exposure, making it easy to see
objects in very bright or dark areas. Specify a value to determine how much
WDR to apply, or select None.
Adjust for overexposure with highlight compensation (HLC). This will
detect strong light sources and compensate by reducing the brightness of
overexposed areas.
Adjust the overall lighting of the image with backlight compensation (BLC).
This will add a weighted region in the center of the display and automatically
adjust the exposure level.
Defog the image to improve the display quality in environments with poor
weather conditions, such as fog or smoke.
Enable this to compensate for minor shaking of the camera, making the
display smoother.
DCS-4618EK
Anti-Flicker
Anti-Flicker Select the frequency to use to avoid interference or distortion.
DCS-4618EK
48D-Link Vigilance H.265 Outdoor Bullet Camera User Manual
Page 49
Section 3: Conguration
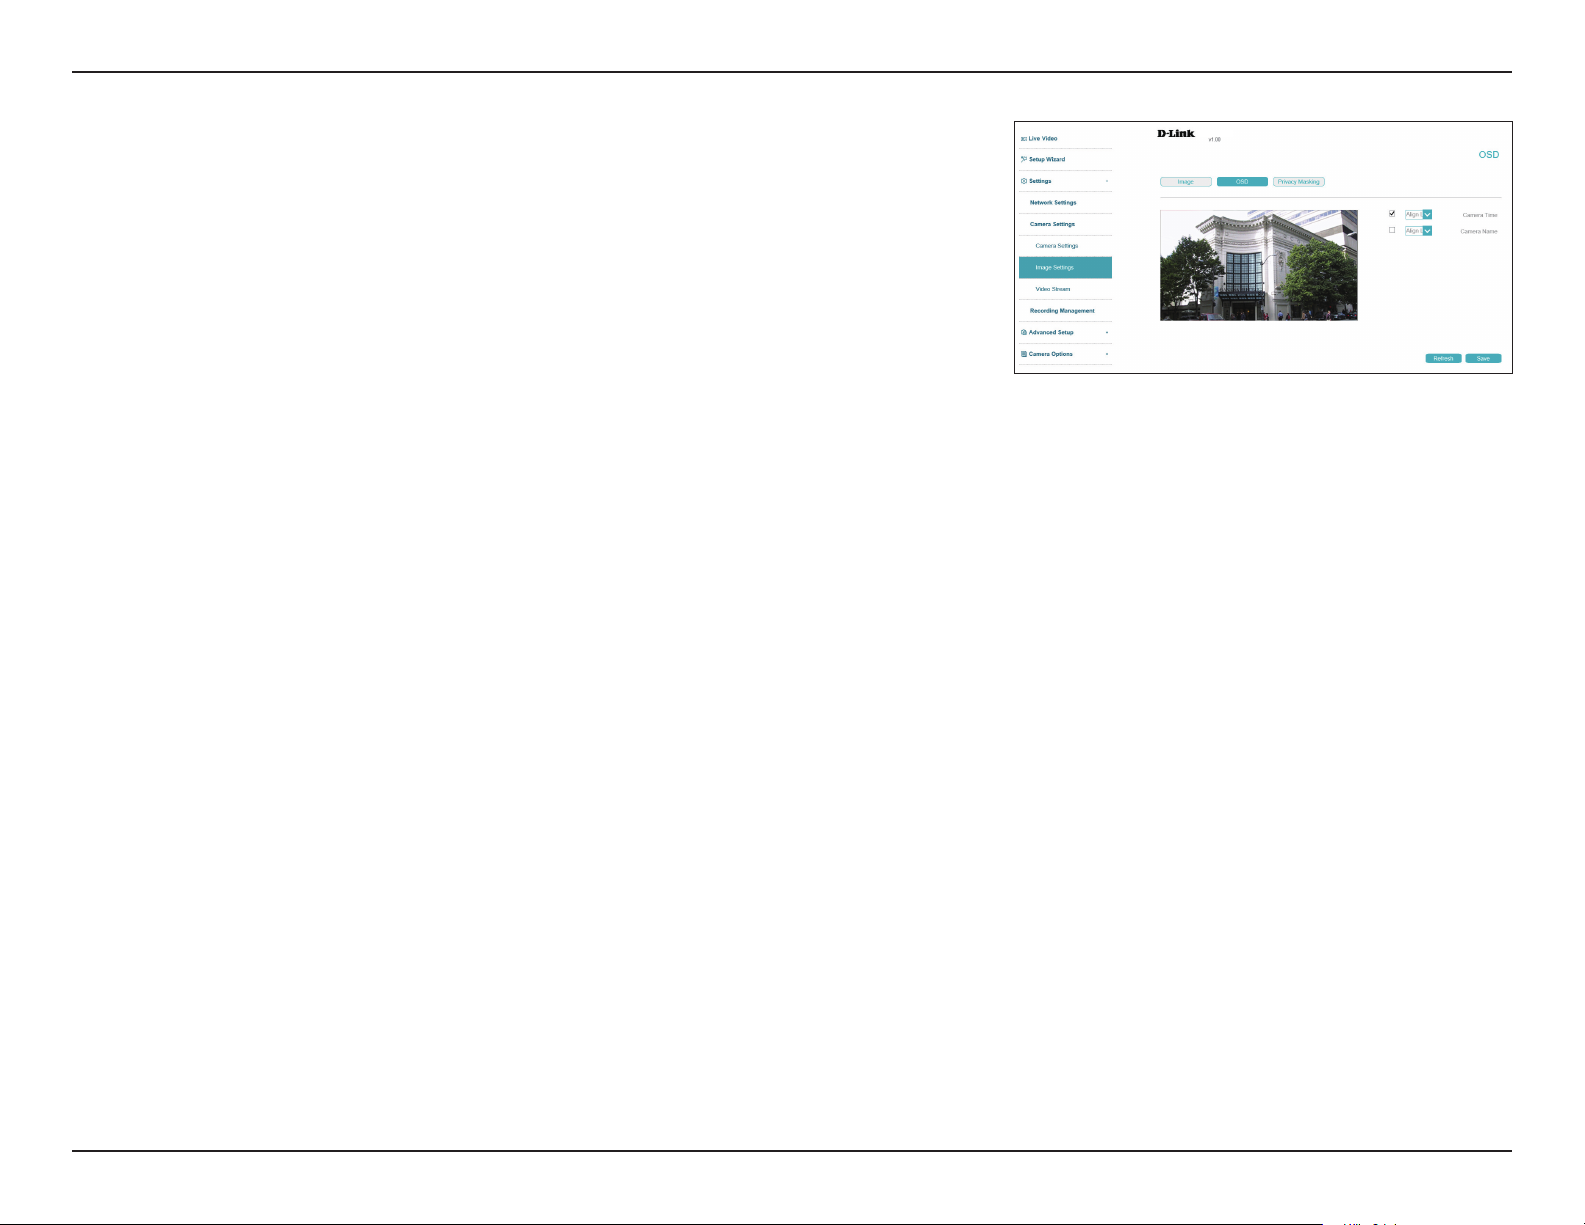
OSD
On this page you can congure the on-screen display (OSD) by using the drop-down menus to
change the alignment and choosing what information to display.
Camera Time
Camera Name
Display the camera time on the OSD.
Display the camera name on the OSD.
DCS-4618EK
49D-Link Vigilance H.265 Outdoor Bullet Camera User Manual
Page 50
Section 3: Conguration
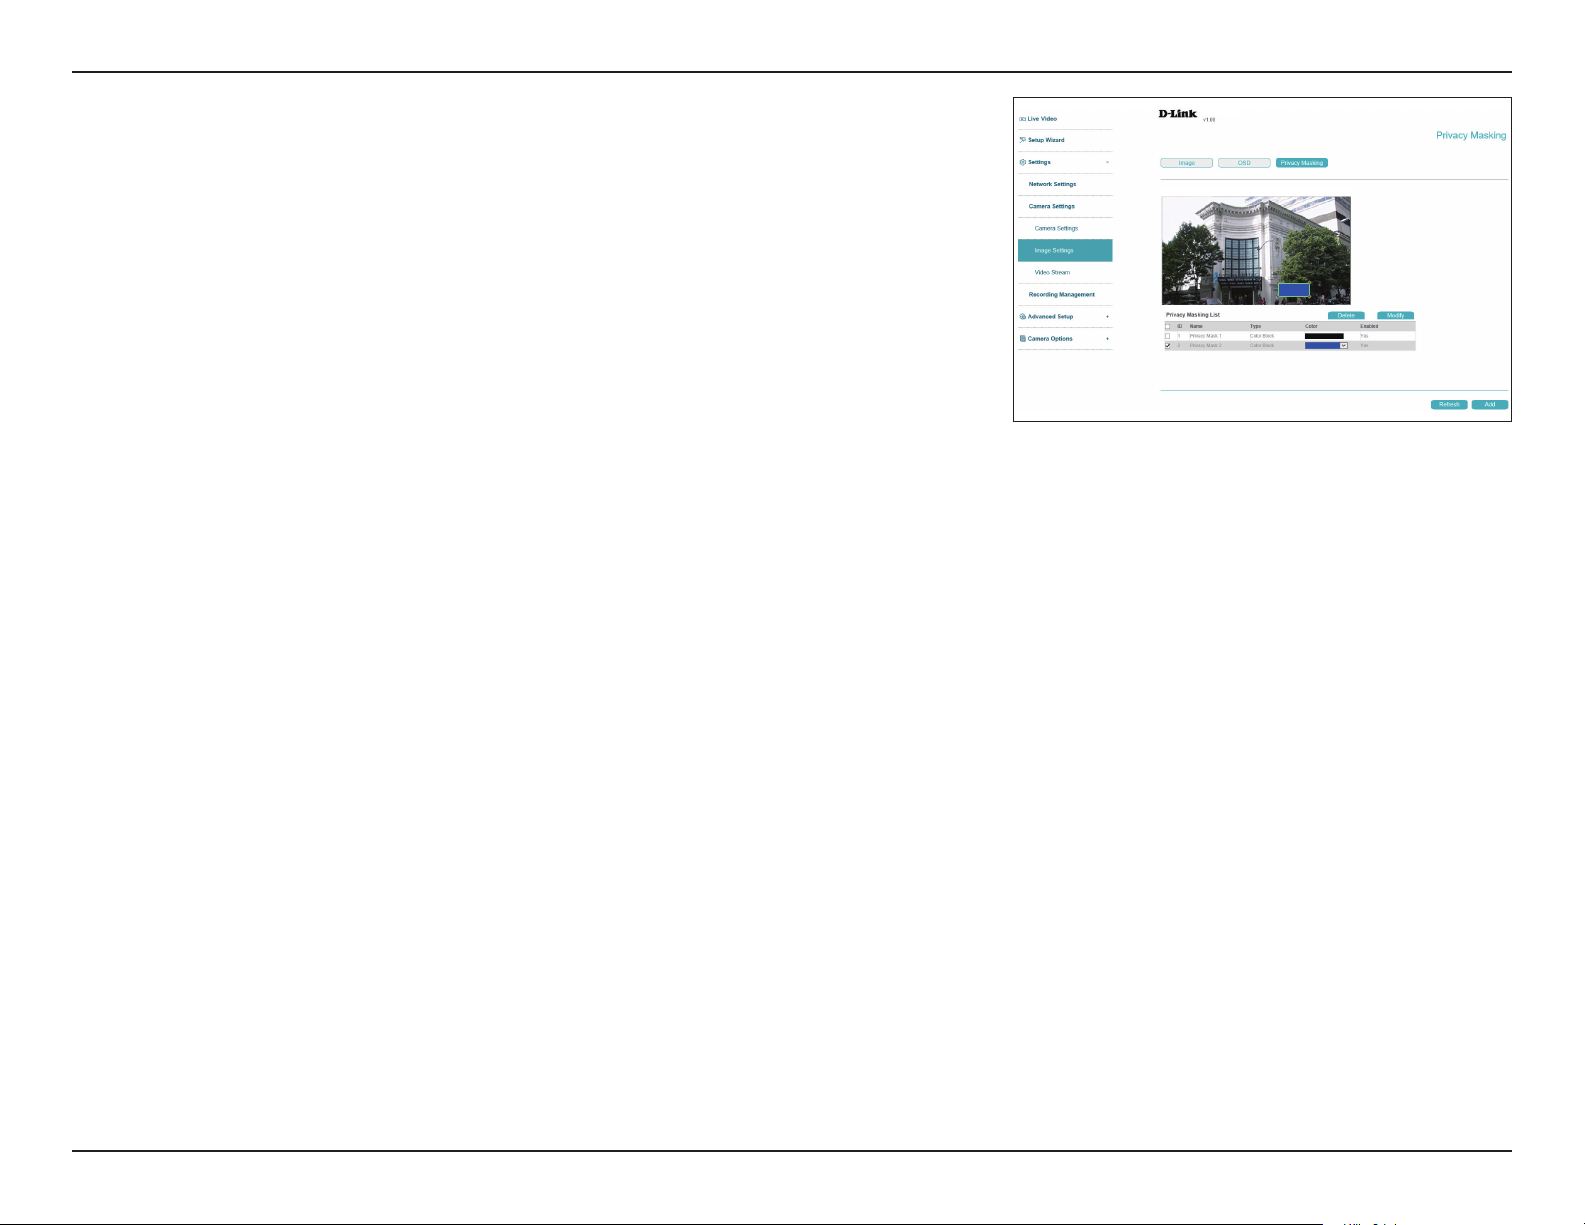
Privacy Masking
On this page you can draw a privacy mask on the screen. This area of the camera's display will
not be visible in the live video or video playback and cannot be recorded. In the list at the
bottom, you can select an existing mask and either Delete or Modify it.
To create a new privacy mask, select an area of the live video display and click Add.
To change the name or color of the privacy mask, click the checkbox next to it under Privacy
Masking List at the bottom of the screen and click Modify.
To clear the mask area, click the checkbox next to the desired privacy mask and click Delete.
The name and color of the mask area is changeable.
DCS-4618EK
50D-Link Vigilance H.265 Outdoor Bullet Camera User Manual
Page 51
Section 3: Conguration
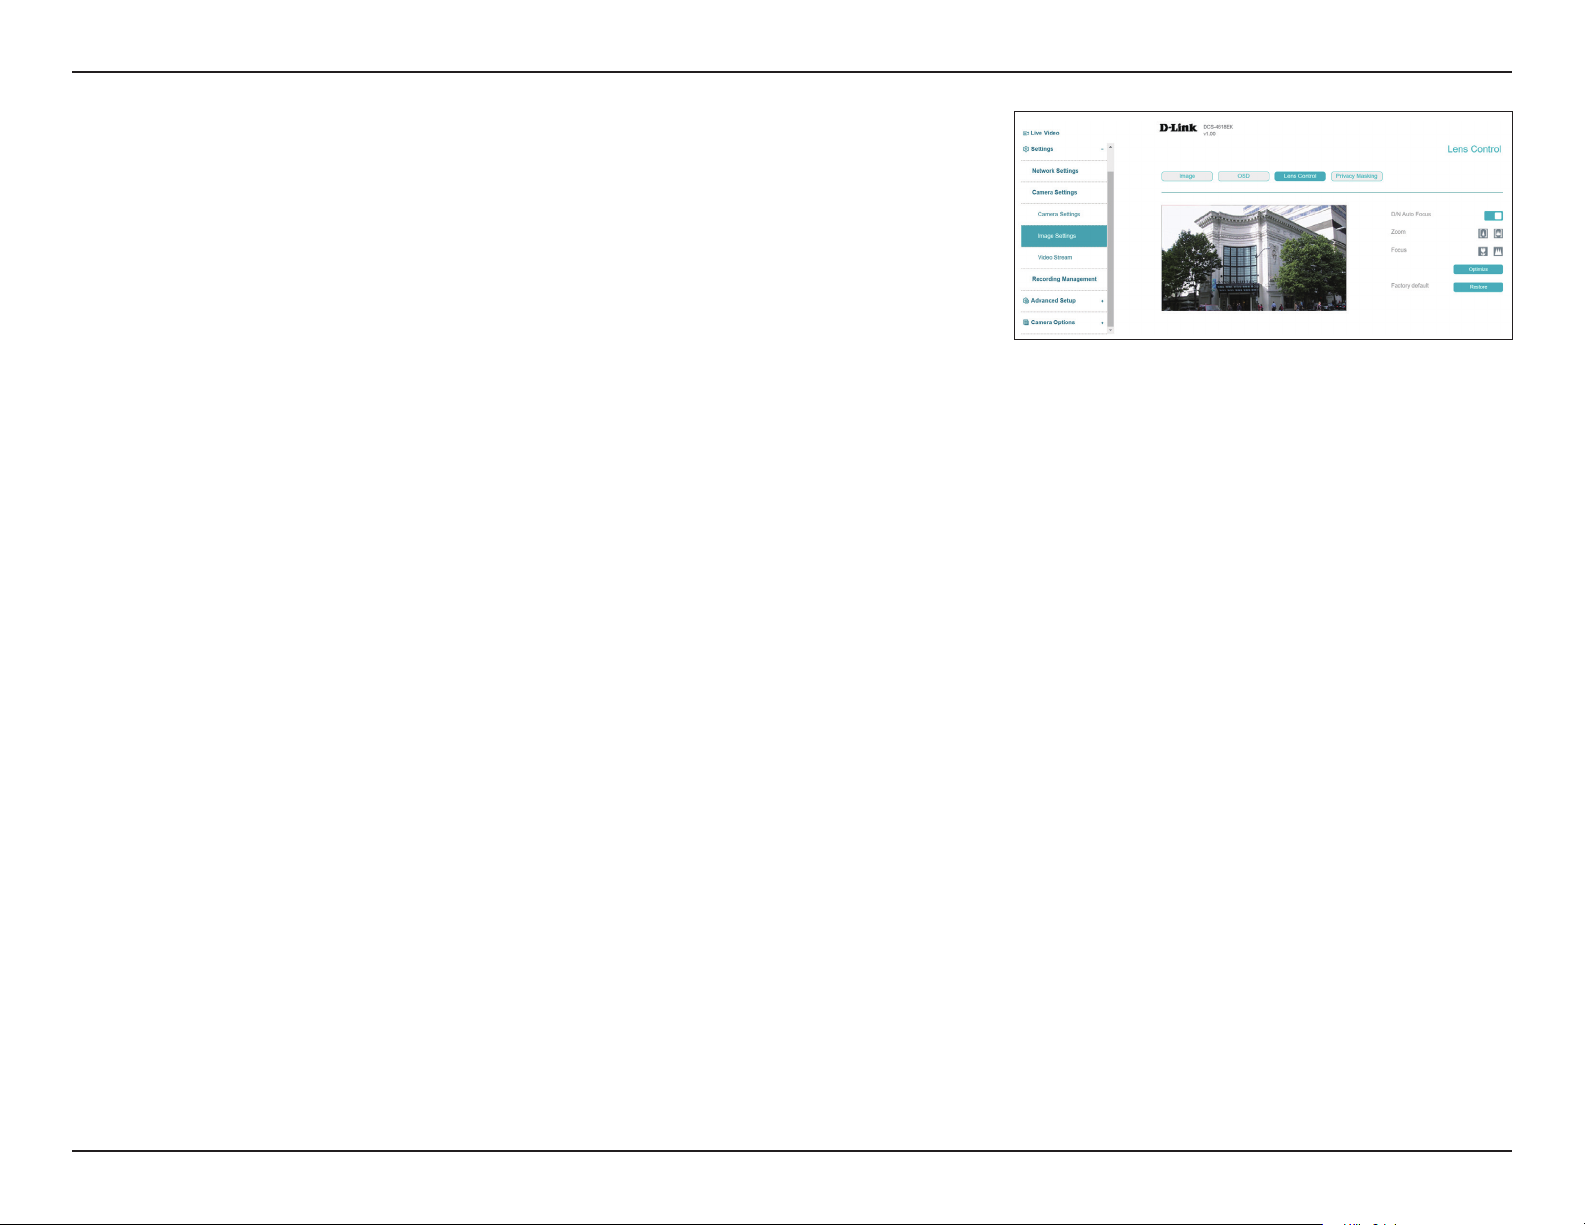
Lens Control ( with the DCS-4618EK only)
D/N Auto Focus
Zoom
Focus
Optimiz
Factory default
Select this option to enable this feature. The camera will automatically adjust
the focus according to daytime and nighttime conditions.
Press and hold the Zoom in and Zoom out icon to adjust the camera zoom.
Press and hold the Near Focus and Far Focus icon to adjust the camera
focus.
Click the Optimize button to automatically adjust the focus.
Click Restore button to restore to factory default settings
51D-Link Vigilance H.265 Outdoor Bullet Camera User Manual
Page 52
Section 3: Conguration
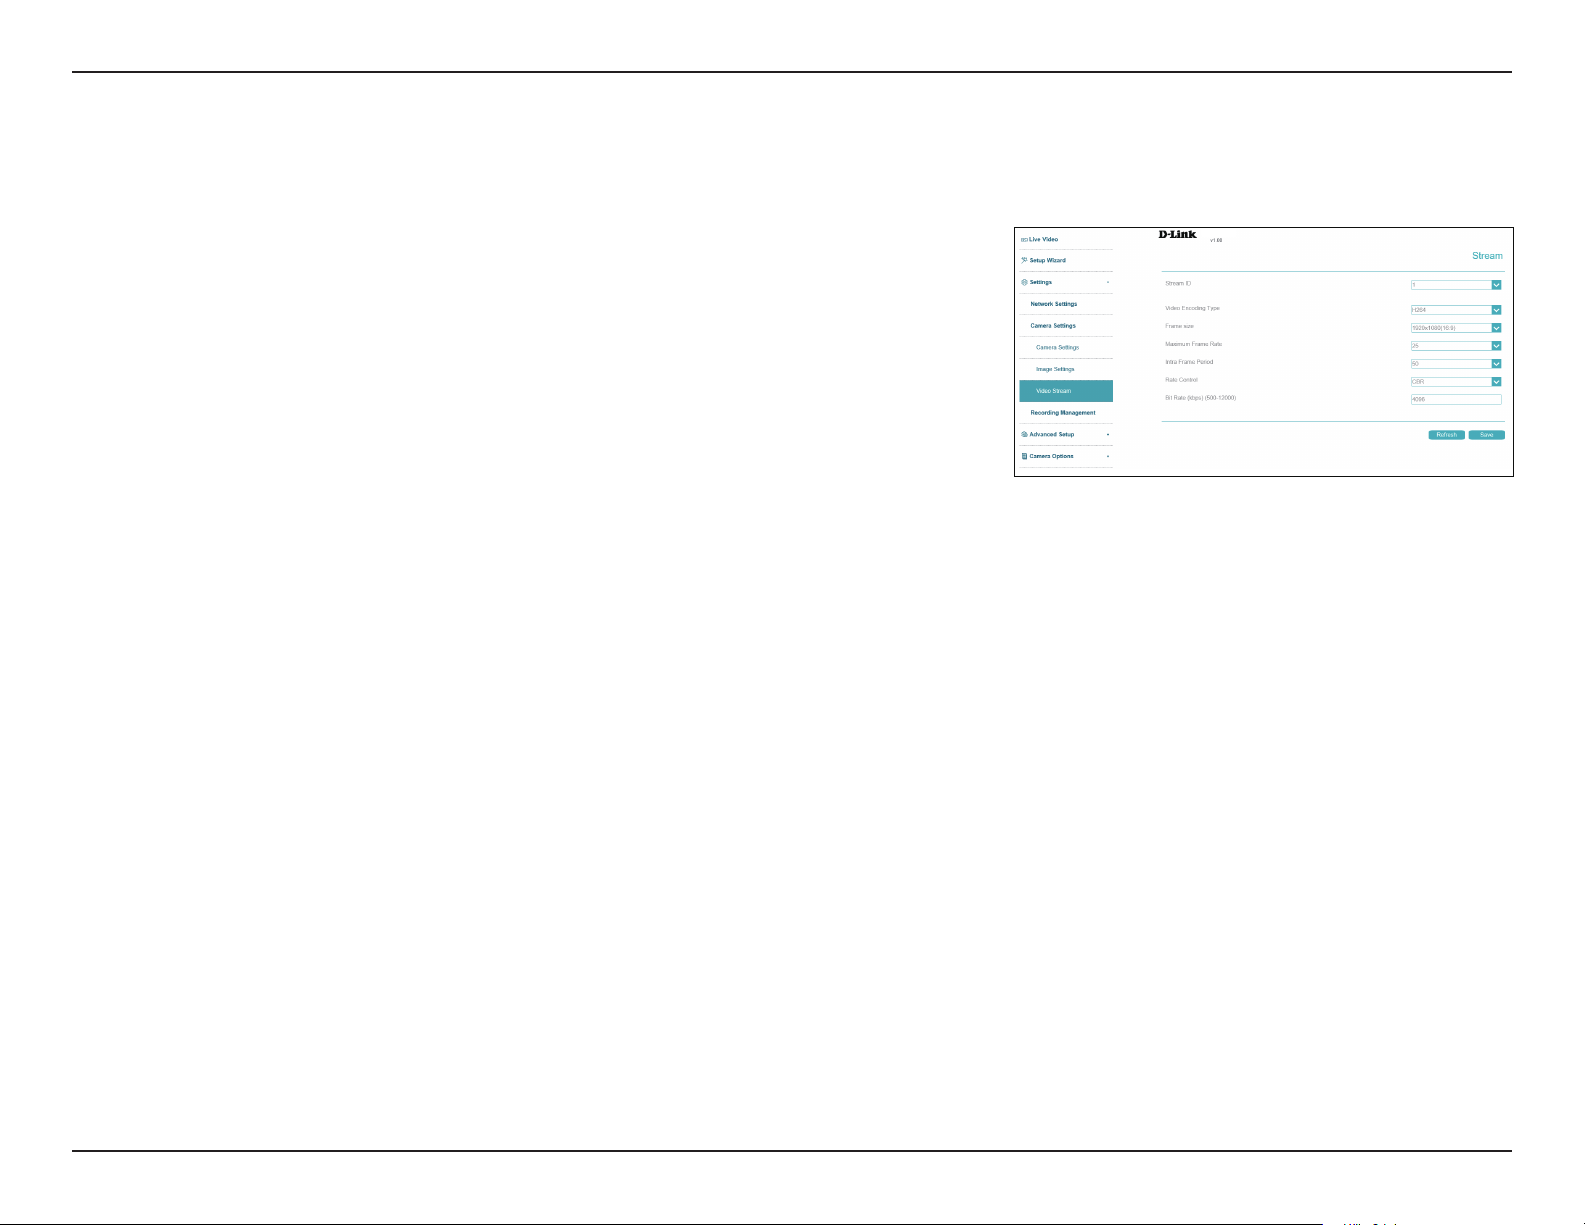
Video Stream
You may congure up to 2 video proles with dierent settings for your camera. This allows you to set dierent settings for recording video and for
viewing your video remotely, for example. After making any changes, click the Save button to save your changes.
Stream ID
Video
Encoding Type
Frame Size
Max. Frame
Rate
Intra Frame
Period
Rate Control
Bit Rate
Select the stream ID to congure.
Select the video encoding type (H265, H264, or MJPEG).
Select the frame size and aspect ratio.
Set the max. frame rate.
Select the interval (in frames) at which the camera should record a complete
image frame. A shorter interval is more resource-intensive than a longer one.
Select the bitrate type (i.e. CBR or VBR).
• VBR: Variable Bit Rate will automatically change the bit rate based on the
camera video's complexity. If the Mode is set to MJPEG, this will be the
only choice available
• CBR: Constant Bit Rate will use a xed bit rate that you set.
Enter the bitrate in kbps.
DCS-4618EK
52D-Link Vigilance H.265 Outdoor Bullet Camera User Manual
Page 53
Section 3: Conguration
Recording Management
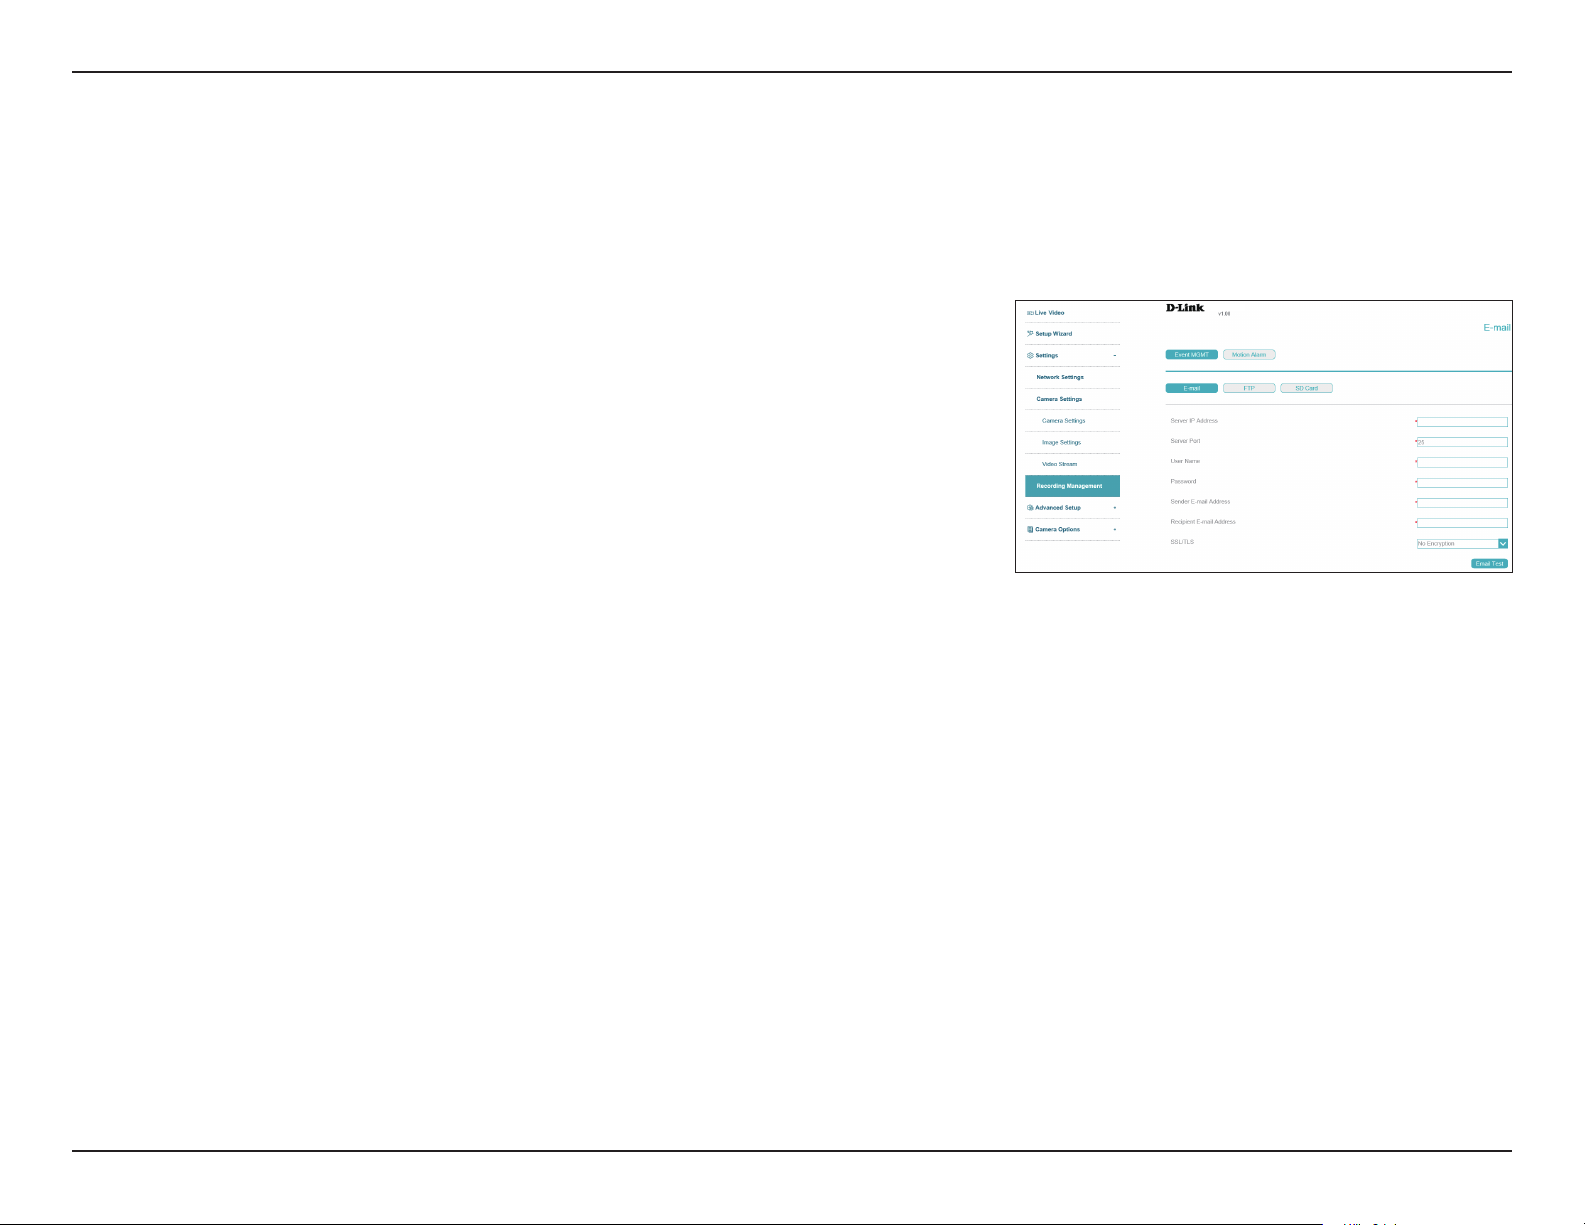
Your camera has a comprehensive event system that lets you congure the camera to perform certain actions when an event occurs. For
example, when motion is detected, you can have snapshots sent to an e-mail address. You can also congure the camera to take regular video
recordings according to a schedule you dene.
Server Address
Server Port
User Name
Password
Sender E-mail
Address
Recipient
E-mail Address
SSL/TLS
Event Management / E-mail
DCS-4618EK
Enter the address of the email server.
Enter the port to use to connect to the email server.
Enter the username associated with the email account.
Enter the password associated with the above username.
Enter the email address that the email should be sent from.
Enter the recipients to send the snapshot to.
Select the protocol to use to secure your email.
53D-Link Vigilance H.265 Outdoor Bullet Camera User Manual
Page 54
Section 3: Conguration
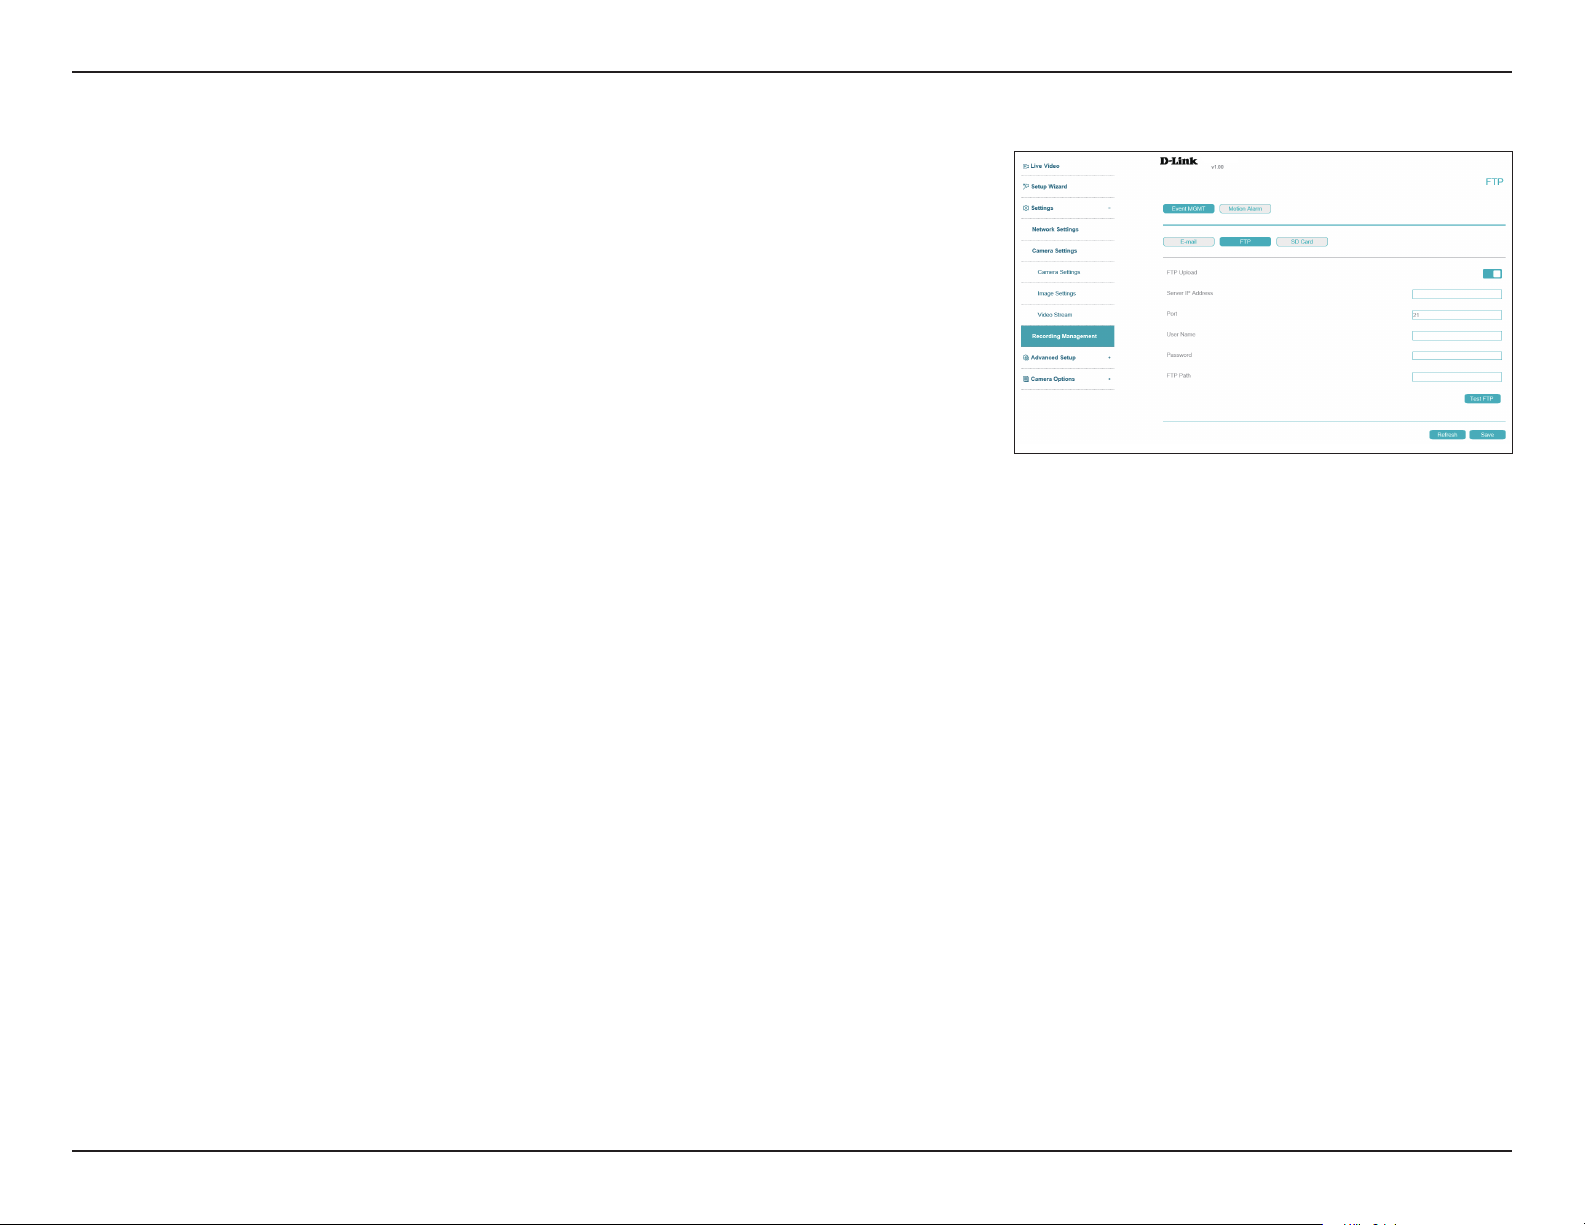
Event Management / FTP
FTP Upload
Server IP
Address
Port
User Name
Password
FTP Path
Check this to upload recordings via FTP.
DCS-4618EK
Enter the IP address of the FTP server you want to use.
Enter the port to use to connect to the server.
Enter the username for the FTP server.
Enter the password associated with the username above.
Enter the path to the directory where you would like your snapshots to be
stored.
54D-Link Vigilance H.265 Outdoor Bullet Camera User Manual
Page 55
Section 3: Conguration
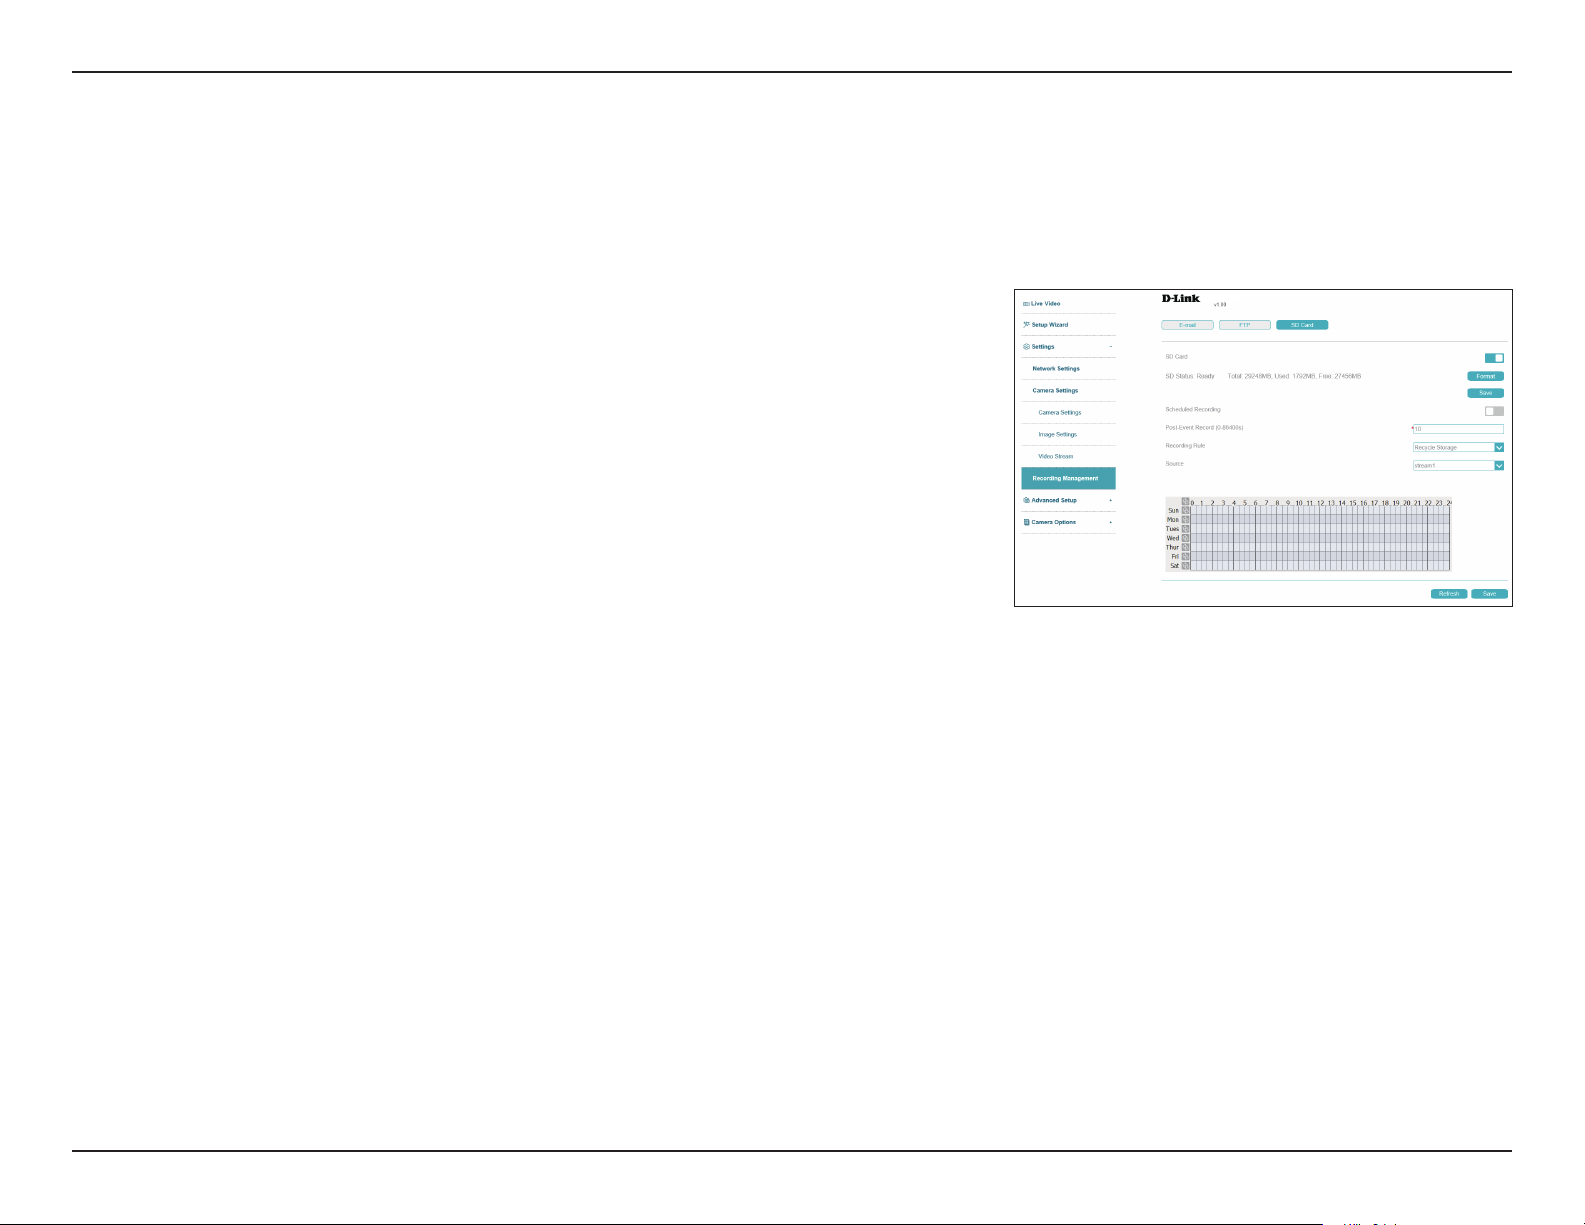
Event Management / SD Card
On this page you can congure your camera to record video to an inserted microSD card. Click Format to format the SD card
(note that this will overwrite all current data on the card). Click Schedule Record to only save footage at set times. Click the blue
square at the bottom of the screen and then click the schedule to indicate when you would like recordings to be stored. Click
Save to save your recordings from the microSD card.
Schedule
Record
Post-Event
Record
Record Rule
Stream Name
Scheduled
Motion
Detection
Toggle this to enable scheduled recording.
This setting allows you to set the length of time to delay before taking a
post-event snapshot. You can enter a value between 1 and 86400 seconds.
Indicate whether the camera should continuously record and overwrite old
data (Cycle Store) or save video for a set number of days (Save Days). If this
option is selected, enter the number of days in the eld below.
Select the stream to record.
Click the schedule at the bottom to specify a schedule to enable motion
detection.
DCS-4618EK
55D-Link Vigilance H.265 Outdoor Bullet Camera User Manual
Page 56
Section 3: Conguration
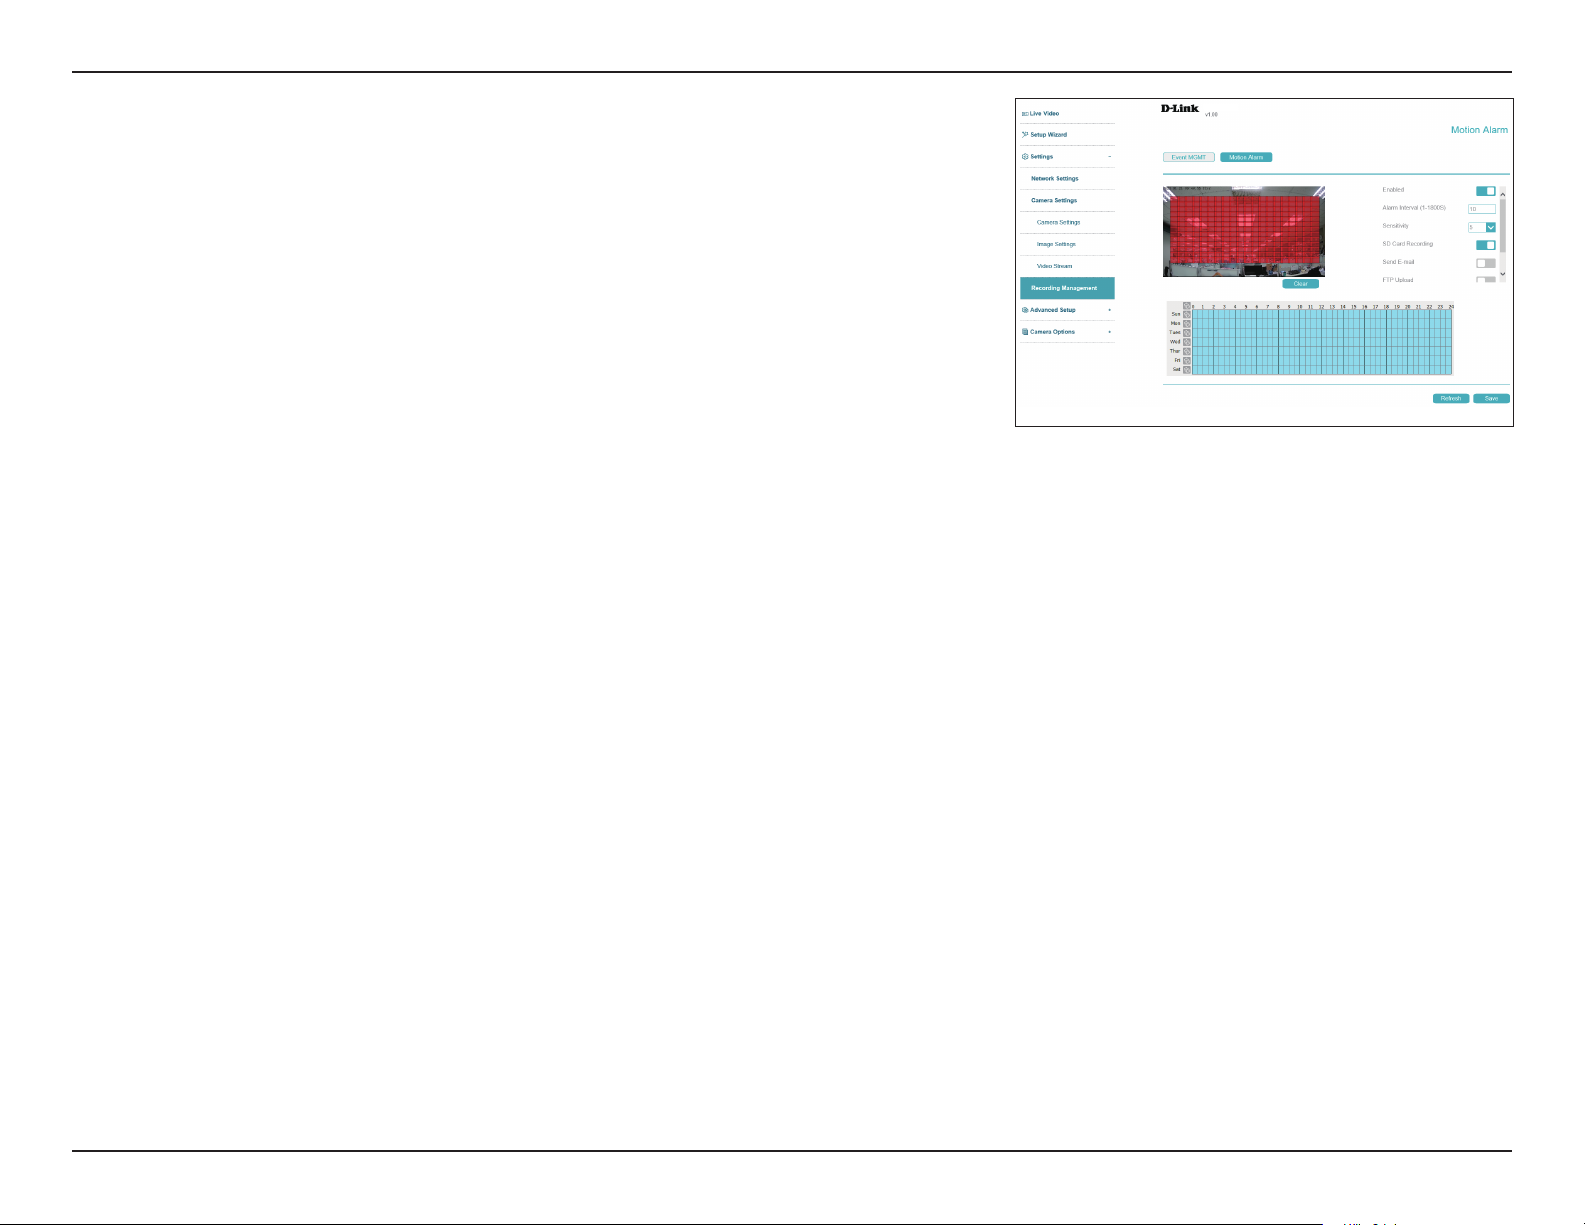
Enable
Alarm Interval
Sensitivity
SD Card/Email/
FTP
Show motion
detection on
NVR
Motion Alarm
On this page you can congure an alarm to trigger when motion is detected
in the camera's display. Click and drag on the screen to determine the area
to monitor for motion.
Click this to activate the motion detection alarm.
Set the alarm interval in seconds.
Set the motion detection sensitivity. A higher number indicates greater
sensitivity.
Toggle these to send a snapshot via email or FTP or record video on the
inserted microSD card. Click the blue square at the bottom of the screen for
schedule setting.
Toggle this to display motion detection alarms on the connected NVR.
Click the blue square on the bottom of the screen to schedule the motion
alarm.
DCS-4618EK
56D-Link Vigilance H.265 Outdoor Bullet Camera User Manual
Page 57
Section 3: Conguration
Advanced Setup
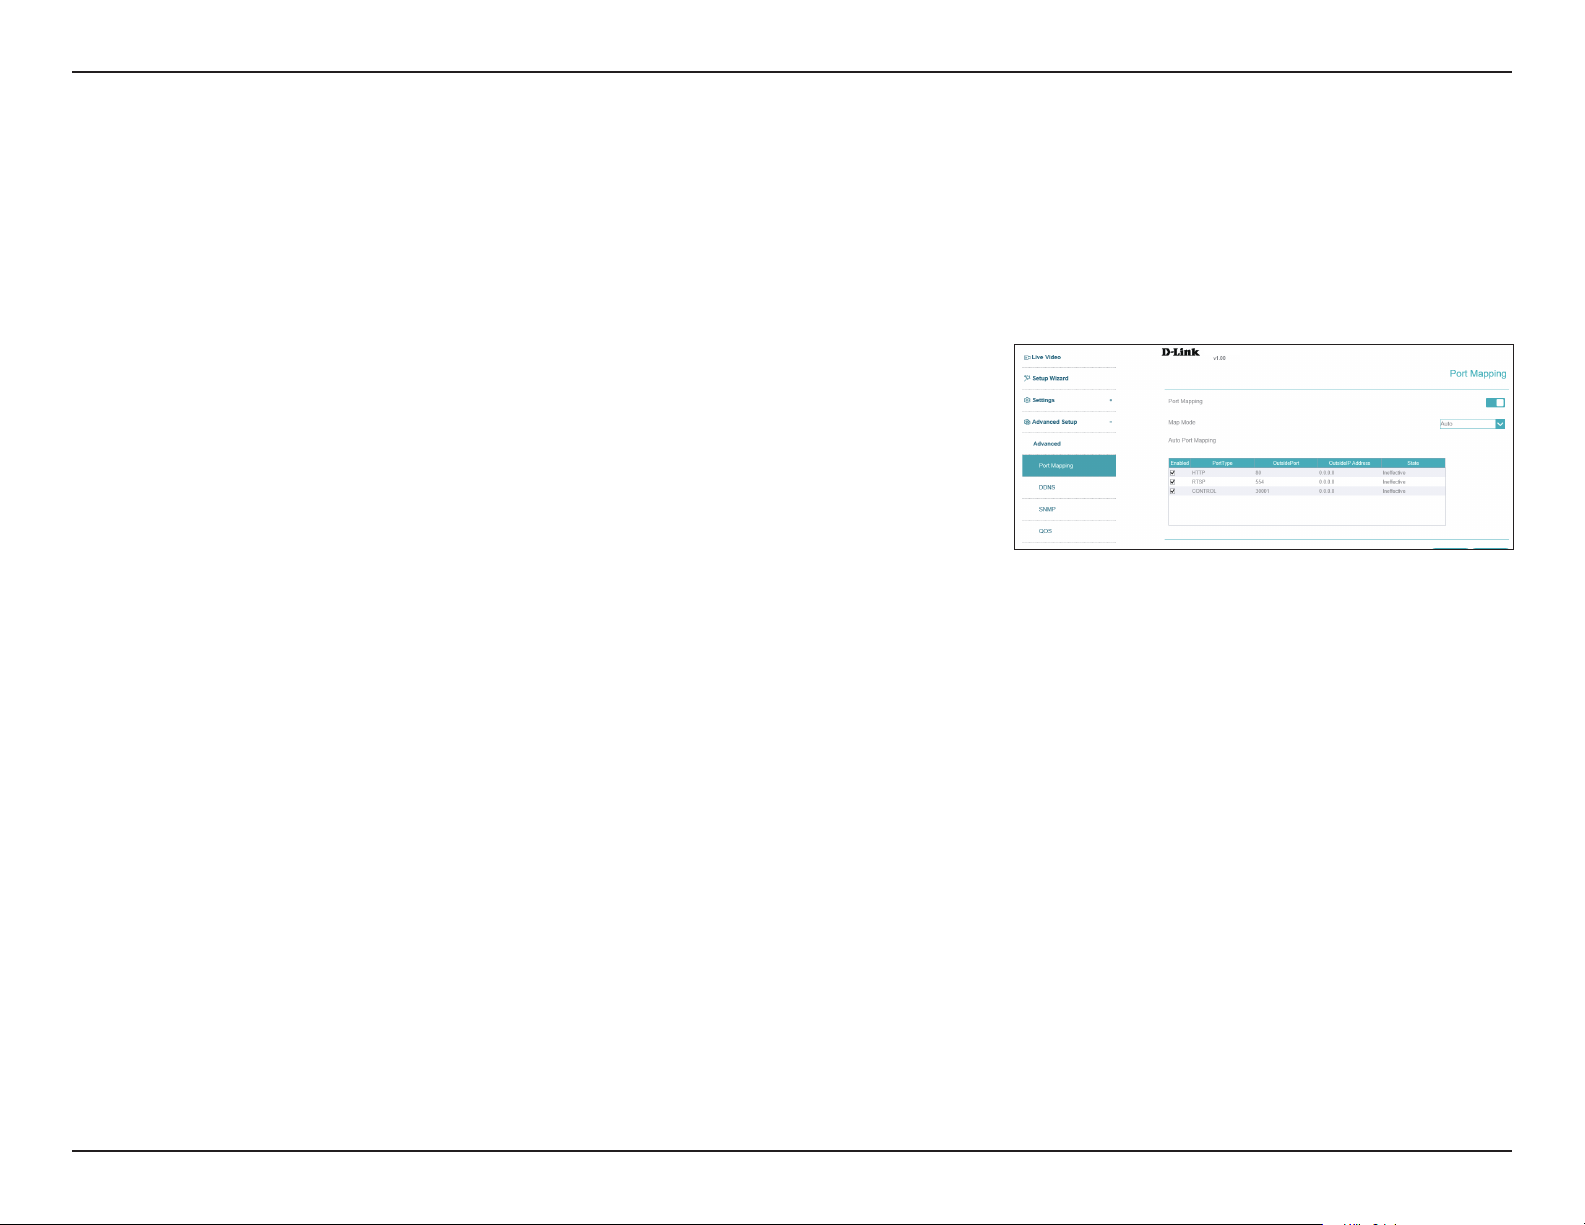
Advanced
Port mapping
On this page you can congure your camera to use UPnP to automatically set up port forwarding on your router. After making any changes, click
the Save button.
Port
Forwarding
Map Mode
Use this setting to congure which port to use for forwarding.
Select whether to congure port forwarding automatically or manually.
If Manual is selected, in the box below, enter the desired ports for each
protocol.
DCS-4618EK
57D-Link Vigilance H.265 Outdoor Bullet Camera User Manual
Page 58
Section 3: Conguration
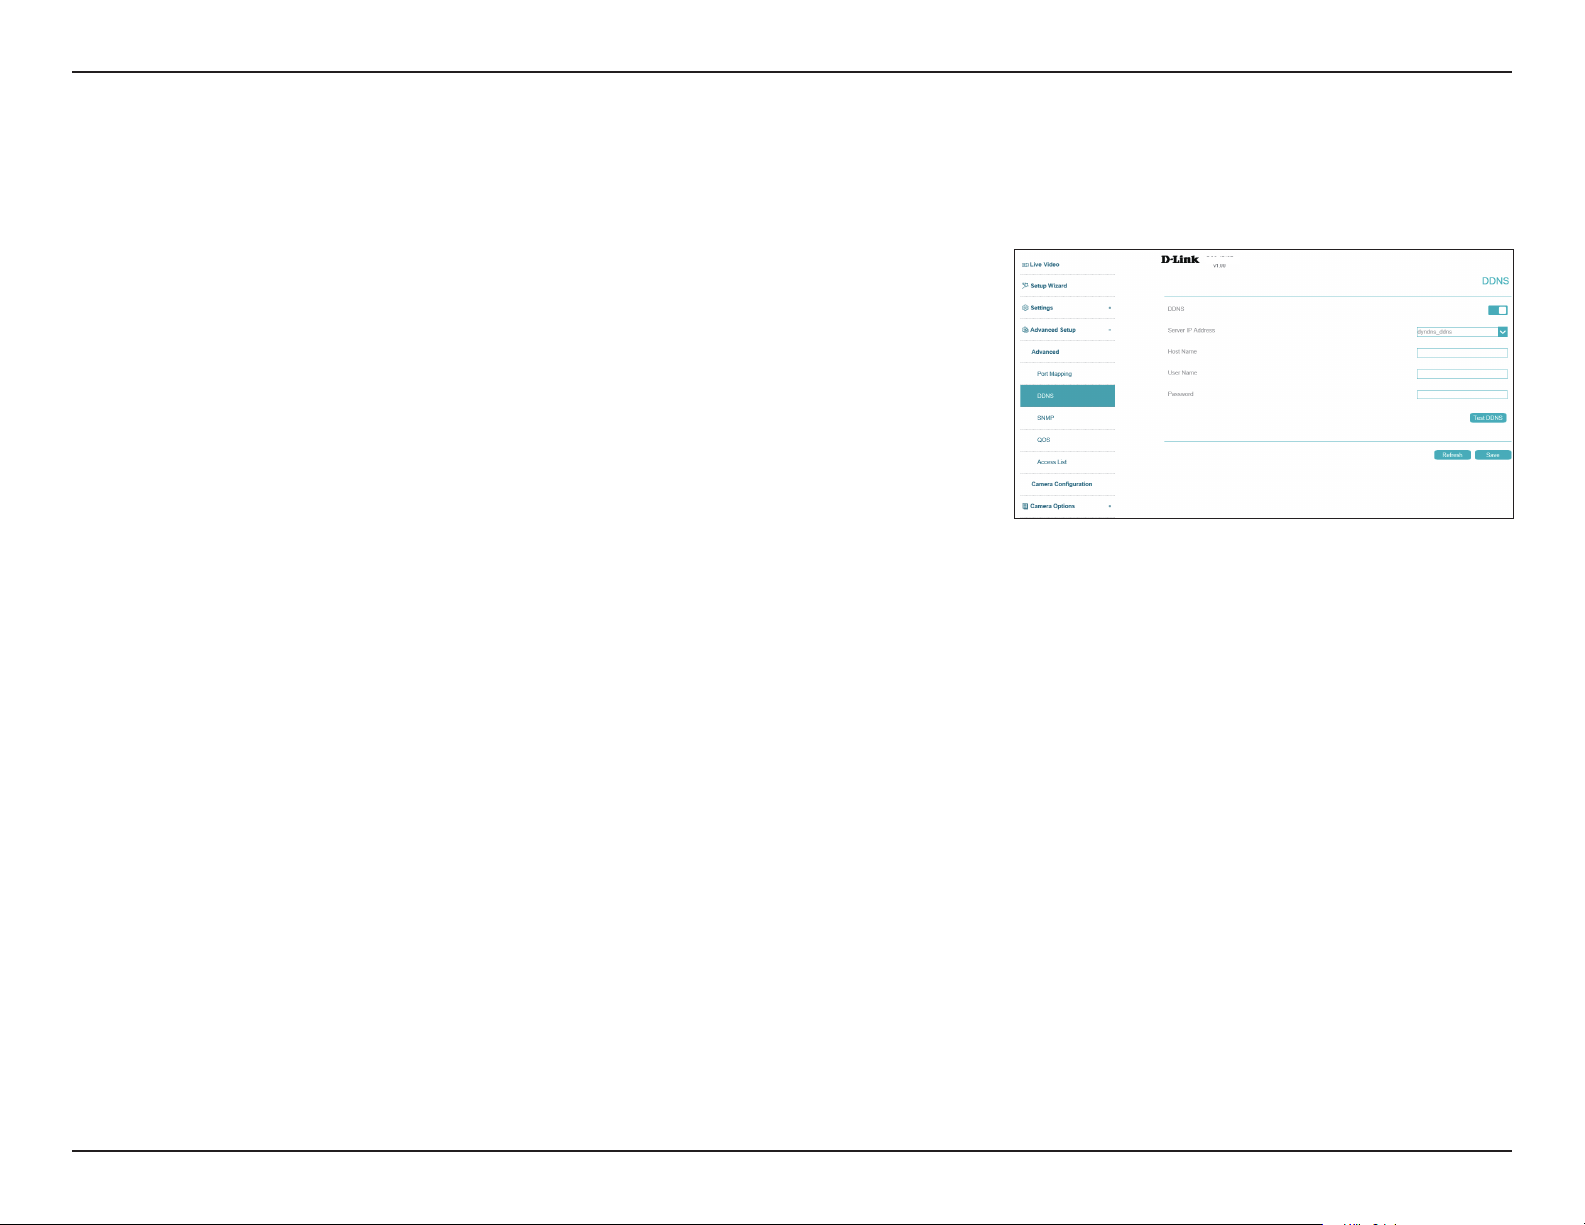
DDNS
DDNS allows you to compensate for changing IP addresses by having a URL that automatically points to the current IP address of the camera. To
do this, you will need to have an account with one of the DDNS services listed in the drop-down box on this page. After making any changes, click
the Save button.
DDNS
Server Address
Host Name
User Name
Password
Click here to enable DDNS.
Select your DDNS server from the drop-down menu.
Enter the host name of the DDNS service.
Enter the username or email address used to connect to the DDNS server.
Enter the password used to connect to the DDNS service.
DCS-4618EK
58D-Link Vigilance H.265 Outdoor Bullet Camera User Manual
Page 59
Section 3: Conguration
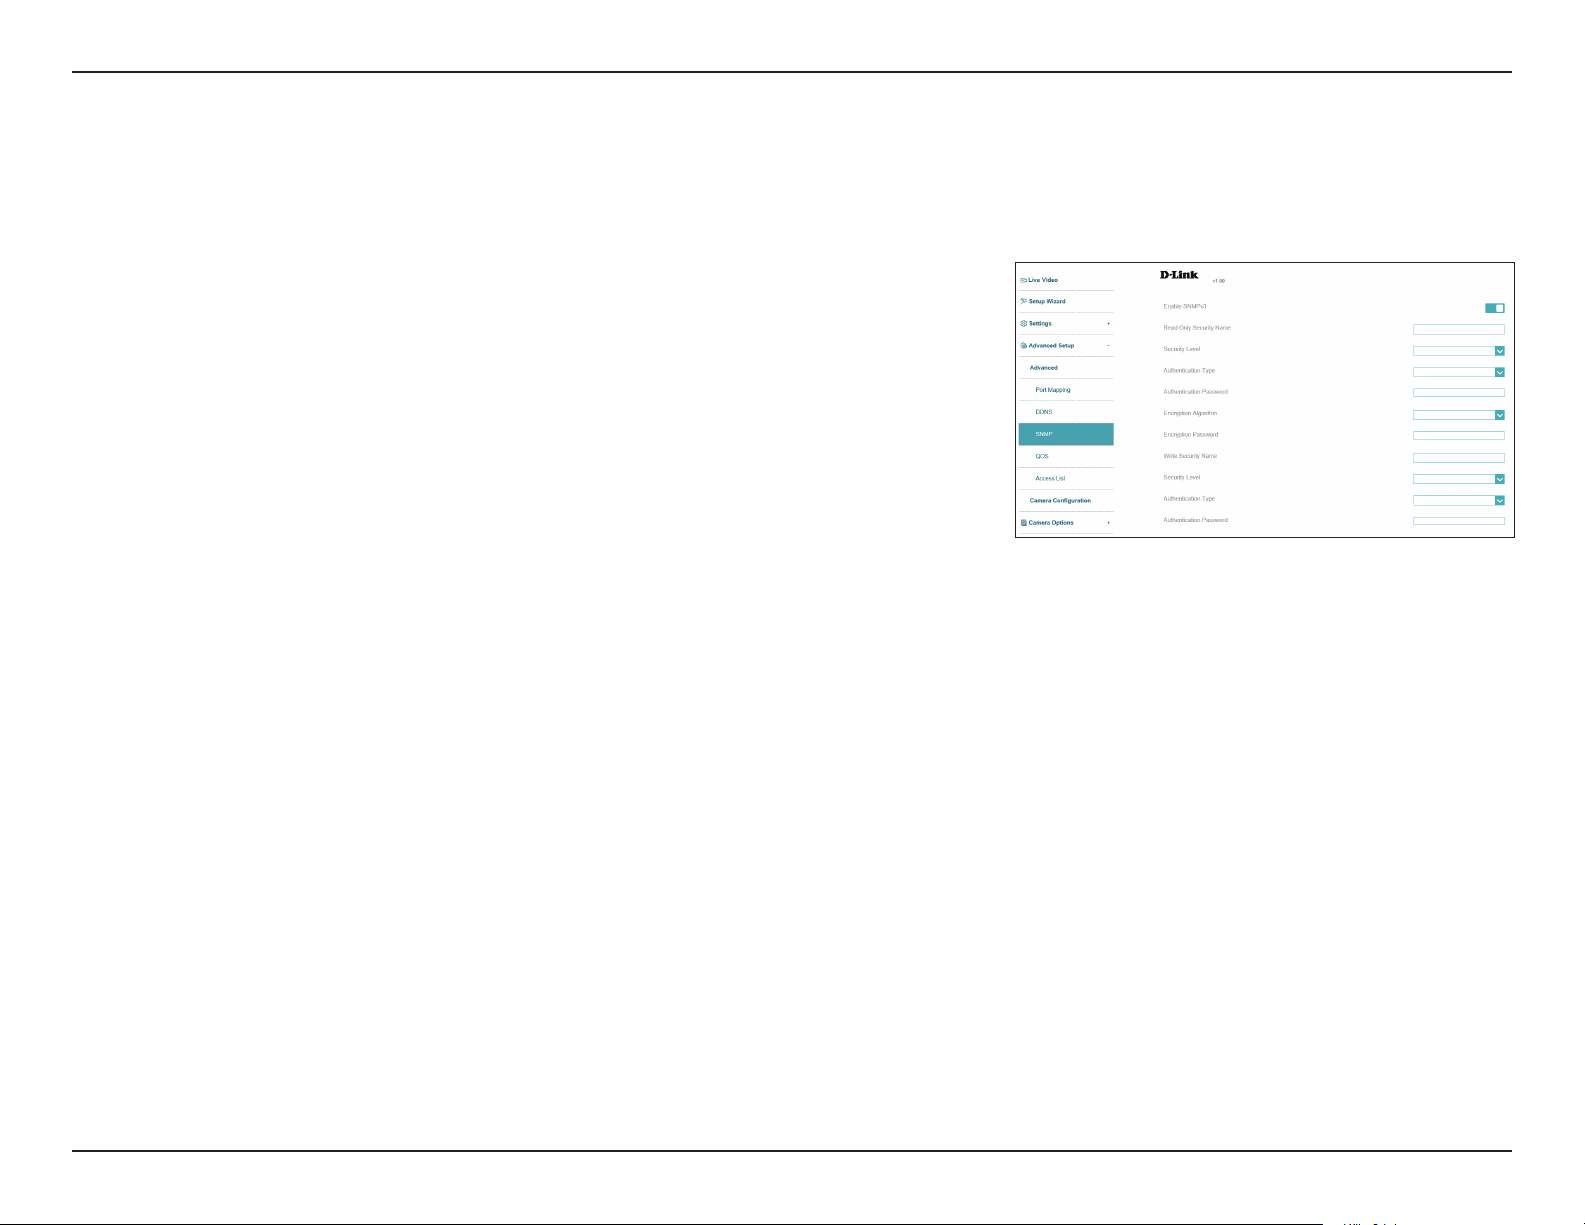
SNMP
Here you can set the Simple Network Management Protocol (SNMP) settings for the camera. After making any changes, click the Save button.
Enable
SNMPv1/v2c
Read/Write
Community
Read-Only
Community
Trap Address
Trap Port
Trap
Community
Enable this option to allow for SNMPv1 and SNMPv2c management of the
camera.
Enter a name for the R/W community of your SNMP server.
Enter a name for the read-only community of your SNMP server.
Enter the IP address where SNMP traps should be sent.
Enter port of the IP address to which the trap messages will be sent.
Enter the SNMP trap community name.
DCS-4618EK
59D-Link Vigilance H.265 Outdoor Bullet Camera User Manual
Page 60
Section 3: Conguration
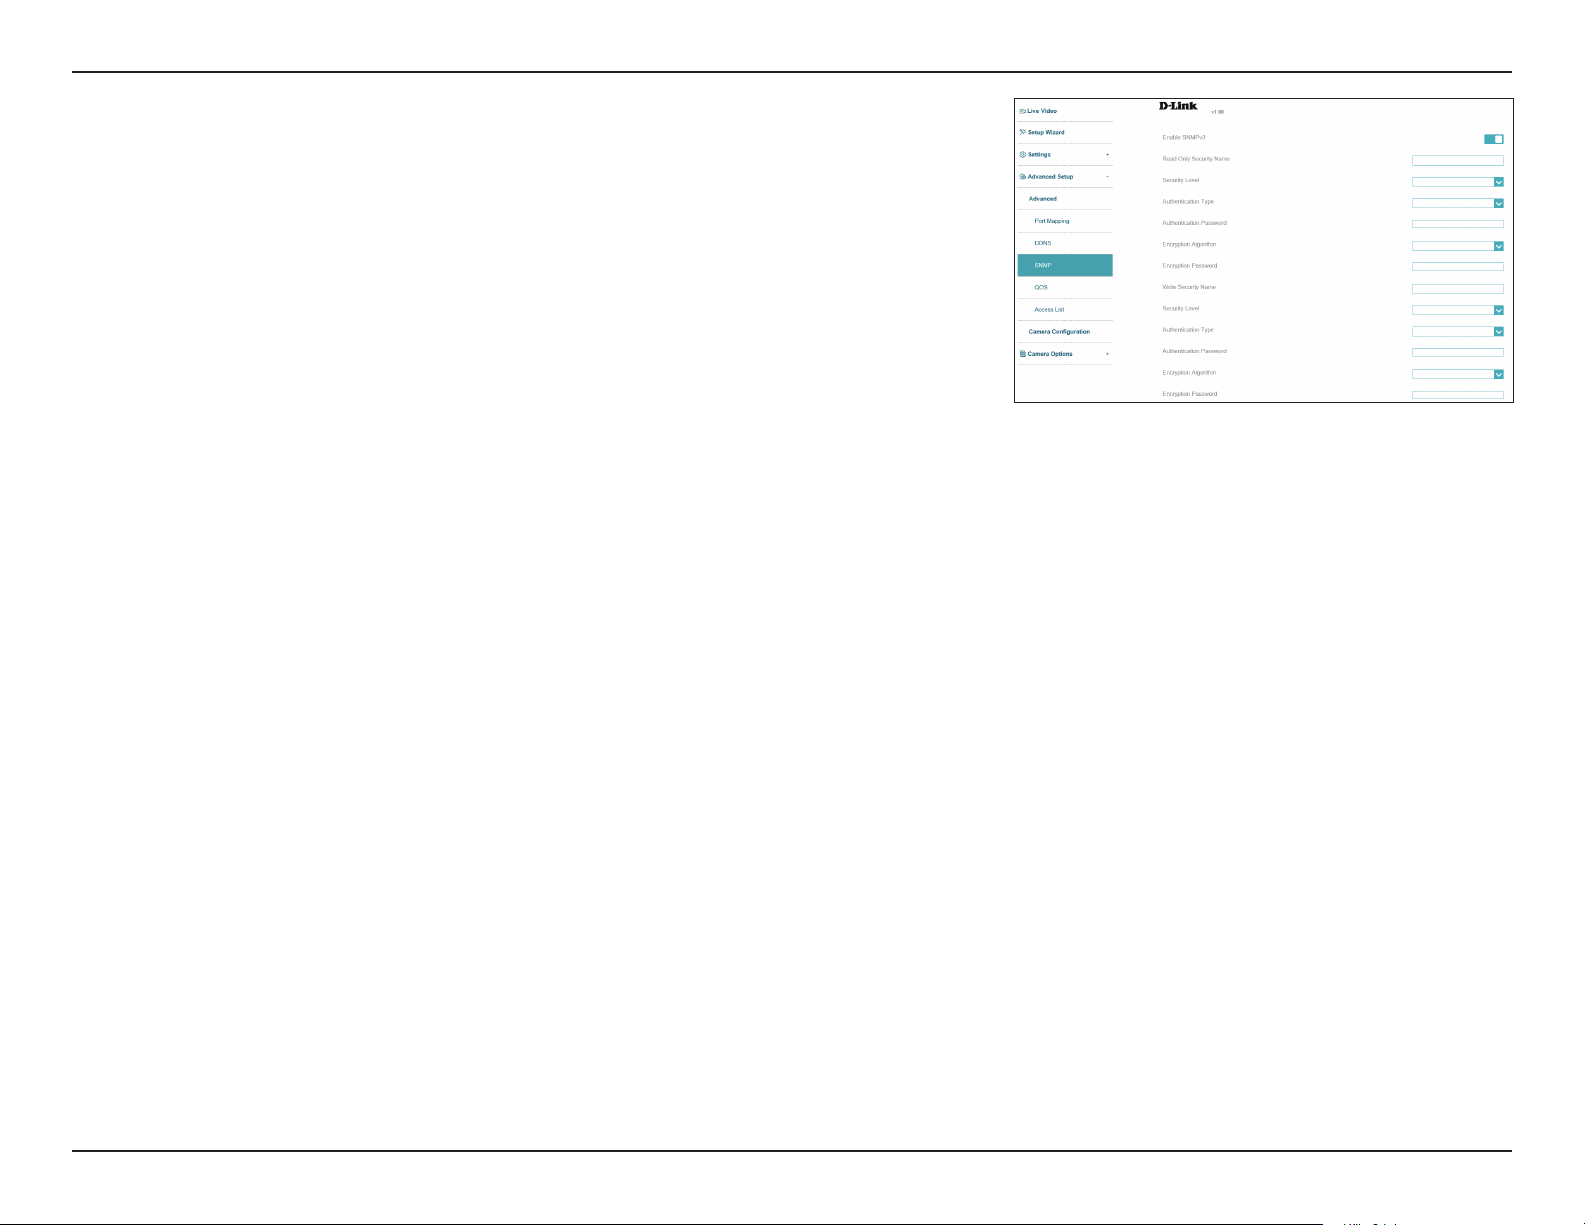
Enable
SNMPv3
Read Only
Security Name
Security Level
Authentication
Type
Authentication
Password
Encryption
Algorithm
Encryption
Password
Click this to enable SNMPv3.
Enter a name for the R/O community of your SNMP server.
Select the security level used by your SNMP server.
Select the type of hash (MD5 or SHA) to use.
Enter the authentication password used for your R/O SNMP server.
Select the encryption algorithm used by your R/O SNMP server.
Select the password used for your R/O SNMP server.
DCS-4618EK
Write Security
Name
Security Level
Enter the name for the R/W community of your SNMP server.
Select the security level used by your R/W SNMP server.
60D-Link Vigilance H.265 Outdoor Bullet Camera User Manual
Page 61
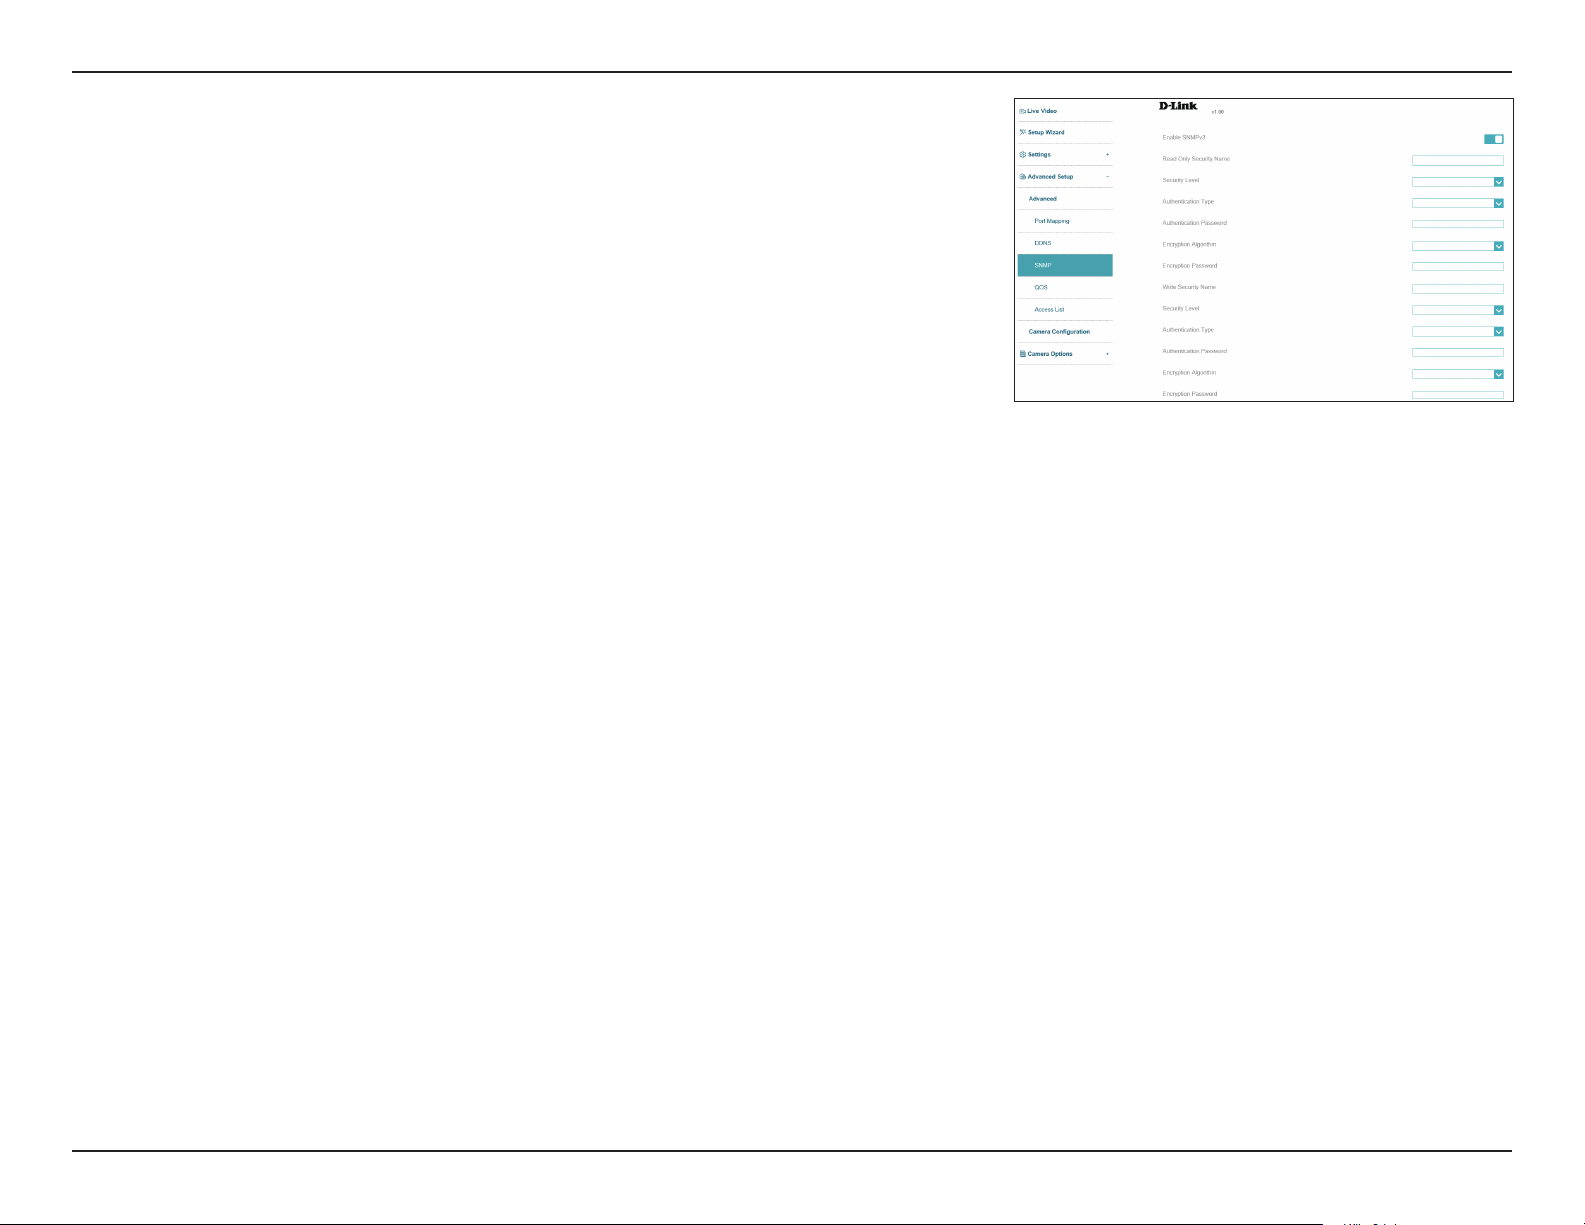
Section 3: Conguration
Authentication
Type
Authentication
Password
Encryption
Algorithm
Encryption
Password
SNMP Port
Select the type of hash (MD5 or SHA) to use.
Enter the authentication password used for your R/W SNMP server.
Select the encryption algorithm used by your R/W SNMP server.
Select the password used for your R/W SNMP server.
Enter the SNMP port to use. The default is 161.
DCS-4618EK
61D-Link Vigilance H.265 Outdoor Bullet Camera User Manual
Page 62
Section 3: Conguration
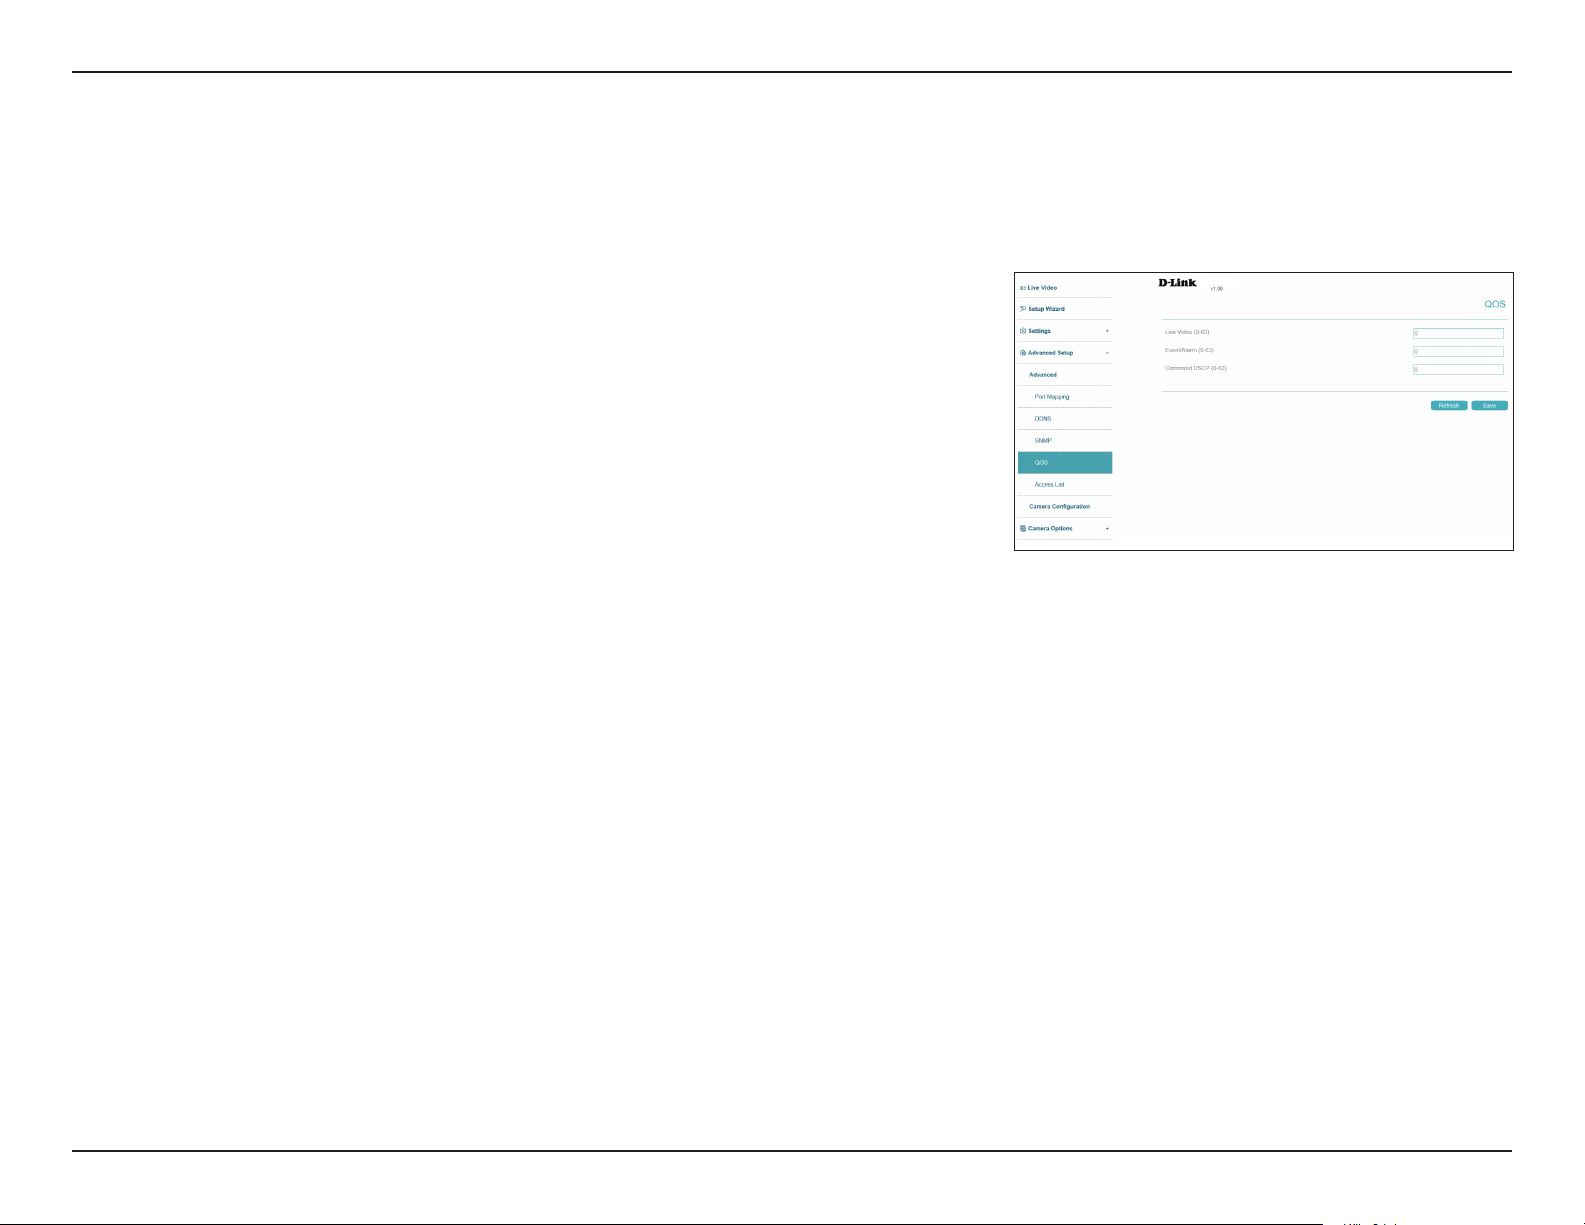
QOS
Class of Service (CoS) and Quality of Service (QoS) allow you to prioritize surveillance trac on your network to ensure that your cameras can
stream video smoothly and remain accessible even when there is heavy trac on your network. Your network must support CoS or QoS in order
to use them. After making changes, click the Save button.
Live Video
Event Alarm
Command
DSCP
Set the priority level for live video.
Set the priority level for event alarms.
Set the priority level for command DSCP.
DCS-4618EK
62D-Link Vigilance H.265 Outdoor Bullet Camera User Manual
Page 63
Section 3: Conguration
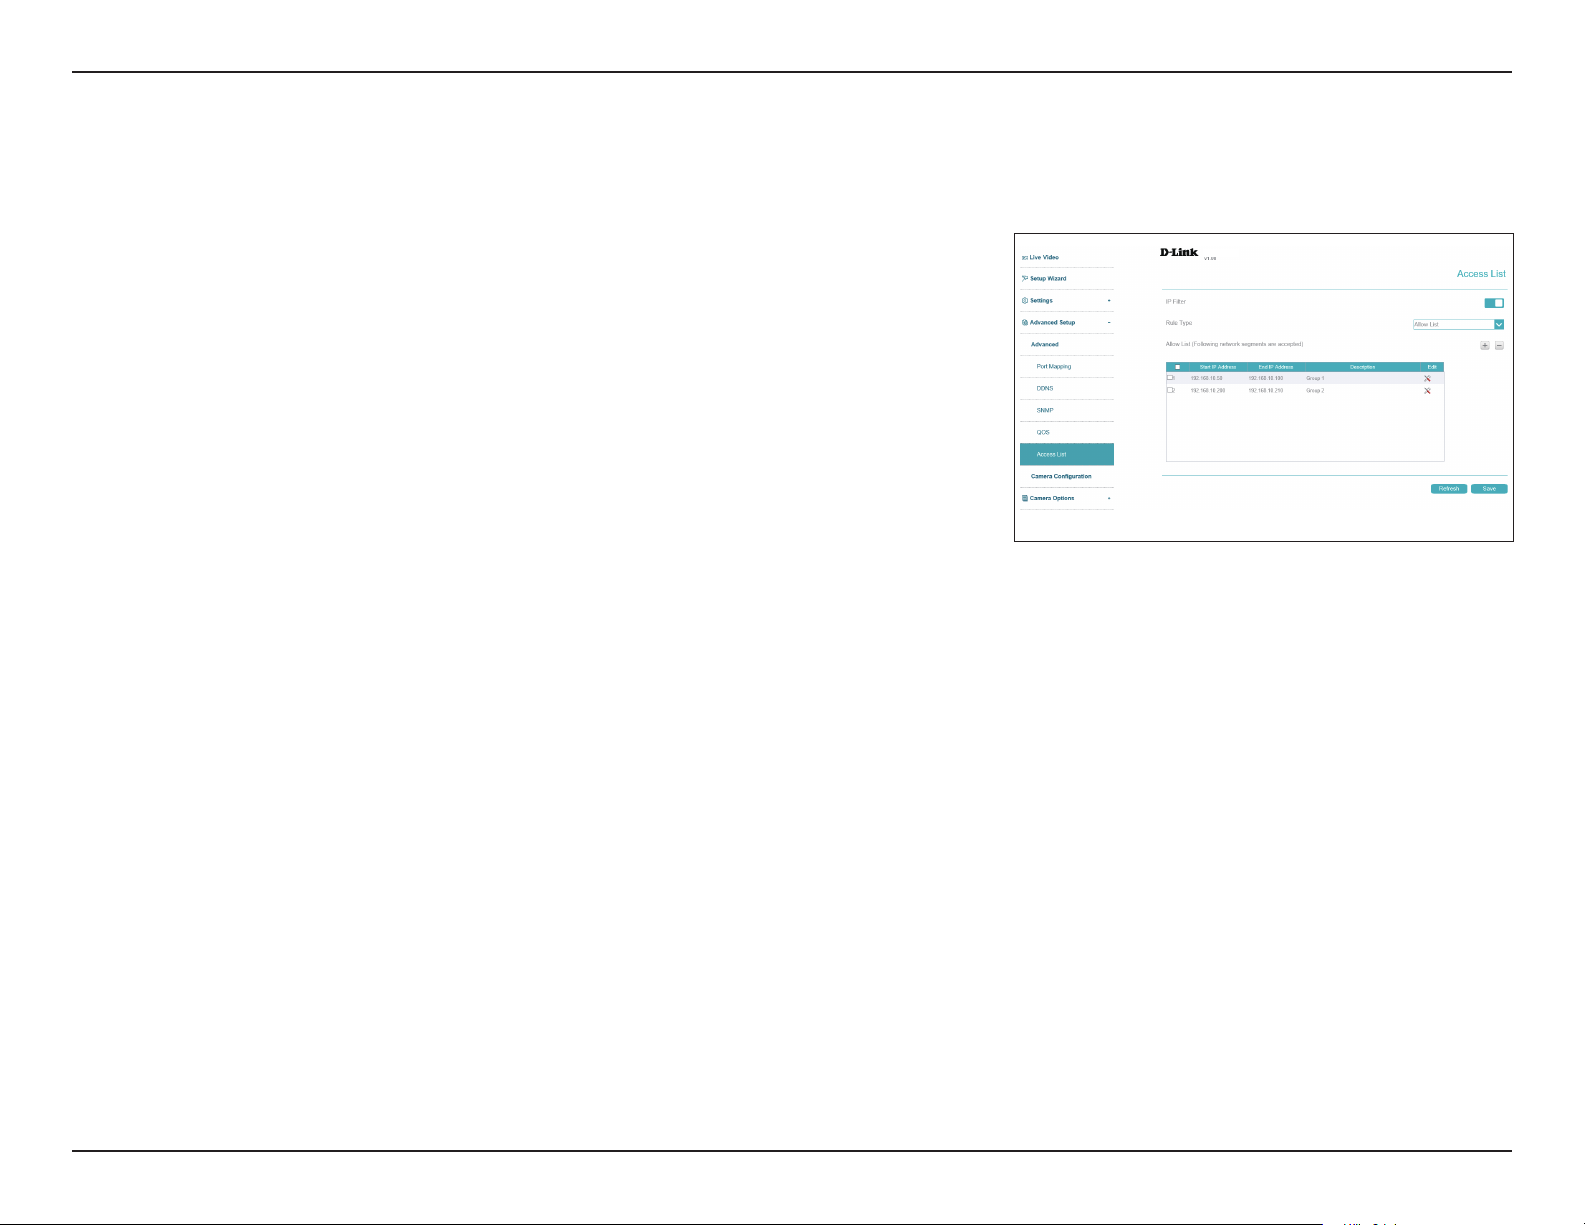
Access List
Here you can dene which IP addresses are allowed to access your camera.
IP Filter
Rule Type
Click this to enable or disable the IP lter.
Select the type of rule to implement, Allow or Deny. Depending on the
rule, the IPs you enter will either be allowed through (meaning others will
be blocked), or they will be blocked (meaning that by default, others will be
allowed through). Click the plus (+) icon to add a new IP range to apply the
rule to.
DCS-4618EK
63D-Link Vigilance H.265 Outdoor Bullet Camera User Manual
Page 64
Section 3: Conguration
Camera Conguration
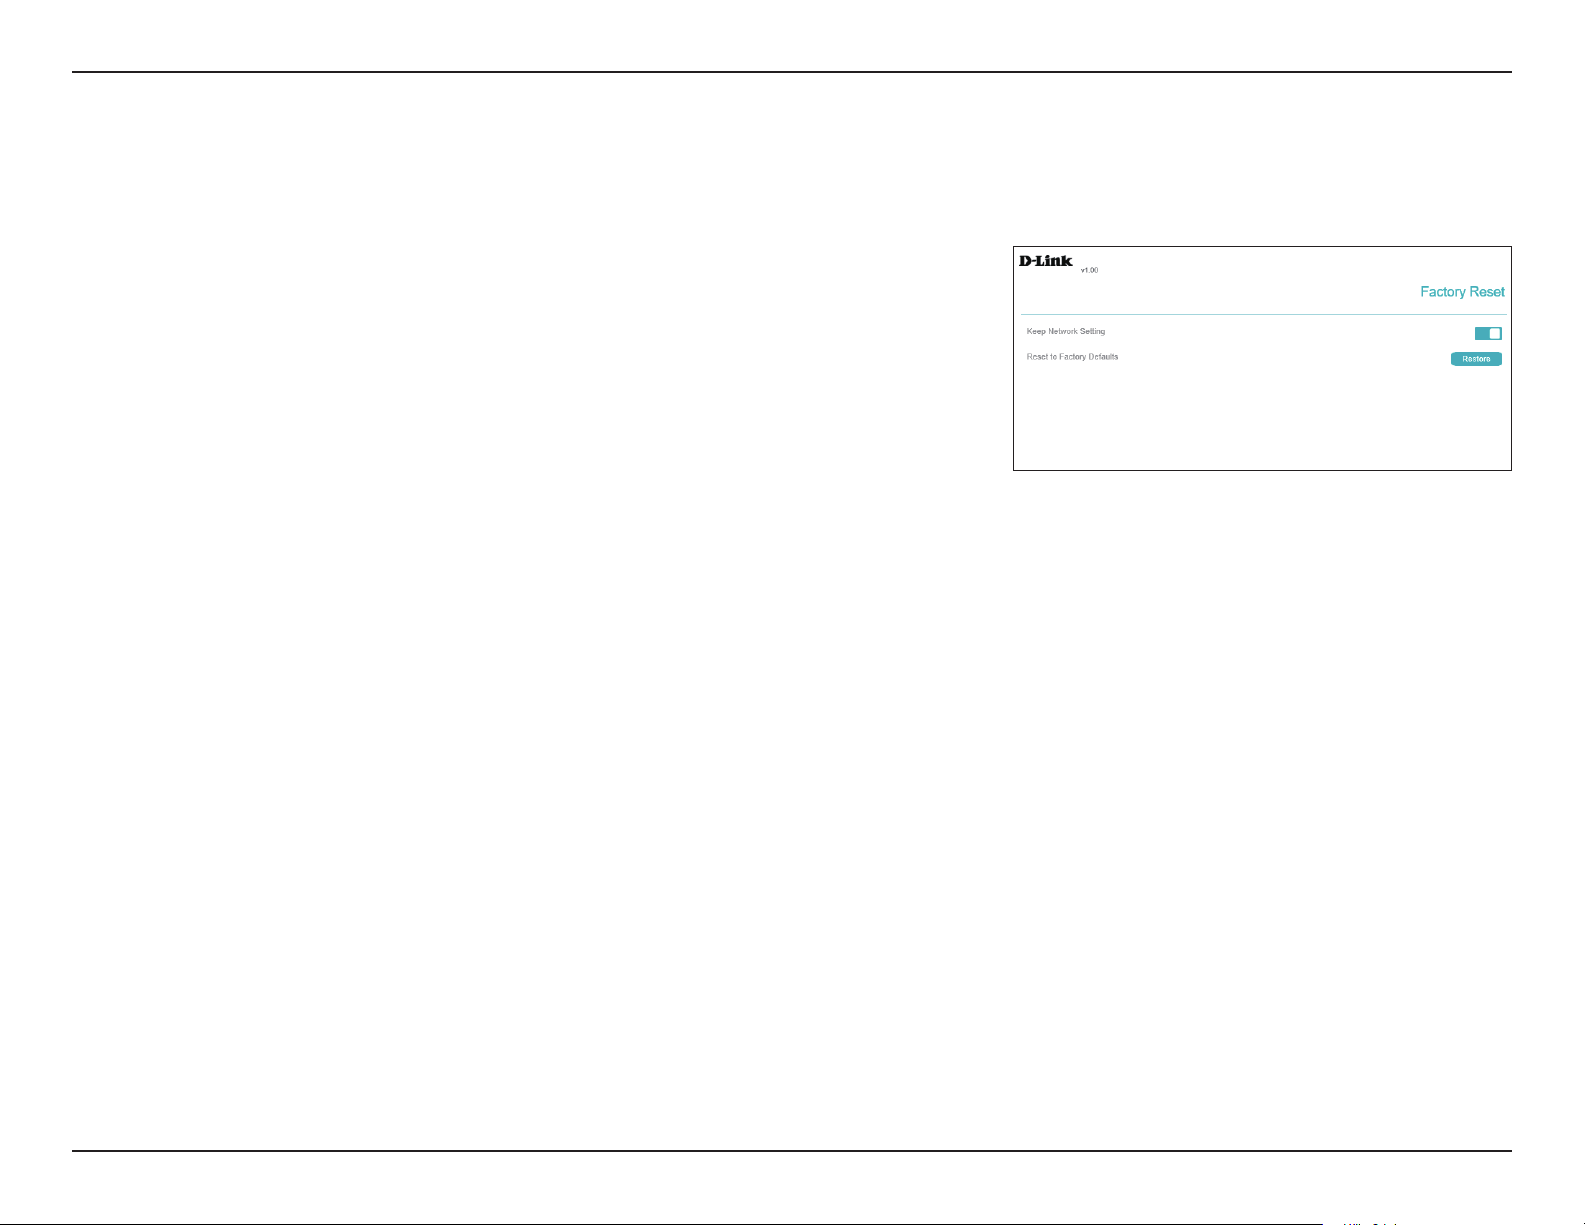
Factory Reset
Here you can reset the camera conguration back to the factory defaults.
Keep Network
Setting
Restore to
Factory Default
Click this to preserve your current network settings when you restore your
camera to factory default settings.
Click this to restore your camera to factory default settings.
DCS-4618EK
64D-Link Vigilance H.265 Outdoor Bullet Camera User Manual
Page 65
Section 3: Conguration
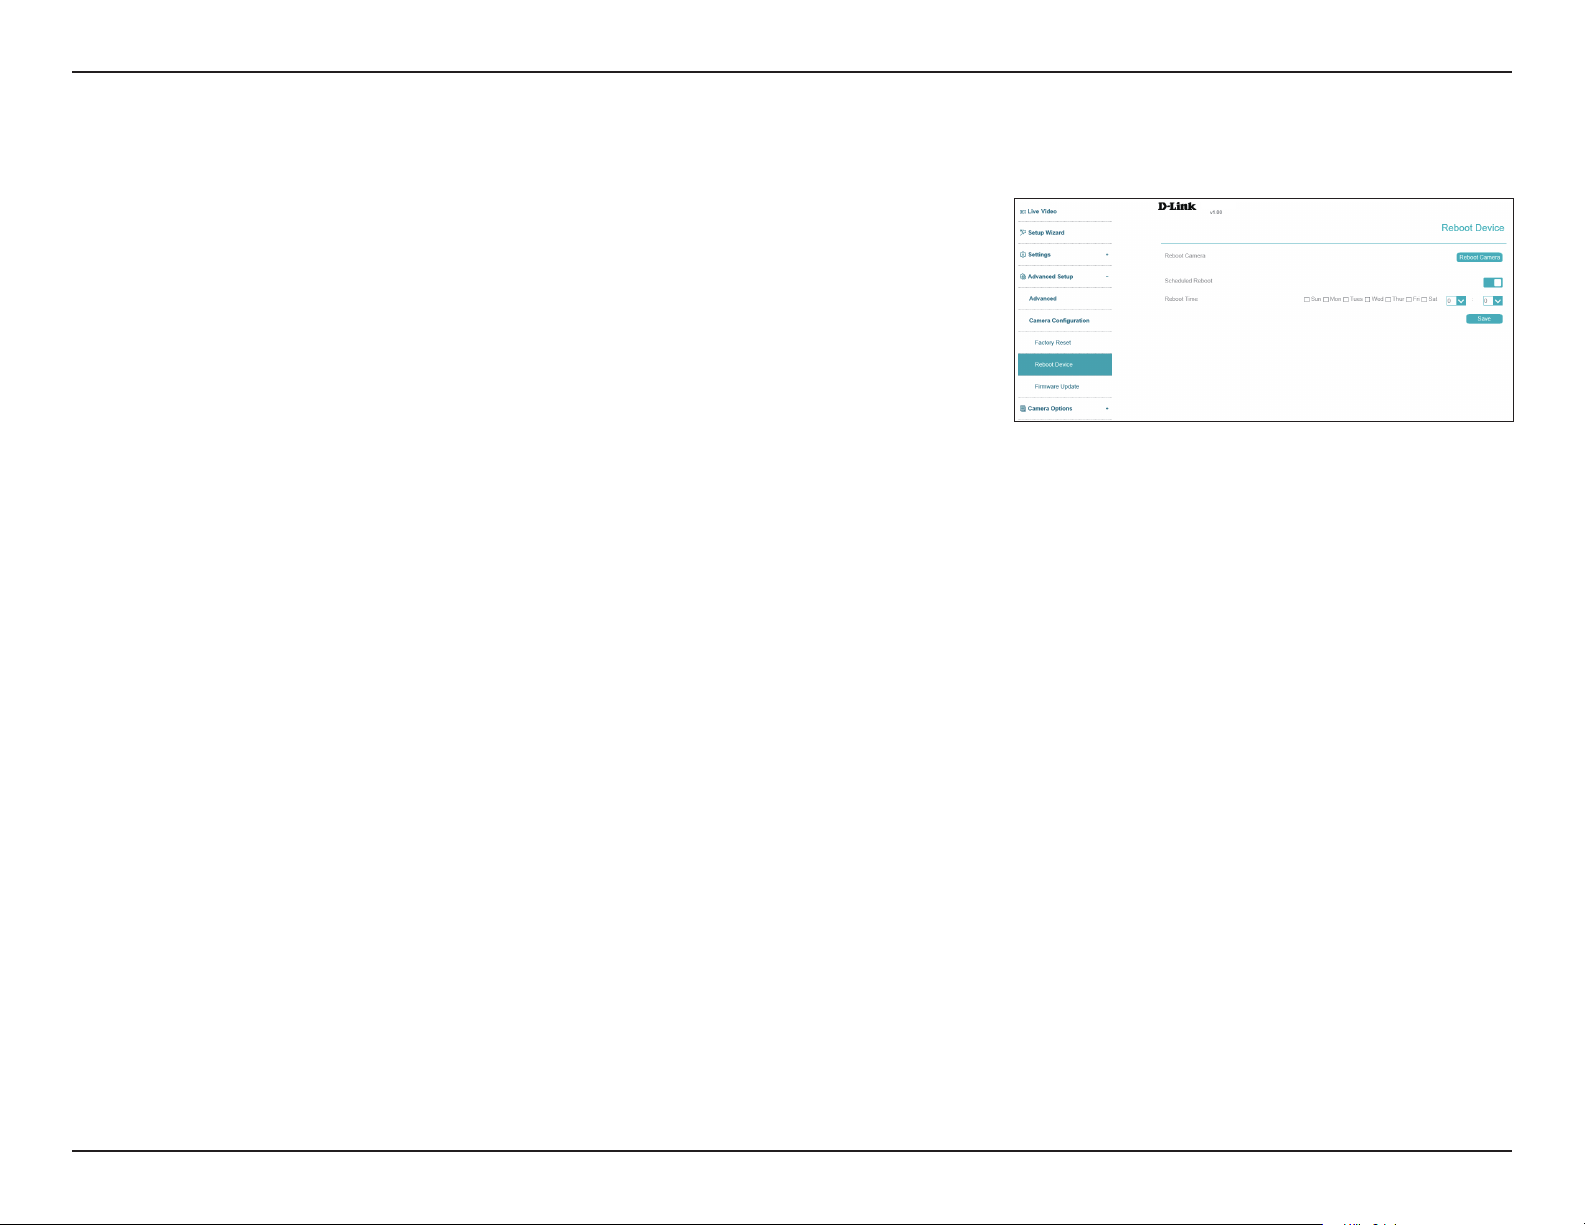
Reboot Device
Here you can reboot the camera, or set a schedule to reboot the camera automatically.
Reboot Device
Schedule
Reboot
This will restart your camera.
If you want your camera to reboot on a regular schedule, enable this option,
then select the days of the week and the time that you want the camera to
reboot and click the Save button.
DCS-4618EK
65D-Link Vigilance H.265 Outdoor Bullet Camera User Manual
Page 66
Section 3: Conguration
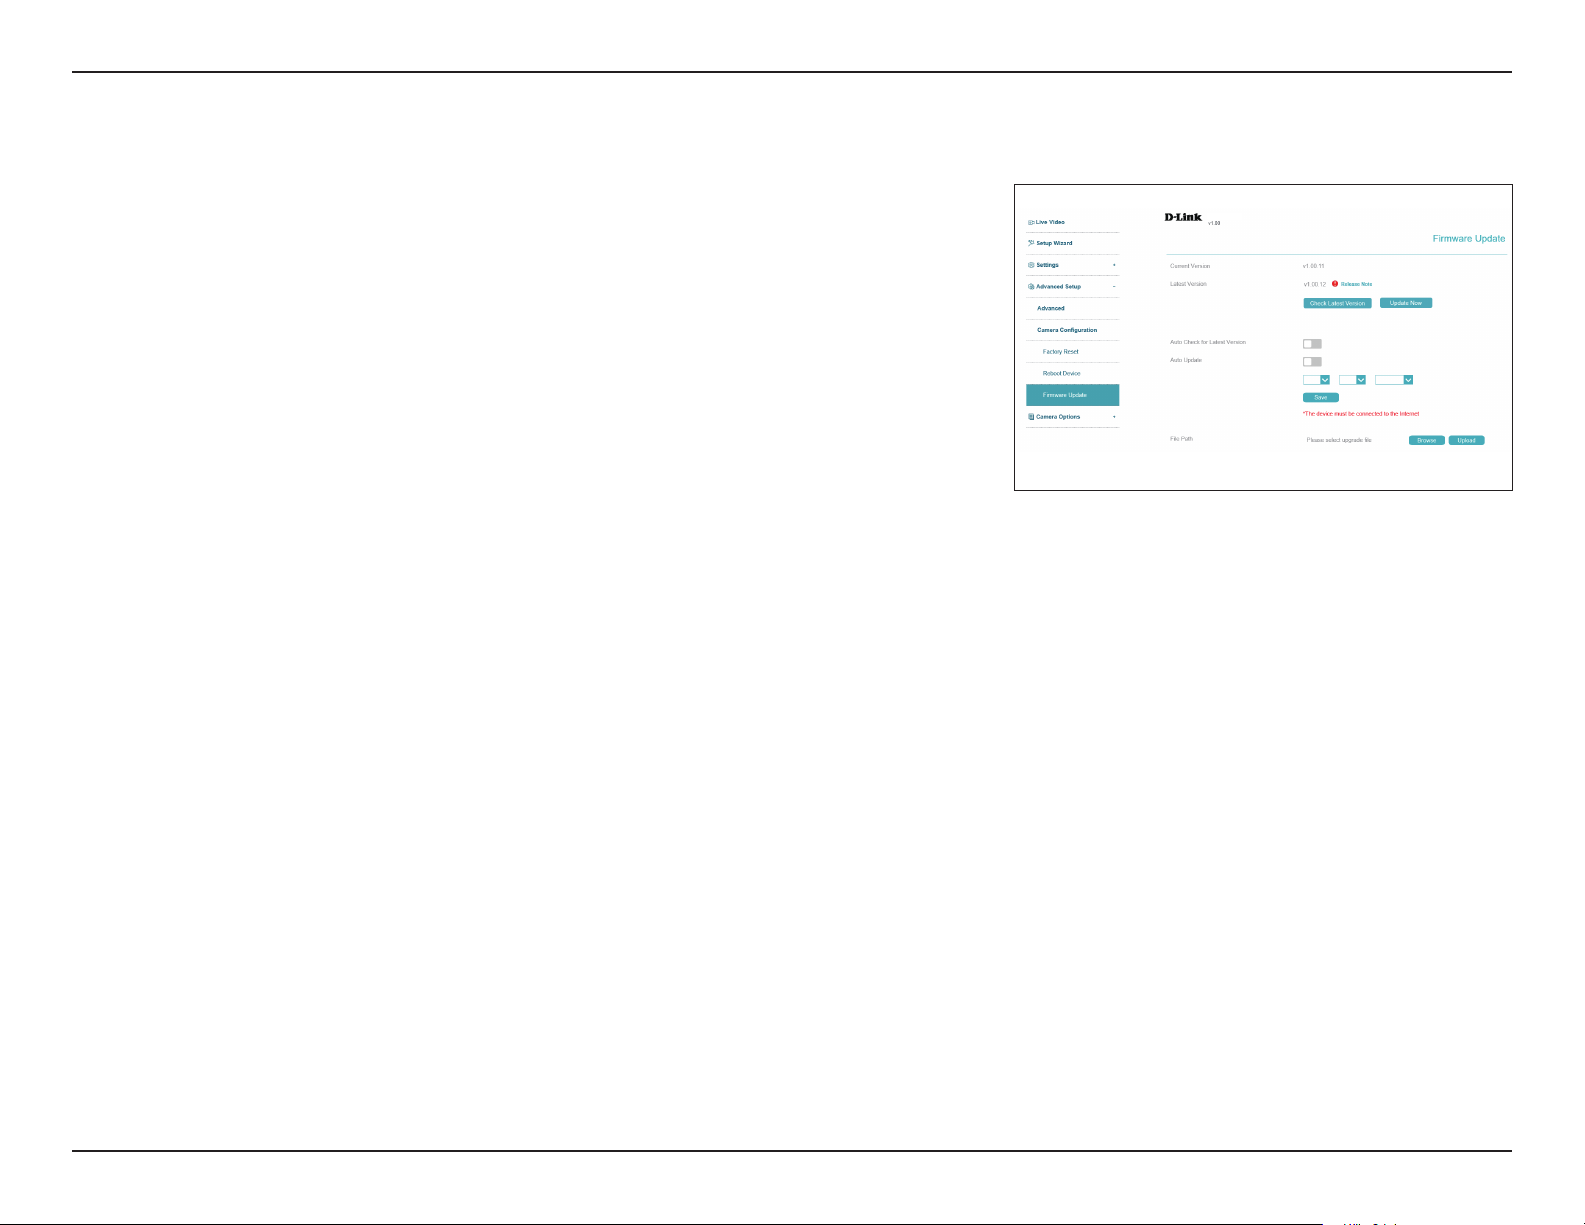
Here you can check and update the camera's rmware.
Firmware Update
Current/Latest
Version
Update Now
Auto Check
Latest Version
Auto Update
File Path
Click this to check for the latest rmware version online.
Click this to perform a rmware upgrade immediately.
Toggle this to automatically check for new rmware versions at the time
you specify with the drop-down menu below.
Toggle this to automatically update to a new version when the auto check
is performed.
Below, you can schedule the automatic check/update with the drop-down
menus. Enter the time of day (in hours/minutes, from left to right) and the
day of the week to perform the check.
To upgrade from a rmware le, click the folder icon, navigate to the le on
your hard drive, and click Upload.
DCS-4618EK
66D-Link Vigilance H.265 Outdoor Bullet Camera User Manual
Page 67
Section 3: Conguration
Camera Options
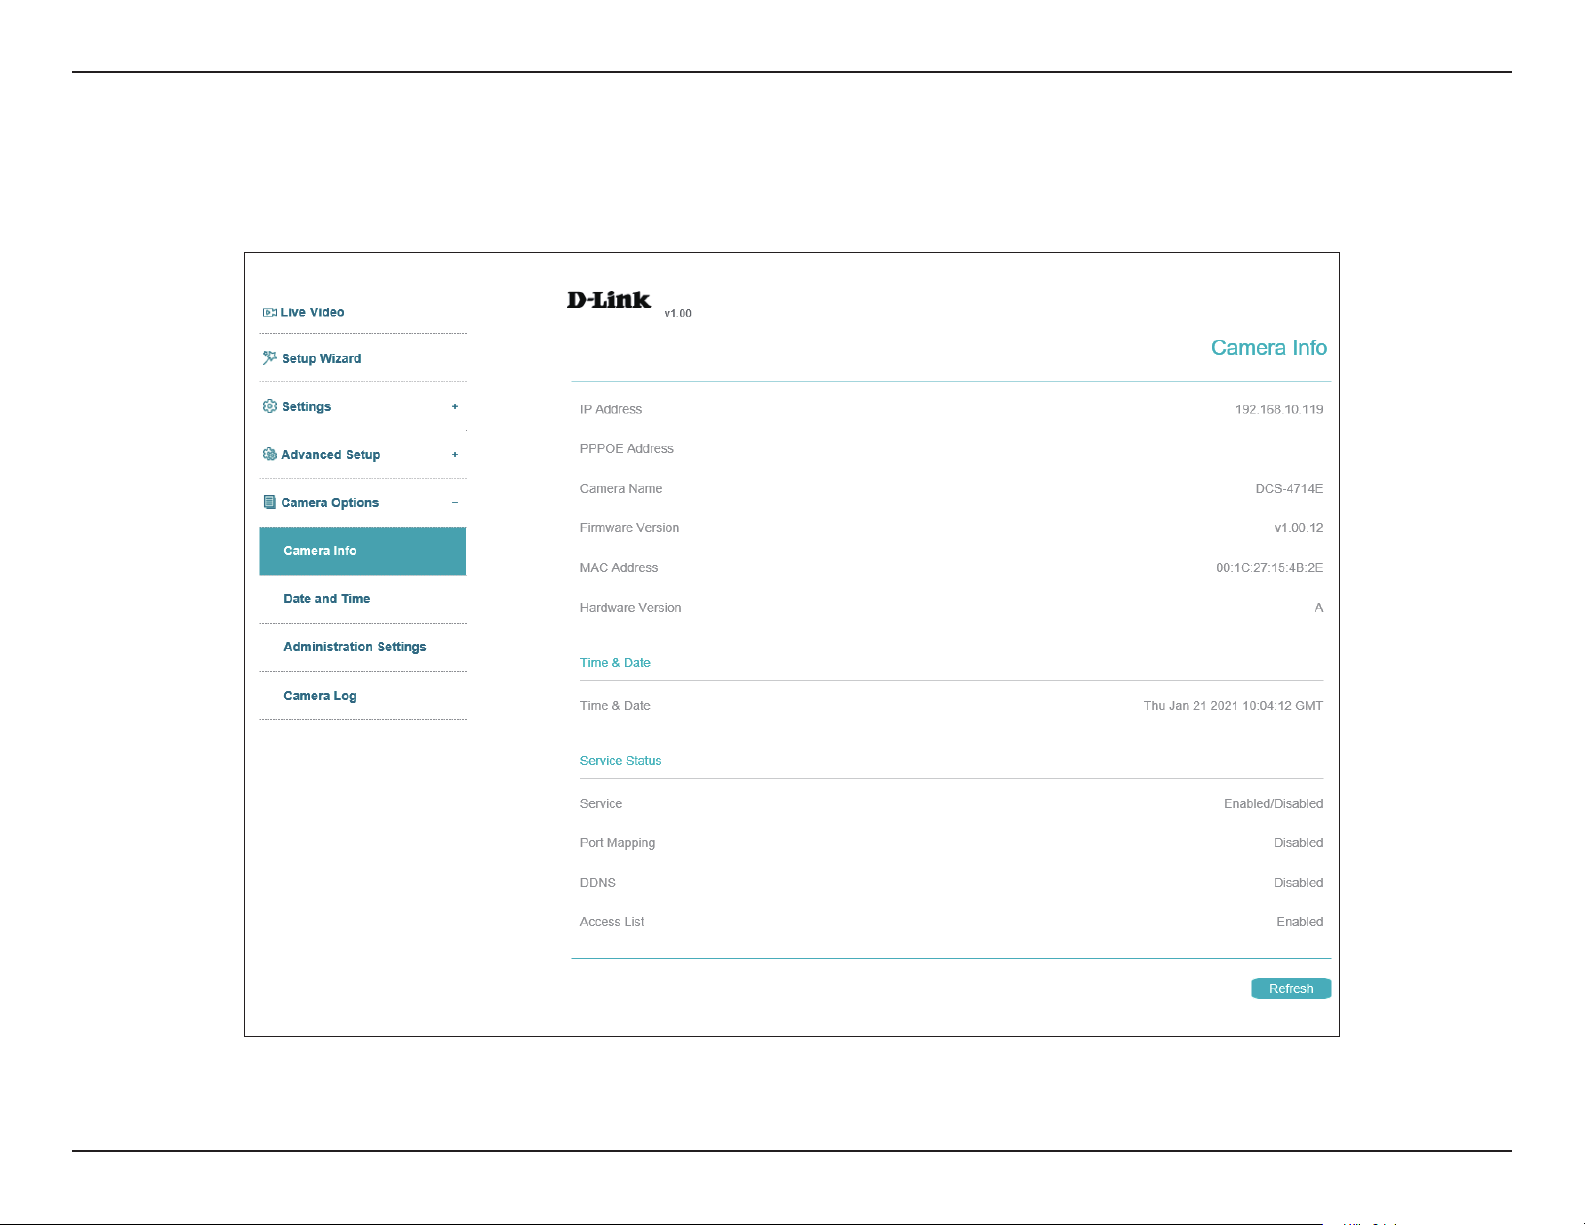
Camera Info
This page displays detailed information about your camera, the services running on your camera, and active video streams.
DCS-4618EK
67D-Link Vigilance H.265 Outdoor Bullet Camera User Manual
Page 68
Section 3: Conguration
Date and Time
Time Settings
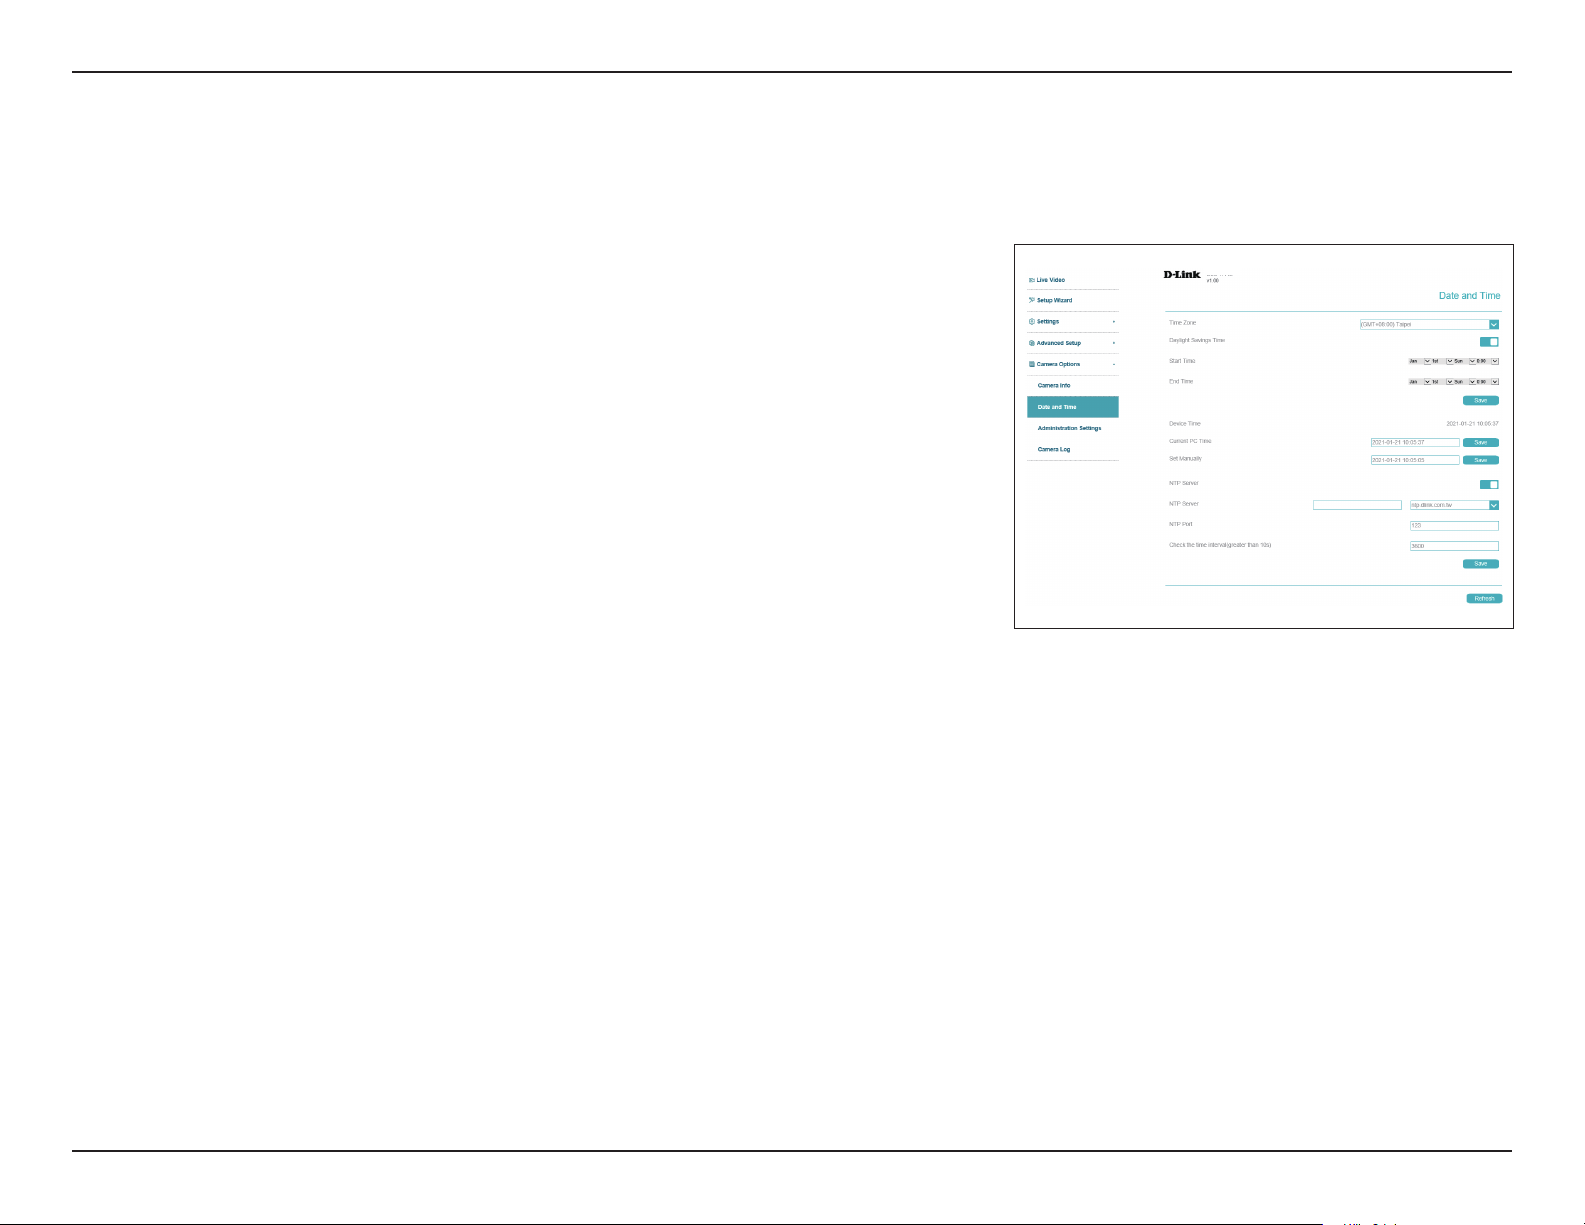
This section allows you set the time zone and Daylight Saving settings for your camera.
Time Zone
Daylight
Savings Time
Start Time:
End Time:
Current PC
Time
Set Manually
NTP Server
NTP Port
Select your time zone from the drop-down menu.
If your region uses Daylight Saving time, you can enable it here. Select
Set date and time manually if you want to manually set the oset and the
period of time that the Daylight Saving correction should be used.
If you enabled the previous option, set the date and time that Daylight
Saving should start.
Set the date and time that Daylight Saving should end.
Click Save to synchronize the camera according to your current PC time.
Enter a time and click Save to set it manually.
Enable this option to set your camera's time using an NTP server, then
select an NTP server to use from the drop-down box.
Enter the port to use to access the NTP server.
DCS-4618EK
Check time
interval
Enter an interval (in seconds) at which to check the camera's time against
the NTP server.
68D-Link Vigilance H.265 Outdoor Bullet Camera User Manual
Page 69
Section 3: Conguration
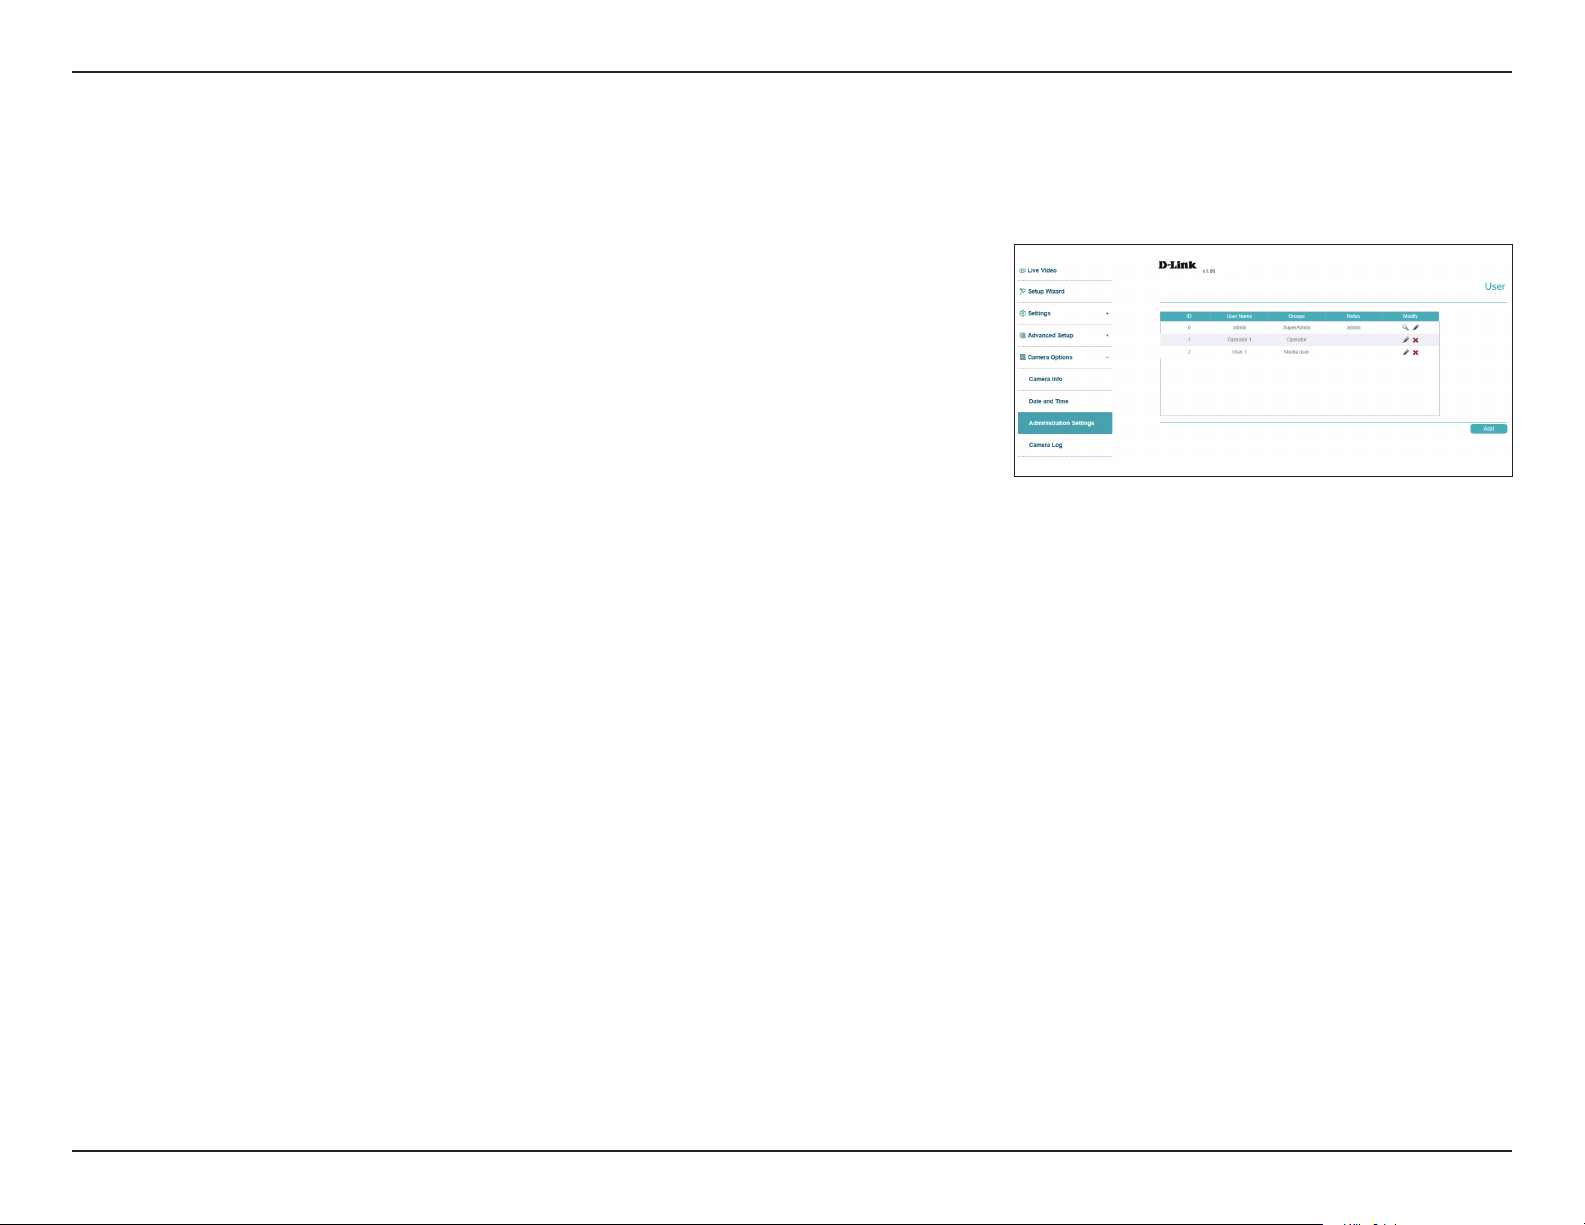
Administration Settings
Admin Password
Here, you may modify the administrator’s password for your camera. Click Add to add a new
user, or click the pencil icon under Operate to edit an existing user's information.
DCS-4618EK
69D-Link Vigilance H.265 Outdoor Bullet Camera User Manual
Page 70
Section 3: Conguration
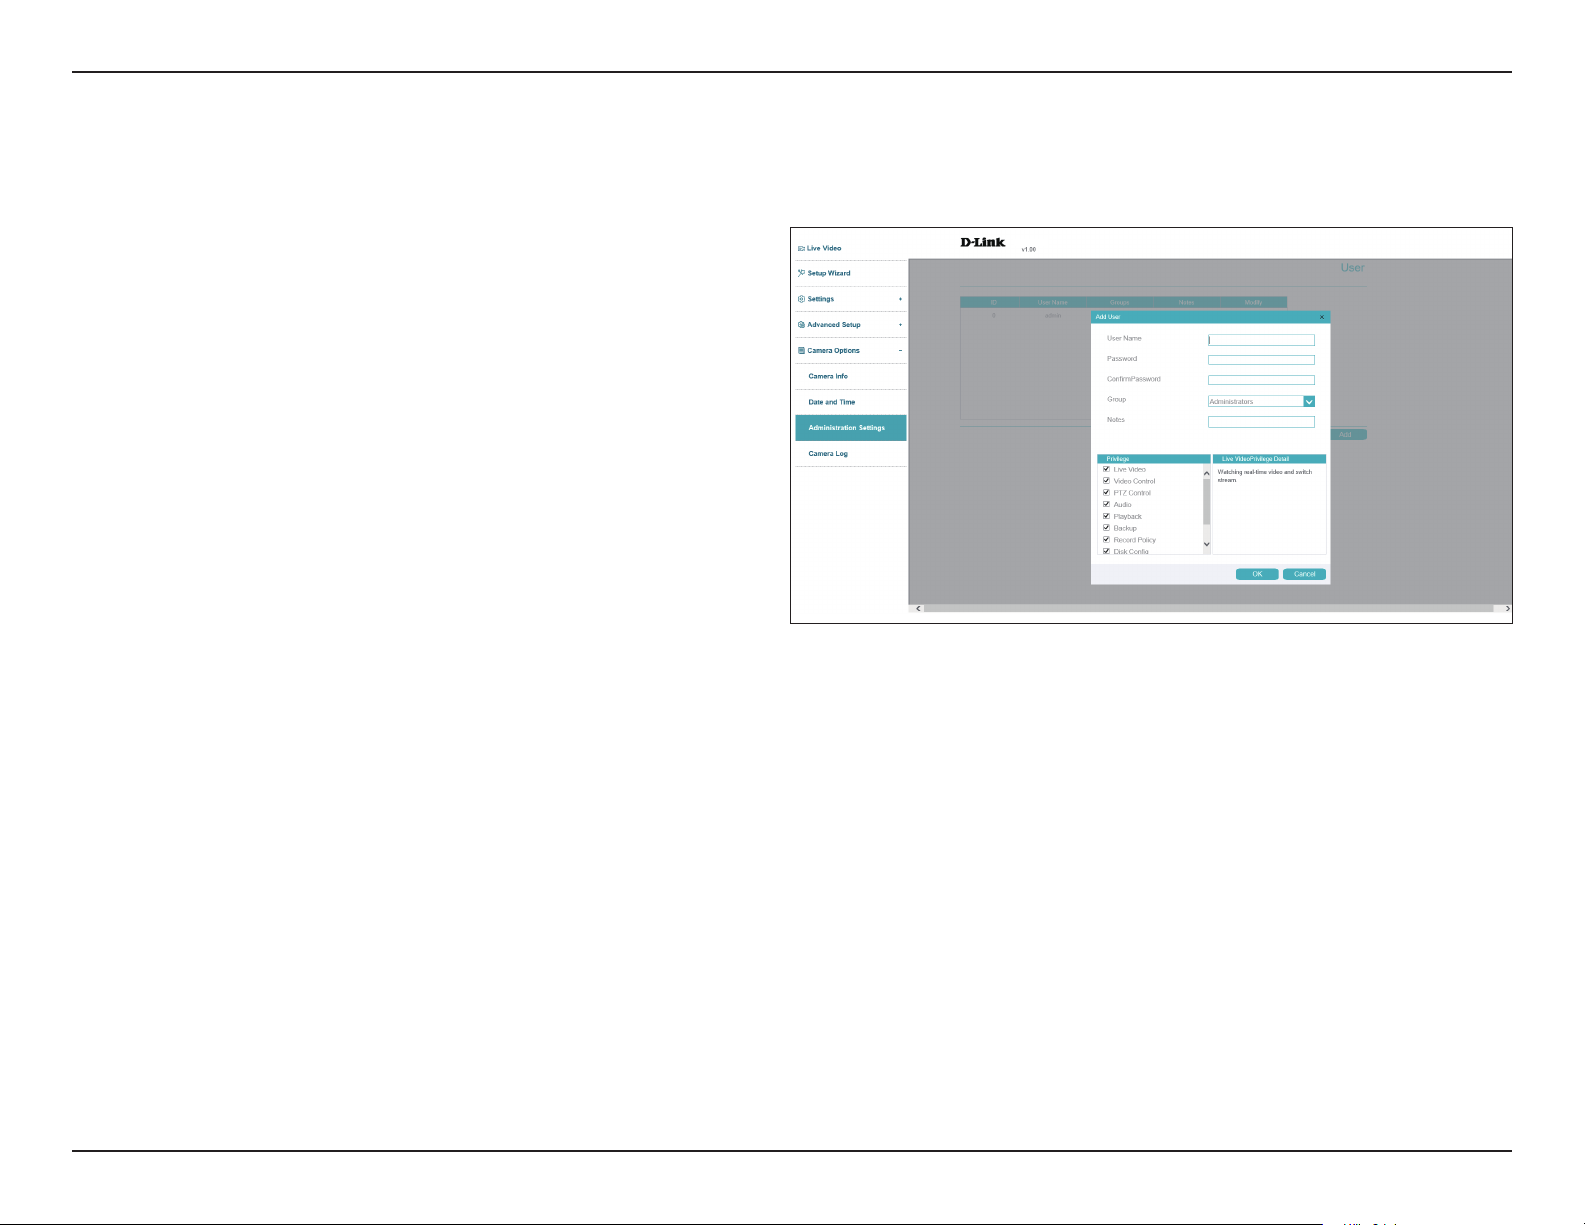
Admin / Add or Edit User
Here, you may add user accounts for accessing the camera. User accounts are allowed to access the Live Video page, but cannot access any of the
camera's conguration pages.
User Name
New/
Conrm
Password
Group
Privilege
Notes
Enter a user name for the user you wish to create.
Enter a password for the user you wish to create. Retype
the password to conrm it.
Designate the new user's group. This will aect the user
privileges they have. This will aect the options that
appear in the Privilege menu.
Click the boxes in this menu to determine that level of
access the specied user should have to the camera's
video display and conguration options.
Enter any notes you would like to record here.
DCS-4618EK
70D-Link Vigilance H.265 Outdoor Bullet Camera User Manual
Page 71
Section 3: Conguration
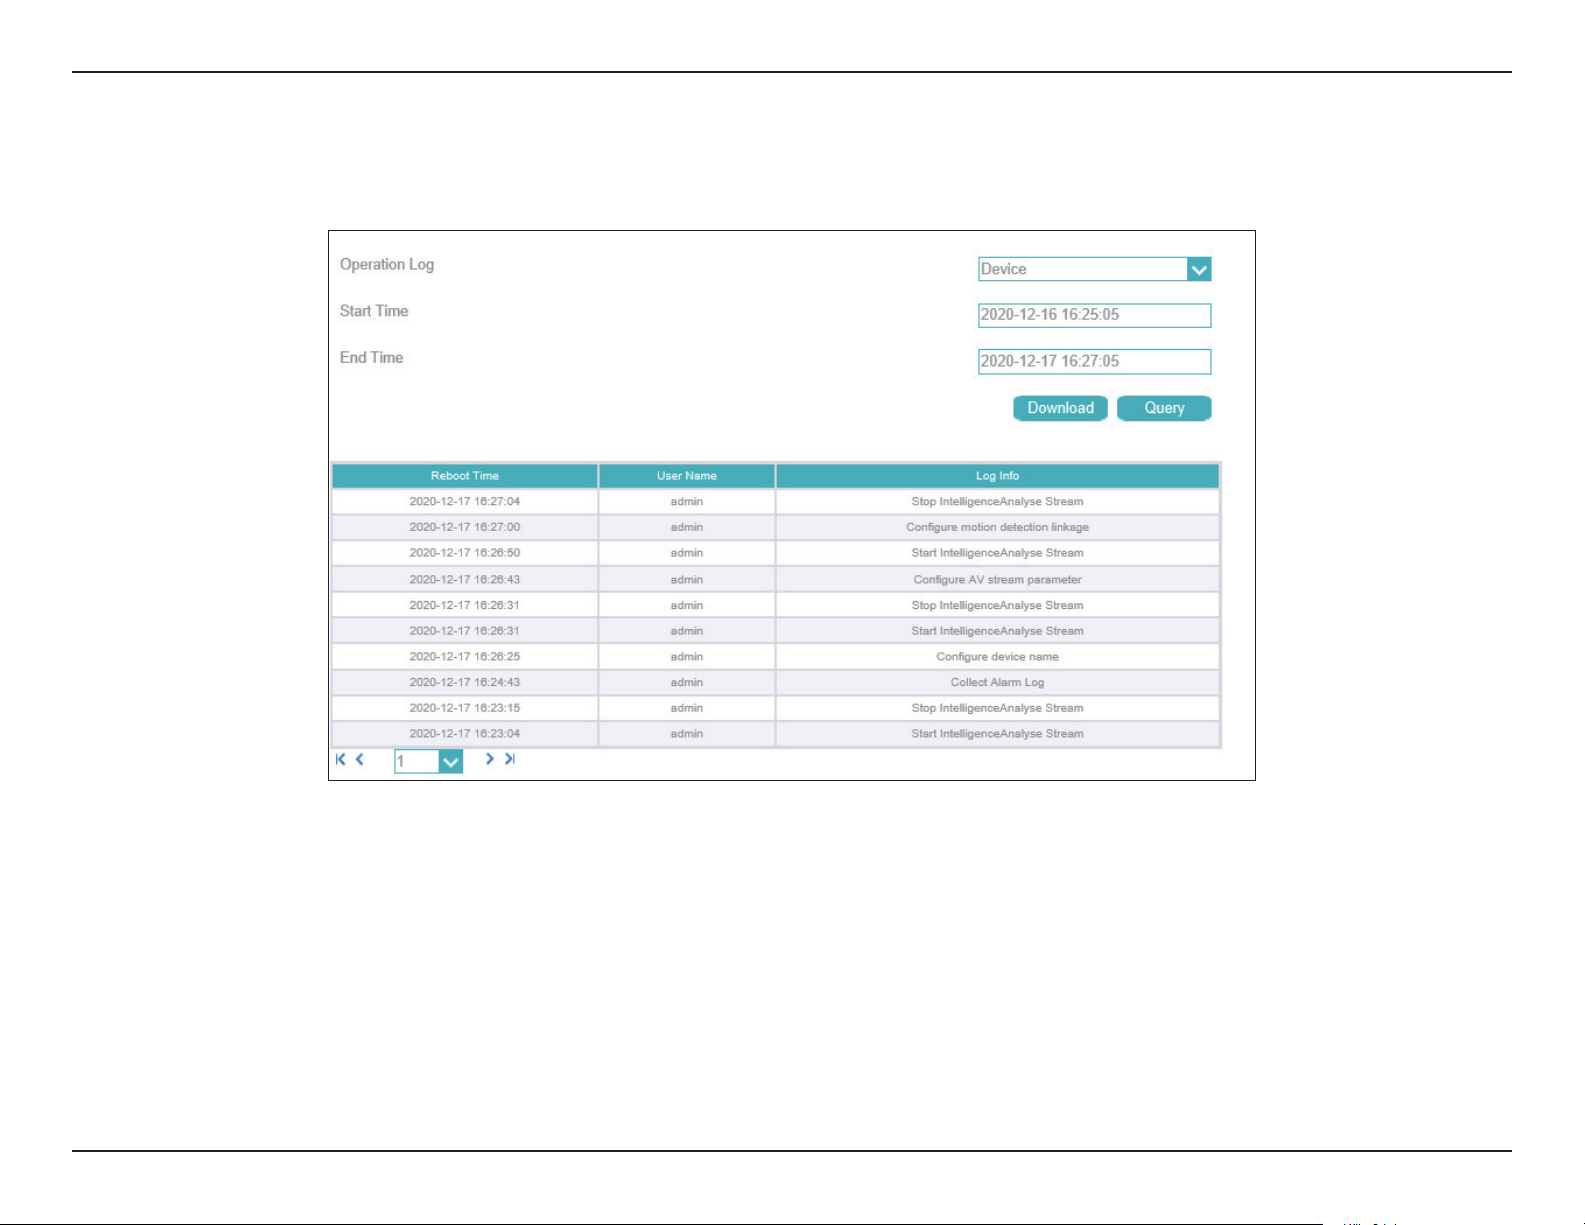
Camera Log
This page displays a log of events, such as motion detection alarms. You may download the information by clicking Download. You may also click
Query to search for an event.
71D-Link Vigilance H.265 Outdoor Bullet Camera User Manual
Page 72
Section 3: Conguration
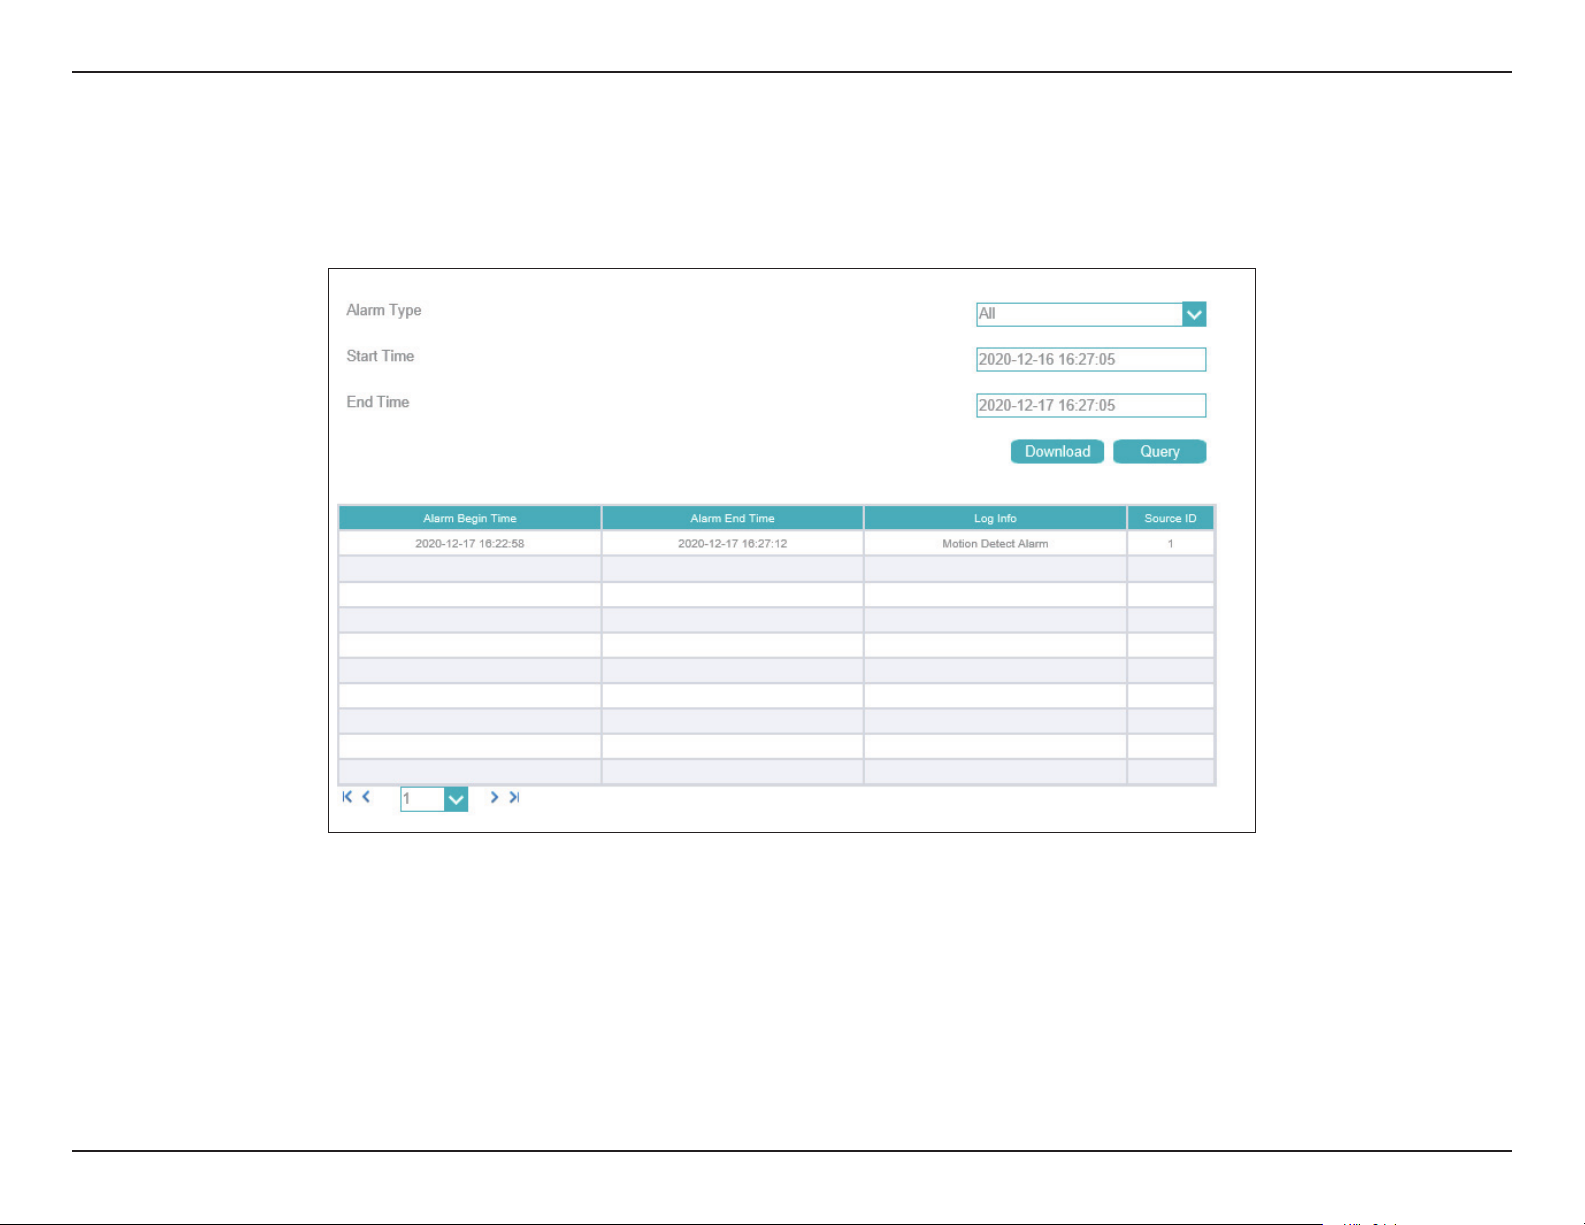
Camera Log / Alarm
An alarm log records information about an alarm generated on a device, including the Security, Disk, and Recording alarms. Choose the Alarm
Type from the drop box, setup Start Time and End Time, and then click Query. The all alarm log will be displayed on the web, click Download to
save the logs to your PC.
72D-Link Vigilance H.265 Outdoor Bullet Camera User Manual
Page 73
Section 3: Conguration
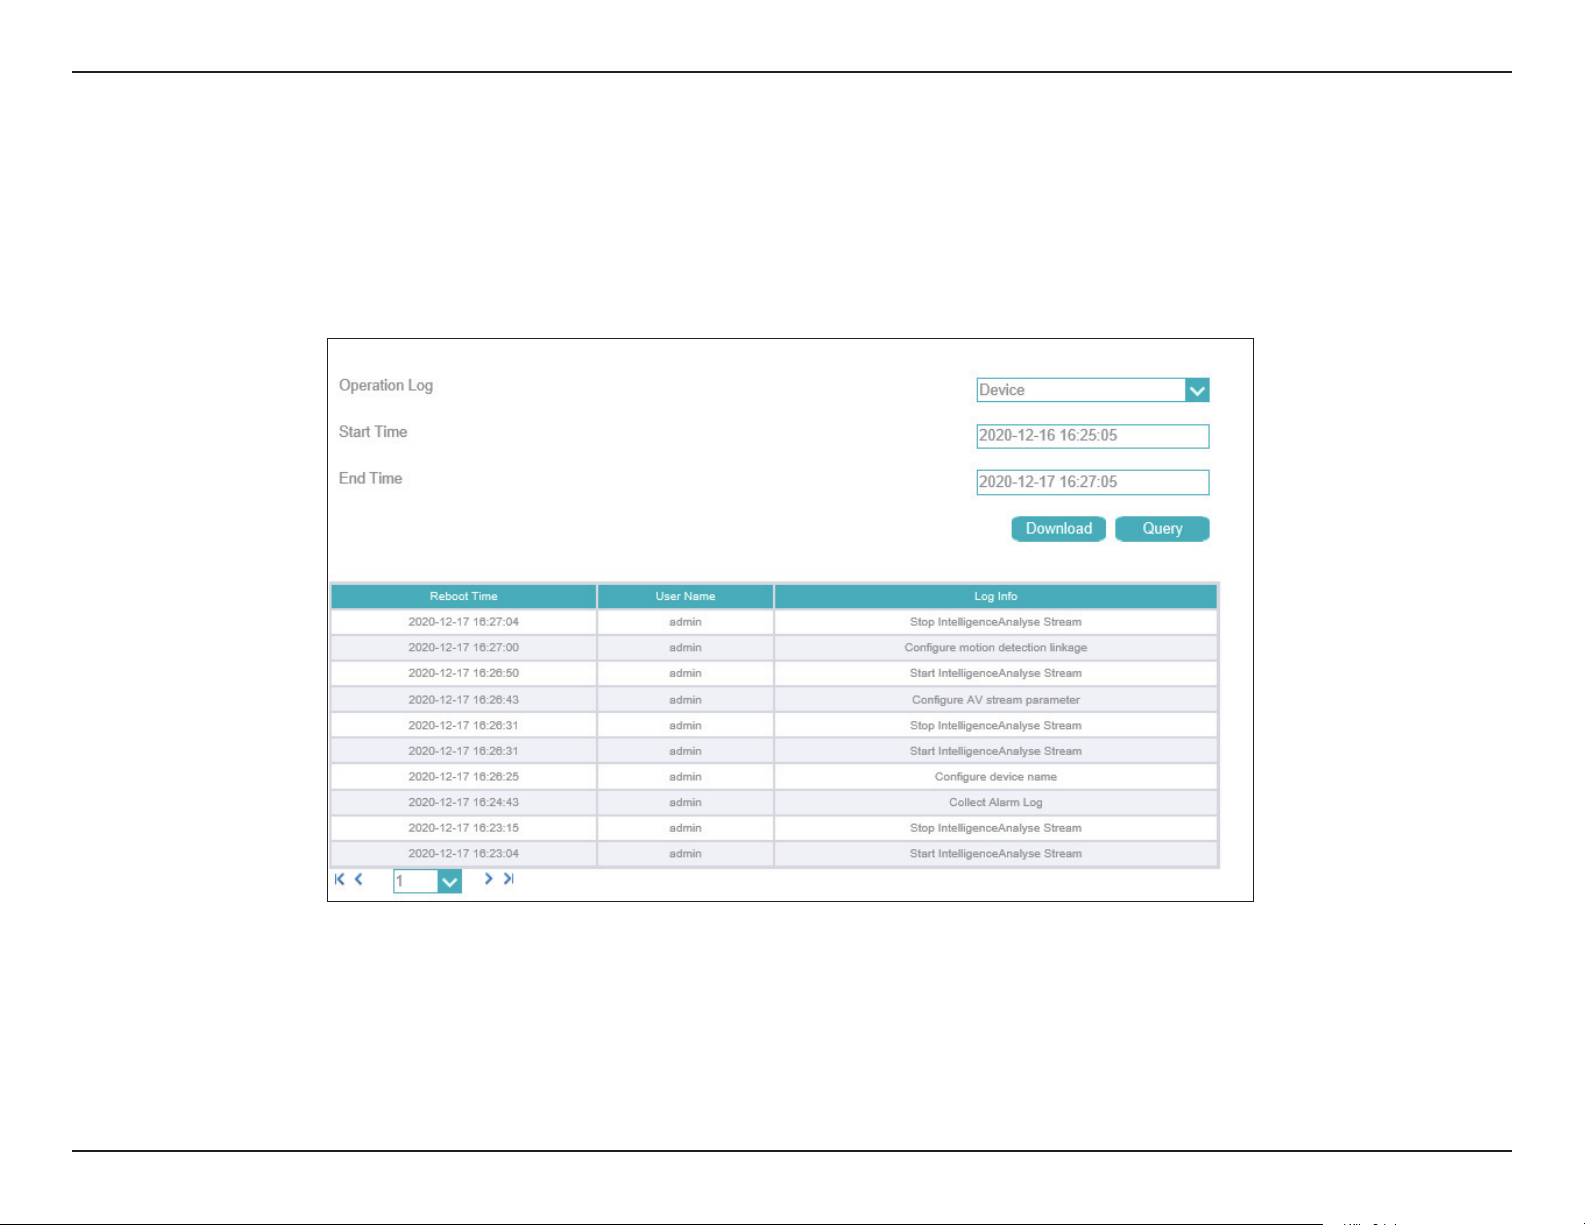
Operation logs record user operations and scheduled task commands during the running of the device. Operation logs can be classied into the
following types: Privilege Manager, System maintenance, Device, Recording operation, Video control, and Live video.
Choose the Operation logs Type from the drop box, setup Start Time and End Time, and then click Query.
The all alarm log will be displayed on the web, click Download to save the logs to your PC.
73D-Link Vigilance H.265 Outdoor Bullet Camera User Manual
Page 74
Section 3: Conguration
You can collect logs about a device, which help you analyze and solve possible problems occurring on the device. The logs include overview
information, key parameters, operation logs, alarm logs, upgrade logs. Click Collect All Log and save the logs to your PC.
74D-Link Vigilance H.265 Outdoor Bullet Camera User Manual
Page 75
Appendix A: Technical Specications
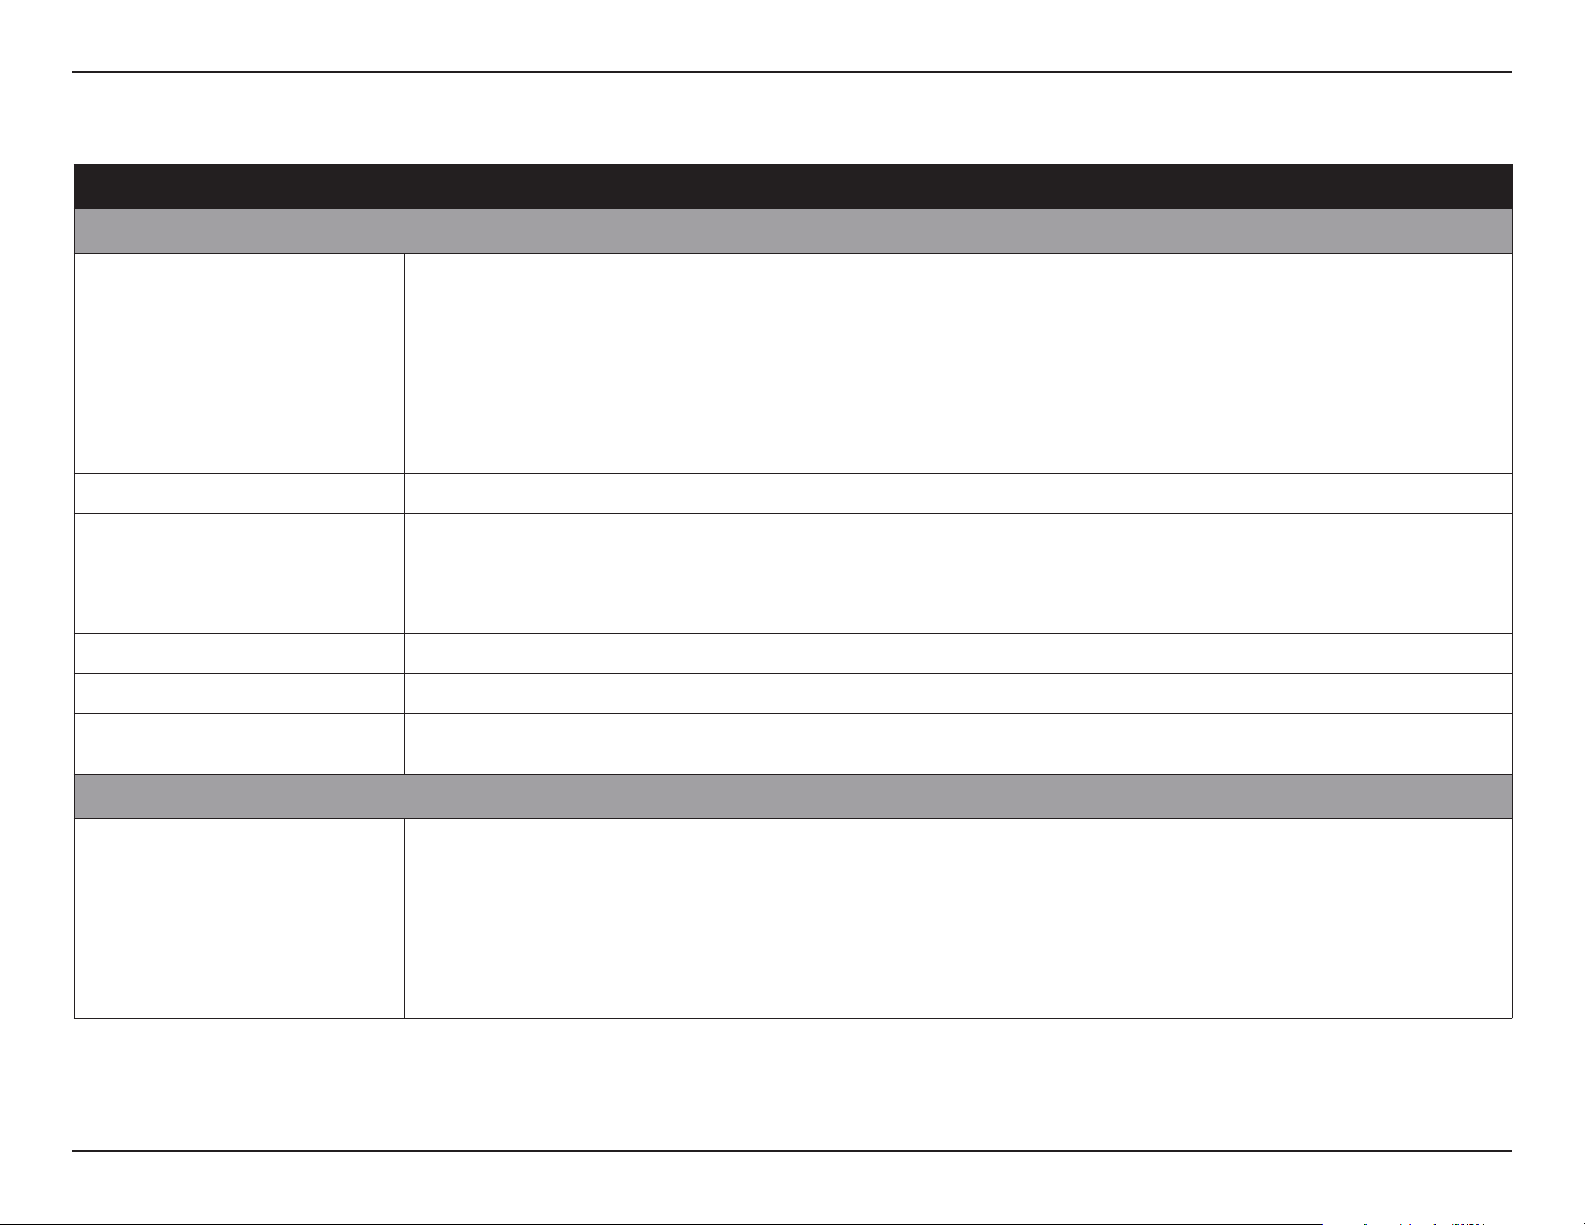
Technical Specications - DCS-4612EK
Technical Specications
Camera
Camera Hardware Profile • 1/2.8” 2-megapixel progressive CMOS sensor
Camera Housing • IP66 compliant weatherproof housing
Image Features • Configurable image size/quality/frame rate/bit rate
Video Compression • Simultaneous H.265/H.264/MJPEG format compression • JPEG for still images
Max. Video Resolution and Frame Rate • 1920 x 1080 at up to 30 fps
External Device Interface • 10/100 Base-TX Fast Ethernet port (supports 802.3af PoE Class 3)
• 30 meter IR illumination distance
• Minimum illumination:
• Color: 0.05 lux @(F1.4, AGC ON)
• B/W: 0 lux @(IR LED ON)
• Built-in Infrared-Cut Removable (ICR) Filter module
• 18x digital zoom
• Minimum object distance 0.5 m
• Focal length: 2.8 m
• Aperture: F2.0
• Time stamp and text overlays
• Configurable shutter speed/brightness/saturation/contrast/sharpness/3D filter
• Configurable motion detection area
• Configurable privacy mask zones
• microSD card slot
1
• Angle of view:
• (H) 106.8°
• (V) 58°
• (D) 126°
• 3-axis adjustment angle (non-motorized):
• Tilt: 15° - 90°
• Pan: 350°
• Rotate: 335°
• Supports IK10 standard
• Auto White Balance (AWB)
• Auto Gain Control (AGC)
• Wide Dynamic Range (WDR)
• Corridor mode
• Reset button
Network
Network Protocols • IPv4
• HTTP/HTTPS
• RTSP/RTP/RTCP
• TCP
• UDP
• DHCP
• DNS
• DDNS
• NTP
• FTP
• SMTP Client
• ONVIF Profile S compliant
• ARP
• ICMP
• PPPoE
• SNMP v1/v2c/v3
75D-Link Vigilance H.265 Outdoor Bullet Camera User Manual
Page 76
Appendix A: Technical Specications
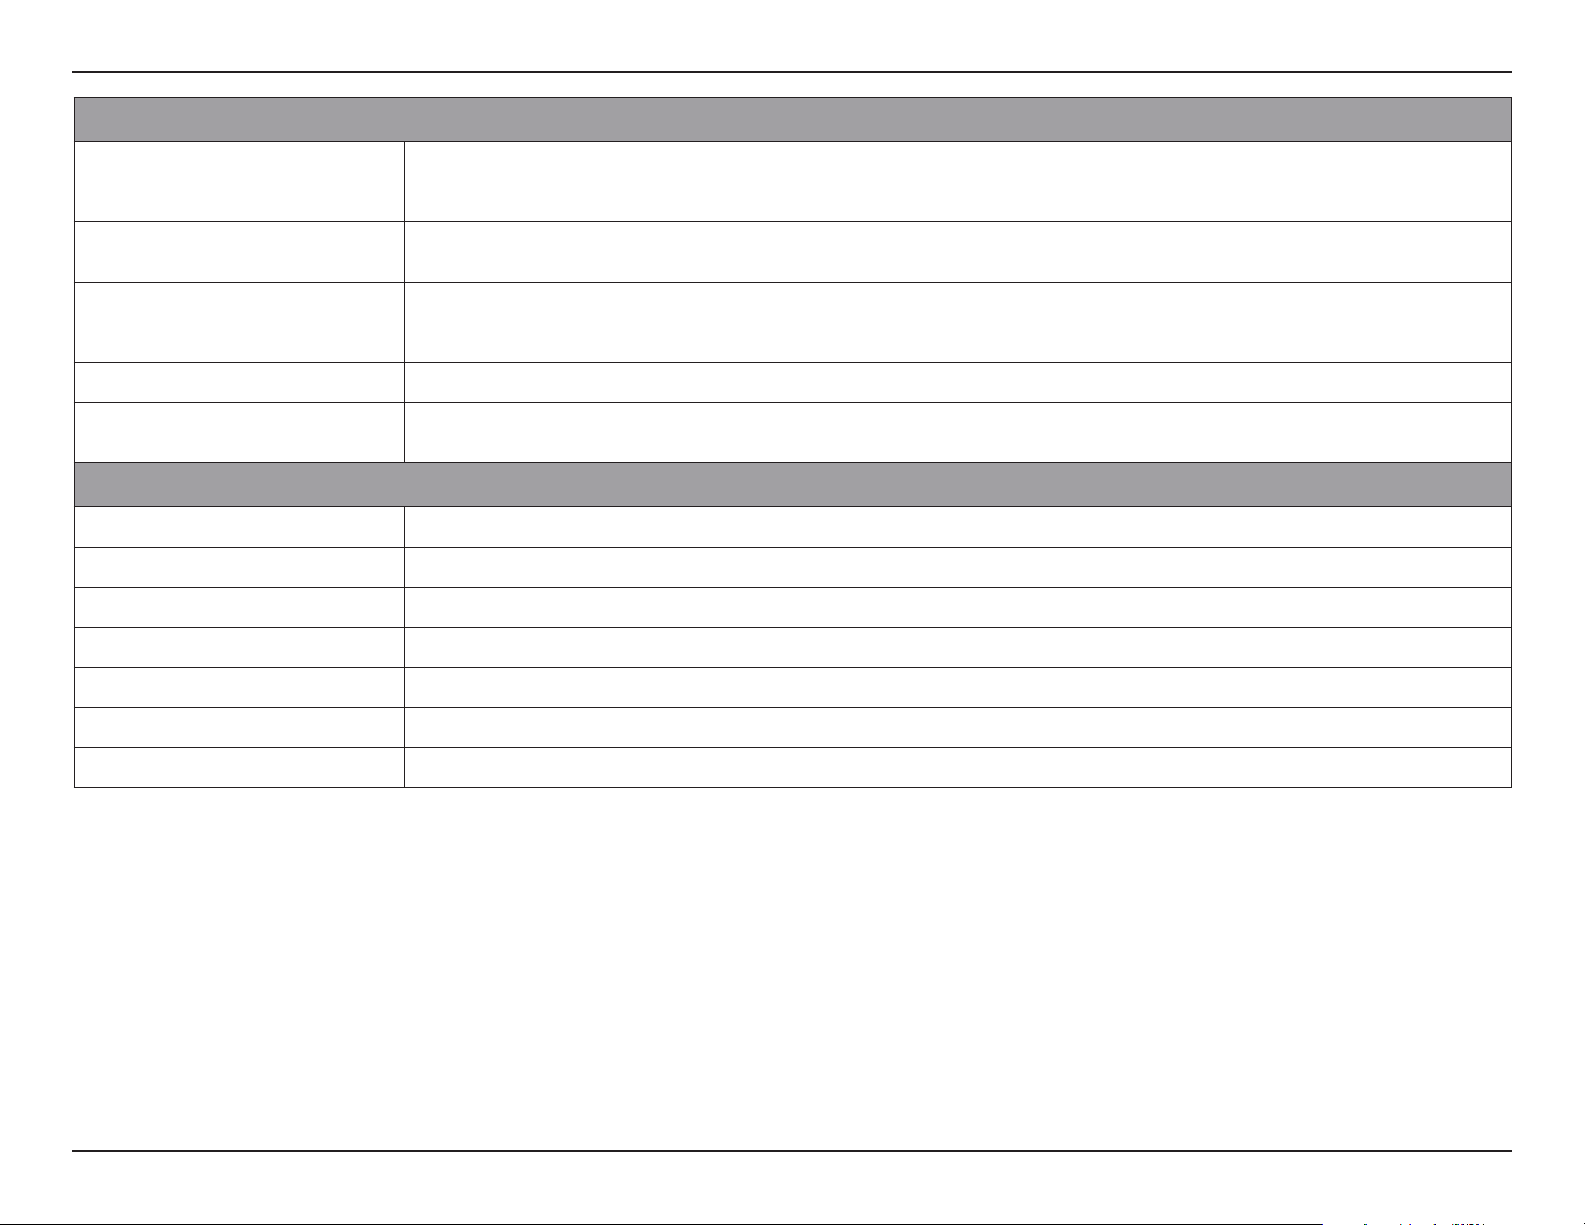
System Management
Event Management • Motion detection
• Multiple event notifications
Remote Management • Remote management via D-ViewCam software
• Remotely take snapshots/video clips and save to a local hard drive
System Requirements for Web Interface • Operating System: Microsoft Windows
• Browser: Internet Explorer 11 for full functionality, Chrome and Firefox (MJPEG
only)
D-ViewCam System Requirements • Operating System: Windows 10 • Protocol: Standard TCP/IP
D-ViewCam Software Functions • Supports all management functions provided in the web interface
• Scheduled motion trigger or manual recording options
• Event notification and uploading of snapshots via e-mail or FTP
• Video recording via microSD card, D-ViewCam, D-Link NVR or ONVIF-compliant
NAS
• Configuration interface accessible via a web browser
• Remote management of up to 64 cameras
• Viewing of up to 64 cameras on one screen
General
Weight • 470 g ± 5%
External Power Adapter • 100 to 240 V AC, 50/60 Hz (Input), 12 V DC 1.5 A (Output)
Power Consumption • 5 W ± 5% (PoE)
Temperature • Operating: -30°C to 50°C (-22°C to 122°F) • Storage: -20 to 70˚ C (-4 to 158 °F)
Operating/Storage Humidity • Max. 90% non-condensing
Certifications • CE, FCC, RCM
Dimensions • ø 110mm x 85.4 mm (ø 4.3 in x 3.4 in)
76D-Link Vigilance H.265 Outdoor Bullet Camera User Manual
Page 77
Appendix A: Technical Specications
Technical Specications - DCS-4614EK
Technical Specications
Camera
Camera Hardware Profile • 1/2.8” 4-megapixel progressive CMOS sensor
Camera Housing • IP66 compliant weatherproof housing
Image Features • Configurable image size/quality/frame rate/bit rate
Video Compression • Simultaneous H.265/H.264/MJPEG format compression • JPEG for still images
Video Resolution • 2592 x 1520 at up to 30 fps
External Device Interface • 10/100 Base-TX Fast Ethernet port (supports 802.3af PoE Class 3)
• 30 meter IR illumination distance
• Minimum illumination:
• Color: 0.05 lux @(F2.0, AGC ON)
• B/W: 0 lux @(IR LED ON)
• Built-in Infrared-Cut Removable (ICR) Filter module
• 18x digital zoom
• Minimum object distance 0.5 m
• Focal length: 2.8 m
• Aperture: F2.0
• Time stamp and text overlays
• Configurable shutter speed/brightness/saturation/contrast/sharpness/3D filter
• Configurable motion detection area
• Configurable privacy mask zones
• microSD card slot
1
• Angle of view:
• (H) 100°
• (V) 58°
• (D) 126°
• 3-axis adjustment angle (non-motorized):
• Tilt: 15° - 90°
• Pan: 350°
• Rotate: 335°
• Supports IK10 standard
• Auto White Balance (AWB)
• Auto Gain Control (AGC)
• Wide Dynamic Range (WDR)
• Corridor mode
• Reset button
Network
Network Protocols • IPv4
• HTTP/HTTPS
• RTSP/RTP/RTCP
• TCPL
• UDP
• DHCP
• DNS
• DDNS
• NTP
• FTP
• SMTP Client
• ONVIF Profile S compliant
• ARP
• ICMP
• PPPoE
• SNMP v1/v2c/v3
77D-Link Vigilance H.265 Outdoor Bullet Camera User Manual
Page 78
Appendix A: Technical Specications
System Management
Event Management • Motion detection
• Multiple event notifications
Remote Management • Remote management via D-ViewCam software
• Remotely take snapshots/video clips and save to a local hard drive
System Requirements for Web Interface • Operating System: Microsoft Windows
• Browser: Internet Explorer 11 for full functionality, Chrome and Firefox (MJPEG
only)
D-ViewCam System Requirements • Operating System: Windows 10 • Protocol: Standard TCP/IP
D-ViewCam Software Functions • Supports all management functions provided in the web interface
• Scheduled motion trigger or manual recording options
• Event notification and uploading of snapshots via e-mail or FTP
• Videoideo recording via microSD card, D-ViewCam, D-Link NVR or ONVIFcompliant NAS
• Configuration interface accessible via a web browser
• Remote management of up to 64 cameras
• Viewing of up to 64 cameras on one screen
General
Weight 470
External Power Adapter • 100 to 240 V AC, 50/60 Hz (Input), 12 V DC 1.5 A (Output)
Power Consumption • 8 W ± 5% (PoE)
Temperature • Operating: -30 to 50 °C (-22 to 122 °F) • Storage: -20 to 70˚ C (-4 to 158 °F)
Operating/Storage Humidity • Max. 90% non-condensing
Certifications • CE, FCC, RCM
Dimensions • ø 110mm x 85.4 mm (ø 4.3 in x 3.4 in)
Order Information
DCS-4614EK Vigilance 4 Megapixel H.265 Outdoor Dome Camera
Hardware Version A
1
microSD card not included. Supports capacity up to 256 GB.
78D-Link Vigilance H.265 Outdoor Bullet Camera User Manual
Page 79
Appendix A: Technical Specications
Technical Specications - DCS-4618EK
Technical Specications
Camera
Camera Hardware Profile • 1/2.5” 8-megapixel progressive CMOS sensor
Camera Housing • IP66 compliant weatherproof housing • Supports IK10 standard
Image Features • Configurable image size/quality/frame rate/bit rate
Video Compression • Simultaneous H.265/H.264/MJPEG format compression • JPEG for still images
Video Resolution • 3840 x 2160 at up to 20 fps
External Device Interface • 10/100 Base-TX Fast Ethernet port (supports 802.3af PoE Class 3)
• 30 meter IR illumination distance
• Minimum illumination:
• Color: 0.02 lux @(F1.4, AGC ON)
• B/W: 0 lux @(IR LED ON)
• Built-in Infrared-Cut Removable (ICR) Filter module
• 18x digital zoom
• Minimum object distance 0.5 m
• Time stamp and text overlays
• Configurable shutter speed/brightness/saturation/contrast/sharpness/3D filter
• Configurable motion detection area
• Configurable privacy mask zones
• microSD card slot
1
• Focal length: 3.3 - 12 m
• Aperture: F1.4
• Angle of view:
• (H) 108.6° - 35°
• (V) 56° - 21°
• (D) 125° - 42°
• 3-axis adjustment angle (non-motorized):
• Pan: 355°
• Tilt: 10° - 90°
• Rotate: 355°
• Auto White Balance (AWB)
• Auto Gain Control (AGC)
• Wide Dynamic Range (WDR)
• Corridor mode
• Reset button
Network
Network Protocols • IPv4
• HTTP/HTTPS
• RTSP/RTP/RTCP
• TCP
• UDP
• DHCP
• DNS
• DDNS
• NTP
• FTP
• SMTP
• ONVIF Profile S compliant
• ARP
• ICMP
• PPPoE
• SNMP v1/v2c/v3
79D-Link Vigilance H.265 Outdoor Bullet Camera User Manual
Page 80
Appendix A: Technical Specications
System Management
Event Management • Motion detection
• Multiple event notifications
Remote Management • Remote management via D-ViewCam software
• Remotely take snapshots/video clips and save to a local hard drive
System Requirements for Web Interface • Operating System: Microsoft Windows
• Browser: Internet Explorer 11 for full functionality, Chrome and Firefox (MJPEG
only)
D-ViewCam System Requirements • Operating System: Windows 10 • Protocol: Standard TCP/IP
D-ViewCam Software Functions • Supports all management functions provided in the web interface
• Scheduled motion trigger or manual recording options
• Event notification and uploading of snapshots via e-mail or FTP
• Video recording via microSD card, D-ViewCam, D-Link NVR or ONVIF-compliant
NAS
• Configuration interface accessible via a web browser
• Remote management of up to 64 cameras
• Viewing of up to 64 cameras on one screen
General
Weight • 750 g ± 5%
External Power Adapter • 100 to 240 V AC, 50/60 Hz (Input), 12 V DC 1.5 A (Output)
Power Consumption • 8 W ± 5% (PoE)
Temperature • Operating: -30 to 50 °C (-22 to 122 °F) • Storage: -20 to 70˚ C (-4 to 158 °F)
Operating/Storage Humidity • Max. 90% non-condensing
Certifications • CE, FCC, RCM
Dimensions • ø 130mm x 112 mm (ø 5.1 in x 4.4 in)
Order Information
DCS-4618EK Vigilance 8 Megapixel H.265 Outdoor Dome Camera
Hardware Version A
1
microSD card not included. Supports capacity up to 256 GB.
80D-Link Vigilance H.265 Outdoor Bullet Camera User Manual
Page 81

Appendix B - Regulatory Statements
Regulatory Information
Federal Communication Commission Interference Statement
This equipment has been tested and found to comply with the limits for a Class A digital device, pursuant to part 15 of the FCC Rules. These limits
are designed to provide reasonable protection against harmful interference when the equipment is operated in a commercial environment. This
equipment generates, uses, and can radiate radio frequency energy and, if not installed and used in accordance with the instruction manual,
may cause harmful interference to radio communications. Operation of this equipment in a residential area is likely to cause harmful interference
in which case the user will be required to correct the interference at his own expense.
Non-modication Statement
Any changes or modications not expressly approved by the party responsible for compliance could void the user's authority to operate the
equipment.
Caution
This device complies with Part 15 of the FCC Rules. Operation is subject to the following two conditions:
(1) This device may not cause harmful interference, and (2) this device must accept any interference received, including interference that may
cause undesired operation.
Innovation, Science and Economic Development Canada (ISED) Statement:
This Class A digital apparatus complies with Canadian ICES-003.
Cet appareil numérique de la classe A est conforme à la norme NMB-003 du Canada.
CE EMI Class A Warning
This equipment is compliant with Class A of CISPR 32. In a residential environment this equipment may cause radio interference.
81D-Link Vigilance H.265 Outdoor Bullet Camera User Manual
Page 82

Appendix B - Regulatory Statements
SAFETY INSTRUCTIONS
The following general safety guidelines are provided to help ensure your own personal safety and protect your product from potential damage.
Remember to consult the product user instructions for more details.
• Static electricity can be harmful to electronic components. Discharge static electricity from your body (i.e. touching grounded bare metal)
before touching the product.
• Do not attempt to service the product and never disassemble the product. For some products with a user replaceable battery, please read
and follow the instructions in the user manual.
• Do not spill food or liquid on your product and never push any objects into the openings of your product.
• Do not use this product near water, areas with high humidity, or condensation unless the product is specically rated for outdoor application.
• Keep the product away from radiators and other heat sources.
• Always unplug the product from mains power before cleaning and use a dry lint free cloth only.
SICHERHEITSVORSCHRIFTEN
Die folgenden allgemeinen Sicherheitsvorschriften dienen als Hilfe zur Gewährleistung Ihrer eigenen Sicherheit und zum Schutz Ihres Produkts.
Weitere Details nden Sie in den Benutzeranleitungen zum Produkt.
• Statische Elektrizität kann elektronischen Komponenten schaden. Um Schäden durch statische Auadung zu vermeiden, leiten Sie
elektrostatische Ladungen von Ihrem Körper ab,
(z. B. durch Berühren eines geerdeten blanken Metallteils), bevor Sie das Produkt berühren.
• Unterlassen Sie jeden Versuch, das Produkt zu warten, und versuchen Sie nicht, es in seine Bestandteile zu zerlegen. Für einige Produkte mit
austauschbaren Akkus lesen Sie bitte das Benutzerhandbuch und befolgen Sie die dort beschriebenen Anleitungen.
• Vermeiden Sie, dass Speisen oder Flüssigkeiten auf Ihr Produkt gelangen, und stecken Sie keine Gegenstände in die Gehäuseschlitze oder
-önungen Ihres Produkts.
• Verwenden Sie dieses Produkt nicht in unmittelbarer Nähe von Wasser und nicht in Bereichen mit hoher Luftfeuchtigkeit oder Kondensation,
es sei denn, es ist speziell zur Nutzung in Außenbereichen vorgesehen und eingestuft.
• Halten Sie das Produkt von Heizkörpern und anderen Quellen fern, die Wärme erzeugen.
• Trennen Sie das Produkt immer von der Stromzufuhr, bevor Sie es reinigen und verwenden Sie dazu ausschließlich ein trockenes fusselfreies
Tuch.
CONSIGNES DE SÉCURITÉ
Les consignes générales de sécurité ci-après sont fournies an d’assurer votre sécurité personnelle et de protéger le produit d’éventuels
dommages. Veuillez consulter les consignes d’utilisation du produit pour plus de détails.
• L’électricité statique peut endommager les composants électroniques. Déchargez l’électricité statique de votre corps (en touchant un objet
en métal relié à la terre par exemple) avant de toucher le produit.
• N’essayez pas d’intervenir sur le produit et ne le démontez jamais. Pour certains produits contenant une batterie remplaçable par l’utilisateur,
82D-Link Vigilance H.265 Outdoor Bullet Camera User Manual
Page 83

Appendix B - Regulatory Statements
• veuillez lire et suivre les consignes contenues dans le manuel d’utilisation.
• Ne renversez pas d’aliments ou de liquide sur le produit et n’insérez jamais d’objets dans les orices.
• N’utilisez pas ce produit à proximité d’un point d’eau, de zones très humides ou de condensation sauf si le produit a été spéciquement
conçu pour une application extérieure.
• Éloignez le produit des radiateurs et autres sources de chaleur.
• Débranchez toujours le produit de l’alimentation avant de le nettoyer et utilisez uniquement un chion sec non pelucheux.
INSTRUCCIONES DE SEGURIDAD
Las siguientes directrices de seguridad general se facilitan para ayudarle a garantizar su propia seguridad personal y para proteger el producto
frente a posibles daños. No olvide consultar las instrucciones del usuario del producto para obtener más información.
• La electricidad estática puede resultar nociva para los componentes electrónicos. Descargue la electricidad estática de su cuerpo (p. ej.,
tocando algún metal sin revestimiento conectado a tierra) antes de tocar el producto.
• No intente realizar el mantenimiento del producto ni lo desmonte nunca. Para algunos productos con batería reemplazable por el usuario,
lea y siga las instrucciones del manual de usuario.
• No derrame comida o líquidos sobre el producto y nunca deje que caigan objetos en las aberturas del mismo.
• No utilice este producto cerca del agua, en zonas con humedad o condensación elevadas a menos que el producto esté clasicado
especícamente para aplicación en exteriores.
• Mantenga el producto alejado de los radiadores y de otras fuentes de calor.
• Desenchufe siempre el producto de la alimentación de red antes de limpiarlo y utilice solo un paño seco sin pelusa"
ISTRUZIONI PER LA SICUREZZA
Las siguientes directrices de seguridad general se facilitan para ayudarle a garantizar su propia seguridad personal y para proteger el producto
frente a posibles daños. No olvide consultar las instrucciones del usuario del producto para obtener más información.
• La electricidad estática puede resultar nociva para los componentes electrónicos. Descargue la electricidad estática de su cuerpo (p. ej.,
tocando algún metal sin revestimiento conectado a tierra) antes de tocar el producto.
• No intente realizar el mantenimiento del producto ni lo desmonte nunca. Para algunos productos con batería reemplazable por el usuario,
lea y siga las instrucciones del manual de usuario.
• No derrame comida o líquidos sobre el producto y nunca deje que caigan objetos en las aberturas del mismo.
• No utilice este producto cerca del agua, en zonas con humedad o condensación elevadas a menos que el producto esté clasicado
especícamente para aplicación en exteriores.
• Mantenga el producto alejado de los radiadores y de otras fuentes de calor.
• Desenchufe siempre el producto de la alimentación de red antes de limpiarlo y utilice solo un paño seco sin pelusa"
83D-Link Vigilance H.265 Outdoor Bullet Camera User Manual
Page 84

Appendix B - Regulatory Statements
VEILIGHEIDSINFORMATIE
De volgende algemene veiligheidsinformatie werd verstrekt om uw eigen persoonlijke veiligheid te waarborgen en uw product te beschermen
tegen mogelijke schade. Denk eraan om de gebruikersinstructies van het product te raadplegen voor meer informatie.
• Statische elektriciteit kan schadelijk zijn voor elektronische componenten. Ontlaad de statische elektriciteit van uw lichaam (d.w.z. het
aanraken van geaard bloot metaal) voordat uhet product aanraakt.
• U mag nooit proberen het product te onderhouden en u mag het product nooit demonteren. Voor sommige producten met door de
gebruiker te vervangen batterij, dient u de instructies in de gebruikershandleiding te lezen en te volgen.
• Mors geen voedsel of vloeistof op uw product en u mag nooit voorwerpen in de openingen van uw product duwen.
• Gebruik dit product niet in de buurt van water, gebieden met hoge vochtigheid of condensatie, tenzij het product speciek geclassiceerd is
voor gebruik buitenshuis.
• Houd het product uit de buurt van radiators en andere warmtebronnen.
• U dient het product steeds los te koppelen van de stroom voordat u het reinigt en gebruik uitsluitend een droge pluisvrije doek"
84D-Link Vigilance H.265 Outdoor Bullet Camera User Manual
Page 85
Appendix B - Regulatory Statements
Disposing and Recycling Your Product
ENGLISH EN
This symbol on the product or packaging means that according to local laws and regulations this product should be not be disposed
of in household waste but sent for recycling. Please take it to a collection point designated by your local authorities once it has
reached the end of its life, some will accept products for free. By recycling the product and its packaging in this manner you help to
conserve the environment and protect human health.
D-Link and the Environment
At D-Link, we understand and are committed to reducing any impact our operations and products may have on the environment. To minimise
this impact D-Link designs and builds its products to be as environmentally friendly as possible, by using recyclable, low toxic materials in both
products and packaging.
D-Link recommends that you always switch o or unplug your D-Link products when they are not in use. By doing so you will help to save energy
and reduce CO2 emissions.
To learn more about our environmentally responsible products and packaging please visit www.dlinkgreen.com.
DEUTSCH DE
Dieses Symbol auf dem Produkt oder der Verpackung weist darauf hin, dass dieses Produkt gemäß bestehender örtlicher Gesetze
und Vorschriften nicht über den normalen Hausmüll entsorgt werden sollte, sondern einer Wiederverwertung zuzuführen ist. Bringen
Sie es bitte zu einer von Ihrer Kommunalbehörde entsprechend amtlich ausgewiesenen Sammelstelle, sobald das Produkt das Ende
seiner Nutzungsdauer erreicht hat. Für die Annahme solcher Produkte erheben einige dieser Stellen keine Gebühren. Durch ein auf
diese Weise durchgeführtes Recycling des Produkts und seiner Verpackung helfen Sie, die Umwelt zu schonen und die menschliche
Gesundheit zu schützen.
D-Link und die Umwelt
D-Link ist sich den möglichen Auswirkungen seiner Geschäftstätigkeiten und seiner Produkte auf die Umwelt bewusst und fühlt sich verpichtet,
diese entsprechend zu mindern. Zu diesem Zweck entwickelt und stellt D-Link seine Produkte mit dem Ziel größtmöglicher Umweltfreundlichkeit
her und verwendet wiederverwertbare, schadstoarme Materialien bei Produktherstellung und Verpackung.
D-Link empehlt, Ihre Produkte von D-Link, wenn nicht in Gebrauch, immer auszuschalten oder vom Netz zu nehmen. Auf diese Weise helfen
Sie, Energie zu sparen und CO2-Emissionen zu reduzieren.
Wenn Sie mehr über unsere umweltgerechten Produkte und Verpackungen wissen möchten, nden Sie entsprechende Informationen im Internet
unter www.dlinkgreen.com.
85D-Link Vigilance H.265 Outdoor Bullet Camera User Manual
Page 86
Appendix B - Regulatory Statements
FRANÇAIS FR
Ce symbole apposé sur le produit ou son emballage signie que, conformément aux lois et règlementations locales, ce produit ne
doit pas être éliminé avec les déchets domestiques mais recyclé. Veuillez le rapporter à un point de collecte prévu à cet eet par les
autorités locales; certains accepteront vos produits gratuitement. En recyclant le produit et son emballage de cette manière, vous
aidez à préserver l’environnement et à protéger la santé de l’homme.
D-Link et l’environnement
Chez D-Link, nous sommes conscients de l'impact de nos opérations et produits sur l'environnement et nous engageons à le réduire. Pour limiter
cet impact, D-Link conçoit et fabrique ses produits de manière aussi écologique que possible, en utilisant des matériaux recyclables et faiblement
toxiques, tant dans ses produits que ses emballages.
D-Link recommande de toujours éteindre ou débrancher vos produits D-Link lorsque vous ne les utilisez pas. Vous réaliserez ainsi des économies
d’énergie et réduirez vos émissions de CO2.
Pour en savoir plus sur les produits et emballages respectueux de l’environnement, veuillez consulter le www.dlinkgreen.com.
ESPAÑOL ES
Este símbolo en el producto o el embalaje signica que, de acuerdo con la legislación y la normativa local, este producto no se debe
desechar en la basura doméstica sino que se debe reciclar. Llévelo a un punto de recogida designado por las autoridades locales una
vez que ha llegado al n de su vida útil; algunos de ellos aceptan recogerlos de forma gratuita. Al reciclar el producto y su embalaje
de esta forma, contribuye a preservar el medio ambiente y a proteger la salud de los seres humanos.
D-Link y el medio ambiente
En D-Link, comprendemos y estamos comprometidos con la reducción del impacto que puedan tener nuestras actividades y nuestros productos
en el medio ambiente. Para reducir este impacto, D-Link diseña y fabrica sus productos para que sean lo más ecológicos posible, utilizando
materiales reciclables y de baja toxicidad tanto en los productos como en el embalaje.
D-Link recomienda apagar o desenchufar los productos D-Link cuando no se estén utilizando. Al hacerlo, contribuirá a ahorrar energía y a reducir
las emisiones de CO2.
Para obtener más información acerca de nuestros productos y embalajes ecológicos, visite el sitio www.dlinkgreen.com.
86D-Link Vigilance H.265 Outdoor Bullet Camera User Manual
Page 87
Appendix B - Regulatory Statements
ITALIANO IT
La presenza di questo simbolo sul prodotto o sulla confezione del prodotto indica che, in conformità alle leggi e alle normative locali,
questo prodotto non deve essere smaltito nei riuti domestici, ma avviato al riciclo. Una volta terminato il ciclo di vita utile, portare il
prodotto presso un punto di raccolta indicato dalle autorità locali. Alcuni questi punti di raccolta accettano gratuitamente i prodotti
da riciclare. Scegliendo di riciclare il prodotto e il relativo imballaggio, si contribuirà a preservare l'ambiente e a salvaguardare la
salute umana.
D-Link e l'ambiente
D-Link cerca da sempre di ridurre l'impatto ambientale dei propri stabilimenti e dei propri prodotti. Allo scopo di ridurre al minimo tale impatto,
D-Link progetta e realizza i propri prodotti in modo che rispettino il più possibile l'ambiente, utilizzando materiali riciclabili a basso tasso di
tossicità sia per i prodotti che per gli imballaggi.
D-Link raccomanda di spegnere sempre i prodotti D-Link o di scollegarne la spina quando non vengono utilizzati. In questo modo si contribuirà
a risparmiare energia e a ridurre le emissioni di anidride carbonica.
Per ulteriori informazioni sui prodotti e sugli imballaggi D-Link a ridotto impatto ambientale, visitate il sito all'indirizzo www.dlinkgreen.com.
NEDERLANDS NL
Dit symbool op het product of de verpakking betekent dat dit product volgens de plaatselijke wetgeving niet mag worden weggegooid
met het huishoudelijk afval, maar voor recyclage moeten worden ingeleverd. Zodra het product het einde van de levensduur heeft
bereikt, dient u het naar een inzamelpunt te brengen dat hiertoe werd aangeduid door uw plaatselijke autoriteiten, sommige
autoriteiten accepteren producten zonder dat u hiervoor dient te betalen. Door het product en de verpakking op deze manier te
recyclen helpt u het milieu en de gezondheid van de mens te beschermen.
D-Link en het milieu
Bij D-Link spannen we ons in om de impact van onze handelingen en producten op het milieu te beperken. Om deze impact te beperken, ontwerpt
en bouwt D-Link zijn producten zo milieuvriendelijk mogelijk, door het gebruik van recycleerbare producten met lage toxiciteit in product en
verpakking.
D-Link raadt aan om steeds uw D-Link producten uit te schakelen of uit de stekker te halen wanneer u ze niet gebruikt. Door dit te doen bespaart
u energie en beperkt u de CO2-emissies.
Breng een bezoek aan www.dlinkgreen.com voor meer informatie over onze milieuverantwoorde producten en verpakkingen.
87D-Link Vigilance H.265 Outdoor Bullet Camera User Manual
Page 88
Appendix B - Regulatory Statements
POLSKI PL
Ten symbol umieszczony na produkcie lub opakowaniu oznacza, że zgodnie z miejscowym prawem i lokalnymi przepisami
niniejszego produktu nie wolno wyrzucać jak odpady czy śmieci z gospodarstwa domowego, lecz należy go poddać procesowi
recyklingu. Po zakończeniu użytkowania produktu, niektóre odpowiednie do tego celu podmioty przyjmą takie produkty
nieodpłatnie, dlatego prosimy dostarczyć go do punktu zbiórki wskazanego przez lokalne władze. Poprzez proces recyklingu i
dzięki takiemu postępowaniu z produktem oraz jego opakowaniem, pomogą Państwo chronić środowisko naturalne i dbać o
ludzkie zdrowie.
D-Link i środowisko
D-Link podchodzimy w sposób świadomy do ochrony otoczenia oraz jesteśmy zaangażowani w zmniejszanie wpływu naszych działań i produktów
na środowisko naturalne. W celu zminimalizowania takiego wpływu rma D-Link konstruuje i wytwarza swoje produkty w taki sposób, aby były
one jak najbardziej przyjazne środowisku, stosując do tych celów materiały nadające się do powtórnego wykorzystania, charakteryzujące się
małą toksycznością zarówno w przypadku samych produktów jak i opakowań.
Firma D-Link zaleca, aby Państwo zawsze prawidłowo wyłączali z użytku swoje produkty D-Link, gdy nie są one wykorzystywane. Postępując w
ten sposób pozwalają Państwo oszczędzać energię i zmniejszać emisje CO2.
Aby dowiedzieć się więcej na temat produktów i opakowań mających wpływ na środowisko prosimy zapoznać się ze stroną Internetową www.
dlinkgreen.com.
ČESKY CZ
Tento symbol na výrobku nebo jeho obalu znamená, že podle místně platných předpisů se výrobek nesmí vyhazovat do komunálního
odpadu, ale odeslat k recyklaci. Až výrobek doslouží, odneste jej prosím na sběrné místo určené místními úřady k tomuto účelu.
Některá sběrná místa přijímají výrobky zdarma. Recyklací výrobku i obalu pomáháte chránit životní prostředí i lidské zdraví.
D-Link a životní prostředí
Ve společnosti D-Link jsme si vědomi vlivu našich provozů a výrobků na životní prostředí a snažíme se o minimalizaci těchto vlivů. Proto své
výrobky navrhujeme a vyrábíme tak, aby byly co nejekologičtější, a ve výrobcích i obalech používáme recyklovatelné a nízkotoxické materiály.
Společnost D-Link doporučuje, abyste své výrobky značky D-Link vypnuli nebo vytáhli ze zásuvky vždy, když je nepoužíváte. Pomůžete tak šetřit
energii a snížit emise CO2.
Více informací o našich ekologických výrobcích a obalech najdete na adrese www.dlinkgreen.com.
88D-Link Vigilance H.265 Outdoor Bullet Camera User Manual
Page 89
Appendix B - Regulatory Statements
MAGYAR HU
Ez a szimbólum a terméken vagy a csomagoláson azt jelenti, hogy a helyi törvényeknek és szabályoknak megfelelően ez a termék
nem semmisíthető meg a háztartási hulladékkal együtt, hanem újrahasznosításra kell küldeni. Kérjük, hogy a termék élettartamának
elteltét követően vigye azt a helyi hatóság által kijelölt gyűjtőhelyre. A termékek egyes helyeken ingyen elhelyezhetők. A termék és
a csomagolás újrahasznosításával segíti védeni a környezetet és az emberek egészségét.
A D-Link és a környezet
A D-Linknél megértjük és elkötelezettek vagyunk a műveleteink és termékeink környezetre gyakorolt hatásainak csökkentésére. Az ezen hatás
csökkentése érdekében a D-Link a lehető leginkább környezetbarát termékeket tervez és gyárt azáltal, hogy újrahasznosítható, alacsony károsanyagtartalmú termékeket gyárt és csomagolásokat alkalmaz.
A D-Link azt javasolja, hogy mindig kapcsolja ki vagy húzza ki a D-Link termékeket a tápforrásból, ha nem használja azokat. Ezzel segít az energia
megtakarításában és a széndioxid kibocsátásának csökkentésében.
Környezetbarát termékeinkről és csomagolásainkról további információkat a www.dlinkgreen.com weboldalon tudhat meg.
NORSK NO
Dette symbolet på produktet eller forpakningen betyr at dette produktet ifølge lokale lover og forskrifter ikke skal kastes sammen
med husholdningsavfall, men leveres inn til gjenvinning. Vennligst ta det til et innsamlingssted anvist av lokale myndigheter når
det er kommet til slutten av levetiden. Noen steder aksepteres produkter uten avgift. Ved på denne måten å gjenvinne produktet
og forpakningen hjelper du å verne miljøet og beskytte folks helse.
D-Link og miljøet
Hos D-Link forstår vi oss på og er forpliktet til å minske innvirkningen som vår drift og våre produkter kan ha på miljøet. For å minimalisere denne
innvirkningen designer og lager D-Link produkter som er så miljøvennlig som mulig, ved å bruke resirkulerbare, lav-toksiske materialer både i
produktene og forpakningen.
D-Link anbefaler at du alltid slår av eller frakobler D-Link-produkter når de ikke er i bruk. Ved å gjøre dette hjelper du å spare energi og å redusere
CO2-utslipp.
For mer informasjon angående våre miljøansvarlige produkter og forpakninger kan du gå til www.dlinkgreen.com.
89D-Link Vigilance H.265 Outdoor Bullet Camera User Manual
Page 90
Appendix B - Regulatory Statements
DANSK DK
Dette symbol på produktet eller emballagen betyder, at dette produkt i henhold til lokale love og regler ikke må bortskaes som
husholdningsaald, mens skal sendes til genbrug. Indlever produktet til et indsamlingssted som angivet af de lokale myndigheder,
når det er nået til slutningen af dets levetid. I nogle tilfælde vil produktet blive modtaget gratis. Ved at indlevere produktet og dets
emballage til genbrug på denne måde bidrager du til at beskytte miljøet og den menneskelige sundhed.
D-Link og miljøet
Hos D-Link forstår vi og bestræber os på at reducere enhver indvirkning, som vores aktiviteter og produkter kan have på miljøet. For at minimere
denne indvirkning designer og producerer D-Link sine produkter, så de er så miljøvenlige som muligt, ved at bruge genanvendelige materialer
med lavt giftighedsniveau i både produkter og emballage.
D-Link anbefaler, at du altid slukker eller frakobler dine D-Link-produkter, når de ikke er i brug. Ved at gøre det bidrager du til at spare energi og
reducere CO2-udledningerne.
Du kan nde ere oplysninger om vores miljømæssigt ansvarlige produkter og emballage på www.dlinkgreen.com.
SUOMI FI
Tämä symboli tuotteen pakkauksessa tarkoittaa, että paikallisten lakien ja säännösten mukaisesti tätä tuotetta ei pidä hävittää
yleisen kotitalousjätteen seassa vaan se tulee toimittaa kierrätettäväksi. Kun tuote on elinkaarensa päässä, toimita se lähimpään
viranomaisten hyväksymään kierrätyspisteeseen. Kierrättämällä käytetyn tuotteen ja sen pakkauksen autat tukemaan sekä ympäristön
että ihmisten terveyttä ja hyvinvointia.
D-Link ja ympäristö
D-Link ymmärtää ympäristönsuojelun tärkeyden ja on sitoutunut vähentämään tuotteistaan ja niiden valmistuksesta ympäristölle mahdollisesti
aiheutuvia haittavaikutuksia. Nämä negatiiviset vaikutukset minimoidakseen D-Link suunnittelee ja valmistaa tuotteensa mahdollisimman
ympäristöystävällisiksi käyttämällä kierrätettäviä, alhaisia pitoisuuksia haitallisia aineita sisältäviä materiaaleja sekä tuotteissaan että niiden
pakkauksissa.
Suosittelemme, että irrotat D-Link-tuotteesi virtalähteestä tai sammutat ne aina, kun ne eivät ole käytössä. Toimimalla näin autat säästämään
energiaa ja vähentämään hiilidioksiidipäästöjä.
Lue lisää ympäristöystävällisistä D-Link-tuotteista ja pakkauksistamme osoitteesta www.dlinkgreen.com.
90D-Link Vigilance H.265 Outdoor Bullet Camera User Manual
Page 91
Appendix B - Regulatory Statements
SVENSKA SE
Den här symbolen på produkten eller förpackningen betyder att produkten enligt lokala lagar och föreskrifter inte skall kastas i
hushållssoporna utan i stället återvinnas. Ta den vid slutet av dess livslängd till en av din lokala myndighet utsedd uppsamlingsplats,
vissa accepterar produkter utan kostnad. Genom att på detta sätt återvinna produkten och förpackningen hjälper du till att bevara
miljön och skydda människors hälsa.
D-Link och miljön
På D-Link förstår vi och är fast beslutna att minska den påverkan våra verksamheter och produkter kan ha på miljön. För att minska denna påverkan
utformar och bygger D-Link sina produkter för att de ska vara så miljövänliga som möjligt, genom att använda återvinningsbara material med
låg gifthalt i både produkter och förpackningar.
D-Link rekommenderar att du alltid stänger av eller kopplar ur dina D-Link produkter när du inte använder dem. Genom att göra detta hjälper
du till att spara energi och minska utsläpp av koldioxid.
För mer information om våra miljöansvariga produkter och förpackningar www.dlinkgreen.com.
PORTUGUÊS PT
Este símbolo no produto ou embalagem signica que, de acordo com as leis e regulamentações locais, este produto não deverá ser
eliminado juntamente com o lixo doméstico mas enviado para a reciclagem. Transporte-o para um ponto de recolha designado pelas
suas autoridades locais quando este tiver atingido o m da sua vida útil, alguns destes pontos aceitam produtos gratuitamente. Ao
reciclar o produto e respectiva embalagem desta forma, ajuda a preservar o ambiente e protege a saúde humana.
A D-Link e o ambiente
Na D-Link compreendemos e comprometemo-nos com a redução do impacto que as nossas operações e produtos possam ter no ambiente.
Para minimizar este impacto a D-Link concebe e constrói os seus produtos para que estes sejam o mais inofensivos para o ambiente possível,
utilizando meteriais recicláveis e não tóxicos tanto nos produtos como nas embalagens.
A D-Link recomenda que desligue os seus produtos D-Link quando estes não se encontrarem em utilização. Com esta acção ajudará a poupar
energia e reduzir as emissões de CO2.
Para saber mais sobre os nossos produtos e embalagens responsáveis a nível ambiental visite www.dlinkgreen.com.
91D-Link Vigilance H.265 Outdoor Bullet Camera User Manual
 Loading...