

Page 1
MAVIC 2
Quick Start Guide
V1.2
ZOOM
Page 2

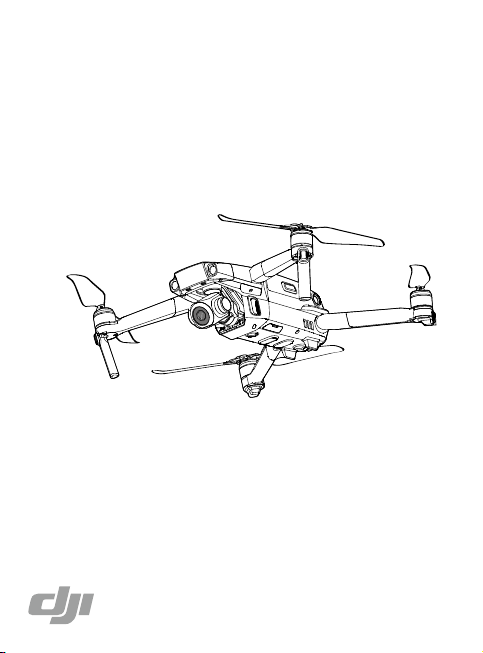
Aircraft
The DJITM MAVICTM 2 Zoom features omnidirectional Vision Systems and Infrared Sensing
Systems*, and comes with a fully stabilized 3-axis gimbal camera with an equivalent 2448 mm 2x optical zoom lens capable of shooting 4K videos and 12-megapixel photos that
support up to 4x FHD lossless zoom. DJI signature technologies such as Obstacle Sensing
and Intelligent Flight Modes like HyperLapse, ActiveTrackTM 2.0, QuickShot, Panorama,
and Advanced Pilot Assistance Systems, help you capture complex shots effortlessly. The
Mavic 2 Zoom boasts a maximum ight speed of 44.7 mph (72 kph) and a maximum ight
time** of 31 minutes.
9
10
2
1
11
1. Gimbal and Camera
2. Forward Vision System
3. Downward Vision System
4. Lateral Vision System
5. Downward Infrared
Sensing System
6. Auxiliary Bottom Light
7. microSD Card Slot
8. Front LEDs
* The Vision Systems and Infrared Sensing Systems are affected by surrounding conditions. Read the Disclaimer
and Safety Guidelines, User Manual, and watch the tutorial videos in the DJI GOTM 4 app or on the ofcial DJI
website to learn more. http://www.dji.com/mavic-2
** Maximum ight time was tested in an environment with no wind while ying at a consistent 15.5 mph (25 kph). This
value is for reference only.
3
9. Motors
10. Propellers
11. Antennas
12. Aircraft Status Indicator
13. Upward Infrared Sensing System
14. Backward Vision System
15. Intelligent Flight Battery
8
4
7
5
6
12
16
17
15
13
18
19
20
14
16. Battery Level LEDs
17. Power Button
18. Battery Buckles
19. USB-C Port
20. Link Button/Linking
Status Indicator
Page 3
Remote Controller
Built into the remote controller is the DJI’s long-range transmission technology OCUSYNCTM 2.0,
offering a maximum transmission range of 5 mi (8 km) and displaying video from the aircraft to
the DJI GO 4 app on your mobile device at up to 1080p. An on-board LCD screen gives realtime aircraft data information and the detachable control sticks make the remote controller
easier to store.
Maximum run time: 2 hours and 15 minutes*
1. LCD Screen
2. Flight Pause Button
3. 5D Button
4. Removable Control Sticks
5. Power Button
6. Antennas
7. RTH Button
8. Control Sticks Storage Slot
9. Reserve Video-Downlink
Port (USB)
10. Mobile Device Clamp
11. Flight Mode Switch
12 13
16
14
* The remote controller is able to reach its maximum transmission distance (FCC) in a wide-open area
with no electromagnetic Interference at an altitude of about 400 ft (120 m).
The maximum runtime is tested in a laboratory environment. This value is for reference only.
Folded
6
7
1
4
2
8
17
18
15
12. Gimbal Dial
13. Zoom Adjustment Dial
14. Record Button
15. Focus/Shutter Button
16. Video-Downlink/Power Port
(micro USB)
17. C1 Button (Customizable)
18. C2 Button (Customizable)
3
9
5
11
10
Page 4
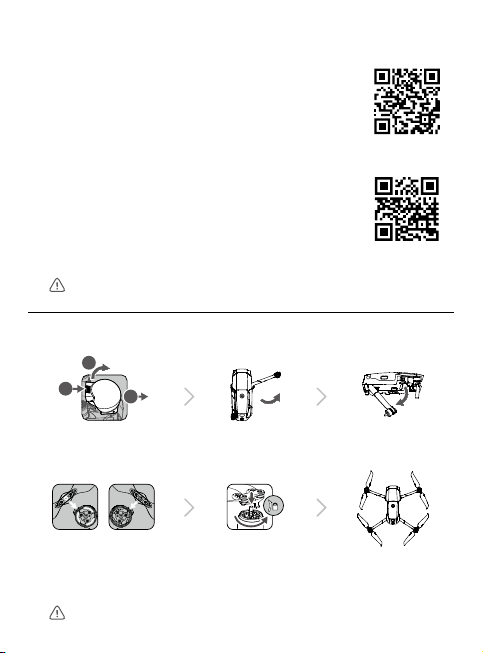
1. Download the DJI GO 4 App and Watching Tutorial Videos
1
2
3
Search “DJI GO 4” in the App Store or Google Play or scan the
QR code below to download the app on your mobile device.
DJI GO 4
Watch the tutorial videos at www.dji.com/mavic-2/info#video or in
DJI GO 4 by tapping the icon in the top right corner of your screen.
Tutorial videos
DJI GO 4 is compatible with iOS 10.0.2 (or later) or Android 5.0 (or later).
2. Preparing the Aircraft
2
1
3
Remove the gimbal
cover from the camera.
Marked Unmarked
Match the propellers
to motors.
Unfold the front arms and the propellers before the rear ones. All arms and propellers
must be unfolded before takeoff.
Unfold the front arms. Unfold the rear arms.
Press the propellers
down rmly and rotate
in the lock direction.
Unfolded
Page 5

3. Charging the Batteries
Use the provided charger to fully
charge the Intelligent Flight Battery
before rst use.
Power Outlet
100 - 240V
B
Remove the remote controller cable before charging.
Checking the Battery Levels and Powering On/O
Low
High
Press once to check the battery level.
Press, then press and hold to turn on/off.
A
Remove the Intelligent Flight Battery
A
Charging Time:
~1 hour 30 minutes
Press once to check the battery level on
the LCD screen.
Press once, then press and hold to turn on/
off the remote controller.
B
Charging Time:
~2 hour 15 minutes
Page 6

4. Preparing the Remote Controller
Unfold the antennas and mobile device clamps,
then attach the control sticks.
Strong
Weak
Set the antennas parallel to each other
1
Place one end of the RC cable to the
end of the slot.
2
3
Optimal Transmission Range
Attach your mobile device within the clamps.
Ensure the control sticks are rmly mounted.
The remote controller cable with the Lightning connector is mounted by default. Use
the appropriate cable for your mobile device to connect to the remote controller. When
using an iPad or tablet, use the USB port on the remote controller.
Do not use the Micro USB and the USB ports simultaneously for linking video.
Page 7

5. Preparing for Takeoff
DJI GO 4
App
Power on the remote controller Power on the aircraft Launch DJI GO 4
Use your DJI account to activate the aircraft. Activation requires an internet connection.
Internet
6. Flight
Before taking off, make sure the Aircraft Status Bar in
DJI GO 4 displays “Ready to Go”.
Auto Takeo / Landing
Manual Takeo / Landing
Combination stick command to start/stop
the motors
Auto Takeoff
Ready to Go (GPS)
OR
Auto Landing
Left stick up (slowly)
to take off
The motors can only be stopped mid-ight when the ight controller detects critical
error.
Left stick down (slowly) until you touch the
ground
Hold a few seconds to stop the motors
Page 8

Left Stick
Right Stick
Remote Controller Operation
The default ight control is known as Mode 2. The left stick controls the aircraft's altitude
and heading, while the right stick controls its forward, backward, left and right movements.
The gimbal dial controls the camera's tilt.
Up
Forward
Down
Turn Left
Turn Right
Left
Press the Flight Pause button for emergency braking during ight.
In DJI GO 4
HyperLapseNormal
Point of Interest
Watch the tutorials in DJI GO 4 or at the ofcial DJI website to learn more.
Always set an appropriate RTH altitude before takeoff. When the aircraft is returning to
the Home Point, you should guide it with the control sticks.
QuickShot
TapFlyWaypoints
Backward
Right
ActiveTrack
Cinematic Mode
Page 9

and motors.
http://flysafe.dji.com/no-fly
7. Fly Safe
120m
Fly in Open
Areas
Avoid flying over or near obstacles, crowds, high voltage power lines, trees or
bodies of water.
DO NOT fly near strong electromagnetic sources such as power lines and base
stations as it may affect the onboard compass.
DO NOT use the aircraft in adverse weather conditions such as rain, snow, fog
and wind speeds exceeding 10 m/s or 22 mph.
Strong GPS
Signal
Maintain Line of
Sight
Fly Below 400 Feet
(120 m)
≥10 m/s
No Fly Zone
Stay away from the rotating propellers
It’s important to understand basic ight guidelines, for the safety of both you and
those around you. Don't forget to read the
MAVIC is a trademark of DJI.
Copyright © 2018 DJI All Rights Reserved. Designed by DJI. Printed in China.
Learn more at:
Disclaimer and Safety Guidelines
.
Page 10

Specications
Aircraft
Weight 905 g
Max Speed 44.7 mph (72 kph) in Sport mode without wind
Max Service Ceiling Above
Sea Level
Operating Temperature 14° to 104° F (-10° to 40° C)
GNSS GPS + GLONASS
Operating Frequency 2.4-2.4835 GHz; 5.725-5.850 GHz
Transmitter Power
(EIRP)
Gimbal
Controllable Range Pitch: -90° to +30°
Camera
Sensor 1/2.3" CMOS; Eective pixels: 12M
Lens FOV: approx. 83° (24 mm), approx. 48° (48 mm)
ISO Range Video: 100-3200
Electronic Shutter Speed 8-1/8000 s
Max Image Size 4000×3000
Still Photography Modes Single shot
Video Recording Modes 4K Ultra HD: 3840×2160 24/25/30p
Video Storage Bitrate 100 Mbps
Photo JPEG, DNG (RAW)
Video MP4, MOV (MPEG-4 AVC/H.264, HEVC)
Supported SD Cards microSD
Remote Controller
Operating Frequency 2.4-2.4835 GHz; 5.725-5.850 GHz
Max Transmission Distance
(Unobstructed and free of
interference)
Operating Temperature 32° to 104° F (0° to 40° C)
Battery 3950mAh @ 3.83V
19685 ft (6000 m)
2.4 GHz
FCC: ≤26 dBm; CE/MIC: ≤20 dBm; SRRC: ≤20 dBm
5.8 GHz
FCC: ≤26 dBm; CE: ≤14 dBm; SRRC: ≤26 dBm
35 mm format equivalent: 24-48 mm
Aperture: f/2.8 (24 mm) - f/3.8 (48 mm)
Focus: 0.5 m to ∞
Photo: 100-1600 (auto); 100-3200 (manual)
Burst shooting: 3/5/7 frames
Auto Exposure Bracketing (AEB): 3/5 bracketed frames at 0.7 EV Bias
Interval
2.7K: 2688×1512 24/25/30/48/50/60p
FHD: 1920×1080 24/25/30/48/50/60/120p
Max Capacity: 128 GB (UHS-I Speed Grade 3 rating required)
FCC: 5 mi (8 km); CE/MIC: 3.1 mi (5 km); SRRC: 3.1 mi (5 km)
Page 11

Transmitter Power
(EIRP)
Operating Voltage
Supported Mobile Device
Size
Charger
Voltage 17.6±0.1 V
Rated Power 60 W
Intelligent Flight Battery
Capacity 3850 mAh
Voltage 17.6 V (max)
Battery Type LiPo 4S
Energy 59.29 Wh
Net Weight Approx. 297 g
Charging Temperature
Range
Max Charging Power 80 W
For more information, read the User Manual:
http://www.dji.com/mavic-2
This content is subject to change without prior notice.
※
2.4 GHz
FCC: ≤26 dBm; CE/MIC: ≤20 dBm; SRRC: ≤20 dBm
5.8 GHz
FCC: ≤26 dBm; CE: ≤14 dBm; SRRC: ≤26 dBm
1800mA @ 3.83V (when charging the mobile device)
Thickness supported: 6.5 - 8.5 mm, Max length: 160 mm
Supported USB port types: Lightning, Micro USB (Type-B)
USB-C
15.4 V (typical)
41° to 104° F (5° to 40° C)
Page 12

MAVIC 2 ZOOM
For online support, please scan this code
with Facebook Messenger
0M6DZMRM03UK
 Loading...