

Page 1
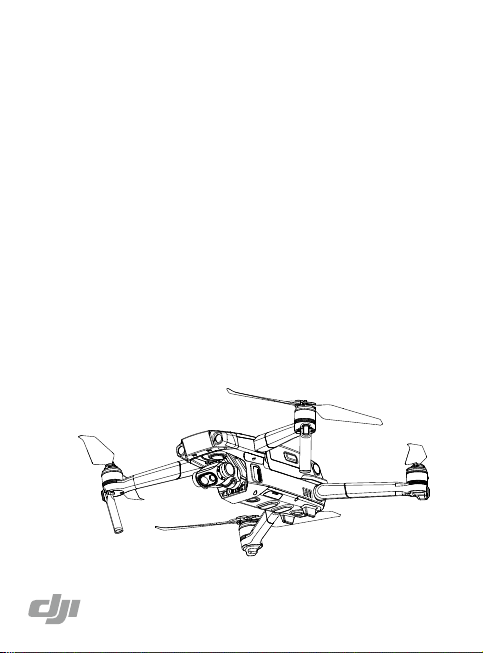
MAVIC 2
ENTERPRISE
Dual
Quick Start Guide
快速入门指南
快速入門指南
クイックスタートガイド
퀵 스타트 가이드
Kurzanleitung
Guía de inicio rápido
Guide de démarrage rapide
Guida di avvio rapido
Snelstartgids
Guia de início rápido
Guia de Início Rápido
Краткое руководство пользователя
v1.0
Page 2

Page 3

Contents
EN
Quick Start Guide
2
CHS
快速入门指南
CHT
快速入門指南
JP
クイックスタートガイド
KR
퀵 스타트 가이드
DE
Kurzanleitung
ES
Guía de inicio rápido
FR
Guide de démarrage rapide
IT
Guida di avvio rapido
NL
Snelstartgids
PT-PT
Guia de início rápido
PT-BR
Guia de Início Rápido
RU
Краткое руководство пользователя 122
12
22
32
42
52
62
72
82
92
102
112
1
Page 4
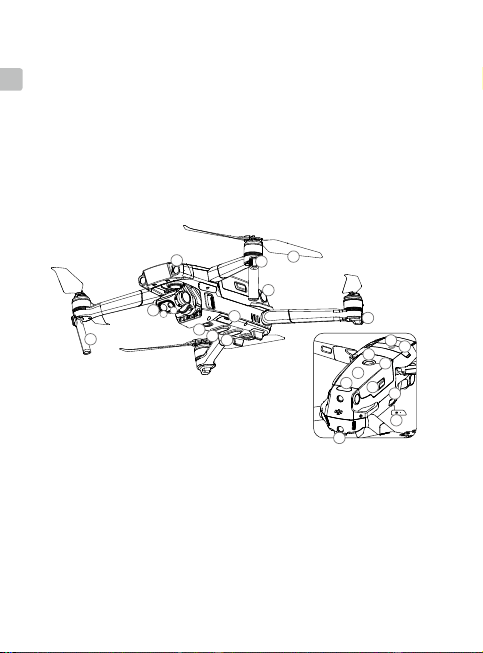
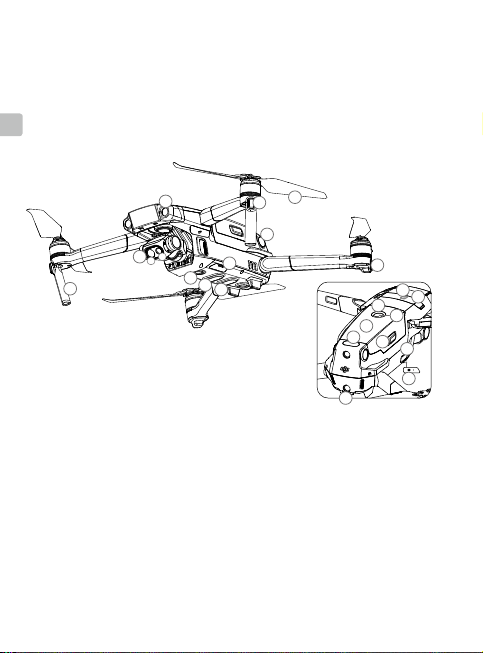
Aircraft
The DJITM MAVICTM 2 Enterprise Dual features omnidirectional Vision Systems and
EN
Infrared Sensing Systems*, and comes with a fully stabilized 3-axis gimbal camera with
a FLIR longwave infrared thermal camera and a visual camera, providing both infrared
and visual images simultaneously. DJI signature technologies such as Obstacle
Sensing help you y and capture complex shots effortlessly. Additional features like
the built-in AirSense makes you aware of your surrounding airspace, and password
protection helps you maintain secure access to your aircraft and protect your data. The
Mavic 2 Enterprise also has attachable modular accessories like the M2E Spotlight, M2E
Beacon and M2E speaker that are purpose built for various applications. The Mavic 2
Enterprise boasts a maximum ight speed of 44.7 mph (72 kph) and a maximum ight
time** of 31 minutes.
2
B
1
A
3
11
1. Gimbal and Camera
A. Visual Camera
B. Thermal Camera
2. Forward Vision System
3. Downward Vision System
4. Lateral Vision System
5. Downward Infrared Sensing
System
6. Auxiliary Bottom Light
7. MicroSD Card Slot
8. Front LEDs
* The Vision Systems and Infrared Sensing Systems are affected by surrounding conditions. Read the
Disclaimer and Safety Guidelines, User Manual, and watch the tutorial videos on the ofcial DJI website to
learn more. http://www.dji.com/mavic-2-enterprise
** Maximum ight time was tested in an environment with no wind while ying at a consistent 15.5 mph (25 kph).
This value is for reference only.
2
5
6
9. Motors
10. Propellers
11. Antennas
12. Aircraft Status Indicator
13. Upward Infrared Sensing
System
14. Backward Vision System
15. Intelligent Flight Battery
16. Battery Level LEDs
17. Power Button
10
8
4
7
12
21
22
16
17
15
13
18
19
20
14
18. Battery Buckles
19. USB-C Port
20. Link Button/Linking
Status Indicator
21. Extended Port (to
connect accessories)
22. Extended Port Cover
Page 5
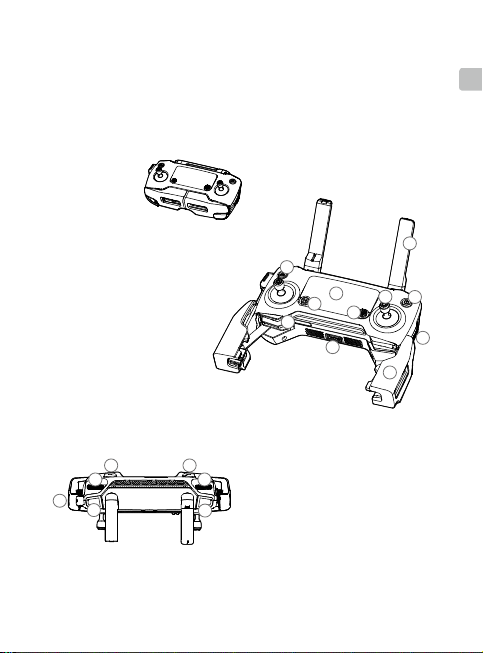
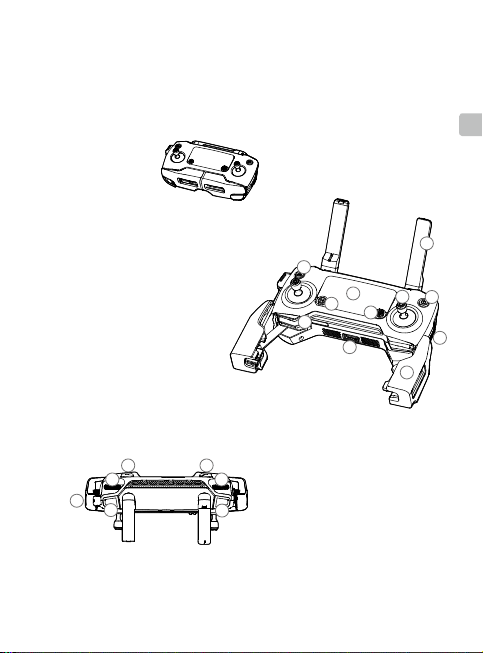
Remote Controller
Built into the remote controller is the DJI’s long-range transmission technology OCUSYNCTM
2.0, offering a maximum transmission range of 5 mi (8 km) and displaying video from the
aircraft to the DJI Pilot app on your mobile device at up to 1080p. An on-board LCD screen
gives real-time aircraft data information and the detachable control sticks make the remote
controller easier to store.
Maximum run time: 2 hours and 15 minutes*
EN
1. LCD Screen
2. Flight Pause Button
3. 5D Button
4. Removable Control Sticks
5. Power Button
6. Antennas
7. RTH Button
8. Control Sticks Storage Slot
9. Reserve Video-Downlink
Port (USB)
10. Mobile Device Clamp
11. Flight Mode Switch
12 13
16
14
* The remote controller is able to reach its maximum transmission distance (FCC) in a wide-open area
with no electromagnetic Interference at an altitude of about 400 ft (120 m).
The maximum runtime is tested in a laboratory environment. This value is for reference only.
Folded
6
7
1
4
2
8
17
18
15
12. Gimbal Dial
13. EV Adjustment Dial
14. Record Button
15. Focus/Shutter Button
16. Video-Downlink/Power Port
(micro USB)
17. C1 Button (Customizable)
18. C2 Button (Customizable)
3
9
5
11
10
3
Page 6
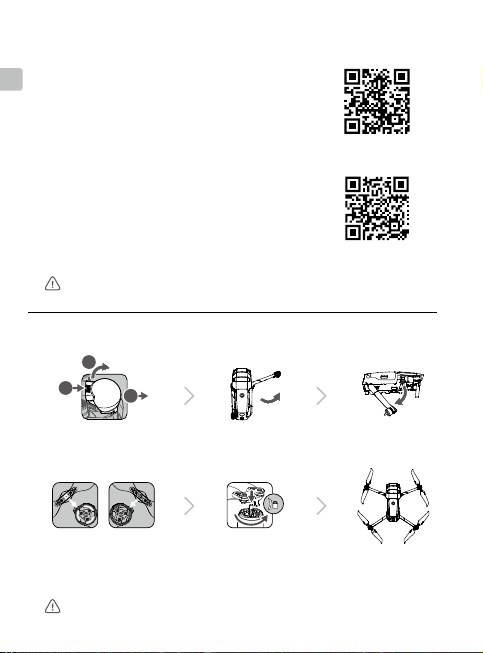
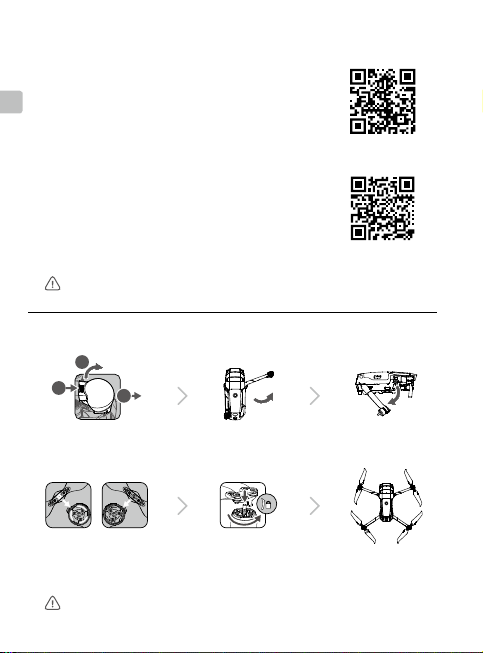
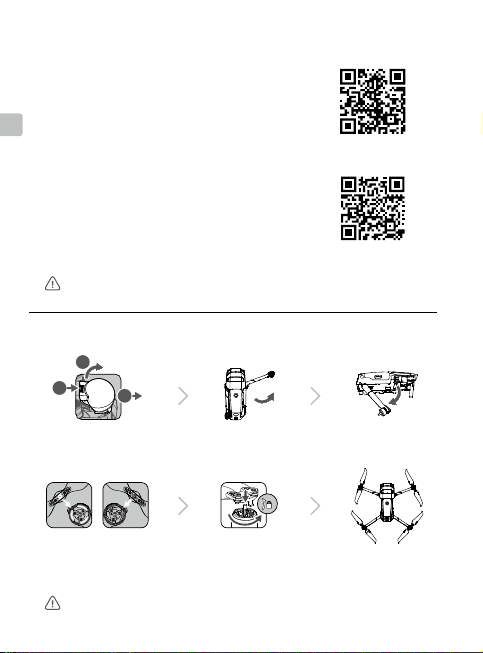
1. Download the DJI Pilot App and Watch the Tutorial Videos
1
2
3
EN
DJI Pilot
Search “
the QR code below to download the app on your mobile
device.
” in the App Store or Google Play or scan
DJI Pilot
Watch the tutorial videos at
info#video
.
DJI Pilot is compatible with iOS 10.0 (or later) or Android 5.0 (or later).
www.dji.com/mavic-2-enterprise/
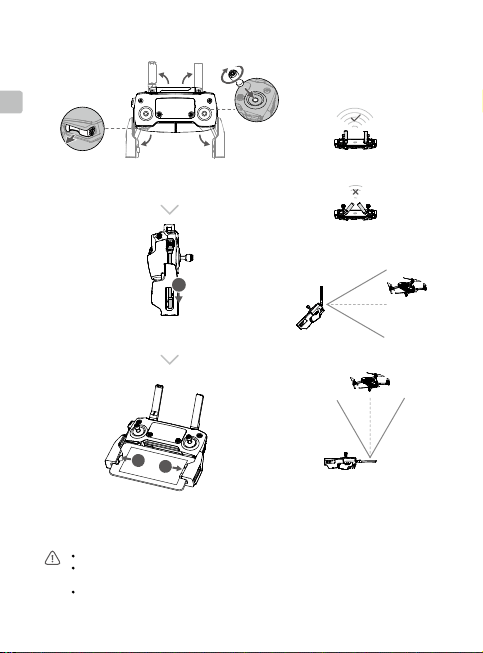
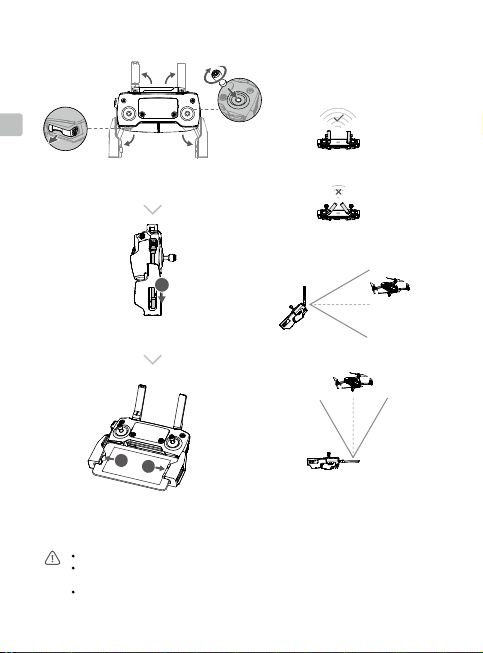
2. Preparing the Aircraft
2
1
Remove the gimbal
cover from the camera.
Marked Unmarked
Match the propellers
to motors.
4
3
Unfold the front arms. Unfold the rear arms.
Press the propellers
down rmly and rotate
in the lock direction.
Unfold the front arms and the propellers before the rear ones. All arms and propellers
must be unfolded before takeoff.
Tutorial videos
Unfolded
Page 7
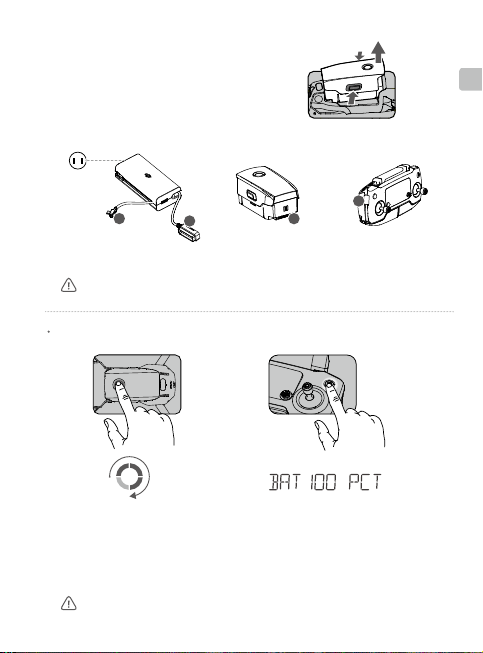
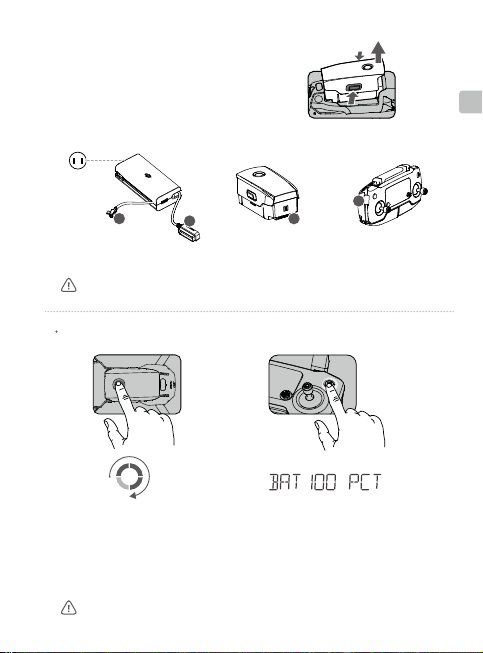
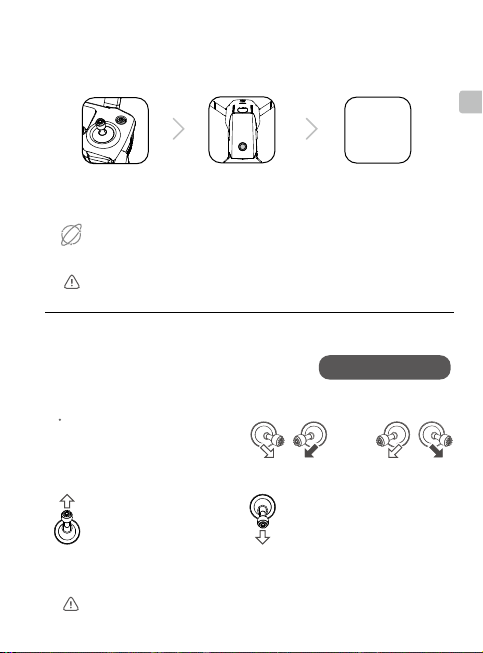
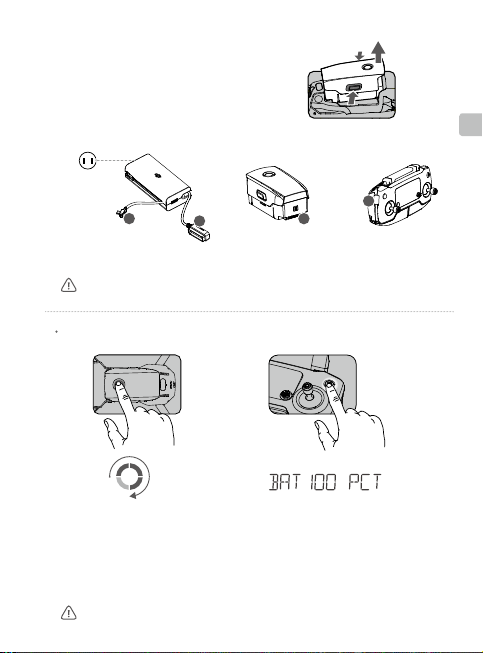
3. Charging the Batteries
Use the provided charger to fully
charge the Intelligent Flight Battery
before rst use.
Remove the Intelligent Flight Battery
Power Outlet
100 - 240V
B
A
A
Charging Time:
~1 hour 30 minutes
Remove the remote controller cable before charging.
Checking the Battery Levels and Powering On/O
Low
High
Press once to check the battery level.
Press, then press and hold to turn on/off.
Install the battery to the aircraft and power it on. Once the battery temperature is lower
than 6° C, it will auto heat to maintain a temperature between 8-10° C. Refer to the
User Manual for more details.
Press once to check the battery level on
the LCD screen.
Press once, then press and hold to turn on/
off the remote controller.
B
Charging Time:
~2 hour 15 minutes
EN
5
Page 8
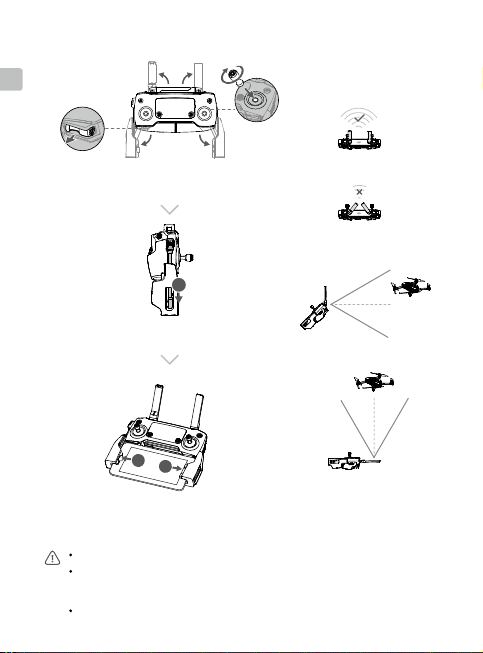
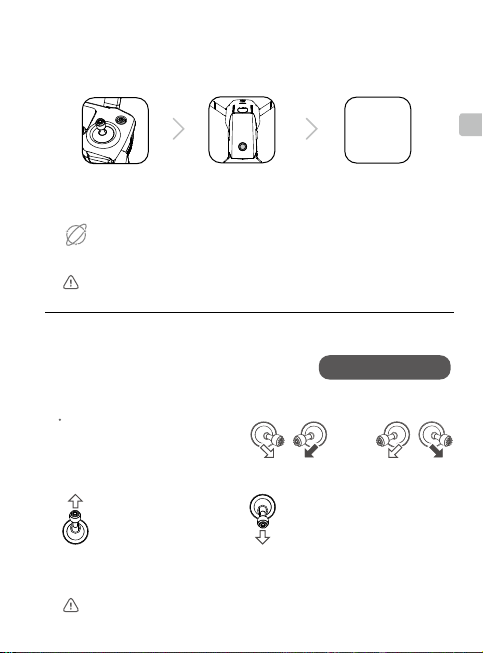
4. Preparing the Remote Controller
EN
Unfold the antennas and mobile device clamps,
then attach the control sticks.
Set the antennas parallel to each other
1
Place one end of the RC cable to the
end of the slot.
2
3
Optimal Transmission Range
Attach your mobile device within the clamps.
Ensure the control sticks are rmly mounted.
The remote controller cable with the Lightning connector is mounted by default. Use
the appropriate cable for your mobile device to connect to the remote controller.
When using an iPad or tablet, use the USB port on the remote controller.
Do not use the Micro USB and the USB ports simultaneously for linking video.
6
Strong
Weak
Page 9
5. Preparing for Takeoff
DJI Pilot
Power on the remote controller Power on the aircraft Launch DJI Pilot
Use your DJI account to activate the aircraft. Activation requires an internet
connection.
Internet
Set a password for the aircraft in the DJI Pilot app to ensure secure access and
protect your onboard data.
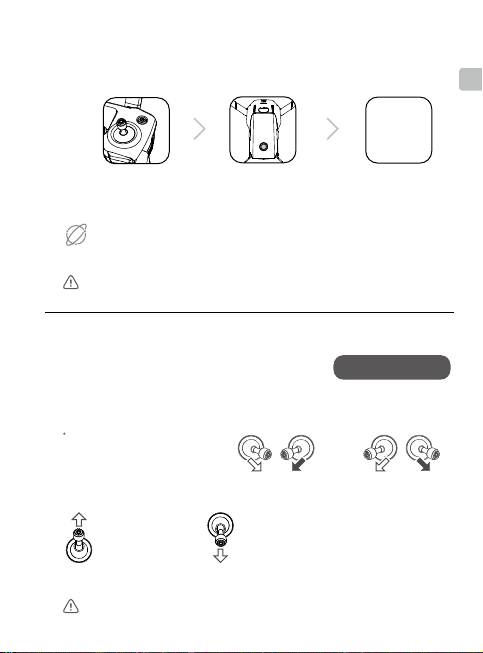
6. Flight
Before taking off, make sure the Aircraft Status Bar
in DJI Pilot displays “Ready to Go”.
Manual Takeo / Landing
Combination stick command to
start/stop the motors
Ready to Go (GPS)
OR
EN
App
Left stick up (slowly)
to take off
The motors can only be stopped mid-flight when the flight controller detects
critical error.
Left stick down (slowly) until you touch the
ground
Hold a few seconds to stop the motors
7
Page 10
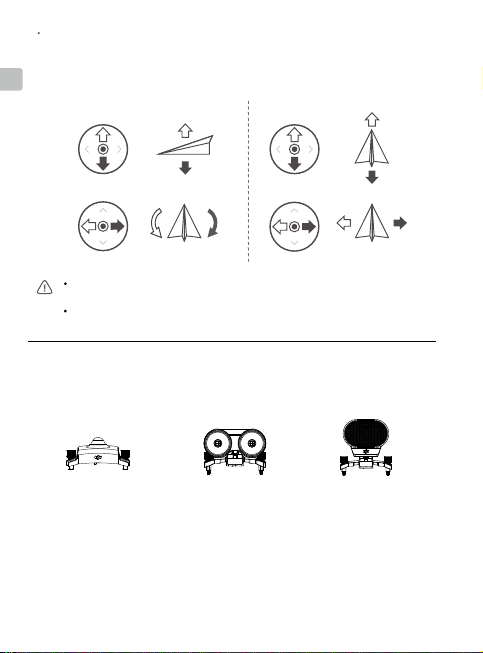
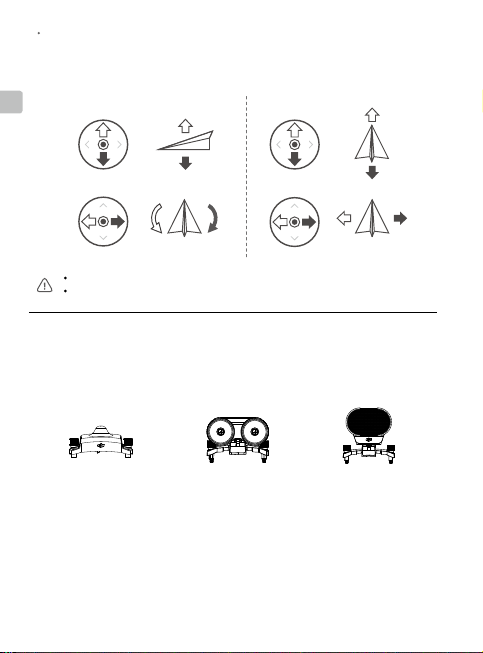
Left Stick
Remote Controller Operation
The default flight control is known as Mode 2. The left stick controls the aircraft's
altitude and heading, while the right stick controls its forward, backward, left and right
EN
movements. The gimbal dial controls the camera's tilt.
Up
Right Stick
Forward
Down
Turn Left
Always set an appropriate RTH altitude before takeoff. When the aircraft is returning to
the Home Point, you should guide it with the control sticks.
Press the Flight Pause button for emergency braking during ight.
*
Modular Accessories
M2E Beacon
Turn Right
M2E Spotlight M2E Speaker
Left
8
Backward
Right
Page 11
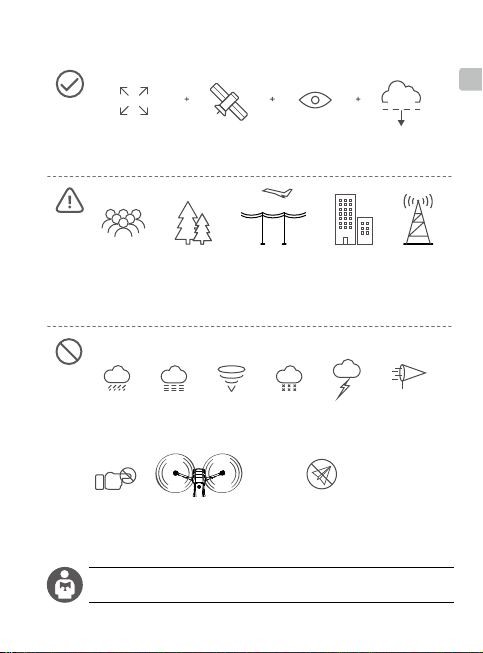
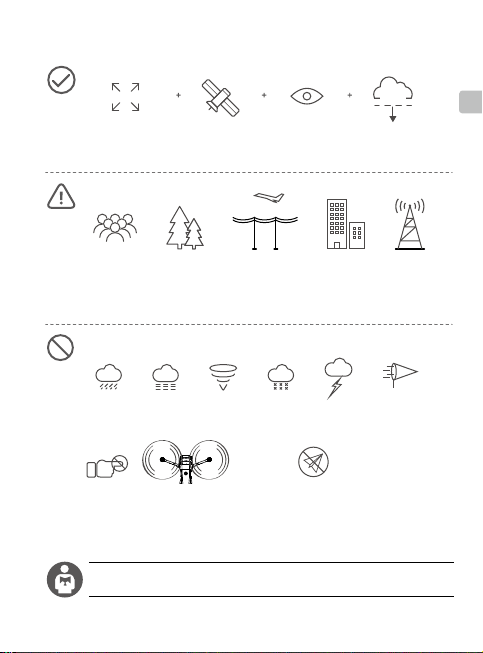
Fly Below 400 Feet
DO NOT fly near strong electromagnetic sources such as power lines and base
and motors.
7. Fly Safe
EN
120m
Fly in Open
Areas
Avoid flying over or near obstacles, crowds, high voltage power lines, trees or
bodies of water.
Strong GPS
Signal
Maintain Line of
Sight
(120 m)
stations as it may affect the onboard compass.
DO NOT use the aircraft in adverse weather conditions such as rain, snow, fog
and wind speeds exceeding 10 m/s or 22 mph.
No Fly Zone
Stay away from the rotating propellers
It’s important to understand basic ight guidelines, for the safety of both you and
those around you. Don't forget to read the
Learn more at:
http://flysafe.dji.com/no-fly
Disclaimer and Safety Guidelines
≥10 m/s
.
9
Page 12

Specications
Aircraft
Weight 899 g
EN
Max Speed 44.7 mph (72 kph) in Sport mode without wind
Max Service Ceiling Above Sea Level 19685 ft (6000 m)
Operating Temperature 14° to 104° F (-10° to 40° C)
GNSS GPS + GLONASS
Operating Frequency 2.4-2.4835 GHz; 5.725-5.850 GHz
Transmitter Power
(EIRP)
Internal Storage 24 GB
Gimbal
Controllable Range Pitch: -90° to +30°
Thermal Camera
Sensor
Lens
Pixel Pitch
Spectral Band
Image Size
Still Photography Modes
Video Recording Modes
Accuracy
Scene Range
Photo
Video
Visual Camera
Sensor
Lens
ISO Range
Max Image Size
Still Photography Modes
Video Recording Modes
Max Video Bitrate
10
2.4 GHz
FCC: ≤26 dBm; CE/MIC: ≤20 dBm; SRRC: ≤20 dBm
5.8 GHz
FCC: ≤26 dBm; CE: ≤14 dBm; SRRC: ≤26 dBm
Uncooled VOx Microbolometer
HFOV: 57°
Aperture: f/1.1
12 μm
8-14 μm
640×480 (4:3); 640×360 (16:9)
Single shot
Burst shooting: 3/5/7 frames
Interval (2/3/5/7/10/15/20/30/60 s)
640×360 @8.7fps
High Gain: Max ±5% (typical)
Low Gain: Max ±10% (typical)
High Gain: -10° to +140°C
Low Gain: -10°to +400°C
JPEG
MP4, MOV (MPEG-4 AVC/H.264)
1/2.3" CMOS; Eective pixels: 12M
FOV: approx. 85°
35 mm format equivalent:24 mm
Aperture: f/2.8
Focus: 0.5 m to ∞
Video: 100-3200 (auto)
Photo: 100-1600 (auto)
4056×3040 (4:3); 4056×2280 (16:9)
Single shot
Burst shooting: 3/5/7 frames
Interval (2/3/5/7/10/15/20/30/60 s)
4K Ultra HD: 3840×2160 30p
2.7K: 2688×1512 30p
FHD: 1920×1080 30p
100 Mbps
Page 13

Photo
Video
Remote Controller
Operating Frequency 2.4-2.4835 GHz; 5.725-5.850 GHz
Max Transmission Distance
(Unobstructed and free of interference)
Operating Temperature 32° to 104° F (0° to 40° C)
Battery 3950mAh @ 3.83V
Transmitter Power
(EIRP)
Operating Voltage
Supported Mobile Device Size Thickness supported: 6.5 - 8.5 mm, Max length: 160 mm
Charger
Voltage 17.6±0.1 V
Rated Power 60 W
Intelligent Flight Battery
Capacity 3850 mAh
Voltage 17.6 V (max)
Battery Type LiPo 4S
Energy 59.29 Wh
Net Weight Approx. 297 g
Charging Temperature Range 41° to 104° F (5° to 40° C)
Max Charging Power 80 W
Auto Heating Temperature Range
Auto Heating Time
Auto Heating Power 35 W (max)
For more information, read the User Manual:
www.dji.com/mavic-2-enterprise
※
MAVIC is a trademark of DJI.
Copyright © 2018 DJI All Rights Reserved. Designed by DJI. Printed in China.
This content is subject to change without prior notice.
JPEG
MP4, MOV (MPEG-4 AVC/H.264)
FCC: 5 mi (8 km); CE/MIC: 3.1 mi (5 km); SRRC: 3.1 mi (5 km)
2.4 GHz
FCC: ≤26 dBm; CE/MIC: ≤20 dBm; SRRC: ≤20 dBm
5.8 GHz
FCC: ≤26 dBm; CE: ≤14 dBm; SRRC: ≤26 dBm
1800mA @ 3.83V (when charging the mobile device)
Supported USB port types: Lightning, Micro USB (Type-B)
USB-C
15.4 V (typical)
-4° to 43° F (-20° to 6° C)
600 s (max)
EN
11
Page 14
认识 Mavic 2 行业双光版
MAVICTM 2 行业双光版飞行器配备先进的全方位视觉系统及红外传感系统 *,可在室内外
稳定悬停、飞行,具备自动返航以及障碍物感知功能。飞行器内置 DJI AirSense 可检测
周围航空器情况,支持密码保护以保障设备及数据安全,并且可搭载指定配件以适应不同
CHS
应用场景。双光版飞行器配备高精度增稳云台,搭载 FLIR 长波红外非制冷热成像相机与
可见光相机,可同时拍摄热成像与可见光影像,并支持两者融合显示。最大飞行速度为
72 km/h,最长飞行时间 ** 约为 31 分钟。
2
B
1
A
11
1. 一体式云台相机
A. 可见光相机
B. 红外相机
2. 前视视觉系统
3. 下视视觉系统
4. 侧视视觉系统
5. 底部红外传感系统
6. 下视补光灯
7. 相机 Micro SD 卡槽
8. 飞行器机头指示灯
* 视觉系统及红外传感系统有使用环境与条件要求,请阅读《免责声明与安全概要》及《用户手册》了解
安全注意事项,并在 DJITM 官方网站观看教学视频以正确使用相关功能。
http://www.dji.com/mavic-2-enterprise
** 最长飞行时间为无风环境时以 25 km/h 匀速飞行时测得。
9. 电机
10. 螺旋桨
11. 天线
12. 飞行器状态指示灯
13. 顶部红外传感系统
14. 后视视觉系统
15. 智能飞行电池
16. 电池电量指示灯
7
3
5
6
10
8
4
17. 电池开关
18. 电池卡扣
19. 调参 / 数据接口
(USB-C)
20. 对频按键 / 对频指示灯
21. 扩展接口(可连接配件)
22. 扩展接口保护盖
12
21
16
17
15
13
18
19
14
20
12
22
Page 15

遥控器
遥控器采用 OCUSYNCTM 2.0 高清图传技术,配合完备的功能按键可在最大 8 千米 * 通信
距离内完成飞行器与相机的操作与设置,并可通过 DJI Pilot App 在移动设备实时显示高
清画面。遥控器状态显示屏可实时显示飞行参数等信息,折叠式手柄可稳定放置移动设备,
可拆卸摇杆设计更便于遥控器收纳。最长工作时间 * 约为 2 小时 15 分钟。
折叠状态
1. 状态显示屏
2. 急停按键
3. 五维按键
4. 可拆卸摇杆
5. 电源按键
6. 天线
7. 智能返航按键
8. 摇杆收纳槽
9. 备用图传接口(USB)
10. 手柄
11. 飞行模式切换开关
7
1
2
8
9
6
4
3
5
11
10
CHS
17
12 13
16
14
* 在开阔无遮挡、无电磁干扰的环境飞行,并且飞行高度为 120 米左右,在 FCC 标准下遥控器可以达到
最大通信距离。最长可工作时间为实验环境下测得,仅供参考。
18
15
12. 云台俯仰控制拨轮
13. 曝光调节拨轮
14. 录影按键
15. 对焦 / 拍照按键
16. 主图传 / 充电接口(Micro USB)
17. 自定义功能按键 C1
18. 自定义功能按键 C2
13
Page 16
1. 下载 DJI Pilot App 和观看教学视频
1
2
3
CHS
请使用移动设备扫描下方二维码或在软件商店
DJI Pilot
下载安装
App。
下载 DJI Pilot
访问 DJI 官方网站
info#video
www.dji.com/mavic-2-enterprise/
观看教学视频。
DJI Pilot App 要求使用 iOS 10.0 及以上系统或 Android 5.0 及以上系统。
2. 准备飞行器
2
1
移除云台保护罩 展开前机臂 展开后机臂
白色标记 无标记
匹配标记安装螺旋桨
14
3
嵌入桨座按压到底,沿锁
紧方向旋转直至弹起锁定
请确保按顺序展开机臂,在机臂与桨叶全部展开之后再开启飞行器。
教学视频
展开状态
Page 17
3. 充 电
首次使用需给智能飞行电池充满电以
激活电池。
取出智能飞行电池
交流电源
100~240 V
B
充电前需将遥控器转接线取下。
检查电量与开启 / 关闭
低
高
短按一次检查电量。
短按一次,再长按 2 秒可开启、
关闭飞行器。
安装电池至飞行器后并开启电源后,一旦电池温度低于 6℃,电池将开启自动加热功能,保持
电池温度在 8-10℃之间。详细内容请参考用户手册。
A
A
完全充满约需
1 小时 30 分钟
短按一次电源按键查看电量。
短按一次电源按键,再长按 2 秒以开启、
关闭遥控器。
B
完全充满约需
2 小时 15 分钟
CHS
15
Page 18
4. 准备遥控器
CHS
展开天线、手柄,取出收纳于
遥控器上的摇杆并安装
1
使转接线的一端置于卡槽底部
2
3
转接线一端连接移动设备接口,
安装移动设备
注意将摇杆拧紧,确保安装到位。
遥控器默认安装 Lightning 接口的转接线,可根据移动设备接口类型更换转接线。若使用
iPad 等较大尺寸移动设备时,可自备数据线连接至遥控器 USB 接口。
Micro USB 接口与 USB 接口作为图传接口时不可同时使用。
16
强
弱
确保天线平行
最佳通信范围
Page 19
5. 准备飞行
开启遥控器 开启飞行器 运行 DJI Pilot App
全新的飞行器需使用 DJI Pilot App 激活才能使用。激活时请确保移动设备可以接入互联网。
Internet
可在 DJI Pilot App 中对飞行器设置安全密码以保证飞行器的使用安全。
6. 飞行
起飞前请务必等待 DJI Pilot App 相机界面显示
“ 起飞准备完毕”。
手动起飞/降落
掰杆动作:
电机启动/停止
起飞准备完毕(GPS)
或
DJI Pilot
App
CHS
起 飞:
缓慢向上推动油门杆(默
认左摇杆)飞行器起飞。
如飞行器在空中检测到严重故障,才可执行掰杆动作以紧急停机。
降 落:
向下拉动油门杆至飞行器落地,
在最低位置保持 2 秒,电机停止。
17
Page 20
遥控器操作
遥控器出厂默认操控方式为“美国手”。左摇杆控制飞行高度与方向,右摇杆控制飞
行器的前进、后退以及左右飞行方向。云台俯仰控制拨轮可控制相机的俯仰拍摄角度。
CHS
左摇杆 右摇杆
上升
前
下降
右转左转
请预先在 DJI Pilot App 设置合适的自动返航高度。
飞行过程中遇到需要紧急刹车的情况,请按急停按键使飞行器悬停。
* 可扩展配件
夜航灯
18
探照灯 喊话器
后
右左
Page 21
7. 飞行安全
120米
在开阔无遮挡
的环境中飞行
飞行时请远离人群、树木、电线、高大建筑物、机场和信号发射塔等。无线电发
射塔、高压线、变电站以及具有磁性的大块金属可能会对遥控信号及指南针产生
干扰,威胁飞行安全。
下雨、大雾、下雪、雷电、大风(风速每秒10米及以上)等天气请勿飞行。
GPS信号良好 在目视范围内飞行
控制飞行高
度低于120米
≥10米/秒
禁飞区
切勿接触旋转中的螺旋桨,
否则可能受到严重人身财产损害。
禁飞区、飞行安全认识对于您、周围人群与环境的安全非常重要。
请务必仔细阅读《免责声明和安全概要》。
详情请访问以下网址:
http://flysafe.dji.com/no-fly
CHS
19
Page 22

规格参数
飞行器
起飞重量
最大水平飞行速度 72 km/h(运动模式,海平面附近无风环境)
CHS
最大起飞海拔高度 6000 m
工作环境温度 -10℃至 40℃
GNSS GPS + GLONASS
工作频率 2.4-2.4835 GHz; 5.725-5.850 GHz
发射功率(EIRP) 2.4 GHz
机载内存 24 GB
云 台
可控转动范围 俯仰:-90°至 +30°
红外相机
传感器 非制冷氧化钒微测辐射热计
镜头 视角:57° (HFOV)
像元间距 12 μm
波长范围 8-14 μm
照片尺寸 640×480(4:3);640×360(16:9)
照片拍摄模式 单张拍摄
录像分辨率 640×360 @8.7fps
测温精度 高增益模式:最大 5%(典型值)
场景动态范围 高增益模式:-10°至 +140°C
图片格式 JPEG
视频格式 MP4,MOV (MPEG-4 AVC/H.264)
可见光相机
影像传感器 1/2.3 英寸 CMOS;有效像素 1200 万
镜头 视角:约 85°
ISO 范围 视频:100-3200(自动)
最大照片尺寸 4056×3040(4:3);4056×2280(16:9)
照片拍摄模式 单张拍摄
录像分辨率 4K Ultra HD:3840×2160 30p
视频最大码流 100 Mbps
20
899 g
FCC: ≤26 dBm; CE/MIC: ≤20 dBm; SRRC: ≤20 dBm
5.8 GHz
FCC: ≤26 dBm; CE: ≤14 dBm; SRRC: ≤26 dBm
光圈:f/1.1
多张连拍(BURST):3/5/7 张
定时拍摄:2/3/5/7/10/15/20/30/60 s
低增益模式:最大 10%(典型值)
低增益模式:-10°至 +400°C
35 mm 格式等效焦距:24 mm
光圈:f/2.8
对焦点:0.5 m 至无穷远
照片:100-1600(自动)
多张连拍(BURST):3/5/7 张
定时拍摄:2/3/5/7/10/15/20/30/60 s
2.7K:2688×1512 30p
FHD:1920×1080 30p
Page 23

图片格式 JPEG
视频格式 MP4,MOV (MPEG-4 AVC/H.264)
遥控器
工作频率 2.4-2.4835 GHz; 5.725-5.850 GHz
最大信号有效距离 FCC: 8 km; CE/MIC: 5 km; SRRC: 5 km
工作环境温度 0℃至 40℃
电池 3950mAh @ 3.83V
发射功率(平均 EIRP) 2.4 GHz
工作电流 / 电压 1800mA @ 3.83V (给外部设备充电时)
支持移动设备 厚度 6.5-8.5 mm,最大长度 160 mm
充电器
电压 17.6±0.1 V
额定功率 60 W
智能飞行电池
容量 3850 mAh
电压 17.6 V(满充电压)
电池类型 LiPo 4S
能量 59.29 Wh
电池整体重量 约 297 g
充电环境温度 5℃ 至 40℃
最大充电功率 80 W
自加热环境温度 -20℃至 6
自加热时间 600 s(最大)
自加热功率 35 W(最大)
了解产品详细信息,请访问以下网址下载 《用户手册》
www.dji.com/mavic-2-enterprise
FCC: ≤26 dBm; CE/MIC: ≤20 dBm; SRRC: ≤20 dBm
5.8 GHz
FCC: ≤26 dBm; CE: ≤14 dBm; SRRC: ≤26 dBm
接口类型:Lightning, Micro USB (Type-B), USB-C
15.4 V(典型电压)
℃
※ 内容如有更新,恕不另行通知。
MAVIC 是大疆创新的商标。
Copyright © 2018 大疆创新 版权所有
CHS
Designed by DJI. Printed in China.
21
Page 24
認識 Mavic 2 Enterprise
MAVICTM 2 行業雙光版飛行器配備先進的全方位視覺系統及紅外線感應系統 *,可在室內
外穩定懸停、飛行,具備自動返航以及障礙物感應功能。航拍機內建 DJI AirSense,可偵
測周圍航拍機情况,支援密碼保護可保障裝置及資料安全,並且可搭載指定配件以滿足不
同應用場景需求。Mavic 2 Enterprise 配備高度精密增穩雲台和等效24-48mm 的二倍光學
CHT
變焦鏡頭,可穩定拍攝 4K 超高畫質影片與 1200 萬像素照片,最高可支援 FHD 6 倍變焦。
最大飛行速度為 72 km/h,最長飛行時間 ** 約為 31 分鐘。
2
B
1
A
11
1. 整合式雲台相機
A. 可見光相機
B. 紅外線相機
2. 前視視覺系統
3. 下視視覺系統
4. 側視視覺系統
5. 底部紅外線傳感系統
6. 補光燈
7. 相機 Micro SD 卡插槽
*
视視覺系統及紅外線傳感系統有使用環境與條件方面的要求,請閱讀《免責聲明與安全總覽》及《使用
者手冊》以了解安全注意事項。另請上 DJITM 官方網站觀看教學影片,以便正確使用相關功能。
http://www.dji.com/mavic-2-enterprise
**
最長飛行時間是在無風環境下,以 25 km/h 等速飛行測得。
8. 航拍機機頭指示燈
9. 馬達
10. 螺旋槳
11. 天線
12. 航拍機狀態指示燈
13. 頂部紅外線傳感系統
14. 後視視覺系統
15. 智能飛行電池
16. 電池電量指示燈
7
3
5
6
10
8
4
17. 電池開關
18. 電池卡扣
19. 調參 / 數據連接埠
(USB-C)
20. 配對按鈕 / 配對指示燈
21. 擴充接頭 ( 可連接配件 )
22. 擴充接頭保護蓋
12
21
16
17
15
13
18
14
22
22
19
20
Page 25
遙控器
Mavic 2 Enterprise 遙控器採用 OCUSYNCTM 2.0 高清圖傳技術,配合完備的功能按鈕,可
在最大 8 千公尺 * 通訊距離內完成航拍機與相機的操作與設定,並可通過 DJI Pilot 應用程
式在行動裝置即時顯示高畫質畫面。遙控器狀態顯示螢幕可即時顯示飛行參數等資訊,摺
疊式把手可穩定放置行動裝置,可拆卸搖桿設計更便於遙控器收納。最長運作時間 * 約為
2 小時 15 分鐘。
摺疊狀態
1. 狀態顯示螢幕
2. 急停按鈕
3. 五維按鈕
4. 可拆卸搖桿
5. 電源按鈕
6. 天線
7. 智能返航按鈕
8. 搖桿收納槽
9. 備用影像傳輸連接埠 (USB)
10. 把手
11. 飛行模式切換開關
7
1
2
8
9
6
4
5
3
11
10
CHT
17
12 13
16
14
* 若在開闊無遮擋、無電磁干擾的環境下,於高度 120 公尺左右飛行時,遙控器即可依據 FCC 標準達到最
大通訊距離。最長運作時間為實驗環境下測得,僅供參考。
18
15
12. 雲台俯仰控制轉盤
13. 曝光調節轉盤
14. 錄影按鈕
15. 對焦 / 拍照按鈕
16. 主要影像傳輸 / 充電連接埠
(Micro USB)
17. 自訂功能按鈕 C1
18. 自訂功能按鈕 C2
23
Page 26
1
2
3
1. 下載 DJI Pilot App 應用程式並觀看教學影片
請使用行動裝置掃描下方的 QR 碼,或在軟體商店下載安裝
CHT
DJI Pilot 應用程式。
下載 DJI Pilot
前往 DJI 官方網站
info#video
觀看教學影片。
DJI Pilot 應用程式要求使用 iOS 10.0 及以上系統或 Android 5.0 及以上系統。
www.dji.com/mavic-2-enterprise/
2. 準備航拍機
2
1
移除雲台保護罩 展開前機臂 展開後機臂
白色標記 無標記
匹配标记安装螺旋桨
24
3
嵌入槳座並按壓到底,沿鎖
緊方向旋轉直到彈起鎖定
請確保按順序展開機臂,在機臂與槳葉全部展開之後再開啟航拍機。
教學影片
展開狀態
Page 27
3. 充電
首次使用時,必須為智能飛行電池充
電以啟動電池。
取出智能飛行電池
交流電源
100~240 V
B
充电前需将遥控器转接线取下。
檢查電量與開啓 / 關閉
低
高
A
電量
短按一次檢查電量。
短按一次,再長按 2 秒可開啟、
關閉航拍機。
在航拍機上安裝電池並開啟電源後,一旦電池溫度低於 6℃,電池將開啟自動加熱功能,讓電
池溫度保持在 8 - 10℃ 之間。詳細內容請參閱使用者手冊。
A
完全充飽電約需 1 小
時 30 分鐘
短按一次電源按鈕以查看電量。
短按一次電源按鈕,再長按 2 秒以開啟、
關閉遙控器。
B
完全充飽電約需
2 小時 15 分鐘
CHT
25
Page 28
4. 準備遙控器
CHT
展開天線、把手,取出收納於
遙控器上的搖桿並加以安裝
確保天線平行
1
將轉接線的一端置於卡插槽底部
2
3
最佳通訊範圍
將轉接線一端連接行動裝置連接
埠,以安裝行動裝置
注意將搖桿鎖緊,以確保安裝到位。
遙控器預設安裝 Lightning 連接埠的轉接線,但可根據行動設備連接埠類型更換轉接線。若使
用 iPad 等尺寸較大的行動裝置,可自備數據傳輸線連接遙控器 USB 連接埠。
作為影像傳輸連接埠時,Micro USB 連接埠和 USB 連接埠不可同時使用
26
強
弱
Page 29
5. 準備飛行
開啟遙控器 開啟航拍機 執行 DJI Pilot App
全新的航拍機需使用 DJI Pilot 應用程式啟動才能使用。啟動時請確認行動裝置已連線至網際
網路。
Internet
可在 DJI Pilot 應用程式中設定航拍機安全密碼以確保航拍機的使用安全。
6. 飛行
起飛前,請務必等待 DJI Pilot 應用程式相機介
面顯示「起飛準備完畢」( 起飞准备完毕 )。
手動起飛 / 降落
綜合控制桿指令:
馬達啟動 / 停止
起飛:
緩慢向上推動油門桿 ( 預設
左搖桿 ) 使航拍機起飛。
如航拍機在空中檢測到嚴重故障,才能執行「綜合控制桿指令」以緊急停機。
降落:
向下拉動油門桿至航拍機落地,在
最低位置保持 2 秒,馬達接著停止。
DJI Pilot
App
應用程式
起飛準備完畢 (GPS)
或
CHT
27
Page 30

遙控器操作
遙控器出廠預設操控方式為「美國手」。左搖桿控制飛行高度與方向,右搖桿控制航
拍機的前進、後退以及左右飛行方向。雲台俯仰控制轉盤可控制相機的俯仰拍攝角度。
CHT
左搖桿 右搖桿
上升
前
下降
右轉左轉
请预先在 DJI Pilot App 设置合适的自动返航高度。
飞行过程中遇到需要紧急刹车的情况,请按急停按键使飞行器悬停。
* 擴充配件
夜航燈
28
探照燈 擴音器
後
右左
Page 31

7. 飛行安全
120 公尺
在開闊無遮蔽
的環境中飛行
飛行時請遠離人群、樹木、電線、高大建築物、機場和訊號發射塔等。無線電發
射塔、高壓線、變電站及具有磁性的大型金屬物體均可能對遙控訊號及指南針產
生干擾,進而威脅飛行安全。
請勿在下雨、起大霧、下雪、打雷閃電、大風 (風速每秒 10 公尺以上) 等天氣下飛行。
GPS 訊號良好 在視線範圍內飛行將飛行高度控制
在 120 公尺以下
≥10 公尺/秒
禁航區
請遠離旋轉中的螺旋槳,
否則可能會嚴重危及人身及財產安全。
了解禁飛區及飛行安全知識,對於您、周圍人群與環境的安全非常重要。
請務必詳讀《免責聲明與安全總覽》。
詳情請參閱以下網站:
http://flysafe.dji.com/no-fly
CHT
29
Page 32

規格
航拍機
起飛重量 899 g
最大水平飛行速度 72 km/h ( 運動模式,海平面附近無風環境 )
最大起飛海拔高度 6000 m
操作溫度 -20℃至 40℃
CHT
GNSS GPS + GLONASS
操作頻率 2.4-2.4835 GHz; 5.725-5.850 GHz
發射功率(EIRP) 2.4 GHz
機載儲存容量 24 GB
雲 台
可操控轉動範圍 俯仰:-90°至 +30°
紅外線相機
感應器
鏡頭 視角:57°(HFOV)
像素間距 12 μm
波長範圍 8-14 μm
照片尺寸 640×480(4:3);640×360(16:9)
照片拍攝模式 單張拍攝
錄影解析度 640×360 @8.7fps
測溫精確度 高增益模式:最大 5%(標準值)
場景動態範圍 高增益模式:-10°至 +140°C
圖片格式 JPEG
影片格式 MP4,MOV (MPEG-4 AVC/H.264)
可见光相机
影像感測器 1/2.3 英寸 CMOS;有效像素 1200 萬
鏡頭 視角:約 85°
ISO 範圍 影片:100-3200(自動)
最大照片尺寸 4056×3040(4:3);4056×2280(16:9)
照片拍攝模式 單張拍攝
FCC: ≤26 dBm; CE/MIC: ≤20 dBm; SRRC: ≤20 dBm
5.8 GHz
FCC: ≤26 dBm; CE: ≤14 dBm; SRRC: ≤26 dBm
非制冷氧化钒微测辐射热计
光圈:f/1.1
多張連拍(高速):3/5/7 張
定時拍攝:2/3/5/7/10/15/20/30/60 秒
低增益模式:最大 10%(標準值)
低增益模式:-10°至 +400°C
35 mm 格式等效焦距:24 mm
光圈:f/2.8
對焦點:0.5 m 至無窮遠
照片:100-1600(自動)
多張連拍(高速):3/5/7 張
定時拍攝:2/3/5/7/10/15/20/30/60 秒
30
Page 33

錄影解析度 4K Ultra HD:3840×2160 30p
影片最大資料傳輸率 100 Mbps
圖片格式 JPEG
影片格式 MP4、MOV(MPEG-4 AVC/H.264)
遙控器
操作
頻率
最大訊號有效距離
操作溫度
電池
(平均 EIRP) 2.4 GHz
發射功率
工作電流 / 電壓
支援行動裝置
充電器
電壓
額定功率
智能飛行電池
容量 3850 mAh
電壓 17.6 V(滿充電壓)
電池類型 LiPo 4S
能量 59.29 Wh
電池整體重量 约 297 g
充電環境溫度 5℃ 至 40℃
最大充電功率 80 W
自動加熱環境溫度 -20℃ 至 6℃
自動加熱時間 600 s ( 最大 )
自動加熱功率 35 W ( 最大 )
要了解產品詳細資訊,請造訪以下網址下載《使用者手冊》
www.dji.com/mavic-2-enterprise
2.7K:2688×1512 30p
FHD:1920×1080 30p
2.4-2.4835 GHz; 5.725-5.850 GHz
FCC: 8 km; CE/MIC: 5 km; SRRC: 5 km
0℃至 40℃
3950mAh @ 3.83V
FCC: ≤26 dBm; CE/MIC: ≤20 dBm; SRRC: ≤20 dBm
5.8 GHz
FCC: ≤26 dBm; CE: ≤14 dBm; SRRC: ≤26 dBm
1800mA @ 3.83V (
厚度 6.5-8.5 mm,最大长度 160 mm
接口类型:Lightning, Micro USB (Type-B), USB-C
17.6±0.1 V
60 W
15.4 V(一般電壓)
為外部設備充電時
※ 内容如有更新,恕不 另行通知。
MAVIC 是大疆創新的商標。
Copyright © 2018 大疆創新 版權所有
CHT
)
Designed by DJI. Printed in China.
31
Page 34

機体
TM
DJI
MAVICTM 2 Enterprise Dual は、全方向性ビジョンシステムおよび赤外線検知システ
ム * を備え、FLIR 社製遠赤外線サーマル(熱画像)カメラと視覚カメラを併せ持つ完全
な安定性を実現する 3 軸ジンバルカメラを搭載し、赤外線画像および視覚画像の両方を同
時に提供します。障害物検知など、DJI の代表的な技術を用いて、複雑な撮影シーンも簡
単に撮影できます。内蔵型の AirSense といった追加機能により、ユーザーは周囲の空域
を把握することができます。また、パスワード保護により、機体への安全なアクセスを
JP
確保し、データを保護することができます。Mavic 2 Enterprise には、M2E スポットラ
イト/ M2E ビーコン/ M2E スピーカーなどの取り付けられるモジュラーアクセサリー
も用意されています。Mavic 2 Enterprise の最大飛行速度は 72km/h、最大飛行時間 ** は
31 分です。
2
B
1
A
3
11
1. ジンバルカメラ
2. 前方ビジョンシステム
A. ビジュアルカメラ
B. サーマルカメラ
3. 下方ビジョンシステム
4. 側面ビジョンシステム
5. 下方赤外線検知システム
6. 底部補助ライト
7. microSD カード用スロット
8. フロント LED
9. モーター
* ビジョンシステムおよび赤外線検知システムは、周辺環境の条件の影響を受けます。詳細に関しては、免責
事項と安全に関するガイドライン/ユーザーマニュアルをお読みになり、公式 DJI ウェブサイトのチュート
リアルビデオをご覧ください。http://www.dji.com/mavic-2-enterprise
** 最長飛行時間は無風状態で、定速 25km/h でテストしたものです。この値は参考値です。
32
5
6
10. プロペラ
11. アンテナ
12. 機体ステータスインジ
ケーター
13. 上方赤外線検知システム
14. 後方ビジョンシステム
15. インテリジェント・
フライト・バッテリー
16. バッテリー残量 LED
17. 電源ボタン
10
8
4
7
12
21
22
16
17
15
13
18
19
20
14
18. バッテリーバックル
19. USB-C ポート
20. リンクボタン/リンク
ステータスインジケー
ター
21. 拡張ポート(アクセサ
リー接続用)
22. 拡張ポートカバー
Page 35

送信機
送信機には DJI の長距離伝送技術 OCUSYNCTM 2.0 が内蔵されているので、最大伝送距
離は 8 km(日本国内では 5 km)で、最大 1,080p の動画を機体からモバイル端末の DJI
Pilot アプリへ送信し表示します。搭載されている液晶画面にはリアルタイムで機体のデ
ータ情報が表示されます。また、コントロールスティックは着脱可能であるため、送信機
の格納が容易です。
最大稼働時間:2 時間 15 分 *
JP
折りたたんだ状態
1. LCD 液晶画面
2. フライト一時停止ボタン
3. 5D ボタン
4. 着脱可能コントロールスティック
5. 電源ボタン
6. アンテナ
7. RTH ボタン
8. コントロールスティック格納
スロット
9. ビデオ・ダウンリンク・ポート
予備(USB)
10. モバイル端末用クランプ
11. フライトモード・スイッチ
17
12 13
16
14
* 最大伝送距離(FCC)は、障害物や電波干渉のないエリアで、機体の高度が約 120m のときに有効です。
最大稼働時間は、ラボ環境でテストされています。この値は参考値です。
18
15
7
1
2
8
9
12. ジンバルダイヤル
13. EV 調整ダイヤル
14. 録画ボタン
15. フォーカス/シャッターボタン
16. ビデオダウンリンク/電源
ポート(micro USB)
17. C1 ボタン(カスタマイズ可能)
18. C2 ボタン(カスタマイズ可能)
6
4
3
5
11
10
33
Page 36

1. DJI Pilot アプリのダウンロードとチュートリアルビデオの視聴
1
2
3
App Store またはGoogle Play で「 DJI Pilot」を検索するか、
以下の QR コードをスキャンして、お手持ちのモバイル
端末にアプリをダウンロードします。
JP
チュートリアルビデオは、www.dji.com/mavic-2-enterprise/
info#video からご覧ください。
DJI Pilot
チュートリアルビデオ
DJI Pilot は iOS 10.0 以降および Android
5.0
以降と互換性があります。
2. 機体の準備
2
1
3
カメラからジンバルカ
バーを取り外します。
マークあり マークなし
プロペラをモーターに
合わせます。
前方のアームとプロペラを展開してから、後方のアームとプロペラを展開します。
離陸前にすべてのアームとプロペラを展開しておく必要があります。
34
前方アームを展開し
ます。
プロペラを下に向かっ
て強く押して、ロック
方向へ回転させます。
後方アームを展開し
ます。
展開状態
Page 37

3. バッテリーの充電
初めて使用する場合は、付属の充電器を使用し
て、インテリジェント・フライト・バッテリー
を完全に充電しておきます。
インテリジェント・フライト・
バッテリーの取り外し
電源コンセント
100 - 240V
B
A
充電する前に送信機のケーブルを取り外します。
バッテリー残量の確認と電源のオン/オフ
低
ボタンを 1 回押すと、バッテリー残量を
確認できます。
ボタンを押してから、次に長押しすると、
電源がオンまたはオフになります。
高
バッテリーを機体に取り付け、電源を入れてください。バッテリー温度が 6℃以下
になると、自動発熱機能により温度を 8 〜 10℃に維持します。 詳しくはユーザー
マニュアルをご覧ください。
A
充電時間:
〜 1 時間 30 分
ボタンを 1 回押すと、液晶画面でバッテリ
ー残量を確認できます。
ボタンを 1 回押し、次に長押しすると、送
信機の電源がオンまたはオフになります。
JP
B
充電時間:
〜 2 時間 15 分
35
Page 38

4. 送信機の準備
JP
アンテナとモバイル端末用クランプを展開してか
ら、コントロールスティックを取り付けます。
1
RC ケーブルの片端をスロット端に置きます。
2
3
クランプ内にモバイル端末を取り付けます。
コントロールスティックをしっかり取り付けてください。
Lightning コネクター付きの送信機ケーブルがデフォルトで装着されています。お
使いのモバイル端末を送信機に接続するのに適切なケーブルを使用してください。
iPad やタブレットを使用するときは、送信機の USB ポートを使用してください。
ビデオリンクの際、Micro USB ポートと USB ポートを同時に使用しないでく
ださい。
36
強い
弱い
アンテナをお互いに平行になる
ように取り付ける
最適な伝送範囲
Page 39

5. 離陸の準備
DJI Pilot
送信機の電源を入れる 機体の電源を入れる DJI Pilot を起動する
自分の DJI アカウントを使用して機体をアクティべーションします。アクティべ
ーションするにはインターネット接続が必要です。
インター
ネット
安全なアクセスと内蔵データの保護を確実にするため、DJI Pilot アプリで機体の
パスワードを設定してください。
6. 飛行
離陸する前に、DJI Pilot の機体ステータスバーに「Ready
to Go」が表示されていることを確認してください。
手動での離陸/着陸
コンビネーション・スティック・コ
マンドでモーター始動/停止
Ready to Go (GPS)
または
App
JP
左スティックを
ゆっくり上に倒
して離陸
フライトコントローラーが深刻なエラーを検知したときに限り、飛行中にモーター
が停止することがあります。
地面に着くまで、左スティックを(ゆっくり
と)下に倒します。
数秒間そのまま保持してから、モーターを停
止します。
37
Page 40

左ス ティック
右ス ティック
前方
送信機操作
デフォルトのフライトコントロールはモード 2 です。左スティックで機体の高度と進
行方向、右スティックで前進、後退、右回転、左回転をコントロールします。ジンバ
ルダイヤルでカメラのチルト操作をコントロールします。
上昇
JP
下降
左旋回
離陸前に、必ず適切な Return-to-Home(RTH)高度を設定してください。機体をホ
ームポイントに戻す際は、コントロールスティックで誘導してください。
飛行中に緊急ブレーキをかけるときは、フライト一時停止ボタンを押します。
右旋回
* モジュラーアクセサリー
M2E ビーコン
38
M2E スポットライト
M2E スピーカー
左
後方
右
Page 41

7. 安全なフライトのために
120m
開けた場所での
飛行
障害物、人混み、高電圧線、樹木、水域の近くで飛行させないでください。
電線や基地局などの強い電磁波域の周辺では、機体のコンパスが性能を発揮で
きないことがあるため、飛行させないでください。
強いGPS信号 視界の維持
120m未満の高度で
飛行
10 m/s以上
雨 、雪 、霧 、風 速 10m/s超などの悪天候時に機体を使用しないでください。
飛行禁止区域
回転中 のプロペラやモ ーターから
離れてください。
ご自身の安全と周りの人々の安全のため、基本的なフライトガイドラインを理解することが
重要です。免責事項および安全に関するガイドラインを必ずお読みください。
詳細については、以下でご確認ください。
http://www.dji.com/jp/flysafe/no-fly
JP
39
Page 42

仕様
機体
重量 899 g
最大速度 無風、スポーツモードで 72 km/h
運用限界高度 6,000 m
動作環境温度 -10 〜 40℃
GNSS GPS + GLONASS
JP
動作周波数 2.4〜 2.4835 GHz、5.725 〜5.850 GHz
送信機出力
(EIRP)
内部ストレージ 24 GB
ジンバル
操作可能範囲 ピッチ:-90 〜 +30°
サーマルカメラ
センサー 非冷却 VOx マイクロボロメーター
レンズ HFOV:57°
画素ピッチ 12 μm
スペクトル帯 8 〜 14 μm
画像サイズ 640× 480(4:3)、640 ×360(16:9)
静止画撮影モード シングルショット
動画撮影モード 640 × 360 @8.7fps
精度 高利得:最大± 5%(標準)
シーン範囲 高利得:-10〜 +140 C
写真 JPEG
動画 MP4、MOV(MPEG-4 AVC/H.264)
視覚カメラ
センサー 1/2.3 インチCMOS、有効画素数:12M
レンズ FOV:約 85°
ISO レンジ 動画:100 〜3200(オート)
最大静止画サイズ
静止画撮影モード シングルショット
40
( 日本国内では 2.4 〜 2.4835 GHz のみ利用可)
2.4 GHz
FCC:26 dBm 以下、CE/MIC:20 dBm 以下、SRRC:20 dBm 以下
5.8 GHz
FCC:26 dBm 以下、CE:14 dBm 以下、SRRC:26 dBm 以下
絞り:F1.1
バーストショット:3/5/7 枚
間隔(2/3/5/7/10/15/20/30/60 秒)
低利得:最大± 10%(標準)
低利得:-10 〜 +400 C
35mm 版換算:24mm
絞り:F2.8
フォーカス:0.5m 〜∞
写真:100 〜 1600(オート)
4056 × 3040(4:3)、4056 × 2280(16:9)
バーストショット:3/5/7 枚
間隔(2/3/5/7/10/15/20/30/60 秒)
Page 43

動画撮影モード 4K Ultra HD:3840× 2160 30p
最大ビデオビットレート 100 Mbps
写真 JPEG
動画 MP4、MOV(MPEG-4 AVC/H.264)
送信機
動作周波数 2.4 〜 2.4835 GHz、5.725 〜 5.850 GHz
最大伝送距離
動作環境温度 0 〜 40℃
バッテリー 3950mAh @ 3.83V
送信機出力
(EIRP)
動作電圧 1800mA @ 3.83V(モバイル端末充電時)
対応モバイル端末
サイズ
充電器
電圧 17.6 ± 0.1 V
定格出力 60 W
インテリジェント・フライト・バッテリー
容量 3850 mAh
電圧 17.6 V(最大)
バッテリータイプ LiPo 4S
電力量 59.29 Wh
正味重量 約 297 g
充電温度範囲 5 〜 40℃
最大充電電力 80 W
自動発熱温度範囲 -20℃〜 6℃
自動発熱時間 600 秒(最大)
自動発熱出力 35 W(最大)
詳細については、以下にあるユーザーマニュアルを参照してください。
www.dji.com/mavic-2-enterprise
このコンテンツは予告なく変更される場合があります。
※
MAVIC は DJI の商標です。
Copyright © 2018 DJI All Rights Reserved. Designed by DJI.Printed in China.
2.7K:2688 × 1512 30p
FHD:1920 × 1080 30p
( 日本国内では 2.4 〜 2.4835 GHz のみ利用可)
FCC:8 km、CE/MIC:5 km、SRRC:5 km (障害物および干渉が
ないこと)
2.4 GHz
FCC:26 dBm 以下、CE/MIC:20 dBm 以下、SRRC:20 dBm 以下
5.8 GHz
FCC:26 dBm 以下、CE:14 dBm 以下、SRRC:26 dBm 以下
対応厚さ:6.5 〜 8.5 mm、最大長:160 mm
対応 USB ポートタイプ:Lightning、Micro USB(Type B)
USB-C
15.4 V(標準)
JP
41
Page 44

기체
DJITM MAVICTM 2 Enterprise Dual은 전방위 비전 시스템 및 적외선 감지 시스템*을 사용하며 FLIR
장파 적외선 열화상 카메라와 시각 카메라를 갖춘 완전 안정화된 3축 짐벌 카메라를 통해 적외선
이미지와 시각 이미지를 동시에 제공합니다. 장애물 감지와 같은 DJI 시그니처 기술을 사용하면 비
행하면서 복잡한 장면도 손쉽게 촬영할 수 있습니다. 내장된 AirSense와 같은 추가 기능으로 주변
공역에 무엇이 있는지 알 수 있습니다. 또한 비밀번호 보안은 기체에 안전하게 액세스할 수 있게 해
주고 데이터를 보호해줍니다. 매빅 2 Enterprise는 M2E 스포트라이트, M2E 비콘, M2E 스피커와
같은 장착 가능한 모듈식 액세서리가 있어 다양한 용도로 활용할 수 있습니다. Mavic 2 Enterprise
는 72 km/h(4 4.7mph )의 최대 비행 속도와 31분에 이르는 최대 비행 시간**을 자랑합니다.
KR
2
B
1
A
11
1. 짐벌 및 카메라
2. 전방 비전 시스템
A. 시각 카메라
B. 열화상 카메라
3. 하향 비전 시스템
4. 측방 비전 시스템
5. 하향 적외선 감지 시스템
6. 보조광
7. microSD 카드 슬롯
8. 전방 LED
* 비젼 시스템 및 적외선 감지 시스템은 주변 환경의 영향을 받습니다. 고지사항 및 안전 가이드와 사용자 매뉴얼을 읽고, 공식 DJI
웹사이트에서 튜토리얼 영상을 시청하여 자세히 알아보십시오. http://www.dji.com/mavic-2-enterprise
** 최대 비행시간은 지속적인 25km/h(15.5mph)의 무풍 환경에서 테스트했습니다. 이 값은 참조용으로만 사용해야 합니다.
9. 모터
10. 프로펠러
11. 안테나
12. 기체 상태 표시기
13. 상향 적외선 감지 시스템
14. 후방 비전 시스템
15. 인텔리전트 플라이트 배터리
16. 배터리 잔량 LED
7
3
5
6
10
8
4
17. 전원 버튼
18. 배터리 버클
19. USB-C 포트
20. 연동 버튼/연동 상태 표시기
21. 확장 포트(액세서리 연결용)
22. 확장 포트 커버
12
21
22
16
17
15
13
18
19
14
20
42
Page 45

조종기
조종기에 내장된 DJI 장거리 전송 기술인 OCUSYNCTM 2.0을 통해 8km(5마일)의 최대 전송 범위를 제공
하고 기체에서 모바일 기기의 DJI Pilot 앱까지 최대 1080p 디스플레이 동영상 전송이 가능합니다. 내장
LCD 화면에 실시간 기체 데이터 정보가 표시되며 조종 스틱은 분리가 가능해 조종기를 더 쉽게 보관할 수
있습니다.
최대 작동 시간: 2시간 15분*
접은 상태
1. LCD 화면
2. 비행 일시 정지 버튼
3. 5D 버튼
4. 탈착식 제어 스틱
5. 전원 버튼
6. 안테나
7. RTH 버튼
8. 조종 스틱 보관 슬롯
9. 예비 동영상 다운링크 포트
(USB)
10. 모바일 기기 클램프
11. 비행 모드 전환
7
1
2
8
9
6
4
3
5
11
10
KR
17
12 13
16
14
* 조종기는 전자기 간섭이 없는 확 트인 넓은 야외에서 비행하는 경우 고도 약 120미터(400피트)에서 최대 전송 거리(FCC)까지
도달할 수 있습니다.
최대 지속 시간은 실험실 환경에서 테스트되었습니다. 이 값은 참조용으로만 사용해야 합니다.
18
12. 짐벌 다이얼
13. EV 조정 다이얼
14. 녹화 버튼
15. 초점/셔터 버튼
15
16. 동영상 다운링크/전원 포트(마이크로 USB)
17. C1 버튼(사용자 지정 가능)
18. C2 버튼(사용자 지정 가능)
43
Page 46

1. DJI Pilot 앱 다운로드 및 튜토리얼 영상 시청
1
2
3
App Store 또는 Google Play에서 "DJI Pilot"를 검색하거나 아래의
QR 코드를 스캔하여 앱을 모바일 기기에 다운로드합니다.
KR
www.dji.com/mavic-2-enterprise/info#video 에서 튜토리얼
영상을 시청하십시오.
DJI Pilot는 iOS 10.0 이상 또는 Android 5.0 이상과 호환됩니다.
2. 기체 준비
2
1
3
DJI Pilot
튜토리얼 영상
카메라에서 짐벌 커버를
분리합니다.
전방 암을 폅니다. 후방 암을 폅니다.
표시됨 표시되지 않음
모터에 프로펠러를 연결합
니다.
앞쪽 암과 프로펠러를 펴고 뒤쪽 암을 폅니다. 이륙 전에 모든 암과 프로펠러를 펴야 합니다.
44
프로펠러를 아래 방향으로 세게 누
르고 잠금 방향으로 돌립니다.
편 상태
Page 47

3. 배터리 충전
처음 사용하기 전에 제공된 충전기를 사용
하여 인텔리전트 플라이트 배터리를 완전히
충전합니다.
전기 콘센트
100~240V
B
충전하기 전에 조종기 케이블을 분리하십시오.
배터리 잔량 확인 및 전원 켜기/끄기
낮음
높음
A
인텔리전트 플라이트 배터리 제거
A
충전 시간:
1시간 30분 미만
KR
B
충전 시간:
2시간 15분 미만
한 번 눌러 배터리 잔량을 확인합니다.
누른 다음 다시 길게 누르면 켜지거나 꺼집니다.
기체에 배터리를 장착하고 전원을 켭니다. 배터리 온도가 6°C보다 낮아지면 자동으로 발열하여
8~10°C 사이의 온도를 유지합니다. 자세한 내용은 사용자 매뉴얼을 참조하십시오.
LCD 화면에서 한 번 눌러 배터리 수준을 확인합
니다.
한 번 누른 다음 길게 누르면 조종기가 켜지거나
꺼집니다.
45
Page 48

4. 조종기 준비
KR
안테나와 모바일 기기 클램프를 편 다음
조종 스틱을 장착합니다.
강함
약함
안테나를 서로 평행하게 설정
1
RC 케이블의 한쪽 끝을 슬롯의
끝에 연결합니다.
2
3
최적 전송 범위
클램프 내에서 모바일 기기를 연결합니다.
조종 스틱이 단단히 장착되었는지 확인하십시오.
라이트닝 커넥터가 있는 조종기 케이블이 기본적으로 장착됩니다. 모바일 기기에 알맞은 케이블
을 사용하여 조종기에 연결하십시오. iPad 또는 태블릿을 사용할 때 조종기에서 USB 포트를 사
용하십시오.
동영상을 연동할 때 마이크로 USB와 USB 포트를 동시에 사용하지 마십시오.
46
Page 49

5. 이륙 준비
조종기 전원을 켭니다. 기체의 전원을 켭니다. DJI Pilot를 실행합니다.
사용자의 DJI 계정을 사용하여 기체를 활성화합니다. 활성화하려면 인터넷에 연결해야 합니다.
인터넷
DJI Pilot 앱에서 기체 비밀번호를 설정하여 안전하게 액세스하고 내부 데이터를 보호하십시오.
6. 비행
이륙하기 전에 DJI Pilot의 기체 상태 표시줄에 'Ready
to Go'가 표시되어 있는지 확인합니다.
수동 이륙/착륙
스틱 조합 명령으로 모터를 시동/중지합니다.
또는
DJI Pilot
App
Ready to Go(GPS)
KR
왼쪽 스틱을 위로
움직여(느리게)
이륙합니다.
비행 컨트롤러에서 심각한 오류를 감지한 경우에만 비행 도중에 모터를 중지할 수 있습니다.
지면에 닿을 때까지 왼쪽 스틱을 천천히 아래로 내
립니다.
몇 초 동안 유지하면 모터가 중지됩니다.
47
Page 50

조종기 조작
기본 비행 제어 방법은 모드 2입니다. 왼쪽 스틱은 기체의 고도 및 방향을 제어하고 오른쪽 스틱은 전진,
후진, 왼쪽 또는 오른쪽 이동을 제어합니다. 짐벌 다이얼은 카메라의 틸트를 제어합니다.
왼쪽 스틱
위로
오른쪽 스틱
전방
KR
이륙하기 전에 항상 적절한 RTH 고도를 설정하십시오. 기체가 홈 포인트로 돌아올 때에는 조종 스
틱으로 유도해야 합니다.
비행 도중 긴급 제동해야 할 경우 Flight Pause 버튼을 누르십시오.
왼쪽으로
아래로
오른쪽으로
* 모듈식 액세서리
M2E 비콘
48
M2E 스포트라이트 M2E 스피커
왼쪽
후방
오른쪽
Page 51

7. 비행 안전
120m
시야가 확보된 넓은
지역에서 비행
장애물, 군중, 고압 전선, 나무 또는 수계 상공이나 근처에서 비행하지 마십시오.
전선 및 기지국에서 발생하는 강력한 전자기는 내장 콤파스에 영향을 줄 수 있으므로 이런
지역 근처에서 비행하지 마십시오.
비, 눈, 안개, 10m/초(22mph) 이상의 강풍이 부는 악천후에서는 기체를 사용하지
마십시오.
강력한 GPS
신호
시야 유지 120m(400피트) 고도
미만에서 비행
10m/초 이상
비행 금지 구역
회전하는 프로펠러와 모터에서 멀리 떨어져
계십시오.
본인과 주변의 안전을 위해 기본 비행 지침을 반드시 숙지해야 합니다. 고지 사항 및 안전 가이드를
잊지 말고 읽어보십시오.
자세한 정보:
http://flysafe.dji.com/no-fly
KR
49
Page 52

사양
기체
무게 899g
최대 속도 바람이 없을 때 스포츠 모드에서 72km/h(44.7mph)
최대 실용 상승 한계 고도(해발) 6,000m(19,685피트)
작동 온도 -10°~40°C(14°~104°F)
GNSS GPS + GLONASS
작동 주파수 2.4~2.4835GHz, 5.725~5.850GHz
송신기 전원
(EIRP)
KR
내부 저장 장치 24 GB
짐벌
제어 가능 범위 피치: -90°~+30°
열화상 카메라
센서 비냉각 VOx 마이크로볼로미터(Uncooled VOx Microbolometer)
렌즈 HFOV: 57°
픽셀 피치 12μm
스펙트럼 범위 8-14μm
이미지 크기 640×480(4:3); 640×360(16:9)
스틸 사진 모드 단일 촬영
동영상 녹화 모드 640×360 @8.7fps
정확도 높은 게인: 최대 ±5%(일반)
장면 범위 높은 게인: -10° ~ +140°C
사진 JPEG
동영상 MP4, MOV(MPEG-4 AVC/H.264)
시각 카메라
센서 1/2.3" CMOS, 유효 픽셀: 12M
렌즈 FOV: 약 85°
ISO 범위 동영상: 100~3200(자동)
최대 이미지 크기 4056×3040(4:3),4056×2280(16:9)
스틸 사진 모드 단일 촬영
동영상 녹화 모드 4K UHD:3840×2160 30p
50
2.4GHz
FCC: 26dBm 이하, CE/MIC: 20dBm 이하, SRRC: 20dBm 이하
5.8GHz
FCC: 26dBm 이하, CE: 14dBm 이하, SRRC: 26dBm 이하
조리개: f/1.1
연사 촬영: 3/5/7프레임
인터벌(2/3/5/7/10/15/20/30/60초)
낮은 게인: 최대 ±10%(일반)
낮은 게인: -10° ~ +400°C
35mm 환산: 24mm
조리개: f/2.8
초점: 0.5m ~ ∞
사진: 100~1600(자동)
연사 촬영: 3/5/7프레임
인터벌(2/3/5/7/10/15/20/30/60초)
2.7K:2688×1512 30p
FHD:1920×1080 30p
Page 53

동영상 저장 비트전송률 100Mbps
사진 JPEG
동영상 MP4,MOV(MPEG-4 AVC/H.264)
조종기
작동 주파수 2.4~2.4835GHz, 5.725~5.850GHz
최대 전송 거리
(장애물과 간섭이 없는 경우)
작동 온도 0°~40°C(32°~104°F)
배터리 3950mAh @ 3.83V
송신기 전원
(EIRP)
작동 전압
지원되는 모바일 기기 크기 지원되는 두께: 6.5~8.5mm, 최대 길이: 160mm
충전기
전압 17.6±0.1V
정격 출력 60W
인텔리전트 플라이트 배터리
용량 3850mAh
전압 17.6V(최대)
배터리 유형 LiPo
에너지 59.29Wh
순중량 약 297g
충전 온도 범위 5°~40°C(41°~104°F)
최대 충전 전력 80W
자동 발열 온도 범위 -20° ~ 6° C
자동 발열 시간 600초 (최대)
자동 발열 전력 35 W (최대)
자세한 내용은 사용자 매뉴얼을 확인하십시오.
www.dji.com/mavic-2-enterprise
본 내용은 사전 고지 없이 변경될 수 있습니다.
※
MAVIC은 DJI의 상표입니다.
Copyright © 2018 DJI All Rights Reserved. Designed by DJI. Printed in China.
FCC: 8km(5마일), CE/MIC: 5km(3.1마일), SRCC: 5km(3.1마일)
2.4GHz
FCC: 26dBm 이하, CE/MIC: 20dBm 이하, SRRC: 20dBm 이하
5.8GHz
FCC: 26dBm 이하, CE: 14dBm 이하, SRRC: 26dBm 이하
1800mA @ 3.83V(모바일 기기 충전 시)
지원되는 USB 포트 유형: Lightning, Micro USB(Type-B)
USB-C
15.4V(일반)
KR
51
Page 54

Fluggerät
Die DJITM MAVICTM 2 Enterprise Dual ist mit Sicht- und Infrarotsensoren zur omnidirektionalen
Hinderniserkennung* ausgestattet. Zudem verfügt sie über einen stabilisierten 3-Achsen Gimbal.
Dank integrierter Sicht- und FLIR-Wärmebildkamera, kann gleichzeitig langwellige unsichtbare
Infrarotstrahlung, als auch Bilder im sichtbaren Spektralbereich dargestellt werden. Bewährte,
charakteristische Technologien von DJI, wie die Hinderniserkennung, unterstützen Sie beim Fliegen
und Meistern komplexer Aufnahmen. Zusätzliche Funktionen wie das eingebaute DJI AirSense
informieren Sie über den Luftraum in Ihrer Nähe. Der integrierte Passwortschutz schützt Ihre Daten
auf der Drohne vor unbefugtem Zugriff. Die Mavic 2 Enterprise lässt sich darüber hinaus durch
modulares Zubehör, wie dem M2E Scheinwerfer, dem M2E Positionslicht und dem M2E Lautsprecher
für verschiedene Anwendungsszenarien erweitern. Die Mavic 2 Enterprise besticht durch eine
maximale Fluggeschwindigkeit von 72 km/h und eine maximale Flugzeit** von 31 Minuten.
DE
2
10
8
4
B
1
A
11
1. Gimbal und Kamera
A. Sichtkamera
B. Wärmebildkamera
2. Vorwärts gerichtetes
Sichtsystem
3. Abwärts gerichtetes
Sichtsystem
4. Seitliches Sichtsystem
5. Nach unten gerichtetes
Infrarotsensorsystem
6. Hilfsbeleuchtung
7. Einschub für die Micro-SD-
Karte
8. Vordere LEDs
* Die Sicht- und Infrarotsensorsysteme reagieren empndlich auf die Umgebungsbedingungen. Lesen Sie zu
Ihrer Information die Bedienungsanleitung, die Sicherheitsrichtlinien und Ausschlüsse und sehen Sie sich
unsere Tutorial-Videos auf der ofziellen DJI Webseite an. http://www.dji.com/mavic-2-enterprise
** Die maximale Flugzeit wurde ohne Wind und bei einer konstanten Geschwindigkeit von 25 km/h getestet.
Dieser Wert dient nur als Referenz.
52
7
3
5
6
9. Motoren
10. Propeller
11. Antennen
12. Statusanzeige des
Fluggeräts
13. Nach oben gerichtete
Infraroterkennung
14. Rückwärts gerichtetes
Sichtsystem
15. Intelligent Flight Battery
16. Akkuladezustands-LED
17. Ein/Aus-Taste
12
21
16
17
15
13
18
19
20
14
18. Batterieklammern
19. USB-C-Anschluss
20. Koppeltaste/KopplungsstatusLED
21. Erweiterungssteckplatz (Zur
Anbindung von Zubehör)
22. Abdeckung des
Erweiterungssteckplatzes
22
Page 55

Fernsteuerung
In die Fernbedienung integriert ist DJIs Langstrecken-Übertragungstechnologie OCUSYNCTM 2.0,
die eine maximale Übertragungsweite von 8 km und die Videoübertragung vom Fluggerät an die
DJI Pilot App auf Ihrem Mobilgerät mit bis zu 1080p ermöglicht. Das integrierte LCD-Display liefert in
Echtzeit wichtige Informationen zum Fluggerät, und die abnehmbaren Steuerknüppel erleichtern das
Verstauen.
Maximale Betriebszeit: 2 Std. und 15 Minuten*
Zusammengeklappt
1. LCD-Bildschirm
2. Flugpausentaste
3. 5D-Taste
4. Abnehmbare Steuerknüppel
5. Ein/Aus-Taste
6. Antennen
7. Rückkehrtaste
8. Staufach für Steuerknüppel
9. USB-Anschluss (Assistant
Video-Downlink)
10. Mobilgeräteklammer
11. Flugmodusschalter
17
12 13
16
14
* Die Fernsteuerung erreicht ihre maximale Übertragungsreichweite (FCC) auf offenem Gelände ohne
elektromagnetische Störquellen bei einer Flughöhe von ca. 120 m.
Die maximale Laufzeit wurde unter Laborbedingungen getestet. Dieser Wert dient nur als Referenz.
18
15
7
1
2
8
9
12. Gimbal-Rädchen
13. EV-Einstellrädchen
14. Videotaste
15. Taste für Fokus/Verschluss
16. Video-Downlink-/Lade-Anschluss
(Micro-USB)
17. C1-Taste (frei belegbar)
18. C2-Taste (frei belegbar)
6
4
3
5
11
10
DE
53
Page 56

1. Die DJI Pilot App herunterladen und Video-Tutorials ansehen
1
2
3
Suchen Sie im App Store oder auf Google Play nach „DJI Pilot“
oder scannen Sie den QR-Code, um die App auf Ihr Mobilgerät
herunterzuladen.
DJI Pilot
DE
Schauen Sie sich die Tutorial-Videos unter folgender Adresse an:
www.dji.com/mavic-2-enterprise/info#video.
Video-Tutorials
DJI Pilot ist mit iOS 10.0 (oder höher) sowie Android 5.0 (oder höher) kompatibel.
2. Fluggerät vorbereiten
2
1
3
Entfernen Sie die Gimbal-
Abdeckung von der Kamera.
Markiert Nicht markiert
Ordnen Sie die Propeller
den richtigen Motoren zu.
Klappen Sie die vorderen Arme und die Propeller aus, bevor Sie die hinteren Arme ausklappen.
Vor dem Losiegen müssen alle Arme und Propeller ausgeklappt sein.
Klappen Sie die
vorderen Arme aus.
Drücken Sie die Propeller
herunter, und drehen Sie sie in
die Verriegelungsrichtung.
54
Klappen Sie die
hinteren Arme aus.
Ausgeklappt
Page 57

3. Die Akkus laden
Verwenden Sie das im Lieferumfang enthaltene
Ladegerät, um die Intelligent Flight Battery vor der
ersten Verwendung vollständig aufzuladen.
Intelligent Flight Battery entnehmen.
Steckdose
100 – 240 V
B
A
A
Ladezeit:
ca. 1 Std. 30 Minuten
Das Fernsteuerungskabel muss vor dem Auaden entfernt werden.
Ladezustand prüfen und Ein/Ausschalten
Niedrig
Hoch
Drücken Sie die Taste einmal, um den AkkuLadezustand zu überprüfen.
Drücken Sie die Taste einmal kurz und dann
lang, um das Gerät ein-/auszuschalten.
Legen Sie den Akku in die Drohne und schalten Sie diese ein. Kühlt sich der Akku auf weniger
als 6°C ab, erwärmt sich dieser automatisch, um seine Temperatur zwischen 8 und 10 °C zu
halten. Für weitere Details schauen Sie bitte in der Bedienungsanleitung nach.
Drücken Sie die Taste einmal, um den
Akkuladezustand auf dem LCD-Display zu
überprüfen.
Drücken Sie die Taste noch einmal,
und halten Sie sie gedrückt, um die
Fernsteuerung ein-/auszuschalten.
B
Ladezeit:
ca. 2 Std. 15 Minuten
DE
55
Page 58

4. Fernsteuerung vorbereiten
Klappen Sie die Antennen und die Mobilgeräteklammern
DE
auf, und montieren Sie die Steuerknüppel.
1
Stecken Sie ein Ende des RC-Kabels in das
Ende des Schlitzes.
2
3
Sichern Sie Ihr Mobilgerät mit den Klammern.
Stellen Sie sicher, dass die Steuerknüppel fest montiert sind.
Das Fernsteuerungskabel mit dem Lightning-Anschluss ist standardmäßig montiert.
Verwenden Sie zur Verbindung mit der Fernsteuerung das richtige Kabel für Ihr
Mobilgerät. Wenn Sie ein iPad oder Tablet verwenden, nutzen Sie den USB-Anschluss
der Fernsteuerung.
Verwenden Sie die Micro-USB- und USB-Anschlüsse nie gleichzeitig für die
Videoverbindung.
56
Stark
Schwach
Stellen Sie die Antennen
parallel zueinander ein
Optimaler Sendebereich
Page 59

5. Vorbereitung für den Start
DJI Pilot
App
Fernsteuerung einschalten Fluggerät einschalten DJI Pilot starten
Verwenden Sie Ihr DJI-Konto, um das Fluggerät zu aktivieren. Für die Aktivierung wird eine
Internetverbindung benötigt.
Internet
Legen Sie in der DJI Pilot App bitte ein Passwort für die Drohne fest und sichern somit den
Zugriff auf den internen Speicher ab.
6. Flug
Vergewissern Sie sich vor dem Losiegen, dass die
Statusleiste in DJI Pilot„Bereit“ anzeigt.
Automatisches Starten/Landen
Knüppelkombination zum Ein-/
Ausschalten der Motoren
Linken Knüppel langsam
nach oben bewegen,
um zu starten
Die Motoren können während des Fluges nur gestoppt werden, wenn der Flugcontroller einen
kritischen Fehler erkennt.
Ready to Go (GPS)
ODER
Drücken Sie den linken Knüppel nach unten
(langsam), bis das Fluggerät den Boden berührt.
Einige Sekunden halten, um die Motoren
auszuschalten
DE
57
Page 60

Linker Knüppel
Rechter Knüppel
Die Fernsteuerung verwenden
Die Standard-Flugsteuerung wird als Modus 2 bezeichnet. Mit dem linken Steuerknüppel steuern
Sie die Höhe und Flugrichtung des Fluggeräts, und mit dem rechten Steuerknüppel steuern Sie
ihre Vorwärts-, Rückwärts-, Links- oder Rechtsbewegung. Mit dem Gimbal-Rädchen wird die
Neigung der Kamera verstellt.
Steigflug
Vorwärts
DE
Stellen Sie vor jedem Start immer eine geeignete Höhe für die Rückkehrfunktion ein. Wenn das
Fluggerät zum Startpunkt zurückkehrt, sollten Sie es mit den Steuerknüppeln korrigieren, falls
nötig.
Drücken Sie die Taste „Flugpausentaste“ zur Notbremsung während des Fluges.
*
Modulares Zubehör
M2E Kollisionswarnlicht
Sinkflug
Linksdrehung Rechtsdrehung
M2E Scheinwerfer M2E Lautsprecher
58
Links
Rückwärts
Rechts
Page 61

gen, Basisstationen), da die Funktion des Bordkompasses dadurch gestört werden kann.
-
7. Sicher iegen
120 m
Nur in offenen
Bereichen fliegen
Über- und umfliegen Sie Hindernisse, Menschenmengen, Hochspannungsleitungen,
Bäume und Gewässer stets mit ausreichendem Sicherheitsabstand.
Fliegen Sie NICHT in die Nähe elektromagnetischer Quellen (z.B. Hochspannungsleitun-
Fliegen Sie NICHT bei widrigem Wetter (z.B. Regen, Schnee, Nebel oder Windgeschwin
digkeiten über 10m/s).
Halten Sie ausreichend Abstand zu den
drehenden Propellern und Motoren.
Um Ihre eigene Sicherheit und die Sicherheit der Menschen in Ihrer Umgebung zu
gewährleisten, ist es wichtig, dass Sie die nötigen Grundregeln kennen. Lesen Sie sich den
Haftungsausschluss und die Sicherheitsvorschriften durch.
Starkes
GPS-Signal
Sichtkontakt
behalten
Flugverbotszonen
(GEO-Zone)
Mehr Informationen:
http://flysafe.dji.com/no-fly
.
Fliegen Sie unterhalb
von 120 m.
DE
≥10 m/s
59
Page 62

Technische Daten
Fluggerät
Gewicht 899 g
Max. Fluggeschwindigkeit 72 km/h im Sportmodus ohne Wind
Max. Dienstgipfelhöhe über N.N. 6.000 m
Betriebstemperatur -10° bis 40 °C
GNSS GPS + GLONASS
Betriebsfrequenz 2,4-2,4835 GHz; 5,725-5,850 GHz
Sendeleistung
(EIRP)
DE
Interner Speicher 24 GB
Gimbal
Kontrollierter Bereich Nickachse: -90° bis +30°
Wärmebildkamera
Sensor Ungekühltes VOx-Mikrobolometer
Objektiv Horizontales Sichtfeld: 57°
Pixelabstand 12 μm
Spektralband 8–14 μm
Max. Bildgröße 640 × 480 (4:3); 640 × 360 (16:9)
Fotomodi Einzelaufnahme
Videomodi 640 × 360 bei 8,7 Bildern/s
Genauigkeit Hohe Verstärkung: Max. ± 5 % (typischer Wert)
Aufnahmebandbreite Hohe Verstärkung: -10 °C bis +140 °C
Fotoformate JPEG
Videoformate MP4, MOV (MPEG-4 AVC/H.264)
Sichtkamera
Sensor 1/2,3-Zoll-CMOS; eektive Pixel: 12 Megapixel
Objektiv Sichtfeld: ca. 85 °
ISO-Bereich Video: 100–3200 (automatisch)
Max. Bildgröße 4056 × 3040(4:3); 4056 × 2280(16:9)
Fotomodi Einzelaufnahme
Videomodi 4K Ultra HD: 3840 × 2160 30p
Max. Video-Bitrate 100 MBit/s
Fotoformate JPEG
2,4 GHz
FCC: ≤26 dBm; CE/MIC: ≤ 20 dBm; SRRC: ≤20 dBm
5,8 GHz
FCC: ≤26 dBm; CE: ≤14 dBm; SRRC: ≤26 dBm
Blende: F1.1
Serienbildaufnahmen: 3/5/7 Bilder
Intervall (2/3/5/7/10/15/20/30/60 s)
Geringe Verstärkung: Max. ± 10 % (typischer Wert)
Geringe Verstärkung: -10 °C bis +400 °C
35 mm Format Äquivalent: 24 mm
Blende: F2.8
Fokus: 0,5 m bis ∞
Foto: 100–1600 (automatisch)
Serienbildaufnahmen: 3/5/7 Bilder
Intervall (2/3/5/7/10/15/20/30/60 s)
2,7K: 2688 × 1512 30p
Full HD: 1920 × 1080 30p
60
Page 63

Videoformate MP4, MOV (MPEG-4 AVC/H.264)
Fernsteuerung
Betriebsfrequenz 2,4-2,4835 GHz; 5,725-5,850 GHz
Sendereichweite
(bei direkter Sichtverbindung
und ohne Störungen)
Betriebstemperatur 0 bis 40 °C
Akku 3950 mAh bei 3,83 V
Sendeleistung
(EIRP)
Betriebsspannung
Unterstützte Mobilgerätegröße Unterstützte Dicke 6,5...8,5 mm, max. Länge: 160 mm
Ladegerät
Spannung 17,6 ± 0,1 V
Nennleistung 60 W
Intelligent Flight Battery
Kapazität 3850 mAh
Spannung 17,6 V (max.)
Akkutyp LiPo 4S
Energie 59,29 Wh
Nettogewicht ca. 297 g
Ladetemperatur 5 bis 40 °C
Max. Ladeleistung 80 W
Temperaturbereich der
Selbsterwärmung
Dauer der Selbsterwärmung Max. 600 Sekunden
Selbsterwärmungsleistung Max. 35 Watt
Nähere Informationen nden Sie in der Bedienungsanleitung:
www.dji.com/mavic-2-enterprise
Der Inhalt kann jederzeit unangekündigt geändert werden.
※
MAVIC ist eine Marke von DJI.
Copyright © 2018 DJI Alle Rechte vorbehalten. Gestaltung: DJI. Gedruckt in China.
FCC: 8 km; CE/MIC: 5 km; SRRC: 5 km
2,4 GHz
FCC: ≤26 dBm; CE/MIC: ≤ 20 dBm; SRRC: ≤20 dBm
5,8 GHz
FCC: ≤26 dBm; CE: ≤14 dBm; SRRC: ≤26 dBm
1800 mA bei 3,83 V (beim Laden des Mobilgeräts)
Unterstützte USB-Porttypen Lightning, Micro-USB (Typ B)
USB-C
15,4 V (normal)
-20° bis 6° C
DE
61
Page 64

Aeronave
El MAVICTM 2 Enterprise Dual de DJITM cuenta con un sistema de detección omnidireccional con
sensores de visión e infrarrojos* y viene con una cámara con estabilizador de 3 ejes con una cámara
térmica de onda larga FLIR y una cámara visual, gracias a las que puede capturar imágenes
tanto imágenes tanto en el espectro infrarrojo como en el visible simultáneamente. Las tecnologías
características de DJI, tales como la detección de obstáculos, le ayudan a volar y le permiten
capturar tomas complejas sin esfuerzo. Otras funciones como AirSense le permiten ser consciente
de su espacio aéreo circundante y la protección por contraseña le ayuda a mantener asegurado
el acceso a su aeronave y a proteger su información. El Mavic 2 Enteprise tiene además módulos
accesorios como el Foco M2E, la Baliza M2E y el Altavoz M2E, diseñados para una gran variedad de
usos. Mavic 2 Enterprise alcanza una velocidad de vuelo máxima de 72 km/h (44,7 mph) y un tiempo
máximo de vuelo de 31 minutos**.
ES
2
B
1
A
11
1. Estabilizador y cámara
A. Cámara visual
B. Cámara térmica
2. Sistema de visión frontal
3. Sistema de visión inferior
4. Sistema de visión lateral
5. Sistema de detección
inferior por infrarrojos
6. Luz inferior auxiliar
7. Ranura para tarjeta microSD
8. Indicadores LED delanteros
9. Motores
* El sistema de visión y el sistema de detección por infrarrojos se ven afectados por las condiciones del entorno.
Lea la Renuncia de responsabilidad y directrices de seguridad, el Manual del usuario y veo los vídeos
tutoriales en la página web de DJI para más información. http://www.dji.com/mavic-2-enterprise
** El tiempo máximo de vuelo se determinó en un entorno sin viento a una velocidad sostenida de 25 km/h
(15,5 mph). Este valor se proporciona sólo como referencia.
10. Hélices
11. Antenas
12. Indicador de estado de la aeronave
13. Sistema de detección superior por
14. Sistema de visión de retroceso
15. Batería de Vuelo Inteligente
16. Indicadores LED de nivel de batería
17. Botón de encendido
18. Bandas de sujeción de la batería
3
infrarrojos
7
5
6
62
10
8
4
12
16
15
13
18
14
19. Puerto USB-C
20. Botón de vinculación/
indicador de estado de
vinculación
21. Puerto de accesorios
22. Tapa del puerto de
accesorios
21
22
17
19
20
Page 65

Control remoto
El control remoto lleva incorporada la tecnología de transmisión de largo alcance de DJI,
OCUSYNCTM 2.0, que ofrece un alcance de transmisión máximo de 8 km (5 millas) y permite
visualizar vídeo de la aeronave en la aplicación DJI Pilot de su dispositivo móvil en 1080p. La pantalla
LCD integrada ofrece información sobre la aeronave en tiempo real, mientras que las palancas de
control desmontables facilitan el almacenamiento del control remoto.
Tiempo de funcionamiento máximo: 2 hora y 15 minutos*
Plegado
1. Pantalla LCD
2. Botón de pausa durante vuelo
3. Botón 5D
4. Palancas de control extraíbles
5. Botón de encendido
6. Antenas
7. Botón RTH
8. Ranura de almacenamiento de las
palancas de control
9. Puerto de transmisión de vídeo de
reserva (USB)
10. Abrazadera para dispositivo móvil
11. Interruptor de modo de vuelo
17
12 13
16
14
* El control remoto es capaz de alcanzar su distancia máxima de transmisión (FCC) en una amplia zona abierta
sin interferencias electromagnéticas y a una altitud de unos 120 metros (400 pies).
El tiempo de funcionamiento máximo se ha probado en un entorno de laboratorio. Este valor se proporciona
sólo como referencia.
18
15
7
1
2
8
9
12. Dial del estabilizador
13. Dial de ajuste de exposición
14. Botón de grabación
15. Obturador/botón de enfoque
16. Puerto de alimentación/transmisión
de vídeo (microUSB)
17. Botón C1 (personalizable)
18. Botón C2 (personalizable)
6
4
3
5
11
10
ES
63
Page 66

1. Descarga de la aplicación DJI Pilot y visualización de los
1
2
3
videotutoriales
Busque "DJI Pilot" en la App Store o en Google Play, o
escanee el código QR siguiente para descargar la aplicación
en su dispositivo móvil.
DJI Pilot
Mire los vídeos tutoriales en www.dji.com/mavic-2-enterprise/
ES
info#video.
Videotutoriales
La aplicación DJI Pilot es compatible con iOS 10.0 (o posterior) y Android 5.0 (o posterior).
2. Preparación de la aeronave
2
1
3
Retire la cubierta del
estabilizador de la cámara.
Con marca Sin marca
Empareje las hélices con
los motores.
Despliegue los brazos y hélices frontales antes que los posteriores. Todos los brazos y
hélices deben estar desplegados antes del despegue.
Despliegue los brazos
delanteros.
Presione las hélices hacia
abajo rmemente y gírelas en la
dirección de bloqueo.
64
Despliegue los brazos
traseros.
Desplegado
Page 67

3. Carga de las baterías
Utilice el cargador suministrado para
cargar completamente la Batería de Vuelo
Inteligente antes del primer uso.
Extraiga la Batería de Vuelo Inteligente
Toma de
alimentación
100 - 240 V
Comprobar los niveles de batería y encendido/apagado
Pulse una vez para comprobar el nivel de
batería.
Pulse una vez, después otra y mantenga
pulsado para encender o apagar.
B
A
Tiempo de carga:
~1 hora y 30 minutos
Retire el cable del control remoto antes de cargar.
Bajo
Alto
Instale la batería en la aeronave y enciéndala. Si la temperatura de la batería desciende por
debajo de 6 ºC, se autocalentará para mantener una temperatura de entre 8 y 10 ºC. Consulte
el Manual de usuario para más detalles.
A
Tiempo de carga:
~2 horas y 15 minutos
Pulse una vez para comprobar el nivel de
batería en la pantalla LCD.
Pulse una vez, después otra y mantenga
pulsado para encender o apagar el control
remoto.
B
ES
65
Page 68

4. Preparación del controlador remoto
Despliegue las antenas, las abrazaderas del
dispositivo móvil y je las palancas de control.
ES
1
Coloque un extremo del cable de RC en el
extremo de la ranura.
2
3
Acople el dispositivo móvil dentro de las abrazaderas.
Compruebe que las palancas de control estén bien montadas.
El cable del control remoto con el conector Lightning viene montado de forma
predeterminada. Utilice el cable adecuado para conectar el dispositivo móvil al control
remoto. Si utiliza un iPad o una tableta, utilice el puerto USB del control remoto.
No utilice el cable micro USB ni los puertos USB de forma simultánea para conectar vídeo.
66
Intensa
Coloque las antenas paralelas entre sí.
Débil
Intervalo de transmisión óptimo
Page 69

5. Preparación para el despegue
DJI Pilot
Encienda el controlador remoto. Encienda la aeronave. Inicie DJI Pilot.
Utilice su cuenta DJI para activar la aeronave. La activación requiere conexión a Internet.
Internet
Establezca una contraseña para la aeronave con la aplicación DJI Pilot para garantizar la
seguridad de los datos de a bordo.
6. Vuelo
Antes de despegar, asegúrese de que la barra de estado de la
aeronave en la aplicación DJI Pilot muestre "Ready to Go".
Despegue/aterrizaje manuales
Comando de combinación de palancas
para arrancar/detener los motores
Ready to Go (GPS)
O bien
App
ES
Palanca izquierda
arriba (despacio)
para despegar
Los motores sólo se pueden detener en pleno vuelo cuando el controlador de vuelo detecta un
error crítico.
Palanca izquierda abajo (despacio) hasta tocar
suelo
Mantenga unos segundos para detener los
motores
67
Page 70

Palanca izquierda
Palanca derecha
Adelante
Funcionamiento del control remoto
El control de vuelo predeterminado se conoce como Modo 2. La palanca izquierda controla
la altitud y la dirección de la aeronave, mientras que la derecha controla los movimientos
hacia delante, atrás, izquierda y derecha. El selector del estabilizador controla la inclinación
de la cámara.
Arriba
Abajo
ES
Girar
Girar
derecha
Establezca siempre una altitud de RTH (Regreso al punto de origen) adecuada antes del
despegue. Cuando la aeronave esté volviendo al punto de origen, debe guiarla con las
palancas de control.
Pulse el botón de pausa de vuelo para una frenada de emergencia durante el vuelo.
*
Módulos accesorios
Baliza M2E
izquierda
Foco M2E Altavoz M2E
68
Izquierda
Atrás
Derecha
Page 71

7. Vuele seguro
120 m
Vuele en espacios
abiertos
Evite volar por encima o cerca de obstáculos, multitudes, líneas de alta tensión, árboles
o masas de agua.
NO vuele cerca de fuentes electromagnéticas, como tendidos eléctricos y estaciones
base, ya que puede afectar a la brújula de a bordo.
NO utilice la aeronave en condiciones climáticas adversas como lluvia, nieve, niebla ni
con una velocidad del viento superior a 10m/s o 22mph.
Manténgase alejado de las hélices y los
motores en rotación.
Es importante conocer las directrices básicas de vuelo para su propia seguridad y la
de quienes le rodean. No olvide leer la
de seguridad
Señal fuerte de
GPS
.
Mantenga una
línea de visión
directa
Obtenga más información en:
http://flysafe.dji.com/no-fly
Vuele por debajo de
120 m (400 pies)
Zona GEO
≥10 m/s
Renuncia de responsabilidad y las directrices
ES
69
Page 72

Especicaciones
Aeronave
Peso 899 g
Velocidad máxima 72 km/h (44,7 mph) en modo Sport sin viento
Altitud de servicio máxima por encima
del nivel del mar
Temperatura de funcionamiento -10 a 40 °C (14 a 104 °F)
GNSS GPS + GLONASS
Frecuencia de funcionamiento 2,4-2,4835 GHz; 5,725-5,850 GHz
Potencia del transmisor
(PIRE)
ES
Almacenamiento interno 24 GB
Estabilizador
Intervalo controlable Cabeceo: -90° a +30°
Cámara térmica
Sensor Microbolómetro VOx no refrigerado
Objetivo HFOV: 57°
Rejilla de píxel 12 μm
Banda espectral 8-14 μm
Tamaño de imagen 640×480 (4:3); 640×360 (16:9)
Modos de fotografía Disparo único
Modos de vídeo 640×360 a 8.7 fps
Precisión Alta ganancia: Máx. ± 5 % (de media)
Rango de escena Alta ganancia: -10 °C a + 140 °C
Fotografía JPEG
Vídeo MP4, MOV (MPEG-4 AVC/H.264)
Cámara visual
Sensor CMOS de 1/2,3’’; píxeles efectivos: 12 MP
Objetivo FOV: aprox. 85°
Rango ISO Vídeo: 100-3200 (automática)
Tamaño máx. de imagen 4056 × 3040(4:3)4056×2280(16:9)
Modos de fotografía Disparo único
6000 m (19685 ft)
2,4 GHz
FCC: ≤ 26 dBm; CE/MIC: ≤ 20 dBm; SRRC: ≤ 20 dBm
5,8 GHz
FCC: ≤ 26 dBm; CE: ≤ 14 dBm; SRRC: ≤ 26 dBm
Apertura: f/1.1
Disparo en ráfaga: 3/5/7 fotogramas
Intervalo (2/3/5/7/10/15/20/30/60 s)
Baja ganancia: Máx. ± 10 % (de media)
Baja ganancia: -10 °C a + 400 °C
Formato equivalente a 35 mm: 24 mm
Apertura: f/2.8
Enfoque: 0,5 m a ∞
Fotografía: 100-1600 (automática)
Disparo en ráfaga: 3/5/7 fotogramas
Intervalo (2/3/5/7/10/15/20/30/60 s)
70
Page 73

Modos de vídeo 4K Ultra HD:3840×2160 30p
Tasa de bits máx. de almacenamiento
de vídeo
Fotografía JPEG
Vídeo MP4, MOV (MPEG-4 AVC/H.264)
Control remoto
Frecuencia de funcionamiento 2,4-2,4835 GHz; 5,725-5,850 GHz
Distancia de transmisión máx.
(Sin obstáculos y sin interferencias)
Temperatura de funcionamiento De 0 °C a 40 °C (de 32 °F a 104 °F)
Batería 3950 mAh a 3,83 V
Potencia de transmisión
(PIRE)
Voltaje de funcionamiento
Tamaño admitido de dispositivo móvil Espesor admitido: 6,5-8,5 mm, longitud máxima: 160 mm
Cargador
Voltaje 17,6±0,1 V
Potencia nominal 60 W
Batería de Vuelo Inteligente
Capacidad 3850 mAh
Voltaje 17,6 V (máx.)
Tipo de batería LiPo 4S
Energía 59,29 Wh
Peso neto Aprox. 297 g
Intervalo de temperatura de carga De 5 °C a 40 °C (de 41 °F a 104 °F)
Potencia de carga máx. 80 W
Intervalo de temperatura de
autocalentamiento
Tiempo de autocalentamiento 600 s (máx)
Potencia de autocalentamiento 35 W (máx)
Para obtener más información, lea el manual del usuario:
www.dji.com/mavic-2-enterprise
Este contenido puede modicarse sin noticación previa.
※
MAVIC es una marca comercial de DJI.
Copyright © 2018 DJI Todos los derechos reservados. Diseñado por DJI. Impreso en China.
2.7K:2688×1512 30p
Full HD:1920×1080 30p
100 Mbps
FCC: 8 km (5 mi); CE/MIC: 5 km (3,1 mi); SRRC: 5 km (3,1 mi)
2,4 GHz
FCC: ≤ 26 dBm; CE/MIC: ≤ 20 dBm; SRRC: ≤ 20 dBm
5,8 GHz
FCC: ≤ 26 dBm; CE: ≤ 14 dBm; SRRC: ≤ 26 dBm
1800 mA a 3,83 V (al cargar el dispositivo móvil)
Tipos de puerto USB compatibles: Lightning, Micro USB (tipo B)
USB-C
15,4 V (típico)
de -20° a 6° C (de -4° a 43° F)
ES
71
Page 74

Appareil
Le DJITM MAVICTM 2 Enterprise Dual propose des systèmes optiques multidirectionnels et des
systèmes de détection infrarouge*. Il est livré avec une caméra à nacelle 3 axes entièrement
stabilisée avec une caméra thermique infrarouge à ondes longues FLIR et une caméra optique,
fournissant simultanément des images thermiques et visuelles. Les technologies emblématiques de
DJI telles que la détection d'obstacles vous aident à piloter et à réaliser des prises de vue complexes
sans effort. Des fonctionnalités supplémentaires comme le DJI AirSense intégré vous permettent
de connaître l'espace aérien environnant, tandis que la protection par mot de passe vous aide à
sécuriser l'accès à votre drone et à protéger vos données. Le Mavic 2 Enterprise dispose également
d'accessoires modulaires amovibles tels que le projecteur, le phare et le haut-parleur qui sont
spécialement conçus pour diverses applications. Le Mavic 2 Enterprise peut se targuer d'une vitesse
de vol maximale de 72 km/h (44,7 mph) et d'un temps de vol maximum de 31 minutes**.
FR
2
10
8
4
B
1
A
11
1. Nacelle et caméra
A. Caméra optique
B. Caméra thermique
2. Système optique avant
3. Système optique inférieur
4. Système optique latéral
5. Système de détection infrarouge
vers le bas
6. Lampe inférieure
7. Logement de la carte microSD
8. LED avant
9. Moteurs
* Les systèmes infrarouge et de vision sont inuencés par les conditions environnantes. Lisez la clause d'exclusion
de responsabilité et les consignes de sécurité ainsi que le guide de l'utilisateur, et regardez les tutoriels vidéo
sur le site web ofciel de DJI pour en savoir plus. http://www.dji.com/mavic-2-enterprise
** Le temps de vol maximum a été testé en l'absence de vent, à une vitesse constante de 25 km/h (15,5 mph).
Cette valeur est fournie à titre indicatif uniquement.
72
7
3
5
6
10. Hélices
11. Antennes
12. Voyant d'état de l'appareil
13. Système de détection
infrarouge vers le haut
14. Système optique arrière
15. Batterie de Vol Intelligente
16. Indicateurs de niveau de
batterie
17. Bouton d'alimentation
12
16
17
15
13
18
14
18. Bouton pressoir de la
batterie
19. Port USB-C
20. Bouton d'appairage/voyant
d'état d'appairage
21. Port d’extension (pour
connecter les accessoires)
22. Couvercle port d’extension
21
22
19
20
Page 75

Radiocommande
Intégrée à la radiocommande, la technologie de transmission à longue portée OCUSYNCTM 2.0 de
DJI offre une portée de transmission maximale de 8 km (5 mi) et permet de transmettre des vidéos
de l'appareil vers l'application DJI Pilot installée sur votre appareil mobile en 1080p. Un écran LCD
embarqué affiche en temps réel les données de l'appareil tandis que les manches de contrôle
amovibles facilitent le rangement de la radiocommande.
Temps de fonctionnement maximal : 2 heures et 15 minutes*
Plié
1. Écran LCD
2. Bouton Pause de la fonction Vol
3. Bouton 5D
4. Manches de contrôle amovibles
5. Bouton d'alimentation
6. Antennes
7. Bouton RTH
8. Emplacement de rangement des
manches de contrôle
9. Port Video-Downlink (USB) de réserve
10. Bride de xation pour appareil mobile
11. Commutateur de mode de vol
7
1
2
8
9
6
4
5
3
11
10
FR
17
12 13
16
14
* La radiocommande peut atteindre une distance de transmission maximale (FCC) dans une zone dégagée sans
interférences électromagnétiques et à une altitude d'environ 120 mètres (400 pieds).
Le temps d'exécution maximum a été testé dans un environnement de laboratoire. Cette valeur est fournie à titre
indicatif uniquement.
18
15
12. Molette de la nacelle
13. Molette de réglage EV
14. Bouton d'enregistrement
15. Bouton de mise au point/d'obturateur
16. Port d'alimentation/Video-Downlink
(micro USB)
17. Bouton C1 (personnalisable)
18. Bouton C2 (personnalisable)
73
Page 76

1. Téléchargement de l'application DJI Pilot et visionnage
1
2
3
des didacticiels vidéo
Recherchez « DJI Pilot » sur l'App Store ou sur Google Play,
ou scannez le code QR ci-dessous pour télécharger
l'application sur votre appareil mobile.
Application
Regardez les tutoriels vidéo sur www.dji.com/mavic-2-enterprise/
info#video.
FR
Didacticiels vidéo
DJI Pilot est compatible avec iOS 10.0 (ou version ultérieure) ou Android 5.0 (ou version
ultérieure).
2. Préparation de l'appareil
2
1
Retirez le cache de la
nacelle de la caméra.
3
Dépliez les bras avant. Dépliez les bras arrière.
Marqué Non marqué
Associez les hélices aux
moteurs correspondants.
Dépliez les bras avant et les hélices avant ceux situés à l'arrière. Tous les bras et les hélices
doivent être dépliés avant le décollage.
Montez solidement l'hélice, puis tournez
dans la direction de verrouillage.
74
Déplié
Page 77

3. Chargement des batteries
Chargez entièrement la Batterie de Vol
Intelligente à l'aide du chargeur fourni
avant la première utilisation.
Retirez la Batterie de Vol Intelligente
Prise de courant
100 à 240 V
B
Retirez le câble de la radiocommande avant de la charger.
Vérication des niveaux de batterie et mise sous/hors tension
Faible
Élevé
Appuyez une fois pour vérier le niveau de
la batterie.
Appuyez, puis maintenez enfoncé pour
allumer/éteindre.
Installez la batterie dans l’appareil et mettez-le sous tension. Une fois que la température de la
batterie est inférieure à 6°C, elle se réchauffe automatiquement pour maintenir une température
entre 8 et 10°C. Reportez-vous au guide d’utilisateur pour plus de détails.
A
A
Temps de charge :
environ 1 heure et
30 minutes
Appuyez une fois pour vérier le niveau de
batterie sur l'écran LCD.
Appuyez une fois, puis maintenez enfoncé pour
allumer/éteindre la radiocommande.
B
Temps de charge :
environ 2 heures et
15 minutes
FR
75
Page 78

4. Préparation de la radiocommande
Dépliez les antennes et la bride de xation pour appareil
mobile, puis xez les manches de contrôle.
FR
1
Placez une extrémité du câble RC dans le
logement.
2
3
Fixez votre appareil mobile dans les brides de xation.
Assurez-vous que les manches de contrôle sont bien en place.
Le câble de la radiocommande doté du connecteur Lightning est monté par défaut. Utilisez
le câble adapté à votre appareil mobile pour brancher ce dernier à la radiocommande. Avec
un iPad ou une tablette, utilisez le port USB de la radiocommande.
N'utilisez pas les ports USB et Micro-USB simultanément pour la liaison vidéo.
76
Fort
Faible
Installez les antennes de façon
parallèle l'une à l'autre
Plage de transmission optimale
Page 79

5. Préparation au décollage
DJI Pilot
App
Mettez la radiocommande
sous tension
Utilisez votre compte DJI pour activer l'appareil. L'activation nécessite une connexion Internet.
Internet
Dénissez un mot de passe pour le drone dans l'application DJI Pilot an de sécuriser l'accès
et de protéger vos données embarquées.
Mettez l'appareil sous
tension
6. Vol
Avant de procéder au décollage, vériez dans DJI Pilot
que la mention « Ready to Go » s'afche dans la barre
d'état de l'appareil.
Décollage/atterrissage manuel
Commande de manche combinée pour
démarrer/couper les moteurs
Relevez lentement le
manche gauche
pour décoller.
Les moteurs peuvent être coupés en plein vol uniquement lorsque le contrôleur de vol détecte
une erreur critique.
Abaissez lentement le manche gauche jusqu'à ce
que l'appareil touche le sol.
Maintenez la position pendant quelques secondes
pour couper les moteurs.
Ready to Go (GPS)
OU
Lancez DJI Pilot
FR
77
Page 80

Manche gauche
Fonctionnement de la radiocommande
Le contrôle de vol par défaut est connu sous le nom de Mode 2. Le manche gauche agit sur
l'altitude et l'orientation de l'appareil, tandis que le manche droit contrôle ses mouvements vers
l'avant, l'arrière, la gauche et la droite. La molette de la nacelle contrôle l'inclinaison de la caméra.
Haut
Manche droit
Avant
Bas
FR
Tourner à
gauche
Dénissez toujours une altitude RTH appropriée avant le décollage. Lorsque l'appareil retourne
au point de départ, guidez-le avec les manches de contrôle.
Appuyez sur le bouton Pause de la fonction Vol pour effectuer un freinage d'urgence en plein
vol.
*
Accessoires modulaires
Tourner à
droite
Phare M2E
Projecteur M2E Haut-parleur M2E
78
Gauche
Arrière
Droite
Page 81

7. Voler en toute sécurité
120 m
Faire voler l'appareil dans
des espaces ouverts
Évitez de faire voler l'appareil au-dessus ou à proximité d'obstacles, de rassemblements
de personnes, de lignes électriques à haute tension, d'arbres ou d'étendues d'eau.
Ne faites PAS voler l'appareil à proximité de sources électromagnétiques puissantes,
telles que des lignes électriques ou des antennes relais. Celles-ci risquent en effet
d'affecter le compas intégré.
N'utilisez PAS l'appareil dans de mauvaises conditions météorologiques (pluie, neige,
brouillard, rafales dont la vitesse dépasse 10m/s ou 35km/h [22mph], etc.).
Tenez-vous à distance des hélices et des
moteurs en rotation.
Il est important que vous compreniez les consignes de vol fondamentales afin d'assurer
votre sécurité et celle de votre entourage. N'oubliez pas de lire la
responsabilité et les consignes de sécurité
Signal GPS fort Garder l'appareil
en vue
.
Pour en savoir plus,
rendez-vous sur le site:
http://flysafe.dji.com/no-fly
Voler à moins de 120
m d'altitude (400pieds)
Zone d'exclusion
aérienne
Clause d'exclusion de
≥ 10m/s
FR
79
Page 82

Caractéristiques techniques
Appareil
Poids 899 g
Vitesse max. 72 km/h (44,7 mph) en mode Sport sans vent
Plafond pratique max.
au-dessus du niveau de la mer
Température de fonctionnement -10 à 40° C (14 à 104° F)
GNSS GPS + GLONASS
Fréquence de fonctionnement 2,4 à 2,4835 GHz ; 5,725 à 5,850 GHz
Puissance de l'émetteur
(EIRP)
Stockage interne 24 Go
Nacelle
FR
Plage réglable Angle vertical : -90 à +30°
Caméra thermique
Capteur Microbolomètre VOx non refroidi
Objectif HFOV : 57°
Pas de pixel 12 μm
Bande spectrale 8 - 14 μm
Taille d'image 640 × 480 (4:3) ; 640 × 360 (16:9)
Modes de photographie Prise de vue unique
Modes d'enregistrement vidéo 640 × 360 @ 8,7 i/s
Précision Haut gain : max ± 5 % (standard)
Plage de tournage Haut gain : -10° à +140 °C
Photo
Vidéo MP4, MOV (MPEG-4 AVC/H.264)
Caméra optique
Capteur CMOS 1/2.3" ; pixels eectifs : 12M
Objectif FOV : environ 85°
Gamme ISO Vidéo : 100 à 3 200 (auto)
Taille max. de l'image 4 056
Modes de photographie Prise de vue unique
6 000 m (19 685 pieds)
2,4 GHz
FCC : ≤ 26 dBm ; CE/MIC : 20 dBm ; SRRC : ≤ 20 dBm
5,8 GHz
FCC : ≤ 26 dBm ; CE : 14 dBm ; SRRC : ≤ 26 dBm
Ouverture : f/1.1
Rafale : 3/5/7 images
Intervalle (2/3/5/7/10/15/20/30/60 s)
Bas gain : max ± 10 % (standard)
Bas gain : -10° à +400 °C
JPEG
Format équivalent 35 mm : 24 mm
Ouverture : f/2.8
Mise au point : 0,5 m à ∞
Photo : 100 à 1 600 (auto)
×
3 040 (4:3); 4 056
Rafale : 3/5/7 images
Intervalle (2/3/5/7/10/15/20/30/60 s)
×
2 280 (16:9)
80
Page 83

Modes d'enregistrement vidéo 4K Ultra HD : 3 840 x 2 160 30p
Débit binaire max. 100 Mbps
Photo JPEG
Vidéo MP4, MOV (MPEG-4 AVC/H.264)
Radiocommande
Fréquence de fonctionnement 2,4 à 2,4835 GHz ; 5,725 à 5,850 GHz
Distance de transmission maximale
(Sans obstacle gênant ni interférence)
Température de fonctionnement 0 à 40 °C (32 à 104 °F)
Batterie 3 950 mAh à 3,83 V
Puissance de l'émetteur
(EIRP)
Tension de fonctionnement
Taille des appareils mobiles pris en
charge
Chargeur
Tension 17,6±0,1 V
Puissance nominale 60 W
Batterie de Vol Intelligente
Capacité 3 850 mAh
Tension 17,6 V (max.)
Type de batterie LiPo 4S
Énergie 59,29 Wh
Poids net Env. 297 g
Plage de température de chargement 5° à 40 °C (41° à 104 °F)
Puissance de charge max. 80 W
Plage de température
d’autochauage
Durée d’autochauage 600 s (max.)
Puissance d'autochauage 35 W (max.)
Pour en savoir plus, consultez le guide de l'utilisateur :
www.dji.com/mavic-2-enterprise
Ce contenu peut être modié sans préavis.
※
MAVIC est une marque commerciale de DJI.
Copyright © 2018 DJI Tous droits réservés. Une création de DJI. Imprimé en Chine.
2.7K : 2 688 x 1 512 30p
FHD : 1 920 x 1 080 30p
FCC : 8 km (5 mi), CE/MIC : 5 km (3,1 mi) ; SRRC : 5 km (3,1 mi)
2,4 GHz
FCC : ≤ 26 dBm ; CE/MIC : 20 dBm ; SRRC : ≤ 20 dBm
5,8 GHz
FCC : ≤ 26 dBm ; CE : 14 dBm ; SRRC : ≤ 26 dBm
1 800 mA à 3,83 V (lors du chargement de l'appareil mobile)
Épaisseur prise en charge : 6,5 à 8,5 mm, longueur maximale : 160 mm
Types de port USB pris en charge : Lightning, Micro-USB (Type B)
USB-C
15,4 V (standard)
de -20° à 6° C (de -4° à 43° F)
FR
81
Page 84

Velivolo
DJITM MAVICTM 2 Enterprise Dual dispone di sistemi di visione omnidirezionale e sistemi di
rilevamento a infrarossi*. È inoltre dotato di fotocamera gimbal stabilizzata a 3 assi, termocamera
FLIR e fotocamera ottica, per acquisire, contemporaneamente, sia immagini a infrarossi che visive.
Tecnologie proprietarie DJI, come il sistema di rilevamento degli ostacoli, offrono la possibilità
di continuare a volare in totale sicurezza anche durante la realizzazione di riprese complesse.
Caratteristiche aggiuntive come l’AirSense integrato vi rendono consapevoli dello spazio aereo
circostante, mentre la protezione con password consente di mantenere un accesso sicuro al velivolo
e proteggere i vostri dati. Mavic 2 Enterprise è anche dotato di accessori modulari aggiuntivi M2E
quali il riettore, il lampeggiante e l’altoparlante, che sono stati progettati per diversi utilizzi. Mavic 2
Enterprise vanta una velocità di volo massima di 72 km/h (44,7 mph) e un tempo di volo massimo** di
31 minuti.
2
IT
11
B
1
A
7
3
5
6
10
8
4
12
16
15
13
18
1. Gimbal e telecamera
A. Fotocamera ottica
B. Termocamera
2. Sistema visivo in avanti
3. Sistema visivo verso il basso
4. Sistema visivo laterale
5. Sistema di rilevamento a
infrarossi verso il basso
6. Luce ausiliaria sulla parte
inferiore
7. Slot per scheda micro-SD
8. LED anteriori
* I sistemi visivi e i sistemi di rilevamento a infrarossi vengono inuenzati dalle condizioni circostanti. Per maggiori
informazioni, si prega di leggere le limitazioni di responsabilità e direttive sulla sicurezza, il manuale d’uso, e di
guardare i video tutorial sul sito web ufciale di DJI. http://www.dji.com/mavic-2-enterprise
** Il tempo massimo di volo è stato testato in assenza di vento e a una velocità costante di 25 km/h (15,5 mph).
Questo valore viene fornito soltanto come riferimento.
9. Motori
10. Eliche
11. Antenne
12. Indicatore di stato del velivolo
13. Sistema di rilevamento a
infrarossi verso l'alto
14. Sistema visivo all'indietro
15. Batteria di volo intelligente
16. LED di livello di carica della
batteria
17. Pulsante di accensione
14
18. Fermi della batteria
19. Porta USB-C
20. Pulsante di collegamento/
Indicatore di stato del
collegamento
21. Porta per gli accessori (per
collegare gli accessori)
22. Coperchio della porta per
gli accessori
82
21
22
17
19
20
Page 85

Dispositivo di controllo remoto
Nel dispositivo di controllo remoto è integrata la tecnologia di trasmissione a lungo raggio
OCUSYNCTM 2.0 di DJI che offre un raggio massimo di trasmissione di 8 km (5 miglia) e che
visualizza il video dal velivolo all'app DJI Pilot sul dispositivo mobile dell'utente no a 1080p. Lo
schermo LCD di bordo fornisce le informazioni in tempo reale sui dati del velivolo, mentre le levette di
comando rimovibili consentono un agevole stoccaggio del dispositivo di controllo remoto.
Durata massima di funzionamento: 2 ore e 15 minuti*
Ripiegato
1. Schermo LCD
2. Pulsante di messa in pausa del volo
3. Pulsante 5D
4. Levette di comando rimovibili
5. Pulsante di accensione
6. Antenne
7. Pulsante RTH
8. Alloggiamenti di stoccaggio delle
levette di comando
9. Porta video-downlink di riserva (USB)
10. Supporto per dispositivo mobile
11. Commutatore della modalità di volo
17
12 13
16
14
* Il dispositivo di controllo remoto è in grado di raggiungere la massima distanza di trasmissione (FCC) in una vasta
area all'aperto priva di interferenze elettromagnetiche, a un'altitudine di circa 120 m (400 piedi).
Il runtime massimo è testato in ambiente di laboratorio. Questo valore viene fornito soltanto come riferimento.
18
15
7
1
2
8
9
12. Selettore gimbal
13. Interruttore EV
14. Pulsante di registrazione
15. Pulsante di messa a fuoco/otturatore
16. Porta video-downlink/alimentazione
(micro USB)
17. Pulsante C1 (personalizzabile)
18. Pulsante C2 (personalizzabile)
6
4
5
3
11
10
IT
83
Page 86

1. Scaricare l'app DJI Pilot e guardare i video tutorial
1
2
3
Cercare "DJI Pilot" nell'App Store o in Google Play, oppure effettuare la
scansione del codice QR quid di seguito per scaricare l'app sul proprio
dispositivo mobile.
I video tutorial sono disponibili su www.dji.com/mavic-2-enterprise/
info#video.
IT
DJI Pilot è compatibile con iOS 10.0 (o versioni successive) o Android 5.0 (o versioni
successive).
2. Preparazione del velivolo
2
1
3
DJI Pilot
Video tutorial
Rimuovere la protezione del
gimbal dalla telecamera.
Contrassegnato Non contrassegnato
Far corrispondere le eliche
ai motori
Dispiegare i bracci e le eliche anteriori prima di quelli posteriori. Tutti i bracci e le eliche
devono essere dispiegati prima del decollo.
Dispiegare i bracci
anteriori.
Premere con decisione le eliche
verso il basso e ruotarle nella
direzione di blocco.
84
Dispiegare i bracci
posteriori.
Dispiegato
Page 87

3. Ricarica delle batterie
Utilizzare il caricabatterie in dotazione per caricare
completamente la batteria di volo intelligente
prima di utilizzarla per la prima volta.
Rimuovere la batteria di volo intelligente
Presa di
alimentazione
100 - 240 V
Controllo dei livelli della batteria e accensione/spegnimento
Premere una volta per vericare il livello di
carica della batteria.
Premere e tenere premuto per accendere/
spegnere.
B
A
A
Tempo di carica:
~1 ora e 30 minuti
Rimuovere il cavo del dispositivo di controllo remoto prima di eseguire la ricarica.
Basso
Alto
Premere una volta per vericare il livello di
carica della batteria sullo schermo LCD.
Premere una volta, quindi premere e tenere
premuto per accendere/spegnere il dispositivo
di controllo remoto.
Installa la batteria sul velivolo e accendila. Se la temperatura della batteria si abbassa sotto i 6°C,
questa inizierà a riscaldarsi automaticamente per mantenere una temperatura tra 8 e 10°C.
Consultare il manuale d’uso per maggiori informazioni.
B
Tempo di carica:
~2 ore e 15 minuti
IT
85
Page 88

4. Preparazione del dispositivo di controllo remoto
Dispiegare le antenne e le staffe del dispositivo
mobile e ssare le levette di comando.
IT
Posizionare una delle estremità del cavo
RC all'estremità dell'alloggiamento.
2
Inserire il dispositivo mobile all'interno delle staffe.
Accertarsi che le levette di comando siano montate saldamente.
Il cavo del dispositivo di controllo remoto con il connettore Lightning è montato per
impostazione predenita. Utilizzare il cavo appropriato per il proprio dispositivo mobile per
il collegamento del dispositivo di controllo remoto. Se si utilizza un iPad o un tablet, usare la
porta USB sul dispositivo di controllo remoto.
Non utilizzare la porta micro USB e la porta USB contemporaneamente per il collegamento
video.
86
Forte
Debole
Sistemare le antenne in parallelo tra loro
1
3
Raggio di trasmissione ottimale
Page 89

5. Preparazione al decollo
DJI Pilot
App
Accendere il dispositivo di
controllo remoto
Utilizzare il proprio account DJI per attivare il velivolo. L'attivazione richiede una connessione
Internet.
Internet
Impostare una password per il velivolo nell’app DJI Pilot, per assicurare un accesso sicuro e
proteggere i vostri dati durante il volo.
Accendere il velivolo Lanciare l'app DJI Pilot
6. Volo
Prima del decollo, assicurarsi che la barra di stato del velivolo
nell'app DJI Pilot indichi "Ready to Go".
Decollo e atterraggio manuali
Combinazione di comandi da levette per
avviare/arrestare i motori.
Portare la levetta sinistra
(lentamente) verso l'alto
per il decollo
I motori possono essere spenti solo a metà volo, quando il sistema di controllo di volo rileva un
errore critico.
Portare la levetta sinistra (lentamente) verso il
basso nché non si tocca il suolo
Tenere premuto alcuni secondi per arrestare i
motori
OPPURE
IT
Ready to Go (GPS)
87
Page 90

Levetta sinistra
Levetta destra
Funzionamento del dispositivo di controllo remoto
La modalità predenita di controllo di volo è "Mode 2". La levetta sinistra controlla l'altitudine e
la direzione del velivolo, mentre la levetta destra ne controlla i movimenti in avanti, all'indietro, a
sinistra e a destra. Il quadrante del gimbal controlla l'inclinazione della telecamera.
Su
In avanti
Giù
IT
*
Accessori modulari
Rotazione
a sinistra
Impostare sempre un'altitudine RTH adeguata prima del decollo. Quando il velivolo sta
tornando al punto iniziale, è consigliabile guidarlo con le levette di comando.
Premere il volo il pulsante Flight Pause per la frenata di emergenza durante il volo.
Lampeggiante M2E
Rotazione
a destra
Riettore M2E Altoparlante M2E
88
A sinistra
Indietro
A destra
Page 91

7. Fly Safe
120m
Volare in zone
aperte
Evitare di volare al di sopra o in prossimità di ostacoli, folle, linee elettriche ad alta
tensione, alberi e specchi d'acqua.
NON utilizzare il velivolo in prossimità di intense sorgenti elettromagnetiche quali linee
elettriche e stazioni di base, in quanto tali sorgenti possono influenzare la bussola di
bordo.
NON utilizzare il velivolo in condizioni meteorologiche avverse come pioggia, neve,
nebbia e venti con velocità superiore a 10 m/s (22 mph).
Mantenere la distanza dalle eliche rotanti e
dai motori.
Per la sicurezza propria e delle altre persone presenti nelle vicinanze, è importante
comprendere le linee guida di base del volo. Ricordare di leggere le
responsabilità e le direttive sulla sicurezza
Segnale GPS
forte
Mantenere la linea
di visione
Per saperne di più:
http://flysafe.dji.com/no-fly
.
Volare a un'altitudine
inferiore a 120 m
(400 piedi)
≥10 m/s
Zona interdetta al volo
Limitazioni di
IT
89
Page 92

Caratteristiche tecniche
Velivolo
Peso 899 g
Velocità massima 72 km/h (44,7 mph) in modalità Sport in assenza di vento
Quota massima di funzionamento
sopra il livello del mare
Temperatura di funzionamento Da -10 °C a 40 °C (da 14 °F a 104 °F)
GNSS GPS + GLONASS
Frequenza di funzionamento 2,4-2,4835 GHz; 5,725-5,850 GHz
Potenza del trasmettitore
(EIRP)
Memoria interna 24 GB
Gimbal
Intervallo controllabile Beccheggio: da -90° a +30°
Termocamera
IT
Sensore Microbolometro VOx non rareddato
Obiettivo HFOV: 57°
Interasse 12 μm
Banda spettrale 8-14 μm
Dimensione immagini 640×480 (4:3); 640×360 (16:9)
Modalità fotograca Scatto singolo
Modalità video 640×360 a 8.7 fps
Accuratezza Guadagno alto: max ± 5% (tipico)
Intervallo scena Guadagno alto: da -10 °C a +140 °C
Foto JPEG
Video MP4, MOV (MPEG-4 AVC/H.264)
Fotocamera ottica
Sensore CMOS da 1/2.3''; pixel eettivi: 12M
Obiettivo FOV: ca. 85°
Intervallo ISO Video: 100-3200 (automatico)
Dimensioni dell’immagine (max.) 4056×3040 (4:3); 4056×2280 (16:9)
Modalità fotograca Scatto singolo
6.000 m (19.685 piedi)
2,4 GHz
FCC: ≤26 dBm; CE/MIC: ≤20 dBm; SRRC: ≤20 dBm
5,8 GHz
FCC: ≤26 dBm; CE: ≤14 dBm; SRRC: ≤26 dBm
Apertura: f/1.1
Scatto a raca: 3/5/7 fotogrammi
Intervallo (2/3/5/7/10/15/20/30/60 s)
Guadagno basso: max ± 10% (tipico)
Guadagno basso: da -10 °C a +400 °C
Formato 35 mm equivalente: 24 mm
Apertura: f/2.8
Messa a fuoco: da 0,5 m a ∞
Foto: 100-1600 (automatico)
Scatto a raca: 3/5/7 fotogrammi
Intervallo (2/3/5/7/10/15/20/30/60 s)
90
Page 93

Modalità video 4K Ultra HD: 3840×2160 30p
Bit-rate massimo del video 100 Mbps
Foto JPEG
Video MP4,MOV (MPEG-4 AVC/H.264)
Dispositivo di controllo remoto
Frequenza di funzionamento 2,4-2,4835 GHz; 5,725-5,850 GHz
Distanza massima di trasmissione
(senza ostacoli né interferenze)
Temperatura di funzionamento Da 0 °C a 40 °C (da 32 °F a 104 °F)
TB50-M200 3950 mAh a 3,83 V
Potenza del trasmettitore
(EIRP)
Tensione di funzionamento
Dimensioni del dispositivo mobile
supportato
Caricatore
Tensione 17,6±0,1 V
Potenza nominale 60 W
Batteria di volo intelligente
Capacità 3850 mAh
Tensione 17,6 V (max)
Tipo di batteria LiPo 4S
Energia 59,29 Wh
Peso netto Circa 297 g
Intervallo temperatura di carica Da 5 °C a 40 °C (da 41 °F a 104 °F)
Massima potenza di carica 80 W
Intervallo di temperatura per il
riscaldamento automatico
Durata riscaldamento automatico 600 s (max)
Potenza riscaldamento automatico 35 W (max)
Per ulteriori informazioni, consultare il Manuale utente:
www.dji.com/mavic-2-enterprise
Questi contenuti sono soggetti a modiche senza preavviso.
※
MAVIC è un marchio registrato di DJI.
Copyright © 2018 DJI Tutti i diritti riservati. Progettato da DJI. Stampato in Cina.
2,7K: 2688×1512 30p
Full HD: 1920×1080 30p
FCC: 8 km (5 mi); CE/MIC: 5 km (3,1 mi); SRRC: 5 km (3,1 mi)
2,4 GHz
FCC: ≤26 dBm; CE/MIC: ≤20 dBm; SRRC: ≤20 dBm
5,8 GHz
FCC: ≤26 dBm; CE: ≤14 dBm; SRRC: ≤26 dBm
1800 mA a 3,83 V (durante la ricarica del dispositivo mobile)
Spessore supportato: 6,5 - 8,5 mm, Lunghezza massima: 160 mm
Tipi di porte USB compatibili: Lightning, Micro USB (Tipo B)
USB-C
15,4 V (tipico)
da -20° a 6° C
IT
91
Page 94

Drone
De DJITM MAVICTM 2 Enterprise Dual heeft omnidirectionele Vision Systems en infraroodsensorsystemen*,
en wordt geleverd met een volledig gestabiliseerde 3-assige gimbalcamera met een FLIR longwave
infrarood thermische camera en een visuele camera, die zowel infrarood- als visuele beelden tegelijkertijd
leveren. Kenmerkende DJI-technologieën zoals obstakeldetectie helpen u bij het moeiteloos nemen en
vastleggen van complexe foto's. Extra functies zoals de geïntegreerde AirSense maken je bewust van
het luchtruim om je heen, en de wachtwoordbeveiliging geeft je veilig toegang tot je drone en beschermt
je gegevens. De Mavic 2 Enterprise heeft ook opzetbare modulaire accessoires zoals de M2-spotlight,
het M2E-baken en de M2E-luidspreker, die speciaal zijn ontwikkeld voor verschillende toepassingen. De
Mavic 2 Enterprise kan bogen op een maximale vliegsnelheid van 72 km/u (44,7 mph) en een maximale
vliegduur** van 31 minuten.
2
NL
11
B
1
A
7
3
5
6
10
8
4
12
16
15
13
18
1. Gimbal en camera
2. Vision System - naar voren
A. Visuele beeldcamera
B. Warmtebeeldcamera
3. Vision System - naar beneden
4. Vision System - dwarsrichting
5. Naar beneden gericht
infraroodsensorsysteem
6. Extra lampje onderaan
7. microSD-kaartsleuf
8. LED's voorzijde
* Het Vision System en infraroodsensorsysteem worden beïnvloed door omgevingsomstandigheden. Lees de
disclaimer en veiligheidsrichtlijnen en de gebruikershandleiding en bekijk de instructielmpjes op de ofciële
DJI-website voor meer informatie. http://www.dji.com/mavic-2-enterprise
** De maximale vliegduur is getest bij omstandigheden zonder wind en met een constante snelheid van 25 km/u
(25,5 mph). Deze waarde geldt alleen ter referentie.
9. Motoren
10. Propellers
11. Antennes
12. Statusindicator drone
13. Infraroodsensorsysteem
14. Vision System naar achteren
15. Intelligent Flight Battery
16. Accuniveau-leds
17. Aan-/uitknop
14
18. Accuaansluitingen
19. USB-C-poort
20. Koppeltoets/
koppelingsstatusindicator
21. Uitbreidingspoort (voor het
aansluiten van accessoires)
22. Afdekking uitbreidingspoort
92
21
22
17
19
20
Page 95

Ingeklapt
g
6
7
1
4
2
8
9
5
3
11
10
Afstandsbedienin
De lange-afstands-transmissietechnologie OCUSYNCTM 2.0 is geïntegreerd in de afstandsbediening
van DJI, waardoor deze een maximaal zendbereik van 8 km (5 mijl) biedt en videostreaming van de
drone naar de DJI Pilot-app op je mobiele apparaat weergeeft met tot wel 1080p. Een on-board-LCD-
scherm biedt real-time-informatie over dronegegevens en door de verwijderbare joysticks kan de
afstandsbediening eenvoudiger worden opgeborgen.
Maximale bedrijfstijd: 2 uur en 15 minuten*
1. LCD-scherm
2. Vluchtpauzeknop
3. 5D-knop
4. Verwijderbare joysticks
5. Aan-/uitknop
6. Antennes
7. RTH-knop
8. Opslagsleuf joysticks
9. Reserve video-downlinkpoort
(USB)
10. Klem mobiel apparaat
11. Vluchtmodusschakelaar
NL
17
12 13
16
14
* De afstandsbediening kan de maximale overdrachtsafstand (FCC) bereiken in een grote open ruimte zonder
elektromagnetische interferentie, en op een hoogte van circa 120 meter (400 ft).
De maximale looptijd is getest in een laboratorium. Deze waarde geldt alleen ter referentie.
18
15
12. Gimbalwiel
13. Draaiknop EV-instelling
14. Opnameknop
15. Scherpstellings-/opnameknop
16. Video-downlink/aan/uit-knop (micro-USB)
17. C1-knop (aanpasbaar)
18. C2-knop (aanpasbaar)
93
Page 96

1. Download de DJI Pilot-app en bekijk de lmpjes met uitleg
1
2
3
Zoek op 'DJI Pilot' in de App Store of Google Play, of scan
de onderstaande QR-code om de app te downloaden op je
mobiele apparaat.
DJI Pilot
Bekijk de instructielmpjes op www.dji.com/mavic-2-enterprise/
info#video.
Filmpjes met uitleg
NL
DJI Pilot wordt ondersteund door iOS 10.0 (of hoger) of Android 5.0 (of hoger).
2. Drone voorbereiden
2
1
3
Verwijder de gimbal-afdekking
van de camera.
Gemarkeerd Ongemarkeerd
Combineer de juiste propellers
met de motoren.
Klap de voorarmen en de propellers uit vóór de achterste. Alle armen en propellers moeten
uitgeklapt zijn voordat mag worden opgestegen.
Klap de voorarmen uit. Klap de achterarmen uit.
Druk de propellers stevig
naar beneden en draai ze
in de vergrendelde stand.
94
Uitgeklapt
Page 97

3. De accu's opladen
Gebruik de meegeleverde oplader om de
Intelligent Battery volledig op te laden vóór
het eerste gebruik.
De Intelligent Flight Battery verwijderen
Stopcontact
100 - 240 V
B
Verwijder vóór het laden de kabel van de afstandsbediening.
Controleer het laadniveau van de accu en de aan/uit-schakelaar
Laag
Hoog
Druk eenmaal op de knop om het
accuniveau te controleren.
Druk eenmaal en druk vervolgens opnieuw
en houd vast om aan/uit te zetten.
Plaats de accu in de drone en schakel de drone in. Wanneer de accutemperatuur lager wordt
dan 6 °C, zal deze automatisch worden opgewarmd tot een temperatuur tussen 8-10 °C.
Raadpleeg de gebruikershandleiding voor meer informatie.
A
A
Oplaadtijd:
~1 uur en 30 minuten
Druk eenmaal om het accuniveau op het LCD-
scherm te controleren.
Druk eenmaal en druk vervolgens opnieuw en
houd vast om de afstandsbediening aan/uit te
zetten.
B
Oplaadtijd:
~2 uur en 15 minuten
NL
95
Page 98

4. Voorbereiding van de afstandsbediening
Klap de antennes en de klemmen van het mobiele
apparaat uit en breng de joysticks aan.
Stel de antennes parallel aan elkaar af
NL
Plaats één uiteinde van de RC-kabel op het
sleufeinde.
Plaats je mobiele apparaat in de klemmen.
Zorg dat de joysticks stevig zijn aangebracht.
De kabel van de afstandsbediening met de Lightning Connector is standaard aangebracht.
Gebruik de juiste kabel om je mobiele apparaat op de afstandsbediening aan te sluiten.
Wanneer je een iPad of tablet gebruikt, gebruik dan de USB-poort op de afstandsbediening.
Gebruik de micro-USB- en de USB-poorten tegelijkertijd om video te koppelen.
1
2
3
Sterk
Zwak
Optimaal zendbereik
96
Page 99

5. Voorbereiding voor opstijgen
Schakel de afstandsbediening in Schakel het luchtvaartuig in Start DJI Pilot
Gebruik je DJI-account om de drone te activeren. Activering vereist een internetverbinding.
Internet
Stel een wachtwoord in voor de drone in de DJI Pilot-app om veilige toegang te waarborgen
en je boordgegevens te beschermen.
6. Vlucht
Zorg er vóór het opstijgen voor dat de statusbalk van de
drone in de DJI Pilot-app 'Ready to Go' aangeeft.
Handmatig opstijgen/landen
Combination Stick Command (CSC) voor
het starten/stoppen van de motoren
Ready to Go (GPS)
OF
DJI Pilot
App
NL
Linkerstick omhoog
(langzaam)
om op te stijgen
De motoren kunnen gedurende de vlucht alleen worden stopgezet wanneer de vluchtcontroller
een kritieke fout detecteert.
Linkerjoystick omlaag (langzaam) totdat u de grond
raakt
Wacht enkele seconden om de motoren uit te
schakelen
97
Page 100

Linkerjoystick
Rechterjoystick
Besturing met de afstandsbediening
De standaard vluchtregeling staat bekend als modus 2. Met de linkerjoystick regel je de hoogte en
koers, terwijl je met de rechterjoystick vooruit, achteruit, naar links en rechts kunt bewegen. Met de
gimbal regel je de kanteling van de camera.
Omhoog
Vooruit
Omlaag
Linksaf
NL
Stel altijd een passende RTH-hoogte in vóór het opstijgen. Als het luchtvaartuig terugkeert naar
de basis, dien je het te begeleiden met de joysticks.
Druk op de Flight Pause-knop om tijdens de vlucht een noodstop uit te voeren.
*
Modulaire accessoires
M2E Baken
Rechtsaf
M2E Spotlicht M2E Luidspreker
98
Links
Achteruit
Rechts
 Loading...