

Page 1
DJI FORCE PRO
User Guide
使用说明
2020.04
v1.0
Page 2
Disclaimer and Warning
Congratulations on purchasing your new DJI OSMO
in this document affects your safety and your legal rights and responsibilities.
EN
Read this entire document carefully to ensure proper configuration before
use. Failure to read and follow instructions and warnings in this document
may result in serious injury to yourself or others, damage to your DJI OSMO
product, or damage to other objects in the vicinity. This document and all other
collateral documents are subject to change at the sole discretion of DJI OSMO.
By using this product, you hereby signify that you have read this disclaimer
and warning carefully and that you understand and agree to abide by the terms
and conditions herein. You agree that you are solely responsible for your own
conduct while using this product, and for any consequences thereof. You agree
to use this product only for purposes that are proper and in accordance with all
applicable laws, rules, and regulations, and all terms, precautions, practices,
policies and guidelines DJI OSMO has made and may make available.
DJI OSMO accepts no liability for damage, injury or any legal responsibility
incurred directly or indirectly from the use of this product. The user shall
observe safe and lawful practices including, but not limited to, those set forth in
this document.
Notwithstanding above, your statutory rights under applicable national
legislation are not affected by this disclaimer.
OSMO is a trademark of SZ DJI OSMO TECHNOLOGY CO., LTD. (abbreviated
as “DJI OSMO”) and its afliated companies. Names of products, brands,
etc., appearing in this document are trademarks or registered trademarks
of their respective owner companies. This product and document are
copyrighted by DJI OSMO with all rights reserved. No part of this product or
document shall be reproduced in any form without prior written consent of or
authorization from DJI OSMO.
TM
product. The information
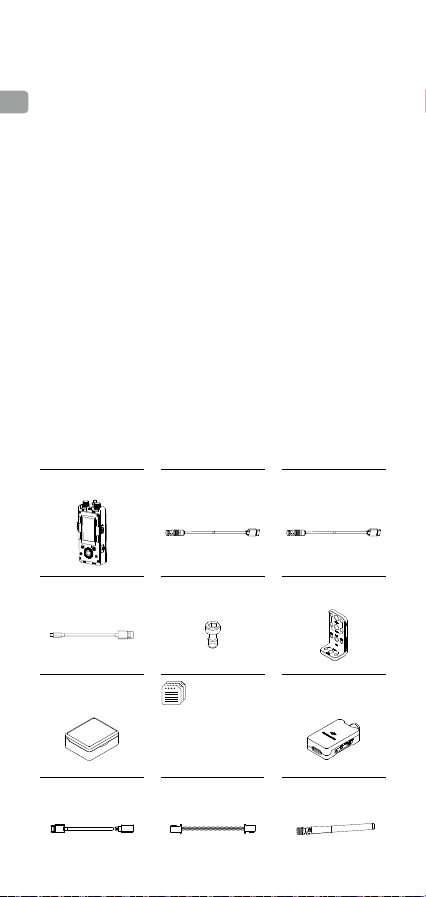
In the Box
Force Pro ×1
Inspire 2 RC CAN Bus
Cable (5 m) ×1
Wireless Receiver CAN
Bus Cable (0.8 m) ×1
USB-C Cable ×1
Storage Case ×1
UART to D-Bus
Cable* ×1
2
Screw ×2 L-Bracket ×1
Manuals
· DJI Force Pro User Guide
· DJI Pro Wireless Receiver
User Guide
S-Bus Cable* ×1
DJI Pro Wireless
Receiver* ×1
Antenna* ×4
Page 3

* Items are included in the DJI Pro Wireless Receiver's package.
• DO NOT mix up the Inspire 2 RC CAN Bus cable and Wireless
Receiver CAN Bus cable, otherwise it may damage the device.
• The storage case can be placed in the Ronin 2 's Water Tight
Protective Case.
Introduction
Employing industry-leading communication technologies and control algorithms,
the DJI Force Pro is a camera movement control system that allows operators
to control gimbals remotely with high accuracy. By precisely synchronizing
operator movement with camera movement, the Force Pro allows operators to
masterfully capture complicated shots more intuitively than ever.
Used with the DJI wireless receiver, Force Pro’s dual-frequency 2.4 GHz and
5.8 GHz wireless transmission system delivers a control distance of up to 3 km
(unobstructed and free of interference). It also supports a wired connection,
which eliminates interference with other equipment on a lm set.
The screen and dedicated buttons make it easy to set up parameters on the
Force Pro and gimbal. Featuring a 4730 mAh battery that offers up to 5 hours
of continuous operation, the Force Pro has enough power for an entire shoot.
The Force Pro is currently compatible with RONIN
support for more devices coming soon. It can be mounted on a tripod or used
handheld with the adapter.
1
2
3
TM
2 and Ronin-S, with
EN
4
5
6
7
8
9
10 11
18
17
16
15
14
19
13
20
12
21
3
Page 4
1. Antenna
Relays control signals. Do not
obstruct the antenna.
2. Pan Axis Speed Control Knob
EN
Turn this to adjust the maximum
speed of the pan axis. Set the
value to 65 for a 1:1 movement
ratio between the gimbal and
Force Pro.
3. Tilt Axis Speed Control Knob
Turn this to adjust the maximum
speed of the tilt axis. Set the
value to 65 for a 1:1 movement
ratio between the gimbal and
Force Pro.
4. Mounting Mode
Press this button to select a
gimbal mounting mode.
5. Roll Axis Speed Control Knob
Turn this to adjust the maximum
speed of the roll axis. Set the
value to 65 for a 1:1 movement
ratio between the gimbal and
Force Pro.
6. Back Button
Press once to return to the
previous menu.
7. Sleep Button
Press and hold the button to
enable and disable gimbal sleep
mode. The Force Pro is unable to
control the gimbal while in sleep
mode.
8. C1 Button
Customizable button.
9. Jog Wheel
Rotate to select options.
10. DC IN Port
Supports 9-26 V DC input with
communication functionality.
The DJI Force Pro can be
powered by other power
source through this port.
11. DC OUT Port
Supports 5 V DC output with
communication functionality.
12. C2 Button
Customizable button.
13. OK Button
Press once to conrm an
option.
14. USB-C Port
For charging and updating
the rmware of the Force Pro.
15. Power/Record Button
Press to turn on/off the Force
Pro (press and hold for
eight seconds to turn it off
mandatorily). Press once to
check the battery level when
powered off. Press once to
start/stop recording video
when powered on.
16. Toggle Button
Press once to toggle between
the submenus.
17. Lock Button
Lock the Force Pro to avoid
accidental operation.
18. Follow Mode Button
Selects Follow mode.
19. Mounting Hole 1
1/4”-20 thread with a 10 mm
depth.
20. Mounting Hole 2
3/8”-16 thread with a 10 mm
depth.
21. Mounting Hole 3
1/4”-20 thread with a 10 mm
depth.
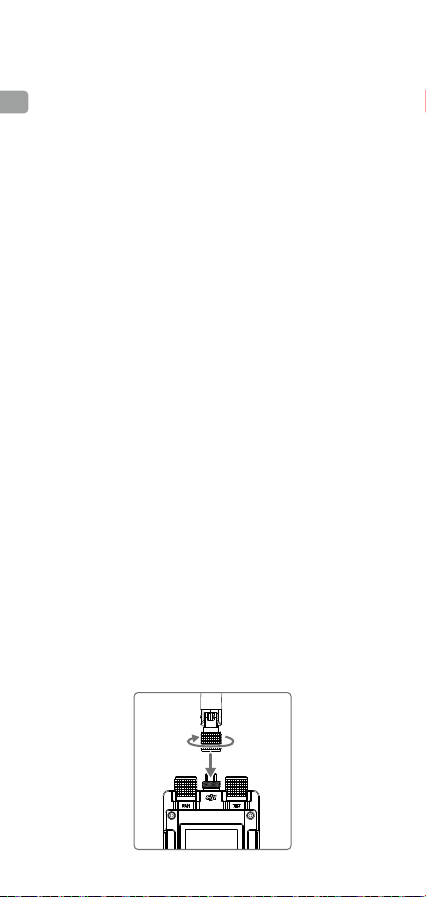
Installation
Attach the antenna to the Force Pro and then tighten the securing knob.
4
Page 5
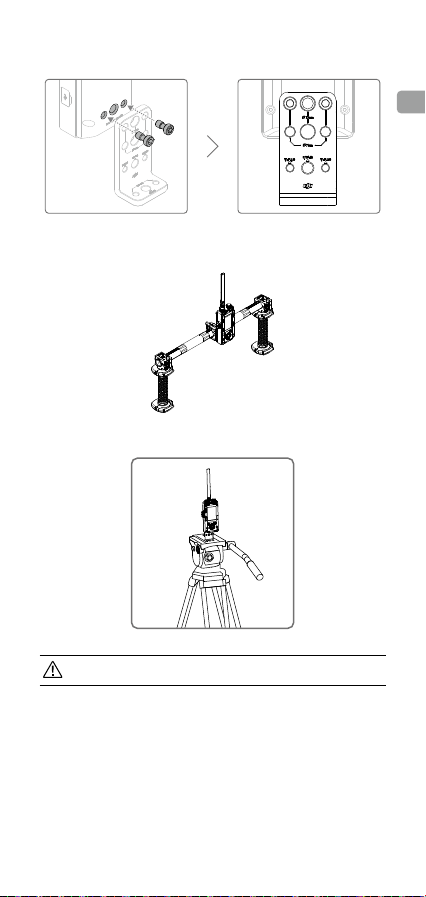
The Force Pro can be used handheld or mounted on a tripod with the provided
adapter. First, attach the adapter using the provided screws and tighten.
Then attach the Force Pro to the handle as shown. A Ronin 2 monitor adapter
(sold separately) is needed during installation.
Mounting the DJI Force Pro on a tripod.
EN
Keep the DJI Force Pro and its antenna vertical during usage to obtain
the optimal performance.
The Force Pro must be used with a DJI Pro wireless receiver, please refer to
the DJI Pro Wireless Receiver User Guide for details.
Activation
Press and hold the power button to turn on the Force Pro. Activation is required
when using it for the rst time.
Download the DJI Pro Assistant for Ronin software, and then connect the Force
Pro to your computer. Launch DJI Pro Assistant for Ronin and follow the onscreen instructions to activate your Force Pro.
5
Page 6
Linking
12
2
Tilt
Gimbal
Pan
Roll
The Force Pro supports both wireless and wired connections. Linking is
required when using a wireless connection:
EN
1. Go to the gimbal settings page on the Force Pro and go to “Settings->
General-> Linking;”
2. Press and hold the link button on the DJI Pro Wireless Receiver for two
seconds to initiate the linking procedure.
Using the DJI Pro Wireless Receiver is recommended for optimal performance.
You can also connect a Force Pro to Ronin 2 using Ronin 2's linking procedures.
For the wired connection, connect the DC OUT port on the Force Pro to Ronin
2 using Ronin 2 CAN Bus Control Cable (30 m, sold separately).
Settings
These settings are based on using the Force Pro with Ronin 2.
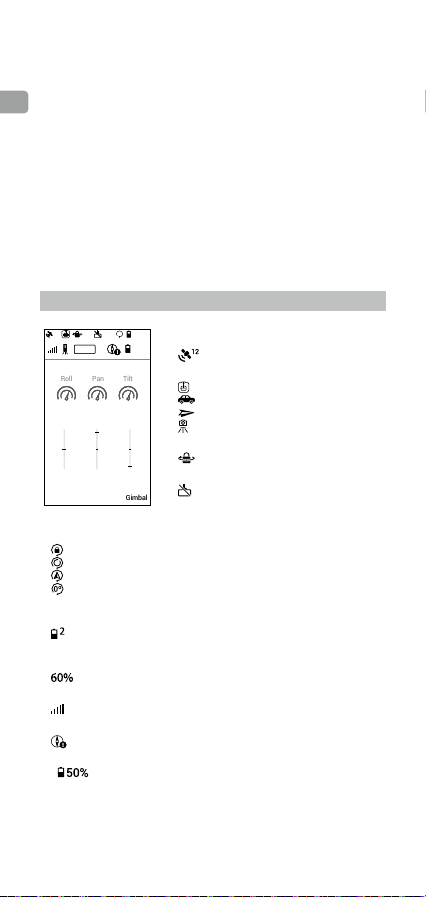
Main UI Settings
0º
60%
1. GPS Signal Strength
50%
RONIN
0 M
0 M 0 M
15
50
Force
5. Follow Mode
: Free mode.
: Follow mode.
: FPV mode.
: Recenter mode.
Select Free mode when using the Force Pro.
6. Working Battery Number
: Shows the number of batteries currently in use by Ronin 2. Ronin 2
can operate with one or two batteries.
7. Battery Level
: Displays the current battery level of Ronin 2.
8. Remote Controller Signal Strength
: Displays the remote controller signal strength.
9. Calibration Notice
: Compass calibration is required.
10. Force Pro Battery Level
: Displays the current battery level of the Force Pro.
11. Axes Control Speed Display
Displays the control speed for the three axes.
: Shows the current GPS signal strength.
2. Mounting Modes (If supported)
: Handheld mode.
10
: Car Mount mode.
: Aerial mode.
: Tripod mode.
3. Pan Lock Mode
: Pan motor follow off.
4. Motor Pause
: Powers off motors.
6
Page 7
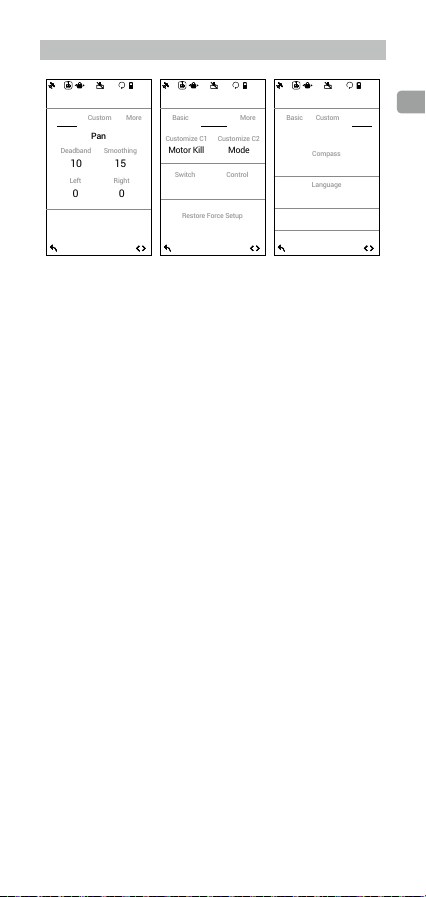
Force Pro Settings
10015
0
More
Custom
Deadband
Smoothing
Left
Right
Pan
12
2
Control
Customize C1
Motor Kill
Customize C2
Mode
More
12
2
Basic
Switch
Restore Force Setup
Compass
Custom
12
2
Basic
Language
0º
60%
Force
Basic
Basic
The Deadband, Smoothing, and Endpoints settings for the pan, roll, and tilt
axes can be independently adjusted. The default endpoint settings for pan axis
are set to 180°, which means there is no endpoint for the pan axis, allowing it to
rotate 360° continuously.
Custom
Customized functions for the C1 and C2 buttons: Includes Pause, Recenter,
Ronin 2 Pause, and Control mode options.
Control Mode: Includes Speed and Position Control modes.
In Speed mode, turn the Speed Control knob to adjust the movement ratio
between the gimbal and Force Pro. Increase the Smoothing to make the
gimbal’s translated movement smoother and slower. Adjust the Deadband to
adjust the gimbal’s response sensitivity.
In Position mode, the movement ratio between the gimbal and Force Pro
remains 1:1. Turn the Speed Control knob to adjust the gimbal’s response
sensitivity. In Position mode, the Speed Control knob is the only factor that will
affect the gimbal movement.
Restore force setup: Restores the Force Pro to its default settings.
More
Access log le: Internal storage is built into the Force Pro for recording data. If
the gimbal is acting abnormally, contact DJI Support. If the provided solutions
are not successful, DJI Support will request log les for further analysis. Access
log les only when instructed to do so by a DJI support specialist.
Compass Calibration: If errors occur with the compass, select “Calibrate” and
then follow the onscreen instructions to calibrate the compass.
Language: Languages can be switched between English and Chinese.
About: Displays the SN number and the rmware version of your Force Pro.
Ronin
Force
Custom
Restore
Speed
0º
60%
Force
0º
60%
More
Access Log File
Calibrate
English
About
EN
7
Page 8

Device
Log
Pan
Tilt
Roll
1.4º
1.4º
4.5º
Deadband20Accel
12
2
Tilt
Roll
SmoothTrack
Push Pan
Speed
Gimbal Settings
0
Power-6-2
1.9
Atti Err
0.6
0.1
0.02
Atti
-0.66
-0.15
Tilt6Roll10Pan
10
More
Stiffness
More
Basic
Gimbal Trim
Pan
Tilt
0.0+0.0
Set power-on position
Balance test
Motor
EN
2
12
0º
60%
Motor
Basic
+
Auto tune
Basic: The Auto tune, Stiffness, Strength, Filter, and Control values for the tilt,
roll, and pan axes can be set independently. Refer to the Ronin 2 user manual
for details.
More: Set power-on position, ne tune the pan or tilt axis, and test the balance
for three axes.
SmoothTrack
0º
SmoothTrack
Pan
ON
OFF
20 5
Settings for the pan, roll, and tilt axes can be set independently.
Monitor
Motor
12
Monitor
Angle
0º
2
12
0º
60%
Motor
More
60%
2
60%
8
Page 9

Remote Freq.
Bind Remote
Axis Mode
More
Motor: Displays the power, angle, and temperature of the motors.
Device: Displays the connection status with other devices.
Log: Displays any abnormal status information of the gimbal.
System Settings
2
12
0º
60%
Settings
General
Calibrate System
2.4HzStart
3-axis
General: Includes the Calibrate System, Binding, operating Wi-Fi frequencies,
and gimbal working modes.
Prole: Custom motor congurations can be saved or reset to default settings.
Camera Page
Control camera recording and various other supported settings when a camera
control cable is attached.
Charging
Use the provided USB-C cable to charge the Force Pro using a USB charger
(not provided).
Connect the DC IN port during usage to power the Force Pro. Connect the DC
OUT port to use the Force Pro to power the connected device.
EN
Charging time: ≈ 2 hours
(when charging at 2 A with the Force Pro powered off)
Updating Firmware
Connect the USB-C port on the Force Pro and the DJI Pro Assistant for Ronin
and follow the onscreen instructions to update the rmware.
9
Page 10

Specications
Power Consumption 3 W
EN
Voltage 3.85 V
Battery Capacity/Energy 4730 mAh/18.21 Wh
Operating Temperature -4° to 104° F (-20° to 40° C)
Charging Temperature 32° to 95° F (0° to 35° C)
Operating Time 5 hours
Charging Current 2 A
Charging Time 2 hours
DC IN 9-26 V
DC OUT 5 V/1 A
• Currently, the Force Pro can be used to control the three axes
movements of the Ronin-S and set the parameters of SmoothTrack
and motor. Other feature are not available.
This content is subject to change.
Download the latest version from
https://www.dji.com/force-pro
RONIN is a trademark of DJI OSMO.
Copyright © 2020 DJI OSMO All Rights Reserved.
10
Page 11

免责声明和警告
感谢您购买大疆灵眸TM(DJI OSMOTM) 产品。本文所提及的内容关系到
您的安全以及合法权益与责任。使用本产品之前,请仔细阅读本文以确
保已对产品进行正确的设置。不遵循和不按照本文的说明与警告来操作
可能会给您和周围的人带来伤害,损坏本产品或其它周围的物品。本文
档及本产品所有相关的文档最终解释权归大疆灵眸(DJI OSMO)所有。
如有更新,恕不另行通知。请访问 www.dji.com 官方网站以获取最新的
产品信息。
一旦使用本产品,即视为您已经仔细阅读免责声明与警告,理解、认可
和接受本声明全部条款和内容。您承诺对使用本产品以及可能带来的后
果负全部责任。您承诺仅出于正当目的使用本产品,并且同意本条款以
及大疆灵眸(DJI OSMO)制定的任何相关条例、政策和指引。
大疆灵眸(DJI OSMO)对于直接或间接使用本产品而造成的损坏、伤
害以及任何法律责任不予负责。用户应遵循包括但不限于本文提及的所
有安全指引。
即使存在上述规定,消费者权益依然受当地法律法规所保障,并不受本
免责声明影响。
OSMO 是深圳市大疆灵眸科技有限公司及其关联公司的商标。本文出现
的产品名称、品牌等,均为其所属公司的商标或注册商标。
物品清单
CHS
体感控制器 ×1
USB-C 数据线 ×1 螺丝 ×2 转接件 ×1
收纳盒 ×1
D-Bus 转接线 *×1 天线 *×4
Inspire 2 RC CAN Bus
连接线(5 m)×1
文档
· DJI 体感控制器专业版使用说明
· DJI 专业无线接收机使用说明
S-Bus 连接线 *×1
无线接收机 CAN Bus
连接线(0.8 m)×1
专业无线接收机 *×1
11
Page 12

* 部分物品包含在 DJI 专业无线接收机包装内。
• Inspire 2 RC CAN Bus 连接线(5 m)和无线接收机CAN
Bus 连接线(0.8 m)不可混用,否则可能损坏设备。
• 收纳盒可放置于 Ronin 2 标配防水设备箱。
CHS
简介
DJI 体感控制器专业版(以下简称“体感控制器”)采用先进的通信技术,
内置指南针和高精度 IMU,配合全新的控制算法使得云台系统能实时响
应体感操作,为专业影视拍摄提供精准直接的操控方式。
体感控制器提供有线和无线两种连接方式,支持 2.4GHz 和 5.8GHz 双
频无线通信,配合 DJI 无线接收机,控制距离可达 3 公里(无干扰、无
遮挡环境);有线连接可有效避免拍摄设备间的干扰,使得设备运行更
稳定可靠。内置显示屏并配备机身按键,方便快速调节云台以及相机参
数。内置 4730 mAh 电池,最长工作时间可达 5 小时。体感控制器目前
适配 RONIN
TM
2 和 Ronin-S,可安装固定在三脚架、云台手持杆等平台。
1
2
3
4
5
6
7
8
9
10 11
12
18
17
16
15
14
19
13
20
12
21
Page 13

1. 天线
传输无线信号。
2. 平移轴速度控制旋钮
调节旋钮以调整体感和云台
之间的速度输出比例。当使
用云台体感速度为 1: 1 时,体
感对应设置值为 65。
3. 俯仰轴速度控制旋钮
调节旋钮以调整体感和云台
之间的速度输出比例。当使
用云台体感速度为 1: 1 时,体
感对应设置值为 65。
4. 挂载模式按键
用于选择云台挂载模式。
5. 横滚轴速度控制旋钮
调节旋钮以调整体感和云台
之间的速度输出比例。当使
用云台体感速度为 1: 1 时,体
感对应设置值为 65。
6. 返回按键
按压按键返回上一级菜单。
7. 休眠按键
长按使体感控制器进入休眠
状态,此时不能控制云台,
再次长按恢复。
8. C1 按键
自定义快捷按键。
9. 转盘
旋转转盘切换选项。
10. DC IN
直流输入接口,支持 9-26 V
电压输入,带通信功能。可
通过此接口让外部设备给体
感控制器供电。
安装
按图示插入天线,并拧紧天线固定旋钮。
11. DC OUT
直流输出接口,输出 5 V,
带通信功能。
12. C2 按键
自定义快捷按键。
13. 确认按键
按压确认按键确定选项。
14. USB-C 接口
用于充电以及升级固件。
15. 电源 / 录影按键
长按开启或关闭体感控制
器(长按 8 秒强制关机)。
关机状态下,短按可查看
电量;开机状态下,短按
以开始 / 停止录影。
16. 切换按键
按压按键切换子页面。
17. 锁定按键
拨动按键以锁定 / 解锁体感
控制器。拍摄过程中可锁
定体感控制器防止误操作。
18. 跟随模式按键
用于选择不同的云台跟随
模式。
19. 螺纹孔 1
1/4”-20 螺纹孔,可用深
度 10 mm。
20. 螺纹孔 2
3/8”-16 螺纹孔,可用深
度 10 mm。
21. 螺纹孔 3
1/4”-20 螺纹孔,可用深
度 10 mm。
CHS
13
Page 14

推荐安装体感控制器在云台手持横杆、三脚架等平台上使用。首先使用
标配螺丝固定转接件在体感控制器上。
CHS
以下为安装至手持横杆示意,安装时需使用 Ronin 2 屏幕转接件(另行
购买)固定体感控制器。
安装体感控制器至三脚架示意。
使用过程中请确保体感控制器与天线竖直以获得最佳通信信号。
体感控制器专业版需配合 DJI 专业无线接收机使用,关于接收机的详细
内容,请参见包装内提供的《DJI 专业无线接收机使用说明》。
激活
长按电源按键开启体感控制器电源。首次使用时需要激活设备。
激活步骤:
下载 DJI Pro Assistant for Ronin 调参软件,使用 USB 连接线,连接体
感控制器与电脑并运行 DJI Pro Assistant for Ronin,按提示激活即可。
14
Page 15

连接云台
横滚
平移
俯仰
云台
体感
12
2
体感控制器支持无线连接和有线连接两种方式。若使用无线连接方式,
推荐使用 DJI 专业无线接收机以获得最好的通信效果。
对频步骤:
1. 进入体感控制器云台设置界面,选择设置 > 通用 > 对频。
2. 长按接收机对频按键 2 秒或以上,进入对频。
如不使用 DJI 专业无线接收机,也可直接将体感控制器与 Ronin 2 对频(通
信效果可能无法达到最佳)。
若采用有线连接方式则无需对频,使用指定的 Ronin 2 CAN Bus 控制线
(30 m 长,需另行购买),连接体感控制器 DC OUT 接口至云台设备。
参数设置
以下参数设置针对体感控制器配合 Ronin 2 云台使用为例进行说明。
主界面说明
0º
1. GPS 星数
60%
50%
RONIN
0 M
0 M 0 M
15
4. 电机关闭提示
:出现此图标,表示云台电机处于关闭状态。
5. 云台跟随模式
:锁定模式。
:跟随模式。
:FPV 模式。
:回中模式。
跟体感搭配使用时,推荐选择锁定模式。
6. 工作电池数量
:显示云台正在工作的电池数量。
7. 云台电量
:云台电池总电量百分比。
8. 遥控信号强度
:显示遥控信号强度。
9. 校准提示
:出现此图标表示体感控制器指南针需要校准。
10. 体感控制器电量
:体感控制器电池电量百分比。
11. 横滚轴、平移轴、俯仰轴速度百分比
表示当前体感三轴控制速度。
:数字表示 GPS 星数。
2. 云台挂载模式
:手持模式。
:车载模式。
:飞行模式。
1050
:三脚架模式。
3. 云台工作模式
:出现此图标,表示云台处于平移轴
锁定模式。云台在平移轴锁定模式下,平
移轴电机关闭,只对俯仰和横滚两轴进行
增稳。
CHS
15
Page 16

更多
配置
死区
10
左
0
平滑度
15
右
0
平移轴
12
2
控制如影切换云台
自定义C1
自定义C2
暂停
关闭电机
更多
12
2
基础
指南针
配置
12
2
基础
语言
体感设置界面
按压左侧按键进入体感控制器设置界面。
0º
CHS
基础
基 础
可设置体感控制器控制云台平移轴、俯仰轴、横滚轴的死区、平滑度与
限位。其中平移轴左右限位设置成 180°的时候表示云台平移轴没有限
位。
配 置
可自定义 C1 与 C2 快捷键功能,可设置暂停、回中、关闭电机、控制
模式切换。
体感
60%
云台挂载模式:选择云台挂载模式。
体感控制模式:体感控制模式分为速度模式和位置模式。速度模式下,
通过体感速度控制旋钮可调节云台 / 体感转速比;改变平滑度,可以调
节云台的缓起缓停;改变死区,可以调节云台对体感的响应灵敏度。
位置模式下,云台、体感的转速比保持为 1: 1。通过体感速度控制旋钮
可以调节云台受体感控制时候的响应灵敏度。在位置模式下,云台只受
体感设置的速度参数的影响。
恢复体感参数:选择恢复至默认设置。
更 多
读取数据记录:内置存储模块,可自动存储相关数据。若出现异常,请
联系 DJI 售后。如有需要,售后人员将会指引用户进入“读取数据记录”
并获得相关数据用于分析问题。
指南针校准:若系统提示指南针异常,则需要点击进入指南针校准。请
根据提示操作。
系统语言:提供中、英两种语言选择。
关于:进入“关于”可查看设备名称、SN 码以及固件版本号。
体感
0º
60%
配置
速度
体感
读取数据记录
校准
中文
关于
0º
60%
更多
16
Page 17

云台设置界面
0-6-2
1.9
姿态
0.6
0.1
0.02
抖动量
-0.66
-0.15
力度
俯仰6横滚10平移
更多
10
电量
12
2
俯仰
平移
云台微调
更多
12
2
俯仰
横滚
手动调节
SmoothTrack
加速度
12
2
设备
日志
俯仰横滚平移
按压右侧按键进入云台设置界面。
电 机
基础
设置平移轴零位
+0.0
平衡度测试
0º
60%
2
0º
60%
电机
+0.0
0º
60%
0º
60%
电机
基础
自动校准
基础:平移轴、俯仰轴、横滚轴的力度、强度、滤波、超前控制值设置;
显示云台电量、姿态与抖动量;进行云台自动校准。
更多:设置平移轴零位;针对平移轴与俯仰轴的云台微调;云台平衡度
测试。
SmoothTrack
SmoothTrack
平移
关闭
开启
20速度5死区20
平移轴、俯仰轴、横滚轴的 SmoothTrack 可分别开启或关闭。平移轴、
俯仰轴可开启手动调节。
监 视
1.4º
12
监视
电机
关节角
1.4º 4.5º
CHS
17
Page 18

电机:显示平移轴、俯仰轴、横滚轴电量、关节角、温度。
遥控频段
遥控对频
工作模式
配置
更多
12
2
设备:显示云台与外设设备连接状态。
日志:显示云台异常信息。当云台发生异常时,可进入该界面检查云台
具体问题。
CHS
设 置
通用:进行系统校准,选择跟云台对频;设置遥控频段和云台工作模式。
配置:选择预设参数;恢复云台参数。
摄影机
在摄影机页面可控制相机录像。
通用
设置
系统校准
三轴模式
0º
60%
2.4Hz开始
充 电
使用 USB-C 连接线,连接 USB-C 接口与充电器(用户自备)即可对体
感控制器充电。
使用过程中,连接 DC IN 接口,可使外部设备为体感控制器供电;连接
DC OUT 接口,体感控制器可为外部设备供电。
充电时间:约 2 小时
(关机状态下,充电电流为 2A 时)
升 级
使用 USB 连接线,连接 USB-C 接口与 DJI Pro Assistant for Ronin 调参
软件,根据提示进行升级。
18
Page 19

规格参数
型号
功耗 3 W
标称电压 3.85 V
电池容量 / 能量 4730 mAh/18.21 Wh
工作环境温度 -20℃至 40℃
充电环境温度 0℃至 35℃
工作时间 5 小时
充电电流 2 A
充电时间 2 小时
DC IN 9-26 V
DC OUT 5 V/1 A
• 使用体感控制器控制 Ronin-S 时,仅可控制云台三轴方向以
及设置 SmoothTrack 和电机参数,其它功能暂不支持。
CHS
内容如有更新,恕不另行通知。
您可以在 DJI 官方网站查询最新版本《使用说明》
https://www.dji.com/force-pro
RONIN 是大疆灵眸的商标。
Copyright ©
2020 大疆灵眸 版权所有
19
Page 20

Compliance Information
FCC Compliance Notice
This device complies with Part 15 of the FCC Rules. Operation is subject to the
following two conditions: (1) This device may not cause harmful interference, and (2)
This device must accept any interference received, including interference that may
cause undesired operation.
Any changes or modifications not expressly approved by the party responsible for
compliance could void the user’s authority to operate the equipment.
This equipment has been tested and found to comply with the limits for a Class B digital
device, pursuant to part 15 of the FCC Rules. These limits are designed to provide
reasonable protection against harmful interference in a residential installation. This
equipment generates, uses and can radiate radio frequency energy and, if not installed
and used in accordance with the instructions, may cause harmful interference to radio
communications. However, there is no guarantee that interference will not occur in a
particular installation. If this equipment does cause harmful interference to radio or
television reception, which can be determined by turning the equipment off and on,
the user is encouraged to try to correct the interference by one or more of the following
measures:
— Reorient or relocate the receiving antenna.
— Increase the separation between the equipment and receiver.
— Connect the equipment into an outlet on a circuit different from that to which the
receiver is connected.
— Consult the dealer or an experienced radio/TV technician for help.
PT-BR
RF Exposure Information
This equipment complies with FCC radiation exposure limits set forth for an uncontrolled
environment. In order to avoid the possibility of exceeding the FCC radio frequency
exposure limits, this transmitter must not be co-located or operating in conjunction with
any other antenna or transmitter.
IC RSS Warning
This device complies with Industry Canada licence-exempt RSS standard (s). Operation
is subject to the following two conditions: (1) this device may not cause interference,
and (2) this device must accept any interference, including interference that may cause
undesired operation of the device.
Le présent appareil est conforme aux CNR d'Industrie Canada applicables aux appareils
radio exempts de licence.
L'exploitation est autorisée aux deux conditions suivantes:
(1) l'appareil ne doit pas produire de brouillage, et
(2) l'utilisateur de l'appareil doit accepter tout brouillage radioélectrique subi, même si
le brouillage est susceptible d'en compromettre le fonctionnement.
IC Radiation Exposure Statement:
This equipment complies with IC RF radiation exposure limits set forth for an
uncontrolled environment. This transmitter must not be co-located or operating in
conjunction with any other antenna or transmitter.
Any Changes or modications not expressly approved by the party responsible for
compliance could void the user’s authority to operate the equipment.
KCC Warning Message
“해당무선설비는 운용 중 전파혼신 가능성이 있으므로 인명안전과 관련된 서비스는 할 수 없습니다.”
“해당 무선설비는 운용 중 전파혼신 가능성이 있음”
NCC Warning Message
低功率電波輻射性電機管理辦法
第十二條 經型式認證合格之低功率射頻電機,非經許可,公司、商號或使用者均不得擅
自變更頻率、加大功率或變更原設計之特性及功能。
第十四條 低功率射頻電機之使用不得影響飛航安全及干擾合法通信;經發現有干擾現象
時,應改善至無干擾時方得繼續使用。前項合法通信,指依電信法規定作業之無線電通信。
低功率射頻電機須忍受合法通信或工業、科學及醫療用電波輻射性電機設備之干擾。
EU Compliance Statement:
that this device is in compliance with the essential requirements and other relevant
provisions of the Directive 2014/53/EU.
SZ DJI Osmo Technology Co., Ltd. hereby declares
20
Page 21

A copy of the EU Declaration of Conformity is available online at www.dji.com/eurocompliance
EU contact address: DJI GmbH, Industriestrasse 12, 97618, Niederlauer, Germany
Declaración de cumplimiento UE:
declara que este dispositivo cumple los requisitos básicos y el resto de provisiones
relevantes de la Directiva 2014/53/EU.
Hay disponible online una copia de la Declaración de conformidad UE en www.dji.com/
euro-compliance
Dirección de contacto de la UE: DJI GmbH, Industriestrasse 12, 97618, Niederlauer,
Germany
EU-verklaring van overeenstemming:
hierbij dat dit apparaat voldoet aan de essentiële vereisten en andere relevante
bepalingen van Richtlijn 2014/53/EU.
De EU-verklaring van overeenstemming is online beschikbaar op www.dji.com/eurocompliance
Contactadres EU: DJI GmbH, Industriestrasse 12, 97618, Niederlauer, Germany
Declaração de conformidade da UE:
através deste documento, que este dispositivo está em conformidade com os requisitos
essenciais e outras disposições relevantes da Diretiva 2014/53/EU.
Existe uma cópia da Declaração de conformidade da UE disponível online em www.dji.
com/euro-compliance
Endereço de contacto na UE: DJI GmbH, Industriestrasse 12, 97618, Niederlauer,
Germany
Dichiarazione di conformità UE:
presente dispositivo è conforme ai requisiti essenziali e alle altre disposizioni rilevanti
della direttiva 2014/53/EU.
Una copia della dichiarazione di conformità UE è disponibile online all'indirizzo Web
www.dji.com/euro-compliance
Indirizzo di contatto UE: DJI GmbH, Industriestrasse 12, 97618, Niederlauer, Germany
Déclaration de conformité UE :
déclare que cet appareil est conforme aux principales exigences et autres clauses
pertinentes de la directive européenne 2014/53/EU.
Une copie de la déclaration de conformité UE est disponible sur le site www.dji.com/
euro-compliance
Adresse de contact pour l'UE : DJI GmbH, Industriestrasse 12, 97618, Niederlauer,
Germany
EU-Compliance:
den wesentlichen Anforderungen und anderen einschlägigen Bestimmungen der EURichtlinie 2014/53/EU entspricht.
Eine Kopie der EU-Konformitätserklärung finden Sie online auf www.dji.com/eurocompliance.
Kontaktadresse innerhalb der EU: DJI GmbH, Industriestrasse 12, 97618, Niederlauer,
Germany
Hiermit erklärt SZ DJI Osmo Technology Co., Ltd., dass dieses Gerät
SZ DJI Osmo Technology Co., Ltd. por la presente
SZ DJI Osmo Technology Co., Ltd. verklaart
A SZ DJI Osmo Technology Co., Ltd. declara,
SZ DJI Osmo Technology Co., Ltd. dichiara che il
Par la présente, SZ DJI Osmo Technology Co., Ltd.
CAUTION: RISK OF EXPLOSION IF BATTERY IS REPLACED BY AN INCORRECT TYPE.
DISPOSE OF USED BATTERIES ACCORDING TO THE INSTRUCTIONS
Environmentally friendly disposal
Old electrical appliances must not be disposed of together with the residual
waste, but have to be disposed of separately. The disposal at the communal
collecting point via private persons is for free. The owner of old appliances is
responsible to bring the appliances to these collecting points or to similar
collection points. With this little personal effort, you contribute to recycle valuable raw
materials and the treatment of toxic substances.
Thailand Warning message
เครื่องโทรคมนาคมและอุปกรณ์นี้ มีความสอดคล้องตามข้อกำาหนดของ กทช.
21
Page 22

Mexico Warning message
“La operación de este equipo está sujeta a las siguientes dos condiciones: (1) es
posible que este equipo o dispositivo no cause interferencia perjudicial y (2) este
equipo o dispositivo debe aceptar cualquier interferencia, incluyendo la que pueda
causar su operación no deseada.”
Brazil Warning message
Este equipamento opera em caráter secundário, isto é, não tem direito a proteção
contra interferência prejudicial, mesmo de estações do mesmo tipo, e não pode causar
interferência a sistemas operando em caráter primário
) 多溴联苯 (PBB) 多溴二苯醚 (PBDE)
+6
有害物质
× ○ ○ ○ ○ ○外壳× ○ ○ ○ ○ ○
× ○ ○ ○ ○ ○
× ○ ○ ○ ○ ○
铅 (Pb) 汞 (Hg) 镉 (Cd) 六价铬 (Cr
线路板
部件名称
22
× ○ ○ ○ ○ ○
内部线材
其他配件
金属部件(铜合金)
本表格依据 SJ/T 11364 的规定编制。
○:表示该有害物质在该部件所有均质材料中的含量均在 GB/T 26572 规定的限量要求以下。
×:表示该有害物质至少在该部件的某一均质材料中的含量超出 GB/T 26572 规定的限量要求。(产品符合欧盟 ROHS 指令环保要求)
Page 23

DJI Support
DJI
技术支持
http://www.dji.com/support
If you have any questions about this document,
please contact DJI by sending a message to
DocSupport@dji.com
如果您对说明书有任何疑问或建议,请通过以下
电子邮箱联系我们:DocSupport@dji.com。
YC.BZ.SS000625.02
.
Printed in China.
中国印制
 Loading...