

Page 1

Page 2

Page 3
Welcome to the DigiTech HammerOn. From the
company that reinvented pitch bending with the
Whammy pedal, we bring you footswitch control over
instantaneous pitch jumps, adding sonic complexity to
your guitar riffs and chord progressions. Like a natural
extension of your guitar neck, you can now use your
feet to hammer-on notes in conjunction with your
hands to play faster, more intricate phrases beyond
your ngers’ reach.
TABLE OF CONTENTS PAGE
HammerOn Story
Guided Tour
Connections
7 Pedals in One
Effects - HammerOn Mode
Effects - Impossible Mode
Effects - Sequence Mode
Deep Dive
Specifications
Info
2
4
9
10
12
16
18
20
21
22
HammerOn Features:
• Dual Footswitch Instantaneous Pitch Jumps
• Fully Chromatic Pitch Selection
• 4 Octave Pitch Shift Range
• TRILL with Tap -Temp Speed
• IMPOSSIBLE mode with alternating pitch
• SEQUENCE mode - multistep pitch transposition
• 2-note, 3-note, and 5-note sequences
• True Bypass
Included Items:
• HammerOn pedal
• Power Supply
• User’s Manual
• 2 Guitar Case Stickers
• 2 Collectable Guitar Picks
• Warranty Registration Information Card
If anything is missing, please contact DigiTech at
digitech.com. If all is well, come see us anyway to
check out our other products and the latest news.
PAGE 1
Page 4

At DigiTech, we have always been intrigued with
incorporating natural guitar playing techniques with
guitar effects. The Whammy Pedal took pitch bending
that is normally done with your ngers and the
whammy bar on the guitar and added an additional
way to control the pitch of your guitar with your feet
using an expression pedal. We weren’t just creating a
guitar effect as much as extending creative control to
let your feet be part of the action, while also opening
up the range of pitch well beyond the capabilities of
string tension.
Wah pedals, talk boxes, and even loopers also
fall into this category of effects because they open
up creative guitar techniques beyond your hands and
ngers. These are guitar effects that you “play”, not
just turn on and off. They become fundamental to your
guitar playing technique.
PAGE 2
Guitar players know hammer-on and pull-off guitar
playing techniques that add additional notes between
the ones you are picking with your right hand, and
without the accent of picking those notes they have a
different, more subtle and expressive feel. We wanted
to extend this concept of adding additional notes to
include foot control that can work in conjunction with
your hands and ngers to multiply the options for
creativity and increasing the range of notes beyond the
reach of your ngers.
So, thanks for buying the DigiTech HammerOn, we
hope you can nd something in there that resonates!
Page 5
Page 6
User Interface
PAGE 4
1
32
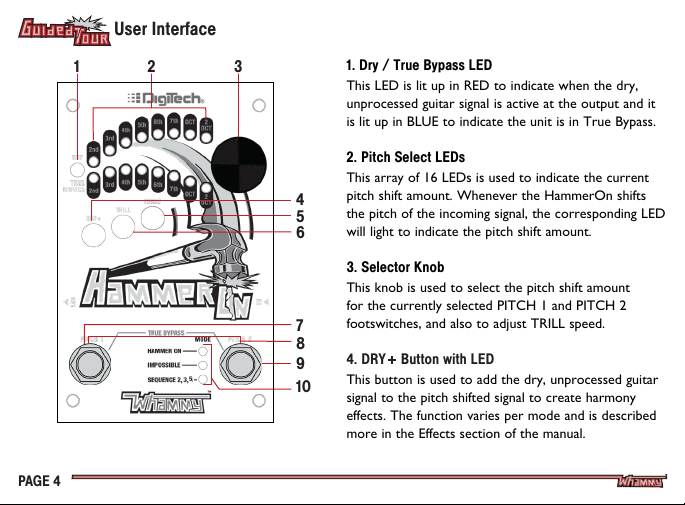
1. Dry / True Bypass LED
This LED is lit up in RED to indicate when the dry,
unprocessed guitar signal is active at the output and it
is lit up in BLUE to indicate the unit is in True Bypass.
2. Pitch Select LEDs
This array of 16 LEDs is used to indicate the current
pitch shift amount. Whenever the HammerOn shifts
4
the pitch of the incoming signal, the corresponding LED
5
will light to indicate the pitch shift amount.
6
3. Selector Knob
This knob is used to select the pitch shift amount
for the currently selected PITCH 1 and PITCH 2
footswitches, and also to adjust TRILL speed.
7
8
4. DRY Button with LED
5
9
This button is used to add the dry, unprocessed guitar
10
signal to the pitch shifted signal to create harmony
effects. The function varies per mode and is described
more in the Effects section of the manual.
Page 7

User Interface
5. Mode Button with LED
This button is used to indicate the current mode
of the PITCH 2 footswitch.
PURPLE = Hammer-On Mode
RED = Impossible Mode
BLUE = 2-note Sequence Mode
TEAL = 3-note Sequence Mode
GREEN = 5-note Sequence Mode
6. Trill Button with LED
This Button is used to turn the TRILL option on
and off. The button’s LED will flash in YELLOW at a
rate corresponding to the TRILL rate. TRILL turns a
single press of the PITCH1 and PITCH 2 footswitches into rapid fire multiple presses at a selectable rate.
7. Pitch 1 Footswitch
This footswitch is dedicated to the hammer-on
effect. Pressing the button will jump the pitch to the
selected value, and releasing it will return the pitch
back to the previous unshifted value.
8. True Bypass
The combination of pushing the PITCH 1 and
PITCH 2 footswitches together will put the unit
into True Bypass. To exit True Bypass, simply press
a single footswitch.
9. Pitch 2 Footswitch
The PITCH 2 footswitch is programable to be
either a momentary hammer-on single pitch jump,
the Impossible momentary alternating pitch jump, or
one of the three latching sequential pitch transpositions, depending on the currently selected MODE.
10. Pitch 2 Mode LEDS
These three LEDs indicate the current mode of the
pedal and the function of the PITCH 2 footswitch.
HAMMER-ON Mode (Purple)
IMPOSSIBLE Mode (Red)
SEQUENCE Mode (Blue 2-note, Teal 3-note, Green 5-note)
PAGE 5
Page 8
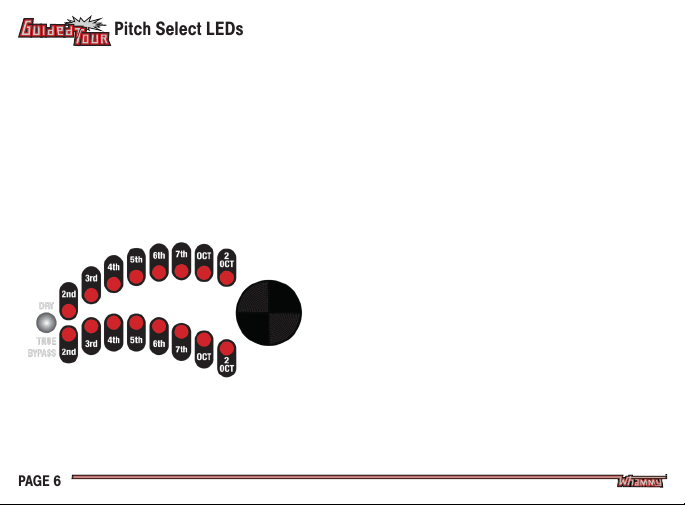
Pitch Select LEDs
This array of 16 LEDs is used to indicate the current
pitch shift amount. Whenever the HammerOn shifts
the pitch of the incoming signal, the corresponding
LED will light to indicate the amount of pitch shifting
being applied. Individual LEDs are labeled as notes of
the major scale, while two adjacent LEDs will light to
indicate the rest of the chromatic scale. Additional
LEDs indicate 2 octaves up and 2 octaves down.
PAGE 6
The HammerOn lets you select from 27 available
pitches from 2 octaves down to 2 octaves up. The
upper set of Pitch Select LEDs are labeled as the
standard major scale intervals showing the tonic, 2nd,
3rd, 4th, 5th, 6th, 7th, Octave and 2 Octaves Up,
and the lower set for shifting down, -2nd, -3rd, -4th,
-5th, -6th, -7th, -Octave and -2 Octaves Down. For
the other chromatic notes of the scale, two adjacent
LEDs are lit together. For instance, when the 2nd Up
and 3rd Up are both lit it is indicating a flatted 3rd
of the scale.
Many guitar players like to also think of the scale in
terms of how many half steps above or below the
current note. The top row of 8 LEDs corresponds
to pitch shifting up the scale from 1 to 12 semitones
up plus 24 semitones. The bottom row corresponds
to pitch shifting down from 1 to 12 semitones plus
down 24 semitones. On the following page, we show
a diagram of the Pitch Select LEDs and the associated
interval names and semitones of pitch shifting.
Page 9
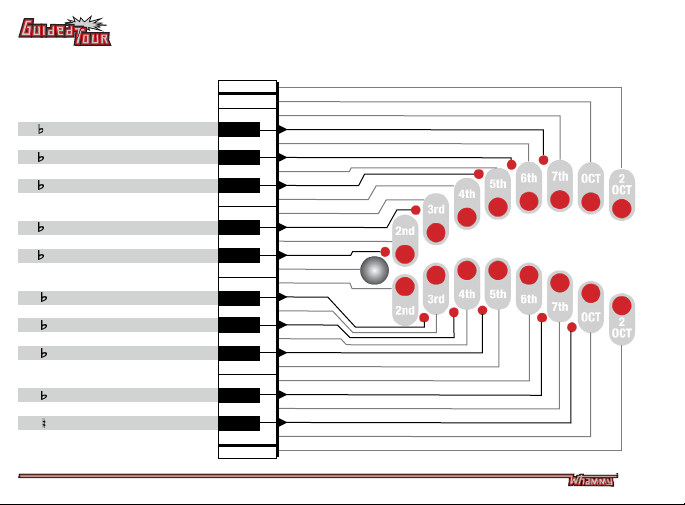
Pitch Intervals
Interval
2 OCT
OCT
7th
7th
6th
6th
5th
5th
4th
3rd
3rd
2nd
2nd
Root , Tonic
-2nd
- 3rd
-3rd
- 4th
-4th
- 5th
-5th
-6th
- 7th
-7th
- 7th
-OCT
-2OCT
Semitone
24
12
11
10
9
8
7
6
5
4
3
2
1
0
-1
-2
-3
-4
-5
-6
-7
-8
-9
-10
-11
-12
-24
Intvl Name
Prfct 1(+2)
Prfct 1(+1)
Maj 7
Min 7
Maj 6
Min 6
Prfct 5
Aug 4
Prfct 4
Maj 3
Min 3
Maj 2
Min 2
Prfct 1
Maj 7
Min 7
Maj 6
Min 6
Prfct 5
Aug 4
Prfct 4
Maj 3
Min 3
Maj 2
Min 2
Prfct 1(-1)
Prfct 1(-2)
Piano Keys
+2
-2
PAGE 7
Page 10
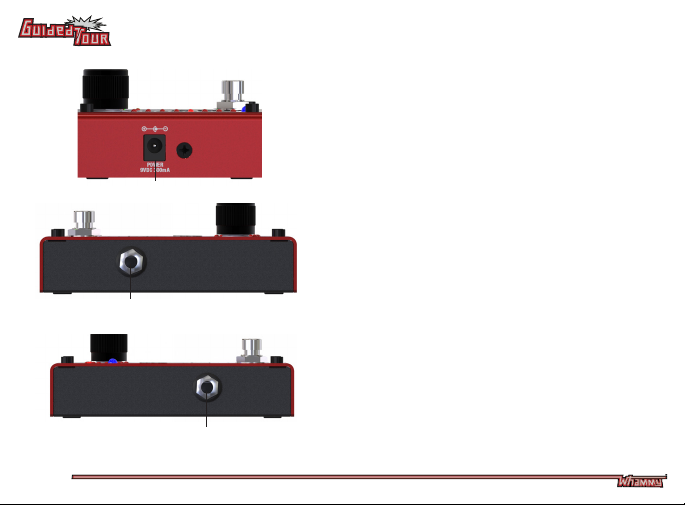
Inputs and Outputs
1
2
3
PAGE 8
1. Power Input
Connect the included 9V DC, 1.3 amp power adapter
to this jack. Be sure to use the proper supplied
adapter or, if powering from a multipedal power brick,
make sure that it can supply at least 300mA of current
at 9V DC. See your pedalboard’s manual for details. It
is always best to use the power supply delivered with
your HammerOn Pedal.
2. Instrument Input
Connect your guitar or other instrument to this input
with a good quality ¼” guitar instrument cable. The
HammerOn should be right up front in the signal
chain getting its signal directly from the guitar for best
operation.
3. Output Jack
Connect this output to the other pedals in your signal
chain or directly into a guitar amplifier using a good
quality ¼” guitar cable.
Page 11
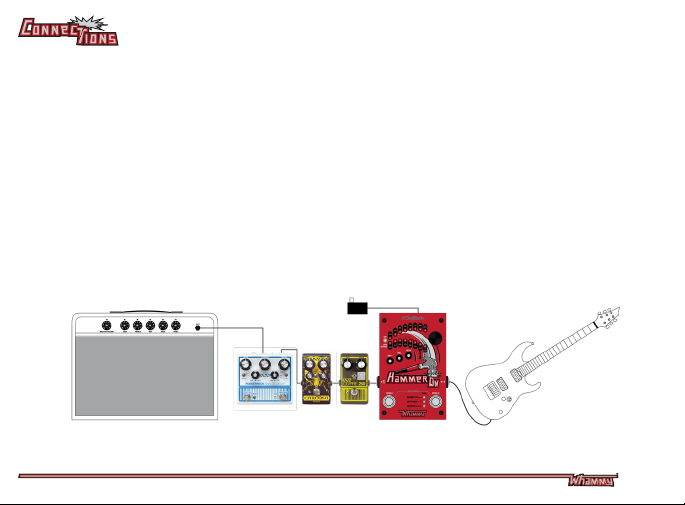
The DigiTech HammerOn pedal is easy to set up and use.
Follow these steps to get set up and get creating.
1. Connect your instrument to the HammerOn’s
input jack. The HammerOn works best being first
in the signal chain so it receives input directly from
the guitar
2 Connect from the HammerOn’s output jack to
your favorite pedals or to an amplifier.
3. Connect the included power supply to an AC
outlet and the other end to the HammerOn’s
power input.
4. Use the PITCH 1 and PITCH 2 footswitches to
instantaneously shift the pitch of your instrument,
and use the user interface to select the desired
pitch shifts and other features.
PAGE 9
Page 12

The DigiTech HammerOn is a versatile effects pedal
with an amazing amount of flexibility and options to
create and channel your musical ideas. Take the time
to get to know the many options and see if it sparks
new creative ideas. The PITCH 1 footswitch is
dedicated to always be a hammer-on selectable
momentary pitch shift above or below what you are
playing. PITCH 2 footswitch has 3 different modes of
operation selectable using the MODE button.
There is a button called DRY+ that can turn on the
dry signal and a button called TRILL that can mimic
rapid presses of the footswitches.
PAGE 10
With all these options it’s like having 7 pedals in one:
1. HAMMER-ON
An instantaneous momentary pitch shifter pedal
At it’s heart the HammerOn pedal is an instantaneous
momentary pitch shifter. PITCH 1 is dedicated to this
function and PITCH 2 can give you a second pitch to
hammer on if the HAMMER-ON MODE is selected.
2. HAMMER-ON with TRILL
A rapid fire hammer-on action pedal
Press the TRILL button and now when you press the
footswitches the pedal acts like you are quickly doing
multiple presses of the footswitch, providing multiple
rapid pitch shifts at a selectable rate.
3. HARMONY-ON!
An instantaneous harmony creation pedal
Press the DRY+ button and now when you press a
footswitch for a hammer-on you also hear your dry
guitar giving you instant harmony phrases.
Page 13
4. The IMPOSSIBLE Pedal
A dual alternating momentary pitch shift pedal
Select Impossible mode with the MODE button, and
now the PITCH 2 footswitch gives you hammer-on
pitch shifts that alternate between two selectable
pitch amounts. Play the impossible!
5. DROP/CAPO SEQUENCE
A multi-setting pitch transposition pedal
Select one of the three sequence modes, the
PITCH 2 footswitch lets you step through a
sequence of selectable pitch transpositions. Select
between 2-note, 3-note, and 5-note sequences.
Pitch 1 hammer-on’s are relative to the current
sequence pitch making it a great way to step
through alternate DROP and CAPO tunings.
6. SEQUENCE with TRILL
An automatic guitar rif sequencer
Select one of the sequence modes and press the
TRILL button and the PITCH 2 pedal automatically
steps through a programmable sequence of 2-note,
3-note, or 5-note pitch shifts at a selectable rate.
The rate can be adjusted using the SELECT knob
or Tap-Tempo TRILL. The sequence can be set to
PlayOnce, Retrigger, or Loop. Experiment with all
three modes! This is a new type of pitch sequencing
effect that works well with single notes and chords.
7. SEQUENCE with DRY and TRILL
An automatic techno guitar sequencer
Select one of the sequence modes and turn on
both the TRILL and DRY+ and the PITCH 2
pedal automatically steps through a programmable
sequence of 2-note, 3-note, or 5-note HARMONY
pitch shifts added to your guitar signal. The rate can
be adjusted using the SELECT knob or Tap-Tempo.
PAGE 11
Page 14
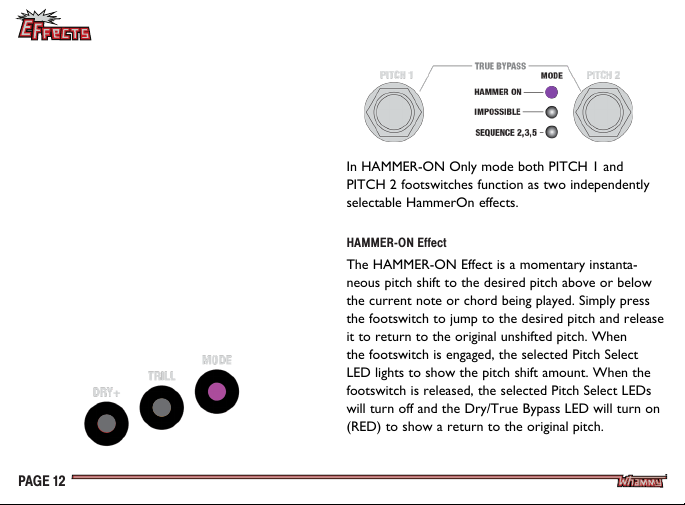
HAMMER-ON Mode
The DigiTech HammerOn is a very versatile effects
pedal with an amazing amount of flexibility and options
to create with. To put the HammerOn in its simplest
mode, “HAMMER-ON Only”, make sure the DRY+
and TRILL buttons are turned off and the MODE button is in Hammer On mode (LED lit Purple):
1. If the DRY+ button LED is lit, press the DRY+
button to turn it off.
2. If the TRILL button LED is lit, press the TRILL
button to turn it off.
3. Press the MODE button to cycle through the
modes until this button is lit in purple, HAMMER-ON
mode. The LEDs by the PITCH 2 footswitch will also
show that HAMMER-ON mode is selected.
PAGE 12
In HAMMER-ON Only mode both PITCH 1 and
PITCH 2 footswitches function as two independently
selectable HammerOn effects.
HAMMER-ON Effect
The HAMMER-ON Effect is a momentary instanta-
neous pitch shift to the desired pitch above or below
the current note or chord being played. Simply press
the footswitch to jump to the desired pitch and release
it to return to the original unshifted pitch. When
the footswitch is engaged, the selected Pitch Select
LED lights to show the pitch shift amount. When the
footswitch is released, the selected Pitch Select LEDs
will turn off and the Dry/True Bypass LED will turn on
(RED) to show a return to the original pitch.
Page 15
HAMMER-ON Mode
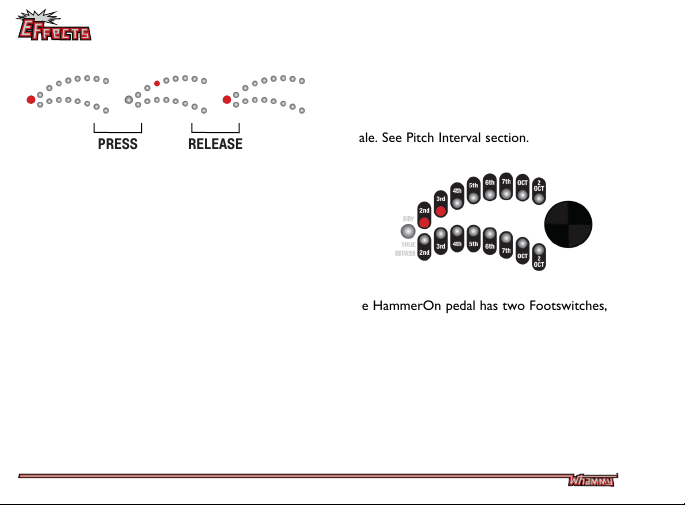
To change the desired pitch shift amount, press and
hold the footswitch and turn the Selector Knob. As
the footswitch is held down, you will also hear the
pitch change as you turn the knob. If you release the
footswitch, the sound will return to the dry (unprocessed) signal, but you can still select the amount that
it will pitch shift the next time it is pressed.
The HammerOn lets you select from 27 available
pitches from 2 octaves down to 2 octaves up with a
full chromatic selection between one octave down
and one octave up. The Pitch Select LEDs are labeled
as a standard major scale showing root, 2nd, 3rd, 4th,
5th, 6th, 7th, Octave and 2 Octaves Up, and another
set for shifting down, 2nd, 3rd, 4th, 5th, 6th, 7th,
PRESS RELEASE
Octave and 2 Octaves Down. For the other
chromatic notes of the scale two adjacent LEDs are
lit together. For instance, when the 2nd Up and 3rd
Up are both lit it is indicating a flatted 3rd of the
Scale. See Pitch Interval section.
The HammerOn pedal has two Footswitches,
PITCH 1 and PITCH 2. The PITCH 1 footswitch
is dedicated to always functioning as a HammerOn
Effect while the PITCH 2 footswitch can be used as
a second HammerOn Effect when the MODE button
is selected to be HammerOn mode (purple). Since
there are two separate footswitches, the SELECT
knob will update the pitch shift amount for the most
recent footswitch that was pressed.
PAGE 13
Page 16
HAMMER-ON Mode
HAMMER-ON with Dry - Harmony On
The HammerOn pedal gives you the option to add
your dry, unprocessed guitar signal to the pitch
shifted hammer-on signal enabling you to instantly
add 2-note harmony. We call this “Harmony On”.
This effect can be used to accentuate notes of your
guitar solos by adding a second shifted note aboce or
below. Try it with octaves, 5th’s or any other melodic
addition.
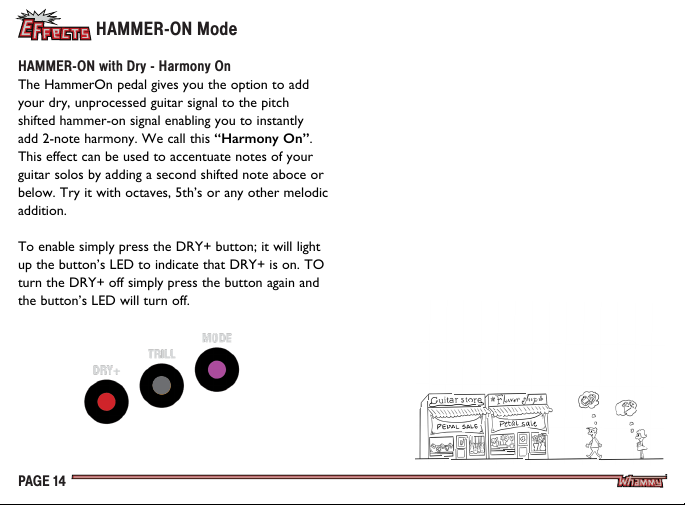
To enable simply press the DRY+ button; it will light
up the button’s LED to indicate that DRY+ is on. TO
turn the DRY+ off simply press the button again and
the button’s LED will turn off.
PAGE 14
Page 17
HAMMER-ON Mode
HammerOn with Trill
A trill is rapid alteration of the pitch of a played note,
much like pressing the HammerOn footswitch many
times in rapid succession. Simple slower trills can
be accomplished by pressing the footswitch multiple
times quickly but there is a limit to how quickly you
can press and release the footswitch. With the Trill
button the HammerOn pedal gives you the option to
turn on an automatic on-off oscillation of the selected
footswitch at a selectable rate.
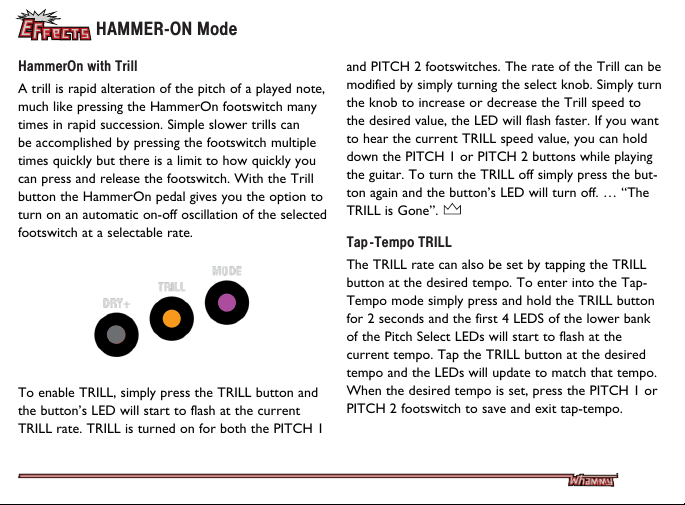
To enable TRILL, simply press the TRILL button and
the button’s LED will start to flash at the current
TRILL rate. TRILL is turned on for both the PITCH 1
and PITCH 2 footswitches. The rate of the Trill can be
modified by simply turning the select knob. Simply turn
the knob to increase or decrease the Trill speed to
the desired value, the LED will flash faster. If you want
to hear the current TRILL speed value, you can hold
down the PITCH 1 or PITCH 2 buttons while playing
the guitar. To turn the TRILL off simply press the but-
ton again and the button’s LED will turn off. … “The
TRILL is Gone”.
Tap -Tempo TRILL
The TRILL rate can also be set by tapping the TRILL
button at the desired tempo. To enter into the Tap-
Tempo mode simply press and hold the TRILL button
for 2 seconds and the first 4 LEDS of the lower bank
of the Pitch Select LEDs will start to flash at the
current tempo. Tap the TRILL button at the desired
tempo and the LEDs will update to match that tempo.
When the desired tempo is set, press the PITCH 1 or
PITCH 2 footswitch to save and exit tap-tempo.
PAGE 15
Page 18
IMPOSSIBLE Mode
Impossible Mode Effect
The Impossible Mode Effect is a variant of the
HammerOn effect but instead of a single selectable
instantaneous pitch shift it alternates between two
separate selectable pitch shift amounts above or
below the current note or chord being played.
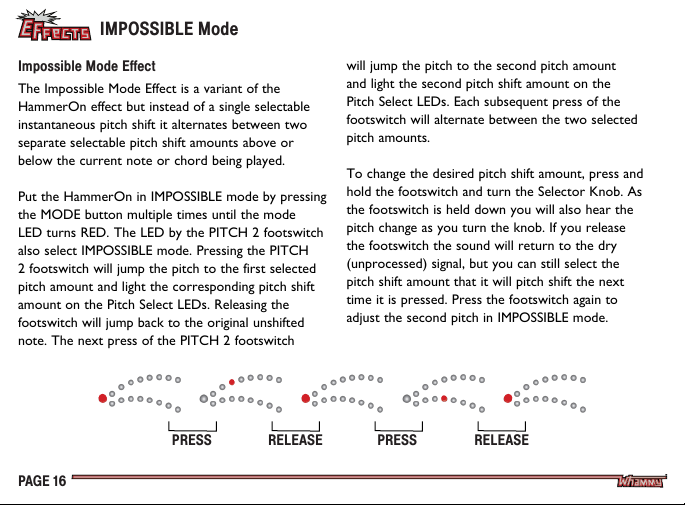
Put the HammerOn in IMPOSSIBLE mode by pressing
the MODE button multiple times until the mode
LED turns RED. The LED by the PITCH 2 footswitch
also select IMPOSSIBLE mode. Pressing the PITCH
2 footswitch will jump the pitch to the first selected
pitch amount and light the corresponding pitch shift
amount on the Pitch Select LEDs. Releasing the
footswitch will jump back to the original unshifted
note. The next press of the PITCH 2 footswitch
PRESS PRESSRELEASE RELEASE
PAGE 16
will jump the pitch to the second pitch amount
and light the second pitch shift amount on the
Pitch Select LEDs. Each subsequent press of the
footswitch will alternate between the two selected
pitch amounts.
To change the desired pitch shift amount, press and
hold the footswitch and turn the Selector Knob. As
the footswitch is held down you will also hear the
pitch change as you turn the knob. If you release
the footswitch the sound will return to the dry
(unprocessed) signal, but you can still select the
pitch shift amount that it will pitch shift the next
time it is pressed. Press the footswitch again to
adjust the second pitch in IMPOSSIBLE mode.
Page 19
IMPOSSIBLE Mode
Impossible with Dry
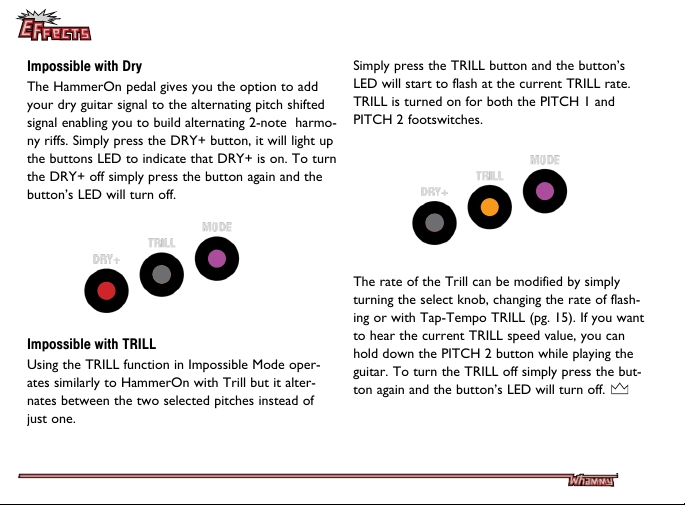
The HammerOn pedal gives you the option to add
your dry guitar signal to the alternating pitch shifted
signal enabling you to build alternating 2-note harmo-
ny riffs. Simply press the DRY+ button, it will light up
the buttons LED to indicate that DRY+ is on. To turn
the DRY+ off simply press the button again and the
button’s LED will turn off.
Impossible with TRILL
Using the TRILL function in Impossible Mode oper-
ates similarly to HammerOn with Trill but it alter-
nates between the two selected pitches instead of
just one.
Simply press the TRILL button and the button’s
LED will start to flash at the current TRILL rate.
TRILL is turned on for both the PITCH 1 and
PITCH 2 footswitches.
The rate of the Trill can be modified by simply
turning the select knob, changing the rate of flash-
ing or with Tap-Tempo TRILL (pg. 15). If you want
to hear the current TRILL speed value, you can
hold down the PITCH 2 button while playing the
guitar. To turn the TRILL off simply press the but-
ton again and the button’s LED will turn off.
PAGE 17
Page 20
SEQUENCE Mode
Sequence Mode Effect
The Sequence Mode Effect is a latching instanta-
neous pitch shift that will cycle through a set of
user definable pitch transposition amounts above
or below the current note or chord being played.
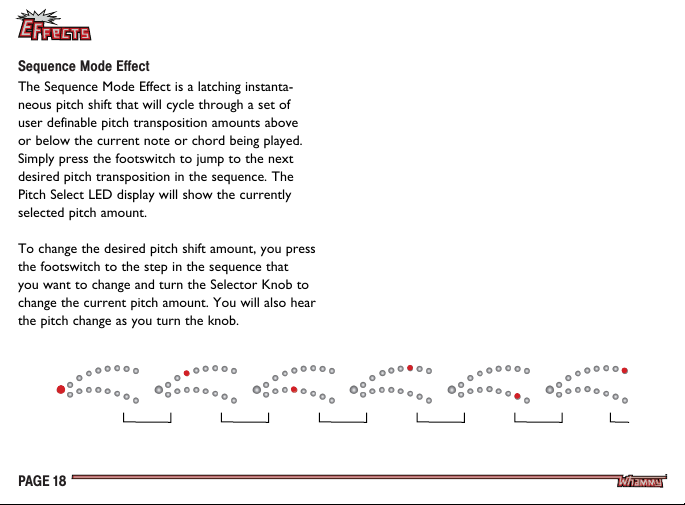
Simply press the footswitch to jump to the next
desired pitch transposition in the sequence. The
Pitch Select LED display will show the currently
selected pitch amount.
To change the desired pitch shift amount, you press
the footswitch to the step in the sequence that
you want to change and turn the Selector Knob to
change the current pitch amount. You will also hear
the pitch change as you turn the knob.
PRESS
RELEASE
PRESS
RELEASE
PAGE 18
Each sequence mode has its own set of programable
pitches. Sequence mode has options for 2-note
(BLUE), 3-note (Teal), and 5-note (Green).
Another interesting feature of the Sequence mode
is that PITCH 1 hammer-on is set to be relative to
the currently selected pitch transposition amount.
For example, if you have the hammer-on value for
PITCH 1 set to jump up an octave, and you have
the current pitch in the sequence to transpose
your guitar down 2 semitones, then the PITCH 1
footswitch will jump up an octave from the current
down 2 semitones pitch. This allows you to use
sequence mode to store alternate tunings (DROP
and CAPO) for your guitar that you can step
through as needed.
PRESS
RELEASE
PRESS
RELEASE
PRESS
RELEASE
Page 21
SEQUENCE Mode
Sequence Mode with Trill Effect
In Sequence mode, with TRILL, HammerOn can
auto-step through the selected sequence of pitch
shifts, much like pressing the footswitch many times
in succession. With the available 2,3, and 5-note
sequences this effect can open-up new worlds of
automatic note shifting that intertwine with your
playing that can range from simple octave echo
jumps notes to complex layered inner melodies.
With TRILL on, press PITCH 2 to start stepping
through the sequence at the selected TRILL rate.
The TRILL rate can be adjusted with the SELECT
Knob or Tap-Tempo Trill (pg. 15). There are three
options for retriggering the sequence once the last
pitch shift in the sequence is finished, PlayOnce,
ReTrigger, and Looping.
1. PlayOnce - will play through the sequence and not
start again until PITCH 2 is released then pressed.
2. ReTrigger - will play through the sequence and if
PITCH 2 is held down it will retrigger the sequence.
3. Looping - will keep playing through the seqence;
PITCH 2 is used to stop/start the sequence.
To change the Sequence Retrigger mode simply press
and hold the mode button until one of the last 3 LEDS
on the bottom row (-7th, -Oct, -2Oct) starts to flash
indicating you are editing the Sequence Retrigger
mode. Press the Mode button to cycle through the
selections and when the desired mode is reached
press either footswitch to save and exit. PlayOnce
(-7th), ReTrigger (-Oct), and Looping (-2Oct). The
current Sequence Retrigger mode will be shown
briefly at power up.
PAGE 19
Page 22
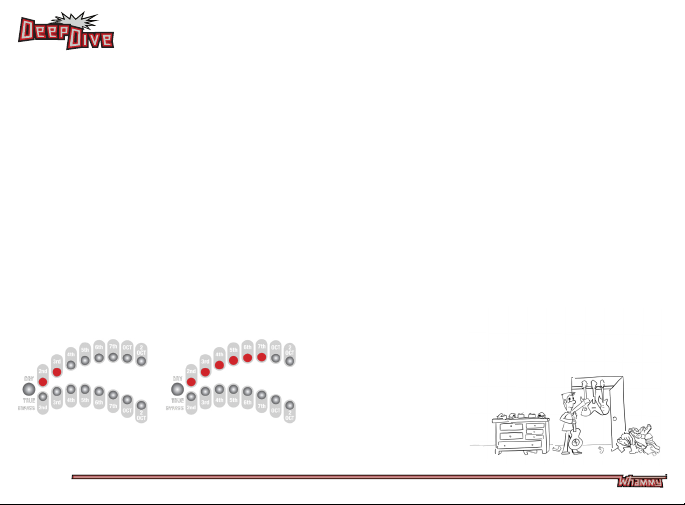
Classic & Chords Modes
The HammerOn provides two modes of operation:
Classic mode (the classic Whammy algorithm) and
Chords mode (the modern algorithm from the
Whammy DT). The Classic mode is ideal for single
note soloing while the Chords mode is best suited
for bending of fullchords. The default mode out of
the box is Chords. To change this option simply
press and hold the DRY+ button for 2 seconds and
the top row of LEDs flashes either 1 LED (2nd) or
6 LEDs (2nd-7th). Change the Classic/Chord mode
by toggling the DRY+ button after selecting the
desired mode press either footswitch to save that
mode and exit.
CLASSIC CHORDS
PAGE 20
Factory Reset
To reset the unit to the factory settings, hold down
the PITCH 1 footswitch and plug in the power cord.
Keep holding the footswitch down until all LEDs
light up then release the PITCH 1 footswitch and
press and hold it again. All LEDs will flash twice to
indicate that the factory reset is complete.
Power Up
When the HammerOn is powered up it will always
be set to TRUE BYPASS.
Page 23
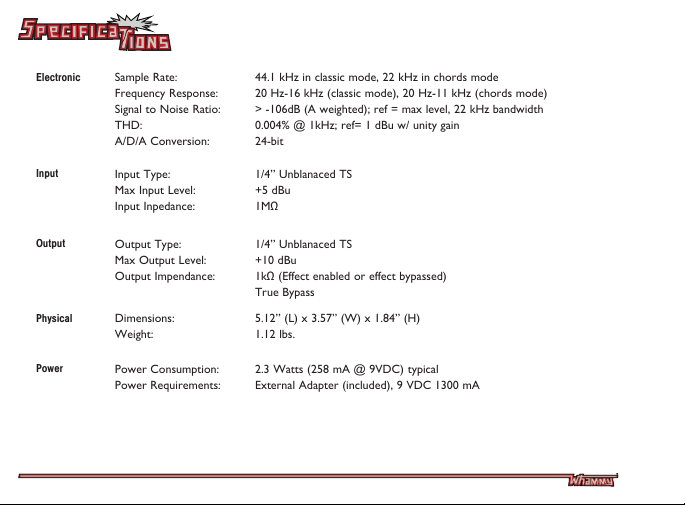
Electronic
Input
Sample Rate:
Frequency Response:
Signal to Noise Ratio:
THD:
A/D/A Conversion:
Input Type:
Max Input Level:
Input Inpedance:
44.1 kHz in classic mode, 22 kHz in chords mode
20 Hz-16 kHz (classic mode), 20 Hz-11 kHz (chords mode)
> -106dB (A weighted); ref = max level, 22 kHz bandwidth
0.004% @ 1kHz; ref= 1 dBu w/ unity gain
24-bit
1/4” Unblanaced TS
+5 dBu
1M�
Output
Physical
Power
Output Type:
Max Output Level:
Output Impendance:
Dimensions:
Weight:
Power Consumption:
Power Requirements:
1/4” Unblanaced TS
+10 dBu
1k� (Effect enabled or effect bypassed)
True Bypass
5.12” (L) x 3.57” (W) x 1.84” (H)
1.12 lbs.
2.3 Watts (258 mA @ 9VDC) typical
External Adapter (included), 9 VDC 1300 mA
PAGE 21
Page 24
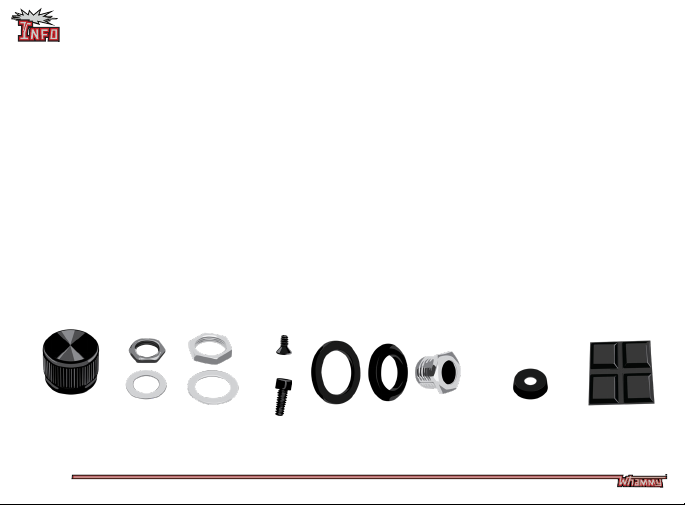
We know the road can be an unforgiving place and hard on your gear.
Replacement parts are available from www.digitech.com.
1. KNOB-0100
2. RPKT-0102
3. RPKT-0103
4. SCRW-0001
5. SCRW-0101
6. RPKT-0100
7. SWCP-0002
8. RPKT-0101
1. 2. 3. 5. 6. 7. 8.
Black Aluminum Encoder Knob
Encoder Hex Nut & Flat Washer Kit (1 set of 2 items)
Footswitch Hex Nut & Flat Washer Kit (1 set of 2 items
1/4” Black Philips Flat Head Rear Panel Grounding Screw
3/8” Black Socket Head Cap Screw for Chassis Top (ea)
Threaded Hex Chrome Ferrule Nut & Black Plastic Washer Kit for 1/4” Jack (1 set of 3 items)
Black Round Lighted Switch Cap (ea)
Black Rubber Stick-On Feet (set of 4)
4.
PAGE 22
Page 25

Warning
For your protection, please read the following:
Important Safety Instructions
1. Read these instructions.
2. Keep these instructions.
3. Heed all warnings.
4. Do not use this apparatus near water.
5. Clean only with dry cloth.
6. Do not block any ventilation openings. Install in accordance with the manufacturer’s instructions.
7. Do not install near any heat sources such as radiators, heat registers, stoves, or other apparatus (including amplifiers)
that produce heat.
8. Protect the power cord from being walked on or pinched particularly at plugs, convenience receptacles, and the point
where they exit from the apparatus.
9. Unplug this apparatus during lightning storms or when unused for long periods of time.
10. No user serviceable parts inside. Refer all servicing to qualified service personnel. Servicing is required when the apparatus
has been damaged in any way, such as power-supply cord or plug is damaged, liquid has been spilled or objects have fallen
into the apparatus, the apparatus has been exposed to rain or moisture, does not operate normally, or has been dropped.
11. WARNING: To reduce the risk of fire or electric shock, do not expose this apparatus to rain or moisture.
12. Refer to labels on the unit, including bottom cover, or other markings and pertinent information.
Page 26
If you want to dispose this product, do not mix it with general household waste. There is a
separate collection system for used electronic products in accordance with legislation that
requires proper treatment, recovery and recycling.
ELECTROMAGNETIC COMPATIBILITY
This device complies with part 15 of the FCC Rules and
the Product Specifications noted on the Declaration of
Conformity. Operation is subject to the following two
conditions:
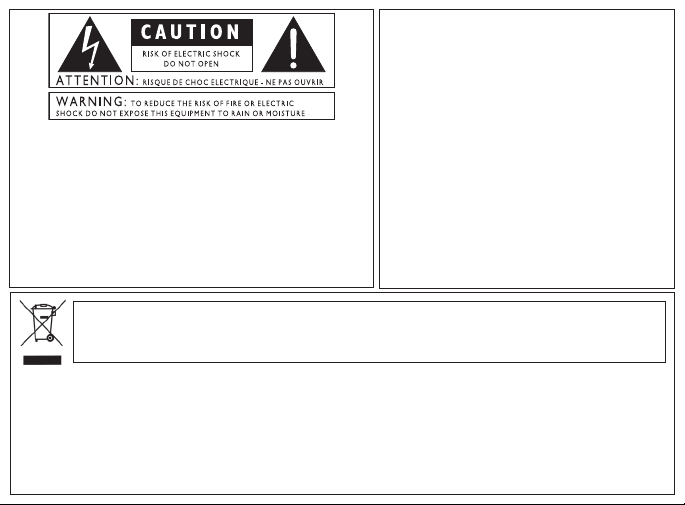
These symbols are internationally accepted symbols that warn of potential
hazards with electrical products. The lightning flash means that there are
dangerous voltages present within the unit. The exclamation point indicates
that it is necessary for the user to refer to the owner’s manual.
These symbols warn that there are no user serviceable parts inside the unit.
Do not open the unit. Do not attempt to service the unit yourself. Refer all
servicing to qualified personnel. Opening the chassis for any reason will void
the manufacturer’s warranty. Do no get the unit wet. If liquid is spilled on
the unit, shut it off immediately and take it to a dealer for service.
Disconnect the unit during storms to prevent damage.
• this device may not cause harmful
interference, and
• this device must accept any interference received,
including interference that may cause undesired
operation.
Operation of this unit within significant
electromagnetic fields should be avoided.
• use only shielded interconnecting cables.
If you want to dispose this product, do not mix it with general household waste. There is a separate
collection system for used electronic products in accordance with legislation that requires proper
treatment, recovery and recycling.
Private household in the 25 member states of the EU, in Switzerland and Norway may return their used electronic
products free of charge to designated collection facilities or to a retailer (if you purchase a similar new one).
For Countries not mentioned above, please contact your local authorities for a correct method of disposal.
By doing so you will ensure that your disposed product undergoes the necessary treatment, recovery and
recycling and thus prevent potential negative effects on the environment and humna health.
Page 27

This declaration has been issued under th e sole responsibility of the manufacturer.
*
DECLARATION OF CONFORMITY
*
The object of the declaration is in confor mity with the relevant Union
harmonization Legislation. For convenien ce, additional non-EU declarations are
included within this Declaration of Confor mity.
Manufacturer: DigiTech DigiTech Headquarters
Address: 6132 S 380 W 59 Hwagok-ro 61gil, Ga ngseo-gu
Murray, UT 84107 Seoul 07590
USA Republic of Korea
Declares that this product
Product SKU Number: HAMMERON-V-04
Product Name: DigiTech HammerOn
Product Options: All (requires an approved DigiTech Class II power adapter or
conforms to the following standards, specifications, and initiatives:
Safety: IEC 62368-1, 2
DOD SD~1995 JL FBC
EMC: EN 55032:2015+A1:20 20, Class B / KS C 9832 : 2023
EN 55035:2017+A11:2 020 / KS C 9835 : 2019
EN IEC 61000-3-2:2019+A1:2021
EN 61000-3-3:2013+A2:2021
EN 61000-4-2:2009 / KS C 9610-4-2 : 2017
EN IEC 61000-4-3:2020 / KS C 9610-4- 3 : 2017
EN 61000-4-4:2012 / KS C 9610-4-4 : 2020
EN 61000-4-5:2014+A1: 2017 / KS C 9610-4-5 : 2023
EN IEC 61000-4-6:2023 / KS C 9610-4- 6 : 2020
EN IEC 61000-4-11:2020 / KS C 9610-4-11 : 2020
RoHS: EN IEC 63000:2018
R&D: DOD 2023-CFEI
equivalent that conforms to the requirements herein)
nd
& 3rd Editions
FCC Part 15 Subpart B / ANSI C63.4a-2017
Supplementary Information:
The product herewith complies with the requirements of the:
Low Voltage D irective 2014/35/EU
EMC Directive 2 014/30/EU
UK Statutory I nstruments requirements, 2 016 No. 1091, Electromagnetic
Compatibility Regulation s 2016
RoHS Directive (EU ) 2015/863, amending An nex II to Directive 2011/65/EU
WEEE Directive 2012/19/EU
ErP Directive 2009/125/EC, amended by energy efficiency Directive 2012/27/EU, and
ecodesign Regulation (EU) 2019/1782
Roger T. Johnsen
VP of Engineering
July 31, 2024
DigiTech
6132 S 380 W
Murray, UT 84107
USA
Contact: Your local DigiTech sales office, or visit the DigiTech website at
www.digitech.com, or contact:
CORTEK Corp.
59 Hwagok-ro 61gil, Ga ngseo-gu
Seoul 07590
Republic of Korea
[email protected]
Page 28

Warranty
We at DigiTech® are very proud of our products and back up each one we sell with the following warranty:
1.
Please register online at www.digitech.com within ten days of purchase to validate this warranty. This warranty is valid only in
the United States.
2.
DigiTech warrants this product, when purchased new from an authorized U.S. DigiTech dealer and used solely within the
U.S., to be free from defects in materials and workmanship under normal use and service. This warranty is valid to the original
purchaser only and is non-transferable.
3.
DigiTech liability under this warranty is limited to repairing or replacing defective materials that show evidence of defect,
provided the product is returned to an authorized DigiTech location, where all parts and labor will be covered up to a period
of one year from date of purchase. The company shall not be liable for any consequential damage as a result of the product’s
use in any circuit or assembly.
4.
Proof-of-purchase is considered to be the responsibility of the consumer. A copy of the original purchase receipt must be
provided for any warranty service.
5.
DigiTech reserves the right to make changes in design, or make additions to, or improvements upon this product without
incurring any obligation to install the same on products previously manufactured.
6.
The consumer forfeits the benefits of this warranty if the product’s main assembly has been tampered with by anyone other than
a certified DigiTech technician (not including user replacement of the battery) or, if the product is used with voltages outside
the range specified by DigiTech.
7.
The foregoing is in lieu of all other warranties, expressed or implied, and DigiTech neither assumes nor authorizes any person
to assume any obligation or liability in connection with the sale of this product. In no event shall DigiTech or its dealers be liable
for special or consequential damages or from any delay in the performance of this warranty due to causes beyond their control.
NOTE: The information contained in this manual is subject to change at any time without notification. Some information contained
in this manual may also be inaccurate due to undocumented changes in the product since this version of the manual was completed.
The information contained in this version of the owner’s manual supersedes all previous versions.
Page 29
PAGE 19
Page 30
Page 31

Page 32

Copyright © 2024
LITP-0002 Rev A
DigiTech
6132 S 380 W
Murray, UT 84107, USA
www.digitech.com
 Loading...