

Page 1

HELLO
SW4600EID
Operators Manual
D3740-US REV C August 14, 2014
Ft. Atkinson, Wisconsin USA
Digi-Star International
Pannigen, The Netherlands
www.digi-star.com
Page 2

SW4600EID
Table of Contents
INDICATOR OVERVIEW ......................................................................... 5
ALLFLEX EID STICK READER, ELECTRONIC ID & VISUAL ID
(OPTIONAL) ...................................................................................... 7
WEIGH SCREEN ............................................................................... 8
STATS SCREEN ............................................................................... 9
OPERATION .......................................................................................... 10
TURN ON INDICATOR .................................................................... 10
GROUP/PREMISE NUMBERS ........................................................ 10
DATA FIELDS .................................................................................. 11
QUICK DATA FIELDS ..................................................................... 11
ZERO BALANCE SCALE ................................................................ 12
READING EARTAGS AND WEIGHING ANIMALS .......................... 12
RECHECK LOCK ON WEIGHT ....................................................... 15
LOW BATTERY INDICATION ......................................................... 15
SELF TEST ...................................................................................... 15
OPTIONAL SETTINGS .......................................................................... 16
CHANGE SETUP AND CALIBRATION ........................................... 16
CHANGING OPTIONS .................................................................... 17
SETTING OPTIONS ........................................................................ 18
MENU 1 .................................................................................................. 18
MENU 2 .................................................................................................. 24
MENU 3 .................................................................................................. 25
MENU 4 .................................................................................................. 26
CALIBRATION ....................................................................................... 26
STOCKWEIGH LINK™ PC SOFTWARE ............................................... 27
GETTING STARTED ....................................................................... 27
READ SOFTWARE LICENSE AGREEMENT .................................. 27
MINIMUM SYSTEM REQUIREMENTS ........................................... 27
INSTALLING STOCKWEIGH LINK™ PC SOFTWARE ................... 27
RECEIVING DATA........................................................................... 28
CLEARING THE INDICATOR .......................................................... 28
QUICK NOTES ................................................................................ 29
REPORT GENERATOR: ................................................................. 31
EID READER – OPTIONAL ................................................................... 32
RE-CONFIGURING ALLFLEX STICK READER ............................. 33
WEIGH METHODS ................................................................................ 34
GENERAL WEIGH METHOD #1 ..................................................... 34
SLOW WEIGH METHOD #2 ............................................................ 34
FAST WEIGH METHOD #3 ............................................................. 34
LOCK-ON WEIGH METHOD #4 ...................................................... 34
EID DATA FORMATS ............................................................................ 35
LSTORE DATA FORMATS ............................................................. 35
EID PRINT FORMAT ....................................................................... 37
2 D3740
Page 3

Operators Manual
All rights reserved. Reproduction of any part of this manual in any form whatsoever without DigiStar’s express written permission is forbidden. The contents of this manual are subject to
change without notice. All efforts have been made to assure the accuracy of the contents of this
manual. However, should any e
informed of them. The above notwithstanding, Digi
in this manual or their consequence.
©
SCOREBOARD METHODS .................................................................. 39
WEIGHING ERRORS ............................................................................ 40
OVRCAP ......................................................................................... 40
+RANGE ......................................................................................... 40
-RANGE .......................................................................................... 40
SOFTWARE LICENSE AGREEMENT................................................... 41
TROUBLESHOOTING ........................................................................... 43
INSTALLATION ..................................................................................... 44
INDICATOR MOUNTING ................................................................ 44
CABLE CONNECTION.................................................................... 45
D3740-US-SW4600EID Operators-Rev C-SCC
rrors be detected, Digi-Star would greatly app rec iate be ing
Copyright 2014 Digi-Star, Fort Atkinson (U.S.A.).
D3740 3
-Star can assume no responsibility for errors
Page 4
SW4600EID
Disconnect
Charging Battery Or Welding
all cords
Important Precaution
Important: Disconnect all indicator leads before charging battery or
welding equipment. Damage may occur to indicator and load cells.
4 D3740
Page 5
Operators Manual
1
2
3
4
5
6
7
8
1
2
3
45678
9
10
11
1213141516
171819
Note: See page 44 for insta llatio n instruct ions
11
20
21
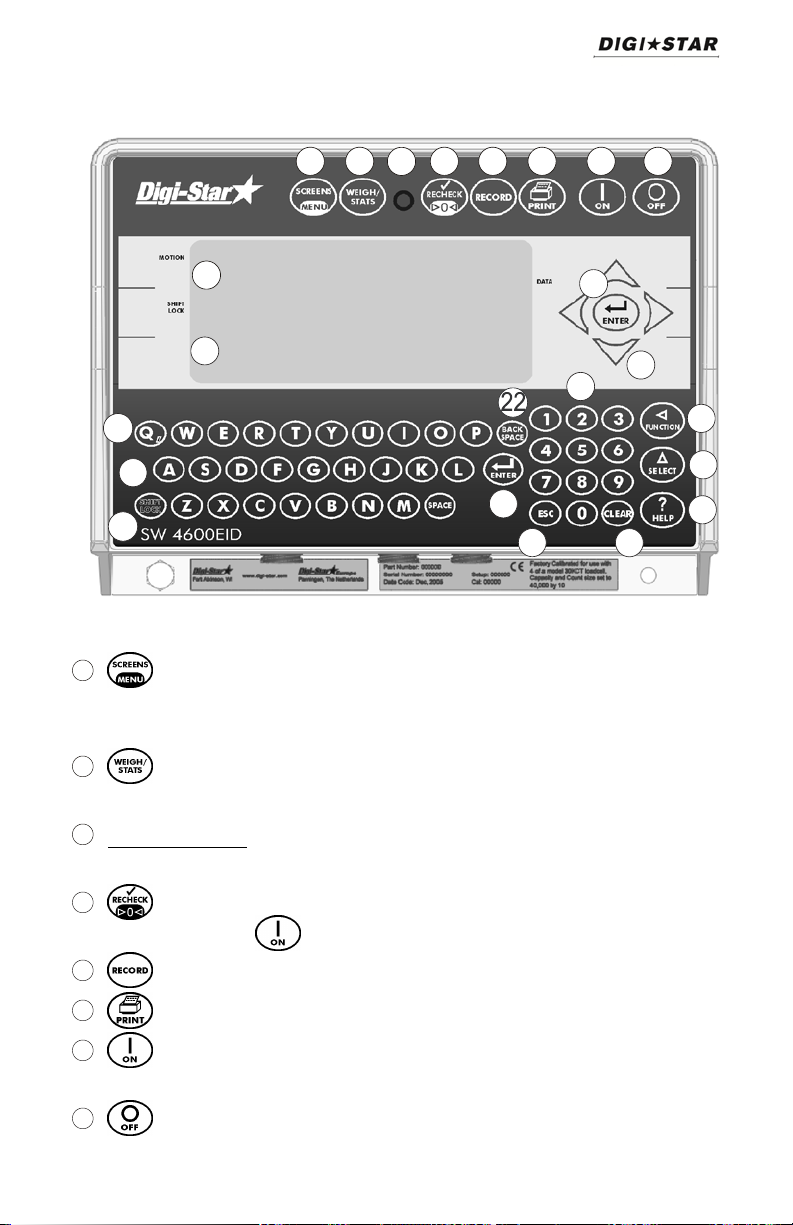
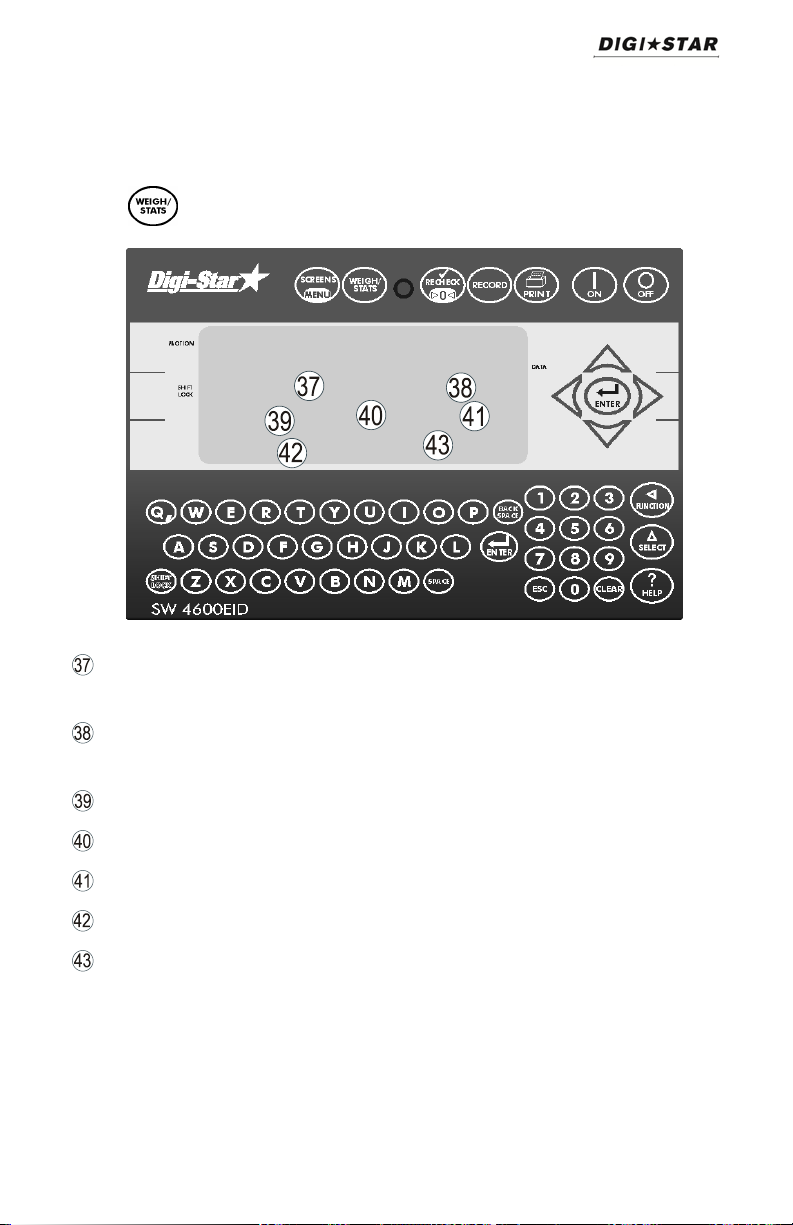
INDICATOR OVERVIEW
– Press to toggle between GROUP/PREMIS (See page 10) and
QUICK NOTE (See page 11) screens. Press and hold for LONG
FORM set up screen (See page 17).
– Press to toggle between WEIGHT (See page 8) and GROUP
STATISTICS screen (See page 9).
Pre-Alarm Light – Starts flashing and alarm sounds when weight is
within preset limit.
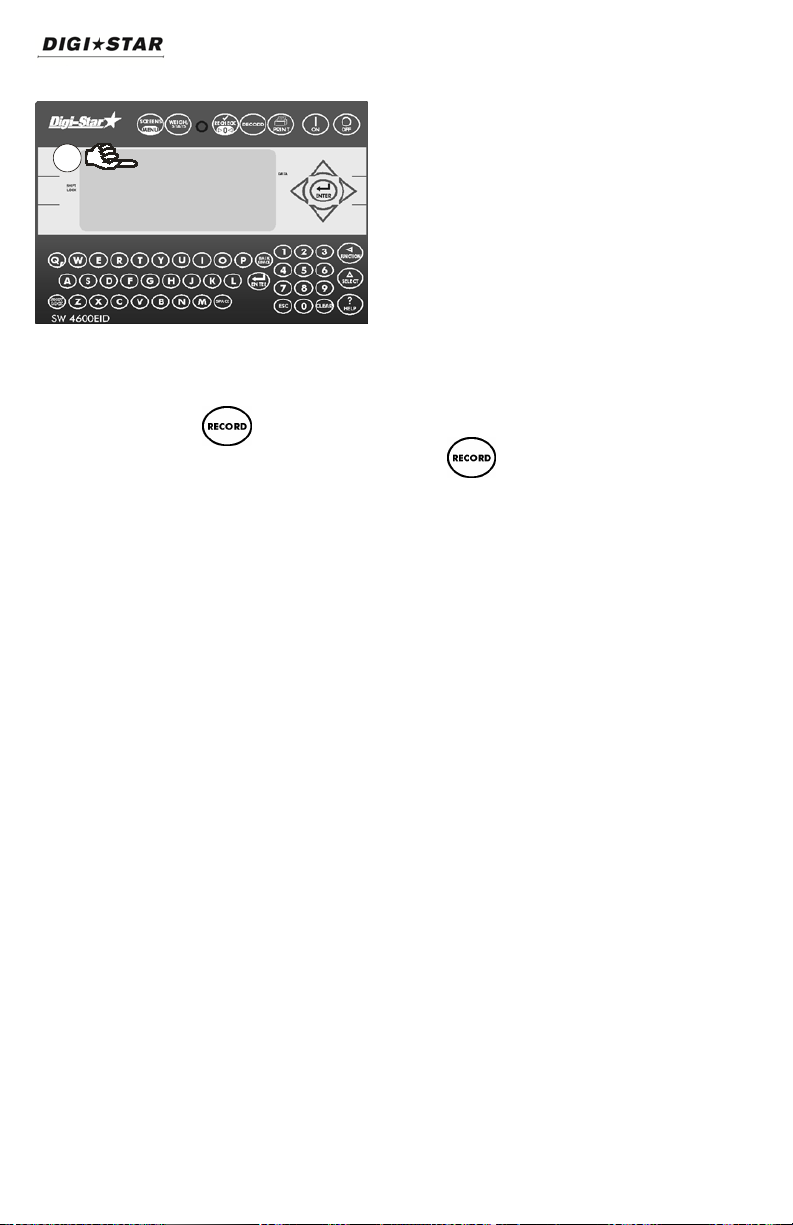
– Press to break indicator lock-on weight and reweigh. Press and
hold, then press to enter short form calibration (See page 26).
– Press in manual mode to record data to indicator memory.
– Press to print displayed weight and EID data.
– Press indicator on. Press while on and in the record or stats
screen to run self test.
– Press indicator off.
D3740 5
Page 6

SW4600EID
9
10
11
12
13
14
15
16
17
18
19
20
21
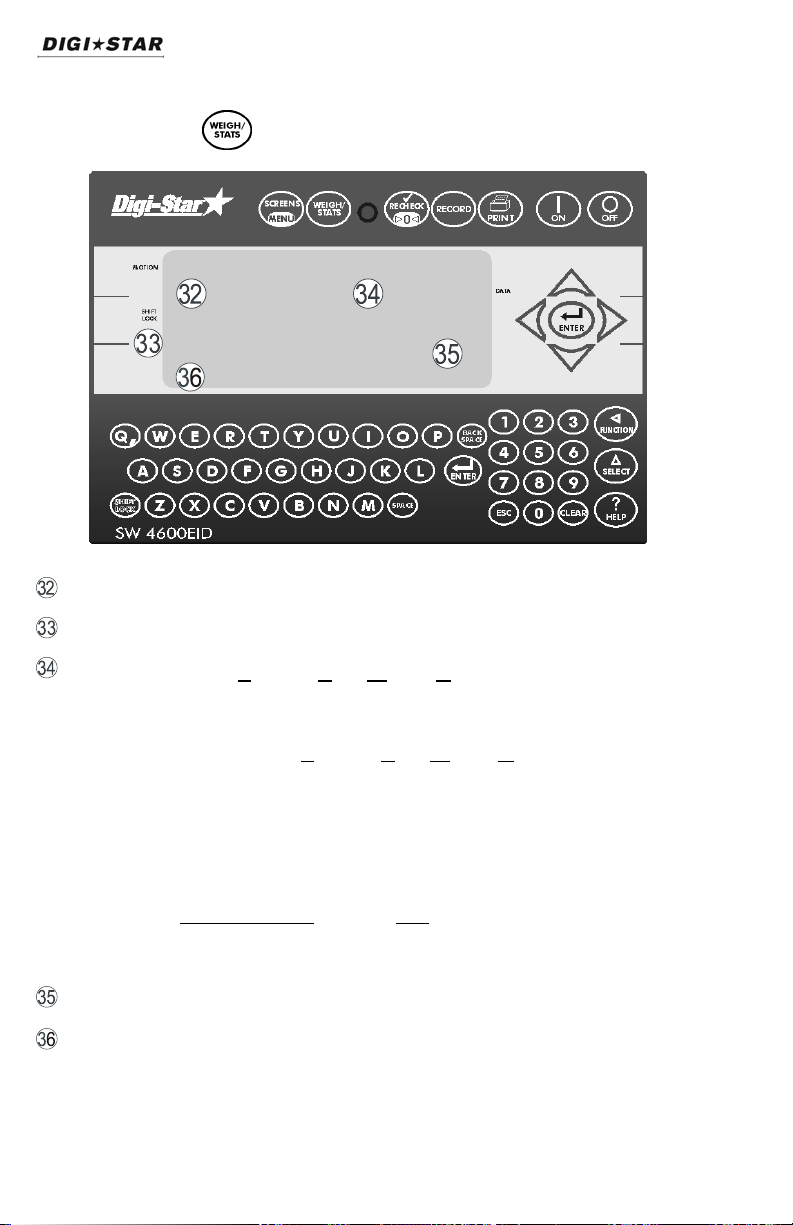
Upper Display Window – Displays current act ions .
Lower Display Window – Displays data for EID, VID, CODE, ADWG
(See page 7).
– Press to accept change or proceed to nex t item.
Directional Arrows – Left or right arrows move cursor inside data field.
Up and down arrows mone to previous or next data field.
Keyboard – Press to input letters.
– Press to undo data field or get out of long form set-up.
Keypad – Press to input numbers.
– performs task displayed by select.
– toggle to determine which operation the function key performs.
Options: QuickD, Menu, Setup, Help, Dimmer
– Press for additional inform ation.
– Press to del et e o ne character . P ress and ho ld t o de let e e ntire line
or field on weigh s cree n.
- Press and release. Then press to enter a comma in data.
- Press after pressing to make a comma.
- - Press to backspace. Press and hold to backspace faster.
6 D3740
Page 7
Operators Manual
31
31
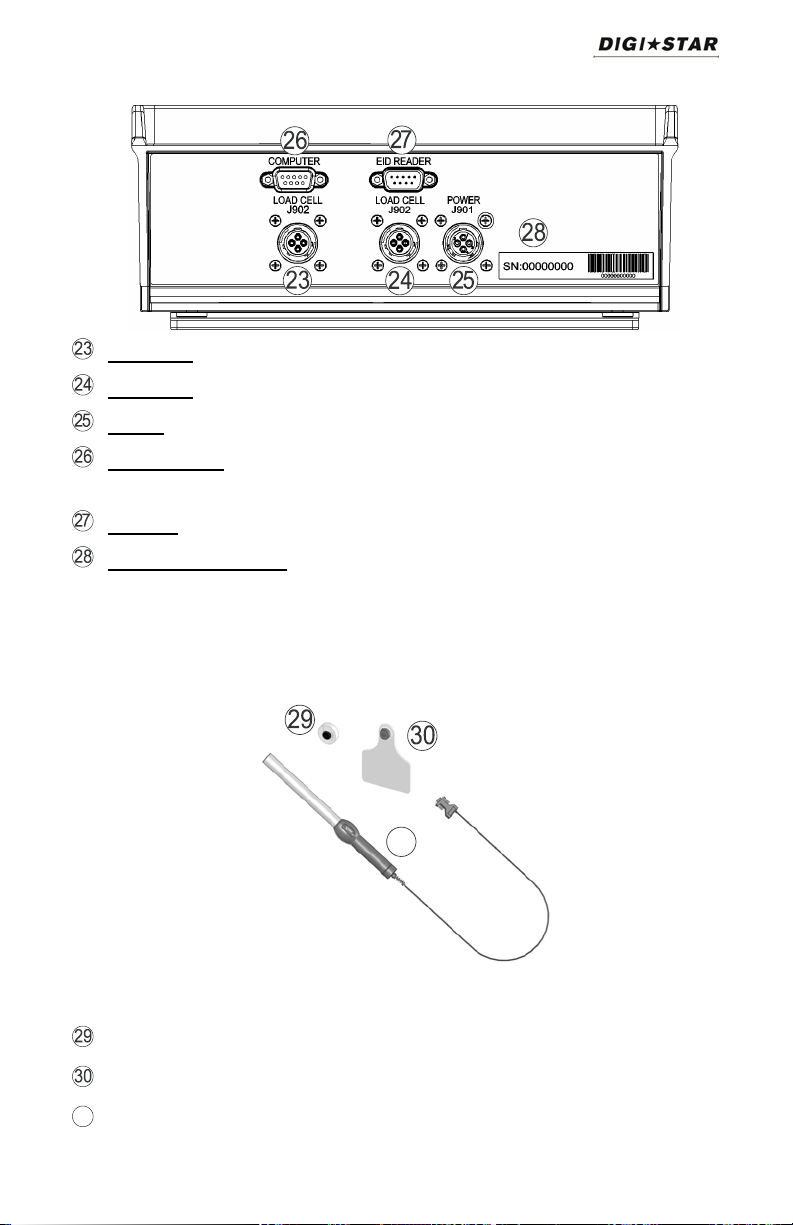
Load Cell – Port for load cell cord.
Load Cell – Port for load cell cord.
Power – Port for Power Cord.
Serial/Printer – Port, if installe d, can be used to communicate with
computer and other digital input/outp ut device s such as a printer.
Remote – EID reader port.
Serial Number Plate – Serial Number of your Indicator.
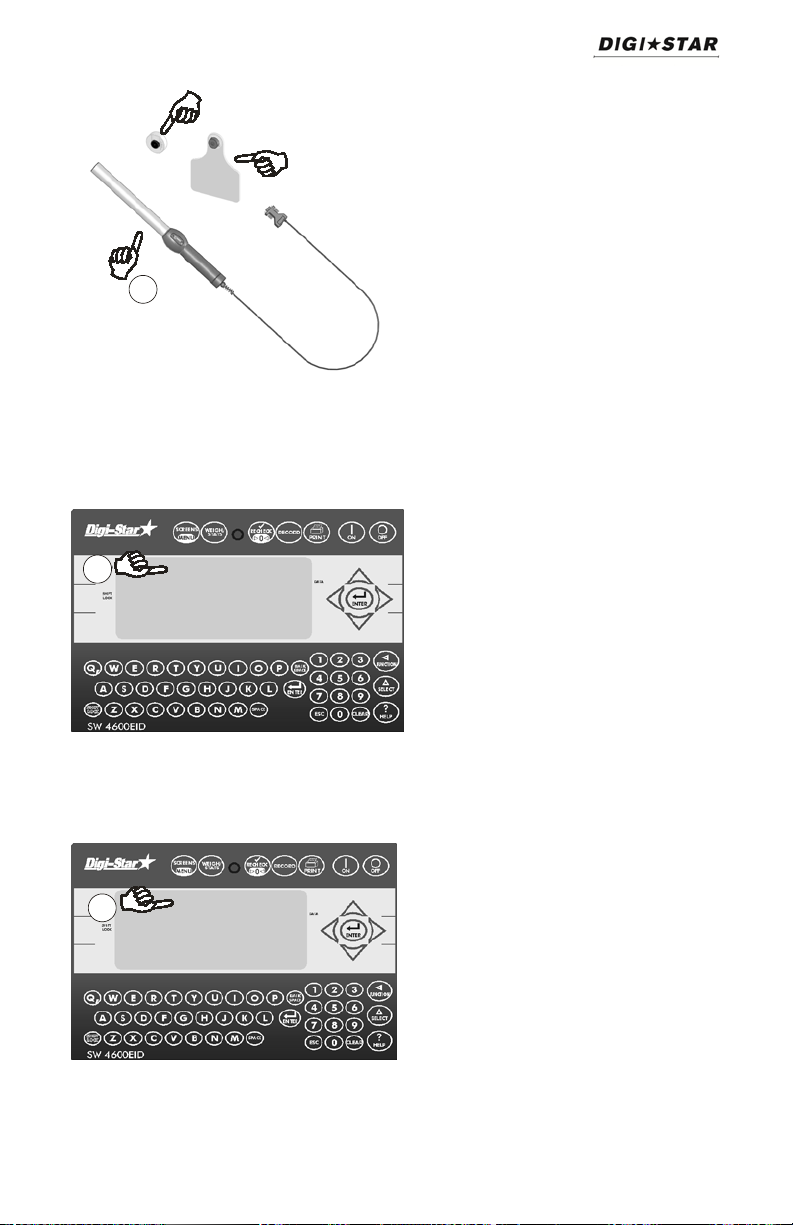
Allflex EID Stick Reader, Electronic ID & Visual ID
(Optional)
Electronic ID (EID) for Allflex® Wand Reader, unique to animal. (Opt.)
Visual ID (VID) for Allflex® Wand Reader, may be duplicated. (Opt.)
EID Stick Reader for Allflex® Electronic ID (EID). (Opt.)
D3740 7
Page 8
SW4600EID
=15lbs ADWG
Vid code
Weigh Screen
Press until weigh scrolls then 0 is displayed.
Eid adwg 0.00
EID – Electronic ID Number.
VID – Visual ID Description enter by user.
ADWG – Displays Average Daily Weight Gain.
Calculates using difference in current weight and last weight in
memory for that animal, divides sum by number of days since last
saved weight, equals Average Daily Weight Gain.
Example:
Current weight-Last saved weight = weight change
4500 - 4200 = 300
Weight change 300
Days passed 20
CODE – Enter by user.
QUICK DATA – Note can be added up to 26 characters. See page 11.
8 D3740
Page 9
Operators Manual
Group pin
Av- lo
hi
Cnt tot
Stats Screen
Displays statistic information for animal records stored with the same group
and premise numbers for today’s date.
Press until stats flashes then 0 is displayed.
GROUP – Assigned group number (alpha/numeric title for group of
animals to be weighed).
PIN – Assigned premise number (may be government issued, unique
number given to farm).
AV – Average weight of the day.
LO – Low weight of the day.
HI – High weight of the day.
CNT – Number of records stored of the day.
TOT – Total weight of the day.
D3740 9
Page 10
SW4600EID
Digi-s tar
Inventory system
HELLO
1
group
Group xxxxxx pin xxx
Enter group and
Values to cont inue
1
See page 44 for installat ion instructions.
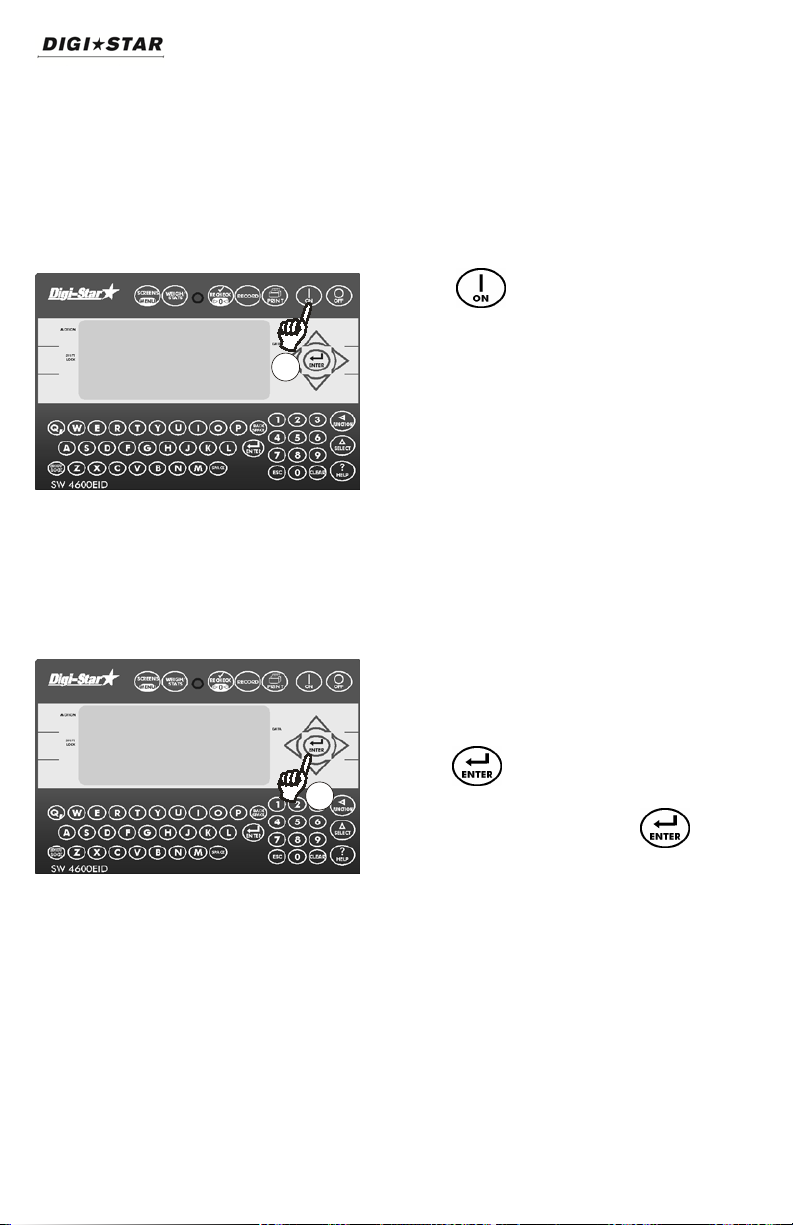
OPERATION
Turn on Indicator
1. Press . .
**** Animal eid ****
Group/Premise Numbers
premises
If set to ON (see page 24) ID
numbers will need to be entered at
start up of indicator.
1. Press twice to accept
current numbers or enter group
number with keypad, press .
Repeat for premise number.
10 D3740
Page 11
Operators Manual
Data 1
Data1
Data2
Data3
0
Eid adwg 0.00
Vid
1
2
3
1
0
Eid
Vid
2
3
1
2
3
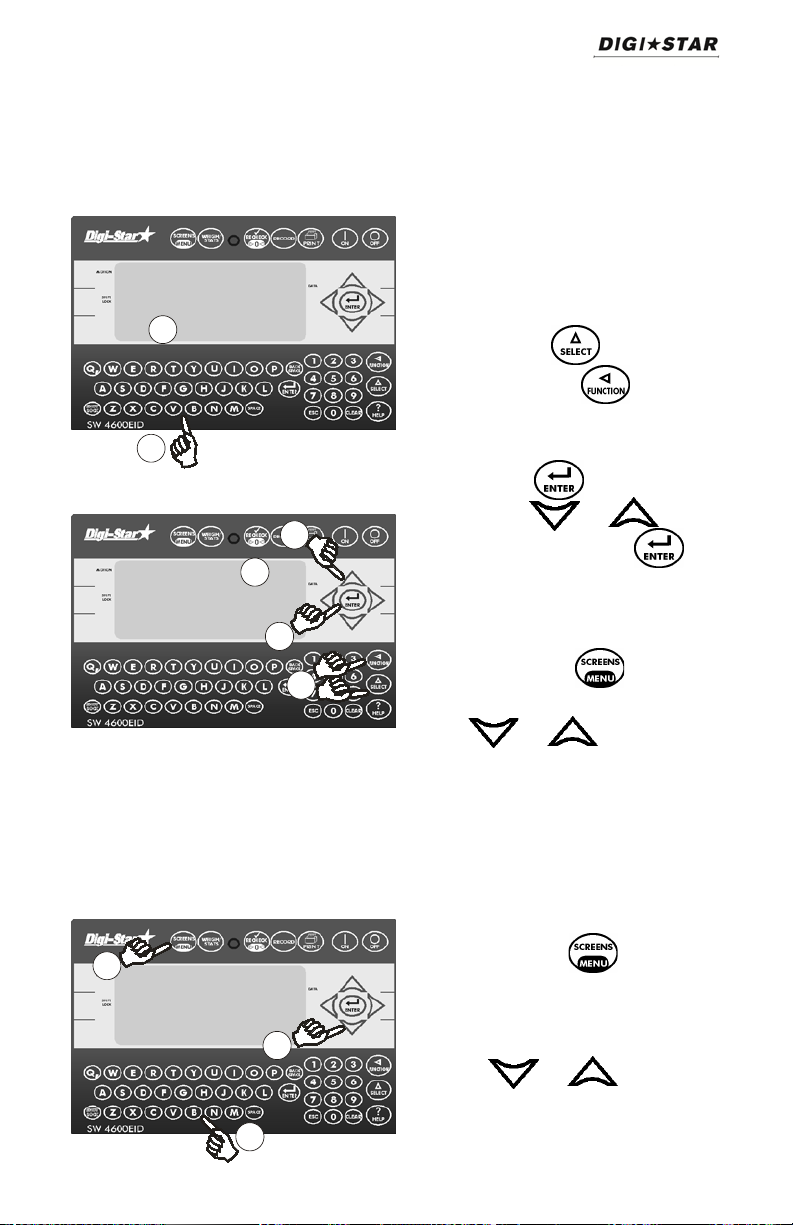
Data Fields
Notes can be added to records
using the Data Field.
Display must be on weigh screen.
1. With cursor in data field, enter
note using keypad
or
code
adwg 0.00
code
Quick Data Fields
There are 20 spaces available for
Quick Data Fields. They can be set
up on indicator or computer (see
page), then transferred to indicator.
2. T o enter a Quick Data Field (see
below) press until quickd is
displayed, press , 0 will flash
in upper display.
3. Enter number of desired data
field, press to save (can
also press or to scroll
through list then press to
save).
Note: For a list of existing Quick
Data Fields press until you
are on the data screen and
press or to scroll
through list.
1. To setup Quick Data fields on
Indicator press until data#
is in top line of display This data
field currently being edited.
2. Enter desired note on keypad.
3. Press or to edit other
fields when they are displayed in
top line of display.
D3740 11
Page 12
SW4600EID
Eid
0
1
No eid
l
Eid adwg 0.00
Vid
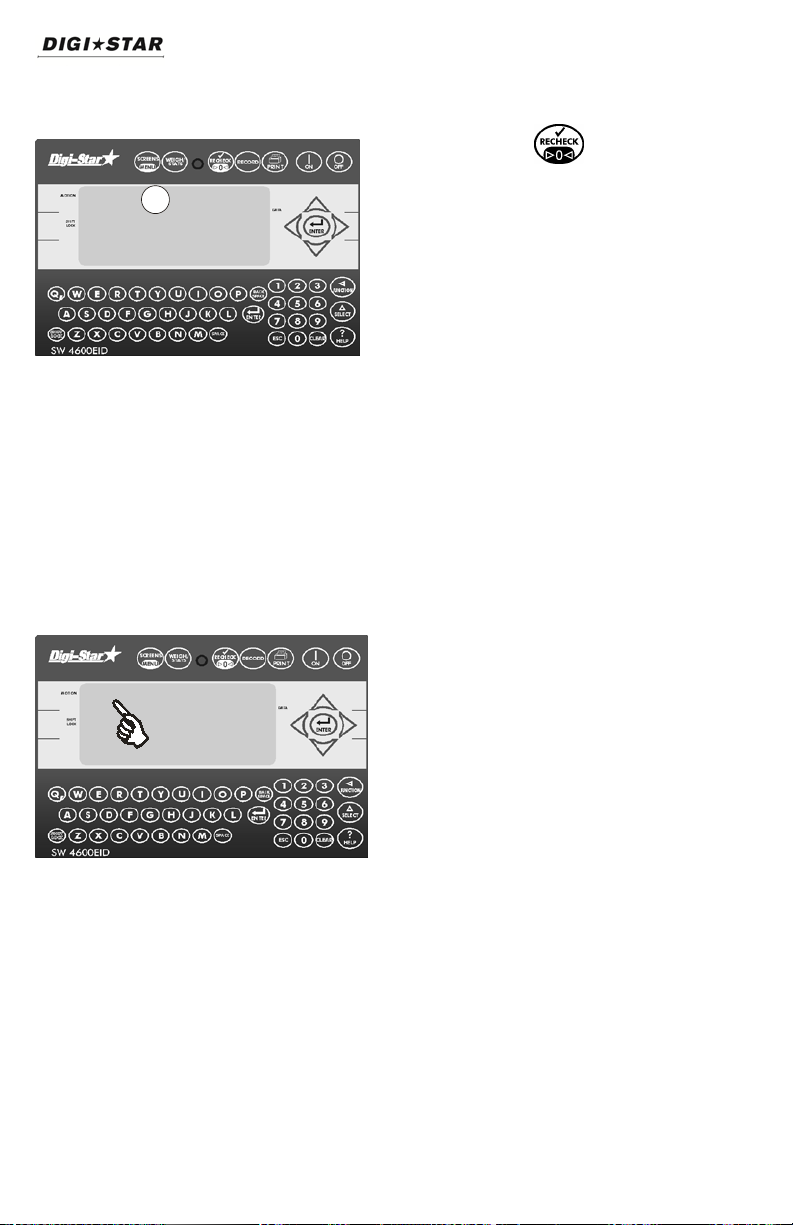
Zero Balance Scale
adwg 0.00
Reading Eartags and Weighing Animals
Indicator must be on the weigh or
stats screen to record animal
weights.
code
1. Press and hold zero
balances scale.
Animal on platform.
1. Indicator “Locks On” animal’s
weight, “L” appears in upper left of
display. Display alternates
between “no eid” and weight.
2. If EID Stick Reader is not being
used release animal. Weight and
EID data stored.
12 D3740
Page 13
Operators Manual
1
Visual ID
EID Stick Reader
Electronic ID (EID)
*XXXX*
Eid adwg 0.00
2
Stored
Eid adwg 0.00
1
(VID)
EID Stick Reader
1. Press button on Stick Reader with
end in range of EID. Stick Reader
beeps, LED indicator turns from
red to green momentarily.
2. Tag may be read any time. Last
four digits of tag displayed
(flanked by –) before data stored.
3. Release animal. Weight and EID
data stored.
D3740 13
Page 14
SW4600EID
- XXXX-
Eid adwg 0.00
1
Notes: Each time pressed, one line of data is stored. Multiple
entries made of same tag by pressing more than once
(results in multiple beeping). Data stored manually for animal, will
not be stored when animal steps off scale. Automatic mode will
resume for next animal.
Stick Reader can read data from other devices such as car keys.
Such devices can cause confusion.
No print device necessary for operation of indicator when weighing
animals.
4. Once stored data flanked by *.
14 D3740
Page 15

Operators Manual
Recharge battery
1
1
test
Running self test - please
Rechck
Eid
1
Recheck Lock On Weight
adwg 0.00
Low Battery Indication
Self Test
1. Animal on platform, press
Weight stored/printed when
animal steps off platform or is
pressed.
Battery voltage low, “RECHARGE
BATTERY - TURNING OFF
” shows on display. After 2
BAT
minutes indicator shuts off.
Note: Disconnect indicator from
battery while recharging. DAMAGE
CAN OCCUR to indicator and stick
reader.
1. Press while on the weigh or
stats screen during operation will
run self-test.
” and “LO
D3740 15
Page 16

SW4600EID
10k kg
Press help for more
1
2
3
OPTIONAL SETTINGS
Change Setup and Calibratio n
3000LB Stoc k Weigh 3300 (pounds)
6600LB Stoc k Weigh 6600 (pounds)
10K LB StockWeigh 10000 (pounds)
14K LB StockWeigh 14000 (pounds)
3300KG StockWeigh 3300 (kilograms)
6600KG StockWeigh 6600 (kilograms)
10K KG Stoc k Weigh 10000 (kilogram s)
14K KG StockWeigh 14000 (kilograms)
Custom Press indicator, SETUP displays and then 6-digit
number with right digit flashing. To change setup number,
enter new number on keypad and press . CAL
displays followed by a 3 to 5-d igit num ber. To change
calibration number enter new number on keypad then
press . .
Verify accuracy of scale and procedure complete!
1. Press and hold .
2. Push three seconds.
3. Press , advances through
selections.
16 D3740
Page 17

Operators Manual
121
2
3
Menu 1
Press select for menu 1,2,3,4,
calib, exit
--then press on key
langag
Press help for more
3
Changing Options
1. Press & Hold ,enters Menu.
2. Press for menu options.
Press again until desired
menu shows.
3. Press to see first option.
1. When option displayed
press .
2. Press , records changes and
next option.
3. Press to exit.
D3740 17
Page 18

SW4600EID
Setting/
D.A.N
Options
Bold
Description
MENU 1
Language
101
English
Display
102
Motion Arrow
103
ON/OFF
Arrow flashes for unstable
Zero
104
ON/OFF
Zero track adjusts to zero for
method.
Weigh
105
1=General,
Select weigh method.
Lock-On
106
Use lowest setting for system
Scale ID
108
NEW EZ
Enter new scale ID on keypad
Setting Options
Display
(LANGAG )
Update Rate
(D-Rate)
(Mot ion)
Tracking
(ZTRACK)
(
= Default)
(ENGLSH)
Dutch (NEDERL)
French (FRANCS)
German (DEUTSH)
Italian (ITAL)
Portuguese (PORT)
Spanish (ESPAN)
Danish (DANSK)
Hungarian (MAGYAR)
Spanish (VESTA)
1,2,3,4
Select desired language.
Update display times per
seconds.
weight.
build-up of snow and mud. If
"ON", the scale will adjust for
small weight variances (+\5lbs) in the Lock-On weigh
Method
(W MTHD)
2=Fast,
3=Slow,
4=Lock-On
1,2,3,4,5,6,7,8,9
(LOCKO N)
(Scal ID)
18 D3740
to lock on consistently.
and press .
Page 19

Operators Manual
Setting/
D.A.N
Options
Bold
Description
Lock-N-Hold
109
OFF
Holds “Lock-On” weight
(records after animal steps off
Next animal steps on platform
Auto Off
111
15,30,45,60,
Indicator shuts “OFF” after set
Lock-On
112
Configure how and when
OFF
-Indicator does not accept
Manual Print
-Indicator does not accept
Display
(LKNHLD)
(AUTOFF)
Store
(LSTORE)
See Page 35
(
ON/
OFF
(OFF)
= Default)
platform). Restarts when:
or 5 min of inactivity or
is pressed.
period of inactivity. Press any
key to prevent.
weighing data printed or sent
to computer port and stored
into memory on indicator
during animal weighing.
EID data.
-Indicator does not store data
to memory.
-Sends data to computer port
only when APRINT set to
“ON”.
-Set PRTFMT to select
desired print format.
D3740 19
(MANPRT)
EID data.
-Indicator does not store data
in me mory.
-Sends time, date and weight
data to computer port,
press .
-Set PRTFMT to select
desired print format.
Page 20

SW4600EID
Setting/
D.A.N
Options
Bold
Description
Automatic Print
-Indicator does not accept
on or animal
Lock-On
112
Manual Weight
-Indicator accepts EID data
Display
Store
(LSTORE)
Continued
(
(AUTPRT)
(MAN WT)
= Default)
EID data.
-Indicator does not store data
in me mory.
-Sends Time, Date and
Weight data to computer port
when scale lockssteps off platform.
-Set LSSEND to select when
data sent.
-Set PRTFMT to select
desired format.
-Message will not alert
operator if EID data is
missing.
-Indicator does not store data
in me mory.
-Sends EID, time, date and
weight data to computer port,
press .
-Print format EID print format.
-Data will print even if EID not
provided.
20 D3740
Page 21

Operators Manual
Setting/
D.A.N
Options
Bold
Description
Automatic Weight
-Indicator accepts EID data.
Lock-On
112
Manual EID
-Indicator accepts EID data.
Display
(
(AUTOWT)
= Default)
-Message will not alert
operator if EID data missing.
-Indicator does not store data
in me mory.
-Sends EID, time, date,
weight data to computer port
when scale “Locks-On” or
when animal steps off
platform.
-Set LSSEND to select when
data sent to computer port.
-Print format is EID print
format.
If LSSEND “ON”, data sent to
computer port when scale
“Locks-On” to weight. EID
must be read before animal
weighed in this mode.
If LSSEND “OFF”, and EID
not read time, date, weight
data sent when animal off
platform.
Store
(LSTORE)
Continued
D3740 21
(MANEID)
-Message alerts operator if
EID data missing.
-Sends EID, time, date,
weight data to computer port
and stores comma-separated
values (CSV) in memory
when . pressed
-Print format EID print format.
-Data stored in EID data
format.
-If ESTORE “OFF”, data not
stored into indicator memory.
Page 22

SW4600EID
Setting/
D.A.N
Options
Bold
Description
Automatic EID
-Indicator accepts EID data.
Sends EID, time, date, weight
If LSSEND “OFF” and EID not
Lock-On
112
Manual Check
-Indicator accepts EID data.
Display
(
(AUTEID)
= Default)
-Message aler ts op er at or if
EID data missing.
data to comput e r po rt an d
stores CSV in memory when
scale “Locks-O n” o r when
animal off p latform.
-Set LSSEND to select when
data printed.
If LSSEND “ON” and EID not
read, press prints data.
read, time, date, weight data
prints when animal off
platform.
-Print format EID print format.
-Data stored in EID data
format.
-If ESTORE “OFF”, data not
stored into indicator memory.
Store
(LSTORE)
Continued
22 D3740
(MANCHK)
-Message alerts operator EID
data missing. Operator must
press to print and store
data with or without EID.
-Sends EID, time, date,
weight data to computer port
and stores comma-separated
values (CSV) in memory
when press .
-Print format EID print format.
-Data stored in EID data
format.
-If ESTORE “OFF”, data not
stored into indicator memory.
Page 23

Operators Manual
Setting/
D.A.N
Options
Bold
Description
Automatic Check
-Indicator accepts EID data.
SV) in memory when
Lock-On-
113
OFF
Data sent when scale
and send/store new data.
EID Store
114
ON
Indicator stores data in
Display
Store Send
(LSSEND)
(
(AUTCHK)
ON/
= Default)
-Message alerts operator if
EID data missing. Press
prints and stores data without
EID.
-Sends EID, time, date,
weight data to computer and
stores (C
EID data read and scale
locks-on or when animal off
platform.
-Set LSSEND to select when
data printed.
-Print format EID print format.
-Data stored in EID data
format.
-If ESTORE “OFF”, data not
stored into indicator memory.
LOCKS-ON and EID read.
Press rechecks weight
(ESTORE)
D3740 23
/OFF
following LSTORE modes:
MANEID, AUTEID, MANCHK,
AUTCHK. “StockWeigh Link”
software retrieves data from
memory.
“OFF” for LSTORE modes
sends data to computer port
and store data into memory
keeps memory from filling up.
Page 24

SW4600EID
Setting/
D.A.N
Options
Bold
Description
EID Auto
117
OFF
With no weight on platform,
applications.
Scroll
118
Sets scroll rate of Display
Group/
OFF
GIN - Group ID Number,
MENU 2
Time Format
201
24 HR
EID Print and EID CSV Data
Set Time
202
XX:XX:XX
Date Format
203
Select date format. (EID print
Set Date
204
Enter XXXXXX
“ARROWS” advance cursor to
Display
(EIDAUT)
(SCROLL)
Premise
Number
(GINPIN)
(TIME F)
(TIME)
(DATE F)
(
ON/
0,1,2,3,4,5,6,7,8,9
ON/
AM/PM
1,2,3,4,5,6,7,8
= Default)
indicator prints, stores data
(per LSTORE and ESTORE
settings) after EID tag read.
Weight on scale, tag read,
scale operates normally
EIDAUT has no effect.
Off - in most weighing
number assigned to pen.
PIN - Premise ID Number
assigned to farms (can be
government issued).
Formats always use 24-hour
time format.
Use increments each
digit and use “ARROW” keys
advances cursor to set date
“mmddyy” field.
and EID CSV data formats
always use #2)
1 = mm – dd
2 = mm/dd/yy
3 = mm/dd/yyyy
4 = dd/mm
5 = dd/mm/yy
6 = dd/mm/yyyy
7 = dd/mm/yy
8 = dd/mm/yyyy
(DATE)
24 D3740
changes date,
set date
Page 25

Operators Manual
Setting/
D.A.N
Options
Bold
Description
One Line
212
OFF
Formats printer output to one
Scoreboard
213
0-10,13,21-26
Methods to output display
Auto Print
214
OFF
Pressing keys will
Print Format
216
AUTO
See Page 35 for details.
Zero Out
219
Com 1 Delay
221
OFF,.10,.25,.50,
Seconds printer delays before
Com 2 Delay
222
OFF,.10,.25,.50,.7
Estimated
299
0
Enter weight on scale
MENU 3
Display
301
.01,.02,.05,.1,.2,.5,
Count set too small, readings
Auto-Range
302
OFF
Scale increases display count
Display Unit
303
LB
When changing weight unit
Capacity
304
4000
Enter maximum weight
WM1
305
10
Increase number to smooth
Display
Print
(1L PRT)
Mode
(SCOREM)
(APRINT)
(PRTFMT)
(zerout)
(C1 DLY)
(C2 DLY)
Weight
(EST WGHT)
(
ON/
ON/
.75,1-5
5,1-5
= Default)
,1,2,3,4,5,6,7,8,9
line.
data to scoreboard via com
port. See page 39.
automatically print weight
values.
Press & hold
advancing line.
Count
(COUNT)
(ARANGE)
(LB-KG)
(CAP)
ADJUST
(WMA 1-1)
D3740 25
1,2,5,10,20, 50,100
ON/
/KG
unstable and indicator not
accurate
size for weights over 300
again at 600 lbs/kgs.
calibration adjusted so scale
displays accurately in new
display unit
measurable
weighing
Page 26

SW4600EID
Setting/
D.A.N
Options
Bold
Description
WM1
306
0=OFF Use values less than
WM1
307
400
Enter weight to activate quick
WM2
311
30
Increase number to smooth
WM2
312
10
0=OFF Use values less than
WM2
313
400
Enter weight activate quick
MENU 4
Buzzer
404
1
Decrease # shortens alarm
Relay
406
SETPNT
Set control for 12 VDC alarm
Gross Set
424
50
Weight below SETPNT to
SETDEL
425 0 Time before 12 VDC alarm
SETOUT
426
OVER
12 VDC alarm = +12 VDC
SETCTR
427
0,1,2,3,4,5,6,7,8,9
Use keypad to enter values.
CALIBRATION
Tcalb
801
ON
Scale adjust for temperature
Zero
802
Add Wt
Enter weight amount on scale
Display
ADJUST 2
(WMA 1-2)
ADJUST 3
(WMA 1-3)
ADJUST 1
(WMA 2-1)
ADJUST 2
(WMA 2-2)
ADJUST 3
(WMA 2-3)
(BUZZER)
(RELAY)
(
= Default)
0,1,2,3,4,5,6,7,8,9
-4, ON, OFF
/OFF
WMA 1-1 for quick weight
response.
weight response.
weighing
WMA2-1 for quick weight
response.
weight response.
horn
Press enter @ setpnt gives
option to enter value
Point Chng
(SETCHG)
/UNDER
/OFF
26 D3740
change 12VDC alarm
output changes
when over or under setpnt
changes
Page 27

Operators Manual
STOCKWEIGH LINK™ PC SOFTWARE
Software imports data collected by indicator. Tag number, weight, date,
time and other information transmitted from indicator to PC and then can
be output in Adobe Acrobat, Microsoft Excel®, Web Page or CSV file
formats.
Getting Started
This section includes steps to install software and run using default
settings. Review this section before beginning installation process.
Read Software License Agreement
Read Digi-Star® software license agreement on page 41. Breaking seal on
CD, and install software, you agree to terms of license agreement.
Minimum System Requirements
Make certain your PC includes following:
Microsoft Windows XP or Vista with 500 Meg Free disk space, 500 Meg
Ram, CD Drive, mouse, printer, serial port or USB port and USB to Serial
Port Adapter
Notes: A USB to Serial Port Adapter used if PC does not have a free
serial port. Certain programs interfere with operation of serial port /
StockWeigh Link™. Programs include Palm Desktop and some
auto ID software. Shut off these programs when reading / writing to
indicator. Failure to shut off these programs during this sequence
may result in errors and lost data.
Installing Sto ckWeigh Link™ PC Software
Install software:
1. Close all open programs.
2. Insert CD into drive. If Auto Run enabled on computer, follow installation
instructions. If installation screen does not appear, go to Start and select
Run. From Run menu, browse CD and select “setup.exe”. Install screen
appears. Follow installation instructions.
3. Disconnect computer from StockWeigh computer port.
4. Double-click StockWeigh Link icon starts program.
5. Connect one end of data cable to a serial port (DB-9 connector) on PC. If
only USB port available, use “USB to Serial Port Converter”. Connect
other end of data cable to indicator bottom panel DB-9 connector labeled
D3740 27
Page 28

SW4600EID
“COMPUTER”. Click start. Attach power to indicator, press . click
Start.
Comm Port Setup
6. Open Utilities/Comm Port Setup and the program will search the current
comm Port. Choose Auto Find if it does not find the indicator.
Receiving Data
Click the Retrieve Data button to retrieve all of the inform ation on the
indicator. After retrieving the data it will ask if you want to clear the
indicator.
Note: If you do not clear the indicator and Retrieve the data again without
deleting the data from the PC, it may duplicate records on reports.
Clearing the Indicator
Click the Clear Indicator button to clear the indicator’s stored data.
28 D3740
Page 29

Operators Manual
Quick Notes
Click the Quick Notes button to enter the Quick Notes area.
You can have as many “Files” of Quick Notes as you want. Each File
consists of maximum of 20 Quick Notes.
To Add a Quick Note File: Click in the box next to the * (the bottom row)
and then type in the name of the File you want to add, then click “Save”.
• To Delete a Quick Note File: Click on the name of the File you
want to delete and click Delete.
• To Receive Quick Notes from the Indicator: Click the name of the
File you want to store the Notes in and then click Receive from
SW.
• To Send Quick Notes to the Indicator: Click the name of the File
you want to send the Notes from and then click Send to SW.
D3740 29
Page 30

SW4600EID
To Edit a Quick Note File: Double click the name of the File you want to
edit or single click the name of the File you want to edit and click Select.
• To Add a Quick Note: Click in the box next to the * and type in
note. Then click Save. Note: Each Quick Note can only be 26
characters long.
• To Delete a Quick Note: Click on the note you want to delete and
click Delete button
• To Re-sort the Quick Notes: Click on the note you want to move
and click the Up or Down arrow buttons.
30 D3740
Page 31

Operators Manual
Report Generator:
Click Report Generator to enter.
• Begin and End: Adjust these by clicking the button “…” next to
each one to change what data is shown.
• Items to Show: Adjust what columns of data are displayed by
checking and unchecking the boxes.
• Indicator: Stockweigh Link will automatically change this to the
indicator model that the most recent data collection was from.
• Reports: Clicking on a report format will display the information in
the lower grid into that format. Some report formats require
additional software to be installed on your PC.
D3740 31
Page 32

SW4600EID
EID READER – OPTIONAL
Notes: Indicator connects to Allflex™ ISO Compatible RFID Stick
Readers only. Do not attempt to use with other RFID readers or
peripherals not approved by Digi-Star. DAMAGE MAY OCCUR .
Allfex™ Stick Reader reconfigures output format if button depressed while
powering “ON”. Don’t lay stick reader with button down while applying
power.
Depending on model, Allflex™ Stick Reader gets its power from “EID
Reader” port or internal battery.
If problem with Allflex™ RFID Stick Reader or number of characters it is
transmitting, follow next procedure to re-configure stick reader to TIRIS
S2000 output format. Refer to Allflex™ RFID Stick Reader manual for
details.
32 D3740
Page 33

Operators Manual
good
Press
1
2
3
5
4
6
5
Re-Configuring Allflex Sti ck Reader
help for more
1. Press .
2. Connect Stick Reader to EID
Reader port.
3. Press and hold “READ” button on
Stick Reader while pressing
4. After 2 seconds, Stick Reader
responds with 6 flashes and 6
beeps. Release “READ” button.
5. Press to start self-test.
Indicator scrolls “Enter “ON” to
continue or Press “ENTER to
reset EID READER”, press
to re-configure Stick Reader to
TIRIS 2000 output format.
6. Re-configure successful, indicator
displays “GOOD”. Indicator displays
“ERROR”, try procedure again.
D3740 33
Contact Digi-Star Technical Service if problems persist.
Page 34

SW4600EID
WEIGH METHODS
Select weigh method #4 in menu 1 for animal weighing. EID features
require indicator set this mode. Using StockWeigh for stable loads, LockOn Weigh method ok. Other methods listed below.
Note: Most of StockWeigh features require weigh method #4.
General Weigh Method #1
All purpose weigh method for weighing stable loads.
Slow Weigh Method #2
Higher accuracy weighing for stable loads.
Fast Weigh Method #3
Determines new weight quickly. This method is for weighing stable loads.
Lock-on Weigh Method #4
Weigh active animals and display stable accurate weight. Set to “OFF” for
weighing stable weights. Lock-On sensitivity adjusted using “LOCKON”
menu.
Once actual weight displayed, scale “Locks-On” to weight. Weight display
stable, even if motion never stops. Small ‘L’ appears on left side of display
indicating weight “Locked-On.” Animal’s weight must be greater than 2.5%
of scales “capacity” weight before system can “Lock-On.”
To break lock, add or remove 50% of di splayed weight. “Locked-On”
weight can be “rechecked”, press . this breaks “lock” and scale
recalculates weight.
34 D3740
Page 35

Operators Manual
EID DATA FORMATS
Data output thru computer port and stored in computer or printed.
“LSTORE” mode can configure data format automatically or allow user to
set print format by using “PRTFMT” menu.
LSTORE Data Formats
Use PRTFMT when in “LSTORE” modes:
OFF
MANPRT Manual Print
AUTPRT Auto Print
Print Fo rmat s
Explanation of StockWeigh print formats. Comma Separated Values (CSV)
makes it easy to input scale data into PC spreadsheet and data base
programs.
Note: Appearance of printouts affected by option settings of 1L PRT,
TIME F and DATE F.
AUTO - “LSTORE” set to “MANPRT” or “AUTPRT” and “PRTFMT” set to
“AUTO”, standard EZ indicator print format used. Print example:
09MR04 10:15
880LB$GR
WTONLY - Includes weight, display unit, $' if unit is "locked on", weight tag
(GR, M+, etc.). Ends with <CR>,<LF>. Print example:
635LB$GR
DOWNLD - Compatible with original Downloader. Includes weight, display
unit, $' if unit "locked on", weight tag (GR, M+, etc.) date, time.
DT+TM - Includes weight, display unit, $' if unit "locked on", weight tag
(GR, M+, etc...) and date. Ends with a <CR>,<LF>. Print example:
" 610,LB, ,GR,13MR02,11:08"
ID+TM - CSV format includes ID, weight, display unit, $' if unit "locked on",
weight tag (GR, M+, etc.) and time. Ends with a <CR>,<LF>. Print example:
" , 0,LB, ,GR,11:08"
IDWTTM - Includes ID, weight, display unit, $' if unit "locked on", weight tag
(GR, M+, etc...), date, time. Ends with <CR>,<LF>. Print example:
"FARM 1, 16090,LB, ,GR,27JA00,10:37P"
D3740 35
Page 36

SW4600EID
ANIMAL - Includes information for animal weighing. Includes $' if unit
"locked on”, weight, weight tag (GR, M+, etc...), display unit, Memory
Weight (RM), Average Count (Number of times M+ key pressed), Average
Weight, Gross weight on scale, ID, date and time. Ends with <CR>,<LF>.
Print example:
" , 1400,GR,LB, 2180, 4, 545, 1400, ,11:09,13MR02"
3200 A - See service bulletin # 19
3200 B - See service bulletin # 20
32 TMR - See service bulletin # 19
BATCH1 - Contact Digi-Star technical support
FDINFO - Contact Digi-Star technical support
WTRCTM - Includes basic weighing information.
Includes Gross Weight, display unit, weight tag (GR, M+, etc.), Total
Rotation Count, Date & Time. Ends with <CR>,<LF>. Print example:
" 280,LB,GR, 187,03JL03, 3:41P"
EIDINF - Includes EID memory status information. Ends with
<CR>,<LF>. Response from StockWeigh indicator:
“uuuuuu,UUUUUU,mmmmmm<CR><LF>”
uuuuuu ......................................... = Used Liv estock EID lines (6 digits)
UUUUUU ........................................... = Un-used Livestock EID lines (6 digits)
mmmmmm ........................................... = Maximum Livestock EID lines (6 digits)
<CR> .............................................. ='Carriage Return' [0D] hex or [13] decimal
<LF> .............................................. ='Line Feed' [0A] hex or [10] decimal
Print example:
"157, 1379, 1536"
EID - Includes EID tag number if available, weight info, date, time. Print
example:
,860,LB,$,GR,03/09/04,08:58,j
Print example (1L PRT=ON):
, 860,LB,$,GR,03/09/04,08:58,j
Note: Only StockWeigh indicator supports EID memory storage.
36 D3740
Page 37

Operators Manual
Following “LSTORE” modes automatically configures print format for
animal weighing with EID data.
MAN W T - Manual Weight
AUTOWT - Automatic Weight
MANEID - Manual EID See EID Print Format and CSV Data Format
AUTEID - Automatic
EID MANCHK - Manual Check
AUTCHK - Automatic Check
EID Print Format
EID print data transmitted out COMPUTER port on bottom of indicator
while weighing animals.
Note: When using computer port for EID data, make sure SCOREM set to
“0”, TAREAP se t to “OFF” and APRINT set to “OFF”.
EID data varies in number of characters, spaces etc. Refer to Allflex TM
Stick Reader user manual for more information.
C>XXXXX>X>XXX>XXXXXXXXXXXX,
XXXXXX,LB,$,GR,mm/dd/yy,hh:mm,Z<cr><lf>
Examples of EID print format:
A 00000 0 982 000017383201,<cr><lf>
890,LB,$,GR,8/27/03,10:15,_<cr><lf>
A 00000 0 982 000017383201,<cr><lf>
1001,LB, ,GR,8/27/03,10:21,M<cr><lf>
EID print data format always uses date format #2 and 24-hour time format
as shown.
EID CSV Data Fo rmat
EID CSV data collected from ear tag using EID Stick Reader and stored in
memory along with weight, date, time, other information. Eight data fields
each separated by comma followed by carriage return and line feed:
Field 1 EID Data
Field 2 Weight Value
Field 3 Unit of Measure (Lb/Kg)
Field 4 “$” Indicates Weight Locked-On
Field 5
Field 6 Date
Field 7 Time
Field 8 Checksum Character
D3740 37
Page 38

SW4600EID
Carriage Return
Line Feed
Four modes store EID CSV data into indicator memory. MANEID Manual
EID AUT E ID - Automatic
EID MANCHK - Manual Check
AUTCHK - Automatic Check.
Data formatted as CSV file and transferred to PC.
Example of two data lines. Note that last line of data, no “$” shown
because weight not “Locked On.
Examples of EID CSV Data:
A 00000 0 982 000017383201, 890,LB,$,GR,8/27/03,10:15,_<cr><lf>A
00000 0 982 000017383201, 1001,LB, ,GR,8/27/03,10:21,M<cr><lf>
EIDVID Data Format
Indicator response will be as follows:
<RS>EEEEEEEEEEEEEEEEEEEEEEEEEEEEEE,vvvvvvv,rrrrrrr,ppppppp,wwwwwww,kk
,$,gg,mm/dd/yy,hh:mm,ccc,aaaaaaa,nnnnnnnnnnnnnnnnnnnnnnnnnn,C<CR><LF>
<RS> ............................................... =Right Shift’ [1E] hex or [30] decimal
EEEEEEEEEEEEEEEEEEEEEEEEEEEEE =EID tag (29 alhpanumeric characters)
vvvvvvv ...................... =VID tag (7 alphanumeric char acters)
rrrrrrr .......................................... =Group ID (7 alphanumeric characters)
ppppppp .......................................... =Premise ID (7 alphanumeric characters)
wwwwwww .......................................... =Weight (7 numeric characters)
kk ................................................... =’LB’ for pounds ‘KG’ for kilograms
$ ..................................................... =$ character or a space character. The $
character indicates the indicator is setup for the
“Lock On” weigh method and has “locked onto”
a weight value.
gg ................................................... =“GR” for gross or ‘NT’ for net
mm/dd/yy ........................................ =Date
hh:mm ............................................. =Time 24 hour format
ccc ................................................. =Code (3 alphanumeric characters)
aaaaaa............................................ =Average Daily Weight Gain (6 numeric
characters. Example: 123.45, -12.34, 2.45)
nnnnnnnnnnnnnnnnnnnnnnnnnnn .. =Note (26 alphanum eric characters)
C ..................................................... =Checksum c har acter
<CR> ............................................... =”Carraige Return’ [0D] hex or [13] decimal
<LF> ............................................... =’Line Feed’ [0A] hex or [10] decimal
38 D3740
Page 39

Operators Manual
SCOREBOARD METHODS
Ten scoreboard methods available. Methods one thru six send numeric
display data out RS232 port periodically while other methods send data
stream as described below.
1. Transmit numeric display data once per second.
2. Transmit numeric display data two times per second.
3. Transmit numeric display data three times per second.
4. Transmit numeric display data at A-D conversion rate.
5. Transmit numeric display data at display rate.
6. Transmit numeric display data whenever display weight changes.
7. Transmit status data string every second. Status data string includes
weight, rotation counter data, date, time.
8. Transmit status data every five seconds. Status data string includes
weight, rotation counter data, date, time.
9. Reserved.
10. Transmit EID data string every 2 seconds.
13. Transmit EIDVID data string every 2 seconds.
Note: When using SCOREM = 1, 2, 3, 4, 5, 6 and 9 set LSTO RE = OFF,
TAREAP = OFF, APRINT = OFF avoids corrupted data when transmitting
scoreboard data and printing scale data.
When using SCOREM = 7, 8 and 10, print data not corrupted by
scoreboard data.
D3740 39
Page 40

SW4600EID
WEIGHING ERRO RS
OVRCAP
Capacity Limit:
Weight on scale system exceeds capacity limit. Capacity value entered in
SETUP to warn of overloading scale system.
+RANGE
Over Range:
Weight on scale system exceeds maximum weight. Over range value
always system’s maximum A/D counts multiplied by scaling factor. Actual
weight which over range occurs depends on calibration, zero, display count
size.
-RANGE
Under Range:
Weight on scale system less than minimum weight. Under range value
always system’s minimum A/D counts multiplied by scaling factor. Actual
weight at which under-range occurs will depend on calibration, zero,
display count size.
Note: EZII Series supports –RANGE that is equal to +RANGE in absolute
value.
40 D3740
Page 41

Operators Manual
SOFTWARE LICENSE AGREEMENT
Digi -Star® LLC
IMPORTANT: The Digi-Star® software being installed by you or by our
technical staff will be licensed to you, the licensee, on the condition that
you agree with DIGI-STAR® LLC ("Digi-Star") to the terms and conditions
set forth in this legal agreement. PLEASE READ THIS AGREEMENT
CAREFULLY, YOU WILL BE BOU ND BY THE TERMS OF THIS
AGREEMENT IF YOU INSTALL, OR IF YOU HAVE DIGI-STAR®'S
TECHNICAL STAFF OR AUTH ORIZED REPRESENTATIVE INSTALL
SOFTWARE FOR YOU. If you do not agree to terms contained in this
agreement, please return disk package to your dealer for a full refund, or
do not have a Digi-Star® technician or authorized representative install this
software. Once you have allowed software to be installed you are bound by
this agreement.
If you agree to these terms and conditions, Digi-Star® grants to you a
nonexclusive license to use accompanying software ("Software") and
documentation. Software and documentation are referr ed to in this
Agreement as "Licensed Material".
Ownership: Licensed Materials are sole and exclusive property of DigiStar® and are protected by U.S. Copy Right Law and international Treaty
Provisions. By paying license fee and by installing, or by allowing a DigiStar® technical or authorized representative to install software, you do not
become owner of Licensed Material according to terms of this agreement.
License: The license granted to you by Digi-Star® in this agreement
authorizes you to use Software on any single computer, or any
replacement for that computer. Software may not be used on a Network
Server. A separate disk, licensed under an additional software agreement,
is required for any other computer on which you wish to load Software.
YOU MAY NOT USE, COPY, OR MODIFY THE LICENSED MATERIAL IN
WHOLE OR PAR T, EXCEPT AS EXPRESSLY PROVIDED IN THIS
AGREEMENT.
Term: This Agreement is effective from date on which you open sealed
disk package and installed Software or have Software installed by DigiStar®. This agreement may be terminated by you at any time by destroying
Licensed Material, together with all copies, modifications and merged
portions in any form. It will also terminate automatically if you fail to comply
with any term of condition of this agreement.
Restrictions and Transfer: You may not sublicense, assign, share, rent,
lease, or otherwise transfer your right to use Licensed Material, nor any
other rights granted to you under this agreement, except stated in this
paragraph. You may permanently transfer software to any other party if the
other party is purchasing your business operation, the other party agrees
to terms and conditions of this agreement, you transfer all copies of
Licensed Material to that party, or destroy those which are not transferred
D3740 41
Page 42

SW4600EID
and that new party pays a license transfer fee of 25% of origina l license
fee. By such transfer, you terminate license granted to you in this
agreement.
Restrictions against copying or modifying Licensed Material: Licensed
Materials are copyrighted by Digi-Star®. Except as expressly permitted in
this agreement, you may not copy or otherwise reproduce Licensed
Materials. In no event does limited copying or reproduction permitted under
this Agreement include the right to decompile, disassemble, or electrically
transfer Software in any form, in whole or in part, or of any modification of
Software, or any updated work containing Software, or any part thereof.
You also agree not to remove any existing copyright notice of the License
Materials.
Protection and Security: You agree to use your best efforts and take all
reasonable steps to safeguard License Materials to ensure that no
unauthorized person has access to them and that non authorized copying,
publication, disclosure, or distribution of any of Licensed Material is made.
You acknowledge that Licensed Materials contain valuable, confidential,
and trade secrets and that unauthorized use and copying are harmful to
Digi-Star® and its software suppliers, and that you have confidential
obligation on such valuable information and trade secrets.
Limited Warranty: Digi-Star® warrants that media on which Software is
recorded will be free from defects in workmanship and materials for a
period of 90 (ninety) days from payment of license fee, and if Digi-Star®
determines media to be defective and provided media was not subject to
misuse, abuse, or use in defective equipment, Digi-Star® will replace
media. ALL IMPLIED WARRANTIES ON MEDIA, INCLUDING IMPUTED
WARRANTIES OF MERCHANTABILITY AND FITNESS FOR A
PARTICULAR PURPOSE, ARE LIMITED T O THE DURATION OF THE
EXPRESS W ARRANTY SET FORTH ABOVE. IN NO EVENT WILL DIGISTAR® OR ANY OTHER PARTY WHO HAS BEEN INVO LVED IN THE
CREATION, PRODUCTION, OR DELIVERY AND INSTALLAT ION OF
THE LICENSE MATERIALS BE LIABLE FOR SPECI AL, DIRECT ,
INDIRECT, OR CONSEQUENTIAL DAMAGES, IN NO EVENT SHALL
DIGI-STAR®'S OR SUCH OTHER PARTY'S LIABILITY FOR ANY
DAMAGE, OR LOSS TO YOU OR ANY OTHER PARTY EXC EED DIGISTAR REPLACING THE MEDIA ON WHICH THE LICENSED
MATERIALS HAS SUPPLIED.
General: If any provision or portion of a provision of this Agreement is
determined to be invalid under any applicable law, it shall be deemed
omitted and remaining provision and partial provisions of this Agreement
shall continue in full force and effect.
This Agreement constitutes entire agreement between parties with respect
to subject matter hereof, and all prior agreements, statements and
undertakings are hereby expressly canceled.
42 D3740
Page 43

Operators Manual
YES
NO
START
Check for 12VDC at the AC/DC c onvertor
Check for d ebris around
mounts on platform.
NO
YES
YES
The other load cell is d efecti ve. Ch eck
YES
NO
Check for debris around
flattened ar eas.
YES
NO
Does the scale weigh y ou
Disconnect the load cell cable from the
reading about twic e your weight?
YES
NO
Disconnect the first load cell and connect
on the indicator. Does the indicator display
The other load cell is
defective, check its cables
or send it back f or repair.
Does indicator respond
when you step on scale?
NO
Disconnect one of the l oad cells and
Does the indicator come on?
YES
NO
YES
NO
YES
NO
This load cell is OK.
about twice your weight?
Disconnect first load
Perform a paper clip test. Take t wo
reading on indicat or jump around?
This load cell is
The other load cell is
Both load cells are defective.
Indic ator is defective. Send it i n for
NO
Connect the load cell to other
Check platform for
ding
and obstruc ti ons.
YES
Indic ator is defective.
Do both load cells weigh you
NO
Connect both load c ells
YES
One of the load cells is bad. A good load
weight with only one load cell connected.
NO
TROUBLESHOOTING
close to your weight?
and under platf orm and
load cells. Check for
warped or damaged
indic ator. Press the indi cator “TARE”
button. (indicator display should go to zer o)
Stand on th e load cell. Does it disp lay a
Disconnect first load cell
and connect other l oad
cell to same connector.
Now stand over second
load cell. Does it weigh
defective. Check its
cable for cut s or
flattened ar eas or send
it back for repair.
Check indicator using a
known good load cell.
con nector on i n dicat or . Sta n d
on load cell. Does it display
about twice your weight?
debris and m ud
interference. Check
mounts for bin
D3740 43
Verify this by substituting
a good working indicator
and under platf orm and
load cells. Check load
cell cables for cuts and
cell an d c o n n ect ot her
load cell to same
connector. Now stand
over second load cell.
Does it wei gh about.
twice your weight?
defective. Check its
cable for cut s or
flattened ar eas or send
it back for repair.
(one at a t i me) t o other
con nector on i n dicat or . Do
both load cells weigh you
about twice your weight?
about th e same but not wit hin
20% of twic e your weight?
power cord. If you do not have a multimeter,
use a car battery to power scale. If indicator
still does not come on, send in for repair.
stand over the connected load cell.
Does the in dicator display a reading
about twice your weight?
its cable for cuts or fl attened areas or
send it bac k for repair. Check defective
load cell by connecti ng it to indicator
and verify it does not weigh.
the other load cell to the same connector
a reading about half y our weight?
for cuts or flatten ed areas
paper clips and careful ly insert one into
pin 2 and th e other into pin 3 of either
load cell connector jack on indicator.
Hold one paper clip in each hand (if they
touch it will not damag e indicat or) Does
Indicator is probably OK. Ch eck
the cabl es for damage and send
both load cells in for repair.
repair. Note: Load cells may also be
defective. Check load cells by
attachin g to a work ing indicator
cell will weigh you at about twice your
Page 44

SW4600EID
RAIL MOUNT
WING MOUNT
WEDGE MOUNT
KEY
PART NUMBER
DESCRIPTION
A
404353
BRACKET-EZ3 PLASTIC RAIL *
B
403780
SCR-#10 X 5/8 FHSTS BLACK ZP
C
840459
SUPPORT-HAT BR ACKET
D
405069
U-BOLT 1/4-20 X 3.25 ZP
E
405084
NUT-1/4-20 TOP LOCKING FLANGE
F
403770
BRACKET- WING MOUNT *
G
405124
PACK-WEDGE MOUNT BRACKET WITH UBOLTS & FLAN GE NUTS
H
405244
EZ3 WEDGE MOUNT
RAM MOUNT
KEY
PART NUMBER
DESCRIPTION
I
404799
RAM MOUNT FOR EZ III INDICATOR WITH
HARDWARE
J
404230
RAM SUCTION CUP W/TWIST LOCK
INSTALLATION
Indicator Mounting
44 D3740
Page 45

Operators Manual
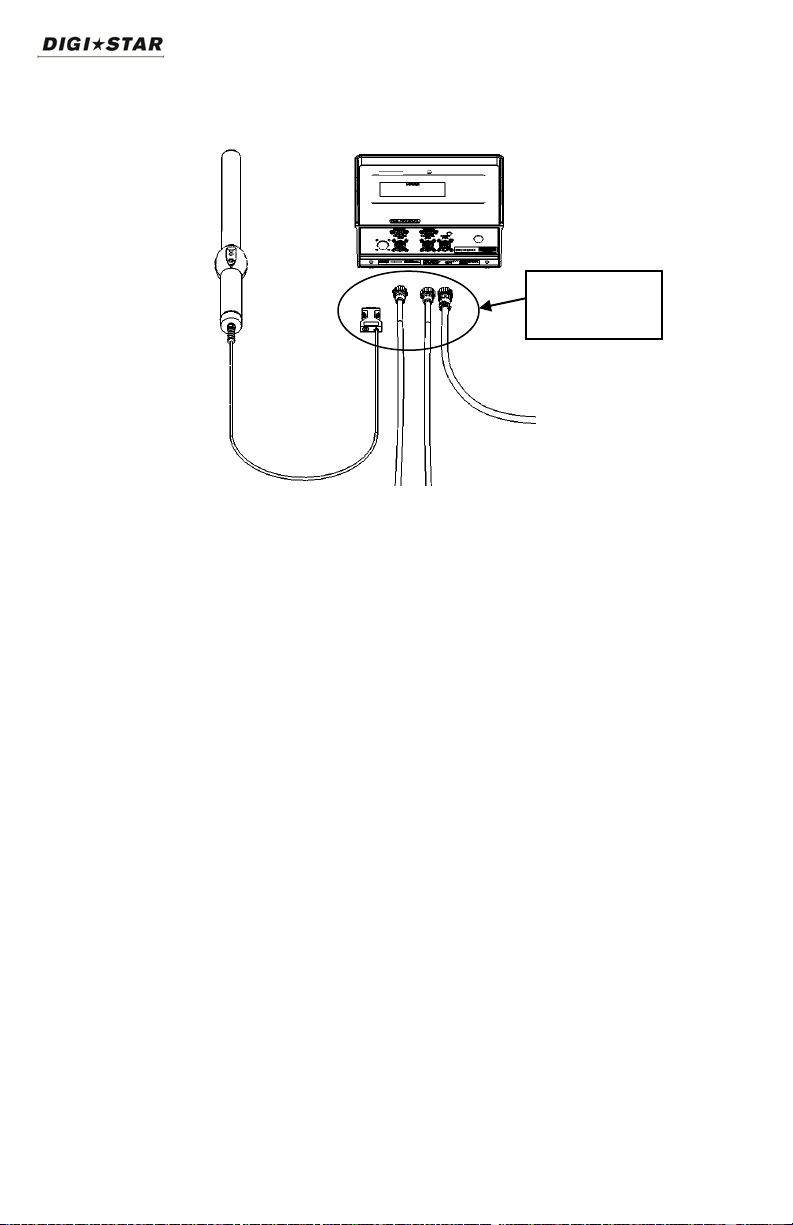
Power Cord
Scale Indicator
Load Cell
Power Cord
Connection
Allflex TM
Computer
12VDC Power Supply
Red
+Terminal
Black
-Terminal
Allflex TM
Load Cell Cables
Cable Connectio n
Stick Reader
NOTE: A small 12V deep cycle
lead acid battery provides hours
of operation.
NOTE: 120VAC power cube to
wall outlet may also be used.
Indicator Connection Diagram
D3740 45
Connections
Bottom Panel Cable Connections
Stick Reader
 Loading...