

Page 1

22
®
DW848
DW852
Page 2

23
Copyright DEWALT
English 1
Español 6
Português12
Page 3
24
B
A
Page 4
25
C
D
Page 5

1 en - 1
ENGLISH
ANGLE GRINDER DW848/DW852
Congratulations!
You have chosen a DEWALT Power Tool. Years of
experience, thorough product development and
innovation make DEWALT one of the most reliable
partners for professional Power Tool users.
Table of contents
Technical data en - 1
Declaration of conformity en - 2
Safety instructions en - 2
Package contents en - 3
Description en - 3
Electrical safety en - 4
Using an extension cable en - 4
Assembly and adjustment en - 4
Instructions for use en - 4
Maintenance en - 5
Guarantee en - 5
Technical data
DW848 DW852
Voltage V 230 230
(Latin America only) V 120 120
Power input W 2,000 1,800
No load speed min-18,000 6,300
Wheel diameter mm 180 230
Spindle M14 M14
Weight kg 4.6 4.6
Fuses:
120 V tools 15 Amperes
230 V tools 10 Amperes
The following symbols are used throughout this
manual:
Denotes risk of personal injury, loss of life
or damage to the tool in case of nonobservance of the instructions in this
manual.
Denotes risk of electric shock.
Fire hazard.
Page 6

2en - 2
ENGLISH
Declaration of conformity
DW848/DW852
DEWALT declares that these Power Tools have been
designed in compliance with: 89/392/EEC,
89/336/EEC, 73/23/EEC, EN 50144, EN 55104,
EN 55014, EN 61000-3-2 & EN 61000-3-3.
Level of sound pressure according to 86/188/EEC &
89/392/EEC, measured according to EN 50144:
DW848 DW852
LpA(sound pressure) dB(A)* 94.2 94.2
LWA(acoustic power) dB(A) 86.2 86.2
* at the operator’s ear
Take appropriate measures for the
protection of hearing if the sound
pressure of 85 dB(A) is exceeded.
Weighted root mean square acceleration value
according to EN 50144:
DW848 DW852
handle/side handle handle/side handle
2.94/1.64 m/s
2
2.94/1.64 m/s
2
Director Engineering and Product Development
Horst Großmann
DEWALT, Idstein, Germany
Safety instructions
When using Power Tools, always observe the
safety regulations applicable in your country to
reduce the risk of fire, electric shock and
personal injury. Read the following safety
instructions before attempting to operate this
product.
Keep these instructions in a safe place!
General
1 Keep work area clean
Cluttered areas and benches can cause accidents.
2 Consider work area environment
Do not expose Power Tools to humidity. Keep
work area well lit. Do not use Power Tools in the
presence of inflammable liquids or gases.
3 Guard against electric shock
Prevent body contact with earthed surfaces (e.g.
pipes, radiators, cookers and refrigerators).
For use under extreme conditions (e.g. high
humidity, when metal swarf is being produced,
etc.) electric safety can be improved by inserting
an isolating transformer or a (FI) earth-leakage
circuit-breaker.
4 Keep children away
Do not let children come into contact with the
tool or extension cord. Supervision is required for
those under 16 years of age.
5 Extension cords for outdoor use
When the tool is used outdoors, always use
extension cords intended for outdoor use and
marked accordingly.
6 Store idle tools
When not in use, Power Tools must be stored in
a dry place and locked up securely, out of reach
of children.
7 Dress properly
Do not wear loose clothing or jewellery. They can
be caught in moving parts. Preferably wear
rubber gloves and non-slip footwear when
working outdoors. Wear protective hair covering
to keep long hair out of the way.
8 Wear safety goggles
Also use a face or dust mask in case the
operations produce dust or flying particles.
9 Beware of maximum sound pressure
Take appropriate measures for the protection of
hearing if the sound pressure of 85 dB(A) is
exceeded.
10 Secure workpiece
Use clamps or a vice to hold the workpiece. It is
safer and it frees both hands to operate the tool.
11 Do not overreach
Keep proper footing and balance at all times.
12 Avoid unintentional starting
Do not carry the plugged-in tool with a finger on
the switch. Be sure that the switch is released
when plugging in.
Page 7

3 en - 3
ENGLISH
13 Stay alert
Watch what you are doing. Use common sense.
Do not operate the tool when you are tired.
14 Disconnect tool
Shut off power and wait for the tool to come to a
complete standstill before leaving it unattended.
Unplug the tool when not in use, before servicing
or changing accessories.
15 Remove adjusting keys and wrenches
Always check that adjusting keys and wrenches
are removed from the tool before operating the
tool.
16 Use appropriate tool
The intended use is laid down in this instruction
manual. Do not force small tools or attachments
to do the job of a heavy-duty tool. The tool will
do the job better and safer at the rate for which it
was intended.
Warning! The use of any accessory or
attachment or performance of any operation with
this tool, other than those recommended in this
instruction manual may present a risk of personal
injury.
17 Do not abuse cord
Never carry the tool by its cord or pull it to
disconnect from the socket. Keep the cord away
from heat, oil and sharp edges.
18 Maintain tools with care
Keep the tools in good condition and clean for
better and safer performance. Follow the
instructions for maintenance and changing
accessories. Inspect the tool cords at regular
intervals and, if damaged, have them repaired by
an authorized DEWALT repair agent. Inspect the
extension cords periodically and replace them if
damaged. Keep all controls dry, clean and free
from oil and grease.
19 Check for damaged parts
Before using the tool, carefully check it for
damage to ensure that it will operate properly
and perform its intended function. Check for
misalignment and seizure of moving parts,
breakage of parts and any other conditions that
may affect its operation. Have damaged guards
or other defective parts repaired or replaced as
instructed.
Do not use the tool if the switch is defective.
Have the switch replaced by an authorized
DEWALT repair agent.
20 Have your tool repaired by an authorized
DEWALT repair agent
This Power Tool is in accordance with the
relevant safety regulations. To avoid danger,
electric appliances must only be repaired by
qualified technicians.
Additional safety rules for Angle Grinders
• Your Angle Grinder has been designed for
grinding and cutting masonry and steel.
Do not cut or grind light metal with a
magnesium content exceeding 80%
since this type of metal is flammable.
• Do not use any accessories other than fibre
reinforced grinding wheels and cutting disks.
• Use the grinding wheels and cutting disks
recommended by the manufacturer only.
• The no-load speed of the grinding wheel or
cutting disk must not exceed the value printed on
the nameplate (instruction sheet).
• Do not cut workpieces requiring a maximum
depth of cut exceeding that of the cutting disk.
Package contents
The package contains:
1 Angle Grinder
1 Guard
1 Side handle
1 Two-pin spanner
1 Instruction manual
1 Exploded drawing
• Check for damage to the tool, parts or
accessories which may have occurred during
transport.
• Take the time to thoroughly read and understand
this manual prior to operation.
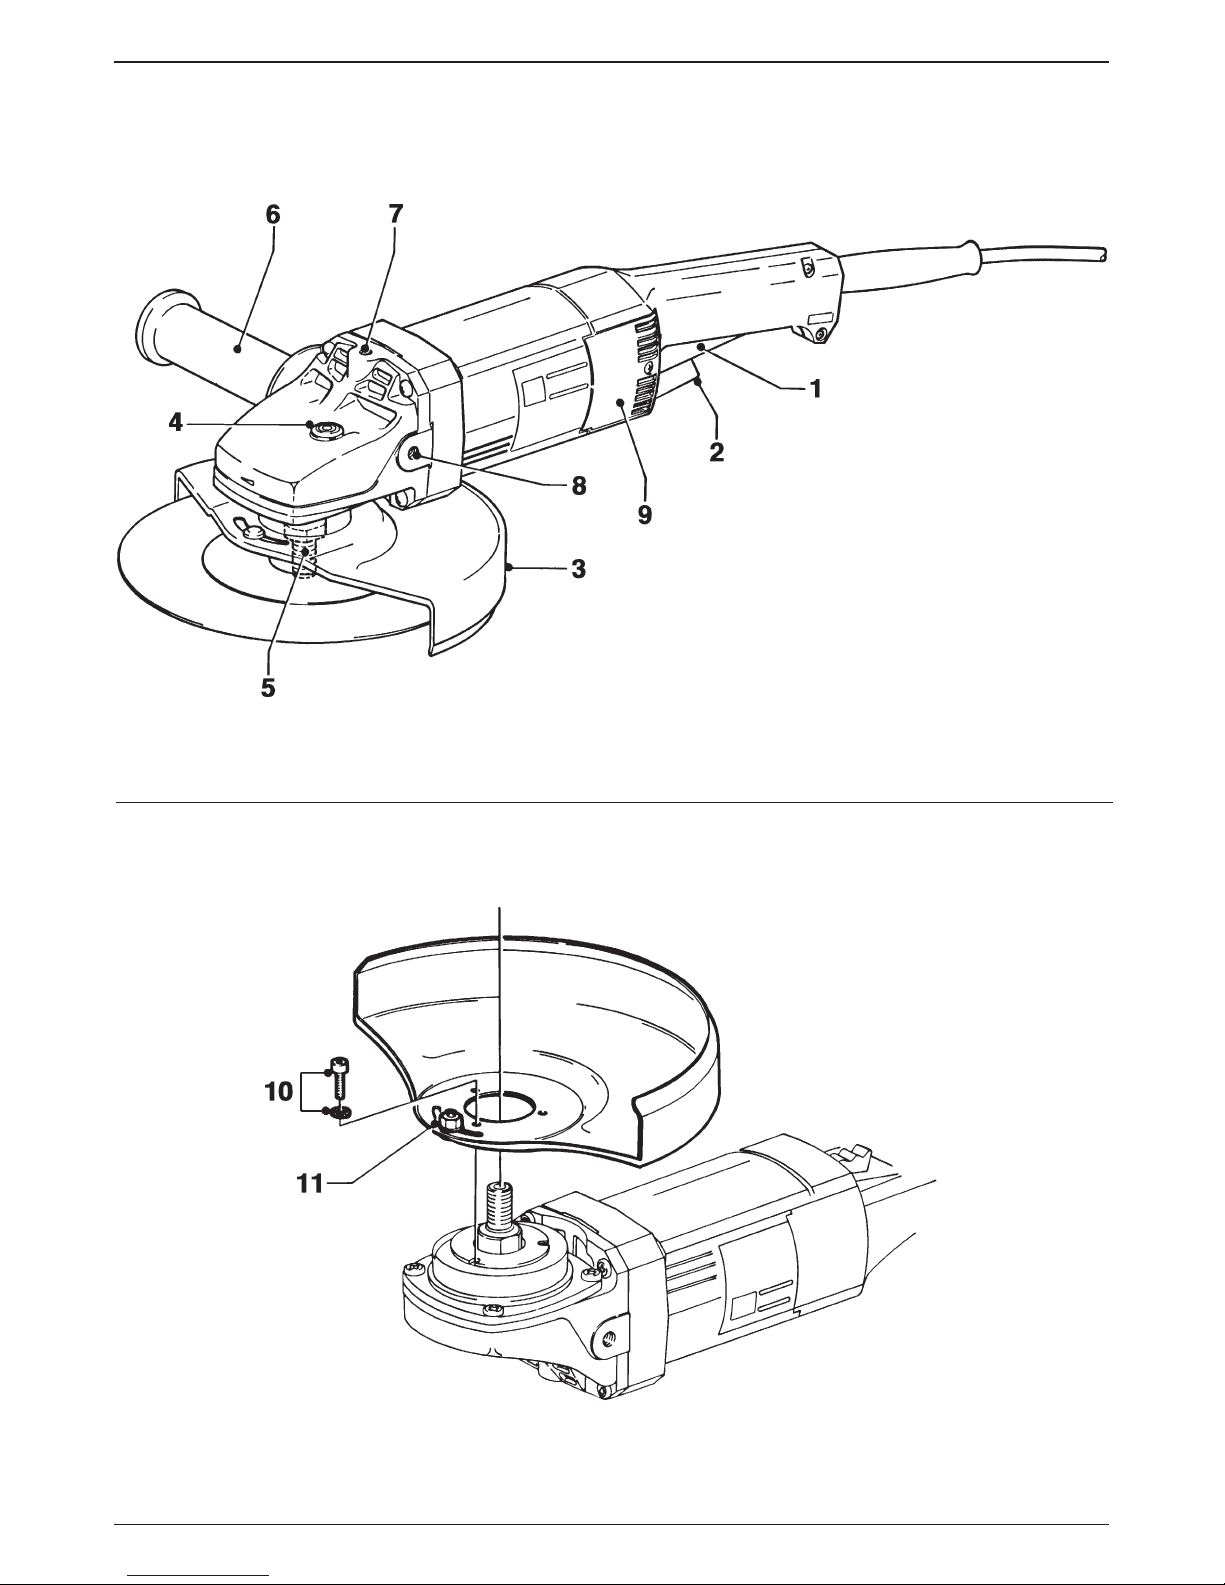
Description (fig. A)
Your DEWALT Angle Grinder has been designed for
professional grinding and cutting applications.
1 ON/OFF-switch
2 Locking switch
3 Guard
4 Spindle lock
5 Spindle
6 Side handle
Page 8

4en - 4
ENGLISH
7 Top hole
8 Side holes
9 Carbon brush covers
Electrical safety
The electric motor has been designed for one
voltage only. Always check that the power supply
corresponds to the voltage on the rating plate.
Your DEWALT tool is double insulated in
accordance with EN 50144; therefore no
earth wire is required.
Using an extension cable
If an extension cable is required, use an approved
extension cable suitable for the power input of this
tool (see technical data). An undersized cable will
cause a drop in line voltage resulting in loss of
power and overheating.
When using a cable reel, always unwind the cable
completely.
Also refer to the table below.
Minimum gage for cable sets
Voltage Total cable length in feet
120 0-25 26-50 51-100 101-150
240 0-50 51-100 101-200 201-300
Ampere rating
More than Not more than AWG
0-6 18 16 16 14
6-10 18 16 14 12
10-12 16 16 14 12
12-16 14 12 not recommended
Assembly and adjustment
Prior to assembly and adjustment always
unplug the tool.
Mounting and removing the guard (fig. B)
• Place the Angle Grinder on a table, spindle up.
• Mount the guard to the tool using the three
screws (10) with star washers.
• Rotate the guard to the required position and
tighten the lock nut (11).
• To remove the guard, loosen the three screws (10).
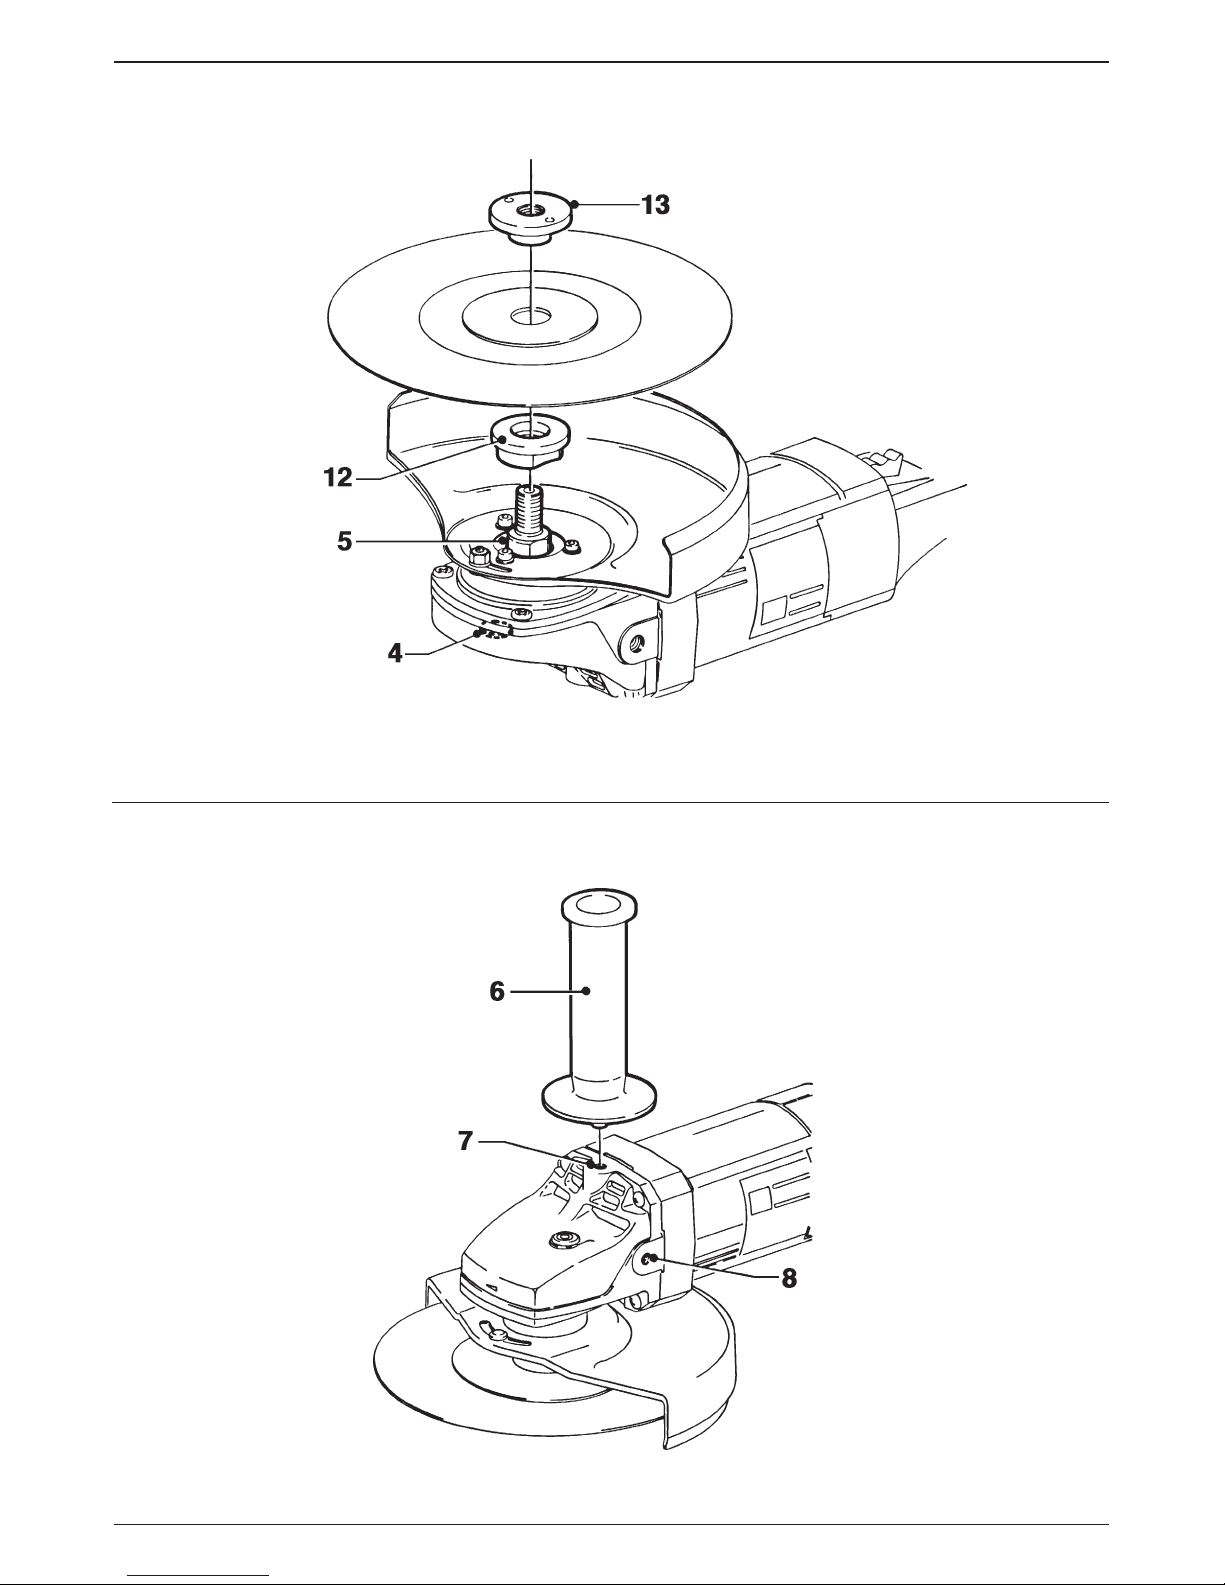
Fitting and removing a grinding wheel or cutting
disk (fig. C)
• Place the tool on a table, guard up.
• Fit the spacer (12) correctly onto the spindle (5).
• Place the grinding wheel or cutting disk on the
spacer.
• Screw the threaded flange (13) onto the spindle (5).
• Press the spindle lock (4) and rotate the grinding
wheel or cutting disk until it locks in position.
• Tighten the threaded flange (13) with the two-pin
spanner supplied.
• Release the spindle lock.
• To remove the grinding wheel or cutting disk,
loosen the threaded flange (13) with the two-pin
spanner.
Fitting a wire cup brush
• Screw the wire cup brush directly onto the
spindle without the use of the spacer and
threaded flange.
Mounting the side handle (fig. D)
• For grinding, screw the side handle (6) tightly into
one of the holes (8) on either side of the gear case.
• For cutting, screw the side handle (6) tightly into
the top hole (7).
Instructions for use
• Always observe the safety instructions
and applicable regulations.
• Ensure all materials to be ground or cut
are secured in place.
• Apply only a gentle pressure to the tool.
Do not exert side pressure on the
grinding wheel or cutting disk.
• Avoid overloading. Should the tool
become hot, let it run a few minutes
under no load condition.
Prior to operation:
• Install the appropriate guard and disk or wheel.
Do not use excessively worn disks or wheels.
• Be sure the spacer and threaded flange are
mounted correctly.
• Make sure the disk or wheel rotates in the
direction of the arrows on the accessory and the
tool.
Page 9

5 en - 5
ENGLISH
Switching ON and OFF (fig. A)
The ON/OFF-switch of your Angle Grinder is
equipped with a locking switch for continuous
operation.
• To run the tool, press the ON/OFF-switch.
The tool now runs in continuous operation.
• To stop the tool, press the locking switch briefly,
and release the ON/OFF-switch.
Do not switch the tool ON or OFF when
under load.
Consult your dealer for further information on the
appropriate accessories.
Maintenance
Your DEWALT Power Tool has been designed to
operate over a long period of time with a minimum
of maintenance. Continuous satisfactory operation
depends upon proper tool care and regular cleaning.
Carbon brushes
The carbon brushes are well accessible and can be
replaced easily. The brushes must be checked every
50 hours of operation.
Lubrication
Your Power Tool requires no additional lubrication.
Cleaning
Keep the ventilation slots clear and regularly clean
the housing with a soft cloth.
Unwanted tools and the environment
Take your tool to an authorized DEWALT repair
agent where it will be disposed of in an
environmentally safe way.
GUARANTEE
• 30 DAY NO RISK SATISFACTION GUARANTEE •
If you are not completely satisfied with the
performance of your DEWALT tool, simply return
it within 30 days, complete as purchased, to a
participating Dealer, or an authorized DEWALT
repair agent, for a full refund or exchange. Proof
of purchase must be produced.
• ONE YEAR FREE SERVICE CONTRACT •
If you need maintenance or service for your
DEWALT tool, in the 12 months following
purchase, it will be undertaken free of charge at
an authorized DEWALT repair agent. Proof of
purchase must be produced. Includes labour and
spare parts for Power Tools. Excludes
accessories.
• ONE YEAR FULL WARRANTY •
If your DEWALT product becomes defective due
to faulty materials or workmanship within 12
months from the date of purchase, we guarantee
to replace all defective parts free of charge or, at
our discretion, replace the unit free of charge
provided that:
• The product has not been misused.
• Repairs have not been attempted by
unauthorized persons.
• Proof of purchase date is produced.
This guarantee is offered as an extra benefit
and is additional to consumers statutory rights.
For the location of your nearest authorized
DEWALT repair agent, please use the appropriate
telephone number on the back of this manual.
Page 10

6es - 6
ESPAÑOL
AMOLADORA ANGULAR DW848/DW852
¡Enhorabuena!
Usted ha optado por una herramienta eléctrica
DEWALT. Muchos años de experiencia y una gran
asiduidad en el desarrollo y la innovación de sus
productos han convertido DEWALT en un socio muy
fiable para el usuario profesional.
Contenido
Características técnicas es - 1
Declaración de conformidad es - 2
Instrucciones de seguridad es - 2
Verificación del contenido del embalaje es - 3
Descripción es - 4
Seguridad eléctrica es - 4
Utilización de un cable de prolongación es - 4
Montaje y ajustes es - 4
Instrucciones para el uso es - 5
Mantenimiento es - 5
Garantía es - 6
Características técnicas
DW848 DW852
Voltaje V 230 230
(solo Latinoamérica) V 120 120
Potencia absorbida W 2.000 1.800
Velocidad en vacío min-18.000 6.300
Diámetro del disco mm 180 230
Eje portamuelas M14 M14
Peso kg 4,6 4,6
Fusibles
Herramientas 120 V: 15 A
Herramientas 230 V: 10 A
En el presente manual figuran los pictogramas
siguientes:
Indica peligro de lesiones, de accidentes
mortales o de averías en la herramienta
en caso de no respeto de las
instrucciones en este manual.
Indica tensión eléctrica.
Peligro de incendio.
Page 11

7 es - 1
ESPAÑOL
Declaración de conformidad
DW848/DW852
DEWALT certifica que estas herramientas eléctricas
han sido construidas de acuerdo a las normas
siguientes: 89/392/CEE, 89/336/CEE, 73/23/CEE,
EN 50144, EN 55104, EN 55014, EN 61000-3-2 &
EN 61000-3-3.
El nivel de la presión acústica de acuerdo con las
normas 86/188/CEE & 89/392/CEE, medida de
acuerdo con EN 50144:
DW848 DW852
LpA(presión acústica) dB(A)* 94,2 94,2
LWA(potencia acústica) dB(A) 86,2 86,2
* al oído del usuario
Tome medidas adecuadas para proteger
sus oídos cuando la presión acústica
exceda el valor de 85 dB(A).
Valor cuadrático medio ponderado en frecuencia de
la aceleración según EN 50144:
DW848 DW852
empuñadura/empuñadura lateral empuñadura/empuñadura lateral
2,94/1,64 m/s
2
2,94/1,64 m/s
2
Director Engineering and Product Development
Horst Großmann
DEWALT, Idstein, Alemania
Instrucciones de seguridad
Al utilizar Herramientas Eléctricas, observe las
reglas de seguridad en vigor en su país, a fin de
reducir el riesgo de descarga eléctrica, de
lesiones y de incendio. Lea las instrucciones de
seguridad siguientes antes de utilizar este
producto.
¡Conserve bien estas instrucciones de
seguridad!
Generalidades
1 Mantenga limpia el área de trabajo
Un área o un banco de trabajo en desorden
aumentan el riesgo de accidentes.
2 Tenga en cuenta el entorno del área de trabajo
No exponga las Herramientas Eléctricas a la
humedad. Procure que el área de trabajo esté
bien iluminada. No utilice Herramientas Eléctricas
en la proximidad de líquidos o gases inflamables.
3 Protéjase contra las descargas eléctricas
Evite el contacto del cuerpo con las superficies
conectadas a tierra (p. ej. tuberías, radiadores,
cocinas eléctricas y refrigeradores).
Para aplicaciones de uso extremas (por ej.
humedad elevada formación de polvo metálico,
etc.), se puede aumentar la seguridad eléctrica a
través de intercalar un transformador de
separación o un interruptor de protección de
corriente de defecto (FI).
4 ¡Mantenga alejados a los niños!
No permita que otras personas toquen la
herramienta o el cable de prolongación. En caso
de uso por menores de 16 años, se requiere
supervisión.
5 Cables de prolongación para el exterior
Al trabajar fuera, utilice siempre cables de
prolongación destinados al uso exterior y
marcados en consecuencia para ello.
6 Guarde las herramientas que no utiliza
Las Herramientas Eléctricas que no se utilizan,
deben estar guardadas en un lugar seco,
cerrado y fuera del alcance de los niños.
7 Vista ropa de trabajo apropiada
No lleve vestidos anchos ni joyas. Estos podrían
ser atrapados por piezas en movimiento. Para
trabajos al exterior, se recomienda llevar guantes
de goma y calzado de suela antideslizante. Si
tiene el pelo largo, téngalo recogido y cubierto.
8 Lleve gafas de protección
Utilice también una mascarilla si el trabajo
ejecutado produce polvo u otras partículas
volantes.
9 Respete el nivel máximo de la presión acústica
Tome medidas adecuadas para la protección de
los oídos cuando la presión acústica exceda el
valor de 85 dB(A).
10 Sujete bien la pieza de trabajo
Utilice abrazaderas o un torno para sujetar la
pieza de trabajo. Es más seguro que sujetarla
Page 12

8
ESPAÑOL
es - 2
con la mano y le permite utilizar ambas manos
para manejar la herramienta.
11 No alargue demasiado su radio de acción
Mantenga un apoyo firme sobre el suelo y
conserve el equilibrio en todo momento.
12 Evite un arranque involuntario
No mantenga el dedo en el interruptor al
transportar la herramienta enchufada. Asegúrese
de que el interruptor esté en posición de parada
al enchufar la herramienta.
13 Esté siempre alerta
Mire lo que está haciendo. Use el sentido
común. No maneje la herramienta cuando está
cansado.
14 Desenchufe la herramienta
Desconecte la herramienta y espere que esté
completamente parada antes de dejarla sin
vigilar. Desenchufe la herramienta cuando no se
utilice y antes de proceder al mantenimiento o
sustituir accesorios.
15 Retire las llaves de maniobra
Antes de poner la herramienta en marcha,
asegúrese de que las llaves y utensilios de reglaje
hayan sido retirados.
16 Utilice la herramienta adecuada
En este manual, se indica para qué uso está
destinada la herramienta. No utilice herramientas
o dispositivos acoplables de potencia demasiado
débil para ejecutar trabajos pesados. La
herramienta funcionará mejor y con mayor
seguridad al ser utilizada de acuerdo con sus
características técnicas.
¡ATENCION! El uso de accesorios o
acoplamientos, o el uso de la herramienta misma
distintos de los recomendados en este manual
de instrucciones, puede dar lugar a lesiones de
personas.
17 Cuide el cable de alimentación
No lleve la herramienta por el cable, ni tire del
cable para desenchufar la herramienta. Proteja el
cable del calor, del aceite y de las aristas vivas.
18 Mantenga las herramientas asiduamente
Mantenga sus herramientas afiladas y limpias
para trabajar mejor y más seguro. Siga las
instrucciones para el mantenimiento y la
sustitución de accesorios. Verifique los cables de
las herramientas con regularidad y, en caso de
avería, llévelos a un Centro de Servicio DEWALT
para que sean reparados. Inspeccione los cables
de prolongación periódicamente y sustitúyalos
cuando presenten defectos. Mantenga todos los
mandos secos, limpios y libres de aceite y grasa.
19 Comprobar que no haya partes averiadas
Antes de utilizar la herramienta, compruebea que
no haya averías, a fin de asegurar que funcionará
correctamente y sin problemas. Compruebe que
no haya desalineamiento o enganchamiento de
piezas en movimiento, ni roturas de piezas, ni
accesorios mal montados, ni cualquier otro
defecto que pudiera perjudicar al buen
funcionamiento de la herramienta. Haga reparar
o sustituir los dispositivos de seguridad u otros
componentes defectuosos según las instrucciones.
No utilice la herramienta cuando el interruptor
esté defectuoso. Haga sustituir el interruptor en
un Centro de Servicio DEWALT.
20 Haga reparar su herramienta en un Centro de
Servicio DEWALT
Esta Herramienta Eléctrica cumple con las reglas
de seguridad en vigor. Para evitar situaciones
peligrosas, la reparación de Herramientas
Eléctricas debe ser efectuada únicamente por un
técnico competente.
Normas de seguridad adicionales para
amoladoras angulares
• La amoladora angular se ha diseñado para el
amolado y corte de mampostería y acero.
No corte ni amole metales de poca
densidad con un contenido en magnesio
superior al 80%, ya que este tipo de
metales son inflamables.
• No utilice accesorios distintos de las muelas y
discos de corte reforzados con fibra.
• Utilice exclusivamente muelas y discos de corte
recomendados por el fabricante.
• La velocidad en vacío de la muela o del disco de
corte no debe superar el valor impreso en la
placa de características (hoja de instrucciones).
• No corte piezas que requieran una profundidad
máxima de corte superior a la del disco de corte.
Verificación del contenido del embalaje
El paquete contiene:
1 Amoladora Angular
1 Protector
Page 13

9
es - 3
ESPAÑOL
1 Empuñadura lateral
1 Llave de dos clavijas
1 Manual de instrucciones
1 Dibujo despiezado
• Compruebe si la herramienta, piezas o
accesorios han sufrido algún daño durante el
transporte.
• Tómese el tiempo necesario para leer y
comprender este manual antes de utilizar la
herramienta.
Descripción (fig. A)
Esta amoladora angular de DEWALT ha sido
diseñada para realizar amolados o cortes
profesionales:
1 Conmutador ON/OFF
2 Botón de bloqueo
3 Protector
4 Bloqueo del eje portamuelas
5 Eje portamuelas
6 Empuñadura lateral
7 Orificio superior
8 Orificios laterales
9 Cubiertas de escobillas de carbono
Seguridad eléctrica
El motor eléctrico ha sido diseñado para un solo
voltaje. Compruebe siempre que el voltaje de la red
corresponde al valor indicado en la placa de
características.
Su herramienta DEWALT tiene doble
aislamiento, conforme a la norma
EN 50144; por consiguiente, no se
requiere conexión a tierra.
Utilización de un cable de prolongación
En caso de que sea necesario utilizar un cable de
prolongación, deberá ser un cable de prolongación
aprobado, adecuado para la potencia de esta
herramienta (véanse las características técnicas). Un
cable de prolongación de menor calibre al necesario
ocasionará una caída en el voltaje de la línea,
produciendo pérdida de potencia y
sobrecalentamiento.
Si utiliza un carrete de cable, desenrolle siempre el
cable completamente.
Véase la tabla.
Calibre mínimo para cables de prolongación
Voltaje
Longitud total del cable de prolongación en
metros
120 0-7,6 7,7-15,2 15,3-30,4 30,5-45,7
240 0-15,2 15,3-30,4 30,5-60,9 70-91,4
Amperaje
Más de No más de AWG
0-6 18 16 16 14
6-10 18 16 14 12
10-12 16 16 14 12
12-16 14 12 no se recomienda
Montaje y ajustes
Desenchufe la herramienta antes de
proceder con el montaje y los ajustes.
Montar y desmontar el protector (fig. B)
• Coloque la Amoladora angular en una mesa, con
el eje portamuelas arriba.
• Monte el protector en la herramienta con los tres
tornillos (10) y las arandelas dentadas.
• Gire el protector hasta obtener la posición
deseada y apriete la tuerca (11).
• Para desmontar el protector, saque los tres
tornillos (10).
Insertar y desmontar una muela o un disco de
corte (fig. C)
• Coloque la herramienta en una mesa, con el
protector arriba.
• Posicione el separador (12) correctamente en el
eje portamuelas (5).
• Coloque la muela o el disco de corte en el
separador.
• Atornille la brida roscada (13) en el eje
portamuelas (5).
• Pulse el botón de bloqueo del eje portamuelas
(4) y gire la muela o el disco de corte hasta que
se bloquee en la posición correcta.
• Apriete la brida conducida (13) con la llave de
dos clavijas suministrada.
• Suelte el bloqueo del eje portamuelas.
• Para desmontar la muela o el disco de corte,
afloje la brida enroscada (13) con la llave de dos
clavijas suministrada.
Page 14

10
ESPAÑOL
es - 4
Montar un cepillo de alambre esférico
• Enrosque el cepillo de alambre esférico
directamente sobre el eje portamuelas sin utilizar
ni el separador ni la brida conducida.
Montar la empuñadura lateral (fig. D)
• Para esmerilar, atornille bien la empuñadura
lateral (6) en uno de los orificios (8) de la carcasa,
en cualquier lado.
• Para cortar, atornille bien la empuñadura el
orificio superior (7).
Instrucciones para el uso
• Respete siempre las instrucciones de
seguridad y las normas de aplicación.
• Asegure que todos los objetos a ser
pulidos o cortados están bien sujetados.
• Sólo se debe ejercer una ligera presión
sobre la herramienta. Evite ejercer
presión lateral sobre la muela o el disco
de corte.
• Evite sobrecargar la herramienta. Si la
amoladora se calienta, hágala funcionar
en vacío durante unos minutos.
Antes del uso:
• Montar el protector adecuado y un disco o una
muela. No use discos o muelas excesivamente
desgastados.
• Asegúrese de que el separador y la brida
conducida han sido montados correctamente.
• Asegúrese de que el disco o la muela gira en el
sentido indicado por las flechas en el accesorio y
la herramienta.
Encender y apagar (fig. A)
El conmutador ON/OFF de esta amoladora angular
está provisto de un botón de bloqueo.
• Para encender la herramienta, pulse el
conmutador ON/OFF. La amoladora funcionará
en modo continuo.
• Para apagar, pulse brevemente el botón de
bloqueo, y suelte el conmutador ON/OFF.
No se debe encender o apagar la
herramienta mientras esté cortando o
puliendo.
Consulte a su proveedor si desea información más
detallada sobre los accesorios apropiados.
Mantenimiento
Su herramienta eléctrica DEWALT ha sido diseñada
para funcionar mucho tiempo con un mínimo de
mantenimiento. El funcionamiento satisfactorio
depende del buen cuidado de la herramienta y de
una limpieza frecuente.
Escobillas de carbono
Las escobillas de carbono son de acceso fácil y
pueden ser sustituidas sencillamente. Las escobillas
deben ser verificadas después de cada 50 horas de
operación.
Lubricación
Su herramienta eléctrica no requiere lubricación
adicional.
Limpieza
Evite que se obturen las ranuras de ventilación y
limpie el exterior con regularidad utilizando un paño
suave.
Herramientas desechadas y el medio
ambiente
Lleve la herramienta vieja a un Centro de Servicio
DEWALT, donde será eliminada sin efectos
perjudiciales para el medio ambiente.
Page 15

11
es - 5
ESPAÑOL
GARANTÍA
• 30 DÍAS DE SATISFACCIÓN COMPLETA •
Si no queda totalmente satisfecho con su
herramienta DEWALT, contacte con su Centro de
Servicio DEWALT. Presente su reclamación,
juntamente con la máquina completa, así como
la factura de compra y le será presentada la
mejor solución.
• UN AÑO DE SERVICIO GRATUITO •
Si necesita mantenimiento o servicio técnico para
su herramienta DEWALT en los 12 meses
siguientes a la compra, podrá obtenerlos
gratuitamente en un Centro de Servicio DEWALT.
Para ello es imprescindible presentar la prueba
de compra. Incluye mano de obra y piezas para
las Herramientas Eléctricas. No se incluye los
accesorios.
• UN AÑO DE GARANTÍA •
Si su producto DEWALT presenta algún defecto
debido a fallos de materiales o mano de obra en
los 12 meses siguientes a la fecha de compra, le
garantizamos la sustitución gratuita de todas las
piezas defectuosas siempre y cuando:
• El producto no haya sido utilizado
inadecuadamente.
• No se haya intentado su reparación por parte
de una persona no autorizada.
• Se presente la prueba de compra.
Para la localización del Centro de Servicio
DEWALT más cercano, consulte el dorso de este
manual.
Page 16

12
PORTUGUÊS
pt - 1
REBARBADORA DW848/DW852
Parabéns!
Escolheu uma Ferramenta Eléctrica DEWALT. Muitos
anos de experiência, um desenvolvimento contínuo
de produtos e o espírito de inovação fizeram da
DEWALT um dos parceiros mais fiáveis para os
utilizadores profissionais.
Conteúdo
Dados técnicos pt - 1
Declaração de conformidade pt - 2
Instruções de segurança pt - 2
Verificação do conteúdo da embalagem pt - 3
Descrição pt - 4
Segurança eléctrica pt - 4
Extensões pt - 4
Montagem e afinação pt - 4
Modo de emprego pt - 5
Manutenção pt - 5
Garantia pt - 6
Dados técnicos
DW848 DW852
Voltagem V 230 230
(apenas Latino-America) V 120 120
Potência W 2.000 1.800
Velocidade em vazio rpm 8.000 6.300
Diâmetro da roda mm 180 230
Veio M14 M14
Peso kg 4,6 4,6
Fusíveis
Ferramentas de 120 V 15 Ampéres
Ferramentas de 230 V 10 Ampéres
Os seguintes símbolos são usados neste manual:
Indica risco de ferimentos, perda de vida
ou danos à ferramenta no caso do nãocumprimento das instruções deste
manual.
Indica tensão eléctrica.
Perigo de incêndio.
Page 17

13
pt - 2
PORTUGUÊS
Declaração de conformidade
DW848/DW852
A DEWALT declara que estas ferramentas eléctricas
foram concebidas em conformidade com
89/392/CEE, 89/336/CEE, 73/23/CEE, EN 50144,
EN 55104, EN 55014, EN 61000-3-2 & EN 61000-3-3.
De acordo com as Directivas 86/188/CEE &
89/392/CEE da Comunidade Europeia, o nível de
potência sonora, medido de acordo com a EN 50144, é:
DW848 DW852
LpA(pressão sonora) dB(A)* 94,2 94,2
LWA(potência sonora) dB(A) 86,2 86,2
* junto ao ouvido do operador
Use protectores auditivos quando a
potência sonora ultrapassar 85 dB(A).
Valor médio quadrático ponderado em frequência
de aceleração conforme à EN 50144:
DW848 DW852
punho/punho lateral punho/ punho lateral
2,94/1,64 m/s
2
2,94/1,64 m/s
2
Director Engineering and Product Development
Horst Großmann
DEWALT, Idstein, Alemanha
Instruções de segurança
Quando usar Ferramentas Eléctricas, cumpra
sempre os regulamentos de segurança
aplicáveis no seu país para reduzir o risco de
incêndio, de choque eléctrico e de ferimentos.
Leia as seguintes instruções de segurança antes
de tentar utilizar este produto.
Guarde estas instruções!
Instruções gerais
1 Mantenha a área de trabalho arrumada
As mesas e áreas de trabalho desarrumadas
podem provocar ferimentos.
2 Cuide do ambiente da área de trabalho
Não exponha Ferramentas Eléctricas à
humidade. Ilumine bem as áreas de trabalho.
Não utilize Ferramentas Eléctricas em presença
de líquidos ou gases inflamáveis.
3 Tenha cuidado com os choques eléctricos
Evite o contacto directo com superfícies ligadas
à terra (p.ex. tubos, radiadores, fogões,
frigoríficos).
Nos casos de serviço sob condições extremas
(tais como humidade elevada, execução de
soldadura, etc.) a segurança eléctrica pode ser
aumentada intercalando-se um transformador de
separação ou um disjuntor de corrente de
defeito (FI).
4 Mantenha as crianças afastadas
Não deixe as crianças tocarem na ferramenta
nem no cabo de extensão. As crianças com
menos de 16 anos de idade devem ser vigiadas.
5 Cabos para uso exterior
Quando as ferramentas se utilizarem no exterior,
empregue sempre cabos previstos para uso no
exterior.
6 Guarde as ferramentas que não estiverem a
ser utilizadas
Quando não forem utilizadas as Ferramentas
Eléctricas, estas devem guardadas num sítio
seco, fechado à chave e fora do alcance das
crianças.
7 Vista-se de maneira apropriada
Não use vestuário largo nem jóias porque podem
prender-se numa peça móvel. Quando se
trabalha no exterior, é de aconselhar o uso de
luvas de borracha e de calçado antiderrapante.
Cubra o cabelo se tiver cabelo comprido.
8 Utilize óculos de protecção
Utilize também uma máscara no caso de os
trabalhos produzirem pó.
9 Tenha cuidado com o ruído
Tome medidas de protecção apropriadas se o
nível do ruído exceder 85 dB(A).
10 Segure firmemente as peças de trabalho
Utilize grampos ou um torno para segurar as
peças a trabalhar. É mais seguro e permite
manter as duas mãos livres para trabalhar.
Page 18

14
PORTUGUÊS
pt - 3
11 Verifique a sua posição
Mantenha sempre o equilíbrio.
12 Evite arranques acidentais
Não transporte uma ferramenta ligada à rede com
o dedo colocado no interruptor. Verifique se o
interruptor está desligado ao ligar a ferramenta à
rede.
13 Esteja atento
Dê atenção ao que vai fazendo. Trabalhe com
precaução. Não utilize ferramentas quando estiver
cansado.
14 Desligue a ferramenta
Desligue e espere até a ferramenta parar
completamente antes de a deixar sem vigilância.
Tire a ficha da tomada quando a ferramenta não
estiver a ser utilizada, antes de proceder à
manutenção ou à substituição de acessórios.
15 Tire as chaves de aperto
Verifique sempre se as chaves de aperto foram
retiradas da ferramenta antes de a utilizar.
16 Empregue as ferramentas apropriadas
Neste manual indicam-se as aplicações da
ferramenta. Não force pequenas ferramentas ou
acessórios para fazer o trabalho duma ferramenta
forte. A ferramenta trabalhará melhor e de uma
maneira mais segura se for utilizada para o efeito
indicado.
AVISO O uso de qualquer acessório ou o uso da
própria ferramenta, além do que é recomendado
neste manual de instruções pode dar origem a
risco de ferimento.
17 Não force o cabo eléctrico
Nunca transporte a ferramenta pelo cabo e não
puxe pelo cabo para tirar a ficha da tomada.
Proteja o cabo contra o calor e evite o contacto
com óleo e objectos cortantes.
18 Cuide das suas ferramentas com atenção
Para uma maior rentabilidade, mantenha as
ferramentas sempre afinadas e limpas. Cumpra as
instruções relativas à manutenção e substituição
dos acessórios. Verifique regularmente os cabos
da ferramenta e, no caso de estes estarem
danificados, mande-os consertar a um Centro de
Assistência Técnica DEWALT. Verifique
periodicamente os cabos de extensão e substituaos se estiverem danificados. Mantenha os
comandos secos, limpos e sem óleo ou gordura.
19 Verifique as peças danificadas
Antes de utilizar a ferramenta, verifique
cuidadosamente se esta apresenta sinais de
danos de modo a assegurar um bom
funcionamento e a obtenção do resultado
desejado.
Verifique o bom alinhamento e fixação das peças
móveis e confirme a ausência de ruptura das
peças. Verifique ainda se a montagem foi bem
feita ou se existe qualquer outra condição que
possa impedir que a ferramenta funcione bem.
Mande consertar ou substituir os dispositivos de
protecção ou outras peças danificadas conforme
as instruções.
Não utilize a ferramenta se o interruptor não
estiver a funcionar. Mande substituir o interruptor
num Centro de Assistência Técnica DEWALT.
20 Mande consertar a sua ferramenta por um
Centro de Assistência Técnica DEWALT.
Esta Ferramenta Eléctrica está conforme às
regulamentações de segurança que lhe dizem
respeito. Para evitar qualquer perigo, a
reparação de ferramentas eléctricas deverá estar
fica exclusivamente a cargo de técnicos
qualificados.
Normas de segurança adicionais parar Discos
de Rebarbar
• O seu Disco de Rebarbar foi concebido para
rebarbar e cortar alvenaria e aço.
Não corte nem rebarbe metais leves
com conteúdo de magnésio superior a
80% pois este tipo de metais é inflamável.
• Não utilize outros acessórios que não sejam os
discos de rebarbar reforçados com fibra e os
discos de corte.
• Utilize apenas os discos de rebarbar e os discos
de corte recomendados pelo fabricante.
• A velocidade sem carga do disco de rebarbar ou
disco de corte não deve exceder o valor
impresso na placa de identificação (folha de
instruções).
• Não corte peças de trabalho que exijam uma
profundidade máxima de corte que exceda a do
disco de corte.
Verificação do conteúdo da embalagem
A embalagem contém:
1 Rebarbadora
Page 19

15
pt - 4
PORTUGUÊS
1 Resguardo
1 Punho lateral
1 Chave de dois pinos
1 Manual de instruções
1 Vista dos componentes destacados
• Verifique se a ferramenta, as peças ou os
acessórios apresentam sinais de danos que
possam ter ocorrido durante o transporte.
• Antes de utilizar a ferramenta, dedique o tempo
necessário à leitura e compreensão deste
manual.
Descrição (fig. A)
A sua Rebarbadora DEWALT foi concebida para
aplicações profissionais de rebarbar e de corte:
1 Interruptor de Ligar/Desligar “ON/OFF”
2 Bloqueio do interruptor
3 Resguardo
4 Botão de travamento do veio
5 Veio
6 Punho lateral
7 Orifício superior
8 Orifícios laterais
9 Coberturas das escovas de carvão
Segurança eléctrica
O motor eléctrico foi concebido para uma única
tensão. Verifique sempre se a tensão da rede
corresponde à voltagem indicada na placa de
identificação.
A sua ferramenta DEWALT tem duplo
isolamento em conformidade com o
estipulado na norma EN 50144, não
sendo, por isso, necessária uma ligação
à terra.
Extensões
Se fôr necessário um fio de extensão, use um cabo
especial, conveniente para a corrente desta
ferramenta (Veja os dados técnicos). Um cabo com
uma amperagem demasiada baixa causará uma
redução na voltagem de linha, resultando em perda
de energia e sobreaquecimento.
No caso de se usar uma bobina, desenrole o cabo
todo.
Use também a tabela em baixo.
Medições mínimas para extensões
Voltagem Comprimento total de cabo (m)
120 0-7,6 7,7-15,2 15,3-30,4 30,5-45,7
240 0-15,2 15,3-30,4 30,5-60,9 70-91,4
Valor nominal de amperes
Mais que Não mais que AWG
0-6 18 16 16 14
6-10 18 16 14 12
10-12 16 16 14 12
12-16 14 12 não se recomende
Montagem e afinação
Antes da montagem de acessórios e da
afinação retire sempre a ficha da
tomada.
Montagem e remoção do resguardo (fig. B)
• Coloque a Rebarbadora sobre uma mesa, com o
veio para cima.
• Monte o resguardo na ferramenta utilizando os
três parafusos (10) com anilhas de estrela.
• Rode o resguardo para a posição requerida e
aperte a porca (11).
• Para remover o resguardo, desaperte os três
parafusos (10).
Instalação e remoção de um disco de corte ou
de rebarbar (fig. C)
• Coloque a ferramenta sobre uma mesa, com o
resguardo para cima.
• Instale o espaçador (12) correctamente no veio (5).
• Coloque o disco no espaçador.
• Aparafuse a flange de rosca (13) no veio (5).
• Pressione o fecho de veio (4) e rode o disco até
prender na posição correcta.
• Aperte a flange exterior (13) com a chave de dois
pinos que vem incluída.
• Solte o botão de bloqueio do veio.
• Para retirar o disco, desaperte a flange exterior
(13) com a chave de dois pinos.
Instalação de uma catrabucha
• Aparafuse a catrabucha de arame directamente
ao veio sem utilizar o espaçador e a flange
exterior.
Page 20

16
PORTUGUÊS
pt - 5
Instalação do punho lateral (fig. D)
• Para operações de rectificação, aparafuse bem o
punho lateral (6) num dos orifícios (8) nos dois
lados da caixa de engrenagens.
• Para cortar, aparafuse bem o punho lateral (6) no
orifício superior (7).
Modo de emprego
• Cumpra sempre as instruções de
segurança e os regulamentos aplicáveis.
• Certifique-se que todos os materiais a
serem rectificados ou cortados estão
devidamente presos.
• Aplique apenas uma ligeira pressão na
ferramenta. Não exerça pressão lateral
na roda de esmeril ou no disco de corte.
• Evite sobrecargas. Se a ferramenta
aquecer, deixe-a trabalhar em vazio
durante alguns minutos.
Antes de pôr em funcionamento:
• Instale o devido resguardo e disco. Não utilize
discos com um nível de desgaste excessivo.
• Certifique-se que o espaçador e a flange exterior
estão devidamente instalados.
• Certifique-se que o disco roda na direcção das
setas indicadas no acessório ou na ferramenta.
Ligar e Desligar (fig.A)
O interruptor ON/OFF da sua rebarbadora está
equipado com un dispositivo de bloqueio para
serviço contínuo.
• Para pôr a rebarbadora em movimento carregue
o interruptor ON/OFF. A rebarbadora fica agora
em serviço contínuo.
• Para desligá-la apoie ligeiramente no interruptor
para bloqueio e desligue o interruptor ON/OFF.
Não ligue ou desligue a ferramenta
quando estiver com carga.
Para mais informações sobre os acessórios
apropriados, consulte o seu Revendedor autorizado.
Manutenção
A sua Ferramenta Eléctrica DEWALT foi concebida
para funcionar durante muito tempo com um
mínimo de manutenção. O funcionamento
satisfatório contínuo depende de bons cuidados e
limpeza regular da ferramenta.
Escovas de carvão
As escovas de carvão são bastante acessíveis e
podem ser substituídas fácilmente. Deixe verificar as
escovas após cada 50 horas de funcionamento.
Lubrificação
A sua Ferramenta Eléctrica não precisa de
lubrificação suplementar.
Limpeza
Conserve livres as aberturas de ventilação e limpe
regularmente o corpo da máquina utilizando um
pano macio.
Ferramentas indesejadas e o ambiente
Leve a sua ferramenta velha a um Centro de
Assistência Técnica DEWALT onde ela será
eliminada de um modo seguro para o ambiente.
Page 21

17
pt - 6
PORTUGUÊS
GARANTIA
• 30 DIAS DE SATISFAÇÃO COMPLETA •
Se não estiver completamente satisfeito com a
sua ferramenta DEWALT, contacte um Centro de
Assistência Técnica DEWALT. Apresente a sua
reclamação, juntamente com a máquina
completa, bem como a factura de compra e serlhe á apresentada a melhor solução.
• UM ANO DE MANUTENÇÃO GRATUITA •
Se necessitar de manutenção para a sua
ferramenta DEWALT, durante os 12 meses após
a compra, entregue-a, sem encargos, num
Centro de Assistência Técnica DEWALT. Deve
apresentar uma prova da compra.
• UM ANO DE GARANTIA •
Se o seu produto DEWALT se avariar por defeito
de montagem ou de material, durante os 12
meses a partir da data da compra, garantimos a
substituição de todas as peças defeituosas sem
encargos desde que:
• O produto não tenha sido mal usado.
• Eventuais reparações não tenham sido
efectuadas por pessoas estranhas aos Centro
de Assistência Técnica DEWALT.
• Se apresente prova da data de compra.
Para a localização do Centro de Assistência
Técnica DEWALT mais próximo, queira consultar
a parte de trás do presente manual.
Page 22

18
Page 23

19
Page 24

21
Belgique et Luxembourg DEWALT Tel: 02 719 07 12
België en Luxemburg Weihoek 1, Nossegem Fax: 02 721 40 45
1930 Zaventem-Zuid Service fax: 02 719 08 10
Danmark D
EWALT Tlf: 70 20 15 10
Hejrevang 26 B Fax: 48 14 13 99
3450 Allerød
Deutschland D
EWALT Tel: 06 12 62 16
Richard-Klinger-Straße, Postfach 1202 Fax: 061 26 21 24 40
65510 Idstein
EÏÏ¿˜ D
EWALT TËÏ: 019 24 28 70
§ÂˆÊ ™˘ÁÁÚÔ‡ 154 Fax: 019 24 28 69
176 71 K·ÏÏÈı¤· Service: 019 24 28 76-7
∞ı‹Ó·
España D
EWALT Tel: 977 29 71 00
Ctra de Acceso Fax: 977 29 71 38
a Roda de Barà, km 0,7 Fax: 977 29 71 19
43883 Roda de Barà, Tarragona
France D
EWALT Tel: 72 20 39 20
Le Paisy Tlx: 30 62 24F
BP 21 Fax: 72 20 39 00
69571 Dardilly Cedex
Helvetia D
EWALT/Rofo AG Tel: 037 43 40 60
Schweiz Warpel Fax: 037 43 40 61
3186 Düdingen
Ireland D
EWALT Tel: 012 78 18 00
Calpe House Rock Hill Fax: 012 78 18 11
Black Rock
Co. Dublin
Italia D
EWALT Tel: 03 92 38 72 04
Viale Elvezia 2 Fax: 03 92 38 75 93
20052 Monza (Mi)
Nederland D
EWALT Tel: 07 65 08
22
01
Florijnstraat 10 Fax: 07 65 03
81
84
4879 AH Etten-Leur
Norge D
EWALT Tel: 22 99 90 00
Strømsveien 344 Fax: 22 99 90 01
1081 Oslo
Österreich D
EWALT Tel: 022 26 61 16
Werkzeugevertriebs GmbH Tlx: 13228 Black A
Erlaaerstraße 165 Fax: 022 26 61 16 14
Postfach 320,1231 Wien
Portugal D
EWALT Tel: 468 7513/7613
Rua Egas Moniz 173 Tlx: 16607 Bladec P
Apartado 19, S. João do Estoril Fax: 466 38 41
2768 Estoril, Codex
Suomi D
EWALT Puh: +35 89 825
45
40
Rälssitie 7 C Fax: +35 89 825 45 444
01510 Vantaa
Frälsevägen 7 C Tel: +35 89 825
45
40
01510 Vanda Fax: +35 89 825 45 444
Sverige D
EWALT Tel: 031 68 61 00
Box 603 Fax: 031 68 60 08
421 26 Västra Frölunda
Besöksadr. Ekonomivägen 11
United Kingdom D
EWALT Tel: 017 53 57 42 77
210 Bath Road Fax: 017 53 52 13 12
Slough
Berks SL1 3YD
12-96
 Loading...