

Page 1
,,_ 0')
NI.LI
"_F-
@
,o z
o
>
oo
w z
nw
091--
E,,,
z 0'3
LU'_
o" W
<_,,,d
u.-i-- F-
uL-w_
o>cl
wg©
u)
O
13
u)
F..Z _
O,_rr
7_ww
_123121
(D
Q.
u)
0
Z"3--
DEWALT Industrial Tool Co., 701 Joppa Road, Baltimore, MD 21286
(AUG09) Part No. N042236 D26950, D26960 Copyright © 2009 DEWALT
The following are trademarks for one or more DEWALT power tools: the yellow and black
color scheme; the "D" shaped air intake grill; the array of pyramids on the handgrip; the kit box
configuration; and the array of lozenge-shaped humps on the surface of the tool.
Definitions: Safety Guidelines \
The definitions below describe the level of severity for each signal word. Please read the
manual and pay attention to these symbols.
DANGER: Indicates an imminently hazardous situation which, if not avoided, will result
in death or serious injury.
A WARNING: Indicates a potentially hazardous situation which, if not avoided, could
result in death or serious injury.
_ CAUTION: Indicates a potentially hazardous situation which, if not avoided, may result
in minor or moderate injury.
NOTICE: Indicates a practice not related to personal injury which, if not avoided, may
xresult in property damage.
IF YOU HAVE ANY QUESTIONS OR COMMENTS ABOUT THIS OR ANY DEWALT TOOL,
CALL US TOLL FREE AT: 1-800-4-DEWALT (1-800-433-9258)
_ _ DANGER: To reduce the risk of injury, read the instruction manual. Failure to follow all
instructions listed below may result in electric shock, fire and/or serious injury,
IMPORTANT SAFETY INSTRUCTIONS
READ THESE INSTRUCTIONS
Safety Instructions for Heat Guns
• To reduce the risk of explosion, DO NOT use in paint spray booths or within 10' (3.0 m) of
paint spraying operations.
• This appliance has a polarized plug (one blade is wider than the other). To reduce the risk of
electric shock, this plug is intended to fit in a polarized outlet only one way, If the plug does
not fit fully in the outlet, reverse the plug. If # still does not fit, contact a qualified electrician.
Do not modify the plug in any way,
• DO NOT use this tool to remove paint containing lead. The peelings, residue and vapors
of paint may contain lead which is poisonous
• Hidden areas such as behind walls, ceilings, floors, soffit boards and other panels may
contain flammable materials that could be ignited by the heat gun when working in these
locations. The ignition of these materials may not be readily apparent and could result in
property damage and injury to persons. When working in these locations, keep the heat gun
moving in a back-and-forth motion. Lingering or pausing in one spot could ignite the panel or
the material behind it.
NOTE: These heat guns are capable of producing temperatures in excess of 1000 °F
• DO NOT use this tool as a hair dryer.
• DO NOT use this tool to heat food.
• DO NOT lay the heat gun on flammable surfaces when operating the gun or immediately after
shutting it off. Allow the tool to cool before storing. Always set the gun on a flat level surface
so that the nozzle tip is pointed upward.
• DO NOT use in the presence of explosive materials.
• Keep moveable items secured and steady while scraping.
• NEVER obstruct the air intake or nozzle outlet. This may cause excessive heat build up
resulting in damage to the tool
• Be sure to direct the hot air blast in a safe direction; away from other people or flammable
objects.
• DO NOT remove the heat barrel cover during use.
• KEEP FINGERS AWAY FROM METAL NOZZLE; it becomes very hot during use and
remains hot for 30 minutes after use. Wear gloves to protect hands.
• ALWAYS keep nozzle away from cord.
• DO NOT touch the nozzle to any surface while running or shortly after running.
• DO NOT place anything inside the nozzle as it could cause an electric shock. Do not look
down the nozzle while the unit is turned on due to the high temperatures being produced.
• Splinters and small particles of stripped paint can be ignited and blown through holes and
cracks in the surface being stripped.
• DO NOT apply heat to the same area for a long period of time.
• DO NOT burn the paint. Use the scraper provided and keep the nozzle at least 1"(25 mm)
away from the painted surface. When working in a vertical direction, work downwards to
prevent paint from falling into the tool and burning.
• DO NOT allow paint to adhere to the nozzle or scraper. It could ignite.
• ALWAYS use good quality scrapers and stripping knives.
• DO NOT use the heat gun in combination with chemical strippers.
• DO NOT use accessory nozzles as scrapers.
• DO NOT direct heatgun airflow directly on glass. The glass may crack and could result in
property damage or personal injury,
• Maintain labels and nameplates. These carry important information.
• Place the heat gun on a stable, level surface when not hand held. Place the cord in a position
that won't cause the heat gun to tip over.
• Be constantly aware that this tool can ignite flammable materials, soften or melt others.
Regardless of the task you are performing, shield or keep the heat gun away from these
materials.
• You may occasionally notice some slight smoking of the tool after it is turned off. This is
the result of heating the residual oil that was deposited on the heating element during the
manufacturing process.
• Use eye protection and other safety equipment.
• Do not abuse the cord. Never use the cord for carrying, pulling or unplugging the tool
Keep cord away from heat, oil, sharp edges or moving parts. Damaged or entangled
cords increase the risk of electric shock.
• When operating a tool outdoors, use an extension cord suitable for outdoor use. Use
of a cord suitable for outdoor use reduces the risk of electric shock.
Do not expose tools to rain or wet conditions. Water entering a tool will increase the risk
of electric shock.
Do not overreach. Keep proper footing and balance at all times. This enables better
control of the tool in unexpected situations.
Store idle tools out of the reach of children and do not allow persons unfamiliar with
the tool or these instructions to operate the tool Tools are dangerous in the hands of
untrained users.
Have your tool serviced by a qualified repair person using only identical replacement
parts. This will ensure that the safety of the tool is maintained.
Air vents often cover moving parts and should be avoided. Loose clothes, jewelry or long
hair can be caught in moving parts.
An extension cord must have adequate wire size (AWG or American Wire Gauge) for
safety. The smaller the gauge number of the wire, the greater the capacity of the cable, that
is 16 gauge has more capacity than 18 gauge. An undersized cord will cause a drop in line
voltage resulting in loss of power and overheating. When using more than one extension to
make up the total length, be sure each individual extension contains at least the minimum
wire size. The following table shows the correct size to use depending on cord length and
nameplate ampere rating, ff in doubt, use the next heavier gauge. The smaller the gauge
number, the heavier the cord.
Minimum Gauge for Cord Sets
Volts Total Length of Cord in Feet (meters)
Ampere Rating
More
Than
0
6
10
12
_ WARNING: Always use eye protection. All users and bystanders must wear eye protection
that conforms to ANSI Z87.1.
WARNING: Always wear proper personal hearing protection that conforms to ANSI
$12.6 ($3.19) during use. Under some conditions and duration of use, noise from this product
may contribute to hearing loss.
A WARNING: Some dust created by power sanding, sawing, grinding, drilling, and other
construction activities contains chemicals known to cause cancer, birth defects or other
reproductive harm. Some examples of these chemicals are:
• lead from lead-based paints,
• crystalline silica from bricks and cement and other masonry products, and
• arsenic and chromium from chemically-treated lumber (CCA).
Your risk from these exposures varies, depending on how often you do this type of work. To
reduce your exposure to these chemicals: work in a well ventilated area, and work with approved
safety equipment, such as those dust masks that are specially designed to filter out microscopic
particles.
_ WARNING: ALWAYS USE SAFETY GLASSES. Everyday eyeglasses are NOT safety glasses.
Also use face or dust mask if cutting operation is dusty, All users and bystanders MUST ALWAYS
wear certified safety equipment:
• ANSI Z87.1 eye protection (CAN/CSA Z94.3),
• ANSI $12.6 ($3.19) hearing protection,
• NIOSH/OSHA/MSHA respiratory protection.
• The label on your tool may include the following symbols. The symbols and their definitions
are as follows:
V.....................volts
Hz ...................hertz
min ..................minutes
--- ................direct current
@ ....................Class I Construction
[] .....................Class II Construction
sfpm .............. surface feet
PERSONS REMOVING PAINT SHOULD ALWAYS FOLLOW THESE GUIDELINES:
WARNING: Extreme care should be taken when stripping paint. The peelings, residue and
vapors of paint may contain lead, which is poisonous. Any pre-1977 paint may contain lead and
paint applied to homes prior to 1950 is likely to contain lead. Once deposited on surfaces, hand
to mouth contact can result in the ingestion of lead. Exposure to even low levels of lead can
cause irreversible brain and nervous system damage; young and unborn children are particularly
vulnerable.
Before beginning any paint removal process you should determine whether the paint you are
removing contains lead. This can be done by your local health department or by a professional
who uses a paint analyzer to check the lead content of the paint to be removed. LEAD-BASED
PAINT SHOULD ONLY BE REMOVED BY A PROFESSIONAL AND SHOULD NOT BE
REMOVED USING A HEAT GUN. Persons removing paint should follow these guidelines:
1.Move the workpiece outdoors, ff this is not possible, keep the work area well ventilated. Open
the windows and put an exhaust fan in one of them. Be sure the fan is moving the air from
inside to outside.
2. Remove or cover any carpets, rugs, furniture, clothing, cooking utensils and air ducts.
3. Place drop cloths in the work area to catch any paint chips or peelings. Wear protective
clothing such as extra work shirts, overalls and hats.
4. Work in one room at a time. Furnishings should be removed or placed in the center of the
room and covered. Work areas should be sealed off from the rest of the dwelling by sealing
doorways with drop cloths.
5. Children, pregnant or potentially pregnant women and nursing mothers should not be
present in the work area until the work is done and all clean up is complete.
6. Wear a dust respirator mask or a dual filter (dust and fume) respirator mask which has
been approved by the Occupational Safety and Health Administration (OSHA), the National
Institute of Safety and Health (NIOSH), or the United States Bureau of Mines. These masks
and replaceable filters are readily available at major hardware stores. Be sure the mask
fits. Beards and facial hair may keep masks from sealing properly, Change filters often.
DISPOSABLE PAPER MASKS ARE NOT ADEQUATE.
Not More
Than
6
10
12
16
(grounded)
(double insulated)
per minute (sfpm)
120V 25 (7.6) 50 (15.2) 100 (30.5) 150 (45.7)
240V 50 (15.2) 100 (30.5) 200 (61.0) 300 (91.4)
18
18
16
14
AWG
16
16
16
12
A.................. amperes
W................. watts
"_ ...............alternating current
no ................no load speed
................. earthing terminal
................safety alert symbol
BPM ............ beats per minute
.../min .........revolutions or
16 14
14 12
14 12
Not Recommended
reciprocation
per minute
Page 2
7.Usecautionwhenoperatingtheheatgun.Keeptheheatgunmovingasexcessiveheatwill
generatefumeswhichcanbeinhaledbytheoperator.
8.Keepfoodanddrinkoutof the work area. Wash hands, arms and face and rinse mouth
before eating or drinking. Do not smoke or chew gum or tobacco in the work area.
9. Clean up all removed paint and dust by wet mopping the floors. Use a wet cloth to clean
all walls, sills and any other surface where paint or dust is clinging. DO NOT SWEEP, DRY
DUST OR VACUUM. Use a high phosphate detergent or trisodium phosphate (TSP) to wash
and mop areas.
10. At the end of each work session put the paint chips and debris in a double plastic bag, close
it with tape or twist ties and dispose of properly.
11. Remove protective clothing and work shoes in the work area to avoid carrying dust into the
rest of the dwelling. Wash work clothes separately. Wipe shoes off with a wet rag that is then
washed with the work clothes. Wash hair and body thoroughly with soap and water.
IMPORTANT NOTICE
In order for this tool to be an effective paint stripper, it must produce extremely high temperatures.
As a consequence, the stripper is capable of igniting paper, wood, paint and varnish residue and
similar materials.
As you become more familiar with the tool and develop the proper technique, the danger of
accidental ignition will be greatly reduced. In establishing the proper technique, the best thing to
do is PRACTICE! Work on simple stripping projects, preferably outdoors, until you get a "feel" for
how to use your stripper safely and effectively.
AS YOU PRACTICE, OBSERVE THE FOLLOWING PROCEDURES FOR SAFETY
• Always be sure the tool is turned off and disconnected from power supply when unattended.
• Clean the scraper blade often during use. Built up residue on the blade is highly flammable.
• Experiment to find the optimum distance from the tool's nozzle to the surface being stripped.
This distance [1"-2" (25.4 mm-50.8 mm)] will vary depending on the material being
removed.
• Keep the heat gun moving ahead of the scraper blade at all times.
• As you work, clean up loose pieces of paint as they accumulate around the work area.
• When working indoors, keep away from curtains, papers, upholstery and similar flammable
materials.
• Above all, remember that this is a serious tool that is capable of producing excellent results
when used properly. Practice on simple projects until you feel comfortable with your stripper.
Only then will you have mastered the proper technique.
SAVE THESE INSTRUCTIONS FOR FUTURE USE
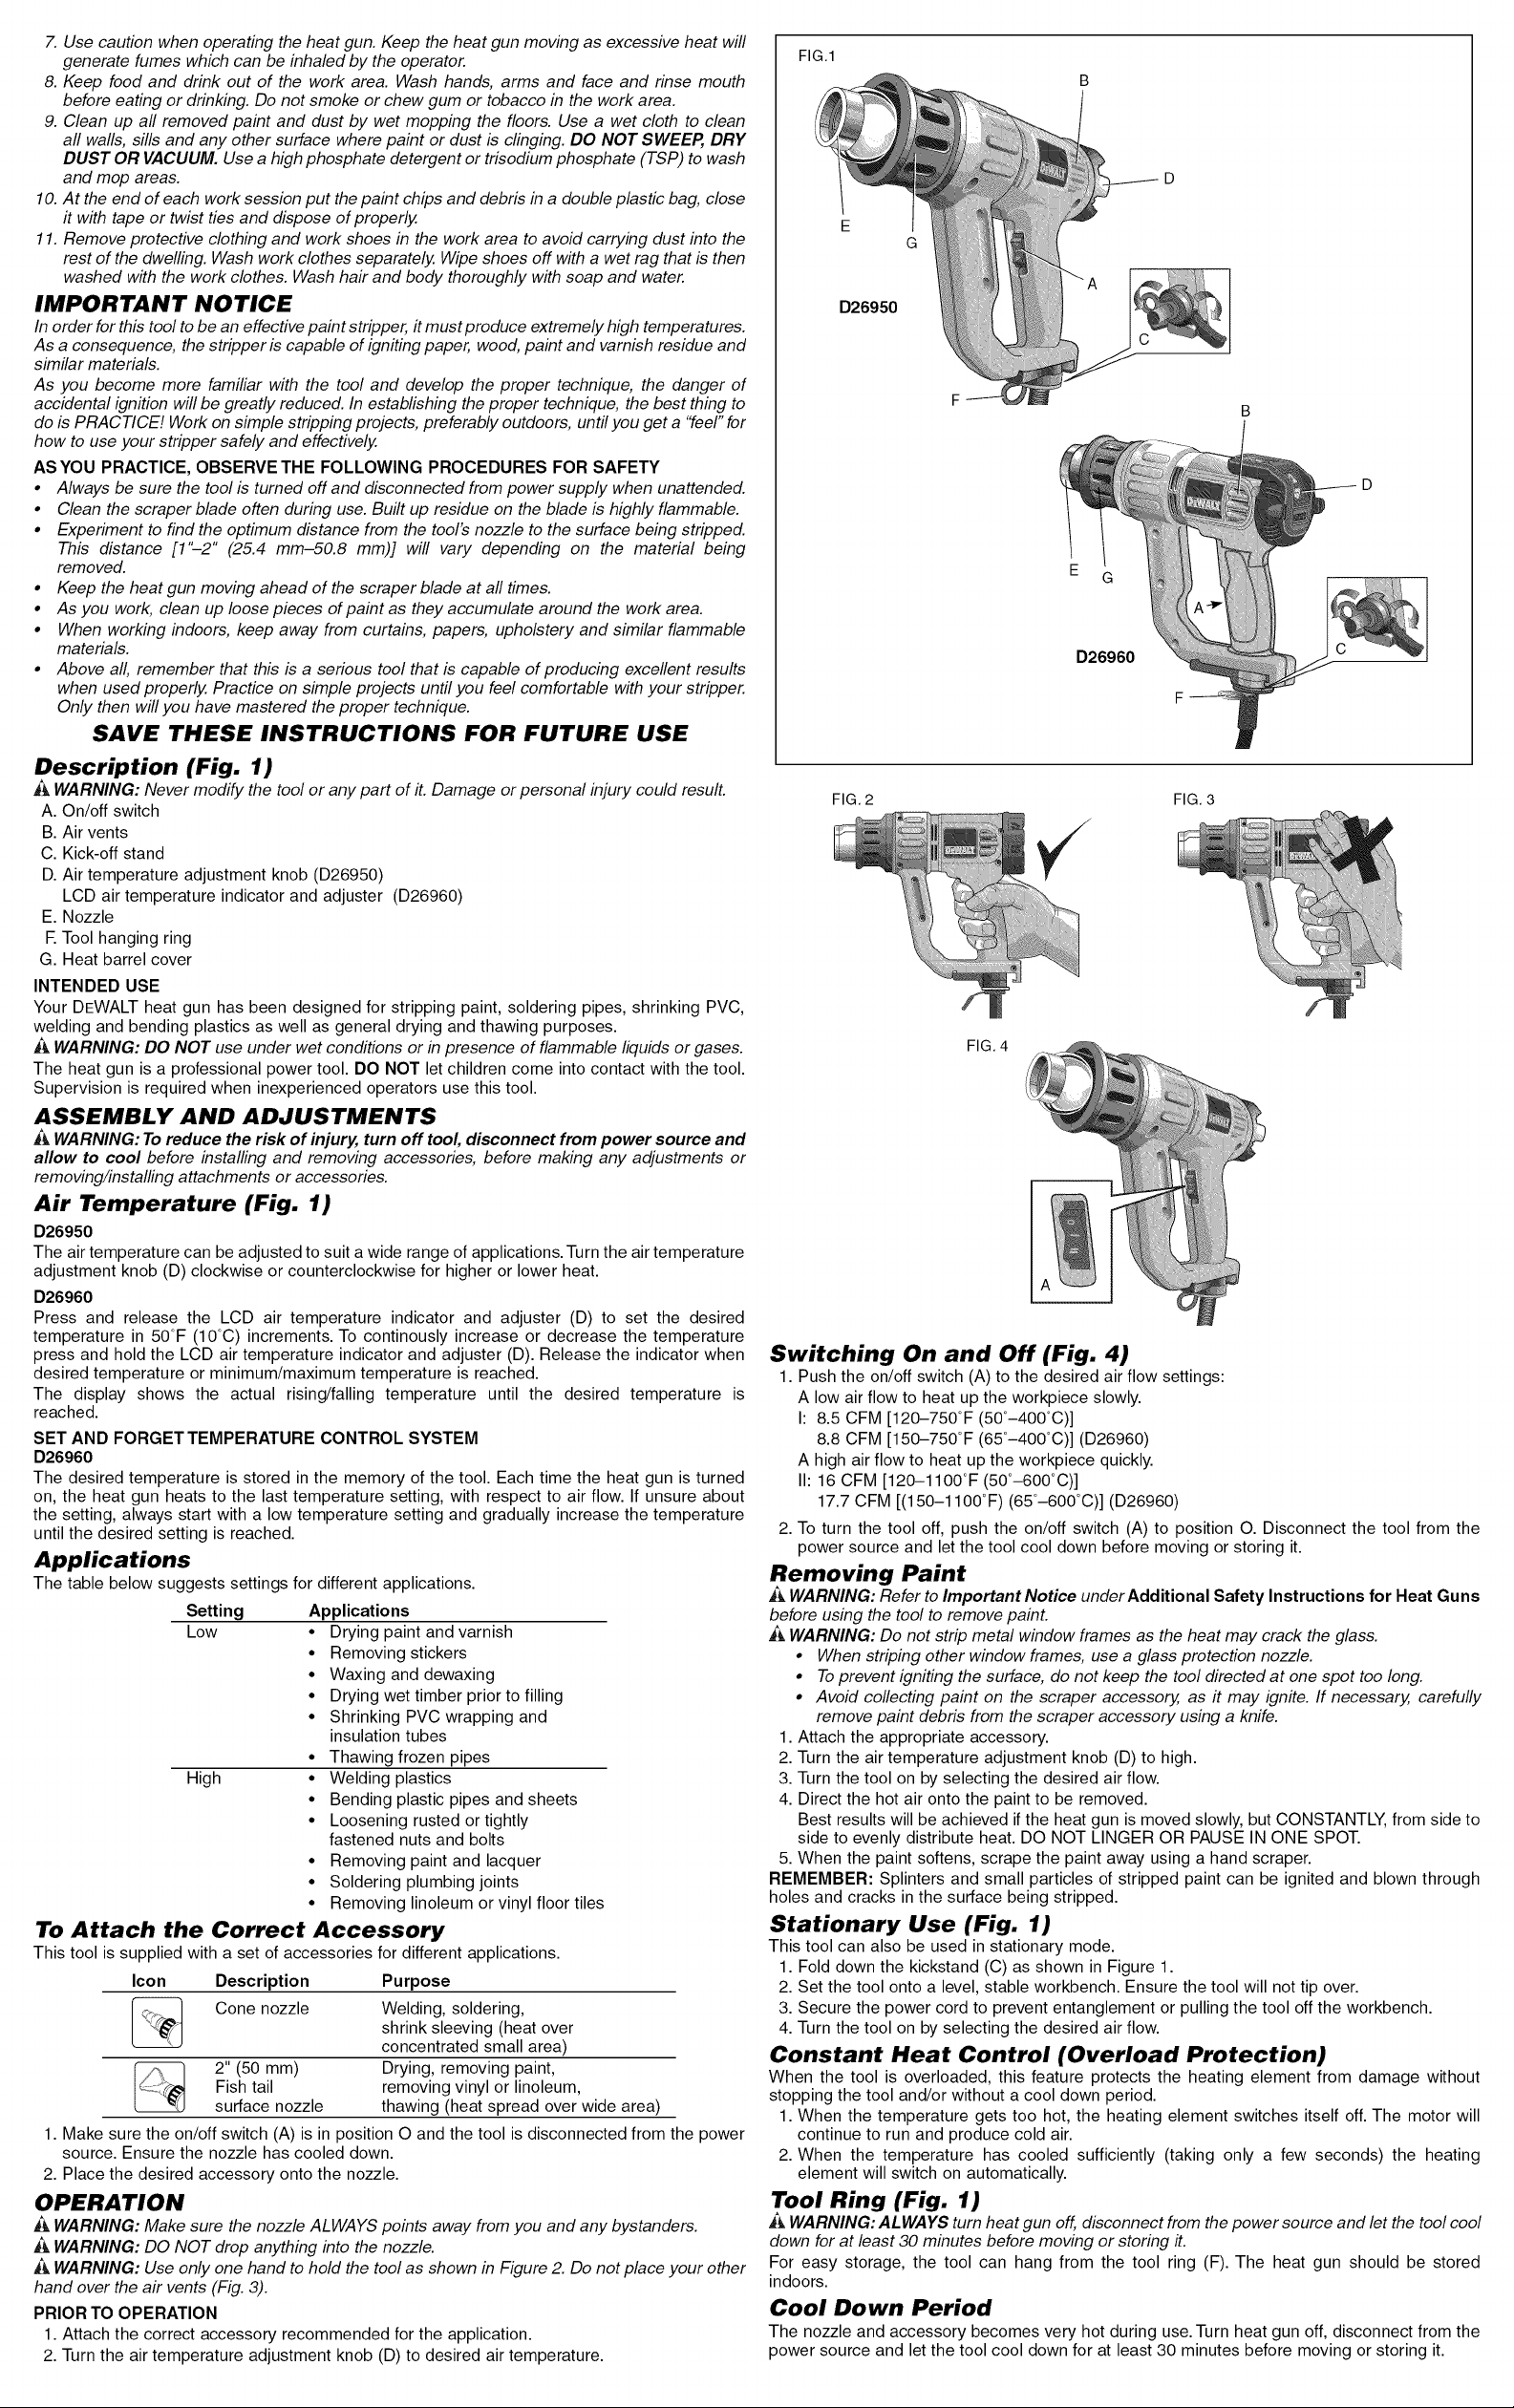
FIG.1
D26950
D26960
F
Description (Fig. 1)
WARNING: Never modify the tool or any part of it. Damage or personal injury could result.
A. On/off switch
B. Air vents
C. Kick-off stand
D. Air temperature adjustment knob (D26950)
LCD air temperature indicator and adjuster (D26960)
E. Nozzle
R Tool hanging ring
G. Heat barrel cover
INTENDED USE
Your DEWALT heat gun has been designed for stripping paint, soldering pipes, shrinking PVC,
welding and bending plastics as well as general drying and thawing purposes.
A WARNING: DO NOT use under wet conditions or in presence of flammable liquids or gases.
The heat gun is a professional power tool. DO NOT let children come into contact with the tool.
Supervision is required when inexperienced operators use this tool.
ASSEMBLY AND ADJUSTMENTS
_ WARNING: To reduce the risk of injury, turn off tool, disconnect from power source and
allow to cool before installing and removing accessories, before making any adjustments or
removing/installing attachments or accessories.
Air Temperature (Fig. 1)
D26950
The air temperature can be adjusted to suit a wide range of applications. Turn the air temperature
adjustment knob (D) clockwise or counterclockwise for higher or lower heat.
D26960
Press and release the LCD air temperature indicator and adjuster (D) to set the desired
temperature in 50°F (10°C) increments. To continously increase or decrease the temperature
press and hold the LCD air temperature indicator and adjuster (D). Release the indicator when
desired temperature or minimum/maximum temperature is reached.
The display shows the actual rising/falling temperature until the desired temperature is
reached.
SET AND FORGET TEMPERATURE CONTROL SYSTEM
D26960
The desired temperature is stored in the memory of the tool. Each time the heat gun is turned
on, the heat gun heats to the last temperature setting, with respect to air flow. If unsure about
the setting, always start with a low temperature setting and gradually increase the temperature
until the desired setting is reached.
Applications
The table below suggests settings for different applications.
Setting Applications
Low • Drying paint and varnish
• Removing stickers
• Waxing and dewaxing
• Drying wet timber prior to filling
• Shrinking PVC wrapping and
insulation tubes
• Thawing frozen pipes
High • Welding plastics
• Bending plastic pipes and sheets
• Loosening rusted or tightly
fastened nuts and bolts
• Removing paint and lacquer
• Soldering plumbing joints
• Removing linoleum or vinyl floor tiles
To Attach the Correct Accessory
This tool is supplied with a set of accessories for different applications.
Icon Description Purpose
Cone nozzle Welding, soldering,
Fish tail removing vinyl or linoleum,
2" (50 mm) Drying, removing paint,
surface nozzle thawing (heat spread over wide area)
1. Make sure the on/off switch (A) is in position O and the tool is disconnected from the power
source. Ensure the nozzle has cooled down.
2. Place the desired accessory onto the nozzle.
shrink sleeving (heat over
concentrated small area)
OPERATION
WARNING: Make sure the nozzle ALWAYS points away from you and any bystanders.
A WARNING: DO NOT drop anything into the nozzle.
_ WARNING: Use only one hand to hold the tool as shown in Figure 2. Do not place your other
hand over the air vents (Fig. 3).
PRIOR TO OPERATION
1. Attach the correct accessory recommended for the application.
2. Turn the air temperature adjustment knob (D) to desired air temperature.
FIG. 2 FIG. 3
FIG. 4
Switching On and Off (Fig. 4)
1. Push the on/off switch (A) to the desired air flow settings:
A low air flow to heat up the workpiece slowly.
I: 8.5 CFM [120-750°F (50°-400°C)]
8.8 CFM [150-750°F (65°-400°C)] (D26960)
A high air flow to heat up the workpiece quickly.
Ih 16 CFM [120-1100°F (50°-600°C)]
17.7 CFM [(150-1100°F)(65°-600°C)] (D26960)
2. To turn the tool off, push the on/off switch (A) to position O. Disconnect the tool from the
power source and let the tool cool down before moving or storing it.
Removing Paint
WARNING: Refer to Important Notice under Additional Safety Instructions for Heat Guns
before using the tool to remove paint.
_ WARNING: Do not strip metal window frames as the heat may crack the glass.
• When striping other window frames, use a glass protection nozzle.
• To prevent igniting the surface, do not keep the tool directed at one spot too long.
• Avoid collecting paint on the scraper accessory, as it may ignite. If necessary, carefully
remove paint debris from the scraper accessory using a knife.
1. Attach the appropriate accessory.
2. Turn the air temperature adjustment knob (D) to high.
3. Turn the tool on by selecting the desired air flow.
4. Direct the hot air onto the paint to be removed.
Best results will be achieved if the heat gun is moved slowly, but CONSTANTLY, from side to
side to evenly distribute heat. DO NOT LINGER OR PAUSE IN ONE SPOT.
5. When the paint softens, scrape the paint away using a hand scraper.
REMEMBER: Splinters and small particles of stripped paint can be ignited and blown through
holes and cracks in the surface being stripped.
Stationary Use (Fig. 1)
This tool can also be used in stationary mode.
1. Fold down the kickstand (C) as shown in Figure 1.
2. Set the tool onto a level, stable workbench. Ensure the tool will not tip over.
3. Secure the power cord to prevent entanglement or pulling the tool off the workbench.
4. Turn the tool on by selecting the desired air flow.
Constant Heat Control (Overload Protection)
When the tool is overloaded, this feature protects the heating element from damage without
stopping the tool and/or without a cool down period.
1. When the temperature gets too hot, the heating element switches itself off. The motor will
continue to run and produce cold air.
2. When the temperature has cooled sufficiently (taking only a few seconds) the heating
element will switch on automatically.
Tool Ring (Fig. 1)
_, WARNING: ALWAYS turn heat gun off, disconnect from the power source and let the tool cool
down for at least 30 minutes before moving or storing it.
For easy storage, the tool can hang from the tool ring (F). The heat gun should be stored
indoors.
Cool Down Period
The nozzle and accessory becomes very hot during use.Turn heat gun off, disconnect from the
power source and let the tool cool down for at least 30 minutes before moving or storing it.
Page 3
NOTE:Toreducethecoolingtime,switchthetoolonatthelowestairtemperaturesettingand
letitrunforafewminutesbeforeturningtheheatgunoff.
MAINTENANCE
WARNING: To reduce the risk of injury, turn off tool, disconnect from power source and
allow to cool before installing and removing accessories, before making any adjustments or
removing/installing attachments or accessories.
Your DEWALT power tool has been designed to operate over a long period of time with a
minimum of maintenance. Continuous satisfactory operation depends upon proper tool care and
regular cleaning.
Cleaning
_ WARNING: Blow dirt and dust out of all air vents with dry air at least once a week. Wear •
proper ANSI Z87.1 (CAN/CSA Z94.3) eye protection and proper NIOSH/OSHA/MSHA •
respiratory protection when performing this. •
WARNING: Never use solvents or other harsh chemicals for cleaning the non-metallic parts
of the tool. These chemicals may weaken the plastic materials used in these parts. Use a cloth •
dampened only with water and mild soap. Never let any liquid get inside the tool; never immerse
any part of the tool into a liquid. •
Lubrication
Your power tool requires no additional lubrication.
Accessories
A WARNING: Since accessories, other than those offered by DEWALT, have not been tested
with this product, use of such accessories with this tool could be hazardous. To reduce the risk •
of injury, only DEWALT, recommended accessories should be used with this product. •
Recommended accessories for use with your tool are available at extra cost from your local
dealer or authorized service center. If you need assistance in locating any accessory, please
contact DEWALT Industrial Tool Co., 701 East Joppa Road, Baltimore, MD 21286, call 1-800-4-
DEWALT (1-800-433-9258) or visit our website www.dewalt.com.
Repairs
To assure product SAFETY and RELIABILITY, repairs, maintenance and adjustments (including
brush inspection and replacement) should be performed by a DEWALT factory service center,
a DEWALT authorized service center or other qualified service personnel. Always use identical
replacement parts. •
Three Year Limited Warranty
DEWALT will repair, without charge, any defects due to faulty materials or workmanship for •
three years from the date of purchase. This warranty does not cover part failure due to normal •
wear or tool abuse. For further detail of warranty coverage and warranty repair information, visit
www.dewalt.com or call 1-800-4-DEWALT (1-800-433-9258). This warranty does not apply to
accessories or damage caused where repairs have been made or attempted by others. This
warranty gives you specific legal rights and you may have other rights which vary in certain
states or provinces. •
In addition to the warranty, DEWALT tools are covered by our:
DEWALT will maintain the tool and replace worn parts caused by normal use, for free, any time
during the first year after purchase.
If you are not completely satisfied with the performance of your DEWALT Power Tool, Laser, or
Nailer for any reason, you can return it within 90 days from the date of purchase with a receipt •
for a full refund - no questions asked. °
LATIN AMERICA: This warranty does not apply to products sold in Latin America. For products
sold in Latin America, see country specific warranty information contained either in the
packaging, call the local company or see website for warranty information.
FREE WARNING LABEL REPLACEMENT: If your warning labels become illegible or are
missing, call 1-800-4-DEWALT (1-800-433-9258) for a free replacement.
1YEAR FREE SERVICE •
90 DAY MONEY BACK GUARANTEE •
DXXXXX.EATGU.
SER.
. , , ,, , TOREDUCETHERiSK
SHOCK,DONOTEXPOSETHISPRODUCT
TORAiNORMOISTURE.STOREiNDOORS.
READINSTRUCTIONMANUALBEFORE
USING.ALWAYSUSEPROPEREYEAND
RESPIRATORYPROTECTION.
_. _,| , ,_ _ ,, PARA REDUCIRELRJESGD
ELI_CTRiCA,NO EXPDNGAESTEPRODUCTOA LLUVIAO HUMEDAD. ALMACENE AL
iNTERiOR, LEA EL MANUAL DE JNSTRUCCJONESANTES DE UTJLJZAR,UTJL.JCE
SiEMPRE LA PROTECCiDN OCULARY RESPBRATORiADEBIDA. POUR REBUIRE
TOUT RISQUE D'JNCENDJEOU BE CHDCS I_LECTBiQUES,PRDTI_GERCE PRDBUIT
CDNTRELA PLUJEOU L'HUMIDiTE. ENTREPOSER A L'iNTERJEUR.LJRELEMANUEL
DEL'UTJLJSATEURAVANT TOUTEUTJLJSATION,PORTERSYSTEMATJQUEM.ENT UN
SYSTEME DE PROTECTIONOCULAIRE ET DES VOJESRESPJRATOJRESABEQUATS.
BEWALT iNDUSTRiAL TOOL CO., BALTIMORE, MB 21286 USA FOR SERVICE INFORMATION, CALL 1-OO0-4-BEWALT www.DEWALT.com
F
Ddfinitions : lignes directrices
en matidre de sdcuritd
Les dGfinitions ci-dessous dGcrivent le niveau de danger pour chaque mot-indicateur
employ& Veuillez lire le mode d'emploi et porter une attention particuli_re & ces
symboles.
ADANGER : Indique une sfluation dangereuse imminente qui, si elle n'est pas
evitee, causera la mort ou des blessures graves.
_,AVERTISSEMENT : Indique une situation potentiellement dangereuse qui, si elle n'est
pas evitGe, pourrait se solder par un deces ou des blessures graves.
i_,ATTENTION : Indique une situation potentiellement dangereuse qui, si elle n'est pas
evitee pourrait se solder par des blessures mineures ou moderees.
AVIS : Indique une pratique ne posant aucun risque de dommages corporels mais
qui par contre, si rien n'est fait pour I'eviter, pourrait poser des risques de dommages
materiels.
POUR TOUT COMMENTAIRE, OU QUESTION, RELATIF ,_ CET OUTIL OU TOUT AUTRE
OUTIL DEWALT, COMPOSEZ GRATUITEMENT LE •1-800-4-DEWALT (1-800-433-9258)
I'utilisateur. Tout manquement aux directives suivantes pose des risques de chocs
_ ,&DANGER : Pour reduire tout risque de dommages corporels, lire le manuel de
electriques, d'incendie et/ou de blessures graves.
CONSlGNES DE SECURITE IMPORTANTES
LIRE CES DIRECTIVES
Consignes de sdcuritd propres aux pistolets thermiques
• Pour reduire tout risque d'explosion, NE PAS utiliser au sein de cabines de pulverisation ou
proximite (moins de 3 m [10 pi]) d'applications de peinture au pistolet.
• Cet appareil est muni d'une fiche polarisee (l'une des lames est plus large que I'autre). Pour
reduire tout risque de chocs electriques, cette fiche a et6 congue pour rentrer dans une prise
polarisee uniquement dans un seul sens. Inverser la fiche si elle ne rentre pas correctement
dans la prise. Si ce n'est toujours pas le cas, consulter un electricien qualifie. Ne modifier la
fiche en aucune fa_on.
• NE PAS utiliser cet outil pour decaper de la peinture au plomb. La peinture ecaillGe, ses
residus ou emanations peuvent contenir du plomb qui est toxique pour I'individu.
• Certains lieux, comme derriere des murs, plafonds, sols, panneaux de coffrage ou autres,
peuvent dissimuler des materiaux inflammables qui pourraient s'enflammer Iorsque le
pistolet thermique est utilise a proximite. L'ignition de ces materiaux pourrait ne pas 6tre
OFFiRE ORELECTRIC
DE INCENDIOODESCARGA
J
immediatement apparente, et causer des dommages corporels et materiels serieux. Au sein
de ce genre d'emplacements, effectuer des va-et-vient continuels avec le pistolet thermique.
Le fait de s'arrGter ou s'attarder sur un point pourrait enflammer le panneau ou le materiau
dissimule derriere.
REMARQUE : Ces pistolets thermiques peuvent produire des temperatures superieures
1000 OF.
NE PAS utiliser cet outil pour s#cher les cheveux.
NE PAS utiliser cet outil pour r#chauffer la nourriture.
NE PAS poser le pistolet thermique sur une surface inflammable pendant ou imm#diatement
apres son utilisation. Laisser Ibutil refroidir avant de I'entreposer. Poser syst#matiquement le
pistolet sur une surface plane, I'embout pointant vers le haut.
NE PAS utiliser I'appareil en pr#sence de mat#riaux explosifs.
Arrimer soigneusement tout #l#ment mobile lots du raclage.
NE JAMAIS obstruer les prises d'air ou I'embout. Cela pourrait causer une accumulation
excessive de chaleur et endommager Ibutil.
S'assurer de diriger syst#matiquement le jet d'air chaud dans une direction s_re, oppos#e
tout individu pr#sent ou tout objet inflammable.
NE PAS retirer le barillet anti-br_lures pendant I'utilisation.
PROTEGER LES DOIGTS DE L'EMBOUT METALLIQUE, car il chauffera #norm#ment
au cours de I'utilisation et restera ainsi pendant une trentaine de minutes apres utilisation.
Proteger les mains avec des gants.
Maintenir SYSTEMATIQUEMENT I'embout a I'ecart du cordon electrique.
NE mettre I'embout en contact avec AUCUNE surface pendant etjuste apres utilisation.
NE RIEN inserer dans I'embout pour prevenir tout risque de chocs electriques. En raison des
temperatures elevees produites Iors de I'utilisation, ne pas regarder a I'interieur de I'embout
pendant le fonctionnement de I'outil.
Des eclats ou de petites particules de peintures pourraient s'enflammer et 6tre ejectes dans
les trous ou fentes de la surface a decaper.
NE PAS appliquer la chaleur au mGme endroit pendant une periode prolongee.
NE PAS brDler la peinture. Utiliser le grattoir fourni a cet effet et maintenir I'embout a un
minimum de 25 mm (1 pc) de la surface peinte. Pour decaper une surface verticale, travailler
de haut en has pour empGcher que la peinture ne tombe sur I'outil et ne br_le.
NE PAS laisser la peinture adherer sur I'embout ou le grattoir, car elle pourrait s'enflammer.
Utiliser SYSTEMATIQUEMENT des grattoirs et des couteaux a decaper de bonne qualite.
NE PAS utiliser le pistolet thermique en mGme temps qu'un decapant chimique.
NE PAS utiliser d'embout accessoire en tant que grattoir.
NE PAS diriger le flot d'air du pistolet thermique sur du verre. Ce dernier pourrait se briser et
poser des risques de dommages corporels ou materiels serieux.
Maintenir en place, etiquettes et plaques signaletiques, car ils comportent des informations
importantes.
Placer le pistolet thermique sur une surface plane et stable apres toute utilisation. Disposer
son cordon de fa_on ace que le pistolet thermique ne puisse 6tre renverse.
Se rappeler systematiquement que cet outil pourrait enflammer des materiaux, les ramollir ou
les faire fondre. Peu importe la t&che en cours, proteger ou eloigner ces materiaux du pistolet
thermique.
fl se pourra occasionnellement que I'outil fume legerement apres utilisation. Cela provient de
I'huile residuelle deposee sur les elements chauffant de I'outil Iors de sa fabrication.
Utiliser une protection oculaire et tout autre materiel de securite approprie.
Ne pas utiliser le cordon de fa_on abusive. Ne jamais utiliser le cordon electrique
pour transporter, tirer ou debrancher I'outil. Proteger le cordon de la chaleur, de
I'huile, d'arGtes coupantes ou de pieces mobiles. Les cordons endommages ou emmGles
augmentent les risques de chocs electriques.
Pour utiliser un outil a I'exterieur, utiliser une rallonge con_ue a cet effet. L'utilisation
d'une rallonge con_ue pour I'exterieur reduit les risques de chocs electriques.
Ne pas exposer les outils electriques a la pluie ou a I'humidite. Tout contact d'un liquide
avec un outil electrique augmente les risques de chocs electriques.
Ne pas effectuer de travaux hors de portee. Les pieds doivent rester bien ancres au
sol afin de maintenir son equilibre en permanence. Cela permet de conserver la maftrise
de I'outil dans les situations imprevues.
Apres usage, ranger les outils hors de portee des enfants, et ne permettre a aucune
personne non familiere avec un outil (ou son manuel d'instruction) d'utiliser ce dernier.
Les outils peuvent 6tre dangereux entre des mains inexperimentees.
Faire entretenir cet outil par un reparateur qualifie qui n'utilisera que des pieces
de rechange identiques. Cela permettra d'assurer I'integrite de I'outil et la securite de
I'utilisateur.
Prendre des precautions a proximite des events car ils cachent des pieces mobiles.
Les vGtements amples, bijoux ou cheveux longs pourraient s'y faire prendre.
Pour la securite de I'utilisateur, utiliser une rallonge de calibre adequat (AWG, American
Wire Gauge [calibrage americain normalise des ills electriques]). Plus son calibre est
petit, plus sa capacite est grande. Une rallonge de calibre 16, par exemple, a plus de capacite
qu'une rallonge de calibre 18.L'usage d'une rallonge de calibre insuffisant causera une chute
de tension qui entrafnera perte de puissance et surchauffe. Si plus d'une rallonge est utilisee
pour obtenir une certaine Iongueur, s'assurer que chaque rallonge presente au moins le
calibre de fil minimum. Le tableau ci-dessous illustre les calibres a utiliser selon la Iongueur
de rallonge et I'intensite nominale indiquee sur la plaque signaletique. En cas de doute,
utiliser le calibre suivant. Plus le calibre est petit, plus la rallonge peut supporter de courant.
Calibres minimaux des rallonges
Intensit6
(en ampbres)
SupGrieur h
o
6
lO
12
_AVERTISSEMENT : Porter systematiquement une protection oculaire. Tout utilisateur ou
individu present dolt porter une protection oculaire homologuee ANSI Z87.1.
_&AVERTISSEMENT : Pendant I'utilisation, porter systematiquement une protection
auditive individuelle adequate homologuee ANSI S12.6 ($3.19). Sous certaines conditions
et suivant la Iongueur d'utilisation, le bruit emanant de ce produit pourrait contribuer a une
perte de I'acuite auditive.
i_,AVERTISSEMENT : Les scies, meules, ponceuses, perceuses ou autres outils de construction,
peuvent produire des poussieres contenant des produits chimiques reconnus pour causer
cancers, malformations congenitales ou 6tre nocifs pour le systeme reproducteur. Parmi ces
produits chimiques, on retrouve :
• le plomb dans les peintures a base de plomb;
• la silice cristallisee clans les briques et le ciment ou autres articles de ma_onnerie; et
• I'arsenic et le chrome dans le bois ayant subi un traitement chimique (ACC).
Le risque associe a de telles expositions varie selon la frequence a laquelle on effectue ces
travaux. Pour reduire toute exposition a ces produits : travailler dans un endroit bien aere, en
utilisant du materiel de securite homologue tel un masque antipoussieres specialement con_u
pour filtrer les particules microscopiques.
_&AVERTISSEMENT : PORTER SYSTEMATIQUEMENT DES LUNETTES DE PROTECTION.
Les lunettes courantes NE sont PAS des lunettes de protection. Utiliser aussi un masque
antipoussieres si la decoupe dolt en produire beaucoup. Tout utilisateur ou individu present DOlT
porter SYSTEMATIQUEMENT un equipement de securite homologue :
• Protection oculaire ANSI Z87.1 (CAN/CSA Z94.3);
• Protection auditive ANSI $12.6 ($3.19);
• Protection des voles respiratoires NIOSH/OSHA/MSHA.
• L'etiquette apposee sur votre outil peut inclure les symboles suivants. Les symboles et leur
definition sont indiques ci-apres :
V.................... volts A.................. amperes
Hz .................. hertz W................. watts
min................. minutes % ............... courant alternatif
.................. courant continu no ................ vitesse a vide
InfGrieur h
6
10
12
16
Volts Longueur totale de cordon en mbtres (pieds)
120V 7,6 (25) 30,5 (100) 45,7 (150)
240V 15,2 (50) 61,0 (200) 91,4 (300)
18
18
16
14
15,2 (50)
30,5 (100)
AWG
16
16
16
12
16 14
14 12
14 12
Non recommand6
Page 4

@ ................... Classe / Fabrication
(mis a la terre)
[] ................... Fabrication Classe II
(double isolation)
sfpm .............. pieds lineaires
par minute (plpm)
TOUT INDIVIDU D#CAPANT DE LA PEINTURE SE DOlT DE SUIVRE
SYST#MATIQUEMENT LES CONSIGNES SUIVANTES :
i_,AVERTISSEMENT : II est recommande de faire preuve de la plus extr6me prudence lots
du decapage de la peinture. La peinture ecaillee, ses residus ou emanations peuvent contenir
du plomb qui est toxique pour I'individu. Les peintures pre 1977 peuvent contenir du plomb et
la peinture des maisons datant d'avant 1950 contiennent presque surement du plomb. Une
fois le plomb etale sur une surface, tout contact manuel posera des risques d'ingestion. Toute
exposition au plomb, m6me a des taux minimes, pose des risques de dommages irreversibles
au cerveau et au systeme nerveux. Les jeunes enfants et les foetus sont particulierement
vulnerables.
Avant de decaper toute peinture, il est recommande de determiner si elle contient du plomb.
Cela peut 6tre fait par votre departement local de la sante ou par un professionnel qui
utilisera un analyseur de peinture pour verifier le taux de plomb contenu par la peinture
decaper. TOUTE PEINTURE AU PLOMB DOlT Y=TRE RETIREE EXCLUSlVEMENT PAR
UN PROFESSIONNEL, ET JAMAIS .4 L'AIDE D'UN PISTOLET THERMIQUE. Tout individu
decapant de lapeinture se doff de suivre les consignes suivantes :
1. Deplacer la piece a decaper a I'exterieur. Si c'est impossible, maintenir I'aire de travail bien
ventilee. Ouvrir les fen6tres et installer un ventilateur d'aspiration a I'une d'elles. S'assurer
que le ventilateur deplace I'air de I'interieur vers I'exterieur.
2. Retirer ou couvrir moquettes, tapis, meubles, v6tements, ustensiles de cuisine et conduits
de ventilation.
3. Installer des toiles de protection sur les lieux de travail pour recup6rer toute peinture ecaillee
ou debris. Porter des v6tements de protection tels que chemises de travail, salopettes,
chapeaux.
4. Travailler dans une piece a la fois. II est recommande de sortir les meubles ou de les
placer au centre de la piece et de les recouvrir. Les lieux de travail devraient 6tre isoles
hermetiquement du reste de I'habitation en scellant les ouvertures avec des toiles de
protection.
5. E-Ioigner les enfants, les femmes enceintes ou potentiellement enceintes, les meres
allaitant, des lieux de travail tant que le travail et le nettoyage ne sont pas termines.
6. Porter un appareil de protection des voies respiratoires normal ou a double filtre (poussieres
et emanations) homologue par I'Administration de la securite et de la sante au travail
(OSHA), I'lnstitut national pour la securite et la sante (NIOSH), ou le Bureau des Mines
americain. Ces appareils respiratoires et leurs filtres de remplacement sont disponibles
aupres de la plupart des grands magasins de bricolage. S'assurer que le masque sied
correctement. La barbe et les poils peuvent interferer avec I'efficacite des masques.
Changer regulibrement les filtres. LES MASQUES JETABLES EN PAPIER NE SONT PAS
ADEQUATS.
7. Utiliser le pistolet thermique avec precautions. Deplacer le pistolet thermique constamment
car une chaleur excessive produira des emanations qui pourront 6tre inhalees par
I'utilisateur.
8. Maintenir toute nourriture ou boisson hors de I'aire de travail. Se laver soigneusement les
mains, bras et le visage, et se rincer la bouche avant de manger ou boire. Ne pas fumer, ou
m_cher du chewing-gum ou du tabac, au sein de I'aire de travail.
9. Nettoyer toute peinture decap6e et poussiere des sols a I'aide d'une lavette humide. Utiliser
un chiffon humide pour nettoyer murs, rebords de fen6tre, et toutes autres surfaces ob
la peinture ou la poussiere s'est accrochee. NE PAS BALAYER, EPOUSSETER .4 SEC
OU PASSER L'ASPIRATEUR. Utiliser un detergent a taux concentre de phosphate ou
triphosphate de sodium (Na3P04) pour nettoyer et laver les lieux de travail.
10. En fin de travail, mettre peinture ecaillee et debris dans un sac de plastique double, fermer
soigneusement a I'aide d'un ruban adhesif ou un lien torsade et jeter conformement aux
normes en vigueur.
11. Retirer tout v6tement de protection et chaussures de travail sur les lieux de travail pour
eviter de transporter la poussiere dans le reste de I'habitation. Nettoyer les v6tements de
travail separement. Nettoyer les chaussures avec un chiffon humide que I'on lavera avec les
v6tements de travail. Laver soigneusement le corps et les cheveux a I'eau et au savon.
................. borne de terre
_&................symbole d'avertissement
BPM ............ battements par minute
.../min ..........tours ou retour
par minute
AVIS IMPORTANT
Pour que cet outil fonctionne efficacement en tant que decapant peinture, il doit produire des
temperatures extr6mement elevees. Par consequent, cet outil est capable d'enflammer papier,
bois, peinture, vernis et autres materiaux similaires.
En vous familiarisant avec Ibutil et son utilisation adequate, vous reduirez grandement les
dangers d'ignition accidentelle. Pour apprendre a maftriser la bonne technique, rien ne vaut
la PRATIQUE ! Travaillez tout d'abord sur des projets de decapage simples, a I'exterieur de
preference, jusqu'a acquerir I'experience voulue pour utiliser Ibutil efficacement et en toute
securite.
EN COURS DE PRATIQUE, SUlVRE LES PROCI_DURES DE SI-CURITI- SUlVANTES :
• S'assurer que I'outil est systematiquement arr6te et deconnecte du secteur Iorsqu'il est
laisse sans surveillance.
• Nettoyer regulierement la lame du grattoir au cours de I'utilisation. Toute accumulation de
residus sur la lame sera extr6mement inflammable.
• Effectuer divers essais pour determiner la distance optimale entre I'embout de Ibutil et
la surface a decaper. Cette distance (25,4 mm a 50,8 mm [1 po a 2 po]) variera selon le
materiau a decaper.
• Maintenir constamment le pistolet thermique en mouvement devant la lame du grattoir.
• Au cours de I'operation, nettoyer tout debris ou peinture ecaillee qui se sera accumule au
sein de I'aire de travail.
• En interieur, rester a distance de tout rideau, papier, tissu d'ameublement ou autre materiau
similaire inflammable.
• Rester surtout conscient que cet outil peut 6tre dangereux mais qu'il peut produire un
excellent resultat Iorsqu'il est utilise correctement. S'exercer sur des projets simples jusqu'a
acquerir une certaine familiarite avec Ibutil. C'est ainsi que I'on apprendra a ma_triser la
bonne technique.
CONSERVER CES CONSIGNES
POUR UTILISATION ULTERIEURE
Description (Fig. 1)
_AVERTISSEMENT : Ne jamais modifier I'outil ni aucun de ses composants, IIy a risques de
dommages corporels ou materiels.
A. Interrupteur marche/arr_t
B. Orifices d'a6ration
C. B6quille
D. R6gulateur de temp6rature d'air (D26950)
Voyant LCD de temp6rature d'air et bouton de r6glage (D26960)
E. Embout
E Anneau d'accrochage
G. Barillet anti-brfilures
USAGE PRI_VU
Votre pistolet thermique DEWALT a 6t6 congu pour d6caper les peintures, souder les tuyaux,
contracter le PVC, souder et modeler les plastiques ainsi que pour des applications g6n6rales
de s6chage et de fonte.
i_AVERTISSEMENT : NE PAS utiliser I'outil en milieu ambiant humide ou en presence de
liquides ou de gaz inflammables.
Ce pistolet thermique est un outil 61ectrique de professionnels. NE PAS le laisser & la port6e
des enfants. Une supervision est n6cessaire aupr_s de tout utilisateur non exp6riment&
ASSEMBLAGE ET REGLAGES
_AVERTISSEMENT : Pour reduire tout risque de dommages corporels, arr6ter et
debrancher I'outil et le laisser refroidir avant tout reg/age ou avant de retirer ou installer toute
piece ou tout accessoire
Temperature de I'air (Fig. 1)
D26950
La temp6rature de I'air peut _tre ajust6e pour I'adapter & une grande vari6t6 d'applications.
Tournez le r6gulateur de temp6rature d'air (D) vers la droite ou vers la gauche pour 61ever ou
r6duire la temp6rature.
D26960
Appuyez rapidement sur le voyant LCD de temp6rature d'air et bouton de r6glage (D) pour
r6gler la temp6rature d6sir6e par incr6ments de 10 °C (50 °F). Pour augmenter ou r6duire la
temp6rature en continu, maintenez appuy6 le voyant LCD de temp6rature d'air et bouton de
r6glage (D). Rel&chez le voyant Iorsque la temp6rature d6sir6e ou le minimum/maximum est
atteint.
1'6cran affichera la temp6rature r6elle, augmentant ou diminuant, jusqu'& ce que la temp6rature
d6sir6e soit atteinte.
R#GLAGE SANS SOUCl DU SYST#ME DE CONTROLE DE LA TEMP#RATURE
D26960
La temp6rature d6sir6e est enregistr6e par la m6moire de I'outil. Chaque fois que le pistolet
thermique est mis en marche, il ajustera le d6bit d'air sur le r6glage de la derni_re temp6rature
utilis6e. Si vous n'6tes pas st]r de ce param_tre, choisissez syst6matiquement une temp6rature
basse et augmentez-la graduellement jusqu'au param_tre d6sir&
Utilisations
Le tableau ci-dessous propose les r6glages appropri6s & diff6rentes applications.
Param_tre Utilisatio ns
Bas • S6cher la peinture et le vernis
€:lev6 • Souder les plastiques
• D6coller les autocollants
• Cirer ou 61iminer la cire
• S6cher le bois avant le masticage
• Contracter le PVC, envelopper et isoler les tubes
• D6geler les tuyaux gel6s
• Modeler tuyaux et panneaux plastiques
• Desserrer 6crous ou boulons rouill6s ou bloqu6s
• D6caper peinture et laque
• Souder les raccords de plomberie
• Retirer le linoleum ou les carreaux en vinyle
Installation des accessoires ad_quats
I'outil est fourni avec un ensemble d'accessoires destin6s & diff6rentes applications.
Icene Description
Embout conique
50 mm (2 po)
Embout queue de poisson
1. Assurez-vous que I'interrupteur marche/arr_t (A) est bien sur la position ,_O _ et que I'outil
est d6connect6 du secteur. Assurez-vous que I'embout a refroidi.
2. Placez I'accessoire d6sir6 sur I'embout.
But
Souder, braser, contracter les gaines
(chauffe sur de petites surfaces
concentr6es)
S6cher et d6caper la peinture,
Retirer le vinyle ou le linol6um,
d6geler (chauffe sur de larges
surfaces)
FONCTIONNEMENT
i_AVERTISSEMENT : S'assurer SYSTEMATIQUEMENT que I'embout pointe a I'oppose de
I'utilisateur et de tout individu present.
i&AVERTISSEMENT : NE RIEN inserer dans I'embout.
AAVERTISSEMENT : Maintenir I'outil d'une seule main comme illustre en figure 2. Ne pas
placer I'autre main sur les orifices d'aeration (fig. 3).
AVANT TOUT UTILISATION
1. Installez I'accessoire ad6quat, recommand6 pour I'application.
2. Ajustez le r6gulateur de temp6rature d'air (D) sur la temp6rature d'air d6sir6e.
Mise en marche et arr_t de I'appareil (Fig. 4)
1. Poussez I'interrupteur marche/arr_t (A) sur le param_tre de d6bit d'air d6sir6 :
Un d6bit d'air r6duit pour chauffer lentement une piece & d6caper.
I : 8,5 piS/min [50 & 400 °C (120 &750 °F)]
8,8 piS/min [65 & 400 °C (150 &750 °F)] (D26960)
Un d6bit d'air 61ev6pour chauffer rapidement une piece & d6caper.
I1:16 piS/min[50 & 600 °C (120 & 1100 °F)]
17,7 piUmin [65 °C & 600 °C (150 & 1100 °F)] (D26960)
2. Pour arr_ter I'outil, d6placez I'interrupteur (A) sur la position ,_O _. D6connectez I'outil du
secteur et laissez-le refroidir avant de le d6placer ou I'entreposer.
D_capage de la peinture
i_AVERTISSEMENT : Se reporter au paragraphe Avis important sous la section Consignes
De S6curit6 Propres Aux Pistolets Thermiques avant d'utiliser I'outil pour decaper la
peinture.
AAVERTISSEMENT :Ne pas decaper les cadres metalliques de fen6tre car la chaleur pourrait
briser le verre.
• Pour decaper les cadres des autres fen6tres, utiliser un embout de protection du verre.
• Pour prevenir I'ignition de toute surface, ne pas diriger I'outil sur le m6me point trop
Iongtemps.
• Eviter toute accumulation de peinture sur le grattoir, car elle pourrait s'enflammer. Si
necessaire, retirer prudemment la peinture ecaillee du grattoir a I'aide d'un couteau.
1. Rattachez I'accessoire ad6quat.
2. Ajustez le r6gulateur de temp6rature d'air (D) sur 61ev&
3. D6marrez routil en choisissant le d6bit d'air d6sir&
4. Dirigez rair chaud sur la peinture & d6caper.
Pour des r6sultats optimums, d6placez le pistolet thermique lentement mais CONSTAMM ENT,
lat6ralement pour distribuer lachaleur uniform6ment. NE PAS S'ATTARDER OU S'ARRC:TER
SUR UN POINT.
5. Lorsque la peinture ramollit, 61iminez-la & I'aide du grattoir.
SE RAPPELER QUE : des 6clats ou de petites particules de peinture pourraient s'enflammer et
_tre 6ject6s dans les trous ou fentes de la surface & d6caper.
Utilisation fixe (Fig. 1)
Cet outil peut aussi _tre utilis6 en mode fixe.
1. Rabattez la b6quille (C) comme illustr6 en figure 1.
2. Installez I'outil sur un 6tabli stable et de niveau. Assurez-vous que I'outil ne tombera pas.
3. Arrimez le cordon 61ectrique pour 6viter qu'il ne s'emm_le ou fasse tomber I'outil de 1'6tabli.
4. D6marrez routil en choisissant le d6bit d'air d6sir&
Contr_le continu de la chaleur (protection contre les
surcharges)
Lorsque I'outil surcharge, cette fonctionnalit6 protege 1'616mentchauffant contre tout dommage
sans pour autant arr_ter I'outil, et/ou sans p6riode de refroidissement.
1. Lorsque la temp6rature est trop 61ev6e, 1'616mentchauffant s'arr_te automatiquement. Le
moteur continuera de fonctionner et de produire de I'air froid.
2. Lorsque la temp6rature aura suffisamment baiss6 (en quelques secondes), 1'616ment
chauffant se remettra automatiquement en marche.
Anneau d'accrochage (Fig. 1)
i_AVERTISSEMENT :Arr6ter SYSTEMATIQUEMENT le pistolet thermique, le deconnecter du
secteur et le laisser refroidir 30 minutes minimum avant de le deplacer ou de I'entreposer.
Pour faciliter le stockage, I'outil peut _tre accroch6 par son anneau (F). Le pistolet thermique
doit _tre rang6 &I'int6rieur.
Temps de refroidissement
I'embout et les accessoires chauffent 6norm6ment pendant I'utilisation. Arr_tez le pistolet
thermique, d6connectez-le du secteur et laissez-le refroidir 30 minutes minimum avant de le
d6placer ou I'entreposer.
Page 5

REMARQUE:Pourr6duireletempsderefroidissement,mettreI'outilsurunetemp6ratured'air
basseetlelaisserfonctionnerquelquesminutesavantd'arr6terlepistolet.
MAINTENANCE
_AVERTISSEMENT : Pour reduire tout risque de dommages corporels, arr6ter et
debrancher I'outil et le laisser refroidir avant tout reg/age ou avant de retirer ou installer toute
piece ou tout accessoire.
Cet outil DEWALT a 6t6 con_u pour fonctionner Iongtemps avec un minimum de maintenance. Le
fonctionnement continu et satisfaisant de I'outil d6pend d'un entretien ad6quat et d'un nettoyage
r6gulier.
Entretien
_AVERTISSEMENT : Expulser tout debris ou poussiere des events a/'aide d'un jet d'air sec
au moins une fois par semaine. Porter une protection oculaire ANSI Z87.1 (CAN/CSA Z94.3)
et respiratoire NIOSH/OSHA/MSHA adequates pour effectuer cette operation.
i_AVERTISSEMENT : Ne jamais utiliser de solvants ou tout autre produit chimique decapant
pour nettoyer les parties non metalliques de I'outil. Ces produits chimiques pourraient attaquer
les materiaux plastiques utilises. Utilisez un chiffon humidifie avec de I'eau et un savon doux.
S'assurer qu'aucun liquide ne penbtre dans I'outil ; ne jamais immerger aucune partie de I'outil
dans un liquide.
Lubrification
Cet outil 61ectrique ne requiert aucune lubrification additionnelle.
Accessoires
J\AVERTISSEMENT : Comme les accessoires autres que ceux offerts par DEWALT n'ont pas
et6 testes avec ce produit, leur utilisation avec cet appareil pourrait comporter un danger. Pour
reduire tout risque de dommages corporels, seuls des accessoires DEWALT recommandes
doivent 6tre utilises avec cet appareil.
Les accessoires recommand6s pour cet outil sont vendus s6par6ment chez les distributeurs
Iocaux ou dans les centres de r6paration agr66s. Si vous avez besoin d'aide pour Iocaliser ces
accessoires, veuillez contacter DEWALT Industrial Tool Co., 701 East Joppa Road, Baltimore,
MD 21286 ou appeler 1-800-4-DEWALT (1-800-433-9258) ou vous rendre sur notre site www.
dewalt.com.
Rdparations
Pour assurer votre S¢:CURIT¢: et la FIABILIT¢: du produit, toute r6paration, maintenance et tout
r6glage (y compris I'inspection et le remplacement des balais) doivent 6tre effectu6s dans un
centre de r6paration en usine DEWALT, un centre de r6paration DEWALT agr66 ou par tout autre
personnel de r6paration qualifi6. Utilisez syst6matiquement des pi_ces de rechange d'origine.
Garantie limit_ de trois ans
DEWALT r6parera, sans frais, tout produit d6fectueux caus6 par un d6faut de mat6riel ou de
fabrication pour une p6riode de trois ans & compter de la date d'achat. La pr6sente garantie
ne couvre pas les pi_ces dont la d6fectuosit6 a 6t6 caus6e par une usure normale ou rusage
abusif de routil. Pour obtenir de plus amples renseignements sur les pi_ces ou les r6parations
couvertes par la pr6sente garantie, visiter le site www.dewalt.com ou composer le 1-800-4-
DEWALT (1-800-433-9258). Cette garantie ne s'applique pas aux accessoires et ne vise pas les
dommages caus6s par des r6parations effectu6es par un tiers. Cette garantie conf_re des droits
16gaux particuliers & racheteur, mais celui-ci pourrait aussi b6n6ficier d'autres droits variant d'un
6tat ou d'une province & I'autre.
En plus de la pr6sente garantie, les outils DEWALT sont couverts par notre :
CONTRAT D'ENTRETIEN GRATUlT D'UN AN
DEWALT entretiendra I'outil et remplacera les pi_ces us6es au cours d'une utilisation normale et
ce, gratuitement, pendant une p6riode d'un an & compter de la date d'achat (& rexception des
articles de la cloueuse susceptibles de s'user rapidement, comme les joints toriques et les lames
de I'enfonceur), et la
GARANTIE DE REMBOURSEMENT DE 90 JOURS
Si I'acheteur n'est pas enti_rement satisfait, pour quelque raison que ce suit, du rendement de
I'outil 61ectrique, du laser ou de la cloueuse DEWALT, celui-ci peut le retourner, accompagn6
d'un re£u, dans les 90 jours & compter de la date d'achat pour obtenir un remboursement
int6gral, sans aucun probl_me.
AM#RIQUE LATINE : Cette garantie ne s'applique aux produits vendus en Am6rique latine.
Pour ceux-ci, veuillez consulter les informations relatives & la garantie sp6cifique pr6sente dans
I'emballage, appeler I'entreprise locale ou consulter le site Web pour les informations relatives
&cette garantie.
REMPLACEMENT GRATUlT DES #TIQUETTES D'AVERTISSEMENT : Si les 6tiquettes
d'avertissement deviennent illisibles ou sont perdues, composer le 1-800-4-DEWALT (1-800-
433-9258) pour les remplacer sans frais.
gЧЧЧЧЧ .EA Cu.
SER,
t , , , _ , TO REDUCETHERJSK
SHOCK,DONOTEXPOSETHiSPRODUCT
TORAiNORMOISTURE.STOREiNDOORS.
READiNSTRUCTiONMANUALBEFORE
USING.ALWAYSUSEPROPEREYEAND
RESPIRATORYPROTECTION,
ELECTRiCA,NO EXPONGA ESTE PRODUCTOALLUVJAO HUMEDAD. ALMACENE AL
iNTERiOR. LEA EL MANUAL DE INSTRUCCIONES ANTES DE UTIUZAB. UT|LICE
SIEMPRE LA PROTECCION OCULARY BESPJBATOR|A DEBiDA. POUR REDUJRE
TOUT RISQUE D'INCENDIE OU DE.CHOCS ELECTRI.QUES,PROTr:GERCE PRODUIT
CONTRE LA PLUJEOUL'HUMJDJTE.ENTREPOSERA LINTERJEUR. LJRELE MANUEL
BE L'UTiLiSATEURAVANT TOOTEUTJLiSATION. PORTERSYSTEMATiQUEMENT ON
SYSTEME DE PROTECTION OCULAiREET DES VOLESRESPiRATOiBESADEQUATS.
DEWALT iNDUSTRiAL TOOL CO., BALTIMORE, MD 21286 USA FOB SERVICE iNFORMATiON, CALL 1 -OO04-DEWALT Www.REWALT.c0m
/ Definiciones: Normas de seguridad
Las siguientes definiciones describen el nivel de gravedad de cada palabra de sepal. Lea el
manual y preste atenci6n a estos simbolos.
APELIGRO: Indica una situacidn de peligro inminente que, si no se evita, provocara la
muerte o lesiones graves.
AADVERTENClA: Indica una situacidn de peligro potencial que, si no se evita, podria
provocar la muerte o lesiones graves.
i_ATENClON : Indica una situacidn de peligro potencial que, si no se evita, puede provocar
lesiones leves o moderadas.
AVISO : Se refiere a una practica no relacionada a lesiones corporales que de no evi-
tarse puede resu/tar en da#os a la propiedad.
SI USTED TIENE ALGUNA PREGUNTA O COMENTARIO ACERCA DE ESTA
O CUALQUIER OTRA HERRAMIENTA DEWALT, LLAMENOS SIN COSTO AL:
1-800-4-DEWALT (1-800-433-9258)
_ PELIGRO: Para reducir el riesgo de lesiones, lea el manual de instrucciones. No ajustarsea/as instrucciones siguientes puede ser causa de choque electrico, incendio y/o lesiones
graves.
INSTRUCCIONES DE SEGURIDAD IMPORTANTES
LEA ESTAS INSTRUCCIONES
Instrucciones de seguridad para el uso de pistolas de
aire caliente
• Para reducir el riesgo de explosidn, NO use en una cabina de rocfo de pintura o dentro de
3,0 metros (10 pies) de una operaci6n de rocfo de pintura.
OFFiRE ORELECTRIC
PARAREDUCiRELRIESGO
DEINCENDIO O DESCARGA
J
• Este producto esta equipado con una clavija polarizada (una pata es mas ancha que la
otra). Para reducir el riesgo de choque electrico, esta clavija s61oencaja de una forma en los
enchufes polarizados. Si la clavija no se acopla al enchufe, inviertala. Si a#n as[ no entra,
comunfquese con un electricista calificado. No modifique ni cambie nunca la clavija.
• NO use esta herramienta para quitar pinturas de plomo. Los pedazos, residuos y gases
de pintura pueden contener plomo, que es venenoso.
• Las areas ocultas, como detras de paredes o cielorrasos, debajo de pisos, tablas de plaf6n u
otros paneles, pueden contener materiales inflamables que podrfan encenderse al usar una
pistola de aire caliente cuando trabaje en estos lugares. Estos materiales podrfan encenderse
en forma imperceptible al comienzo, Io que podrfa resultar en dai_os de propiedad y lesiones
a personas. Cuando trabaje en este tipo de lugar, mantenga la pistola de aire caliente en
movimiento, hacia adelante y hacia atras. El detenerse o pausar en un lugar podrfa prender
el panel o los materiales que se encuentran detras del mismo.
NOTA: Estas pistolas de aire caliente son capaces de emitir temperaturas superiores a los
1000 °Fahrenhe#
• NO use esta herramienta como secadora de pelo.
• NO use esta herramienta para calentar comida.
• NO deje la pistola de aire caliente sobre superficies inflamables mientras este en operaci6n
o inmediatamente despues de apagarla. Deje que la herramienta se enfrfe bien antes de
guardarla. Siempre ponga la pistola de aire caliente sobre una superficie plana y nivelada de
modo que la punta quede hacia arriba.
• NO Io use en frente de materiales explosivos.
• Afirme y fije cualquier artfculo movible mientras raspe.
• NUNCA obstruya la entrada de aireo la salida de aire de la pistola para evitar la acumulaci6n
excesiva de calor, Io cual puede dai_ar la herramienta.
• Aseg#rese de dirigir la salida de aire caliente en una direcci6n segura; alejela de otras
personas o de objetos inflamables.
• NO quite la tapa del barril de aire caliente durante el uso.
• MANTENGA LOS DEDOS ALEJADOS DE LA PUNTA DE METAL; se calienta mucho y
sigue caliente 30 minutos despues de cada uso. Use guantes para protegerse /as manos.
• SIEMPRE mantenga la punta alejada de/cable.
• NO toque la punta contra ninguna superficie mientras este en operaci6n o al poco tiempo de
haber dejado de operarla.
• NO introduzca nada por la punta, porque podrfa causar un choque electrico. No mire dentro
de la punta cuando la unidad esta prendida por la producci6n de altas temperaturas.
• Las astillas y partfculas peque#as de pintura pueden encenderse y luego introducirse con el
aire de la pistola dentro de orificios y ranuras en la superficie a remover.
• NO aplique el aire caliente sobre la misma superficie durante un perfodo largo.
• NO queme la pintura. Use la espatula incluida y guarde la punta por Io menDs a 25 mm (1
pulg.) de una superficie pintada. Si trabaja en el sentido vertical, trabaje hacia abajo para que
no caiga la pintura dentro de la herramienta y la parte quemada.
• NO permita la adherencia de pintura a la punta o espatula. Puede encenderse.
• SIEMPRE use espatulas y cuchillos de buena calidad cuando remueva pintura.
• NO use la pistola de aire caliente con removedores de pintura qufmicos.
• NO use/as puntas de accesorio como espatulas.
• NO apunte el fluiD de aire de la pistola de aire caliente directamente sobre vidrio. Puede rajar
el vidrio y podrfa resultar en dai_os de propiedad y lesiones corporales.
• Mantenga las etiquetas y las placas nominales, porque incluyen informacidn importante.
• Coloque la pistola de aire caliente sobre una superficie estable y pareja si no la tiene a la
mano. Coloque el cable en un lugar que no va a volcar la pistola de aire caliente.
• Este siempre atento a que esta herramienta puede encender materiales inflamables y
ablandar o derretir otros. No importa que tarea este desempei_ando, siempre proteja y
mantenga alejados de la pistola aquellos materiales.
• Es posible que en ocasidn note algo de humo salir de la herramienta una vez apagada. Este
es el resultado del calentamiento de residuos de aceite depositados en el elemento de calor
durante el proceso de fabricacidn.
• Use proteccion ocular y otro equipo de seguridad.
• No abuse el cable. Nunca use el cable para cargar, jalar o desenchufar la herramienta.
Mantenga el cable alejado de las fuentes de calor, el aceite, las orillas afiladas o las
piezas en movimiento. Los cables da_ados o enredados aumentan el peligro de choque
electrico.
• Si emplea una herramienta electrica en el exterior, use un cable de extension adecuado
para el uso afuera. El uso de un cable de extensi6n para el exterior reduce el peligro de
choque electrico.
• No exponga la herramienta a condiciones de humedad o Iluvia. El agua que entra dentro
de una herramienta aumenta el riesgo de choque electrico.
• No ponga en peligro su estabilidad. Mantengase siempre bien apoyado y equilibrado.
Esto permite controlar mejor la herramienta si se produce alg#n imprevisto.
• Cuando no las utilice, guarde las herramientas fuera del alcance de los nilus y no
permita la operacion en manos de usuarios que no conocen la herramienta o las
instrucciones. Las herramientas son peligrosas en manos de usuarios no capacitados.
• Su herramienta debe de ser reparada por personal de reparacion cafificado usando
solo repuestos originales. Esto asegura la seguridad de la herramienta.
• Las rejillas de ventilacion suelen cubrir piezas en movimiento, por Io que se debe
evitar el contacto con elias. Las piezas en movimiento pueden atrapar prendas de vestir
sueltas, joyas o cabellos largos.
• Los hilos del alargador deben ser de un calibre apropiado (AWG o American Wire
Gauge) para su seguridad. Mientras menor sea el calibre de/hilo, mayor la capacidad
de/cable. Es decir, un hilo calibre 16 tiene mayor capacidad que uno de 18. Un cable de
un calibre insuficiente causara una cafda en la tensi6n de la Ifnea dando por resultado
una perdida de energfa y sobrecalentamiento. Cuando se utilice mas de un alargador para
completar el largo total, aseg#rese que los hilos de cada alargador tengan el calibre mfnimo.
La tabla siguiente muestra el tama#o correcto a utilizar, dependiendo de la Iongitud de/cable
y de/amperaje nominal de la placa de identificaci6n. Si tiene dudas sobre cua/calibre usar,
use un calibre mayor. Cuanto mas peque#o sea el n#mero de/calibre, mas resistente sera el
cable.
Calibre minimo para cables
de alimentacion
Voltios LarDo total del cable en metros (pies)
Mas
Amperaje
de
o
6
lO
12
No mas de
6
10
12
16
120V 7.6 (25) 30.5 (100) 45.7 (150)
240V 15.2 (50) 61.0 (200) 91.4 (300)
18
18
16
14
15.2 (50)
30.5 (100)
AWG
16
16
16
12
16 14
14 12
14 12
No recomendado
_&ADVERTENCIA: Siempre use protecci6n ocular. TodD usuario o persona circunstante
debera utilizar protecci6n ocular en conformidad con ANSI Z87.1.
AADVERTENClA: Siempre use proteccion auditiva personal en conformidad con ANSI
$12.6 (S3.19) durante el uso de este aparato. Bajo algunas condiciones y duraciones de uso,
el ruido producido por este producto puede contribuir a la perdida auditiva.
i_ADVERTENClA: Parte de/polvo generado al lijar, serrar, esmerilar o taladrar, as[ como
al realizar otras actividades de/ sector de la construcci6n, contienen productos qufmicos
que pueden producir cancer, defectos congenitos u otras afecciones reproductivas. Algunos
ejemplos de estos qufmicos son:
• plomo procedente de pinturas basadas en plomo,
• 6xido de silicio cristalino procedente de ladrillos, cemento y otros productos de
mamposterfa, y
• arsenico o cromo procedente de madera tratada qufmicamente (CCA).
Su riesgo de exposici6n a estos qufmicos varfa, dependiendo de la frecuencia con la cual realiza
usted este tipo de trabajo. Para reducir su exposici6n a estos qufmicos, trabaje en un lugar
con buena ventilaci6n y trabaje con equipo de seguridad aprobado, como mascaras antipolvo
especialmente dise#adas para filtrar partfculas microsc6picas.
AADVERTENClA: USE SIEMPRE LENTES DE SEGURIDAD. Los anteojos de uso diario
NO son anteojos de seguridad. Utilice ademas una mascara para la cara o guardapolvo si
la operaci6n de corte genera demasiado polvo. Todos los usuarios y personas circunstantes
DEBEN Ilevar protecci6n ocular en conformidad con:
• Protecci6n ocular ANSI Z87.1 (CAN/CSA Z94.3),
Page 6

• Proteccidn auditiva ANSI S12.6 (S3.19),
• Protecci6n respiratoria NIOSH/OSHA/MSHA.
La etiqueta de su herramienta puede incluir los siguientes sfmbolos. A continuacidn se
indican los sfmbolos y sus definiciones:
V.................... voltios
Hz .................. hercios
min ................. minutos
corriente directa
@ ................... Construccidn de clase I
(tierra)
[] .................... Construccidn de clase II
(doble aislamiento)
sfpm .............. pies de superficie
por minuto (sfpm)
LAS PERSONAS QUE REMUEVEN PINTURA DEBEN SIEMPRE DE RESPETAR ESTAS
PAUTAS:
i_,ADVERTENCIA: Es importante tener mucho cuidado al remover pintura. Los pedazos,
residuos y gases de pintura pueden contener plomo, que es venenoso. Cualquier pintura
aplicada antes de 1977 puede contener plomo, y es probable que la pintura aplicada a casas
construidas antes de 1950 contenga plomo. Una vez depositada sobre una superficie, el
contacto de las manos con ella puede resultar en una ingestidn de plomo si se Ileva las manos
a la boca. La exposicidn a incluso niveles bajos de plomo puede causar dafios irreversibles al
cerebro y al sistema nervioso; los nifios y bebes no natos son particularmente vulnerables.
Antes de comenzar el proceso de remover pintura, deberfa determinar si la pintura a remover
contiene plomo o no. Esto puede hacerlo su oficina local de la salud o un profesional que use un
analizador de pintura para verificar el contenido de plomo de la pintura a remover. LA PlNTURA
EN BASE A PLOMO SOLO DEBE SER REMOVIDA POR UN PROFESIONAL Y NO DEBER[A
SER REMOVIDA CON UNA HERRAMIENTA QUE EMITA AIRE CALIENTE. La persona que
quita la pintura debe de respetar estas pautas:
1. Coloque la pieza de trabajo afuera. Si esto no es posible, el area de trabajo debe de estar
bien ventilado. Abra las ventanas y coloque un ventilador de extraccidn dentro de una de
elias. Aseg#rese que el ventilador desplaza el aire de adentro a afuera.
2. Quite o cubra alfombras, tapetes, muebles, ropa, utensilios de cocina y conductos de aire.
3. Coloque las laminas de proteccidn en el area de trabajo para contener astillas opedazos de
pintura. Vista ropa protectora como camisas de trabajo adicionales, overoles y cascos.
4. Trabaje en un cuarto a la vez. Debe de quitar o colocar el mobiliario en medic del cuarto y
cubrirlo. El area de trabajo debe de ser aislado del resto de la vivienda sellando las puertas
con laminas de proteccidn.
5. Nifios, mujeres embarazadas oprobablemente embarazadas y madres lactantes no deberfan
de estar presentes en el area de trabajo hasta que el trabajo haya sido completado.
6. Utilice una mascara de respiracidn antipolvo o una mascara de respiracidn de doble filtro
(polvo y humo) que ha sido aprobado pot Occupational Safety and Health Administration
(OSHA), National Institute of Safety and Health (NIOSH) o United States Bureau of Mines.
Puede obtener estas mascaras y estos filtros reemplazables en las grandes ferreterfas.
Aseg#rese que la mascara le queda bien. Las barbas y el vello de la cara pueden
impedir un sello correcto de la mascara. Cambie los filtros a menudo. LAS MASCARAS
DESECHABLES DE PAPEL NO SON ADECUADAS.
7. Tenga cautela cuando opere la pistola de aire caliente. La pistola de aire caliente debe de
permanecer en movimiento porque el exceso de calor genera humos que el operador podrfa
inhalar.
8. Mantenga la comida y las bebidas fuera del area de trabajo. Debe de lavarse las manos, los
brazos y la cara y enjuagar la boca antes de comer o de beber. No fume o mastique chicle
o tabaco en el area de trabajo.
9. Limpie el suelo de pintura y polvo acumulados con un trapeador mojado. Use un trapo
mojado para limpiar las paredes, umbrales y las superficies que acumularon pintura o
polvo. NO LIMPIE CON UNA ESCOBA, UN TRAPO SECO 0 UNA ASPIRADORA. Use un
detergente con un alto nivel de fosfato o fosfato tribasico de sodio (TSP) para lavar y trapear
las areas.
10. Cuando finalice cada sesidn de trabajo, coloque los pedazos de pintura y los restos dentro
de una bolsa de plastico doble, cierre la bolsa con cinta adhesiva o un lazo de enrollo y
deshagase de la bolsa correctamente.
11. Quftese la ropa protectora y los zapatos de trabajo dentro del area de trabajo para no
esparcir el polvo dentro de la vivienda. Lave la ropa de trabajo pot separado. Limpie los
zapatos con un trapo mojado que puede lavar con la ropa de trabajo. Lavese el cabello y el
cuerpo con jabdn y agua.
A.................. amperios
W................. vatios
* ............... corriente altema
no ................no velocidad sin carga
G ................. terminal de conexidn a tierra
...............sfmbolo de advertencia de
seguridad
BPM ............ golpes pot minuto
.../min ..........revoluciones o
inversiones
por minuto
AVISO IMPORTANTE
Para que esta herramienta sirva de removedor de pintura eficaz, debe de producir temperaturas
extremadamente elevadas. Por Io tanto, el removedor es capaz de prender papel, madera,
residuos de pintura y de barniz y materiales similares.
Cuando se familiarice mas con la herramienta y desarrolle la tecnica apropiada, reducira
enormemente el peligro de causar un incendio accidentalmente, iAI establecer la tecnica
apropiada, el mejor metodo es la PR,4CTICA! Trabaje en proyectos simples para remover la
pintura, preferiblemente afuera, hasta que "sepa" cdmo usar el removedor de manera segura y
eficaz.
CUANDO PRACTIQUE, RESPETE LAS PAUTAS SIGUIENTES PARA SU SEGURIDAD
• Aseg#rese siempre que la herramienta esta apagada y desenchufada sin supervisidn.
• Limpie la cuchilla de la espatula a menudo durante el uso. La acumulacidn de residuo sobre
la cuchilla es sumamente inflamable.
• Experimente para encontrar la distancia ideal entre la punta de la herramienta y la superficie
de trabajo. Esta distancia [25.4 mm-50.8 mm (1-2 pulg.)] puede cambiar dependiendo del
material que desea remover.
• La pistola de aire caliente siempre debe de permanecer delante de la cuchilla del
removedor.
• A medida que complete el trabajo, limpie los pedazos de pintura suelta acumulados alrededor
del area de trabajo.
• Cuando trabaje adentro, mantengase alejado de cortinas, papeles, tapizado y materiales
inflamables parecidos.
• Sobre todo, no se olvide que este aparato es serio y capaz de producir resultados excelentes
si Io usa correctamente. Practique con proyectos simples hasta que se sienta a gusto con su
removedor. Sdlo entonces habra dominado la tecnica apropiada.
GUARDE ESTAS INSTRUCCIONES
PARA SU FUTURA UTILIZACION
Descripcidn (Fig. 1)
AADVERTENCIA: Nunca cambie la herramienta o piezas de la herramienta. Podrfa producir
lesiones corporales o dafios.
A. Interruptor de encendido y apagado
B. Orificios de ventilaci6n
C. Pie de apoyo
D. Bot6n de ajuste de la temperatura del aire (D26950)
Ajustador e indicador de latemperatura del aire con pantalla de cristal liquido (D26960)
E. Punta
E Anillo para colgar la herramienta
G. Tapa del barril de aire caliente
USO DEBIDO
Su pistola de aire caliente DEWALT ha sido diseSada para remover pintura, soldar tuberia,
encoger PVC, soldar y torcer plasticos y secar y descongelar en general.
i_ADVERTENCIA: NO utilice la herramienta en condiciones h_medas o en la presencia de
Ifquidos o gases inflamables.
Estas pistolas de aire caliente son herramientas el_ctricas profesionales. NO permita que un
niSo juegue con ellos. 'Si el operador no tiene experiencia operando esta herramienta, su uso
debera ser supervisado.
MONTAJE Y AJUSTES
i_ADVERTENCIA: Para reducir el riesgo de lesiones, apague y desenchufe la herramienta
y permita que se enfrie antes de realizar ajustes o de quitar o poner accesorios.
Temperatura del aire (Fig. 1)
D26950
Puede ajustar la temperatura del aire para que corresponda a una gran variedad de usos. Gire
el bot6n de ajuste de la temperatura del aire (D) hacia la derecha o la izquierda para aumentar
o disminuir el nivel de calor.
D26960
Presione y suelte el ajustador e indicador de la temperatura del aire con la pantalla de cristal
liquido (D) para establecer la temperatura deseada en incrementos de 10°C (50°F). Para
aumentar o disminuir continuamente la temperatura, presione y mantenga presionado el
ajustador e indicador de la temperatura del aire (D). Suelte el indicador cuando haya obtenido
la temperatura deseada o la temperatura minima/maxima.
La pantalla le indica el aumento/la disminuci6n de temperatura actual hasta haber Ilegado a la
temperatura deseada.
SISTEMA PARA ESTABLECER Y OLVIDAR EL CONTROL DE LA TEMPERATURA
D26960
Puede guardar la temperatura deseada en la memoria de la herramienta. La pistola de aire
caliente se calienta hasta la t]ltima temperatura seleccionada a cada vez que prenda la pistola
de aire caliente, con respecto al flujo de aire. Si no conoce la temperatura seleccionada, siempre
arranque a una temperatura baja y aumente latemperatura gradualmente hasta haber Ilegado
a la temperatura deseada.
Aplicaciones
La tabla siguiente sugiere
Ajuste
Bajo
Alto • Para soldar plastico
el ajuste segt]n el uso.
Uso
• Para secar pintura y barniz
• Para quitar etiquetas
• Para encerar y quitar cera
• Para secar madera mojada antes de rellenar
• Para encoger envoltura de policloruro de vinilo y
tubos de aislamiento
• Para descongelar tubos congelados
• Para torcer tubos y hojas de plastico
• Para soltar tuercas y pernos demasiado
apretados u oxidados
• Para quitar pintura y laca
• Para soldar juntas de plomeria
• Para quitar baldosas de vinilo o de lin61eo
Para instalar el accesorio correcto
Esta herramienta incluye un juego de accesorios para diferentes usos.
Icono Descripci6n Uso
Punta en cono Soldar, Encoger fundas (calor por encimade una pequeSa regi6n concentrada)
Cola de pescado Remover vinilo o lin61eo,
50 mm (2 pulg.) Secar, remover pintura,
Punta de superficie descongelar (calor esparcido sobre una
grande regi6n)
1. Asegt]rese que el interruptor de encendido y apagado (A) est6 en la posici6n O y que la
herramienta est6 desenchufada. Asegt]rese que la punta se haya enfriado.
2. Coloque el accesorio deseado sobre la punta.
OPERACION
i_ADVERTENCIA: Aseg_rese que la punta SIEMPRE apunte lejos de usted y observadores.
i_ADVERTENClA: NO debe de caer nada dentro de la punta.
i_,ADVERTENClA: Use s61o una mano para sujetar la herramienta, tal como indicado en la
Figura 2. No coloque su otra mano por encima de las rejillas de ventilaci6n (Fig. 3).
ANTES DE SU OPERAClON
1. Conecte el accesorio correcto recomendado para el uso.
2. Gire el bot6n de ajuste de la temperatura del aire (D) hasta la temperatura de aire
deseada.
Encender y apagar (Fig. 4)
1. Presione el interruptor de encendido y apagado (A) hasta el ajuste de flujo de aire
deseado:
Un flujo de aire bajo para calentar la pieza de trabajo lentamente.
I: 8,5 CFM [50 °-400 °C (120-750 °F)]
8,8 CFM [65 °- 400 °C (150-750 °F)] (D26960)
Un flujo de aire alto para calentar la pieza de trabajo rapidamente.
I1:16 CFM [50 °- 600 °C (120-1100 °F)]
17,7 CFM [65 °-600 °C (150-1100 °F) (D26960)
2. Para apagar la herramienta, presione el interruptor de encendido y apagado (A) hasta la
posici6n O. Desenchufe la herramienta y permita que se enfrie antes de mover o guardar la
herramienta.
Remover pintura
_4DVERTENCIA: Consulte elAviso importante bajo Instrucciones de Seguridad Adicionales
para Pistolas de Aire Caliente antes de usar la herramienta para remover pintura.
AADVERTENClA: No remueva los marcos de ventanas de metal porque el calor puede rajar
el vidrio.
• AI remover pintura de otros marcos de ventanas, use una punta de protecciSn de vidrio.
• Para evitar de prender la superficie, no deje la herramienta directamente sobre un sSIo
lugar demasiado tiempo.
• No acumule la pintura sobre el removedor, porque puede originar la igniciSn. En caso
necesario, remueva los pedazos de pintura del removedor con cautela usando una
cuchilla.
1. Instale el accesorio apropiado.
2. Gire el bot6n de ajuste de la temperatura del aire (D) al nivel alto.
3. Prenda la herramienta escogiendo el flujo de aire deseado.
4. Dirija el aire caliente sobre la pintura que debe de remover.
ObtendrA los mejores resultados si mueve la pistola de aire caliente despacio, pero
CONSTANTEMENTE, de un lado al otro para distribuir el calor uniformemente. NO SE
DETENGA EN UN SOLO LUGAR.
5. Cuando la pintura suavice, puede remover la pintura usando una espAtula de mano.
RECUERDE: Pueden encenderse las astillas y las pequeSas particulas de pintura removida
sopladas dentro agujeros y rajas en lasuperficie de trabajo.
Uso estacionario (Fig. 1)
Tambi_n se puede usar esta herramienta en el modo estacionario.
1. Pliegue el pie de apoyo (C), como se muestra en la Figura 1.
2. Coloque la herramienta sobre una mesa de trabajo nivelada y estable. Asegt]rese de no
volcar la herramienta.
3. Sujete el cable el_ctrico correctamente para que no se enrede alrededor de la herramienta
y para que no se caiga de la mesa de trabajo.
4. Encienda la herramienta seleccionando el flujo de aire deseado.
Control de calentamiento constante (proteccidn de
sobrecarga)
Cuando se sobrecarga la herramienta, esta caracteristica impide los daSos al elemento de
calentamiento sin detener la herramienta y/o sin necesitar un periodo de enfriamiento.
Page 7

1.Cuandolaherramientasecalientademasiado,elelementodecalentamientoseapaga.El
motorsigueenmarchayproduceairefrio.
2.Cuandolatemperaturahabajadosuficiente(despu6sdeunossegundos)elelementode
calentamientoseprendeautomaticamente.
Anillo de la herramienta (Fig. 1)
_ADVERTENCIA: SIEMPRE debe de apagar la pistola de aire caliente, desconectarla de la
fuente de alimentaci6n y dejar que la herramienta se enfrfe por Io mends 30 minutos antes de
moverla o almacenarla.
Para facilitar el almacenamiento, puede colgar la herramienta usando el anillo de la herramienta
(F). Debe de almacenar la pistola de aire caliente en el interior.
Periodo de enfriamiento
La punta y el accesorio se calientan mucho durante el uso. Apague la pistola de aire caliente,
descon6ctela de la fuente de alimentaci6n y permita que se enfrie por Io menDs 30 minutos
antes de moverla o almacenarla.
NOTA: Para reducir el periodo de enfriamiento, encienda la herramienta con la temperatura de
aire mas baja y d_jela prendida algunos minutos antes de apagar la pistola de aire caliente.
MANTENIMIENTO
_ADVERTENCIA: Para reducir el riesgo de lesiones, apague la herramienta y desench_fela,
y permita que se enfrie antes de instalar y de remover accesorios, antes de realizar ajustes o
antes de remover/instalar piezas o accesorios.
Su herramienta el_ctrica DEWALT ha sido diseSada para operar durante un periodo largo de
tiempo necesitando un minimo de mantenimiento. Su operaci6n continuamente satisfactoria
depende del cuidado apropiado de la herramienta y regularidad de limpieza.
Limpieza
i_,ADVERTENCIA: Use aire seco para soplar el polvo de todas las rejillas de ventilaci6n por
Io menDs una vez por semana. Lleve protecci6n ocular ANSI Z87.1 (CAN/CSA Z94.3) debida
y protecci6n respiratoria NIOSH/OSHA/MSHA debida al efectuar esto.
i_ADVERTENClA: Nunca utilice solventes u otros qufmicos fuertes cuando limpie las piezas
no metalicas de la herramienta. Estos qufmicos pueden debilitar los materiales de plastico
utilizados en estas piezas. Use un paho humedecido con agua y jab6n suave. No permita que
ning#n Ifquido se introduzca en la herramienta; no sumerja ninguna parte de la herramienta en
un Ifquido.
Lubricacidn
Su herramienta el_ctrica no requiere lubricaci6n adicional.
Accesorios
AADVERTENClA: Como otros accesorios fuera de los ofrecidos por DEWALT no han sido
probados con este producto, el uso de tales accesorios con esta herramienta puede ser
peligroso. Para reducir el riesgo de lesiones, sdlo se deberfan usar los accesorios recomendados
por DEWALT con este producto.
Los accesorios recomendados para su herramienta estan disponibles con un cargo adicional en
su distribuidor local o en el centro de servicio autorizado. Si necesita ayuda para ubicar algQn
accesorio, por favor p6ngase en contacto con DEWALT Industrial Tool Co., 701 East Joppa
Road, Baltimore, MD 21286, Ilame al 1-800-4- DEWALT (1-800-433-9258) o visite nuestro sitio
web www.dewalt.com.
Reparaciones
Las reparaciones, el mantenimiento y los ajustes de este producto (incluyendo la inspecci6n y el
remplazo del cepillo) deberian ser realizados por un centro de servicio de fabrica DEWALT, un
centro de servicio autorizado por DEWALT u otro personal de servicio calificado para garantizar
la SEGURIDAD y la CONFIABILIDAD. Siempre utilice repuestos id_nticos.
Pdliza de Garantia
IDENTIFICACION DEL PRODUCTO:
Sello o firma del Distribuidor.
Nombre del producto: Mod./Cat.:
Marca: NQm. de serie:
(Datos para ser Ilenados por el distribuidor)
Fecha de compra y/o entrega del producto:
Nombre y domicilio del distribuidor donde se adquiri6 el producto:
DXXXXX.EATGUN
SER.
_r/_F,_[_ TOREDUCETHERiSK
SHOCK,DONOTEXPOSETHiSPRODUCT
TORAiNORMOISTURE.STOREiNDOORS.
READiNSTRUCTiONMANUALBEFORE
USING.ALWAYSUSEPROPEREYEAND
RESPIRATORYPROTECTION.
V _ | . t _ ' kA k PARAREDUCIRELR|ESGO
ELECTRJCA,NO EXPONGAESTEPRODUCTOA LLUViA 0 HUMEDAD. ALMACENE AL
iNTERiOR. LEA ELMANUAL DE INSTROCCJONESANTES BE OTiLiZAR. UTJL|CE
SJEMPRE LA PROTECCBONOCULARY RESpJRATORIA DEBJDA. POUR REDUIRE
TOOT RISQUE D'JNCENDJEOU BE CHOCS ELECTRJ.QUES,pROTI_GERCE PRODUJT
CONTRE LA PLOJEOU L'HUMiDJTE. ENTREPOSERA L'JNTERJEUR,URE LE MANUEL
DE L'U.TJLJSATEORAVANT TOUTE UTiLJSATION. PORTERSYSTEMATiQUEMENT UN
SYSTEME DE PROTECTIONOCULAiRE ET DES VOJESRESPiRATOJRESADEQUATS,
OEWALT iNDUSTRIAL TOOL CO., BALTIMORE, MO 21286 USA FOR SERVICE iNFORMATION, CALL 1-8064-DEWALT www.DEWALT.com
PARA REPARACION Y SERVIClO DE SUS HERRAMIENTAS ELI_CTRICAS,
FAVOR DE DIRIGIRSE AL CENTRO DE SERVICIO MAS CERCANO
CULIACAN, SIN
Blvd.Emiliano Zapata 5400-1 Poniente
Col. San Rafael
GUADALAJARA, JAL
Av. La Paz #1779 - Col. Americana Sector Juarez
MEXICO, D.F.
Eje Central Lazaro Cardenas No. 18
Local D, Col. Obrera
MERIDA, YUC
Calle 63 #459-A - Col. Centro
MONTERREY, N.L.
Av. Francisco I. Madero 831 Poniente - Col. Centro
PUEBLA, PUE
17 Norte #205 - Col. Centro
QUERETARO, QRO
Av. San Roque 274 - Col. San Gregorio
SAN LUlS POTOSl, SLP
Av. Universidad 1525 - Col. San Luis
TORREON, COAH
Blvd. Independencia, 96 Pte. - Col. Centro
VERACRUZ, VER
Prolongaci6n Diaz Mir6n #4280 - Col. Remes
VILLAHERMOSA, TAB
Constituci6n 516-A - Col. Centro
PARAOTRAS LOCALIDADES:
Si se encuentra en M_xico, por favor Ilame al (55) 5326 7100
Si se encuentra en U.S.,por favor Ilarne al
1-800-433-9258(1-800 4-DEWALT)
ESPECIFICACIONES
Voltaje: 120 V c.a. - 120 V c.a.
Amperaje: 13,0 A 13,0 A
Frecuencia: 60 Hz 60 Hz
Vatios: 1 550 W 1 550 W
Temperatura: 120-1 100 °F 150-1 100 °F
OFFiREORELECTRIC
D26950 D26960
BEINCENDIO 0 DESCARGA
(667) 717 89 99
(33) 3825 6978
(55) 5588 9377
(999) 928 5038
(818) 375 23 13
(222) 246 3714
(442) 2 17 63 14
(444) 814 2383
(871) 716 5265
(229) 921 7016
(993) 312 5111
Este producto esta garantizado por un aSo a partir de la fecha de entrega, contra cualquier
defecto en su funcionamiento, asi como en materiales y mano de obra empleados para su
fabricaci6n. Nuestra garantia incluye la reparaci6n o reposici6n del producto y/o componentes
sin cargo alguno para el cliente, incluyendo mano de obra, asi como los gastos de transportaci6n
razonablemente erogados derivados del cumplimiento de este certificado.
Para hacer efectiva esta garanfia debera presentar su herramienta y esta p61izasellada por
el establecimiento comercial donde se adquiri6 el producto, de no contar con _sta, bastara la
factura de compra.
EXOEPOIONES.
Esta garanfia no sera valida en los siguientes casos:
• Cuando el producto se hubiese utilizado en condiciones distintas alas normales;
• Cuando el producto no hubiese sido operado de acuerdo con el instructivo de uso que se
acompaSa;
• Cuando el producto hubiese sido alterado o reparado por personas distintas a las
enlistadas al final de este certificado.
Anexo encontrara una relaci6n de sucursales de servicio de fabrica, centros de servicio
autorizados y franquiciados en la RepQblica Mexicana, donde podra hacer efectiva su garanfia
y adquirir partes, refacciones y accesorios originales.
Garantia limitada por tres a_os
DEWALT reparar& sin cargo, cualquier falla que surja de defectos en el material o la fabricaci6n
del producto, por hasta tres aSos a contar de la fecha de compra. Esta garanfia no cubre fallas
de las piezas causadas por su desgaste normal o abuso a la herramienta. Para mayores detalles
sobre la cobertura de la garanfia e informaci6n acerca de reparaciones realizadas bajo garanfia,
visitenos en www.dewalt.com o Ilamenos al 1 800 433-9258 (1-800-4-DEWALT). Esta garantia no
aplica a accesorios o a daSos causados por reparaciones realizadas o intentadas por terceros.
Esta garanfia le otorga derechos legales especificos, ademas de los cuales puede tener otros
dependiendo del estado o provincia en que se encuentre.
Ademas de la garanfia, las herramientas DEWALT estan cubiertas por:
1 ANO DE SERVIClO GRATUITO
DEWALT mantendra la herramienta y reemplazara las piezas gastadas por su uso normal,
sin cobro, en cualquier momento durante un aSo a contar de la fecha de compra. Las piezas
gastadas de la clavadora, tales como anillos t6ricos y hojas del impulsor, no estan cubiertas.
GARANT|A DE REEMBOLSO DE SU DINERO
POR 90 D|AS
Si no esta completamente satisfecho con el desempeSo de su maquina herramienta, laser
o clavadora DEWALT, cualquiera sea el motivo, podra devolverlo hasta 90 dias de la fecha
de compra con su recibo y obtener el reembolso completo de su dinero - sin necesidad de
responder a ninguna pregunta.
AMI_RICA LATINA: Esta garanfia no se aplica a los productos que se venden en America
Latina. Para los productos que se venden en America Latina, debe consultar la informaci6n de
la garanfia especifica del pais que viene en el empaque, Ilamar a la compa_ia local o visitar el
sitio Web a fin de obtener esa informaci6n.
SUSTITUCl0N GRATUlTA DE LAS ETIQUETAS DE ADVERTENClA: Si las etiquetas de
advertencia se vuelven ilegibles o se pierden, Ilame al 1 800 433-9258 (1-800-4-DEWALT) para
conseguir gratuitamente otras de repuesto.
SOLAMENTE PARA PROPOSITO DE Mt_XICO:
IMPORTADO POR: DEWALT S.A. DE C.V.
BOSQUES DE ClDROS, ACCESO RADIATAS NO.42
3A. SECCION DE BOSQUES DE LAS LOMAS
DELEGACl0N CUAJIMALPA,
05120, MEXICO, D.R
TEL. (52) 555-326-7100
R.RC.: BDE810626-1W7
Para servicio y ventas consulte ,"-_ ",
"HERRAMIENTAS ELECTRICAS" SECCI_
en la seccibn amarilla. AM!,!!!!A
 Loading...