


TA 33USB
international
User Guide

Thank you for deciding to purchase this DeTeWe product. Our product represents the highest standards of quality combined with high-grade design.
This user guide will assist you in using the TA 33USB international, answering all the most important questions. Should you require any additional support or information, please contact EIRCOM
Support on 1901, choose fault.
A CSR will take your details and the support centre will contact you.
We hope you enjoy using your TA 33USB international.
Welcome to DeTeWe
Planning your system

* This is the telephone number which – unless blocked by your settings – is displayed on the called
subscriber’s terminal.
Analogue line 1
code digit
Analogue line 1 telephone number
code digits
Your telephone numbers
for line 1
1
Analogue line 2
code digit
Analogue line 2 telephone number
code digits
Your telephone numbers for line 2
*
1
*

In the table opposite, please enter the telephone numbers (MSNs*), calls to which are to be signalled on the corresponding line. The TA 33USB international can manage up to six numbers. A
number can be allocated to more than one line, and each line can be allocated up to 2 numbers.
Analogue lines 1 and 2 and the telephone numbers are assigned code digits. These are required for
setting and/or programming the relevant features. Please use this setting aid to program the
TA 33USB international.
Note
After mounting and commissioning the TA 33USB international you can start making and receiving
calls immediately without any programming. To ensure that you don’t miss a call, all calls are signalled on both lines.
When you make an external call, the main number of your ISDN line is transmitted to the called
party by the network operator.
* MSN = Multiple Subscriber Number. These are the ISDN numbers which you received from your
network operator.

i
Safety Precautions......................................................................................................................1
Getting to Know Your TA 33USB international............................................................................2
General information ………………………………………………………………………2
Symbols Used ……………………………………………………………………………3
Operating Display …………………………………………………………………………3
Power failure………………………………………………………………………………3
The features provided by the TA 33USB international ………………………………………4
Supported ISDN features …………………………………………………………………4
Mounting the device and putting it into operation ....................................................................5
What is included in the package?……………………………………………………………5
The ports of the TA 33USB international ……………………………………………………6
What is needed to operate the TA 33USB international?………………………………………7
Mounting and installation sequence ………………………………………………………8
Mounting location …………………………………………………………………………9
Mounting the TA 33USB international ……………………………………………………10
Tools for wall mounting …………………………………………………………………10
Wall mounting……………………………………………………………………………10
Connecting equipment……………………………………………………………………10
Connecting the TA 33USB international to the ISDN network ………………………………11
Connecting analogue terminals to the TA 33USB international ………………………………12
Connecting a computer to the TA 33USB international………………………………………12
Connecting the TA 33USB international to the power supply ………………………………12
Power Supply Socket ……………………………………………………………………14
The default settings of the TA 33USB international on delivery ………………………………15
Setting the Dialling Mode …………………………………………………………………15
Data communication.................................................................................................................16
System requirements ……………………………………………………………………16
The components of the PC software ………………………………………………………16
The TA 33USB international software ……………………………………………………16
Driver software with CAPI / TAPI …………………………………………………………17
Installing the software ……………………………………………………………………18
Start up …………………………………………………………………………………19
Configuring the system using a PC…………………………………………………………21
Data transfer ……………………………………………………………………………23
ISDN telephone numbers …………………………………………………………………24
Call allocation ……………………………………………………………………………25
Internal ports ……………………………………………………………………………26
Call forwarding …………………………………………………………………………27
Further features …………………………………………………………………………29
Invoking the program from the Windows taskbar …………………………………………31
CAPIControl………………………………………………………………………………32
Contents

ii
Contents
FlashLoad (updating the system software) …………………………………………………33
PC software ……………………………………………………………………………33
FlashLoad (updating the system software) ………………………………………………33
Configuring Internet access ………………………………………………………………34
Removing drivers…………………………………………………………………………37
Making calls..............................................................................................................................38
Basic information…………………………………………………………………………38
Taking calls ………………………………………………………………………………38
Displaying the caller's telephone number ………………………………………………38
What is an “external call” and what is an “internal call”? ……………………………………39
Automatic and manual trunk line seizure …………………………………………………40
Automatic seizure (default setting) ……………………………………………………40
Manual seizure…………………………………………………………………………40
Making internal calls ……………………………………………………………………41
Automatic trunk line seizure (the default setting on delivery) ……………………………41
Manual trunk line seizure ………………………………………………………………41
Making external calls ……………………………………………………………………41
Automatic trunk line seizure (the default setting on delivery) ……………………………41
Manual trunk line seizure ………………………………………………………………41
Seizing a specific telephone number / MSN for an outgoing call …………………………42
Making enquiry calls………………………………………………………………………42
Transferring calls with the TA 33USB international without any notification …………………43
Transferring calls with the TA 33USB international with notification …………………………44
Speaking with two subscribers alternately (toggling) ………………………………………45
Speaking with two subscribers simultaneously (three-party conference) ……………………46
Changing from a three-party conference to toggling ……………………………………46
Picking up calls …………………………………………………………………………47
Picking up calls from an answering machine ………………………………………………47
DTMF post-dialling ………………………………………………………………………47
Keeping in touch.......................................................................................................................48
Call forwarding …………………………………………………………………………48
Activating call forwarding ………………………………………………………………48
Deactivating call forwarding ……………………………………………………………49
Accepting or rejecting waiting calls ………………………………………………………49
Call-waiting protection……………………………………………………………………50
Activating call-waiting protection ………………………………………………………50
Deactivating call-waiting protection ……………………………………………………50
Special settings / features.........................................................................................................51
The blacklist ……………………………………………………………………………51
Activating the blacklist …………………………………………………………………51
Deactivating the blacklist ………………………………………………………………51
Emergency numbers ……………………………………………………………………52

iii
Contents
Configure the system using a telephone ...................................................................................53
Programming Other Settings ……………………………………………………………53
Activating the configuration mode ………………………………………………………54
For automatic trunk line seizure…………………………………………………………54
For manual trunk line seizure …………………………………………………………55
Deactivating the configuration mode ……………………………………………………55
Changing your PIN ………………………………………………………………………56
Storing your telephone numbers …………………………………………………………56
Deleting telephone numbers………………………………………………………………57
Call allocation ……………………………………………………………………………58
Resetting call allocation …………………………………………………………………59
Configuring external line seizure …………………………………………………………59
Manual trunk line seizure with “0” ………………………………………………………59
Automatic trunk line seizure ……………………………………………………………59
Telephone number busy …………………………………………………………………60
Activating telephone number busy ……………………………………………………60
Deactivating telephone number busy……………………………………………………60
Configuring the terminal types for the lines ………………………………………………60
Configuring trunk line access rights ………………………………………………………61
Emergency telephone numbers……………………………………………………………62
Storing the emergency telephone numbers ……………………………………………62
Deleting the emergency telephone numbers ……………………………………………63
Programming the telephone number for transmission………………………………………63
Suppressing transmission of your telephone number (anonymous call, CLIR) ………………63
Activating the suppression of telephone number transmission ……………………………64
Deactivating the suppression of telephone number transmission …………………………64
Managing call forwarding …………………………………………………………………64
Activating call forwarding in the TA 33USB international ……………………………………65
Deactivating all call forwarding ……………………………………………………………65
SMS in a fixed network ……………………………………………………………………66
Configuring the service centre’s telephone number ………………………………………66
Configuring a line for SMS ………………………………………………………………66
Deleting the SMS line …………………………………………………………………66
Notes on the configured SMS line ………………………………………………………67
Automatic keypad signalling………………………………………………………………67
Activating automatic keypad signalling …………………………………………………67
Deactivating automatic keypad signalling ………………………………………………67
Resetting the system data…………………………………………………………………68

iv
Contents
Appendix ..................................................................................................................................69
Audio cadences and ring tones ……………………………………………………………69
Troubleshooting …………………………………………………………………………70
Service and warranty ……………………………………………………………………71
Guarantee Conditions ……………………………………………………………………71
Declaration of Conformity…………………………………………………………………71
Disposal and recycling ……………………………………………………………………71
Notes on disposal ………………………………………………………………………72
Programming Table ………………………………………………………………………73
Technical data ……………………………………………………………………………74
Glossary …………………………………………………………………………………75
Index ……………………………………………………………………………………76
Drilling Template …………………………………………………………………………78

1
Safety Precautions
Before you set up or use the TA 33USB international ...
...please ensure that you observe the instructions in this guide. We are legally required to inform you
of important precautions you need to take in order to ensure your own safety and avoid damage to
the TA 33USB international and to other devices.
If these instructions are not observed, the manufacturer cannot accept any liability for damage arising from negligent or deliberate disregard of the instructions in this guide.
Only devices supplying SELV (safety extra-low voltage) may be connected to the TA 33USB international.
• The correct usage of permitted devices meets this requirement.
• Do not open the casing. Unauthorised opening of the casing and incorrect repairs may result in
risks to the user. It also renders the warranty null and void.
• Do not allow any liquid to penetrate into the interior of the TA 33USB international as this could
result in electric shocks or short-circuits.
• Position the connection cables so as to prevent accidents.
• Do not install your TA 33USB international
- in the vicinity of heat sources,
- in direct sunlight,
- in the vicinity of other electrical devices.
• Do not allow the device to come into contact with damp, dust, caustic liquids or vapour.
• Plug the connection cables only into the appropriate sockets .
• Connect only permitted accessories to the device.
• Use only the AC adapter supplied, part no. 4505617.
• Use only a slightly damp cloth to clean the device
• Do not use the TA 33USB international in damp areas (e.g. bathrooms) or in areas where there is
a risk of explosion.

2
General information
The TA 33USB international is an ISDN communications system that enables you to connect up to
two analogue devices to a basic ISDN access (e.g. a telephone and a fax machine). In addition, when
used in conjunction with a PC equipped with a USB port, the TA 33USB international software that is
included in the package enable you to perform a variety of useful functions relating to communications.
The two B-channels of an ISDN access can be used to establish two completely independent connections (e.g. telephone calls), which means you can call your business partner on one channel while
simultaneously transferring data to a different destination on the other channel via your PC.
The TA 33USB international complies with the statutory requirements for communications systems.
You are permitted to mount and install it yourself.
The TA 33USB international supports the DSS1 protocol and can be operated on ISDN multi-terminal
accesses. It is not designed to be operated on ISDN point-to-point lines or system accesses.
Analogue devices can be operated on the TA 33USB international using either DTMF (dual-tone
multi-frequency) dialling with a Flash function or pulse dialling.
Note
The full range of features provided by the TA 33USB international can only be used by telephones
that support the DTMF dialling mode with a Flash function; telephones using pulse dialling do not
have the Flash function, which is necessary for making enquiry calls, for example, and do not have
any star or hash keys either, which are necessary to control certain features. The caller's telephone
number can only be displayed on telephones supporting this feature.
Getting to Know Your TA 33USB
international

3
Getting to Know Your TA 33USB international
Symbols Used
b
Lift the handset
d
Replace the handset
g
Your telephone is ringing
c
Conduct your conversation
r
Press the R-key
*
Press the star key
#
Press the hash key
t
Dial a number or press a code digit
q
You will hear a tone, e.g. dialling tone, busy tone, acknowledgement tone, call waiting
tone, etc.
Operating Display
The LED above the sockets for the analogue lines is:
• continuously illuminated: TA 33USB international power supply is on.
• flashing: If you hear the busy tone approx. five seconds after lifting the handset and the LED
starts flashing, the ISDN connection cable is not plugged in or the NTBA is faulty.
To stop the flashing once you have successfully connected to the ISDN, lift the handset, wait for
approx. five seconds and then replace the handset.
Power failure
In the event of a power failure, all program and user data is saved without any changes and only the
date and time are reset to the system default values when power is restored. The internal clock is
automatically reset when the first external call is made.
All callbacks are deleted.
Please note that you cannot make any calls during a power failure.

4
The features provided by the TA 33USB internatio
nal
• Call waiting
• Call pick-up from an answering machine
• Call forwarding immediately, after a set time or on busy
• Display of caller's number on suitably equipped analogue telephones
• Automatic keypad signalling
• Automatic callback (on no reply and on busy)
• Trunk (i.e. external) line access can be granted at five different levels
• Trunk line seizure can be either manual or automatic
• Calls can be transferred internally and externally
• Call pick-up
• Channel bundling (for data communication if this is supported by the software)
• Multi-purpose terminal line
• Configuration via a telephone
• Configuration via a PC
• Toggling
• DTMF post-dialling
• Emergency numbers are programmable (can be dialled regardless of external line access rights)
• Enquiry calls
• Blacklist
• SMS in the fixed network (requires a suitably equipped telephone)
•USB interface to a PC
Supported ISDN features
Please note that the following features are only available for use on your TA 33USB international if
they are also supported by your network operator.
• Call waiting
• Call forwarding
• Three-party conference (two simultaneous three-party conferences are possible)
• Toggling
• Enquiry calls
• Restrict transmission of your own telephone number (CLIR)
Getting to Know Your TA 33USB international

5
What is included in the package?
Check that the contents of your package are complete:
• One ISDN TA 33USB international communications system
• One plug-in adapter with a 3 m connector cable (No. 4505617)
• One ISDN connector cable, 3 m in length
• One PC connector cable (USB), 3 m in length
• One CD-ROM with the installation software for Windows 98/Me/2000/XP
• One user guide for the TA 33USB international (this document)
You will find the following on the CD-ROM:
• The driver set-up software with the Common ISDN Application Programming Interface (CAPI) as
well as CapiPort, CapiControl and the installation software.
Note
Up-to-date information on this equipment and the latest version of the user guide can be found on
the Internet at our Web site www.detewe.com under TA 33USB international.
Mounting the device and putting it into
operation
6
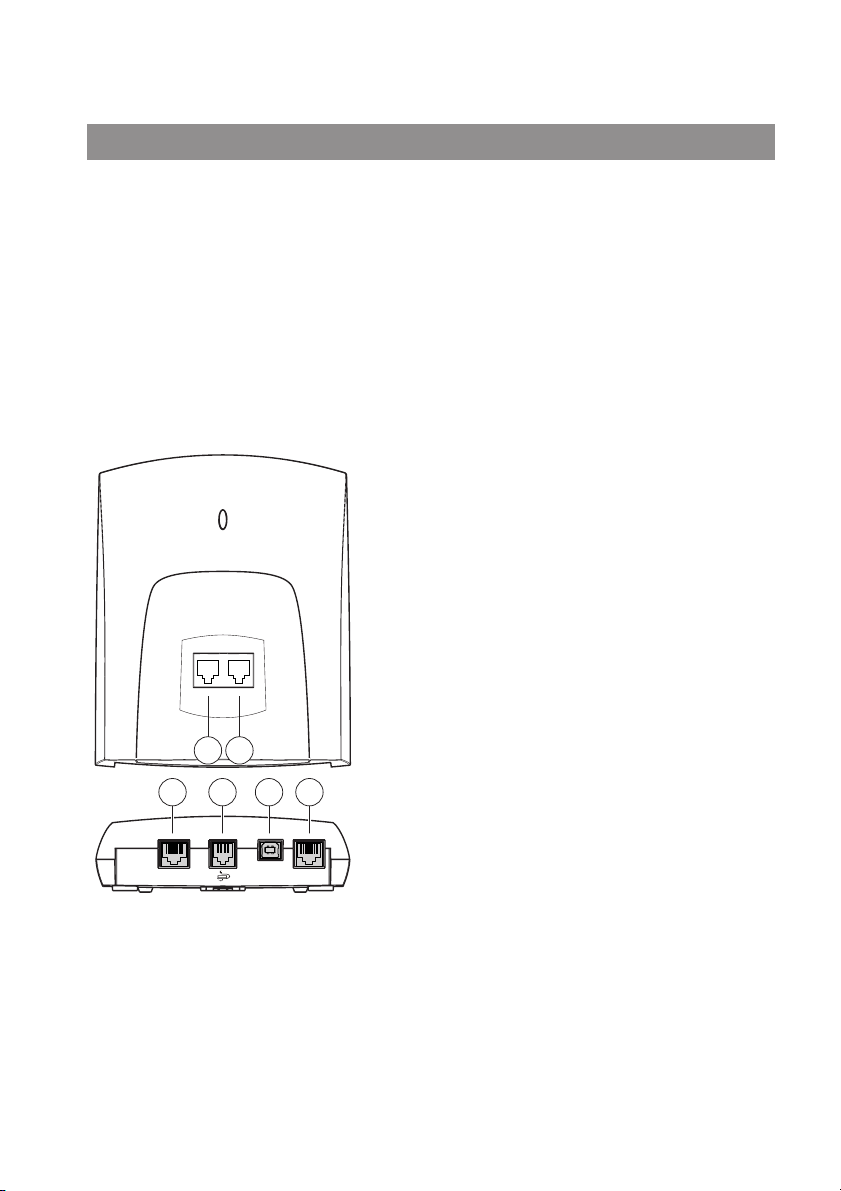
The ports of the TA 33USB international
➀ Analogue (a/b) port 1
for a telephone, fax machine, modem or answering machine. The internal telephone
number is “11”.
➁ Analogue (a/b) port 2 a/ b*
for a telephone, fax machine, modem or answering machine. The internal telephone
number is “12”.
➂ Looped-through S
0
bus
➃ Socket for plug-in AC adapter
➄ One free USB port on your PC
➅ Socket for connection to ISDN (NTBA)
Mounting the device and putting it into operation
1 2
3 4 5 6
ISDN/S0
OUT
USB ISDN/S0
IN

7
Mounting the device and putting it into operation
What is needed to operate the TA 33USB international?
Certain requirements must be met in order for the TA 33USB international, the configuration software to be installed and operated correctly:
•A Euro-ISDN basic access and a network terminator (NTBA with DSS1) must be supplied by your
network operator. The TA 33USB international is not designed to be operated on any other type
of access. Connection to any other type of access is therefore not permitted.
• Only devices which deliver SELV (safety extra low voltage) should be connected to the TA 33USB
international. The correct use of authorised terminals meets this requirement.
• You can only use the full range of features provided by the TA 33USB international on telephones with DTMF dialling and featuring a Flash function.

8
Mounting the device and putting it into operation
Mounting and installation sequence
The TA 33USB international consists of various components. This user guide first describes how to
mount the communications system and connect the terminals. Once you have completed this, you
will be able to use your system.
However, we recommend you to configure your TA 33USB international to your personal requirements before using it. You can configure the system using either a telephone or by means of a menu
on a connected PC.
Please proceed as follows:
1. Mount the TA 33USB international and connect the terminals. This is described in the sections
immediately below.
2. Configure the system. You can do this in one of two ways:
• Configuration using a PC: in order to use the menu-supported PC configuration, all the drivers
on the CD supplied must first be installed. This is described in the section entitled “Data communication” from page 16 onwards.
• Configuration using a telephone: use a connected telephone to configure the system. This is
described in the section entitled “Configuring the system using a telephone” from page 53
onwards.
3. Installation of the CAPI drivers. This is described in the section entitled “Data communication” .
With regard to points 2, 3 and 4, please note the system requirements listed in the section entitled
“What is needed to operate the TA 33USB international?” on page 7 above.
In the Appendix you will find a glossary, an index of key words and a visual representation of the
TA 33USB international’s audio signals and cadences.

9
Mounting the device and putting it into operation
Mounting location
The ambient operating temperature of the TA 33USB international must not be lower than +5°C or
higher than +40°C.
For this reason you should not mount your TA 33USB international
• in the vicinity of any heat sources (e.g. radiators),
• in direct sunlight,
• behind drapes or curtains,
• in small, unventilated or damp rooms,
•outdoors, or
• in the vicinity of combustible materials.
In addition, ensure that
• the room is dry and as free of dust as possible,
• no high-frequency equipment (e.g. transmitters, radiation equipment or similar devices) is in
the vicinity,
• no fluid can drop onto or into the device (this is very important),
• the wall on which the device is mounted is flat and even.
The following criteria are important when selecting the mounting site:
• there must be a mains socket with an earthing contact available nearby for the plug-in AC
adapter,
• the device must not be any more than three meters (approx. 10 ft) away from the PC if you want
to connect the two via USB
• the distance to the analogue terminals must not exceed three meters (approx. 10 ft).
Important note
In order to avoid injury and damage, the mains socket for the plug-in AC adapter must be installed
by a qualified electrician. Ensure that the socket is freely accessible at all times.
Provide a separate mains circuit for the TA 33USB international; short circuits caused by other household devices will then not render your TA 33USB international non-operational. To protect it against
power surges, which can occur during stormy weather, we recommend installing a surge protector.
Consult your electrician for more information on this matter if necessary.

10
Mounting the device and putting it into operation
Mounting the TA 33USB international
You can simply place your TA 33USB international on a solid surface such as a table. Please note that
the rubber feet of the TA 33USB international may, under certain circumstances, leave unseemly
marks on the surface of your furniture.
Tools for wall mounting
To wall-mount the system you will require the following utensils:
• two 4 x 30 mm DIN 7996 buttonhead screws
•two 6 mm rawlplugs
•a 6 mm masonry drill bit (the type of drill bit you need depends on the wall)
•a percussion drill
•a screwdriver.
Wall mounting
Warning! Make sure that there are no supply lines, power cables, etc. where you plan to drill.
Drill the 6 mm holes for the upper and lower mounting screws 93 mm (3.66 inches) apart. Insert the
rawlplugs and fix the screws into the wall leaving a distance of 4 mm (0.15 inches) between the
screw head and the wall.
Then attach the back of the housing to the screws and pull it slightly downwards.
Connecting equipment
Warning! Do not connect the TA 33USB international during a thunderstorm. Arrange the cables so
that they cannot be stepped on, tripped or fallen over, causing injury.
Ensure that the connecting lines and cables are not bent, stretched or put under any mechanical
stress in any way.

11
Mounting the device and putting it into operation
Connecting the TA 33USB international to the ISDN network
The TA 33USB international has a general connection licence. This means that anyone may connect
the device to the network, but only if the following conditions are met:
• The device is only designed for Euro-ISDN basic access. Never connect it to lines or facilities in an
analogue network or to ISDN tie lines. This could result in malfunctions and/or damage to both
the TA 33USB international and the network.
• The Euro-ISDN basic access must be the multi-terminal type and equipped with a network terminator (NTBA) from your network operator.
Insert one end of the TA 33USB international's ISDN connector cable in the corresponding socket on
the NTBA and the other in the socket on the underside of the TA 33USB international.
ISDN
NTBA
230 V
USB
ISDN/S
PC
o

12
Mounting the device and putting it into operation
Connecting analogue terminals to the TA 33USB international
Located on the front of the casing are two RJ sockets for connecting analogue terminals.
Please refer to the note on setting the dialling mode on page 15.
1a/b
for a telephone, fax machine,
modem or answering
machine
Connecting a computer to the TA 33USB international
First connect the USB cable to the PC, then to the TA 33USB international.
When uninstalling, first remove the cable from the TA 33USB international and only then from the
PC.
A PC is not necessary for configuring and operating the TA 33USB international. It does, however,
simplify the programming of your communications system and provide various additional applications in conjunction with the communications software.
Connecting the TA 33USB international to the power supply
The connection to the 230-V mains supply can only be carried out without risk if the instructions
below are followed very carefully.
• Position the mains cable behind the AC adapter to ensure that no-one can trip over it.
• Ensure that the socket and the AC adapter are easily accessible so that the adapter can be
unplugged from the socket quickly in the event of danger. This is also necessary because the
2a/b

13
TA 33USB international does not have a separate mains switch. The TA 33USB international can
only be completely disconnected from the mains by unplugging the AC adapter.
• Never unplug the adapter by pulling on the cable. If you want to disconnect the device from the
power supply, always pull the adapter itself out of the mains socket.
Caution!
Only use the AC adapter supplied, part no. 4505617. Other adapters can cause malfunctions or even
electric shocks or material damage.
Warning!
Never operate or continue to operate the device if the AC adapter is damaged.
This could be life-threatening due to risk of electric shock.
If the AC adapter plugged in is damaged:
• First turn the power off at the mains before unplugging the AC adapter.
• The AC adapter must not be repaired. Purchase a new adapter from your supplier if you notice
any sign of damage.
• Never remove the AC adapter supplied from its connection cable. This could be life-threatening
due to electric shock. Use a suitable extension cable from a specialist dealer if the adapter plug
cable cannot reach a socket.
Mounting the device and putting it into operation

14
Mounting the device and putting it into operation
Power Supply Socket
Telecommunications systems can be affected by interference from the power supply originating
from other electrical devices. This is a known issue with photocopiers, laser printers, electric typewriters, air conditioning units, fan heaters, vacuum cleaners and refrigerators in particular. For this
reason, the following points must be observed:
• Connect the TA 33USB international to a socket which is as far away as possible from the sockets for the devices mentioned above. The ideal situation would be to have a separate power
supply for the TA 33USB international .
• Ensure that the AC adapter is safely and securely inserted into the socket at all times. Loose
plugs and sockets represent a fire hazard.
Such danger spots must be repaired immediately by an electrician.
• Use only socket adapters with an adequate level of safety. This can only be guaranteed for
adapters with a safety registration code displayed on the outside (e.g. with the CE symbol, previously the GS symbol for approved safety). Otherwise malfunctions may occur when operating
the TA 33USB international , including a risk of fire in the event of a fault.
Note
Provide a separate power supply to the 230-V connection for the TA 33USB international . This
excludes the risk of short circuits from other existing devices rendering the TA 33USB international
non-operational.
To protect against surges, which can occur during thunderstorms, it is advisable to install a surge
protection device. Contact an electrician for specialist advice.
Following correct assembly and installation, connect the TA 33USB international to the power supply. The AC adapter socket is located on the underside of the TA 33USB international . Insert the AC
adapter cable plug into this socket. Then plug the adapter into the mains socket.
If the LED is continually illuminated, the TA 33USB international is connected to the power supply.
In the event of an error, please first attempt to rectify the fault using the “Troubleshooting” table.

15
The default settings of the TA 33USB international on delivery
The following default settings and features are active on delivery:
• The secret personal identification number (PIN) is set to “0000” (four zeros).
• Incoming calls are signalled on both connected terminals.
• The analogue line 1a/b has the internal telephone number “11”.
• The analogue line 2a/b has the internal telephone number “12”.
• Trunk line access rights: all of the terminals have unrestricted rights and can be used to dial
international calls.
• When you lift the handset, you will hear an external dialling tone (i.e. automatic trunk line
seizure is active).
• Your own telephone number is transmitted to and can be displayed on the remote subscriber's
terminal when you make an external call.
• All of the ports are set to the “Telephone” terminal type.
• Call waiting is deactivated.
• The emergency numbers “999” and “112” can be dialled.
• The blacklist is deactivated.
We recommend that you configure your TA 33USB international to suit your own requirements
before using it. You can do this by means of either a connected telephone or the software supplied.
You can reset your device to the default state at any time.
Setting the Dialling Mode
• Analogue devices using the DTMF dialling mode and flash function are detected automatically.
No settings need to be made.
• Analogue devices using pulse dialling must be checked in before being used for the first time. To
do this, lift the telephone handset and press any digit other than “1”. Replace the handset. The
dialling mode will be detected automatically.
If at a later stage a DTMF signal is detected on a line which has been set for pulse dialling, the
TA 33USB international will automatically switch back to DTMF operating mode. It is therefore advisable to avoid using hand-held transmitters or signal transmitters for the remote querying of answerphones on devices using pulse dialling
Mounting the device and putting it into operation

16
Data communication
The communications software supplied enables your PC to use the following ISDN services via the
USB port: data transfer, reception and transmission of e-mails and Class 3 and 4 faxes, mailbox connections, an answerphone function and Internet applications.
System requirements
The following requirements must be met in order to install the PC software for the TA 33USB international:
• IBM or a fully compatible PC,
• Pentium II CPU with a speed of 266 MHz or higher,
• at least 64 MB of main memory,
• Microsoft Windows 98/Me/2000/XP,
•a CD-ROM drive, and
•a USB port.
Important note
Before you install the drivers for the TA 33USB international, you must first uninstall any other CAPI
drivers that may be present (e.g. from a previously used ISDN card). Please also refer to the description of the “Cleanreg.exe” program.
The components of the PC software
The software on the CD-ROM supplied consists of several components.
The TA 33USB international software
This provides the following functions and interfaces:
• Common ISDN Application Programming Interface (CAPI)
This standardised interface is used by applications that provide data transfer functions.
• Telephony Application Programming Interface (TAPI)
This interface is also standardised and enables the remote control of the terminals connected to
the TA 33USB international.
• CapiPort drivers
These drivers are utilised by the Windows “Dial-up network” component. The dial-up network
enables the Internet to be accessed without the need for special software from an Internet service provider (ISP). It can also be used to dial into a corporate network, for example.

17
Data communication
• Configuration of the communications system (set-up)
This program enables you to use your PC to configure your TA 33USB international to your own
requirements. It enables you to do this easily and gives you a comprehensive overview.
• System software update (FlashLoad). This enables you to update the operating system of your
TA 33USB international whenever additional features become available in the framework of
ongoing product development.
• CapiControl
This program provides you with a quick overview of the data transfer status and enables you to
configure several of the CAPI interface parameters. You will find this program in the Windows
taskbar.
•
Cleanreg.exe
The “Cleanreg.exe” program uninstalls any components that may be left over from previous
CAPI installations. We recommend that you run this program after you have uninstalled your old
CAPI installations.
Driver software with CAPI / TAPI
CAPI and TAPI are standardised software interfaces allowing data and telephony applications to use
the ISDN functions of basic and primary multiplex accesses (TAPI also performs this function for a
modem / analogue access). The drivers for the data module of the TA 33USB international control
the communications processes and the data transfer.

18
Data communication
Installing the software
Before you begin the new software installation, please ensure that any previous ISDN installation
that may be present on your PC is uninstalled. No other CAPI drivers may be present on your PC as
this can lead to conflicts between the different CAPI drivers.
Please run the “Cleanreg.exe” program that you will find on the installation CD-ROM. This program
uninstalls any components that may be left over from old CAPI installations.
This program is in the root folder of the CD-ROM.
Before you install the TA 33USB international software, please boot your PC and start up Windows.
Keep your Windows operating system CD-ROM handy as you may require it in the course of the
installation procedure. In order to configure Internet access you will also require the access data
issued to you by your ISP.
It is easiest to install the software when your PC has not been connected to the TA 33USB international yet. The installation can still be performed when the PC has been connected, of course. In this
case, the hardware wizard opens and prompts you for drivers for the unknown device. Insert the CDROM in the drive and, if necessary, key in the correct path to the drive.

19
Data communication
Start up
You can greatly simplify the installation by proceeding as follows (the PC has not been connected to
the TA 33USB international yet):
The following steps refer to Windows 2000/XP. The information in brackets refers to Windows 98.
1. Insert the TA 33USB international CD-ROM in the drive. If Autostart is active, the program will
start automatically. If this does not happen, please start it manually by clicking on the
“Setup.exe” program in the root folder of the CD-ROM.
2. You then see the TA 33USB international installation screen.
3. Clicking on the highlighted entry starts the respective installation procedure.
•
Software installation
Installs the configuration program, CAPI, TAPI, CAPIPort und CAPIControl
•
Configuration software
Only installs the configuration program; select this if a CAPI installation is present and you
want to continue using it or if you simply want to program the TA 33USB international
conveniently and do not require any other data applications. This option also installs a
program for updating the TA 33USB international firmware.
Note
Do not select this installation program if you want to install the complete software (see above, “Software installation”).

20
Data communication
4. Select the “Software installation” option. This installs all the drivers required for the configuration, software update and the ISDN adapter function of the TA 33USB international.
• You see the “Welcome” screen.
Click on “
Next”.
• You see the “Software licence agreement” screen. Accept the agreement by clicking on
“
Next” (Yes).
• The “Information” screen opens. Click on “
Next”.
• The “Target folder” screen opens. To accept this suggestion, click on “
Next”. If you would
prefer to use a different folder, click on “
Browse” and select one.
Under Windows 2000/XP you key your user data into the following screen and click on
“
Next”.
• The “Set-up type” screen opens. Select “Typical” (
Express) and click on “Next”.
• Windows 98 only: skip the “Select program folder” screen by clicking on “
Next”.
• Windows 98: Click on “
Next” to start copying the files.
Windows 2000/XP: Click on “I
nstall” to start the installation.
• Exit the set-up wizard by clicking on “
Finish” (Beenden ).
• You will be prompted to restart your PC.
Only remove the CD-ROM once you have restarted the PC.
5. Now connect the TA 33USB international to a USB port on your PC. Insert the USB cable in the PC
first, then in the TA 33USB international. You will see a message on your monitor telling you that
the driver database is being updated. Once this has been done, the CAPIControl monitor will
turn grey (see page 31).
Note
If the installation wizard reports finding more recent files, please do not overwrite them.
Now you can configure your TA 33USB international (see the following pages for details).

21
Data communication
Configuring the system using a PC
If you attempt to configure your system from a PC when the configuration mode has already been
activated from a connected telephone, you will see an error message on your monitor. Similarly, if
the system is being configured from a PC, any attempt to open the configuration mode from a connected telephone will result in you hearing a busy tone.
The configuration procedure does not interrupt the operation of the communications system, so you
can continue to make calls normally. Any changes made to the configuration will only take effect
once the configuration file has been exported to the system.
Start the TA 33USB configuration program in the “TA33USB” program group.
You can select whether you want to configure your system online or offline, i.e. with or without
being connected to the system.
Access to the configuration program in the online mode is protected by a PIN. This PIN is “0000”
(four zeros) in the default setting (as on delivery) and corresponds to the PIN that you require to activate the configuration mode from a telephone. If you configure the system offline, you will have to
enter the PIN in order to export the data to the system.
Note
If you select “Offline configuration” you can save the configuration data to your hard disk under a
name of your choosing. You can subsequently load any of the configurations you have saved to your

22
Data communication
TA 33USB international as required. This means that you can create several configurations for various purposes, and then simply load one of them to your system whenever it is needed.
When the configuration software has started, you can edit a broad range of settings for your
TA 33USB international.
Select the relevant input screen by clicking on the corresponding key word in the menu items visible
on the left-hand side of the screen.
The screens “ISDN telephone numbers”, “Call allocation” and “Internal ports” contain explanatory
images / texts.
You can find the corresponding inputs / settings in the following input screens described below:
“ISDN telephone numbers”, “Call allocation”, “Internal ports”, “Call forwarding” and “Further features”.

23
Data communication
Data transfer
Save configuration
Save configuration in the system:
exports the current configuration file to the connected device.
Save configuration to external file: saves the current configuration file to the hard disk.
Load configuration
Load configuration from system:
reads out the configuration from the connected device.
Load configuration from external file: opens the configuration file most recently saved on the hard
disk.
Load default configuration: creates a new configuration file using the default (factory) settings. This
does not overwrite the configuration saved on your hard disk.
Print configuration: prints the configuration.
Change system PIN: here you can change your personal identification number (PIN).
Information: displays version and copyright.

24
Data communication
ISDN telephone numbers
Key in the telephone numbers (MSNs) issued to you for your ISDN access by your network operator,
but don’t include the local area code.

25
Data communication
Call allocation
Allocate one or more telephone numbers (MSNs) to the connected telephones. Incoming calls for
the corresponding telephone number (MSN) are signalled on the terminal allocated. Obtain the telephone number of the SMS centre from your network operator and key it into the appropriate field.
In addition, specify the line (port) to which your SMS-capable telephone is connected.

26
Data communication
Internal ports
Trunk line access rights: class of service for the external line
You specify the trunk line access rights for both connected terminals.
Internal only: can neither make nor receive external calls.
Outward restricted: cannot make external calls. No restrictions on incoming calls.
Local area: can only make external calls to numbers not requiring the prefix “0”. No restrictions on
incoming calls.
National: can only make external calls to numbers not requiring the prefix “00”. No restrictions on
incoming calls.
International: no restrictions on either incoming or outgoing calls.
Terminal type
Select the type of terminal connected to each of the lines (ports) so that the TA 33USB international
can manage the corresponding terminal type correctly. This ensures that fax transmissions are not
interrupted by call-waiting tones, for example.
Note
Only one line can be configured to “Answering machine” at any one time.

27
Data communication
Call-waiting protection
Specify whether calls coming in during a conversation are to be indicated by means of call-waiting
tones or not.
Telephone number transmission
Select the telephone number (MSN) that is to be transmitted from the respective terminal to the
called subscriber during an outgoing call.
Call forwarding
Note
Your selection of the input screen “Exchange” or “System” specifies the call-forwarding type.
Depending on your choice here, one of the two screens will open.
Call forwarding in the system
In the case of call forwarding in the system, you specify a forwarding destination for incoming calls
to each of the connected terminals.
If a call is forwarded to an external destination, both B-channels will always be busy for the duration
of the forwarded call, i.e. the access will be busy. The costs incurred for the forwarded call are billed
to the line from which forwarding was initiated.

28
Data communication
Call forwarding in the exchange
In the case of call forwarding in the exchange, you specify a forwarding destination for incoming
calls to your telephone numbers / MSN. The difference to call forwarding in the system is that even
when a call is being forwarded, your access can still be contacted via other telephone numbers /
MSNs
In order to be used, this feature must be available on your access.
The alternatives for both types of call forwarding are the same. You can select the following conditions:
Call forwarding immediately: an incoming call is immediately forwarded without being signalled on
the terminal originally dialled.
Call forwarding on busy: if the dialled terminal is busy, every subsequent call is immediately for-
warded to the given terminal.
Call forwarding after a set time: the call is first signalled on the dialled terminal, but if it is not taken
within approx. 20 seconds it is forwarded to the destination that has been set.

29
Data communication
Fur ther features
In this input field you can edit the settings for your communications system. These settings apply to
both connected terminals.
Seizing a trunk line
The setting “with a 0” means that you have to press the code digit “0” before you can dial an external telephone number. The default setting is “automatically”: in this case, you can dial the external
telephone number immediately. Please note that when this setting is active, internal calls cannot be
made from terminals using pulse dialling.
“Telephone number busy” feature
When this feature is active, any further calls to this telephone number / MSN (i.e. calls during an
existing conversation) are met with a busy tone.
Emergency telephone numbers
You can configure three emergency telephone numbers that can always be dialled from any telephone and are not dependent on trunk line access rights (“999” and “112” are preset). You can also
use one of the emergency telephone number stack entries to store, for example, an area code (e.g.
“020” for London). Telephones with no external access can thus make calls in this area, while external calls to all other areas remain blocked.

30
Data communication
Automatic keypad signalling
If you operate the TA 33USB international as a sub-system, depending on the type of main system
you are operating it may be necessary to switch the signalling procedure from “Keypad” (default setting) to “Telephone number”. This will deactivate the automatic switchover to keypad input triggered by the star or the hash key (#). The star and hash keys can then also be used to transmit
dialling information. Please refer to the documentation of your main system for the required signalling procedure.
Note
Keypad signalling is required by some network operators and system manufacturers in order to activate features.
Blacklist
In the blacklist you can enter any telephone numbers that you don’t wish to be dialled from your
communications system (this also applies to Internet connections established via dial-up networking).
The telephone numbers entered in the blacklist apply to the analogue subscribers and to connections made via the CAPI applications.
Example: in order to block calls to premium rate numbers, you just enter “0190” in the blacklist. Any
attempt to dial the sequence “0-1-9-0” will then be aborted. You can enter up to five telephone
numbers if you wish.
The three blacklist input screens at the bottom already contain some preset dialling codes that can
be attached to those numbers you want to block, for example international codes and network
dialling codes.
Any numbers blacklisted by you that are prefixed by theses codes are thus recognised and blocked.
You can edit these entries as desired, and use the “#” (hash symbol) as a wildcard standing for any
digit.

31
Data communication
Invoking the program from the Windows taskbar
In the lower right-hand corner of the Windows taskbar you will see the icon illustrated, in the form
of an LED for each of the B-channels (Windows 98/Me/2000/ XP).
The colour of the icon represents the status of the CAPI interface.
The colours have the following meanings:
Red - deactivated
Yellow - not connected to device
Grey - connected to device
Green - connected to ISDN
After clicking on the pull-down menu with the right-hand mouse button, you can start the following
programs and edit the following settings:
FlashLoad: see the section entitled “FlashLoad (updating the system software)”.
Configuration: starts the configuration software of your TA 33USB international .
Deactivate / activate CAPI: activates or deactivates CAPI, depending on its current status.
View: by selecting “compact”, “standard” or “extended” you can specify how detailed the display for
the active CAPI connection should be.
Settings: opens the CAPIControl program with which you can edit the various CAPI interface settings
(see below).

32
Data communication
CAPIControl
The CAPIControl program provides both detailed information about an active connection and a variety of control and settings options for the CAPI interface. It is run automatically by Windows and can
be invoked from the taskbar. Click on the “Help” button for further details about each of the available tabs.
In the default setting, the CAPIControl screen opens whenever there is an incoming or outgoing call.
You can edit this setting by clicking on the CAPI icon in the Windows taskbar with the right-hand
mouse button. In the menu that opens, select the item “Settings” and then click on the “Events” tab.
If desired, deactivate the function “Call up CAPIControl on incoming call and outgoing call”.

33
Data communication
FlashLoad (updating the system software)
PC software
You can update the TA 33USB international system software yourself. This may be necessary when,
for example, new features become available. You can download the latest version from the following Web site:
http://www.detewe.com > home+office > ISDN Terminal Adapters > TA 33USB international - new
> Downloads.
• Select the download version matching your operating system by double-clicking on it.
• Click on the “Save” button.
• Select the folder on your PC in which you want to save the downloaded update package and
click on “Save” again.
• Disconnect the PC from the TA 33USB international.
• Uninstall the version of the system software that is currently installed:
Control panel > Software >
TA 33USB international > Add/Remove.
• Reboot your PC.
• Install the new version by double-clicking on the update package you saved.
• Reboot your PC.
• Connect the PC to the TA 33USB international again. Windows recognises the device automati-
cally.
FlashLoad (updating the system software)
To install the new software (i.e. the firmware), please proceed as follows:
• Save the current configuration of the TA 33USB international to the hard disk of your PC (see
page 23).
• Updating the system software of your TA 33USB international (FlashLoad):
locate the new system software in the folder “C:\Programme\detewe\ta33usb\firmware”.
You can identify the software by its file name extension, “*.efw”.
• Start the program by double-clicking on it, by invoking it from the Windows taskbar using Start
> (All) programs > TA 33USB international > FlashLoad, or by clicking on it in the CAPI icon popup menu (see page 31), then follow the instructions on the screen.
While the software is being uploaded to the TA 33USB international, the system is deactivated,
which means that you cannot make any calls and that any existing calls will be terminated.
The procedure takes around two minutes in all, after which the TA 33USB international is fully operational again. Your current configuration is not affected.
• Resetting the system to the default settings (as on delivery) (see page 23).
• Load the saved configuration from the hard disk of your PC to the TA 33USB international (see
page 23).

34
Data communication
Configuring Internet access
The following example describes the configuration of a dial-up networking entry under Windows 98.
Proceed analogously to set up Internet access under other operating systems.
Requirements: in order to access the Internet from your PC, you require a “Internet Service Provider”
(ISP), who will provide that access. Your ISP will supply you with the following data, which you need
to configure your access:
-a dial-up number,
-a user name, and
-a password.
In addition, an Internet browser must be installed on your PC (e.g. Netscape Communicator or
Microsoft Internet Explorer).
If you have any questions with regard to your access data, please contact your ISP.
An additional requirement is that the “Dial-up Networking” folder is present on your PC. Check that
this is the case by double-clicking on the “My Computer” symbol.
The “Dial-up Networking” folder should be visible here. If this is not the case, then please install the
Windows component “Dial-up Networking” from your Windows CD-ROM. You can find information
on how to do this in the operating system documentation.
To establish a connection to your ISP, proceed as follows:
Open the “Dial-up Networking” folder and double-click on the icon “
Make New Connection”.

35
Data communication
If desired, change the name of this icon (e.g. to the name of your provider). Find the modem or corresponding PPP driver (this is “DeTeWe ISDN PPP (Internet)” for the TA 33USB international).
Confirm your choice by clicking on “
Next”.
Key your provider's telephone number into the field marked “Telephone number” and click on
“
Next”.
Click on “
Complete” to complete the installation procedure. The new network connection will be
saved in the “Dial-up Networking” folder under the name you assigned it above.
You now have to edit certain settings. In order to do this, click on the dial-up networking entry you
have just created with the right-hand mouse button and select the “Properties” item from the menu
which appears.

36
Data communication
Click on the “Server Types” tab and edit the settings as illustrated.
If you want to be able to use both B-channels of your ISDN line for data transfer, edit the settings on
the “Multilink” tab as illustrated and close the window by clicking on “
OK”.
Now double-click on the symbol of the entry you have just created and key in your access data.
Then click on “
Connect”.
When the connection has been established, start your Web browser.
Note
If you activate (i.e. tick) the “Save Password” field in the screen depicted, then people who do not
know your password will be able to use your Internet connection and possibly access your e-mail
server.

37
Data communication
Removing drivers
If you subsequently want to remove the driver software from your PC, proceed as follows:
1. Close the drivers by clicking on the LED symbol on the right-hand side of the taskbar with the
right-hand mouse button. You may also have to shut down other data applications that are running. Now open the Control Panel (“Start > Settings - in the case of Windows 98 - > Control
Panel”). Click on “Software” twice.
2. The list of installed software contains the entry “TA 33USB”. Mark this and then click on the
“Add/Remove…” button.
3. Follow the instructions on the screen. If uninstallation is necessary, click on the corresponding
symbol. To remove the software, click with the right-hand mouse button and select “Complete”
in the context menu.
Note
In order to ensure that there are no parts of the driver software left over after uninstallation, we recommend that you subsequently run the “CleanReg.exe” program, which you can find in the root
folder of the CD-ROM.

38
Making calls
Making calls
Basic information
The full range of the TA 33USB international features can only be used when the dialling mode of
the connected terminals is set to DTMF with a Flash function.
Terminals with pulse dialling cannot execute functions requiring an R-key, a star or a hash key.
Note
You should not use a DTMF device (e.g. a handheld transmitter) to establish a connection to a pulse
dialling terminal. If you did this, it would cause the TA 33USB international to reset this terminal to
the DTMF mode, which would block it from further dialling. (The terminal can be unblocked again
by keying in any digit except “1”.)
Taking calls
Your telephone rings: internal or external call. Please refer to the Appendix for information on the
various ring cadences.
b
Lift the telephone handset.
c
Conduct an internal or external conversation.
d
End the call by replacing the handset.
Displaying the caller's telephone number
The TA 33USB international supports the display of the caller's telephone number (CLIP) on suitably
equipped analogue terminals if the feature is provided by your telephone company.

39
Making calls
What is an “external call” and what is an “internal call”?
An external call is a call to a subscriber who is not connected to the same TA 33USB international
that you are. An external call thus requires a trunk line, i.e. an external line, which it has to “seize” in
order to make the call. An internal call is a no-charge call to a subscriber who is connected to the
same TA 33USB international that you are. This applies to the analogue ports of the TA 33USB international, but not to the looped-through ISDN bus. Terminals connected to this bus are connected
parallel to the TA 33USB international, which means that no-charge calls between the analogue terminals connected to the TA 33USB international and those connected to the looped-through ISDN
bus are not possible.

40
Making calls
Automatic and manual trunk line seizure
Depending on your requirements, you can configure your TA 33USB international so that a trunk line
is seized automatically when you lift the handset or manually when you dial “0” (see the section
entitled “Configuring trunk line seizure” on page 61).
Automatic seizure (default setting)
c
After lifting the handset you will hear an external dialling tone and can dial an
external telephone number immediately.
r
To make an internal call, press the R-key.
t
You will then hear an internal dialling tone and can dial an internal telephone
number (“11” or “12”).
Note
If the trunk line is automatically seized, analogue terminals with pulse dialling cannot dial internal
telephone numbers.
Manual seizure
c
After lifting the handset you will hear an internal dialling tone and can dial an internal
telephone number immediately.
0
To make an external call, press “0”. This seizes an external line and you then hear an
external dialling tone.
t
Dial the external telephone number.
Note
In all dialling procedures from here on, please bear in mind the difference between automatic and
manual trunk line seizure using the prefix “0”.

41
Making calls
Making internal calls
An internal call is a no-charge call to a subscriber who is connected to the same TA 33USB international that you are.
Automatic trunk line seizure (the default setting on delivery)
c
Lift the handset and wait for the external dialling tone.
r
Press the R-key.
t
Dial the desired internal subscriber's telephone number (“11” or “12”). Your call is s
ignalled on the internal subscriber's terminal and you hear the internal ring tone.
Manual trunk line seizure
c
Lift the handset and wait for the internal dialling tone.
t
Dial the desired internal subscriber's telephone number (“11” or “12”). Your call is
signalled on the internal subscriber's terminal and you hear the internal ring tone.
Making external calls
Automatic trunk line seizure (the default setting on delivery)
c
Lift the handset and wait for the external dialling tone.
t
Dial the external telephone number.
Manual trunk line seizure
c
Lift the handset and wait for the internal dialling tone.
0
Press “0” and wait for the external dialling tone.
t
Dial the external telephone number.

42
Seizing a specific telephone number / MSN for an outgoing call
You can temporarily seize a specific telephone number/MSN for a call. This number is then transmitted to and can be displayed on the terminal of the called party (if calling number presentation – CLIP
– is enabled for that subscriber).
c
Lift the handset.
r
Press the R-key and wait for the external dialling tone (omit this step in the case of
manual trunk line seizure).
5
Press the code digit “5”.
t
Press the code digit for the desired telephone number / MSN (see the overview
on page 58).
t
Dial the external telephone number.
Making enquiry calls
Let's say you want to put a call on hold to conduct an enquiry call. The subscriber on hold cannot listen in on the enquiry call.
c
You are conducting a call with the first subscriber.
r
Press the R-key and wait for the internal dialling tone.
You can now do one of the following:
t
Dial an internal telephone number,
or
0
press “0” and
t
then dial an external telephone number.
When you want to end the enquiry call and speak to the subscriber on hold again,
r
press the R-key
1
and press “1”.
c
Continue your first conversation.
d
End the call by replacing the handset.
Making calls

43
Making calls
Transferring calls with the TA 33USB international without
any notification
You can transfer calls with the TA 33USB international in the following ways: internal to internal,
internal to external, and external to internal.
c
You are conducting a conversation.
r
Press the R-key and wait for the internal dialling tone.
t
Dial the internal telephone number
or
0
press “0”
t
and then dial the external telephone number.
The subscriber is called.
d
Replace the handset.
If the called subscriber does not lift the handset, a recall to your telephone occurs after
approx. 45 seconds.
b
When you lift the handset, you will be connected with the original subscriber again.
If you hear a busy tone after dialling the telephone number,
r
press the R-key again to return to the original subscriber.

44
Making calls
Let's say you want to transfer a call internally, after first speaking to the subscriber to whom you are
transferring the call. You can transfer calls with the TA 33USB international in the following ways:
internal to internal, internal to external, and external to internal.
c
You are conducting a conversation.
r
Press the R-key and wait for the internal dialling tone.
t
Dial the internal telephone number
or
0
press “0” and then
t
dial the external telephone number.
The subscriber is called. The subscriber lifts the handset.
c
Conduct your call. Inform the other subscriber of the transfer.
d
Replace the handset. The two subscribers are then connected.
If you hear a busy tone after dialling the subscriber's telephone number, press the R-key again to
return to the original subscriber.
Transferring calls with the TA 33USB international with
notification

45
Making calls
Speaking with two subscribers alternately (toggling)
You can switch between two subscribers and speak with them alternately. This is known as “toggling” and you can do it with both internal and external subscribers.
Let’s say you are conducting a conversation and want to make an enquiry call with a second subscriber.
r
Press the R-key.
You can now do one of the following:
t
Dial an internal telephone number,
or
0
press “0” and then
t
dial the external telephone number.
c
Conduct your enquiry call.
r
Press the R-key
2
and the code digit “2” to toggle between the first and second subscriber.
External calls without ECT: if you replace the handset during a call with two external subscribers, the
current call will be terminated and you will get a recall from the subscriber who was on hold.
External call with ECT: if you replace the handset during a call with two external subscribers, the
external subscribers are then connected with each other.
Note
If your exchange does not support the “Transfer in the exchange ECT” feature and you activate ECT,
the attempt to establish two external calls will result in a recall, while the second subscriber remains
on hold.

46
Making calls
When connected to a multi-terminal access, the TA 33USB international enables two three-party
conferences to be held simultaneously. Two external and one internal subscriber can hold a conference call. This requires a free line (B-channel). You can turn an existing call into an external threeparty conference call if you wish.
b
Lift the telephone handset.
t
Dial the first external subscriber's telephone number.
c
You are conducting an external call.
r
Press the R-key to initiate an enquiry call.
0
Press “0” and then
t
dial the second external subscriber's telephone number.
c
You are conducting a second external call. The first external subscriber is on hold.
r
Press the R-key and then
3
the code digit “3”. Conduct your conference call.
A subscriber who has been included in the conference can hang up at any time. The initiating subscriber then continues the call with the remaining subscriber.
d
The initiating subscriber ends the conference call by replacing the handset.
Changing from a three-party conference to toggling
Using the toggling procedure you can return to the originally held call.
r
Press the R-key and
2
the code digit “2”. This ends the conference and you are again connected with the
subscriber with whom you were speaking before the conference.
r
To speak with the other held subscriber (i.e. the second subscriber),
2
press the R-key again, then the code digit “2”.
Speaking with two subscribers simultaneously (three-party
conference)

47
Making calls
Picking up calls
You can pick up an external call when another TA 33USB international telephone rings:
b
Lift the telephone handset.
r
Press the R-key.
*
Press the star key
0
and the code digit “0”.
c
Conduct your call.
Picking up calls from an answering machine
You can pick up calls from an analogue answering machine that has already started answering the
call. In order to do this, an analogue line must be set to “Answering machine” (see the section entitled “Configuring the terminal types for the lines” on page 60).
b
Lift the telephone handset.
r
Press the R-key.
*
Press the star key
3 3
and then press the code digits “33”.
The call is forwarded to your terminal.
DTMF post-dialling
DTMF post-dialling is only possible for live connections if you are instructed by an automated
announcement to post-dial digits and symbols (“1” to “0”, “*” and “#”), for fax polling, remote access
to an answering machine, communication with a voice mailbox or other such applications, for example.
c
You have established an external connection. You hear, for example, the signal tone
of an answering machine or automated announcement.
t
You can now post-dial. The external connection remains live.

48
Keeping in touch
Call forwarding
You can forward calls from an internal to an external terminal or from one internal to another internal terminal. Depending on the configuration, this call forwarding is carried out either in the
TA 33USB international or the exchange (in the latter case, this will incur charges). Internal call forwarding must be activated in the TA 33USB international (see page 64).
When you activate call forwarding, it applies to a line and the telephone numbers allocated to it. To
use call forwarding, therefore, your numbers must first be stored and allocated (see the section entitled “Storing your telephone numbers” on page 56).
Three different types of call forwarding are possible:
Immediate (code digits “71”): an incoming call is immediately forwarded without being signalled on
the terminal originally dialled.
After a set time (code digits “72”): the call is first signalled on the dialled terminal and is forwarded
to a preset destination after a certain time. The delay is set at around 20 seconds.
On busy (code digits “73”): if the dialled terminal is busy, the call is immediately forwarded to the
preset terminal.
If the “Immediate” call forwarding option is activated, you will hear a special dialling tone if manual
trunk line seizure is active.
Activating call forwarding
b
Lift the telephone handset.
(
r
) Press the R-key (only if trunk line seizure is automatic, see page 54 and page 29).
*
Press the star key and then press the code digits for the type of call forwarding you
want to activate:
t
• Code digits “71” for immediate call forwarding
• Code digits “72” for call forwarding after a set time
• Code digits “73” for call forwarding on busy
*
Press the star key.
t
Enter the destination number for the forwarded call. This will be either an internal
telephone number (“11” or “12”) or an external telephone number (without a “0” for
manual trunk line seizure).

49
#
Press the hash key. You hear a positive acknowledgement tone.
d
Replace the handset. All calls to your internal telephone number and to the external
telephone number allocated to your terminal are then forwarded.
Deactivating call forwarding
b
Lift the telephone handset.
(
r
) Press the R-key (only if trunk line seizure is automatic, see page 54 and page 29).
#
Press the hash key and then press the code digit for the type of call forwarding you
want to deactivate:
t
• Code digit “7” for immediate call forwarding
• Code digit “8” for call forwarding after a set time
• Code digit “9” for call forwarding on busy
#
Press the hash key again. You hear a positive acknowledgement tone.
d
Replace the handset.
Accepting or rejecting waiting calls
An external subscriber rings you while you are already conducting a call. You are notified of this new
call by a call-waiting tone. Internal callers always hear a busy tone if you are conducting another call.
The following options are available to deal with waiting calls:
d
You can end the current call by replacing the handset
b
and take the new call by lifting the handset again.
r
You can reject the waiting call
0
by pressing the R-key and then pressing the code digit “0”.
You can then continue your original call.
Keeping in touch

50
Keeping in touch
r
You can end the current call
1
and take the waiting call by pressing the R-key and then pressing the code digit “1”.
r
You can put the current call on hold
2
and take the waiting call by pressing the R-key and then pressing the code digit “2”.
or
c
You can ignore the call-waiting tone and continue your current call.
Call-waiting protection
If you want to make a call without being disturbed by call-waiting tones, you can activate “call-waiting protection” for the line you are calling from. Other subscribers calling you while you are making
a call will then hear a busy tone. Once activated, call-waiting protection then remains active until it
is deactivated again.
Activating call-waiting protection
b
Lift the telephone handset.
(
r
) Press the R-key (only if trunk line seizure is automatic, see page 54 and page 29).
#
Press the hash key and
4 1
then press the code digits “41”.
#
Press the hash key. You will hear a positive acknowledgement tone.
d
Replace the handset.
Deactivating call-waiting protection
b
Lift the telephone handset.
(
r
) Press the R-key (only if trunk line seizure is automatic, see pages 41 and 70).
*
Press the star key and
4 1
then press the code digits “41”.
#
Press the hash key. You will hear a positive acknowledgement tone.
d
Replace the handset.

51
Special settings / features
The blacklist
You can program a common blacklist for both the analogue terminals connected to the TA 33USB
international. This list can contain up to five telephone numbers or parts of telephone numbers. You
program these numbers in the Configurator.
With the aid of the blacklist, you can prevent subscribers from dialling undesirable phone numbers.
Any attempt to dial a number listed in the blacklist results in the dialling procedure being aborted as
soon as the blacklist detects such an attempt, followed by a negative acknowledgement tone.
Activating the blacklist
b
Lift the telephone handset.
*
Press the star key
7 4
and then press the code digits “74”.
#
Press the hash key. You will hear a positive acknowledgement tone.
d
Replace the handset.
Deactivating the blacklist
b
Lift the telephone handset.
#
Press the hash key
7 4
and then press the code digits “74”.
#
Press the hash key. You will hear a positive acknowledgement tone.
d
Replace the handset.
Note
• The configuration mode must first be activated and subsequently deactivated.
• The blacklist functions for both telephony and Internet connections. Before you activate the
blacklist, please check the numbers listed so that you do not block dial-in numbers that you may
require. The blacklist contains some pre-set numbers.

52
Special settings / features
Emergency numbers
In configuration mode you can configure two emergency telephone numbers that can always be
dialled from any telephone and are not dependent on trunk line access rights. You can also use one
of the emergency telephone number stack entries to store, for example, an area code. Telephones
without external access can thus make calls in this area, while external calls to all other areas remain
blocked.

53
Configure the system using a telephone
You can configure the TA 33USB international and edit the pre-programmed settings to meet your
personal requirements. You can do this in one of two ways: by means of a menu on a connected PC
(see the section entitled "Configuring the system using a PC" from page 61 onwards) or by means of
a connected telephone (which must support DTMF dialling).
To configure your system using a telephone, please proceed as follows:
• Activate the configuration mode by keying in your personal identification number (PIN). The
default setting is "0000" (four zeros).
• Begin every configuration procedure by lifting the handset and complete it by replacing the
handset after you have heard a positive or negative acknowledgement tone.
• If you hear a negative acknowledgement tone, the procedure is interrupted and the entries you
have made for this procedure are lost. You then have to restart and carry out the procedure
again. As soon as you hear a positive acknowledgement tone, it means that your entries have
been saved.
• When you have completed the configuration, deactivate the configuration mode. If you fail to
do this manually, it will be done automatically four minutes after you have replaced the handset
or made your last input.
Call protection is automatically activated on the telephone you are configuring from while the configuration mode is active, which means that you cannot receive calls.
In configuration mode you always hear the special internal dialling tone on lifting the handset.
If you attempt to configure the TA 33USB international from a telephone while configuration is
being carried out from a PC or another connected telephone, you will hear a busy tone.
Programming Other Settings
Before you can carry out any programming on the TA 33USB international, you need to switch the
programming mode on. This then remains active for 15 minutes before being switched off automatically. You can also switch the programming mode off manually by entering a code. Please note that
whilst the programming mode is active, no outgoing or incoming calls are possible on any terminals
connected to the TA 33USB international.
Programming is carried out using a DTMF telephone which is plugged into one of the RJ11 sockets
on the front. This telephone is also used to switch on the programming mode on.

54
Configuring the system using a telephone
Once you have switched the programming mode on, you start the individual programming procedures by lifting the handset. After a few seconds you will hear a series of very short high-pitched
tones (programming tone). Your inputs have been saved once you hear a low-pitched tone for one
second (positive acknowledgement tone).
Invalid inputs are rejected with three short high-pitched tones (negative acknowledgement tone).
End the programming sequence by replacing the handset. Replacing the handset before acknowledgement will cancel the programming process.
Please do not forget to switch the programming mode off again when you have finished programming.
Activating the configuration mode
For automatic trunk line seizure
b
Lift the telephone handset. (If you hear an external dialling tone,
r
press the R-key.)
*
Press the star key
8 8
and then press the code digits “88”.
t
Key in your PIN (the default setting on delivery is “0000”).
#
Press the hash key. You will hear a positive acknowledgement tone.
d
Replace the handset. You are now in configuration mode.

55
Configuring the system using a telephone
For manual trunk line seizure
b
Lift the telephone handset.
*
Press the star key
8 8
and then press the code digits “88”.
t
Key in your PIN (the default setting on delivery is “0000”).
#
Press the hash key. You will hear a positive acknowledgement tone.
d
Replace the handset. You are now in configuration mode.
When you lift the handset you hear the special internal dialling tone and can start configuring your
system.
Deactivating the configuration mode
b
Lift the telephone handset. The configuration mode is active and you can hear the s
pecial internal dialling tone.
#
Press the hash key
8 8
and then press the code digits “88”
#
Press the hash key. You will hear a positive acknowledgement tone.
d
Replace the handset.
If you fail to do deactivate the configuration mode manually, it will be done automatically four minutes after you have replaced the handset or made your last input.

56
Configuring the system using a telephone
Changing your PIN
The personal identification number (PIN) is required to activate the configuration mode. In the
default setting on delivery this is “0000” (four zeros).
It is advisable to change this setting. Keep the new PIN code in a safe and secret place.
b
Lift the telephone handset. The configuration mode is active and you can hear a s
pecial internal dialling tone.
9 0 2
Press the code digits “902”.
t
Key in the old four-digit PIN (this is “0000”in the default setting on delivery).
*
Press the star key.
t
Key in your new four-digit PIN.
*
Press the star key.
t
Key in the new four-digit PIN again.
#
Press the hash key. You will hear a positive acknowledgement tone .
Storing your telephone numbers
You need to store the telephone numbers / MSNs (without your local area code) issued to you by
your network operator on the TA 33USB international so that incoming calls ring on the appropriate
terminal. Please also enter the stored numbers in the table on page 58.
b
Lift the telephone handset. The configuration mode is active and you will hear a s
pecial internal dialling tone.
0 2 3
Press the code digits “023”.
t
Press the code digit “1” for the first telephone number (“2” for the second, “3” for
the third and so on up to “0” for the tenth). These code digits are required for call
allocation (see the table on page 58). Enter your first telephone number without the
area code.
#
Press the hash key. You will hear a positive acknowledgement tone.
d
Replace the handset.

57
Configuring the system using a telephone
Store the rest of your telephone numbers - up to ten if applicable - in the same way.
If you want to delete a specific telephone number, press the corresponding code digit and then confirm it immediately by pressing the hash key, i.e. you carry out the procedure for storing a telephone
number without entering any telephone number at all. The telephone number corresponding to this
code digit will then be deleted.
Deleting telephone numbers
You can delete all the stored telephone numbers / MSNs:
b
Lift the telephone handset. The configuration mode is active and you hear the
special internal dialling tone.
9 0 5
Press the code digits “905”.
#
Press the hash key. You will hear a positive acknowledgement tone.
d
Replace the handset. All the telephone numbers are deleted.

58
Call allocation
You need to specify call allocation so that calls can be made to specific terminals. Call allocation
determines which terminal rings for a call to a specific telephone number (MSN). In order to do this,
you allocate each external telephone number to the internal line or lines which are to signal the call.
Please enter the telephone numbers you allocated in the table below.
b
Lift the telephone handset. The configuration mode is active and you hear the
special internal dialling tone.
0 5 1
Press the code digits “051”.
t
Press the code digit “1” to “9” or “0” that corresponds to the external telephone
number / MSN. Key in the internal telephone number (“11” or “12”) of the terminal
that is to ring when a call comes in for this external telephone number / MSN.
If you want to enter an additional internal telephone number,
*
Press the star key and
t
key in the internal telephone number.
#
Press the hash key. You will hear a positive acknowledgement tone.
d
Replace the handset.
Code digit Call for telephone number / MSN ... Rings on telephone:
11 12
1
2
3
4
5
6
7
8
9
0
Configuring the system using a telephone

59
Configuring the system using a telephone
Resetting call allocation
b
Lift the telephone handset. The configuration mode is active and you can hear the s
pecial internal dialling tone.
9 0 7
Press the code digits “907”.
#
Press the hash key. You will hear a positive acknowledgement tone.
d
Replace the handset.
Call allocation is deleted. When a call now comes in, all connected telephones will ring.
Configuring external line seizure
Manual trunk line seizure with “0”
When your system is configured in this way you have to press the code digit “0” before dialling an
external telephone number.
b
Lift the telephone handset. The configuration mode is active and you hear the
special internal dialling tone.
0 5
Press the code digits “0530”.
3 0
#
Press the hash key. You will hear a positive acknowledgement tone.
d
Replace the handset.
Automatic trunk line seizure
This is the default setting: when you lift the handset you can dial an external number right away, i.e.
without pressing “0” first. Please note that when your system is configured in this way, you will not
be able to make any internal calls from telephones that use the pulse-dialling mode.
b
Lift the telephone handset. The configuration mode is active and you hear the
special internal dialling tone.
0 5
Press the code digits “0531”.
3 1
#
Press the hash key. You will hear a positive acknowledgement tone.
d
Replace the handset.

60
Configuring the system using a telephone
Telephone number busy
This feature enables you to select whether second calls to this telephone number / MSN (i.e. calls
during an existing conversation) are to be indicated by the call-waiting tone or by ringing on
another telephone, or whether the caller hears a busy tone.
Activating telephone number busy
If you activate this feature, a second caller to a busy telephone number / MSN hears the busy tone
(just as they would on any analogue line):
b
Lift the telephone handset. The configuration mode is active and you hear the
special internal dialling tone.
0 5
Press the code digits “0541”.
4 1
#
Press the hash key. You will hear a positive acknowledgement tone.
d
Replace the handset. Second calls for a busy telephone number are not signalled.
Deactivating telephone number busy
b
Lift the telephone handset. The configuration mode is active and you hear the
special internal dialling tone.
0 5
Press the code digits “0540”.
4 0
#
Press the hash key. You will hear a positive acknowledgement tone.
d
Replace the handset. Second calls are signalled by the call-waiting tone or by ringing
on another telephone.
Configuring the terminal types for the lines
You can assign each line a certain type of terminal (e.g. fax, answering machine) so that the
TA 33USB international can manage the corresponding terminal type correctly. This ensures that fax
transmissions are not interrupted by call-waiting tones, for example.

61
Configuring the system using a telephone
b
Lift the telephone handset. The configuration mode is active and you hear the special
internal dialling tone.
t
Press the code digits for the terminal type:
• “10” for a telephone
• “11” for an answering machine
• “12” for a fax machine
• “13” for a modem
• “14” for a multi-purpose terminal
t
Key in the internal telephone number of the line (“11” or “12”).
#
Press the hash key. You will hear a positive acknowledgement tone.
d
Replace the handset. Repeat this procedure for the other line.
Note
Only one line can be configured to “Answering machine” at any one time. If the second line is then
configured to “Answering machine” (code digits “11”), then the first is automatically reset to “Telephone” (code digits “10”).
Configuring trunk line access rights
You can configure the trunk line access rights for each line to any one of five levels. If subscribers dial
external telephone numbers for which their lines do not have access rights, they will hear a busy
tone. The emergency telephone numbers (see page 62) can always be dialled.
Carry out this procedure for both lines.
b
Lift the telephone handset. The configuration mode is active and you hear the
special internal dialling tone.
t
Press the code digits for the trunk line access rights level.
t
Key in the internal telephone number for the line (“11” or “12”).
#
Press the hash key. You will hear a positive acknowledgement tone.
d
Replace the handset.

62
Configuring the system using a telephone
Emergency telephone numbers
You can configure 2 (= 999 / 112) emergency telephone numbers that can always be dialled from
any telephone and are not affected by trunk line access rights.
Storing the emergency telephone numbers
b
Lift the telephone handset. The configuration mode is active and you hear the
special internal dialling tone.
6 2
Press the code digits “62”.
t
Key in the emergency number storage code “01” or “02” and
*
press the star key.
t
Key in the emergency telephone number (max. 24 digits) and
#
press the hash key.
d
Replace the handset.
Repeat this procedure for each emergency telephone number. Please refer to the notes in the section entitled “Special settings / features” on page 51.
Access rights Code digit Meaning
International 21 All possible numbers can be dialled without
restriction
National 22 The international prefix “00” is blocked
Local 24 The national prefix “0” and international prefix “00”
are both blocked
Outward 25 Outgoing external calls are blocked, incoming
restricted calls are unrestricted
Internal only 26 Only internal calls are possible, but external calls can
be forwarded by other subscribers.

63
Configuring the system using a telephone
Deleting the emergency telephone numbers
b
Lift the telephone handset. The configuration mode is active and you hear the special
internal dialling tone.
6 3
Press the code digits “63”.
t
Key in the storage code of the emergency number you want to delete. “01” or “02”,
and
#
press the hash key.
d
Replace the handset.
Programming the telephone number for transmission
You can program the telephone number that is transmitted to the called subscriber. If you do not
program anything, the main telephone number of your ISDN access will be transmitted.
b
Lift the telephone handset. The configuration mode is active and you hear the special
internal dialling tone.
0 5 2
Press the code digits “052”.
t
Press the code digit for the telephone number (see the section entitled “Storing your
telephone numbers” on page 56).
t
Key in your internal telephone number (“11” or “12”).
#
Press the hash key. You will hear a positive acknowledgement tone.
d
Replace the handset.
Suppressing transmission of your telephone number
(anonymous call, CLIR)
If you have ordered the “Calling line identification restriction” feature (CLIR) from your network
operator, you can suppress the transmission of your telephone number to the called subscriber's terminal.

64
Configuring the system using a telephone
Activating the suppression of telephone number transmission
b
Lift the telephone handset. The configuration mode is active and you hear the special
internal dialling tone.
3 0
Press the code digits “30”.
t
Key in the internal telephone number of the line (“11” or “12”).
#
Press the hash key. You will hear a positive acknowledgement tone.
d
Replace the handset.
Deactivating the suppression of telephone number transmission
You can deactivate the suppression of telephone number transmission for both lines simultaneously:
b
Lift the telephone handset. The configuration mode is active and you hear the special
internal dialling tone.
3 1
Press the code digits “31”.
#
Press the hash key. You will hear a positive acknowledgement tone.
d
Replace the handset. Your telephone number will be transmitted to the called
subscriber's terminal.
Managing call forwarding
You can specify whether call forwarding is to take place in the TA 33USB international (this is the
default setting) or in the exchange. There are various advantages to both methods. Call forwarding
in the exchange has to be ordered from your network operator.
In the exchange, the telephone number allocated to the terminal that activated call forwarding is
diverted. Call forwarding using the TA 33USB international saves you the additional monthly fee, but
seizes both user channels simultaneously, which means that no further external calls are possible as
long as a call is being forwarded.

65
Configuring the system using a telephone
Activating call forwarding in the TA 33USB international
b
Lift the telephone handset. The configuration mode is active and you hear the special
internal dialling tone.
7 0
Press the code digits “70”.
#
Press the hash key. You will hear a positive acknowledgement tone.
d
Replace the handset.
Deactivating all call forwarding
You can deactivate all call forwarding by means of the following procedure:
b
Lift the telephone handset. The configuration mode is active and you hear the special
internal dialling tone.
9 0 8
Press the code digits “908”.
#
Press the hash key. You will hear a positive acknowledgement tone.
d
Replace the handset.

66
Configuring the system using a telephone
SMS in a fixed network
This function can only be used on analogue terminals that explicitly support the feature “SMS in a
fixed network”. For the service to function correctly, the SMS service centre telephone number must
be configured and SMS calls assigned to the desired analogue line. You can find an alternative to the
configuration method described below in the section entitled “Configuring the system using a PC /
Call allocation” on page 25).
Configuring the service centre’s telephone number
b
Lift the telephone handset. The configuration mode is active and you hear the special
internal dialling tone.
5 0
Press the code digits “50”.
t
Key in the telephone number of your network operator's SMS service centre.
#
Press the hash key. You will hear a positive acknowledgement tone.
d
Replace the handset.
Configuring a line for SMS
b
Lift the telephone handset. The configuration mode is active and you hear the special
internal dialling tone.
5 1
Press the code digits “51”.
t
Key in the internal telephone number of the line (“11” or “12”) you want to use for SMS.
#
Press the hash key. You will hear a positive acknowledgement tone.
d
Replace the handset.
Deleting the SMS line
b
Lift the telephone handset. The configuration mode is active and you hear the special
internal dialling tone.
5 2
Press the code digits “52”.
#
Press the hash key. You will hear a positive acknowledgement tone.
d
Replace the handset.

67
Configuring the system using a telephone
Notes on the configured SMS line
If a call is forwarded from the SMS provider to the SMS line on the TA 33 USB international:
• there is no compatibility check,
• any call forwarding configured for this line is not carried out,
• there is no validation check, and
• call waiting is not signalled.
If a call is already active on the SMS line, calls from the SMS provider will be rejected: SMS calls do
not trigger a call-waiting tone.
Automatic keypad signalling
If you operate the TA 33USB international as a sub-system, it may be necessary to switch the signalling procedure from “Keypad” (default setting) to “Telephone number”, depending on the type of
main system you are operating. This deactivates the automatic switchover to keypad input triggered
by the star or the hash key. The star and hash keys can then also be used to transmit dialling information. Please refer to the documentation of your main system for the required signalling procedure.
Activating automatic keypad signalling
b
Lift the telephone handset. The configuration mode is active and you hear the special
internal dialling tone.
*
Press the star key
7 5
and press the code digits “75”.
#
Press the hash key. You will hear a positive acknowledgement tone.
d
Replace the handset.
Deactivating automatic keypad signalling
b
Lift the telephone handset. The configuration mode is active and you hear the special
internal dialling tone.
#
Press the hash key

68
Configuring the system using a telephone
7 5
and press the code digits “75”.
#
Press the hash key. You will hear a positive acknowledgement tone.
d
Replace the handset.
Resetting the system data
With this function you can deactivate or delete all the settings that have been edited and reset the
system to the default setting as it was on delivery. This function also resets the PIN to “0000” (four
zeros):
b
Lift the telephone handset. The configuration mode is active and you hear the special
internal dialling tone.
9 0 0
Press the code digits “900”.
#
Press the hash key. After a short pause you will hear a positive acknowledgement tone.
d
Replace the handset.

69
Appendix
Audio cadences and ring tones
The following diagram shows the durations and intervals of the individual audio cadences and ring
tones.
Dialling tone
Call signalling
Busy tone
Special busy tone
Call-waiting tone
Positive acknowledgement tone
Negative acknowledgement tone
Signal tone
Programming tone
External call signalling
Internal call signalling
Continuous tone, 425 Hz You can dial a number
1s T one, 425 Hz,
4s Pause
0,25s Tone, 425 Hz, The subscriber you
0,25s Pause
3x 0, 5s Tone, 425 Hz, 0,5 s
Pause, 0,1s Tone , 425 H z,
0,9 s Pause
0,1s Tone, 425 Hz,
0,25s Pause, 0,1 s Tone
425 Hz, 3s Pause
1s Tone, 425 Hz Positive acknowledgement
0,3 s Tone 1600 Hz, 0,3 s
Pause, 0,3 s Tone 1600 Hz,
0,3 s Pause, 0,3 s Tone
1600 Hz
0, 25 s Tone 1600 Hz, 0,25s
Pause, 0,25s, Tone, 1600 Hz
0, 2s Tone, 1600 Hz
0, 2s Pau se, 0, 2 s Tone 1600
Hz , 0,2s Pause, 0,2s Tone
1600 Hz,
1s Call, 4 s Pause External call
0, 5s Call, 0,5s Pause
1s Call, 4 s Pause
Another subscriber is
being called
called is busy
The subscriber you
called is busy.
You can activate a
callback request.
You are conducting a
conversation when you
receive a second call
of a programming action
A programming action
has been rejected
After pressing the R-key
when in the call state
Programming mode has
been switched on.
Call from the other
analogue line

70
Annex
Troubleshooting
If your system or one of its accessories fails to function correctly, please report it to your supplier's
customer service department.
However, before doing so, disconnect the AC adapter plug from the mains, then plug it in again, as
your system may be in an undefined state. In this case you can clear the “fault” by means of this procedure.
External calls are not possible
• Check whether the telephone cable and the ISDN cable are firmly plugged into their sockets on
the TA 33USB international and the network terminator or the splitter provided by your network
operator.
☞ page 11 ff
• The trunk line access rights are restricted and block dialling
Change the setting.
☞ page 62
• Manual trunk line seizure with “0” may be configured. Try pressing “0” before dialling the external number.
• Both B-channels are busy because a call is being forwarded by the TA 33USB international.
Incoming calls are signalled on both terminals.
• Call allocation has not been carried out. Save your telephone numbers and allocate them to the
terminals.
☞ page 58
Incoming calls are not signalled
• “The “telephone number busy” feature is active and call-waiting is thus blocked. Deactivate the
function.
☞ page 60
• Call forwarding is active. Deactivate call forwarding if necessary.
☞ page 65
Problems with data applications
You will find up-to-date information in the “Readme.txt” file located in the root folder of the CDROM or under “Current information” on the installation screen.

71
Annex
Service and warranty
In the event of a problem, please contact the dealer from whom you purchased the device.
Guarantee Conditions
The guarantee conditions for this device are as defined by our representative in your country in
which it is sold. Details regarding these conditions can be obtained from the dealer from whom the
device was purchased. The bill of sale or receipt must be produced when making any claims under
the terms of this guarantee.
Declaration of Conformity
The EC Declaration of Conformity can be viewed on the Internet at http://www.detewe.de.
Disposal and recycling
Please dispose of the product packaging and your electrical devices in accordance with your local
by-laws and make use of your local recycling facilities. Electronic equipment should not be disposed
of with your normal household waste.

72
Notes on disposal
In order to avoid any possible effects resulting from the disposal of electrical and electronic equipment containing substances damaging to the environment and human health, the European Parliament and Council directives
2002/96/EC on waste electrical and electronic equipment (WEEE)
and
2002/95/EC on the restriction of the use of certain hazardous substances in
electrical and electronic equipment (RoHS)
have been transferred into national law in all EU member states.
The primary aim of the legislation is the prevention of waste electrical and electronic equipment,
and also the recycling, material recovery and any other form of recovery of such waste in order to
reduce the quantities of waste to be disposed of and the amount of hazardous substances from electrical and electronic equipment in waste.
The product that you have purchased was developed in line with the current state of the art in an
environmentally friendly manner and with a view to recycling. It therefore meets the specifications
of the European directives.
The product is labelled with the symbol illustrated above. If you wish to dispose of this product, this
symbol obliges you to do so separately from unsorted domestic waste. Suitable facilities have been
set up for the return of waste electrical and electronic equipment. Waste equipment can be handed
in at these return centres free of charge. To find out where these return centres are located, please
consult the information provided by the department of your local authority responsible for waste
disposal.
Please note:
Electrical equipment does not belong in household waste.
Deposit it free of charge at a return centre.
Annex

73
Annex
Programming Table
Please enter the settings you have programmed here and cross out any points which do not apply.
Settings on delivery are shown in bold print.
Analogue line 1 Analogue line 2
Line code digit “1” Line code digit “2”
First telephone number:
Telephone number code digit “1”
Second telephone number:
Telephone number code digit “2”
Third telephone number:
Telephone number code digit “3”
Call waiting
on
/ off
on
/ off
Calling line identification
(first telephone number
for the line)
on
/ off
on
/ off
Operation on telephone systems
or
Operation on an ISDN basic
access without keypad
or
Operation on an ISDN basic
on
access with keypad

74
Annex
Technical data
Supply voltage 230 V AC; 50 Hz via AC adapter
Rated output 3 VA
Protection class 2
2 analogue ports
- RJ connector cable permitted up to 3 m in length,
Standard 128 kbit/s USB port
Channel bundling (128 kbit/s)
Supported data protocols
- X.75
- HDLC transparent
- ISO 8208 (Eurofile Transfer)
- PPP (Internet)
- T.90 / T.70 NL
Scope of the software on the CD-ROM
- CAPI 2.0, 32 bit with a VxD interface from Win 98 onwards
- TAPI 2.1
- Windows configuration software
- FlashLoader
- CAPIControl program
- CAPIPort driver
Permissible temperature range
Stationary, weatherproof +5°C to +40°C
Dimensions (W x H x D) approx. 130 x160 x 41 mm
Weight (system) approx. 200 g
Declaration of Conformity
The EC Declaration of Conformity can be viewed on the Internet at http://www.detewe.de.

75
Annex
Glossary
a/b line
Line for analogue terminals using RJ11 sockets.
CLIP (Calling Line Identification Presentation)
Display of the calling subscriber’s number on suitable terminals (this feature depends on whether
the number is transmitted and whether this service is provided by the network operator).
DTMF dual-tone multifrequency
Dialling via internationally standardised tones of different pitches assigned to the digit keys and the
star and hash keys. This means that functions at the exchange can be controlled, e.g. callback on
busy, and answerphones can be operated remotely.
Flash function
Function of the R-key or, where applicable, of another key on your terminal (flash detection of the
TA 33USB international: 60 to 350 ms).
Keypad signalling
For controlling special functions on the ISDN network (if provided by the network operator).
Line code digit
Code digit assigned to the a/b lines (0, 1 or 2).
MSN
With your ISDN basic connection, your operator provides you with several telephone numbers (Multiple Subscriber Numbers) which can be allocated to different terminals.
Pulse dialling
Dialling mode via electrical pulses; no input via the star and hash keys is possible.
SMS (Short Message Service)
SMS are text messages which you can receive on suitable terminals. The prerequisite is that your
network operator supports SMS and CLIP.
Telephone number code digit
The code assigned to the telephone numbers (MSNs).

76
Annex
Index
A
AC adapter.....................................................9, 13
Audio cadences.................................................69
B
Blacklist........................................................30, 51
C
Call allocation .............................................25, 58
Call forwarding ..............................27, 48, 64, 65
Call-waiting protection ...................................50
CAPI (deactivate / activate) ............................31
CAPI Control program......................................32
CD-ROM................................................................5
Change system PIN ..........................................23
Configuration mode.........................................54
Configuration software ...................................19
Configuring the system...................................21
Connecting a computer...................................12
Connecting analogue terminals ....................12
Connecting to the ISDN network...................11
Connecting to the power supply ...................12
D
Data communication .......................................16
Default settings.................................................15
Dial-up Network ...............................................34
Dialling Mode....................................................15
Display ..................................................................3
Drilling Template..............................................78
Driver CAPI / TAPI .............................................17
DTMF post-dialling...........................................47
E
Emergency numbers.....................29, 52, 62, 63
Enquiry calls.......................................................42
External call.................................................39, 41
F
Features provided by the TA 33USB int. .........4
Flash function....................................................75
FlashLoad ....................................................31, 33
G
Guarantee ..........................................................71
I
Installation sequence.........................................8
Internal call..................................................39, 41
Internal ports.....................................................26
Internet access ..................................................34
ISDN features.......................................................4
K
Keypad signalling.......................................30, 67
L
Load configuration...........................................23
Load default configuration.............................23
M
Mains cable........................................................12
Making calls.......................................................38
Mounting location..............................................9
MSN .................................................29, 42, 60, 75
P
Package ................................................................5
PC software........................................................16
Personal identification number (PIN) ...........56
Picking up calls..................................................47
Ports of the TA 33USB int. .................................6
Power failure .......................................................3
Power Supply Socket .......................................14
Print configuration...........................................23
Programming Table .........................................73

77
Annex
Putting it into operation...................................5
R
Removing drivers .............................................37
Resetting system data .....................................68
Ring tones..........................................................69
S
Safety Precautions..............................................1
Save configuration ...........................................23
Service ................................................................71
Settings ..............................................................31
SMS .....................................................................75
SMS in a fixed network....................................66
Software Installation .................................18, 19
Suppressing transmission (CLIR) ...................63
Symbols................................................................3
System software ...............................................33
T
Technical data...................................................74
Telephone number busy .................................29
Telephone Numbers............................24, 56, 57
Terminal types............................................26, 60
Three-party conference..................................46
Toggling.......................................................45, 46
Tools....................................................................10
Transferring call ................................................43
Troubleshooting ...............................................70
Trunk line access rights ...................................61
Trunk line seizure .............................................40
W
Wall mounting ..................................................10
Windows taskbar..............................................31

78

79
Hole spacing
93 mm
✃
Drilling Template
!!! Danger !!!
Before drilling, ensure that there are no pipes or cables located at the drilling points.
There is a risk of fatal injury or material damage if gas, electricity, water or sewage cables
and pipes are damaged.
Annex

80


DeTeWe Systems GmbH · Zeughofstraße 1 · 10997 Berlin • www.detewe.de
Mat.-no. 69273.019
As of 07/05
The right to technical modifications is reserved.
 Loading...