

MID-7117 CM BOXCHIP A13方案 E N G L I S H M A N U A L
A
标准说 明 书 ,70g书纸,135x102mm,钉装
USER'S MANUAL
TAC-70041
www .fa ceboo k.c om /de nve re lec tro ni cs
Befor e con necti ng, o pe rat ing o r ad jus tin g th is pr oduct ,
ple as e rea d this us er' s ma nua l car ef ull y and c om ple tely.

Table of Contents
Tabl e of C on tents .. ....... .. ....... .. ..... .. .. ..... .. P1
Feature s. ..... .. .. ..... .. ....... .. ....... .. ..... .. .. ..... .P 2
Unit at a Gla nc e ..... .. .. ..... .. ....... .. ....... .. ..... P3
Getting S ta rted. .. .. ..... .. ....... .. ....... .. ..... P4 -P 5
About Applic at ions... .. ..... .. .. ..... .. ....... .P 5-P6
Preinst al led Applicat io ns... .. .. ..... .. ....... .. .P6
Connect in g to the In te rn et .......
....... .. ..... .. .. ..... .. ....... P8
Email ....... .. ..... .. .. .....
Transfer ri ng File s. .. ..... .. ....... .. ....... .. ..... .. .P 9
Troubles ho oting .. .. ..... .. ....... .. ....... .. P10-P 11
Specifi ca tions .. .. ..... .. ....... .. ....... .. ..... .. .. .P11
....... .. ..... . .P7
1

Features
Browse th e Web.
Vis it y ou r favor it e we bsite s
Check you r e- mail
Keep in tou ch w ith fri en ds a nd fami ly
Wat ch YouTub e™ vide os
Browse th e wo rld’s m os t popul ar v ideosharing c om munity
Read your f av orite b oo ks
Downloa d th ousands o f bo oks wit h th e
include d E- book re ad er *
Discove r th ousan ds o f ap ps for And ro id ™
Games, ap pl icati on s, a nd more w it h
marketp la ce(ne ed f or c ustom er i ns talle d)
Connect t o th e Inter ne t wi reles sl y
High-sp ee d Wi-Fi 8 02 .11 b/g/ n ne tworkin g
Enjoy you r me dia libra ry a nywhe re
2
Portabl e po werhous e pl ays pop ul ar m usic,
video,a nd p hoto fo rm at s
microSD m em ory car d re ad er
Increas e yo ur stor ag e ca pacit y (u p to 3 2 GB
support ed )
Built-i n ca mera
Conveni en t front -f ac ing cam er a
Automat ic o rient at io n detec ti on
Read any wa y yo u want; the d is play ad ju st s
automat ic ally!
Reading b oo ks in the ePu b fo rmat re qu ir es
the inclu de d E-boo k re ad er appl ic at ion.
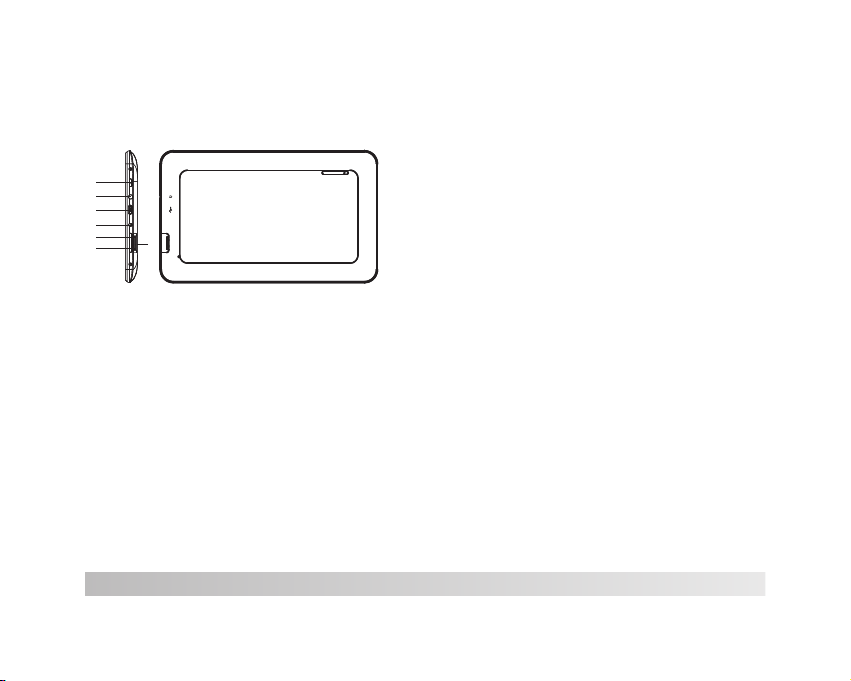
Unit at a Glance
①
②
③
④
+
+
TF CARDDC IN 5V
⑤
⑥
1.POWER
Press to turn the unit on, or to turn the screen on
or off.
Press and hold to access the Power Off menu.
2. Headphone
Audio output connection for headphones.
3. USB
Connect to a USB device
TF CARDDC IN 5V
-
-
⑦
RESET
RESET
4.DC IN 5V
Change and power the tablet with the included
power adapter.
5/6. VOL+/VOL-
Press VOL+ to increase the volume level.
Press VOL- to decrease the volume level.
7.TF CARD
Load external microSD memory cards here.
3

Getting Started
Turning the Tablet on or off
To turn the tab le t on:
Press and h ol d the Pow er k ey u ntil th e LC D
screen tu rn s on. Wait until t he H ome scree n
appears ; th e table t is n ow r eady fo r us e.
To turn the tab le t off :
1.Press a nd h old the P ow er k ey unti l th e
power off m enu app ea rs .
2. Touc h ok t he s creen t o tu rn o ff th e ta blet.
4
Turning the Scree n On or off
(Standby)
When the ta bl et is on, y ou c an t urn off t he
screen to c on serve b at te ry powe r. Si mp ly pres s
the Power k ey o nce to tu rn t he s creen
off . Pr es s the Pow er k ey again to t ur n the
screen ba ck o n.
To conserve b at tery po we r, th e scree n
can be set to t ur n off a ut omatica ll y when
the table t is n ot in use ( be tw een
1 minute an d 30 m inute s) .
This Scre en t imeou t op ti on can be f ou nd
in the Disp la y menu.

Getting Started
Unlocking the Screen
When the sc re en turn s of f, you wi ll h ave to
unlock th e sc reen
when you tu rn i t back on .
To unlock the s cr een, dr ag t he l ock ico n ac ro ss
the scree n to wards t he s li de lock i co n to wards
right sid e of t he scre en w he re ther e is a n un lock
icon show n. This w il l un lock ta bl et.
.
About Applications
To open an appl ic ation, to uc h the app li ca tion
icon on the h om e scree n or i n th e Launc he r
where you c an t ap the ic on r ig ht up on th e
home scre en t o get in. .
Launche r sc reen:
The screen shown above is for illustrative
purposes only. Reserves the right to modify
and improve the final list of applications
available on the tablet.
5

About Applications
Preinstalled Applications
Som e applications ha ve be en installed on you r
tab let for you r con ven ien ce.
The se applications incl ude :
Browse th e we b.
Perform s im ple mat he ma tical o pe ra tions .
Take pictur es o r video s wi th t he
frontfa ci ng came ra .
Check you r e- mail.
Play musi c.
Music
Access th e Se tting s me nu t o adjus t th e
tablet’ s optio ns .
Setti ngs
6
Preinstalled Applications
Installing Applications
You ca n also down lo ad an insta ll a ddition al
applica ti ons fro m th e de vice’ s applica ti ons
marketp la ce, the w eb b ro wser, or o th er
sources .
The table t mu st be set t o al lo w insta ll at ion of
applica ti ons fro m no n- Marke t so ur ces. Th e
Unknown s ou rces op ti on c an be set i n th e
Applica ti on sett in gs m enu.

Connecting to the Internet
Connecting to Wirel ess Internet
1.Press the Settings Icon.
2.Locate the Wi-Fi setting and slide it to the
On position.
5.If the network is secured with a password, enter
the password to continue.
3.Select a network from the list of available networks.
To refresh the list of available networks, press the
Scan button.
To manually add a network, select the Add Network
button.
4.Select Connect from the pop up menu.
6.Once finished connecting, the display will show
Connected under the name of the network.
To conserve battery life, turn off Wi-Fi when not in
use.
7
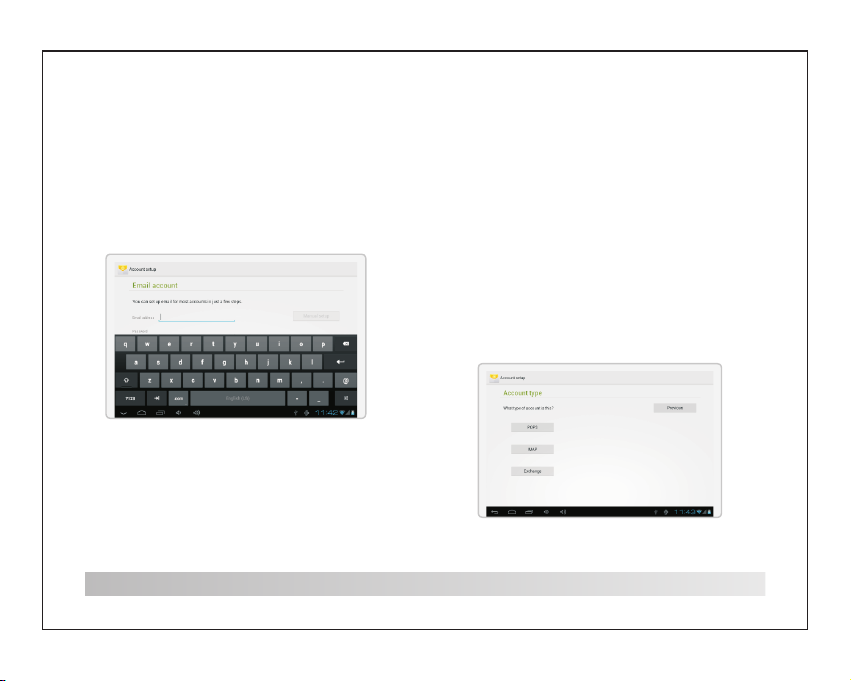
Email
Setting Up an Email account
1.Press Email icon under App menu.
2.Enter your email address and password, then
press Next.
If this does not work, you will need to manua lly
configure your account. Before atte mpting to
configure manually,re-enter y ou email and
password to make sure they are correct.
Manually Configuring an Email account
It is recommended to consult an IT pr ofessiona l
before attempting to manually confi gure your
email address.
1.To set up your email manually, detailed
information is required. Check your provider’s
website or phone supportfor individual provider
information.
8
2.The first thing you will need to determi ne is
the server type. While most servers are P OP3,
IMAP an d Exchange ar e also suppor ted service s.
3.Enter your email address and password then
press Next.
4.Fill in all information for the Incomi ng server
portion of the manual setup.
5.Press Next and the app will test your sett ings.
Wi-Fi is required to be active for this ste p.
6.Fill in all information for the
Outgoing server settings.
7.Press Next and the app will test your sett ings.
Wi-Fi is required to be active for this ste p.

Transferring Files
Transferring Files with a Co mputer
1.To begin transferring files to your computer,
plug one end of the included Mini-USB to USB
cord into the unit, and the other into the US B port
on a computer.
2.Press the USB icon in the lower right hand corner.
3.Select USB Connected.
4.Press the Turn On USB Storage button.
Using the native controls, accept any prompts on
the connected computer.
5.You will now be able to transfer files to and from
your computer.
6.To end the sessions, press the
Turn Off USB Storage button.
9

Troubleshooting
1.1 Device can not connect to Wi-Fi
• Ensure the wireless network is working by
testing it using another wireless device.
• Ensure the device and the wireless router is
within the range of the wireless network to be
connected too. Walls or other obstructions will
reduce the possible distances between wireless
devices.
• Ensure the security password being used is
correct.
1.2 Device doesn’t turn on
• You can not turn on the device when the battery
charge is below the critical level, please charge
the battery.
• Press the RESET button on the top of the device
and check if it is restarting is normally or not.
• Check if the charger is connected correctly.
1.3 Heat Issues
• When running multiple applications, using the
screen on its brightest setting, or when being
charged, this device can get quite hot. This is
normal and should not cause any inconvenience
when in use.
1.4 System has anomalies and doesn’t work
correctly
• Installing some third-party applications may
cause the system not to operate correctly. Press
the RESET button and perform a system reset to
resolve this issue.
10
1.5 Cannot set E-mail Account or registration
application
• Ensure that the MID is connected to a Wi-Fi
network and can connect to the Internet.
• Ensure you E-mail settings have been entered
correctly for the account being accessed.
• Make sure your system time and local time are
correct.
1.6 Can not record
• Press the RESET button on the top of the device,
then check if the record function works correctly.
1.7 The stand-by time of the device is too short
• The duration of the lithium battery varies with
environmental temperature changes and the
service conditions. If the environment temperature
is too low or too high, the duration of the battery will
be affected. It is recommended to use this device at
normal temperature.
• Battery life is dependent on usage. High volume,
WIFI, and the frequent use may cause the battery
to be drained at a higher rate.
1.8 No sound via earphone
• Please check if the volume setting is 0.
• Please check if audio file is broken, and try to play
another audio file to confirm. If the audio file is
broken, it may cause severe noise or static.
1.9 The color distortion of video or picture display
• Press the RESET button on the top of the device
to resolve this issue.

Troubleshooting
1.10 Can not copy files
• Please check if the device is connected to the
computer correctly.
• Please check if the memory space is full.
• Please check if the USB cable is broken.
1.11 Other troubles
Please follow up the steps as below to fix the
other troubles before you return the MID/Tablet
PC to us:
• Step 1: Press the RESET button on the top of
the device, then check if the function works
correctly;
• Step 2: Upgrade the firmware from the PC and
restart the device and then check if the function
works correctly.
Specifications
A13 1.2GHz(Cortex
Processor
RAM
Storage
Display
Wi-Fi Networking
Audio Output
PC Interface
Additional Features
Operating System
Power
Playback Time
(hours)
Music was t es ted wit h a 12 8 kb ps MP3 fi le ; vi deo
was teste d wi th a 1920 x1 08 0 MPEG- 4/ AVC file ;
browsin g wa s teste d wi th t he scre en b ri ghtne ss
set to defa ul t. Actua l pl ay back re su lt s may var y.
BOXCHIP
512M DDR3
4GB flash built-in; micro
SD card slot (max.32GB supported)
7” TFT LCD(800x480)
IEEE 802.11 b/g/n
3.5mm headphone
USB 2.0 high speed
Built-in microphone
Front facing camera(0.3MP)
1W speaker
And roid™ 4 .0
Rechargeable Li-poly battery power
Adapter(DC 5V,2A)
Up to 6 hours music,
3 hours video,
3 hours web browsing
A8)
11

www.denver-electronics.com
Importer:
DENVER ELECTRONICS A/S
Stavneagervej 22, DK-8250 EGAA, DENMARK
 Loading...