

Page 1
Instruction Manual
Smart Watch
SW-500
www.denver-electronics.com
Before operating this product, please read this instruction manual
carefully and completely.
Feature
• 1.3-inch IPS full screen display
• Multi-Sport Mode (Running, Walking, Hiking,
Biking, Indoor Run & Trail Run)
Page 2

• Track your sport performance
• Provide comprehensive GPS location
• Digital Crown integrated, rotate it to change the
menu easily
• Built-in HR sensor, monitor your heart rate and
set your heart rate zone
• Built-in altimeter, barometer & temperature
• Monitor your daily activity and sleep
• Built-in sedentary reminder
• Synchronize phonebook, answer or reject calls
from your wrist
• Display SMS, emails, calendar events and social
media activity
• Smart wake-up, raise or shake your arm to wake
up the device
• Remote control music playback, remote capture
photo on your Smartphone
• Built-in loudspeaker and Microphone
• Built-in 350mAh Li-poly battery, up to 5-7 days
standby time
• Fully compatible with iOS7 or above and Android
4.4 or above
• Different design styles for your different
occasions and preferences
Overview
Smart Watch
2
Page 3
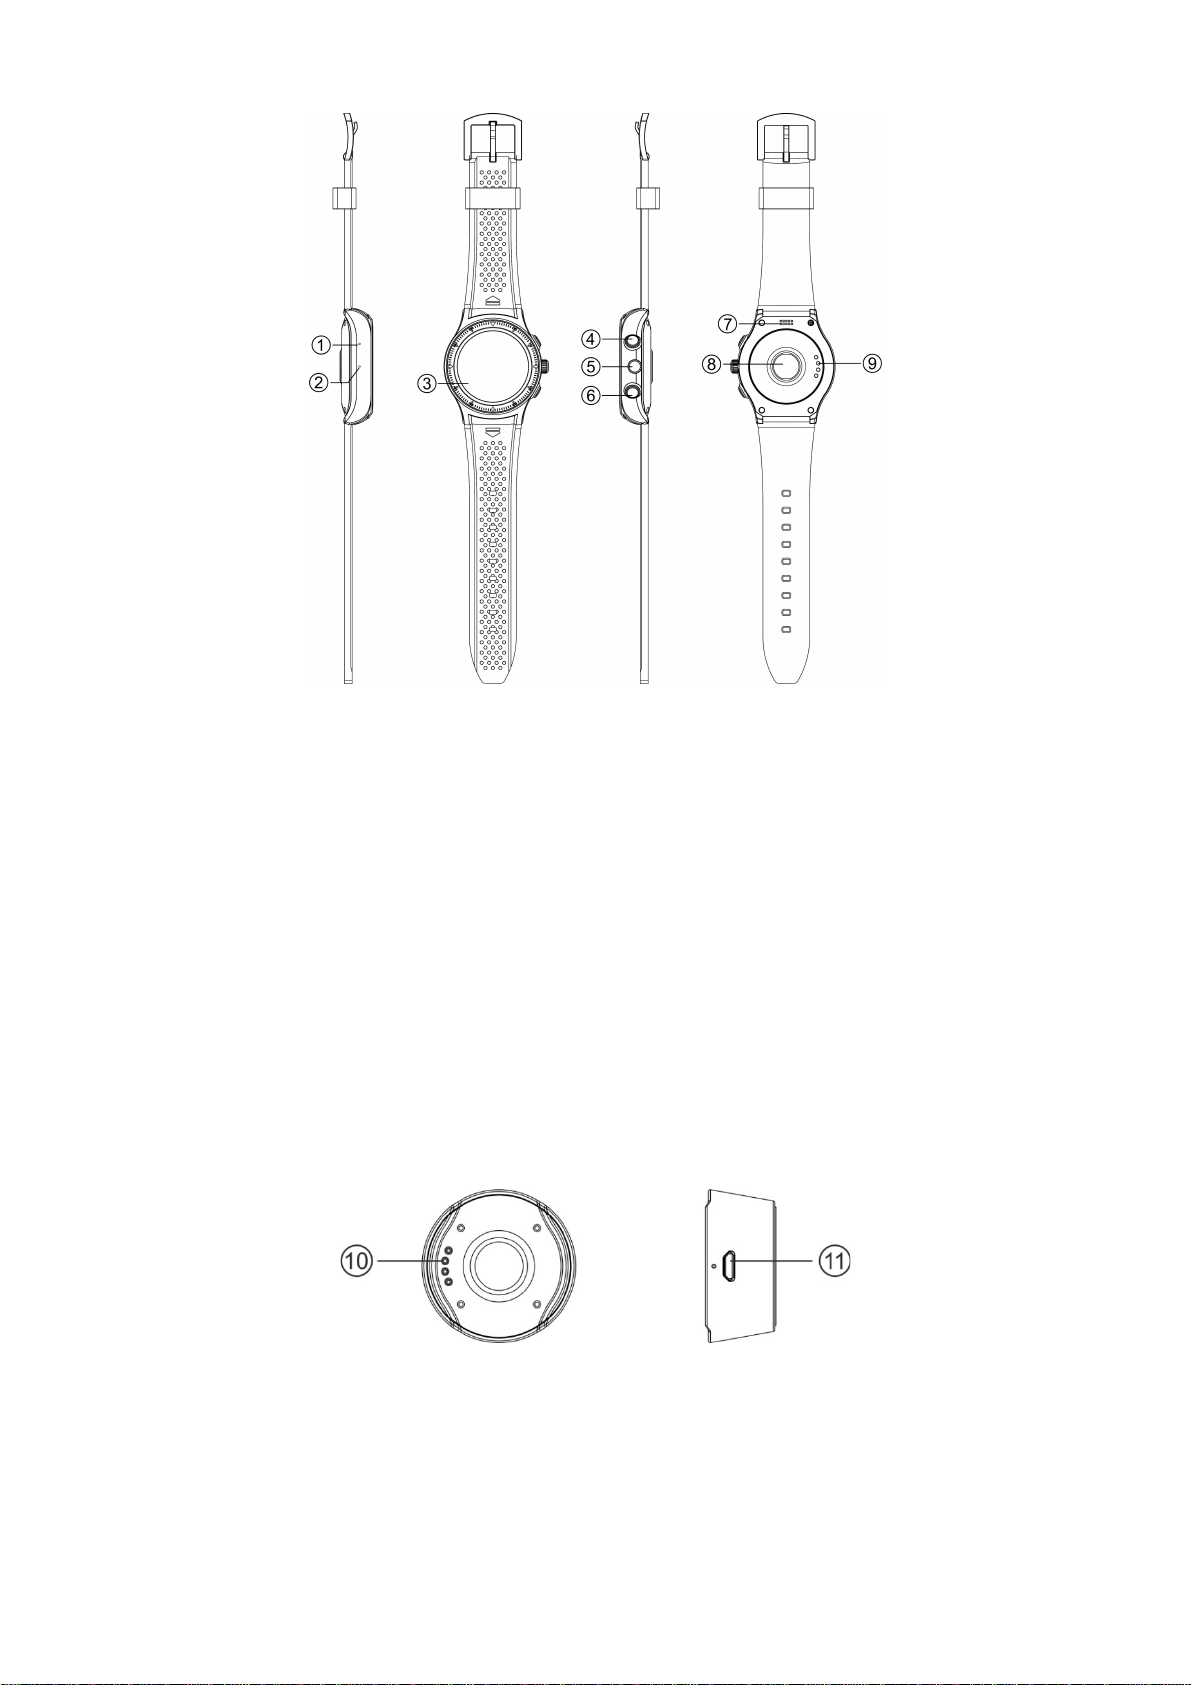
1. MIC
2. Barometer sensor
3. Touch screen
4. Shortcut key for Sport mode
5. Digital crown
6. Power button
7. Speaker
8. Heart rate sensor
9. POGO-Pin Charging terminals
POGO-Pin Charger
10. POGO-Pin
11. Micro-USB port
3
Page 4
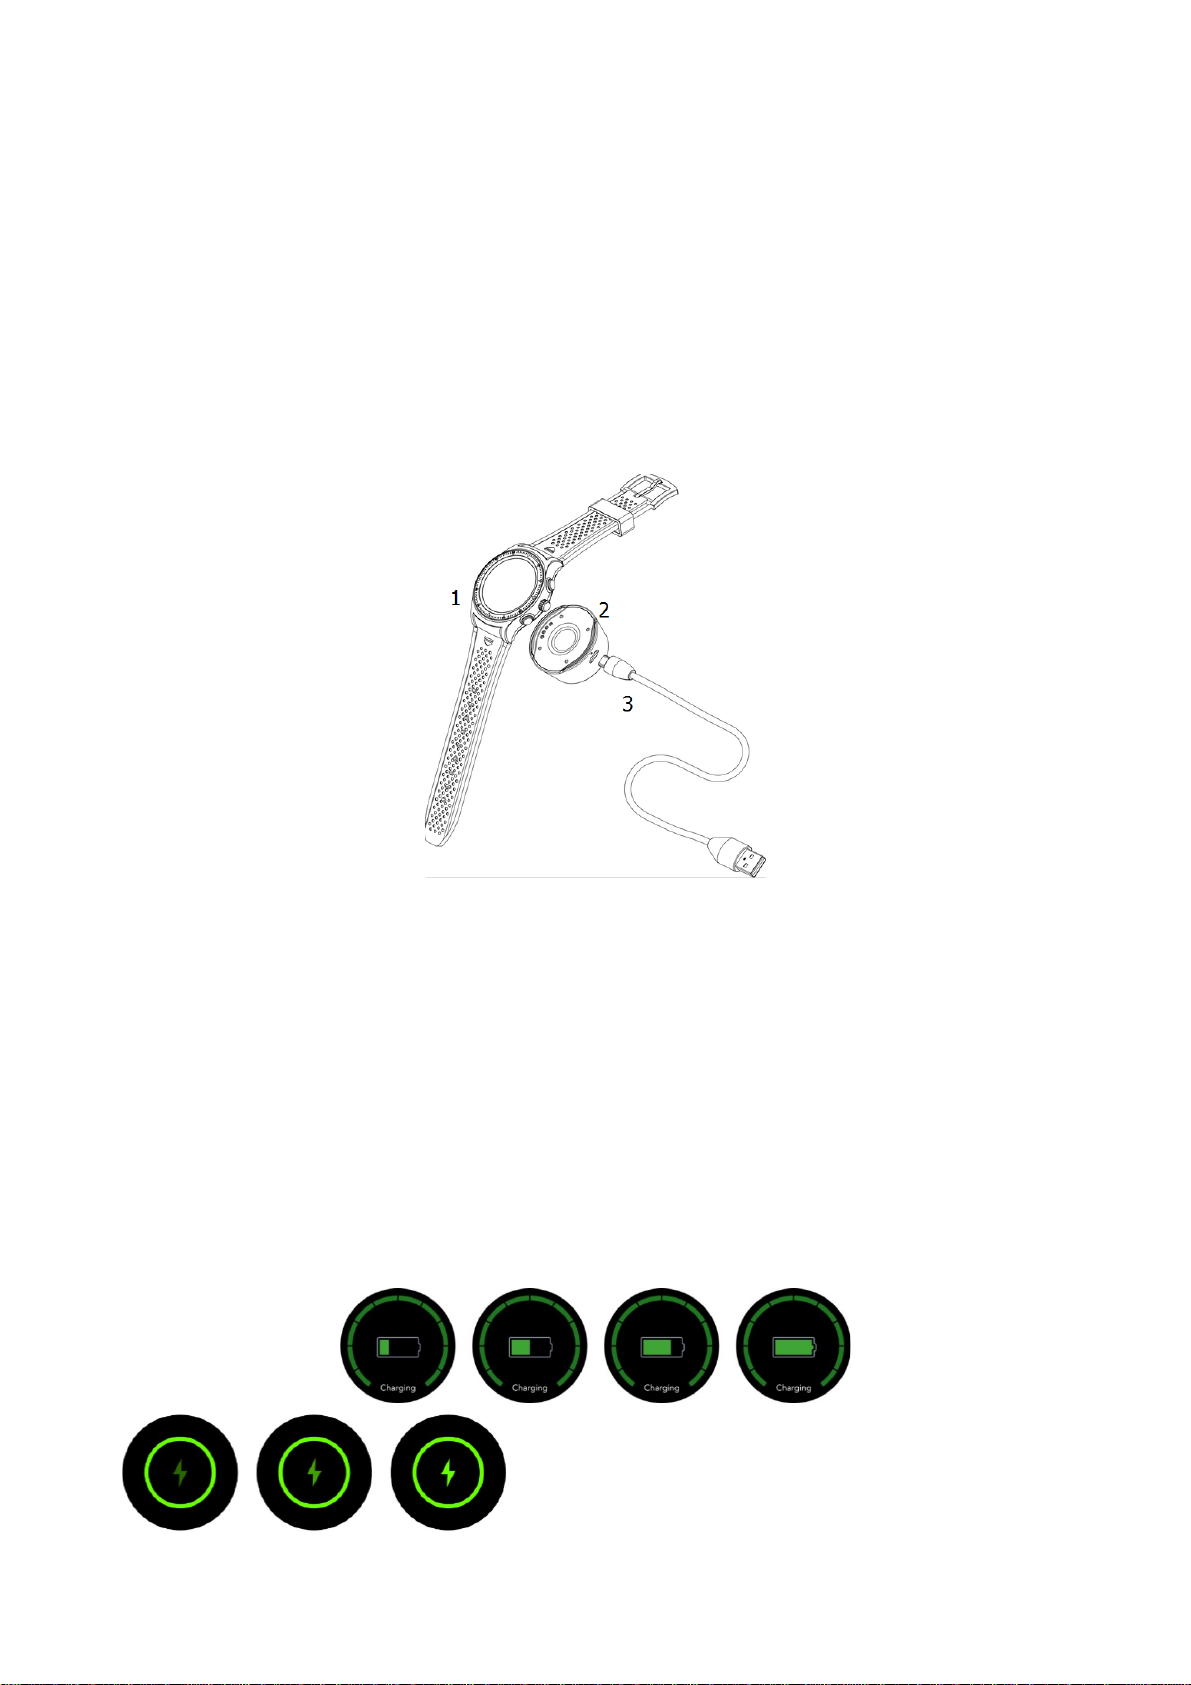
Charging
• If you use a Power Adaptor (Not included), Power
Adaptor current is: 5V, 500mA.
• It takes 2-hours to fully charge the smart watch,
please follow steps below to charge.
1. Put the charging cradle beneath the watch. Make
sure the POGO-pins on the cradle fit correctly onto
the charging terminals on the back of smart watch.
2. Connect the charging cradle with the USB cable
3. Plug the big end of the USB cable to a power
source
Charging when power off Charging when power on
4
Page 5
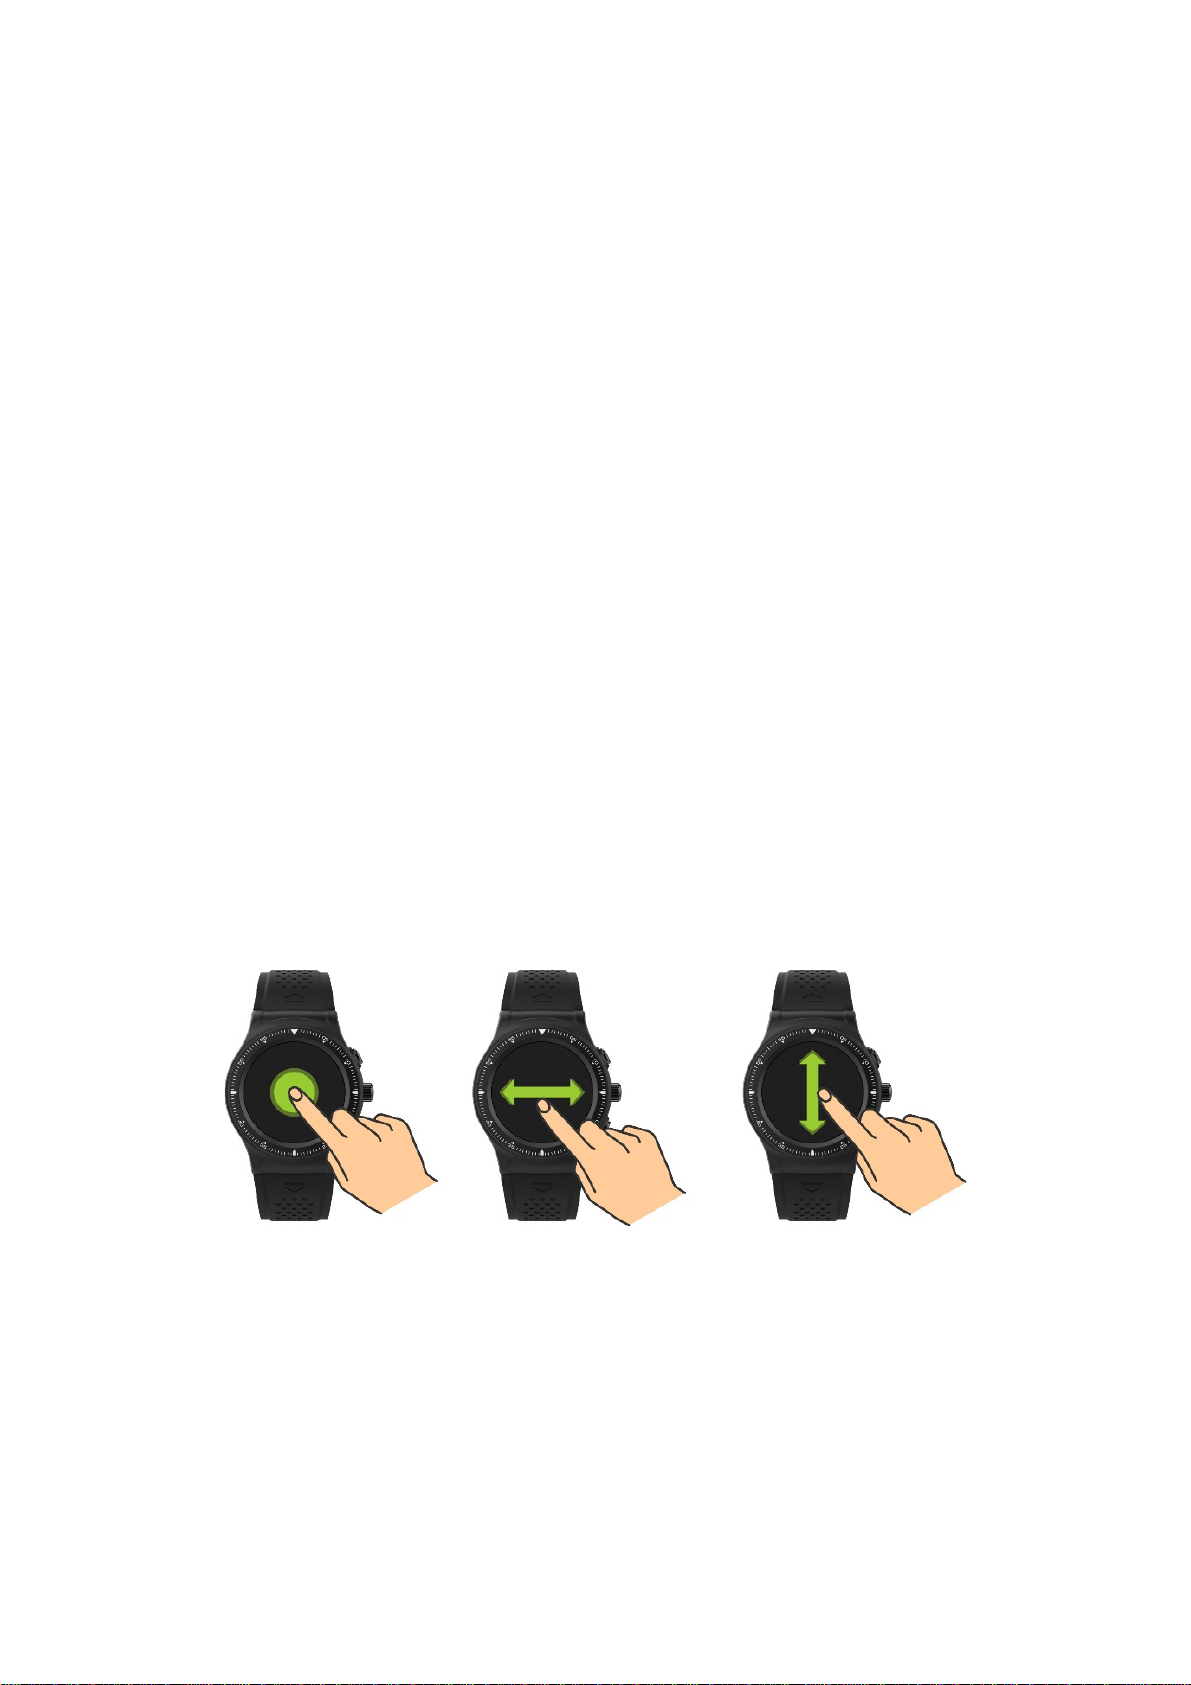
How to use
• Turn on: Hold press power button in 3 seconds
• Go to main menu: Swipe from right to left on
watch face interface
• Switch main menu: Swipe up/ down
• Confirm: Tap the icon or press digital crown
• Exit: Swipe from left to right
• Return to watch face interface: Short press
power button on any interfaces
• Sport mode shortcuts: Press the upper button
• Check notifications: Swipe from left to right on
watch face interface
• Switch submenu/ shortcuts: Swipe up/ down or
Turn digital crown
• Turn off: Hold press power button in 3 seconds
How to calibrate the sensor
In the settings inside, there is a “Sensor calibration”
option.
If you find the temperature, altitude, pressure of the
watch are wrong, you can calibrate the sensor to make
5
Page 6
the watch display more accurate. (We will make
sensor calibration for each device before packing
when mass production)
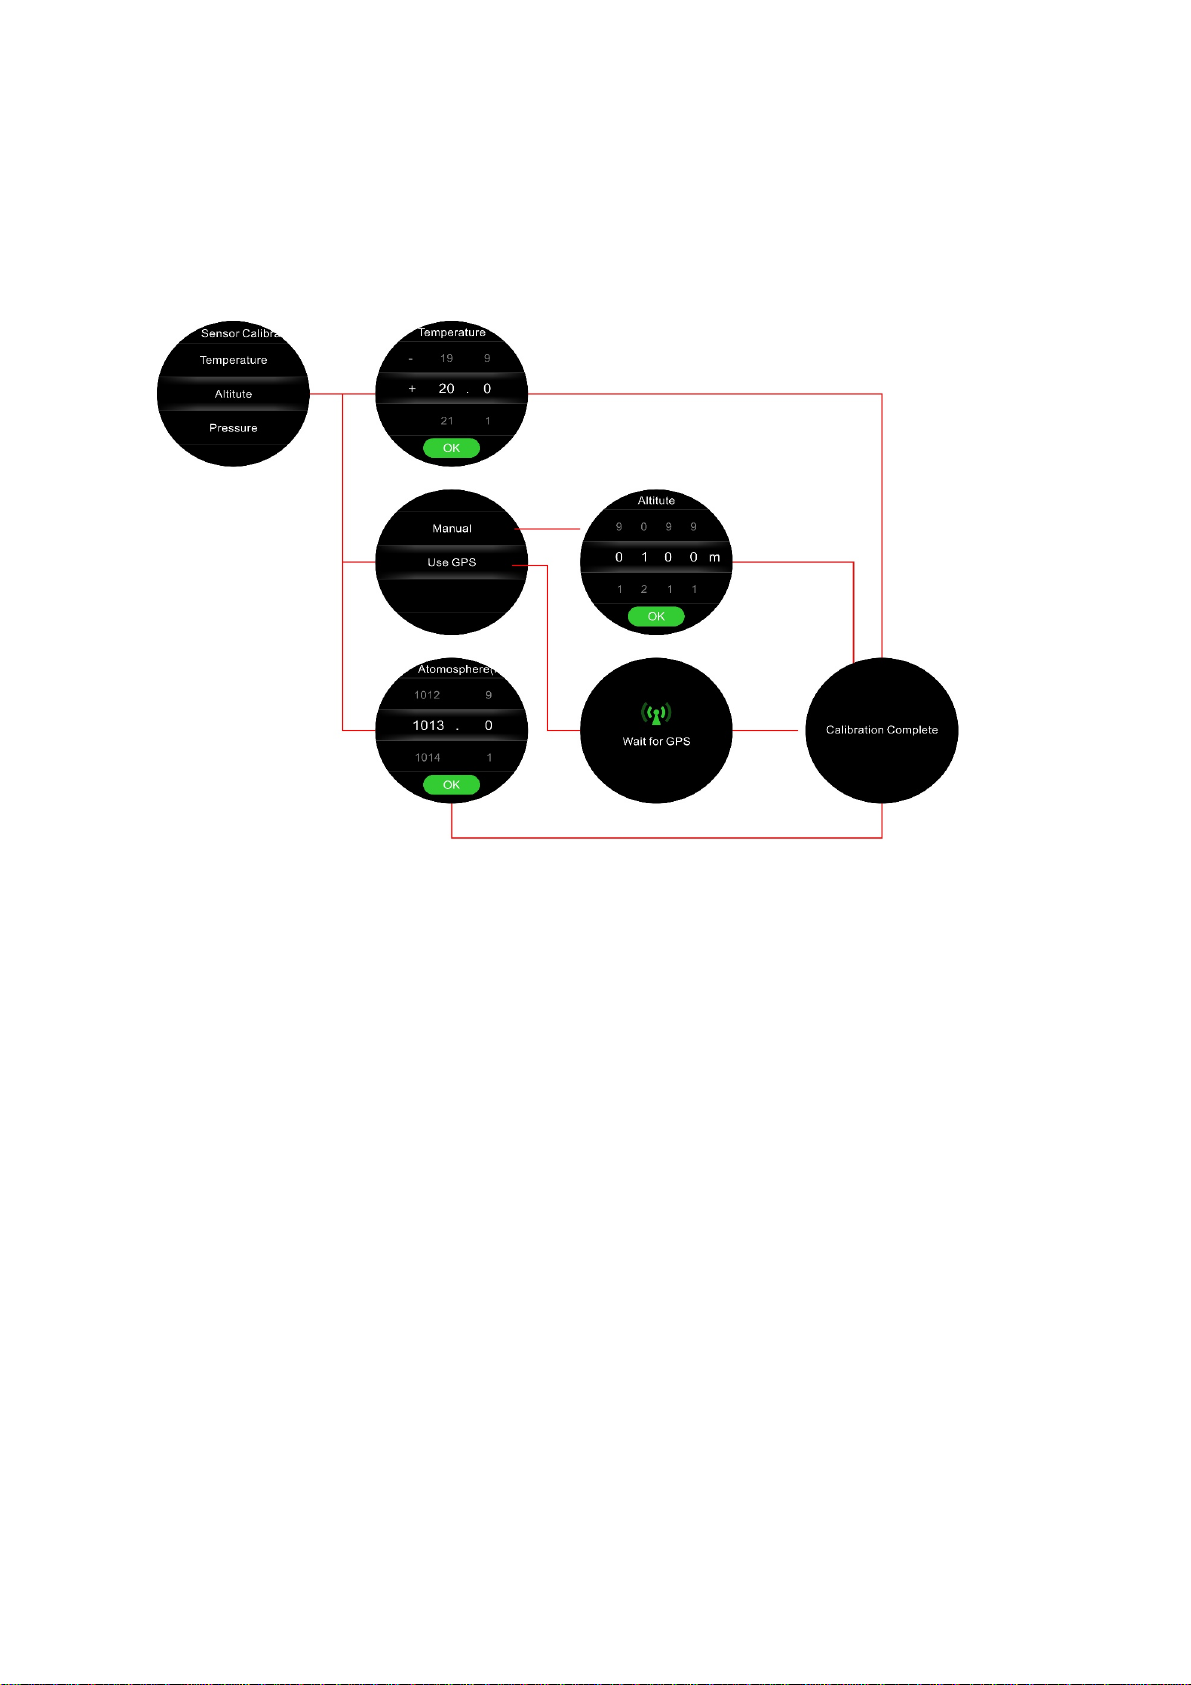
The steps to calibrate the sensor:
Temperature: Settings-> Sensor calibration->
Temperature, set up the correct temperature value
and click “OK”.
Pressure: Settings-> Sensor calibration-> Pressure,
set up the correct pressure value and click “OK”.
Altitude: Settings-> Sensor calibration-> Altitude, if
you select “Manual”, set up the correct altitude
value and click “OK”. If you select “Use GPS”,
wait for GPS located successfully, the watch will
automatically show the current altitude, then click
“OK’.
6
Page 7
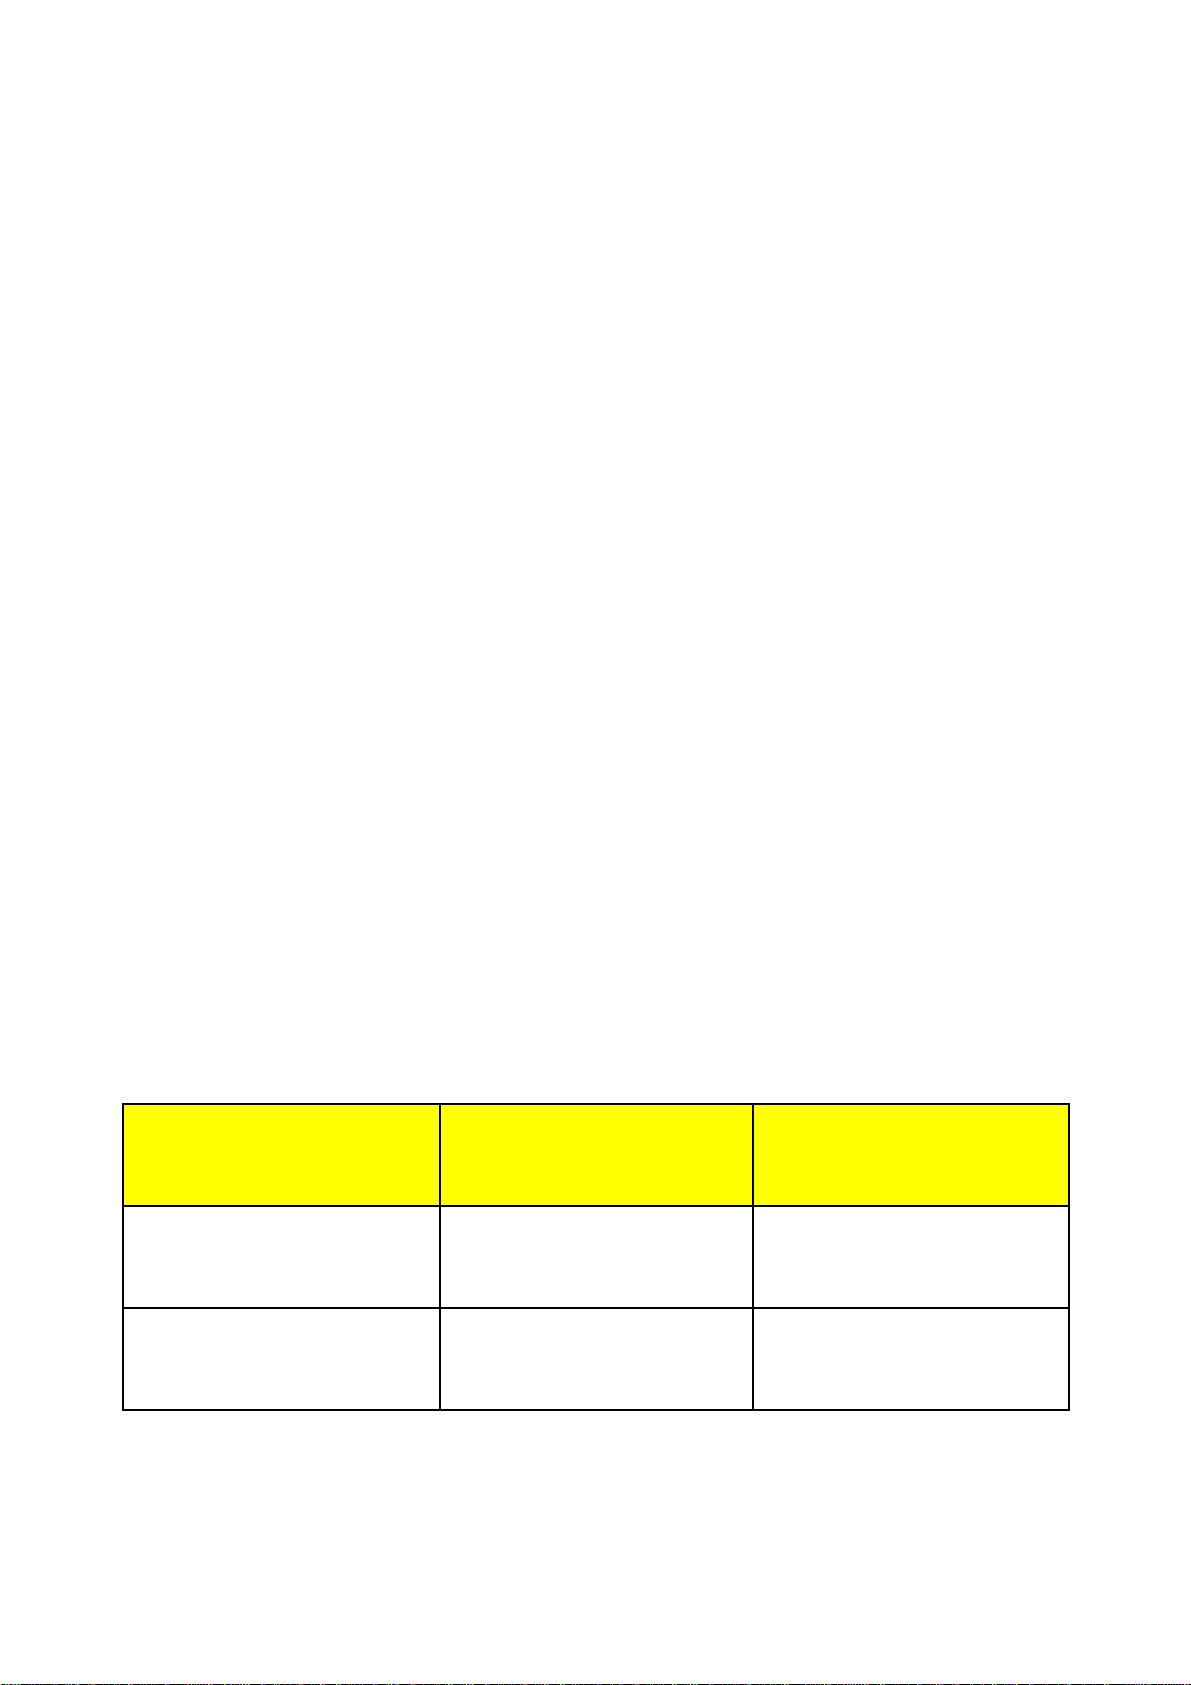
Calibration reference:
Temperature: You can refer to the thermometer to
calibrate the watch's temperature;
Pressure: If you are using iPhone, you can see the
current city pressure in the Weather application
Altitude: You can download an app called "GPS
Recorder", open your mobile phone location
service, and then refer to "Meter" interface
"Altimeter" in iOS system.
PS: If you use GPS to calibrate the altitude, please
operate in an open area.
If you need to calibrate both altitude and atmospheric
pressure, please calibrate the atmospheric pressure
first, then calibrate the altitude.
If you go to another city, you need to re-calibrate the
pressure and altitude on your watch.
The watch Units
you set up
Units of
Temperature
Units of
Altitude
Degrees Celsius
Metric
Meter (m)
(℃)
Degrees
Imperial
Feet
Fahrenheit (℉)
7
Page 8
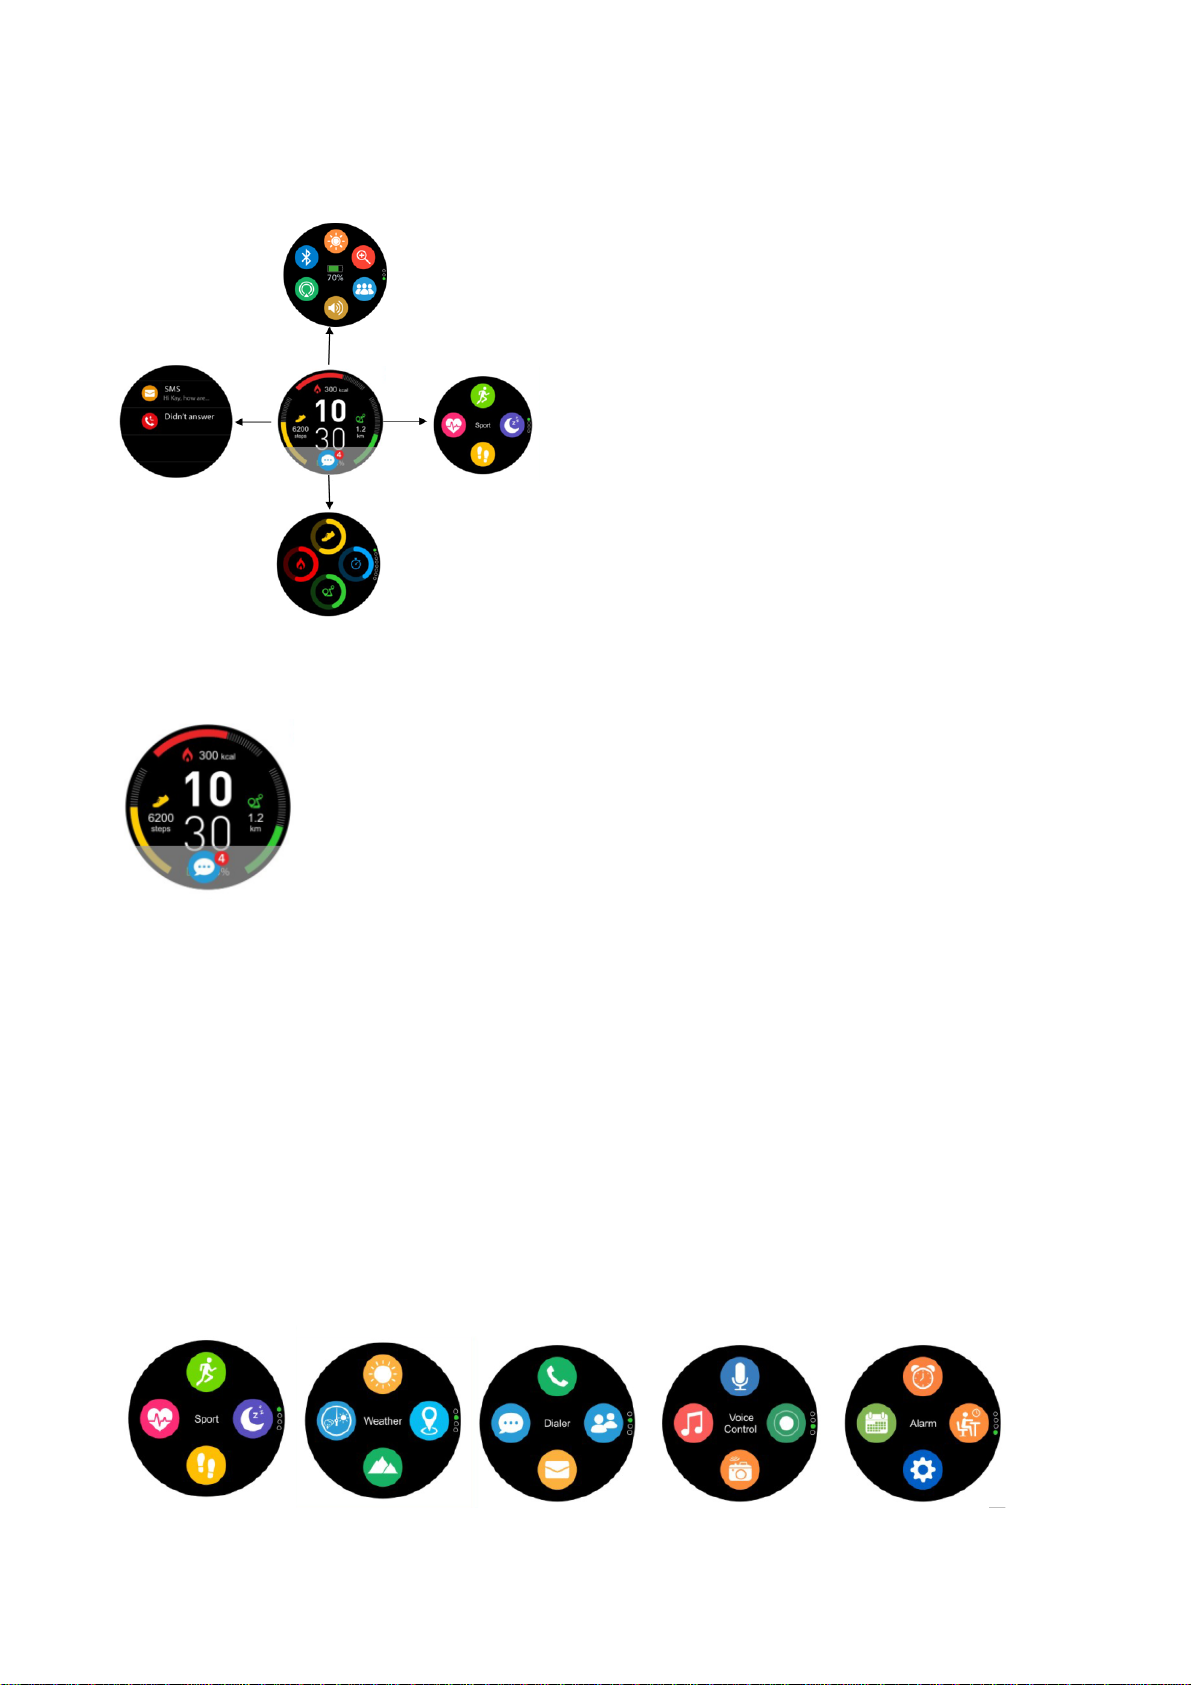
Main Menu
When turning on smart watch, you will see the watch
face.
From watch face:
1. Go to Main Menu
a. Slide from right to left to enter into main menu.
b. Swipe up and down (or turn the digital crown)
to switch the main menu.
c. Click the icon (or press the digital crown) to
enter the corresponding menu. Slide from left
to right to return to the previous menu.
2. Go to Notification shortcut page
8
Page 9

Slide from left to right
3. Go to other shortcuts page
Swipe up and down.
Pair with smart phone
Mobile phones requirement:
Android 4.4 and above
iOS7.0 and above
Search and download “Orunning” app from App store
or the Google Play Store on your smart phone.
Step 1: Pairing through the application “Orunning” to
sync activity data and notifications etc..
1. Enable Bluetooth on your smart phone
2. Open Orunning App on your smart phone, set up
your profile on Settings.
3. Tap “Connect Smart Watch” on Settings, select
the name of your smart watch (or your smart
watch name_LE if iPhone) in the list of devices
for connection.
Step 2: Pairing for calling function (Only for iPhone)
9
Page 10
Go to iPhone “Settings”→”Bluetooth” and select
your smart watch name in the list of devices for
connection.
Remark:
• If the connection is successful, a check mark will
appear next to the name of your phone
• Make sure your smart phone is set to be “Visible
to all nearby Bluetooth device”.
• The smart watch will automatically pair with your
smartphone after the initial pairing is successful.
• The smart watch will auto-sync the date and time
with your smartphone.
Function
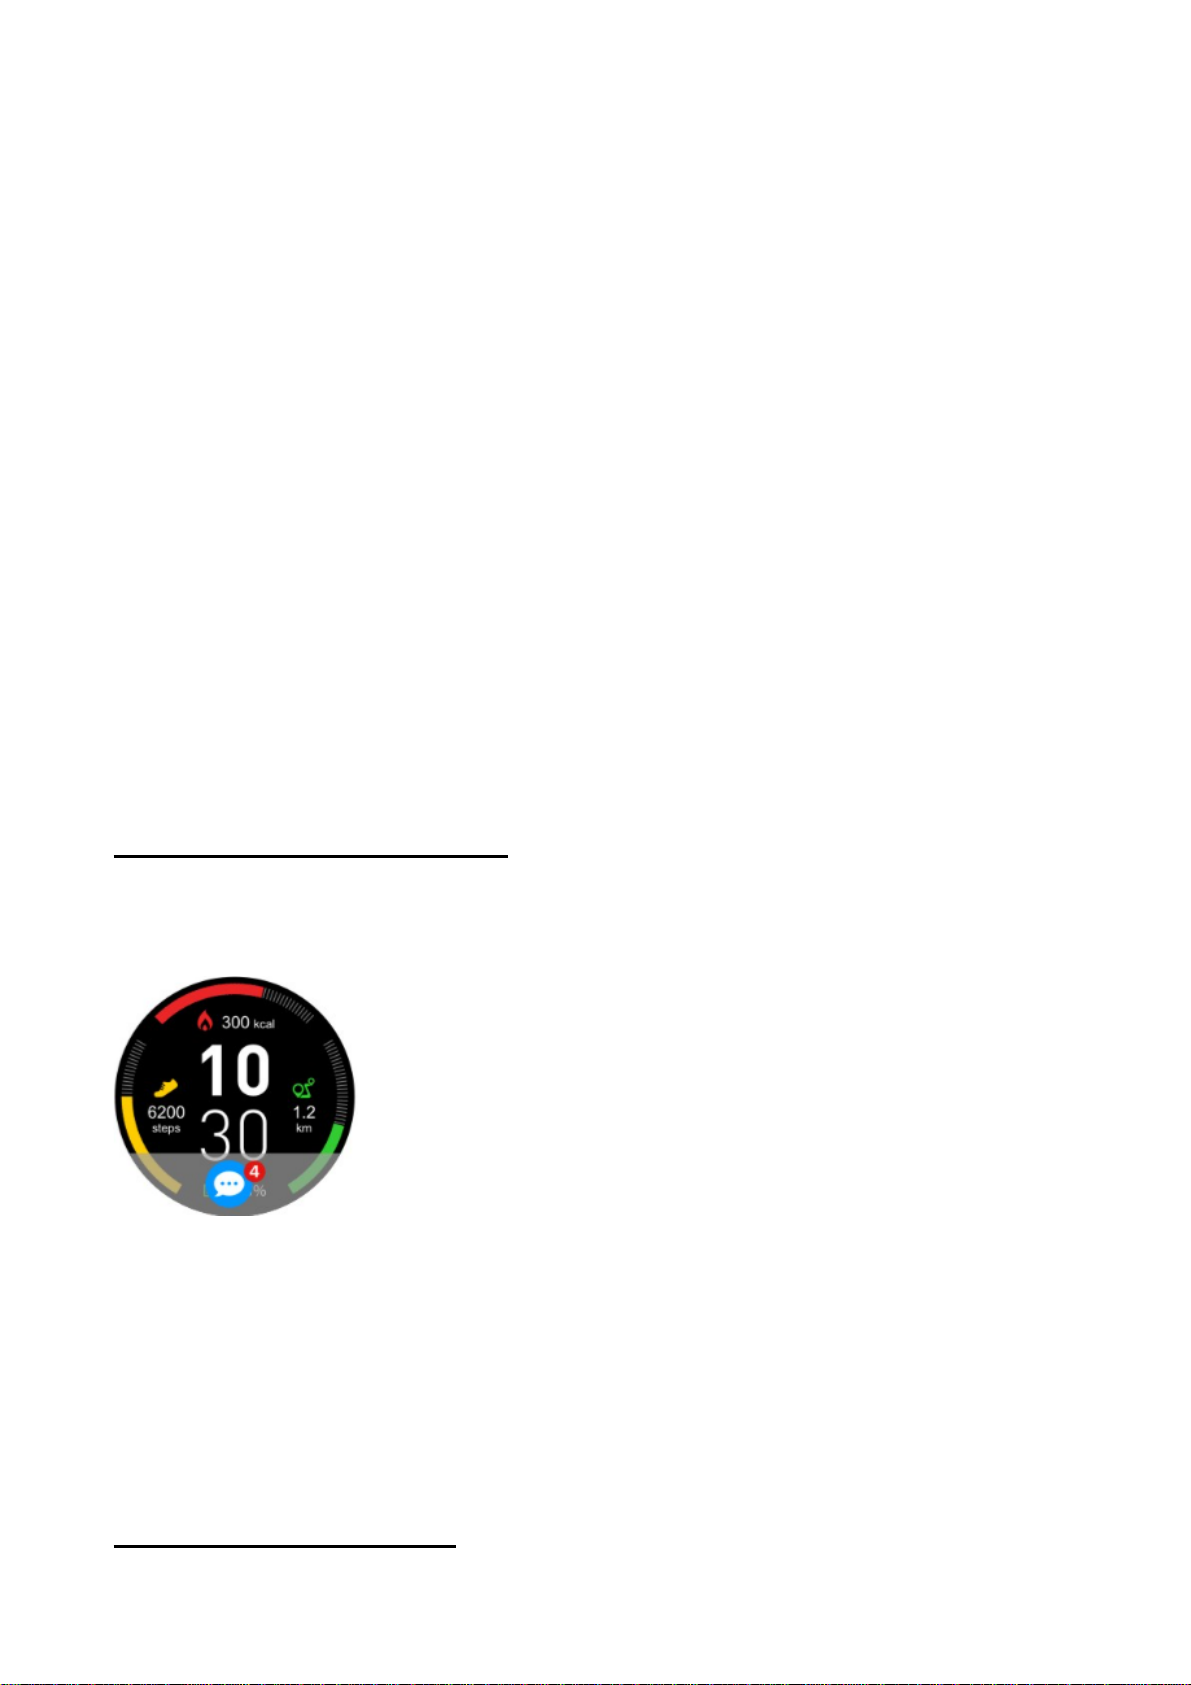
Watch face
You can press the power button to go to the watch
face interface quickly.
If you want to change the watch face of your smart
watch, press the current watch face for 3 seconds,
swipe left or right to go through the different watch
faces and tap on the one you want to select and use.
10
Page 11

Shortcut
1. Bluetooth
Meaning the status of Bluetooth, when you click the
icon, you can enter the Bluetooth settings.
Means Bluetooth disconnected
Means Bluetooth 3.0 connected (for
making and receiving calls with smart
watch)
Means Bluetooth 4.0 connected (for
activity data and notifications
synchronization)
Means Bluetooth3.0 & 4.0 connected
2. GPS
Meaning the status of GPS, you can click the icon to
switch on/ off the GPS.
Means GPS is off;
11
Page 12

Means GPS is on;
Sound mode
Meaning the status of Sound mode, you can click the
icon to ring, vibration or mute mode;
Means ring mode
Means vibration mode
Means mute mode
3. Scene mode
Showing the current scene mode, you can click the
icon to switch different scene mode.
General mode: smart watch will
automatically “Activate on wrist
flisk”, turn off GPS, set up midbrightness and ring mode.
Meeting mode: smart watch will
automatically turn on Bluetooth and
“Activate on wrist flisk”, turn off GPS,
set up mid-brightness and vibration
mode.
Airplane mode: smart watch will
automatically turn on the ”Activate on
wrist flisk”, turn off Bluetooth and
12
Page 13

GPS, set up mid-brightness and ring
mode.
Sport mode: smart watch will
automatically turn on Bluetooth,
“Activate on wrist flisk” and GPS, set
up high-brightness and ring mode;
Power saving mode: smart watch will
automatically turn off Bluetooth,
“Activate on wrist flisk” and GPS, set
up low-brightness and mute mode.
4. Find me
When the icon turn red, means the smart watch
well connected with “Orunning” App. Tap the icon
,your phone will ring and vibration to find where your
phone is.
5. Brightness
You can click the icon to adjust the display brightness.
Means high-Brightness
Means mid-Brightness
Means low-Brightness
13
Page 14

Sport mode
1. You can press the shortcut key of sport mode or tap
below icon on main menu to enter sport mode.
2. Multi-Sport mode: with 6 sport mode as below.
Slide up/ down (or turn the digital crown) to select
the sport mode you want to start.
3. Activity distance record
When turned on
Distance
calculation
GPS
When turned off
Calculate by GPS
(except Run indoor)
Calculate by steps
GPS
4. Activity goal
(except Biking )
You can set up the following goals before going to
activity.
Distance
14
Page 15

Calories
Duration
Pace
Free
Style
Remark: The watch will pop up a reminder once
you achieve the goal (Pace and Free Style without
reminder).
5. Dynamic Heart Rate Tracking
The watch will remind you if you want to track the
heart rate or not before starting sport. If you select
yes, the watch will track your real-time heart rate
and show the heart rate zone.
6. GPS locate
Acquiring Satellite Signals
The device may need a clear view of the sky to
acquire satellite signals.
a. Go outdoors to an open area,
15
Page 16

The front of the device should be oriented toward
the sky.
b. Wait while the device locates satellites.
Improving GPS Satellite Reception
• Take your device outside to an open area
away from tall buildings and trees.
• Remain stationary for a few minutes.
.
Remarks: The watch will remind you to wait for a
few seconds to obtain the first heart rate data before
starting sports for better activity experience.
7. Sports tracking
2. Duratio
1. Distance
3. Pace 4. Calories
n
5. Dynamic heart rate 6. Target 7. Current
16
Page 17

value
8. Altitude (works on
Trail running, Hiking,
Biking mode only)
GPS off
Searching GPS signal
GPS located successfully
progress
status
9. GPS
status
time
10. Heart
rate zone
Heart rate range: the watch will automatically
calculate your heart rate interval according to your
age.
Warm up- Help to warm up or help restore,
improve metabolism
Easy- Increase metabolism, fat metabolism ...
weight control
Aerobic - Medium intensity training to improve
aerobic capacity. Help to strengthen the heart and
lung and blood vessels
Threshold - Improve lactic acid tolerance, enhance
high-speed exercise strength and endurance
Maximum - Show breathing and muscle strength
treatment of anaerobic state. It is recommended to
reduce heart rate
17
Page 18

PS:You can choose to save the sport data or choose
to discard to delete the sport data after clicking
“STOP”.
8. History
You can check your sport records at the bottom of the
sport mode. Including the percentage of goals,
exercise time, movement distance, calories, the
average pace, average heart rate value.
Delete record: Check the record, then tap “Delete” or
long press the corresponding data.
18
Page 19

Heart rate
Fasten the watch, make sure it fits closely on your
wrist when measuring your heart rate.
Pedometer
The watch will automatically record your daily
number of steps, movement distance, calories and
exercise duration. Select the corresponding icon, slide
from right to left to check the detailed histogram
report of per hour.
19
Page 20

Goals
Set daily pedometer goals, including steps, distance,
calories, exercise duration.
If you achieve the goal you set up, the watch will pop
up a reminder.
20
Page 21

Notification
See app notifications from a connected smart phone,
including notifications of incoming and missed calls,
SMS, email, social media activity, etc..
SETTING UP NOTIFICATIONS FOR ANDROID USERS
Go to the Settings of your Android device:
Tap Notifications in Settings.
Select which type of notifications you want to receive
on Smart Watch
Enable Show in Notifications to receive the
notification on Smart Watch
21
Page 22

Sedentary reminder
When you set up the sedentary reminder, the watch
will automatically detect whether you are sedentary
and pop up “Move up now” with ring and vibration if
yes.
Sleep monitor
Slide from right to left to set up the bed time and
wake time. The watch will automatically monitor
your sleep quality (light sleep and deep sleep)
during the period which you set up.
Your sleep data will be synchronized to APP once
you paired the watch with your smart phone. You
can check your sleep data of last night as well.
22
Page 23

Reminder
Support multiple reminders.
With 6 different interfaces to remind you.
23
Page 24

You can check and turn/ off your next reminder on
shortcut menu (from watch face interface, slide from
down to up).
Voice
Trigger the Siri assistant/ Google Talk when
connected to your iPhone/ Android phone.
Examples of what you can ask or do:
Call (name of your contact)
Send a SMS to (name of your contact)
What’s the weather like?
Set an alarm for tomorrow 5 am
Weather
When you paring the watch with your smart phone in
the case of your phone have Internet, the watch will
sync your local weather forecast (Max/ Min
temperature of the day) as below.
24
Page 25

Remark: it’s better to turn on your smart phone GPS
function when pushing weather forecast.
(Shortcuts: from watch face interface, slide from up
to down)
Barometer
With the smart watch, you can check the current
atmospheric pressure and temperature.
If you need to calibrate the temperature and
pressure,please follow “The steps to calibrate the
sensor” above.
(Shortcuts: from watch face interface, slide from
down to up)
Altitude
With the smart watch, you can check the current
altitude.
25
Page 26

If you need to calibrate altitude,please press “Cal”
to enter altitude calibration.
(Shortcuts: from watch face interface, slide from
down to up)
Location
If you turned on GPS of your smart watch and located
your position successfully, there will show the current
latitude and longitude. If you close the GPS or enter
indoor, the watch will keep latest latitude and
longitude.
(Shortcuts: from watch face interface, slide from
down to up)
26
Page 27

Remote capture
To enjoy this feature, make sure the camera of your
smart phone is on. Enabling Remote capture function
will let you take pictures remotely from your Smart
Watch.
Dialer
The watch allows you to make and receive calls in
case of connected smart watch with your phone via
Bluetooth)
27
Page 28

Making a call
Receive call
FROM THE PHONE
MENU
Go to the Phone menu,
enter a number with
the dialer pad and tap
INCOMING
CALL OPTIONS
When your phone receive
a call, the watch will pop
up.
INCOMING-CALL
OPTIONS
1. ANSWER
2. REJECT
3. MUTE
1.REJECT
During the call, you can select hang up, mute and
enter the dial.
28
Page 29

SMS
View SMS messages from a connected Android
phone.
QUICK REPLY
You can reply through the SMS template (Android
only)
The SMS of iPhone will be displayed in Notification
menu.
BT music
Control the music player app of a connected smart
phone.
Settings
Use the Settings panel to configure the settings of
your Smart Watch
I Profile:Set up Gender, Height, Weight, Birthday
29
Page 30

I Bluetooth:Turn Bluetooth on/off and visibility
on/off
I GPS:Turn GPS on / off
I Sensor Calibration: You can manually calibrate the
watch's temperature, altitude, and atmospheric
pressure
I Time and date:Set up the clock type on the display
screen and set the time
I Units: Set units of measurement to metric or
imperial
I Activate on wrist flick:Turn on/ off the function of
“lifting your arm to wake up the Smart Watch display”
I Sound:Set up the ringtones and sound mode, as
well as the volume level
I Display:Set up the brightness of the screen and the
standby time
I Watch info:Displays the provider, device name,
model, and firmware version
I Language:Multi-languages (You can turn “Auto
sync” off to select the languages you need)
I Power display:Displays the current power status
I Restore to Factory:Reset to factory default
30
Page 31

Electric and electronic equipment and included batteries contains materials, components and substances
that can be hazardous to your health and environment, if the waste material (discarded electric and
electronic equipment and batteries) is not handled correctly.
Electric and electronic equipment and batteries is marked with the crossed out trash can symbol, seen
below. This symbol signifies that electric and electronic equipment and batteries should not be disposed
with other household waste, but should be disposed of separately.
As the end user it is important that you submit your used batteries to the appropriate and designated
facility. In this manner you make sure that the batteries are recycled in accordance with legislature and will
not harm the environment.
All cities have established collection points, where electric and electronic equipment and batteries can
either be submitted free of charge at recycling stations and other collection sites, or be collected from the
households. Additional information is available at the technical department of your city.
Hereby, Inter Sales A/S declares that the radio equipment type SW-500 is in compliance with Directive
2014/53/EU. The full text of the EU declaration of conformity is available at the following internet address:
http://www.denver-electronics.com/denver-sw-500/
Operating Frequency Range:
Max Output Power:
Imported by:
DENVER ELECTRONICS A/S
Omega 5A, Soeften
DK-8382 Hinnerup
Denmark
www.facebook.com/denverelectronics
31
 Loading...