

Page 1
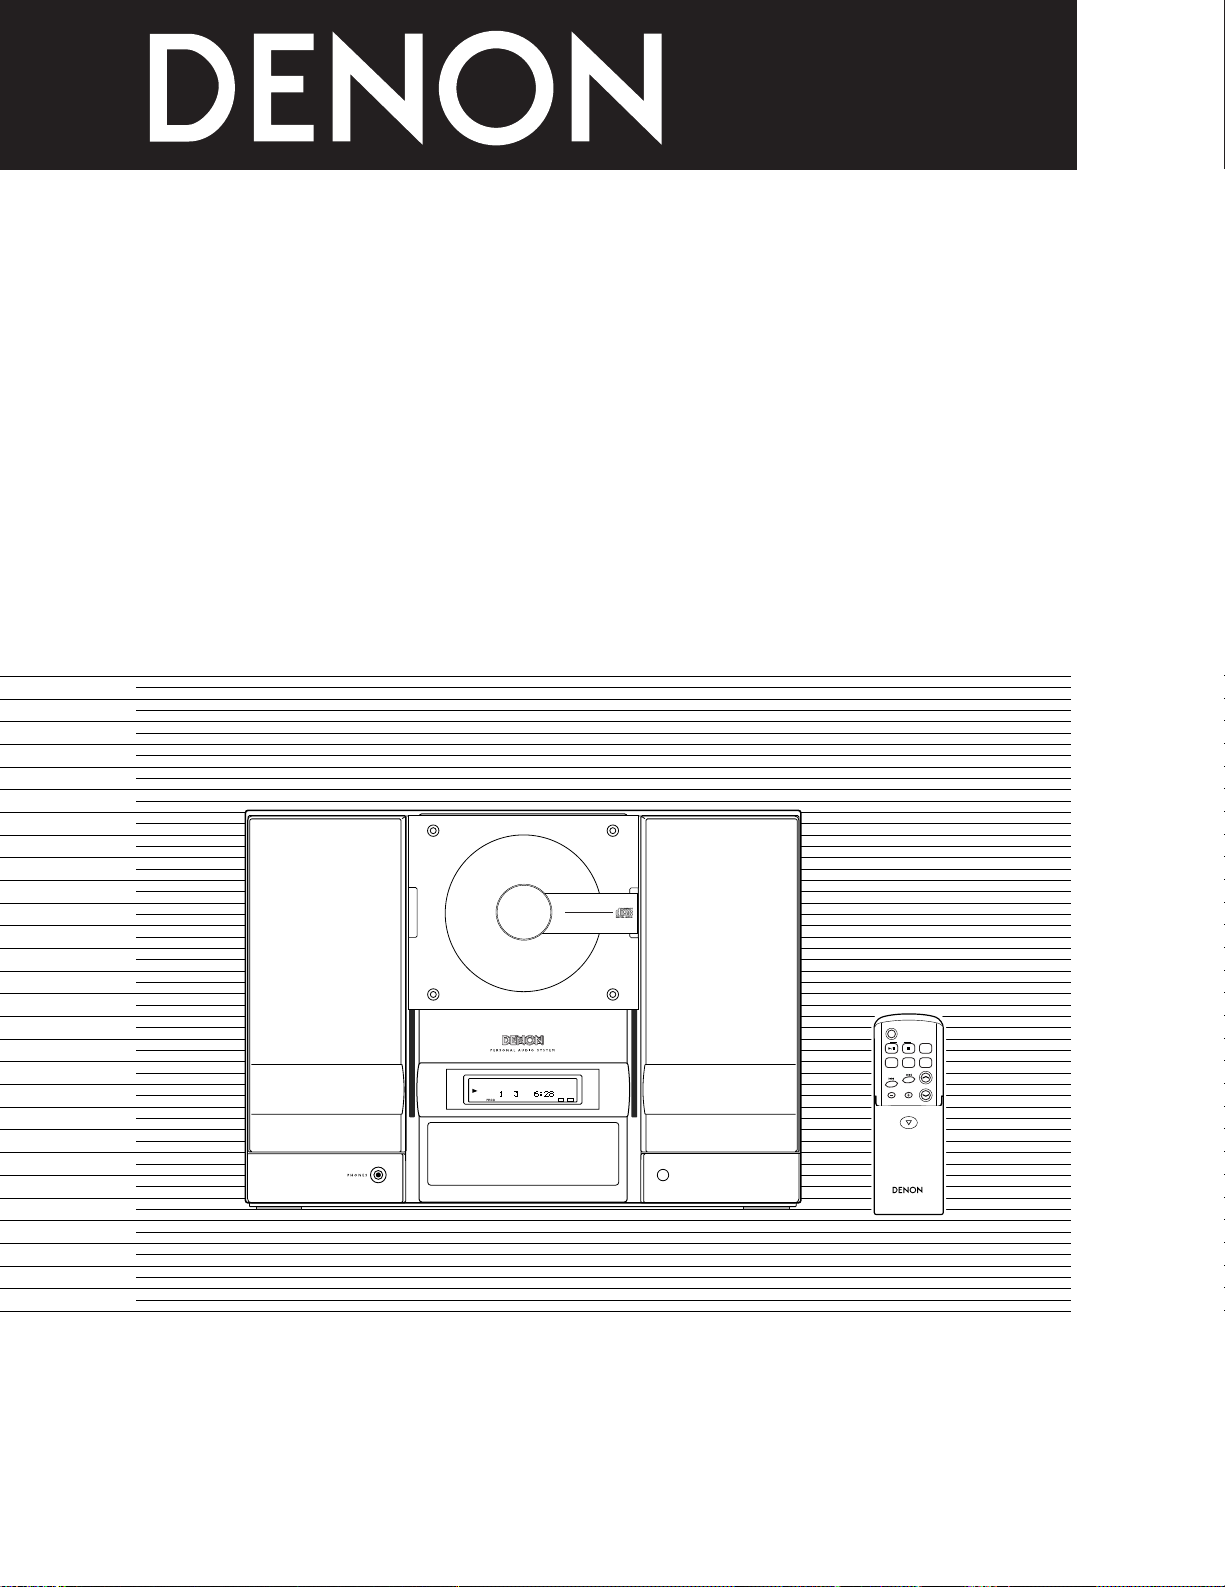
PERSONAL AUDIO SYSTEM
EQ
AUXFM/AM
C D
POWER
VOLUME
SDB
TUNING/
PRESET
REMOTE CONTROL UNIT
EQ
AUXFM/AM
C D
POWER
VOLUME
SDB
TUNING/
PRESET
REMOTE CONTROL UNIT
VERTICAL LOADING SYSTEM
COMPACT DISC PLAYER
DIGEST
TRACK
SDB
EQ
REMOTE
SENSOR
CD STEREO RECEIVER
D-AJ03
40-STATIONS PRESET MEMORY
6-MODES PRESET EQUALIZER
D-AJ03
OPERATING INSTRUCTIONS
MODE D’EMPLOI
INSTRUCCIONES DE OPERACION
FOR ENGLISH READERS PAGE 2 ~ PAGE 38
POUR LES LECTEURS FRANCAIS PAGE 2, 4, 39 ~ PAGE 72
PARA LECTORES DE ESPAÑOL PÁGINA 2, 4, 73 ~ PÁGINA 106
Page 2
ENGLISH FRANCAIS ESPAÑOL
CAUTION
RISK OF ELECTRIC SHOCK
DO NOT OPEN
IMPORTANT TO SAFETY
WARNING:
TO PREVENT FIRE OR SHOCK HAZARD, DO NOT
EXPOSE THIS APPLIANCE TO RAIN OR MOISTURE.
NOTE:
This system uses the semiconductor laser. To allow you to
enjoy music at a stable operation, it is recommended to use
this in a room of 5°C ( 41°F ) ~ 35°C ( 95°F ).
CAUTION
1.Handle the power supply cord carefully
Do not damage or deform the power supply cord. If it is
damaged or deformed, it may cause electric shock or
malfunction when used. When removing from wall outlet,
be sure to remove by holding the plug attachment and not
by pulling the cord.
2.Do not open the top cover
In order to prevent electric shock, do not open the top
cover.
If problems occur, contact your DENON DEALER.
3.Do not place anything inside
Do not place metal objects or spill liquid inside the system.
Electric shock or malfunction may result.
Please, record and retain the Model name and serial number
of your set shown on the rating label.
Model No. D-AJ03 Serial No.
CAUTION:
The lightning flash with arrowhead symbol,
within an equilateral triangle, is intended to
alert the user to the presence of uninsulated
“dangerous voltage” within the product’s
enclosure that may be of sufficient magnitude
to constitute a risk of electric shock to persons.
The exclamation point within an equilateral
triangle is intended to alert the user to the
presence of important operating and
maintenance (servicing) instructions in the
literature accompanying the appliance.
TO REDUCE THE RISK OF ELECTRIC
SHOCK, DO NOT REMOVE COVER
(OR BACK). NO USERSERVICEABLE PARTS INSIDE.
REFER SERVICING TO QUALIFIED
SERVICE PERSONNEL.
CAUTION:
USE OF CONTROLS OR ADJUSTMENTS OR REFORMANCE OF PROCEDURES OTHER THAN THOSE
SPECIFIED HEREIN MAY RESULT IN HAZARDOUS
RADIATION EXPOSURE.
THE COMPACT DISC PLAYER SHOULD NOT BE
ADJUSTED OR REPAIRED BY ANYONE EXCEPT
PROPERLY QUALIFIED SERVICE PERSONNEL.
This device complies with Part 15 of the FCC Rules.
Operation is subject to the following two conditions:
(1) This device may not cause harmful interference,
and (2) this device must accept any interference
received, including interference that may cause
undesired operation.
This Class B digital apparatus meets all requirements
of the Canadian Interference-Causing Equipment
Regulations.
Cet appareil numérique de la classe B respecte toutes
les exigences du Règlement sur le matériel brouilleur
du Canada.
CAUTION
TO PREVENT ELECTRIC SHOCK DO NOT USE THIS
(POLARIZED) PLUG WITH AN EXTENSION CORD,
RECEPTACLE OR OTHER OUTLET UNLESS THE
BLADES CAN BE FULLY INSERTED TO PREVENT
BLADE EXPOSURE.
ATTENTION
POUR PREVENIR LES CHOCS ELECTRIQUES NE
PAS UTILISER CETTE FICHE POLARISEE AVEC UN
PROLONGATEUR UNE PRISE DE COURANT OU
UNE AUTRE SORTIE DE COURANT, SAUF SI LES
LAMES PEUVENT ETRE INSEREES A FOND SANS
EN LAISSER AUCUNE PARTIE A DECOUVERT.
2
Page 3
SAFETY INSTRUCTIONS
FIGURE A
EXAMPLE OF ANTENNA GROUNDING
AS PER NATIONAL
ELECTRICAL CODE
ANTENNA
LEAD IN
WIRE
GROUND
CLAMP
ELECTRIC
SERVICE
EQUIPMENT
ANTENNA
DISCHARGE UNIT
(NEC SECTION 810-20)
GROUNDING CONDUCTORS
(NEC SECTION 810-21)
GROUND CLAMPS
POWER SERVICE GROUNDING
ELECTRODE SYSTEM
(NEC ART 250, PART H)
NEC - NATIONAL ELECTRICAL CODE
1. Read Instructions – All the safety and operating instructions
should be read before the product is operated.
2. Retain Instructions – The safety and operating instructions
should be retained for future reference.
3. Heed Warnings – All warnings on the product and in the
operating instructions should be adhered to.
4. Follow Instructions – All operating and use instructions should
be followed.
5. Cleaning – Unplug this product from the wall outlet before
cleaning. Do not use liquid cleaners or aerosol cleaners.
6. Attachments – Do not use attachments not recommended by
the product manufacturer as they may cause hazards.
7. Water and Moisture – Do not use this product near water – for
example, near a bath tub, wash bowl, kitchen sink, or laundry
tub; in a wet basement; or near a swimming pool; and the like.
8. Accessories – Do not place this product on an unstable cart,
stand, tripod, bracket, or table. The product may fall, causing
serious injury to a child or adult, and serious damage to the
product. Use only with a cart, stand, tripod, bracket, or table
recommended by the manufacturer, or sold with the product.
Any mounting of the product should follow the manufacturer’s
instructions, and should use a
mounting accessory
recommended by the
manufacturer.
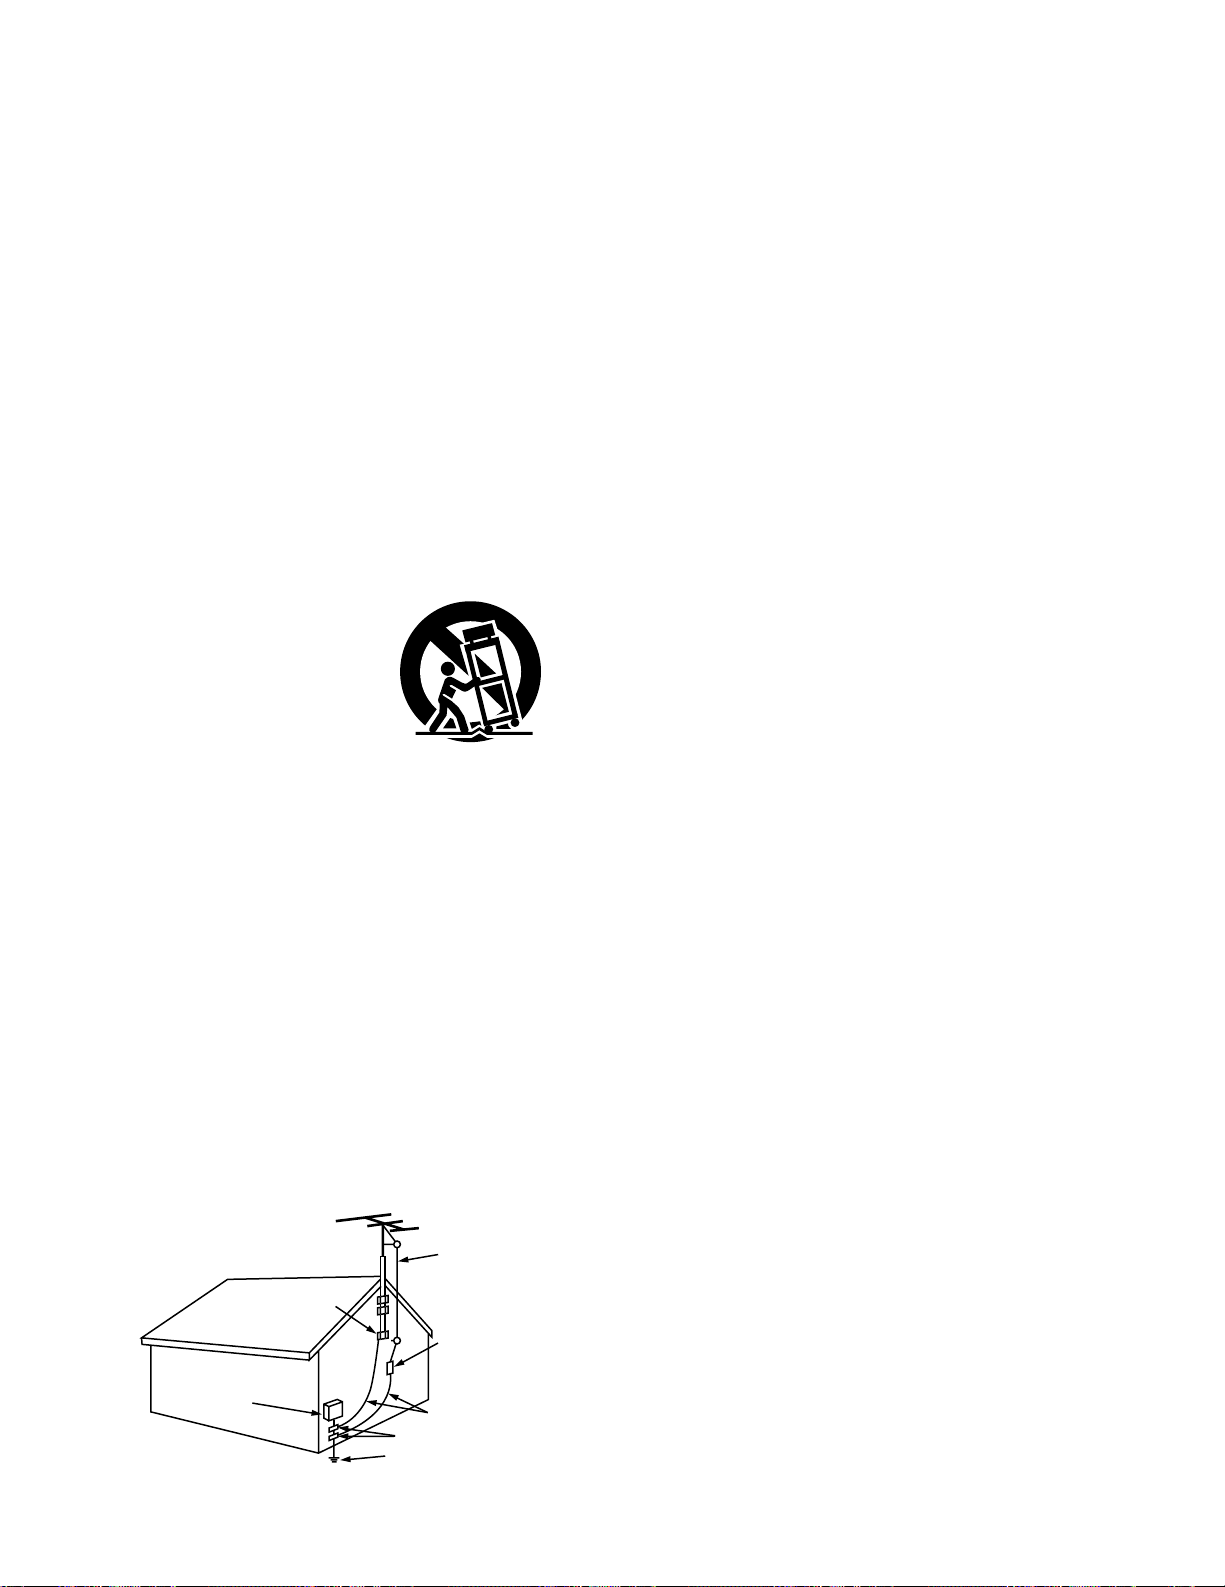
9. A product and cart
combination should be
moved with care. Quick
stops, excessive force,
and uneven surfaces may
cause the product and cart
combination to overturn.
10. Ventilation – Slots and openings in the cabinet are provided for
ventilation and to ensure reliable operation of the product and
to protect it from overheating, and these openings must not be
blocked or covered. The openings should never be blocked by
placing the product on a bed, sofa, rug, or other similar
surface. This product should not be placed in a built-in
installation such as a bookcase or rack unless proper
ventilation is provided or the manufacturer’s instructions have
been adhered to.
11. Power Sources – This product should be operated only from
the type of power source indicated on the marking label. If
you are not sure of the type of power supply to your home,
consult your product dealer or local power company. For
products intended to operate from battery power, or other
sources, refer to the operating instructions.
12. Grounding or Polarization – This product may be equipped with
a polarized alternating-current line plug (a plug having one
blade wider than the other). This plug will fit into the power
outlet only one way. This is a safety feature. If you are unable
to insert the plug fully into the outlet, try reversing the plug. If
the plug should still fail to fit, contact your electrician to replace
your obsolete outlet. Do not defeat the safety purpose of the
polarized plug.
13. Power-Cord Protection – Power-supply cords should be routed
so that they are not likely to be walked on or pinched by items
placed upon or against them, paying particular attention to
cords at plugs, convenience receptacles, and the point where
they exit from the product.
15. Outdoor Antenna Grounding – If an outside antenna or cable
system is connected to the product, be sure the antenna or
cable system is grounded so as to provide some protection
against voltage surges and built-up static charges. Article 810
of the National Electrical Code, ANSI/NFPA 70, provides
information with regard to proper grounding of the mast and
supporting structure, grounding of the lead-in wire to an
antenna discharge unit, size of grounding conductors, location
of antenna-discharge unit, connection to grounding electrodes,
and requirements for the grounding electrode. See Figure A.
16. Lightning – For added protection for this product during a
lightning storm, or when it is left unattended and unused for
long periods of time, unplug it from the wall outlet and
disconnect the antenna or cable system. This will prevent
damage to the product due to lightning and power-line surges.
17. Power Lines – An outside antenna system should not be
located in the vicinity of overhead power lines or other electric
light or power circuits, or where it can fall into such power
lines or circuits. When installing an outside antenna system,
extreme care should be taken to keep from touching such
power lines or circuits as contact with them might be fatal.
18. Overloading – Do not overload wall outlets, extension cords, or
integral convenience receptacles as this can result in a risk of
fire or electric shock.
19. Object and Liquid Entry – Never push objects of any kind into
this product through openings as they may touch dangerous
voltage points or short-out parts that could result in a fire or
electric shock. Never spill liquid of any kind on the product.
Servicing – Do not attempt to service this product yourself
20.
as opening or removing covers may expose you to
dangerous voltage or other hazards. Refer all servicing to
qualified service personnel.
21.
Damage Requiring Service – Unplug this product from the
wall outlet and refer servicing to qualified service
personnel
under the following conditions:
a) When the power-supply cord or plug is damaged,
b) If liquid has been spilled, or objects have fallen into the
product,
c) If the product has been exposed to rain or water,
d) If the product does not operate normally by following the
operating instructions. Adjust only those controls that are
covered by the operating instructions as an improper
adjustment of other controls may result in damage and will
often require extensive work by a qualified technician to
restore the product to its normal operation,
e) If the product has been dropped or damaged in any way,
and
f) When the product exhibits a distinct change in performance
– this indicates a need for service.
22. Replacement Parts – When replacement parts are required, be
sure the service technician has used replacement parts
specified by the manufacturer or have the same characteristics
as the original part. Unauthorized substitutions may result in
fire, electric shock, or other hazards.
23. Safety Check – Upon completion of any service or repairs to
this product, ask the service technician to perform safety
checks to determine that the product is in proper operating
condition.
24. Wall or Ceiling Mounting – The product should be mounted to
a wall or ceiling only as recommended by the manufacturer.
25. Heat – The product should be situated away from heat sources
such as radiators, heat registers, stoves, or other products
(including amplifiers) that produce heat.
3
Page 4
ENGLISH FRANCAIS ESPAÑOL
NOTE ON USE / OBSERVATIONS RELATIVES A L’UTILISATION /
NOTAS SOBRE EL USO
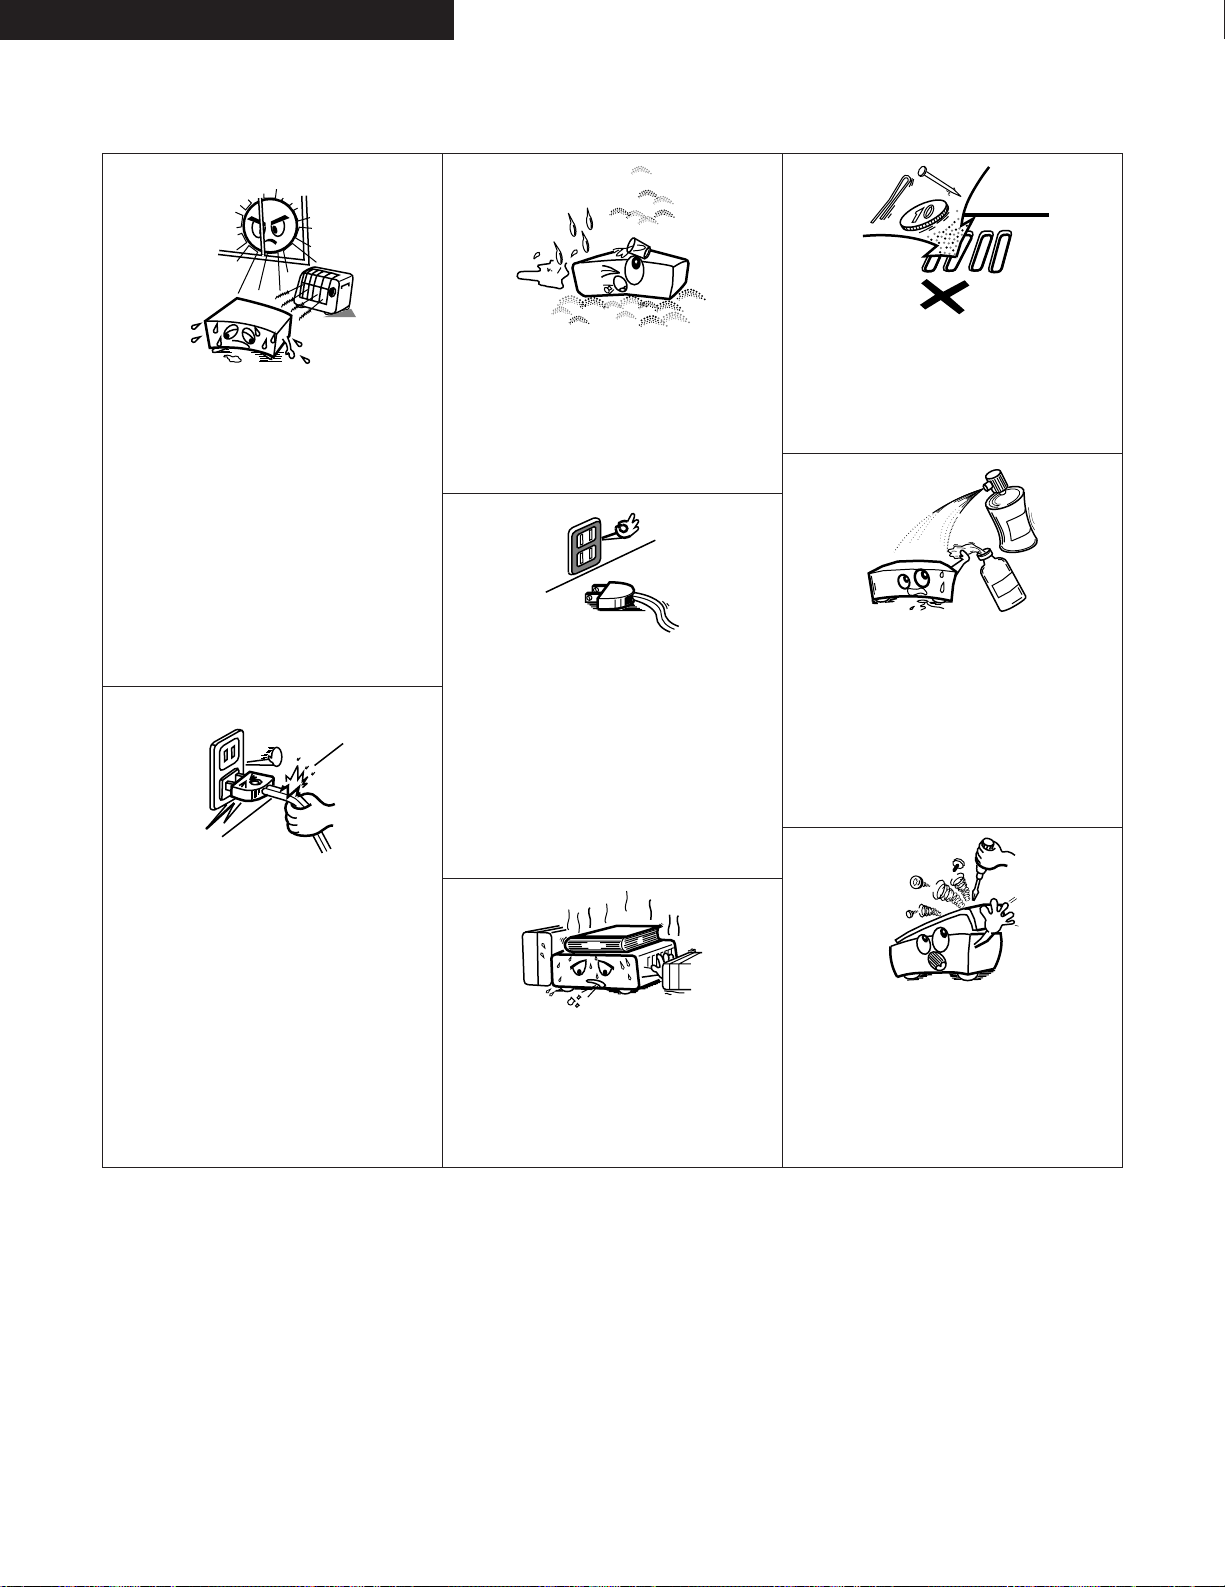
• Avoid high temperatures.
Allow for sufficient heat dispersion
when installed on a rack.
• Eviter des températures élevées
Tenir compte d’une dispersion de
chaleur suffisante lors de
l’installation sur une étagère.
• Evite altas temperaturas.
Permite la suficiente dispersión del
calor cuando está instalado en la
consola.
• Handle the power cord carefully.
Hold the plug when unplugging the
cord.
• Manipuler le cordon d’alimenta-tion
avec précaution.
Tenir la prise lors du débranchement
du cordon.
• Maneje el cordón de energía con
cuidado.
Sostenga el enchufe cuando
desconecte el cordón de energía.
• Keep the set free from moisture,
water, and dust.
• Protéger l’appareil contre l’humidité,
l’eau et lapoussière.
• Mantenga el equipo libre de
humedad, agua y polvo.
• Unplug the power cord when not
using the set for long periods of
time.
• Débrancher le cordon d’alimenta-tion
lorsque l’appareil n’est pas utilisé
pendant de longues périodes.
• Desconecte el cordón de energía
cuando no utilice el equipo por
mucho tiempo.
* (For sets with ventilation holes)
• Do not obstruct the ventilation holes.
• Ne pas obstruer les trous d’aération.
• No obstruya los orificios de
ventilación.
• Do not let foreign objects in the set.
• Ne pas laisser des objets étrangers
dans l’appareil.
• No deje objetos extraños dentro del
equipo.
• Do not let insecticides, benzene, and
thinner come in contact with the set.
• Ne pas mettre en contact des
insecticides, du benzène et un
diluant avec l’appareil.
• No permita el contacto de
insecticidas, gasolina y diluyentes
con el equipo.
• Never disassemble or modify the set
in any way.
• Ne jamais démonter ou modifier
l’appareil d’une manière ou d’une
autre.
• Nunca desarme o modifique el
equipo de ninguna manera.
4
Page 5
Copyrights
RATING SHEET
2 It is prohibited by law to reproduce, broadcast, rent or play discs in public without the consent of the copyright holder.
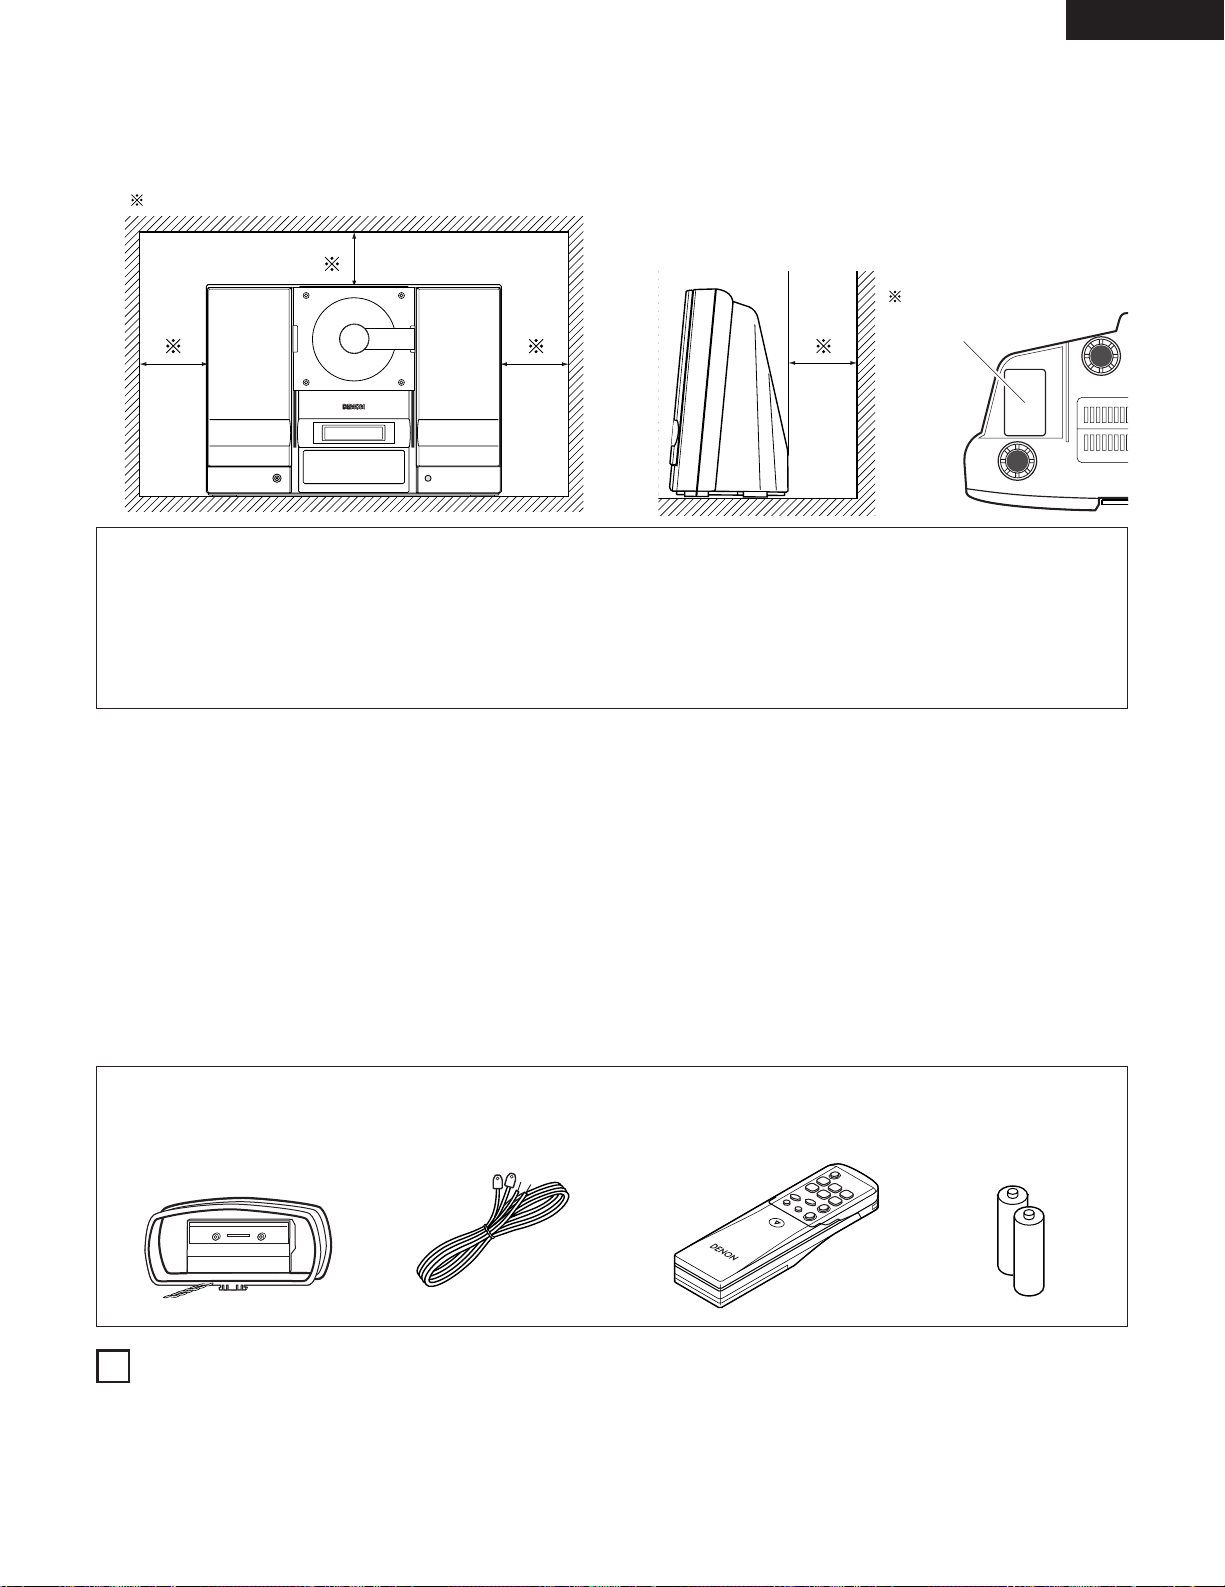
• CAUTION ON INSTALLATION
10 cm or greater
Wall
CAUTION
✽ The ventilation should not be impeded by covering the ventilation openings with item, such as newspapers, table-cloths, curtains,
etc.
✽ No naked flame sources, such as lighted candles, should be placed on the apparatus.
✽ Please be care the environmental aspects of battery disposal.
✽ The apparatus shall not be exposed to dripping or splashing for use.
✽ No objects filled with liquids, such as vases, shall be placed on the apparatus.
ENGLISH
— TABLE OF CONTENTS —
Features …………………………………………………………… 5
z
Connections …………………………………………………… 6, 7
x
Part Names and Functions ………………………………… 8~10
c
Remote Control Unit …………………………………………… 11
v
Clock Adjustment …………………………………………… 12, 13
b
Playing CDs ………………………………………………… 14~16
n
Listening to the Radio ……………………………………… 17~19
m
Volume and Tone Adjustments ………………………………… 20
,
CD Functions ……………………………………………… 21~25
.
Using the Timers …………………………………………… 26~33
⁄0
Cleaning ………………………………………………………… 34
⁄1
CDs ……………………………………………………………… 35
⁄2
Messages ………………………………………………………… 35
⁄3
Troubleshooting …………………………………………… 36, 37
⁄4
Major Specifications …………………………………………… 38
⁄5
• ACCESSORIES
Please check to make sure the following items are included with the main unit in the carton:
q AM loop antenna ………………………………………………… 1
w FM antenna ……………………………………………………… 1
e Remote control unit (RC - 911) ………………………………… 1
r R 6 P/AA batteries ……………………………………………… 2
t Operating instructions ………………………………………… 1
y Service station list ……………………………………………… 1
ewq r
1
FEATURES
1. 40-Stations Preset Memory
(See Page 18)
2. 6-Modes Preset Equalizer
(See Page 20)
3. Built-in deep bass circuit
(See Page 20)
5
Page 6
ENGLISH
MONO
OUT
AM
LOOP ANT.
FM
AUX IN
ANTENNA
wq e r
5
0
M
I
N
2
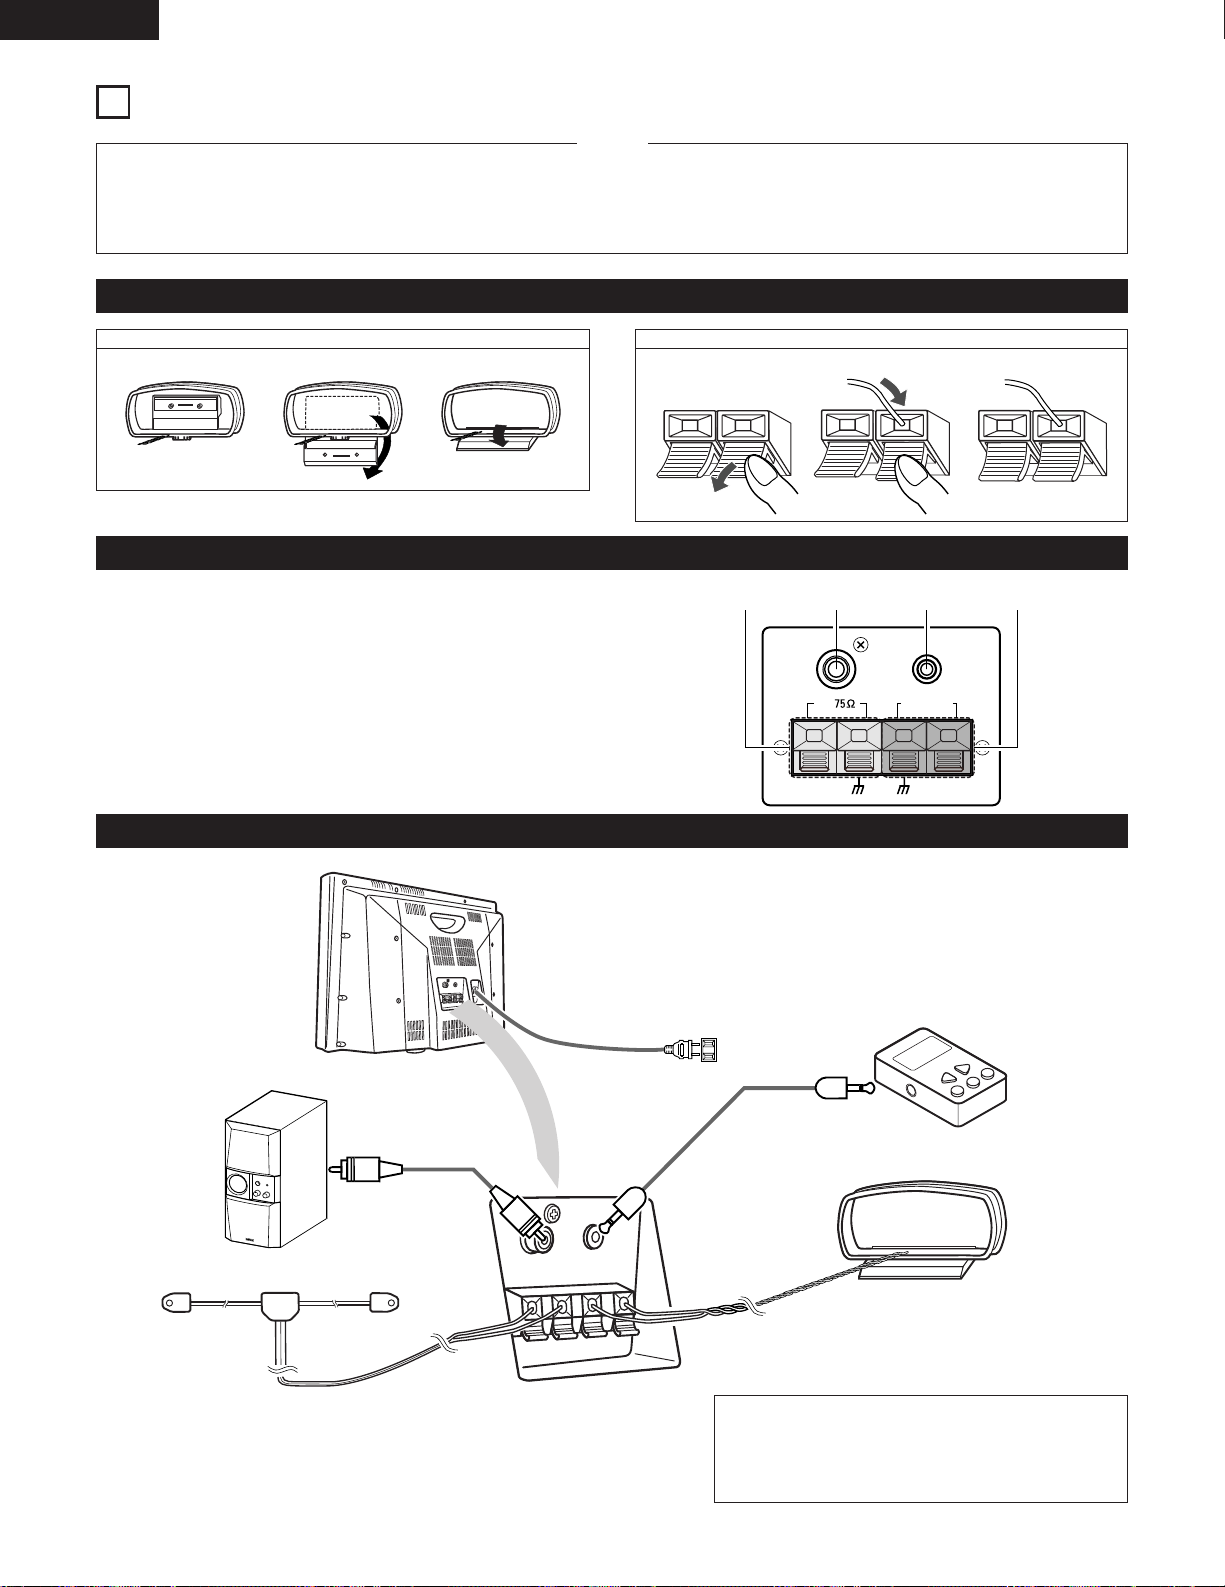
• Do not plug in the power plug into an outlet until all connections
• Insert the power plug securely. An incomplete connection will
(1) Connecting Antennas and Audio Equipment
q
w
e
r
CONNECTIONS
NOTES:
• Do not bundle the (pin plug) connection cables together or place
have been completed.
cause noise to occur.
Assembly of the AM loop antenna Connection of the AM loop antenna
1. Pull out 2. Bend 3. Insert into hole 1. Lower the lever 2. Insert wire 3. Release
Rear Panel Names and Connections
FM antenna terminal
MONO output terminal
AUX input terminal
AM loop antenna terminals
• These connect the supplied AM loop antenna.
them close to other electrical products such as TVs since this may
cause hum or other noise.
Connection of Audio Equipment
Super woofer
FM antenna
To listen to equipment that is connected to the external input
terminals, set the input to “AUX” with the remote control
external input selection button.
Power cord
Use a connection cable
that is available on the
market.
Note to CATV system installer:
This reminder is provided to call the CATV system installer’s
attention to Article 820-40 of the NEC which provides guidelines
for proper grounding and, in particular, specifies that the cable
ground shall be connected to the grounding system of the
building, as close to the point of cable entry as practical.
Portable player, etc.
AM loop antenna
6
Page 7
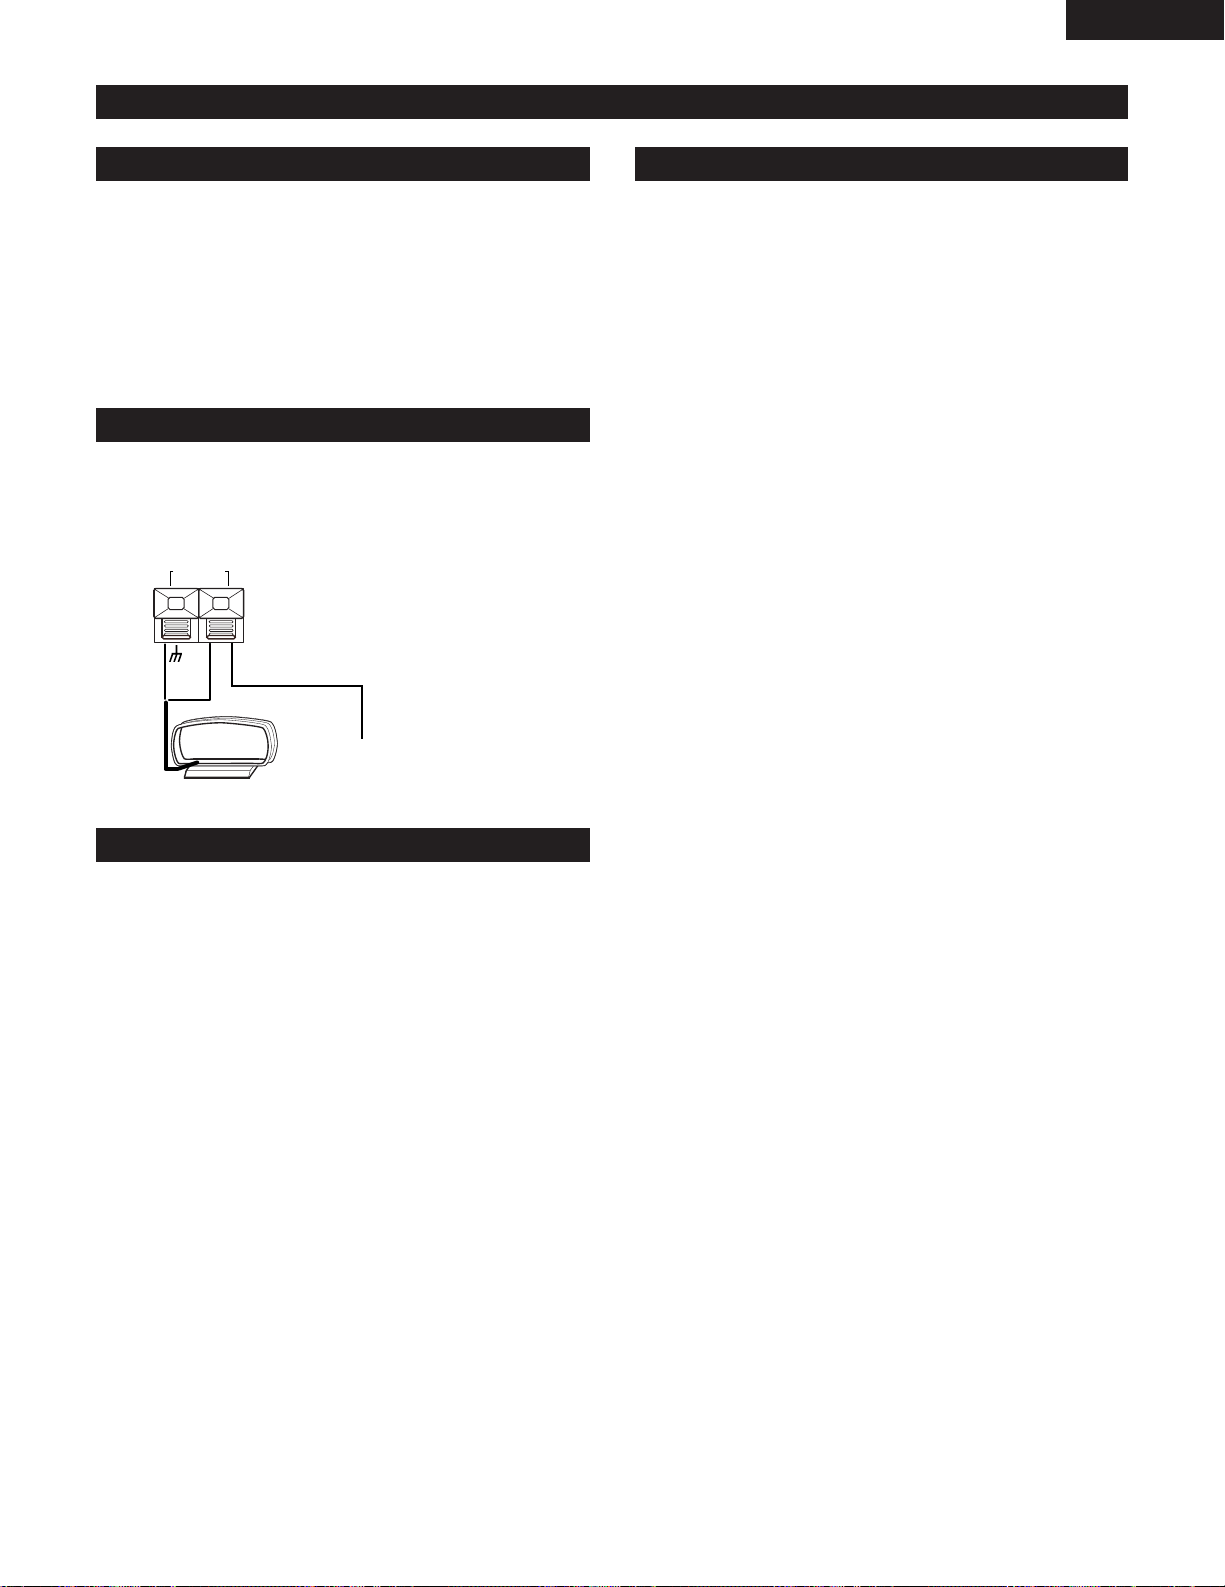
(2) Setting Up the Antennas
AM
LOOP ANT.
ENGLISH
Setting Up the AM Loop Antenna
Tune in an AM broadcast (See Page 17) and while listening
to the sound separate the antenna from the main unit as
much as possible and place the antenna in a position where
distortion and noise are at a minimum. In some
circumstances, a reverse polarity of the connection will
provide better reception.
Failure to connect the AM loop antenna, or placement near
metal objects will result in poor reception of AM broadcasts.
Connection of an AM Outdoor Antenna
Connect the signal wires of the AM outdoor antenna to the
AM antenna terminals (marked AM ANTENNA). Be certain to
leave the supplied AM loop antenna connected.
AM antenna terminals
Setting Up an FM Indoor Antenna
Tune in an FM broadcast (See Page 17) and while listening to
the sound find the position where distortion and noise are at
a minimum. Secure the antenna at this position by taping the
ends of the antenna in place or by using thumb tacks.
AM outdoor antenna
(10 to 12 meters of vinyl covered wire)
LOOP ANT.
Ground Rod
• A ground connection can serve to prevent an electrical
shock accident. Embed a ground rod in the ground or
make a connection to an iron water pipe.
• Do not make a connection to a gas pipe because this is
very dangerous.
7
Page 8
ENGLISH
ON/STANDBY
OPEN/CLOSE
SKIP
TUNER
VOL.
UP
DOWN
C D
AUX
PLAY MODE
q w
t
u
i o
e
r
y
VERTICAL LOADING SYSTEM
COMPACT DISC PLAYER
REMOTE
SENSOR
CD STEREO RECEIVER
D-AJ03
40-STATIONS PRESET MEMORY
6-MODES PRESET EQUALIZER
!0 !1
!4 !2!3
3
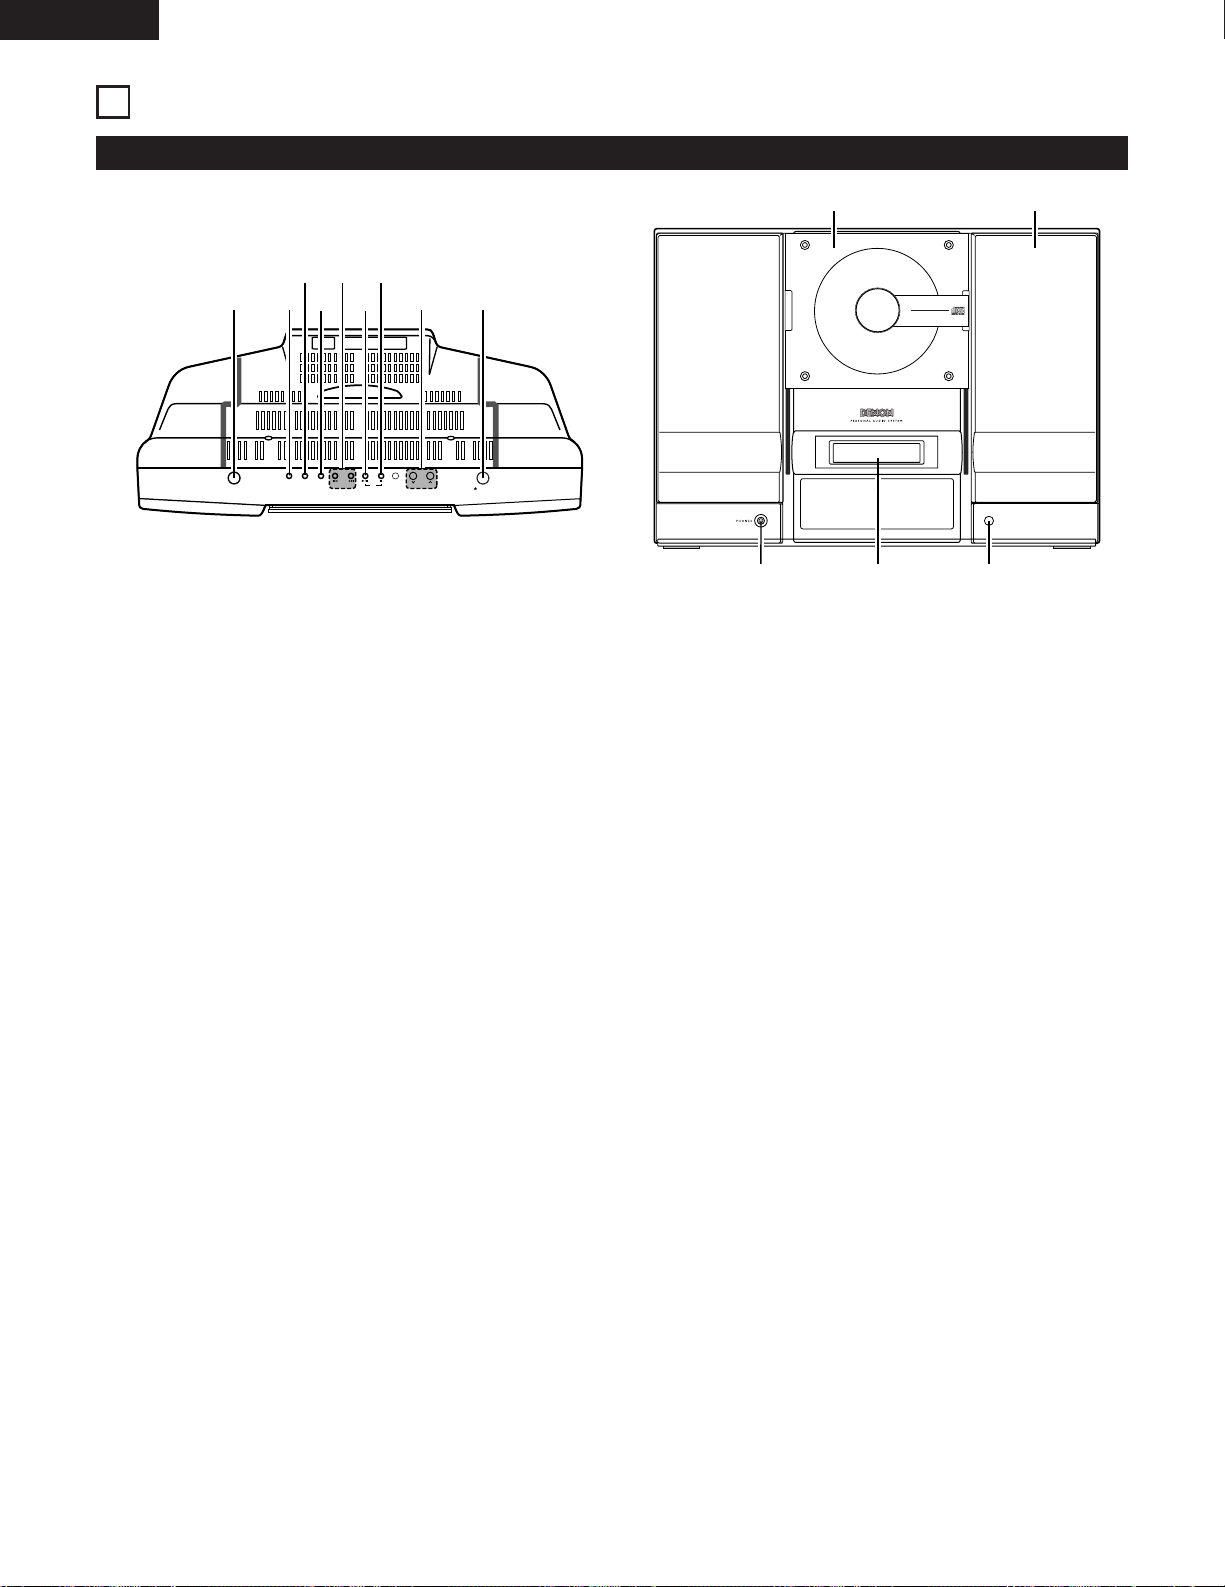
(1) Front Panel
PART NAMES AND FUNCTIONS
Power Operation Switch (ON/STANDBY)
q
• Press to switch on the power and press again to set
the standby mode.
TUNER Button
w
• Press to switch the input to “TUNER”.
External Input Selection Button (AUX)
e
• See Page 6.
Play Mode Select Button (PLAY MODE)
r
• See Page 22.
Skip Button (8/9)
t
• Permits fast reverse and forward of the track.
• Used to adjust the reception frequency when the
function is set to tuner.
CD Play/Pause Button (CD 1/3)
y
• Press to switch the input to “CD” and start playing
the CD if one has been loaded.
• Press again to pause the track.
CD Stop Button (CD 2)
u
• Use to stop play or recording.
• Press to switch the input to “CD”.
Volume Control Button (VOL. UP/DOWN)
i
• Use to lower or raise the volume.
CD Door Open/Close Button (5)
o
• Press and the CD door goes down.
• Press again and the CD door goes up.
CD Door
!0
• A press of the CD Door Open/Close button makes the
door go down and allows a CD to be loaded.
Speakers
!1
REMOTE SENSOR
!2
• Aim the supplied remote control at this sensor and
operate.
Display
!3
• See Page 9.
Headphone Jack (PHONES)
!4
• Allows the use of headphones (available on the
market).
• Insertion of the headphone plug switches off the
sound from the speakers and allows you to listen just
from the headphones.
8
Page 9
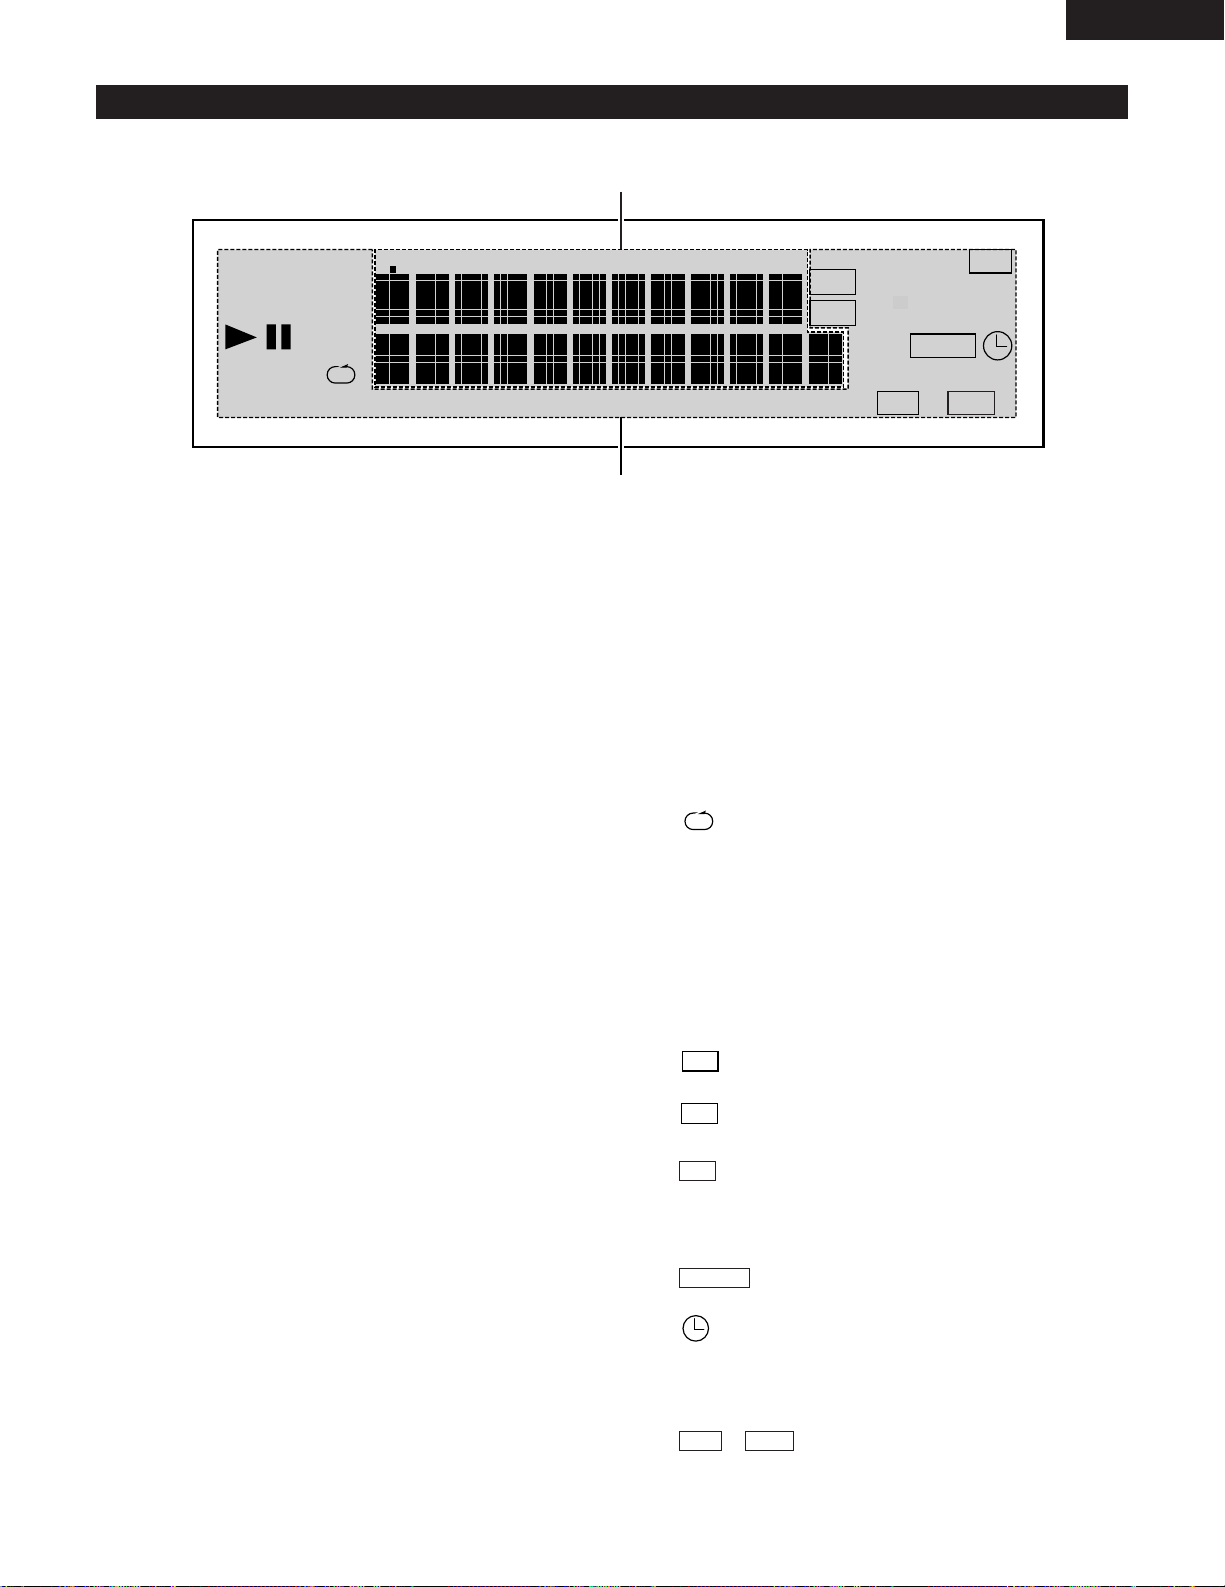
(2) Display
RANDOM PROG
DIGEST
TUNED
STEREO
SLEEP
PLAY
TOTAL REMAIN
TRACK
KHz
MHz
FM
AM
TIMER
SDB
ST
EQ
z
x
ENGLISH
Main Display Portion
q
• Displays various functions, the time, the timer
settings, etc.
• The following is displayed when the function is
switched to CD.
• Track number display section (TRACK):
When a disc is loaded.
Stop mode:
Total number of tracks on disc
Play and programmed play modes:
Currently playing track.
• Time display section:
When a disc is loaded.
Stop mode:
Total number of tracks on disc.
Play and programmed play modes:
Elapsed time of currently playing track.
• The volume level is displayed when the volume is
being adjusted.
Mode display portion
w
1:
Lights in the play mode .
:
3
Lights in the pause mode.
DIGEST:
Lights in the digest play mode.
RANDOM:
Lights in the random play mode.
:
Lights in the repeat play mode.
PROG:
Lights in the programmed play mode.
TUNED:
Lights when a broadcast is tuned in.
STEREO:
Lights when the tuner is set to the stereo reception
mode.
AM
:
Lights during reception of an AM broadcast.
FM
:
Lights during reception of a FM broadcast.
:
ST
Lights when a stereo broadcast is tuned in.
SLEEP:
Light when the sleep timer is set.
TIMER
PLAY:
:
Lights when the timer is set.
:
Lights when the everyday timer is set.
Lights when timer playback is set.
Displays the current tone settings.
/ :
SDBEQ
9
Page 10
C D
POWER
VOLUME
TIMER/DELETE
PLAY MODE
PROG.
ENTER
CLEAR
TUNING/
PRESET
EQAUXFM/AM
SDB
RC-911
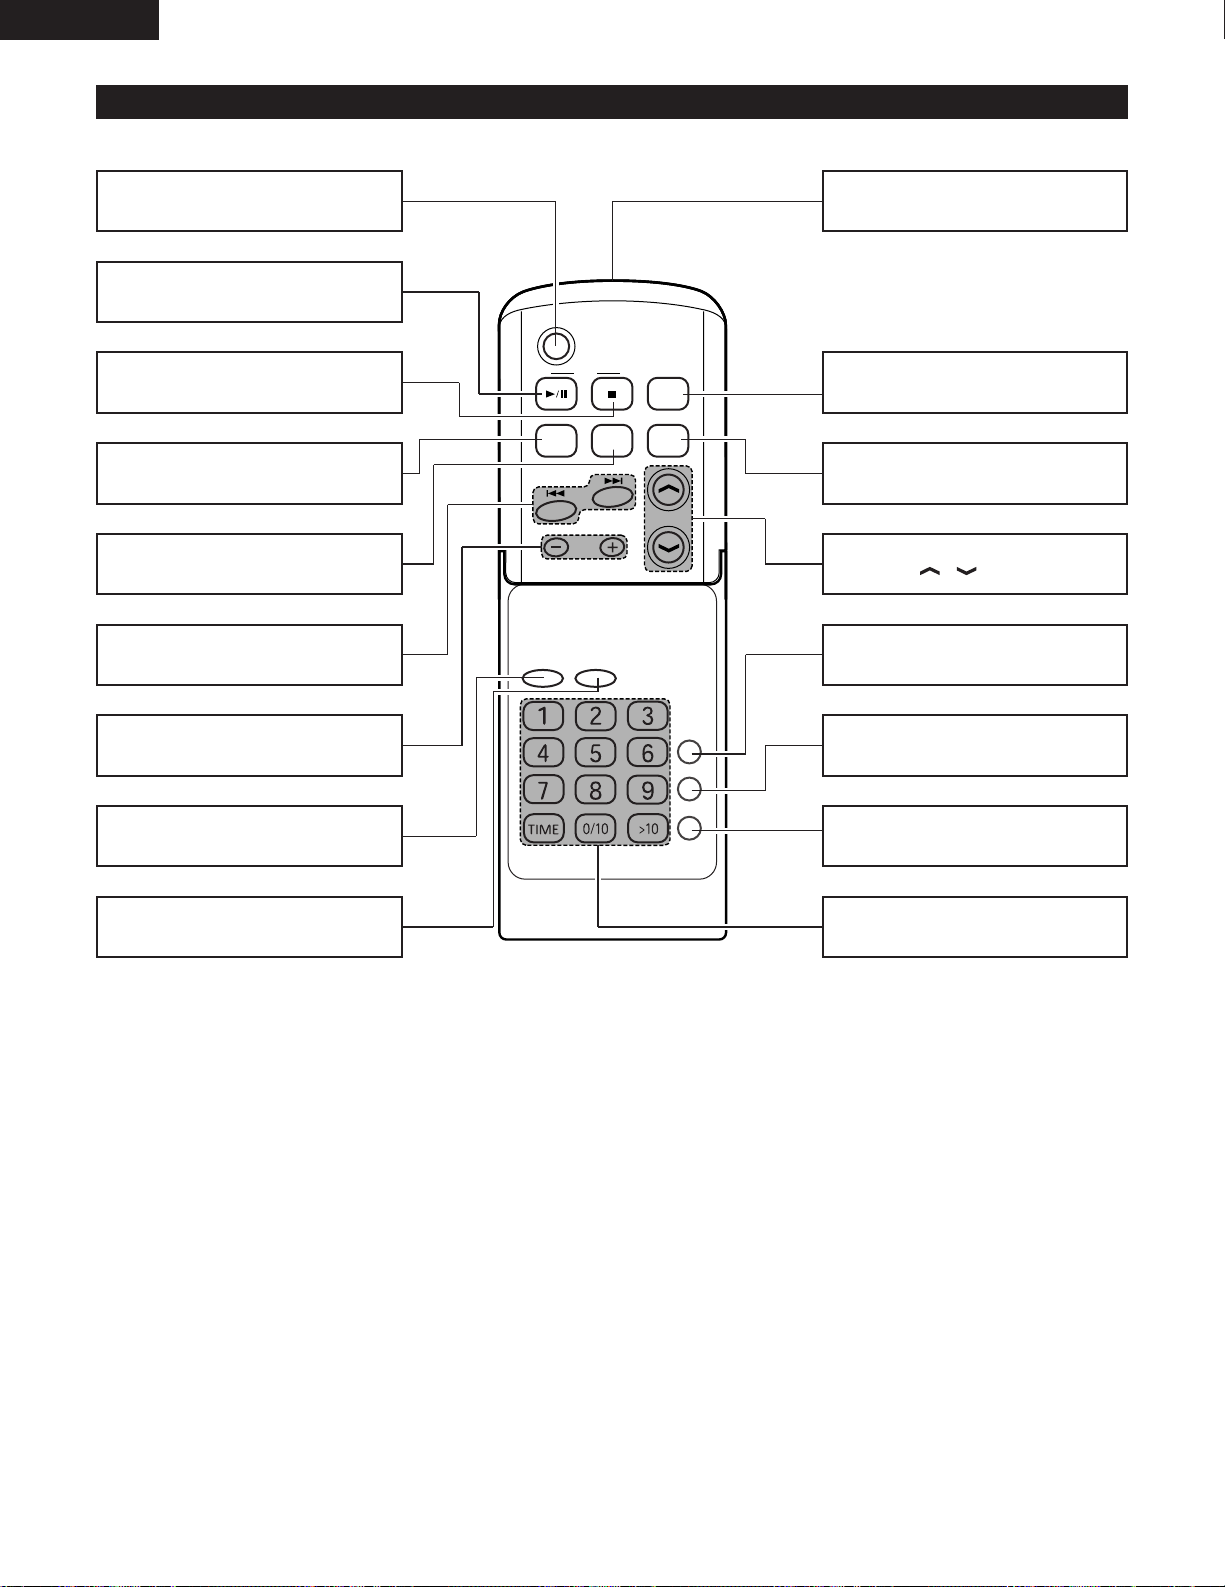
ENGLISH
(3) Names and Functions of the Remote Control Buttons
Power Button (POWER)
CD Play/Pause Button (CD
1/3)
........................................................(14)
CD Stop Button (CD
2)
........................................................(15)
Band Select Button (FM/AM)
........................................................(17)
External Input Selection Button
(AUX) ................................................(6)
Automatic Search Buttons
8/9) .............................(15 , 17)
(
Tuning/Preset Button (–/+)
........................................................(18)
Remote control signal transmitter
Super Dynamic Bass Button
(SDB) ..............................................(20)
Equalizer Button (EQ)
........................................................(20)
Volume Adjustment Buttons
(VOLUME / ) ......................(20)
TIMER/DELETE Button
(TIMER/DELETE).....................(12 , 27)
PLAY MODE Select Button
(PLAY MODE) .................................(22)
ENTER Button (ENTER)
CLEAR Button (CLEAR)
Program Button (PROG.)
........................................................(23)
Direct Selection Button
........................................................(21)
10
Page 11
4
DIGEST
T
R
A
C
K
S
D
B
EQ
G
P
MD
C
D
S
T
E
R
E
O
R
E
C
E
I
V
E
R
D-AJ03
4
0
-
S
T
A
T
I
O
N
S
P
R
E
S
E
T
M
E
M
O
R
Y
6
-
M
O
D
E
S
P
R
E
S
E
T
E
Q
U
A
L
I
Z
E
R
REMOTE
SENSOR
V
E
R
T
I
C
A
L
L
O
A
D
I
N
G
S
Y
S
T
E
M
C
O
M
P
A
C
T
D
I
S
C
P
L
A
Y
E
R
O
N
/S
T
A
N
D
B
Y
O
P
E
N
/C
L
O
S
E
S
K
IP
T
U
N
E
R
V
O
L
.
U
P
D
O
W
N
C
D
A
U
X
P
L
A
Y
M
O
D
E
30
30
REMOTE CONTROL UNIT
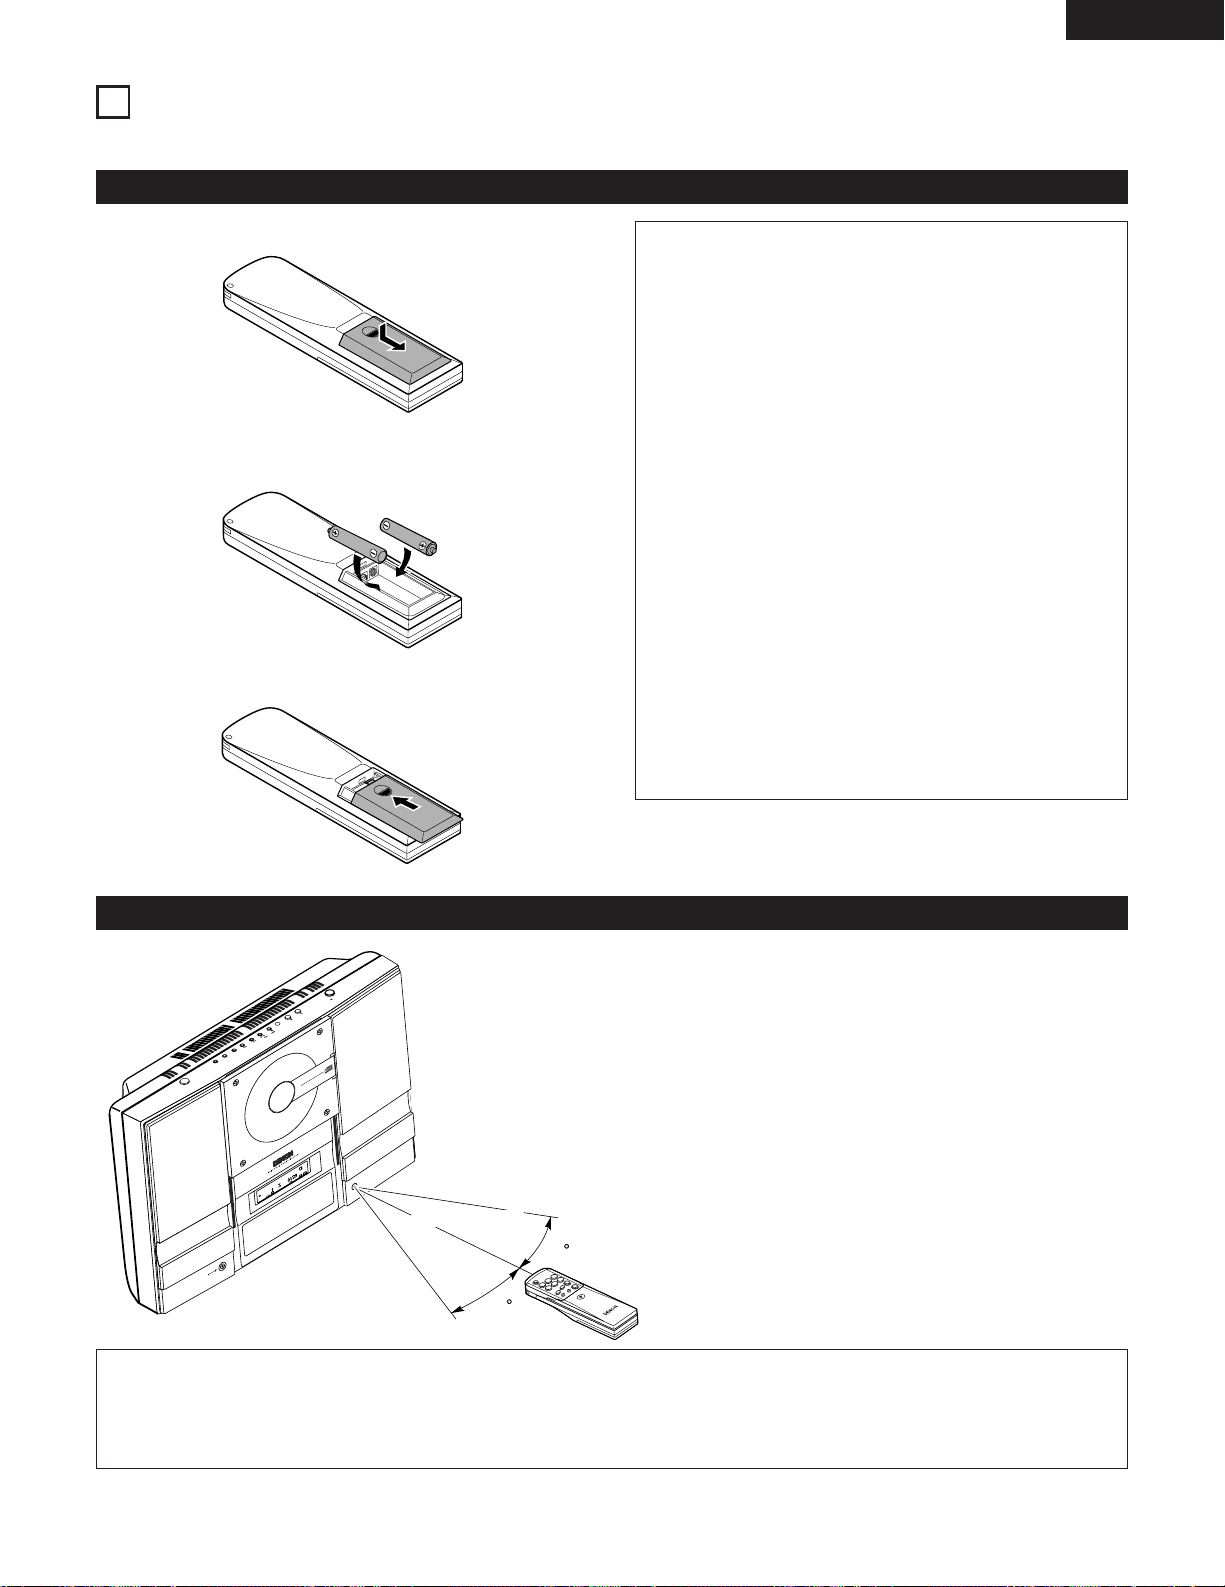
2 The D-AJ03 can be controlled from a distance using the included remote control unit (RC - 911).
(1) Inserting Batteries
ENGLISH
q Remove the remote control unit’s rear cover.
w Place two R 6 P (AA) batteries in the battery compartment
in the direction indicated by the marks.
e Close the rear cover.
Cautions On Batteries
• Use R6P (AA) batteries in this remote control unit.
• Replace the batteries with new ones approximately
once a year, though this depends on the frequency
with which the remote control unit is used.
• If the remote control unit does not operate from close
to the main unit, replace the batteries with new ones,
even if less than a year has passed.
• The included battery is only for verifying operation.
Replace it with a new battery as soon as possible.
• When inserting the batteries, be careful to do so in the
proper direction, following the < and > marks in the
remote control unit’s battery compartment.
• To prevent damage or battery fluid leakage:
• Do not use a new battery with an old one.
• Do not use two different types of batteries.
• Do not short-circuit, disassemble, heat or dispose of
batteries in flames.
• Remove the batteries when not planning to use the
remote control unit for a long period of time.
• If the batteries should leak, carefully wipe off the fluid
from the inside of the battery compartment, then insert
new batteries.
(2) Using the Remote Control Unit
• When operating the remote control unit, point it at the
remote control sensor as shown on the diagram.
• The remote control unit can be used from a direct
distance of approximately 7 meters. This distance will
be shorter, however, if there are obstacles in the way
or if the remote control unit is not pointed directly at
the remote control sensor.
• The remote control unit can be operated at a horizontal
angle of up to 30° with respect to the remote control
sensor.
NOTES:
• It may be difficult to operate the remote control unit if the remote control sensor is exposed to direct sunlight or strong
artificial light.
• Do not press buttons on the main unit and on the remote control unit at the same time. Doing so will result in malfunction.
Approx. 7 meters
11
Page 12
ENGLISH
ON/STANDBY
OPEN/CLOSE
SKIP
TUNER
VOL.
UP
DOWN
C D
AUX PLAY MODE
C D
POWER
VOLUME
TIMER/DELETE
PLAY MODE
PROG.
ENTER
CLEAR
TUNING/
PRESET
EQAUXFM/AM
SDB
RC-911
POWER
ON/STANDBY
TIMER/DELETE
SLEEP 1:00
TUNING/
PRESET
ENTER
ENTER
TUNING/
PRESET
ENTER
TUNING/
PRESET
TIME ADJUST
AM12:00
PM 7:00
PM 7:30
5
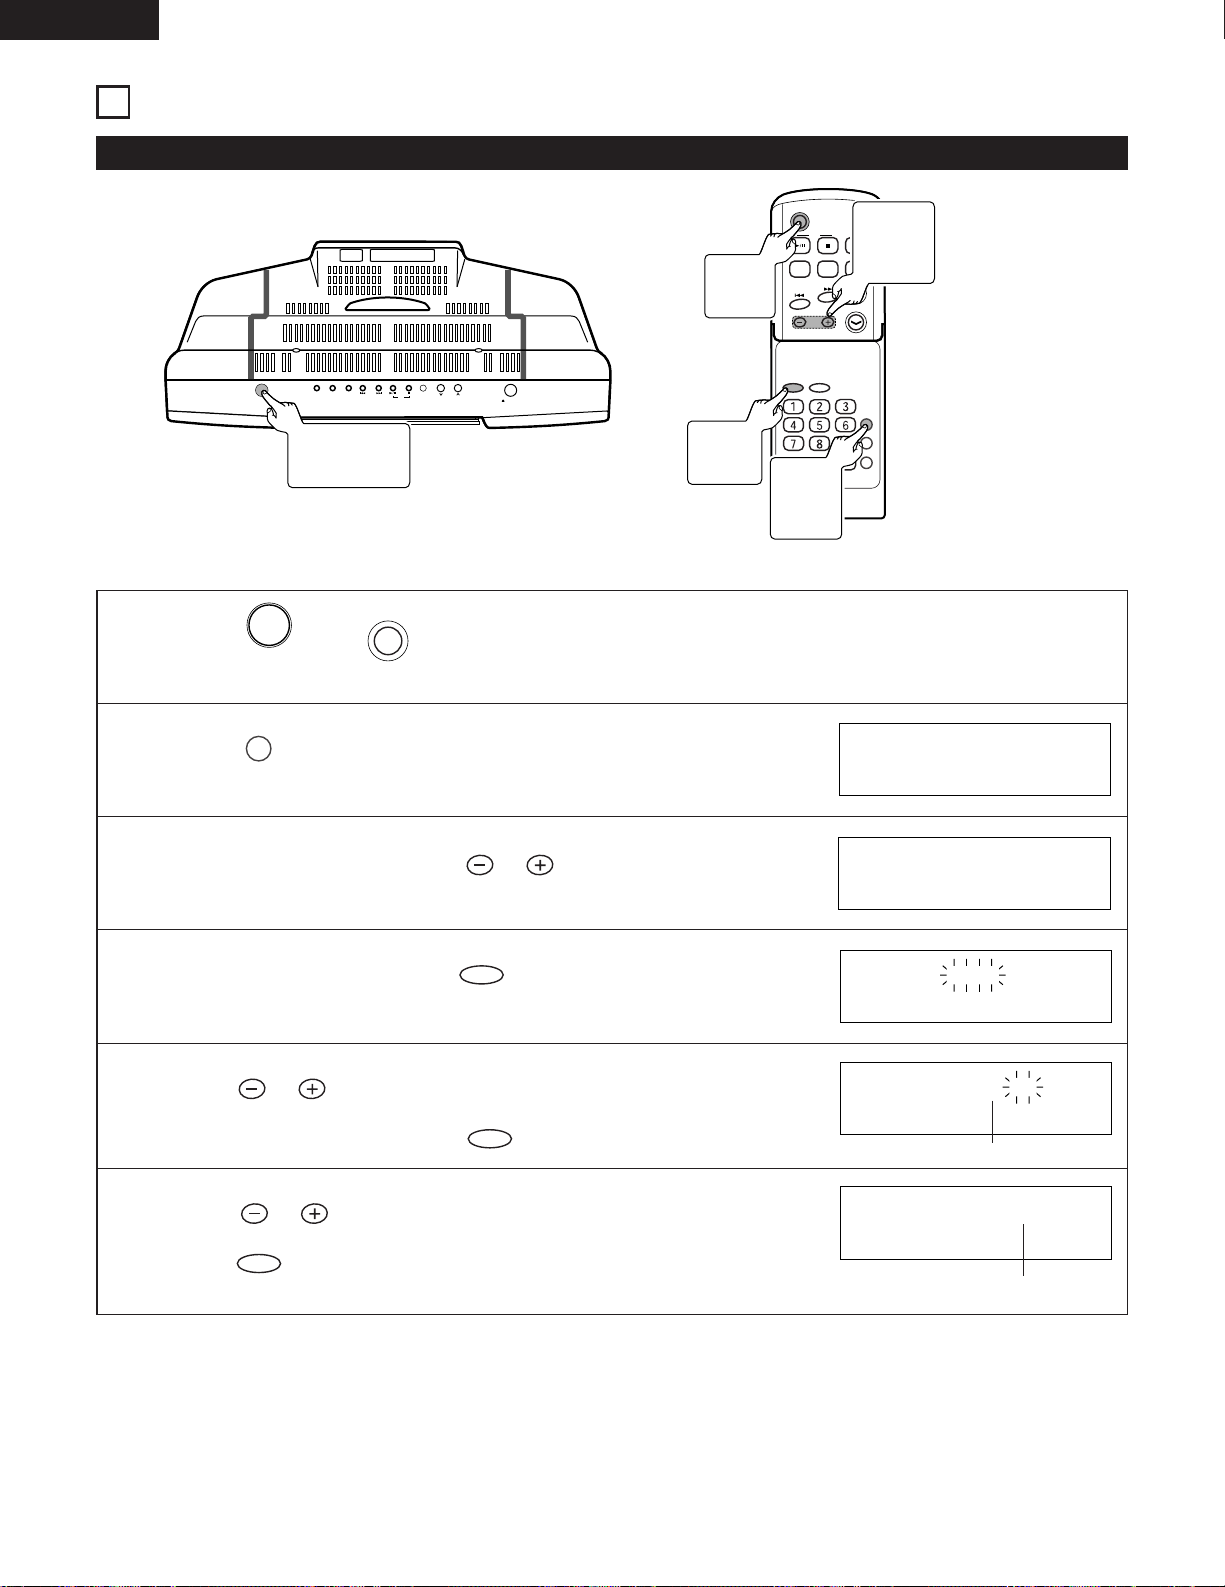
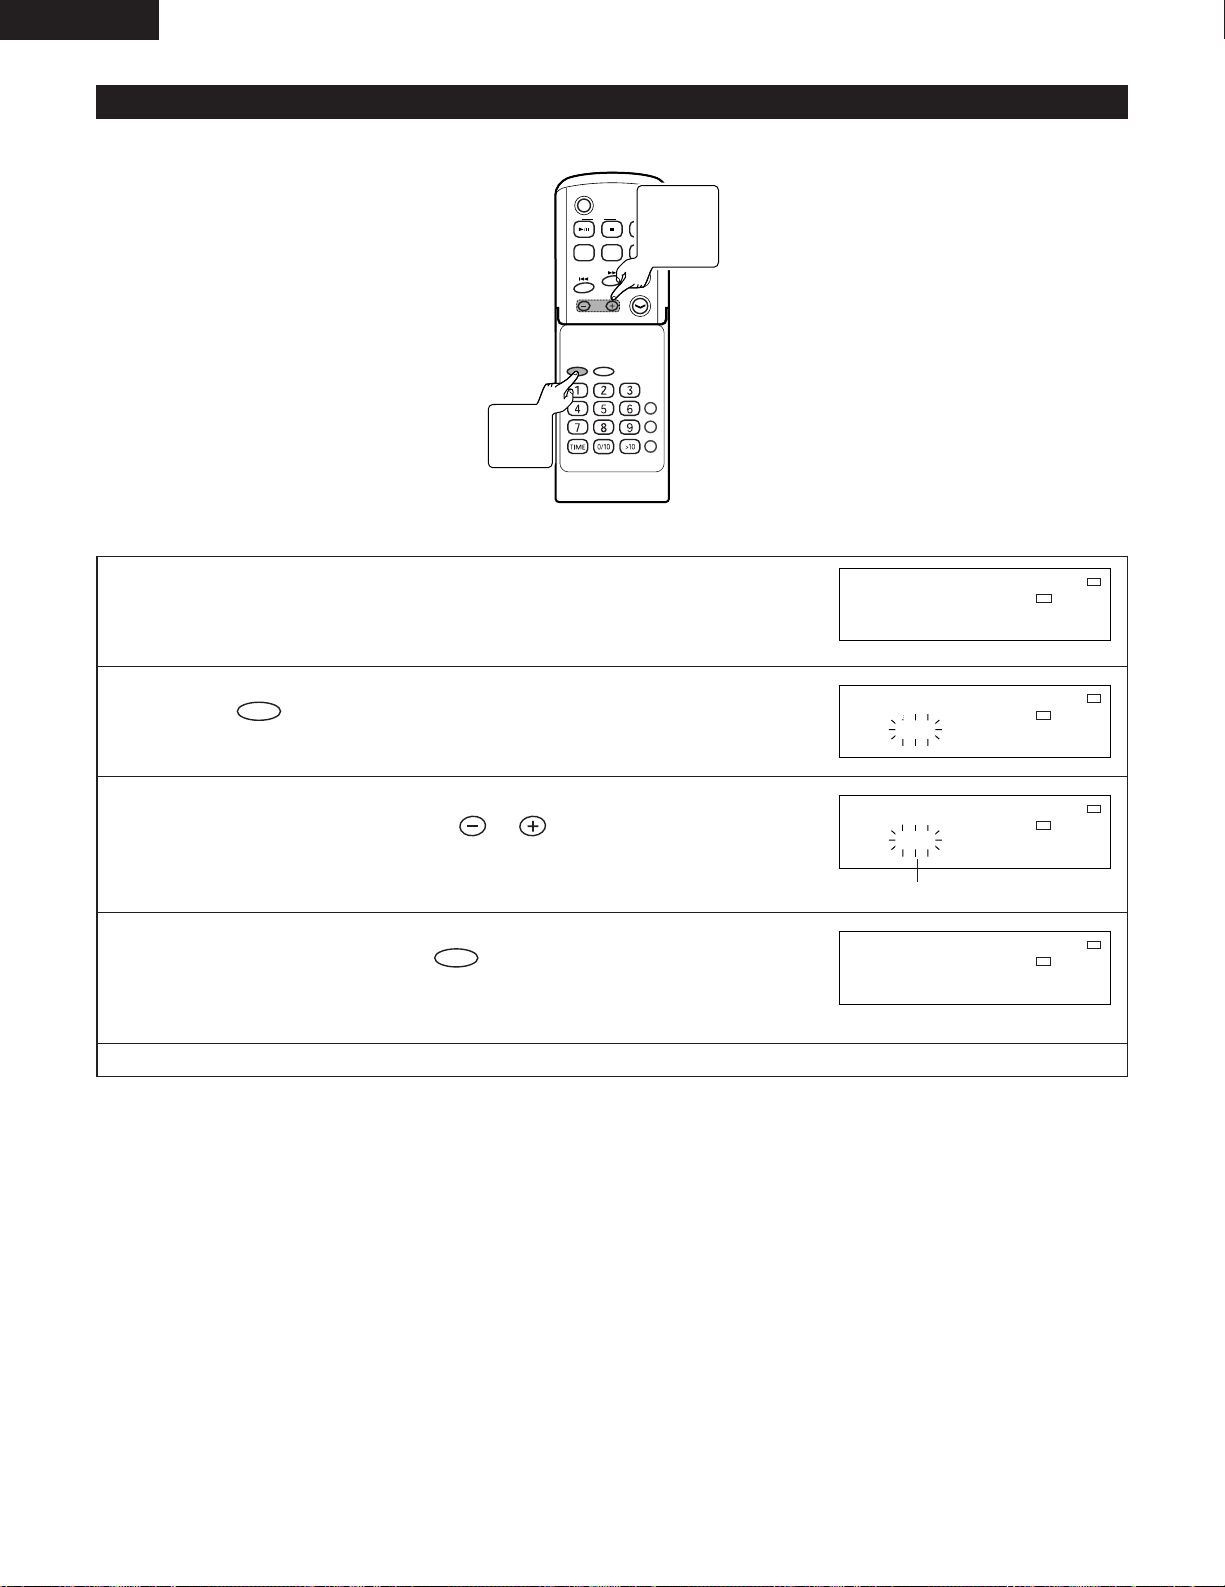
(1) Clock adjustment
CLOCK ADJUSTMENT
1
POWER
Button
3, 5, 6
TUNING/
PRESET
Button
1
ON/STANDBY
Button
(Example) Set the current time to “PM7:30” (7:30 p.m.).
1
Press (or on the remote control) to turn the
power on.
2
Press on the remote control.
3
Within 10 seconds, press on the remote control
to select “
4
Within 10 seconds, press on the remote control.
TIME ADJUST ”.
4, 5, 6
ENTER
Button
2
TIMER/
DELETE
Button
5
Press on the remote control to adjust the hour
“ PM 7 ”, and then press on the remote control.
6
Press to adjust the minutes “ 30 ”, and then
press .
• The time display will disappear after a few second.
12
Adjust the hour
Adjust the minutes
Page 13

(2) To correct the Time
Redo from Operation 1.
✽ During this procedure, “ STANDBY ” is displayed in
Operation 2 and the current setting time is displayed in
Operation 3.
NOTE:
• The clock setting will be cleared when the unit is
unplugged or the power failure occurs.
Perform “Clock adjustment” form the beginning.
ENGLISH
13
Page 14
ENGLISH
ON/STANDBY
OPEN/CLOSE
SKIP
TUNER
VOL.
UP
DOWN
C D
AUX PLAY MODE
C D
POWER
VOLUME
TUNING/
PRESET
EQAUXFM/AM
SDB
POWER
ON/STANDBY
C D
C D
5 OPEN/CLOSE
CD NO DISC
CD OPEN
5 OPEN/CLOSE
C D
C D
C D
C D
TRACK
CD 1 0:01
6
PLAYING CDs
2
CD 2
Button
1
POWER
Button
5
CD
1
ON/STANDBY
Button
5
CD 1/3
Button
3, 4
5 OPEN/
CLOSE Button
1/3
Button
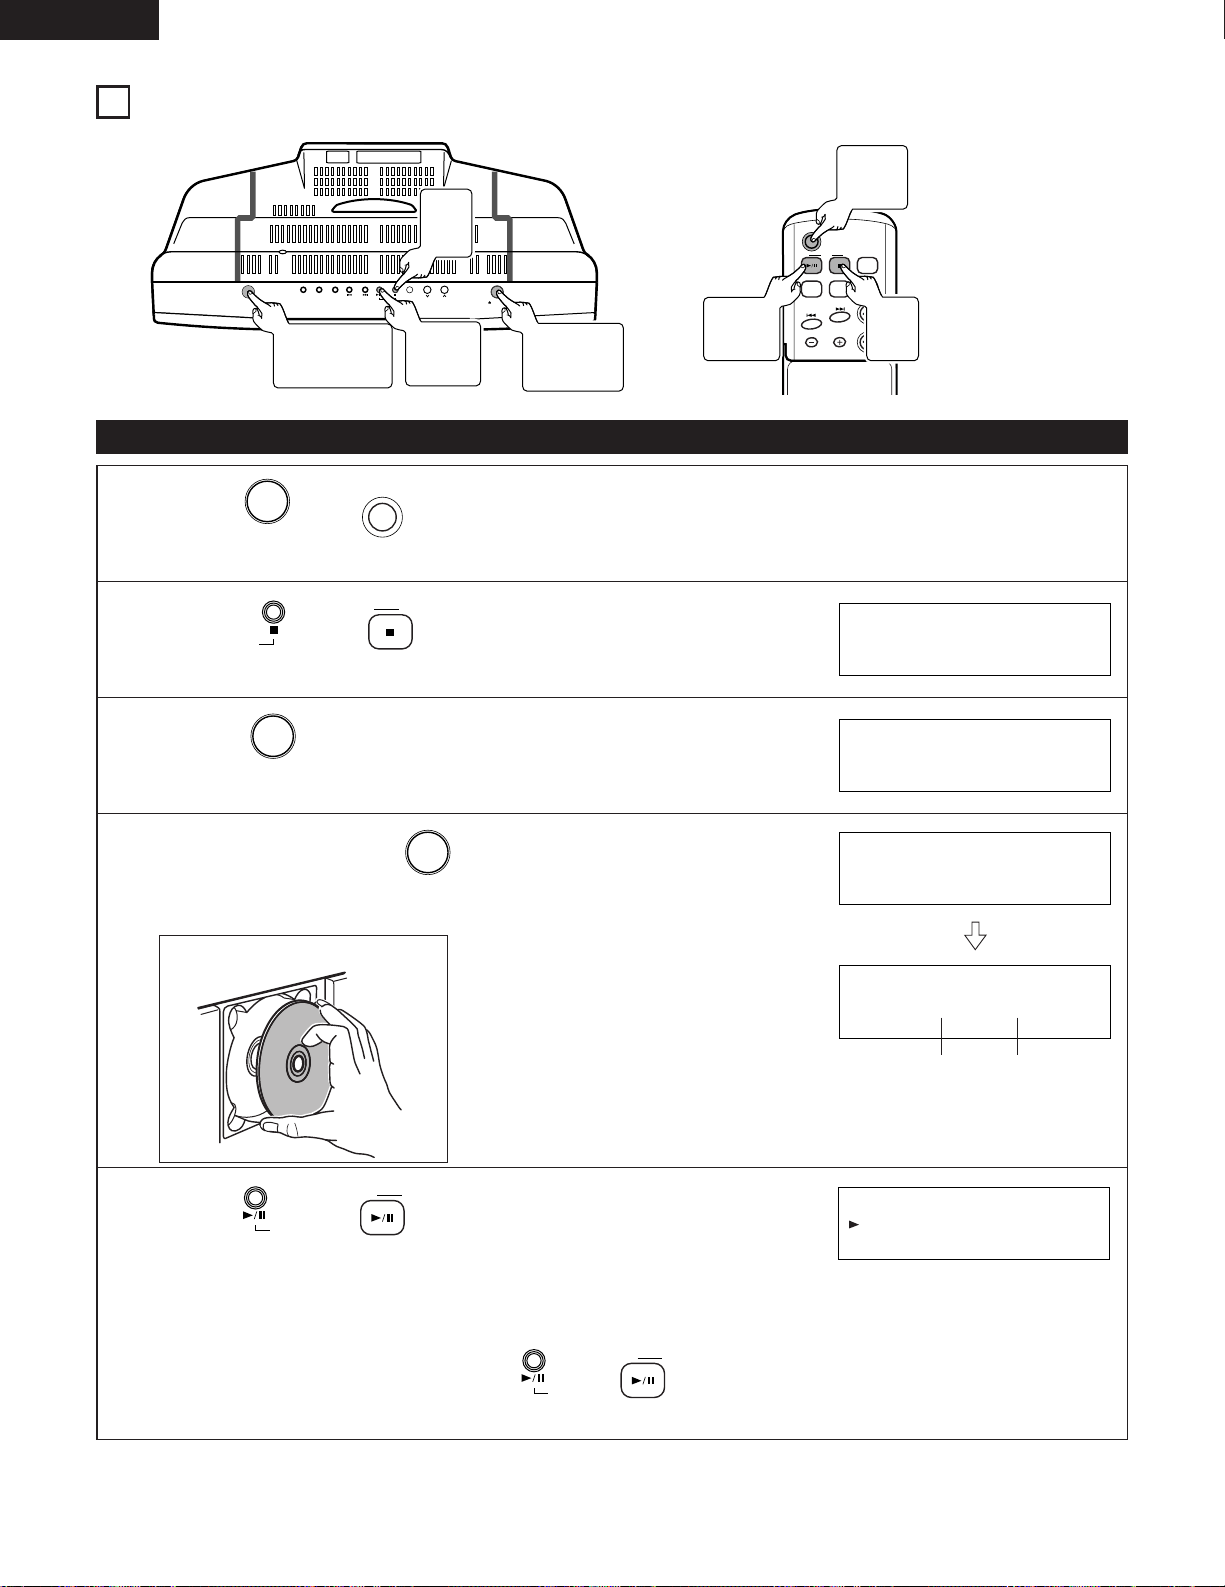
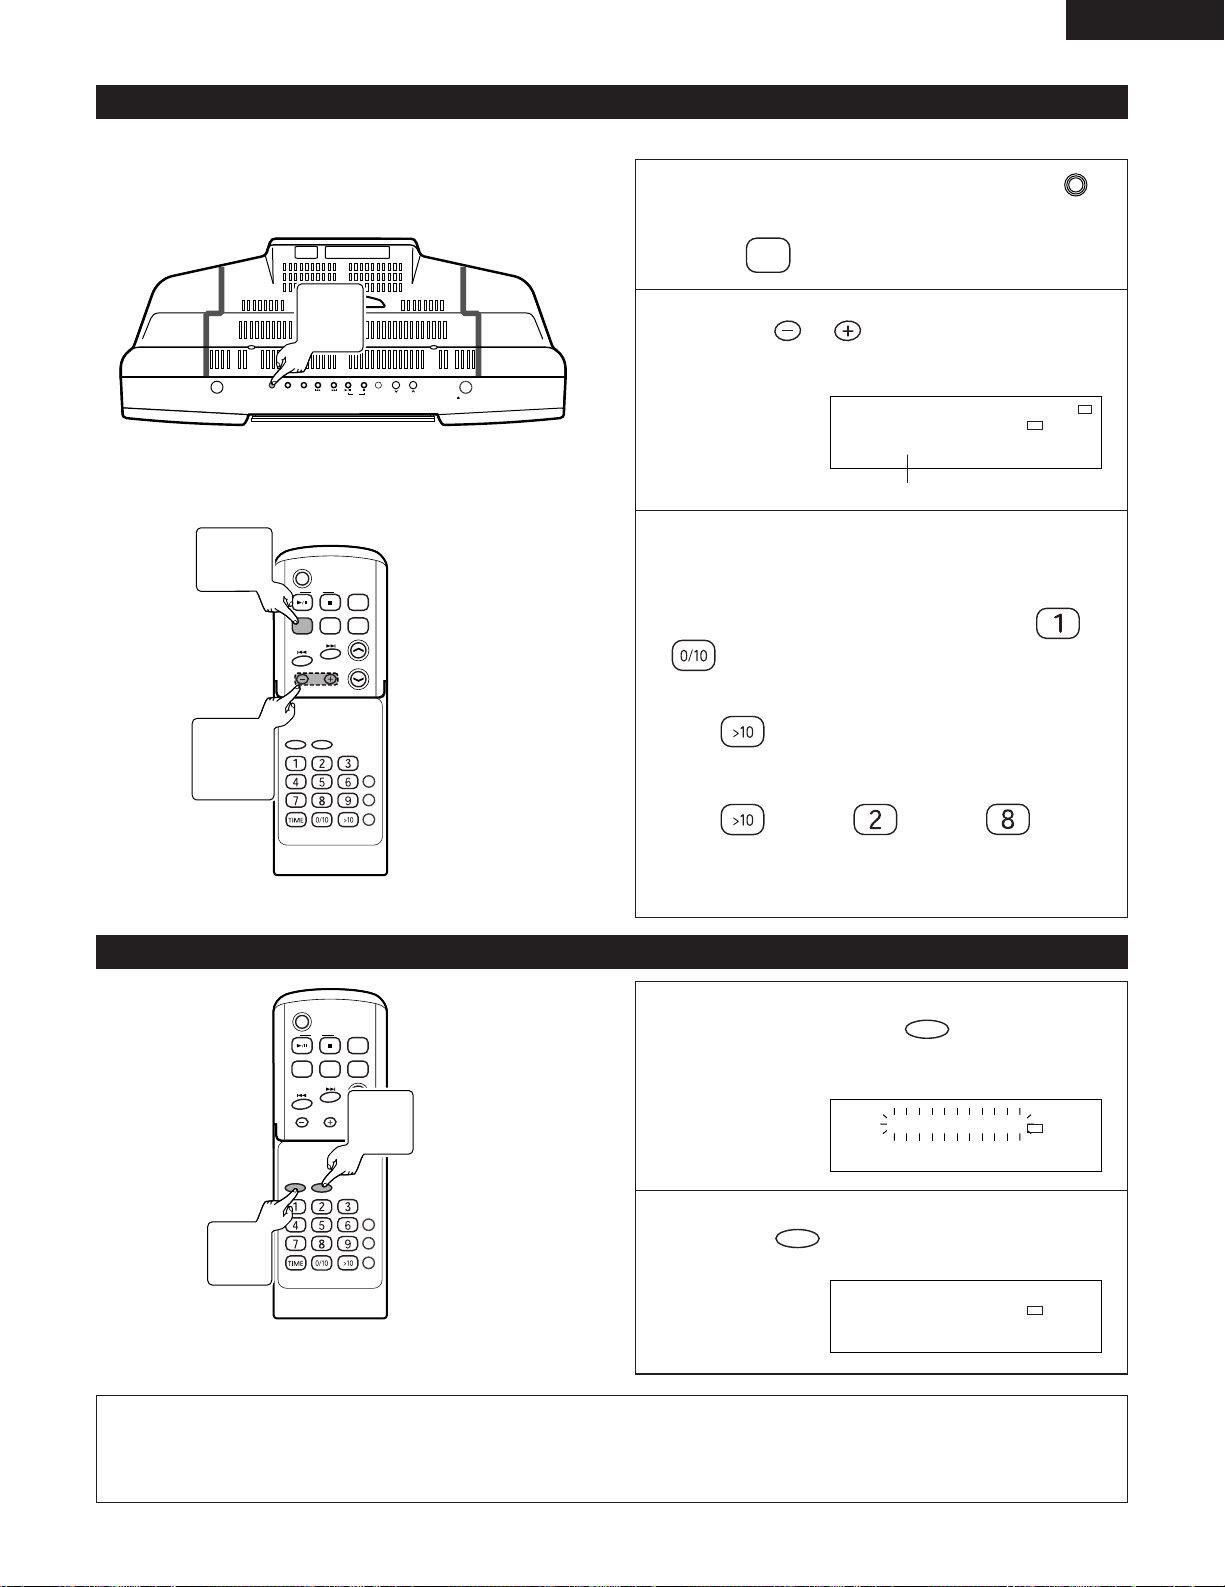
(1) Playing CDs
1
Press (or on the remote control) to turn the power on.
2
Press (or on the remote control) to set the
input to “CD”.
3
Press of the main unit to open the CD door.
4
Set a CD and press to close the door.
2
CD 2
Button
CD CLOSE
• CD door will close automatically.
• Loading a CD
5
Press (or on the remote control) to start
Load a CD firmly with the label side facing
to ward you.
TOTAL
CD 16 72:31
The total number
of tracks
TRACK
The total
playing time
playback.
• Play will start from the first track and continue in order. The unit will automatically stop at the completion of the last
track.
✽ When opening the CD door, by pressing (or on the remote control), you can close the CD door
automatically.
14
Page 15
ON/STANDBY
OPEN/CLOSE
SKIP
TUNER
VOL.
UP
DOWN
C D
AUX PLAY MODE
C D
POWER
VOLUME
TIMER/DELETE
PLAY MODE
ENTER
CLEAR
TUNING/
PRESET
EQAUXFM/AM
SDB
C D
C D
C D
C D
SKIP
SKIP
SKIP
SKIP
TOTAL
TRACK
CD 16 72:31
TRACK
PAUSE
CD 3 1:23
CD 1/3
Button
ENGLISH
CD 2
Button
8,9
Button
SKIP
Button
CD 1/3
Button
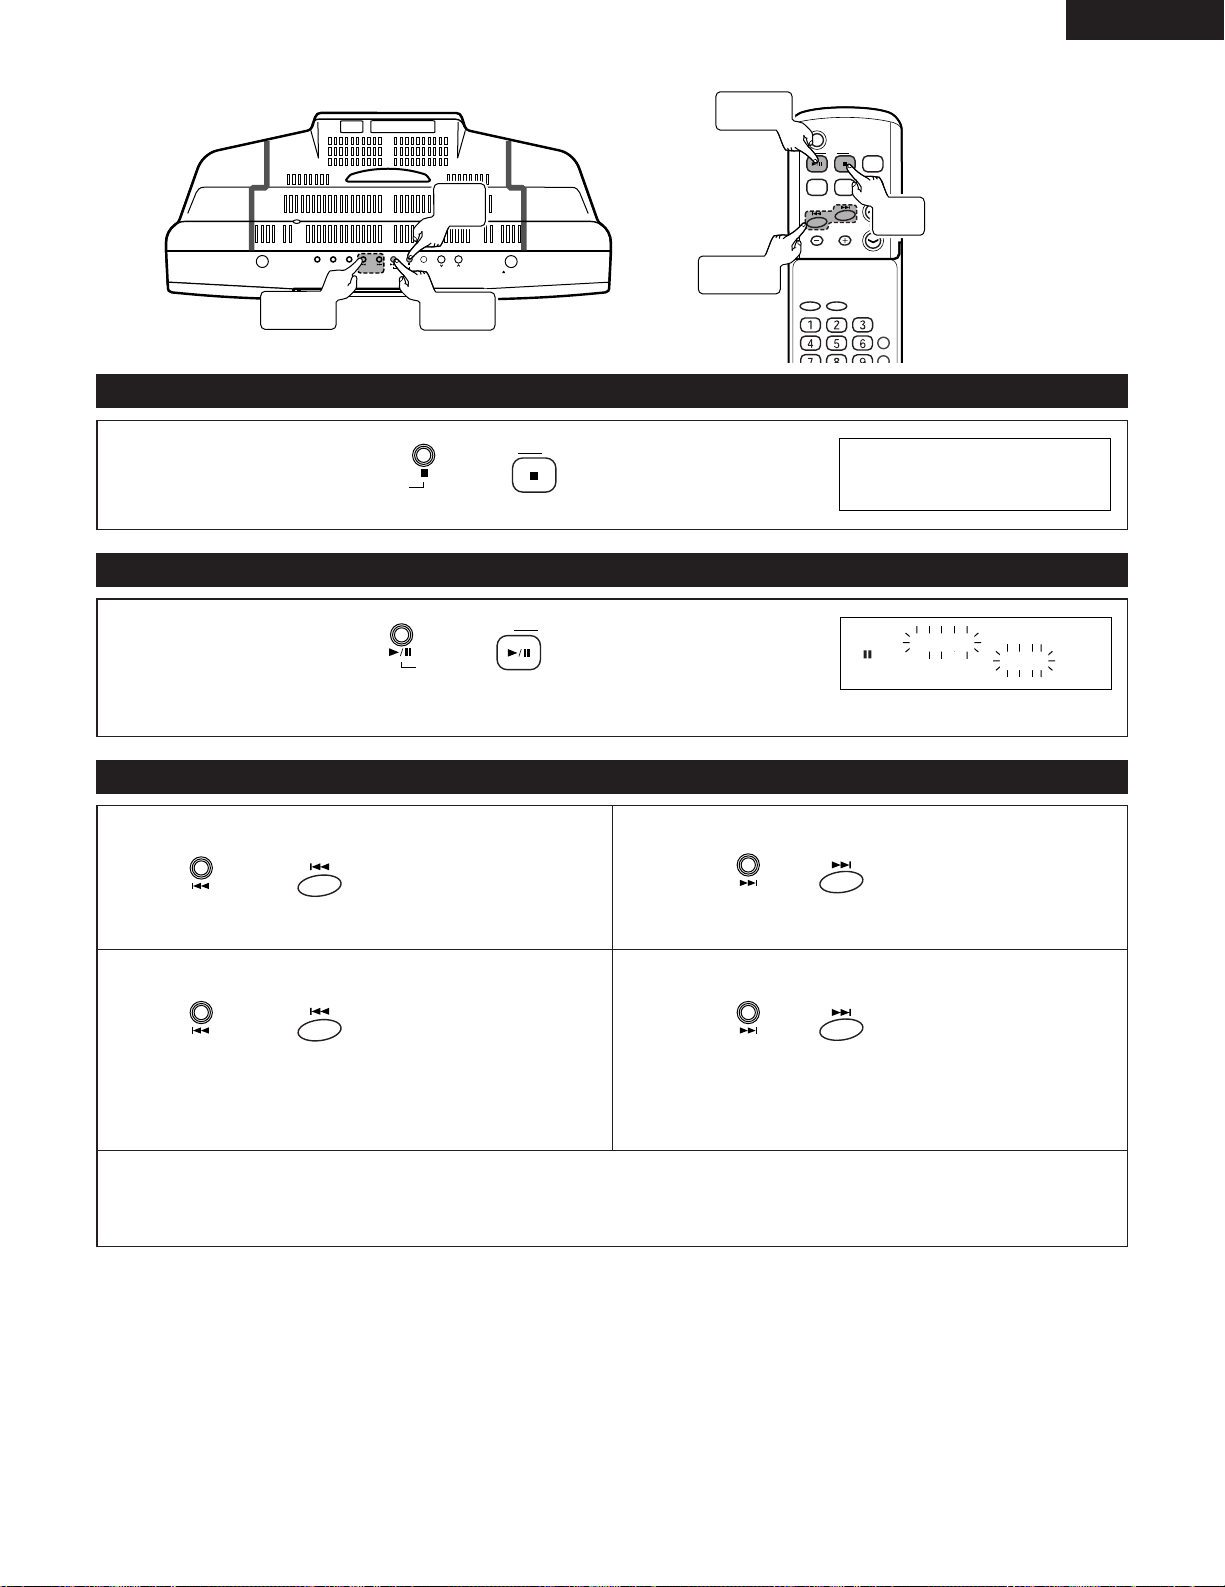
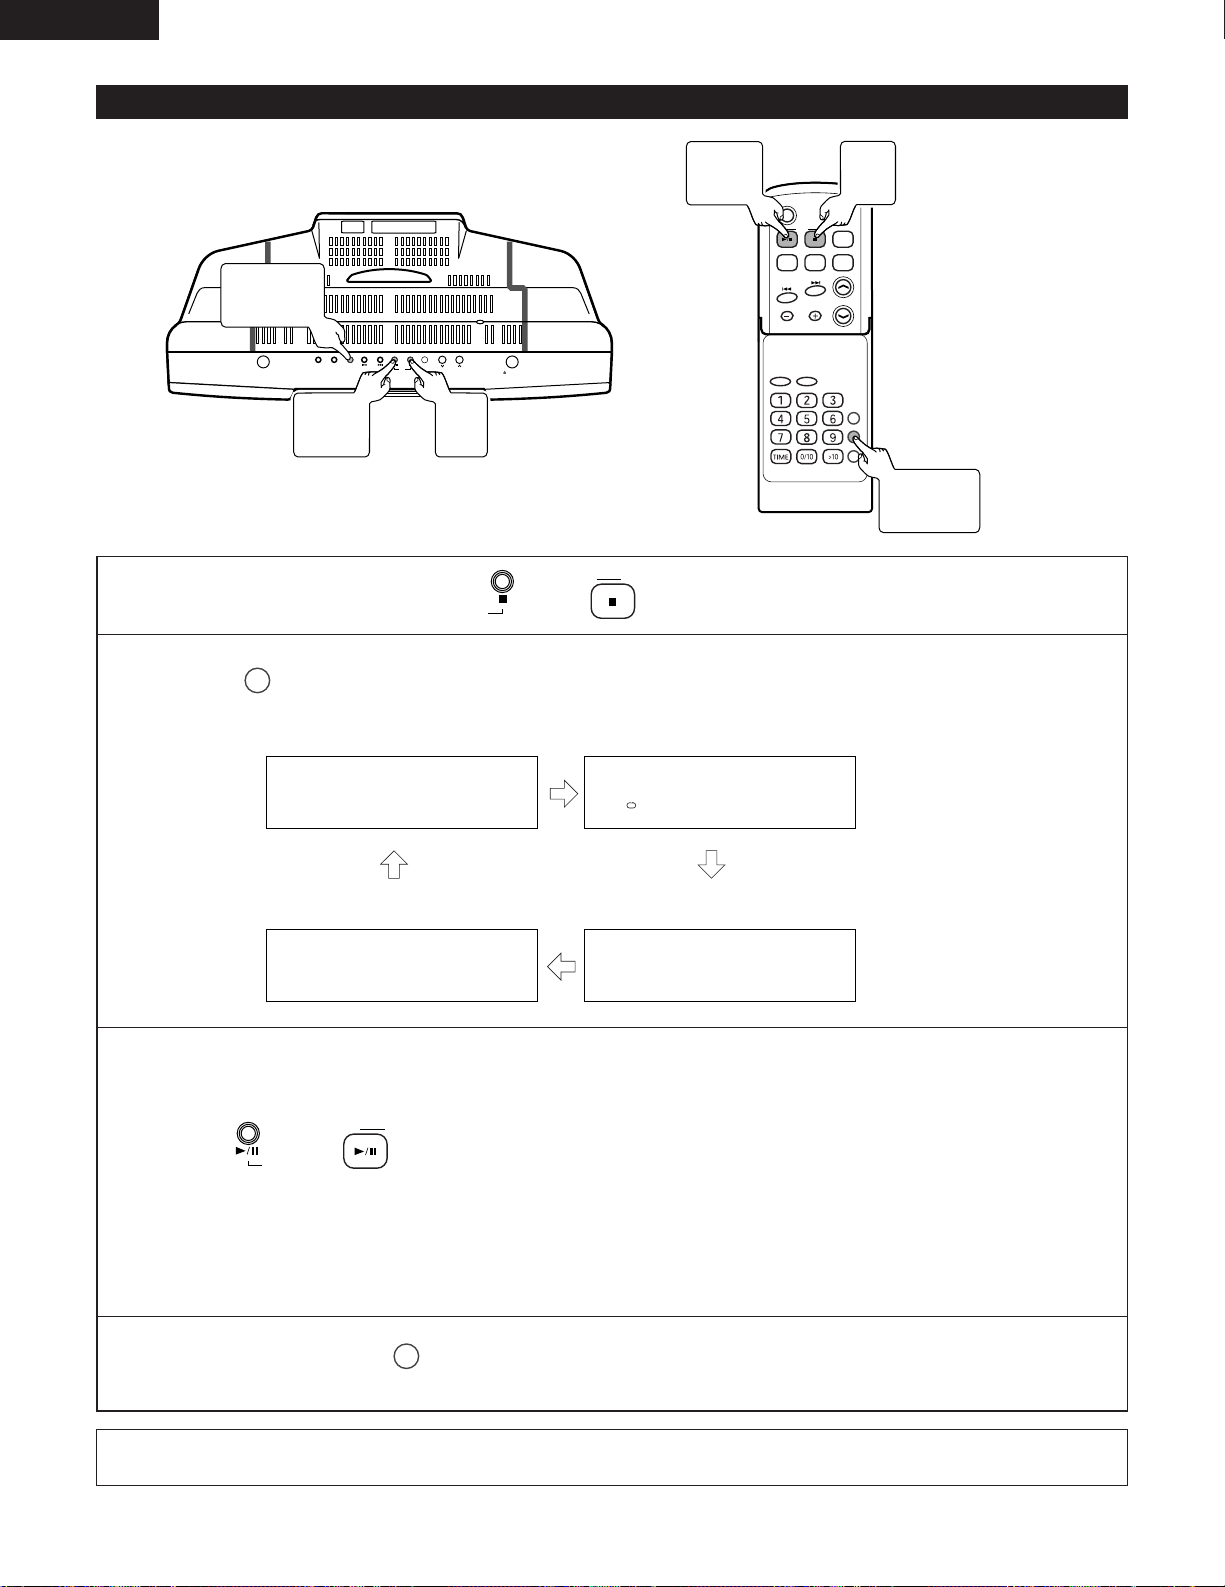
(2) Stopping Play
During playback, press (or on the remote
control).
(3) Pausing
During playback, press (or on the remote
control).
✽ One more press of the button will start play from the paused position.
CD
2
Button
(4) To locate the beginning of a track
[To restart the track being played]
Press (or on the remote
control) once during playback.
[When selecting the previous track number]
Press (or on the remote
control) during stop.
✽ You can skip to any track by pressing the button
repeatedly until the desired track number appears.
✽ When playback is started after displaying the desired track number in stop mode, playback starts from the beginning of
that track.
✽ The direct selection button of the remote control can be used to select track numbers. (See Page 21.)
[To move to the beginning of the next track]
Press (or on the remote
control) once during playback.
[When selecting the next track number]
Press (or on the remote
control) during stop.
✽ You can skip to any track by pressing the button
repeatedly until the desired track number appears.
15
Page 16
ENGLISH
ON/STANDBY
OPEN/CLOSE
SKIP
TUNER
VOL.
UP
DOWN
C D
AUX PLAY MODE
C D
POWER
VOLUME
TIMER/DELETE
PLAY MODE
ENTER
CLEAR
TUNING/
PRESET
EQAUXFM/AM
SDB
5 OPEN/CLOSE
C D
C D
TOTAL
TRACK
CD 16 72:31
CD OPEN
5 OPEN/CLOSE
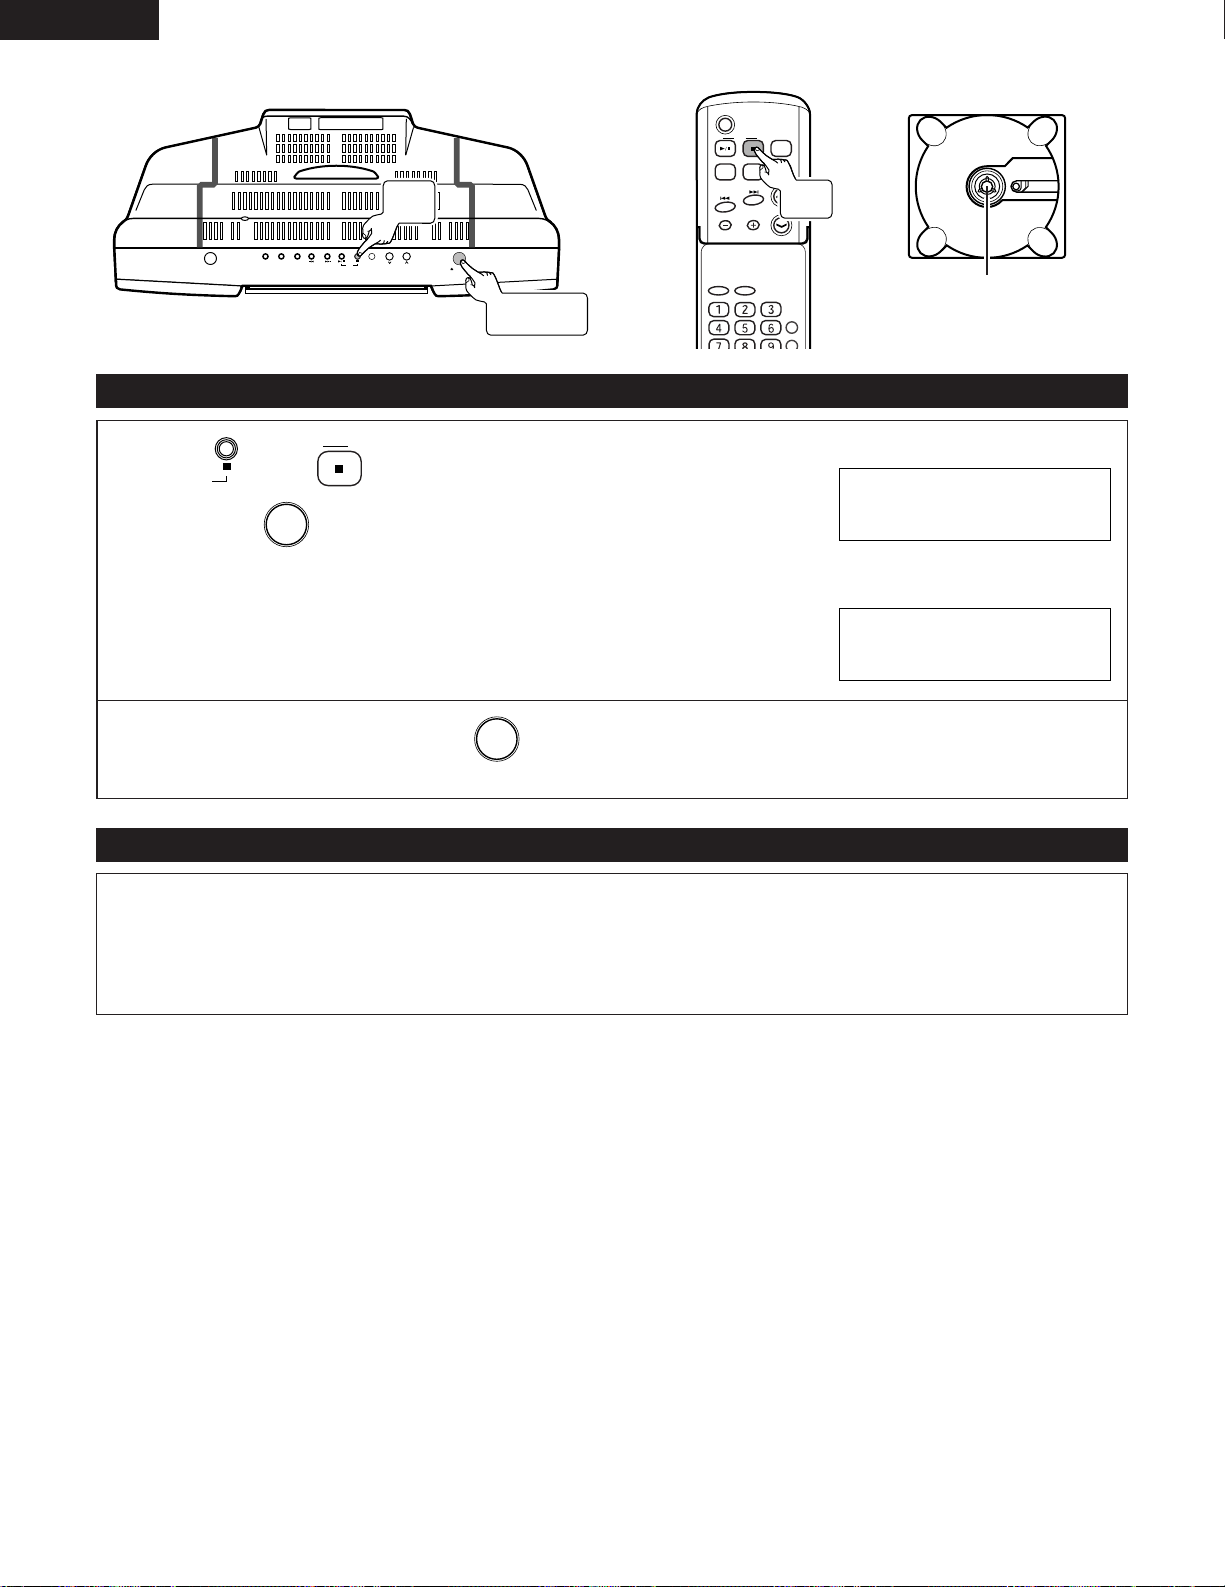
(5) Removing the CD
2
CD 2
Button
CD
Button
5 OPEN/
CLOSE Button
Press (or on the remote control) to stop the CD,
then press .
CD eject button
• After the CD door opens, pull out the CD.
✽ When the unit is not being used , press and be sure to close the CD door.
Precautions When Loading the CD
• Load only one CD. The loading of two or more (one above the other) will cause a breakdown and may scratch the CDs.
• Be careful not to get your fingers caught when the CD door opens or closes.
• Do not use CDs that are cracked, misshapen, or have been repaired with adhesives, etc.
• Do not use CDs that have the exposed adhesive or marks remaining from cellophane tape, rental CD labels, or other
sources. Use of CDs in this condition will result in difficulty in removing the CD or could cause breakdown.
16
Page 17
7
ON/STANDBY
OPEN/CLOSE
SKIP
TUNER
VOL.
UP
DOWN
C D
AUX PLAY MODE
C D
POWER
VOLUME
TIMER/DELETE
PLAY MODE
PROG.
ENTER
CLEAR
TUNING/
PRESET
EQAUXFM/AM
SDB
POWER
ON/STANDBY
FM/AM
TUNER
STEREO
MHz
FM
MHz
FM
KHz
AM
87.5 87.5 520
STEREO
MHz
FM
ST
87.5
SKIP
TUNED
STEREO
MHz
FM
ST
89.5
LISTENING TO THE RADIO
(1) Station Selection
2
TUNER
Button
2
FM/AM
Button
ENGLISH
1
POWER
Button
1
ON/STANDBY
Button
3
SKIP
Button
(Example) Set the reception frequency to “89.5 MHz, FM”.
1
Press (or on the remote control) to turn the power on.
2
Press (or on the remote control) to select FM.
✽ The tuner mode changes as follow each time the button pressed.
3
Press (or on the remote control) and
3
8/9
Button
set the receive frequency to “89.5 MHz, FM”.
• Auto Tuning:
Hold the tuning button down for more than 1 second and release to
automatically receive broadcast stations with strong signals.
To stop auto tuning, press the tuning button of the opposite direction once.
• Manual Tuning:
Press the button in short steps to also permit reception of stations having weak
signals.
17
Page 18
ENGLISH
C D
POWER
VOLUME
TIMER/DELETE
PLAY MODE
PROG.
ENTER
CLEAR
TUNING/
PRESET
EQAUXFM/AM
SDB
RC-911
TUNED
STEREO
MHz
FM
ST
89.5
ENTER
TUNED
STEREO
MHz
FM
ST
P1 89.5
TUNING/
PRESET
TUNED
STEREO
MHz
FM
ST
P 3 89.5
ENTER
TUNED
STEREO
MHz
FM
ST
P 3 89.5
(2) Storing Broadcast Stations
2 Up to 40 FM and AM stations can be preset.
2, 4
ENTER
Button
(Example) Store the tuned “89.5 MHz, FM” to preset number “3”.
1
Receive the broadcast station “89.5 MHz, FM” that you
want to store to preset memory.
3
TUNING
/PRESET
Button
2
Press .
3
Within 5 seconds, press to display the number
that you want to store.
4
Within 5 second, press .
✽ When a new station is stored in memory, the station previously memorized will
be erased.
✽ Repeat step 1 to 4 to set other station, or change a preset station.
(Which in this example will be “3”.)
18
Page 19
(3) Listening to Preset Stations
ON/STANDBY
OPEN/CLOSE
SKIP
TUNER
VOL.
UP
DOWN
C D
AUX PLAY MODE
C D
POWER
VOLUME
TIMER/DELETE
PLAY MODE
PROG.
ENTER
CLEAR
TUNING/
PRESET
EQAUXFM/AM
SDB
RC-911
FM/AM
TUNER
TUNING/
PRESET
TUNED
STEREO
MHz
FM
ST
P 3 89.5
C D
POWER
VOLUME
TIMER/DELETE
PLAY MODE
PROG.
ENTER
CLEAR
TUNING/
PRESET
EQAUXFM/AM
SDB
RC-911
CLEAR
TUNED
STEREO
MHz
FM
TUNER CLEAR
ENTER
TUNED
STEREO
MHz
FM
COMPLETE
(Example) Listen to the station of preset number “3” that was set in step (2).
1
Turn the power on and press
(or on the remote control).
1
TUNER
Button
Press to select the desired
2
station.
ENGLISH
(Select numbers)
1
FM/AM
Button
2
TUNING/
PRESET
Button
(4) To erase the contents of the preset memory
1
CLEAR
Button
✽ The direct button on the remote control allow you
to recall a memorized station.
2To select preset station between 1 to 10:
Select numbers that were registered in to
.
2To select preset station between 11 to 40:
Press , then select the registered numbers.
(Example) To choose 28.
Press
/ Press / Press .
✽ When buttons are pressed in succession, press the
next button within 5 seconds.
1
Press and hold down for 3
seconds or more.
2
2
ENTER
Button
NOTE:
• The backup function protect the memorized stations for a few hours should there be a power failure or the AC lead
disconnection.
Press .
19
Page 20
ENGLISH
ON/STANDBY
OPEN/CLOSE
SKIP
TUNER
VOL.
UP
DOWN
C D
AUX PLAY MODE
C D
POWER
VOLUME
TIMER/DELETE
PLAY MODE
PROG.
ENTER
CLEAR
TUNING/
PRESET
EQAUXFM/AM
SDB
RC-911
VOLUME
VOLUME
VOL.
DOWN
VOL.
UP
VOLUME 12
SDB
SDB ON
SDB OFF
FLAT
EQ
CLASSIC
EQ
JAZZ
EQ
ROCK
EQ
POPS
EQ
VOCAL
8
VOLUME AND TONE ADJUSTMENTS
VOL.
Button
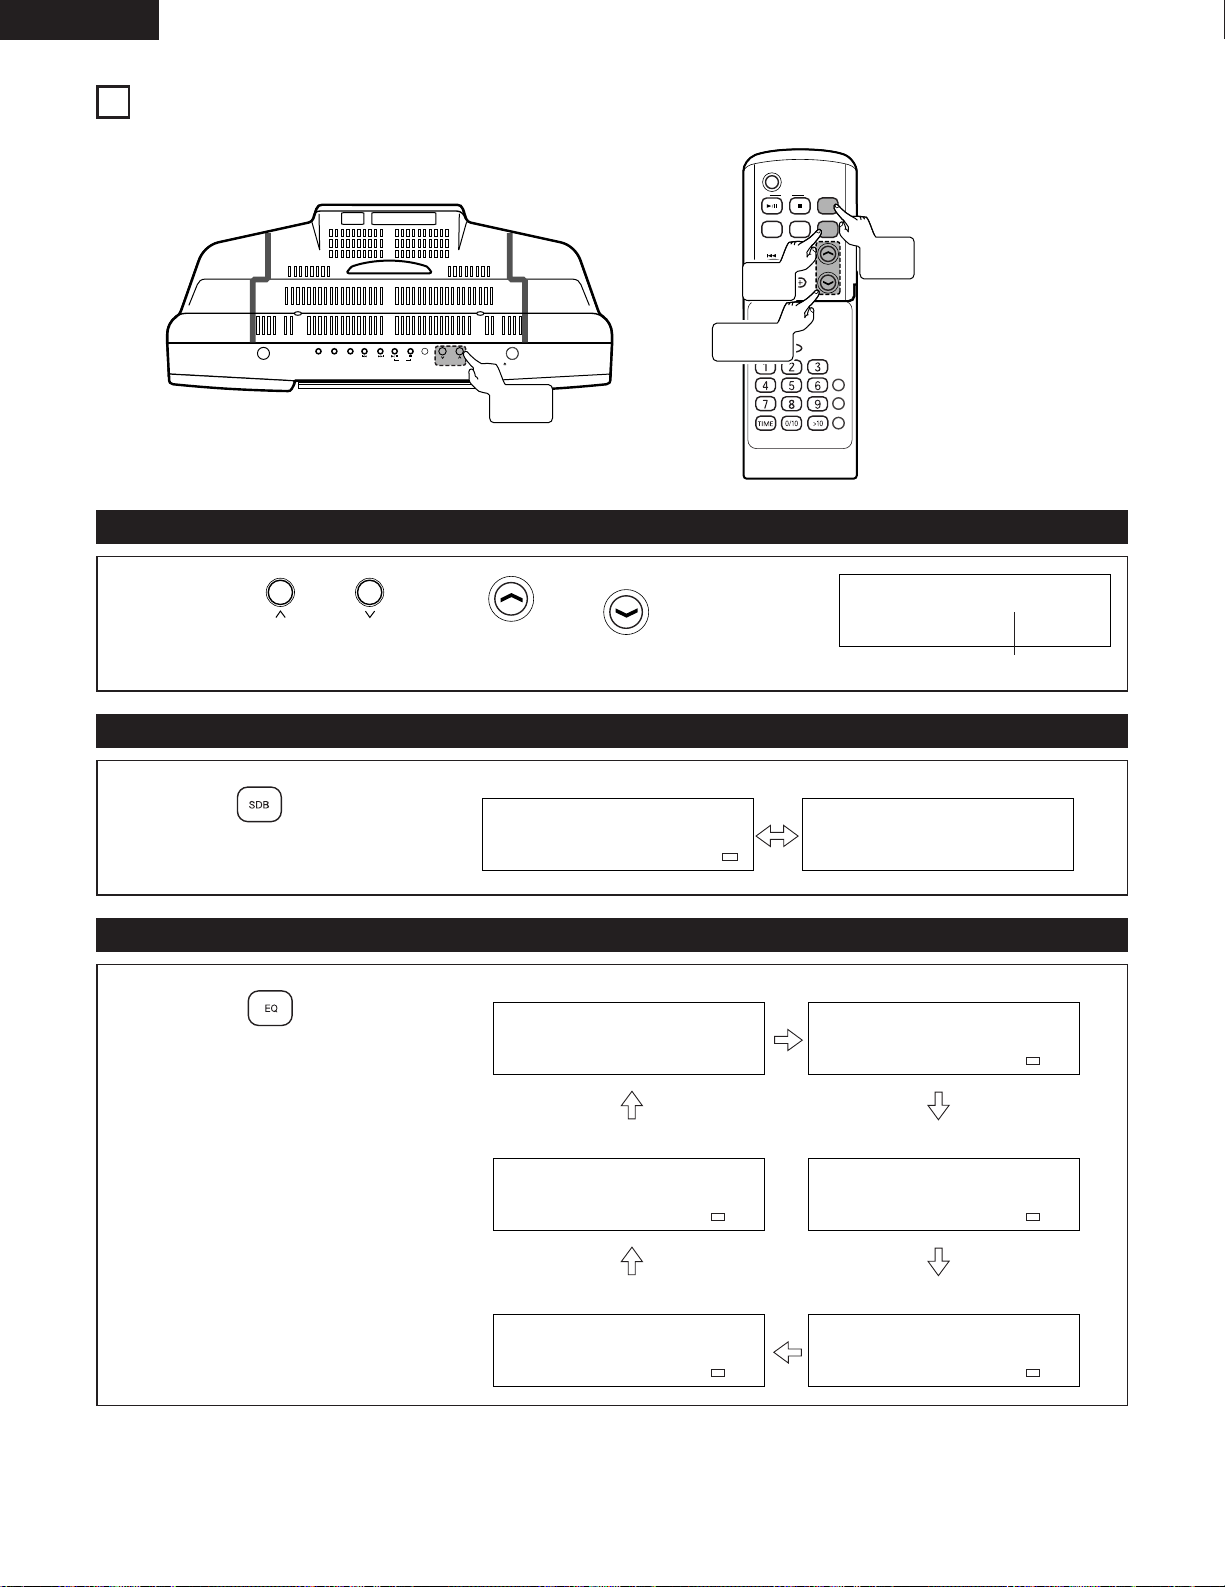
(1) Adjust the volume
1
Press or (or, or on the
EQ
Button
VOLUME
Button
SDB
Button
remote control).
(2) Boosting Bass
1
Press on the remote
control.
(3) Changing the Tone
1
Press on the remote
control.
Emphasize Do not Emphasize
Flat response
Suited for Classic
Suited for Rock
Suited for Pops
Volume 0 (Min) ~ MAX
20
Suited for Jazz
Vocals are emphasized
Page 21
9
C D
C D
TRACK
CD 8 0:00
CD FUNCTIONS
ENGLISH
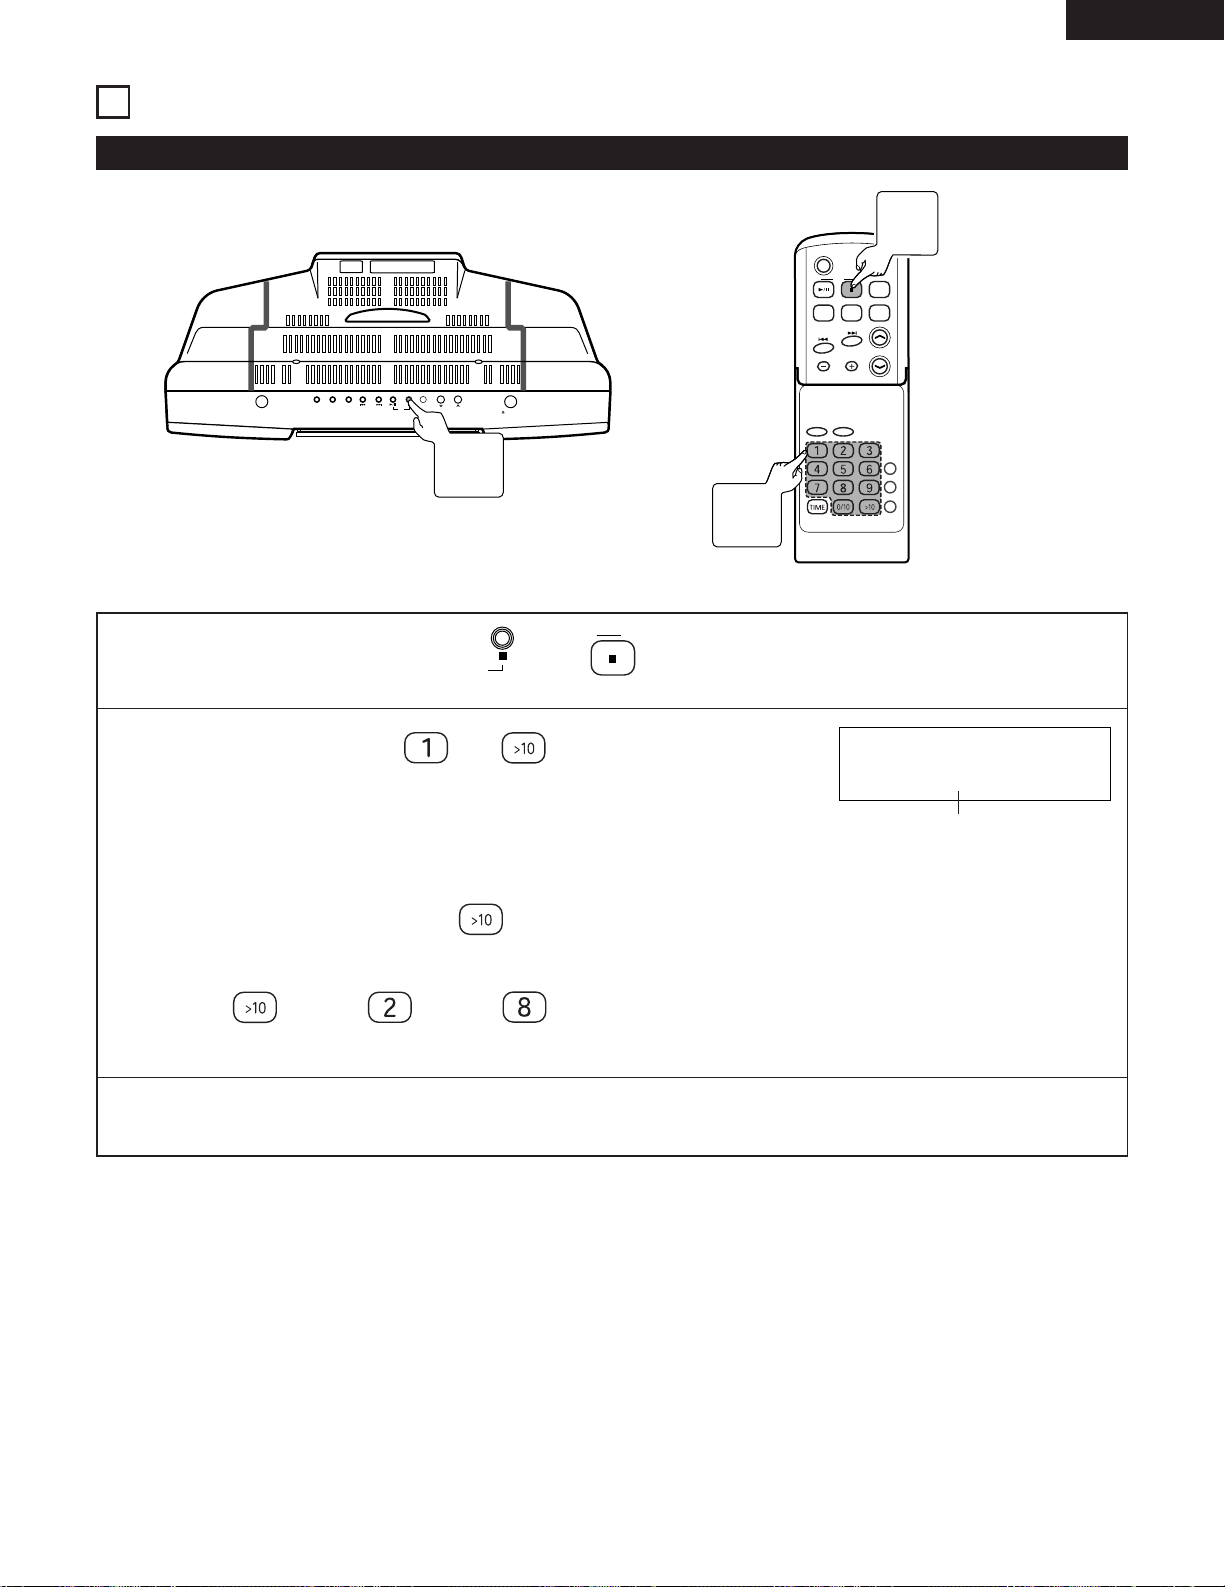
(1) Listening to the desired track of a CD .............................................................................
1
CD 2
C D
TUNING/
PRESET
Button
SDB
EQAUXFM/AM
VOLUME
CLEAR
TIMER/DELETE
PLAY MODE
PROG.
RC-911
SKIP
AUX PLAY MODE
TUNER
ON/STANDBY
(Example) Listening to the 8th track.
1
Loading the CD and press (or on the remote control).
POWER
VOL.
C D
DOWN
UP
OPEN/CLOSE
ENTER
1
CD 2
Button
2
Direct
Button
Direct Play
2
Press direct button ( to ) on the remote control
to select the track number.
• The selected track will start playing.
2 To select a track between the 11th to 99th track.
Select the track after pressing the button.
(Example) To choose 28.
Press
✽ When direct buttons are pressed in succession, press the next button within 5 seconds.
✽ During random or programme operation, direct play is not possible.
/ Press / Press .
track number
21
Page 22
ENGLISH
ON/STANDBY
OPEN/CLOSE
SKIP
TUNER
VOL.
UP
DOWN
C D
AUX PLAY MODE
C D
POWER
VOLUME
TIMER/DELETE
PLAY MODE
PROG.
ENTER
CLEAR
TUNING/
PRESET
EQAUXFM/AM
SDB
RC-911
C D
C D
PLAY MODE
NORMAL
REPEAT
RANDOM
RANDOM
C D
C D
PLAY MODE
DIGEST
DIGEST
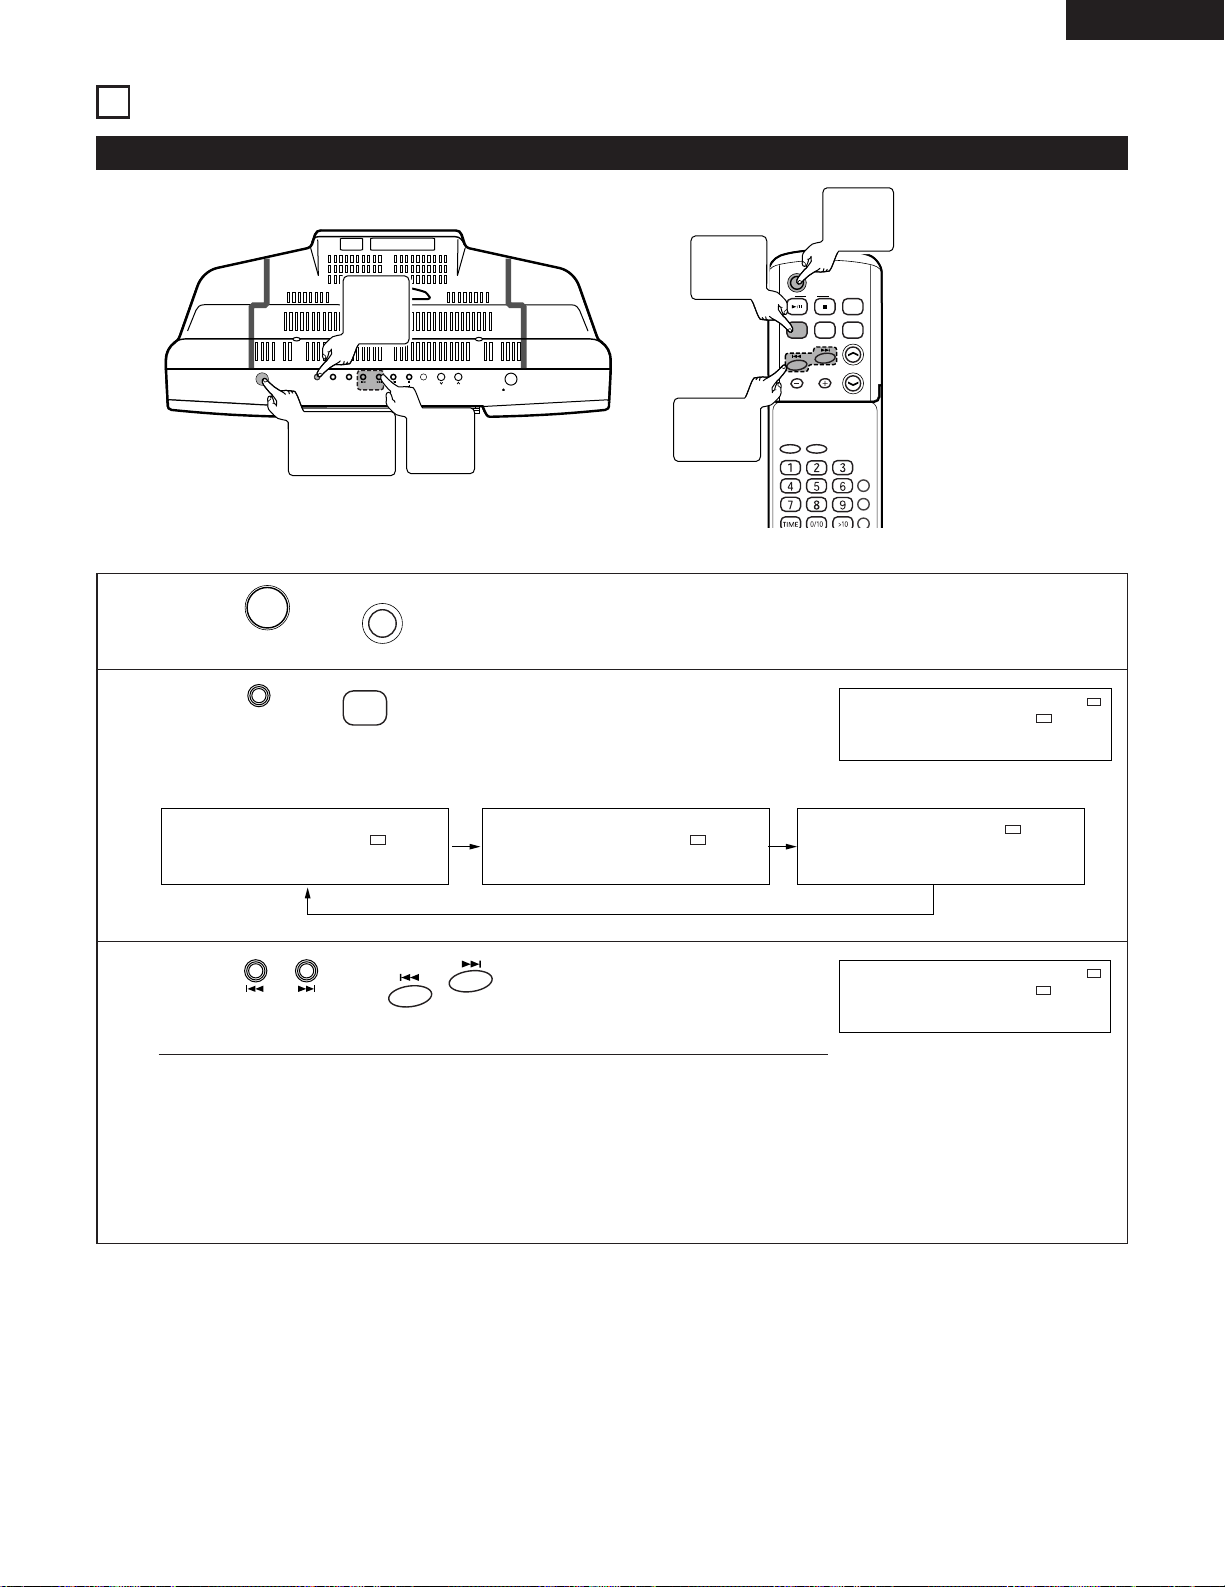
(2) Listening to tracks repeatedly/Listening in random order ...........................
3
CD 1/3
Button
2
PLAY MODE
Button
3
CD 1/3
Button
1
Loading the CD and press (or on the remote control).
2
Press on the remote control to select the playback mode.
1
CD 2
Button
1
CD 2
Button
2
PLAY MODE
Button
Repeat/Random play
Normal play Repeat play
3
Starting the playback.
Digest play
Random play
Press (or on the remote control) to start playback.
• Normal play : The unit stops after the last track is played.
• Repeat play : The unit continues until playback is stopped.
• Random play : The random play will stop automatically when all tracks are played once.
• Digest play : The first 90 seconds are played, the sound fades out, and this is repeated for all tracks through to
the last track.
22
✽ To return normal play, press of the remote control repeatedly and select “ NORMAL ”.
✽ To repeatedly play only one desired track, perform repeat play after registering the track with program play.
NOTE:
• During programme operation, random play and digest play is not possible.
Page 23

ENGLISH
ON/STANDBY
OPEN/CLOSE
SKIP
TUNER
VOL.
UP
DOWN
C D
AUX PLAY MODE
C D
POWER
VOLUME
TIMER/DELETE
PLAY MODE
PROG.
ENTER
CLEAR
TUNING/
PRESET
EQAUXFM/AM
SDB
RC-911
C D
C D
PROG.
PROG
PROGRAM
CD
CLEAR
PROG
P1:
C
D
9 3:44
PROG
TRACK
P2:
C 3 4:12
D
(3) Listening to desired tracks in a desired order ...........................................................
2 A maximum of 20 tracks can be programmed.
If the total programmed track number exceeds 20, “ OVER P20 ” is displayed.
6
CD 1/3
Button
6
CD 1/3
Button
1, 5
CD 2
Button
3
Direct
Button
1
Loading the CD and press (or on the remote control).
1, 5
CD 2
Button
2
PROG.
Button
Program Play
2
Press on the remote control to enter the program
mode.
Press direct button ( to ) on the remote control
3
to select the track number.
✽ To correct the contents of the program...
Tracks can be deleted in order starting from the last track of the program by
pressing during programming.
4
Repeat step 3 to select the number in order.
✽ If the total programmed playback time exceeds 400 minutes, “__: __” is displayed.
However, it is properly memorized.
Flash
Programme number
Playback time
23
Page 24

ENGLISH
C D
C D
C D
C D
SKIP
SKIP
CLEAR
C D
When registration is completed
5
Press (or on the remote control).
Starting the playback
6
Press (or on the remote control) to start playback.
• When playback of the track last registered is completed, the unit will stop automatically.
To check which tracks are programmed To clear the programmed selection
While in the stop mode, press or
(or, or on the remote control).
• Each time the button is pressed, programmed selections
are displayed in order.
Adding tracks to the program
If a program has been previously stored,
then follow step 1 to 5 to add tracks.
✽ The new tracks will be stored after the last track of the
original program.
z Press on the remote control and
select the input.
x While the unit is stopped in the
programmed play mode, press on
the remote control.
Ejecting a CD automatically cancels the programmed
sequence.
NOTE:
• Tracks cannot be registered or deleted while the unit
is stopped or in pause mode.
24
Page 25

(4) Search for the track while listening to the sound at high speed
ON/STANDBY
OPEN/CLOSE
SKIP
TUNER
VOL.
UP
DOWN
C D
AUX PLAY MODE
C D
POWER
VOLUME
TIMER/DELETE
PLAY MODE
PROG.
ENTER
CLEAR
TUNING/
PRESET
EQAUXFM/AM
SDB
RC-911
SKIP
SKIP
(CD) .............................................................................................................
8,9
Button
SKIP
Button
Fast reverse: Fast forward:
During play.....
During play.....
ENGLISH
Fast forward/Fast reverse
Press and hold down (or on
the remote control).
• Release your finger from the button when you have
found the desired place.
• Play will start from that position.
Press and hold in the 8.
4th
track
Skip Skip Skip Skip
5th track
✽ Activating the fast reverse operation during the pause
mode permits faster reverse operation than when
activation is from the play mode.
The sound will be muted when this is done and
therefore, the time display should be used to judge
the relative position.
6th
track
Press and hold down (or on
the remote control).
• Release your finger from the button when you have
found the desired place.
•“END” is displayed when the end of the last track is
reached.
Press and hold in the 9.
2nd
track
(Playback)
Skip SkipSkipSkipSkip
3rd track
✽ Activating the fast forward operation during the pause
mode permits faster forward operation than when
activation is from the play mode.
The sound will be muted when this is done and
therefore, the time display should be used to judge
the relative position.
4th
track
25
Page 26

ENGLISH
10
USING THE TIMERS
Types of Timers and their Use Before Using the Timer
• Timer play:
Switches the power on/off at the desired time permitting
radio reception, CD play or external input.
• Everyday timer:
The power can be turned on and off at the same times
every day for listening to a CD, radio program or external
input.
• Sleep function:
Permits the power to be switched off after a desired time.
• Combination of sleep and timer functions:
Combinations of sleep and timer play allow the use of a
variety of timer functions.
• Set the clock
Timer operations are not possible unless the time of the
clock has been set. (See Page 12.)
• Prepare play.
Timer play requires the following preparation...
Radio reception: Register the desired broadcast station
to a preset.(See Page 19.)
CD loading: Load the CD
• Rough procedure for timer setting
Setting of the starting time and ending time
Setting of the timer device
NOTE:
• Other equipment cannot be operated with the timer
settings of this product.
26
Page 27

C D
POWER
VOLUME
TIMER/DELETE
PLAY MODE
PROG.
ENTER
CLEAR
TUNING/
PRESET
EQAUXFM/AM
SDB
RC-911
TIMER/DELETE
TUNING/
PRESET
ENTER
ON AM12:00
(1) Timer Registration
TUNING/
PRESET
ENTER
2, 4 ~ 10
TUNING/PRESET
Button
3, 5 ~ 10
ENTER Button
1
TIMER/
DELETE
Button
(Example) Use the timer to listen to the radio broadcast on 89.5 MHz (FM) that is stored in preset number 3.
(Setting the to tuner on at 5:10 pm off at 6:10 pm.)
ENGLISH
Switch on the power...
1
Press .
✽ When “ STANDBY ” is not displayed, setting the clock.
Timer operations are not possible unless the time of the clock. (See Page 12.)
2
Within 10 seconds, press to select “ TIMER SET ”.
3
Press .
4
Press and select the registration mode.
ONCE PLAY ”.
5
Press .
For timer playback
For timer playback at the
same times every day
Select “
Select “ EVERYDAY ”.
27
Page 28

ENGLISH
ENTER
TUNING/
PRESET
ON PM 5:00
ENTER
TUNING/
PRESET
TUNING/
PRESET
ON PM 5:10
ENTER
TUNING/
PRESET
OFF PM 6:10
ENTER
TUNING/
PRESET
OFF PM 6:10
ENTER
TUNING/
PRESET
TUNER
TUNED
STEREO
MHz
FM
ST
P 3 89.5
TUNING/
PRESET
CD
TUNER AUX
ENTER
TUNING/
PRESET
(1) Timer Registration (continued)
Press , adjust the hours of the starting time and
6
press .
7
Press , adjust the minutes and press .
✽ Press and hold to fast forward in 5-minute steps.
✽ Unless the time setting is changed,the ending time will automatically be set
for one hour after the starting time.
Press , adjust the hour of the ending time and
8
press .
9
10
11
Press adjust the minutes of the ending time
and press .
Press , select the desired functions and then
press .
✽ Each press of , function changes as below.
• If you select “ TUNER ” in step 10
Press , select the desired broadcast station and
then press .
✽ When a desired broadcast station has not registered, first register it, then
repeat the procedure from Step 1. (See Page 18)
28
Page 29

(1) Timer Registration (continued)
ENTER
TUNING/
PRESET
VOLUME 12
PLAY
TIMER
AM 12:00
VOLUME
TIMER/DELETE
PLAY MODE
PROG.
ENTER
CLEAR
TUNING/
PRESET
RC-911
TIMER/DELETE
ENTER
PLAY
TIMER
AM 12:00
ENGLISH
12
Press , adjust the volume and then press .
✽ Be careful not to turn the volume up too high.
The unit will enter the standby mode and then the playback standby mode automatically.
During timer playback During operation of the everyday timer
When the preset time is reached, playback will start.
When the timer end time is reached, the system will enter the power standby mode automatically.
NOTES:
• If the power is turned on while the timer is in the standby mode, the timer will not operate. If you want the timer to
operate, set the power to standby before the timer start time is reached.
• The timer setting will be cleared when the unit is unplugged or the power failure occurs.
(2) Using the same timer setting
• Even when the timer has been cancelled, once the contents of the timer have been set, they are retained. This allows the
same contents to be set again on the next occasion if a change is not needed, Once memorised, the timer setting can be
used as follows.
2
1
ENTER
Button
When the power is on, press .
1
TIMER/DELETE
Button
✽ “ STANDBY ” is displayed.
If “ STANDBY ” is not displayed, the clock setting has been cleared.
In this case, reset the clock and the timer.
2
Within 10 seconds, press .
• The timer settings is displayed in order.
The unit will enter the standby mode and then the playback standby mode automatically.
29
Page 30

ENGLISH
TIMER/DELETE
TUNING/
PRESET
ENTER
PLAY
TIMER
PM 12:00
TIMER CALL
PLAY
TIMER
PM 12:00
TIMER/DELETE
TUNING/
PRESET
ENTER
PLAY
TIMER
PM 12:00
PM 12:00
VOLUME
TIMER/DELETE
PLAY MODE
PROG.
ENTER
CLEAR
TUNING/
PRESET
RC-911
(3) To check the timer setting
2
TUNING/PRESET
Button
3
ENTER
Button
1
While in the timer playback standby mode, press .
2
Within 10 seconds, press to select “ TIMER
CALL ”.
1
TIMER/DELETE
Button
3
Within 10 seconds, press .
• After the timer setting is displayed in order, the display will return to normal.
(4) To change the timer setting
• Perform “Timer Registration” from the beginning. (See Page 27 ~29.)
(5) To cancel the timer playback
2 If the power is turned on while in the timer playback standby mode, the timer setting will be cancelled.
Proceed as follows to cancel without turning the power on.
1
Press .
2
Within 10 seconds, press to select the cancel mode.
“ CANCEL ” :The set timer playback is cancelled.
“ ONCE CANCEL ” :Only the next timer playback session for the everyday timer is cancelled (the
timer remains set).
“ ALL CANCEL ” :The set everyday timer is cancelled.
3
Within 10 seconds, press .
• The timer mode will be cancelled.
✽ The timer will not operate if the power is on when the timer start time is
30
(The set contents cannot be deleted.)
reached.
Page 31

(6) Sleep function
C D
POWER
VOLUME
TIMER/DELETE
PLAY MODE
PROG.
ENTER
CLEAR
TUNING/
PRESET
EQAUXFM/AM
SDB
RC-911
TIMER/DELETE
TUNING/
PRESET
ENTER
TUNING/
PRESET
ENTER
SLEEP 1:00
SLEEP 1:00
SLEEP45
• The time for switching off the power can be set at up to 120 minutes in 5-minute intervals.
2, 4
TUNING
/PRESET
Button
3, 5
ENTER
Button
1
Press during playback of music you wish to listen to
1
TIMER/
DELETE
Button
ENGLISH
or during radio reception.
2
Within 10 seconds, press to select “ SLEEP ”.
3
Within 10 seconds, press .
4
Press to match the setting time.
5
Press .
• The sleep function is set.
After the preset time has elapsed, the unit will enter the power standby mode automatically.
The volume will be turned down 1 minute before the sleep function finishes.
31
Page 32

ENGLISH
C D
POWER
VOLUME
TIMER/DELETE
PLAY MODE
PROG.
ENTER
CLEAR
TUNING/
PRESET
EQAUXFM/AM
SDB
RC-911
C D
POWER
VOLUME
TIMER/DELETE
PLAY MODE
PROG.
ENTER
CLEAR
TUNING/
PRESET
EQAUXFM/AM
SDB
RC-911
TIMER/DELETE
TUNING/
PRESET
ENTER
SLEEP
SLEEP15
TIMER/DELETE
TUNING/
PRESET
SLEEP
SLEEP OFF
ENTER
(7) To check the remaining time of the sleep
function during the sleep operation
2
TUNING/
PRESET
Button
1
TIMER/
DELETE
Button
Press during the sleep
1
(8) To cancel the sleep function during the
sleep operation
2 The sleep timer is cancelled when the unit is turned off.
2 Use the procedure described below if you wish to cancel
the sleep timer without turning off the power.
2
TUNING/
PRESET
Button
3
ENTER
Button
Press during the sleep
1
1
TIMER/
DELETE
Button
operation.
Within 10 seconds, press
2
to select “ SLEEP ”.
• The display will return to normal after
approximately 10 second.
• Pressing while the sleep remaining time
is displayed, you can change the sleep time.
(See steps 4 to 5 page 31)
Sleep remaining time
operation.
Within 10 seconds, press
2
to select “ SLEEP OFF ”.
Within 10 seconds, press .
3
32
Page 33

(9) To use sleep timer and timer playback in combination
ON OFF
ON OFF
ON OFF
ON OFF
ON OFF
1
Set the sleep timer.
(See step 1 to 5 on page 31.)
2
Set the timer playback.
ENGLISH
(See steps 1 to 10 on page 27.)
(See steps 1, 2 on page 29.)
Sleep timer setting
Timer playback setting
(10) Precedence between the Timer playback and the Sleep Timer
• The sleep timer has priority over timer playback. When the starting time of the timer is reached, the timer will be cancelled.
Sleep timer
Timer playback
• The timer playback will not operate when its starting time has been set within the operational time of the sleep timer.
Timer playback
Sleep timer
33
Page 34

ENGLISH
11
CLEANING
Cleaning the Main Unit
2 Use a soft cloth and wipe lightly to remove dirt from the
cabinet and operation panel.
• When using chemically treated cloths, follow the
precautions that have been written for them.
2 Do not use benzene, thinners, or other organic solvents or
insecticides on the main unit since they may cause a
change in quality or color.
NOTE:
• Do not use record spray or antistatic. Also do not
use volatile chemicals such as benzene or thinner.
Cleaning Discs
2 Fingerprints or dirt on the disc may lower sound and
picture quality or cause breaks in playback. Wipe off
fingerprints or dirt.
2 Use a commercially available disc cleaning set or a soft
cloth to wipe off fingerprints or dirt.
Wipe gently from the middle
outwards.
Do not wipe with a circular
motion.
Record
spray
Thinner Benzene
34
Page 35

12
CDs
Handling Discs
ENGLISH
Discs
Use compact discs that include the , marks.
CD’s with special shapes (heart-shaped CD’s, octagonal CD’s
etc.) cannot be played on this set.
Attempting to do so may damage the set. Do not use such
CD’s.
C
Holding Discs
Avoid touching the surface of discs when loading and
unloading them.
Be careful not to get
fingerprints on the signal
surface (the side which
shines in rainbow colors).
Cautions on Handling Discs
• Do not get fingerprints, grease or dirt on discs.
• Be especially careful not to scratch discs when removing
them from their cases.
• Do not bend discs.
• Do not heat discs.
• Do not enlarge the center hole.
• Do not write on the labeled (printed) side with a ball-point
pen or a pencil.
• Water droplets may form on the surface if the disc is
moved suddenly from a cold place to a warm one. Do not
use a hairdryer, etc., to dry the disc.
Cautions on Storing Discs
• Always eject discs after playing them.
• Keep discs in their cases to protect them from dust,
scratches and warping.
• Do not put discs in the following places:
1. Places exposed to direct sunlight for long periods of time
2. Humid or dusty places
3. Places exposed to heat from heaters, etc
13
MESSAGES
• When an error message is displayed, proceed as follows:
Error Messages Meaning Remedy
Can't READ*
• The disc is damaged.
• TOC information cannot be read.
(*:Number or symbol)
CD NO DISC
NOT AUDIO
• A CD has not been loaded.
• The CD data cannot be read.
• The data recorded on this disc is not audio
data.
• Replace it with another disc.
• Load a CD.
• Reload the CD.
• Replace the disc.
35
Page 36

ENGLISH
14
TROUBLESHOOTING
Check the following before assuming there is a problem with the set.
2 Are connections proper?
2 Are you operating as described in these operating instructions?
2 Be sure to check that the main power switch on the rear panel is turned on.
If the set does not seem to be operating properly, check the items listed on the table below.
If the cause of the problem cannot be found, the set may be malfunctioning. Immediately turn off the power and unplug the
power cord, then contact your store of purchase or your nearest DENON dealer.
Symptom Cause
There is no power.
There is no sound from the
speakers.
The remote control does not work.
Common Sections
There is sound of noise on the FM
broadcast.
There is interference on the AM
broadcast.
Tuner Section
There is a hum on the AM
broadcast.
Pressing the operation buttons
does not result in operation.
• The power plug is disconnected from
the outlet.
• The volume is set to minimum.
• Headphones are plugged in.
• Batteries are not properly inserted.
• Batteries are weak.
• Direction of the antenna is not
appropriate.
• Signals of the broadcast station are
weak.
• Noise is coming from a TV, etc.
• Interference sound of a broadcast
station can be heard.
• Radio signals being carried on the
power cable are being modulated by
the power line frequency.
• The CD has been mistakenly inserted
in reverse orientation.
• The CD is dirty.
• The CD is scratched.
Measure
• Insert the power plug into the outlet.
• Set the volume to a suitable level.
• Disconnect the headphones.
• Reinsert the batteries properly.
• Replace with fresh batteries.
• Change the direction of the antenna.
• Turn off the TV.
• Change the direction of the AM loop
antenna.
• Connect an outdoor antenna.
• Try reversing the orientation of the
power plug and reinserting it.
• Reinsert the CD correctly.
• Clean the CD.
• Replace the CD with one that is not
scratched.
Page
6
20
8
11
11
7
–
7
7
–
14
34
–
CD Player Section
36
Play stops part way through the
track and correct play is no longer
possible.
The reproduced sound is choppy.
• The CD is soiled with dust,
fingerprints, saliva, etc.
• The CD is scratched.
• The unit is located in an unstable
location with much vibration.
• Radio signals being carried on the
power cable are being modulated by
the power line frequency.
• Clean the CD.
• Replace the CD with one that is not
scratched.
• Set the unit up in a stable place that
is free of strong vibration.
• Try reversing the orientation of the
power plug and reinserting it.
34
–
–
–
Page 37

Condensation Setup Precautions
ENGLISH
2 Condensation
Condensation can be seen as water droplets that have
formed on the windows of a heated room in winter.
2 Conditions for the Formation of Condensation
In winter, when the unit is brought from outdoors to a
warm indoor location, or when the room temperature is
suddenly raised by a heater, condensation will form on the
operating parts within the unit and normal operation will
no longer be possible.
Condensation can also form in summer when the breeze
from an air conditioner strikes the unit directly. Should this
occur, change the setup location of the unit.
2 Measures to Take After Condensation Forms
• If condensation has formed, switch on the power and
leave the unit for a while. Although the time will differ
according to the surrounding conditions, the unit should
be usable in 1 to 2 hours.
• Should condensation form on the disc, wipe the disc
clean.
Other Precautions
2 Illustrations used for descriptive purposes may differ from
the actual items.
2 Please keep the instruction manual.
After reading this instruction manual, please keep it in a
safe place together with the warranty. It is also convenient
to enter the required items into the columns on the rear
cover.
Please provide a spacing of more than 10 cm between the
top, rear, and side surfaces of this unit and walls or other
audio/video equipment, etc.
2 When using this unit or other electronic equipment that
contains microprocessors at the same time as using a
tuner or TV, noise or screen interference can occur on the
audio and video of the tuner or TV. Should this occur, pay
careful attention to the following points.
• Separate this unit as much as possible from the tuner or
TV.
• Separate the antenna line of the tuner or TV from the
power cable and input/output connection cables of this
unit as much as possible.
• Use of indoor antennas and 300 Ω /ohm feedline are
especially susceptible to such interference. We
recommend the use of outdoor antennas and 75 Ω/ohm
coaxial cable.
300 Ω/ohm feedline 75 Ω/ohm coaxial cable
When not using the D-AJ03
2 Under normal circumstances
• Always remove the disc and turn the power off.
• When leaving home for long periods of times such as
for trips, be sure to unplug the power cord.
2 When moving the D-AJ03
• Do not subject the D-AJ03 to
shocks.
• Always check that the disc has
been removed and the connection
cords disconnected before moving
the D-AJ03.
37
Page 38

ENGLISH
15
MAJOR SPECIFICATIONS
2 Amplifier Section
Practical maximum output: Front speaker 11 W (5.5 W+5.5 W, EIAJ)
Audio input/output jacks: MONO output terminal, AUX input terminal, 3.5 mm headphone jack
2 Tuner Section
Receive frequency bands: FM: 87.5 MHz to 107.9 MHz
AM: 520 kHz to 1710 kHz
Receive sensitivity: FM: 1.5 µV/75 Ω/ohms
AM: 20 µV
FM stereo separation: 35 dB (1 kHz)
2 CD Section
Wow and flutter: Below measurement limits (±0.001% W peak)
Sampling frequency: 44.1 kHz
Light source: Semiconductor laser
2 Clock and Timer Section
Clock: Within one minute per month
Timers: Timer play (One, everyday)
Sleep timer (120 minutes, MAX.)
2 Common Sections
Power supply: AC 120 V, 60 Hz
Power consumption: 16 W
Approximately 0.8 W during standby
Maximum external dimensions: 390 (W) x 280 (H) x 165 (D) mm
(Including feet, knobs, and terminals)
Mass: 5.0 kg
2 Remote Control (RC - 911)
Remote control system: Infrared pulse
Power supply: 3 V DC (using two R 6 P/AA type batteries)
Maximum external dimensions: 49 (W) x 140 (H) x 30 (D) mm
Mass: 120 g (including batteries)
* For improvement purposes, specifications and design are subject to change without notice.
38
Page 39

ESPAÑOL
RATING SHEET
Derechos de Autor
2 Se prohibe la reproducción, emisión, alquiler o reproducción de discos en público sin el consentimiento del titular del copyright.
• PRECAUCIONES DURANTE LA INSTALACIÓN
10 cm o más
Pared
HOJA DE
CLASIFICACIÓN
— ÍNDICE —
Características …………………………………………………… 73
z
Conexiones ………………………………………………… 74, 75
x
Nombre de las piezas y funciones ……………………… 76~78
c
Mando a distancia ……………………………………………… 79
v
Ajuste del reloj ……………………………………………… 80, 81
b
Reproducción de CDs ……………………………………… 82~84
n
Escucha de radio …………………………………………… 85~87
m
Control de volumen y graves …………………………………… 88
,
Reproducción de CD avanzada …………………………… 89~93
.
Utilización del temporizador ……………………………… 94~101
⁄0
Limpieza ………………………………………………………… 102
⁄1
CDs ……………………………………………………………… 103
⁄2
Mensajes ……………………………………………………… 103
⁄3
Resolución de problemas ……………………………… 104, 105
⁄4
Especificaciones ……………………………………………… 106
⁄5
• ACCESORIOS
Compruebe los siguientes artículos para asegurarse de que están inlcuidos en el embalaje junto con la unidad principal:
q Antena de bucle de AM ………………………………………… 1
w Antena de FM …………………………………………………… 1
e Mando a distancia (RC - 911) ………………………………… 1
1
CARACTERÍSTICAS
r Pilas R 6 P/AA …………………………………………………… 2
t Manual de instrucciones ……………………………………… 1
y Lista de estaciones de servicio ………………………………… 1
ewq r
1. Memoria de preselección de 40 canales
(Véase la página 86)
2. Ecualizador de preselección de 6 modos
(Véase la página 88.)
3. Circuito de reforzador de graves incorporado
(Véase la página 88.)
73
Page 40

ESPAÑOL
MONO
OUT
AM
LOOP ANT.
FM
AUX IN
ANTENNA
wq e r
5
0
M
I
N
2
CONEXIONES
• No enchufe el cable de alimentación en la toma de corriente
eléctrica hasta que todas las conexiones hayan quedado
realizadas.
• Introduzca el enchufe firmemente. Si la conexión no está bien
realizada se pueden producir ruidos.
NOTAS:
• No junte los cables de conexión (enchufe macho), ni los coloque
cerca de otros aparatos eléctricos, como televisores, ya que esto
podría causar zumbidos y otros ruidos.
(1) Connecting Antennas and Audio Equipment
Montaje de la antena de bucle de AM Conexión de la antena de bucle de AM
1. Sacar 2. Doblar 3. Insertar en el orificio 1. Bajar la palanca 2. Insertar el cable 3. Liberar
Nombres y conexiones del panel trasero
Terminales de antena de FM
q
Terminal de salida en MONO
w
Terminal de entrada AUX
e
Terminales de antena de bucle de AM
r
• Estos terminales sirven para conectar la antena de
cuadro de AM.
Conexión del equipo de sonido
Reforzador de graves
(Super woofer)
Antena de FM
Para escuchar un equipo conectado a los terminales de entrada
externa, escoja la opción de entrada “AUX” con el botón de
selección de entrada externa del mando a distancia.
Enchufe de corriente
eléctrica
Utilice un cable de
conexión disponible en
el mercado
Lector de portador, etc.
Antena de bucle de AM
74
Page 41

(2) Colocación de las antenas
AM
LOOP ANT.
ESPAÑOL
Instalación de la antena de bucle de AM
Sintonice una emisora de AM (Véase la página 85), coloque
la antena tan alejada del equipo como lo permita la posición
en la que la distorsión y el ruido sean mínimos. En algunos
casos es mejor invertir las polaridades.
Las transmisiones en AM no pueden recibirse bien si la
antena de bucle no está conectada o si está situada cerca de
objetos metálicos.
Instalación de una antena exterior de AM
Conecte el cable de señales de la antena exterior de AM al
terminal de la antena. Asegúrese de que la antena queda
puesta a tierra y conecte el cable de tierra a la terminal GND
(tierra). Compruebe que la antena de bucle de AM que se
incluye con el equipo también queda conectada.
Terminales de la antena AM
Instalación de la antena interior de FM
Sintonice una emisora de FM (Véase la página 85), coloque la
antena en una posición en la cual la distorsión y el ruido sean
mínimos, luego sujete el extremo de la antena en su
posición, utilizando cinta o un alfiler.
Antena exterior de AM
(de 10 a 12 metros de cable con
Antena de bucle
cubierta de vinilo)
Varilla de toma de tierra
• Una conexión de toma de tierra puede servir para evitar un
accidente por descarga eléctrica. Entierre una varilla de
toma de tierra o realice una conexión a una tubería de
hierro.
• No realice la conexión a una tubería que lleve gas ya que
podría resultar muy peligroso.
75
Page 42

ESPAÑOL
ON/STANDBY
OPEN/CLOSE
SKIP
TUNER
VOL.
UP
DOWN
C D
AUX
PLAY MODE
q w
t
u
i o
e
r
y
VERTICAL LOADING SYSTEM
COMPACT DISC PLAYER
REMOTE
SENSOR
CD STEREO RECEIVER
D-AJ03
40-STATIONS PRESET MEMORY
6-MODES PRESET EQUALIZER
!0 !1
!4 !2!3
3
NOMBRE DE LAS PIEZAS Y FUNCIONES
(1) Panel frontal
Interruptor de corriente (ON/STANDBY)
q
• Cuando se presiona y se sitúa en la posición “ON”, la
alimentación eléctrica se activa. Presiónelo de nuevo
para situarlo en la posición “STANDBY”.
Botón del sintonizador
w
• Presione este botón para cambiar la salida al
sintonizador.
Botón de selección de entrada externa (AUX)
e
• Véase la página 74.
Botón selector del modo de reproducción de
r
discos (PLAY MODE)
• Véase la página 90.
Botón de salto (8/9)
t
• Permite un avance y retroceso rápido de la pista.
• Se utiliza para ajustar la frecuencia de recepción
cuando la función elegida es la de sintonizador.
Botón de reproducción/pausa de CD (CD 1/3)
y
• Pulse para cambiar a “CD” y comience la
reproducción del CD en el caso de que haya cargado
alguno en la unidad.
• Si se pulsa este botón mientras se está
Botón de parada de CD (CD 2)
u
• Pulse este botón para detener la grabación.
• Presione este botón para cambiar salida al CD.
reproduciendo un CD, se establece el modo Pausa.
Botón de control de volumen (VOL. UP/DOWN)
i
• Utilice estos botones para ajustar el volumen general.
Botón abrir/cerrar compuerta del CD (5)
o
• Pulse y la compuerta del CD bajará.
• Pulse de nuevo y la compuerta del CD subirá.
Compuerta del CD
!0
• Pulsar una vez en el botón abrir/cerrar compuerta del
CD hace que la compuerta baje y permite que se
pueda cargar un CD.
Altavoces
!1
Sensor remoto
!2
• Cuando utilice el mando a distancia, diríjalo hacia este
sensor.
Pantalla de visualización
!3
• Véase la página 77.
Toma de auriculares (PHONES)
!4
• Conecte los auriculares en esta toma.
• Cuando los auriculares están conectados en este
toma, en los altavoces no se produce sonido alguno.
76
Page 43

(2) Pantalla de visualización
RANDOM PROG
DIGEST
TUNED
STEREO
SLEEP
PLAY
TOTAL REMAIN
TRACK
KHz
MHz
FM
AM
TIMER
SDB
ST
EQ
z
x
ESPAÑOL
Visualizador principal de pista
q
• Visualiza varias funciones, la hora, los ajustes del
temporizador, etc.
• Cuando la función se cambia a CD se visualizará lo
siguiente.
• Sección de la pantalla de número de pista
(TRACK):
Cuando se carga un disco.
Modo de parada:
Número total de pistas en el disco
Modos de reproducción normal y reproducción
programada:
Pista que se reproduce en este momento.
• Sección de la pantalla de tiempo:
Cuando se carga un disco.
Modo de parada:
Número total de pistas en el disco.
Modos de reproducción normal y reproducción
programada:
Tiempo transcurrido de la pista que se está
reproduciendo.
• El nivel de volumen se visualiza cuando se ajusta el
volumen.
Visualización del modo de pista
w
1:
Se ilumina en el modo de reproducción.
:
3
Se ilumina en el modo de pausa.
DIGEST:
Se ilumina en el modo de reproducción seleccionada.
RANDOM:
Se ilumina en el modo de reproducción aleatoria.
:
Se ilumina en el modo de reproducción repetida.
PROG:
Se ilumina en el modo de reproducción programada.
TUNED:
Se ilumina cuando se sintoniza una emisora.
STEREO:
Se ilumina cuando el sintonizador se ajusta al modo
de recepción estéreo.
AM
:
Se ilumina durante la recepción de una emisora AM.
FM
:
Se ilumina durante la recepción de una emisora FM.
:
ST
Se ilumina cuando se sintoniza una emisora estéreo.
SLEEP:
Se ilumina cuando se ajusta el temporizador de
desconexión automática.
TIMER
PLAY:
:
Se ilumina cuando se ajusta el temporizador.
:
Se ilumina cuando se ajusta el temporizador diario.
Se ilumina cuando se ajusta la reproducción con
temporizador.
Visualiza los ajustes de tono actuales.
/ :
SDBEQ
77
Page 44

ESPAÑOL
C D
POWER
VOLUME
TIMER/DELETE
PLAY MODE
PROG.
ENTER
CLEAR
TUNING/
PRESET
EQAUXFM/AM
SDB
RC-911
(3) Nombres y funciones de los botones del mando a distancia
Botón de alimentación (POWER)
Botón de reproducción/pausa de CD
1/3) .......................................(82)
(CD
Botón de parada de CD (CD
2)
........................................................(83)
Botón de selección de banda
(FM/AM).........................................(85)
Botón de selección de entrada externa
(AUX)..............................................(74)
Botones de búsqueda automática
8/9) .............................(83 , 85)
(
Botón de sintonización/preselección
(–/+) ................................................(86)
Transmisor de control remoto
Botón de reforzador de graves dinámico
(SDB) ..............................................(88)
Botón del ecualizador (EQ)
........................................................(88)
Botones de ajuste de volumen
(VOLUME / ) ......................(88)
Botón del temporizador/cancelación
(TIMER/DELETE).....................(80 , 95)
Botón selector del modo de reproducción
de discos
(PLAY MODE) ..................(90)
Botón de entrada (ENTER)
Botón de borrado (CLEAR)
Botón de programa (PROG.)
........................................................(91)
Botones de selección directa
........................................................(89)
78
Page 45

ESPAÑOL
DIGEST
T
R
A
C
K
SD
B
EQ
G
P
MD
C
D
S
T
E
R
E
O
R
E
C
E
I
V
E
R
D-AJ03
4
0
-
S
T
A
T
I
O
N
S
P
R
E
S
E
T
M
E
M
O
R
Y
6
-
M
O
D
E
S
P
R
E
S
E
T
E
Q
U
A
L
I
Z
E
R
REMOTE
SENSOR
V
E
R
T
I
C
A
L
L
O
A
D
I
N
G
S
Y
S
T
E
M
C
O
M
P
A
C
T
D
I
S
C
P
L
A
Y
E
R
O
N
/S
T
A
N
D
B
Y
O
P
E
N
/C
L
O
S
E
S
K
IP
T
U
N
E
R
V
O
L
.
U
P
D
O
W
N
C
D
A
U
X
P
L
A
Y
M
O
D
E
30
30
4
MANDO A DISTANCIA
2 La unidad de mando a distancia incluida (RC - 911) puede utilizarse para manejar el D-AJ03 a distancia.
(1) Inserción de las pilas
q Extraiga la tapa posterior de la unidad de mando a
distancia.
w Inserte dos pilas R6P (AA) en el compartimiento de pilas
en la dirección indicada por las marcas que hay dentro del
compartimiento.
e Vuelva a colocar la tapa posterior.
Precaución con las pilas
• En la unidad de mando a distancia debe utilizar pilas
R6P (AA).
• Las pilas deben cambiarse por otras nuevas
aproximadamente una vez al año, aunque esto
dependerá de la frecuencia con que se utiliza la unidad
de mando a distancia.
• Aunque las pilas tengan menos de un año, cámbielas
por otras nuevas si la unidad de mando a distancia ya
no fuenciona a corta distancia de la unidad principal.
• La pila incluida es sólo per verificare il funzionamento.
Cámbiela por otra nueva lo antes posible.
• Asegúrese de colocar las pilas en la dirección correcta
“< ” y “> ”, tal como lo indican las marcas del
compartimiento de pilas de la unidad de mando a
distancia.
• Para evitar explosiones y fugas del líquido:
• No utilice una pila nueva con otra usada.
• No utilice dos tipos distintos de pilas.
• No realice corto circuitos, no desmonte, caliente o
eche las pilas al fuego.
• Cuando no vaya a utilizar la unidad de mando a
distancia por prolongados períodos de tiempo, extraiga
las pilas.
• Si hubiera fugas del líquido de la pila, limpie todo el
compartimiento de pilas y luego inserte pilas nuevas.
(2) Uso de la unidad de mando a distancia
• Cuando utilice la unidad de mando a distancia diríjala a
la unidad principal tal como se ilustra en el diagrama.
• La unidad de mando a distancia puede utilizarse desde
una distancia directa de aproximadamente 7 metros de
la unidad principal. Esta distancia puede acortarse, sin
embargo, si hubiera algún obstáculo o cuando se
utiliza desde un ángulo.
• La unidad de mando a distancia funcionará en un
ángulo horizontal de hasta unos 30°.
NOTAS:
• La unidad de mando a distancia puede que no funcione bien si el sensor de mando distancia está expuesto a la luz solar
directa o a luz artificial fuerte.
• No pulse los botones de la unidad principal y del mando a distancia al mismo tiempo. De lo contrario puede producirse una
avería.
Aproximadamente
7 metros
79
Page 46

ESPAÑOL
ON/STANDBY
OPEN/CLOSE
SKIP
TUNER
VOL.
UP
DOWN
C D
AUX PLAY MODE
C D
POWER
VOLUME
TIMER/DELETE
PLAY MODE
PROG.
ENTER
CLEAR
TUNING/
PRESET
EQAUXFM/AM
SDB
RC-911
POWER
ON/STANDBY
TIMER/DELETE
SLEEP 1:00
TUNING/
PRESET
ENTER
ENTER
TUNING/
PRESET
ENTER
TUNING/
PRESET
TIME ADJUST
AM12:00
PM 7:00
PM 7:30
5
AJUSTE DEL RELOJ
(1) Ajuste del reloj
1
Botón
POWER
3, 5, 6
Botones
TUNING/
PRESET
1
Botón
ON/STANDBY
(Ejemplo) Introducción de las 7:30 pm.
1
Pulse el (o del controlador remoto) para conectar la alimentación.
2
Pulse el del controlador remoto.
3
Antes de 10 segundos, pulse el del controlador
remoto para seleccionar “
4
Antes de 10 segundos, pulse el del controlador
remoto.
TIME ADJUST ”.
4, 5, 6
Botón
ENTER
2
Botón
TIMER/
DELETE
Pulse el del controlador remoto para ajustar el
5
año “ PM 7 ”,
remoto
6
Pulse el del controlador remoto para ajustar el
mes “ 30 ”, y pulse luego el del controlador remoto.
• El visualizador del reloj desaparecerá después de unos pocos segundos.
80
y pulse luego el
del controlador
Ajustar las horas
.
Ajustar los minutos
Page 47

(2) Para reajustar el reloj
Repita desde el paso 1.
✽ Durante este procedimiento, aparece “ STANDBY ”
en el paso 2 y la hora establecida aparecerá en el paso
3.
NOTA:
• El ajuste del reloj se borrará cuando se desenchufe el
aparato o ocurra una falla de la alimentación.
Efectúe “Ajuste del reloj” desde el principio.
ESPAÑOL
81
Page 48

ESPAÑOL
ON/STANDBY
OPEN/CLOSE
SKIP
TUNER
VOL.
UP
DOWN
C D
AUX PLAY MODE
C D
POWER
VOLUME
TUNING/
PRESET
EQAUXFM/AM
SDB
POWER
ON/STANDBY
C D
C D
5 OPEN/CLOSE
CD NO DISC
CD OPEN
5 OPEN/CLOSE
C D
C D
C D
C D
TRACK
CD 1 0:01
6
REPRODUCCIÓN DE CDs
2
CD 2
Button
1
Botón
POWER
1
Botón
ON/STANDBY
5
Botón
CD 1/3
3, 4
Botón
5 OPEN/CLOSE
5
Botón
CD
1/3
2
Botón
CD 2
(1) Reproducción de CDs
1
Pulse el (o del controlador remoto) para conectar la alimentación.
2
Pulse el (o del controlador remoto) para
cambiar a la función “CD”.
3
Pulse el en la unidad principal para abrir la
compuerta del CD.
4
Inserte un CD y pulse el para cerrar la compuerta.
CD CLOSE
•La compuerta del CD se cerrará automáticamente.
• Inserción de discos
5
Pulse el (o del controlador remoto) para
Cargue firmemente un CD con el lado de la
etiqueta hacia usted.
TOTAL
CD 16 72:31
Número total de
pistas
TRACK
Tiempo total de
reproducción
iniciar la reproducción.
• Cuando se haya terminado la reproducción de la última pista, el reproductor de CD se detendrá automáticamente.
✽ Cuando abra la compuerta del CD, pulsando el (o en el mando a distancia), puede cerrar la
compuerta del CD automáticamente.
82
Page 49

C D
C D
C D
C D
TOTAL
TRACK
CD 16 72:31
TRACK
PAUSE
CD 3 1:23
Botón
SKIP
SKIP
SKIP
SKIP
CD 1/3
Botón
CD 2
ON/STANDBY
Botones
SKIP
SKIP
AUX PLAY MODE
TUNER
C D
VOL.
DOWN
UP
Botón
CD 1/3
OPEN/CLOSE
Botones
8,9
(2) Detener la reproducción
Pulse el (o del controlador remoto) durante la
reproducción.
(3) Pausa
ESPAÑOL
POWER
C D
SDB
EQAUXFM/AM
Botón
VOLUME
CD 2
TUNING/
PRESET
CLEAR
ENTER
TIMER/DELETE
PLAY MODE
Pulse el (o del controlador remoto) durante la
reproducción.
✽ Para reanudar la reproducción a partir del mismo lugar pulse de nuevo el botón.
(4) Para localizar el principio de una pista
[Para empezar de nuevo la pista que está
reproduciendo]
Pulse el (o del controlador
remoto) durante la reproducción.
[Para inversión rápida audible]
Pulse y mantenga pulsado el (o
del controlador remoto).
✽ Podrá saltar a cualquier pista pulsando el botón
repetidamente hasta que aparezca el número de la pista
deseada.
[Para pasar al principio de la siguiente pista]
Pulse el (o del controlador
remoto) durante la reproducción.
[Para avance rápido audible]
Pulse y mantenga pulsado el (o
del controlador remoto).
✽ Podrá saltar a cualquier pista pulsando el botón
repetidamente hasta que aparezca el número de la pista
deseada.
✽ Cuando se inicia la reproducción después de mostrar el número de pista deseado en modo parado (stop), la reproducción
se iniciará al comienzo de esa pista.
✽ Puede utilizarse el botón de selección directa del mando a distancia para seleccionar números de pistas.
(Véase la página 89.)
83
Page 50

ESPAÑOL
5 OPEN/CLOSE
C D
C D
TOTAL
TRACK
CD 16 72:31
CD OPEN
5 OPEN/CLOSE
Botón
CD
2
POWER
C D
TUNING/
PRESET
SDB
EQAUXFM/AM
Botón
VOLUME
CD 2
ON/STANDBY
SKIP
AUX PLAY MODE
TUNER
VOL.
C D
DOWN
UP
OPEN/CLOSE
Botón
5 OPEN/CLOSE
CLEAR
ENTER
TIMER/DELETE
PLAY MODE
(5) Para extraer el CD
Pulse el (o del controlador remoto) para detener
el CD, luego pulse el .
• Después de que se abra la compuerta del CD, extraiga el CD.
✽ Cuando no se utilice la unidad, pulse el y asegúrese de cerrar la compuerta del CD.
Botón de expulsión
de CD
Precauciones en la carga de discos
• Cargue sólo un disco. Si se cargan dos o más discos apilados pueden romperse y además pueden producirse arañazos en
los discos.
• Procure que la compuerta del CD no atrape sus dedos cuando se abra o se cierre.
• No utilice discos agrietados, deformados o que hayan sido reparados con cinta adhesiva,etc.
• No utilice discos con adhesivo de celo o la etiqueta de un disco de alquilar despegados o con restos de adhesivo después
de quitar la etiqueta. Si se utiliza un disco en estas condiciones, puede ocurrir que el disco no sea expulsado o que se
rompa.
84
Page 51

7
ON/STANDBY
OPEN/CLOSE
SKIP
TUNER
VOL.
UP
DOWN
C D
AUX PLAY MODE
C D
POWER
VOLUME
TIMER/DELETE
PLAY MODE
PROG.
ENTER
CLEAR
TUNING/
PRESET
EQAUXFM/AM
SDB
POWER
ON/STANDBY
FM/AM
TUNER
STEREO
MHz
FM
MHz
FM
KHz
AM
87.5 87.5 520
STEREO
MHz
FM
ST
87.5
SKIP
TUNED
STEREO
MHz
FM
ST
89.5
ESCUCHA DE RADIO
(1) Sintonización
2
Botón
TUNER
2
Botón
FM/AM
ESPAÑOL
1
Botón
POWER
1
Botón
ON/STANDBY
3
Botones
SKIP
(Ejemplo) Sintonización en FM 89,5 MHz.
1
Pulse el (o del controlador remoto) para conectar la alimentación.
2
Pulse el (o del controlador remoto) para
seleccionar FM.
✽ El modo sintonizador cambia de la siguiente manera cada vez que se pulsa el
botón.
3
Botones
8/9
3
Pulse el (o del controlador remoto)
para llegar a la frecuencia FM 89,5 MHz.
• Sintonización automática:
Cuando se pulse el botón durante más de 1 segundos, la exploración se iniciará
automáticamente y el sintonizador se parará en la primera emisora difusora que
pueda recibirse.
Para detener la sintonización automática, pulse une el botón de sintonización del
sentido contrario.
• Sintonización manual:
Pulse el botón tantas veces como sea necesario para sintonizar la emisora
deseada.
85
Page 52

ESPAÑOL
C D
POWER
VOLUME
TIMER/DELETE
PLAY MODE
PROG.
ENTER
CLEAR
TUNING/
PRESET
EQAUXFM/AM
SDB
RC-911
TUNED
STEREO
MHz
FM
ST
89.5
ENTER
TUNED
STEREO
MHz
FM
ST
P1 89.5
TUNING/
PRESET
TUNED
STEREO
MHz
FM
ST
P 3 89.5
ENTER
TUNED
STEREO
MHz
FM
ST
P 3 89.5
(2) Sintonización prefijada
2 Podrá almacenar 40 emisoras de AM y FM en la memoria y llamarlas pulsando un botón.
3
TUNING
/PRESET
Button
2, 4
ENTER
Button
(Ejemplo) Preajuste de la emisora de FM 89,5 MHz en el número 3.
1
Recibe la emisora de radio “FM 89,5 MHz” que quiere
almacenar en la memoria de preselección.
2
Pulse el del controlador remoto.
3
En menos de 5 segundos, pulse el para mostrar
el número que quiere almacenar.
4
Antes de 5 segundos, pulse el del controlador
remoto.
✽ Cuando se almacene una nueva emisora en la memoria, la emisora previamente
memorizada se borrará.
✽ Repita los pasos 1 a 4 para ajustar otras emisoras o para cambiar una emisora preajustada.
(Que en este ejemplo será el “3”.)
86
Page 53

ESPAÑOL
ON/STANDBY
OPEN/CLOSE
SKIP
TUNER
VOL.
UP
DOWN
C D
AUX PLAY MODE
C D
POWER
VOLUME
TIMER/DELETE
PLAY MODE
PROG.
ENTER
CLEAR
TUNING/
PRESET
EQAUXFM/AM
SDB
RC-911
FM/AM
TUNER
TUNING/
PRESET
TUNED
STEREO
MHz
FM
ST
P 3 89.5
C D
POWER
VOLUME
TIMER/DELETE
PLAY MODE
PROG.
ENTER
CLEAR
TUNING/
PRESET
EQAUXFM/AM
SDB
RC-911
CLEAR
TUNED
STEREO
MHz
FM
TUNER CLEAR
ENTER
TUNED
STEREO
MHz
FM
COMPLETE
(3) Para llamar la emisora memorizada
(Ejemplo) Escuche la emisora del número de preselección “3” que ha sido fijada en el paso (2).
1
Encienda el aparato y pulse el
(o del controlador remoto).
1
Botón
TUNER
Pulse el del controlador
2
remoto para seleccionar la emisora
deseada.
(Seleccione los números)
1
Botón
FM/AM
✽ Los botones directos le permiten llamar una
emisora memorizada.
2Para seleccionar una emisora preajustada entre las
1 a 10:
Seleccione los números que fueron grabados en
a .
2Para seleccionar una emisora preajustada entre las
2
Botones
TUNING/
PRESET
11 a 40:
Pulse el , y después seleccione los números
grabados.
Ejemplo: Para elegir 28.
Pulse el
✽ Cuando se pulsen botones sucesivamente, pulsar
el siguiente botón antes de 5 segundos.
(4) Para borrar todo el contenido de la memoria de preajustes
1
Pulse y mantenga pulsado el
durante 3 o más segundos.
1
Botón
CLEAR
/ Pulse el / Pulse el .
2
2
Botón
ENTER
NOTA:
• La función de seguridad protege todas las emisoras memorizadas durante algunas horas en el caso de una falla de
alimentación o de la desconexión del cable de alimentación de CA.
Pulse el del controlador
remoto.
87
Page 54

ESPAÑOL
ON/STANDBY
OPEN/CLOSE
SKIP
TUNER
VOL.
UP
DOWN
C D
AUX PLAY MODE
C D
POWER
VOLUME
TIMER/DELETE
PLAY MODE
PROG.
ENTER
CLEAR
TUNING/
PRESET
EQAUXFM/AM
SDB
RC-911
VOLUME
VOLUME
VOL.
DOWN
VOL.
UP
VOLUME 12
SDB
SDB ON
SDB OFF
FLAT
EQ
CLASSIC
EQ
JAZZ
EQ
ROCK
EQ
POPS
EQ
VOCAL
8
CONTROL DE VOLUMEN Y GRAVES
Botones
VOL.
(1) Control de volumen
1
Pulse el o (o, o del
Botón
EQ
Botones
VOLUME
Botón
SDB
controlador remoto).
(2) Control de graves
1
Pulse el del
controlador remoto.
(3) Ecualizador
1
Pulse el del
controlador remoto.
Se acentúan los graves Cancelado
Respuesta plana
Ajustado para Clásica
Ajustado para Rock
Ajustado para Pop
Volumen 0 (Mín) - MÁX
88
Ajustado para Jazz
Las voces son realzadas
Page 55

9
C D
C D
TRACK
CD 8 0:00
REPRODUCCIÓN DE CD AVANZADA
ESPAÑOL
(1) Escuchar la pista deseada de un CD ............................................................
POWER
C D
TUNING/
PRESET
SKIP
AUX PLAY MODE
TUNER
ON/STANDBY
(Ejemplo) Reproducción de la pista 8.
1
Cargar el CD y pulsar el (o del controlador remoto).
VOL.
C D
DOWN
UP
OPEN/CLOSE
CLEAR
ENTER
1
Botón
CD 2
2
Botones
de directa
Reproducción directa
1
Botón
CD 2
SDB
EQAUXFM/AM
VOLUME
TIMER/DELETE
PLAY MODE
PROG.
RC-911
2
Pulsar el botón de directa ( a ) del controlador
remoto para seleccionar el número de pista.
• La pista seleccionada será reproducida.
2 Para seleccionar una pista entre las pistas 11 a 99.
Seleccione la pista después de pulsar el .
(Ejemplo) Para elegir la 28.
Pulse el
✽ Cuando se pulsen botones directos sucesivamente, pulsar el siguiente botón antes de 5 segundos.
✽ Durante la reproducción aleatoria o programada, la reproducción directa no es posible.
/ Pulse el / Pulse el .
Numero de pista
89
Page 56

ESPAÑOL
ON/STANDBY
OPEN/CLOSE
SKIP
TUNER
VOL.
UP
DOWN
C D
AUX PLAY MODE
C D
POWER
VOLUME
TIMER/DELETE
PLAY MODE
PROG.
ENTER
CLEAR
TUNING/
PRESET
EQAUXFM/AM
SDB
RC-911
C D
C D
PLAY MODE
NORMAL
REPEAT
RANDOM
RANDOM
C D
C D
PLAY MODE
DIGEST
DIGEST
(2) Escuchar pistas repetidamente / Escuchar en orden aleatorio
.........................................................................
Repetición de la reproducción o reproducción aleatoria
3
Botón
CD 1/3
1
Botón
CD 2
2
Botón
PLAY MODE
3
Botón
CD 1/3
1
Botón
CD 2
2
Botón
PLAY MODE
1
Cargar el CD y pulsar el (o del controlador remoto).
2
Pulse el del controlador remoto para seleccionar el modo de reproducción.
Reproducción normal Reproducción repetida
90
Reproducción repetida
3
Iniciar la reproducción.
Reproducción seleccionada
Pulse el (o del controlador remoto) para iniciar la reproducción.
• Reproducción normal : La unidad de detiene después de reproducir la última pista.
•
Reproducción repetida : La unidad sigue con la reproducción hasta que sea detenida.
•
Reproducción aleatoria : La reproducción aleatoria se detendrá automáticamente cuanto se hayan reproducido todas
•
Reproducción seleccionada : Se reproducen los primeros segundos, el sonido desaparece gradualmente, y esto se repite
✽ Para volver al modo de reproducción normal, pulse el en el mando a distancia repetidamente y seleccione
NORMAL ”.
✽ Para reproducir repetidamente una sola pista; seleccione el modo de reproducción repetida después de grabar la
pista con la reproducción programada.
NOTA:
• Durante el funcionamiento del programa, no es posible realizar la reproducción aleatoria ni la reproducción resumida.
las pistas una vez.
para todas las pistas hasta llegar a la última.
Page 57

ESPAÑOL
ON/STANDBY
OPEN/CLOSE
SKIP
TUNER
VOL.
UP
DOWN
C D
AUX PLAY MODE
C D
POWER
VOLUME
TIMER/DELETE
PLAY MODE
PROG.
ENTER
CLEAR
TUNING/
PRESET
EQAUXFM/AM
SDB
RC-911
C D
C D
PROG.
PROG
PROGRAM
CD
CLEAR
PROG
P1:
C
D
9 3:44
PROG
TRACK
P2:
C 3 4:12
D
(3) Escuchar las pistas deseadas en el orden deseado ..............................
2 Se pueden programar un máximo de 20 pistas.
Si el total de números de pistas programadas supera las 20, aparecerá el mensaje “ OVER P20 ”.
6
Botón
CD 1/3
6
Botón
CD 1/3
1
Cargar el CD y pulsar el (o del controlador remoto).
1, 5
Botón
CD 2
3
Botones
de directa
Reproducción programada
1, 5
Botón
CD 2
2
Botón
PROG.
2
Pulse el del controlador remoto para introducir el
modo de programa.
3
Pulse el botón de directa ( a ) del controlador
remoto para seleccionar el número de pista.
✽ Para corregir los contenidos del programa...
Se pueden borrar las pistas en orden comenzando desde la última pista del
programa, pulsando el durante la programación.
4
Repetir el paso 3 para seleccionar el número en orden.
✽ Si el tiempo total de reproducción programada excede de 400 minutos, se visualiza “__: __”.
Sin embargo, se memoriza correctamente.
Parpadea
Número de programa
Tiempo de
reproducción
91
Page 58

ESPAÑOL
C D
C D
C D
C D
SKIP
SKIP
CLEAR
C D
Cuando la grabación haya finalizado
5
Pulse el (o del controlador remoto).
Comenzar la reproducción
6
Pulse el (o del controlador remoto) para iniciar la reproducción.
• Cuando haya acabado la reproducción de la última pista grabada, la unidad se detendrá automáticamente.
Para comprobar las pistas que se han programado
Mientras se encuentre en modo parado,
pulse el o (o, o del
controlador remoto ).
• Cada vez que se pulsa un botón, las selecciones
programadas se muestran en orden.
Para añadir pistas al programa
Si se ha almacenado un programa
previamente, siga los pasos del 1 a 5 para
añadir pistas.
✽ Se almacenarán las pistas nuevas después de la última
pista del programa original.
Para borrar las selecciones programadas
z Pulse el del controlador remoto
y seleccione la entrada.
x Cuando la unidad se haya detenido en
el modo de reproducción programada,
pulse el del controlador remoto.
Si se expulsa un CD, se cancelará automáticamente la
secuencia programada.
NOTA:
• No se puede grabar ni borrar pistas mientras la unidad
está en modo parado o pausa.
92
Page 59

(4) Búsqueda de pista mientras se escucha el sonido a gran velocidad
ON/STANDBY
OPEN/CLOSE
SKIP
TUNER
VOL.
UP
DOWN
C D
AUX PLAY MODE
C D
POWER
VOLUME
TIMER/DELETE
PLAY MODE
PROG.
ENTER
CLEAR
TUNING/
PRESET
EQAUXFM/AM
SDB
RC-911
SKIP
SKIP
(CD) ................................................................................................
Botones
8,9
Botones
SKIP
Avance rápido / Retroceso rápido
Retroceso rápido: Avance rápido:
Durante la reproducción.....
Durante la reproducción.....
ESPAÑOL
Pulse y mantenga pulsado el (o
en el mando a distancia).
• Retire su dedo del botón cuando haya encontrado la
posición deseada.
• La reproducción se iniciará a partir de esa posición.
Mantenga pulsado el 8 del
controlador remoto.
4ª
pista
Salto Salto Salto Salto
5ª pista
✽ Activar el retroceso rápido durante el modo de pausa
permite un retroceso más rápido que cuando la
activación se produce en el modo de reproducción.
El sonido cambiará cuando finalice la operación y en
ese momento se podrá utilizar el visualizador de
tiempo para saber cuál es la posición relativa.
6ª
pista
Pulse y mantenga pulsado el (o
en el mando a distancia).
• Retire su dedo del botón cuando haya encontrado la
posición deseada.
• Aparecerá “END” cuando se alcance el final de la
última pista.
Mantenga pulsado el 9 del
controlador remoto.
2ª
pista
Reproducción
Salto SaltoSaltoSaltoSalto
3ª pista
✽ Activar el avance rápido durante el modo de pausa
permite un avance más rápido que cuando la
activación se produce en el modo de reproducción.
El sonido cambiará cuando finalice la operación y en
ese momento se podrá utilizar el visualizador de
tiempo para saber cuál es la posición relativa.
4ª
pista
93
Page 60

ESPAÑOL
10
UTILIZACIÓN DEL TEMPORIZADOR
Tipos de temporizadores y sus usos Antes de usar el temporizador
• Reproducción temporizada:
Activa/desactiva la alimentación en el momento deseado
permitiendo así la recepción de radio, entrada externa o
reproducción de CD.
• Temporizador diario:
La alimentación se puede activar y desactivar a las mismas
horas todos los días con el fin de escuchar un CD, un
programa de radio o una entrada externa.
• Temporizador de apagado (Sleep):
Permite apagar el equipo después de una hora
determinada.
• Combinación de las funciones de reproducción
temporizada y temporizador de apagado:
La combinación de ambas funciones permite la utilización
de un buen número de funciones de temporización.
• Fijar la hora en el reloj
El funcionamiento del temporizador no es posible a menos
que se haya fijado previamente la hora en el reloj.
(Véase la página 80.)
• Prepare la reproducción
La reproducción temporizada requiere de la siguiente
preparación...
Recepción de radio: Grabe la emisora de radio deseada
en una preselección. (Véase la página 87.)
Carga del CD: cargue el CD
•
Procedimiento aproximado de fijación del temporizador
Establecimiento de la hora de inicio y de final
Establecimiento del dispositivo del temporizador
NOTA:
• Ningún otro equipo puede funcionar con la
configuración del temporizador de este producto.
94
Page 61

ESPAÑOL
C D
POWER
VOLUME
TIMER/DELETE
PLAY MODE
PROG.
ENTER
CLEAR
TUNING/
PRESET
EQAUXFM/AM
SDB
RC-911
TIMER/DELETE
TUNING/
PRESET
ENTER
ON AM12:00
TUNING/
PRESET
ENTER
(1) Ajuste del temporizador
2, 4 ~ 10
Botones
TUNING/PRESET
3, 5 ~ 10
Botón ENTER
(Ejemplo) Utilice el temporizador para escuchar la emisora de radio de la frecuencia 89,5 MHz (FM) almacenada en el
número de preselección 3.
(Ajustar el temporizador para que se active a las 5:10 pm y se desactive a las 6:10 pm.)
1
Botón
TIMER/
DELETE
Encienda el equipo...
1
Pulse el del controlador remoto.
✽ Mientras no aparezca “ STANDBY ”, ajuste la hora del reloj.
El funcionamiento del temporizador no es posible a menos que se haya fijado previamente la hora en el reloj.
(Véase la página 80.)
2
Antes de 10 segundos, pulse el del controlador remoto para seleccionar
“ TIMER SET ”.
3
Pulse el del controlador remoto.
4
Pulse el y seleccione el modo de registro.
Para la reproducción con
Seleccione “
ONCE PLAY ”.
temporizador
Seleccione “ EVERYDAY ”.
Para la reproducción con
temporizador a la misma
hora todos los días
5
Pulse el del controlador remoto.
95
Page 62

ESPAÑOL
ENTER
TUNING/
PRESET
ON PM 5:00
ENTER
TUNING/
PRESET
TUNING/
PRESET
ON PM 5:10
ENTER
TUNING/
PRESET
OFF PM 6:10
ENTER
TUNING/
PRESET
OFF PM 6:10
ENTER
TUNING/
PRESET
TUNER
TUNED
STEREO
MHz
FM
ST
P 3 89.5
TUNING/
PRESET
CD
TUNER AUX
ENTER
TUNING/
PRESET
(1) Ajuste del temporizador (continuación)
Pulse el del controlador remoto para
6
especificar las horas de la hora de inicio, y pulse luego el
del controlador remoto.
Pulse el del controlador remoto para
7
especificar los minutos, y pulse luego el del
controlador remoto.
✽ Pulse y mantenga pulsados los para avanzar rápidamente en
pasos de 5 minutos.
✽ A menos que se cambie el ajuste del temporizador, la hora de parada se
ajustará automáticamente una hora después de la hora inicio.
8
9
10
Pulse el del controlador remoto para
especificar las horas de la hora de parada, y pulse luego
el del controlador remoto.
Pulse el del controlador remoto para
especificar los minutos, y pulse luego el del
controlador remoto.
Pulse el del controlador remoto para
seleccionar la función deseada, y pulse luego el
del controlador remoto.
✽ Cada vez que pulse el , la función cambia como se indica más
adelante.
96
11
• Si selecciona “ TUNER ” en el paso 10.
Pulse el , seleccione la emisora de radio
deseada y pulse el .
✽ Cuando una emisora de radio deseada no haya sido seleccionada, en primer
lugar grábela y después repita el procedimiento desde el paso 1. (véase la
página 86.)
Page 63

(1) Ajuste del temporizador (continuación)
ENTER
TUNING/
PRESET
VOLUME 12
PLAY
TIMER
AM 12:00
VOLUME
TIMER/DELETE
PLAY MODE
PROG.
ENTER
CLEAR
TUNING/
PRESET
RC-911
TIMER/DELETE
ENTER
PLAY
TIMER
AM 12:00
ESPAÑOL
12
Pulse el del controlador remoto para ajustar el
volumen, y pulse luego el del controlador remoto.
✽ Tenga cuidado de no subir demasiado el volumen.
El aparato se establecerá en el modo de reserva y luego en el modo de reserva de reproducción de forma automática.
Durante la reproducción con temporizador Durante el funcionamiento del temporizador diario
Cuando se llegue a la hora preajustada, se iniciará la reproducción o la grabación.
Cuando se llegue al final de la hora de parada del temporizador, el sistema se establecerá automáticamente en el modo de
reserva de alimentación.
NOTAS:
• Si la alimentación se activa mientras el temporizador está en el modo de espera, el temporizador no funcionará. Si desea
que el temporizador funcione, ajuste la alimentación al modo de espera antes de la hora de inicio del temporizador.
• La configuración del temporizador se borrará cuando se desenchufe la unidad o se produzca un corte en la alimentación.
(2) Empleo del mismo ajuste del temporizador
• Incluso cuando el temporizador haya sido cancelado, una vez que los contenidos del temporizador han sido establecidos, se
mantendrán. Esto permite que los mismos contenidos puedan ser activados de nuevo si no se necesita hacer ningún cambio.
Una vez memorizada, la configuración del temporizador puede utilizarse de la siguiente manera.
2
1
2
Botón
ENTER
Con el equipo encendido, pulse el .
✽ Aparecerá “ STANDBY ” .
Si no se visualiza “ STANDBY ”, se habrá borrado el ajuste del reloj.
En este caso, reajuste el reloj y el temporizador.
Antes de 10 segundos, pulse el del controlador remoto.
1
Botón
TIMER/DELETE
• El ajuste del temporizador se visualiza en orden.
El aparato se establecerá en el modo de reserva y luego en el modo de reserva de reproducción o grabación de
forma automática.
97
Page 64

ESPAÑOL
TIMER/DELETE
TUNING/
PRESET
ENTER
PLAY
TIMER
PM 12:00
TIMER CALL
PLAY
TIMER
PM 12:00
TIMER/DELETE
TUNING/
PRESET
ENTER
PLAY
TIMER
PM 12:00
PM 12:00
VOLUME
TIMER/DELETE
PLAY MODE
PROG.
ENTER
CLEAR
TUNING/
PRESET
RC-911
(3) Para comprobar el ajuste del temporizador
2
Botones
TUNING/PRESET
3
Botón
ENTER
Estando en el modo de reserva de reproducción con
1
1
Botón
TIMER/DELETE
temporizador, pulse el del controlador remoto.
Antes de 10 segundos, pulse el del controlador
2
remoto para seleccionar “ TIMER CALL ”.
Antes de 10 segundos, pulse el del controlador
3
remoto.
• Después de que se haya visualizado el ajuste del temporizador en orden, la
visualización volverá al estado normal.
(4) Para cambiar el ajuste del temporizador
• Efectúe “Ajuste del temporizador” desde el principio. (Vea las página 95 a 97.)
(5) Para cancelar la reproducción con temporizador
2 Si se activa la alimentación mientras se está en el modo de espera de reproducción con temporizador, el ajuste del
temporizador será cancelado.
Proceda de la forma siguiente para cancelar sin conectar la alimentación.
1
Pulse el del controlador remoto.
2
Antes de 10 segundos, pulse el para seleccionar el modo de cancelación.
“ CANCEL ” :Se cancela el ajuste de la reproducción con temporizador.
“ ONCE CANCEL ” :Solo se cancela la siguiente sesión de reproducción con temporizador para el
temporizador diario (el temporizador permanece ajustado).
“ ALL CANCEL ” :Se cancela el ajuste del temporizador diario.
Antes de 10 segundos, pulse el del controlador
3
remoto.
• El modo temporizador se cancelará.
✽ El temporizador no funcionará si la alimentación estaba activada cuando se
98
(Los contenidos establecidos no pueden borrarse.)
alcanza el tiempo de inicio del temporizador.
Page 65

(6) Operación de desconexión automática
C D
POWER
VOLUME
TIMER/DELETE
PLAY MODE
PROG.
ENTER
CLEAR
TUNING/
PRESET
EQAUXFM/AM
SDB
RC-911
TIMER/DELETE
TUNING/
PRESET
ENTER
TUNING/
PRESET
ENTER
SLEEP 1:00
SLEEP 1:00
SLEEP45
• La hora de apagado se puede establecer hasta en 120 minutos en intervalos de 5 minutos.
2, 4
Botones
TUNING
/PRESET
3, 5
Botón
ENTER
Pulse el durante la reproducción de música que
1
1
Botón
TIMER/
DELETE
ESPAÑOL
desea escuchar o durante la recepción de una emisora de
radio.
2
Antes de 10 segundos, pulse el del controlador
remoto para seleccionar “ SLEEP ”.
3
Antes de 10 segundos, pulse el del controlador
remoto.
4
Pulse el del controlador remoto para especificar
el tiempo de desconexión automática.
5
Pulse el del controlador remoto.
• La función de temporizador de apagado (Sleep) está activada.
Una vez que se haya consumido el tiempo seleccionado, la unidad pasará automáticamente en modo de “ standby ”.
El volumen se reducirá 1 minuto antes de terminar la operación de desconexión automática.
99
Page 66

ESPAÑOL
C D
POWER
VOLUME
TIMER/DELETE
PLAY MODE
PROG.
ENTER
CLEAR
TUNING/
PRESET
EQAUXFM/AM
SDB
RC-911
C D
POWER
VOLUME
TIMER/DELETE
PLAY MODE
PROG.
ENTER
CLEAR
TUNING/
PRESET
EQAUXFM/AM
SDB
RC-911
TIMER/DELETE
TUNING/
PRESET
ENTER
SLEEP
SLEEP15
TIMER/DELETE
TUNING/
PRESET
SLEEP
SLEEP OFF
ENTER
(7) Para confirmar el tiempo remanente de
desconexión artomática
2
Botones
TUNING/
PRESET
1
Botón
TIMER/
DELETE
(8)
Para cancelar la operación de desconexión
automática
2 El temporizador de desconexión automática se cancela
cuando el aparato se establece en el modo de reserva.
2 Para cancelar sólo el temporizador de desconexión
automática sin establecer el aparato en el modo de
reserva, proceda de la forma siguiente.
2
Botones
TUNING/
PRESET
3
Botón
ENTER
1
Botón
TIMER/
DELETE
Pulse el del controlador remoto
1
mientras se ajusta el temporizador
de desconexión automática.
Antes de 10 segundos, pulse el
2
del controlador remoto
para seleccionar “ SLEEP ”.
• La visualización volverá al estado normal
después de unos 10 segundos.
• Si pulsa el mientras el tiempo restante
hasta el apagado aparece en pantalla, puede
cambiar el tiempo establecido.
(Consulte los pasos del 4 a 5 en la página 99)
Tiempo remanente de desconexión automática
Pulse el del controlador remoto
1
mientras se ajusta el temporizador
de desconexión automática.
Antes de 10 segundos, pulse el
2
del controlador remoto
para seleccionar “ SLEEP OFF ”.
Antes de 10 segundos, pulse el
3
del controlador remoto.
100
Page 67

ESPAÑOL
ON OFF
ON OFF
ON OFF
ON OFF
ON OFF
(9) Para emplear el temporizador de desconexión automática en combinación con la
reproducción con temporizador
1
Ajustar el temporizador de apagado (Sleep).
(Consulte los pasos del 1 a 5 en la página 99.)
Ajuste la reproducción
2
con temporizador.
(Consulte los pasos del 1 a 10
en la página 95.)
(Consulte los pasos del 1, 2 en
la página 97.)
(10) Precedencia entre la reproducción con temporizador y el temporizador de desconexión
automática
Ajuste del temporizador
de desconexión
automática
Ajuste de reproducción con
temporizador
• El reproductor de apagado tiene prioridad sobre el de reproducción. Cuando se alcanza la hora de inicio del temporizador, éste
quedará cancelado.
Temporizador de apagado
(Sleep)
Reproducción temporizada
• La reproducción con temporizador no funcionará cuando su tiempo ha sido ajustado dentro del tiempo operacional del
temporizador de desconexión automática.
Reproducción temporizada
Temporizador de apagado
(Sleep)
101
Page 68

11
LIMPIEZA
ESPAÑOL
Limpiar la unidad principal
2 Utilice un paño suave y limpie suavemente para quitar la
suciedad del equipo y del panel de funcionamiento.
• Si utiliza un paño que contenga algún tipo de producto
químico, siga las precauciones establecidas para él.
2 No utilice bencina, disolventes o cualquier otro disolvente
orgánico o insecticida para limpiar la unidad, ya que esto
podría causar un cambio en su calidad o color.
NOTA:
• No utilice aerosoles para discos o productos para
evitar la electricidad estática. No utilice benzeno,
diluyente u otros productos químicos volátiles.
Limpieza de discos
2 Las huellas de dedos o la suciedad depositada sobre los
discos puede disminuir la calidad de sonido o causar
saltos durante la reproducción. Limpie las huellas o la
suciedad.
2 Utilice para ello un juego de limpieza de discos disponible
en los comercios o un paño suave para limpiar las huellas
de dedos o la suciedad.
Limpie suavemente en la
dirección que va del centro
hacia afuera, al borde.
No limpie en forma circular.
Spray
para cintas
Disolvente Bencina
102
Page 69

12
CDs
Manipulaci de discos
ESPAÑOL
Discos
Use discos compactos con la marca .
En este equipo no es posible reproducir CDs con formas
especiales (CDs con forma de corazón, CDs octagonales,
etc.).
Si intenta hacerlo, el equipo podrá resultar dañado. No use
este tipo de CDs.
C
Manipulación de discos
Evite tocar la superficie del disco al insertarlo o al extraerlo.
Tenga cuidado para no
dejar huellas de dedos en
la superficie de grabación
de señales.
Precauciones con la manipulaci de discos
• Trate de evitar que se adhieran huellas de dedos, aceite o
suciedad.
• Tenga cuidado de no producir arañazos en la superficie,
especialemente al extraer o guardar el disco en su
estuche.
• No doble el disco.
• No caliente el disco.
• No agrande el orficio central.
• No escriba en la superficie de etiqueta (v.gr. el lado
impreso) con bolígrafos o lápices.
• Cuando se traslada súbitamente un disco desde un sitio
frío como el exterior, a otro cálido pueden formarse gotas
de agua en la superficie del disco. En casos como estos,
no intente secar el disco con un secador de pelo.
Precauciones con el almacenamiento de discos
•
Asegúrese de expulsar el disco después de la
reproducción.
•
Guarde siempre el disco en su estuche para evitar el polvo,
arañazos o deformaciones.
•
No deje el disco en los siguientes sitios:
1.
Donde quede expuesto a la luz solar directa durante
períodos de tiempo prolongados.
2.
Donde haya mucha humedad y polvo.
3.
Donde quede expuesto al calor, como el de un
calefactor.
13
MENSAJES
• Cuando se visualice un mensaje de error, proceda del modo siguiente:
Mensajes de error Significado Remedio
Can't READ*
• El disco está dañado.
• No puede leerse la información de la TOC.
• Cámbielo por otro disco.
(*:Number or symbol)
CD NO DISC
NOT AUDIO
• No se ha cargado ningún disco CD.
• No se pueden leer los datos del CD.
• Los datos grabados en el disco no son
datos de audio.
• Cargue un disco CD.
• Vuelva a cargar el disco CD.
• Reemplace el disco.
103
Page 70

ESPAÑOL
14
RESOLUCIÓN DE PROBLEMAS
Compruebe otra vez lo siguiente antes de suponer que el sistema tiene un problema.
2 ¿ Están bien hechas las conexiones ?
2 ¿ Se ha utilizado el equipo según se explica en las instrucciones ?
2 Asegúrese de verificar que esté encendido el interruptor de alimentación principal en el panel trasero.
Si el sistema no funciona correctamente, compruebe la lista que figura a continuación.
Si ninguna de estas comprobaciones responde al problema, el sistema puede que esté funcionando mal. Desconecte el cable de
alimentación inmediatamente y póngase en contacto con su proveedor.
Problema Causa
No hay energía.
Los altavoces no emiten sonido.
General
El mando a distancia no funciona.
En los programas de FM se oyen
sonidos sibilantes.
En los programas de AM se oyen
sonidos sibilantes.
Tuner Section
En los programas de AM se oyen
zumbidos.
Cuando se pulsan los botones de
funcionamiento no ocurre nada.
• El cable de alimentación no está
enchufado en la toma.
• Los botones VOLUME están bajados.
• Están conectados los auriculares.
• Las baterías no están bien colocadas.
• Las baterías están gastadas.
• La dirección de la antena no es
buena.
• Las señales procedentes de la
emisora son débiles.
• El TV emite ruidos, etc.
• Se pueden escuchar sonidos de
interferencias de emisoras.
• Las señales del cable de alimentación
están siendo moduladas por la
frecuencia de la fuente de
alimentación.
• El disco está colocado al revés.
• El disco está sucio.
• El disco está rayado.
Medidas a tomar
• Enchufe bien el cable de
alimentación en la toma.
• Coloque el mando en la posición
adecuada.
• Desconecte los auriculares.
• Coloque bien las pilas.
• Sustituya las pilas por otras nuevas.
• Cambie la dirección de la antena.
• Apague la televisión.
• Cambie la dirección de la antena de
bucle.
• Instale una antena exterior.
• Enchufe el cable de alimentación en
dirección opuesta.
• Vuelva a introducir el disco.
• Limpie el disco.
• Sustituya el disco por otro no rayado.
Página
74
88
76
79
79
75
–
75
75
–
82
102
–
Reproductor de CDs
104
La reproducción se detiene en una
parte de la pista y no será posible
continuar con una reproducción
correcta.
Cuando se reproduce el disco se
oyen zumbidos.
• El disco tiene suciedad, huellas
dactilares, saliva, etc.
• El disco está rayado.
• El reproductor está en un lugar
inestable y vibra mucho.
• Las señales del cable de alimentación
están siendo moduladas por la
frecuencia de la fuente de
alimentación.
• Limpie el disco.
• Sustituya el disco por otro no rayado.
• Coloque el reproductor en lugar
estable que no tenga vibraciones.
• Enchufe el cable de alimentación en
dirección opuesta.
102
–
–
–
Page 71

ESPAÑOL
Condensación
2 Condensación
La condensación puede verse en forma de gotas de agua
que se forman en las ventanas de una habitación con
calefacción en invierno.
2 Condiciones para la formación de condensación
En invierno, cuando la unidad se coloca en un lugar
interior cálido, o cuando la temperatura ambiente sube de
repente por la presencia de una calefacción, se acumulará
condensación en las partes operativas de la unidad y ésta
no podrá funcionar adecuadamente.
La condensación también puede formarse en verano
cuando las emisiones de un aparato de aire acondicionado
alcanzan directamente la unidad. Si esto ocurre, cambie la
localización de la unidad.
Precauciones referidas a la localización de la unidad
Deje un espacio de más de 10 cm entre cualquier cara de
esta unidad y paredes o cualquier otro equipo de
sonido/vídeo, etc.
2 Durante el funcionamiento de esta unidad o de cualquier
otro aparato electrónico que contenga microprocesadores
al mismo tiempo que utiliza un sintonizador o una
televisión, pueden aparecer ruidos o interferencias en la
pantalla en el sonido y en la imagen del sintonizador o de
la televisión. Si esto sucede, preste mucha atención a los
siguientes puntos.
• Separe la unidad del sintonizador o de la televisión tanto
como sea posible.
• Separe el cable de la antena del sintonizador o de la
televisión del cable de alimentación y de los cables de
conexión de entrada/salida de esta unidad tanto como
sea posible.
• Las antenas interiores y los cables de alimentación de
300 Ω/ohmios son especialmente susceptibles a estas
interferencias. Recomendamos el uso de antenas
exteriores y cable coaxial de 75 Ω/ohmios.
2 Medidas que se pueden tomar después de que se
haya formado la condensación
• Si ya se ha formado la condensación, encienda la unidad
y manténgala así durante un rato. Aunque el tiempo
puede variar dependiendo de las condiciones del
entorno, la unidad debería poderse utilizar en 1 o 2
horas.
• Si se forma condensación sobre el disco, limpie el
disco.
Otras precauciones
2
Las ilustraciones utilizadas con propósito descriptivo
pueden ser diferentes de los elementos reales.
2
Conserve el manual de instrucciones.
Después de leer este manual de instrucciones, guárdelo
en un lugar seguro junto a la garantía. También es
conveniente introducir los elementos requeridos en las
columnas de la cubierta trasera.
Cable de alimentación de
300 Ω/ohmios
Cable coaxial de
75 Ω/ohmios
Cuando no utilice el D-AJ03
2 En condiciones normales
• Extraiga siempre el disco y apague la unidad.
• Cuando esté ausente de su domicilio durante largos
periodos de tiempo, asegúrese de desenchufar el cable
de alimentación eléctrica.
2 Cuando mueva el D-AJ03
• No exponga el D-AJ03 a ningún
tipo de golpe.
• Compruebe siempre que ha
extraído el disco y que los cables
de conexión están desconectados
antes de mover el D-AJ03.
105
Page 72

ESPAÑOL
15
ESPECIFICACIONES
2 Sección del amplificador
Potencia máxima práctica: Altavoz delantero 11 W (5,5 W+5,5 W, EIAJ)
Tomas de audio de entrada/salida: Terminal de salida en MONO, terminal de entrada AUX,
enchufe hembra de 3,5 mm para auriculares
2 Sección del sintonizador
Banda de frecuencia de recepción: FM: 87,5 MHz a 107,9 MHz
AM: 520 kHz a 1710 kHz
Sensibilidad de recepción: FM: 1,5 µV/75 Ω/ohmios
AM: 20 µV
Separación estéreo FM: 35 dB (1 kHz)
2 Sección del reproductor de CD
Fluctuación y trémolo: Por debajo de los límites medibles (±0,001% W. pico)
Frecuencia de muestreo: 44,1 kHz
Fuente óptica: Semiconductor
2 Sección del temporizador del reloj
Sistema de reloj: Un minuto cada mes
Funciones del temporizador: Reproducción temporizada (Una, todos los días)
Temporizador para dormir (máximo 120 minutos)
2 General
Fuente de alimentación: CA 120 V, 60 Hz
Consumo: 16 W
Aproximadamente 0,8 W mientras permanece en “ standby ”
Dimensiones externas máximas: 390 (An) x 280 (Al) x 165 (Fd) mm
(incluyendo pies, controles y terminales)
Peso: 5,0 kg
2 Mando a distancia (RC - 911)
Sistema de control remoto: Impulsos infrarrojos
Fuente de alimentación: 3 V CC (Utilizando 2 pilas del tipo R 6 P/AA)
Dimensiones externas máximas: 49 (An) x 140 (Al) x 30 (Fd) mm
Peso: 120 g (incluyendo las pilas)
* Para facilitar la introducción de mejoras, las especificaciones y funciones quedan sujetas a cambios sin previo aviso.
106
Page 73

16-11, YUSHIMA 3-CHOME, BUNKYO-KU, TOKYO 113-0034, JAPAN
Telephone: (03) 3837-5321
Printed in China 511 4095 003
 Loading...