

Page 1
DE
NON
cocon
PORTABI
PORTABLE
SPEAKER
F
DOCK
www.denon .com
QUICK
SETUP
GUIDE
.
;
FEEL
IT
Page 2

Page 3

EN
THANK
YC)LJ
FOR
PURCHASING
THE DENON
COCOON
PORTABLE
DE
FR
ES
NL
IT
SE
VIELEN
MERCI D'AVOIR FAIT LACOUISITION
GRACIAS POR ADOUIRIR DENON
BEOANKT
POR-fABLE
GRAZIE
TACK
DANK
PER
FOR
F(JR
OAT
ATT DU VALT
U HEBT
AVER
DEN KAUF DES DENON
SCELTO OENON
COCOON
GEKOZEN VOOR
DENON
COCOON
COCOON
OU
DENON
PORTABLE
DE
OENON
COCOON
PORTABLE
PORTABLE
COCOON
COCOON
PORTABLE
PORTABLE
CH
~i~11~~~
OENON
COCOON
PORTABLE
Page 4

MUSIK ABSPIELEN
DE
Schalten Sie
Schlie
0
die
Drucken
8
iOS-Gerat
Wahlen
0
mit der Plus- oder Minustaste an lhrem Cocoon Portable aus. Bitte
warten
Hinweis: Wenn ,Always
8
(AUS)
Um die Cocoon Portable zu nutzen, schlieBen Sie
0
stellen
Fur
5
PROFITEZ
FR
Mise en marche de votre Cocoon Portable et insertion de votre appareil
Connectez le cordon secteur du Cocoon Portable,
0
Pressez pour ouvrir
8
musique et de charger votre appa
Selectionnez"
0
pressant les boutons + ou jusqu'a
Note quand
8
(Toujours afficher l'horloge) apparait et que vous selectionnez 'No' (Non)
le
Pour utiliser le Cocoon Portable connecter le
0
bouton
Allez
5
COMO DISFRUTAR
ES
Enciende
Enchufe a
0
Pulsa para
f)
el
Selecciona "Yes/No" (Sf/No)
0
pulsando los botones + o - en el Cocoon Portable. Espera a que
aparez
Nota: Cuando seleccione
8
Cocoon Portable automaticamente pasara a
Para usar Cocoon Portable , conecte
0
"POWER"
Ve
5
NAAR
NL
Schake!
Sluit
0
en een stopcontact.
Druk
8
iOS-apparaat kunt opladen.
Selecteer "Yes/ No" (Ja/Nee) voor continue weergave van de klok door
0
het indrukken van de +
het woord
Noot: Wanneer u de
8
'NO'
Om
0
"POWER"-schakelaarop "ON".
Ga naar
5
lhren Cocoon Portable ein und docken
das mitgelieferte Netzte
Sie
Ben
Steckdose
steht, schaltet sich die Cocoon Portable automatisch
das Netzwerk-Setup gehen
Cocoon Portable se mettra automatiquement en veille.
a
dispositivo
lapagina
a
MUZIEK LUISTEREN
de Cocoon Portable
de meegeleverde AC-adapter aan op de Cocoon Portable
om
instelt gaat
de
an.
um den Dock auszufahren, Musik abzuspielen und lhr
Sie,
aufzuladen.
eine permanente Anzeige der Uhrzeit ,Yes/ No"
fUr
Sie
,iDevice"
bis
Sie,
,POWER"-Schalter
den
VOTRE MUSIQUE
DE
Yes/No"
que"
ce
question
Ia
" POWER " sur" ON "·
7
page
Ia
Cocoon Portable y acopla el dispositivo
el
pared Cocoon Portable con
Ia
jar a
de
OS.
i
palabra
Ia
ca
"ON".
en
7
dock
het
"iDevice"
Cocoon Portable te gebruiken sluit u
pagina
auf dem Display erscheint.
Display
auf ,ON".
station d'accueil permettant d'ecouter votre
Ia
(Oui/ Non) pour toujours afficher l'horloge en
votre Cocoon Portable.
de
"s'affiche a
iDevice
" Always Display Clock ?
pour configurer
MUSICA
TU
DE
base a fin de reproducir musica y cargar
Ia
vista
Ia
para que
"iDevice"
para consultar
onthullen,
te
op
"Always
Cocoon Portable automatisch
de
voor
7
en
"Always
en plaats uw
in
knoppen op je Cocoon Portable. Wacht tot
ofje display verschijnt.
Display
netwerkconfiguratie.
de
an
il
(Zeit immer anzeigen?) auf
Clock?"
Seite
zu
Sie
OS.
i
il
re
l'ecran.
connexion reseau.
Ia
el
el
pantalla.
Ia
isplay
D
alimentador
el
configuraci6n
Ia
zodat u uw muziek kunt afspelen en
Clock?"
Sie
den Cocoon Portable und
das Netzteil
7.
"
cable secteur et mettez le
iOS
alimentador suministrado
reloj siempre sea visible
en
Clock?"
STANDBY
de
iOS-apparaat
(Kiok alti
in
AC-adapter en zet u de
de
iOS-Gerat
lhr
in
secteur.
au
Veu
NO
CAy
red.
op
zichtbaar) op
jd
NDBY.
TA
S
a/Nein)
(J
,NO"
STANDBY.
den
und
an
iOS
illez patienter
,
(OFF)
ponga
dock
het
uw
MUSICA
LA
ASCOLTO
IT
Accendere l'impianto Cocoon Portable
doc
0
8
0
8
0
5
NJUT
SE
Sla pa
0
e
0
8
0
5
~~~
JP
:J?-::.n!'{-5'7J~O)
0
8
0
8
0
5
CH
:!!5:
fiX
tJ7ff~i¥JCocoon
0
8
0
8
0
5
DEL
king station
Collegare l'adattato
presa di corrente.
Premere
musica e caricare il dispositivo
Scegliere "Yes/ No" (S
premendo i pulsanti + o - sui Cocoon
quando l'indicazione
Nota: quando selezionate "Always
sempre l'orologio) su
jautomaticamente in Pausa.
Per utilizzare Cocoon Portable,
nare
Passare a
Anslut
och
Tryck
din
Valj "Yes/No"
knapparna +
visas
For
"POWER"-knappen pa "ON".
Obs! Nar
al
in
Ga
~mJO)AC?$'75'-~
tC.
~GJ.J.<tC.c!E~'o
'iii''t:~~tH.~)]i:9.Q't:
"t'.A(-)
3':9o
ii:~~O)~jf-:0)
t,
:J?-/Jte-5'7J~
r~iffli.A-1·:;7-J
~·:;
ffll!C~i¥J~;]itetl.
~ll1&11§"5f#-7'9f~i¥J
l:ti.'"ff~i¥J
(~/'i'S)IJ.~~Jm.)Ji:E-;J{l!lo
ii~:
Cocoon
~~ffl
1&Ei¥1J
~~i9:ii'm$~~~
per
tasto
il
pagina
DIN MUSIK
AV
Cocoon Portable och docka din
den
eluttag.
ett
att
for
iOS-enhet.
display
pa
att anvanda din Cocoon Portable, anslut natadaptern och
du staller
ltid klockan?)
vilolage
pa
side
till
I_,Jj.~C:
;!;)~
\0
~
c!E
I--L--i~W9t,
1!{$'/~WVt'
71'.A7[..,-{'t:
-:lE~M~
-?0)-tz·
1--'7
*
t-:m
fi!.H
Cocoon Portable
Mlfmtel "Always
Portabl
Cocoon Portable
"ON"
re
mostrare
"POWER"
7
medfoljande AC-adaptern
dockan for
oppna
(Ja/Nej)
eller- pa
.*
en
in
pa "NO" (
DBY).
(STAN
natverksinstallningar
for
7
foJ;.Q
~iffli
~·:;?1J{/:l:j"t~3':9
"Always Display
'FVJ:~'~-8-,
i
~roN
;;
Portable,
ffitleJCocoon
i
~ElMJtt.A.m$tJ;;it
e
7
a
ll
dispositivo
e inserire
AC in dotazione tra C
docking stational
Ia
iOS.
per visualizzare sempre l'oro
No)
l/
"iDevice"
'NO'
per
for
installningen "Always
ftDeviceJ
~~ffl9-Qil.~lH<l:,
l--:r·;;7,<~:7-"'-V'~~Ji<tc'c!E\-'o
iOS i9:1lnetl.,
Display
:m
appare
Display
Cocoon Portable
),
(spento
collegare I
"ON".
su
configurazione di
Ia
iOS-enhet
kunna spela din musik och ladda
att
att alltid visa klockan genom a
din Cocoon Portable.
din Cocoon Portable au
stalls
AV),
~.A.tl."t,
:J
<l:,
'
"Yes/
(
tfli%f~i¥J
fl'1,
0
iOS7J\-1.A~~
t::J?-/Jte-5'
/'lz/"
i
o
:J?-::.;Jte-5'7'WC'77.A(+)a':td<l:';('-i
rt<l:~'J
(
No"
t~)]i:'c!Etl..Qa':L'm-:>"t(tc'c!E\,\0
k?"
oc
Cl
EJti.JIY~Ht:.A
{
~iffllfJ
'c:
1
/)
:::t
iOS
ablef0Etl.1fll~i¥:tii8Hl~
rt
Po
i~l:ti.'"fl:ti.'ill
..ti¥J "+"
iM
!ilG
¥~mg..tl±l
Clock?"
J!:til'l3ifflltftel7f3C "Power Switch"
il
oon Portable e una
oc
ne di riprodurre
fi
rtable. Attendere fino a
Po
su
mellan
OS7
~iffli7"
G
i9:\l!§~~)!:fi
i9:ififol~IJ"NO"
o
y.
i displa
k?"
oc
Cl
tor
'adatta
rete.
din Cocoon Portable
Vanta tills
splay
Di
·
JH.A~:ti~G"t~~~dS
~,,
r
a':td<l:
\,
(
~"NO
"-"
/J\-1
5'
-7J~~:ti~G
tC.
<
"t
IJ.~IE't~SI±lo
,
l:ti.'illizlH~
"iDevice"
ml
iOS ne
Ia
logio
(Mostrare
mette
si
e AC e selezio-
pa
ycka
tr
tt
Device"
"i
in
stall
Clock?" (Visa
tomatiskt
:;?,c::ti~G3':9
7J~'t::-:>fJ:~
~,\~.J
\j{_)
\\,
~'o
c!E
"Yes/No"
(3<:)
Y{'(
G
)~i!tiR
"t
o
.Q
,
"'t:~:lE9
't:tJ:IJ3':9o
~~
fl'1,
Page 5
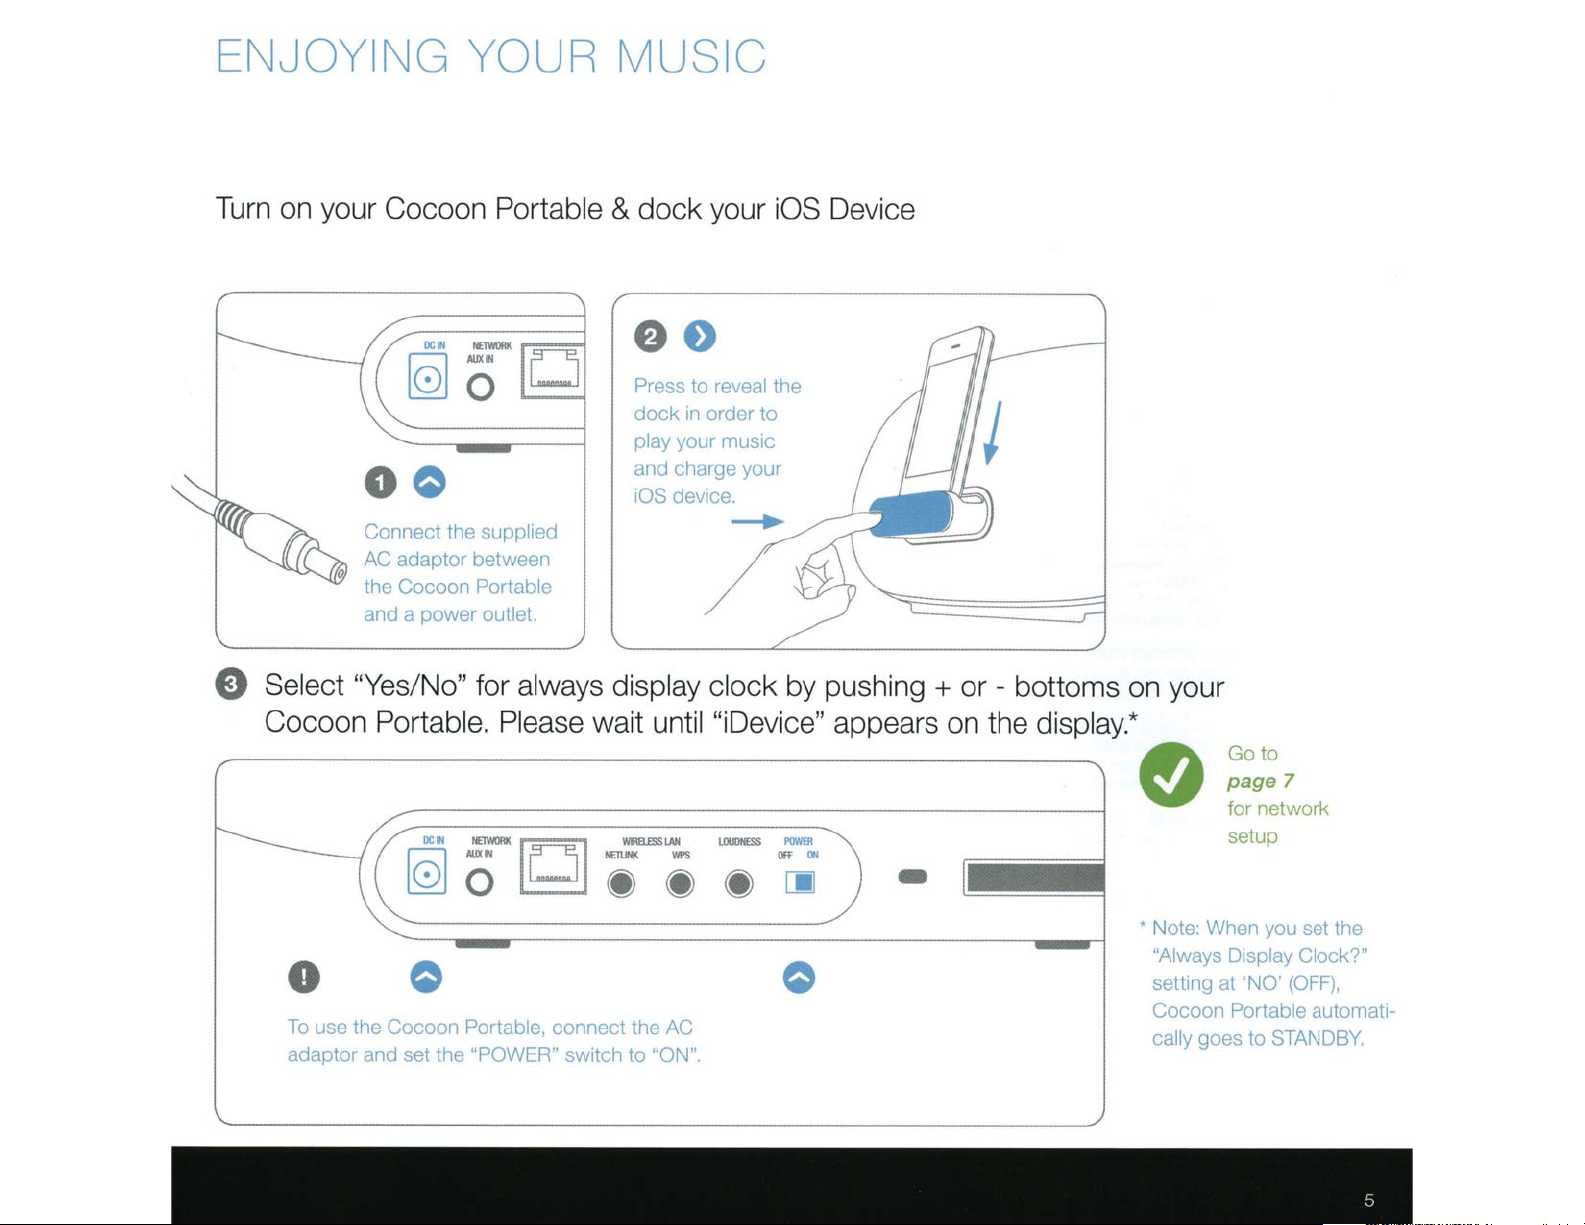
ENJOYING YOUR MUSIC
Turn on your Cocoon
Portable
dock
&
your
e o
iOS
Device
0 0
Connect the
adaptor between
AC
Cocoon Portable
·he
and a power
Select "Yes/No"
Cocoon
Portable. Please wait
supp
outlet.
for
0 0
use the Cocoon
To
adaptor and set the "POWER"
Portable,
D
Press
dock
ay
pl
and charge your
iOS
reveal
to
order to
rn
your rnusrc
devrce.
__,.
lied
always display clock
until "iDevice"
to
AC
"ON".
connect the
switch
the
by pushing
appears on the
-
+
- bottoms on your
or
display.*
e
• Note: When you set the
to
Go
7
page
network
tor
setup
"Always Display Clock?"
(OFF),
settrng at
Cocoon
cally
'NO'
Portable
goes to
autornatr-
STANDBY.
Page 6
DE
FR
ES
NL
VERBINDUNG
EINE
Wireless
0
Wenn
0
WPS-
0
sondern einen
Keinen
8
WPS-Router besitzen, 9ehen
Kabel9ebunden
8
Verbinden Sie
&
zu
CONNEXION
Reseau sans
0
Appareil
0
Routeur
0
routeur
Pas
e
WPS,
Reseau
8
Avec
&
Cocoon
CONEX16N
lnalambrica I Eli9e
0
Dispositive iOS I Si
0
WPS-router
0
pero sf un
Sin
e
un router
Conexi6n
8
Conecta
&
Portable
AANSLUITEN
Draadloos I
0
iOS-apparaat I
0
Wahlen Sie
1
im Besitz eines
Sie
RouteriWenn
WPS-Router I
Cocoon
lhrem
iOSISi
WPS I Si
WPS, allez a
routeur
de
allez
cable
le cable
Portable,
A
router
WPS,
el
y
ZU IHREM
Sie
WPS-Router
mit9elieferte
das
Portable
VOTRE RESEAU DOMESTIOUE
A
fil I Choisissez
vous avez un
vous n'avez
Ia
WPS I
page
Ia
a
reseau fourni, raccordez votre routeur
puis allez a
RED DOMESTICA
LA
una
tienes un dispositive
WPS) I
(Router
router WPS, ve a
no tienes un dispositive
Si
1
WPS
con
cab
lue9o
Kies een van
lapagina
ve a
le
cab
LAN provisto entre
le
nsulta
co
EEN
OP
u een
Is
A
9.
WPS-router I Als
0
WPS-router,
WPS-router I Als
Geen
e
router hebt,
Bedraad
8
&
mee9eleverde LAN-kabel
de
Sluit
Cocoon
9aat u naar
9aat
Portable
u 9een
u naar
9a
en
eine
iOS-Gerats
nicht im Besitz eines
Sie
Wenn
und 9ehen
page
vous n'avez ni
Si
sind, 9ehen
besitzen, 9ehen
iOS-Gerat
kein
Seite
Sie zu
Kabel
LAN-
Sie
options suivantes
des
l'une
appareil iOS, alleza
d'appa
pas
15.
appareil iOS,
HEIM-NETZWERK
fol9enden M69lichkeiten
der
17.
21.
Iapage
opciones si9uientes
las
de
tienes un dispositive
Sino
lapagina
15.
17.
el
lapagina
THUISNETWERK
de
iOS-apparaat
iOS-apparaat
pagina
u 9een
pagina
vervol9ens naar
21.
vol9ende
opties
15.
iOS-apparaat en 9een
17.
aan tussen
HERSTELLEN
zu
Sie
iOS-Gerats
Seite
Sie zu
und keinen
17 .
lhrem
von
21.
Seite
zu
lapage9
iOS, mais un
il
re
ni routeur
votre
a
pagina
Ia
ve a
iOS,
iOS
router
hebt, 9aat u naar
maar
,
hebt
pagina
tampoco
ni
Cocoon
el
y
router en
de
21.
iOS,
wei een
WPS-
Seite
nd
si
15.
Router
.
pagina
de
9.
IT CONNESSIONE
9.
,
SE
JP
Wireless I Sce91iere
0
Device (dispositive
iOS
0
andare a
WPS-router
0
ma un router
WPS-router
No
8
dispositive
Wired (con cavo)
8
il
Con
&
Cocoon
SLUT
AN
dlos
r~
T
0
-e
iOS
0
WPS-router I
0
WPS-router,
ln9en WPS-router I Om
e
WPS-router,
~dbunden
Tr
8
Anslut
&
Cocoon
din
iti-.l..::f.'YI--'7-?fC::ffl
11!U~milff.:(J)i~r€l
0
iOS7'J\1:A~if,)j>~f5(J)
0
WPSJL--5'-~<l5m'5L',
0
:;~
-
iOS7'J\1:A'tWPS
8
17~-:.i~L:'
(;j:,
lf~milff.:(J)~'€i"
e
~ffij(J)LAN'T-/J[.,L'J
&
~'"f~\,\0
ALLA
una delle se9uenti opzioni
iOS) I Se
9.
pagina
cavo LAN fornito in dotazione colle9are
Portable,
TILL
I Valj
nhet I
den
<=-Ji'"f~
WPS) ISe non si
(router
and are
WPS,
(senza router
iOS ne un
DITT
av fo ljande alternativ
ett
du
Om
Om
till
9a
ti
9~
medfo
Portable,
te
rou
quindi passare a
MA
HEM
iOS-enhet
har en
har
du inte
15.
sid
du inte har varken en
17.
sid
ll
ljande natverkskabeln
och
H-iS
*:;
;:;t/Sl3Yf.J'6iiH.RV'L
:;X(J)
iHi9~-:J~L:'~'"f~\,\o
Ilf
\,\0
ter(
rou
-
~'"f~\,\0
-5'-c::J?-y~milff.:V'L
t.-
apagina
WPS) I Se
PS,
rW
NATVER K
iOS-enhet
en
sedan t
9a
7'J\1
iOS
WPSJL--5'-
de un
ie
si poss
ssiede un disp
po
15.
non
apagina
andare
21.
pagina
sid
till
9~
och
me
21.
sid
ill
:A~<l5m'5
:t<l5m'5L'tcJ:\,\~'€;
)
itive
os
disp
itive
os
possiede
si
un
17.
router all'
il
9.
r en
ha
du
iOS-enhet
an routern och
ll
<t2~\,\o
eller
~'€;-(i15~
\
L'fd:\,
21~-:.i~L:'
,
imp
iOS,
iOS
ianto
DOMESTICA
RETE
Page 7

CONNECTING TO YOUR
0
Wireless
HOME
NETWORK
Choose from one
0
iOSdevice
D
@
If
you
have
an
10S
dev1ce
f.)
go to
Wired
page
9.
of
the following options
e
If
you don't
you
have
a
WPS-router
have
an
10S
di""ICe
WPS
router,
go to
and
page
15.
e
If
you
don't
WPS
router.
No WPS-router
have
an
iOS
device or a
go
to
page
1Z
l
~~
HErul(
g
(I) (I)
WRUSSINC
WI'S
UlllNESS
(I)
Connect the
SUP!=Iied
cable
your router and
your Cocoon
Portable,
go to
LAN
between
then
page
21.
Page 8
MIT
MIT HILFE DER
DE
OEM
HEIM-NETZWERK
DENON COCOON A
Mit Hilfe der Denon Cocoon App kann lhr
VERBINDEN
PP
iOS-Gerat
die Netzwerkeinstellungen lhres Cocoon Portable konfigurieren.
nach
Sie
en
en
die kost
Cocoon App zu
on
si
lose Denon C
iOS-Gerats
nd, gehen
FR
f)
Gehen
f)
Scannen Sie
8
Scan-App,
zu
und
Gehen
f)
Sie
Wenn
CONNEXION
Seite
zu
Sie
den OR-Code mit Hilfe lhres
um die kostenlose Den
installieren.
Seite
zu
Sie
im Besitz eines Android-Gerats
VOTRE RESEAU DOMESTIOUE
A
auf den App
Sie
Gehen
0
Download en und installieren
Store®
11.
.
11
und such
Sie
UTILISANT L'APPLICATION DENON COCOON
on Cocoon peut co
cherch
et
Den
on Cocoon
Den
"
ez
!'application gratuite
installer
iOS et une
!'application
OS,
utilisant votre appareil
En
rer automatiquement
Rendezvous sur
0
chargez
Tele
f)
f)
8
eza
All
Lisez
lapage
code
le
i
parametres reseau sur votre Cocoon Portabl
les
'App Store®
I
installez
et
.
11
pour
OR
et
!'application gratuite Denon Cocoon.
telecharger
Denon Cocoon en utilisant votre appareil
de decodage.
.
11
areil Android,
app
RED DOME STICA MEDIANTE
LA
A
allez a
Ia
page
21.
ES
Allezalapage
f)
vous avez un
Si
CONEXION
APLICACION DENON COCOON
Media
configurar automaticamente los
Store®
App
Ia
a
Ve
0
Descarga e instala
f)
lapagina
a
Ve
f)
Escanea
8
el
c6di
gratuita Denon Cocoon mediante
aplicaci6n de escaneo
lapagina
a
Ve
f)
enes un dispositive Android, ve a
ti
Si
NL
AANSLUITEN
OP
ajustes
busca "Den
y
aplicaci6n gratui
Ia
.
11
OR
go
.
11
THUISNETWERK
EEN
on
para descargar e instalar
c6digos.
de
red en
de
coon
Co
Denon Cocoon.
ta
dispositive
el
lapagina
MET DE
".
21
aplicaci6n Den on
Ia
iOS,
ve
dispositi
el
e
nt
DENON COCOON -APP
coon-app gebrui
Co
Denon
de
Als u
u de netwerkinstellingen van de
kt
coon Portable automatisch
Co
iOS-apparaat,
uw
op
configureren.
Cocoon'.
dow
on
iOS-apparaat
nload en
pagina
Ga naar de App
0
f)
f)
e
Downl
Ga naar
de
Scan
oa
Store®
atis Denon Cocoon-app.
gr
de
r
ee
ll
insta
d en
11
pagina
OR-code met een scan-app op uw
zoek naar 'Den
en
de gratis Denon Cocoon-app te
11
pagina
Ga naar
f)
Als u een Android-apparaat hebt, gaat u naar
automat
Denon
..
e
Si
EN
app
LA
coon puede
Co
Coc
el
aplicaci6n
Ia
y
iOS
.
installeren.
en
21.
oc
und
dow
zu
lication
oo
una
isch
Cocoo
oon App.
ner
ei
nloaden
Seite
nfi
"·
table.
or
n P
kunt
om
n"
21.
gu-
CONNESSIONE
IT
DENON CO
dispositive iOS, l'
il
Con
automaticamente
Andare
.
0
Scaricare e
f)
Andare
f)
cq
A
8
uisire
Cocoon tramite
Andare
f)
si possiede un dispositive Android,
Se
SLUT
AN
SE
DENON
Med
na
e.
0
f)
f)
8
COCO
hjalp
tverksinstallningarna auto
Ga till
Ladda ner och installera
sid
ill
Ga t
Skanna
appen Denon
ON
CO
Ap
neii'
in
apagina
cod
il
apagina
DITT
TILL
ON
av din
din App
11.
OR-koden
AL
Denon C
app
impostazio
le
p Store®
stallare
e
l'app gratuita Denon Cocoon.
.
11
pe
OR
ice
io dispositive
pr
pro
il
11.
HEMNATV
iOS-enhet
Store®
kan appen Denon Cocoon k
och
de
tt
a
for
oon med
Coc
oco
di rete del Cocoon Po
ni
"Den
rcare
ce
re e
ca
ari
sc
r
K MED
ER
pa
skt
ti
ma
efter
sok
n kostnadsfria appen Denon Cocoo
och installera
hamta
av d
hjalp
configurare
puo
on
Cocoon".
on
installare
iOS
andare
din Co
en
"D
l'app gratuita Denon
e un'app di scansion
apagina
AV
HJALP
on
co
Cocoo
on
den kostnadsfria
iOS-enhet
in
APPEN
or
P
n".
oc
able.
rt
21.
gurera
fi
on
table.
h en
e.
n.
DOMESTICA CO N L'APP
TE
RE
LA
scanningsapp.
.
11
sid
Ga till
JP
CH
f)
du har en Android-enhet, ga till
Om
J'tf1Jffll..<
7'
:/r
.<J ? -
:.
/:
7
ST'l\-1'A....tL'T'
O
i
~'7-?0R
~
w4<.
AppStore
0
f)
f)
8
f)
Androi
¥fffl
i
Denon
Portable
0
f)
e
e
e
~D~
7'
0
1m*4
0
2'~\
11"'--::i';::::)it
S7'1\-1A.cOR::J-
iO
G'l1m*407
t'/
G'l(t
i.-
J
11"'--::i,;::::)it
dT'l
ON
DEN
Cocoon
ilkJ!n.l~
~Appiff.i/;5#:!!~
~
~!X#~JI!i~~
-rt~m~m
m~ffl1i!.:ilkJiOS
~~MilkJDe
~~m
uu
1i!.::tm~ilkJ~-l'!ll
/::
~
enonC
ro
L'
::J?-/77
/ /
0
//
2'~'o
c
0
A.'t<f.>~'b0
\-1'
COCOON APP
App
i[
i~
Denon
0
:ar
11
i~
Cocoon Ap po
non
o
m
11
/
-
?
.<J
't9~~c~L'~*9
oo
oc
1
J't:$1''7/
1
)-:$1'-77
f.:
::J?-/77
H
fi
ll
~~:i1.
~g
"Denon Cocoon"
Coc
~
-
D
fhf
Android
21.
sid
~~9~
:::
%
·
-
~'7
·:;
- b4<.
l'111
1
J't~ffl9~c
77
G'l(tc2'~'
*
c~
nJ
D-
1
J't~fflG'l
1
'7/D-
:$1'
't
)
't2
::i
<I:21"'--
~Jfi:!m!&
!!.1fEJ
ii~:¥:1
i!.UlkJ
1
iOS
fhEI
i~
'l-1/A.
G
f.:
2'
Jl~
l!C'l§'
~
Elltlff.HC::::J
,
o
1---
OR::J-
,
'l-1/A.
G
f.:
'o
~
Cocoon
11!.:
i.-
J
o
oon Appo
~~
~
¢}
B:f!B@ffl~I¥B:nl=
m$~~m
i..
~B
i~fh,
;t
21
i'io
? - /
'l
G
f.:'t
~
tc
(
:f
A.
~
#~
Page 9

CONNECTING
TO
YOUR HOME NETWORK
0
0
USING THE DENON
device, the Denon Cocoon
Using your
iOS
COCOON
App
configure the network settings on your Cocoon
e®
r
to
S
App
the
to
Go
and
Denon
search for
Cocoon".
Download and
the free Denon
1nstall
Cocoon App.
APP
automatically
can
Portable.
8
to
Go
page
11
OR
the
Scan
Oenon Cocoon
free
the
to
and
page
dev1ce
If you have
go
download
to
Code
App
a scann1ng app.
Android
an
21.
dev1ce.
instal
and
using your
10S
8
to
Go
page
11
Page 10
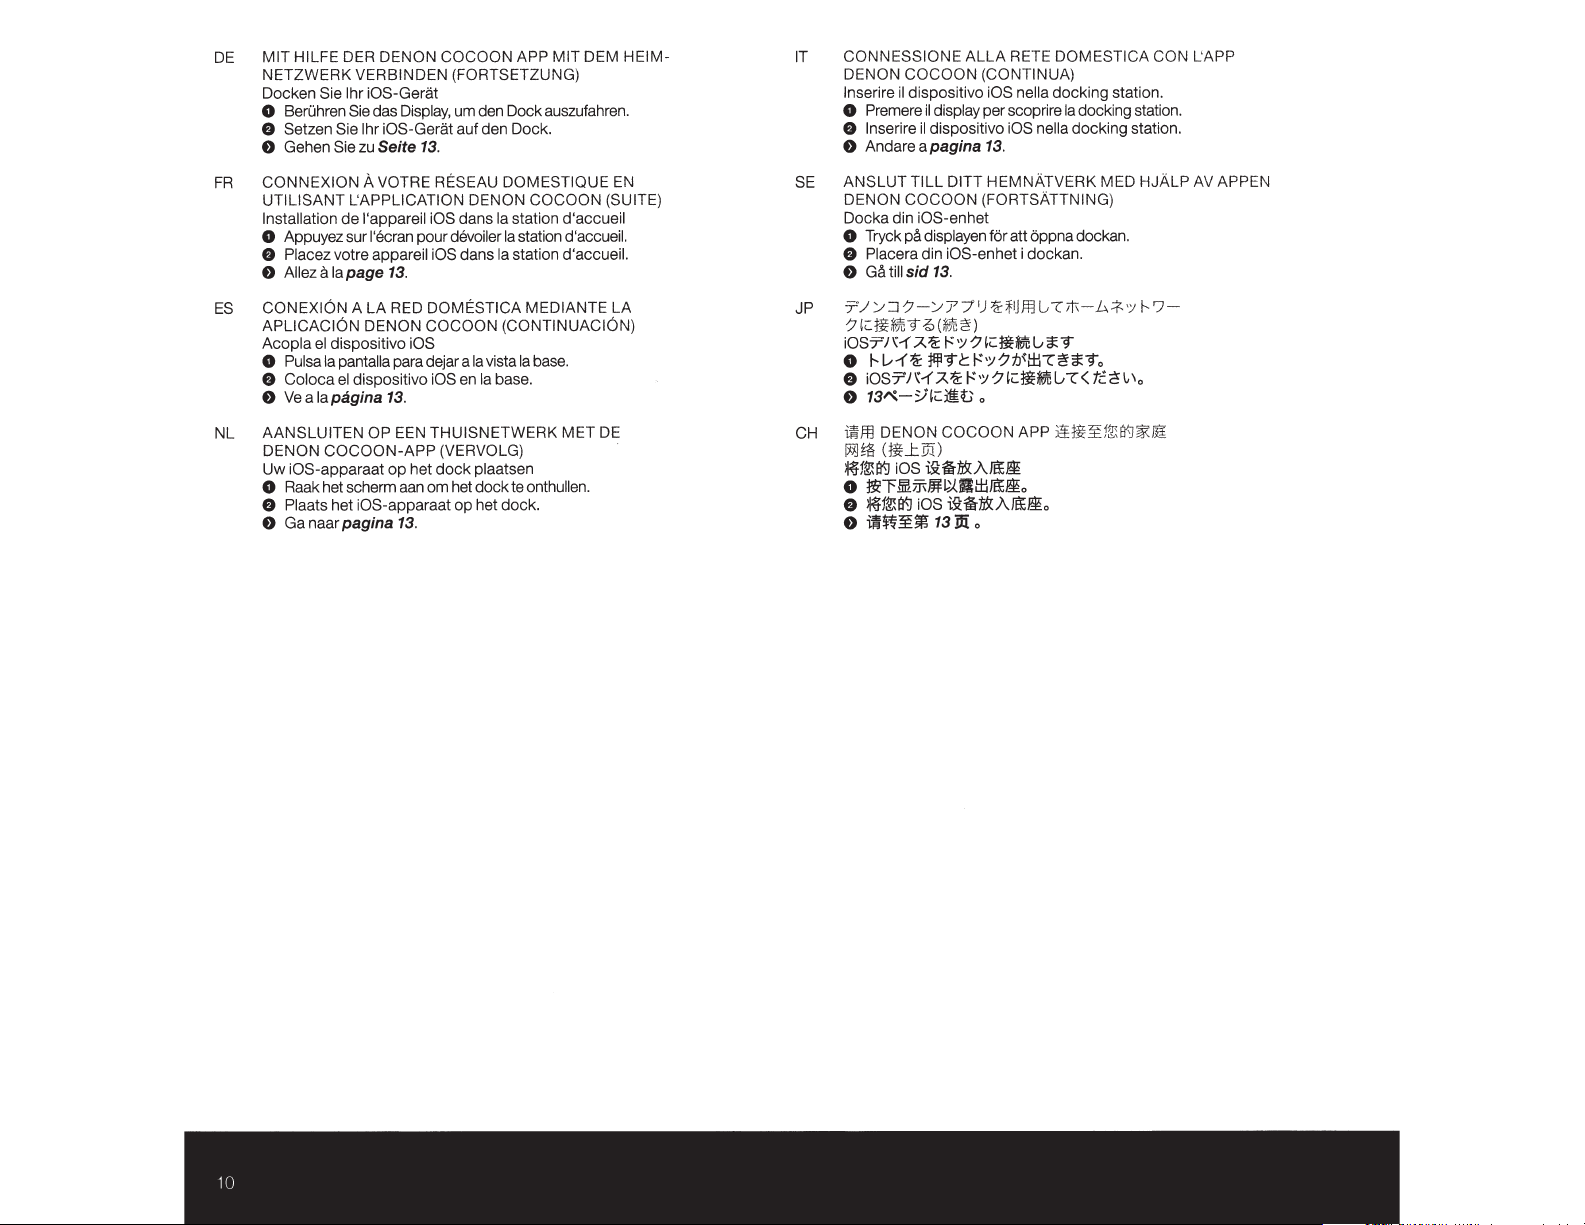
MIT HILFE
DE
NET
Docken
0
8 Setzen Sie lhr iOS-Gerat
8
DER
ERK
ZW
Sie lhr iOS-Gerat
BerOhren
Sie
Gehen
DENON COCOON APP MIT OEM HEIM -
VERBINDEN (FORTSETZUNG)
auszufahren.
Sie
zu
das
Seite
Display,
13.
um den Do
auf den Dock.
ck
IT C
NESSIONE
ON
NON C
DE
lnserire
Pre
0
lnserire
8
Andare
8
di
il
mere
A
OCOO
itive iOS ne
spos
display
il
dispositive
il
apagina
A RETE DOMES
LL
N (CONTINUA)
per scopri
docking station.
a
ll
re
iOS nella
Ia
13.
TI
cking statio
do
cking statio
do
CA CON
n.
n.
L'
APP
VOTRE RESEAU DOMESTIQUE
CONNEXION
FR
UTILISANT L'APPLICATION DENON COCOON (SUITE)
Installation
Appuyez sur
0
Placez
8
Allez
t)
CONEXION
ES
APLICACION DENON COCOON (CONTIN UACION)
Acopla el
Pulsa
0
Coloca el
8
Ve
8
AANSLUITEN
NL
ON
DEN
Uw iOS-apparaat
Raak het scherm
0
8 Plaats
Ga naar
8
A
l'appareil iOS
de
l'ecran
appareil iOS
votre
13.
Iapage
a
RED
LA
A
dispositive
pantalla para dejar a
Ia
dispositive
13
pagina
la
a
OP
COCOON-APP
iOS-apparaat
het
pagina
op het
dans
devoiler
pour
dans
DOMESTICA ME
iOS
iOS
Ia
en
.
THUISNETWER K
EEN
(VERVOLG)
plaatsen
dock
doc
om het
aan
op
het
13.
station
Ia
station
Ia
station d'accueil.
Ia
Ia base.
vista
base.
Ia
k te onthu
ck.
do
DI
d'accueil
d'accueil.
LA
ANTE
DE
MET
.
en
ll
EN
SE
JP
CH
ANSLUT
DE
Docka din
0
8
8
7/:
-:/
iOST'/ H
0
8
8
il!iffl
w.J
~
o
8
e
TILL
NON COCOON (FORTSATTNING)
pa
T ryck
Placera
sid
Ga till
:.<J-:7 -
9~(
~~
<::
,
.A.~~
-(~
l..-
1-
OST'/H.A.~~·
i
13~-Y,<:llt
DENON COCOON APP
.r.
~
<
;g
iOS
!f!.ll¥.1
ntf.IDl.)f-M~Rt±liEE~
l¥.!
f!.l
1
~
W:¥:~
ll
et
iOS-enh
displayen for
iOS-enhet
din
att
i
oppna
ckan.
do
13.
Ot\
,-
L
ffl
flj
'lt
')
7
/7
)
~
~
7 '
•;;
·;;
J:!ll9c~
;;
o
v.n
:
i9:~1D!:AIEE
~~tD!:
iOS
o
Di
13
*9
l.;
H%
<:n
-r~*9
t±l
-:/:f.J~
?
~
A
~l.;
<::~
'
o
o
~
IEE
T(
ii~
d
-b.
oc
o
tc
~
K MED
ER
ATV
MN
HE
DITT
kan.
'Y
.f.
~\,\
"J%
t
&H
1
HJALP AV
'7-
f..
o
JM
APPEN
Page 11

CONNECTING
TO YOUR
HOME
NETWORK
USING
Dock your iOS device
THE
0
Press the
to
reveal
d1splay
the dock.
DENON
COCOON
APP (CONTINUED)
Go to
page
13
Place your
tnto
the dock.
iOS
device
Page 12
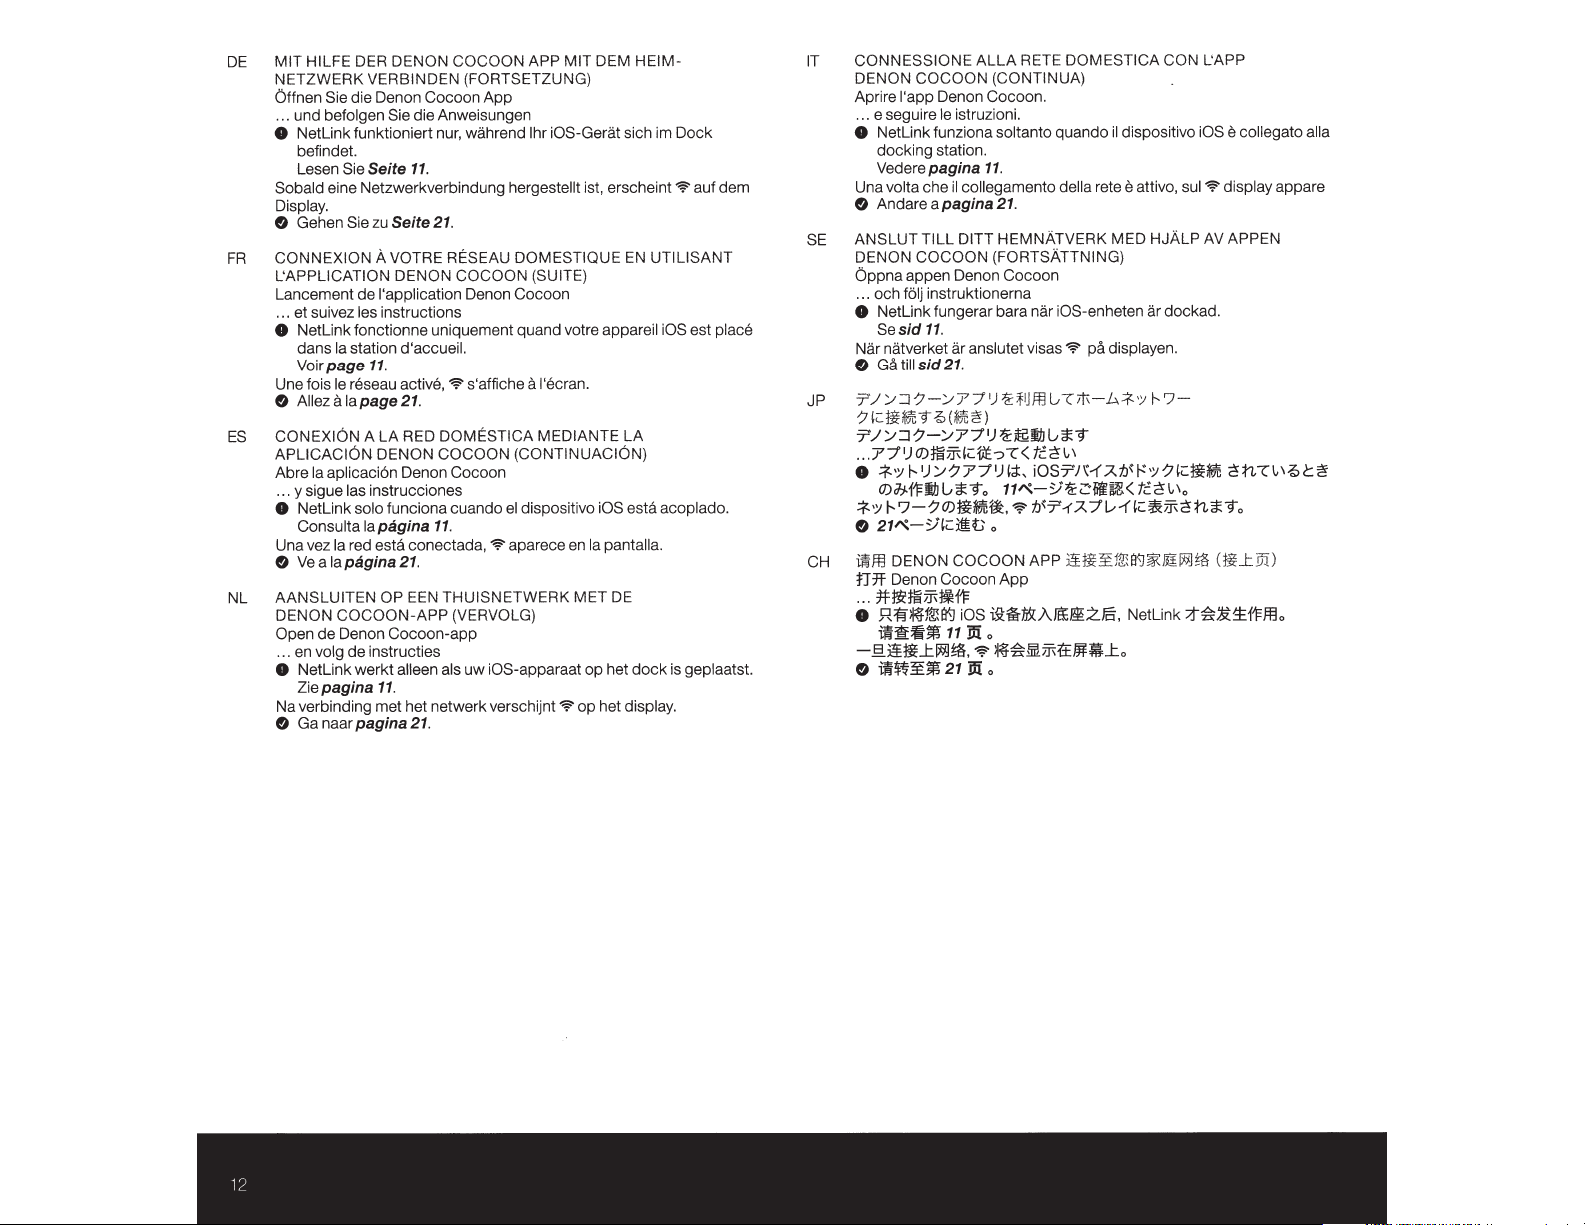
COCOON APP MIT DEM HEIM-
MIT HILFE
DE
NETZWERK VERBINDEN (FORTSETZUNG)
Offnen Sie
. . und befolgen
.
8
Sobald eine Netzwerkverbindung hergestellt ist, erscheint
Display.
&
CONNEXION
FR
L'APPLICATION DENON COCOON (SUITE)
Lancement de !'application Denon Cocoon
. . et suivez les instructions
.
8
Une fois
&
CONEXION
ES
APLICACION DENON COCOON (CONTINUACION)
Abre
... y sigue
8
Una vez
&
NL AANSLUITEN OP
DENON COCOON-APP
Open de Denon Cocoon-app
en
...
8
Na verbinding met het netwerk verschijnt
&
DERDEN
die Den on Cocoon App
funktioniert nur,
Netlink
befindet.
Sie
Lesen
Sie
Gehen
fonctionne uniquement quand votre appareil iOS
Netlink
station d'accueil.
Ia
dans
page
Voir
reseau active,
le
Allezalapage21.
A LA RED
aplicaci6n Denon Cocoon
Ia
las
solo funciona cuando
Netlink
Consulta
Ve
Netlink
Ziepagina
Ga naar
lapagina
red
Ia
pagina
Ia
a
volg de instructies
werkt
pagina
ON
die Anweisungen
Sie
Seite
Seite
zu
VOTRE RESEAU DOMESTIQUE
A
11.
instrucciones
esta
21.
aileen
11.
wah rend lhr iOS-Gerat
11.
21.
s'affiche
"9'
DOMESTICA
dispositivo
el
.
11
con ectad
THUISNETWERK MET
EEN
als
21.
aparece
"9'
a,
(VERVOLG)
iOS-apparaat
uw
l'ecran.
a
MEDIANTE LA
"9'
sich im Dock
EN
iOS esta
pantalla.
Ia
en
DE
dock
op het
op het display.
auf dem
"9'
UTILISANT
place
est
acoplado.
geplaatst.
is
CONNESSIONE
IT
DENON COCOON (CONTINUA)
l'app Denon Cocoon .
re
Apri
... e seguire
Netlink
8
docking station.
Vederepagina
Una volta che
dare a
An
&
SLUT
AN
SE
JP
CH
ON COCOON (FORTSATTNING)
DEN
appen Denon Cocoon
Oppna
folj
... och
Netlink
8
Sesid
natverket
Nar
till
Ga
&
-7-Y77')
::J
Y
7'/
7'C
:n<:::j~J
Y::J-7-Y77'){i':~liJG*9
'T/
(J)fei~'<=1tf.-:::>-r<
77'J
.
..
Yi'-
* '
8
(J)#f'FII.J
I--'7-?(J)Ji*5i:ftt,
* 'Y
21~-Y,<:::Jit
&
DENON COCOON APP
mffl
Denon Cocoon App
:IJ1f
tt~fei~tif'F
...
.R~~P.!.\il'J
8
m:li~m
-.§.)!ji_t~~'
ilW~m
e
ALLA
istruzioni.
le
funziona soltanto quando
collegamento
il
pagina
TILL DITT HEMNATVERK MED
instruktionerna
fungerar bara
11.
anslutet visas
ar
21.
sid
9.0(~~)
1
)Y-777')'i,
u*9o
iOS
iii
11
"9'
:w:
21
RETE DOMESTICA CON L'APP
collegato alia
e
dispositivo
il
11.
21.
o
i9:li-$:A/Ei::~;Z)§,
o
~~@.~tE3HJ...to
o
della
nar iOS-enheten ar
"9'
ffl[.,Tiil-b.*•
{i':;flj
tc.~~..,
iOS'T/\-(.AtJ{j·~·;;?,<:::Ji~
11~-Y:a:<:-!ii~<
tl''T-1-A
"9'
u::t~~
attivo, sui
e
rete
displayen.
pa
tC.~
7Ld'<:::~~~tL*9o
f:Eil'J~if!
Netlink
iOS
display appare
"9'
APPEN
AV
HJALP
dockad .
l--'7-
;;
l..\o
~tl.TI..\.0(::~
:ffi)
(ji_t
~
INJ
::t~.&~f'Ffflo
Page 13
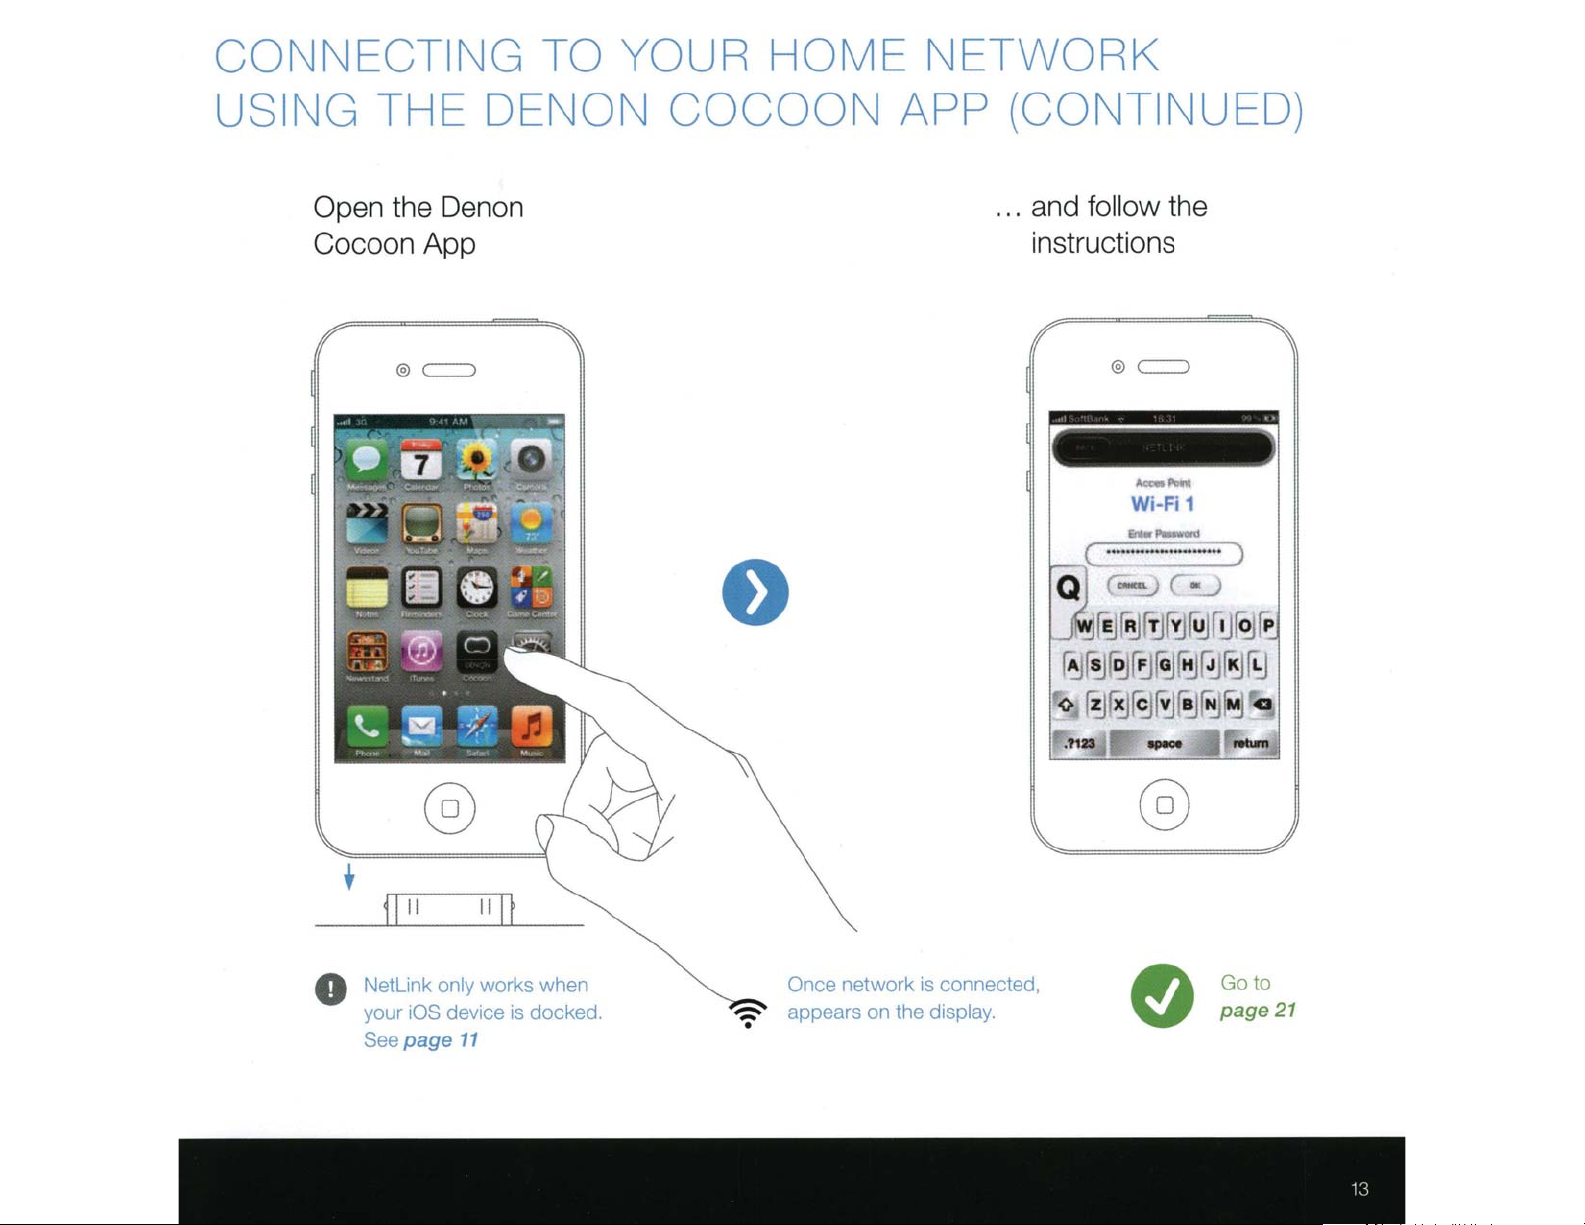
CONNECTING TO YOUR
HOME
NETWORK
USING THE
Open
Cocoon
the Denon
App
<:::::::)
@)
DENON C
OCOON
APP (
... and
CONT
follow the
instructions
Q
-
~
J
fE
~r
~~
,
INUED)
.)
•
l
rp
~ro
!J~
Jr
T
~r':J
~(j
~
O
Netlink
your lOS
page
See
works when
only
device is docked.
11
network is connected,
Once
appears on the
display.
~~rc
<>
~
N
~ra
Go to
page
21
Page 14

DE
MIT HILFE EINES WPS-ROUTERS MIT
NETZWERK
Wi-Fi gesichertes
0
Drucken
8
Drucken
WPS-Schalter auf
8
Bitte haben
einige Minuten
Die vordere Anzeige des Cocoon zei
&
Gehen
FR
CONNEXION
UTILISANT
Configuration d'un reseau WiFi protege
0
Appuyez sur le bouton
8
Puis,
dans les
e
Attendez patiemment l'etablissement de
prendre quelques minutes.
L.:ecran
&
Allezalapage21.
ES
CONEXION
ROUTER
Configuraci6n para Wi-Fi protegida
0
Pulsa el bot6n
8
Luego pulsa el bot6n
de
e
Espera un momenta, puesto
minutos
El
&
Ve
NL
AANSLUITEN OP
WPS-ROUTER
Beschermde configuratie via Wi-Fi
0
Druk op
8
Druk vervolgens binnen
Portable.
e
Het
Op
verbinding weergegeven.
&
Ga naar
VERBINDEN
Setup
Sie den
Sie
Sie
appuyez sur
deux minutes
en
WPS
2 minutos
en
panel frontal del Cocoon muestra
a
lapagina 21.
de
tot
stand brengen van de verbind ing kan enkele minuten duren.
het frontpaneel van de Cocoon wordt de status van
pagina 21.
WPS-Schalter
anschlieBend innerhalb von
lhrem Cocoon
Sie
ein wenig Geduld, da die Verbindungsherste llung
in
Anspruch nehmen kann.
zu
Seite
21.
A
VOTRE RESEAU DOMESTIQUE
UN ROUTEUR
le
bouton
fa<;ade
du Cocoon affichera le statut de
A
LA
RED
DOMESTICA MEDIANTE
WPS
del router.
WPS
como maximo.
realizarse.
EEN
THUISNETWERK
WPS-knop
WPS
WPS
de
votre routeur.
WPS
qui suivent.
del Cocoon
que
op
de
route
2 minuten
OEM
HEIM -
auf lhrem Router.
2
Portable.
de votre Cocoon
Ia
Minuten
gt
den Verbindungsstatus.
Ia
connexion qui peut
Portable
conexi6n puede tardar unos
el
estado
MET
r.
op de
WPS-knop
den
EN
Portable
Ia
connexion.
UN
en un periodo
de
Ia
conexi6n.
EEN
op de Cocoon
de
IT CONNESSIONE
ROUTER
Configurazione Wi-Fi protetta
0
8
e
&
SE
ANSL
Wi-Fi skyddad
0
8
8
&
JP
WPSJl.--7-~
Wi-Fi
0
8
e
&
CH
ij1ff
Wi-Fi
o
8
e
&
WPS
Premere
Entro
Attendere;
II pannello
An dare a
Tryck
Tryck sedan
inom 2 minut
Vanta
minuter. Frampanelen
for
Gatillsid21
JI,-')7-0)WPS7t{7/'[:ti!!Vr<tc2'~'a
2Jtl;{p;j~;::J?-/lt{-77Ji,WPSJt{7
li~1J~7'C79.Q*~~7t
:J
21~-V'~c:::iiV
j~
i1fnfffi!.l~!E~...tll'9
f?.\l§:f:E
ifjfi!l~.
Cocoon
~W~~21
il
tasto
2 minuti,
Ia
anteriore
pagina 21.
UT TILL OITT
anslutningen.
in
pa
WPS-knappen pa din rou t
ett
tag
.
Protected Setup
?-/lt{-77Ji,7
lf!-flB
WPS
:IJO\fi9:
1l
2
Jt~P'l~'ffi!.l
7'CP.!Zl!liPJim~~J1.7t~ll'91l'<ti'B.lo
il'9ii1.iYilijim~~~!m.ml!fflll'9~~
AL
LA
RETE
DOMESTICA CON
WPS
del router.
premere
connessione potrebbe durare qualche minuto.
sta
pa WPS-knappen pa
er.
da
slutforandet av anslutningen kan ta
{~lf!
il
tasto
WPS
de
l Cocoon indica lo stato
HEMNA
ll
TVERK MEO
ation
din Cocoon
pa
din Cocoon
G-ul\-l.>.f.
·:;
f-..'J-
del Cocoon
er.
ko
/'[:ti!!Vr<
r
l3,~'!5*9a
o /
a
l
liHE~i.!m
ill:
o
f-..J\;t.Mc::JitJ'W
:¥1
&.Hf.J%1M~~
WPS
~rno
Cocoon
Portable
UN
Portabl
de
ll
a
connessione.
EN
WPS-
ROUTER
Portable
mmer
:'7((::}ii;~9
~5.71.1J~
_til{]
o
nagra
at
t visa status
-iS
tc2'~'a
~m2'n*9
W
PS
~W
e.
a
a
Page 15
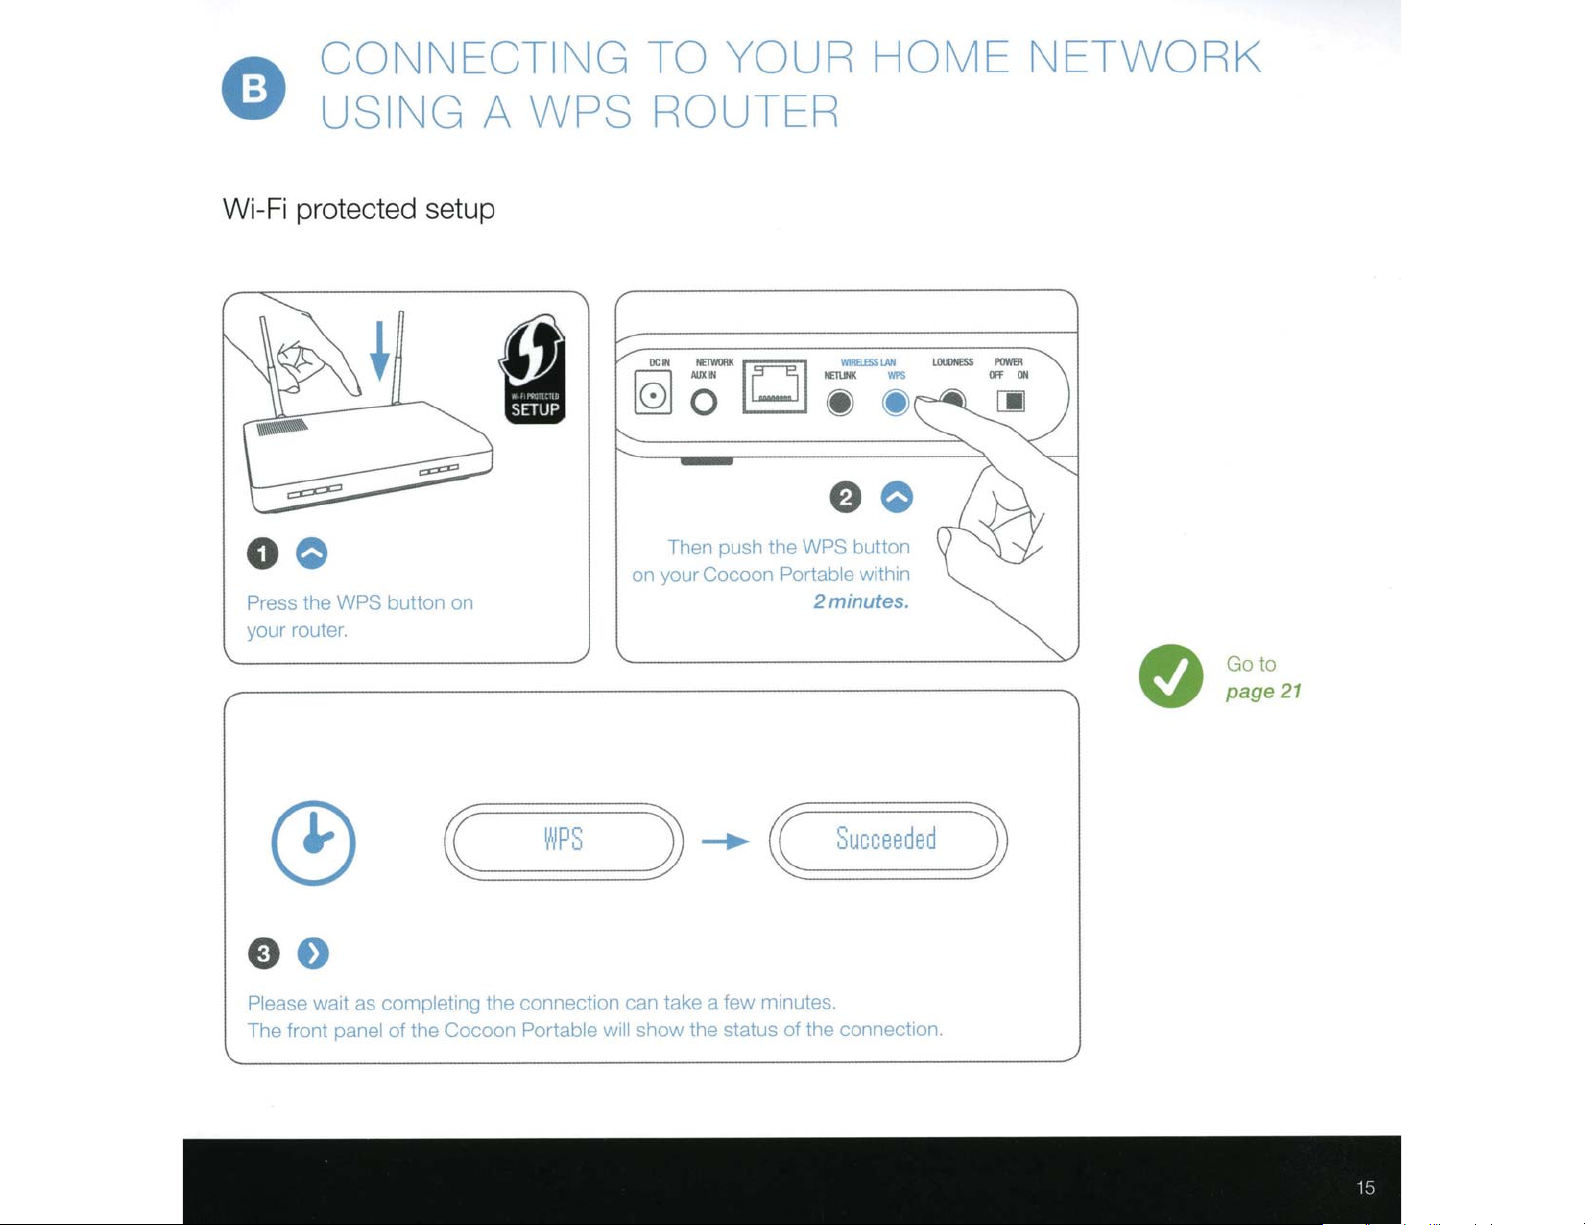
CONNECTING
TO YOUR
HOME
NETWORK
USING A
Wi-Fi protected setup
Press the
router.
"~Ur
WPS
button
on
WPS
ROUTER
pusl1 the
Then
on
your
Cocoon
Portable wtthtn
tt
bu
WPS
2minutes.
on
Go to
page
21
e o
as completing the connection
Please
The front panel of the
wa1t
~======
Cocoon
W
Portable
w11
can
show
:::=::::::)
S
===
P
-
take a few
the status of the connectton.
~
rn1nutes.
Su
eeded
cc
)
Page 16
DE
MIT
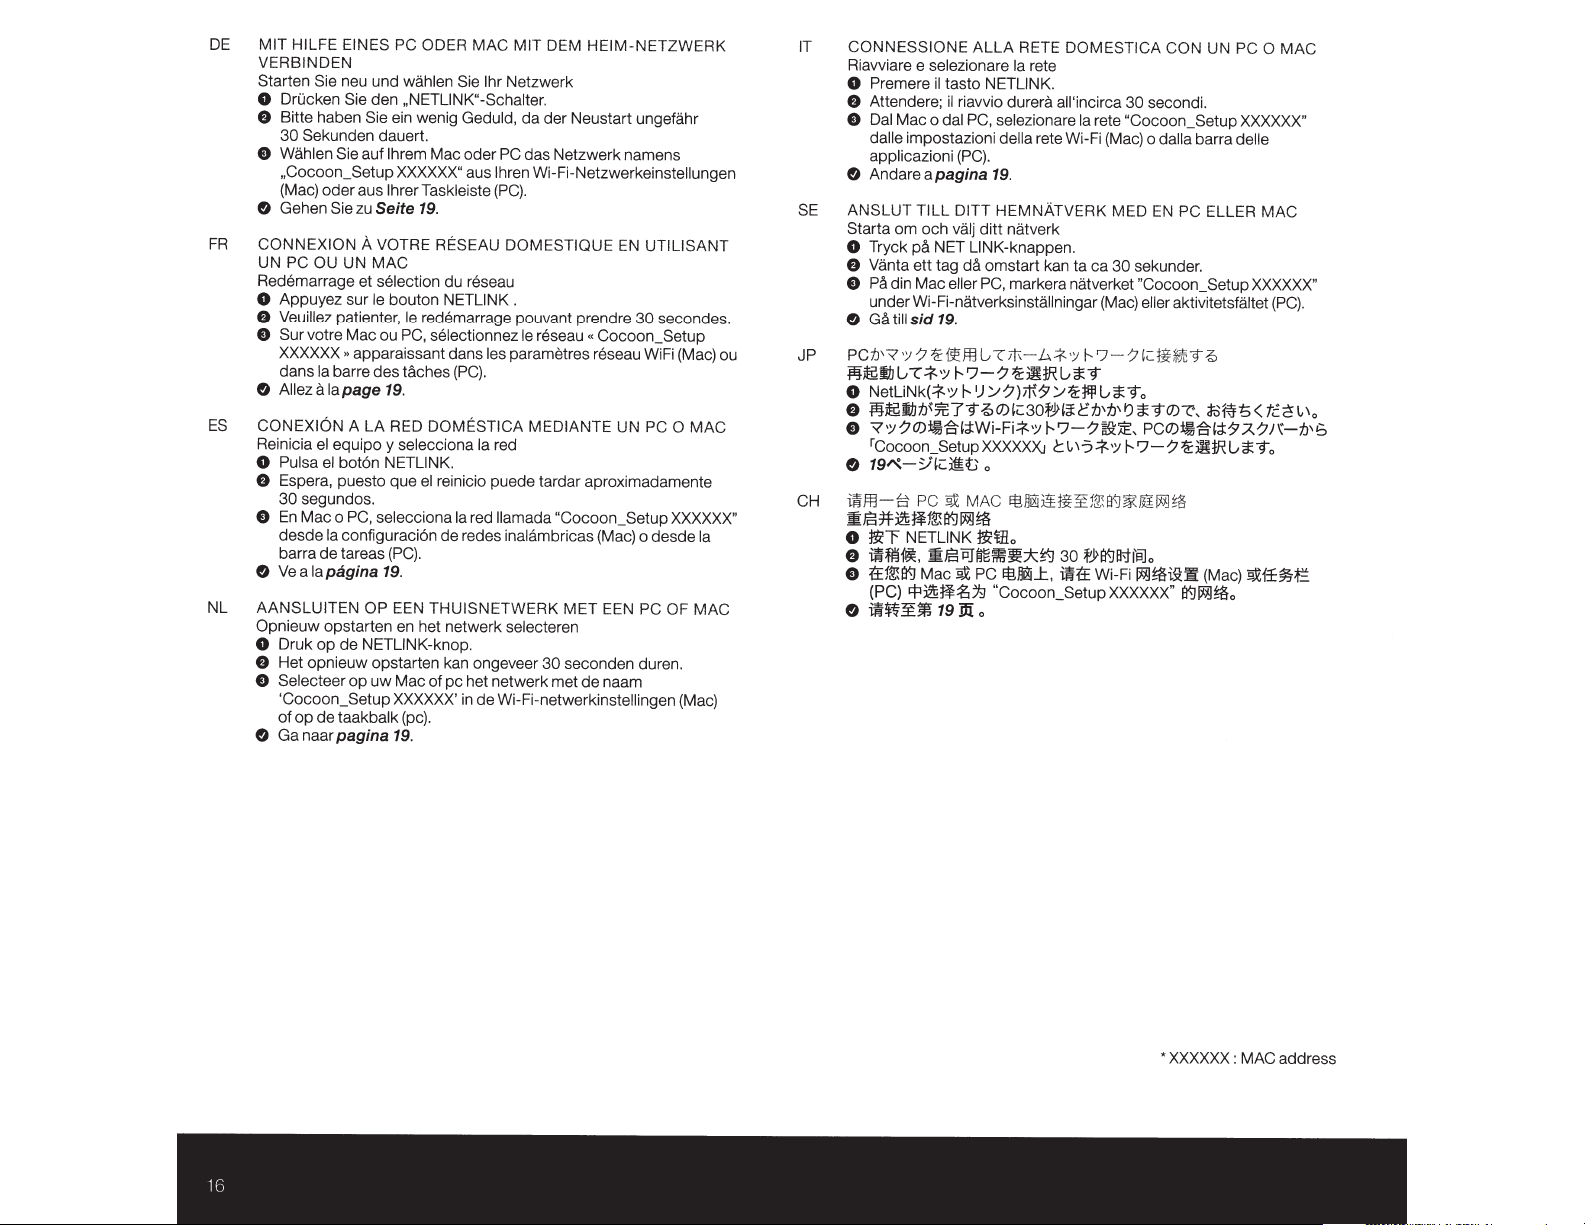
HILFE EINES PC ODER
VERBINDEN
Starten Sie
0
Drucken
0
Bitte haben
30
0
Wahlen
,Cocoon_
(Mac) oder aus lhrer Taskleiste
G
Gehen
FR
CONNEXION
UN
Redemarrage et selection du reseau
0
Appuyez sur le bouton NETLINK .
0
Veuillez patienter, le redemarrage pouvant prendre
0
Sur
XXXXXX,
dans
G
Allez
ES
CONEXION
Reinicia el equipo y selecciona
0
Pulsa
0
Espera, puesto que
30
0
En
desde
barra de tareas
G
Ve
NL
AANSLUITEN OP
Opnieuw
0
Druk
0
Het opnieuw opstarten kan ongeveer
0
Selecteer
'Cocoon_
of
G
Ga naar pagina
neu und wahlen
Sie
den
Sie
Sekunden dauert.
Sie
PC OU UN
votre Mac ou
Ia
a
Iapage
el bot6n NETLINK.
segundos.
Mac o
Ia
a lapagina
opstarten en het netwerk selecteren
op
op
de
ein wenig Geduld,
Sie auf lhrem Mac oder
Setup XXXXXX"
zu Seite
A
VOTRE RESEAU DOMESTIQUE
MAC
PC,
apparaissant dans les parametres reseau Wi
barre des taches
19.
A
LA
RED
PC,
selecciona
configuraci6n de redes inalambricas (Mac) o desde
(PC).
19.
EEN
de NETLINK-knop.
op
uw
Mac
Setup
XXXXXX'
taakbalk
19.
MAC
MIT
OEM
HEIM-NETZWERK
Sie lhr
Ne
,NETLINK"-Schalter.
aus lhren Wi-Fi-Netzwerkeinstellungen
19.
selectionnez le reseau
(PC).
DOMESTICA MEDIANTE
el
reinicio puede tardar aproximadamente
Ia
THUISNETWERK
of
pc
het netwerk met de naam
in
(pc).
tzwerk
da
der
PC
das Netzwerk namens
(PC).
Ia
red
red llamada
"Cocoon_Setup
30
de
Wi-
Fi
-netwerkinstellingen (Mac)
Neustart ungefahr
EN
" Cocoon_Se
UN
MET EEN
seconden duren.
UTILISANT
30
secondes.
tup
Fi
(Mac) ou
PC
0
MAC
XXXXXX"
Ia
PC OF MAC
IT
CONNESSIONE
Riavviare e selezionare
0
Premere
0
Attendere;
0
Dal Mac o dal
da
lle impostazioni de
ap
plicazioni
G
An
dareapagina
SE
ANSLUT
Starta
om och
0
Tryck
0
0
G
JP PC
~m~G-r*~t--'7-?~~m
0
o
0
G
CH
i~Ff]
~lt,g:J:t.z~f~rt:J~~
0
0
0
G
pa
Vanta
ett tag
Pa
din
under Wi-Fi-natverksinstallningar (Mac) eller aktivitetsfaltet
Ga ti
ll
sid
il''Y'Y?
NetLiNk(*•;;I'-
~mtJJtJ'jG79
?•;;?O)~'i~d;!:Wi-Fi*•;;
rcocoon_Setup
19~-:ll<::i1H.J
-g
~"f
NETLINK
mffl*,
tEf~fi"J
(PC)
tpz~;g,1;)
m~~m
ALLA
RETE DOMESTICA CON
il
tasto NETLINK.
il
TILL
val
NET LINK-knappen.
Mac
eller
19.
~~Ffl
Ia
riavvio durera all'incirca
PC,
selezionare
ll
(PC).
19.
DITT
HEMNATVERK MED
j
di
tt
natverk
da
omstart kan
PC,
markera natverket
G (
11\
1
J~?);t{$'~~~L_,*9o
.QO)I<=3
XXXXXXJ
o
PC
9X:
MAC
E13
~W
mli~fliJfjg~~="'~
Mac
19:ifio
o
9X:
PC
E131l&J...t
"Cocoon_ Setup XXXXXX"
UN
rete
30
Ia
a rete Wi-Fi {Mac) o dalla barra delle
ta
-
Lx*
·
;;
t--
G
*9
o
f'J>Ia:ct.l'tJ
t--
'7-?~:lE
C~'?*~
1l&Jii
:l§f~j(r,ft:J%1H
30
f'.J>ft:JI!<Hill
,
mff
second
rete
"Cocoon_ Se
EN
ca
30
sekunder.
"Cocoo n_S
'7-?
'<=
'!
N
~
''?
*9on._
,
PCO)~-ei;I:$'.A?J\-tJ'6
l--'7-?~~tRG*9o
I#Jtil
o
Wi-Fi
~~i9:1!
PC 0 MAC
i.
tu
p
XXXXXX"
PC
ELL
ER
e
tup
XXXXXX"
9
.Q
<~S~'5
<
(Mac)
fi"JI#.l~o
9X:ff%-t
MAC
(
PC).
t.:~
~,
0
*
XXXXXX :
MA
C address
Page 17
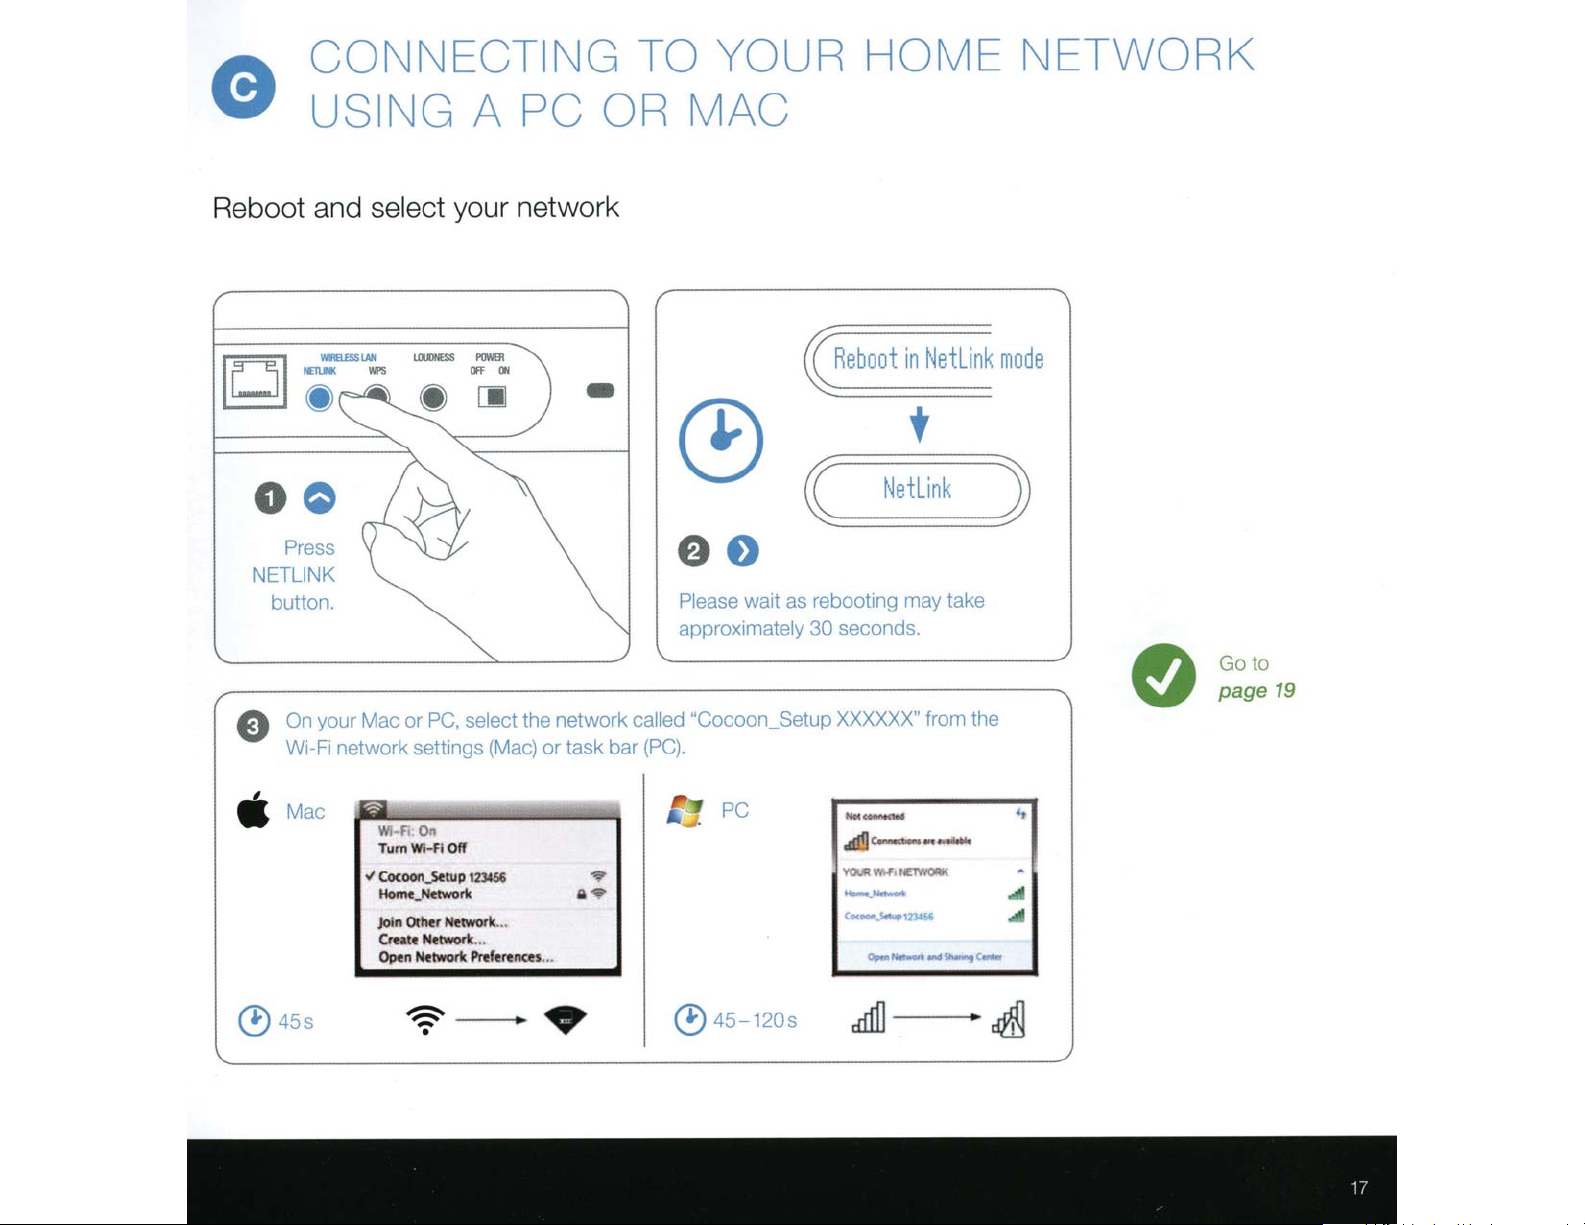
CONNECTING TO YOUR
HOME
NETWORK
e
Reboot and select
E)
USING A
Press
ETLINK
N
button.
your Mac or
On
network
W1-F1
LllllliiESS
PC,
sett1ngs
PC OR
your network
I'OMII
ON
Off
-
the network
select
task bar
or
ac)
(M
MAC
Please
approximately 30
called "Cocoon_
.
(PC)
wa1t
reboot1ng
as
Setup
t in
oo
b
Re
may
seconds.
XXXXXX"
link
Net
take
from the
mo
de
Go to
page
19
Mac
•
45s
(!)
·
~
o....
r
\\'
Wl..fl
Tum
Cocoon_.sttup
.t
Homt_Ndwork
join Other
Create Nttworlt.
Network
()pen
~
•
Off
123&56
Network.
..
Pn!ferencu
..
•
a•
...
•
(!)
PC
45-120s
--
.d!!J
'1'01.1111'1'0~
--
Ce<~1n-Si
cd11]
--
c-
~
·
,.,__,...so-..,
••
4l
..
c-
~
Page 18
DE
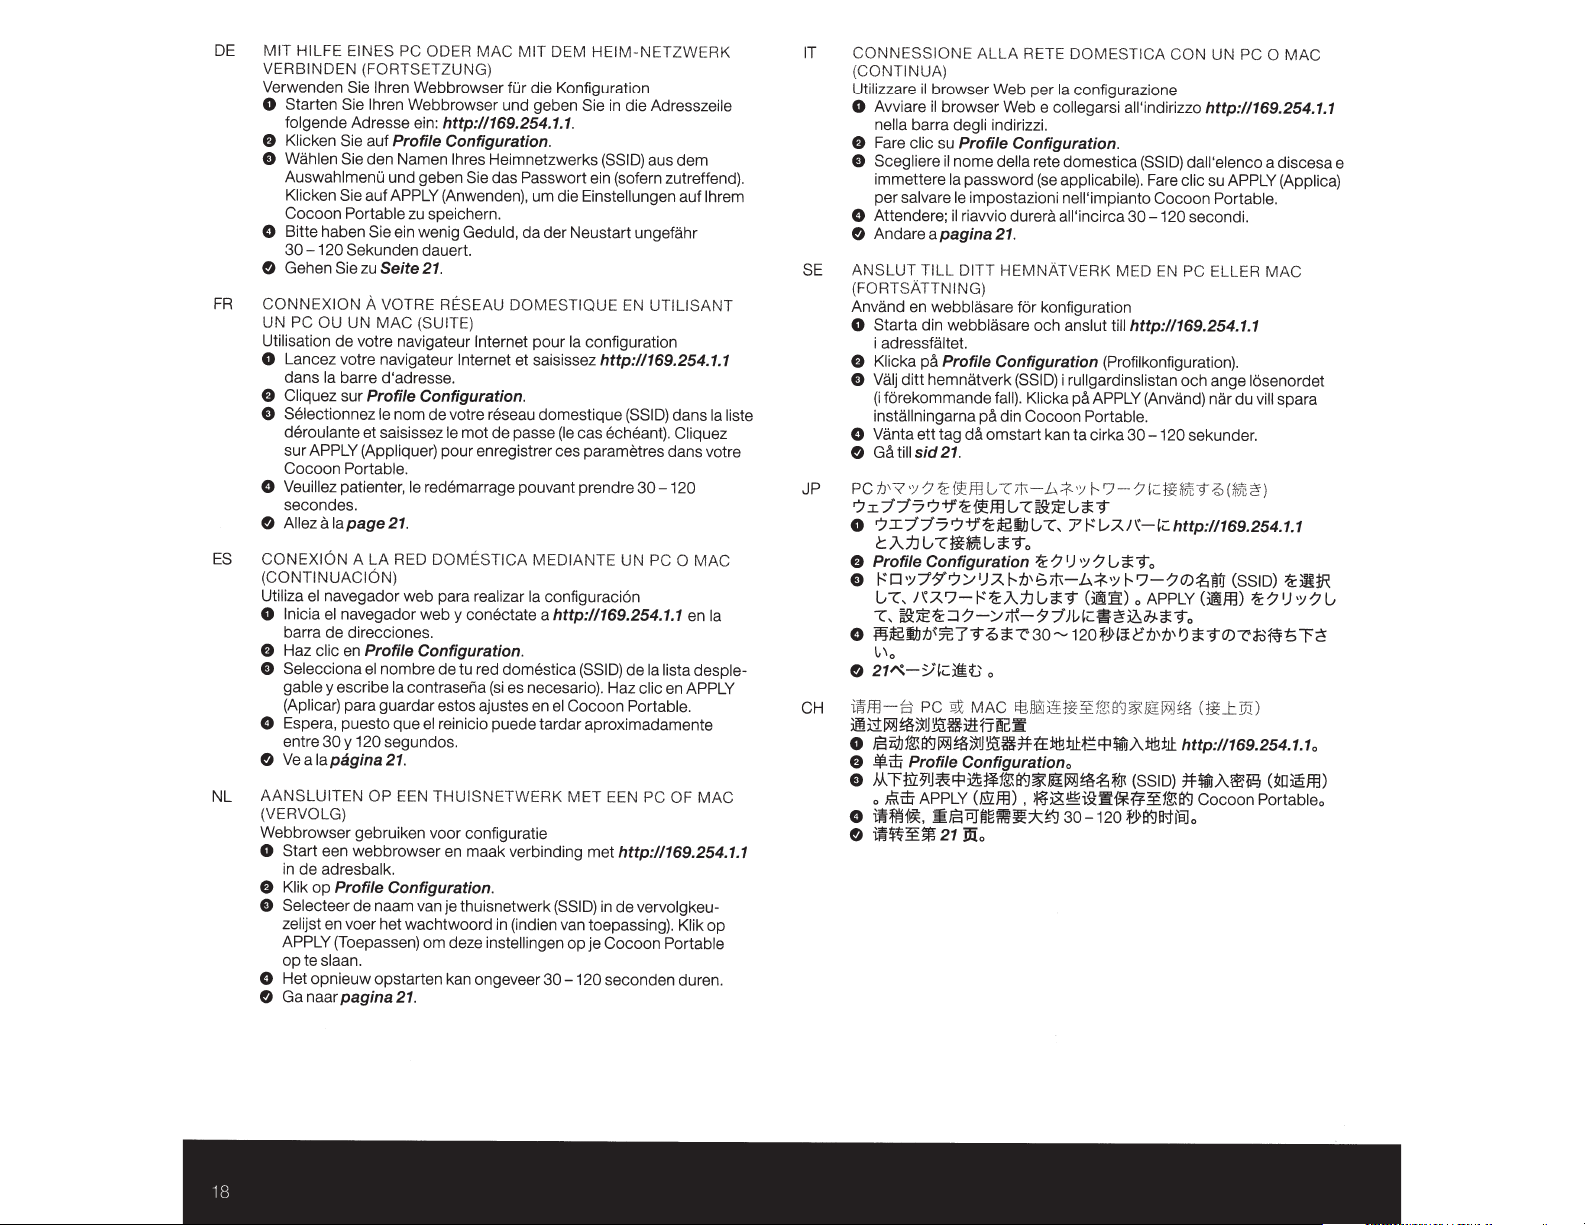
MIT
HILFE EINES PC ODER
VERBINDEN
Verwenden Sie
0
Starten Sie
folgende Adresse ein:
f)
Klicken
f)
Wahlen Sie
Auswahlmenu und geben Sie
Klicken
Cocoon
0
Bitte haben
30
&
Gehen
FR
CONNEXION
UN
PC OU
Utilisation
0
Lancez votre navigateur Internet et saisissez
dans
f)
Cliquez sur
f)
Selectionnez le
deroulante et saisissez
sur
Cocoon
0
Veuillez
secondes.
&
Allezalapage21.
ES CONEXION
(CO
NTINUA
Utiliza el navegador web para realizar
0
lnicia el
barra
f)
Haz clic en
f)
Selecciona
gable
(Aplica
0
Espera, puesto
entre
&
Ve
NL
AANSLUITEN
(VERVOLG)
Webbrowser gebruiken voor configuratie
0
Start
in
de
f)
Klik
f)
Selecteer
zelijst en voer het wachtwoord
APPLY
opteslaan.
0
Het opnieuw opstarten kan
&
Ga naar
(FORTSETZUNG)
lhren Webbrowser
lhren Web browser und geben
Sie
auf
Profile Configuration.
den Namen lhres Heimne
Sie
auf
APPLY
Portable
- 120
Sekunden dauert.
Sie
de
Ia
barre d'adresse.
zu speichern.
Sie
ein wenig Geduld,
zu
Seite
21.
A
VOTRE RESEAU DOMESTIQUE EN
UN
MAC
votre navigateur Internet
(SUITE)
Profile Configuration.
nom
de
APPLY
(Appliquer) pour enregistrer ces parametres dans vo
Portable.
patienter,
navegador web
de
direcciones.
le
redemarrage pouvant prendre
A
LA
RED DOMESTICA
CION)
Profile Configuration.
el
nombre
y
escribe
r)
para guardar estos ajustes en
30y
120
a
Ia
pagina
OP
een webbrowser en maak verbinding
ad
resbalk.
op
Profile Configuration.
de
naam van je thuisnetwerk (
(Toepassen) om deze
pagina
de
Ia
contraseiia
qu
e
el
reinicio puede tardar aproximadamente
segundos.
21.
EEN THUISNETWERK
21.
MAC
MIT
OEM
H
fur die Konfiguration
Sie
http:/1169.254.1.1.
tzw
).
urn die
da
po
der
ur
erks
ort
ein (sofern zutreffend).
Einstellungen auf lhrem
Neustart ungefa
Ia
configuration
das Passw
(Anwenden
http:/1169.254.1.1
votre reseau domestique
le
mot
de
passe
(le
cas
MEDIANTE UN
Ia
y
conectate a
tu red
onge
configuraci6n
http:/1169.254.1.1
domest
ica
(si
es
in
(indien van toepassing
instelli
veer 30
(SSID)
necesario). Haz
el
Cocoon Portabl
MET
met
SSID)
in
ng
en
op je Cocoon
-120
EIM-NETZWERK
in
die Adresszeile
(SSID)
aus
dem
hr
UTILISANT
(SSID)
dans
echeant).
30-1
PC 0
de
Ia
clic
EEN
PC OF
Ia
Cliquez
20
MAC
en
Ia
lis
ta
desple-
en APPLY
e.
MAC
http:/1169.254.1.1
de
v
er
volgkeu-
).
Klik op
Portab
le
seconden duren.
liste
tre
IT CONNESSI
(CONTINUA)
Utilizzare
0
Avviare
ne
f)
Fare
f)
Sce
i
per salvare
0
A
&
Andareapagina21.
SE ANSLUT TI
(FORTSATTN ING)
Anv
ONE
il
browser Web
il
browser Web e col legarsi all'indirizzo
ll
a
barra degli indirizzi.
clic su
gliere
mm
ettere
tt
endere;
LL
and
en
web
0 Starta din
i adressfaltet.
f)
Kl
ick
a pa
f)
Valj
(i forekommande
installningarna
0
Vanta
&
Ga
JP
PC
J'J•
?I~~7?~'5;~ffi
o
?
.t.A.t.J
e
Profile Configuration
f)
t'D
u
T,
o
~~ttJt.J
l,\0
&
21-"'-Y''<:::~t
CH
i~f§-g
~
i1WJ~~JW:
0
J6i1;JJ1~~WJ~
f)
~$Profile
0
M.TI.iL11J~>Pl2'H~
•
0
~~~.
&
il~:¥:m
Profile Configuration
ditt
hemnatverk (SSI
ett
tag
till
sid
21.
'?·
;;-:7
'5;{
:r:
~~
7
u
-rii
•:;
7$"'?Y
T,
J\:J..'7-i-!'5::/\t.Ju*9
~J'E-5::::J-:/'-Yit{-$'~Jl,,<::i!fal6<h-*9•
~
jt79
PC
#.\$APPLY
~16PJ
21
ALLA
RETE
DOMESTICA CON
per
Ia
co
n
fi
gurazione
Profile Configuration.
il
nome
della
re
te
domesti
ca
(
Ia
password (se applicabile).
le
impostazioni nell'impianto Cocoon
il
ria
vv
io durera
DI
TT
blasa
webb
lasare och anslut
fa
pa
da
oms
'f.i
ffllJ
?~{!:~
*1Cu
*9
1
)'A
~
0
llX
MAC
~l~H1~X
~JW:
a
ll
'incirca
HE
MNATV
ERK MED
re
for
ko
nfiguration
D)
i rullgardinslistan och ange losenor
ll)
.
Klicka
din
T/1\- b.
lJ
IIJ
f--il
*-z:-
~:J:t.f:E~!.tl:t>P
pa
Co
coo
n
ta
T~~u*9
·
~~i3iff1§f~
Po
rt
ka
n
ta
;:f:.•
:;
u
-c
7
1
'5::
-:7
)';
'
6!1\-b*'
3o
~
12of'.,Ha;ct.J'b'fJ
SS
Fa
30 - 120
till
http:/1169.254.1.1
(P
ro
fi
lkonfiguratio
APPLY
(Anvand )
rt
able.
ci
rk
a
30-120
f--'7-
-:/'l<:::m&,"C-9
t'
t--::z..;
\-rc.
1
-:7
u
*
9
0
Y
f-'7--:/'0):g
(~:§:
)
o
APPLY
1
1Eftl%1liW!~&
!fW)Ij{g!.tl:
Configuration.
1~~
~1liWJ~:gfl]l
(@ffi) ,
~~
~lli~
~::*:
~i2'i'-l*ff::¥:1
r-.J
30-120
(SSID)
f'}~II'Jfii].
m.
UN
PC 0
http:/1169.254.1.1
ID)
da
ll'el
re clic su
EN
enco
APPLY
Portable.
secondi.
PC
ELLER MAC
n)
.
nar
du
sekunder.
~
(
t>J
viii spara
"C~
http:/1169.254.1.1
il1.J
(SSID)
(
~ffi)
{f:-:/'
*9
0)-z:-
t.>~'S"'F<!
(:l~
..t
:Ui)
http:/1169.254.1.1.
:J:t.~A~~
~~
Coco
on
P
MAC
a discesa e
(Applica)
det
)
'5;)R
;IR
1
) ·:;
-:/'1.,
(~D~ffi)
or
ta
bl
e.
Page 19
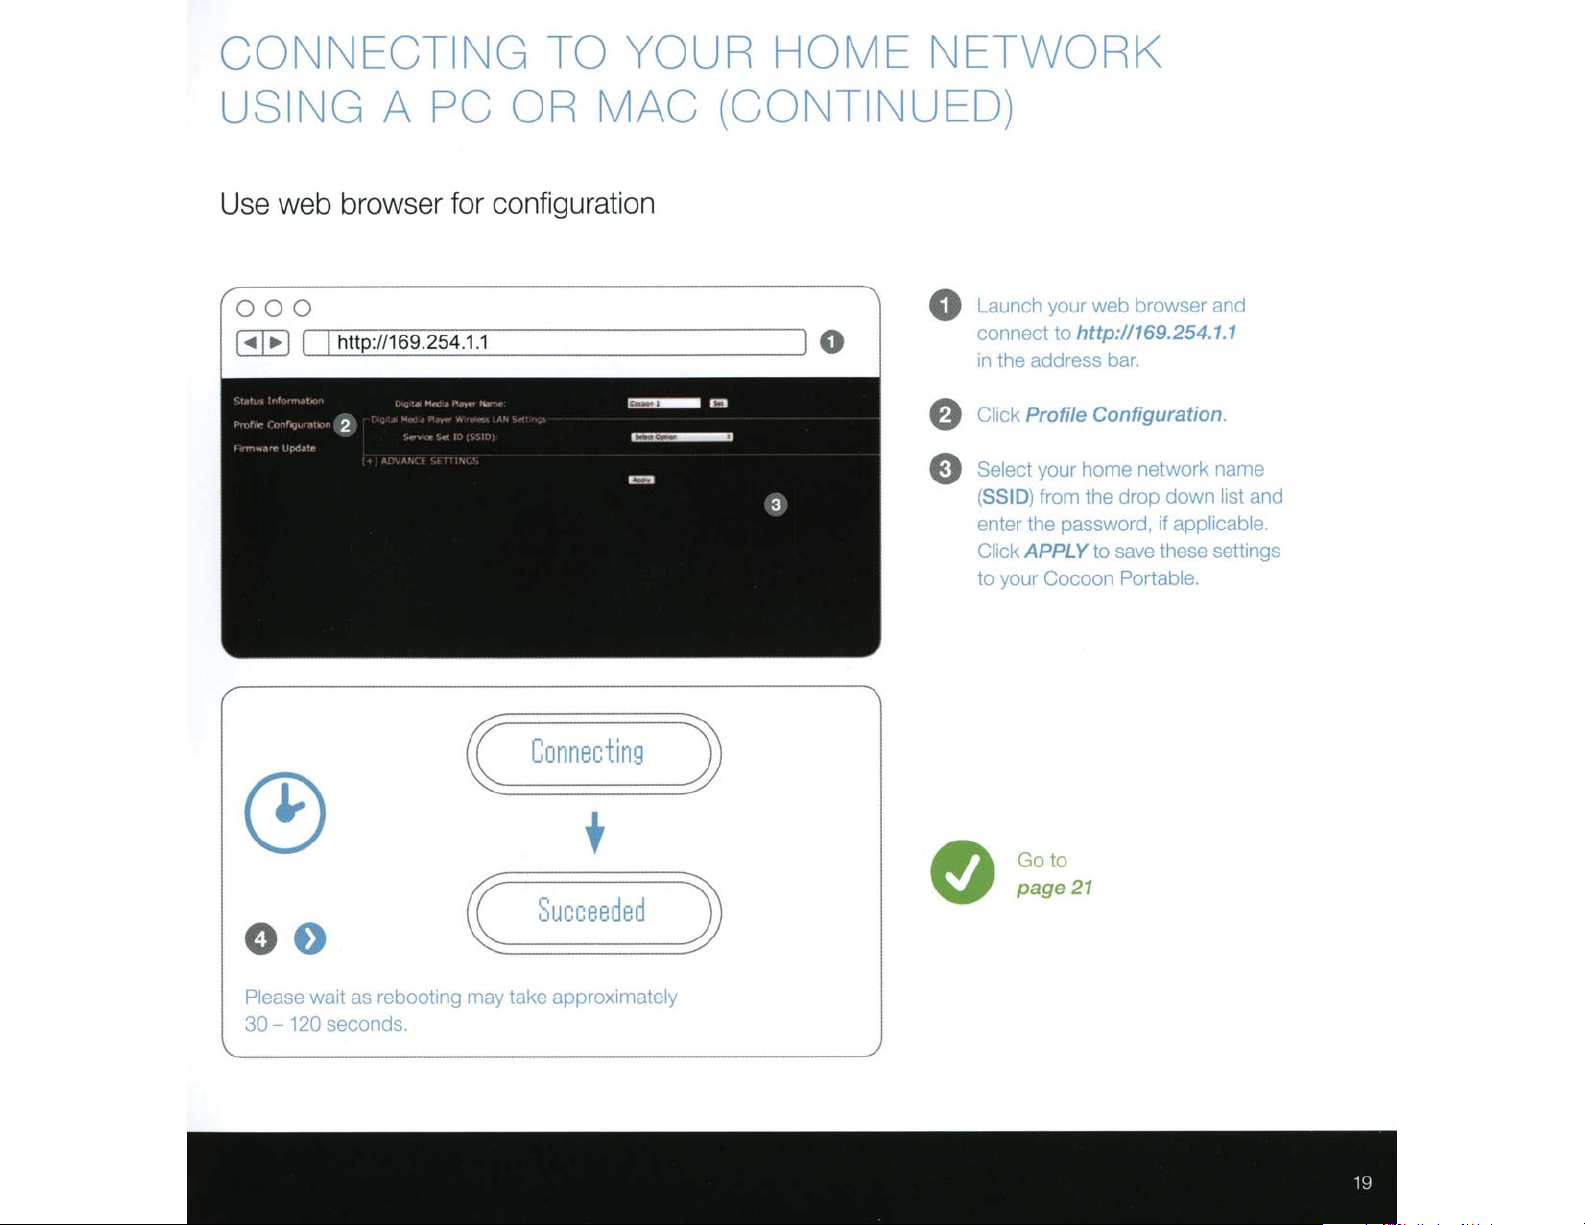
CONNECTING
TO YOUR
HOME
NETWORK
USING
Use web browser for configuration
000
Gill81~~~~
A PC
16
~
:V
~
tp
-
ht
54
~
.2
~
9
=
OR MAC
------------------~J
1
.
~
.1
~
(CONTINUED )
Launch your web browser and
0
0
connect to
the address bar.
rn
Click
f)
Select your home network
e
(SSID)
enter the password, if
Click
to your Cocoor. Portable.
.254.1.1
/1169
:
http
Profile Configuration.
down list and
from the dr
APPLY
op
li
app
to save these settrngs
11ame
cable
~
0 0
rebooting may take approximately
seconds.
120
as
Plense wart
-
30
(
Conne
cti
+
ucceeded
S
~
ng
)
)
e
to
Go
page
21
Page 20
DE
MIT HILFE
Downloaden
Gehen
nach ,Den
Den on
DER
DENON COCOON APP MU
Sie die Denon Cocoon
Sie
auf
den
on
Cocoon"
Cocoon
App
zu downloaden und zu installieren.
Wahlen Sie
. . . und genieBen
FR
ECOUTER SES MUSIOUES
einen Musik-Piayer ...
Sie lhre
COCOON
Telechargement
Allez
sur
Cocoon
De
non
Cocoon
de
decodage.
de
I'App Store®
»
ou
lisez le
au moyen
Selectionnez le lecteur
... et ecoutez vos morceaux
ES
COMO DISFRUTAR
DENON C
Descarga
Ve
o escanea
Den on
escaneo
Selecciona
a
Ia
OCOON
Ia apli
App
Cocoon
cac
Store"
el
c6
digo
con
de
c6digos.
el
reproductor de musica ...
... y empieza a disfrutar
NL
LUISTEREN
De
Denon Cocoon-
Ga
naar
Cocoon'
om
de
Selecteer
. . .
en
N
de
App
of
scan
Denon
Coco
de
muziekspeler ...
geniet van
AA
R
Store"
de
uw
App
Store®
oder
oder scannen
mit
lhrem
Smartphone und einer Scan-App
Lieblingsmusik.
AVEC
!'application
ou sur
code
de musi
Denon
Google Play
OR
pour
de
votre smartphone et d'une
que
preferes.
DE
LA
MUSICA CON
i6n
Denon
o
a Google Play
OR
Coco
para descargar e
el telefono inteligen
de
tu musica favorita.
MUZ
IE
K
M
app
of naar
ET
downloaden.
Google Play
OR-code met een
o
n-app
te
downloaden
favoriete muziek.
App
.
Google Play
Sie
und suchen Si
den OR-Code, um die
L'APPLICATION
SIK ABSPIELEN
Co
coon.
et cherchez
telec harger et
...
LA
APLICACION
o
n.
y busca
"Denon
instalar
te
y una
aplicaci6n
DE
DENON
COCOON
en zoek naar 'Denon
sca
n-app
en
installeren.
e
DE
NON
•
Denon
installer !'a pplication
ap
plication
Coco
on"
Ia aplicaci6n
de
-APP
op
uw
sma
r
tph
one
ASCOLTO Dl
IT
S
And a
oppure acquisire
Coco
Scegliere
.
..
NJ
SE
car
icare
re
on
e godetersi
UT
MUS
I
l'app
neii'App
con
illett
AV
MUSIK
CACO
De
non Co
St
ore®
il
cod
uno smartphone e un'app di scansione.
or
e
...
Ia
propria musica preferita .
MED
Ladda ner appen Denon Co
Ga ti
ll
App
el
l
er
kostnadsfria a
och en scannings
Valj
. ..
JP
7''/:
App
-l-7;;t/0)0R
/:J?-/7/'J
Music
cl;)ilf~td:E?f~~
CH
llili.:t
~
~
Wi! J
=~:jij,
Store® eller Google Play
sk
anna OR
Musikspelare
oc
h njut
f J
Store:t
Play
-ko
pp
en
av
din favoritmusik.
?-/
7/
L.,
<
I
~G
:J-~
~:9"?/D-
er(.O::
.:1.
ci;)
de
n
De
ap
p.
..
.
')
~
oogl
-
~'Y?
~GJ;.
DENON COCOON APP
Den on
Co
coo
App
Store"
~m~~=Ffll.ffH3tli\'/S)Zffl.ffill¥~
n A
lit
Google Play,
Appo
)2\i~E?f)f;Jit!ll:~
...
:tt
fiX
~!ir-~:@'~ll'J'Iit}f;
...
N L'APP DENON
coon
.
o su
Googl e Pla
ice
OR
per
sc
ar
HJA
LP
AV
APP
co
on
och
for
att
l
adda
non C
{
~ffl
e
P
lay
'
J-:9"-7/
7L.,-1'V-)~i~U~Ga:;9
<
t
c
pp
.
0
ner
oc
oon
med
l_
;"('g;JR~~[,{;
~
roen
'
H
~
G,
-1/.A
'd~''
fiX3l:
!Til'JE§'}f;
:It~
COCOON
y
e
cerc
are
icare e
insta
EN
DE
NON C
siik
efter
oc
h
installera
hjalp
av
o
on CocoonJ
.'
OR:J-
~~
1--J~Vr
"Denon
Cocoo
!.t:t
t·~
~
"Denon Cocoon"
ll
are
"Den
di
n
sm
~~~9
.A:fv
<
o
Denon C
l'
app
De
OCOON
on
Co
co
de
n
ar
tphone
~
/
V
t
c
'd~'
o
n"
~Btlil
ocoo
n on
on"
'h\
C
'T/
n
.A
7?
Page 21

ENJOYING MUSIC USING
TH
E
DENON
Download
Denon Cocoon
App
the
to
Go
Google Play and search for
uoenon
OR Code
Install the free Denon Cocoon
App
and a scanning app.
Cocoon"
download and
to
usrng your smartphone
COCOON
the
App
to
scan the
or
or
Store
APP
Select
Music
Player
...
and enjoy
..
.
your favourite music
@
Page 22
DE
MIT HILFE VON APPLE AIRPLAY
Beruhren
Sie das AirPlay-Symbol
MUSIK
der
Musik-App die
ABSPIELEN
unterstUtzt.
Wahlen Sie
GenieBen
FR
ECOUTER SES MUSIQUES
Cocoon
1 aus der Liste
Sie lhre Musik!
AVEC
der
AirPiay-Gerate
A
F'PL
E AIRPLAY
Activez l'ic6ne AirPlay depuis l'une des applications musicales
prenant en charge cette fonction.
ES
NL
Selectionnez
Profitez
COMO
Pulsa el
con
AirPlay.
Selecciona
iDisfruta
LUISTEREN
Tik
op
AirPlay
Selecteer
Geniet van
Cocoon 1 dans
de
votre musique
DISFRUTAR
DE
!
LA
MUSICA
Ia
liste
des appareils
CON APPLE AIRPLAY
icono AirPlay desde cualquier aplicaci6n
Cocoon 1 desde
de
Ia
musical
NAAR
het AirPiay-symbool
MUZIEK
in
Ia
lista de dispositivos
MET
APPLE AIRPLAY
een willekeurige muziek-app die
ondersteunt.
de
Cocoon 1 in
uw
muz
iek!
de
AirPiay-lijst met apparaten
AirPlay
AirPlay.
compa
AirPlay
tible
IT ASCOLTO
Sfiora
Dl
MUSICA
re
l'icona di AirPlay
supporti AirPlay.
Se
lezionare
Godetevi
SE
N
JUT
Tr
yck
Val
j
Njut av din
JP
APPLE
Apple
1
J
·;,o?
Ai
rPiay
.g-~~<13~GJ.;.<
CH
}ID
lj
:f±ff-lftr~:¥-f
f.A
AirPlay
ID\~~~~m.*o~!
Cocoon
Ia
musical
AV
MUSIK
pA
AirPiay-ikonen inifr
Denon Cocoon 1
mus
AIRPLA
AirPiay'1i::tti'f--1--9
vc<
t.:~~
7'
J
\1'
A
)i'i:\1(:
AIRPLAY
AirPlay
i~'§?
CO
N APPLE AIRPLAY
da
una qualsiasi app musicale che
1
da
ll'elenco dei dis positi
MED
HJALP
AV
APPLE AIRPLAY
An
nAg
frA
n
i
k!
Y".t~
1
)
I
J~<Pz~
AirPiays enhetslista
IJ
FIJ
I_;
\0
A
1--
t.l'
6
Cocoon 1
tc~~\!
ID\1)3:
§5fo
~mlfoJI~mi,ElH~~<P
on musik
l'
f§'
~{f:
.Q
~l_;<l_;
~::I.-:;)>;;
?77
{f:)gjR
Cocoon 1
vi
AirPlay.
app
som
st
od
1
)0)A
i
rPiay71'
~._;;~;
9
.
l'Ii:"'f
AirPlay
jer AirPlay.
::J
::.-:a:?
l!llff-
Page 23
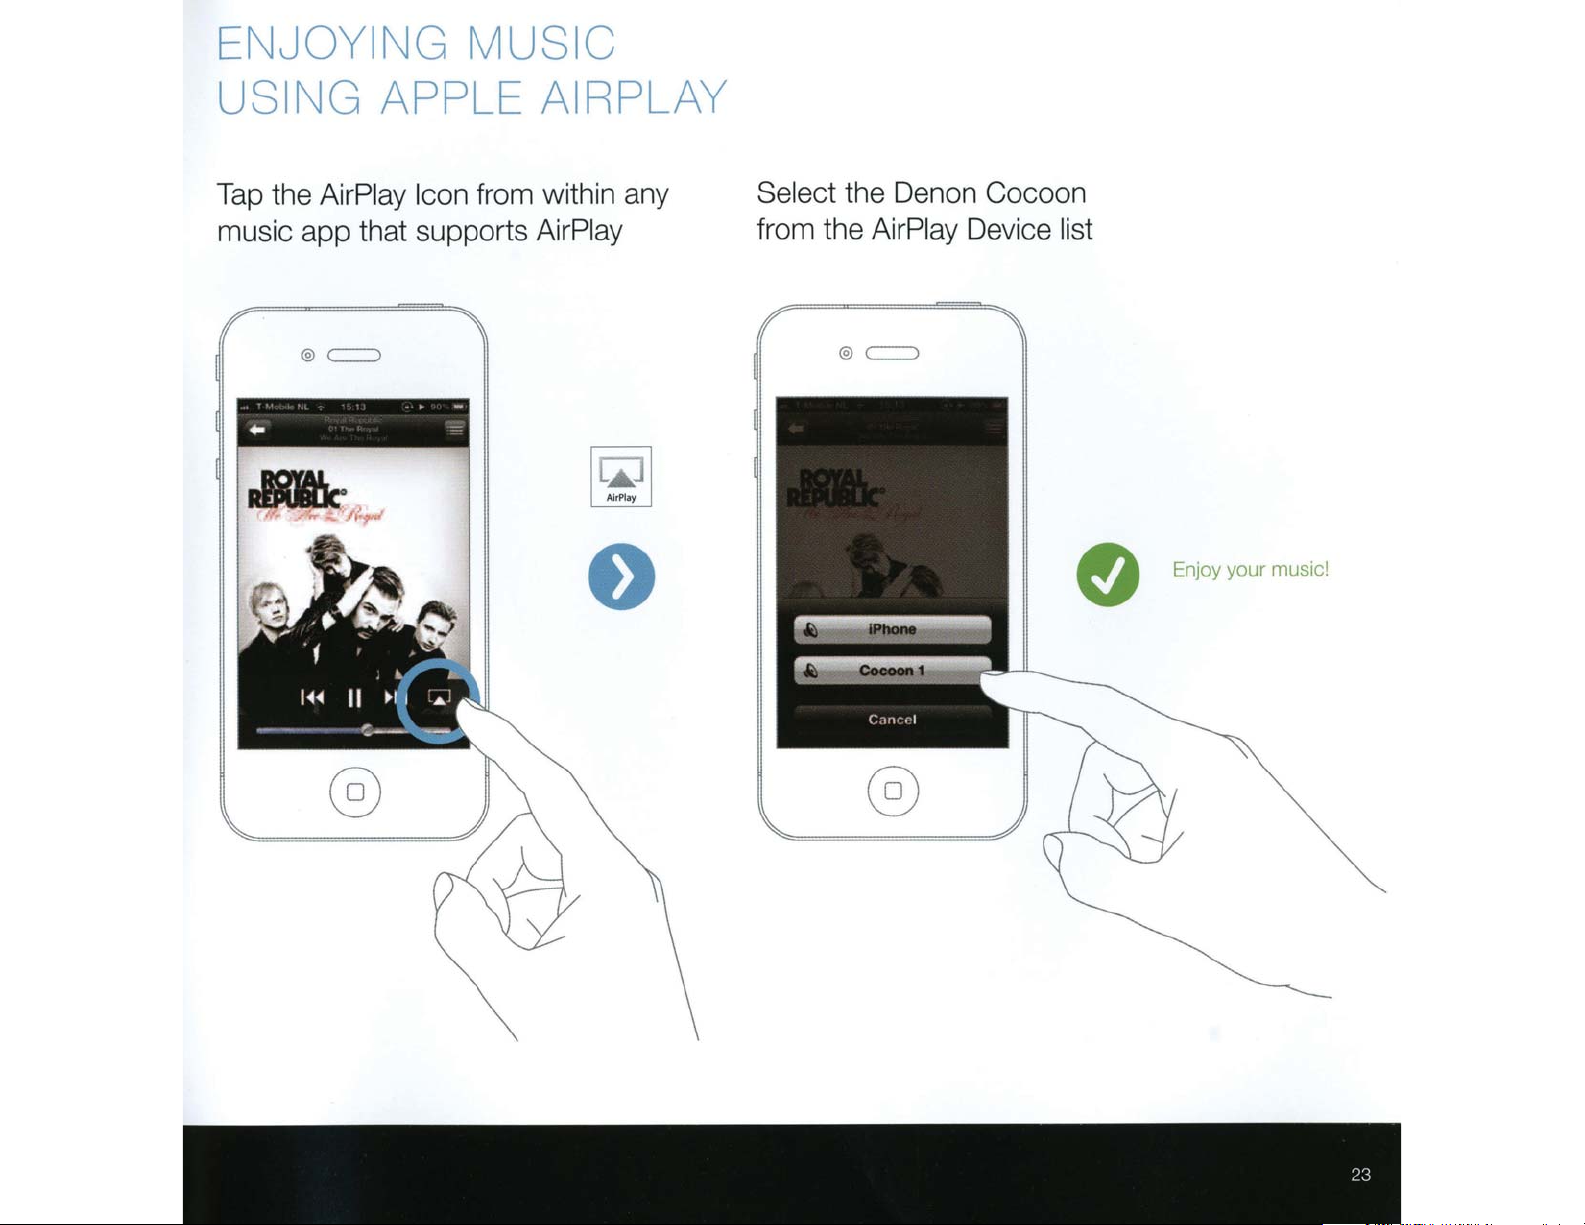
ENJOYING
MUSIC
USING
Tap the
music app that supports
AirPlay Icon
APPLE
from within any
AIRPLAY
AirPlay
Select
from the
the Denon
AirPlay
Cocoon
Device list
e
Enjoy
your
music!
Page 24

DEN
www.denon.com
ON
Page 25

Preparations
Operations
Informations
DSD-300
PORTABLE SPEAKER DOCK
Owner’s Manual
Page 26

SAFETY PRECAUTIONS
Preparations
Operations
Informations
n
CAUTION
RISK OF ELECTRIC SHOCK
DO NOT OPEN
CAUTION:
TO REDUCE THE RISK OF ELECTRIC SHOCK, DO NOT REMOVE
COVER (OR BACK). NO USER-SERVICEABLE PARTS INSIDE.
REFER SERVICING TO QUALIFIED SERVICE PERSONNEL.
The lightning flash with arrowhead symbol, within an equilateral
triangle, is intended to alert the user to the presence of
uninsulated “dangerous voltage” within the product’s enclosure
that may be of sufficient magnitude to constitute a risk of
electric shock to persons.
The exclamation point within an equilateral triangle is intended
to alert the user to the presence of important operating
and maintenance (servicing) instructions in the literature
accompanying the appliance.
WARNING:
TO REDUCE THE RISK OF FIRE OR ELECTRIC SHOCK, DO NOT
EXPOSE THIS APPLIANCE TO RAIN OR MOISTURE.
IMPORTANT SAFETY
INSTRUCTIONS
1. Read these instructions.
2. Keep these instructions.
3. Heed all warnings.
4. Follow all instructions.
5. Do not use this apparatus near water.
6. Clean only with dry cloth.
7. Do not block any ventilation openings.
Install in accordance with the manufacturer’s instructions.
8. Do not install near any heat sources such as radiators, heat registers,
stoves, or other apparatus (including amplifiers) that produce heat.
9. Do not defeat the safety purpose of the polarized or grounding-type plug. A
polarized plug has two blades with one wider than the other. A grounding
type plug has two blades and a third grounding prong. The wide blade or the
third prong are provided for your safety. If the provided plug does not fit into
your outlet, consult an electrician for replacement of the obsolete outlet.
10. Protect the power cord from being walked on or pinched particularly at
plugs, convenience receptacles, and the point where they exit from the
apparatus.
11. Only use attachments/accessories specified by the manufacturer.
12. Use only with the cart, stand, tripod, bracket, or table
specified by the manufacturer, or sold with the apparatus.
When a cart is used, use caution when moving the cart/
apparatus combination to avoid injury from tip-over.
13. Unplug this apparatus during lightning storms or when
unused for long periods of time.
14. Refer all servicing to qualified service personnel.
Servicing is required when the apparatus has been damaged in any way,
such as power-supply cord or plug is damaged, liquid has been spilled or
objects have fallen into the apparatus, the apparatus has been exposed to
rain or moisture, does not operate normally, or has been dropped.
15. Batteries shall not be exposed to excessive heat such as sunshine, fire or
the like.
Rechargeable battery precautions
•Do not toss the rechargeable battery into a fire, and do not heat up the battery.
Doing so could cause battery heat generation, battery fires, and battery
rupture.
•Do not subject the rechargeable battery to strong impact forces, such as
stabbing it with sharp objects (a nail, etc.), tapping it with a hammer, or
stepping on it. Doing so could cause battery heat generation, battery fires,
and battery rupture.
•Do not place foreign objects inside the Portable Speaker Dock. Doing so could
cause fires and electrical shocks.
•Do not charge, use, or place the Portable Speaker Dock in high-temperature
locations such as near heaters and stove burners, in areas exposed to direct
sunlight, or inside a car on a hot day. Doing so could cause battery heat
generation, battery fires, and battery rupture.
Such actions could also affect the performance and shorten the life of the
internal rechargeable battery.
•Stop using the Portable Speaker Dock immediately, and contact the sales
outlet or DENON in the event that abnormal odors or heat generation occurs
while using, charging, or storing the Portable Speaker Dock, or if other
abnormalities such as discoloration, etc., are detected.
•Always observe the following precautions:
•Do not place the Portable Speaker Dock in a microwave oven or in a high-
pressure container.
•Do not place the Portable Speaker Dock on top of an electromagnetic cooker.
•Do not attempt to recharge the internal rechargeable battery by connecting
it to a power outlet or a car's cigarette lighter socket.
•Strictly observe the recharging procedure and conditions specified by
DENON.
•If fluid should leak from the rechargeable battery and get into the eyes, do not
rub the eyes. Instead, rinse the eyes thoroughly with tap water, etc., and see
a doctor without delay for treatment. Leaving the eyes untreated could cause
vision impairment.
•Do not use the Portable Speaker Dock near medical devices, automatic doors,
or fire alarms, etc. Signals from the Portable Speaker Dock could interfere with
the operation of those devices, possibly causing malfunctions and accidents.
•If recharging fails to complete even though the prescribed recharging time
period has elapsed, stop the recharging operation. Continuing to recharge the
battery could cause battery heat generation, battery fires, and battery rupture.
CAUTION:
To completely disconnect this product from the mains, disconnect the plug
from the wall socket outlet.
The mains plug is used to completely interrupt the power supply to the unit
and must be within easy access by the user.
I
Page 27

FCC Information (For US customers)
Preparations
Operations
Informations
1. COMPLIANCE INFORMATION
Product Name: Portable Speaker Dock
Model Number: DSD-300
FCC ID: PPQ-DSD300
This product complies with Part 15 of the FCC Rules. Operation is subject
to the following two conditions: (1) this product may not cause harmful
interference, and (2) this product must accept any interference received,
including interference that may cause undesired operation.
Denon Electronics (USA), LLC
(a D&M Holdings Company)
100 Corporate Drive
Mahwah, NJ 07430-2041
Tel. (201) 762-6665
2. IMPORTANT NOTICE: DO NOT MODIFY THIS PRODUCT
This product, when installed as indicated in the instructions contained
in this manual, meets FCC requirements. Modification not expressly
approved by DENON may void your authority, granted by the FCC, to use
the product.
3. CAUTION
•TocomplywithFCCRFexposure compliancerequirement, separation
distance of at least 20 cm must be maintained between this product
and all persons.
•This product and its antenna must not be co-located or operating in
conjunction with any other antenna or transmitter.
4. NOTE
This product has been tested and found to comply with the limits for
a Class B digital device, pursuant to Part 15 of the FCC Rules. These
limits are designed to provide reasonable protection against harmful
interference in a residential installation.
This product generates, uses and can radiate radio frequency energy and,
if not installed and used in accordance with the instructions, may cause
harmful interference to radio communications. However, there is no
guarantee that interference will not occur in a particular installation. If this
product does cause harmful interference to radio or television reception,
which can be determined by turning the product OFF and ON, the user
is encouraged to try to correct the interference by one or more of the
following measures:
•Reorientorrelocatethereceivingantenna.
•Increasetheseparationbetweentheequipmentandreceiver.
•Connect the product into an outlet on a circuit differentfrom that to
which the receiver is connected.
•Consultthelocalretailerauthorizedtodistributethistypeofproductor
an experienced radio/TV technician for help.
CAUTION:
This product has a built-in battery, so you can also use it outdoors.
This unit has a water-proof structure that can withstand a small amount of
rain. However, be careful not to get water directly on this unit.
In case water gets on this unit, immediately turn the power off and wipe the
water off the surface.
IC Information (For Canadian customers)
1. PRODUCT
IC 4491A-DSD300
This product complies with RSS-210 of Industry Canada. Operation is
subject to the following two conditions: (1) this product may not cause
harmful interference, and (2) this product must accept any interference
received, including interference that may cause undesired operation.
This Class B digital apparatus complies with Canadian ICES-003.
2. CAUTION
To reduce potential radio interference to other users, the antenna
type and its gain should be so chosen that the equivalent isotropically
radiated power (e.i.r.p.) is not more than that permitted for successful
communication.
For Canadian customers:
This Class B digital apparatus complies with Canadian ICES-003.
NOTES ON USE
n
WARNINGS
•Avoid high temperatures.
Allow for sufficient heat dispersion when installed in a rack.
•Handle the power cord carefully.
Hold the plug when unplugging the cord.
•Keep the unit free from moisture, water, and dust.
•Unplug the power cord when not using the unit for long periods of time.
•Do not obstruct the ventilation holes.
•Do not let foreign objects into the unit.
•Do not let insecticides, benzene, and thinner come in contact with the unit.
•Never disassemble or modify the unit in any way.
•Ventilation should not be impeded by covering the ventilation openings
with items, such as newspapers, tablecloths or curtains.
•Naked flame sources such as lighted candles should not be placed on
the unit.
•Observe and follow local regulations regarding battery disposal.
•Do not expose the unit to dripping or splashing fluids.
•Do not place objects filled with liquids, such as vases, on the unit.
•Do not handle the mains cord with wet hands.
•When the switch is in the OFF (STANDBY) position, the equipment is not
completely switched off from MAINS.
•The equipment shall be installed near the power supply so that the power
supply is easily accessible.
•Do not keep the battery in a place exposed to direct sunlight or in places
with extremely high temperatures, such as near a heater.
n CAUTIONS ON INSTALLATION
z
z z
z
Wall
z For proper heat dispersal, do not install this unit in a confined
space, such as a bookcase or similar enclosure.
•More than 12 in. (0.3 m) is recommended.
•Do not place any other equipment on this unit.
II
Page 28

Getting started
Preparations
Operations
Informations
Thank you for purchasing this DENON product. To ensure proper operation, please read this owner’s manual carefully before using the product.
After reading them, be sure to keep them for future reference.
Contents
Getting started ·············································································· 1
Accessories ··················································································1
Features ························································································ 2
Cautions on handling ····································································2
Remote operation ········································································· 3
Preparations ·············································································4
Connections ··················································································· 5
Connecting the power cord ·························································· 5
Connecting a portable player ························································ 5
Connecting an iOS device·····························································6
Connecting to a home network (LAN) ········································ 7
Required system···········································································7
Network connections and settings ··············································· 8
Operations ··············································································12
Playback ······················································································· 13
Preparations ················································································ 13
Operations possible during playback ·········································· 13
Various memory functions ·························································· 14
Playing an iOS device ·································································14
AirPlay function ··········································································· 15
Listening to internet radio ··························································· 17
Playing a portable player ····························································· 17
Playing back files stored on PC
or NAS with Cocoon App (Music server) ···································· 18
How to make detailed settings ·················································· 20
Menu map ··················································································20
Setting the language (Language) ················································ 21
Setting the clock (Clock) ····························································· 21
Setting the volume limit (Max Vol Level) ···································· 23
Setting the network (Network Info.) ··········································· 23
Informations···········································································25
Part names and functions···························································26
Front panel ·················································································· 26
Rear panel ··················································································· 27
Remote control unit ···································································· 27
Other information ·······································································28
Trademark information ································································28
Explanation of terms ··································································· 29
Troubleshooting ·········································································· 31
Resetting the microprocessor ····················································33
Specifications ··············································································33
Accessories
Check that the following parts are supplied with the product.
q Quick Setup Guide .................................................................. 1
w CD-ROM (Owner’s manual) .................................................... 1
e Safety Instructions .................................................................. 1
r Warranty (for North America model only) ................................ 1
t Service network list ................................................................. 1
y Power cord .............................................................................. 1
u AC adaptor ............................................................................... 1
i Remote control unit (With battery) .......................................... 1
o Ethernet cable (CAT-5) ............................................................ 1
iy o
1
Page 29

Features
Preparations
Operations
Informations
Cautions on handling
Equipped with a lithium-ion battery
This unit is equipped with a rechargeable lithium-ion battery,
allowing you to enjoy high-quality sound anywhere without a
power outlet.
Equipped with a Dock that supports iPhone® and
iPod touch® (vpage6)
This unit employs a slide type Dock that comes out when you push
its front. By storing the Dock within this unit when you do not use
it, this unit becomes compact.
You can charge iPhone or iPod touch at the same time while
playing back music.
Compatible with the AirPlay® function
(vpage15)
You can enjoy comfortable streaming playback of music from
iPhone, iPod touch and iPad.
Received song and artist names appear on the display.
Compatible with “Cocoon App” for performing
basic operations of the unit with an iPhone and
iPod touch (vpage3)
Equipped with Wi-Fi capabilities including Wi-Fi
Protected Setup (WPS) (vpage9)
Compatible with the Internet radio (vpage17)
Also equipped with the Music Server function
that plays back audio content on the network
(vpage18)
In addition to music files stored on PC and music servers on the
network, you can enjoy various audio sources on the Internet such
as the Internet radio.
Equipped with an organic EL display with great
visibility
High contrast with low power can be achieved. Song and artist
names are clearly displayed.
•Before turning the power on
Check once again that all connections are correct and that there are
no problems with the connection cables.
•Power is supplied to some of the circuitry even when the unit is
set to the standby mode. When going on vacation or leaving home
for long periods of time, be sure to unplug the power cord from the
power outlet.
•About condensation
If there is a major difference in temperature between the inside of
the unit and the surroundings, condensation (dew) may form on
the operating parts inside the unit, causing the unit not to operate
properly.
If this happens, let the unit sit for an hour or two with the power
turned off and wait until there is little difference in temperature
before using the unit.
•Cautions on using mobile phones
Using a mobile phone near this unit may result in noise. If that
occurs, move the mobile phone away from this unit when it is in use.
•Moving the unit
Turn off the power and unplug the power cord from the power
outlet. Next, disconnect the connection cables to other system units
before moving the unit.
•About care
•Wipe the cabinet and control panel clean with a soft cloth.
•Follow the instructions when using a chemical cleaner.
•Benzene, paint thinner or other organic solvents as well as
insecticide may cause material changes and discoloration if brought
into contact with the unit, and should therefore not be used.
2
Page 30

Remote operation
Preparations
Operations
Informations
About the remote control unit
n Before using
Remove the insulating sheet before using the remote control unit.
n Inserting the batteries
q Remove the rear lid in the
direction of the arrow and
remove it.
w Load the two batteries properly
as indicated by the marks in the
battery compartment.
CR2025
•If the battery fluid should leak, carefully wipe the fluid off the inside
of the battery compartment and insert new batteries.
•Remove the batteries from the remote control unit if it will not be in
use for long periods.
•Used batteries should be disposed of in accordance with the local
regulations regarding battery disposal.
•The remote control unit may function improperly if rechargeable
batteries are used.
n Operating range of the remote control unit
Point the remote control unit at the remote sensor when operating
it.
Approx. 23 ft/7 m
30°30°
Cocoon App
Cocoon App is DENON’s proprietary application developed for iPhone
and iPod touch.
With Cocoon App, you can use iPhone and iPod touch to:
•Operate this unit
•Manually make the wireless LAN settings on this unit (vpage9)
•Change preset Internet radio stations (vpage17)
15:05iPod
Cocoon 1
SLEEP TIMER
00:29 min
iDevice
AUXiDeviceInternet RadioMusic Player
TunelnMusic Server
e Put the rear cover back on.
NOTE
•Insert the specified batteries in the remote control unit.
•Replace the batteries with new ones if the set does not operate
even when the remote control unit is operated close to the unit. (The
supplied batteries are only for verifying operation. Replace them
with new batteries at an early date.)
•When inserting the batteries, be sure to do so in the proper direction,
following the q and w marks in the battery compartment.
•To prevent damage or leakage of battery fluid:
•Do not use a new battery together with an old one.
•Do not use two different types of batteries.
•Do not attempt to charge dry batteries.
•Do not short-circuit, disassemble, heat or dispose of batteries in
flames.
•Do not keep the battery in a place exposed to direct sunlight or in
places with extremely high temperatures, such as near a heater.
NOTE
•The set may function improperly or the remote control unit may not
operate if the remote control sensor is exposed to direct sunlight,
strong artificial light from an inverter type fluorescent lamp or
infrared light.
•When using 3D video devices that transmit radio communication
signals (such as infrared signals etc.) between the various units
(such as the monitor, 3D glasses, 3D transmitter unit etc.), the
remote control unit may not operate due to interference from those
radio communication signals. If this occurs, adjust the direction and
distance of the 3D communication for each unit, and check that the
remote control unit operation is not affected by these signals.
3
•Bidirectional communication is performed.
•The Cocoon App can be downloaded for free from the App Store.
Page 31

Preparations
Preparations
Operations
Informations
Preparations
Preparations
Here, we explain the connections methods for this unit.
F Connections vpage5
vpage5
PORTABLE
PLAYER
v
page5
F Connecting to a home network (LAN) vpage7
v
page9
v
page10
v
page6
4
Page 32

Connections
Preparations
Operations
Informations
Preparations
NOTE
•Do not plug in the power cord until all connections have been
completed.
•When making connections, also refer to the owner’s manual of the
other components.
•Do not bundle power supply cords together with connection cables.
Doing so can result in humming or noise.
Connecting the power cord
When all of the connections are completed, insert the power plug into
the power outlet.
AC adaptor
(Supplied)
To household power outlet
(AC 120 V, 60 Hz)
NOTE
•When using this unit for the first time or when this unit has not been
used for a long time, its battery has no charge. In this case, connect
this unit to the power outlet before use.
•Only use the supplied power cord and AC adaptor.
•Be sure the power cord is unplugged from the power outlet before
connecting or disconnecting it to the AC inlet.
Power cord
(Supplied)
Connecting a portable player
•If a portable player is connected via the AUX IN jack of the unit,
music from the portable player can be played.
•For operating instructions see “Playing a portable player”
(vpage17).
Cables used for connections
Audio cable (sold separately)
Stereo mini
plug cable
Portable
Audio
HEADPHONE
5
Page 33

Connecting an iOS device
Preparations
Operations
Informations
Preparations
•You can enjoy music stored on an iOS device.
•For operating instructions see “Playing an iOS device” (vpage14)
Dismantling
iPod
Dock connector
NOTE
•Depending on the type of iOS device and the software version, some functions may not operate.
•Note that DENON will accept no responsibility whatsoever for any problems arising with the data on an
iOS device when using this unit in conjunction with the iOS device.
How to eject/store the Dock
q Push the front of the Dock, and it comes out. w Push it again to store within this unit.
Supported iPod models
•iPod / iPod classic
•iPod nano
•iPod touch
•iPhone
(as of July 2012)
NOTE
•When ejecting/storing the Dock, hold the upper part of this unit with your hand to prevent this unit from
moving or tipping over.
•When iPhone or iPod touch is not connected to this unit, store the Dock within this unit.
6
Page 34

Connecting to a home network (LAN)
Preparations
Operations
Informations
Preparations
When this unit is connected to your home network (LAN), you can
enjoy various audio sources via the network.
•Streaming playback from iPhone, iPod touch or iPad with AirPlay
•Internet radio
•Music files on music servers
Furthermore, you can operate this unit by using Cocoon App on
iPhone or iPod touch.
To check for any firmware update available for improving this unit,
etc., see “Firmware Update” (vpage24) in the menu.
Required system
n Broadband internet connection
n Modem
Device that connects to the broadband circuit and conducts
communications on the Internet.
A type that is integrated with a router is also available.
n Router
When using this unit, we recommend you use a router equipped
with the following functions:
•Built-in DHCP server
This function automatically assigns IP addresses on the LAN.
•Built-in 100BASE-TX switch
When connecting multiple devices, we recommend a switching
hub with a speed of 100 Mbps or greater.
•When using with a wireless LAN, prepare a broadband router
with built-in access point.
n Ethernet cable (supplied)
(CAT-5 or greater recommended)
•Use only a shielded STP or ScTP LAN cable which is available at
retailer.
•The normal shielded-type Ethernet cable is recommended. If a
flat-type cable or unshielded-type cable is used, other devices
could be affected by noise.
•If you have an Internet provider contract for a line on which network
settings are made manually, make the settings at “When “DHCP” is
set to “Off” on your router” (vpage10).
•With this unit, it is possible to use the DHCP and Auto IP functions
to make the network settings automatically.
•When using this unit with the broadband router’s DHCP function
enabled, this unit automatically performs the IP address setting and
other settings.
When using this unit connected to a network with no DHCP function,
make the settings for the IP address, etc., at “When “DHCP” is set
to “Off” on your router” (vpage10).
•When setting manually, check the setting contents with the network
administrator.
NOTE
•A contract with an ISP is required to connect to the Internet.
No additional contract is needed if you already have a broadband
connection to the Internet.
•The types of routers that can be used depend on the ISP. Contact an
ISP or a computer shop for details.
•DENON assumes no responsibility whatsoever for any
communication errors or troubles resulting from customer’s network
environment or connected devices.
•This unit is not compatible with PPPoE. A PPPoE-compatible router
is required if you have a contract for a type of line set by PPPoE.
•Do not connect an NETWORK connector directly to the LAN port/
Ethernet connector on your computer.
•To listen to audio streaming, use a router that supports audio
streaming.
7
Page 35

Network connections and settings
Preparations
Operations
Informations
Preparations
There are two types of network connections available – wired and wireless. Select either of them according to your router functions and operating environment.
Using a router equipped with the wireless LAN
function
Connect this unit to your router wirelessly. Connection procedures
differ according to the type of your router.
n When your router is equipped with a WPS button
(vpage9)
n When your router is not equipped with a WPS
button and you are using iPhone or iPod touch
(vpage9)
Using a router that is not equipped with the
wireless LAN function
Connect this unit to your router with an Ethernet cable. Connection
procedures differ according to your router settings.
n When “DHCP” is set to “On” on your router
(vpage10)
n When “DHCP” is set to “Off” on your router
(vpage10)
Using PC to make network settings of this unit
You can also use your PC to make network settings of this unit without
iPhone or iPod touch.
n When this unit is connected to your PC through
wireless LAN (vpage11)
“WPS” stands for Wi-Fi Protected Setup, a standard for making it
easy to make security settings required when connecting wireless
LAN devices.
8
Page 36

Wireless LAN
Preparations
Operations
Informations
Preparations
v See overleaf
Internet
Modem
To WAN side
iPhone
and iPod touch
Router with
access point
PC
n When your router is equipped with a WPS
button
By just pressing the WPS button on your router and this unit, the
wireless LAN connection settings are made.
•Before turning this unit on, make sure that an Ethernet cable is
not connected to this unit. If a cable is connected, have this unit
enter the power standby mode and disconnect the cable.
•After the unit is turned on, it takes approximately 30 seconds for
the WPS button on this unit to be available.
Press the WPS button of the router.
1
Press
WPS
2
“Connecting” is displayed, and the unit starts connecting to
the LAN.
•When the connection is made successfully, “Succeeded” appears.
•If the connection cannot be established, “Connection Failed” is
displayed. Perform steps 1 – 2 again.
•If this unit is still not connected to the network after this procedure,
manually enter the PIN code of WPS (vpage23).
on the rear panel.
Network connections and settings
n When your router is not equipped with a
WPS button and you are using iPhone or
iPod touch
Use the DENON application “Cocoon App” to make the wireless
LAN connection settings.
•“Cocoon App” is free.
•Before turning this unit on, make sure that an Ethernet cable is
not connected to this unit. If a cable is connected, have this unit
enter the power standby mode and disconnect the cable.
•To make the connection settings by using PC without iPhone or
iPod touch, see “Using PC to make network settings of this unit”
(vpage11).
Download “Cocoon App” to your iPhone or iPod
1
touch from App Store.
Start the application.
2
When the “Setup” screen is
3
displayed, tap “NetLink”.
•“Scanning network for devices”
is displayed.
SETUPBACK
App Setting
Device DSD300 Bed Room
Theme
NetLink
Language
DSD300 Bed Room Setting
Clock
Network Settings
Volume Settings
English
Auto
9
Page 37

Network connections and settings
Preparations
Operations
Informations
Preparations
Enter the encryption key.
q Enter the encryption key of your
4
router that is connected to your
iPod or iPhone.
w Tap “Join”.
21:12iPod
NETLINKBACK JOIN
Access Point
Cocoon
Enter Password
E R T Y U I O P
MQ
A
S D F G H J K L
Z X C V B N M
Join123 space
Place your iPod or iPhone in the dock of this unit
5
(vpage 6).
Tap “JOIN”.
The network settings are copied to
6
this unit from your iPod or iPhone
and this unit is connected to the
network.
•When this unit could not connect to the network, the application
displays an error message. Perform steps 1 – 6 again.
15:10iPod
NETLINKBACK JOIN
Access Point
Cocoon
Enter Password
Wired LAN
NAS
Internet
Router
For connections to the Internet, contact an ISP (Internet
Service Provider) or a computer shop.
Modem
To WAN side
To LAN port
To LAN port
Ethernet cable
(Supplied)
n When “DHCP” is set to “On” on your router
When using this unit with the broadband router’s DHCP function
enabled, this unit automatically performs the IP address setting
and other settings.
(Network Attached
PC
LAN port/
Ethernet
connector
Storage)
LAN port/
Ethernet
connector
You may need to set the network connection manually, depending on
the provider you use. To set the connection manually, use the setting
procedure of “When “DHCP” is set to “Off” on your router”.
n When “DHCP” is set to “Off” on your router
This section explains the settings when connecting this unit to a
network that does not have a DHCP function.
To configure the settings manually, check the setting details with
your network administrator.
Complete steps 1 – 4 in “When this unit is connected
1
to your PC through wireless LAN” (vpage 11).
On the page that appears, set the information
2
necessary for the network connection.
q Click “Profile Configuration” on the upper left part of the
page.
w Click “ADVANCE SETTING”.
e Enter required items.
r When settings are completed, click “Apply”.
t Connect the Ethernet cable.
•“Connecting” is displayed, and the unit starts connecting to the
LAN.
•When the connection is made successfully, “Succeeded” appears.
•If the connection cannot be established, “Connection Failed” is
displayed. Turn this unit off and on.
If this unit is still not connected to the network after this procedure,
complete steps 1 – 2 again.
The wireless network name (SSID) and encryption method used for
this unit are the same as those set for the connected iPod or iPhone.
Connect the supplied Ethernet cable by referring to
1
the above gure.
Press X to turn on power to the main unit.
2
•When this unit could not connect to the network, perform steps 1
and 2 again.
10
Page 38

Using PC to make network settings of this
Preparations
Operations
Informations
Preparations
unit
n When this unit is connected to your PC through
wireless LAN
Before turning this unit on, make sure that an Ethernet cable is not
connected to this unit. If a cable is connected, have this unit enter
the power standby mode and disconnect the cable.
Press X to turn on power to the main unit.
1
It takes approximately 30 seconds for this unit to start.
Press NETLINK on the rear panel.
2
This unit restarts and “NetLink” appears on the display.
Connect to “Cocoon_Setup” in the wireless network
3
settings on your PC.
•If “Cocoon_Setup” is not displayed, refresh the network.
•It may take up to two minutes to establish the connection.
Launch the browser on the PC connected to this unit,
4
and enter the address “http://169.254.1.1”.
On the page that appears, set the information
5
necessary for the network connection.
q Click “Profile Configuration” on the upper left part of the
page.
w From the “Digital Media Player Wireless LAN Settings”
dropdown list, select the SSID (Service Set ID) of your
router.
e Enter the password.
r When settings are completed, click “Apply”.
•“Connecting” is displayed, and the unit starts connecting to the
LAN.
•When the connection is made successfully, “Succeeded” appears.
•If the connection cannot be established, “Connection Failed” is
displayed. Perform steps 1 – 5 again.
•It may take 120 seconds to establish the network connection.
Network connections and settings
•Enter the name in the “Friendly Name” box and click “Set” to
change the friendly name. A friendly name is the name of this unit
that is presented to the network.
•In “ADVANCE SETTING”, you can manually make settings such as
the IP address.
NOTE
NETLINK does not support proxy servers.
11
Page 39

Operations
Preparations
Operations
Informations
Operations
Operations
Here, we explain functions and operations that let you make better use of this unit.
F Playback vpage13
PORTABLE
PLAYER
v
v
page14
page17
v
v
page15
page18
F How to make detailed settings vpage20
v
page17
12
Page 40

Playback
Preparations
Operations
Informations
Operations
This section provides how to play back music with this unit.
This unit can play back music from the following devices (media).
•iPhone and iPod
When connected to this unit (vpage14)
When using AirPlay (vpage15)
•Internet radio (vpage17)
•Portable player (vpage17)
•Music server (PC on the network) (vpage18)
Preparations
Turning the power on
Press X to turn on power to the unit.
This unit is turned on and the operation
button on top lights.
n When power is switched to standby
Press X.
•The operation button on top lights off and this unit enters the
standby mode.
Preparations
Setting the current time (Auto Adjust)
(12-Hour Display)
When this unit is connected to the network, the current time is
automatically set.
•The default time zone of this unit is set to Eastern Standard Time.
To change the Time Zone and Summer Time, see “Adjusting the
clock automatically (Auto Adjust)” (vpage21).
•When this unit is not connected to the network, set the time
manually. See “Setting the current time (Manual Adjust) (12-Hour
Display)” (vpage22).
Operations possible during playback
Selecting the input source
You can select the device for which this unit outputs the audio that is
connected to this unit.
Press .
•The input source is switched each time the button is pressed.
z
iDevice
z
AUX
z These items are displayed if a relevant device is connected
to this unit.
Adjusting the master volume
Press + or –.
The volume level is displayed.
GAdjustable rangeH
0 – 50
Preset 2Preset 1
Preset 3
n Completely turning off the power
Power continues to be supplied to some of the circuitry even when
the power is in the standby mode. When leaving home for long
periods of time, unplug the power cord from the power outlet.
NOTE
The settings made for the various functions may be cleared if the
power cord is left unplugged from a power outlet for an extended
period of time.
13
Page 41

Operations possible during playback
Preparations
Operations
Informations
Operations
Adjusting the tone (LOUDNESS)
When you press LOUDNESS to the “On” (h) state, bass and treble
sounds, which are hard to hear at a low volume level, are enhanced for
a more natural audio quality.
Press LOUDNESS
•Press the button again to the “Off” (j) state to return to the
original audio quality.
on the main unit.
Various memory functions
Last function memory
This function stores the settings which were made before going into
the standby mode.
When the power is turned back on, the settings are restored.
Playing an iOS device
With this unit, you can listen to music on an iOS device. It is also
possible to operate the iOS device from the main unit or remote
control.
For information on the iOS device models that can be played back with
this unit, see “Connecting an iOS device” (vpage6).
Load the iOS device onto the Dock of this unit
(vpage 6 “Connecting an iOS device”).
When the iOS device is loaded to the dock tray on this unit, the input
source automatically switches to “iDevice”.
•During AirPlay, the input source does not switch automatically.
Press
NOTE
This function is activated around 30 seconds after the power is turned
on.
to switch the input source to “iDevice”.
n Streaming music stored in iPhone, iPod touch or
iPad directly to the unit (vpage15)
n Playing iTunes music with this unit
(vpage15)
n Disconnecting the iOS device
Press X to set the standby mode.
1
Remove the iOS device from the
2
Dock of this unit.
NOTE
•Depending on the type of iOS device and the software version,
some functions may not operate.
•Note that DENON will accept no responsibility whatsoever for any
problems arising with the data on an iOS device when using this unit
in conjunction with the iOS device.
n Remote control and iOS device button relations
Remote control
buttons
13 13
8, 9
(Press and release)
8, 9
(Press and hold)
iOS device
buttons
8, 9
(Press and
release)
8, 9
(Press and hold)
Operation on this unit
Play the track / Pause the track.
Play the track from the beginning/Play the
next track.
Fast-reverse the track/Fast-forward the
track.
14
Page 42

AirPlay function
Preparations
Operations
Informations
Operations
v See overleaf
Enjoy music from your iTunes library with high quality sound anywhere
in your home.
Use the Apple Remote appz for iPhone, iPod touch and iPad to control
iTunes from any room in your home.
z Available as a free download from the App Store.
NOTE
•Before using the AirPlay function, this unit must be connected to the
network. For how to connect this unit to the network, see “Network
connections and settings” (vpage8).
•To use the AirPlay function, you must update iPhone, iPod touch or
iPad to iOS 4.2.1 or higher.
n Streaming music stored in iPhone, iPod touch or
iPad directly to the unit
Make the Wi-Fi settings for iPhone, iPod touch or
1
iPad.
•For details, see your device’s manual.
Startup iPhone, iPod touch, or iPad music or iPod
2
app.
is displayed on the iPhone, iPod touch or iPad screen.
Tap the AirPlay icon .
3
NOTE
When the AirPlay function is used, this unit plays back at the volume
level set on iPhone, iPod touch, iPad, or iTunes.
First minimize the volume level on iPhone, iPod touch, iPad, or iTunes
before playback. Then, start playback and adjust the volume to the
desired level.
n Playing iTunes music with this unit
Install iTunes 10, or later, on a Mac or Windows PC
1
that is connected to the same network as this unit.
Turn this unit ON.
2
Launch iTunes and click the AirPlay icon
3
displayed in the lower right of the window and select
this unit from the list.
Selecting multiple speakers (devices)
It is possible to play iTunes songs on your home’s AirPlay compatible
speakers (devices) other than those of this unit.
Click the AirPlay icon and select “Multiple
1
Speakers” from the list.
Check the speakers you want to use.
2
Multiple Speakers
Master Volume
My Computer
This Computer
Cocoon 1
AirPlay Device
4
Select the speaker you want to use.
Cocoon 1
Cancel
Choose a song and click play in iTunes.
The music will stream to this unit.
4
15
Page 43

n Perform iTunes playback operations with the
Preparations
Operations
Informations
Operations
remote control unit of this unit
With this unit’s remote control unit, you can perform iTunes song
play, pause, and auto search (cue) operations.
Select “Edit” – “Preferences...” on the menu.
1
Select “Devices” in the iTunes setting window.
2
Check “Allow iTunes control from remote speakers”,
3
and then click “OK”.
Devices
AirPlay function
•Source input will be switched to “AirPlay” when AirPlay playback
is started.
•You can stop AirPlay playback by choosing other input source.
•For information about how to use iTunes, also see the Help for
iTunes.
•The screen may differ depending on the OS and software versions.
General Playback Sharing Store Parental Advanced
Device backups:
Prevent iPods, iPhones, and iPads from syncing automatically
Allow iTunes control from remote speakers
iTunes is not paired with any Remotes
?
more than 5%Warn when
of the data on this computer will be changed
Reset Sync History
Devices
Delete Backup ...
Forget All Remotes
OK Cancel
16
Page 44

Listening to internet radio
Preparations
Operations
Informations
Operations
Internet radio refers to radio broadcasts distributed over the Internet.
Internet radio stations from around the world can be received.
NOTE
Before playing back the Internet radio, this unit must be connected
to the network. For how to connect this unit to the network, see
“Network connections and settings” (vpage8).
Press to switch the input
2
source to “Preset 1”, “Preset 2”
or “Preset 3”.
Playback starts.
Playing a portable player
The following describes the procedure for playing portable player.
Connect the portable player to this unit
1
(vpage 5 “Connecting a portable player”).
Press X to turn on power to the
2
main unit.
Important information
The broad cast station types and specifications supported by this unit
for playback are as follows.
GPlayable broadcast station typesH
Supported file types Internet radio
WMA (Windows Media Audio)
MP3 (MPEG-1 Audio Layer-3)
GPlayable broadcast station specificationsH
Sampling
frequency
WMA (Windows
Media Audio)
MP3 (MPEG-1
Audio Layer-3)
32/44.1/48 kHz 48 – 192 kbps .wma
32/44.1/48 kHz 32 – 320 kbps .mp3
Bit rate Extension
P
P
Listening to preset Internet radio stations
Prepare for playback.
q Check the network environment, then turn on this unit’s
1
power (vpage8 “Network connections and settings”).
w If settings are required, make the “Network connections and
settings” (vpage8).
e If settings are required, make the “Setting the current time
(Auto Adjust) (12-Hour Display)” (vpage13).
•Use Cocoon App to change preset details.
•There are many Internet radio stations on the Internet, and the
quality of the programs they broadcast as well as the bit rate of the
tracks varies widely.
Generally, the higher the bit rate, the higher the sound quality, but
depending on the communication lines and server traffic, the music
or audio signals being streamed may be interrupted. Inversely, lower
bit rates mean a lower sound quality but less tendency for the sound
to be interrupted.
•“Server Full” or “Connection Down”is displayed if the station is
busy or not broadcasting.
•The Internet radio station name appears on the display of this unit.
NOTE
The radio station database service may be suspended without notice.
n Internet radio operation buttons
Operation buttons Function
+, – Volume up / down
13
X
Mute On/Off
Switching the input source
Power on/standby
Press to switch the input
3
source to “AUX”.
Play the component connected to
4
this unit.
17
Page 45

Playing back files stored on PC or NAS with Cocoon App (Music server)
Preparations
Operations
Informations
Operations
This unit can play back music files and playlists (m3u, wpl) stored on
a PC, Digital Media Server (DMS) and on Network Attached Storage
(NAS) that supports DLNA.
NOTE
•Before playing back music files on music servers, this unit must be
connected to the network. For how to connect this unit to the network,
see “Connecting to a home network (LAN)” (vpage7).
For playable file formats and restrictions, see“Important information”
(vpage19).
Applying media sharing settings
Here, we apply the settings to share music files stored on a PC and
NAS on the network.
n Sharing media stored in PC
If you are using a media server, be sure to apply this setting first.
•While this unit is operated by a media control device, “Music server”
appears on the display of this unit.
•When selecting this unit from the media control device, the name of
this unit is displayed as its friendly name.
•To check the friendly name, see “Checking the network information”
(vpage23).
Settings for playing back with Windows Media
Player 12 (Windows 7)
NOTE
Perform this procedure after changing the control panel display to
“Category”.
In the PC’s “Control Panel”, select “Network
1
and Internet” - “Choose homegroup and sharing
options”.
Select the “Stream my pictures, music, and videos
2
to all devices on my home network” check box and
select “Choose media streaming options”.
Select “Allowed” in the drop-down list for “Cocoon
3
1”.
Select “Allowed” in the drop-down list for “Media
4
programs on this PC and remote connections...”.
Click “OK” to nish.
5
Settings for playing back with Windows Media
Player 11
Start up Windows Media Player 11 on the PC.
1
Select “Media Sharing” in the “Library”.
2
Click the “Share my media” check box, select
3
“Cocoon 1”, and then click “Allow”.
As you did in step 3, select the icon of the device
4
(other PCs and mobile devices) you want to use as a
media controller, and then click “Allow”.
Click “OK” to nish.
5
Sharing media stored in NAS
Change settings on the NAS to allow this unit and other devices (PCs
and mobile devices) used as media controllers to access the NAS. For
details, see the owner’s manual that came with the NAS.
18
Page 46

Playing back files stored on PC or NAS with Cocoon App (Music server)
Preparations
Operations
Informations
Operations
Important information
About playback
When you start playback on PC, NAS, or DMS, the input source for
this unit automatically switches to “Music server”, and audio is output
from this unit.
The name of the currently played back track and its artist name appear
on the display of this unit.
When this unit is operating, you can perform operations such as
playing back and stopping files through DMC operations. You can also
adjust or mute the volume.
Pressing while this unit is playing back stops the playback on this
unit and switches to “Preset 1”.
•When using a server that supports transcoding such as Windows
Media Player (version 11 or higher), you can play back WMA
Lossless files.
•Depending on the played back file, the track name or artist name
may not be displayed.
NOTE
The music display order depends on the specifications of your PC,
NAS, or DMS.
n Music server operation buttons
Operation buttons Function
+, – Volume up / down
13
X
Mute On/Off
Switching the input source
Power on/standby
•The network audio playback function of this unit connects to the server using technologies shown below.
•Windows Media Player Network Sharing Service
•File types that this unit can play back and specifications are shown below.
GSupported file typesH
Supported file types Music server
WMA (Windows Media Audio)
MP3 (MPEG-1 Audio Layer-3)
WAV
MPEG-4 AAC
FLAC (Free Lossless Audio Codec)
A server or server software compatible with distribution in the corresponding formats is required to play
music files via a network.
z1 Music server
•This unit is compatible with MP3 ID3-Tag (Ver. 2) standard.
•This unit is compatible with WMA META tags.
z2 Only files that are not protected by copyright can be played on this unit.
Content downloaded from pay sites on the Internet are copyright protected. Also, files encoded in
WMA format when ripped from a CD, etc. on a computer may be copyright protected, depending on
the computer’s settings.
z1
P
P
P
z2
P
P
NOTE
File types that this unit does not support are not displayed.
GSpecifications of supported filesH
Sampling frequency Bit rate Extension
WMA (Windows Media Audio) 32/44.1/48 kHz 48 – 192 kbps .wma
MP3 (MPEG-1 Audio Layer-3) 32/44.1/48 kHz 32 – 320 kbps .mp3
WAV 32/44.1/48 kHz – .wav
.aac/
MPEG-4 AAC 32/44.1/48 kHz 16 – 320 kbps
FLAC (Free Lossless Audio Codec) 32/44.1/48 kHz – .flac
.m4a/
.mp4
19
Page 47

How to make detailed settings
Preparations
Operations
Informations
Operations
Menu map
Setting items Detailed items Description Page
Language
Language
Clock
Clock
Max Vol Level
Max Vol Level
Network Info.
Network Info.
WPS
WPS(PIN)
Firmware Update
Firmware Update
Factory Reset
Factory Reset
Exit
Exit
Sets the language for display the menu.
Auto Adjust(On) Automatically performs the clock setting from the time information on
the Internet.
Time Zone(+12H) Sets your local time zone (for Auto Adjust).
Summer Time(Off) Sets the Summer Time information (for Auto Adjust).
Auto Adjust Now Obtains the current time.
Manual Adjust Adjusts the clock manually.
Make a setting for maximum volume.
Display network information.
Friendly Name / DHCP=On or Off / IP Address / Primary DNS /
Secondary DNS / MAC Address
Sets the wireless connection using WPS (PIN code method).
Starts the firmware update.
Reset to the defaults. –
To exit the menu, select “Exit”.
21
21
21
22
22
22
23
23
23
24
Menu operation
NOTE
Use buttons on this unit for menu operations. Buttons on the remote
control do not work.
Press + and – at the same time.
1
Menu
Language
•The selected item appears on the display.
Press + or – to select the menu to be set.
2
Press 13 to enter the setting.
3
•To return to the previous item, use + or – to select “Exit”, and
press 13.
–
•To exit the menu, select “Exit” in the top menu, and press 13.
The menu disappears.
20
Page 48

Setting the language (Language)
Preparations
Operations
Informations
Operations
Sets the language for display the menu.
•The factory default setting is “English”.
Press + and – at the same time.
1
Turns on the menu settings mode and the menu appears on the
display (vpage20 “Menu map”).
Menu
Language
Press 13, then press + or – to select the language
2
you want to set.
English
3
/
Français
Press 13 to enter the setting
The top menu is displayed again.
/
Español
/
(EXIT)
Setting the clock (Clock)
You can automatically adjust the clock of this unit using the Internet.
To use this function, the unit must be connected to the Internet.
Adjusting the clock automatically (Auto
Adjust)
Use the following procedure to automatically adjust the clock.
Press + and – at the same time.
1
Turns on the menu settings mode and the menu appears on the
display (vpage20 “Menu map”).
Menu
Language
Press + or – to select “Clock”, then press 13.
2
Press + or – to select “Auto Adjust(On)”, then press
3
13.
Press + or – to select “On” or “Off”.
4
The operation to receive the current time starts.
Setting the Time Zone
(Time Zone)
Use the following procedure to select your local standard time (time
zone).
Press + and – at the same time.
1
Turns on the menu settings mode and the menu appears on the
display (vpage20 “Menu map”).
Menu
Language
Press + or – to select “Clock”, then press 13.
2
“Auto Adjust(On)” is displayed.
Press + or – to select “Time Zone(+1H)”, then press
3
13.
“–5H(Eastern Standard Time)” is displayed.
Press + or – to select your local standard time (time
4
zone) in your lives, then press 13.
The “Clock” menu is displayed again.
On
Automatically adjust the clock.
Off
Does not automatically adjust the clock.
Press 13 to enter the setting
5
The “Clock” menu is displayed again.
21
Page 49

Setting the clock (Clock)
Preparations
Operations
Informations
Operations
Setting the Summer Time
(Summer Time)
Use the following procedure to set Summer time if the Summer time
system is used in your country.
Press + and – at the same time.
1
Turns on the menu settings mode and the menu appears on the
display (vpage20 “Menu map”).
Menu
Language
Press + or – to select “Clock”, then press 13.
2
“Auto Adjust(On)” is displayed.
Press + or – to select “Summer Time(Off)”, then
3
press 13.
Press + or – to select “Off(0H)” or “On(+1H)”, then
4
press 13.
The “Clock” menu is displayed again.
Setting the current time
(Auto Adjust Now)
When the unit is connected to the Internet, the current time is set
automatically.
Press + and – at the same time.
1
Turns on the menu settings mode and the menu appears on the
display (vpage20 “Menu map”).
Menu
Language
Press + or – to select “Clock”, then press 13.
2
“Auto Adjust(On)” is displayed.
Press + or – to select “Auto Adjust Now”, then press
3
13.
The operation to receive the current time starts.
•The current time is displayed for several seconds when it is
received successfully.
•If the current time is not received successfully, “Connection
Failed” appears.
Setting the current time (Manual Adjust)
(12-Hour Display)
When the unit is not connected to the Internet, set the current time
manually.
Press + and – at the same time.
1
Turns on the menu settings mode and the menu appears on the
display (vpage20 “Menu map”).
Menu
Language
Press + or – to select “Clock”, then press 13.
2
“Auto Adjust(On)” is displayed.
Press + or – to select “Manual Adjust”, then press
3
13.
Press + or – to set the “hours”, then press 13.
4
Press + or – to set the “minutes”, then press 13.
5
The current time is set.
If you use “Manual Adjust” to set the time, “Auto Adjust” is set to
“Off”.
22
Page 50

Setting the volume limit
Preparations
Operations
Informations
Operations
Setting the network (Network Info.)
(Max Vol Level)
Make a setting for maximum volume.
•The factory default setting is “50”.
Press + and – at the same time.
1
Turns on the menu settings mode and the menu appears on the
display (vpage20 “Menu map”).
Menu
Language
Press + or – to select “Max Vol Level”, then press
2
13.
“Max Volume” menu appears.
Press + or – to select the volume “0 – 50”, then press
3
13.
The top menu is displayed again.
Checking the network information
Press + and – at the same time.
1
Turns on the menu settings mode and the menu appears on the
display (vpage20 “Menu map”).
Menu
Language
Press + or – to select “Network Info.”, then press
2
13.
Press + or – to select the item you want to check.
3
•Select “Exit” and press 13 to return to the top menu.
WPS Settings (PIN code method)
Use this procedure to configure the wireless LAN settings.
Before turning this unit on, make sure that an Ethernet cable is not
connected to this unit. If a cable is connected, have this unit enter the
power standby mode and disconnect the cable.
Press + and – at the same time.
1
Turns on the menu settings mode and the menu appears on the
display (vpage20 “Menu map”).
Press + or – to select “WPS(PIN)”, then press 13.
2
“Searching” is displayed, and the access point you have set is
displayed.
Press + or – to select the access point whose PIN code
3
you want to display, and press 13.
PIN code number is displayed.
Set this PIN code to the register.
When connection is established with access point, “Succeeded”
4
is displayed.
•For how to register the PIN code, see the owner’s manual of your
router with access point.
23
Page 51

Firmware Update
Preparations
Operations
Informations
Operations
•In order to update the firmware, the environment and settings
required for connecting to broadband internet are needed
(vpage8)
•Perform the firmware update operation after at least 2 minutes has
elapsed since turning this unit’s power ON.
Press + and – at the same time.
1
Turns on the menu settings mode and the menu appears on the
display (vpage20 “Menu map”).
Press + or – to select “Firmware Update”, then press
2
13.
Press + or – to select “Check for Update” or “Start”,
3
then press 13.
n Notes concerning use of “Firmware Update”
•Do not turn off the power until updating or upgrading is completed.
•Even with a broadband connection to the Internet, approximately
20 minutes is required for the updating procedure to be
completed.
•Once updating starts, normal operations on this unit cannot be
performed until updating is completed. Furthermore, updating
the firmware may reset the backup data for the parameters, etc.
set for this unit.
•If the update fails, remove and re-insert the power cord. “Update
Retry” appears on the display and update restarts from the point
at which update failed. If the error continues despite this, check
the network environment.
See the DENON website for details about updates.
Setting the network (Network Info.)
Auto standby
With the Auto Standby ON, this unit will automatically enter the
standby mode after about 30 continuous minutes of stop mode with
no operation.
•The default setting for the Auto Standby mode is “On”.
Move the power operation slide
1
switch on the rear panel from
“OFF” to “ON”.
“Always Display Clock?” is displayed.
Press + or – to select “Yes” or
2
“No”, then press 13.
Check for Update
Use
+ or – to select the item, and press 13.
•Up to Date: It is already the latest firmware.
•Available Yes: Updates to the latest firmware.
•Available No: Does not update to the latest firmware.
Start
+ or – to select the item, and press 13.
Use
•Yes: Performs update.
•No: Does not perform update.
•If updating fails, the set automatically retries, but if updating is still
not possible, one of the messages shown below is displayed. If
the display reads as shown below, check the settings and network
environment, then update again.
Display Description
Updating fail Updating failed.
Login failed Failure to log into server.
Server is busy Server is busy. Wait a while then try again.
Connection fail Failure in connecting to server.
Download fail Downloading of the firmware has failed.
Check for firmware updates.
Determines whether to update or not.
Yes
(Auto Satandby Off)
No
(Auto Satandby On)
NOTE
In the following situations, the Auto standby function does not operate.
•When iPod or iPhone is connected to the Dock connector on this
unit.
•When the input source is “AUX” and a devices connected to the
AUX IN jack.
•When the input source being played is “Internet Radio”or “Music
Server”.
The unit does not go into standby automatically.
The unit goes into standby after 30 minutes.
24
Page 52

Informations
Preparations
Operations
InformationsInformations
Informations
Here, we list various information related to this unit.
Please refer to this information as needed.
F Part names and functions vpage26
F Other information vpage28
F Troubleshooting vpage31
F Specifications vpage33
F Index vpage34
25
Page 53

Part names and functions
Preparations
Operations
InformationsInformations
Front panel
For buttons not explained here, see the page indicated in parentheses ( ).
q ew
r t y
q Display
GWireless LAN signal strengthH
: Strong
: Medium
: Weak
: Not connected
GRemaining battery level indication during
battery operationH
: 75 % or more
: 50 – 75%
: 25 – 50%
: 25 % or less
(“Low Battery” is displayed.)
•Battery level indication while the battery is
being charged during AC operation
During AC operation, the battery mark lights
off when the battery is fully charged.
NOTE
•If the battery level reaches zero during use, the
power is turned off.
•Usage time may vary depending on the usage
environment’s temperature, method of use, etc.
•If usage time is extremely short even when the
battery has been fully charged, the battery may be
near the end of its life. In this case, please contact
DENON service center.
•Battery replacement must be performed by a
service person.
w Remote control sensor ································ (3)
e Dock ······························································· (6)
r Input source select button ( ) ················· (13)
t Play/Pause button (13) ······················ (14, 20)
y Volume control buttons
(+, – ) ······················································ (13, 20)
26
Page 54

Rear panel
Preparations
Operations
InformationsInformations
See the page indicated in parentheses ( ).
Remote control unit
For buttons not explained here, see the page indicated in parentheses ( ).
q Skip buttons (8, 9) ··························· (14)
w Play/Pause button (13) ···························· (14)
e Input source select button ( ) ················· (13)
t
r Power operation button (X) ······················ (13)
t Volume control buttons (+, – ) ·················· (13)
q
q
wq e r t y u i o
q DC input (DC IN) ··········································· (5)
w AUX IN jack ··················································· (5)
e Network connector (NETWORK) ·············· (10)
r NETLINK button ·········································(11)
t WPS button ··················································· (9)
y LOUDNESS button ····································· (14)
u Power operation slide switch
(POWER ON/OFF) ······································· (13)
Turns power to this unit on and off.
i Security slot
You can attach a security cable to deter theft.
Use a security cable that is compatible with this
unit. For details, contact your dealer.
NOTE
Security cables have deterrent effects, but do
not completely prevent theft or misuse of this
unit.
o Remote control storage space
w
e
r
t
27
Page 55

Other information
Preparations
Operations
InformationsInformations
n Trademark information (vpage28)
n Explanation of terms (vpage29)
Trademark information
This product uses the following technologies (Random order):
“Made for iPod” and “Made for iPhone” mean that an electronic
accessory has been designed to connect specifically to iPod, or
iPhone, respectively, and has been certified by the developer to
meet Apple performance standards.
Apple is not responsible for the operation of this device or its
compliance with safety and regulatory standards. Please note that
the use of this accessory with iPod or iPhone, may affect wireless
performance.
AirPlay, the AirPlay logo, iPad, iPhone, iPod, iPod classic, iPod nano,
iPod shuffle and iPod touch are trademarks of Apple Inc., registered
in the U.S. and other countries.
•Individual users are permitted to use iPhone, iPod, iPod classic, iPod
nano, iPod shuffle, and iPod touch for private copy and playback of
non-copyrighted contents and contents whose copy and playback
is permitted by law. Copyright infringement is prohibited by law.
28
Page 56

Explanation of terms
Preparations
Operations
InformationsInformations
A
AES (Advanced Encryption Standard)
This is a next generation standard encryption
method replacing the current DES and 3DES, and
because of its high security it is expected to be
applied widely to wireless LANs in the future. It
uses the “Rijndael” algorithm developed by two
Belgian cryptographers to divide the data into
blocks of fixed lengths and encrypt each block.
It supports data lengths of 128, 192 and 256 bits
and key lengths of 128, 192 and 256 bits as well,
offering extremely high encryption security.
AirPlay
AirPlay sends (plays) contents recorded in iTunes
or on an iPhone/iPod touch/iPad to a compatible
device via the network.
App Store
App Store is a site that sells application software
for such devices as the iPhone or iPod Touch, and
is operated by Apple Inc.
B
Bit rate
This expresses the read amount per 1 second of
video/audio data recorded in a disc. A larger number
means higher sound quality, but also means a larger
file size.
D
DLNA
DLNA and DLNA CERTIFIED are trademarks and/
or service marks of Digital Living Network Alliance.
Some contents may not be compatible with other
DLNA CERTIFIED™ products.
F
FLAC
FLAC stands for Free lossless Audio Codec, and is a
lossless free audio file format. Lossless means that
the audio is compressed without any loss in quality.
The FLAC license is as shown below.
Copyright (C) 2000,2001,2002,2003,2004,2005,200
6,2007,2008,2009 Josh Coalson
Redistribution and use in source and binary forms,
with or without modification, are permitted provided
that the following conditions are met:
•Redistributions of source code must retain the
above copyright notice, this list of conditions and
the following disclaimer.
•Redistributions in binary form must reproduce the
above copyright notice, this list of conditions and
the following disclaimer in the documentation and/
or other materials provided with the distribution.
•Neither the name of the Xiph.org Foundation nor
the names of its contributors may be used to
endorse or promote products derived from this
software without specific prior written permission.
THIS SOFTWARE IS PROVIDED BY THE
COPYRIGHT HOLDERS AND CONTRIBUTORS “AS
IS” AND ANY EXPRESS OR IMPLIED WARRANTIES,
INCLUDING, BUT NOT LIMITED TO, THE
IMPLIED WARRANTIES OF MERCHANTABILITY
AND FITNESS FOR A PARTICULAR PURPOSE
ARE DISCLAIMED. IN NO EVENT SHALL THE
FOUNDATION OR CONTRIBUTORS BE LIABLE
FOR ANY DIRECT, INDIRECT, INCIDENTAL,
SPECIAL, EXEMPLARY, OR CONSEQUENTIAL
DAMAGES (INCLUDING, BUT NOT LIMITED TO,
PROCUREMENT OF SUBSTITUTE GOODS OR
SERVICES; LOSS OF USE, DATA, OR PROFITS; OR
BUSINESS INTERRUPTION) HOWEVER CAUSED
AND ON ANY THEORY OF LIABILITY, WHETHER
IN CONTRACT, STRICT LIABILITY, OR TORT
(INCLUDING NEGLIGENCE OR OTHERWISE)
ARISING IN ANY WAY OUT OF THE USE OF
THIS SOFTWARE, EVEN IF ADVISED OF THE
POSSIBILITY OF SUCH DAMAGE.
I
IEEE 802.11b
This is one wireless LAN standard set by the 802
working group that establishes LAN technology
standards at the IEEE (Institute of Electrical and
Electronics Engineers) of the United States. It
uses the 2.4 GHz band usable freely without
a radio frequency license (ISM band), enabling
communications at a maximum speed of 11 Mbps.
•The value indicated above is the maximum
theoretical value for the wireless LAN standard,
and does not indicate the actual data transfer rate.
IEEE 802.11g
This is another wireless LAN standard set by the
802 working group that establishes LAN technology
standards at the IEEE (Institute of Electrical and
Electronics Engineers) of the United States, and
is compatible with IEEE 802.11b. It also uses the
2.4 GHz band, but enables communications at a
maximum speed of 54 Mbps.
•The value indicated above is the maximum
theoretical value for the wireless LAN standard,
and does not indicate the actual data transfer rate.
iTunes
iTunes is the name of the multimedia player
provided by Apple Inc. It enables management
and playback of multimedia contents including
music and movies. iTunes supports many main file
formats including AAC, WAV, and MP3.
M
MP3 (MPEG Audio Layer-3)
This is an internationally standardized audio data
compression scheme, using the “MPEG-1” video
compression standard. It compresses the data
volume to about one eleventh its original size while
maintaining sound quality equivalent to a music CD.
MPEG (Moving Picture Experts Group),
MPEG-2, MPEG-4
These are the names for digital compression format
standards used for the encoding of video and audio.
Video standards include “MPEG-1 Video”, “MPEG2 Video”, “MPEG-4 Visual”, “MPEG-4 AVC”. Audio
standards include “MPEG-1 Audio”, “MPEG-2
Audio”, “MPEG-4 AAC”.
N
Network Names
(SSID: Security Set Identifier)
When forming wireless LAN networks, groups are
formed to prevent interference, data theft, etc.
This grouping is done by “SSID” or “Security Set
Identifiers”. For further security, a WEP key is set
and signal transfer is not possible unless the SSID
and WEP key match.
P
Protection Circuit
This is a function to prevent damage to devices
within the power supply when an abnormality
such as an overload, excess voltage occurs or
temperature for any reason.
In this unit, the power indicator blinks and the unit
enters standby mode when an abnormality occurs.
S
Sampling frequency
Sampling involves taking a reading of a sound wave
(analog signal) at regular intervals and expressing
the height of the wave at each reading in digitized
format (producing a digital signal).
The number of readings taken in one second is
called the “sampling frequency”. The larger the
value, the closer the reproduced sound is to the
original.
T
TKIP (Temporal Key Integrity Protocol)
This is a network key used for WPA. The encryption
algorithm is RC4, the same as for WEP, but the
security level is increased by changing the network
key used for encryption for each packet.
29
Page 57

V
Preparations
Operations
InformationsInformations
vTuner
This is a free online content server for Internet
radio. Note that usage fees are included in upgrade
costs.
For inquiries about this service, visit the vTuner site
below.
vTuner website: http://www.radiodenon.com
This product is protected by certain intellectual
property rights of Nothing Else Matters Software
and BridgeCo. Use or distribution of such technology
outside of this product is prohibited without a
license from Nothing Else Matters Software and
BridgeCo or an authorized subsidiary.
W
WEP Key (Network Key)
This is key information used for encrypting data
when conducting data transfer. On this unit, the
same WEP key is used for data encryption and
decryption, so the same WEP key must be set on
both devices in order for communications to be
established between them.
®
Wi-Fi
Wi-Fi Certification assures tested and proven
interoperability by the Wi-Fi Alliance, a group
certifying interoperability among wireless LAN
devices.
Windows Media DRM
This is a copyright protection technology developed
by Microsoft.
Content providers are using the digital rights
management technology for Windows Media
contained in this device (WM-DRM) to protect
the integrity of their content (Secure Content) so
that their intellectual property, including copyright,
in such content is not misappropriated. This
device uses WM-DRM software to play Secure
Content (WM-DRM Software). If the security of
the WM-DRM Software in this device has been
compromised, owners of Secure Content (Secure
Content Owners) may request that Microsoft
revoke the WM-DRM Software’s right to acquire
new licenses to copy, display and/or play Secure
Content. Revocation does not alter the WM-DRM
Software’s ability to play unprotected content.
A list of revoked WM-DRM Software is sent to
your device whenever you download a license for
Secure Content from the Internet or from a PC.
Microsoft may, in conjunction with such license,
also download revocation list onto your device on
behalf of Secure Content Owners.
Windows Media Player Ver.11 or later
This is a media player distributed free of charge by
Microsoft Corporation.
It can play playlists created with Ver.11 or later of
Windows Media Player, as well as WMA, DRM
WMA, WAV, and other files.
WMA (Windows Media Audio)
This is audio compression technology developed by
Microsoft Corporation.
WMA data can be encoded using Windows
Media® Player Ver.7, 7.1, Windows Media® Player
for Windows® XP and Windows Media® Player 9
Series.
To encode WMA files, only use applications
authorized by Microsoft Corporation. If you use
an unauthorized application, the file may not work
properly.
Explanation of terms
WPA (Wi-Fi Protected Access)
This is a security standard established by the Wi-Fi
Alliance. In addition to the conventional SSID
(network name) and WEP key (network key), it also
uses a user identification function and encrypting
protocol for stronger security.
WPA2 (Wi-Fi Protected Access 2)
This is a new version of the WPA established by the
Wi-Fi Alliance, compatible with more secure AES
encryption.
WPA-PSK/WPA2-PSK (Pre-shared Key)
This is a simple authentication system for mutual
authentication when a preset character string
matches on the wireless LAN access point and
client.
WPS (Wi-Fi Protected Setup)
This is a standard drawn up by the Wi-Fi Alliance
to ease the task of setting up wireless LAN
connections and configuring security.
There are two methods: push-button and PIN (Personal
Identification Number) code.
30
Page 58

Troubleshooting
Preparations
Operations
InformationsInformations
v See overleaf
If a problem should arise, first check the following:
1. Are the connections correct?
2. Is the set being operated as described in the owner’s manual?
3. Are the other devices operating properly?
If this unit does not operate properly, check the items listed in the table below. Should the problem persist,
there may be a malfunction.
In this case, disconnect the power immediately and contact your store of purchase.
GGeneralH
Symptom Cause/Solution Page
Power does not turn
on.
The operation
buttons on the upper
part of this unit flash
white approximately
every 2 seconds.
The operation
buttons on the upper
part of this unit flash
white approximately
every 0.5 seconds.
Set does not operate
properly.
GAudioH
Symptom Cause/Solution Page
Audio is not output. •Check the connections for all devices.
•Check whether the power plug is correctly inserted into the power
outlet.
•The protection circuit has been activated by a rise in the humidity
inside the unit. Please turn off power once, and re-apply the power
after the temperature has fallen sufficiently.
•Please re-install this unit in a place having good ventilation.
•This unit amplifier circuit has failed. Turn off the power and please
contact the DENON service adviser.
•Reset the microprocessor.
•Check whether the audio device power is turned on.
•Adjust the master volume.
•Check the connection with the playback device and select the
proper input source.
5
29
–
–
33
6,9,10
–
13
13
GiPod / Internet radio / Music server H
Symptom Cause/Solution Page
iOS device cannot be
played.
The file names
are not displayed
properly (“...”, etc.).
Internet radio cannot
be played.
Files stored on a
computer cannot be
played.
Music stored on
a NAS cannot be
played.
Server is not found,
or it is not possible
to connect to the
server.
•Some iOS devices do not support being used connected directly
to the Dock connector.
•Characters that cannot be displayed are used. This is not a
malfunction. On this unit, characters that cannot be displayed are
replaced with a “.” (period).
•Ethernet cable is not properly connected or network is
disconnected. Check the connection status.
•Program is being broadcast in non-compatible format. Only
Internet radio programs in MP3 and WMA can be played on this
unit.
•The firewall of the PC or router has been activated. Check the
firewall settings of the connected PC or router.
•Radio station is not currently broadcasting. Choose a radio station
that is currently broadcasting.
•IP address is wrong. Check the set’s IP address.
•Some radio stations may go silent at certain times of the day. In
this case, no audio is output even when a station is received. Try
again later, or switch to another radio station.
•Files are stored in a non-compatible format. Record in a compatible
format.
•You are attempting to play a file that is copyright protected. Files
that are copyright protected cannot be played on this unit.
•Media sharing settings are not correct. Change media sharing
settings so that the unit can access the folders on your computer.
•If you use a NAS in conformity with the DLNA standard, enable
the DLNA server function in the NAS setting.
•If you use a NAS that does not conform with the DLNA standard,
play the music via a PC. Set Windows Media Player’s media
sharing function and add NAS to the selected play folder.
•If connection is restricted, set audio equipment as the connection
target.
•The computer’s or router’s firewall is activated. Check the
computer’s or router’s firewall settings.
•Computer’s power is not turned on. Turn on the power.
•Server is not running. Launch the server.
•Set’s IP address is wrong. Check the set’s IP address.
6
–
9,10
17
–
–
23
–
19
19
18
–
18
–
–
–
–
23
31
Page 59

Symptom Cause/Solution Page
Preparations
Operations
InformationsInformations
Cannot connect to
preset radio stations.
For some radio
stations, “Radio
station server full” or
“Connection down”
is displayed and
station cannot be
connected to.
Sound is broken
during playback.
Sound quality is poor
or noise is heard
during play.
GAirPlayH
Symptom Cause/Solution Page
The AirPlay icon
is not displayed
in iTunes or on the
iPhone/iPod touch/
iPad.
No sound. •The volume in iTunes or on the iPhone/iPod touch/iPad is set to
When using AirPlay
with the iPhone/
iPod touch, the
sound suffers from
intermittent breaks
or AirPlay does not
function.
•Radio station is not currently broadcasting. Wait a while before
trying again.
•Radio station is not currently in service. It is not possible to
connect to radio stations that are no longer in service.
•Station is congested or not currently broadcasting. Wait a while
before trying again.
•Network signal transfer speed is slow or communications lines or
radio station is congested. This is not a malfunction. When playing
broadcast data with a high bit rate, the sound may be broken,
depending on the communications conditions.
•File being played has a low bit rate. This is not a malfunction. –
•This unit and the computer or iPhone/iPod touch/iPad are not
connected to the same network (LAN). Connect the computer or
iPhone/iPod touch/iPad to the same network as this unit.
•iTunes or the iPhone/iPod touch/iPad do not have firmware that
supports AirPlay installed. Update to the latest firmware.
the minimum setting. Adjust the volume to the optimum level.
•This unit is not selected in the screen that is displayed when
iTunes or the iPhone/iPod touch/iPad is started. Start iTunes or
switch on the iPhone/iPod touch/iPad, click the AirPlay icon
the displayed screen, and select this unit.
•AirPlay playback has not started. Click the 1 button in iTunes or
press the 1 button on the iPhone/iPod touch/iPod.
•Quit the application running in the background of the iPhone/iPod
touch, and then play using AirPlay.
•When playing via a wireless connection, outside conditions may
affect the unit. To remedy this, change the network environment,
e.g. shorten the distance to the wireless LAN access point.
•Update the iPhone/iPod touch application or iTunes to the latest
version.
in
–
–
–
–
9,10
24
–
15
–
–
–
–
GRemote control unitH
Symptom Cause/Solution Page
The set cannot be
operated with the
remote control unit.
•Batteries are worn out. Replace with new batteries.
•Operate the remote control unit within a distance of about
23 ft/7 m from this unit and at an angle of within 30°.
•Remove any obstacle between this unit and the remote control
unit.
•Insert the batteries in the proper direction, checking the q and
w marks.
•The set’s remote control sensor is exposed to strong light (direct
sunlight, inverter type fluorescent bulb light, etc.). Move the set
to a place in which the remote control sensor will not be exposed
to strong light.
3
3
3
3
3
32
Page 60

Resetting the microprocessor
Preparations
Operations
InformationsInformations
When the microprocessor is reset, all the settings are reset to their default values.
Press + and – at the same time.
1
Turns on the menu settings mode and the menu appears on the
display (vpage20 “Menu map”).
Press + or – to select “Factory Reset”, then press 13.
2
Specifications
n Audio section
•Amplifiers 2 x 25 W ClassD
•Drivers 2 x 100 mm Woofer
n Clock
•Clock method Within 1 – 2 minutes per month
Press + or – to select “Reset? Yes”, then press 13.
3
“Initialized” is displayed and the default settings are restored.
If “Initialized” does not display in step 3, start over from step 1.
n Wireless LAN
Network type
(wireless LAN standards):
Transfer rate: DS-SS: 11 / 5.5 / 1 Mbps (Automatic switching)
Security: SSID (Network name)
Used frequency range: 2.412 MHz – 2.462 MHz
No. of channels: Conforming to IEEE 802.11b : 11 ch (DS-SS) (Of which 1 channel used)
Conforming to IEEE 802.11b
Conforming to IEEE 802.11g (Conforming to Wi-Fi®)z
OFDM: 54 / 48 / 36 / 24 / 18 / 12 / 9 / 6 Mbps (Automatic switching)
WEP key (network key) (64/128 bits)
WPA-PSK (TKIP/AES)
WPA2-PSK (TKIP/AES)
Conforming to IEEE 802.11g : 11 ch (OFDM) (Of which 1 channel used)
n General
AC adapter:
z Wi-Fi® conformity indicates tested and proven interoperability by the “Wi-Fi Alliance”, a group certifying
interoperability among wireless LAN devices.
For purposes of improvement, specifications and design are subject to change without notice.
Input: 100 – 240 V 50/60 Hz
Output: DC 20 V, 2.5 A
33
Page 61

Preparations
Operations
InformationsInformations
Index
v A
Accessories ·························································· 1
Adjusting the master volume ····························· 13
Adjusting the tone ·············································· 14
AES ···································································· 29
AirPlay ·························································· 15, 29
App Store ················································· 3, 15, 29
Auto Adjust ························································ 21
Auto Adjust Now ················································ 22
Auto standby ······················································ 24
v B
Bit rate ································································ 29
v C
Cable
Ethernet cable·················································· 10
Power cord ························································ 5
Stereo mini plug cable ······································· 5
Clock
Auto Adjust ······················································ 21
Auto Adjust Now ············································· 22
Manual Adjust ·················································· 22
Summer Time ·················································· 22
Time Zone ························································ 21
Cocoon App ·············································· 3, 17, 18
Condensation ······················································· 2
Connection
Home network (LAN) ········································· 7
iOS device·························································· 6
Portable player ··················································· 5
Power cord ························································ 5
Wired LAN ······················································· 10
Wireless LAN ····················································· 9
v D
DHCP ································································· 10
Display ································································ 26
DLNA ···························································· 18, 29
v F
Firmware Update ··············································· 24
FLAC ···························································· 19, 29
Front Panel ························································· 26
v H
How to eject/store the Dock ································ 6
v I
IEEE 802.11b ······················································ 29
IEEE 802.11g ······················································ 29
Inputting characters ··········································· 23
iTunes ··························································· 15, 29
v L
Language ···························································· 21
v M
Manual Adjust ···················································· 22
Max Vol Level ····················································· 23
Menu map ·························································· 20
Menu operation ·················································· 20
MP3 ························································ 17, 19, 29
MPEG ··························································· 19, 29
v N
NETLINK ····························································· 11
Network Info ······················································ 23
Network Info.
Firmware Update ············································· 24
PIN code method ············································· 23
Network Names ················································· 29
v O
Operation Mode ················································· 14
v P
Playback
AirPlay function ················································ 15
FLAC ································································ 19
Internet radio ··················································· 17
iOS device························································ 14
MP3 ··························································· 17, 19
MPEG-4 AAC ··················································· 19
Music server ···················································· 18
NAS·································································· 18
PC ···································································· 18
Portable player ················································· 17
WAV································································· 19
WMA ························································· 17, 19
Progressive ························································ 29
Protection circuit ················································ 29
v R
Rear panel ·························································· 27
Remote control unit ··········································· 27
Inserting the batteries········································ 3
Resetting the microprocessor ···························· 33
v S
Sampling frequency ······························· 17, 19, 29
Security slot ······················································· 27
Selecting the input source ································· 13
Setting the current time ····································· 13
Setting the volume limit
(Max Vol Level) ··················································· 23
Summer Time ···················································· 22
Supported iPod models ········································ 6
v T
Time Zone ·························································· 21
TKIP ···································································· 29
Trademark ·························································· 28
Troubleshooting ················································· 31
Turning the power on ········································· 13
v V
vTuner ································································ 30
v W
WAV ··································································· 19
WEP Key ···························································· 30
Wi-Fi ··································································· 30
Windows Media DRM ········································ 30
Windows Media Player ································ 18, 30
WMA ······················································ 17, 19, 30
WPA ··································································· 30
WPA2 ································································· 30
WPA-PSK/WPA2-PSK ········································· 30
WPS ························································· 9, 23, 30
34
Page 62

Dimensions
Preparations
Operations
InformationsInformations
Unit : in. (mm)
Weight : 7 lbs 4 oz (3.3 kg)
7 3/32 (180.0)
13 55/64 (352.0) 1 1/16 (27.0) 5 23/64 (136.0) 25/64 (10.0)
35
Page 63

V00
www.denon.com
D&M Holdings Inc.
3520 10123 00AD
Page 64

DE
I
I
NON
PORTABLE
DSD-300
SPEAKER
DOCK
Adobe
Reader®
Incorporated
is
Adobe
registered trademarks or trademarks
in
the United States
Reader®
is included.
and/or
other countries.
of
Adobe
Systems
Page 65

Page 66

To
start
your
Extended
Protection
Plan
coverage:
1.
2.
Call
Have your
us
toll-free
model
at
(855)
number,
720-0823
serial
number,
(US
and purchase receipt available when
Log on
to
http://servicecontracts.denon.com
Copyright
©
2011
D&M Holdings
Residents
Only)
calling.
Inc. All
Rights Reserved.
Page 67

The
Today's highly technical products are mechanically and electronically
complex, and even the best equipment may need periodic attention that
Denon
Extended
Protection
Plan
can
there are no deductibles
product is unrepairable,
has
Don't delay!
warranty expires.
http://servicecontracts.denon.com,
result in costly repair bills. With the Denon Extended Protection Plan,
or
hidden charges. Best
we
similar features and functionality.
You
must extend your coverage before
To
extend your warranty, simply log on
will replace it, absolutely free with a unit that
or
call us toll-free
of
all,
your
at
(855)
if
your Denon
factory
to
our
720-0823.
(US
website:
Residents
Only)
Page 68

Features
&
Benefits
• 1
• If unrepairable, we'll replace it!
• No deductibles
• Power surge protection
• Unlimited service calls
• Nationwide authorized service
00°/o
center network
coverage on parts & labor
or
hidden charges
• Service representatives
to
available
24 hours a day
• No Lemon guarantee
• Fully insured
• Fully transferable
assist you
Page 69

Albania
Argentina
Australia
Austria
Bahrain
Belarus
Belgium
Bosnia
Herzegowina
Brasil
Bulgaria
Canada
Chile
China
Croatia
Cyprus
republic
Czech
Denmark
Egypt
Estonia
Finland
France
Germany
Georgia
Greece
Hong Kong
Hungary
Iceland
India
Indonesia
Israel
Italy
Jordan
Kazachstan
Korea
Kosovo
Kuwait
Latvia
Lebanon
Lithuania
DENON DISTRIBUTOR NETWORK I
AVevolution
e-mail: office@av-evolution.rs
ICAP S.A. Av. Diaz Velez 3531 Buenos Aires (C1200AAC). ARGENTINA Tel : +5411-4865-3755
Audio Products Group Pty Ltd.
1460 Australia Tel : 1300
Denon DEUTCHLAND. A div
Tel: +49 (0)2157-1208-0
Yusif Bin Yusif Fakhro W.W.L. P 0 Box 214 Manama. Kingdom
Tel: +973
Neotechnostyle MOSKOVSKAJA STR.20, ROOM
Transtei-Sabi
AV evolution doo
e-mail: office@av-evolution.rs
Syncrotape Sistemas
Sofia
D&M
Tel: 905-475-4085
Music
..t~~~~~±~-:f~illl!i}q]
~15:
Mastermed
E-Mail:
URL:
MODESTOU SOUND&VISION
EUROSTAR
Tel: 261-112-901
AUDIONORD DISTRIBUTION DALI ALLE
Sigma
Square, Mohandeseen. Cairo. Egypt. Tel: +20 2 3305 0806 Fax: +20 2 338 9574
Sperco lmpex Ltd. Ehitajate tee 122, 13517 Tallinn Tel : +372 6509810
Simex
URL:
DENON FRANCE Une division de
Asnieres Sur Seine
DENON
Tel: +49(0)2157-1208-0 Fax: +49(0)2157-1208- 15
Pegasi .
KINOTECHNIKI
D&M
Mong
ll!lil!tLU:;t:;J330E!~Biil:i3511i
HORN DISTRIBUTION (HU)
Tel: +36 1 347 0020
Einar Farestveit & co hf., Borgartun 28, P.Box 5440, 125 Reykjavik.
PROFX
Bazaar.
PT
Autoaccindo Jaya. Cideng Barat
Newpan Ltd. 14 Rosansky st. Rishon Lezion
Audiogamma
URL:
DIGITAL AUDIO VIDEO SYSTEMS CORP. P.
Tel: +962 6 568 2880
Samat Electroni
D&M
135-936. Korea Tel: 02-715-9041 Fax: 02-715-9040
AV
e-mail: office@av-evolution.rs
OCEAN
Tel: +965
Sperco lmpex Ltd. Ehitajate tee 122. 13517 Tallinn Tel : +372 6509810 Fax: +372 6509811
AMAC
Tel: +961 1
UAB Hi-Fi
doo
TC
cumicevo
17
408 111
ma P.V.
B.A. Duboisst
TC
cumicevo
Audio Centre 8 Angel Kanchev St., 1000 Sofia Tel: +359 2 9806213 Fax: +359 2 9806212
CANADA
INC.
104621slington Avenue, Unit 8-B,
World Pedro de Valdivia Norte 0691 , Providencia, Santiago, CHILE Tel: +562-334-2300
086-21-62485151
mladen.ricijas@carpemedia.hr
http://www.mastermedia.hr
Import
Oy
http://www.denon
DEUTSCHLAND
6, Sanapiro Street. 108, Tbilisi Tel : +995 32952802
Sales and Marketing (H.K.) Ltd - Denon Group. Unit 2. 9/F
Road, Tai Kok Tsui, Kowloon, Hong Kong . Tel: (+852) 2516 5864
SERVICE
Bangalore - 560 027, India Tel : 080 3297 0853 Fax: 080
http://www.denon.it
Sales and Marketing Korea Ltd.
evolution doo
STAR
S.A.R.L. Mazraa
Fax:
ia
Kranjceviceva ulica 50 10000 Zagreb Croatia TEL: +385 (0) 1 3821043
OSTRAVA
Fax: 261
(RADWAN
Siiyniislahdentie
France Tel: +33(0)1-41-383230
LTD. 14,
Fax
CE.NTRE
Spa
Via
cs
Ltd
TC
cumicevo
TRADING
5731975
pasaulis Kalvariju 168, LT-08206, Vilnius, Lithuania Tel &
651
Fax: +965
774 Fax:
sokace.
lokal5
11000 Belgrade. Serbia Tel: +381
67
O'Riordan Street Alexandria NSW 2015.
Fax: +61
134 400
is
ion of D&M Germany GmbH,
Fax
: 49 (0)2157-1208-15
Fax:
+973 17 406 080
sokace.
Rua
Hermann Hering 1193.89010-600 Blumenau. SC, BRASIL Tel: +5547-2111-4700
905-475-4159
..t~f!J~JP:i!§il§1600-5
ffl~:
086-21-62494434
PLC
s.r.o.
areal
Vodni stavby
-112-904
El
OGAIL STORES). 52, Gameat
18
00560
.fi
A division of D&M Germany
PYRGOU
STR.
~JI:;t:;jji:Jt~91l!!9o2~
KFT
. Ady Endre tlt 28.,
: +36 1 347 0021
Advanced Audio Solutions (Bangalore)Pvt. Ltd. No 53, K.H.Road, Opp .Big
Pietro Calv
Fax
88,
i.
: +962 6 568
Karasai
Satyr
sokace.
EST.(Easa
5751175
Street-
Arab Bank Bldg. P.O. Box 155230, Beirut. Lebanon.
+961 1 651
2 9578 0159
raa
t 48. B-2060 Antwerpen. Belgium Tel : 03-237-3607
lokal 5 11000 Belgrade. Serbia Tel :
LTD 2, Salaminos Avenue, 1045 Nicosia Tel: +357 996 23 014
HELSINKI FINLAND
16 20129 Milano
Husain
Praha,
1.
9610 NOERAGER Tel: +45 8743 2157 Fax: +45 8743 2140
D&M
France
166 75,
GLYFADA
No.7
Jakarta, Indonesia Tel: +62-21-633-2730 Fax: +62-21-632-2886
75706. Israel. Tel : +972-3-953-5900 Fax: +972-3-961-6193
O.
BOX 926478, Amman 11190, Jordan.
2881
St.
050012Aimaty
7F
.. Kyoungnam Bldg
lokal 5 11000 Belgrade. Serbia Te
AI
Yousifi & Sons Co.) P.O. Box. 126. Safat 13002, Kuwait.
754
BllfllllaA
Ander
1,
220007
Minsk
RR
#1, Kleinburg, Ontario,
~f!JRiLilC~BOB~
~:lt~f'mH311:1~:
budova
A2
Dobroni
El
Dowal
TEL
: +
358
(0) 9 41
SAS
Tour D'Asnie res 4 Avenue Laurent Cely 92600
Fax
: +33(0)1-41-380110
GmbH. Ander
Fax
ATHENS
Tel: +30
~~l"i:
852-2516-5864
1191
Budapest, Hungary
-Italy
Ph.
+39.02.55181610
Tel
: +7 3272 718304
..
830-48. Yeoksam-dong, Gangnam-gu, Seoul
I Bl*liJ!I
PO
Kleinbahn
of
: +995 32964821
18,
D-41334 Nettetal, Germany
Bahrain.
Tel: +375
17
+381
086-21-62494424
cka
635,148 00
El
Arabia Street, Mostafa Mahmoud
Fax
: +372 6509811
500
210
Kleinbahn 18, D-41334 Nettetal, Germany
210
960
.,
North Block, Skyway House. 3 Sham
Tel: +3
2211
Fax
1071
Fax
: (+852) 2516 5940
1liJ~:
54
5207900
2043
Fax:
l: +381
: +370 5 2762659
63 44 00 66
Box 150.
Mascot
228 69 86
63 44 00 66
LOJ
lCO
Praha 4 Czech
FAX: +358(0) 9
Fax
: +
30
852
-2516-5940
Fax:
+354 5207910
Fax.
+39.02.55181961
+7
3272 581945718438
63 44 00 66
210
41
500
960
NSW
Rep
299
1072
Macedonia
Malaysia
Malta
Mauritius
Mexico
Mexico
Mexico
Moldova
Montenegro
Morocco
Netherlands
New
Norway
Oman
Pakistan
Philippines
.
Poland
Portugal
Qatar
Romania
Russia
Serbia
Singapore
Slovakia
Slovenia
South
Spain
Sweden
Switzerland
Taiwan R.O.C.
Thailand
Turkey
U.A.E.
Ukraine
United
U.S.
Vietnam
Zealand
Africa
Kingdom & Eire
A.
D.T. KODI ul. Cedomir Kantargiev 21a. 1000 Skopje Tel
Wo
Kee Hong Trading Sdn Bhd. 2nd Floor,
Petaling Jaya, Selangor Darul Ehsan, Malaysia Tel: 03-7954-8088
& Zammit Ltd.
Doublesin
TECHNICAL DYNAMICS
Productos Exitosos Durango
lnteligos Boulevard Rogelio Cantu 370. Colonia Santa Maria. Monterrey. Nuevo Le6n.
Tel : +5281-8335-2000
Best Buy
Mundo
Edomex Mexico
Mandolina
AV evolution doo
e-mail: office@av-evolution.rs
lnes Marokko
Denon
Tel:
Audio Products Group Pty
Tel: +64-4-2320-030
AUDIONORD DISTRIBUTION DALI ALLE
HITEC
Tel:
Hi
Tel :
Lotteworld Audio Video Systems Incorporated
Barangay Bahay
HORN DISTRIBUTI
Tel :
Infinite Connections
Te
TECHNO Q
LOTUS TELECOM
3KCK0103~BHbiH
Cepe6pAKosa,
E-Mail:
AV
e-mail: office@av-evolution.rs
TRINITY AV
Te
PRIMALINE
Digital-Professional Audio Seeb6ckgasse 59. 1160 Wien Tel : +43 1 480 10 06
The
Tel: +27
Gaplasa S.A.AV. lng. Conde
Hi-Fi
DKB
D&M Sales and Marketing Taiwan
Tel: 02-2516
Mahajak
Bangkok
Ertekin
Te
V.V.
Tel: +9
Mirs
DE
BTl
DEN
Te
Anh
Tel: +84 8 898 3424 Fax: +84 8 898 3425
SRL
Benelux. A division
31
(0)40 2507800
+
CENTER
+968 24 497 384
na
Import & Export Suite #721-725 Regal Trade Square, Preedy Street, Saddar Karachi-74400, Pakistan
+92
21
273 5757
22
331
+48
l:
+351
214 342 298
P.O.
info@bonanzacom.ru
evolution doo
SERVICES
l:
6273 7955 Fax: 6273 9455
d.o.o.
Soundlab (Pty)
11
466 4700
Klubben G6teborg Skiinegatan
Household Switzerland
-5
028
Development Co.,
Thailand. 10110 Tel: 66-2-256-0020
Elektronik Tic.
l:
+90 212 293 95
& SONS L.L.C. Street No-11/B. Road N0-128. Shed No-39
71
-4-266-2435, 268-4575 Fax: +
ltd
. Osipova str. 37/
NON
UK
A division
5HD, United Kingdom Tel : +
ON
ELECTRONICS
l:
201-762-6665
Duy
Manufacturing - Trading
53
Nicolo lsouard Street, SLM04
ltd.
George Guilbert Street. MU Curepipe.
247,
Piso
E Blvd. Manuel Avila Camacho, #1007 , locai4B y 1 D
C.P.
54055 Tel: +5255-52929211
Techomarket
TC
KM
PO
Tore, Project 8, Quezon City, Philippines. Tel: +632-929-5334 Fax: +632-929-1343
55
Box. 18860, Doha, Qatar. Tel: +974 468 9494 Fax: +974 468 9565
J:I~CTp~6biOTOP
):1.4,
TC
CELOVSKA
Bul.
cumicevo
11.5
Fax: +64-4-2325-984
Box.3558. Ruwi Postal Code: 112. Sultanate
ON
33 Fax: +48 22
Un
ipessoal
SRL
cTpoeH~e
cumicevo
ltd
Fax
15
Fax
Mircea eel Batrin
sokace.
BD
Chefchaouni. 20250 Casablanca Tel : +212
of
D&M
ltd
. 13 Wall Place. Tawa. Wellington
Fax
: +968 24 698 389
Fax
: +92
21
S.A.
Ulica Kurantow 34. 02-873 Warszawa Poland
LDA.
Fax:+351
39 Mehadia St..
1 TEL: (495) 780-58-20
sokace.
19 Jalan Kilang Barat #03-06 Ace Tech Building Singapore 159361
280
1000
17
Indianapolis Street, Kyalami
de Torroja, 25, 28022 Madrid Tel : 91-746--00-45
AG
EggbOhlstrasse 28,8052
: 02-2517-1452
ltd.
ve
San. A.:;;
Fax: +90 212 249 35
0ffice
1.
of
D&M
Audiovisual, First floor Imperial House. 4-10 Donegal I Square East. Belfast
(USA).
LLC
: 201-762-6686
Co
(left
4,
Colonia
lokal 5 11000 Belgrade, Serbia Tel: +381
Europe
B.V.
1.
9610 NOERAGER Tel: +47 815 000 90
222 7427
331
55
00
Rua
Consiglieri Pedroso 71. E 5 E
214 342 299
6.
060541 Bucharest
000
«KOMnaH~A
lokal 5 11000 Belgrade. Serbia Tel:
LJUBLJANA,
25.41252
ltd. 9F, 66, Sec. 2, Jian Guo
46 Mahajak Building, Sukhumvit Soi 3 (Nana-Nua) Klongtoey, Wattana.
Galipdede Cd. No.: 83 Kuledibi - Karak6y. istanbul, Turkey
65012 Odessa. Ukraine Tel : +380 (482) 305530
44(0)28
(a
..
DE
www.denon.com
12
971
-4-
266-2052
9027 9830 Fax: +44
D&M Holdings Company)
Ltd. 170 Ung
NON
:+
Wing). Bangunan Infinite Centre. Lot
Roma
6,
Beemdstraat 11, 5653
CET
G6teborg Tel:
Fax
389 2 3133 104
Fax:
Sliema Tel: +
, Mexico D. F
2022
Chisinau
Building Mezzannine Floor No. 4 Mindanao Avenue,
6oHaH3a»
SLOVENIA
: 66--2-253-1696
Van
TEL: +386 1 510
Park,
1685, Kyalami , South
ZOrich
100
Khe
im
St.,
03-7954-7088
356 (213)
Tel
: +230 6983927
.,
06700
MEXICO
San
Lucas Tepetlatalco, Tlalnepantla,
Tel
: +373
22
22
66 6768
MA
New
Zealand
Of
Oman.
sq
2730-055 Queluz de
Tel
: +40-21-2202440
Pocc~A.
129343, r. MocKsa.
031
33 51010 Fax:
Tel
: +
41
1 3061615
N.
Rd
..
Taipei 10479. Taiwan R.O.C.
AI
Khabisi. Deira. Dubai. U.A.E
(0)
28 9031 2643
Corporate Drive. Mahwah,
Ward
25,
Blinh
1.
Jalan 13/6, 46200
40562
Fax
: +
356
Fax:
Tel: +5255-5514-0401
C.P.
64650. MEXICO
241033
Fax: +373
63 44 00 66
Fax
Eindhoven, Holland
: +212
Fax
Fax
+381
63 44 00 66
31
30
FAX:
Fax
: +43 1 485 76 79
Africa
Fax
: 91-329-44-
031
Fax:
Fax
: +380 (482) 305555
Thanh
Dist.,
D&M
: +47 228 063 05
: +40-744-501516
+386 1 510
33 51019
+41-044-3061690
HCMC,
5431
+230 6980322
Baixo,
NJ
(213)
45522
22
226009
22
35 42 77
Portugal
npoe3):1
31
45
57
07430-2041
Vietnam
Holdings Inc.
10032 50AD
Page 70

Notes
USA
0
FCC
(For
1.
IMPORTANT
DO
Any changes or modifications not expressly approved
by the grantee
au
thority
2.
CAUTION
This equipment must be
in accordance with provided instructions
antenna(s) used for this transmitter must
to
provide a separation distance of at least
all
persons and must not be co-located or operating
in
conjunction
End-users and installers must be provide with antenna
installation instructions
conditions for satisfying
3.
COMPLIANCE INFORMATION
Product
This device complies
Operation is subject
(1)
this device may not cause harmful interference,
and
(2)
this device must accept any interference
received,
undesired operation.
Denon Electronics
(a
D & M Holdings
1
00 Corporate
Mahwah,
Tel.
(201)
4.
NOTE
This equipment
comply
with
pursuant
are
designed to provide reasonable protection against
harmful interference in a residential
equipment generates, uses and
frequency energy
accordance with the
interference
there is no guarantee that interfe
in
a particular installation.
cause harmful interference
reception, which
equipment
to correct the interference by one or more
following
o
Reorient or relocate the receiving antenna.
o
Increase
and receiver.
o
Connect
different from that to
connected.
o
Consult
technician for help.
on
radio
CANADA
Information
US
customers)
NOT
to
operate the equipment.
including interference that may cause
NJ
762-6665
to
off
measures:
the separation between the equipment
the equipment into
the dealer or
NOTICE:
MODIFY THIS PRODUCT
of
this device could void the user's
installed
with
any other antenna or transmitter.
and
RF
exposure compliance.
Name
: Speaker
with
Part 15
to
the
following
(USA).
LLC
Company)
Drive
07430-2041
has
the limits for a
part
been tested
15
of
the
FCC
and,
if not installed
in
structions, may cause harmful
to
radio communi
If
can
be determined by turning the
and
on,
the user is encouraged to try
wh
an
and operated
transmitter operating
Dock
of
the
two
and_
Class
B digital device,
Rules.
These limits
installation.
can
radiate radio
and
ca
tions. However,
re
nce
will
this equipment does
to
radio or television
an
outlet
ich the receiver is
experienced radio/
and
be
installed
20
em
FCC
Rule
conditions:
found
used
not occur
of
on
a circuit
the
from
to
This
the
lV
0
IC
Information
(For
Canadian
CAUTION
To reduce potential radio interfe
the a
nt
enna
that the equivalent isotropical
(e
.i.r.p.) is not more than that permitted for successful
communication.
ATTENTION
Afin de reduire
utili
ga
in de facon
equi
niveau requis pour !'obtention d'
satisfaisante.
This equipment complies w ith
exposure limits set forth for
environment and meets the
(RF
) Exposure Guidelines
and
rules. This equipment has ve
energy that are deemed to comp
specific absorption
s.
For Canadian customers:
Th
is
ICES-003
Operation
(1
) this device may not cause interference, and (
this device must accept
interference that may cause undesired operation of
the device.
The
is below the
exposure limits.
in such a manner such that the potential for
contact during normal operation is minimized.
Th
is device
compliant with the
mobile exposure conditions. (antennas are greater
than
in
APPAREIL
Ce
t
normes canadiennes
Son
suivantes
d'interference et
interferenc
peuvent affecter son fonctionnement.
La
pu
est inferieure
rad
io d'lndustry
til
de
fonctionnement
Ce
peripherique
conforms
des conditions d'expositi
(les
d'une personnel.
type
sa
teurs,
il
faut choisir
ace
va
lents (p.i.r.e.) ne soit
RSS-1
02
of the
Class
B
digital
and
RSS-21
is
subject
rad
iated output power of the Wireless Device
In
has
20
em
from a person's body).
appareil numerique de
fonctionnement
(1)
e,
notamment
issance de sortie
a
Ia
fa9on
antennes se situent
Canada
a
minimiser les
normal.
au
x limites d'expositi
customers)
re
nce
to
and
its
ga
in should be so chosen
le
risque d'interference aux autres
le
que
ra
apparatus
dustry
The
also been evaluated
cet appareil ne doit pas causer
(2)
limite d'exposition aux frequences
a egalement ete evalue
type d
Ia
puissance isotrope rayon nee
FCC
in
Sup
IC
radio frequency
tio
(SAR).
complies
0.
to
the fo
ll
owing
an
y interference, including
Canada
Wireless
Dev
IC
RF
Expos
cl
asse B est conforme aux
ICES
-003
est
cet appareil doit accepter toute
et
soumis
les
emi
se
par
(I
C)
.
Uti
li
contacts humains lors du
on
a
des appareils mobiles
a
moins
other users,
ly
radiated power
'a
ntenne
pas
superieure
un
e communication
FCC/IC
an
uncontrolled
radio frequency
plement
C
(RF)
ry
low levels
ly
without testing of
with
two
(I
C)
radio frequency
ice should be used
and
ure limits under
RSS
-
21
0.
aux
deux conditions
interferences q
l'appareil
sez
l'appareil de sans
et
on
aux
RF
de
20 em du co
et
son
au
radiation
to
OET65
Exposure
of
RF
Canadian
conditions:
hu
ma
shown
de sans
demontre
d'IC
da
ns
rp
2)
n
ui
fil
s
[ENGLISH]
1.
IMPORTANT
This product, when installed
contained in this
requirements. Modification
hazardous Radio and
2.
CAUTION
Separation
between this product and
This product and its antenna
or
operating in conjunction
transmitter.
[DEUTSCH]
1.
WICHTIGER
VERANDERUNGEN
Wenn dieses Produkt entsprechend dieser
Bedienungsanleitung aufgebaut
Anforderungen der R&TTE-Richtlinie. Veranderungen am
Produkt konnen
fOhren.
2.
VORSICHT
Zwischen dieses Produkts
Schutzabstand von
Dieses Produkt und
anderen Antennen oder
mit
ihnen verwendet werden.
[FRAN<;AIS]
1.
MISE
PRODUIT
Si
toutes
respectees pendant son
aux directives R&
risquerait alors de
dangereuses.
2.
ATTENTION
L'appareil devra
moins des personnes.
Ce
produit ainsi que son antenna ne devront en aucun c
€me
[ITALIANO]
1.
AWERTENZA
PRODOTTO
Se
installato
manuals,
R&TTE.
causare pericolose radiazioni radio ed
2.
~TTENZIONE
E necessaria mantenere una distanza minima
questo prodotto e
Questo prodotto e
posizionati in
non devono essere utilizzati conqiuntamente a auesti ultimi.
[ESPANOL]
1.
NOTA
Este producto, si es instalado de acuerdo con
instrucciones contenidas en este
requisites de
producto puede producir radiaci6n de Rad
peligrosa.
2.
PRECAUCI6N
Se
debe mantener una separaci6n de
producto y
Este producto y
conjuntatnente con otra antena o transmisor.
NOTICE:
DO
NOT
MODIFY
as indicated in the instructions
manual,
EMC
distance
of
at least
HINWEIS:
AN
zu
gefiihrlicher Funk- und
20
em eingehalten werden.
se
Sendern
EN
GARDE
IMPORT
les
consignes indiquees dans
TTE
. Toute modification du produit
generer
etre situee
utilises
a
proximite d'une autre ante nne ou transmetteur.
IMPORTANTE:
come indicato
questa prodotto soddisfa i requisiti
Eventuali modifiche apportate
le
persona.
Ia
relativa antenna non devono essere
prossi
mitil
IMPORT
ANTE:
NO
Ia
directiva R&
las
personas.
su
antena no debe instalarse ni utilizarse
meets
of
the product could result in
radiation.
20
em must be maintained
all
persons.
must
with
any other antenna or
NEHMEN
DIESEM
PRODUKT
wird
,
und
Personen muss ein
ine Antenne
ANTE
installation,
des radiations rad
il
di
altre antenne o trasmettitori e
MODIFIQUE
dOrfen
aufgestellt oder zusammen
:
NE
JAMAIS
ce produit est conforme
une
distance de
NON
MODIFICARE QUESTO
nelle
is
tr
uzioni del
al
prodotto potrebbero
EMC
ESTE PRODUCTO
manual, cumple los
TTE.
La
al
THIS
PRODUCT
R&TTE
not be co-located
SIE KEINE
VOR
entspricht
EMV-Strahlung
nicht neben
MODIFIER CE
ce
mode
io
20
della
.
di
20
modif
icaci6n
io
menos
20 em del
directive
es
den
ont
ete
et
EMC
em au
as
presents
direttiva
em tra
las
del
y
EMC
[NEDERLANDS]
1. BELANGRIJKE MEDEDELING:
GEEN
AANPASSINGEN
Dit product, indian ge'installeerd
deze gebruiksaanwijzing, voldoet aan de vereisten van de
R&TTE-richtlijn. Aanpassing van dit product kan
radio- en
2.
LETOP
Houd tussen en personen altijd een afstand van
20
Dit product en zijn antenna mogen niet in de
andere antenne
daarmee worden aebruikt.
[SVENSKA]
1.
VIKTIGT:
Under forutsattning att apparaten
anvisningarna i denna bruksanvisning,
kraven i R&TTE-direktivet.
resultera i farlig radio- och elektromagnetisk
2.
FORSIKTIGT
Se ti
apparatens och personer i
Apparaten och dess antenn
niirheten av andra antenner
[PYCCKI/IIil]
1.
BA>KHO!
npoAyKT
HaCTORlUeM
R&TTE.
onacHoro
2.
nPEAYnPE~EHIIIE
He
CM.
3an
AOVfOH
[POLSKI]
1.
UWAGA
ZABRONIONA
Po
niniejszej instrukcji obslugi ur
wymog
do
niebezpiecznego promieniowania elektromagnetycznego
oraz radiowego.
2.
OSTRZEZENIE
Mi~dzy
zac
Urzqdzenia w
z
(
This product may be operated in the
Indoor use only.
EMC-straling
em aan.
of
zender
APPARATEN FAR
ll
att
det finns
HE
,
yc
pyKOBOACTBe,
ii13MeHeHHe
3neKTpoMarH~THoro
np~6
ni1JKa~TeCb
p8lU88TCA
aHT8HHO~
:
MODYFIKACJA
zainstalowaniu zgodnie z instrukcjami zawartymi w
i dyrektywy R&TTE.
tego
tego produktu i wszelki
ho
wa
na
odleglosc
inna
antena
E:
<D
AT
FR
IT
ES
ett
1/13MEHRiiiTE .QAHHbllil
Ta
HOB08
npOAYKTa
K
~cnonb30BaTb
~n~
urz<jdzenia
przynajmniej
raz
z
antenq
lub
nadainikiem.
R&TTE Directive
BE
DE
NL PL
SE
BRENG
AAN
AAN
vo
lgens de aanwijzingen in
tot
gevolg hebben.
worde
n geplaatst
INTE
MODIFIERAS
Ev.
modif
avstAnd
pA
omg
ivningen.
fA
r
inte placeras
eller
siindare.
HH
bl~
CO
rn
aCHO
OTBeYae
T
T
M
OJKeT
113
ny
YeH~R
AaHH
oro
~3
A
en~R
Aa
HHbl
neDBABTY~KOM.
TEGO
z<j
dzenie
Wpr
moie
skutkowac': powstaniem
mi
mo
ina
1999/5/EC
cz
GR
GB
20
follo
nie
DIT
buurt
of
in combinatie
installeras en
uppfyller
iering av apparaten kan
str
Ainin
minst
20
eller
nPOAYKT
~HCTPYKU~RM
pe6oBa
H
~RM
npHeecT~
~
owadzanie
instalowac
K noReneH"
.
6n~
JKe,
npOAYKT
~
UR~DZENIA
to
b~dz
mo
osobami musi
em.
w
wi
ng
coun
tr
DK
HU
PT
NO
PRODUCT
gevaarlijke
tenm
em
a
nviindas i
A~P8KTio
YeM
aHT8HH
ie
pol<jczeniu
ies;
inste
van een
li
denna
g.
me
llan
1
Ha
Y C
JEST
spelnia
d
yf
ik
ac
bye':
Fl
IE
SK
CH
gt
B
Bbl
to
20
c':
ji
Page 71

©l
o•)llt:IJliT<l»~)~ll
*1m(ct~5Bi5~!::¥-:5<I~~£l'~H~~~
7'-5'~18YAT
*1m~~ffl9-@
•
*
L')
--r
0).::
~-g-
0
•
f*J~9
-@lj\~)J7'-5'~18YA
M I
2)1~9
•
f*l~9
~c!i-=>
T®.S.~Bft.l5
5Bi~<i*C2.4GHz)
~~ffl11!\!5a0)~~,
n •
-s.fnn1*~~UfflO)t~f*l~~FcllC~~q:~~9
fcll),
t~Af:lj\~)J~~fcll(~~q:~~L-16L
J:.r5??7
nn•~9o
1 .
.::0)mt5a~~m-g--s.mc,
pg~l!!j!,Fq),
FcllfJ~:lifflc:tln
2.
l5fJ~-,
11
L-
T1[~t6~5Bi'f5ifiO)~j91JfJ~~~
-~~C~fflFo.IB~~2.'~9.S.~,
!1~~.tt
i81QJJ!!iO)t-::llD0)911~~C"JL
3 .
.lfO)fl!L
~FcllU-::(cJ:?77
O)~j91J~~~L-kW-8'16c,
t-::C:
E(:(ct,
Ji~~:
~*it~:f±
d:l~~;f§~-tz~-$1-
.b,O)~l!!j!fcll~£!'1ffll~pg~L.,
C E
(;:::~l!!j!,Fq)O)~~f(cj:~'~ili)
C
~
i£.::
16-')
(::5~1$-c'~
-s..::C:
-@lj\~)J7'-5'~18YA7
"\Jl!~
(cJ:fJ~9.::
"C'(ct,
~~1/Y::/~O)ilf~
IW0)~~5~~~"C~fflc:tl
2
?~l!!i!FcllC~H~~-g-
ti<-r;m!!J1*~~fflO)m
~Af:lj\~)J~l!!j!,Fq]d:JJ:.0?77
•t6L
•.::C:Hi&'tlL-
.::0)11!\!5afJ'6;m!JJ1*~~UfflO)t~f*J~l!!i!Fcllt::
u-::...t,
--r~cli~J'Ct:.::Jt~L
•-r
.::0)11!\!5afJ'6fnb1*~~UfflO)~Af:lj\~)J~
2'P~l!!i!FcllC11L-
~j(O)JI~~f\d:li'IIJL
7'-1'-
?~ t-:I.b.iii-Jll7'-1'
044(670)5555
http:/ I den
on.i
p/j p/
support/
pages/
EIJ(1~
L.-t,::Jj\
~)J
H
~~9
o
L)
~
i±
fuo
i±
6:tl-@.::
7
.b,O)~~Fcll~1ilil~:$T
.b,O)~l!!j!,Fq]~1iliJ(:
C:
.::0)11!\!5aO)~fflFo.l
-s.~l!!i!Fcll)
-r < t::.cc
(::
fJ~ili)
·
f~~
-s.~l!!i!
~~l!!i!Fcll\
m'imc-
2
?~l!!i!
•o
L...t-::t~-§-l::(ct,
~k~~-0)~
•t-::t::.e-,
.::';f§~L...
-r < t::.cc
T1[~t6~H'f5ifi
~~d:l~~O).::C:lf~E
•-8-t>i±<
t::."CL
lo
lo
>:7'.::<,
servi
cecenter
.aspx
*11!1!-c'(ct,
~1*-r,
fJ~~~
[2.4GHz
·~~v~v
L)
•
~l!!i!
(/-t--J\~:1~,
AV
·:J-t-:vA7:t~
• Bluetooth
•
':J~
·
·r:J~-\?v.::Z,:J~t--o-5-
*
.g.mmwnt-::
0)1J$"Cc)1~9
;£
1.
2.
©l
I'\-.::<,)<
'f)ifiL...
'f)ifil_,
(;::(cj:,
5Bi(:J:.
©l
A.::'J:>O)cp"C~fflGt-::~,
r0)~~~~16C:'O)~~~M~®.S.C:,
<
16~-g.mmwnt-::LJ,
0
;m
~
-§-C(ct,
©
~~O)lfeili~~~~~M~t6L
(;:::J:.
-§-t::(ct*m!O)iDJE~lli~~2.';t
~~9o
©l
5V:t~7
ffl
L...t-::11!\!5aO).lf(<f"C~ffl9-@
(::
fJ~ili)
T<t::.cc
©*11!1!~--~.ltm!IJE~ffi~GT<£~~9~
fJ''th.~~
©l
*m!(cJ:,::'~jgf*J"C'O).g.~,
kiil-.b.IY5'-7~..X~rYA7.b."C9o~O)~m,
El~"C'O)~ffl(ctd:J~IlD<
1~0~0~1
2.4
OS/
OF
4
---
2.4Ghz
<m~~m-g-
2.'ID1!1Jit~~L-~9
fH!J1:¢:~~U~~O)t~f*J~l!!i!Fcllt::11L-
2.4GHz
<i*O)~<i*~~~m
.S.1lU~~iilll~~
0
L-~9
o
-r~AE:c:tl.S.~'f5ifi!leili~~L...~-g-c;j\{J
L...,
iJ'"J;m!JJ1*~~u~~O)<i*~~IQI1!!fOJ!lE-r®-s..::e:
2.4GHz
--rgc11!\!5ac'f5ifiL-,
G
t-::
O)FoJ5Bi~<i*~~fflL-
LAN
11!!!5a~)
O)FoJ5Bi~<i*0)~5Bi~1'1JfflG
.g.mmwnt-::~,
L)
9-@
DJiiE'tiiJ~®
~
~
9 0
n
•.S.::!1611!!!5al
HIJfflL-t-::11!!!5a
~l!!i!Jl!--$1-,
~l!!i!LAN111Z\
111Z\11!!!5a
-\7
v;:<,jjffi
:g.~~ffl~3K~5a..X
-s.s~~~
s;
9 o
L)~i8fJ~-')
L)
AV
11!!!5a
~~.g.tJ~~~
-s.
OJiiE'tiiJ~®
TL
1-@11!\!5aC:O)lfeiliHl9
n
1-@11!\!5a0)~)/fi!~t}J-@o
-7:J-
~O)~~ffl~3Km!5a~
.::'Mfg~O)...t.::'~ffl
a-tJ~llilwnt-::
J'i~L.,O)N,L
~
< L
vC::',
BS/CS 7
~
9 o
.lfO)i~-§'(;::(cJ:11!\!5afJ'6~C'(t"f~~
u-::
~
-g-
-s,t~-8-C(ct,
~
~
9 o
o
-7:J-
~
t-::(ctll&5DJ6(:~
< t::.cc
*1I!!!O)rs.J!::~Wi:JY-?1J
~i8:1t~H~
~.g.tJ~~~L-t-=~9
~,
~HtJ'~~
~~fi!Tt::~~L...@L...
•t~-8--rt..,
•fJ'16L
li~-§-fJ~®
~5Bi0)&:!1~
~
.S.C:C)I~-g-
2-7--16
C:'
J
~
.::;(~~~9
•o
t-::(cti~~t:~i89
.S.
DJilEtlfJ~®
B!Ri!!li~O)M~
t::.cc
•o
40
m)o
~~~L-~
n
•.S.
~.g.
oH~
B-;;}
Ol
7f~OjfA-j
X[~OliAi
oH
Iii
~+=;*
~~~&'f,;,~-§-.fe,;Lft\JJJ$~1~~~
--rgc
1JDA:J.1J$~~~@:~~t,;L~~1.&.J.1Jij~
~+~;*
f~J;J]$~!9:!i~~,;Li§effl::f~~~~~~f1Uli~:i:.&'fll-8'5~®1a;
ffl
.::~fflO)i~-§
~I~-8-i~®ia
i~J.1J$~j!9:!!~~~B~-8'5~®ia~I~
•0
-s..::e:tJ~
u-::
LJ
9
~w
-r--rcL
•o
~-g-0 -'fO)t~
-s..::
C:
1:/®
c0)~5Bi~fiJ
~.::
l_,
-~~
~
~
9 o
~
§
B'-.H:
L-
9 0
~+~*
1.•
2.
3.
4.
5.
KOREA
.!jL~:!1;!t:ti.C
7171
717I.C
~
'i'--~1:1
8'--1
cf
,
illi~9:~!:Ei~!!IHJ't~:r.J~~~Uii§effl
j§effl!ij?¥
•
~~~10Jm~1JJJ~
7:!ii~~
7:!ii~~>
•
~A:JJJ$i~~~
7:!ii~~<
7:!iil!i~
•
~~g~~
•
9~~~~JJJ$
< -80
•
5'f.;~~!1
<
-36
<
-33
<
-40
<
-40
< -
30
1'1~1!§~~9:~!1~$,
7:~i~~9:ffl;l"tE~!17:!i
f§effl
H1::fi~~1&f!Jl-8'5t8'il7C!iEg@®il!.?iF~f[~'flt
i~lti§effl,
1§efflf;&J;I]$7C!iEgilJ:§,
m~~'ftte;
::f
i~i±
tJ.rrf~t)
(
7f~~
7f~~
(B-;;})
Af~<S'fr
Af~%1-
9 'UE-'--Ief
t:tf.C
g~
7f~~OI
~~~tJ71XfXH)
tj:Af.rrf<S:jg)-717I~Ai
~~
&<S:J£~
%
t!
'U££~
<Sfo~,
.rrf~t!
7f~~
~~~tj:i!.f
-'?-~
.2.-E
01
'U£~~
-E!-~~
o1
o~
of::<:1:i!.'
a.....:
o
L.....:
L.....:
Ait:ti~.C
r
%!-
-'lf2~£1
AJ
L.....: L.....:
L.....: ·I w -
.
,
~F*~~DJ
,
:'L}q]
,
ffii51!E~f§elf.l~:t?l::f~~11§~~!9:!!$
o
*~~IJ!.fHitm~~
o
'
:tl::li~~Fa$:mAE:i'F~,;L!!\U,'R~laiia
'f4~.&Hmiffl~)$~~11~~~~ifii,;L'fif
: 2.4 - 2.4835
< 1
OdBi
10dBi
(EIRP)
fl1
: < 1 00
fl1:
GHz
:
< 500
mW
mW
~
< 20
~<
27
dBm
dBm
o
G)
(g)
:
10d8i
fl1:
< 20
dBm
I MHz(EIRP)
> 1
OdBi
fl1
: < 27
dBm
I MHz(EIRP)
: 20
ppm
(
tE
2.4-2.4835GHz
dBm I Hz
(EIRP)
( mt1 l
JJJ?¥
(
dBm I 1 00 kHz
dBm I 1 00 kHz (2.4 - 2.4835
dBm I 1 MHz (3.4 - 3.53 GHz)
dBm I 1 MHz (5.725 - 5.85
dBm I 1 MHz ( ;i"tE 1-12.75
(30
~§!U9~)
~1m~i$
- 1
000
MHz)
1JDA:~!1JJJ$
± 2.5
GHz)
GHz)
G)
(g)
1i?ira®:m!'in;~,9~
GHz)
(
·eH6®Ji9~1JD~~~!ijJ;I]$$A:~
l :
l,
;
; -
§.~I!iiJ~'fliti.lli.~H'.t,
#*IIN~~i~~=f-ttFo:r.JDJm~f§effl
!0~Y'il&~&f!Jl7C!iEgif!.?;8'il'f1te~Iil!.,
'llil,fDlJ1~
~1
i1I
lieffl
o
;
f-'+~:&~fi@lf.lill:§8'il
Printed in
China
5431
9 llt-§L-!cf
UI.A..=.
*•
L-
~
,
n!ll:I'!D~
o
::fi~11§9~1l
Jillll:I'!P
10209 30AD
_,._
T
,
Page 72

SAFETY
INSTRUCTION
MANUAL
DENON
0 SAFETY PRECAUTIONS
CAUTION:
TO
REDUCE
SERVICEABLE PARTS INSIDE.
A
.A
THE
RISK
OF
ELECTRIC SHOCK,
DO
REFER SERVICING
Th
e lightning flash with arrowhead symbol, w ithin
to the presence of uninsulated
sufficient magnitude to c
The
exclamation point within
of important operating
appliance.
"dangerous voltage"
on
stitute a risk of electric shock
an
equilat
and
maintenance
era
(se
NOT
REMOVE
TO
QUALIFIED SERVICE PERSONNEL.
an
l triangle is intended to
rvicing) instructions in the literature accomp
equilater
within the
to
persons.
COVER (OR
al
triangle,
p
ro
duct' s enclosure t
al
ert the user
is
WARNING:
TO
REDUCE
RAIN
OR
MOISTURE.
THE
RISK
OF
FIRE OR ELECTRIC SHOCK,
DO
NOT
EXPOSE
THIS
IMPORTANT SAFETY INSTRUCTIONS
1.
Read
these ins
tr
2. Keep th
3.
Heed
4.
5. Do not use this apparatus near water.
6.
7.
8.
9.
10
11.
1
13
14
15.
all
Follow
Clean
only
Do not block any vent
In
stall
in accordance
Do not
a
mplifiers) that produce heat.
Do not defeat the safety purpose of the polarized or grounding-type plug. A polarized plug
one wider than the other. A g
the third
for replacement
.
Protect
point where they e
Only
use attachments/accessories specified by the manufacturer.
2.
Use
only
with
the apparatus. When a cart is used, use caution when moving the carVapparatus
combination
.
Unplug this apparatus duri
.
Refer
a
been damaged in any w
spilled
operate
Batteries shall
uctions.
es
e
in
structions.
warnings.
all
instructions.
with
dry cloth.
ila
tion openings.
with
install
near
pr
ong a
the power cord from being walked on or
with the cart, st
to
avoid inju
ll
servicing
or objects have
normally,
not be exposed
the manufacturer's instructions.
an
y heat sources such
ro
re
provided for yo
of
the obsolete outlet.
xi
t from the apparatus.
to
q
or has been dropped.
unding type plug has t
ur
and,
tripod, bracket, or table specified by the manufacturer, or sold
ry
from tip-over.
ng
light
ni
ual
ified service personnel. Servicing is required when the a
ay
, such
fa
as
llen
into the apparatus, the apparatus has been expos
to
excessive
as
sa
fe
ty
.
If
ng
storms or when
power-supply cord or plug
hea
r
adi
ators, heat registers, stoves, or other apparatus (including
wo
bl
the provided plug does not fit into your outlet, consult
pi
t such
ades and a third grounding prong.
nched particularly at plugs, convenience receptacles, and t
unu
se
d for long perio
is damaged, liq
as
sunshine, fire or the
ds
of
uid
ed
li
ke.
time.
pp
aratus has
to rain or
BACK).
NO
USER-
intended to alert the user
ha
t may
to
the presence
an
yi
APPLIANCE
ha
s t
wo
blades with
Th
e wide blade or
an
electrician
®
~
•
ng
""
,.,
be
the
TO
~
has
been
~-
mo
isture, does not
of
1. COMPLIANCE INFORMATION
Product Name:
Model
Number:
This product contains
This p
ro
duct complies with
he
Operation i
111
and
recei
undesired operation.
Denon Electronics !US
(a
100
Mahwa
Te
2.
IMPORTANT NOTICE:
PRODUCT
This p
i
ns
requi
DE
to use the
3.
CAUTION
•
•
4,
NOTE
Th
with the
to
to
interference in a residential in
Th
fr
accordance with the instructions,
interference to
there is no
in a particular
harmful interference
whi
and
th
measures:
•
• Increase
• Connect
• Consult
s subject
this p
ro
duct
12
)
this product must ac
ved
, including i
D&M Holdings
Co
rporate
h,
NJ
l.
1
201
)
762-6665
ro
duct, when
tructions contained in this ma
re
me
nt
NON
may void your authorit
product.
To
co
mply with
requirement, separation distance of at l
mu
st
be maintained be
persons.
This
product and its ante nna mu
or o
pe
ra
ting in conjunction with any other
transmi
tt
e
is product has been tested a
li
mits for a Class
Part
15
of the
provide r
is product generate
eque
nc
y
en
ch
can be determined by t
ON
,
the user is encou
e interferen
Reo
ri
ent or relocate the receiving antenna.
the
receive
r.
th
differe
nt
connected.
the
this type of product or
te
ch
nic
ia
n for help.
FCC
Information
(For
US
customers)
Speaker
Dock
DSD-
300
FCC
ID:
PPO-DSD300.
Part
15 of the
FC
C
to
the fo
ll
ma
y n
Company)
Drive
07430
-2
0
s. Modification not expressly approved by
FC
r.
FC
C
ea
sonable protection against harmfu l
ergy and, if not installed and used in
rad
io comm
gua
rantee that
in
sta
ll
ation. If
ce
by one or more
separation bet
e product
from that
lo
ca
l retailer autho
owing
ot
cause harmful interference,
ce
pt
nt
erfere
A)
,
LLC
41
DO
in
st
a
C RF ex
tw
Rules. Th
s,
uses and c
to
radio or
in
to
an
nc
e
th
NOT MODIFY THIS
ll
ed
as
in
nu
y,
gra
nt
po
sure compliance
ee
n this product and
st
not be co-located
nd
found to comply
B
di
gital device, pursuant
ese
lim
it
sta
l
la
tion.
an
ma
y cause harmful
un
ications. Howeve
in
terference
t
hi
s product does c
te
levision reception,
urn
ing the product
raged
to try to co
of
we
en the equipment and
to an outlet on a ci
w
hi
ch the recei
ri
ze
an
ex
pe
rienced r
Rules.
tw
o conditions:
y interfe rence
at may cause
dicated in the
al, meets
ed by the
s are designed
d to distribute
FCC
F
ea
st
20
an
te
nn
radiate radio
will
not occur
au
OFF
rr
the
following
rcu
ve
r is
ad
io(TV
CC
em
a or
ect
a
se
,
ll
r,
it
INFORMATION
(Pour
Ia
clientele
1.
INFORMATIONS
Nom
du produit: Enceinte Dock
Numero
Ce produit contient
Ce
p
ro
reglement
conditions
d'interferen
tou
te
interference, y com
pouvant entrai
De
non Electronics (
(a D
&M
100
Corporate
Mahwah,
Te
l.
120
11
2,
REMAROUE IMPORTANTE:
PRODUIT
Ce
produit, lorsq
dans l
es
aux normes
expressement approuvees par
annuler l'autori
3.
PRECAUTION
•
Po
ur
d'
exposition
de separation
les person
• Ce
produit et son antenne
installes
an
tenne ou un
4, REMAROUE
Ce
produit a
des disp
secti
on 15
c
o
n
~ue
s
cont
re
les interferences nocives sur une installation
residentie lle.
Ce
produit
radi
of
req
conformeme
interferences nefastes avec les communi
To
ut
ef
ois, nous ne pouvons pas
d'in
te
rference avec certaines insta
d'
interferences
de
Ia teh
3v
au
mome
OF
F,
nous
corriger !'interference comme suit:
•
Reorienter
•
Augmenter
recept
•
Co
nnecter l'appare
different de celui du recepteur.
• Con
su
distribution
ra
di
o(TV expe
DE
de
modele: DSD-300
duit
es
t conforms
FCC
.
L.:
su
iv
a
nt
e
ces
nocives et
ne
r un fonctionnem
Holdin
gs
Co
D
ri
ve
NJ
07430-2041
76
2-
6665
inst
ruc
tions de ce manu
FC
C.
sa
tion
assurer
Ia
F
CC
d'
au moins
nes
.
ou
utili
ses
au
ete teste
os
itifs numeriques de
du
regleme
po
ur
fournir une protection raisonnable
ge
nere,
ue
nce et
nt aux instructions,
netastes
ision
provoq
nt
de
)'
ac
co
ns
ei
ou
deplacer
Ia
distance e
eu
r.
lter
un
re
de
ce type de produit
ri
mente.
etasunienne)
CONFORMITE
FCC
ID: PPO-DSD300,
ut
s:
USA
mp
u'il est
Les modifications qui ne sont
R
F,
tre t
s'
tivation
llons
vendeur
a
ilisation
est suj
(1)
ce produit ne provoque pas
121
ce produit doit accepter
pr
is
),
LLC
any)
NE
installe comm e
FCC
a
utiliser
conformite
veill
ez
a
maint
20
em
ra
nsme
tt
il
est conforme
Class
nt
FCC.
emet
n'est pas
sur
Ia
reception de
ON
ou de
a
l'utilisateur d'e
l'
ante
nn
nt
re
a
Ia
pri
se murale d'
l
oca
ne doivent
eur.
en meme
et
utilise et
il
uees par cet a
il
FCC
Ia
se
ction 15 du
e
tt
e
au
x deux
les
interfere
en
t non
souha
PAS
MODIFIER CE
el
DE
le produit.
av
entre ce produit et
temps qu'une
Ces
i
ns
il
peu
ga
ppa
e.
l'e
qu
l agree
indique
, est conforme
N
ON
peuvent
ec
l
es
normes
en
ir u
ne
distance
pa
s etre
au
x
li
mitations
B, en vertu de
limitations sont
de l'energie
ta
ll
e
et
t entralner des
ca
tions r
r
an
tir !'absence
ll
ations.
En
Ia radio
re
il,
survenant
Ia
de
sa
cti
ssa
yer de
ipement et
un
pour
ou
un technician
nces
itable.
pa
autre
Ia
de
utilise
ad
io.
c
as
ou
va
tion
le
ci
rcuit
Ia
s
Page 73

IC
lnfonnation
1. PRODUCT
This product contains
This product
is subject
not cause harmful interference, and
any interference received, including interference that may cause
undesired operation .
This
2. CAUTION
To
type and
isotropically radiated power (e.i.r.p.) is not more than that permitted
for successful communication.
For Canadian customers:
This Class B digital apparatus complies
comp
to
the
Class B digital apparatus complies
reduce potential radio interference to other users, the antenna
its
lnfonnations
1.
APPAREIL
Cet appareil contiens
Cet appareil est con forme a
L.:ut
ilisation de ce dispositif est autorisee seulement aux deux
su
conditions
(2)
l'utilisateur du dispositif doit etre pret a accepter
radioelectrique
compromettre
Cet appareil numerique de
NMB-003 du Canada.
2. ATTENTION
Afin de reduire le risque d'interference aux autres utilisateurs,
choisir
isotrope rayonnee
niveau requis pour
Pour les clients canadiens:
Cet appareil numerique de
du Canada.
ivantes :
le type d'antenne
(For
Canadian
IC
4491A-DSD300.
lies
with
RSS-210
following
ga
in should be so chosen that
sur
rec;u,
le fonctionnement du dispositif.
two
conditions:
IC
(pour
IC
4491A-DSD300.
Ia
(1)
il
ne doit pas produire de brouillage,
meme
si ce brouillage
Ia
cla
sse B est conforme a
et
son gain de
equivalents
I'
obtention d'une communication satisfaisante.
Ia
classe
(p
.i.r.e.) ne soit pas superieure
Best
customers)
of
Industry Canada. Operati
(1)
this produc t
with
Canadian
Canadian
clients
CNR-210 du
est
fac;on
ace
this product may
the
ICES
canadiens)
tout
susceptible de
que
Ia
norme
(2)
with
les
norme
conforme a
must
ICES
-003.
equivalent
-003.
Canada.
brouillage
Ia
Ia
puissance
NMB
accept
norme
CAUTION:
To completely disconnect this product from the mains, disconnect the
plug
from
the wall socket outlet.
The mains
the unit and
plug is used
must
to
completely interrupt the pow er supply to
be w ithin easy access by the user.
PRECAUTION:
Pour deconnecter compi€Hement ce produit du courant secteur.
debranchez
La
de
Ia
prise de
Ia
prise secteu r est uti Iisee pour couper completement
et
l'appareil
prise murale.
l'utilisateur doit pouvoir y acceder facilement.
I'
alimentation
PRECAUCION:
Para
desconectar completamente este producto de
electrica, desconecte
El
enchufe de
el
completo
encontrarse
el
enchufe del enchufe de
Ia
alimentacion electrica se utili
suministro de alimentacion electrica a
en
un
Iugar
al
que el usuario tenga facil acceso.
Ia
alimentacion
Ia
pared.
za
para interrumpir por
Ia
unidad y debe de
il
on
taut
au
-003
0 NOTES
NOTAS SOBRE
• Avoid high temperatures. • Eviter des temperatures elevees. • Evite altas temperaturas.
Allow for sufficient heat dispersion Tenir compte d'une dispersion Permite
w
hen
• Handle the pow
Hold the plug when unp lugging • Manipuler
the cord.
• Keep the unit free from
water, and dust. debranchement du cordon.
• Unplug the power cord
using the unit
of
time. • Debrancher le cordon • Desconecte
• Do not obstruct the ventilation d'alimentation lorsque l'appareil cuando no utilice
holes. n'est
• Do not let foreign objects into longues periodes. • No obstruya los orificios de
the unit.
•
Do
and thinner come
the
• Never disassemble or modify the
unit
• Ventilation should not be diluant avec l'apparei
et
impeded by covering the • Ne jamais demonter ou modifier
ventilation openings
such
or curtains.
• Naked flame sources such
lighted candles should not be
placed on the unit.
• Observe and follow local ventilation . sin protecci6n, como velas
regulations regarding
disposal.
•
Do
dripping or splashing fluids. • Veillez a respecter les lois
Do
•
liquids, such
unit.
• Do not handle the mains cord
with
• When the switch is
OFF
equipment
switched
• The equipment shall be installed
near the power supply so that
the power supply is
accessible.
Do
•
place exposed to direct sunlight
in
or
temperatures, such
heater.
ON
USE I OBSERVATIONS RELATIVES A L'UTILISATION I
EL
USO
WARNINGS
installed
in a rack
. de
er
cord carefully. I' installation sur une etagere. en
mo
isture, Tenir Ia prise lors du Sostenga el enchufe cuando
when
for
long periods l'hum idite, l'eau
not let insecticides, benzene, d'aeration. • No deje objetos extrafios dentro
unit.
in
any way. insecticides, du benzene
as
not expose the unit to bougies allumees. pilas, respete
not place objects filled
wet
(STANDBY! position, the
not keep the battery in a
places
in
newspapers, tablecloths autre. obstruida por haberse cubierto
as
vases,
hands. • Ne
is
not completely
off
from MAINS.
with
extremely high
not • Proteger
contact
with • Ne
with
items,
as
ba
ttery • Ne jamais
with
on
the piles usagees. salpicaduras cuando se utilice.
in
the du liqui
easily est sur
as
near a
AVERTISSEMENTS
cha
leur suffisante lors de del calor cuando esta instalado
le
d'alimentation avec precaution. cui dado.
• Ne pas obstruer les trous
etrangers dans l'apparei
• Ne
l'appareil d'une maniere
• Ne
de ventilation avec des objets peri6dicos, manteles o cortinas.
tels que des journaux, nappes
ou
sur l'appareil, notamment des
vigueur lorsque vous jetez les
• L'
appareil ne doit
expose
sur
•
Ne pas manipuler le cordon
al
d'
mouillees.
• Lorsque l'interrupteur
(STANDBY). l'appareil n'est
completement
SECTEUR
• L' appareil sera installe pres de
Ia
source d'alimentation, de
sorte que cette derniere soit
facilement accessible.
Ne placez
•
endroit expose a
directe
des endroits presentant des
temperatures extremement
elevees, par exemple pres d'un
radiateur.
cordon • Maneje
I'
appareil contre • Mantenga
et
Ia
poussiere. humedad, agua y polvo.
pas
utilise pendant de mucho tiempo.
pas
laisser des objets del equipo.
pas
mettre
pas
recouvrir les orifices
rideaux.
Cela entraverait
pla
cer de !Iamme nue encendidas.
a l'eau ou a l'humidite. objetos I Ienos de liquido. como
pas
poser d' objet contenant jarros.
de,
par exemple un vase, • No maneje
l'appareil. alimentaci6n con
imentation avec les mains
Ia
position
(MAINS).
pas
du
solei!
l.
en
contact des
et
un
l.
ou
d'une
Ia
en
pas
etre • No colocar sobre
OFF
lumiere
dans
pas
un
deconnecte du
Ia
pile dans
Ia
ou
ADVERTENCIAS
Ia
consola.
desconecte
ventilaci6n .
• No permita el contacto de
insecticidas, gasolina y diluyentes
con
el
• Nunca desarme o modifique
equipo de ninguna manera.
•
La
ventilaci6n no debe quedar
las
aperturas con objetos como
• No deberan colocarse sobre
el
apa
• A
Ia
hora de deshacerse de
cuidado del medio ambiente.
• No exponer
mojadas.
• Cuando
Ia
posicion
equipo no
desconectado de
MAINS.
•
El
equipo se instalara cerca de
Ia
fuente de alimentaci6n de
manera que resulte
a
ella.
• No coloque
expuesto a
sol o donde
extremadamente alta, como
cerca de
Ia
suficiente dispersion
el
cordon de energia con
el
cord6n de energi
el
equipo libre de
el
cord6n de energia
el
equipo por
equipo.
rato fuentes inflamables
al
goteo o
el
aparato
las
manos
Ia
alimentacion
facil acceder
en
un
las
en
Iugar
sea
Ia
normativa para
el
aparato
el
cable de
el
interrupter esta
OFF
(STANDBY).
esta completamente
las
pi
las
Ia
luz
directa del
Ia
temperatura
una
calefacci6n.
0 CAUTIONS
ON
INSTALLATION
PRECAUTIONS D'INSTALLATION
EMPLAZAMIENTO DE
LA
INSTALACI6N
a.
* For proper heat dispersal, do not install this unit
el
in
enclosure.
• More than
• Do not place any other equipment
*
a confined space,
12
in. (0.3 m)
such
as
a bookcase or similar
is
recommended.
on
* Pour permettre Ia dissipation de chaleur requise,
n'installez pas cette unite dans un espace confine tel
bibllotheque ou un endroit similalre.
qu'une
• Une distance de plus de
• Ne placez aucun
* Para
Ia
el
el
dispersion del calor adecuadamente, no instale
en
este equipo
o unidad similar.
•
Se
recomienda dejar mas de 12 pulg. (0,3
• No coloque ningun otro equipo sobre
un
12
po (0,3
ma
teriel sur cet appareil.
Iugar confinado tal como una libreria
m)
DENON
www
.denon.com
in
China
Printed
Wall
Paroi
Pared
this unit.
est recommandee.
m)
alrededor.
Ia
unidad.
D&M
Holdings Inc.
5431
10211
01AD
Page 74

DE
NON
Congratulations on purchasing this Denon product!
We
invite you
Be
the
previews
first
of
our
new
online store and be the
http://usa.denon .com/us/MyAccount/Pages/Login .aspx
to
to
join the Denon Owner's Club.
Thank
you
for
know
about upcoming Denon products and
technologies.
choosing Denon.
You
will
first
in line
Join
today!
also receive members
for
all
promotions
get
exclusive
only
offers
and contests.
from
Please register
USA
Customers
Canada
Customers
: http://usa.denon.com/us/Support/Pages/ProductRegistration.aspx
: http://ca.denon.com/CA/Support/Pages/ProductRegistration.aspx
Denon Factory Service Information
DENON FACTORY SERVICE by PANURGY
701
Ford Road (South Dock)
Rockaway, NJ 07866-2053
(973) 625-4056
(973) 625-9489 Fax
.panurgyoem.com/Denon/Denonrepair.
to
one
of
UNITED RADIO SERVICE
5717
Enterprise Parkway
E. Syracuse, NY 13057-2905
(800) 634-8606
(315) 446-8505 Fax
To
locate an authorized warranty service center
http://usa.
or
you
can send
DENON
PYRAMID
305 E. Braker Lane
Austin, TX 78753-2746
(512) 458-8292
(512) 453-4542 Fax
REGIONAL SUPER SERVICE CENTERS (Repair only-No parts orders please)
AUDIO
http://www
denon
.com/us/Support/Pages/ServiceCenterSearch.aspx
your
product
your
product at,
USA
OEM
html
within
your
area please
our
Regional Super Service Centers listed
visit
our
web
site at
below
.
AUDIO SERVICES
544 Central Dr., Suite
Virginia Beach,
(757) 498-9554 Fax
VA
(757) 498-8277
101
23454-5245
INNER
14
16 S.E. Morrison Street
Portland,
(503) 238-1787 Fax
SOUND
OR
97214-2646
(503) 238-1955
ELECTRONIC EXPRESS, Inc.
1809 E. Fabyan Parkway
West Chicago, IL 60185
(630) 208-4600
(630) 208-4601
DENON
Fax
FACTORY SERVICE
To
locate an authorized warranty service center
http://ca.denon.com/CA/Support/Pages/ServiceCenterSearch.aspx.
NORMAN'S ELECTRONICS
3653
Clairmont
Atlanta, GA 30341-4907
(770) 451-5057
(770) 455-8337
Road
Fax
CANADA
by
MICROLANDTECHNICAL
170 Alden Road,
Markham, ON
(905) 940-1982
http://clientportal.microland.ca/rmastart.aspx
Unit
L3R4C1
within
2
your
area please visit
GOLD CROWN ELECTRONICS
Victoria Business Park
129 E. Savarona Way
Carson, CA 90746-1406
(310) 538-8282
(310) 538-8281 Fax
SERVICES
our
web
site at
WARRANTY
5431
DE
COMMON
10003
40AD
1
Page 75

LIMITED
t
Length
of
Non-
~
This
warranty
t the date
'f
What
t Except as specified below, this Warranty covers all defects in material and workmanship in this product occurring during the above warranty periods.
'
~
not covered by the Warranty:
' the U.S.A. from an authorized
' the stores.
t number has been defaced, modified
F product repair, opening
c) Any shipment
•
Transferable
on
your
of
the
original consumer purchase from an AUTHORIZED
is
Covered
If
you are uncertain as to whether a dealer is a DEN
of
the product (claim must be presented to carrier). (5) Items subject to wear from normal usage (tape heads, cartridges, stylus, battery, etc.). (6) Periodic
! check-ups which do not disclose any defect. (7) Use
' and/or professional applications. (10) Any installation
;
What
We
WiD
~
If
during the applicable warranty period from the date
t repair,
How
;
~
If
your unit ever needs service,
Pay
or
at its option, replace with new, used
to
Obtain
Warranty
t a service station is
~
below.) In all
a. You are responsible for transporting
b.
'
c.
i
d. You should include the following: your name, address, daytime telephone number, model
•
~
• THIS WARRANTY IS VALID
;
If
THIS
;
WARRANTIES
~
OUR
INCLUDE
•
• PRODUCTS LOST,
'
SOME
'
INCIDENTAL
• This warranty gives you specific legal rights, but you
W writing signed by an officer
t
"'f
•
;
~
other
cases, the following procedures apply whenever
If
shipment
You must pay
WHEN
In the
your product does not require service, but you have questions regarding its operation, please contact
WARRANTY
LIABILITY
STATES DO
of
RETURNING
case
of a CD
OF
IS
INCIDENTAL
OR
CONSEQUENTIAL
DENON ELECTRONICS (USA), LLC
(a
•
i
~•lll••
·•·
•lll••
·
•·•o
l
>•·•·••''"•
•
on••·•
Warranty
DENON
product which is distributed and warranted by
Product Category
A
/V
Controller, A
AVR-xx11CI
DVD
Receiver,
Pre-Amplifier. Digital Pre-Amplifier
Power-Amplifier,
Tuner,
Option
CD Player,
CD
Reco
CD
Receiver,
Network Audio
System Audio
Turntable
Speaker
Sub-woofer
Microphone
iPhone<B> I iPod<ll>
Headphone
Front
Surround Home Theater System
Video Processor
Cartridge
Remote Controller
Cables
Speaker
of
or
For
DENON
your
unit is required;
the
initial shipping charges, but
or
IS EXPRESSLY
MERCHANTABILITY
LIMITED
STOLEN
NOT
D&M
IV
Receiver,
AM I
FM
series,
AVR-xx12CI
DVD
Home Theater System
Head
Integrated Amplifier
Board
DVD
rder
stands
(I)
DENON
modification or failure to follow instructions supplied with the product. b) Repair or attempted repair by anyone not authorized by DEN ON.
Performance
authorized, please visit
YOUR
DVD
OR
AND/OR
ALLOW
of
Denon Electronics USA, LLC. '
Amplifier
Player, Blu-ray
Network
CD
Receiver
Player
I
l
Docks
Any product which is not distributed in the U.S.A. by DENON ELECTRONICS (USA), LLC. (2) Any product which is not purchased in '
dealer. (Note: AUTHORIZED DENON DEALERS can be identified by DENON AUTHORIZED DEALER sticker displayed in I
or
removed. (4) Damaged deterioration or malfunction resulting from: a) Accident, act
or
it
may
be
taken
your
UNIT
FOR
Player
, please enclose
IN
THE U.S.A
TO
CONSEQUENTIAL
. ONLY.
MADE
AND
THE
REPAIR
DAMAGED
LIMITATIONS
DAMAGES, SO
Receiver
series
and
later
Disc Pl
ayer
1
I Autolift I Manual
J
Full
Automatic
2
ON
AUTHORIZED DEALER, please contact DENON as listed below). (3) Any product on which the serial '
of
the product outside the U.S.A. (8) Damaged magnetic tape or CD/DVD discs. (9) Use in industrial , commercial, '
or
removal charges resulting from product failure. i
of
equivalent model, such defective product without charge for parts
or
unit
WARRANTY SERVICE. A
IN
LIEU
FITNESS
original
shipped to any authorized
our
website at http://usa.denon.com/us/Support/Pages/ServiceCenterSearch.aspx
or
arranging
for
we
will
pay
the return shipping charges
ONE
(I)
OF
ALL
FOR
OR
REPLACEMENT, AT
COMMERCIAL
DURING
ON
SHIPPING
HOW
LONG
THE
ABOVE
may
also have other rights which vary from state to state. This Warranty
Holdings Company)
100 Corporate Drive
Mahwah, NJ 07430-2041
(201) 762-6665
www.usa.denon.com
•ol
>•·•·•ol"
·
•·•ol'"•·•oH"•·•oll"·•·•oll"
·
-•oll"·•·•oll"
·
•·•oll••·•·•oll••·•·•otl••
WARRANTY
DENON
DEN
ON
ELECTRONICS (USA),
consumer
your
unit must be transported for warranty service; •
its transportation.
COPY
disc
that
the unit has failed with for test reasons. It will be returned with the unit.
OTHER
WARRANTIES,
A PARTICULAR PURPOSE. ;
OR
.
AN
LIMITATIONS
ELECTRONICS (USA),
AVC,
AVR, DRA
Special
Cl
ADV,
S 1
PRA
, AVP,DAP, POA,HA
TU,
PMA 3
ACD
DCD, DCM, DVD,
CDRW
RCD
DNP
D-F,
D-M, S 1
DP-L, DP-M
DP-F,
DP-USB
sc
DSW
DM-S
, DM-A
ASD,DSD
AH
DHT-FS
DVP
DL
RC
AK
ASF
i
Pod
purchase
your
DENON
service station
OF
THE
OUR
OPTION,
PROPERTY
IMPLIED WARRANTY
AND
LLC
DVM, DBP,
is a trademark of Apple Inc
DEN
ON
if
the repairs are covered by
ORIGINAL
and
serial number
EXPRESSED
OF
ANY
DAMAGES
EXCLUSIONS
DENON FACTORY SERVICE
http://www.panurgyoem.com/Denon/Denonrepair.html t
·
•·•oll"·•
•
otl>•·•·•~·-·
•
otl••-·•oii''-"1110•-·•111••-·•IIIO•-·•UIO•-·•IIIO•
LLC
DEALER.
product is found to
or
DEN
SALES
our
OF
LASTS
701
remains in effect for the following periods from
2
3
3
DBT
.,
registered in the U.S. and other count ries.
of
or
labor.
ON
ELECTRONICS
the
SLIP
MUST
of
the product
Technical Services Department as listed below.
OR
IMPLIED,
DEFECTIVE
ANY
AND/OR
MAY
KIND.
NOT
PRODUCT
DO
APPLY
3
1
1
1
2
YEAR($)
4
2
5
1
2
1
1
1
3
90
90
DAYS
90
90
nature, abuse , misuse, neglect, unauthorized
be
defective
by
(if
you
are uncertain as to whether ;
or
Warranty.
BE
ATTACHED .
and
a description
INCLUDING
WE
NOT
WITHOUT
AND
ARE
NOT
ALLOW
TO
YOU. •
may
not be altered other than in a z.·
by
PANURGY OEM
Ford Road (South Dock) '
Rockaway, NJ 07866-2053 ;
(973) 625-4056
(973) 625-9489
Fax
·
•·"tl''
·•·
2
The
following are
DENON,
contact
SHALL
THE
DENON
DENON
as listed ·
of
the problem.
LIMITATION, '
IN
NO
RESPONSIBLE
•lll''
·
•·•lll''
EVENT
FOR
EXCLUSION
·•·
•lll"·•·•oiiO•·-•oii"·.J
will •
OF
I.
i_._·
.
I.
~
'
;
'
;
"'
i
•
•
;
Page 76

~·ttllh~·•tllh~·•llll•~·otll:..._•llll•~·•tllh~
'
This
warranty will
be
honored
·
•tlllo·
..
·ot~ll•·
...
only m Canada.
~
·otlll•
.....
·otllh·
.. ·•tltl•·
...
·•tlll•·
...
·•tlll•·
...
·•tlll,....,tllh·
....
•tlll•·
...
·•tHio_....,,lllo·
..
·•tllh·
...
·•tlll•·
...
·•tlll•·
..
·
•tlll•..-.·•tlll•~·•tlll•..-.·•tlll•·
..
·•tlll•..-.·•tlll•
...
·•tllh
...
·otllh·'*'·•tllh
...
·otllh·
..
·•tlll.
~
.
!
t
~
Length
of
Non-
•
t This warranty on your DEN
¥ original consumer purchase from an AUTHORIZED D&M CANADA INC. DEALER.
What
Except as specified below, this Warranty covers all defects in material and workmanship in this product occurring during the above warranty periods. The following 4
• are not covered by the Warranty:
~
from an authorized DENON dealer. (Note: AUTHORIZED DENON DEALERS can
' stores.
1 which the serial number has been defaced, modified or removed. ( 4) Damaged deterioration
Transferable
is Covered
If
you are uncertain as to whether a dealer is a DENON AUTifORIZED DEALER, please contact D&M CANADA INC. as listed below). (3) Any product on '
t neglect, unauthorized product repair, operting
; not authorized by DENON. c) Any shipment
~
stylus, battery, etc.). (6) Periodic check-ups which do not disclose any defect. (7) Use
(9) Use in industrial, commercial, and/or professional applications.
I
What
We Will
'
If
'
; repair, or at its option, replace with new, used
~
How
'
If
~
station near you, please check our website http://ca.denon.com/CA/Support/Pages/ServiceCenterSearch.aspx
Pay
during the applicable warranty period from the date
to
Obtain
your unit ever needs service, it may be taken
Warranty
Warranty
ON
product which is distributed and warranted by D&M CANADA INC. remains in effect for the following periods from the date
Product Category
AIV
Controller,
AIV
DVD
Receiver,
Pre-Amplifier, Digital Pre-Amplifier
Powe
Amplifier,
Tuner,
Integrated Amplifier
Option
Board
CD
Player,
CD
Recorder
CD
Receiver,
Network Audio
System Audio
Turntable
Speaker
Sub-woofer
Microphone
iPhone<B> I iPod<B>
Headphone
Front Surround Home Theater System
Video Processor
Cartridge
Remote Controller
Cables
Speaker
stands
For
Performance
Receiver, AM I
DVD
Home Theater System
Head
Amplifier
DVD
Player,
Blu-ray
Network
CD
Player
J
Docks
(I)
Any product which is not distributed in Canada by D&M CANADA INC. (2) Any product which is not purchased in Canada
DENON®
LIMITED
FM
Receiver
Disc
Player
Receiver
1 I Autolift I Manual
I
.J
Full
Automatic
2
of
or modification
of
the product (claim must be presented to carrier). (5) Items subject to wear from normal usage (tape heads, cartridges,
or
equivalent model, such defective product without charge for parts or labor.
or
shipped to any authorized DENON service station or D&M CANADA INC. (For an authorized DENON service
or
of
original consumer purchase your DENON product is found to be defective by DENON, DENON will
WARRANTY
AVC,
AVR,
ORA
ADV.
S 1
PRA,AVP,DAP,POA,HA
TU,
PMA
ACD
DCD, DCM,
CDRW
RCD
DNP
D-F,
DP-L,
DP-F,
sc 5
DSW
DM-S,
ASD,DSD
AH
DHT-FS
DVP
DL
RC
AK
ASF
failure to follow instructions supplied with the product. b) Repair or attempted repair by anyone '
(I
0) Any installation
DVD,
DVM,
DBP.
DBT
D-M,
S 1
DP-M
DP-USB
OM-A
tPod
tS
a trademark of Apple Inc., registered
be
identified by DENON AUTHORIZED DEALER sticker displayed in the '
or
malfunction resulting from: a) Accident, act
of
the product outside Canada. (8) Damaged magnetic tape
or
removal charges resulting from product failure .
or
contact D&M CANADA INC. as listed below.) In all
tn
the
U.S.
2
3
3
3
1
1
1
2
YEAR
IS)
4
2
1
2
1
1
1
3
90
90
DAYS
90
90
and other countnes.
of
nature, abuse, misuse, ·
or
CD/DVD discs.
of
the
r other cases, the following procedures apply whenever your unit must be transported for warranty service;
a.
You
1
~
are responsible for transporting your unit
b.
If
shipment
of
You
must pay the initial shipping charges, but we will pay the return shipping charges
c. WHEN RETURNING YOUR UNIT FOR WARRANTY SERVICE, A COPY
d.
You
should include the following: your name, address, daytime telephone number, model and serial number
In the case
your unit is required; 4
of a CD
or
DVD Player, please enclose ONE
t TIDS WARRANTY IS VALID IN CANADA
If
your product does not require service, but you have questions regarding its operation, please contact our Techrtical Services Department as listed below.
t
• TIDS WARRANTY IS EXPRESSLY MADE IN LIEU
~
WARRANTIES OF MERCHANTABILITY AND FITNESS
• OUR LIABILITY IS LIMITED TO
~
INCLUDE
INCIDENTAL
THE
OR
CONSEQUENTIAL
ONLY.
REPAIR
or
arranging for its transportation. =
if
the repairs are covered by the Warranty.
OF
THE ORIGINAL SALES SLIP MUST BE ATIACHED.
(I)
disc that the unit has failed with for test reasons. It will be returned with the unit.
OF
ALL OTifER WARRANTIES, EXPRESSED OR IMPLIED, INCLUDING WITHOUT LIMITATION,
FOR
A PARTICULAR PURPOSE.
OR
REPLACEMENT,
COMMERCIAL
AT
OUR OPTION, OF ANY DEFECTIVE PRODUCT AND SHALL IN NO EVENT I
OR
PROPERTY DAMAGES
of
the product and a description
OF
ANY
KIND.
WE
ARE
NOT
RESPONSIBLE
of
the problem.
FOR
i PRODUCTS LOST, STOLEN AND/OR DAMAGED DURING SHIPPING. '
~--
SOME PROVINCES DO NOT ALLOW LIMITATIONS ON HOW LONG AN IMPLIED WARRANTY LASTS AND/OR DO NOT ALLOW THE EXCLUSION
' INCIDENTAL OR CONSEQUENTIAL DAMAGES, SO
This warranty gives you specific legal rights, but you may also have other rights which vary from province to province. This Warranty may not be altered other than
in a writing signed by an officer
of
D&M Canada Inc.
THE
ABOVE LIMITATIONS AND EXCLUSIONS MAY NOT APPLY TO YOU. •
OF
~
i_
'
~
~
~
;
?
=-
4.
D&M
CANADA
10462 Islington Avenue,
t Kleinburg, Ontario
INC.
Unit
LOJ
1CO
88
by
DENON
MICROLANDTECHNICAL
t (905) 475-4085 Markham, ON
FACTORY SERVICE
170 Alden Road,
L3R
Unit
• www.ca.denon.com (905) 940-1982
~
t,,,
__
.,,,,,
__
.,.,
.. _ ..
,,.,
__
,,
...
___
,,,,
___
,,,,
__ ,,,,
___
,,, ___
,,
...
__
,,,
___
,,,,
___
,,,.
___
,,,,
___
,,,,
____
,,,, ____
http://clientportal.microland.ca/rmastart.aspx +
,,,, ___
,,,,
____
,,,,
___
,.,,,
__
,,,, ___
,,,,
__
.,,,,, ___
,,._,,.,
__
.,,,,
SERVICES
2
4C1
___
,,,
___
,,,
__
,,,,,
___
,,,
___
,,,,
____
,,,
..
..,l
3
Page 77

~-·•1111·
.... ·•1111•·
.... ·••11''·7""·••11••·
I
Ce~g-oooo=•OOoore>q,·,,~
....
·•11
11•·
.... ·•11111·
.... ·•!111
.......
,,111
•·
....
·••111•·
.... ·•1111•· ....
·•tiii•· ....
·••IP•· ... ·•IIII•·
...
·••II••
....
·••IIt•-
...
·ulll•
.....
·••lllo-
......
,lll•·
....
·•tllh·
...
·•llll•·
DEN
0
... ·•tll1•_...·•tlll•_....,,lll•-....
N®
,llll•·
...
·•llll•_...·•tMI•·
... ·•IIII•· ... ·••II''_....,,III•·
...
·•llll•_....,,lll•
...... ,,lll.
l
i GARANTIE
Duree du garantie non-transferable
La garantie de votre produit DENON, distribue et garanti par D&M CANADA INC. prend effet a partir de Ia date
revendeur official D&M CANADA INC. pendant les peri odes suivantes.
Categorie de produit
ContrOieur A IV.
Recepteur
Preamplificateur, pr8amplificateur
Amplificateur de puissance, Pr8amplificateur phone
Svntoniseur, amplificateur integra
Carte ootionnelle
Lecteur
Enregistreur
Ampri-tuner
Recepteur
Lecteur Audio
Systeme
Table tournante
Haut-parleurs
Sul:>-woofer
Micro
iPhone<B> I iPod<!l>
Casque d'Scoute
Avant Surround Systeme Home Theater
Processeur video
Cellule phonolectrice
Telecommande
Cable
Support pour enceinte acoustique
Couverture
Cette garantie couvre tous les defauts de materiel
de
Ia
garantie. Ne sont pas couverts par
Canada aupres
dans leur magasin. Si vous doutez qu'un revendeur soit officiellement reconnu, contactez D&M CANADA
de
serie a ete efface, modifie
impropre, negligence, reparation
tentative de reparation par quelqu'un non reconnu par DENON. c) tout envoi
par'J'usage (tetes de magnetophone, cellules phono, pointes de lecture phono, pile
du
Canad
deplacement resultant d'un defaut du produit.
Notre paiement
Si votre produit DEN ON est reconnu defectueux par DEN ON durant Ia peri ode d' application de
a son choix, remplacera avec un modele neuf, usage ou equivalent ce produit defectueux sans frais de pieces
ou,
d'un
revendeur officiel DENON (Note: On peut identifier les revendeurs officiels DENON par leur auto-collant "REVENDEUR OFFICIEL DENON" affiche
a.
(8) Bandes magnetiques, disques CD ou DVD endommages. (9) Utilisation commerciale, industrielle
Recepteu A IV, Recepteur AM I
DVD
, Systems
DVD
Home Theater
num8
CD,
Lecteur
DVD
CD
avec
audio I CD
Audio
ou
enleve. (4) Dommages dus a
au
, Lecteur Disque
Lecteur de
CD,
avec
resea
Reseau
Docks
Ia
moyen d'un produit non autorise, debate, modification, emploi contraire aux instructions fournies avec le produit, b) reparation
u integra
1 I
I
2 I Auto complet
I
garantie:
Levee
ou
de fabrication du produit, a I' exception de ceux indiques ci-apres qui conforrment selon les termes durant
(I)
Tout produit qui n'est pas distribue au Canada par D&M CANADA INC. (2) Tout produit qui n'a pas ete achete
FM
rique
Blu-ray
auto
Apple
et
iPod sont des mar
Ia
deterioration ou a un fonctionnement defectueux a
du
LIMITEE
AVC,
AVR,
ORA
ADV,
S 1
PRA
,AV
P,DAP,POA,HA
TU,
PMA 3
ACD
DCD, DCM, DVD,
CDRW
RCD
DNP
0-F
, 0-M, S 1
DP-L, DP-M
DP-F, DP-USB
sc
DSW
OM-S
, OM-A
ASD,DSD
AH
DHT-FS
DVP
DL
RC
AK
ASF
ques
produit (Ia reclamation doit etre presentee
s,
etc.). (6) verification periodique qui
commerciales
DVM,
DBP.
DBT
d:A.pple Inc
.,
deposees
aux Etats-Unis
INC. a l'adresse ci-dessous.) (3) Tout produit dont
Ia
suite de: a) accident, acte de
ne
revele aucun defaut. (7) Utilisation
ou
professionnelle. (10) Toutes charges d'installation
Ia
garantie apres Ia date
ni
de main
d'achat
du consommateur original aupres
2
3
3
1
1
1
2 ANNtES
4
2
5
1
2
1
1
1
3
90
90
J
OURS
90
90
et
dans
d'a
utr
es
pays.
Ia
Ia
nature, abus, utilisation
au
transporteur), (5) Articles sujets a deterioration
d'
achat du consommateur, DEN ON reparera
d'
reuvre.
le
du
produit hors
d'un
periode
numero
ou
ou
au
de
Application de Ia garantie
Si votre appareil necessite une verification ou une reparation, il peut etre apporte ou envoye a tout atelier de service autorise DEN ON ou directement chez D&M CANADA
INC. (Pour trouver !'atelier autorise le plus pres, priere de verifier sur le site Internet
contactez D&M Canada Inc aux coordonnes indiquees
Dans tous les autres cas, les procedures suivantes
a. Vous
b.
c. LORSQUE
d.
CETTE GARANTIE EST VALABLE SEULMENT
Si
votre produit
CETTE GARANTIE
COMPRIS, SANS SE LIMITER
NOTRE
N'INCLUT
PAS
RESPONSABLES POUR LA PERTE
CERTAINES
PAS
L'EXCLUSION DE DOMMAGES FORTUITS. LES LIMITATIONS
VOTRECAS.
Cette garantie vous donne des droits legaux
etre modifiee que par un document signe par un gestionnaire autorise de D&M Canada.
responsable du transport de votre article ou vous devez vous arranger vous-meme pour son transport.
etes
Si votre article doit etre envoy e. vous devez payer les frais
D'ACHAT D' ORIGINE.
Vous devez inclure egalement VOS nom, adresse, numero de telephone de jour, numeros de modele et de serie du produit et une description du probleme .
Dans le cas d'un lecteur
VOUS RENVOYEZ VOTRE ARTICLE POUR
CD
ou DVD,joindre un disque que l'appareil
ne
requiert aucun service
EST
EXPRESSEMENT FAITE EN LIEU
mais
A CELLES-CI, LES GARANTIES MARCHANDES ET SPECIFIQUES POUR UN USAGE PARTICULIER.
RESPONSABILITE
EN
AUCUN CAS DES DOMMAGES FORTUITS, COMMERCIAUX INDIRECTS Nl MATERIELS D' AUCUNE SORTE. NOUS NOUS SOMMES
PROVINCES
NE
D&M
SE
LIMITE A LA
PERMETTENT
CANADA
10462 Islington Avenue,
Kleinburg, Ontario
ci
bas).
s'
appliquent si votre appareil doit etre envoye pour une verification ou une reparation sous garantie.
d'
envoi initiaux, mais nous payerons les frais de retour si Ia garantie couvre les reparations.
UN
AU CANADA.
que
vous
avez
des
questions quanta
ET
PLACE DE TOUTES LES AUTRES GARANTIES EXPRIMEES OU SOUS-ENTENDUES' Y
REPARATION
DE
LES PRODUITS ETIOU LES MARCHANDISES ENDOMMAGEES PENDANT LE TRNASPORT DES BIENS.
PAS
DE
specifiques, mais il se pourrait que vous ayez d'autres droits qui varient
OU
LIMITES QUANT A LA DUREE
INC.
Unit
88
LOJ
1CO
(905) 475-4085 Markham, ON
t
• http://clientportal.microland.ca/rmastart.aspx t
·
·•ll''· ....
·lll''· ... ··••l"·.,...··•ll••· ...
www.ca.denon.com
·••l••··,...·•lll•·
... ··••l'•·
...
··•ll"·
... ··•lll•·
....
·•ll•··.,....·••••··
... ··•ll•·
· ......
ll'·· ....
·•ll
•··
... ··••••··.,....·tll+•
de
DENON au http:llca.denon.com/CNSupport/Pages/ServiceCenterSearch.aspx
SERVICE SOUS GARANTIE VOUS DEVEZ JOINDRE UNE COPIE DE LA FACTURE
n'a
pu lire pour test.
son
fonctionnement, contactez notre departement technique doni I'adresse
AU REMPLACEMENT, A NOTRE
ET
EXCLUSIONS MENTIONNEES PLUS HAUT PEUVENT
II
vous sera retoume avec !'article.
CHOIX,
DE
TOUT
D'UNE
GARANTIE SOUS-ENTENDUE ETIOU NE PERMETTENT
d'une
DENON
by
MICROLANDTECHNICAL
FACTORY SERVICE ;
170 Alden Road,
figure
PRODUIT
province a !'autre. La garantie ne peut
DEFECTUEUX
NE
PAS
S' APPLIQUER A
SERVICES ;
Unit
2
L3R
4C1
ou
ci-dessous
bien
.
ET
(905) 940-1982
·.,...••ll''_... .
... , ...
.................
ll•·
·.._,,,., ........
,u
...
...,.,., ••. ~ .•
,u•··.,...••ll••
·...,.·
•tll••-.-··•ll••·
......
ll,,·.,....·•ll'•·.....,•ll'•·.,...·otll••·
....
i_~
·••••·-..,:.
4
 Loading...