

Denon CEOL-Carino Owners Manual
Contents Connections Playback
.
CEOL carino
Computer Audio System N-2
Owner’s Manual
Setting procedure
Tips Appendix
Front panel Display
Rear panel
You can print more than one page of a PDF onto a single sheet of
1
Remote Index
paper.
Contents Connections Playback
Contents
Setting procedure
Tips Appendix
Accessories
Before using the remote control unit
Operating range of the remote control unit
Features
Part names and functions
Front panel
Display
Rear panel
Remote control unit
Connections
Installing this unit
Installing horizontally
Installing vertically
Speaker installation
Connecting the speaker cables
Storing speaker cables in the speaker base
Connecting devices
Connecting the power cord
4
Playback
5
Basic operation
6
Turning the power on
7
Selecting the input source
8
Adjusting the master volume
8
Playing a device
10
11
12
13
13
14
15
16
17
18
19
Playing music on a computer (USB-DAC)
Listening to music via a analog connection (ANALOG IN)
Listening to music on a Bluetooth device
Convenient function menu
Wide Sound function
Auto Volume Adjust function
Setting procedure
Setting the auto standby mode
Turning the auto standby mode off
Turning the auto standby mode on
Turning the display on/off
Turning the display off
Turning the display on
21
21
22
22
23
23
25
26
32
32
32
33
33
33
33
33
33
Front panel Display
Rear panel
2
Remote Index
Contents Connections Playback
Tips
Tips
Troubleshooting
Resetting to factory settings
Appendix
Types of playable digital audio input signals
Audio signals that can be input to USB-DAC
Playing back Bluetooth devices
Bluetooth communications
Explanation of terms
Trademark information
Specifications
Index
Setting procedure
35
36
41
42
42
42
42
43
44
45
48
Tips Appendix
Front panel Display
Rear panel
3
Remote Index
Contents Connections Playback
Setting procedure
Tips Appendix
Thank you for purchasing this Denon product. To ensure proper operation, please read this owner’s manual carefully before using the product.
After reading this manual, be sure to keep it for future reference.
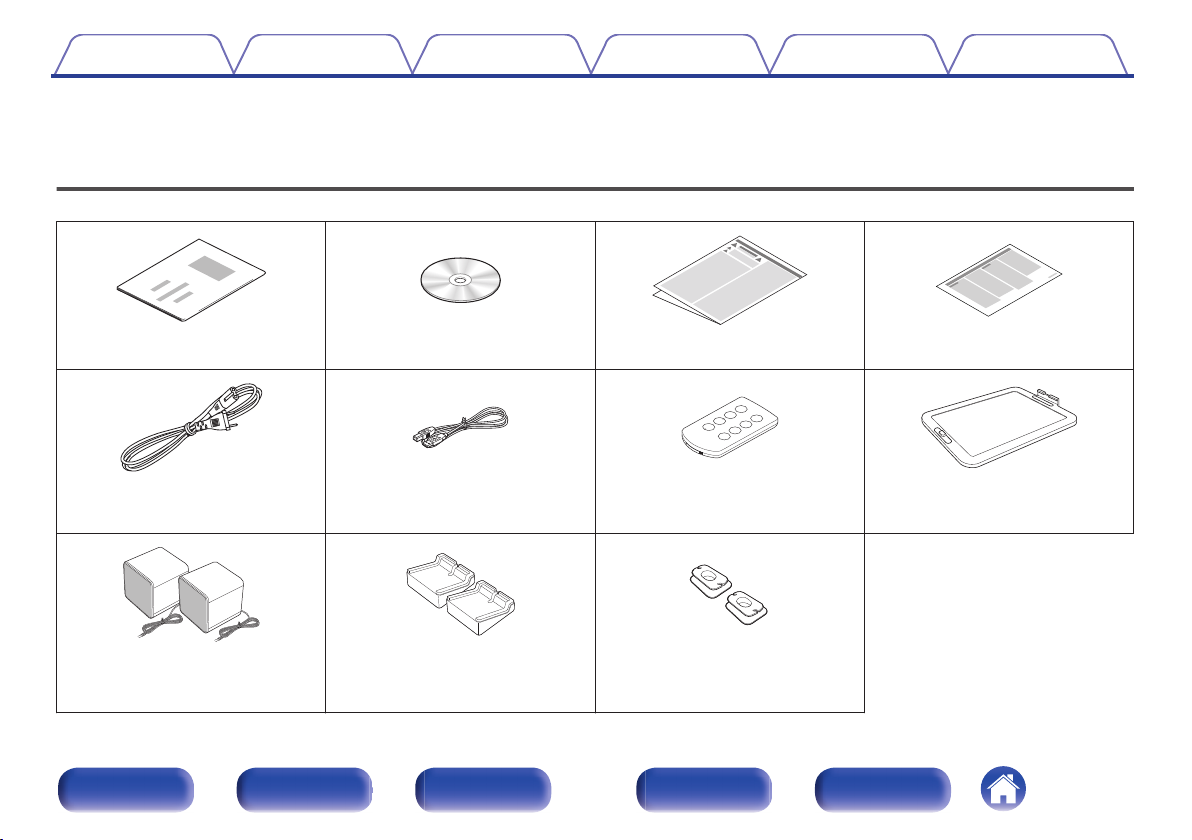
Accessories
Check that the following parts are supplied with the product.
.
.
.
Quick Start Guide CD-ROM (Owner’s Manual) Safety Instructions Notes on radio
.
.
Power cord USB cable
(cable length: 1.2 m)
.
Speakers (x2)
.
Speaker bases (x2)
(cable length: 1.5 m)
Stored under the speaker bases at
0
.
Remote control unit (RC-1195)
(built-in battery)
.
Cable winders (x2)
.
the time of shipment.
Front panel Display
Rear panel
4
Remote Index
.
CEOL carino base
Battery case
Ta b
Contents Connections Playback
Setting procedure
Tips Appendix
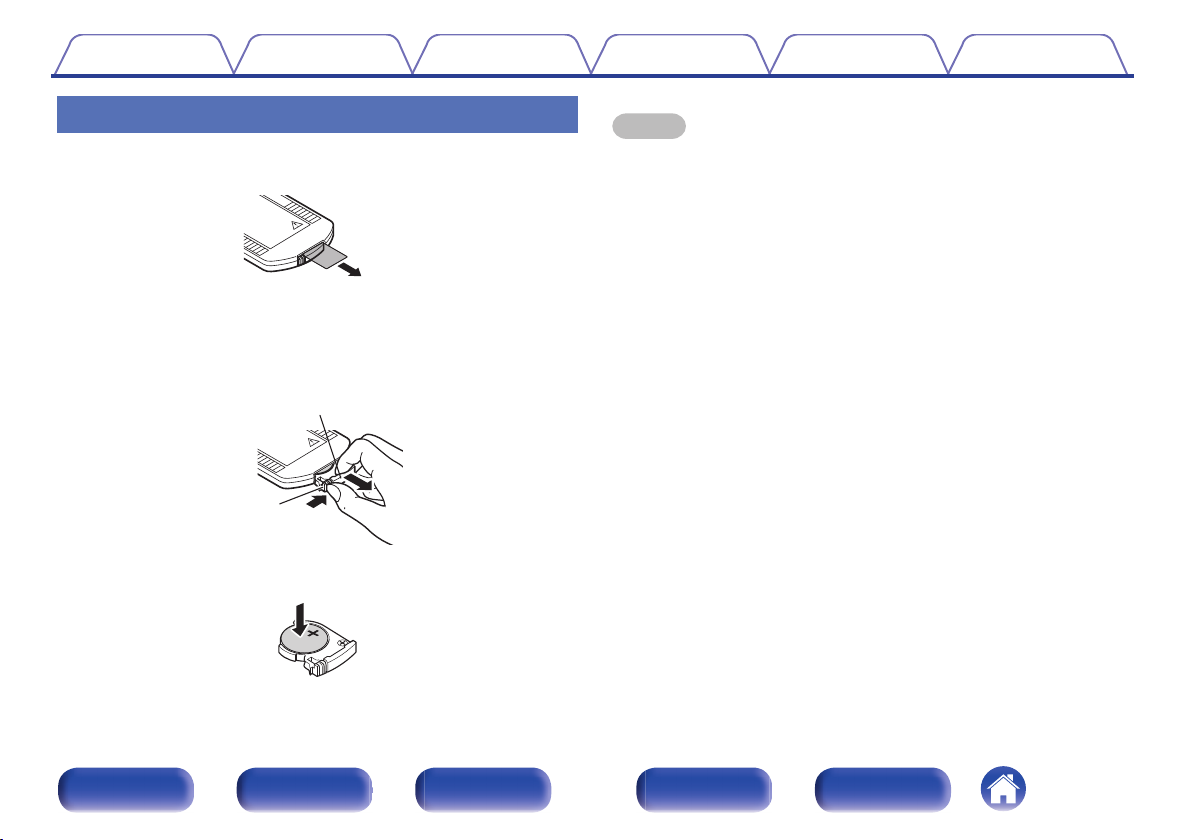
Before using the remote control unit
The remote control unit has a built-in lithium battery.
Pull out the insulation sheet before use.
.
o
Replacing the battery
1. Pull out the battery case while pressing the tab.
2. Insert the lithium battery correctly into the battery compartment as
indicated.
3. Replace the battery case in the original position.
.
.
NOTE
When inserting the lithium battery, be sure to do so in the proper direction,
0
following the F and G marks in the battery compartment.
If the battery should have a leakage, immediately replace and dispose of the
0
battery. In this case, there is a risk of burn when the liquid comes in contact with
skins or clothes, so a great care should be taken. If the liquid accidentally comes in
contact, wash with tap water and consult a doctor.
Remove the battery from the remote control unit if it will not be in use for long
0
periods.
Front panel Display
Rear panel
5
Remote Index
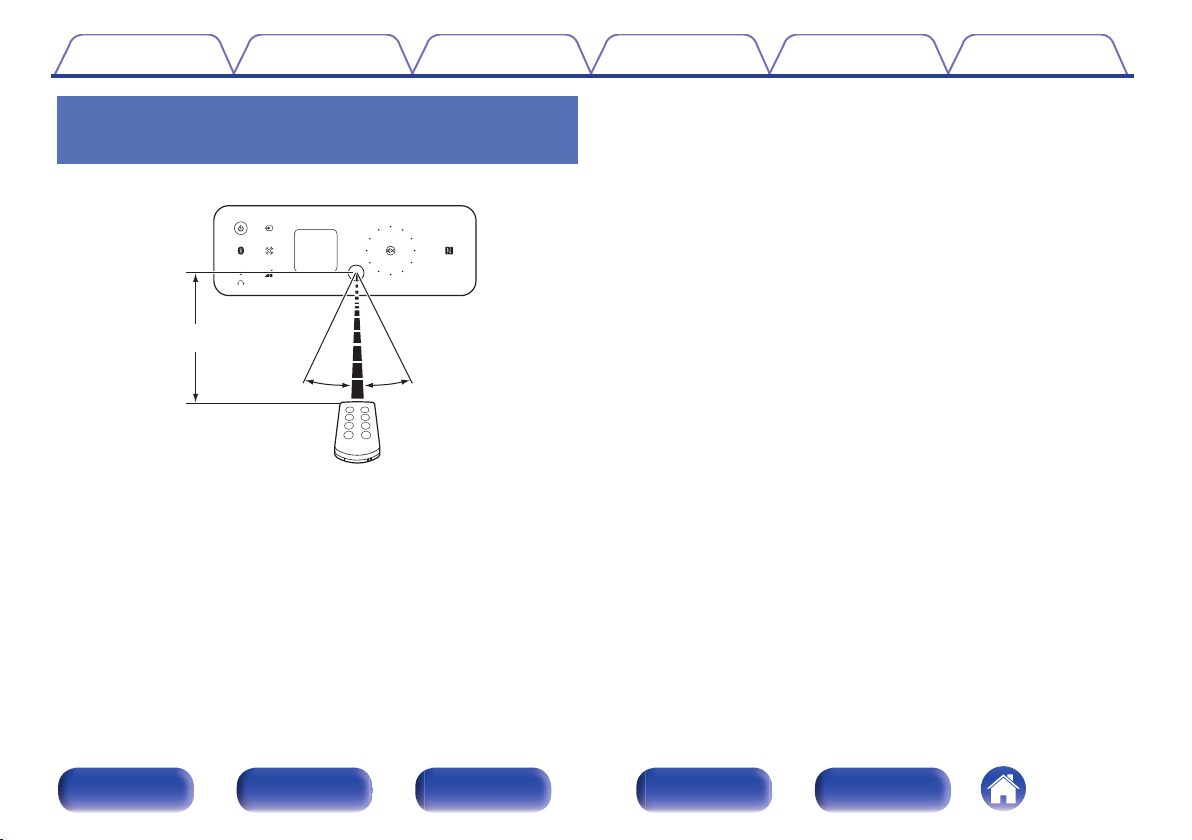
Approx. 7 m
30°
30°
Contents
Connections Playback
Operating range of the remote control unit
Point the remote control unit at the remote sensor when operating it.
.
Setting procedure
Tips Appendix
Front panel Display
Rear panel
6
Remote Index
Contents Connections Playback
Features
Powerful sound with a compact body (25W + 25W high power)
0
You can enjoy music and games with more powerful sound on a
computer, smartphone, or tablet. Realistic sound is achieved in spite of
the compact size by combining passive radiator full range speakers that
reproduce rich bass with our unique audio processing technology and a
full digital amplifier.
Installation possible even in a small space (v p. 13)
0
This unit can be placed either horizontally or vertically. Do not worry
about the installation place. You can place this unit even in a desk with
a limited space. Furthermore, convenient speaker bases are supplied
with this unit for altering the speaker angle. Adjust to your desired angle
for listening.
Equipped with a USB-B port for upgrading audio on a computer
0
You can just connect a computer with this unit to enjoy content stored
on the computer and streaming content with high quality audio.
Setting procedure
Wireless connection with Bluetooth enabled devices (v p. 26)
0
You can connect Bluetooth enabled devices such as smartphones and
tablets with this unit to listen to music while browsing email and Web
sites in the Internet away from this unit. In addition, this unit supports
high quality audio codecs, aptX and AAC, to enjoy music and games
with a powerful sound.
NFC function included that enables one touch
0
connection (v p. 30)
You can just touch this unit with an NFC enabled smartphone or tablet
to turn on power to this unit and establish the Bluetooth connection.
Tips Appendix
Front panel Display
Rear panel
7
Remote Index
q
oy Q0r t i Q1
w
e
u
Contents Connections Playback
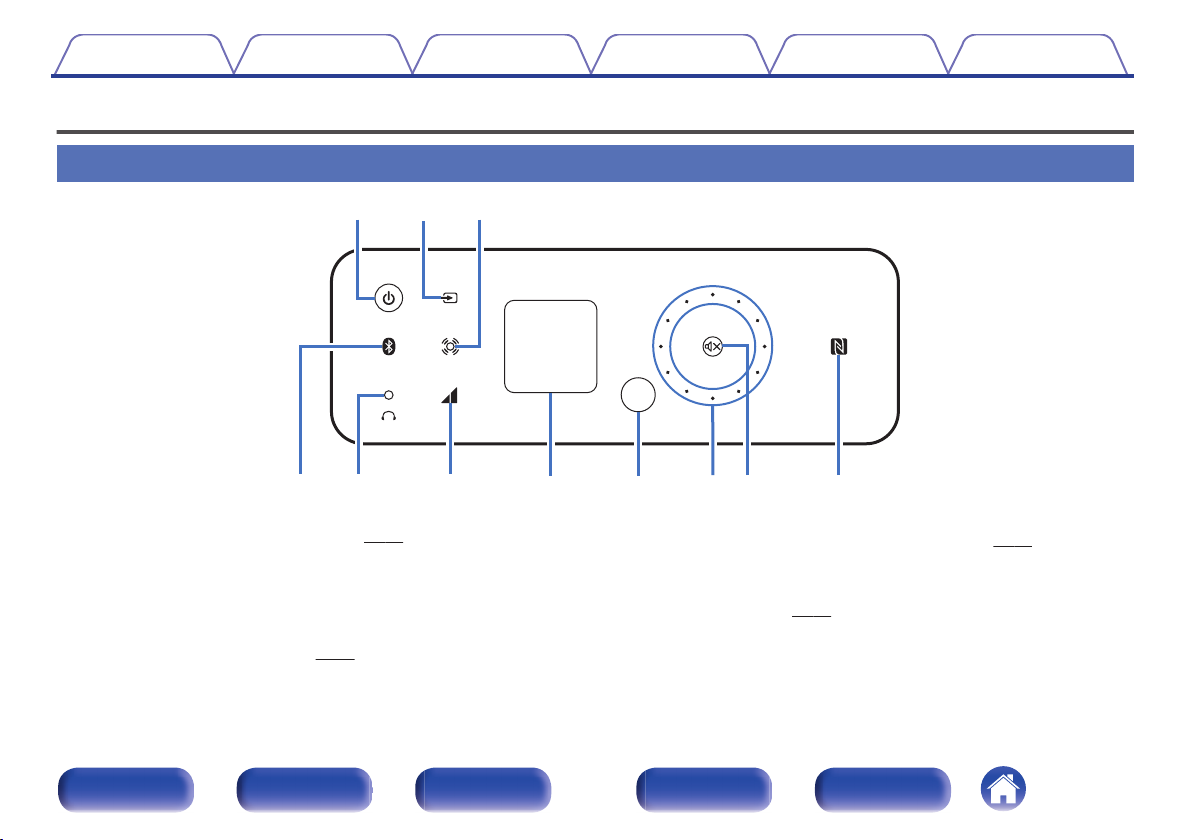
Part names and functions
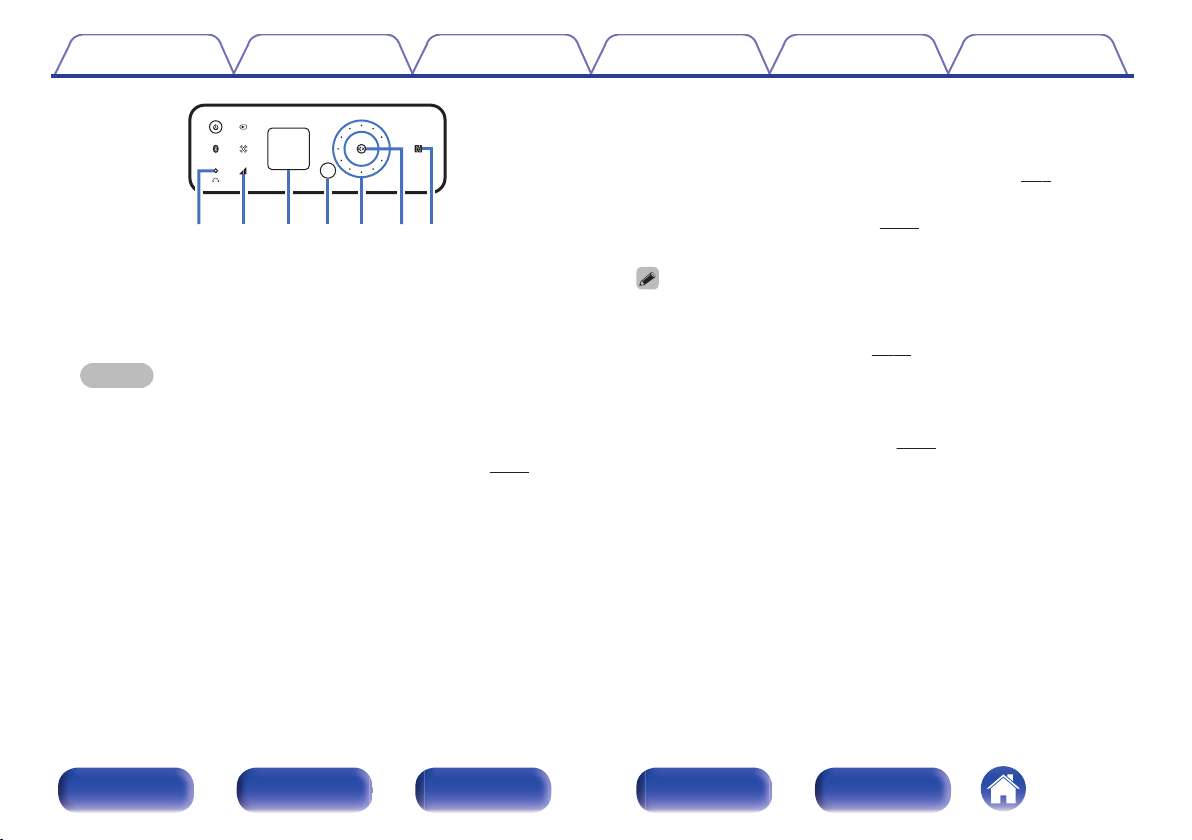
Front panel
.
Power button/display (X)
A
This turns the power on/to standby. (v p. 21)
The power status is indicated as follows.
Power on: Lit
0
Standby: Off
0
B
Input source switching key (W)
This switches input sources. (v p. 22)
Setting procedure
C
Wide Sound key (S)
This switches the Wide Sound function on/off. (v p. 32)
D
Bluetooth key (V)
This switches the input to Bluetooth. This is also touched during the
paring operation. (v p. 27)
Tips Appendix
Front panel Display
Rear panel
8
Remote Index
o Q0 Q1y
t
i
u
Contents
.
E
Headphones jack (R)
Used to connect headphones.
When the headphones are plugged into this jack, audio will no longer
be output from the speaker terminals.
NOTE
To prevent hearing loss, do not raise the volume level excessively when using
headphones.
F
Auto Volume Adjust key (U)
This switches the Auto Volume Adjust function on/off. (v p. 32)
Connections Playback
Setting procedure
Display
G
This displays various pieces of information.
Remote control sensor
H
This receives signals from the remote control unit. (v
Volume adjustment wheel
I
This adjusts the volume level. (v
The wheel is lit when touched.
The volume level appears on the display.
Mute button (:)
J
This mutes the output audio. (v p. 22)
This button flashes when muting is on.
K
N mark (Q)
Touch this mark with a Bluetooth device that includes the NFC function
when paring (registering) with it. (v
Tips Appendix
p. 6)
p. 22)
p. 30)
Front panel Display
Rear panel
9
Remote Index
w
e
q
r
Contents Connections Playback
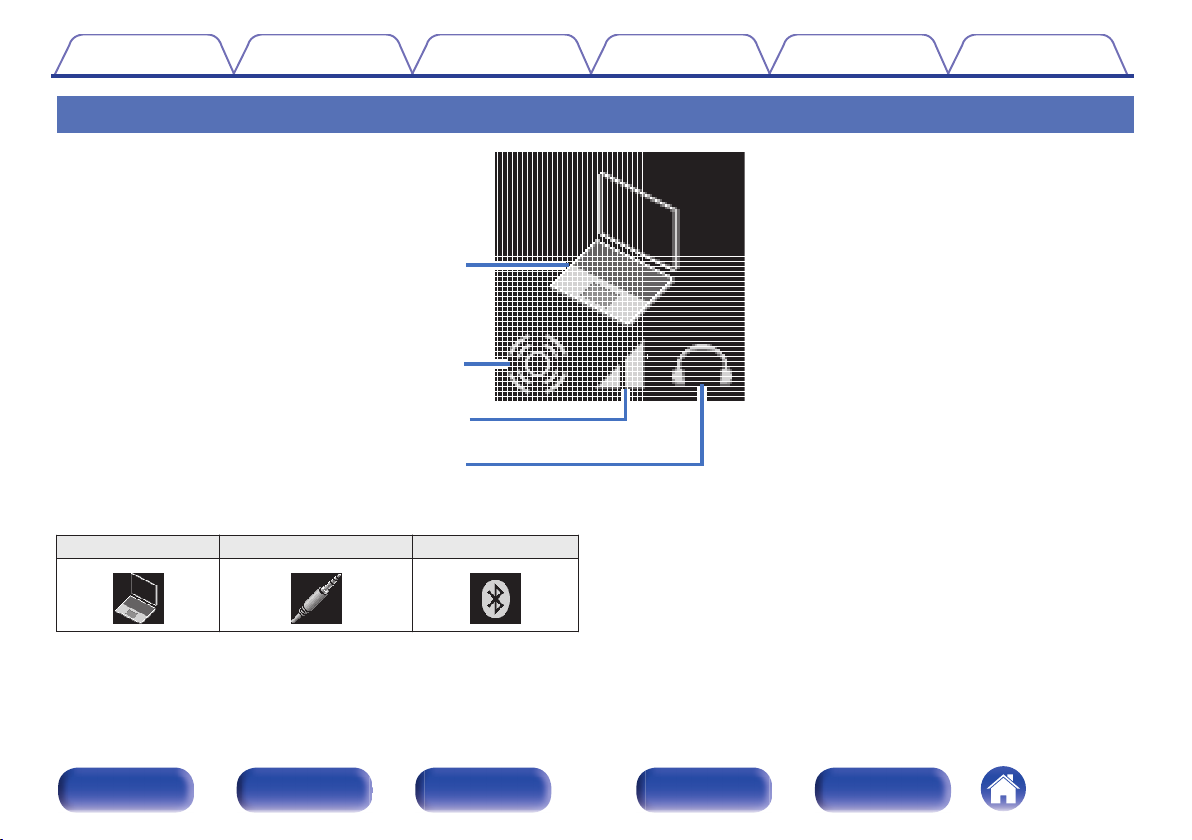
Display
.
Input source indicator
A
The following is displayed depending on the selected input source.
USB-DAC ANALOG IN Bluetooth
. . .
Setting procedure
Wide Sound indicator
B
Lit when the Wide Sound function is on.
Auto Volume Adjust indicator
C
Lit when the Auto Volume Adjust function is on.
Headphones indicator
D
Lit when the headphones are used.
Tips Appendix
Front panel Display
Rear panel
10
Remote Index
SPEAKERS
IMPEDANCE 6㹼16Ȑ
OFF
ON
ANALOG IN
USB-DAC
SUB WOOFER
OUT
SPEAKER
OPTIMIZATION
AC IN
R
L
q
t y
wer
Contents Connections Playback
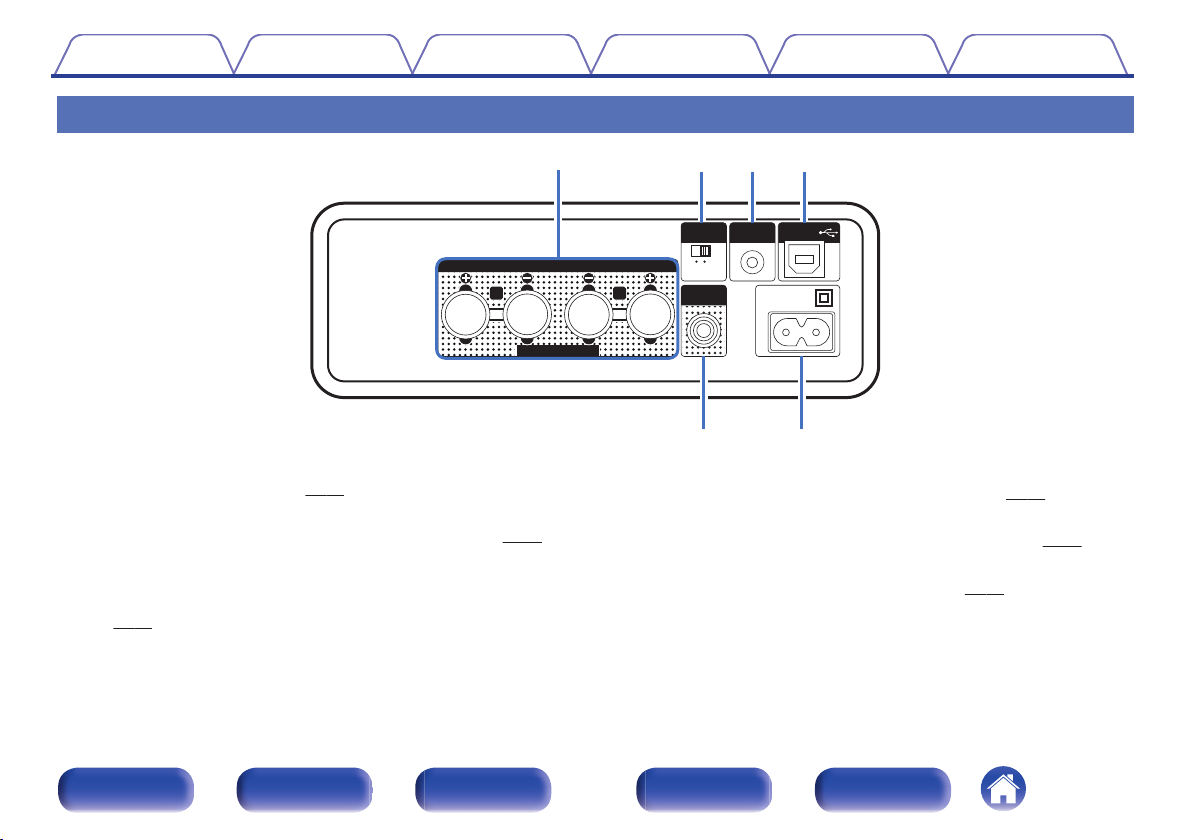
Rear panel
.
Speaker terminals (SPEAKERS)
A
Used to connect speakers. (v
Speaker Optimization switch (SPEAKER OPTIMIZATION)
B
This switches the Speaker Optimization function on/off. (v p. 17)
Analog audio input terminal (ANALOG IN)
C
Use a stereo mini plug cable (sold separately) to connect between this
terminal and a headphones jack on a portable music player, etc.
p. 18)
(v
p. 17)
Setting procedure
D
USB digital audio input terminal (USB-DAC T)
Tips Appendix
Used to connect to a computer with a USB port. (v p. 18)
Subwoofer terminal (SUB WOOFER OUT)
E
Used to connect a subwoofer with a built-in amplifier. (v
AC inlet (AC IN)
F
Used to connect the supplied power cord. (v
p. 19)
p. 18)
Front panel Display
Rear panel
11
Remote Index
w
e
r
t
y
u
q
Contents
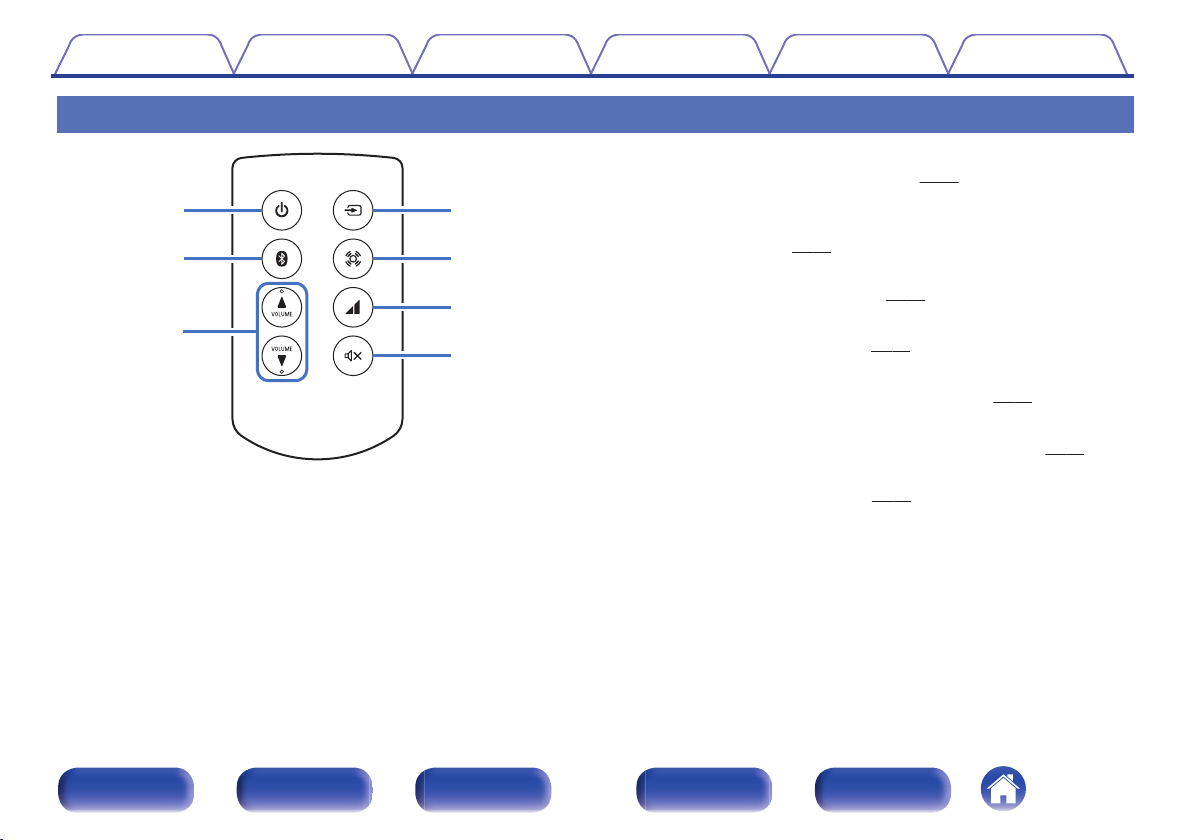
Remote control unit
.
Connections Playback
Setting procedure
Power operation button (X)
A
This turns the power on/to standby. (v p. 21)
B
Bluetooth button (V)
This switches the input to Bluetooth. This is also pressed during the
paring operation. (v p. 27)
VOLUME buttons (VOLUME df)
C
These adjust the volume level. (v
D
Input source switching button (W)
This switches input sources. (v
E
Wide Sound button (S)
This switches the Wide Sound function on/off. (v p. 32)
F
Auto Volume Adjust button (U)
This switches the Auto Volume Adjust function on/off. (v p. 32)
Mute button (:)
G
This mutes the output audio. (v
Tips Appendix
p. 22)
p. 22)
p. 22)
Front panel Display
Rear panel
12
Remote Index
1
2
CEOL carino base
(supplied)
Contents
Connections Playback
Connections
Installing this unit
Setting procedure
Tips Appendix
This unit can be installed in two ways - horizontally or vertically. You can
select how to install this unit according to the installation place and your
preference.
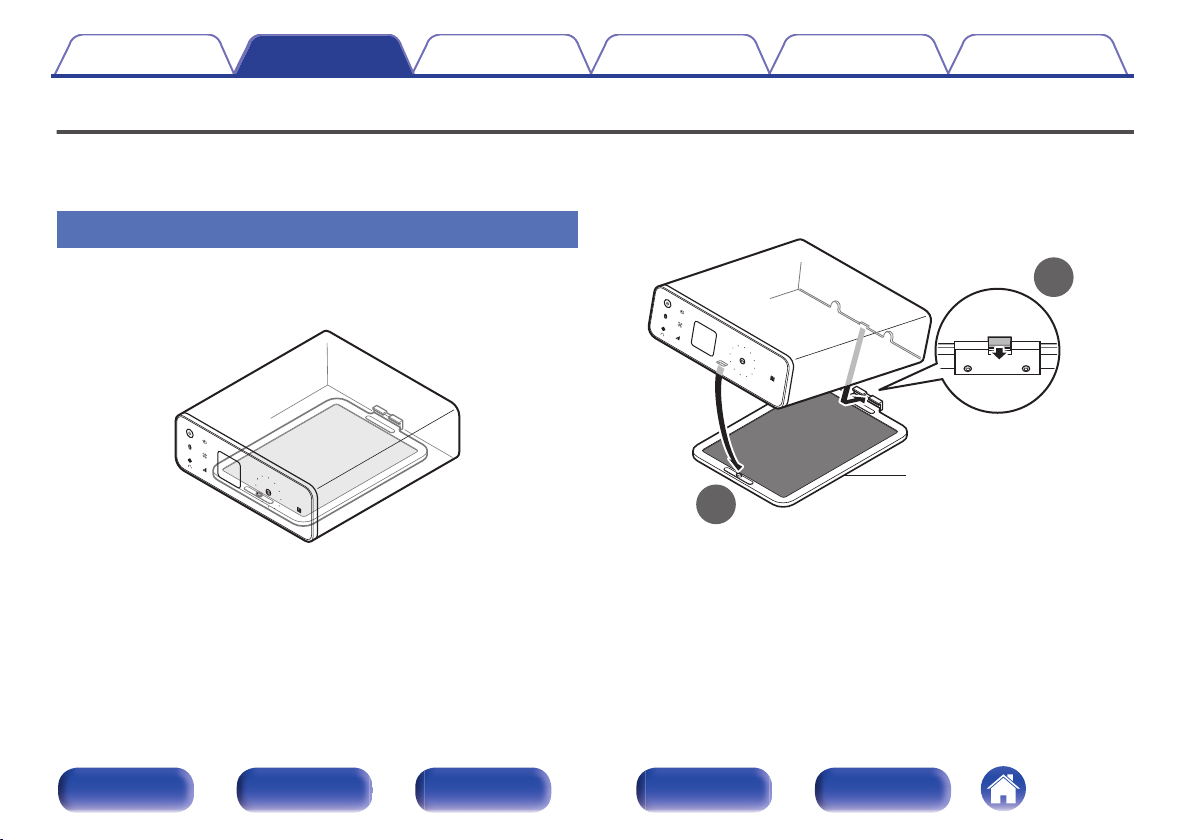
Installing horizontally
This orientation is suitable for placing this unit under the monitor when you
use a desktop computer.
When placing this unit horizontally, install as follows.
.
How to attach the CEOL carino base (for
o
horizontal placement)
Attach the base to this unit as follows.
.
Front panel Display
Rear panel
13
Remote Index
1
2
CEOL carino base
(supplied)
Contents
Connections Playback
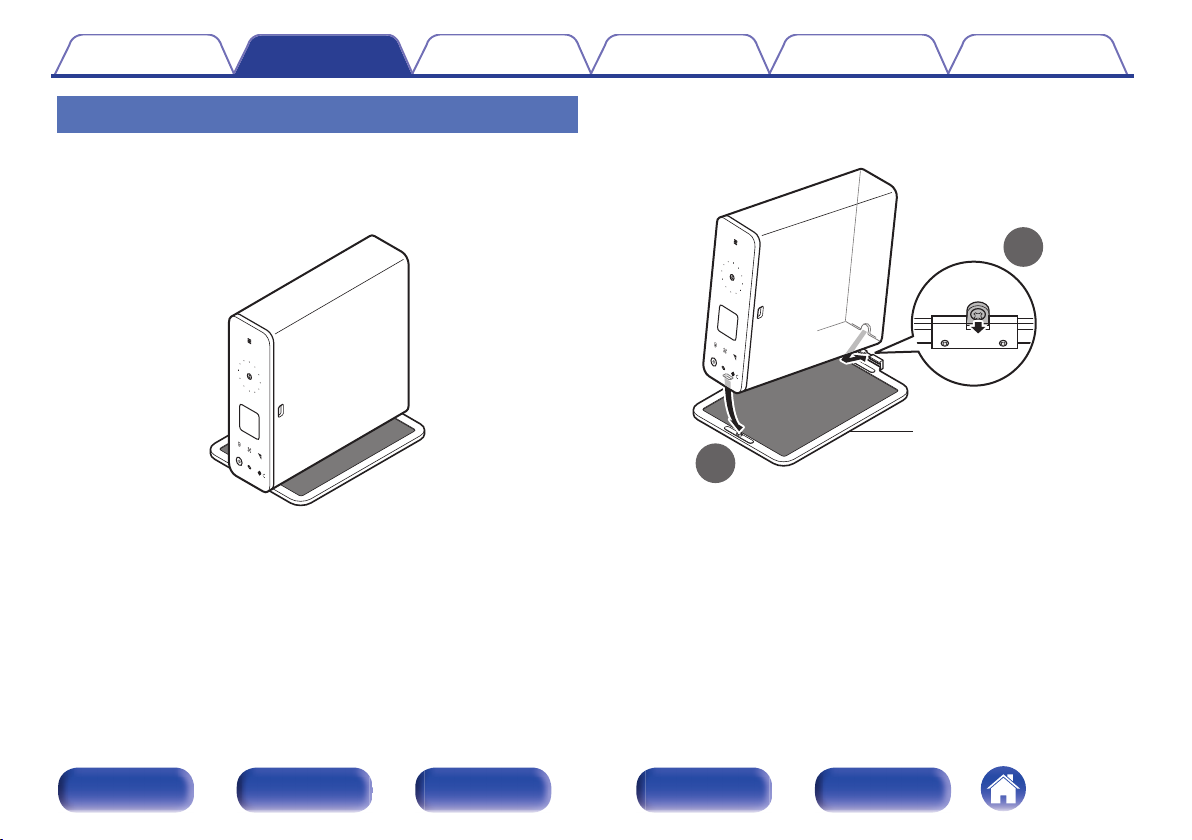
Installing vertically
This orientation is suitable for placing a narrow place such as a place next
to a laptop computer.
When placing this unit vertically, install as follows with the power button
placed on the lower part.
Setting procedure
How to attach the CEOL carino base (for
o
Tips Appendix
vertical placement)
.
Front panel Display
Rear panel
.
To remove the base from this unit, follow the installation steps in the
0
reverse order.
14
Remote Index
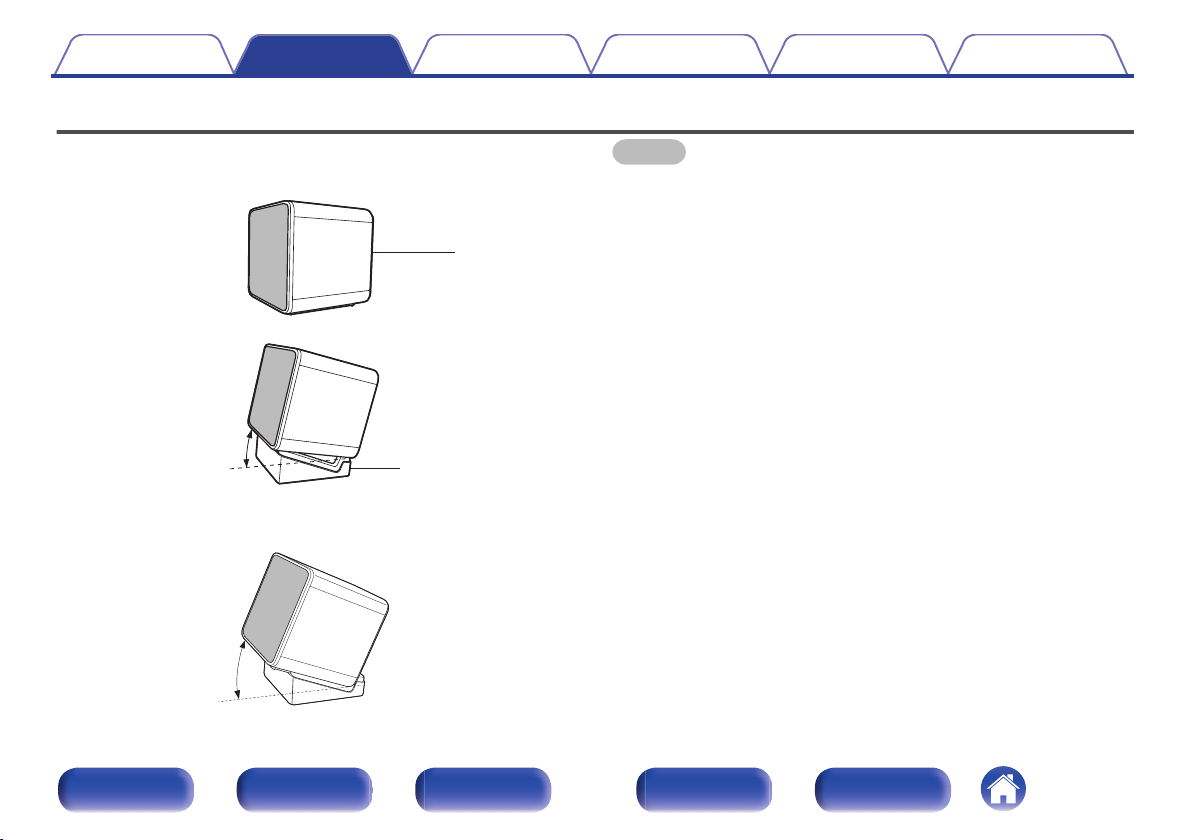
Speaker
(supplied)
10°
Speaker base
(supplied)
20°
Contents Connections Playback
Speaker installation
Setting procedure
Tips Appendix
You can use the speaker base to place the speaker in three angles. Adjust
to your desired angle for placement.
.
.
.
NOTE
You cannot remove the speaker net.
0
Place the speaker and speaker base so that they do not rattle.
0
Front panel Display
Rear panel
15
Remote Index
 Loading...