

Page 1
AVR-X8500H
INTEGRATED NETWORK AV RECEIVER
Quick Start Guide
Guide de démarrage rapide / Guía de inicio rápido
Read Me First....
Lisez-moi en premier.... / Lea esto primero....
Check our AVR setup tips online
Usa.denon.com/SetupTips
Please do not return this unit to the
store.
If you need help…
Ca.Denon.com/SetupTips
Call for Assistance
1-855-MY.DENON (USA) 1-855-693-3666
1-800-668-0652 (Canada)
Monday – Friday 10:00AM to 10:00PM E.S.T
Saturday 12:00PM to 8:00PM E.S.T
ENGLISH
FRANÇAIS
ESPAÑOL
Page 2
Welcome Before You Begin
Thank you for choosing a Denon AV
receiver.
This guide provides step-by-step
instructions for setting up your AV
receiver.
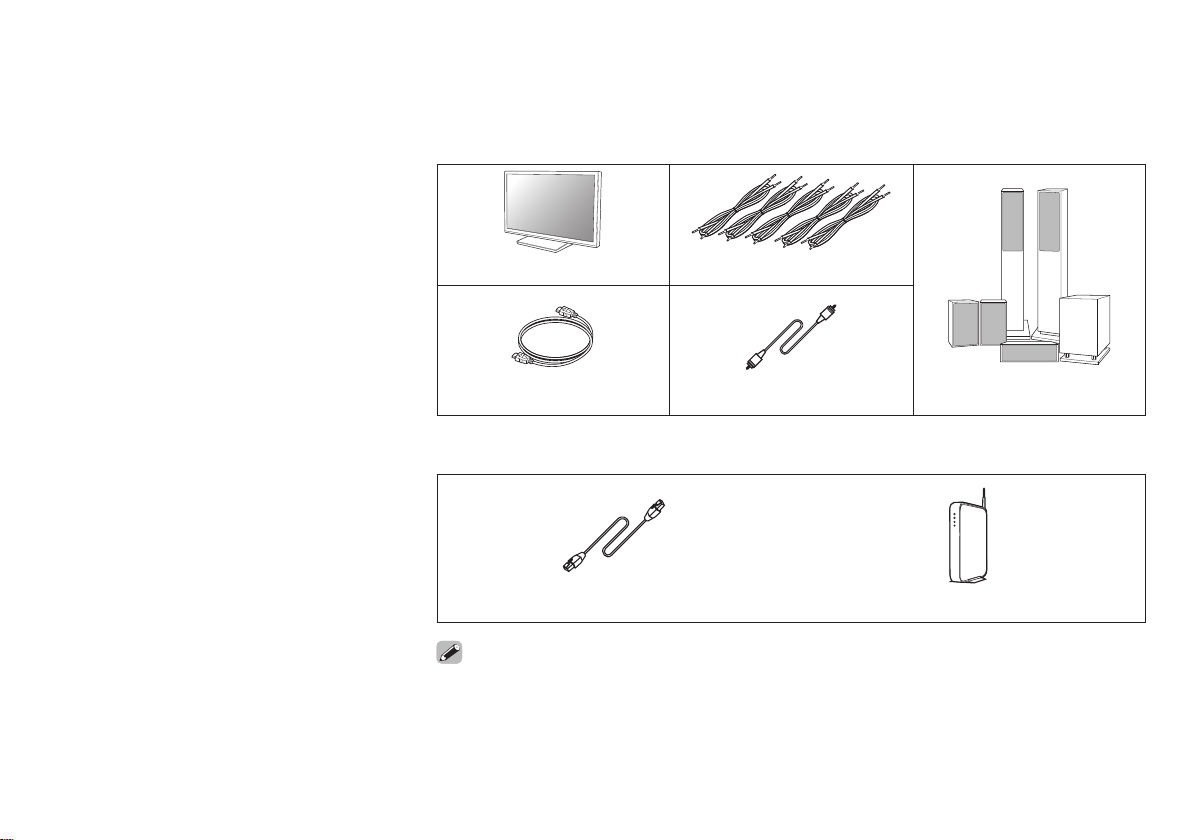
Required for Setup
TV Speaker cables
HDMI cable Subwoofer cable Speakers
Optional
or
LAN cable Wi-Fi router
• When connecting this unit to a device that is compatible with the Deep Color, 4K and ARC
functions, use a “High Speed HDMI cable with Ethernet” that displays the HDMI logo.
• These drawings are for illustrative purposes only and may not represent the actual product(s).
1
Page 3
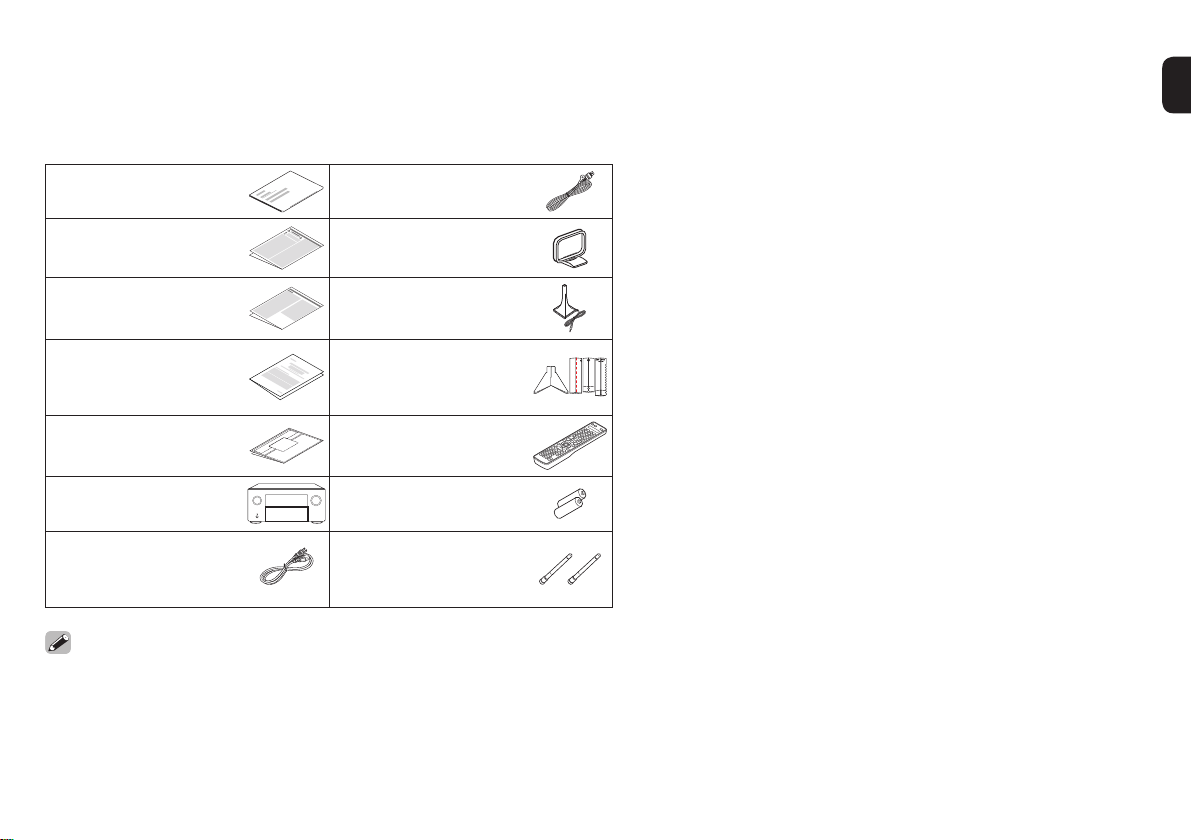
What’s In the Box
Quick Start Guide
Safety Instructions AM loop antenna
Notes on radio Sound calibration
FM indoor antenna
microphone
Warranty
(for North America
Sound calibration
microphone stand
model only)
Cable labels Remote control unit
(RC-1221)
Receiver LR6/AA batteries
Power cord External antennas
for Bluetooth /
wireless connectivity
• The included sound calibration microphone stand is convenient for use
when performing Speaker Calibration. Using your own tripod or the supplied
Sound calibration microphone stand enables settings to be automatically
configured to the optimum listening environment, providing exceptionally
high performance.
2
Page 4
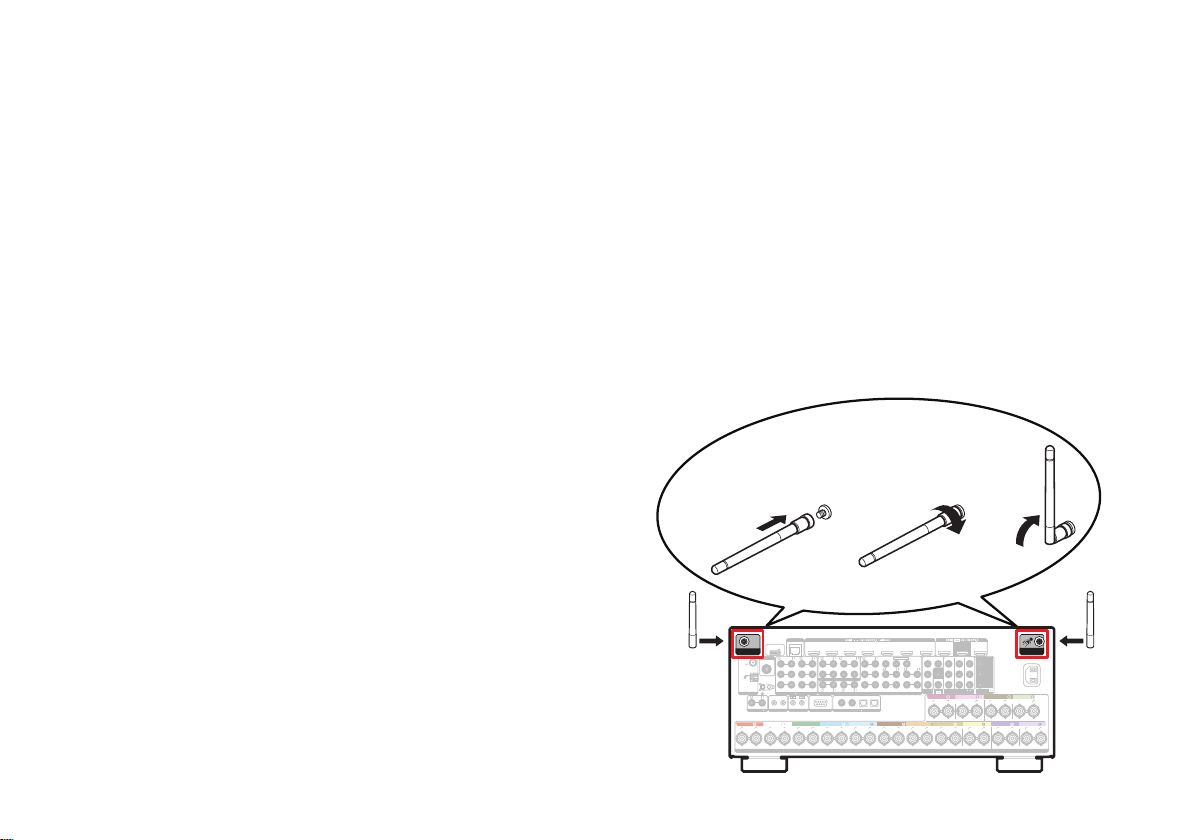
Important: External Antennas
The removable external antennas are required for both
Bluetooth and Wireless network connectivity. Please make
sure to connect the antennas before attempting to use the
Bluetooth or Wi-Fi features of the AVR-X8500H.
n Connecting the external antennas for
Bluetooth / Wireless connectivity
For each of the two antennas:
q Place the antenna evenly over the antenna terminal
located at the upper left or right corner of the rear panel.
w Turn the antenna clockwise until it is fully connected. Do
not over tighten.
e Rotate the antenna upwards for the best possible
reception.
qwe
Bluetooth/Wi-Fi
NETWORK
1 CBL/SAT
POWER SUPPLY
5V/1.5A
ANTENNA
Denon Link HD
1 CBL/SAT
4 GAME
FM
AM
ANTENNA
PHONO
AUDIO
FRONT
SURROUND
2 DVD
5 MEDIAPLAYER
SIGNAL
GND
6 CD
3 Blu-ray
(ASSIGNABLE)
AUDIO
STRAIGHT CABLE
DC12V 150mA MAX.
12
I
R
RS-232C
REMOTE CONTROL
TRIGGER OUT
FRONT
CENTER
3 Blu-ray 6 AUX2 7 CD
4 GAME
2 DVD
FRONT
SURROUND BACK
FRONT
CENTER
SUBWOOFER
SURROUND
7.1CH IN
ZONE2ZONE3
SURROUND BACK
PRE OUT
TV
2 CD1
2
DVD1CBL/SAT
AUDIO
COAXIALOPTICAL
(ASSIGNABLE)
DIGITAL AUDIO
SURROUND SURROUND
5 MEDIA PLAYER
SUBWOOFER
CENTER
2
1
HEIGHT3
HEIGHT1
HEIGHT2
HEIGHT4/FRONT WIDE
SURROUND BACK SURROUND BACK
ASSIGNABLE ASSIGNABLE
SPEAKERS
ZONE2
MONITOR1
MONITOR2
ARC
MONITOR
1
CBL/SAT1 CBL/SAT
Blu-ray
4 GAME
2 DVD3
2 DVD
3 Blu-ray
VIDEO
(ASSIGNABLE)
Y
MONITOR/ZONE3
P
B/
C
B
ZONE2
PR/
C
R
VIDEO
COMPONENT VIDEO
COMPONENT VIDEO
(ASSIGNABLE)(ASSIGNABLE)
HEIGHT4/FRONT WIDE
HEIGHT3 HEIGHT3
ASSIGNABLE ASSIGNABLE
HEIGHT1 HEIGHT1 HEIGHT2 HEIGHT2
Bluetooth/Wi-Fi
ANTENNA
HEIGHT4/FRONT WIDE
ASSIGNABLE
AC IN
3
Page 5
Setup
There are four steps to the setup
process.
Installing batteries in the remote control unit
1
Connecting the receiver
2
Following the On-Screen Setup Assistant
3
Downloading the Mobile Apps
4
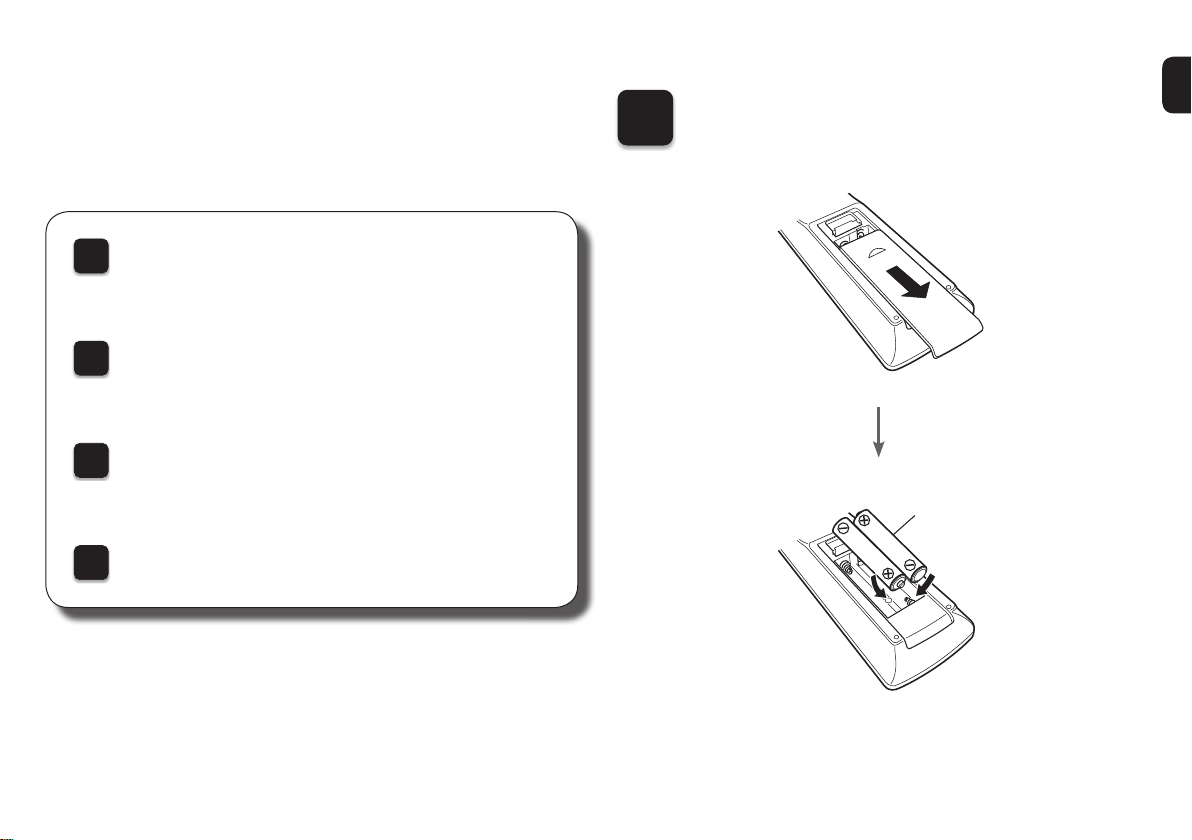
Installing batteries in the
1
remote control unit
Batteries
4
Page 6

2
Connecting the receiver
1) Place the receiver near your TV and
connect the power cord
TV
Receiver
Power cord
(supplied)
Connect to household
power outlet
(AC 120 V, 60 Hz)
5
Page 7

2) Connect the receiver to your home network
Wired LAN
Connect an Ethernet cable (not included) between your
receiver and your network router.
To LAN port
Router
Bluetooth/Wi-Fi
ANTENNA
FM
AM
ANTENNA
FRONT
NETWORK
POWER SUPPLY
5V/1.5A
Denon Link HD
1 CBL/SAT
2 DVD
SIGNAL
GND
3 Blu-ray
AUDIO
DC12V 150mA MAX.
1 2
PHONO
TRIGGER OUT
AUDIO
REMOTE CONTROL
FRONT
4 GAME
5 MEDIA PLAYER
6 CD
(ASSIGNABLE)
IR
CENTER
1 CBL/SAT
FRONT
SURROUND
ZONE2 ZONE3
STRAIGHT CABLE
RS-232C
SURROUND SURROUND
2 DVD
CENTER
7.1CH IN
DIGITAL AUDIO
5 MEDIA PLAYER
4 GAME
3 Blu-ray 6 AUX2 7 CD
FRONT
SURROUND
SURROUND BACK
2 CD1
(ASSIGNABLE)
SUBWOOFER
CENTER
1
HEIGHT1 HEIGHT3
HEIGHT2
2
HEIGHT4/FRONT WIDE
SURROUND BACK
SUBWOOFER
PRE OUT
TV
2
DVD1CBL/SAT
AUDIO
COAXIAL OPTICAL
SURROUND BACK SURROUND BACK
ASSIGNABLE ASSIGNABLE
SPEAKERS
ZONE2
MONITOR1
2 DVD 3
1
CBL/SAT1 CBL/SAT
4 GAME
2 DVD
MONITOR/ZONE3
ZONE2
3 Blu-ray
VIDEO
VIDEO
COMPONENT VIDEO
(ASSIGNABLE)
(ASSIGNABLE) (ASSIGNABLE)
HEIGHT3 HEIGHT3
ASSIGNABLE ASSIGNABLE
HEIGHT1
MONITOR2
ARC
MONITOR
Blu-ray
Y
B/
P
C
B
PR/
C
R
COMPONENT VIDEO
HEIGHT4/FRONT WIDE
HEIGHT4/FRONT WIDE
HEIGHT1 HEIGHT2 HEIGHT2
ASSIGNABLE
Bluetooth/Wi-Fi
ANTENNA
Wireless LAN
When connecting to wireless LAN (Wi-Fi), follow the
instructions in “Connecting the external antennas for
Bluetooth / Wireless connectivity” and connect the
antennas.
NETWORK
POWER SUPPLY
5V/1.5A
Bluetooth/Wi-Fi
ANTENNA
Denon Link HD
AC IN
ANTENNA
FRONT
1 CBL/SAT
FM
2 DVD
AM
SIGNAL
GND
3 Blu-ray
AUDIO
DC12V 150mA MAX.
1 2
PHONO
REMOTE CONTROL
TRIGGER OUT
AUDIO
FRONT CENTER SURROUND SURROUND
4 GAME
5 MEDIA PLAYER
6 CD
(ASSIGNABLE)
IR
1 CBL/SAT
STRAIGHT CABLE
RS-232C
2 DVD
FRONT
SURROUND
ZONE2 ZONE3
CENTER
7.1CH IN
DIGITAL AUDIO
5 MEDIA PLAYER
4 GAME
3 Blu-ray 6 AUX2 7 CD
SURROUND
SURROUND BACK
TV
(ASSIGNABLE)
SUBWOOFER
CENTER
FRONT
2
1
HEIGHT1 HEIGHT3
HEIGHT2
HEIGHT4/FRONT WIDE
2 CD1
SURROUND BACK
SUBWOOFER
PRE OUT
2
DVD1CBL/SAT
AUDIO
COAXIAL OPTICAL
SURROUND BACK SURROUND BACK
ASSIGNABLE ASSIGNABLE
SPEAKERS
ZONE2
MONITOR1
MONITOR2
ARC
1
CBL/SAT1 CBL/SAT
4 GAME
2 DVD
MONITOR/ZONE3
ZONE2
3 Blu-ray
VIDEO
VIDEO
(ASSIGNABLE)
HEIGHT3 HEIGHT3
MONITOR
Blu-ray
2 DVD 3
Y
B/
P
C
B
PR/
C
COMPONENT VIDEO
HEIGHT1 HEIGHT1 HEIGHT2 HEIGHT2
R
COMPONENT VIDEO
(ASSIGNABLE) (ASSIGNABLE)
HEIGHT4/FRONT WIDE
ASSIGNABLE ASSIGNABLE
Bluetooth/Wi-Fi
ANTENNA
HEIGHT4/FRONT WIDE
ASSIGNABLE
AC IN
6
Page 8

3) Connect the receiver to your TV with
an HDMI cable
HDMI IN
(ARC)
HDMI cable
HDMI OUT
MONITOR 1
(ARC)
NETWORK
2 DVD
1 CBL/SAT
POWER SUPPLY
5V/1.5A
Bluetooth/Wi-Fi
ANTENNA
Denon Link HD
1 CBL/SAT
FM
2 DVD
AM
SIGNAL
GND
3 Blu-ray
ANTENNA
AUDIO
DC12V 150mA MAX.
1 2
PHONO
TRIGGER OUT
AUDIO
FRONT
FRONT CENTER SURROUND SURROUND
4 GAME
5 MEDIA PLAYER
(ASSIGNABLE)
IR
REMOTE CONTROL
6 CD
SURROUND
STRAIGHT CABLE
RS-232C
FRONT
7.1CH IN
ZONE2 ZONE3
Receiver (Rear panel)
ARC (Audio Return Channel) :
If your TV supports ARC, your TV can send audio back to the AV receiver
when you are using your TV’s built-in video sources (TV tuner, Smart TV
streaming services, etc…) ARC requires that you enable HDMI CEC on
your TV. Please refer to your TV’s Owner’s Manual for instructions on how
to setup HDMI CEC. Note that some TV manufacturers use other names
for the HDMI CEC function.
5 MEDIA PLAYER
3 Blu-ray 6 AUX2 7 CD
4 GAME
FRONT
SURROUND
SURROUND BACK
TV
2 CD1
AUDIO
(ASSIGNABLE)
SURROUND BACK SURROUND BACK
SUBWOOFER
CENTER
1
HEIGHT1 HEIGHT3
HEIGHT2
ASSIGNABLE ASSIGNABLE
SPEAKERS
SURROUND BACK
CENTER
PRE OUT
COAXIAL OPTICAL
DIGITAL AUDIO
SUBWOOFER
2
DVD1CBL/SAT
2
HEIGHT4/FRONT WIDE
ZONE2
MONITOR1
1
CBL/SAT1 CBL/SAT
4 GAME
2 DVD 3
2 DVD
MONITOR/ZONE3
ZONE2
3 Blu-ray
VIDEO
VIDEO
COMPONENT VIDEO
(ASSIGNABLE)
(ASSIGNABLE) (ASSIGNABLE)
HEIGHT3 HEIGHT3
ASSIGNABLE ASSIGNABLE
HEIGHT1
MONITOR2
ARC
MONITOR
Blu-ray
Y
P
B/
C
B
PR/
C
R
COMPONENT VIDEO
HEIGHT4/FRONT WIDE
HEIGHT4/FRONT WIDE
HEIGHT1 HEIGHT2 HEIGHT2
ASSIGNABLE
Bluetooth/Wi-Fi
ANTENNA
AC IN
4) Turn on the TV
TV remote control unit
5) Select the appropriate HDMI input on
your TV
HDMI
TV/
INPUT
TV remote control unit
or
VIDEO
7
Page 9

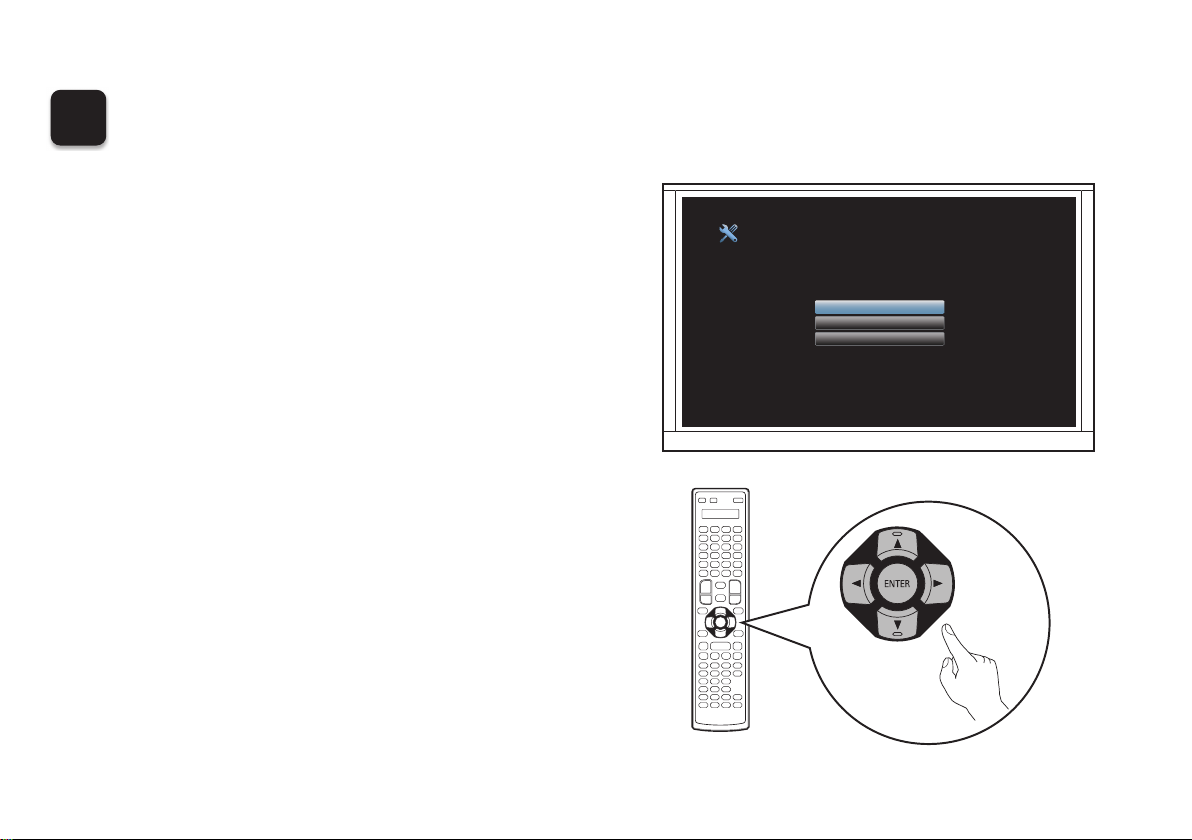
6) Turn on the receiver
7) Verify the connection
• Press X to turn on the receiver.
• Verify that you can see this screen on your TV.
AV Receiver Setup Assistant
Please select a language...
English
Français
Español
If this screen is not displayed, please go back and retry
the steps again in the recommended sequence.
8
Page 10
3
Following the On-Screen Setup Assistant
The Setup Assistant will walk you through connecting and
confi guring your speakers and components to your Denon
receiver. Please use the remote control and follow the
on-screen instructions.
AV Receiver Setup Assistant
Please select a language...
English
Français
Español
9
Page 11

4
Download both the “HEOS” App and the “Denon 2016 AVR Remote” App for the full home entertainment experience.
The HEOS App is required to access online music through your AVR.
Downloading the Mobile Apps
HEOS
The HEOS App allows you to explore,
browse, and play music from many online
streaming services or from your own music
library.
Denon 2016 AVR Remote
Control your new AVR with the latest
Denon 2016 AVR Remote App. Volume
control, sound mode selection and
advanced settings are always only a tap
away.
10
Page 12
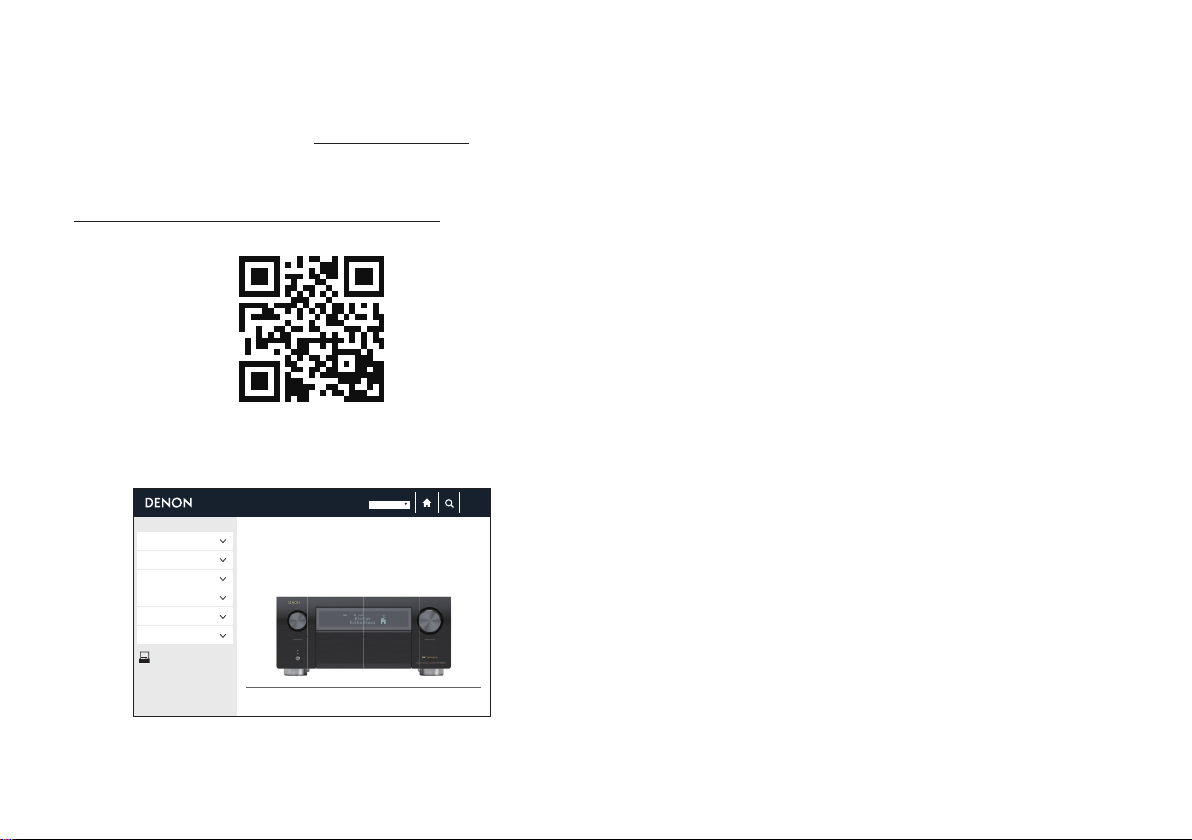
Owner’s Manual
• For more information, visit www.denon.com
• Refer to the Online Manual for other functions
information and operation procedure details.
manuals.denon.com/AVRX8500H/NA/EN/
Online Manual
11
Overview
Connections
Playback
Settings
Tips
Appendix
PDF
PDF Download
English
WEB Manual
INTEGRATED NETWORK AV RECEIVER
AVR-X8500H
INTEGRATED NETWORK AV RECEIVER
Copyright © 2017 D&M Holdings Inc. All Rights Reserved.
Contents
Page 13

Page 14

www.denon.com
Printed in Japan 5411 11552 00AD
Copyright © 2017 D&M Holdings Inc. All Rights Reserved.
 Loading...