

Page 1
®
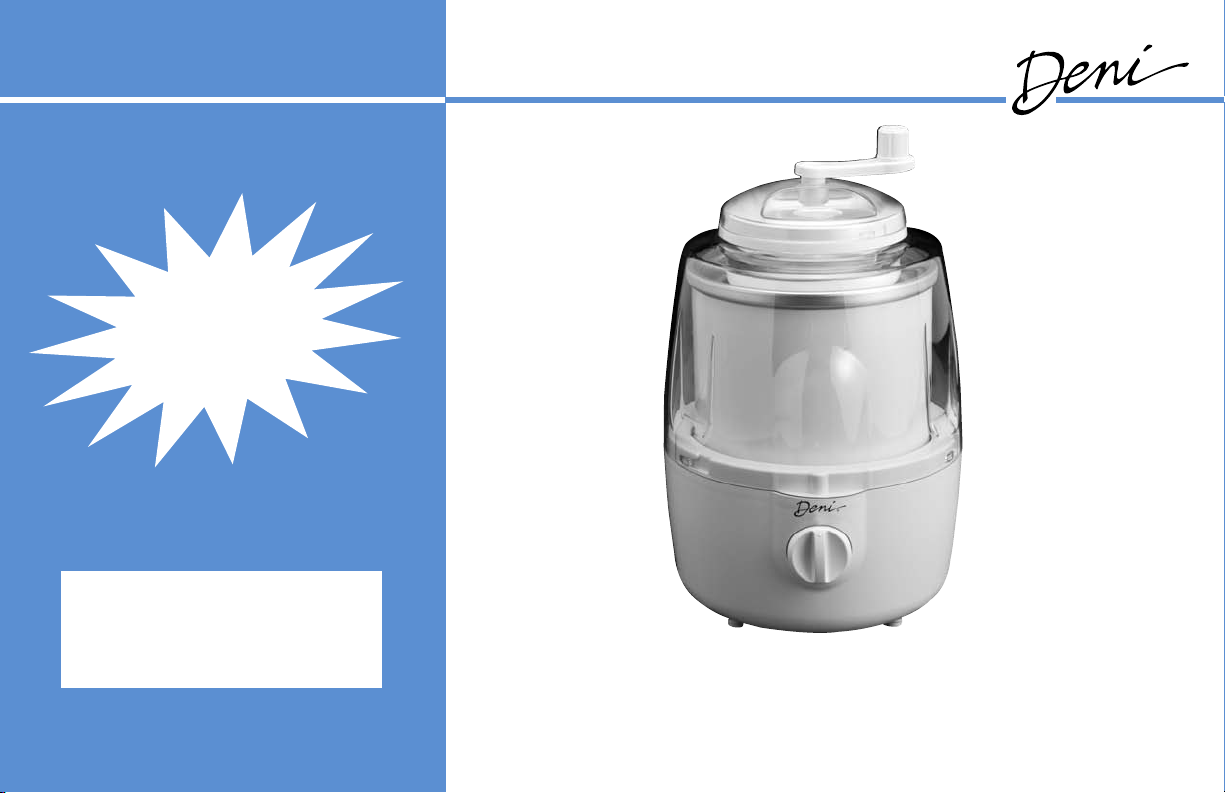
Ice Cream Maker
with Candy Crusher
BONUS
Includes Ice Cream
Recipes for Delicious
Desserts
Models #5201, 5202, 5203, 5205, 5210
IMPORTANT!
Please keep these instructions and
your original box packaging.
www.deni.com
INSTRUCTIONS
www.deni.com
FOR PROPER USE AND CARE
Page 2

®
IMPORTANT SAFEGUARDS
When using this electrical appliance, safety precautions
should always be observed, including the following:
n Read all of the instructions before using.
n Close adult supervision must be provided when this
appliance is used by or near children
n Avoid any contact with moving parts. Fingers, hair,
clothing, etc. should be kept away during operation.
n Using attachments not recommended or sold by
Keystone Manufacturing Co., Inc. may cause hazards.
n Do not operate with a damaged cord or plug. If the
appliance is not working as it should, has been
dropped or damaged, left outdoors or dropped into
water, do not use it and return it to the manufacturer
for proper service and replacement or repair.
n Always unplug before cleaning and removing parts.
n For indoor use only.
n Do not place near hot gas or electric burner. Do not let
cord contact hot surface, including the stove.
n Keep utensils out of the canister while in use to reduce
the risk of harm to persons or to the ice cream maker.
SHARP OR METAL UTENSILS OR OBJECTS SHOULD
NOT BE USED ON THE INSIDE OF THE CANISTER.
They can scratch or damage it. Rubber or wooden
utensils may be used when the ice cream maker is off.
n Portable - Do not let cord hang over edge of table or
counter
n Do not clean with metal scrubbing pads. Pieces can
break off the pad and short-circuit electrical parts,
creating a possibility of an electrical shock.
n To protect against electrical shock, do not immerse
plug, cord or motor base in water or any other liquid.
n Do not use an extension cord with this ice cream
maker. However, if one is used, it must have a rating
equal to or exceeding the rating of this appliance.
n The ice cream maker is for household use only.
n The ice cream maker should not be used for other than
the intended use.
n The ice cream maker has a polarized plug (one
blade is wider than the other). This plug will fit in
a polarized outlet only one way, as a safety feature.
Reverse the plug if the plug does not fit fully in the
outlet. Contact a qualified electrician if it still does
not fit. Do not attempt to defeat this safety feature.
SAVE THESE INSTRUCTIONS
1
Page 3
2
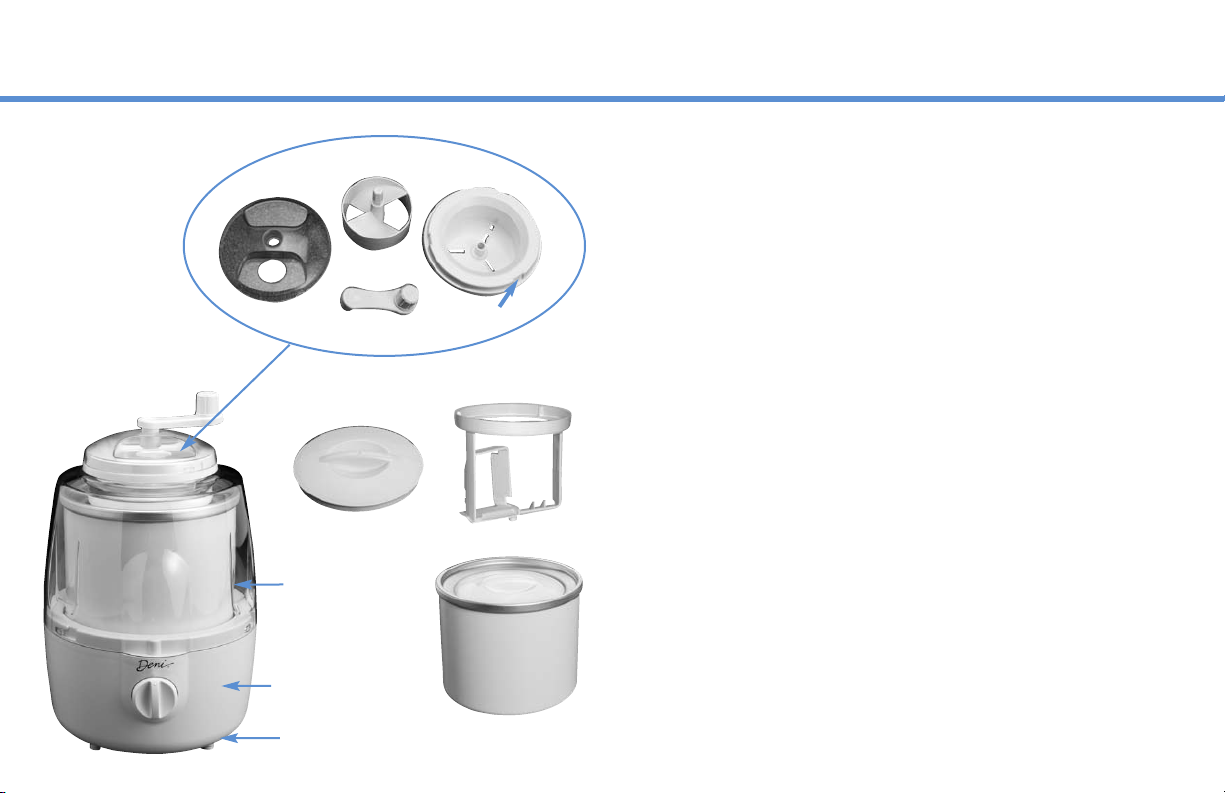
Candy Crusher
Mixing Paddle
Lid
Handle
Top
Clear-Vue Lid
Motor Base
Hidden Cord Storage
Base
Notches
Stir Paddle
Canister
FEATURES AND FUNCTIONS
Your new Deni Ice Cream Maker with Candy Crusher allows you to create
a variety of frozen treats: hundreds of ice cream flavors, sorbets, sherbet,
frozen yogurt, margaritas, even your favorite frozen drink in 5 to 30
minutes, depending on the coldness of your canister!
The following features come with the Deni Ice Cream Maker with Candy
Crusher:
n Candy Crusher
Dispenses crushed candy into your favorite ice cream.
n Top
Can be used on the clear view lid or the canister.
n Clear-Vue Lid
You can easily add ingredients through the opening in the lid
without turning the machine off.
n Canister
Thorough and even freezing is provided by the liquid inside
the walls. The double insulated walls keep the cylinder bowl
cold longer, for best freezing results.
n Motor Base
The 40 watt, high performance motor base requires minimal
counter space. Anti-slip rubber feet keep the ice cream maker
in place during use.
n Hidden Cord Storage
Adjusts to needed length and keeps countertops neat by
keeping excess cord out of the way.
Page 4

®
BEFORE FIRST USE
1. Remove all packing materials and literature.
2. Wash the canister, lid, paddle, and candy crusher in
warm soapy water. Rinse and dry all parts thoroughly.
NEVER immerse motor base in water or any other
liquid. NEVER clean any parts in a dishwasher.
FREEZING THE CANISTER
n Before making frozen desserts, it is very important that
the canister be properly frozen. The ice cream maker
features a double insulated bowl that requires thorough
freezing. We recommend placing the canister upright
in the back (coldest part) of your freezer.
n Make sure the canister is washed and thoroughly dried.
For best results, wrap canister in a plastic bag and
place in the freezer.
n The length of time necessary to properly freeze the
canister depends on the temperature in your freezer.
Freezing is approximately 8 hours, depending on
freezer temperatures ranging from -30°C/-22°F to
-17°C/+0°F.
n Shake the canister to ensure a properly frozen bowl.
The canister should have no liquid moving inside. If
you hear liquid, it is not frozen.
n Keep your canister in the freezer when not in use so
you can create frozen desserts anytime.
HOW TO OPERATE
1. Place canister in the freezer for 8 hours, (see Freezing
the Canister on this page).
2. Follow the recipes in our instruction booklet. Almost any
frozen dessert recipe can be used providing it does not
make more then 4 cups of liquid. 4 cups will make 1
quarts of ice cream.
3. Prepare the ingredients (see pages 7-15).
4. Take the canister out of freezer and place on motor base.
The canister should be used immediately after removal
from freezer because it will begin to thaw once placed
in room temperature.
5. Place the paddle inside the canister. Be sure the round
side of the stir paddle faces up (photo on page 2).
6. Lock the lid onto the motor base. The tabs on the bottom
of the lid should line up with the indentations in the
motor base. This ensures that the lid is locked into place.
When placing the lid on the motor base, the stir paddle
should fit into the lid.
7. Turn the On/Off dial to the right (on position). It is
important to turn the unit on first before pouring in the
mixture. The canister rotates while the stir paddle
remains stationary.
1
⁄2
3
Page 5

8. Slowly pour the mixture in the top opening of the lid. It
is at this time that you leave the machine on for about
5–30 minutes (time varies, depending on the coldness
of the ingredients and/or canister), or until mixture
becomes the desired thickness. If making ice cream,
your result should be a soft, custard-like ice cream.
9. When the frozen dessert is ready, make sure the unit is
off. Remove the lid and the mixture from the bowl with
a plastic spoon or plastic scoop. Do not use metal
utensils or metal objects in the canister.
10. Ice cream will be a custard like ice cream. If you
prefer hard ice cream, place ice cream in an air tight
container, then place in the the freezer and allow it
to set until it reaches your desired hardness. It is
recommended to remove the frozen dessert from
canister and place in an airtight, freezer safe container.
If the frozen dessert is left in the canister with the top
on in the freezer, it should only be for a short period
of time (less than 30 minutes) or the frozen dessert will
freeze to the canister and possibly damage the canister.
NOTE: Continually check the ice cream mixture while the
unit is on.
4
HOW TO OPERATE WITH CANDY CRUSHER
1. Place candy bars in freezer until cold. Do not put soft
chocolate in the crusher.
2. Break candy bars into smaller pieces before putting in
the crusher. Pieces should be about 1 inch or less.
3. When your ice cream is almost done (about 5 mins left)
position the candy crusher base in the opening on top
of the clear-vue lid so it fits snug.
4. Place the mixing paddle into the candy crusher base.
5. Put the lid on the candy crusher making sure the notches
(see pg. 2) line up properly, securing the lid.
6. Place the handle over the arm of the mixing paddle that
comes up through the lid.
7. Place the candy into the candy crusher. Some candy
works best when placed on it’s side. Do not over fill the
candy crusher, it will not have room to be crushed. Fill
both sides of the candy crusher.
8. Begin turning the handle clockwise. Place your hand
on the lid to keep in place. The candy will be crushed
up and mixed into the ice cream as the stir paddle
continues to mix the ice cream.
The result will be finely chopped candy or cookies.
Page 6

®
HINTS AND TIPS
n Read all the instructions and save for future reference.
n Cool all cooked recipes in the refrigerator before using.
n Flavors will be stronger before freezing.
n For better results, drain your yogurt.
n For best results, chill nuts, fruits, alcohol, and garnishes
before adding to the frozen treat. Generally these
products are added at the end of the freeze cycle.
n For pre-cooked recipes, make the mixture one day
before. This will allow it to cool completely and
increase in volume. Chilling recipes will produce
better results.
n Recipes that do not require cooking are best made
with an electric mixer to increase the mixture’s volume.
n Cream, sugar, eggs, and milk are the most common
ingredients in ice cream. Substitutions with similar
ingredients may be used depending upon your
preference. For example, any type of cream can be
used, however, there will be a difference in color,
texture and flavor. The richer the cream you use, the
richer the results. Heavy cream contains about 36% fat,
which is the richest. Whipping cream, coffee (light)
cream and half-and-half contain approximately 30%,
18%, and 10% fat respectively.
n 4 oz. of egg substitute is equivalent to two eggs.
n When using or adding eggs or egg substitute in any of
our recipes, we recommend heating/cooking the recipe
mixture.
n Artificial sweeteners can be used in place of sugar;
however, they should be added when the mixture is
cool, at most, room temperature. If sugar is dissolved
by heat in a recipe, omit this process when using a
sugar substitute. Instead, add sweetener into the
mixture until it is thoroughly dissolved.
n Adding one small egg white will volumize most mixes.
n If a recipe calls for alcohol, add it last, about one to
three minutes before the end of the freezing process.
Otherwise, the alcohol may stop the freezing process.
n The taste of sorbets is largely affected by the ripeness
and sweetness of fruit or juice. For tart fruit, add sugar
or omit sugar if fruit is very ripe. Once frozen, the
sorbet or other frozen desserts will taste less sweet than
the mixture.
n Long-term storage of homemade ice cream in the
freezer should be done in airtight freezer-safe
containers.
n Ice cream and other frozen dessert mixtures stay fresh
in the refrigerator for several days. However, they
should be mixed well minutes before being added to
the canister.
n Mixture will increase in volume during the freezing
process; therefore, pour no more than 4 cups mixture
into the canister.
5
Page 7

CANDY CRUSHER HINTS AND TIPS
n Make sure chocolate is cold before putting in candy
crusher.
n Cookies, chocolate bars, chocolate filled candy, peanut
butter filled candy bars and pieces, and chocolate malt
candy balls can be used in the candy crusher.
n Do not put nuts (almonds, peanuts, etc.) in candy
crusher
n Do not put hard candy or gummies in candy crusher.
n Do not put fruit in candy crusher.
n Do not put hot fudge or syrup in candy crusher.
n Do not put soft or melted candy in candy crusher.
n All parts are dishwasher safe.
CLEANING INSTRUCTIONS
n Clean the canister, paddle, lid and candy crusher with
warm soapy water. Only the candy crusher, can be put
on the top rack in the dishwasher to clean.
n Use a damp cloth to clean the motor base.
n Never immerse the motor unit, plug or cord in water or
in any other liquid.
n Never place the canister in freezer if it is still wet.
n Make sure all parts are dried thoroughly.
n Never store plastic parts in freezer.
6
TROUBLESHOOTING
n ICE CREAM DID NOT BECOME A SOFT CUSTARD.
The canister must be frozen properly. Check the
temperature in your freezer. If it is higher than
-17°C /0°F lower it. If you cannot lower the freezer
temperature, the ingredients should be as cold as
possible. Put mixture in the freezer for 1 hour until the
mix starts to crystallize. Then pour mixture into ice
cream maker.
n UNIT STARTED AND THEN STOPPED.
Take the canister off of the motor base and turn on the
unit. If it works, the unit wasn’t turned on before adding
the mix. Pour mix into the canister AFTER the unit is
turned on.
n THE PADDLE ISN’T TURNING. Only the canister turns.
The paddle should remain stationary.
Page 8

®
FROZEN DESSERT
RECIPES
The following recipes are for 1
Note: 1 quart of liquid makes 1
of frozen dessert.
TIP: Use the “Basic Vanilla Ice Cream”
recipe as a base for creating your
own favorite ice cream flavors. As
an example, to make a fruit ice
cream, decrease the cream or milk
by one cup and add one cup of
pureed fruit to the basic vanilla ice
cream recipe.
NOTE: The ice cream’s texture and
taste may change depending on how
rich of a cream you use.
1
⁄2 qts.
1
⁄2 qts.
Basic Vanilla Ice Cream
Ingredients:
4 oz. egg substitute
1 cup of sugar
1 cup half and half (or milk)
2 cups heavy cream
1
1
⁄2 tsp. vanilla
Method:
1. Combine egg substitute, sugar, and
vanilla in a mixing bowl or blender.
2. Add cream and half and half (or milk).
3. Mix well and chill thoroughly.
4. Follow standard instructions on page 3.
Banana Orange Frozen Yogurt
Ingredients:
1 16-oz carton (2 cups) vanilla yogurt
1 cup orange juice
1
⁄4 cup light corn syrup
1
⁄4 cup milk
1 cup mashed banana
Method:
1. In a mixing bowl, combine all the
ingredients, mix well and chill thoroughly.
2. Follow standard instructions on page 3.
Blackberry Sorbet
Ingredients:
3 cups fresh blackberries
1
⁄2 cup water
2
⁄3 cup sugar
1
⁄2 cup orange juice
2 egg whites
Method:
1. Over medium heat, in a saucepan,
combine blackberries with water and
sugar.
2. Stir until sugar is dissolved.
3. Puree, then chill thoroughly.
4. Beat egg whites until soft peaks form.
5. Add orange juice to the blackberries.
6. Whisk in egg whites.
7. Follow standard instructions on page 3.
7
Page 9

Chocolate Frozen Yogurt
Ingredients:
2 cups plain or vanilla flavored yogurt
1 cup sour cream
1
⁄4 cup light corn syrup
3
⁄4 cup sugar
1
⁄2- 2⁄3 cup baking cocoa (to taste)
Method:
1. Combine all ingredients in a mixing
bowl and beat well.
2. Chill thoroughly.
3. Follow standard instructions on pg. 3.
8
Chocolate Chip Frozen Yogurt
Ingredients:
2 cups plain or vanilla flavored yogurt
1 cup sour cream
1
⁄4 cup light cor
3
⁄4 cup sugar
1 tsp. vanilla
1 cup mini chocolate chips
Method:
1. Combine first five ingredients in a
mixing bowl and beat well.
2. Chill thoroughly.
3. Follow standard instructions on pg. 3.
4. Fold in chocolate chips at end of
freezing process.
NOTE: Egg substitute can be added to
a mix without cooking for those who
are concerned about eggs,you may
also eliminate the eggs. If any recipes
in this book are to be used by a dia-
betic or persons with other afflictions,
please consult your doctor before using.
n syrup
Chocolate Ice Cream
Ingredients:
1 cup of heavy cream
1 cup half and half or milk
1 cup sugar
4 oz. egg substitute
1
⁄2 teaspoon vanilla
1
1
⁄2 -2⁄3 cups baking cocoa (for taste)
Method:
1. Combine cocoa and sugar in a mixing
bowl, processor, or blender and mix.
2. Add eggs and vanilla to the mixture
and blend well.
3. Add cream and half and half.
4. Beat well and chill thoroughly.
5. Follow standard instructions on pg. 3.
Page 10

®
Chocolate Peanut Butter Ice Cream
Ingredients:
1 cup of heavy cream
1 cup half and half or milk
1 cup sugar
4 oz. egg substitute
1
⁄2 teaspoon vanilla
1
1
⁄2 -2⁄3 cups baking cocoa (for taste)
1 cup peanut butter
Method:
1. Combine cocoa and sugar in a mixing
bowl, processor, or blender and mix.
2. Blend in peanut butter and eggs.
3. Add cream, half and half and vanilla.
4. Beat well and chill thoroughly.
5. Follow standard instructions on pg. 3.
Espresso Ice
Ingredients:
3 tbsp. instant espresso or 4 tbsp. regular
instant coffee powder
2
⁄3 cups boiling water
3
1 tbsp. vanilla extract
3
⁄4 cup sugar
Method:
1. Dissolve coffee in boiling water.
2. Stir sugar into coffee until dissolved.
3. Stir in vanilla extract.
4. Chill thoroughly.
5. Follow standard instructions on pg. 3.
6. Serve with a dollop of whipped cream
and a sprinkle of cocoa.
Fat Free Peach Ice Cream
Ingredients:
11⁄2 cups evaporated skim milk
1 cup pureed ripe peaches
1
1
⁄2 tsp. plain gelatin
4 oz. egg substitute
6 oz. fat-free cream cheese
1 tsp. vanilla
1 cup sugar
1
⁄2 tsp. cinnamon
1
⁄4 tsp. ground all spice
1
⁄4 tsp. ground cloves
1
⁄4 tsp. grated nutmeg
Method:
1. To soften gelatin, place 11⁄2 cups of
milk in a small saucepan and sprinkle
the gelatin over the surface. Allow 3
minutes for gelatin to absorb into the
mixture, warm the milk and stir the
mixture to completely dissolve.
2. Combine remaining ingredients in a
blender or food processor. Mix well.
Add the milk/gelatin and continue
processing to ensure proper mixing.
3. Chill thoroughly and follow standard
instructions on pg. 3.
9
Page 11

Fat Free Chocolate Ice Cream
Ingredients:
3 cups evaporated skim milk
1 tsp. vanilla extract
1
1
⁄2 tsp. plain gelatin
1 cup sugar
4 oz. egg substitute
1
⁄2 to 3⁄4 cup baking cocoa (to taste)
Note: Combine cocoa and sugar before
adding to recipe to facilitate easy
mixing of the cocoa.
Method:
1. To soften gelatin, place 11⁄2 cups of
milk in a small saucepan and sprinkle
the gelatin over the surface. Allow 3
minutes for gelatin to absorb into the
mixture, warm the milk and stir the
mixture to completely dissolve.
2. Combine remaining ingredients in a
blender or food processor. Mix well.
Add the milk/gelatin and continue
processing to ensure proper mixing.
3. Chill thoroughly.
4. Follow standard instructions on pg. 3.
10
Fat Free Pineapple Frozen Yogurt
Ingredients:
3
⁄4 cup evaporated skim milk
4 tbsp. pineapple juice
1
1
⁄2 tsp. plain gelatin
4 oz. egg substitute
1
2
⁄2 cup vanilla fat- free yogurt
1 tbsp. orange zest
1 cup sugar
dash salt
Method:
1. To dissolve gelatin, place 3⁄4 cups of
milk in a small saucepan and sprinkle
the gelatin over the surface. Allow 3
minutes for gelatin to absorb into the
mixture, warm the milk and stir the
mixture completely to dissolve.
2. Combine remaining ingredients in a
blender or food processor. MIx well.
Add the milk/gelatin and continue
processing to ensure proper mixing.
3. Chill thoroughly.
4. Follow standard instructions on pg. 3.
French Chocolate Mint Ice Cream
Ingredients:
3 egg yolks
1 cup sugar
1
⁄3 cup cocoa
1 cups milk
2 cups cream
1 tsp. vanilla
1
1
⁄2 tbsp. mint extract
Method:
1. Beat milk and egg yolks together.
2. Blend in sugar.
3. In a saucepan,cook over medium heat,
stirring constantly, until thick enough to
coat the spoon.
4. Remove from heat and gently sift
cocoa and add mint into the mixture.
5. Beat well until blended.
6. Cool, then add cream and vanilla.
7. Mix well and refrigerate overnight.
8. Follow standard instructions on pg. 3.
Page 12

®
French Vanilla Ice Cream
Ingredients:
3 eggs
1 cup of sugar
1
1
⁄2 cups milk
2 cups cream
2 tsp. vanilla
Method:
1. Beat eggs and milk together in a large
saucepan.
2. Add sugar and cook over low heat,
stirring constantly until thickened
(approx. 10 minutes).
3. Mixture should coat the spoon.
4 Cool, then add cream and vanilla.
5. Mix well and refrigerate overnight.
6. Follow standard instructions on pg. 3.
Frozen Margaritas
Ingredients:
21⁄3 cups of water
1
⁄2 cup lime juice
3
⁄4 cup triple sec
2
⁄3 cup tequila
Method:
1. Combine first two ingredients.
2. Follow standard instructions on pg. 3.
3. When complete, add triple sec and
tequila and serve.
Frozen Pina Colada
Ingredients:
1 8-oz can cream of coconut
1
2
⁄2 cups sweetened pineapple juice
1
⁄2 cup dark rum
Method:
1. Combine first two ingredients.
2. Follow standard instructions on pg. 3.
3. When complete, add rum and serve.
Fruit Sorbet
Ingredients:
3 cups fruit
blueberries or fresh pineapple)
1
⁄2 cup sugar
1 cup water
Method:
1. Combine ingredients in a processor to
puree the fruit.
2. Follow standard instructions on pg. 3.
(such as strawberries, raspberries,
11
Page 13

Lemon Ice
Ingredients:
1 12-oz. can frozen lemonade concentrate
3 cups of water
1
1
⁄2 cups of sugar
Method:
1. Combine water and sugar in a small
saucepan. Simmer to dissolve sugar,
cool.
2. Mix ingredients in a mixing bowl,
processor, or blender.
3. Follow standard instructions on pg. 3.
12
Lemon Sherbet
Ingredients:
1 cup frozen lemonade concentrate
3 cups milk
1
⁄2 cup sugar
2 tbsp. grated lemon rind
1 egg white
Method:
1. Combine all ingredients and stir until
sugar dissolves & mixture appears
curdled.
2. Follow standard instructions on page 3.
Ice Cream Sandwiches
Ingredients:
Pre-baked cookies — 2 per sandwich,
select large 2
texture cookies work best. Freeze
cookies before filling.
Filling — Prepare ice cream of choice.
Firm up in freezer before assembling
sandwiches.
Assembling
Spread about 1⁄2” thick layer of ice
cream on one cookie. Top with a second
cookie. If desired, roll the sandwiches in
toasted coconut or sprinkles.
Storage
Individually wrap frozen cookies and
freeze.
1
⁄2 to 3” diameter, soft
Page 14

®
Low Fat Non-Dairy Mango Freeze
Ingredients:
3 cups non-dairy creamer
4 oz. egg substitute
1
⁄2 tsp. plain gelatin
1
1
⁄2 cups very ripe mango puree
1
3
⁄4 cup sugar
1 tsp. vanilla
Method:
1. In a small saucepan, sprinkle the
gelatin over 1
creamer. Warm the mixture (do not
allow to boil) to dissolve the gelatin,
stirring if necessary.
2. Add remaining ingredients and mix
well in a blender or food processor.
3. Chill thoroughly.
4. Follow standard instructions on pg. 3.
1
⁄2 cups of non-dairy
Low Fat Non-Dairy Strawberry Freeze
Ingredients:
3 cups non-dairy creamer
4 oz. egg substitute
1
⁄2 tsp. plain gelatin
1
1
⁄2 cups pureed strawberries
1
3
⁄4 cup sugar
1 tsp. vanilla
Method:
1. In a small saucepan, sprinkle the
gelatin over 1
creamer. Warm the mixture (do not
allow to boil) to dissolve the gelatin,
stirring if necessary.
2. Add remaining ingredients and mix
well in a blender or food processor.
3. Chill thoroughly.
4. Follow standard instructions on pg. 3.
1
⁄2 cups of non-dairy
Pina Colada Sherbet
Ingredients:
11⁄2 cups milk
1 cup crushed pineapple
2 tbsp. non-fat dry milk
2 tbsp. dark rum
1 cup coconut milk
dash salt
1 can (10 oz.) piña colada mix, partially
defrosted
Method:
1. In a blender or food processor,
combine ingredients until milk is
dissolved.
2. Cover and chill thoroughly.
3. Follow standard instructions on pg. 3.
13
Page 15

Pineapple Ice
Ingredients:
12 oz. can frozen pineapple concentrate
3 cups water
1 cup of sugar
Method:
1. Combine sugar and water in a small
saucepan. Simmer to dissolve the
sugar. Cool.
2. Mix all ingredients in a mixing bowl,
blender or food processor.
3. Follow standard instructions on pg. 3.
14
Pistachio Ice Cream
Ingredients:
2
⁄3 cup unsalted, shelled pistachios
2 oz egg substitute
3
⁄4 cup sugar
2 cups whipping cream
1 cup milk
1
⁄4 tsp. almond extract
1 tsp. vanilla extract
Method:
1. In a blender or processor, combine
nuts, egg and milk.
2. Blend until nuts are finely chopped.
3. Mix in remaining ingredients.
4. Follow standard instructions on pg. 3.
Variation:
1. Substitute pecans or walnuts for
pistachios.
2. Substitute
3
⁄4 cup maple syrup for sugar.
Raspberry Ice Cream
Ingredients
2 cups heavy cream
1 cup half and half or milk
1 cup sugar
4 oz. egg substitute
1 tsp. vanilla
1 cup raspberry puree’
Method:
1. Combine eggs, sugar, and vanilla in a
mixing bowl and beat well.
2. Beat in raspberry puree’.
3. Add cream and half and half (or milk).
4. Beat well and chill thoroughly.
5. Follow standard instructions on pg. 3.
NOTE: Strawberries, blueberries or black
berries can substitute for raspberries.
Page 16

®
Strawberry Cheesecake Ice Cream
Ingredients:
1
⁄2 cup half & half (or milk)
8 oz. cream cheese
2 cups heavy cream
1
⁄2 tsp. vanilla
1
4 oz. egg substitute
3
⁄4 -1 cup pureed strawberries
1 cup sugar
Method:
1. Beat eggs and sugar in a mixer,
blender or processor until thick and
cream colored.
2. Add milk, cream, vanilla and cream
cheese. Mix thoroughly.
3. Add strawberries and mix well.
4. Follow standard instructions on pg. 3.
Sugar Free Black Walnut Ice Cream
Ingredients:
2 cups heavy cream
dash salt
1 cup half & half
4 oz. egg substitute
5 tsp. sweetener (or to taste)
1 tbsp. vanilla
1
⁄2 cup finely chopped black walnuts*
1
⁄8 tsp. black walnut extract or 2-3 drops
almond extract
Method:
1. Mix all ingredients in a food processor
or blender, except for nuts.
2. Mix thoroughly.
3. Cover and chill thoroughly.
4. Follow instructions on page 4.
5. Add nuts at end of freezing process.
* Toasted almonds, pecans, hazelnuts and
macadamia nuts can be substituted.
Sugar Free Raspberry Sherbet
Ingredients:
11⁄2 cups milk
3 cups raspberry puree
1
⁄3 cup non-fat dry milk
2 tsp. artificial sweetener
1
⁄2 tsp. plain gelatin
1
2 tbsp. triple sec or grand mariner or
1 tbsp. orange zest + 3 tbsp. orange juice
Method:
1. In a small saucepan, add milk, sprinkle
gelatin over surface to soften. Warm
slightly until gelatin is dissolved, stirring
if necessary.
2. Add dry milk and mix thoroughly. Add
remaining ingredients. Mix completely.
3. Chill thoroughly.
4. Follow standard instructions on page 4.
Note: Because of the addition of the alcohol, it is
necessary to be sure the mix is well chilled before
placing in the ice cream maker, and freezing
canister is as close to -20°F as possible.
15
Page 17
®
CUSTOMER SERVICE
If you have any questions or
problems regarding the operation of
your Deni Ice Cream Maker with
Candy Crusher, call our customer
service department toll free:
Monday through Friday
8:30 a.m. to 5:00 p.m.
(Eastern Standard Time)
1-800-DENI-822
or E-mail us at
www.deni.com
Deni by Keystone Manufacturing Company
, Inc.
ONE-YEAR LIMITED WARRANTY
Your Deni Ice Cream Maker with Candy Crusher is warranted for one year from date
of purchase or receipt against all defects in material and workmanship. Should your
appliance prove defective within one year from date of purchase or receipt, return the
unit, freight prepaid, along with an explanation of the claim. If purchased in the U.S.A.
or other country, please send to: Keystone Manufacturing Company, Inc. 33 Norris
Street, Buffalo, NY 14207. If purchased in Canada, please send to: Keystone
Manufacturing Company, Inc., 151 Cushman Road, St. Catherines, Ontario L2M 6T4.
(Please package your appliance carefully in its original box and packing material to
avoid damage in transit. Keystone is not responsible for any damage caused to the
appliance in return shipment.) Under this warranty, Keystone Manufacturing Company,
Inc. undertakes to repair or replace any parts found to be defective.
This warranty is only valid if the appliance is used solely for household purposes in
accordance with the instructions. This warranty is invalid if the unit is connected to an
unsuitable electrical supply, or dismantled or interfered with in any way or damaged
through misuse.
We ask that you fill in the details on your warranty card and return it within one
week from date of purchase or receipt.
This warranty gives you specific legal rights. You may also have other rights which
vary from state/province to state/province.
®
©2006 Keystone Manufacturing Company, Inc.
All rights reserved.
 Loading...