

Page 1
Page 2
5011200503
200305-22
AE02
Page 3
Page 4

TABLE OF CONTENTS
Chapter 1 Introduction
Getting Started .............................................................................................. 1
Receiving Storage and Transportation .......................................................... 2
Nameplate Information .................................................................................. 2
Identification of components and accessories ............................................... 3
Chapter 2 Installation and Wiring
Installation Requirements .............................................................................. 5
Main Circuit Wiring ........................................................................................ 6
Control Circuit Wiring..................................................................................... 9
Basic Wiring Diagram ...................................................................................10
Chapter 3 Digital Keypad Operation
Description of the Digital Keypad..................................................................11
Explanation of Displayed Messages .............................................................12
Chapter 4 Start Up .......................................................................................................16
Chapter 5 Parameter Settings.....................................................................................19
Chapter 6 Summary of Parameter Settings ...............................................................52
Chapter 7 Troubleshooting and Fault information ....................................................57
Appendix A Standard Specifications.............................................................................61
Appendix B Serial Communications..............................................................................64
Appendix C Dimensions .................................................................................................70
Appendix D Accessories List .........................................................................................77
Appendix E EMI Filters ...................................................................................................78
Appendix F EC Declaration of Conformity....................................................................79
Appendix G NFB (No-Fuse Breaker) Specification .......................................................81
Page 5

1
Introduction
Congratulations on your purchase of the DELTA VFD-A series AC motor drive. The VFD series is a
high-performance / low noise general-purpose AC motor drive, manufactured using high-quality
components and incorporating the latest micro-processor technology available.
The purpose of this chapter is to provide specific, yet simple information to unpack, install, and
operate the AC drive. This chapter contains information on the following:
Getting Started
Receiving, Transportation, and Storage
Nameplate Information
Identification of Components and Accessories
Getting Started
This manual will help in the installation, parameter setting, troubleshooting, and maintenance of
the AC drive. To guarantee safe operation of the equipment, read the following safety guidelines
before connecting the drive to the AC power line. Keep this manual in a place where it is available
to all users for their reference.
!
Warning! To avoid personal injury, do not remove the cover of the AC motor drive until all of the
digital keypad “DISPLAY LED” lamps are off. The DC-link capacitor remains charged with a
hazardous voltage even after input power is removed.
!
Warning! Do not connect or disconnect wires and connectors while power is applied to the circuit.
All connections should be performed by qualified personnel.
Attention: Grounding the VFD-A drive is done by connecting the Earth Ground to the drive
!
ground terminal.
Attention: The final enclosure for operating the AC Motor Drive must comply with the
!
requirements of EN 50178. ( Live parts shall be arranged in enclosures or located behind barriers
that meet at least the requirements of the Protective Type IP20; Top surfaces of enclosures or
barriers that are easily accessible shall meet at least the requirements of the Protective Type IP40
)
Caution: There are highly sensitive components on the printed circuit boards. These components
!
are especially sensitive to ESD (electrostatic discharge). To avoid damage to the drive, do not
touch components or the circuit boards until all static control precautions have been taken.
!
Caution: Never connect the main circuit output terminals U, V, and W directly to the AC main
circuit power supply as this will damage the drive.
!
Caution: Do not apply the antirust to screws for fastening drives; Please clean the drives and
screws with dry cloth or alcohol, not with synthetic cleaner. Fasten the screws with washers and
rated torque lest the enclosure corners of drives be distorted.
This manual is for DELTA AC Motor Drive VFD-A and VFD-H Series. For the frequency in Pr.03,
Pr.04, Pr.06, Pr.16, Pr.17, Pr.18, Pr.19, Pr.20, Pr.21, Pr.22, Pr.23, Pr.36, Pr.37, Pr.47, Pr.67, Pr.68
and Pr.69, VFD-A Series can be regulated up to 400Hz and VFD-H Series up to 1500Hz.
1
Page 6
Receiving, Storage and Transportation
The AC motor drive has gone through rigorous quality control tests at the factory before shipment.
After receiving the AC drive, check for the following.
Receiving
Check to make sure that the package includes an AC drive, the User Manual, dust covers
and rubber bushings.
Inspect the unit to insure it was not damaged during shipment.
Make sure that the part number indicated on the nameplate corresponds with the part
number of your order.
Storage
The AC Drive should be kept in the shipping carton before installation. In order to retain the
warranty coverage, the AC drive should be stored properly when it is not to be used for an
extended period of time. Some storage suggestions are:
Store in a clean, dry location.
Store within an ambient temperature range of -20°C to +60°C.
If possible, store in an air-conditioned environment where the relative humidity is less
than 95%, non-condensing.
Do not store the AC drive in places where it could be exposed to corrosive gases.
Do not store the AC drive on a shelf or on an unstable surface.
Transportation
Temperature: -25°C to +70°C; R.H.: 0% to 95%; Air Pressure: 70kPa to 106kPa.
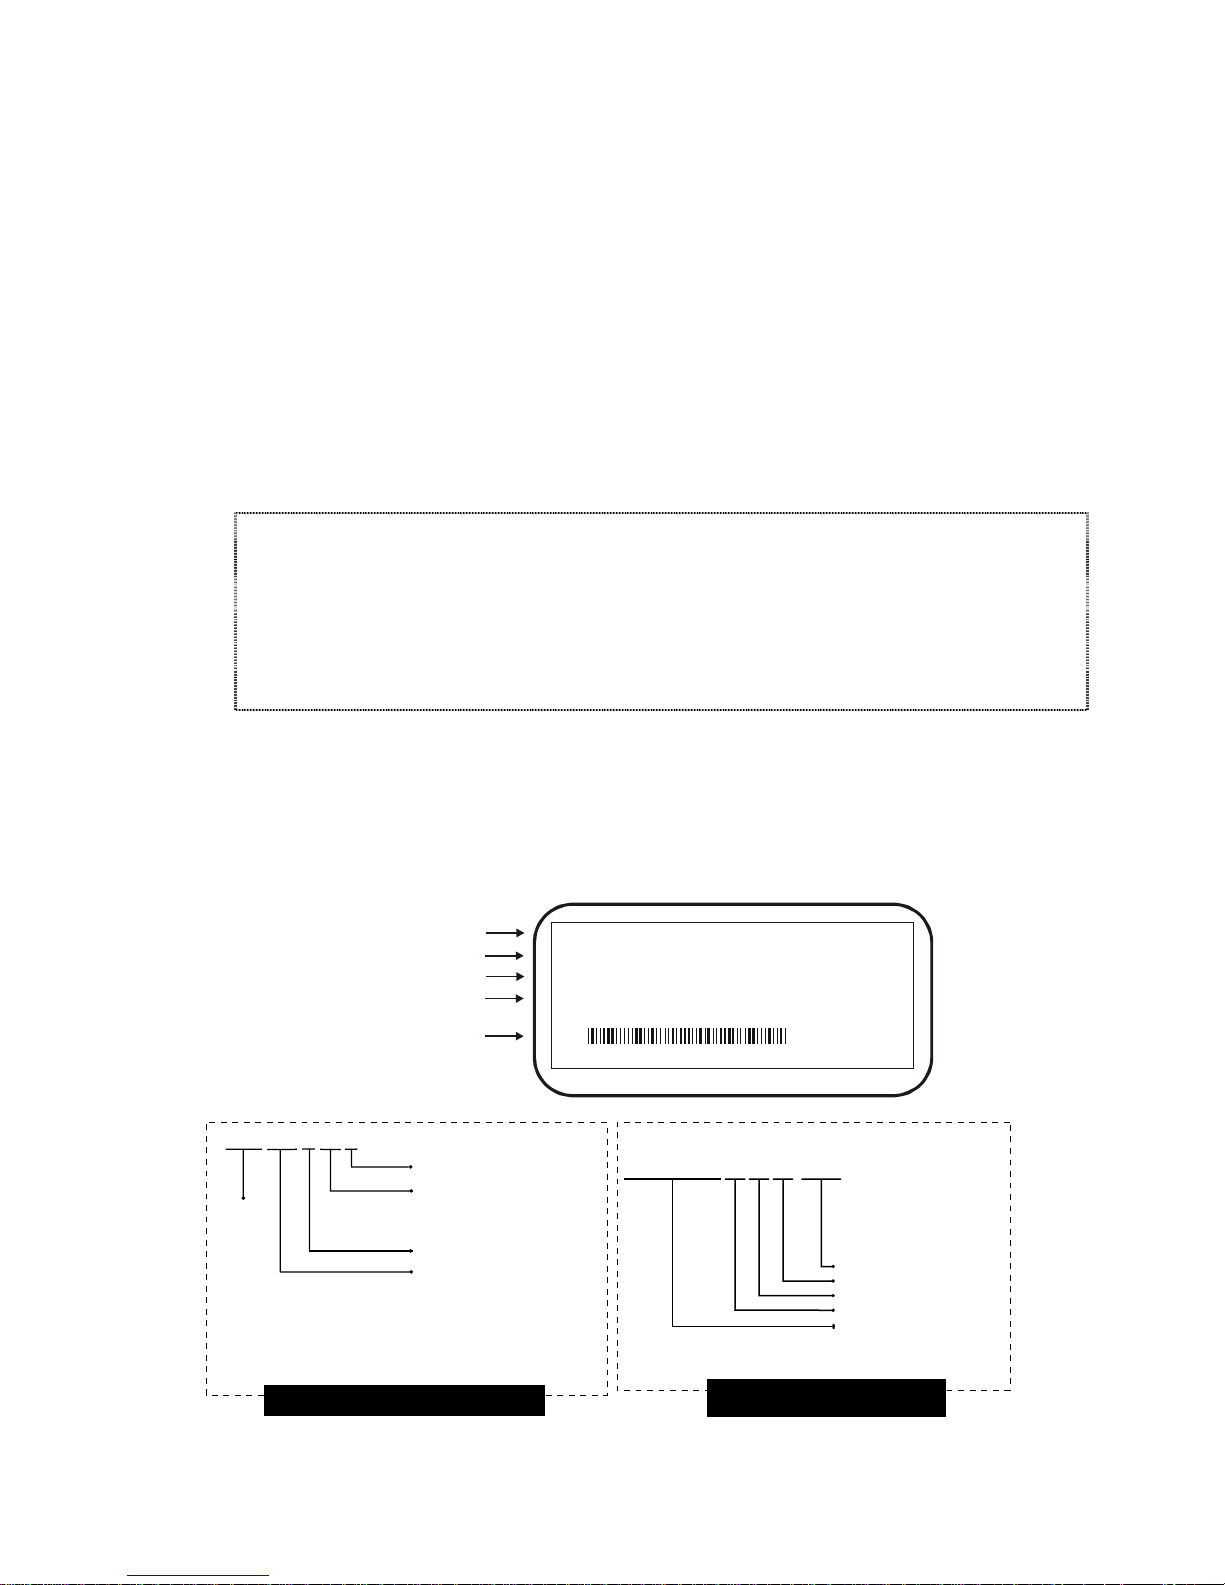
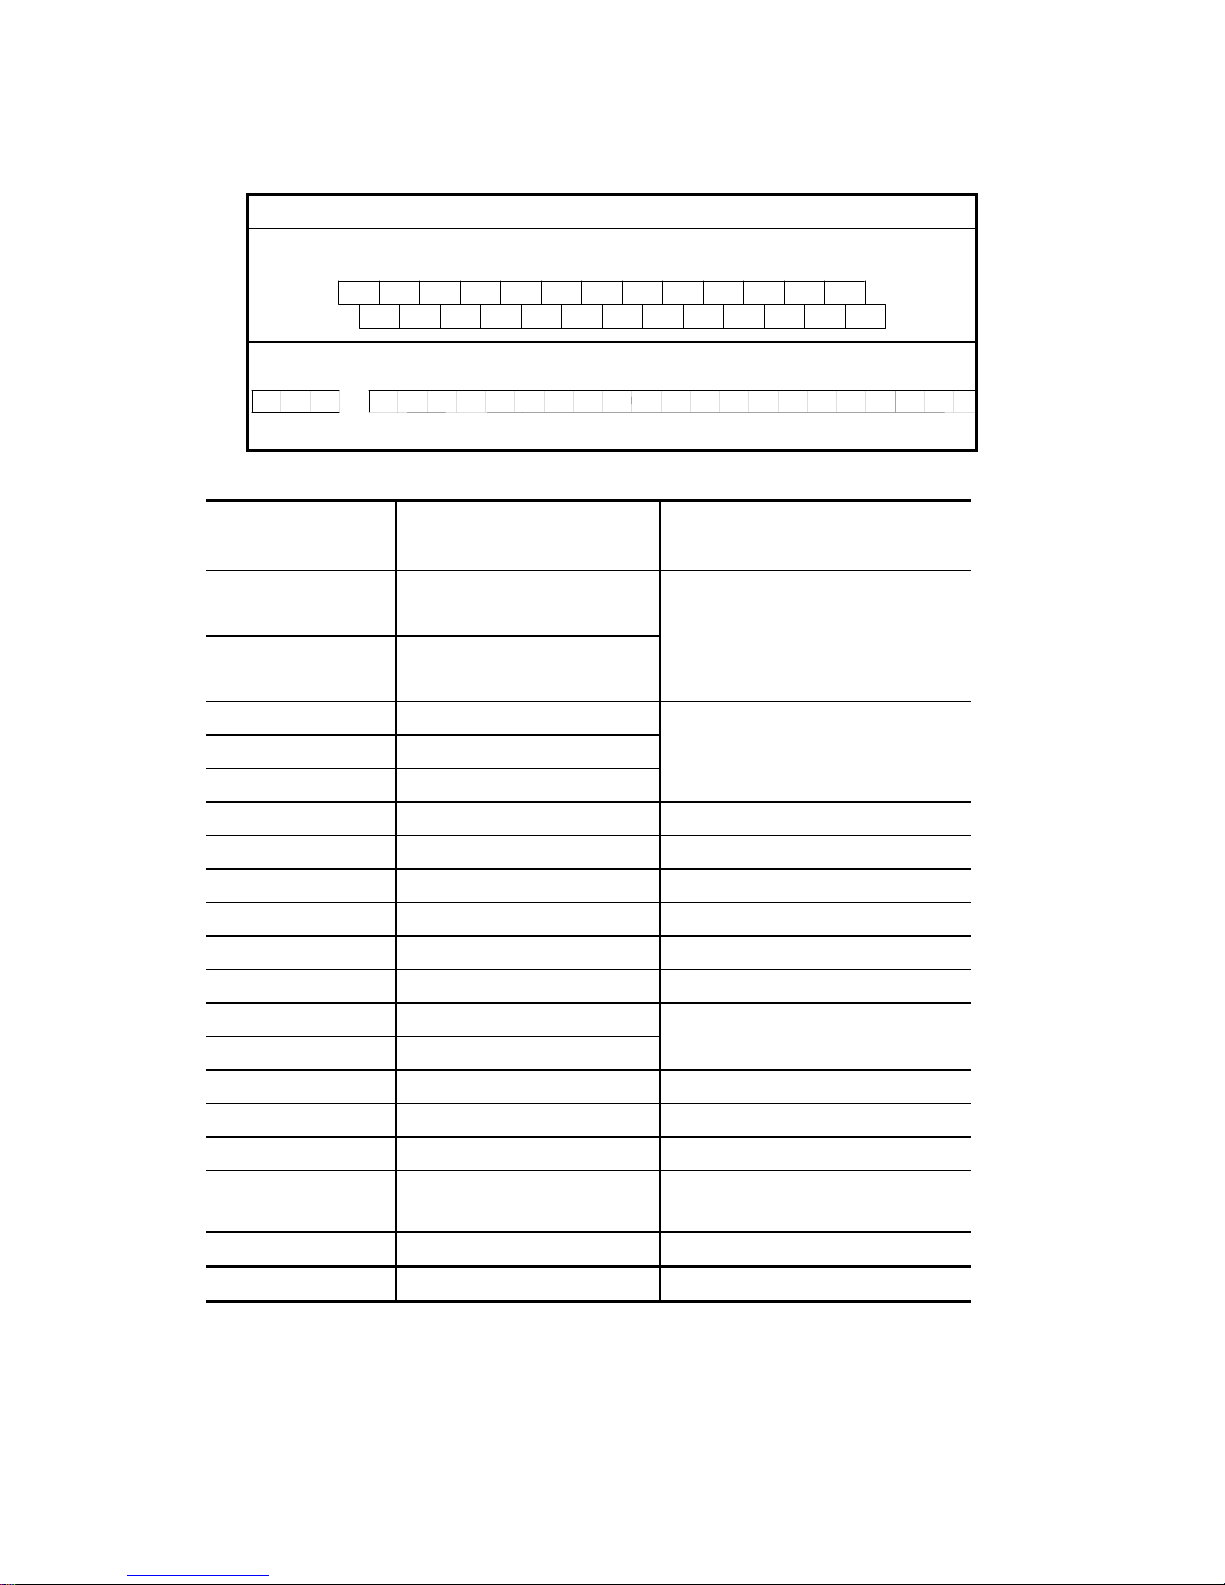
Nameplate Information
3HP, 440V AC Drive example
Output Frequency Range
Serial Number & Bar Code
VFD 022 A 43 A
Series name
AC Drive Model
Input Spec.
Output Spec.
Version type
Input voltage
21 : Single phase 220V class
23 : Three phase 220V class
43 : Three phase 440V class
A Series
Applicable motor capacity
007 : 0.75 kW
015 : 1.5 kW
022 : 2.2 kW
037 : 3.7 kW
055 : 5.5 kW
075 : 7.5 kW
MODEL : VFD022A43A
INPUT : 3PH 380-480V 50/60Hz 7.2A
OUTPUT : 3PH 0-480V 5.5A 4.2KVA 3HP
Frequenc y Range : 0.1-400Hz
022A43AT7010001
DELTA ELECTRONICS INC.
022A43A T 8 01 0001
110 : 11.0 kW
150 : 15.0 kW
185 : 18.5 kW
220 : 22.0 kW
MADE IN XXXXX
Production number
Production week
Production year
Factory control code
Model Name
Description of AC Motor Drive Model
Description of Serial Number
2
Page 7
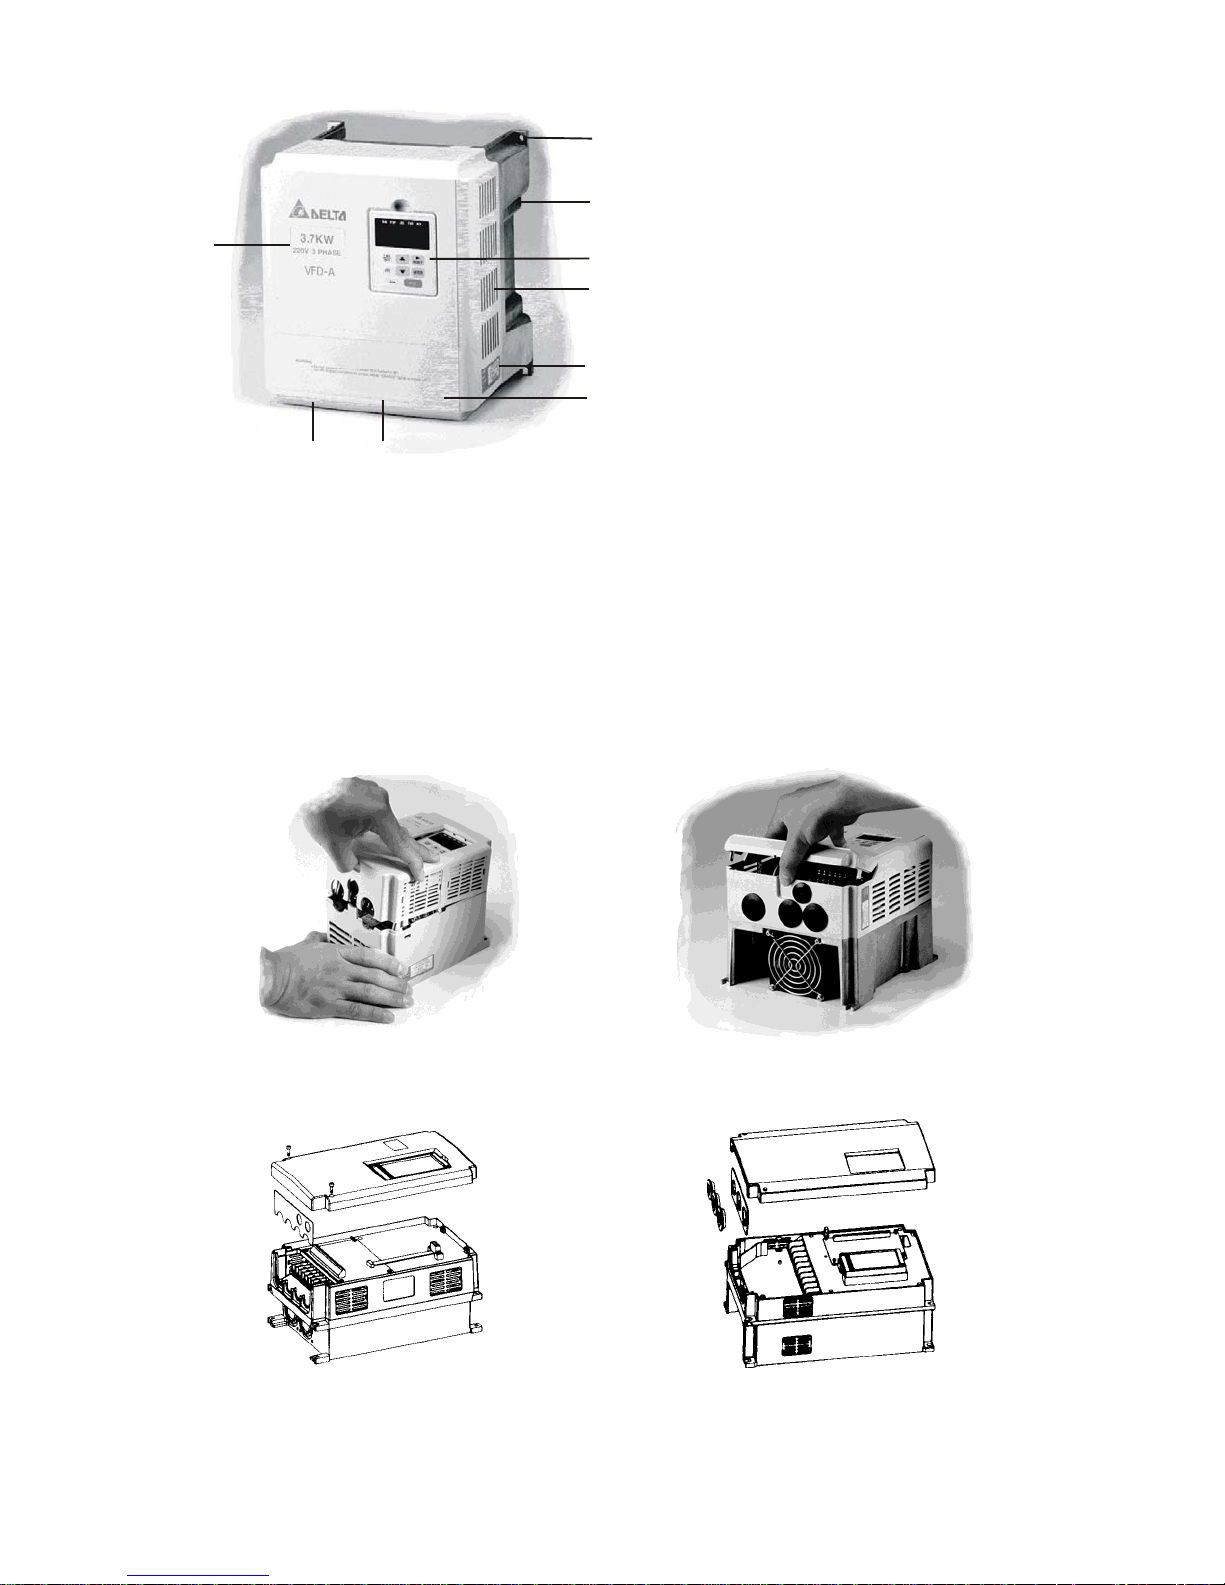
Identification of components and accessories
1
2
7
3
4
1. Mounting screw holes
2. Heat sink
3. Digital keypad
4. Ventilation hole and blind plate
installation position
5. Nameplate label
6. Terminal cover
7. Input / output rating
8. Cooling fan
9. External braking resistor (optional)
5
6
9
8
Removing and Installing the Front Cover
Refer to the figure shown below to remove the front cover. To re-install the front cover,
simply reverse the indicated procedures.
♦0.75 - 1.5 KW (1-2HP) ♦2.2 - 3.7 KW (3-5HP)
The front cover snaps on. Pull as The front terminal block cover snaps
shown to remove the front cover. on. Pull as shown to release cover.
♦5.5 - 22.0 KW (7.5-30HP) ♦5.5 - 22.0 KW (7.5-30HP)
3
Page 8
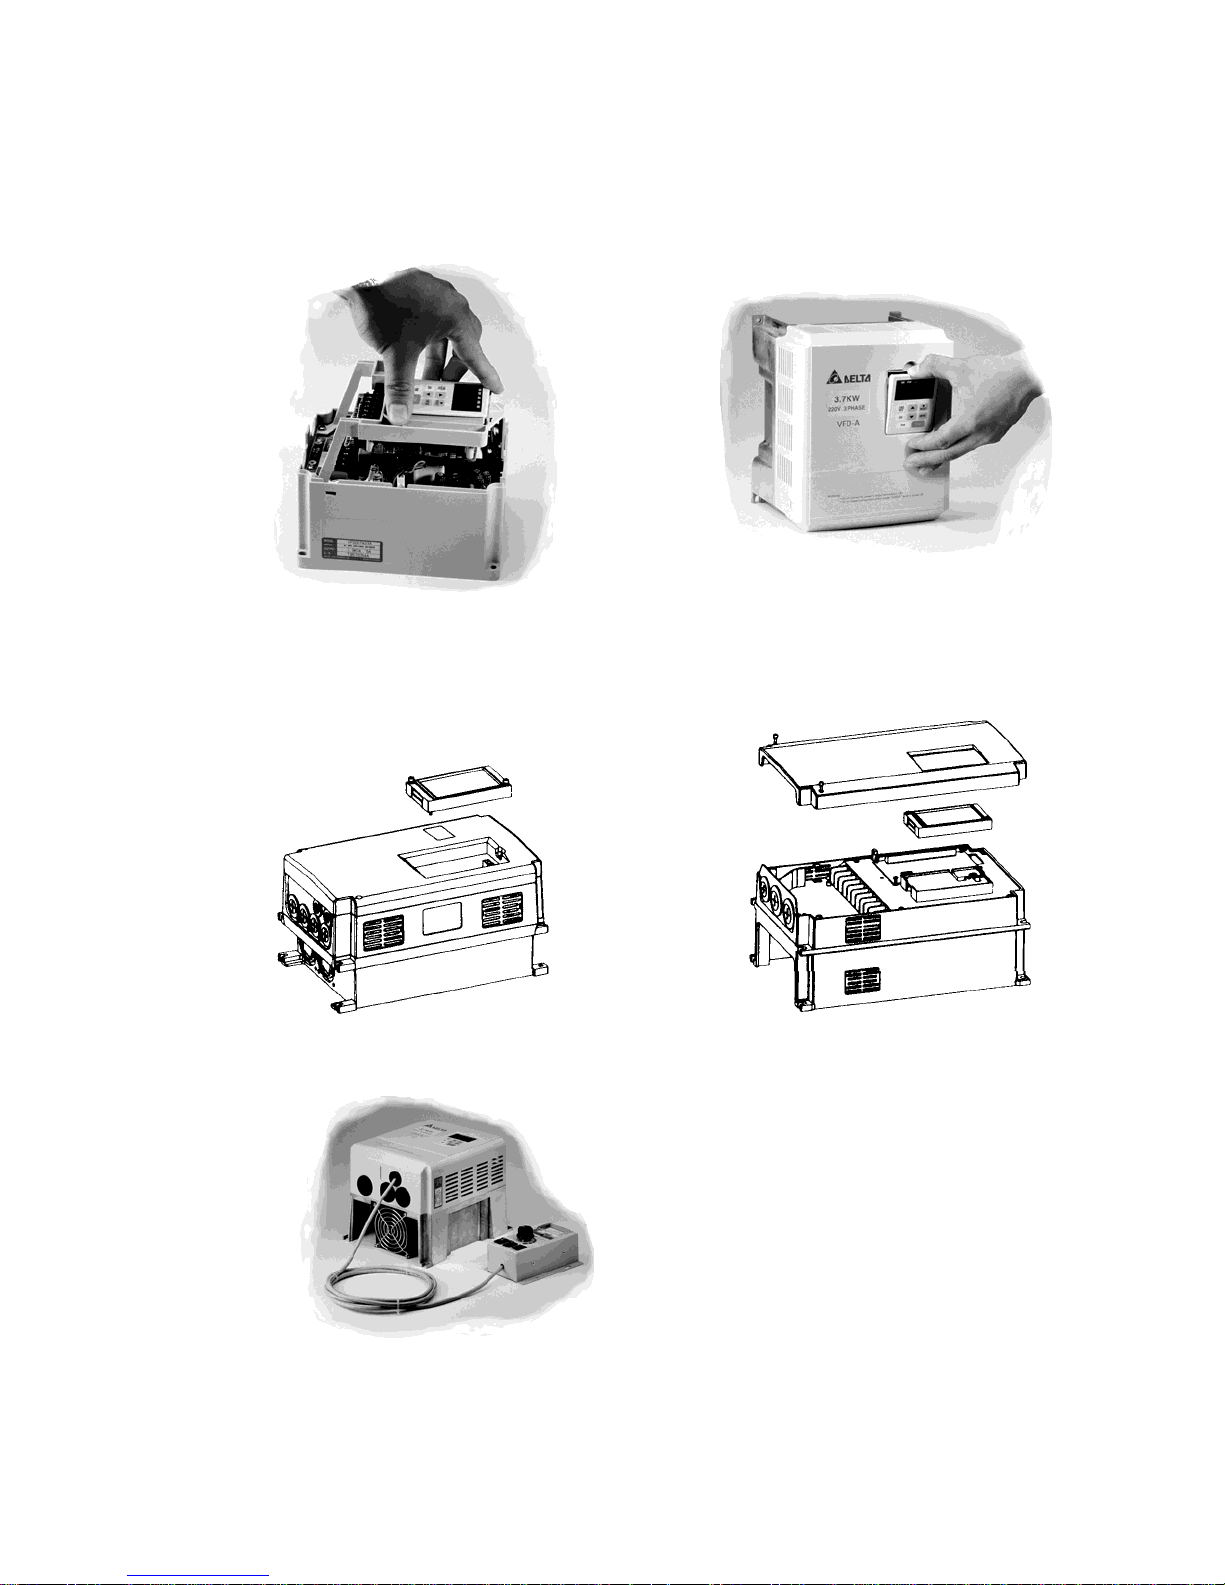
Removing the Digital Keypad
The digital keypad can be easily removed from the AC motor drive unit as shown
below.
♦0.75 - 1.5 KW (1-2HP) ♦2.2 - 3.7 KW (3-5HP)
♦5.5 KW - 22.0 KW The 7.5 thru 30 HP units have screws holding the digital
keypads in place. To remove the keypad, first remove the screws and then lift the
keypad out of the AC drive.
♦5.5 – 7.5 KW (7.5-10HP) ♦11.0 – 22.0 KW (15-30HP)
♦Installing the Optional Remote Control Unit (RC-01)
4
Page 9

2
Installation and Wiring
Chapter 2 provides the information needed to properly install and wire the AC drive. Make sure that
the AC drive is wired according to the instructions contained in this chapter. The instructions should be
read and understood before the actual installation begins.
Installation Requirements
Wiring
Basic Wiring Diagram
Installation Requirements
Install the AC drive vertically to provide proper ventilation. Adequate space is required between
the drive and a wall or other equipment. The figure below shows the minimum space needed. All
enclosures must provide adequate ventilation and the internal ambient temperature must be kept
C or below.
°
at 40
2 inches
(50mm)
OR MORE
Caution: The AC drive should be installed in an environment that is:
!
5 inches
(120mm)
OR MORE
5 inches
(120mm)
OR MORE
2 inches
(50mm)
OR MORE
AIR
protected from rain or moisture;
protected from direct sunlight;
protected from corrosive gases or liquids;
free from airborne dust or metallic particles;
free from vibration;
free from magnetic noise
temperature: -10°C to +40°C; R.H.: 0% to 90%; air pressure: 86kPa to 106 kPa
Violating the conditions listed above may void the warranty!
5
Page 10
Wiring
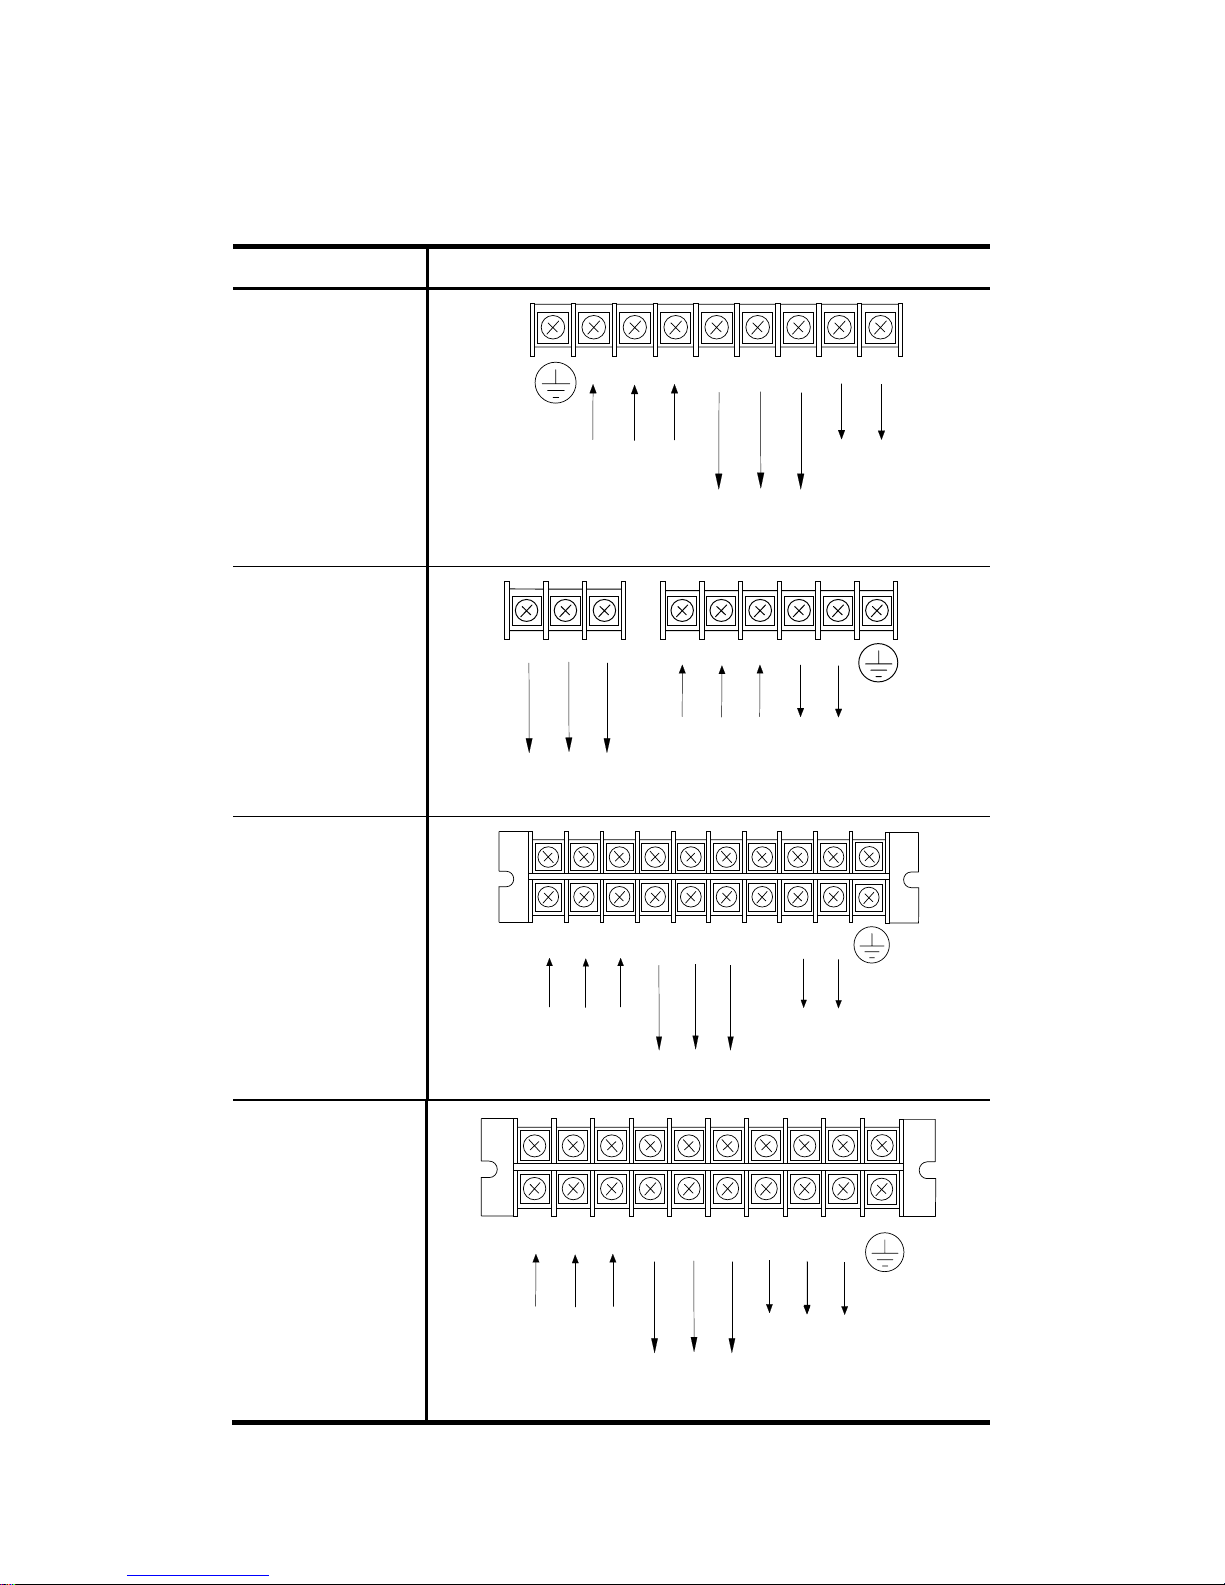
Main Circuit Wiring
(1) Power terminal block designations
Power input and output may be connected via a nine or ten position terminal block. The
pin assignments are as follows:
Model Power terminal pin assignments
VFD007A21A
VFD007A23A
VFD015A21A
VFD015A23A
VFD007A43A
VFD015A43B
AWG: 22-16
Torque: 10kgf-cm
Earth
Ground
VFD022A21A
VFD022A23A
VFD037A23A
VFD022A43A
VFD037A43A
AWG:18-10
Torque: 16kgf-cm
RST UVWB1
AC Input Line
Terminals
UVW RST B1
Motor
Connection
Motor
Connection
AC Input Line
Terminals
Braking
Resistor
B2
Braking
Resistor
B2
Earth
Ground
VFD055A23B
VFD075A23B
VFD055A43B
VFD075A43B
AWG: 14-8
Torque: 20kgf-cm
VFD110A23A
VFD150A23A
VFD185A23A
VFD220A23A
VFD110A43A
VFD150A43A
VFD185A43A
VFD220A43A
AWG:10-2
Torque: 52kgf-cm
R
S
AC Input Line
Terminals
R/L1
AC Input Line
Terminals
S/L2
T/L3 +1
T U W N P/B1 B2V
Motor
Connection
Braking
6
Unit
Earth
Ground
Braking
Resistor
+2
N(-)
V/T2
U/T1
Motor
Connection
W/T3
Earth
Ground
Page 11
For VFD-A Series 15-30HP (VFD110A23A/43A, VFD150A23A/43A, VFD185A23A/43A,
VFD220A23A/43A), the ring terminals below are suggested to be used when proceeding
with main circuit wiring:
Vendor AWG Vendor Part NO.
Moles 2 (Red) G-975-14
4 (Yellow) F-966-14
6 (Blue) E-957-14
8 (Red) D-950-14
AMP : ECBT 2 320383
4 33469
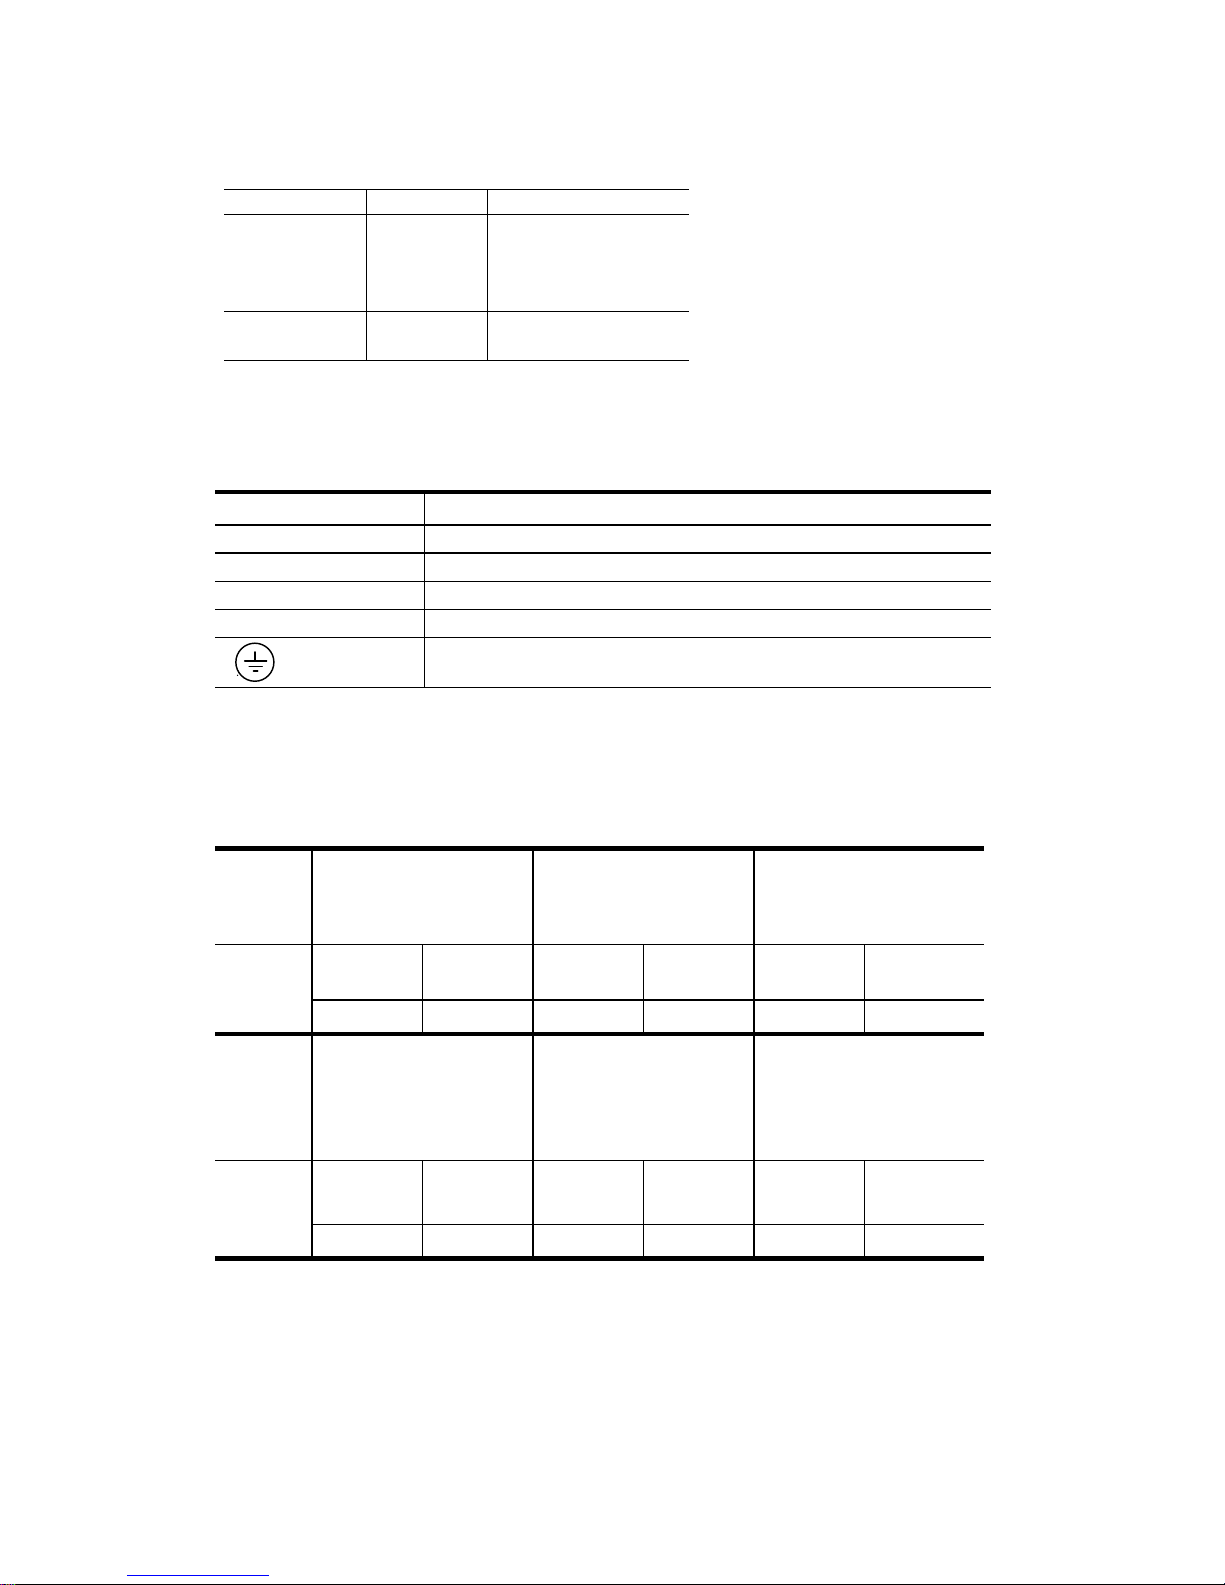
(2) Power block terminal designations
Terminals Description
R, S, T AC input line terminals
U, V, W Motor connection
P/B1, B2 Connection for the regenerative resistor (option)
P/B1, N Connection for the braking unit
Ground (connect appropriate ground wire to avoid electrical shock
and noise interference)
(3) Terminal dimensions
Model
Terminal
Spec.
Model
Terminal
Spec.
VFD007A21A⋅VFD007A23A VFD022A21A⋅VFD022A23A VFD055A23B⋅VFD075A23B
VFD037A23A
VFD015A21A⋅VFD015A23A
VFD007A43A⋅VFD015A43B VFD022A43A⋅VFD037A43A
Terminal
diameter
Terminal
width
Terminal
diameter
Terminal
width
VFD055A43B⋅VFD075A43B
Terminal
diameter
Terminal
width
M3 7 mm M3.5 8 mm M4 10 mm
VFD110A23A⋅VFD110A43A
VFD150A23A⋅VFD150A43A
VFD185A23A⋅VFD185A43A
VFD220A23A⋅VFD220A43A
Terminal
diameter
Terminal
width
M6 18.5mm
7
Page 12
(4) Attention:
!
The user must provide a circuit breaker or disconnect switch and fuses in accordance
with all applicable electrical codes.
Make sure that the leads are connected correctly and the AC drive is properly
grounded. (Ground leads should be at least the same size wire as the input leads R, S,
and T.)
Use ground leads that comply with AWG standards. Make the length of these ground
leads as short as possible.
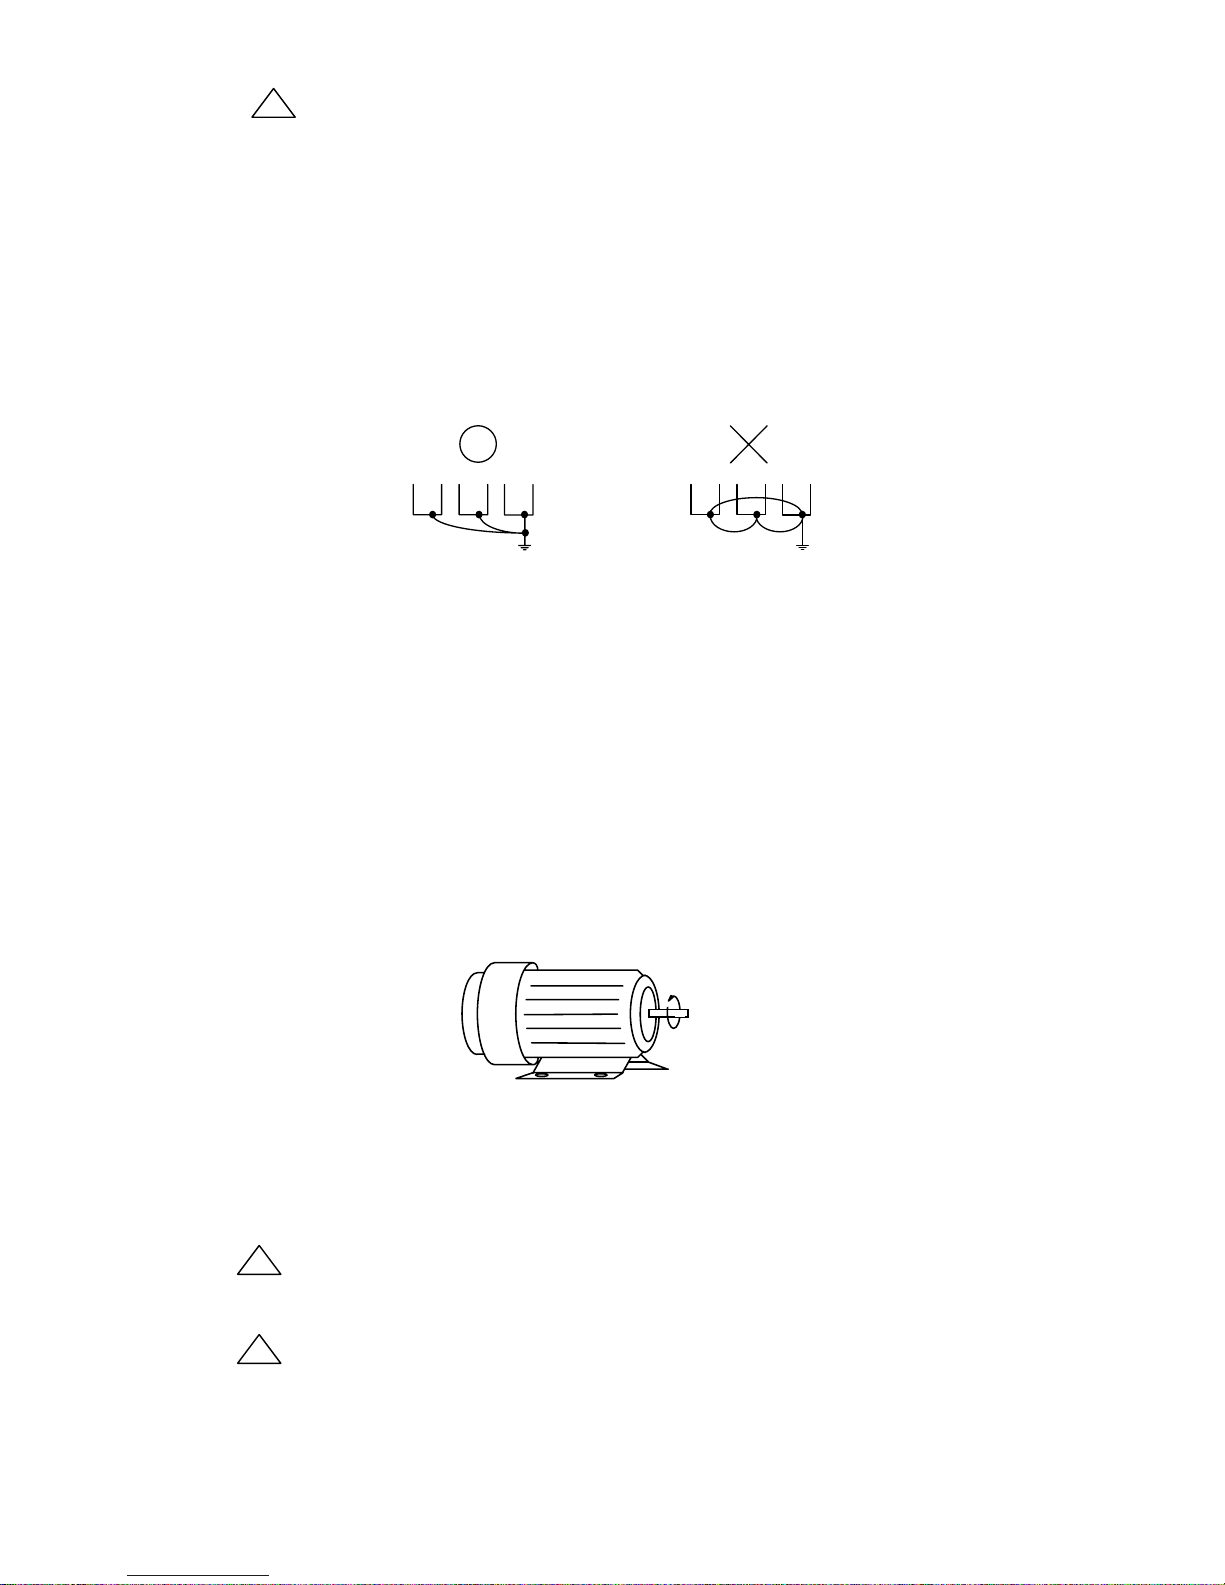
Should several AC drive units be installed side by side, all the units should be
grounded directly to the ground poles. Do not form a loop with the ground leads.
Make sure that the power source supplies the correct voltage and is capable of
supplying the required current to the AC drive. Refer to specification for “Rated AC
Input Power.” Motor Voltage should match the line voltage.
When power is applied to the AC drive, the DC bus charge indicator LED will be on.
For single phase applications, the AC input line can be connected to any two of the
three input terminals R, S, T. A single phase VFD-A drive can be powered from three
phase as well as single phase.
Note: This drive is not intended for use with single-phase motors.
When the AC drive output terminals U, V, and W are connected to the motor terminals
U, V, and W, respectively, the motor will rotate counter-clockwise (viewed from the
shaft of the motor as shown below) if a forward operation command is entered (FWD
lamp is ON).
Forward
running
To reverse the direction of rotation, interchange any two connections of the three
motor leads.
The control lines and power lines (R,S,T;U,V,W;P,N,B1,B2) should be separated and
avoid parallel wiring lest it should generate noise and cause mis-operation.
Caution: Do not attach or remove wiring or connectors when power is applied to the
!
AC drive. Do not monitor the signals at any point on the circuit board while the AC
drive is in operation.
Caution: Do not connect the AC input to any of the U, V, W terminals, as this will
!
damage the AC drive.
8
Page 13
Control Circuit Wiring
G
(1) Control terminal block designations
The control leads must be routed separately from the power supply and motor leads.
They must not be fed through the same cable conduit.
220V/440V Class 1∼5HP (AWG: 28 – 14; Torque:4 kgf-cm)
RA
MI1
RB RC
MI2
+10V
MI3 DCM
Terminal Symbol
ACI
AVI
RST
REVFWD
ACMAFM
TRGEF SG-SG+DFM
MO1
+EV
MCMMO2
DCM
220V/440V Class 7.5∼30HP (AWG: 24 – 12; Torque:4 kgf-cm)
RA
MI1
MI2 MI3
REV
FWD
RST
MO1 ACM
MO2
DCMTRGEF S
MCM
+10VRB RC
AFM
XX
ACIAVI
(2) Control terminal block descriptions
Close Contacts
between Terminals
RA - RC Multi-function indication output
contact
RB - RC Multi-function indication output
contact
MI1 - DCM Multi-function input 1
MI2 - DCM Multi-function input 2 Refer to Chapter 5, Pr.39, 40, 41
MI3 - DCM Multi-function input 3
REV - DCM Reverse / Stop “Open”→stop, “Close” → Reverse
FWD - DCM Forward / Stop “Open”→stop, “Close” → Forward
RST - DCM Reset “Close” → Reset
EF - DCM External fault “Close” → External fault
DFM - DCM Digital frequency meter Digital frequency output (0, +10 V)
TRG - DCM Counter trigger input “Open”→“Close”:(counter value)+1
MO1 - MCM Multi-function PHC output 1 Refer to Pr.45, 46
MO2 - MCM Multi-function PHC output 2 (open collector output)
+10V - ACM Power supply for speed setting +10 V (20 mA max. output current)
AVI - ACM Analog voltage input 0 ∼10 V (Max. output freq.) input
ACI - ACM Analog current input 4 ∼20 mA (Max. output freq.) input
AFM - ACM
Analog frequency/current
meter
SG+ - SG- Serial communication interface RS-485 serial port
Terminals Use Function
Refer to Chapter 5, Pr.57
0 ∼10 V (Max. output freq.) output
SG+DFM
+EV - DCM Auxiliary control power source DC 20V ~ 24V (50mA Max.)
Note: Use twisted-shielded or twisted-pair shielded-lead wires for the control signal. It is
recommended to run signal wiring in a separate steel conduit. The shield wire should only be
connected at the drive.
9
Page 14
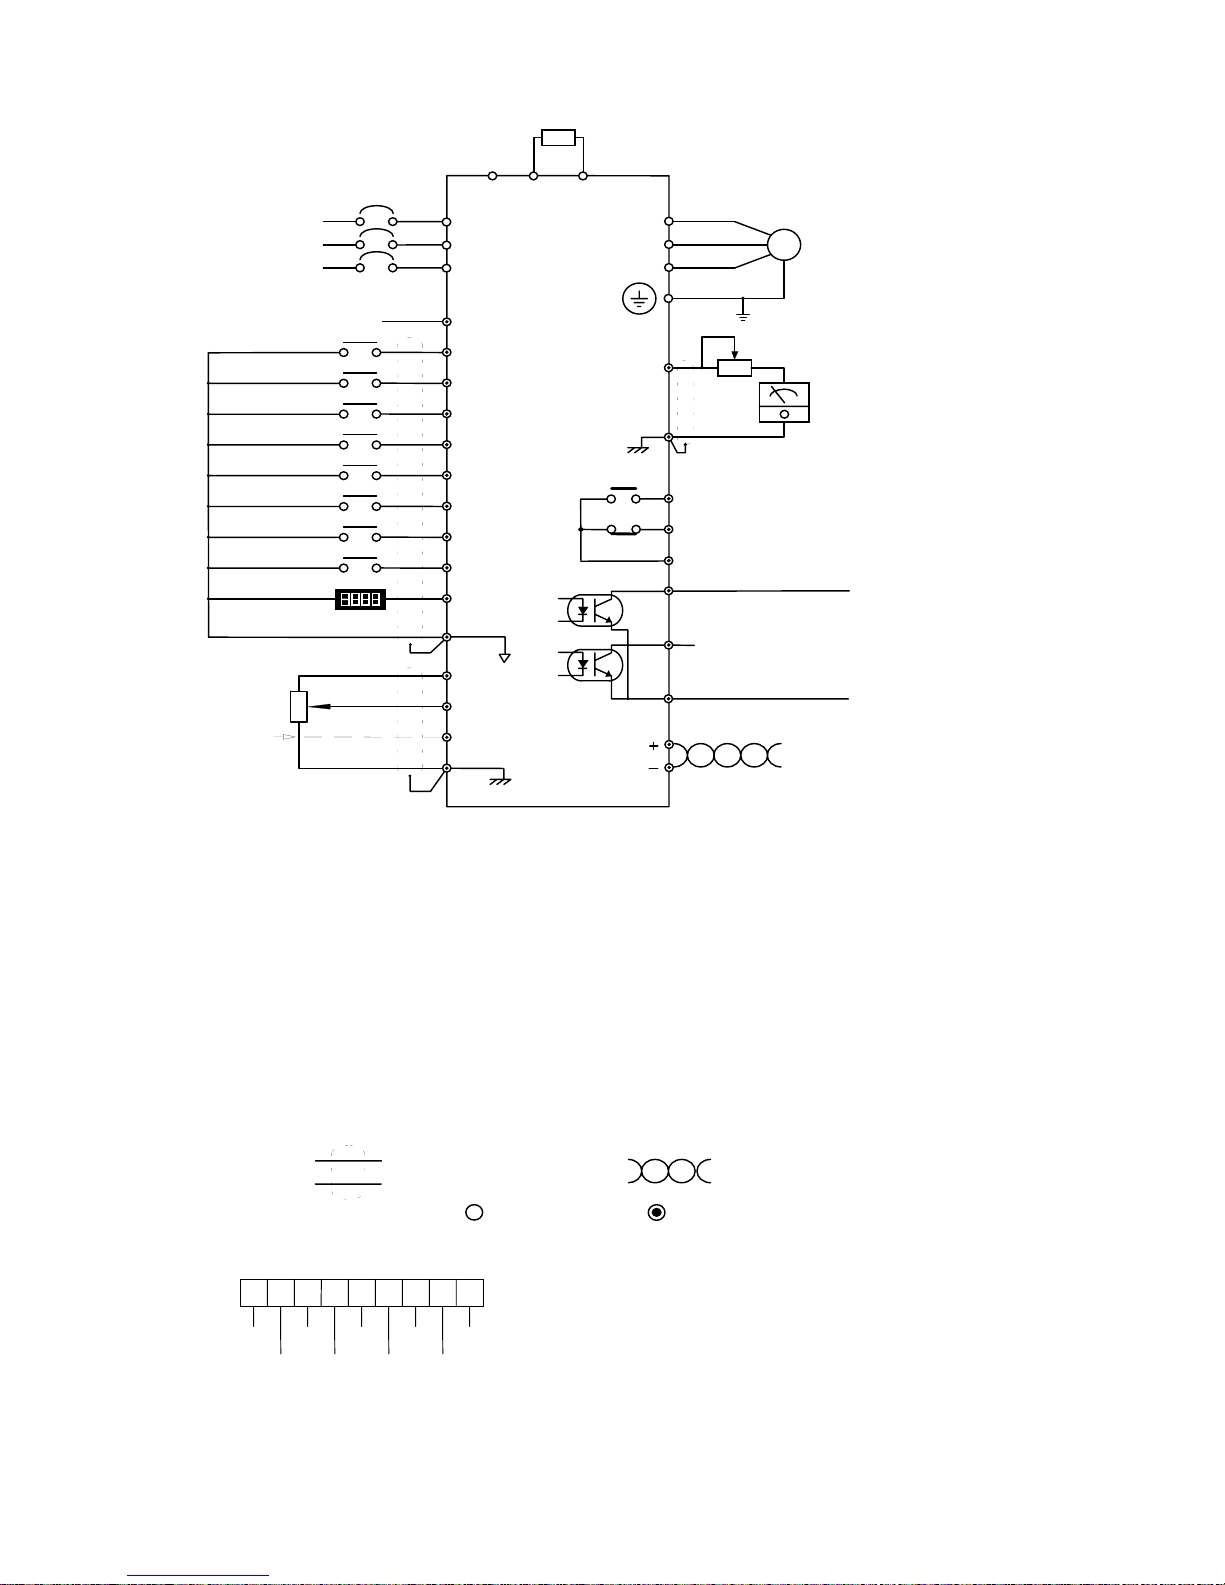
Basic Wiring Diagram
>
Braking resistior(option)
Power source 3 phase
200-240V or
380-480V
50/60Hz
DC 20V ~ 24V ( 50mA Max. )
Multi-function input 1
Multi-function input 2
Multi-function input 3
REV/STOP(REV/STOP)
FWD/STOP(RUN/STOP)
Reset
External fault
Counter trigger input
Digital frequency meter
Digital signal common
Frequency setting
0- +10V
1K
- 5K
Current input
4 - 20ma
5
Analog signal common
R
S
T
1
1
1
2
2
3
4
3
2
1
Use a disconnect
and fuse
R
S
T
+EV
MI1
MI2
MI3
REV
FWD
RST
EF
TRG
DFM
DCM
+10V
AVI
ACI
ACM
0V
P/B1
VFD-A
B2N
U
V
W
AFM
ACM
RA
RB
RC
MO1
MO2
MCM
SG
SG
Multi-function indication
output contact
}
RS-485 Serial interface
Motor
IM
Grounding
Analog frequency/current meter
7
AC 250V 2A below
DC 30V 2A below
Multi-function PHC output 2
48V 50mA below
Signal +
Signal -
8
}
PC
9
6
Multi-function PHC output 1
48V 50mA below
8
Notes A:
AC Motor Drive
1
Refer to Pr.39, 40, 41 on page 35.
2
Refer to Pr.38 on page 34.
3
Refer to Pr.45, 46 on page 38 and Pr.63, 64, 66 on pages 45 and 46.
4
Refer to Pr.43 on page 36.
5
Refer to Pr.00 on page 21, Pr.48, 49 on page 39.
6
Refer to Pr.42, 44 on pages 36 and 37.
7
Refer to Pr.57 on page 42.
8
Refer to Pr.45, 46 on page 38.
9
Refer to Pr.00, 01 on page 21 and Pr.77, 78 on page 50.
Notes B:
1.
2.
Terminal symbols :
indicates shielded leads and twisted-pair shielded leads.
shows main circuit; shows control circuit;
Wiring diagram and programming for the RC-01 external control.
AVI
+10V
16
151413 11
DCM
RST
FWD
REV
MI1
or
MI2
or
MI3
Program Parameters
Pr. 00 =d0001 Pr. 01 = d0001 or d0002
Pr. 38 = d0001 Pr. 39, Pr. 40 or Pr. 41 =d0003
Note: Pr. 41
Pr. 40 > Pr. 39
8654
AFM
ACM
10
Page 15
Digital Keypad Operation
,
Chapter 3 describes the various controls and indicators found on the digital keypad of the VFD-A
AC drive. The information in this chapter should be read and understood before performing the
start-up procedures described in Chapter 4.
Description of the Digital Keypad
Explanation of Screen Display
Digital Keypad Operating Modes & Programming steps
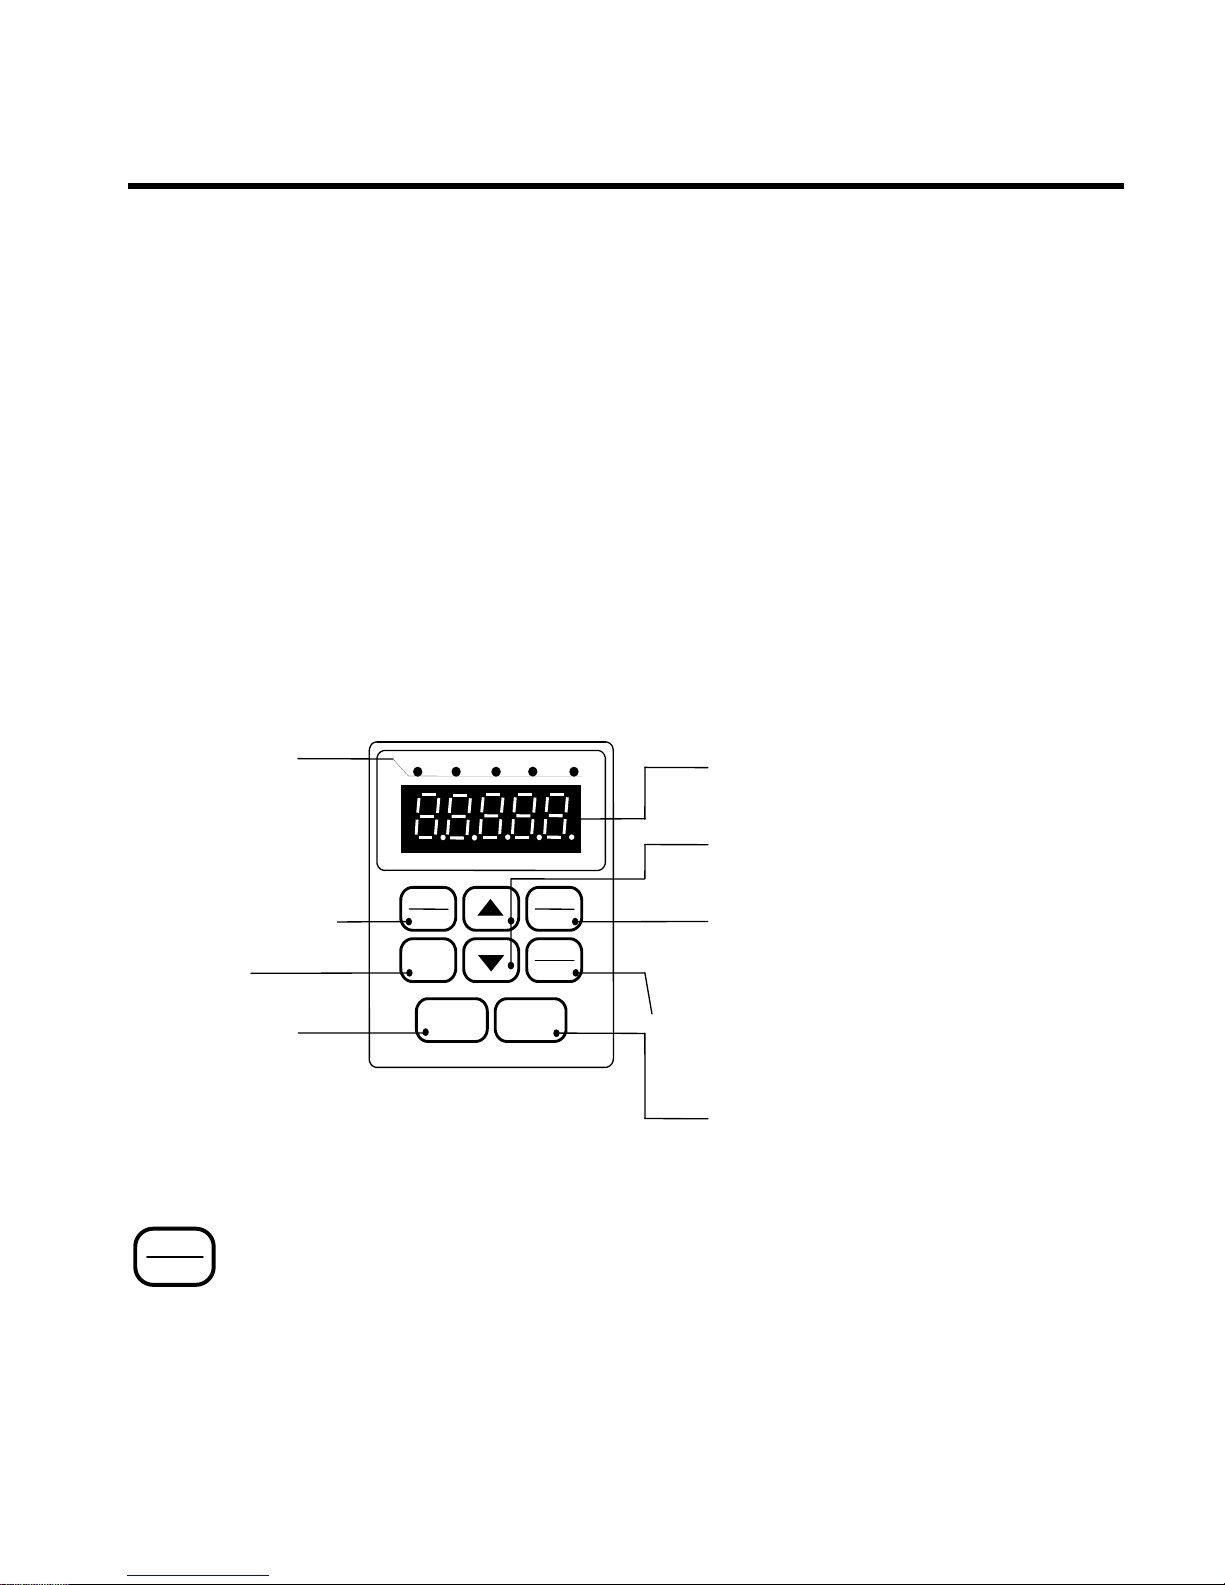
Description of the Digital Keypad
Digital Keypad Parts and Functions
This digital keypad module includes two parts: display panel and a keypad. The display panel
allows the user to program the AC drive, as well as view the different operating parameters. The
keypad is the user interface to the AC motor drive. Refer to the following figure for a description of
the different parts.
3
LED indication
Red lamp lights during RUN,
STOP, JOG, FWD, or
REV operation.
Forward / Reverse key
Selects FWD or REV operation.
Jog key
While pressing this key, jog
speed is available.
Run key
Starts inverter drive
operation.
PRGM
RESET
Program / Reset
Used to select the Normal mode of operation or to program the AC drive when either the
drive is running or has stopped. Switch to the PRGM mode to select a parameter or change
the setting of a parameter. If the AC drive has stopped due to a fault, press this button to
reset the drive.
RUN STOP JOG FWD REV
FWD
REV
JOG
RUN STOP
PRGM
RESET
FUNC
DATA
LED display
Indicates frequency, motor current
and alarm contents.
Up and down keys
Sets the parameter number or changes
the numerical data such as the
frequency reference.
Program / Reset key
Selects normal mode / program mode.
Displays the motor drive status, such
as output freq., selects the
parameters, FWD/REV or output
etc.
current
Function / Data key
Displays the motor drive status, such as frequency
program mode.
reference, output fr equency or output current under
the normal mode; or sets parameters under the
Stop key
Stops AC Motor Drive operation.
11
Page 16
FUNC
DATA
Function / Data
Displays information on the AC drive status such as the reference frequency, output frequency, or
output current in the normal mode.
While the drive is in the Program Mode, press this key once to display the current parameters.
After changing the parameters, press this key again to store the new parameters.
FWD
REV
JOG
RUN
STOP
Forward / Reverse
Used to toggle between forward and reverse operation.
Pressing this key will cause the motor to ramp down to 0 Hz and then ramp up to the preset
speed in the opposite direction. By default, the digital keypad controls the AC drive
forward/reverse operation. To control the forward/reverse operation via the control terminal block,
change the Pr.01 parameter to “d0001” or “d0002”.
Jog
Used to start the AC drive, then run at the jog frequency as set by the parameter specified under
Pr.23 [Jog Frequency].
Run
Used to start the AC drive operation. This key has no effect when the drive is set to terminal run.
Stop
Used to stop the AC drive operation.
Up / Down
Press the “Up” or “Down” button to change parameter settings. These keys may also be used to
scroll through different operating values or parameters.
Note: Pressing the “Up” or “Down” button momentarily changes the parameter settings in
increments. Press and hold down either of these keys to rapidly run through the possible
settings.
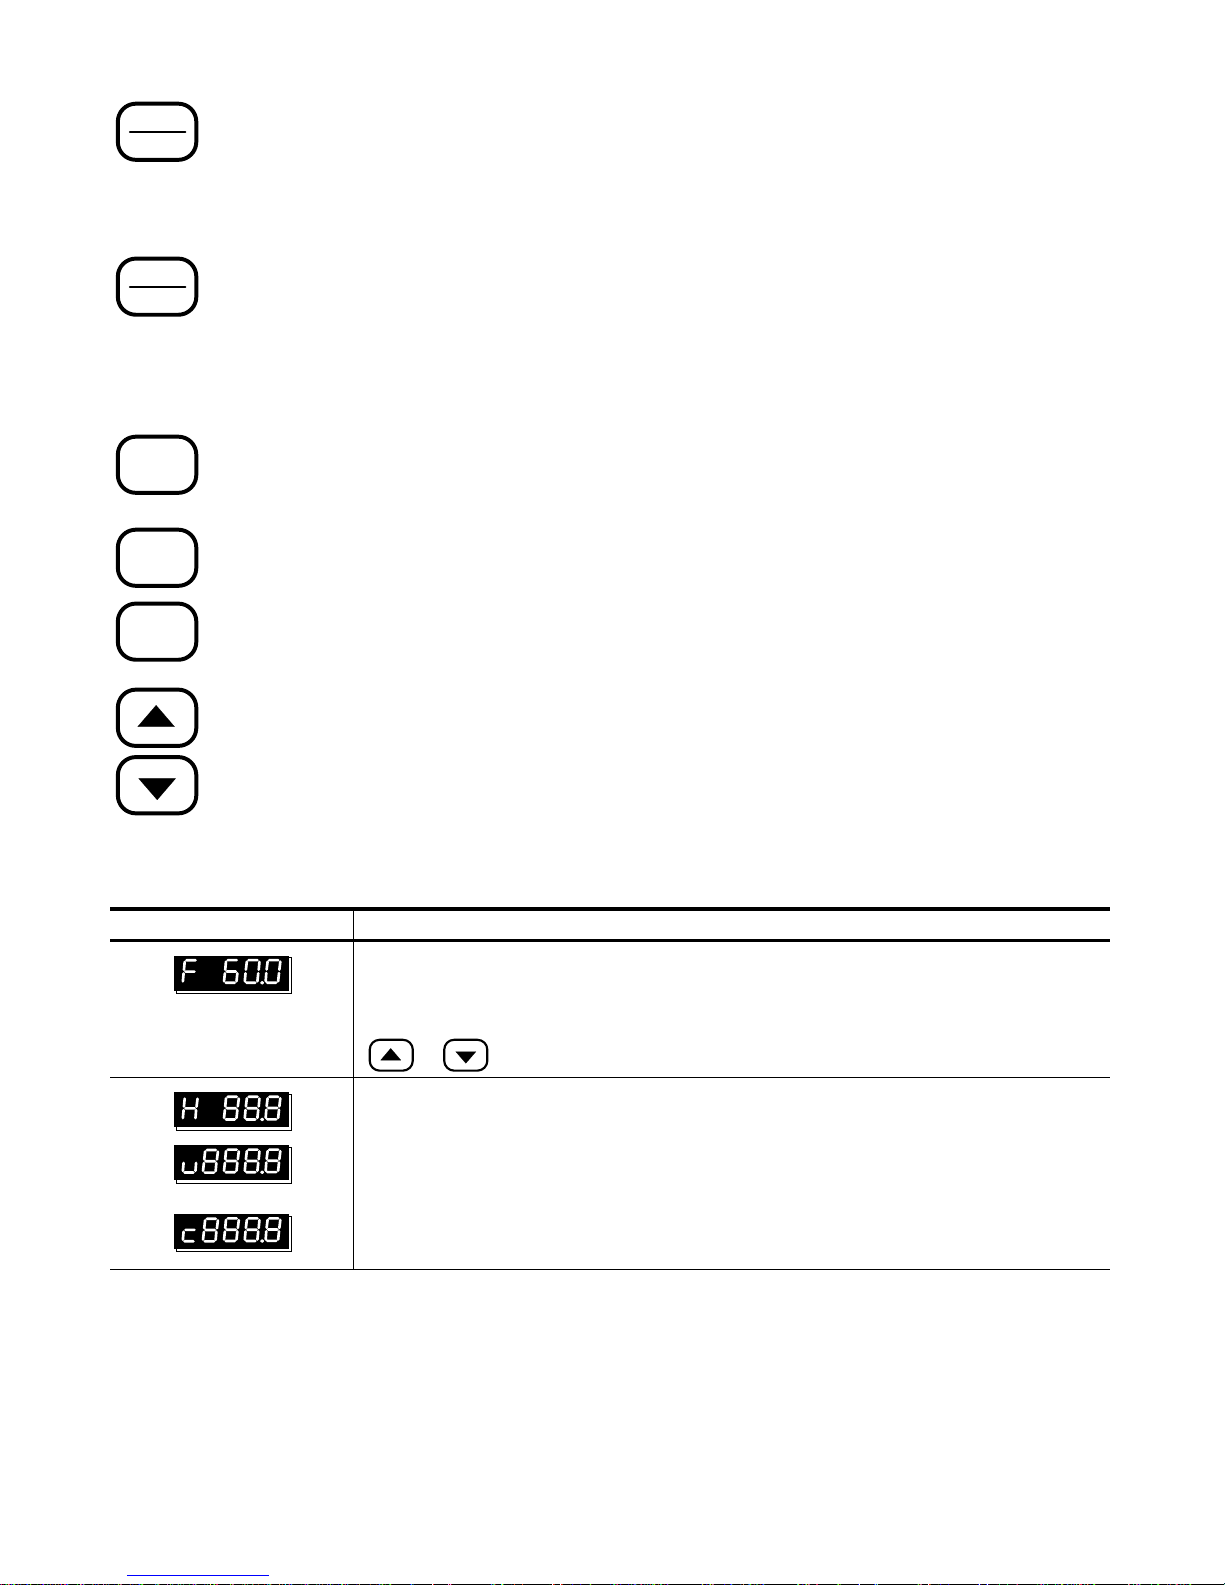
Explanation of Displayed Messages
Displayed Message Description
Displays the AC drive output frequency controlled by the Maximum Output Frequency
(Pr. 03), Jog Frequency (Pr. 16), or by the Multi-Function Input Terminals (Pr. 39-41).
If the frequency source originates from the Digital keypad, the user can use either the
or key to set the frequency.
Displays the output frequency present at terminals U, V, and W.
Displays the custom unit (v), where v = H x Pr.65.
Displays the internal counter value (C).
Note: Refer to Chapter 5, Pr.45, 46, 64 - 66 for a detailed description of the above.
12
Page 17
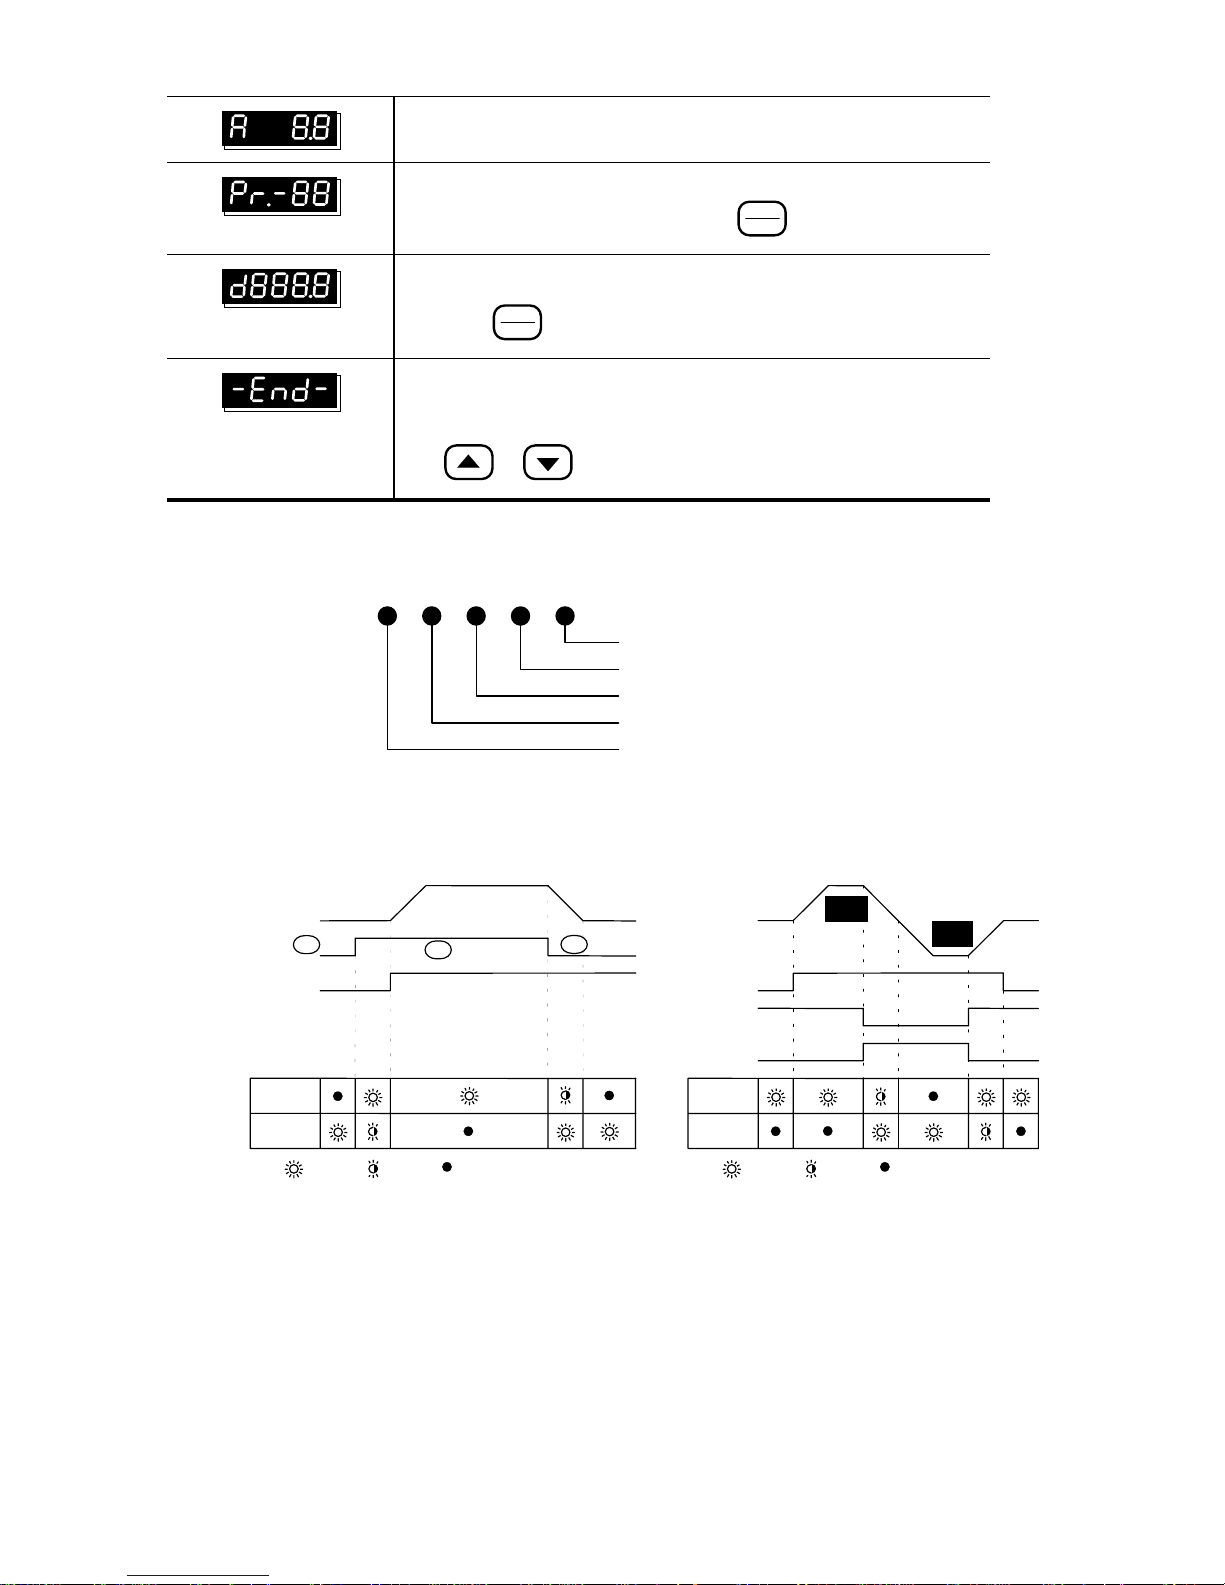
Displays the output current present at terminals U, V, and W
Displays the specified parameter number. The actual parameter
value may be displayed by pressing the
Displays actual value stored within the specified parameter.
Press the
The display will read “end” (as shown) for approximately 1 second if
Explanation of the LED Indicators
the input has been accepted. After a parameter value has been set,
the new value is automatically stored in memory. To modify an entry,
use
STOPRUN
FUNC
DATA
or key.
FWD
JOG
FUNC
DATA
key.
key to store the value of the specified parameter.
REV
Red lamp lights during REV operation.
Red lamp lights during FWD operation.
Red lamp lights during JOG.
Red lamp lights by pressing STOP.
Red lamp lights by pressing RUN.
RUN or STOP lamp indication is
defined by the following operation
Inverter output frequency
STOP
key
Frequency command
RUN
LAMP
STOP
LAMP
LIGHT
BLINK
RUN
key
LIGHT OFF
STOP
key
FWD or REV lamp changes indication is
defined by the following operation
OUTPUT
FREQ.
RUN
FWD
REV
FWD
LAMP
REV
LAMP
LIGHT
FWD
BLINK
LIGHT OFF
REV
13
Page 18
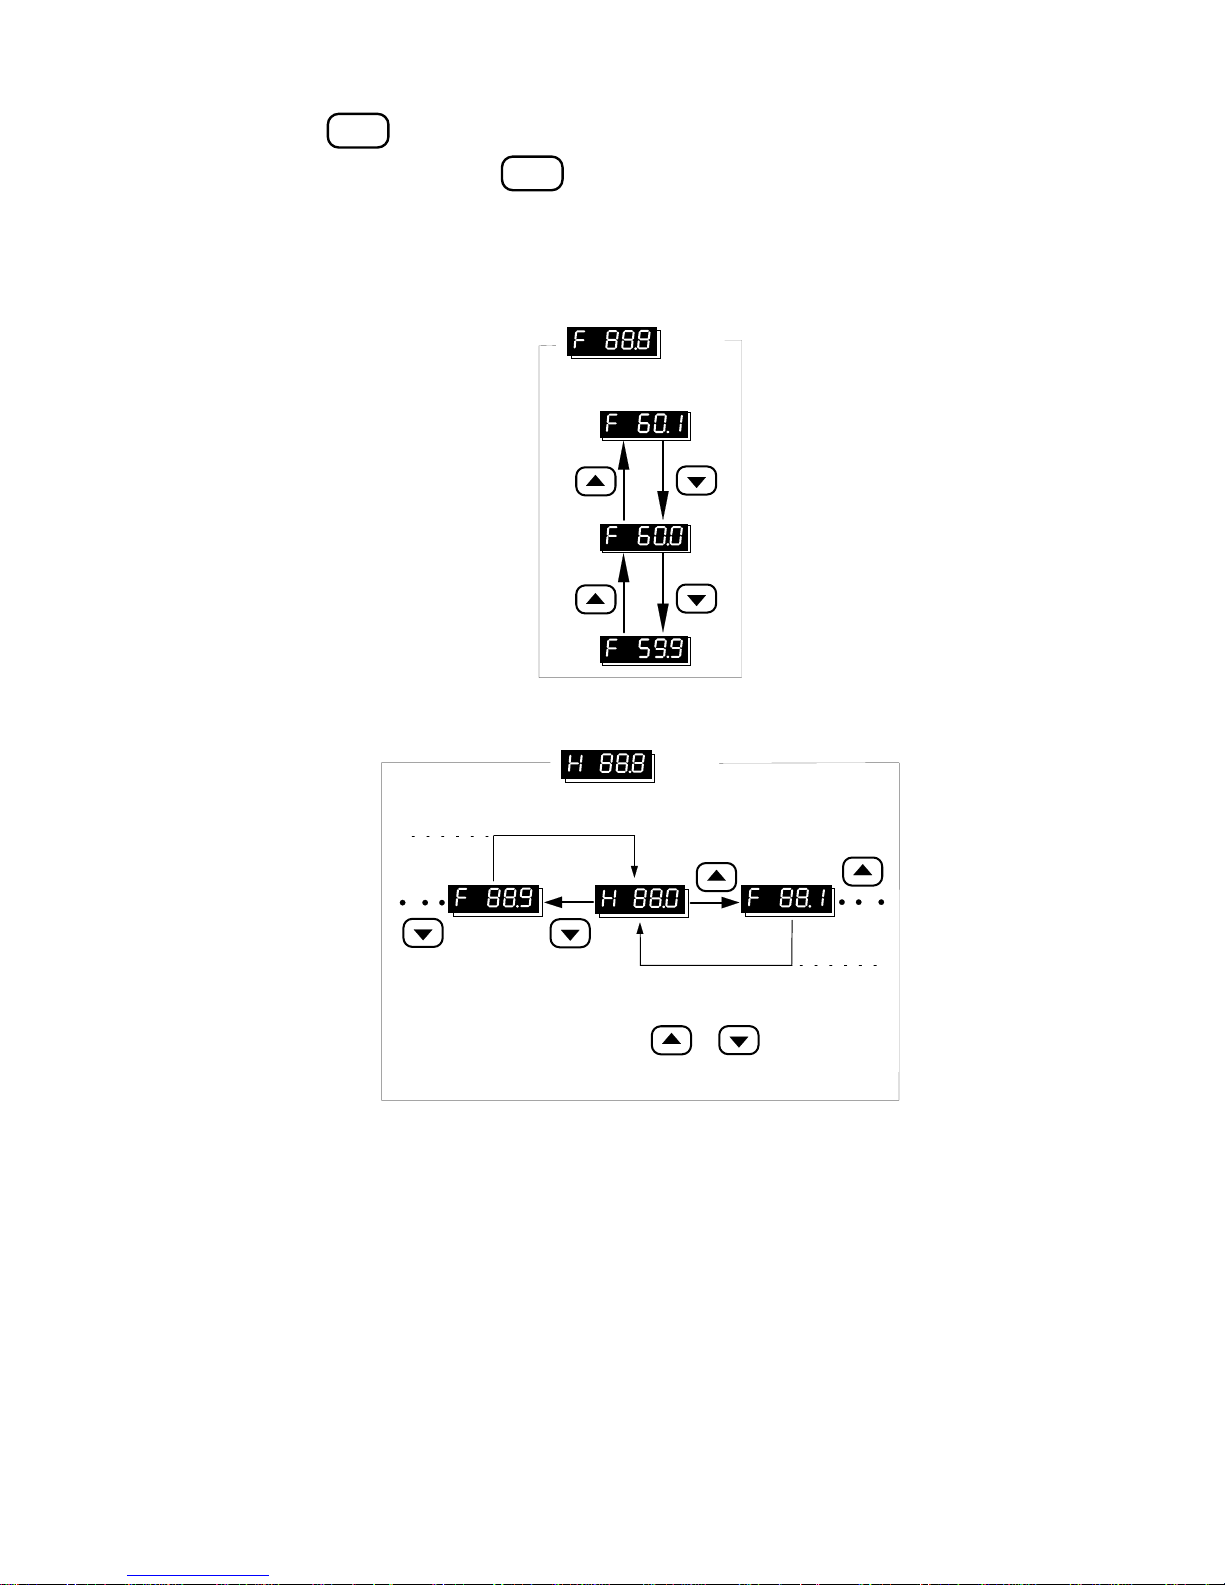
Digital Keypad Operating Modes & Programming steps
RUN
Pressing the
factory default setting. Use the
key after power on will cause the AC drive to operate at 60 Hz, which is the
STOP
key to halt operation. Refer to the Basic Wiring Diagram in
Chapter 2 for information on the wiring connection.
To change the operating frequency, proceed as follows:
The operating frequency may be changed in either the “STOP” or “RUN” mode.
MODE
MODE
Increase the frequency
Decrease the frequency
NOTES:
Display changes every time key is pressed.
or
14
Page 19

Setting parameters:
To operate the AC drive under optimum conditions, some parameter values may be modified
as required. During the “Run” mode, the following set of parameters may be modified: 10-14,
16-23, 44, 48-50, 52-55, 65. It is also possible to check all the parameter settings during
operation.
Indication after
power on.
Frequency command
PRGM
RESET
Press PRGM key
FUNC
DATA
Press FUNC key
Press PRGM key
PRGM
RESET
Press PRGM key, return to
the normal operation mode.
Output frequency
monitor
PRGM
RESET
FUNC
DATA
Press FUNC key
PRGM
RESET
Press PRGM key
Press up / down key to set
the parameter setting number.
FUNC
DATA
Press DATA key to display
parameter data.
Output current
monitor
FUNC
DATA
Press FUNC key
PRGM
RESET
Press PRGM key, return to
the normal operation mode.
(Data entered will not be stored.)
Press up / down key to set
the parameter data.
FUNC
DATA
Press DATA key to
store the data.
15
Page 20

4
Start-up
Initial Operation - Motor Disconnected
Verify that the AC power line, at the disconnect device, is within the rated power
of the AC drive.
Disconnect and lockout all incoming power to the drive.
Connect the AC drive to the power line.
Reconnect the incoming power to the drive.
Proceed as follows to select a mode of operation.
This chapter describes the steps needed to start the AC drive and typical adjustment
and verification procedures to ensure a simple and efficient start-up. The following
start-up procedures describe the most common parameter settings and system
configurations.
1. Operating frequency determined by the digital keypad,
Digital keypad enabled to control AC drive operation.
(Pr.00 = d0000, Pr.01 = d0000) (Factory default setting)
IM
2. Operating frequency determined by the digital keypad,
Control terminals enabled to control AC drive operation; ”Stop” key on digital
keypad is enabled.
Two wire “REV/STOP” and “FWD/STOP” remote control enabled.
(Pr.00 = d0000, Pr.01 = d0001, Pr.38 = d0000)
IM
REV/STOP
FWD/STOP
REV
FWD
DCM
16
Page 21
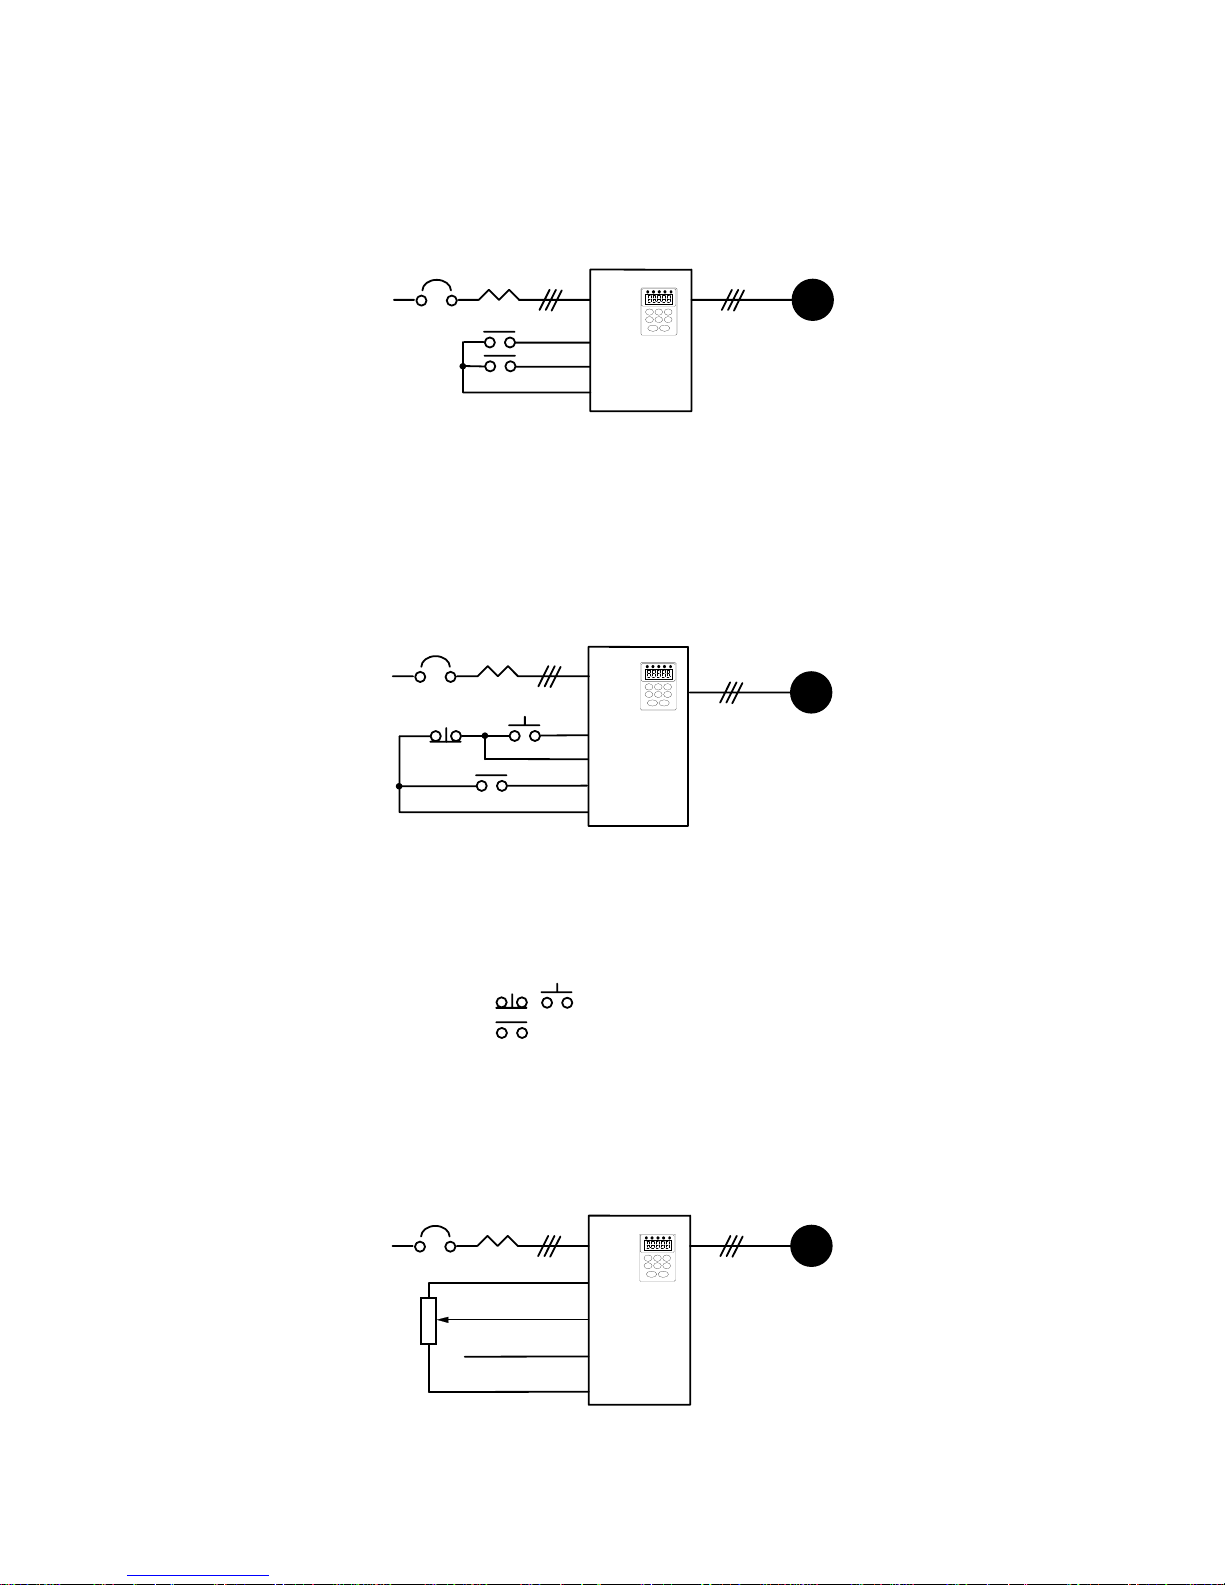
3. Operating frequency determined by the digital keypad;
Control terminals enabled to control AC Drive operation; ”Stop” key on digital
keypad is enabled.
Two wire “REV/FWD and “RUN/STOP” remote control enabled.
(Pr.00 = d0000, Pr.01 = d0001, Pr.38 = d0001)
IM
RUN/STOP
REV/FWD
FWD
REV
DCM
4. Operating frequency determined by the digital keypad;
Control terminals enabled to control AC Drive operation; ”Stop” key on digital
keypad is enabled.
Three wire sequence remote control is enabled.
(Pr.00 = d0000, Pr.01 = d0001, Pr.38 = d0002)
IM
STOP
REV/FWD
RUN
FWD
EF
REV
DCM
Note: Descriptions of the close / open function are as follows:
Example: To select Rev and Stop operations:
Rev / Fwd Contact “close” = reverse operation
Stop Contact “open” = stop
Momentary input
Maintained input
5. Operating frequency determined by analog input;
(DC 0 to +10 V) + (DC 4 to 20 mA)
Digital keypad enabled to control AC Drive operation.
(Pr.00 = d0001, Pr.01 = d0000)
3
2
0-10V Analog input
4-20mA Analog input
1
+10V
AVI
ACI
ACM
17
IM
Page 22

6. Operating frequency determined by remote control via the RS-485 serial interface;
RS-485 interface enabled to control AC Drive operation. “Stop” key on digital
keypad is enabled.
(Pr.00 = d0002, Pr.01 = d0003)
INVERTER
SG+,SG-
This completes the operation mode selection. Verify your operation mode works correctly,
then proceed to the next section for motor connection and initial operation.
Initial Operation – Setting Parameters and connecting the Motor.
1) Verify Minimum and Maximum Output Frequency Settings (Pr. 08 and 03) are
correct for your application.
2) Verify the Motor Stop Method (Pr.02) is correct for your application. If set to
“Ramp to Stop”, then verify the Accel/Decel Time Settings (Pr.10 and 11) are
correct for your application.
3) Disconnect and lock out all incoming power to the AC drive. A DC bus voltage
may be present at the terminal block for up to 1 minute after the power has been
removed from the drive.
IM
PC
4) Connect the motor to the terminals U, V, and W
5) Connect all applicable control wiring. Refer to the Control Circuit Wiring diagram
in Chapter 2.
6) Reconnect the incoming power to the AC drive.
7) Check for correct motor shaft rotation (counter clockwise when viewed from the
shaft).
8) Verify the Stop command is functioning by pressing the Stop Key on the Digital
Keypad or using your Control Terminal Stop method.
This completes the basic start-up. Depending on the application, some parameter values
may need to be modified. Refer to Chapter 5 for parameter settings.
18
Page 23

5
Parameter Settings
Chapter 5 describes all VFD-A drive parameters. These parameters are divided into
groups to simplify “start-up” programming procedures and minimize tuning.
AC Drive parameters and functions:
Operation Modes ....................................................................................21
V / F Data Settings ..................................................................................22
Accel. / Decel. Time Setting....................................................................25
Frequency Reference Setting ................................................................27
Operating and Protective Functions Setting ........................................28
External Control Terminal .....................................................................34
Torque and Slip Compensation ............................................................41
Overload Detection ................................................................................43
Display Functions ..................................................................................46
System Functions ..................................................................................47
19
Page 24

Operation Modes
Pr.00
Pr.01
Operating Frequency Source Select
Parameter # 00
Parameter Name
Factory Setting
Settings
d0001
d0002 Master Frequency determined by the RS-485 Interface.
This parameter is used to determine the AC drive command frequency source.
However, the actual AC drive command frequency may also be determined by [Jog
frequency], [Multi-step speed 1-7] or [Up / Down frequency], using the Multi-function
inputs 1, 2, and 3. Refer to Pr.39, 40, 41.
Operation Command Source Select
Parameter Name
Factory Setting
Settings
d0001 Operating instructions determined by the external terminal
d0002 Operating instructions determined by the external terminal
d0003 Operating instructions determined by the RS-485 interface,
d0004 Operating instructions determined by the RS-485 interface,
d0000 Master Frequency determined by the digital keypad
Parameter # 01
d0000 Operating instructions determined by the digital keypad
Master Frequency source select
d0000
Master Frequency determined by the analog input signal
(DC 0 to +10V) + (DC 4 to 20 mA)
Operation instructions source select
d0000
connections, Keypad STOP key is enabled
connections, Keypad STOP key is not enabled
Keypad STOP key is enabled
Keypad STOP key is not enabled
This parameter is used to determine the source of the AC Drive operating
instructions.
Pr.02
Motor Stop Method Select
Parameter # 02
Parameter Name
Factory Setting
Settings
d0001 Coast to stop
This parameter determines how the motor is stopped when the AC Drive receives a
valid stop command.
d0000 Ramp stop
Motor stop method
d0000
20
Page 25
Ramp The AC drive output frequency decelerates in the time specified by Pr.11
or Pr.13, down to the frequency specified by Pr.08, and then the drive output
turns off.
Coast The AC drive is turned off immediately while the motor free runs until it
comes to a complete stop.
Hz
Frequency command
Speed
Stop command
Ramp
Setting value
sec
Frequency command
Hz
Stop command
Speed(Free running to stop)
?
Coast
sec
V / F Data Setting
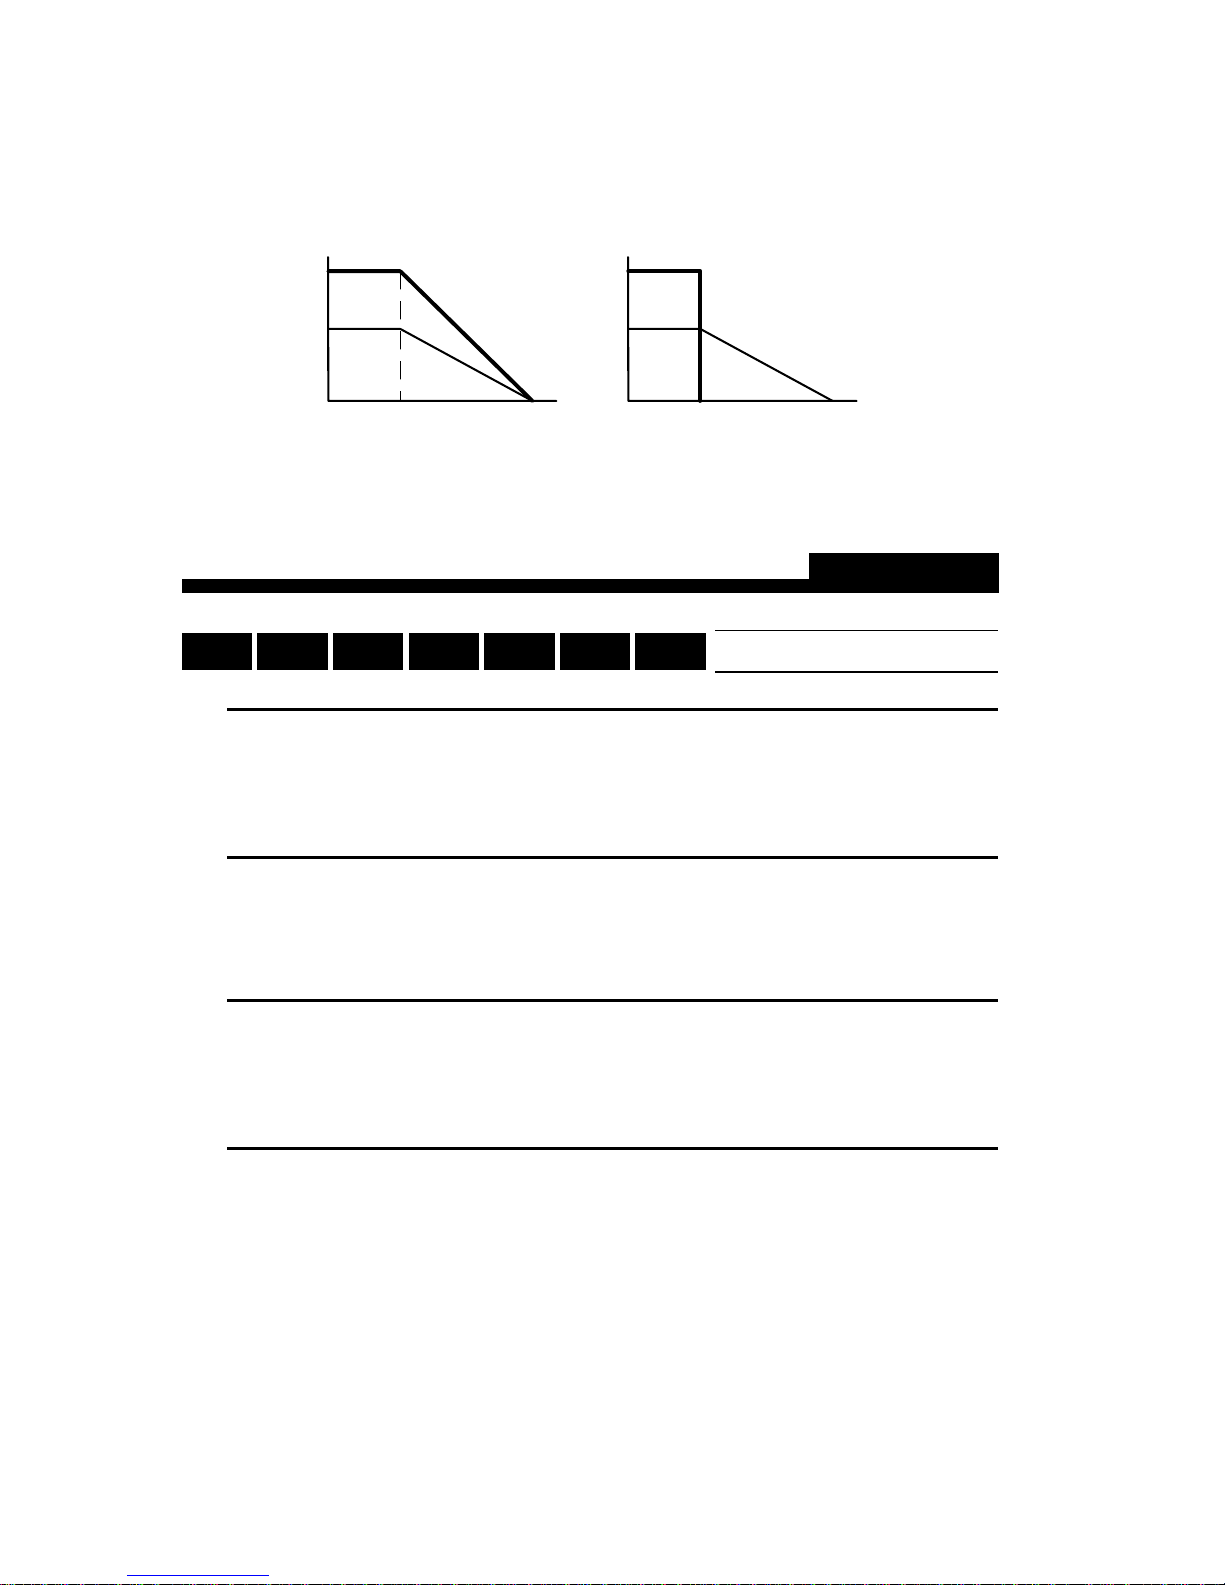
Pr.09Pr.03 Pr.04 Pr.05 Pr.06 Pr.07 Pr.08
V / F Curve
Parameter # 03
Parameter Name
Factory Setting
Units
Parameter value
Maximum output frequency
d060.0 Hz
0.1 Hz
d050.0 - d400.0 Hz
This parameter determines the AC drive’s maximum output frequency. All the AC
drive analog inputs (0 - 10V, 4 - 20mA) are scaled to correspond to the output
frequency range. (See graph on Page 24)
Parameter # 04
Parameter Name
Factory Setting
Units
Parameter value
Maximum voltage frequency (Base frequency)
d060.0 Hz
0.1 Hz
d010.0 -d400.0 Hz
This value should be set according to rated frequency of the motor as indicated on
the motor nameplate (See graph on Page 24). Maximum voltage frequency
determines the volts per hertz ratio. For example, if the drive is rated for 460 VAC
output and the maximum voltage frequency is set to 60Hz, the drive will maintain a
constant ratio of 7.66 v/Hz.
21
Page 26

Parameter # 05
Parameter Name
Factory Setting
Units
Parameter value
Maximum output voltage
d220.0 V ; d440.0 for 440 V class.
0.1 V
d002.0 - d255.0 V ; d004.0 – d510.0 for 440 V class.
This parameter determines the Maximum Output Voltage of the AC drive. The
maximum output voltage setting must be smaller than or equal to the rated voltage
of the motor as indicated on the motor nameplate. (See graph on Page 24)
Parameter # 06
Parameter Name
Factory Setting
Units
Parameter value
Mid-point frequency
d001.5 Hz
0.1 Hz
d000.1 - d400.0 Hz
This parameter sets the Mid-point frequency on the V/F curve. It may be used to
determine the V/F ratio between the Minimum frequency and the Mid-point
frequency. (See graph on Page 24)
Parameter # 07
Parameter Name
Factory Setting
Units
Parameter value
Mid-point voltage
d010.0 V ; d020.0 for 440 V class.
0.1 V
d002.0 - d255.0 V ; d004.0 – d510.0 for 440 V class.
This parameter sets the Mid-point voltage on the V/F curve. It may be used to
determine the V/F ratio between the Minimum frequency and the Mid-point
frequency. (See graph on Page 24)
Parameter # 08
Parameter Name
Factory Setting
Units
Parameter value
Minimum output frequency
d001.5 Hz
0.1 Hz
d000.1 - d020.0 Hz
This parameter sets the minimum output frequency of the AC Drive. (See graph on
Page 24)
Parameter # 09
Parameter Name
Factory Setting
Units
Parameter value
Minimum output voltage
d010.0 V ; d020.0 for 440 V class.
0.1 V
d002.0 - d050.0 V ; d004.0 – d100.0 for 440 V class.
This parameter sets the minimum output voltage of the AC Drive.
22
Page 27

Voltage
Pr.05
Pr.09Pr.07
0
Voltage
Pr.05
Pr.07
Pr.09
Pr.06
Pr.08
Pr.08
Pr.03
Pr.04
Standard V/F Curve
Pr.06
Pr.04 Pr.03
Custom V/F Curve
Frequency
Frequency
Voltage
Pr.05
Pr.07
Pr.09
Pr.08 Pr.06 Pr.04 Pr.03
Fan/Pump V/F Curve
23
Frequency
Page 28

Commonly Used V / F Pattern Settings
(1) General
Factory Settings
Motor Spec. 60Hz
No.
Set value
Motor Spec. 50Hz
No.
Set value
V
220
10
1.5
60.0
(2) Fans and Pumps
Motor Spec. 60Hz
V
220
50
10
1.5
30
60.0
Pr.03
Pr.04
Pr.05
Pr.06
Pr.07
Pr.08
Pr.09
f
No.
Pr.03
Pr.04
Pr.05
Pr.06
Pr.07
Pr.08
Pr.09
f
60.0
60.0
220.0
1.5
10.0
1.5
10.0
Set value
60.0
60.0
220.0
30
50.0
1.5
10.0
V
220
10
1.5
Motor Spec. 50Hz
V
220
50
10
1.3
25
50.0
50.0
Pr.03
Pr.04
Pr.05
Pr.06
Pr.07
Pr.08
Pr.09
50.0
50.0
220.0
1.3
12.0
1.3
12.0
f
Set value
No.
Pr.03
Pr.04
Pr.05
Pr.06
Pr.07
Pr.08
Pr.09
50.0
50.0
220.0
25
50.0
1.3
10.0
f
(3) High Starting Torque
Motor Spec. 60Hz
V
220
23
18
1.5
3
60.0
f
No.
Pr.03
Pr.04
Pr.05
Pr.06
Pr.07
Pr.08
Pr.09
Set value
60.0
60.0
220.0
3.0
23
1.5
18.0
24
Motor Spec. 50Hz
V
220
23
14
2.2
1.3
50.0
Set value
No.
Pr.03
Pr.04
Pr.05
Pr.06
Pr.07
Pr.08
Pr.09
50.0
50.0
220.0
2.2
23.0
1.3
14
f
Page 29

Accel / Decel Time Setting
Pr.10 Pr.11 Pr.12 Pr.13
Accel / Decel Time Setting
Parameter # 10
Parameter Name
Factory Setting
Units
Parameter value
Acceleration Time 1
d010.0 Sec
0.1 Sec
d000.1 - d600.0 Sec
This parameter can be programmed while the drive is running.
This parameter is used to determine the time required for the AC drive to ramp from
0 Hz to its Maximum operating frequency (Pr.03). The rate is linear unless S Curve
is “Enabled.”
Parameter # 11
Parameter Name
Factory Setting
Units
Parameter value
Deceleration Time 1
d010.0 Sec
0.1 Sec
d000.1 - d600.0 Sec
This parameter can be programmed while the drive is running.
This parameter is used to determine the time required for the AC drive to decelerate
from the Maximum operating frequency (Pr.03) down to 0 Hz. The rate is linear
unless S Curve is “Enabled.”
Speed
Command frequency
Accel
Time
Pr.10
Decel
Time
or
Pr.11Pr.12
Time
or
Pr.13
25
Page 30

Parameter # 12
Parameter Name
Factory Setting
Units
Parameter value
This parameter can be programmed while the drive is running.
This parameter determines the time required for the AC drive to ramp from 0 Hz to
the Maximum operating frequency (Pr.03). The rate is linear unless S Curve is
“Enabled.” Acceleration time 1 is the default. A Multi-Function Input Terminal can
be programmed to select Acceleration time 1 or Acceleration time 2. See
parameters 39, 40, and 41.
Parameter # 13
Parameter Name
Factory Setting
Units
Parameter value
Acceleration time 2
d010.0 Sec
0.1 Sec
d000.1 - d600.0 Sec
Deceleration time 2
d010.0 Sec
0.1 Sec
d000.1 - d600.0 Sec
This parameter can be programmed while the drive is running.
This parameter determines the time for the AC drive to decelerate from the
Maximum operating frequency (Pr.03) down to 0 Hz. The rate is linear unless S
Curve is “Enabled.” Deceleration time 1 is the default. A Multi-Function Input
Terminal can be programmed to select Deceleration time 1 or Deceleration time 2.
See parameters 39, 40, and 41.
Pr.14
Jog Accel / Decel Time
Parameter # 14
Parameter Name
Factory Setting
Units
Parameter value
Jog Accel / Decel time select
d010.0 Sec
0.1 Sec
d000.1 - d600.0 Sec
This parameter can be programmed while the drive is running.
This parameter determines the time required for the AC Drive to ramp from 0 Hz to the
Jog frequency and the time required to ramp from the Jog frequency to 0 Hz.
This parameter must accompany with parameter P111 deceleration S curve. In order to
get the different results of S curves, just setting the parameter P111 to meet the
requirement.
26
Page 31

Pr.15
S-curve
Parameter # 15
Parameter Name
Factory Setting
Parameter value
S-curve setting
d0000 (Disabled)
d0000 - d0007
This parameter should be set during start-up. It is used to provide smooth
acceleration and deceleration. The S-curve may be set from 1 to 7.
Frequency
Pr.15 > d0001
"S curve Enabled"
S-curve characteristics Time S-curve characteristics Time
Accel Time
1 or 2
Decel Time
1 or 2
Time
Pr.15 = d0000
"S curve Disabled"
Time
Frequency Reference Setting
Pr.22Pr.16 Pr.17 Pr.18 Pr.19 Pr.20 Pr.21
Multi-speed Operation
Parameter # 16, 17, 18, 19, 20, 21, 22
Parameter Name
Factory Setting
Units
Parameter value
Multi-step speed setting 1, 2, 3, 4, 5, 6, 7
d000.0 Hz
0.1 Hz
d000.1 - d400.0 Hz
These parameters can be programmed while the drive is running.
The multi-function input terminals (refer to parameters 39, 40, and 41) are used to
select one of eight AC drive Multi-Speed output frequencies. The frequency is
determined by Pr.16 to 22.
27
Page 32

Pr.23
Jog Frequency
Parameter # 23
Parameter Name
Factory Setting
Units
Parameter value
This parameter can be programmed while the drive is running.
Jog frequency select
d006.0 Hz
0.1 Hz
d000.1 - d400.0 Hz
This parameter is used to set the AC drive jog frequency. Upon receipt of a jog
command the drive will ramp to the jog frequency.
Speed
JOG frequency
Pr.23
Time
JOG command
Accel
Time
Pr.14
ON
Decel
Time
Pr.14
Operating and Protective Functions Setting
Pr.24
REV Run Setting
Parameter # 24
Parameter Name
Factory Setting
Settings
d0000 REV run enabled
d0001 REV run disabled
REV run
d0000
This parameter determines whether the AC Drive can operate in the reverse
direction.
28
Page 33

Pr.25
Over-voltage Stall Prevention
Parameter # 25
Parameter Name
Factory Setting
Settings
d0000 Disable over-voltage stall prevention
Over-voltage stall prevention during deceleration
d0001
d0001 Enable over-voltage stall prevention
During deceleration, the motor DC bus voltage may exceed its maximum allowable
value due to motor regeneration. When Pr.25 is enabled and an over-voltage is
detected, the AC drive will cease to decelerate and will then maintain a constant
output frequency. The drive will only resume deceleration when the DC bus voltage
drops below the preset value.
DC bus
voltage
Over voltage
detection
level
Time
Time
Pr.26 Pr.27
Output
frequency
Over voltage stall prevention
Over-current Stall Prevention
Parameter # 26
Parameter Name
Factory Setting
Units
Parameter value
Over-current stall prevention during acceleration
d0170 %
1%
d0050 - d0200 %
During periods of rapid acceleration or excessive load on the motor, the AC drive
output current may increase abruptly and exceed the value specified by Pr.26.
When over-current occurs, the AC drive will cease to accelerate and will maintain a
constant output frequency until the current falls below the preset value. (The drive
will only resume acceleration when the current drops below the preset value.)
29
Page 34

Output
current
Pr.26
Overcurrent
detection
level
Output
frequency
Stall prevention during acceleration
Time
Time
Parameter # 27
Parameter Name
Factory Setting
Units
Parameter value
Over-current stall prevention during steady-state operation
d0170%
1%
d0050 - d0200%
During steady-state operation with the motor load rapidly increasing, the AC drive
output current may exceed the limit specified in Pr.27. When this occurs, the output
frequency will decrease to maintain a constant motor speed. The drive will
accelerate to the steady-state operating frequency only when the output current
drops below the level specified by Pr.27. A setting of 100% is equal to the rated
current of the drive.
Output
current %
Pr.27
Over current
detection
level
Output
frequency
Over-current stall prevention during steady-state operation
30
Time
Time
.
Page 35

Pr.28 Pr.29 Pr.30 Pr.31
Parameter # 28
Parameter Name
Factory Setting
Units
Parameter value
This parameter determines the DC current that will be applied to the motor during
braking when the Motor Stop Method is set to “RAMP stop” (refer to Pr.02). DC
braking current is set in increments of 1%. A setting of 100% is equal to the rated
current of drive.
Note: When setting this parameter, begin at a lower current level then increase the
value until sufficient holding torque is achieved. The rated motor current cannot be
exceeded.
Parameter # 29
Parameter Name
Factory Setting
Units
Parameter value
DC Braking Current (DC Injection Current)
DC braking current
d0000%
1%
d0000 - d0100%
DC braking time during start-up
d000.0 Sec
0.1 Sec
d000.0 - d005.0 Sec
This parameter determines the time duration that DC braking current will be applied
to the motor during the AC drive start-up.
Parameter # 30
Parameter Name
Factory Setting
Units
Parameter value
This parameter determines the time duration that DC braking current will be applied
to the motor when the Motor Stop Method is set to “Ramp Stop”.
Parameter # 31
Parameter Name
Factory Setting
Units
Parameter value
This parameter determines the frequency at which DC breaking will start during AC
drive deceleration. The frequency may be set in 0.1 Hz increments.
When the preset value is less than that specified by Pr.08 (Minimum output
frequency), the starting frequency for DC braking will be the Pr.08 frequency.
DC braking time during stopping
d000.0 Sec
0.1 Sec
d000.0 - d025.0 Sec
DC braking starting frequency
d000.0 Hz
0.1 Hz
d000.0 - d060.0 Hz
31
Page 36

Pr.08
Minimum output
frequency
DC brake starting frequency
Pr.31
Pr.29
DC braking current %
Pr.28
Pr.30
Pr.32 Pr.33 Pr.34 Pr.35
Momentary Power Loss Protection
Parameter # 32
Parameter Name
Factory Setting
Settings
d0000 Operation stops after momentary power loss
d0001
Momentary power failure operation mode
d0000
Operation continues after momentary power loss.
Speed search starts with the frequency reference value
d0002
Operation continues after momentary power loss.
Speed search starts with the Minimum output frequency, Pr.08
Note Multi-function Indication and Photocoupler outputs that are
programmed for “fault indication” will not be energized during
restart after a momentary power failure. (refer to Pr. 45 and 57)
This parameter determines the AC drive mode of operation after recovery from a
momentary power failure.
Parameter # 33
Parameter Name
Factory Setting
Units
Parameter value
Maximum allowable power loss time
d002.0 Sec
0.1 Sec
d000.3 - d005.0 Sec
If during a power failure the power loss is less than the time defined by Pr.33, then
the AC drive will resume operation (set by Pr.32). If the maximum allowable power
loss time is exceeded, the AC drive output power will remain off and must be reset
to resume operation (the fault indication will be set).
Parameter # 34
Parameter Name
Factory Setting
Units
Parameter value
Minimum base block time
d000.5 Sec
0.1 Sec
d000.3 - d005.0 Sec
When a momentary power loss is detected and the power failure is less than the
time set by Pr.33, the AC drive output will resume operation after the specified
period of time determined by Pr.34. This parameter should be set to a value where
the residual output voltage is nearly zero.
32
Page 37

Parameter # 35
Parameter Name
Speed Search Current Limit
Factory Setting
Units
Parameter value
d0150%
1%
d0030 - d0200%
Following a power failure, the AC drive will start its speed search operation, only if
the output current is greater than the value determined by Pr.35.
When the output current is less than that of Pr.35, the AC drive output frequency is
at a “speed synchronization point”. The drive will start to accelerate or decelerate
back to the operating frequency at which it was running prior to the power failure.
Speed search time increases as the current limit setting is reduced.
INPUT
POWER
OUTPUT
FREQUENCY
OUTPUT
VOLTAGE
Allowable maximum
power loss time
Pr.33
Pr.32
Speed search starts with
the frequency reference value
Min. baseblock time
= d0001
Pr.34
Speed synchronization
detection
Speed search
operation
INPUT
POWER
OUTPUT
FREQUENCY
OUTPUT
VOLTAGE
Allowable maximum
power loss time
Pr.33
Pr.32
Speed search starts with
minimum starting frequency
Min. baseblock time
= d0002
Pr.34
Pr.36 Pr.37
Reference Frequency Upper / Lower Limit
Parameter # 36
Parameter Name
Factory Setting
Units
Parameter value
Reference frequency upper limit setting
d400.0 Hz
0.1 Hz
d000.1 - d400.0 Hz
Determines the upper limit of the reference frequency in 0.1 Hz increments.
Parameter # 37
Parameter Name
Factory Setting
Units
Parameter value
Reference frequency lower limit setting
d000.0 Hz
0.1 Hz
d000.0 - d400.0 Hz
Determines the lower limit of the reference frequency in 0.1 Hz increments.
33
Page 38

Output frequency
Pr.36
Pr.37
Input frequency
External Control Terminal
Pr.38
External Control Terminal Configuration
Parameter # 38
Parameter Name
Factory Setting
Settings
d0000 FWD / STOP, REV / STOP
2-wire / 3-wire operation control selection
d0000
d0001 FWD / REV, RUN / STOP
d0002 3-WIRE operation control mode
This parameter determines the control functions and operating modes available
through the external control terminals. The following configurations are available:
Pr.38 Control terminal wiring diagram
d0000
Two wire
FWD/STOP
REV/STOP
FWD
"Open" : Stop; "Close" : FWD Run
REV
"Open" : Stop; "Close" : REV Run
FWD / STOP
REV / STOP
DCM
VFD-A
d0001
FWD
Two wire
REV / FWD
RUN / STOP
d0002
Three wire
RUN/STOP
REV/FWD
STOP
RUN
REV/FWD
"Open" : Stop; "Close" : Run
REV
"Open" : FWD; "Close" : REV
DCM
FWD
(Run command, Runs when "Close)
EF
(Stop command, stops when "Open")
REV ( REV/FWD Run select
"Open" : FWD Run
"Close" : REV Run)
DCM
VFD-A
VFD-A
34
Page 39

Pr.39 Pr.40 Pr.41
Multi-function Input Terminals
Parameter # 39 (MI1), 40 (MI2), 41 (MI3)
Parameter Name
Factory Setting
Settings
d0000 Multi-step speed command 1
Multi-function input terminals 1, 2, 3
d0000, d0001, d0002
d0001 Multi-step speed command 2
d0002 Multi-step speed command 3
d0003 Jog frequency reference select
d0004 Accel/decel speed inhibit command
d0005 First and second accel/decel time select
d0006 External baseblock (NO-contact input)
d0007 External baseblock (NC-contact input)
d0008 Up command
d0009 Down command
Parameter setting value limit Pr.41> Pr.40> Pr.39.
Description
d0000∼d0002: The multi-step speed commands 1 to 3 are used to determine a
command frequency via the multi-step speed settings (Pr.16 to Pr.22).
Pr.-16
Pr.-17
Pr.-18
Pr.-19
Pr.-20
Pr.-21
Pr.-22
step 1
step 2
step 3
step 4
step 5
step 6
step 7
Master frequency
reference
MI1-DCM
MI2-DCM
MI3-DCM
Hz
step 1
ON
ON
step 2
ON
ON
step 3
step 4
ON ON
step 5
ON
step 6
ON
ON
ON
ON
ON
step 7
Time
d0003: When “Closed,” the jog reference frequency is selected.
d0004: When “Closed,” the output frequency remains constant.
d0005: When “Open,” the AC drive accelerates / decelerates according to the
values set by ACCEL time 1 and DECEL time 1 (Pr.10,11).
When “Closed,” the AC drive accelerates / decelerates according to the values set
by in ACCEL time 2 and DECEL time 2 (Pr.12, 13).
d0006: When “Closed,” the AC drive output is turned off. (The reference frequency
is held constant.)
d0007: When “Open,” the AC Drive output is turned off. (The reference frequency
is held constant)
35
Page 40

d0008: When “Closed,” the AC Drive output frequency is increased.
d0009: When “Closed,” the AC Drive output frequency is decreased.
FWD RUN COMMAND
UP COMMAND
DOWN COMMAND
MAX. OUTPUT FREQUENCY
MIN. OUTPUT FREQUENCY
UP TO FREQUENCY SETTING SIGNAL
Note: When both the Up and Down command terminals are “closed”, the AC
drive neither accelerates or decelerates. The output frequency is also held
constant.
Pr.42
Analog Meter Output Select
Parameter # 42
Parameter Name
Factory Setting
Settings
d0000 Analog frequency meter ( 0 to [Maximum Frequency])
d0001
Analog meter output select
d0000
Analog current meter (0 to 250% of the rated drive output
current)
This parameter selects the analog Meter output for either output frequency or output
current (refer to Control Terminals AFM, ACM).
Pr.43
Digital Output Frequency Multiplier Factor
Parameter # 43
Parameter Name
Factory Setting
Units
Parameter value
This parameter determines the multiplying factor for the AC drive digital output
frequency (+10V pulse, 50% duty cycle) at the digital output terminals (DFM, DCM).
The number of output pulses per second on DFM is equal to the AC drive output
frequency multiplied by Pr.43. The maximum output frequency is 1.2 KHz or less.
Digital output frequency multiplier factor
d0001
1
d0001 - d0020
36
Page 41

Pr.44
Analog Output Gain Setting
Parameter # 44
Parameter Name
Factory Setting
Units
Parameter value
Analog output gain setting
d0100%
1%
d0001 - d0200%
This parameter can be programmed while the drive is running.
This function regulates the voltage level of the analog signal output (frequency or
current) at the AFM output terminal, which is then fed to the meter.
AFM ACM
Analog frequency meter
AFM ACM
Analog current meter
The analog voltage output is proportional to the
AC drive output frequency. The AC drive
maximum operating frequency (Pr.03) is
equivalent to 10 VDC. If necessary, adjust the
output level using Pr.44 Analog Output Gain.
The analog voltage output is proportional to the
AC drive output current. 10 VDC of analog voltage
is equivalent to 2.5 times the AC drive rated
output current. If necessary, adjust the output
level using Pr.44 Analog Output Gain.
DFM DCM
DC10V
Digital frequency meter
T1
T2
T1 / T2 (duty cycle) = 50%
The number of output pulses per second is equal
to the output frequency multiplied by [Pr.43].
Note: The digital frequency output should be less
than 1.2 KHz.
37
Page 42

Pr.45 Pr.46
Parameter Name
Factory Setting
Settings
d0001 Pre-set frequency attained
d0002 Desired frequency attained
d0003 Count down complete
d0004 Non-zero speed
Control terminals MO1 and MO2 are open collector outputs. Terminal MCM is
signal return (refer to Control Terminal Block description).
Multi-function Output Terminal Setting
Parameter # 45 (MO1), 46(MO2)
Multi-function photocoupled output terminals: MO1, MO2
d0000, d0001
Units
d0000 AC drive operational
d0005 Over-torque detection
d0006 Baseblock indicator
d0007 Low-voltage detect indicator
d0008 AC drive operation mode
d0009 Fault indicator
None
Please see
descriptions below.
Description
AC drive operational: This terminal will be “closed” when there is output from the
AC drive or when the FWD or REV run command is input.
Pre-set frequency attained: This terminal will be “closed” once the AC drive
attained the specified operating frequency.
Desired frequency attained: This terminal will be “closed” once the AC drive
attained the desired operating frequency.
Count down complete: This terminal will be “closed” when the AC drive’s internal
counter, triggered by the external input TRG, starts countdown and reaches d0001.
Set the count down value using Pr.63 and Pr.66.
Non-zero speed: This terminal will be “closed” when the AC drive output frequency
is greater than the minimum output frequency.
Over-torque detection: This terminal will remain “closed” as long as over-torque is
detected. Set the over-torque detection level using Pr.61 and the over-torque
detection time using Pr.62.
Baseblock indicator: This terminal will always be “closed” as long as the AC drive
output is turned off.
Low-voltage detect indicator: This terminal will be “closed” when the AC drive
detects a low voltage state.
AC drive operation mode: This terminal will be “closed” when the AC drive is
operated by commands via the RS-485 serial interface or control terminals.
Fault indicator: This terminal will be “closed” when a major fault is detected.
38
Page 43

Pr.47
Pr.48 Pr.49
Desired Frequency Attained Setting
Parameter # 47
Parameter Name
Factory Setting
Units
Parameter value
Used to select a specified frequency, set in increments of 0.1 Hz. ( See Pr.45, 46 )
Analog Input Setting for Output Frequency Range
Parameter # 48
Parameter Name
Factory Setting
Units
Parameter value
Desired frequency attained setting
d000.0 Hz
0.1 Hz
d000.0 - d400.0 Hz
Maximum output frequency voltage setting
d010.0 V
0.1 V
d000.0 - d010.0 V
This parameter can be programmed while the drive is running.
Sets the input signal voltage level (0 – 10V) that corresponds to the maximum
output frequency (Pr.03). Used in conjunction with Pr.49, this parameter may be
used to set the analog input for frequency command curve setting. (See graph on
next page)
Parameter # 49
Parameter Name
Factory Setting
Units
Parameter value
Minimum output frequency voltage setting
d000.3 V
0.1 V
d000.0 - d010.0 V
This parameter can be programmed while the drive is running.
Sets the input signal voltage level (0 – 10V) that corresponds to the minimum
output frequency (Pr.08). (See graph on next page)
Note: The absolute value of the difference between the settings of Pr.48 and Pr.49
should be greater than or equal to 3.
39
Page 44

Output frequency Output frequency
Pr.03
Pr.03
Pr.08
Pr.49 Pr.48
0V
10V
Pr.08
0V
Pr.49Pr.48
10V
Analog input signal levelAnalog input signal level
The analog input signal level is the combined input signals from the analog voltage input
(AVI) (0 - 10 V) and analog current input (ACI) (4 - 20 mA). The voltage corresponding to
the analog current input (4 - 20 mA) and analog input signal level is defined as follows:
Voltage corresponding to the
analog input signal level
10 V
5 V
0 V
4 mA
Analog current frequency command
12 mA
20 mA
An example of such application may be illustrated as follows:
Output frequency Output frequency
Pr.03
= 60.0 Hz
Pr.08
= 1.5 Hz
Pr.48 = 5.0 V
Pr.49
= 0 V
Pr.50
Pr.51
60 Hz
1.5 Hz
Reserved
Reserved
0V
5V
Analog input signal level
10V
Pr.03
Pr.08
Pr.48 = 5.0 V
Pr.49
40
= 60.0 Hz
= 1.5 Hz
= 1 V
60 Hz
1.5 Hz
0 V
5 V1 V
Analog input signal level
10 V
Page 45

Torque and Slip Compensation
Pr.52 Pr.53
Parameter Name
Factory Setting
Parameter value
Motor Current Setting
Parameter # 52
Motor rated current
d0100%
Units
1%
d0030 - d0120%
This parameter can be programmed while the drive is running.
This parameter must be set according to the motor specification found on its
nameplate. This setting will limit the AC drive output current in order to prevent the
motor from overheating. When the motor current exceeds this value, the output
frequency will be reduced until the current drops below this limit.
Parameter # 53
Parameter Name
Factory Setting
Units
Parameter value
Motor no-load current
d0040
1%
d0000 - d0099%
This parameter can be programmed while the drive is running.
This parameter sets the motor no-load current in 1% increments.
Pr.54
Torque Compensation Setting
Parameter # 54
Parameter Name
Factory Setting
Units
Parameter value
Auto torque-compensation
d0000
1%
d0000 - d0010%
This parameter can be programmed while the drive is running.
This parameter may be set so that the AC drive will increase the voltage output
during startup to obtain a higher initial starting torque. This additional torque will be
present until the master operating frequency is attained.
Be careful while setting the value for Pr.54. If the value is too high, the motor might
!
overheat or be damaged.
41
Page 46

Pr.55
Slip Compensation
Parameter # 55
Parameter Name
Factory Setting
Units
Parameter value
Slip compensation
d000.0
0.1%
d000.0 - d010.0%
This parameter can be programmed while the drive is running.
This parameter is used to compensate for the nominal slip within a range of 0.0 -
10.0%. When the output current of the AC drive is greater than the motor no-load
current (Pr.53), the AC drive will adjust its output frequency according to Pr.55.
Example: If Pr. 04 is set at 60Hz and Pr. 55 is set at 10%, the drive will increase the
output frequency up to 6% under full load conditions to compensate for slip.
Pr.56
Pr.57
Reserved
Multi-function Indication Output Contact
Parameter # 57
Parameter Name
Factory Setting
Settings
d0001 AC drive operational
d0002 Pre-set frequency attained
d0003 Desired frequency attained
d0004 Non-zero speed
d0005 Over-torque detection
d0006 Baseblock indicator
This parameter sets the multi-function programmable relay contact outputs. The
contact ratings are 250Vac @ 2A, 30Vdc @ 2A. Set parameter Pr.57 according to
the table listed above.
d0000 Fault indicator
Multi-function indication output contact
d0000
RA-RC(NO), RB-RC(NC)
42
Page 47

Overload Detection Setting
Pr.58 Pr.59
Parameter Name
Factory Setting
Settings
d0001 Active with special motor
d0002 Inactive
To prevent self-cooling motors from over-heating while running at low speeds, this
parameter may be set to limit the AC drive output power.
Electronic Thermal Overload Relay
Parameter # 58
Motor derating curve during temperature change
d0002
Units
None
d0000 Active with standard motor
d0000:
The electronic thermal characteristics behave in accordance with a
reduced torque motor (standard motor).
d0001:
The electronic thermal characteristics behave in accordance with a
constant torque motor (special motor).
Parameter # 59
Parameter Name
Factory Setting
Units
Parameter value
Electronic thermal characteristics selection
d0060
1 Sec
d0030 - d0300 Sec.
This parameter determines the time required to activate the I
protection function. The activation time may be defined according to short, standard
and long time ratings.
Operation
time (min)
5
4
3
60Hz or more
50Hz
10Hz
5Hz
2
t electronic thermal
2
1
0 80 120 140 20020 40 60 100
43
160 180
Load
factor (%)
Page 48

Pr.60 Pr.61 Pr.62
Parameter # 60
Parameter Name
Factory Setting
Settings
d0001
d0002
d0003
d0004
This parameter determines the AC drive operation after an over-torque is detected.
Over-torque detection is based on the following: When the output current exceeds
the over-torque detection level (Pr.61, factory preset value = 150%) and the overtorque detection time (Pr.62, factory preset value = 0.1 second, hysteresis fixed at
10%). The Multi-function PHC output 1 and 2 may be set to indicate an over-torque
condition. Refer to Pr.45, 46. The Multi-function Indication Output (Pr. 57) may also
be set to indicate an over-torque condition.
Over-torque Detection Setting
Over-torque detection mode select
d0000
d0000 Over-torque detection not enabled
Over-torque detection during constant speed operation,
operation halted after over-torque detection
Over-torque detection during constant speed operation,
operation continues after over-torque detection
Over-torque detection during operation, operation halted
after over-torque detection
Over-torque detection during operation, operation continues
after over-torque detection
Parameter # 61
Parameter Name
Factory Setting
Units
Parameter value
This parameter sets the over-torque detection level at 1% increments. The AC
drive rated current is regarded as 100%.
Parameter # 62
Parameter Name
Factory Setting
Units
Parameter value
This parameter sets the over-torque detection time in units of 0.1 second.
Over-torque detection level
d0150
1%
d0030 - d0200%
Over-torque detection time
d000.1 Sec
0.1 Sec
d000.1 - d010.0 Sec
44
Page 49

Pr.63
Pre-set Count Down Value Attained Setting
Parameter # 63
Parameter Name
Factory Setting
Parameter value
Pre-set count down value attained
d0001
d0001 - d9999
When the VFD-A internal counter, triggered by the external input TRG, counts down
and reaches this specified value, the specified output terminal (MO1) will be closed
(assuming that Pr.45 is set to d0003). The output terminal (MO1) will be opened
when the internal counter reaches the value specified in Pr.66. (See chart below)
Pr.66
Count Down Value Setting
Parameter # 66
Parameter Name
Factory Setting
Units
Parameter value
Count down value setting
d0001
1
d0001 - d9999
This parameter determines the value of the VFD-A internal counter. The internal
counter may be triggered by an external signal via the external input TRG terminal.
Upon completion of the countdown, the specified output terminal (MO2) will be
closed (assuming that Pr.46 is set to d0003). (See chart below)
The timing chart is illustrated as follows:
Application example:
Control
terminal
Control
terminal
Control
terminal
Pr.45 = d0003
Pr.46 = d0003
c 10 c 09
TRG
MO1
MO2
Pr.63 = d0005
Pr.66 = d0010
c 08
2
T
1
T
c 07 c 06 c 05 c 04 c 03 c 02 c 01 c 10
"CLOSED"
"CLOSED"
c 09 c 08
Note: The minimum On time for T2 is 2 msec or more.
The minimum cycle time for T1 is 6 msec. or more.
45
Page 50

Display Functions
Pr.64
Function Display Setting
Parameter # 64
Parameter Name
Factory Setting
Settings
d0001 Displays the user-defined setting (v)
d0002 Displays the value of the internal counter (c)
Displays the contents of the monitored item as follows:
H: Displays the actual operation frequency
v: Displays the user-defined setting ( where v = H x Pr.65 )
c: Displays the value of the internal counter. This counter is triggered by an
external signal provided via the external input TRG. When the counter reaches
d0000 during count down, the multi-function output terminal MO1 or MO2 will be
“closed” (Refer to Pr.45, 46). The counter will use the value contained in Pr.66 as
its starting point when another count down is to be executed.
d0000 Displays the actual operating frequency (H)
Displays the contents of the monitored item
d0000
Pr.65
Coefficient K Setting
Parameter # 65
Parameter Name
Factory Setting
Units
Parameter value
Coefficient of line speed
d001.0
0.1
d000.1 - d200.0
This parameter can be programmed while the drive is running.
Coefficient K determines the multiplying factor for the user-defined setting (v).
The value of the user-defined setting (v) is calculated and displayed as follows:
Display value of v = output frequency x K. The maximum value that can be
displayed is
the display value multiplied by 10.
. If the value of v exceeds 9999, the actual value is equal to
46
Page 51

System Functions
Pr.67 Pr.68 Pr.
69
Pr.70
Parameter # 67, 68, 69
Parameter Name
Factory Setting
Units
Parameter value
Skip frequency 1, 2, 3
d000.0 Hz
0.1 Hz
d000.1 - d400.0 Hz
This parameter determines the three skip frequencies, which in conjunction with
Pr.70 [Skip Frequency Band] will cause the AC drive to skip operation at these
frequency ranges. (See graph below)
Parameter # 70
Parameter Name
Factory Setting
Units
Parameter value
Skip frequency band
d000.1
0.1 Hz
d000.1 - d020.0 Hz
Skip Frequencies 1 to 3 Setting
This parameter determines the frequency band of a given [Skip frequency]. The
actual band is 2 x Skip frequency band, half of which is above and the other half is
below the [Skip frequency] setting. Setting this parameter to 0.1 to disable all skip
frequencies. (See graph below)
Output frequency
Pr.67
Skip frequency
set point
Pr.68
Pr.69
0
Decelerating
Accelerating
Adjustable range
Command
Pr.70
Frequency to
be jumped
Pr.70
frequency
47
Page 52

Pr.71
PWM Frequency Setting
Parameter # 71
Parameter Name
Factory Setting
Settings
d0001 fc = 3 KHz
PWM frequency setting
d0005
d0002 fc = 6 KHz
d0003 fc = 9 KHz
d0004 fc = 12 KHz
d0005 fc = 15 KHz
This parameter determines the carrier frequency for the PWM (Pulse Width
Modulation) output.
Carrier frequency Acoustic noise Leakage current Heat dissipation
3 KHz significant minimal minimal
6 KHz
9 KHz
12 KHz
15 KHz minimal significant significant
Note: For AC drives rated below 7.5 KW (10HP), the output current derating applies
above 9 KHz. For AC drives rated 7.5KW and above, the output current derating
applies above 12KHz. See figure below:
% Output Current
(A)
100
90
80
36
Carrier Frequency, KHz
12
9
15
Pr.72
Auto Reset / Restart Operation after Fault
Parameter # 72
Parameter Name
Factory Setting
Parameter value
Auto reset / restart operation after fault
d0000
d0000 - d0010
48
Page 53

Reset / restart operation may be performed up to 10 times after a fault has occurred.
Setting this parameter to 0 disables the reset / restart operation after any fault has
occurred. If a protective shut-down operation (oc, ov) occurs during operation, the
auto reset / restart function can be selected. (Refer to Fault Names in Ch. 7)
Pr.73 Pr.74 Pr.75
Parameter # 73, 74, 75
Parameter Name
Factory Setting
Settings
d0001 Over-current (oc)
d0002 Over-voltage (ov)
d0003 Overheat (oH)
d0004 Overload (oL)
d0005 Overload 1 (oL1)
d0006 External fault (EF)
d0007 CPU failure 1 (CF1)
d0008 CPU failure 3 (CF3)
d0009 Hardware protection failure (HPF)
d0010 Over-current during acceleration (ocA)
d0011 Over-current during deceleration (ocd)
d0012 Over-current during steady state operation (ocn)
d0013 Ground fault or fuse failure (GFF)
d0014 Manufacturer-used diagnostics
d0015 Manufacturer-used diagnostics
d0016 Manufacturer-used diagnostics
d0017 External baseblock (bb)
d0018 Overload 2 (oL2)
d0019 Manufacturer-used diagnostics
d0020 Manufacturer-used diagnostics
Fault Records
Three most recent fault records
d0000
d0000
These parameters store records of the three most recent faults that have occurred.
Pr.76
Keypad Lockout / Reset
Parameter # 76
Parameter Name
Factory Setting
Settings
d0001 All parameters are read-only
d0002 - d0009 Not used
d0000 All parameters can always be set and read
d0010 Resets all parameters to the factory defaults
Keypad Lockout / Reset
d0000
49
Page 54

This setting determines the access to the parameters and allows the user to return
all parameters to the factory default settings.
Pr.77
Pr.78
Baud Rate
Parameter # 77
Parameter Name
Factory Setting
Settings
d0001 2400 baud (Data rate bps)
d0002 4800 baud (Data rate bps)
This parameter sets the communication baud rate between the personal computer
and the AC drive. A personal computer may be connected to the AC drive via its
RS-485 serial port. The PC may then be used to set or modify the internal
parameters of the AC drive, or to control and monitor the AC drive operation. Thirtytwo AC drives may be connected simultaneously to a personal computer.
Slave Address
Parameter Name
Factory Setting
Parameter value
d0000 1200 baud (Data rate bps)
Parameter # 78
Units
Special function parameter
d0000
Slave address
d0000
None
d0000 - d0031
If the VFD-A is to be operated by remote control via the RS-485 serial interface, the
bus address should be specified using this parameter.
RS-485
PC
A 0 A 1 A 2 A 30 A 31
A personal computer may be used to load, change, or monitor the parameter value
through the PC‘s RS-485 interface, which permits communication with higher-level
automation systems.
50
Page 55

Pr.79
Pr.80
Reserved
Manufacturer-used Function
This parameter displays the firmware version number of the AC drive, which may
vary according to the software version and AC drive system number.
This parameter is read only.
51
Page 56

Summary of Parameter Settings
This chapter summarizes all the 10 groups of parameters. The page number shown in
parenthesis will direct you to the explanation of settings associated with each parameter.
NO. Parameter Name Function Explanation Parameter Value
6
Factory
Setting
Command frequency
00
source select
(page 20)
Operation
01
Command source
(page 21)
Command frequency
source select
Operation command
source select
d0000: Command frequency input determined
by the digital control panel
d0001: Command frequency input determined
by the analog signal (DC 0 to +10 V) +
(DC 4 to 20 mA)
d0002: Command frequency input determined
by remote control via the RS-485 serial
interface
d0000: Operating instructions determined by
the digital control panel
d0001: Operating instructions determined by
the external terminal connections,
keypad STOP key effective
d0002: Operating instructions determined by
the external terminal connections,
keypad STOP key not effective
d0003 Operating instructions determined by
the RS-485 serial interface, keypad
STOP key effective
d0004: Operating instructions determined by
the RS-485 serial interface, keypad
STOP key not effective
d0000
d0000
02 Motor stop method Motor stop method d0000: RAMP stop d0000
(page 20)
03 V / F curve setting Max. operating d050.0 - d400.0 Hz d060.0
04 (page 21) Max. voltage frequency d010.0 - d400.0 Hz d060.0
05 Max. output voltage d002.0 - d255.0 V d220.0
06 Mid-point frequency d000.1 - d400.0 Hz d001.5
07 Mid-point voltage d002.0 - d255.0 V d010.0
08 Min. output frequency d000.1 - d020.0 Hz d001.5
09 Min. output voltage d002.0 - d050.0 V d010.0
52
d0001:
Coasting to stop
Page 57

NO. Parameter Name Function Explanation Parameter Value
Factory
Setting
10 Accel / decel time Acceleration time 1 d000.1 - d600.0 sec d010.0
11 Setting Deceleration time 1 d000.1 - d600.0 sec d010.0
12 (page 24) Acceleration time 2 d000.1 - d600.0 sec d010.0
13 Deceleration time 2 d000.1 - d600.0 sec d010.0
Jog accel / decel
14
time (page 25)
S-curve (page 26)
15
Jog accel / decel time
d000.1 - d600.0 sec
d010.0
select
S-curve setting d0000 - d0007 d0000
16 Multi-step speed Multi-step speed setting 1 d000.0 - d400.0 Hz d000.0
17 operation Multi-step speed setting 2 d000.0 - d400.0 Hz d000.0
18 (page 26) Multi-step speed setting 3 d000.0 - d400.0 Hz d000.0
19 Multi-step speed setting 4 d000.0 - d400.0 Hz d000.0
20 Multi-step speed setting 5 d000.0 - d400.0 Hz d000.0
21 Multi-step speed setting 6 d000.0 - d400.0 Hz d000.0
22 Multi-step speed setting 7 d000.0 - d400.0 Hz d000.0
Jog frequency
23
(page 27)
REV run setting
24
(page 27)
Over-voltage stall
25
prevention
(page 28)
Over-current stall
26
prevention
(page 28)
27
Jog frequency select d000.1 - d400.0 Hz d006.0
REV run
d0000: REV run enable
d0000
d0001: REV run disable
Over-voltage stall
d0000:
Disable over-voltage stall prevention
d0001
prevention
d0001: Enable over-voltage stall prevention
Over-current stall
prevention during
d0050 - d0200 % d0170
acceleration
Over-current stall
prevention during
d0050 - d0200 % d0170
operation
DC braking current
28
setting
(page 30)
29
30
31
Momentary power
32
loss protection
(page 31)
DC braking current
DC braking time during
start-up
DC braking time during
stopping
DC braking start-up
frequency
Momentary power failure
operation mode selection
53
d0000 - d0100% d0000
d000.0 - d005.0 sec d000.0
d000.0 - d025.0 sec d000.0
d000.0 - d060.0 Hz d000.0
d0000: Operation stops after momentary power
Loss.
d0001:
Operation continues after momentary
power loss. Speed search starts with
the frequency reference value.
d0002: Operation continues after momentary
power loss. Speed search starts with
d0000
the minimum output frequency.
Page 58

NO. Parameter Name Function Explanation Parameter Value
38
Factory
Setting
33
34
35
Reference freq.
36
upper / lower limit
setting (page 32)
37
External control 2-wire / 3-wire operation d0000: FWD / STOP, REV / STOP d0000
Maximum allowable
power loss time
d000.3 - d005.0 sec d002.0
Minimum base block time d000.3 - d005.0 sec d000.5
Speed search
current limit
Reference frequency
upper limit setting
Reference frequency
lower limit setting
d0030 - d0200 % d0150
d000.1 - d400.0 Hz
d400.0
d000.0 - d400.0 Hz d000.0
terminal setting control selection d0001: FWD / REV, RUN / STOP
(page 33)
d0002: 3-WIRE operation control mode
39 Multi-function input Multi-function input 1 d0000: Multi-step speed command 1 d0000
40 terminal setting Multi-function input 2 d0001: Multi-step speed command 2 d0001
41 Multi-function input 3 d0002: Multi-step speed command 3 d0002
(page 34) d0003: Jog frequency reference select
d0004: Accel / decel speed inhibit command
d0005: First and second accel/decel time select
d0006: External baseblock (NO- contact input)
d0007: External baseblock (NC- contact input)
d0008: Up command
d0009: Down command
Analog meter
42
output select
(page 35)
Digital output
43
frequency multiplier
Analog output select d0000:
d0001:
Digital output frequency
multiplier select
d0001 - d0020 d0001
Analog frequency meter ( 0 to Maximum
Frequency )
Analog current meter ( 0 to 250% of the
rated drive output current )
d0000
factor (page 35)
Analog output gain
44
Analog output gain select d0001 - d0200 % d0100
setting (page 36)
45 Multi-function output Multi-function output d0000: AC drive operational d0000
terminal setting terminal 1 (MO1) d0001: Pre-set frequency attained
46 (page 37) Multi-function output d0002: Desired frequency attained d0001
terminal 2 (MO2) d0003: Count down complete
d0004: Non-zero speed
d0005: Over-torque detection
d0006: Baseblock indicator
d0007: Low-voltage detect indicator
d0008: AC drive operation mode
d0009: Fault indicator
Desired frequency
47
attained setting
Desired frequency
attained
d000.0 - d400.0 Hz d000.0
(page 38)
54
Page 59

NO. Parameter Name Function Explanation Parameter Value
Analog input for
48
output frequency
range
(page 38)
49
50 Reserved
51 Reserved
Motor
52
current setting
53 (page 40) Motor no-load current d0000 - d0099 % d0040
Torque
54
compensation
setting (page 40)
Slip compensation
55
(page 41)
56 Reserved
57 Multi-function
indication output d0001: AC drive operational
contact d0002: Pre-set frequency attained
RA-RC (NO) d0003: Desired frequency attained
RB-RC (NC) d0004: Non-zero speed
(page 41) d0005: Over-torque detection
d0006: Baseblock indicator
58 Electronic thermal Motor current derated by d0000: Active with standard motor d0002
overload relay
(page 42)
d0002: Inactive
59 Electronic thermal characteristics selection (42) d0030 d0300 sec d0060
Max. output frequency
voltage setting.
Min. output frequency
voltage setting.
Motor rated current d0030 - d0120 % d0100
Auto torque
compensation gain
Slip correction
compensation
temperature.
d000.0 - d010.0 V d010.0
d000.0 - d010.0 V
d0000 - d0010 % d0000
d000.0 - d010.0 % d000.0
d0000: Fault indicator d0000
d0001: Active with special motor
Factory
Setting
d000.3
Over-torque
60
detection setting
(page 43)
61
62 Over-torque detection time d000.1 d010.0 sec d000.1
64 Function display Function Display Setting d0000: Displays the actual operating freq. (H) d0000
setting d0001: Displays the user-defined setting (v)
d0002: Displays the value of the internal
(page 45) Counter (c)
65 Coefficient K setting for line speed (page45) d000.1 d200.0 d001.0
Over-torque detection
mode select
Over-torque detection d0030 d0200 % d0150
d0000: Over-torque detection not enabled d0000
d0001:
d0002:
d0003:
d0004:
Over-torque detection during constant
speed operation, operation halted after
over-torque
Over-torque detection during constant
speed operation, operation continues
after over-torque detection
Over-torque detection during operation,
operation halted after over-torque
Over-torque detection during operation,
operation continues after over-torque
detection
55
Page 60

(pag
(pag
NO. Parameter Name Function Explanation Parameter Value
63 Pre-set count down setting (page 44) d0001 - d9999 d0001
66 Count down value setting (page 44) d0001 - d9999 d0001
67 Skip frequencies Skip Frequency 1 d000.0 - d400.0 Hz d000.0
68 1 to 3 setting Skip Frequency 2 d000.0 - d400.0 Hz d000.0
69 (page 46) Skip Frequency 3 d000.0 - d400.0 Hz d000.0
70 Skip Frequency Band d000.1 - d020.0 Hz d000.1
Factory
Setting
PWM Frequency
71
setting (page 47)
Carrier frequency select
fc = 3 KHz, d0002: fc = 6 KHz
d0001:
d0003: fc = 9 KHz, d0004: fc = 12 KHz
d0005: fc = 15 KHz
d0005
72 Auto reset/restart operation after fault (page47) d0000 - d0010 d0000
73
Fault records
74
(page 48)
75
Most recent fault record d0000: Fault records clear (No errors occurred ) d0000
Second most recent fault
record
Third most recent fault
record
d0001: Over-current (oc) d0000
d0002: Over-voltage (ov) d0000
d0003: Overheat (oH)
d0004: Overload (oL)
d0005: Overload 1 (oL1)
d0006: External fault (EF)
d0007: CPU failure 1 (CF1)
d0008: CPU Failure 3 (CF3)
d0009: Hardware protection failure (HPF)
d0010: O.C. during acceleration (ocA)
d0011: O.C. during deceleration (ocd)
d0012: O.C. during steady state operation (ocn)
d0013: Ground fault or fuse failure (GFF)
d0014-16: Manufacture used diagnostics
d0017: External baseblock (bb)
d0018: Overload 2 (oL2)
d0019-20: Manufacture used diagnostics
76 Keypad lockout
e 48)
e 49)
d0002: 4800 baud (Data rate bps)
Slave address (page49)
78
79 Reserved
80 AC motor drive model number and software version (page 50)
56
Keypad lockout or reset
d0000:
All parameters can always be set and
d0000
read
d0001: All parameters are read-only
d0002-d0009: not used
d0010: Resets all parameters to the factory
defaults
d0000: 1200 baud (Data rate bps) d0002
d0001: 2400 baud (Data rate bps)
d0000-d0031 d0000
Page 61

Troubleshooting and Fault Information
The AC drive has a comprehensive fault diagnosis system that includes more than 20
different alarms and fault messages. Once a fault is detected, the corresponding
protective functions will be activated to turn off the AC drive output. The various AC
drive failures may be classified as follows:
•
Over Voltage / Low Voltage
•
Heat sink Over Temperature
•
Motor Overload
•
AC drive Overload
•
Motor Stalled
•
Microprocessor Systems Failure
7
The three most recent faults are stored in the AC drive non-volatile memory and may
be read through the digital keypad, or through the RS-485 interface on the control
board.
Troubleshooting and Fault Information
This section provides information to guide the user in understanding the various AC drive
fault conditions and their general troubleshooting procedures. A listing and description of
the different AC drive failures is given, along with their possible solutions. A section on
general troubleshooting is also included for reference.
Important: Pressing the Reset button will not restore the AC drive to its normal operating
conditions unless the fault is corrected. During any failure, the AC drive switches off and
an error message will appear in the display. The last error that occurred is stored in Pr.73.
57
Page 62

Common Problems and Solutions
Fault Name Fault Descriptions Corrective Actions
The over-current hardware
trip circuit detects an
abnormal increase in current.
Check whether the motor output power
corresponds to the AC drive output power.
Check the wiring connections between the AC
drive and motor for possible short circuits.
Increase the Acceleration time 1 and 2 (Pr. 10,
12).
Check for possible excessive loading conditions
at the motor.
After short-circuit being removed, if there is any
abnormal conditions when operating the AC
Motor Drive, it should be sent back to the
agency or manufacturer.
The AC drive detects that the
DC bus voltage has exceeded
its maximum allowable value.
Check whether the input voltage falls within the
rated AC drive input voltage. Check for
possible voltage transients.
Bus over-voltage may also be caused by motor
regeneration. Either increase the Decel time or
add an optional braking resistor. Check whether
the required braking power is within the
specified limits.
The AC drive temperature
sensor detects excessive
heat.
Ensure that the ambient temperature falls
within the specified temperature range.
Make sure that the ventilation holes are not
obstructed.
Remove any foreign objects on the heatsinks
and check for possible dirty heatsink fins.
Provide enough spacing for adequate
ventilation.
The AC drive detects that the
DC bus voltage has fallen
Check whether the input voltage falls within the
rated AC drive’s input voltage.
below its minimum value.
excessive drive output
current.
The AC drive can withstand
up to 150% of the rated
The AC drive detects
Check whether the motor is overloaded.
Reduce the torque compensation setting as set
in Pr.54.
Increase the AC drive’s output capacity.
current for a maximum of 60
seconds.
58
Page 63

Fault Name Fault Descriptions Corrective Actions
Internal electronic overload
trip:
Motor is overloaded.
Reduce the current level so
that the drive output current
does not exceed the value set
by the [Motor rated current]
Pr.52.
Motor overload. Check the
parameter settings Pr.60, 62.)
Over-current during
acceleration:
1. Short-circuit at motor
output.
2. Torque boost too high.
3. Acceleration time too short.
4. AC drive output capacity
too small.
Over-current during
deceleration:
1. Short-circuit at motor
output.
2. Deceleration time too
short.
3. AC drive output capacity
too small.
Check for possible motor overload.
Check electronic thermal overload setting.
Increase motor capacity.
Reduce the motor load.
Adjust the over-torque detection setting to an
appropriate setting.
Check for possible poor insulation at the output
line.
Decrease the torque boost setting in Pr.-54.
Increase the acceleration time.
Replace with an AC drive with higher output
capacity.
Check for possible poor insulation at the output
line.
Increase the deceleration time.
Replace with an AC drive with higher output
capacity.
Over-current during steady
state operation:
1. Short-circuit at motor
output.
2. Sudden increase in motor
loading.
3. AC drive output capacity
too small.
The external terminal EFDCM goes from ON to OFF.
AC drive internal circuitry
failure.
Check for possible poor insulation at the output
line.
Check for possible motor stall.
Replace with an AC drive with higher output
capacity.
External fault.
1. Switch off power supply.
2. Check whether the input voltage falls within
the rated AC drive input voltage.
3. Switch the AC drive back on.
59
Page 64

Fault Name Fault Descriptions Corrective Actions
AC drive E
invalid data or can not be
programmed.
2
PROM contains
Check the connections between the main
control board and the power board.
Reset drive to factory defaults.
Ground fault or fuse failure:
Ground fault :
The AC drive output is
abnormal. When the output
terminal is grounded (short
circuit current is 50% more
than the AC drive rated
current), the AC drive power
Ground fault :
1. Check whether the IGBT power module is
damaged.
2. Check for possible poor insulation at the
output line.
module may be damaged.
The short circuit protection is
provided for the AC drive
protection, not user
protection.
Fuse failure:
The fuse failure information
will be displayed by the LED
located on the power board.
Fuse failure:
1. Replace Fuse.
2. Check whether the IGBT power module is
damaged.
3. Check for possible poor insulation at the
output line.
External baseblock.
AC drive output is turned off.
When the multi-function input 1 (2, 3)-DCM
terminal goes from OFF to ON, the AC drive
output will be turned off.
Drive’s internal circuitry
abnormal.
Switch off power supply. Check whether the
input voltage falls within the rated AC drive
input voltage. Switch on the AC drive.
Protection circuitry of
hardware detected abnormal
operation.
Remove power from the AC drive and then
restore power. If H.P.F. fault appears again, the
AC drive should be returned for service.
60
Page 65

Standard Specifications
APPENDIX
A
61
Page 66

Voltage classification 230V
Model name VFD-
3 Phase motor rating (KW) 0.75 1.5 2.2 3.7 5.5 7.5 11.0 15.0 18.5 22.0
3 Phase motor rating (HP) 1.0 2.0 3.0 5.0 7.5 10.0 15.0 20.0 25.0 30.0
Inverter output (KVA) 1.9 2.5 4.2 6.5 9.5 12.5 17.5 22.8 28.6 33.2
Output current (A) 5.0 6.5 11 17 25 33 46 60 75 87
Output voltage (V) Adjustable from 0 to input voltage
Output frequency (Hz) Programmable from 0 to 400 Hz
Output Rating
Rated AC input power supply 200 / 208/ 220 / 240 VAC, three phase, 50 / 60Hz
Single (3-phase Input Current) 6.8 8.9 14.3
Input Current (A)
Operational range (V)
Input Rating
Power factor (Displacement) 0.8 (Lagging)
Control system Sinusoidal PWM control
Frequency control range
Frequency setting resolution 0.1 Hz
Output frequency resolution 0.1 Hz
Overload current rating 150% of rated current for 1 minute
Acceleration / deceleration time
Torque characteristics Starting torque 150% or more (at 5 Hz)
Regenerative braking Incorporate regenerative braking circuit
Control Characteristics
V / F pattern Any V / F pattern setting
Stall prevention level Setting to percentage of rated current
Frequency
setting
Operation
Setting Signal
Multi-function input signal
Multi-function output signal
Operating Characteristics
Analog / Digital Output Analog frequency / current signal output, digital frequency signal output
Protective function
Installation site Altitude 1,000m or lower, keep from corrosive gasses, liquid and dust
Pollution Degree 2
Ambient temperature
Storage temperature
Ambient Humidity Below 90% RH (non-condensing)
Environments
Vibration
* Only 220V Series, 0.75∼2.2Kw provide single-phase input.
Note 1: The frequency can be reached to 1500Hz by VFD-H Series AC Motor Drives.
Note 2: 11Kw∼22Kw models, exclude inherent braking transistor, external braking is optional.
Digital operation
External signal
Digital operation Setting by RUN, STOP, FWD / REV
External signal FWD, REV, EF can be combined for 2 or 3-wire operation, RS-485 serial interface.
Other functions
Cooling Method Forced air-cooling
Options
007* 015* 022* 037 055 075 110 150 185 220
7.4 9.9 15.5
180∼265 VAC, 47∼63 Hz
0.1∼400.0 Hz
0.1∼600.0 Sec
Setting by
Variable resistor of 5K/ 0.5W, 0 to 10 VDC, 4∼20mA, RS-485 serial port,
Multi-function 1∼3(JOG, Multi-step speed, Up / Down)
Multi-step selection 1 ∼7, Jogging, Accel. / Decel. Prohibit, First / Second
Accel. / Decel. Switching command, External BB (NC, NO selection), etc.
During running, Up to frequency setting, Up to desired frequency setting Count out
detection, Non zero-speed, Over-torque detection, etc.
Automatic Voltage Regulation (AVR), S-Curve, over voltage, over-current stall prevention,
abnormal records checking, Carrier-frequency adjustable, DC braking, DB starting
frequency setting, Momentary power failure restart, Frequency limit, etc.
Over-current, over voltage, under voltage, electronic thermal, overheat ground fault,
overload limit, over voltage supply, etc., but no short-circuit protection of output terminals.
-10°C ∼ 40°C (-10°C∼50°C without blind plate) at rated voltage and rated current.
-20°C ∼ 60°C
1.0G less than 20Hz, 0.6G at 20∼50Hz
EG2010A extension cable, LC-A05E, LC-A10E digital keypad, RC-01 remote control unit,
MVR / MHR Braking resistor
﹑
19.6 33.5 43.3 46 76 83 99
JOG
or
62
Page 67

Voltage classification 460V
Model name VFD-
007 015 022 037 055 075 110 150 185 220
3 Phase motor rating (KW) 0.75 1.5 2.2 3.7 5.5 7.5 11.0 15.0 18.5 22.0
3 Phase motor rating (HP) 1.0 2.0 3.0 5.0 7.5 10.0 15.0 20.0 25.0 30.0
Inverter output (KVA) 2.3 3.2 4.2 6.3 9.9 13.7 18.3 24.4 28.9 34.3
Output current (A) 3 4.2 5.5 8.2 13 18 24 32 38 45
Output voltage (V) Adjustable from 0 to input voltage
Output frequency (Hz) Programmable from 0 to 400 Hz
Output Rating
Rated AC input power supply 380 / 400 / 415 / 480 VAC, three phase, 50 / 60Hz
Input Current (A) 4.2 43A
Operational range (V)
Input Rating
Power factor (Displacement) 0.8 (Lagging)
340∼500 VAC, 47∼63 Hz
5.8
43B
7.2 8.5 14.0 20.6 28 30 39 49
6.0
Control system Sinusoidal PWM control
Frequency control range
0.1∼400.0 Hz
Frequency setting resolution 0.1 Hz
Output frequency resolution 0.1 Hz
Overload current rating 150% of rated current for 1 minute
Acceleration / deceleration time
0.1∼600.0 Sec
Torque characteristics Starting torque 150% or more (at 5 Hz)
Regenerative braking Incorporate regenerative braking circuit
Control Characteristics
V / F pattern Any V / F pattern setting
Stall prevention level Setting to percentage of rated current
Frequency
setting
Digital operation
External signal
Setting by
﹑
JOG
or
Variable resistor of 5K/ 0.5W, 0 to 10 VDC, 4∼20mA, RS-485 serial port,
Multi-function 1∼3(JOG, Multi-step speed, Up / Down)
Operation Setting
Signal
Multi-function input signal
Multi-function output signal
Operating Characteristics
Digital operation Setting by RUN, STOP, FWD / REV
External signal FWD, REV, EF can be combined for 2 or 3-wire operation, RS-485 serial interface.
Multi-step selection 1 ∼7, Jogging, Accel. / Decel. Prohibit, First / Second
Accel. / Decel. Switching command, External BB (NC, NO selection), etc.
During running, Up to frequency setting, Up to desired frequency setting Count out
detection, Non zero-speed, Over-torque detection, etc.
Analog / Digital Output Analog frequency / current signal output, digital frequency signal output
Automatic Voltage Regulation (AVR), S-Curve, over voltage, over-current stall prevention,
Other functions
abnormal records checking, Carrier-frequency adjustable, DC braking, DB starting
frequency setting, Momentary power failure restart, Frequency limit, etc.
Protective function
Over-current, over voltage, under voltage, electronic thermal, overheat ground fault,
overload limit, over voltage supply, etc., but no short-circuit protection of output terminals.
Cooling Method Forced air-cooling
Installation site Altitude 1,000m or lower, keep from corrosive gasses, liquid and dust
Pollution Degree 2
Ambient temperature
Storage temperature
Ambient Humidity Below 90% RH (non-condensing)
Environments
Vibration
Options
-10°C∼ 40°C (-10°C∼50°C without blind plate) at rated voltage and rated current.
-20°C∼60°C
1.0G less than 20Hz, 0.6G at 20∼50Hz
EG2010A extension cable, LC-A05E, LC-A10E digital keypad, RC-01 remote control unit,
MVR / MHR Braking resistor
Note 1: The frequency can be reached to 1500Hz by VFD-H Series AC Motor Drives.
Note 2: 11Kw∼22Kw models, exclude inherent braking transistor, external braking is optional.
63
Page 68

APPENDIX
Serial Communications
The different AC motor drive parameters can be programmed and displayed by remote control
via the RS-485 serial interface. A personal computer may be used to load, change, or monitor
the parameter value through the PC‘s RS-485 interface, which permits communication with
higher-level automation systems. This appendix describes the following:
Computer Control
Data Format and Protocol
Character Delay Time and Response Delay Time
Computer Control
The VFD-A series AC motor drive has a built in RS-485 serial communication port on its control
terminal block marked SG+, SG-. The two connector pins are defined as follows:
SG + : Signal +
SG- : Signal -
Each VFD-A AC motor drive has a pre-assigned slave address specified by Pr.-78. The computer
may select any AC drive according to this slave address. The computer may also control all of the
AC drives connected to it when the “A” code in command string is 02H.
B
Data Format and Protocol
Data Format
Baud Rate (Transmission speed in bits per second)
Range of values: 1200, 2400, 4800 Baud (See Pr.-77)
Eleven (11) bits are required to represent each character, as shown in the following
example:
Number of bits Function
1 start bit
8 data bits
1 odd parity bit
1 stop bit
64
Page 69

1
V
R
Start
01234567
bit
Odd
parity
Stop
bit
0
Character string
Protocol
Control Command
COMMAND STRUCTURE
"C,S,A,UU,MM,FFFF"
Word length = 11 characters
C: Header of control string
S: Check sum (03H)
A: Command acknowledge
01H: Command acknowledged by a single AC drive
02H: Command acknowledged by all AC drives
UU: Slave address (“00” - “31”)
MM: Operation command (X = don‘t care)
X0 Stop
X1 Forward running
X2 Stop
X3 Reverse running
X4, X5 Jog (FWD)
X6, X7 Jog (REV)
X8 Reset after AC drive error
FFFF
11-bit (character frame)
COMPUTER TO AC MOTOR DRI
Frequency command, Setting range: from 0000 (0.0Hz) to 4000 (400.0Hz)
Example: A setting of “1234” = 123.4 Hz
The AC drive will return a character string, the format of which will be as follows:
COMMAND STRUCTURE
"C,S,B,UU,MM,FFFF"
Word length = 11 characters
C: Header of control string
S: Check sum (03H)
B: Acknowledge back
Correct: 06H
Error: 07H
UU: Slave address (“00” - “31”)
AC MOTOR DRIVE TO COMPUTE
65
Page 70

V
Operation command (X = don‘t care)
MM:
X0 Stop
X1 Forward running
X2 Stop
X3 Reverse running
X4, X5 Jog (FWD)
X6, X7 Jog (REV)
X8 Reset after AC drive error
FFFF
Parameter Setting Command
COMMAND STRUCTURE
Frequency command, Setting range: from 0000 (0.0Hz) to 4000 (400.0Hz)
Example: A setting of “1234” = 123.4 Hz
"P,S,A,UU,NN,DDDD"
Word length = 11 characters
P: Header of parameter string
S: Check sum (03H)
A: Command acknowledge
01H: Command acknowledged by a single AC drive
02H: Command acknowledged by all AC drives
UU: Slave address (“00” - “31”)
NN: Parameter number (“00” “80”)
DDDD: Data of parameter
The AC drive will return a character string, the format of which will be as follows:
COMMAND STRUCTURE
"P,S,B,UU,NN,DDDD"
Word length = 11 characters
P: Header of parameter string
S: Check sum (03H)
COMPUTER TO AC MOTOR DRI
AC MOTOR DRIVE TO COMPUTE
B: Acknowledge back
Correct: 06H
Error: 07H
UU: Slave address (“00” - “31”)
NN: Parameter number (“00” “80”)
DDDD: Data of parameter
66
Page 71

Parameter Read Command
V
E
V
COMMAND STRUCTURE
"R,S,A,UU,NN"
Word length = 7 characters
R: Header of read string
S: Check sum (03H)
A: Command acknowledge
01H: Command acknowledged by a single AC drive
02H: Command acknowledged by all AC drives
UU: Slave address (“00” - “31”)
NN: Parameter number (“00” “80”)
The AC drive will return a character string, the format of which will be as follows:
COMMAND STRUCTURE
"R,S,B,UU,NN,DDDD"
Word length = 11 characters
R: Header of read string
S: Check sum (03H)
B: Acknowledge back
Correct: 06H
Error: 07H
UU: Slave address (“00” - “31”)
NN: Parameter number (“00” “80”)
DDDD: Data of parameter
COMPUTER TO AC MOTOR DRI
AC MOTOR DRIVE TO COMPUT
AC drive Status Read Command
COMMAND STRUCTURE
"Q,S,A,UU,NN"
Word length = 7 characters
Q: Header of question string
S: Check sum (03H)
A: Command acknowledge
01H: Command acknowledged by a single AC drive
02H: Command acknowledged by all AC drives
UU: Slave address (“00” - “31”)
NN: Retrieve contents of drive status. (x = don‘t care)
X0: Frequency command
X1: Output frequency
X2: Output current
X3: Operation command Drive status and Error code
COMPUTER TO AC MOTOR DRI
67
Page 72

The AC drive will return a character string, the format of which will be as follows:
R
COMMAND STRUCTURE
"Q,S,B,UU,NN,ABCD"
Word length = 11 characters
Q: Header of question string
S: Check sum (03H)
B: Acknowledge back
Correct: 06H
Error: 07H
UU: Slave address (“00” - “31”)
NN: 00 Frequency command = ABC.D (Hz)
01 Output frequency = ABC.D (Hz)
02 Output current = ABC.D (Amp)
03 Operation command, Drive status & Error code
ABCD: When NN = 00, ABC.D (Hz)
When NN = 01, ABC.D (Hz)
When NN = 02, ABC.D (Amp)
0: Stop
1: Forward operation
2: Stop
3: Reverse operation
4: Forward jog
5: Forward jog
6: Reverse jog
7: Reverse jog
8: Reset after AC drive error
“” = Binary code bit map
bit 0: 0 = Stop 1 = Run
bit 1: 0 = Forward 1 = Reverse
bit 2:
bit 3:
When NN = 03, A: Operation command
B: AC drive status
bit no.
7 6 5 4 Frequency reference source
0 0 0 0 Keypad control
0 0 0 1 Multi-step speed command 1
0 0 1 0 Multi-step speed command 2
0 0 1 1 Multi-step speed command 3
0 1 0 0 Multi-step speed command 4
0 1 0 1 Multi-step speed command 5
0 1 1 0 Multi-step speed command 6
0 1 1 1 Multi-step speed command 7
AC MOTOR DRIVE TO COMPUTE
0 = Non-DC
braking start
0 = Non-DC
braking stop
1 = DC braking
start
1 = DC braking
stop
68
Page 73

1 0 0 0 Jog speed command
1 0 0 1 Analog input freq. command
1 0 1 0 RS-485 serial interface
1 0 1 1 Up/Down control
Code Fault Name
0 No error
01 Over-current (oc)
02 Over voltage (ov)
03 Overheat (oH)
04 Overload (oL)
05 Overload 1 (oL1)
06 External fault (EF)
07 CPU fault 1 (cF1)
08 CPU fault 3 (cF3)
09 Hardware Protection Fault (HPF)
10 Over-current acceleration (ocA)
11 Over-current deceleration (ocd)
12 Over-current normal (ocn)
13 Ground and fuse fault (GFF)
14 Low voltage (Lv)
15 Low voltage 1 (Lv1)
16 CPU fault 2 (cF2)
17 Baseblock (bb)
18 Overload (oL2)
19, 20 Reserved
CD: Error code
Character Delay Time and Response Delay Time
Character Delay Time
CHAR
1
CHAR
2
< 5ms
Response Delay Time
InverterComputer
String String
Inverter
1
10ms...20ms
2
CHAR
3
Computer
String
3
69
Page 74

Dimensions
VFD007A21A/H
VFD007A23A/H
VFD007A43A/H
VFD015A21A/H
VFD015A23A/H
VFD015A43B/H
Unit: mm
APPENDIX
C
VFD015A43A
VFD022A21A/H
VFD022A23A/H
VFD022A43A
VFD037A23A/H
VFD037A43A/H
Unit: mm [inches]
196.0 [7.72]
181.5 [7.15]
5.5 [0.22]
213.0 [8.39]
226.0 [8.90]
167.0 [6.57]
5.5 [0.22]
9.3 [0.36]
70
Page 75

VFD055A23A/H
VFD055A43A/H
VFD075A23A/H
VFD075A43A/H
Unit: mm [inches]
203.3 [8.00]
185.3 [7.30]
6.5 [0.26]
308 [12.13]
323.3 [12.73]
178 [7.01]
10.2 [0.40]
6.5 [0.26]
VFD110A23A/H
VFD110A43A/H
VFD150A23A/H
VFD150A43A/H
VFD185A23A/H
VFD185A43A/H
VFD220A23A/H
VFD220A43A/H
250.0 [9.84]
226.0 [8.90]
10.0[0.39]
403.8 [15.90]
384.0 [15.12]
200 [7.87]
13.0 [0.51]
71
10.0 [0.39]
Page 76

Digital Keypad
1. LC-A05E: it is used for A-Series 1HP~5HP
Unit: mm [inch]
FWD
REV
PRGM
FUNC
DATA
2. LC-A10E: it is used for A-Series 7.5HP~30HP
Unit: mm [inch]
FWD
REV
PRGM
FUNC
DATA
72
Page 77

Remote Controller RC01 Adapter
Unit: mm [inches]
Standard Extension Cable
Unit: mm
73
Page 78

All Braking Resistors & Braking Units Use in AC Drives
Note: Please only use DELTA resistors and recommended values. Other
resistors and values will void Delta’s warranty. Please contact your nearest Delta
representative for use of special resistors. For instance, in 460 V series, 100 HP,
AC drive has 2 braking units with total of 16 braking resistors, so each braking
unit uses 8 braking resistors. There should be at least 10 cm away from AC drive
to avoid possible noise. Refer to the “Braking Unit Module User Manual” for
further detail.
Applicable
Motor
HP kW
Voltage
1/4 0.2 0.110
1/2 0.5 0.216
1 0.75 0.427
2 1.5 0.849
3 2.2 1.262
5 3.7 2.080
7.5 5.5 3.111
10 7.5 4.148
15 11 6.186
230V Series
20 15 8.248
25 18.5 10.281
30 22 12.338
40 30 16.497
50 37 20.6
1/4 0.2 0.110
1/2 0.5 0.216
1 0.75 0.427
2 1.5 0.849
3 2.2 1.262
5 3.7 2.080
7.5 5.5 3.111
10 7.5 4.148
15 11 6.186
20 15 8.248
460V Series
25 18.5 10.281
30 22 12.338
40 30 16.497
50 37 20.6
60 45 24.745
75 55 31.11
100 75 42.7
Full
Load
Torque
KG-M
Specification
of
Resistors
80W 200Ω
80W 200Ω
80W 200Ω
300W 100Ω
300W 70Ω
400W 40Ω
500W 30Ω
1000W 20Ω
2400W 13.6Ω
3000W 10Ω
4800W 8Ω
4800W 6.8Ω
6000W 5Ω
9600W 4Ω
80W 750Ω
80W 750Ω
80W 750Ω
300W 400Ω
300W 250Ω
400W 150Ω
500W 100Ω
1000W 75Ω
1000W 50Ω
1500W 40Ω
4800W 32Ω
4800W 27.2Ω
6000W 20Ω
9600W 16Ω
9600W 13.6Ω
12000W 10Ω
19200W 6.8Ω
Braking Unit
Model VFDB
No. of Unit Used
2015 1
2015 1
2022 1
2022 1
2015 2
2015 2
4030 1
4030 1
4030 1
4030 1
4030 1
4045 1
4045 1
4030 2
4045 2
Braking Resistors
Model No. of Units Used
BR080W200 1 400
BR080W200 1 220
BR080W200 1 125
BR300W100 1 125
BR300W070 1 125
BR400W040 1 125
BR500W030 1 125
BR1K0W020 1 125
BR1K2W6P8 2 125
BR1K5W005 2 125
BR1K2W008 4 125
BR1K2W6P8 4 125
BR1K5W005 4 125
BR1K2W008 8 125
BR080W750 1 300
BR080W750 1 230
BR080W750 1 125
BR300W400 1 125
BR300W250 1 125
BR400W150 1 125
BR500W100 1 125
BR1K0W075 1 125
BR1K0W050 1 125
BR1K5W040 1 125
BR1K2W008 4 125
BR1K2W6P8 4 125
BR1K5W005 4 125
BR1K2W008 8 125
BR1K2W6P8 8 125
BR1K5W005 8 125
BR1K2W6P8 16 125
Braking
Torque
10%ED
74
Page 79

Braking Resistors & Braking Units
Braking Resistors & Braking Units
75
Page 80

Braking resistors model no.: BR1K0W050, BR1K2W008, BR1K2W6P8,
BR1K5W005, BR1K5W040
76
Page 81

APPENDIX
D
Accessories
Name Model Remarks
Remote control box RC-01 Used the twisted shielded or twisted-pair shield.
Digital keypad LC-A05E Used for A-Series 1HP~5HP.
Digital keypad LC-A10E Used for A-Series 7.5HP~30HP.
Standard extension cable (0.6 M) EG0610A Used for A-Series 1~30HP, M-Series 0.5HP~2HP.
Standard extension cable (1 M) EG1010A Used for A-Series 1~30HP, M-Series 0.5HP~2HP.
Standard extension cable (2 M) EG2010A Used for A-Series 1~30HP, M-Series 0.5HP~2HP.
Standard extension cable (3 M) EG3010A Used for A-Series 1~30HP, M-Series 0.5HP~2HP.
Standard extension cable (5 M) EG5010A Used for A-Series 1~30HP, M-Series 0.5HP~2HP.
Braking resistor (400Ω120W)
Braking resistor (200Ω120W)
Braking resistor (200Ω200W)
Braking resistor (200Ω120W)
Braking resistor (80Ω120W)
Braking resistor (80Ω200W)
Braking resistor (50Ω120W)
Braking resistor (50Ω200W)
Braking resistor (25Ω500W)
Braking resistor (50Ω500W)
Braking resistor (100Ω500W)
EMI CORE ( 22*14*8 )
EMI CORE ( 31*19*13 )
EMI CORE ( 51*31*13 )
EMI CORE ( 68*44*13.5 )
MHR400W120 Used for 1, 2 HP / 440 V.
MVR200W120 Used for 3, 5 HP / 440 V.
MVR200W200 Used for 3, 5 HP / 440 V.
MHR200W120 Used for 1, 2 HP / 220 V.
MVR080W120 Used for 3 HP / 220 V.
MVR080W200 Used for 3 HP / 220 V.
MVR050W120 Used for 5 HP / 220 V.
MVR050W200 Used for 5 HP / 220 V.
MHR025W500
MHR050W500
MHR100W500
CTC221408A Integrated by the wiring diameter
CTC311913A Integrated by the wiring diameter
CTC513113A Integrated by the wiring diameter
CTC684413B Integrated by the wiring diameter
Used for 7.5∼10 HP / 220 V.
Used for 7.5∼10 HP / 220 V and 440 V.
Used for 7.5∼10 HP / 440 V.
77
Page 82

APPENDIX
E
EMI Filters
The EC Declaration of Conformity for AC Motor Drives VFD-A Series 1-30HP was
completed in conjunction of DELTA’s EMI Filters. The correspondence of AC Motor
Drives to EMI Filters is shown as below:
Model of AC Motor Drive Model of EMI Filter Spec. of EMI Filter
VFD007A21A, VFD015A21A 16DRT1W3A
VFD007A23A, VFD007A43A,
VFD015A23A, VFD015A43B,
VFD022A21A 30DRT1W3
VFD022A43A, VFD037A43A 10TDT1W4B
VFD022A23A, VFD037A23A 20TDT1W4
VFD055A43B, VFD075A43B 21TDT1W4
VFD055A23B, VFD075A23B,
VFD110A23A, VFD110A43A,
VFD150A43A, VFD185A43A,
VFD220A43A
VFD150A23A, VFD185A23A,
VFD220A23A
If the users need to operate the AC Motor Drives VFD-A Series with DELTA’s EMI
Filters, the suitable models can be determined from the above table.
10TDT1W4
50TDS4W4
100TDS8A
220V, 1φ, 16A
220V/440V, 3φ, 10A
220V, 1φ, 30A
440V, 3φ, 10A
220V, 3φ, 20A
440V, 3φ, 21A
220V/440V, 3φ, 50A
220V, 3φ, 100A
78
Page 83

EC Declaration of Conformity
DELTA ELECTRONICS, INC.
EC Declaration of Conformity
According to the Low Voltage Directive 73/23/EEC and the
APPENDIX F
Amendment Directive
For the following equipment:
AC Motor Drive
(Product Name)
VFD007A21A, VFD007A23A, VFD007A43A, VFD015A21A, VFD015A23A, VFD015A43A,
VFD015A43B, VFD022A21A, VFD022A23A, VFD022A43A, VFD037A23A, VFD037A43A,
VFD055A23B, VFD055A43B, VFD075A23B, VFD075A43B, VFD110A23A, VFD110A43A,
VFD150A23A, VFD150A43A, VFD185A23A, VFD185A43A, VFD220A23A, VFD220A43A
(Model Name)
93/68/EEC
is herewith confirmed to comply with the requirements set out in the Council
Directive 73/23/EEC for electrical equipment used within certain voltage limits
and the Amendment Directive 93/68/EEC. For the evaluation of the compliance
with this Directive, the following standard was applied:
EN 50178
The following manufacturer/importer is responsible for this declaration:
Delta Electronics, Inc.
(Company Name)
79
Page 84

DELTA ELECTRONICS,INC.
EC Declaration of Conformity
According to the Electromagnetic Compatibility 89/336/EEC and the
Amendment Directive
For the following equipment:
AC Motor Drive
(Product Name)
VFD007A21A, VFD007A23A, VFD007A43A, VFD015A21A, VFD015A23A, VFD015A43A,
VFD015A43B, VFD022A21A, VFD022A23A, VFD022A43A, VFD037A23A, VFD037A43A,
VFD055A23B, VFD055A43B, VFD075A23B, VFD075A43B, VFD110A23A, VFD110A43A,
VFD150A23A, VFD150A43A, VFD185A23A, VFD185A43A, VFD220A23A, VFD220A43A
(Model Designation)
93/68/EEC
is herewith confirmed to comply with the requirements set out in the Council
Directive 89/336/EEC for electromagnetic compatibility and the Amendment
Directive 93/68/EEC. For the evaluation of the compliance with this Directive,
the following standard was applied:
EN61800-3, EN55011, EN61000-4-2, EN61000-4-3, EN61000-4-4, EN61000-4-5,
EN61000-4-6, EN61000-4-8
The following manufacturer/importer is responsible for this declaration:
Delta Electronics, Inc.
(Company Name)
80
Page 85

APPENDIX
Non-fuse Circuit Breaker Chart
Per UL 508C, paragraph 44.8.6, part a,
1. For 1-phase drives, the current rating of the breaker shall be four times Max. of
input current rating.
2. For 3-phase drives, the current rating of the breaker shall be four times Max. of
output current rating.
(Note: Please select enough current capacity of NFB.)
1-phase 3-phase
Model
VFD007A21A 11 VFD007A23A 5.0 VFD075A23B 33
VFD015A21A 15 VFD007A43A 3.0 VFD075A43B 18
VFD022A21A 27 VFD015A23A 6.5 VFD110A23A 46
VFD015A43A 4.2 VFD110A43A 24
VFD015A43B 4.2 VFD150A23A 60
VFD022A23A 11 VFD150A43A 32
VFD022A43A 5.5 VFD185A23A 75
VFD037A23A 17 VFD185A43A 38
VFD037A43A 8.2 VFD220A23A 87
VFD055A23B 25 VFD220A43A 45
VFD055A43B 13
Input Current
(A)
Model
Output
Current (A)
Model
G
Output
Current (A)
81
Page 86

Fuse Specification Chart
Smaller fuses than those shown in the table are permitted.
Model
Input
Current (A)
Output
Current (A)
VFD007A21A 11 5.0
VFD007A23A 7.4 5.0
VFD007A43A 4.2 3.0
VFD015A21A 15 6.5
VFD015A23A 9.9 6.5
VFD015A43A 6 4.2
VFD015A43B 5.8 4.2
VFD022A21A 27 11
VFD022A23A 15.5 11
VFD022A43A 7.2 5.5
VFD037A23A 19.6 17
VFD037A43A 8.5 8.2
VFD055A23B 33.5 25
VFD055A43B 14 13
VFD075A23B 43.3 33
VFD075A43B 20.6 18
VFD110A23A 46 46
VFD110A43A 28 24
VFD150A23A 76 60
VFD150A43A 30 32
VFD185A23A 83 75
VFD185A43A 39 38
VFD220A23A 99 87
VFD220A43A 49 45
I (A) Bussmann P/N
40 JJN-40
20 JJN-20
10 JJS-10
60 JJN-60
25 JJN-25
15 JJS-15
15 JJS-15
100 JJN-100
40 JJN-40
20 JJS-20
60 JJN-60
30 JJS-30
100 JJN-100
50 JJS-50
125 JJN-125
70 JJS-70
175 JJN-175
90 JJS-90
225 JJN-225
125 JJS-125
300 JJN-300
150 JJS-150
340 JJN-300
175 JJS-175
Line Fuse
82
 Loading...