

Page 1
DRIVER 230 CPL
User guide
3 zone weekly programmer using power
line carriers
*2702030_rev1*
Device complying with the requirements of the directives:
2004/108/EEC (electromagnetic compatibility) and
2006/95/EEC (low voltage safety).
DELTA DORE - Bonnemain
35270 COMBOURG - FRANCE
E-mail : deltadore@deltadore.com
Page 2
Description . . . . . . . . . . . . . . . . . . . . . . . . . 3
Time Setting . . . . . . . . . . . . . . . . . . . . . . . . . 5
The Pilot Wire . . . . . . . . . . . . . . . . . . . . . . . 5
Comfort, Economy, Frost Protection . . . . . . . . 6
Automatic mode . . . . . . . . . . . . . . . . . . . . . . 6
Change the programming . . . . . . . . . . . . . . . . 7
Comfort or Economy Override . . . . . . . . . . . . 8
Shutdown mode . . . . . . . . . . . . . . . . . . . . . . 8
Adjustable frost protection . . . . . . . . . . . . . . 9
Remote controlled absence mode . . . . . . . . .10
Domotic functions (if radio option)
with a door/window magnetic contact.......................... 11
with a TYXIA Transmitter............................................. 11
with a TYDOM 200 remote control.............................. 12
with a TYDOM 300 telephone transmitter................... 13
with a TYXAL alarm control unit ............................. 13-14
- 3 -
Because of changes in standards and equipment, the characteristics given in the text and
the illustrations of this document are not binding unless confirmed by Delta Dore.
DescriptionContents
8
2 3
4
Economy
5
6
7
Economy
Frost Protection
Shutdown
Programming
Starting up
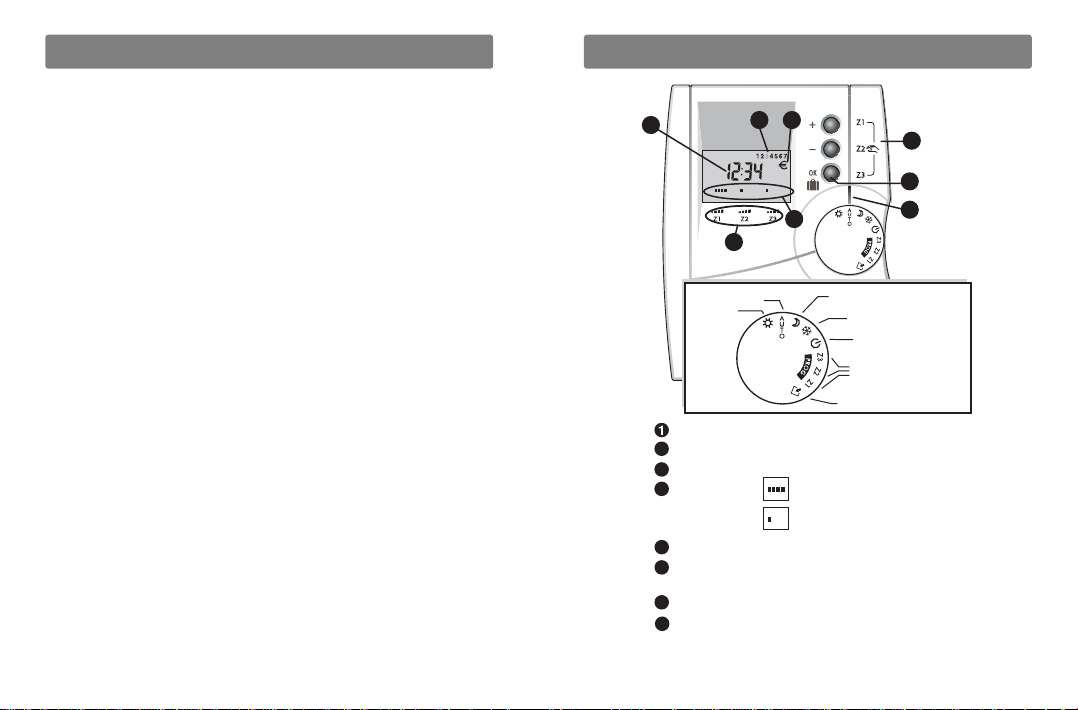
1
Automatic mode
Comfort
Time
2
Current day
Tariff reduction in progress
3
4
Current mode: Comfort
5
Modification or override buttons
6
Timed absence button or validation
in programming mode
7
Knob selection mark
8
Identification of the heating zone
Page 3
The pilot wire principle enables the required operating mode
for the heating element to be selected from the programming
control unit.
The corresponding temperature is set directly by the heating
element thermostat (room by room control).
• Heating Programming
- 1 customizable program per day and per zone
- Automatic mode override:
It is possible to use a different operating mode (Comfort,
Economy, etc.) from the current one, until the next change
of program
- Absence:
Constant or timed (from 1 to 99 days) to set
the installation to frost protection mode
• Transmission by power line carrier
- No damage to the existing installation
- Use with pilot wire receivers of the X2D PLC range
- Compatible with an energy manager
(e.g. GECPL1, GP4 CPL)
- Upgradeable system
• Tariff Management
- Linked with a CPL X2D energy manager (e.g. GECPL1
or GP4 CPL), it can reduce your energy consumption
according to the current tariff period
- Compatibility with all tar iffs
• Radio Option
- DRIVER CPL is compatible with the TYDOM 520 radio
module that is used to associate domotics functions:
door/window magnetic contact, alarm control unit, etc.
- 5 -- 4 -
The Pilot Wire
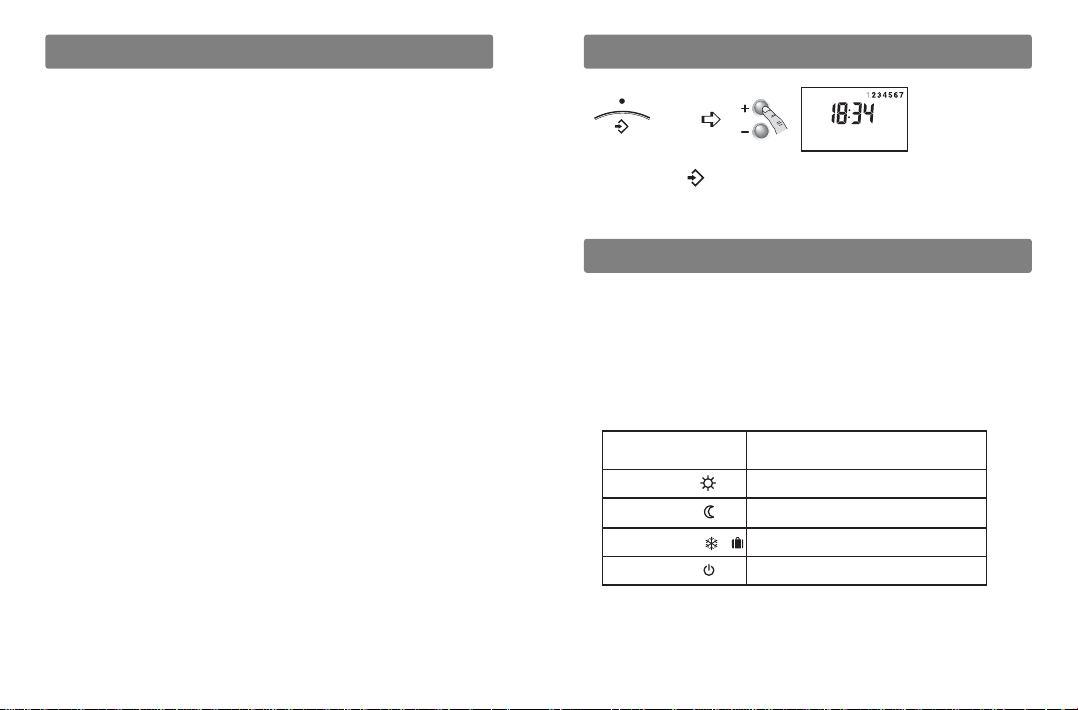
Time SettingDescription
Turn the
selector to
Each time you pass 0.00 you change the day
Press and release: slow forward.
Press and hold: fast forward.
Command sent by
the control unit
Comfort Comfort setting (thermostat knob)
Economy
Frost Protection
Shutdown Heating shutdown
Corresponding temperature
on the heating element
Economy setting or -2°C or -3°C in relation
to the comfort setting (according to the model)
Frost protection set to 7°C or 8°C
or
(depending on model)
Page 4

Permanent comfort
Continuous Economy mode
Continuous Frost Protection
- 7 -- 6 -
Change the programmingComfort, Economy or Continuous Frost
Protection
Automatic Mode
Turn
the selector to
Turn
the selector to
Turn
the selector to
Turn the selector
to PROG Z1.
The 1st time slot flashes on and off.
The programming uses
Z2 Z3Z1
slots of one hour.
Press the buttons
+ (comfort) or - (economy)
to set each time slot.
E.g. Comfort from 6.00 am to 9.00 am
from 12am to 2pm,
Z2 Z3Z1
from 6pm to 11pm.
Confirm and go to
the next day.
Repeat for each day.
Z2 Z3Z1
Comfort for
1 hour
Economy for
1 hour
Z2 Z3Z1
Turn
the selector to AUTO
The unit follows the program for the three zones.
A
U
T
O
Z2 Z3Z1
Holding down the OK button lets you allocate the same
program as the previously programmed day to the following day.
To modify the program of zones 2 or 3 , turn the knob to PROG Z2
or PROG Z3 and repeat the steps above.
Z2 Z3Z1
Change the position selector to exit the mode.
Page 5

- 9 -- 8 -
Note: If you are using 6-order pilot wire, override takes
place amongst 4 modes:
Adjustable frost protection
(1 to 99 days) - Absence mode
Heating shutdown
Override with automatic return
(comfort or economy mode)
The selector is set to AUTO
The unit follows the program
(e.g. comfort in zone 1 and
economy in zone 2 and 3)
Press .
On zone 1, the unit operates
in Economy mode until the next
program change.
For a zone 2 or 3 override,
press or .
Comfort
Economy
Comfort -2˚C
Comfort -1˚C
Z2 Z3Z1
Z2 Z3Z1
Turn the
selector to
Z2 Z3Z1
From the AUTO mode.
Press for approximately
3 seconds until the suitcase
symbol displays
(continuous absence).
Set the number of days of
absence with the + or - buttons,
the suitcase symbol flashes.
The countdown begins.
Example: leaving on 10 January, returning on 19 January,
indicate 9 days.
Automatic operation will resume on 19 January
at 0:00 a.m.
Page 6

- 13 -- 12 -
- TYPHONE 2 + GECPL1 :
Setting the absence mode
Before leaving the dwelling, confirm your
absence on the telephone remote control.
"tELE" is displayed.
➀ Return to normal operation
Order the termination of absence mode either remotely or
locally (on the telephone remote control).
The operation
reverts to the one shown by the knob position.
- TYPHONE 2 CPL:
Setting the absence mode
Remotely, send the absence command.
The screen of the DRIVER CPL displays the
suitcase and telephone symbols.
➀ Return to normal operation
Remotely: stop the absence order.
Locally: change the knob position, then return it to the required
position.
Domotic functions
With the TYDOM 520 radio option, up to 16 domotics products can be associated (door/window magnetic contacts,
telephone transmitter, alarm control unit, remote controls, etc.)
using the DRIVER CPL.
Operation with a door/window
magnetic contact
You can combine up to 16 door/window
magnetic contacts (maximum number of
domotics products that can be combined).
If one of them is opened, DRIVER CPL sets
the installation to Frost Protection mode.
Operation with a TYXIA Transmitter
For this type of operation, the DRIVER CPL
must be in automatic mode.
Pressing the button enables a comfort override with
automatic return at the next change of program.
Pressing the button enables an economy override with
automatic return at the next change of program.
The override can be cancelled by pressing a button or turning
the selector of the DRIVER CPL.
DRIVER 230 CPL can be associated with a power line carrier
telephone remote control (e.g.
TYPHONE 2 CPL
) or a
GECPL1
whose telephone remote control input is connected to a
TYPHONE 2 to enable remote selection between the absence
mode and automatic operation.
Remote controlled absence mode
(Frost Protection)
Page 7

Operation with a Tydom 200
remote control
From the home domain :
You can shut down the installation by pressing
the tactile button .
This shutdown command is cancelled:
- either by pressing the button ,
- or by changing the position of the DRIVER CPL selector.
In the AUTO position of the DRIVER CPL only:
Pressing the tactile button or
once enables an override operation
The override is cancelled:
By zone:
- the next time the program switches over in the zone,
- by pressing the , or button of the DRIVER CPL.
On the 3 zones:
- by changing the position of the DRIVER CPL selector.
- by pressing the , or button of the TYDOM 200.
- 1 -- 1 -
Domotic functions
Operation with a TYDOM 300 telephone
transmitter
By calling the TYDOM 300 telephone transmitter, let the
synthetic voice guide you to determine or modify the status
of the heating system (see the TYDOM 300 transmitter
guide).
If a change is made via the TYDOM 300
telephone transmitter, the DRIVER CPL
displays the telephone symbol and the mode
controlled (e.g. comfort).
Change the position of the DRIVER CPL to return to normal
operation.
Operation with a TYXAL alarm
control unit
The DRIVER CPL receives and displays the “technical fault”
information of the TYXAL alarm control unit. If a fault occurs,
the display flashes alternately with the current program for 2
minutes and indicates:
1. Intruder or technical alar m
2.Tamper alarm
3. Battery
4. Supervision
5. Open entry
6. Mains fault in progress
7.Technical fault in progress
OR
Page 8

- 15 -- 14 -
Domotic functions Maintenance
Override according to the alarm status
In the AUTO position only and if the function
(1)
is activated:
- Starting up the control unit fully sets the installation to
Economy mode in the 3 zones (up to the next change of program).
- Shutting down the control unit sets the installation to
Comfort mode in the 3 zones (up to the next change of program).
The override is cancelled:
By zone:
- the next time the program switches over in the zone,
- by pressing the ,
or
button of the DRIVER CPL.
On the 3 zones:
- by changing the position of the DRIVER CPL selector.
(1)
The override function is enabled by default depending on
the status of the alarm, it can be deactivated during the radio
configuration:
From the radio screen, press the buttons and together
to display ON or OFF. Release.
Press or to select
ON or OFF.
After 2 seconds without
pressing, the screen of the DRIVER CPL returns to the radio
display, press the DRIVER CPL button until the time
displays.
OR
Nothing is displayed
on the room unit screen.
The symbol is displayed.
You cannot access the Comfort.
-1°C and Comfort -2°C
operating modes.
The equipment
displays:
The equipment
displays:
The equipment
displays:
Diagnosis/Solutions
You have just switched the unit on.
You have just switched the unit on.
There is no power supply
Check your circuit breaker.
An economy period interrupts
automatic operation.
The reduced tariff operating mode can
be modified (§ Price Programming).
Overrides are permitted.
You have 4 order pilot wire heating or
it has been defined as such (see
installation guide § Allocation
of receivers).
• Communication fault with the GECPL1
or GPCPL.
Check the power supply of the GECPL1
or GP4 CPL or reconfigure your units.
• Communication fault with electronic
meter.
Check the connection between the
electronic meter and the energy manager
or contact your installer.
• Communication fault with the
TYPHONE 2 CPL.
Check the power supply of the TYPHONE 2
CPL or reconfigure your units (see
installation guide, § Allocation of receivers).
 Loading...