

Delonghi TCH 6590ER Instructions Manual [zh]

TOWER CERAMIC HEATER
INSTRUCTIONS FOR USE
SAVE THESE INSTRUCTIONS
AQUECEDOR TERMOVENTILADOR CERÂMICO
DE COLUNA
INSTRUÇÕES DE UTILIZAÇÃO
GUARDE ESTAS INSTRUÇÕES
MODEL/MODELO
TCH6590ER
2
A
B
C
D
E
F
G
F
D
E
C
G
Voltage
Wattage
See rating label
ELECTRONIC CHARACTERISTICS/CARACTERÍSTICAS ELÉTRICAS
Tensão
Potência
Ver a placa de características
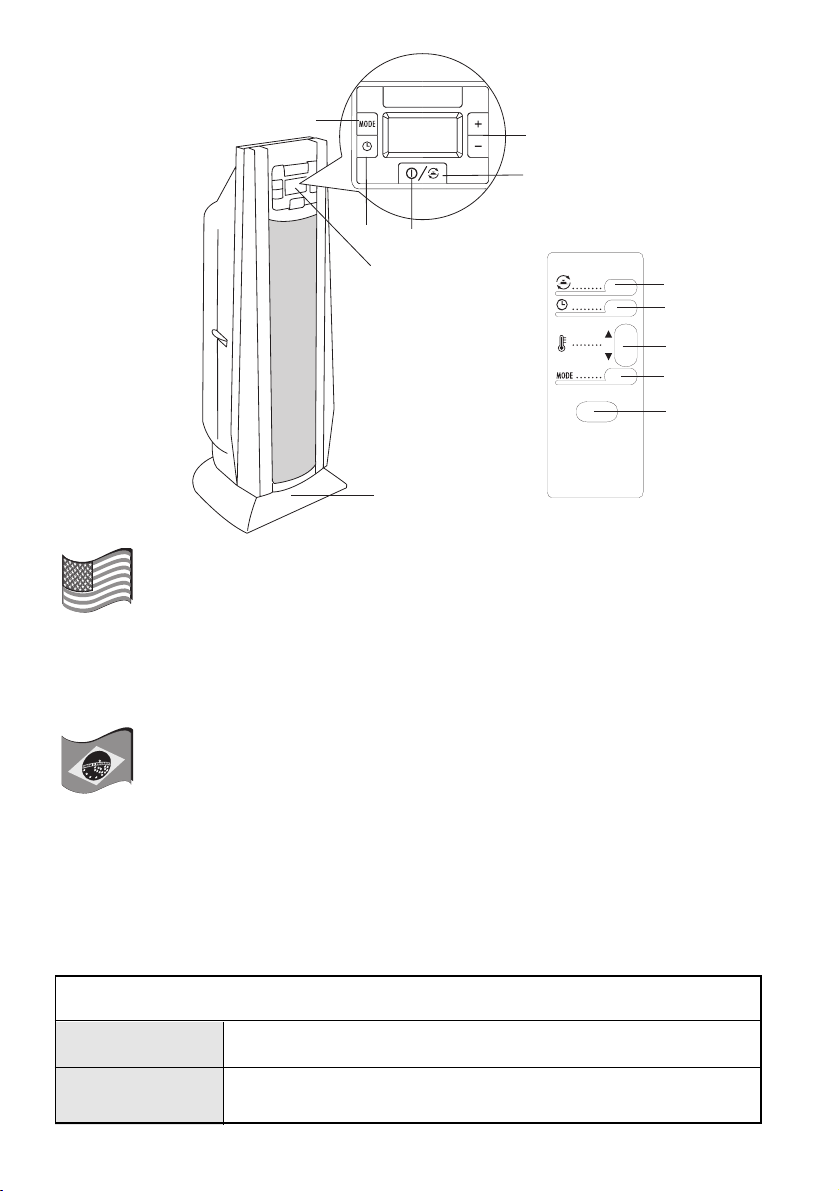
A Control panel
B Motorized rotating base
C Motorized Oscillation button (swing)
D Set time button
E Temperature adjustment button
F MODE button
G ON/OFF button
A Painel de controle
B Base giratória motorizada
C Botão de oscilação motorizada (swing)
D Botão de regulagem do tempo
E Botão de regulagem da temperatura
F Botão MODE
G Botão ON/OF

3
IMPORTANT INSTRUCTIONS
When using electrical appliances, basic precautions should always be followed to reduce risk of fire, electric
shock, and injury to persons, including the following:
1. Read all instructions before using this heater.
2. If your appliance is equipped with a polythene tape used as carry handle, remove it before connecting
appliance to the outlet.
3. This heater is hot when in use. To avoid burns, do not let bare skin touch hot surfaces. Use handle when
moving this heater. Keep combustible materials, such as furniture, pillows, bedding, papers, clothes, and
curtains at least 3 feet (0,9 m) from the front and top of the heater and keep them away from the sides
and rear.
4. Extreme caution is necessary when any heater is used by or near children and whenever the heater is left
operating and unattended.
5. Always unplug the heater when not in use.
6. Do not operate any heater with a damaged cord or plug or after the heater malfunctions, has been
dropped or damaged in any manner. Return heater to authorized service facility for examination,
electrical or mechanical adjustment, or repair.
7. Do not use outdoors.
8. This heater is not intended for use in bathrooms, laundry areas and similar indoor locations. Never place
heater where it may fall into a bathtub or other water container.
9. Do not run cord under carpeting. Do not cover cord with rugs, runners, or the like. Arrange cord away
from traffic area and where it will not be tripped over.
10. To disconnect heater, turn it off then unplug it.
11. Connect to properly polarized outlets only.
12. Do not insert or allow any object to enter any ventilation or exhaust opening as this may cause an electric
shock, fire, or damage the heater.
13. To prevent the risk of fire, do not block air intakes or exhaust in any manner. Do not use on soft surfaces,
like a bed, where ventilation or exhaust openings may be blocked.
14. A heater has hot, arcing or sparking parts inside. Do not use it in areas where gasoline, paint, or
flammable liquids are used or stored.
15. Use this heater only as described in this manual. Any other use not recommended by the manufacturer
may cause fire, electric shock, or injury to persons
16. To prevent overloaded fuses, be sure that no other appliance is plugged into the same outlet or into
another outlet wired into the same circuit.
17. It is normal for the heater’s plug and cord to feel warm to the touch. A plug or cord which becomes hot to
the touch or becomes distorted in shape may be a result of a worn electrical outlet. Worn outlets should
be replaced prior to further use of the heater. Plugging heater into a worn outlet may result in overheating
of the power cord or may cause the risk of fire.
18. This heater is not intended for use with an extension cord. Plug the cord directly into an appropriate wall
receptable.
19. Be sure that the plug is fully inserted into an appropriate outlet. Please remember that outlets also deteriorate due to aging and continuous use: check periodically if signs of overheating or deformations are evidenced by the plug. Do not use a deteriorated outlet . CALL your electrician.
20. Check that neither the appliance nor the power cable have been damaged in any way during transportation.
21. Make sure that no pieces of polystyrene or other packaging material are left in ventilation or exhaust
openings. It may be necessary to pass over the appliance with a vacuum cleaner.
22. When switching on the appliance for the first time, allow it to run at full power for at least two hours
to get rid of possible unpleasant smell. Make sure that the room in which the appliance is placed is
well ventilated during this operation. It is normal for the appliance to emit small crackling sounds
when you turn it on for the first time.
23. CAUTION: to prevent electric shock match wide blade of plug to wide slot, and fully insert the plug into
the outlet.
24. Do not cover the appliance while it is functioning in order to avoid overheating and the risk of fire.
SAVE THESE INSTRUCTIONS
4
ELECTRICAL CONNECTION
Before plugging the appliance into the mains socket, check that the mains power supply corresponds to the value indicated on the rating plate.
Installation
The appliance can be used on any rigid horizontal surface.
OPERATION AND USE
1. Plug the appliance into an appropriate outlet.
2. The appliance will emit a "beep" and the ON light will come on. It will remain lit as long as
there is power to the appliance.
3. Press button (G) to turn the appliance on.
4. The appliance starts up in LOW mode (minimum heat output). The display shows the current
room temperature.
5. Press the MODE button (F) to switch to HIGH mode (maximum heat output). The display
shows the current room temperature.
6. Press the MODE button (F) again to switch the appliance to AUTO mode.
The display shows the temperature set point. Use the + and - buttons to set a different temperature. After a few seconds, room temperature is shown on the display.
7. Press the MODE button (F) again to switch the appliance back to LOW mode.
When the MODE button is pressed continuously, the appliance switches through the following modes in sequence: LOW HIGH AUTO.
8. To turn the appliance off, hold button (G) down for a few seconds.
MOTORIZED ROTATING BASE
The appliance has a motorized rotating base to distribute the air flow over a larger area. To
activate the motorized base press the swing switch (C). The appliance swings from right to left.
To stop the appliance in the desired position, simply press button (C).
To turn the appliance off, hold button (G) down for a few seconds.
Adjusting the thermostat
1. Press the MODE button (F) until AUTO is displayed.
2. Use the + and - buttons to increase or reduce the temperature set point. The thermostat will automatically maintain the temperature set and keep it constant.
3. When room temperature is 2°C above the set temperature, the appliance goes off. The internal fan
will stop after 15 seconds.
4. When room temperature drops below the set temperature, the appliance comes on automatically.
Note: if swing mode is active, press buttons to change the set temperature, the swinging of the
base will stop to allow a new temperature to be set. After the setting procedure has been completed, the swinging of the base will resume automatically.
Timer function
This function can be activated during any operating mode. The timer can be used to program
the time the appliance remains in operation, from 1 to 8 hours.
Each time you press the button (D), the operating time increases by one hour.
When the timer has been set, the time decreases in steps of one hour and the time remaining is
displayed. At the end of the set time the appliance goes off.
If you do not want to use the appliance with the timer, press the button (D) again to return to
manual operation.
Note: The display shows room temperature in either °C or °F. To select, press the + and - buttons together for a few seconds, then release.
 Loading...