

DeLonghi MAGNIFICA Instructions Manual
instructions
Magnifica Coffee Maker
Please retain instructions for future reference

NEDERLAND: Ingeval van een defect of voor meer inlichtingen, gelieve het num-
mer
071-5320909 te bellen alvorens u te wenden tot een tech-
nisch servicecentrum.
êêééëëëëààüü::
З ТОЫ˜‡В МВЛТФ‡‚МУТЪЛ ЛОЛ ‰Оfl ‡Б˙flТМВМЛИ ‰У
У·‡˘ВМЛfl ‚ ТВ‚ЛТМЫ˛ ЪВıМЛ˜ВТНЫ˛ ТОЫК·Ы ФУБ‚УМЛЪВ ФУ
ЪВОВЩУМЫ
095-275-7821.
UNITED KINGDOM: In the event of malfunction or for further information, before contac-
ting the technical assistance service, you are recommended to call:
0845-6006845.
BELGIUM: En cas de mauvais fonctionnement ou pour tout renseignement,
avant de s'adresser au service assistance technique, nous vous conseillons d'appeler le numéro
15-280840.
DEUTSCHLAND: Es wird empfohlen bei Betriebsstörungen oder Fragen zuerst die
Rufnummer
01805-225521 zu kontaktieren, bevor Sie sich an
den technischen Kundendienst wenden.
ITALIA: In caso di malfunzionamento o per chiarimenti, prima di rivolgersi
al servizio assistenza tecnica, si consiglia contattare
il numero verde
800-854040.
ÖSTERREICH: Es wird empfohlen bei Betriebsstörungen oder Fragen zuerst die
Rufnummer
0820-240542 zu kontaktieren, bevor Sie sich an
den technischen Kundendienst wenden.
• TELEFONISCHE KLANTENDIENST
•
ääééççííÄÄääííççÄÄüü ëëÖÖêêÇÇààëëççÄÄüü ëëããììÜÜÅÅÄÄ
•CUSTOMER HELPLINE
• HOT LINE
• KUNDEN HELPLINE
• ASSISTENZA CLIENTI
5732128000/10.03

2
Electrical requirements
Before using this appliance ensure that the voltage indicated on the product corresponds with the main voltage in your home, if you are in any
doubt about your supply contact your local electricity company.
The flexible mains lead is supplied connected to a B.S. 1363 fused plug having a fuse of
13 amp capacity. Should this plug not fit the socket outlets in your home, it should be
cut off and replaced with a suitable plug, following the procedure outlined below.
Note: Such a plug cannot be used for any other appliance and should therefore be
properly disposed of and not left where children might find it and plug it into a supply
socket - with the obvious consequent danger.
N.B. We recommend the use of good quality plugs and wall sockets that can be
switched off when the machine is not in use.
important: the wires in the mains lead fitted to this appliance are coloured in accordance with the following code:
As the colours of the wires in the mains lead of this appliance may not correspond
with the coloured markings identifying the terminals in your plug, proceed as follows:
The wire which is coloured green and yellow must be connected to the terminal in
the plug which is marked with the letter E or by the earth symbol or coloured
green or green and yellow.
The wire which is coloured blue must be connected to the terminal which is marked
with the letter N or coloured black.
The wire which is coloured brown must be connected to the terminal which is
marked with the letter L or coloured red.
When wiring the plug, ensure that all strands of wire are securely retained in each terminal. Do not forget to tighten the mains lead clamp on the plug. If your electricity
supply point has only two pin socket outlets, or if you are in doubt, consult a qualified
electrician.
Should the mains lead ever require replacement, it is essential that this operation be
carried out by a qualified electrician and should only be replaced with a flexible cord
of the same size.
After replacement of a fuse in the plug, the fuse cover must be refitted. If the fuse
cover is lost, the plug must not be used until a replacement cover is obtained. The
colour of the correct replacement fuse cover is that of the coloured insert in the base
of the fuse recess or elsewhere on the plug.Always state this colour when ordering a
replacement fuse cover.
Only 13amp replacement fuses which are asta approved to B.S. 1362 should be fitted.
This appliance conforms to the Norms EN 55014 regarding the suppression of radio
interference.
Warning - this appliance must be earthed
GREEN AND YELLOW
BLUE
BROWN
EARTH
NEUTRAL
LIVE
Green and Yellow to Earth
Blue to
Neutral
13 amp
Fuse
Brown
to Live
Cord Clamp

Bean container lid
Centre lid for the ground coffee
Cup warmer tray
Steam knob
Steam spout
Milk frother
Water tank (removable)
Power cable
Cup support tray
Drip tray (removable)
Coffee spout,
adjustable in height
Control panel
Measure for pre-ground coffee
Compartment for the measure (for pre-ground coffee)
Container for pre-ground coffee
Container for the coffee beans
Grinding coarseness adjustment knob
Removable container
for the coffee grounds
Milk frother nozz
le
(removable)
Milk frother
(removable)
Service door
M
obile drawer
Infuser
3

4
OPERATING INSTRUCTIONS
1 Description of the control panel … … … … … … … … … … … … … … … … …5
2 Safety warning … … … … … … … … … … … … … … … … … … … … … … …6
3 Installation … … … … … … … … … … … … … … … … … … … … … … … …6
4 Preparing the coffee maker … … … … … … … … … … … … … … … … … … …7
4.1 Filling the water tank … … … … … … … … … … … … … … … … … … …7
4.2 Filling the container with coffee beans … … … … … … … … … … … … … …7
4.3 Using the coffee maker for the first time … … … … … … … … … … … … …7
5 Preparing the coffee (using coffee beans) … … … … … … … … … … … … … …8
6 Adjusting the coffee grinder … … … … … … … … … … … … … … … … … …9
7 Preparing espresso coffee with ground coffee (instead of beans) … … … … … … …10
8 Hot water delivery … … … … … … … … … … … … … … … … … … … … …15
9 Preparing cappuccinos (using steam) … … … … … … … … … … … … … … …16
10 Cleaning and maintenance … … … … … … … … … … … … … … … … … …14
10.1 Cleaning the coffee maker … … … … … … … … … … … … … … … … …14
10.2 Cleaning the infuser … … … … … … … … … … … … … … … … … … …15
10.3 Descaling … … … … … … … … … … … … … … … … … … … … … …16
10.4 Setting the water hardness … … … … … … … … … … … … … … … … …17
11 Meaning of the normal operation indicator lights … … … … … … … … … … …18
12 Meaning of the alarm indicator lights and what to do when they are on … … … …19
13 Problems that can be resolved before calling the service centre … … … … … … …20
5
OPERATING INSTRUCTIONS
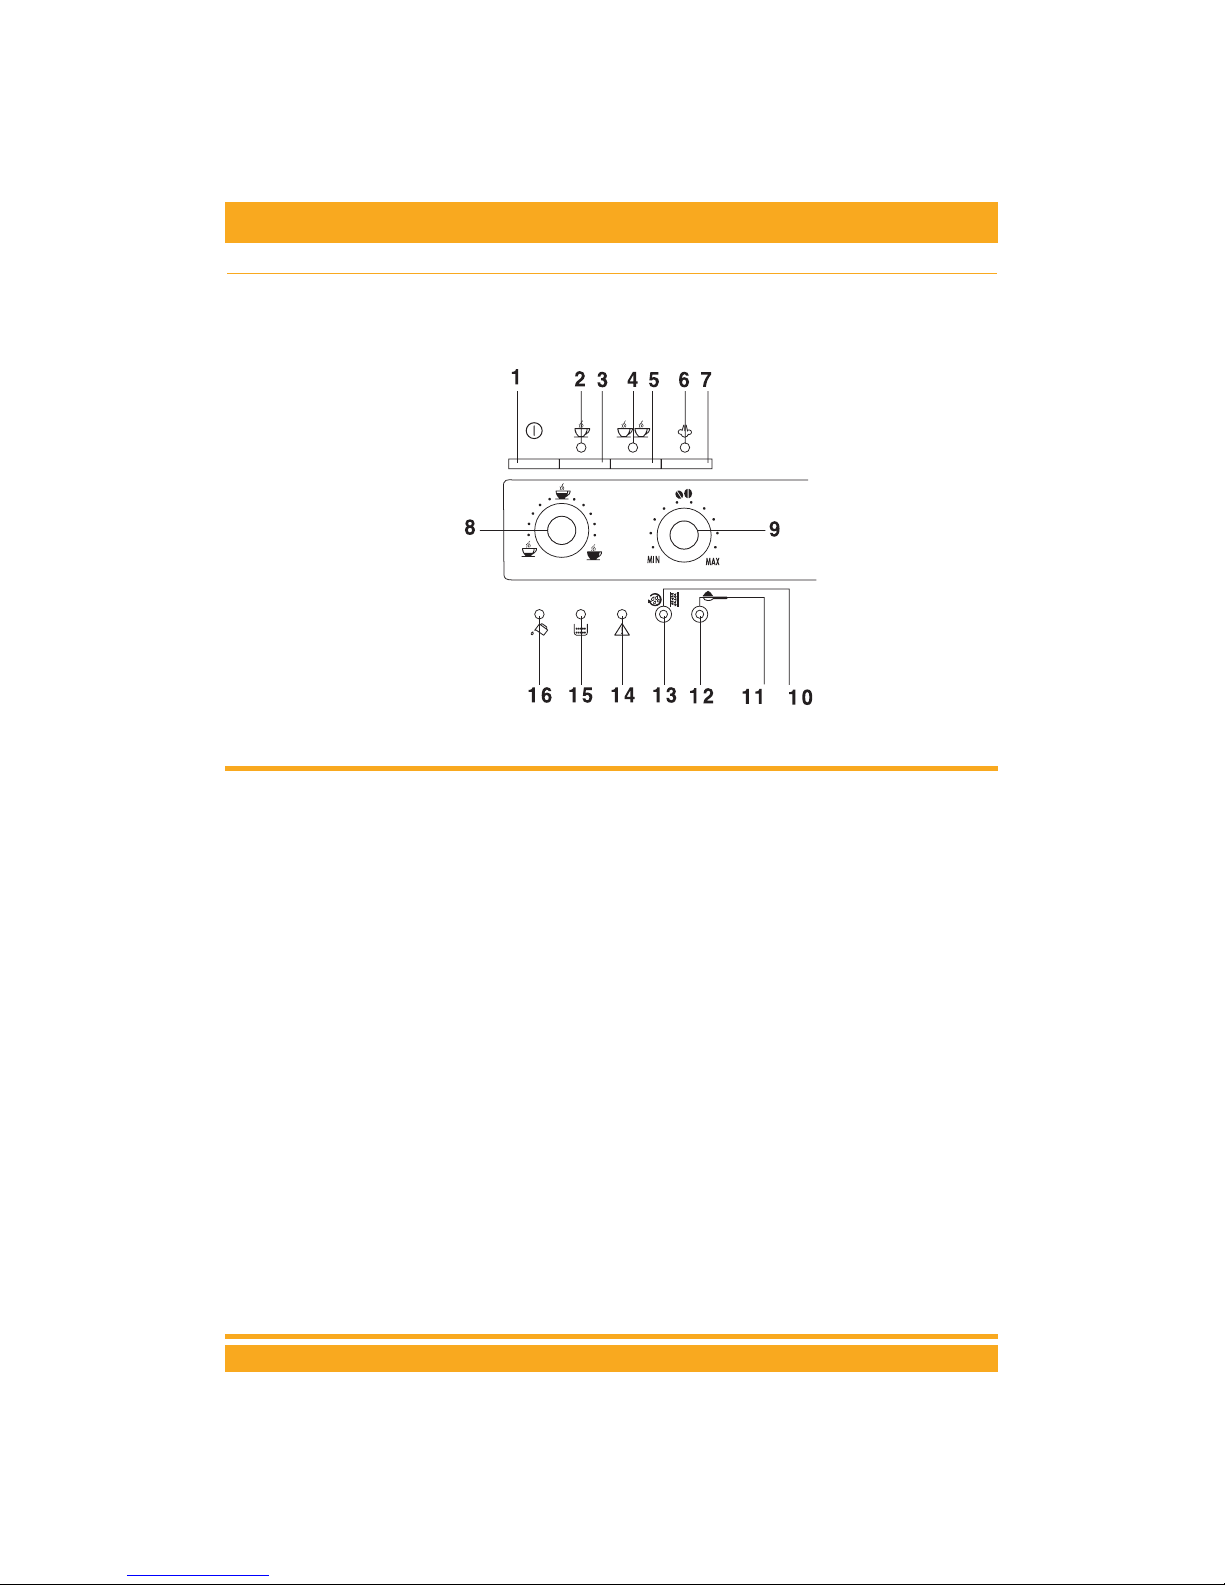
1. DESCRIPTION OF THE CONTROL PANEL
1) On/off button
2) 1 cup and coffee temperature OK light
3) One cup button
4) 2 cup and coffee temperature OK light
5) Tw o cup button
6) Steam and steam temperature OK light
7) Steam function selector button
8) Coffee quantity selector knob (short, normal or
long)
9) Grinding quantity selector knob (for weak, normal or strong coffee)
10)Rinse and descaling button
11)Ground coffee button (disables the coffee grin-
der)
12)Ground coffee light (coffee grinder disabled)
13)Scale alarm light
14)Generic alarm indicator light
15)Grounds container full or absent indicator light
16)No water or water tank absent indicator light

6
OPERATING INSTRUCTIONS
2 SAFETY WARNINGS
CAREFULLY READ AND KEEP THESE INSTRUCTIONS!
• This machine is designed to “make espresso cof-
fee” and to “heat drinks”: be careful to avoid
scalding from the water and steam jets or by
using the machine incorrectly.
• This appliance is for household use only. All
other use is considered improper and consequently dangerous.
• The manufacturer is not liable for damage cau-
sed by improper, incorrect or unreasonable use
of the appliance.
• During operation, do not touch the hot surfaces
of the appliance. Use the knobs or handles.
• Do not touch the appliance with damp hands or
feet.
• Do not allow children or unfit persons to use
the appliance unsupervised.
• Do not allow children to play with the applian-
ce.
•In the event of breakdown or faulty operation,
turn the appliance off and do not tamper with
it. For repairs, contact a technical service centre
authorised by the manufacturer only. Request
that only original spare parts be used. Failure to
respect the above may compromise the safety
of the appliance.
3 INSTALLATION
• After unpacking, make sure the appliance is
complete and undamaged. If in doubt, do not
use it. Contact professionally qualified personnel.
• Packing elements (plastic bags, polystyrene etc)
must not be left within reach of children as they
may represent a hazard.
• Place the appliance on a work surface far away
from water taps, basins and sources of heat.
•
After having positioned the appliance on
the work bench, make sure that there is a
free space of around 5 cm between the
surfaces of the appliance and the side and
rear walls and a free space of at least 20
cm above the coffee maker.
•Never install the machine in environments
where the temperature may reach 0°C or
lower (the appliance may be damaged if the
water freezes).
• Check that the voltage of the mains power supply corresponds to the value indicated on the
appliance’s rating plate. Only connect the
appliance to a power outlet with a minimum
rating of 10A that is properly earthed. The
manufacturer declines all liability for any accidents caused if the system is not correctly
earthed.
• If the power outlet does not match the plug on
the appliance, have the outlet replaced with a
suitable type by qualified personnel.
• The power cable for this appliance must not be
replaced by the user, in that this operation
requires the use of special tools. In the event of
damage, only contact a service centre authorised by the manufacturer so as to avoid any
risks.
• The water hardness should be set as soon as
possible, following the procedure described in
chapter 10.4.
 Loading...